To start, we’d like to say we’re sorry that you’re here reading this document instead of having a good time using the Integrated Terminal in Visual Studio Code. The VS Code team works hard to make the terminal experience as seamless as possible but in some cases, there are issues with shell or terminal configurations that the VS Code editor can’t work around.
After having worked with hundreds of developers to diagnose their terminal launch failures, the VS Code team has put together this topic with the advice and troubleshooting tips that have helped people in the past. We hope you’ll find an answer here for your shell or terminal issue and can get quickly back to work.
Integrated Terminal user guide
If you are new to using the VS Code Integrated Terminal, you can learn more in the Integrated Terminal user guide. There you can read how to configure the terminal, as well as review answers to common questions.
Below are specific troubleshooting steps, if the user guide hasn’t helped you diagnose the launch failure. The troubleshooting steps, such as checking your settings and enabling logging, apply to all platforms that support VS Code; macOS, Linux, and Windows.
Note: If you’re on Windows, you may want to review the common issues on Windows section first.
Troubleshooting steps
To troubleshoot Integrated Terminal launch failures in Visual Studio Code, follow these steps to diagnose issues:
-
Check your user settings. Review these
terminal.integratedsettings that could affect the launch:terminal.integrated.defaultProfile.{platform}— The default shell profile that the terminal uses.terminal.integrated.profiles.{platform}— The defined shell profiles. Sets the shell path and arguments.terminal.integrated.cwd— The current working directory (cwd) for the shell process.terminal.integrated.env.{platform}— Environment variables that will be added to the shell process.terminal.integrated.inheritEnv— Whether new shells should inherit their environment from VS Code.terminal.integrated.automationProfile.{platform}— Shell profile for automation-related terminal usage like tasks and debug.terminal.integrated.splitCwd— Controls the current working directory a split terminal starts with.terminal.integrated.windowsEnableConpty— Whether to use ConPTY for Windows terminal process communication.
You can review settings in the Settings editor (File > Preferences > Settings) and search for specific settings by the setting ID.

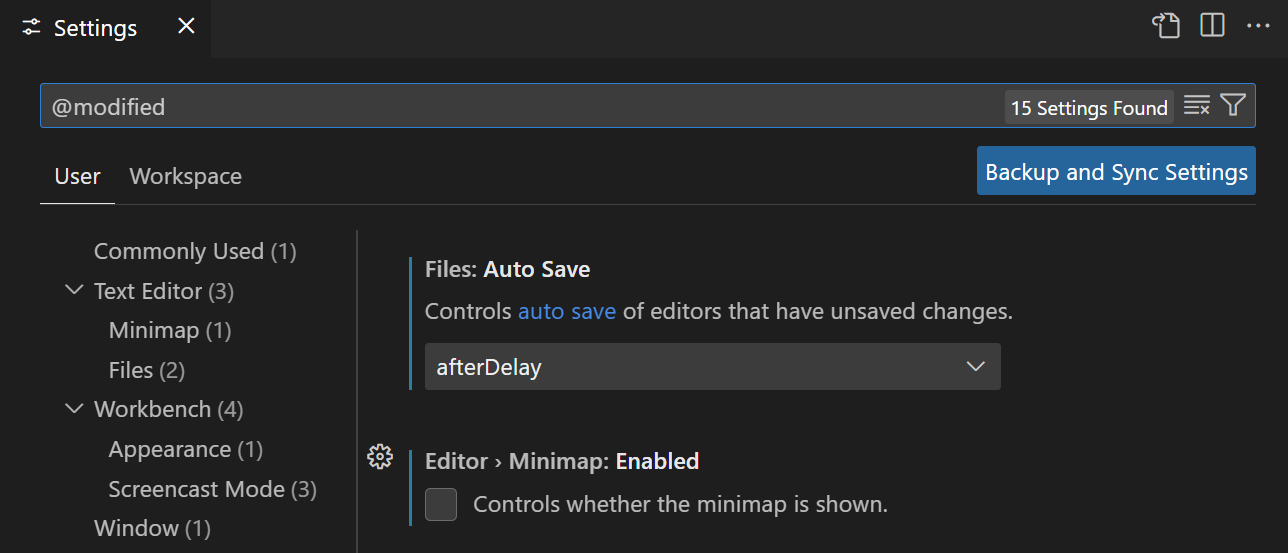
A quick way to check if you have changed settings that you might not be aware of, is to use the
@modifiedfilter in the Settings editor.Most Integrated Terminal settings will need to be modified directly in your user
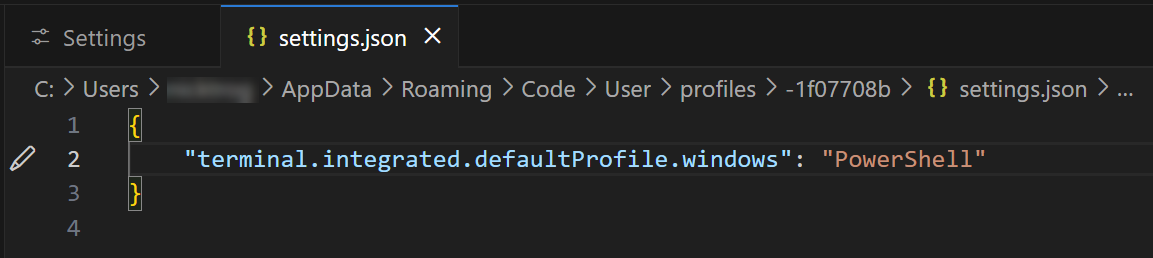
settings.jsonJSON file. You can opensettings.jsonvia the Edit in settings.json link in the Settings editor or with the Preferences: Open Settings (JSON) command from the Command Palette (⇧⌘P (Windows, Linux Ctrl+Shift+P)). -
Test your shell directly. Try running your designated integrated terminal shell outside VS Code from an external terminal or command prompt. Some terminal launch failures may be due to your shell installation and are not specific to VS Code. The exit codes displayed come from the shell and you may be able to diagnose shell issues by searching on the internet for the specific shell and exit code.
-
Use the most recent version of VS Code. Each VS Code monthly release has many updates and fixes and may include integrated terminal improvements. You can check your VS Code version via Help > About (on macOS Code > About Visual Studio Code). To find the latest version of VS Code, go to the VS Code release notes. You may also want to check that you have installed the latest version of your shell.
-
Use the most recent version of your shell. If your shell is installed separate from your platform, try installing the latest available version of the shell. The same advice applies if you are on an older build of your operating system. For example, some older versions of Windows 10 did not work well with the VS Code terminal.
-
Enable trace logging. You can enable trace logging and capture a log when launching the terminal. Logging often reveals what is wrong as all arguments used to create the terminal process/pty are recorded. Bad shell names, arguments, or environment variables can cause the terminal to not launch. Keep this log for later if your problem isn’t solved.

Additional troubleshooting steps
If none of these steps helped solve the issue, you can also try:
- Ask about it on Stack Overflow, often launch issues are related to environment setup and not a problem with VS Code.
- If the terminal is being launched from an extension, report the issue to the extension by opening the issue reporter (Help > Report Issue) and set File On = «An Extension»
- If you believe it to be a bug with VS Code, report the issue using the issue reporter (Help > Report Issue). The issue reporter will autofill relevant information, see Creating great terminal issues for what else to include in the report.
- If you’re on Windows 10 1809 (build 17763) or below, the issue is related to the legacy «winpty» backend. Upgrading to Windows 1903 (build 18362) will move you onto the new «conpty» backend that is built by Microsoft and could fix your problem.
- If your terminal is set to run as administrator only, and you are not launching VS Code as administrator, the terminal will not be able to open. You can either change the default terminal or edit the properties of the terminal exe to not run as administrator.
Exit codes
The exit codes displayed in the terminal launch failure notification are returned from the shell process and are not generated by VS Code. There are many available shells that can be used in the terminal and hundreds of possible exit codes.
- Try searching on the internet for your specific shell and exit code (for example, «PowerShell 4294901760») and you may find specific suggestions or known issues related to your terminal launch failure.
- Try searching in your shell’s issue repository. For example, if you are having trouble with WSL, you might find a workaround searching for your error code in the open or resolved issues at https://github.com/microsoft/WSL/issues.
Common issues on Windows
Make sure compatibility mode is disabled
When upgrading to Windows 10, some apps may have compatibility mode turned on automatically. When this happens with VS Code, the terminal breaks as it does some low level things to enable the emulation it uses. You can check and disable compatibility mode by right-clicking on the VS Code executable and selecting properties, then uncheck the Run this program in compatibility mode option in the compatibility tab.
The terminal exited with code 1 on Windows 10 (with WSL as the default shell)
This can happen if Windows Subsystem for Linux (WSL) is not set up with a valid default Linux distribution.
Note: ‘docker-desktop-data’ is not a valid distribution.
- Open PowerShell and enter
wslconfig.exe /lto confirm WSL is installed correctly and list the currently available Linux distributions within your system. Confirm a valid distribution has (default) next to it. - To change the default distribution, enter
wslconfig.exe /setdefault "distributionNameAsShownInList"
The terminal not working when running the 32-bit Windows client on 64-bit Windows?
The easy fix for this issue is to use the 64-bit version. If you must use the 32-bit version, you need to use the sysnative path when configuring your shell path instead of System32. Adding this setting should fix the issue:
{
  "terminal.integrated.profiles.windows": {
    "Command Prompt": {
      "path": "${env:windir}\Sysnative\cmd.exe"
    }
  }
}
A native exception occurred
Typically this error occurs due to anti-virus software intercepting and blocking the winpty/conpty components from creating the terminal process. To work around this error, you can exclude the following file from your anti-virus scanning:
{install_path}resourcesappnode_modules.asar.unpackednode-ptybuildReleasewinpty.dll
{install_path}resourcesappnode_modules.asar.unpackednode-ptybuildReleasewinpty-agent.exe
{install_path}resourcesappnode_modules.asar.unpackednode-ptybuildReleaseconpty.node
{install_path}resourcesappnode_modules.asar.unpackednode-ptybuildReleaseconpty_console_list.node
Reporting this issue to the Anti-virus team can also help stamp out the issue all together.
Terminal exits with code 259
Exit code 259 can mean STILL_ACTIVE when the terminal is trying to start a new process such as PowerShell.exe. You can try killing unused programs and processes on your machine in case one of them is keeping a terminal shell process active and unable to relaunch.
Anti-virus software running on your machine may also interfere with starting your terminal shell.
Terminal exits with code 3221225786 (or similar)
This can happen when you have legacy console mode enabled in conhost’s properties. To change this, open cmd.exe from the start menu, right-click the title bar, go to Properties and under the Options tab, uncheck Use legacy console.

Next steps
- Integrated Terminal user guide — Learn more about general terminal use and configuration.
2/2/2023
Python выводит трассировку (далее traceback), когда в вашем коде появляется ошибка. Вывод traceback может быть немного пугающим, если вы видите его впервые, или не понимаете, чего от вас хотят. Однако traceback Python содержит много информации, которая может помочь вам определить и исправить причину, из-за которой в вашем коде возникла ошибка.
Содержание статьи
- Traceback — Что это такое и почему оно появляется?
- Как правильно читать трассировку?
- Обзор трассировка Python
- Подробный обзор трассировки в Python
- Обзор основных Traceback исключений в Python
- AttributeError
- ImportError
- IndexError
- KeyError
- NameError
- SyntaxError
- TypeError
- ValueError
- Логирование ошибок из Traceback
- Вывод
Понимание того, какую информацию предоставляет traceback Python является основополагающим критерием того, как стать лучшим Python программистом.
К концу данной статьи вы сможете:
- Понимать, что несет за собой traceback
- Различать основные виды traceback
- Успешно вести журнал traceback, при этом исправить ошибку
Python Traceback — Как правильно читать трассировку?
Traceback (трассировка) — это отчет, который содержит вызовы выполненных функций в вашем коде в определенный момент.
Есть вопросы по Python?
На нашем форуме вы можете задать любой вопрос и получить ответ от всего нашего сообщества!
Telegram Чат & Канал
Вступите в наш дружный чат по Python и начните общение с единомышленниками! Станьте частью большого сообщества!
Паблик VK
Одно из самых больших сообществ по Python в социальной сети ВК. Видео уроки и книги для вас!
Traceback называют по разному, иногда они упоминаются как трассировка стэка, обратная трассировка, и так далее. В Python используется определение “трассировка”.
Когда ваша программа выдает ошибку, Python выводит текущую трассировку, чтобы подсказать вам, что именно пошло не так. Ниже вы увидите пример, демонстрирующий данную ситуацию:
|
def say_hello(man): print(‘Привет, ‘ + wrong_variable) say_hello(‘Иван’) |
Здесь say_hello() вызывается с параметром man. Однако, в say_hello() это имя переменной не используется. Это связано с тем, что оно написано по другому: wrong_variable в вызове print().
Обратите внимание: в данной статье подразумевается, что вы уже имеете представление об ошибках Python. Если это вам не знакомо, или вы хотите освежить память, можете ознакомиться с нашей статьей: Обработка ошибок в Python
Когда вы запускаете эту программу, вы получите следующую трассировку:
|
Traceback (most recent call last): File «/home/test.py», line 4, in <module> say_hello(‘Иван’) File «/home/test.py», line 2, in say_hello print(‘Привет, ‘ + wrong_variable) NameError: name ‘wrong_variable’ is not defined Process finished with exit code 1 |
Эта выдача из traceback содержит массу информации, которая вам понадобится для определения проблемы. Последняя строка трассировки говорит нам, какой тип ошибки возник, а также дополнительная релевантная информация об ошибке. Предыдущие строки из traceback указывают на код, из-за которого возникла ошибка.
В traceback выше, ошибкой является NameError, она означает, что есть отсылка к какому-то имени (переменной, функции, класса), которое не было определено. В данном случае, ссылаются на имя wrong_variable.
Последняя строка содержит достаточно информации для того, чтобы вы могли решить эту проблему. Поиск переменной wrong_variable, и заменит её атрибутом из функции на man. Однако, скорее всего в реальном случае вы будете иметь дело с более сложным кодом.
Python Traceback — Как правильно понять в чем ошибка?
Трассировка Python содержит массу полезной информации, когда вам нужно определить причину ошибки, возникшей в вашем коде. В данном разделе, мы рассмотрим различные виды traceback, чтобы понять ключевые отличия информации, содержащейся в traceback.
Существует несколько секций для каждой трассировки Python, которые являются крайне важными. Диаграмма ниже описывает несколько частей:

В Python лучше всего читать трассировку снизу вверх.
- Синее поле: последняя строка из traceback — это строка уведомления об ошибке. Синий фрагмент содержит название возникшей ошибки.
- Зеленое поле: после названия ошибки идет описание ошибки. Это описание обычно содержит полезную информацию для понимания причины возникновения ошибки.
- Желтое поле: чуть выше в трассировке содержатся различные вызовы функций. Снизу вверх — от самых последних, до самых первых. Эти вызовы представлены двухстрочными вводами для каждого вызова. Первая строка каждого вызова содержит такую информацию, как название файла, номер строки и название модуля. Все они указывают на то, где может быть найден код.
- Красное подчеркивание: вторая строка этих вызовов содержит непосредственный код, который был выполнен с ошибкой.
Есть ряд отличий между выдачей трассировок, когда вы запускает код в командной строке, и между запуском кода в REPL. Ниже вы можете видеть тот же код из предыдущего раздела, запущенного в REPL и итоговой выдачей трассировки:
|
Python 3.7.4 (default, Jul 16 2019, 07:12:58) [GCC 9.1.0] on linux Type «help», «copyright», «credits» or «license» for more information. >>> >>> >>> def say_hello(man): ... print(‘Привет, ‘ + wrong_variable) ... >>> say_hello(‘Иван’) Traceback (most recent call last): File «<stdin>», line 1, in <module> File «<stdin>», line 2, in say_hello NameError: name ‘wrong_variable’ is not defined |
Обратите внимание на то, что на месте названия файла вы увидите <stdin>. Это логично, так как вы выполнили код через стандартный ввод. Кроме этого, выполненные строки кода не отображаются в traceback.
Важно помнить: если вы привыкли видеть трассировки стэка в других языках программирования, то вы обратите внимание на явное различие с тем, как выглядит traceback в Python. Большая часть других языков программирования выводят ошибку в начале, и затем ведут сверху вниз, от недавних к последним вызовам.
Это уже обсуждалось, но все же: трассировки Python читаются снизу вверх. Это очень помогает, так как трассировка выводится в вашем терминале (или любым другим способом, которым вы читаете трассировку) и заканчивается в конце выдачи, что помогает последовательно структурировать прочтение из traceback и понять в чем ошибка.
Traceback в Python на примерах кода
Изучение отдельно взятой трассировки поможет вам лучше понять и увидеть, какая информация в ней вам дана и как её применить.
Код ниже используется в примерах для иллюстрации информации, данной в трассировке Python:
Мы запустили ниже предоставленный код в качестве примера и покажем какую информацию мы получили от трассировки.
Сохраняем данный код в файле greetings.py
|
def who_to_greet(person): return person if person else input(‘Кого приветствовать? ‘) def greet(someone, greeting=‘Здравствуйте’): print(greeting + ‘, ‘ + who_to_greet(someone)) def greet_many(people): for person in people: try: greet(person) except Exception: print(‘Привет, ‘ + person) |
Функция who_to_greet() принимает значение person и либо возвращает данное значение если оно не пустое, либо запрашивает значение от пользовательского ввода через input().
Далее, greet() берет имя для приветствия из someone, необязательное значение из greeting и вызывает print(). Также с переданным значением из someone вызывается who_to_greet().
Наконец, greet_many() выполнит итерацию по списку людей и вызовет greet(). Если при вызове greet() возникает ошибка, то выводится резервное приветствие print('hi, ' + person).
Этот код написан правильно, так что никаких ошибок быть не может при наличии правильного ввода.
Если вы добавите вызов функции greet() в конце нашего кода (которого сохранили в файл greetings.py) и дадите аргумент который он не ожидает (например, greet('Chad', greting='Хай')), то вы получите следующую трассировку:
|
$ python greetings.py Traceback (most recent call last): File «/home/greetings.py», line 19, in <module> greet(‘Chad’, greting=‘Yo’) TypeError: greet() got an unexpected keyword argument ‘greting’ |
Еще раз, в случае с трассировкой Python, лучше анализировать снизу вверх. Начиная с последней строки трассировки, вы увидите, что ошибкой является TypeError. Сообщения, которые следуют за типом ошибки, дают вам полезную информацию. Трассировка сообщает, что greet() вызван с аргументом, который не ожидался. Неизвестное название аргумента предоставляется в том числе, в нашем случае это greting.
Поднимаясь выше, вы можете видеть строку, которая привела к исключению. В данном случае, это вызов greet(), который мы добавили в конце greetings.py.
Следующая строка дает нам путь к файлу, в котором лежит код, номер строки этого файла, где вы можете найти код, и то, какой в нем модуль. В нашем случае, так как наш код не содержит никаких модулей Python, мы увидим только надпись , означающую, что этот файл является выполняемым.
С другим файлом и другим вводом, вы можете увидеть, что трассировка явно указывает вам на правильное направление, чтобы найти проблему. Следуя этой информации, мы удаляем злополучный вызов greet() в конце greetings.py, и добавляем следующий файл под названием example.py в папку:
|
from greetings import greet greet(1) |
Здесь вы настраиваете еще один файл Python, который импортирует ваш предыдущий модуль greetings.py, и используете его greet(). Вот что произойдете, если вы запустите example.py:
|
$ python example.py Traceback (most recent call last): File «/path/to/example.py», line 3, in <module> greet(1) File «/path/to/greetings.py», line 5, in greet print(greeting + ‘, ‘ + who_to_greet(someone)) TypeError: must be str, not int |
В данном случае снова возникает ошибка TypeError, но на этот раз уведомление об ошибки не очень помогает. Оно говорит о том, что где-то в коде ожидается работа со строкой, но было дано целое число.
Идя выше, вы увидите строку кода, которая выполняется. Затем файл и номер строки кода. На этот раз мы получаем имя функции, которая была выполнена — greet().
Поднимаясь к следующей выполняемой строке кода, мы видим наш проблемный вызов greet(), передающий целое число.
Иногда, после появления ошибки, другой кусок кода берет эту ошибку и также её выдает. В таких случаях, Python выдает все трассировки ошибки в том порядке, в котором они были получены, и все по тому же принципу, заканчивая на самой последней трассировке.
Так как это может сбивать с толку, рассмотрим пример. Добавим вызов greet_many() в конце greetings.py:
|
# greetings.py ... greet_many([‘Chad’, ‘Dan’, 1]) |
Это должно привести к выводу приветствия всем трем людям. Однако, если вы запустите этот код, вы увидите несколько трассировок в выдаче:
|
1 2 3 4 5 6 7 8 9 10 11 12 13 14 15 16 17 18 |
$ python greetings.py Hello, Chad Hello, Dan Traceback (most recent call last): File «greetings.py», line 10, in greet_many greet(person) File «greetings.py», line 5, in greet print(greeting + ‘, ‘ + who_to_greet(someone)) TypeError: must be str, not int During handling of the above exception, another exception occurred: Traceback (most recent call last): File «greetings.py», line 14, in <module> greet_many([‘Chad’, ‘Dan’, 1]) File «greetings.py», line 12, in greet_many print(‘hi, ‘ + person) TypeError: must be str, not int |
Обратите внимание на выделенную строку, начинающуюся с “During handling in the output above”. Между всеми трассировками, вы ее увидите.
Это достаточно ясное уведомление: Пока ваш код пытался обработать предыдущую ошибку, возникла новая.
Обратите внимание: функция отображения предыдущих трассировок была добавлена в Python 3. В Python 2 вы можете получать только трассировку последней ошибки.
Вы могли видеть предыдущую ошибку, когда вызывали greet() с целым числом. Так как мы добавили 1 в список людей для приветствия, мы можем ожидать тот же результат. Однако, функция greet_many() оборачивает вызов greet() и пытается в блоке try и except. На случай, если greet() приведет к ошибке, greet_many() захочет вывести приветствие по-умолчанию.
Соответствующая часть greetings.py повторяется здесь:
|
def greet_many(people): for person in people: try: greet(person) except Exception: print(‘hi, ‘ + person) |
Когда greet() приводит к TypeError из-за неправильного ввода числа, greet_many() обрабатывает эту ошибку и пытается вывести простое приветствие. Здесь код приводит к другой, аналогичной ошибке. Он все еще пытается добавить строку и целое число.
Просмотр всей трассировки может помочь вам увидеть, что стало причиной ошибки. Иногда, когда вы получаете последнюю ошибку с последующей трассировкой, вы можете не увидеть, что пошло не так. В этих случаях, изучение предыдущих ошибок даст лучшее представление о корне проблемы.
Обзор основных Traceback исключений в Python 3
Понимание того, как читаются трассировки Python, когда ваша программа выдает ошибку, может быть очень полезным навыком, однако умение различать отдельные трассировки может заметно ускорить вашу работу.
Рассмотрим основные ошибки, с которыми вы можете сталкиваться, причины их появления и что они значат, а также информацию, которую вы можете найти в их трассировках.
Ошибка AttributeError object has no attribute [Решено]
AttributeError возникает тогда, когда вы пытаетесь получить доступ к атрибуту объекта, который не содержит определенного атрибута. Документация Python определяет, когда эта ошибка возникнет:
Возникает при вызове несуществующего атрибута или присвоение значения несуществующему атрибуту.
Пример ошибки AttributeError:
|
>>> an_int = 1 >>> an_int.an_attribute Traceback (most recent call last): File «<stdin>», line 1, in <module> AttributeError: ‘int’ object has no attribute ‘an_attribute’ |
Строка уведомления об ошибке для AttributeError говорит вам, что определенный тип объекта, в данном случае int, не имеет доступа к атрибуту, в нашем случае an_attribute. Увидев AttributeError в строке уведомления об ошибке, вы можете быстро определить, к какому атрибуту вы пытались получить доступ, и куда перейти, чтобы это исправить.
Большую часть времени, получение этой ошибки определяет, что вы возможно работаете с объектом, тип которого не является ожидаемым:
|
>>> a_list = (1, 2) >>> a_list.append(3) Traceback (most recent call last): File «<stdin>», line 1, in <module> AttributeError: ‘tuple’ object has no attribute ‘append’ |
В примере выше, вы можете ожидать, что a_list будет типом списка, который содержит метод .append(). Когда вы получаете ошибку AttributeError, и видите, что она возникла при попытке вызова .append(), это говорит о том, что вы, возможно, не работаете с типом объекта, который ожидаете.
Часто это происходит тогда, когда вы ожидаете, что объект вернется из вызова функции или метода и будет принадлежать к определенному типу, но вы получаете тип объекта None. В данном случае, строка уведомления об ошибке будет выглядеть так:
AttributeError: ‘NoneType’ object has no attribute ‘append’
Python Ошибка ImportError: No module named [Решено]
ImportError возникает, когда что-то идет не так с оператором import. Вы получите эту ошибку, или ее подкласс ModuleNotFoundError, если модуль, который вы хотите импортировать, не может быть найден, или если вы пытаетесь импортировать что-то, чего не существует во взятом модуле. Документация Python определяет, когда возникает эта ошибка:
Ошибка появляется, когда в операторе импорта возникают проблемы при попытке загрузить модуль. Также вызывается, при конструкции импорта
from listвfrom ... importимеет имя, которое невозможно найти.
Вот пример появления ImportError и ModuleNotFoundError:
|
>>> import asdf Traceback (most recent call last): File «<stdin>», line 1, in <module> ModuleNotFoundError: No module named ‘asdf’ >>> from collections import asdf Traceback (most recent call last): File «<stdin>», line 1, in <module> ImportError: cannot import name ‘asdf’ |
В примере выше, вы можете видеть, что попытка импорта модуля asdf, который не существует, приводит к ModuleNotFoundError. При попытке импорта того, что не существует (в нашем случае — asdf) из модуля, который существует (в нашем случае — collections), приводит к ImportError. Строки сообщения об ошибке трассировок указывают на то, какая вещь не может быть импортирована, в обоих случаях это asdf.
Ошибка IndexError: list index out of range [Решено]
IndexError возникает тогда, когда вы пытаетесь вернуть индекс из последовательности, такой как список или кортеж, и при этом индекс не может быть найден в последовательности. Документация Python определяет, где эта ошибка появляется:
Возникает, когда индекс последовательности находится вне диапазона.
Вот пример, который приводит к IndexError:
|
>>> a_list = [‘a’, ‘b’] >>> a_list[3] Traceback (most recent call last): File «<stdin>», line 1, in <module> IndexError: list index out of range |
Строка сообщения об ошибке для IndexError не дает вам полную информацию. Вы можете видеть, что у вас есть отсылка к последовательности, которая не доступна и то, какой тип последовательности рассматривается, в данном случае это список.
Иными словами, в списке a_list нет значения с ключом
3. Есть только значение с ключами0и1, этоaиbсоответственно.
Эта информация, в сочетании с остальной трассировкой, обычно является исчерпывающей для помощи программисту в быстром решении проблемы.
Возникает ошибка KeyError в Python 3 [Решено]
Как и в случае с IndexError, KeyError возникает, когда вы пытаетесь получить доступ к ключу, который отсутствует в отображении, как правило, это dict. Вы можете рассматривать его как IndexError, но для словарей. Из документации:
Возникает, когда ключ словаря не найден в наборе существующих ключей.
Вот пример появления ошибки KeyError:
|
>>> a_dict = [‘a’: 1, ‘w’: ‘2’] >>> a_dict[‘b’] Traceback (most recent call last): File «<stdin>», line 1, in <module> KeyError: ‘b’ |
Строка уведомления об ошибки KeyError говорит о ключе, который не может быть найден. Этого не то чтобы достаточно, но, если взять остальную часть трассировки, то у вас будет достаточно информации для решения проблемы.
Ошибка NameError: name is not defined в Python [Решено]
NameError возникает, когда вы ссылаетесь на название переменной, модуля, класса, функции, и прочего, которое не определено в вашем коде.
Документация Python дает понять, когда возникает эта ошибка NameError:
Возникает, когда локальное или глобальное название не было найдено.
В коде ниже, greet() берет параметр person. Но в самой функции, этот параметр был назван с ошибкой, persn:
|
>>> def greet(person): ... print(f‘Hello, {persn}’) >>> greet(‘World’) Traceback (most recent call last): File «<stdin>», line 1, in <module> File «<stdin>», line 2, in greet NameError: name ‘persn’ is not defined |
Строка уведомления об ошибке трассировки NameError указывает вам на название, которое мы ищем. В примере выше, это названная с ошибкой переменная или параметр функции, которые были ей переданы.
NameError также возникнет, если берется параметр, который мы назвали неправильно:
|
>>> def greet(persn): ... print(f‘Hello, {person}’) >>> greet(‘World’) Traceback (most recent call last): File «<stdin>», line 1, in <module> File «<stdin>», line 2, in greet NameError: name ‘person’ is not defined |
Здесь все выглядит так, будто вы сделали все правильно. Последняя строка, которая была выполнена, и на которую ссылается трассировка выглядит хорошо.
Если вы окажетесь в такой ситуации, то стоит пройтись по коду и найти, где переменная person была использована и определена. Так вы быстро увидите, что название параметра введено с ошибкой.
Ошибка SyntaxError: invalid syntax в Python [Решено]
Возникает, когда синтаксический анализатор обнаруживает синтаксическую ошибку.
Ниже, проблема заключается в отсутствии двоеточия, которое должно находиться в конце строки определения функции. В REPL Python, эта ошибка синтаксиса возникает сразу после нажатия Enter:
|
>>> def greet(person) File «<stdin>», line 1 def greet(person) ^ SyntaxError: invalid syntax |
Строка уведомления об ошибке SyntaxError говорит вам только, что есть проблема с синтаксисом вашего кода. Просмотр строк выше укажет вам на строку с проблемой. Каретка ^ обычно указывает на проблемное место. В нашем случае, это отсутствие двоеточия в операторе def нашей функции.
Стоит отметить, что в случае с трассировками SyntaxError, привычная первая строка Tracebak (самый последний вызов) отсутствует. Это происходит из-за того, что SyntaxError возникает, когда Python пытается парсить ваш код, но строки фактически не выполняются.
Ошибка TypeError в Python 3 [Решено]
TypeError возникает, когда ваш код пытается сделать что-либо с объектом, который не может этого выполнить, например, попытка добавить строку в целое число, или вызвать len() для объекта, в котором не определена длина.
Ошибка возникает, когда операция или функция применяется к объекту неподходящего типа.
Рассмотрим несколько примеров того, когда возникает TypeError:
|
>>> 1 + ‘1’ Traceback (most recent call last): File «<stdin>», line 1, in <module> TypeError: unsupported operand type(s) for +: ‘int’ and ‘str’ >>> ‘1’ + 1 Traceback (most recent call last): File «<stdin>», line 1, in <module> TypeError: must be str, not int >>> len(1) Traceback (most recent call last): File «<stdin>», line 1, in <module> TypeError: object of type ‘int’ has no len() |
Указанные выше примеры возникновения TypeError приводят к строке уведомления об ошибке с разными сообщениями. Каждое из них весьма точно информирует вас о том, что пошло не так.
В первых двух примерах мы пытаемся внести строки и целые числа вместе. Однако, они немного отличаются:
- В первом примере мы пытаемся добавить
strкint. - Во втором примере мы пытаемся добавить
intкstr.
Уведомления об ошибке указывают на эти различия.
Последний пример пытается вызвать len() для int. Сообщение об ошибке говорит нам, что мы не можем сделать это с int.
Возникла ошибка ValueError в Python 3 [Решено]
ValueError возникает тогда, когда значение объекта не является корректным. Мы можем рассматривать это как IndexError, которая возникает из-за того, что значение индекса находится вне рамок последовательности, только ValueError является более обобщенным случаем.
Возникает, когда операция или функция получает аргумент, который имеет правильный тип, но неправильное значение, и ситуация не описывается более детальной ошибкой, такой как IndexError.
Вот два примера возникновения ошибки ValueError:
|
>>> a, b, c = [1, 2] Traceback (most recent call last): File «<stdin>», line 1, in <module> ValueError: not enough values to unpack (expected 3, got 2) >>> a, b = [1, 2, 3] Traceback (most recent call last): File «<stdin>», line 1, in <module> ValueError: too many values to unpack (expected 2) |
Строка уведомления об ошибке ValueError в данных примерах говорит нам в точности, в чем заключается проблема со значениями:
- В первом примере, мы пытаемся распаковать слишком много значений. Строка уведомления об ошибке даже говорит нам, где именно ожидается распаковка трех значений, но получаются только два.
- Во втором примере, проблема в том, что мы получаем слишком много значений, при этом получаем недостаточно значений для распаковки.
Логирование ошибок из Traceback в Python 3
Получение ошибки, и ее итоговой трассировки указывает на то, что вам нужно предпринять для решения проблемы. Обычно, отладка кода — это первый шаг, но иногда проблема заключается в неожиданном, или некорректном вводе. Хотя важно предусматривать такие ситуации, иногда есть смысл скрывать или игнорировать ошибку путем логирования traceback.
Рассмотрим жизненный пример кода, в котором нужно заглушить трассировки Python. В этом примере используется библиотека requests.
Файл urlcaller.py:
|
import sys import requests response = requests.get(sys.argv[1]) print(response.status_code, response.content) |
Этот код работает исправно. Когда вы запускаете этот скрипт, задавая ему URL в качестве аргумента командной строки, он откроет данный URL, и затем выведет HTTP статус кода и содержимое страницы (content) из response. Это работает даже в случае, если ответом является статус ошибки HTTP:
|
$ python urlcaller.py https://httpbin.org/status/200 200 b» $ python urlcaller.py https://httpbin.org/status/500 500 b» |
Однако, иногда данный URL не существует (ошибка 404 — страница не найдена), или сервер не работает. В таких случаях, этот скрипт приводит к ошибке ConnectionError и выводит трассировку:
|
1 2 3 4 5 6 7 8 9 10 11 12 13 14 15 16 17 18 |
$ python urlcaller.py http://thisurlprobablydoesntexist.com ... During handling of the above exception, another exception occurred: Traceback (most recent call last): File «urlcaller.py», line 5, in <module> response = requests.get(sys.argv[1]) File «/path/to/requests/api.py», line 75, in get return request(‘get’, url, params=params, **kwargs) File «/path/to/requests/api.py», line 60, in request return session.request(method=method, url=url, **kwargs) File «/path/to/requests/sessions.py», line 533, in request resp = self.send(prep, **send_kwargs) File «/path/to/requests/sessions.py», line 646, in send r = adapter.send(request, **kwargs) File «/path/to/requests/adapters.py», line 516, in send raise ConnectionError(e, request=request) requests.exceptions.ConnectionError: HTTPConnectionPool(host=‘thisurlprobablydoesntexist.com’, port=80): Max retries exceeded with url: / (Caused by NewConnectionError(‘<urllib3.connection.HTTPConnection object at 0x7faf9d671860>: Failed to establish a new connection: [Errno -2] Name or service not known’,)) |
Трассировка Python в данном случае может быть очень длинной, и включать в себя множество других ошибок, которые в итоге приводят к ошибке ConnectionError. Если вы перейдете к трассировке последних ошибок, вы заметите, что все проблемы в коде начались на пятой строке файла urlcaller.py.
Если вы обернёте неправильную строку в блоке try и except, вы сможете найти нужную ошибку, которая позволит вашему скрипту работать с большим числом вводов:
Файл urlcaller.py:
|
try: response = requests.get(sys.argv[1]) except requests.exceptions.ConnectionError: print(—1, ‘Connection Error’) else: print(response.status_code, response.content) |
Код выше использует предложение else с блоком except.
Теперь, когда вы запускаете скрипт на URL, который приводит к ошибке ConnectionError, вы получите -1 в статусе кода и содержимое ошибки подключения:
|
$ python urlcaller.py http://thisurlprobablydoesntexist.com —1 Connection Error |
Это работает отлично. Однако, в более реалистичных системах, вам не захочется просто игнорировать ошибку и итоговую трассировку, вам скорее понадобиться внести в журнал. Ведение журнала трассировок позволит вам лучше понять, что идет не так в ваших программах.
Обратите внимание: Для более лучшего представления о системе логирования в Python вы можете ознакомиться с данным руководством тут: Логирование в Python
Вы можете вести журнал трассировки в скрипте, импортировав пакет logging, получить logger, вызвать .exception() для этого логгера в куске except блока try и except. Конечный скрипт будет выглядеть примерно так:
|
# urlcaller.py import logging import sys import requests logger = logging.getLogger(__name__) try: response = requests.get(sys.argv[1]) except requests.exceptions.ConnectionError as e: logger.exception() print(—1, ‘Connection Error’) else: print(response.status_code, response.content) |
Теперь, когда вы запускаете скрипт с проблемным URL, он будет выводить исключенные -1 и ConnectionError, но также будет вести журнал трассировки:
|
$ python urlcaller.py http://thisurlprobablydoesntexist.com ... File «/path/to/requests/adapters.py», line 516, in send raise ConnectionError(e, request=request) requests.exceptions.ConnectionError: HTTPConnectionPool(host=‘thisurlprobablydoesntexist.com’, port=80): Max retries exceeded with url: / (Caused by NewConnectionError(‘<urllib3.connection.HTTPConnection object at 0x7faf9d671860>: Failed to establish a new connection: [Errno -2] Name or service not known’,)) —1 Connection Error |
По умолчанию, Python будет выводить ошибки в стандартный stderr. Выглядит так, будто мы совсем не подавили вывод трассировки. Однако, если вы выполните еще один вызов при перенаправлении stderr, вы увидите, что система ведения журналов работает, и мы можем изучать логи программы без необходимости личного присутствия во время появления ошибок:
|
$ python urlcaller.py http://thisurlprobablydoesntexist.com 2> my—logs.log —1 Connection Error |
Подведем итоги данного обучающего материала
Трассировка Python содержит замечательную информацию, которая может помочь вам понять, что идет не так с вашим кодом Python. Эти трассировки могут выглядеть немного запутанно, но как только вы поймете что к чему, и увидите, что они в себе несут, они могут быть предельно полезными. Изучив несколько трассировок, строку за строкой, вы получите лучшее представление о предоставляемой информации.
Понимание содержимого трассировки Python, когда вы запускаете ваш код может быть ключом к улучшению вашего кода. Это способ, которым Python пытается вам помочь.
Теперь, когда вы знаете как читать трассировку Python, вы можете выиграть от изучения ряда инструментов и техник для диагностики проблемы, о которой вам сообщает трассировка. Модуль traceback может быть полезным, если вам нужно узнать больше из выдачи трассировки.
- Текст является переводом статьи: Understanding the Python Traceback
- Изображение из шапки статьи принадлежит сайту © Real Python

Являюсь администратором нескольких порталов по обучению языков программирования Python, Golang и Kotlin. В составе небольшой команды единомышленников, мы занимаемся популяризацией языков программирования на русскоязычную аудиторию. Большая часть статей была адаптирована нами на русский язык и распространяется бесплатно.
E-mail: vasile.buldumac@ati.utm.md
Образование
Universitatea Tehnică a Moldovei (utm.md)
- 2014 — 2018 Технический Университет Молдовы, ИТ-Инженер. Тема дипломной работы «Автоматизация покупки и продажи криптовалюты используя технический анализ»
- 2018 — 2020 Технический Университет Молдовы, Магистр, Магистерская диссертация «Идентификация человека в киберпространстве по фотографии лица»
Ошибка «В вашем приложении возникло необработанное исключение» — как исправить?
Случается, что при запуске компьютера с операционной системой Windows появляется такая проблема, как необрабатываемое исключение в приложении net framework. Само сообщение об ошибке выглядит так и отображается в окне платформы microsoft.NET Framework:
Необрабатываемое исключение в приложении. При нажатии кнопки «Продолжить» приложение проигнорирует ошибку и попытаеться продолжить работу. При нажатии кнопки «выход» приложение немедленно завершит работу.
Ниже, тоже сообщение, но на английском языке

В чем причина ошибки «Unhandled exception has occurred in your application» в Windows и что делать?
Существует несколько простых причин из-за которых возникает эта проблема и устранить их достаточно легко, если правильно их выявить. Посмотрите список ниже:
-
Дело в антивирусе. Некоторые антивирусные программы, такие как Panda Antivirus, могут вызывать такую ошибку. Для того, чтобы проверить в антивирусе ли дело, временно отключите его или установите другой.
-
На компьютере могут быть установлены некоторые вредоносные программы или вирусы. Проверьте ваш компьютер и, если есть вирусы, удалите их.
-
Microsoft.NET Framework был неправильно установлен. Например из-за того, что файлы установщика содержали ошибку. В этом случае можно попробовать установить программу еще раз, скачать более новую версию с официального сайта Майкрософт.
-
Если это не поможет, выполните сканирование SFC (проверка и восстановление целостности системных файлов Windows).
-
Для этого в меню «Пуск»-«Выполнить» наберите cmd, а затем в командной строке команду: sfc /scannow. Система начнет сканировать файлы и через некоторое время выдаст результат.
-
Установка или устранение неисправностей в Microsoft.NET Framework
Нужно проверить состояние Microsoft.NET Framework — установлен ли он на компьютере? После чего, его можно либо установить (если установка не была проведена) или восстановить («отремонтировать»)
Какие действия нужно выполнить для установки или восстановления Microsoft.NET Framework:

-
Закройте все открытые программы.
-
Нажмите кнопку «Пуск» и выберите пункт «Выполнить». (Если у вас Windows10, используйте комбинацию клавиш на клавиатуре Win+R, где Win — клавиша с эмблемой Windows )
-
Наберите команду «control» в окне «Открыть» и нажмите кнопку «ОК». Откроется «Панель управления».
-
Выберите пункт «Программы и компоненты»
-
Просмотрите список программ, найдите Microsoft.NET Framework (на картинке ниже Microsoft.NET Framework установлен):

-
Если вы не нашли программу в списке, значит Microsoft.NET Framework у вас не установлен. Нажмите здесь, чтобы загрузить последнюю версию Microsoft .NET Framework с веб-сайта Microsoft. После чего проведите установку.
-
Если вы видите программу в списке (как на рисунке выше) и она не работает (работает неправильно, с ошибкой «необрабатываемое исключение в приложении net framework»), то нужно ее исправить (переустановить). Для этого:
-
Выберите Microsoft.NET Framework, а затем кликните правой кнопкой мыши и выберите «Изменить/Удалить».
-
В отрывшемся окне выберите команду «Восстановить исходное состояние .NET Framework», а затем нажмите «Далее».
-
Следуйте инструкциям, и потом перезагрузите компьютер

Если проблема не решена, попробуйте безопасную загрузку Windows.
Как выполнить безопасную загрузку?

Чтобы воспользоваться параметром безопасной загрузки, выполните следующие действия.
-
Нажмите перезагрузить и во время перезагрузки нажимайте клавишу F8 на клавиатуре.
-
Выберите опцию с помощью клавиш со стрелками на клавиатуре, когда появится меню дополнительных параметров Windows, а затем нажмите клавишу ENTER.
-
Мы рекомендуем запустить Windows в чистой среде загрузки, чтобы убедиться, что эта проблема не вызвана фоновой программой (выберите параметры как на рисунке выше).
-
После запуска компьютера проверьте, решена ли проблема с установкой Microsoft.NET Framework
Выполните поиск неисправностей аппаратного обеспечения
Любые аппаратные проблемы также могут быть причиной ошибки. Поэтому очень важно выполнить анализ аппаратных средств и устройств, чтобы исключить возможность того, что аппарат или устройство могут влиять на работу программы.
- Чтобы определить это оборудование, введите в окне запуска (Пуск -> Выполнить или WIN+R) следующую команду: «%systemroot%system32msdt.exe -id DeviceDiagnostic» и нажмите клавишу Enter или нажмите кнопку OK

- Следуйте инструкциям на экране, чтобы определить неисправное оборудование.
- Вы также можете исправить аппаратные проблемы на странице настроек, как показано на рисунке ниже.


Зайдите «Панель управления», кликните кнопкой мышки на стрелочку возле надписи и выберите «Все элементы панели управления», далее нажмите «Устранение неполадок» и следуйте инструкциям.

Возможно вас заинтересует:
Several VirtualBox users are encountering the “Virtual machine has terminated unexpectedly during startup with exit code 1 (0x1)” error whenever they try to open a virtual machine. Affected users report that this error occurs with multiple virtual machines (including any new ones that they try to create). This particular issue is confirmed to occur on Windows 7, Windows 8.1 and Windows 10.
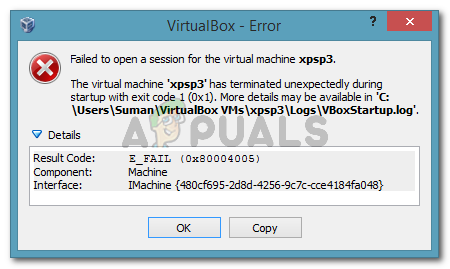
The virtual machine has terminated unexpectedly during startup with exit code (0x1).
What is causing the “Virtual machine has terminated unexpectedly during startup with exit code 1 (0x1)” error
We tried to get to the bottom of this issue by investigating various user reports. Based on what we gathered and based on several solutions that affected users advertised, we have managed to identify several potential culprits that might trigger this particular error message:
- The VirtualBox kernel driver is not installed (or is corrupted) – A couple of users have managed to get the issue resolved by reinstalling VirtualBox along with the VirtualBox kernel driver.
- 3rd-party antivirus is interfering with VirtualBox – In a couple of reports, affected users were able to get the issue resolved by temporarily disabling the real-time protection of their 3rd party AV.
- A bad Windows Update is causing the error – There’s one particular update that is confirmed to be causing this particular error. So far, this issue is only confirmed to occur on Windows 7.
If you’re currently struggling to resolve this particular issue, one of the methods below will enable you to resolve the issue. Below you have several fixes that other users in a similar situation have used to get the issue resolved.
Since the methods below are ordered by efficiency and severity, follow them in the order that they are presented until you find a fix that successfully resolves the issue in your particular scenario.
Method 1: Restarting your system
If you haven’t already done this, start simply by rebooting your machine. Several users have reported that after they rebooted their computer, VirtualBox was able to open virtual machines without being interrupted by the “Virtual machine has terminated unexpectedly during startup with exit code 1 (0x1)” error.
If a restart is not effective or you’re looking for a more permanent fix, move down to the next method below.
Method 2: Disable the antivirus while running the virtual machine
Another frequent culprit that will trigger the “Virtual machine has terminated unexpectedly during startup with exit code 1 (0x1)” error is an external antivirus suite ( a security option different than Windows Defender).
Several users that were using a 3rd party security suite have reported that the error doesn’t occur if the real-time protection of the AV is disabled. The steps of disabling the real-time protection are specific to each 3rd party antivirus, but you can typically disable it by right-clicking the taskbar icon and using the context menu.

An alternative would be to uninstall the security suite completely by removing the 3rd party security suite from your system. You can do this by following this guide (here).
Once the antivirus has been taken care of, open VirtualBox and launch the virtual machine again. If the AV was interfering with VirtualBox, you’ll no longer get the “Virtual machine has terminated unexpectedly during startup with exit code 1 (0x1)” error.
If you’re still seeing the error despite disabling your 3rd party security suite, move down to the next method below.
Method 3: Installing the VirtualBox kernel driver
Several users have managed to resolve the issue by reinstalling VirtualBox along with the VBoxDrv.inf (the VirtualBox Kernel driver). This approach seems to have helped a lot of uses to resolve the issue for good.
Some users have reported that just installing the VBoxDRV.inf driver was enough, but you’re better off re-initiating all of VirtualBox’s components. Here’s a quick guide through the whole thing:
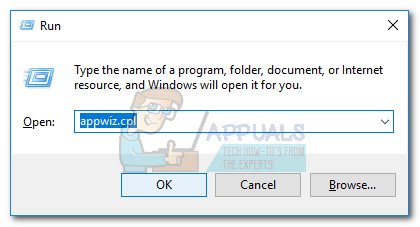
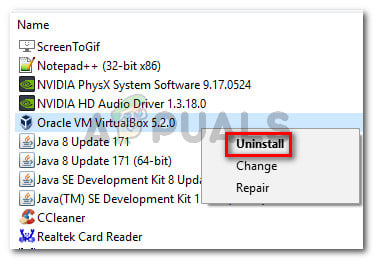
- Pres Windows key + R to open up a Run Dialog Box. Then, type “appwiz.cpl” and press Enter to open up Programs and Features.

Run dialog: appwiz.cpl - Inside Programs and Features, scroll through the list of applications to locate Oracle VM VirtualBox. Once you see the entry, right-click on it and choose Uninstall. Then, follow the on-screen prompts to remove the software from your system.

Uninstalling Oracle VM VirtualBox - Once the software has been uninstalled, restart your machine. At the next startup, make sure that no 3rd party antivirus is running.
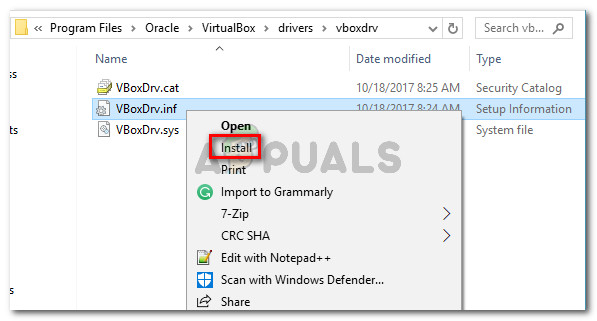
- Open File Explorer and navigate to the following location:
C: Program Files Oracle VirtualBox drivers vboxdrv VBoxDrv.inf
- Once you get there, right-click on VBoxDRv.inf and choose Install, then click Yes at the UAC (User Account Control) prompt.

Installing the VBoxDRV.inf (VirtualBox kernel driver) file - Once you see “The operation completed successfully” prompt, click Ok and run the virtual machine again. It should open without the “Virtual machine has terminated unexpectedly during startup with exit code 1 (0x1)” error.

The operation is completed successfully
Method 4: Installing Microsoft’s bug fix update (Windows 7 only)
As per various user reports, there is one Windows update that is confirmed to be causing the “Virtual machine has terminated unexpectedly during startup with exit code 1 (0x1)” error. As it turns out, the KB3004394 update will miss installing a .cat file which prevents VirtualBox from verifying the authenticity of several DDL files.
Note: If you are not on Windows 7, jump straight to Method 5.
Luckily, the fix for it is extremely simple since Microsoft has already released a hotfix for it. Follow the steps below to resolve the error (if it was caused by a bad update) on Windows 7:
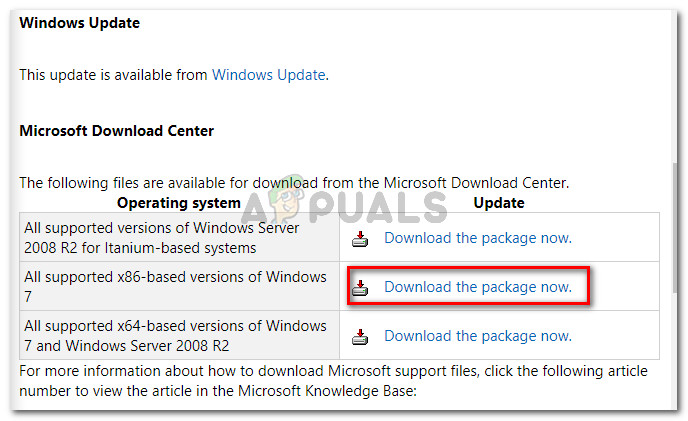
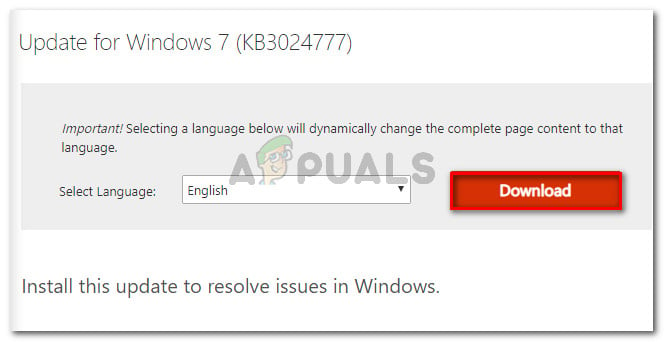
- Visit this Microsoft official link (here) and download the hotfix for Windows 7 by clicking on Download the package now.

Choosing the appropriate download package - In the next screen, click the Download button to commence the download.

Downloading the hotfix - Once the download is complete, open the update executable and follow the on-screen prompts to install it on your system. It will act as a removal tool, deleting the bad update altogether.
- Reboot your computer and open the virtual machine again at the next startup and see if you’re still encountering the “Virtual machine has terminated unexpectedly during startup with exit code 1 (0x1)” error. If you are, move over to the final method below.
Method 5: Starting the machine in the Headless mode (Temporary fix)
If you’ve come this far without a result, there’s one fix that a lot of affected users have used to circumvent the “Virtual machine has terminated unexpectedly during startup with exit code 1 (0x1)” error. But it has one major downside – it’s only a temporary fix.
Several users have reported that the error doesn’t occur if they start the machine in Headless mode and then clicking on Show. Here’s a quick guide on how to do this:
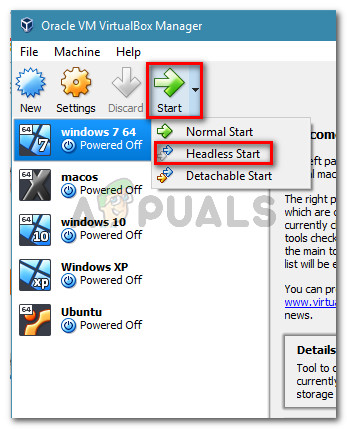
- Open VM VirtualBox and click once to select the machine that is showing you the error message. Then, with the machine selected, click the arrow near the Start icon and choose Headless start.

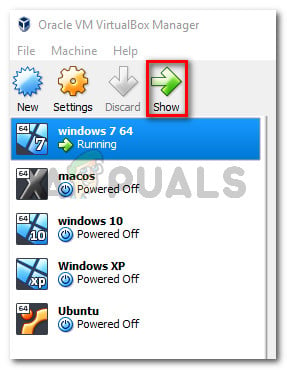
Click the drop-down menu associated with Start, then click on Headless Start - Wait 10-15 seconds, then click on Show to bring up the screen.

Click on Show to bring up the virtual machine window That’s all there is to it. But keep in mind that you will have to repeat the procedure above every time you start up the virtual machine.
Note: Also, make sure that there isn’t any plugin installed on your browser that is causing this issue with Virtual box. It has been bought to our attention that the IBM Trusteer Rapport plugin is incompatible with Virtual box so make sure to uninstall that before you try to access it.

Kevin Arrows
Kevin is a dynamic and self-motivated information technology professional, with a Thorough knowledge of all facets pertaining to network infrastructure design, implementation and administration. Superior record of delivering simultaneous large-scale mission critical projects on time and under budget.
Recently I have encountered an error I wasn’t too familiar with how to resolve, working with the ELK Stack. This specific error is the "[circuit_breaking_exception] [parent] Data too large, data for [<http_request>]". It is not directly visible where the error originates from, but with some sleuthing I discovered that it is caused by Elasticsearch preventing some requests from executing to avoid possible out of memory errors, as detailed in Elasticsearch Circuit Breaker documentation.
This error can come from the monitoring cluster when executing a simple search query. An example of such error log:
{
  "error" : {
    "root_cause" : [
      {
        "type" : "circuit_breaking_exception",
        "reason" : "[parent] Data too large, data for [<http_request>] would be [`1004465832/957.9mb`], which is larger than the limit of [`986061209/940.3mb`]",
        "bytes_wanted" : 1004465832,
        "bytes_limit" : 986061209
      }
    ],
    "type" : "circuit_breaking_exception",
    "reason" : "[parent] Data too large, data for [<http_request>] would be [1004465832/710.9mb], which is larger than the limit of [745517875/710.9mb]",
    "bytes_wanted" : 1004465832,
    "bytes_limit" : 986061209
  },
  "status" : 503
}
The same error can be encountered when trying to access the data via Kibana:
[circuit_breaking_exception] [parent] Data too large, data for [<http_request>] would be [1004465832/957.9mb], which is larger than the limit of [986061209/940.3mb], real usage: [1004465832/957.9mb], new bytes reserved: [0/0b], with { bytes_wanted=1004465832 & bytes_limit=986061209 & durability="TRANSIENT" }
Solution
There are different ways of resolving this issue, but the most simple one is to change the Heap size used by Elasticsearch. This can be done by adapting the JVM options of Elasticsearch as detailed in the Elasticsearch documentation.
As detailed in my previous posts on the ELK Stack, I am running the framework using Docker containers and initializing everything using a docker-compose.yml file. Because I am running the ELK Stack for testing purposes, I opted for setting up the ES_JAVA_OPTS variable, instead of adding a custom options file in the form of a jvm.options file. Another important point is that when deploying the ELK Stack for production purposes, it is recommended to set the JVM heap size to 30-32 GB and it should be less than 50% of the total available memory.
To fix my problem, I simply changed the values of the ES_JAVA_OPTS variable in the docker-compose.yml file to increase the available heap size and afterwards restarted the containers. I changed the original java options from:
ES_JAVA_OPTS: "-Xmx256m -Xms256m"to
ES_JAVA_OPTS: "-Xmx4g -Xms4g"This resolved the issue right away.
services:
  elasticsearch:
    build:
      context: elasticsearch/
      args:
        ELK_VERSION: $ELK_VERSION
    volumes:
      - type: bind
        source: ./elasticsearch/config/elasticsearch.yml
        target: /usr/share/elasticsearch/config/elasticsearch.yml
        read_only: true
      - type: volume
        source: elasticsearch
        target: /usr/share/elasticsearch/data
    ports:
      - "9200:9200"
      - "9300:9300"
    environment:
      ES_JAVA_OPTS: "-Xmx4g -Xms4g"
      ELASTIC_PASSWORD: changeme
      # Use single node discovery in order to disable production mode and avoid bootstrap checks.
      # see: https://www.elastic.co/guide/en/elasticsearch/reference/current/bootstrap-checks.html
      discovery.type: single-node
    networks:
      - elk
In the case of using a custom options file, we would include this file in the ./elasticsearch/config/jvm.options.d/ directory, which afterwards will be shared with the container via the volume bound to it.
The same can be done to change the JVM heap size used by Logstash by changin the LS_JAVA_OPTS environment variable.
Conclusion
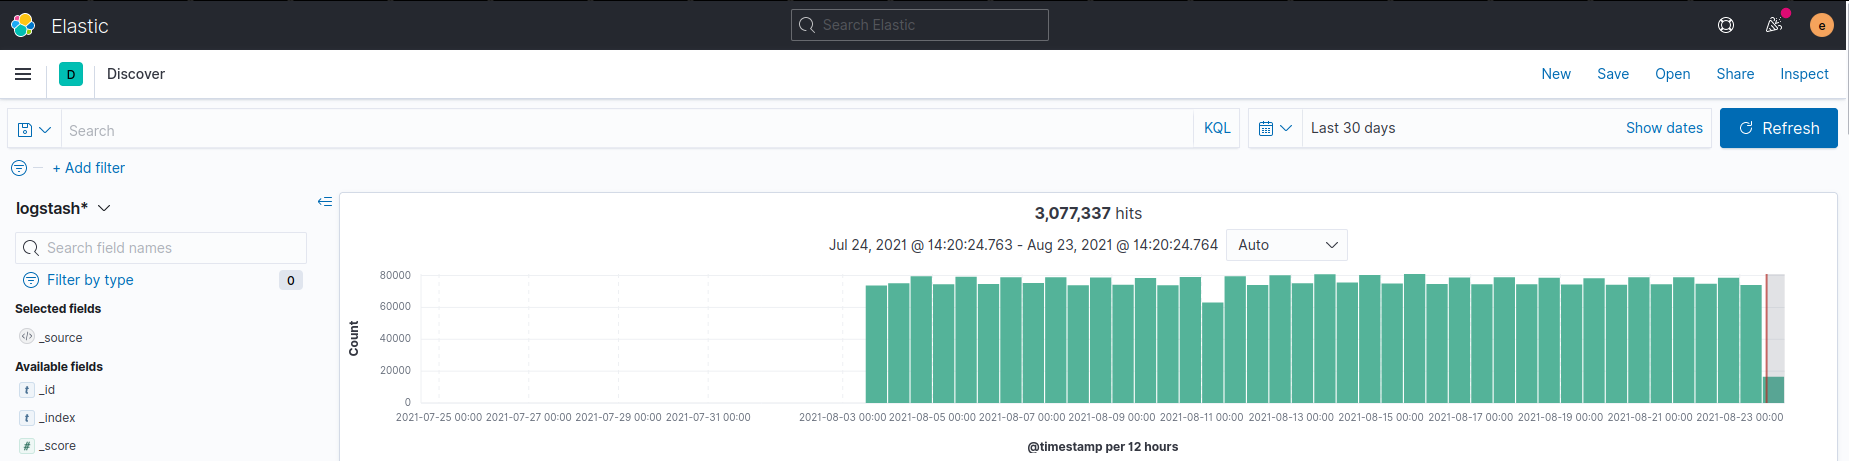
When trying out new technologies we often run into unexpected problems. Luckily the ELK Stack is well documented and their support forums answer a lot of our questions. In my case, it took a bit of research to figure out how to change my configuration to get the stack up and running again. The ELK Stack has since been running for a bit less than a month, with more than 3 million entries added.
You will encounter various kinds of errors while developing Node.js
applications, but most can be avoided or easily mitigated with the right coding
practices. However, most of the information to fix these problems are currently
scattered across various GitHub issues and forum posts which could lead to
spending more time than necessary when seeking solutions.
Therefore, we’ve compiled this list of 15 common Node.js errors along with one
or more strategies to follow to fix each one. While this is not a comprehensive
list of all the errors you can encounter when developing Node.js applications,
it should help you understand why some of these common errors occur and feasible
solutions to avoid future recurrence.
🔭 Want to centralize and monitor your Node.js error logs?
Head over to Logtail and start ingesting your logs in 5 minutes.
1. ECONNRESET
ECONNRESET is a common exception that occurs when the TCP connection to
another server is closed abruptly, usually before a response is received. It can
be emitted when you attempt a request through a TCP connection that has already
been closed or when the connection is closed before a response is received
(perhaps in case of a timeout). This exception will usually
look like the following depending on your version of Node.js:
Output
Error: socket hang up
    at connResetException (node:internal/errors:691:14)
    at Socket.socketOnEnd (node:_http_client:466:23)
    at Socket.emit (node:events:532:35)
    at endReadableNT (node:internal/streams/readable:1346:12)
    at processTicksAndRejections (node:internal/process/task_queues:83:21) {
  code: 'ECONNRESET'
}
If this exception occurs when making a request to another server, you should
catch it and decide how to handle it. For example, you can retry the request
immediately, or queue it for later. You can also investigate your timeout
settings if you’d like to wait longer for the request to be
completed.
On the other hand, if it is caused by a client deliberately closing an
unfulfilled request to your server, then you don’t need to do anything except
end the connection (res.end()), and stop any operations performed in
generating a response. You can detect if a client socket was destroyed through
the following:
app.get("/", (req, res) => {
  // listen for the 'close' event on the request
  req.on("close", () => {
    console.log("closed connection");
  });

  console.log(res.socket.destroyed); // true if socket is closed
});
2. ENOTFOUND
The ENOTFOUND exception occurs in Node.js when a connection cannot be
established to some host due to a DNS error. This usually occurs due to an
incorrect host value, or when localhost is not mapped correctly to
127.0.0.1. It can also occur when a domain goes down or no longer exists.
Here’s an example of how the error often appears in the Node.js console:
Output
Error: getaddrinfo ENOTFOUND http://localhost
    at GetAddrInfoReqWrap.onlookup [as oncomplete] (node:dns:71:26) {
  errno: -3008,
  code: 'ENOTFOUND',
  syscall: 'getaddrinfo',
  hostname: 'http://localhost'
}
If you get this error in your Node.js application or while running a script, you
can try the following strategies to fix it:
Check the domain name
First, ensure that you didn’t make a typo while entering the domain name. You
can also use a tool like DNS Checker to confirm that
the domain is resolving successfully in your location or region.
Check the host value
If you’re using http.request() or https.request() methods from the standard
library, ensure that the host value in the options object contains only the
domain name or IP address of the server. It shouldn’t contain the protocol,
port, or request path (use the protocol, port, and path properties for
those values respectively).
// don't do this
const options = {
  host: 'http://example.com/path/to/resource',
};

// do this instead
const options = {
  host: 'example.com',
  path: '/path/to/resource',
};

http.request(options, (res) => {});
Check your localhost mapping
If you’re trying to connect to localhost, and the ENOTFOUND error is thrown,
it may mean that the localhost is missing in your hosts file. On Linux and
macOS, ensure that your /etc/hosts file contains the following entry:
You may need to flush your DNS cache afterward:
sudo killall -HUP mDNSResponder # macOS
On Linux, clearing the DNS cache depends on the distribution and caching service
in use. Therefore, do investigate the appropriate command to run on your system.
3. ETIMEDOUT
The ETIMEDOUT error is thrown by the Node.js runtime when a connection or HTTP
request is not closed properly after some time. You might encounter this error
from time to time if you configured a timeout on your
outgoing HTTP requests. The general solution to this issue is to catch the error
and repeat the request, preferably using an
exponential backoff
strategy so that a waiting period is added between subsequent retries until the
request eventually succeeds, or the maximum amount of retries is reached. If you
encounter this error frequently, try to investigate your request timeout
settings and choose a more appropriate value for the endpoint
if possible.
4. ECONNREFUSED
The ECONNREFUSED error is produced when a request is made to an endpoint but a
connection could not be established because the specified address wasn’t
reachable. This is usually caused by an inactive target service. For example,
the error below resulted from attempting to connect to http://localhost:8000
when no program is listening at that endpoint.
Error: connect ECONNREFUSED 127.0.0.1:8000
    at TCPConnectWrap.afterConnect [as oncomplete] (node:net:1157:16)
Emitted 'error' event on ClientRequest instance at:
    at Socket.socketErrorListener (node:_http_client:442:9)
    at Socket.emit (node:events:526:28)
    at emitErrorNT (node:internal/streams/destroy:157:8)
    at emitErrorCloseNT (node:internal/streams/destroy:122:3)
    at processTicksAndRejections (node:internal/process/task_queues:83:21) {
  errno: -111,
  code: 'ECONNREFUSED',
  syscall: 'connect',
  address: '127.0.0.1',
  port: 8000
}
The fix for this problem is to ensure that the target service is active and
accepting connections at the specified endpoint.
5. ERRADDRINUSE
This error is commonly encountered when starting or restarting a web server. It
indicates that the server is attempting to listen for connections at a port that
is already occupied by some other application.
Error: listen EADDRINUSE: address already in use :::3001
    at Server.setupListenHandle [as _listen2] (node:net:1330:16)
    at listenInCluster (node:net:1378:12)
    at Server.listen (node:net:1465:7)
    at Function.listen (/home/ayo/dev/demo/node_modules/express/lib/application.js:618:24)
    at Object.<anonymous> (/home/ayo/dev/demo/main.js:16:18)
    at Module._compile (node:internal/modules/cjs/loader:1103:14)
    at Object.Module._extensions..js (node:internal/modules/cjs/loader:1157:10)
    at Module.load (node:internal/modules/cjs/loader:981:32)
    at Function.Module._load (node:internal/modules/cjs/loader:822:12)
    at Function.executeUserEntryPoint [as runMain] (node:internal/modules/run_main:77:12)
Emitted 'error' event on Server instance at:
    at emitErrorNT (node:net:1357:8)
    at processTicksAndRejections (node:internal/process/task_queues:83:21) {
  code: 'EADDRINUSE',
  errno: -98,
  syscall: 'listen',
  address: '::',
  port: 3001
}
The easiest fix for this error would be to configure your application to listen
on a different port (preferably by updating an environmental variable). However,
if you need that specific port that is in use, you can find out the process ID
of the application using it through the command below:
Output
COMMAND  PID USER   FD   TYPE DEVICE SIZE/OFF NODE NAME
node    2902  ayo   19u  IPv6 781904      0t0  TCP *:3001 (LISTEN)
Afterward, kill the process by passing the PID value to the kill command:
After running the command above, the application will be forcefully closed
freeing up the desired port for your intended use.
6. EADDRNOTAVAIL
This error is similar to EADDRINUSE because it results from trying to run a
Node.js server at a specific port. It usually indicates a configuration issue
with your IP address, such as when you try to bind your server to a static IP:
const express = require('express');
const app = express();

const server = app.listen(3000, '192.168.0.101', function () {
  console.log('server listening at port 3000......');
});
Output
Error: listen EADDRNOTAVAIL: address not available 192.168.0.101:3000
    at Server.setupListenHandle [as _listen2] (node:net:1313:21)
    at listenInCluster (node:net:1378:12)
    at doListen (node:net:1516:7)
    at processTicksAndRejections (node:internal/process/task_queues:84:21)
Emitted 'error' event on Server instance at:
    at emitErrorNT (node:net:1357:8)
    at processTicksAndRejections (node:internal/process/task_queues:83:21) {
  code: 'EADDRNOTAVAIL',
  errno: -99,
  syscall: 'listen',
  address: '192.168.0.101',
  port: 3000
}
To resolve this issue, ensure that you have the right IP address (it may
sometimes change), or you can bind to any or all IPs by using 0.0.0.0 as shown
below:
var server = app.listen(3000, '0.0.0.0', function () {
  console.log('server listening at port 3000......');
});
7. ECONNABORTED
The ECONNABORTED exception is thrown when an active network connection is
aborted by the server before reading from the request body or writing to the
response body has completed. The example below demonstrates how this problem can
occur in a Node.js program:
const express = require('express');
const app = express();
const path = require('path');

app.get('/', function (req, res, next) {
  res.sendFile(path.join(__dirname, 'new.txt'), null, (err) => {
    console.log(err);
  });
  res.end();
});

const server = app.listen(3000, () => {
  console.log('server listening at port 3001......');
});
Output
Error: Request aborted
    at onaborted (/home/ayo/dev/demo/node_modules/express/lib/response.js:1030:15)
    at Immediate._onImmediate (/home/ayo/dev/demo/node_modules/express/lib/response.js:1072:9)
    at processImmediate (node:internal/timers:466:21) {
  code: 'ECONNABORTED'
}
The problem here is that res.end() was called prematurely before
res.sendFile() has had a chance to complete due to the asynchronous nature of
the method. The solution here is to move res.end() into sendFile()‘s
callback function:
app.get('/', function (req, res, next) {
  res.sendFile(path.join(__dirname, 'new.txt'), null, (err) => {
    console.log(err);
    res.end();
  });
});
8. EHOSTUNREACH
An EHOSTUNREACH exception indicates that a TCP connection failed because the
underlying protocol software found no route to the network or host. It can also
be triggered when traffic is blocked by a firewall or in response to information
received by intermediate gateways or switching nodes. If you encounter this
error, you may need to check your operating system’s routing tables or firewall
setup to fix the problem.
9. EAI_AGAIN
Node.js throws an EAI_AGAIN error when a temporary failure in domain name
resolution occurs. A DNS lookup timeout that usually indicates a problem with
your network connection or your proxy settings. You can get this error when
trying to install an npm package:
Output
npm ERR! code EAI_AGAIN
npm ERR! syscall getaddrinfo
npm ERR! errno EAI_AGAIN
npm ERR! request to https://registry.npmjs.org/nestjs failed, reason: getaddrinfo EAI_AGAIN registry.npmjs.org
If you’ve determined that your internet connection is working correctly, then
you should investigate your DNS resolver settings (/etc/resolv.conf) or your
/etc/hosts file to ensure it is set up correctly.
10. ENOENT
This error is a straightforward one. It means «Error No Entity» and is raised
when a specified path (file or directory) does not exist in the filesystem. It
is most commonly encountered when performing an operation with the fs module
or running a script that expects a specific directory structure.
fs.open('non-existent-file.txt', (err, fd) => {
  if (err) {
    console.log(err);
  }
});
Output
[Error: ENOENT: no such file or directory, open 'non-existent-file.txt'] {
  errno: -2,
  code: 'ENOENT',
  syscall: 'open',
  path: 'non-existent-file.txt'
}
To fix this error, you either need to create the expected directory structure or
change the path so that the script looks in the correct directory.
11. EISDIR
If you encounter this error, the operation that raised it expected a file
argument but was provided with a directory.
// config is actually a directory
fs.readFile('config', (err, data) => {
  if (err) throw err;
  console.log(data);
});
Output
[Error: EISDIR: illegal operation on a directory, read] {
  errno: -21,
  code: 'EISDIR',
  syscall: 'read'
}
Fixing this error involves correcting the provided path so that it leads to a
file instead.
12. ENOTDIR
This error is the inverse of EISDIR. It means a file argument was supplied
where a directory was expected. To avoid this error, ensure that the provided
path leads to a directory and not a file.
fs.opendir('/etc/passwd', (err, _dir) => {
  if (err) throw err;
});
Output
[Error: ENOTDIR: not a directory, opendir '/etc/passwd'] {
  errno: -20,
  code: 'ENOTDIR',
  syscall: 'opendir',
  path: '/etc/passwd'
}
13. EACCES
The EACCES error is often encountered when trying to access a file in a way
that is forbidden by its access permissions. You may also encounter this error
when you’re trying to install a global NPM package (depending on how you
installed Node.js and npm), or when you try to run a server on a port lower
than 1024.
fs.readFile('/etc/sudoers', (err, data) => {
  if (err) throw err;
  console.log(data);
});
Output
[Error: EACCES: permission denied, open '/etc/sudoers'] {
  errno: -13,
  code: 'EACCES',
  syscall: 'open',
  path: '/etc/sudoers'
}
Essentially, this error indicates that the user executing the script does not
have the required permission to access a resource. A quick fix is to prefix the
script execution command with sudo so that it is executed as root, but this is
a bad idea
for security reasons.
The correct fix for this error is to give the user executing the script the
required permissions to access the resource through the chown command on Linux
in the case of a file or directory.
sudo chown -R $(whoami) /path/to/directory
If you encounter an EACCES error when trying to listen on a port lower than
1024, you can use a higher port and set up port forwarding through iptables.
The following command forwards HTTP traffic going to port 80 to port 8080
(assuming your application is listening on port 8080):
sudo iptables -t nat -I PREROUTING -p tcp --dport 80 -j REDIRECT --to-port 8080
If you encounter EACCES errors when trying to install a global npm package,
it usually means that you installed the Node.js and npm versions found in your
system’s repositories. The recommended course of action is to uninstall those
versions and reinstall them through a Node environment manager like
NVM or Volta.
14. EEXIST
The EEXIST error is another filesystem error that is encountered whenever a
file or directory exists, but the attempted operation requires it not to exist.
For example, you will see this error when you attempt to create a directory that
already exists as shown below:
const fs = require('fs');

fs.mkdirSync('temp', (err) => {
  if (err) throw err;
});
Output
Error: EEXIST: file already exists, mkdir 'temp'
    at Object.mkdirSync (node:fs:1349:3)
    at Object.<anonymous> (/home/ayo/dev/demo/main.js:3:4)
    at Module._compile (node:internal/modules/cjs/loader:1099:14)
    at Object.Module._extensions..js (node:internal/modules/cjs/loader:1153:10)
    at Module.load (node:internal/modules/cjs/loader:975:32)
    at Function.Module._load (node:internal/modules/cjs/loader:822:12)
    at Function.executeUserEntryPoint [as runMain] (node:internal/modules/run_main:77:12)
    at node:internal/main/run_main_module:17:47 {
  errno: -17,
  syscall: 'mkdir',
  code: 'EEXIST',
  path: 'temp'
}
The solution here is to check if the path exists through fs.existsSync()
before attempting to create it:
const fs = require('fs');

if (!fs.existsSync('temp')) {
  fs.mkdirSync('temp', (err) => {
    if (err) throw err;
  });
}
15. EPERM
The EPERM error may be encountered in various scenarios, usually when
installing an npm package. It indicates that the operation being carried out
could not be completed due to permission issues. This error often indicates that
a write was attempted to a file that is in a read-only state although you may
sometimes encounter an EACCES error instead.
Here are some possible fixes you can try if you run into this problem:
- Close all instances of your editor before rerunning the command (maybe some
files were locked by the editor). - Clean the
npmcache withnpm cache clean --force. - Close or disable your Anti-virus software if have one.
- If you have a development server running, stop it before executing the
installation command once again. - Use the
--forceoption as innpm install --force. - Remove your
node_modulesfolder withrm -rf node_modulesand install them
once again withnpm install.
Conclusion
In this article, we covered 15 of the most common Node.js errors you are likely
to encounter when developing applications or utilizing Node.js-based tools, and
we discussed possible solutions to each one. This by no means an exhaustive list
so ensure to check out the
Node.js errors documentation or the
errno(3) man page for a
more comprehensive listing.
Thanks for reading, and happy coding!
Check Uptime, Ping, Ports, SSL and more.
Get Slack, SMS and phone incident alerts.
Easy on-call duty scheduling.
Create free status page on your domain.
Got an article suggestion?
Let us know
![]()
![]()
![]()
Next article
How to Configure Nginx as a Reverse Proxy for Node.js Applications
→
![]()
This work is licensed under a Creative Commons Attribution-NonCommercial-ShareAlike 4.0 International License.