Change Canvas Size
Changes the size of the current canvas.
|
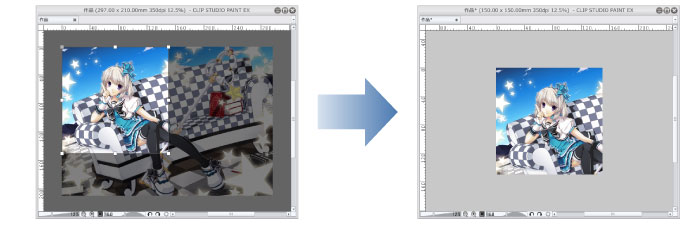
If you use [Change Canvas Size] when there is a selection area or when the crop marks are not aligned correctly in a two-page spread, the crop marks and default border will be deleted. You can also remove the crop marks and default border by turning off [Fix center] in the [Change Canvas Size] dialog box. |
|
If you create a selection area, you can fit the canvas size to the selected area. |
1Select the [Edit] menu > [Change Canvas Size].
2Adjust the settings in the dialog box that appears.
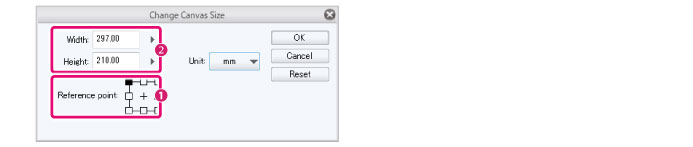
(1) In [Reference point], set the point of reference for changing the canvas size.
(2) Set the new canvas size.
3A preview will be shown on the canvas.
You can change the position or size by dragging the bounding box or handles.

|
·Hold down Shift while dragging a handle to resize without changing the original image ratio. ·To resize with the center as the reference point, hold down Alt while dragging the handles. ·You can move the reference point by dragging it on the preview canvas. |
4Click [OK] on the [Change Canvas Size] dialog box.
The dialog box closes and the canvas resizing is complete.
[Change canvas size] Dialog Box

|
In DEBUT, the maximum canvas size is 10000 (height) x 10000 (width) pixels. |
(1) Width
Sets the paper width.
(2) Height
Sets the paper height.
(3) Reference point
Specify the point of reference for adjusting the canvas size. If a reference point is specified, the canvas size will change with respect to that point when the width or height are changed in the dialog box.
(4) Unit
Select a unit for the width and height. You can choose from centimeters, millimeters, inches, pixels, or points.
(5) Fix center [PRO/EX]
Turn this on to fix the center of the crop marks and default border so they remains in the same position when changing the size of the canvas.
If the reference point is not set to the center, the actual center of the canvas may be in a different position from the center of the crop marks and default border after changing the canvas.
Turning this off will clear the crop marks and default border from the canvas.
|
This option will only appear if the canvas has crop marks or a default border. |
(6) Reset
Resets the settings set in the [Change Canvas Size] dialog box to the previous settings.
Как обрезать в Canvas CSP?
Изменить размер холста
- 1Выберите меню [Правка] > [Изменить размер холста].
- 2 Настройте параметры в появившемся диалоговом окне.
- 3Предварительный просмотр будет показан на холсте.
- 4Нажмите [OK] в диалоговом окне [Изменить размер холста].
Привет! Clip Studio Paint не построена на редактировании изображений, как некоторые другие программы. … Однако это не означает, что вы не можете редактировать изображения и фотографии в CSP!
Как заливать клип студию краской?
Выберите слой, который вы хотите заполнить, из палитры [Слой]. Создайте область выделения, затем выберите меню [Правка] > [Заполнить], чтобы заполнить выделение. Использование [Заливка] для слоя без выделения заполнит весь слой. Цвет заливки будет текущим цветом рисунка.
Как обрезать в CSP?
Вы можете обрезать в Clip Studio Paint следующими способами.
- Выберите инструмент [Выделение] > [Прямоугольник].
- Окружите части изображения, которые вы хотите обрезать, с помощью инструмента [Прямоугольник].
- Выберите [Обрезать] в меню [Редактировать].
Подходит ли clip studio для редактирования фотографий?
Поскольку CLIP STUDIO PAINT не является программным обеспечением для ретуши фотографий, существует ограничение на обработку и исправление фотографий самих по себе. Обработка/модификация изображения, которую можно выполнить с помощью CLIP STUDIO PAINT, вероятно, уступает таковой в бесплатном программном обеспечении для ретуши фотографий.
Как отредактировать импортированное изображение в Studio Paint?
Фото товара
- 1Выберите меню [Файл] > [Импорт] > [Изображение].
- 2Откроется диалоговое окно [Открыть]. Выберите изображение для импорта.
- 3Изображение будет импортировано на новый слой изображения над текущим слоем.
- 4Метод преобразования можно изменить в палитре [Свойства инструмента].
- 5Направляющие линии отображаются на холсте.
Просто нажмите и перетащите, пока не получите нужный размер, возьмите ведро с краской и заполните выделение! Используя прямоугольное выделение, вы можете создать выделение с размерами, которые вы хотите создать прямоугольной формы!
Пример вспомогательного инструмента: Лассо
Выбор [Лассо] на палитре [Вспомогательный инструмент] позволяет создать выделение любой формы.
Залейте выделение или слой цветом
- Выберите цвет переднего плана или фона. …
- Выберите область, которую хотите заполнить. …
- Выберите «Правка» > «Заливка», чтобы заполнить выделение или слой. …
- В диалоговом окне «Заливка» выберите один из следующих параметров для «Использовать» или выберите пользовательский узор: …
- Укажите режим наложения и непрозрачность краски.
Есть ли в CSP заполнение с учетом содержимого?
Инструмента с учетом содержимого пока нет. Вы можете скопировать и вставить что угодно стандартными командами Win (CTRL+C, CTRL+V,CTRL+X).
Как вы окрашиваете CSP?
Окрашивание кожи
- 1Нажмите [Новый растровый слой] на палитре [Слой]. …
- 2 Выберите инструмент [Заливка] на палитре [Инструмент] и выберите [Ссылаться на другие слои] на палитре [Вспомогательный инструмент]. …
- 3Выберите персиковый цвет кожи на палитре [Цветовой круг].
- 4Щелкните, чтобы заполнить открытые участки кожи.
- 5Используйте инструмент [Перо], чтобы раскрасить небольшие незакрашенные области.
Обновлено: 08.02.2023


Change Image Resolution
Change the resolution of the current canvas.
Changing the image resolution will delete the crop marks and default border.
1 Select the [Edit] menu > [Change Image Resolution].
2 The [Change Image Resolution] dialog box will appear.

(1) Configure settings for the size and resolution.
3 The dialog box will close, and the canvas resolution will be changed.
[Change Image Resolution] Dialog Box

In DEBUT, the maximum canvas size is 10000 (height) x 10000 (width) pixels.
(1) Width
Sets the paper width.
(2) Height
Sets the paper height.
(3) Resolution
Input the paper’s resolution or Click the drop-down button next to it to select a value.
(4) Unit
Select a unit for the width and height. You can choose from centimeters, millimeters, inches, pixels, or points.
(5) Scale
Specify the paper size as a ratio of the current paper size.
(6) Fix pixels
Changes the resolution without changing the number of pixels.
(7) Interpolation method
You can select the method for interpolating the colors of pixels when changing the image resolution.
Smooth edges (bilinear)
This method blends the colors of neighboring pixels to create smooth outlines (boundaries between colors). However, outlines may become blurred depending on the image.
Clear edges (bicubic)
The average colors of the original pixels are strictly calculated and contained for each pixel after the transformation. Scaling up makes the lines sharper and scaling down makes the lines smoother. Even detailed lines can be preserved when scaling the image down. However, this method can result in blurred outlines and can take a long time to process depending on the image.

Сильно тормозят текстурные кисти. Комп достаточно мощный. Можно как-то от этого избавиться?
версия 1.8.4

Tomo, второе окно открой на тот же документ. И спусти его вниз потянув за название окна. В результате получится одно окно плавающим, а другое прилепленным. В каждом окне навигация своя. Отдельно можно задавать свой масштаб, положение холста в окне, отражать вид. Плавающему окну можно менять положение, его габариты. Смещать за название окна, менять габариты за края, углы окна.


Анна, не достаточно информации. Это с одной кистью у Вас или со всеми?
Варианты —
1.это кисть с включённым на максимум свойством Correction и очень хитрой текстурой. Будет работать нормально только на компах, где больше 12 гиг оперативки. Попробуйте другие, начните с простых.
2. если такое со всеми кистями, то ваша конфигурация железа не хочет работать с клип студио. по разным причинам.

Здравствуйте, можно пожайлуста узнать, как сделать так, чтобы во время рисовки анимации импортированное аудио звучало. Оно как бы есть но говорить не хочет
Lorika, когда проигрываешь звучит. А чтоб во время рисовки, в смысле не проигрывая фрагмент, ну не знаю) В отдельном проигрывателе открыть этот аудиофайл и пусть звучит)
Lorika, есть какие-то аудиофайлы которые не проигрываются, человек где-то в темах вопрос задавал и сам же на него ответ нашел. Там что-то с нестандартным битрейтом или с герцами связанно, не знаю что в них измеряется, громкость наверное.
Lorika, на 40 странице данной темы человек спрашивал, правда у него чуть другая проблема с аудио была, там какой-то несинхрон был.
Александр, интересно, это я ещё не пробовала, завтра сделаю, но если не поможет то это правда очень прискорбно :с

Можно ли как нибудь сделать копирование слоев в бесплатной версии без лицензии? У одного ютубера видела, она скопировала в бесплатной, но по другому. Кто подскажет, как именно?


У меня есть пара вопросов:
1. Как отразить холст (зеркальный эффект)?
2. Как скопировать то, что изображено на одном слое и вставить на другой слой? (для анимации)
3. Как изменять форму нарисованного объекта (увеличить, уменьшить, растянуть по всему холсту)? Я новичок и, выделяя объект, не могу найти кнопку, где могу его увеличить :с
Сёма, 1. Отразить холст в меню Edit (подпункт трансформация). Чаще достаточно отразить вид, это в одноименном меню View (подменю поворот..). так же аналогичные пунктам кнопки присутствуют в панеле навигатора. Отразить вид как и другие команды навигации, например масштаб, работают на каждое окно отдельно.Удобно если открыто несколько окон на один и тот же документ.
2. Ctrl+C. Ctrl+V копируешь на новый слой. Привязать к кадрам эту копию?- правой кнопкой по кадру куда вставить хочешь и выбрать свой скопированный слой по названию из списка.
3. Ctrl+T

Александр, Спасибо большое, очень помогли
У меня ещё есть одно уточнение:могу я, например, скопировать часть рисунка (допустим руку у человека) с одного слоя и вставить её на этот же слой (предварительно отразив, чтобы не рисовать вторую руку)
Или копировать элемент можно только на отдельный слой?
Simon, через Ctrl+T в параметре инструмента можно поставить галочку применить к копии(точнее там как-то не трогать оригинал, короче скрин сделаю отмечу) и там же есть кнопки отразить. Это если на том же слое нужно сделать переместить, исказить(с Ctrl, Alt, Shift пробуешь за маркеры перемещаешь. С Ctrl независимо каждый маркер тянешь) повернуть, масштабировать, отзеркалить, ну и применить к копии если галочку поставить.
Simon, кстати эта же команда, что на Ctrl+T в менюшке, что при выделении появляется, может удобнее жать эту кнопку.
Дарья, в настройках, я бы поставил размер кисти+крестик (короче, как на скрине)

Анна, могу повторить. Стоишь на нужном ключевом кадре, жмешь Ctrl+C, Ctrl+V (скопируется слой), потом жмешь правой кнопкой по фрейму где хочешь создать ключевой кадр и выбираешь свой скопированный слой. Тоже самое можно с вложенными папками в анимационную папку проделывать.
Еще можешь экшн записать.
У тебя скайп есть?
Анна, экшн такой можешь записать:
1. Ctrl+C
2. создать новый ключевой кадр
3. удалить слой
4. Ctrl+V
На экшн повесь горячую клавишу. Будешь ее жать и все.

Подскажите пожалуйста, как можно вставить референс, так, чтобы он был не на основном артблоке а отдельно. Нашла как вставлять картинку но мешает очень. у меня айпад версия
В клип студио имеются функции пластика или деформация, что-то кроме «пальца», подскажите пожалуйста?
Анюта, а каким образом вам удалось? Кто-то спрашивал как вставить референс, но что-то методы виндовс ему не подходили.
Анюта, Если вы открываете картинку вторым документом, разве нельзя окно этого документа сделать плавающим, просто перетащив за вкладку. Размер этого плавающего окна любой можно сделать, при необходимости его скрыть. Не совсем понял, в чем неудобство?
Александр, во первых оно не делается плавающим, оно просто открыто, во вторых там открываются файлы с которыми я работала в клип студио а не библиотека с картинками(

Никита,
а вот я бы хотел узнать как деформировать «пальцем» так, чтобы область и смещалась и не размывалась, при этом не просто копировалассь. А был эффект как при меш трансформ, но «пальцем». Если в настройках «пальца» колор стрендж =100, то просто происходит как бы бесконечное копирование стартовой области. А меньше тоже но с размазыванием.
Меш трансформ, он хорош, но порой сама сетка мешает разглядеть, то что сдвигаешь + когда много точек начинаешь уже в них путаться. Жаль, что секторами нельзя двигать, а только точками.

Как я понимаю, здесь должны быть фигурные/текстурные кисти, но большая часть у меня почему-то отсутствует, вместо них просто круги.
Была у кого-нибудь такая проблема? Как решали?
Клип студио лицензия, если это важно.
Михаил, на 43 странице данного обсуждения Ирина описывает как решила эту проблему(то что на скрине и ниже коменты ее)


Диана, Так поделись чем нибудь) Со своей стороны могу тебе рассказать, что в программе существует панель быстрого доступа куда можно добавить кнопки почти всех команд, инструменты, экшны.
Панель называется Quick Access.
В ней можно создать несколько отдельных сетов(наборов команд) и переключаться между ними в зависимости от того какой набор тебе сейчас нужен для работы. Пункты в этой панели можно сделать с надписями или без, маленькими или большими. Панель можно разместить где угодно, придать произвольную форму. Например сделав большие кнопки в ней, сжав полоской и разместив сбоку, будет удобно переключатся на команды собранные в ней, нажимая их на сенсорном экране пальцами той руки которой поддерживаешь планшет. Это если рисуешь на коленке на планшетах типа Сурфейса или Айпада. когда быстрее нажать кнопку на экране чем горячую клавишу на клавиатуре.
Кстати о горячих клавишах, в программе они очень гибко настраиваются. Почти на любое действие, даже тех, которых нет в пунктах меню их можно настроить. А так же на любой отдельный инструмент, отдельную группу или подгруппу инструментов.
Так же, можно настроить произвольно модификаторы. «Модификаторы» это альт, конрл, шифт. При их нажатии по отдельности или их комбинаций ты временно попадаешь на какой-то дополнительный инструмент. Яркий пример такого дополнительного инструмента это пипетка, подвязанная по умолчанию к инструментам рисования на альт. Жмешь альт и пока он нажат временно переключаешься на пипетку. Но ты можешь это поменять и вместо пипетки привязать на альт, скажем, резинку или какой нибудь инструмент размытия. Притом как глобально на все инструменты рисования, так и на отдельную кисть, конкретное перо и тд, отдельно.
Что тебе еще сказать по интерфейсу? Не важно как он настроен нажимая Tab ты сворачиваешь все панели, расчищая рабочее пространство, если тебе его не хватает. Повторное нажатие все возвращает на свои места. Shift+Tab дополнительно скрывает верхние меню и строку с названием документа и именем программы.
Что ты еще можешь сделать по интерфейсу, например ты можешь создать и сохранить несколько интерфейсов. Один со всеми видимыми панелями, а другой со всеми скрытыми, кроме плавающей палитры цветов или каких других особо нужных тебе. На эти интерфейсы повесить горячие клавиши. Теперь нажимая их ты можешь быстро переключаться между всеми палитрами и состоянием когда все они скрыты. кроме самых нужных. Еще больше удобства чем жать Tab, скрывая их все.
Что еще? В настройке интерфейса есть галочка внизу, которую если поставить, интерфейс станет более удобный для сенсорных планшетов.
Больше ничего полезного по организации рабочего пространства в голову не приходит.
Если у тебя есть чем дополнить, дополняй)

Я подключил планшет, он работает, могу управлять курсором в пределах всяких панелей, а когда перевожу его на холст, он сразу пропадает и рисовать не рисует, что делать?Настроить как то?
Герман, попробуй файл/преференсес/таблет — и там
Винтаб
на ТаблетПС. Если не поможет то и другие настройки там.
Читайте также:
- Avast safeprice как удалить
- 1с изменить регистр строки
- Урок вставка графических объектов в word
- Как поставить adblock в браузере
- Программа для записи телефонных разговоров на андроид

Построение формы предметов
Введение в клип студио пэйнт
(для компьютера)
В чем плюсы этой программы?
Для простого скетчинга
- очень гибкая настройка нажатия кисти для каждого параметра каждого инструмента
- хорошая стабилизация линий
- мощные перспективные сетки
- линейки
- манекены и 3Д
- возможность делать трансформирование и копипаст с нескольких слоев сразу
Для чистой отрисовки
/ лайнарта
- векторные слои (но векторную графику делать нельзя)
- возможность корректировать, трансформировать, дублировать линии на векторных слоях
- удалять пересечения векторной резинкой
- референсные слои- выделение с другого слоя во время покраски
- закрытие дырок в выделении и расширение выделенной области
- интерфейс программы очень похож на фотошоп. при переходе туда и обратно не будет больших проблем
- программа сохраняет и открывает psd. Я спокойно работал с компанией, где у всех был фотошоп, а я при этом рисовал в клип студио пэйнт, отправляя им файлы в psd.
- в клип студио пэйнт можно импортировать фотошопные кисти в формате .abr
https://www.clipstudio.net/en/
Если будете покупать, то версии Pro (которая дешевле) для курса достаточно.
В версии EX дополнительно есть разные инструменты для верстки книг, которые нам не понадобятся.
Если будете качать с торрентов, то там скорее всего будет лежать версия EX,
она включает в себя инструментарий Pro версии, и тоже подойдет. Но лучше купить, ибо программа часто обновляется и улучшается.
Примерно 4 раза в год на нее стабильно бывают большие скидки. Нужно следить за их сайтом и подписаться на новости.
- Закрыть все лишние.
- Оставить tool, subtool, tool property, layers, color (поменять на треугольник).
- Если вдруг что-то случайно закрыли — ищите в window.
Pen pressure settings — калибровка нажатия кисти.
- Выбрать pen > pen > G-pen.
- Дублировать ее (кликнуть правой кнопкой, duplicate subtool).
- Перетащить ее в новую группу.
- Переименовать в sketch (кликнуть правой кнопкой, settings of subtool).
- отключить нажатие в панели brush size
- включить pen pressure в панели opacity
На кривой у меня стоит только одна точка, в середине. Если поставились лишние — уберите их, перетащив в угол. Если потянуть за эту точку вверх, то кисть будет более жесткая, если вниз — более мягкая. Я изменяю это по ходу рисования, в зависимости от того, что делаю
- Stabilization 20
Значение стабилизации также можно менять по ходу рисования. Если нужно прорисовать мелочи — поменьше (от 0 до 10). Если нужны длинные ровные линии (10 до 20 и больше).
layer > new raster layer > Alt + A
(обратите внимание на какой ставить, а то будет постоянно появляться всплывающее окно)
layer > duplicate layer > ctrl + J
layer > delete layer > ctrl + backspace
layer > merge selected layers > ctrl + shift + E
view > rotate/ invert> flip horizontal > Ctrl + Shift + A
tool property pallete > reduce brush size > Z
tool property pallete > Increase brush size > X
drawing color > switch main color and sub color > C
удалить все горячие клавиши (к одной клавише могут быть привязаны несколько инструментов)
pen > sketch > S (это наша новая созданная кисть, по умолчанию её там нет)
eraser > hard > R
eraser > soft > E
move layer > move layer> V
selection area > rectangle > M
selection area > lasso > L
operation- select layer > B
figure > straight line > G
Часть 1. Простая иллюстрация
Ctrl + N
1500 x 2000 px, 72 px — разрешение.
Сохраните шаблон, чтобы потом было удобнее.
пробел — перемещаться по холсту
ctrl + пробел — увеличивать/ уменьшать
R — вращать холст (зажав Shift, можно поворачивать ровно на 90 градусов)
Ctrl + Shift + A — отражение экрана
Группы инструментов (tools) > подгруппы инструментов (subtools) > конкретный инструмент.
Горячая клавиша S — наша кисть для рисования, ее можно дублировать с разными параметрами и новым кистям будет тоже присвоена эта
горячая клавиша. Таким образом вы можете выбирать их по очереди, или перенести вверх ту, которая больше нужна в данный момент
Три квадратика — основной цвет, дополнительный и прозрачность, — можно выбирать в квадратиках в панели color.
Аlt — пипетка. Можно брать цвет с холста.
Менять местами основной и дополнительный цвет — C.
Выбрав прозрачность, можно стирать кистью, как резинкой
Горячие клавиши — Z, X
или зажать ctrl + alt и двигать пером по холсту.
Можно переключать в tool property.
Соединить точки прямой линией
Точка > зажать shift > точка.
Вертикальные и горизонтальные линии
С зажатым shift, как в фотошопе не получится =(
Если все таки нужно, можно это сделать с помощью инструмента Figure > straight line или создав сетку одноточечной перспективы с отключенным центром.
Твердая и мягкая резинки — Eraser > soft/ hard
- мягкая — горячая клавиша E
- твердая — горячая клавиша R
У твердой убери brush size > pen pressure, размер изменять теми же клавишами, которые установили для кисти.
ctrl + S или ctrl + shift + S
Сохранить проект, чтобы потом доделывать его
CLIP STUDIO FORMAT (.clip) — формат программы клип студио пэйнт.
PHOTOSHOP DOCUMENT (.psd) — формат программы Фотошоп, его потом можно открыть в фотошопе и работать с ним там. В этом формате не сохраняются векторные слои и перспективные линейки.
Если в будущем при сохранении в PSD у вас будут странные цвета,
то сохраняйте через file > save duplicate > psd
и там в окне psd export settings поставmnt галочку Embed ICC profile.
Сохранить картинку — формат .jpeg
ВНИМАНИЕ!
Если вы активно используете отражение экрана, то может сохранится отраженная версия.
Чтобы это исправить, зайдите в view> rotate/ flip и уберите галочку с flip horizontal.
выделите все слои и edit > transform > flip hotizontal.
Теперь сохраняйте.
Упражнение 1
Рисуем небольшую иллюстрацию!
Часть 2. Использование слоёв
Картинка состоит из слоев прозрачной кальки — их может быть сколько угодно.
В самом низу находится фон (paper) — можно щелкнуть по нему и менять цвет.
Слои дают возможность рисовать и изменять разные части картинки независимо друг от друга.
- Создать новый слой — ALt + A или иконка в панели слоев
- Переименовать слой
- Переключаться между слоями
- Рисовать на слое
- Скрыть слой — иконка глаза
- Замкнуть слой — иконка замка
- Удалить содержимое слоя— backspace
- Удалить слой — ctrl + backspace
- Дублировать слой — ctrl + J
- Объединять в группы — ctrl + G
- Регулировать прозрачность слоя — ползунок opacity
- Залить слой цветом — alt+ backpace
- Перетаскивать слои в панели
- Выбрать несколько слоев
Зажав ctrl и поочередно щёлкать по слоям
Выбрать один слой, зажать Shift, выбрать другой, — выделятся все слои между ними
- Сливание слоев
Слить выбранный слой с нижним слоем — ctrl + E
Если выделить несколько стоящих рядом слоев, то можно слить их все — ctrl + shift + E
Если нужно слить несколько слоев, которые не стоят рядом, нужно выбрать их с ctrl, собрать в группу ctrl + G и потом слить ctrl + shift + E
- Выбирать слои прямо на холсте — очень полезная штука!
Инструмент select layer — B, можно выбирать рамкой
- Передвигать содержимое слоя
инструмент Move layer V, зажав alt, можно дублировать слой.
Удобно настроить этот инструмент, чтобы можно было выбирать слои прямо на холсте. Для этого нужно выбрать инструмент move layer, зайти в modify key settings > ctrl+ shift > change tool temporary > select layer.
Упражнение 2
Рисуем несколько иллюстраций на разных слоях!
Упражнение 3
Используем слои для поэтапного рисования иллюстрации
Вставить картинку в документ
Принт скрин > ctrl + V
File > import > image
В этом случае может быть нужно растеризовать вставленное изображение: нажать на его слой правой кнопкой мыши и нажать rasterize.
Упражнение 4
Вставляем фотографию в документ и рисуем с неё
Часть 3. Выделение и трансформирование частей рисунка
Прямоугольное выделение — M
Lasso (L)
выделяем,
Cнять выделение- Ctrl + D
Добавить к выделению — зажать Shift
Убрать из выделения — зажать Alt
Что можно делать с выделенной областью
Двигать инструментом move layer — V
Очистить выделенную область — backspace
Копировать часть картинки на новый слой — ctrl + C > ctrl + V
Вырезать часть картинки на новый слой — ctrl + X > ctrl + V
Можно делать это с одним выбранным слоем или сразу с несколькими слоями или группами.
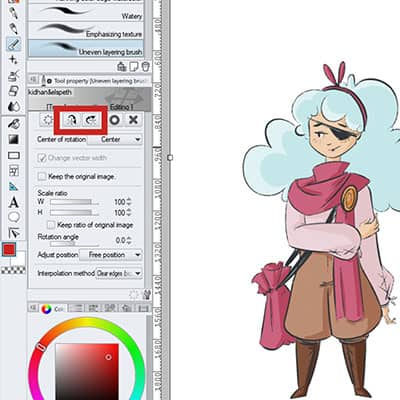
Свободная трансформация — ctrl + T
Если есть выделение — будет трансформироваться выбранная зона (на одном или нескольких слоях), если нет, то — весь слой (или несколько слоёв)
- Увеличивать / уменьшать
Снять галочку keep aspect ratio — чтобы непропорционально
Если зажать alt, то будет относительно центра
- Вращать (зажав Shift — на 90 градусов)
- Отражать вертикально или горизонтально — кнопки в панели tool property
- Distort — выбрать в меню, или зажать ctrl и тянуть за концы рамки
ВНИМАНИЕ! Если у вас вдруг копируется изображение — уберите галочку keep original image
Когда закончили трансформацию — нажать enter или галочку
Warp трансформация — edit > transfrom > mesh transformation (можно задать количество точек)
Упражнение 5
Экспериментируем с пропорциями рисунка с помощью трансформа!

Часть 4. Размер холста и изображения
Edit > Change canvas size
Изменить размер изображения
Edit > Сhange image resolution
Сбросить настройки программы
Это нужно, если вы что то совсем не то наделали и непонятно, как это исправить. При запуске программы зажать и держать shift
My forever specific recommendation.
-
Make a file of 6000 pixels on the longer side… Take that number as a base.
If your computer handles it well, go for it. If your computer gets slow try reducing this value, for example, 5000px, but try not go below 4000px on the longer side. -
Forget about physical dimensions and PPI settings. That is only a relative number, just maintain the correct proportion.
I recommend this 6000px value for digital paint, or 3D renders for images that need to be printed. It is similar to a 24Mpx photo of a DSLR camera, with good size to be printed but also in a manageable weight to be manipulated.
Why 6000?
It is an easy number to remember. Additionally, you can correlate it, as I say with a 24 Mpx camera.
But there are more numbers to it.
An image to be viewed at 30cm, for example, a letter size magazine, at 300 PPI is 3300px, but I could round these numbers more, to repeat the 30.
A 30 cm image (a tiny bit larger than A4), viewed at 30 cm from your eyes, of 3000px, is 100px per cm. Which is a pretty good resolution. (254 PPI) 6000 px is just the double in case you need to blow the image.
Now an explanation of your settings.
As Billy Kerr mentioned, the PPI settings have nothing to do with any pixelation, at the end depends on what is the real size of your image, in pixels, which leads you to my initial answer. Make it about 6000px on the longest side.
What resolution and size is the best for drawing in Clip Studio Paint?
It is all a matter of personal preference, most often informed by experience. Higher DPIs will allow you to publish your image at larger physical sizes. Smaller canvases will be easier for a computer to store in memory and lead to a faster computer experience. You need to choose values to balance out your drawing needs versus the strength of your computer.
Clip Studio Paint is not a horrible memory hog, though. You’d be surprised how big a file it can handle before things start to slow down. So let’s ignore that for now. Let’s talk about optimizing for user happiness and end product usefulness.
The “New” Window
Let’s start a new illustration. You can use the menu and navigate to File -> New or use the keyboard shortcut CMD-N (Mac) or CTRL-N (Windows)
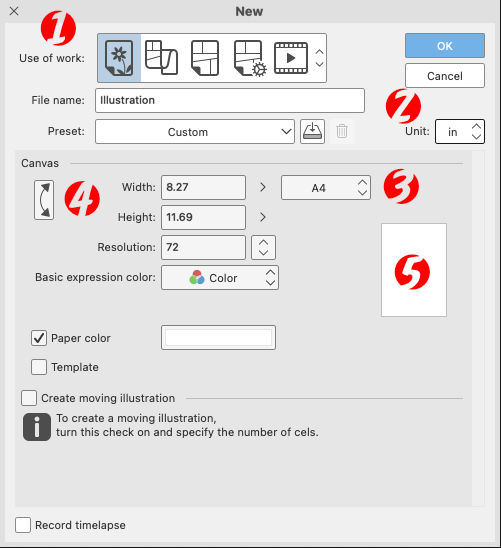
This is the window you’ll see in CSP v 1.10.10. Older versions have some very minor differences. It’s essentially been the same window, functionally, for years now.
First, you need to tell CSP that you just want to draw on the screen. You’re not looking to do an animation or create a comics page or a Webtoon style vertical scroll comic or make an entire comic book (which you can’t do in CSP Pro, anyway.)
That’s what those five lineart-filled squares at the top of the window are for (1). Click on the one to the far left to tell CSP you just want to have a canvas to doodle on.
Second, you need to pick what measurement you’re using to find these page sizes. That’s in a drop down all the way over on the far right side of the window. (2) You’ll likely want to use “in” for inches, or “px” for pixels.
Choosing “in” means you have an easy way to tell the difference between A4, A5, A6, B4, B5, and B6 sizes (3). A4, for example, is the closest to 8.5″ x 11″ that you’ll get.
To get an idea of the dimensions of the canvas you’re choosing, there’s a white silhouette of the page (5) in the window.
If you’d rather reverse the dimensions to create a wider page than tall, click the arrows to the left of the Width and Height options (4). The white silhouette will change along with the numbers. I often draw in my sketchbook in landscape orientation, so I’ll switch those dimensions around often.
But What Canvas Size Do You Choose?
As is the answer to so many other questions like this, the answer is a solid, “It depends.”
But that’s not what you want to hear. Let me give you my shortcut idea.
Do you have a sketchbook you draw in all the time? Do you just use random sheets of paper you steal out of the printer?
That’s the size you choose. Start with what’s comfortable. Start with an aspect ratio you’re familiar with.
Don’t stick with it forever. Mix things up once in a while to test new things. Change the canvas size to handle something you’re drawing for a specific space.
But when you’re starting? Set the width and height to the size of the paper you draw on most now. I bet for most people that’ll be 8.5″ x 11″. If you live in your sketchbook, then maybe you’re looking more at 5.5″ x 8.5″ or 11″ x 14″. If you want to be a professional comic artist, you might want to work at something close to the standard 11″ x 17″ pages that comic artists use. (They usually draw inside a 10″ x 15″ section of that. You can buy a two dollar template for this kind of thing, if you’re so interested.)
If your plan is to paint digitally with Clip Studio Paint — and the brush tools are an awesome fit for that — then look at real world canvas sizes. That can go anywhere from 6″ squares to 20″ x 24″
If you’re the type to emulate Todd Nauck and draw on Post-It Notes, then set it to 3″ x 3″ or 4″ x 4″. (If you are emulating Todd, be sure to use a Copic Marker brush to color it in!)
Or, Do The Math
You can convert from pixels to inches pretty easily. Remember that DPI stands for dots per inch. If you’re drawing at 600 dpi and your canvas is 6000 pixels wide, do the math:
6000 pixels / 600 dots (pixels) per inch = 10 inches.
You can work it out in reverse, too. If you have the measurements showing in inches, multiple that by the dots (pixels) per inch to get the number of pixels in the dimension.
600 dots (pixels) per inch x 10 inches = 6000 pixels
We return you now to your less mathematically challenging tutorial…
Which DPI Do I pick?
300.
It’s not just an awesome Frank Miller comic.
It’s a printable dpi should you later decide to print something, and it gives you enough fine grain control to zoom in and add details without letting you go so small that you waste time on things nobody will ever see.
If you’re drawing something simple for the web only, you can get away with 72, but realize you’ll never be able to blow that up cleanly to anything larger, unless you’re using vector brushes only.
I tend to draw at 600 dpi, which is likely overkill, but it’s always easier to shrink something than to make it larger. I always export to 72 dpi for the web in the end, anyway. The thing I need to work on most when drawing at that size is to use thicker ink lines. The thinner lines won’t show up so well when you later downsize the image to something more web-friendly.
The Only Hard and Fast Rule…
…is that there are no hard and fast rules. Now that you know where the settings are and what they do, play with them. Experiment. What sizes fit your needs? Are you going to print with something? Then you need a higher DPI. Are you sticking with just the web? Ultimately, 72 dpi is your friend for web reproduction, but could be your worst enemy for creating your art or collecting your art in a print book edition.
Are you drawing something with lots of details? If so, give yourself some room. Use a bigger canvas size with a higher dpi. Feel free to zoom in, just remember that those zoomed in lines will look smaller when zoomed back out to full image size.
If you have a favorite resolution for a particular reason, chime in in the comments below. I’d be curious to hear how you all like to draw.
Updates
June 2016: Original article
September 2021: Updated screenshot, added details, minor tweaks.
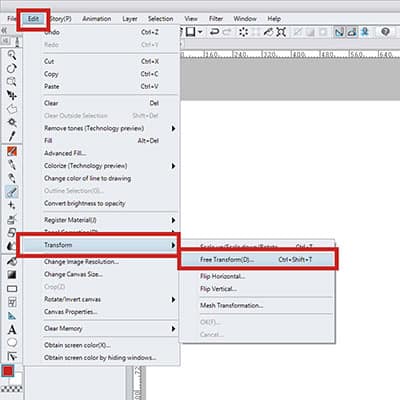
Free Transform in Clip Studio Paint is very simple. With it, you can scale your image, rotate it, flip your selection horizontally or vertically and even distort it a bit! I don’t use it for very complex actions, but I still use the Free Transform mode a lot! Constantly I need to make small selections of my drawings so resize them or rotate them to a position where it makes more sense.
How can you Free Transform a selection in Clip Studio Paint? Simply go to ‘Edit -> Transform -> Free Transform or press ‘Ctrl+T’ on your keyboard. You’re now ready to make any change you need to make!
You might notice though, that once you enter this mode, some options and settings will appear and there’s more to Free Transform than it looks at first glance. Let’s see in detail all the ways you can resize, rotate and even distort your images and how!
Table Of Contents
- 1 How To Free Transform In Clip Studio Paint
- 1.1 Scaling and Rotating With Free Transform
- 1.2 Skew And Distort
- 1.3 Free Transform Menu
- 2 How To Flip Your Selection In Clip Studio Paint
- 3 Scale The Horizontal And Vertical Ratio In Free Transform
- 4 Frequently Asked Questions
I use Free Transform a lot while working. Mostly very simple things. Resizing the whole work or just parts of it, flipping things around and very rarely distorting things a bit.
It is a very common tool, very useful, and easy to use!
You can access it by either selecting the layer or layers you want to transform or make a selection of a specific part of your drawing. After that, you can go to ‘Edit -> Transform -> Free Transform’. Alternatively, you can use the shortcut by pressing ‘Ctrl + Shift + T’.
Scaling and Rotating With Free Transform
Once you enter in Free Transform mode, a frame will appear around your selection. The points around this frame can be used to scale up and down your drawing or to rotate it. Just hover the mouse above these and then click and move.
When you’re able to rotate the selection a curved arrow with two ends will appear. To resize, it shows a straight arrow. Very simple and similar to other drawing software!
Careful with resizing though! If you’re using raster layers, you’ll lose quality as you scale things. For example, if you’re trying to scale it up, you’ll notice the selection will start to look fuzzy and distorted. If it’s a very small resize of the selection, it won’t be noticeable. But if you’re doing so, better use vector layers (here’s how), so you won’t lose any quality in your drawings!
I always use vector layers for my line art so that I can resize them if I ever need to. That way I’m never worried about having to redo my lines because they lost quality.
Skew And Distort
Even though Clip Studio doesn’t have a clear option to skew and distort a selection in the menu, you can do it while in Free Transform mode.
Simply hover the mouse over the points that show around the frame. Press ‘Ctrl’ and a small white arrow will appear. Click the Left Button of your mouse while pressing Ctrl and you can now skew and distort your image! You can do this with either of the points and move everything around as you wish.
Now, when you enter in Free Transform mode, you’ll notice a new tab to the left. This tab has a few options that you can use. For example, let’s say you need to rotate the selection you just made.
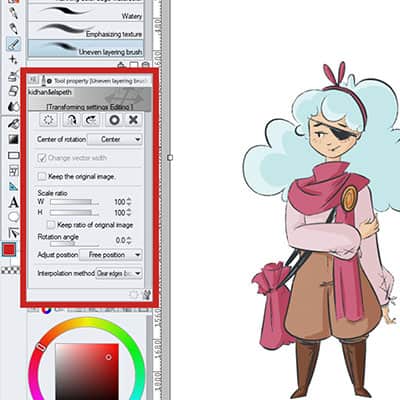
There are different ways to rotate. What I mean by this is that you can choose where the center of your rotation will be. It can be in the center of the drawing, top left, top right and so on. Depending on what you choose, the rotation will behave differently.
You can also select the scale ratio you want and even type in the rotation angle you need! At the top bar of the Free Transform window, there are also some useful buttons.
The first one will reset the transformations you made. The two that follow serve to flip your selection and then you can confirm or cancel the transformation.
If you end up doing something you don’t want to, let’s say you scaled the drawing up but decided it was too much, you can hit Ctrl+Z to undo your last move. You don’t need to cancel the whole transformation. Here are 30 other Clip Studio Paint Shortcuts To Create Art Quicker!
This is very useful because sometimes we’ve done quite a few changes and then misclick something by accident. If we cancel the transformation, it will cancel everything we did so far and now we have to repeat everything all over. Instead, just go one or more steps back with the ‘Undo’ shortcut and you’re good!
When you’re done with your changes, select the confirmation button on the tab to your left or simply press ‘Enter’. Your selection is now transformed!
Sometimes Clip Studio might take some time to apply the changes you’ve made. Don’t worry though, most of the time it will pull through it. This happens because the selection you’ve made is very big and the software takes a bit more time to process it!
How To Flip Your Selection In Clip Studio Paint
There are different ways to flip your work or selection in Clip Studio. You can do it through Free Transform. Simply press ‘Ctrl + Shift + T’ and then you have two buttons on the Free Transform tab: one will flip the selection horizontally, the second vertically. Choose the one you want and when you’re done, press enter.
You can also go to ‘Edit -> Rotate/Invert Canvas -> Flip Horizontal or Flip Vertical’ to flip the whole canvas. Notice that you have other options in here as well, such as rotate by 90 degrees, 180 degrees, etc. You can do these simple rotations through this menu as well!
I want to take the time here to give a very quick tip: If you’re in Free Transform mode and want to rotate your selection by 90 degrees, press ‘Shift+LeftMouseButton’ and move the mouse around. This will rotate your drawing from 90 to 90 degrees, perfectly!
Flipping the whole canvas or a simple selection is very useful, especially if you’re drawing the human figure. While working, we flip our work to be sure the proportions are right and that everything makes sense, even seeing it from a different perspective
Scale The Horizontal And Vertical Ratio In Free Transform
As I mentioned before you can scale your selection by controlling its horizontal and vertical ratio on the Free Transform menu.
This means that instead of scaling using the frame around the selection, you can use these two bars. The first bar is signaled with a ‘W’, when moving the bar around you’ll notice that the width size is changing. The second, marked with an ‘H’ scales the height of the selection.
Personally, I feel it’s very weird to scale something using these bars. I prefer to have more control over it by moving my selection around. But, as always, everyone has their own preferences and both ways work!
Notice the option right below these bars. You can enable the ‘Keep ratio of the original image’ and now, if you scale the width of the image, the height will scale accordingly. This way you’ll avoid any kind of distortion in your selection!
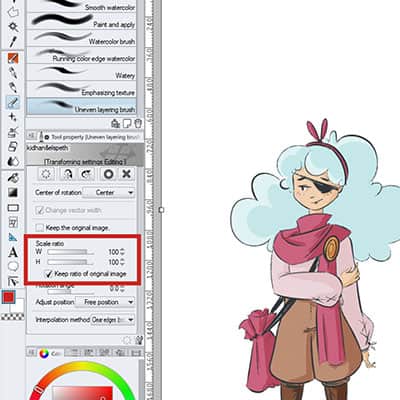
If you have this option enabled and decide to use your mouse on the selection to scale it, the same will happen, maintaining the original ratio of the image. If you have the ‘Keep ratio of the original image’ disabled, you can also press ‘Shift+LeftButtonMouse’ when resizing and it has the same effect!
Frequently Asked Questions
Can you liquify in Clip Studio Paint? No. Currently, there is no tool or option to liquify in Clip Studio Paint, but you can do a similar process by using the Mesh Transformation option which I cover here.
How do you rotate the canvas in Clip Studio Paint? As mentioned above you can go to ‘Edit -> Rotate/Invert canvas’ and choose one of the options. Alternatively, you can also use the rotate tool by pressing ‘R’ on your keyboard and rotate the canvas at will!
I have an entire article on how you can rotate, move and flip the canvas right here!
Patricia Caldeira is the main writer here at Don Corgi. She’s an art teacher with over 20.000 happy students across many platforms and courses!
Enjoy your stay and as always:
Keep on drawing!
Опубликовано 27.11.2021
Если будете покупать, то версии Pro (которая дешевле) для курса достаточно.
В версии EX дополнительно есть разные инструменты для верстки книг, которые нам не понадобятся.
Если будете качать с торрентов, то там скорее всего будет лежать версия EX,
она включает в себя инструментарий Pro версии, и тоже подойдет. Но лучше купить, ибо программа часто обновляется и улучшается.
- Закрыть все лишние.
- Оставить tool, subtool, tool property, layers, color (поменять на треугольник).
- Если вдруг что-то случайно закрыли — ищите в window.
- Выбрать pen > pen > G-pen.
- Дублировать ее (кликнуть правой кнопкой, duplicate subtool).
- Перетащить ее в новую группу.
- Переименовать в sketch (кликнуть правой кнопкой, settings of subtool).
- отключить нажатие в панели brush size
- включить pen pressure в панели opacity
layer > new raster layer > Alt + A
(обратите внимание на какой ставить, а то будет постоянно появляться всплывающее окно)
layer > duplicate layer > ctrl + J
layer > delete layer > ctrl + backspace
layer > merge selected layers > ctrl + shift + E
view > rotate/ invert> flip horizontal > Ctrl + Shift + A
tool property pallete > reduce brush size > Z
tool property pallete > Increase brush size > X
drawing color > switch main color and sub color > C
удалить все горячие клавиши (к одной клавише могут быть привязаны несколько инструментов)
pen > sketch > S (это наша новая созданная кисть, по умолчанию её там нет)
eraser > hard > R
eraser > soft > E
move layer > move layer> V
selection area > rectangle > M
selection area > lasso > L
operation- select layer > B
figure > straight line > G
пробел — перемещаться по холсту
ctrl + пробел — увеличивать/ уменьшать
R — вращать холст (зажав Shift, можно поворачивать ровно на 90 градусов)
Ctrl + Shift + A — отражение экрана
Группы инструментов (tools) > подгруппы инструментов (subtools) > конкретный инструмент.
Горячая клавиша S — наша кисть для рисования, ее можно дублировать с разными параметрами и новым кистям будет тоже присвоена эта
горячая клавиша. Таким образом вы можете выбирать их по очереди, или перенести вверх ту, которая больше нужна в данный момент
Три квадратика — основной цвет, дополнительный и прозрачность, — можно выбирать в квадратиках в панели color.
Аlt — пипетка. Можно брать цвет с холста.
Менять местами основной и дополнительный цвет — C.
Выбрав прозрачность, можно стирать кистью, как резинкой
С зажатым shift, как в фотошопе не получится =(
Если все таки нужно, можно это сделать с помощью инструмента Figure > straight line или создав сетку одноточечной перспективы с отключенным центром.
- мягкая — горячая клавиша E
- твердая — горячая клавиша R
ctrl + S или ctrl + shift + S
Сохранить проект, чтобы потом доделывать его
CLIP STUDIO FORMAT (.clip) — формат программы клип студио пэйнт.
PHOTOSHOP DOCUMENT (.psd) — формат программы Фотошоп, его потом можно открыть в фотошопе и работать с ним там. В этом формате не сохраняются векторные слои и перспективные линейки.
Если в будущем при сохранении в PSD у вас будут странные цвета,
то сохраняйте через file > save duplicate > psd
и там в окне psd export settings поставmnt галочку Embed ICC profile.
Сохранить картинку — формат .jpg
Change Canvas Size
Changes the size of the current canvas.
If you use [Change Canvas Size] when there is a selection area or when the crop marks are not aligned correctly in a two-page spread, the crop marks and default border will be deleted. You can also remove the crop marks and default border by turning off [Fix center] in the [Change Canvas Size] dialog box.
If you create a selection area, you can fit the canvas size to the selected area.
1 Select the [Edit] menu > [Change Canvas Size].
2 Adjust the settings in the dialog box that appears.
(1) In [Reference point], set the point of reference for changing the canvas size.
(2) Set the new canvas size.
3 A preview will be shown on the canvas.
You can change the position or size by dragging the bounding box or handles.
· Hold down Shift while dragging a handle to resize without changing the original image ratio.
· To resize with the center as the reference point, hold down Alt while dragging the handles.
· You can move the reference point by dragging it on the preview canvas.
4 Click [OK] on the [Change Canvas Size] dialog box.
The dialog box closes and the canvas resizing is complete.
[Change canvas size] Dialog Box
In DEBUT, the maximum canvas size is 10000 (height) x 10000 (width) pixels.
(1) Width
Sets the paper width.
(2) Height
Sets the paper height.
(3) Reference point
Specify the point of reference for adjusting the canvas size. If a reference point is specified, the canvas size will change with respect to that point when the width or height are changed in the dialog box.
(4) Unit
Select a unit for the width and height. You can choose from centimeters, millimeters, inches, pixels, or points.
(5) Fix center [PRO/EX]
Turn this on to fix the center of the crop marks and default border so they remains in the same position when changing the size of the canvas.
If the reference point is not set to the center, the actual center of the canvas may be in a different position from the center of the crop marks and default border after changing the canvas.
Turning this off will clear the crop marks and default border from the canvas.
This option will only appear if the canvas has crop marks or a default border.
(6) Reset
Resets the settings set in the [Change Canvas Size] dialog box to the previous settings.
Layer settings
The [Layer] menu > [Layer Settings] contains commands for editing settings related to layers.
Set as reference layer
Set the selected layer as a reference layer. When you set a layer as a reference layer, you will be able to use certain tools to select and draw on a layer while referring only to this layer.
Tools that can use the [Reference] layer
[Auto select] tool
[Shrink selection] tool
[Fill] tool (Close and fill)
[Fill] tool (Fill leftover areas)
How to set as reference layer
On the [Layer] palette, select the layer you want to use as a reference layer and then select [Layer] menu > [Layer Layer Settings] > [Set as Reference Layer].
The selected is set as a Reference layer. A lighthouse icon will appear in the [Layer] palette next to layers that are set as reference layers.
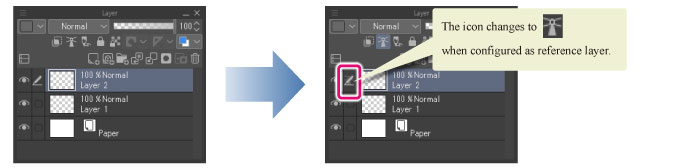
· Select the [Layer] menu > [Layer Settings] > [Set as Reference Layer] again to stop using the layer as a reference layer.
· You can select multiple layers and assign them as reference layers.
· A layer folder can also be set as a reference layer.
Set as Draft Layer [PRO/EX]
Select the [Layer] menu > [Layer Settings] > [Set as Draft Layer] to set the selected layer as a draft layer.
Draft layers can be excluded when setting references or exporting files.
· You can choose whether to include draft layers when exporting files with [File] menu > [Save Duplicate] or [Export (Single Layer)].
· You can choose whether to refer to draft layers when creating a selection or using fill tools.
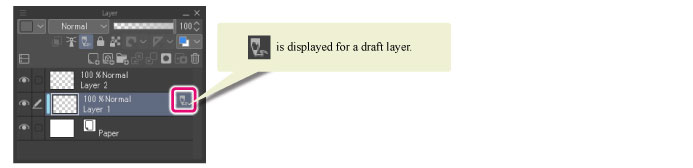
· Select the [Layer] menu > [Layer Settings] > [Set as Draft Layer] again to stop using the layer as a reference layer.
· You can assign multiple layers as draft layers.
· Layer folders can also be set as draft layers.
Clip to Layer Below
Select [Layer] menu > [Layer settings] > [Clip to Layer Below] to limit the shown area of the selected layer to the drawn parts of the layer immediately below. Any content on the clipped layer that is outside of the drawn area of the lower layer (above transparent pixels) will not be shown. This allows you to add extra details without going outside of the area of the lower layer.
Layers that are clipped to lower layers will have a green bar shown next to the layer thumbnail.
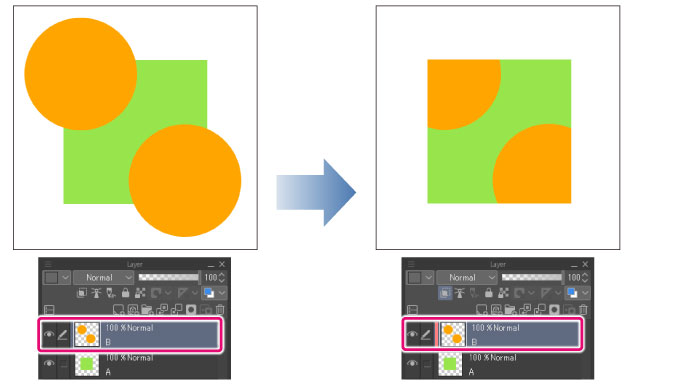
If you create a new layer below a clipped layer using any of the following methods, the created layer will also be clipped.
· Creating a new layer or folder layer
· Inserting a material from the [Material] palette
· Pasting an image
· Creating an image material layer with [File] menu > [Import]
Lock Layer
Select the [Layer] menu > [Layer settings] > [Lock Layer] to lock the selected layer. Locked layers cannot be drawn on or edited.
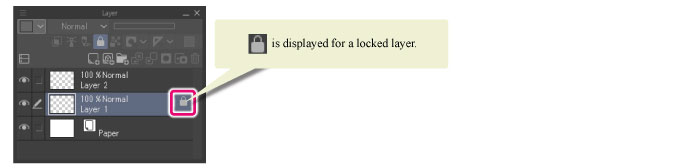
Select the [Layer] menu > [Layer settings] > [Lock Layer] again to unlock the selected layer.
Lock transparent pixels
Select the [Layer] menu > [Layer settings] > [Lock transparent pixels] to lock transparent pixels on the selected layer. Allows you to draw on already drawn areas without going out of the drawn area.
Show Layer
Select the [Layer] menu > [Layer settings] > [View Layer] to view or hide the selected layer. An eye icon is shown on the [Layer] palette next to layers that are visible.
Change Layer Name
Allows you to rename the selected layer.
1 On the [Layer] palette, select the layer you want to rename.

2 Select the [Layer] menu > [Layer Settings] > [Change Layer Name].
3 Enter the new name in the [Change Layer Name] dialog box then, click [OK] to change its name.

4 Changes the name of the selected layer to the name set in the dialog box.

Display palette colors in parent folder [PRO/EX]
When a palette color is specified for a layer, the specified color will also be shown by the parent layer folder.
Select the layer with a specified palette color, then go to the [Layer] menu > [Layer Settings] > [Display palette colors in parent folder] to toggle whether the palette color is shown.
· If the parent folder is already showing the palette color of a higher layer than the selected layer, the palette color will not be shown by the parent folder.
· For details on how to change the palette color, see » Functions of Layer Palette » .
Display palette colors on canvas [PRO/EX]
Select the [Layer] menu > [Layer Settings] > [Display palette colors on canvas] to fill the canvas with the specified palette color.
The palette color will be shown at half the opacity of the layer itself. If the opacity of the layer is changed, the opacity of the palette color will adjust accordingly.
The displayed palette color will not appear in exported files.
· If you hide the layer or select a frame in the [Timeline] palette that does not include the layer, the palette color will be hidden.
· For details on how to change the palette color, see » Functions of Layer Palette » .
Advanced Settings
Select the [Layer] menu > [Layer Settings] > [Advanced Settings] to edit settings for tonal correction layers and fill layers.
· When selecting a tonal correction layer, a dialog box for editing tonal correction effects will appear.
· When selecting a fill layer, the [Color settings] dialog box will appear.
· For details on the dialog box for tonal correction, see » New Correction Layer [PRO/EX] » .
· For details on the [Color settings] dialog box, see » Advanced settings of color Dialog Box » .
Change Image Resolution
Change the resolution of the current canvas.
Changing the image resolution will delete the crop marks and default border.
1 Select the [Edit] menu > [Change Image Resolution].
2 The [Change Image Resolution] dialog box will appear.
(1) Configure settings for the size and resolution.
3 The dialog box will close, and the canvas resolution will be changed.
[Change Image Resolution] Dialog Box
In DEBUT, the maximum canvas size is 10000 (height) x 10000 (width) pixels.
(1) Width
Sets the paper width.
(2) Height
Sets the paper height.
(3) Resolution
Input the paper’s resolution or Click the drop-down button next to it to select a value.
(4) Unit
Select a unit for the width and height. You can choose from centimeters, millimeters, inches, pixels, or points.
(5) Scale
Specify the paper size as a ratio of the current paper size.
(6) Fix pixels
Changes the resolution without changing the number of pixels.
(7) Interpolation method
You can select the method for interpolating the colors of pixels when changing the image resolution.
Smooth edges (bilinear)
This method blends the colors of neighboring pixels to create smooth outlines (boundaries between colors). However, outlines may become blurred depending on the image.
Hard edges (nearest neighbor)
When interpolating the image, the pixels in the image are duplicated. Since the colors are not affected by neighboring pixels, outlines (boundaries between colors) remain sharp. However, outlines may become jagged depending on the image.
Clear edges (bicubic)
This method blends the colors of neighboring pixels to create smooth outlines (boundaries between colors). This method results in stronger outlines compared to the [Smooth outline (bilinear method)] setting. However, white noise may appear around outlines depending on the image.
High accuracy (average colors)
The average colors of the original pixels are strictly calculated and contained for each pixel after the transformation. Scaling up makes the lines sharper and scaling down makes the lines smoother. Even detailed lines can be preserved when scaling the image down. However, this method can result in blurred outlines and can take a long time to process depending on the image.
Юля,
на скрине с курсором все нормально он такой и должен быть, в настройках можно еще перекрестье или точку середине добавить. Короче, немного изменить внешний вид. А то, что прекращает работать проблема может быть в конкретной программе. На скрине японская поломаная версия с кривым локализатором.

Александр, я скачивала после этого и официальную триал версию. Проблема так и осталась. Этот курсор появляется на пару секунд когда я захожу в программу, а потом исчезает, как будто он находится за слоем
Юля, кроме лицензионного конфликта, проблемы могут быть из-за кириллицы в пути установки(имя пользователя компа на русском языке)

Александр,
Уже пробовал. Тут холст обрезается под размер рамы, а надо наоборот. Не скейлить же всю анимацию!?
Может в преференсах есть что-то?

ребята, в первый раз использую программу clip studio paint, столкнулась с такой проблемой: вытаскиваю на холст 3D модель, ставлю в позу. Нажимаю на новый слой и 3D модель исчезает (сам слой на месте, если нажимаю обратно на него, то 3D модель появляется). Я не могу использовать ее как основу, чтобы нарисовать персонажа. Может кто знает что я делаю не так?

Я могу предположить только, что 1 — у тебя триал версия и в ней такое органичение, или у тебя версия с багом. Попробуй другие модели / позы, закинь слой с позой в папку, или же сделав позу конвертируй 3Д слой в растовый. Ещё можешь попробовать сбросить все настройки на дефолтные (может ты как то где то не то нажал) — вроде файл / ресет материалс ту инитиал.
Читайте также:
- Как пользоваться программой vkurse на андроид
- Как сделать опись документов в ворде
- Как обновить драйвера для rainbow six siege
- Программы для 3д анимации
- Как пользоваться программой геотрекер на смартфоне