В последние дни столкнулся с проблемой, что очень медленно грузились стримы на Twitch. Сегодня же плеер вообще перестал загружаться. Мной было принято решение поискать информацию по поводу того, как же с этой проблемой справиться.
Через 5 минут поисков нашел тред на DTF, где у пользователя тоже не прогружались стримы, и ему посоветовали установить WARP. Надеясь, что это решит мою проблему, я-то его установил, но следующей проблемой было то, что теперь не прогружался WARP. Он зависал на тексте «Подключение… Защита подключения….» и ничего более не происходило.
Ну что же, далее я искал в гугле как же решить эту проблему. Наткнувшись на новый тред на DTF по WARP, там предложили установить еще один ВПН, чтобы заработал WARP ВПН… Короче, это тоже не помогло. В этом же треде нашел идею от комментатора заменить строку в конфиге программы на другой айпишник. Мне это, екарный бабай, тоже не помогло. У меня теперь выскакивала ошибка, мол, «не удается зарегистрировать» что-то такое.
Потанцевав с бубном, наконец-то, слава богам, я нашел то, что искал. Если у вас в точности такая же проблема, как у меня, и вам не помогли все те же способы, что и мне не помогли, просто запустите командную строку от имени администратора и впишите это:
warp-cli set-custom-endpoint 162.159.193.1:2408
Вот в этом видео я нашел наконец-то способ решения, cпасибо чуваку за этот метод
И се! Все заработало. К слову, Twitch наконец-то тоже начал грузить стримы.
Я пишу это на Хабре, так считаю что этой темы здесь не было.
В этой статье я расскажу как установить Cloudflare WARP на официально не поддерживаемые версии Windows, такие как 32-битные Windows 8 и 10, 32 и 64-битная Windows 7.
Убедитесь, что у вас версия Windows которая не поддерживается Cloudflare WARP, это можно сделать открыв свойства системы.

Вам нужно скачать следующее программное обеспечение:
WireGuard — https://www.wireguard.com/install/
WGCF — https://github.com/ViRb3/wgcf/releases/tag/v2.2.15
Для 32-битной Windows нужно скачивать wgcf_2.2.15_windows_386.exe, а для 64-битной версии нужно скачивать wgcf_2.2.15_windows_amd64.exe.

Сначала устанавливаем WireGuard, запустив файл «wireguard-installer.exe».

Сворачиваем окно WireGuard, теперь желательно переименовать скачанный файл WGCF для вашего удобства.
Теперь надо скопировать или запомнить путь к файлу WGCF и его название — у меня это «C:UsersUserDownloadswgcf.exe», открываем командную строку, самый быстрый способ это — нажать клавиши Windows и R одновременно и ввести «cmd».

Я рекомендую для удобства перейти в вашу папку введя команду «cd (ваш путь к папке с WGCF», у меня это «cd C:UsersUserDownloads» .
Введите команду «(имя файла WGCF) register», у меня это будет «wgcf register» и нажмите Enter.

Нажмите Enter для ответа на вопрос «Согласны ли вы с условиями использования?».

Теперь нужно создать файл настроек для WireGuard, введя команду «(имя файла WGCF) generate», у меня это будет «wgcf generate» и нажмите Enter.

Файл настроек находится в папке с WGCF.

Возвращаемся к WireGuard, нажимаем кнопку «Добавить туннель», указываем путь к файлу «wgcf-profile.conf».

И так мы добавили туннель, теперь надо его исправить.
Нажимаем кнопку «Редактировать», меняем «engage.cloudflareclient.com:2408» на «162.159.193.5:2408» и нажимаем кнопку «Сохранить».


Осталось совсем немного, нажимаем кнопку «Подключить», и можем проверять работу.


Теперь можно проверить работу Cloudflare WARP, зайдя на сайт по проверке IP — например 2ip.ru, если у вас вместо вашего провайдера указано Cloudflare, то вы всё сделали правильно!

Пока это моя первая статья на Хабре, но если будут плюсы — постараюсть публиковать больше.
В этой статье я расскажу как установить Cloudflare WARP на официально не поддерживаемые версии Windows, такие как 32-битные Windows 8 и 10, 32 и 64-битная Windows 7.
Убедитесь, что у вас версия Windows которая не поддерживается Cloudflare WARP, это можно сделать открыв свойства системы.

Вам нужно скачать следующее программное обеспечение:
WireGuard — https://www.wireguard.com/install/
WGCF — https://github.com/ViRb3/wgcf/releases/tag/v2.2.15
Для 32-битной Windows нужно скачивать — https://github.com/ViRb3/wgcf/releases/download/v2.2.15/wgcf_2.2.15_windows_386.exe
а для 64-битной версии нужно скачивать — https://github.com/ViRb3/wgcf/releases/download/v2.2.15/wgcf_2.2.15_windows_amd64.exe

Сначала устанавливаем WireGuard, запустив файл «wireguard-installer.exe».

Сворачиваем окно WireGuard, теперь желательно переименовать скачанный файл WGCF для вашего удобства.
Теперь надо скопировать или запомнить путь к файлу WGCF и его название — у меня это «C:UsersUserDownloadswgcf.exe», открываем командную строку, самый быстрый способ это — нажать клавиши Windows и R одновременно и ввести «cmd».

Я рекомендую для удобства перейти в вашу папку введя команду «cd (ваш путь к папке с WGCF», у меня это «cd C:UsersUserDownloads» .
Введите команду «(имя файла WGCF) register», у меня это будет «wgcf register» и нажмите Enter.

Нажмите Enter для ответа на вопрос «Согласны ли вы с условиями использования?».
Теперь нужно создать файл настроек для WireGuard, введя команду «(имя файла WGCF) generate», у меня это будет «wgcf generate» и нажмите Enter.

Файл настроек находится в папке с WGCF.

Возвращаемся к WireGuard, нажимаем кнопку «Добавить туннель», указываем путь к файлу «wgcf-profile.conf».

И так мы добавили туннель, теперь надо его исправить.
Нажимаем кнопку «Редактировать», меняем «engage.cloudflareclient.com:2408» на «162.159.193.5:2408» и нажимаем кнопку «Сохранить».


Осталось совсем немного, нажимаем кнопку «Подключить», и можем проверять работу.


Теперь можно проверить работу Cloudflare WARP, зайдя на сайт по проверке IP — например 2ip.ru, если у вас вместо вашего провайдера указано Cloudflare, то вы всё сделали правильно!

Do you encounter a strange error message that reads «Installation ended prematurely because of an error» when installing applications on a Windows PC? If yes, worry not; it’s a pretty common Windows error. The prompt mainly appears when some specific services are not running on the system.
Fortunately, it’s pretty easy to troubleshoot this error message. Just try the below solutions to get rid of the problem for good.
What Cause the «Installation Stopped Prematurely» Error on Windows?
The error message isn’t limited to a specific Windows version; all modern Windows systems can display this error. The problem mainly appears when the Windows Installer Service is disabled, but there are other culprits that can be responsible for this error, too:
- If you try to run the installer without administrative permissions, you’ll most likely face the problem.
- The third-party antivirus program can interrupt the installation and cause the problem in the question.
- The issue can also pop up if .NET Framework 3.5 is disabled on the system.
Now let’s check out different solutions you can try to get rid of this error prompt.
1. Run the Installer as an Administrator
The problem mainly appears due to a lack of administrative privileges. So, make sure you are running the executable with admin access. You can do it by following the below steps.
- Right-click on the file that you want to install.
- Choose Run as administrator from the context menu.
- Click Yes to the UAC that pops up.
Check if you still encounter the Installer stopped prematurely error. If yes, move on to the next solution.
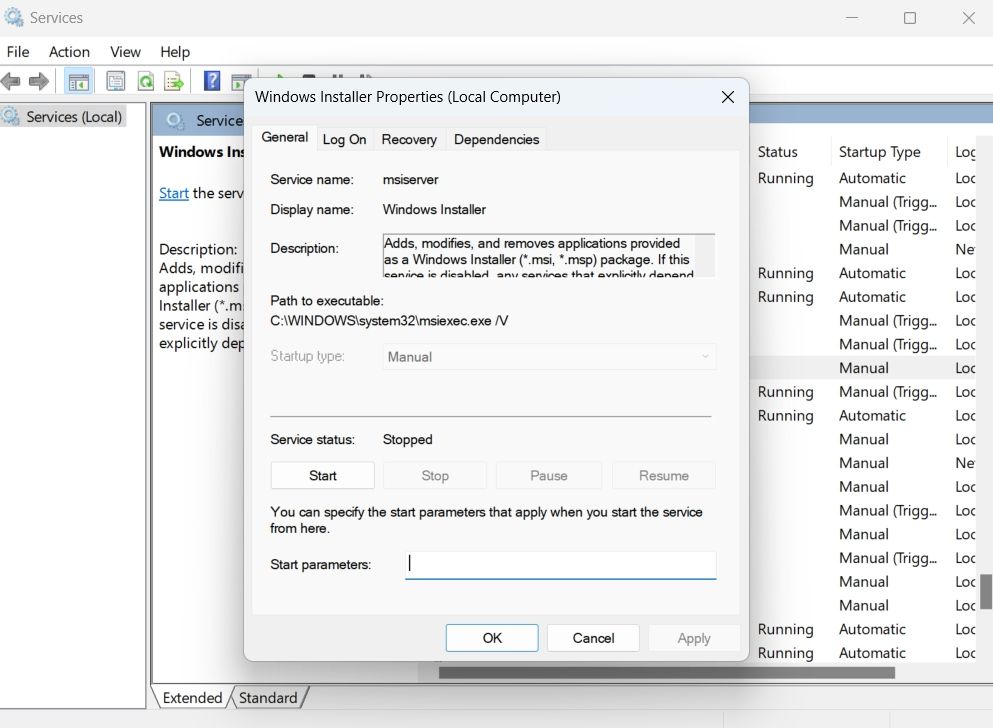
2. Enable the Windows Installer Service
To install, modify, or remove any application, you must ensure that the Windows Installer is enabled under the Services panel. If it’s disabled, you’ll come across a variety of issues when installing applications, such as the «installation stopped prematurely» error.
You can enable this service by following the below steps.
- Open the Start menu using the Win key.
- Type Services and press Enter.
- Locate and right-click on Windows Installer.
- Choose Properties from the context menu.
- Click on Start under Service status.

That’s it. Now try installing the application with admin rights and check if the problem continues.
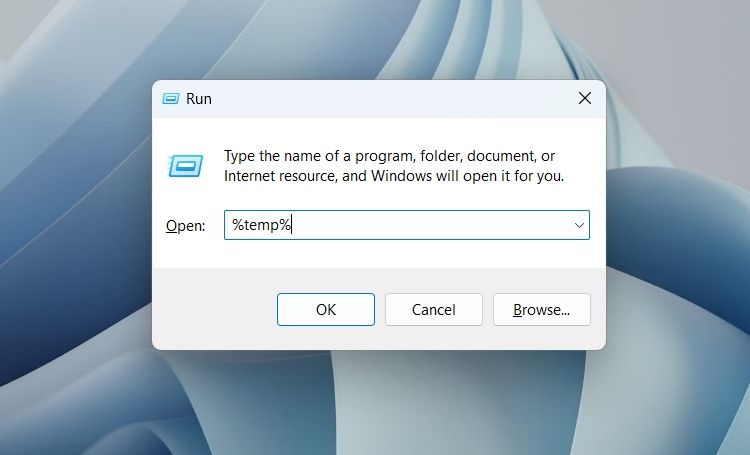
3. Clear the Temp Folder
The temp folder contains temporary files of all the installed applications. These files help the applications to offer faster service. But if the content of the temp folder gets corrupt, it will cause various issues.
So, make sure to regularly clear the temp folder to keep the system free from problems. Here’s how to do it.
- Open the Run dialogue box using Win + R.
- Type %temp% and press Enter.

- Select everything inside the temp folder, right-click and choose the Delete option.
4. Re-Register VBScript.dll and the Windows Installer Service
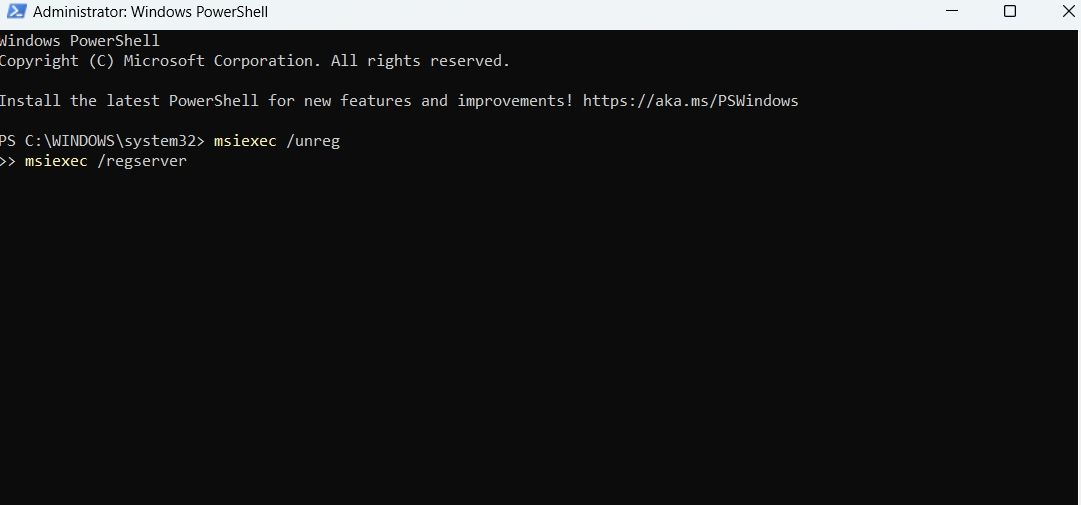
The next solution on the list is to re-register the VBScript.dll and Windows Installer Service. Either or both of the services can get disabled during virus scans or system restoration.
You’ll have to re-register both these services to solve the problem in the discussion. Here’s how.
- Open the Start Menu, type Windows PowerShell and choose Run as administrator from the result.
- Click Yes to UAC that pops up.
- To re-register the Windows Installer Service, type the following command and press Enter.
 msiexec /unreg
msiexec /regserver - To re-register the VBScript.dll, type the following command and press Enter.
regsvr32 vbscript.dll
That’s it. Now reboot the system and check if the problem continues. If yes, try the next solution on the list.
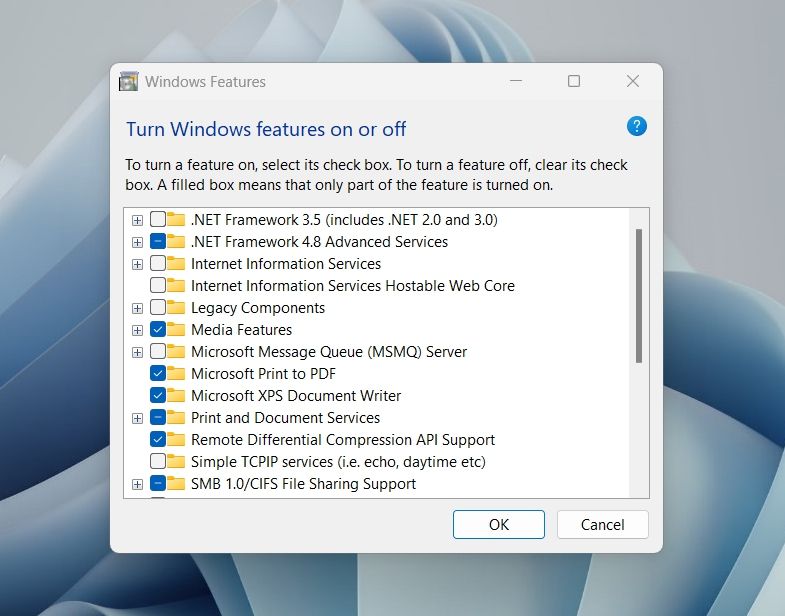
5. Turn On .NET Framework 3.5 or 4.8
The NET Framework helps create and run software applications on Windows. If you have Windows 10, you can try installing .NET Framework 3.5 to fix this error. On Windows 11, you need .NET Framework 4.8.
Here’s how to get either version of .NET Framework:
- Open Control Panel using one of the many ways to open the control panel.
- Go to Program > Program and Features.
- Choose Turn Windows features on or off from the left pane.
- If you have Windows 10, select .NET Framework 3.5.
- If you have Windows 11, choose .NET Framework 4.8 Advanced Services.

- Click on OK.
Wait until the selected package is installed successfully on the system. Once done, reboot and check for the issue.
6. Disable or Uninstall Any Third-Party Antivirus Programs
The problem in the discussion can appear due to third-party antivirus programs installed in the system. These programs can interfere with the installation process and cause issues. As a solution, disable or permanently uninstall all such applications and check if it fixes the problem.
If this works, try another antivirus or use Microsoft Defender instead. If it doesn’t work, don’t forget to re-enable or reinstall your antivirus before continuing.
7. Run an SFC Scan
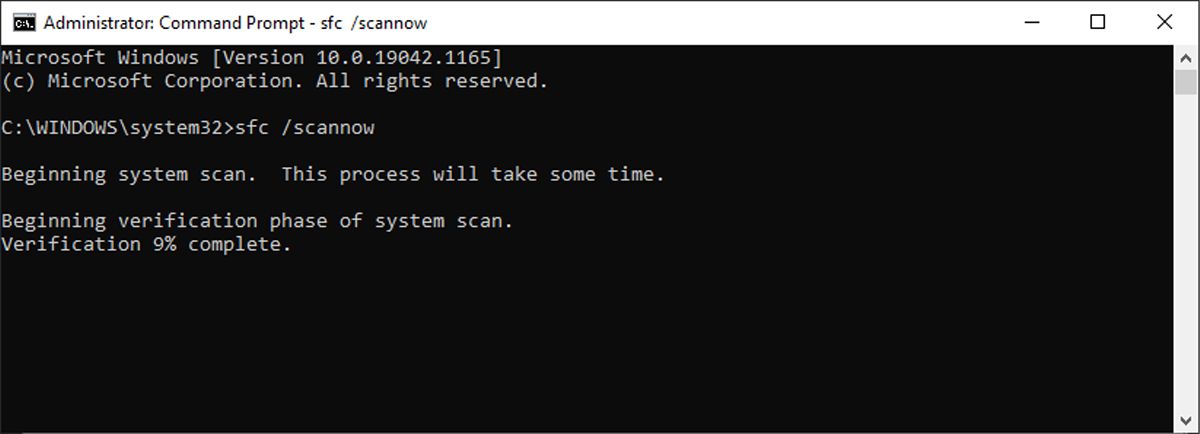
The System File Checker, aka SFC, is a Windows utility that detects and replaces corrupt system files. Running an SFC scan can help fix any issues with your system files, which can in turn fix your installation issues. Here’s how to do it:
- Open Command Prompt with admin rights.
- Type sfc /scannow and press Enter.
Wait for the scan to finish, then try installing your app again.
7. Perform a Clean Boot
Different startup applications and drivers can be the reason why you’re facing the issue. You will have to disable all such applications and check if it resolves the problem. You can do it by performing a clean boot.
Here’s how.
- Open the Run dialogue box, type msconfig, and press Enter.
- Switch to the Services tab.
- Checkmark Hide all Microsoft services box.

- Click on Disable all.
- Switch to the Startup tab.
- Click on Open the Task Manager.
- Right-click on all unnecessary startup applications and choose Disable from the context menu.
- Come to the Services tab again and click on OK.
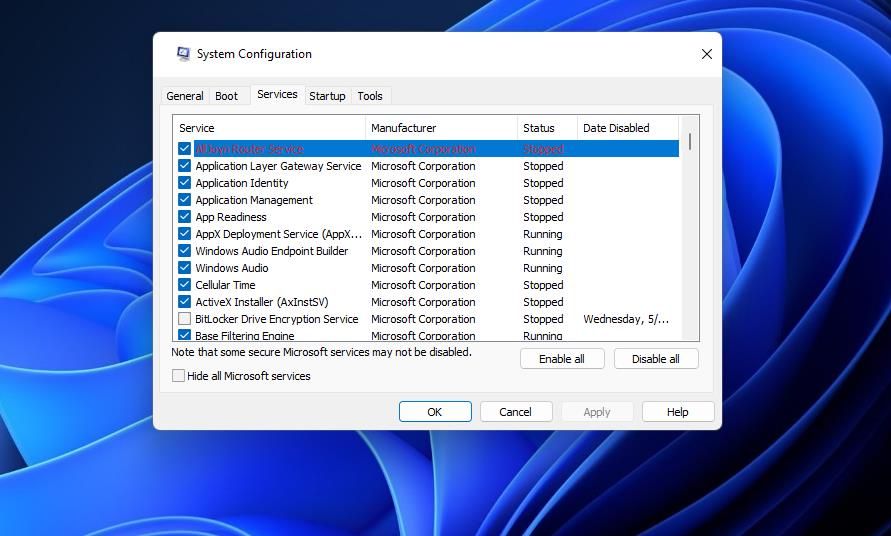
The system will start in the clean boot state on the next reboot.
8. Switch to a New Account
The «installation stopped prematurely» error can result from an issue with your current Windows account. If this is the case, consider switching to a new Windows account to solve the problem. Here’s how.
- Open Settings using Win + I hotkeys.
- Choose Account from the left pane.
- Click on Other users > Add account.

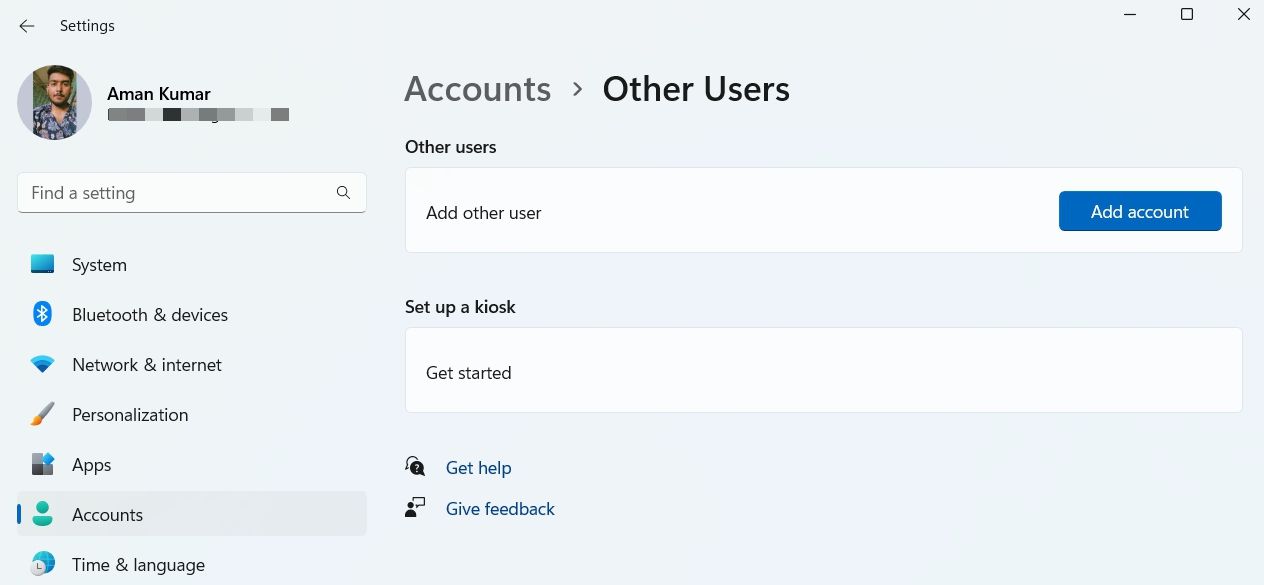
Now, follow the onscreen instructions to create a new account.
The «Installation Stopped Prematurely» Error, Fixed
Hopefully, the above solutions helped fix the issue. But if you still face the problem, most likely it is being caused due to an issue in the Windows installation. In this case, resetting Windows is the best thing to consider.