Как сменить тему в Кловере?
Однообразие удручает, это общеизвестно. Хоть и нечасто приходится перезагружать хакинтош, но иногда все же хочется сменить иконки и значки в кловере, на более позитивные, т.к. темы по умолчанию установленные в кловере уж очень мрачные. На Ваш выбор предлагаем 5 загрузочных тем для кловера. Установка новой темы в клевере — не бином Ньютона, проблем вызвать не должна, раз уж Вы сумели установить хакинтош на свой компьютер, но на всякий случай в конце поста видео, как сменить тему в клевере.
Clover Theme Galaxy shadows
Серо-синяя лаконичная тема для Clover Galaxy shadows

Скачать тему Clover Galaxy_shadows
Clover Theme Steampunk black
Вычурная тема для кловера в стиле стимпанк Steampunk black, комплект стандартный — иконки, шрифт, фон.

Скачать Clover тему Steampunk black
Clover Theme BGM — черно-зеленая, мрачная тема
Тема содержит полный набор изображений, включая значки устройств ОС для разных версий Linux, содержит различных 14 анимаций.

Скачать Clover Theme BGM
Clover Theme Catalina ALT
Лаконично — стильная, хорошо проработанная загрузочная тема для Clover, содержит иконки для различных OS и шрифт.

Скачать Theme Catalina ALT
Clover Theme Apple dark
Стильная тема Apple dark в комплекте, как и положено — иконки, фон и шрифт.

Скачать тему Apple dark
Где скачать темы для Clover
Хорошая подборка тем для кловера тут
Надоела каждый раз при запуске компьютера наблюдать тему Clover где вы выбирайте ОС для загрузки? Может пора ее поменять? Не знаете как? Тогда заходите на сайт Android +1! Расскажем и покажем как установить и настроить Хакинтош!
Ранее мы рассказывали что необходимо, чтобы установить хакинтош:
- Выбор железа для Хакинтош
- Скачивание образа macOS
- Настройка BIOS / UEFI
- Значение аргументов (ключей) загрузки
- Создание загрузочной флешки
- С помощью терминала
- В Windows с помощью (BDU) Boot Disk Utility
- С помощью UniBeast в macOS
- Скачать kext для Хакинтош
- Куда и как установить Kext для Хакинтош?
- Какие драйверы устанавливать в drivers64UEFI
- Создание config.plist для установки Хакинтош
- Установка Хакинтош
- Установить загрузчик Clover на системный диск
- Установка драйвера Nvidia Web Driver
- Как завести звук на Хакинтош?
- Как завести USB?
- Изменить таймер запуска Хакинтош
- Включить ускорение Intel Quick Sync Video на Хакинтош
- Как перенести файлы с Mac в Windows
- Не удается установить программы, срабатывает защита
- Настройка Windows клавиатуры в Mac
- USB Bluetooth адаптер «отваливается»
- Сбивается время в Windows
- Как обновить Хакинтош на новую версию macOS
Сегодня же речь пойдет о том, как поменять тему оформления при запуске Clover, если она вам надоела!
- Установить некоторые темы можно во время установки Clover, для этого, во время инсталляции нажмите настроить и укажите оформление, что вы хотите добавить!

- Зайдите в раздел EFI и откройте с помощью Clover Configurator, файл config.plist

- Переключитесь во вкладку «GUI»
- Введите название темы, точнее имя папки, где лежат файлы оформления, в поле Theme

- Сохраните выполненные действия и перезагрузите компьютер
Вот и все! Больше статей и инструкций читайте в разделе Статьи и Хаки Mac. Оставайтесь вместе с сайтом Android +1, дальше будет еще интересней!
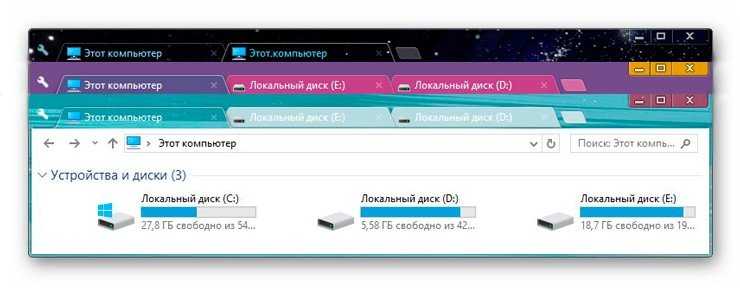
Данная статья наверняка очень понравится тем пользователям, которые пользуются надстройкой над Проводником Windows под названием Clover.
Напомню, что это дополнение к скучному стандартному файловому менеджеру добавляет вкладки, как в браузере Google Chrome, которые многократно повышают его функциональность и удобство использования.
Так вот, сегодня поговорим про темы для Clover — откуда их можно скачать, как установить и даже как сделать свои личные «шедевры» самостоятельно.
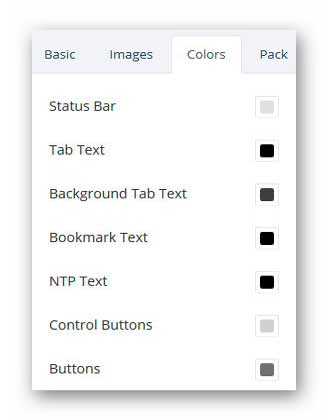
Сможете изменить цвет вкладок и окон Windows на модные нынче тёмные тона, кричащие разноцветные или нежные и приятные.
Замечательной программой Clover пользуюсь уже несколько лет — она установлена на всех компьютерах в нашей семье. Несколько раз уже задумывался, почему есть кнопка «Выбрать тему» в её настройках, а самих тем нет.
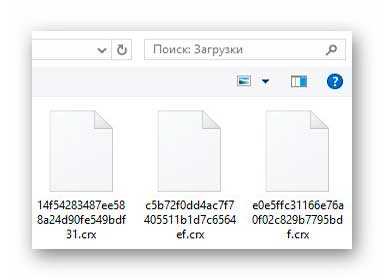
Изыскания ответа на этот вопрос в сети Интернет заканчивались лишь информацией, что эти темы подходят от браузера Google Chrome (в формате .crx). Попытался «выудить» их прямо из браузера (из его рабочего каталога), но ничего у меня не получилось — на том и бросил это дело до лучших времён и соответствующего настроения.
Вот время с настроением наконец-то пришли и «победил» этот вопрос — спешу поделиться полученными сегодня знаниями.
Откуда скачать красивые темы для Clover
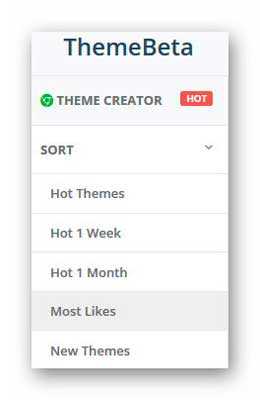
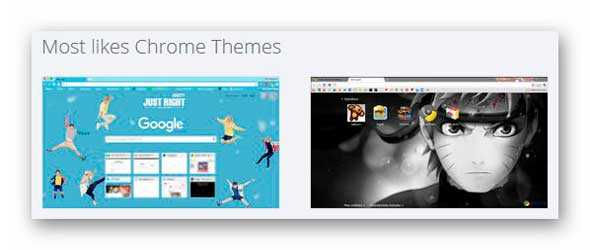
Как и говорил выше — нам нужны темы в формате .crx . Огромное их количество отыскал на одном замечательном сайте ThemeBeta.
Они там ждут с нетерпением, даже уже разбились по популярности за неделю и месяц, по количеству лайков и новизне…
…
…
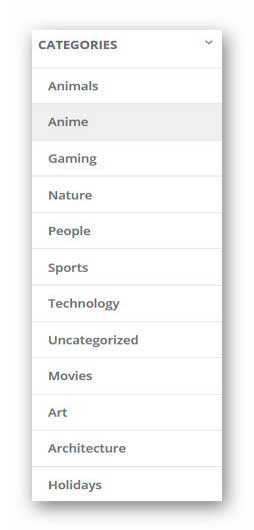
…рассортировались по категориям…
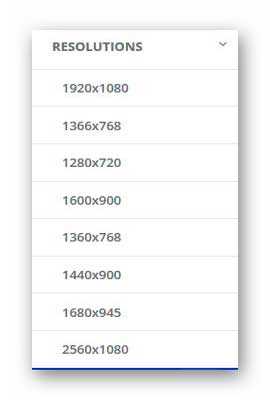
…и даже по разрешениям экранов…
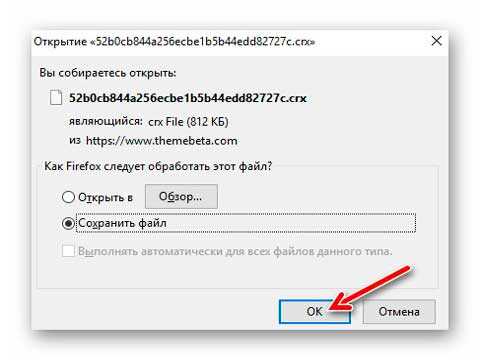
Чтоб скачать понравившуюся тему нужно по ней кликнуть…
…и в следующей странице нажать на большую зелёную кнопку «Apply theme» …

Установка тем в Clover
Заходим, через значок ключика, в настройки Clover…
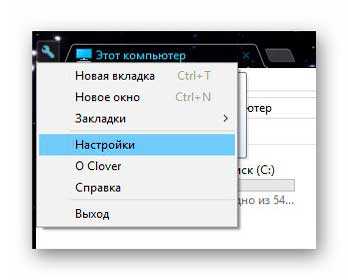
…жмём кнопку «Выбрать тему»…
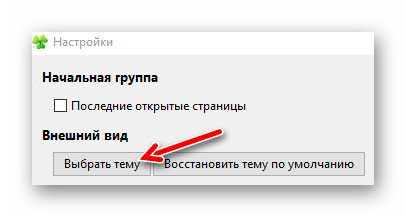
…и указываем скачанную, из вышеуказанного источника, тему…
Радуемся кипятком…
Мне лично понравилась вот такая нежная тема…
Её и оставил.
К сожалению, тема не меняет цвет фона в окнах Проводника, но его всегда можно попробовать сменить описанным на сайте ранее методом.
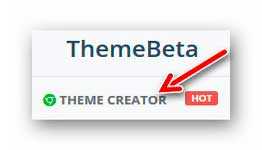
Как создать тему для Clover
В самостоятельном создании темы для надстройки Clover тоже нет ничего сложного — тыкаем по кнопке «THEME CREATOR»…
…и попадаем на страницу редактора тем Clover…
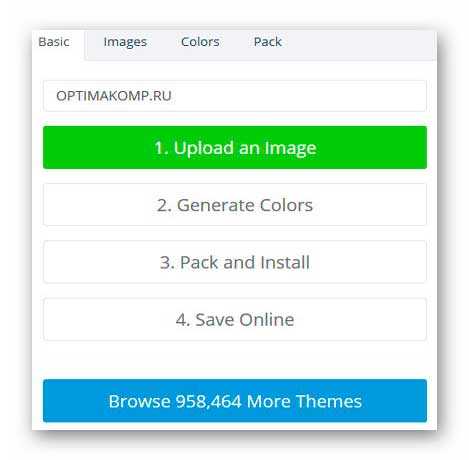
Тут методом волшебного тыка делайте свою тему, а можете и переводчиком программ воспользоваться…
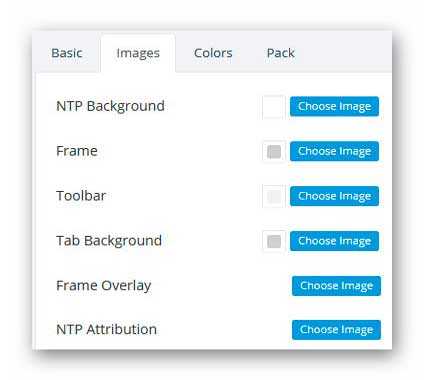
Справа в специальном окошке сможете отслеживать все изменения интерфейса программы Clover…

Повторюсь, ничего сложного нет в создании тем — «потыкав» значения и кнопочки наугад в онлайн редакторе пару минут всё поймёте.
Маленький бонус
Напоследок дам совет полезный тем пользователям, которые захотят установить эту замечательную надстройку в Проводник Windows — на официальном сайте программы Clover «лежит» версия с китайским на всю голову инсталлятором (деинсталлятор тоже «очень понятный»). Более того — в которой не убирается панель закладок, хоть ты тресни.
Категорически советую скачивать и устанавливать проверенную годами версию Clover под номером 3.0.406 (работает на всех разновидностях Windows).
Вот и узнали где скачать и как установить темы для Clover. До новых полезных компьютерных программ и полезных андроид-приложений.
ПОЛЕЗНОЕ ВИДЕО
…
…
 Уверенный пользователь трех домашних ПК с многолетним опытом, «компьютерщик» для всех родственников, соседей и знакомых, в течении 12-ти лет автор более тысячи обзоров интересных и полезных программ для компьютера на собственном софтовом блоге OptimaKomp.RU


Home > Design
Table of Contents
- What is a theme
- Choosing a theme
- Creating a theme
- File Types
- File Sizes
- theme.plist
- Description
- Origination
- Background
- Badges
- Banner
- Components
- Selection
- Layout
- Font
- Scroll
- Anime
- ScreenHight
- Vector Themes
What is a theme
A theme represents elements of a design: a banner, a background, icons, buttons, fonts — all united into one artistic conception.
Choosing a theme
Some themes are currently bundled with the installer package. You can install them all and later set which one you want to use.

Note: At some point in the future, themes will no longer be included in the installer and instead Clover will be shipped with a single embedded theme (which it already has).
You can now get themes from the new Clover Theme Repository by either downloading them manually using the Terminal or through the new Clover Theme Manager for OS X which is currently being developed. This Clover Theme Manager can view, install/uninstall and update themes directly from the new Clover theme repository.

Source code for the Clover Theme Manager can be found here.
You can currently download latest builds from the following forum topic * insanelymac
You can also get a quick overview of all available themes at our Theme database. However it’s now encouraged for all theme designers to use the Clover Theme Repository for their existing and new themes.
Creating a theme
File Types
Clover’s GUI can load and use .png and .icns formats.
Traditionally, the OS device icons (for example, os_cougar.icns), used Apple’s ICNS format which encapsulates multiple image sizes in one file. When using .ICNS files with Clover, two image sizes are made use of: 128×128 and 32×32 pixels. Click the following link to the os_cougar.icns file from the BGM theme for an example: os_cougar.icns
However, Clover’s .ICNS decoding only supports icon types which were introduced in OS X 10.0. OS X 10.7 introduced extra icon types which are currently not supported. For example, you can see in the following wiki link that a 128×128 pixel image created from OS X 10.7 and newer can use an OSType of ic07. This is not supported because even though Clover can read and decode the embedded .PNG file itself, it is not aware of the new type(s) to extract the data from within the ICNS file. http://en.wikipedia.org/wiki/Apple_Icon_Image_format
To help this situation, as of Clover r2231, the GUI can now also use .PNG images to represent the OS device icons. Clover can scale the .PNG images, if necessary, depending on the user/designers choice of the Badges->Swap option in the theme.plist.
Please note: Clover still expects to find an OS device icon with a .icns file extension. So even though the image may be a .png it still needs to have a .icns extension.
File Sizes
A complete Clover theme can contain many images which if not controlled can result in a theme directory being many megabytes is size. This has had a direct impact on Clovers’ packaged installer which has grown considerably over the last year. As a result the themes that are in the packaged installer are being optimised so the files can be as small as possible whilst retaining the original design.
It’s the responsibility of the designer to keep their images optimised and to also make sure they remove any unwanted excess. To help you do that, please read this insanleymac forum topic which is a basic overview of an original post from projectosx which is no longer available.
theme.plist
The theme settings are defined in theme.plist, which resides in the theme directory and is unique for each theme. For instance the path to the metal theme is /EFI/CLOVER/themes/metal/theme.plist.
Opening the existing theme.plist in a plist editor (recommended) or a text editor will show the xml structure which is described as follows.
Description
<key>Author</key>
<string>Slice</string>
<key>Year</key>
<string>2012</string>
<key>Description</key>
<string>Main metallic looking theme</string>
<key>Theme</key>
<dict>
Origination
Let Clover know the screen resolution that the theme was originally design at. This is so animation positions can be recalculated when using the theme at a different resolution. * Note, this is currently only used when using the newer positioning settings in the Anime array (see below).
<key>Origination</key>
<dict>
    <key>DesignWidth</key>
    <integer>1920</integer>
    <key>DesignHeight</key>
    <integer>1080</integer>
</dict>
Background
<key>Background</key>
<dict>
    <key>Path</key>
    <string>MetalBack.png</string>
    <key>Type</key>
    <string>Crop</string>
    <key>Sharp</key>
    <string>0x80</string>
    <key>Dark</key>
    <true/>
</dict>
Path— Name (or path) of the background imageTypeCrop— Cut a big image to fit the monitor size or fill the remaining space with a solid colour without rescaling.Tile— Tile the image to fill the area.Scale— Stretch the image to occupy the whole screen, with cutting.
Increasing the image size produces square pixels, which can be minimised with smoothing. However, smoothing distorts the edges. Clover will detect them and the following parameter allows fine-tuning:
-
Sharp -
Minimal value
0x0— no detection, smooth edges. -
Maximal value
0xFF(255) — Full detection, no smoothing. -
Dark -
<true/>— Dark image with bright lines. <false/>— Bright image with dark lines.
The image format is PNG, optimally with a correct header. The «Preview» app for example saves them in a correct format.
Badges
Badges are small icons in the lower right corner of a loader entry. The initial design was to show disk in the main icon (like Boot Camp) and the operating system in the badge.
<key>Badges</key>
<dict>
    <key>Show</key>
    <true/>
    <key>Inline</key>
    <true/>
    <key>Swap</key>
    <false/>
    <key>OffsetX</key>
    <integer>nn</integer>
    <key>OffsetY</key>
    <integer>nn</integer>
    <key>Scale</key>
    <integer>nn</integer>
</dict>
Show— Show badges or notInline— Move badge to the information line of a chosen loader.Swapis ignored in this case. Take iClover theme as a reference.Swap— Swap the meaning of icons and badges. Icons will show the OS, badges the device type (not interesting to display them in this case).Scale— Sets the badge’s scale to n/16 of original size. Examples (based on original image being 128x128px). A value of 5 results in scaling to 40x40px, 8 scales to 64x64px, 16 doesn’t scale so leave at 128x128px.OffsetX— Sets the badge’s horizontal position inside the main menu item.OffsetY— Sets the badge’s vertical position inside the main menu item.
OffsetX and OffsetY set the number of pixels across and down from the top left corner of the OS device selection area and indicate where to draw the badge icon. Valid lowest value is 0, and the max valid value is calculated by subtracting the badge width (64px) from the with of the OS device selection area (Selection Big). If either value is larger than the result then the default position of the result is automatically set and the boot log will contain an entry similar to ‘User offset X nn is out of range’.

The banner is a centred image with limited dimensions depending on the monitor size. For instance, theme dawn has a banner with a dimension of 672x190px, which should be considered as a limit. If you do not use a background drawing, the banner should be opaque and its first pixel will determine the background colour. Otherwise you may use a trick and set transparency of the first pixel to 1%.
<key>Banner</key>
<string>logo-trans.png</string>
UPDATE: Since rev2524 (and with better placement with rev2534) the Banner can now optionally use new positional settings as used for the animations.
<key>Banner</key>
<array>
    <dict>
        <key>Path</key>
        <string>logo_trans.png</string>
        <key>ScreenEdgeX</key>
        <string>left</string>
        <key>DistanceFromScreenEdgeX%</key>
        <integer>nn</integer>
        <key>ScreenEdgeY</key>
        <string>top</string>
        <key>DistanceFromScreenEdgeY%</key>
        <integer>nn</integer>
        <key>NudgeX</key>
        <integer>nn</integer>
        <key>NudgeY</key>
        <integer>nn</integer>
    </dict>
</array>
See the Anime section for an explanation of these settings.
Components
Components are groups of UI elements, you may specify which groups your theme uses.
<key>Components</key>
<dict>
  <key>Banner</key>
  <true/>
  <key>Functions</key>
  <true/>
  <key>Tools</key>
  <true/>
  <key>Label</key>
  <true/>
  <key>Revision</key>
  <true/>
  <key>MenuTitle</key>
  <true/>
  <key>MenuTitleImage</key>
  <true/>
</dict>
Banner— Show or hide the banner image.Functions— Show or hide the system functions such as About, Restart, and Shutdown.Tools— Show or hide the system tools such as Shell.Label— Show or hide the entry description label.Revision— Show or hide the Clover GUI revision version.MenuTitle— Show or hide the menu title on the help, about and options screens.MenuTitleImage— Show or hide the menu icons that are drawn beside the menu text on the help, about and options screens.
Selection
<key>Selection</key>
<dict>
    <key>Color</key>
    <string>0xF3F3F380</string>
    <key>Small</key>
    <string>Select_trans_small.png</string>
    <key>Big</key>
    <string>Select_trans_big.png</string>
    <key>OnTop</key>
    <true/>
    <key>ChangeNonSelectedGrey</key>
    <true/>
</dict>
Color— Row selection colour in menus, optimally matching the overall theme colours. Example0x11223380: red=0x11, green=0x22, blue=0x33, alpha=0x80. The transparency (alpha) value of 0x80 is 50%. 0x00 means a fully transparent selection, 0xFF means a solid colour.Small— Selection image for small option icons in the lower GUI row.Big— Selection image for big OS icons in the upper GUI row.OnTop— If true, the selection image will be drawn over the main image.ChangeNonSelectedGrey— Draw all non selected device icons and their associated badges as greyscale.
Note: The Selection Big image is to be sized at 144×144 pixels when using 128×128 pixel device icons, or 288×288 pixels when using 256×256 pixel device icons. The Selection Small image is to be sized at 64×64 pixels.
Note2: Clover r2707 or newer is required for full support of positioning device icons sized 256×256 pixels.
Layout
Change the vertical position of some of the GUI’s elements.
<key>Layout</key>
<dict>
    <key>BannerOffset</key>
    <integer>nn</integer>
    <key>ButtonOffset</key>
    <integer>nn</integer>
    <key>MainEntriesSize</key>
    <integer>nn</integer>
    <key>TextOffset</key>
    <integer>nn</integer>
    <key>TileXSpace</key>
    <integer>nn</integer>
    <key>TileYSpace</key>
    <integer>nn</integer>
    <key>Vertical</key>
    <true/>
</dict>
BannerOffset— Increase the space (pixels) under the banner. Effectively pushing the OS icons down on the main screen.ButtonOffset— Move the vertical position (pixels) of the tool buttons.MainEntriesSize— The size of the main device icons is set internally in the code to 128. Changing this value will instruct Clover to scale the device icons. For example, using a value of 256 on a theme with 128px icons will show the device icons scaled up to 256px. Note: badges will not be affected and will more than likely need repositioning.TextOffset— Move the vertical position (pixels) of the Main menu text; the one that reads ‘Boot Mac OS X from xxxx’.TileXSpace— The spacing between the Selection Big area of each main device icon. Internally, this defaults to 8. So if using 128×128 pixel icons with a 144×144 pixel selection big, the next device icon’s selection big area will be drawn 144 + 8 pixels to the right of the previous one.TileYSpace— The spacing between the Selection Big area of the main device icons and the Selection Small area of the smaller tool buttons. Internally, this defaults to 24. Note, the ButtonOffset setting also affects this position (needs to be verified).Vertical— Displays the OS Icons vertically down the right edge of the screen. Set either true or false. (Introduced in rev2535).
Note experiment moving these by small amounts (ie. 10’s pixels and not 100’s pixels because when viewed at a smaller resolution this could be drawn off screen).
Font
<key>Font</key>
<dict>
    <key>Type</key>
    <string>Load</string>
    <key>Path</key>
    <string>BoG_LucidaConsole_10W_NA.png</string>
    <key>CharWidth</key>
    <integer>10</integer>
</dict>
Type
— Font type
Alfa— built-in fontGray— built-in font-
Load— Load external font -
Path
— External font path, e.g.
BoG_LucidaConsole_10W_NA.png
-
Following conventions exist for the file name (blackosx):
- BoG — Black on Gray
- LucidaConsole — original font name
- 10W — font width
- NA — No Antialiasing
-
CharWidth— Character width, default is 16
One way to create fonts is by using a bash script together with Imagemagick. See this thread at insanelymac
The settings menu can be bigger than the actual vertical size of the monitor and in this case scroll bars will appear.
<key>Scroll</key>
<dict>
    <key>Width</key>
    <integer>N</integer>
    <key>Height</key>
    <integer>N</integer>
    <key>BarHeight</key>
    <integer>N</integer>
    <key>ScrollHeight</key>
    <integer>N</integer>
</dict>
Width—Height—BarHeight—ScrollHeight—
Anime
A theme may contain animated images in PNG format.
<key>Anime</key>
<array>
    <dict>
        <key>ID</key>
        <integer>1</integer>
        <key>Path</key>
        <string>logo_3D</string>
        <key>Frames</key>
        <integer>15</integer>
        <key>FrameTime</key>
        <integer>200</integer>
        <key>Once</key>
        <false/>
        <key>ScreenEdgeX</key>
        <string>left</string>
        <key>DistanceFromScreenEdgeX%</key>
        <integer>nn</integer>
        <key>ScreenEdgeY</key>
        <string>top</string>
        <key>DistanceFromScreenEdgeY%</key>
        <integer>nn</integer>
        <key>NudgeX</key>
        <integer>nn</integer>
        <key>NudgeY</key>
        <integer>nn</integer>
    </dict>
</array>
— Determines the animation type and placement
1— Logo2— About3— Help4— Options5— Graphics6— CPU7— Binaries8— DSDT9— BOOT Sequence10— SMBIOS11— Tables Dropping12— RC Scripts Variables13— PCI Devices14— Themes21— Apple22— WinXP23— Clover24— Linux25— BootX64.efi26— Vista30— Recovery34— Tiger35— Leopard36— Snow Leopard37— Lion38— Mountain Lion-
39— Lynx
Path
— Animation name. Points to a folder containing the animation sequence. It is possible to omit frames to create a pause while the last working frame is being used: -
ML_Anim_000.png
- ML_Anim_001.png
- ML_Anim_008.png
-
ML_Anim_014.png
-
Frames— Total frame amount. Missing frames will be replaced using above method. -
FrameTime— Time between each single frame in milliseconds.
— Loop setting
<true/>— Animation is played once until the menu is quit with the Esc key or pressing the right mouse button.-
<false/>— Animation is looped endlessly without any pause between the last and first frame. -
ScreenEdgeX— the edge of the screen to use for the calculation. Options are left or right. -
DistanceFromScreenEdgeX%— % away from left or right of the screen edge to place the animation. Value is as an integer. -
ScreenEdgeY— the edge of the screen to use for the calculation. Options are top or bottom. -
DistanceFromScreenEdgeY%— % away from top or bottom of the screen edge to place the animation. Value is as an integer. -
NudgeX— Fine tune the horizontal position by a range of +-32 pixels. -
NudgeY— Fine tune the vertical position by a range of +-32 pixels.
ScreenHight
New feature for theme designers. Automatic choose «yourtheme» or «yourtheme@2x» if monitor is 2k or larger.
The criteria is ScreenHight > 1100.
For example, if you choose theme=metal then you will use theme from folder «metal» on monitor 1920×1080 and a theme from folder «metal@2x» on monitor 2048×1560.
Vector Themes
Rev 4560
Here I want to introduce support for Scalable Vector Graphics for Clover GUI will not depend on screen resolution.
https://en.wikipedia.org/wiki/Scalable_Vector_Graphics
We will can draw all interface elements in SVG and scale theme to screen resolution.
To do that I found very tiny and simple project nanosvg which is written in C and open source.
Nonetheless including it into Clover has obvious problems:
— we have no float mathematica; (OK, I made it)
— we have no standard sscanf(), we just have feeble StrDecimalToUintn() function, etc.;
— we have no some other standard functions (malloc, realloc, free, qsort);
and non-obvious problem: I don’t know how many logical mistakes in the project.
I will work on these problems and invite all coders to help me.
Next steps will be learn Clover how to load SVG graphics and render it.
Then scalable GUI layout.
Then scalable fonts. AFAIK there can be SVG fonts.
Moreover SVG can be animated.
Meanwhile designers may started to draw vector themes. Welcome to new era!
Rev 4639
New design for Clover.prefPane, CloverUpdater, Clover Package and embedded theme. By Clovy.

Rev 4752
Multilevel dithering. By default level = 1.
level = 0 will be without dithering.
For radial gradients like on Clovy vector theme this is not enough. A distance between different colors is too big. So we need dithering with larger steps. I can’t calculate the step automatically, so I introduce addition for SVG «ditherCoarse».
It must have a namespace Clover to be ignored by other applications.
<radialGradient id="GrayRadialBackground_1_" cx="358.2806" cy="0.743" r="0.8783"
                    gradientTransform="matrix(4.700000e-14 768 -768 4.700000e-14 1176.1536 -274946.875)"
                    gradientUnits="userSpaceOnUse"
                    clover:ditherCoarse="16">
        <stop  offset="0" style="stop-color:#606060"/>
        <stop  offset="1" style="stop-color:#1F1F1F"/>
    </radialGradient>
So there is a result.
Test square dithered with coarse level=1. As well as the sphere.
While radial background with coarse=16

Rev 4779
Implemented bootcamp style for vector themes
It looks like this:

In <clover:theme…settings there will be:
BootCampStyle="1"
And there must be indicator image. I draw simple triangle.
<g id="selection_indicator">
      <rect visibility="hidden" id="BoundingRect_141_" x="83" y="15" class="st162" width="64" height="64"/>
        <path d="M 490.376 309.525 Q 490.992 308.43 491.641 309.525 L 507.876 336.934 Q 508.525 338.029 507.26 338.029 L 475.613 338.029 Q 474.348 338.029 474.964 336.934 Z" style="fill: rgb(216, 216, 216);" />
</g>
Rev 4789
Three big news with SVG support:
- Image can contain text

2. Images can be constructed with <symbol>. The picture above
3. Vector theme can have animated main screen. The first one in BGM_SVG by Blackosx.
-
#1
Hi guys i try to change my clover theme but i don’t know to do it with clover configurator
Can you help me TY
-
#2
Hi guys i try to change my clover theme but i don’t know to do it with clover configurator
Can you help me
TY
If you installed the Clover System Preferences panel, that’s the easiest way to change it. There’s a «Themes» tab on the panel, you can select the theme you want from the dropdown, which lists the themes installed with your Clover installation.
With Clover Configurator, follow these steps:
- Mount your EFI partition and choose File -> Open from the menu to select and open your config.plist file (should be /EFI/CLOVER/CLOVER/clover.plist).
- Go to the Tools section (on the left side of the Clover Configurator interface) and select Themes.
- Click the Load Themes/Partitions button at the bottom right of the dialog.
- Now you should be able to select your desired theme (from the ones that are installed) from the dropdown under «Other themes in folder».
- Once you’ve selected your theme, select File -> Save from the Clover Configurator menu to update your config.plist file.
- Then you may close Clover Configurator, unmount the EFI partition, and reboot — your new theme should be in effect.
-
#3
Hi,
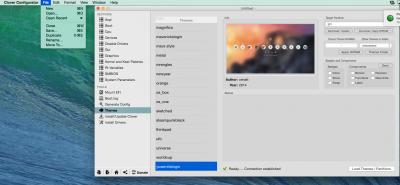
Thanks for the input, I tried as per you steps, but it seems I am still having problem getting the theme. Attached is the screenshot of what I did,
1) I opened my Clover Configurator
2) Mounted my EFI
3) Opened my config.plist
4) Then under Tools > Themes > Load themes/partitions > Selected my theme
5) Then File > Save
Do I need to do anything else to get the theme I want?
Thanks for your time.
-

Screen Shot 2015-06-16 at 9.29.52 pm.png
879.2 KB
· Views: 15,005
-
#4
Hi,
Thanks for the input, I tried as per you steps, but it seems I am still having problem getting the theme. Attached is the screenshot of what I did,
1) I opened my Clover Configurator
2) Mounted my EFI
3) Opened my config.plist
4) Then under Tools > Themes > Load themes/partitions > Selected my theme
5) Then File > SaveDo I need to do anything else to get the theme I want?
Thanks for your time.
In the upper right corner is the section that you are NOT doing before you save. I just taught myself how. Select your theme «yosemitelogin» e.g. Make sure EFI partition is selected. Picking «download/update» will add to your themes folder. Picking «download/Apply NVRAM will put in the folder; plus, make it your default. Other themes in folder list will show you your possible choices from previous d/ls. «Clover: Theme NVRAM» is your current choice. Yours probably says embedded? Go back to the choices; pick your desire and click >Clover: theme NVRAM.
Save
Reboot to check. Hope it is clear???????????
-
#5
Do you have any resaults?? How it go? I want to try it my shelf but i heart systems anable to boot after this….
-
#6
I tried the steps displayed here and it didn’t do it for me.
In the boot loader, there are options you can navigate through. Navigate to the Themes Option and then write down the name of your theme. Mine was SGR, so I erased what was there and wrote SGR (with caps) and behold, the theme changed right away.
-
#7
Hi guys i try to change my clover theme but i don’t know to do it with clover configurator
Can you help me
TY
I would not do it with CC — mount the EFI partition, run the Clover install package, select only the theme you want — make sure nothing else is checked — then run it. It will put the theme in the themes folder.
Then edit the config.plist to cahnge the theme to the one you want. Get rid of Random theme folder or it will randomly switch between all of the themes in the theme folder.
-
#9
I would not do it with CC — mount the EFI partition, run the Clover install package, select only the theme you want — make sure nothing else is checked — then run it. It will put the theme in the themes folder.
Then edit the config.plist to cahnge the theme to the one you want. Get rid of Random theme folder or it will randomly switch between all of the themes in the theme folder.
Hi,
Slight newbie to clover here.
Can you elaborate on how would i run the Clover Install Package and where can i find this?
Clover has many themes, some of which come included with the Clover installer but different themes, sometimes more up to date and better themes, have otherwise been listed in the Clover wiki with a download link to find the files. Not all themes can be included in the Clover installer as their many files make them large in file size and the installer would be unnecessarily bloated.
Because of this, it’s been decided (soon) to move all themes from Clover’s source repository and instead host them in a new specific theme repository at sourceforge, next to the Clover repository. This will result in a smaller Clover repository allowing for faster check out of the source and downloading of the Clover installer quicker. Clover with still have it’s own very simple embedded theme so users installing without a theme will not be left in the dark.
Clover Theme Manager
==========================================
Clover Theme Manager has now been retired
This is due to the lack of time to maintain and develop any further
Please see Clover.app instead which includes a theme manager
==========================================
4th June 2019 — Now at version 0.77.2 (Recent changelog)
If updating from a previous version fails then please download the new version from the bottom of this post.
Please take note. To get themes from the new Clover theme repository you will need to have git installed.
You can install git either by itself by downloading the installer from http://git-scm.com or you can install the Xcode command line developer tools by loading up Terminal and typing xcode-select —install

It started out as a simple app which displayed a list of themes in the repository and gave you the option to download and install themes to your /EFI/Clover/Themes directories.
It’s since grown with the aim of becoming more of a manager app by reading the Clover bootlog to determine what happened last boot and offering a set of options to change the theme for next boot depending on your system.
On launch, the app will attempt to read your boot device and use your boot device. If this device uses an MBR partition then the app will ask for your password so it can run fdisk to match the device. If your boot volume is an EFI system partition and it’s currently unmounted then the app will ask for you password to mount it.
What happens if a theme designer updates their theme?
The theme manager can check for updates to themes and notify you giving you the option to update your installed version.
I no longer want to use a theme.
You can simply remove installed themes by clicking the UnInstall button.
I have created a theme. How do I add it to the repository?
Theme designers can have access to add and amend their themes for anyone else to install and try out. Step by step instructions can be found by clicking the ‘How to add my theme’ foot link in the app.
What does the Clover Theme Manager app install to my system?
A support directory is used for cloning the necessary repository files for the app to function. You will find that at:
~/Library/Application Support/CloverThemeManager
All application data gets saved to:
~/Library/Preferences/org.black.CloverThemeManager.plist
App runtime files, including a log are written to:
/tmp/CloverThemeManager
Where’s the source code for the app?
http://sourceforge.net/p/cloverefiboot/themes/ci/master/tree/CloverThemeManagerApp/CloverThemeManager/
Credits:
The app is based on the objective-c macgap (MIT license) with a couple of modifications by me. The web view presented by macgap is where I effectively run a web app which communicates back and forth with a bash script which is initially launched by macgap when it’s loaded.
The Clover git repo has been setup by apianti.
Thanks to apianti, dmazar, JrCs, SoThOr and Micky1979 for their help.
Thanks to alexq, arsradu, asusfreak, Badruzeus, chris1111, droplets, eMatoS, kyndder, mnfesq, oswaldini & SavageAUS for testing.
The application has been in development for a few months now and while I think it’s pretty stable I can only test on my systems and respond to the feedback of others so there may well be bugs and issues yet to be squashed. If you wish to try out the application then please report any feedback, both positive and negative here.
Note: If you are reporting any problems then please supply a description of the problem, a screenshot and attach a .zip of the /tmp/CloverThemeManager directory (available only while the app is running).
Can I download themes without using the CloverThemeManager app?
Yes, you can manually manage your own /EFI/Clover/Themes directories yourself as you may currently do.
Dmazar suggests the following command in Terminal, replacing XXXXXXXX with the name of the theme. So cd to a directory of your choice and run this…
git archive --remote=git://git.code.sf.net/p/cloverefiboot/themes HEAD themes/XXXXXXXX | tar -x
Download v0.77.2:
Clover Repo at sourceforge
Edited May 16, 2020 by blackosx