Assume your Web API is protected and a client attempts to access it without the appropriate credentials. How do you deal with this scenario? Most likely, you know you have to return an HTTP status code. But what is the more appropriate one? Should it be 401 Unauthorized or 403 Forbidden? Or maybe something else?
As usual, it depends 🙂. It depends on the specific scenario and also on the security level you want to provide. Let’s go a little deeper.
If you prefer, you can watch a video on the same topic:
Web APIs and HTTP Status Codes
Before going into the specific topic, let’s take a quick look at the rationale of HTTP status codes in general. Most Web APIs are inspired by the REST paradigm. Although the vast majority of them don’t actually implement REST, they usually follow a few RESTful conventions when it comes to HTTP status codes.
The basic principle behind these conventions is that a status code returned in a response must make the client aware of what is going on and what the server expects the client to do next. You can fulfill this principle by giving answers to the following questions:
- Is there a problem or not?
- If there is a problem, on which side is it? On the client or on the server side?
- If there is a problem, what should the client do?
This is a general principle that applies to all the HTTP status codes. For example, if the client receives a 200 OK status code, it knows there was no problem with its request and expects the requested resource representation in the response’s body. If the client receives a 201 Created status code, it knows there was no problem with its request, but the resource representation is not in the response’s body. Similarly, when the client receives a 500 Internal Server Error status code, it knows that this is a problem on the server side, and the client can’t do anything to mitigate it.
In summary, your Web API’s response should provide the client with enough information to realize how it can move forward opportunely.
Let’s consider the case when a client attempts to call a protected API. If the client provides the appropriate credentials (e.g., a valid access token), its request is accepted and processed. What happens when the client has no appropriate credentials? What status code should your API return when a request is not legitimate? What information should it return, and how to guarantee the best security experience?
Fortunately, in the OAuth security context, you have some guidelines. Of course, you can use them even if you don’t use OAuth to secure your API.
«The basic principle behind REST status code conventions is that a status code must make the client aware of what is going on and what the server expects the client to do next»
Tweet This

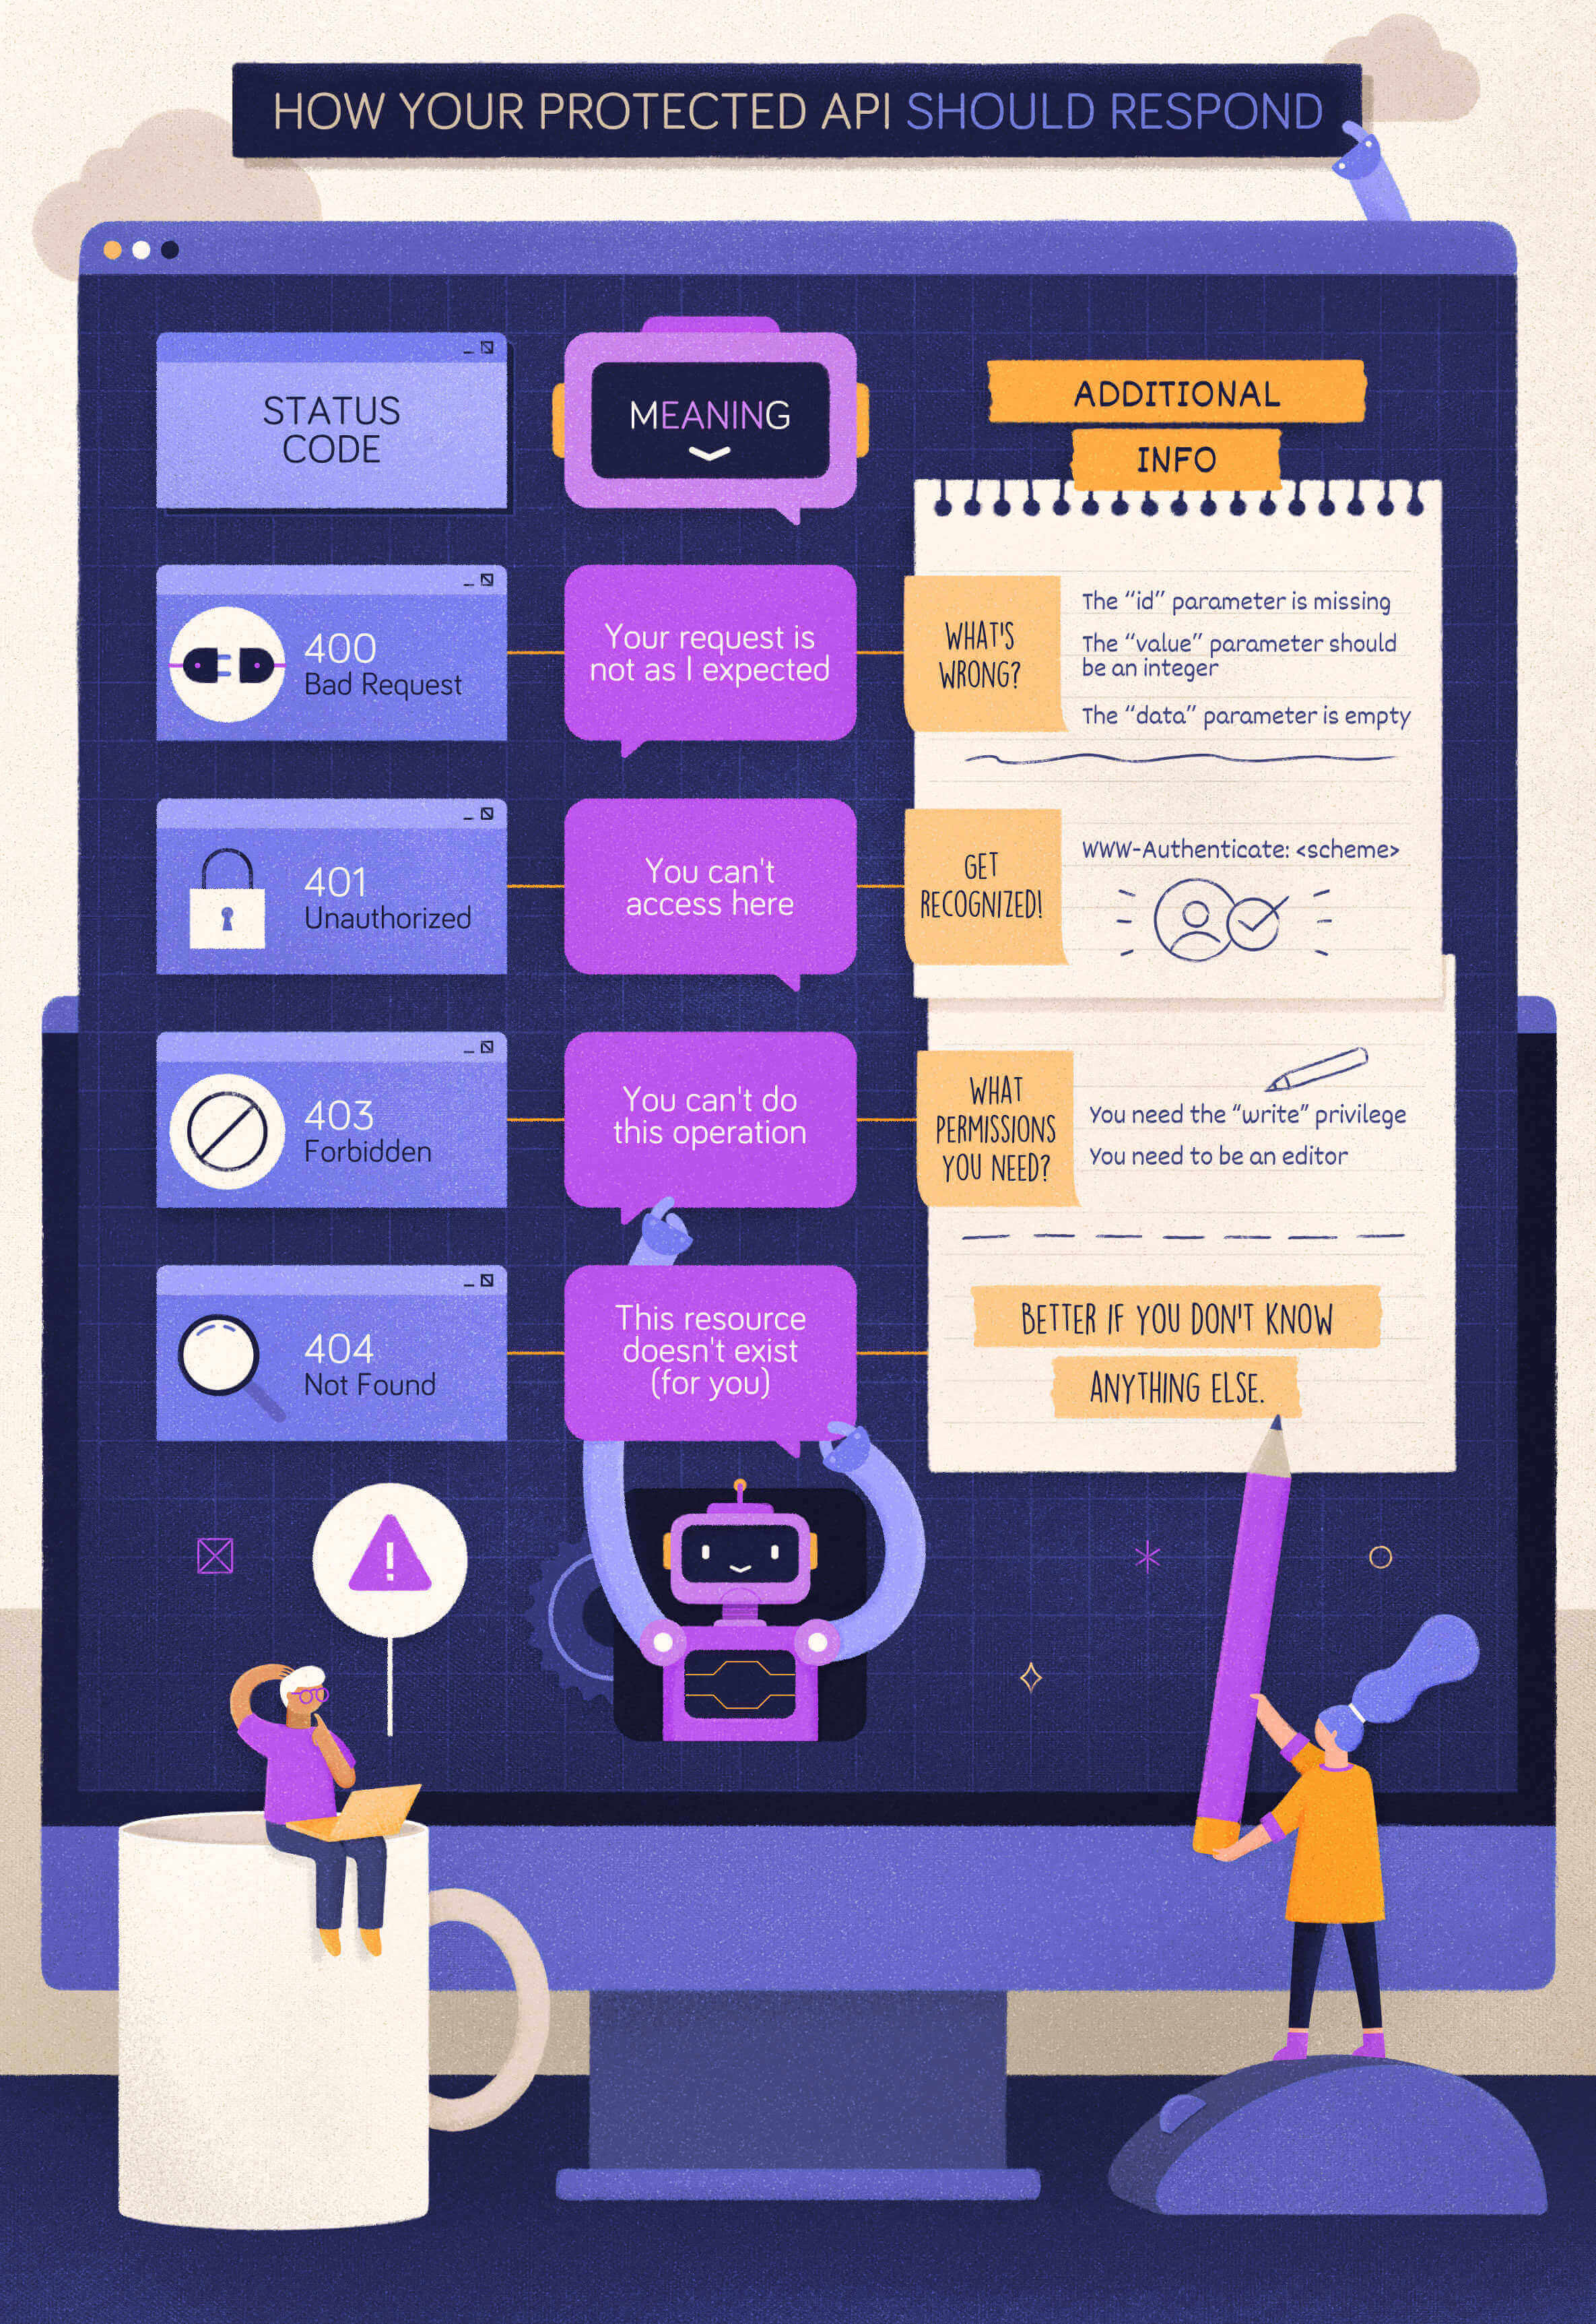
When to Use 400 Bad Request?
Let’s start with a simple case: a client calls your protected API, omitting a required parameter. In this case, your API should respond with a 400 Bad Request status code. In fact, if that parameter is required, your API can’t even process the client request. The client’s request is malformed.
Your API should return the same status code even when the client provides an unsupported parameter or repeats the same parameter multiple times in its request. In both cases, the client’s request is not as expected and should be refused.
Following the general principle discussed above, the client should be empowered to understand what to do to fix the problem. So, you should add in your response’s body what was wrong with the client’s request. You can provide those details in the format you prefer, such as simple text, XML, JSON, etc. However, using a standard format like the one proposed by the Problem Details for HTTP APIs specifications would be more appropriate to enable uniform problem management across clients.
For example, if your client calls your API with an empty value for the required data parameter, the API could reply with the following response:
HTTP/1.1 400 Bad Request
Content-Type: application/problem+json
Content-Language: en

{
  "type": "https://myapi.com/validation-error",
  "title": "Validation error",
  "detail": "Your request parameters are not valid.",
  "invalid-params": [
    {
      "name": "data",
      "reason": "cannot be blank."
    }
  ]
}
When to Use 401 Unauthorized?
Now, let’s assume that the client calls your protected API with a well-formed request but no valid credentials. For example, in the OAuth context, this may fall in one of the following cases:
- An access token is missing.
- An access token is expired, revoked, malformed, or invalid for other reasons.
In both cases, the appropriate status code to reply with is 401 Unauthorized. In the spirit of mutual collaboration between the client and the API, the response must include a hint on how to obtain such authorization. That comes in the form of the WWW-Authenticate header with the specific authentication scheme to use. For example, in the case of OAuth2, the response should look like the following:
HTTP/1.1 401 Unauthorized
WWW-Authenticate: Bearer realm="example"
You have to use the Bearer scheme and provide the realm parameter to indicate the set of resources the API is protecting.
If the client request does not include any access token, demonstrating that it wasn’t aware that the API is protected, the API’s response should not include any other information.
On the other hand, if the client’s request includes an expired access token, the API response could include the reason for the denied access, as shown in the following example:
HTTP/1.1 401 Unauthorized
WWW-Authenticate: Bearer realm="example",
                  error="invalid_token",
                  error_description="The access token expired"
When to Use 403 Forbidden?
Let’s explore a different case now. Assume, for example, that your client sends a request to modify a document and provides a valid access token to the API. However, that token doesn’t include or imply any permission or scope that allows the client to perform the desired action.
In this case, your API should respond with a 403 Forbidden status code. With this status code, your API tells the client that the credentials it provided (e.g., the access token) are valid, but it needs appropriate privileges to perform the requested action.
To help the client understand what to do next, your API may include what privileges are needed in its response. For example, according to the OAuth2 guidelines, your API may include information about the missing scope to access the protected resource.
Try out the most powerful authentication platform for free.Get started →
Security Considerations
When you plan how to respond to your client’s requests, always keep security in mind.
How to deal with response details
A primary security concern is to avoid providing useful information to potential attackers. In other words, returning detailed information in the API responses to attempts to access protected resources may be a security risk.
For example, suppose your API returns a 401 Unauthorized status code with an error description like The access token is expired. In this case, it gives information about the token itself to a potential attacker. The same happens when your API responds with a 403 Forbidden status code and reports the missing scope or privilege.
In other words, sharing this information can improve the collaboration between the client and the server, according to the basic principle of the REST paradigm. However, the same information may be used by malicious attackers to elaborate their attack strategy.
Since this additional information is optional for both the HTTP specifications and the OAuth2 bearer token guidelines, maybe you should think carefully about sharing it. The basic principle on sharing that additional information should be based on the answer to this question: how would the client behave any differently if provided with more information?
For example, in the case of a response with a 401 Unauthorized status code, does the client’s behavior change when it knows that its token is expired or revoked? In any case, it must request a new token. So, adding that information doesn’t change the client’s behavior.
Different is the case with 403 Forbidden. By informing your client that it needs a specific permission, your API makes it learn what to do next, i.e., requesting that additional permission. If your API doesn’t provide this additional information, it will behave differently because it doesn’t know what to do to access that resource.
Don’t let the client know…
Now, assume your client attempts to access a resource that it MUST NOT access at all, for example, because it belongs to another user. What status code should your API return? Should it return a 403 or a 401 status code?
You may be tempted to return a 403 status code anyway. But, actually, you can’t suggest any missing permission because that client has no way to access that resource. So, the 403 status code gives no actual helpful information. You may think that returning a 401 status code makes sense in this case. After all, the resource belongs to another user, so the request should come from a different user.
However, since that resource shouldn’t be reached by the current client, the best option is to hide it. Letting the client (and especially the user behind it) know that resource exists could possibly lead to Insecure Direct Object References (IDOR), an access control vulnerability based on the knowledge of resources you shouldn’t access. Therefore, in these cases, your API should respond with a 404 Not Found status code. This is an option provided by the HTTP specification:
An origin server that wishes to «hide» the current existence of a forbidden target resource MAY instead respond with a status code of 404 (Not Found).
For example, this is the strategy adopted by GitHub when you don’t have any permission to access a repository. This approach avoids that an attacker attempts to access the resource again with a slightly different strategy.
How to deal with bad requests
When a client sends a malformed request, you know you should reply with a 400 Bad Request status code. You may be tempted to analyze the request’s correctness before evaluating the client credentials. You shouldn’t do this for a few reasons:
- By evaluating the client credentials before the request’s validity, you avoid your API processing requests that aren’t allowed to be there.
- A potential attacker could figure out how a request should look without being authenticated, even before obtaining or stealing a legitimate access token.
Also, consider that in infrastructures with an API gateway, the client credentials will be evaluated beforehand by the gateway itself, which doesn’t know at all what parameters the API is expecting.
The security measures discussed here must be applied in the production environment. Of course, in the development environment, your API can provide all the information you need to be able to diagnose the causes of an authorization failure.
Recap
Throughout this article, you learned that:
400 Bad Requestis the status code to return when the form of the client request is not as the API expects.401 Unauthorizedis the status code to return when the client provides no credentials or invalid credentials.403 Forbiddenis the status code to return when a client has valid credentials but not enough privileges to perform an action on a resource.
You also learned that some security concerns might arise when your API exposes details that malicious attackers may exploit. In these cases, you may adopt a more restricted strategy by including just the needed details in the response body or even using the 404 Not Found status code instead of 403 Forbidden or 401 Unauthorized.
The following cheat sheet summarizes what you learned:
Содержание
- http error: Invalid JWT token (err=Invalid JWT token) (code=401) #5238
- Comments
- Resolve errors
- Resolve a 400 error: Bad request
- Resolve a 401 error: Invalid credentials
- Resolve a 403 error: Usage limit exceeded
- Resolve a 403 error: Daily limit exceeded
- Resolve a 403 error: User rate limit exceeded
- Resolve a 403 error: Rate limit exceeded
- Resolve a 403 error: App with id cannot be used within the authenticated user’s domain
- Resolve a 429 error: Too many requests
- Mail sending limits
- Bandwidth limits
- Concurrent Requests
- Resolve a 500 error: Backend error
- Retry failed requests to resolve errors
- View or change usage limits, increase quota
- Batch requests
- Ошибка сервера 401: что это за ошибка и как ее исправить
- Причины появления ошибки сервера 401 и способы ее устранения на стороне пользователя
- Устранение ошибки 401 администратором веб-ресурса
- Дополнительная информация об ошибке с кодом 401
http error: Invalid JWT token (err=Invalid JWT token) (code=401) #5238
Bug description
Session for OAuth2 users expires very fast (within minutes, it seems) and user is logged out.
Expected behavior
Session for OAuth2 users to be valid until expired.
Portainer Logs
Steps to reproduce the issue:
Technical details:
- Portainer version: 2.6.0
- Docker version (managed by Portainer): Docker version 20.10.7, build f0df350
- Platform (windows/linux): Linux 4.19.0-16-amd64
Rdash theme integration #1 SMP Debian 4.19.181-1 (2021-03-19) x86_64 GNU/Linux
Additional context
Only an upgrade from 2.5.1 to 2.6.0 was performed without any other changes. Currently Portainer is unusable for OAuth2 users since they get kicked out almost immediately. This does not apply to local users.
The text was updated successfully, but these errors were encountered:
Hi
pl change the session lifetime and chck if it works 
Can not reproduce the issue.
I’ve tested 2.5.1 with Oauth —> Upgrade to 2.6.0 with Oauth + SSO.
I’m using github for oauth provider.
@loelkes
Need more info, please provide us with any info that you may think might be relevant.
Right now I cannot reproduce it as well. At the time of writing the issue I double and triple checked and it was there, maybe something was cached somewhere.
There’s a 7h timezone difference between the host portainer is running on and my device, but the data is tunnel through a proxy. Also my network was extremely bad (slow and high ping).
I would see if this occurs again in the next 1-2 days and if not close the issue.
It’s still there. After some time I get a 401 on the Webinterface but I’m not logged out. I just need to go through the OAuth2 (Keycloak) again to get a valid session (?).
Session is set to 24h in Portainer. I have a ping of 300ms and a 7h timezone shift to the host running portainer. I use Keycloak as OAuth2 provider and no settings were modified (SSO in Portainer is disabled, if enabled the error does not change or go away) and all other connected services work as expected with the same OAuth2 provider.
From the browser JavaScript log
This is all I have. All I did was the update. I don’t know where to get more logs.
I can confirm the problem.
After upgrading Portainer to 2.6.0 the session for OAuth2 users expires very fast.
The new option SSO is enabled and i am using Keycloak to log into Portainer.
Both (Portainer and Keycloak) are on my local network and on the same host. So the timezone is not the problem.
I did some research about my keycloak settings and i am really sure that the logout happens after the access token expire.
On my server it is set to 5 minutes.
When i decrease it to 1 minute i will be logged out after about 1 minute.
When i increase the lifestspan for e. g. 10 minutes, the logout happens after 10 minutes.
Maybe Portainer isn’t able to refresh the access token.
Can you have a look at the JWT that’s being sent in the header?
Parsed by jwt.io you’ll get something like:

Note that the exp indicates when the token expires.
If your session is set to 24h in Portainer then I would expect that token to expire a day after you log in with OAuth.
As you can see, the JWT Token expires after a few minutes (when i logged into Portainer it was round about 01:44 am in the morning)

And you can see, that the Session lifetime is 8 hours in Portainer

I’ve configured my Auth0 setup with short timeouts: 
But my Portainer JWT somehow has an expiry of 24h.
Even though my Portainer session is set to 8h.
When I change the Portainer session to 1 week, after logging out, the JWT still has an expiry of 24h after the login.
So at least that doesn’t look right to me.
Edit:
Apparently on Auth0 the expiration of the access token for the userinfo is fixed at 24h:
https://auth0.com/docs/tokens/access-tokens#-userinfo-endpoint-token-lifetime
The expiry from the OAuth token gets copied into the Portainer JWT (ignoring the Portainer Session lifetime Settings).
Источник
Resolve errors
The Gmail API returns two levels of error information:
- HTTP error codes and messages in the header.
- A JSON object in the response body with additional details that can help you determine how to handle the error.
Gmail apps should catch and handle all errors that might be encountered when using the REST API. This guide provides instructions on how to resolve specific API errors.
Resolve a 400 error: Bad request
This error might result from these errors your code:
- A required field or parameter hasn’t been provided.
- The value supplied or a combination of provided fields is invalid.
- Invalid attachment.
Note: This list is not exhaustive, other cases can cause a 400 error.
Following is a sample JSON representation of this error:
To fix this error, check the message field and adjust your code accordingly.
Resolve a 401 error: Invalid credentials
A 401 error indicates that the access token you’re using is either expired or invalid. This error can also be caused by missing authorization for the requested scopes. Following is the JSON representation of this error:
To fix this error, refresh the access token using the long-lived refresh token. If you are using a client library, it automatically handles token refresh. If this fails, direct the user through the OAuth flow, as described in Authorizing your App with Gmail.
For additional information on Gmail limits, refer to Usage limits.
Resolve a 403 error: Usage limit exceeded
An error 403 occurs when a usage limit has been exceeded or the user doesn’t have the correct privileges. To determine the specific type of error, evaluate the reason field of the returned JSON. This error occurs for the following situations:
- The daily limit was exceeded.
- The user rate limit was exceeded.
- The project rate limit was exceeded.
- Your app can’t be used within the authenticated user’s domain.
For additional information on Gmail limits, refer to Usage limits.
Resolve a 403 error: Daily limit exceeded
A dailyLimitExceeded error indicates that the courtesy API limit for your project has been reached. Following is the JSON representation of this error:
To fix this error:
- Visit the Google API Console
- Select your project.
- Click the Quotas tab
- Request additional quota. For more information, see Request additional quota.
For additional information on Gmail limits, refer to Usage limits.
Resolve a 403 error: User rate limit exceeded
A userRateLimitExceeded error indicates that the per-user limit has been reached. Following is the JSON representation of this error:
To fix this error, try to optimize your application code to make fewer requests or retry requests. For information on retrying requests, refer to Retry failed requests to resolve errors.
For additional information on Gmail limits, refer to Usage limits.
Resolve a 403 error: Rate limit exceeded
A rateLimitExceeded error indicates that the user has reached Gmail API’s maximum request rate. This limit varies depending on the type of requests. Following is the JSON representation of this error:
For additional information on Gmail limits, refer to Usage limits.
Resolve a 403 error: App with id cannot be used within the authenticated user’s domain
A domainPolicy error occurs when the policy for the user’s domain doesn’t allow access to Gmail by your app. Following is the JSON representation of this error:
To fix this error:
- Inform the user that the domain doesn’t allow your app to access Gmail.
- Instruct the user to contact the domain Admin to request access for your app.
Resolve a 429 error: Too many requests
A 429 «Too many requests» error can occur due to daily per-user limits, including mail sending limits, bandwidth limits, or a per-user concurrent request limit. Information on each limit follows. However, each limit can be resolved either by trying to retry failed requests or splitting processing across multiple Gmail accounts.
Mail sending limits
The Gmail API enforces the standard daily mail sending limits. These limits differ for paying Google Workspace users and trial gmail.com users. For these limits, refer to Gmail sending limits in Google Workspace.
These limits are per-user and are shared by all of the user’s clients, whether API clients, native/web clients or SMTP MSA. If these limits are exceeded, a HTTP 429 Too Many Requests «User-rate limit exceeded» «(Mail sending)» error is returned with time to retry. Note that daily limits being exceeded may result in these types of errors for multiple hours before the request is accepted.
The mail sending pipeline is complex: once the user exceeds their quota, there can be a delay of several minutes before the API begins to return 429 error responses. So you cannot assume that a 200 response means the email was successfully sent.
Bandwidth limits
The API has per-user upload and download bandwidth limits that are equal to, but independent of, IMAP. These limits are shared across all Gmail API clients for a given user.
These limits are typically only hit in exceptional or abusive situations. If these limits are exceeded a HTTP 429 Too Many Requests «User-rate limit exceeded» error is returned with a time to retry. Note that daily limits being exceeded may result in these types of errors for multiple hours before the request is accepted.
Concurrent Requests
The Gmail API enforces a per-user concurrent request limit (in addition to the per-user rate limit). This limit is shared by all Gmail API clients accessing a given user and ensures that no API client is overloading a Gmail user mailbox or their backend server.
Making many parallel requests for a single user or sending batches with a large number of requests can trigger this error. A large number of independent API clients accessing the Gmail user mailbox simultaneously can also trigger this error. If this limit is exceeded a HTTP 429 Too Many Requests «Too many concurrent requests for user» error is returned.
Resolve a 500 error: Backend error
A backendError occurs when an unexpected error arises while processing the request.
To fix this error, retry failed requests. Following is a list of 500 errors:
- 502 Bad Gateway
- 503 Service Unavailable
- 504 Gateway Timeout
Retry failed requests to resolve errors
You can periodically retry a failed request over an increasing amount of time to handle errors related to rate limits, network volume, or response time. For example, you might retry a failed request after one second, then after two seconds, and then after four seconds. This method is called exponential backoff and it is used to improve bandwidth usage and maximize throughput of requests in concurrent environments.
Start retry periods at least one second after the error.
View or change usage limits, increase quota
To view or change usage limits for your project, or to request an increase to your quota, do the following:
- If you don’t already have a billing account for your project, then create one.
- Visit the Enabled APIs page of the API library in the API Console, and select an API from the list.
- To view and change quota-related settings, select Quotas. To view usage statistics, select Usage.
Batch requests
Using batching is encouraged, however, larger batch sizes are likely to trigger rate limiting. Sending batches larger than 50 requests is not recommended. For information on how to batch requests, refer to Batching requests.
Except as otherwise noted, the content of this page is licensed under the Creative Commons Attribution 4.0 License, and code samples are licensed under the Apache 2.0 License. For details, see the Google Developers Site Policies. Java is a registered trademark of Oracle and/or its affiliates.
Источник
Ошибка сервера 401: что это за ошибка и как ее исправить
Появление сообщения об ошибке 401 Unauthorized Error («отказ в доступе») при открытии страницы сайта означает неверную авторизацию или аутентификацию пользователя на стороне сервера при обращении к определенному url-адресу. Чаще всего она возникает при ошибочном вводе имени и/или пароля посетителем ресурса при входе в свой аккаунт. Другой причиной являются неправильные настройки, допущенные при администрировании web-ресурса. Данная ошибка отображается в браузере в виде отдельной страницы с соответствующим описанием. Некоторые разработчики интернет-ресурсов, в особенности крупных порталов, вводят собственную дополнительную кодировку данного сбоя:
- 401 Unauthorized;
- Authorization Required;
- HTTP Error 401 – Ошибка авторизации.
Попробуем разобраться с наиболее распространенными причинами возникновения данной ошибки кода HTTP-соединения и обсудим способы их решения.
Причины появления ошибки сервера 401 и способы ее устранения на стороне пользователя
При доступе к некоторым сайтам (или отдельным страницам этих сайтов), посетитель должен пройти определенные этапы получения прав:
- Идентификация – получение вашей учетной записи («identity») по username/login или email.
- Аутентификация («authentic») – проверка того, что вы знаете пароль от этой учетной записи.
- Авторизация – проверка вашей роли (статуса) в системе и решение о предоставлении доступа к запрошенной странице или ресурсу на определенных условиях.
Большинство пользователей сохраняют свои данные по умолчанию в истории браузеров, что позволяет быстро идентифицироваться на наиболее часто посещаемых страницах и синхронизировать настройки между устройствами. Данный способ удобен для серфинга в интернете, но может привести к проблемам с безопасностью доступа к конфиденциальной информации. При наличии большого количества авторизованных регистрационных данных к различным сайтам используйте надежный мастер-пароль, который закрывает доступ к сохраненной в браузере информации.
Наиболее распространенной причиной появления ошибки с кодом 401 для рядового пользователя является ввод неверных данных при посещении определенного ресурса. В этом и других случаях нужно попробовать сделать следующее:
- Проверьте в адресной строке правильность написания URL. Особенно это касается перехода на подстраницы сайта, требующие авторизации. Введите правильный адрес. Если переход на страницу осуществлялся после входа в аккаунт, разлогинитесь, вернитесь на главную страницу и произведите повторный вход с правильными учетными данными.
- При осуществлении входа с сохраненными данными пользователя и появлении ошибки сервера 401 проверьте их корректность в соответствующих настройках данного браузера. Возможно, авторизационные данные были вами изменены в другом браузере. Также можно очистить кэш, удалить cookies и повторить попытку входа. При удалении истории браузера или очистке кэша потребуется ручное введение логина и пароля для получения доступа. Если вы не помните пароль, пройдите процедуру восстановления, следуя инструкциям.
- Если вы считаете, что вводите правильные регистрационные данные, но не можете получить доступ к сайту, обратитесь к администратору ресурса. В этом случае лучше всего сделать скриншот проблемной страницы.
- Иногда блокировка происходит на стороне провайдера, что тоже приводит к отказу в доступе и появлению сообщения с кодировкой 401. Для проверки можно попробовать авторизоваться на том же ресурсе с альтернативного ip-адреса (например, используя VPN). При подтверждении блокировки трафика свяжитесь с провайдером и следуйте его инструкциям.
Некоторые крупные интернет-ресурсы с большим количеством подписчиков используют дополнительные настройки для обеспечения безопасности доступа. К примеру, ваш аккаунт может быть заблокирован при многократных попытках неудачной авторизации. Слишком частые попытки законнектиться могут быть восприняты как действия бота. В этом случае вы увидите соответствующее сообщение, но можете быть просто переадресованы на страницу с кодом 401. Свяжитесь с администратором сайта и решите проблему.
Иногда простая перезагрузка проблемной страницы, выход из текущей сессии или использование другого веб-браузера полностью решают проблему с 401 ошибкой авторизации.
Устранение ошибки 401 администратором веб-ресурса
Для владельцев сайтов, столкнувшихся с появлением ошибки отказа доступа 401, решить ее порою намного сложнее, чем обычному посетителю ресурса. Есть несколько рекомендаций, которые помогут в этом:
- Обращение в службу поддержки хостинга сайта. Как и в случае возникновения проблем с провайдером, лучше всего подробно описать последовательность действий, приведших к появлению ошибки 401, приложить скриншот.
- При отсутствии проблем на стороне хостинг-провайдера можно внести следующие изменения в настройки сайта с помощью строки Disallow:/адрес проблемной страницы. Запретить индексацию страницам с ошибкой в «rоbоts.txt», после чего добавить в файл «.htассеss» строку такого типа:
Где в поле /oldpage.html прописывается адрес проблемной страницы, а в http://site.com/newpage.html адрес страницы авторизации.
Таким образом вы перенаправите пользователей со всех страниц, которые выдают ошибку 401, на страницу начальной авторизации.
- Если после выполнения предыдущих рекомендаций пользователи при попытках авторизации все равно видят ошибку 401, то найдите на сервере файл «php.ini» и увеличьте время жизни сессии, изменив значения следующих параметров: «session.gc_maxlifetime» и «session.cookie_lifetime» на 1440 и 0 соответственно.
- Разработчики веб-ресурсов могут использовать более сложные методы авторизации и аутентификации доступа для создания дополнительной защиты по протоколу HTTP. Если устранить сбой простыми методами администрирования не удается, следует обратиться к специалистам, создававшим сайт, для внесения соответствующих изменений в код.
Хотя ошибка 401 и является проблемой на стороне клиента, ошибка пользователя на стороне сервера может привести к ложному требованию входа в систему. К примеру, сетевой администратор разрешит аутентификацию входа в систему всем пользователям, даже если это не требуется. В таком случае сообщение о несанкционированном доступе будет отображаться для всех, кто посещает сайт. Баг устраняется внесением соответствующих изменений в настройки.
Дополнительная информация об ошибке с кодом 401
Веб-серверы под управлением Microsoft IIS могут предоставить дополнительные данные об ошибке 401 Unauthorized в виде второго ряда цифр:
- 401, 1 – войти не удалось;
- 401, 2 – ошибка входа в систему из-за конфигурации сервера;
- 401, 3 – несанкционированный доступ из-за ACL на ресурс;
- 401, 501 – доступ запрещен: слишком много запросов с одного и того же клиентского IP; ограничение динамического IP-адреса – достигнут предел одновременных запросов и т.д.
Более подробную информацию об ошибке сервера 401 при использовании обычной проверки подлинности для подключения к веб-узлу, который размещен в службе MS IIS, смотрите здесь.
Следующие сообщения также являются ошибками на стороне клиента и относятся к 401 ошибке:
Как видим, появление ошибки авторизации 401 Unauthorized не является критичным для рядового посетителя сайта и чаще всего устраняется самыми простыми способами. В более сложной ситуации оказываются администраторы и владельцы интернет-ресурсов, но и они в 100% случаев разберутся с данным багом путем изменения настроек или корректировки html-кода с привлечением разработчика сайта.
Источник
TL;DR: 401
Long version, in addition to crunk1 (valid) answer:
401 would mean that the token was missing or invalid. In other words, it failed validation or parsing for some reason.
403 would mean that the token was successfully validated/parsed, but then the authorization to perform the action was denied for some reason.
Now, an expired token means that the token was successfully parsed but that the expiration date set in that token is already passed. Which is somewhat in-between if you consider that checking the expiration date is part of the authorization process. Personally I believe that it is part of the token validation, not the authorization, for those reasons:
There are some cases where the resource server (the API that receives and validates the token) would not even be able to know that the token is expired, and would return a 401 instead:
- if the resource server uses its Authorization Server introspection endpoint and that one only returns
{"active": false}with no further info, which means that the token is not valid (it might have been valid in the past, but that information was «forgotten» by the AS). - if the resource server tries to validate the token signature but the token is so old and expired that the validation keys have been renewed since it was issued. In that case even if the token is syntaxically valid but expired, the RS has no reason to trust that and should consider it as invalid instead.
Also, a 403 response would instruct the client that it is an authorization issue, so retrying with an new token carrying the same access rights doesn’t have much chance to succeed, while a 401 would pass the information that the token was not accepted, so maybe retrying with a new fresh token might work.
For those reasons, I chose to return a 401 in my implementations. But TBH this doesn’t matter much, since the token expiration is supposed to be handled by the client, based on the expires_in information returned by the AS at the same time as the token, more than by a return code from the API when the token is expired.
- Error description
- Short error description in the response
- Example of an error message
If an error occurs, the request processing stops, and the server returns an HTTP response code that identifies the error. In addition to the code, the response contains a short error description.
The error message is returned in the format specified in the request URL after the method name or in the Accept HTTP header.
The error description is passed in the error parameter. This parameter contains the error code (the code parameter) and a short error description (the message parameter).
|
Code |
Name |
Explanation |
|---|---|---|
|
200 |
OK |
The request is successfully completed. |
|
206 |
Partial Content |
The request is partially completed. |
|
400 |
Bad Request |
The request is invalid. |
|
401 |
Unauthorized |
The request doesn’t include authorization data. |
|
403 |
Forbidden |
Incorrect authorization data is specified in the request, or access to the requested resource is denied. |
|
404 |
Not Found |
The requested resource isn’t found. |
|
405 |
Method Not Allowed |
The requested method isn’t supported for the specified resource. |
|
415 |
Unsupported Media Type |
The requested content type isn’t supported by the method. |
|
420 |
Enhance Your Calm |
The resource access restriction is exceeded. |
|
500 |
Internal Server Error |
Internal server error. Try calling the method after a while. If the error persists, contact the Yandex.Market support service. |
|
503 |
Service Unavailable |
The server is temporarily unavailable due to high load. Try calling the method after a while. |
-
For the
400 Bad Requesterror:Description
Explanation
Possible solution
Collection of field must not be emptyThe parameter must not be empty.
Specify at least one element for the parameter.
Invalid status: 'status'Invalid status is specified.
Check if the sent status is correct for order filtering by status.
JSON: {message}The JSON data format contains an error.
Check if the data passed in the request body has the correct JSON format.
Missing fieldThe required parameter isn’t specified.
Specify a value for the required parameter.
The request is too bigThe HTTP request size limit is exceeded.
Cut the request size by reducing the amount of the sent data.
Too long time period. Maximum is 'maxPeriod' daysThe specified date range is too large. Maximum range — maxPeriod.
Reduce the date range to filter orders by date.
Unexpected character 'character': expected a valid value 'values'Invalid character.
Check the request body encoding. The required encoding is UTF-8.
Unexpected end of contentThe request body ends unexpectedly.
Check if the data passed in the request body has the correct format.
Value / length of field (value) must be between min and max [exclusively]The parameter value (length) must be between the min and max values and not equal to them.
Check if the parameter value is correct.
Value / length of field (value) must be greater / less than [or equal to] limitThe parameter value (length) must be equal to or greater than (less than) the specified limit value.
Check if the parameter value is correct.
Value of field has too high scale: 'price'The accuracy of the parameter is set too high.
Set the parameter values with less precision.
Value of field must match the pattern: 'regExp'The parameter value must match the regular expression.
Check if the parameter value is correct.
XML: {message}The XML data format contains an error.
Check if the data passed in the request body has the correct XML format.
Other short descriptions that can be found in messages about this error are provided in the descriptions of the corresponding resources.
-
For the
401 Unauthorizederror:Description
Explanation
Possible solution
Unsupported authorization type specified in Authorization headerAuthorization type passed in the Authorization HTTP header isn’t supported.
Check if the authorization data is correct.
Authorization header has invalid syntaxThe Authorization HTTP header format is incorrect.
Check if the authorization data is correct.
OAuth credentials are not specifiedThe request doesn’t include authorization data.
Check that the authorization data is correct.
OAuth token is not specifiedThe request doesn’t include the authorization token (the oauth_token parameter).
Check if the authorization data is correct.
OAuth client id is not specifiedThe request doesn’t include the application ID (the oauth_client_id parameter).
Check if the authorization data is correct.
-
For the
403 Forbiddenerror:Description
Explanation
Possible solution
Access deniedAccess to the specified resource is prohibited.
Check if the resource is specified correctly, and if the authorized user login has access to it.
Access to API denied for the client / campaignThe client or store isn’t allowed to access the Yandex.Market Partner API.
Agency clients should contact their agency about getting access to the Yandex.Market Partner API.
Client id is invalidThe specified application ID (the oauth_client_id parameter) is invalid.
Check if the authorization data is correct. If they are correct, get a new app ID, repeat the request with the new authorization data.
Scope is invalidThe specified authorization token (the oauth_token parameter) doesn’t have the necessary set of rights.
Get a new authorization token, mention the right to use the Yandex.Market Partner API when you receive it, and repeat the request with the new authorization data.
Token is invalidThe specified authorization token (parameter oauth_token) is invalid.
Check if the authorization data is correct. If they are correct, get a new authorization token, repeat the request with the new authorization data.
User account is disabledThe user account for which the specified authorization token was issued is blocked.
Contact the Yandex.Market support service.
-
For the
404 Not Founderror:Description
Explanation
Possible solution
Feed not found: 'feedId'The price list specified in the request isn’t found.
Check if the sent price list ID is correct.
Login not found: 'login'The username specified in the request isn’t found.
Check if the sent username is correct.
Model not found: 'modelId'The model specified in the request isn’t found.
Check if the model ID you are passing is correct.
-
For the
405 Method Not Allowederror:Description
Explanation
Possible solution
Request method 'method' not supportedThe requested HTTP method isn’t supported.
Check the methods supported by the resource. You can find the list of methods in the Requests reference section.
-
For the
415 Unsupported Media Typeerror:Description
Explanation
Possible solution
Content type 'content-type' not supportedThe requested content type isn’t supported.
Pass one of the supported content types.
Missing Content-TypeThe content type isn’t specified.
Pass the content type.
Unknown content-type: 'content-type'The requested content type is unknown.
Pass one of the supported content types.
-
For the
420 Enhance Your Calmerror:Description
Explanation
Possible solution
Hit rate limit of 'N' parallel requestsExceeded the global limit on the number of simultaneous requests to the Yandex.Market Partner API.
Reduce the number of concurrent requests to the partner API within a single store or partner to N requests.
Hit rate limit of 'N' requests per 'period' for resource 'R'The resource restriction for the N number of requests to the R resource over the period for the same store or partner is exceeded.
The time until which the limit applies is specified in the X-RateLimit-Resource-Until header. You can use of the resource after the specified time.
-
For the
503 Service Unavailableerror:Description
Explanation
Possible solution
Service temporarily unavailable. Please, try again laterThe server is temporarily unavailable due to high load.
Try repeating the request after a while.
Request example:
GET /v2/campaigns.xml HTTP/1.1
Host: api.partner.market.yandex.ru
Accept: */*
Authorization: OAuth oauth_token=,oauth_client_id=b12320932d4e401ab6e1ba43d553d433
Response example:
<response>
  <errors>
    <error code="UNAUTHORIZED" message="OAuth token is not specified"/>
  </errors>
  <error code="401">
    <message>OAuth token is not specified</message>
  </error>
</response>
Request example:
GET /v2/campaigns.json HTTP/1.1
Host: api.partner.market.yandex.ru
Accept: */*
Authorization: OAuth oauth_token=,oauth_client_id=b12320932d4e401ab6e1ba43d553d433
Response example:
{
  "errors":
  [
    {
      "code": "UNAUTHORIZED",
      "message": "OAuth token is not specified"
    }
  ],
  "error":
  {
    "code": 401,
    "message": "OAuth token is not specified"
  }
}Страница с ошибкой при обращении к WordPress-сайту всегда вызывает неудобства, вне зависимости от того, ваш это сайт или чужой. Как и в случае со многими другими кодами ответов HTTP, ошибка 401 не содержит детальных данных для диагностики и решения проблемы.
Ошибка 401 может появиться в любом браузере. В большинстве случаев ее легко решить.
В этой статье мы расскажем, что означает 401 ошибка, почему она происходит, и какие методы ее устранения существуют.
Итак, приступим!
Содержание
- Код ошибки 401 – что это?
- Что вызывает ошибку 401
- Как исправить ошибку 401 (5 методов)
Код ошибки 401 – что это?
Коды состояния HTTP 400 возникают в случае проблем с выполнением запросов. В частности, ошибка 401 появляется, когда браузер отказывает вам в доступе к странице, которую вы хотите посетить.
В результате вместо загрузки страниц браузер выведет сообщение об ошибке. Ошибки 401 могут возникать в любом браузере, потому отображаемое сообщение может варьироваться.
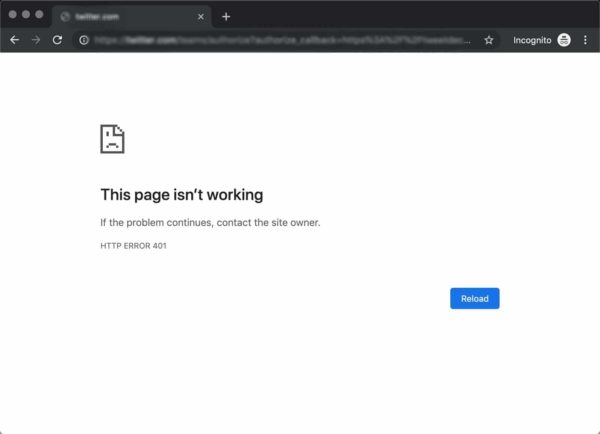
К примеру, в Chrome и Edge вы, скорее всего, увидите иконку бумаги с простым сообщением о том, что запрашиваемая страница не отвечает. Вы увидите фразу «HTTP Error 401». Вам будет предложено связаться с владельцем сайта, если ошибка не пропадет:
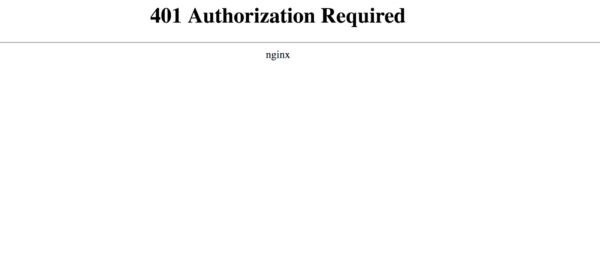
В иных случаях и в других браузерах вы можете получить менее дружелюбное предупреждение. К примеру, может выводиться пустая страница с сообщением «401 Authorization Required»:
Другие вариации текста:
- HTTP 401 Error – Unauthorized
- 401 Unauthorized
- Access Denied
Эти ошибки часто появляются на сайтах, где требуется вводить данные для входа. В большинстве случаев это означает, что что-то не так с учетными данными. Возможно, браузер перестал считать их действительными.
Эта ошибка похожа на HTTP 403 Forbidden Error, когда доступ к сайту для пользователя запрещен. Однако, в отличие от ошибки 403, сообщение об ошибке 401 указывает, что процесс аутентификации завершился неудачно.
Код ошибки передается через заголовок WWW-Authenticate, который отвечает за определение метода аутентификации, используемого для предоставления доступа к веб-странице или ресурсу.
Что вызывает ошибку 401
Если вы столкнулись с кодом ошибки в кодах 400, вы должны знать, что проблема произошла на стороне клиента (либо на стороне браузера). Случается, что виновником проблемы является браузер, но так бывает не всегда. Об этом мы еще расскажем позже.
Ошибки 401 возникают на ресурсах с ограниченным доступом – к примеру, на страницах, защищенных паролем. Потому можно предположить, что причина проблемы связана с данными аутентификации.
Устаревшие Cookie и кэш браузера
Одной из наиболее распространенных причин возникновения ошибки 401 является то, что кэш и файлы cookie вашего браузера устарели, что не позволяет выполнить авторизацию. Если ваш браузер использует недействительные данные для авторизации (либо вообще их не использует их), сервер отклонит запрос.
Несовместимые плагины
Также бывают ситуации, когда ошибка вызвана несовместимостью плагинов или какими-либо сбоями в них. К примеру, плагин безопасности может ошибочно принять вашу попытку входа за вредоносную активность, а потому будет возвращена ошибка 401 для защиты страницы.
Неверный URL или устаревшая ссылка
Бывает, что источником проблемы является незначительная оплошность. К примеру, был неверно введен URL, ссылка была устаревшей и т.д.
Как исправить ошибку 401 (5 методов)
Теперь, когда мы разобрались с причинами ошибки 401, пришло время обсудить, как ее устранить.
Давайте рассмотрим 5 методов, которые вы можете использовать.
- Проверьте ваш URL.
Начнем с самого простого потенциального решения: убедитесь, что вы использовали верный URL. Это может выглядеть банально, но 401 ошибки нередко появляются, если URL-адрес был введен неправильно.
Еще один вариант: ссылка, которую вы использовали для перехода на запрашиваемую страницу, указывает на неправильный URL. К примеру, ссылка устарела, ведет на страницу, которой больше нет (и редиректов не задано).
Стоит тщательно перепроверить URL-адрес, который вы использовали. Если вы набирали адрес самостоятельно, убедитесь, что все написано безошибочно. Если вы переходили по ссылке, убедитесь в том, что она ведет на страницу, к которой вы хотите получить доступ (либо попробуйте перейти на эту страницу непосредственно через сайт).
- Почистите кэш браузера.
Кэш браузера предназначен для улучшения процесса взаимодействия с сайтами в сети за счет сокращения времени загрузки страниц. К сожалению, иногда это может вести к нежелательным последствиям.
Как мы уже говорили выше, одной из распространенных причин появления ошибки 401 являются устаревшие или неправильные данные кэша или cookies. Потому, если URL введен верно, следующий шаг – чистка кэша браузера.
В итоге вы удалите любую недействительную информацию, которая хранится локально в вашем браузере и может приводить к прерываниям процесса аутентификации. Аналогично, файлы cookie вашего браузера могут содержать аутентификационные данные, которые нужно обновить.
Если вы пользуетесь Chrome, вам нужно щелкнуть по иконке с меню в правом верхнем углу браузера и выбрать пункт Settings. В разделе «Privacy and security» нажмите «Clear browsing data:»
![]()
Далее вводим URL требуемого сайта и очищаем для него данные.
![]()
В других браузерах процесс очистки кэша и cookie может отличаться. К примеру, в Firefox нужно щелкать по иконке с библиотекой и выбирать History > Clear Recent History:
![]()
Информацию по остальным браузерам вы можете найти в поисковиках.
- Очистка DNS.
Еще один метод, который вы можете попробовать для устранения ошибки 401 – это очистка DNS. Эта причина встречается относительно редко, но стоит попробовать и такой подход, особенно если первые два ничего не дали.
Чтобы очистить DNS, перейдите в Windows к меню «Пуск» и там уже введите в строку поиска cmd. Нажмите Enter. Откроется командная строка. Далее вставьте команду ipconfig/flushdns, после чего снова нажмите Enter.

Если вы пользуетесь Mac, вы можете открыть командную строку следующим образом: Finder > Applications > Utilities > Terminal.
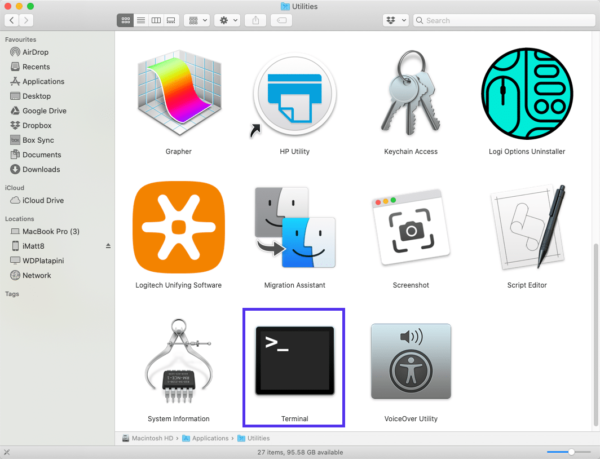
Введите команду sudo killall -HUP mDNSResponder и нажмите Enter. Затем вы можете обновить страницу, чтобы посмотреть, пропала ли ошибка 401 или нет.
- Деактивируйте ваши плагины
Проблема может возникать и по вине плагинов.
Некоторые плагины, особенно связанные с безопасностью, могут выдавать ошибку 401 при подозрении на вредоносную активность. Также у них могут быть проблемы с совместимостью. Потому лучше всего деактивировать все плагины и посмотреть, будет ли страница работать.
Вы можете деактивировать все плагины разом, перейдя в раздел Plugins > Installed Plugins в консоли WordPress. Выберите все плагины и в меню Bulk Actions задайте Deactivate, после чего щелкните по кнопке Apply:
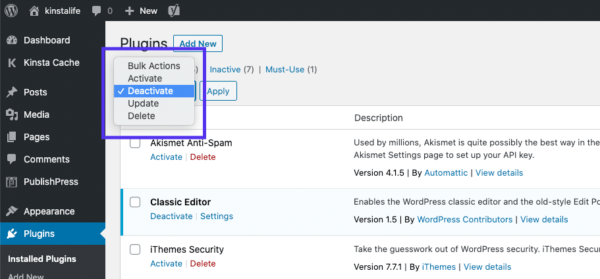
После этого попробуйте перезагрузить страницу с ошибкой. Если ошибка пропала, вы можете вручную по одному активировать плагины заново, чтобы выявить виновника всех бед.
Далее вы уже можете либо удалить плагин, либо написать его разработчикам, чтобы они предоставили рабочее решение.
- Проверьте заголовок WWW-Authenticate
Если проблема все еще остается, то в таком случае она может быть связана с ошибками на сервере. А значит, исправить ее будет чуть сложнее.
Как мы уже писали ранее, ответ 401 передается через заголовок WWW-Authenticate, который отображается как “WWW-Authenticate: <type> realm=<realm>”. Он включает в себя строки данных, указывающие на то, какой тип аутентификации требуется для предоставления доступа.
Вам нужно посмотреть, был ли отправлен ответ в WWW-Authenticate, а точнее какая схема аутентификации была использована. По крайней мере, это позволит вам приблизиться на один шаг к решению.
Перейдите на страницу с ошибкой 401 и откройте консоль разработчика в Chrome. Вы можете щелкнуть правой кнопкой мыши на странице и выбрать Inspect (Ctrl+Shift+J).
Далее перейдите на вкладку Network и перезагрузите страницу. Это позволит сгенерировать список ресурсов. Выберите заголовок Status, чтобы отсортировать таблицу, и найдите код 401:
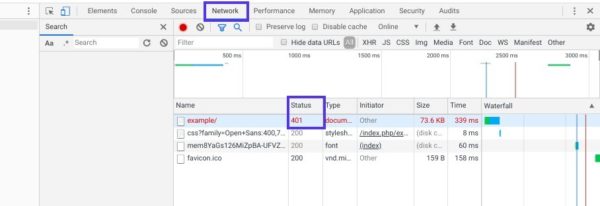
Выберите данную запись, после чего перейдите на вкладку Headers. В Response Headers найдите заголовок WWW-Authenticate:
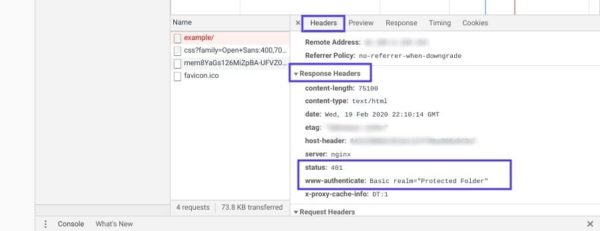
Информация, представленная в заголовке ответа, в частности, в схеме аутентификации, даст вам больше сведений о том, что произошло, и укажет на решение. Это позволит вам понять, какой тип аутентификации требуется серверу.
К примеру, в приведенном выше примере мы видим, что схема аутентификации задана как «Basic». Это означает, что запрос аутентификации требует только ID и password. Для получения более подробной информации и инструкций мы рекомендуем обратиться к HTTP Authentication Scheme Registry.
Источник: kinsta.com