Dahua conf.loginerrorNo-20 is caused by compatibility issues and it usually shows up when newer Dahua IP cameras are connected to older (PoE or regular) NVRs.
In some cases, you may get the error 20 on the NVR directly (on the monitor connected to the recorder), but the cameras may work fine accessed through the web interface (IE, Mozilla) or via Smart PSS monitoring software.
There are a few solutions to this problem: you can upgrade the NVR’s firmware to the latest version (if there’s one), or you can reset the camera to factory default and then activate it via the NVR’s menu (this method works on certain models only).
Upgrade the NVR
As we said, most of the time the issue is caused by compatibility issues, when the camera is newer and the NVR is old. In other words, there’s a mismatch in the software compatibility and the cameras cannot communicate properly with the NVR.
If you get error code 20, the first thing you should do is find the latest firmware of the NVR and update it. You can get the firmware from Dahua’s official website, or through your seller/dealer.
Provide them with the NVR’s model, place the firmware on a USB drive and plug it on the NVR, and then follow the prompts (or, you can update via the website).
Once updated, the NVR will reboot and you should see the cameras showing up fine when the unit comes back online.
If there’s no new firmware version, then you either need to replace the NVR with a newer model or downgrade the cameras (older cameras, lower the resolution).
Reset the camera and activate it via NVR
Sometimes, Dahua error 20 is caused by password-related issues, the NVR cannot access the camera using its password. The solution is to reset the camera to factory default and activate it via the NVR (the camera and the NVR will have the same password).
You can reset the camera by using the reset button (as explained here), or by accessing the camera directly via the web browser (through its IP address) and clicking on the Factory Default option (under the camera’s settings).
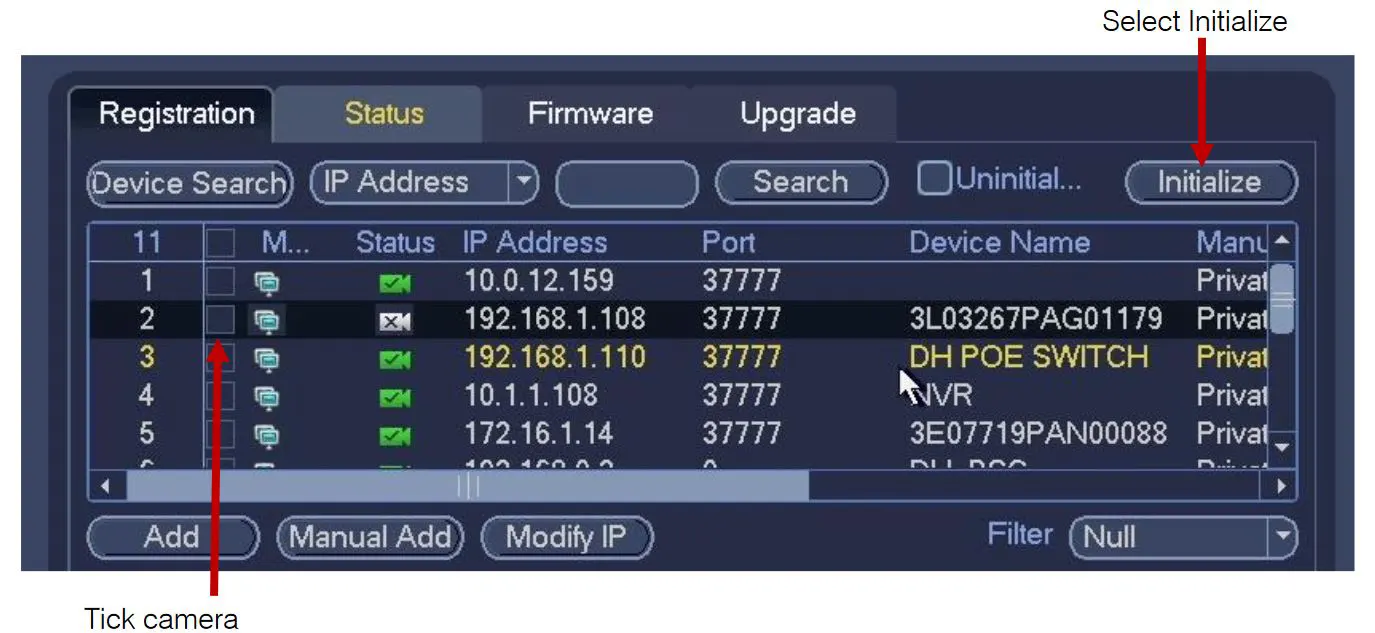
Once the reset is done, you need to activate the camera via the NVR. Let’s say you have a PoE NVR, plug the camera at the back, then go to the Device Search section and look up the cameras discovered by the recorder. Tick the camera with the white logo and then select Initialize.
You will be asked if you want to use the NVR’s password and email info. If you tick this option then the camera’s password and recovery email will change to the same as the NVR’s.
In other words, the camera and the NVR will share the same password and email. Once you do so, reboot the NVR and when it comes back online you should see the camera’s image showing up fine on the screen.
Note: Additionally, you may activate/initialize the camera (meaning, setting a password) using the Config Tools.
Add the camera manually
Another way is to add the camera manually on the NVR. Sometimes the NVR is not able to auto add the camera (or adds it with errors). Just go to the Device/Remote section and select Manual Add.
Fill out the information, such as the camera’s IP address, the username, and the password. Leave the rest on default. Click Add and wait to see if the camera shows up online.
Add the camera using ONVIF
This method works by adding the camera as an ONVIF device. Normally, if the NVR and the camera are both Dahua, they should work together using the “private” protocol.
However, if the cameras are newer and the NVR is old, then we can avoid the compatibility issues by adding the devices as ONVIF.
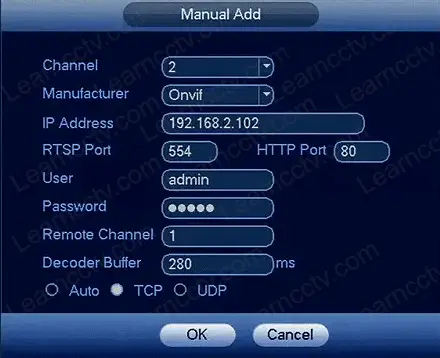
To do so, go to Device/Remote and click Add Manually. Fill out the prompt, such as the Manufacturer “ONVIF”, RTSP port “554”, HTTP port “80”, username, password, etc (as shown on the screenshot below).
Click OK and wait for the camera to show on the live mode. Sometimes you may need to reboot the NVR for the changes to take effect.
Enable Compatibility Mode
Access the camera via the web browser. You can either access the camera by connecting it to the local network or typing the IP address.
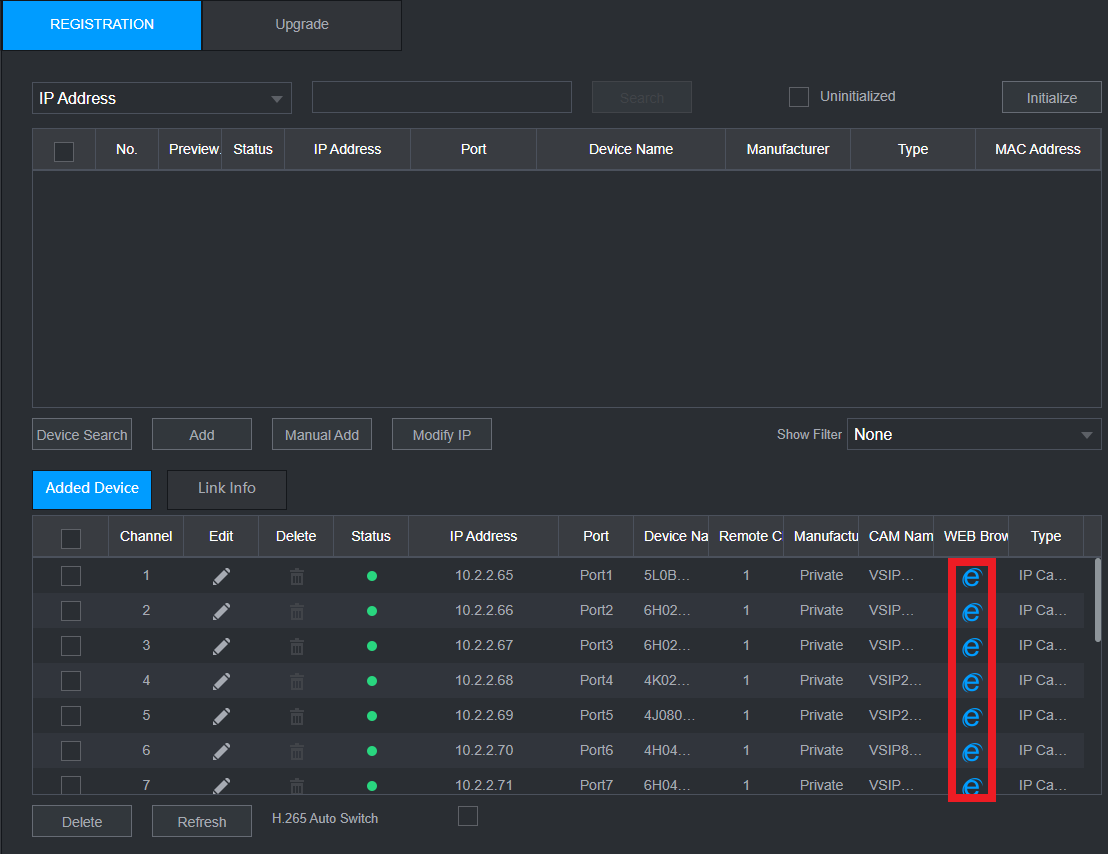
Or you can access the NVR and then go to Registration and then click the IE icon next to the camera that you’re having problems with.
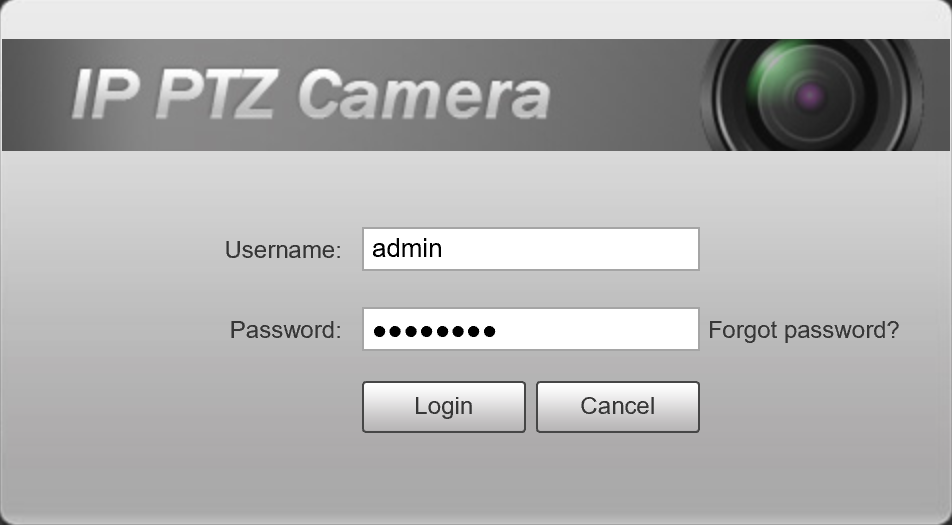
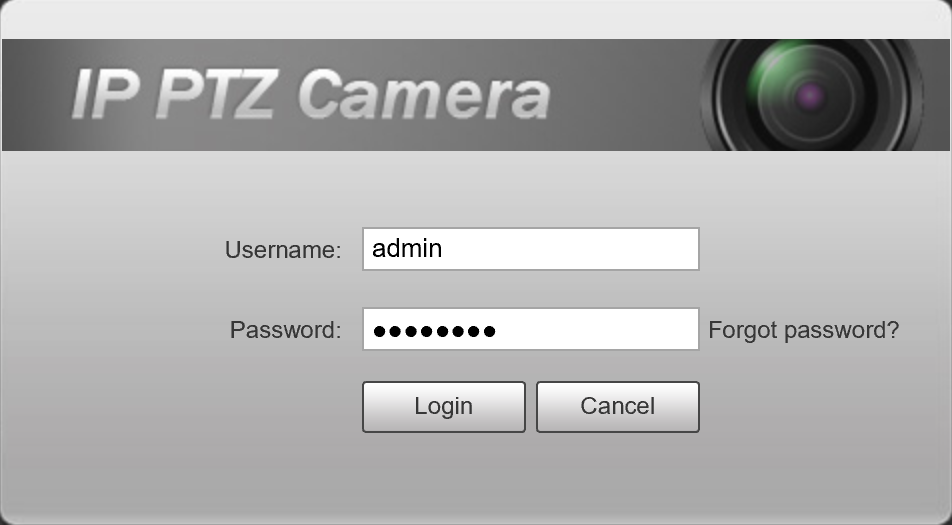
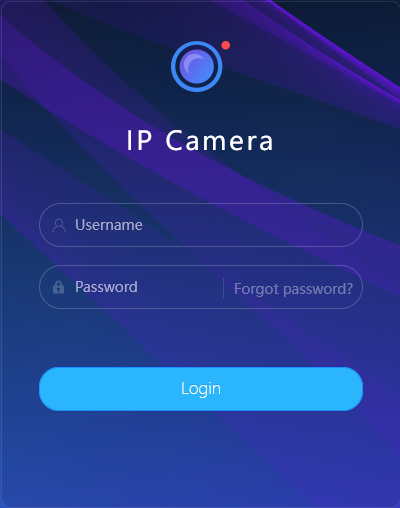
A new page will open, bringing up the login page for the camera. Enter the username and password for the camera.
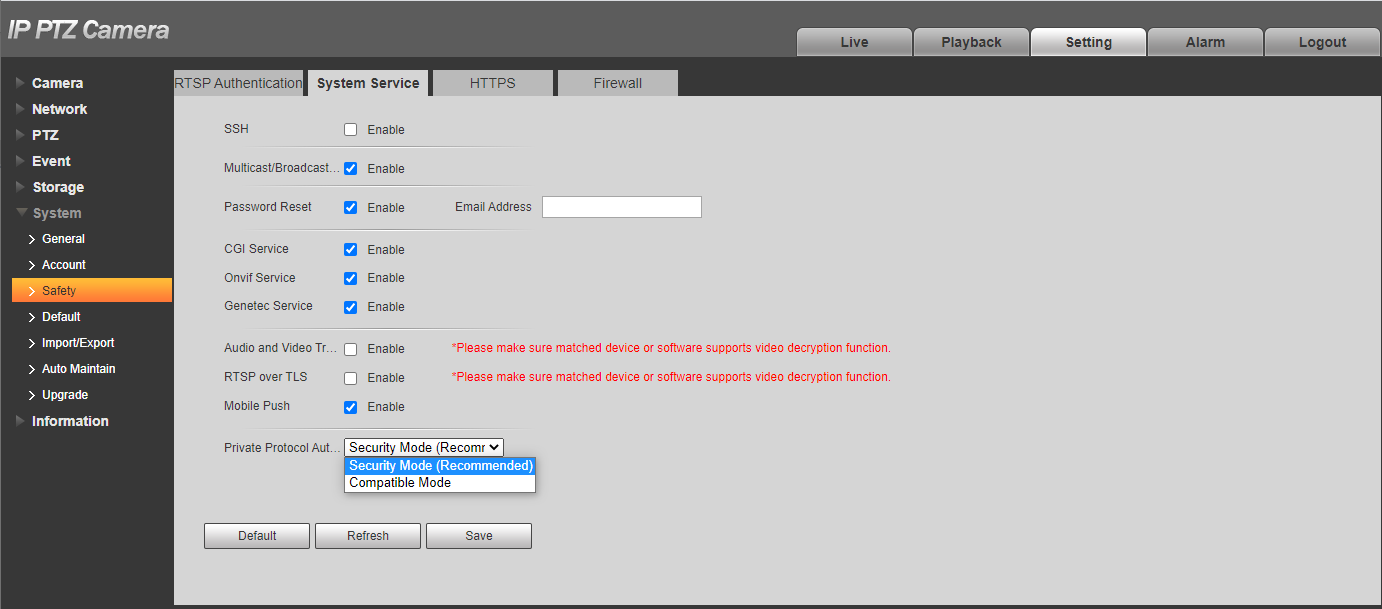
To enable the Compatibility Mode, navigate to Settings > System > Safety > System Service. Set Private Protocol Authentication Mode to Compatible Mode.
Lower the resolution of the camera
Sometimes the NVR cannot handle the resolution coming from the camera. Let’s say the NVR supports 2MP resolution, but the camera is 4MP. In this case, you need to downgrade the camera’s resolution to match the one supported by the NVR.
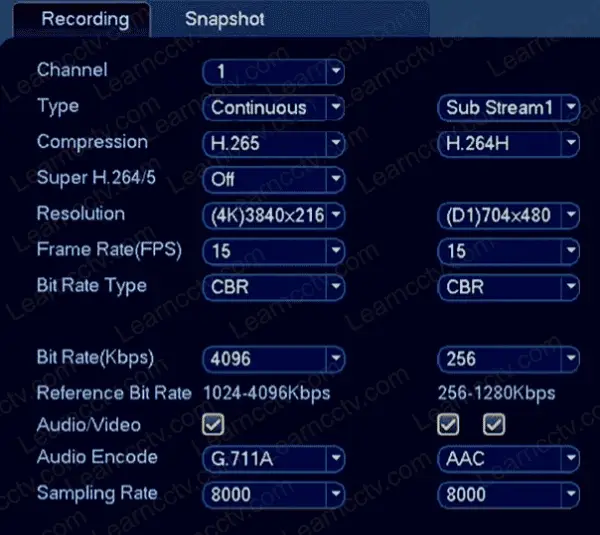
From the Live View display, right-click to open the Quick Menu, then click Main Menu. Click the gear icon, then click the Recording section. Click the Recording tab on the top panel.
Here you need to lower the resolution on the camera until the picture shows up. Additionally, you may lower the frame rate and try different compression modes until you get the picture on the screen. Basically, play with the settings until you get it right.
Conclusion
Even though the Dahua conf.loginerrorNo-20 error can seem complicated, you can troubleshoot it yourself easily without the need of hiring a technician and wasting money. Just go through the tips one by one until you fix it.
If you need a new camera system, you may check our recommendations and reviews here.
Errors in cameras occur quite often. Luckily they are recipes for the solution. Let’s examine the Dahua conf.loginerrorNo-20 error.
This particular issue is caused by compatibility issues and shows up when more recent IP cameras try connecting to more outdated NVRs. The error can still appear whether you use PoE or a standard NVR.
At times, you might see the Dahua conf.loginerrorNo-20 error directly on your NVR’ s monitor. Even when your camera is working fine, an error can appear.
Thus, to fix it, this guide will show you a few troubleshooting tips and tricks you can try out yourself. These solutions include upgrading the firmware of your recorder, if possible, and resetting the camera to its default state.
Resetting the camera and then activating it through your NVR is a possibility we will discuss below; however, it may not work entirely for specific NVR models.
Let’s look at some ways that you can solve this standard error!
Out with the old, in with the new
An excellent upgrade to your NVR can do wonders. As mentioned previously, connectivity is the main culprit for creating these issues. Thus, if your camera is new and your recorder is outdated, they might not be at the same level.
Due to miscommunication between the devices due to their software, the two might be unable to connect or communicate appropriately.
When you see the Dahua conf.loginerrorNo-20 error, the first step to take is updating your NVR’s firmware to keep it up to date. These updates can be received through the official Dahua website, or you might have to search for it from the seller you bought from.
You can either update directly from the website or connect a USB with the firmware on the NVR. By updating, you help make your NVR safer and remove bugs that might be causing these errors.
After the update, the NVR will reboot itself and return to its online status. The cameras should be available to monitor and no Dahua conf.loginerrorNo-20 error should appear.
Unfortunately, if on the off chance that there is no new firmware update, you have two options. You can either upgrade your NVR to a newer model, which is recommended. Or you might have to use older cameras and downgrade the ones you have, which will probably cost you way more than a new NVR.
Resetting and activating
Another trigger of the Dahua conf.loginerrorNo-20 error can be passwords. In this case, the NVR is not able to access the camera using the password. If for any reason you need to reset Dahua NVR password, check out the article to learn how!
To solve the issue, you will need to reset the camera to its factory reset and activate it through the NVR. Therefore, both the recorder and camera will have identical passwords.
To perform a reset, you can manually use the reset button on the camera or reset it using the web browser interface and log in using the camera’s IP address.
There you will find a factory default resetting option in the settings that will revert the camera as if it was brand new. Post reset, you will need to activate the camera using your NVR.
Begin by plugging the camera into the back of your recorder and opening “Device Search.” This page will display the cameras that the recorder has discovered. Choose the camera with the white logo and click on “Initialize.”
A prompt will appear, asking if you want to use the same email and password of the NVR on the camera. Choose to set them both to the same email/password to have them both under the same credentials.
Now, reboot your recorder, and once it is online, the camera footage should show on your monitor. You might also have to activate and set up your camera because it was factory reset!
Manual Camera Input
There is the option to add your camera to the NVR manually. This should be done if the NVR cannot automatically add the camera itself or it creates errors for whatever reason.
Open and locate the “Device/Remote” option and click on “Manual Add.” There you will add all the camera’s information, including username and password and the camera’s IP address.
Any other information should be left in its default setting. Once you are done inputting, click on “Add” to finalize and check if the camera’s status is online.
Using ONVIF to add cameras
If the above two options give you trouble, you might just find luck by adding the camera as if it were an ONVIF device. The Dahua NVRs and cameras should work seamlessly together through private protocol because they are the same brand.
Nevertheless, due to the circumstance of the old recorder and new cameras, the compatibility problem can be avoided altogether by adding the devices as if they were ONVIF.
To perform this function, open the “Device/Remote” and select “Add Manually.” Follow the steps provided by the prompt as pictured below.
In the prompt, include the following:
- Manufacturer- ONVIF
- RTSP port- 554
- HTTP port- 80
You will also be asked to provide a username and password. Lastly, select “OK” and wait as the camera turns on. You might have to reboot the NVR in order for the Dahua conf.loginerrorNo-20 error to disappear.
Compatibility Mode
There is a compatibility mode that must be enabled and can be done through the camera’s interface in a web browser. You can access this mode through the camera or the NVR.
Select “Registration” and then choose the “IE” icon that displays beside the camera that is experiencing the Dahua conf.loginerrorNo-20 error. Then a new page will emerge, and you will have to log in using the camera’s credentials.
Open “Settings,” then “System,” and from there, open “Safety.” Lastly, you should see the option “System Service.” Once you are there, enable the Compatibility mode by changing the default “Private Protocol Authentication Mode.”
The resolution is too high
Lastly, your camera’s resolution might just be too high for your NVR to process correctly. Hence, triggering the Dahua conf.loginerrorNo-20 error to occur.
If your NVR only supports 2MP and is bombarded with 4MP by your camera, then you might have to either invest in an NVR that can handle your incoming MPs or downgrade the camera’s resolution.
To match your camera’s resolution to the one supported by your NVR, open the Quick Menu on the Live View display page by clicking right on your mouse.
Then select the “Main Menu” and find the gear icon, click on it. You should open the “Recording” section and the “Recording” tab on the top panel.
Then continue lowering the resolution until an image appears. You can also reduce the camera’s frame rate or attempt some compression modes. The goal is to get the image back on the screen.
Final Thoughts
Though the Dahua conf.loginerrorNo-20 error can seem complicated; you can troubleshoot it from your home. But if your NVR cannot keep up with your Dahua camera‘s top resolution, it might be time to invest in a better alternative.
-
#1
Just got a IPC-T5442TM
after setting the Ip through the web browser I connected to my dahua NVR but I am getting the error=20
I did a search for it but I only find instructions on an error-18. I followed those but did not work. Has anyone seen the errorNo-20 and know what it maybe?
-
#2
Here’s the message
-
2 MB
Views: 34
-
#11
This is a common issue when connecting a newer Dahua IP camera to the internal PoE of a older NVR. The solution is either (A) upgrade NVR firmware if an update is available (B) Plug your computer in a unused port on the back of the NVR, set your computers ip address to the 192.168.1.x range, find the camera, initialize it and then line it up with the internal PoEs range (default is 10.1.1.X) then go back to the NVR and re-add it via a manual add.
On some older model recorders, the «Config Error 20″/»conf.LoginErrorNo-20» error may be seen on the Live-View Page when trying to add a new camera.
The steps below show how to resolve the issue.
Step 1 — Initialise the Camera
What is camera initialisation?
When configuring a new IP camera for the first time (or after a factory reset), an initialisation process must be performed before the camera can be used. This process was introduced to enhance security by removing the default «admin» password, instead adding a method for the installer to create this password themselves during installation.
When do you need to initialise a camera?
On recorders released after January 2018 this process can be performed through the recorder user interface — On recorders with inbuilt PoE ports this process happens automatically and the current recorder «admin» password is copied to the cameras. Any recorder built before this date will need to have cameras initialised manually using a PC / Laptop before they can be used.
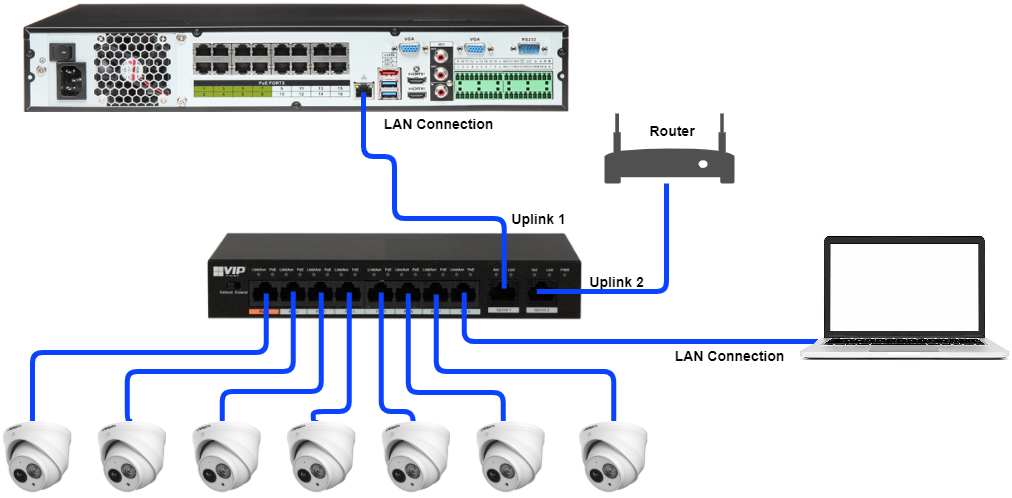
If you are installing multiple cameras that will be connected to an external PoE switch, the cameras will need to initialised, the quickest way of doing so is by following method 1 below and initialising cameras in a bulk lot.
Method 2: Initialization using the Web Interface
This method does not involve the use of the Config Tool software, this method can be used if you have a single camera to setup and do not have access to the internet to download Config Tool.
Accessing the Camera for Setup
The Camera will need to be connected to the Laptop via an Ethernet cable.
You can access the Web Interface by entering the camera’s IP address into the address bar of Internet Explorer. 192.168.1.108 is the default IP of our cameras.
You may need to change the IP address of your laptop to reach it.
Changing the IP address on a Windows Computer
Delete
Delete
Old GUI (Grey)
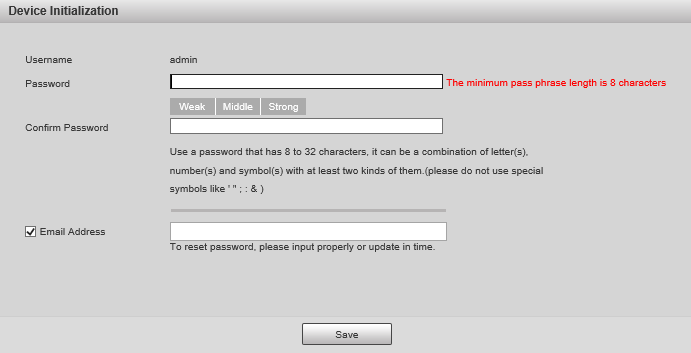
Initialize the camera by entering a new password (It will need to be at least 8 characters long), then click Save.
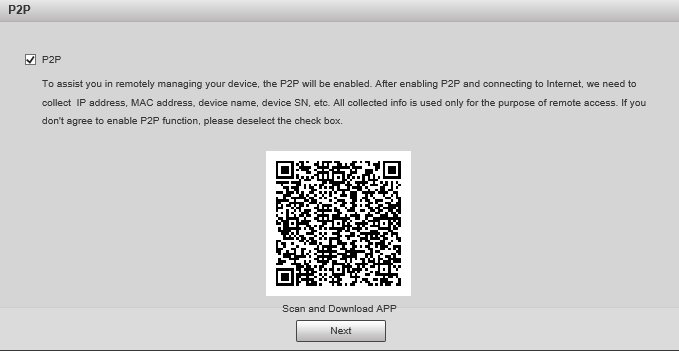
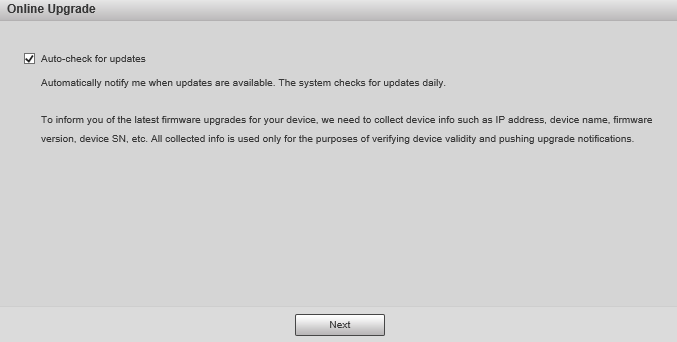
Ensure P2P is enabled and click Next
Click Next.
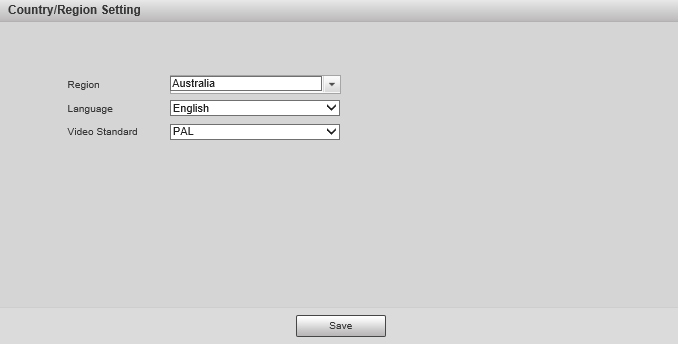
If prompted, select a region and click Save
Delete
Step 2 — Enable Compatibility Mode
Accessing the Cameras Web Interface
There are two methods to connect to an IP camera’s web interface, depending on how the camera is connected to the recorder. The reason to connect directly to the web interface, is to adjust specific settings that are unable to be setup from the recorder. Such as PTZ camera idle motion settings, and ANPR camera settings.
Accessing Cameras that are directly connected to an NVR
When using a recorder with inbuilt PoE ports, the cameras that are connected will automatically get assigned an IP address from the recorder.
In order to login to the camera, we first need to login to the NVR. This method works on recorders that are using the black user interface.
- Connect your computer to the same network as the recorder.
- If there is internet access, your computer should receive an IP address in the same IP address range of the recorder. If your computer does not receive an IP address or there is no modem/router, see the «Changing the IP address on a Windows Computer» section to statically assign an IP address in the same range as the recorders IP address.
- On the recorder, go to Main Menu > Network. Note down the IP address of the recorder.
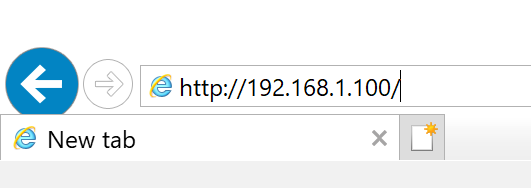
- On the computer, open Internet Explorer and enter the IP address of the recorder.
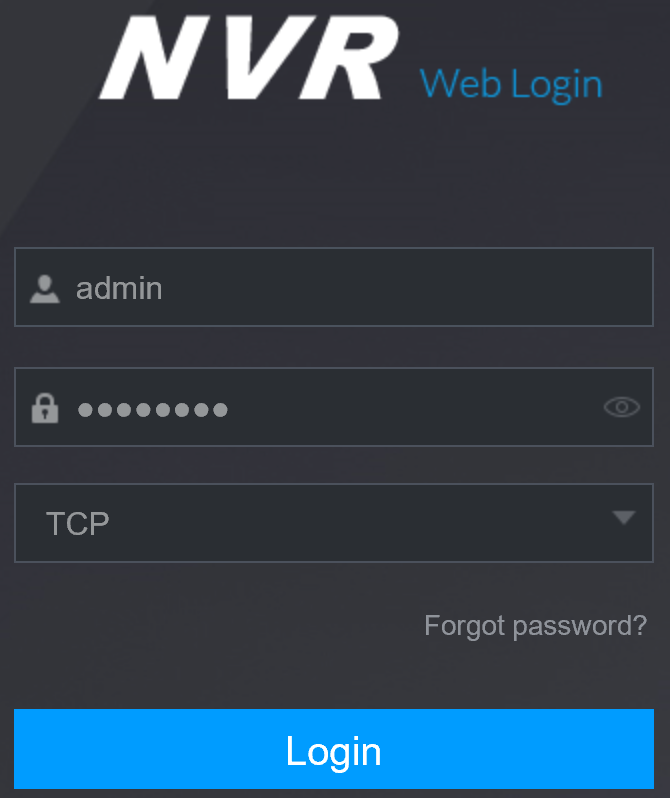
- If the computer is able to see the recorder, you will see a login page. Enter the recorders username and password.
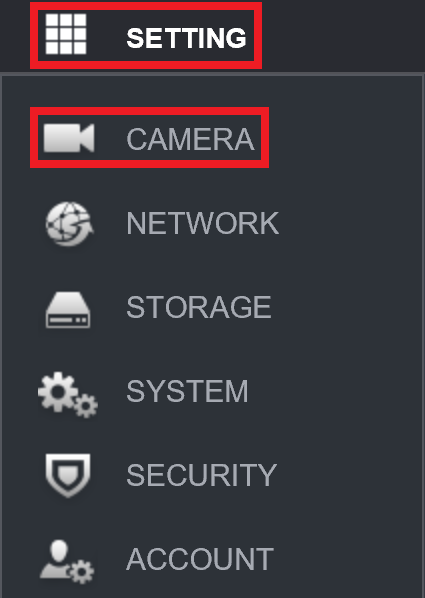
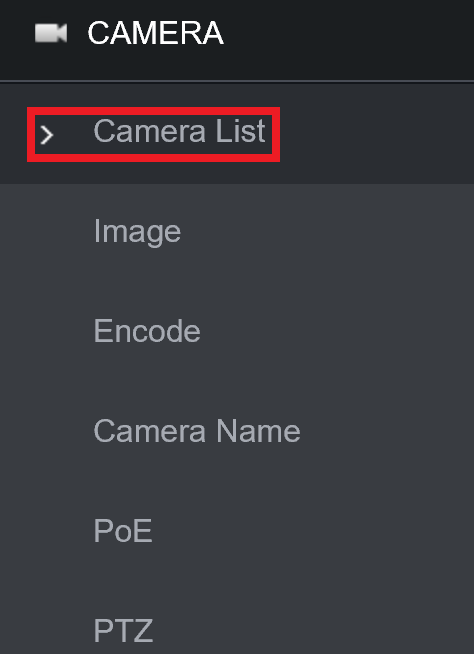
- Select Setting > Camera > Camera List.
- Next to each camera, there will be a
icon. Select the icon next to the camera you wish to connect to.
- A new page will open, bringing up the login page for the camera. Enter the username and password for the camera. Usually, the username is admin, and the password is the same as the recorder.
Connecting to cameras that are connected via a PoE switch.
This guide requires that the recorder and camera are already setup for network access. If the camera is not currently connected to the NVR, you may need to assign an IP address to your PC/Laptop Manually, see the «Changing the IP address on a Windows Computer» below to statically assign an IP address in the same range as the cameras IP address.
Changing the IP address on a Windows Computer — If no Modem/Router is connected
Follow the below steps to manually assign an IP address to a Windows computer, this will need to be done if the recorder/camera you are connecting to is not connected to a local network where DHCP is being assigned to devices.
- Connect the computer to the same network as the cameras.
- Download the Config tool program.
- Once the download is complete, extract the zip file, and open the ConfigTool.exe file.
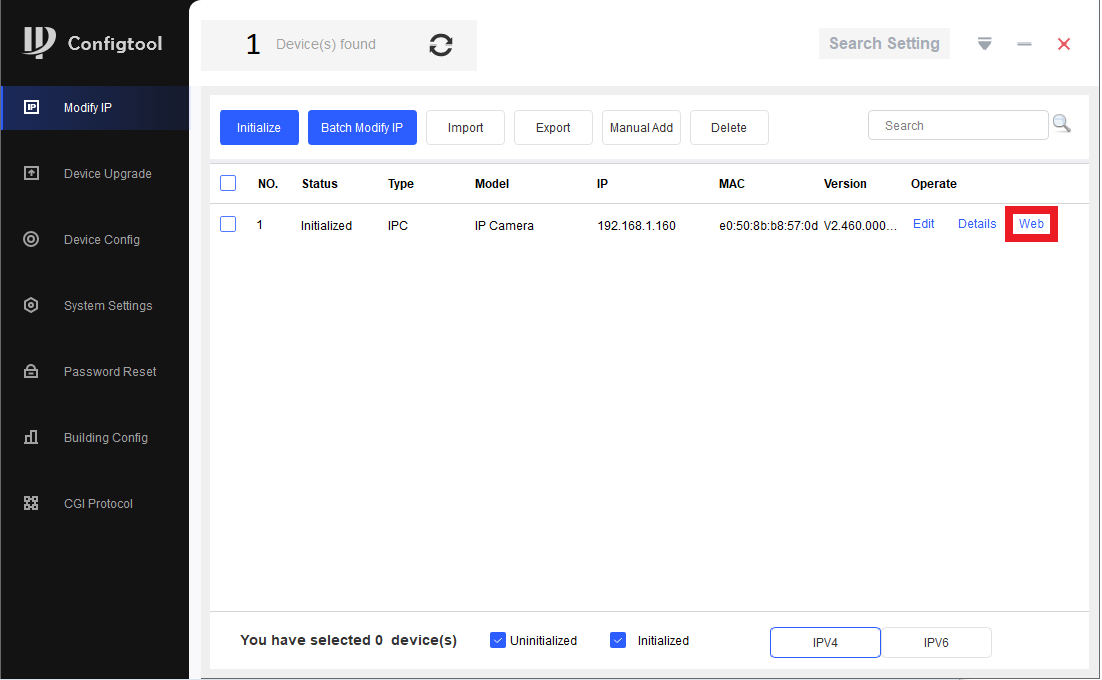
- Select the
button, devices that are found on the network will be listed.
- Click the Web button next to the camera you would like to login to.
- A new page will open, bringing up the login page for the camera. Enter the username and password for the camera. Usually, the username is admin, and the password is the same as the recorder.
Delete
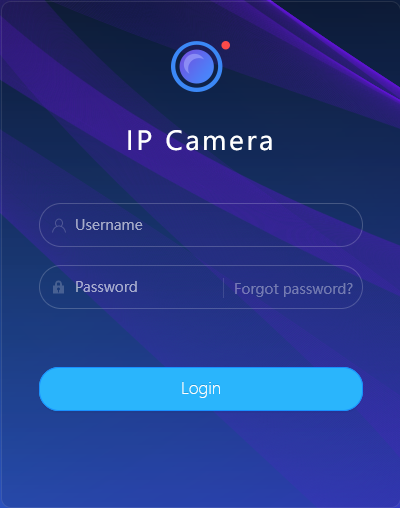
Enabling Compatibility Mode — New GUI (White/Blue)
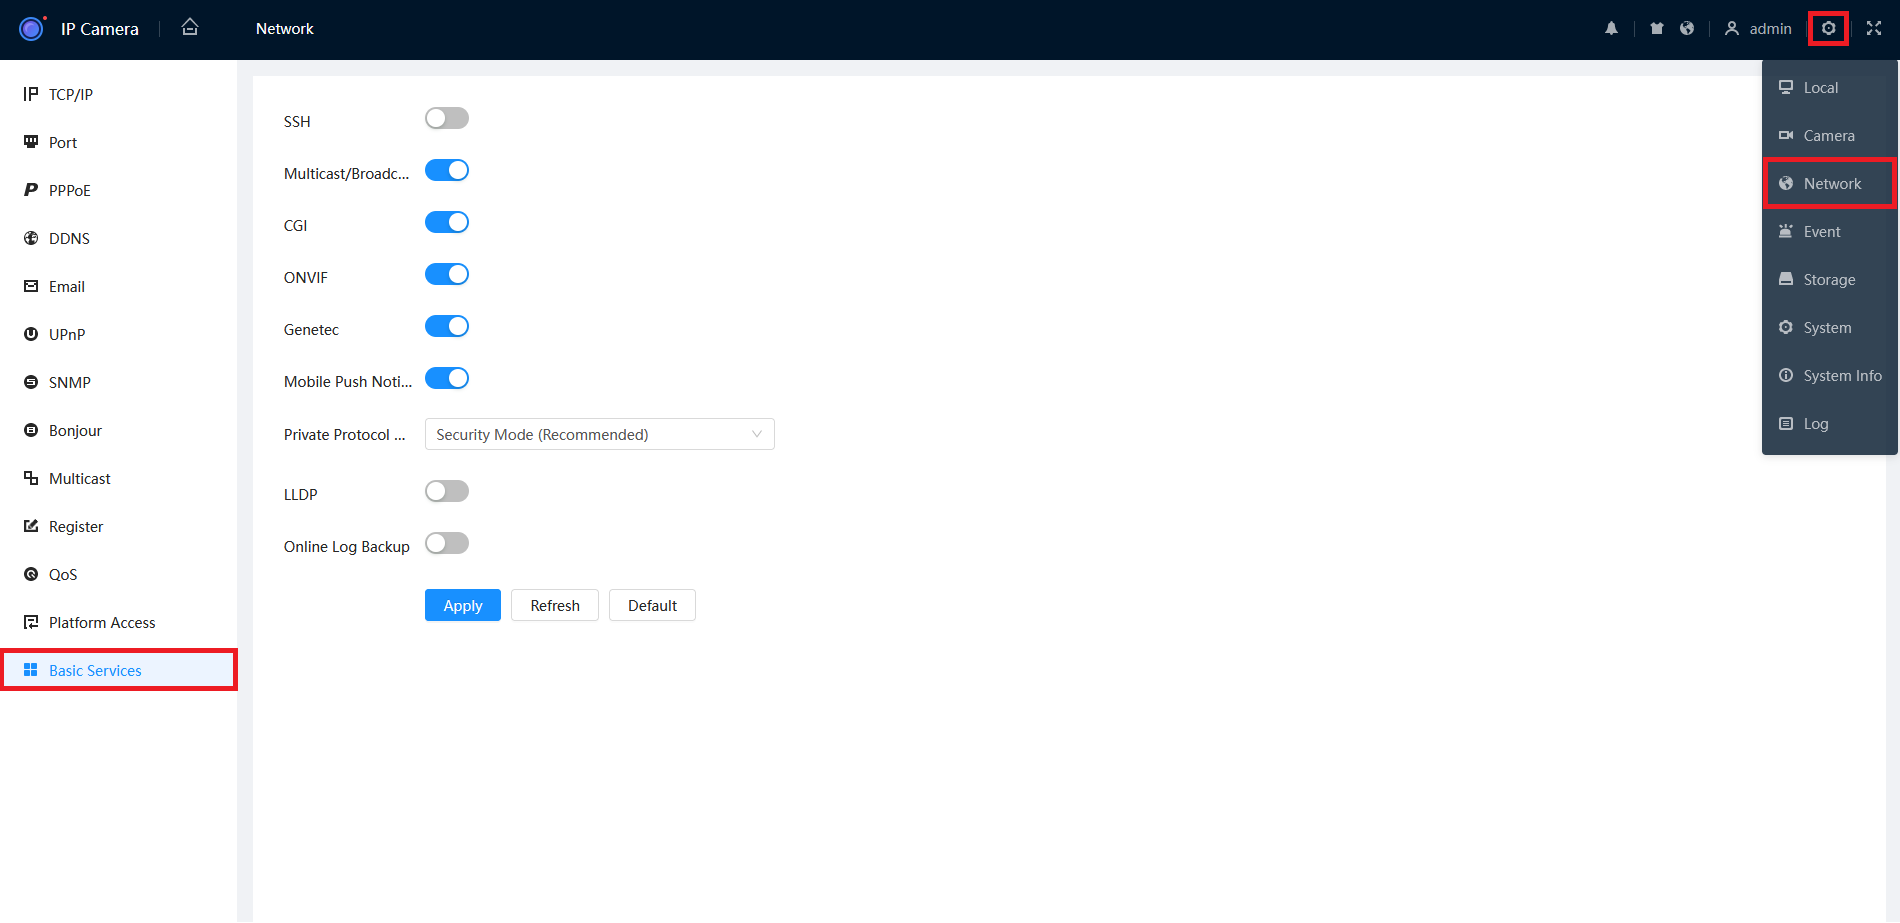
- Navigate to Setting > Network > Basic Services.
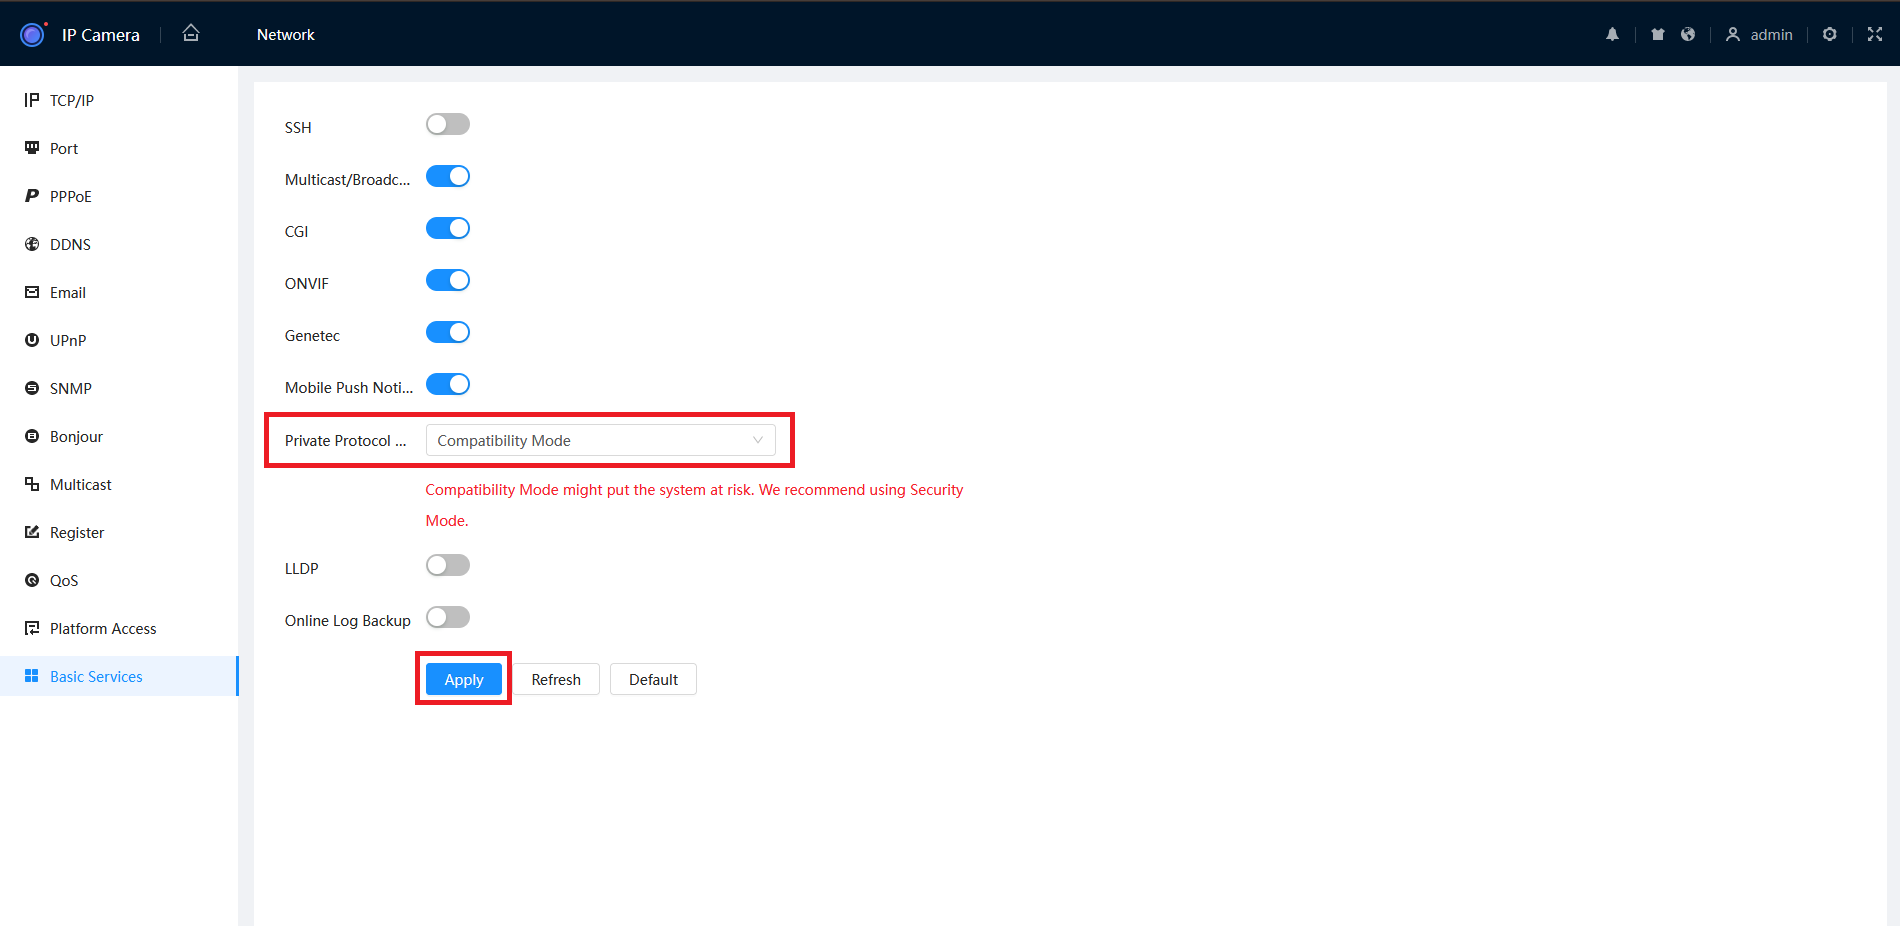
- Set the Private Protocol to Compatibility Mode, then press Apply.
Enabling Compatibility Mode — Old GUI (Grey)
- Navigate to Settings > System > Safety > System Service.
- Set Private Protocol Authentication Mode to Select Compatible Mode.
Delete
Содержание
- conf.loginerrorNo-20
- Bret_FL
- Bret_FL
- Attachments
- gordon861
- SouthernYankee
- gordon861
- SouthernYankee
- Cornick Help Center
- Как подключить ip камеру Dahua ?
- Help Needed — Login Error on NVR W/ 5231
- jon7487
- Faezal
- jon7487
- Faezal
- mat200
conf.loginerrorNo-20
Bret_FL
Young grasshopper
Bret_FL
Young grasshopper
Attachments
gordon861
Did you ever work out the problem with this?
I’m getting the same error with my new camera, works fine directly through IE and the web interface, and SmartPSS works too. But when I try to add to my Dahua NVR I get the message.
I wonder if it might be because the old NVR doesn’t like a new 4k camera.
SouthernYankee
What is the make and model of the NVR?
Are you adding it to the poe PORT on the NVR ? Or on a POE switch that is accessed by the NVR ?
gordon861
I have a standalone POE Injector which I’m using to power a Dahua IPC-HDW2831T-AS camera, and using a Dahua NVR4108-P. The camera is perfectly viewable through a browser it just throws up errors when I try to use the NVR.
I think the problem is the recorder has a build date of 2015/16, designed for 4MP cameras. And the new camera is a 4K/8MP unit.
So to make full use of it I expect I’ll need to pick up an up to date NVR which isn’t too expensive without the hard drive (can cannibalize the WD Purple from the existing kit for now)
SouthernYankee
I agree, if the camera is set to a higher resolution then the nvr can process it will not work.
Does the camera have the same username / password as the nvr ?
Have you tried setting the camera, via the browser to a lower resolution and test with the nvr ?
Источник
Cornick Help Center
Having trouble with your CCTV System? Here you’ll find guides to help you troubleshoot common issues.
24 Articles in this category
In the video above Jeff shows how to quickly rectify the DNS invalid error that c.
If you see this error, it means Camera Registration is trying to access your came.
Config Error 18 or conf.LoginErrorNo-18 means that a camera needs to be initialis.
Before you change the resolution of your recorder, determine what resolutions the.
In some installations you may find the Switch IP address and LAN port IP address .
This error message can be displayed if there was a suspicious activity such as in.
When installing HDCVI or analogue cameras, below are some problems that can arise.
IR / Night Vision Most CCTV cameras have Infrared Illumination that is automatica.
How to Reinstall the DMSS App Step 1 — Backup the Devices on your App Tap on Tap .
On some Android phones that are experiencing issues live viewing or playing back .
System logs are useful if troubleshooting a recorder. Below are some of the codes.
Many new cameras have inbuilt Voltage Detection that will display an warning icon.
If your camera time is drifting, it may be because the time on the recorder/camer.
Below are some problems that can be encountered with IP Cameras, and ways to reso.
To reset your device, refer to either of the following images. You can choose to .
Turret Cameras Reset Button under Flap AI turret cameras, or turret cameras built.
Info Network cabling needs to be installed by a qualified Licenced Cabler Network.
In some cases the audio settings on VIP cameras will need to be changed before be.
To enable ActiveX controls go to: Tools > Internet Options > Security > .
Follow the steps below to configure your recorder for Remote Access. Warning Have.
Ensure that the IP address of your PC is in the same range as the device you are .
If you are receiving multiple notifications on the DMSS application one second ap.
On some older model recorders, the «Config Error 20″/»conf.LoginErrorNo-20» error.
In a recent Windows update, when you attempt to open Internet Explorer you will g.
Источник
Как подключить ip камеру Dahua ?
Если вы приобрели IP камеру Dahua и не знаете как подключить и настроить, используйте следующую инструкцию для первичной настройки камеры.
В данной инструкции мы расскажем как подключить и настроить проводную IP камеру Dahua с помощью компьютера.
Если Вам необходимо подключить беспроводную Wi-Fi камеру Dahua с помощью телефона, воспользуйтесь инструкцией —
Подключите камеру по РоЕ или блоком питания к электросети 220В и Lan-кабелем к роутеру.
Через 2-3 минуты камера запустится и будет готова к работе.
Загрузите и установите программу ConfigTool для активации камеры и модификации ip-адреса по ссылке ниже:
После успешной инсталляции запустите программу ConfigTool.
Данная программа отобразит список подключенных IP камер Dahua в вашей сети.
Как видим у нас в сети есть 7 настроенных рабочих камер со статусом Initialized и одна новая (не настроенная) камера со статусом Uninitialized.
Её и будем настраивать. Отмечаем камеру и нажимаем — Initialize
В новом окне вновь нажимаем — Initialize
Затем нам нужно задать пароль на камеру.
Тут всё просто придумываем пароль который должен содержать не менее 8 символов и состоять из букв и цифр.
Вводим пароль дважды в полях — New Password и Confirm Password.
Так же в поле Email Adress нужно указать рабочий адрес почты для сброса пароля.
Посл ввода всех данных нажимаем — Next.
В следующем окне отмечаем пункты Easy4ip и Auto-check for updates и нажимаем Ок.
Для подтверждения активации нажимаем — Finish
На этом активация камеры закончена. Как видим статус поменялся с Uninitialized на Initialized.
Теперь нам нужно поменять IP адрес камеры под настройки нашей сети.
Для этого нажимаем — Search setting.
В поле Password прописываем пароль который Вы задавали при активации камеры и нажимаем Ок.
Затем напротив нашей камеры нажимаем на Карандаш 
В новом окне Modify IP Address у нас есть два варианта:
- Static — можно указать сетевые параметры вручную, но если Вы точно их знаете.
- DHCP — автоматическая настройка — рекомендуется при первоначальной настройке.
Выбираем DHCP и нажимаем Ок.
Затем через 1-2 минуты обновляем список устройств.
И если всё прошло нормально то можно заметить что IP адрес камеры сменился со стандартного 192.168.1.108 на 192.168.0.144
У Вас он поменяется на какой-то другой.
Далее можно зайти на Веб интерфейс камеры. Для этого нажимаем на значок 
В открывшейся форме заполните поля логин — admin, пароль Вы задавали при активации камеры.
При первом входе в web — интерфейс камеры, браузер Вас попросит установить плагин для просмотра видео потока с камеры. Для загрузки плагина нажмите на ссылку «Нажмите для установки плагина» (1). Установите загруженный плагин и обновите web-страницу с интерфейсом камеры.
Перейдите во вкладку настроек «Настройки». Выберите пункт «IP видеокамера => Видео», закладка «Видео». Тут можно сделать настройку режимов видео потока (основной поток, дополнительный поток).
В закладке «Путь», можно указать пути хранения на компьютере (видео, фото).
Вкладка «Сеть => TCP/IP», закладка «TCP/IP». Содержит информацию про IP-адрес (статич., DHCP).
Если Вы планируете подключать камеру к видеорегистратору, то смените Режим с DHCP на Статический и нажмите — Сохранить
Закладка Easy4ip. Содержит информацию о P2P протоколе (S/N, QRcode). Ставим флажок напротив «Вкл.» и нажимаем «Сохранить». Теперь камеру можно будет подключить на телефон/планшет через приложение IMOU или iDMSS / gDMSS. Для добавления камеры в приложение на телефон перейдите к разделу «Настройка мобильного приложения».
Если камера имеет встроенный Wi-Fi модуль перейдите в пункт «Сеть => WIFI», закладка «WiFi».
Установите флажок «Вкл.» (1) и нажмите кнопку «Обновить» (2). В поле ID список появится список доступных Wi-Fi сетей. Выберите вашу сеть (3) (тип шифрования должен быть wpa/wpa2), в открывшемся окне введите пароль от Вашей Wi-Fi сети (4) и нажмите кнопку «Подключение» (5). Если камера подключилась статус подключения сменится на «Подключено». Теперь можно отключить кабель от роутера.
Повторно запустите программу Config tool. В списке устройств отобразится камера с новым ip-адресом. В браузере в строке адреса введите новый ip — адрес и выполните вход в web — интерфейс камеры после чего можно продолжить настройки камеры.
Настройка записи производится в меню «Запись и хранение => Расписание», закладка «Расписание записи». В данном разделе можно настроить постоянную запись(Основной), по детекции движения(Движение), по тревоге(Тревога).
Для того чтобы указать путь для сохранения записи с камеры перейдите в раздел «Запись и хранение => Хранение архива», закладка «Хранение». Тут можно выбрать место хранения записи Local (SD-карта), FTP, NAS.
Настройку даты и времени можно выполнить в разделе «Система => Базовые настройки», закладка «Дата/Время».
Для смены паролей на вход в камеру и добавления новых пользователей перейдите в раздел «Система => Пользователи».
Для добавления нового пользователя нажмите кнопку «Добавить». В открывшемся окне заполните поля Пользователь (логин), Пароль (пароль), Подтверждение (повторный ввод пароля) Группа (группа admin — администратор или user — пользователь). В поле Права можно указать какими правами доступа будет обладать новый пользователь.
Основные настройки камеры выполнены. Для просмотра видео в реальном времени перейдите в закладку «Просмотр».
Надеемся данная статья была полезной. Если у Вас возникнут вопросы, пишите в чат или звоните в нашу техническую поддержку.
Источник
Help Needed — Login Error on NVR W/ 5231
jon7487
Update: I solved the issue
Hello, I recently received two IPC-HDW5231RP-Z & when I plug either of them into my NVR5216-16P I am receiving an error that shows the cameras IP & says «conf.LoginErrorNo-18»
I Have two other 5231’s that are working on the NVR along with 4 other various Dahua cameras.
I know the cable is good & Google doesn’t seem to turn up any answers, any help would be appreciated.
Faezal
jon7487
I did a hard reset on the cameras, than connected via my PC at which point I was prompted to create a new password. I believe this has something to do with a new firmware because the password had to be 8 characters & include a symbol & I was not allowed to bypass & use the default «admin» password. I than connected the cameras to by NVR & edited the camera log in settings to match what I changed the password to.
This could be normal, this is my first time having to connect to a camera directly, all my others were plug & play. They also, from what I can tell simply used «admin» as the user & password.
Faezal
I did a hard reset on the cameras, than connected via my PC at which point I was prompted to create a new password. I believe this has something to do with a new firmware because the password had to be 8 characters & include a symbol & I was not allowed to bypass & use the default «admin» password. I than connected the cameras to by NVR & edited the camera log in settings to match what I changed the password to.
This could be normal, this is my first time having to connect to a camera directly, all my others were plug & play. They also, from what I can tell simply used «admin» as the user & password.
mat200
DId you solve the issue the same way or a different way?
Источник
- Вся активность
регистатор DAHUA ошибка логина
Эта тема закрыта для публикации сообщений.

Чтобы подключить цифровое устройство Dahua без привлечения специалистов, придется изрядно потрудиться. Казалось бы, инструкция из комплекта должна упростить задачу до невозможности, но подобные руководства только запутывают и сбивают с толку. Они прилагаются к товару, как сущая формальность, но проку от таких инструкций действительно мало.
Почему так происходит?
Ответ: принцип подключения камеры зачастую описан сложным языком. Это приводит к не самому приятному результату: пользователю очень трудно разгадать все эти технические «ребусы» без определенных познаний. Он тратит слишком много времени и нервов ради налаживания системы видеонаблюдения, но порой и это не приносит нужных плодов.
В данной статье мы постараемся упростить жизнь неопытному пользователю.
Содержание
- 1 Подключение
- 1.1 Дополнительные настройки оборудования
- 2 Как настроить IP-камеру Dahua для наблюдения через смартфон
- 2.1 Как настроить IP-камеру Dahua для удаленного просмотра через Internet
- 2.2 Особенности цифровых камер Dahua
Подключение
Подключить dahua можно такими же методами, что и обычную IP-камеру.
Пошаговая инструкция:
- Подключите устройство к роутеру и источнику питания. Для этих целей используйте специальный LAN-кабель (в народе витая пара).
- Теперь займитесь установкой программного обеспечения. В большинстве своем к новому оборудованию прилагается установочный диск. Если он не содержится в комплекте, скачайте программу под названием «Config Tool». С её помощью вы сможете узнать IP-адрес цифровой камеры.
- Определите устройства, подключенные к сети. Если есть необходимость изменить IP-адрес устройства, нужно проделать эти манипуляции именно сейчас, ведь более подходящего момента и придумать трудно.
- Двигаемся дальше! Откройте веб-обозреватель на своем компьютере, введите IP-адрес камеры в поисковой строке, после чего нажмите кнопку «Enter». На экране появится окошко для ввода стандартных личных данных (логин и пароль). Укажите слово «admin» в каждой из этих строк. Программа запросит установку плагина для беспроблемной передачи видеосигнала.
- Затем действуйте по схеме: Настройки => IP-камера. Через эту утилиту будут осуществляться все дальнейшие настройки оборудования.
- Кликните мышкой по строке «Сеть», если хотите изменить сетевой адрес устройства. Эту строку можно обнаружить в левой части экрана. Далее перейдите во вкладку TCP/IP и укажите новый уникальный адрес цифровой камеры. Сохраните изменения. Если вы планируете вести видеоконтроль с мобильного телефона, в этом же окошке перейдите во вкладку Easy4ip. Чтобы активировать эту функцию, достаточно указать команду «Вкл.». Готово! Теперь вы сможете получать изображение с камеры на смартфон (через специальное приложение). Основные настройки произведены. Сохраните изменения.
- Проверьте новое оборудование на предмет наличия в нем Wi-Fi модуля. Если таковой имеется, укажите «Wi-Fi» во вкладке «Сеть». Таким образом, устройство сможет функционировать благодаря беспроводному соединению. Выберите этот режим при активации устройства. Чтобы осуществить задуманное, пользователю достаточно выбрать домашнюю сеть. Устройство подключиться после того, как вы введете пароль от WI-FI.
- Убедитесь в том, что цифровая камера подключена. Обычно это указано в её статусе. Затем отсоедините кабель – он вам больше не пригодится.
- Перезапустите программу Config Tool. Важное примечание: для нормальной работы оборудования это действие нужно выполнить в обязательном порядке. Еще раз откройте веб-обозреватель на своем компьютере. Введите все необходимые данные для входа, как это описывалось ранее.
Смотрим видео как настроить IP-камеру dahua
Дополнительные настройки оборудования
Пошаговые действия:
- Изучите все доступные режимы во вкладке «Запись и хранение». Выберите наиболее подходящий вариант (на свое усмотрение). В зависимости от вашего выбора, оборудование активирует запись на постоянной или выборочной основе. С первым вариантом все понятно и без объяснений. Во втором случае вы получите видеоконтент, отснятый в те промежутки времени, когда срабатывали датчики движения и тревоги.
- Далее нажмите на «Хранение архива» и выберите точное место в «Хранении». Где можно хранить информацию? Доступные варианты: SD-карта, FTP или NAS.
- Укажите актуальную дату и точное время в настройках цифровой камеры.
После выполнения упомянутых рекомендаций вы можете приступить к использованию оборудования по его прямому назначению. Камера полностью готова к работе.
Что предпринять пользователю в крайнем случае? Рекомендация: если вы боитесь прикасаться к новому устройству, и совершенно не разбираетесь в тонкостях подключения современных видеокамер, обратитесь за помощью к опытному профессионалу. Такой сценарий нельзя списывать со счетов, однако, мы еще раз настаиваем на том, что полное соблюдение рекомендаций, предоставленных читателю в этой статье, приведет к грамотной настройке оборудования и его нормальному функционированию в дальнейшем. Выбор остается только за вами!
Как настроить IP-камеру Dahua для наблюдения через смартфон
Прогрессивный и деловой человек не всегда привязан к своему рабочему месту. При этом он хочет оставаться в курсе происходящего, если речь идет об управлении системой видеоконтроля. И такая возможность есть!
Чтобы воплотить эту идею в жизнь, необходимо установить на смартфон специальное мобильное приложение. На рынке приложение существует немало альтернатив, поэтому выбор осуществляется в индивидуальном порядке. Как вариант, можно скачать на телефон программу gDMSS Lite (либо другой аналогичный софт).
Пошаговые действия:
- Установите приложение на смартфоне, откройте эту программу.
- Добавьте новое устройство. Путь: Устройства => P2P => ввод наименования нового гаджета.
- Затем найдите строку «SN». Впишите здесь серийный номер оборудования.
- Введите слово «admin» в строках, где запрашивается логин и пароль.
- После ввода необходимых данных нажмите на кнопку «Отображение». Готово!
Как настроить IP-камеру Dahua для удаленного просмотра через Internet
В целом, настройка видеонаблюдения через Интернет мало чем отличается от настройки для локальных сетей. И все же, здесь встречаются некоторые сложности, о которых стоит знать новичку.
Чтобы иметь доступ к наблюдению из любого удобного места, IP-камера подключается к Интернету. Это возможно при наличии внешнего статичного IP-адреса. Если статичный адрес отсутствует, его нужно получить у провайдера, соблюдая при этом определенные условия.
Гораздо сложнее, если адреса не совпадают. Такое случается при динамическом IP. В этой ситуации нужно прибегнуть к «Плану Б». Запасной вариант предполагает использование сторонних сервисов (например, DynDNS).
Особенности цифровых камер Dahua
Примечательно, что некоторые модели оборудования поддерживают функцию под названием «Тревожная сигнализация». Пользователь может настроить аварийный сигнал по своему усмотрению.
На что может реагировать система:
- Обнаружение движения;
- Ошибка диска;
- Не осталось свободного места на диске;
- Несогласованное вмешательство в видео;
- Незаконное получение доступа к системе;
- Обнаружение аудио;
- И другое.
Произведите настройку аварийного сигнала, если есть такая необходимость. Еще раз хотим напомнить о том, что подобная функция встречается далеко не в каждом устройстве Dahua.
Заключение
Как видите, самостоятельное подключение IP-камеры Dahua – весьма реальная задача при внимательном ознакомлении с материалом. После выполнения этих действий вы поймете, что не так страшен чёрт, как о нем говорят. Немного стараний – и дело в шляпе. С этого момента прибор вступает в фазу своей полной готовности к работе.






 icon. Select the icon next to the camera you wish to connect to.
 button, devices that are found on the network will be listed.