If you have a Dahua security camera system (DVR, NVR or single IP camera) that shows the message invalid username or password or account locked, there are a few ways to fix this issue.
The invalid username or password error occurs for a few different reasons. When you set up your NVR and cameras for the first time, the NVR will share its password with all of the cameras that are connected to it. So the NVR and the cameras will have the same password.
If, somehow, you forget the password of the NVR and log in using an unlock pattern then perform a factory reset of the NVR via the local interface, this reset will not change the cameras’ password (just the NVR’s).

Another way that you can get this error is if you have multiple NVRs and attempt to move an IP camera from one NVR to another NVR.
In some other cases, when you do a “forgot password” function, the NVR should change the camera passwords as well. However, in rare occasions, some or all of the cameras may not receive the new password information and will still have the old password.
How to fix invalid password or username issue
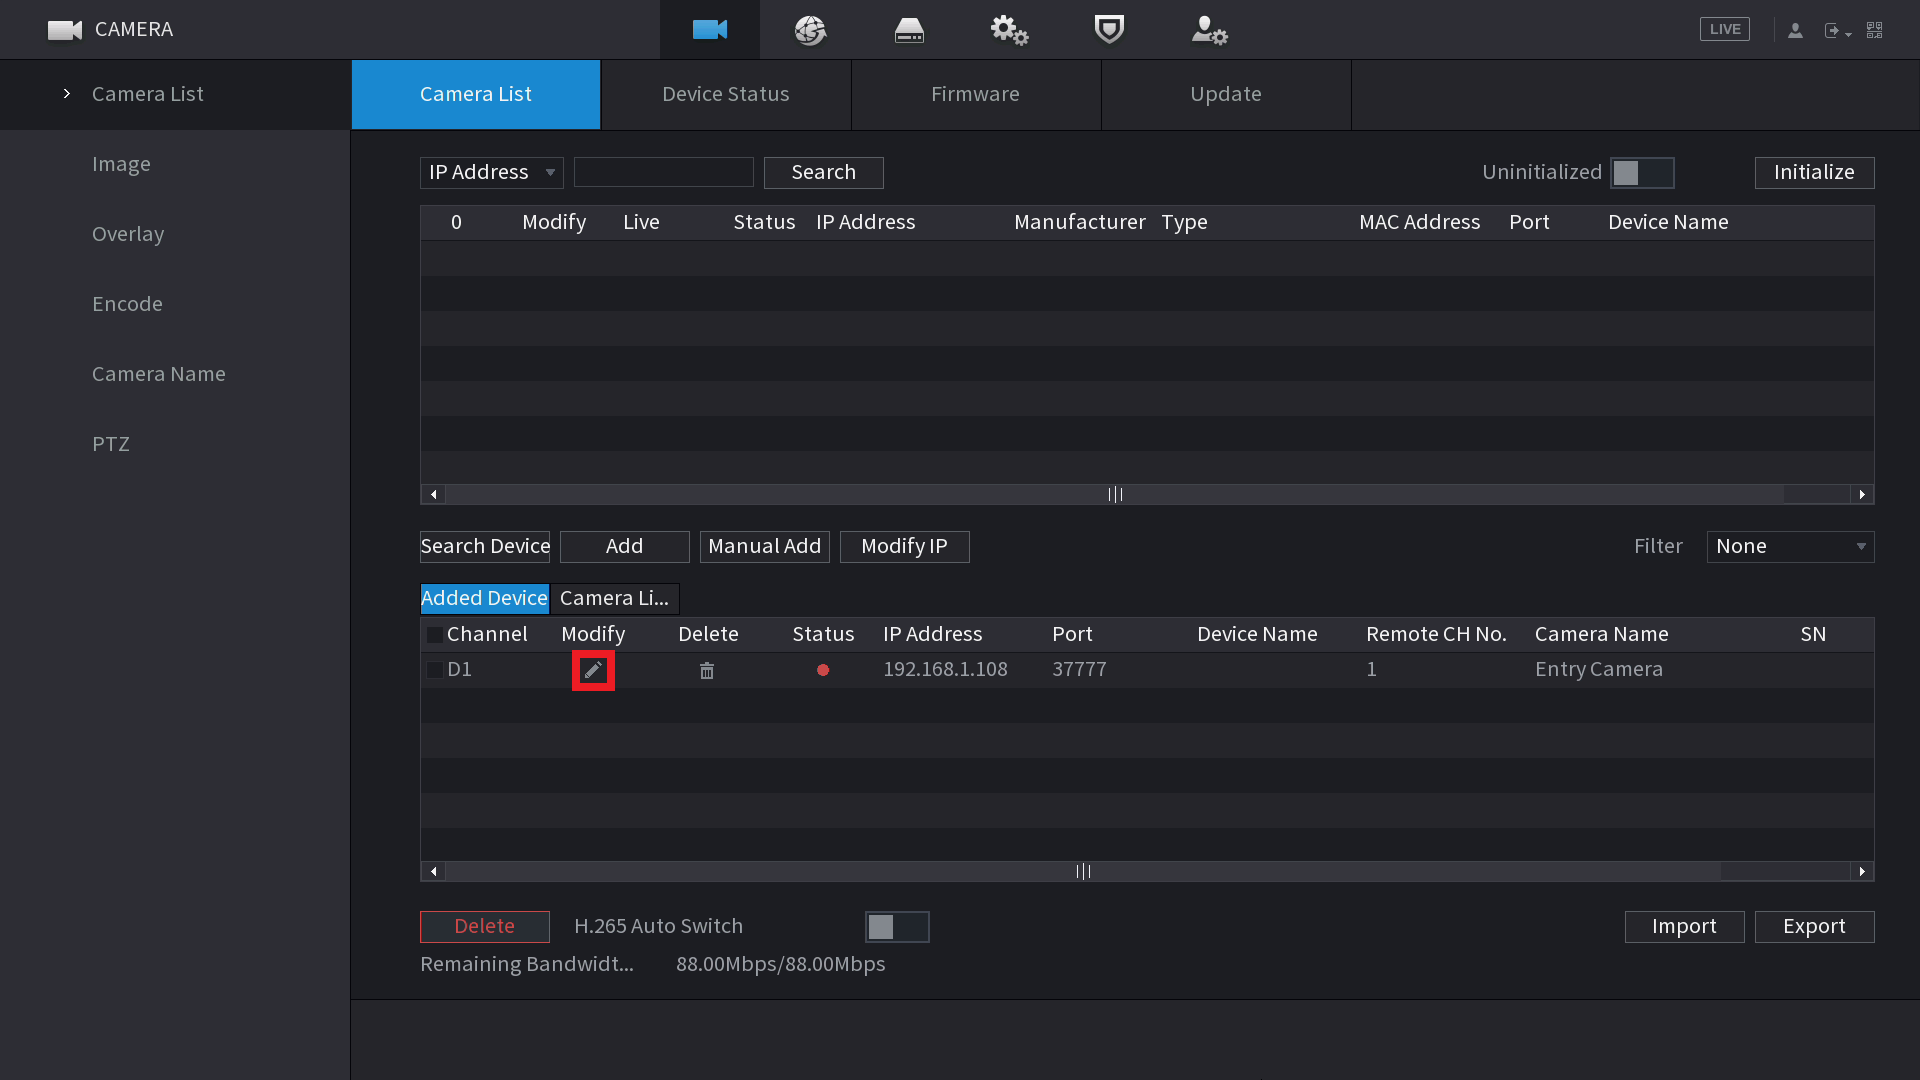
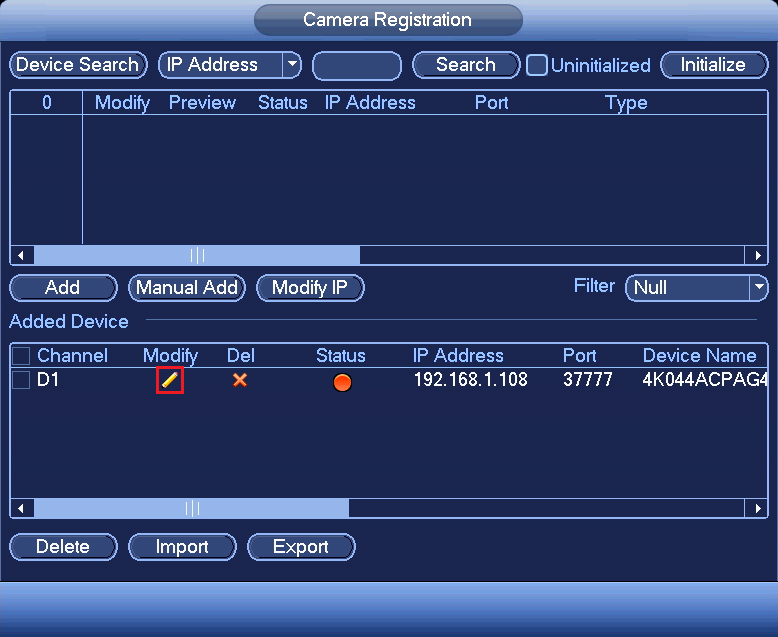
To fix the invalid username or password, your options are limited. If you know what the old password is then the fix is quite simple. Go to the Main Menu on the NVR and select Camera in the lower left. Then click on Registration from the menu on the left side.
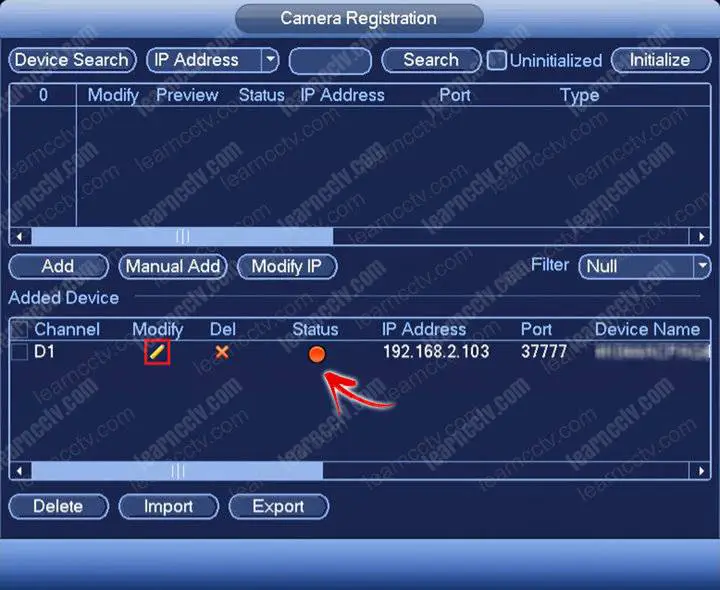
Here, you will see a list of the cameras that are on your NVR. Any cameras with errors and no pictures will have a red dot under status.
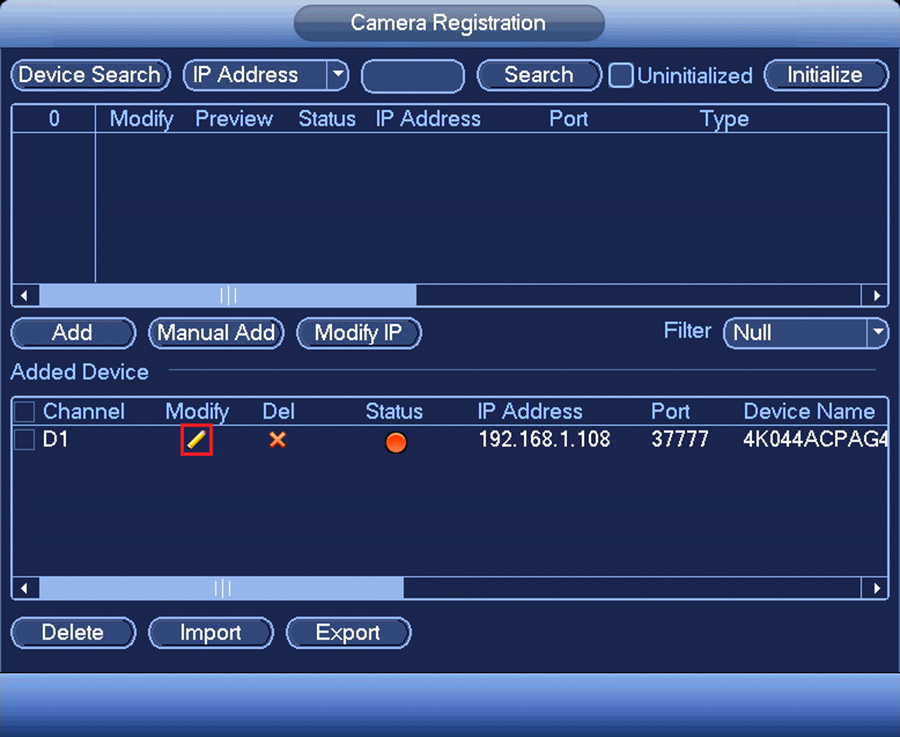
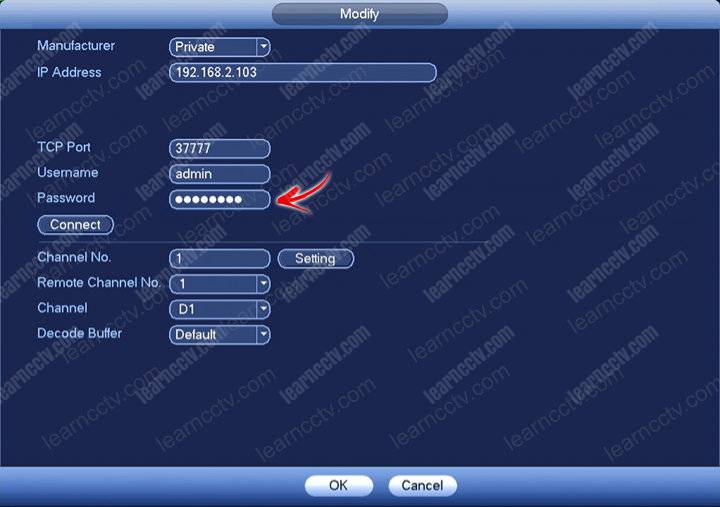
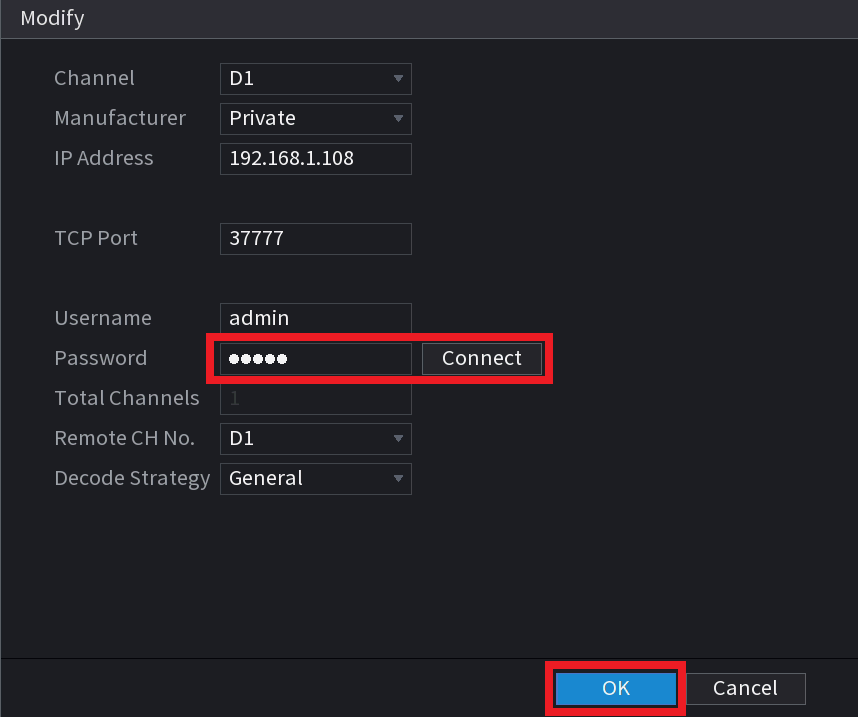
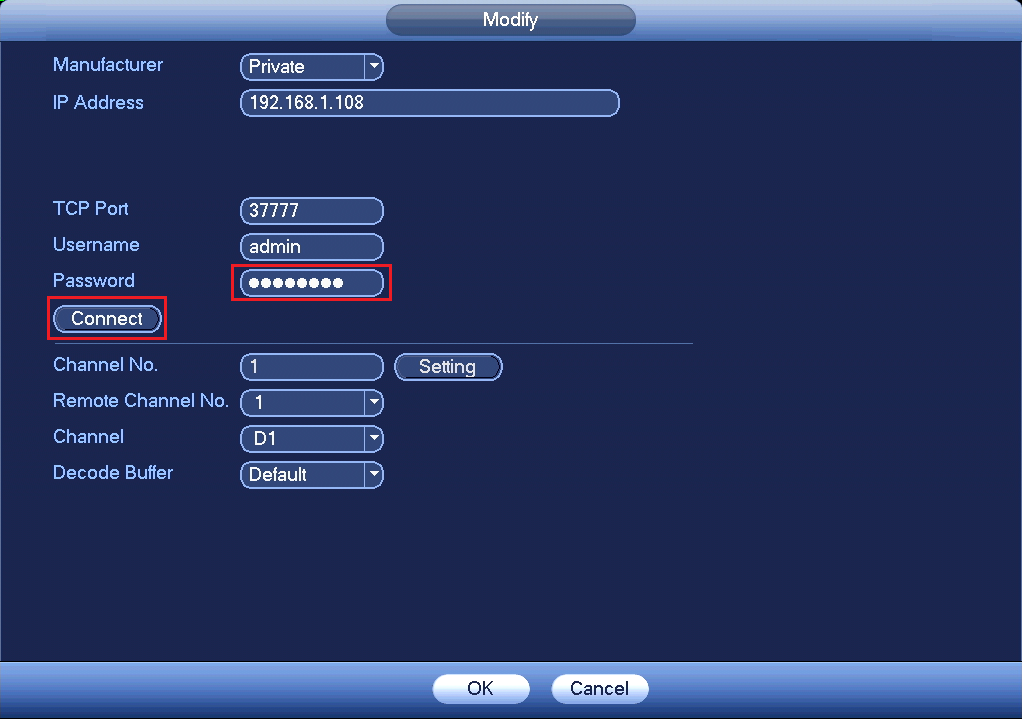
Change this password to the previous password or the password that you believe that camera is using. Click connect, apply and OK.

To continue attempting to log in to the camera you will need to unplug the camera or remove the power source from the camera, with 20 seconds and then plug it back in. This will reset the account so you can continue to attempt to log into it.
The other way to fix this issue is by performing a reset on the camera. If you have a PoE switch or a way to power the camera separately from the NVR then you can connect the camera or switch to your router. Connect a laptop to the same router. Find the IP address of the camera by using the Dahua Config tool.
Enter the IP address of the camera into your web browser. You will then be presented with the login screen. Click on Forgot password and follow the instructions to reset the password. Note that if an email address was not entered during setup then this function may not work on the camera.
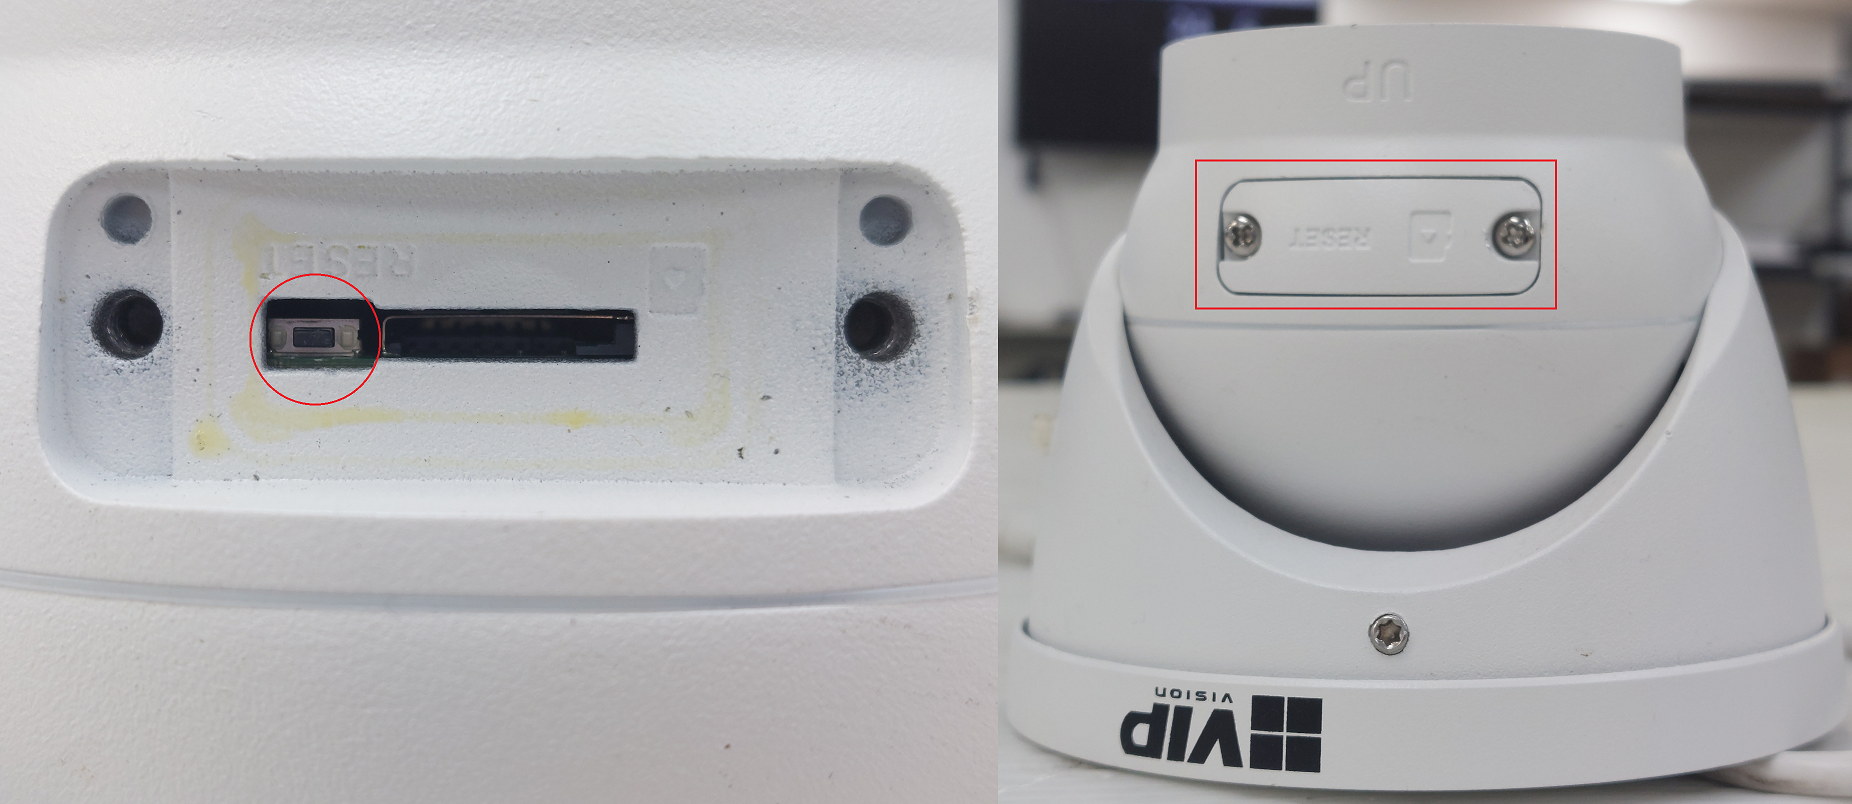
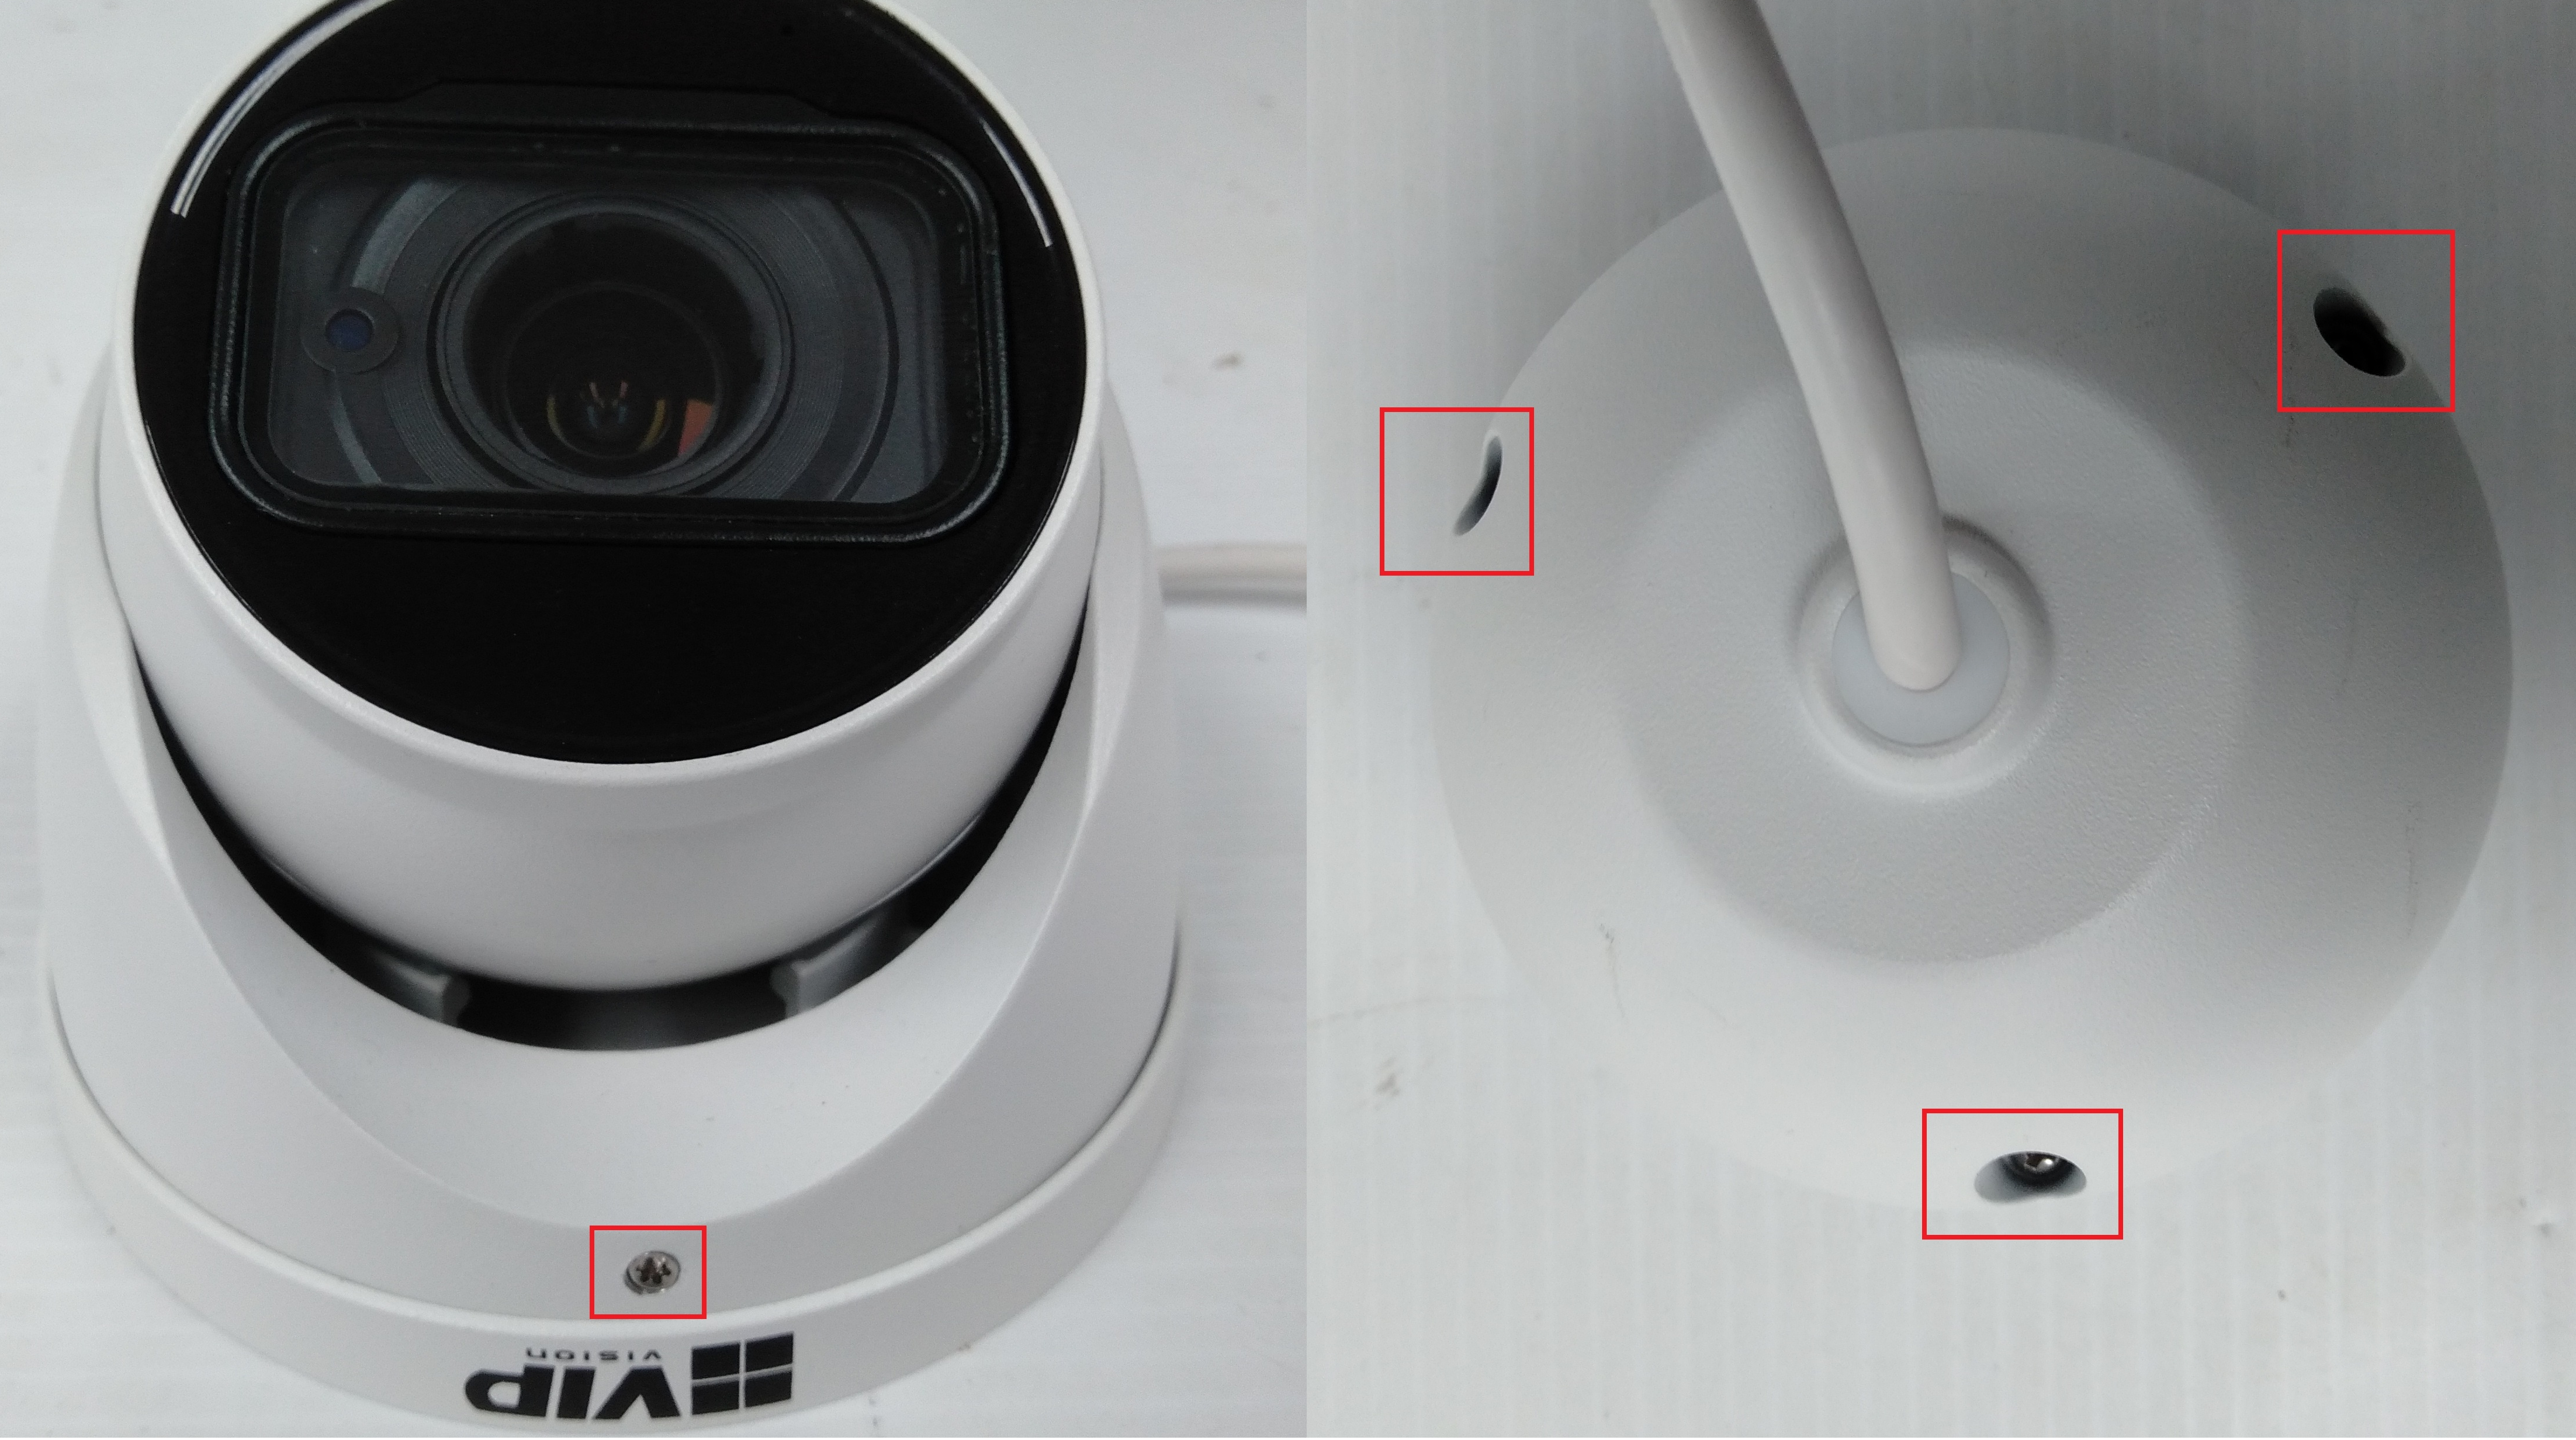
Another way is to manually reset the camera. This is done by disassembling the camera and pressing the small reset button on the motherboard of the camera and holding it for 30 seconds. The camera will need to remain powered when performing the reset. Read this article about resetting Dahua IP cameras.
Note: this guide works for Dahua and their OEMs sold under these brands: Activecam, Advidia, Amcrest, Ameta, Ascendent, Backstreet Surveillance, BV Security, CCTV Security Pros, CCTV Star, CP Plus (Orange Line), Dax Networks, eLine, ENS (formerly Eastern CCTV and SavvyTech), Expose, Lorex, GSS, Honeywell, IC Realtime, Ikegami, Impath Networks, Inaxsys, IndigoVision, Infinity CCTV, Innekt, Intelbras, KBVision, Lumixen, Maxron, Montavue, Oco, Optiview, Rhodium, RVI, Saxco, Security Camera King (Elite), Space Technology, Speco, ToughDog, Tyco Holis, Tyco Illustra Essentials, Unisight, VIP Vision, Watchnet, Winic, Zuum.
На самом деле восстановить пароль достаточно просто.
Во-первых: при настройке оборудования, как правило, вводится логин и пароль, которые можно запомнить или записать.
Во-вторых: указывается эл.почта и заполняются дополнительные параметры по типу «Вопрос/ответ».
Все эти процедуры помогают упростить взаимодействие с оборудованием.
Если при первом подключении все процедуры произведены правильно, восстановить данные несложно. Небольшая заминка может быть при взаимодействии с оборудованием до 2017 года производства. Но обо всем по порядку.
Процедуру можно производить как локально, так и удаленно по Web-интерфейсу. Условимся, что у нас есть три варианта интерфейса, где мы производим сброс пароля.
- Монитор. С его помощью производится настройка видеорегистратора.
- Браузер. Он позволяет произвести настройки IP-камер.
- Приложение DMSS. В нем также можно изменить пароль в меню «Password Resetting».
Примем за правило, что первоначальные настройки произведены правильно, у пользователя есть доступ к электронной почте, на которую была произведена регистрация, и он помнит секретный вопрос и ответ.
Восстановление доступа при помощи опции «Вопрос-ответ»
Подключаем устройство.
Открываем окно интерфейса настроек оборудования.
Видеорегистратор должен быть подключен к монитору (через GUI-интерфейс), на котором и будет отображаться меню навигации. Для настройки камер используется браузер, в адресной строке которого вводится IP-адрес камеры (по умолчанию это 192.168.1.108). Или запускаем приложение DMSS.
Во всех случаях доходим в интерфейсе до момента ввода логина и пароля.
В интерфейсе выбираем «Забыл пароль» (Forgot Password) и выбрать метод восстановления – «ответить на вопросы».
Указав нужные данные на латинице, следует указать новый пароль и нажать кнопку «сохранить». Новый пароль следует записать в надежном месте. В противном случае в следующий раз придется повторить процедуру заново. Заметим, что настройки оборудования при таком методе сохраняются.
Сброс пароля при помощи QR-кода
Если в прошлом методе мы рассматривали вариант – «вопрос/ответ», то в данном случае следует нажать кнопку «Забыл пароль» и выбрать метод восстановления «при помощи QR-кода».
Вариант 1. Скачиваем приложение DMSS
Открываем и входим в настройки.
- Входим в приложение. Выбираем «Основное меню»;
- Выбираем «Дополнительно»;
- «Сброс пароля»;
- Нажимаем «Ок»;
- Сканируем QR-код.
После этого придет письмо, где будет содержаться специальный проверочный код.
Затем следует снова обратиться к интерфейсу (монитору, браузеру или меню Password Resetting в DMSS) и ввести в поле Secure code полученный по почте из приложения код. Нажать «Далее» и ввести новый пароль. Подтверждается новый пароль нажатием кнопки «Ок». Настройка завершена.
Вариант 2. Скачиваем утилиту Configtool
При помощи утилиты находим оборудование и напротив него нажимаем Reset. Утилита передаст специальное окно с QR-кодом. Дальнейшие действия аналогичны действиям при помощи приложения DMSS. Полученный Security Code вводим во все тот же интерфейс, где производится сброс пароля.
Это были основные варианты сброса настроек пароля к моделям оборудования после 2017 года производства.
Если эти методы не подходят, —
можно воспользоваться
двумя дополнительными методами.
Сброс пароля при помощи локальной учетной записи «888888»
Многие мастера по монтажу систем видеобезопасности знают, что учетная запись с названием «888888» и пароль к ней, состоящий из такой же комбинации «888888», в регистраторах Dahua устанавливается по умолчанию. Для того чтобы произвести сброс пароля к логину «admin», вполне можно воспользоваться существующей по умолчанию парой: 888888/888888.
Для этого входим в интерфейс и на этапе ввода данных выбираем «888888» и пароль «888888». Переходим далее в меню, где производится «Сброс пароля». Маршрут: Главное меню; Система; Сброс пароля.
Выбираем вариант «по умолчанию» и все настройки оборудования сбрасываются.
Далее потребуется заново сгенерировать пароль для учетной записи «admin».
При этом методе восстановления пароля сбрасываются все настройки оборудования до заводских, и необходимо будет после процедуры заново произвести желаемые настройки видеорегистратора.
Аппаратный сброс пароля при помощи кнопки Reset
Если не удалось воспользоваться приложением или по какой-то иной причине нет возможности восстановить пароль – можно воспользоваться грубым способом и сбросить настройки до заводских при помощи кнопки Reset. Чаще всего кнопка установлена внутри оборудования на его плате. После сброса пароля все настройки откатываются до заводских, потому придется заново настраивать оборудование.
Если все вышеперечисленные методы не удалось по каким-либо причинам произвести, можно воспользоваться еще одним дополнительным методом.
Сброс через XML-файл
Запускаем утилиту ConfigTool и напротив необходимого оборудования нажимаем иконку скачивания. Выбираем формат XML File.
Полученный файл отправляется на почту техподдержки в приложении к нему. В самом же письме необходимо указать: Ф.И.О. покупателя оборудования, контактный телефон, модель и серийный номер устройства, адрес магазина, где приобретено оборудование, приложить фотографию устройства с той стороны, где отчетливо видно модель и серийный номер. В теме письма следует указать: «Reset_название_устройства_».
Через некоторое время в ответном письме вам будет отправлен файл result.xml, который следует загрузить в меню Import XML. После этой процедуры необходимо перейти к меню ввода нового пароля.
В любом случае, если не удалось восстановить пароль – обращайтесь в компанию, где было приобретено оборудование.
Nano Zoom – официальный золотой партнер Dahua
Являясь Золотым Партнером Dahua в России, компания Nano Zoom, естественно, помогает своим покупателям решать любые вопросы, касающиеся своих товаров. Наша служба технической поддержки поможет в восстановлении пароля к оборудованию Dahua.
По вопросам приобретения, монтажа и обслуживания товаров Dahua обращайтесь в компанию Nano Zoom.
КАТАЛОГ ТОВАРОВ DAHUA
Сброс пароля на регистраторах
Если помните графический ключ (пароль) который вводится локально, то можно сбросить устройство на заводские настройки, тем самым сбросив пароль.
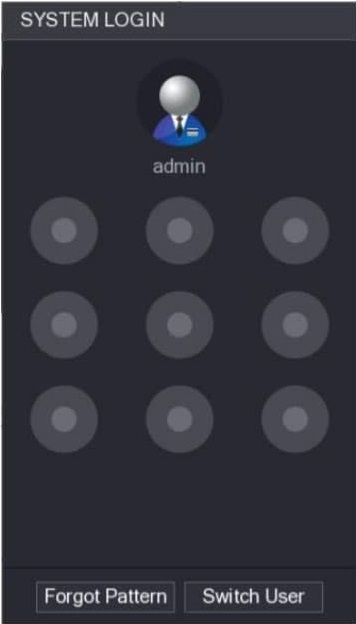
- Находясь в меню регистратора пароль которого забыт, с запрограммированным графическим ключом, при входе в меню можно увидеть интерфейс:
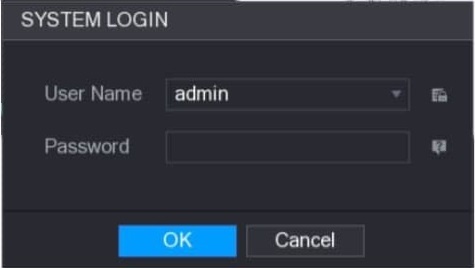
После нажатия кнопки «Forgot Pattern» откроется интерфейс входа:
Если графический ключ не был задан, то интерфейс входа будет показан сразу.
Для входа под другим пользователем на интерфейсе графического ключа нужно нажать кнопку «Switch User» или на интерфейсе входа выбрать пользователя для входа. - Далее необходимо нажать иконку сообщения со значком «?».
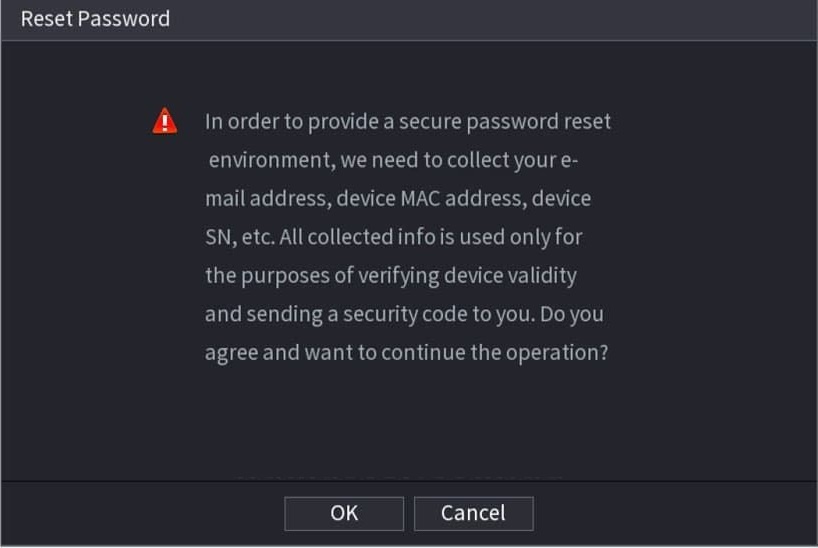
Если при первом включении или настройке регистратора указывался e-mail, будет показано следующее:После нажатия кнопки «OK», система считает информацию для сброса пароля, такую как e-mail, mac адрес, серийный номер устройства и прочее.
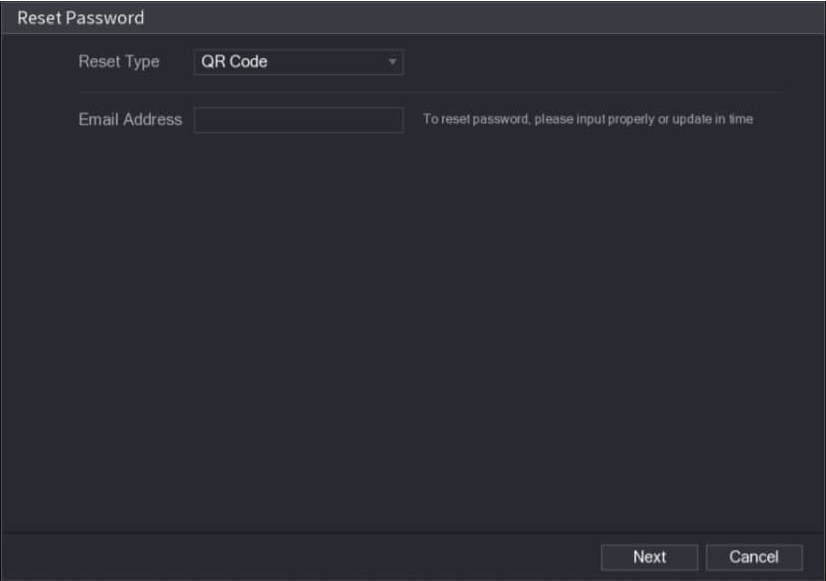
Если при первом включении e-mail не указывался, то будет предложено его ввести. - В интерфейсе сброса пароля, в верхней строке будет предложено выбрать один из типов сброса: по QR коду или с помощью секретных вопросов.
Так же нужно ввести рабочий e-mail адрес и нажать кнопку «Next»: -
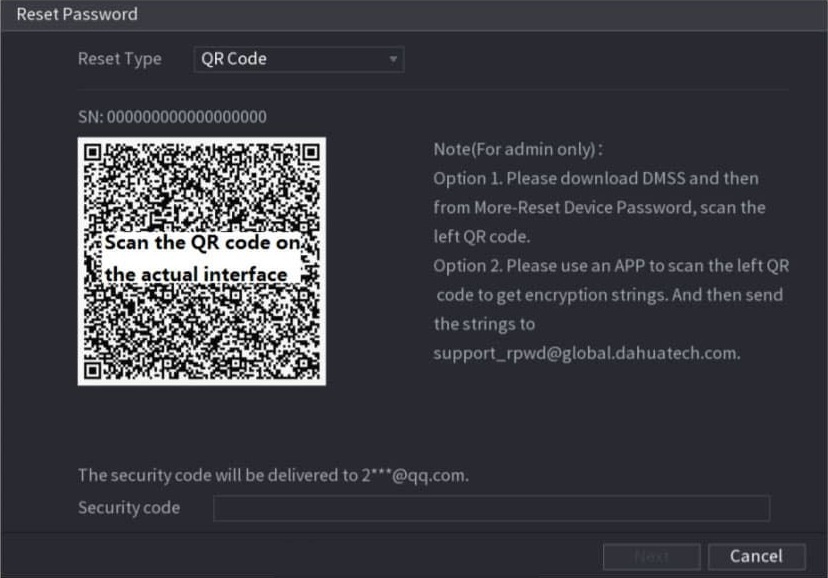
Сброс с помощью QR кода:
Загрузить приложение DMSS и в его настройках по пути More>Reset Device> Password отсканировать QR код.
Или с помощью любого приложения отсканировать QR код и отправьте его по адресу e-mail: support_rpwd@global.dahuatech.com
В строке Security Code ввести полученный в ответ на e-mail код.
Можно получить секретный код дважды сканируя один и тот же QR код. Если необходимо получить код ещё раз — требуется обновить интерфейс.Секретный код полученный по e-mail актуален в течении 24 часов
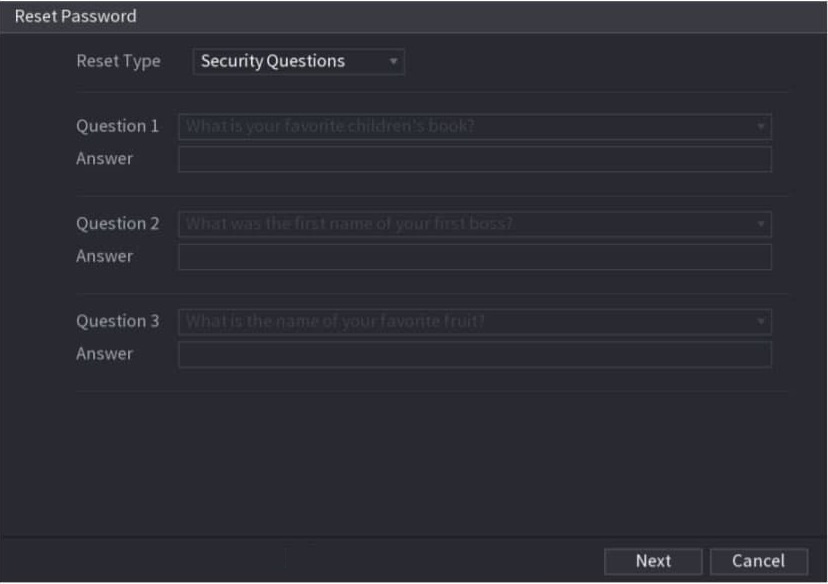
- Сброс с помощью секретных вопросов:
В строке Ответы (Answer) необходимо написать правильные ответы для каждого вопроса.
Если при настройке регистратора в списке способов сброса пароля не указывались секретные вопросы то они будут отсутствовать.
После ввода правильных ответов, нажимаем клавишу «Next».
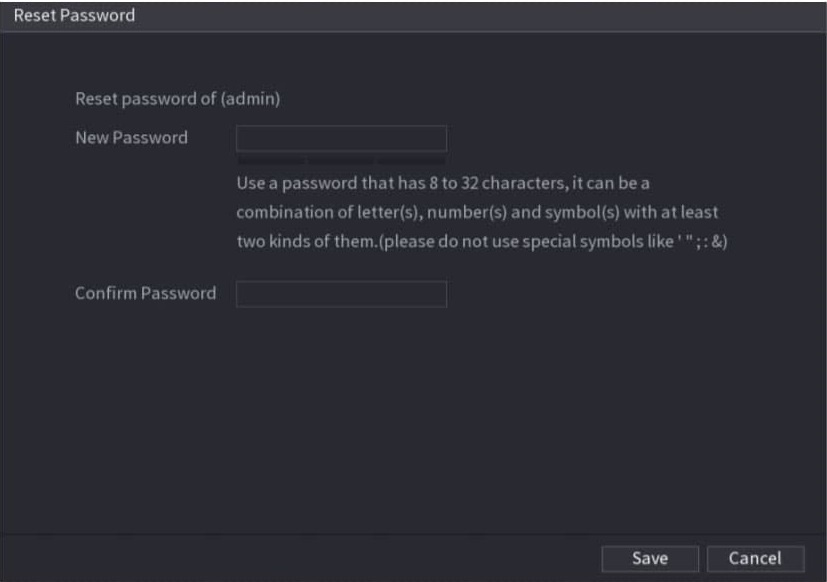
Новый пароль необходимо ввести дважды в строках «New Password» и «Confirm Password» соответственно:После нажатия кнопки «Save» (Сохранить). Сброс пароля будет закончен.
После сброса пароля регистратора, можно синхронизировать пароль удалённых камер подключенных к видеорегистратору:
Сброс пароля при помощи программы ConfigTool на камерах и регистраторах
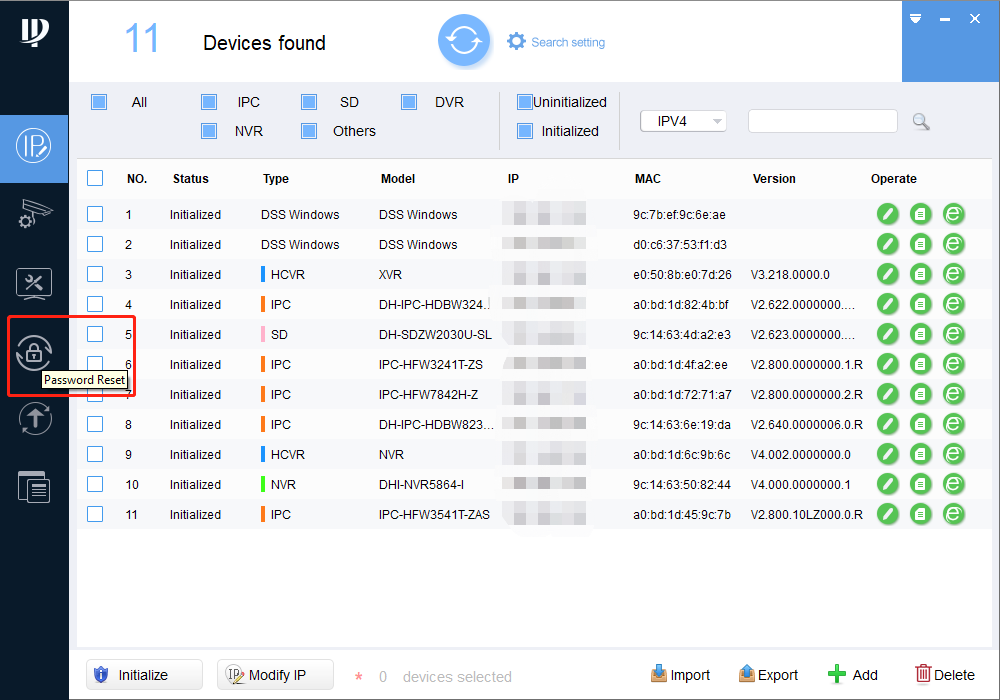
В меню программы Config Tool необходимо нажать кнопку «Password Reset»:
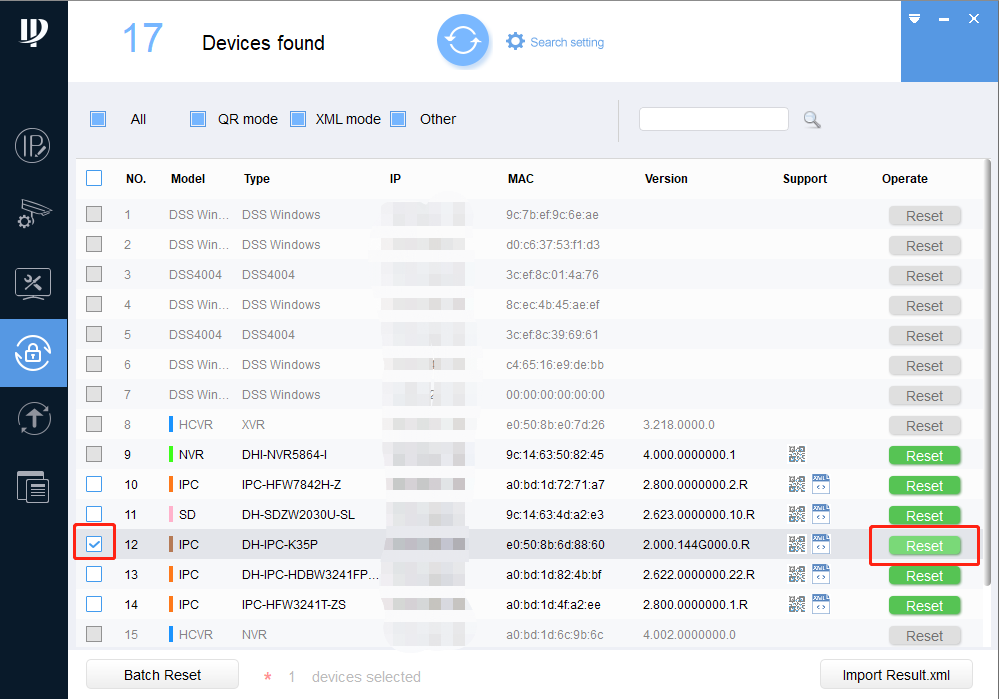
Выбрать устройство на котором требуется сбросить пароль из списка:
Сбросить пароль можно двумя способами: через QR или с помощью XML файла. Рассмотрим их оба.
Вариант сброса пароля через QR код (если была указана почта при инициализации устройства)
- Для сброса пароль потребуется программа DMSS Plus. Можно скачать мобильное приложение iDMSS plus (для устройств IOS) или gDMSS plus (для устройств Android).
В настройках приложения, в разделе “Я” -> “Защита пароля”, -> “Сброс пароля”, необходимо сканировать QR код, который указан в программе ConfigTool.
После сканирования на почту автоматически будет выслан временный пароль. - В полученном письме будет указан securty code, который должен быть введён в поле “Security Code” программы ConfigTool.
После чего можно задать новый пароль для устройства и нажать кнопку «ОК».
В случае если письмо не приходит, можно выполните процедуру сброса через XML файл.
Сброса пароля через XML файл
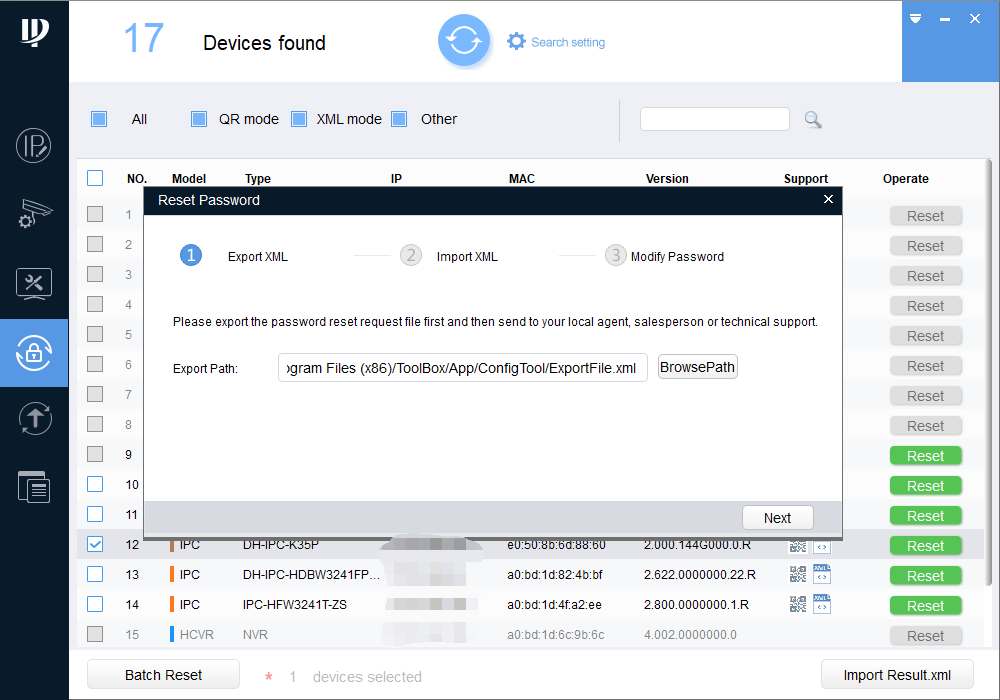
- В разделе «Reset Mode» нужно выбрать пункт «XML File»:
-
После чего экспортировать XML файл и запомнить путь экспорта.
Каждое устройство может экспортировать XML файл только пять раз в день.
- Отправить сохранённый файл ExportFile.xml на почту: cis_support@dahuatech.com
- В ответ будет отправлен файл result.xml, который надо будет указать в интерфейсе программы:
- После открытия файла можно задать новый пароль для устройства:
Функция «Забыл пароль»
Описание есть в самой функции и в мануале к устройству, которое также можно скачать на сайте www.dahuasecurity.com
Бублик Данил
This article is for you if you have a Dahua DVR, NVR, and got an «invalid username or password» error. Here I explain what can cause such error and how to fix it.
Be aware that this error also occurs with Dahua OEM products.
Here’s a list of devices that this article applies to.
Activecam, Advidia, Amcrest, Ameta, Ascendent, Backstreet Surveillance, BV Security, CCTV Security Pros, CCTV Star, CP Plus (Orange Line), Dahua, Dax Networks, eLine, ENS (formerly Eastern CCTV and SavvyTech), Expose, Lorex, GSS, Honeywell, IC Realtime, Ikegami, Impath Networks, Inaxsys, IndigoVision, Infinity CCTV, Innekt, Intelbras, KBVision, Lumixen, Maxron, Montavue, Oco, Optiview, Rhodium, RVI, Saxco, Security Camera King (Elite), Space Technology, Speco, ToughDog, Tyco Holis, Tyco Illustra Essentials, Unisight, VIP Vision, Watchnet, Winic, Zuum.
What causes the invalid username or password error
There are different causes for the invalid username or password error; most of the time, it’s related to the credentials’ misconfiguration in the NVR or camera.
The first thing you need to do is to keep calm and don’t get stressed.
When you set up the NVR for the first time, the credentials are shared with the IP cameras connected to the network, that’s the usual approach for a fresh installation because it helps you have everything working quickly.
Suppose you reset your NVR and change the credentials to recover from a lost password. In that case, the new password you use is not updated in the camera, and that causes a login error when the NVR tries to send the username/password combination to the cameras.
The other common reason for the invalid username or password error is the use of the wrong credential due to incorrect typing. Keep in mind that the camera and NVR are aware of case sensitive letters and spaces you could be using while typing.
How to fix the invalid username or password error
The best way to fix the invalid password or username error is to double-check if the NVR and IP cameras use the correct credentials.
You can check which cameras have the wrong credentials by opening the camera registration menu in the NVR and checking the camera status.
The IP cameras with problems show up with a red dot, as shown in the picture.
To fix the problem, click on the «Modify» pencil to change the camera credentials.
A new screen pops up to allow you to change the camera’s password.
Change the password and click the «Connect» and «OK» button to finish.
That changes the password for the camera and fix the error.
Other problems
There is a limitation in the number of attempts to use a password.
This limitation is meant to protect your device from people trying to log in with different username and password combinations.
If the camera gets 3 login attempts in a short period of time it locks itself for some minutes and doesn’t allow any new login from the NVR.
You can restart the camera to attempt a new login and if the problem happens again just isolate the camera from the network and change it’s password manually.
Related articles
Conclusion
The invalid username or password error shows up on Dahua and other devices manufactured by this company as OEM.
This article brings the solution for this problem but you need to consider try different approaches by yourself as long as you understand the concept.
Want to learn more ?
If you want to become a professional CCTV installer or designer, take a look at the material available in the blog. Just click the links below:
Please share this information with your friends…
-
#1
I managed to enter my IP address range and only then did I see my camera. I’m trying to change the IP address from the default and somewhere along the line I had to select a new password. I then tried to change the Ip address, entered the correct subnet mask and gateway but got a «failed to config» . Now when I try to login I get the message «Account has been locked».
I now have found the Config Tool login page but on trying to login it tells me that only letters and numbers are allowed for the password but I had been able to make a new password that contained the underline character! So now I cannot use admin admin or my new user name and password.
How can i start again?
Last edited: Apr 23, 2019
ИНСТРУКЦИЯ: СБРОС ПАРОЛЯ НА ОБОРУДОВАНИИ DAHUA
На самом деле восстановить пароль достаточно просто.
Во-первых: при настройке оборудования, как правило, вводится логин и пароль, которые можно запомнить или записать.
Во-вторых: указывается эл.почта и заполняются дополнительные параметры по типу «Вопрос/ответ».
Все эти процедуры помогают упростить взаимодействие с оборудованием.
Если при первом подключении все процедуры произведены правильно, восстановить данные несложно. Небольшая заминка может быть при взаимодействии с оборудованием до 2017 года производства. Но обо всем по порядку.
Процедуру можно производить как локально, так и удаленно по Web-интерфейсу. Условимся, что у нас есть три варианта интерфейса, где мы производим сброс пароля.
- Монитор. С его помощью производится настройка видеорегистратора.
- Браузер. Он позволяет произвести настройки IP-камер.
- Приложение DMSS. В нем также можно изменить пароль в меню «Password Resetting».
Примем за правило, что первоначальные настройки произведены правильно, у пользователя есть доступ к электронной почте, на которую была произведена регистрация, и он помнит секретный вопрос и ответ.
Восстановление доступа при помощи опции «Вопрос-ответ»
Открываем окно интерфейса настроек оборудования.
Видеорегистратор должен быть подключен к монитору (через GUI-интерфейс), на котором и будет отображаться меню навигации. Для настройки камер используется браузер, в адресной строке которого вводится IP-адрес камеры (по умолчанию это 192.168.1.108). Или запускаем приложение DMSS.
Во всех случаях доходим в интерфейсе до момента ввода логина и пароля.
В интерфейсе выбираем «Забыл пароль» (Forgot Password) и выбрать метод восстановления – «ответить на вопросы».
Указав нужные данные на латинице, следует указать новый пароль и нажать кнопку «сохранить». Новый пароль следует записать в надежном месте. В противном случае в следующий раз придется повторить процедуру заново. Заметим, что настройки оборудования при таком методе сохраняются.
Сброс пароля при помощи QR-кода
Если в прошлом методе мы рассматривали вариант – «вопрос/ответ», то в данном случае следует нажать кнопку «Забыл пароль» и выбрать метод восстановления «при помощи QR-кода».
Вариант 1. Скачиваем приложение DMSS
Открываем и входим в настройки.
- Входим в приложение. Выбираем «Основное меню»;
- Выбираем «Дополнительно»;
- «Сброс пароля»;
- Нажимаем «Ок»;
- Сканируем QR-код.
После этого придет письмо, где будет содержаться специальный проверочный код.
Затем следует снова обратиться к интерфейсу (монитору, браузеру или меню Password Resetting в DMSS) и ввести в поле Secure code полученный по почте из приложения код. Нажать «Далее» и ввести новый пароль. Подтверждается новый пароль нажатием кнопки «Ок». Настройка завершена.
Вариант 2. Скачиваем утилиту Configtool
При помощи утилиты находим оборудование и напротив него нажимаем Reset. Утилита передаст специальное окно с QR-кодом. Дальнейшие действия аналогичны действиям при помощи приложения DMSS. Полученный Security Code вводим во все тот же интерфейс, где производится сброс пароля.
Это были основные варианты сброса настроек пароля к моделям оборудования после 2017 года производства.
Если эти методы не подходят, —
можно воспользоваться
двумя дополнительными методами.
Сброс пароля при помощи локальной учетной записи «888888»
Многие мастера по монтажу систем видеобезопасности знают, что учетная запись с названием «888888» и пароль к ней, состоящий из такой же комбинации «888888», в регистраторах Dahua устанавливается по умолчанию. Для того чтобы произвести сброс пароля к логину «admin», вполне можно воспользоваться существующей по умолчанию парой: 888888/888888.
Для этого входим в интерфейс и на этапе ввода данных выбираем «888888» и пароль «888888». Переходим далее в меню, где производится «Сброс пароля». Маршрут: Главное меню; Система; Сброс пароля.
Выбираем вариант «по умолчанию» и все настройки оборудования сбрасываются.
Далее потребуется заново сгенерировать пароль для учетной записи «admin».
При этом методе восстановления пароля сбрасываются все настройки оборудования до заводских, и необходимо будет после процедуры заново произвести желаемые настройки видеорегистратора.
Аппаратный сброс пароля при помощи кнопки Reset
Если не удалось воспользоваться приложением или по какой-то иной причине нет возможности восстановить пароль – можно воспользоваться грубым способом и сбросить настройки до заводских при помощи кнопки Reset. Чаще всего кнопка установлена внутри оборудования на его плате. После сброса пароля все настройки откатываются до заводских, потому придется заново настраивать оборудование.
Если все вышеперечисленные методы не удалось по каким-либо причинам произвести, можно воспользоваться еще одним дополнительным методом.
Сброс через XML-файл
Запускаем утилиту ConfigTool и напротив необходимого оборудования нажимаем иконку скачивания. Выбираем формат XML File.
Полученный файл отправляется на почту техподдержки в приложении к нему. В самом же письме необходимо указать: Ф.И.О. покупателя оборудования, контактный телефон, модель и серийный номер устройства, адрес магазина, где приобретено оборудование, приложить фотографию устройства с той стороны, где отчетливо видно модель и серийный номер. В теме письма следует указать: «Reset_название_устройства_».
Через некоторое время в ответном письме вам будет отправлен файл result.xml, который следует загрузить в меню Import XML. После этой процедуры необходимо перейти к меню ввода нового пароля.
В любом случае, если не удалось восстановить пароль – обращайтесь в компанию, где было приобретено оборудование.
Nano Zoom – официальный золотой партнер Dahua
Являясь Золотым Партнером Dahua в России, компания Nano Zoom, естественно, помогает своим покупателям решать любые вопросы, касающиеся своих товаров. Наша служба технической поддержки поможет в восстановлении пароля к оборудованию Dahua.
По вопросам приобретения, монтажа и обслуживания товаров Dahua обращайтесь в компанию Nano Zoom.
Источник
Сброс пароля на регистраторах и камерах Dahua
Сброс пароля на регистраторах
Если помните графический ключ (пароль) который вводится локально, то можно сбросить устройство на заводские настройки, тем самым сбросив пароль.
- Находясь в меню регистратора пароль которого забыт, с запрограммированным графическим ключом, при входе в меню можно увидеть интерфейс:
После нажатия кнопки «Forgot Pattern» откроется интерфейс входа:
Если графический ключ не был задан, то интерфейс входа будет показан сразу.
Для входа под другим пользователем на интерфейсе графического ключа нужно нажать кнопку «Switch User» или на интерфейсе входа выбрать пользователя для входа.
Далее необходимо нажать иконку сообщения со значком «?».
Если при первом включении или настройке регистратора указывался e-mail, будет показано следующее:
После нажатия кнопки «OK», система считает информацию для сброса пароля, такую как e-mail, mac адрес, серийный номер устройства и прочее.
Если при первом включении e-mail не указывался, то будет предложено его ввести.
В интерфейсе сброса пароля, в верхней строке будет предложено выбрать один из типов сброса: по QR коду или с помощью секретных вопросов.
Так же нужно ввести рабочий e-mail адрес и нажать кнопку «Next»:
Сброс с помощью QR кода:
Загрузить приложение DMSS и в его настройках по пути More>Reset Device> Password отсканировать QR код.
Или с помощью любого приложения отсканировать QR код и отправьте его по адресу e-mail: support_rpwd@global.dahuatech.com
В строке Security Code ввести полученный в ответ на e-mail код.
Можно получить секретный код дважды сканируя один и тот же QR код. Если необходимо получить код ещё раз — требуется обновить интерфейс.
Секретный код полученный по e-mail актуален в течении 24 часов
Сброс с помощью секретных вопросов:
В строке Ответы (Answer) необходимо написать правильные ответы для каждого вопроса.
Если при настройке регистратора в списке способов сброса пароля не указывались секретные вопросы то они будут отсутствовать.
После ввода правильных ответов, нажимаем клавишу «Next».
Новый пароль необходимо ввести дважды в строках «New Password» и «Confirm Password» соответственно:
После нажатия кнопки «Save» (Сохранить). Сброс пароля будет закончен.
После сброса пароля регистратора, можно синхронизировать пароль удалённых камер подключенных к видеорегистратору: 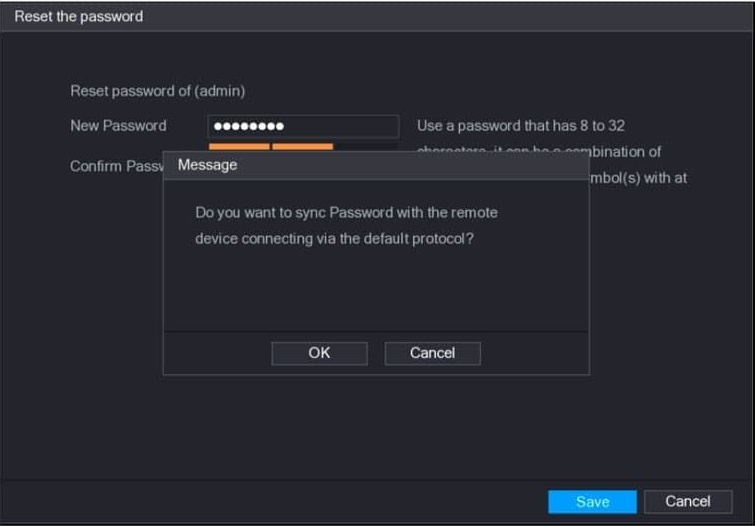
Сброс пароля при помощи программы ConfigTool на камерах и регистраторах
В меню программы Config Tool необходимо нажать кнопку «Password Reset»:
Выбрать устройство на котором требуется сбросить пароль из списка:
Сбросить пароль можно двумя способами: через QR или с помощью XML файла. Рассмотрим их оба.
Вариант сброса пароля через QR код (если была указана почта при инициализации устройства)
- Для сброса пароль потребуется программа DMSS Plus. Можно скачать мобильное приложение iDMSS plus (для устройств IOS) или gDMSS plus (для устройств Android).
В настройках приложения, в разделе “Я” -> “Защита пароля”, -> “Сброс пароля”, необходимо сканировать QR код, который указан в программе ConfigTool .
После сканирования на почту автоматически будет выслан временный пароль.
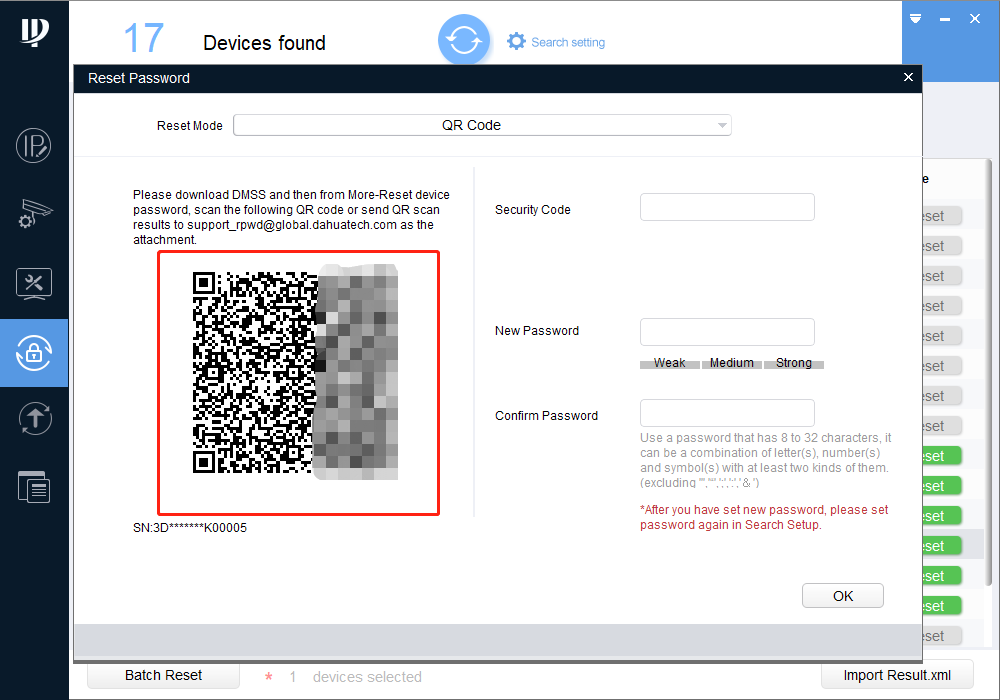
В полученном письме будет указан securty code , который должен быть введён в поле “ Security Code ” программы ConfigTool.
После чего можно задать новый пароль для устройства и нажать кнопку «ОК».
В случае если письмо не приходит, можно выполните процедуру сброса через XML файл.
Сброса пароля через XML файл
- В разделе «Reset Mode» нужно выбрать пункт «XML File»:
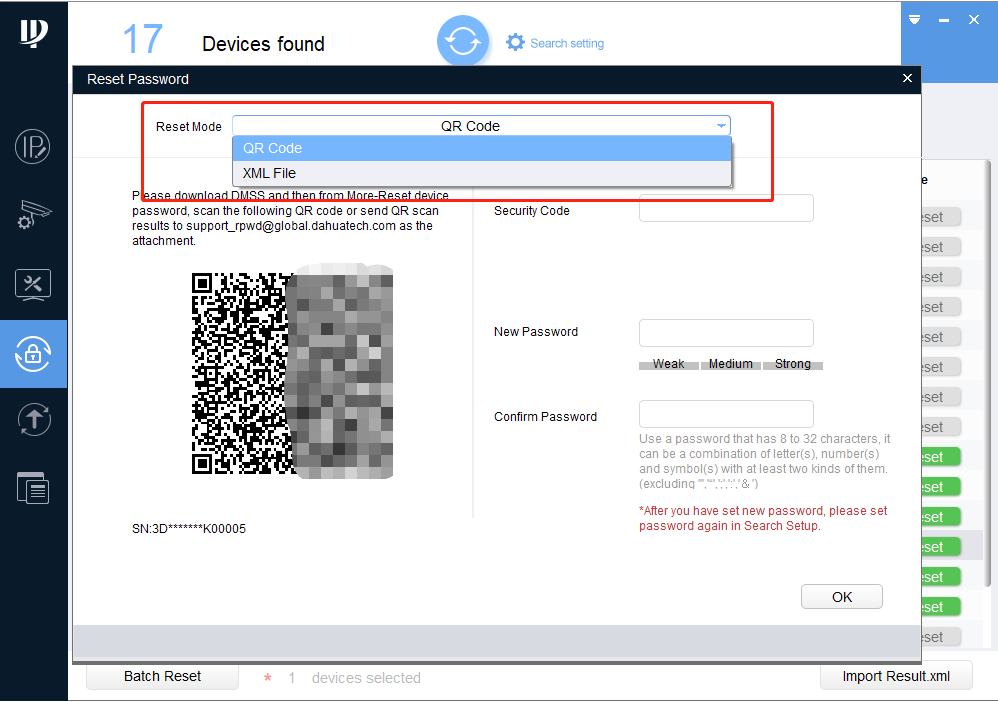
После чего экспортировать XML файл и запомнить путь экспорта.
Каждое устройство может экспортировать XML файл только пять раз в день.
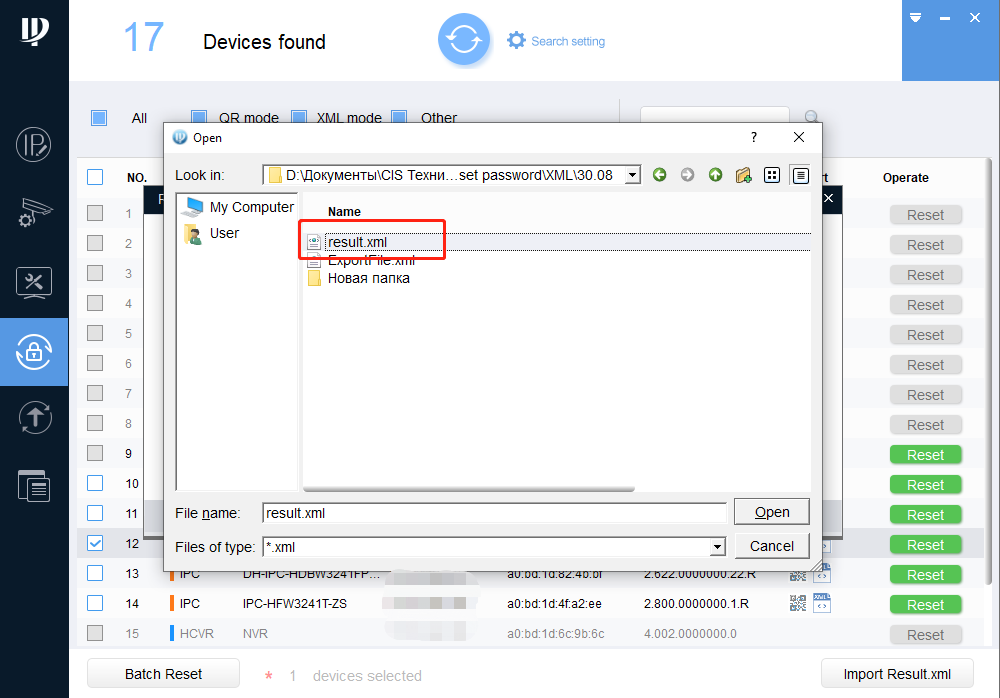
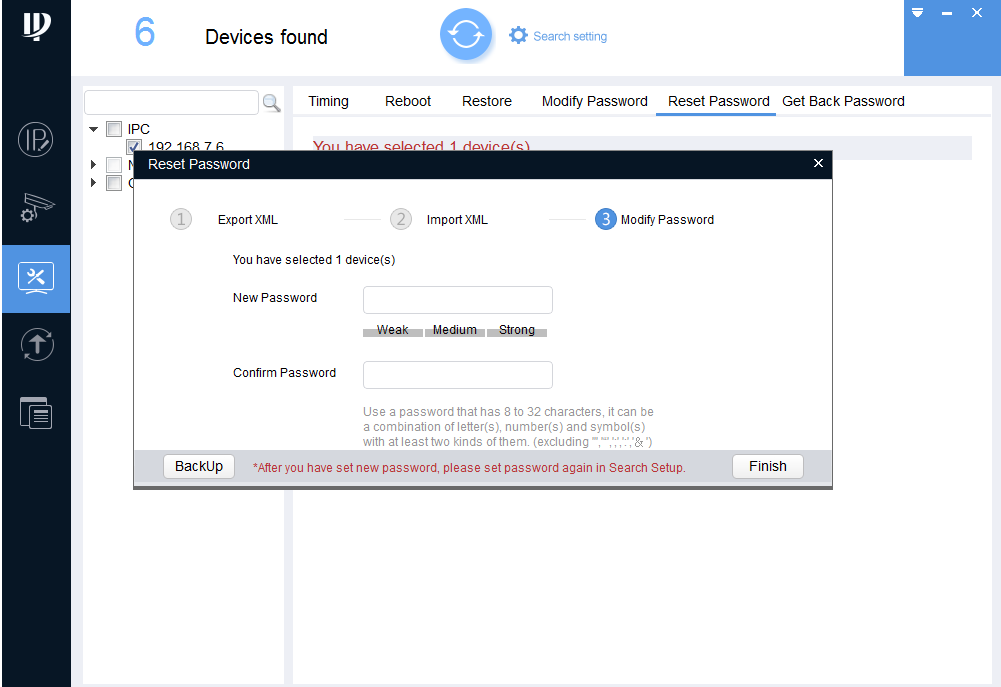
Источник
Dahua Invalid username or password error (quick fix)
If you have a Dahua security camera system (DVR, NVR or single IP camera) that shows the message invalid username or password or account locked, there are a few ways to fix this issue.
The invalid username or password error occurs for a few different reasons. When you set up your NVR and cameras for the first time, the NVR will share its password with all of the cameras that are connected to it. So the NVR and the cameras will have the same password.
If, somehow, you forget the password of the NVR and log in using an unlock pattern then perform a factory reset of the NVR via the local interface, this reset will not change the cameras’ password (just the NVR’s). 
Another way that you can get this error is if you have multiple NVRs and attempt to move an IP camera from one NVR to another NVR.
In some other cases, when you do a “forgot password” function, the NVR should change the camera passwords as well. However, in rare occasions, some or all of the cameras may not receive the new password information and will still have the old password.
How to fix invalid password or username issue
To fix the invalid username or password, your options are limited. If you know what the old password is then the fix is quite simple. Go to the Main Menu on the NVR and select Camera in the lower left. Then click on Registration from the menu on the left side.
Here, you will see a list of the cameras that are on your NVR. Any cameras with errors and no pictures will have a red dot under status. 
Change this password to the previous password or the password that you believe that camera is using. Click connect, apply and OK. 
To continue attempting to log in to the camera you will need to unplug the camera or remove the power source from the camera, with 20 seconds and then plug it back in. This will reset the account so you can continue to attempt to log into it.
The other way to fix this issue is by performing a reset on the camera. If you have a PoE switch or a way to power the camera separately from the NVR then you can connect the camera or switch to your router. Connect a laptop to the same router. Find the IP address of the camera by using the Dahua Config tool.
Enter the IP address of the camera into your web browser. You will then be presented with the login screen. Click on Forgot password and follow the instructions to reset the password. Note that if an email address was not entered during setup then this function may not work on the camera.
Another way is to manually reset the camera. This is done by disassembling the camera and pressing the small reset button on the motherboard of the camera and holding it for 30 seconds. The camera will need to remain powered when performing the reset. Read this article about resetting Dahua IP cameras.
Note: this guide works for Dahua and their OEMs sold under these brands: Activecam, Advidia, Amcrest, Ameta, Ascendent, Backstreet Surveillance, BV Security, CCTV Security Pros, CCTV Star, CP Plus (Orange Line), Dax Networks, eLine, ENS (formerly Eastern CCTV and SavvyTech), Expose, Lorex, GSS, Honeywell, IC Realtime, Ikegami, Impath Networks, Inaxsys, IndigoVision, Infinity CCTV, Innekt, Intelbras, KBVision, Lumixen, Maxron, Montavue, Oco, Optiview, Rhodium, RVI, Saxco, Security Camera King (Elite), Space Technology, Speco, ToughDog, Tyco Holis, Tyco Illustra Essentials, Unisight, VIP Vision, Watchnet, Winic, Zuum.
Источник
If you see this error, it means Camera Registration is trying to access your camera with the incorrect login information.
Cameras plugged into a Switch
If you know the password of the camera, you will just need to update the password of the camera in Camera Registration.
(Black GUI) Update Password in Camera List
Open Camera Registration by right clicking and selecting Main Menu > Camera > Camera List
Click on the Modify pencil 
Enter the password of the Camera (You would have set this during the initialisation process in Config Tool) and click Connect, then OK.
If you still see the Account Locked error, you may need to reboot the camera by unplugging it briefly.
(Blue GUI) Update Password in Camera Registration
Open Camera Registration by right clicking and selecting Camera Registration OR by Navigating to Main Menu > Camera > Registration
Click on the Modify pencil 
Enter the password of the Camera (You would have set this during the initialisation process in Config Tool) and click Connect, then OK.
If you still see the Account Locked error, you may need to reboot the camera by unplugging it briefly.
If you don’t know the password of the Camera you will have to reset it.
Reset IP Camera Guide
Turret Cameras
Reset Button under Flap
AI turret cameras, or turret cameras built post 2021 usually have their reset button located under a flap next to the MicroSD card slot. Press and hold the reset button for 30 seconds while the camera is powered on to reset the camera.
Reset Button on Mainboard
Cameras built pre-2021 require the camera to be opened to expose the mainboard.
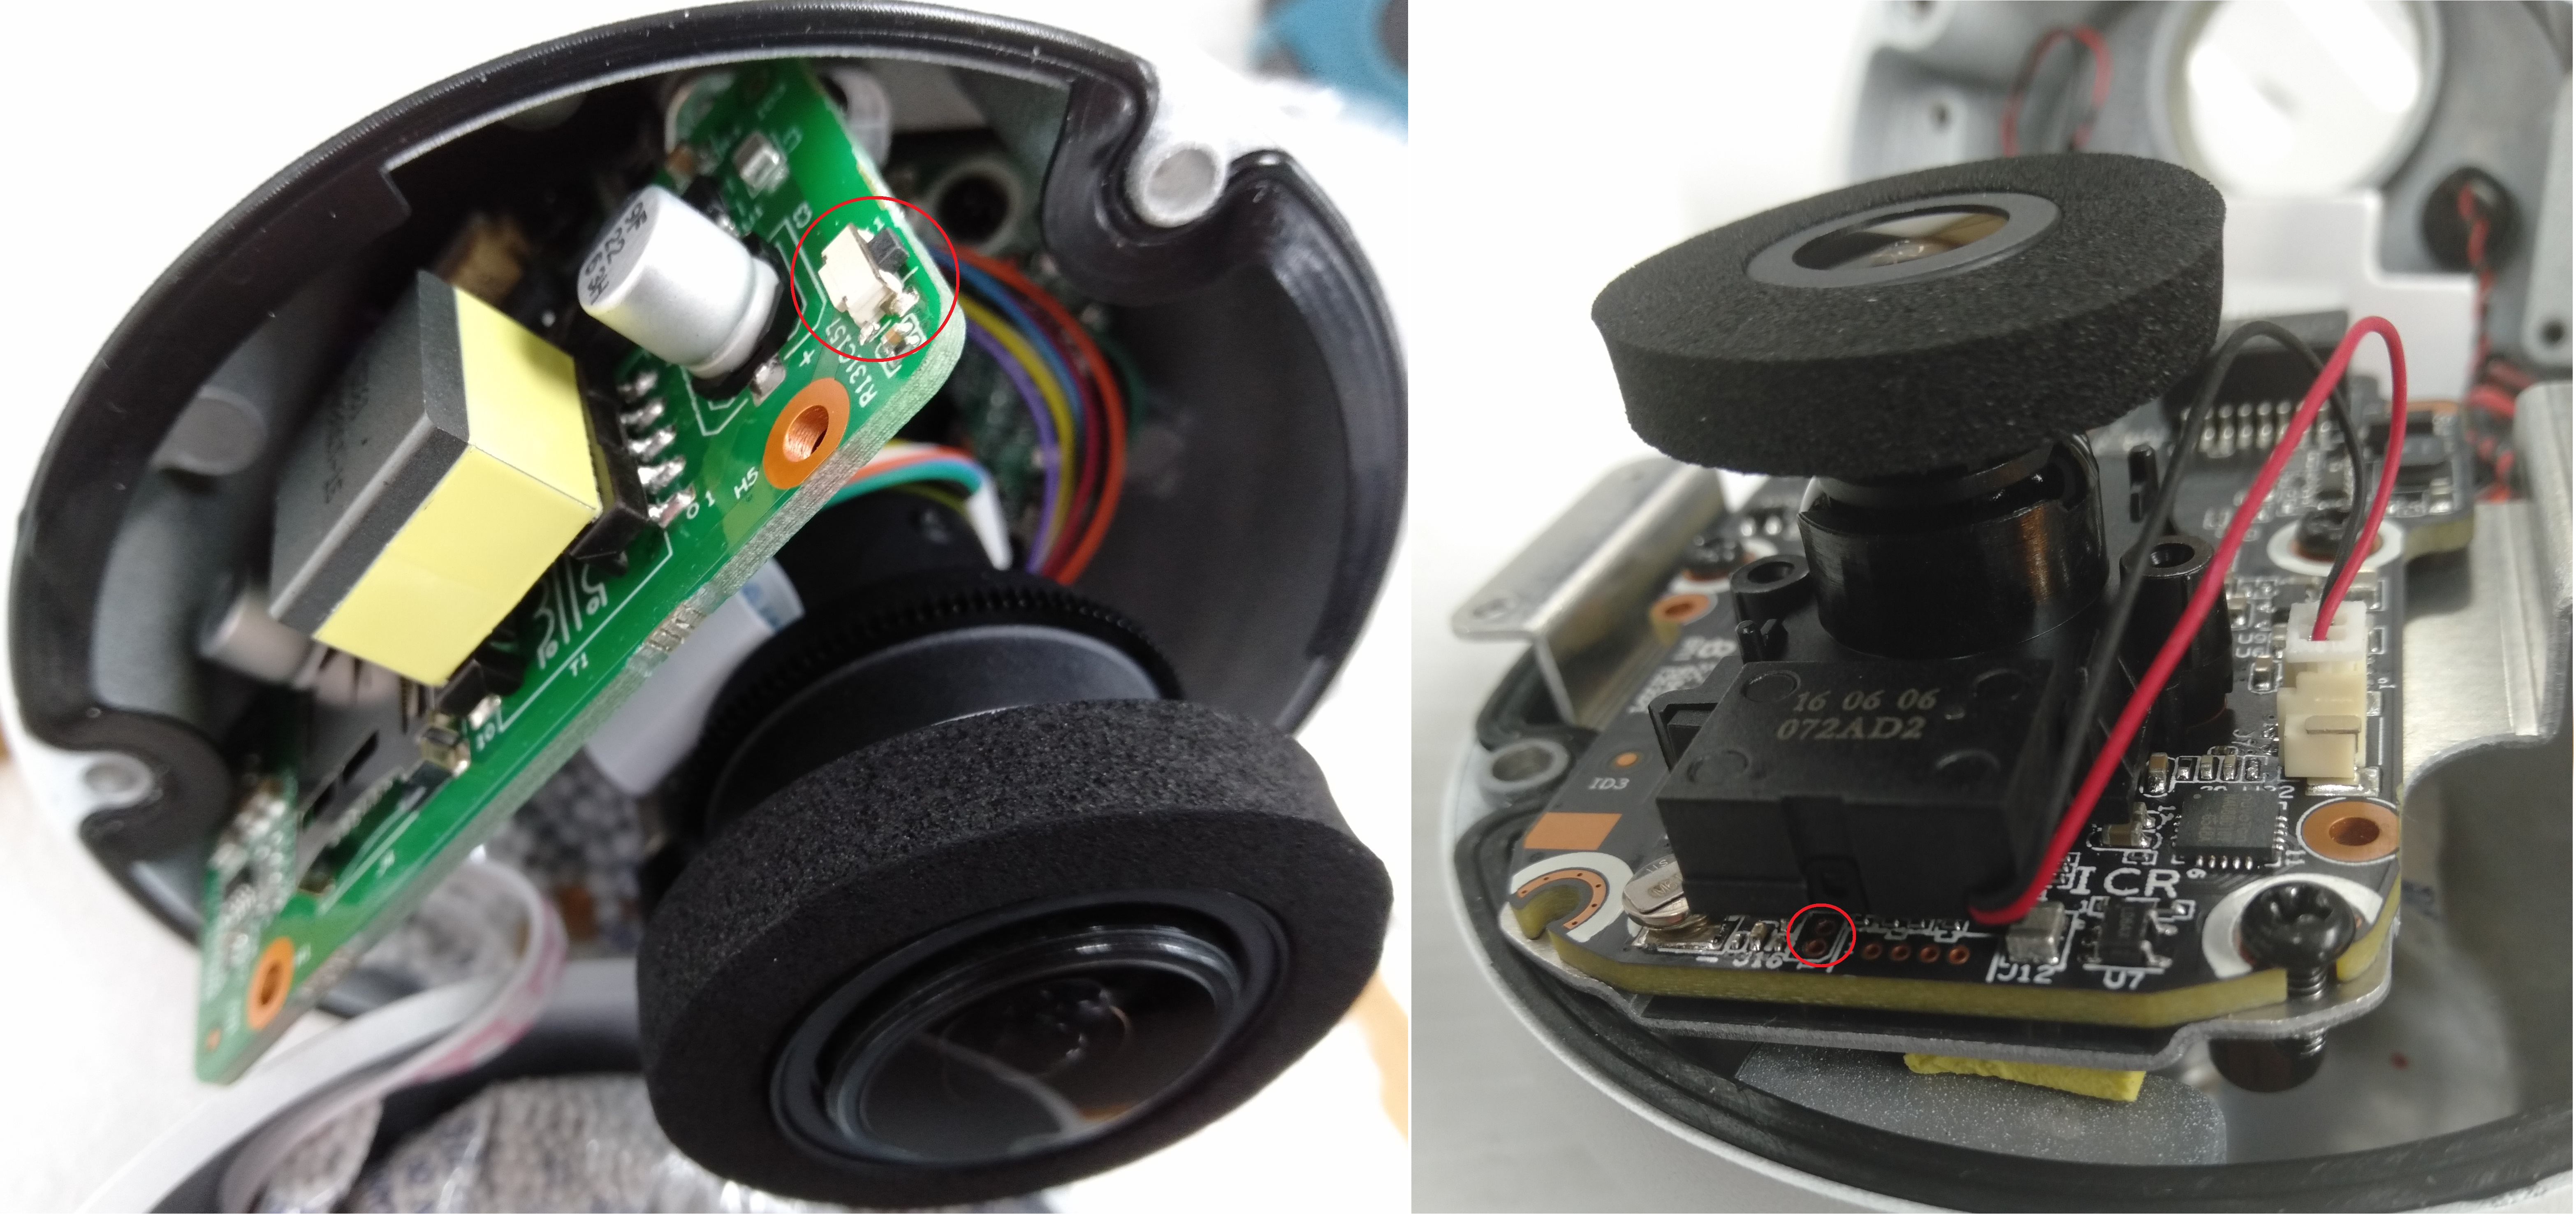
Once opened, the button will on the edge of the mainboard (see left image), press and hold this button for 30 seconds while the camera is powered on. In some cases you may need to undo two screws holding the mainboard in place, as the the button may be on the underside or on the second board.
When no button can be found, the reset may be performed by shorting two copper pads (see right image) for 30 seconds using a paperclip while the camera is powered on.
Vandal Dome Cameras
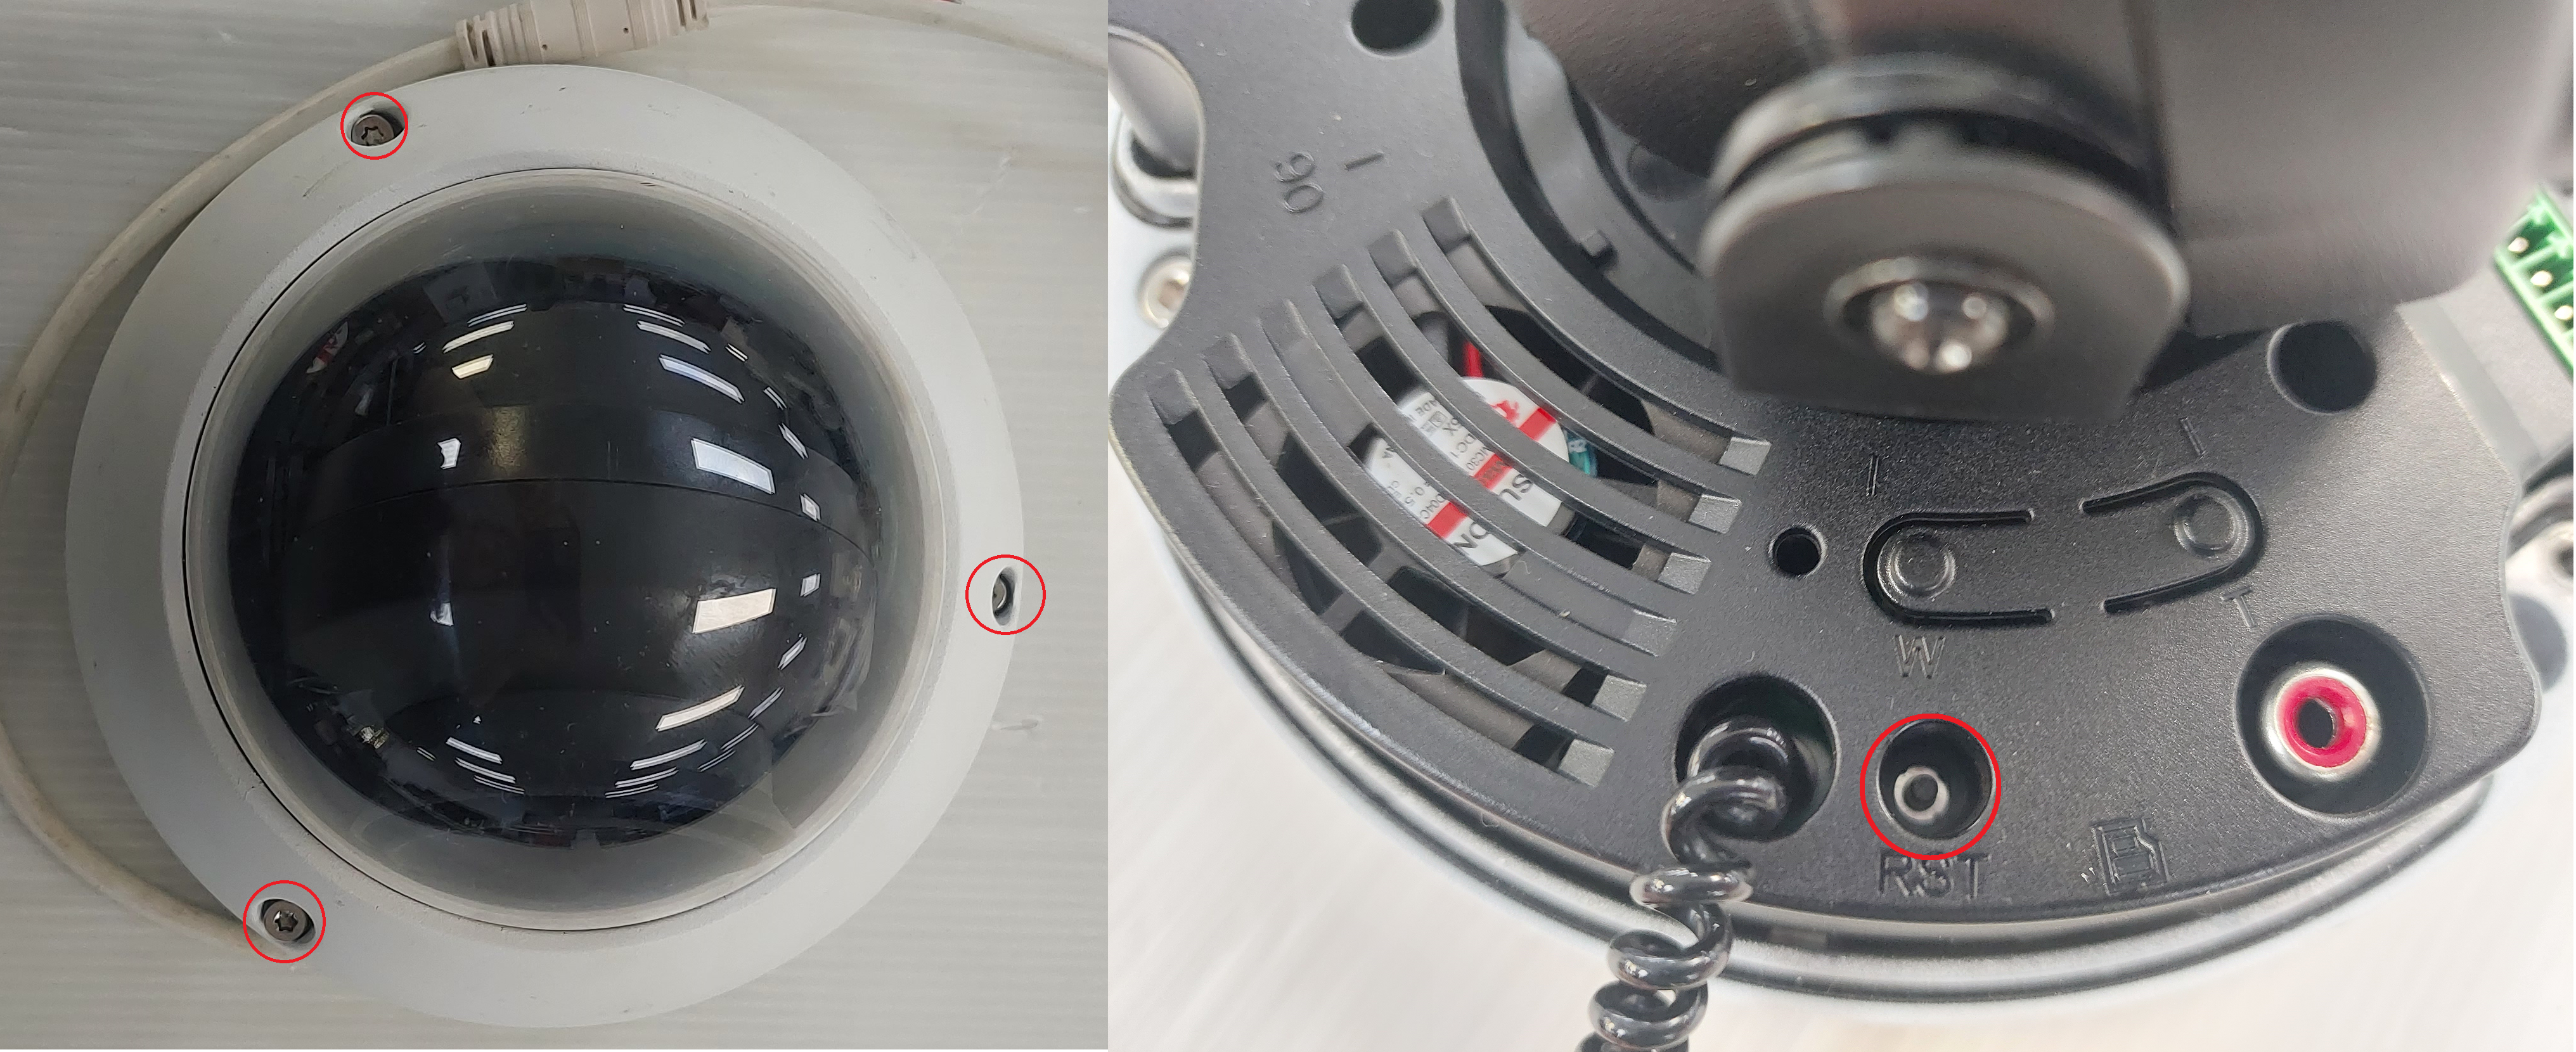
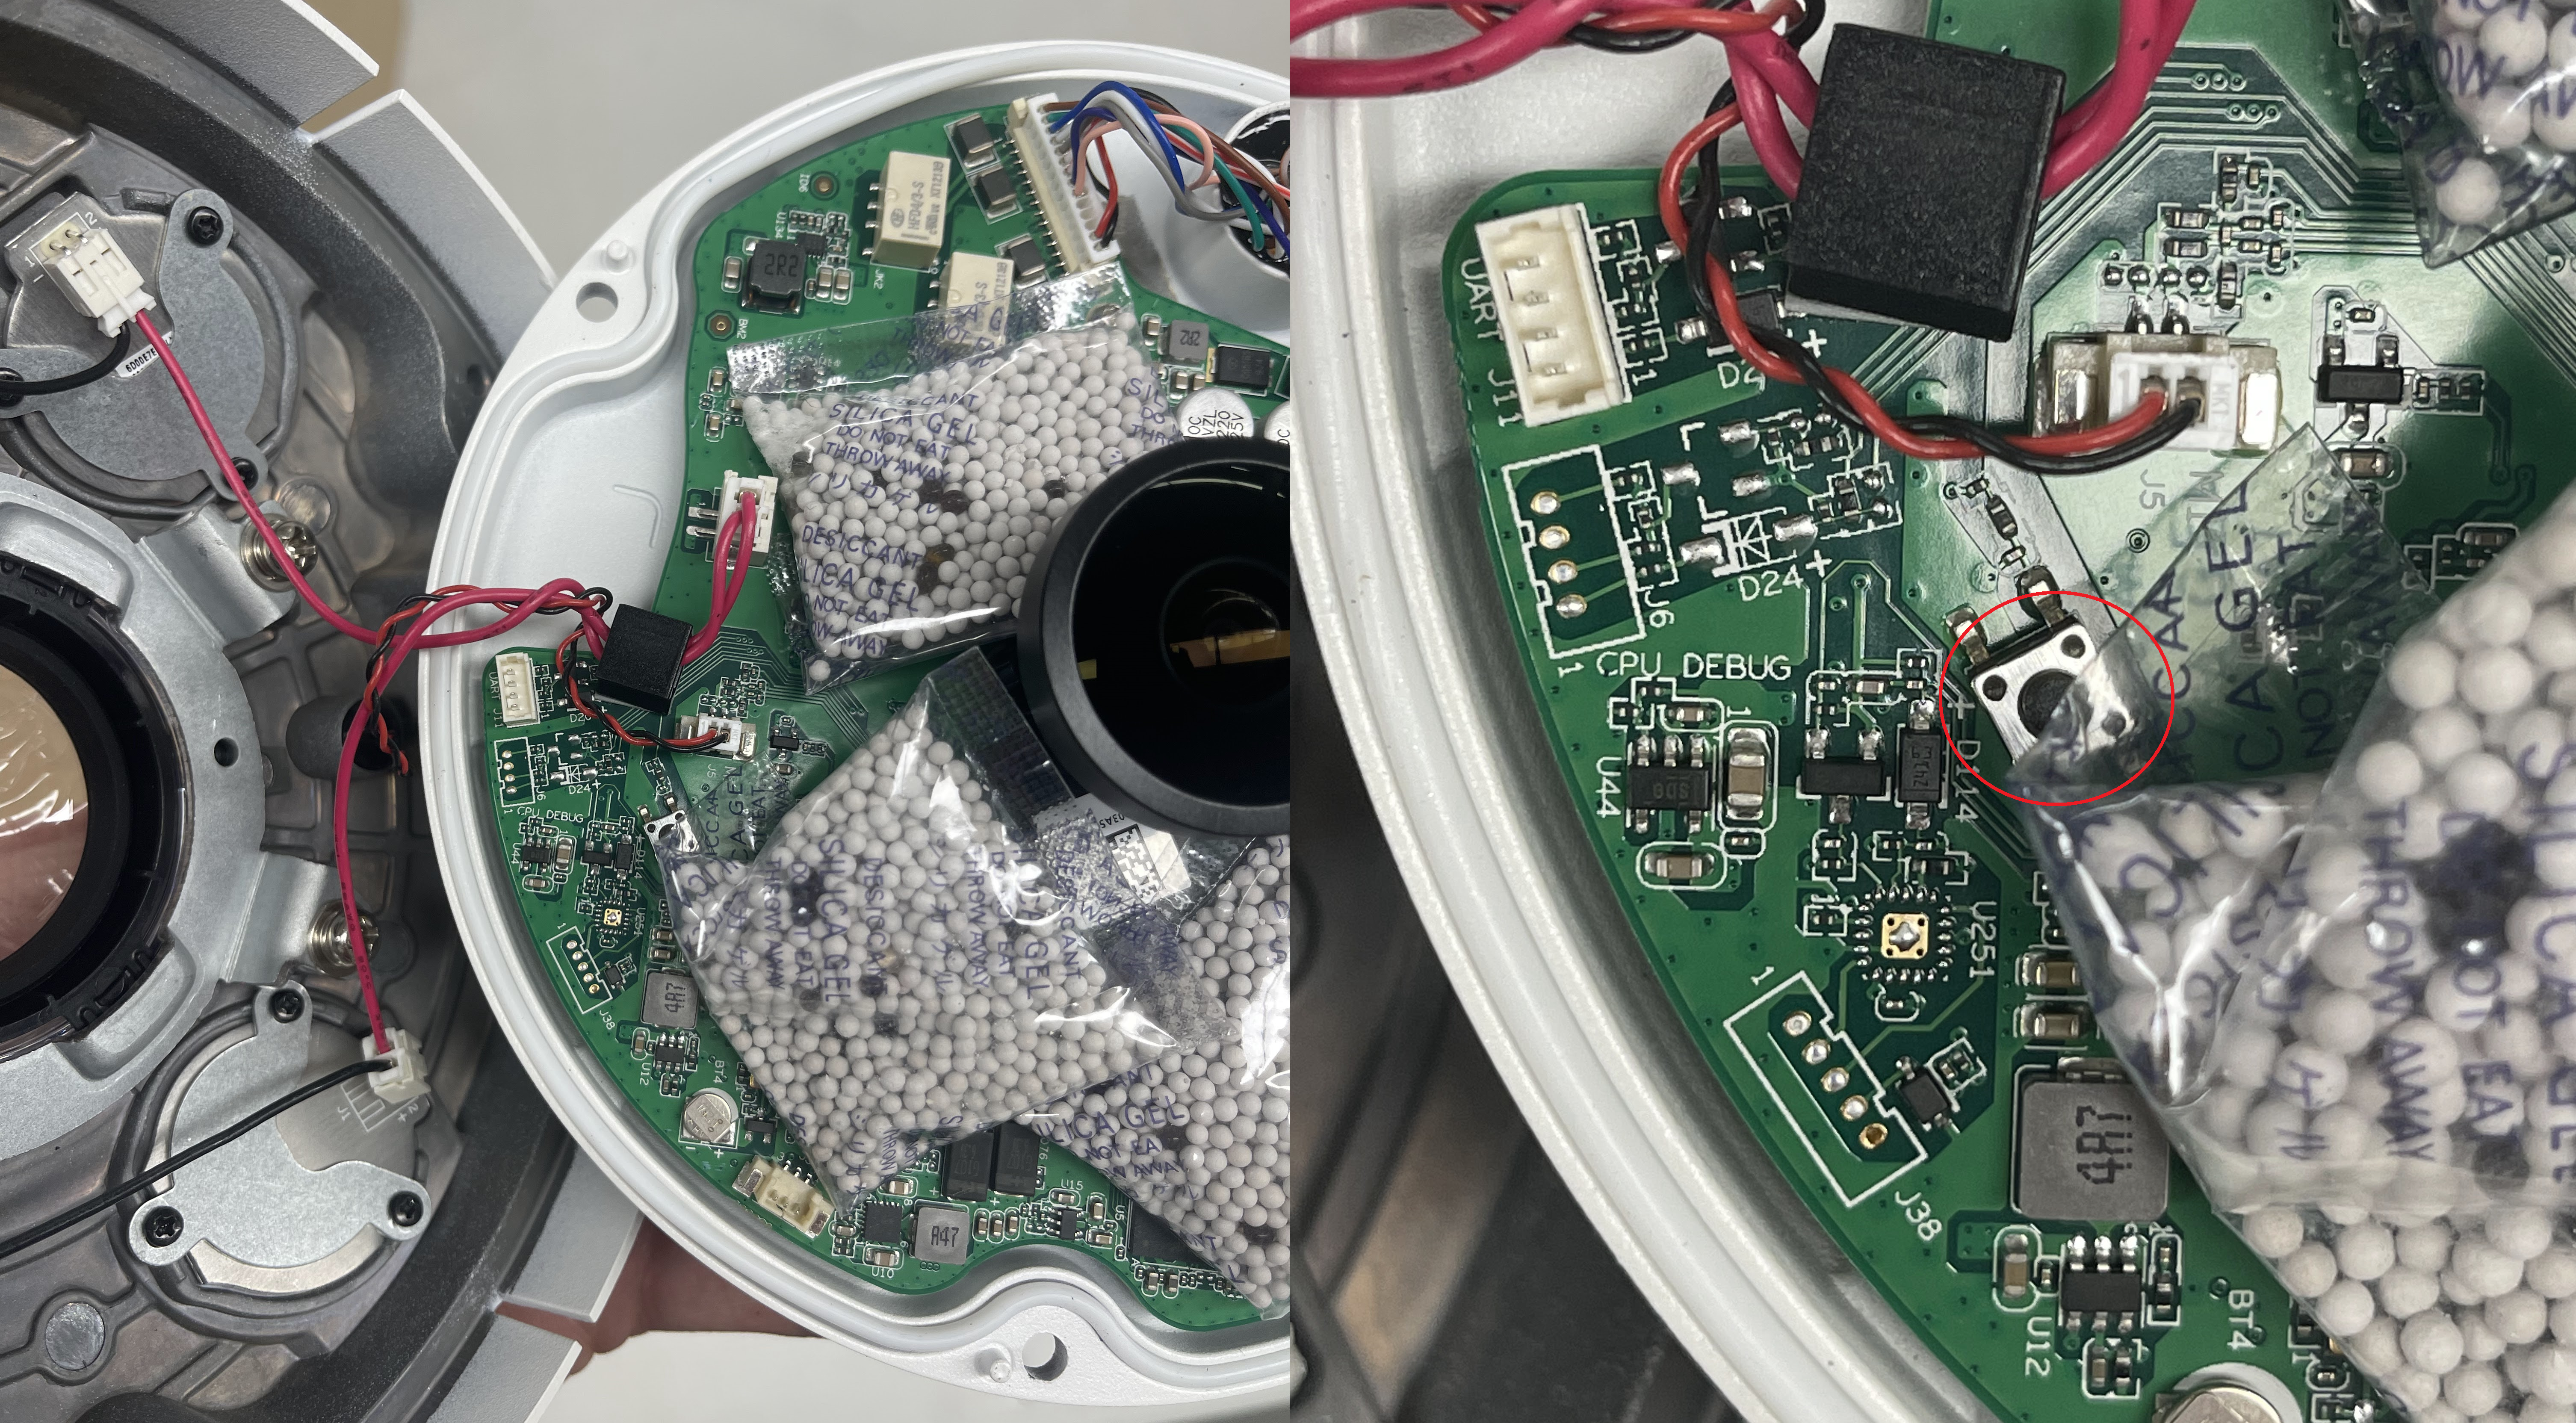
To access the reset button on large vandal dome cameras, you will need to first remove the vandal dome (see left image) by removing 3 screws.
The most common style of reset button will be the one in the middle image. Press and hold it for 30 seconds while the camera is powered on to reset it.
If there is no button, there may be copper pads you can short out for 30 seconds to reset the camera (right side of right image). There may also be four silver pads located where the reset button would usually be (left side of right image) you can short out two of vertically or diagonally for 30 seconds to reset the camera. Do not attempt to short any other part of the camera as you may cause irreversible damage.
Large Vandal Dome Cameras
To access the reset button on large vandal dome cameras, you will need to first remove the vandal dome (see left image) by removing 3 screws.
The reset button will then be located toward the edge of the housing, recessed into the plastic (see right image). Press and hold the button for 30 seconds to reset the camera.
Bullet Cameras
Most Bullet Cameras will have a flap that will reveal the MicroSD card slot and reset button. Press and hold the button for 30 seconds to reset the camera. Some cameras will not have a reset button, instead they will have two copper pads (see right image) which you can short out with a paperclip for 30 seconds to reset the camera.
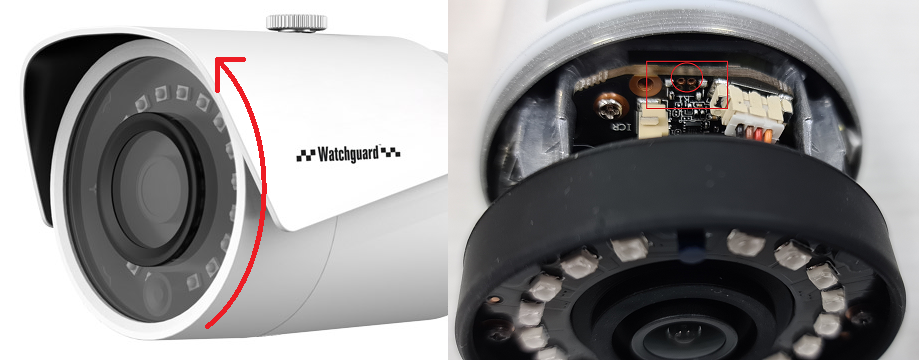
Bullet cameras without a flap
For cameras without a reset flap you will need to remove the front of the camera (e.g by unscrewing it for cylindrical cameras) to access the reset button. Some cameras will have a physical button to press and hold for 30 seconds to reset it. Other cameras (see right image) will have copper pads to short out for 30 seconds to reset the camera.
Bullet Camera reset locations for specific models
Delete
PTZ Cameras
PTZ Camera reset locations for specific models
|
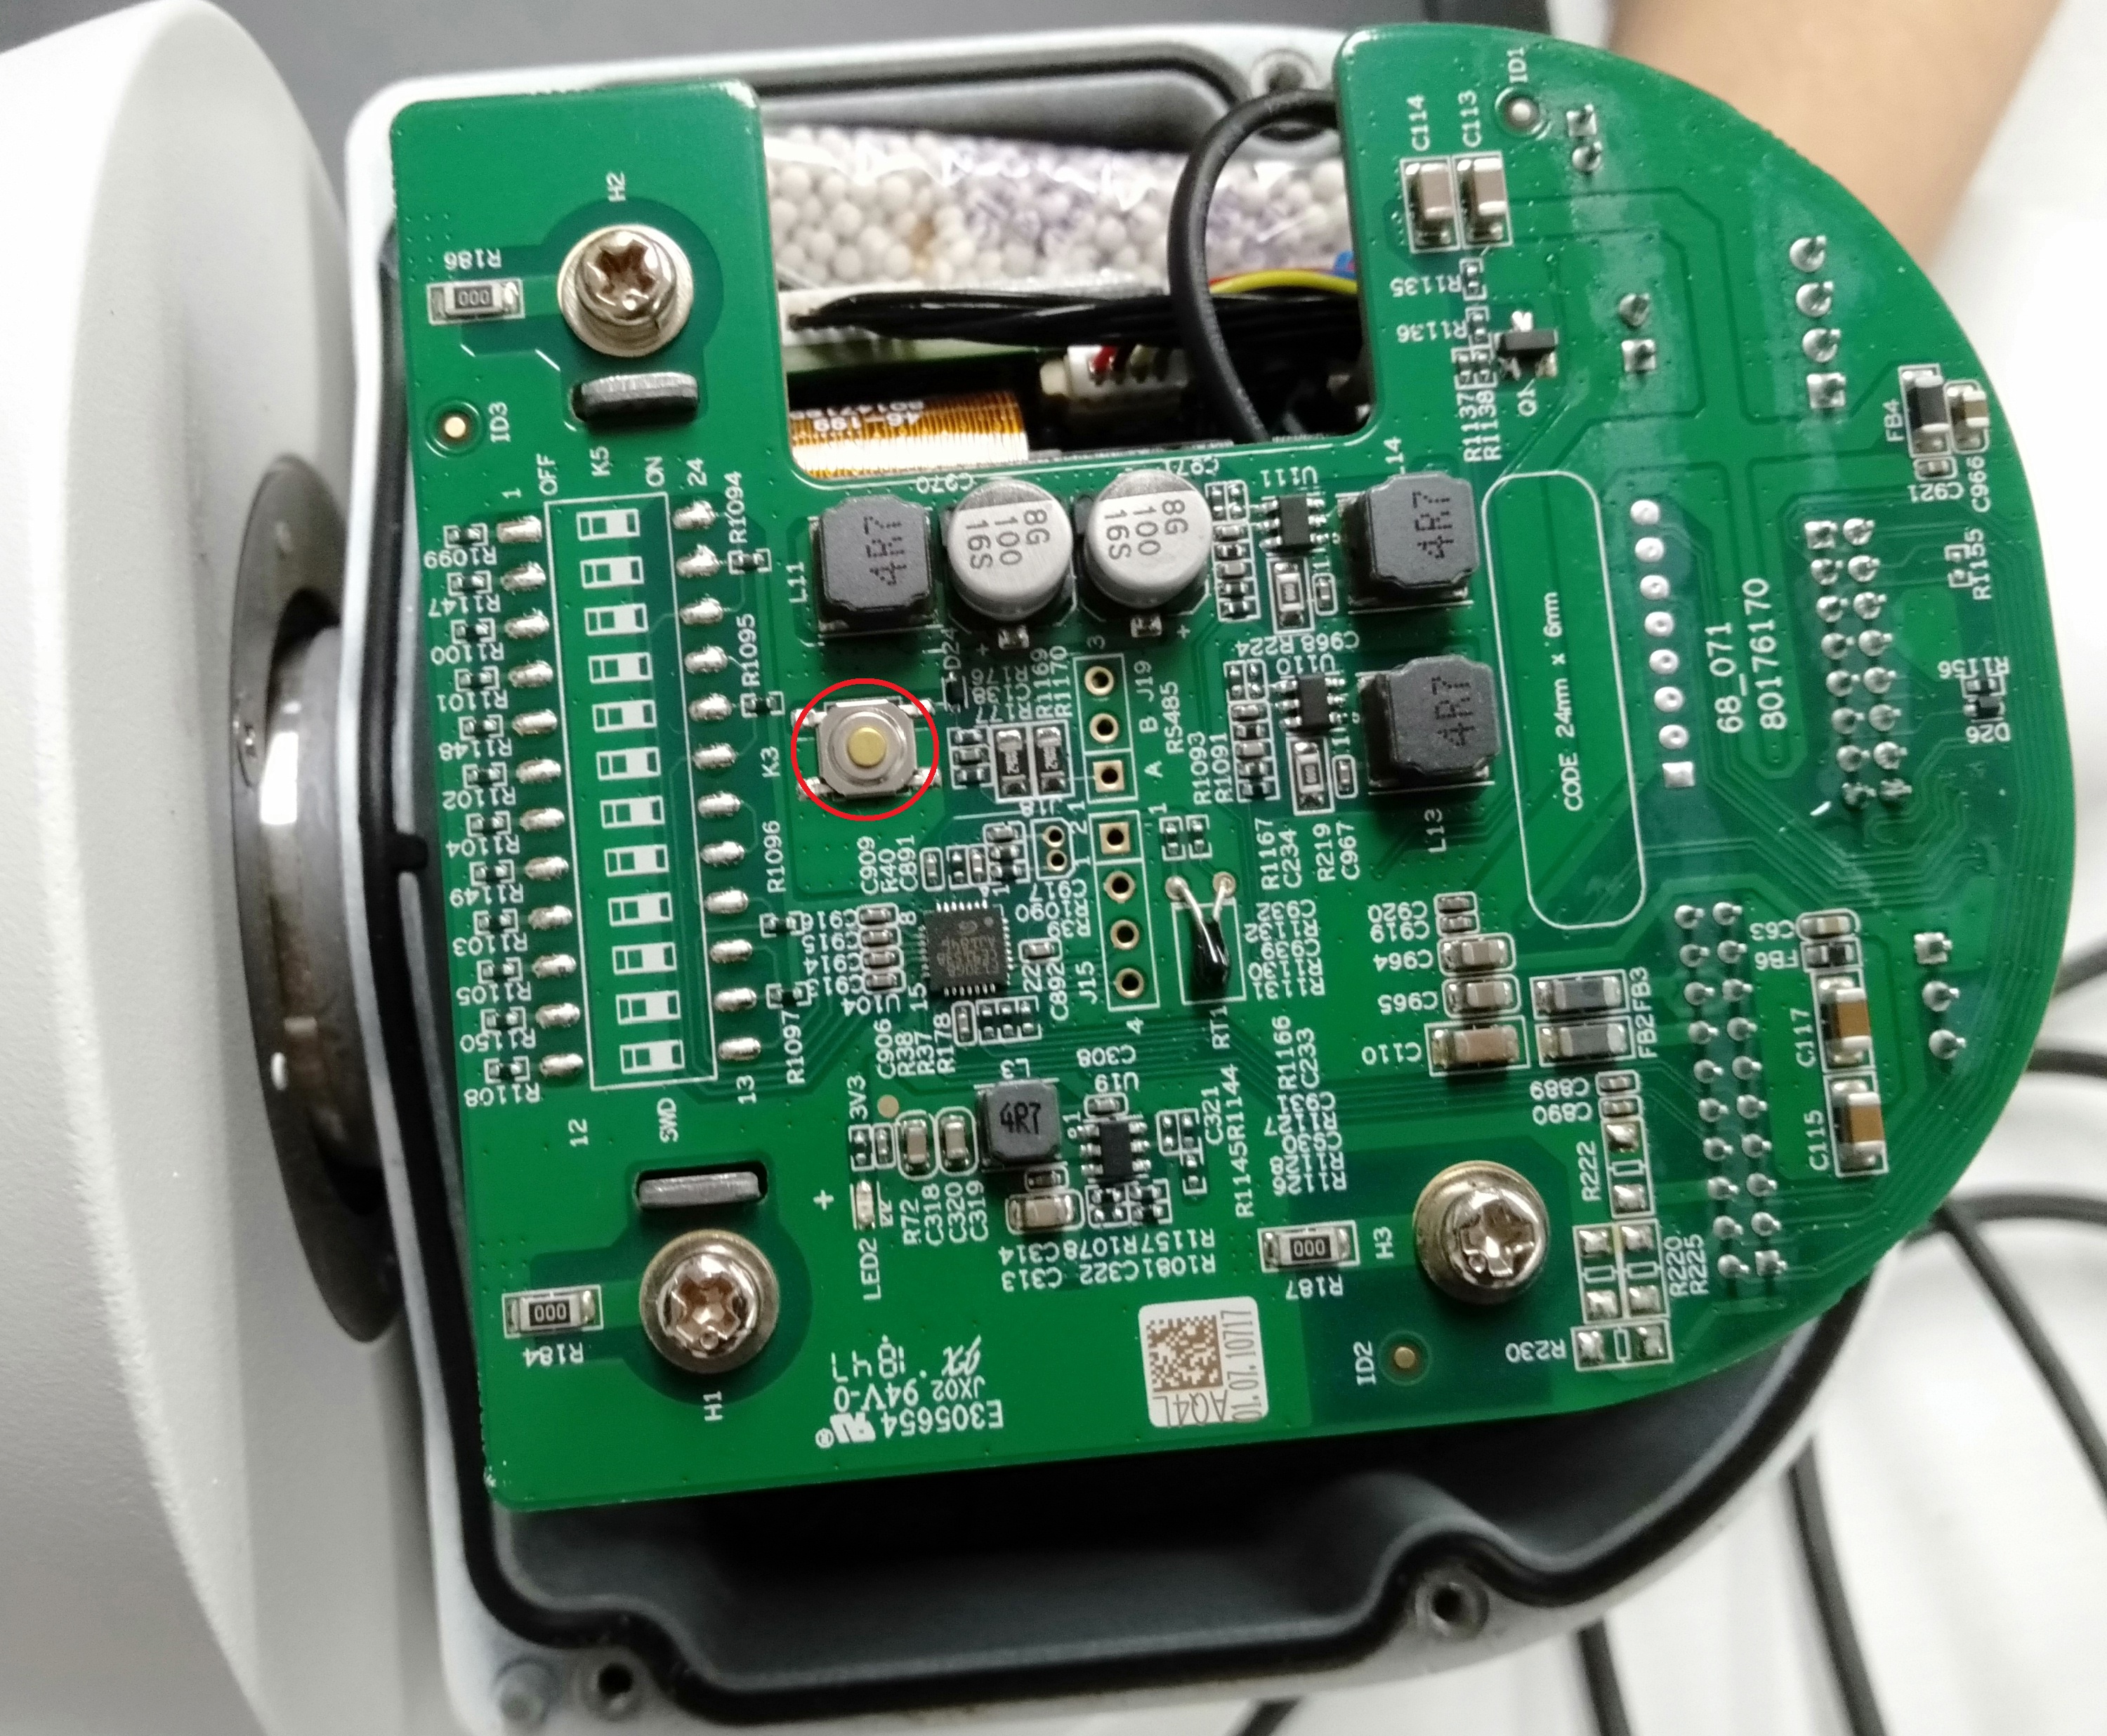
VIP2MPPTZIRW You will have to undo 4 screws on the back to get access. |
 |
|
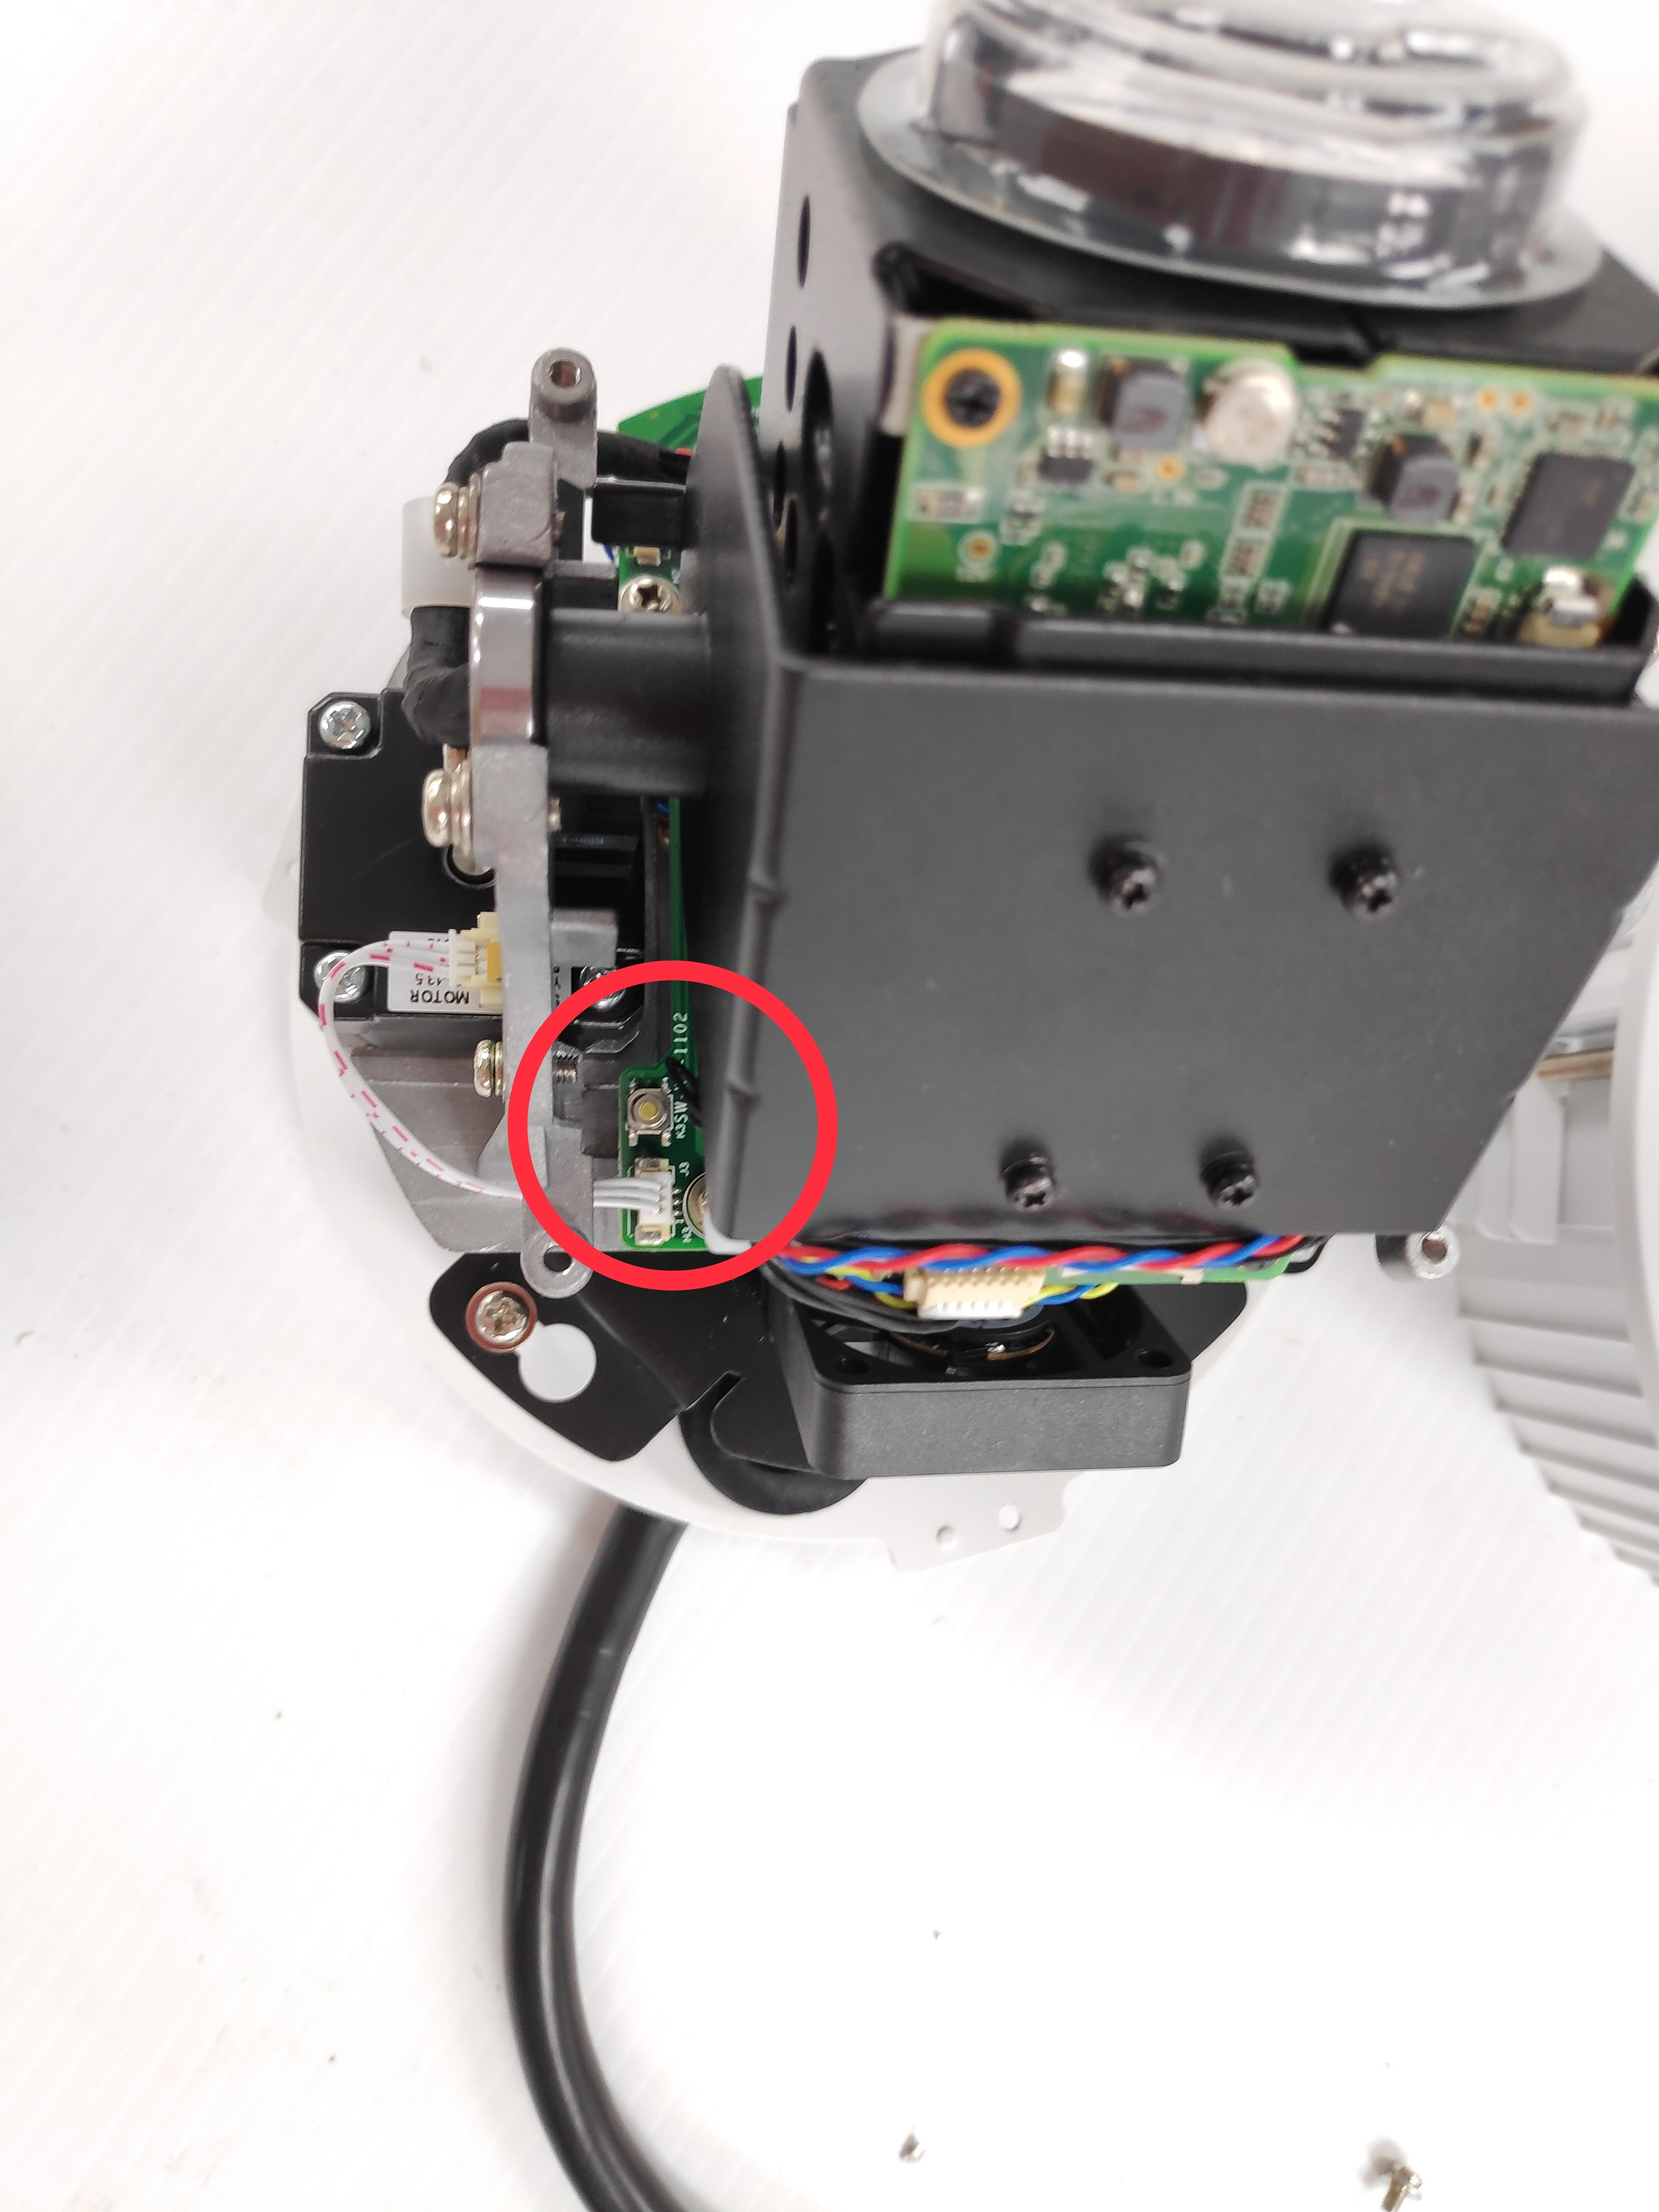
VSIP2MPPTZCV3 Remove the outer shell and round lens cover (4 x Phillips screws) Press & hold button for 30 seconds. |
 |
|
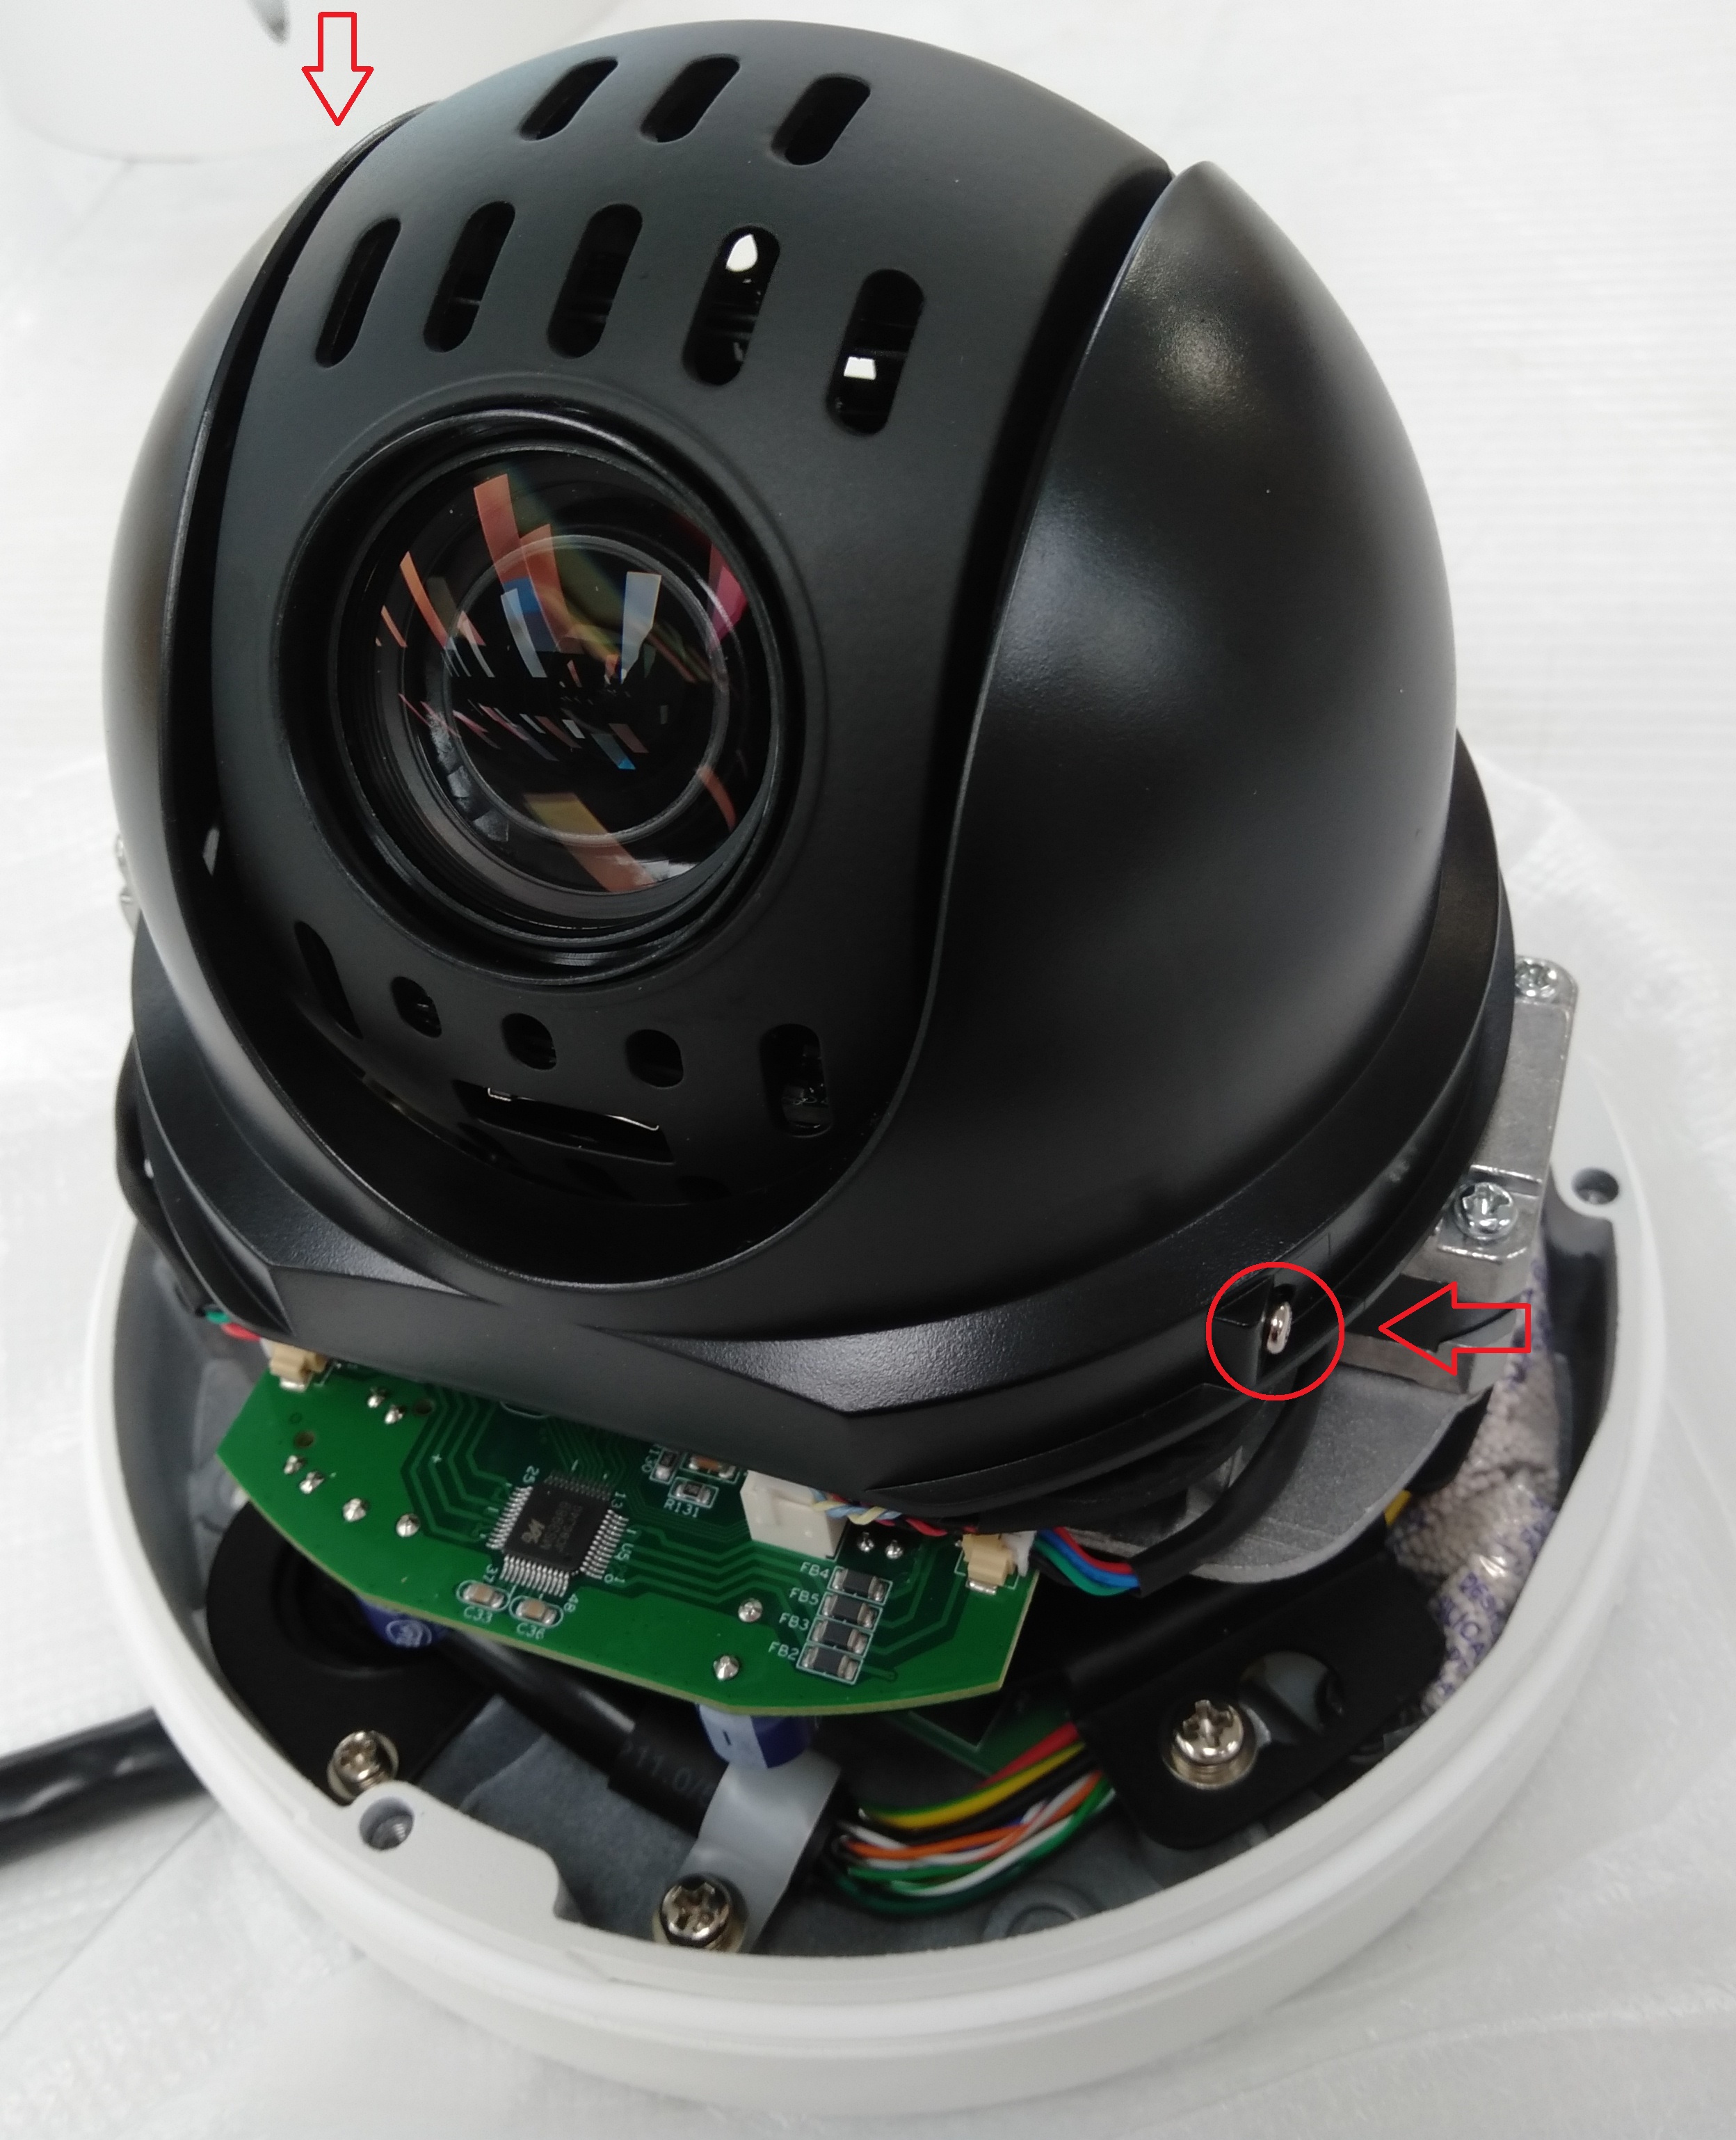
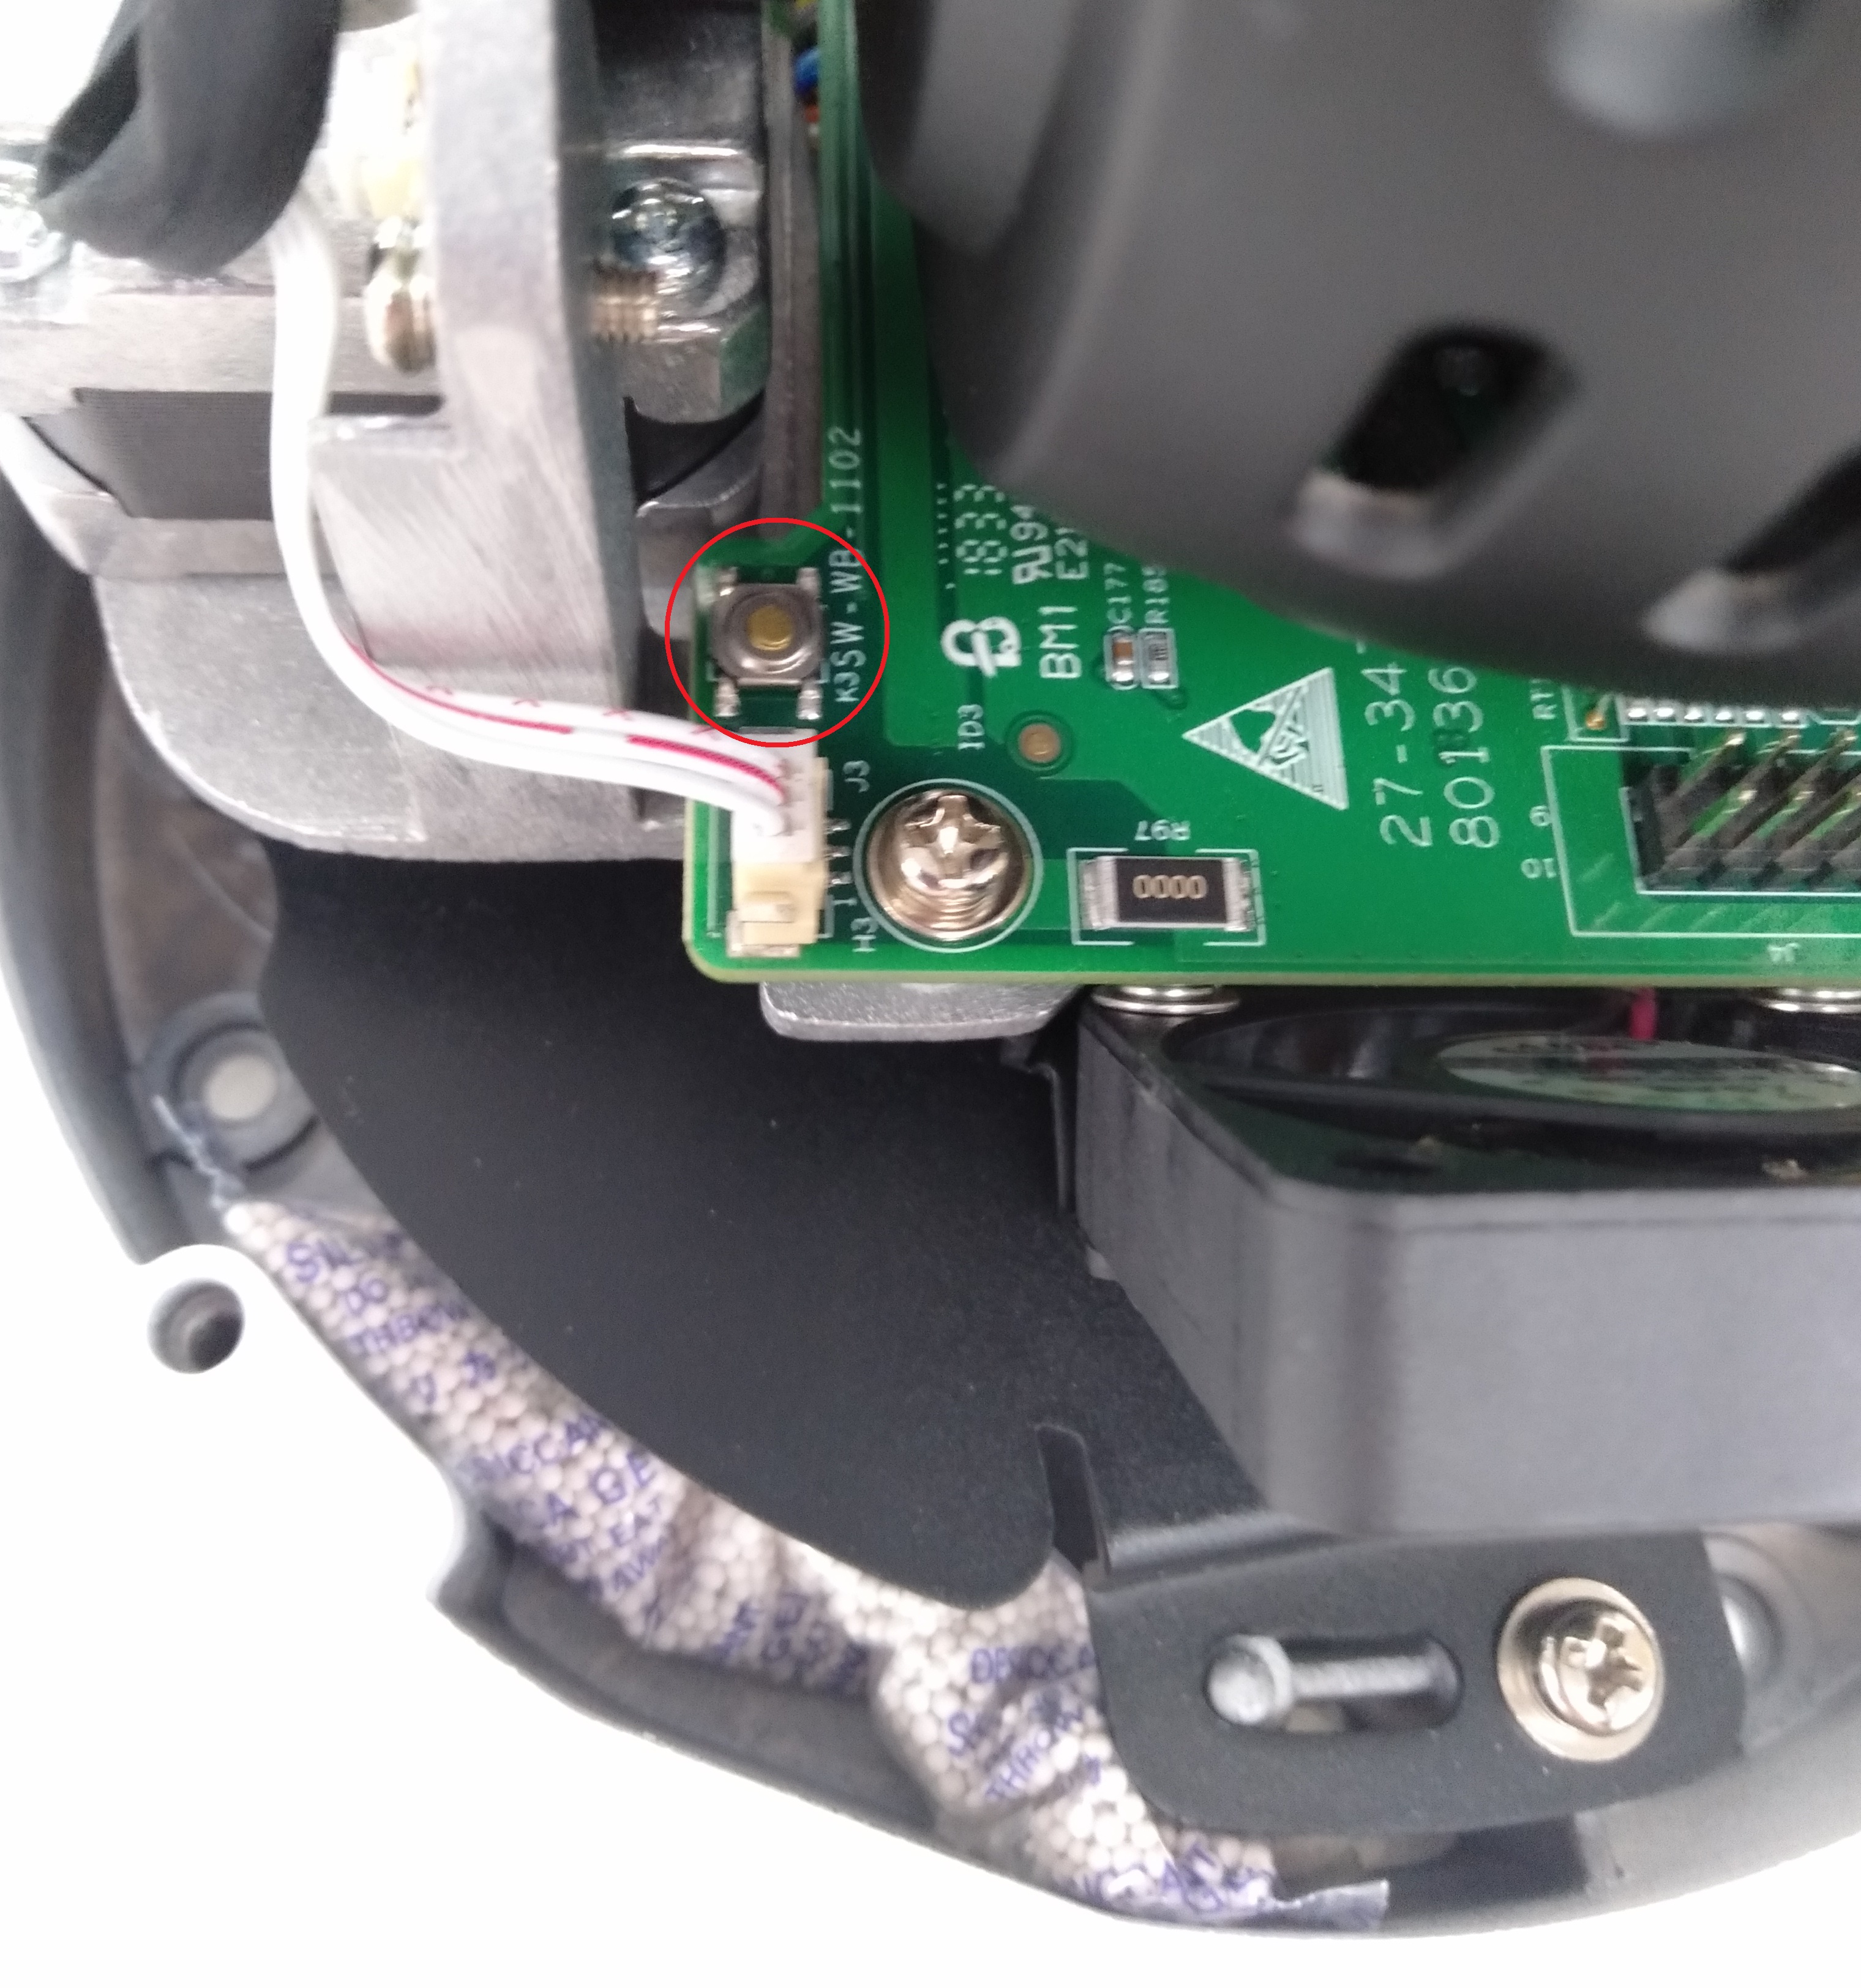
VSIP2MPPTZV3 There will be two screws on opposite sides that you will need to remove to take the plastic housing off. Then Press & hold the golden button for 30 seconds to reset the camera. |
|
Delete
Fisheye Cameras
To reset a fisheye camera, you will need to undo three screws on the base of the camera to expose the mainboard.
Once the Mainboard is exposed, press and hold the reset button for 30 seconds to reset the camera.
You will then need to initialise and add the camera to the recorder again.
Camera Initialisation Guide
What is camera initialisation?
When configuring a new IP camera for the first time (or after a factory reset), an initialisation process must be performed before the camera can be used. This process was introduced to enhance security by removing the default «admin» password, instead adding a method for the installer to create this password themselves during installation.
When do you need to initialise a camera?
On recorders released after January 2018 this process can be performed through the recorder user interface — On recorders with inbuilt PoE ports this process happens automatically and the current recorder «admin» password is copied to the cameras. Any recorder built before this date will need to have cameras initialised manually using a PC / Laptop before they can be used.
If you are installing multiple cameras that will be connected to an external PoE switch, the cameras will need to initialised, the quickest way of doing so is by following method 1 below and initialising cameras in a bulk lot.
Method 2: Initialization using the Web Interface
This method does not involve the use of the Config Tool software, this method can be used if you have a single camera to setup and do not have access to the internet to download Config Tool.
Accessing the Camera for Setup
The Camera will need to be connected to the Laptop via an Ethernet cable.
You can access the Web Interface by entering the camera’s IP address into the address bar of Internet Explorer. 192.168.1.108 is the default IP of our cameras.
You may need to change the IP address of your laptop to reach it.
Changing the IP address on a Windows Computer
Delete
Delete
Old GUI (Grey)
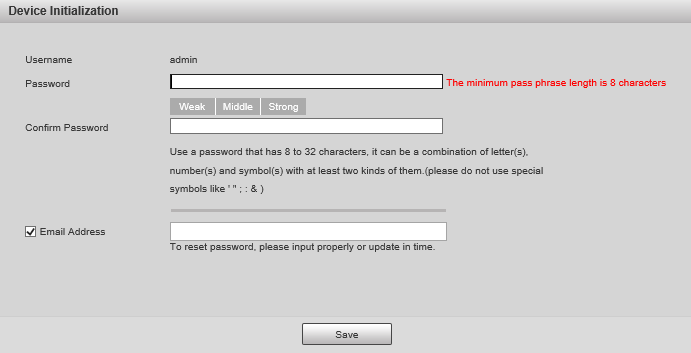
Initialize the camera by entering a new password (It will need to be at least 8 characters long), then click Save.
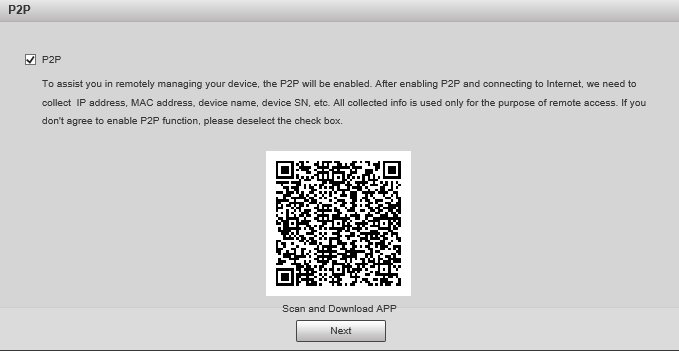
Ensure P2P is enabled and click Next
Click Next.
If prompted, select a region and click Save
Delete
Camera plugged into back of an NVR
If you know the password of the camera, you will just need to update the password of the camera in Camera Registration.
(Black GUI) Update Password in Camera Registration
Open Camera Registration by right clicking and selecting Main Menu > Camera > Camera List
Click on the Modify pencil of the camera with the error. It’s Status will likely be red.
Enter the password of the Camera (You would have set this during the initialisation process in Config Tool) and click «Connect», then «OK».
If you still see the Account Locked error, you may need to reboot the camera by unplugging it briefly.
(Blue GUI) Update Password in Camera Registration
Open Camera Registration by right clicking and selecting «Camera Registration» OR by Navigating to Main Menu > Camera > Registration
Click on the Modify pencil of the camera with the error. It’s Status will likely be red.
Enter the password of the Camera (You would have set this during the initialisation process in Config Tool) and click «Connect», then «OK».
If you still see the Account Locked error, you may need to reboot the camera by unplugging it briefly.
If you don’t know the password of the camera, you will need to reset it.
Reset IP Camera Guide
Turret Cameras
Reset Button under Flap
AI turret cameras, or turret cameras built post 2021 usually have their reset button located under a flap next to the MicroSD card slot. Press and hold the reset button for 30 seconds while the camera is powered on to reset the camera.
Reset Button on Mainboard
Cameras built pre-2021 require the camera to be opened to expose the mainboard.
Once opened, the button will on the edge of the mainboard (see left image), press and hold this button for 30 seconds while the camera is powered on. In some cases you may need to undo two screws holding the mainboard in place, as the the button may be on the underside or on the second board.
When no button can be found, the reset may be performed by shorting two copper pads (see right image) for 30 seconds using a paperclip while the camera is powered on.
Vandal Dome Cameras
To access the reset button on large vandal dome cameras, you will need to first remove the vandal dome (see left image) by removing 3 screws.
The most common style of reset button will be the one in the middle image. Press and hold it for 30 seconds while the camera is powered on to reset it.
If there is no button, there may be copper pads you can short out for 30 seconds to reset the camera (right side of right image). There may also be four silver pads located where the reset button would usually be (left side of right image) you can short out two of vertically or diagonally for 30 seconds to reset the camera. Do not attempt to short any other part of the camera as you may cause irreversible damage.
Large Vandal Dome Cameras
To access the reset button on large vandal dome cameras, you will need to first remove the vandal dome (see left image) by removing 3 screws.
The reset button will then be located toward the edge of the housing, recessed into the plastic (see right image). Press and hold the button for 30 seconds to reset the camera.
Bullet Cameras
Most Bullet Cameras will have a flap that will reveal the MicroSD card slot and reset button. Press and hold the button for 30 seconds to reset the camera. Some cameras will not have a reset button, instead they will have two copper pads (see right image) which you can short out with a paperclip for 30 seconds to reset the camera.
Bullet cameras without a flap
For cameras without a reset flap you will need to remove the front of the camera (e.g by unscrewing it for cylindrical cameras) to access the reset button. Some cameras will have a physical button to press and hold for 30 seconds to reset it. Other cameras (see right image) will have copper pads to short out for 30 seconds to reset the camera.
Bullet Camera reset locations for specific models
Delete
PTZ Cameras
PTZ Camera reset locations for specific models
|
VIP2MPPTZIRW You will have to undo 4 screws on the back to get access. |
 |
|
VSIP2MPPTZCV3 Remove the outer shell and round lens cover (4 x Phillips screws) Press & hold button for 30 seconds. |
 |
|
VSIP2MPPTZV3 There will be two screws on opposite sides that you will need to remove to take the plastic housing off. Then Press & hold the golden button for 30 seconds to reset the camera. |
 
|
Delete
Fisheye Cameras
To reset a fisheye camera, you will need to undo three screws on the base of the camera to expose the mainboard.
Once the Mainboard is exposed, press and hold the reset button for 30 seconds to reset the camera.


