Symptoms
Confluence is installed via the installer, as a service. This can happen to Standalone installations as well, though the probability would be much lesser. Confluence is setup to use the Evaluation/Embedded Database (HSQLDB). The installation fails with this message on screen:
The following appears in the atlassian-confluence.log:
2013-08-06 20:29:13,901 ERROR [http-8090-1] [sf.hibernate.util.JDBCExceptionReporter] logExceptions user lacks privilege or object not found: BANDANA
 -- referer: http://localhost:8090/setup/setuplicense.action;jsessionid=8E640305FC14823583841A95C4C4DC59 | url: /setup/dosetuplicense.action | userName: anonymous
2013-08-06 20:29:13,931 ERROR [http-8090-1] [[Standalone].[localhost].[/].[action]] log Servlet.service() for servlet action threw exception
org.springframework.jdbc.BadSqlGrammarException: Hibernate operation: Could not execute query; bad SQL grammar []; nested exception is java.sql.SQLSyntaxErrorException: user lacks privilege or object not found: BANDANA
Cause
Insufficient file system privilege for the user running Confluence to read/write/delete files in the Confluence Home and other important directories or the Confluence Installation Directory.
Resolution
- Make sure that the user running Confluence has all the file system privileges to read/write/delete files in Confluence Home Directory and the Confluence Installation Directory
- For Windows, simply right click on the Confluence Home Directory and Confluence Installation Directory, click Properties, and then the Security tab. Make sure that the necessary permissions are given to the user running Confluence
-
For Linux, make sure that you chown the Confluence Home Directory and the Confluence Installation Directory to the user running Confluence. Example:
chown -R confluence:confluence confluence
chown -R confluence:confluence confluencehome
- Remove the following folders from the Confluence Home Directory:
bundled-pluginsplugins-cacheplugins-osgi-cacheplugins-tempdatabaseconfluence.cfg.xml
- Restart Confluence, which will restart the Setup Wizard again
Last modified on Nov 18, 2016
Related content
- No related content found
I am in the process of moving an existing Confluence installation to have the users managed by crowd.
To avoid doing my testing in the production environment I’ve installed an evaluation Confluence where I planned to import two spaces and existing users.
However I’ve run into a «Set up step error» in the setup with seemingly no way to get out of it.
I got to the step «Load Content» and selected «Restore from backup» and tried to install the space I had exported from the existing Confluence, and was told that at this stage I could only import a complete backup.
And there was no abort button or back button and no way forward, so I tried the back button on the browser.
When I was back in «Load content» I tried pressing «Empty site» but was greeted with «Set up step error».
I tried back button in the browser again, and then «Example site» but got a «Set up step error» again.
Is there a way out of this other than scrubbing the installation and starting fresh?
2 answers
Suggest an answer

Still have a question?
Get fast answers from people who know.
Was this helpful?
Thanks!
ВНИМАНИЕ!!!
Информация ниже относительно настройки лицензии только для ознакомления и личного использования!
Для коммерческого использования обязательно купите лицензию! Для изучения включите демоверсию.
Далее информация только для ознакомления! Автор не несет ответственности за последствия!
Подготовка
Установим все последние обновления.
После установим нужны часовой пояс сервера.
timedatectl set-timezone Europe/Moscow
Проверим, что параметры установлены корректно.
date

# Пример вывода:
# Sun 10 Apr 2022 09:49:47 PM MSK
Не забываем установить Java:
apt-get install default-jdk
Идем дальше.
Установим СУБД
Установка PostgreSQL для работы базы данных Confluence. На момент написания инструкции это 14 версия СУБД.
# Создаем файл конфигурации репозитория
sudo sh -c 'echo "deb http://apt.postgresql.org/pub/repos/apt $(lsb_release -cs)-pgdg main" > /etc/apt/sources.list.d/pgdg.list'

# Импортируем ключ для подписи репозитория
wget --quiet -O - https://www.postgresql.org/media/keys/ACCC4CF8.asc | sudo apt-key add -

# Обновляем список доступных пакетов
sudo apt-get update

# Устанавливаем последнюю версию PostgreSQL
sudo apt-get -y install postgresql
После чего нужно выполнить начальные настройки. В самом простом виде нужно добавить возможность подключения со всех адресов. В файле postgresql.conf”” в параметр **listen_addresses нужно поставить значение *****.
Затем в файле pg_hba.conf добавим запись, чтобы пользователи могли подключаться с любого адреса с помощью логина и пароля.
# IPv4 local connections:
host  all   all   0.0.0.0/0   password
Перезапускаем PostgreSQL для принятия изменений.
systemctl restart postgresql
Остается добавить пользователя в PostgreSQL для приложения или других целей. Для простоты добавим привилигированного пользователя confluence.
Далее запускаем команду SQL.
CREATE ROLE confluence LOGIN SUPERUSER PASSWORD 'passwordstring';
На рабочем окружении обязательно меняем настройки PostgreSQL для оптимальной работы СУБД. (Вот этот инструмент может помочь](https://pgtune.leopard.in.ua/#/).
Тепер можно приступить к установке Confluence.
Установка Confluence
Скачиваем установщик Confluence с официального сайта.
wget https://www.atlassian.com/software/confluence/downloads/binary/atlassian-confluence-7.17.1-x64.bin
Делаем установщик доступным для запуска.
chmod a+x atlassian-confluence-7.17.1-x64.bin
И, внезапно, запускаем!
./atlassian-confluence-7.17.1-x64.bin

# По итогу каталог приложения будет: /opt/atlassian/confluence
# Каталог с данными: /var/atlassian/application-data/confluence
По окончанию установки можно перейти по адресу **http://<адрес_сервера>:8090** и проверить доступность приложения. Выполнять шаги мастера установки сейчас не требуется, нужно подготовить лицензию.
Интерактивно отвечаем на все вопросы. В основном, для большинства случаев, можно оставить параметры по умолчанию.
Установка лицензии
ВНИМАНИЕ!!!
Информация ниже только для ознакомления и личного использования!
Для коммерческого использования обязательно купите лицензию! Для изучения включите демоверсию.
Далее информация только для ознакомления! Автор не несет ответственности за последствия!
Для изучения полнофункциональных возможностей Confluence можно воспользоваться atlassian-agent и через него активировать лицензию на Confluence. Для этого идем по ссылке с репозитория сюда. Скачиваем atlassian-agent-v1.3.1.tar.gz.
wget https://gitee.com/pengzhile/atlassian-agent/attach_files/832832/download/atlassian-agent-v1.3.1.tar.gz
Для хранения агента создадим каталог и скопируем туда файл запуска приложения, предварительно распаковав архив.
mkdir /opt/atlassian/atlassian-agent
tar -xf atlassian-agent-v1.3.1.tar.gz
cp atlassian-agent-v1.3.1/atlassian-agent.jar /opt/atlassian/atlassian-agent/atlassian-agent.jar
Согласно инструкции из репозитория, добавим установки переменной окружения JAVA_OPTS в файл /opt/atlassian/confluence/bin/setenv.sh. В самом начале файла нужно добавить такую строку:
export JAVA_OPTS="-javaagent:/opt/atlassian/atlassian-agent/atlassian-agent.jar ${JAVA_OPTS}"
А также добавим права пользователю Confluence на каталоги приложения (не обязательно, но лучше удостовериться):
chown -R confluence:confluence /opt/atlassian/atlassian-agent
chown -R confluence:confluence /opt/atlassian/confluence
chown -R confluence:confluence /var/atlassian/application-data
Остается перезапустить службу и можно приступить к регистрации.
systemctl restart confluence
Рекомендую перед этим перезапустить хост и проверить состояние службы.
reboot

# Ждем перезапуска...

systemctl status confluence
Если ошибок нет, то идем дальше.
Регистрация
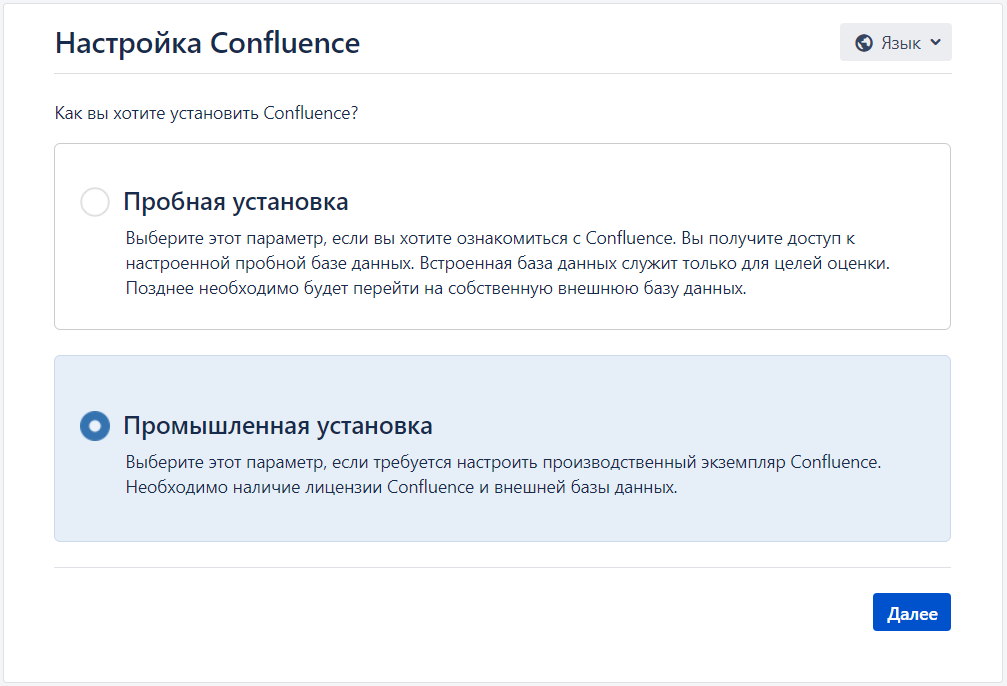
И так, заходим на страницу Confluence, выбираем установку продукта (Production Installation). на первой странице нам представят код вида XXXX-XXXX-XXXX-XXXX. Сохраните его для следующих шагов.
В консоли выполняем команду.
java -jar /opt/atlassian/atlassian-agent/atlassian-agent.jar -mail 'my@email.com' -n userName -o CompanyName -p conf -s XXXX-XXXX-XXXX-XXXX
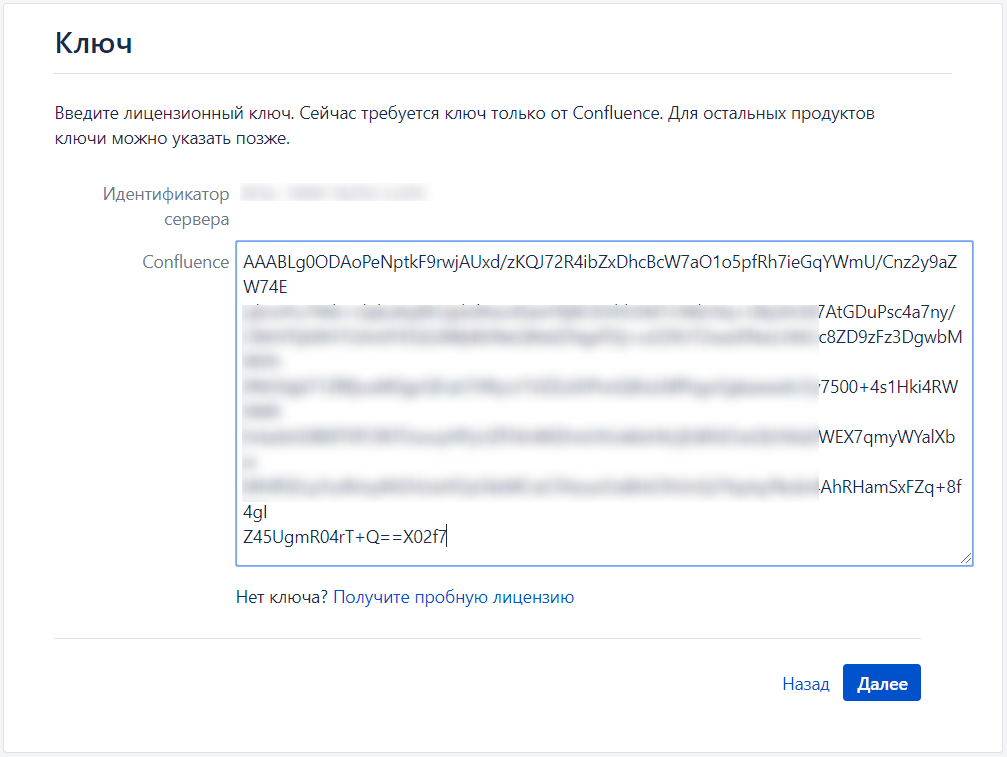
В ответ Вы получите лицензионный ключ, который нужно ввести на веб-странице.
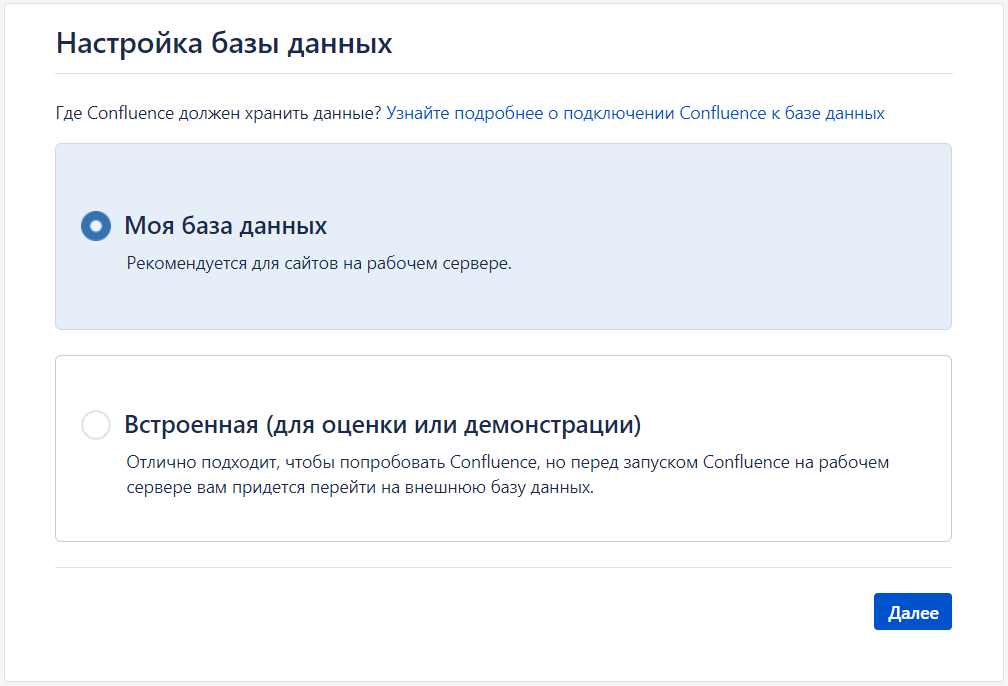
На следующем шаге выбираем “My own database”, чтобы настроить параметры подключения к базе данных самостоятельно. Тут нужно ввести имя сервера БД, тип (в нашем случае PostgreSQL), порт (5432), имя базы (предварительно нужно создать пустую базу и дать доступ для пользователя), пользователя и пароль. Перед переходом на следующий этап, мастер создаст необходимые объекты базы данных.
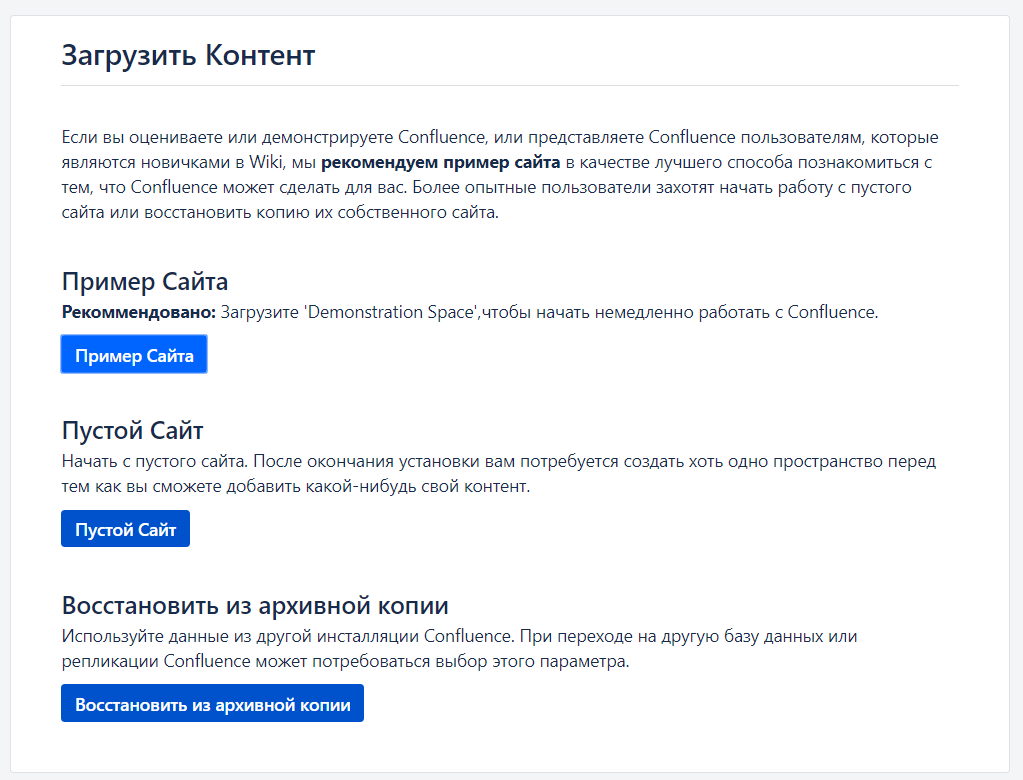
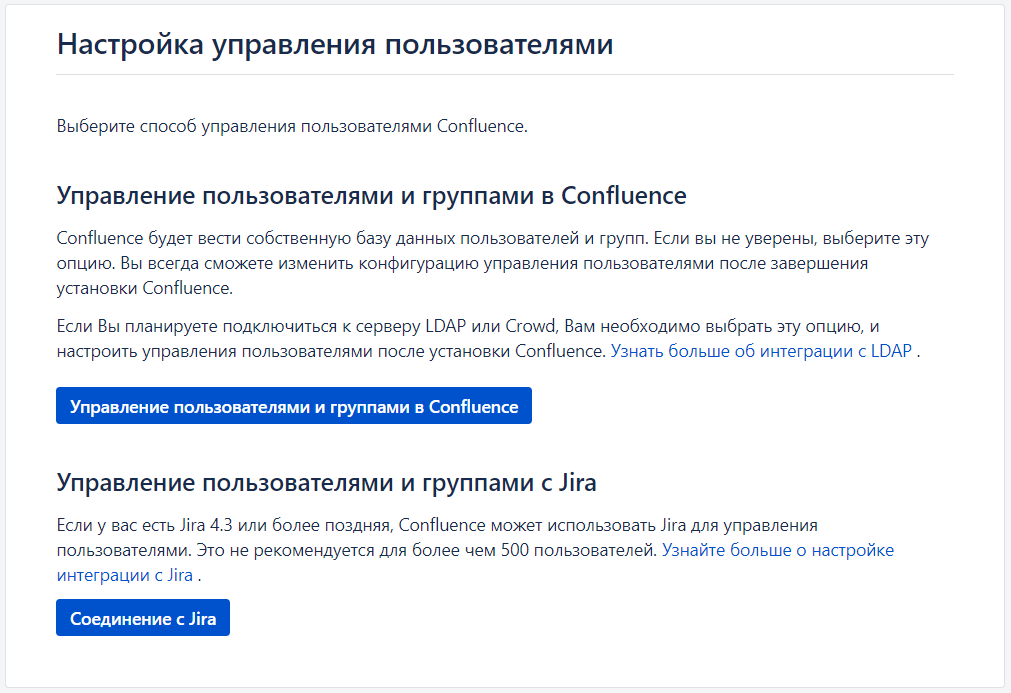
Следующий шаг — это выбор с чего начать. Если установка происходит с нуля, то рекомендую создать пример сайта. Потом его можно удалить и вообще сделать с контеному все что необходимо. Также будет предлоежно подключиться к Jira в части настройки доступа, но в простых случаях можно остаться на системе управления пользователей самого Confluence.
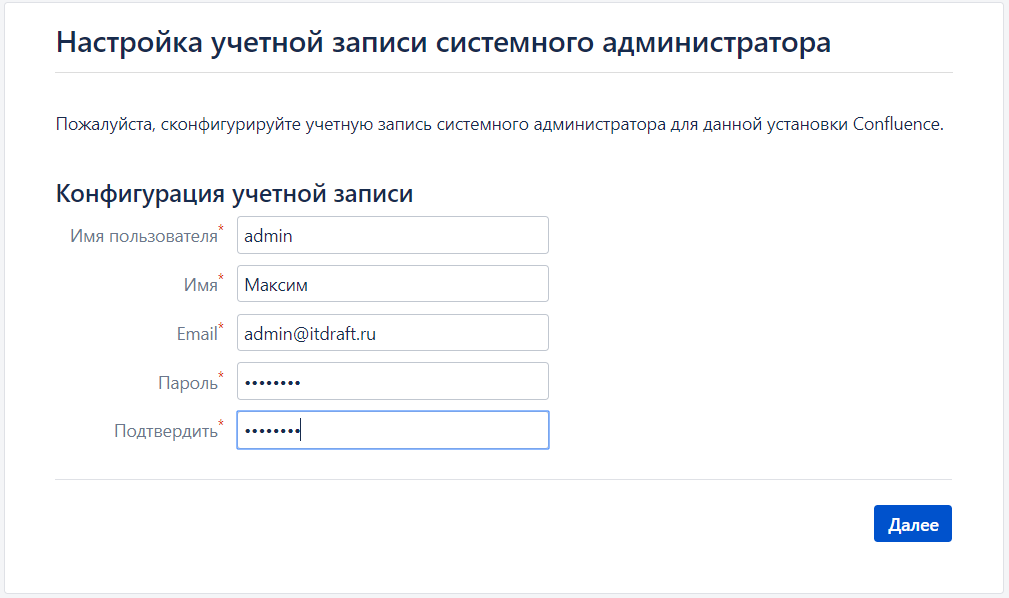
Если выбрали второе, то настраивайте учетную запись администратора для продолжения. После чего создаете первое пространство и начинаете наводить порядок 
Что дальше
Далее по обстоятельствам настраиваете пространства, восстанавливайте данные из бэкапов, настраиваете доступы и так далее. В общем, можно работать 
Полезные ссылки
- Atlassian Stack — Jira Confluence Bitbucket и остальное
- Установка и настройка Jira на Ubuntu
- Docker installs JIRA and Confluence (cracked version)
- atlassian-agent
- atlassian-agent by ipwnosx
- Confluence installation fails with set up step error
- Installing Confluence on Linux
Here’s the error:
HTTP Status 500 – java.lang.IllegalStateException: Spring Application context has not been set
You’re trying to set up Confluence, but after “trying stuff”, you eventually get this error.
Here’s the fix:
Restart the Confluence setup wizard. How? Go to the following directory and delete the file confluence.cfg.xml:
/var/atlassian/application-data/confluence
That makes Confluenc run the setup wizard the next time you get there.
Here’s more of what you’ve likely been starting at on the error page. Hopefully this helped:
HTTP Status 500 – java.lang.IllegalStateException: Spring Application context has not been set
type Exception report
message java.lang.IllegalStateException: Spring Application context has not been set
description The server encountered an internal error that prevented it from fulfilling this request.
exception
com.atlassian.util.concurrent.LazyReference$InitializationException: java.lang.IllegalStateException: Spring Application context has not been set
com.atlassian.util.concurrent.LazyReference.getInterruptibly(LazyReference.java:149)
com.atlassian.util.concurrent.LazyReference.get(LazyReference.java:112)
com.atlassian.confluence.setup.webwork.ConfluenceXWorkTransactionInterceptor.getTransactionManager(ConfluenceXWorkTransactionInterceptor.java:34)
com.atlassian.xwork.interceptors.XWorkTransactionInterceptor.intercept(XWorkTransactionInterceptor.java:56)
com.opensymphony.xwork.DefaultActionInvocation.invoke(DefaultActionInvocation.java:165)
com.atlassian.confluence.xwork.SetupIncompleteInterceptor.intercept(SetupIncompleteInterceptor.java:40)
com.opensymphony.xwork.DefaultActionInvocation.invoke(DefaultActionInvocation.java:165)
com.atlassian.confluence.security.interceptors.NosniffSecurityHeaderInterceptor.intercept(NosniffSecurityHeaderInterceptor.java:21)
com.opensymphony.xwork.DefaultActionInvocation.invoke(DefaultActionInvocation.java:165)
com.atlassian.confluence.security.interceptors.XXSSSecurityHeaderInterceptor.intercept(XXSSSecurityHeaderInterceptor.java:21)
com.opensymphony.xwork.DefaultActionInvocation.invoke(DefaultActionInvocation.java:165)
com.opensymphony.xwork.interceptor.AroundInterceptor.intercept(AroundInterceptor.java:35)
com.opensymphony.xwork.DefaultActionInvocation.invoke(DefaultActionInvocation.java:165)
com.atlassian.confluence.setup.actions.SetupCheckInterceptor.intercept(SetupCheckInterceptor.java:32)
com.opensymphony.xwork.DefaultActionInvocation.invoke(DefaultActionInvocation.java:165)
com.opensymphony.xwork.DefaultActionProxy.execute(DefaultActionProxy.java:115)
com.atlassian.confluence.servlet.ConfluenceServletDispatcher.serviceAction(ConfluenceServletDispatcher.java:58)
com.opensymphony.webwork.dispatcher.ServletDispatcher.service(ServletDispatcher.java:199)
javax.servlet.http.HttpServlet.service(HttpServlet.java:727)
In this guide we’ll run you through installing Confluence in a production environment, with an external database, manually using a zip file.
This method gives you the most control of the installation process.
Other ways to install Confluence:
- Evaluation — get your free trial up and running in no time.
- Installer – install Confluence using the Windows installer.
- Linux – install Confluence on a Linux operating system.
Before you begin
Before you install Confluence, there’s a few questions you need to answer.
| Are you using a supported operating system and Java version? |
Tell me more about this… Check the Supported Platforms page for the version of Confluence you are installing. This will give you info on supported operating systems, databases and browsers. Good to know:
|
| Do you want to run Confluence as a Windows Service? |
Tell me more about this… Running Confluence as a service in Windows means that Confluence will automatically start up when Windows is started. You should use the Windows installer if you want to run Confluence as a Service. If you choose not to run Confluence as a service:
|
| Are ports 8090 and 8091 available? |
Tell me more… Confluence runs on port 8090 by default. If this port is already in use, the installer will prompt you to choose a different port. Synchrony, which is required for collaborative editing, runs on port 8091 by default. If this port is already in use, you will need to change the port that Synchrony runs on after your Confluence installation is complete. See Administering Collaborative Editing to find out how to change the port Synchrony runs on. You won’t be able to edit pages until Synchrony has an available port. See Ports used by Atlassian Applications for a summary of all the ports used. |
| What database do you plan to use? |
Tell me more about this… To run Confluence you’ll need an external database. Check the Supported Platforms page for the version you’re installing for the list of databases we currently support. If you don’t already have a database, PostgreSQL is free and easy to set up. Good to know:
|
|
Do you have a Confluence license? |
Tell me more about this… You’ll need a valid license to use Confluence. Good to know:
|
| Is your JRE_HOME variable set correctly? |
Tell me more about this… Before you install Confluence, check that you’re running a supported Java version and that the To check the JRE_HOME variable: Open a command prompt and type
|
There’s a known issue during setup where a load balancer (or proxy) pings the server and breaks Confluence installation or migration to Data Center. See
CONFSERVER-61189
—
Getting issue details…
STATUS
During installation, you need to disable load balancer health checks and make sure you don’t open multiple tabs that point to the same Confluence URL.
Install Confluence
1. Download Confluence
Download the zip file for your operating system – https://www.atlassian.com.rproxy.goskope.com/software/confluence/download.
2. Create the installation directory
-
Create your installation directory (with full control permission for the dedicated Windows administrator account you’ll use to run Confluence) – this is where Confluence will be installed. Avoid using spaces or special characters in the path. We’ll refer to this directory as your
<installation-directory>. - Extract the Confluence zip file to your
<installation-directory>. We recommend using 7zip or Winzip.
3. Create the home directory
- Create your home directory (with full control permission) – this is where Confluence data like logs, search indexes and files will be stored. This should be seperate to your installation directory. We’ll refer to this directory as your
<home-directory>. - Edit
<installation-directory>confluenceWEB-INFclassesconfluence-init.properties. -
At the bottom of the file, enter the path to your
<home directory>.Show me how to do this…
You can edit the confluence-init.properties file in Notepad or any other text editor.
-
Scroll to the bottom of the text and find this line:
# confluence.home=c:/confluence/data -
Remove the ‘#’ and the space at the beginning of this line (so Confluence doesn’t regard the line as a comment)
confluence.home=c:/data/confluence-home - If you decide to use a different directory as the home directory you should:
- Avoid spaces in the directory path or file name.
-
Use forward slashes ‘/’ to define the path in this file.
-
4. Check the ports
By default Confluence listens on port 8090. If you have another application running on your server that uses the same ports, you’ll need to tell Confluence to use a different port.
Show me how to do this…
To change the ports:
-
Edit
<installation-directory>confserver.xml -
Change the Server port (8000) and the Connector port (8090) to free ports on your server.
In the example below we’ve changed the Server port to 5000 and the Connector port to 5050.
Server port="5000" shutdown="SHUTDOWN" debug="0">
  <Service name="Tomcat-Standalone">
    <Connector port="5050" connectionTimeout="20000" redirectPort="8443"
        maxThreads="48" minSpareThreads="10"
        enableLookups="false" acceptCount="10" debug="0" URIEncoding="UTF-8"
        protocol="org.apache.coyote.http11.Http11NioProtocol" />
5. Start Confluence
- Run
<installation-directory>/bin/start-confluence.batto start the install process. We recommend using a dedicated user account.A command prompt will open. Closing this window will stop Confluence.
- Go to
http://localhost:8090/
Trouble starting Confluence?
- If the command prompt window closes immediately, your JAVA_HOME variable may not be set correctly. See Setting the JAVA_HOME Variable in Windows.
- If you see an error, see Confluence does not start due to Spring Application context has not been set for troubleshooting options.
Set up Confluence
6. Choose installation type
- Choose Production installation.
- Choose any apps you’d also like to install.
7. Enter your license
8. Connect to your database
- If you’ve not already done so, it’s time to create your database. See the ‘Before you begin’ section of this page for details and connection options.
- For MySQL and Oracle, follow the prompts to download and install the required driver.
-
Enter your database details. Use test connection to check your database is set up correctly.
Advanced setup options…
If you want to specify particular parameters, you can choose to connect By connection string. You’ll be prompted to enter:
- Database URL – the JDBC URL for your database. If you’re not sure, check the documentation for your database.
- Username and Password – A valid username and password that Confluence can use to access your database.
9. Populate your new site with content
Choose whether you’d like Confluence to populate your site with content:
Demonstration space…
This option will create a space that you and your users can use to get to know Confluence. You can delete this space at any time.
Import data from an existing site…
Use this option if you have a full site export of an existing Confluence site. This is useful when you’re migrating to another database or setting up a test site.
Good to know:
- You can only import sites from the same or earlier Confluence version.
- The system administrator account and all other user data and content will be imported from your previous installation.
In the setup wizard:
- Upload a backup file – use this option if your site export file is small (25mb or less).
-
Restore a backup file from the file system – use this option if your backup file is large. Drop the file into your
<confluence-home>/restoredirectory then follow the prompts to restore the backup. -
Build Index – we’ll need to build an index before your imported content is searchable. This can take a long time for large sites, so deselect this option if you would rather build the index later. Your content won’t be searchable until the index is built.
10. Choose where to manage users
Choose to manage Confluence’s users and groups inside Confluence or in a Jira application, such as Jira Software or Jira Service Management:
Manage users and groups in Confluence…
Choose this option if you’re happy to manage users in Confluence, or don’t have a Jira application installed.
Good to know:
- If you do plan to manage users in a Jira application, but have not yet installed it, we recommend installing Jira first, and then returning to the Confluence setup.
- You can add external user management (for example LDAP, Crowd or Jira) later if you choose.
Connect to Jira…
Choose this option if you have a Jira application installed and want to manage users across both applications.
Good to know:
- This is a quick way of setting up your Jira integration with the most common options.
- It will configure a Jira user directory for Confluence, and set up application links between Jira and Confluence for easy sharing of data.
- You’ll be able to specify exactly which groups in your Jira app should also be allowed to log in to Confluence. Your license tiers do not need to be the same for each application.
- You’ll need either Jira 4.3 or later, Jira Core 7.0 or later, Jira Software 7.0 or later, or Jira Service Management 3.0 or later.
In the setup wizard:
-
Jira Base URL – the address of your Jira server, such as
http://www.example.com:8080/jira/orhttp://jira.example.com/ - Jira Administrator Login – this is the username and password of a user account that has the Jira System Administrator global permission in your Jira application. Confluence will also use this username and password to create a local administrator account which will let you access Confluence if Jira is unavailable. Note that this single account is stored in Confluence’s internal user directory, so if you change the password in Jira, it will not automatically update in Confluence.
- Confluence Base URL – this is the URL Jira will use to access your Confluence server. The URL you give here overrides the base URL specified in Confluence, for the purposes of connecting to the Jira application.
- User Groups – these are the Jira groups whose members should be allowed to use Confluence. Members of these groups will get the ‘Can use’ permission for Confluence, and will be counted in your Confluence license. The default user group name differs depending on your Jira version:
- Jira 6.4 and earlier:
jira-users. - Jira Software 7.x and later:
jira-software-users - Jira Core 7.x and later:
jira-core-users - Jira Service Management (formerly Jira Service Desk) 3.x and later:
jira-servicedesk-users
- Jira 6.4 and earlier:
- Admin Groups – provide one or more Jira groups whose members should have administrative access to Confluence. The default group is
jira-administrators. These groups will get the system administrator and Confluence administrator global permissions in Confluence.
11. Create your administrator account
Enter details for the administrator account.
Skip this step if you chose to manage users in a Jira application or you imported data from an existing site.
12. Start using Confluence
That’s it! Your Confluence site is accessible from a URL like this: http://<computer_name_or_IP_address>:<port>
If you plan to run Confluence behind a reverse proxy, check out Proxy and SSL considerations before you go any further.
Here’s a few things that will help you get your team up and running:
- Set the server base URL – this is the URL people will use to access Confluence.
- Set up a mail server – this allows Confluence to send people notification about content.
- Add and invite users – get your team on board!
- Start and stop Confluence – find out how to start and stop Confluence.
Troubleshooting
One of our newly built Confluence stacks failed to start, and the error message is as below:
BootstrapException: Unable to bootstrap application: Failed to parse config file: Error on line 19 of document : The reference to entity “k” must end with the ‘;’ delimiter. Nested exception: The reference to entity “k” must end with the ‘;’ delimiter.
As written in my previous post Use AWS Secret Manager to handle credentials, we use AWS secret manager to generate random password for the Confluence database. The reason is that the randomly generated database password has a special character > that caused the syntax error in the confluence.cfg.xml file.
The fix is simply to exclude those special characters in the CloudFormation via ExcludeCharacters property. For example:
  DbUserPassword:
    Type: 'AWS::SecretsManager::Secret'
    Properties:
      Name: /confluence/database/
      Description: confluence DB password
      GenerateSecretString:
        SecretStringTemplate: '{"username": "confluence"}'
        GenerateStringKey: "password"
        PasswordLength: 16
        ExcludeCharacters: '"@/<>'
      KmsKeyId: !ImportValue EnvKmsKeyId
      Tags:
        - Key: Name
          Value: confluence-db
        - Key: Environment
          Value: !Ref Env
Published
July 13, 2020July 13, 2020
Confluence + PostgreSQL + NGINX SSL reverse-proxy
Confluence — тиражируемая вики-система для внутреннего использования организациями с целью создания единой базы знаний. Написана на Java. Разрабатывается австралийской компанией Atlassian, является одним из двух её основных продуктов.
Установка PostgreSQL 12
Добавляем репозиторий PostgreSQL 12
$ sudo yum -y install https://download.postgresql.org/pub/repos/yum/reporpms/EL-7-x86_64/pgdg-redhat-repo-latest.noarch.rpmУстанавливаем необходимые пакеты
$ sudo yum -y install epel-release yum-utils
$ sudo yum-config-manager --enable pgdg12
$ sudo yum -y install postgresql12-server postgresql12
После установки требуется инициализация базы данных, прежде чем можно будет запустить службу
$ sudo /usr/pgsql-12/bin/postgresql-12-setup initdbЗапускаем сервис PostgreSQL и проверяем статус
$ sudo systemctl enable --now postgresql-12
$ systemctl status postgresql-12
Редактируем настройки PostgreSQL, открываем доступ для Confluence
$ sudo nano /var/lib/pgsql/12/data/pg_hba.conf
[...]
# IPv4 local connections:
#host    all             all             127.0.0.1/32            ident
host    confluence      confluenceuser  127.0.0.1/32            md5
Перезапускаем PostgreSQL
$ sudo systemctl restart postgresql-12Создаем пользователя и базу
$ sudo su - postgres
$ psql
postgres=# CREATE ROLE confluenceuser WITH LOGIN PASSWORD 'password' VALID UNTIL 'infinity';
CREATE ROLE
postgres=# CREATE DATABASE confluence WITH ENCODING='UTF8' OWNER=confluenceuser CONNECTION LIMIT=-1;
CREATE DATABASE
postgres-# q
$ exit
Установка Confluence
Создаем пользователя, от которого будет работать Confluence
$ sudo useradd -m -U -r -d /opt/atlassian confluenceЗадаем пароль пользователю
$ sudo passwd confluence
New password:
Retype new password:
Добавляем пользователя confluence в группу wheel, то бы у него появились права суперпользователя (sudo)
$ sudo usermod -aG wheel confluenceПереключаемся на пользователя confluence, переходим в домашниий каталог. Все дальнейшие операции будут выполняться из-под этого пользователя
$ sudo su confluence
$ cd
Скачиваем дистрибутив confluence 7.5.0 и делаем его исполняемым
$ wget https://product-downloads.atlassian.com/software/confluence/downloads/atlassian-confluence-7.5.0-x64.bin
$ chmod a+x atlassian-confluence-7.5.0-x64.bin
Запускаем установку Confluence
$ sudo ./atlassian-confluence-7.5.0-x64.binВ процессе установки надо будет выбирать действия
This will install Confluence 7.5.0 on your computer.
OK [o, Enter], Cancel [c]
o
Click Next to continue, or Cancel to exit Setup.

Choose the appropriate installation or upgrade option.
Please choose one of the following:
Express Install (uses default settings) [1],
Custom Install (recommended for advanced users) [2, Enter],
Upgrade an existing Confluence installation [3]
2

Select the folder where you would like Confluence 7.5.0 to be installed, then click Next.
Where should Confluence 7.5.0 be installed?
[/opt/atlassian/confluence]


Default location for Confluence data
[/var/atlassian/application-data/confluence]


Configure which ports Confluence will use.
Confluence requires two TCP ports that are not being used by any other applications on this machine. The HTTP port is where you will access Confluence through your browser. The Control port is used to Startup and
Shutdown Confluence.
Use default ports (HTTP: 8090, Control: 8000) - Recommended [1, Enter], Set custom value for HTTP and Control ports [2]
1

Confluence can be run in the background.
You may choose to run Confluence as a service, which means it will start automatically whenever the computer restarts.
Install Confluence as Service?
Yes [y, Enter], No [n]
y

Extracting files ...

Please wait a few moments while we configure Confluence.

Installation of Confluence 7.5.0 is complete
Start Confluence now?
Yes [y, Enter], No [n]
y

Please wait a few moments while Confluence starts up.
Launching Confluence ...

Installation of Confluence 7.5.0 is complete
Your installation of Confluence 7.5.0 is now ready and can be accessed via
your browser.
Confluence 7.5.0 can be accessed at http://localhost:8090
Finishing installation ...
Настраиваем Firewall, открываем порт 8090/tcp
$ sudo firewall-cmd --permanent --add-port=8090/tcp
$ sudo firewall-cmd --reload
Проверяем, запустился ли Confluence
$ netstat -nltup | grep 8090Если записи с номером порта нет, запускаем Confluence вручную
$ /etc/init.d/confluence start
либо
$ sudo /opt/atlassian/confluence/bin/catalina.sh start
Переходим на сайт http://localhost:8090 и продолжаем установку
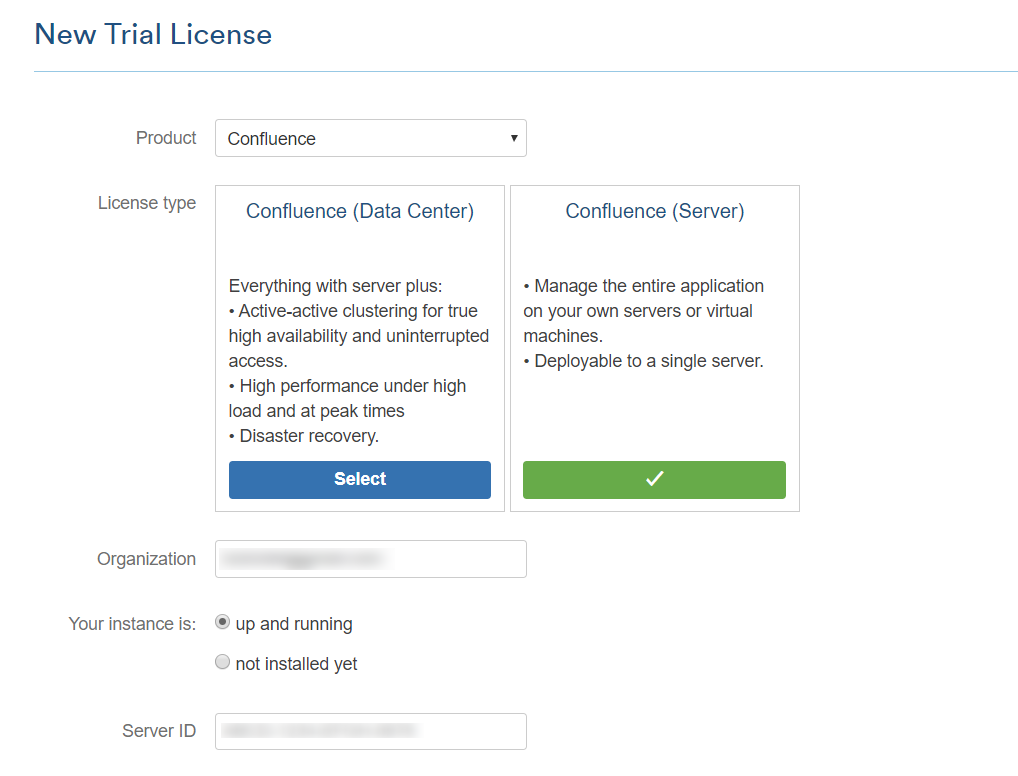
На сайте https://my.atlassian.com/license/evaluation генерим триальную лицензию по идентификатору сервера
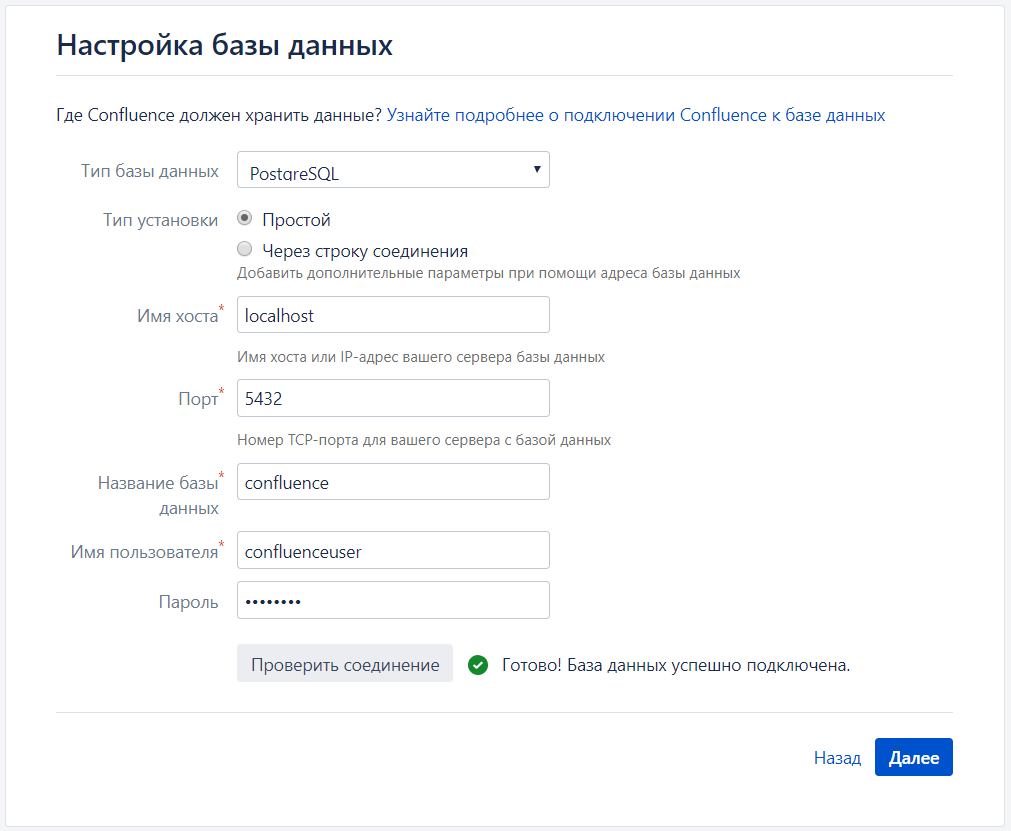
Вводим данные по подключению к PostgreSQL и жмем кнопку «Проверить соединение»
	Тип базы данных: PostgreSQL
	Тип установки: Простой
	Имя хоста: localhost
	Порт: 5432
	Название базы данных: confluence
	Имя пользователя: confluenceuser
Пароль: passwordДля первого раза рекомендую установить пример сайта. Вы всегда сможете удалить это тестовое пространство.
Настройка Nginx в качестве reverse-proxy
Добавляем репозиторий Nginx
$ sudo nano /etc/yum.repos.d/nginx.repo
[nginx-stable]
name=nginx stable repo
baseurl=http://nginx.org/packages/centos/$releasever/$basearch/
gpgcheck=1
enabled=1
gpgkey=https://nginx.org/keys/nginx_signing.key

[nginx-mainline]
name=nginx mainline repo
baseurl=http://nginx.org/packages/mainline/centos/$releasever/$basearch/
gpgcheck=1
enabled=0
gpgkey=https://nginx.org/keys/nginx_signing.key
Устанавливаем nginx, добавляем службу в автозагрузку и запускаем его
$ sudo yum install -y nginx
$ sudo systemctl enable --now nginx
Создаем каталог, где будет лежать самоподписанный ssl сертификат
$ sudo mkdir /etc/nginx/ssl
$ sudo chmod 700 /etc/nginx/ssl
Создаем самоподписанный сертификат и ключ
$ sudo openssl req -x509 -nodes -days 365 -newkey rsa:2048 -keyout /etc/nginx/ssl/nginx.key -out /etc/nginx/ssl/nginx.crt
Country Name (2 letter code) [XX]: RU
State or Province Name (full name) []: Moscow
Locality Name (eg, city) [Default City]: Moscow
Organization Name (eg, company) [Default Company Ltd]: Company
Organizational Unit Name (eg, section) []: IT
Common Name (eg, your name or your server's hostname) []: localhost
Email Address []: admin@itdraft.ru

$ sudo openssl dhparam -out /etc/nginx/ssl/dhparam.pem 2048
Отредактируем файл конфигурации NGINX
$ sudo nano /etc/nginx/conf.d/default.conf
server {
 server_name localhost;

 listen 443 default ssl;
 ssl_certificate /etc/nginx/ssl/nginx.crt;
 ssl_certificate_key /etc/nginx/ssl/nginx.key;
 ssl_dhparam /etc/nginx/ssl/dhparam.pem;

 ssl_session_timeout 5m;

 ssl_protocols TLSv1 TLSv1.1 TLSv1.2;
 ssl_ciphers 'ECDHE-ECDSA-CHACHA20-POLY1305:ECDHE-RSA-CHACHA20-POLY1305:ECDHE-ECDSA-AES128-GCM-SHA256:ECDHE-RSA-AES128-GCM-SHA256:ECDHE-ECDSA-AES256-GCM-SHA384:ECDHE-RSA-AES256-GCM-SHA384:ECDHE-ECDSA-AES128-SHA256:ECDHE-RSA-AES128-SHA256:ECDHE-ECDSA-AES128-SHA:ECDHE-RSA-AES256-SHA384:ECDHE-RSA-AES128-SHA:ECDHE-ECDSA-AES256-SHA384:ECDHE-ECDSA-AES256-SHA:ECDHE-RSA-AES256-SHA:ECDHE-ECDSA-DES-CBC3-SHA:ECDHE-RSA-DES-CBC3-SHA:EDH-RSA-DES-CBC3-SHA:AES128-GCM-SHA256:AES256-GCM-SHA384:AES128-SHA256:AES256-SHA256:AES128-SHA:AES256-SHA:DES-CBC3-SHA:!DSS';
 ssl_prefer_server_ciphers on;

 location / {
 client_max_body_size 100m;
 proxy_set_header X-Forwarded-Host $host;
 proxy_set_header X-Forwarded-Server $host;
 proxy_set_header X-Forwarded-For $proxy_add_x_forwarded_for;
 proxy_pass http://localhost:8090;
 }
 location /synchrony {
 proxy_set_header X-Forwarded-Host $host;
 proxy_set_header X-Forwarded-Server $host;
 proxy_set_header X-Forwarded-For $proxy_add_x_forwarded_for;
 proxy_pass http://localhost:8091/synchrony;
 proxy_http_version 1.1;
 proxy_set_header Upgrade $http_upgrade;
 proxy_set_header Connection "Upgrade";
 }
}

server {
 listen 80;
 server_name localhost;
 return 301 https://$server_name$request_uri;
}
Хост localhost в строке server_name можно заменить на любое доменное имя. На тестовой машине я бычно использую localhost.
Проверим конфиг и перезапускаем nginx
$ sudo nginx -t
$ sudo systemctl restart nginx
Теперь необходимо сделать настройки со стороны Confluence, правим настройки tomcat
$ sudo nano /opt/atlassian/confluence/conf/server.xmlЗакомментируем строку:
<!--
< Connector port="8090" connectionTimeout="20000" redirectPort="8443"
maxThreads="48" minSpareThreads="10"
enableLookups="false" acceptCount="10" debug="0" URIEncoding="UTF-8"
protocol="org.apache.coyote.http11.Http11NioProtocol"/ >
-->
Раскомментируем и подправим строку ниже:
< Connector port="8090" connectionTimeout="20000" redirectPort="8443"
maxThreads="48" minSpareThreads="10"
enableLookups="false" acceptCount="10" debug="0" URIEncoding="UTF-8"
protocol="org.apache.coyote.http11.Http11NioProtocol"
scheme="https" proxyName="localhost" proxyPort="443"/>
Если вы не будите использовать ssl, то последняя строка будет выглядеть:
scheme="http" proxyName="localhost" proxyPort="80"/>localhost так же можно заменить на ваш хост
Перезапускаем Confluence:
$ sudo /etc/init.d/confluence restartНастраиваем Firewall
Т.к. ранее мы открывали порт 8090, закрываем его
$ sudo firewall-cmd --permanent --remove-port=8090/tcpОткрываем порты 80,443
$ sudo firewall-cmd --permanent --add-service=http
$ sudo firewall-cmd --permanent --add-service=https
$ sudo firewall-cmd --reload
Настраиваем SeLinux
$ sudo cat /var/log/audit/audit.log | grep nginx | grep denied | audit2allow -M mynginx
$ sudo semodule -i mynginx.pp
$ sudo setsebool httpd_can_network_connect on
$ sudo setsebool httpd_can_network_connect on -P
Завершение настройки Confluence
Обновляем базовый URL в настройках Confluence
Администрирование (справа вверху шестерёнка) -> Основные настройки -> Настройки сайта -> Базовый адрес сервера (https://localhost/admin/editgeneralconfig.action)
http://localhost:8090 -> https://localhost
Confluence как системный сервис в Linux
Создаем юнит-файл confluence.service
$ sudo nano /lib/systemd/system/confluence.service
[Unit]
Description=Confluence
After=network.target

[Service]
Type=forking
User=confluence
PIDFile=/opt/atlassian/confluence/work/catalina.pid
ExecStart=/opt/atlassian/confluence/bin/start-confluence.sh
ExecStop=/opt/atlassian/confluence/bin/stop-confluence.sh
TimeoutSec=200
LimitNOFILE=4096
LimitNPROC=4096

[Install]
WantedBy=multi-user.target
Меняем права на файл
$ sudo chmod 664 /lib/systemd/system/confluence.serviceПосле создания юнит-файла, необходимо перезагрузить процесс самого systemd, для подхвата изменений. Затем запускаем сервис и добавляем его в автозагрузку. Проверяем статус
$ sudo systemctl daemon-reload
$ sudo systemctl enable --now confluence
$ sudo systemctl status confluence
Error: dedicated user confluence
Изменить пользователя, от которого запускается Confluence с помощью скрипта start-confluence.sh
$ sudo nano /opt/atlassian/confluence/bin/user.sh
# START INSTALLER MAGIC ! DO NOT EDIT !
CONF_USER="confluence" # user created by installer
# END INSTALLER MAGIC ! DO NOT EDIT !

export CONF_USER
У блога появился хостинг, его любезно предоставила компания Облакотека. Облакотека — облачные сервисы для создания и управления виртуальной ИТ-инфраструктурой.
Если вам понравился мой блог и вы хотели бы видеть на нем еще больше полезных статей, большая просьба поддержать этот ресурс.
Если вы размещаете материалы этого сайта в своем блоге, соц. сетях, и т.д., убедительная просьба публиковать обратную ссылку на оригинал


