I am having issues loading my model from a Swift Package with the following structure:
| Package.swift
| Sources
| — | SamplePackage
| — | — Core
| — | — | — SamplePackageDataStack.swift
| — | — | — DataModel.xcdatamodeld
| — | — | — | — Model.xcdatamodel ( <- is this new? )
As mentioned, I am not required to list the xcdatamodeld as a resource in my Package manifest.
When trying to load the model in the main app, I am getting
CoreData: error: Failed to load model named DataModel
Code:
In my swift Package:
Code Block swiftpublic class SamplePackageDataStack: NSObject { public static let shared = SamplePackageDataStack() private override init() {} public lazy var persistentContainer: NSPersistentContainer = { let container = NSPersistentContainer(name: "DataModel") container.loadPersistentStores(completionHandler: { (storeDescription, error) in if let error = error as NSError? { fatalError("Unresolved error (error), (error.userInfo)") } }) return container }() /// The managed object context associated with the main queue. (read-only) public var context: NSManagedObjectContext { return self.persistentContainer.viewContext } public func saveContext () { if context.hasChanges { do { try context.save() } catch { let nserror = error as NSError fatalError("Unresolved error (nserror), (nserror.userInfo)") } } } }
Main App:
Code Block swiftimport SamplePackage class ViewController: UIViewController { override func viewDidLoad() { super.viewDidLoad() var container = SamplePackageDataStack.shared.persistentContainer print(container) } }
Replies
My code is a little older, but the principles should be the same. Here’s how I created an NSManagedObjectModel:
Code Block lazy var managedObjectModel: NSManagedObjectModel = { // The managed object model for the application. This property is not optional. // It is a fatal error for the application not to be able to find and load its model. let bundle = Bundle.module let modelURL = bundle.url(forResource: self.managedModelRootName, withExtension: self.managedModelExtension)! return NSManagedObjectModel(contentsOf: modelURL)! }()
The key is I had to find the reference to it myself using the bundle that contains the module. To find the bundle I used Bundle.module which may be new to things this year. I found out about it from Insert link text here.
For your code, which looks like it is based off of newer template code, you’ll have to find the proper load point. The key is to use the right bundle, though.
I just looked at it. Bundle.main is generated. It essentially boils down to Bundle(for: BundleFinder.self) where BundleFinder.self is the name of the generated file. That’s really close to what I had in there before all this. It looks for the resources in three places so you have flexibility on where to put your resources:
Code Block let candidates = [ // Bundle should be present here when the package is linked into an App. Bundle.main.resourceURL, // Bundle should be present here when the package is linked into a framework. Bundle(for: BundleFinder.self).resourceURL, // For command-line tools. Bundle.main.bundleURL, ]
@endres How would you load the container to context from a Bundle though? I do see you can load the object that way
Hi,
This post helped me so I figured I’d post a working example of the core data model that I am successfully using in a new Swift Package. This code below is from the lazy var persistentContainer:
Code Block let bundle = Bundle.module let modelURL = bundle.url(forResource: "ModelName", withExtension: ".momd")! let model = NSManagedObjectModel(contentsOf: modelURL)! let container = NSPersistentCloudKitContainer(name: "ModelName", managedObjectModel: model)
You can make the model a lazy var.
I call it from the host app below:
Code Block NavigationLink(destination: GenericListCDView() .environment(.managedObjectContext,ModelCDStack.shared.context) , label: { Text("My List") })
Hope this helps.
Update note: This tutorial has been updated to Xcode 9 and Swift 4 by George Andrews. The original tutorial was written by Brian Moakley.
The one constant in software development is bugs. Let’s face it, no one gets it right the first time. From fat fingers to incorrect assumptions, software development is like baking cakes in a roach motel – except that developers supply the critters!
Luckily, Xcode gives you a myriad of tools to keep the nasties at bay. There’s obviously the debugger you know and love, but there’s a lot more it can do for you than simply examine variables and step over code!
This is a tutorial for intermediate iOS developers, where you’ll get hands-on experience with some of the lesser-known but extremely useful debugging techniques, such as:
- Getting rid of NSLog in favor of breakpoint logging
- Using a build script to produce compiler warnings for comment TODOs and FIXMEs
- Breaking on conditions with expressions
- Dynamically modifying data with LLDB
- And much more!
My own goal is to become a truly lazy developer. I’d rather do the heavy work up front so I can relax on the backend. Thankfully, Xcode values my martini time. It provides great tools so I don’t have to be glued to my computer all day and all night.
Let’s take a look at these tools. Pull up a bean bag chair. Crack open your favorite beverage. It is time to get lazy! :]
Note that this tutorial assumes you already know the basics about the Xcode debugger. If you are completely new to debugging with Xcode, check out this beginner debugging tutorial first.
Getting Started
I put together a sample app for this project. You can download it here.
The app is called Gift Lister, and tracks gifts you might want to buy for people. It’s like Gifts 2 HD which was awarded Most Visually Impressive Reader’s App by this site way back in 2012. Gift Lister is like Gifts 2 HD… but far, far worse.
For one thing, it’s filled with bugs. The developer (myself in a different shirt) was ambitious and tried to fix the app the old fashioned way…and yes, it’s still broken :]
This tutorial will walk you through fixing the app while being as lazy as possible.
Okay, it’s time to get started — but don’t feel like you have to rush. :]
Open up the project and take a look around the various files. You’ll notice the app is a simple front end to a basic Core Data persistent store.
Note: If you don’t know Core Data, don’t worry! Core Data is an object persistence framework which is a whole tutorial to itself. In this tutorial, you will not dive into the framework, nor will you interact with Core Data objects in any meaningful way, so you don’t need to know much about it. Just keep in mind that Core Data loads objects and saves them so you don’t have to.
Now that you’ve taken a look around, you can set up the debugger.
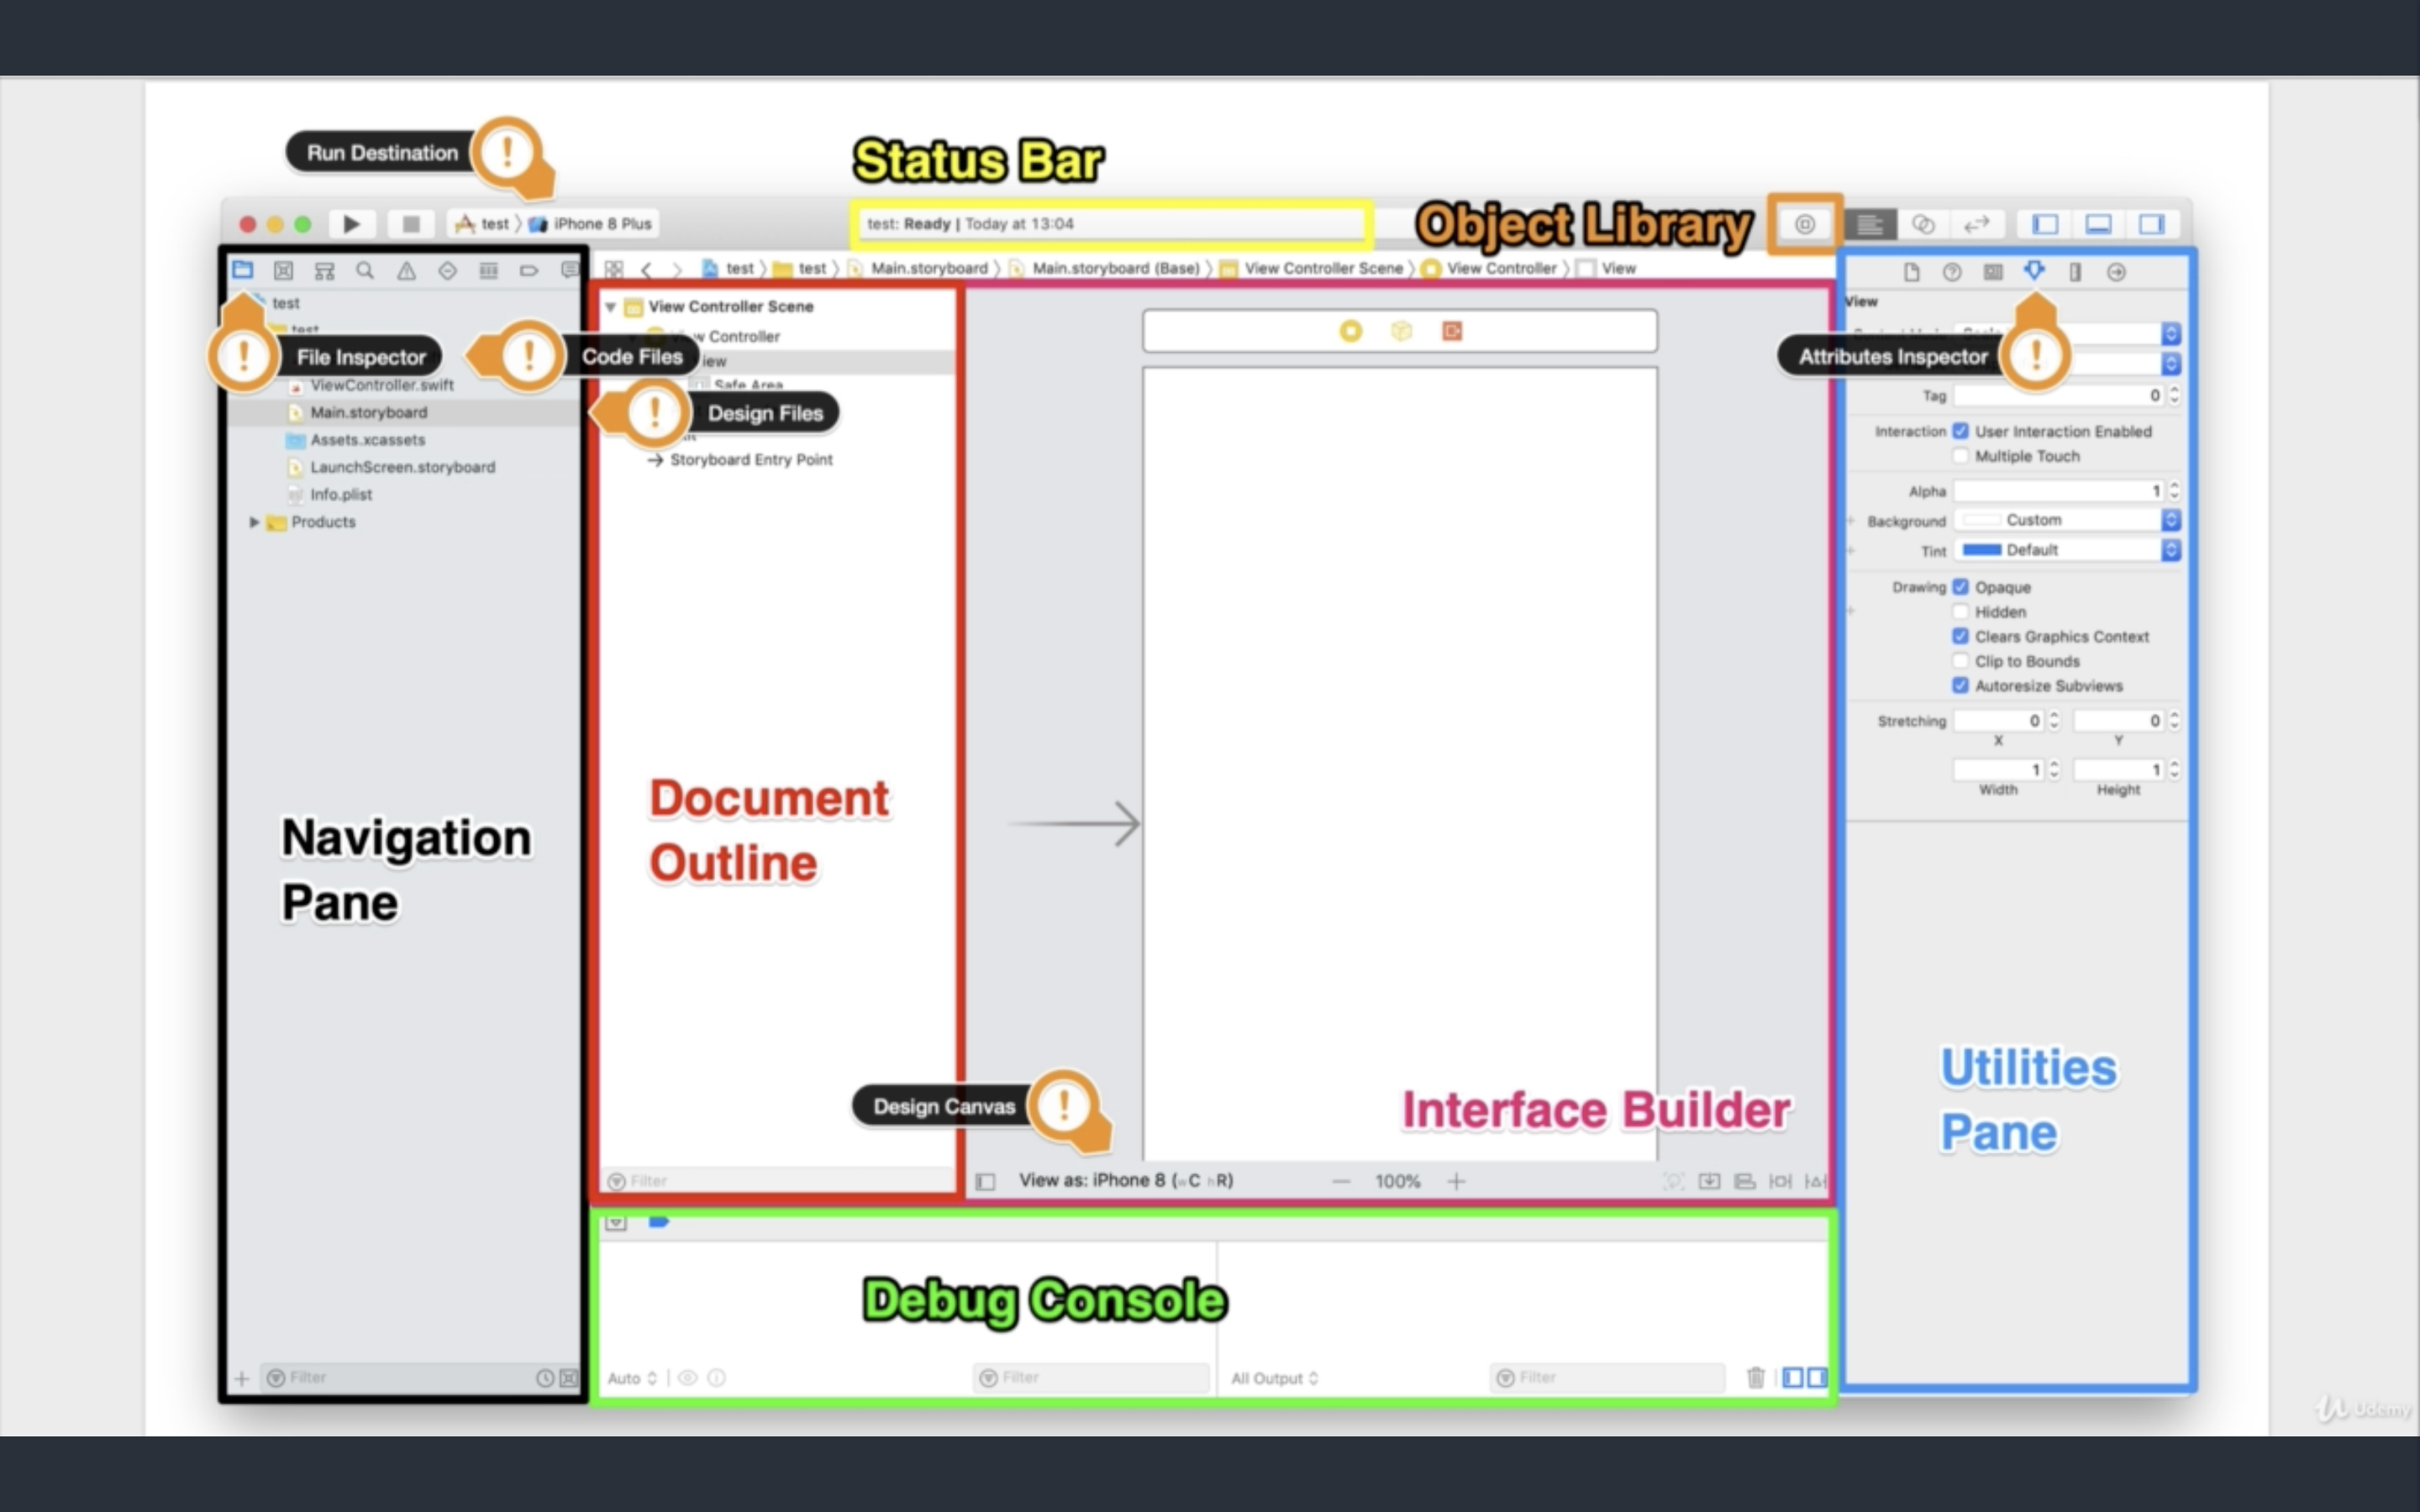
Setting up the Debugger Console
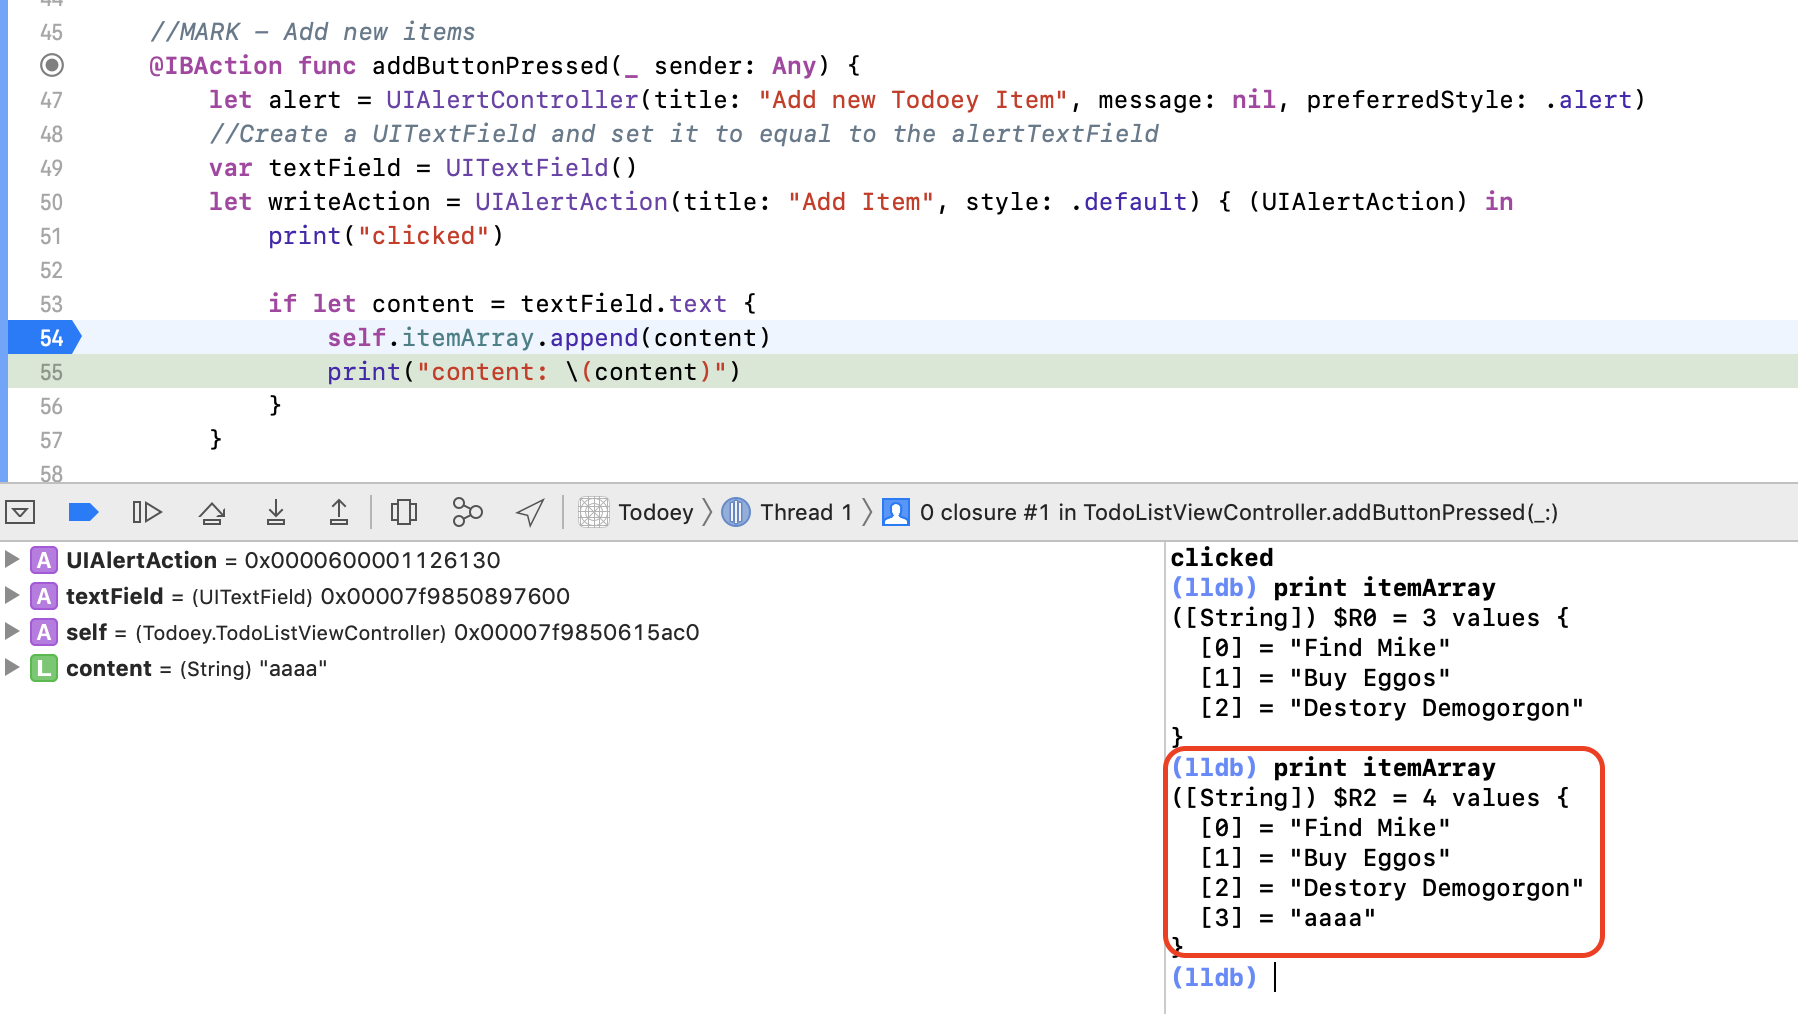
The first thing to do whenever you start a debugging session is to open the debugging console. Open it by clicking this button on the main toolbar:

While the button is nice and convenient, clicking it for every debug session will provide unnecessary wear and tear on your fingertip. :] Wouldn’t you prefer that Xcode do it for you?
To do so, open the Xcode preferences by clicking ⌘, or by going to the application menu and selecting XcodePreferences. Click the Behaviors button (the button with the gear over it).

Click the RunningStarts item on the left hand side of the dialog. You will see a bunch of options appear on the right hand side. On the right hand side, click the seventh checkbox and then select Variables & Console View on the last dropdown.
Do this for the Pauses and the Generates Output items, which are located just underneath the Starts item.
The Variables & Console View option tells the debugger to show the list of local variables, as well as the console output each time a debugger session starts. If you wanted to view just the console output, you would select Console View. Likewise, if you wanted to see just the variables, you would select the Variable View.
The Current Views option defaults to the last debugger view on your last debugger session. For example, if you closed Variables and opted to just the view the console, then only the console would open the next time the debugger was started.
Close the dialog, then build and run.
The debugger will now open each time you build and run your app – without having to go through the major bother of clicking that button. Although it only takes a second to do that, it adds up to minutes per week. And after all, you’re trying to be lazy! :]
The NSLog Jam
Before continuing, it’s important to review the definition of a breakpoint.
A breakpoint is a point of time in a program that allows you to perform actions on the running program. Sometimes, the program may pause at the designated point to allow you to inspect the program’s state and/or step through the code.
You can also run code, change variables, and even have the computer quote Shakespeare. You will be doing all these things later in the tutorial.
Note: This tutorial will be covering some of the advanced uses of breakpoints. If you are still wrapping your head around some of its basic uses such as stepping-in, stepping-out, and stepping-over, please read over the My App Crashed, Now What? tutorial.
Build and run the app. Then, try to add a new Friend to track gifts for. Not surprisingly, the app crashes when you try to add a new Friend. Let’s fix it up.

Can you feel the hours ticking away?
This project needs a little sanity. Currently, you can’t see the source of the compile error. To find it, you need to add an exception breakpoint to track down the source of the error.
Switch to the breakpoint navigator as shown below:

Then, click the plus sign at the bottom of the pane. From the menu, select Exception Breakpoint… .
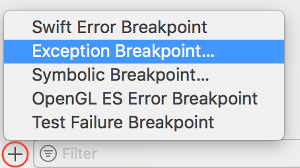
You should now see this dialog:

The Exception field gives you the option of activating the breakpoint in Objective-C, C++, or All. Keep the default option of All.
The Break field in the dropdown allows you to pause execution depending on whether an error is thrown or caught. Keep it selected on thrown. If you’re actually making use of exception handling in your code, then select On Catch. For the purposes of this tutorial, leave it at On Throw.
You’ll cover the final two fields later in this tutorial. Click away to dismiss the dialog, then build and run.
This time the result is cleaner:

Take a look at the debugger console — it’s filled with log messages, and a lot of them appear unnecessary.
Logging is critical to debugging code. Log messages need to be actively pruned, or else the console will become littered with noise. Sifting through all that noise takes away from time on the golf course, so it’s important to remove it, otherwise you’ll waste more time on a problem than it deserves.
Open AppDelegate.swift and you should see a bunch of old messages in didFinishLaunchingWithOptions. Select them all and delete them.
Time to find the next set of log statements. Open up the search navigator, and look for in viewDidLoad.
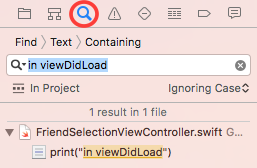
Click the search results and FriendSelectionViewController.swift will open to the line with the log statement.
Notice that this time the code uses print to create the log statement instead of NSLog. Generally, in Swift, you will use print to write to standard output, although you can use NSLog when needed.
It’s critical that the log message appears in the log; if you’re logging from multiple threads you don’t want to have to synchronize them yourself. Either approach can be used to display a message to the Console in a debug session.
At this point, the effort you’re putting into managing your log statements is starting to accumulate. It may not seem like a lot, but every minute adds up. By the end of a project cycle, those stray minutes can easily equate to hours.
Another disadvantage to hard-coding log statements is that each time you add one to the code base, you take a risk of injecting new bugs into your code. All it takes is a few keystrokes, a little autocomplete, then a small distraction – and your once-working app now has a bug.
It’s time to move those log statements out of the code to where they belong: breakpoints.
First, comment out both of the print statements. Next, add a breakpoint by left-clicking in the gutter beside each of the statements.
Your code window should look like this:

Control-click or right-click the first breakpoint and select Edit Breakpoint. From the dialog, click Add Action, then select Log Message from the Action dropdown. In the text field, type in viewDidLoad. The dialog should now look like the following:

Click away to dismiss the dialog, then build and run. You should now see in viewDidLoad in the console – but now it’s done with breakpoints instead of NSLog statements!
Note: Throughout this tutorial, you will be clicking build and run after each breakpoint modification, as this is easier to explain. The key point to remember: breakpoints are a runtime addition. You can add as many of them as you want during the execution of your program. This includes NSLog statements.
There is one major problem, though: the program stops at that breakpoint when you want it to continue, but changing that behavior is simple.
Control-click or right-click the breakpoint and select Edit Breakpoint. At the bottom of the dialog, click the Automatically continue after evaluating checkbox.
Now build and run again. This time it correctly logs the message…but it pauses on the second breakpoint.
Control-click or right-click the second breakpoint. Click Add Action, then select Log Message in the action dropdown, then type Loading friends…. At the bottom of the dialog, click the Automatically continue after evaluating checkbox.
Now build and run again. The app works great… until you try to add a Friend again and it crashes. You can’t have everything, it seems. :]
Believe it or not, you’re still doing too much work. Control-click or right-click the first breakpoint and replace in viewDidLoad with %B. Now run the app again. The console should look like this:

%B prints out the name of the containing method. You can also use %H to print out the number of times the method is being touched. Simple expressions can also be included.
So you could write: %B has been touched %H times. The console will read: viewDidLoad() has been touched 1 times.
Build and run, try to add a Friend, and then let the program crash. If you hit the exception breakpoint you set up earlier, click continue so you can see the crash description. The stack trace reads:
libc++abi.dylib: terminating with uncaught exception of type NSException
Something is not working in Core Data.
Scanning the code, you see that the entity is created from the persistentContainer's viewContext. You have a hunch that persistentContainer is probably the cause of the problem.
Take a look further up in the Console view and you will find the stack trace also reads:
CoreData: error:  Failed to load model named GiftList
Could not fetch. Error Domain=Foundation._GenericObjCError Code=0 "(null)", [:]
CoreData: error:  Failed to load model named GiftList
The error message is informing you that CoreData failed to load a data model named “GiftList”. If you look at the data model provided in the project, you will find it is actually named “GiftLister.”
Take another look at the code in AppDelegate.swift.
In my haste, I made a typo when providing the name argument for the Core Data stack’s persistentContainer. Instead of naming it “GiftLister”, I named it “GiftList.”
Change the name argument from “GiftList” to “GiftLister.”
let container = NSPersistentContainer(name: "GiftLister")
Build and run. Now try to add a Friend. Hooray — the app is (kind of) working!

Breakpoints and Expressions
So far so good, but you may have noticed that the breakpoint logging doesn’t show a timestamp of when the log message occurs, which can be useful for debugging purposes. The good news is that it’s easy to fix with breakpoint expressions!
Note: Date logging is indeed useful, but keep in mind it also makes the logging a bit slower as the system has to query all the date information. Keep that in mind if you ever find your logging calls lagging behind your application.
Let’s restore your log statements to their previous glory. Right-click or Control-click the second breakpoint in FriendSelectionViewController.swift. Click Edit Breakpoint. In the action, change from Log Message to Debugger Command and add the following to the text field:
expression NSLog("Loading friends...")
It should look like this:
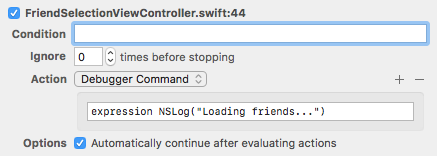
The Debugger command will now evaluate an expression in real time.
Build and run. You should now see the following:
2012-12-20 08:57:39.942 GiftLister[1984:11603] Loading friends...
Being able to add NSLog messages with a breakpoint means you no longer have to stop the program just to log important data, so there’s little chance you’ll introduce new bugs because you aren’t touching the code — but best of all, there’s no last-minute scrambles to remove all your debug statements the night before release.
Now to disable logging in the app. It’s simply a matter of clicking the breakpoints button in the debugger view.
![]()
Click that button and then build and run. Your logs are now nice and clean. You can also turn off individual log calls in the breakpoint navigator.
The days of filling your codebase with commented-out log statements are now over! :]
MARKs, TODOs, FIXMEs, oh my!
The next thing to do is to create some friends so you can keep a list of gift suggestions for them.
Build and run the app. When the app starts, press the Add a friend cell. The app loads another view controller with a name text field and a date picker. Enter a name and select a birthday, then press the OK button.
You’ll be returned back to the root controller with your new friend added to the table. Click Add a friend once again.
Enter the name of another friend, only this time select February 31st, 2010 for the birthday.
In a typical date picker, such a date would not be selectable. This is not the case with this amazing app! In a fit of delirium, I decided to be ambitious and use a regular picker, instead of the date picker. This meant I was forced to rewrite all of the date validation logic which, of course, created some new bugs.
Press the OK button. Tragically, the invalid date is recorded. It’s time to do a little debugging to see what is wrong.
Open AddFriendViewController.swift and add a breakpoint at the start of the method saveFriend.
Note: Finding methods in large files can take a lot of time. The long way is to manually scan each line until you stumble into it. The second way is to use the jump bar, then scroll through the list of method names. I actually prefer to do a search, although not in the search navigator, but in the jump bar itself. To do so, click on the jump bar then just start typing. Your method name should show up like it were in a regular search field.

In the simulator, press the Add a friend button, like your previous entry, and add an invalid date. Step down the method until you reach this line:
if name.hasText, isValidDateComposedOf(month: selectedMonth, day: selectedDay, year: selectedYear) {
Step into isValidDateComposedOf. The validation code failure is clear — there isn’t any! There’s just a comment promising to do it sometime in the future.
Comments are a nice way to describe the particular meaning of code chunks, but using them for task management is futile. Even on tiny projects, there are just too many items to juggle, and comment tasks will be forgotten.
The best way to prevent them from being lost is to really make them stand out. One way to make them stand out is to leave messages in the jump bar.
Open the jump bar. You should see something like this:

You can also write FIXME: or MARK:.
MARK:, TODO:, and FIXME: comments you add to your code will appear in the jump bar. In addition, if you add a hyphen to a MARK: comment after the colon (e.g. MARK: - UIPickerViewDataSource), the jump bar message will add a horizontal rule above the comment to make it even easier to read!
These statements don’t have the same emphasis as a compiler warning or error, but they at least have a greater visibility than a lone comment at the bottom of a method. It’s best to leave comments for, well, comments and keep a list of required tasks outside of the codebase.
Now, wouldn’t it be great if Xcode gave you a compiler warning whenever you have TODO: or FIXME: comments in your code? I thought so!
To do this, you’ll add a build script to the project that will search the code for all TODO: and FIXME: comments and then flag them as compiler warnings.
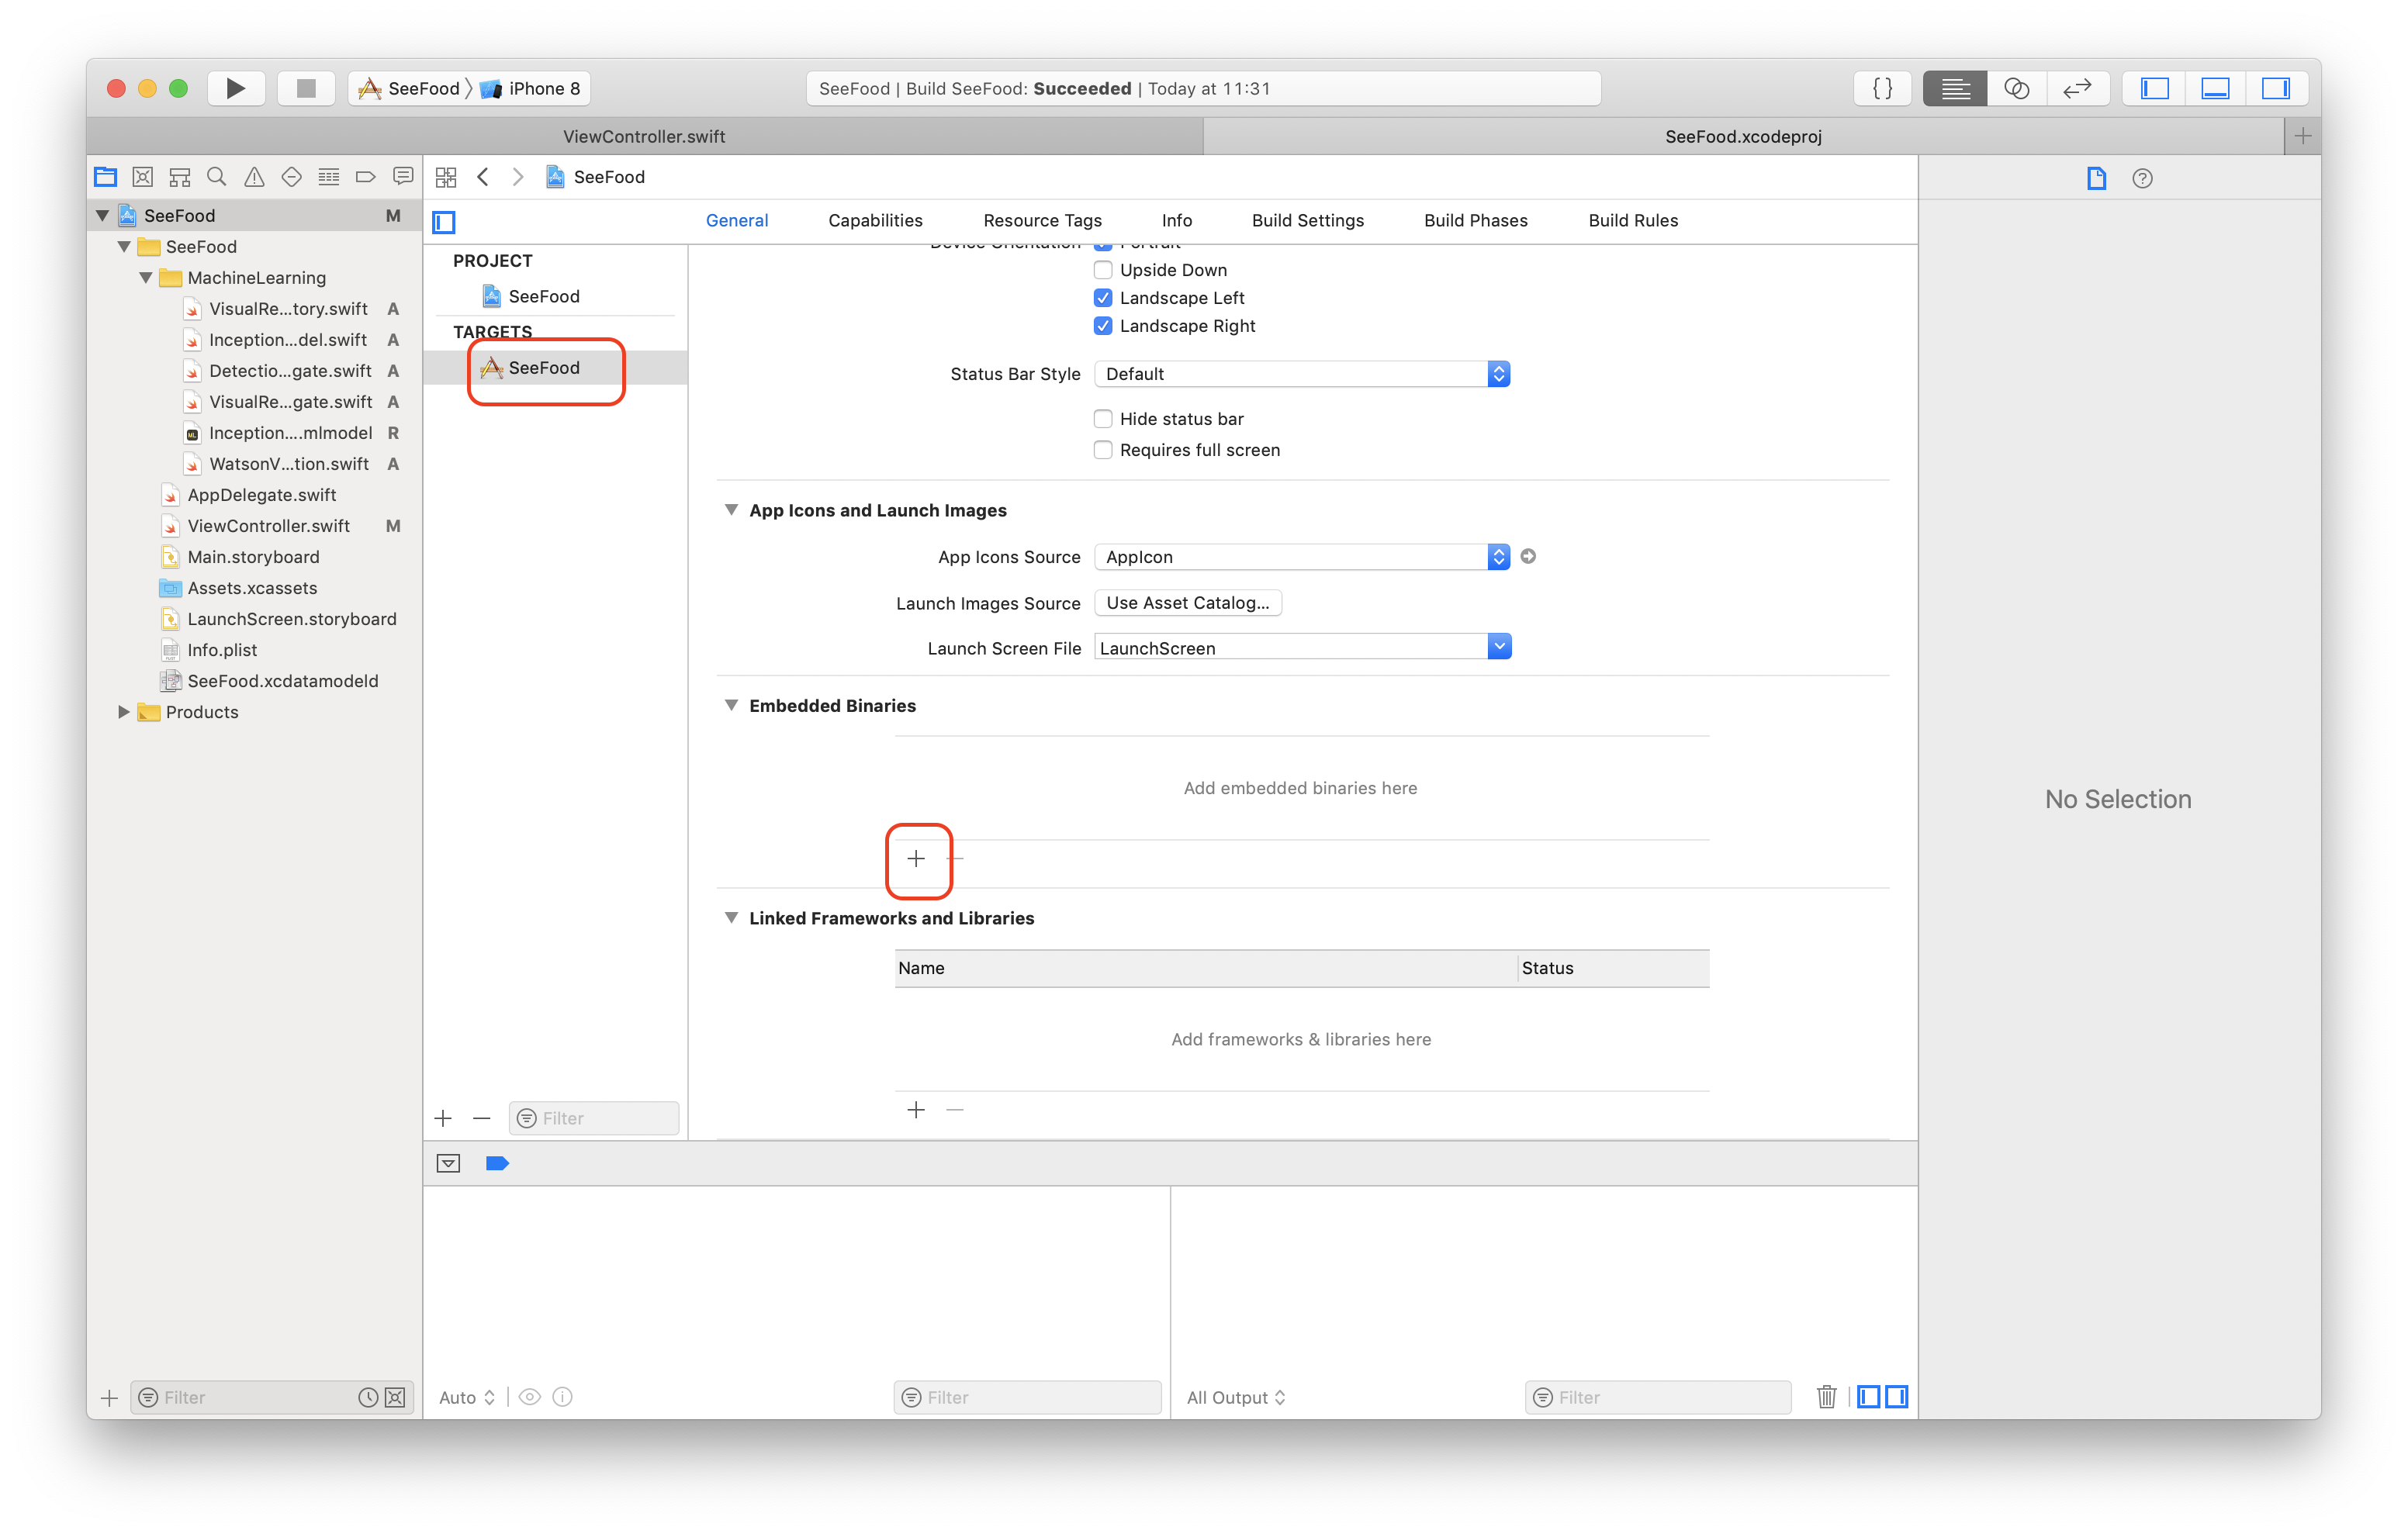
To add a build script, choose the project from the Project Navigator and select Build Phases. From here click on the + button to add a New Run Script Phase.

Next, add the following code to your build script:
TAGS="TODO:|FIXME:"
find "${SRCROOT}" ( -type f -name "*.swift" ) -print0 | xargs -0 egrep --with-filename --line-number --only-matching "($TAGS).*$" | perl -p -e "s/($TAGS)/ warning: $1/"
Your Run Script code should look like this:

Now build your project and show the issue navigator:

The TODO: comment now shows up as a Shell Script Invocation Warning and you won’t be able to forget about it! :]
Variables View & Return Values
Now let’s take a quick look at a nice little feature included since Xcode 4.4.
Restart the app, keeping the breakpoint fixed in the empty validation method.
Add a new friend and press the OK button. The application should stop at the breakpoint and show the debugger with the Variables & Console view displayed.
Now, step out of the code. Look at the Variables view in the debugger. You should see this:

Displaying the return value is a feature that hasn’t received much attention, but it makes your life so much easier. Consider that the code was being called from here:
if name.hasText, isValidDateComposedOf(month: selectedMonth, day: selectedDay, year: selectedYear) {
The code that calls isValidDateComposedOf immediately uses the return value in an expression.
Before this was added to Xcode, you needed to break apart the line, then log out the value if you wanted to inspect return values. Now, you can simply step out of a method and see the return value right in the debugger.
Conditions for Successful Debugging
There are times when it’s necessary to change the state of your program at certain intervals. Sometimes these changes occur in the middle of large sequences of events, which makes normal debugging quite difficult. That’s where conditions come into play.
Now that you have some friends listed in the app, tap one of their names in the root view controller to bring up the gift interface. It’s just a simple grouped table that can be sorted on whether the gift can be purchased or not.
Press the add button on the navigation bar to add a new item. For the name, put shoes. For the price, put 88.00. Tap the OK button. The shoes should now appear in the gift table.
Now add the following items:
- Candles / 1.99
- Sleigh / 540.00
- XBox / 299.99
- iPad / 499.99
Yikes. You realized that you actually wanted to record a PS4 instead of an XBox. You could simply tap the cell to edit it, but for the sake of demonstration, you will edit it through the debugger.
Open up GiftListsViewController.swift and look for cellForRowAtIndexPath. Add a breakpoint on the line underneath the code that reads:
if let gift = gift {
Like so:
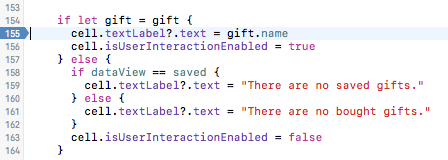
Now right-click or Control-click the breakpoint, and select Edit Breakpoint.
It’s time to add your condition. Think of this like a simple if statement. Add the following code:
gift.name == "Xbox"

Now, press the Bought segmented control button. The table reloads new data, but the breakpoint doesn’t trip.
Press the Saved segmented control button. This time everything should pause with the highlighted item selected in the debugger console.
In the debugger console, add the following:
expression gift.name = "PS4"
Now, press the Run button and the table will continue to load. The PS4 replaces the XBox in the gift results.
You can get the same results by setting the number of iterations. Control-click or right-click the break point, and select Edit Breakpoint. This time, remove the condition from its text field, and select the number 2. Click Done.

Now press the Bought segmented control then the Saved segmented control. You should hit the same breakpoint.
To confirm that you are at the correct object, type:
(lldb) po gift
Now revert the object back to its previous state:
(lldb) expression gift.name = "Xbox"
The table should now reflect the update. Isn’t real-time editing just great?
Starting Up by Tearing Down
When developing data driven apps, it’s often important to wipe the data store clean. There are a number of ways of doing this, from reseting the iPhone simulator to locating the actual datastore on your computer and deleting it. Doing this over and over can be a bit tedious, so get a little lazy and have Xcode do it for you.
You’ll start by creating a shell script. A shell script is a list of commands that automate some actions of the operating system. To create a shell script, create a new file from the application menu. Click FileNewFile or Command-N. From the category listings, select Other and then select Shell Script as the type.

For the name, put wipe-db.sh.

In order to wipe out the actual datastore, you need to use the remove command along with the full path to the data store (including the name for the current user). You could use Finder or Terminal to find the data store and then copy/paste its path into the shell script, but in Xcode 8, the name of the folder that contains the data store will continuously change each time you build and run the application.
To overcome this issue, you can use the whoami command to output the current user and the wildcard character * to provide for the changing folder names.
So enter the following into your script:
rm /Users/$(whoami)/Library/Developer/CoreSimulator/Devices/*/data/Containers/Data/Application/*/Library/Application Support/GiftLister.sqlite
Save the shell script and close it.
By default, shell scripts are read-only. You can use Terminal to set this script as executable.
If you don’t know where Terminal is located, you can find it in your Application folder inside of the Utilities folder.
Start Terminal and change your location to your home directory by entering the following:
YourComputer$ cd ~
Now, list the contents of the directory by typing:
YourComputer$ ls
You will have to navigate to the location of your project folder. If you placed it on your desktop, you would navigate to it by typing:
 YourComputer$ cd Desktop
 YourComputer$ cd GiftLister
If you have to navigate up a directory, type the following:
YourComputer$ cd ..
After a long crawl through Terminal, you should see all the project files. To make the shell script executable, type the following:
YourComputer$ chmod a+x wipe-db.sh
chmod changes the permissions of a file. a+x allows the file to be executable for all users, groups, and others.
Wow… that was a lot. Take a breather. You deserve it. Sometimes being lazy takes a lot of work. :]
Close Terminal and return to Xcode. Open AppDelegate.swift.
Set a breakpoint on the first line of didFinishLaunchingWithOptions. Right-click or Control-click the breakpoint and select Edit Breakpoint. Add an action and select Shell Command. In the next dialog, click Choose and select the shell script you just created. Click the Automatically continue after evaluating checkbox, and click away.
Stop the simulator if it is running.
Now build and run; the database has been deleted.
The simulator tends to cache a lot of data, so I find the best thing to do is perform a clean build by selecting Clean from Xcode’s product menu, then build and run. Otherwise, you can run the app, stop it, then run it again. The cached data will be gone with a brand-spanking new database.
While it did take some bit of work to setup, clearing out the database can now be performed with the press of a button. When not in use, simply disable the breakpoint.
Note: You just created a shell script and wrote a simple Unix command to delete the file. You could just as easily have loaded a PHP file within the shell script to do the same thing. You could also launch a Java program, Python script, or any other program on the machine. The key point is that you don’t need to learn shell scripting to manipulate the underlying operating system through a breakpoint.
Bonus Material: Sounding Out Your Save Methods
At this point, you should have plenty of data in the app. It’s time to save it all.
With apps like this, saving should be done frequently so that nothing is lost. That’s not the case with this app. It only saves when the user exits the application.
If you aren’t already there, click Back on the navbar to return to the root view controller, then simulate a Home button press. You can do this from the Simulator’s menu by selecting HardwareHome or by pressing Shift-Command-H.
Now stop the program from Xcode, and build and run. The tableview is empty. The app failed to save anything. Hm.
Open AppDelegate.swift. In applicationDidEnterBackground, you should see the problem at once in doLotsOfWork. The work isn’t being finished in time, so iOS is terminating your app before it finishes its cleanup. The result of this early termination is that saveData is not being called.
You’ll need to make sure that data is saved first. In applicationDidEnterBackground, move the saveContext call above doLotsOfWork call like so:
saveContext()
doLotsOfWork()
Now, add a breakpoint on the doLotsOfWork line. Right-click or Control-click the breakpoint and select Edit Breakpoint. Select a sound action and choose Submarine as the sound. When dealing with sound actions, I try to avoid system sounds, as I may easily overlook them.
Next, click the checkbox next to Automatically continue after evaluating.
Finally, click build and run.

When the app starts again, add a new user then press the Home button in the simulator. Just after the app closes, you should hear the submarine sound, indicating that the data has been saved.
Stop the app in Xcode, then press Run. You should see the data in all its glory.
Playing a sound is a good way to know if a certain code path has been reached without having to look through the logs. You can also provide your own custom sounds in case you want to play an explosion for a particularly bad crash.
To do so, just drop your sound files in this folder:
YOUR_HOME_DIRECTORY/Library/Sounds
You’ll have to restart Xcode before you can use them, but think of all the potential shenanigans. :]
Time for one last bit of fun. Find your first breakpoint in FriendSelectionViewController and Control-click or right-click the breakpoint. Click Edit Breakpoint from the menu. In the dialog, click the plus button; this lets you add multiple actions to a single breakpoint.
Select the Log Message action, only this time, type To be, or not to be. Select the Speak Message radio button, then click Done. The dialog should look like this:

Now build and run and enjoy the performance!
Note: Novelty aside, this feature can be quite useful! Audio messages can be especially useful when debugging complicated networking code and the like.
Where to Go from Here?
You can download the finished project here.
As you can see, Xcode debugging tools have a lot of flexibility in meeting the day-to-day challenges you face in your development process. For example, LLDB provides the ability to dynamically inspect and update your code without having to worry about injecting any additional bugs.
Believe it or not, this is just the beginning. LLDB provides a host of other features such as custom variable summaries, dynamic breakpoints, and even custom scripting of the debugger through Python.
Granted, moving beyond NSLog() or debugging can be challenging, but at the end of the day, you’ll find your projects will be stronger for it. You will no longer have to worry about stripping all your debugging code on the eve of launch, nor will you have to write complex macros to provide a sane debugging environment. Xcode provides you all the tools so you can relax at the end of the day! :]
If you want to learn more, LLDB is a good place to start. A great place to begin with LLDB is Brian Moakley’s Video Tutorial: Using LLDB in iOS.
New features for LLDB were also highlighted in the WWDC 2016 session: Debugging Tips and Tricks.
If you have any questions or comments, feel free to join the discussion below!
Я решил переименовать свой проект Xcode. Затем я переименовал файл.xcdatamodeld. Я вошел в Утилиты и установил Codegen в Manual, а затем перешел к редактору — Create NSManagedOb.. и он сгенерировал два файла данных суррогатных данных.
Теперь, когда я компилирую и запускаю, я получаю сбой SIGABRT с ошибкой
"Failed to load model named Warehouse
CoreData: error:  Failed to load model named Warehouse"
Не знаете, как это исправить?
19 окт. 2017, в 22:37
Поделиться
Источник
1 ответ
Где-то в вашем приложении у вас есть код, который пытается загрузить модель с именем Warehouse, которая, вероятно, является старым именем проекта. Вам нужно найти этот код и изменить его, чтобы использовать новое имя.
В зависимости от того, сколько лет ваш код Core Data, это может быть, когда вы создаете NSPersistentContainer. Или может быть, когда вы создаете NSManagedObjectModel.
Tom Harrington
19 окт. 2017, в 22:47
Поделиться
Ещё вопросы
- 0Как скрыть таблицу с помощью переключателя, используя Java Script в HTML?
- 0Я хочу добавить предел прокрутки в фиксированный нижний колонтитул с помощью CSS
- 1Как узнать пользовательский агент браузера в Android
- 1Ember Ajax Idicator в модели
- 1Коллекции XML-сериализации не отображаются в XML
- 1Установка полей в ячейке таблицы слов программно с помощью c #
- 00x80070002 при попытке установить браузер по умолчанию
- 0Продолжительность между двумя раза в PHP MySQL
- 0как выполнить функцию php Android Call с сервера (10.0.2.2)?
- 0Mysql-запрос с порядком по индексу использования, но все равно дает «используя где»
- 0Почему Flask возвращает <embed> файлы для загрузки вместо их отображения
- 0как перейти на график API версии 2.0 для этого вызова
- 0PHP SOAP-клиент несколько элементов
- 0Оптимизировать функцию ucallwords
- 1Java — Ошибка не может найти символ
- 1Конкатные столбцы в цикле for
- 1Как я могу использовать плагин ServiceStack RegistrationFeature с Redis?
- 1Динамическое вычисление точек круга в игре для Android
- 0Отмените выделение выбранной области карты изображения при наведении на карту
- 1Ошибки измерения прошедшего времени
- 1нельзя использовать Tablelayout в виджете?
- 1Ошибка создания бина для org.springframework.beans.propertyeditors.StringTrimmerEditor
- 0Многомерные массивы, проверьте разницу
- 1преобразование моего длинного заявления в понимание списка
- 1Зачем мне явно импортировать модули, когда они уже импортированы?
- 0Превращение списка URL в панель навигации
- 0как я проверяю уже таблицу в схеме MySQL?
- 0MySQL Cursor не может выбрать переменную извлечения
- 1Upcasting и Downcasting в c #
- 0CodeIgniter — извлекает данные из MySQL и отображает без обновления страницы
- 1Захват ключа в андроид
- 1Отображение значений внутри столбца панд
- 1Проблемы с относительным размещением в Android
- 0как сделать производный класс для определения структуры данных
- 1Как добавить картинку в html-страницу в приложении Spring
- 1Функция простой практики отображает NaN
- 0Угловой пост $ http с ASP.NET MVC
- 0Uncaught TypeError: Невозможно прочитать свойство ‘length’ из неопределенного при наличии родителя
- 1Javascript — как обнаружить отличие от двух массивов
- 0Как вы можете вручную перезагрузить директиву?
- 0как хранить кратные записи с некоторыми ограничениями?
- 1Модель сначала или код сначала для большой базы данных
- 0Проверка формы и пароля хэша в php
- 1ASP.Net публикует главную страницу в каталоге сервера
- 1Настройка адаптера в моем списке просмотра
- 0kineticJS children — Jquery, перетаскиваемый
- 1Android ListView элемент из пользовательского адаптера не выбирается
- 1Tensorflow не хватает памяти, когда я меняю свой оптимизатор
- 1Удалить элементы массива, которые появляются более одного раза
- 1MongoDB $ cmp (агрегация) дает ложные результаты

iOS Development Tutorial
iOS 12 & Swift — The Complete iOS App Development Bootcamp
Navigation
- Resolution
- Auto Layout
- Segues
- Navigation Controller
- Create the Navigation Controller
- Another way to trigger segues
- Protocol and Delegate
- View
- TableView
- UISearchBar
- Create Classes and Objects from Scratch
- Useful tools
- Sideloading
- Settings
- Debugging wirelessly through the air
- CocoaPods
- Podfile
- Carthage
- The anatomy of an app
- Coding Style
- MARK
- Extension
- Internal and external parameters
- Delegation
- Applications
- Tips
- Ask the user for permissions
- Completion Handler
- Thread Handling
- 6 ways to persistent Local Data Storage
- UserDefaults
- FileManager
- Databases
- Core Data
- Realm
- Network Connection
- Alamofire
- URLSession
- Machine Learning
- Supervised Learning
- Unsupervised Learning
- CoreML
- CreateML
- Explore more app services
- App distribution
- More useful resources
- Command Game
- Swift
- Reference
Resolution
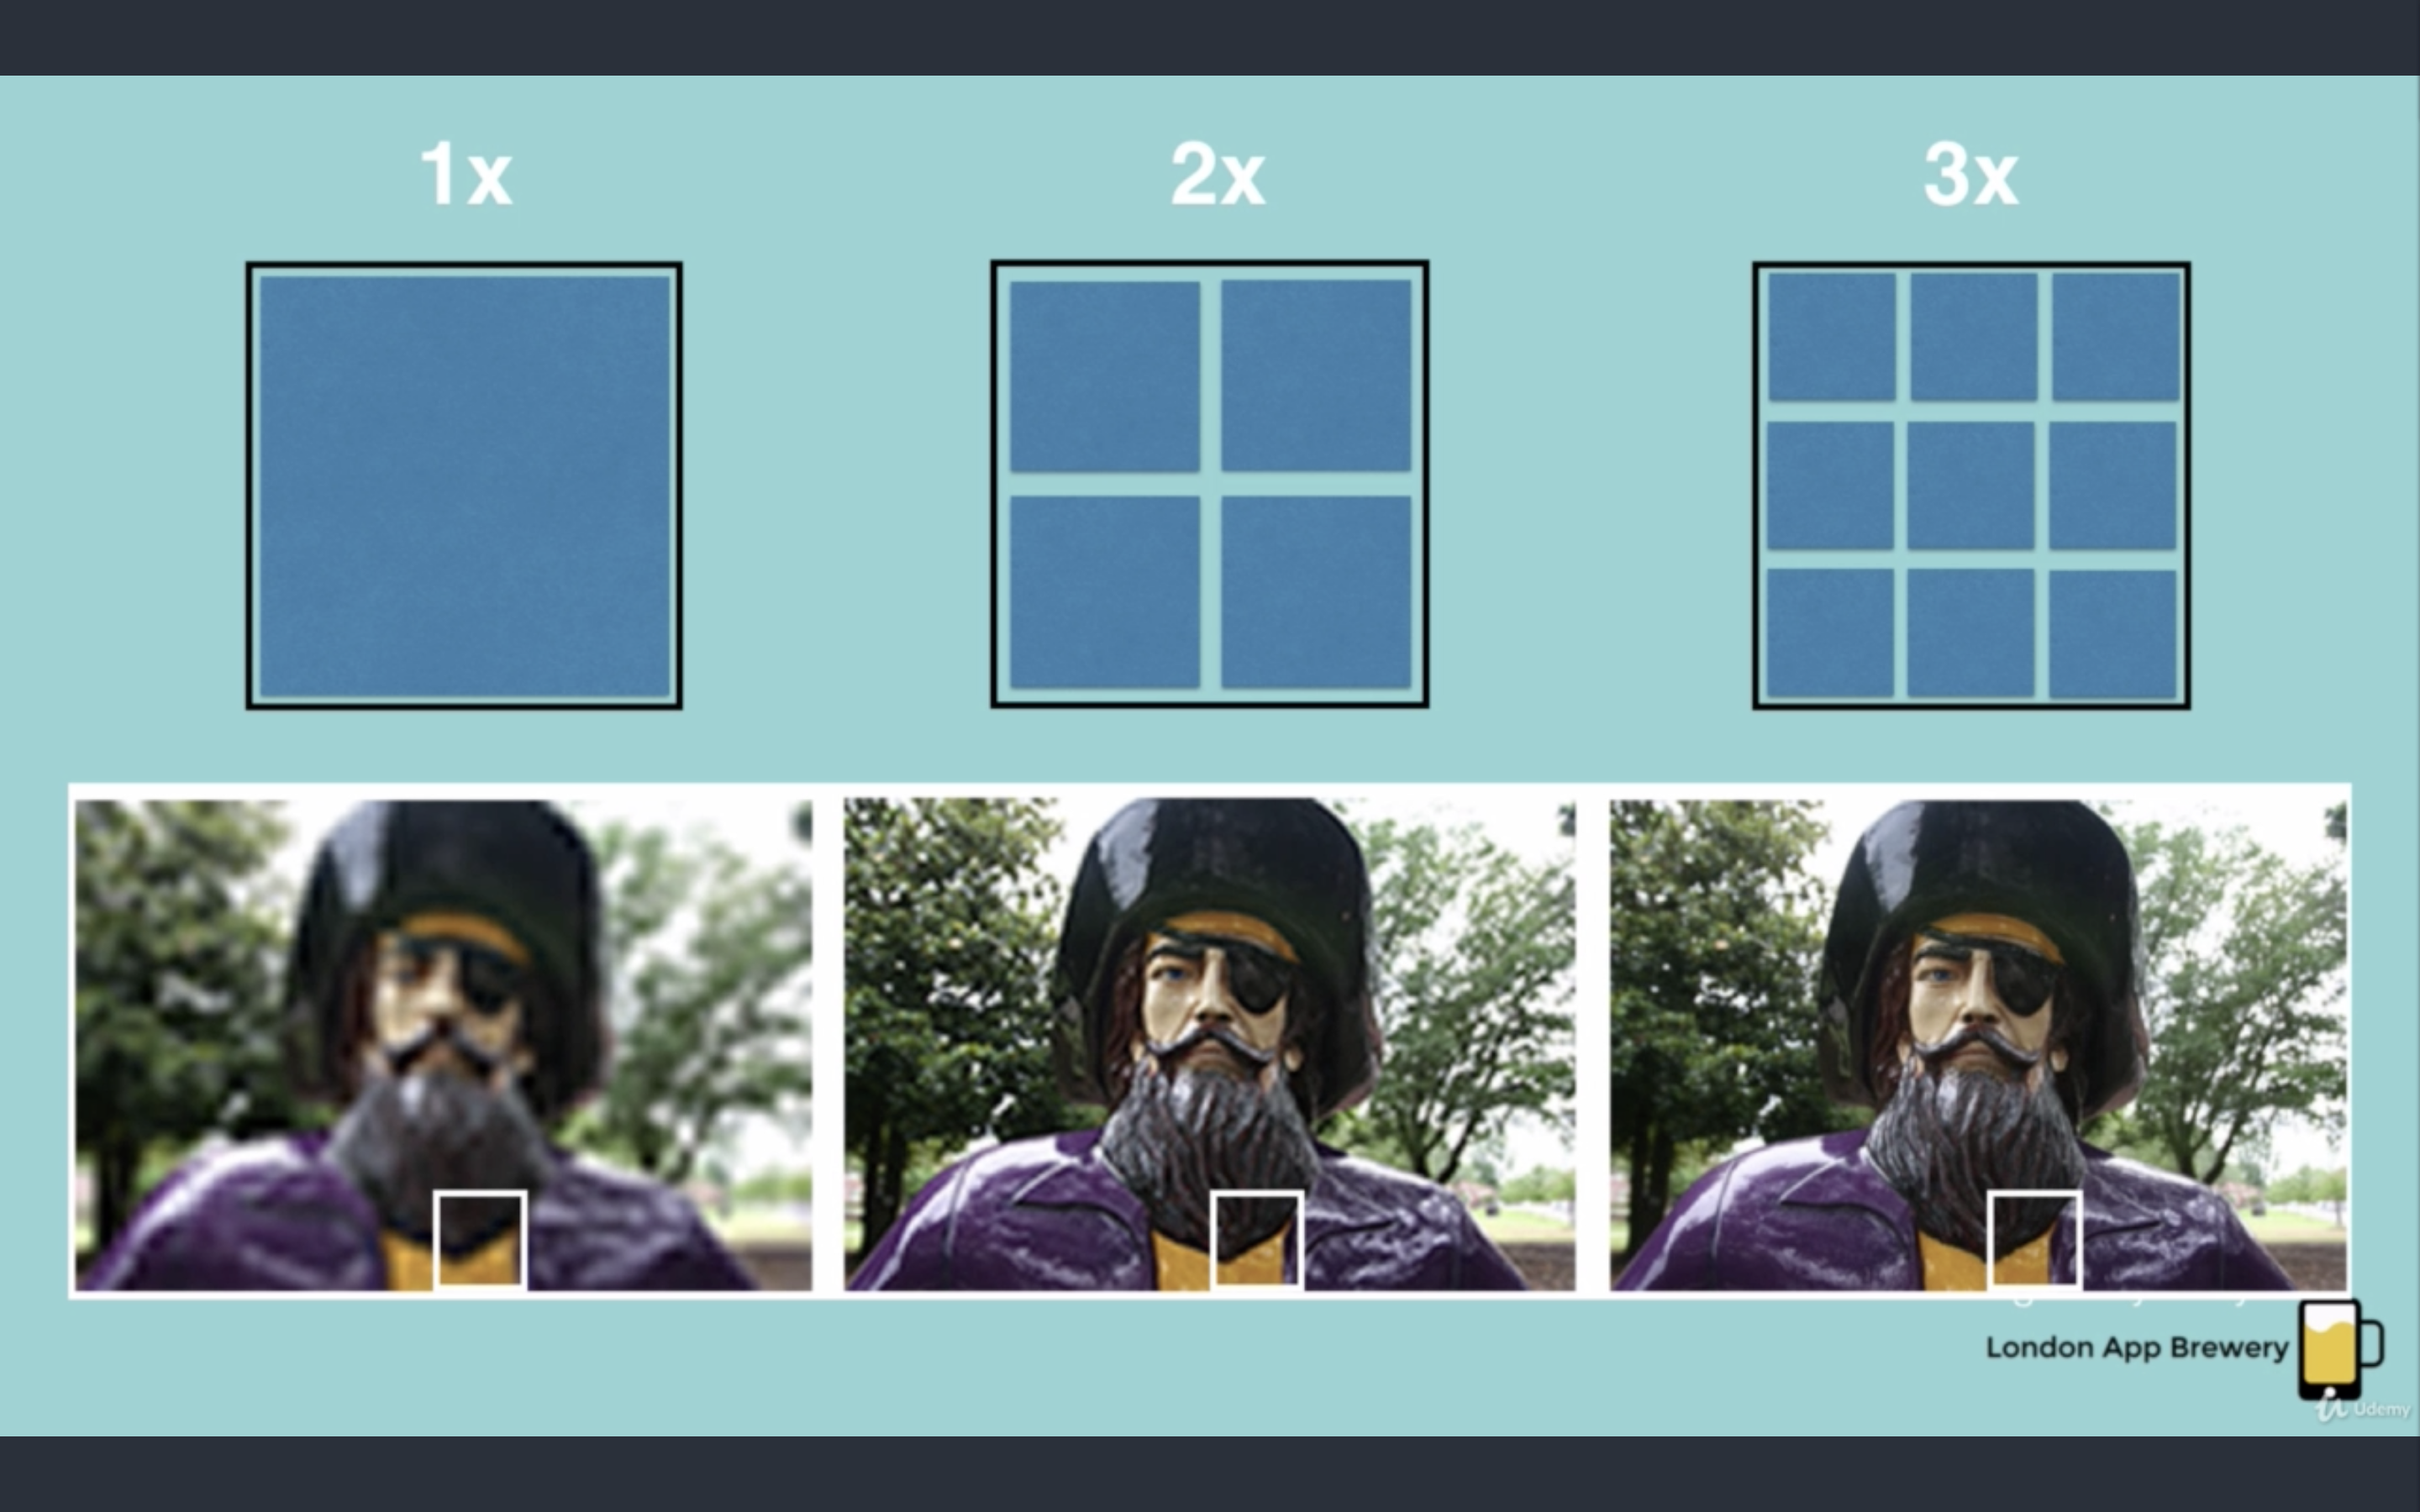
If we want to display beautiful, then we need to ensure that the resolution is height
- Pixel (Pix-El, Picture Element)
- Point
- ppi — e.g. 72 ppi = 72 pixels per inch
1 Inch = 72 Point
1x: In normal screens, 1 pixel = 1 point.
2x: In Retina screens, 4 pixels = 1 point.
3x: 9 pixels = 1 point.
Auto Layout
See More
Segues
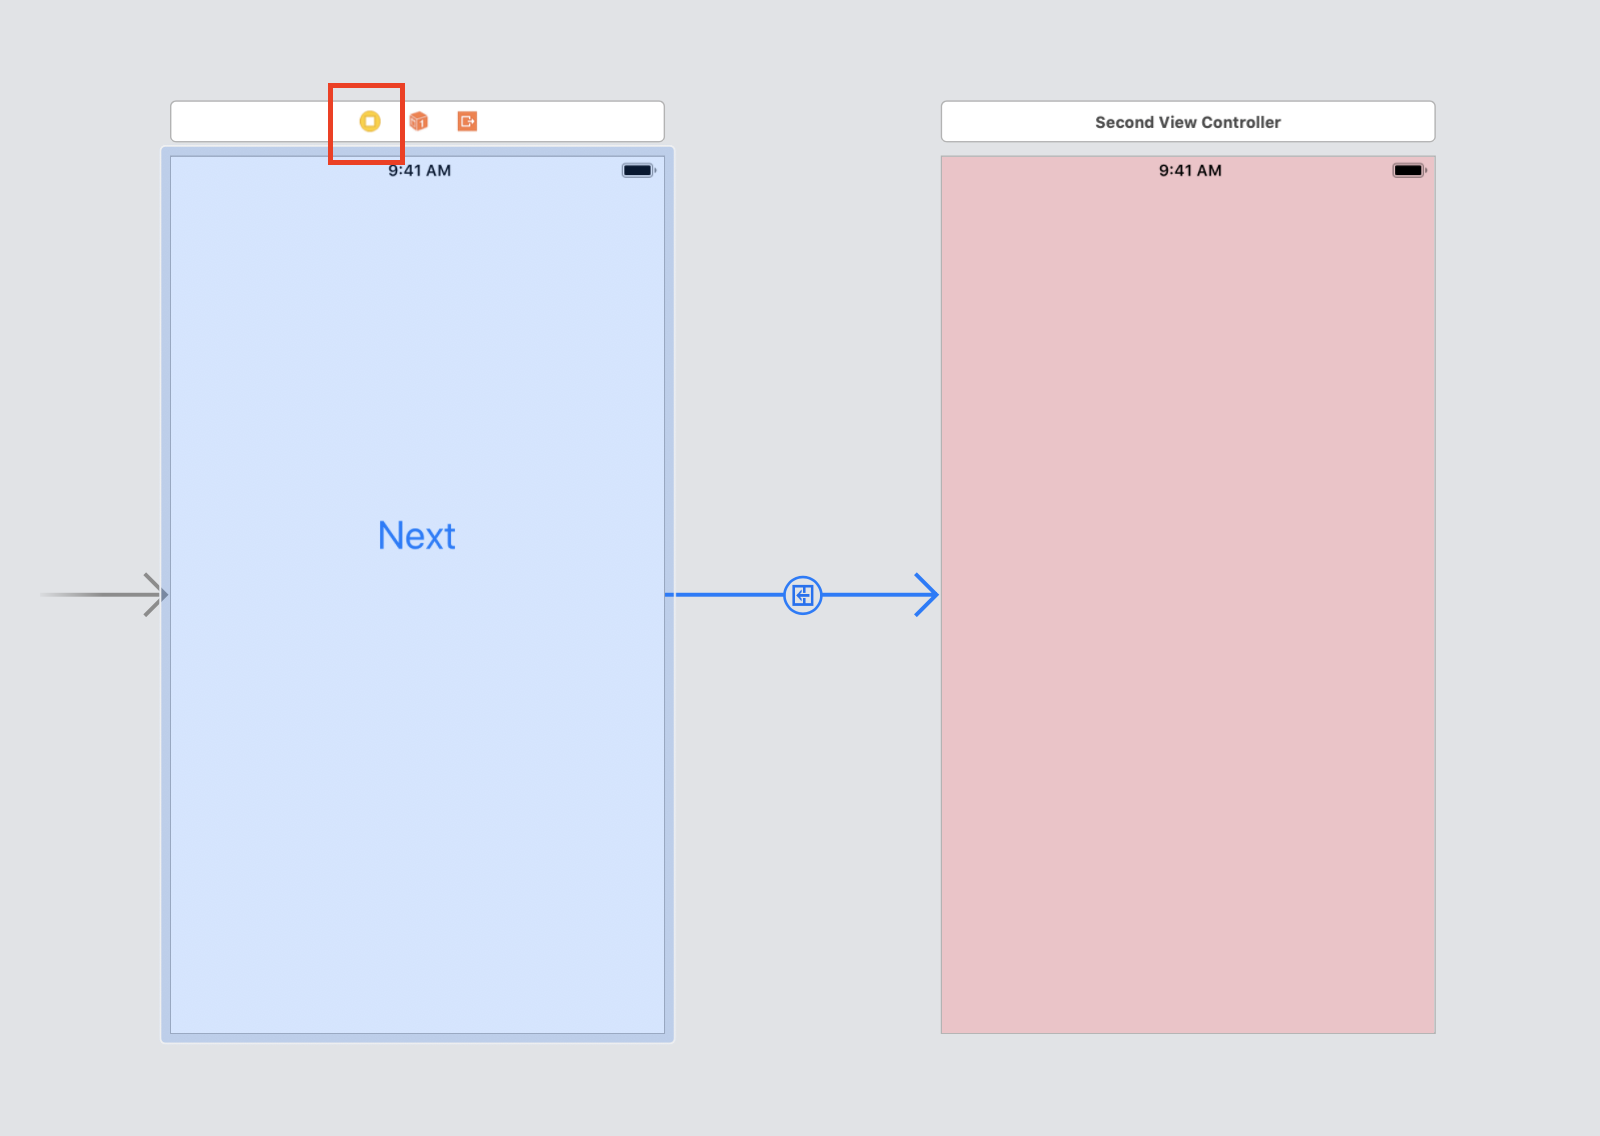
For example, I’d like to click «next» button to navigate to another page. In this case, I need segues.
-
Create a UIViewController with a «next» button
-
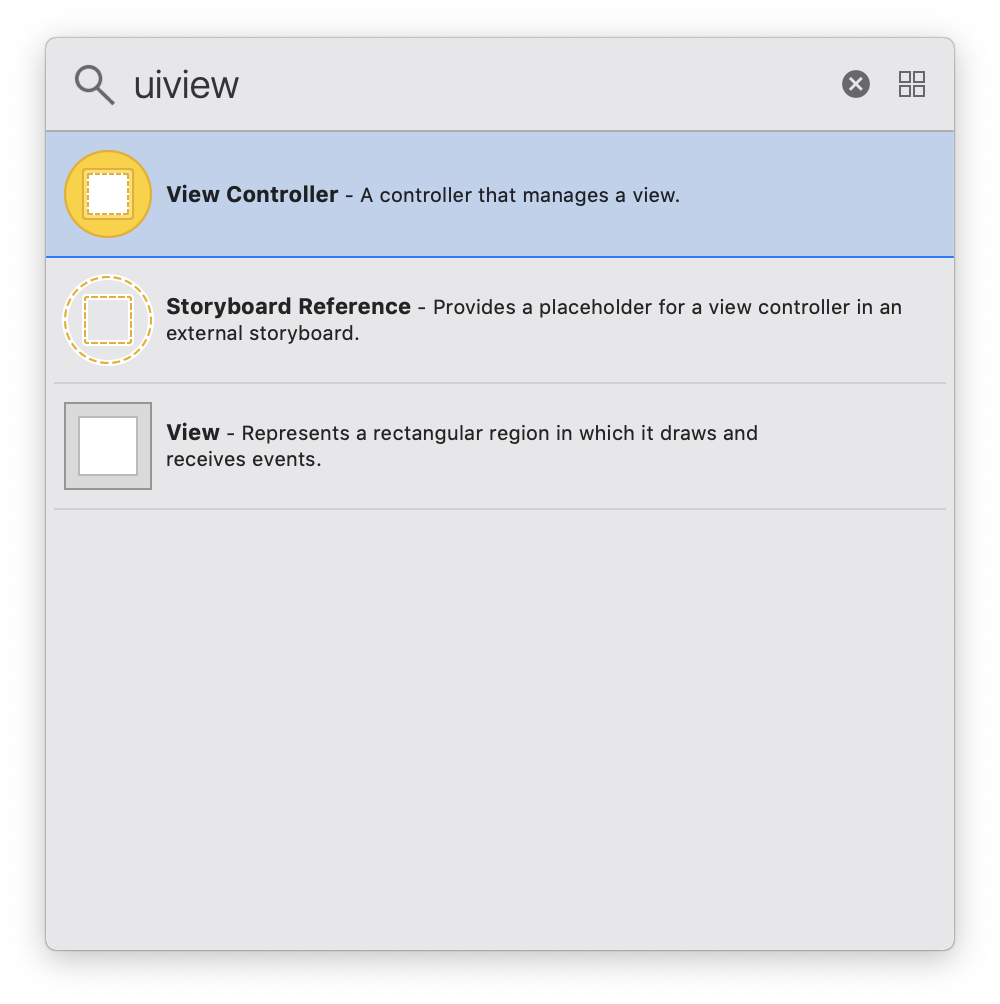
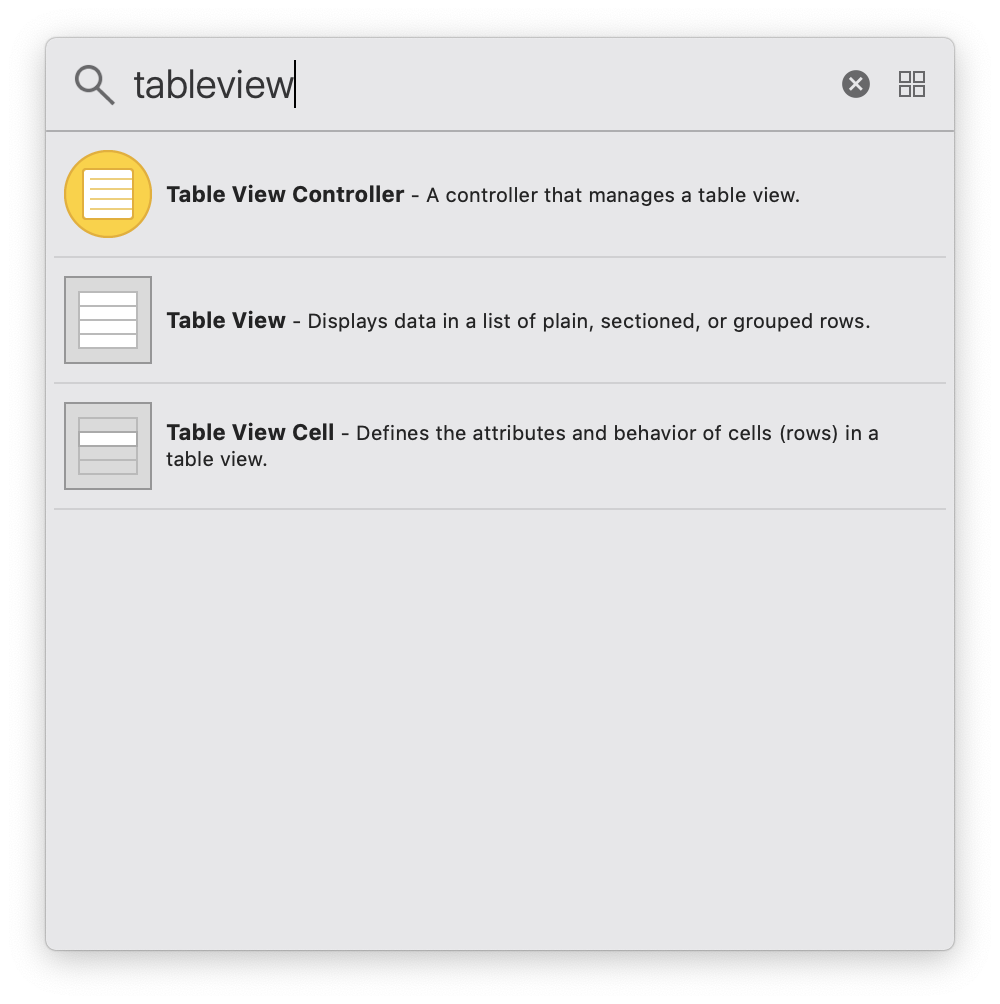
Create another UIViewController by searching «uiviewcontroller» in the object libraries.

-
Click
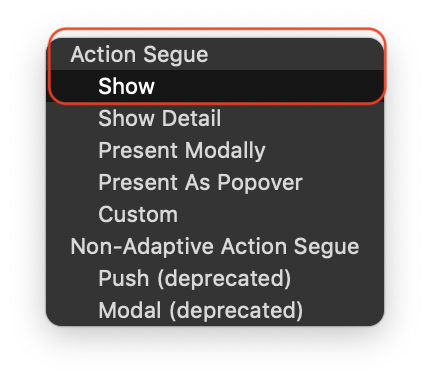
⌃and the «next» button, drag to another UIViewController, select «show»
Now when you click the Next button, it will jump to the second page -
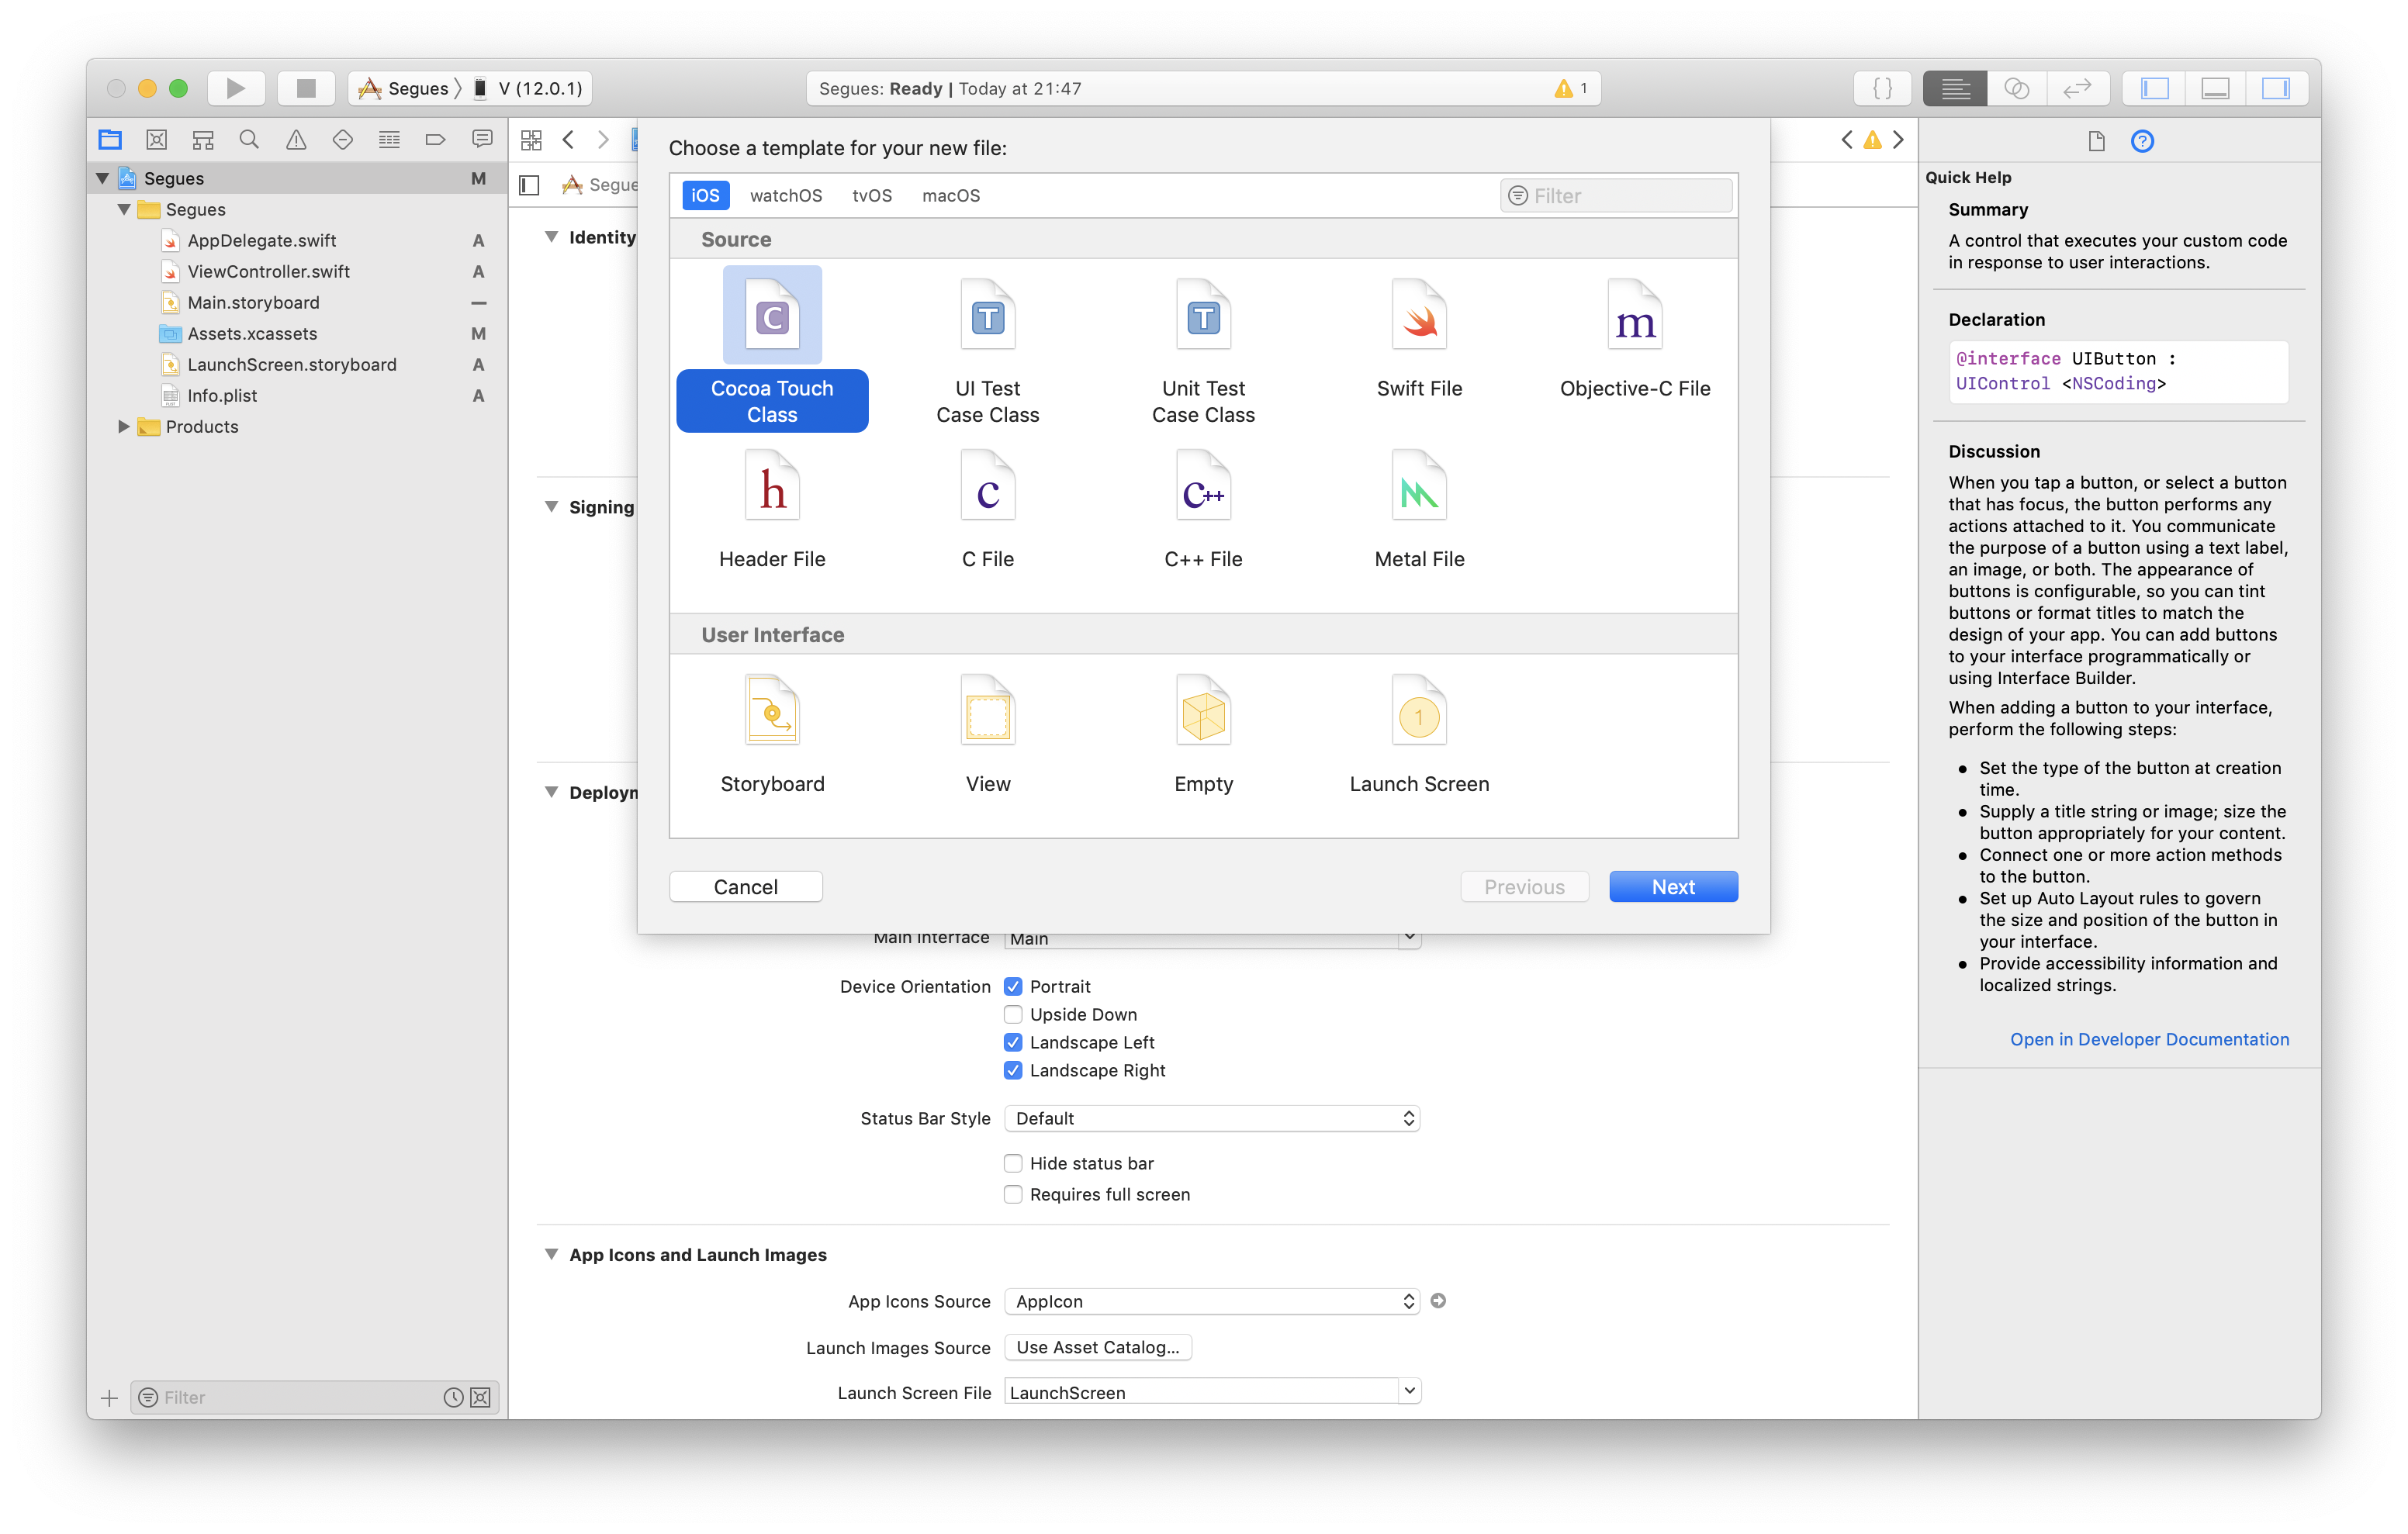
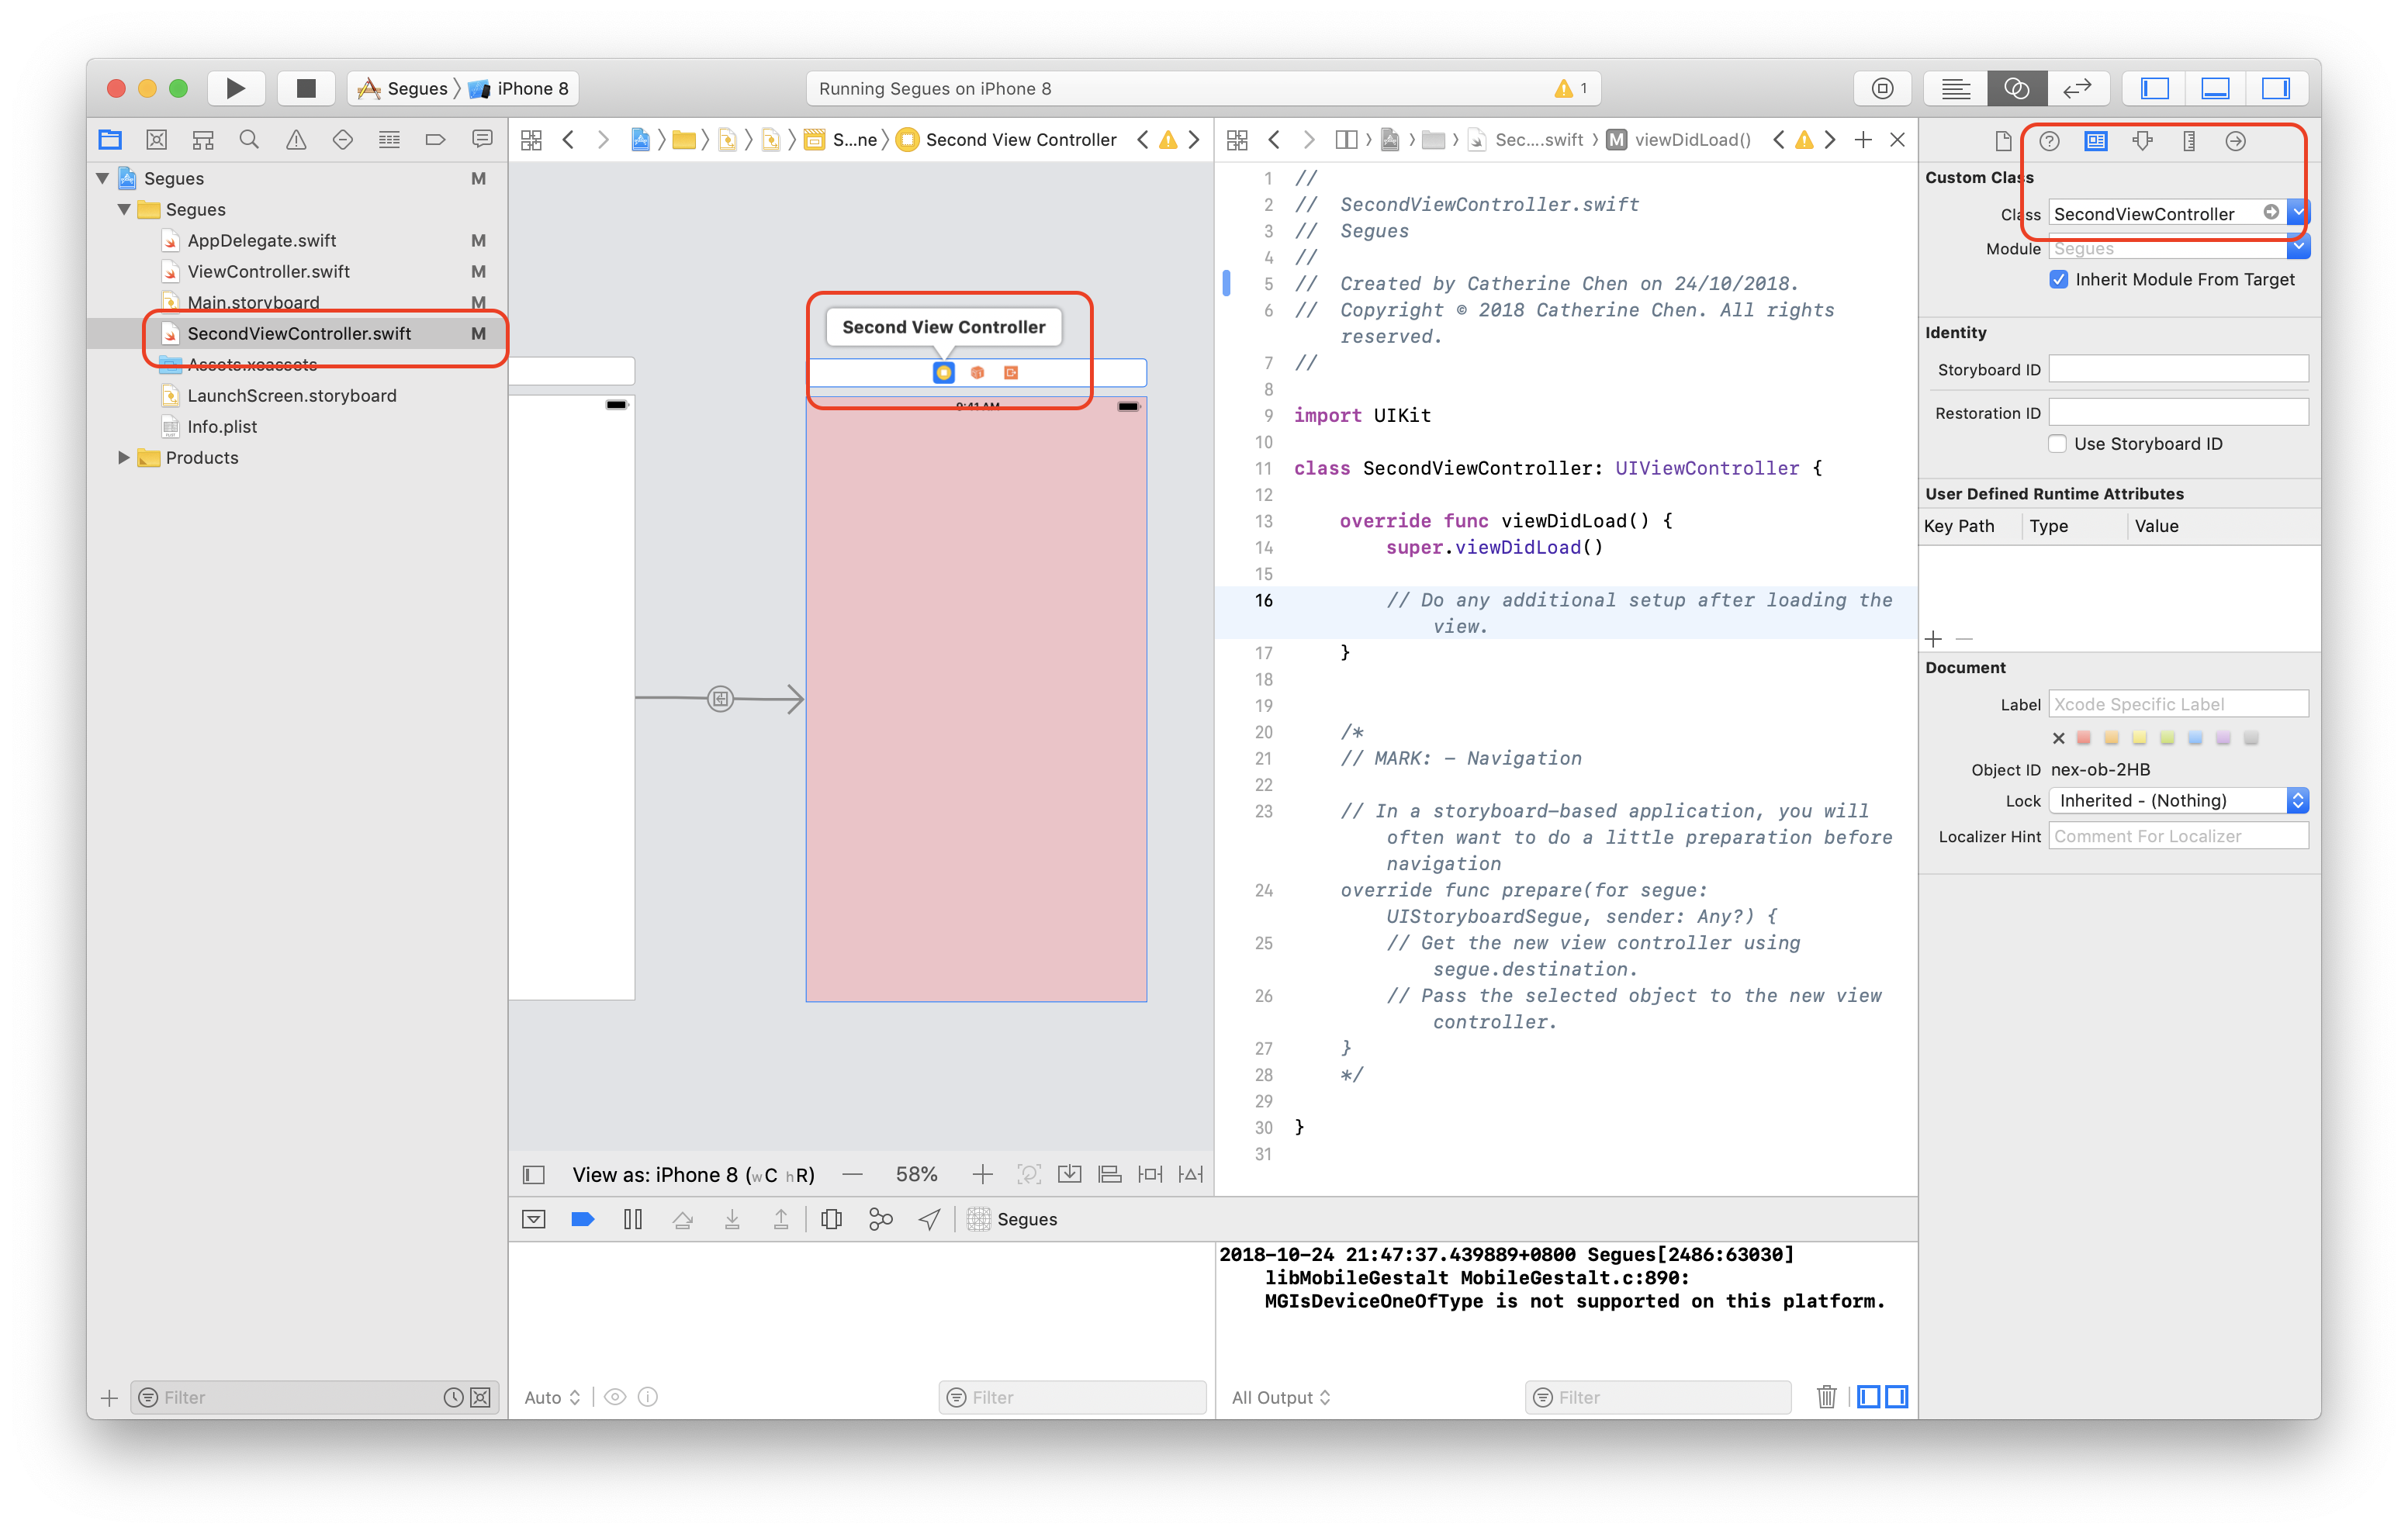
In order to customise the second page, go to File — New — File to create a new Cocoa Touch Class, named «SecondViewController»
-
Link the segue we just created to SecondViewController
Navigation Controller
Create the Navigation Controller

- Select the initial ViewController
- Editor — Embed in — Navigation Controller
Another way to trigger segues
- Click
⌃and the «View Controller» button, drag to another UIViewController, select «show»
- Set
IBActionof the Next button, and jump to another segue by callingperformSegue, select the segue to name Identifier
@IBAction func buttonPressed(_ sender: Any) {
  performSegue(withIdentifier: "GoToSecondScreen", sender: self)
}

override func prepare(for segue: UIStoryboardSegue, sender: Any?) {
  if segue.identifier == "GoToSecondScreen" {
    // We are not allowed to create a ViewController Object regularly, like
    // let destinationVC = SecondViewController()
    // Instead, we do
    let destinationVC = segue.destination as! SecondViewController
    destinationVC.textPassedOver = textField.text
  }
}
Who initialised the segue will be the sender, which in this case, will be the ViewController.

Protocol and Delegate
Inside the Clima application, we have a ChangeCityDelegate delegate on the second ViewController.
protocol ChangeCityDelegate{
    func userEnteredANewCityName(name: String)
}
We also defined the delegate variable in the class
var delegate: ChangeCityDelegate?
While user clicks the button, sending data to the first ViewController and the second ViewController will be dismissed and go back to the first ViewController
if (delegate != nil) {
  delegate?.userEnteredANewCityName(name: city)
  // close this ViewController
  self.dismiss(animated: true, completion: nil)
}
View
TableView

-
Drag a TableView into your storyboard
-
Create
.xibfile, and define the identifier and class
-
The class example
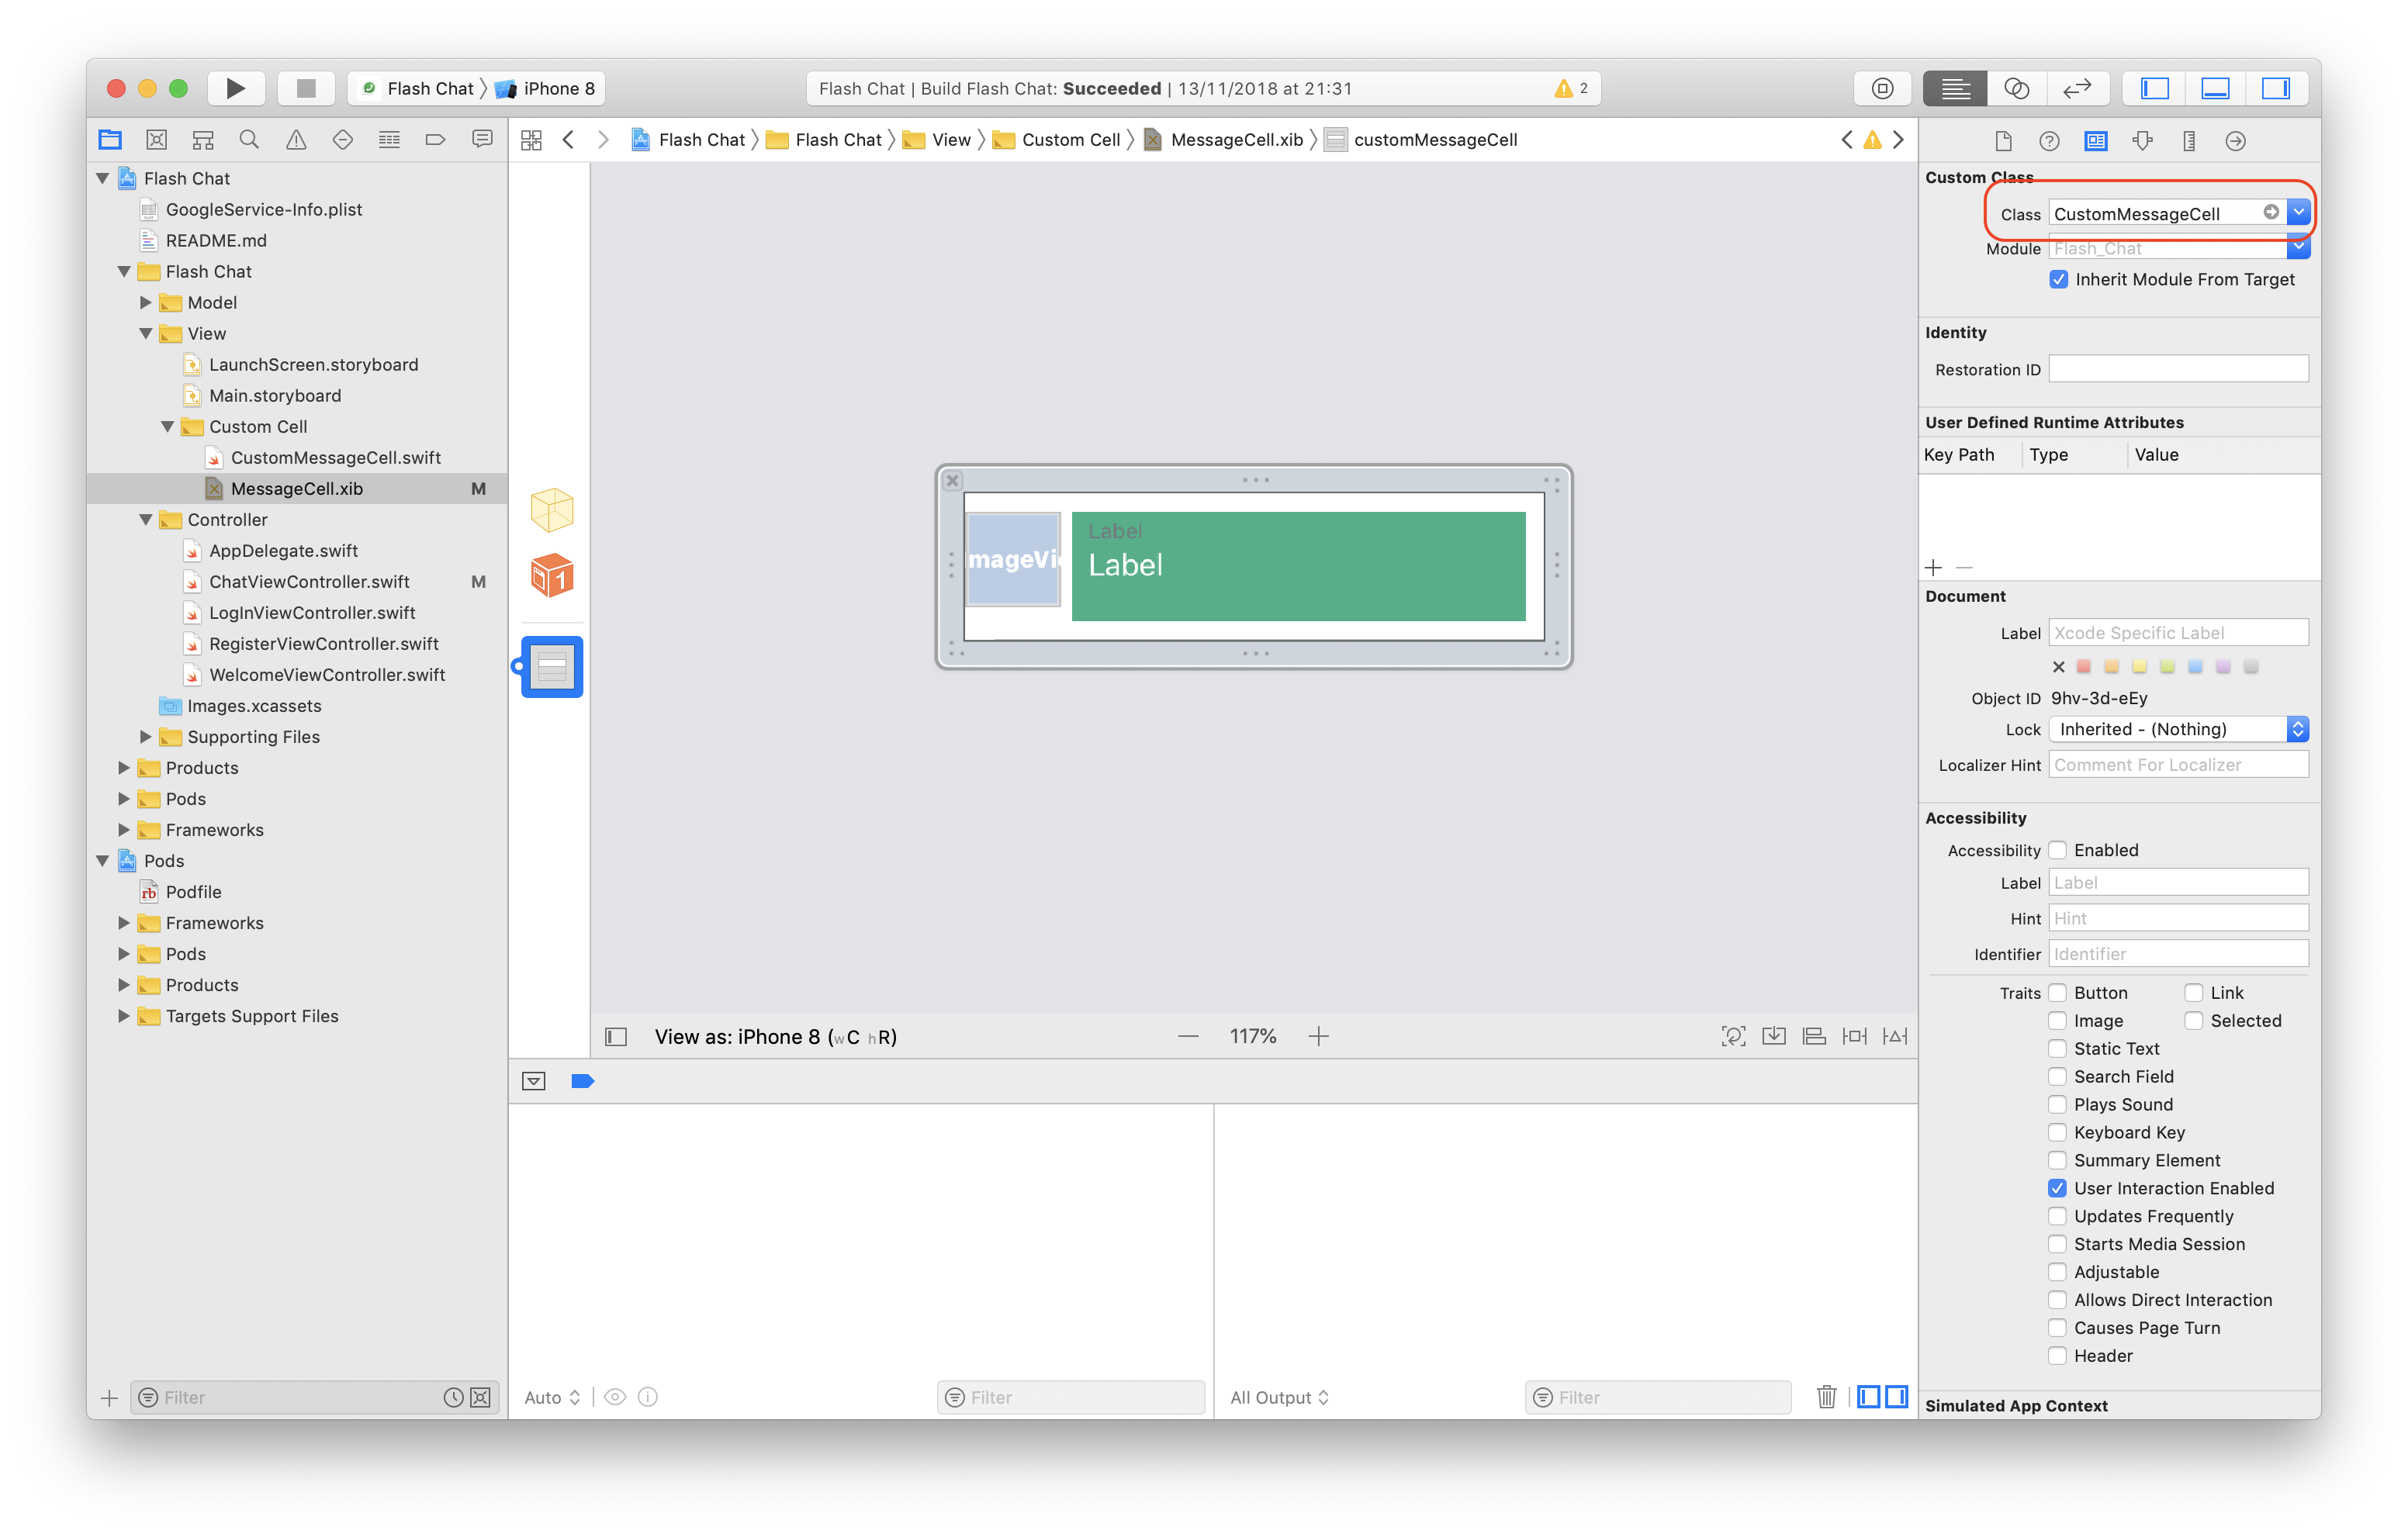
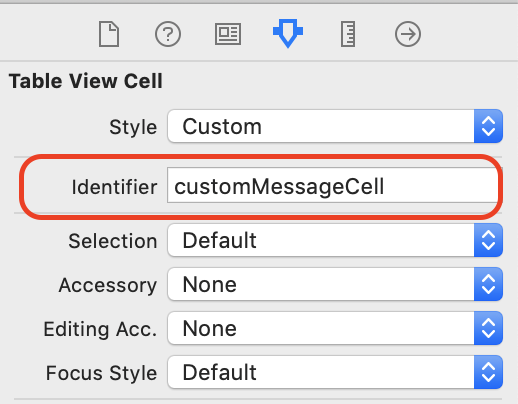
import UIKit

class CustomMessageCell: UITableViewCell {
    @IBOutlet var messageBackground: UIView!
    @IBOutlet var avatarImageView: UIImageView!
    @IBOutlet var messageBody: UILabel!
    @IBOutlet var senderUsername: UILabel!

    override func awakeFromNib() {
        super.awakeFromNib()
        // Initialization code goes here
    }
}
- Import the TableView in the UIViewController
class ChatViewController: UIViewController, UITableViewDelegate, UITableViewDataSource {
  @IBOutlet var messageTableView: UITableView!

  override func viewDidLoad() {
    super.viewDidLoad()

    //TODO: Set yourself as the delegate and datasource here:
    messageTableView.delegate = self
    messageTableView.dataSource = self

    //TODO: Register your MessageCell.xib file here:
    messageTableView.register(UINib(nibName: "MessageCell", bundle: nil), forCellReuseIdentifier: "customMessageCell")
  }

  //TODO: Declare cellForRowAtIndexPath here:
  // This message gets called for every single cell that exists inside the tableView
  func tableView(_ tableView: UITableView, cellForRowAt indexPath: IndexPath) -> UITableViewCell {
      let cell = tableView.dequeueReusableCell(withIdentifier: "customMessageCell", for: indexPath) as! CustomMessageCell
      let messageArray = ["First message", "Second message", "Third message"]
      cell.messageBody.text = messageArray[indexPath.row]
      return cell
  }


  //TODO: Declare numberOfRowsInSection here:
  // Specify how many cells you want and what cells you want to display
  func tableView(_ tableView: UITableView, numberOfRowsInSection section: Int) -> Int {
      return 3
  }
}
- Resize the cells. Let’s say we want to reset the height
override func viewDidLoad() {
  super.viewDidLoad()

  //TODO: Set yourself as the delegate and datasource here:
  messageTableView.delegate = self
  messageTableView.dataSource = self

  //TODO: Register your MessageCell.xib file here:
  messageTableView.register(UINib(nibName: "MessageCell", bundle: nil), forCellReuseIdentifier: "customMessageCell")
  configureTableView()
}

//TODO: Declare configureTableView here:
func configureTableView() {
  messageTableView.rowHeight = UITableView.automaticDimension
  messageTableView.estimatedRowHeight = 120.0
}
UISearchBar
UISearchBar in UIViewController
Example: CategorySheetFloatingPanel.swift
-
Drag a Search Bar in to main.storyboard
-
Indicate the delegate
-
Implement
UISearchBarDelegatein our ViewController
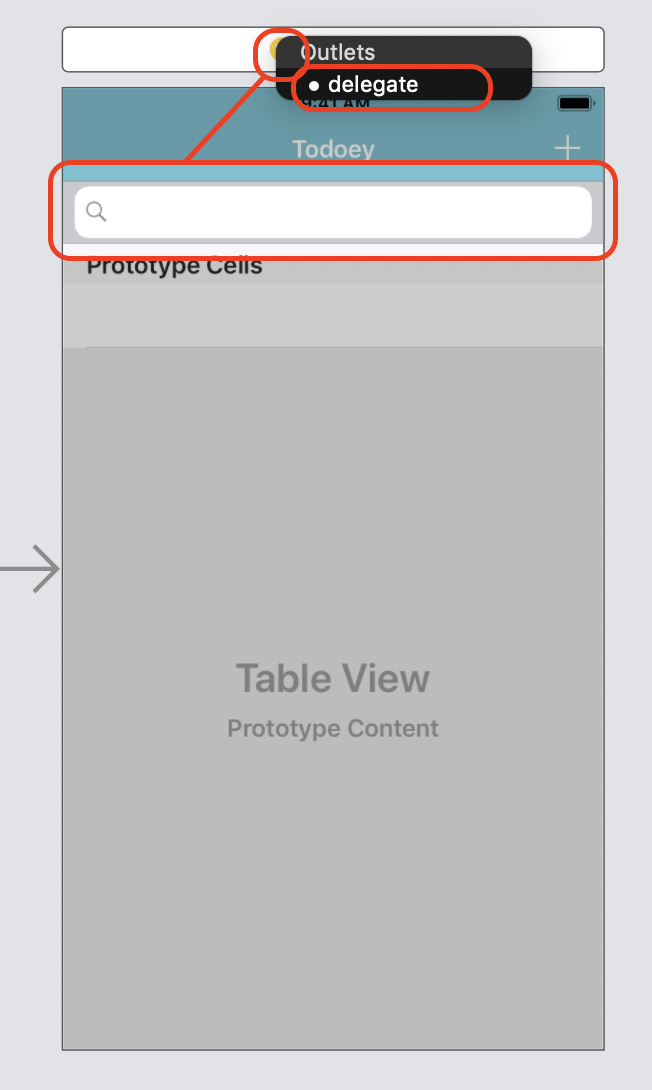
extension TodoListViewController: UISearchBarDelegate {

    // This method will be triggered as "Enter" is typed
//    func searchBarSearchButtonClicked(_ searchBar: UISearchBar) {
//      queryData(text: searchBar.text!)
//    }

    // This method will be triggered as users are typing
    func searchBar(_ searchBar: UISearchBar, textDidChange searchText: String) {
      // Do something as users clear the Search Bar
      if searchBar.text?.count == 0 {
        reloadData()
      } else {
        // Query data as users are typing to improve user experience.
        queryData(text: searchBar.text!)
      }
    }
}
UISearchBar inside NavigationController
Example: ItemViewController.swift
- Embed your UIViewController in Navigation Controller
- Implement delegates
class ItemViewController: UIViewController {

  var searchController : UISearchController!

  override func viewDidLoad() {
    super.viewDidLoad()

    // Set searchBar inside NavigationController
    initUISearchController()
  }
}

extension ItemViewController: UISearchControllerDelegate, UISearchBarDelegate {

    // This method will be triggered as "Enter" is typed
    //    func searchBarSearchButtonClicked(_ searchBar: UISearchBar) {
    //        updateTableView(text: searchBar.text!)
    //    }

    func initUISearchController() {
        searchController = UISearchController(searchResultsController: nil)
        searchController.delegate = self
        searchController.searchBar.delegate = self
        searchController.hidesNavigationBarDuringPresentation = true
        searchController.dimsBackgroundDuringPresentation = true

        navigationItem.searchController = searchController
        definesPresentationContext = true
    }

    func searchBar(_ searchBar: UISearchBar, textDidChange searchText: String) {
        // Reload all the data as users clear the Search Bar
        if searchBar.text?.count == 0 {
            loadItems()
            DispatchQueue.main.async {
                // No longer have the cursor and also the keyboard should go away
                searchBar.resignFirstResponder()
            }
        } else {
            // Query data as users are typing to improve user experience.
        }
    }
}
Create Classes and Objects from Scratch
Useful tools
- Xcode
- Scale images from mobile development
- Flat UI colors
- Canva
Sideloading
Install your apps on your physical iPhone for free.
Settings
- Ensure your Xcode version matches with your iOS version on your iPhone. E.g. Xcode 10.0 -> iOS 12.0, Xcode 10.1 -> iOS 12.1
- Go to Xcode, you need:
- A unique bundle identifier
- «Automatically manage signing» is ticked
- Create a team
- Go to Product -> Destination -> Choose your device
- Run the app on your iPhone
- On your iPhone, go to Settings -> General -> Device Management -> Trust
- Run the app on your iPhone again
Debugging wirelessly through the air
- Have your iPhone plug in through USB
- Go to Window -> Devices and Simulators -> Find your phone and select «Connect via network»
- Unplug yor phone
- Run the app on your iPhone
CocoaPods
https://cocoapods.org/
CocoaPods is what’s known as dependency manager for Xcode project.
- Install CocoaPods on your computer
$sudo gem install cocoapods
- Install new pods in my Xcode project
Go to your Xcode project, e.g. /Users/catherine/Workspace/Clima-iOS12/, initialise CocoaPods.
- You have a Podfile now. Open it by Xcode
Podfile
In Ruby, we don’t use {} as code block, instead, we use
Add CocoaPods, the Pods we will use for our app
do
  pod 'SwiftyJSON'
  pod 'Alamofire'
  pod 'SVProgressHUD'
end
Check the current version of CocoaPods
Fix for CocoaPods v1.0.1 and below, add the following code in your Podfile
post_install do |installer|
  installer.pods_project.targets.each do |target|
    target.build_configurations.each do |config|
      config.build_settings['SWIFT_VERSION'] = '3.0'
      config.build_settings['MACOSX_DEPLOYMENT_TARGET'] = '10.10'
    end
  end
end
Install all the CocoaPods that we specified earlier in our Podfile
Open xcworkspace file instead which contains all of our CocoaPods.
Podfile example
Carthage
- Install Carthage
$brew update
$brew install carthage
- Create Cartfile file
Create a file called Cartfile, paste needed libraries. E.g. SVProgressHUD, and save it to project folder
github "watson-developer-cloud/swift-sdk"
github "SVProgressHUD/SVProgressHUD"
- Run
carthage updateto install libraries - Import all the libraries you needed (the file path will be in /Carthage/Build/iOS/xxx.framework)
The anatomy of an app
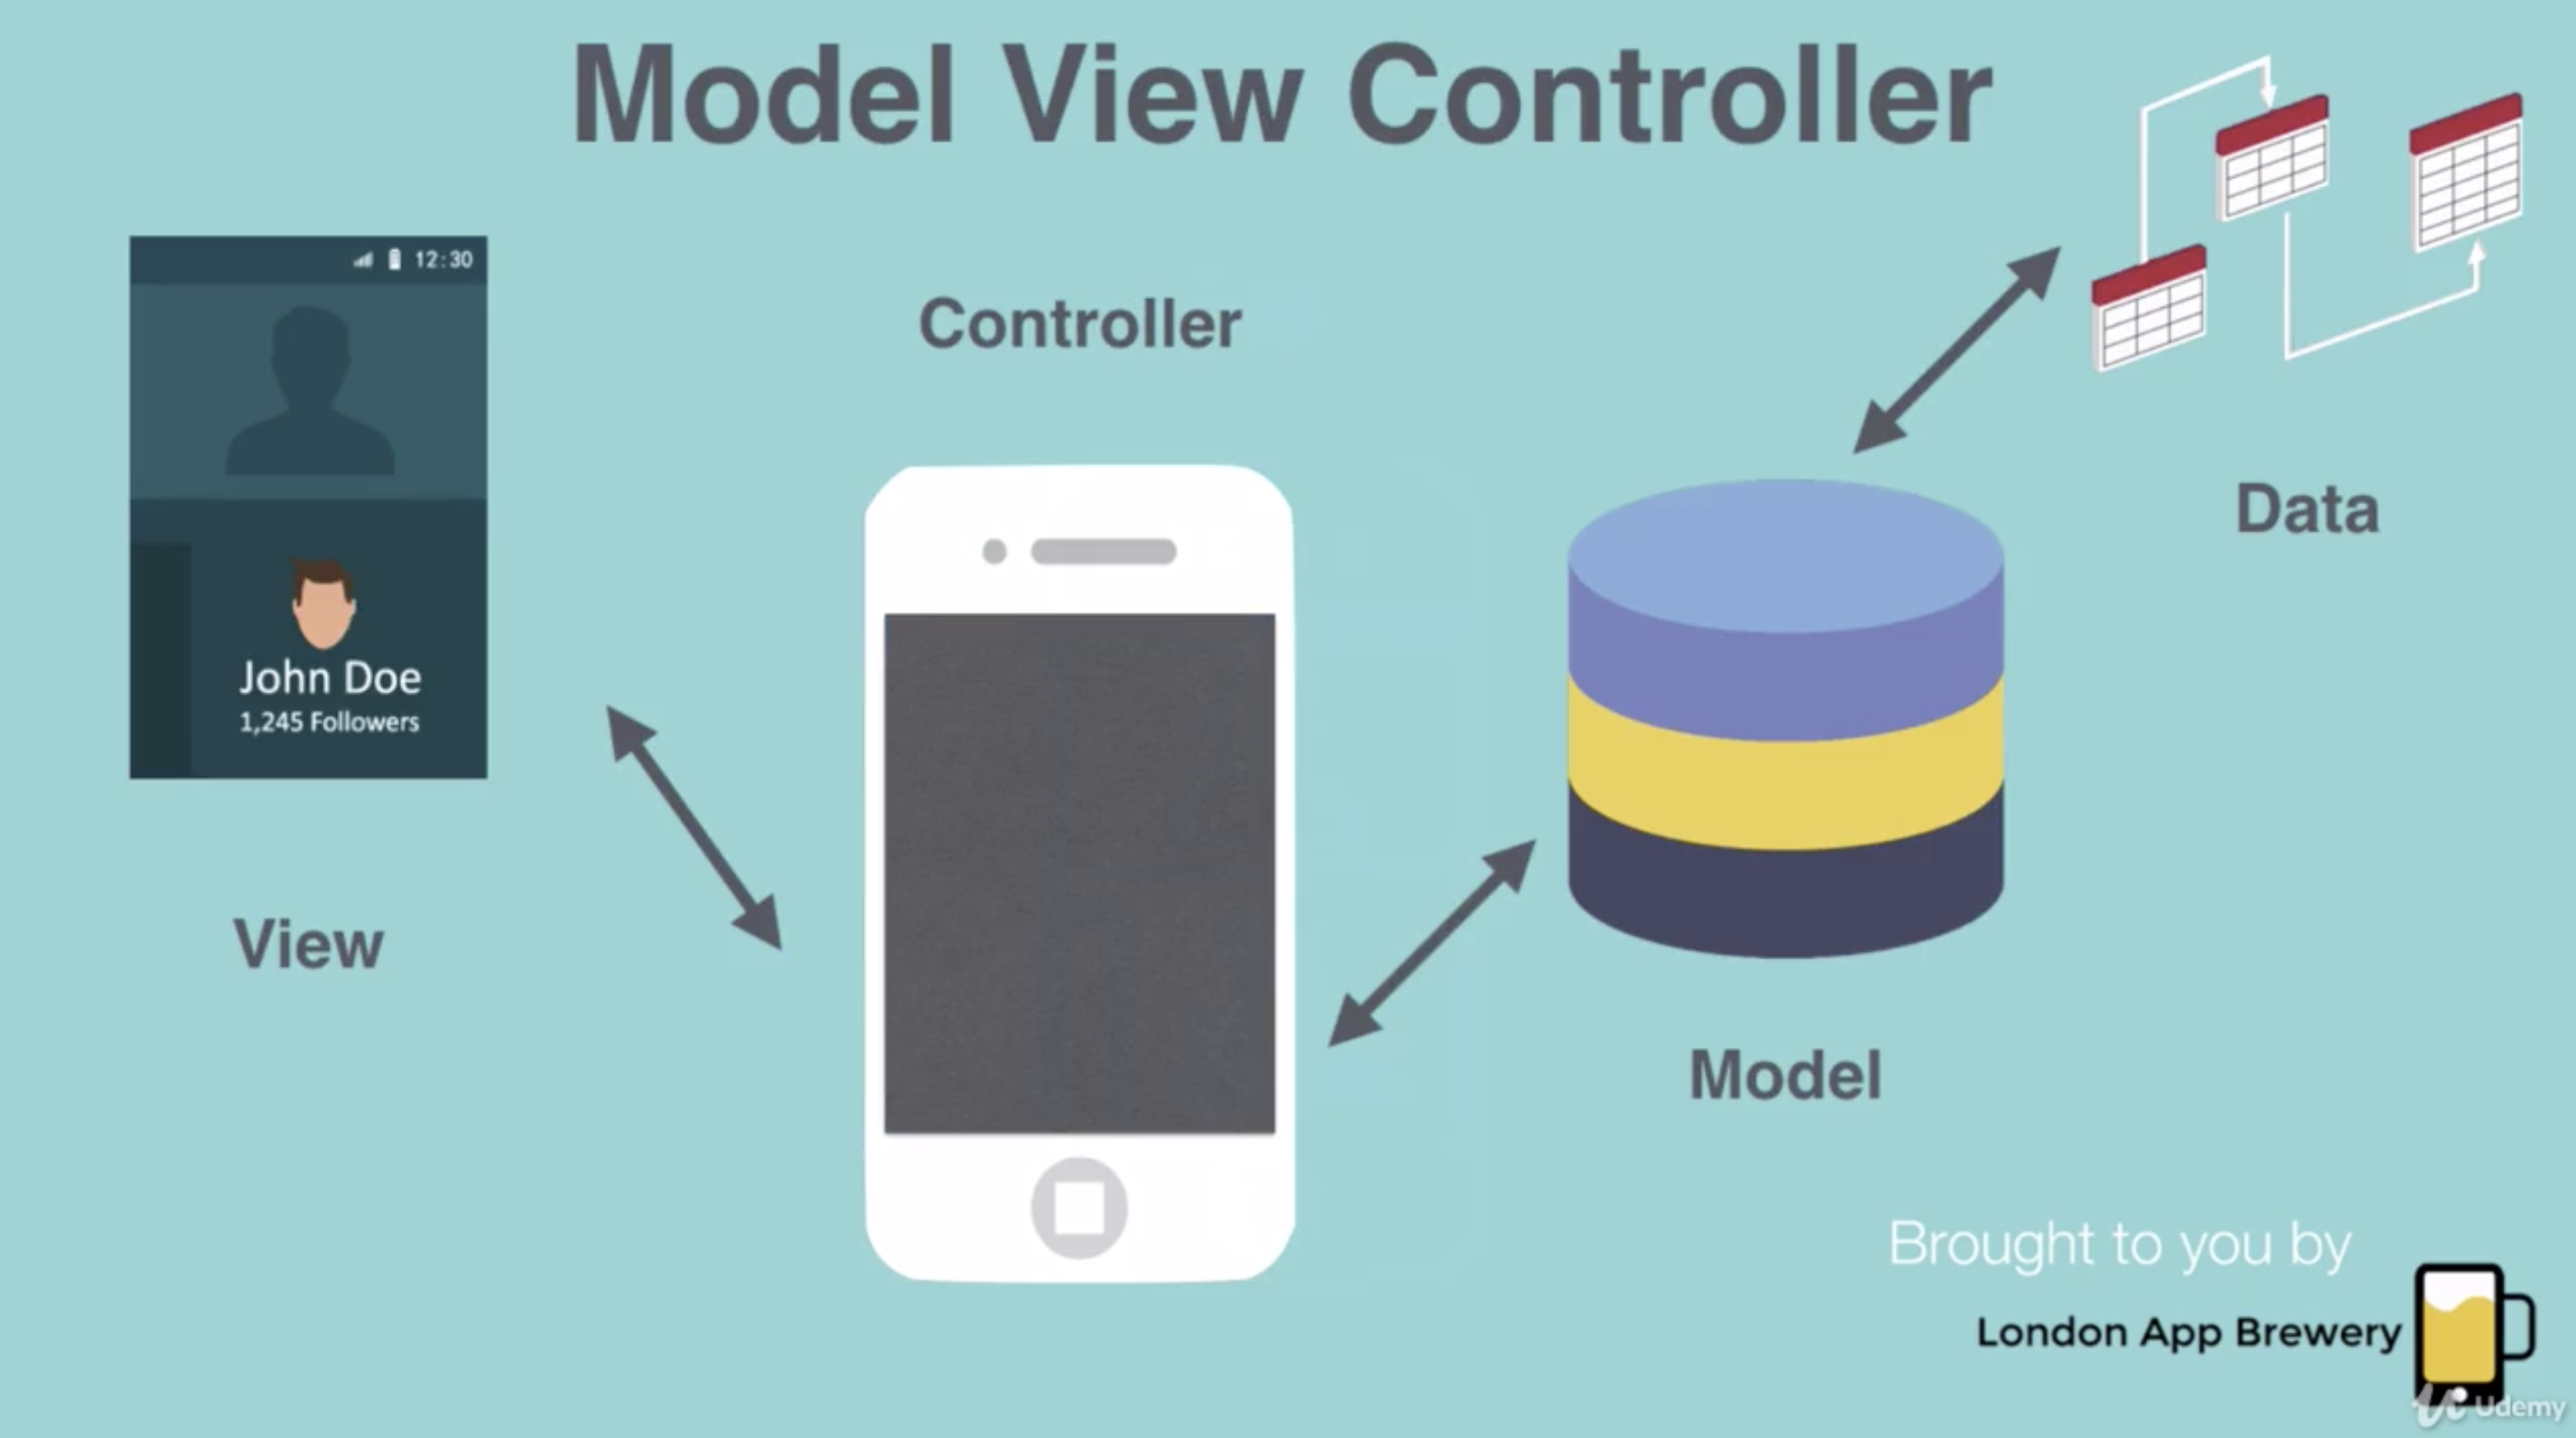
- View: What you see or what appear on the screen.
- ViewController: This goes behind the scene. This is the code that controls what should happen when the user taps a button, or what will happen when you have a piece of data to display on screen.
- Model: Model is what controls the data. It manipulates the data and prepares the date to be served up to the ViewController.
Coding Style
MARK
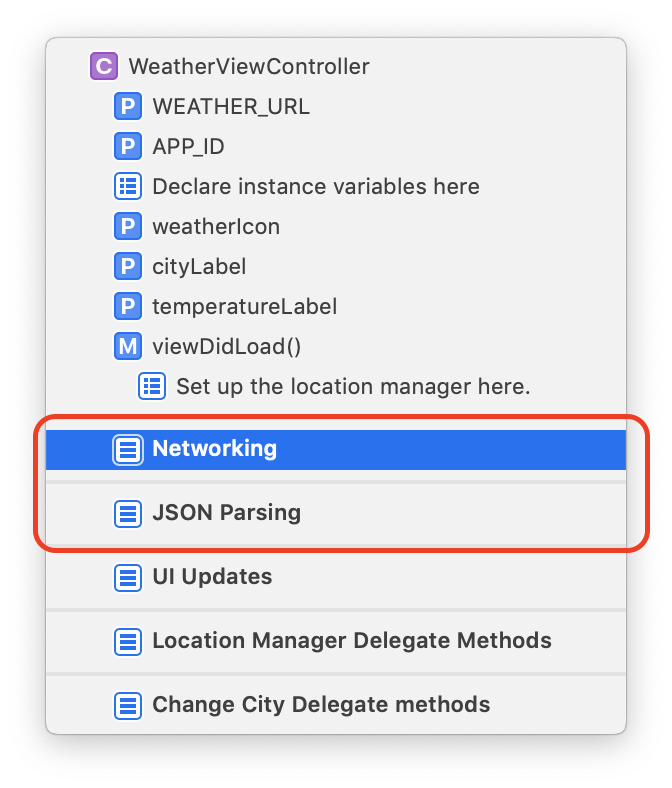
We can separate our code into describe sections by adding
//MARK: - Networking
func retrieveMessage() {
//TODO: Retrieve messages from Firebase

}


//MARK: - JSON Parsing
Fold code block
Extension
Instead of implement delegates directly, creating an extension
E.g. The original code might be:
class TodoListViewController: UISearchBarDelegate {
  func searchBarSearchButtonClicked(_ searchBar: UISearchBar) {
    <#code#>
  }
}
Split up the functionality of our ViewController, and we can have specific parts that are responsible for specific things.
class TodoListViewController {

}

//MARK: - SearchBar methods
extension TodoListViewController: UISearchBarDelegate {
  func searchBarSearchButtonClicked(_ searchBar: UISearchBar) {
    <#code#>
  }
}

Internal and external parameters
Let’s say we have a function
func fetchRequest(request: NSFetchRequest<MyTodoeyItem>) {
  do {
    itemArray = try context.fetch(request)
    } catch {
      print("Error fetching data from context (error)")
    }
  }
Modify ‘request’ parameter with an external parameter.
The external parameter is with whereas the internal parameter: request.
Instead of calling the fetchRequest function with fetchRequest(request: request), we are using
fetchRequest(with: request)
Delegation
Let’s say there’s a property data in B, and we are going to pass data from class A to class B, the easiest way is to create an instance of B.
class A {
  let b = B()
  b.data = "xxx"
}
But what if we cannot access properties in class A which is provided by Apple lick UIButton, CoreLocation and so forth? For example, once the LocationManager has found the user’s current location, it will send out an address, and how do we pass that address from the LocationManager (class A) into our own ViewController (class B)?
That’s what delegation comes in.
Once the LocationManager finds a location, it will send it out to the delegation, if the delegation happens to be nil, then nothing happens to the information. But if the delegation happens to be sat, it will handle the data from the LocationManager.
Applications
- I Am Rich, I Am Poor
- Magic8Ball, Dicee
- Random number
- AutoLayout
- Quizzler, Destini
- MVC
- ProgressHUD
- Alert
- Xylophone
- Play wav audio
do catch
- Stack View Practice, Auto Layout Practice
- AutoLayout
- Stack View
- Segues
- Segue example
- Navigation ViewController
- Delegates and Protocols
- Pass data between View Controllers
- Segues
- Clima
- Ask for permissions
- Geo Location
- Delegation
- Fetching data via
Alamofireand handling JSON bySwiftyJSON
- BitcoinTicker
- UIPickerViewDelegate, UIPickerViewDataSource
- Fetching data via
Alamofireand handling JSON bySwiftyJSON
- FlashChat
- Authenticate with Firebase
- Firebase Realtime Database
- Completion Handler
- Navigation ViewController
- UITableView
- Popup keyboard animation (UI Animations + UITextFieldDelegate + UITapGestureRecognizer)
ProgressHUD(Loading + alert)- Get more colours via
ChameleonFramework
- CoreData Example
- Persistent standard types and object array with
UserDefaultsandCoreDatarespectively. - Persistent data with CoreData.
- UISearchBar
- UITableView
- [Swift] Error handling (
guard else,do catchandif try) - [Swift] Internal, external and default parameters (
loadItemsinTodoListViewController) - [Swift] extension
- Persistent standard types and object array with
- Todoey with Realm
- Persistent data with Realm
- 2 ways to use UISearchBar (put UISearchBar inside NavigationController or UIViewController)
- UITableView
- FloatingPanel
- ChameleonFramework gradient color + random flat color
- Customise NavigationController style
- Calculator
- Swift tips: struct, if-let statement and guard-let statement
- SeeFood
- UIImagePickerController (Pick out images from users’ photos or camera)
- CoreML (Machine learning)
- WhatFlower
- UIImagePickerController (Pick out images from users’ photos or camera)
- CoreML (Machine learning)
- Display Web images via SDWebImage
Tips
Breakpoint
-
Set breakpoints
-
Step over

Ask the user for permissions
For example, Location Permissions.
let locationManager = CLLocationManager()
override func viewDidLoad() {
  super.viewDidLoad()

  locationManager.delegate = self
  locationManager.requestWhenInUseAuthorization();
}
In Info.plist,
Update Locations
// Asynchronous method (It works in the background), call didUpdateLocations and didFailWithError methods to handle callbacks
locationManager.startUpdatingLocation()
func locationManager(_ manager: CLLocationManager, didUpdateLocations locations: [CLLocation]) {
  // the laster the more accurate
  let location = locations[locations.count - 1]
  // Accuracy means the spread of possible locations.
  // When that value is negative, that represents an invalid result
  if (location.horizontalAccuracy > 0) {
    // Unless you want to destroy users' battery, you should stop updating locations as soon as you get the valid data
    locationManager.stopUpdatingLocation()
    print("((location.coordinate.longitude), (location.coordinate.latitude))")
  }
}

func locationManager(_ manager: CLLocationManager, didFailWithError error: Error) {
  // Location unavailable
  print(error)
}
If you get Error Domain=kCLErrorDomain Code=0 "(null)" error, 2 solutions to fix this:
- Run on an iPhone device
- In your simulator, click Debug — Location, select Apple’s headquarter or Custom Location
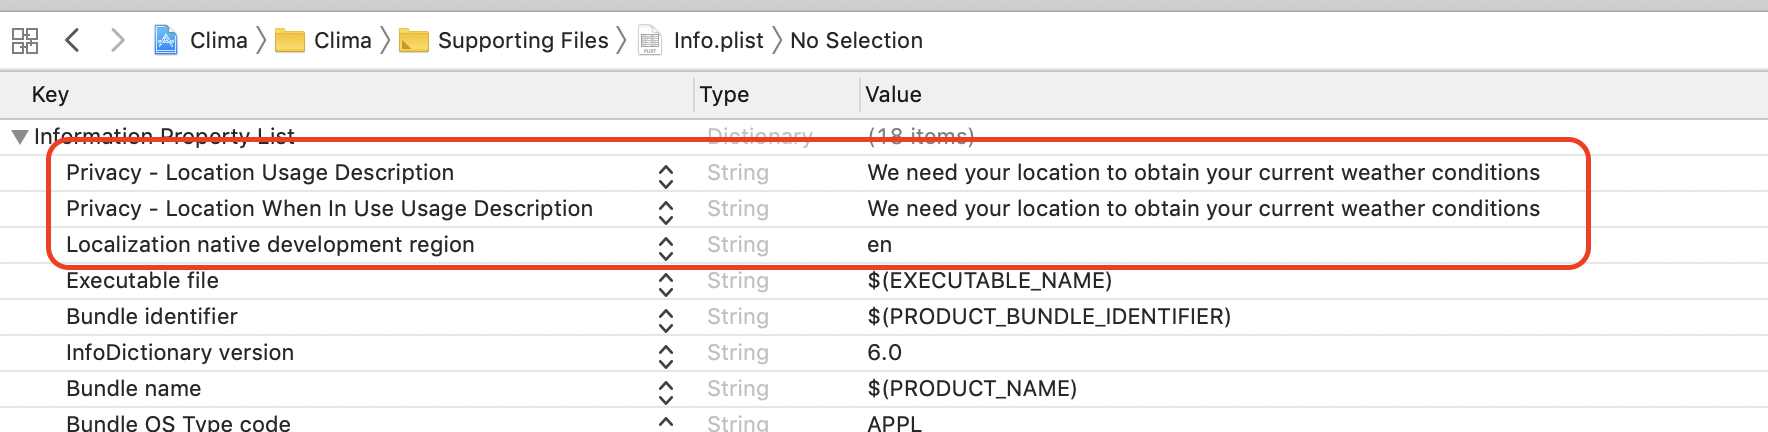
Another example, in order to launch users’ camera or open their photo albums, you need Privacy - Camera Usage Description and Privacy - Photo Library Usage Description.
Completion Handler
Callback: Do something time consuming
class DataManager {
    func save(key: String, value: String, callback: (Bool, String) -> Void){
      // Do something time consuming
        let isSuccess = true
        let message = "(key) saved"
        callback(isSuccess, message)
    }
}
class MyViewController: UIViewController {

  func completion(isSuccess: Bool, message: String) {
    print("isSuccess:(isSuccess), message:(message)")
  }

  @IBAction func registerPressed(_ sender: AnyObject) {
    let dataManager = DataManager()
    dataManager.save(key: "name", value: "Nick", callback: completion)
  }
}
or
let dataManager = DataManager()
dataManager.save(key: "name", value: "Nick") { (isSuccess, message) in
  print("isSuccess:(isSuccess), message:(message)")
}
Thread Handling
Run on background thread:
DispatchQueue.global(qos: .background).async {
  //do something
}
Run on main(UI) thread:
DispatchQueue.main.async {
  //do something
}
6 ways to persistent Local Data Storage

UserDefaults
Persistent an array
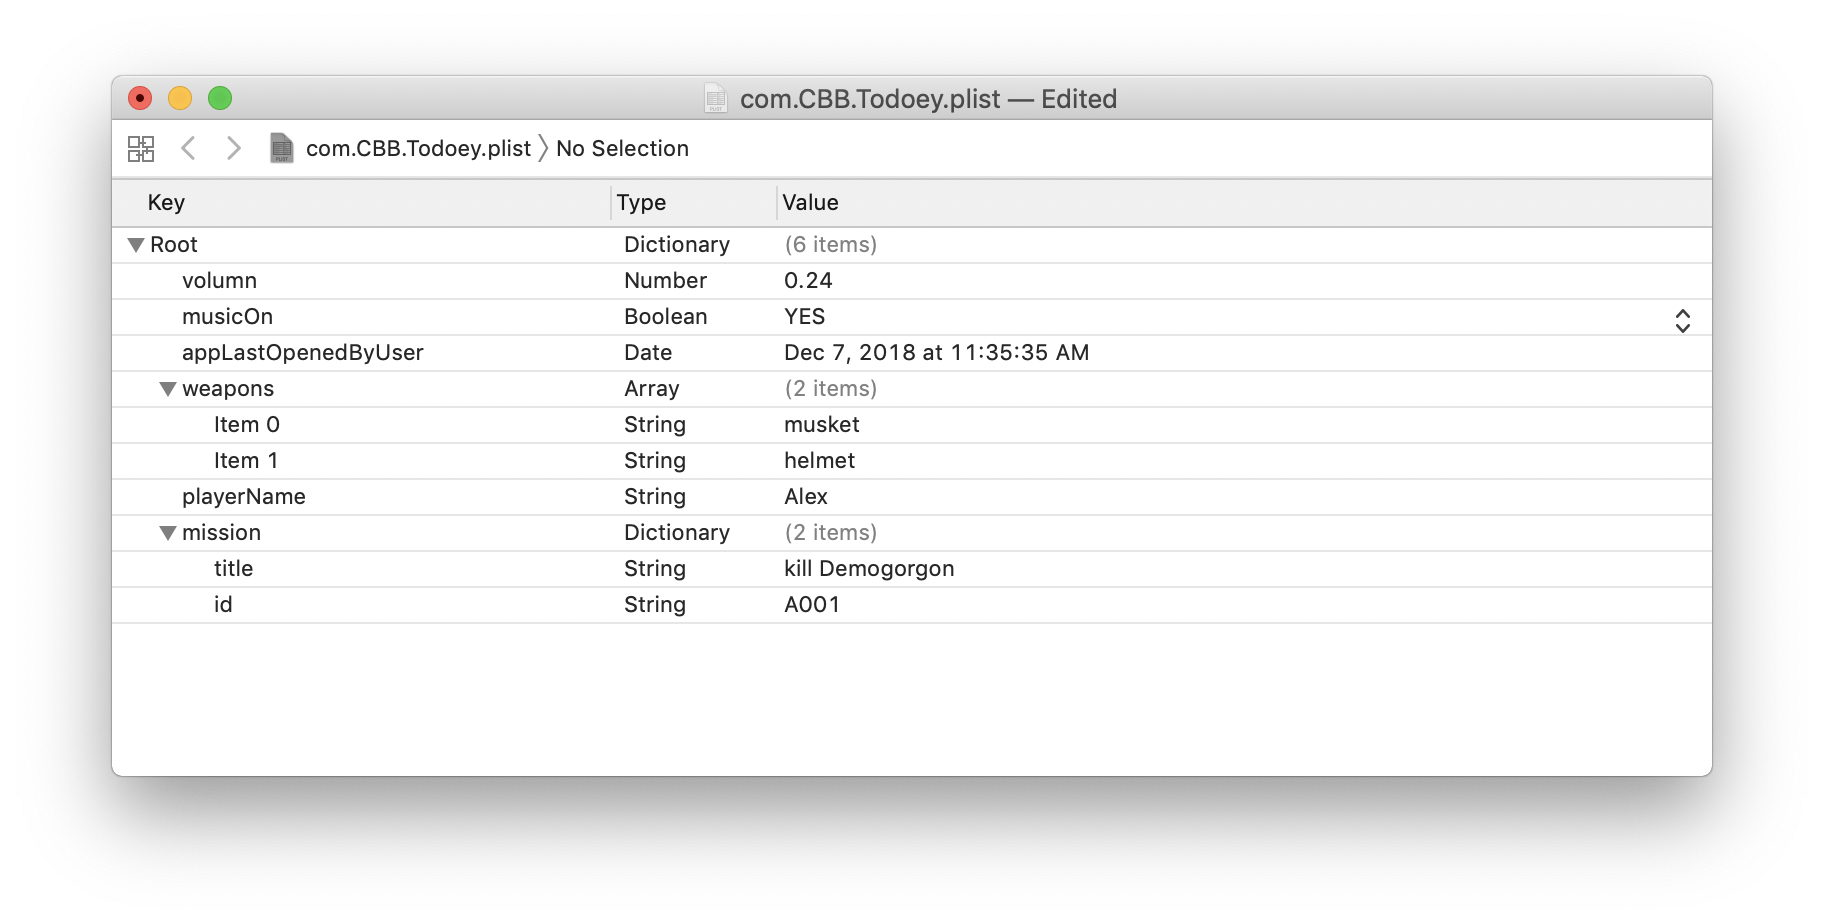
let defaults = UserDefaults.standard
defaults.set(0.24, forKey: "volumn")
defaults.set(true, forKey: "musicOn")
defaults.set("Alex", forKey: "playerName")
defaults.set(["musket", "helmet"], forKey: "weapons")
defaults.set(["id": "A001", "title": "kill Demogorgon"], forKey: "mission")
defaults.set(Date(), forKey: "appLastOpenedByUser")
Retrieve the array from the local storage (plist)
if let volumn = defaults.float(forKey: "volumn") as? Float {
  print("volumn:(volumn)")
}
if let musicOn = defaults.bool(forKey: "musicOn") as? Bool {
  print("musicOn:(musicOn)")
}
if let playerName = defaults.string(forKey: "playerName") {
  print("playerName:(playerName)")
}
if let appLastOpenedByUser = defaults.object(forKey: "appLastOpenedByUser") {
  print("appLastOpenedByUser:(appLastOpenedByUser)")
}
if let weapons = defaults.array(forKey: "weapons") as? [String] {
  print("weapons:(weapons)")
}
if let mission = defaults.dictionary(forKey: "mission") as? Dictionary<String, String> {
  print("mission:(mission)")
}
To print the simulator and application path in AppDelegate
func application(_ application: UIApplication, didFinishLaunchingWithOptions launchOptions: [UIApplication.LaunchOptionsKey: Any]?) -> Bool {
    print(NSSearchPathForDirectoriesInDomains(.documentDirectory, .userDomainMask, true).last! as String)
    return true
}
We gonna get
/Users/catherine/Library/Developer/CoreSimulator/Devices/C2161038-1255-44C0-88EA-E61BEDD0EDE3/data/Containers/Data/Application/E927D9CE-FAF9-4229-8D6A-2D2B82EBF832/Documents
And the plist file is going to be actually saved in
/Users/catherine/Library/Developer/CoreSimulator/Devices/C2161038-1255-44C0-88EA-E61BEDD0EDE3/data/Containers/Data/Application/E927D9CE-FAF9-4229-8D6A-2D2B82EBF832/Library/Preferences/com.CBB.Todoey.plist
Notice: Object array is not allowed to persistent in local storage directly. Why not create our own plist by using
FileManager.
FileManager
Initialise the file with a reasonable name
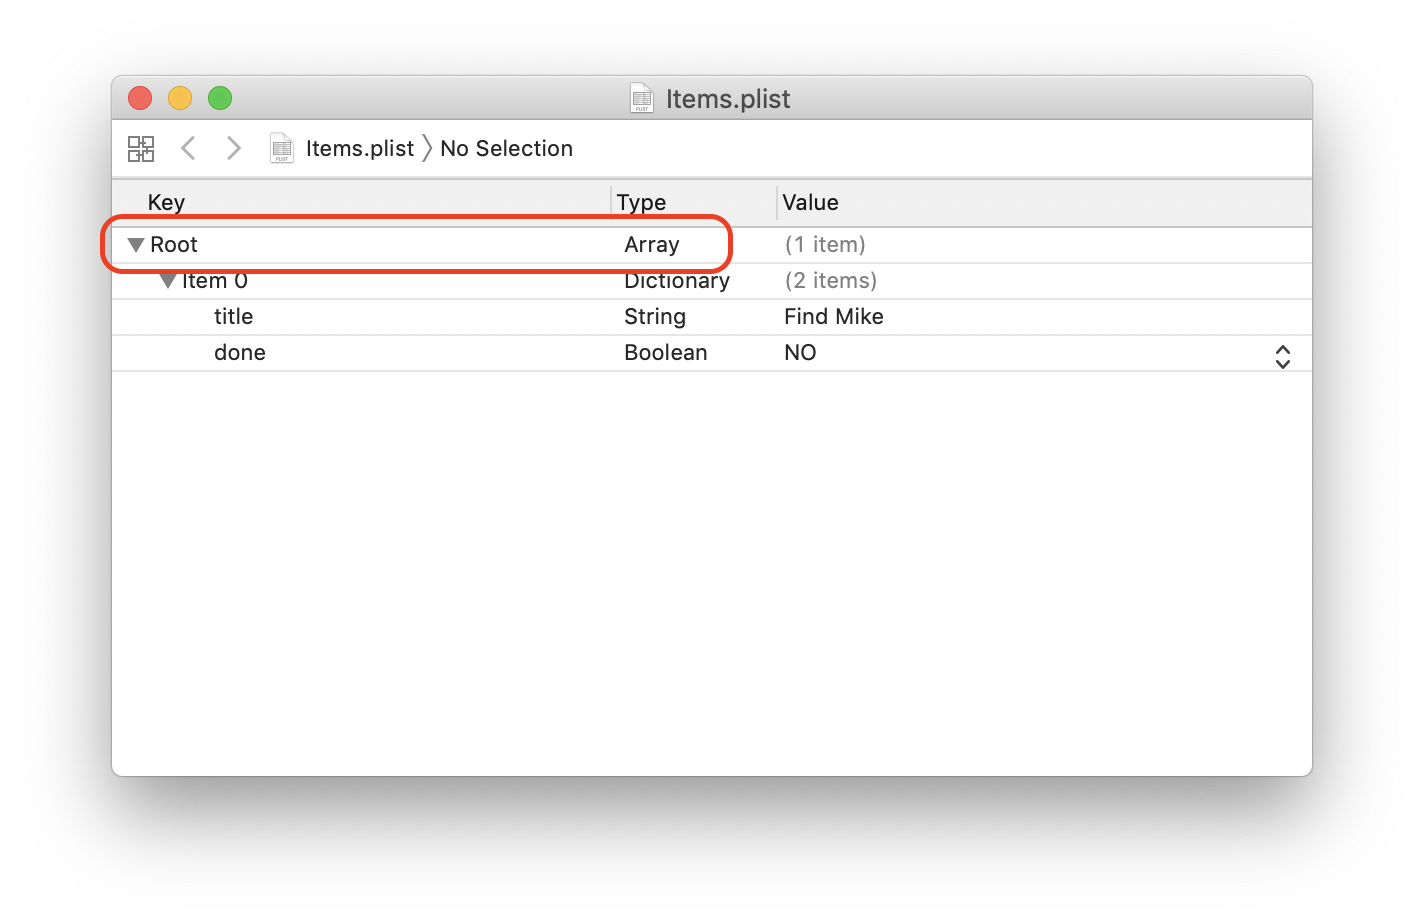
let dataFilePath = FileManager.default.urls(for: .documentDirectory, in: .userDomainMask).first?.appendingPathComponent("Items.plist")
Make the object encodable
import Foundation

class TodoeyItem: Encodable {
    var title: String
    var done: Bool

    init(title: String, done: Bool) {
        self.title = title
        self.done = done
    }
}
Encode the item array and save
do {
  let encoder = PropertyListEncoder()
  let data = try encoder.encode(self.itemArray)
  try data.write(to: dataFilePath!)
  } catch {
    print("Error encoding item array")
  }
Make the object decodable (Encodabe + Decodable = Codable)
import Foundation

class TodoeyItem: Codable {
    var title: String
    var done: Bool

    init(title: String, done: Bool) {
        self.title = title
        self.done = done
    }
}
Retrieve and decode the item array
if let data = try? Data(contentsOf: dataFilePath!) {
  let decoder = PropertyListDecoder()
  do {
    itemArray = try decoder.decode([TodoeyItem].self, from: data)

    //Refresh the tableView
    self.tableView.reloadData()
    } catch {
      print("Error decoding item array, (error)")
    }
} else {
  print("Error decoding item array")
}
Cp. The difference between UserDefaults and FileManager plist is the type of Root directory, and that’s why UserDefaults is supposed to keep standard types rather than Object.

Databases
Core Data
- Create a new project with CoreData
Or paste the following code in AppDelegate
import UIKit
import CoreData

@UIApplicationMain
class AppDelegate: UIResponder, UIApplicationDelegate {
    func applicationWillTerminate(_ application: UIApplication) {
        // Called when the application is about to terminate. Save data if appropriate. See also applicationDidEnterBackground:.
        // Saves changes in the application's managed object context before the application terminates.
        self.saveContext()
    }


    // MARK: - Core Data stack

    lazy var persistentContainer: NSPersistentContainer = {
        /*
         The persistent container for the application. This implementation
         creates and returns a container, having loaded the store for the
         application to it. This property is optional since there are legitimate
         error conditions that could cause the creation of the store to fail.
         */
        let container = NSPersistentContainer(name: "YOUR_DATA_MODEL_NAME")
        container.loadPersistentStores(completionHandler: { (storeDescription, error) in
            if let error = error as NSError? {
                // Replace this implementation with code to handle the error appropriately.
                // fatalError() causes the application to generate a crash log and terminate. You should not use this function in a shipping application, although it may be useful during development.

                /*
                 Typical reasons for an error here include:
                 * The parent directory does not exist, cannot be created, or disallows writing.
                 * The persistent store is not accessible, due to permissions or data protection when the device is locked.
                 * The device is out of space.
                 * The store could not be migrated to the current model version.
                 Check the error message to determine what the actual problem was.
                 */
                fatalError("Unresolved error (error), (error.userInfo)")
            }
        })
        return container
    }()

    // MARK: - Core Data Saving support

    func saveContext () {
        let context = persistentContainer.viewContext
        if context.hasChanges {
            do {
                try context.save()
            } catch {
                // Replace this implementation with code to handle the error appropriately.
                // fatalError() causes the application to generate a crash log and terminate. You should not use this function in a shipping application, although it may be useful during development.
                let nserror = error as NSError
                fatalError("Unresolved error (nserror), (nserror.userInfo)")
            }
        }
    }
}
-
Add a Core Data model DataModel
File -> New -> File, scroll to Core Data section
-
Match the file name to NSPersistentContainer in AppDelegate
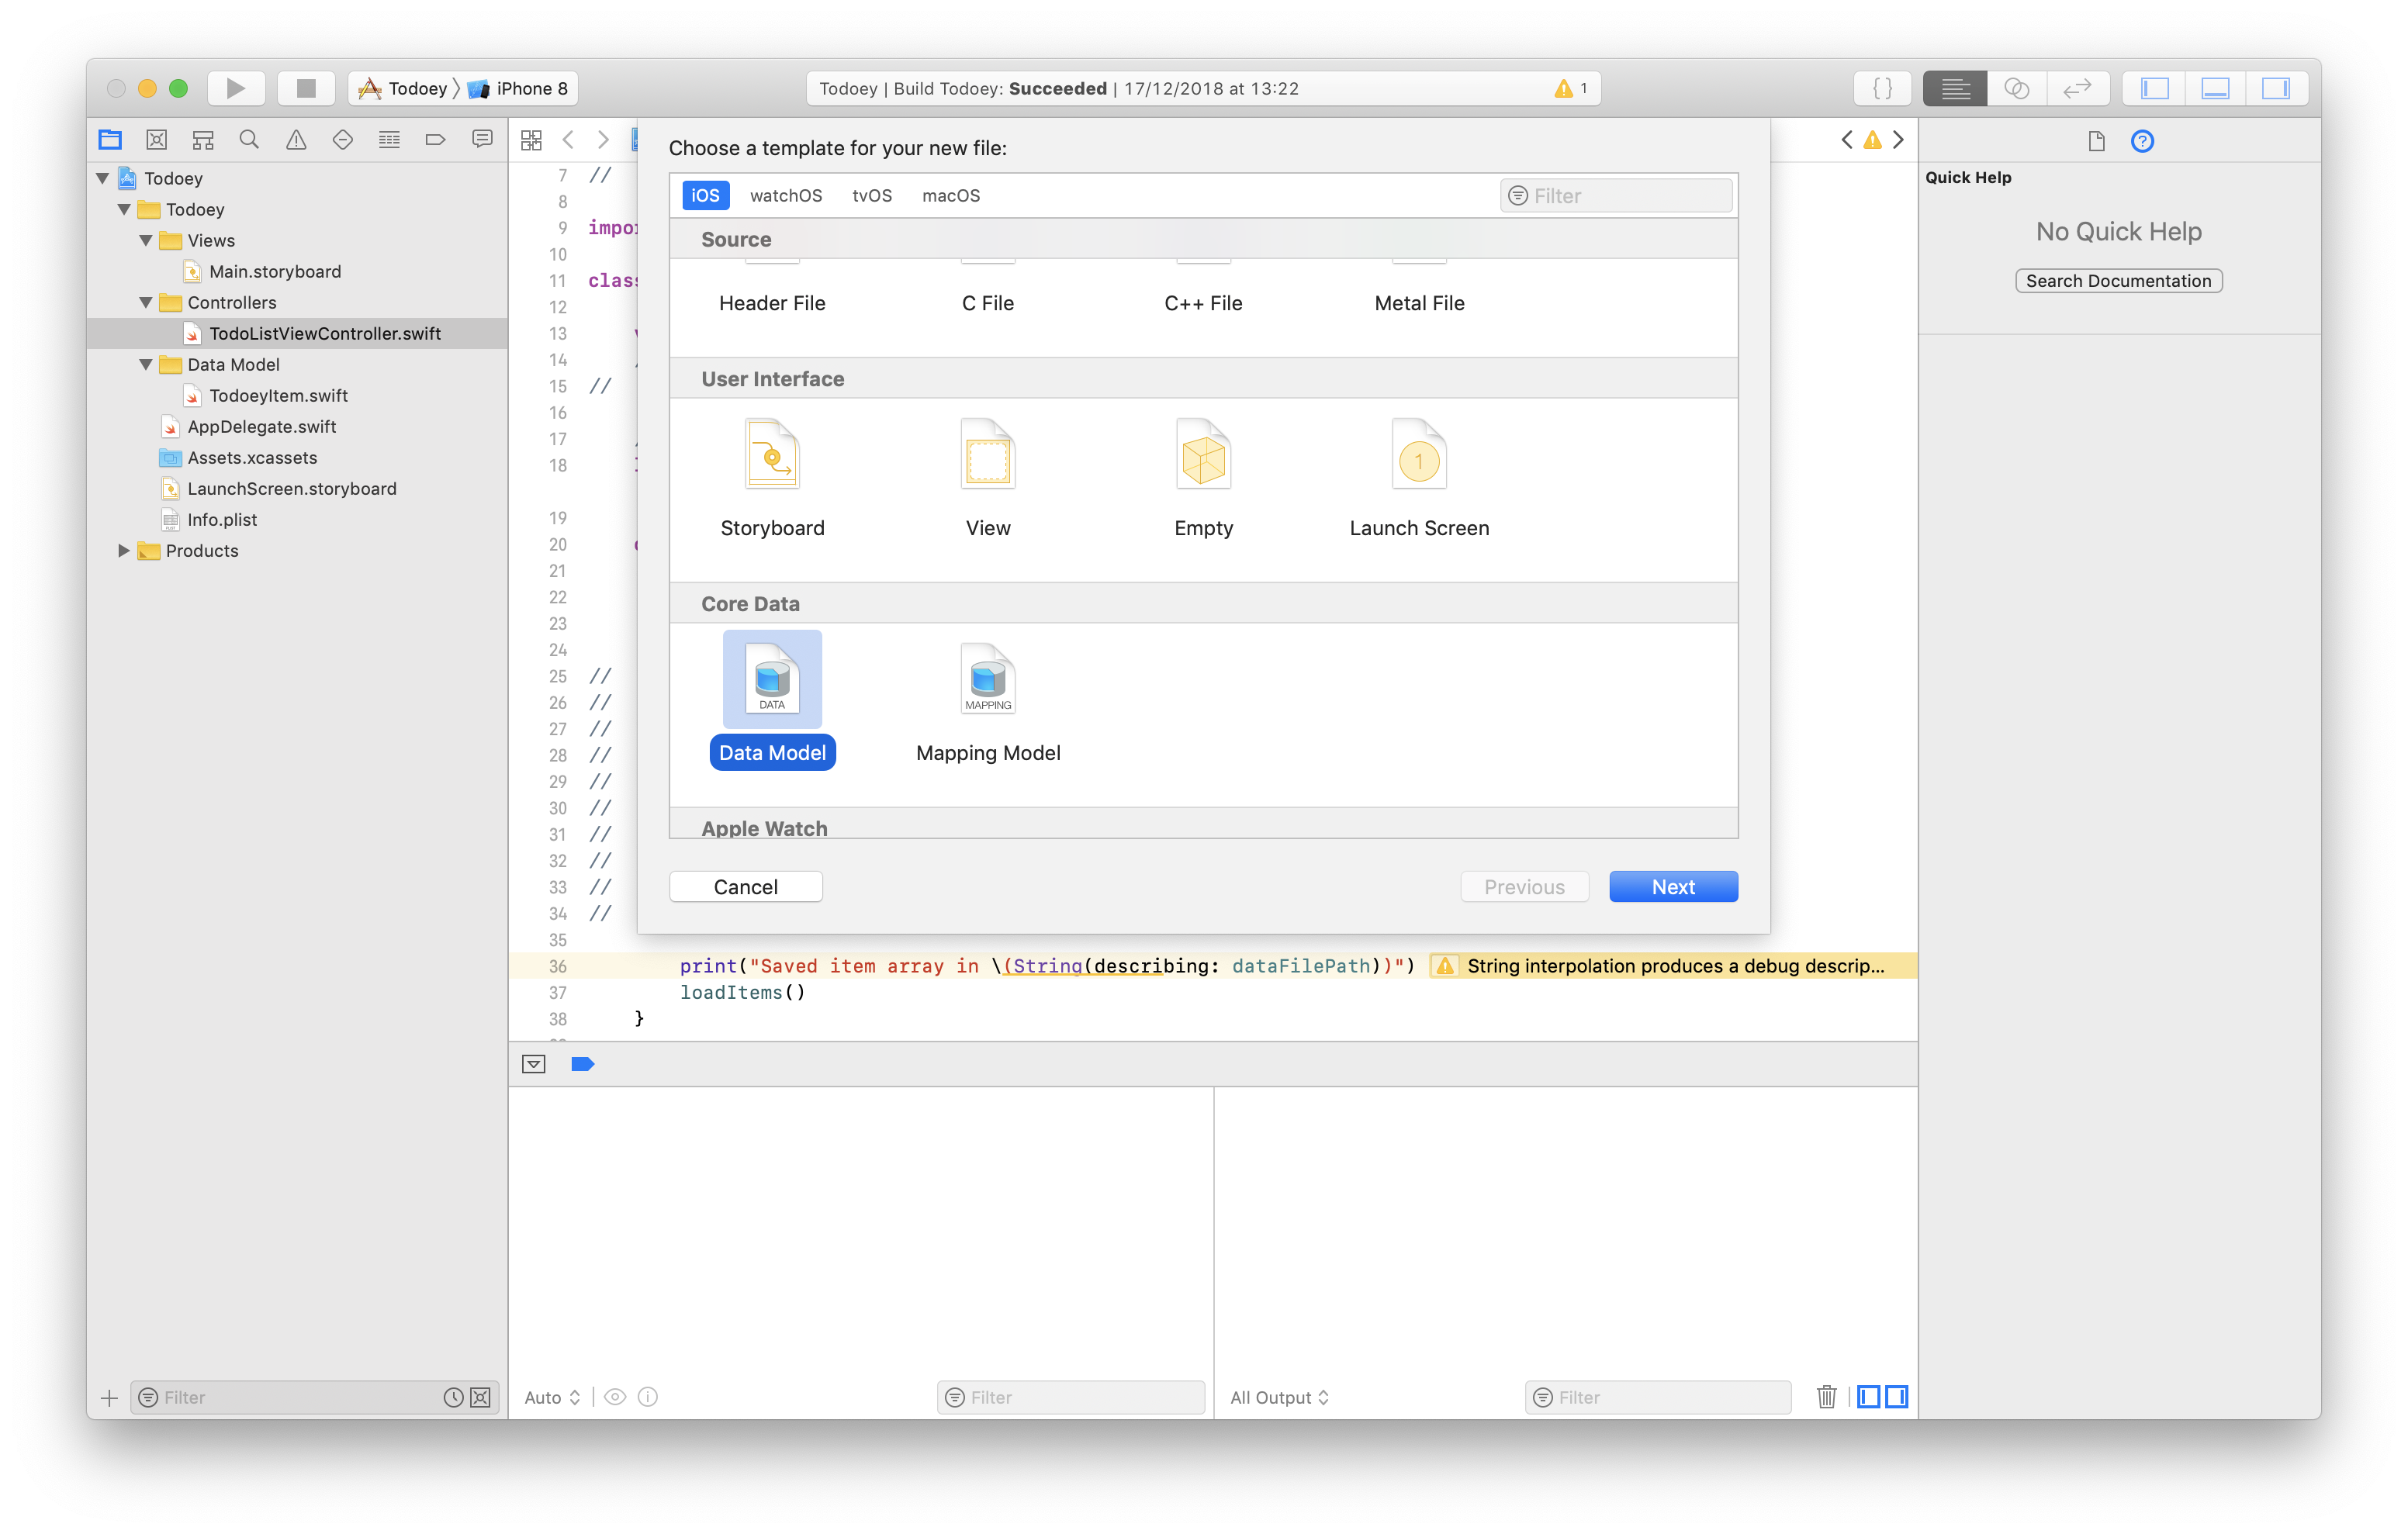
let container = NSPersistentContainer(name: "DataModel")
You might get CoreData: error: Failed to load model named xxx if you forget to update the name.
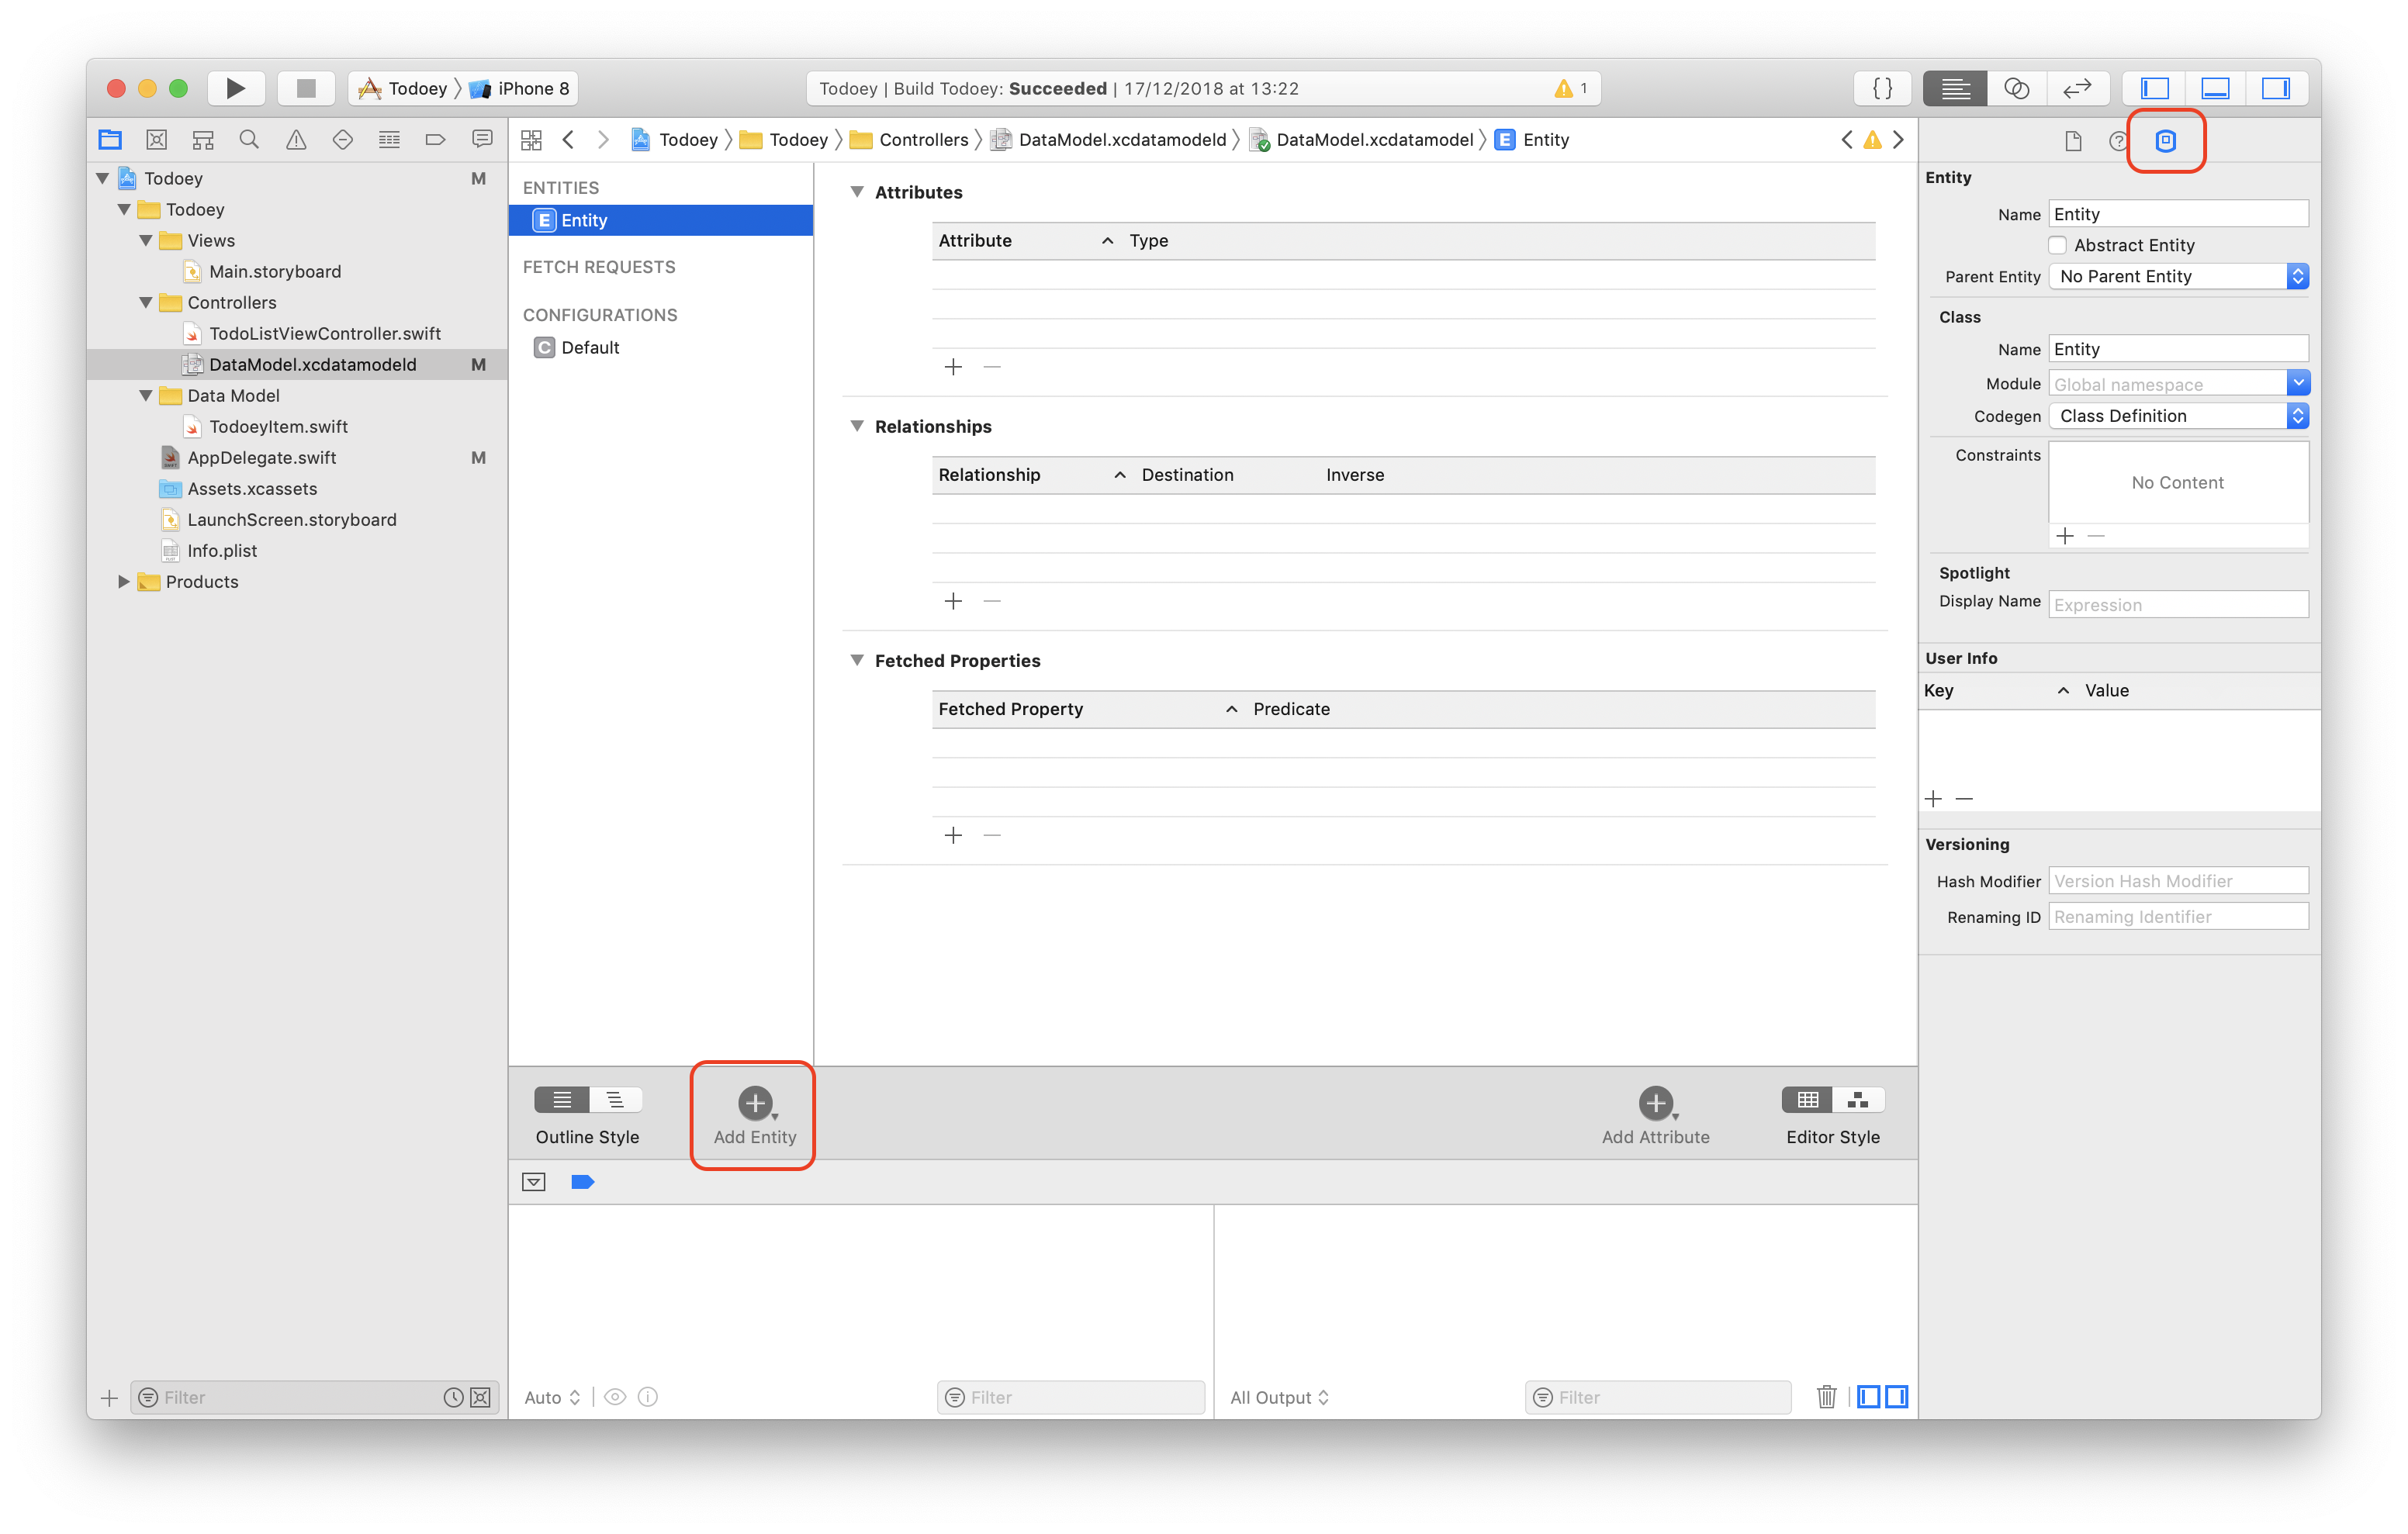
-
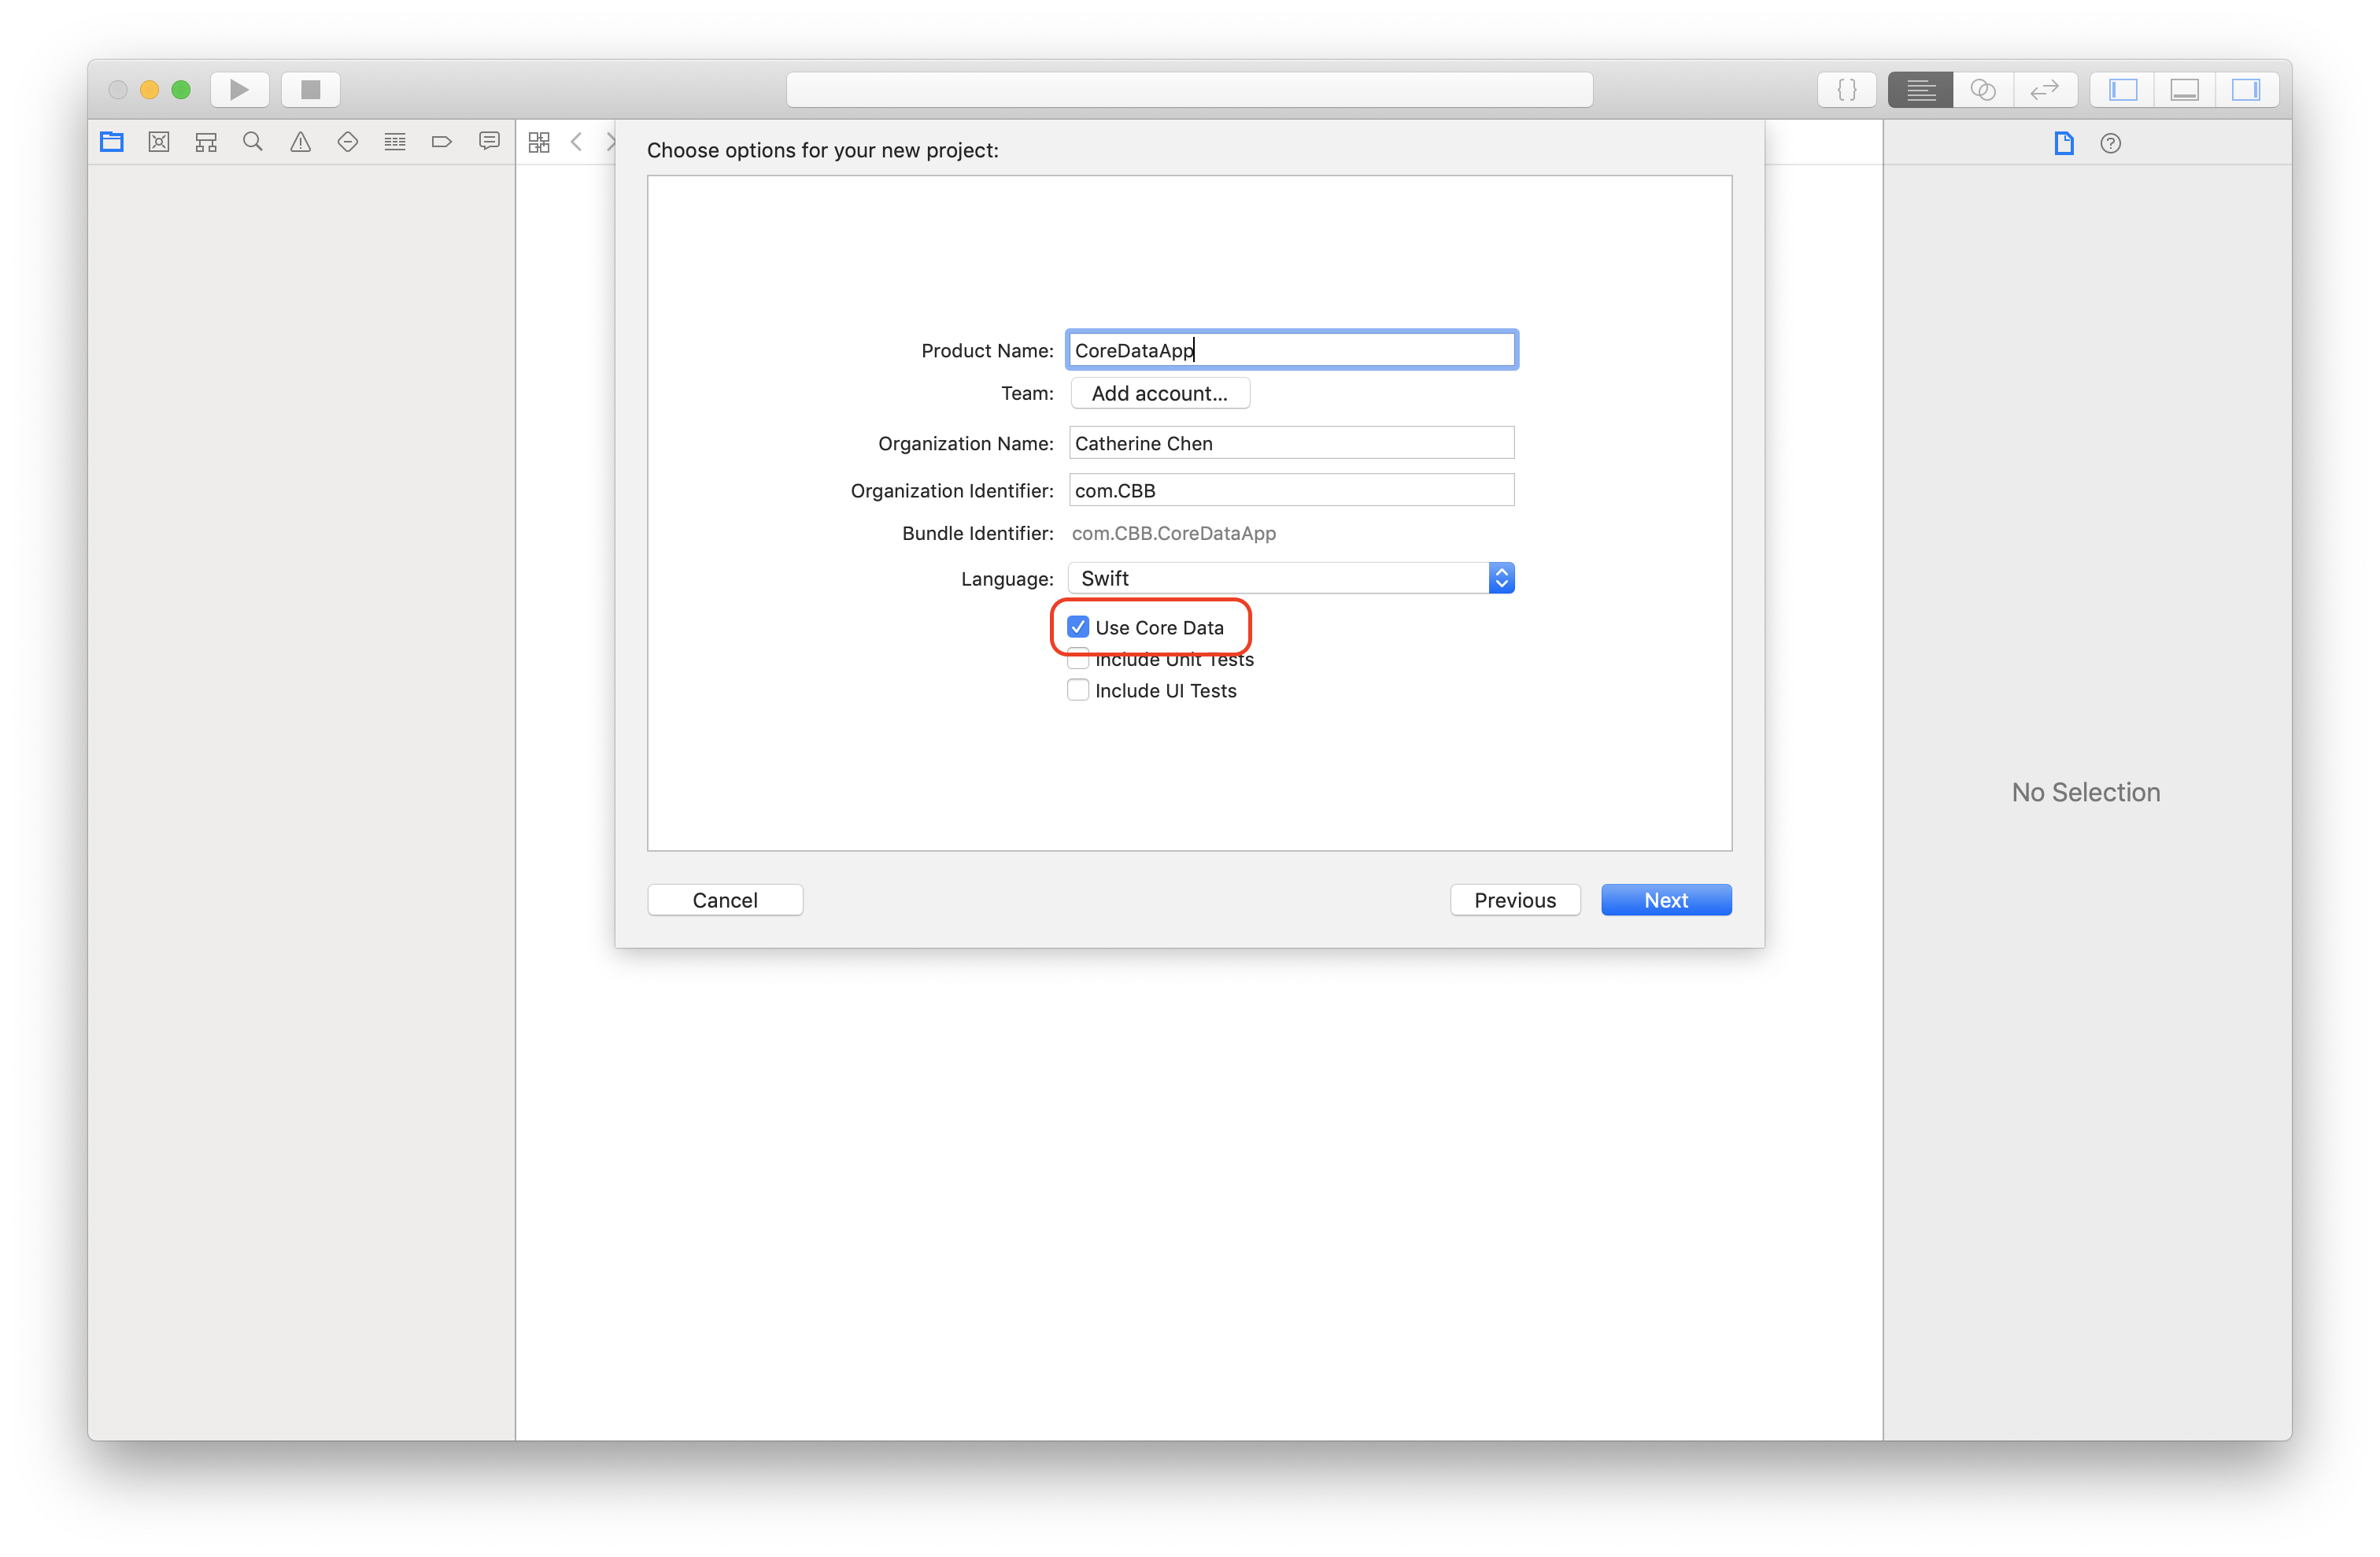
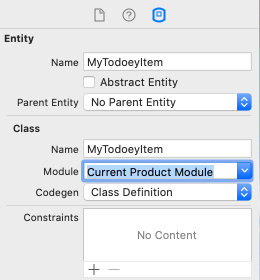
Go to DataModel, add a new Entity named
MyTodoeyItem
-
Add attributes and make them optional if you need

-
Change the module from ‘Global namespace’ to ‘Current Product Module’
-
(Optional) You could either skip this step by setting ‘Class Definition’ as default, or select Category/Extension in Codegen if you are going to customise your entities, i.e. You have to create classes that are identically named to you entities.
Now you might notice that we essentially replace the TodoeyItem class with
TodoeyItem class:
import Foundation

class TodoeyItem: Codable {
    var title: String
    var done: Bool

    init(title: String, done: Bool) {
        self.title = title
        self.done = done
    }
}
- Save data (Class name refers to the entity name)
let context = (UIApplication.shared.delegate as! AppDelegate).persistentContainer.viewContext
let newItem = MyTodoeyItem(context: context)
newItem.title = content
newItem.done = false

itemArray.append(newItem)
do {
  try context.save()
} catch {
  if let error = error as NSError? {
    fatalError("Unresolved error (error), (error.userInfo)")
  }
}
- Load data
import CoreData

class TodoListViewController: UITableViewController {
  var itemArray:[MyTodoeyItem] = []
  func loadItems() {
    do {
      let request: NSFetchRequest<MyTodoeyItem> = MyTodoeyItem.fetchRequest()
      itemArray = try context.fetch(request)
      } catch {
        print("Error fetching data from context (error)")
      }
  }
}
- Update data
itemArray[indexPath.row].setValue("new value", forKey: "title")
itemArray[indexPath.row].setValue(true, forKey: "done")
do {
  try context.save()
} catch {
  print("Error saving context (error)")
  }
- Delete data
This is a little tricky, we cannot delete the item like updating data we was doing.
We are going to callcontext.delete()andcontext.save().
// Delete data from our Core Data, then call 'context.save()' to save data
context.delete(itemArray[indexPath.row])
do {
  try self.context.save()
} catch {
  print("Error saving context (error)")
}

// Does nothing for our Core Date, it merely update our itemArray which is used to populate our tableView
itemArray.remove(at: indexPath.row)
- Query data
Have a look at NSPredicate Cheatsheet and NSHelper.
- Check the DB file if you want
To print the simulator and application path in AppDelegate
func application(_ application: UIApplication, didFinishLaunchingWithOptions launchOptions: [UIApplication.LaunchOptionsKey: Any]?) -> Bool {
    print(NSSearchPathForDirectoriesInDomains(.documentDirectory, .userDomainMask, true).last! as String)
    return true
}
Then we got
/Users/catherine/Library/Developer/CoreSimulator/Devices/C2161038-1255-44C0-88EA-E61BEDD0EDE3/data/Containers/Data/Application/D6149CD2-A9F4-4051-AB2E-0314F26082B7/Documents
Go to the following path to check the sqlite file via Datum
/Users/catherine/Library/Developer/CoreSimulator/Devices/C2161038-1255-44C0-88EA-E61BEDD0EDE3/data/Containers/Data/Application/D6149CD2-A9F4-4051-AB2E-0314F26082B7/Library/Application Support/DataModel.sqlite
- Edit Data model like a pro
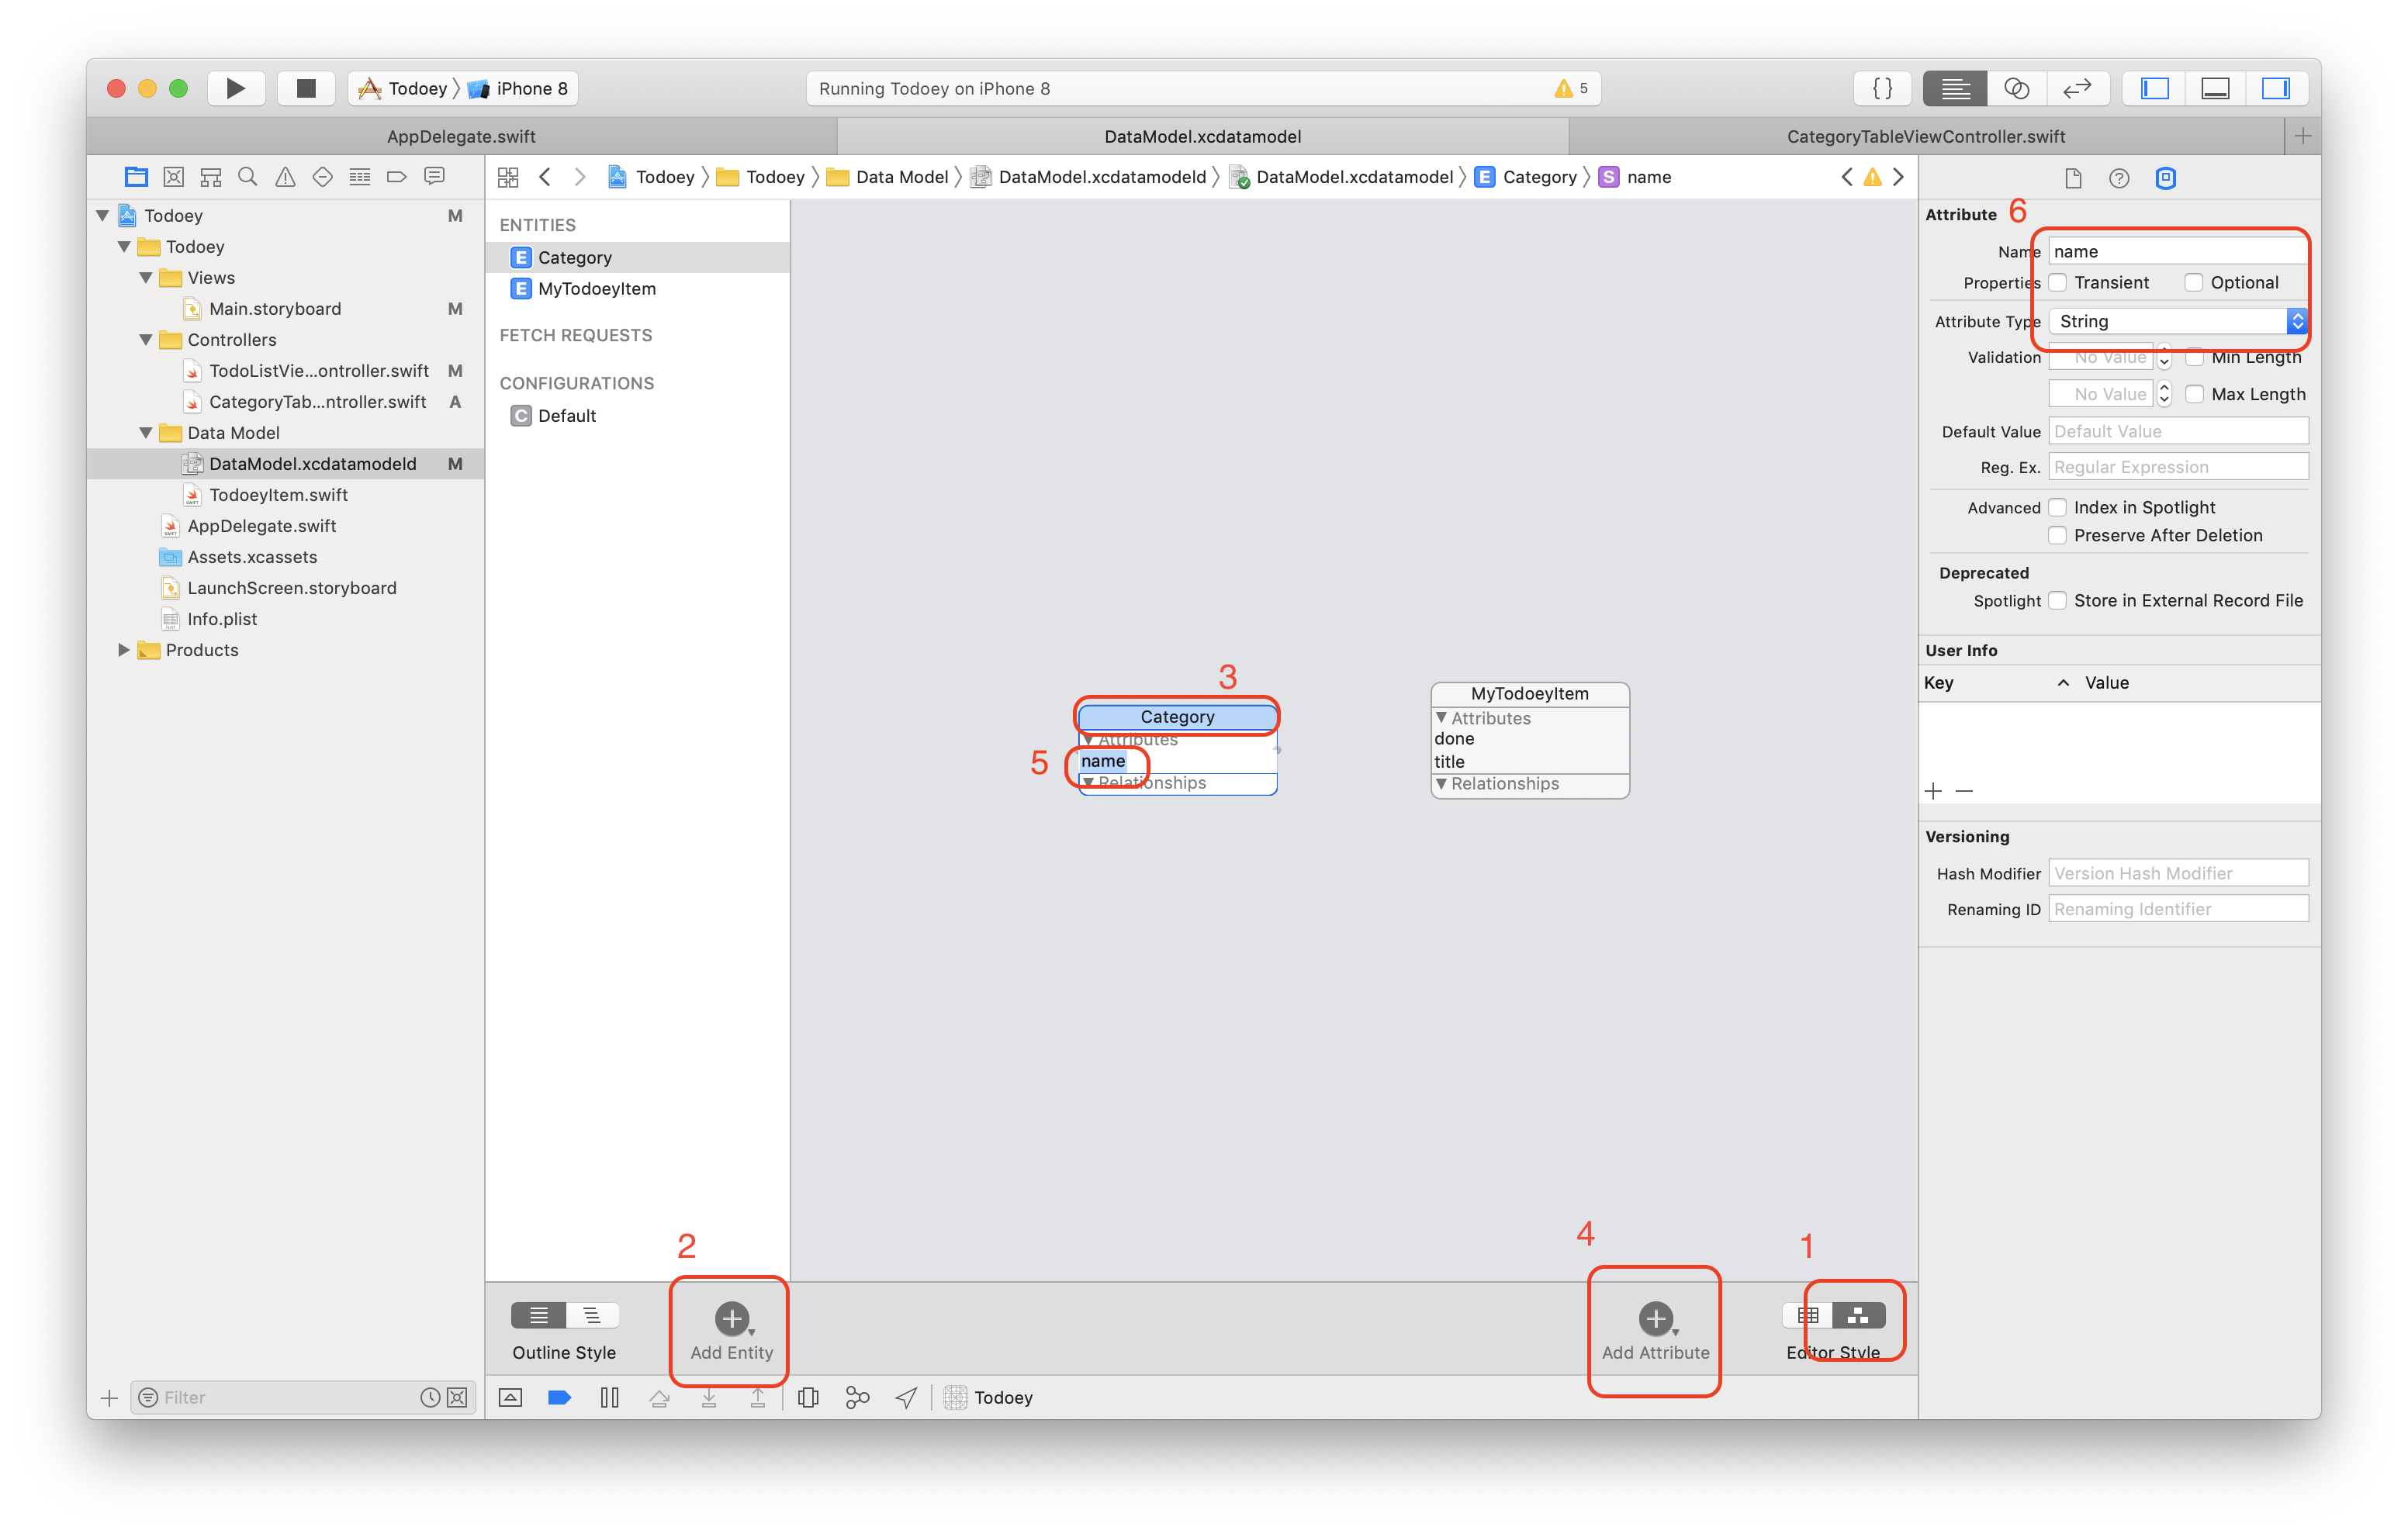
(1) Switch to Graph style
(2) Add a new entity
(3) Select the entity
(4) Add an attribute
(5) Select the attribute
(6) Update attribute’s name and type. Check the optional box if you want
Build the relationship between Category and MyTodoeyItem
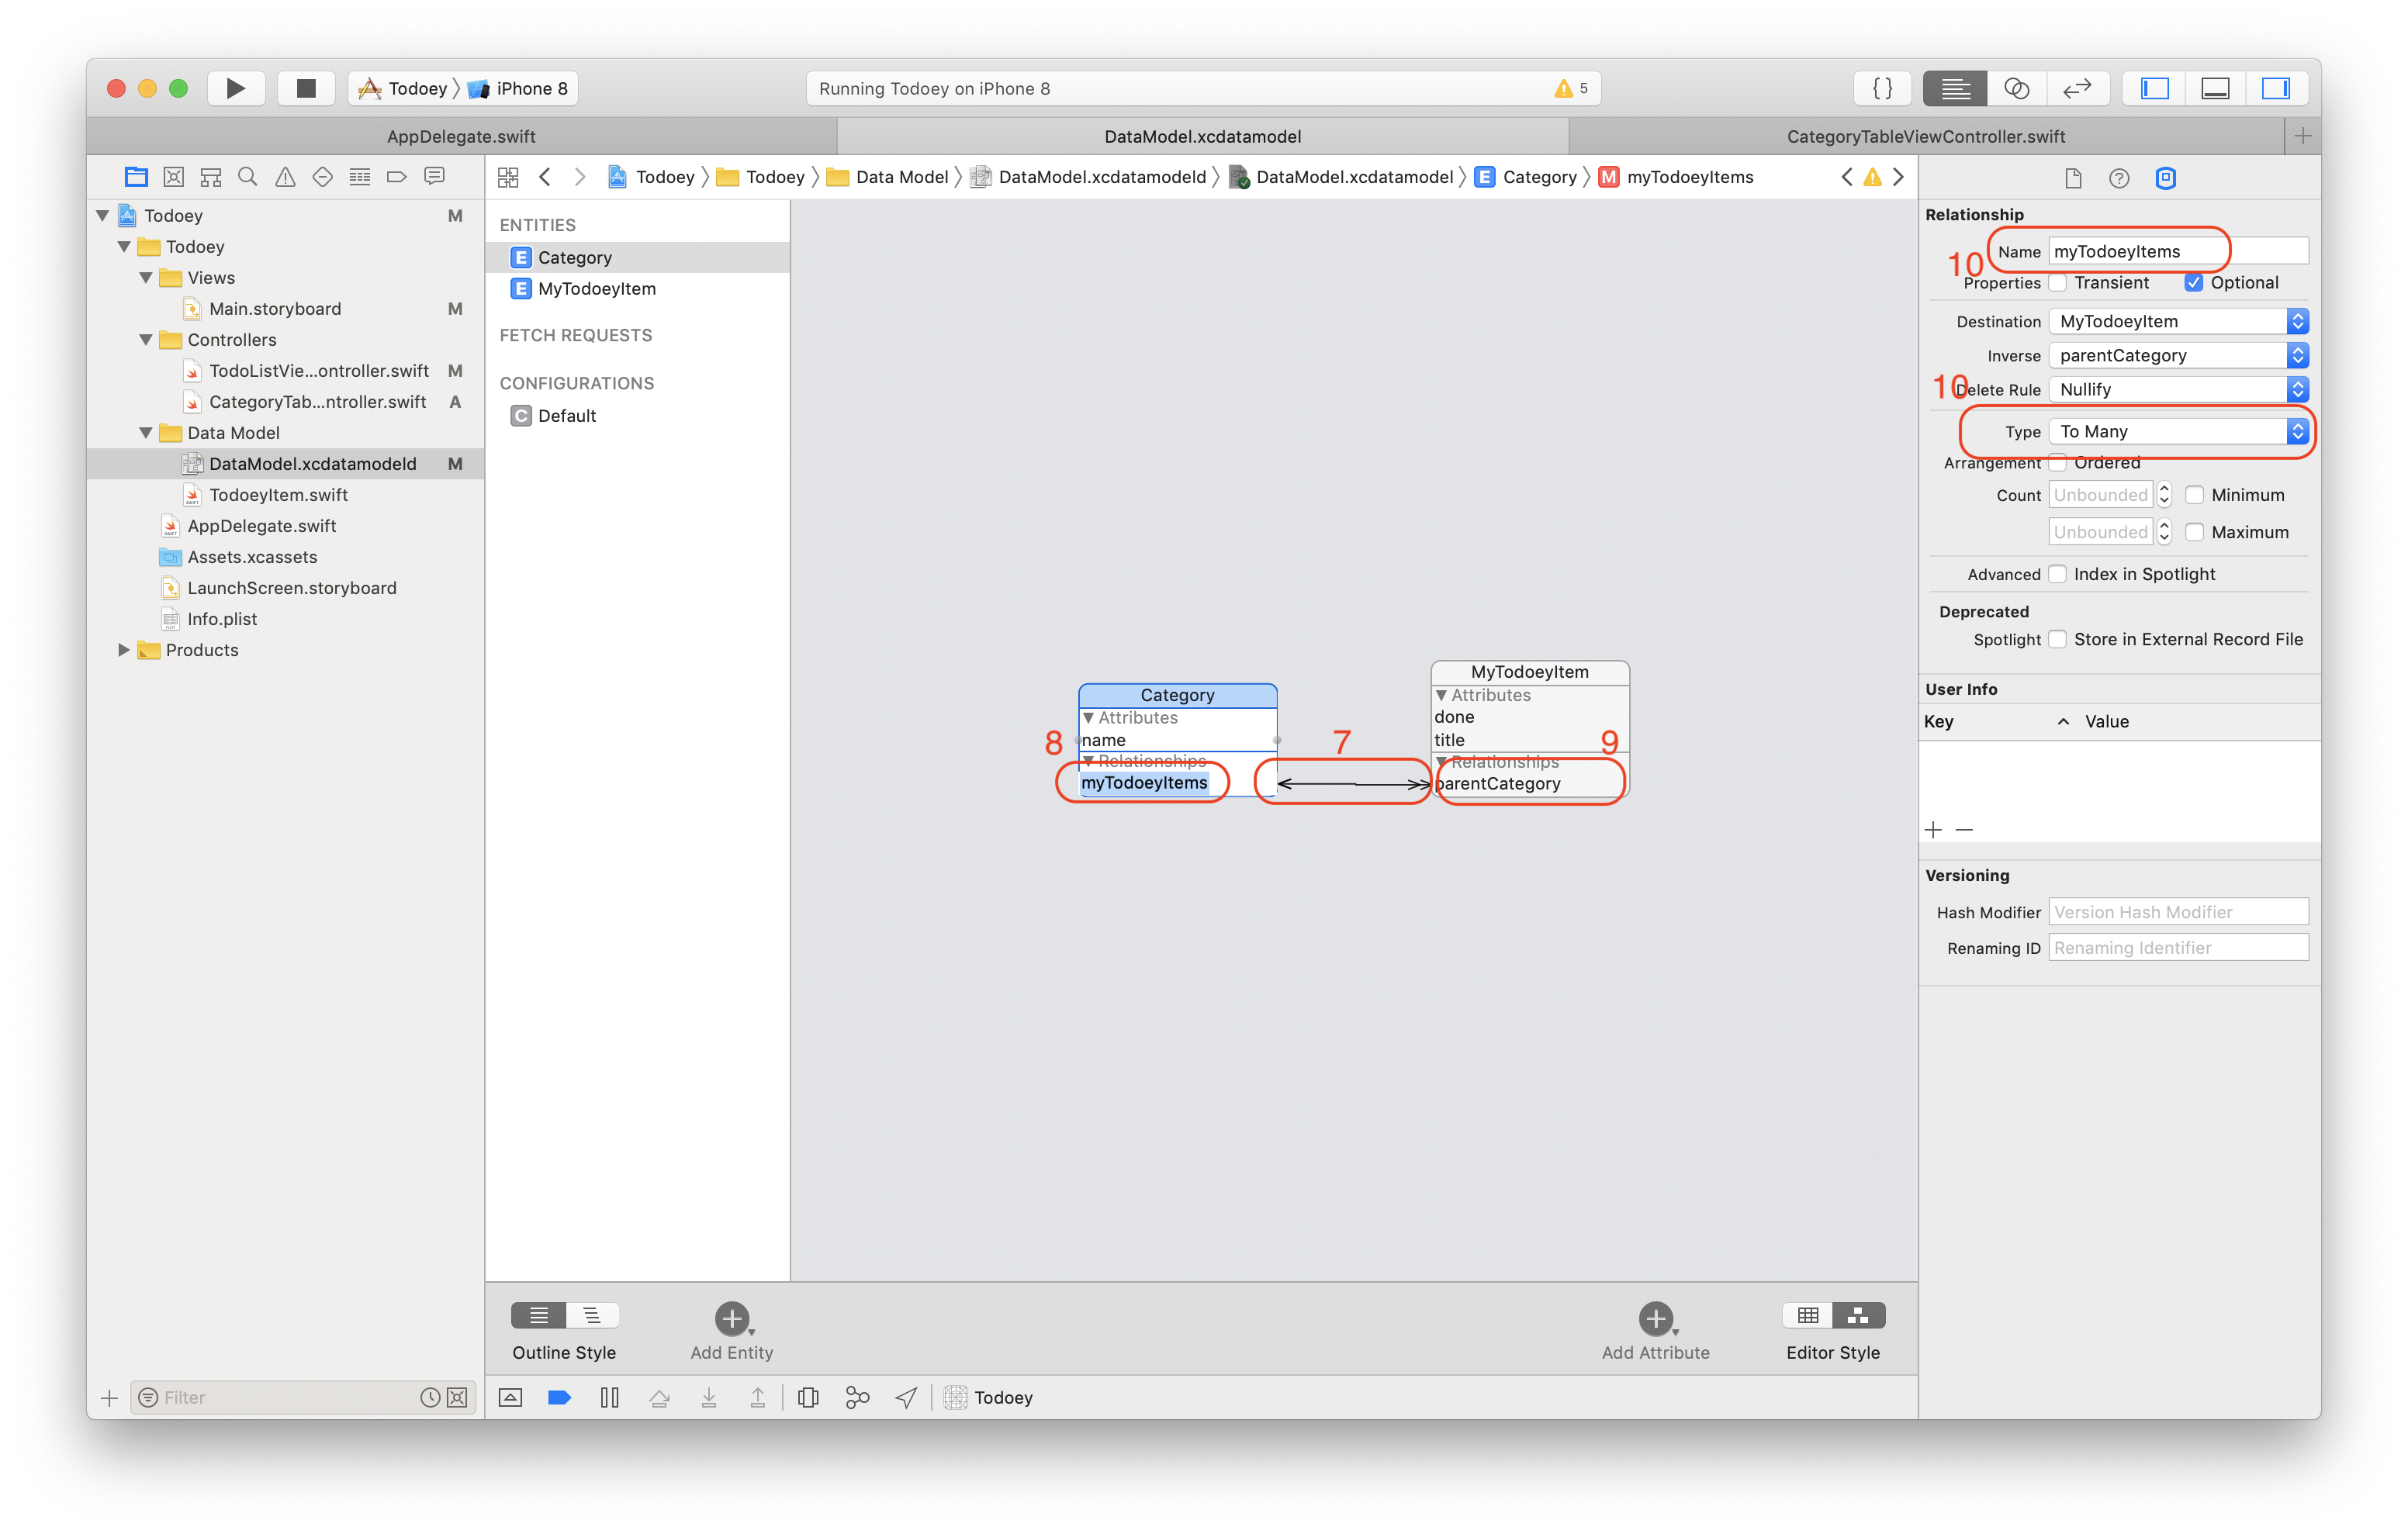
(7) Press Control and drag the Category to MyTodoeyItem
(8)(9)(10) Update relations. Each Category can have many MyTodoeyItems associated with it. Therefore, the type should be «To Many». On the contrary, each MyTodoeyItem belongs to one single Category, so we set «To one».
Realm
Realm example:
Todoey with Realm
- Install, setup and configure Realm
- Go to realm.io to download SDK (Dynamic framework / CocoaPods / Carthage).
- Download Realm browser to open .realm file. The realm would be saved in:
class ViewController: UIViewController {
    var realm: Realm? = nil

    override func viewDidLoad() {
        super.viewDidLoad()
        // Do any additional setup after loading the view, typically from a nib.

        // MARK: Realm - initialising
        do {
            realm = try Realm()
        } catch {
            NSLog("Error Initialising Realm: (error)")
        }

        print(Realm.Configuration.defaultConfiguration.fileURL)
    }
}
- Add a new piece of data
Let’s say, we have some categories and items, each item belongs to one single category.
Create Category
import Foundation
import RealmSwift

class Category: Object {
    @objc dynamic var name: String = ""
    let items = List<Item>()
}
Create Item
import Foundation
import RealmSwift

class Item: Object {
    // dynamic is a declaration modifier, it basically tells the runtime to use dynamic dispatch over the standard which is a static dispatch.This allows the property "name" to be monitered for change at runtime.
    @objc dynamic var name: String = ""

    // If we just simpily wrote "Category", then this is just a class. In order to make it the type of "Category", we have to say ",self"
    // property: what the parent list named in Category
    var parentCategory = LinkingObjects(fromType: Category.self, property: "items")
}
- Save data
Save data in the database
do {
    try realm?.write {
        let category = Category()
        category.name = "any category"
        realm?.add(category)
    }
} catch {
    NSLog("Error writing Realm: (error)")
}
- Update data
do {
    try realm?.write {
        // do something here
    }
} catch {
    NSLog("Error writing Realm: (error)")
}
- Read data
For example, in ViewController
var categories: Results<Category>?
class ViewController: UIViewController {
  override func viewDidLoad() {
        super.viewDidLoad()

        do {
            realm = try Realm()
            categories = realm?.objects(Category.self)
        } catch {
            NSLog("Error Initialising Realm: (error)")
        }
  }
}
- Delete data
Notice: no need to remove items from the Results list, Realm would automatically do it.
do {
  try realm?.write {
    realm?.delete(category)
    }
  } catch {
    NSLog("Error writing Realm: (error)")
    }
Network Connection
You could either use URLSession or popular third-party SDK like Alamofire
The following features are included in
IO Operations
-
SSL certificate validation (Read the documentation: HTTPS Server Trust Evaluation)
- Using
openssl s_client -connect www.apple.com:443 - Get the full certificate by
openssl s_client -showcerts -host www.apple.com -port 443 - Copying the text (the ——BEGIN CERTIFICATE—— line through to the ——END CERTIFICATE—— line) into a text file with the .pem extension
- Using
-
Generic request/response types with associatedtype
Tools you might need:
- (Check SSL online)[https://www.ssllabs.com/ssltest/]
- Convert .pem file to .crt file via
openssl x509 -outform der -in xxxx.pem -out xxxx.crt
Alamofire
- Alamofire + SwiftyJSON
URLSession
- Generic request/response types with
associatedtype
Check how exactly SSL pinning does on HttpClient.swift
ATS, App Transport Security
Since iOS 9.0, app must follow App Transport Security:
- At least TLS 1.2
- HTTP is not allowed
- Apple will heavily censor when app infringes ATS settings (
NSAllowsArbitraryLoads).
Info.plist settings:
<?xml version="1.0" encoding="UTF-8"?>
<!DOCTYPE plist PUBLIC "-//Apple//DTD PLIST 1.0//EN" "http://www.apple.com/DTDs/PropertyList-1.0.dtd">
<plist version="1.0">
<dict>

    <!-- network related constants -->
    <key>NSAppTransportSecurity</key>
    <dict>
        <!-- lift ATS restriction -->
        <key>NSAllowsArbitraryLoads</key>
        <true/>
        <!-- lift ATS restriction of AV Foundation -->
        <key>NSAllowsArbitraryLoadsInMedia</key>
        <true/>
        <!-- lift ATS restriction of WebView -->
        <key>NSAllowsArbitraryLoadsInWebContent</key>
        <true/>
        <!-- to support localhost -->
        <key>NSAllowsLocalNetworking</key>
        <true/>
        <!-- to support minimum TLS version, could be TLSv1.0、TLSv1.1、TLSv1.2. Default value = TLSv1.2 -->
        <key>NSExceptionMinimumTLSVersion</key>
        <string>TLSv1.0</string>


        <!-- define special cases -->
         <key>NSExceptionDomains</key>
         <dict>
            <key>sdk_domain.com</key>
            <dict>
                <!-- to support HTTP -->
                <key>NSExceptionAllowsInsecureHTTPLoads</key>
                <true/>
        </dict>
        <key>your_domain.com</key>
        <dict>
            <key>NSExceptionAllowsInsecureHTTPLoads</key>
            <true/>
            <!-- apply all of the domain exceptions to every subdomain of your domain -->
            <key>NSIncludesSubdomains</key>
            <true/>
        </dict>
    </dict>
    </dict>


</dict>
</plist>
Third Party keys
NSThirdPartyExceptionAllowsInsecureHTTPLoads
NSThirdPartyExceptionMinimumTLSVersion
NSThirdPartyExceptionRequiresForwardSecrecy
Machine Learning
Machine Learning is usual split into 2 broke categories — Supervised Machine Learning or Unsupervised Machine Learning.
Supervised Learning
Unsupervised Learning
CoreML
- Load a pre-trained model, i.e., no training
- Make predictions
- Not encrypted
Get started from scratch Sample code
Example1 — Inceptionv3:
- Download pre-trained models from Apple website: https://developer.apple.com/machine-learning/build-run-models/
- Drag .mlmodel file into your project
- Check detection code here: Inceptionv3Model.swift
Example2 — Watson Visual Recognition:
- Install Carthage and download SDK
Add the dependency in our Cartfile:
github "watson-developer-cloud/swift-sdk"
- Register IBM cloud account
- Add Visual Recognition to IBM console
- Import VisualRecognition3.framework and Restkit.framework
- Check detection code here: WatsonVisualRecognition.swift
Python Settings
- Install python, pip and virtualenv
- Create python2.7 environment in a specific directory
$mkdir Environments
$cd Environments
$virtualenv --python=/usr/bin/python2.7 python27
- Now we have a python27 directory in Environments, to activate our python
$source python27/bin/activate
You will see (python27) username Environments (git-branch-name) $
- Stop virtual environment if you want
- Install CoreML tools
$pip install -U coremltools
-U means install or update coremltools to the latest version
- Convert the caffe model to .mlmodel
Convert a Caffe model to Core ML format
- Download Oxford 102 category flower dataset caffe model
- Convert a Caffe model to Core ML format (doc)
convert-script.py
import coremltools

# Convert a caffe model to a classifier in Core ML
caffe_model = ('oxford102.caffemodel', 'deploy.prototxt')
labels = 'flower-labels.txt'

coreml_model = coremltools.converters.caffe.convert(
    caffe_model,
    class_labels = labels,
    image_input_names='data'
)

# Now save the model
coreml_model.save('FlowerClassifier.mlmodel')
- Execute convert-script.py
CreateML
You could train your own models since Xcode 10 and iOS 12. It allows us to take data such as texts, images or other types of files to fill in CreateML framework to create our very own CoreML models.
- Prepare for training and testing data (the classic ratio is 80:20) and divide them into different groups. Notice the folder name must be what category we are going to define.
In this case, I download 20 training images and 5 testing images per animals
TrainingData/
  Dog/a lot of dog images
  Cat/a lot of cat images
  Horse/a lot of horse images


TestingData/
  Dog/one quarter of dog training images
  Cat/one quarter of cat training images
  Horse/one quarter of horse training images
- Create macOS Blank playground, show the assistant editor
- Drag training and testing images sequentially into playground
NOTICE, you should prepare images Xcode has never seen before to make sure the evaluation (success rate) is accurate. Besides, if your evaluation is low, that means you need more training data.
- Rename and save
Using CreateML for Natural Language Processing (NLP)
- Download the Twitter Sentiment Dataset
- Train our own model by creating an macOS playground
import Cocoa
import CreateML

let data = try MLDataTable(contentsOf: URL(fileURLWithPath: "/Users/xxx/Workspace/iOS-tutorial/twitter-sanders-apple3.csv"))

// training data : testing data = 80 : 20
let (trainingData, testingData) = data.randomSplit(by: 0.8, seed: 5)

// textColumn and labelColumn depend on the .csv file
let sentimentClassfier = try MLTextClassifier(trainingData: trainingData, textColumn: "text", labelColumn: "class")

// test the model
let evaluationMetrics = sentimentClassfier.evaluation(on: testingData)
let evaluationAccuracy = (1 - evaluationMetrics.classificationError) * 100

// create our own mlmodel
let metadata = MLModelMetadata(author: "Catherine", shortDescription: "A model trained to classify sentiment on Tweets", license: "MIT", version: "0.1")
try sentimentClassfier.write(to: URL(fileURLWithPath: "/Users/xxx/Workspace/iOS-tutorial/tweetSentimentClassifer.mlmodel"), metadata: metadata)
- Predict
try sentimentClassfier.prediction(from: "@Apple is a terrible company") //Neg
try sentimentClassfier.prediction(from: "I just found the best restaurant ever, and it's @Taco Bell") //Pos
try sentimentClassfier.prediction(from: "I think @CocaCola ads are just ok") //Neutral
Explore more app services
- Firebase
- crashlytics
- mapBox
- Sinch
App distribution
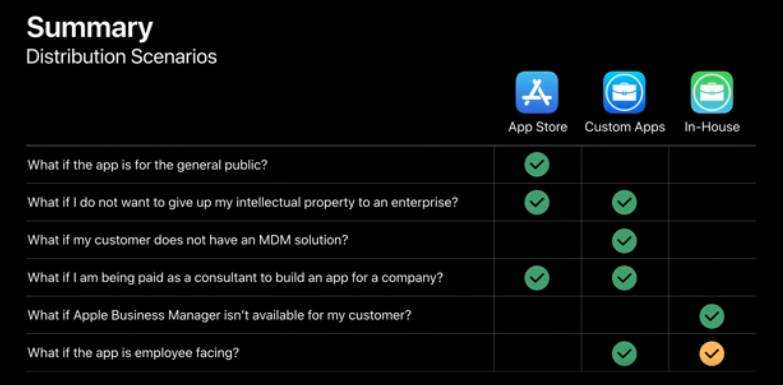
Distribution methods
| methods | developer | access | lifetimes | user | distribution |
|---|---|---|---|---|---|
| Ad Hoc | individuals | limited private | short, unscalable | Distribute your app to testers on registered devices (100 devices limits) | ipa installed by xCode, Apple configurator, OTA |
| App Store | individuals / organisations | public | 90 days | 25 internal testers; 10,000 testers via links | testFlight, email, links |
| In-House | organisations | limited private | distribution certificates expire every 3 years, provisioning profiles expire annually | Proprietary apps built by internal developers for their employees | MDM |
| Custom Apps | organisations | limited private | Apps won’t expire | Proprietary apps built by internal developers for their employees | MDM or Redemption codes |
In-House vs. Custom Apps
- Apps distributed via In-House distribution expires annually, developers have to resign and re-deploy apps.
- Custom Apps, on the other hand, is part of the Apple Developer Program. The apps won’t expire and you can have TestFlight, additional App Store features and App Store Connect tools.
Examples:
-
App Store: Restaurant A wants to build their app with their apple developer account, they hire freelance app developer Micheal to help them.
-> Micheal has to join A’s developer program to build the app for A to submit to app store. Role doc -
In-House / Custom App: Companies want to build an app for employees.
video
Apple Business Manager
As an Apple Business Manager, you can buy apps, custom apps and books in bulk
More useful resources
- https://mobile-patterns.com/
- https://jgthms.com/web-design-in-4-minutes/#share
- colour palette websites such as https://coolors.co/
Command Game
Swift
Tutorial
Reference
Swift.org
iOS 12 & Swift — The Complete iOS App Development Bootcamp
Apple human interface guidelines
Я получаю такую ошибку:
2018-09-08 17:53:36.795035+0200 Movie Roulette[826:263749] [error]
error: Failed to load model named ett CoreData: error: Failed to
load model named ett 2018-09-08 17:53:36.796536+0200 Movie
APP[826:263749] *** Terminating app due to uncaught exception
‘NSInvalidArgumentException’, reason: ‘+entityForName: nil is not a
legal NSManagedObjectContext parameter searching for entity name
‘MovieData»
Может быть, кто-то из вас поможет мне решить эту проблему. Я искал и читал, что мне нужно создать NSManagedObjectContext. Я создал это в своей функции, но все еще получаю эту ошибку.
func save(name: String) {
    guard let appDelegate =
        UIApplication.shared.delegate as? AppDelegate else {
            return
    }

    // 1
    let managedContext =
        appDelegate.persistentContainer.viewContext
    // 2
    let entity =
        NSEntityDescription.entity(forEntityName: "MovieData",
                                   in: managedContext)!

    let MovieDT = NSManagedObject(entity: entity,
                                  insertInto: managedContext)

    // 3
    MovieDT.setValue(name, forKeyPath: "titel")

    // 4
    do {
        try managedContext.save()
        movieArray.append(MovieDT)
    } catch let error as NSError {
        print("Could not save. (error), (error.userInfo)")
    }
}
Несвязанный, но никогда не guard AppDelegate. Принудительно развернуть его. Ваше приложение даже не дойдет до этой строки, если AppDelegate отсутствовал.
— vadian
10.09.2018 15:55


REACT и NEXT JS вместе с Tailwind CSS
Наличие собственного или персонального сайта необходимо в современном мире, а сочетание React и Next JS позволяет разработчику сделать это за меньшее…

В чем разница между HTML4 и HTML5?
HTML4 и HTML5 — это версии HTML, стандартного языка разметки, используемого для создания веб-страниц. Некоторые из ключевых различий между HTML4 и…
Ответы
1
Ответ принят как подходящий
Эта проблема может возникнуть только в случае изменения названия модели, здесь, в AppDelegate.
let container = NSPersistentcontainer(name:"thisMayChanged")
container.loadPersistentStores......
В аварии ясно
CoreData: error: Failed to load model named ett
И название проекта: Movie APP
Movie APP[826:263749]
Вы изменили исходное имя на ett, так как по умолчанию оно должно быть Movie_APP
Убедитесь, что объект с именем MovieData содержит титул ??
— Sh_Khan
08.09.2018 18:42
Спасибо за вашу помощь. Я решил эту проблему. Иногда мне приходится просто читать некоторые ошибки более 1 раза 
— Ozan Gümüstas
08.09.2018 18:48