Консольная утилита Diskpart предоставляет больше возможностей, чем оснастка «Управление дисками», но и с ошибками при работе в Diskpart приходится сталкиваться чаще. Одной из них является ошибка «Не найдены свободные области…», с которой вы можете столкнуться при создании разделов. Возможные причины ошибки указываются в ее же описании, однако сама формулировка этих причин требует некоторых пояснений для тех пользователей, которые еще не набили руку на применении инструментария Diskpart.
Так, под недостатком места на диске утилита имеет ввиду не отсутствие свободного места на разделах, а нераспределенное пространство, обозначаемое черным или ярко-зеленым цветом в графическом интерфейсе оснастки управления дисками.
А еще взявшемуся за разметку в Diskpart пользователю необходимо четкое понимание того, сколько и каких разделов можно создать на одном физическом диске с конкретным типом разметки, например, на диске MBR нельзя создать более четырех primary-разделов.
Основные способы устранения ошибки «Не найдены свободные области…»
Если вы работаете с физическим диском MBR, убедитесь, что на диске имеется не более трех основных разделов плюс нераспределенная область или двух основных, одного дополнительного плюс нераспределенная область.
В противном случае в команде create partition primary вместо «primary» используйте параметр «logical».
Если вам нужно создать основной раздел, диск придется либо переразбить в соответствии с обозначенными выше требованиями, либо очистить его и конвертировать в GPT командой convert gpt, что в дальнейшем позволит создавать на нём более четырех основных томов.
Примечание: для конвертирования разметки MBR в GPT можно воспользоваться штатной утилитой mbr2gpt, доступной в Windows 10 и 11.
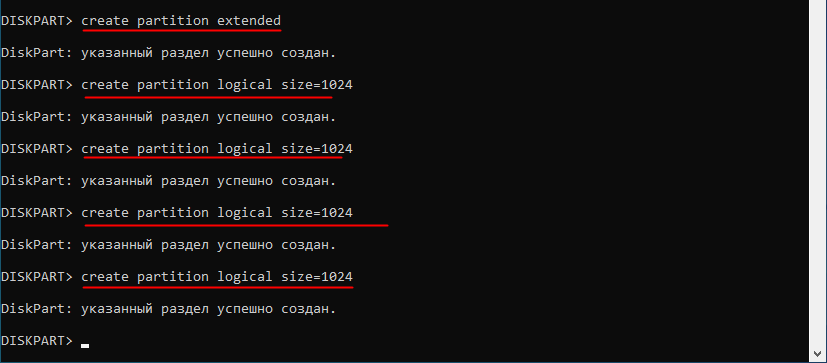
Если на MBR-диске требуется создать несколько разделов, в имеющемся нераспределенном пространстве сначала создаем расширенный раздел командой create partition extended, а затем уже в нём создаем логические диски командой create partition extended logical с добавлением параметра size=размер.
Если вы создаете раздел с указанием параметра size, попробуйте выполнить операцию без него.
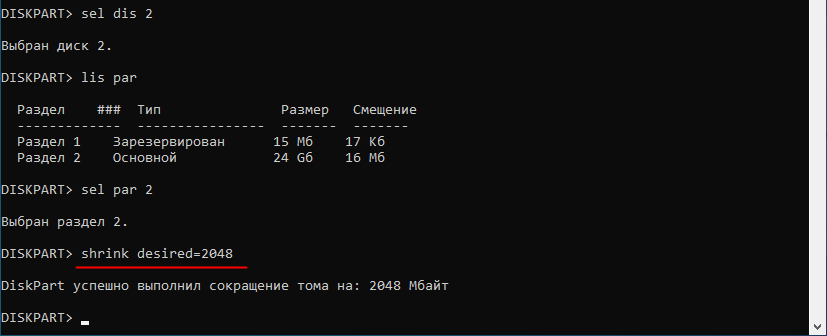
Похоже на то, что вы ошиблись с назначением размера создаваемого тома, указав размер больший, чем имеется нераспределенного пространства на диске. Без указания параметра size Diskpart определит доступный объем места автоматически. Не забудьте также убедиться, что это самое свободное место на диске имеется и в случае его отсутствия, выберите ближайший раздел командой sel par номер и сожмите его командой shrink desired=размер.
Менеджеры разделов
Наконец, вы всегда можете прибегнуть к помощи сторонних менеджеров разделов, более функциональных и гораздо более простых в использовании, чем Diskpart. Впрочем, это нисколько не отменяет необходимости понимания того, что можно делать с дисками и разделами в Windows, а что нет.
Загрузка…
Microsoft Windows is fairly easy to install, even if you’re a novice user. However, this doesn’t mean that there aren’t things that can go wrong.
In Windows 10, one of the most common installation hurdles is the «We couldn’t create a new partition» error. There are multiple reasons why this error appears; however, you can easily fix it by using the following methods.
1. Disconnect All Other External and Internal Storage Devices
One of the most common reasons behind partition errors is interference from other connected peripherals. Thus, the first step you should take when diagnosing the error is to remove all external and internal storage devices except the primary hard disk drive (HDD) and the USB you’re using to install Windows.
This includes external HDDs, Solid State Drives (SSDs), USB drives, and SD cards. To err on the side of caution, also remove any external USB Wi-Fi and Bluetooth adaptors.
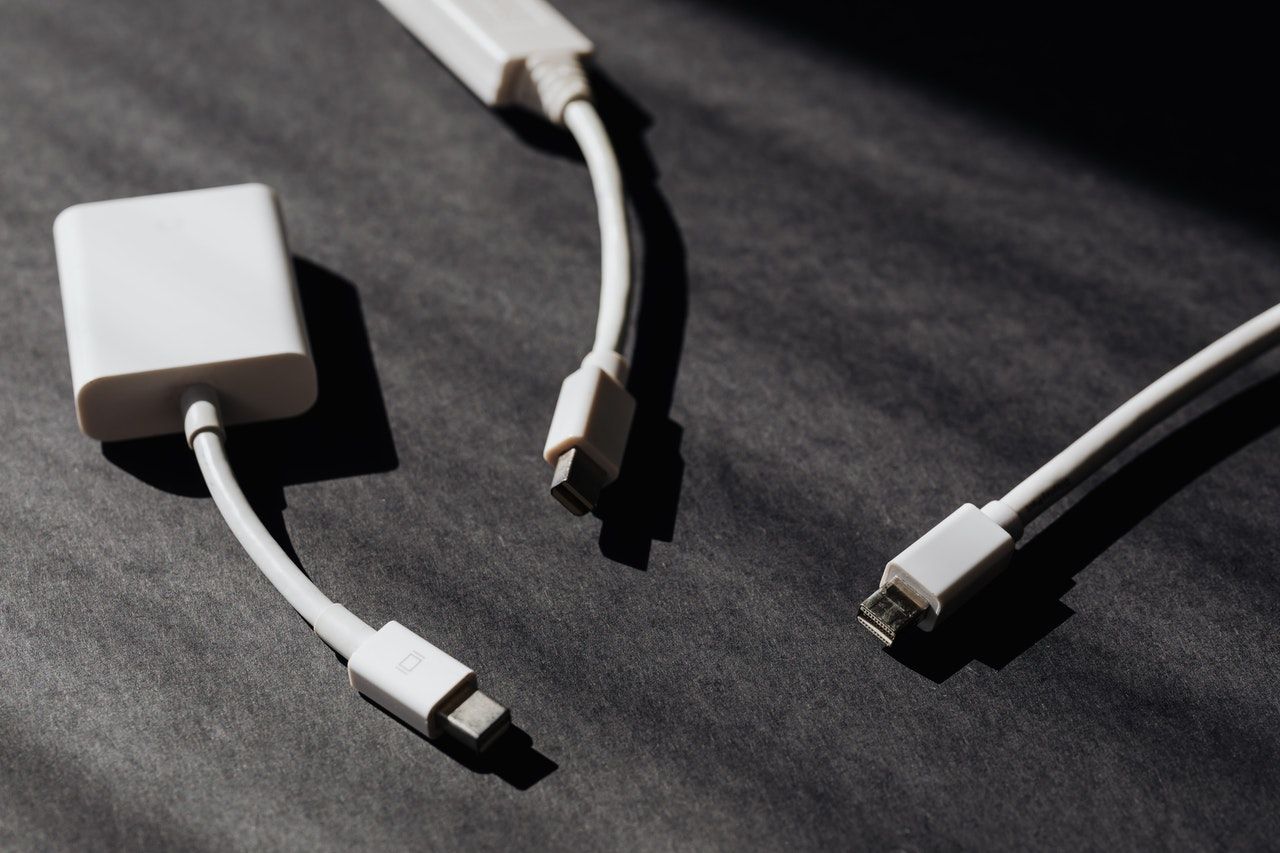
If removing the internal HDDs is too much of a hassle, you can disable them using the BIOS. While the steps differ across various motherboard manufacturers, the process should be similar to this:
- Press F2 or DEL as soon as you see the manufacturer’s logo when powering on your computer. The exact keys differ across manufacturers.
- Once you’re inside the BIOS, look for a menu that lists all the devices connected to your computer.
- Disable all storage devices except the one that you’ll install Windows on.
- Reboot your computer.
How to Use Third-Party Software to Create a Windows Bootable Device
Sometimes, the «we couldn’t create a new partition» error can be caused by an improperly created Windows Bootable Device. This is usually the fault of the Windows Media Creation tool. To eliminate this possibility, create the bootable device using third-party software. There are plenty of programs for creating a Windows bootable USB from an ISO.
As an example, we will be using Rufus, an open-source bootable USB creating program:
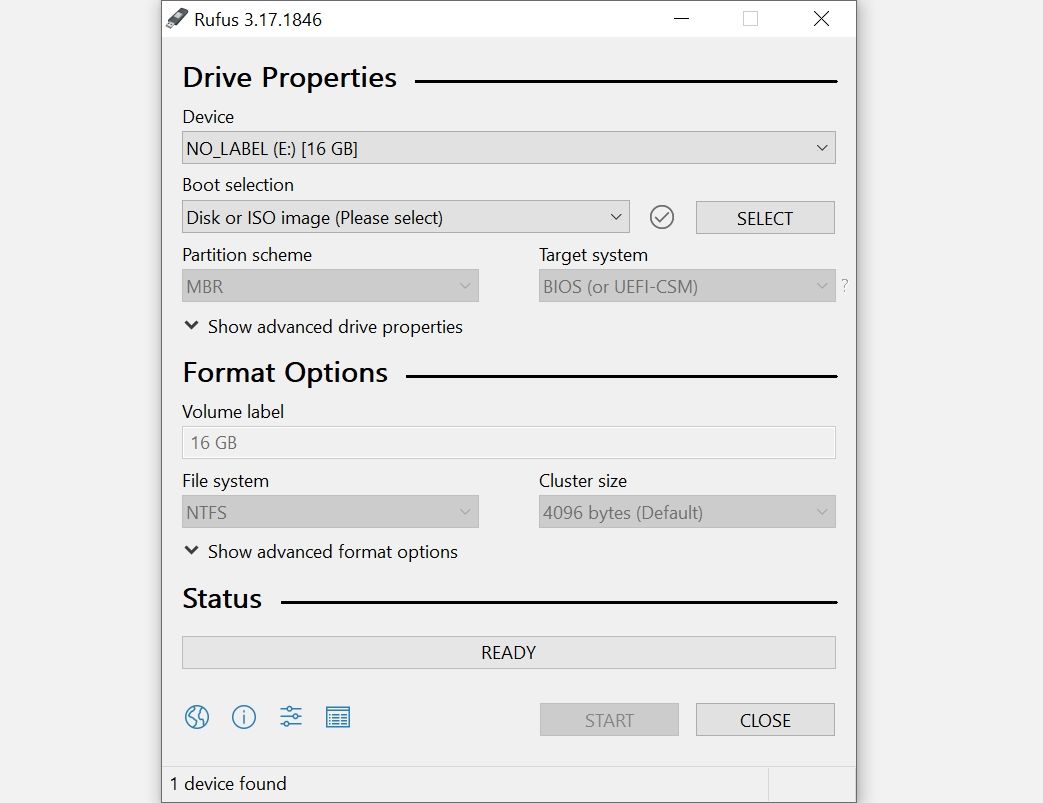
- Download Rufus.
- Download the Windows Media Creation tool. If you already have it downloaded, simply run it. You will need it to download the Windows ISO file.
- Accept the license agreements in the Media Creation Tool.
- In the next window, click Create installation media. Click Next.
- Select the relevant version and edition of Windows on the next page. Click Next.
- Now, select the ISO File option. Click on Next.
- Choose the download location of the ISO file.
- After the ISO file has finished downloading, run Rufus.
- Under Device, select the relevant USB drive from the drop-down menu.
- Under Boot Selection, pick the Disk or ISO File option.
- Click Select, then browse for the Windows ISO file you just downloaded.
- Click on Start.
- Rufus will create a bootable USB drive for you.
How to Set the Hard Drive as the First Boot Device
Typically, when installing Windows, your USB or CD will be the first boot device. But there are instances where doing this can lead to Windows confusing the USB drive or CD for a hard drive, leading to the «we couldn’t create a new partition» error.
Luckily, this can be easily resolved by selecting the hard drive as the first boot device:
- Disconnect the USB or CD containing Windows from your computer.
- Enter the motherboard’s BIOS using Step 1 from the section above.
- Now, look for the boot menu in the BIOS. You can refer to the motherboard’s manual to find it easily.
- Under the menu that lists the boot devices, ensure that the hard drive is at the top, i.e.it is the first boot device.
- After doing this, connect the Windows USB or CD, and restart your computer.
- As soon as your computer reboots, press F8, F10, F11, or F12 enter the boot menu. Depending on your motherboard, it could be any of the aforementioned keys. Refer to the manual.
- Select the USB or CD as the boot device from this menu.
- Proceed to install Windows.
Use Diskpart to Create a New Partition
The diskpart utility can be used to create a new partition while installing Windows. It is run using the Command Prompt during the installation process of Windows.
Do remember to back up your data before attempting the following steps, since they will completely wipe out the hard drive.
Here’s how you can use Diskpart to create a new partition:
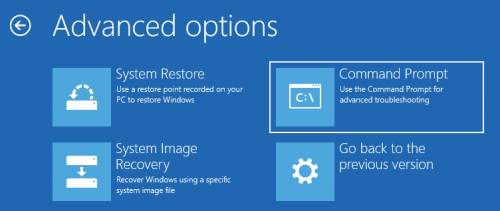
- As soon as you get the «We couldn’t create a new partition» error, close the setup wizard. Then click on the Repair option.
- Now, go to Advanced Tools and then click on Command Prompt.
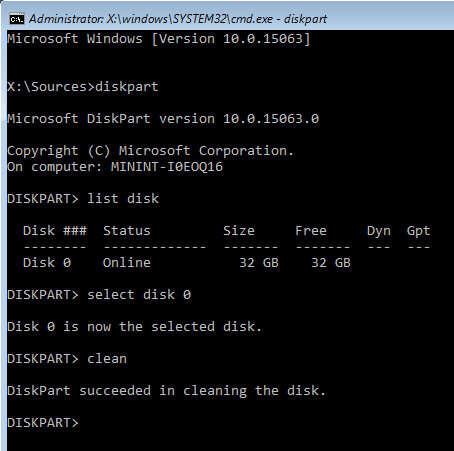
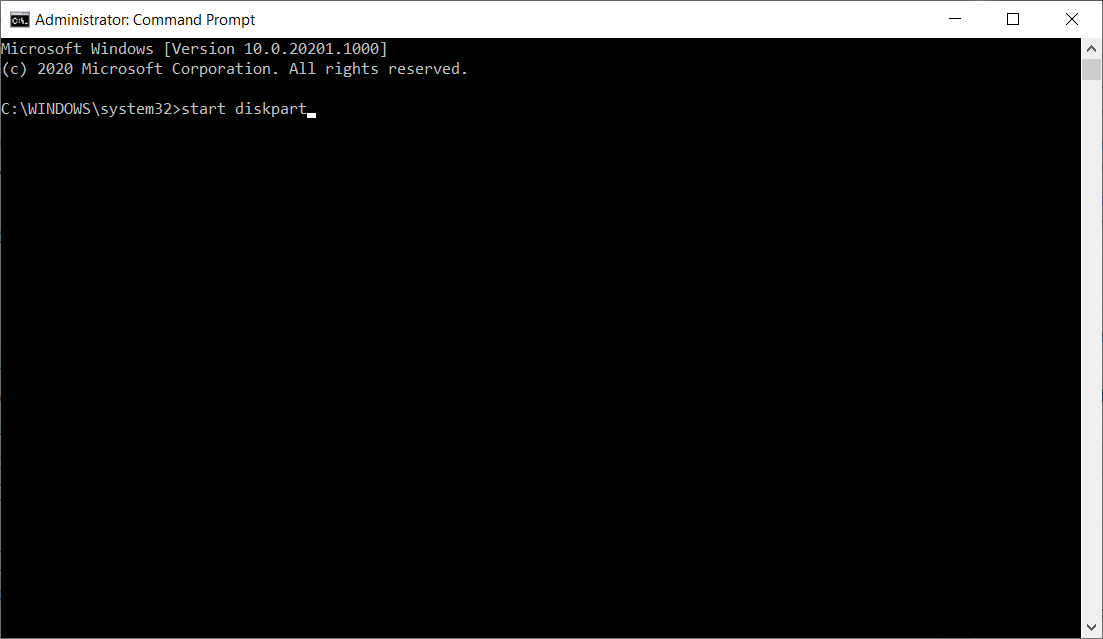
- In the Command Prompt console, type start diskpart, and press Enter.
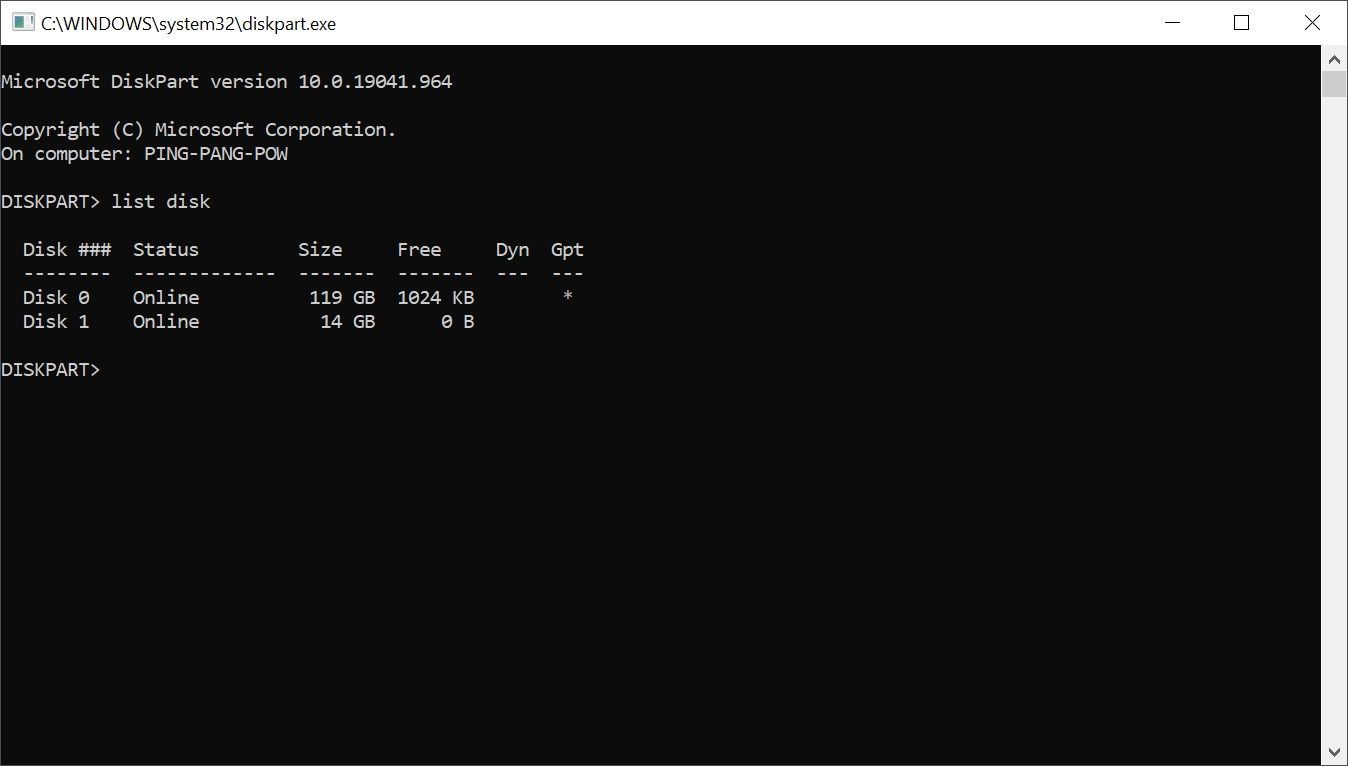
- After this, type list disk, and hit Enter. This will display a list of hard disk drives (HDD) connected to your computer.
- Find the relevant number that is next to the hard drive you want to partition. Type select disk x (here, replace x with the number of your hard drive).
- Now, you’ll have to type a chain of commands that will be listed below. Remember to press Enter after typing each command.
- clean
- create partition primary
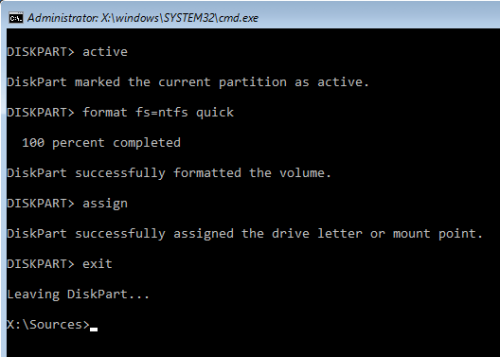
- active
- format fs=ntfs quick
- assign
- After the process is complete, close Command Prompt. You can type exit in the console to do so.
- Restart the Windows installation process.
How to Convert the Windows Partition to the GPT Format
GPT Partitions have fewer limitations compared to the default MBR format. Thus, it is worthwhile to convert the partition to the GPT format and then install Windows. Here too, you will have to make use of the Diskpart utility. The only caveat is that converting the partition format from MBR to GPT will delete all your files, so ensure you back up all important data before proceeding.
Here’s how you can convert your Windows Partition to the GPT format:
- Follow steps 1 and 2 from the section above to open Command Prompt.
- Type in start diskpart in the Command Prompt console, and press Enter.
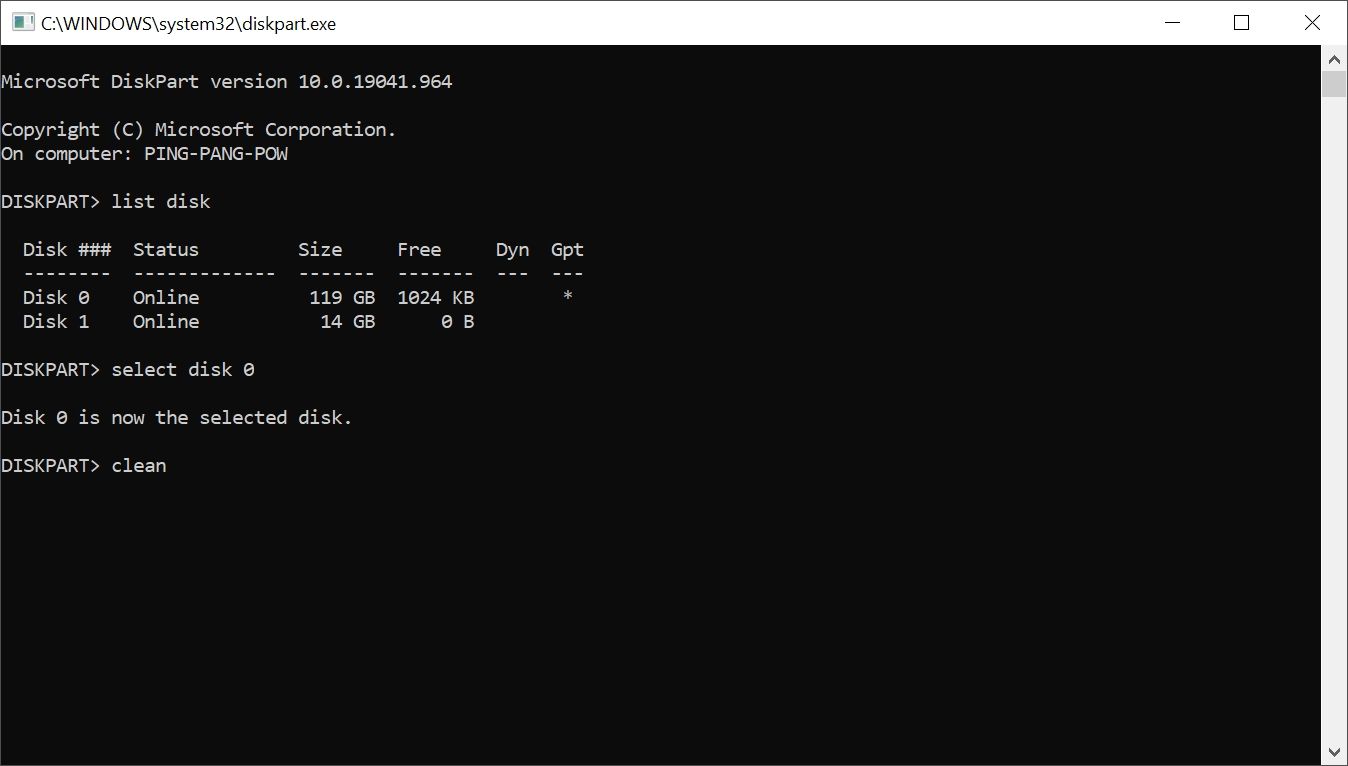
- After this, type list disk and press Enter.
- Now, enter select disk x, where x corresponds to the number next to your hard drive listing.
- You’ll have to completely wipe the hard drive before proceeding. To do so, type clean and press Enter.
- Lastly, type convert gpt and press Enter.
- Wait for the process to complete, then try reinstalling Windows.
The Partition Error, Now Resolved
Using the methods listed above, you can easily fix the «we couldn’t create a new partition» error and smoothly install Windows. However, you could face other common Windows installation errors as well. So it’s best to be aware of the steps you can take to solve them as well.
Greetings, all,
Using the following set of commands, I am attempting to create a new partition on an unused RAID drive:
select disk 1
create partition primary
It sits for a few minutes and then eventually times out with the following error:
Virtual Disk Service error:
The operation timed out.
DiskPart has referenced an object which is not up-to-date.
Refresh the object using the RESCAN command.
If the problem persists exit DiskPart, then restart DiskPart or restart the
computer.
Performing the same action in Disk Management results in roughly the same error (operation timed out). Using ‘RESCAN’, exiting DiskPart or Disk Management and reopening, or restarting; as recommended by the error; do not resolve the issue.
After it times out, the partition actually shows up, but no volume accompanies it, and any attempt to perform any action on the partition in Disk Management fails. Selecting «Change Drive Letter and Paths…» results in:
The operation failed to complete because the Disk Management
console view is not up-to-date. Refresh the view by using the refresh
task. If the problem persists close the Disk Management console, then
restart Disk Management or restart the computer.
Selecting «Format» results in:
An unexpected error has occurred. Check the System Event Log for
more information on the error. Close the Disk Management console,
then restart Disk Management or restart the computer.
Here is the error in the System log:
Source: Virtual Disk Service
Event ID: 25
Level: Error
Message: A failure was encountered while retrieving the volume properties. Error code:
0x80070002@020A000D.
I have tried the following (sometimes with hope, other times just as a result of being out of real ideas):
- Converted to dynamic disk
- Converted to GPT
- Replaced the two SATA disks and re-created the RAID array
Just in case it will provide any help, the RAID is a hardware RAID 1 on an Intel SATA RAID controller. I used the Intel Matrix Storage Console to create and modify the array.
Thanks in advance for any help!
-
Edited by
Thursday, August 2, 2012 3:19 PM
Added some detail
During a clean install of Windows on your device with the Custom option, you may get the error message We couldn’t create a new partition or locate an existing one. This post is intended to help affected PC users with solutions and suggestions to get past this installation issue.
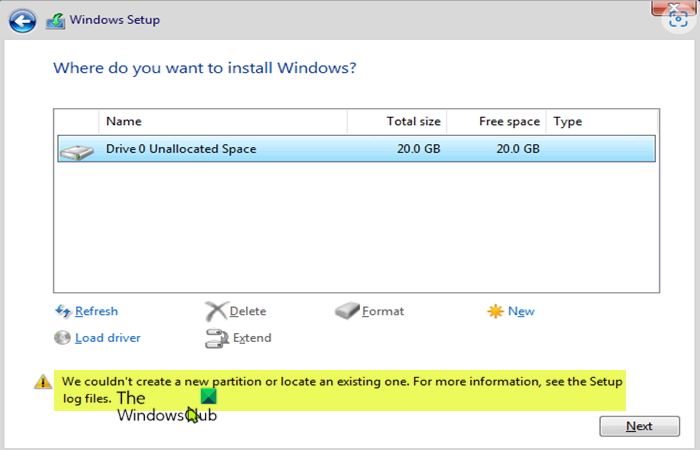
We couldn’t create a new partition or locate an existing one. For more information, see the Setup log files.
If you get the We couldn’t create a new partition or locate an existing one when you try to clean install Windows 11 or Windows 10 on your device, you can try the recommended solutions in the order presented below to resolve the issue on your system.
- Refresh the Windows installation
- Change SATA configuration in BIOS
- Use DiskPart to create new partition
- Make sure the Windows Install partition is set as Primary/Active
Let’s take a look at the description of the process involved concerning each of the listed solutions.
Before you jump right into the solutions below, make sure to disconnect additional peripherals like hard drives, USB drives, and Memory cards. Only have the bootable USB drive plugged in and make sure you’re not using a USB 3.0 bootable drive, rather try using a USB 2.0 drive. Once you disconnect all your other hard drive(s), try to install Windows again and see if you can proceed with the installation without encountering the error.
1] Refresh the Windows installation
The first step you can take to quicky and easily resolve the We couldn’t create a new partition or locate an existing one when you try to clean install Windows 11/10 on your device is, to give the installation a quick refresh. To perform this task, do the following:
- Unplug any USB external drive.
- While in the Windows installation error dialog, unplug the Windows installation USB from the PC and wait for 15 to 30 seconds.
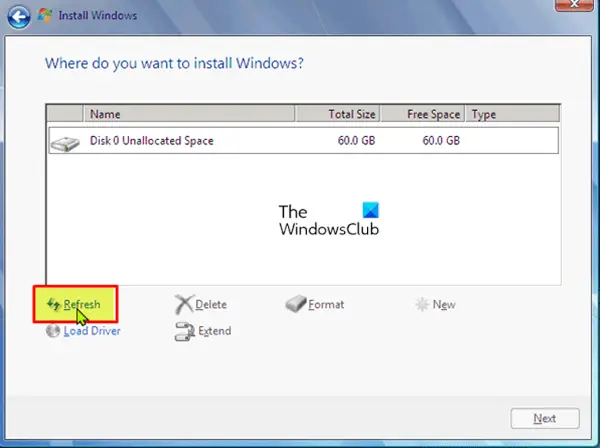
- Plug the USB back to the PC and click on Refresh.
Now, see if you can proceed with the OS installation without issues. Otherwise, try the next solution.
Read: Windows 11 won’t install [Fixed]
2] Change SATA configuration in BIOS
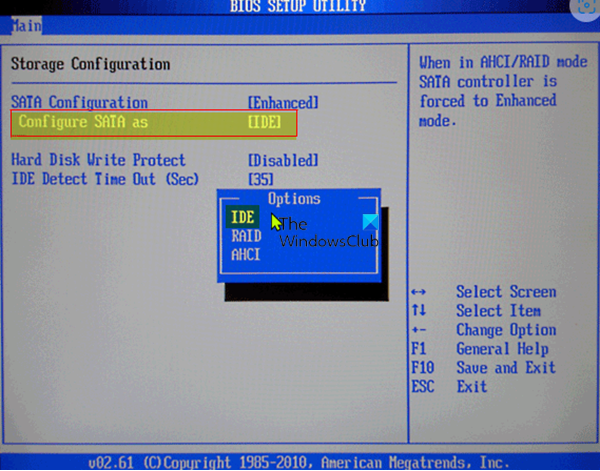
You may encounter this issue if the HDD controller mode is set to AHCI or RAID and the system lacks appropriate drivers. In this case, to fix the problem, the disk controller must be interchanged to IDE. For this task, you have to boot into BIOS and make the required changes by following proper guidelines. You can find the proper guidelines in the instruction manual of the motherboard supplied at the time of buying it or check on the internet.
Read: Windows was unable to create a required installation folder, Error 0x8030002F
3] Use DiskPart to create new partition
This solution requires you to use DiskPart to create a new partition, then install Windows 11/10 to that partition. To perform this task, do the following:
- Start Windows setup using bootable USB or DVD.
- If you get the error message close the setup.
- Next, click the Repair button.
- Choose Advanced tools.
- Select Command Prompt.
- When Command Prompt opens, enter the following command and hit Enter:
start diskpart
- Next, enter the following command and hit Enter:
list disk
You should see the list of all hard drives connected to your computer.
- Find the number that represents your hard drive and enter the command below and be sure to replace 0 with a number that matches your hard drive.
select disk 0
- Next, run the following commands and press Enter after each line:
disk 0 clean

disk 0 create partition primary

disk 0 active

disk 0 format fs=ntfs quick

disk 0 assign
After running the commands, type exit and hit Enter to close Command Prompt. Start the installation process again and see if it completes successfully. If not, try the next solution.
4] Make sure the Windows Install partition is set as Primary/Active
The issue you are currently facing could be due to the parttion you are trying to install Windows on is not set as primary or the active partition. So, make sure this isn’t the case.
Do the following:
- Start DiskPart as shown above.
- Next, type the command below and hit Enter
list disk
You should see the list of available hard drives.
- Locate your hard drive and enter the command below and be sure to replace 0 with a number that represents your hard drive.
select disk 0
- Next, type the command below and hit Enter
list partition
The list of available partitions will appear.
- Now, locate the partition on which you want to install Windows and type the command below and hit Enter. Replace 1 with a number that matches your partition.
select partition 1
- Lastly, type the command below and hit Enter to set the partition as primary/active.
Active
- Once done, type exit and press Enter to exit Command Prompt.
Every other thing being equal, you should be able to start and complete the installation process without any issue. Otherwise, you can review the Setup log files for further troubleshooting.
Related post: We couldn’t create a new partition error 0x9cfc7550 during Windows Setup
Why can’t I create a new partition?
In some cases, the “We couldn’t create a new partition” error can be caused by an improperly created Windows bootable drive, especially if you used the Windows Media Creation Tool to create the bootable drive. To rule out this possibility, create the bootable device using third-party software like Rufus.
How do I fix a partition error?
You can repair errors on partitions manually. Simply right-click the partition which has errors and select Advanced > Check Partition. In the pop-up window, choose the first option Check partition and fix errors in this partition by using chkdsk.exe.
Hope this post helps you!
Содержание
- 1 Причина ошибки «Нам не удалось создать новый или найти существующий раздел»
- 2 Исправление ошибки при отсутствии важных данных на диске (разделе)
- 3 Как исправить «Не удалось создать новый или найти существующий раздел» при установке Windows 10 на диск с важными данными
- 4 Как решить ошибку «Программе установки не удалось создать новый или найти существующий системный раздел»?
- 5 Дополнительный вариант

В этой инструкции — информация о том, почему возникает такая ошибка, и, естественно, о способах исправить её в различных ситуациях: когда важных данных на системном разделе или диске нет, или же в тех случаях, когда такие данные есть и их нужно сохранить. Похожие ошибки при установке ОС и способы их решения (которые в том числе могут появиться после некоторых предлагаемых в Интернете способов исправить описываемую здесь проблему): На диске находится таблица MBR разделов, Выбранный диск имеет стиль разделов GPT, Ошибка «Установка Windows на данный диск невозможна» (в контекстах, отличных от GPT и MBR).
Причина ошибки «Нам не удалось создать новый или найти существующий раздел»
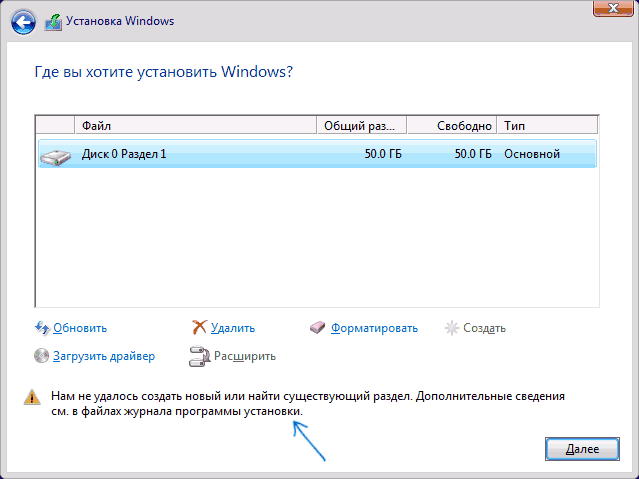
Основная причина невозможности установки Windows 10 с указанным сообщением о том, что не удается создать новый раздел — уже имеющаяся структура разделов на жестком диске или SSD, мешающая созданию необходимых системных разделов с загрузчиком и средой восстановления.
Если из описанного не до конца ясно, что именно происходит, пробую пояснить иначе
- Ошибка возникает в двух ситуациях. Первый вариант: на единственном HDD или SSD, на который устанавливается система, существуют только разделы, созданные вами вручную, в diskpart (или с помощью сторонних программ, например, средств Acronis), при этом они занимают всё пространство диска (например, один раздел на весь диск, если он ранее использовался для хранения данных, был вторым диском на компьютере или только что куплен и отформатирован). При этом, проблема проявляет себя при загрузке в EFI режиме и установке на GPT диск. Второй вариант: на компьютере более одного физического диска (или флешка определяется как локальный диск), вы устанавливаете систему на Диск 1, а Диск 0, который находится перед ним, содержит какие-то свои разделы, которые не могут использоваться в качестве системного раздела (а системные разделы всегда записываются установщиком на Диск 0).
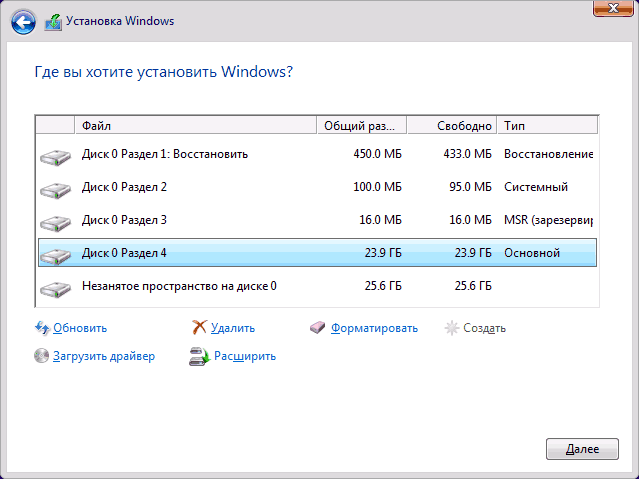
- В данной ситуации программе установки Windows 10 «негде» создать системные разделы (которые можно увидеть на следующем скриншоте), а ранее созданные системные разделы также отсутствуют (так как диск не был ранее системным или, если был, был переформатирован без учета необходимости места под системные разделы) — именно так трактуется «Нам не удалось создать новый или найти существующий раздел».
Уже это объяснение может быть достаточно для более опытного пользователя, чтобы понять суть проблемы и исправить её. А для начинающих пользователей несколько решений описаны далее.
Внимание: приведенные далее решения предполагают, что вы устанавливаете одну единственную ОС (а не, например, Windows 10 после установки Linux), и, кроме этого, диск, на который производится установка обозначен как Диск 0 (если это не так, когда у вас несколько дисков на ПК, измените порядок жестких дисков и SSD в БИОС/UEFI таким образом, чтобы целевой диск оказался на первом месте, либо просто переключите SATA-кабели).
Несколько важных примечаний:
- Если в программе установки Диск 0 — это не тот диск (речь о физическом HDD), на который планируется устанавливать систему (т.е. вы ставите ее на Диск 1), а, например, диск с данными, то можно поискать в БИОС/UEFI параметры, отвечающие за порядок следования жестких дисков в системе (не то же самое, что порядок загрузки) и установить диск, на который следует ставить ОС на первое место. Уже этого может оказаться достаточно для решения проблемы. В разных версиях БИОС параметры могут находиться в разных местах, чаще всего в отдельном подразделе Hard Disk Drive Priority на вкладке Boot configuration (но может быть и в конфигурации SATA). Если найти такого параметра найти не удается, можно просто поменять местами шлейфы между двумя дисками, это изменит их очередность.
- Иногда при установке Windows с флешки или внешнего жесткого диска, именно они отображаются как Диск 0. В этом случае попробуйте установить загрузку не с флешки, а с первого жесткого диска в БИОС (при условии, что ОС на нем не установлена). Загрузка все равно произойдет с внешнего накопителя, но теперь под Диск 0 у нас будет нужный жесткий диск.
Исправление ошибки при отсутствии важных данных на диске (разделе)
Первый из способов исправить проблему предполагает один из двух вариантов:
- На диске, на который планируется установить Windows 10 нет важных данных и всё подлежит удалению (или уже удалено).
- На диске есть более одного раздела и на первом из них нет важных данных, которые требуется сохранить, при этом размер раздела достаточен для установки системы.
В этих ситуациях решение будет очень простым (данные с первого раздела будут удалены):
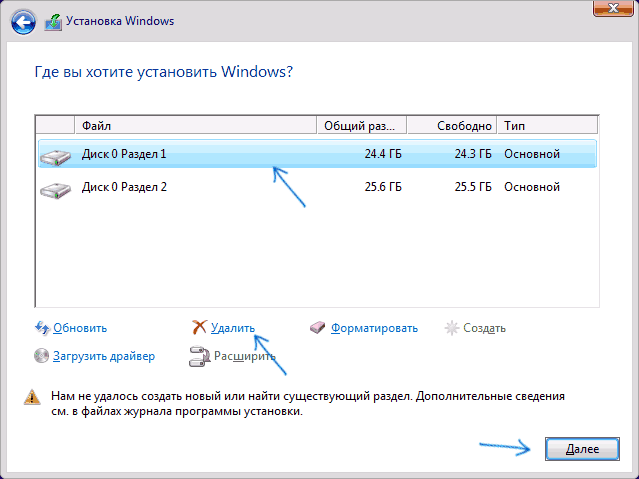
- В программе установки выделите тот раздел, на который вы пробуете установить Windows 10 (обычно Диск 0 раздел 1).
- Нажмите «Удалить».
- Выделите «Незанятое пространство на диске 0» и нажмите «Далее». Подтвердите создание системных разделов, установка продолжится.
Как видите, все довольно просто и какие-либо действия в командной строке с помощью diskpart (удаление разделов или очистка диска с помощью команды clean) в большинстве случаев не требуются. Внимание: программе установки необходимо создавать системные разделы именно на диске 0, а не 1 и т.д.
В завершение — видео инструкция по исправлению ошибки при установке описанным выше способом, а затем — дополнительные методы решения проблемы.
Вторая распространенная ситуация — установка Windows 10 производится на диск, который ранее служил для хранения данных, при этом, скорее всего, как описано в предыдущем решении, содержит всего один раздел, но данные на нем пострадать не должны.
В этом случае наша задача — сжать раздел и высвободить место на диске, чтобы там были созданы системные разделы операционной системы.
Сделать это можно как средствами программы установки Windows 10, так и в сторонних бесплатных программах для работы с разделами дисков, причем в данном случае второй способ, при возможности его использовать, будет предпочтительнее (далее объясняется, почему).
Освобождаем место для системных разделов с помощью diskpart в программе установки
Этот способ хорош тем, что для его использования нам не потребуется что-то дополнительное, помимо уже запущенной программы установки Windows 10. Минус способа в том, что после установки мы получим не совсем обычную структуру разделов на диске, когда загрузчик находится на разделе с системой, а дополнительные скрытые системные разделы — в конце диска, а не в его начале, как это обычно бывает (при этом все будет работать, но в дальнейшем, например, при возникновении проблем с загрузчиком, некоторые стандартные способы решений проблем могут работать не так, как ожидается).
В этом сценарии необходимые действия будут следующими:
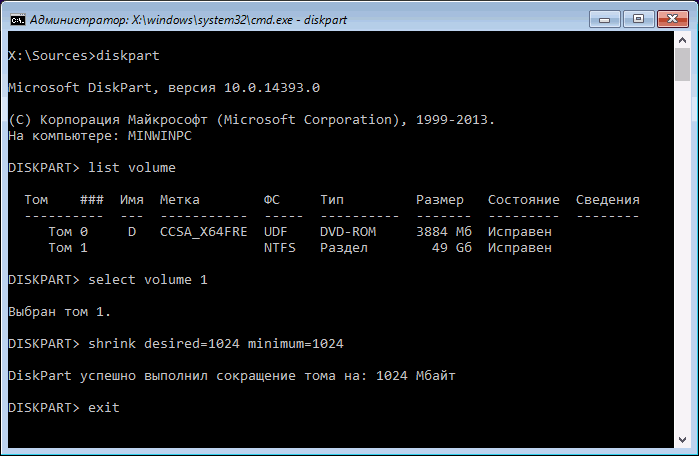
- Находясь в программе установки Windows 10 нажмите клавиши Shift+F10 (или Shift+Fn+F10 на некоторых ноутбуках).
- Откроется командная строка, в ней по порядку используйте следующие команды
- diskpart
- list volume
- select volume N (где N — номер единственного тома на жестком диске или последнего раздела на нем, если их несколько, номер берется из результата выполнения предыдущей команды. Важно: на нем должно быть около 700 Мб свободного места).
- shrink desired=700 minimum=700 (у меня на скриншоте — 1024, потому что не было уверенности в том, сколько места действительно нужно. 700 Мб достаточно, как оказалось).
- exit
После этого закройте командную строку, а в окне выбора раздела для установки нажмите «Обновить». Выберите раздел для установки (не незанятое пространство) и нажмите «Далее». При этом установка Windows 10 продолжится, а незанятое пространство будет использовано для создания системных разделов.
Использование Minitool Partition Wizard Bootable для освобождения места под системные разделы
Для того, чтобы освободить место для системных разделов Windows 10 (при этом не в конце, а в начале диска) и не потерять важные данные подойдет, по сути, любое загрузочное ПО для работы со структурой разделов на диске. В моем примере это будет бесплатная утилита Minitool Partition Wizard, доступная в виде ISO образа на официальном сайте https://www.partitionwizard.com/partition-wizard-bootable-cd.html (Обновление: с официального сайта убрали загрузочный ISO но он есть в веб-архиве, если просматривать указанную страницу за предыдущие годы).
Этот ISO вы можете записать на диск или загрузочную флешку (загрузочную флешку можно сделать с помощью программы Rufus, выбираем MBR или GPT для BIOS и UEFI соответственно, файловая система — FAT32. Для компьютеров с EFI загрузкой, а это, вероятнее всего, ваш случай можно просто скопировать все содержимое ISO образа на флешку с файловой системой FAT32).
Затем загружаемся с созданного накопителя (безопасная загрузка должна быть отключена, см. Как отключить Secure Boot) и производим следующие действия:
- На заставке программы нажимаем Enter и дожидаемся загрузки.
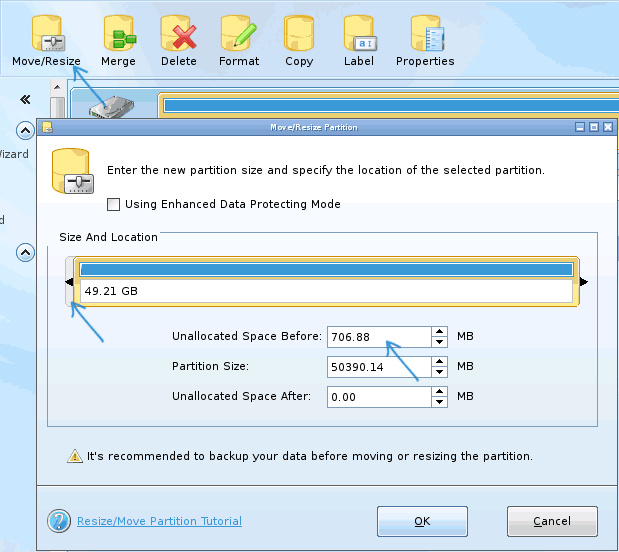
- Выберите первый раздел на диске, а затем нажмите «Move/Resize» для изменения размера раздела.
- В следующем окне с помощью мыши или указания чисел освободите место «слева» от раздела, около 700 Мб должно быть достаточным.
- Нажмите Ок, а затем, в главном окне программы — Apply.
После применения изменений, перезагрузите компьютер с дистрибутива Windows 10 — в этот раз ошибка о том, что не удалось создать новый или найти существующий раздел появиться не должна, а установка пройдет успешно (при установке выбирайте раздел, а не незанятое пространство на диске).
Надеюсь, инструкция смогла помочь, а если вдруг что-то не получилось или остаются вопросы — задавайте в комментариях, буду стараться ответить.
При желании установки любой из современных версий операционных систем, будь это Windows 10 или Windows 7, возникают у пользователей проблемы, которые вгоняют их в ступор. Вот пример такой проблемы.
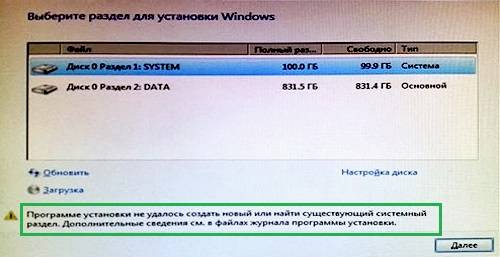
Вы вставляете диск в дисковод, или установочную флешку в USB-разъем, загружаетесь с них и видите загрузку той или иной системы. Далее появляется окошко установщика, где мы должны выбрать диск для установки Windows. Там есть некоторые параметры, которые мы могли бы использовать, но они нам сейчас ни к чему. Как только мы нажимаем кнопку «Далее», чтобы началась установка винды, происходит худшее – ошибка «Программе установки не удалось создать новый или найти существующий системный раздел».
К сожалению, этот способ, описанный чуть выше, уже не помогает, но есть другой.
Чтобы не заниматься такими бреднями, как перетыкать флешку, что-то перезапускать и т. д, есть более эффективный способ. Суть его в том, что вам нужно файлы с флешки, на котором находится Windows, перекинуть на тот диск или раздел, куда вы собирались ее устанавливать. Другими словами, мы делаем будущий системный раздел установочным диском, на который же и будем устанавливать винду. А теперь перейдем к практике.
Как решить ошибку «Программе установки не удалось создать новый или найти существующий системный раздел»?
Быстро и легко, нужно всего лишь внимательно читать инструкцию из этой статьи.
- Вставляете загрузочную флешку в компьютер и загружаетесь с нее;
- При появлении окна с выбором диска нажимаете клавиши Shift+F10, для открытия командной строки;
- В командной строке прописываем команду: diskpart;
- Командная строка теперь использует дисковую утилиту DISKPART, далее пишем команду: list disk. Данная команда показывает все подключенные к компьютеру диски. Ищем в списке нужный диск (можно ориентироваться по объему) и запоминаем число;
- select disk=0. Этой командой мы выбираем диск. Цифра 0 – номер дика из предыдущей команды, у вас он может быть другой.
Это интересно: Невозможно установить Windows на диск 0 раздел 1
При выбирании диска будьте очень внимательны, я рекомендую отключить другие жесткие диски, чтобы потом не было проблем.
- Дальше мы выполняем команду create partition primary size=XXXXX. В место «XXXXX» вы должны вписать объем системного диска, на который будете устанавливать Windows. Другими словами, будет создан новый раздел;
- select partition=1. Выводит раздел выбранного нами диска;
- active. Выбранный раздел становится активным;
- format fs=ntfs quick. Эта команда быстро отформатирует диск в файловую систему NTFS;
- assign. Эта команда задаст разделу букву, если она самостоятельно не указана, то выберется свободная следующая буква;
- exit. Выходим из утилиты DISKPART.
Так, мы выполнили все необходимые команды по созданию раздела для установки Windows, но теперь нам нужно перенести файлы с флешки на этот раздел.
- Снова открываем командную строку. Вам нужно узнать, какой буквой обозначена ваша флешка с виндой. С помощью команды cd. То есть в командной строке вы должны ввести, например, «cd e:», где е: — буква установочной флешки. Как определять букву дисков;
- Вы попали в каталог флешки. Прописываем команду для копирования файлов на системный диск: xcopy e: c: /e /h /k;
- Нужно зайти в каталог boot уже на самом разделе, не флешке: cd boot;
- С помощью команды bootsect мы создадим загрузочный код на системном диске: bootsect /nt60 c:. Где c: — системный диск, будьте внимательны, у вас может быть и другая буква;
- Мы сделали системный раздел загрузочным диском. Теперь вы можете вытащить флешку, перезапустить компьютер и устанавливать винду на этот же диск. После установки вы можете удалить файлы установки.
Это интересно: Чистая установка Windows 10
После установки Windows и ее загрузки, нужно кое-что подкорректировать.
- Открываем от имени администратора командную строку;
- Прописываем команду bcdedit;
- Среди результатов команды найдите строчку Windows Setup, где копируем identifier;
- Далее прописываем команду bcdedit /delete {identifier}.
Дополнительный вариант
Как вариант, для устранения этой ошибки можно воспользоваться Boot Menu, если эта функция поддерживается BIOS. Когда вы вставляете флешку, она может в порядке очередности дисков стоять на первом месте, либо вы сами так сделали, из-за этого Windows хочет записать таблицу MBR не на нужный нам диск, а на флешку, но ничего не выходит, так как она используется вами. Возможно, это и есть причина появления вышеназванной ошибки.
Для ее решения можно в BIOS поставить диск, который будет системным, на первое место, если он еще не стоит, потом зайти в Boot Menu (не в BIOS), и просто загрузиться с установочной флешки. Конечно, не факт, что данный метод поможет, но попытка не пытка, от этого вы ничего не потеряете. Boot Menu может выглядеть вот так:
</span></p>
Установка Windows 10 на ПК очень проста. Все, что вам нужно сделать, это загрузить Windows 10, создать загрузочный USB-диск, вставить его и следовать за подсказками. При установке Windows 10, вас попросят выбрать раздел. Как правило, вы просто выбираете нужный раздел или диск из списка, а Windows выполняет остальную часть задания.
Однако иногда Windows может показать вам сообщение об ошибке: «Нам не удалось создать новый или существующий раздел». Эта ошибка может возникнуть по ряду причин, даже на отлично функционирующих SSD и жестких дисках. В таких ситуациях вы можете попытаться устранить эту ошибку и продолжить установку Windows 10.
- Отсоедините дополнительные жесткие диски
В настоящее время, очень часто используется SSD для установки Windows и обычный жесткий диск для хранения данных. При использовании нескольких жестких дисков, прежде всего, нужно отключить все жесткие диски, кроме основного жесткого диска, на котором вы устанавливаете Windows. После отключения всех других жестких дисков попробуйте снова установить Windows и посмотрите, cможете ли вы продолжить установку.
- Отключите все USB-накопители и карты памяти
Помимо фактического загрузочного USB-диска с Windows 10, у вас могут быть другие USB-накопители и карты памяти, подключенные к вашей системе, и в такой ситуации, но в редких случаях, Windows может спутать их с обычным жестким диском. Чтобы убрать ошибку с текстом «Нам не удалось создать новый раздел» попробуйте отключите эти дополнительные USB-накопители или карты памяти и попробуйте снова установить Windows.
- Используйте диск USB 2.0
Если вы используете загрузочный диск USB 3.0 для установки Windows, это также может быть причиной того, что Windows выдает вам именно эту ошибку. Чтобы решить эту проблему, вы можете попробовать использовать USB 2.0.
Читайте также: Как создать диск восстановления Windows 8
- Сделайте раздел активным
Если вышеуказанные методы не работают, то раздел, в который вы пытаетесь установить Windows 10, может быть неактивным. Чтобы сделать раздел активным, вам необходимо получить доступ к командной строке. Чтобы получить доступ, вернитесь к первоначальному экрану установки Windows и нажмите ссылку «Восстановить компьютер». Теперь нажмите «Устранение неполадок» и затем нажмите «Командная строка».
Вышеуказанное действие откроет командную строку. Здесь введите «diskpart» и нажмите Enter. Это откроет утилиту diskpart, для того, чтобы вы смогли сделать раздел активным.
Теперь используйте следующую команду, чтобы увидеть все перечисленные диски в вашей системе.
list disk
select disk 0
Очистка выбранного диска:
clean
Чтобы сделать диск основным, запустите команду
create partition primary
Активируйте раздел:
active
После активации введите
format fs=ntfs quick
для его форматирования в файловой системе NTFS.
Теперь вы можете выбрать диск, выполнив команду
assign
Теперь так: дважды нажмите команду «exit», чтобы закрыть утилиту diskpart и командную строку.
После закрытия командной строки перезагрузите компьютер и попробуйте снова установить Windows.
Это все, что нужно сделать. Ниже оставляйте комментарии, и делитесь своими мыслями и опытом по использованию вышеуказанного метода для решения проблемы «Нам не удалось создать новый или существующий» при установке Windows.
Download WordPress ThemesDownload WordPress Themes FreeDownload WordPress Themes FreePremium WordPress Themes Downloadudemy paid course free downloaddownload huawei firmwareDownload Nulled WordPress ThemesЧитайте также: Что такое sttray64.exe?Используемые источники:
- https://remontka.pro/couldnt-create-new-partition-windows-10/
- https://computerinfo.ru/ne-udalos-sozdat-novyj-ili-najti-sushhestvuyushhij-razdel/
- https://allerror.ru/reshenie-problem/my-ne-mozhem-sozdat-novyj-ili-sushhestvuyushhij-razdel-pri-ustanovke-windows-10.html
Using the Windows tool diskpart will surely help
by Milan Stanojevic
Milan has been enthusiastic about technology ever since his childhood days, and this led him to take interest in all PC-related technologies. He’s a PC enthusiast and he… read more
Updated on January 13, 2023
Reviewed by
Alex Serban
After moving away from the corporate work-style, Alex has found rewards in a lifestyle of constant analysis, team coordination and pestering his colleagues. Holding an MCSA Windows Server… read more
- If you’ve met with the We couldn’t create a new partition error message, you were probably trying to install Windows 10.
- This error won’t allow you to install Windows but this guide will help you fix that problem.
Windows 10 is a great operating system, however, the installation process of Windows 10 isn’t always simple.
A number of users reported that We couldn’t create a new partition error message while installing Windows 10.
This error can prevent you from installing Windows 10, but fortunately, there are several solutions available.
- How can I fix the new partition error message on Windows 10?
- How do I fix the new partition error in Windows 10 installation?
- 1. Use diskpart
- 2. Make your partition active
- How do I fix the new partition error for Windows 10 USB?
- 1. Use a USB 2.0 flash drive
- 2. Disconnect any additional USB drives
- 3. Reconnect your USB flash drive
- 4. Use a third-party tool
- 5. Set your hard drive as the first boot device
- 6. Use Rufus or any other tool to create a bootable USB drive
- 7. Convert the partition to the GPT format
- How can I fix the new partition error for Windows 10 SSD?
How can I fix the new partition error message on Windows 10?
We couldn’t create a new partition error that can appear while trying to install Windows 10. This error can be quite problematic, and speaking of this error, users reported the following issues:
- Couldn’t create partition or locate an existing one in Windows 10 – If you encounter this problem, be sure to try some of the solutions from this article.
- We couldn’t create a new partition error 0x8004240f, 0x80042468 – Sometimes this error message might be followed by error code 0x8004240f or 0x80042468. If you encounter this problem, you might be able to fix it by formatting your hard drive.
- We couldn’t create a new partition or locate an existing one SSD, RAID – If you encounter this problem while using SSD or RAID, the problem might be additional hard drives on your PC.
- We couldn’t create a new partition Windows setup, Windows 10 USB – If you encounter this problem, simply disconnect all additional USB drives and check if that solves the issue.
- We couldn’t create a new partition unallocated space – This is another problem that can appear while trying to install Windows 10. To fix it, you might have to check your partitions and their configuration.
- We couldn’t create a new partition BIOS, dual boot, GPT – There are various factors that can cause this issue to appear, and in order to fix the problem, it’s advised to check your BIOS.
How do I fix the new partition error in Windows 10 installation?
1. Use diskpart
- Start Windows 10 setup using a bootable USB or DVD.
- If you get the We couldn’t create a new partition error message, close the setup and click the Repair button.
- Choose Advanced tools and then select Command Prompt.
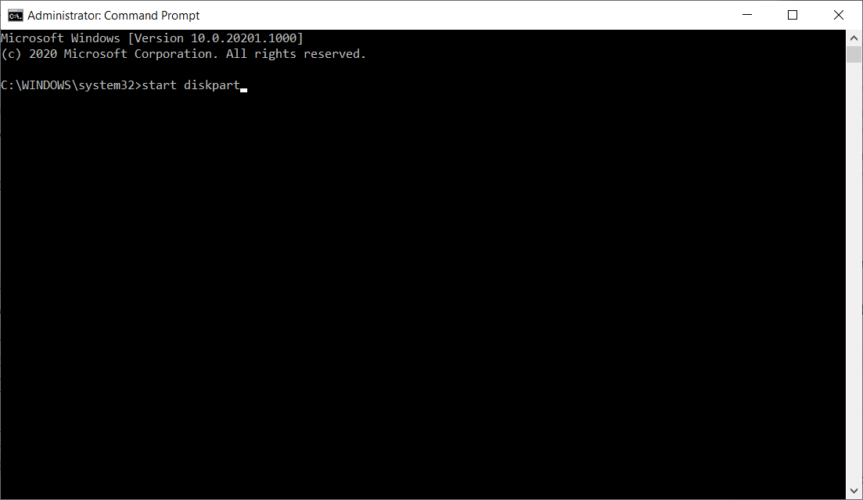
- When Command Prompt opens, enter start diskpart.
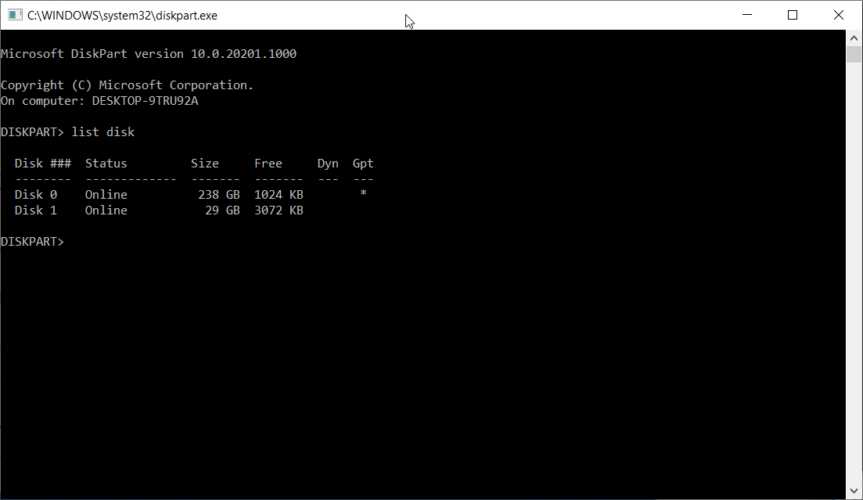
- Enter list disk. You should see the list of all hard drives connected to your computer.
- Find the number that represents your hard drive and enter select disk 0 (we used 0 as an example, so be sure to replace 0 with a number that matches your hard drive).
- Enter the following lines and press Enter after each line:
- clean
- create partition primary
- active
- format fs=ntfs quick
- assign
- Enter exit in order to close Command Prompt.
- Start the installation process again.
Note: This solution will delete all files on your selected hard drive, so use it on a new computer that doesn’t have any files on it, or only if you have a backup available.
Before starting this process, make sure that you don’t have any SD Cards connected to your PC.
2. Make your partition active
- Start diskpart as we described in the previous solution.
- Enter list disk.
- Locate your hard drive and enter select disk 0 (we used disk 0 in our example, so be sure to replace 0 with a number that represents your hard drive).
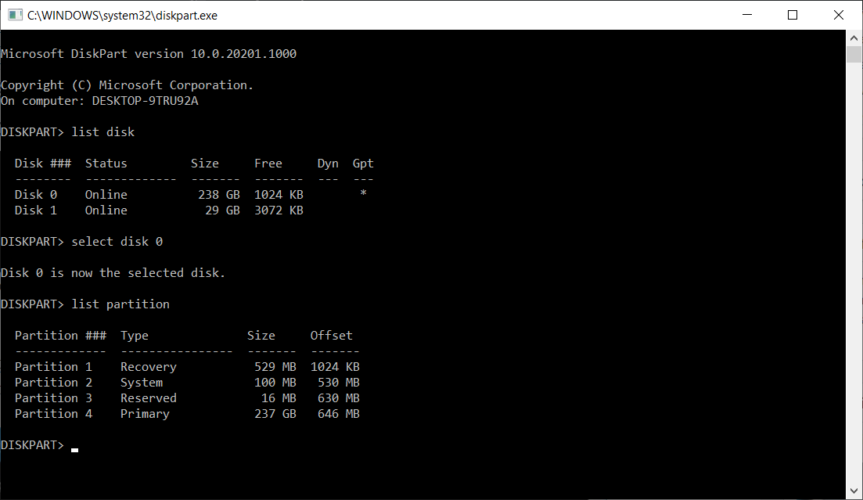
- Enter list partition.
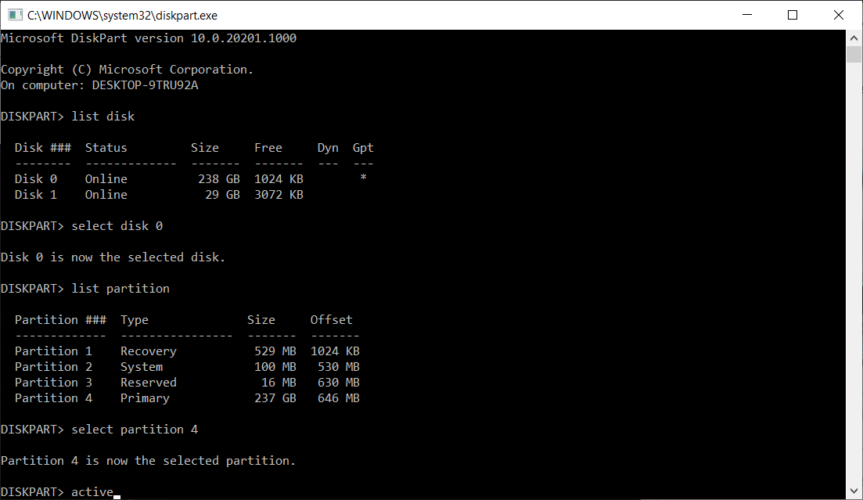
- Locate the partition on which you want to install Windows 10 and enter select partition 4. Remember to replace 4 with a number that matches your partition.
- Enter active.
- Type exit and press Enter to exit the Command Prompt.
- Start the installation process again and check if the problem is resolved.
How do I fix the new partition error for Windows 10 USB?
1. Use a USB 2.0 flash drive
If you’re installing Windows 10 from a USB drive, you might experience this problem if you’re using a USB 3.0 flash drive.
According to users, it seems that there are problems with USB 3.0 flash drives, and many users advise using USB 2.0 flash drives when installing Windows 10.
Alternatively, you can also create Windows 10 bootable DVD and use it instead of a USB flash drive.
2. Disconnect any additional USB drives
If you’re planning to install Windows 10 from a USB flash drive you might encounter We couldn’t create a new partition error message if more than one USB drive is connected to your PC.
In order to avoid this problem, we strongly advise that you disconnect any additional USB drives and leave only your Windows 10 USB flash drive connected.
3. Reconnect your USB flash drive
To fix We couldn’t create a new partition error message while installing Windows 10, some users are suggesting that you unplug your USB flash drive.
When you get the error message, unplug your USB drive and connect it to a different port.
Check if you’re able to create a new partition. If the process fails, unplug the USB drive again and connect it to the original USB port. Try to create the partition again.
4. Use a third-party tool
If you can’t install Windows 10 due to We couldn’t create a new partition error message, you might be able to fix the problem by using a third-party tool.
If you’re not familiar with command-line tools, you might be able to fix this problem by using Aomei Partition Assistant.
This tool is perfect for recovering lost partitions and copying disks. It also offers a friendly user interface so you should be able to easily modify your hard drive and perform the necessary tasks.
Not only that it will solve your partitioning issue in no time but it also comes with some advanced features like migrating your OS to SSD/HDD, formatting, wiping and erasing disks, and more.
⇒ Get Aomei Partition Assistant
5. Set your hard drive as the first boot device
When installing a new operating system from a USB flash drive, you are probably going to set that device as a first boot device in BIOS.
Unfortunately, sometimes it happens that your USB flash drive is mistaken as a hard drive during the Windows 10 installation thus giving you the We couldn’t create a new partition error message.
Some PC issues are hard to tackle, especially when it comes to corrupted repositories or missing Windows files. If you are having troubles fixing an error, your system may be partially broken.
We recommend installing Restoro, a tool that will scan your machine and identify what the fault is.
Click here to download and start repairing.
In order to fix this issue, you have to set your hard drive as your first boot device from BIOS.
After you’ve done that, connect your bootable USB flash drive and restart your computer.
While you computer boots, you’ll have to press F10, F11, or F12 (it might be a different key depending on your motherboard) and select your USB flash drive as a boot device.
Now, the installation process should work without any issues. Bear in mind that the Boot Menu might not be enabled on your PC by default, so you’ll have to enable it manually from BIOS.
For detailed instructions on how to do that, check your motherboard manual.
6. Use Rufus or any other tool to create a bootable USB drive
According to users, problems with We couldn’t create a new partition error message might be caused by Media Creation Tool.
Users reported that the problem was fixed by using a third-party tool, such as Rufus, instead of the Media Creation Tool in order to create a bootable USB flash drive.
7. Convert the partition to the GPT format
- Start Command Prompt and enter diskpart.
- Now enter the list disk. Locate the hard drive on that you want to install Windows 10 to.
- Now enter select disk X. Replace the X with the number that matches your hard drive. If you have two or more hard drives, it’s crucial that you select the correct drive, so be extra cautious.
- Type clean into Command Prompt and press Enter. This command will completely remove all files from your hard drive, so be sure to select the correct hard drive and back up your files.
- Now enter convert gpt and run this command.
MBR partitions have certain limitations and they can only work with drives that are less than 2TB in size.
GPT doesn’t have any of these limitations, it works better with UEFI, so it’s usually a better choice.
We have to mention that converting the drive from MBR to GPT will remove all your files, so be sure to back up important files before proceeding.
Diskpart is one of the oldest methods for converting an MBR drive to GPT, even though it’s effective, it will delete all your files.
Fortunately, Microsoft introduced two new ways to convert MBR to GPT drive without file loss, MBR2GPT, and gptgen.
Both of these are command-line tools, and if you want to use them, you need to start Command Prompt before booting to Windows 10 and running one of these commands.
We explained in great detail how to use both these commands in our guide on how to convert MBR to GPT disk, and we strongly advise you to check it out for detailed instructions and more solutions.
- Can’t install Windows 10/11 on your computer? Try this
- Windows installation error 0x80070017 [Fixed]
How can I fix the new partition error for Windows 10 SSD?
Disconnect other hard drives
Many users reported We couldn’t create a new partition error message while trying to install Windows 10 on an SSD.
According to users, in order to fix this issue, you’ll have to disconnect all other hard drives and leave only your SSD drive connected.
Alternatively, you can try disabling all other hard drives except for your SSD from BIOS.
After you’ve disabled or disconnected all other drives, the SSD should be recognized by the installer.
Now, all that you have to do is to delete all partitions on your SSD and Windows 10 should install without any problems.
We couldn’t create a new partition error message that can prevent you from installing Windows 10, but as you can see, you can easily fix it by following one of our solutions.


