- Login
- Register
- FAQ
- Search
- It is currently Thu Feb 09, 2023 9:29 am
- Print view
Critical Error Saving Project
- Message
![]() Tue Jan 18, 2022 2:00 pm
Tue Jan 18, 2022 2:00 pm
Today 2 very frightening situation has occurred.
What happen.
1 Case
On PC 1 (windows 10 Davinci Resolve Free 17.4 build 12)
I rename the Project from the Project Manager.
Export the Project from the Project Manager.
Then i open the project. Before i close the project i save but i was not able to save.
It has appeared a message box that give me 2 options (reload Current) and (Export change and Reload)
neither option works.
I try to randomly open others project (not all) and the are ok.
2 Case
ON PC 2 (windows 10 Davinci Resolve Studio 17.4 build 12)
I just open a old project, made in 2017.
check some footage without any changes. And before i exit i save.
Unfortunately i get the same error message of case 1
I try to randomly open others project (not all) and the are ok.
I am very worried. I have big project, with hundreds of timeline.
Somebody can help me to recover those project and give me some logic explanation of what happen.
- Attachments
-

- davinci_Critical_error Saving.jpg.png (22.42 KiB) Viewed 6624 times
Last edited by Marco Quaglia Faccio on Tue Jan 18, 2022 3:49 pm, edited 1 time in total.
Resolve Studio 17 | Fusion Studio 17 | Win 10 Enterprise (64-bit) |
X99-A II | i7-6800K CPU @ 3.40GHz | Memory 32GB
NVIDIA GeForce GTX 1080 | Samsung SSD 970 EVO Plus 500GB | CT240BX500SSD1 | WDC WD30EFRX-68EUZN0
Andy Mees
- Posts: 2226
- Joined: Wed Aug 22, 2012 7:48 am
![]() Tue Jan 18, 2022 2:56 pm
Tue Jan 18, 2022 2:56 pm
Did you have Dynamic Project Switching enabled and did you copy and paste any timeline from a different project version into this current project version before the error occurred?
Only time I have seen this (and I can reproduce) is when working as above. Specifically, if copying a timeline from an older project version where the older timeline contains nested and/or compound and/or multicam timelines*, and then pasting it into the new project. The new project will then throw up this ‘critical error when saving’ message. The solution for me was to export the timeline needed from the first project as a DRT file and then import that DRT into the second project. The timeline plus new master instances of source content is then created in the new project without issue, albeit that the timeline is linked to the newly created media references and not the already extant media references.
If you are having similar trouble then, if no other options present, as a last resort you might try exporting drt’s from the faulting project and using those to rebuild in a new empty project.
* Note: I’m not sure if its any or all of these combined that specifically cause the problem, but I don’t recall ever getting this error when copying and pasting simple timelines without such references between projects.
EDIT: Removed unexpected URL tag from the post.
Last edited by Andy Mees on Tue Jan 18, 2022 4:37 pm, edited 1 time in total.
Let’s have a return to the glory days, when press releases for new versions included text like «…with over 300 new features and improvements that professional editors and colorists have asked for.»
![]() Tue Jan 18, 2022 3:47 pm
Tue Jan 18, 2022 3:47 pm
[quote=»Andy Mees»][url]Did you have Dynamic Project Switching enabled and did you copy and paste any timeline from a different project version into this current project version before the error occurred?
No in this 2 specific case i did not copy any Timelines.
In both case the «Dynamic Project Switching» was not enabled.
In both case i did a Export project.
In the first case i renamed the project, then from Project Manager i Export with still and LUTs, then open the project, when i went to save without changes it appears this Critical Error.
In the second case from Inside the project i Export the project, no modification was made then save.
As the first case i had the Error.
The only common thing i can see is Davinci Version (17.4 build 12).
After the Error i can’t Export the project.
I try from the Project Manager (with the project close) and
i try from inside the project with export project.
I also try to «Save Project as». In all case i cant export and cant Save.
Resolve Studio 17 | Fusion Studio 17 | Win 10 Enterprise (64-bit) |
X99-A II | i7-6800K CPU @ 3.40GHz | Memory 32GB
NVIDIA GeForce GTX 1080 | Samsung SSD 970 EVO Plus 500GB | CT240BX500SSD1 | WDC WD30EFRX-68EUZN0
Andy Mees
- Posts: 2226
- Joined: Wed Aug 22, 2012 7:48 am
![]() Tue Jan 18, 2022 4:42 pm
Tue Jan 18, 2022 4:42 pm
Marco Quaglia Faccio wrote:from Inside the project i Export the project, no modification was made then save.
Are you able to open and use the exported project without error?
Marco Quaglia Faccio wrote:After the Error i can’t Export the project
Are you are to export timelines (DRT files)?
Let’s have a return to the glory days, when press releases for new versions included text like «…with over 300 new features and improvements that professional editors and colorists have asked for.»

Dwaine Maggart
Blackmagic Design
- Posts: 9948
- Joined: Wed Aug 22, 2012 2:53 pm
![]() Tue Jan 18, 2022 10:28 pm
Tue Jan 18, 2022 10:28 pm
Logs could be helpful.
Would also recommend going forward, that for any critical multi-days/weeks/months/years long projects, that you make a Project Export .drp at the end of each workday, and keep copies of those off the main system drive. Then if anything happens to the drive or the Resolve database, you have backups.
Are the projects in a Disk or PostgreSQL database? If its a Disk database, where is the location? Is it on a removable drive?
Dwaine Maggart
Blackmagic Design DaVinci Support
![]() Wed Jan 19, 2022 5:42 am
Wed Jan 19, 2022 5:42 am
Dwaine Maggart wrote:Logs could be helpful.
i will send privately
Would also recommend going forward, that for any critical multi-days/weeks/months/years long projects, that you make a Project Export .drp at the end of each workday, and keep copies of those off the main system drive. Then if anything happens to the drive or the Resolve database, you have backups.
I believe that if only a bit in the DB file is corrupt all the DB will not work.
in my case only some project.
My C drive is a SSD with 117 GB free . I run a check disk andis all ok
My footage are on a HardDisk
Also keep in mind that i had the same issue on 2 different PC with 2 different project.
Are the projects in a Disk or PostgreSQL database?
Disk
If its a Disk database, where is the location?
C:ProgramDataBlackmagic DesignDaVinci ResolveSupportResolve Disk Database
Is it on a removable drive?
No
Other Test
FROM Davinci Studio 17.4 build 12
(1) from Project Manager i Export Project…, Davinci just close without any warning, no message of crash was show.
(2) From Project Manager i Export Project Archive…, Davinci just close without any warning, no message of crash was show.
(3) Reopen Davinci an then the Project. It open.
But if i save i have the «Critical Error Saving Project»
-> if i select Reload Current i get the message «Unable to Open the Project»
-> if i select Export Changes & Reload i get the message «Unable to Export Project»
From inside the Project i Export Project, message box give me 3 options:
-> (Cancel)
-> click on (Don’t save ) i type the name and presse Save, then i get a message «Unable to Export Project»
-> click on (Save ) i have the «Critical Error Saving Project»
—> if i select Reload Current i get the message «Unable to Open the Project»
—> if i select Export Changes & Reload i get the message «Unable to Export Project»
Resolve Studio 17 | Fusion Studio 17 | Win 10 Enterprise (64-bit) |
X99-A II | i7-6800K CPU @ 3.40GHz | Memory 32GB
NVIDIA GeForce GTX 1080 | Samsung SSD 970 EVO Plus 500GB | CT240BX500SSD1 | WDC WD30EFRX-68EUZN0
Andy Mees
- Posts: 2226
- Joined: Wed Aug 22, 2012 7:48 am
![]() Wed Jan 19, 2022 7:53 am
Wed Jan 19, 2022 7:53 am
Marco Quaglia Faccio wrote:From inside the Project i Export Project, … message «Unable to Export Project»
Hey Marco
Asking once more, just in case there’s any misunderstanding.
What about Export > Timeline? Not Export Project. As you are able to open the project (but not save it), maybe try to export just the timeline (ie a DRT file). Does that work or does that also give an error? How about Export Bin? I realise testing this doesn’t explain or fix your issue, but if these functions work then it might be wise to see if you can use them to rebuild a new (working) version of your project.
- Screenshot 2022-01-19 at 07.47.49.png (167.32 KiB) Viewed 6250 times
Hope it helps
Andy
Let’s have a return to the glory days, when press releases for new versions included text like «…with over 300 new features and improvements that professional editors and colorists have asked for.»
![]() Wed Jan 19, 2022 2:27 pm
Wed Jan 19, 2022 2:27 pm
[quote=»Andy Mees»][/quote]
I follow your suggestion.
The first Time i try to export 3 TimeLine. I was able to process the export operation without issue.
I was also also able to import them on a new test project, but only 1 timeline was with clip, the other two were just black, no video and audio. I delete all the timelines from the test projet.
I went again back to the original project and i again export the same 3 timelines, no errors.
Then back to the test project and in this case i was able to successfully import them with video and audio and text.
Thanks for your help, i appreciate, but the problem is that this thing they should not happen.
I don’t think is a corrupt file (i may be wrong). In all my life it never happen that i lose a single bit and in Davinci resolve it happen (to now) 2 times in 2 different computers.
Resolve Studio 17 | Fusion Studio 17 | Win 10 Enterprise (64-bit) |
X99-A II | i7-6800K CPU @ 3.40GHz | Memory 32GB
NVIDIA GeForce GTX 1080 | Samsung SSD 970 EVO Plus 500GB | CT240BX500SSD1 | WDC WD30EFRX-68EUZN0
Andy Mees
- Posts: 2226
- Joined: Wed Aug 22, 2012 7:48 am
![]() Wed Jan 19, 2022 2:59 pm
Wed Jan 19, 2022 2:59 pm
Marco Quaglia Faccio wrote:i was able to successfully import them with video and audio and text.
That’s great news, at least you have some immediate options to move forward with your project.
Marco Quaglia Faccio wrote:the problem is that this thing they should not happen.
Yes, I agree, but sometimes things go wrong. The trick is to be able to deliver regardless!
I don’t know why this happened to your two projects. Whatever it is, the conditions that cause this error must be quite rare, I think, as Resolve has a great many users but I don’t often see this message reported (and I’ve been hanging around here for a few years now). The fact that it just happened to you on two different computers is certainly very strange, assuming you are using separate disk databases and separate storage for both. Either way, hopefully your logs and sys info files will help Dwaine diagnose so that BMD can implement a solution, if it’s a product issue.
Good luck
Andy
Let’s have a return to the glory days, when press releases for new versions included text like «…with over 300 new features and improvements that professional editors and colorists have asked for.»
floh79
- Posts: 296
- Joined: Thu Dec 17, 2020 10:45 am
- Real Name: Florian Erfurth
![]() Thu Feb 24, 2022 2:43 pm
Thu Feb 24, 2022 2:43 pm
Hi. I found out. Maybe the filename (including the path ![]() ) you tried to use is too long
) you tried to use is too long ![]() NTFS only allows max 255 characters for full path.
NTFS only allows max 255 characters for full path.
See:
viewtopic.php?f=21&t=155869&p=827523#p827523
Try with shorter filename and directory names. Does it help?
Best regards
Floh

Marc Wielage
- Posts: 9056
- Joined: Fri Oct 18, 2013 2:46 am
- Location: Hollywood, USA
![]() Fri Feb 25, 2022 12:32 am
Fri Feb 25, 2022 12:32 am
floh79 wrote:Hi. I found out. Maybe the filename (including the path
As a best practice, we usually aim for abbreviated session file names of no more than about 36 characters, sort of like «ClientName_Project_Name_Season_Ep_Date,» so it’d be «Netflix_StrThings_S3Ep01_2-24-2022.» That will always fit, plus it’s easy to understand and all the characters will show up in the window. You could even eliminate the client name if it was going into an entire database devoted to just that show and just that client, so just the Show name, Season number, Episode number, and date could work. If it were me, that’s what I would do.
I’m used to the standard Linux thing of never having spaces in file names, so I always use underscores instead. Punctuation is frowned upon, but I’ve found that dashes are acceptable and don’t cause any issues. No high-ASCII characters, though.
marc wielage, csi • VP/color & workflow • chroma | hollywood
Uli Plank
- Posts: 16601
- Joined: Fri Feb 08, 2013 2:48 am
- Location: Germany and Indonesia
![]() Fri Feb 25, 2022 2:29 am
Fri Feb 25, 2022 2:29 am
Same here, old habit from UNIX days with SGI workstations. No umlaut or anything fancy.
I’m convinced it has saved me some hair at my age ![]()
Don’t approach DR with your preconceptions from another NLE.
Many features are better, some worse, most are different.
Resolve Studio 18.1.2, MacOS 12.6.2
MacBook M1 Pro, 16 GPU cores, 32 GB RAM
and
iMac 2017, Radeon 580, 32 GB RAM
Speed Editor
floh79
- Posts: 296
- Joined: Thu Dec 17, 2020 10:45 am
- Real Name: Florian Erfurth
![]() Fri Feb 25, 2022 7:46 am
Fri Feb 25, 2022 7:46 am
Don’t understand me wrong, I’m not using over-100-chars-project-names. It also depends on Windows username (which is also in path!), subdirectories (which appends to path to projects too).
@Marc: So you suggest, not to use subdirectories ![]()
Return to DaVinci Resolve
Who is online
Users browsing this forum: billbyrnes, Google Feedfetcher, Lexvid, oniongarlic, pan2lennart, panos_mts, roger.magnusson, Shrinivas Ramani, Steve Golding, SteveMullen, Torbjörn Lindström and 69 guests
Just in case someone else comes across this and it’s as persistent as it was for me and therefore not fixable with a simple restart, here’s what worked for me.
I was working on a project that was originally edited in Avid and being finished in Resolve. This meant that a lot of media including all titles, was offline. This is never usually a problem and indeed hadn’t been a problem the entire time I was working on this project. I was replacing all the offline titles with Resolve text generators one by one, and I used the offline media segments on the timeline as a guide for timing. Therefore I’d disable/mute the offline clip and put the text generator on a layer above in order to help match timing, and then delete or overwrite the old offline clip.
Inexplicably, Resolve had developed an affection for one of these pieces of offline media because one of them, and only one of them, triggered the critical error saving project behaviour when deleted, and not when left in. Since it’s disabled or muted it doesn’t really matter whether it gets deleted or not so as a janky sort of a patch I just left it sitting there and suddenly there was no issue at all anymore. Makes no sense but whatever.
I actually don’t like having it sitting there just for the sake of neatness even if it doesn’t matter so I worked around not being allowed to delete it by simply making a new timeline and copying and pasting everything except this one offline media segment, from the old to the new timeline and it continued to save just fine.
Stupid and weird, I tried many more logical troubleshooting steps before I noticed it was happening every time I deleted that offline segment.
DaVinci Resolve от Blackmagic Design — популярный бесплатный видеоредактор, доступный на нескольких платформах. Однако некоторые пользователи сообщают, что DaVinci Resolve продолжает падать при редактировании видео.
В отличие от Adobe Premier Pro, популярный видеоредактор DaVinci Resolve лучше работает с системой с выделенным графическим процессором. Отсутствие которых может привести к случайным сбоям.
В этой статье мы рассмотрим несколько шагов по устранению неполадок, которые помогут вам навсегда решить проблемы сбоев DaVinci Resolve.
Как исправить сбой DaVinci Resolve при запуске?
1. Изменить приоритет процесса

- Убедитесь, что DaVinci Resolve запущен.
- Щелкните правой кнопкой мыши на панели задач и выберите «Диспетчер задач».
- Откройте детали
- Прокрутите вниз и щелкните правой кнопкой мыши Разрешить. исполняемый файл
- Перейдите в «Установить приоритет» и выберите «Высокий».
Вот и все. Попробуйте поработать над любым из ваших проектов и проверьте, решена ли проблема. Обратите внимание, что при каждом перезапуске DaVinci Resolve вам, возможно, придется устанавливать высокий приоритет.
2. Установите драйвер Nvidia Studio

- Запустите опыт Nvidia GeForce.
- Нажмите на значок меню (три точки в правом верхнем углу).
- Выберите Студийный драйвер.
- GeForce Experience загрузит и установит драйвер Nvidia Studio.
Если у вас уже установлены драйверы Studio, попробуйте выполнить чистую установку.

- Загрузите и установите программу удаления драйвера дисплея.
- Запустите инструмент и выберите графическую карту,
- Нажмите «Очистить» и перезапустите.
- После удаления загрузите последнюю версию драйвера NVIDA Studio.
- Запустите установщик и установите необходимые пакеты через выборочную установку.
- Перезагрузите компьютер и перезапустите DaVinci Resolve.
Драйвер Nvidia Studio также может вызывать сбои DaVinci Resolve. Попробуйте выполнить чистую установку драйверов, чтобы устранить проблемы.
Если вам нужно правильно установить этот драйвер Nvidia, не вызывая серьезных проблем, лучше попробуйте специальный инструмент обновления драйверов и эффективно установите или обновите любые драйверы на вашем ПК.
3. Какая версия DaVinci Resolve лучше всего подходит для предотвращения сбоев?
Начнем с наиболее распространенной причины сбоев DaVinci Resolve. DaVinci Resolve 15 был пронизан несколькими сбоями и ошибками, которые приводили к частым сбоям.
Эти сбои также происходили в системе, в которой было достаточно оборудования для запуска видеоредактора. Тем не менее, установка последней версии DaVinci Resolve 16, похоже, устранила многие проблемы с программным обеспечением.
Обновить DaVinci Resolve

- Запустите приложение Разрешение.
- Щелкните DaVinci Resolve.
- Выберите Проверить наличие обновлений.
- Загрузите и установите все ожидающие обновления.
После установки перезапустите приложение и проверьте, решена ли проблема сбоя. Если нет, возможно, вам придется удалить, а затем переустановить последнюю версию, чтобы устранить проблему. Вот как это сделать.

- Нажмите клавишу Windows + R.
- Введите appwiz. cpl и нажмите OK.
- В Панели управления выберите DaVinci Resolve.
- Нажмите «Удалить», а затем подтвердите действие.
- После удаления загрузите последнюю версию DaVinci Resolve отсюда.
- Запустите установщик и проверьте наличие улучшений.
4. Включите мультимониторинг IGPU

- Выключите компьютер.
- Нажмите кнопку питания, чтобы перезагрузить компьютер. При перезапуске начните нажимать клавишу настройки (F2) на клавиатуре, чтобы войти в BIOS.
Примечание. Клавиша настройки обычно отображается на начальном экране. Обратитесь к руководству пользователя для вашего ноутбука или материнской платы (в случае настольного компьютера), чтобы найти ключ настройки. - В меню BIOS откройте вкладку Advanced.
- Найдите IGPU Multi-Monitoring и убедитесь, что он включен.
- Сохраните изменения и выйдите.
5. Проверьте совместимость графического процессора
Отключить встроенный графический процессор

- Нажмите клавишу Windows + R.
- Введите devmgmt.msc и нажмите OK.
- В диспетчере устройств разверните раздел «Адаптер дисплея».
- Щелкните правой кнопкой мыши встроенный графический процессор Intel.
- Выберите Отключить устройство.
- Откройте DaVinci Resolve и проверьте, не возникают ли сбои по-прежнему.
Обновление графического процессора
Как обсуждалось ранее, DaVinci Resolve — это приложение, интенсивно использующее GPU. Для стабильной работы рекомендуется установить достойную дискретную видеокарту. Если у вас есть только интегрированный графический процессор Intel, самое время подумать о переходе на выделенный графический процессор.
Решение DaVinci продолжает давать сбой. Обычно это происходит из-за несовместимости драйвера графического процессора или ошибки в самом программном обеспечении. Выполните шаги один за другим, чтобы диагностировать и устранить проблемы, вызывающие сбои.
Открываю проект в DaVinci Resolve 16.2.8, он открывается, но появляется окошко с сообщением об ошибке:
The GPU failed to perform image processing because of an error.
Error Code: 209.
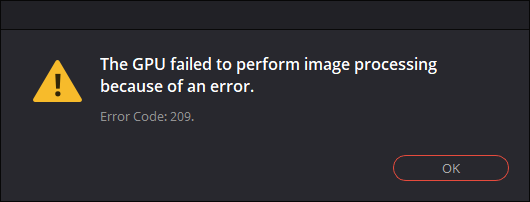
Накануне я обновил DaVinci Resolve. Скорее всего из неё обрали поддержку CUDA (в моём случае минимум Compute Capability of 3.0).
Посмотрел логи:
«C:UsersDenisAppDataRoamingBlackmagic DesignDaVinci ResolveSupportlogsResolveDebug.txt»
Там была такая запись:
[0x0000323c] | GPUManager           | INFO  | 2021-02-04 13:33:04,843 | Flushing GPU memory...
[0x0000323c] | DVIP                 | ERROR | 2021-02-04 13:33:04,845 | C:/jenkins/workspace/dvip/DaVinciIP/DaVinciIP/Unpacker/Unpacker_kernel.cu:226: CUDA error cudaErrorNoKernelImageForDevice (209)
[0x0000323c] | GPUManager           | ERROR | 2021-02-04 13:33:04,851 | Exception caught while running GPU algorithms:
[0x0000323c] | DVIP                 | ERROR | 2021-02-04 13:33:04,851 |
DVIP Exception: At position C:/jenkins/workspace/dvip/DaVinciIP/DaVinciIP/Unpacker/Unpacker_kernel.cu:226
 - API: CUDA
 - API Error Code: cudaErrorNoKernelImageForDevice (209)
Как всегда для решения подобной проблемы у пользователя аж 3 варианта:
1. Купить видео-карту помощнее
2. Установить старую версию DaVinci (16.2.6)
3. Переключить режим работы программы на OpenCL:
▶ ▶
GPU Processing Mode = OpenCL
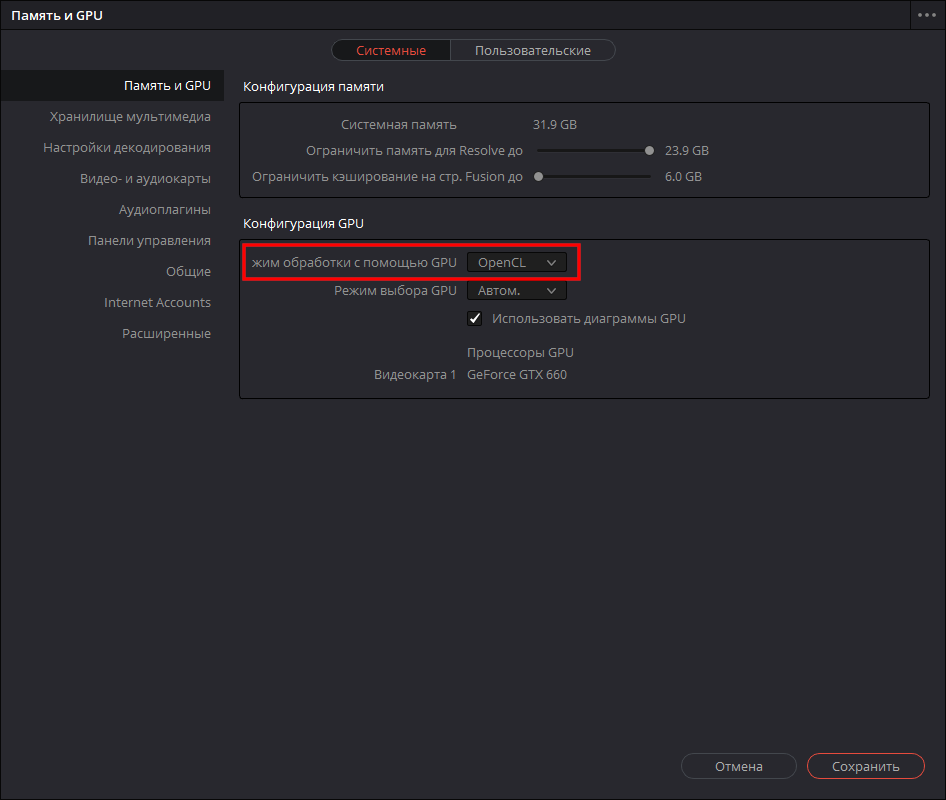
Придётся воспользоваться вторым вариантом, т.к. вариант (3) почему-то замедляет производительность программы (судя по некоторым отзывам, хотя по идее не должен), а тратить деньги на новую видюху я не хочу. К тому же сейчас из-за ажиотажа вокруг майнинга криптовалют, видео-карты стоят нереальных денег.
Текущий драйвер NVIDIA GeForce: 461.40.
Попробовал драйверы:
461.09 — проблема не решилась
460.89 — аналогично
460.79 — та же ошибка при открытии проекта
457.61 — увы
457.30 — не сработало
457.09 — ошибка осталась
456.71 — нет
456.55 — тоже нет
456.38 — и этот драйвер не сработал.
Таким образом рекомендация с форума, в которой предлагалось попробовать старый драйвер, мне не помогла.
Зато проблема решилась установкой DaVinci Resolve версии 16.2.6.005
- Об авторе
- Недавние публикации

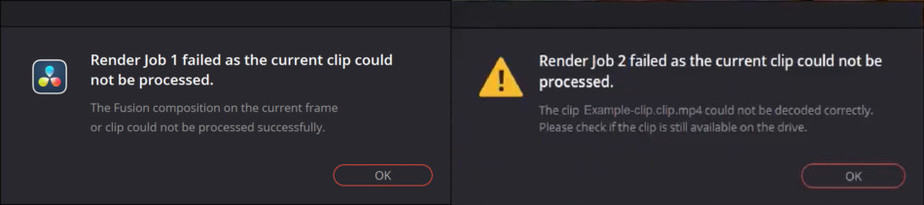
4 Ways to Fix “Render Job Failed” in Davinci Resolve
There are many reasons you might receive the “Render Job failed” error when rendering your videos in Davinci Resolve.
However, some of them are more common than others, therefore I’ve gathered the most common ones in this article.
I’ve seen there are two types of errors that occur for most people. The first one is related to rendering fusion composition & the second is a video file that could not be decoded correctly.
However, the solutions shared in this article will work on both error types.
Anyways, let’s solve this problem of yours!
1. Export Rendered Cache Files
This one is actually quite genius, and solved the problem immediately when I was facing this problem.
So let’s get to it! Here’s a picture of the two most normal errors to experience:
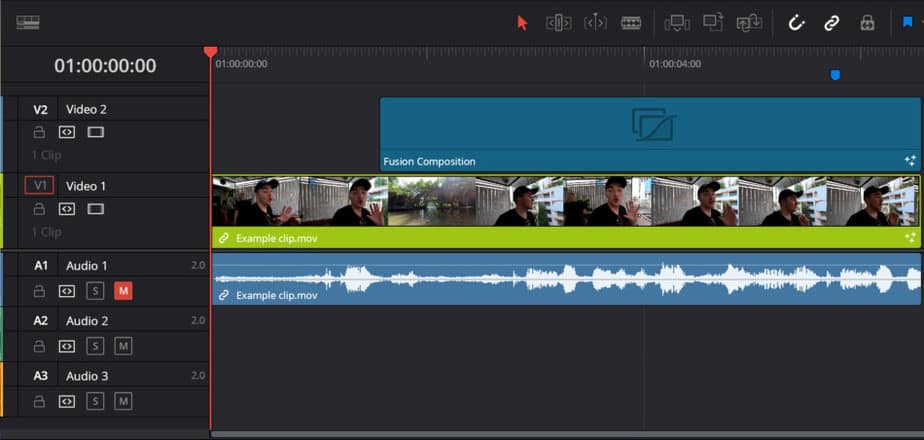
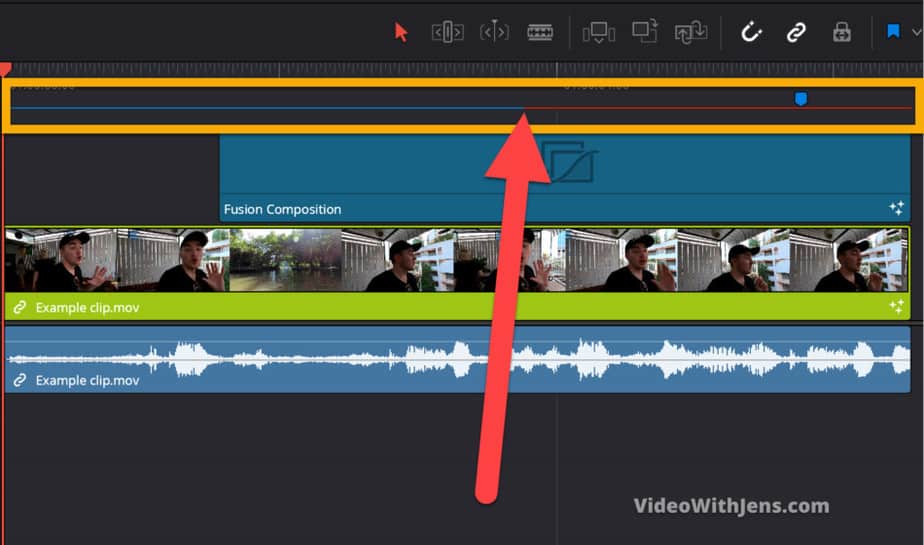
Here you can see my timeline, just a normal clip and a fusion composition which are causing this error:
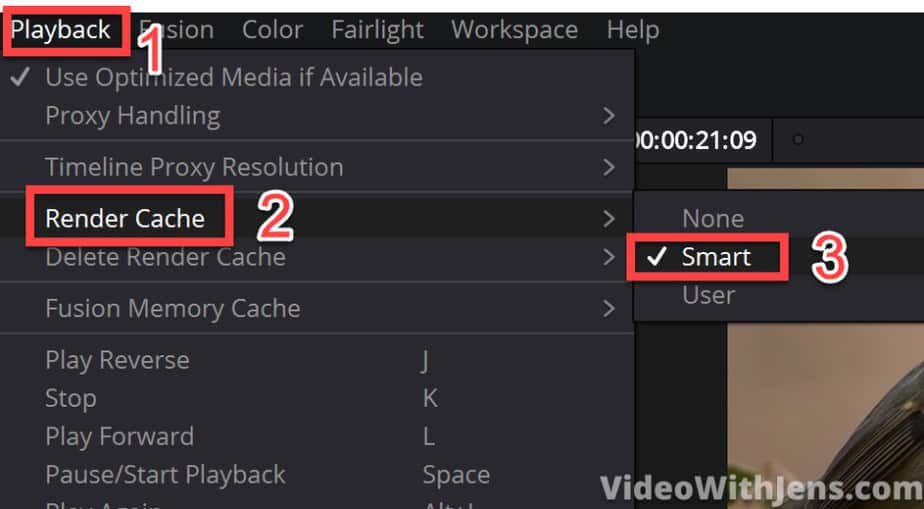
The first thing you want to do is open “Playback > Render Cache > Smart“:
Once that is done you will see a red line, which is slowly turning blue above your clips in the timeline. Let it finish rendering before moving on. At least it should render the clip which is causing you problems (if you know which it is).
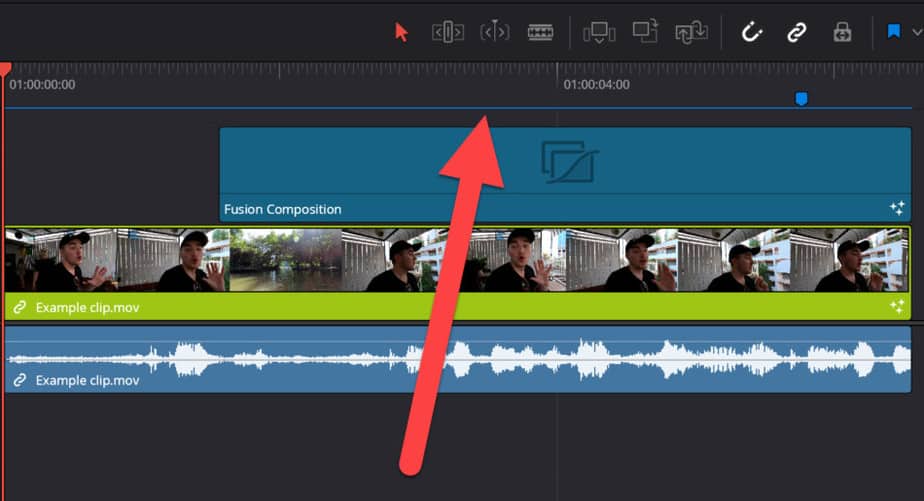
Once it’s done it will be totally blue like this:
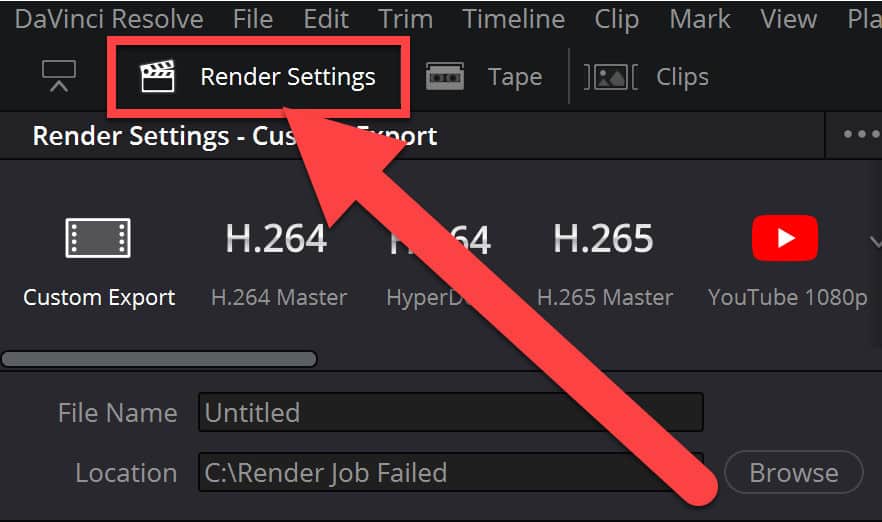
Now, go to the “Deliver” page:

Go to the “Render Settings” window:
Now we are getting into more uncommon territory for a lot of people.
Go ahead and open the “Advanced Settings“:
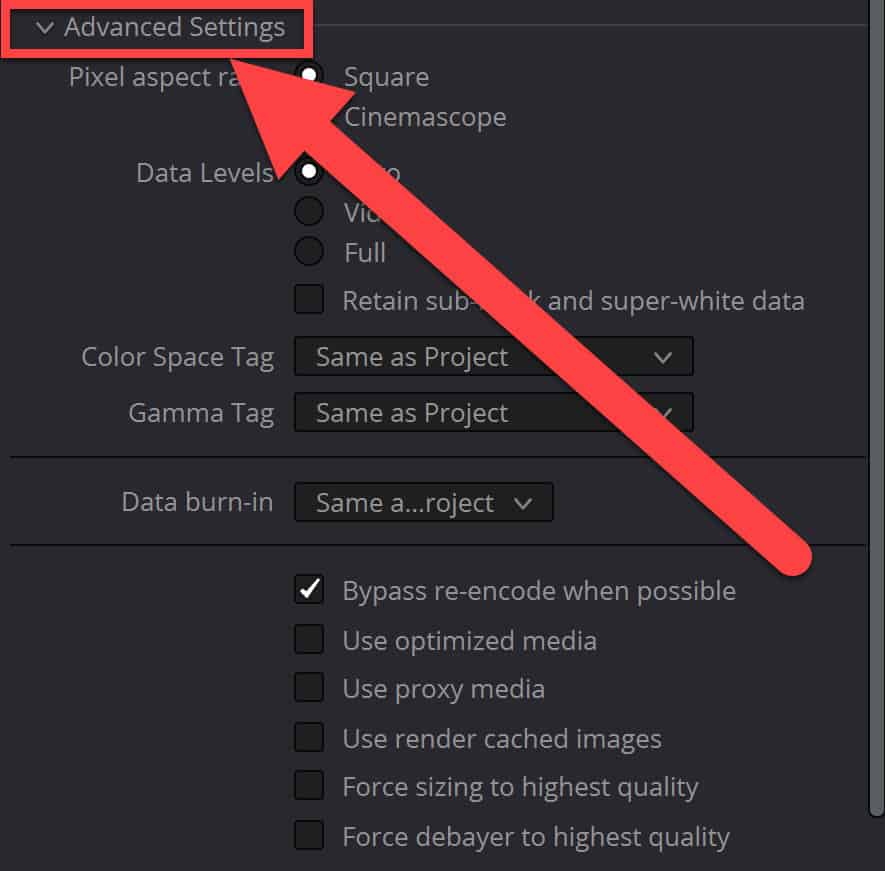
AND finally, we have found the golden nugget!
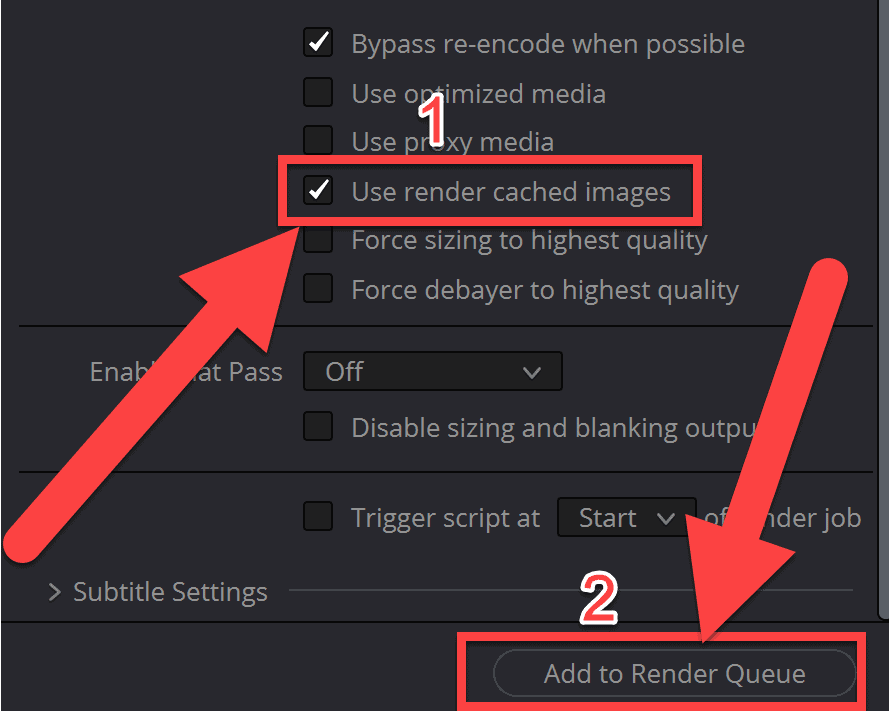
Now you want to tick off the box next to “Use render cached images“. What this does, is use the cached files we created when that red line turned blue. So it basically renders how the timeline memory created of your timeline and in that memory, all the files worked, thus they work in the rendered file as well!
So tick off the box next to “Use render cached images” and hit “Add to Render Queue“:
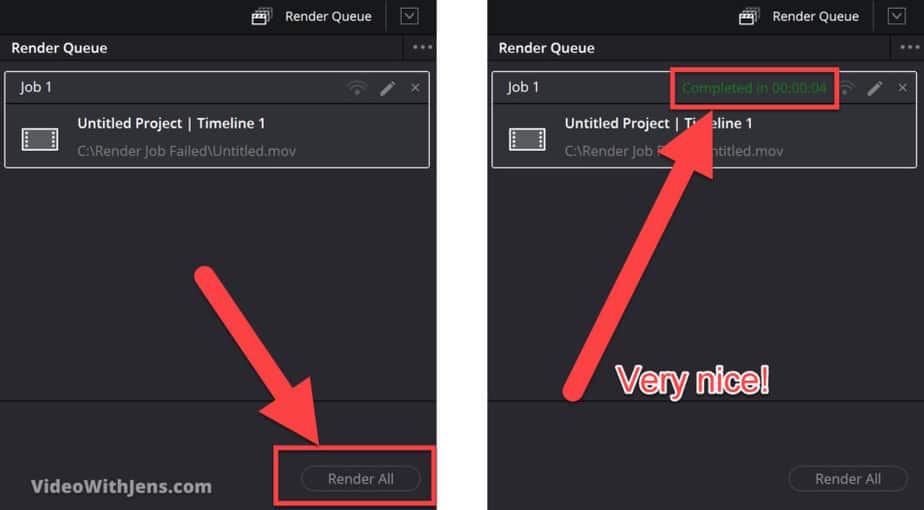
Now head over to the “Render Queue” and start the render job! Hopefully, once it’s done, it looks like the picture below:
2. Copy the Timeline and Create a New Project
This one is very easy, which is the reason I’m placing it as number two on the list!
If it doesn’t work, no big deal just proceed to the next method.
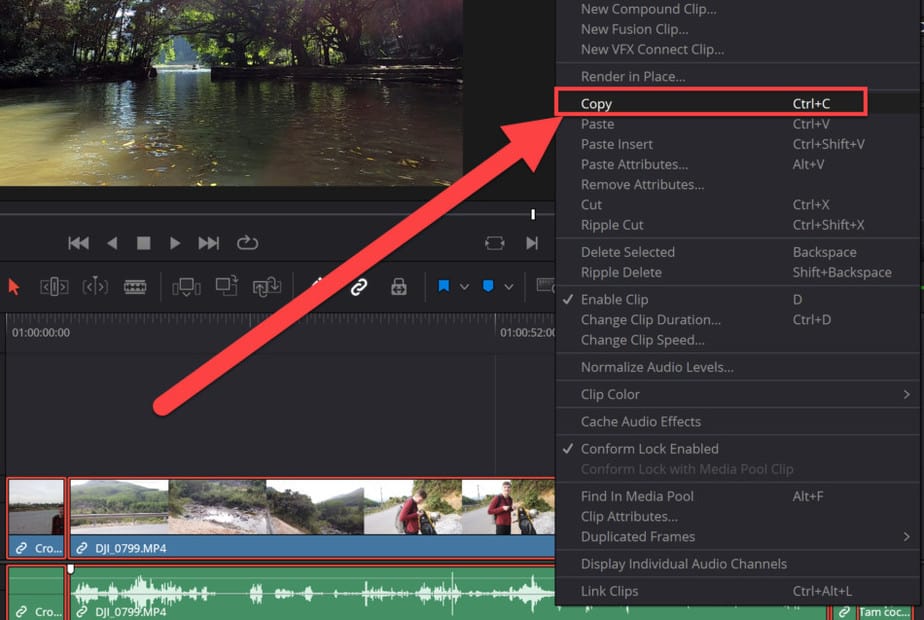
So we are not going to copy the timeline as it sounds. Instead, we are going to copy all the clips in the timeline.
You can do this by simply pressing “CTRL+A” or “Cmd+A”(on a Mac), then press “CTRL+C” or “Cmd+C”(on a Mac) to copy.
If you are not the shortcut kind of person, you can select all your clips by dragging over them and then right-click a clip > Copy.
Next, save your current project.
Then, click on this house icon in the bottom right-hand corner:
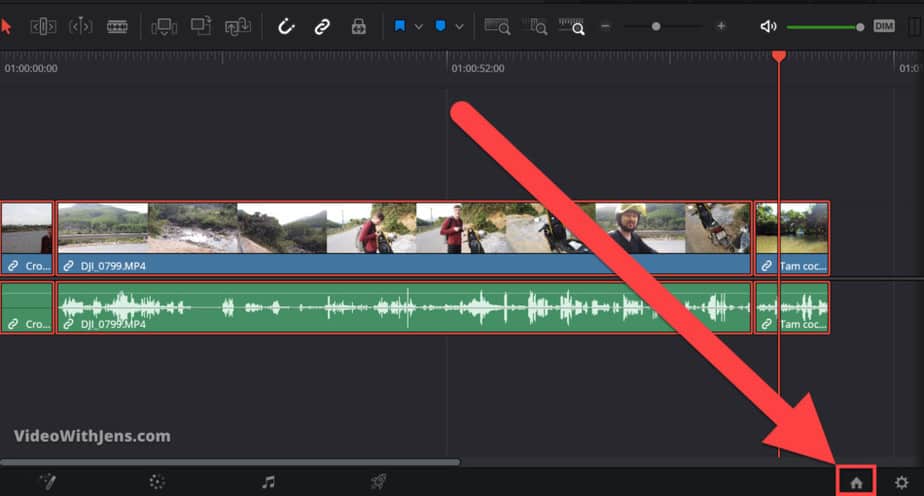
In this window go ahead and click on “New Project“, then call it whatever you want and click on “Create“:
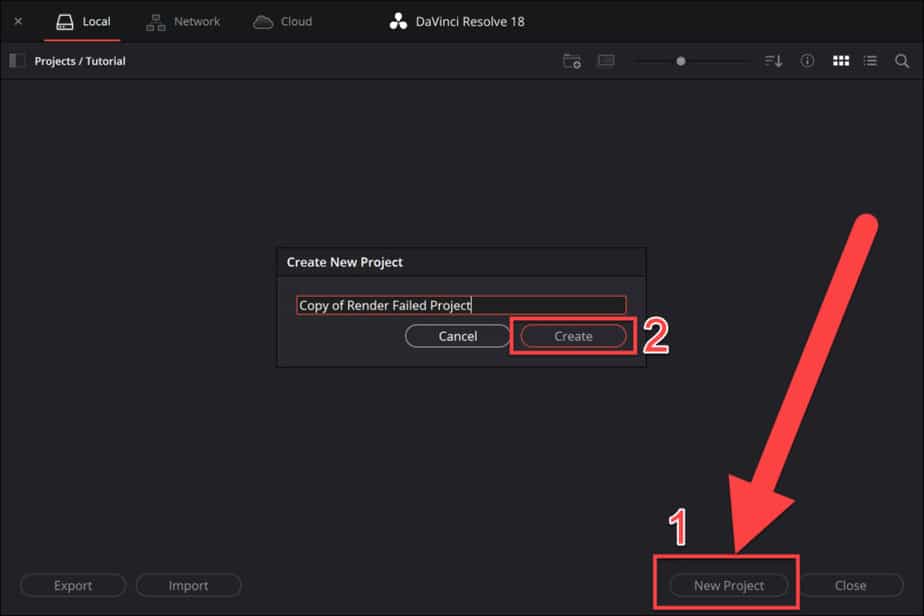
Inside your new project, click once on the timeline and then press “CTRL+V” or “Cmd+V” (on a Mac).
For those who don’t like shortcuts: Right-click on the timeline and click on “Paste“.
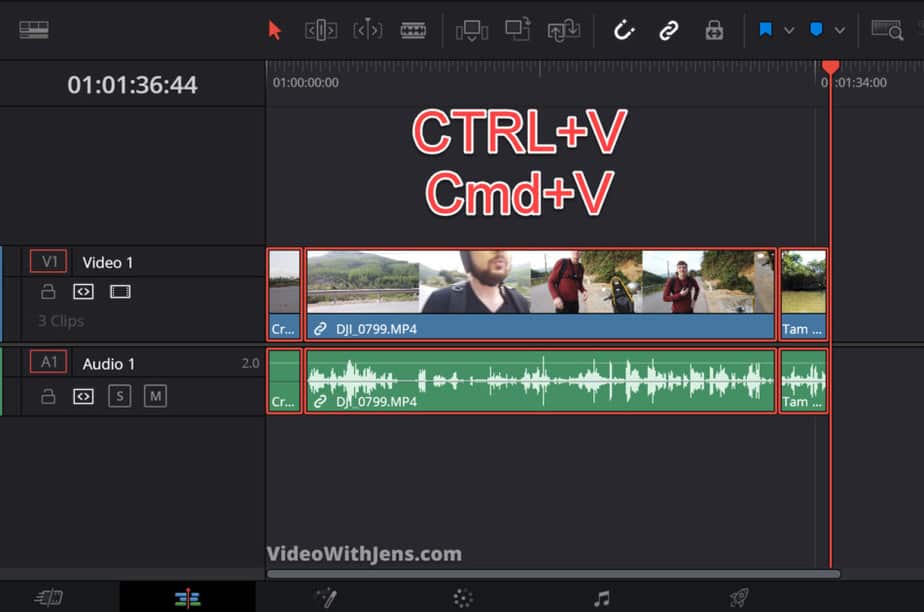
Once you’ve done this, go ahead and try to render!
If it didn’t work. We have other methods which has worked for a bunch of people:
3. Convert Your Videos to DNxHR
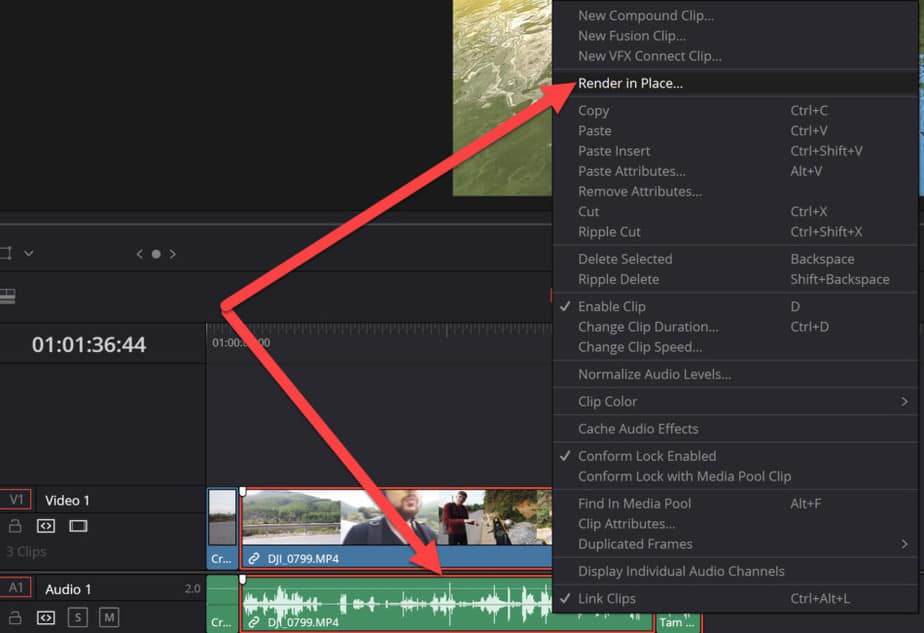
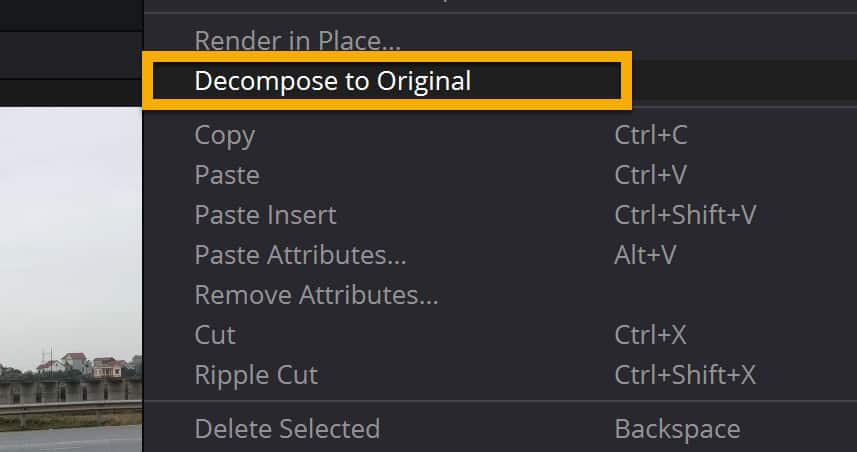
- Select the clips in your timeline.
- Right-click and click on “Render in Place…“
- Set “Format” to “QuickTime“.
- Set “Codec” to “DNxHR” and “Type” to “DNxHR HQ“.
- Click on “Render“.
This solution seems to have worked for some people as well.
If you’re having the fusion composition error, this solution most likely will not work. (All the others work for both errors).
However, let’s go into a bit more in detail on how to do it and some consequences of doing this.
The consequence of converting to the DNxHR codec is that the file size is HUGE. If you are used to handling such as .MP4 and .MOV.
We’ll not go too much into detail on this, however, DNxHR is utilizing something called intraframe compression. These are ALOT less compressed than a .MP4 which is normally paired with an H.264 codec which usually compresses the video a lot.
So by converting your video to DNxHR, it will be a lot less compressed, then it’s a lot easier on your computer when playing it back as well and gives you a better experience while editing.
Here’s how much larger your files will get:
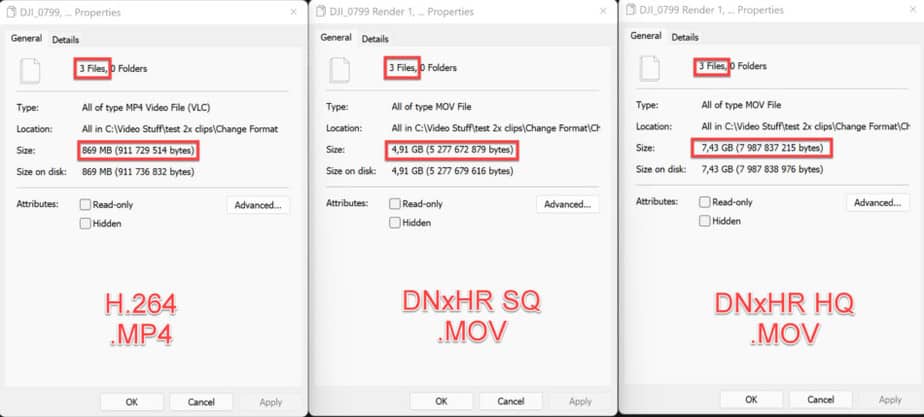
You can see it’s quite a lot, but if you have enough disk space, you can just delete it afterward, as you will still have your original footage.
It’s worth a shot! However, you could try the other solutions first.
Here’s a more detailed description of how to do it:
First, select the clips in your timeline, or if you know which clip is causing the error select that one.
Then click on “Render in Place…“
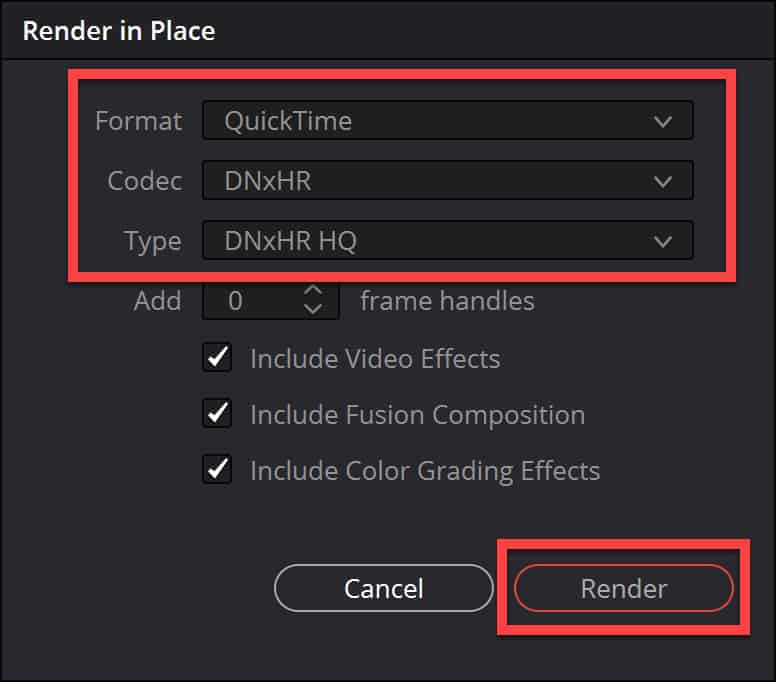
Next, you want to change the following:
- Format – QuickTime
- Codec – DNxHR
- Type – DNxHR HQ
If you want a bit smaller file size you could try changing to DNxHR ‘SQ’ instead of ‘HQ’. As the only difference is that HQ is of higher quality. That said people who have solved this error used ‘HQ’…
Choose one of them, and then click on “Render“:
The rendering takes a little bit of time.
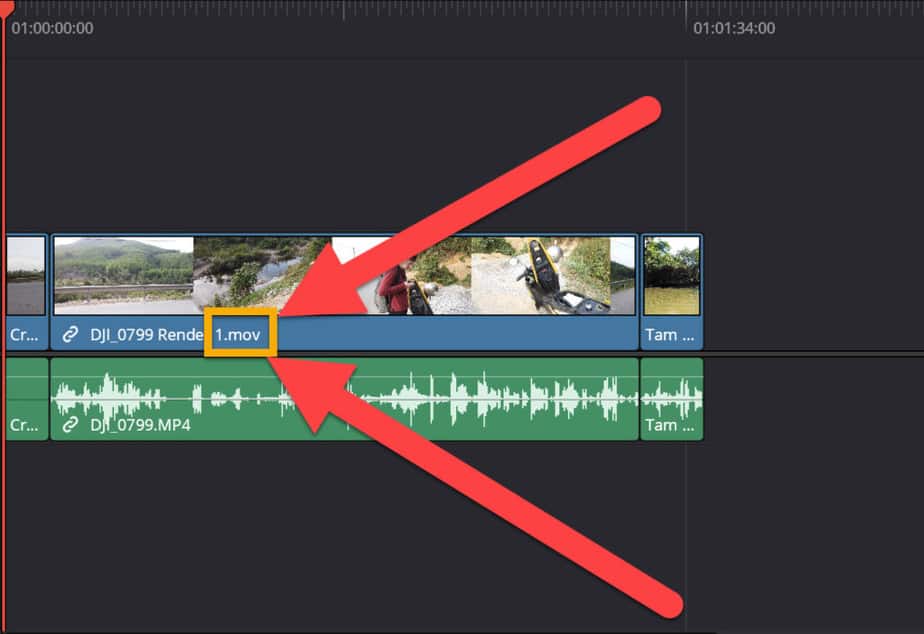
Once it’s done you can see that you have now both your old format and new format in your “Media Pool“:
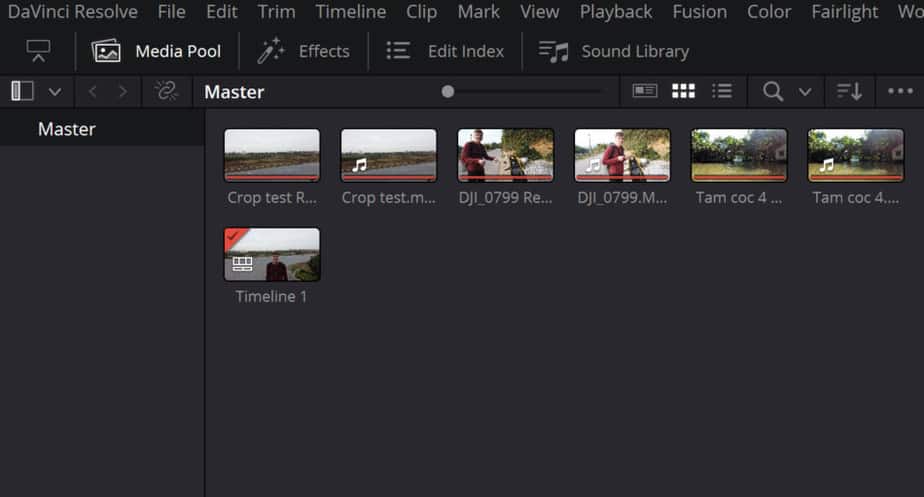
And you don’t have to add the new files to the timeline, as they will have swapped places as part of the render process! You can see in the picture below that it has changed from .mp4 to .mov.
.mov is representing the QuickTime format:
Next, go ahead and render your project! Fingers crossed…
If you want to swap the clips in the timeline back to the original files, “select the clips > right-click > Decompose to Original”: (You will still have them on your computer and in the media pool.)
4. Change Workspace Options
This is the option almost everyone suggests. And my least favorite solution to the problem, which is why it’s the last on the list…
This solution does work, and most of these errors will get solved by using it. The problem with doing this you will render out your project even if there is an error, and then it will be included in your final product.
However, after experimenting a little bit with this solution, I’ve found that sometimes the error is just in the render faze, and I could not see any negative impact on the exported file.
So without further ado, here’s solution number 4:
Click on “Davinci Resolve” in the left-hand top corner of Davinci Resolve. Then click on “Preferences…“.
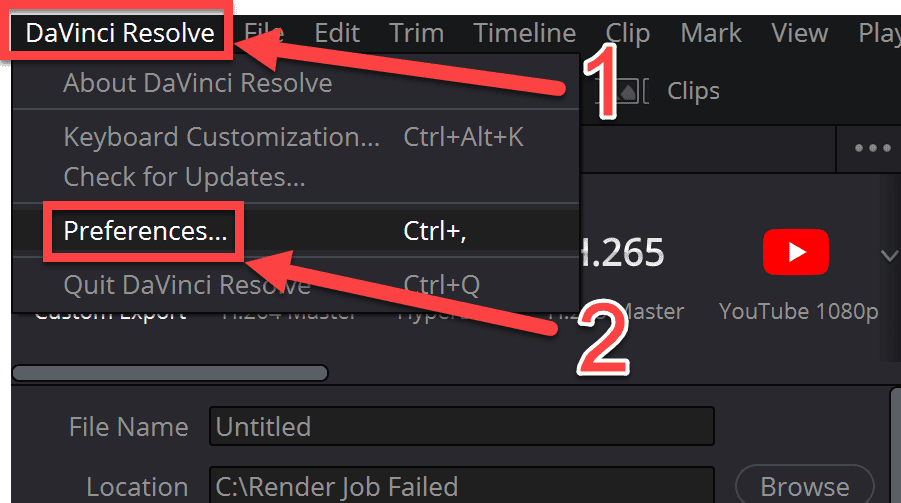
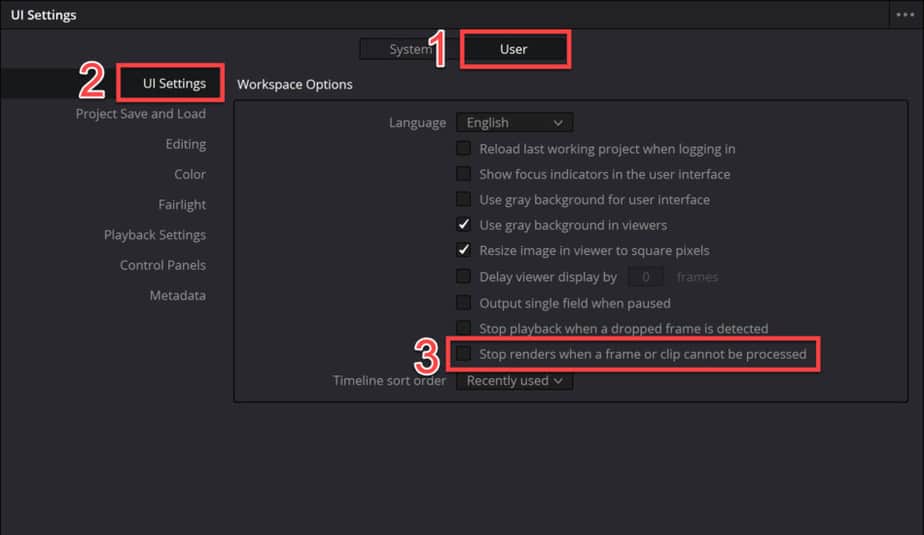
Then in the window that pops up, click on “User“, then “UI Settings“.
Next, uncheck the option called “Stop renders when a frame or clip cannot be processed“.
Watch the picture below:
Once you have done this go ahead and click on “Save“, located in the lower right-hand corner of the window:

Now you can go ahead and try to render your video again.
Afterward, watch through your video if there are any errors, etc. A common one to watch out for is this:

There’s a big chance you have seen this one inside Davinci Resolve. However, it’s actually possible to render this one into your final product as well.
That’s it and I really hope one of these solutions solved your problem!
If you are facing problems with the “Add to Render Queue” button turning gray, check out this article.
Источник
Quickly Troubleshoot DaVinci Resolve 17 Render Crashes
![]()
You have worked hard on your edit in DaVinci Resolve, and 20 minutes into an hour-long render it crashes! Other times when you watch back your final render one of the effects has a glitch. There are few things as frustrating as a render crash or glitch in your final render. It’s something every video editor has experienced at some point. A render crash in DaVinci Resolve can be caused by a number of things so the first step to fixing it is determining the cause.
Most of the time when you have a rendering issue in Resolve it falls in one of these categories: hardware problem, software problem, or a mistake by the user. This can be a very wide subject so we will focus on some of the more common problems and fixes.
Part 1: Smart Fixes for Common DaVinci Resolve Render Crashes
Hardware Fixes
One of the first things to consider is your hardware. Is it up to the task of what you are trying to render? Make sure that your system meets at least the minimum system requirements for DaVinci Resolve. Intensive visual effects in Fusion and complex color grades can be extremely taxing on your computer, so make sure it is up to the task. This is especially important when working in higher resolutions like 4K.
Sometimes multiple GPUs can cause a problem. Check your GPU settings are correct. Disabling 1 GPU may be required, especially if it is an onboard GPU. It is important to note that DaVinci Resolve does support and use multiple GPUs in the correct configuration but this is only available in the paid Studio version.
This leads us to another important point. You may have a very high-end computer with a great GPU but if you are using the free version, DaVinci Resolve does not utilize all this capacity since the free version has limitations.
The next step is to ensure all your drivers for your system and especially your GPU is up to date. GPU drivers are regularly updated to deal with new versions of operating systems and software, so if you have done any updates it is key to ensure your drivers are up to date.
Software Fixes
If your render keeps getting stuck on a certain frame in your project and you can’t figure out why try changing these settings:
- Go to Preferences > User > UI.
- Deselect Stop renders when a frame or clip cannot be processed.
- And then also deselect Stop playback when a dropped frame is detected.
While this may work it is not really a fix, but more of a workaround. You will still need to determine what is the actual cause of the render crash as this simply bypasses the problem. But it may save you in a critical situation. Work out why that frame is causing the crash. It often helps to monitor your system resources while performing a render to see if something like your CPU or memory is maxed out when the crash happens.
If it is a resource problem you can try reducing the render speed in your render settings on the delivery page.
- Go to the File tab. The render speed always defaults to the maximum.
- We recommend adjusting the Render Speed setting to 75 or even 50. This will not affect the quality of your render but will help reduce the load on your computer.
- Turn off Updates during Render by clicking on Minimal from the menu in the viewer (the 3 dots next to the viewer, top right). This turns off live updates in the viewer as the render progresses.
Sometimes the problem is with a particular clip that has heavy effects or color grading on it. If that is the case the best solution is often to render that clip on its own to a format that is easy to edit like ProRes or DNxHR, then reimport the rendered clip to use in your project. This saves DaVinci Resolve from the complex render of the clip while trying to render audio, color, and everything else as well.
It is important to know that render crashes in DaVinci Resolve are often system and project-specific. Reasons can be wide-ranging and difficult to determine at times. Your best way to avoid them is to ensure your system, software and drivers are up to specifications and up to date as this will avoid most of the common problems.
Part 2: Quick Fixes for DaVinci Resolve 17 Render Glitches
Sometimes it is not a render crash that is the problem but rather a glitch in the rendered file. This mostly happens with fast-moving motion graphics when exported to H.264/H.265. Below are a few potential solutions.
- Render to a different file type first, e.g., ProRes or DNxHR. These files are larger but are better suited to editing and less likely to cause these glitches.
- Don’t use automatic keyframes when rendering to H.264/H.265. Instead, change it to 1 or 0. This often fixes the problem.
- Update DaVinci Resolve. Each new version generally fixes a bunch of bugs in the software, so it is worth checking if your problem has been addressed within an update.
Render crashes are frustrating for any editor but a systematic approach to finding the reason for the crash will help you solve it. Common problems are typically associated with hardware, software or user error. Making sure your system is up to spec and up to date is one of the best ways to avoid these problems.
If you are looking for more information on working with DaVinci Resolve, check out our tutorial article on rendering. Learn more about how to achieve smooth playback in DaVinci Resolve as well.
Источник
Содержание
- Полное руководство: как решить проблему с отказом или отказом от открытия DaVinci Resolve [Советы по MiniTool]
- Резюме :
- Быстрая навигация:
- О Davinci Resolve Not Opening Issue
- Как исправить, что DaVinci Resolve не открывается
- Исправление 1. Запустите DaVinci Resolve в режиме совместимости.
- Исправление 2: используйте выделенный графический процессор и отключите встроенный графический процессор
- Исправление 3: включить IGPU Multi-Monitor
- Исправление 4: переместите исходные видеофайлы в другое место
- Исправление 5: преобразование видеофайлов в формат MOV
- Исправление 6: увеличьте виртуальную память
- Исправление 7. Чистая установка DaVinci Resolve
- Исправление 8: обновление до Windows 10
Полное руководство: как решить проблему с отказом или отказом от открытия DaVinci Resolve [Советы по MiniTool]
Full Guide How Solve Davinci Resolve Crashing
Резюме :

Быстрая навигация:
О Davinci Resolve Not Opening Issue
В течение последних нескольких месяцев некоторые пользователи сообщали, что DaVinci Resolve продолжает давать сбой при запуске или не открывается. И некоторые другие пользователи сталкиваются с проблемой сбоя, когда они пытаются редактировать свои видео после запуска программного обеспечения. Причины этой неприятной проблемы могут быть разными, но беспокоиться не о чем.
Ряд пользователей опубликовали свой опыт решения проблемы, когда Davinci Resolve не открывается или не дает сбой на форуме. Некоторые решения, которые доказали свою эффективность, перечислены ниже, и вы можете попробовать их одно за другим.
Наконечник: Если вы открыли DaVinci Resolve, но оно не работает, вы можете закрыть программу и связанные с ней процессы в Диспетчер задач а затем перезапустите его.
Как исправить, что DaVinci Resolve не открывается
Исправление 1. Запустите DaVinci Resolve в режиме совместимости.
Если вы не можете запустить Davinci Resolve обычным способом, возможно, он конфликтует с вашей текущей системой, и вы можете попробовать открыть его в режиме совместимости, чтобы решить проблему.
Шаг 2 : Щелкните Совместимость вкладка и проверьте Запустите эту программу в режиме совместимости для вариант.
Шаг 3 : Выберите Windows 8 из раскрывающегося списка и щелкните Применять и Хорошо кнопку, чтобы сохранить изменение.
Заметка: Вы также можете проверить Запустите эту программу от имени администратора чтобы предоставить программе права администратора.

После этого проверьте, можете ли вы запустить и правильно использовать программу.
Исправление 2: используйте выделенный графический процессор и отключите встроенный графический процессор
С Системные Требования Однако графический процессор, вероятно, является самым важным компонентом DaVinci Resolve. Если вы используете встроенный графический процессор, а DaVinci Resolve не открывается, пора перейти на выделенный графический процессор, который обычно обеспечивает лучшую графическую производительность, например GeForce 1070, 1060 или эквиваленты AMD.
Если ваш компьютер включает оба встроенные и выделенные видеокарты в то же время вы должны убедиться, что ваш DaVinci Resolve всегда использует выделенный графический процессор. Для этого вы можете отключить встроенный графический процессор. Вот что тебе следует делать.
Шаг 1 : Щелкните правой кнопкой мыши Начало кнопку и выберите Диспетчер устройств открыть его.
Шаг 2 : Дважды щелкните значок Видеоадаптеры чтобы расширить категорию.
Шаг 3 : Щелкните правой кнопкой мыши встроенный графический процессор и выберите Отключить устройство вариант. Затем щелкните Хорошо кнопку для подтверждения операции.

Перезагрузите компьютер и проверьте, решена ли проблема с запуском DaVinci Resolve или сбой. Если вы по-прежнему не можете запустить DaVinci Resolve, просто используйте следующее решение.
Исправление 3: включить IGPU Multi-Monitor
Сообщается, что сбой или не запуск DaVinci Resolve может иметь какое-то отношение к функции IGPU Multi-Monitor. Некоторые пользователи эффективно решили проблему, включив эту функцию в настройках BIOS, и вы также можете попробовать.
Наконечник: Если вы не можете найти конкретную настройку в своем BIOS, вы можете выполнить поиск в Интернете, указав производителя вашего BIOS.
Шаг 3 : Сохраните внесенные изменения и выйдите из BIOS.
Затем ваш компьютер автоматически перезагрузится. Если вы по-прежнему сталкиваетесь с аварийным завершением работы DaVinci Resolve или проблемой не открытия, перейдите к следующему решению ниже.
Исправление 4: переместите исходные видеофайлы в другое место
По сообщениям некоторых пользователей, DaVinci Resolve продолжает давать сбой только при обработке видеофайлов в определенной папке. Если это применимо к вашему случаю, скорее всего, вы имеете дело с проблемой разрешений соответствующей папки. Другими словами, программа не имеет полного разрешения на доступ к папке, и она не может получить доступ или изменить ее содержимое должным образом.
В этом случае вы можете просто переместить исходные видеофайлы в другое место, отличное от исходной папки. Затем импортируйте их в DaVinci Resolve и снова запустите свое издание.
Исправление 5: преобразование видеофайлов в формат MOV
Более того, формат исходных видеофайлов также может привести к сбою DaVinci Resolve. В некоторых случаях проблема возникает, когда пользователи пытаются импортировать MP4 файлы, чтобы редактировать их с помощью программы, особенно на ноутбуках. К счастью, некоторые пользователи обнаружили, что DaVinci Resolve снова правильно работает с этими файлами после того, как они преобразовали их в MOV формат.
Исправление 6: увеличьте виртуальную память
Шаг 2 : Перейдите к Система и безопасность > Система и нажмите Расширенные системные настройки на левой панели, чтобы открыть Свойства системы окно.
Шаг 3 : Переключиться на Продвинутый вкладку и щелкните Настройки кнопка под Спектакль раздел.

Шаг 4 : Когда вы получите Параметры производительности окно, перейдите в Продвинутый вкладку и щелкните + Изменить кнопка под Виртуальная память раздел. Во всплывающем окне снимите флажок Автоматически управлять размером файла подкачки для всех дисков вариант.
Шаг 5 : Выберите системный диск (обычно диск C:) в списке и установите флажок Обычный размер вариант. Затем установите Начальный размер на 3500 МБ и Максимальный размер на 7000 МБ и нажмите Набор кнопка.

После этого перезагрузите компьютер, чтобы изменения вступили в силу.
Исправление 7. Чистая установка DaVinci Resolve
Иногда DaVinci Resolve не открывается из-за определенных проблем с данными установки. Согласно предложениям некоторых затронутых пользователей, вам может потребоваться чистая установка программы с новой копией.
Для чистой установки программы вам необходимо:

Шаг 4 : После полного удаления приложения посетите официальный веб-сайт, чтобы загрузить нужную версию и установить ее в соответствии с данными инструкциями.
Заметка: Если вы используете довольно старую версию DaVinci Resolve, вам может потребоваться переустановить ее с последней доступной сборкой. Но если вы используете DaVinci Resolve 15 или выше, рекомендуется установить предыдущий основной выпуск после его удаления.
После этого перезагрузите систему и запустите новую программу. Теперь проблема, не открывающая DaVinci Resolve, должна была быть решена.
Исправление 8: обновление до Windows 10
Как правило, DaVinci Resolve может правильно работать в Windows 10 / 8.1 и других более старых версиях Windows. Однако последние версии приложения могут поддерживать только Windows 10, и вы можете столкнуться с проблемой сбоя при попытке запустить последнюю версию в более старых версиях Windows, таких как Windows 7.
Это последнее средство. Если вы настаиваете на использовании текущей версии DaVinci Resolve и все вышеперечисленные методы вам не подходят, возможно, вам нужно обновить операционную систему до Windows 10.
Перед обновлением системы настоятельно рекомендуется заранее создать резервную копию исходного системного диска, чтобы избежать потери данных. Кстати, вы также можете использовать резервную копию для откат Windows 10 к вашей исходной версии. Для резервного копирования вашего диска вам рекомендуется использовать MiniTool Partition Wizard. Вы можете нажать следующую кнопку, чтобы попробовать эту профессиональную утилиту.
Шаг 1 : Подготовьте внешний жесткий диск, на котором не хранятся важные данные, но достаточно большой, чтобы вместить все данные на системном диске. Подключите диск к компьютеру.
Шаг 2 : Запустите MiniTool Partition Wizard, чтобы получить основной интерфейс.

Шаг 4 : Выберите внешний жесткий диск в качестве целевого и нажмите следующий кнопка.
Шаг 5 : Выберите параметры копирования и настройте размер и расположение разделов на целевом диске в соответствии с вашими потребностями. Нажмите следующий кнопку, чтобы продолжить.

Шаг 6 : Прочтите примечание о том, как загрузиться с нового диска и нажмите Конец кнопка. Когда вы вернетесь в основной интерфейс, нажмите Применять кнопку, чтобы выполнить все отложенные операции.

После резервного копирования всех данных вы можете установить Windows 10 на вашем компьютере без каких-либо забот. Теперь вы сможете использовать DaVinci Resolve для правильного редактирования видео в Windows 10.
Источник