|
Pichugin |
|
|
Статус: Новичок Группы: Участники
|
Добрый день. Работаю с ГИС ЖКХ. КриптоПро версии 4.0.9969 используется для подписания запросов, а stunnel из комплекта КриптоПро для установки защищенного соединения. Изначальный конфиг stunnel Для него выдает ошибку **** Error 0x80090304 returned by AcquireCredentialsHandle Нашел на форуме совет добавить в конфиг строчку pincode=12345678 Прошу совета в решении возникшей проблемы. |
|
|
|

|
Pichugin |
|
|
Статус: Новичок Группы: Участники
|
Все еще не могу решить проблему. Прошу помощи. Использую Windows 7, служба stunnel запускается от имени того же пользователя, под которым установлен сертификат. Файл конфигурации stunnel: Код: При использовании stunnel.x64.exe возникает ошибка При использовании stunnel-msspi.exe возникает ошибка Лог файл для stunnel-msspi.exe: Код: |
|
|
|
|
Михаил Селезнёв |
|
|
Статус: Сотрудник Группы: Участники Сказал «Спасибо»: 3 раз |
Добрый день! |
|
|
|

|
pavlovskiy.an |
|
|
Статус: Новичок Группы: Участники
|
Добрый день! Аналогичная проблема, после истечения срока сертификата тензора с заменой на ФНС, такая вот история 2022.11.07 19:32:19 LOG7[4220:4304]: https accepted FD=144 from 127.0.0.1:57080 Нашлось решение? |
|
|
|
|
Pichugin |
|
|
Статус: Новичок Группы: Участники
|
Мне в конце концов помог переход на windows 10 и КриптоПро 5. |
|
|
|
|
Андрей * |
|
|
Статус: Сотрудник Группы: Участники Сказал «Спасибо»: 451 раз |
Автор: pavlovskiy.an Добрый день! Аналогичная проблема, после истечения срока сертификата тензора с заменой на ФНС, такая вот история 2022.11.07 19:32:19 LOG7[4220:4304]: https accepted FD=144 from 127.0.0.1:57080 Нашлось решение? CryptAcquireCertificatePrivateKey failed. Error = 0x80090016 А что Вы сделали после получения нового сертификата? Просто заменили файл с сертификатом? Его необходимо установить через панель управления КриптоПРО CSPСервисУстановить личный сертификат… |
|
Техническую поддержку оказываем тут |
|
|
|
WWW |

|
pavlovskiy.an |
|
|
Статус: Новичок Группы: Участники
|
Конечно серт установлен в личные и экспортирован в директорию стунеля. Стунель крутится на отдельном скл и сервере1с (rphost), к которому пользователи не подключаются, а работают в терминале, на котором просто 1с предприятие, т.е два сервера. Связать с контейнером можно, если он в реестре или на флэшке/рутокене подсоединённом к машине с стунелем. Т.к. ключ ФНС можно только ставить и работать, скопировать его нельзя — в этом была вся засада. Проблему решил. Можно вопрос закрыть. |
|
|
|
| Пользователи, просматривающие эту тему |
|
Guest (2) |
Быстрый переход
Вы не можете создавать новые темы в этом форуме.
Вы не можете отвечать в этом форуме.
Вы не можете удалять Ваши сообщения в этом форуме.
Вы не можете редактировать Ваши сообщения в этом форуме.
Вы не можете создавать опросы в этом форуме.
Вы не можете голосовать в этом форуме.
I’ve created a self-signed certificate in Key Vault using the managed certificates features there and am trying to use that certificate in my fabric application. This smells similar to #235 but the HRESULT is different (0x80090016 instead of 0x80090014). I see the following in my event log:
- Event 256: Can’t get private key filename for certificate. Error: 0x80090016
- Event 257: All tries to get private key filename failed.
- Event 256: CryptAcquireCertificatePrivateKey failed. Error:0x80090016
- Event 256: Failed to get the Certificate’s private key. Thumbprint:E2ADCA7A99BE1481EF4AE0020B0D23AE43C62E68. Error: E_FAIL
- Event 256: Failed to get private key file. x509FindValue: E2ADCA7A99BE1481EF4AE0020B0D23AE43C62E68, x509StoreName: My, findType: FindByThumbprint, Error E_FAIL
- Event 23041: ACLing private key filename for thumbprint E2ADCA7A99BE1481EF4AE0020B0D23AE43C62E68. ErrorCode=E_FAIL
Repro steps
- Create a new self-signed certificate using the managed certificate features of Key Vault
- Export the certificate from Key Vault using
Get-AzureKeyVaultSecret - Import the certificate into cert:/LocalMachine/My
- Create an application that relies on the certificate via
<SecretsCertificate>in ApplicationManifest.xml - Deploy the application
- Application fails to provision/start on the cluster
Things I’ve tried
- When imported to LocalMachine/My from Key Vault, it is using «Microsoft Enhanced RSA and AES Cryptographic Provider» so I converted it to use «Microsoft Enhanced Cryptographic Provider v1.0». This didn’t help. The same errors show up in the event log.
- Executing my code as an administrator outside the context of a service fabric application. This works; my code is able to load the cert and use it for AAD authentication. At least I know the cert was generated properly.
- Running the service as LocalSystem and not referencing the cert in ApplicationManifest.xml. This doesn’t work; the service is unable to get the private key when it comes time to do so.
- Manually ACL’ing the cert to allow access to the private key to
NETWORK SERVICE(using mmc.exe), running the service as NetworkService and not referencing the cert in ApplicationManifest.xml. This doesn’t work; the service is unable to get the private key when it comes time to do so. - Manually ACL’ing the cert to allow access to the private key to
LOCAL SERVICE(using mmc.exe), running the service as LocalService and not referencing the cert in ApplicationManifest.xml. This doesn’t work; the service is unable to get the private key when it comes time to do so.
Содержание
- CryptAcquireCertificatePrivateKey failed. Error:0x80090016 #1249
- Comments
- neilhuiz commented Aug 29, 2018
- Cryptacquirecertificateprivatekey failed error 0x80090016
- Answered by:
- Question
- Answers
- All replies
- Troubleshooting SSL related issues (Server Certificate)
- Tools Used in this Troubleshooter:
- Overview
- Scenarios
- Scenario 1
- Scenario 2
- Scenario 3
- Scenario 4
- Scenario 5
- Scenario 6
CryptAcquireCertificatePrivateKey failed. Error:0x80090016 #1249
I’ve created a self-signed certificate in Key Vault using the managed certificates features there and am trying to use that certificate in my fabric application. This smells similar to #235 but the HRESULT is different (0x80090016 instead of 0x80090014). I see the following in my event log:
- Event 256: Can’t get private key filename for certificate. Error: 0x80090016
- Event 257: All tries to get private key filename failed.
- Event 256: CryptAcquireCertificatePrivateKey failed. Error:0x80090016
- Event 256: Failed to get the Certificate’s private key. Thumbprint:E2ADCA7A99BE1481EF4AE0020B0D23AE43C62E68. Error: E_FAIL
- Event 256: Failed to get private key file. x509FindValue: E2ADCA7A99BE1481EF4AE0020B0D23AE43C62E68, x509StoreName: My, findType: FindByThumbprint, Error E_FAIL
- Event 23041: ACLing private key filename for thumbprint E2ADCA7A99BE1481EF4AE0020B0D23AE43C62E68. ErrorCode=E_FAIL
Repro steps
- Create a new self-signed certificate using the managed certificate features of Key Vault
- Export the certificate from Key Vault using Get-AzureKeyVaultSecret
- Import the certificate into cert:/LocalMachine/My
- Create an application that relies on the certificate via in ApplicationManifest.xml
- Deploy the application
- Application fails to provision/start on the cluster
Things I’ve tried
- When imported to LocalMachine/My from Key Vault, it is using «Microsoft Enhanced RSA and AES Cryptographic Provider» so I converted it to use «Microsoft Enhanced Cryptographic Provider v1.0». This didn’t help. The same errors show up in the event log.
- Executing my code as an administrator outside the context of a service fabric application. This works; my code is able to load the cert and use it for AAD authentication. At least I know the cert was generated properly.
- Running the service as LocalSystem and not referencing the cert in ApplicationManifest.xml. This doesn’t work; the service is unable to get the private key when it comes time to do so.
- Manually ACL’ing the cert to allow access to the private key to NETWORK SERVICE (using mmc.exe), running the service as NetworkService and not referencing the cert in ApplicationManifest.xml. This doesn’t work; the service is unable to get the private key when it comes time to do so.
- Manually ACL’ing the cert to allow access to the private key to LOCAL SERVICE (using mmc.exe), running the service as LocalService and not referencing the cert in ApplicationManifest.xml. This doesn’t work; the service is unable to get the private key when it comes time to do so.
The text was updated successfully, but these errors were encountered:
Источник
Cryptacquirecertificateprivatekey failed error 0x80090016
This forum has migrated to Microsoft Q&A. Visit Microsoft Q&A to post new questions.
Answered by:
![]()
Question
![]()
![]()
When using CryptAcquireCertificatePrivateKey with a self signed CNG certificate (with either a RSA or ECDSA private key) the function always fails with: NTE_BAD_KEYSET (0x80090016L)
I experience the same problem when calling AcquireCredentialsHandle from Schannel with the same certificate context. Most likely because AcquireCredentialsHandle calls CryptAcquireCertificatePrivateKey as well.
How to reproduce:
- Create NCrypt key: ::NCryptCreatePersistedKey. Tested algorithms: BCRYPT_RSA_ALGORITHM, BCRYPT_ECDSA_P256_ALGORITHM, BCRYPT_ECDH_P256_ALGORITHM
- Generate a self signed certificate with CertCreateSelfSignCertificate() passing a NCRYPT_KEY_HANDLE
- Add certificate to certificate store
- Load certificate from store
- ::CryptAcquireCertificatePrivateKey(pCertContext, CRYPT_ACQUIRE_PREFER_NCRYPT_KEY_FLAG, nullptr, &hCryptProvOrNCryptKey, &dwKeySpec, nullptr)
It might be important to note that the same works with self signed certificates created with a CSP (CryptoAPI) instead of CNG provider
Environment: Windows 7 SP1 64-bit
Answers
![]()
![]()
The problem was that a szKeyName must be passed to NCryptCreatedPersistedKey and as well set in the CRYPT_KEY_PROV_INFO (pwszContainerName member) structure that is passed to CertCreateSelfSignedCertificate.
It is also important that dwKeySpec must be set to 0 (in the NCryptCreatePersistedKey call as well as in the CRYPT_KEY_PROV_INFO structure that is passed to CertCreateSelfSignedCertificate) if the algorithm name is not equal to BCRYPT_RSA_ALGORITHM.
Another limitation is that it is not possible to create a (self signed) certificate using a BCRYPT_DSA_ALGORITHM ncrypt key.
![]()
![]()
I have just wrote a sample (for BCRYPT_RSA_ALGORITHM) the does exactly what you described and it worked perfectly on my Windows 7 SP1 64-bit box: I used MS_KEY_STORAGE_PROVIDER, and the key was created by NCryptCreatePersistedKey(hProv, &hKey, BCRYPT_RSA_ALGORITHM, L»KeyName»,0, 0) followed by NCryptFinalizeKey(hKey, 0).
Can you check the information stored in the CERT_KEY_PROV_INFO_PROP_ID of the certificate context in the MY store? You can use my tool StoreExplorer for that (http://www.idrix.fr/Root/Samples/StoreExplorer.zip). For me, it contained the following :
- Container Name : «KeyName»
- Provider Name : «Microsoft Software Key Storage Provider»
- Provider Type : 0
- Key Spec : AT_KEYEXCHANGE
For the error you are getting (NTE_BAD_KEYSET), it seems as if the CNG key doesn’t exist. Can you check that it is indeed present by enumerating all CNG keys using NCryptEnumKeys? If the name referenced in the store is not present in the enumeration, then your key have been somehow destroyed. In this case, check your code for any hidden bug.
Источник
Tools Used in this Troubleshooter:
This material is provided for informational purposes only. Microsoft makes no warranties, express or implied.
Overview
This document will help you in troubleshooting SSL issues related to IIS only. Client Certificates troubleshooting will not be covered in this document. Server Certificates are meant for Server Authentication and we will be dealing only with Server Certificates in this document.
If the Client certificates section is set to «Require» and then you run into issues, then please don’t refer this document. This is meant for troubleshooting SSL Server certificates issue only.
It is important to know that every certificate comprises of a public key (used for encryption) and a private key (used for decryption). The private key is known only to the server.
The default port for https is 443.
I am under the assumption the reader is well-versed in SSL Handshake and the Server Authentication process during the SSL handshake.
Description of the Secure Sockets Layer (SSL) Handshake:
Description of the Server Authentication Process during the SSL Handshake:
Scenarios
The following error message is seen while browsing the website over https:

The first thing that has to be checked is whether the website is accessible over http. If it is not, there likely is a separate issue not covered here. You will need to have the website working on http first before continuing with this troubleshooter.
Now let’s assume the website is accessible over http and we get the above error when trying to browse over https. The problem is seen because the SSL handshake failed and hence the error message was seen. There could be many reasons. We will follow a step-by-step approach to solve this problem.
Scenario 1
Check if the server certificate has the private key corresponding to it. Refer the below picture:

If private key is missing, then you need to get a certificate containing the private key, which is essentially a .PFX file. There is a command that we could try to run in order to associate the private key with the certificate:

If the association is successful, then you would see the following window:

Note: 1a 1f 94 8b 21 a2 99 36 77 a8 8e b2 3f 42 8c 7e 47 e3 d1 33 is the thumbprint of the certificate. Open the certificate and click on the details tab. Scroll down to find the thumbprint section. Select the thumbprint section and click on the text below. Do a «Ctrl+A» and then «Ctrl+C» to select and copy it. Below is a snapshot for your reference:

Note: This command doesn’t succeed always. If this fails, then you need to get a certificate containing the private key from the CA. The file extension for a certificate containing private key is .pfx.
Scenario 2
We went pass the first hurdle and now we have a server certificate containing the private key installed on the website. However, we still get the same error as above. The website is still not accessible over https.
The SSLDiag tool comes in handy here.
Windows Server 2003:
Download X64 ( https://www.microsoft.com/download/en/details.aspx?displaylang=en&id=5329 )
Download X86 ( https://www.microsoft.com/download/en/details.aspx?displaylang=en&id=674 )
For IIS 7 and IIS 7.5, use vijaysk’s SSL Diagnostics tool. Below is the link:
Install the tool and run it on the server. If you have a certificate containing private key and still not able to access the website, then you may want to run this tool or check the system event logs for SChannel related warnings/errors.
While running the SSLDiag tool you may get the following error:
You have a private key that corresponds to this certificate but CryptAcquireCertificatePrivateKey failed

There will also be a SChannel warning in the system event logs as shown below:
| Event Type: Error |
|---|
| Event Source: Schannel |
| Event Category: None |
| Event ID: 36870 |
| Date: 2/11/2012 |
| Time: 12:44:55 AM |
| User: N/A |
| Computer: |
| Description: A fatal error occurred when attempting to access the SSL server credential private key. The error code returned from the cryptographic module is 0x80090016. |
This event/error indicates that there was a problem acquiring certificate’s private key. So let’s try the below steps one by one:
Firstly, verify the permissions on the machinekeys folder as per the KB Article: https://support.microsoft.com/kb/278381. All the private keys are stored within the machinekeys folder, so we need to ensure that we have necessary permissions.
If the permissions are in place and if the issue is still not fixed. Then it must be a problem with the certificate. It may have been corrupted (You may see an error code of 0x8009001a in the SChannel event log).
| Event Type: Error |
|---|
| Event Source: Schannel |
| Event Category: None |
| Event ID: 36870 |
| Date: 2/11/2012 |
| Time: 12:44:55 AM |
| User: N/A |
| Computer: |
| A fatal error occurred when attempting to access the SSL server credential private key. The error code returned from the cryptographic module is 0x8009001a. |
We will test if the website works with a test certificate. Take a back-up of the existing certificate and then replace it with a self-signed certificate. Try accessing the website via https. If it works then the certificate used earlier was corrupted and it has to be replaced with a new working certificate.
Sometimes the problem may not be with the certificate but with the issuer. You may see the following error in SSLDiag:

CertVerifyCertificateChainPolicy will fail with CERT_E_UNTRUSTEDROOT (0x800b0109), if the root CA certificate is not trusted root.
To fix this add the CA’s certificate to the «Trusted Root CA» store under My computer account on the server.
You may also get the following error:
CertVerifyCertificateChainPolicy returned error -2146762480(0x800b0110).
If the above error is received then we need to check the usage type of the certificate. Open the certificate, click on the «Details» tab and then click on «Edit Properties…» button. Under General tab make sure «Enable all purposes for this certificate» is selected and most importantly «Server Authentication» should be present in the list.

Scenario 3
The first 2 steps check the integrity of the certificate. Once we have confirmed that there are no issues with the certificate, a big problem is solved. But, what if the website is still not accessible over https. Check the HTTPS bindings of the website and determine what port and IP it is listening on. You could run the following command to ensure no other process is listening on the SSL port used by the website.
If there is another process listening on that port then check why that process is consuming that port. Try changing the IP-Port combination to check if the website is accessible or not.
Scenario 4
By now we are sure that we have a proper working certificate installed on the website and there is no other process using the SSL port for this website. However, I still get «Page cannot be displayed» error while accessing over https. When a client connects and initiates an SSL negotiation, HTTP.sys looks in its SSL configuration for the «IP:Port» pair to which the client connected. The HTTP.sys SSL configuration must include a certificate hash and the name of the certificate store before the SSL negotiation will succeed. The problem may be with the HTTP.SYS SSL Listener.
The Certificate hash registered with HTTP.SYS may be NULL or it may contain invalid GUID. Execute the following from a command prompt:
httpcfg is part of Windows Support tools and is present on the installation disk. You could download it from here as well: https://www.microsoft.com/download/en/details.aspx?id=7911
Below is a sample of a working and non-working scenario:
Working scenario:
| Configuration | Setting |
|---|---|
| IP | 0.0.0.0:443 |
| Hash | |
| Guid | |
| CertStoreName | MY |
| CertCheckMode | |
| RevocationFreshnessTime | |
| UrlRetrievalTimeout | |
| SslCtlIdentifier | |
| SslCtlStoreName | |
| Flags |
Non-working scenario:
| Configuration | Setting |
|---|---|
| IP | 0.0.0.0:443 |
| Hash | c09b416d6b 8d615db22 64079d15638e96823d |
| Guid | |
| CertStoreName | MY |
| CertCheckMode | |
| RevocationFreshnessTime | |
| UrlRetrievalTimeout | |
| SslCtlIdentifier | |
| SslCtlStoreName | |
| Flags |
The Hash value seen above is the Thumbprint of your SSL certificate. Notice, that the Guid is all zero in a non-working scenario. You may see the Hash either having some value or blank. Even if we remove the certificate from the web site, and then run «httpcfg query ssl», the website will still list Guid as all 0’s. If you see the GUID as «<0000. 000>, then there is a problem.
We need to remove this entry by running the command:
Delete any entries in the IP Listen list.
To determine whether any IP addresses are listed, open a command prompt, and then run the following command:
If the IP Listen list is empty, the command returns the following string:
If the command returns a list of IP addresses, remove each IP address in the list by using the following command:
restart IIS after this via command «net stop http /y»
Scenario 5
After all this if you are still unable to browse the website on https, then capture a network trace either from the client or server. Filter the trace by «SSL or TLS» to look at SSL traffic.
Below is a network trace snapshot of a non-working scenario:


Well, this is definitely now how you look at a network trace. You need to expand the frame details and see what protocol and cipher was chosen by the server. Select «Server Hello» from the description to get those details.
In the non-working scenario, the client was configured to use TLS 1.1 and TLS 1.2 only. However, the web server was IIS 6, which can support until TLS 1.0 and hence the handshake failed.
Do check the registry keys to determine what protocols are enabled or disabled. Here’s the path:
The «Enabled» DWORD should be set to «1». If «0» then the protocol is disabled.
For example, SSL 2.0 is disabled by default.
Scenario 6
If everything has been verified and if you are still running into issues accessing the website over https, then it most likely is some update which is causing the SSL handshake to fail.
Microsoft has released an update to the implementation of SSL in Windows:
There is potential for this update to impact customers using Internet Explorer, or using an application that uses Internet Explorer to perform HTTPS requests.
There were actually two changes made to address information disclosure vulnerability in SSL 3.0 / TLS 1.0. The MS12-006 update implements a new behavior in schannel.dll, which sends an extra record while using a common SSL chained-block cipher, when clients request that behavior. The other change was in Wininet.dll, part of the December Cumulative Update for Internet Explorer (MS11-099), so that IE will request the new behavior.
If a problem exists, it may manifest as a failure to connect to a server, or an incomplete request. Internet Explorer 9 is able to display an «Internet Explorer cannot display the webpage» error. Prior versions of IE may simply display a blank page.
Fiddler does not use the extra record when it captures and forwards HTTPS requests to the server. Therefore, if Fiddler is used to capture HTTPS traffic, the requests will succeed.
Registry keys
As documented in https://support.microsoft.com/kb/2643584, there is a SendExtraRecord registry value, which can:
- Globally disable the new SSL behavior
- Globally enable it, or
- (Default) enable it for SChannel clients that opt in to the new behavior.
Источник
Исправления ошибки 80090016 в Outlook Windows 10/11
Ошибка с кодом 80090016 очень часто появляется после замены материнской платы на компьютере, а также при переносе пользовательских аккаунтов между разным железом. Главная проблема в том, что наступает сбой лицензирования всего Office, но в первую очередь это проявляется при аутентификации Outlook Exchange. Система пытается сопоставить данные пользователя с существующей папкой, но токен проверки подлинности (сгенерированный на основе другого модуля TPM) больше не совпадает. Также проблема может проявляться при вводе PIN-кода во время входа в систему.
Модуль доверенного платформенного модуля вашего компьютера неисправен. Если эта ошибка будет повторяться, обратитесь к системному администратору с кодом ошибки 80090016.
Как исправить ошибку 80090016?
Подавляющее большинство затронутых пользователей ощутили положительный эффект в результате выполнения нескольких процедур. По причине наличия множества подтверждений эффективности действий, мы надеемся, что они сработают и у вас.
Переименование папки
Суть проблемы в том, что TPM собирает новый код безопасности на основании железа и он, естественно, не совпадает со старым, который был сгенерирован на другой сборке. Однако это можно исправить вручную.
Что нужно сделать:
- Сейчас нам нужна другая учетная запись. Желательно, с правами администратора. Если есть альтернативный аккаунт, не тот, где появляется ошибка 80090016, нужно выйти из системы и войти сразу с него. При условии, что дополнительного профиля нет, его нужно создать, так как выполнить процедуры с проблемной учетной записи не получится.
- Идем по пути C:users$dirAppDataLocalPackagesMicrosoft.AAD.BrokerPlugin_cw5n1h2txyewy, где $dir – имя пользователя. Чтобы увидеть папку AppData, нужно включить отображение скрытых элементов на вкладке «Вид» в Проводнике.
- Жмем правой кнопкой мыши по папке и выбираем «Переименовать». Просто добавляем в конец, через точку – old.

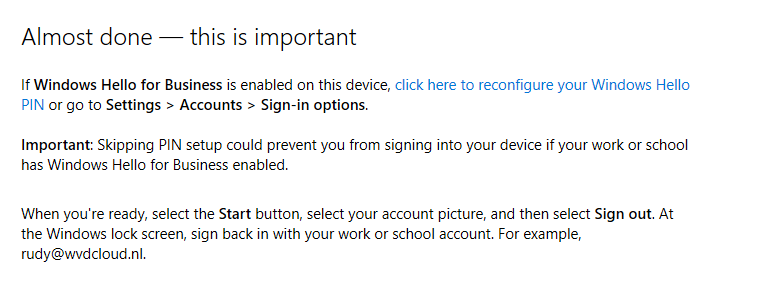
При следующей попытке запуска Outlook нужно будет заново ввести пароль, а также «разрешить моей организации управлять этим устройством». Если ошибка появится снова, стоит ее проигнорировать в первый раз. Дальше она может не появляться.
Сбросить PIN
Метод получил немало лестных отзывов, может сработать и у вас. Чтобы обойтись без путаницы, воспользуйтесь инструкцией ниже.
Руководство по устранению ошибки 80090016:
- При помощи проводника переходим по пути C:WindowsServiceProfilesLocalServiceAppDataLocalMicrosoftNGC.
- Чтобы получить доступ к данной папке, нужно стать ее владельцем. Для этого нажимаем правой кнопкой мыши, выбираем «Свойства», а затем идем во вкладку «Безопасность». Кликаем по элементу «Дополнительно». Сверху в строке «Владелец» выбираем «Изменить». Вводим «Администраторы» в нижнюю рабочую область и жмем на «Поиск». Остается только применить изменения.
- Удаляем все внутренние файлы NGC.
- Теперь при входе в Windows нужно ввести пароль, но это еще не все. Нужно перейти в «Параметры» – «Учетные записи» и «Параметры входа в систему».
- Жмем на кнопку «Добавить PIN-код» и устанавливаем новый.
Перед началом процедуры лучше сделать резервную копию данных.
Дополнительные способы
Они тоже срабатывали, но не так часто, как предыдущие:
- Создать новую учетную записьOutlook. Это не очень хорошее решение, так как связано с неудобствами по переносу данных, но работает.
- Удалить старую учетную запись. В «Параметрах» в разделе «Учетные записи» следует выбрать «Доступ к работе или учебе». Нужно удалить все старые аккаунты отсюда, а затем нажать «Подключиться» и ввести свои учетные данные в Office 365.
- Выключить аутентификацию. Риски, связанные с данным способом, могут быть оправданы только для тех аккаунтов, на которых нет ничего важного. Нужно в редакторе реестра по пути HKEY_CURRENT_USERSoftwareMicrosoftOffice16.0Common создать файл EnableADAL и задать ему значение 0.
- Преобразование почтового ящика. У некоторых пользователей сработало изменение почты сначала на общий почтовый ящик, а затем обратно в личный.
- Сбросить статус активацииOffice. Если проблема в конфликте учетных записей, инструмент OLicenseCleanup.vbs позволит исправить проблему.
В большинстве случаев против ошибки 80090016 в Office и Outlook в частности помогают первые пара способов, но иногда приходится прибегать и к запасным методикам. Пока это все процедуры, которые имеют высокий шанс на успех. Просим оставлять комментарии, что сработало, что нет. Также описывайте вашу проблему в комментариях. Возможно, для вашей конкретной ошибки у нас найдется более подходящее решение.
Источник
CryptAcquireCertificatePrivateKey failed. Error:0x80090016 #1249
Comments
neilhuiz commented Aug 29, 2018
I’ve created a self-signed certificate in Key Vault using the managed certificates features there and am trying to use that certificate in my fabric application. This smells similar to #235 but the HRESULT is different (0x80090016 instead of 0x80090014). I see the following in my event log:
- Event 256: Can’t get private key filename for certificate. Error: 0x80090016
- Event 257: All tries to get private key filename failed.
- Event 256: CryptAcquireCertificatePrivateKey failed. Error:0x80090016
- Event 256: Failed to get the Certificate’s private key. Thumbprint:E2ADCA7A99BE1481EF4AE0020B0D23AE43C62E68. Error: E_FAIL
- Event 256: Failed to get private key file. x509FindValue: E2ADCA7A99BE1481EF4AE0020B0D23AE43C62E68, x509StoreName: My, findType: FindByThumbprint, Error E_FAIL
- Event 23041: ACLing private key filename for thumbprint E2ADCA7A99BE1481EF4AE0020B0D23AE43C62E68. ErrorCode=E_FAIL
Repro steps
- Create a new self-signed certificate using the managed certificate features of Key Vault
- Export the certificate from Key Vault using Get-AzureKeyVaultSecret
- Import the certificate into cert:/LocalMachine/My
- Create an application that relies on the certificate via in ApplicationManifest.xml
- Deploy the application
- Application fails to provision/start on the cluster
Things I’ve tried
- When imported to LocalMachine/My from Key Vault, it is using «Microsoft Enhanced RSA and AES Cryptographic Provider» so I converted it to use «Microsoft Enhanced Cryptographic Provider v1.0». This didn’t help. The same errors show up in the event log.
- Executing my code as an administrator outside the context of a service fabric application. This works; my code is able to load the cert and use it for AAD authentication. At least I know the cert was generated properly.
- Running the service as LocalSystem and not referencing the cert in ApplicationManifest.xml. This doesn’t work; the service is unable to get the private key when it comes time to do so.
- Manually ACL’ing the cert to allow access to the private key to NETWORK SERVICE (using mmc.exe), running the service as NetworkService and not referencing the cert in ApplicationManifest.xml. This doesn’t work; the service is unable to get the private key when it comes time to do so.
- Manually ACL’ing the cert to allow access to the private key to LOCAL SERVICE (using mmc.exe), running the service as LocalService and not referencing the cert in ApplicationManifest.xml. This doesn’t work; the service is unable to get the private key when it comes time to do so.
The text was updated successfully, but these errors were encountered:
Источник
Cryptacquirecertificateprivatekey failed error 0x80090016
This forum has migrated to Microsoft Q&A. Visit Microsoft Q&A to post new questions.
Answered by:
![]()
Question
![]()
![]()
When using CryptAcquireCertificatePrivateKey with a self signed CNG certificate (with either a RSA or ECDSA private key) the function always fails with: NTE_BAD_KEYSET (0x80090016L)
I experience the same problem when calling AcquireCredentialsHandle from Schannel with the same certificate context. Most likely because AcquireCredentialsHandle calls CryptAcquireCertificatePrivateKey as well.
How to reproduce:
- Create NCrypt key: ::NCryptCreatePersistedKey. Tested algorithms: BCRYPT_RSA_ALGORITHM, BCRYPT_ECDSA_P256_ALGORITHM, BCRYPT_ECDH_P256_ALGORITHM
- Generate a self signed certificate with CertCreateSelfSignCertificate() passing a NCRYPT_KEY_HANDLE
- Add certificate to certificate store
- Load certificate from store
- ::CryptAcquireCertificatePrivateKey(pCertContext, CRYPT_ACQUIRE_PREFER_NCRYPT_KEY_FLAG, nullptr, &hCryptProvOrNCryptKey, &dwKeySpec, nullptr)
It might be important to note that the same works with self signed certificates created with a CSP (CryptoAPI) instead of CNG provider
Environment: Windows 7 SP1 64-bit
Answers
![]()
![]()
The problem was that a szKeyName must be passed to NCryptCreatedPersistedKey and as well set in the CRYPT_KEY_PROV_INFO (pwszContainerName member) structure that is passed to CertCreateSelfSignedCertificate.
It is also important that dwKeySpec must be set to 0 (in the NCryptCreatePersistedKey call as well as in the CRYPT_KEY_PROV_INFO structure that is passed to CertCreateSelfSignedCertificate) if the algorithm name is not equal to BCRYPT_RSA_ALGORITHM.
Another limitation is that it is not possible to create a (self signed) certificate using a BCRYPT_DSA_ALGORITHM ncrypt key.
All replies
![]()
![]()
The problem was that a szKeyName must be passed to NCryptCreatedPersistedKey and as well set in the CRYPT_KEY_PROV_INFO (pwszContainerName member) structure that is passed to CertCreateSelfSignedCertificate.
It is also important that dwKeySpec must be set to 0 (in the NCryptCreatePersistedKey call as well as in the CRYPT_KEY_PROV_INFO structure that is passed to CertCreateSelfSignedCertificate) if the algorithm name is not equal to BCRYPT_RSA_ALGORITHM.
Another limitation is that it is not possible to create a (self signed) certificate using a BCRYPT_DSA_ALGORITHM ncrypt key.
![]()
![]()
I have just wrote a sample (for BCRYPT_RSA_ALGORITHM) the does exactly what you described and it worked perfectly on my Windows 7 SP1 64-bit box: I used MS_KEY_STORAGE_PROVIDER, and the key was created by NCryptCreatePersistedKey(hProv, &hKey, BCRYPT_RSA_ALGORITHM, L»KeyName»,0, 0) followed by NCryptFinalizeKey(hKey, 0).
Can you check the information stored in the CERT_KEY_PROV_INFO_PROP_ID of the certificate context in the MY store? You can use my tool StoreExplorer for that (http://www.idrix.fr/Root/Samples/StoreExplorer.zip). For me, it contained the following :
- Container Name : «KeyName»
- Provider Name : «Microsoft Software Key Storage Provider»
- Provider Type : 0
- Key Spec : AT_KEYEXCHANGE
For the error you are getting (NTE_BAD_KEYSET), it seems as if the CNG key doesn’t exist. Can you check that it is indeed present by enumerating all CNG keys using NCryptEnumKeys? If the name referenced in the store is not present in the enumeration, then your key have been somehow destroyed. In this case, check your code for any hidden bug.
Источник
Married with System Boards’s: 976-TPM
Last Updated on July 28, 2022 by rudyooms
This blog will be about why “Things” could break with your totally TPM Protected Autopilot Azure Ad Joined device when your System board is replaced!
It’s a topic that needs some more explanation. Joymalya Basu Roy put me up to it with the draft he created. So this blog is the first cooperation between me and Joymaly in writing a blog! Hopefully, there are more to come!
It’s all about the Device Key (DKPriv/DKPub), the Storage / Transport key (TKPub/TKPriv), and something with the thing called TPM. Blog done!

No, I am just kidding! but before we continue I would recommend you to read these next few blogs first… I know I know, it could be a lot to digest… but I guess it’s worth the time (and maybe the brain freeze?)
To start with a small summary from the blogs above, we can assume that the MS-Organization-Certificate AKA the Device Certificate is quite important. Without that certificate, there will be no communication, whatsoever!
I will divide this blog into multiple parts
1. The Situation before the System Board Replacement
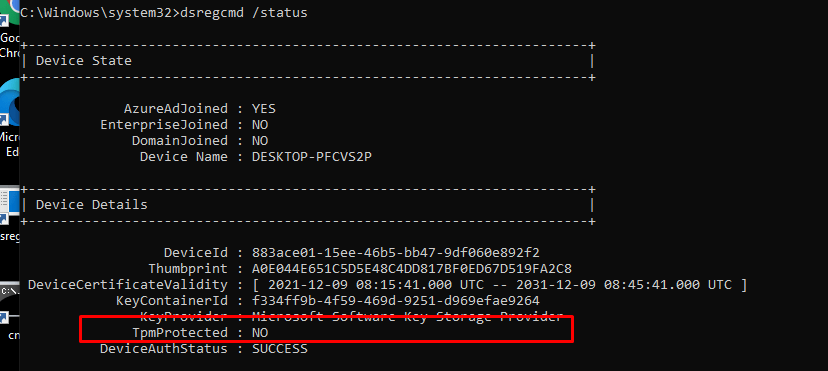
Let’s start with getting to know the situation before we decide to swap the system boards. To do so, we need to take a look at some device details. First with the use of DSRegcmd /status
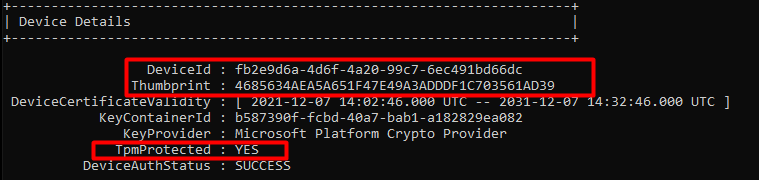
In the picture above we will notice the device is of course TPM protected and it will show you the device ID and also the Thumbprint of the important Device Certificate. A little small warning before you are going to pull out the existing system boards and replace it… please make sure you turn Bitlocker off.

Or make 100% sure you have a working recovery key. If you don’t have those, you will end up in the Bitlocker recovery console to enter your recovery key. You can guess what you will need to tell the customer when you don’t have the recovery keys available.
Also please make a note of the serial number, by entering this command WMIC BIOS GET SERIALNUMBER . So you can be sure you can remove the old hardware hash from the allow list. I will tell you why in the important stuff to know part!
2. The Situation after the System Board Replacement (in a User perspective)
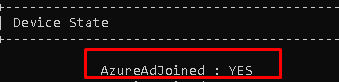
Okay, so we replaced the device its system board, booted up the device, and logged in. Yes, you read it right! We can still log in with our Azure Ad account, Even while the whole device trust is blown.
Do you know what’s funny? We can even still log in with an Azure Ad User that has never ever logged in onto the device before. Why? Because the Device Certificate is still available and with it, the Azure Ad Join is still a little bit alive.
Beware, because after logging in you will be prompted with some errors, that’s for sure. This warning will be fully portrayed when you logged in. You will need to contact your IT admin.. I guess it’s a good thing that you are the IT admin you is replacing the system board!

Luckily everything you will try to access without your device being trusted will be blocked and a nice error will be shown. I will guide you through a few.
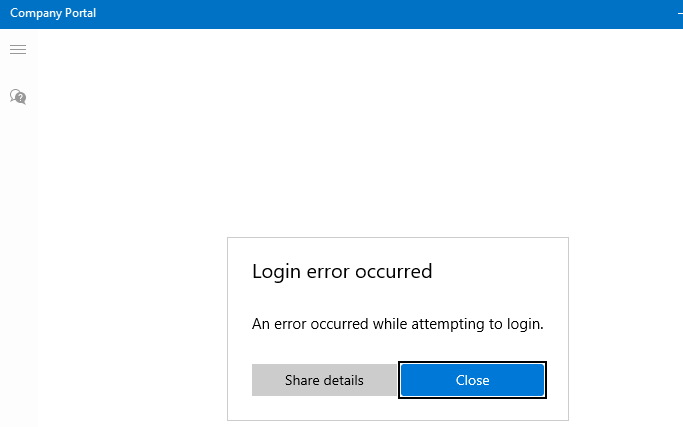
2.1 Company Portal
Let’s start with the famous company portal. This App is just fantastic.. as always I have done a blog about it.
Just try to open the company portal yourself, good luck with that! A nice login error will occur.
2.2 Opening Office
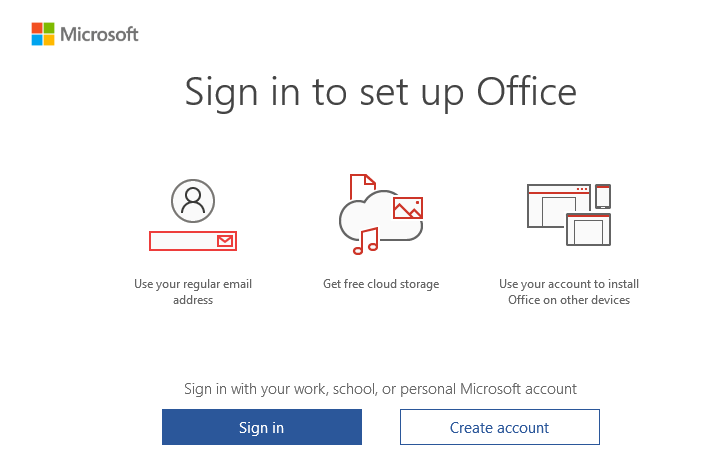
Also opening the Office 365 Apps will just prompt you for your credentials/sign in instead of signing you in with the nice PRT SSO functionality you got before the System board replacement.
2.3 Opening OneDrive
But I am not done yet, as I also need to show you what beautiful errors you will get when opening OneDrive. This will result in a nice error 80090016
Also, another warning will be shown, telling you there was a problem signing you in with the error 0x8004deb4

3. The Situation after the System Board replacement (In the IT Admin perspective)
Now we have witnessed the nice errors the end-user could notice when he logged in, we are also going to take a better look at what a good IT admin could notice.
3.1 Dsregcmd /status /debug
I guess this command is well known by every IT pro that is doing some Azure Ad troubleshooting. So let’s see what it is telling us as the IT admin!
You will notice multiple errors on this picture above and every error is telling you something is really broken. Let’s start with these two:
Error PrivateKeySigntest 0x80090016 (isNGcTransportKeyerror: False)
DeviceAuthStatus : FAILED, Error:8007013d
Please note: The DeviceAuthStatus field was added in the Windows 10 May 2021 update (version 21H1).
Mmm again that 80090016 error…. And the PrivateKeySignTest error, that doesn’t sound too good. You will also notice the Failed sign key test when looking at the diagnostic data fields.
3.2 The Famous Device Certificate
As every screenshot and almost every error is telling us there is something wrong with the Private Key or transport keys, shall we take a look if the MS-Organization-Access (aka device certificate) still looks valid?
Because if you have been reading my older blog about Autopilot and the Lost Azure Ad Join and especially part 8, you will know that without this device certificate your Azure Ad Join is screwed! So, I guess it’s very important you don’t mess with it or delete it…

So let’s take a look at the MS-Organization-Access certificate. It’s still there where it should be and it does look like there are no missing private keys? The key icon is still there as shown below.
3.3 Event logs
Almost forgot to mention the event logs. Everyone knows that looking at the event logs could really help you out, so let’s do so. Open the event log and take a good look at what the Nice AADTokenBroker event log tells us. A lot of nice errors can be discovered within all those red error messages.
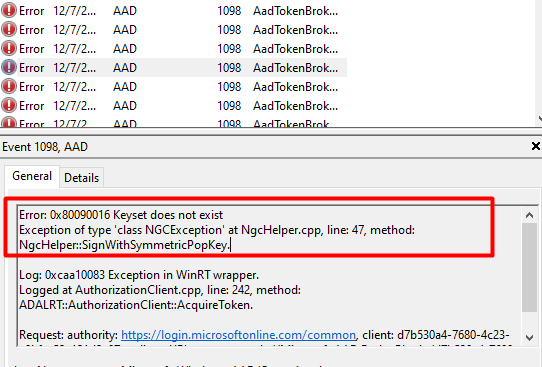
0x80090016: Keyset does not exist. The error code itself certainly does ring a bell or two as we have seen that error popping up earlier! And again, the error mentions something about the Keyset missing?
And the next error will come!
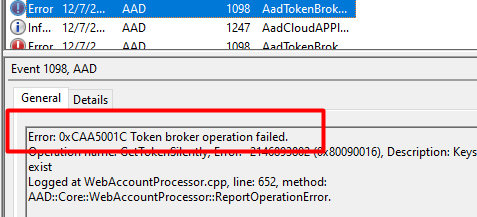
Looking at the picture above, the event 1098 and again the 0x80090016 (or 0xc0090016) error warning. It shows us there are issues getting a token silently.
3.4 MDMDiagnosticstool
DSregcmd and the mdmdiagnosticstool go hand in hand when you need to troubleshoot Azure Ad Join or Intune problems. You can also use this tool to get some more information about the TPM as I showed you in the TPM attestation series.
So, let’s enter this nice command (mdmdiagnosticstool -area TPM -cab c:temptpm.cab) to see if we can get some good results.
Beautifull, another error we can add to our collection: Element not found: 0x80070490
3.5 Windows Performance Analyzer
Like I showed you in my last blogs that showed you how to start troubleshooting some nice TPM attestation errors, I was using the WPA. So why shouldn’t we use it now?
I started the WPR trace, logged off, and logged in again. After logging in I waited a couple of minutes to be sure I have everything I need and stopped the tracing. Let’s take a look at what the ETL file tells us.

Certificate Private Key test failed… Funny, that almost looks like this error we’ve seen earlier

This error is also known as 2146893802 and TPM operation failed or was invalid
4. The Wonderful Story behind it
I already sort of explained the Azure Ad Join process in the Willys White Glove wonderland blog, But I will focus a little bit more on the Device Certificate part this time. Because that certificate is of utmost importance for your Azure Ad Join.
I will do so, to get a better understanding of who is responsible and what is needed for the creation of the so much-needed device certificate!
First, the end of the graphical flow when we are enrolling a nice new device into Azure Ad
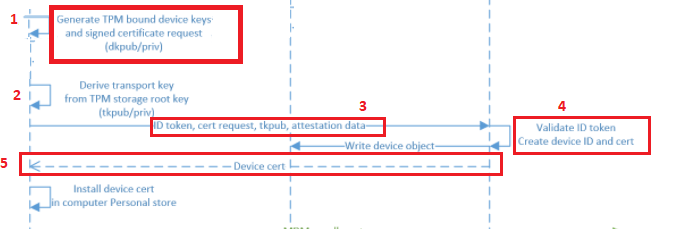
And the details behind the flow, but I will explain it a little bit more:
1. The TPM Bound *Device Keys (DkPub/DkPriv) are needed to be generated to start the request to retrieve the device certificate. After the devices keys are generated, a certificate request will be generated by using the DkPub and signed by the DkPriv
*Device Keys are used to identify the device itself
2. After the singing request is created successfully, an additional key pair will be created. This *Transport key (TKPub/TKPriv) will be used to make sure you get your SSO when authenticating to Azure AD and of course to validate the device state during PRT requests. This Transport key is derived from the Storage Root Key of the TPM.
*Transport keys are used to decrypt the session key.
*The Session key is an encrypted symmetric key, generated by the Azure AD authentication service, issued as part of the PRT and acts as proof of possession
3. A device registration request is sent to the Azure Device Registration Service (DRS). In the request, it will send the ID token, the Certificate Request (CSR), and the public part of the transport key (TkPub) along with its attestation data.
4. After Azure DRS received the request with all the important data attached, the ID token will be validated and the corresponding device object is going to be created in Azure AD.(When using Autopilot white-glove it will be in a disabled state)
5. Azure DRS will send back the device Certificate to the client and the client will install the device certificate in the Personal Certificate Store. After this step the MDM enrollment will start, but as this is not part of this blog… I will skip it
So, to summarize the flow, the TPM is responsible for the creation of the device certificate. Without the TPM that started the device certificate generation, the device will also lose access to the Device and Transport keys. Without these keys you will end up with a nice “Keyset does not exist” error 0x80090016 as I showed you in part 3 of this blog.
5. Solving the Broken Device Authentication?
I will divide this part into multiple subparts
5.1. Trying to fix it!
First, let’s just try a funny thing and launch a dsregcmd /debug /join from an admin session to see if that will fix our issue with the missing keys

I guess not because a lot of errors will be thrown at us at once!
CryptAcquireCertificatePrivateKey failed 0x80090016
PrivateKeyAquireTest failed with error code 0x801c002c.
TestTransportKeyHealth failed with error code 0x80090011
That certainly doesn’t look good … But then again… I guess after you have read the flow from part 4, we know why it’s telling us the Transport and Private Keys are failing us. It’s simply because the TPM is changed and with that, the device bound Device Keys!
Okay, okay… We know it’s totally broken now, Let’s fix it!
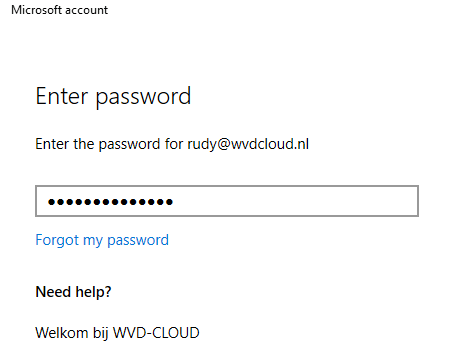
Let’s sign off from the broken Azure Ad account and log back in with a nice dedicated local admin account protected with LAPS… Once you found the proper credentials to log in, fire up a command prompt and run Dsregcmd /forcerecovery

You will be prompted to log in with your Microsoft 365 credentials to start some recovery
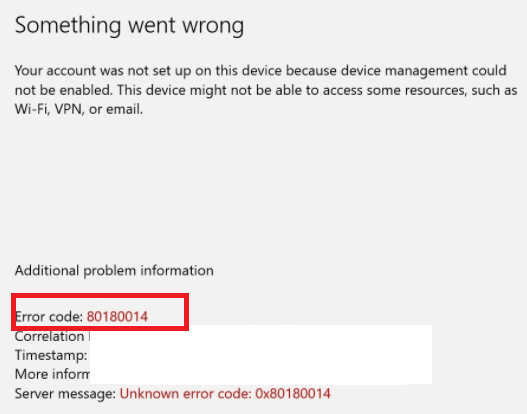
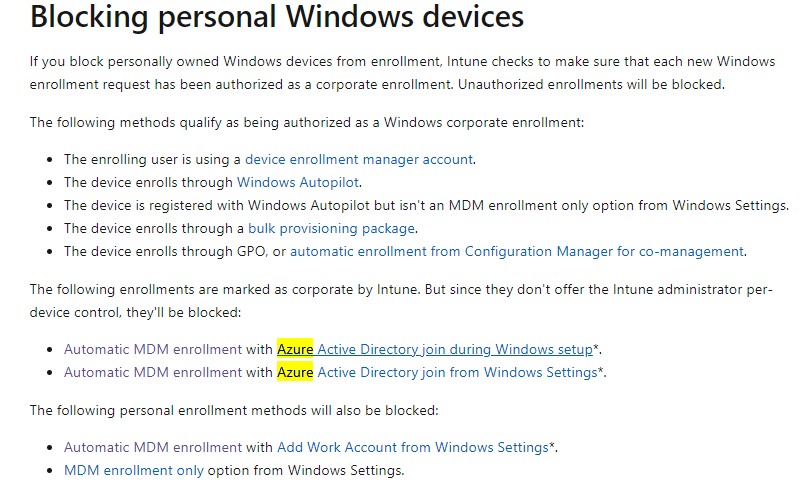
Of course, please make sure you don’t have Device Enrollment Restrictions enabled, otherwise you could end up with the error: 80180014 | DeviceNotSupported error
After a while you will receive a nice prompt telling you, it’s almost done. Please read it.
So just do what they tell you to do. Sign out with your local admin account and immediately (without rebooting!!) log in with that account and you will notice everything is fixed and your Device Authentication is working again.
5.2.The Results
Do you want to guess what happened, when we forced a recovery? While forcing a recovery the “OLD” Device ID, will be removed from Intune. So when clicking on the device when you are performing the recovery you will get a nice error: “Not Found” for a few moments

But at the same time, the “NEW” Device ID you also notice in the dsregcmd will be attached to that same Device(Name)

So everything assigned to “All Devices” will still work. For example, opening WU4B still tells us the policy is assigned to that specific device.

Clicking on the device brings us to the hardware overview and in it, you will find the new DeviceID and the serial number.
But beware even when it has the same device name… multiple device records will be created!
And we all know what that means… nothing good when you are targeting device configuration profiles based on the Autopilot Enrollment profile (which doesn’t target that device anymore)
6. What happens when you don’t have a TPM?
I guess that’s indeed a very good question… But. Why don’t you have a TPM? That isn’t smart at all, maybe just plain stupid 🙂
Well enough said, let’s take a look at what will happen when you are replacing the system board on an Azure Ad Joined device and you weren’t using a TPM.
Before we replace the System Board, let’s take a look at the dsregcmd status first. As shown below, this device isn’t TPM protected.
To be sure we do see some difference when we are changing the hardware, let’s fire up a cmd and type this command to get back our serial number: Get-WmiObject win32_bios | select Serialnumber

After we replaced that virtual “System board”, let’s fire up the VM and take a look at what happens… Pretty much no difference… except the serial number changed.

Everything just works like expected, the device is still Azure Ad Joined and the DeviceAuthStatus is still showing as a success, isn’t that great!
So without a TPM (stupid idea… as a TPMgreatly enhances the security of your Azure AD Joined device!) nothing breaks…

7. Important Stuff to know!
7.1: Rebooting the Device after the Recovery
If you have chosen to fix it manually instead of throwing away the device, you need to make sure you are not rebooting the device. Because when you are not logging out with the local admin account and logging in with the user account but instead you are rebooting the device.. guess what nice ESP will be shown in a state that’s pretty much stuck.
7.2: 4K HH Hardware Hash for Autopilot
Please, pretty please when you are using Autopilot, you will need to make sure you are uploading the new 4K HH (Hardware Hash) to the trusted EkPub autopilot devices like I am explaining in this blog
Why? As the hardware hash will be totally different from the old one. I will try to explain a little bit more.
The hardware hash contains a lot of information unique to the device itself, like the *SmbiosUuid and SMbiosSystemSerialNumber
*SMbiosUUID: It’s a unique number bound to the system/motherboard and if you change that you can safely say you changed your computer.

Of course, the Hardware Hash also contains some really important stuff about the TPM itself, like the famous EkPub! (Which we need when we need to do some AIK Attestation)

So, without this new important information about the hardware of the new system board, how could we still perform device authentication? As this device authentication is totally based on trust and the new device (TPM) isn’t the one, we imported earlier into the allowed/trusted list of EkPub’s.
And without this trust, you will not get your device enrolled into Autopilot. You could check out for yourself what’s inside the Hardware Hash. To do so download the OEM Activation 3 Tool (OA3Tool) from this link
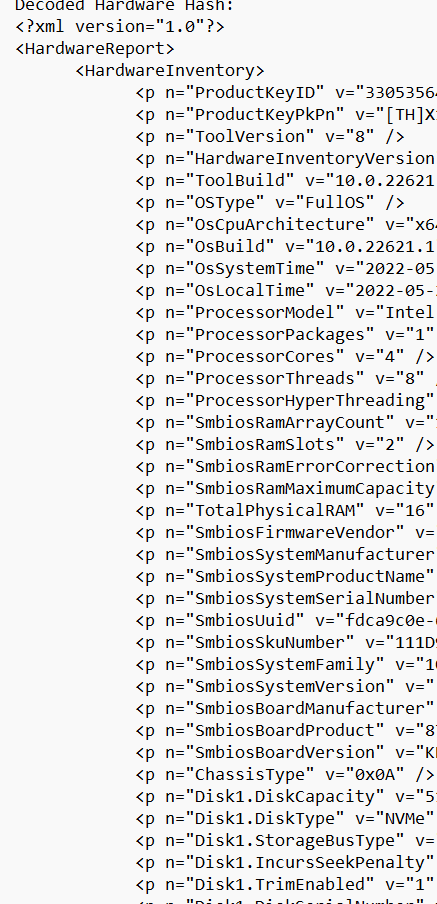
I already had the HardwareHash exported with the wonderful get-windowsautopilot info PowerShell tool, so I only needed to add the Hardware Hash.
Please note: Even the hardware hash can be different each time you create it, why?

As shown above, it also contains the OsSystemTime and OsLocalTime. Luckily these time details are NOT used for the Autopilot registration! Let’s move on to the oa3tool and start decoding it yourself!
oa3tool.exe /DecodeHwHash=”hardwareHash from the csv” > c:temphh.txt

When opening that text file, you will a lot of useful stuff in it. As shown below.. it contains a lot of information!
7.3 Testing it yourself
It’s easy to reproduce what happens when a system board is replaced, just use Hyper-V. First I created a Virtual Machine

I added a virtual TPM to the device and installed Windows 10 21h2 on the device itself and uploaded the 4K HH
After the hardware hash was uploaded I reinstalled the device and enrolled it into Azure/Intune and made sure everything was working fine.
In the virtual machine picture, I showed you, you could have noticed I also created a second Virtual Machine (also with A TPM) and mapped the hard drive to the same VHDX file from the first machine we created!

So what happens when you shut down the first Virtual Machine and boot that second Virtual Machine? Yes indeed! It looks like the system board and the TPM has been replaced!
7.4 Deleting the Hardware Hash
I also have to point out the fact that changing the system board on these devices is not my most favorite option! I know that sometimes you need to deal with warranties, but then again…. A way,way,way better option would be to remove the hash from the list of allowed Autopilot devices and just buy a new device and enroll that device!

Because when the Hardware Hash isn’t removed from the tenant (one that you don’t control!) and that system board ends up in your device you have some work to do… Because you will end up with the ZtdDeviceAssignedToOtherTenant (808) error message and/or ZtdProfileAssignedToOtherTenant.

You will end up creating a Microsoft Support ticket or asking the vendor to send a new one to get it fixed. When putting in a service ticket, please make sure you have the Device CSV, Proof of ownership and the Diagnostic logs ready for them.
Please read this MS Doc for more information:
8. Existing Devices and the Hardware Hash
When you have some existing devices from which you need to get the Hardware Hash uploaded, you have still some other methods at your disposal
8.1. AutoPilot Profile
If you don’t want to spend time manually uploading the Hash from AADR/AADJ devices to have the possibility to start using them as autopilot devices, maybe create an Autopilot profile to convert all targeted devices to autopilot?

Please note: As mentioned below, AADR/AADJ…It’s not supported to transform HAADJ device into an Azure Ad Autopilot device…

But…. it’s not supported doesn’t mean it doesn’t work right?
8.2 Remote Diagnostics
Another possibility to get the Hardware Hash from existing Intune enrolled devices would be to execute the task “collect diagnostics” on the device.

You will find the possibility to download this zip file from the “device diagnostics” screen
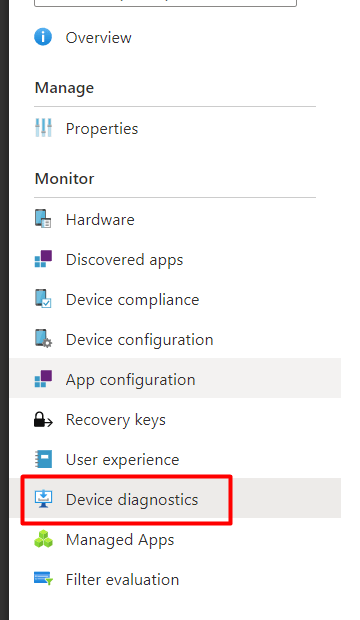
Once downloaded, extract the zip file and in this zip file, you will find the MDMLogs CAB file and the DeviceHash CSV file in it!. Isn’t that beautiful?

9. Microsoft Autopilot Auto-remediation
With this new upcoming feature, after a motherboard replacement, the Autopilot service will try to fix the device when it comes online. It’s not totally clear what this is going to look like but it’s coming! But looking at this Autopilot CSP Doc
You will probably notice the “HardwareMismatchRemediationData” part as shown below

This MS Doc is telling us “Collects hardware information about a device and returns it as an encoded string. This string is used as input for calling Windows Autopilot Service to remediate a device if the device underwent a hardware change that affects its ability to use Windows Autopilot”
So translating it to my own words: Autopilot will try to fetch some additional hardware information and will store it service side. When a device needs remediation during Autopilot because of a motherboard replacement it will use that information to fix it. The remediation service will make sure the “hardware hash match” between your device and Autopilot will be restored
Check out the Ask me Anything session. In the first few minutes, Juanita Baptiste is mentioning the Auto-Remediation!
Conclusions
I guess this conclusion can be short? When replacing your system board, the trust between your device and Azure will be broken because your TPM isn’t the one the device first married with!

Again… just buy a new device…. but when that’s not possible you will need to fix the issue with the Device/Transport keys and the TPM, you can do so by using the dsregcmd /forcerecovery (but beware of all the group assignments that would break)
Another and better option would be to just wipe the device from intune/azure, upload the new keys and reenroll the device! Just like Microsoft is telling us 🙂
6 thoughts on “ Married with System Boards’s: 976-TPM ”
Hi Rudy, Thank you for a very interesting article! For me motherbord change is a fact of life… I have more then 7000 devices in my tenant – all of them Laptops, they break and one of the most common repair is a change of the motherbord. I have adapted a ‘procedure’ for that – i wipe the device (and hence remove it from Intune) if possible or just delete from Intune, I then remove the HW Hash from AutoPilot and remove the device from AAD (just to make sure) I am waiting a day for all that to sync and then revers the procedure by uploading the new HW hash etc. It is actually bit of a ‘pain in the but’ so to say as I can be sure to always get a ‘device allredy exist’ error when trying to import the new HW hash to autopilot. right now my devices are almost one year old and I am getting this error on one or two of them every time i am importing the HW hash on a group of computers ( I use to collect them and then run the procedure on about 5 – 6 at a time for the sake of effectivity…). When this happens, troubles begin because the only way to overcome that is by a Microsoft support case. Upload a proof of ownership, mdmdiagnostics cab report, the HW hash etc. it usually takes up to a week to resole this when they eventually remove the bords form where ever it is written. All that because of the use of refurbish boards – something that is well in use by the repair companies and the manufacturers. It is a bad procedure but i cannot see a way around it… I think this will only get worse with time. 🙁 best regards, Ido
Hi.. I guess the Autopilot Auto HardwareMismatchRemediationData feature could help you when it will be ever released? as I am only noticing this in their documentation
Hi just started a new role with the most basic intune rights anyway the IT staff were saying they have a HP laptop which was domain joined and then added to intune cloud and that the machine ended up in another businesses tenant, i asked the hardware guy if there board was ever replaced and he also mentioned that the laptops come direct from HP he could be wrong there maybe it’s a 3rd party vendor and that they have shipped us a new Hp laptop which actually had a refurbished board possibly, anyway I’ll check with our boss on that , but this great article would explain the issue with the device being in someone else’s tenant
Rudy,
1) This link from July has screenshots of the new AutoPilot remediation. Maybe worth adding to your article.
https://techcommunity.microsoft.com/t5/intune-customer-success/return-of-key-functionality-for-windows-autopilot-sign-in-and/ba-p/3583130
2) Have you seen this work in the versions listed? (Do the version #’s even make sense to you? I think there might be some typos.)
What a goldmine your blog is! KUDOS! Deep and thorough explanations.
My Surface 8 Pro just felt like showing med the ☝️, not that; you know what I mean…
Don’t know what happened, haven’t change mobo or anything like that. But non the less: 0x80090016. Without your explanation here I would have been stuck.
So just a big thank you!
Ridiculous, this has nothing to do with any form of (consumer) security. This is to avoid that the consumer is able to repair an owned device so you need to buy a whole new device and a bundled operating system if you are unable to this. This is a shame, this is a crime, this generating e-waste because dickheads wants to own your (expensive) device, dependency and slap some extra dollars out of it when defective or obsolete (too early). Disgusting.
In the name of security for a few fools who may be possible ‘misbehave’, they will put everyone a chain on their feet. The excuse of safety.
Источник
Ошибка 0x80090016 «Неправильный зарегистрированный набор ключей» или ошибка обращения к контейнеру закрытого ключа «Набор ключей не существует» может появиться по различным причинам. У нас она появилась после обновления КриптоПро с 4 до 5 версии на MacOS. В этой статье мы расскажем, как устранить эту ошибку. Думаем, наши инструкции будут актуальны как для пользователей MacOS, так и для Windows. Если у вас не получается устранить данную ошибку, то рекомендуем обратиться к нашим специалистам за помощью.
- Извлеките носитель с ЭЦП из устройства. Это необходимо, чтобы исключить влияние носителя ЭЦП и закрытого контейнера с ключами на работу КриптоПро.
- Удалите установленный сертификат ЭЦП, с которым возникает проблема, из личного хранилища сертификатов.
- Вставьте носитель с ЭЦП в устройство. Иногда может возникать проблема с отображением контейнера в КриптоПро. В этом случае извлеките носитель с ЭЦП и вставьте в другой порт устройства.
- Установите сертификат вашей электронной подписи повторно.
Как установить сертификат электронной подписи? Инструкция.
Если сертификат ЭЦП удалили, а установить повторно не получается.
В большинстве случаев после указанных действий ошибка 0x80090016 «Неправильный зарегистрированный набор ключей» или ошибка обращения к контейнеру закрытого ключа «Набор ключей не существует» отображаться не будет. Однако если ошибка преследует вас, можно полностью удалить КриптоПро и установить его заново.
Как удалить КриптоПро и следы его использования из реестра Windows?
Если ошибка 0x80090016 продолжает появляться и ничего не помогло.
- Remove From My Forums
-
Question
-
When using CryptAcquireCertificatePrivateKey with a self signed CNG certificate (with either a RSA or ECDSA private key) the function always fails with: NTE_BAD_KEYSET (0x80090016L)
I experience the same problem when calling AcquireCredentialsHandle from Schannel with the same certificate context. Most likely because AcquireCredentialsHandle calls CryptAcquireCertificatePrivateKey as well.
How to reproduce:
- Create NCrypt key: ::NCryptCreatePersistedKey. Tested algorithms: BCRYPT_RSA_ALGORITHM, BCRYPT_ECDSA_P256_ALGORITHM, BCRYPT_ECDH_P256_ALGORITHM
- Generate a self signed certificate with CertCreateSelfSignCertificate() passing a NCRYPT_KEY_HANDLE
- Add certificate to certificate store
- Load certificate from store
- ::CryptAcquireCertificatePrivateKey(pCertContext, CRYPT_ACQUIRE_PREFER_NCRYPT_KEY_FLAG, nullptr, &hCryptProvOrNCryptKey, &dwKeySpec, nullptr)
It might be important to note that the same works with self signed certificates created with a CSP (CryptoAPI) instead of CNG provider
Environment: Windows 7 SP1 64-bit
Answers
-
Problem solved.
The problem was that a szKeyName must be passed to NCryptCreatedPersistedKey and as well set in the CRYPT_KEY_PROV_INFO (pwszContainerName member) structure that is passed to CertCreateSelfSignedCertificate.
It is also important that dwKeySpec must be set to 0 (in the NCryptCreatePersistedKey call as well as in the CRYPT_KEY_PROV_INFO structure that is passed to CertCreateSelfSignedCertificate) if the algorithm name is not equal to BCRYPT_RSA_ALGORITHM.
Another limitation is that it is not possible to create a (self signed) certificate using a BCRYPT_DSA_ALGORITHM ncrypt key.
-
Marked as answer by
Wednesday, July 6, 2011 1:21 AM
-
Marked as answer by
I’m develoving a custom CNG Key Storage Provider. It works fine with some applications like Chrome, but a third party application uses the CryptAcquireCertificatePrivateKey method with the certificate context causing a 0x80090016 without invoking any method of my KSP.
¿Is possible to use the CryptAcquireCertificatePrivateKey method with a certificate with a private key stored in a Key Storage Provider?
![]()
asked Oct 4, 2021 at 13:55
![]()
I found an answer in the NCryptTranslateHandle function documentation:
This is a helper function intended to help
applications and system components that currently use the CryptoAPI to
make a graceful transition to using CNG.This function will only be successful if a CNG key storage provider is
registered with a name or alias that is identical to the name of the
cryptographic service provider (CSP) referred to by the hLegacyProv
parameter.This function will perform the following steps to translate the CSP
handle into a CNG key handle:Obtain the name of the CSP from the hLegacyProv handle. Open the CNG
provider whose name or alias is identical to the CSP name. Obtain the
name of the current key container in the CSP. Obtain the CryptoAPI
key, translate it into a CNG key, and return it in the phKey
parameter.
Registering the KSP with the same name or alias as the CSP does the trick.
answered Jun 21, 2022 at 12:02
![]()
Last Updated on July 28, 2022 by rudyooms
This blog will be about why “Things” could break with your totally TPM Protected Autopilot Azure Ad Joined device when your System board is replaced!
It’s a topic that needs some more explanation. Joymalya Basu Roy put me up to it with the draft he created. So this blog is the first cooperation between me and Joymaly in writing a blog! Hopefully, there are more to come!
It’s all about the Device Key (DKPriv/DKPub), the Storage / Transport key (TKPub/TKPriv), and something with the thing called TPM. Blog done!
No, I am just kidding! but before we continue I would recommend you to read these next few blogs first… I know I know, it could be a lot to digest… but I guess it’s worth the time (and maybe the brain freeze?)
Autopilot White Glove Pre-Provisioned Deployment Flow (call4cloud.nl)
How does device based Conditional Access work? (call4cloud.nl)
Azure Ad joined vs Azure Ad Registered | AADR vs AADJ (call4cloud.nl)
To start with a small summary from the blogs above, we can assume that the MS-Organization-Certificate AKA the Device Certificate is quite important. Without that certificate, there will be no communication, whatsoever!
I will divide this blog into multiple parts
- The Situation before the System Board replacement
- The Situation after the System Board replacement (in user perspective)
- The Situation after the System Board replacement (in the IT Admin perspective)
- The wonderful story behind it
- Solving the broken Authentication?
- What happens when you have no TPM?
- Important stuff to know!
- Existing devices and the Hardware Hash
- Autopilot Auto-remediation
1. The Situation before the System Board Replacement
Let’s start with getting to know the situation before we decide to swap the system boards. To do so, we need to take a look at some device details. First with the use of DSRegcmd /status
In the picture above we will notice the device is of course TPM protected and it will show you the device ID and also the Thumbprint of the important Device Certificate. A little small warning before you are going to pull out the existing system boards and replace it… please make sure you turn Bitlocker off.
Or make 100% sure you have a working recovery key. If you don’t have those, you will end up in the Bitlocker recovery console to enter your recovery key. You can guess what you will need to tell the customer when you don’t have the recovery keys available.
Also please make a note of the serial number, by entering this command WMIC BIOS GET SERIALNUMBER . So you can be sure you can remove the old hardware hash from the allow list. I will tell you why in the important stuff to know part!
2. The Situation after the System Board Replacement (in a User perspective)
Okay, so we replaced the device its system board, booted up the device, and logged in. Yes, you read it right! We can still log in with our Azure Ad account, Even while the whole device trust is blown.
Do you know what’s funny? We can even still log in with an Azure Ad User that has never ever logged in onto the device before. Why? Because the Device Certificate is still available and with it, the Azure Ad Join is still a little bit alive.
Beware, because after logging in you will be prompted with some errors, that’s for sure. This warning will be fully portrayed when you logged in. You will need to contact your IT admin.. I guess it’s a good thing that you are the IT admin you is replacing the system board!
Luckily everything you will try to access without your device being trusted will be blocked and a nice error will be shown. I will guide you through a few.
2.1 Company Portal
Let’s start with the famous company portal. This App is just fantastic.. as always I have done a blog about it.
Sharpe’s Company Portal | Offline (device) vs Online (user) (call4cloud.nl)
Just try to open the company portal yourself, good luck with that! A nice login error will occur.
2.2 Opening Office
Also opening the Office 365 Apps will just prompt you for your credentials/sign in instead of signing you in with the nice PRT SSO functionality you got before the System board replacement.
2.3 Opening OneDrive
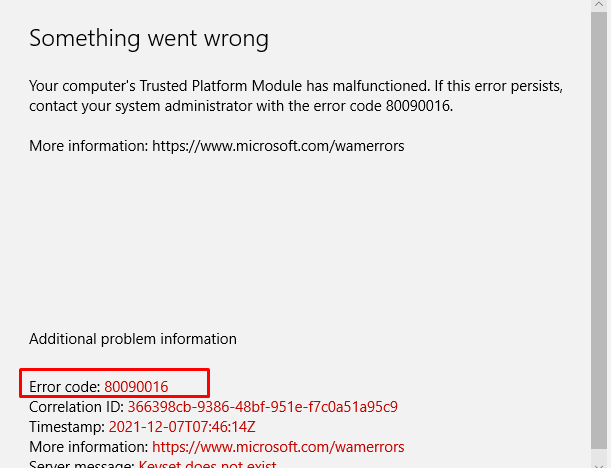
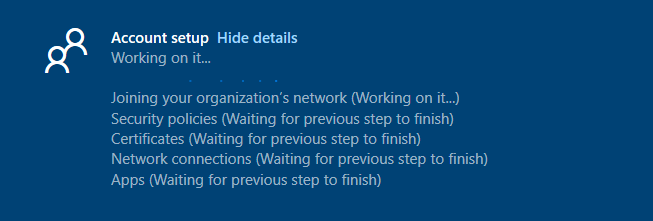
But I am not done yet, as I also need to show you what beautiful errors you will get when opening OneDrive. This will result in a nice error 80090016
Also, another warning will be shown, telling you there was a problem signing you in with the error 0x8004deb4
3. The Situation after the System Board replacement (In the IT Admin perspective)
Now we have witnessed the nice errors the end-user could notice when he logged in, we are also going to take a better look at what a good IT admin could notice.
3.1 Dsregcmd /status /debug
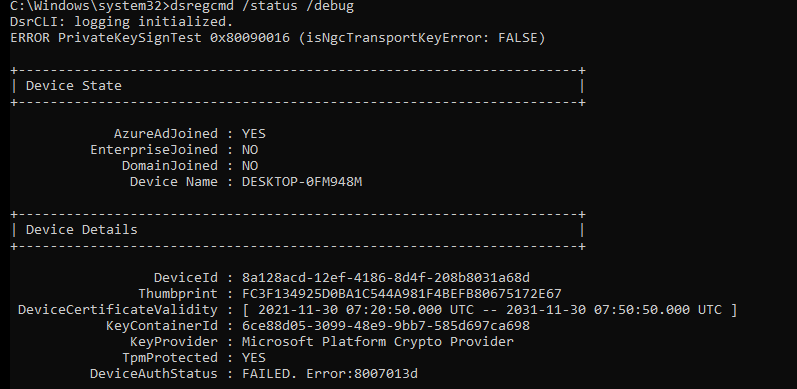
I guess this command is well known by every IT pro that is doing some Azure Ad troubleshooting. So let’s see what it is telling us as the IT admin!
You will notice multiple errors on this picture above and every error is telling you something is really broken. Let’s start with these two:
Error PrivateKeySigntest 0x80090016 (isNGcTransportKeyerror: False)
DeviceAuthStatus : FAILED, Error:8007013d
Please note: The DeviceAuthStatus field was added in the Windows 10 May 2021 update (version 21H1).
Mmm again that 80090016 error…. And the PrivateKeySignTest error, that doesn’t sound too good. You will also notice the Failed sign key test when looking at the diagnostic data fields.
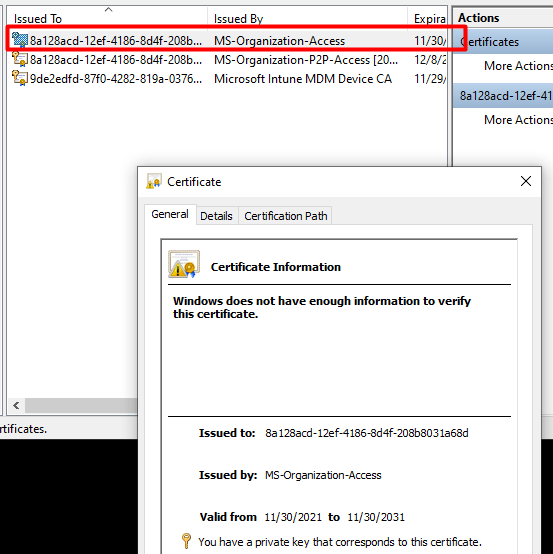
3.2 The Famous Device Certificate
As every screenshot and almost every error is telling us there is something wrong with the Private Key or transport keys, shall we take a look if the MS-Organization-Access (aka device certificate) still looks valid?
Because if you have been reading my older blog about Autopilot and the Lost Azure Ad Join and especially part 8, you will know that without this device certificate your Azure Ad Join is screwed! So, I guess it’s very important you don’t mess with it or delete it…
So let’s take a look at the MS-Organization-Access certificate. It’s still there where it should be and it does look like there are no missing private keys? The key icon is still there as shown below.
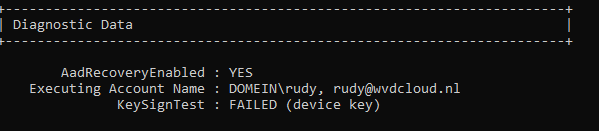
3.3 Event logs
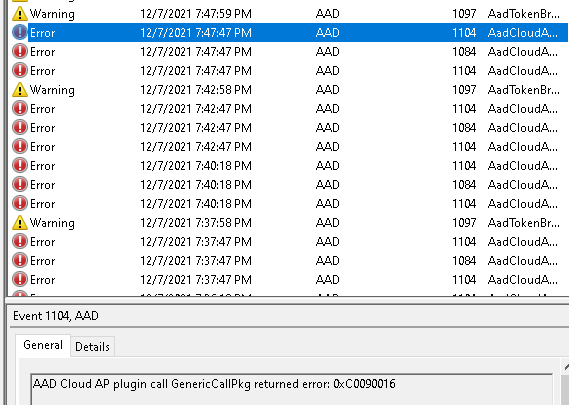
Almost forgot to mention the event logs. Everyone knows that looking at the event logs could really help you out, so let’s do so. Open the event log and take a good look at what the Nice AADTokenBroker event log tells us. A lot of nice errors can be discovered within all those red error messages.
0x80090016: Keyset does not exist. The error code itself certainly does ring a bell or two as we have seen that error popping up earlier! And again, the error mentions something about the Keyset missing?
And the next error will come!
Looking at the picture above, the event 1098 and again the 0x80090016 (or 0xc0090016) error warning. It shows us there are issues getting a token silently.
3.4 MDMDiagnosticstool
DSregcmd and the mdmdiagnosticstool go hand in hand when you need to troubleshoot Azure Ad Join or Intune problems. You can also use this tool to get some more information about the TPM as I showed you in the TPM attestation series.
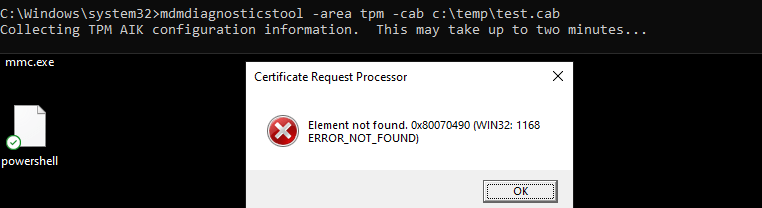
So, let’s enter this nice command (mdmdiagnosticstool -area TPM -cab c:temptpm.cab) to see if we can get some good results.
Beautifull, another error we can add to our collection: Element not found: 0x80070490
3.5 Windows Performance Analyzer
Like I showed you in my last blogs that showed you how to start troubleshooting some nice TPM attestation errors, I was using the WPA. So why shouldn’t we use it now?
I started the WPR trace, logged off, and logged in again. After logging in I waited a couple of minutes to be sure I have everything I need and stopped the tracing. Let’s take a look at what the ETL file tells us.
Certificate Private Key test failed… Funny, that almost looks like this error we’ve seen earlier
![]()
This error is also known as 2146893802 and TPM operation failed or was invalid
4. The Wonderful Story behind it
I already sort of explained the Azure Ad Join process in the Willys White Glove wonderland blog, But I will focus a little bit more on the Device Certificate part this time. Because that certificate is of utmost importance for your Azure Ad Join.
I will do so, to get a better understanding of who is responsible and what is needed for the creation of the so much-needed device certificate!
First, the end of the graphical flow when we are enrolling a nice new device into Azure Ad
And the details behind the flow, but I will explain it a little bit more:
1. The TPM Bound *Device Keys (DkPub/DkPriv) are needed to be generated to start the request to retrieve the device certificate. After the devices keys are generated, a certificate request will be generated by using the DkPub and signed by the DkPriv
*Device Keys are used to identify the device itself
2. After the singing request is created successfully, an additional key pair will be created. This *Transport key (TKPub/TKPriv) will be used to make sure you get your SSO when authenticating to Azure AD and of course to validate the device state during PRT requests. This Transport key is derived from the Storage Root Key of the TPM.
*Transport keys are used to decrypt the session key.
*The Session key is an encrypted symmetric key, generated by the Azure AD authentication service, issued as part of the PRT and acts as proof of possession
3. A device registration request is sent to the Azure Device Registration Service (DRS). In the request, it will send the ID token, the Certificate Request (CSR), and the public part of the transport key (TkPub) along with its attestation data.
4. After Azure DRS received the request with all the important data attached, the ID token will be validated and the corresponding device object is going to be created in Azure AD.(When using Autopilot white-glove it will be in a disabled state)
5. Azure DRS will send back the device Certificate to the client and the client will install the device certificate in the Personal Certificate Store. After this step the MDM enrollment will start, but as this is not part of this blog… I will skip it
So, to summarize the flow, the TPM is responsible for the creation of the device certificate. Without the TPM that started the device certificate generation, the device will also lose access to the Device and Transport keys. Without these keys you will end up with a nice “Keyset does not exist” error 0x80090016 as I showed you in part 3 of this blog.
5. Solving the Broken Device Authentication?
I will divide this part into multiple subparts
- Trying to fix it
- The Results
5.1. Trying to fix it!
First, let’s just try a funny thing and launch a dsregcmd /debug /join from an admin session to see if that will fix our issue with the missing keys
I guess not because a lot of errors will be thrown at us at once!
CryptAcquireCertificatePrivateKey failed 0x80090016
PrivateKeyAquireTest failed with error code 0x801c002c.
TestTransportKeyHealth failed with error code 0x80090011
That certainly doesn’t look good … But then again… I guess after you have read the flow from part 4, we know why it’s telling us the Transport and Private Keys are failing us. It’s simply because the TPM is changed and with that, the device bound Device Keys!
Okay, okay… We know it’s totally broken now, Let’s fix it!
Let’s sign off from the broken Azure Ad account and log back in with a nice dedicated local admin account protected with LAPS… Once you found the proper credentials to log in, fire up a command prompt and run Dsregcmd /forcerecovery
![]()
You will be prompted to log in with your Microsoft 365 credentials to start some recovery
Of course, please make sure you don’t have Device Enrollment Restrictions enabled, otherwise you could end up with the error: 80180014 | DeviceNotSupported error
https://docs.microsoft.com/en-us/mem/intune/enrollment/enrollment-restrictions-set#blocking-personal-windows-devices?id=5004252
After a while you will receive a nice prompt telling you, it’s almost done. Please read it.
So just do what they tell you to do!!! Sign out with your local admin account and immediately (without rebooting!!) log in with that account and you will notice everything is fixed and your Device Authentication is working again.
5.2.The Results
Do you want to guess what happened, when we forced a recovery? While forcing a recovery the “OLD” Device ID, will be removed from Intune. So when clicking on the device when you are performing the recovery you will get a nice error: “Not Found” for a few moments
But at the same time, the “NEW” Device ID you also notice in the dsregcmd will be attached to that same Device(Name)
So everything assigned to “All Devices” will still work. For example, opening WU4B still tells us the policy is assigned to that specific device.
Clicking on the device brings us to the hardware overview and in it, you will find the new DeviceID and the serial number.
But beware even when it has the same device name… multiple device records will be created!
And we all know what that means… nothing good when you are targeting device configuration profiles based on the Autopilot Enrollment profile (which doesn’t target that device anymore)
6. What happens when you don’t have a TPM?
I guess that’s indeed a very good question… But??? Why don’t you have a TPM? That isn’t smart at all, maybe just plain stupid 🙂
Well enough said, let’s take a look at what will happen when you are replacing the system board on an Azure Ad Joined device and you weren’t using a TPM.
Before we replace the System Board, let’s take a look at the dsregcmd status first. As shown below, this device isn’t TPM protected.
To be sure we do see some difference when we are changing the hardware, let’s fire up a cmd and type this command to get back our serial number: Get-WmiObject win32_bios | select Serialnumber
After we replaced that virtual “System board”, let’s fire up the VM and take a look at what happens… Pretty much no difference… except the serial number changed.
Everything just works like expected, the device is still Azure Ad Joined and the DeviceAuthStatus is still showing as a success, isn’t that great!
So without a TPM (stupid idea… as a TPMgreatly enhances the security of your Azure AD Joined device!) nothing breaks…
7. Important Stuff to know!
7.1: Rebooting the Device after the Recovery
If you have chosen to fix it manually instead of throwing away the device, you need to make sure you are not rebooting the device. Because when you are not logging out with the local admin account and logging in with the user account but instead you are rebooting the device.. guess what nice ESP will be shown in a state that’s pretty much stuck.
7.2: 4K HH Hardware Hash for Autopilot
Please, pretty please when you are using Autopilot, you will need to make sure you are uploading the new 4K HH (Hardware Hash) to the trusted EkPub autopilot devices like I am explaining in this blog
Autopilot White Glove Pre-Provisioned Deployment Flow (call4cloud.nl)
Why? As the hardware hash will be totally different from the old one. I will try to explain a little bit more.
The hardware hash contains a lot of information unique to the device itself, like the *SmbiosUuid and SMbiosSystemSerialNumber
*SMbiosUUID: It’s a unique number bound to the system/motherboard and if you change that you can safely say you changed your computer.
Of course, the Hardware Hash also contains some really important stuff about the TPM itself, like the famous EkPub! (Which we need when we need to do some AIK Attestation)
So, without this new important information about the hardware of the new system board, how could we still perform device authentication? As this device authentication is totally based on trust and the new device (TPM) isn’t the one, we imported earlier into the allowed/trusted list of EkPub’s.
And without this trust, you will not get your device enrolled into Autopilot. You could check out for yourself what’s inside the Hardware Hash. To do so download the OEM Activation 3 Tool (OA3Tool) from this link
https://call4cloud.nl/wp-content/uploads/2021/12/oa3tool.zip
I already had the HardwareHash exported with the wonderful get-windowsautopilot info PowerShell tool, so I only needed to add the Hardware Hash.
Please note: Even the hardware hash can be different each time you create it, why?
As shown above, it also contains the OsSystemTime and OsLocalTime. Luckily these time details are NOT used for the Autopilot registration! Let’s move on to the oa3tool and start decoding it yourself!
oa3tool.exe /DecodeHwHash=”hardwareHash from the csv” > c:temphh.txt
When opening that text file, you will a lot of useful stuff in it. As shown below.. it contains a lot of information!
7.3 Testing it yourself
It’s easy to reproduce what happens when a system board is replaced, just use Hyper-V. First I created a Virtual Machine
![]()
I added a virtual TPM to the device and installed Windows 10 21h2 on the device itself and uploaded the 4K HH
After the hardware hash was uploaded I reinstalled the device and enrolled it into Azure/Intune and made sure everything was working fine.
In the virtual machine picture, I showed you, you could have noticed I also created a second Virtual Machine (also with A TPM) and mapped the hard drive to the same VHDX file from the first machine we created!
So what happens when you shut down the first Virtual Machine and boot that second Virtual Machine? Yes indeed! It looks like the system board and the TPM has been replaced!
7.4 Deleting the Hardware Hash
I also have to point out the fact that changing the system board on these devices is not my most favorite option! I know that sometimes you need to deal with warranties, but then again…. A way,way,way better option would be to remove the hash from the list of allowed Autopilot devices and just buy a new device and enroll that device!
Because when the Hardware Hash isn’t removed from the tenant (one that you don’t control!) and that system board ends up in your device you have some work to do… Because you will end up with the ZtdDeviceAssignedToOtherTenant (808) error message and/or ZtdProfileAssignedToOtherTenant.
You will end up creating a Microsoft Support ticket or asking the vendor to send a new one to get it fixed. When putting in a service ticket, please make sure you have the Device CSV, Proof of ownership and the Diagnostic logs ready for them.
Please read this MS Doc for more information:
Error 806 or 808 when importing CSV files – Intune | Microsoft Docs
8. Existing Devices and the Hardware Hash
When you have some existing devices from which you need to get the Hardware Hash uploaded, you have still some other methods at your disposal
8.1. AutoPilot Profile
If you don’t want to spend time manually uploading the Hash from AADR/AADJ devices to have the possibility to start using them as autopilot devices, maybe create an Autopilot profile to convert all targeted devices to autopilot?
Please note: As mentioned below, AADR/AADJ…It’s not supported to transform HAADJ device into an Azure Ad Autopilot device…
But…. it’s not supported doesn’t mean it doesn’t work right?
Auto-Pilot for Existing Windows Devices – Microsoft Tech Community
8.2 Remote Diagnostics
Another possibility to get the Hardware Hash from existing Intune enrolled devices would be to execute the task “collect diagnostics” on the device.
You will find the possibility to download this zip file from the “device diagnostics” screen
Once downloaded, extract the zip file and in this zip file, you will find the MDMLogs CAB file and the DeviceHash CSV file in it!. Isn’t that beautiful?
9. Microsoft Autopilot Auto-remediation
With this new upcoming feature, after a motherboard replacement, the Autopilot service will try to fix the device when it comes online. It’s not totally clear what this is going to look like but it’s coming! But looking at this Autopilot CSP Doc
WindowsAutoPilot CSP – Windows Client Management | Microsoft Docs
You will probably notice the “HardwareMismatchRemediationData” part as shown below
This MS Doc is telling us “Collects hardware information about a device and returns it as an encoded string. This string is used as input for calling Windows Autopilot Service to remediate a device if the device underwent a hardware change that affects its ability to use Windows Autopilot”
So translating it to my own words: Autopilot will try to fetch some additional hardware information and will store it service side. When a device needs remediation during Autopilot because of a motherboard replacement it will use that information to fix it. The remediation service will make sure the “hardware hash match” between your device and Autopilot will be restored
Check out the Ask me Anything session. In the first few minutes, Juanita Baptiste is mentioning the Auto-Remediation!
Conclusions
I guess this conclusion can be short? When replacing your system board, the trust between your device and Azure will be broken because your TPM isn’t the one the device first married with!
Again… just buy a new device…. but when that’s not possible you will need to fix the issue with the Device/Transport keys and the TPM, you can do so by using the dsregcmd /forcerecovery (but beware of all the group assignments that would break)
Another and better option would be to just wipe the device from intune/azure, upload the new keys and reenroll the device! Just like Microsoft is telling us 🙂
Windows Autopilot motherboard replacement | Microsoft Docs
Ошибка 0x80090016 может возникнуть у пользователей, когда они пытаются настроить PIN-коды Windows 10 или войти с ними. В сообщении об ошибке говорится:
Нам не удалось установить ваш PIN-код. Иногда полезно попробовать еще раз или вы можете пропустить это сейчас и сделать это позже.
Если вам нужно исправить это, чтобы настроить PIN-код в Windows 10, ознакомьтесь с этими потенциальными решениями для ошибки 0x80090016.
Основной причиной возникновения этой ошибки является определенная системная папка, которая может быть повреждена и заблокировать настройку PIN-кода на вашем устройстве.
Многие пользователи сообщали о соответствующих сообщениях об ошибках, когда пытались получить доступ или установить пароль для своих учетных записей Microsoft.
Что такое код ошибки 0x80090016?
Сообщение об ошибке 0x80090016 появляется на устройствах Windows, когда вы пытаетесь установить защитный PIN-код и заблокировать свое устройство.
Эта конкретная проблема также может возникнуть при использовании Microsoft Store и попытке войти в свою учетную запись.
Вы можете столкнуться с проблемой такого типа после выполнения системных обновлений на своем ПК и повреждения папки NGC.
Эта проблема может оставить ваш компьютер незащищенным от любого пользователя, который приблизится к вашему устройству, и, таким образом, поставить под угрозу ваши личные данные.
Как исправить ошибку Windows 0x80090016?
1. Запустите проверку системных файлов
- Сначала попробуйте выполнить сканирование с помощью средства проверки системных файлов. Нажмите Windows + R, чтобы запустить Run.
- Введите cmd в поле «Выполнить».
- Нажмите комбинацию Ctrl + Shift + Enter, чтобы открыть командную строку с повышенными привилегиями.
- Хотя это и не всегда необходимо, рекомендуется сначала запустить сканирование образа развертывания. Для этого введите:
DISM.exe /Online /Cleanup-image /Restorehealth - Нажмите «Ввод».
- Затем введите sfc /scannow в командной строке и нажмите клавишу Enter.

- Подождите, пока сканирование SFC сделает свое дело, а затем перезапустите Windows, если оно восстанавливает файлы.
2. Очистите папку NGC
Очистка папки NGC, владельцем которой вы должны стать, является одним из наиболее подтвержденных исправлений ошибки 0x80090016.
- Сначала нажмите комбинацию Windows + E key, которая открывает проводник. Установите флажок «Скрытые элементы» на вкладке «Вид».

- Затем откройте путь к этой папке в Проводнике: C: > Windows > ServiceProfiles > LocalService > AppData > Local > Microsoft.
- Затем щелкните правой кнопкой мыши папку NGC, чтобы выбрать «Свойства».
- Выберите вкладку «Безопасность» в открывшемся окне.

- Нажмите «Дополнительно», чтобы открыть окно, показанное на снимке экрана ниже.

- Затем нажмите «Изменить», чтобы открыть окно «Выбор пользователя или группы».

- Введите имя учетной записи пользователя для той, в которую вы вошли в данный момент.
- Нажмите кнопку Проверить имена.
- Нажмите кнопку ОК.
- Выберите параметр Заменить владельца подконтейнеров и объектов.
- Выберите опцию Применить.
- Нажмите OK, чтобы закрыть окно.
- Откройте подпапку NGC.
- Нажмите Ctrl + A, чтобы выбрать все его содержимое.
- Нажмите кнопку «Удалить» на вкладке «Главная».
3. Включите Включить удобный вход с помощью PIN-кода.
Пользователи могут исправить ошибку 0x80090016 с помощью редактора групповой политики в Windows 10 Pro и Enterprise.
- Для этого введите gpedit.msc в «Выполнить»; и нажмите кнопку ОК.

- Разверните узел Конфигурация компьютера на панели навигации редактора групповой политики.
- Затем нажмите «Административные шаблоны», «Система» и «Вход в систему» в левой части окна.
- Дважды щелкните Включить удобный вход с помощью PIN-кода на правой панели в редакторе групповой политики.

- Выберите переключатель Включено.
- Нажмите кнопку Применить, чтобы сохранить настройку.
- Нажмите кнопку OK, чтобы выйти из окна.
4. Откат Windows
Ошибка 0x80090016 также может быть связана с недавно установленным сторонним программным обеспечением, которое вы удаляете, восстанавливая Windows до точки восстановления. Для этого ознакомьтесь с публикацией о восстановлении системы, в которой содержатся рекомендации по откату Windows.
Выбор точки восстановления, которая идет дальше, скорее всего, устранит ошибку, так как будет удалено больше программного обеспечения.

Это некоторые из подтвержденных разрешений, с которыми пользователи исправили ошибку PIN-кода 0x80090016. Таким образом, приведенные выше решения обычно решают проблему.
Обратите внимание, что приведенные выше разрешения не относятся к ошибке Microsoft Store, которая имеет тот же код 0x80090016.
Дайте нам знать, какие из них работали лучше всего для вас, оставив нам сообщение в разделе комментариев ниже.