(PHP 4 >= 4.0.3, PHP 5, PHP 7, PHP 
curl_error — Возвращает строку с описанием последней ошибки текущего сеанса
Описание
Список параметров
-
handle -
Дескриптор cURL, полученный из curl_init().
Возвращаемые значения
Возвращает сообщение об ошибке или '' (пустую строку),
если ошибки не произошло.
Список изменений
| Версия | Описание |
|---|---|
| 8.0.0 |
handle теперь ожидает экземпляр CurlHandle;раньше, ожидался ресурс (resource). |
Примеры
Пример #1 Пример использования curl_error()
<?php
// Создаём дескриптор curl к несуществующему адресу
$ch = curl_init('http://404.php.net/');
curl_setopt($ch, CURLOPT_RETURNTRANSFER, true);
if(
curl_exec($ch) === false)
{
echo 'Ошибка curl: ' . curl_error($ch);
}
else
{
echo 'Операция завершена без каких-либо ошибок';
}// Закрываем дескриптор
curl_close($ch);
?>
patrick at ibuildings dot nl 
9 years ago
If you want to fetch the error message, make sure you fetch it before you close the current cURL session or the error message will be reset to an empty string.
paul at paulmcgarry dot com 
14 years ago
For a 404 response to actually trigger an error as the example seems to be trying to demonstrate the following option should be set:
curl_setopt($ch,CURLOPT_FAILONERROR,true);
As per http://curl.haxx.se/libcurl/c/libcurl-errors.html
CURLE_HTTP_RETURNED_ERROR (22)
This is returned if CURLOPT_FAILONERROR is set TRUE and the HTTP server returns an error code that is >= 400. (This error code was formerly known as CURLE_HTTP_NOT_FOUND.)
anrdaemon at freemail dot ru 
3 years ago
curl_error is not a textual representation of curl_errno.
It's an actual error *message*.
If you want textual representation of error *code*, look for curl_strerror.
Anonymous 
2 years ago
If you're using curl_multi and there's an error, curl_error() will remain empty until you've called curl_multi_info_read(). That function "pumps" the information inside the curl libraries to the point where curl_error() will return a useful string.
This should really be added to the documentation, because it's not at all obvious.
you can generate curl error after its execution
$url = 'http://example.com';

$ch = curl_init($url);
curl_setopt($ch, CURLOPT_RETURNTRANSFER, true);
$result = curl_exec($ch);
if(curl_errno($ch)){
    echo 'Request Error:' . curl_error($ch);
}
and here are curl error code
if someone need more information about curl errors
<?php

    $error_codes=array(
    [1] => 'CURLE_UNSUPPORTED_PROTOCOL',
    [2] => 'CURLE_FAILED_INIT',
    [3] => 'CURLE_URL_MALFORMAT',
    [4] => 'CURLE_URL_MALFORMAT_USER',
    [5] => 'CURLE_COULDNT_RESOLVE_PROXY',
    [6] => 'CURLE_COULDNT_RESOLVE_HOST',
    [7] => 'CURLE_COULDNT_CONNECT',
    [8] => 'CURLE_FTP_WEIRD_SERVER_REPLY',
    [9] => 'CURLE_REMOTE_ACCESS_DENIED',
    [11] => 'CURLE_FTP_WEIRD_PASS_REPLY',
    [13] => 'CURLE_FTP_WEIRD_PASV_REPLY',
    [14]=>'CURLE_FTP_WEIRD_227_FORMAT',
    [15] => 'CURLE_FTP_CANT_GET_HOST',
    [17] => 'CURLE_FTP_COULDNT_SET_TYPE',
    [18] => 'CURLE_PARTIAL_FILE',
    [19] => 'CURLE_FTP_COULDNT_RETR_FILE',
    [21] => 'CURLE_QUOTE_ERROR',
    [22] => 'CURLE_HTTP_RETURNED_ERROR',
    [23] => 'CURLE_WRITE_ERROR',
    [25] => 'CURLE_UPLOAD_FAILED',
    [26] => 'CURLE_READ_ERROR',
    [27] => 'CURLE_OUT_OF_MEMORY',
    [28] => 'CURLE_OPERATION_TIMEDOUT',
    [30] => 'CURLE_FTP_PORT_FAILED',
    [31] => 'CURLE_FTP_COULDNT_USE_REST',
    [33] => 'CURLE_RANGE_ERROR',
    [34] => 'CURLE_HTTP_POST_ERROR',
    [35] => 'CURLE_SSL_CONNECT_ERROR',
    [36] => 'CURLE_BAD_DOWNLOAD_RESUME',
    [37] => 'CURLE_FILE_COULDNT_READ_FILE',
    [38] => 'CURLE_LDAP_CANNOT_BIND',
    [39] => 'CURLE_LDAP_SEARCH_FAILED',
    [41] => 'CURLE_FUNCTION_NOT_FOUND',
    [42] => 'CURLE_ABORTED_BY_CALLBACK',
    [43] => 'CURLE_BAD_FUNCTION_ARGUMENT',
    [45] => 'CURLE_INTERFACE_FAILED',
    [47] => 'CURLE_TOO_MANY_REDIRECTS',
    [48] => 'CURLE_UNKNOWN_TELNET_OPTION',
    [49] => 'CURLE_TELNET_OPTION_SYNTAX',
    [51] => 'CURLE_PEER_FAILED_VERIFICATION',
    [52] => 'CURLE_GOT_NOTHING',
    [53] => 'CURLE_SSL_ENGINE_NOTFOUND',
    [54] => 'CURLE_SSL_ENGINE_SETFAILED',
    [55] => 'CURLE_SEND_ERROR',
    [56] => 'CURLE_RECV_ERROR',
    [58] => 'CURLE_SSL_CERTPROBLEM',
    [59] => 'CURLE_SSL_CIPHER',
    [60] => 'CURLE_SSL_CACERT',
    [61] => 'CURLE_BAD_CONTENT_ENCODING',
    [62] => 'CURLE_LDAP_INVALID_URL',
    [63] => 'CURLE_FILESIZE_EXCEEDED',
    [64] => 'CURLE_USE_SSL_FAILED',
    [65] => 'CURLE_SEND_FAIL_REWIND',
    [66] => 'CURLE_SSL_ENGINE_INITFAILED',
    [67] => 'CURLE_LOGIN_DENIED',
    [68] => 'CURLE_TFTP_NOTFOUND',
    [69] => 'CURLE_TFTP_PERM',
    [70] => 'CURLE_REMOTE_DISK_FULL',
    [71] => 'CURLE_TFTP_ILLEGAL',
    [72] => 'CURLE_TFTP_UNKNOWNID',
    [73] => 'CURLE_REMOTE_FILE_EXISTS',
    [74] => 'CURLE_TFTP_NOSUCHUSER',
    [75] => 'CURLE_CONV_FAILED',
    [76] => 'CURLE_CONV_REQD',
    [77] => 'CURLE_SSL_CACERT_BADFILE',
    [78] => 'CURLE_REMOTE_FILE_NOT_FOUND',
    [79] => 'CURLE_SSH',
    [80] => 'CURLE_SSL_SHUTDOWN_FAILED',
    [81] => 'CURLE_AGAIN',
    [82] => 'CURLE_SSL_CRL_BADFILE',
    [83] => 'CURLE_SSL_ISSUER_ERROR',
    [84] => 'CURLE_FTP_PRET_FAILED',
    [84] => 'CURLE_FTP_PRET_FAILED',
    [85] => 'CURLE_RTSP_CSEQ_ERROR',
    [86] => 'CURLE_RTSP_SESSION_ERROR',
    [87] => 'CURLE_FTP_BAD_FILE_LIST',
    [88] => 'CURLE_CHUNK_FAILED');

    ?>
I’m using curl at the command line on Linux to issue HTTP requests. The response bodies are printed to standard out, which is fine, but I can’t see from the man page how to get curl to print the HTTP status code from the response (404, 403 etc). Is this possible?
asked Apr 18, 2011 at 10:28
![]()
4
This should work for you if the web server is able to respond to HEAD requests (this will not perform a GET request):
curl -I http://www.example.org
As an addition, to let cURL follow redirects (3xx statuses) add -L.
![]()
Wouter
1291 silver badge7 bronze badges
answered Apr 18, 2011 at 10:56
![]()
pberlijnpberlijn
9,1501 gold badge14 silver badges8 bronze badges
11
A more specific way to print out just the HTTP status code is something along the lines of:
curl -s -o /dev/null -w "%{http_code}" http://www.example.org/
A lot easier to work with in scripts, as it doesn’t require any parsing 
The parameter -I might be added to improve response load performance. This will change the call to a HEAD call which will fetch response overhead only, without the body.
Note: %{http_code} returns on first line of HTTP payload (available variables for the -w option on the curl documentation page)
i.e.:
curl -s -o /dev/null -I -w "%{http_code}" http://www.example.org/
![]()
answered Jun 28, 2012 at 0:25
![]()
pvandenberkpvandenberk
13.6k2 gold badges13 silver badges3 bronze badges
21
You can print the status code, in addition to all the headers by doing the following:
curl -i http://example.org
The good thing about -i is that it works with -X POST as well.
answered Dec 4, 2012 at 20:45
![]()
Cyril DavidCyril David
4,4271 gold badge12 silver badges2 bronze badges
8
If you want to see the header as well as the result you can use the verbose option:
curl -v http://www.example.org
curl --verbose http://www.example.org
The status will appear in the header. E.g.
< Date: Tue, 04 Nov 2014 19:12:59 GMT
< Content-Type: application/json; charset=utf-8
< Status: 422 Unprocessable Entity
![]()
Dennis
4425 silver badges14 bronze badges
answered May 3, 2012 at 4:28
![]()
Enrico SusatyoEnrico Susatyo
3,4362 gold badges18 silver badges20 bronze badges
4
If you want to capture the HTTP status code in a variable, but still redirect the content to STDOUT, you must create two STDOUTs. You can do so with process substitution >() and command substitution $().
First, create a file descriptor 3 for your current process’ STDOUT with exec 3>&1.
Then, use curl’s -o option to redirect the response content to a temporary fifo using command substitution, and then within that command substitution, redirect output back to your current process STDOUT file descriptor 3 with -o >(cat >&3).
Putting it all together in bash 3.2.57(1)-release (standard for macOS):
# creates a new file descriptor 3 that redirects to 1 (STDOUT)
exec 3>&1
# Run curl in a separate command, capturing output of -w "%{http_code}" into HTTP_STATUS
# and sending the content to this command's STDOUT with -o >(cat >&3)
HTTP_STATUS=$(curl -w "%{http_code}" -o >(cat >&3) 'http://example.com')
Note that this doesn’t work in /bin/sh as SamK noted in the comments below.
answered Jan 8, 2015 at 20:59
![]()
8
Redefine curl output:
curl -sw '%{http_code}' http://example.org
Can be used with any request type.
answered Aug 5, 2014 at 18:18
![]()
2
Status code ONLY
[0]$ curl -LI http://www.example.org -o /dev/null -w '%{http_code}n' -s
[0]$ 200
All credit to this GIST
answered Feb 8, 2017 at 10:44
![]()
mahatmanichmahatmanich
6255 silver badges7 bronze badges
1
This is a painful curl --fail limitation. From man curl :
-f, —fail
(HTTP) Fail silently (no output at all) on server errors
But there is no way to get both the non-zero return code AND the response body in stdout.
Based on pvandenberk’s answer and this other very useful trick learned on SO, here is a workaround :
curl_with_error_code () {
    _curl_with_error_code "$@" | sed '$d'
}
_curl_with_error_code () {
    local curl_error_code http_code
    exec 17>&1
    http_code=$(curl --write-out 'n%{http_code}n' "$@" | tee /dev/fd/17 | tail -n 1)
    curl_error_code=$?
    exec 17>&-
    if [ $curl_error_code -ne 0 ]; then
        return $curl_error_code
    fi
    if [ $http_code -ge 400 ] && [ $http_code -lt 600 ]; then
        echo "HTTP $http_code" >&2
        return 127
    fi
}
This function behaves exactly as curl, but will return 127 (a return code non-used by curl) in case of a HTTP code in the range [400, 600[.
![]()
answered Apr 6, 2016 at 13:08
![]()
Lucas CimonLucas Cimon
4724 silver badges11 bronze badges
3
This will send a request to url, get only the first line of the response, split it on blocks and select the second one.
It contains the response code
curl -I http://example.org 2>/dev/null | head -n 1 | cut -d$' ' -f2
![]()
answered Jul 15, 2015 at 20:08
![]()
2
For a POST request, the following worked:
curl -w 'RESP_CODE:%{response_code}' -s -X POST --data '{"asda":"asd"}' http://example.com --header "Content-Type:application/json"|grep -o 'RESP_CODE:[1-4][0-9][0-9]'
answered Jan 7, 2016 at 8:36
![]()
zafar142003zafar142003
2512 silver badges4 bronze badges
Use the following cURL command and pipe it to grep like so:
$ curl -I -s -L http://example.com/v3/get_list | grep «HTTP/1.1»
Here’s what each flag does:
-I: Show only response headers-s: Silent — Don’t show progress bar-L: FollowLocation:headers
Here is a link to HTTP status codes.
Run from the command line. This curl runs in silent mode, follows any redirects, get the HTTP headers. grep will print the HTTP status code to standard output.
![]()
Cas
1,9142 gold badges18 silver badges42 bronze badges
answered Nov 21, 2016 at 11:28
![]()
Here is some curl command that is using GET and that returns the HTTP code.
curl -so /dev/null -w '%{response_code}' http://www.example.org
Please remember that the approach below is using HEAD, which is faster but it may not work well with some web less compliant HTTP servers.
curl -I http://www.example.org
answered Jun 23, 2016 at 10:37
![]()
sorinsorin
11.4k20 gold badges62 silver badges73 bronze badges
2
curl -so -i /dev/null -w "%{http_code}" http://www.any_example.com
This will return the following information:
- response data, if any data is returned by API like error
- status code
answered Mar 8, 2017 at 5:12
![]()
sranasrana
611 silver badge2 bronze badges
2
An example of how to use the response codes. I use this to re-download Geolite databases only if they have changed (-z) & also following redirects (-L):
url=http://example.com/file.gz
file=$(basename $url)

response=$(curl -L -s -o $file -z $file $url -w "%{http_code}")

case "$response" in
        200) do_something ;;
        301) do_something ;;
        304) printf "Received: HTTP $response (file unchanged) ==> $urln" ;;
        404) printf "Received: HTTP $response (file not found) ==> $urln" ;;
          *) printf "Received: HTTP $response ==> $urln" ;;
esac
answered Apr 1, 2018 at 17:21
![]()
Split output content to stdout and HTTP status code to stderr:
curl http://www.example.org -o >(cat >&1) -w "%{http_code}n" 1>&2
If only HTTP status code is desired to stderr, --silent can be used:
curl --silent http://www.example.org -o >(cat >&1) -w "%{http_code}n" 1>&2
The desired stream can then be picked by redirecting unwanted one to /dev/null:
$ (curl --silent http://www.example.org -o >(cat >&1) -w "%{http_code}" 1>&2) 1>/dev/null
200
$ (curl --silent http://www.example.org -o >(cat >&1) -w "%{http_code}" 1>&2) 2>/dev/null
<!doctype html>
...
Note that for the second redirection to behave as desired, we need to run the curl command in subshell.
answered Jun 4, 2019 at 8:08
![]()
JaakkoJaakko
3102 silver badges12 bronze badges
2
The OP wants to know the status code. Often when downloading a file you also want to get a feel of it’s size so I’m using curl first to show status code and size of file and then shut off verbose and direct file to the place and name I want:
curl -R -s -S -w "nhttp: %{http_code} %{size_download}n" -o /Users/myfiles/the_local_name.html http://archive.onweb.com/the_online_name.html
Then I wait for the finishing of curl
wait ${!}
before I run the next command. The above when used in a script of many commands like above gives a nice response like:
http: 200 42824
http: 200 34728
http: 200 35452
Please note that -o in curl needs to be followed by the full path of the file + name of file. This allows you thusly to save files in a sensible name structure when you d/l them with curl. Also note that -s and -S used together silence the output but does show errors. Note also that -R tries to set the file timestamp to that of the web file.
My answer is based on what @pvandenberk originally suggested, but in addition it actually saves the file somewhere, instead of merely directing to /dev/null.
![]()
answered Oct 7, 2017 at 7:32
![]()
$ curl -kv https://www.example.org 2>&1 | grep -i 'HTTP/1.1 ' | awk '{print $3}'| sed -e 's/^[ t]*//'
- 2>&1: error is stored in output for parsing
- grep: filter the response code line from output
- awk: filters out the response code from response code line
- sed: removes any leading white spaces
answered Apr 14, 2021 at 4:44
![]()
There is another way by using Powershell command which is alias to curl.exe
Just type the following:
(Invoke-WebRequest -Uri https://your.website).StatusCode
answered Jul 14, 2022 at 10:30
![]()
In Windows PowerShell:
curl https:\www.example.org -Method HEAD
It’s really just an alias for Invoke-WebRequest though.
answered Sep 14, 2022 at 18:24
![]()
KebmanKebman
5072 gold badges5 silver badges13 bronze badges

cURL is a command line tool and a library which can be used to receive and send data between a client and a server or any two machines connected over the internet. It supports a wide range of protocols like HTTP, FTP, IMAP, LDAP, POP3, SMTP and many more.
Due to its versatile nature, cURL is used in many applications and for many use cases. For example, the command line tool can be used to download files, testing APIs and debugging network problems. In this article, we shall look at how you can use the cURL command line tool to perform various tasks.
Contents
- 1 Install cURL
- 1.1 Linux
- 1.2 MacOS
- 1.3 Windows
- 2 cURL basic usage
- 3 Downloading Files with cURL
- 4 Anatomy of a HTTP request/response
- 5 Following redirects with cURL
- 6 Viewing response headers with cURL
- 7 Viewing request headers and connection details
- 8 Silencing errors
- 9 Setting HTTP request headers with cURL
- 10 Making POST requests with cURL
- 11 Submitting JSON data with cURL
- 12 Changing the request method
- 13 Replicating browser requests with cURL
- 14 Making cURL fail on HTTP errors
- 15 Making authenticated requests with cURL
- 16 Testing protocol support with cURL
- 17 Setting the Host header and cURL’s —resolve option
- 18 Resolve domains to IPv4 and IPv6 addresses
- 19 Disabling cURL’s certificate checks
- 20 Troubleshooting website issues with “cURL timing breakdown”
- 21 cURL configuration files
- 22 Conclusion
Install cURL
Linux
Most Linux distributions have cURL installed by default. To check whether it is installed on your system or not, type curl in your terminal window and press enter. If it isn’t installed, it will show a “command not found” error. Use the commands below to install it on your system.
For Ubuntu/Debian based systems use:
sudo apt update
sudo apt install curl
For CentOS/RHEL systems, use:
sudo yum install curl
On the other hand, for Fedora systems, you can use the command:
sudo dnf install curl
MacOS
MacOS comes with cURL preinstalled, and it receives updates whenever Apple releases updates for the OS. However, in case you want to install the most recent version of cURL, you can install the curl Homebrew package. Once you install Homebrew, you can install it with:
brew install curl
Windows
For Windows 10 version 1803 and above, cURL now ships by default in the Command Prompt, so you can use it directly from there. For older versions of Windows, the cURL project has Windows binaries. Once you download the ZIP file and extract it, you will find a folder named curl-<version number>-mingw. Move this folder into a directory of your choice. In this article, we will assume our folder is named curl-7.62.0-win64-mingw, and we have moved it under C:.
Next, you should add cURL’s bin directory to the Windows PATH environment variable, so that Windows can find it when you type curl in the command prompt. For this to work, you need to follow these steps:
- Open the “Advanced System Properties” dialog by running
systempropertiesadvancedfrom the Windows Run dialog (Windows key + R). - Click on the “Environment Variables” button.
- Double-click on “Path” from the “System variables” section, and add the path
C:curl-7.62.0-win64-mingwbin. For Windows 10, you can do this with the “New” button on the right. On older versions of Windows, you can type in;C:curl-7.62.0-win64-mingwbin(notice the semicolon at the beginning) at the end of the “Value” text box.
Once you complete the above steps, you can type curl to check if this is working. If everything went well, you should see the following output:
C:UsersAdministrator>curl
curl: try 'curl --help' or 'curl --manual' for more information
cURL basic usage
The basic syntax of using cURL is simply:
curl <url>
This fetches the content available at the given URL, and prints it onto the terminal. For example, if you run curl example.com, you should be able to see the HTML page printed, as shown below:
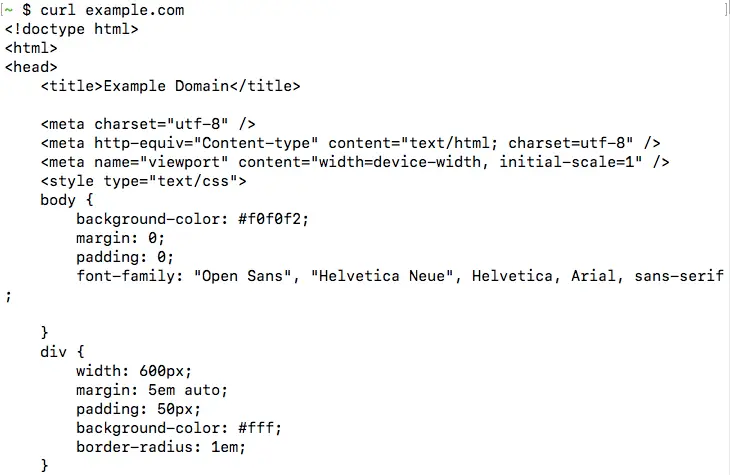
This is the most basic operation cURL can perform. In the next few sections, we will look into the various command line options accepted by cURL.
Downloading Files with cURL
As we saw, cURL directly downloads the URL content and prints it to the terminal. However, if you want to save the output as a file, you can specify a filename with the -o option, like so:
curl -o vlc.dmg http://ftp.belnet.be/mirror/videolan/vlc/3.0.4/macosx/vlc-3.0.4.dmg
In addition to saving the contents, cURL switches to displaying a nice progress bar with download statistics, such as the speed and the time taken:

Instead of providing a file name manually, you can let cURL figure out the filename with the -O option. So, if you want to save the above URL to the file vlc-3.0.4.dmg, you can simply use:
curl -O http://ftp.belnet.be/mirror/videolan/vlc/3.0.4/macosx/vlc-3.0.4.dmg
Bear in mind that when you use the -o or the -O options and a file of the same name exists, cURL will overwrite it.
If you have a partially downloaded file, you can resume the file download with the -C - option, as shown below:
curl -O -C - http://ftp.belnet.be/mirror/videolan/vlc/3.0.4/macosx/vlc-3.0.4.dmg

Like most other command line tools, you can combine different options together. For example, in the above command, you could combine -O -C - and write it as -OC - .
Anatomy of a HTTP request/response
Before we dig deeper into the features supported by cURL, we will discuss a little bit about HTTP requests and responses. If you are familiar with these concepts, you directly skip to the other sections.
To request a resource such as a webpage, or to submit some data to a server, a HTTP client (such as a browser or cURL) makes a HTTP request to the server The server responds back with a HTTP response, which contains the “contents” of that page.
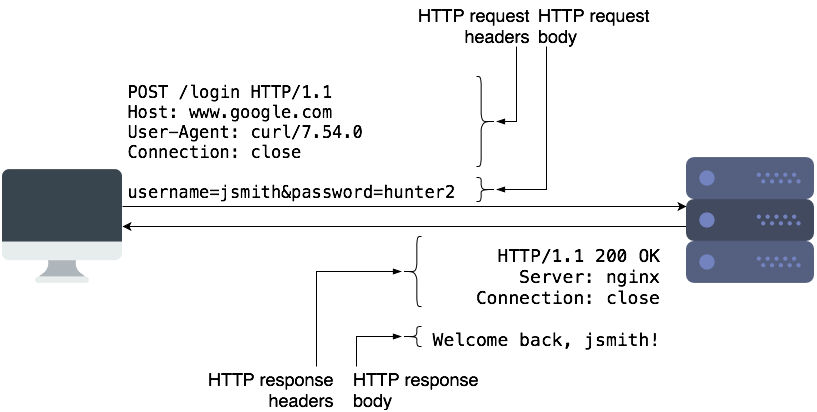
HTTP requests contain the request method, URL, some headers, and some optional data as part of the “request body”. The request method controls how a certain request should be processed. The most common types of request methods are “GET” and “POST”. Typically, we use “GET” requests to retrieve a resource from the server, and “POST” to submit data to the server for processing. “POST” requests typically contain some data in the request body, which the server can use.
HTTP responses are similar and contain the status code, some headers, and a body. The body contains the actual data that clients can display or save to a file. The status code is a 3-digit code which tells the client if the request succeeded or failed, and how it should proceed further. Common status codes are 2xx (success), 3xx (redirect to another page), and 4xx/5xx (for errors).
HTTP is an “application layer protocol”, and it runs over another protocol called TCP. It takes care of retransmitting any lost data, and ensures that the client and server transmit data at an optimal rate. When you use HTTPS, another protocol called SSL/TLS runs between TCP and HTTP to secure the data.
Most often, we use domain names such as google.com to access websites. Mapping the domain name to an IP address occurs through another protocol called DNS.
You should now have enough background to understand the rest of this article.
Following redirects with cURL
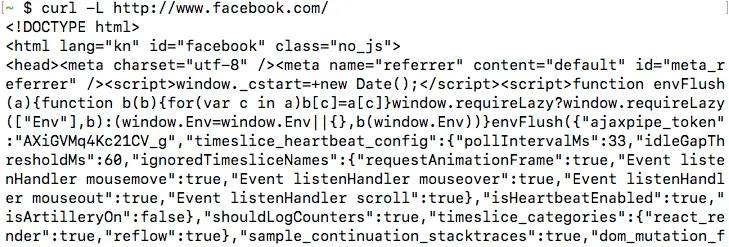
By default, when cURL receives a redirect after making a request, it doesn’t automatically make a request to the new URL. As an example of this, consider the URL http://www.facebook.com. When you make a request using to this URL, the server sends a HTTP 3XX redirect to https://www.facebook.com/. However, the response body is otherwise empty. So, if you try this out, you will get an empty output:
![]()
If you want cURL to follow these redirects, you should use the -L option. If you repeat make a request for http://www.facebook.com/ with the -L flag, like so:
curl -L http://www.facebook.com/
Now, you will be able to see the HTML content of the page, similar to the screenshot below. In the next section, we will see how we can verify that there is a HTTP 3XX redirect.
Please bear in mind that cURL can only follow redirects if the server replied with a “HTTP redirect”, which means that the server used a 3XX status code, and it used the “Location” header to indicate the new URL. cURL cannot process Javascript or HTML-based redirection methods, or the “Refresh header“.
If there is a chain of redirects, the -L option will only follow the redirects up to 500 times. You can control the number of maximum redirects that it will follow with the --max-redirs flag.
curl -L --max-redirs 700 example.com
If you set this flag to -1, it will follow the redirects endlessly.
curl -L --max-redirs -1 example.com
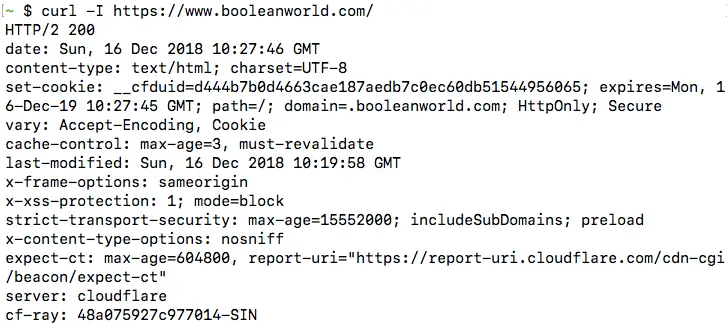
When debugging issues with a website, you may want to view the HTTP response headers sent by the server. To enable this feature, you can use the -i option.
Let us continue with our previous example, and confirm that there is indeed a HTTP 3XX redirect when you make a HTTP request to http://www.facebook.com/, by running:
curl -L -i http://www.facebook.com/
Notice that we have also used -L so that cURL can follow redirects. It is also possible to combine these two options and write them as -iL or -Li instead of -L -i.
Once you run the command, you will be able to see the HTTP 3XX redirect, as well as the page HTTP 200 OK response after following the redirect:

If you use the -o/-O option in combination with -i, the response headers and body will be saved into a single file.
Viewing request headers and connection details
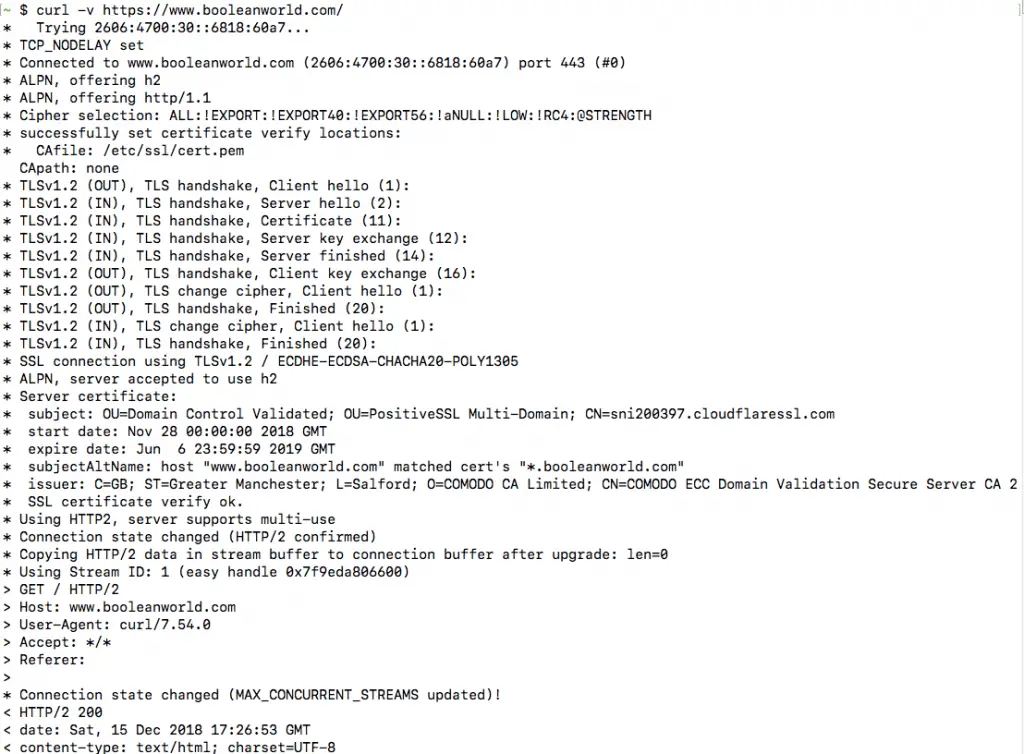
In the previous section, we have seen how you can view HTTP response headers using cURL. However, sometimes you may want to view more details about a request, such as the request headers sent and the connection process. cURL offers the -v flag (called “verbose mode”) for this purpose, and it can be used as follows:
curl -v https://www.booleanworld.com/
The output contains request data (marked with >), response headers (marked with <) and other details about the request, such as the IP used and the SSL handshake process (marked with *). The response body is also available below this information. (However, this is not visible in the screenshot below).
Most often, we aren’t interested in the response body. You can simply hide it by “saving” the output to the null device, which is /dev/null on Linux and MacOS and NUL on Windows:
curl -vo /dev/null https://www.booleanworld.com/ # Linux/MacOS
curl -vo NUL https://www.booleanworld.com/ # Windows
Silencing errors
Previously, we have seen that cURL displays a progress bar when you save the output to a file. Unfortunately, the progress bar might not be useful in all circumstances. As an example, if you hide the output with -vo /dev/null, a progress bar appears which is not at all useful.
You can hide all these extra outputs by using the -s header. If we continue with our previous example but hide the progress bar, then the commands would be:
curl -svo /dev/null https://www.booleanworld.com/ # Linux/MacOS
curl -svo NUL https://www.booleanworld.com/ # Windows
The -s option is a bit aggressive, though, since it even hides error messages. For your use case, if you want to hide the progress bar, but still view any errors, you can combine the -S option.
So, if you are trying to save cURL output to a file but simply want to hide the progress bar, you can use:
curl -sSvo file.html https://www.booleanworld.com/
When testing APIs, you may need to set custom headers on the HTTP request. cURL has the -H option which you can use for this purpose. If you want to send the custom header X-My-Custom-Header with the value of 123 to https://httpbin.org/get, you should run:
curl -H 'X-My-Custom-Header: 123' https://httpbin.org/get
(httpbin.org is a very useful website that allows you to view details of the HTTP request that you sent to it.)
The data returned by the URL shows that this header was indeed set:
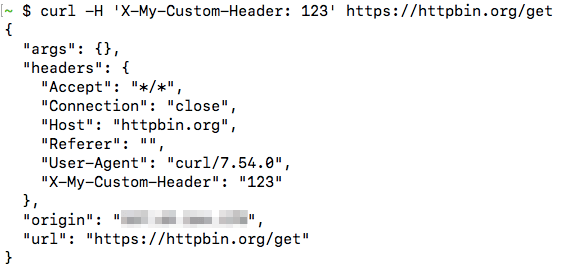
You can also override any default headers sent by cURL such as the “User-Agent” or “Host” headers. The HTTP client (in our case, cURL) sends the “User-Agent” header to tell the server about the type and version of the client used. Also, the client uses the “Host” header to tell the server about the site it should serve. This header is needed because a web server can host multiple websites at a single IP address.
Also, if you want to set multiple headers, you can simply repeat the -H option as required.
curl -H 'User-Agent: Mozilla/5.0' -H 'Host: www.google.com' ...
However, cURL does have certain shortcuts for frequently used flags. You can set the “User-Agent” header with the -A option:
curl -A Mozilla/5.0 http://httpbin.org/get
The “Referer” header is used to tell the server the location from which they were referred to by the previous site. It is typically sent by browsers when requesting Javascript or images linked to a page, or when following redirects. If you want to set a “Referer” header, you can use the -e flag:
curl -e http://www.google.com/ http://httpbin.org/get
Otherwise, if you are following a set of redirects, you can simply use -e ';auto' and cURL will take care of setting the redirects by itself.
Making POST requests with cURL
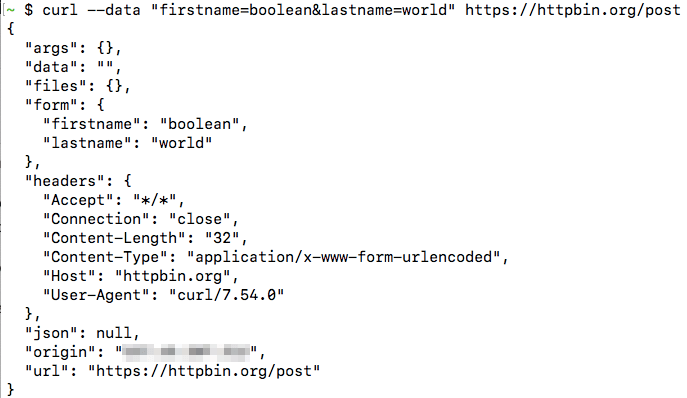
By default, cURL sends GET requests, but you can also use it to send POST requests with the -d or --data option. All the fields must be given as key=value pairs separated by the ampersand (&) character. As an example, you can make a POST request to httpbin.org with some parameters:
curl --data "firstname=boolean&lastname=world" https://httpbin.org/post
From the output, you can easily tell that we posted two parameters (this appears under the “form” key):
Any special characters such as @, %, = or spaces in the value should be URL-encoded manually. So, if you wanted to submit a parameter “email” with the value “[email protected]”, you would use:
curl --data "email=test%40example.com" https://httpbin.org/post
Alternatively, you can just use --data-urlencode to handle this for you. If you wanted to submit two parameters, email and name, this is how you should use the option:
curl --data-urlencode "[email protected]" --data-urlencode "name=Boolean World" https://httpbin.org/post
If the --data parameter is too big to type on the terminal, you can save it to a file and then submit it using @, like so:
curl --data @params.txt example.com
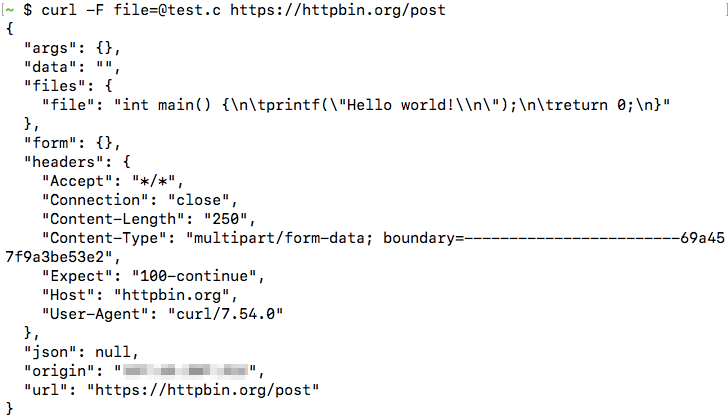
So far, we have seen how you can make POST requests using cURL. If you want to upload files using a POST request, you can use the -F (“form”) option. Here, we will submit the file test.c, under the parameter name file:
curl -F [email protected] https://httpbin.org/post
This shows the content of the file, showing that it was submitted successfully:
Submitting JSON data with cURL
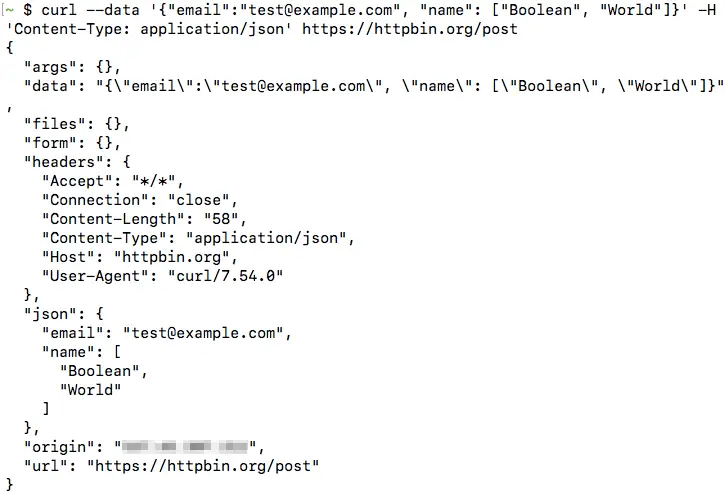
In the previous section, we have seen how can submit POST requests using cURL. You can also submit JSON data using the --data option. However, most servers expect to receive a POST request with key-value pairs, similar to the ones we have discussed previously. So, you need to add an additional header called ‘Content-Type: application/json’ so that the server understands it’s dealing with JSON data and handles it appropriately. Also, you don’t need to URL-encode data when submitting JSON.
So if you had the following JSON data and want to make a POST request to https://httpbin.org/post:
{
  "email": "[email protected]",
  "name": ["Boolean", "World"]
}
Then, you can submit the data with:
curl --data '{"email":"[email protected]", "name": ["Boolean", "World"]}' -H 'Content-Type: application/json' https://httpbin.org/post
In this case, you can see the data appear under the json value in the httpbin.org output:
You can also save the JSON file, and submit it in the same way as we did previously:
curl --data @data.json https://httpbin.org/post
Changing the request method
Previously, we have seen how you can send POST requests with cURL. Sometimes, you may need to send a POST request with no data at all. In that case, you can simply change the request method to POST with the -X option, like so:
curl -X POST https://httpbin.org/post
You can also change the request method to anything else, such as PUT, DELETE or PATCH. One notable exception is the HEAD method, which cannot be set with the -X option. The HEAD method is used to check if a document is present on the server, but without downloading the document. To use the HEAD method, use the -I option:
curl -I https://www.booleanworld.com/
When you make a HEAD request, cURL displays all the request headers by default. Servers do not send any content when they receive a HEAD request, so there is nothing after the headers:
Replicating browser requests with cURL
If you want to replicate a request made through your browser through cURL, you can use the Chrome, Firefox and Safari developer tools to get a cURL command to do so.
The steps involved are the same for all platforms and browsers:
- Open developer tools in Firefox/Chrome (typically F12 on Windows/Linux and Cmd+Shift+I on a Mac)
- Go to the network tab
- Select the request from the list, right click it and select “Copy as cURL”
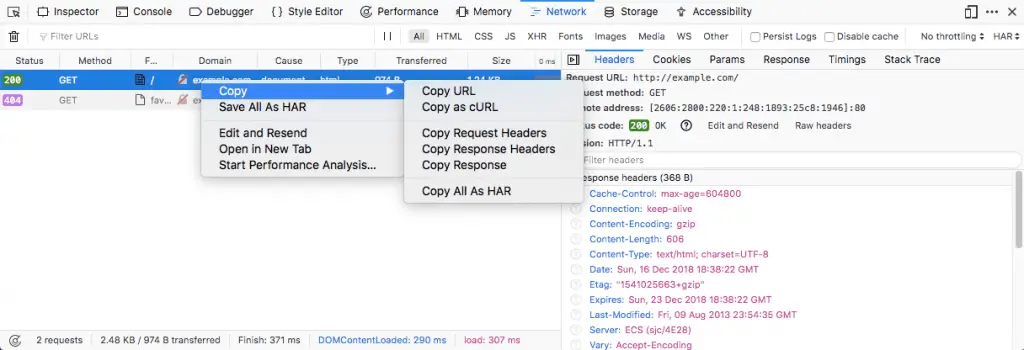
The copied command contains all the headers, request methods, cookies etc. needed to replicate the exact same request. You can paste the command in your terminal to run it.
Making cURL fail on HTTP errors
Interestingly, cURL doesn’t differentiate between a successful HTTP request (2xx) and a failed HTTP request (4xx/5xx). So, it always returns an exit status of 0 as long as there was no problem connecting to the site. This makes it difficult to write shell scripts because there is no way to check if the file could be downloaded successfully.
You can check this by making a request manually:
curl https://www.booleanworld.com/404 -sSo file.txt
You can see that curl doesn’t print any errors, and the exit status is also zero:

If you want to consider these HTTP errors as well, you can use the -f option, like so:
curl https://www.booleanworld.com/404 -fsSo file.txt
Now, you can see that cURL prints an error and also sets the status code to 22 to inform that an error occured:

Making authenticated requests with cURL
Some webpages and APIs require authentication with an username and password. There are two ways to do this. You can mention the username and password with the -u option:
curl -u boolean:world https://example.com/
Alternatively, you can simply add it to the URL itself, with the <username>:<password>@<host> syntax, as shown:
curl https://boolean:[email protected]/
In both of these methods, curl makes a “Basic” authentication with the server.
Testing protocol support with cURL
Due to the wide range of protocols supported by cURL, you can even use it to test protocol support. If you want to check if a site supports a certain version of SSL, you can use the --sslv<version> or --tlsv<version> flags. For example, if you want to check if a site supports TLS v1.2, you can use:
curl -v --tlsv1.2 https://www.booleanworld.com/
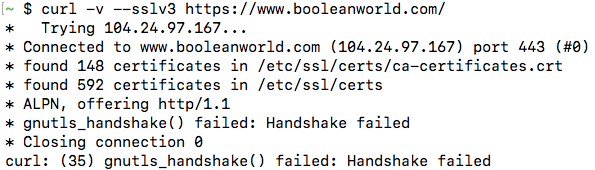
The request takes place normally, which means that the site supports TLSv1.2. Now, let us check if the site supports SSL v3:
curl -v --sslv3 https://www.booleanworld.com/
This command throws a handshake_failed error, because the server doesn’t support this version of SSL.
Please note that, depending on your system and the library version/configuration, some of these version options may not work. The above output was taken from Ubuntu 16.04’s cURL. However, if you try this with cURL in MacOS 10.14, it gives an error:

You can also test for HTTP protocol versions in the same way, by using the flags --http1.0, --http1.1 or --http2.
Setting the Host header and cURL’s --resolve option
Previously, we have discussed about how a web server chooses to serve different websites to visitors depending upon the “Host” header. This can be very useful to check if your website has virtual hosting configured correctly, by changing the “Host” header. As an example, say you have a local server at 192.168.0.1 with two websites configured, namely example1.com and example2.com. Now, you can test if everything is configured correctly by setting the Host header and checking if the correct contents are served:
curl -H 'Host: example1.com' http://192.168.0.1/
curl -H 'Host: example1.com' http://192.168.0.1/
Unfortunately, this doesn’t work so well for websites using HTTPS. A single website may be configured to serve multiple websites, with each website using its own SSL/TLS certificate. Since SSL/TLS takes place at a lower level than HTTP, this means clients such as cURL have to tell the server which website we’re trying to access at the SSL/TLS level, so that the server can pick the right certificate. By default, cURL always tells this to the server.
However, if you want to send a request to a specific IP like the above example, the server may pick a wrong certificate and that will cause the SSL/TLS verification to fail. The Host header only works at the HTTP level and not the SSL/TLS level.
To avoid the problem described above, you can use the --resolve flag. The resolve flag will send the request to the port and IP of your choice but will send the website name at both SSL/TLS and HTTP levels correctly.
Let us consider the previous example. If you were using HTTPS and wanted to send it to the local server 192.168.0.1, you can use:
curl https://example1.com/ --resolve example1.com:192.168.0.1:443
It also works well for HTTP. Suppose, if your HTTP server was serving on port 8080, you can use either the --resolve flag or set the Host header and the port manually, like so:
curl http://192.168.0.1:8080/ -H 'Host: example1.com:8080'
curl http://example.com/ --resolve example1.com:192.168.0.1:8080
The two commands mentioned above are equivalent.
Resolve domains to IPv4 and IPv6 addresses
Sometimes, you may want to check if a site is reachable over both IPv4 or IPv6. You can force cURL to connect to either the IPv4 or over IPv6 version of your site by using the -4 or -6 flags.
Please bear in mind that a website can be reached over IPv4 and IPv6 only if:
- There are appropriate DNS records for the website that links it to IPv4 and IPv6 addresses.
- You have IPv4 and IPv6 connectivity on your system.
For example, if you want to check if you can reach the website icanhazip.com over IPv6, you can use:
curl -6 https://icanhazip.com/
If the site is reachable over HTTPS, you should get your own IPv6 address in the output. This website returns the public IP address of any client that connects to it. So, depending on the protocol used, it displays an IPv4 or IPv6 address.
You can also use the -v option along with -4 and -6 to get more details.
Disabling cURL’s certificate checks
By default, cURL checks certificates when it connects over HTTPS. However, it is often useful to disable the certificate checking, when you are trying to make requests to sites using self-signed certificates, or if you need to test a site that has a misconfigured certificate.
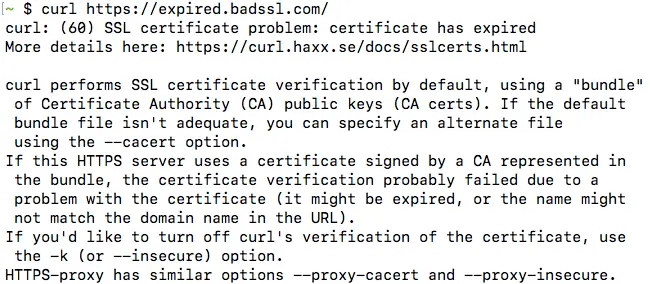
To disable certificate checks, use the -k certificate. We will test this by making a request to expired.badssl.com, which is a website using an expired SSL certificate.
curl -k https://expired.badssl.com/
With the -k option, the certificate checks are ignored. So, cURL downloads the page and displays the request body successfully. On the other hand, if you didn’t use the -k option, you will get an error, similar to the one below:
Troubleshooting website issues with “cURL timing breakdown”
You may run into situations where a website is very slow for you, and you would like to dig deeper into the issue. You can make cURL display details of the request, such as the time taken for DNS resolution, establishing a connection etc. with the -w option. This is often called as a cURL “timing breakdown”.
As an example, if you want to see these details for connecting to https://www.booleanworld.com/, run:
curl https://www.booleanworld.com/ -sSo /dev/null -w 'namelookup:t%{time_namelookup}nconnect:t%{time_connect}nappconnect:t%{time_appconnect}npretransfer:t%{time_pretransfer}nredirect:t%{time_redirect}nstarttransfer:t%{time_starttransfer}ntotal:tt%{time_total}n'
(If you are running this from a Windows system, change the /dev/null to NUL).
You will get some output similar to this:
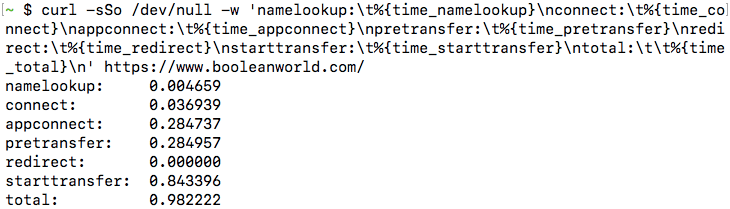
Each of these values is in seconds, and here is what each value represents:
- namelookup — The time required for DNS resolution.
- connect — The time required to establish the TCP connection.
- appconnect — This is the time taken to establish connections for any layers between TCP and the application layer, such as SSL/TLS. In our case, the application layer is HTTP. Also, if there is no such intermediate layer (such as when there is a direct HTTP request), this time will always be 0.
- pretransfer — This is the time taken from the start to when the transfer of the file is just about to begin.
- redirect — This is the total time taken to process any redirects.
- starttransfer — Time it took from the start to when the first byte is about to be transferred.
- total — The total time taken for cURL to complete the entire process.
As an example, say, you are facing delays connecting to a website and you notice the “namelookup” value was too high. As this indicates a problem with your ISP’s DNS server, you may start looking into why the DNS lookup is so slow, and switch to another DNS server if needed.
cURL configuration files
Sometimes, you may want to make all cURL requests use the same options. Passing these options by hand isn’t a feasible solution, so cURL allows you to specify options in a configuration file.
The default configuration file is located in ~/.curlrc in Linux/MacOS and %appdata%_curlrc in Windows. Inside this file, you can specify any options that you need, such as:
# Always use IPv4
-4
# Always show verbose output
-v
# When following a redirect, automatically set the previous URL as referer.
referer = ";auto"
# Wait 60 seconds before timing out.
connect-timeout = 60
After creating the above file, try making a request with curl example.com. You will find that these options have taken effect.
If you want to use a custom configuration file instead of the default one, then you can use -K option to point curl to your configuration file. As an example, if you have a configuration file called config.txt, then you can use it with:
curl -K config.txt example.com
Conclusion
In this article, we have covered the most common uses of the cURL command. Of course, this article only scratches the surface and cURL can do a whole lot of other things. You can type man curl in your terminal or just visit this page to see the man page which lists all the options.

--abstract-unix-socket <path>Example:curl --abstract-unix-socket socketpath https://example.com
--alt-svc <file name>Example:curl --alt-svc svc.txt https://example.com
--anyauthExample: curl --anyauth --user me:pass https://example.com
-a, --appendExample:curl --upload-file local --append ftp://example.com/
--aws-sigv4 <provider1[:provider2[:region[:service]]]>Example: curl --aws-sigv4 "aws:amz:east-2:es" --user "key:secret" https://example.com
--basicExample: curl -u name:password --basic https://example.com
--cacert <file>Example: curl --cacert CA-file.txt https://example.com
--capath <dir>Example: curl --capath /local/directory https://example.com
--cert-statusExample: curl --cert-status https://example.com
--cert-type <type>PEM (default), DER, ENG and P12.
Example: curl --cert-type ENG --cert file https://example.com
-E, --cert <certificate[:password]>Example: curl --cert certfile --key keyfile https://example.com
--ciphers <list of ciphers>Example: curl --ciphers ECDHE-ECDSA-AES256-CCM8 https://example.com
--compressed-sshExample: curl --compressed-ssh sftp://example.com/
--compressedExample: curl --compressed https://example.com
-K, --config <file>Example: curl --config file.txt https://example.com
--connect-timeout <fractional seconds>Example: curl --connect-timeout 30 https://example.com
--connect-to <HOST1:PORT1:HOST2:PORT2>Example: curl --connect-to example.com:443:example.net:8443 https://example.com
-C, --continue-at <offset>curl -C 400 https://example.com
-c, --cookie-jar <filename>curl -c store.txt https://example.com
-b, --cookie <data|filename>Example: curl -b cookiefile https://example.com
--create-dirs--output option.
Example: curl --create-dirs --output local/dir/file https://example.com
--create-file-mode <mode>Example: curl --create-file-mode 0777 -T localfile sftp://example.com/new
--crlfcurl --crlf -T file ftp://example.com/
--crlfile <file>curl --crlfile revoke.txt https://example.com
--curves <algorithm list>Example: curl --curves X25519 https://example.com
--data-ascii <data>-d, --data.
Example: curl --data-ascii @file https://example.com
--data-binary <data>curl --data-binary @filename https://example.com
--data-raw <data>-d, --data, but the @ character is not treated differently from the rest.
curl --data-raw "@[email protected]@" https://example.com
--data-urlencode <data>-d, --data, but perform URL encoding.
Example: curl --data-urlencode name=val https://example.com
-d, --data <data> Example: curl -d "name=curl" https://example.com
--delegation <LEVEL> Example: curl --delegation "always" https://example.com
--digest Example: curl -u name:password --digest https://example.com
--disable-eprt Example: curl --disable-eprt ftp://example.com/
--disable-epsv Example: curl --disable-epsv ftp://example.com/
-q, --disablecurl -q https://example.com
--disallow-username-in-url Example: curl --disallow-username-in-url https://example.com
--dns-interface <interface> Example: curl --dns-interface eth0 https://example.com
--dns-ipv4-addr <address> Example: curl --dns-ipv4-addr 10.1.2.3 https://example.com
--dns-ipv6-addr <address> Example: curl --dns-ipv6-addr 2a04:4e42::561 https://example.com
--dns-servers <addresses> Example: curl --dns-servers 192.168.0.1,192.168.0.2 https://example.com
--doh-cert-status--cert-status for DNS-over-HTTPS.
Example: curl --doh-cert-status --doh-url https://doh.server https://example.com
--doh-insecure-k, --insecure for DoH.
Example: curl --doh-insecure --doh-url https://doh.server https://example.com
--doh-url <URL> Example: curl --doh-url https://doh.server https://example.com
-D, --dump-header <filename> Example: curl --dump-header store.txt https://example.com
--egd-file <file> Example: curl --egd-file /path/here https://example.com
--engine <name> Example: curl --engine flavor https://example.com
--etag-compare <file> Example: curl --etag-compare etag.txt https://example.com
--etag-save <file> Example: curl --etag-save etag.txt https://example.com
--expect100-timeout <seconds> Example: curl --expect100-timeout 2.5 -T file https://example.com
--fail-early Example: curl --fail-early https://example.com https://two.example
--fail-with-body Example: curl --fail-with-body https://example.com
-f, --fail Example: curl --fail https://example.com
--false-start Example: curl --false-start https://example.com
--form-string <name=string>-F, --form, but the value strings are processed literally.
Example: curl --form-string "data" https://example.com
-F, --form <name=content>@ sign forces the content to be a file. The < sign extracts only the content part of the file.
Example: curl --form "name=curl" --form "[email protected]" https://example.com
--ftp-account <data> Example: curl --ftp-account "account_data" ftp://example.com/
--ftp-alternative-to-user <command> Example: curl --ftp-alternative-to-user "U53r" ftp://example.com
--ftp-create-dirs Example: curl --ftp-create-dirs -T file ftp://example.com/dirs/one/file
--ftp-method <method>multicwd, nocwd, and singlecwd.
Example: curl --ftp-method multicwd ftp://example.com/dir1/dir2/file
--ftp-pasv Example: curl --ftp-pasv ftp://example.com/
-P, --ftp-port <address> Example: curl -P eth0 ftp:/example.com
--ftp-pret Example: curl --ftp-pret ftp://example.com/
--ftp-skip-pasv-ip Example: curl --ftp-skip-pasv-ip ftp://example.com/
--ftp-ssl-ccc-mode <active/passive> Example: curl --ftp-ssl-ccc-mode active --ftp-ssl-ccc ftps://example.com/
--ftp-ssl-ccc Example: curl --ftp-ssl-ccc ftps://example.com/
--ftp-ssl-control Example: curl --ftp-ssl-control ftp://example.com
-G, --get Example: curl --get -d "tool=curl" -d "age=old" https://example.com
-g, --globoff Example: curl -g "https://example.com/{[]}}}}"
--happy-eyeballs-timeout-ms <milliseconds> Example: curl --happy-eyeballs-timeout-ms 500 https://example.com
--haproxy-protocol Example: curl --haproxy-protocol https://example.com
-I, --head Example: curl -I https://example.com
-H, --header <header/@file> Example: curl -H "X-First-Name: Joe" https://example.com
-h, --help <category>all lists all the available options.
Example: curl --help all
--hostpubmd5 <md5> Example: curl --hostpubmd5 e5c1c49020640a5ab0f2034854c321a8 sftp://example.com/
--hsts <file name> Example: curl --hsts cache.txt https://example.com
--http0.9 Example: curl --http0.9 https://example.com
-0, --http1.0 Example: curl --http1.0 https://example.com
--http1.1 Example: curl --http1.1 https://example.com
--http2-prior-knowledge Example: curl --http2-prior-knowledge https://example.com
--http2 Example: curl --http2 https://example.com
--http3 Example: curl --http3 https://example.com
--ignore-content-length Example: curl --ignore-content-length https://example.com
-i, --include Example: curl -i https://example.com
-k, --insecure Example: curl --insecure https://example.com
--interface <name> Example: curl --interface eth0 https://example.com
-4, --ipv4 Example: curl --ipv4 https://example.com
-6, --ipv6 Example: curl --ipv6 https://example.com
-j, --junk-session-cookies Example: curl --junk-session-cookies -b cookies.txt https://example.com
--keepalive-time <seconds> Example: curl --keepalive-time 30 https://example.com
--key-type <type>PEM (default), DER, and ENG.
Example: curl --key-type ENG --key here https://example.com
--key <key> Example: curl --cert certificate --key here https://example.com
--krb <level>clear, safe, confidential, and private (default).
Example: curl --krb clear ftp://example.com/
--libcurl <file> Example: curl --libcurl client.c https://example.com
--limit-rate <speed> Example: curl --limit-rate 100K https://example.com
-l, --list-only Example: curl --list-only ftp://example.com/dir/
--local-port <num/range> Example: curl --local-port 1000-3000 https://example.com
--location-trusted-L, --location, but enables you to send name and password to all redirections.
Example: curl --location-trusted -u user:pass https://example.com
-L, --location Example: curl -L https://example.com
--login-options <options> Example: curl --login-options 'AUTH=*' imap://example.com
--mail-auth <address> Example: curl --mail-auth [email protected] -T mail smtp://example.com/
--mail-from <address> Example: curl --mail-from [email protected] -T mail smtp://example.com/
--mail-rcpt-allowfails Example: curl --mail-rcpt-allowfails --mail-rcpt [email protected] smtp://example.com
--mail-rcpt <address> Example: curl --mail-rcpt [email protected] smtp://example.com
-M, --manual Example: curl --manual
--max-filesize <bytes>Example:
curl --max-filesize 500K https://example.com --max-redirs <num>--location is active.
Example: curl --max-redirs 3 --location https://example.com
-m, --max-time <fractional seconds> Example: curl --max-time 5.52 https://example.com
--metalink Example: curl --metalink file https://example.com
--negotiate Example: curl --negotiate -u : https://example.com
--netrc-file <filename>--n, --netrc, but allows you to specify the file to be used.
Example: curl --netrc-file netrc https://example.com
--netrc-optional--n, --netrc, but using netrc is optional.
Example: curl --netrc-optional https://example.com
-n, --netrc Example: curl --netrc https://example.com
-:, --next Example: curl -I https://example.com --next https://example.net/
--no-alpn Example: curl --no-alpn https://example.com
-N, --no-buffer Example: curl --no-buffer https://example.com
--no-keepalive Example: curl --no-keepalive https://example.com
--no-npn Example: curl --no-npn https://example.com
--no-progress-meter Example: curl --no-progress-meter -o store https://example.com
--no-sessionid Example: curl --no-sessionid https://example.com
--noproxy <no-proxy-list> Example: curl --noproxy "www.example" https://example.com
--ntlm-wb--ntlm, but also hands authentication to ntlmauth.
Example: curl --ntlm-wb -u user:password https://example.com
--ntlm Example: curl --ntlm -u user:password https://example.com
--oauth2-bearer <token> Example: curl --oauth2-bearer "mF_9.B5f-4.1JqM" https://example.com
--output-dir <dir> Example: curl --output-dir "tmp" -O https://example.com
-o, --output <file> Example: curl -o file https://example.com -o file2 https://example.net
--parallel-immediate Example: curl --parallel-immediate -Z https://example.com -o file1 https://example.com -o file2
--parallel-max <num> Example: curl --parallel-max 100 -Z https://example.com ftp://example.com/
-Z, --parallel Example: curl --parallel https://example.com -o file1 https://example.com -o file2
--pass <phrase> Example: curl --pass secret --key file https://example.com
--path-as-is/./ and /../ sequences.
Example: curl --path-as-is https://example.com/../../etc/passwd
-pinnedpubkey <hashes> Example: curl --pinnedpubkey keyfile https://example.com
--post301 Example: curl --post301 --location -d "data" https://example.com
--post302curl --post302 --location -d "data" https://example.com
--post303 Example: curl --post303 --location -d "data" https://example.com
--preproxy [protocol://]host[:port] Example: curl --preproxy socks5://proxy.example -x http://http.example https://example.com
-#, --progress-bar Example: curl -# -O https://example.com
--proto-default <protocol> Example: curl --proto-default https ftp.example.com
--proto-redir <protocols> Example: curl --proto-redir =http,https https://example.com
--proto <protocols> Example: curl --proto =http,https,sftp https://example.com
--proxy-anyauth Example: curl --proxy-anyauth --proxy-user user:passwd -x proxy https://example.com
--proxy-basic Example: curl --proxy-basic --proxy-user user:passwd -x proxy https://example.com
--proxy-cacert <file>--cacert for HTTPS proxies.
Example: curl --proxy-cacert CA-file.txt -x https://proxy https://example.com
--proxy-capath <dir>--capath for HTTPS proxies.
Example:curl --proxy-capath /local/directory -x https://proxy https://example.com
--proxy-cert-type <type>--cert-type for HTTPS proxies.
Example: curl --proxy-cert-type PEM --proxy-cert file -x https://proxy https://example.com
--proxy-cert <cert[:passwd]>-E, --cert for HTTPS proxies.
Example: curl --proxy-cert file -x https://proxy https://example.com
--proxy-ciphers <list>--ciphers for HTTPS proxies.
curl --proxy-ciphers ECDHE-ECDSA-AES256-CCM8 -x https://proxy https://example.com
--proxy-crlfile <file>--crlfile for HTTPS proxies.
Example: curl --proxy-crlfile rejects.txt -x https://proxy https://example.com
--proxy-digest Example: curl --proxy-digest --proxy-user user:passwd -x proxy https://example.com
--proxy-header <header/@file>-H, --header for proxy communication.
Example: curl --proxy-header "Host:" -x http://proxy https://example.com
--proxy-insecure-k, --insecure for HTTPS proxies.
Example: curl --proxy-insecure -x https://proxy https://example.com
--proxy-key-type <type>--key-type for HTTPS proxies.
Example: curl --proxy-key-type DER --proxy-key here -x https://proxy https://example.com
--proxy-key <key>--key for HTTPS proxies.
Example: curl --proxy-key here -x https://proxy https://example.com
--proxy-negotiate--negotiate for proxy communication.
Example: curl --proxy-negotiate --proxy-user user:passwd -x proxy https://example.com
--proxy-ntlm Example: curl --proxy-ntlm --proxy-user user:passwd -x http://proxy https://example.com
--proxy-pass <phrase>--pass for HTTPS proxies.
Example: curl --proxy-pass secret --proxy-key here -x https://proxy https://example.com
--proxy-pinnedpubkey <hashes> Example: curl --proxy-pinnedpubkey keyfile https://example.com
--proxy-service-name <name> Example: curl --proxy-service-name "shrubbery" -x proxy https://example.com
--proxy-ssl-allow-beast--ssl-allow-beast for HTTPS proxies.
Example: curl --proxy-ssl-allow-beast -x https://proxy https://example.com
--proxy-ssl-auto-client-cert--ssl-auto-client-cert for HTTPS proxies.
Example: curl --proxy-ssl-auto-client-cert -x https://proxy https://example.com
--proxy-tls13-ciphers <ciphersuite list> Example: curl --proxy-tls13-ciphers TLS_AES_128_GCM_SHA256 -x proxy https://example.com
--proxy-tlsauthtype <type>--tlsauthtype for HTTPS proxies.
Example: curl --proxy-tlsauthtype SRP -x https://proxy https://example.com
--proxy-tlspassword <string>--tlspassword for HTTPS proxies.
Example: curl --proxy-tlspassword passwd -x https://proxy https://example.com
--proxy-tlsuser <name>--tlsuser for HTTPS proxies.
Example: curl --proxy-tlsuser smith -x https://proxy https://example.com
--proxy-tlsv1-1, --tlsv1 for HTTPS proxies.
Example: curl --proxy-tlsv1 -x https://proxy https://example.com
-U, --proxy-user <user:password> Example: curl --proxy-user name:pwd -x proxy https://example.com
-x, --proxy [protocol://]host[:port] Example: curl --proxy http://proxy.example https://example.com
--proxy1.0 <host[:port]> Example: curl --proxy1.0 -x http://proxy https://example.com
-p, --proxytunnel Example: curl --proxytunnel -x http://proxy https://example.com
--pubkey <key> Example: curl --pubkey file.pub sftp://example.com/
-Q, --quote <command> Example: curl --quote "rm file" ftp://example.com/foo
--random-file <file> Example: curl --random-file rubbish https://example.com
-r, --range <range> Example: curl --range 40-80 https://example.com
--raw Example: curl --raw https://example.com
-e, --referer <URL> Example: curl --referer "https://test.example" https://example.com
-J, --remote-header-name Example: curl -OJ https://example.com/file
--remote-name-all-O, --remote-name option to all the URLs.
Example: curl --remote-name-all ftp://example.com/file1 ftp://example.com/file2
-O, --remote-name Example: curl -O https://example.com/filename
-R, --remote-time Example: curl --remote-time -o foo https://example.com
--request-target <path> Example: curl --request-target "*" -X OPTIONS https://example.com
-X, --request <command> Example: curl -X "DELETE" https://example.com
--resolve <[+]host:port:addr[,addr]...> Example: curl --resolve example.com:443:127.0.0.1 https://example.com
--retry-all-errors Example: curl --retry-all-errors https://example.com
--retry-connrefused--retry.
Example: curl --retry-connrefused --retry https://example.com
--retry-delay <seconds> Example: curl --retry-delay 5 --retry https://example.com
--retry-max-time <seconds>--retry attempts.
Example: curl --retry-max-time 30 --retry 10 https://example.com
--retry <num> Example: curl --retry 7 https://example.com
--sasl-authzid <identity> Example: curl --sasl-authzid zid imap://example.com/
--sasl-ir Example: curl --sasl-ir imap://example.com/
--service-name <name> Example: curl --service-name sockd/server https://example.com
-S, --show-error-s, --silent option enabled.
Example: curl --show-error --silent https://example.com
-s, --silent Example: curl -s https://example.com
--socks4 <host[:port]> Example: curl --socks4 hostname:4096 https://example.com
--socks4a <host[:port]> Example: curl --socks4a hostname:4096 https://example.com
--socks5-basic Example: curl --socks5-basic --socks5 hostname:4096 https://example.com
--socks5-gssapi-nec Example: curl --socks5-gssapi-nec --socks5 hostname:4096 https://example.com
--socks5-gssapi-service <name> Example: curl --socks5-gssapi-service sockd --socks5 hostname:4096 https://example.com
--socks5-gssapi Example: curl --socks5-gssapi --socks5 hostname:4096 https://example.com
--socks5-hostname <host[:port]> Example: curl --socks5-hostname proxy.example:7000 https://example.com
--socks5 <host[:port]> Example: curl --socks5 proxy.example:7000 https://example.com
-Y, --speed-limit <speed> Example: curl --speed-limit 300 --speed-time 10 https://example.com
-y, --speed-time <seconds> Example: curl --speed-limit 300 --speed-time 10 https://example.com
--ssl-allow-beast Example: curl --ssl-allow-beast https://example.com
--ssl-auto-client-cert Example: curl --ssl-auto-client-cert https://example.com
--ssl-no-revoke Example: curl --ssl-no-revoke https://example.com
--ssl-reqd Example: curl --ssl-reqd ftp://example.com
--ssl-revoke-best-effort Example: curl --ssl-revoke-best-effort https://example.com
--ssl Example: curl --ssl pop3://example.com/
-2, --sslv2 Example: curl --sslv2 https://example.com
-3, --sslv3 Example: curl --sslv3 https://example.com
--stderr <file>- symbol tells curl to output stderr to stdout.
Example: curl --stderr output.txt https://example.com
--styled-outputcurl --styled-output -I https://example.com
--suppress-connect-headers Example: curl --suppress-connect-headers --include -x proxy https://example.com
--tcp-fastopen Example: curl --tcp-fastopen https://example.com
--tcp-nodelay Example: curl --tcp-nodelay https://example.com
-t, --telnet-option <opt=val>TTYPE, XDISPLOC, and NEW_ENV options to the telnet protocol.
Example: curl -t TTYPE=vt100 telnet://example.com/
--tftp-blksize <value> Example: curl --tftp-blksize 1024 tftp://example.com/file
--tftp-no-options Example: curl --tftp-no-options tftp://192.168.0.1/
-z, --time-cond <time> Example: curl -z "Wed 01 Sep 2021 12:18:00" https://example.com
--tls-max <VERSION> Example: curl --tls-max 1.2 https://example.com
--tls13-ciphers <ciphersuite list> Example: curl --tls13-ciphers TLS_AES_128_GCM_SHA256 https://example.com
--tlsauthtype <type> Example: curl --tlsauthtype SRP https://example.com
--tlspassword <string> Example: curl --tlspassword pwd --tlsuser user https://example.com
--tlsuser <name> Example: curl --tlspassword pwd --tlsuser user https://example.com
--tlsv1.0 Example: curl --tlsv1.0 https://example.com
--tlsv1.1 Example: curl --tlsv1.1 https://example.com
--tlsv1.2 Example: curl --tlsv1.2 https://example.com
--tlsv1.3 Example: curl --tlsv1.3 https://example.com
-1, --tlsv1 Example: curl --tlsv1 https://example.com
--tr-encoding Example: curl --tr-encoding https://example.com
--trace-ascii <file> Example: curl --trace-ascii log.txt https://example.com
--trace-time Example: curl --trace-time --trace-ascii output https://example.com
--trace <file> Example: curl --trace log.txt https://example.com
--unix-socket <path> Example: curl --unix-socket socket-path https://example.com
-T, --upload-file <file> Example: curl -T "img[1-1000].png" ftp://ftp.example.com/
--url <url> Example: curl --url https://example.com
-B, --use-ascii Example: curl -B ftp://example.com/README
-A, --user-agent <name> Example: curl -A "Agent 007" https://example.com
-u, --user <user:password> Example: curl -u user:secret https://example.com
-v, --verboseExample: curl --verbose https://example.com
-V, --version Example: curl --version
-w, --write-out <format> Example: curl -w '%{http_code}n' https://example.com
--xattr Example: curl --xattr -o storage https://example.com
Я использую функции PHP curl для отправки данных на веб-сервер с моей локальной машины. Мой код выглядит следующим образом:
$c = curl_init();
curl_setopt($c, CURLOPT_URL, $url);
curl_setopt($c, CURLOPT_RETURNTRANSFER, true);
curl_setopt($c, CURLOPT_POST, true);
curl_setopt($c, CURLOPT_POSTFIELDS, $data);
$result = curl_exec($c);
if (curl_exec($c) === false) {
echo «ok»;
} else {
echo «error»;
}
curl_close($c);
К сожалению, я не могу поймать ни одной ошибки типа 404, 500 или сетевого уровня. Как же мне узнать, что данные не были размещены или получены с удаленного сервера?
Ответ 1
Вы можете использовать функцию curl_error(), чтобы определить, произошла ли какая-то ошибка. Например:
$ch = curl_init();
curl_setopt($ch, CURLOPT_URL, $your_url);
curl_setopt($ch, CURLOPT_FAILONERROR, true); // Требуется для того, чтобы коды ошибок HTTP сообщались через наш вызов к curl_error($ch)
//…
curl_exec($ch);
if (curl_errno($ch)) {
$error_msg = curl_error($ch);
}
curl_close($ch);
if (isset($error_msg)) {
// TODO — Обработать ошибку cURL соответствующим образом
}
Ответ 2
Если CURLOPT_FAILONERROR равно false, ошибки http не будут вызывать ошибок curl.
<?php
if (@$_GET[‘curl’]==»yes») {
header(‘HTTP/1.1 503 Service Temporarily Unavailable’);
} else {
$ch=curl_init($url = «http://».$_SERVER[‘SERVER_NAME’].$_SERVER[‘PHP_SELF’].»?curl=yes»);
curl_setopt($ch, CURLOPT_FAILONERROR, true);
$response=curl_exec($ch);
$http_status = curl_getinfo($ch, CURLINFO_HTTP_CODE);
$curl_errno= curl_errno($ch);
if ($http_status==503)
echo «HTTP Status == 503 <br/>»;
echo «Curl Errno returned $curl_errno <br/>»;
}
Ответ 3
Вы можете сгенерировать ошибку curl после его выполнения:
$url = ‘http://example.com’;
$ch = curl_init($url);
curl_setopt($ch, CURLOPT_RETURNTRANSFER, true);
$result = curl_exec($ch);
if(curl_errno($ch)){
echo ‘Request Error:’ . curl_error($ch);
}
И вот коды ошибок curl:
если кому-то нужна дополнительная информация об ошибках curl
<?php
$error_codes=array(
[1] => ‘CURLE_UNSUPPORTED_PROTOCOL’,
[2] => ‘CURLE_FAILED_INIT’,
[3] => ‘CURLE_URL_MALFORMAT’,
[4] => ‘CURLE_URL_MALFORMAT_USER’,
[5] => ‘CURLE_COULDNT_RESOLVE_PROXY’,
[6] => ‘CURLE_COULDNT_RESOLVE_HOST’,
[7] => ‘CURLE_COULDNT_CONNECT’,
[8] => ‘CURLE_FTP_WEIRD_SERVER_REPLY’,
[9] => ‘CURLE_REMOTE_ACCESS_DENIED’,
[11] => ‘CURLE_FTP_WEIRD_PASS_REPLY’,
[13] => ‘CURLE_FTP_WEIRD_PASV_REPLY’,
[14]=>’CURLE_FTP_WEIRD_227_FORMAT’,
[15] => ‘CURLE_FTP_CANT_GET_HOST’,
[17] => ‘CURLE_FTP_COULDNT_SET_TYPE’,
[18] => ‘CURLE_PARTIAL_FILE’,
[19] => ‘CURLE_FTP_COULDNT_RETR_FILE’,
[21] => ‘CURLE_QUOTE_ERROR’,
[22] => ‘CURLE_HTTP_RETURNED_ERROR’,
[23] => ‘CURLE_WRITE_ERROR’,
[25] => ‘CURLE_UPLOAD_FAILED’,
[26] => ‘CURLE_READ_ERROR’,
[27] => ‘CURLE_OUT_OF_MEMORY’,
[28] => ‘CURLE_OPERATION_TIMEDOUT’,
[30] => ‘CURLE_FTP_PORT_FAILED’,
[31] => ‘CURLE_FTP_COULDNT_USE_REST’,
[33] => ‘CURLE_RANGE_ERROR’,
[34] => ‘CURLE_HTTP_POST_ERROR’,
[35] => ‘CURLE_SSL_CONNECT_ERROR’,
[36] => ‘CURLE_BAD_DOWNLOAD_RESUME’,
[37] => ‘CURLE_FILE_COULDNT_READ_FILE’,
[38] => ‘CURLE_LDAP_CANNOT_BIND’,
[39] => ‘CURLE_LDAP_SEARCH_FAILED’,
[41] => ‘CURLE_FUNCTION_NOT_FOUND’,
[42] => ‘CURLE_ABORTED_BY_CALLBACK’,
[43] => ‘CURLE_BAD_FUNCTION_ARGUMENT’,
[45] => ‘CURLE_INTERFACE_FAILED’,
[47] => ‘CURLE_TOO_MANY_REDIRECTS’,
[48] => ‘CURLE_UNKNOWN_TELNET_OPTION’,
[49] => ‘CURLE_TELNET_OPTION_SYNTAX’,
[51] => ‘CURLE_PEER_FAILED_VERIFICATION’,
[52] => ‘CURLE_GOT_NOTHING’,
[53] => ‘CURLE_SSL_ENGINE_NOTFOUND’,
[54] => ‘CURLE_SSL_ENGINE_SETFAILED’,
[55] => ‘CURLE_SEND_ERROR’,
[56] => ‘CURLE_RECV_ERROR’,
[58] => ‘CURLE_SSL_CERTPROBLEM’,
[59] => ‘CURLE_SSL_CIPHER’,
[60] => ‘CURLE_SSL_CACERT’,
[61] => ‘CURLE_BAD_CONTENT_ENCODING’,
[62] => ‘CURLE_LDAP_INVALID_URL’,
[63] => ‘CURLE_FILESIZE_EXCEEDED’,
[64] => ‘CURLE_USE_SSL_FAILED’,
[65] => ‘CURLE_SEND_FAIL_REWIND’,
[66] => ‘CURLE_SSL_ENGINE_INITFAILED’,
[67] => ‘CURLE_LOGIN_DENIED’,
[68] => ‘CURLE_TFTP_NOTFOUND’,
[69] => ‘CURLE_TFTP_PERM’,
[70] => ‘CURLE_REMOTE_DISK_FULL’,
[71] => ‘CURLE_TFTP_ILLEGAL’,
[72] => ‘CURLE_TFTP_UNKNOWNID’,
[73] => ‘CURLE_REMOTE_FILE_EXISTS’,
[74] => ‘CURLE_TFTP_NOSUCHUSER’,
[75] => ‘CURLE_CONV_FAILED’,
[76] => ‘CURLE_CONV_REQD’,
[77] => ‘CURLE_SSL_CACERT_BADFILE’,
[78] => ‘CURLE_REMOTE_FILE_NOT_FOUND’,
[79] => ‘CURLE_SSH’,
[80] => ‘CURLE_SSL_SHUTDOWN_FAILED’,
[81] => ‘CURLE_AGAIN’,
[82] => ‘CURLE_SSL_CRL_BADFILE’,
[83] => ‘CURLE_SSL_ISSUER_ERROR’,
[84] => ‘CURLE_FTP_PRET_FAILED’,
[84] => ‘CURLE_FTP_PRET_FAILED’,
[85] => ‘CURLE_RTSP_CSEQ_ERROR’,
[86] => ‘CURLE_RTSP_SESSION_ERROR’,
[87] => ‘CURLE_FTP_BAD_FILE_LIST’,
[88] => ‘CURLE_CHUNK_FAILED’);
?>
Ответ 4
Поскольку вы заинтересованы в отлове ошибок, связанных с сетью, и ошибок HTTP, ниже приведен лучший подход:
function curl_error_test($url) {
$ch = curl_init();
curl_setopt($ch, CURLOPT_URL, $url);
curl_setopt($ch, CURLOPT_RETURNTRANSFER, true);
$responseBody = curl_exec($ch);
/*
* if curl_exec failed then
* $responseBody равно false
* curl_errno() возвращает ненулевое число
* curl_error() возвращает непустую строку
* Какой из них использовать — решать вам
*/
if ($responseBody === false) {
return «CURL Error: » . curl_error($ch);
}
$responseCode = curl_getinfo($ch, CURLINFO_HTTP_CODE);
/*
* 4xx коды состояния — ошибки клиента
* 5xx коды состояния — ошибки сервера
*/
if ($responseCode >= 400) {
return «HTTP Error: » . $responseCode;
}
return «Нет ошибки CURL или HTTP «;
}
Тесты:
curl_error_test(«http://expamle.com»); // Ошибка CURL : Невозможно определить хост : expamle.com
curl_error_test(«http://example.com/whatever»); // Ошибка HTTP: 404
curl_error_test(«http://example.com»); // Все в порядке с CURL или HTTP
Ответ 5
Еще один вариант кода:
$responseInfo = curl_getinfo($ch);
$httpCode = curl_getinfo($ch, CURLINFO_HTTP_CODE);
$header_size = curl_getinfo($ch, CURLINFO_HEADER_SIZE);
$body = substr($response, $header_size);
$result=array();
$result[‘httpCode’]=$httpCode;
$result[‘body’]=json_decode($body);
$result[‘responseInfo’]=$responseInfo;
print_r($httpCode);
print_r($result[‘body’]); exit;
curl_close($ch);
if($httpCode == 403) {
print_r(«Доступ запрещен»);
exit;
} else {
// другие ошибки
}
PHP’s cURL functions are extremely useful for sending HTTP requests.
Some examples of its usefulness.
- Retrieving data from an external API.
- Sending data to an external web service.
- Checking to see if a HTTP resource exists.
- Crawling / scraping web pages (logging into other websites with PHP).
Although you can easily request external content via the function file_get_contents, cURL is much more useful in the sense that it allows us to detect and handle certain HTTP errors.
Let’s take the following example.
$url = 'http://example.com';
$ch = curl_init($url);
curl_setopt($ch, CURLOPT_RETURNTRANSFER, true);
$result = curl_exec($ch);
echo $result;
As you can see, we have setup a very simple GET request that returns the contents of a website called example.com.
Unfortunately, this code doesn’t take into account the fact that the cURL request could fail. As a result, the request might fail without providing us with any details about what happened.
Using curl_errno to detect cURL errors.
This is where the curl_errno function comes in handy.
The curl_errno function will return the number 0 (zero) if the request was successful. In other words, it will return a “falsey” value if no error occurs. This is because PHP sees 0 as a false value in a boolean context.
This allows us to figure out whether or not our cURL request resulted in an error.
Take a look at the following example.
$url = 'http://example.com';

$ch = curl_init($url);
curl_setopt($ch, CURLOPT_RETURNTRANSFER, true);
$result = curl_exec($ch);
if(curl_errno($ch)){
    echo 'Request Error:' . curl_error($ch);
}
If an error occurs, then our script will print out the result of the curl_error function.
Throwing Exceptions.
In certain situations, you might want to throw an exception if a cURL request fails.
For this example, let us pretend that we have an object function called get.
/**
 * Send a GET request to a URL.
 *
 * @param string $url
 * @return string
 * @throws Exception If cURL request fails.
 */
public function get($url){
    $ch = curl_init($url);
    curl_setopt($ch, CURLOPT_RETURNTRANSFER, true);
    $result = curl_exec($ch);
    if(curl_errno($ch)){
        throw new Exception(curl_error($ch));
    }
    return $result;
}
As you can see, the function above will attempt to send a GET request to a given URL.
If all goes well, the function will return the contents of the URL.
However, if the request fails and a cURL error exists, PHP will throw an Exception.
This allows us to handle the request like so.
try{
    $object->get('http://test.com');
} catch(Exception $e){
    //do something with the exception you caught
}
In the above piece of code, we are using a TRY-CATCH block.
If we do not want our application to continue after a failed HTTP request, we can omit the TRY-CATCH block and let our Exception Handler deal with it.
Updated: 08/16/2021 by

The curl command transfers data to or from a network server, using one of the supported protocols (HTTP, HTTPS, FTP, FTPS, SCP, SFTP, TFTP, DICT, TELNET, LDAP or FILE). It is designed to work without user interaction, so it is ideal for use in a shell script.
The software offers proxy support, user authentication, FTP uploading, HTTP posting, SSL connections, cookies, file transfer resume, metalink, and other features.
Syntax
curl [options] [URL...]
Options
| -a, —append | (FTP/SFTP) When used in an FTP upload, this will tell curl to append to the target file instead of overwriting it. If the file doesn’t exist, it is created.
Note that this option is ignored by some SSH servers, including OpenSSH. |
| -A, —user-agent <agent string> | (HTTP) Specify the User-Agent string to send to the HTTP server. Some CGI fail if the agent string is not set to «Mozilla/4.0«. To encode blanks in the string, surround the string with single quote marks.
This value can also be set with the -H/—header option. If this option is set more than once, the last one will be the one that’s used. |
| —anyauth | (HTTP) Tells curl to figure out authentication method by itself, and use the most secure method the remote site claims it supports. This is done by first making a request and checking the response-headers, thus possibly inducing a network round-trip. This is used instead of setting a specific authentication method, which you can do with —basic, —digest, —ntlm, and —negotiate.
Note that using —anyauth is not recommended if you do uploads from stdin since it may require data to be sent twice and then the client must be able to rewind. If the need should arise when uploading from stdin, the upload operation fails. |
| -b, —cookie <name=data> | (HTTP) Pass the data to the HTTP server as a cookie. It is expected to be the data previously received from the server in a «Set-Cookie:» line. The data should be in the format «NAME1=VALUE1; NAME2=VALUE2«.
If no ‘=‘ (equals) character is used in the line, it is treated as a file name to use to read previously stored cookie lines from, which should be used in this session if they match. Using this method also activates the «cookie parser» which makes curl record incoming cookies too, which may be handy if you’re using this in combination with the —location option. The file format of the file to read cookies from should be plain HTTP headers or the Netscape/Mozilla cookie file format. NOTE: the file specified with -b/—cookie is only used as input. No cookies will be stored in the file. To store cookies, use the -c/—cookie-jar option, or you can save the HTTP headers to a file using -D/—dump-header. If this option is set more than once, the last occurrence will be the option that’s used. |
| -B, —use-ascii | (FTP/LDAP) Enable ASCII transfer. For FTP, this can also be enforced using an URL that ends with «;Type=A«. This option causes data sent to stdout to be in text mode for win32 systems.
If this option is used twice, the second one disables ASCII usage. |
| —basic | (HTTP) Tells curl to use HTTP Basic authentication. This is the default and this option is usually pointless, unless you use it to override a previously set option that sets a different authentication method (such as —ntlm, —digest and —negotiate). |
| —ciphers <list of ciphers> | (SSL) Specifies which ciphers to use in the connection. The ciphers listed must be valid. You can read up on SSL cipher list details at openssl.org.
NSS ciphers are done differently than OpenSSL and GnuTLS. The full list of NSS ciphers is in the NSSCipherSuite entry at this URL: https://pagure.io/mod_nss#Directives. If this option is used several times, the last one overrides the others. |
| —compressed | (HTTP) Request a compressed response using one of the algorithms curl supports, and return the uncompressed document. If this option is used and the server sends an unsupported encoding, Curl will report an error. |
| —connect-timeout <seconds> | Maximum time in seconds that the connection to the server may take. This only limits the connection phase; once curl has connected this option no longer applies. Since 7.32.0, this option accepts decimal values, but the actual timeout decreases in accuracy as the specified timeout increases in decimal precision. See also the -m/—max-time option.
If this option is used several times, the last one will be used. |
| -c, —cookie-jar <file name> | (HTTP) Specify what file you want curl to write all cookies after a completed operation. Curl writes all cookies previously read from a specified file and all cookies received from remote server(s). If no cookies are known, no file will be written. The file will be written using the Netscape cookie file format. If you set the file name to a single dash («—«), the cookies will be written to stdout.
This command line option activates the cookie engine that makes curl record and use cookies. Another way to activate it is to use the -b/—cookie option. NOTE: If the cookie jar can’t be created or written to, the whole curl operation won’t fail or even report an error. If -v is specified a warning is displayed, but that is the only visible feedback you get about this possibly fatal situation. If this option is used several times, the last specified file name will be used. |
| -C, —continue-at <offset> | Continue/Resume a previous file transfer at the given offset. The given offset is the exact number of bytes that will be skipped, counted from the beginning of the source file before it is transferred to the destination. If used with uploads, the ftp server command SIZE is not used by curl.
Use «-C —» to tell curl to automatically find out where/how to resume the transfer. It then uses the given output/input files to figure that out. If this option is used several times, the last one will be used. |
| —create-dirs | When used in conjunction with the -o option, curl creates the necessary local directory hierarchy as needed. This option creates the dirs mentioned with the -o option, nothing else. If the -o file name uses no directory or if the directories it mentions already exist, no directories are created.
To create remote directories when using FTP or SFTP, try —ftp-create-dirs. |
| —crlf | (FTP) Convert LF to CRLF in upload. Useful for MVS (OS/390). |
| —crlfile <file> | (HTTPS/FTPS) Provide a file using PEM format with a Certificate Revocation List that may specify peer certificates that are to be considered revoked.
If this option is used several times, the last one will be used. (Added in 7.19.7) |
| -d, —data <data> | (HTTP) Sends the specified data in a POST request to the HTTP server, in a way that emulates as if a user has filled in an HTML form and pressed the submit button. Note that the data is sent exactly as specified with no extra processing (with all newlines cut off). The data is expected to be «url-encoded». This causes curl to pass the data to the server using the content-type application/x-www-form-urlencoded. Compare to -F/—form. If this option is used more than once on the same command line, the data pieces specified are merged together with a separating «&» character. Thus, using ‘-d name=daniel -d skill=lousy’ would generate a POST chunk that looks like ‘name=daniel&skill=lousy’.
If you start the data with the «@» character, the rest should be a file name to read the data from, or «—» (dash) if you want curl to read the data from stdin. The file’s contents must already be url-encoded. Multiple files can also be specified. Posting data from a file named ‘foobar’ would thus be done with «—data @foo-bar«. -d/—data is the same as —data-ascii. To post data purely binary, use the —data-binary option. To URL-encode the value of a form field you may use —data-urlencode. If this option is used several times, the ones following the first will append data. |
| —data-ascii <data> | (HTTP) This is an alias for the -d/—data option.
If this option is used several times, the ones following the first will append data. |
| —data-binary <data> | (HTTP) This posts data exactly as specified with no extra processing whatsoever.
If you start the data with the character @, the rest should be a filename. Data is posted in a similar manner as —data-ascii does, except that newlines are preserved and conversions are never done. |
| —data-urlencode <data> | (HTTP) This posts data, similar to the other —data options with the exception that this performs URL-encoding. (Added in 7.18.0)
To be CGI-compliant, the <data> part should begin with a name followed by a separator and a content specification. The <data> part can be passed to curl using one of the following syntaxes: content This makes curl URL-encode the content and pass that on. Just be careful so that the content doesn’t contain any = or @ symbols, as that will then make the syntax match one of the other cases below! =content This makes curl URL-encode the content and pass that on. The preceding = symbol is not included in the data. name=content This makes curl URL-encode the content part and pass that on. Note that the name part is expected to be URL-encoded already. @filename This makes curl load data from the given file (including any newlines), URL-encode that data and pass it on in the POST. [email protected] This makes curl load data from the given file (including any newlines), URL-encode that data and pass it on in the POST. The name part gets an equal sign appended, resulting in name=urlencoded-file-content. Note that the name is expected to be URL-encoded already. |
| —delegation LEVEL | Set LEVEL to tell the server what it is allowed to delegate with the user credentials. Used with GSS/kerberos.
none Don’t allow any delegation. policy Delegates if and only if the OK-AS-DELEGATE flag is set in the Kerberos service ticket, a matter of realm policy. always Unconditionally allow the server to delegate. |
| —digest | (HTTP) Enables HTTP Digest authentication. This is an authentication that prevents the password from being sent as clear text. Use this in combination with the normal -u/—user option to set username and password. See also —ntlm, —negotiate and —anyauth for related options.
If this option is used several times, the following occurrences make no difference. |
| —disable-eprt | (FTP) Tell curl to disable the use of the EPRT and LPRT commands when doing active FTP transfers. Curl will normally always first attempt to use EPRT, then LPRT before using PORT, but with this option, it uses PORT right away. EPRT and LPRT are extensions to the original FTP protocol, may not work on all servers but enable more functionality in a better way than the traditional PORT command.
—eprt can explicitly enable EPRT again and —no-eprt is an alias for —disable-eprt. Disabling EPRT only changes the active behavior. If you want to switch to passive mode you need to not use -P, —ftp-port or force it with —ftp-pasv. |
| —disable-epsv | (FTP) Tell curl to disable the use of the EPSV command when doing passive FTP transfers. Curl will normally always first attempt to use EPSV before PASV, but with this option, it will not try using EPSV.
—epsv can explicitly enable EPSV again and —no-epsv is an alias for —disable-epsv. Disabling EPSV only changes the passive behavior. If you want to switch to active mode you need to use -P, —ftp-port. |
| -D, —dump-header <file> | Write the protocol headers to the specified file.
This option is handy to use when you want to store the headers that an HTTP site sends to you. Cookies from the headers could then be read in a second curl invoke using the -b/—cookie option. However, the -c/—cookie-jar option is a better way to store cookies. When used on FTP, the ftp server response lines are considered being «headers» and thus are saved there. If this option is used several times, the last one is used. |
| -e, —referer <URL> | (HTTP) Sends the «Referer Page» information to the HTTP server. This can also be set with the -H/—header. When used with -L/—location, you can append «;auto» to the —referer URL to make curl automatically set the previous URL when it follows a Location: header. The «;auto» string can be used alone, even if you don’t set an initial —referer.
If this option is used several times, the last one will be used. |
| —engine <name> | Select the OpenSSL crypto engine to use for cipher operations. Use —engine list to print a list of build-time supported engines. Note that not all (or none) of the engines may be available at run time. |
| —environment | (RISC OS ONLY) Sets a range of environment variables, using the names the -w option supports, to easier allow extraction of useful information after having run curl. |
| —egd-file <file> | (HTTPS) Specify the path name to the Entropy Gathering Daemon socket. The socket is used to seed the random engine for SSL connections. See also the —random-file option. |
| -E, —cert <certificate [:password]> |
(SSL) Tells curl to use the specified client certificate file when getting a file with HTTPS, FTPS or another SSL-based protocol. The certificate must be in PEM format. If the optional password isn’t specified, it will be queried for on the terminal. Note that this option assumes a «certificate» file that is the private key and the private certificate concatenated. See —cert and —key to specify them independently.
If curl is built against the NSS SSL library then this option can tell curl the nickname of the certificate to use in the NSS database defined by the environment variable SSL_DIR (or by default /etc/pki/nssdb). If the NSS PEM PKCS#11 module (libnsspem.so) is available then PEM files may be loaded. If you want to use a file from the current directory, please precede it with «./» prefix, to avoid confusion with a nickname. If the nickname contains «:«, it needs to be preceded by «» so that it is not recognized as password delimiter. If the nickname contains ««, it needs to be escaped as «\» so that it is not recognized as an escape character. (iOS and Mac OS X only) If curl is built against Secure Transport, then the certificate string must match the name of a certificate that’s in the system or user keychain. The private key corresponding to the certificate, and certificate chain (if any), must also be present in the keychain. If this option is used several times, the last one will be used. |
| —cert-type <type> | (SSL) Tells curl the type of certificate type of the provided certificate. PEM, DER and ENG are recognized types. If not specified, PEM is assumed.
If this option is used several times, the last one will be used. |
| —cacert <CA certificate> |
(SSL) Tells curl to use the specified certificate file to verify the peer. The file may contain multiple CA certificates. The certificate(s) must be in PEM format. Normally curl is built to use a default file for this, so this option is used to alter that default file.
curl recognizes the environment variable named ‘CURL_CA_BUNDLE‘ if that is set, and uses the given path as a path to a CA cert bundle. This option overrides that variable. The Windows version of curl automatically looks for a CA certs file named ‘curl-ca-bundle.crt‘, either in the same directory as curl.exe, or in the current working directory, or in any folder along your PATH. If curl is built against the NSS SSL library, the NSS PEM PKCS#11 module (libnsspem.so) needs to be available for this option to work properly. If this option is used several times, the last one will be used. |
| —capath <CA certificate directory> |
(SSL) Tells curl to use the specified certificate directory to verify the peer. The certificates must be in PEM format, and the directory must be processed using the c_rehash utility supplied with openssl. Using —capath can allow curl to make https connections more efficiently than using —cacert if the —cacert file contains many CA certificates.
If this option is used several times, the last one will be used. |
| -f, —fail | (HTTP) Fail silently (no output at all) on server errors. This is mostly done to better enable scripts, etc. to better deal with failed attempts. In normal cases when an HTTP server fails to deliver a document, it returns an HTML document stating so (which often also describes why). This flag prevents curl from outputting that and return error 22.
This method is not fail-safe and there are occasions where non-successful response codes will slip through, especially when authentication is involved (response codes 401 and 407). |
| —ftp-account [data] | (FTP) When an FTP server asks for «account data» after username and password was provided, this data is sent off using the ACCT command. (Added in 7.13.0)
If this option is used twice, the second overrides the previous use. |
| —ftp-create-dirs | (FTP/SFTP) When an FTP URL/operation uses a path that doesn’t currently exist on the server, the standard behavior of curl is to fail. Using this option, curl will instead attempt to create missing directories. |
| —ftp-method [method] | (FTP) Control what method curl should use to reach a file on an FTP(S) server. The method argument should be one of the following alternatives:
multicwd curl does a single CWD operation for each path part in the given URL. For deep hierarchies this means a lot of commands. This is the default but the slowest behavior. nocwd curl does no CWD at all. curl will do SIZE, RETR, STOR, etc. and give a full path to the server for all these commands. This is the fastest behavior. singlecwd curl does one CWD with the full target directory and then operates on the file «normally» (like in the multicwd case). This is somewhat more standards-compliant than ‘nocwd‘ but without the full penalty of ‘multicwd‘. |
| —ftp-pasv | (FTP) Use PASV when transferring. PASV is the internal default behavior, but using this option can override a previous —ftp-port option. (Added in 7.11.0)
If this option is used several times, the following occurrences make no difference. Undoing an enforced passive really isn’t doable but you must then instead enforce the correct -P, —ftp-port again. Passive mode means that curl will try the EPSV command first and then PASV, unless —disable-epsv is used. |
| —ftp-alternative-to-user <command> | (FTP) If authenticating with the USER and PASS commands fail, send this command. When connecting to Tumbleweed’s Secure Transport server over FTPS using a client certificate, using «SITE AUTH» will tell the server to retrieve the username from the certificate. (Added in 7.15.5) |
| —ftp-skip-pasv-ip | (FTP) Tell curl to not use the IP address the server suggests in its response to curl‘s PASV command when curl connects the data connection. Instead, curl will re-use the same IP address it already uses for the control connection. (Added in 7.14.2)
This option has no effect if PORT, EPRT or EPSV is used instead of PASV. |
| —ftp-pret | (FTP) Tell curl to send a PRET command before PASV (and EPSV). Certain FTP servers, mainly drftpd, require this non-standard command for directory listings and up and downloads in PASV mode. (Added in 7.20.x) |
| —ftp-ssl | (FTP) Try to use SSL/TLS for the FTP connection. Reverts to a non-secure connection if the server doesn’t support SSL/TLS. (Added in 7.11.0)
If this option is used twice, the second will again disable this. |
| —ftp-ssl-ccc | (FTP) Use CCC (Clear Command Channel) Shuts down the SSL/TLS layer after authenticating. The rest of the control channel communication will be unencrypted. This allows NAT routers to follow the FTP transaction. The default mode is passive. See —ftp-ssl-ccc-mode for other modes. (Added in 7.16.1) |
| —ftp-ssl-ccc-mode [active/passive] | (FTP) Use CCC (Clear Command Channel) Sets the CCC mode. The passive mode will not initiate the shutdown, but instead wait for the server to do it, and will not reply to the shutdown from the server. The active mode initiates the shutdown and waits for a reply from the server. (Added in 7.16.2) |
| —ftp-ssl-control | (FTP) Require SSL/TLS for the FTP login, clear for transfer. Allows secure authentication, but non-encrypted data transfers for efficiency. Fails the transfer if the server doesn’t support SSL/TLS. (Added in 7.16.0) |
| —ftp-ssl-reqd | (FTP) Require SSL/TLS for the FTP connection. Terminates the connection if the server doesn’t support SSL/TLS. (Added in 7.15.5)
If this option is used twice, the second will again disable this. |
| -F, —form <name=content> | (HTTP) This lets curl emulate a filled-in form where a user has pressed the submit button. This causes curl to POST data using the Content-Type multipart/form-data according to RFC1867. This enables uploading of binary files etc. To force the ‘content’ part to be a file, prefix the file name with an «@» character. To get the content part of a file, prefix the file name with the letter «<«. The difference between «@» and «<» is that @ makes a file get attached in the post as a file upload, while the < makes a text field and gets the contents for that text field from a file.
For example, to send your password file to the server, where ‘password’ is the name of the form-field that /etc/passwd is the input: curl -F [email protected]/etc/passwd www.mypasswords.com To read the file’s content from stdin instead of a file, use «—» where the file name should’ve been. This goes for both @ and < constructs. You can also tell curl to use a specific Content-Type using ‘Type=‘, in a manner similar to: curl -F «[email protected];Type=text/html» url.com or curl -F «name=daniel;Type=text/foo» url.com You can also explicitly change the name field of a file upload part by setting filename=, like this: curl -F «[email protected];filename=nameinpost» url.com If filename/path contains ‘,‘ or ‘;‘, it must be double-quoted, for example: curl -F «[email protected]»localfile»;filename=»nameinpost»» url.com or curl -F ‘[email protected]»localfile»;filename=»nameinpost»‘ url.com Note that if a filename/path is double-quoted, any double quote or backslash in the filename must be escaped by backslash. This option can be used multiple times. |
| —form-string <name=string> | (HTTP) Similar to —form except that the value string for the named parameter is used literally. Leading ‘@‘ and ‘<‘ characters, and the ‘;Type=‘ string in the value have no special meaning. Use this in preference to —form if there’s any possibility that the string value may accidentally trigger the ‘@‘ or ‘<‘ features of —form. |
| -g, —globoff | This option switches off the «URL globbing parser». When you set this option, you can specify URLs that contain the letters {}[] without having them being interpreted by curl itself. Note that these letters are not normal legal URL contents but they should be encoded according to the URI standard. |
| -G, —get | When used, this option makes all data specified with -d/—data or —data-binary to be used in an HTTP GET request instead of the POST request that otherwise would be used. The data will be appended to the URL with a ‘?‘ separator.
If used in combination with -I, the POST data will instead be appended to the URL with a HEAD request. If this option is used several times, only the first one is used. This is because undoing a GET doesn’t make sense, but enforce the alternative method you prefer. |
| -H, —header <header> | (HTTP) Extra header to use when getting a web page. You may specify any number of extra headers. Note that if you add a custom header with the same name as one of the internal ones curl would use, your externally set header will be used instead of the internal one. This lets you make even trickier stuff than curl would normally do. You should not replace internally set headers without knowing perfectly well what you’re doing. Remove an internal header by giving a replacement without content on the right side of the colon, as in: -H «Host:». If you send the custom header with no-value then its header must be terminated with a semicolon, such as -H «X-Custom-Header;» to send «X-Custom-Header:«.
curl makes sure that each header you add/replace get sent with the proper end of line marker, therefore don’t add that as a part of the header content: do not add newlines or carriage returns they only mess things up for you. See also the -A/—user-agent and -e/—referer options. This option can be used multiple times to add/replace/remove multiple headers. |
| —hostpubmd5 <md5> | (SCP/SFTP) Pass a string containing 32 hexadecimal digits. The string should be the 128 bit MD5 checksum of the remote host’s public key, curl will refuse the connection with the host unless the md5sums match. (Added in 7.17.1) |
| —ignore-content-length | (HTTP) Ignore the Content-Length header. This is particularly useful for servers running Apache 1.x, which will report incorrect Content-Length for files larger than 2 gigabytes. |
| -i, —include | (HTTP) Include the HTTP-header in the output. The HTTP-header includes things like server-name, date of the document, HTTP-version and more. |
| —interface <name> | Perform an operation using a specified interface. You can enter interface name, IP address or hostname. An example could look like:
curl —interface eth0:1 http://www.netscape.com/ If this option is used several times, the last one will be used. |
| -I, —head | (HTTP/FTP/FILE) Fetch the HTTP-header only. HTTP-servers feature the command HEAD which this uses to get nothing but the header of a document. When used on an FTP or FILE file, curl displays the file size and last modification time only. |
| -j, —junk-session-cookies | (HTTP) When curl is told to read cookies from a file, this option makes it discard all «session cookies.» This option has the same effect as if a new session is started. Typical browsers always discard session cookies when they’re closed down. |
| -J, —remote-header-name | (HTTP) This option tells the -O, —remote-name option to use the server-specified Content-Disposition filename instead of extracting a filename from the URL. |
| -k, —insecure | (SSL) This option explicitly allows curl to perform «insecure» SSL connections and transfers. All SSL connections are attempted to be made secure using the CA certificate bundle installed by default. All connections considered «insecure» fail unless -k/—insecure is used.
See this online resource for more information: https://curl.se/docs/sslcerts.html. |
| —key <key> | (SSL/SSH) Private key file name. Allows you to provide your private key in this separate file.
If this option is used several times, the last one will be used. |
| —key-type <type> | (SSL) Private key file type. Specify which type your —key provided private key is. DER, PEM, and ENG are supported. If not specified, PEM is assumed.
If this option is used several times, the last one is used. |
| —krb <level> | (FTP) Enable Kerberos authentication and use. The level must be entered and should be one of ‘clear’, ‘safe’, ‘confidential’, or ‘private’. Should you use a level that is not one of these, ‘private’ instead is used.
This option requires a library built with kerberos4 or GSSAPI (GSS-Negotiate) support. This is not very common. Use -V, —version to see if your curl supports it. If this option is used several times, the last one is used. |
| -K, —config <config file> | Specify which config file to read the curl arguments. The config file is a text file where command line arguments can be written, which then are used as if they were written on the actual command line. Options and their parameters must be specified on the same config file line. If the parameter is to contain white spaces, the parameter must be enclosed within quotes. If the first column of a config line is a ‘#‘ character, the rest of the line is treated as a comment. Only write one option per physical line in the config file.
Specify the filename as ‘—‘ to make curl read the file from stdin. Note that to be able to specify a URL in the config file, you need to specify it using the —url option, and not by writing the URL on its own line. So, it could look similar to this: url = «https://curl.se/docs/» Long option names can optionally be given in the config file without the initial double dashes. When curl is invoked, it always (unless -q is used) checks for a default config file and uses it if found. The default config file is checked for in the following places in this order: 1) curl tries to find the «home dir»: It first checks for the CURL_HOME and then the HOME environment variables. Failing that, it uses getpwuid() on unix-like systems (which returns the home dir given the current user in your system). On Windows, it then checks for the APPDATA variable, or as a last resort the ‘%USER-PROFILE%Application Data‘. 2) On Windows, if there is no _curlrc file in the home dir, it checks for one in the same dir the executable curl is placed. On unix-like systems, it will try to load .curlrc from the determined home dir. This option can be used multiple times to load multiple config files. |
| —keepalive-time <seconds> | This option sets the time a connection needs to remain idle before sending keepalive probes and the time between individual keepalive probes. It is currently effective on operating systems offering the TCP_KEEPIDLE and TCP_KEEPINTVL socket options (meaning Linux, recent AIX, HP-UX, and more). This option has no effect if —no-keepalive is used. (Added in 7.18.0)
If this option is used several times, the last one will be used. If unspecified, the option defaults to 60 seconds. |
| —limit-rate <speed> | Specify the maximum transfer rate you want curl to use. This feature is useful if you have a limited pipe and you’d like your transfer not use your entire bandwidth.
The given speed is measured in bytes/second, unless a suffix is appended. Appending ‘k‘ or ‘K‘ will count the number as kilobytes, ‘m‘ or ‘M‘ makes it megabytes while ‘g‘ or ‘G‘ makes it gigabytes. Examples: 200K, 3m and 1G. The given rate is the average speed counted during the entire transfer. It means that curl might use higher transfer speeds in short bursts, but over time it uses no more than the given rate. If you are also using the -Y/—speed-limit option, that option takes precedence and might cripple the rate-limiting slightly, to help keep the speed-limit logic working. If this option is used several times, the last one will be used. |
| -l/—list-only | (FTP) When listing an FTP directory, this switch forces a name-only view. Especially useful if you want to machine-parse the contents of an FTP directory since the normal directory view doesn’t use a standard look or format.
This option causes an FTP NLST command to be sent. Some FTP servers list only files in their response to NLST; they do not include subdirectories and symbolic links. |
| —local-port <num>[—num] | Set a preferred number or range of local port numbers to use for the connection(s). Note that port numbers by nature are a scarce resource that will be busy at times so setting this range to something too narrow might cause unnecessary connection setup failures. (Added in 7.15.2) |
| -L, —location | (HTTP/HTTPS) If the server reports that the requested page has moved to a different location (indicated with a Location: header and a 3XX response code) this option makes curl redo the request on the new place. If used together with -i/—include or -I/—head, headers from all requested pages are shown. When authentication is used, curl only sends its credentials to the initial host. If a redirect takes curl to a different host, it won’t be able to intercept the user+password. See also —location-trusted on how to change this. You can limit the amount of redirects to follow using the —max-redirs option.
When curl follows a redirect and the request is not a plain GET (for example POST or PUT), it does the following request with a GET if the HTTP response was 301, 302, or 303. If the response code was any other 3xx code, curl re-sends the following request using the same unmodified method. |
| —libcurl <file> | Append this option to any ordinary curl command line, and you receive as output C source code that uses libcurl, written to the file that does the equivalent of what your command-line operation does! It should be noted that this option is extremely awesome.
If this option is used several times, the last given file name is used. (Added in 7.16.1) |
| —location-trusted | (HTTP/HTTPS) Similar to -L/—location, but allows sending the name + password to all hosts that the site may redirect to. This may or may not introduce a security breach if the site redirects you do a site to send your authentication info (which is plaintext in the case of HTTP Basic authentication). |
| —max-filesize <bytes> | Specify the maximum size (in bytes) of a file to download. If the file requested is larger than this value, the transfer doesn’t start and curl returns with exit code 63.
NOTE: The file size is not always known before download, and for such files this option has no effect even if the file transfer ends up being larger than this given limit. This concerns both FTP and HTTP transfers. |
| -m, —max-time <seconds> | Maximum time in seconds you allow the whole operation to take. This is useful for preventing your batch jobs from hanging for hours due to slow networks or links going down. See also the —connect-timeout option.
If this option is used several times, the last one will be used. |
| —mail-auth <address> | (SMTP) Specify a single address. This will be used to specify the authentication address (identity) of a submitted message that is being relayed to another server.
(Added in 7.25.0) |
| —mail-from <address> | (SMTP) Specify a single address that the given mail should get sent from.
(Added in 7.20.0) |
| —mail-rcpt <address> | (SMTP) Specify a single address that the given mail should get sent to. This option can be used multiple times to specify many recipients.
(Added in 7.20.0) |
| —metalink | This option can tell curl to parse and process a given URI as Metalink file (both version 3 and 4 (RFC 5854) are supported) and make use of the mirrors listed within for failover if there are errors (such as the file or server not being available). It also verifies the hash of the file after the download completes. The Metalink file itself is downloaded and processed in memory and not stored in the local file system.
Example to use a remote Metalink file: curl —metalink http://www.example.com/example.metalink To use a Metalink file in the local file system, use FILE protocol (file://): curl —metalink file://example.metalink Please note that if FILE protocol is disabled, there is no way to use a local Metalink file at the time of this writing. Also, note that if —metalink and —include are used together, —include will be ignored. This is because including headers in the response will break Metalink parser and if the headers are included in the file described in Metalink file, hash check fails. (Added in 7.27.0, if built against the libmetalink library.) |
| -n, —netrc | Makes curl scan the .netrc file in the user’s home directory for login name and password. This is used for ftp on unix. If used with http, curl enables user authentication. See netrc(4) or ftp documentation for details on the file format. Curl will not complain if that file hasn’t the right permissions (it should not be world nor group readable). The environment variable «HOME» is used to find the home directory.
A quick and very simple example of how to set up a .netrc to allow curl to ftp to the machine host.domain.com with username ‘myself’ and password ‘secret’ should look similar to: machine host.domain.com login myself password secret If this option is used twice, the second will again disable netrc usage. |
| —negotiate | (HTTP) Enables GSS-Negotiate authentication. The GSS-Negotiate method was designed by Microsoft and is used in their web applications. It is primarily meant as a support for Kerberos5 authentication but may be also used with another authentication methods.
This option requires that the curl library was built with GSSAPI support. This is not very common. Use -V/—version to see if your version supports GSS-Negotiate. When using this option, you must also provide a fake -u/—user option to activate the authentication code properly. Sending a ‘-u :‘ is enough as the username and password from the -u option aren’t actually used. If this option is used several times, the following occurrences make no difference. |
| —no-keepalive | Disables the use of keepalive messages on the TCP connection, as by default curl enables them.
Note that this is the negated option name documented. You can thus use —keepalive to enforce keepalive. |
| —no-sessionid | (SSL) Disable curl‘s use of SSL session-ID caching. By default, all transfers are done using the cache. Note that while nothing should ever get hurt by attempting to reuse SSL session-IDs, there seem to be broken SSL implementations in the wild that may require you to disable this for you to succeed. (Added in 7.16.0)
Note that this is the negated option name documented. You can thus use —sessionid to enforce session-ID caching. |
| —noproxy <no-proxy-list> | Comma-separated list of hosts which do not use a proxy, if one is specified. The only wildcard is a single * character, which matches all hosts, and effectively disables the proxy. Each name in this list is matched as either a domain which contains the hostname, or the hostname itself. For example, local.com would match local.com, local.com:80, and www.local.com, but not www.notlocal.com. (Added in 7.19.4). |
| -N, —no-buffer | Disables the buffering of the output stream. In normal work situations, curl uses a standard buffered output stream with the effect of outputting the data in chunks, not necessarily exactly when the data arrives. Using this option disables that buffering.
Note that this is the negated option name documented. You can thus use —buffer to enforce the buffering. |
| —netrc-file | This option is similar to —netrc, except you provide the path (absolute or relative) to the netrc file that curl should use. You can only specify one netrc file per invocation. If several —netrc-file options are provided, only the last one will be used. (Added in 7.21.5)
This option overrides any use of —netrc as they are mutually exclusive. It also abides by —netrc-optional if specified. |
| —netrc-optional | Very similar to —netrc, but this option makes the .netrc usage optional and not mandatory as the —netrc option does. |
| —ntlm | (HTTP) Enables NTLM authentication. The NTLM authentication method was designed by Microsoft and is used by IIS web servers. It is a proprietary protocol, reverse-engineered by clever people and implemented in curl based on their efforts. This kind of behavior should not be endorsed, encourage everyone who uses NTLM to switch to a public and documented authentication method instead, such as Digest.
If you want to enable NTLM for your proxy authentication, then use —proxy-ntlm. This option requires a library built with SSL support. Use -V, —version to see if your curl supports NTLM. If this option is used several times, only the first one is used. |
| -o, —output <file> | Write output to <file> instead of stdout. If you are using {} or [] to fetch multiple documents, you can use ‘#‘ followed by a number in the <file> specifier. That variable will be replaced with the current string for the URL being fetched. Like in:
curl http://{one,two}.site.com -o «file_#1.txt» or use several variables like: curl http://{site,host}.host[1-5].com -o «#1_#2» You may use this option as many times as you have number of URLs. See also the —create-dirs option to create the local directories dynamically. Specifying the output as ‘—‘ (a single dash) will force the output to be done to stdout. |
| -O, —remote-name | Write output to a local file named like the remote file we get. (Only the file part of the remote file is used, the path is cut off.)
The remote file name to use for saving is extracted from the given URL, nothing else. Consequentially, the file will be saved in the current working directory. If you want the file saved in a different directory, make sure you change current working directory before you invoke curl with the -O, —remote-name flag! You may use this option as many times as you have number of URLs. |
| —pass <phrase> | (SSL/SSH) Pass phrase for the private key.
If this option is used several times, the last one will be used. |
| —post301 | (HTTP) Tells curl to respect RFC 2616/10.3.2 and not convert POST requests into GET requests when following a 301 redirection. The non-RFC behaviour is ubiquitous in web browsers, so curl does the conversion by default to maintain consistency. However, a server may require a POST to remain a POST after such a redirection. This option is meaningful only when using -L, —location (Added in 7.17.1) |
| —post302 | (HTTP) Tells curl to respect RFC 2616/10.3.2 and not convert POST requests into GET requests when following a 302 redirection. The non-RFC behaviour is ubiquitous in web browsers, so curl does the conversion by default to maintain consistency. However, a server may require a POST to remain a POST after such a redirection. This option is meaningful only when using -L, —location (Added in 7.19.1) |
| —post303 | (HTTP) Tells curl to respect RFC 2616/10.3.2 and not convert POST requests into GET requests when following a 303 redirection. The non-RFC behaviour is ubiquitous in web browsers, so curl does the conversion by default to maintain consistency. However, a server may require a POST to remain a POST after such a redirection. This option is meaningful only when using -L, —location (Added in 7.26.0) |
| —proto <protocols> | Tells curl to use the listed protocols for its initial retrieval. Protocols are evaluated left to right, are comma separated, and are each a protocol name or ‘all‘, optionally prefixed by zero or more modifiers. Available modifiers are:
+ Permit this protocol in addition to protocols already permitted (this is the default if no modifier is used). — Deny this protocol, removing it from the list of protocols already permitted. = Permit only this protocol (ignoring the list already permitted), though subject to later modification by subsequent entries in the comma separated list. For example: —proto -ftps uses the default protocols, but disables ftps —proto -all,https,+http only enables http and https —proto =http,https also only enables http and https Unknown protocols produce a warning. This allows scripts to safely rely on being able to disable potentially dangerous protocols, without relying upon support for that protocol being built into curl to avoid an error. This option can be used multiple times, which is the same as concatenating the protocols into one instance of the option. (Added in 7.20.2) |
| —proto-redir <protocols> |
Tells curl to use the listed protocols after a redirect. See —proto for how protocols are represented. (Added in 7.20.2) |
| —proxy-anyauth | Tells curl to pick a suitable authentication method when communicating with the given proxy. This causes an extra request/response round-trip. (Added in 7.13.2) |
| —proxy-basic | Tells curl to use HTTP Basic authentication when communicating with the given proxy. Use —basic for enabling HTTP Basic with a remote host. Basic is the default authentication method curl uses with proxies. |
| —proxy-digest | Tells curl to use HTTP Digest authentication when communicating with the given proxy. Use —digest for enabling HTTP Digest with a remote host. |
| —proxy-ntlm | Tells curl to use HTTP NTLM authentication when communicating with the given proxy. Use —ntlm for enabling NTLM with a remote host. |
| —proxy1.0 <proxyhost[:port]> |
Use the specified HTTP 1.0 proxy. If the port number is not specified, it is assumed at port 1080.
The only difference between this and the HTTP proxy option (-x, —proxy), is that attempts to use CONNECT through the proxy specifying an HTTP 1.0 protocol instead of the default HTTP 1.1. |
| —pubkey <key> | (SSH) Public key file name. Allows you to provide your public key in this separate file.
If this option is used several times, the last one is used. |
| -p, —proxytunnel | When an HTTP proxy is used (-x, —proxy), this option causes non-HTTP protocols to attempt to tunnel through the proxy instead of merely using it to do HTTP-like operations. The tunnel approach is made with the HTTP proxy CONNECT request and requires that the proxy allows direct connect to the remote port number curl wants to tunnel through to. |
| -P, —ftp-port <address> |
(FTP) Reverses the default initiator/listener roles when connecting with FTP. This switch makes curl use active mode. In practice, curl then tells the server to connect back to the client’s specified address and port, while passive mode asks the server to set up an IP address and port for it to connect to. <address> should be one of:
interface i.e «eth0» to specify which interface’s IP address you want to use (Unix only) IP address i.e «192.168.10.1» to specify the exact IP address hostname i.e «my.host.domain» to specify the machine — make curl pick the same IP address that is already used for the control connection. If this option is used several times, the last one is used. Disable the use of PORT with —ftp-pasv. Disable the attempt to use the EPRT command instead of PORT using —disable-eprt. EPRT is really PORT++. Starting in 7.19.5, you can append «:[start]-[end]» to the right of the address, to tell curl what TCP port range to use. That means you specify a port range, from a lower to a higher number. A single number works as well, but do note that it increases the risk of failure since the port may not be available. |
| -q | If used as the first parameter on the command line, the curlrc config file is not read and used. See the -K, —config for details on the default config file search path. |
| -Q, —quote <command> |
(FTP/SFTP) Send an arbitrary command to the remote FTP or SFTP server. Quote commands are sent BEFORE the transfer is taking place (after the initial PWD command to be exact). To make commands take place after a successful transfer, prefix them with a dash ‘—‘. To make commands get sent after libcurl has changed working directory, before the transfer command(s), prefix the command with ‘+‘ (this is only supported for FTP). You may specify any amount of commands. If the server returns failure for one of the commands, the entire operation will be aborted. You must send syntactically correct FTP commands as RFC959 defines to FTP servers, or one of the commands listed below to SFTP servers.
This option can be used multiple times. When speaking to an FTP server, prefix the command with an asterisk (*) to make curl continue even if the command fails as by default curl stops at first failure. SFTP is a binary protocol. Unlike for FTP, curl interprets SFTP quote commands itself before sending them to the server. File names may be quoted shell-style to embed spaces or special characters. Following is the list of all supported SFTP quote commands: chgrp group file The chgrp command sets the group ID of the file named by the file operand to the group ID specified by the group operand. The group operand is a decimal integer group ID. chmod mode file The chmod command modifies the file mode bits of the specified file. The mode operand is an octal integer mode number. chown user file The chown command sets the owner of the file named by the file operand to the user ID specified by the user operand. The user operand is a decimal integer user ID. ln source_file target_file The ln and symlink commands create a symbolic link at the target_file location pointing to the source_file location. mkdir directory_name The mkdir command creates the directory named by the directory_name operand. pwd The pwd command returns the absolute pathname of the current working directory. rename source target The rename command renames the file or directory named by the source operand to the destination path named by the target operand. rm file The rm command removes the file specified by the file operand. rmdir directory The rmdir command removes the directory entry specified by the directory operand, provided it is empty. symlink source_file target_file See ln. |
| —random-file <file> | (SSL) Specify the path name to file containing what will be considered as random data. The data is used to seed the random engine for SSL connections. See also the —egd-file option. |
| —raw | (HTTP) When used, it disables all internal HTTP decoding of content or transfer encodings and instead makes them passed on unaltered, raw. (Added in 7.16.2) |
| —remote-name-all | This option changes the default action for all given URLs to be dealt with as if -O, —remote-name were used for each one. So if you want to disable that for a specific URL after —remote-name-all is used, you must use «-o —» or —no-remote-name. (Added in 7.19.0) |
| —resolve <host:port:address> | Provide a custom address for a specific host and port pair. Using this, you can make the curl requests(s) use a specified address and prevent the otherwise normally resolved address to be used. Consider it a sort of /etc/hosts alternative provided on the command line. The port number should be the number used for the specific protocol the host will be used for. It means you need several entries if you want to provide address for the same host but different ports.
This option can be used many times to add many hostnames to resolve. (Added in 7.21.3) |
| -r, —range <range> | (HTTP/FTP) Retrieve a byte range (i.e a partial document) from an HTTP/1.1 or FTP server. Ranges can be specified in many ways.
0-499 specifies the first 500 bytes; 500-999 specifies the second 500 bytes; -500 specifies the last 500 bytes; 9500- specifies the bytes from offset 9500 and forward; 0-0,-1 specifies the first and last byte only(*)(H); 500-700,600-799 specifies 300 bytes from offset 500(H); 100-199,500-599 specifies two separate 100 bytes ranges(*)(H). (*) = NOTE that this causes the server to reply with a multipart response! Also be aware that many HTTP/1.1 servers do not have this feature enabled, so that when you attempt to get a range, you’ll instead get the whole document. FTP range downloads only support the simple syntax ‘start-stop‘ (optionally with one of the numbers omitted). It depends on the non-RFC command SIZE. Only digit characters (0-9) are valid in the ‘start‘ and ‘stop‘ fields of the ‘start-stop‘ range syntax. If a non-digit character is given in the range, the server’s response will be unspecified, depending on the server’s configuration. If this option is used several times, the last one will be used. |
| -R, —remote-time | When used, this makes libcurl attempt to figure out the timestamp of the remote file, and if that is available make the local file get that same timestamp. |
| —retry <num> | If a transient error is returned when curl tries to perform a transfer, it retries this number of times before giving up. Setting the number to 0 makes curl do no retries (which is the default). Transient error means either: a timeout, an FTP 5xx response code or an HTTP 5xx response code.
When curl is about to retry a transfer, it first waits one second, and then for all forthcoming retries, it doubles the waiting time until it reaches 10 minutes, which then is the delay between the rest of the retries. Using —retry-delay, you disable this exponential backoff algorithm. See also —retry-max-time to limit the total time allowed for retries. (Added in 7.12.3) If this option is used multiple times, the last occurrence decide the amount. |
| —retry-delay <seconds> |
Make curl sleep this amount of time between each retry when a transfer has failed with a transient error (it changes the default backoff time algorithm between retries). This option is only interesting if —retry is also used. Setting this delay to zero makes curl use the default backoff time. (Added in 7.12.3)
If this option is used multiple times, the last occurrence decide the amount. |
| —retry-max-time <seconds> | The retry timer is reset before the first transfer attempt. Retries will be done as usual (see —retry) as long as the timer hasn’t reached this given limit. Notice that if the timer hasn’t reached the limit, the request will be made and while performing, it may take longer than this given time. To limit a single request’s maximum time, use -m, —max-time. Set this option to zero to not timeout retries. (Added in 7.12.3)
If this option is used multiple times, the last occurrence decide the amount. |
| -s, —silent | Silent mode. Don’t show progress meter or error messages. Makes curl mute. It still outputs the data you ask for, potentially even to the terminal/stdout unless you redirect it. |
| —sasl-ir | Enable initial response in SASL authentication. (Added in 7.31.0) |
| -S, —show-error | When used with -s, it makes curl show error message if it fails. |
| —ssl | (FTP, POP3, IMAP, SMTP) Try to use SSL/TLS for the connection. Reverts to a non-secure connection if the server doesn’t support SSL/TLS. See also —ftp-ssl-control and —ssl-reqd for different levels of encryption required. (Added in 7.20.0)
This option was formerly known as —ftp-ssl (Added in 7.11.0). That option name can still be used but will be removed in a future version. |
| —ssl-reqd | (FTP, POP3, IMAP, SMTP) Require SSL/TLS for the connection. Terminates the connection if the server doesn’t support SSL/TLS. (Added in 7.20.0)
This option was formerly known as —ftp-ssl-reqd (added in 7.15.5). That option name can still be used, but is removed in a future version. |
| —ssl-allow-beast | (SSL) This option tells curl not to work around a security flaw in the SSL3 and TLS1.0 protocols known as BEAST. If this option isn’t used, the SSL layer may use work-arounds known to cause interoperability problems with some older SSL implementations. WARNING: this option loosens the SSL security, and using this flag, you ask for exactly that. (Added in 7.25.0) |
| —socks4 <host[:port]> | Use the specified SOCKS4 proxy. If the port number is not specified, it is assumed at port 1080. (Added in 7.15.2)
This option overrides any previous use of -x, —proxy, as they are mutually exclusive. Since 7.21.7, this option is superfluous since you can specify a socks4 proxy with -x, —proxy using a socks4:// protocol prefix. If this option is used several times, the last one is used. |
| —socks4a <host[:port]> | Use the specified SOCKS4a proxy. If the port number is not specified, it is assumed at port 1080. (Added in 7.18.0)
This option overrides any previous use of -x, —proxy, as they are mutually exclusive. Since 7.21.7, this option is superfluous since you can specify a socks4a proxy with -x, —proxy using a socks4a:// protocol prefix. If this option is used several times, the last one is used. |
| —socks5-hostname <host[:port]> | Use the specified SOCKS5 proxy (and let the proxy resolve the hostname). If the port number is not specified, it is assumed at port 1080. (Added in 7.18.0)
This option overrides any previous use of -x, —proxy, as they are mutually exclusive. Since 7.21.7, this option is superfluous since you can specify a socks5 hostname proxy with -x, —proxy using a socks5h:// protocol prefix. If this option is used several times, the last one is used. (This option was previously wrongly documented and used as —socks without the number appended.) |
| —socks5 <host[:port]> | Use the specified SOCKS5 proxy — but resolve the hostname locally. If the port number is not specified, it is assumed at port 1080.
This option overrides any previous use of -x, —proxy, as they are mutually exclusive. Since 7.21.7, this option is superfluous since you can specify a socks5 proxy with -x, —proxy using a socks5:// protocol prefix. If this option is used several times, the last one is used. (This option was previously wrongly documented and used as —socks without the number appended.) This option (and —socks4) does not work with IPV6, FTPS or LDAP. |
| —socks5-gssapi-service <servicename> | The default service name for a socks server is rcmd/server-fqdn. This option lets you change it.
Examples: —socks5 proxy-name —socks5-gssapi-service sockd would use sockd/proxy-name; —socks5 proxy-name —socks5-gssapi-service sockd/real-name would use sockd/real-name for cases where the proxy-name does not match the principal name. |
| —socks5-gssapi-nec | As part of the gssapi negotiation a protection mode is negotiated. RFC 1961 says in section 4.3/4.4 it should be protected, but the NEC reference implementation does not. The option —socks5-gssapi-nec allows the unprotected exchange of the protection mode negotiation. (Added in 7.19.4). |
| —stderr <file> | Redirect all writes to stderr to the specified file instead. If the file name is a plain ‘—‘, it is instead written to stdout.
If this option is used several times, the last one is used. |
| —tcp-nodelay | Turn on the TCP_NODELAY option. See the curl_easy_setopt man page for details about this option. (Added in 7.11.2) |
| —tftp-blksize <value> | (TFTP) Set TFTP BLKSIZE option (must be >512). This is the block size that curl tries to use when transferring data to or from a TFTP server. By default, 512 bytes is used.
If this option is used several times, the last one is used. (Added in 7.20.0) |
| —tlsauthtype <authtype> |
Set TLS authentication type. Currently, the only supported option is «SRP», for TLS-SRP (RFC 5054). If —tlsuser and —tlspassword are specified but —tlsauthtype is not, then this option defaults to «SRP». (Added in 7.21.4) |
| —tlsuser <user> | Set username for use with the TLS authentication method specified with —tlsauthtype. Requires that —tlspassword also be set. (Added in 7.21.4) |
| —tlspassword <password> |
Set password for use with the TLS authentication method specified with —tlsauthtype. Requires that —tlsuser also be set. (Added in 7.21.4) |
| —tr-encoding | (HTTP) Request a compressed Transfer-Encoding response using one of the algorithms curl supports, and uncompress the data while receiving it.
(Added in 7.21.6) |
| -t, —telnet-option <OPT=val> | Pass options to the telnet protocol. Supported options are:
TType=<term> Sets the terminal type. XDISPLOC=<X display> Sets the X display location. NEW_ENV=<var,val> Sets an environment variable. |
| -T, —upload-file <file> | This transfers the specified local file to the remote URL. If there is no file part in the specified URL, Curl appends the local file name. NOTE you must use a trailing / on the last directory to really prove to curl that there is no file name or curl thinks that your last directory name is the remote file name to use. That most likely causes the upload operation to fail. If this is used on a http(s) server, the PUT command is used.
Use the file name «—» (a single dash) to use stdin instead of a given file. Alternately, the file name «.» (a single period) may be specified instead of «—» to use stdin in non-blocking mode to allow reading server output while stdin is being uploaded. You can specify one -T for each URL on the command line. Each -T + URL pair specifies what to upload and to where. curl also supports «globbing» of the -T argument, meaning you can upload multiple files to a single URL using the same URL globbing style supported in the URL, like this: curl -T «{file1,file2}» http://www.uploadtothissite.com or even curl -T «img[1-1000].png» ftp://ftp.picturemania.com/upload/ |
| —trace <file> | Enables a full trace dump of all incoming and outgoing data, including descriptive information, to the given output file. Use «—» as filename to have the output sent to stdout.
This option overrides previous uses of -v, —verbose or —trace-ascii. If this option is used several times, the last one is used. |
| —trace-ascii <file> | Enables a full trace dump of all incoming and outgoing data, including descriptive information, to the given output file. Use «—» as filename to have the output sent to stdout.
This is very similar to —trace, but leaves out the hex part and only shows the ASCII part of the dump. It makes smaller output that might be easier to read for untrained humans. This option overrides previous uses of -v, —verbose or —trace. If this option is used several times, the last one is used. |
| —trace-time | Prepends a timestamp to each trace or verbose line that curl displays. (Added in 7.14.0) |
| -u, —user <user:password> | Specify user and password to use for server authentication. Overrides -n, —netrc and —netrc-optional.
If you give the username (without entering a colon) curl prompts for a password. If you use an SSPI-enabled curl binary and do NTLM authentication, you can force curl to pick up the username and password from your environment by specifying a single colon with this option: «-u :«. If this option is used several times, the last one is used. |
| -U, —proxy-user <user:password> | Specify user and password to use for proxy authentication.
If you use an SSPI-enabled curl binary and do NTLM authentication, you can force curl to pick up the username and password from your environment by specifying a single colon with this option: «-U :«. If this option is used several times, the last one is used. |
| —url <URL> | Specify a URL to fetch. This option is mostly handy when you want to specify URL(s) in a config file.
This option may be used any number of times. To control where this URL is written, use the -o, —output or the -O, —remote-name options. |
| -v, —verbose | Makes the fetching more verbose/talkative. Mostly usable for debugging. Lines starting with ‘>‘ means «header data» sent by curl, ‘<‘ means «header data» received by curl that is hidden in normal cases and lines starting with ‘*‘ means additional info provided by curl.
Note that if you only want HTTP headers in the output, -i, —include might be option you’re looking for. If you think this option still doesn’t give you enough details, consider using —trace or —trace-ascii instead. This option overrides previous uses of —trace-ascii or —trace. Use -s, —silent to make curl quiet. |
| -w, —write-out <format> |
Defines what to display on stdout after a completed and successful operation. The format is a string that may contain plain text mixed with any number of variables. The string can be specified as «string«, to get read from a particular file you specify it «@filename» and to tell curl to read the format from stdin you write «@-«.
The variables present in the output format are substituted by the value or text that curl thinks fit, as described below. All variables are specified like %{variable_name} and to output a normal % you write them like %%. You can output a newline using n, a carriage return with r and a tab space with t. NOTE: The %-letter is a special letter in the win32-environment, where all occurrences of % must be doubled when using this option. Available variables are at this point: content_type The Content-Type of the requested document, if there was any. filename_effective The ultimate filename that curl writes out to. This is only meaningful if curl is told to write to a file with the —remote-name or —output option. It’s most useful in combination with the —remote-header-name option. (Added in 7.25.1) ftp_entry_path The initial path curl ended up in when logging on to the remote FTP server. (Added in 7.15.4) http_code The numerical response code that was found in the last retrieved HTTP(S) or FTP(s) transfer. In 7.18.2 the alias response_code was added to show the same info. http_connect The numerical code that was found in the last response (from a proxy) to a curl CONNECT request. (Added in 7.12.4) local_ip The IP address of the local end of the most recently done connection — can be either IPv4 or IPv6 (Added in 7.29.0) local_port The local port number of the most recently done connection (Added in 7.29.0) num_connects Number of new connects made in the recent transfer. (Added in 7.12.3) num_redirects Number of redirects that were followed in the request. (Added in 7.12.3) redirect_url When an HTTP request was made without -L to follow redirects, this variable shows the actual URL a redirect would take you to. (Added in 7.18.2) remote_ip The remote IP address of the most recently done connection — can be either IPv4 or IPv6 (Added in 7.29.0) remote_port The remote port number of the most recently done connection (Added in 7.29.0) size_download The total amount of bytes that were downloaded. size_header The total amount of bytes of the downloaded headers. size_request The total amount of bytes that were sent in the HTTP request. size_upload The total amount of bytes that were uploaded. speed_download The average download speed that curl measured for the complete download. Bytes per second. speed_upload The average upload speed that curl measured for the complete upload. Bytes per second. ssl_verify_result The result of the SSL peer certificate verification that was requested. 0 means the verification was successful. (Added in 7.19.0) time_appconnect The time, in seconds, it took from the start until the SSL/SSH/etc connect/handshake to the remote host was completed. (Added in 7.19.0) time_connect The time, in seconds, it took from the start until the TCP connect to the remote host (or proxy) was completed. time_namelookup The time, in seconds, it took from the start until the name resolving was completed. time_pretransfer The time, in seconds, it took from the start until the file transfer was about to begin. This includes all pre-transfer commands and negotiations that are specific to the particular protocol(s) involved. time_redirect The time, in seconds, it took for all redirection steps include name look up, connect, pretransfer, and transfer before the final transaction was started. time_redirect shows the complete execution time for multiple redirections. (Added in 7.12.3) time_starttransfer The time, in seconds, it took from the start until the first byte was about to be transferred. This includes time_pretransfer and also the time the server needed to calculate the result. time_total The total time, in seconds, that the full operation lasted. The time is displayed with millisecond resolution. url_effective The URL that was fetched last. This is most meaningful if you’ve told curl to follow location: headers. |
| -x, —proxy <[protocol://][user:password @]proxyhost[:port]> |
Use the specified HTTP proxy. If the port number is not specified, it is assumed at port 1080.
This option overrides existing environment variables that set the proxy to use. If there’s an environment variable setting a proxy, you can set proxy to «» to override it. All operations that are performed over an HTTP proxy are transparently converted to HTTP. It means that certain protocol specific operations might not be available. This is not the case if you can tunnel through the proxy, as one with the -p, —proxytunnel option. User and password that might be provided in the proxy string are URL decoded by curl. This lets you pass in special characters, such as @, using %40 or pass in a colon with %3a. The proxy host can be specified the exact same way as the proxy environment variables, including the protocol prefix (http://) and the embedded user + password. From 7.21.7, the proxy string may be specified with a protocol:// prefix to specify alternative proxy protocols. Use socks4://, socks4a://, socks5:// or socks5h:// to request the specific SOCKS version to be used. No protocol specified, http:// and all others are treated as HTTP proxies. If this option is used several times, the last one is used. |
| -X, —request <command> |
(HTTP) Specifies a custom request method to use when communicating with the HTTP server. The specified request is used instead of the method otherwise used (which defaults to GET). Read the HTTP 1.1 specification for details and explanations. Common additional HTTP requests include PUT and DELETE, but related technologies like WebDAV offers PROPFIND, COPY, MOVE, and more.
Normally you don’t need this option. All sorts of GET, HEAD, POST, and PUT requests are rather invoked using dedicated command line options. This option only changes the actual word used in the HTTP request, it does not alter the way curl behaves. So for example if you want to make a proper HEAD request, using -X HEAD does not suffice. You need to use the -I, —head option. (FTP) Specifies a custom FTP command to use instead of LIST when doing file lists with FTP. If this option is used several times, the last one is used. |
| —xattr | When saving output to a file, this option tells curl to store certain file metadata in extended file attributes. Currently, the URL is stored in the xdg.origin.url attribute and, for HTTP, the content type is stored in the mime_type attribute. If the file system does not support extended attributes, a warning is issued. |
| -y, —speed-time <time> | If a download is slower than speed-limit bytes per second during a speed-time period, the download gets aborted. If speed-time is used, the default speed-limit is 1 unless set with -Y.
This option controls transfers and thus will not affect slow connects etc. If this is a concern for you, try the —connect-timeout option. If this option is used several times, the last one is used. |
| -Y, —speed-limit <speed> | If a download is slower than this given speed, in bytes per second, for speed-time seconds it gets aborted. speed-time is set with -y and is 30 if not set.
If this option is used several times, the last one is used. |
| -z, —time-cond <date expression>|<file> | (HTTP) Request a file that was modified later than the given time and date, or one that was modified before that time. The <date expression> can be all sorts of date strings or if it doesn’t match any internal ones, it is taken as a filename and tries to get the modification date (mtime) from <file> instead. See the curl_getdate man pages for date expression details.
Start the date expression with a dash (-) to make it request for a document that is older than the given date/time, default is a document that is newer than the specified date/time. If this option is used several times, the last one is used. |
| —max-redirs <num> | Set maximum number of redirections which may be followed. If -L/—location is used, this option can prevent curl from following redirections «in absurdum». By default, the limit is set to 50 redirections. Set this option to -1 to make it limitless.
If this option is used several times, the last one is used. |
| -0, —http1.0 | (HTTP) Forces curl to issue its requests using HTTP 1.0 instead of using its internally preferred: HTTP 1.1. |
| -1, —tlsv1 | (SSL) Forces curl to use TSL version 1 when negotiating with a remote TLS server. |
| -2, —sslv2 | (SSL) Forces curl to use SSL version 2 when negotiating with a remote SSL server. |
| -3, —sslv3 | (SSL) Forces curl to use SSL version 3 when negotiating with a remote SSL server. |
| —3p-quote | (FTP) Specify arbitrary commands to send to the source server. See the -Q, —quote option for details. (Added in 7.13.0) |
| —3p-url | (FTP) Activates an FTP 3rd party transfer. Specifies the source URL to get a file from, while the «normal» URL will be used as target URL, the file that will be written/created.
Note that not all FTP server allow 3rd party transfers. (Added in 7.13.0) |
| —3p-user | (FTP) Specify user:password for the source URL transfer. (Added in 7.13.0) |
| -4, —ipv4 | If libcurl can resolve an address to multiple IP versions (which it is if it’s ipv6-capable), this option tells libcurl to resolve names to IPv4 addresses only. |
| -6, —ipv6 | If libcurl can resolve an address to multiple IP versions (which it is if it’s ipv6-capable), this option tells libcurl to resolve names to IPv6 addresses only. |
| -#, —progress-bar | Make curl display progress information as a progress bar instead of the default statistics.
If this option is used twice, the second again disables the progress bar. |
URLs
The URL syntax is protocol-dependent. You’ll find a detailed description in RFC 3986.
You can specify multiple URLs or parts of URLs by writing part sets within braces as in:
http://site.{one,two,three}.com
or you can get sequences of alphanumeric series using [] as in:
ftp://ftp.numericals.com/file[1-100].txt
ftp://ftp.numericals.com/file[001-100].txt
ftp://ftp.letters.com/file[a-z].txt
Nested sequences are not supported, but you can use several ones next to each other:
http://any.org/archive[1996-1999]/vol[1-4]/part{a,b,c}.html
You can specify any amount of URLs on the command line. They are fetched in a sequential manner in the specified order.
You can specify a step counter for the ranges to get every Nth number or letter:
http://www.numericals.com/file[1-100:10].txt
http://www.letters.com/file[a-z:2].txt
If you specify URL without protocol:// prefix, curl attempts to guess what protocol you might want. It then defaults to HTTP but try other protocols based on often-used hostname prefixes. For example, for hostnames starting with «ftp.» curl assumes you want to speak FTP.
curl does its best to use what you pass to it as a URL. It is not trying to validate it as a syntactically correct URL by any means but is instead very liberal with what it accepts.
curl attempts to re-use connections for multiple file transfers, so that getting many files from the same server does not do multiple connects / handshakes. This improves speed. Of course, this is only done on files specified on a single command line and cannot be used between separate curl invokes.
Progress meter
curl normally displays a progress meter during operations, indicating the amount of transferred data, transfer speeds and estimated time left, etc.
curl displays this data to the terminal by default, so if you invoke curl to do an operation and it is about to write data to the terminal, it disables the progress meter as otherwise it would mess up the output mixing progress meter and response data.
If you want a progress meter for HTTP POST or PUT requests, you need to redirect the response output to a file, using shell redirect (>), -o [file] or similar.
It is not the same case for FTP upload as that operation does not spit out any response data to the terminal.
If you prefer a progress «bar» instead of the regular meter, -# is your friend.
Environment variables
The environment variables can be specified in lowercase or uppercase. The lowercase version has precedence. http_proxy is an exception as it is only available in lowercase.
Using an environment variable to set the proxy has the same effect as using the —proxy option.
| http_proxy [protocol://]<host>[:port] | Sets the proxy server to use for HTTP. |
| HTTPS_PROXY [protocol://]<host>[:port] | Sets the proxy server to use for HTTPS. |
| [url-protocol]_PROXY [protocol://]<host>[:port] | Sets the proxy server to use for [url-protocol], where the protocol is a protocol that curl supports and as specified in a URL: FTP, FTPS, POP3, IMAP, SMTP, LDAP etc. |
| ALL_PROXY [protocol://]<host>[:port] | Sets the proxy server to use if no protocol-specific proxy is set. |
| NO_PROXY <comma-separated list of hosts> |
List of hostnames that shouldn’t go through any proxy. If set to an asterisk ‘*‘ only, it matches all hosts. |
Exit codes
There are a bunch of different error codes and their corresponding error messages that may appear during bad conditions. At the time of this writing, the exit codes are:
| 1 | Unsupported protocol. This build of curl has no support for this protocol. |
| 2 | Failed to initialize. |
| 3 | URL malformed. The syntax was not correct. |
| 4 | A feature or option that was needed to perform the desired request was not enabled or was explicitly disabled at build-time. To make curl able to do this, you probably need another build of libcurl! |
| 5 | Couldn’t resolve proxy. The given proxy host could not be resolved. |
| 6 | Couldn’t resolve host. The given remote host was not resolved. |
| 7 | Failed to connect to host. |
| 8 | FTP weird server reply. The server sent data curl couldn’t parse. |
| 9 | FTP access denied. The server denied login or denied access to the particular resource or directory you wanted to reach. Often this is caused when trying to change to a directory that doesn’t exist on the server. |
| 11 | FTP weird PASS reply. Curl couldn’t parse the reply sent to the PASS request. |
| 13 | FTP weird PASV reply, Curl couldn’t parse the reply sent to the PASV request. |
| 14 | FTP weird 227 format. Curl couldn’t parse the 227-line the server sent. |
| 15 | FTP can’t get host. Couldn’t resolve the host IP we got in the 227-line. |
| 17 | FTP couldn’t set binary. Couldn’t change transfer method to binary. |
| 18 | Partial file. Only a part of the file was transferred. |
| 19 | FTP couldn’t download/access the given file, the RETR (or similar) command failed. |
| 21 | FTP quote error. A quote command returned error from the server. |
| 22 | HTTP page not retrieved. The requested url was not found or returned another error with the HTTP error code being 400 or above. This return code only appears if -f, —fail is used. |
| 23 | Write error. Curl couldn’t write data to a local filesystem or similar. |
| 25 | FTP couldn’t STOR file. The server denied the STOR operation, used for FTP uploading. |
| 26 | Read error. Various reading problems. |
| 27 | Out of memory. A memory allocation request failed. |
| 28 | Operation timeout. The specified time-out period was reached according to the conditions. |
| 30 | FTP PORT failed. The PORT command failed. Not all FTP servers support the PORT command, try doing a transfer using PASV instead! |
| 31 | FTP couldn’t use REST. The REST command failed. This command is used for resumed FTP transfers. |
| 33 | HTTP range error. The range «command» didn’t work. |
| 34 | HTTP post error. Internal post-request generation error. |
| 35 | SSL connect error. The SSL handshaking failed. |
| 36 | FTP bad download resume. Couldn’t continue an earlier aborted download. |
| 37 | FILE couldn’t read file. Failed to open the file. Permissions? |
| 38 | LDAP cannot bind. LDAP bind operation failed. |
| 39 | LDAP search failed. |
| 41 | Function not found. A required LDAP function was not found. |
| 42 | Aborted by callback. An application told curl to abort the operation. |
| 43 | Internal error. A function was called with a bad parameter. |
| 45 | Interface error. A specified outgoing interface could not be used. |
| 47 | Too many redirects. When following redirects, curl hit the maximum amount. |
| 48 | Unknown option specified to libcurl. This indicates that you passed a weird option to curl that was passed on to libcurl and rejected. Read up in the manual! |
| 49 | Malformed telnet option. |
| 51 | The peer’s SSL certificate or SSH MD5 fingerprint was not OK. |
| 52 | The server didn’t reply anything, which here is considered an error. |
| 53 | SSL crypto engine not found. |
| 54 | Cannot set SSL crypto engine as default. |
| 55 | Failed sending network data. |
| 56 | Failure in receiving network data. |
| 58 | Problem with the local certificate. |
| 59 | Couldn’t use specified SSL cipher. |
| 60 | Peer certificate cannot be authenticated with known CA certificates. |
| 61 | Unrecognized transfer encoding. |
| 62 | Invalid LDAP URL. |
| 63 | Maximum file size exceeded. |
| 64 | Requested FTP SSL level failed. |
| 65 | Sending the data requires a rewind that failed. |
| 66 | Failed to initialize SSL Engine. |
| 67 | The username, password, or similar was not accepted and curl failed to log in. |
| 68 | File not found on TFTP server. |
| 69 | Permission problem on TFTP server. |
| 70 | Out of disk space on TFTP server. |
| 71 | Illegal TFTP operation. |
| 72 | Unknown TFTP transfer ID. |
| 73 | File already exists (TFTP). |
| 74 | No such user (TFTP). |
| 75 | Character conversion failed. |
| 76 | Character conversion functions required. |
| 77 | Problem with reading the SSL CA cert (path? access rights?). |
| 78 | The resource referenced in the URL does not exist. |
| 79 | An unspecified error occurred during the SSH session. |
| 80 | Failed to shut down the SSL connection. |
| 82 | Could not load CRL file, missing or wrong format (added in 7.19.0). |
| 83 | Issuer check failed (added in 7.19.0). |
| 84 | The FTP PRET command failed. |
| 85 | RTSP: mismatch of CSeq numbers. |
| 86 | RTSP: mismatch of Session Identifiers. |
| 87 | Unable to parse FTP file list. |
| 88 | FTP chunk callback reported error. |
Examples
curl https://www.computerhope.com/index.htm
Fetch the file index.htm from www.computerhope.com using the HTTP protocol, and display it to standard output. This is essentially the same as «viewing the source» of the webpage; the raw HTML is displayed.
curl https://www.computerhope.com/index.htm > index.htm
Fetch the same file as above, but redirect the output to a file, index.htm, in the current directory.
curl -O https://www.computerhope.com/index.htm
Fetch the same file as above, and output to a file with the same name (index.htm) in the current directory, this time using the curl function -O.
curl --limit-rate 1234B -O https://www.computerhope.com/index.htm
Same as above, but this time, limit the download speed to (an average speed of) 1,234 bytes/second.
curl --limit-rate 1234B -O -# https://www.computerhope.com/index.htm
Same as above, but this time, display a progress bar (the -# option) instead of the numerical progress meter.
wget — Download files via HTTP or FTP.