Joi is a powerful JavaScript validation library. You can use it to validate the input you receive to your API, among other uses.
While it comes pretty good error messages out of the box, let’s see some ways to customize them.
You can test any of the examples below using Joi’s playground.
Adding custom labels
Let’s define a schema that accepts a matrix 2D array field.
Joi.object({
  matrix: Joi.array().items(Joi.array().items(Joi.number()))
})
The following object wouldn’t pass validation because it has a string a among its elements.
{
 matrix: [[0, 1, 2], ['a', 1, 2]]
}
By default, Joi returns the following error message:
Validation Error: "matrix[1][0]" must be a number
The error message includes the full path of the invalid value. The top-most key is matrix. Then, each array element is identified by its array index, starting from 0.
We can override the default key with label:
Joi.object({
  matrix: Joi.array().items(
    Joi.array().items(Joi.number().label("matrix value"))
  ),
});
Validation Error: "matrix value" must be a number
We can do the same for any key. Or even specify labels for each array element.
For example, let’s add a label for the elements passed to the matrix array.
Joi.object({
  matrix: Joi.array().items(
    Joi.array().items(Joi.number()).label("matrix row")
  ),
});
Now, the error message will be::
{
 matrix: [[0, 1, 2], 'a'],
}
Validation Error: "matrix row" must be an array
Return the key name instead of full path in error messages
Let’s define the following deeply nested schema:
const schema = Joi.object({
  a: {
    b: {
      c: {
        d: {
          e: Joi.number(),
        },
      },
    },
  },
});
Validating the following object, yields the error message:
const obj = {
  a: {
    b: {
      c: {
        d: {
          e: "a",
        },
      },
    },
  },
};
Validation Error: "a.b.c.d.e" must be a number
See the faulty field is identified with its full path in the object.
We can tweak this behavior by setting the errors.label option to key. The default value is path.
schema.validate(obj, {errors: {label: 'key'}})
Validation error: "e" must be a number
Additionally, we can delete the quotes that wrap the label with the errors.wrap option:
schema.validate(obj, {errors: {label: 'key', wrap: {label: false}}})
Validation error: e must be a number
See more information about the wrap and label options in the any.validate documentation
To pass custom error messages, we first need to identify the associated error type. For example, a numerical field being less than the specified minimum value is associated to a number.min error type.
Once we have identified the error type, we can ask Joi to override the predefined error message with the messages method.
Joi.object({
  age: Joi.number()
    .integer()
    .min(18)
    .messages({ "number.min": "You must be at least 18 years old" }),
});
See the messages method accepts an object where each key corresponds to the error type and the value is the desired error message.
With this configuration, the following object will return the error message:
{
 age: 1,
}
Validation Error: You must be at least 18 years old
You can find the full list of error types in Joi’s documentation.
Referencing the values of other fields in error messages
Let’s include the actual field values in the error message. We can do so with Joi’s templating syntax.
Let’s create a schema that requires both a name and age fields.
Joi.object({
  name: Joi.string().required(),
  age: Joi.number()
    .required()
    .messages({ "any.required": "You must tells us your age, {name}" }),
});
If we don’t set the age, Joi will return an error message with the value passed to the name field. See that the field names was wrapped inside {}.
{
 name: "John",
}
Validation Error: You must tells us your age, John
You can find more about template syntax in Joi’s documentation.
Referencing fields in deeply nested objects
Let’s modify the schema above by nesting age inside a data field.
Joi.object({
  name: Joi.string().required(),
  data: {
    age: Joi.number()
      .required()
      .messages({ "any.required": "You must tells us your age, {name}" }),
  },
});
Now, let’s pass the following object to validate:
{
  name: "John",
  data: {},
}
We’ll receive a custom error message, but Joi didn’t catch the name this time.
Validation Error: You must tells us your age,
By default, the key will recognize only siblings of the validated field. In our case, those are all the properties of the data field. To be more specific we have to use Joi references.
A simple solution in our case is to reference the parent of name with relative references:
Joi.object({
  name: Joi.string().required(),
  data: {
    age: Joi.number()
      .required()
      .messages({ "any.required": "You must tells us your age, {...name}" }),
  },
});
See that we’re prepending the field name with three dots: ...name.
This is s similar to the rules of path resolution in the command line. .. references the parent field (default behavior), and . references the current field. We can go higher up the hierarchy by prepending additional dots.
Using templates
I had to dig through the source to find an example of how to do context-dependent templating / formatting of messages since it doesn’t seem to be documented:
messages: {
  'string.alphanum': '{{#label}} must only contain alpha-numeric characters',
  'string.base': '{{#label}} must be a string',
  'string.base64': '{{#label}} must be a valid base64 string',
  'string.creditCard': '{{#label}} must be a credit card',
  'string.dataUri': '{{#label}} must be a valid dataUri string',
  'string.domain': '{{#label}} must contain a valid domain name',
  'string.email': '{{#label}} must be a valid email',
  'string.empty': '{{#label}} is not allowed to be empty',
  'string.guid': '{{#label}} must be a valid GUID',
  'string.hex': '{{#label}} must only contain hexadecimal characters',
  'string.hexAlign': '{{#label}} hex decoded representation must be byte aligned',
  'string.hostname': '{{#label}} must be a valid hostname',
  'string.ip': '{{#label}} must be a valid ip address with a {{#cidr}} CIDR',
  'string.ipVersion': '{{#label}} must be a valid ip address of one of the following versions {{#version}} with a {{#cidr}} CIDR',
  'string.isoDate': '{{#label}} must be in iso format',
  'string.isoDuration': '{{#label}} must be a valid ISO 8601 duration',
  'string.length': '{{#label}} length must be {{#limit}} characters long',
  'string.lowercase': '{{#label}} must only contain lowercase characters',
  'string.max': '{{#label}} length must be less than or equal to {{#limit}} characters long',
  'string.min': '{{#label}} length must be at least {{#limit}} characters long',
  'string.normalize': '{{#label}} must be unicode normalized in the {{#form}} form',
  'string.token': '{{#label}} must only contain alpha-numeric and underscore characters',
  'string.pattern.base': '{{#label}} with value {:[.]} fails to match the required pattern: {{#regex}}',
  'string.pattern.name': '{{#label}} with value {:[.]} fails to match the {{#name}} pattern',
  'string.pattern.invert.base': '{{#label}} with value {:[.]} matches the inverted pattern: {{#regex}}',
  'string.pattern.invert.name': '{{#label}} with value {:[.]} matches the inverted {{#name}} pattern',
  'string.trim': '{{#label}} must not have leading or trailing whitespace',
  'string.uri': '{{#label}} must be a valid uri',
  'string.uriCustomScheme': '{{#label}} must be a valid uri with a scheme matching the {{#scheme}} pattern',
  'string.uriRelativeOnly': '{{#label}} must be a valid relative uri',
  'string.uppercase': '{{#label}} must only contain uppercase characters'
}
An example of using a templated message:
const Joi = require("joi");

const schema = Joi.object({
  nested: Joi.object({
    name: Joi.string().required().messages({
      "any.required": "{{#label}} is required!!",
      "string.empty": "{{#label}} can't be empty!!",
    }),
  }),
});

const result = schema.validate({
  nested: {
    // comment/uncomment to see the other message
    // name: "",
  },
});

console.log(result.error.details);
When using the template syntax, the context values that seem to be passed are something like the following, though specific rules / validators may pass more context:
{
key: "name", // this key, without ancestry
label: `"nested.name"`, // full path with dots as separators, in quotes
value: "", // the value that was validated
}
Create global or application-level Exception handlers and return Custom Error Messages in Spring REST APIs.
Overview
Effective communication is the key to healthy and efficient relationships. Interestingly, the same applies to any Client and Server relationships. The client’s request may succeed or fail on the server. However, the server should provide the most appropriate status code in either of the outcomes.
Although sending a correct status code is enough for a client to take real action based on the outcome of a request, in case of failures, the client may need more details about what went wrong. For example, failure details like the exception type and an error message can help clients log the error or provide appropriate failure messages to their clients.
This article will teach How to handle different failures and return Custom Error Messages from a Spring REST API. If you don’t know how to handle exceptions in Spring REST API, please read Spring Rest Service Exception Handling.
Return a Generic Error Message using @ResponseStatus
The most basic way of returning an error message from a REST API is to use the @ResponseStatus annotation. We can add the error message in the annotation’s reason field. Although we can only return a generic error message, we can specify exception-specific error messages.
Next is an example of a @ControllerAdvice using @ResponseStatus annotations to return exception-specific error messages.
@ControllerAdvice public class ApplicationExceptionHandler { @ResponseStatus( value = HttpStatus.NOT_FOUND, reason = "Requested Student Not Found") @ExceptionHandler(StudentNotFoundException.class) public void handleException(StudentNotFoundException e) { } @ResponseStatus( value = HttpStatus.BAD_REQUEST, reason = "Received Invalid Input Parameters") @ExceptionHandler(InputValidationException.class) public void handleException(InputValidationException e) { } @ResponseStatus( value = HttpStatus.GATEWAY_TIMEOUT, reason = "Upstream Service Not Responding, Try Again") @ExceptionHandler(ServiceUnavailableException.class) public void handleException(ServiceUnavailableException e) { } }Code language: Java (java)
The Exception handler class has three exception handlers, each of which returns a specific HTTP Response Status. Each response status specifies a reason field with a particular error message.
To view the error message in the response, ensure you have turned on include-messages in the server configuration. To learn more about Spring Boot server configurations, please visit Spring Boot Embedded Tomcat Configuration.
Code language: YAML (yaml)
server: error: include-message: always
Next is an example of a response object the REST API returns. Note that the response object has the specified error message.
Code language: JSON / JSON with Comments (json)
{ "timestamp": "", "status": 404, "error": "Not Found", "message": "Requested Student Not Found", "path": "/students/Jack" }
Although we can specify exception-specific error messages, it is still not informative. Therefore in the following sections, we will learn how to return a more specific error message from Spring REST API.
Return Error Message Using Custom Error Object
Let’s create a class representing the error message and the status code. We will return an instance of that in case of errors.
Next is the Error class representing the status code and a String message. We use a few Lombok annotations that introduce regular getter and setter methods and a constructor using the final fields.
Custom Response Error Class
@Data @RequiredArgsConstructor public class Error { private final HttpStatus httpStatus; private final String message; }Code language: Java (java)
Now that we have an error model created, we will use it to return a detailed error message from Controller Advice.
Code language: Java (java)
@ExceptionHandler(StudentNotFoundException.class) public ResponseEntity handleException( StudentNotFoundException e) { Error error = new Error(HttpStatus.NOT_FOUND, e.getLocalizedMessage()); return new ResponseEntity<>(error, error.getHttpStatus()); }
The exception handler returns an instance of the Error class populated with the exception message and HTTP Status Code.
Now, we can throw our Not Found Exception with a custom error message.
Code language: Java (java)
throw new StudentNotFoundException ("Student service failed, studentId : " + studentId);
When the REST API cannot find the requested resource, we get a detailed error as a response.
Code language: JSON / JSON with Comments (json)
{ "httpStatus": "NOT_FOUND", "message": "Student service failed, studentId : Jack" }
Return Error Message Using HashMap
Also, instead of creating a dedicated error class, we can return a detailed error message using a simple HashMap. Next is an example of producing and returning a Custom Error Message using Java HashMap.
Code language: Java (java)
@ExceptionHandler(StudentNotFoundException.class) public ResponseEntity<Map<String, String>> handleException(StudentNotFoundException e) { Map<String, String> errorResponse = Map.of( "message", e.getLocalizedMessage(), "status", HttpStatus.NOT_FOUND.toString() ); return new ResponseEntity<>(errorResponse, HttpStatus.NOT_FOUND); }
Handle Bad Request Exceptions
The Bad Request errors are the Client errors where the client’s request doesn’t meet the requirements of the target server. This section will see how to handle Bad Request exceptions and provide a custom or detailed error response.
Type Mismatch Exceptions
The Type Mismatch Exceptions occur when Spring Controller cannot map the request parameters, path variables, or header values into controller method arguments. This section covers the handling of MethodArgumentTypeMismatchException and TypeMismatchException.
Spring throws MethodArgumentTypeMismatchException when the controller argument doesn’t have a required type. On the other hand, Spring throws TypeMismatchException when there is a type mismatch while setting Bean properties. Also, both exceptions provide a detailed error message that we can use to prepare the Error object.
To demonstrate that, next is an example of Handling MethodArgumentTypeMismatchException and TypeMismatchException and returning a detailed error message in Controller Advice.
Code language: Java (java)
@ExceptionHandler({ MethodArgumentTypeMismatchException.class, TypeMismatchException.class }) public ResponseEntity<Map<String, String>> handleException(TypeMismatchException e) { Map<String, String> errorResponse = Map.of( "message", e.getLocalizedMessage(), "status", HttpStatus.BAD_REQUEST.toString() ); return new ResponseEntity<>(errorResponse, HttpStatus.BAD_REQUEST); }
Note that the controller advice catches both exceptions; however, the method arguments accept an exception of type TypeMismatchException because it is the parent of the other exception.
Next, the snippet shows a detailed error message when we call a rest endpoint with an incompatible path variable leading to MethodArgumentTypeMismatchException.
Code language: JSON / JSON with Comments (json)
{ "httpStatus": "BAD_REQUEST", "message": "Failed to convert value of type 'java.lang.String' to required type 'java.lang.Long'; nested exception is java.lang.NumberFormatException: For input String: "Jack"" }
Bean Validation Exceptions
The Bean Validation exceptions occur when the request contents do not pass the provided validations.
The BindException occurs when the binding errors are fatal. While the MethodArgumentNotValidException occurs when validations specified by @Valid fail. Note that the MethodArgumentNotValidException is a subclass of BindException. Thus, we can handle them using the same Spring REST API’s exception handler.
@ExceptionHandler({ BindException.class, MethodArgumentNotValidException.class }) public ResponseEntity<Map<String, Object>> handleException(BindException e) { List<String> errors = new ArrayList<>(); e.getFieldErrors() .forEach(err -> errors.add(err.getField() + ": " + err.getDefaultMessage())); e.getGlobalErrors() .forEach(err -> errors.add(err.getObjectName() + ": " + err.getDefaultMessage())); Map<String, Object> errorResponse = Map.of( "error", errors, "message", e.getLocalizedMessage(), "status", HttpStatus.BAD_REQUEST.toString() ); return new ResponseEntity<>(errorResponse, HttpStatus.BAD_REQUEST); }Code language: Java (java)
Here we have created a List<String> to represent individual binding errors and add that to the response Map. Instead, we can add a List<String> field to the Error class we created in the previous section and populate the list with individual errors.
Spring throws HttpMediaTypeNotSupportedException, when a POST, PUT, or PATCH endpoint on the server cannot handle the content type sent by the client. The REST Controllers on the server specify the content type they can support. When the media type that a client sends doesn’t match, the client gets this exception back.
To demonstrate, next is an example of handling HttpMediaTypeNotSupportedException and returning a custom error response.
Code language: Java (java)
@ExceptionHandler(HttpMediaTypeNotSupportedException.class) public ResponseEntity<Map<String, String>> handleException( HttpMediaTypeNotSupportedException e) { String provided = e.getContentType().toString(); List<String> supported = e.getSupportedMediaTypes().stream() .map(MimeType::toString) .collect(Collectors.toList()); String error = provided + " is not one of the supported media types (" + String.join(", ", supported) + ")"; Map<String, String> errorResponse = Map.of( "error", error, "message", e.getLocalizedMessage(), "status", HttpStatus.UNSUPPORTED_MEDIA_TYPE.toString() ); return new ResponseEntity<>(errorResponse, HttpStatus.UNSUPPORTED_MEDIA_TYPE); }
As seen in the exception handler above, the instance of HttpMediaTypeNotSupportedException provides detailed information about the incorrect media type we provided and a list of actually supported media types. Thus, we create a custom error message based on the available information.
Code language: JSON / JSON with Comments (json)
{ "error":"text/plain;charset=UTF-8 is not one of the supported media types ( application/octet-stream, text/plain, application/xml, text/xml, application/x-www-form-urlencoded, application/*+xml, multipart/form-data, multipart/mixed, application/json, application/*+json, */*)", "message":"Content type 'text/plain;charset=UTF-8' not supported", "status":"415 UNSUPPORTED_MEDIA_TYPE" }
The above snippet shows a client’s sample error response when it sends a request with an invalid media type.
Handle Request Body Not Readable Exception
Now we will see an example of handling HttpMessageNotReadableException and returning a custom error response. The HttpMessageNotReadableException occurs when the request body is missing or unreadable.
Code language: Java (java)
@ExceptionHandler(HttpMessageNotReadableException.class) public ResponseEntity<Map<String, String>> handleException( HttpMessageNotReadableException e) throws IOException { Map<String, String> errorResponse = Map.of( "message", e.getLocalizedMessage(), "status", HttpStatus.BAD_REQUEST.toString() ); return new ResponseEntity<>(errorResponse, HttpStatus.BAD_REQUEST); }
Handle HTTP Request Method Not Supported Exception
The HttpMethodNotSupportedException occurs when the HTTP endpoint on the REST API does not support the HTTP request method. Let’s write an exception handler for HttpMethodNotSupportedException and return a detailed error message.
Code language: Java (java)
@ExceptionHandler(HttpRequestMethodNotSupportedException.class) public ResponseEntity<Map<String, String>> handleException( HttpRequestMethodNotSupportedException e) throws IOException { String provided = e.getMethod(); List<String> supported = List.of(e.getSupportedMethods()); String error = provided + " is not one of the supported Http Methods (" + String.join(", ", supported) + ")"; Map<String, String> errorResponse = Map.of( "error", error, "message", e.getLocalizedMessage(), "status", HttpStatus.METHOD_NOT_ALLOWED.toString() ); return new ResponseEntity<>(errorResponse, HttpStatus.METHOD_NOT_ALLOWED); }
As seen in the exception handler above, the exception instance provides detailed information about the provided HTTP Method and an array of Supported HTTP Methods. We use it to form a clear error message.
Code language: JSON / JSON with Comments (json)
{ "error": "GET is not one of the supported Http Methods (POST)", "message": "Request method 'GET' not supported", "status": "405 METHOD_NOT_ALLOWED" }
The snippet showed an example response when the client attempted to execute a GET endpoint, while the REST API supports only POST.
Default Exception Handler
Similarly, we can create a default exception handler advice that handles all Exception types. Spring attempts to find the most specific handler when we have multiple exception handlers and falls back to the default handler if there is no suitable handler.
Code language: Java (java)
@ExceptionHandler(Exception.class) public ResponseEntity<Map<String, String>> handleException( Exception e) throws IOException { Map<String, String> errorResponse = Map.of( "message", e.getLocalizedMessage(), "status", HttpStatus.INTERNAL_SERVER_ERROR.toString() ); return new ResponseEntity<>(errorResponse, HttpStatus.INTERNAL_SERVER_ERROR); }
Above is an example of writing a default exception handler that returns an error message by the exception instance and an HTTP Status of 500.
Summary
This detailed tutorial taught us how to Return Custom Error Messages in Spring REST API. Firstly, we understood that Spring returns a generic error message and the most suitable HTTP Status Code by default. However, we can write our exception handlers for specific exceptions using @ControllerAdvice and produce a custom and detailed error response.
For more on Spring and Spring Boot Tutorials, please visit Spring Tutorials.
In this article, let us learn about printing error messages from Exceptions with the help of 5 specifically chosen examples.
I have divided this article into 2 major sections
- Printing custom error messages and
- Printing a specific part of the default error message. By “default error message“, I mean the error message that you typically get in the command line if you did not catch a given exception)
Depending on which of the 2 options above you are looking for, you can jump to the respective section of the article using the table of content below.
So, let’s begin!
Printing Custom Error messages
There are 3 ways to print custom error messages in Python. Let us start with the simplest of the 3, which is using a print() statement.
Option#1: Using a simple print() statement
The first and easiest option is to print error messages using a simple print() statement as shown in the example below.
try:
    #Some Problematic code that can produce Exceptions
    x = 5/0
except Exception as e:
  print('A problem has occurred from the Problematic code: ', e)
Running this code will give the output below.
A problem has occurred from the Problematic code: division by zeroHere the line “x = 5/0″ in Example 1 above raised a “ZeroDivisionError” which was caught by our except clause and the print() statement printed the default error message which is “division by zero” to the standard output.
One thing to note here is the line “except Exception as e“. This line of code’s function is to catch all possible exceptions, whichever occurs first as an “Exception” object. This object is stored in the variable “e” (line 4), which returns the string ‘division by zero‘ when used with the print() statement (line 5).
To summarize if you wish to print out the default error message along with a custom message use Option#1.
This is the simplest way to print error messages in python. But this option of putting your custom messages into print statements might not work in cases where you might be handling a list of exceptions using a single except clause. If you are not exactly sure how to catch a list of exceptions using a single except clause, I suggest reading my other article in the link below.
Python: 3 Ways to Catch Multiple Exceptions in a single “except” clause
There I have explained the 3 ways through which you can catch a list of exceptions along with tips on when is the right situation to catch each of these exceptions.
Now that we have learned how to print the default string which comes with an exception object, let us next learn how to customize the message that e carried (the string ‘division by zero‘) and replace that with our own custom error message.
Option#2: Using Custom Exception classes to get customized error messages
In Python, you can define your own custom exception classes by inheriting from another Exception class as shown in the code below.
class MyOwnException(Exception):
    def __str__(self):
        return 'My Own Exception has occurred'

    def __repr__(self):
        return str(type(self))
try:
    raise MyOwnException
except MyOwnException as e:
    print(e)
    print(repr(e))
How to choose the exception class to inherit from?
In the above example, I have inherited from the Exception class in python, but the recommended practice is to choose a class that closely resembles your use-case.
For example, say you are trying to work with a string type object and you are given a list type object instead, here you should inherit your custom exception from TypeError since this Exception type closely resembles your use case which is “the variable is not of expected type”.
If you are looking for getting an appropriate Exception class to inherit from, I recommend having a look at all the built-in exceptions from the official python page here. For the sake of keeping this example simple, I have chosen the higher-level exception type named “Exception” class to inherit from.
In the code below, we are collecting values from the user and to tell the user that there is an error in the value entered we are using the ValueError class.
class EnteredGarbageError(ValueError):
    def __str__(self):
        return 'You did not select an option provided!'

try:
    options = ['A', 'B', 'C']
    x = input('Type A or B or C: ')
    if x not in options:
        raise EnteredGarbageError
    else:
        print ('You have chosen: ', x)

except EnteredGarbageError as err:
    print(err)
Now that we understand how to choose a class to inherit from, let us next have a look at how to customize the default error messages that these classes return.
How to customize the error message in our custom exception class?
To help us achieve our purpose here which is to print some custom error messages, all objects in python come with 2 methods named __str__ and __repr__. This is pronounced “dunder-str” and “dunder-repr” where “dunder” is short for “double underscore”.
Dunder-str method:
The method __str__ returns a string and this is what the built-in print() function calls whenever we pass it an object to print.
print(object1)In the line above, python will call the __str__ method of the object and prints out the string returned by that method.
Let us have a look at what python’s official documentation over at python.org has to say about the str method.
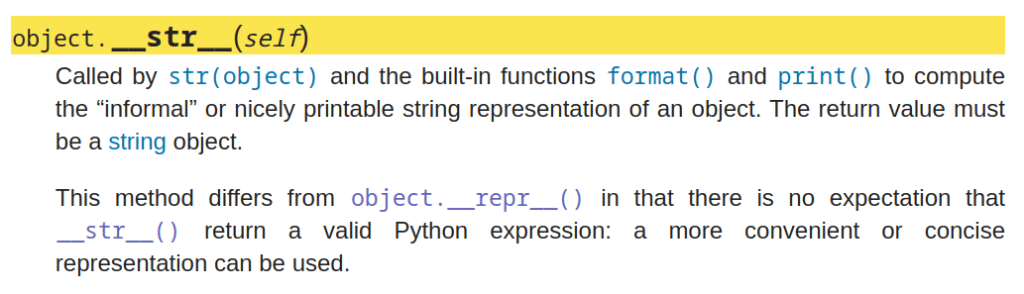
In simpler words, the str method returns a human-readable string for logging purposes, and when this information is passed to the built-in function print(), the string it returns gets printed.
So since our implementation of str returns the string “My Own Exception has occurred” this string got printed on the first line of the exception message.
Dunder-repr method:
__repr__ is another method available in all objects in python.
Where it differs from the dunder-str method is the fact that while the __str__ is used for getting a “friendly message”, the __repr__ method is used for getting, a more of a, “formal message”. You can think of str as a text you got from your friends and repr as a notice you got from a legal representative!
The below screenshot from python’s official documentation explains the use of __repr__ method.

Again, in simpler words, repr is typically used to print some “formal” or “official” information about an object in Python
In our Example 2 above, the repr method returned the class name using the built-in type() function.
Next, let us see another variation where we can print different error messages using a single Exception class without making a custom class.
Option#3: Custom Error messages from the raise statement
try:
  raise Exception('I wish to print this message')
except Exception as error:
  print(error)
Lucky for us, python has made this process incredibly simple! Just pass in the message as an argument to the type of exception you wish to raise and this will print that custom message instead!
In the above code, we are throwing an exception of type “Exception” by calling its constructor and giving the custom message as an argument, which then overrides the default __str__ method to return the string passed in.
If you wish to learn more about raise statement, I suggest reading my other article in the link below
Python: Manually throw/raise an Exception using the “raise” statement
where I have explained 3 ways you can use the raise statement in python and when to use each.
But when to use option 2 and when to use option 3?
On the surface, Option#3 of passing in the custom message may look like it made option#2 of using custom classes useless. But the main reason to use Option#2 is the fact that Option#2 can be used to override more than just the __str__ method.
Let’s next move on to section 2 of this article and look at how to choose a specific part of the default error message (the error printed on the console when you don’t catch an exception) and use that to make our own error messages
Choosing Parts of Default Error Messages to print
To understand what I mean by “Default Error Message” let us see an example
raise ValueError("This is an ValueError")This line when run, will print the following error message
Traceback (most recent call last):

  File "<ipython-input-24-57127e33a735>", line 1, in <module>
    raise ValueError("This is an ValueError")

ValueError: This is an ValueError
This error message contains 3 Parts
- Exception Type (ValueError)
- Error message (This is an ValueError)
- and the stack trace (the 1st few lines showing us where exactly in the program the exception has occurred)
The information needed
- to extract and use each of the individual pieces of information listed above and
- when to use what piece of information
is already covered with the help of several examples in my previous article in the link below
Python Exceptions: Getting and Handling Error Messages as strings.
And with that I will end this article!
If you are looking for another interesting read, try the article in the link below.
Exceptions in Python: Everything You Need To Know!
The above article covers all the basics of Exception handling in Python like
- when and how to ignore exceptions
- when and how to retry the problematic code that produced the exception and
- when and how to log the errors
I hope you enjoyed reading this article and got some value from it.
Feel free to share it with your friends and colleagues!
Hello guys, today I’m going to show you how to display validation error custom messages. I’ll share three methods to change the error messages. Let’s start:
Table of Contents
- Set Error Messages in Controller
- Adding Error Messages in Language File
- Creating Custom Request
Step 1 : Set Error Messages in Controller
We can easily change custom error messages in the controller. This is a quick solution. Have a look at this method:
BookController.php
<?php

namespace AppHttpControllers;

use AppBook;
use IlluminateHttpRequest;
use Validator;

class BookController extends Controller
{
    public function store(Request $request)
    {
        // validator
        $validator = Validator::make($request->all(), [
            'name' => 'required',
            'author' => 'required',
        ], [
            'name.required' => 'Please enter book name',
            'author.required' => 'Please enter book author',
        ]);

        // check validation
        if ($validator->fails()) {
            $response = [
                'success' => false,
                'message' => $validator->messages()
            ];
            return response()->json($response, 404);
        }

        // try to store the book
        try {
            $input = $request->all();
            Book::create($input);

            $success = true;
            $message = "Stored successful";
        } catch (IlluminateDatabaseQueryException $ex) {
            $success = false;
            $data = null;
            $message = $ex->getMessage();
        }

        // make response
        $response = [
            'success' => $success,
            'message' => $message
        ];

        // return response
        return response()->json($response, 200);
    }
}
Step 2 : Adding Error Messages in Language File
This is the last method. If we set custom error messages here, these will work in the whole project.
Open resources/lang/en/validation.php file and add custom errors with messages in the “custom” array. Here’s an example:
validation.php
'custom' => [
    'name' => [
        'required' => 'Please enter book name',
    ],
    'author' => [
        'required' => 'Please enter book author',
    ],
],
and the BookController looks like:
BookController.php
<?php

namespace AppHttpControllers;

use IlluminateHttpRequest;
use AppBook;
use Validator;

class BookController extends Controller
{
    public function store(Request $request)
    {
        // validator
        $validator = Validator::make($request->all(), [
            'name' => 'required',
            'author' => 'required',
        ]);

        // check validation
        if ($validator->fails()) {
            $response = [
                'success' => false,
                'message' => $validator->messages()
            ];
            return response()->json($response, 404);
        }

        // try to store the book
        try {
            $input = $request->all();
            Book::create($input);

            $success = true;
            $message = "Book successfully stored";
        } catch (IlluminateDatabaseQueryException $ex) {
            $success = false;
            $message = $ex->getMessage();
        }

        // make response
        $response = [
            'success' => $success,
            'message' => $message
        ];

        // return response
        return response()->json($response, 200);
    }
}
Step 3 : Creating Custom Request
By creating a custom request we can do this. To do this, we have to create a request. Let’s create a request by using this artisan command:
php artisan make:request BookFormRequestOpen the BookFormRequest from appHttpRequests and paste this code:
BookFormRequest.php
<?php

namespace AppHttpRequests;

use IlluminateFoundationHttpFormRequest;

class BookFormRequest extends FormRequest
{
    /**
     * Determine if the user is authorized to make this request.
     *
     * @return bool
     */
    public function authorize()
    {
        return true;
    }

    /**
     * Get the validation rules that apply to the request.
     *
     * @return array
     */
    public function rules()
    {
        return [
            'name' => 'required',
            'author' => 'required',
        ];
    }

    /**
     * Get the error messages for the defined validation rules.
     *
     * @return array
     */
    public function messages()
    {
        return [
            'name.required' => 'Please enter book name',
            'author.required' => 'Please enter book author',
        ];
    }
}
Let’s use this BookFormRequest request in our BookController.
BookController.php
<?php

namespace AppHttpControllers;

use IlluminateHttpRequest;
use AppHttpRequestsBookFormRequest;
use AppBook;

class BookController extends Controller
{
    public function store(BookFormRequest $request)
    {
        // try to store the book
        try {
            $input = $request->all();
            Book::create($input);

            $success = true;
            $message = "Book successfully stored";
        } catch (IlluminateDatabaseQueryException $ex) {
            $success = false;
            $message = $ex->getMessage();
        }

        // make response
        $response = [
            'success' => $success,
            'message' => $message
        ];

        // return response
        return response()->json($response, 200);
    }
}
Note: To get the response from the custom request, we have to set header Accept: application/json.
The tutorial is over. You can choose any method. Thank you.