
The 404 error page is a generic, browser-issued webpage that tells a visitor when a page they are looking for can’t be found. A custom 404 error page, on the other hand, is a specially designed page that delivers the same message but in a more helpful, user-friendly way.
It can tell the visitor what’s going on and what to do next. It can even help save a sale.
This post walks through the steps of how to add an IIS custom error 404 page if you’re a small business administering your own Microsoft IIS server either directly or through a hosting provider. In this post:
- How to identify your web server
- How to prepare custom 404 error pages in IIS 8.5
- How to prepare custom 404 error pages in IIS 10
- How to test your custom 404 error page
- Troubleshooting error pages in IIS 8.5 and 10.0
How to Identify Your Web Server

There are several popular (and many more besides) software programs used to store and host webpages, called servers. If you’re not sure which server you use, contact your web host and they’ll tell you.
If they say Apache — and it very well might be since it’s one of the most widely used servers on the web — leave this post and read How to Configure a Custom 404 Error Page — Apache Server Edition.
Not using Apache? There’s a high chance you’re using another very popular server, Microsoft IIS. Another way to tell that you’re using Microsoft IIS is if your website is programmed in .NET or another Microsoft stack, such as ASP.
So you’re using Microsoft IIS? Let’s begin.
Putting in place a custom 404 error page in Microsoft IIS takes four steps:
- Design a custom 404 error page.
- Put it in the root directory of IIS.
- Edit your Microsoft IIS server properties to deliver your custom error page.
- Test the page.
This post skips to Step 3. We assume you’ve already created a branded, custom 404 error page. We also assume you’ve put this page in the appropriate directory so that IIS has it available to serve. If that’s correct, then you’re in the right guide.
If you’d like a primer on how to do the first step, visit How to Design a 404 Error Page That Saves a Sale.
A Possible Microsoft IIS Complication
Before diving into the process, it’s important to note a potential complication regarding your IIS web server. If your website resides on a dedicated server (one that isn’t shared), you’re good to go with the steps below.
If your website lives on a shared server run by a third-party hosting provider, only the administrator is allowed to make changes to your server files. In other words, you will have to contact the hosting provider before you can gain access to the server and implement the changes outlined below. Unfortunately, this might take a while – but hopefully it’s a brief setback.
Another way to get administrative rights back in your power if you’re on a shared IIS server is to install an ISAPI_Rewrite plug-in into IIS. ISAPI stands for Internet Server Application Program Interface, and you can easily purchase this software from several places. Helicon Tech (www.isapirewrite.com) creates a good version of the software.
Ready to go? Here’s how to tell your server to replace a generic 404 error with your new and improved page.
How to Program Microsoft IIS to Deliver Your Custom Error Page
With administrative rights to make changes to your server files, you can now get in and make the changes. Exactly how to make those changes depends on the version of the software that you’re using.
Here’s a brief guide for IIS 8.5 followed by another set of instructions for IIS 10.0.
How to Prepare Custom 404 Error Pages in IIS 8.5
Step 1: Open the “Internet Information Services (IIS) Manager” tab. This is located on the Task Bar below “Server Manager,” and then underneath “Tools.”
Step 2: Identify website or application. Go to the “Connections” pane and click the plus sign (+) next to your server name to expand it. Then expand “Sites.” Next, find the site or application you want to set a custom error page for.
Step 3: Open “Error Pages.” You can do this by double-clicking “Error Pages,” located in the home pane.

Step 5: Enter the HTTP “Status Code.” When you see the dialog box “Add Custom Error Page,” enter “404” underneath “Status Code.”
Step 6: Select “Execute a URL on this site,” located in the same dialog box. This allows you to serve dynamic content, such as an asp file for the custom error page you’ve created.
Step 7: Enter the URL. Within the text box, “File path,” type the URL of the custom error page, and then click “OK.” Note: Make sure when selecting this option that the path is a relative path.

Once you hit “OK,” your custom 404 error page should be live and doing its job.
How to Prepare Custom 404 Error Pages in IIS 10
Step 1: Open the “Internet Information Services (IIS) Manager” tab. This is located on the Task Bar below “Server Manager,” and then underneath “Tools.”
Step 2: Identify website or application. Go to the “Connections” pane and click the plus sign (+) next to your server name to expand it. Then expand “Sites.” Next, go to the site or application you want to set a custom error page for.
Step 3: Open Error Pages. Double-click the “Error Pages” icon located in the home pane; click “Edit.”
Step 4: Enter the HTTP Status Code. When you see the dialog box “Edit Custom Error Page,” enter “404” underneath “Status Code.”
Step 6: Select “Execute a URL on this Site.” In the same dialog box, select “Execute a URL on this site” so that you can serve your custom page.
Step 7: Enter the URL. Within the text box “URL (relative to the site root),” type the URL of the custom error page and then click “OK.”
Step 8: Select “Edit Feature Settings.” Once you hit “OK,” right-click on the 404 error and select “Edit Feature Settings.”
Step 9: Choose “Custom Error Page,” and then click “OK.” After you click this last OK, your new page should be live and ready.
Test Your New and Improved Custom 404 Error Page
Whether you’re using IIS version 8.5 or 10.0, it’s time to check if your new page is working properly. The easiest way to test your new page is to visit a bogus page on your website. Go to your web browser and type in a fake page on the site, such as www.mywebsite.com/bogus-cheeseburgers.
If the new custom page comes up, congratulations! You’ve properly set up a custom 404 error page for the Microsoft IIS server.
If you’re still getting the generic 404 error page, it’s time to check a common problem and try again.
Troubleshooting in IIS 8.5 and 10.0
- Did you use an absolute path instead of a relative path? It has to be a relative path. This is a common issue that plagues both IIS 8.5 and 10.0. To fix this issue, simply go back to Step 6 and add a relative path. And test again. Hopefully this time you’ll find your custom page live and ready.
- Are you not seeing the admin menus described here? It may be that you don’t have administrative access. If for some reason you cannot get admin access, there is an alternative: you can configure your custom 404 page manually by editing the Web.config file or putting it in code. Here’s where Microsoft offers steps on how to do both.
Note: If your website is programmed in something other than C#, VB.NET, JavaScript or VBScript, you can still use the steps outlined above, but you’ll have to learn how to do it depending on your programming language/framework.
Simple Change, Big Results
No one enjoys getting a bite of something they don’t want. From a visitor’s point of view, coming across a 404 error page on your website is disappointing and confusing.
And depending on what they get instead of what they wanted, a visitor can lose their appetite. In fact, it’s not uncommon for a consumer who encounters a 404 error page to immediately click the back button and exit the site completely.
A sad ending to a potential conversion.
The good news is that a custom error 404 can save the day.
While it might not be the main course that your visitors are craving, a custom error page can serve as the amuse-bouche that opens their appetites and leads them to the final entrée.
Help your hungry visitors get over the disappointment of reaching a generic error by creating and setting up a custom 404 page.
Adding a custom 404 error page is just one of the best practices in SEO. There’s so much more to learn, and you can do just that through our official Bruce Clay SEO Training course.
Melanie Saxe was a senior content writer for Bruce Clay Inc. She holds a B.A. degree in journalism and has many years of experience crafting content for the web. When she’s not writing at work, she’s usually playing Legos with her son, tinkering with her poems, or singing jazzy songs.
See Melanie’s author page for links to connect on social media.
Custom error pages are used to hide technical information from end users. Often default error pages can leak technical information to potential attackers. In this post Ill show how to implement custom error pages for IIS and Asp.net to assist with hardening the security of a system.
Hackers can often force deliberate errors in a system. They do this to expose technical details about its inner workings of a system. A simple example of this is to request a resource from a website that does not exists. How the system responds will give away some technical details.
Type this in your browser. http://[yourdomain]/abc.xyz
The file extension being requested does not exists and as a result a 404 error will be raised. The HTML from the default error pages can give away what OS and web services is being used. This could aid an attacker with his attack strategy. To prevent the leaking of the technical information we provide custom error pages.
Below is an IIS default 404 error page. Slight variations exists between the different versions of IIS further assisting a potential attacker.

I will show how to change these default error pages in IIS and in Asp.net applications.
Custom error pages for Asp.net
ISAPI filters can manage their own error pages by having entries in their web.config files. These error pages will only be used within asp.net for file types that the ISAPI filter has knowledge of.
<system.web>
<!--Custom asp.net error pages for the application-->
<customErrors defaultRedirect="~/Errors/Default.aspx" mode="On" redirectMode="ResponseRewrite">
<error statusCode="401" redirect="~/Errors/AccessDenied.aspx" />
<error statusCode="403" redirect="~/Errors/AccessDenied.aspx" />
<error statusCode="404" redirect="~/Errors/PageNotFound.aspx" />
<error statusCode="500" redirect="~/Errors/ApplicationError.aspx" />
</customErrors>
</system.web>
The configuration above will work for file types that can be handled by the asp.net. File types not supported by the ISAPI filter will be directed to the IIS to handle. Ill cover that in the next section.
Here is a article that has more details specific to custom error pages in asp.net
Custom error pages for IIS
Error codes not handled by the ISAPI filters are left for the webserver to catch and respond to using its error pages. These default error pages are often left as is.
In IIS there are 2 places where the custom error pages can be defined, per website or per webserver. The IIS error pages can be replace with custom page by adding configuration into the web.config file. An IIS reset is needed before he error pages will take affect.
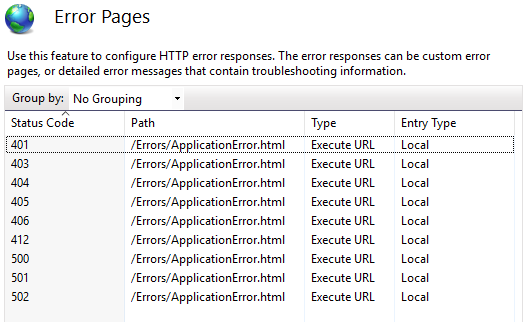
<system.webServer>
<!--Prevents default IIS error pages from being shown-->
<httpErrors errorMode="Custom" defaultResponseMode="ExecuteURL">
<remove statusCode="401" />
<remove statusCode="403" />
<remove statusCode="404" />
<remove statusCode="405" />
<remove statusCode="406" />
<remove statusCode="412" />
<remove statusCode="500" />
<remove statusCode="501" />
<remove statusCode="502" />
<error statusCode="401" responseMode="ExecuteURL" path="/Errors/ApplicationError.html" />
<error statusCode="403" responseMode="ExecuteURL" path="/Errors/ApplicationError.html" />
<error statusCode="404" responseMode="ExecuteURL" path="/Errors/ApplicationError.html" />
<error statusCode="405" responseMode="ExecuteURL" path="/Errors/ApplicationError.html" />
<error statusCode="406" responseMode="ExecuteURL" path="/Errors/ApplicationError.html" />
<error statusCode="412" responseMode="ExecuteURL" path="/Errors/ApplicationError.html" />
<error statusCode="500" responseMode="ExecuteURL" path="/Errors/ApplicationError.html" />
<error statusCode="501" responseMode="ExecuteURL" path="/Errors/ApplicationError.html" />
<error statusCode="502" responseMode="ExecuteURL" path="/Errors/ApplicationError.html" />
</httpErrors>

</system.webServer>
Something to note here is that even to the defaultResponseMode is ‘ExecuteURL’ the webserver default back to “file”. To use ‘ExecuteURL’ for custom error pages the developer will have to specify it per error page as done above.
When you click on the error pages of the affected website it should look like this.
Related posts
How to disable insecure cipher suits.
Securing Http with HSTS in IIS
Enable secure cookies over HTTPS.
Remove the IIS version from HTTP response header
Securing website access control
19 Feb 2017
If you are a .NET web developer you must have played around with exception handling in a website. I certainly have and most of the times it has not been a easy exercise. There just seem to be to many levels of exception handling. And too many ways to notify the user that something went wrong. New (ok, some not so new anymore) technologies like MVC.NET, IIS integrated mode and .NET CORE adding their own options. What I won’t be talking about is how to catch and handle exceptions in code here, I will focus on ways to display exception information to the user with customized error pages.
What is a good error page
A good error page should display all the necessary information about what went wrong and if possible what the user can do to fix the problem. With necessary information I mean just enough information to describe to the average user what the problem is, so don’t flood the user with technical details like SQL query xxx on database yyyy failed due to a primary key violation. No average user of any website does need that kind of information (except if your average user is the developer of the site, but in that case you have another problem). A better message would be something like Your account could not be created, please try again. If the problem persists contact us at xxx-yyy. Besides the fact that your users don’t need the technical details, it can also pose a big security problem when you expose those details to the public. So just don’t.
It is also good practice to supply the user with options to either fix the problem or help them find a workaround. An example of this is an Internal Server Error (code 500) caused by an timeout, in this case you could tell the user to try again in x minutes. Another example is a Page Not Found (code 404) error, here it is good practice to give the user alternative links to pages that he might be looking for (this can sometimes be done by taking a closer look at the URL requested). If it its not possible to determine what the user was looking for you could just supply a link to your search page or to the first valid parent page of the requested URL. If you really want to help your users as best as possible, supply options on your error pages to contact you, either by mail, phone, chat or what other options work best for you. Last but not least you could add an unique Id to your error pages and display it to the user. This Id should allow you to get all available technical details from your logs. If a user supplies this Id to you when he contacts you about an error on your site you can easily retrieve all details you need to identify (and hopefully fix) the exact problem.
How to display an error page
Now that we have determined what our error pages should contain we need to tell our application how and when to use them. In a .NET web application (I’m leaving out .NET Core for the time being) you roughly have the following options:
- Using CustomErrors section via web.config
- Using HttpErrors section via web.config
- Routing to a custom error page from code
1. Using CustomErrors section via web.config
The CustomErrors section in the web.config has been around for some time. It is part of the system.web section.
It handles unhandled exceptions which are thrown in the .NET code of your application and routes the requests which caused the exception to custom pages based on the status code of the error. You can set different pages for each error status code (>= 400). Usually the CustomErrors section looks something like this:
<customErrors mode="RemoteOnly" redirectMode="ResponseRewrite" defaultRedirect="~/error.aspx">
      <error statusCode="500" redirect="~/500.aspx" />
      <error statusCode="400" redirect="~/400.aspx" />
      <error statusCode="404" redirect="~/404.aspx" />
</customErrors>
mode attribute
The mode attribute can have one of three values:
- Off
- On
- RemoteOnly
Off disables displaying the custom error pages, in this case the default ASP.NET detailed error pages are always shown.
On always displays your custom error pages. RemoteOnly only shows your custom pages if the request comes from a remote server and not from the server itself, this in the recommended setting, although for testing your custom pages in your development environment you will want to use the On setting.
redirectMode attribute
This attribute has only 2 values:
- Redirect
- ResponseRewrite
Redirect does as it says and redirects your request to the URL you set in the redirect attribute of your custom error page. I would not recommend using this setting. The redirect might confuse the user (changing the URL), and is not a good idea from a SEO perspective. The better option is the ResponseRewrite, this renders the result of your given custom error page without changing the URL. This option has a catch however. The final response returns a statuscode 200. Your error page should always return the appropriate statuscode to the client. To fix this the easiest solution is to use a .ASPX page as your error page (yes, also when using a MVC application) and set the response status code manually in the code(behind) of this .ASPX.
<% Response.StatusCode = 500; %>
defaultRedirect attribute
Sets a default page for all errors for which you have not explicitly set a custom page, if you would get an error with status code 401 and you have not set a specific error page for this, the default page is used. It is advisable to always set this value.
2. Using HttpErrors section via web.config
Since the introduction of IIS Integrated Mode in IIS 7, we have another option to display custom error pages. Through the httpErrors section (under system.webServer) you can configure the IIS integrated mode error handling. The main difference with ASP.NET CustomErrors is the fact that httpErrors can handle all errors that occur in the entire request pipeline, not just in the ASP.NET code. This means that when something goes wrong while requesting a static resource (like an image) your custom error page will also be shown for this request. The config section for httpErrors normally looks like this:
<httpErrors errorMode="Custom" existingResponse="Auto" defaultResponseMode="ExecuteURL" defaultPath="/error.aspx">
      <clear />
      <error statusCode="500" path="/500.aspx" />
      <error statusCode="404" path="/404.aspx" />
</httpErrors>
Within the httpErrors section you can add different paths to error pages for specific status codes, just like with CustomErrors. You should first clear all error pages before you add your own. On the root httpErrors element the most important attributes are the following:
errorMode attribute
This attributes works like the mode attribute of CustomErrors, it has 3 values Custom, Detailed and DetailedLocalOnly. You will usually use either Custom or DetailedLocalOnly, the first always displaying your own custom error pages, the second one only when the request is coming from a remote source.
existingResponse attribute
This attribute determines what should be done with the original response. If the response has an error status code (code >= 400) the httpErrors section could handle it. With this attribute you set whether httpErrors actually should handle it. There are 3 options here, Auto, Passthrough and Replace. Passthrough lets the response pass through untouched, not displaying any error page. Replace always displays a (custom or detailed) errorpage in case of een error statuscode. The Auto option is a little fussy, it chooses between Passthrough and Replace based on whether a flag called SetStatus is true or false. This flag seems to correspond with the TrySkipIisCustomErrors property of the HttpResponse object in ASP.NET. More on this later.
defaultResponseMode attribute
With this attribute you set how the request pipeline routes to a custom error page. Again 3 options, File, ExecuteUrl and Redirect. File simply displays the content of the file you supply. ExecuteUrl actually executes the code under the given local URL, with this option you can use .ASPX files or other executable code. Redirect does as it claims and redirects the client to the givens URL, best not to use this option.
defaultPath attribute
Sets the default path for errors with a status code which has not been explicitly assigned a path. Works just like the defaultRedirect attribute of CustomErrors.
error element
The error element has only 2 required attributes, statusCode and path. Both attributes need little explaining. Keep in mind though that path should be set to either a filepath or a URL path depending on the setting of the defaultResponseMode attribute of the httpErrors element. You can also set the response mode at the error element level instead of at the httpErrors element level. Use the responseMode attribute for this.
How httpErrors handles errors
One of the big catches with httpErrors seems to be that while CustomErrors handles actual (.NET) exceptions, httpErrors handles status codes. This last functionality has given me some problems when I was working on a site which switched from IIS classic to integrated mode. Switching to integrated mode enabled the httpErrors functionality. This had some unexpected side effects with some of the handlers we were using in the site. Many handlers where designed to return a 500 statuscode and some JSON data in the response body whenever something went wrong. The httpErrors functionality picked up on those 500 status codes and started to display Html error pages in stead of the JSON result. It took me some time to figure this out and some more time to find a good fix.
The default settings of httpErrors set the existingResponse attribute to Auto which means for all responses returning an error status code the original response will be substituted with either a custom error page or a detailed IIS error page. Only if you explicitly set the TrySkipIisCustomErrors property of the response in ASP.NET to true the original response will remain untouched. I our case we had to set this property to true in all handlers which set the statuscode for the response to 500. The alternative would have been to disable the httpErrors entirely by setting the existingResponse property to Passthrough, this was not desirable for our site however.
Bypassing CustomErrors
HttpErrors could be a good replacement for CustomErrors, it handles all possible errors, not just those raised in .NET code. However, if you just set the mode property of CustomErrors to Off your site will (whenever an exception is thrown) display detailed ASP.NET error pages, not your httpError pages. CustomErrors seems to bypass httpErrors by setting TrySkipIisCustomErrors to true. The easiest fix for this is setting the existingResponse attribute of httpErrors to Replace. This would mean however that all response which do not throw an exception but do return an error status code will display a httpErrors error page instead of the original response. As mentioned earlier this might not always be desirable. An alternative solution is tweaking your global.asax to just return a 500 status code whenever an exception is thrown and not pass the exception itself.
void Application_Error(object sender, EventArgs e)
{
    Exception error = Server.GetLastError();

    // TODO : Log Exception

    Server.ClearError();

    var httpException = error as HttpException;
    Response.StatusCode = httpException != null ? httpException.GetHttpCode() : (int)HttpStatusCode.InternalServerError;
}
3. Routing to a custom error page from code
Apart from the 2 options to route to custom error pages through web.config settings, there are a few options to do the same from code. I won’t explain these option in depth here, but just do a quick summary.
Using MVC Error attributes
You can add the HandleError attribute to actions you want to have custom error pages in the event of an exception.
[HandleError()]
public ActionResult Index()
{
}
All exceptions within the action are routed to the default Error.cshtml view. You can add a different view by setting the View parameter of the HandleError method, like this HandeError(View="500.cshtml"). HandleError only works if CustomErrors is not set to Off in your web.config.
Overriding the OnException method on a MVC controller
For individual controllers or for a base controller (if you have one) you can override the OnException method.
protected override void OnException(ExceptionContext filterContext)
{
    filterContext.ExceptionHandled = true;

    filterContext.Result = new ViewResult
    {
        ViewName = "~/Views/Error/500.cshtml"
    };
}
Using the Application_Error event
This is an event you can add in your Global.asax, it handles all exceptions which have not been handled at an earlier stage.
protected void Application_Error(object sender, EventArgs e)
{
    var raisedException = Server.GetLastError();

    // TODO : Log Exception

    Server.ClearError();

    Server.Transfer("~/500.aspx");
}
Using a HttpModule
If you add a HttpModule to your request pipeline you can build your error handling into this module. Many 3rd party error handling extensions like Elmah use this technique.
public class ErrorModule : IHttpModule
{
    public void Init(HttpApplication context)
    {
        context.Error += OnError;
    }

    private void OnError(object sender, EventArgs e)
    {
        // Handle error here, log, redirect or alter response
    }

    public void Dispose()
    {
        // TODO : Dispose
    }
}
Conclusion
From the techniques discussed httpErrors seems to have the best papers. It works for all requests, even for static files. CustomErrors has little to no use cases which httpErrors can’t handle. MVC error pages are very easy to use but can only handle errors from within controllers, not in other parts of the code and not for static files. Error handling in Global.asax or in a HttpModule are good options, because they catch all exceptions anywhere in your code. But they still won’t handle errors with static files (although you could configure all files, including static files, to pass through a custom HttpModule and thus handle errors for static files that way). But if you want to easily handle all errors for all request and maintain your custom errorpages in a single place, httpErrors is in most cases your best option. You do have to tweak to get it working properly (bypassing customErrors, fixing possible issues with handlers which should not display a custom html error page, etc.). Keep in mind though that in many cases custom error pages can be avoided altogether. Many site sites still return a full blown custom error page in situations like invalid user input in a form. Such cases should be handled by showing the user which field is invalid within the form not by routing to a custom error page. If you do have to route to a custom error page, try to provide the user with just enough information to help him on his way (‘try again later’, ‘maybe the following links are helpfull…’, ‘if the problem persists contact us at …’). Getting the right texts can be a challenge. In the end better custom error pages make your customer happy and can reduces calls to your service desk. Errors are bad but if they do happen, make them as clear and helpful as possible…
- Instructions document for Hardening
- Disable Directory Browsing in IIS
- Disable OPTIONS and TRACE METHOD in IIS and Enable Get / Post / Head.
- Enable X-Frame-Options in IIS.
- Enable XSS-Protection in IIS.
- Configure Custom Error pages in IIS.
- Implement Secure Referrer Policy
- Enable Content-Security-Policy in IIS.
- Enable Stirct-Transport-Security in IIS. HSTS
- Enable X-Content-Type-Options in IIS.
- Suppress Web Server in IIS.
- Remove ASP.NET Version, Server Verion and Other un wanted headers.
- Remove ASP.NET 4.5
- Disable ASP.NET debug feature (http-asp-dot-net-debug)
- Modify the Web.config File
- Modify the Machine.config File
- Removing X-Powered-By Header.
- Disable Default IIS document in IIS.
- Cookies (Secure only / Http only)
- Secure Cookies with root path
- Check your headers.
- Security Headers
- Disable ViewState in Asp.NET Pages
- Host Header Remediation
- Content Security Policy
- References:
- CORS — Cross Origin Resource Sharing.
- Microsoft IIS Tilde Vulnerability
Table of contents generated with markdown-toc
Table of contents generated with markdown-toc
Instructions document for Hardening
Disable Directory Browsing in IIS
- Open IIS manager and navigate to the level you to manage
- In features view ,double click Directory browsing
- In the Actions pane, click Disable if the Directory Browsing feature is enabled.
Disable OPTIONS and TRACE METHOD in IIS and Enable Get / Post / Head.
- Open IIS manager and navigate to the level you to manage
- In features view ,double click Request Filtering
- Click the HTTP VERBS. Remove all the VERBS one by one.
- Under ALLOW VERB, add «GET», «POST», «HEAD»
- Under DENY VERB, add «OPTIONS», «TRACE», «PATCH», «PUT», «DELETE»
- Run Command line from Administrator and then issue «IISRESET» to restart the IIS
Enable X-Frame-Options in IIS.
- Open Internet Information Services (IIS) Manager. START > RUN > inetmgr
- In the Connections pane on the left side, expand the Sites folder and select the site that you want to protect.
- Double-click the HTTP Response Headers icon in the feature list in the middle.
- In the Actions pane on the right side, click Add.
- In the dialog box that appears, type X-Frame-Options in the Name field and type SAMEORIGIN or DENY in the Value field.
- Click OK to save your changes.
- Run Command line from Administrator and then issue «IISRESET» to restart the IIS
Enable XSS-Protection in IIS.
- Open Internet Information Services (IIS) Manager. START > RUN > inetmgr
- In the Connections pane on the left side, expand the Sites folder and select the site that you want to protect.
- Double-click the HTTP Response Headers icon in the feature list in the middle.
- In the Actions pane on the right side, click Add.
- In the dialog box that appears, type X-XSS-Protection in the Name field and type 1; mode=block in the Value field.
- Click OK to save your changes.
- Run Command line from Administrator and then issue «IISRESET» to restart the IIS
Configure Custom Error pages in IIS.
Follow the Steps listed in this link.
https://docs.microsoft.com/en-us/iis/configuration/system.webserver/httperrors/
- In the Connections pane, expand the server name, expand Sites, and then navigate to the Web site or application that you want to configure custom error pages for.
- In the Home pane, double-click Error Pages.
- In the Actions pane, click Add…
- In the Add Custom Error Page dialog box, under Status code, type the number of the HTTP status code for which you want to create a custom error message.
- In the Response Action section, do one of the following:
a. Select Insert content from static file into the error response to serve static content, for example, an .html file, for the custom error.
b. Select Execute a URL on this site to serve dynamic content, for example, an .asp file for the custom error.
c. Select Respond with a 302 redirect to redirect client browsers to a different URL that contains the custom error file. - In the File path text box, type the path of the custom error page if you chose Insert content from static file into the error response or the URL of the custom error page if you use either the Execute a URL on this site or Respond with a 302 redirect, and then click OK.
One command line for this work to be performed is
appcmd.exe set config -section:system.webServer/httpErrors /+"[statusCode='404',subStatusCode='5',prefixLanguageFilePath='%SystemDrive%inetpubcusterr',path='404.5.htm']"
/commit:apphost
Implement Secure Referrer Policy
The documentation for Referrer policy is @ https://developer.mozilla.org/en-US/docs/Web/HTTP/Headers/Referrer-Policy. It should be implemented using HTTP Headers.
- Open Internet Information Services (IIS) Manager. START > RUN > inetmgr
- In the Connections pane on the left side, expand the Sites folder and select the site that you want to protect.
- Double-click the HTTP Response Headers icon in the feature list in the middle.
- In the Actions pane on the right side, click Add.
- In the dialog box that appears, type Referrer-Policy in the Name field and type strict-origin-when-cross-origin in the Value field. One could also choose required values from the documentation provided above.
- Click OK to save your changes.
- Run Command line from Administrator and then issue «IISRESET» to restart the IIS
Alternatively, one could choose to edit the relevant Web.Config file add these header.
Enable Content-Security-Policy in IIS.
- Open Internet Information Services (IIS) Manager. START > RUN > inetmgr
- In the Connections pane on the left side, expand the Sites folder and select the site that you want to protect.
- Double-click the HTTP Response Headers icon in the feature list in the middle.
- In the Actions pane on the right side, click Add.
- In the dialog box that appears, type Content-Security-Policy in the Name field and type default-src ‘none’; script-src ‘self’; connect-src ‘self’; img-src ‘self’; style-src ‘self’; in the Value field.
NOTE: The Content Security Policy is the Starter Policy for any application. It is generally recommended to add a custom Content Security Policy as per needs. - Click OK to save your changes.
- Run Command line from Administrator and then issue «IISRESET» to restart the IIS
Links to Read
https://content-security-policy.com/
https://rehansaeed.com/content-security-policy-for-asp-net-mvc/
https://developer.mozilla.org/en-US/docs/Web/HTTP/CSP
Enable Stirct-Transport-Security in IIS. HSTS
- Open Internet Information Services (IIS) Manager. START > RUN > inetmgr
- In the Connections pane on the left side, expand the Sites folder and select the site that you want to protect.
- Double-click the HTTP Response Headers icon in the feature list in the middle.
- In the Actions pane on the right side, click Add.
- In the dialog box that appears, type Strict-Transport-Security in the Name field and type max-age=31536000; includeSubDomains in the Value field.
- Click OK to save your changes.
- Run Command line from Administrator and then issue «IISRESET» to restart the IIS
Also, the following XML could be added in for Re-Direction from HTTP to HTTPS.
<httpProtocol>
    <customHeaders>
      <!-- SECURITY HEADERS - https://securityheaders.io/? -->
      <!-- Protects against Clickjacking attacks. ref.: http://stackoverflow.com/a/22105445/1233379 -->
      <!-- Protects against MIME-type confusion attack. ref.: https://www.veracode.com/blog/2014/03/guidelines-for-setting-security-headers/ -->
      <add name="Referrer-Policy" value="strict-origin" />
    </customHeaders>
  </httpProtocol>
</system.webServer>
<system.webServer>
        <httpRedirect enabled="true" destination="https://MachineName.DomainName.com/URI" httpResponseStatus="Permanent" />
</system.webServer>
HSTS Header could also be added in Web.Config
<?xml version="1.0" encoding="UTF-8"?>
<configuration>
    <system.webServer>
        <httpProtocol>
            <customHeaders>
                <add name="Strict-Transport-Security" value="max-age=31536000" />
            </customHeaders>
        </httpProtocol>
    </system.webServer>
</configuration>
Read this link for more information.
https://docs.microsoft.com/en-us/iis/get-started/whats-new-in-iis-10-version-1709/iis-10-version-1709-hsts#:~:text=HTTP%20Strict%20Transport%20Security%20(HSTS)%2C%20specified%20in%20RFC%206797,contacted%20only%20through%20HTTPS%20connections.
Enable X-Content-Type-Options in IIS.
- Open Internet Information Services (IIS) Manager. START > RUN > inetmgr
- In the Connections pane on the left side, expand the Sites folder and select the site that you want to protect.
- Double-click the HTTP Response Headers icon in the feature list in the middle.
- In the Actions pane on the right side, click Add.
- In the dialog box that appears, type X-Content-Type-Options in the Name field and type nosniff in the Value field.
- Click OK to save your changes.
- Run Command line from Administrator and then issue «IISRESET» to restart the IIS
Suppress Web Server in IIS.
- Open Internet Information Services (IIS) Manager. START > RUN > inetmgr
- In the Connections pane on the left side, expand the Sites folder and select the site that you want to protect.
- Double-click the HTTP Response Headers icon in the feature list in the middle.
- Confirm if there is a Header by the name of SERVER.
- Remove it by clicking REMOVE from the actions pane
- Run Command line from Administrator and then issue «IISRESET» to restart the IIS
Remove ASP.NET Version, Server Verion and Other un wanted headers.
Detailed instructions provided here.
https://blog.insiderattack.net/configuring-secure-iis-response-headers-in-asp-net-mvc-b38369030728
Remove ASP.NET 4.5
- Open the Web.Config file,
- find the node under <system.web>
- add the enableVersionHeader attribute to httpRuntime node and set it to false.
Disable ASP.NET debug feature (http-asp-dot-net-debug)
Detailed instructions are @ https://support.microsoft.com/en-us/help/815157/how-to-disable-debugging-for-asp-net-applications
To disable debugging, modify either the Web.config file or the Machine.config file, as detailed in the following steps.
Modify the Web.config File
To enable debugging, add the compilation element to the Web.config file of the application. The Web.config file is located in the application directory. To do this, follow these steps:
-
Open the Web.config file in a text editor such as Notepad.exe. Web.config file is typically located in the application directory.
-
In the Web.config file, locate the compilation element. Debugging is enabled when the debug attribute in the compilation element is set to true.
-
Modify the debug attribute to false, and then save the Web.config file to disable debugging for that application.
The following code sample shows the compilation element with debug set to false:
<compilation debug="false" /> -
Save the Web.config file. The ASP.NET application automatically restarts.
Modify the Machine.config File
You can also enable debugging for all applications on a system by modifying the Machine.config file. To confirm that debugging has not been enabled in the Machine.config file, follow these steps.
- Open the Machine.config file in a text editor such as Notepad.exe. The Machine.config file is typically located in the following folder:
%SystemRoot%Microsoft.NETFramework%VersionNumber%CONFIG - In the Machine.config file, locate the compilation element. Debugging is enabled when the debug attribute in the compilation element is set to true.
If the debug attribute is true, change the debug attribute to false. - The following code sample shows the compilation element with debug set to false:
<compilation
  debug="false"
/>
- Save the Machine.config file.
Removing X-Powered-By Header.
- Open the Web.Config file,
- find the node under the <system.webServer> node.
- Check whether these is a child node under called . By default in MVC, you will not see this customHeaders child node. If it does not exist, create a node and add following include following to remove X-Powered-By header.
<httpProtocol>
 <customHeaders>
  <remove name="X-Powered-By"/>
 </customHeaders>
</httpProtocol>
Disable Default IIS document in IIS.
- In Run, type “inetmgr”. This will open IIS.
- Go to Sites | Default Web Site and select Default Document property.
- Double click on Default Document property. This will open Default document pages.
- Right click on Default.htm page and click on disable.
From https://www.greytrix.com/blogs/sagecrm/2013/03/29/how-to-restrict-users-from-accessing-default-iis-page-and-virtual-directory/
and
https://docs.microsoft.com/en-us/iis/web-hosting/web-server-for-shared-hosting/default-documents
Cookies (Secure only / Http only)
The application cookies needs to be set as SECURE and HttpOnly Flag. The following line is to be added in Web.Config to make the Cookies Secure.
The line below is quite relaxed, but will make the cookies Secure and HTTPOnly.
Add this line within Web.config within <system.web>:
<httpCookies httpOnlyCookies="true" requireSSL="true" />
Secure Cookies with root path
Root path is generally added in cookies to make cookies for that particular path / domain. Best approach is to use the path directive and domain directive.
<httpCookies httpOnlyCookies="true" requireSSL="true" path="/" domain="xyz.*.com" />
Read the following links for further understanding
https://developer.mozilla.org/en-US/docs/Web/HTTP/Headers/Set-Cookie
https://wiki.owasp.org/index.php/Testing_for_cookies_attributes_(OTG-SESS-002)
https://headmelted.com/securing-asp-net-cookies-a1e1b1648ed
Check your headers.
Lastly check your headers from https://securityheaders.io/.
Read more about it here.
https://www.troyhunt.com/shhh-dont-let-your-response-headers/
https://blogs.msdn.microsoft.com/varunm/2013/04/23/remove-unwanted-http-response-headers/
Also, search for the httpRuntime string in Web.Config and set the attribute enableVersionHeader it to FALSE.
<system.web>
  <httpRuntime enableVersionHeader="false" />
</system.web>
One could also follow along this link to remove un wanted Server header.
https://blogs.msdn.microsoft.com/varunm/2013/04/23/remove-unwanted-http-response-headers/
Security Headers
Security Headers provide a very powerful way to further harden your Web application. The following Security Headers should be added in your applications Web.Config file.
<! — Start Security Headers →
 <httpProtocol>
 <customHeaders>
 <add name=”X-XSS-Protection” value=”1; mode=block”/>
 <add name=”Content-Security-Policy” value=”default-src ‘self’”/>
 <add name=”X-frame-options” value=”SAMEORIGIN”/>
 <add name=”X-Content-Type-Options” value=”nosniff”/>
 <add name=”Referrer-Policy” value=”strict-origin-when-cross-origin”/>
 <add name=”Cache-Control" value="no-store, no-cache, must-revalidate"/>
 <remove name=”X-Powered-By”/>
 </customHeaders>
 </httpProtocol>
 <! — End Security Headers →
Disable ViewState in Asp.NET Pages
- Open desired Web.Config file and go to <system.web> tag.
- Add the following tag in <system.web>
<system.web>
 <page enableViewStateMac="true" viewStateEncryptionMode="Always">
 </pages>
</system.web>
or
<system.web>
<pages enableViewState="false" />
</system.web>
- ReStart the Webserver by issuing «cmd» from command line and issues «IISRESET» from Administrator command prompt.
Host Header Remediation
Host Header detailed description about what is it and how it is exploited can be seen at the URL.
https://www.acunetix.com/blog/articles/automated-detection-of-host-header-attacks/
For remediation on IIS, follow the below steps.
- In IIS, click the Website you need to change.
- In the ACTIONS Tab, click BINDINGS
- Click ADD or Choose the list item and click EDIT.
- Make sure, you specify the HostName to Website or Domain name being called.
- Choose SSL Certificate as per need. Normally you would choose the Certificate binded with your Website.
- Click OK to close this dialog box
- Repeat Steps 3 to 6 if you want another HOST Header. Normally, you would choose this if you have a one Website, and you would like to call it by different URLs.
- Click Close to finish off the settings and
- Got to Command line by «Windows + R» followed by type «CMD».
- Type «IISRESET» to restart the IIS with the new settings.
PS: Command line for the same is
appcmd set site /site.name:»digicert.com» /+bindings.[protocol=’https’,bindingInformation=’*:443:digicert.com’]
Image URL
https://cdn-images-1.medium.com/max/800/1*3AgIok349W9tvYMrnSdPww.png
Content Security Policy
Content Security Policy is the header which is applied in applications. With this policy in place, application developers could enable / disable many areas of their Web site to be executed in browser environment. Things like Links, Cross Links, Images, JavaScripts, resources lying in their server and / or in partner’s Servers. In other words, it allows to define a policy to run on major browsers, which will be a defense mechanism for Websites.
More details here. https://content-security-policy.com/
For remediation on IIS, follow the below steps.
-
Open Internet Information Services (IIS) Manager. START > RUN > inetmgr
-
In the Connections pane on the left side, expand the Sites folder and select the site that you want to protect.
-
Double-click the HTTP Response Headers icon in the feature list in the middle.
-
In the Actions pane on the right side, click Add.
-
Add the following key value pairs one by one repeating 4 and 5.
Content-Security-Policy
default-src ‘self’; connect-src ‘self’; font-src ‘self’; img-src ‘self’; script-src ‘self’ ‘unsafe-inline’ ‘unsafe-eval’; style-src ‘self’ ‘unsafe-inline’; object-src ‘none’X-Content-Security-Policy
default-src ‘self’; connect-src ‘self’; font-src ‘self’; img-src ‘self’; script-src ‘self’ ‘unsafe-inline’ ‘unsafe-eval’; style-src ‘self’ ‘unsafe-inline’; object-src ‘none’X-WebKit-CSP
default-src ‘self’; connect-src ‘self’; font-src ‘self’; img-src ‘self’; script-src ‘self’ ‘unsafe-inline’ ‘unsafe-eval’; style-src ‘self’ ‘unsafe-inline’; object-src ‘none’ -
Click OK to save your changes.
-
Run Command line from Administrator and then issue «IISRESET» to restart the IIS
PS: Command line for the same is
appcmd set site /site.name:»digicert.com» /+bindings.[protocol=’https’,bindingInformation=’*:443:digicert.com’]
This is how Security headers are added in Code.
app.UseHsts(hsts => hsts.MaxAge(365).IncludeSubdomains());
app.UseXContentTypeOptions();
app.UseReferrerPolicy(opts => opts.NoReferrer());
app.UseXXssProtection(options => options.EnabledWithBlockMode());
app.UseXfo(options => options.Deny());
app.UseCsp(opts => opts
.BlockAllMixedContent()
.StyleSources(s => s.Self())
.StyleSources(s => s.UnsafeInline())
.FontSources(s => s.Self())
.FormActions(s => s.Self())
.FrameAncestors(s => s.Self())
.ImageSources(s => s.Self())
.ScriptSources(s => s.Self())
);
//End Security Headers
References:
https://medium.com/@shehackspurple/security-headers-1c770105940b
https://damienbod.com/2018/02/08/adding-http-headers-to-improve-security-in-an-asp-net-mvc-core-application/
CORS — Cross Origin Resource Sharing.
Cross-origin resource sharing (CORS) is a browser mechanism which enables controlled access to resources located outside of a given domain. It extends and adds flexibility to the same-origin policy (SOP). However, it also provides potential for cross-domain based attacks, if a website’s CORS policy is poorly configured and implemented. CORS is not a protection against cross-origin attacks such as cross-site request forgery (CSRF).
One could the following CORS headers in IIS and / or webserver of their choice. The following are the types of CORS Headers, which should be used.
Access-Control-Allow-Origin: http://foo.example
Access-Control-Allow-Methods: POST, GET, OPTIONS
Access-Control-Allow-Headers: X-PINGOTHER, Content-Type
Access-Control-Max-Age: 86400
Access-Control-Allow-Credentials: true
Access-Control-Expose-Headers: None
Access-Control-Request-Method: POST, GET, OPTIONS
Access-Control-Request-Headers: X-PINGOTHER, Content-Type
The other options are self explanatory, but Access-Control-Max-Age gives the value in seconds for how long the response to the preflight request can be cached for without sending another preflight request. In this case, 86400 seconds is 24 hours.
Do the following to add your required CORS Headers in IIS.
- Open Internet Information Service (IIS) Manager
- Right click the site you want to enable CORS for and go to Properties
- Change to the HTTP Headers tab
- In the Custom HTTP headers section, click Add
- Enter Access-Control-Allow-Origin as the header name
- Enter * as the header value
- Click Ok twice
Alternatively, the following snippet of WebConfig can be dropped in related WebConfig of IIS.
<?xml version="1.0" encoding="UTF-8"?>
<configuration>
    <system.webServer>
        <cors enabled="true" failUnlistedOrigins="true">
            <add origin="https://daraz.com" />
            <add origin="https://microsoft.com"
                 allowCredentials="true"
                 maxAge="120">
                <allowHeaders allowAllRequestedHeaders="true">
                    <add header="header1" />
                    <add header="header2" />
                </allowHeaders>
                <allowMethods>
                     <add method="POST" />
                     <add method="GET" />
                     <add method="OPTIONS" />
                </allowMethods>
                <exposeHeaders>
                    <add header="header1" />
                    <add header="header2" />
                </exposeHeaders>
            </add>
            <add origin="http://*" allowed="false" />
        </cors>
    </system.webServer>
</configuration>
References, Reading Material is here.
https://portswigger.net/web-security/cors
https://portswigger.net/web-security/cors/access-control-allow-origin
https://developer.mozilla.org/en-US/docs/Web/HTTP/CORS
https://www.w3.org/wiki/CORS_Enabled#For_IIS7
https://developer.mozilla.org/en-US/docs/Web/HTTP/CORS
https://docs.microsoft.com/en-us/iis/extensions/cors-module/cors-module-configuration-reference
Microsoft IIS Tilde Vulnerability
This is a very old vulenrability and detailed write up is documented at https://support.detectify.com/support/solutions/articles/48001048944-microsoft-iis-tilde-vulnerability
The remidiation is as follows
- Discard all web requests using the tilde character
- Open Registry editor by doing START > Run, followed by «RegEdit».
- add a registry key named NtfsDisable8dot3NameCreation to HKLMSYSTEMCurrentControlSetControlFileSystem.
- Set the value of the key to 1 to mitigate all 8.3 name conventions on the server.
I need to send a Customized Error page for 503 Errors produced by my asp.net website. I have tried to simulate the condition by switching off the application pool (doesn’t work) and by flooding my application with requests. Even though IIS sends me the default 503 error page, and even though I have tried setting a Custom URL in IIS and ASP.NET for this error code, it still returns me the default 503 error page !
I’d appreciate if someone could also tell me where the default 503 error page is kept that IIS sends.
asked Feb 16, 2010 at 9:51
![]()
Ran into the same problems, but I’ve just managed to get this working for us using a Classic ASP holding page in a .NET application (I’m not sure if it’ll work the same for an apsx):
-
Make sure Classic ASP is enabled in IIS. Worth a read: http://blogs.iis.net/bills/archive/2007/05/21/tips-for-classic-asp-developers-on-iis7.aspx
-
Create a classic ASP file called Offline.asp and place it in the root of your website with the following contents:
<% Response.Status = "503 Service Unavailable" Response.CacheControl = "no-cache" Response.AddHeader "Pragma", "no-cache" Response.Expires = -1 %> <!DOCTYPE HTML PUBLIC "-//W3C//DTD HTML 4.01 Transitional//EN" "http://www.w3.org/TR/html4/loose.dtd"> <html> <head> <meta http-equiv="Content-Type" content="text/html; charset=iso-8859-1"> <meta name="robots" content="noindex,nofollow" /> <title>Sorry, we're down for essential maintenance</title> </head> <body><h1>Sorry, we're down for essential maintenance</h1></body> </html> -
Now in IIS7 Manager go the Error Pages administration section, add a Custom Error Page like so:


Now whenever IIS receives a 503, it will send the contents of the Offline.asp to the browser, as well as the 503 code (which is important so that Search Engines don’t list your error page!)
Now if you want to take your application offline you can just set up a simple redirect rule to redirect everything to Offline.asp.
answered Feb 10, 2011 at 11:36
![]()
Chris HainesChris Haines
6,4055 gold badges49 silver badges62 bronze badges
7
You cannot customise the default 503 Service Unavailable error message. This is returned typically when the app pool is unavailable for some reason.
This description of when it occurs states that it comes directly from http.sys and everything on the internet seems to concur that it cannot be changed. I’ve looked at the http.sys registry settings and theres nothing useful there.
http://technet.microsoft.com/en-us/library/cc781893(WS.10).aspx
answered Jul 27, 2011 at 4:19
![]()
mike nelsonmike nelson
20.2k13 gold badges63 silver badges71 bronze badges
2
Take a look at HttpContext.Current.Response.TrySkipIisCustomErrors. just a suggestion.
answered Feb 16, 2010 at 9:54
![]()
Sky SandersSky Sanders
35.8k8 gold badges69 silver badges91 bronze badges
2
As far as i can see, error pages are kept under %SystemDrive%inetpubcusterr<LANGUAGE-TAG><HTTP-CODE>.htm
You can configure custom error pages per website in your iis7 mmc.
edit
Apperently there is no way past http.sys in case of 503 — the only choice you get, is to send the default http 503 error message or to terminate the connection on tcp level.
answered Feb 16, 2010 at 10:00
![]()
FilburtFilburt
17.4k12 gold badges65 silver badges113 bronze badges
If you’re having problems setting up custom error pages in ASP.NET MVC you’re not alone. It’s surprisingly difficult to do this correctly, not helped by the fact that some errors are handled by ASP.NET and others by IIS.
Ideally (and I expect such is the case with some other frameworks/servers) we would just configure our custom error pages in one place and it would just work, no matter how/where the error was raised. Something like:
<customErrors mode="On">
	<error code="404" path="404.html" />
	<error code="500" path="500.html" />
</customErrors>
Custom 404 error pages
When a resource does not exist (either static or dynamic) we should return a 404 HTTP status code. Ideally we should return something a little friendlier to our site visitors than the error pages built in to ASP.NET/IIS, perhaps offering some advice on why the resource may not exist or providing an option to search the site.
For the purposes of this blog post, my custom 404 page is very simple, but you can see some really nice examples here.
<!DOCTYPE html>
<html lang="en">
<head>
    <meta charset="utf-8"/>
    <title>404 Page Not Found</title>
</head>
<body>
    <h1>404 Page Not Found</h1>
</body>
</html>
I created a new ASP.NET MVC 5 application using the standard template in Visual Studio. If I run the site and try to navigate to a resource that does not exist e.g. /foo/bar, I’ll get the standard ASP.NET 404 page with the following information:
Server Error in '/' Application.

The resource cannot be found.

Description: HTTP 404. The resource you are looking for (or one of its dependencies) could have been removed, had its name changed, or is temporarily unavailable.  Please review the following URL and make sure that it is spelled correctly.

Requested URL: /foo/bar

Version Information: Microsoft .NET Framework Version:4.0.30319; ASP.NET Version:4.0.30319.33440
Not exactly friendly, is it?
In this case the error was raised by ASP.NET MVC because it could not find a matching controller and/or action that matched the specified URL.
In order to set up a custom 404 error page add the following to web.config inside <system.web></system.web>:
<customErrors mode="On">
  <error statusCode="404" redirect="~/404.html"/>
</customErrors>
I’ve set mode="On" so we can view the custom errors pages locally. Generally you would only want to display these in production so would set mode="RemoteOnly".
Now if I navigate to /foo/bar once more I see my custom error page.
However, the URL is not /foo/bar as I’d expect. Instead ASP.NET issued a redirect to /404.html?aspxerrorpath=/foo/bar. Also if I check the HTTP status code of the response, it’s 200 (OK).
This is very wrong indeed. Not only is is misleading as we’re returning a 200 response when a resource does not exist, but it’s also bad for SEO. Quite simply, if a resource does not exist at the specified URL you should return a 404 or redirect to a new location if the resource has moved.
To fix this we can change ASP.NET’s default behaviour of redirecting to the custom error page to rewrite the response:
<customErrors mode="On" redirectMode="ResponseRewrite">
  <error statusCode="404" redirect="~/404.html"/>
</customErrors>
Unfortunately this doesn’t help us much. Although the original URL is now preserved, ASP.NET still returns a 200 response and furthermore displays our custom error page as plain text.
To fix the incorrect content type we have to return an ASP.NET page. So if you thought that you’d never have to deal with *.aspx pages again, I’m sorry to dissapoint you.
After renaming the error page to 404.aspx and updating web.config accordingly, the URL is preserved and we get the correct content type (text/html) in the response.
However, we still get a HTTP 200 response. This bug (and it is one) was logged with Microsoft who subsequently closed it and offered the following solution — to set the status code within your error page. We therefore need to add the following to the top of 404.aspx:
<% Response.StatusCode = 404 %>
We now get the correct status code, URL preserved and our custom error page. All done, right?
Wrong.
If we navigate to a static resource (e.g. foo.html) or a URL that doesn’t match our routing configuration (e.g. /foo/bar/foo/bar) we get the standard IIS 404 error page.
In the above scenarios ASP.NET is bypassed and IIS handles the request. Also if you happen to be returning HttpNotFound() from your controller actions you’ll get the same result — this is because MVC simply sets the status code rather than throwing an exception, leaving IIS to do its thing.
In these cases we need to set up custom error pages in IIS (note that this only works in IIS 7+). In web.config add the following inside <system.webServer></system.webServer>:
<httpErrors errorMode="Custom">
  <remove statusCode="404"/>
  <error statusCode="404" path="/404.html" responseMode="ExecuteURL"/>
</httpErrors>
Similar to ASP.NET custom errors I’ve set errorMode="Custom" so we can test the error page locally. Normally you’d want this set to errorMode="DetailedLocalOnly".
Also note that I’m using a html page again, not aspx. Ideally you should always use simple static files for your error pages. This way if there’s something wrong with ASP.NET you should still be able to display your custom error pages.
If we navigate to a static file that does not exist we now get our custom error page instead of the default IIS one. However if we look at the response headers we get a 200 status code, not 404; just like the problem we had with ASP.NET’s custom errors (hey, at least the IIS and ASP.NET teams are consistent).
Fortunately IIS actually provides a built in solution to resolve this rather than having to rely on hacks. If you set responseMode="File" IIS will return your custom errors page without altering the original response headers:
<error statusCode="404" path="404.html" responseMode="File"/>
Does the trick.
Custom 500 error pages
Most of the issues addressed above relate to other error pages so if you use the same techniques you should be able to set up a custom “500 Server Error” page. There are however a few caveats.
The standard ASP.NET MVC template sets up the built in HandleErrorAttribute as a global filter. This captures any error thrown in the ASP.NET MVC pipeline and returns a custom “Error” view providing you have custom errors enabled in web.config. It will look for this view at ~/views/{controllerName}/error.cshtml or ~/views/shared/error.cshtml.
If you’re using this filter you’ll need to either update the existing view with your custom error page HTML or create the view if it doesn’t already exist (best to do so in the views/shared directory).
Personally, I don’t really see the value in this filter. Any exceptions thrown outside of the MVC pipeline will fall back to the standard ASP.NET error pages configuration. Since you’re going to have to set those up anyway there is no real need to have the filter.
To do so add the following to the ASP.NET custom error pages configuration:
   <customErrors mode="On" redirectMode="ResponseRewrite">
     <error statusCode="404" redirect="~/404.aspx"/>
     <error statusCode="500" redirect="~/500.aspx"/>
   </customErrors>
Like before I created an ASPX page that sets the response code:
<% Response.StatusCode = 500 %>

<!DOCTYPE html>
<html lang="en">
<head>
    <meta charset="utf-8" />
    <title>500 Server Error</title>
</head>
<body>
    <h1>500 Server Error</h1>
</body>
</html>
Unfortunately this won’t capture every exception you’re likely to encounter in your application. A fairly common error is produced by ASP.NET’s request validation, for example requesting a URL with a dangerous path such as /foo/bar<script></script>. This will actually produce a 400 (Bad Request) response so you can either add a specific error page for this or set up a default like so:
<customErrors mode="Off" redirectMode="ResponseRewrite" defaultRedirect="~/500.aspx">
 <error statusCode="404" redirect="~/404.aspx"/>
 <error statusCode="500" redirect="~/500.aspx"/>
</customErrors>
Finally to capture any non ASP.NET exceptions we can set up an IIS custom error page for server errors:
<error statusCode="500" path="500.html" responseMode="File"/>
In Summary
-
Create the following pages in the root of your application:
- 404.html — for IIS
- 404.aspx — for ASP.NET
- 500.html — for IIS
- 500.aspx — for ASP.NET
-
Ensure you set the appropriate response status code within the ASPX pages.
-
Ditch the MVC
HandleErrorAttributeglobal filter and configure ASP.NET’s custom errors as below:<customErrors mode="RemoteOnly" redirectMode="ResponseRewrite" defaultRedirect="~/500.aspx"> <error statusCode="404" redirect="~/404.aspx"/> <error statusCode="500" redirect="~/500.aspx"/> </customErrors> -
Configure IIS’s custom errors as below:
 <httpErrors errorMode="DetailedLocalOnly">
  <remove statusCode="404"/>
  <error statusCode="404" path="404.html" responseMode="File"/>
  <remove statusCode="500"/>
  <error statusCode="500" path="500.html" responseMode="File"/>
 </httpErrors>
When you need to restrict access to your web application on IIS, any unauthorized users will see the standard 401 Error Page from IIS:
401 – Unauthorized: Access is denied due to invalid credentials. You do not have permision to view this directory or page using the credentials that you supplied.

Often times, though, you want to show your end users a custom error page with specific instructions on what to do. That is certainly a more graceful way of handling the error than just showing the standard windows 401 error page.
If you have the flexibility to setup your own web instances, you might want to try using 302 Redirect instead as it’s much simpler to setup. Otherwise, this is also a viable option, although a bit long.
Steps to Use Custom 401 Error Page in IIS
-
Create an HTML page as our custom 401 page. In this example, it will be called ITNOTA-Custom-401.htm.

For simplicity, we’ll save the file in C:Temp folder.
-
Next, launch Internet Information Services (IIS) Manager and click on your site on the left pane.
-
Click on Error Pages.

-
On the next screen, you will see a list of default error pages according to its Status Code. In this example, we want to select 401.

-
On the Edit Custom Error Page window, click on the Set… button.

-
Under Set Localized Custom Error Path window, type in the location where the custom 401 HTML page resides in the Directory path box. Only type in the path/folder. The file name itself should be in the Relative file path textbox, then click OK.

-
You should see something similar to this. Click OK again.

-
At this point, we’re done setting up the custom 401 error page. However, unless if you still use the default for other settings, you may run into this error:
        HTTP Error 500.19 – Internal Server Error
        Absolute physical path "c:temp" is not allowed in system.webServer/httpErrors section in web.config file. Use relative path instead.
If you read the error message, it points exactly at the problem in the configuration, that is in the system.webServer/httpErrors section.
-
In IIS Manager, click on the server on the left navigation pane and click on Configuration Editor

-
In the Configuration Editor, under Section:, click on the drop-down and select system.webServer, then httpErrors.

-
Click on allowAbsolutePathsWhenDelegated, then click on the Unlock Attribute if it’s locked. If it’s already unlocked (no padlock sign), then you’re good. Then click Apply under Actions.

-
Now, click on your site on the left pane of navigation, and also click on Configuration Editor.

-
Repeat the step to get to the system.webServer/httpErrors and set allowAbsolutePathsWhenDelegated to True. Then, click Apply.
-
At this point, depending on your Authentication setting, you should be able to see the custom 401 error page in your browser (if you failed to authenticate). However, if you use Windows Authentication, you might see a 401.2 error page.
HTTP Error 401.2 - UnauthorizedYou are not authorized to view this page due to invalid authentication headers.
Rest easy, we just need to redirect this 401.2 error to our custom 401 error page.
-
Go back to Internet Information Services (IIS) Manager and click on your site on the left
and Error Pages on the right. -
This time, we create an additional entry for 401.2 error by clicking on the Add… link under Actions on the right pane. You can duplicate the entry for 401 setup, except this time the Status code should have a value of 401.2. Click OK.

-
Now you should see the list in your Error Pages windows similar to this.


That’s all there is to it.
As a test, we can try to load the page and when prompted to type in the a credential, you can leave it blank and click the Cancel button.

If you purposely fail the authentication to access your test website, you should see your custom 401 error page is displayed in your browser now.

Yes, it’s almost like an anti-climax to see a plain custom 401 error page being displayed. I hope you can come up with a much better design than my example to make all the effort worthwhile.
If you go to your web folder, you will see a web.config file, and your configuration is saved there:
  <httpErrors allowAbsolutePathsWhenDelegated="true">
    <remove statusCode="401" subStatusCode="-1" />
    <error statusCode="401" prefixLanguageFilePath="c:temp" path="ITNOTA-Custom-401.htm" responseMode="File" />
    <error statusCode="401" subStatusCode="2" prefixLanguageFilePath="c:temp" path="ITNOTA-Custom-401.htm" responseMode="File" />
  </httpErrors>
</system.webServer>

This setting for a custom 401 works for both ASP.NET and Classic ASP.
Further Reading
How to Customize 401 Error Page with 302 Redirect on IIS
How to Fix Access Denied (401) Error in Microsoft IIS
Custom 401 page in IIS with ASP.NET
Error: Vault Pre-check fails on TestASPNet.aspx – IIS shows absolute physical path is not allowed
500.19 error in IIS7 when an error occurs