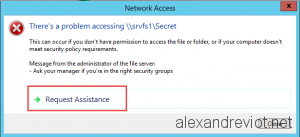
When you access a file share in Windows and the conditions for access are not met, you are normally presented with a generic access denied message. It is actually possible to customize the error message to provide more meaningful and understandable output that aids with dynamic access control, rather than the simple «contact your network administrator,» which will invariably result in a call to the service desk. However, there are a couple of limitations to this functionality.
Contents
- Enabling the functionality
- Customize via Group Policy Objects
- Customize message for Access Denied errors
- Enable access-denied assistance on the client for all file types
- Customize via File Server Resource Manager
- Email configuration
- Testing
- Author
- Recent Posts

James is a consultant from the UK, specializing mainly in end-user computing, Active Directory and client-side monitoring. When not consulting for james-rankin.com, he can often be found blogging, writing technical articles and speaking at conferences and user groups.
First, it can only be activated on Windows-based file servers. File shares that are not fronted by the Windows operating system will not be able to use this method. You can, however, front access to network- or cloud-based storage through a Windows file server instance and use this method.

Default access denied error message
Second, you can only configure the customized access denied message on a device-by-device basis. This means that each file server can only have a single customized error message displayed. While you could set up separate departmental file shares on different file servers and then customize the messages on a share-by-share basis, this seems like a very inefficient method. It would be good if this functionality could be extended so that different shares could have different access messages.
Enabling the functionality
To customize this, you first need to ensure that File Server Resource Manager is installed on the file server instance. You do this by opening Server Manager and installing File Server Resource Manager from within the File Server role.

Add the File Server Resource Manager feature

Add supporting features
Once this is installed, you can now customize your error message in one of two ways on the file server end, both of which are detailed below. However, the configuration that is required on the client end must be done via Group Policy.
Customize via Group Policy Objects
In an Active Directory domain, the easiest way is to use GPOs to enable the functionality. The GPOs need to be applied in two places—on the file server and on the clients that will access the file server.
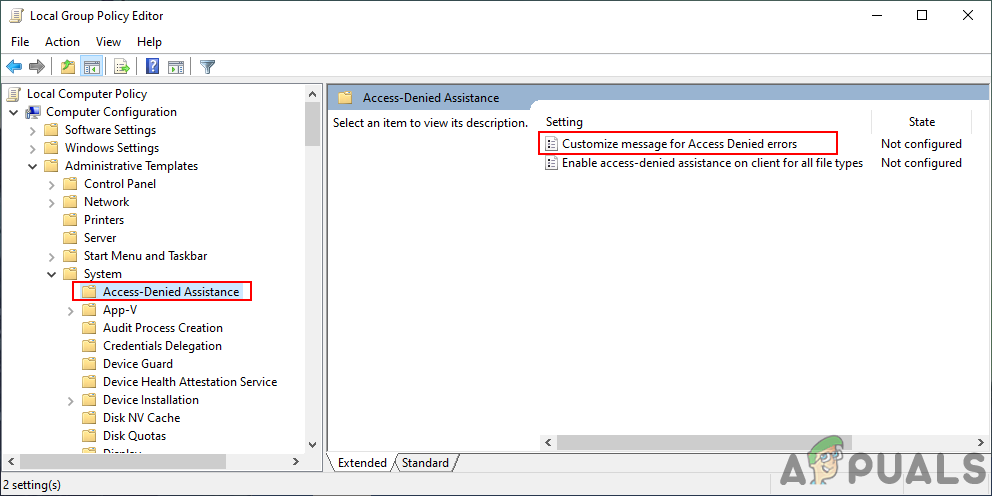
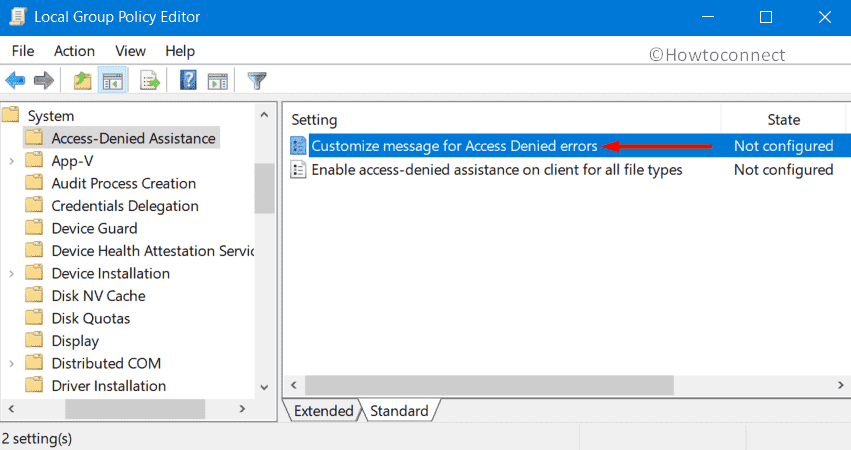
Navigate to the following settings in GPMC: Computer Configuration > Policies > Administrative Templates > System > Access-Denied Assistance
Set the policies described below.
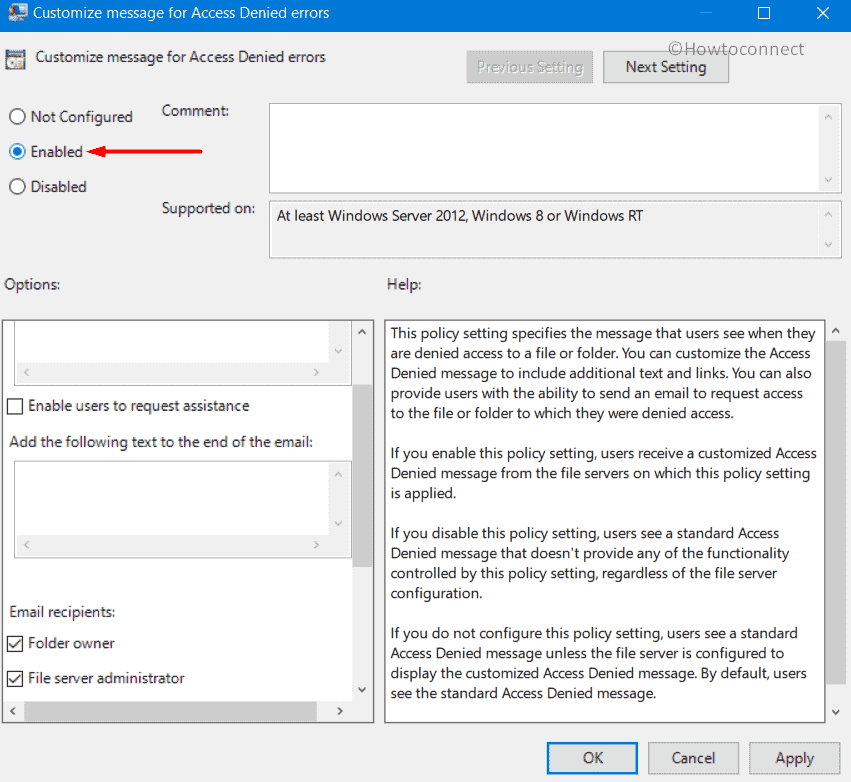
Customize message for Access Denied errors

Customize message for access denied errors
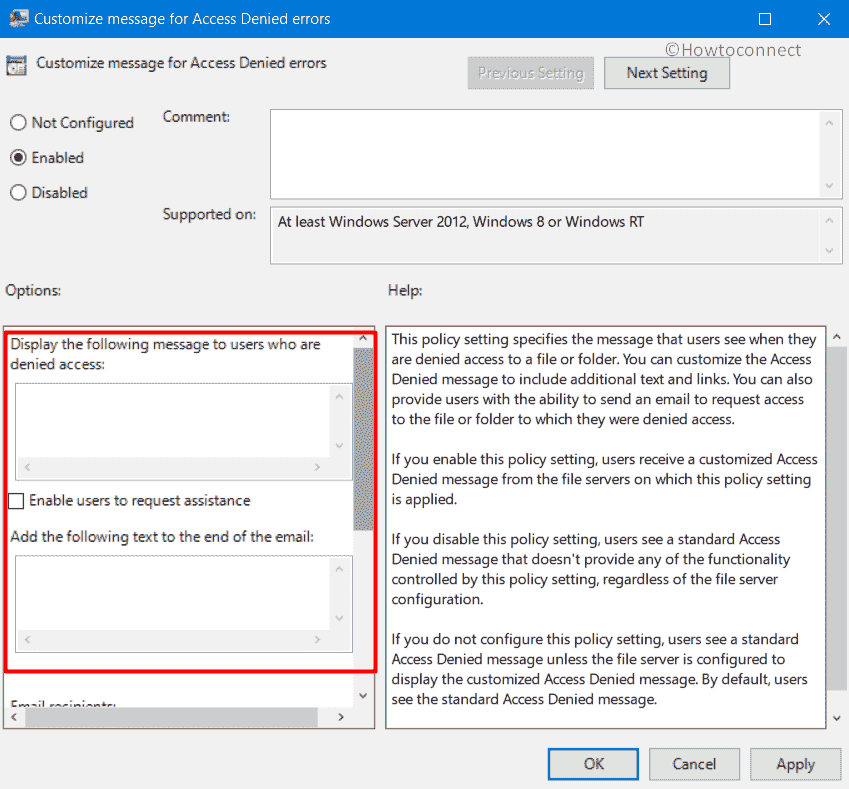
This has a number of settings that should be self-explanatory. The first field, Display the following message to users who are denied access, allows you to customize the error message that you will display. There are a set of variables you can add to the text fields that may help you to form the most appropriate message. The available variables are:
- [Original File Path] The original file path accessed by the user.
- [Original File Path Folder] The parent folder of the original file path accessed by the user.
- [Admin Email] The administrator email recipient list.
- [Data Owner Email] The data owner’s email recipient list.
The Enable users to request assistance check box enables the email functionality to help with dynamic access control.
The second field, Add the following text to the end of the email, allows you to put a suffix onto the emails that are sent regarding the access request.
For both the first and second text fields, a blank line on its own is not accepted as input. If you insert a carriage return and no other text, you will see the following error when trying to click OK.

Group Policy error No text was entered for this field. Make sure that you enter text
Fortunately, a simple way to enable spaced formatting is to use a single space as the line input instead.
The next section deals with email settings. You can configure a Folder Owner and File Server Administrator email recipient. You can also specify additional recipients as well.
Finally, you can choose whether to include either device (device information) and/or user claims (user information) in the email. There’s also the option to log the emails in the event logs, which is useful for troubleshooting.
Link the configured GPO to the OUs where the file server and the clients that access the file server exist.
Enable access-denied assistance on the client for all file types
This second GPO setting simply needs to be set to Enabled. This setting is specifically for the client end and must be set directly via GPO or in the image. The clients must be at least Windows 8 or Server 2012 for this functionality to work.

Enable access denied assitance on client for all file types
Customize via File Server Resource Manager
The first set of GPO settings can, if you wish, be configured directly on the file server itself via File Server Resource Manager. Once installed, File Server Resource Manager can be run by opening Server Manager and choosing File Server Resource Manager from the Tools menu.

File Server Resource Manager in Server Manager
Once it launches, right-click File Server Resource Manager and choose Configure Options, as shown below.

Configuring options in File Server Resource Manager
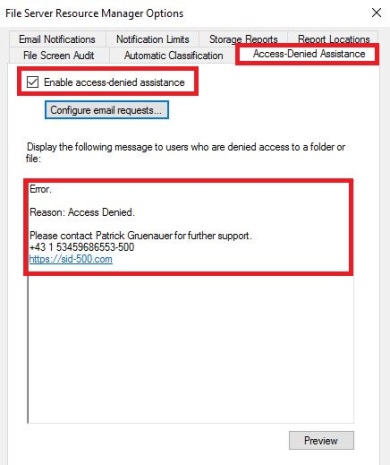
On the Access-Denied Assistance tab, you can configure much the same set of options as specified in the GPO section.

FSRM options
Click the Configure email requests button to access the additional options mentioned in the GPO section.

Accessed Denied Assistance Configure email request
Email configuration
One aspect that can only be configured directly from File Server Resource Manager is the email configuration. This should be done in addition to the GPO settings. The configuration is done on the Email Notifications tab.

Configuring FSRM email notifications
Note that the email settings currently require an open relay. There is no way to provide authentication settings within the FSRM console. In an ideal world, it would be better to allow an authenticated connection, but for now, if you can’t use an open relay, there are a few options:
- Configure a server in your domain with IIS, and make it an open relay. It can then forward the mail with an authenticated account to some other service.
- Install a program like hmail and use it as the open relay to an authenticated account.
- Configure an account in your own email system (if you have one) to not require authentication.
Once this is configured, you can click the Send Test Email button to verify that everything is working correctly for dynamic access control.
Testing
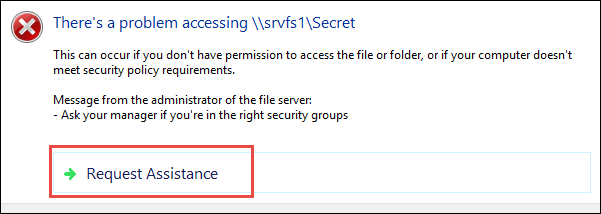
Once the server and client are configured in this way, you can try setting up a file share and denying your test user access so you can see what the custom error message looks like.

Custom error message for access denied
Hopefully, you can configure this custom error message so that your users can contact the folder owner and/or file server administrator to provide access without them having to generate helpdesk calls.
![]()
![]()
Вместе с Dynamic Access Control в Windows Server 2012 появился интересный функционал, призванный облегчить разрешение проблем с доступом пользователей к файловым ресурсам. Этот функционал имеет название Access Denied Assistance, или помощь при отказе в доступе.
Стандартное сообщение, которое выдается пользователю при отказе в доступе, довольно неинформативно и не дает представления о том, что делать дальше. Получив такое сообщение, пользователь должен найти администратора, отвечающего за доступы и внятно объяснить, кто он такой, куда ему нужен доступ, и, главное, почему этот доступ должен быть ему предоставлен.
По опыту скажу, что у некоторых пользователей вызывает затруднение даже назвать свое имя пользователя, поэтому выяснение подробностей может занять немало времени. Кроме того, решение о предоставлении доступа, как правило, не входит в компетенцию системного администратора, за этим надо обращаться к владельцу ресурса. Процесс предоставления доступа затягивается, а в результате мы получаем недовольного пользователя и загруженного бесполезной работой администратора.

Access Denied Assistance как раз предназначен для разрешения подобных проблем. Он активируется на файловом сервере, и когда пользователь пытается получить доступ к ресурсу, ему будет показано специальное диалоговое окно, в котором можно запросить разрешение на доступ. Microsoft описывает несколько вариантов решения проблемы с доступом:
• Self-assistance (Помоги себе сам) — в этом варианте в окне содержится пошаговое описание процедуры получения доступа. Пользуясь этой информацией, пользователь самостоятельно запрашивает доступ к ресурсу;
• Assistance by the data owner (Помощь владельца ресурса) — в этом случае отправляется уведомление владельцу файлового ресурса. Владелец принимает решение о предоставлении доступа и либо сам предоставляет соответствующие разрешения, либо обращается за помощью к администратору;
• Assistance by the server administrator (Помощь администратора сервера) — в том случае, если пользователь не смог решить проблему ни сам, ни с помощью владельца, можно настроить отправку сообщения администратору сервера.
Предварительные требования
Для включения Access Denied Assistance необходим файловый сервер Windows Server 2012 с установленными ролями File Server и File Server Resource Manager.

Для настройки Access Denied Assistance есть два способа — распространить настройки на все файловые сервера с помощью групповых политик либо произвести настройку каждого сервера отдельно из оснастки FSRM.
Групповые политики
Создаем новый объект групповой политики (или берем существующий) и открываем его в редакторе. Переходим в раздел Computer ConfigurationPoliciesAdministrative TemplateSystemAccess-Denied-Assistance, в котором находятся две политики:
1) Enable access-denied assistance on client for all file types — форсирует использование Access Denied Assistance на клиентской стороне, надо просто включить;
2) Customize message for Access Denied errors — отвечает за настройки Access Denied Assistance на файловых серверах, к которым применена данная политика.

Для настройки «Customize message for Access Denied errors» переводим ее в Enabled. Затем отмечаем чекбокс «Enable users to request assistance» и набираем текст, который увидит пользователь при отказе в доступе. Для удобства в тексте можно использовать специальные макросы:
[Original File Path] — путь к файлу;
[Original File Path Folder] — путь к родительской папке;
[Admin Email] — email администратора ресурса;
[Data Owner Email] — email владельца ресурса.
Должно получиться что то вроде: ″При проблеме с доступом к [Original File Path] обратитесь к администратору по адресу [Admin Email]″.
В разделе Email recipients указываем получателей сообщения. Можно выбрать владельца ресурса (Folder owner), администратора сервера (File server administrator), либо вручную ввести необходимые адреса email в поле «Additional recipients».
И в разделе Email Settings указываем, нужно ли включать в письмо утверждения для пользователей и устройств, а также надо ли делать соответствующие записи в системном журнале.

Созданные настройки надо применить к файловым серверам и к клиентским компьютерам. Тут есть выбор — создать один GPO и прилинковать его ко всему домену, или разнести клиентские и серверные настройки по разным GPO и применять их к различным OU.
И еще. Для того, чтобы файловые сервера смогли отправлять почтовые сообщения, на них также необходимо произвести некоторые настройки. Для этого зайдем на сервер и выполним следующую команду PowerShell:
Set-FSRMSetting -SMTPServer ″mail.contoso.com″ -AdminEmailAddress ″admin@contoso.com″ -FromEmailAddress ″fsrm@contoso.com″
В этой команде мы указываем SMTP сервер mail.contoso.com, адрес администратора сервера admin@contoso.com и адрес отправителя fsrm@contoso.com.
Оснастка File System Resource Manager
Если вы хотите использовать для каждого сервера индивидуальные настройки, то можно воспользоваться оснасткой File System Resource Manager.
Для ее открытия надо нажать Win+R и ввести команду fsrm.msc (или из меню Tools в Server Manager). Открыв оснастку, кликаем правой клавишей на основном разделе и выбираем пункт Configure Options.

Переходим на вкладку Access-Denied Assistance, отмечаем чекбокс «Enable access-denied assistance» и вводим текст сообщения для пользователя. При составлении текста также можно использовать макросы, а внизу есть кнопка Preview, нажав которую можно посмотреть получившееся сообщение.
Затем жмем кнопку «Configure email requests», отмечаем чекбокс «Enable users to request assistance» и настраиваем дополнительные параметры: какую информацию надо включать в запрос, кому отправлять сообщение и надо ли делать запись о событии в системный журнал.

Теперь остается настроить параметры отправки почтовых сообщений. Это можно сделать как уже знакомой нам командой PowerShell, так и из оснастки FSRM. Переходим на вкладку Email Notifications и указываем SMTP сервер, который будет отправлять сообщение, а также адрес администратора сервера и адрес отправителя по умолчанию.
Для проверки можно воспользоваться кнопкой «Send Test Email». Если все данные были введены правильно, то на адрес администратора сервера будет отправлено тестовое сообщение.

После настройки Access Denied Assistance пользователь, не имеющий разрешений на доступ к ресурсу, получит вот такое сообщение. Как видите, теперь его не просто посылают на к администратору, а дают возможность самостоятельно запросить помощь по email либо воспользоваться запросом о помощи.

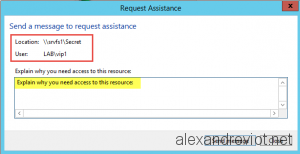
При нажатии на запрос помощи открывается форма, в которой пользователь может указать причину, по которой ему нужен доступ, и отправить сообщение администратору или владельцу ресурса (или обоим, в зависимости от настроек).

А вот так выглядит сообщение, полученное администратором сервера. В нем содержится вся необходимая информация: путь к ресурсу, имя пользователя и его текущие разрешения, утверждения для пользователя и устройства и описание проблемы самим пользователем. Все это поможет оперативно принять решение о предоставлении доступа.

По моему очень удобно, причем как для пользователя так и для администратора. А теперь о грустном 🙁 . Помощь при отказе в доступе работает только в том случае, если в качестве клиентской ОС используется Windows 8. Пользователи Windows 7 или XP увидят стандартное сообщение об ошибке, независимо от настроек на сервере. Впрочем, это еще один повод перейти на Windows 8.
Download PC Repair Tool to quickly find & fix Windows errors automatically
In Windows, every file has user permission, and if a user who doesn’t have access to it gets an Access denied message in Windows 11/10. The user gets a general error message, and it can be customized by the system administrator or an admin account on the computer. This post will guide you on how you can customize the Access denied message on Windows 11/10.
The standard access denied messages are of no help as they ask to contact the administrator. Instead, Windows offers a group policy and registry method, which can add sense to it, like allowing users to add a message, email folder owner, server admin, and so on.
- Using Group Policy
- Using Registry Editor
As an admin, make sure to configure it carefully, so it all makes sense when an admin or owner of the file receives the email.
Using Group Policy

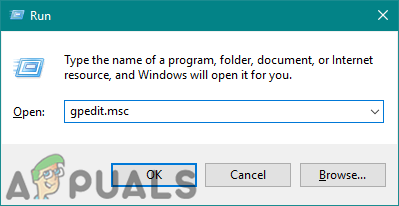
Open Group Policy Editor by typing gpedit.msc in the Run prompt (Win +R) and pressing the Enter key. In the Group Policy console, navigate to the below-mentioned path and locate the policy—Customize message for Access Denied errors.
Computer Configuration Administrative Templates System Access-Denied Assistance
Double click to open, and configure the following:
- Display the following message to users who are denied access
- Enable users to request assistance
- Add the following text to the end of the email.
- Email recipients (folder owners and file server administrator)
- Additional recipients
- Email settings can also include device claims and user claims.
- You can also Log emails in the applications and services event log.
Using Registry Editor
The same can be configured on computers through the Registry Editor. This method is handy if the computer doesn’t have a group policy or plans to deploy this through a network computer registry file. Registry Hive allows you to connect to Network Registry, and that’s where it comes in handy.
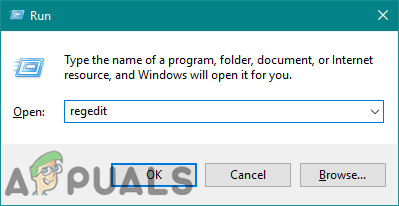
- Open Registry Editor by typing Regedit in the Run prompt followed by pressing the Enter key.
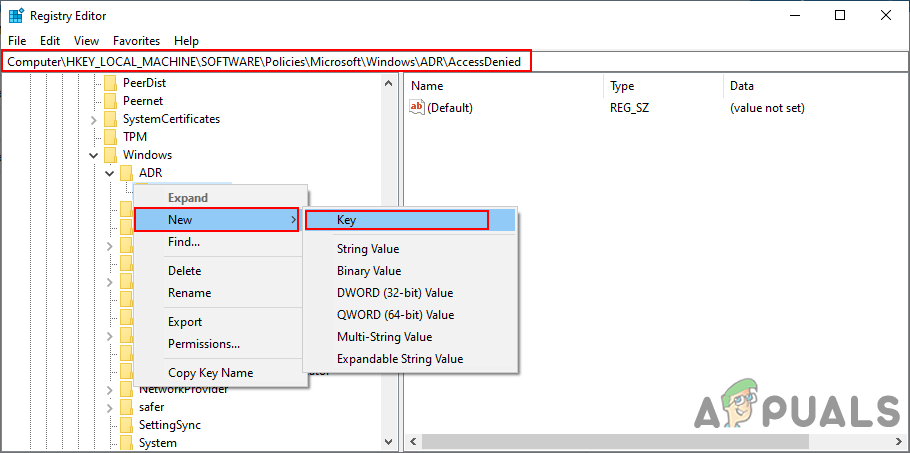
- Navigate to the following path
ComputerHKEY_LOCAL_MACHINESOFTWAREPoliciesMicrosoftWindowsADRAccessDenied
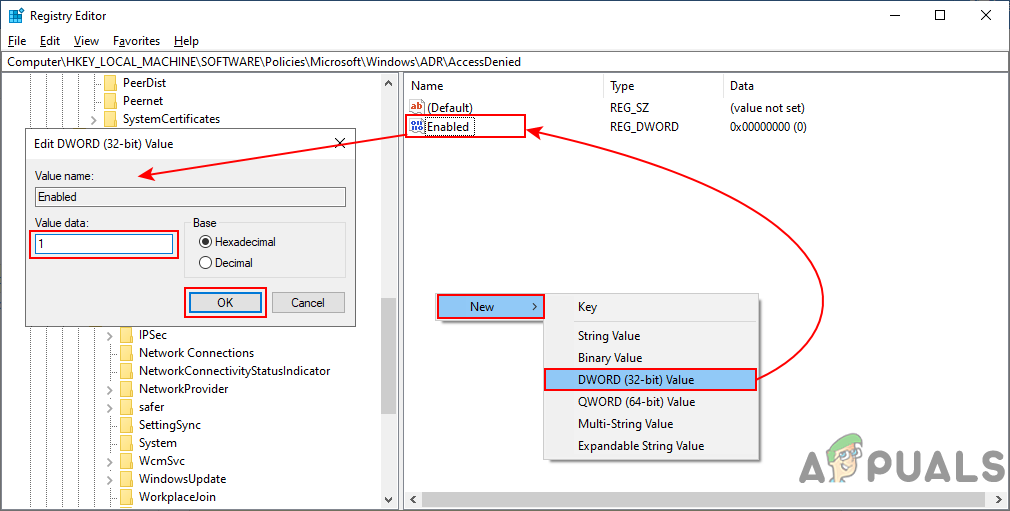
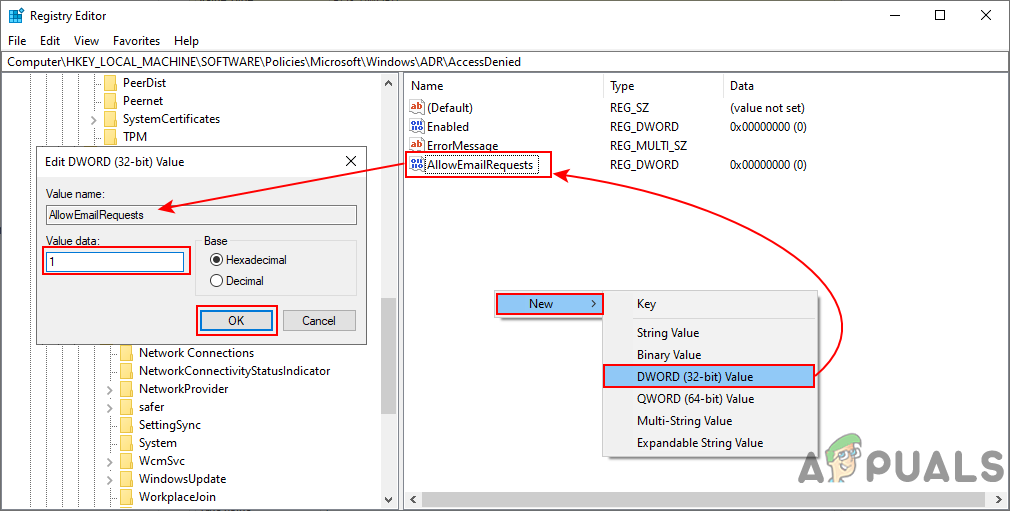
- Right-click on the right panel, and create New > DWORD (32-bit Value) and name it as Enabled
- Double click to edit the Enabled DWORD and set it to 1
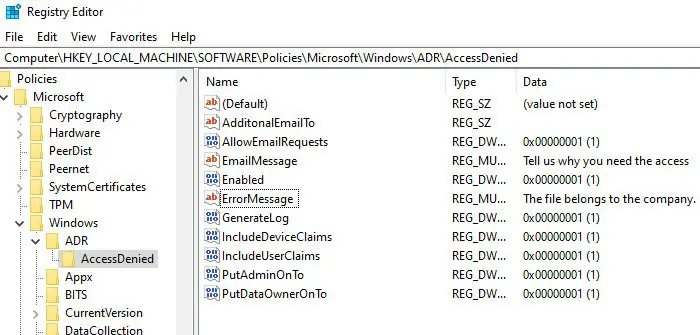
Next, create the following DWORD and Strings.
- AdditonalEmailTo — String – Blank
- AllowEmailRequests — Dword -1
- EmailMessage — Multi-String – Your personalized message
- Enabled — Dword – 1
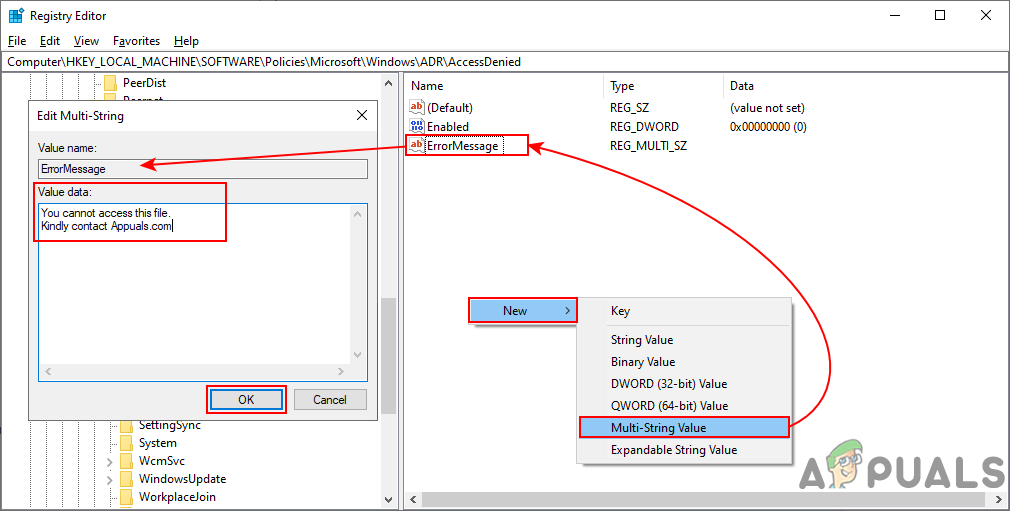
- ErrorMessage — Multi-String – Your personalized message
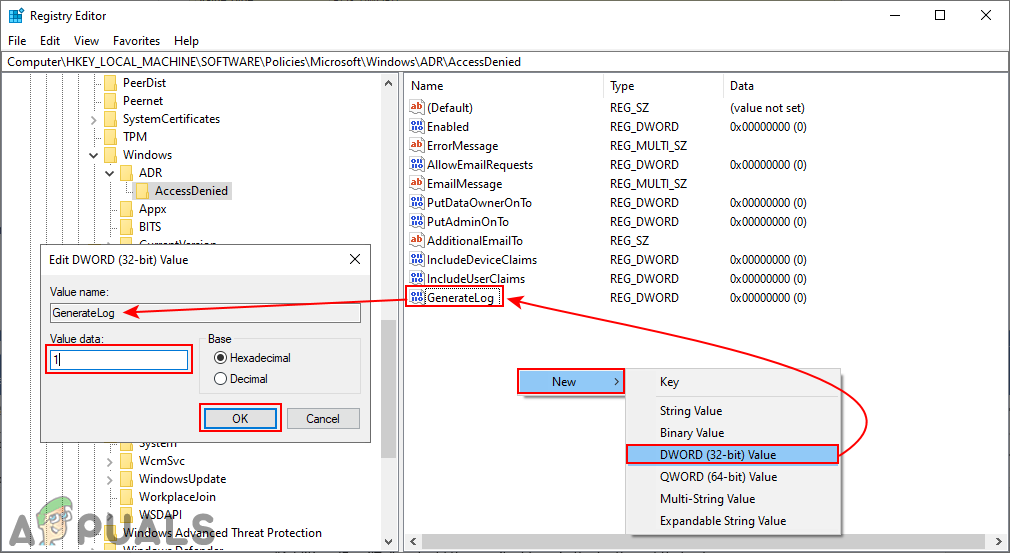
- GenerateLog — Dword – 1
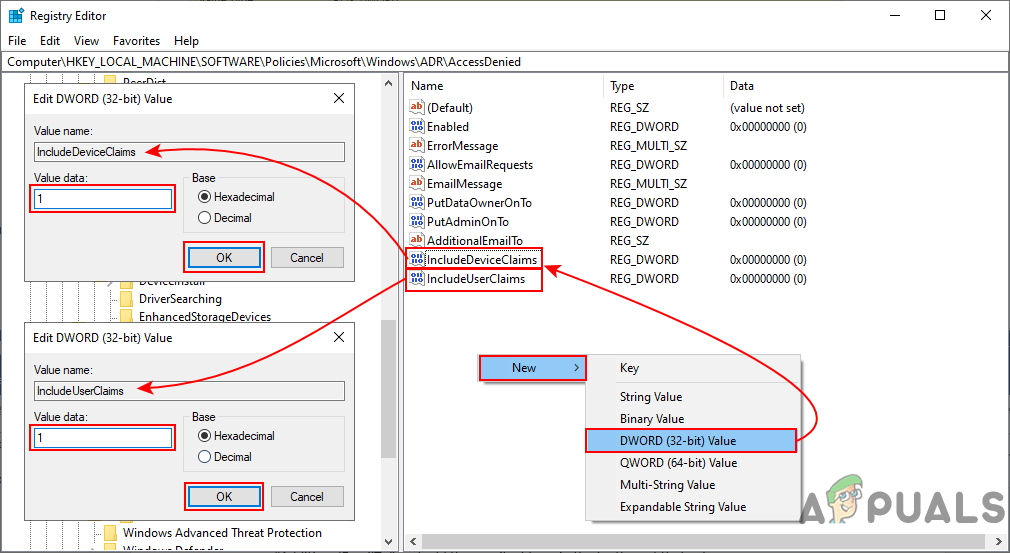
- IncludeDeviceClaims — Dword – 1
- IncludeUserClaims — Dword – 1
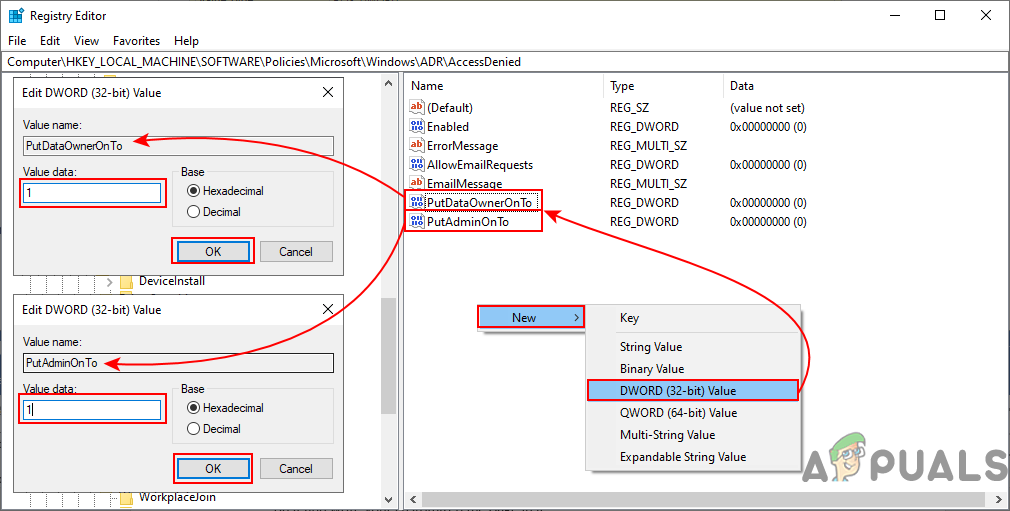
- PutAdminOnTo — Dword – 1
- PutDataOwnerOnTo — Dword – 1
Make sure to set the value according to what is shown in the screenshot.
You can customize the details for strings such as Email message, Error message, and Additional emails.
An easy way to do it is to enable Group Policy on a computer. It will create the respective registry keys, which you can export and then import into other computers.
I hope you were able to customize the Access denied message on Windows 11/10.
How do I fix Access Denied messages?
On Windows 11/10, users may receive such error messages for different tasks. For example, if you receive an Access is denied error message while installing software, then options like running the setup as administrator, temporarily disabling the security software, and using the built-in administrator account can be helpful. On the other hand, if access is denied while accessing a file, then you have to take full ownership of the file to access it.
How do I fix the Access Denied Folder in Windows 11/10?
If you want to access denied restricted folder, you should have administrative privileges. So, try to access the folder with an admin account. You may also need to take full ownership of that folder for your user account. You should also check if the folder is encrypted and then decrypt that folder. You can do that by accessing the Advanced Attributes of the folder (using that folder’s Properties) and unchecking the Encrypt contents to secure data option.
Hope this helps.

Ashish is a veteran Windows and Xbox user who excels in writing tips, tricks, and features on it to improve your day-to-day experience with your devices. He has been a Microsoft MVP (2008-2010).
Whenever users try to access files that aren’t allowed to load, the users will get an access denied message with a reason. An administrator can manage the permissions of specific files and applications for other standard users. A standard user account will get an access denied message for unable to access those files or applications. Windows have an additional setting that can let the administrators customize the access denied message for other users. They can also include a link for requesting access to the following files/applications.
We also included the Registry Editor method since Windows Home edition users will not have the Local Group Policy Editor on their systems.
Customizing Access Denied Message
The default access denied message will just hint about why the user can not access the program or folder. However, the owner can further provide additional text and assistance link to the access denied message. By doing this you can let the user know who they should contact and why the access is not allowed in your own words. It also provides additional options for the access denied message that users can use to help the standard users.
The following setting used in the below methods is supported on at least Windows 8, Windows RT, or Windows Server 2012.
Method 1: Customizing Access Denied Message by Using Group Policy Editor
The setting with all the options already available is in the Local Group Policy Editor. Users can just open it and modify the settings according to their needs. The customized message can be written any way the users want it to be. Follow the below steps to configure this setting:
If your system doesn’t have the Local Group Policy Editor, then skip to method 2 directly.
- Open a Run dialog on your system by pressing Windows + R keys together. Type “gpedit.msc” in the Run dialog and press the Enter key to open the Local Group Policy Editor.
Note: Choose the Yes button for UAC (User Account Control) prompt.
Opening Local Group Policy Editor - In the Local Group Policy Editor, navigate to the following path:
Computer Configuration Administrative Templates System Access-Denied Assistance

Opening the path - After that, double-click on the “Customize message for Access Denied errors” setting. A new window will open up, modify the toggle from Not Configured to Enabled. Then set the custom message for the users who will get access denied.
Note: You can also enable request assistance to the users that will allow them to send an email to the owner for requesting access. There are also additional settings for the email that the real owner will get. Adjust them according to your needs.
Writing a customized message and modifying other options - Click the Apply/Ok button to apply the changes. As a result, standard users will see the customized message.

Method 2: Customizing Access Denied Message by Using Registry Editor
This customization comes with a number of additional options. All the options were already available in the Local Group Policy Editor; however, they are not already existing in the Registry Editor. Therefore, users need to create each value by themselves to set it up. There are many additional options, so each one will require a specific value and value data for it. Follow the below steps to check it out:
Note: The value data 1 in the following steps is for Enabled/True Value and 0 is for Disabled/False Value. So set the value according to your needs by reading the steps.
- Hold the Windows key and press R to open a Run dialog. Type “regedit” in the box and press Enter to open Registry Editor. Also, make sure to choose Yes for the User Account Control prompt.
Opening the Registry Editor - Navigate to the following path in the left pane of Registry Editor:
HKEY_LOCAL_MACHINESOFTWAREPoliciesMicrosoftWindowsADRAccessDenied
- Some of the keys may be missing, so just create it by right-clicking on the key that is available and choosing New > Key option. In our case, “ADR” and then “AccessDenied” were the two keys missing.

Creating the missing keys - The first value that will be required is “Enabled“. You can create it by right-clicking on the right pane and choosing New > DWORD (32-bit Value). Double-click on it, set data value 1 for enable.

Creating Enabled value - Right-click again to choose New > Multi-String Value and name it “ErrorMessage“. Double-click on it and write your customized message in it.
Writing a customized message - To enable request assistance, you can create value by right-clicking on the right pane and choosing New > DWORD (32-bit Value). Name it as “AllowEmailRequests” and change the value data to 1.
Creating allow email requests value - For adding the text to the end of the email, you can create another value by choosing New > Multi-String Value. Name it as “EmailMessage” and add the text in it as you want.
Value for Email Message - To add email recipients, users can create multiple values. You can create two value by choosing the same New > DWORD (32-bit Value) options. For folder owner, you can name it “PutDataOwnerOnTo” and change the value data to 1. For server administrator name it “PutAdminOnTo” and change value data to 1.
Adding owner and admin as email recipients - For additional recipients, create a string value by choosing New > String Value. Name it as “AdditionalEmailTo” and add the email address in the textbox of that value.

Adding additional email recipients - Further, you can create more values for email settings. You can create two more values by choosing the New > DWORD (32-bit Value) option. For including device claims in email, name the value as “IncludeDeviceClaims” and set value data to 1. For including user claims in email, name the value as “IncludeUserClaims” and set value data to 1.
More value for email settings - Lastly, you can also create value for log emails in the application and services event log. Create it by choosing New > DWORD (32-bit Value) option, name it as “GenerateLog” and set value data to 1.
Value for generating log


Kevin Arrows
Kevin is a dynamic and self-motivated information technology professional, with a Thorough knowledge of all facets pertaining to network infrastructure design, implementation and administration. Superior record of delivering simultaneous large-scale mission critical projects on time and under budget.
Back to top button
Today, in this article, we will discuss the way to Customize Access Denied Message in Windows 10 and 11. In many cases, administrators keep the use of Windows 10 restricted to some extent for certain users or user-categories. When a user tries to get access to the files for which they are restricted, they will get an error message stating denied access. Or, they may see a message instructing them to contact the administrator to gain access.
This is to prevent them from accessing important files or folders on the system without explicit permissions. Such restrictions are often necessary because changes made by those users could potentially affect the stability and performance of the system.
The ability to control the level of access that users have in a system is definitely an important factor in a huge corporate system. Not just for Enterprises, but this control can be handy for even Home versions which have multiple user accounts set up.
Windows 10 has a setting to manage and customize the access denied message for all possible content and resource available on the system.
This option is available in the Windows Group Policy Editor. Here are the steps you need to follow for managing the access denied message:
Step-1: Press Win logo + R keys to open Run dialog box. Type in gpedit.msc and click OK to continue.
Step-2: Once you access Group Policy Editor, navigate to the path mentioned below.
Computer Configuration => Administrative Templates => System => Access-Denied Assistance
Step-3: Switch to the right pane of Access-Denied Assistance. Here, double-click the policy namely Customize message for Access Denied errors.
Step-4: When the policy window opens up, select Enabled radio button.
Step-5: After you enable this policy, you will be able to create a custom message. Go to the ‘Display the following message to users who are denied access’ section at the lower left side of the window. So, type a denial note as per preference. The system will display this very message when any user tries to access the restricted content.
Step-6: Moving ahead, you can also set up the additional parameters. Checkmark the box Enable users to request assistance. Doing so will provide the users with the ability to send an email request to access the specific file or folder for which they were denied.
Step-7: Next insert your customizable text in the box below the option Add the following text to the end of the email.
More about the policy
When you Customize Access Denied Message in Windows 11 or 10, you can see the guideline and description that Microsoft shares about the policy.
The description states that this group policy, when enabled, allows you to display customize access denied message to the user. It can include additional links or texts. Also, you will be able to let the user contact the administrator by sending an email requesting access to a folder or file.
If you disable this policy, the system will display the standard message for access denied. This eliminates any functionality offered by this policy set-up. You should note this if you have already set up any restrictions or if you are planning to do so.
The access denied message customization policy was brought out far back, with Windows 8 and is available in other versions including Windows Server 2012, Windows RT, etc.
Note that you must enable restricted access before you enable this policy.
- Go to the above-mentioned location (Computer Configuration => Administrative Templates => System => Access-Denied Assistance).
- On the right side, find and double-click the other policy “Enable access-denied assistance on client for all file types”.
- Choose Enabled option. Click Apply and OK.
That’s all!
For each policy rule, you can create a custom access denied error message that displays when users attempt to sign in and fail because their credentials are invalid.
The custom message can include a message and a link to another URL to help users resolve their issues. You can use up to 4000 characters, which are about 650 words.
Procedure
- In the VMware Identity Manager console Identity & Access Management tab, select Manage > Policies.
- Select the access policy to edit.
- Click Edit and then Next.
- Select the rule to edit.
- Click Advanced Properties and in the Custom Error Message text box, type the error message.
- To add a link to a URL, in the Custom Error Link text text box enter the message to display as the link that sends users to another screen when authentication fails.
The link is displayed at the end of the custom message. If you do not add a message in the Link text box but add a URL, the link that displays is
Continue.
- In the Custom Error Link URL text box, enter the URL.
- Click Save and then click Next and click Save again.
What to do next
Create custom error messages for other policy rules.
Have you always wanted to manipulate Windows error messages? Starting with Windows Server 2012, and of course also with Windows Server 2016 there is the possibility to do this. The prerequisite for this is the installation of the File Server Resource Manager, which is available as of Windows Server 2012.
What I’m talking about is this message:

What do you think about this? This looks more sweeter …

Prerequisites
As mentioned, make sure your File Server is running Windows Server 2012 or higher. Additionally, make sure the File Server Resource Manager Role is installed. Check it with PowerShell:
Get-WindowsFeature *FS-Res*

Or open the FS Manager with the command
fsrm

If the FS Resource Manager is not installed, install it with PowerShell:
Install-WindowsFeature -Name FS-Resource-Manager -IncludeManagementTools

Ok, that’s it. Let’s move on with modifying the error messages users get when they are access denied to a file or folder.
Configuring the Access Denied Error Message
There are two ways to accomplish this task. Using the FSRM Manager or using GPO.
Using the FSRM Manager
Open the FSRM Manager. Right click File Server Resource Manager (Local) and select Configure Options.

Click on Access-Denied Assistance and tick the checkbox Enable access-denied assistance. Now modify the message users will get when they are access denied to a file or folder. You can also enable e-mail requests. Make sure your mail server accepts messages from your file server.
Click Ok. Do not test this yet. We have to configure the client computers as well.
Using GPO
On a Domain Controller of your domain open gpmc.msc
gpmc.msc
Create a new GPO. You’ll find the exact same settings in
Computer ConfigurationPoliciesAdministrative TemplatesSystemAccess-Denied Assistance

Configure the settings that meet your needs and link the GPO to the Organizational Unit of your File Servers.
Configuring the Clients
Create a new GPO Object and enable the setting Enable access-denied assistance for all file types.
In the GPO Object navigate to
Computer ConfigurationPoliciesAdministrative TemplatesSystemAccess-Denied Assistance.
Select Enabled.

Link this GPO to the OU of the Client Workstations.
The Test
Now when a user is access denied to a file within a shared folder, the user get’s the message you’ve configured.

Conclusion
Try to be user-friendly as much as possible. The shown above is a feature for your users. It brings user-friendliness. Remember: If you are good to your users, they are also good to you.
![]()
Published by Patrick Gruenauer
Microsoft MVP on PowerShell [2018-2023], IT-Trainer, IT-Consultant, MCSE: Cloud Platform and Infrastructure, Cisco Certified Academy Instructor.
View all posts by Patrick Gruenauer
Table of Contents
- Introduction
- Requirements
- Access Denied Errors
- Derived from File System Error Messages
- Services Error Messages
- Internet-based Error Messages
- Access-Denied Assistance Function
- Group Policy — Access Denied Assistance
- Practice
Introduction
Hello,
We offer our articles about another Group Policy content. Group Policy Assistance as mentioned this feature, our Microsoft’s Directory Service structure since the start, against our faulty we do some operations that appear in «Access Denied», «You dont have
permission for this process» as some of the messages contain. And we are system administrators, especially in the authorization and program installation folder too are faced with this error stages can say. So, in which case we encounter this error a look.
Requirements
This policy, because it contains email feature, SMTP Server must be installed on the server.
Access Denied Errors
Derived from File System Error Messages
Services Error Messages
Internet-based Error Messages
Mentioned above, some of the error messages from all sorts of groups are just some of the error messages. In addition, «Access Denied Errors» under the caption on each link of our department, we
Access Denied Solution Center post details about the solution can reach by clicking on the links.
Institutional some buildings, Microsoft’s users has shown that complex messages, rather than companies set for a single message, the error is what you want to see and Group Policy exactly at this time in our distress «Access-Denied Assistance» by setting
grows.
Access-Denied Assistance Function
Task of this policy, we will prepare your own show error messages on the user side, we have identified further again to authorized persons, users real-time as they encounter this error is sending an email.
Group Policy — Access Denied Assistance
This policy is a Computer Configuration rules. Therefore, if we want to apply the rule, we have two major way:
1- Message we want to get out of the computers in an OU gathered under the rules of the OU method to define and implement the Block Policy Inheritance.
2- These rules apply on the Default Domain Policy.
Practice
Computer Configuration — Administrative Templates — System — Access-Denied Assistance
watching the road and we reach the below screen:

Enable access-denied assistance on client for all file types : The client extensions for all files on the computer activates the message means. The first condition for the operation of our protocol, this setting is set to Enable.

Customise message for Access Denied errors: This section is the part privatisation of error messages.

Display the following message to users who are denied access : It
is an error message will show the end-user side.
Enable users to request assistance : Goes to the admin side of the paper is to be seen
in the mail.

Folder owner : Folder associated with an access authorization if there is an error, the folder
owner has the authority sends the user an email.
File server administrator : Configure
the File Server role on Server 2012 send an email to the user.
Additional recipients : We will send e-mail to determine the extra users. In this section
«;» with more than one email address can be added.
Include device claims : In e-mail to admin side device sends a request for authorization.
Include user claims : Admin side sends the user authorization request.
Log emails in Application and Services event log : These operations saves in the Event Viewer
logs.
MS Technet readers and members,
We have come to the end of the article. Wishing to appear in our later writings.
Thanks

If you manage one or several file servers in your infrastructure, you may have the will to customize the Access Denied error message displayed to users. This feature can be used since Windows 8 and Windows Server 2012. It is called Access-Denied Assistance.
Access Denied Custom Message
Access-Denied Assistance can be useful if you want to simplify the process to grant folder permissions to users. Sometime, the user does not know the full path, neither rights needed.
With Access-Denied Assistance, shared folder administrator will receive an email with all information required. No more call for user access.
Let’s see how to do that with Server 2012 R2.
Role Installation
File Server Resource Manager is a role included under the File and Storage Services.
- To install FSRM, go to Server Manager and check File Server Resource Manager:
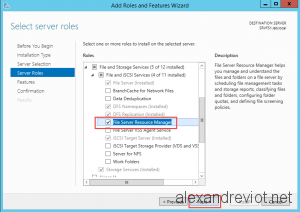
FSRM Installation
- Confirm Role installation and wait to finish:
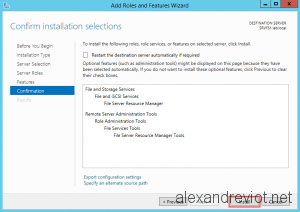
Role Installation
Role Installation
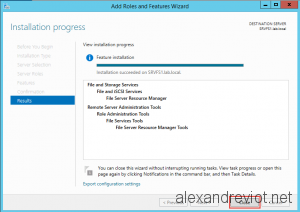
- After the installation, you will get the File Server Resource Manager console.

FSRM Console
Configuring Server Options
We need to enable file server to send email for each request assistance. To do this, we need to configure Server Options:
- Right click on File Server Resource Manager (Local) and select Configure Options.
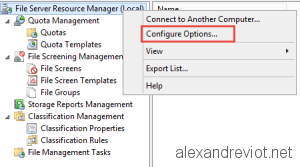
FSRM Server Options
- On the Email notification tab, set your email server and an email address. You can set your security team distribution list for example.
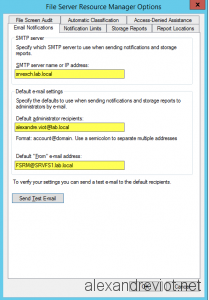
FSRM Email notification
Default Access Denied message
When we enable the Access-denied Assistance, Microsoft suggests an error message. You can adapt it according your language or your strategy. It will be displayed for all shared folder.
- Right click on File Server Resource Manager (Local) and select Configure Options.
FSRM Server Options
- On the Access-Denied tab, check the Enable access-denied assistance.
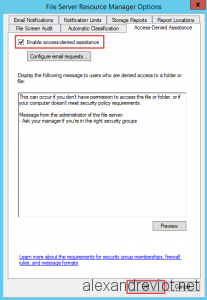
Access-denied Enabled
- Now, when unauthorized user tries to access shared folder, he gets this message:
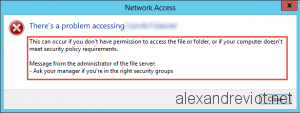
Custom Access Denied Message
Message for specific folder
It is also possible to set a specific custom access denied message for one folder.
- Under Classification Management, Right clic on Classification Properties and select Set Folder Management Properties.
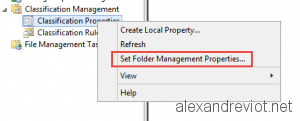
Folder Management Properties
- Add a Path/value property:
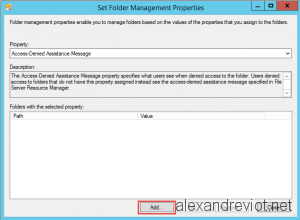
Set Folder Management Properties
- Set Folder path and your custom message:

Specific Message
- User will get the specifc message:

Specific error message
Request Assistance
In order to allow user to get the Request Assistance action, we need to configure Email Requests options.
- On the Access-Denied Assistance tab, under the server options, clic on Configure email requests:
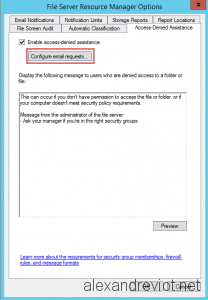
Configure email request
- On the Access-Denied Assistance window, check Enable users to request assistance and set others information:
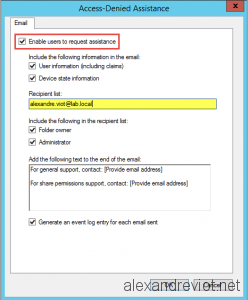
Access-denied email request
- For a access denied error, user will have the possibility to request Assistance.

Request Assistance
Request Assistance
- Administrator will get an email with all information required.
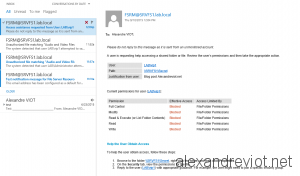
Request Assistance Email
More
You can have more information about Access-Denied Assistance here.