I have this object below:
I thought about putting the messages in html like this
<div id = "text_identifier">text_here</div> // div is hidden.
and then using getElementById to pull the message into JavaScript and finally display to the user in the correct element ( the parameter element in Message )
Two related questions?
Is it bad practice to have content in JavaScript like this?
If I do move the messages into the HTML, is the method I described above best practice?
/**
 *Message
 */

var Message = function( element )
{
    var messages =
    {
        name:         'Please enter a valid name',
        email:        'Please enter a valid email',
        pass:         'Please enter passoword, 6-40 characters',
        url:          'Please enter a valid url',
        title:        'Please enter a valid title',
        tweet:        'Please enter a valid tweet',
        empty:        'Please complete all fields',
        email_s:      'Please enter a valid email.',
        same:         'Please make emails equal',
        taken:        'Sorry, that email is taken',
        validate:     'Please contact <a class="d" href="mailto:guy@host.com">support</a> to reset your password',
    }
    this.display = function( type )
    {
        element.innerHTML = messages[ type ];
        new Effects().fade( element, 'down', 4000 );
    }
};
DigitalOcean provides cloud products for every stage of your journey. Get started with $200 in free credit!
Introduction
HTML elements can have attributes on them that are used for anything from accessibility information to stylistic control.
<!-- We can use the `class` for styling in CSS, and we've also make this into a landmark region -->
<div class="names" role="region" aria-label="Names"></div>
What is discouraged is making up your own attributes, or repurposing existing attributes for unrelated functionality.
<!-- `highlight` is not an HTML attribute -->
<div highlight="true"></div>

<!-- `large` is not a valid value of `width` -->
<div width="large">
There are a variety of reasons this is bad. Your HTML becomes invalid, which may not have any actual negative consequences, but robs you of that warm fuzzy valid HTML feeling. The most compelling reason is that HTML is a living language and just because attributes and values that don’t do anything today doesn’t mean they never will.
Good news though: you can make up your own attributes. You just need to prefix them with data-* and then you’re free to do what you please!
Syntax
It can be awfully handy to be able to make up your own HTML attributes and put your own information inside them. Fortunately, you can! That’s exactly what data attributes are. They are like this:
<!-- They don't need a value -->
<div data-foo></div>

<!-- ...but they can have a value -->
<div data-size="large"></div>

<!-- You're in HTML here, so careful to escape code if you need to do something like put more HTML inside -->
<li data-prefix="Careful with HTML in here."><li>

<!-- You can keep dashing if you like -->
<aside data-some-long-attribute-name><aside>
Data attributes are often referred to as data-* attributes, as they are always formatted like that. The word data, then a dash -, then other text you can make up.
Can you use the data attribute alone?
<div data=""></div>It’s probably not going to hurt anything, but you won’t get the JavaScript API we’ll cover later in this guide. You’re essentially making up an attribute for yourself, which as I mentioned in the intro, is discouraged.
What not to do with data attributes
Store content that should be accessible. If the content should be seen or read on a page, don’t only put them in data attributes, but make sure that content is in the HTML content somewhere.
<!-- This isn't accessible content -->
<div data-name="Chris Coyier"></div>

<!-- If you need programmatic access to it but shouldn't be seen, there are other ways... -->
<div>
  <span class="visually-hidden">Chris Coyier</span>
</div>
Here’s more about hiding things.
Styling with data attributes
CSS can select HTML elements based on attributes and their values.
/* Select any element with this data attribute and value */
[data-size="large"] {
  padding: 2rem;
  font-size: 125%;
}

/* You can scope it to an element or class or anything else */
button[data-type="download"] { }
.card[data-pad="extra"] { }
This can be compelling. The predominant styling hooks in HTML/CSS are classes, and while classes are great (they have medium specificity and nice JavaScript methods via classList) an element either has it or it doesn’t (essentially on or off). With data-* attributes, you get that on/off ability plus the ability to select based on the value it has at the same specificity level.
/* Selects if the attribute is present at all */
[data-size] { }

/* Selects if the attribute has a particular value */
[data-state="open"],
[aria-expanded="true"] { }

/* "Starts with" selector, meaning this would match "3" or anything starting with 3, like "3.14" */
[data-version^="3"] { }

/* "Contains" meaning if the value has the string anywhere inside it */
[data-company*="google"] { }
The specificity of attribute selectors
It’s the exact same as a class. We often think of specificity as a four-part value:
inline style, IDs, classes/attributes, tags
So a single attribute selector alone is 0, 0, 1, 0. A selector like this:
div.card[data-foo="bar"] { }…would be 0, 0, 2, 1. The 2 is because there is one class (.card) and one attribute ([data-foo="bar"]), and the 1 is because there is one tag (div).

Attribute selectors have less specificity than an ID, more than an element/tag, and the same as a class.
Case-insensitive attribute values
In case you’re needing to correct for possible capitalization inconsistencies in your data attributes, the attribute selector has a case-insensitive variant for that.
/* Will match
<div data-state="open"></div>
<div data-state="Open"></div>
<div data-state="OPEN"></div>
<div data-state="oPeN"></div>
*/
[data-state="open" i] { }
It’s the little i within the bracketed selector.
Using data attributes visually
CSS allows you to yank out the data attribute value and display it if you need to.
/* <div data-emoji="✅"> */

[data-emoji]::before {
  content: attr(data-emoji); /* Returns '✅' */
  margin-right: 5px;
}
Example styling use-case
You could use data attributes to specify how many columns you want a grid container to have.
<div data-columns="2"></div>
<div data-columns="3"></div>
<div data-columns="4"></div>
Accessing data attributes in JavaScript
Like any other attribute, you can access the value with the generic method getAttribute.
let value = el.getAttribute("data-state");

// You can set the value as well.
// Returns data-state="collapsed"
el.setAttribute("data-state", "collapsed");
But data attributes have their own special API as well. Say you have an element with multiple data attributes (which is totally fine):
<span
data-info="123"
data-index="2"
data-prefix="Dr. "
data-emoji-icon="🏌️♀️"
></span>If you have a reference to that element, you can set and get the attributes like:
// Get
span.dataset.info; // 123
span.dataset.index; // 2

// Set
span.dataset.prefix = "Mr. ";
span.dataset.emojiIcon = "🎪";
Note the camelCase usage on the last line there. It automatically converts kebab-style attributes in HTML, like data-this-little-piggy, to camelCase style in JavaScript, like dataThisLittlePiggy.
This API is arguably not quite as nice as classList with the clear add, remove, toggle, and replace methods, but it’s better than nothing.
You have access to inline datasets as well:
<img src="spaceship.png"
  data-ship-id="324" data-shields="72%"
  onclick="pewpew(this.dataset.shipId)">
</img>
JSON data inside data attributes
<ul>
  <li data-person='
    {
      "name": "Chris Coyier",
      "job": "Web Person"
    }
  '></li>
</ul>
Hey, why not? It’s just a string and it’s possible to format it as valid JSON (mind the quotes and such). You can yank that data and parse it as needed.
const el = document.querySelector("li");

let json = el.dataset.person;
let data = JSON.parse(json);

console.log(data.name); // Chris Coyier
console.log(data.job); // Web Person
JavaScript use-cases
The concept is that you can use data attributes to put information in HTML that JavaScript may need access to do certain things.
A common one would have to do with database functionality. Say you have a “Like” button:
<button data-id="435432343">♡</button>That button could have a click handler on it which performs an Ajax request to the server to increment the number of likes in a database on click. It knows which record to update because it gets it from the data attribute.
Specifications
- Selectors Level 4 (Working Draft)
- Selectors Level 3 (Recommended)
- Selectors Level 2, Revision 1 (Initial Definition)
Browser support
Desktop
| Chrome | Firefox | IE | Edge | Safari |
|---|---|---|---|---|
| 7 | 6 | 11 | 12 | 5.1 |
Mobile / Tablet
| Android Chrome | Android Firefox | Android | iOS Safari |
|---|---|---|---|
| 109 | 109 | 3 | 5.0-5.1 |
Время прочтения
8 мин
Просмотры 71K
Представляем вашему вниманию перевод статьи, посвящённой использованию атрибутов data-*. Это — атрибуты, которые можно применять для удобного хранения в стандартных HTML-элементах различной полезной информации. Эта информация, в частности, может применяться в JavaScript и CSS.

Общие сведения
HTML-элементы могут иметь атрибуты, которые используются для решения самых разных задач — от предоставления данных ассистивным технологиям, до стилизации элементов.
<!-- Атрибут `class` можно использовать для стилизации в CSS, атрибут `role` используется ассистивными технологиями -->
<div class="names" role="region" aria-label="Names"></div>
При этом не рекомендуется создавать собственные атрибуты, или применять существующие атрибуты такими способами, на которые они не рассчитаны.
<!-- `highlight` не является HTML-атрибутом-->
<div highlight="true"></div>

<!-- `large` не является допустимым значением для `width` -->
<div width="large">
Это плохо по многим причинам. HTML-код оказывается неправильно сформированным. И хотя подобное может и не иметь реальных негативных последствий, это лишает разработчика тёплого чувства вызываемого тем, что он создаёт валидный HTML-код. Но главная причина того, что так поступать не следует, заключается в том, что HTML — это язык, который постоянно развивается. В результате, если некий атрибут сегодня в языке не применяется, это не значит, что в будущем ничего не изменится.
Правда, если кому-то нужно использовать подобные атрибуты, у него есть совершенно нормальный способ это делать. Речь идёт о создании собственных атрибутов, названия которых начинаются с префикса data-. С этими атрибутами можно совершенно спокойно работать, применяя их так, как нужно программисту.
Синтаксис
Возможность создавать собственные HTML-атрибуты и записывать в них данные может оказаться крайне полезной. Это, как вы понимаете, возможно благодаря атрибутам data-*. Именно для этого такие атрибуты и предназначены. Выглядит это так:
<!-- Этим атрибутам необязательно назначать значения -->
<div data-foo></div>

<!-- ...но они могут содержать значения -->
<div data-size="large"></div>

<!-- Тут мы имеем дело с HTML, поэтому надо экранировать HTML-код, который, возможно, решено будет записать в атрибут -->
<li data-prefix="Careful with HTML in here."><li>

<!-- Если надо - можно создавать длинные имена атрибутов -->
<aside data-some-long-attribute-name><aside>
Эти атрибуты, именно из-за того, что они всегда начинаются с префикса data-, часто называют атрибутами data-* или data-атрибутами. При формировании имён этих атрибутов сначала идёт слово data, потом — тире (-), а потом — оставшаяся часть имени, устроенная так, как нужно разработчику.
Можно ли использовать атрибут, имеющий имя data?
Вот пример кода, в котором используется атрибут с именем data:
<div data=""></div>Атрибут с таким именем, вероятно, никому не повредит, но его применение не позволит пользоваться JavaScript-инструментами, которые мы рассмотрим ниже. В этом примере разработчик, фактически, создаёт некий собственный атрибут, что, как уже было сказано, делать не рекомендуется.
Чего не стоит делать с атрибутами data-*
В таких атрибутах не стоит хранить содержимое, которое должно быть доступно ассистивным технологиям. Если некие данные должны быть видимы на странице, или должны быть доступны средствам для чтения с экрана, их недостаточно просто поместить в атрибут data-*. Такие данные должны появиться и в обычной HTML-разметке.
<!-- Эти данные не выводятся на странице, они недоступны ассистивным технологиям -->
<div data-name="Chris Coyier"></div>

<!-- Если нужен программный доступ к данным, но они не должны выводиться на странице, есть и другие способы... -->
<div>
  <span class="visually-hidden">Chris Coyier</span>
</div>
Вот материал о том, как скрывать элементы веб-страниц.
Стилизация элементов с использованием атрибутов data-*
В CSS можно выбирать HTML-элементы, основываясь на атрибутах и их значениях.
/* Выбрать элемент с таким именем атрибута, имеющим такое значение */
[data-size="large"] {
  padding: 2rem;
  font-size: 125%;
}

/* Выбор можно ограничить элементом, классом, или чем-то другим */
button[data-type="download"] { }
.card[data-pad="extra"] { }
Это может показаться интересным. Для стилизации в HTML/CSS используются, в основном, классы. И хотя классы — это замечательный инструмент (они отличаются средним уровнем специфичности, с ними можно работать с помощью удобных JavaScript-методов через свойство элементов classList), элемент может либо иметь, либо не иметь некоего класса (то есть, класс в элементе либо «включен», либо «выключен»). При использовании атрибутов data-* в распоряжении разработчика оказываются и возможности классов («включено/выключено»), и возможность выбора элементов, основываясь на значении атрибута, которое он имеет на том же уровне специфичности.
/* Выбор элементов, у которых имеется указанный атрибут */
[data-size] { }

/* Выбор элемента, атрибут которого имеет заданное значение */
[data-state="open"],
[aria-expanded="true"] { }

/* Селектор "начинается с", использование которого приведёт к выбору элементов, атрибут которых содержит "3", а так же - что угодно другое, начинающееся с 3 - вроде "3.14" */
[data-version^="3"] { }
/* Селектор "содержит" указывает на то, что заданная строка должна содержаться где-то в значении свойства */
[data-company*="google"] { }
Специфичность селекторов атрибутов
Специфичность селекторов атрибутов такая же, как у классов. Специфичность часто рассматривают как значение, состоящее из 4 частей:
- Встроенный стиль
- ID
- Классы и атрибуты
- Теги
В результате, если представить себе значение специфичности для элемента, который стилизуется только с использованием селектора атрибута, то оно будет выглядеть так: 0, 0, 1, 0.
А вот ещё один селектор:
div.card[data-foo="bar"] { }
Он уже будет описываться значением 0, 0, 2, 1. Число 2 здесь появляется из-за того, что тут имеется и класс (.card), и атрибут ([data-foo="bar"]). А 1 здесь из-за того, что тут присутствует лишь один тег (div).
Вот, чтобы было понятнее, иллюстрированная версия этих рассуждений.

1 тег, 1 класс и 1 атрибут
У селекторов атрибутов специфичность ниже, чем у идентификаторов (ID), но выше, чем у тегов (элементов). Их специфичность равна специфичности классов.
Значения атрибутов, нечувствительные к регистру
Если нужно, чтобы селекторы выбирали бы атрибуты, значения которых могут содержать строки, записанные с использованием разных комбинаций строчных и прописных букв, можно воспользоваться вариантом селектора, нечувствительным к регистру.
/* Всё это соответствует следующему селектору
<div data-state="open"></div>
<div data-state="Open"></div>
<div data-state="OPEN"></div>
<div data-state="oPeN"></div>
*/
[data-state="open" i] { }
Такое поведение обеспечивает использование в селекторе символа i.
Вывод данных, хранящихся в атрибутах data-*
CSS позволяет извлекать значения атрибутов data-* и выводить их на странице.
/* <div data-emoji=":-)"> */

[data-emoji]::before {
  content: attr(data-emoji); /* Возвращает ':-)' */
  margin-right: 5px;
}
Примеры использования атрибутов data-* для стилизации элементов
Атрибуты data-* можно использовать для указания того, сколько столбцов должно быть у grid-контейнера. Вот HTML-код:
<div data-columns="2">
  <div></div>
  <div></div>
  <div></div>
  <div></div>
</div>

<div data-columns="3">
  <div></div>
  <div></div>
  <div></div>
  <div></div>
  <div></div>
  <div></div>
</div>

<div data-columns="4">
  <div></div>
  <div></div>
  <div></div>
  <div></div>
</div>
Вот соответствующий CSS-код:
[data-columns] {
  display: grid;
  grid-gap: 1rem;
  padding: 1rem;
  margin: 0 0 1rem 0;
}

[data-columns] > div {
  height: 100px;
  background: white;
}

[data-columns="2"] {
  background: #64B5F6;
  grid-template-columns: repeat(2, 1fr);
}

[data-columns="3"] {
  background: #9CCC65;
  grid-template-columns: repeat(3, 1fr);
}

[data-columns="4"] {
  background: #FFB74D;
  grid-template-columns: repeat(4, 1fr);
}
А вот — фрагмент результирующей страницы.

Grid-контейнеры, настройка которых производится с помощью атрибутов data-*
Поэкспериментировать с этим примером можно на CodePen.
Работа с атрибутами data-* в JavaScript
К значениям атрибутов data-* можно обращаться, как и к значениям других атрибутов, пользуясь методом getAtribute для чтения данных, и методом setAttribute для записи.
// Чтение значения атрибута
let value = el.getAttribute("data-state");

// Запись значения атрибута.

// В data-state записывается значение "collapsed"
el.setAttribute("data-state", "collapsed");
Однако атрибуты data-* имеют и собственный особый API. Предположим, у нас есть элемент с несколькими атрибутами data-* (что совершенно нормально):
<span
  data-info="123"
  data-index="2"
  data-prefix="Dr. "
  data-emoji-icon=":-)"
></span>
Если имеется ссылка на этот элемент, то читать и записывать значения его атрибутов можно так:
// Чтение
span.dataset.info; // 123
span.dataset.index; // 2

// Запись
span.dataset.prefix = "Mr. ";
span.dataset.emojiIcon = ";-)";
Обратите внимание на то, что в последней строке JS-кода используется запись имени атрибута в верблюжьем (CamelCase) стиле. Система автоматически преобразует имена HTML-атрибутов, записанные в кебаб-стиле, в имена, записанные в верблюжьем стиле. То есть — data-this-little-piggy превращается в dataThisLittlePiggy.
Этот API, конечно, не такой удобный, как API classList, поддерживающий понятные методы вроде add, remove, toggle и replace, но это, всё же, лучше чем ничего.
В JavaScript можно работать и со встроенными в элементы наборами данных:
<img align="center" src="spaceship.png"
  data-ship-id="324" data-shields="72%"
  onclick="pewpew(this.dataset.shipId)">
</img>
<h2><font color="#3AC1EF">JSON-данные в атрибутах data-*</font></h2>
<ul>
  <li data-person='
    {
      "name": "Chris Coyier",
      "job": "Web Person"
    }
  '></li>
</ul>
А почему бы не записать в атрибут data-* JSON-данные? Ведь это всего лишь строки, которые можно отформатировать как валидные JSON-данные (учитывая кавычки и прочее). При необходимости эти данные можно извлечь из атрибута и распарсить.
const el = document.querySelector("li");

let json = el.dataset.person;
let data = JSON.parse(json);

console.log(data.name); // Chris Coyier
console.log(data.job); // Web Person
Об использовании атрибутов data-* в JavaScript
Идея тут заключается в том, чтобы, пользуясь атрибутами data-*, размещать в HTML-коде данные, к которым можно обращаться из JavaScript для выполнения неких действий.
Распространённый вариант реализации этого сценария направлен на организацию работы с базами данных. Предположим, у нас имеется кнопка Like:
<button data-id="435432343">Like</button>
У этой кнопки может быть обработчик нажатия, выполняющий AJAX-запрос к серверу. Обработчик, если пользователь лайкнет что-то с помощью кнопки, увеличивает количество лайков в серверной базе данных. Обработчик знает о том, какую именно запись надо обновить, так как берёт сведения об этом из атрибута data-*.
Итоги
Вот, вот и вот — стандарты, связанные с селекторами атрибутов data-*. Здесь, на сайте Caniuse, можно узнать о поддержке атрибутов data-* браузерами. Если вы раньше не пользовались этими атрибутами, надеемся, этот материал дал вам пищу для размышлений.
Уважаемые читатели! Как вы применяете HTML-атрибуты data-*?

How to show custom validation error message in HTML5 form?
As we all know that there is no uniformity in the form element validation messages comes in different browsers. To make these error messages uniform, we can set custom error message so that all browser displays the same error message.
This solution is not full proof however it works in most modern browser except Internet Explorere 10.
First we have created a simple form with a textbox, email and url textbox.
 <form action="somepage.html" method="post">
        <fieldset>
            <legend>Login</legend>Name:
            <input type="text" id="myName" name="myName" required
                   placeholder="Please enter your name" data-error="Name is required" />*
            <br />
            Email:
            <input name="myEmail" id="myEmail" type="email" required
                placeholder="Enter email" data-error="Email is required in you@domain.com" />
            <br />
            Url:
            <input type="url" id="myUrl" name="myUrl" />
            <input type="submit" id="mySubmit" name="mySubmit" />
        </fieldset>
    </form>
In the above all other element and its attributes are normal except the data-error attribute. Attribute starts with «data-» is a special type of attribute introduced in HTML 5 that can be used to hold that element specific data. It doesn’t have any meaning to the browser. It is used only for the developer to hold some temporary data.
In this case, we are holding our custom error message into the data-error attribute.
Now write following jQuery code (Do not forget to refer the jQuery file into the page).
<script>
        $(function () {
            var inputs = document.getElementsByTagName("INPUT");
            for (var i = 0; i < inputs.length; i++) {
                inputs[i].oninvalid = function (e) {
                    e.target.setCustomValidity("");
                    if (!e.target.validity.valid) {
                        e.target.setCustomValidity(e.target.getAttribute("data-error"));
                    }
                };
            }
        });
    </script>
In the above jQuery code we are doing following
- getting all input element of the page using getElementsByTagNam function of JavaScript
- looping through all of them
- setting oninvalid event function on each element that executes only when the element is marked as invalid by the browser
- setting its customValidity to empty so that the default error message of the browser is set to empty
- after checking if that element is not valid, setting its customValidity to that particular element’s «data-error» attribute value.
OUTPUT
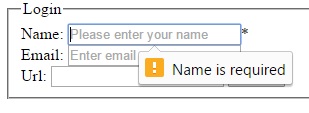
NOTE
If data-error attribute is not specified for a particular element, few browser like Firefox may display «null» is the element is invalid (like in this case, notice that we do not have data-error attribute in the URL textbox). So it is suggested to always set data-error attribute to each input type element.
Views: 16457 | Post Order: 100
Related Posts
HTML5 (en-US) спроектирован с возможностью расширения данных ассоциированных с каким-либо элементом, но в то же время не обязательно имеющих определённое значение. data-* атрибуты позволяют хранить дополнительную информацию в стандартных элементах HTML, без хаков вроде нестандартных атрибутов, лишних DOM-свойств или Node.setUserData().
Синтаксис HTML
Синтаксис прост — любой атрибут, чьё имя начинается с data-, является data-* атрибутом. Предположим у нас имеется статья и мы хотим сохранить дополнительную информацию без визуального представления. Для этого можно использовать data-атрибуты:
<article
  id="electriccars"
  data-columns="3"
  data-index-number="12314"
  data-parent="cars">
...
</article>
Доступ в JavaScript
Чтение data-атрибутов в JavaScript осуществляется также просто. Для этого можно использовать метод getAttribute() с параметром, равным полному имени атрибута. Но есть и более простой способ, используя объект dataset (en-US).
Чтобы получить data-атрибут можно взять свойство объекта dataset с именем, равным части имени атрибута после data- (обратите внимание, что дефисы в имени преобразуются в camelCase).
var article = document.getElementById('electriccars');

article.dataset.columns // "3"
article.dataset.indexNumber // "12314"
article.dataset.parent // "cars"
Каждое свойство является строкой и может быть прочитано и записано. В приведённом выше примере выполнение кода article.dataset.columns = 5 приведёт к тому, что новое значение атрибута станет равным "5".
Доступ в CSS
Заметим, что data-атрибуты являются обычными HTML-атрибутами, к которым можно получить доступ в CSS. Например, чтобы показать родительские данные о статье можно использовать генерируемый контент и CSS функцию attr:
article::before {
  content: attr(data-parent);
}
Также можно использовать селекторы атрибутов в CSS для изменения стилей в соответствии с данным:
article[data-columns='3']{
  width: 400px;
}
article[data-columns='4']{
  width: 600px;
}
Увидеть как это работает можно в примере на JSBin.
Data-атрибуты также могут использоваться для хранения информации, которая постоянно изменяется, например, счёт в игре. Используя CSS селекторы и возможности JavaScript можно создавать некоторые изящные эффекты, без необходимости писать свои функции отображения. Посмотрите скринкаст чтобы увидеть больше примеров использующих сгенерированный контент и переходы на CSS. Пример кода из скринкаста можно также посмотреть на JSBin.
Проблемы
Не храните данные, которые должны быть видимы и доступны в data-атрибутах. Дело в том, что вспомогательная техника (assistive technology) может не получить к ним доступ. В дополнение, поисковые роботы не индексируют данные, содержащиеся в data-атрибутах.
Печально, что всё простое и полезное в этой жизни не достаётся бесплатно. Internet Explorer 11+ поддерживает этот стандарт, но все более ранние версии не поддерживают dataset. Для поддержки IE 10 и более ранних версий получение доступа к data-атрибутам необходимо осуществлять через getAttribute(). Также, производительность чтения data-атрибутов по сравнению с хранением этих данных в хранилище данных JS значительно хуже. Использование dataset ещё медленнее, чем чтение данных с getAttribute().
Тем не менее, для пользовательских метаданных, связанных с элементами, data-атрибуты являются отличным решением.
Смотрите также
This post shows you how to customize browser built-in HTML5 form validation with JavaScript and CSS. You will be able to validate from JavaScript, add customized error messages, perform remote validation, perform confirmation validation, perform file validation and apply customized styling to error messages.
We are going to use built-in form validation (HTML5) as much as possible, it is faster than JavaScript validation and it means less work for us. We will need JavaScript, the Constraint Validation API and CSS to add more rules, customize messages and to style error messages.
This plugin for HTML5 validation is designed so that you have a choice to add some custom error messages and to style some error messages. Browser built-in error messages will be used if you don’t add custom error messages and built-in styling will be used if you don’t add custom error containers.
This plugin has been tested and is working with Google Chrome (75.0.3770.100), Mozilla Firefox (67.0.4) and Microsoft Edge (42.17134.1.0), without any polyfill. If you want to support older browsers, check out our post on how to transpile and polyfill JavaScript. We need to transpile the code and add polyfills to get this plugin to work in Internet Explorer (11.829.17134.0), we write about this at the end in this post.
JavaScript
This is the JavaScript that handles all forms of validation, validation can be triggered from a submit event or by calling the public function named valid.
var annytab = annytab || {};
annytab.validation = (function ()
{
    'use_strict';

    // Variables
    var forms = document.getElementsByTagName('form');

    // Loop forms
    for (var i = 0; i < forms.length; i++) {

        // Set forms to not validate, this code will handle validation
        forms[i].noValidate = true;

        // Add submit listener
        window.onload = forms[i].addEventListener('submit', async function (event) {

            // Prevent the form from submitting
            event.preventDefault();

            // Validate a form
            if (await validate(this) === true)
            {
                // Submit the form
                this.submit();
            }

        }, false);

        // Get elements in the form
        var elements = forms[i].querySelectorAll('input, select, textarea');

        // Add listener for elements
        for (var j = 0; j < elements.length; j++)
        {
            // Add input listeners
            elements[j].addEventListener('keydown', removeValidationErrors, false);
            elements[j].addEventListener('mousedown', removeValidationErrors, false);
        }

    } // End of for (var i = 0; i < forms.length; i++)

    // Remove validation errors
    function removeValidationErrors(event)
    {
        // Variables
        var error_output = null;

        // Find equalto element
        var confirmation = event.target.form.querySelector('[data-validation-equalto="' + event.target.getAttribute('name') + '"]');

        // Remove confirmation error
        if (confirmation !== null)
        {
            error_output = event.target.form.querySelector('[data-error-for="' + confirmation.name + '"]');
            if (error_output !== null) { error_output.innerHTML = ''; }
        }

        // Remove all errors for this element
        error_output = event.target.form.querySelector('[data-error-for="' + event.target.getAttribute('name') + '"]');
        if (error_output !== null) { error_output.innerHTML = ''; }

        // Remove IE 11 errors
        removeErrorsIE11(event.target.form);

    } // End of the removeValidationErrors method

    // Validate a form
    async function validate(form)
    {
        // Get elements in the form
        var elements = form.querySelectorAll('input, select, textarea');

        // Remove IE 11 errors
        removeErrorsIE11(form);

        // Create a focus flag
        var focus = false;

        // Loop elements
        for (i = 0; i < elements.length; i++)
        {
            // Get the control
            var ctrl = elements[i];

            // Check if the control should be validated
            if (ctrl.willValidate === false) { continue; }

            // Get error message container
            var error_output = form.querySelector('[data-error-for="' + ctrl.getAttribute('name') + '"]');

            // Get custom validation attributes
            var data_validation_remote = ctrl.getAttribute('data-validation-remote');
            var data_validation_equalto = ctrl.getAttribute('data-validation-equalto');
            var data_validation_file = ctrl.getAttribute('data-validation-file');

            // Get custom error attributes
            var data_error_input = ctrl.getAttribute('data-error-input');
            var data_error_pattern = ctrl.getAttribute('data-error-pattern');
            var data_error_range = ctrl.getAttribute('data-error-range');
            var data_error_step = ctrl.getAttribute('data-error-step');
            var data_error_length = ctrl.getAttribute('data-error-length');
            var data_error_type = ctrl.getAttribute('data-error-type');
            var data_error_required = ctrl.getAttribute('data-error-required');
            var data_error_remote = ctrl.getAttribute('data-error-remote');
            var data_error_equalto = ctrl.getAttribute('data-error-equalto');
            var data_error_file = ctrl.getAttribute('data-error-file');
            var data_error_datalist = ctrl.getAttribute('data-error-datalist');

            // Reset custom validation
            ctrl.setCustomValidity('');

            // Check for errors
            if (ctrl.validity.badInput === true) // parsing error
            {
                if (data_error_input !== null) { ctrl.setCustomValidity(data_error_input); }
            }
            else if (ctrl.validity.patternMismatch === true) // pattern
            {
                if (data_error_pattern !== null) { ctrl.setCustomValidity(data_error_pattern); }
            }
            else if (ctrl.validity.rangeOverflow === true || ctrl.validity.rangeUnderflow === true) // max value or min value
            {
                if (data_error_range !== null) { ctrl.setCustomValidity(data_error_range); }
            }
            else if (ctrl.validity.stepMismatch === true) // step value
            {
                if (data_error_step !== null) { ctrl.setCustomValidity(data_error_step); }
            }
            else if (ctrl.validity.tooLong === true || ctrl.validity.tooShort) // max length or min length
            {
                if (data_error_length !== null) { ctrl.setCustomValidity(data_error_length); }
            }
            else if (ctrl.validity.typeMismatch === true) // input type error
            {
                if (data_error_type !== null) { ctrl.setCustomValidity(data_error_type); }
            }
            else if (ctrl.validity.valueMissing === true) // required
            {
                if (data_error_required !== null) { ctrl.setCustomValidity(data_error_required); }
            }
            else if (data_validation_equalto !== null) // confirmation
            {
                if (equaltoValidation(ctrl, data_validation_equalto) === false) { ctrl.setCustomValidity(data_error_equalto); }
            }
            else if (data_validation_file !== null) // File
            {
                if (fileValidation(ctrl, data_validation_file) === false) { ctrl.setCustomValidity(data_error_file); }
            }
            else if (data_error_datalist !== null) // Datalist
            {
                if (datalistValidation(ctrl) === false) { ctrl.setCustomValidity(data_error_datalist); }
            }
            else if (data_validation_remote !== null) {
                // Perform remote validation
                if (await remoteValidation(ctrl, data_validation_remote) === false) { ctrl.setCustomValidity(data_error_remote); }
            }

            // Set error message in custom control or report validity
            if (ctrl.validationMessage !== '' && error_output !== null) {
                error_output.innerHTML = ctrl.validationMessage;

                // Set focus to the first element
                if (focus === false) { focus = true; ctrl.focus(); }
            }
            else if (ctrl.validationMessage !== '' && ctrl.reportValidity) {
                ctrl.reportValidity();
            }
            else if (ctrl.validationMessage !== '') {
                // IE 11
                ctrl.insertAdjacentHTML('afterend', '<div class="validation-error ie-11-error-output">' + ctrl.validationMessage + '</div>');
            }

        } // for (i = 0; i < elements.length; i++)

        // Return true or false
        return form.checkValidity();

    } // End of the validate method

    // Perform equalto validation
    function equaltoValidation(ctrl, other_field)
    {
        // Get the value of the other field
        var other_value = document.getElementsByName(other_field)[0].value;

        // Check if values are different
        if (ctrl.value !== other_value) {
            return false;
        }

        // Return true
        return true;

    } // End of the equaltoValidation method

    // Perform file validation
    function fileValidation(ctrl, max_size)
    {
        // Make sure that there is files
        if (ctrl.files.length <= 0) {
            return true;
        }

        // Check accept attribute
        var accepts = ctrl.getAttribute('accept') !== null ? ctrl.getAttribute('accept').toLowerCase().replace(' ', '').split(',') : null;

        // Loop files
        for (var i = 0; i < ctrl.files.length; i++) {
            // Get the file extension
            var extension = ctrl.files[i].name.substring(ctrl.files[i].name.lastIndexOf('.')).toLowerCase();

            // Check for errors
            if (accepts !== null && accepts.includes(extension) === false) {
                return false;
            }
            else if (max_size !== null && max_size > 0 && ctrl.files[i].size >= max_size) {
                return false;
            }
        }

        // Return true
        return true;

    } // End of the fileValidation method

    // Perform a datalist validation
    function datalistValidation(ctrl)
    {
        // Loop options
        for (var i = 0; i < ctrl.list.options.length; i++) {
            if (ctrl.value === ctrl.list.options[i].value) {
                return true;
            }
        }

        // Return false
        return false;

    } // End of the datalistValidation method

    // Perform remote validation
    async function remoteValidation(ctrl, input)
    {
        // Return a promise
        return new Promise((resolve, reject) => {

            // Get input values
            var values = input.split(',');
            var uri = values[0].trim();
            var fields = [];
            fields.push(ctrl.getAttribute('name'));
            for (var i = 1; i < values.length; i++) { fields.push(values[i].trim()); }

            // Create form data
            var fd = new FormData();
            for (i = 0; i < fields.length; i++) { fd.append(fields[i], document.getElementsByName(fields[i])[0].value); }

            var xhr = new XMLHttpRequest();
            xhr.open('POST', uri, true);
            xhr.onload = function () {

                // Check if the response is successful
                if (xhr.status === 200) {
                    // Return a success response
                    if (xhr.response === 'false') { resolve(false); } else { resolve(true); }
                }
                else {
                    // Return a reject response
                    reject(xhr.status + ' ' + xhr.statusText);
                }
            };
            xhr.onerror = function () {
                // Return a reject response
                reject('There was a network error.');
            };
            xhr.send(fd);
        });

    } // End of the remoteValidation method

    // Remove IE 11 errors
    function removeErrorsIE11(form)
    {
        var ie_errors = form.querySelectorAll('.ie-11-error-output');
        for (var i = 0; i < ie_errors.length; i++) { ie_errors[i].remove(); }

    } // End of the removeErrorsIE11 method

    // Public methods
    return {
        valid: async function (form) {
            return await validate(form);
        }
    };

})();
Form
This is a form with html syntax and razor syntax, it shows som input elements and includes a method to post the form. You do not need to post the form with JavaScript, you can use a submit button instead.
@{
// Set the layout for the page
Layout = "/Views/shared_admin/_standard_layout.cshtml";
// Get form data
WebDomain current_domain = ViewBag.CurrentDomain;
KeyStringList tt = ViewBag.TranslatedTexts;
AdministratorDocument post = ViewBag.Post;
// Get translated texts
string administrator_tt = tt.Get("administrator");
string new_tt = tt.Get("new");
string edit_tt = tt.Get("edit");
string id_tt = tt.Get("id");
string username_tt = tt.Get("username");
string password_tt = tt.Get("password");
string confirm_password_tt = tt.Get("confirm") + " " + tt.Get("password").ToLower();
string admin_role_tt = tt.Get("role");
string email_tt = tt.Get("email");
string save_tt = tt.Get("save");
string cancel_tt = tt.Get("cancel");
// Set the title for the page
if (post.admin_username == "")
{
ViewBag.Title = administrator_tt + " - " + new_tt.ToLower();
}
else
{
ViewBag.Title = administrator_tt + " - " + edit_tt.ToLower();
}
}
@*Title*@
<h1>@ViewBag.Title</h1>
@*Menu*@
@await Html.PartialAsync("/Views/admin_administrators/_form_menu.cshtml")
@*Main form*@
<form id="inputForm" action="/admin_administrators/edit" method="post" enctype="multipart/form-data">
@*Hidden data*@
@Html.AntiForgeryToken()
@*Id*@
<div class="annytab-form-label">@id_tt</div>
<input name="txtId" type="text" class="annytab-form-control" tabindex="-1" readonly value="@post.id" />
@*Text*@
<div class="annytab-form-label">@username_tt</div>
<input name="txtUsername" type="text" class="annytab-form-control" value="@post.admin_username" placeholder="@username_tt" autofocus required
data-error-required="You must enter a username!" data-validation-remote="/admin_administrators/verify_username,txtId"
data-error-remote="The username is already in use!" maxlength="10" minlength="2" />
<div class="validation-error" data-error-for="txtUsername"></div>
@*Confirmation*@
<div class="annytab-form-label">@password_tt</div>
<input name="txtPassword" type="password" class="annytab-form-control" value="" placeholder="@password_tt" />
<input name="txtConfirmPassword" type="password" class="annytab-form-control" value="" placeholder="@confirm_password_tt"
data-validation-equalto="txtPassword" data-error-equalto="Passwords does not match!" />
<div class="validation-error" data-error-for="txtConfirmPassword"></div>
@*Select*@
<div class="annytab-form-label">@admin_role_tt</div>
<select name="selectAdminRole" class="annytab-form-control" required>
<!option value="">--- Select a role ---</!option>
<!option value="Administrator" @(post.admin_role == "Administrator" ? "selected" : "")>Administrator</!option>
<!option value="Editor" @(post.admin_role == "Editor" ? "selected" : "")>Editor</!option>
<!option value="Translator" @(post.admin_role == "Translator" ? "selected" : "")>Translator</!option>
</select>
@*Email*@
<div class="annytab-form-label">Email</div>
<input name="txtEmail" type="email" class="annytab-form-control" value="@post.admin_email" placeholder="my@email.com" required data-error-input="Bad input!" />
@*Multiple emails*@
<div class="annytab-form-label">Multiple emails</div>
<input name="txtEmail" type="email" class="annytab-form-control" value="" placeholder="my@email.com, your@email.se" multiple required />
@*Hidden field*@
<div class="annytab-form-label">Hidden field</div>
<input name="txtHidden" type="text" class="annytab-form-control" style="display:none;" value="ee" required data-error-required="Hidden field is required!" />
<div class="validation-error" data-error-for="txtHidden"></div>
@*Date*@
<div class="annytab-form-label">Date</div>
<input name="txtDate" type="date" class="annytab-form-control" value="" />
@*Number*@
<div class="annytab-form-label">Number</div>
<input name="txtNumber" type="number" class="annytab-form-control" value="" min="1" max="10" />
@*Range*@
<div class="annytab-form-label">Range</div>
<input name="txtRange" type="range" class="annytab-form-control" value="" min="1" max="10" step="1" />
@*Pattern*@
<div class="annytab-form-label">True/false</div>
<input name="txtPattern" type="text" class="annytab-form-control" value="" pattern="^(?:tru|fals)e$" data-error-pattern="true or false only!" />
@*Textarea*@
<div class="annytab-form-label">Textarea</div>
<textarea name="txtContents" required></textarea>
<div class="annytab-basic-space"></div>
@*Button panel*@
<div class="annytab-form-button-container">
<input type="button" class="annytab-form-button btn-disablable" value="@save_tt" onclick="sendForm(document.getElementById('inputForm'))" />
@*<input type="submit" class="annytab-form-button" value="@save_tt" />*@
<input type="button" class="annytab-form-button btn-disablable" value="@cancel_tt" onclick="location.href='/admin_administrators'" />
</div>
</form>
@section scripts {
<script>
// Submit a form
async function sendForm(form)
{
// Disable buttons
disableButtons();
// Make sure that the form is valid
if (await annytab.validation.valid(form) === false) { enableButtons(); return false; }
// Get form data
var fd = new FormData(form);
// Post form data
var xhr = new XMLHttpRequest();
xhr.open('POST', form.getAttribute('action'), true);
xhr.onload = function () {
if (xhr.status === 200)
{
// Get the response
var data = JSON.parse(xhr.response);
// Check the success status
if (data.success === true)
{
// Output a success message
toastr['success'](data.message);
}
else
{
// Output error information
toastr['error'](data.message);
}
}
else
{
// Output error information
toastr['error'](xhr.status + " - " + xhr.statusText);
}
// Enable buttons
enableButtons();
};
xhr.onerror = function ()
{
// Output error information
toastr['error'](xhr.status + " - " + xhr.statusText);
// Enable buttons
enableButtons();
};
xhr.send(fd);
} // End of the sendForm method
// Disable buttons
function disableButtons()
{
var buttons = document.getElementsByClassName('btn-disablable');
for (var i = 0; i < buttons.length; i++) {
buttons[i].setAttribute('disabled', true);
}
} // End of the disableButtons method
// Enable buttons
function enableButtons()
{
var buttons = document.getElementsByClassName('btn-disablable');
for (var i = 0; i < buttons.length; i++) {
setTimeout(function (button) { button.removeAttribute('disabled'); }, 1000, buttons[i]);
}
} // End of the enableButtons method
</script>
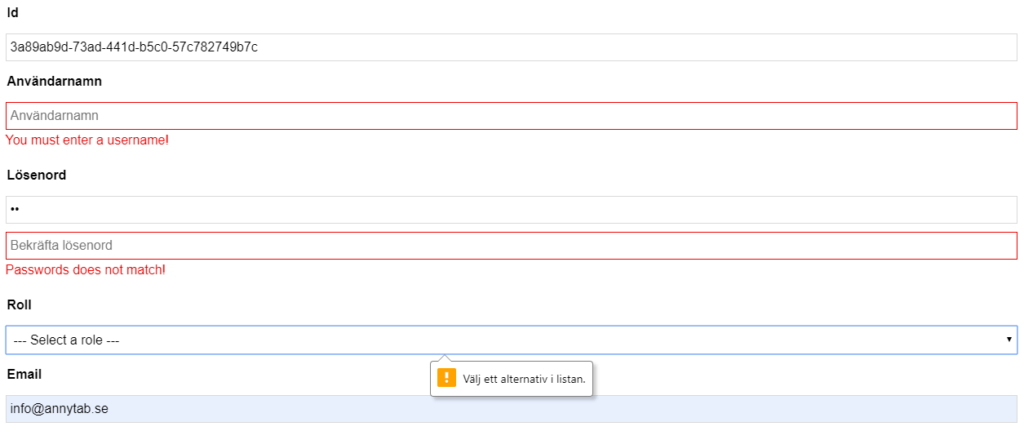
}Styling
You can style error messages, apply styles to invalid and valid elements. This is an element that is used to output error messages for the txtUsername element.
<div class="validation-error" data-error-for="txtUsername"></div>This is example CSS to style the error output element and to apply a style to invalid elements.
/* Validation */
.validation-error {
    display: block;
    font-weight: normal;
    font-size: 16px;
    line-height: 16px;
    color: #f00000;
    padding: 5px 5px 10px 0;
    margin: 0;
}
input:invalid, textarea:invalid{
    border: 1px solid #f00000;
}
input:disabled, button:disabled, input:disabled:hover, button:disabled:hover {
    resize: none;
    outline: none;
    color: #000000;
    background-color: #ddd;
    border-color: #ddd;
    cursor: default;
}
A visual image of a form is displayed below, browers built-in styling is applied if a error message element not is present.
Remote validation
Remote validation means that we call a server method to get a true/false response. If you want to add remote validation you need to add a data-validation-remote attribute and a data-error-remote attribute to an element. The data-validation-remote attribute should include an url and names of additional fields, data is delimited by comma (,).
<input name="txtUsername" type="text" class="annytab-form-control" value="" data-validation-remote="/admin_administrators/verify_username,txtId" data-error-remote="The username is already in use!" />You will also need a server method that is called by the validation code.
HttpPost]
[Authorize(Roles = "Administrator")]
public async Task<IActionResult> verify_username(IFormCollection collection)
{
    // Get the current domain
    WebDomain current_domain = await this.web_domain_repository.GetCurrentDomain(ControllerContext.HttpContext);

    // Get translated texts
    KeyStringList tt = await this.static_text_repository.GetFromCache(current_domain.back_end_language_code);

    // Get form data
    string id = collection["txtId"].ToString();
    string username = collection["txtUsername"].ToString();

    // Get a administrator on user name
    ModelItem<AdministratorDocument> admin_username_model = await this.administrator_repository.GetByUsername(username);

    // Check if the username exists already
    if (admin_username_model.item != null && id != admin_username_model.item.id)
    {
        // Return false
        return Ok(false);
        //return Json(data: false);
    }

    // Return success
    return Ok(true);
    //return Json(data: true);

} // End of the verify_username method
Confirmation validation
Confirmation validation (equalto) requires you to add a data-validation-equalto attribute and a data-error-equalto attribute to the element that is used to confirm another input element.
<input name="txtConfirmPassword" type="password" class="annytab-form-control" value="" data-validation-equalto="txtPassword" data-error-equalto="Passwords does not match!" />File validation
File validation requires you to add a data-validation-file attribute with a maximum file size in bytes and a data-error-file attribute with an error message. Set the maximum file size to -1 if you only want to validate on file extensions. You can add an accept attribute to restrict upload to allowed file extensions only.
<div class="annytab-form-label">File</div>
<input type="file" accept=".jpg, .PNG" data-validation-file="262144" data-error-file="Max 256 KiB per file, must be .jpg or .png!" />
Validation of a datalist
A datalist can be used to combine search and select. The datalist element is not supported in older browsers, download a datalist polyfill to add this functionality to incompatible browsers. Add a data-error-datalist attribute if you want to validate that a user only selects one of the specified options.
<input name="selectLanguage" type="text" value="sv"
        placeholder="Select language" list="dtLanguagues"
        data-error-datalist="You must select a valid language code!" />
<datalist id="dtLanguagues">
    <option value="sv">Swedish</option>
    <option value="no">Norwegian</option>
    <option value="da">Danish</option>
    <option value="en">English</option>
    <option value="fi">Finnish</option>
</datalist>
Internet Explorer 11 (older browsers)
Internet Explorer 11 and older versions of browsers do not support Async/Await, XMLHttpRequest, Array.prototype.includes, Promise and Element.prototype.remove. We are going to compile our JavaScript as TypeScript by using JavaScript Transpiler by Mads Kristensen. We add a tsconfig.json file to our root folder with the contents shown below. Included files will be transpiled to new files in the specified directory. Files in the transpiled folder can be minified and you can decide on the order in which files should be loaded in a browser.
{
  "compileOnSave": true,
  "files": [
    "wwwroot/js/annytab.html5.validation.js",
    "wwwroot/js/annytab.effects.js"
  ],
  "compilerOptions": {
    "allowJs": true,
    "sourceMap": false,
    "target": "es5",
    "outDir": "wwwroot/tjs-typescript"
  }
}
Transpiled files will be created to the outDir folder each time we build/debug our project or when one of the files is changed.
var __awaiter = (this && this.__awaiter) || function (thisArg, _arguments, P, generator) {
return new (P || (P = Promise))(function (resolve, reject) {
function fulfilled(value) { try { step(generator.next(value)); } catch (e) { reject(e); } }
function rejected(value) { try { step(generator["throw"](value)); } catch (e) { reject(e); } }
function step(result) { result.done ? resolve(result.value) : new P(function (resolve) { resolve(result.value); }).then(fulfilled, rejected); }
step((generator = generator.apply(thisArg, _arguments || [])).next());
});
};
var __generator = (this && this.__generator) || function (thisArg, body) {
var _ = { label: 0, sent: function() { if (t[0] & 1) throw t[1]; return t[1]; }, trys: [], ops: [] }, f, y, t, g;
return g = { next: verb(0), "throw": verb(1), "return": verb(2) }, typeof Symbol === "function" && (g[Symbol.iterator] = function() { return this; }), g;
function verb(n) { return function (v) { return step([n, v]); }; }
function step(op) {
if (f) throw new TypeError("Generator is already executing.");
while (_) try {
if (f = 1, y && (t = op[0] & 2 ? y["return"] : op[0] ? y["throw"] || ((t = y["return"]) && t.call(y), 0) : y.next) && !(t = t.call(y, op[1])).done) return t;
if (y = 0, t) op = [op[0] & 2, t.value];
switch (op[0]) {
case 0: case 1: t = op; break;
case 4: _.label++; return { value: op[1], done: false };
case 5: _.label++; y = op[1]; op = [0]; continue;
case 7: op = _.ops.pop(); _.trys.pop(); continue;
default:
if (!(t = _.trys, t = t.length > 0 && t[t.length - 1]) && (op[0] === 6 || op[0] === 2)) { _ = 0; continue; }
if (op[0] === 3 && (!t || (op[1] > t[0] && op[1] < t[3]))) { _.label = op[1]; break; }
if (op[0] === 6 && _.label < t[1]) { _.label = t[1]; t = op; break; }
if (t && _.label < t[2]) { _.label = t[2]; _.ops.push(op); break; }
if (t[2]) _.ops.pop();
_.trys.pop(); continue;
}
op = body.call(thisArg, _);
} catch (e) { op = [6, e]; y = 0; } finally { f = t = 0; }
if (op[0] & 5) throw op[1]; return { value: op[0] ? op[1] : void 0, done: true };
}
};
var annytab = annytab || {};
annytab.validation = (function () {
'use_strict';
// Variables
var forms = document.getElementsByTagName('form');
// Loop forms
for (var i = 0; i < forms.length; i++) {
// Set forms to not validate, this code will handle validation
forms[i].noValidate = true;
// Add submit listener
window.onload = forms[i].addEventListener('submit', function (event) {
return __awaiter(this, void 0, void 0, function () {
return __generator(this, function (_a) {
switch (_a.label) {
case 0:
// Prevent the form from submitting
event.preventDefault();
return [4 /*yield*/, validate(this)];
case 1:
// Validate a form
if ((_a.sent()) === true) {
// Submit the form
this.submit();
}
return [2 /*return*/];
}
});
});
}, false);
// Get elements in the form
var elements = forms[i].querySelectorAll('input, select, textarea');
// Add listener for elements
for (var j = 0; j < elements.length; j++) {
// Add input listeners
elements[j].addEventListener('keydown', removeValidationErrors, false);
elements[j].addEventListener('mousedown', removeValidationErrors, false);
}
} // End of for (var i = 0; i < forms.length; i++)
// Remove validation errors
function removeValidationErrors(event) {
// Variables
var error_output = null;
// Find equalto element
var confirmation = event.target.form.querySelector('[data-validation-equalto="' + event.target.getAttribute('name') + '"]');
// Remove confirmation error
if (confirmation !== null) {
error_output = event.target.form.querySelector('[data-error-for="' + confirmation.name + '"]');
if (error_output !== null) {
error_output.innerHTML = '';
}
}
// Remove all errors for this element
error_output = event.target.form.querySelector('[data-error-for="' + event.target.getAttribute('name') + '"]');
if (error_output !== null) {
error_output.innerHTML = '';
}
// Remove IE 11 errors
removeErrorsIE11(event.target.form);
} // End of the removeValidationErrors method
// Validate a form
function validate(form) {
return __awaiter(this, void 0, void 0, function () {
var elements, focus, ctrl, error_output, data_validation_remote, data_validation_equalto, data_validation_file, data_error_input, data_error_pattern, data_error_range, data_error_step, data_error_length, data_error_type, data_error_required, data_error_remote, data_error_equalto, data_error_file, data_error_datalist;
return __generator(this, function (_a) {
switch (_a.label) {
case 0:
elements = form.querySelectorAll('input, select, textarea');
// Remove IE 11 errors
removeErrorsIE11(form);
focus = false;
i = 0;
_a.label = 1;
case 1:
if (!(i < elements.length)) return [3 /*break*/, 15];
ctrl = elements[i];
// Check if the control should be validated
if (ctrl.willValidate === false) {
return [3 /*break*/, 14];
}
error_output = form.querySelector('[data-error-for="' + ctrl.getAttribute('name') + '"]');
data_validation_remote = ctrl.getAttribute('data-validation-remote');
data_validation_equalto = ctrl.getAttribute('data-validation-equalto');
data_validation_file = ctrl.getAttribute('data-validation-file');
data_error_input = ctrl.getAttribute('data-error-input');
data_error_pattern = ctrl.getAttribute('data-error-pattern');
data_error_range = ctrl.getAttribute('data-error-range');
data_error_step = ctrl.getAttribute('data-error-step');
data_error_length = ctrl.getAttribute('data-error-length');
data_error_type = ctrl.getAttribute('data-error-type');
data_error_required = ctrl.getAttribute('data-error-required');
data_error_remote = ctrl.getAttribute('data-error-remote');
data_error_equalto = ctrl.getAttribute('data-error-equalto');
data_error_file = ctrl.getAttribute('data-error-file');
data_error_datalist = ctrl.getAttribute('data-error-datalist');
// Reset custom validation
ctrl.setCustomValidity('');
if (!(ctrl.validity.badInput === true)) return [3 /*break*/, 2];
if (data_error_input !== null) {
ctrl.setCustomValidity(data_error_input);
}
return [3 /*break*/, 13];
case 2:
if (!(ctrl.validity.patternMismatch === true)) return [3 /*break*/, 3];
if (data_error_pattern !== null) {
ctrl.setCustomValidity(data_error_pattern);
}
return [3 /*break*/, 13];
case 3:
if (!(ctrl.validity.rangeOverflow === true || ctrl.validity.rangeUnderflow === true)) return [3 /*break*/, 4];
if (data_error_range !== null) {
ctrl.setCustomValidity(data_error_range);
}
return [3 /*break*/, 13];
case 4:
if (!(ctrl.validity.stepMismatch === true)) return [3 /*break*/, 5];
if (data_error_step !== null) {
ctrl.setCustomValidity(data_error_step);
}
return [3 /*break*/, 13];
case 5:
if (!(ctrl.validity.tooLong === true || ctrl.validity.tooShort)) return [3 /*break*/, 6];
if (data_error_length !== null) {
ctrl.setCustomValidity(data_error_length);
}
return [3 /*break*/, 13];
case 6:
if (!(ctrl.validity.typeMismatch === true)) return [3 /*break*/, 7];
if (data_error_type !== null) {
ctrl.setCustomValidity(data_error_type);
}
return [3 /*break*/, 13];
case 7:
if (!(ctrl.validity.valueMissing === true)) return [3 /*break*/, 8];
if (data_error_required !== null) {
ctrl.setCustomValidity(data_error_required);
}
return [3 /*break*/, 13];
case 8:
if (!(data_validation_equalto !== null)) return [3 /*break*/, 9];
if (equaltoValidation(ctrl, data_validation_equalto) === false) {
ctrl.setCustomValidity(data_error_equalto);
}
return [3 /*break*/, 13];
case 9:
if (!(data_validation_file !== null)) return [3 /*break*/, 10];
if (fileValidation(ctrl, data_validation_file) === false) {
ctrl.setCustomValidity(data_error_file);
}
return [3 /*break*/, 13];
case 10:
if (!(data_error_datalist !== null)) return [3 /*break*/, 11];
if (datalistValidation(ctrl) === false) {
ctrl.setCustomValidity(data_error_datalist);
}
return [3 /*break*/, 13];
case 11:
if (!(data_validation_remote !== null)) return [3 /*break*/, 13];
return [4 /*yield*/, remoteValidation(ctrl, data_validation_remote)];
case 12:
// Perform remote validation
if ((_a.sent()) === false) {
ctrl.setCustomValidity(data_error_remote);
}
_a.label = 13;
case 13:
// Set error message in custom control or report validity
if (ctrl.validationMessage !== '' && error_output !== null) {
error_output.innerHTML = ctrl.validationMessage;
// Set focus to the first element
if (focus === false) {
focus = true;
ctrl.focus();
}
}
else if (ctrl.validationMessage !== '' && ctrl.reportValidity) {
ctrl.reportValidity();
}
else if (ctrl.validationMessage !== '') {
// IE 11
ctrl.insertAdjacentHTML('afterend', '<div class="validation-error ie-11-error-output">' + ctrl.validationMessage + '</div>');
}
_a.label = 14;
case 14:
i++;
return [3 /*break*/, 1];
case 15: // for (i = 0; i < elements.length; i++)
// Return true or false
return [2 /*return*/, form.checkValidity()];
}
});
});
} // End of the validate method
// Perform equalto validation
function equaltoValidation(ctrl, other_field) {
// Get the value of the other field
var other_value = document.getElementsByName(other_field)[0].value;
// Check if values are different
if (ctrl.value !== other_value) {
return false;
}
// Return true
return true;
} // End of the equaltoValidation method
// Perform file validation
function fileValidation(ctrl, max_size) {
// Make sure that there is files
if (ctrl.files.length <= 0) {
return true;
}
// Check accept attribute
var accepts = ctrl.getAttribute('accept') !== null ? ctrl.getAttribute('accept').toLowerCase().replace(' ', '').split(',') : null;
// Loop files
for (var i = 0; i < ctrl.files.length; i++) {
// Get the file extension
var extension = ctrl.files[i].name.substring(ctrl.files[i].name.lastIndexOf('.')).toLowerCase();
// Check for errors
if (accepts !== null && accepts.includes(extension) === false) {
return false;
}
else if (max_size !== null && max_size > 0 && ctrl.files[i].size >= max_size) {
return false;
}
}
// Return true
return true;
} // End of the fileValidation method
// Perform a datalist validation
function datalistValidation(ctrl) {
// Loop options
for (var i = 0; i < ctrl.list.options.length; i++) {
if (ctrl.value === ctrl.list.options[i].value) {
return true;
}
}
// Return false
return false;
} // End of the datalistValidation method
// Perform remote validation
function remoteValidation(ctrl, input) {
return __awaiter(this, void 0, void 0, function () {
return __generator(this, function (_a) {
// Return a promise
return [2 /*return*/, new Promise(function (resolve, reject) {
// Get input values
var values = input.split(',');
var uri = values[0].trim();
var fields = [];
fields.push(ctrl.getAttribute('name'));
for (var i = 1; i < values.length; i++) {
fields.push(values[i].trim());
}
// Create form data
var fd = new FormData();
for (i = 0; i < fields.length; i++) {
fd.append(fields[i], document.getElementsByName(fields[i])[0].value);
}
var xhr = new XMLHttpRequest();
xhr.open('POST', uri, true);
xhr.onload = function () {
// Check if the response is successful
if (xhr.status === 200) {
// Return a success response
if (xhr.response === 'false') {
resolve(false);
}
else {
resolve(true);
}
}
else {
// Return a reject response
reject(xhr.status + ' ' + xhr.statusText);
}
};
xhr.onerror = function () {
// Return a reject response
reject('There was a network error.');
};
xhr.send(fd);
})];
});
});
} // End of the remoteValidation method
// Remove IE 11 errors
function removeErrorsIE11(form) {
var ie_errors = form.querySelectorAll('.ie-11-error-output');
for (var i = 0; i < ie_errors.length; i++) {
ie_errors[i].remove();
}
} // End of the removeErrorsIE11 method
// Public methods
return {
valid: function (form) {
return __awaiter(this, void 0, void 0, function () {
return __generator(this, function (_a) {
switch (_a.label) {
case 0: return [4 /*yield*/, validate(form)];
case 1: return [2 /*return*/, _a.sent()];
}
});
});
}
};
})();We need to add a polyfill and transpile JavaScript code that calls our valid method to be able to use our es5 code. Our sendForm method in the example above has been compiled to es5 as TypeScript as well, it uses helper methods from the transpiled file.
<script crossorigin="anonymous" src="https://polyfill.io/v3/polyfill.min.js?features=Array.prototype.includes%2CPromise%2CXMLHttpRequest%2CElement.prototype.remove"></script>
<script src="/tjs-typescript/annytab.html5.validation.js"></script>
<script>

    function sendForm(form)
    {
        return __awaiter(this, void 0, void 0, function () {
            var fd, xhr;
            return __generator(this, function (_a) {
                switch (_a.label) {
                    case 0:
                        // Disable buttons
                        disableButtons();
                        return [4 /*yield*/, annytab.validation.valid(form)];
                    case 1:
                        // Make sure that the form is valid
                        if ((_a.sent()) === false) {
                            enableButtons();
                            return [2 /*return*/, false];
                        }
                        fd = new FormData(form);
                        xhr = new XMLHttpRequest();
                        xhr.open('POST', form.getAttribute('action'), true);
                        xhr.onload = function () {
                            if (xhr.status === 200) {
                                // Get the response
                                var data = JSON.parse(xhr.response);
                                // Check the success status
                                if (data.success === true) {
                                    // Output a success message
                                    alert(data.message);
                                }
                                else {
                                    // Output error information
                                    alert(data.message);
                                }
                            }
                            else {
                                // Output error information
                                alert(xhr.status + " - " + xhr.statusText);
                            }
                            // Enable buttons
                            enableButtons();
                        };
                        xhr.onerror = function () {
                            // Output error information
                            alert(xhr.status + " - " + xhr.statusText);
                            // Enable buttons
                            enableButtons();
                        };
                        xhr.send(fd);
                        return [2 /*return*/];
                }
            });
        });

    } // End of the sendForm method

</script>
От автора: в этой серии статей я буду излагать свои мысли после тщательного изучения современной валидации форм в CSS и JS. Я расскажу про нативные сообщения в HTML-валидации, CSS псевдоклассы :invalid и :valid, а также про Constraint Validation API, которое должно было упростить валидацию форм, но получилось слегка иначе.
В этой статье мы попробуем провести валидацию формы в стиле user-friendly с помощью нативных возможностей HTML, CSS и JS и написания пары небольших скриптов для вытягивания якобы простых строк в Constraint Validation API.
У нас ничего не получится. Мы поймем, что в дизайне были допущены серьезные ошибки, и что не просто так веб-разработчики не используют ни одну из этих техник. Современная валидация форм страдает от следующих проблем:
Между спецификациями HTML, CSS и JS нет четкой связи. Иногда они работают в совершенно разных целях.
Не существует декларативного способа вставки сообщений об ошибках в отдельные поля формы. (есть JS-способ, но он плохо спроектирован)

Практический курс по верстке адаптивного сайта с нуля!
Изучите курс и узнайте, как верстать современные сайты на HTML5 и CSS3
Узнать подробнее
Сообщения HTML-валидации невозможно стилизовать, а их отвратительное и непостоянное поведение невозможно изменить. Можно только работать с командами show и hide, которые совсем не похожи не отображение и скрытие.
Псевдоклассы CSS – отличная штука, но когда вы начинаете их использовать, все становится не так гладко. Также все способы вставки сообщений об ошибках на псевдоклассах довольно сложные.
Эти проблемы кажутся еще более странными, когда узнаешь, что валидация форм буквально самый старый трюк в JS: когда JS был представлен в Netscape 2, он только и умел делать валидацию форм. У нас было 20 лет, чтобы все исправить, но все осталось как есть.
В своих статьях я обычно расплывчато говорю о совместимости с браузерами, так как вся информация представлена в таблице совместимости. Там можно все подробно посмотреть.
И прежде чем мы начнем еще кое-что: всегда помимо клиентской проверки делайте валидацию не сервере. Если скрипты поломаются, а фолбека под рукой не будет, может случиться что-то очень нехорошее.
И еще кое-что. Огромное спасибо Stéphanie Walter и Geoffrey Crofte за их крайне полезные комментарии к черновику этой статьи.
UI валидации полей формы
Прежде чем окунуться с головой в API и псевдоклассы, мы должны понять, чего хотим добиться. В теории все просто: мы хотим предложить пользователю хороший UX, т.е. понятные и короткие сообщения об ошибках в правильное время в правильном месте.
onsubmit, т.е. когда пользователь пытается отправить форму;
onblur, т.е. когда пользователь переходит на другое поле формы;
onkeypress, т.е. когда пользователь меняет значение поля формы (это может происходить по 10 или 12 раз, прежде чем пользователь перейдет к следующему полю).
Какой сценарий лучше? Christian Holst подробно рассматривает UI и customer experience валидации форм. Его главные советы заключается в том, что сообщения об ошибках необходимо показывать рядом с полями, в которых они возникают. Сообщения необходимо показывать сразу, как только пользователь заполнил поля. Другими словами, лучше всего по событию onblur.
Luke Wroblewski соглашается с такими утверждениями и добавляет замечание, что пользователям лучше постоянно показывать сообщения, а не так, чтобы они со временем пропадали. (Угадайте, как все браузеры показывают сообщения за исключением Firefox на Android?) Это же относится и к сообщениям о положительной проверке.
(Luke также протестировал четвертый вариант: focus + keypress. Сообщения показываются, когда пользователь вводит текст в поле формы. Его тесты убедительно показали, что это плохая идея)
Adrian Roselli также говорит: сообщения об ошибках следует показывать над полем формы, а не снизу, так как на маленьких экранах мобильных устройств сообщения под полем могут закрываться экранной клавиатурой или другими UI-элементами.
Есть и контраргумент – пользователи привыкли к тому, что сообщения об ошибках показываются рядом с полем или под ним. Ширины экрана мобильного устройства может не хватить для показа сообщения рядом с полем, поэтому такое расположение крайне нежелательно. Если разместить сообщение снизу, такой проблемы не возникнет.
Что лучше, решайте сами. Но я замечу, что почти все браузеры размещают сообщения об ошибках под полем формы, хотя некоторые мобильные браузеры нарушают это правило.
С размещением сообщения об ошибке не все так ясно, но появляться оно должно по событию onblur, т.е. когда пользователь дает понять, что он заполнил поле и переходит на следующее. Также должен быть легкий способ добавления своих сообщений об ошибке к отдельным полям формы.
CSS, API и браузеры не выполняют эти простые правила. Невозможно добавить сообщения об ошибках простым декларативным методом. Constraint Validation API основано на событии onsubmit, а CSS :invalid и :valid на событии onkeypress.
Валидация форм на чистом CSS
Валидация форм на чистом CSS работает на псевдоклассах :invalid и :valid. (Есть и другие псевдоклассы типа out-of-range, но мы опустим их, так как их принцип работы точно такой же, и это более частные случаи invalid)
Поиграться с псевдоклассами можете в первом примере на тестовой странице. Валидация перезапускается при каждом нажатии клавиш. Не самый красивый способ и, возможно, запутанный. Пользователю не нужно знать о состоянии введенного значения на каждом этапе: нужно одно четкое сообщение, когда поле будет заполнено целиком. (Пользователь пока не видит сообщения об ошибке. Чуть ниже мы к этому вернемся)
Вне фокуса
К счастью, перейти на onblur довольно легко. Потребуется задействовать немного сложный селектор (спасибо, Krijn, за этот трюк):
|
input:invalid:not(:focus) |
Смотрите второй пример на тестовой странице. Теперь невалидные и валидные стили видны только, когда поле вне фокуса, т.е. когда пользователь не вводит в него значение. Уже лучше.
Практический курс по верстке адаптивного сайта с нуля!
Изучите курс и узнайте, как верстать современные сайты на HTML5 и CSS3
Узнать подробнее
Сообщения об ошибках на чистом CSS
Такие сообщения решают проблему тайминга, но не решают проблему показа самих сообщений. Теоретически решение будет следующим:
|
input:invalid:not(:focus):before { content: attr(data—error—message); } |
Показывайте контент невалидного атрибута data-error-message перед полем, если пользователь не печатает текст. Звучит хорошо, правда?
Увы, увы, но :before и :after нельзя использовать на замененных элементах типа input.
Это нужно исправить. :before и :after не заточены под замененные элементы, однако в Chrome и Safari они работают с диапазонами, чекбоксами и радиокнопками. В Chrome Safari/iOS, но не в Safari/Mac они также работают с полями типа date. (Почему именно эти типы? Я не знаю. Возможно, парочка разработчиков браузеров были пьяны)
Это не работает. Нужно передвинуть сообщение об ошибке за пределы поля. Что-то типа:
|
span.errorMessage { display: none; } input:invalid:not(:focus) + span.errorMessage { display: block; } |
Это работает, но сложность объявления сообщений сбивает с толку. Вы можете сказать, что сообщения не относятся к CSS, но, как мы позже увидим, их нет и в HTML и JS. Это фундаментальная проблема спецификация на данный момент.
Проблема с required
Нам может показаться, что мы прошли достойный путь, и валидация на чистом CSS у нас в руках, но все разваливается, когда необходимо учесть обязательные поля формы. Пустые обязательные поля считаются невалидными.
Смотрите псевдоклассы в третьем примере на тестовой странице. Проблема заключается в том, что поле становится невалидным сразу после загрузки страницы. Говорить пользователю, что он ошибся, даже не дав ему возможность взаимодействия с формой – плохой UX.
Можете использовать решение Krijn (добавить текст в плейсхолдер в виде одного пробела!), но тогда придется использовать псевдокласс :placeholder-shown.
|
:not(:focus):not(:placeholder—shown):invalid |
Вам еще не смешно? Мы же не просим какой-то скрытый функционал, который нужен только для пары полей. Нам лишь нужно подождать сигнала от пользователя, что он готов, прежде чем проверять поле на валидность.
Другими словами, валидация на чистом CSS вам не подойдет, если у вас есть обязательные поля. А так как почти каждая форма имеет минимум пару обязательных полей, CSS валидация – не вариант.
:user-invalid и :user-error
Эта проблема признана всеми, кто работает с CSS. Решение – сделать в форме псевдоклассы :user-invalid (W3C) или :user-error (WHATWG). Оба значат «поле невалидно после взаимодействия с пользователем». Эти псевдоклассы решили бы большую часть описанных выше проблем.
В настоящее время оба псевдокласса не поддерживаются, но в будущем они будут реализованы и продвинут валидацию в CSS еще дальше. Тем не менее, проблема нативной и простой системы сообщений об ошибках никуда не девается.
:valid и :invalid на других элементах
Мало кто знает, но :invalid и :valid работают не только на input. Эти псевдоклассы можно использовать на fieldset и form. :invalid срабатывает, если fieldset или form содержит минимум одно невалидное поле.
Еще круче, fieldset поддерживает :before и :after. Эта техника может пригодиться:
|
fieldset:invalid { border—color: red; } fieldset:invalid:before { content: attr(data—error—message); } |
К сожалению, она не поддерживается в Edge и парочке старых мобильных браузеров.
И если fieldset и form могут быть невалидными, если внутри них есть хотя бы одно невалидное поле, то почему лейблы с невалидными полями не могут быть невалидными? Ну, потому что не могут. Браузеры не поддерживают такой функционал. Мы не можем иметь что-то хорошее, потому что тогда все будет хорошо. Поэтому такой функционал и не поддерживается.
Так завершается часть 1. В следующей статье (скоро) мы поговорим о парочке опций HTML и JS API.
Автор: Peter-Paul Koch
Источник: //medium.com/
Редакция: Команда webformyself.
Практический курс по верстке адаптивного сайта с нуля!
Изучите курс и узнайте, как верстать современные сайты на HTML5 и CSS3
Узнать подробнее

PSD to HTML
Практика верстки сайта на CSS Grid с нуля
Смотреть
August 21, 2014
•
3 min read

Heads up! This post was written in 2014, so it may contain information that is no longer
accurate. I keep posts like this around for historical purposes and to prevent link rot, so please keep this in
mind as you’re reading.
— Cory
Before HTML5, working with arbitrary data sucked. To keep things valid, you had to stuff things into rel or class attributes. Some developers even created their own custom attributes. Boy, was it a mess.
But that all changed with the introduction of HTML5 custom data attributes. Now you can store arbitrary data in an easy, standards-compliant way.
How do data attributes work? #
A data attribute is exactly that: a custom attribute that stores data. They are always prefixed with data- followed by something descriptive (according to the spec, only lower case letters and hyphens are allowed). An element can have any number of data attributes you want.
Here’s an example using a list item to store data for a user:
<li data-id="1234" data-email="calvin@example.com" data-age="21">Calvin</li>
Of course, this data isn’t very useful to a visitor because they can’t actually see it, but it’s wildly useful for building web applications. Imagine a delete button in your app:
<button type="button" data-cmd="delete" data-id="1234">Delete</button>
All the data you need is right there to send to your backend script. No more rel stuffing or parsing IDs and actions out of other attributes. Data URLs make your life easier.
What can you store? #
One thing to remember when working with data attributes is that you can’t store objects in them. Well, you can if you serialize them, but we’ll save that for another post.
For now, just know that you’re pretty much limited to storing strings.
Reading/writing data attributes with JavaScript #
Using the delete button as an example, let’s look at how we can access this data with JavaScript.
// Here's our button
var button = document.getElementById('your-button-id');

// Get the values
var cmd = button.getAttribute('data-cmd');
var id = button.getAttribute('data-id');

// Change the values
button.setAttribute('data-cmd', yourNewCmd);
button.setAttribute('data-id', yourNewId);
Pretty simple, right? Now you can pass cmd and id to your app in an AJAX request or do whatever else you need to do with it.
Reading/writing data attributes with jQuery #
Here’s the same thing using jQuery’s .attr() method:
// Get the values
var cmd = $('#your-button-id').attr('data-cmd');
var id = $('#your-button-id').attr('data-id');

// Change the values
$('#your-button-id')
    .attr('data-cmd', yourNewCmd)
    .attr('data-id', yourNewId);
Don’t get this confused with jQuery’s .data() method. Although there is some overlap in how data attributes and .data() work, they’re two totally different things. If you’re not familiar with it, just stick with .attr().
Using the dataset API #
HTML5 actually has an API just for working with this type of data. Alas, IE10 and below don’t fully support it, but it’s still worth mentioning.
Using the button example again, here’s how to get and set data attributes using the dataset API:
// Here's our button
var button = document.getElementById('your-button-id');

// Get the values
var cmd = button.dataset.cmd;
var id = button.dataset.id;

// Change the values
button.dataset.cmd = yourNewCmd;
button.dataset.id = yourNewId;
Note how there’s no data prefix or dashes here. Similar to the way CSS properties work in JavaScript, you’ll need to use camel case notation. The dataset API converts each one so you’ll always have data-some-attribute-name in your HTML and dataset.someAttributeName in your JavaScript. Magic!
Things you can do with data attributes #
The examples above are very basic, but you can do so much with custom data attributes. Here are a few examples off the top of my head.
Filtering #
Say you have a list of things and you want to filter them by keyword. Just put the keywords into a data attribute and write a short script to loop through and show/hide them accordingly.
<input type="text" id="filter">

<ul class="cars">
    <li data-models="mustang, f150, 500, fusion">Ford</li>
    <li data-models="corvette, silverado, impala, cavalier">Chevrolet</li>
    ...
</ul>
Here’s a quick and dirty filter using jQuery:
$('#filter').on('keyup', function() {
  var keyword = $(this).val().toLowerCase();
  $('.cars > li').each(function() {
    $(this).toggle(keyword.length < 1 || $(this).attr('data-models').indexOf(keyword) > -1);
  });
});
Styling #
It’s arguably better to use classes, but you can style things against data attributes too. Here’s how to apply a style if the element has a certain data attribute (regardless of its value). First, the HTML:
<span class="label" data-warning>
Now the CSS:
[data-warning] {
  background: red;
}
But what if we wanted to style it based on the data attribute’s value? This will work for any data-warning attribute that contains the word error:
[data-warning*=error] {
    color: red;
}
Configuring #
Bootstrap uses data attributes as an HTML alternative to configuring plugins via JavaScript. Here’s an example of a popover:
<button type="button" class="btn btn-default" data-container="body" data-toggle="popover" data-placement="top" data-content="Vivamus sagittis lacus vel augue laoreet rutrum faucibus.">
  Popover on top
</button>
A better way to store data #
Custom data attributes are widely used all over the web. The nice thing is that they work fine in older browsers, and they adhere to web standards moving forward. That means you can start using them today knowing that they won’t stop working tomorrow.
I’ve shown you a few common ways to use custom data attributes. What other uses can you think of? Have you used them before? Let me know by commenting below!
В HTML 4 крайне не хватало возможности создавать свои собственные атрибуты для хранения значений. Зачем это надо? Вот несколько задач, где это может потребоваться.
- Создание всплывающих подсказок без применения скриптов.
- Определение стиля элемента на основе значения атрибута.
- Получение и изменение значений через скрипты.
В HTML5 появился новый универсальный атрибут, который можно добавлять к любому тегу. Правила написания атрибута простые:
- всегда начинаем с data-;
- используем только латинские буквы, дефис (-), двоеточие (:) и подчёркивание (_).
CSS и JavaScript немного по разному обращаются к таким атрибутам, так что разберём примеры для них отдельно.
CSS
В CSS есть атрибуты тегов, при наличии какого-либо атрибута или заданного значения мы задаём необходимый стиль.
<div data-fluid>Содержимое</div>Теперь можем в стилях обратиться к этому элементу как div[data-fluid] и установить для него нужное оформление. В общем, это напоминает работу классов, поэтому не является какой-то уникальной или необходимой фичей. Так что полезнее задавать значения.
<div data-columns="3">Содержимое</div>В CSS после этого можем задавать разный стиль при различных значениях нашего атрибута data-columns.
div[data-columns=2] { width: 480px; }
div[data-columns=3] { width: 720px; }
Опять же, это в какой-то мере является заменой классам, ничего ведь не мешает сделать классы с именами column-2, column-3 и добавлять их при необходимости.
Более изящной областью применения выступает включение функции attr(). Она получает значение заданного атрибута и вставляет его в стиль. Удобно это использовать для создания всплывающих подсказок. Текст пишем прямо внутри элемента, а вывод и оформление подсказки реализуем с помощью CSS.
<!DOCTYPE html>
<html>
 <head>
  <meta charset="utf-8">
  <title>Всплывающая подсказка</title>
  <style>
   meter {
    position: relative;
   }
   meter:hover::after {
    content: attr(data-description);
    background: #ffe;
    padding: 5px;
    border: 1px solid #666;
    position: absolute;
    top: 20px;
   }
  </style>
 </head>
 <body>
  <p>Температура воды</p>
  <meter value="0" max="100" low="10" high="60" data-description="Низкая"></meter>
  <meter value="30" max="100" low="10" high="60" data-description="Нормальная"></meter>
  <meter value="80" max="100" low="10" high="60" data-description="Горячая"></meter>
  <meter value="100" max="100"  data-description="Кипяток"></meter>
 </body>
</html>
В данном примере к элементу <meter> добавляется атрибут data-description содержащий необходимый текст для вывода. Само отображение происходит с помощью псевдоэлемента ::after и свойства content, значением которого как раз и выступает функция attr().
JavaScript
Если в CSS мы обращаемся к имени атрибута напрямую, указывая его полностью, то в JavaScript это делается через метод dataset. Само имя атрибута преобразовывается в переменную по следующим правилам:
- data- отбрасывается;
- любой дефис идущий перед буквой отбрасывается, а буква за ним становится заглавной.
На практике это выглядит так.
data-description превращается в description.
data-full-description превращается fullDescription.
data-description-of-tag превращается descriptionOfTag.
Традиционный способ получить доступ к элементу и его атрибутам — задать идентификатор и обратиться к элементу через getElementById, как показано в примере ниже.
<!DOCTYPE html>
<html>
 <head>
  <meta charset="utf-8">
  <title>dataset</title>
 </head>
 <body>
  <div id="user" data-id="1234567890"
       data-user="Вася Пупкин"
       data-date-of-birth="01.04.1990">Пользователь</div>
  <script>
   var el = document.getElementById('user');
   id = el.dataset.id; // Получаем значение атрибута data-id
   user = el.dataset.user;
   dob = el.dataset.dateOfBirth; // Получаем значение атрибута data-date-of-birth
   el.dataset.ban = 'Нет'; // Назначаем новый атрибут data-ban и его значение
   console.log(user); // Выводим в консоль значение переменной user
   console.log(dob); // Выводим в консоль значение переменной dob
  </script>
 </body>
</html>
Вначале добавляем к элементу идентификатор с уникальным значением. Затем получаем доступ к элементу через getElementById. Теперь мы можем обращаться к любым атрибутам data через метод dataset, причём не только получать, но и устанавливать значения. Храниться они будут до перезагрузки страницы или до установки нового значения.
См. также
- Описание атрибута data на сайте webref.ru
- data-* в живом стандарте HTML5