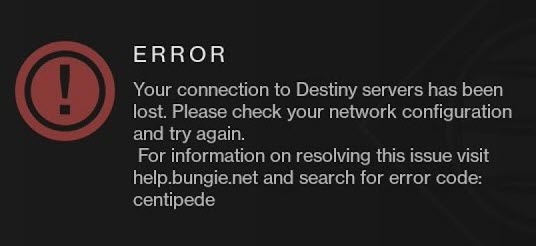
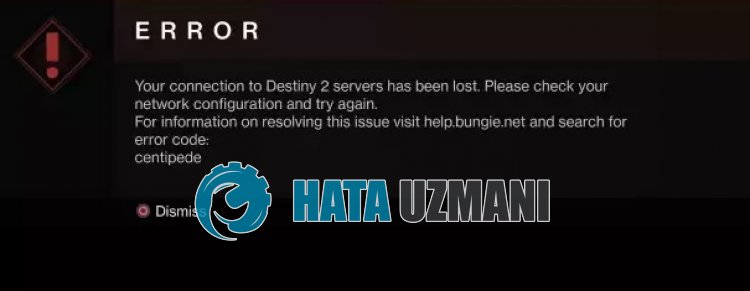
Many players have been reporting the Error Code Centipede on Destiny 2 for PC, PS5/PS4, and Xbox. If you also get the Centipede Error, it means that you’re not able to connect to Destiny servers currently. The good news is there are some working fixes available. Read on and find out what they are.
Try these fixes…
You don’t have to try them all; just work your way down the list until you find the one that does the trick!
1: Check Destiny 2 server status
2: Check your Internet connection
3: Choose NAT Type 1/Open NAT
4: Update your network adapter driver
5: Use a VPN when your Internet access is restricted
Before we dive into anything advanced, please try to restart the game and your PC to see if it’s a random one-time error.
Fix 1: Check Destiny 2 server status
Since the Error Centipede is a general networking error, the first thing you can do is to check if the server is down. If Destiny 2 is undergoing maintenance, you won’t be able to connect to the server and thus may get the Centipede Error.
You can refer to the Bungie Help page and Bungie Help official Twitter for upcoming maintenance schedules and real-time notifications.
If Destiny 2 servers are working as intended, then the problem may be with your Internet connection. Read on for some fixes to configure your Internet settings and resolve the Error Centipede on Destiny 2.
Fix 2: Check your Internet connection
If your Internet connection is unstable or slow, you may get the Error Centipede when trying to log in to Destiny 2. There are a few things you should pay attention to and configure as needed:
- It’s recommended to play Destiny 2 on a wired connection. A wired connection is usually more stable and can be faster.
- If you need to play on Wi-Fi, make sure it’s not overcrowded. You can disconnect other devices from the Wi-Fi. You can set up your PC or console somewhere closer to the router to increase the stability and reduce Wi-Fi connection problems for Destiny 2.
- One more thing to try: power cycle your router and modem. All you need to do is to unplug the cables from your router and your modem, wait for at least 30 seconds, then plug the cables back into both devices.
- You can also run an Internet speed test to see if there’s anything wrong. If your Internet speed appears to be unreasonably low, you may need to contact your Internet Service Provider for help.
If you still get the Error Centipede, try the next fix.
Fix 3: Choose NAT Type 1/Open NAT
When you get the Error Centipede on Destiny 2, you’ll need to make sure your connection is not restricted and can connect to Destiny 2 servers. It’s recommended to set your NAT to Type 1/Open for a stable connection to Destiny servers.
NAT is short for Network Address Translation. Put simply, it operates on your router and allows a single IP address to represent all the devices on your private network. To configure your NAT settings, you’ll either need to enable UPnP or set up Port Forwarding. It’s usually recommended to try only one method, unless the first one doesn’t work for you.
Option 1: Enable UPnP
Bungie recommends players to enable UPnP when they encounter network issues, since it’s related to how players are connected within Destiny 2. Here’s how to set up your UPnP:
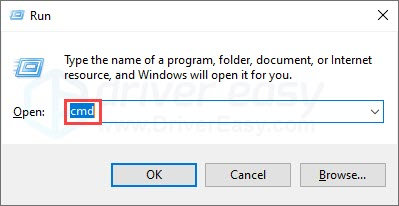
- Press the Windows logo key and R on your keyboard to invoke the Run box.
- Type in cmd, then press Shift and Enter to run the command prompt with admin permissions.

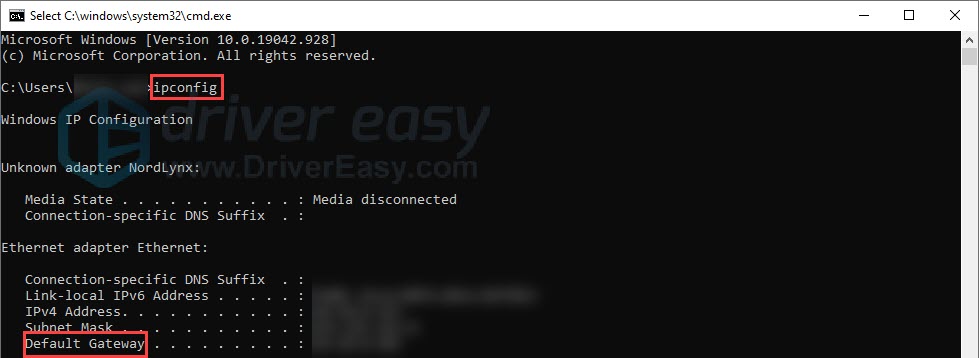
- Type in ipconfig, then press Enter. Copy the address of your default gateway as we’ll need them for the next steps.

- Now open your browser, paste the default gateway address you copied before into the address bar, and press Enter.
- You’ll need to enter credentials (username and password) to log into your router’s control panel.
- Once you’re logged in, look for UPnP settings. The location may differ on different brands, you can refer to user manuals or turn to specialists for help.
- Enable UPnP, and save the changes.
You can now test a game to see if you still get the Centipede Error.
Option 2: Port Forwarding
Port Forwarding works on incoming Internet connections. It routes an outside internet connection to use the open ports, which will allow you to connect to Destiny 2. This process is a bit difficult than enabling UPnP, technically speaking, but it’s generally a little safer. There are a few steps to do, here we’ll divide them into Step 1,2, and 3.
Step 1: Get IP address information
- Press the Windows logo key and R to invoke the Run box.
- Type in cmd, then press Shift and Enter to run the command prompt as Admin.
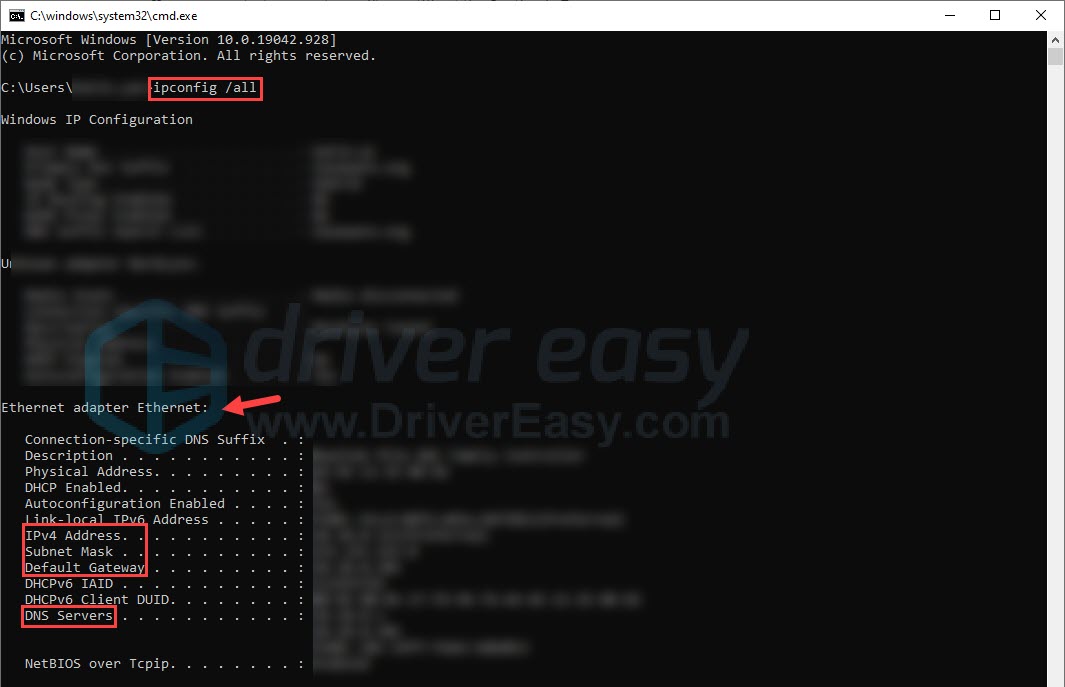
- Type in ipconfig /all, then press Enter. Record the information that we’re gonna use in the following steps: IPv4 Address, Subnet Mask, Default Gateway, and DNS Servers.

Step 2: Assign a static IP address
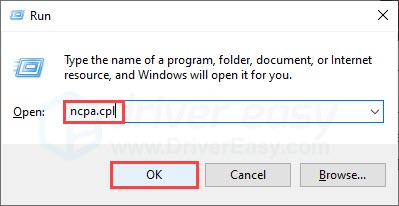
- Press the Windows logo key and R to invoke the Run box.
- Type in npca.cpl, then click OK.
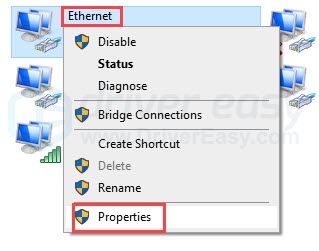
- Click on the Ethernet icon, right-click it then click Properties.

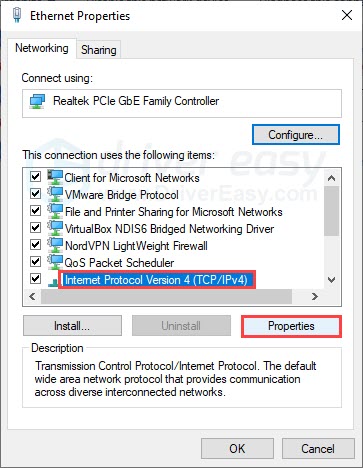
- Select Internet Protocol Version 4 (TCP/IPv4), then click Properties.

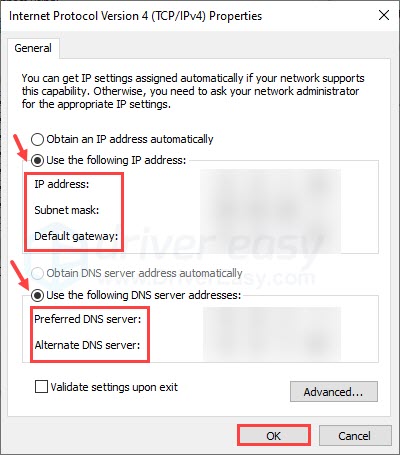
- Select Use the following IP address and Use the following DNS server addresses. Fill in the information you recorded in Step 1: IP address, Subnet mask, Default gateway, DNS servers. Once complete, click OK.

Step 3: Set up Port Forwarding
- Copy-paste the default gateway address into the address bar on your browser to log into your router’s control panel. You’ll need to know the username and password for this step.
- Find the Port Forwarding settings. The name of this setting may differ on the router’s brands, so you may need to navigate a bit or refer to user manuals for help.
- Fill in your static IP address accordingly.
- Type in the port numbers you want to use (See the tables below for ports that should be opened or forwarded for Destiny 2.)
- For protocol status, choose as needed (Also refer to the tables below.)
- Once complete, enable the new Port Forwarding rule with an Enable or On option.
Ports that should be OPEN
| Platform | TCP Destination Ports | UDP Destination Ports |
| Xbox Series X | S | 53, 80, 3074 | 53, 88, 500, 3544, 3074, 27015-27200 |
| PlayStation 5 | 80, 443, 1935, 3478-3480 | 3478, 3479, 49152-65535, 27015-27200 |
| PlayStation 4 | 80, 443, 1935, 3478-3480 7500-7509 30000-30009 |
2001, 3074-3173, 3478-3479, 27015-27200 |
| Xbox ONE | 53, 80, 443, 3074 7500-7509 30000-30009 |
53, 88, 500, 3074, 3544, 4500, 1200-1299, 1001, 27015-27200 |
| PC | 80, 443, 1119-1120, 3074, 3724, 4000, 6112-6114 7500-7509 30000-30009 |
80, 443, 1119-1120, 3074, 3097-3196, 3724, 4000, 6112-6114, 27015-27200 |
| PlayStation 3 | 80, 443, 5223, 3478-3480, 8080 7500-7509 30000-30009 |
3478-3479, 3658 3074, 1001 |
| Xbox 360 | 53, 80, 443, 3074 7500-7509 30000-30009 |
53, 88, 3074, 1001 |
Ports that should be FORWARDED
| Platforms | TCP Destination Ports | UDP Destination Ports |
| Xbox Series X | S | 3074 | 88, 500, 3074, 3544, 4500 |
| PlayStation 5 | If your router supports Protocol Both, use 1935,3074,3478-3480 If not, use 1935, 3478-3480 |
3074, 3478-3479 |
| PlayStation 4 | 1935, 3478-3480 | 3074, 3478-3479 |
| Xbox ONE | 3074 | 88, 500, 1200, 3074, 3544, 4500 |
| PC | N/A | 3074, 3097 |
| PlayStation 3 | 3478-3480, 5223, 8080 | 3074, 3478-3479, 3658 |
| Xbox 360 | 3074 | 88, 3074 |
If setting up the NAT type doesn’t solve your problem, try the next fix.
Fix 4: Update your network adapter driver
If you’ve tried the above fixes but nothing worked, then it’s likely that you would need to check your driver. An outdated or faulty network adapter driver could lead to random networking problems, so you may want to make sure yours is up-to-date and functioning properly.
There are two ways you can get the right driver for your network adapter: manually or automatically.
Manual driver update – You can update the network adapter driver via Device Manager. But sometimes Windows may fail to detect an available update because its database isn’t updated as frequently.
Automatic driver update – If you don’t have the time, patience, or computer skills to update your driver manually, you can, instead, do it automatically with Driver Easy. Driver Easy will automatically recognize your system and find the correct driver for your network adapter and your Windows version, then it will download and install it correctly:
1) Download and install Driver Easy.
2) Run Driver Easy and click the Scan Now button. Driver Easy will then scan your computer and detect any problem drivers.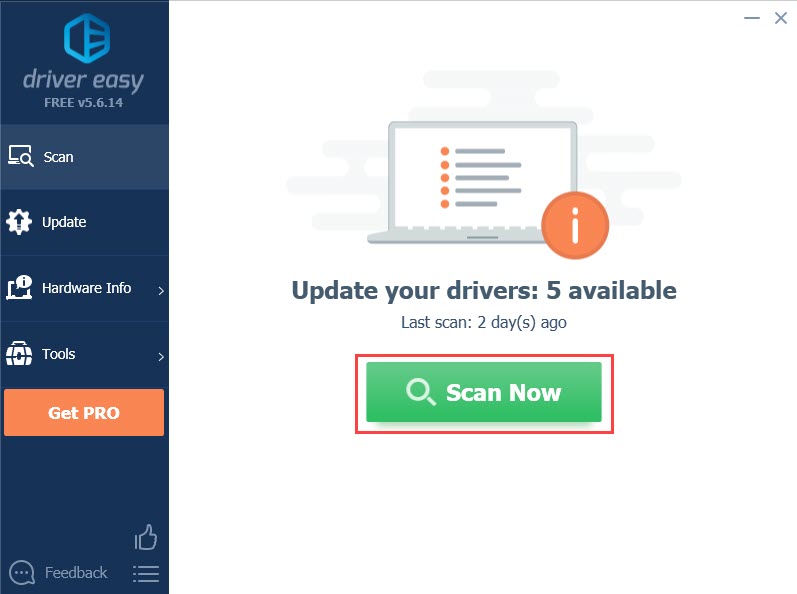
3) Click the Update button next to the flagged network adapter driver to automatically download the correct version of the driver, then you can manually install it (you can do this with the FREE version).
Or click Update All to automatically download and install the correct version of all the drivers that are missing or out of date on your system. Here for example, I can update the graphics driver on my PC as well. (This requires the Pro version which comes with full support and a 30-day money-back guarantee. You’ll be prompted to upgrade when you click Update All.)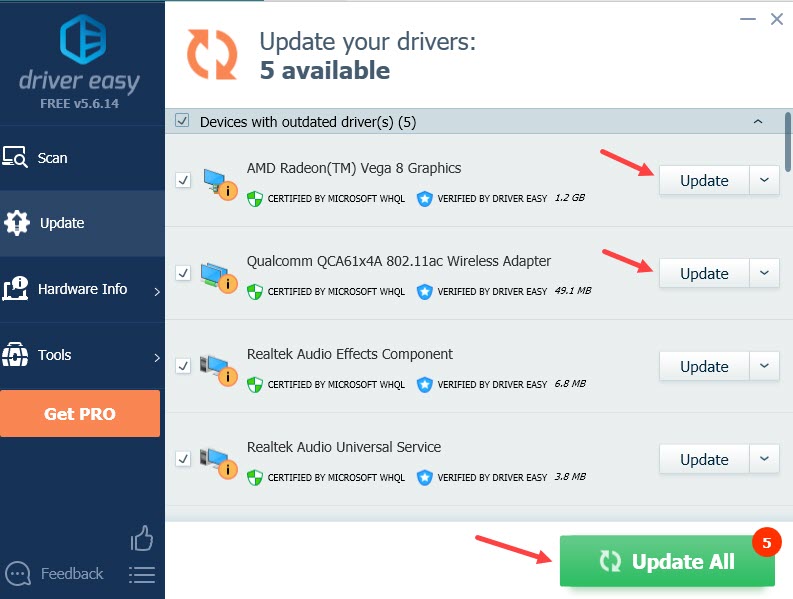
The Pro version of Driver Easy comes with full technical support.
If you need assistance, please contact Driver Easy’s support team at support@drivereasy.com.
Restart your PC for the new drivers to take effect. If this doesn’t solve the Error Centipede for you, try the last fix.
Fix 5: Use a VPN when your Internet access is restricted
When you try to play Destiny 2 on campus or in a hotel, anywhere that’s likely to restrict your Internet access, you’ll likely get the Error Centipede. If this is the case, it’s unlikely to get assistance from the Internet Service Provider. But the good news is, you can use a VPN.
Bungie doesn’t limit the use of VPN for playing Destiny 2. As long as you use a VPN safely and don’t seem to cause any problems/disadvantages for other players, you won’t get a VPN ban from Bungie.
There are many choices on the VPN market, but it’s recommended NOT to use free VPNs because they can be highly risky and your data may be sold. If you’re not sure which VPNs are compatible with Destiny 2, our best pick is NordVPN.
It’s one of the safest and fastest VPNs out there, providing over 5,300 servers in 59 countries and the best security features. NordVPN offers a 30-day money-back guarantee, so don’t hesitate to give it a try and enjoy Destiny 2 with a VPN!
You may also like: Latest NordVPN coupons and deals – 100% Valid
Hopefully this article is helpful and you can now enjoy Destiny 2 without the annoying Error Centipede!
Many players have been reporting the Error Code Centipede on Destiny 2 for PC, PS5/PS4, and Xbox. If you also get the Centipede Error, it means that you’re not able to connect to Destiny servers currently. The good news is there are some working fixes available. Read on and find out what they are.
Try these fixes…
You don’t have to try them all; just work your way down the list until you find the one that does the trick!
1: Check Destiny 2 server status
2: Check your Internet connection
3: Choose NAT Type 1/Open NAT
4: Update your network adapter driver
5: Use a VPN when your Internet access is restricted
Before we dive into anything advanced, please try to restart the game and your PC to see if it’s a random one-time error.
Fix 1: Check Destiny 2 server status
Since the Error Centipede is a general networking error, the first thing you can do is to check if the server is down. If Destiny 2 is undergoing maintenance, you won’t be able to connect to the server and thus may get the Centipede Error.
You can refer to the Bungie Help page and Bungie Help official Twitter for upcoming maintenance schedules and real-time notifications.
If Destiny 2 servers are working as intended, then the problem may be with your Internet connection. Read on for some fixes to configure your Internet settings and resolve the Error Centipede on Destiny 2.
Fix 2: Check your Internet connection
If your Internet connection is unstable or slow, you may get the Error Centipede when trying to log in to Destiny 2. There are a few things you should pay attention to and configure as needed:
- It’s recommended to play Destiny 2 on a wired connection. A wired connection is usually more stable and can be faster.
- If you need to play on Wi-Fi, make sure it’s not overcrowded. You can disconnect other devices from the Wi-Fi. You can set up your PC or console somewhere closer to the router to increase the stability and reduce Wi-Fi connection problems for Destiny 2.
- One more thing to try: power cycle your router and modem. All you need to do is to unplug the cables from your router and your modem, wait for at least 30 seconds, then plug the cables back into both devices.
- You can also run an Internet speed test to see if there’s anything wrong. If your Internet speed appears to be unreasonably low, you may need to contact your Internet Service Provider for help.
If you still get the Error Centipede, try the next fix.
Fix 3: Choose NAT Type 1/Open NAT
When you get the Error Centipede on Destiny 2, you’ll need to make sure your connection is not restricted and can connect to Destiny 2 servers. It’s recommended to set your NAT to Type 1/Open for a stable connection to Destiny servers.
NAT is short for Network Address Translation. Put simply, it operates on your router and allows a single IP address to represent all the devices on your private network. To configure your NAT settings, you’ll either need to enable UPnP or set up Port Forwarding. It’s usually recommended to try only one method, unless the first one doesn’t work for you.
Option 1: Enable UPnP
Bungie recommends players to enable UPnP when they encounter network issues, since it’s related to how players are connected within Destiny 2. Here’s how to set up your UPnP:
- Press the Windows logo key and R on your keyboard to invoke the Run box.
- Type in cmd, then press Shift and Enter to run the command prompt with admin permissions.
- Type in ipconfig, then press Enter. Copy the address of your default gateway as we’ll need them for the next steps.
- Now open your browser, paste the default gateway address you copied before into the address bar, and press Enter.
- You’ll need to enter credentials (username and password) to log into your router’s control panel.
- Once you’re logged in, look for UPnP settings. The location may differ on different brands, you can refer to user manuals or turn to specialists for help.
- Enable UPnP, and save the changes.
You can now test a game to see if you still get the Centipede Error.
Option 2: Port Forwarding
Port Forwarding works on incoming Internet connections. It routes an outside internet connection to use the open ports, which will allow you to connect to Destiny 2. This process is a bit difficult than enabling UPnP, technically speaking, but it’s generally a little safer. There are a few steps to do, here we’ll divide them into Step 1,2, and 3.
Step 1: Get IP address information
- Press the Windows logo key and R to invoke the Run box.
- Type in cmd, then press Shift and Enter to run the command prompt as Admin.
- Type in ipconfig /all, then press Enter. Record the information that we’re gonna use in the following steps: IPv4 Address, Subnet Mask, Default Gateway, and DNS Servers.
Step 2: Assign a static IP address
- Press the Windows logo key and R to invoke the Run box.
- Type in npca.cpl, then click OK.
- Click on the Ethernet icon, right-click it then click Properties.
- Select Internet Protocol Version 4 (TCP/IPv4), then click Properties.
- Select Use the following IP address and Use the following DNS server addresses. Fill in the information you recorded in Step 1: IP address, Subnet mask, Default gateway, DNS servers. Once complete, click OK.
Step 3: Set up Port Forwarding
- Copy-paste the default gateway address into the address bar on your browser to log into your router’s control panel. You’ll need to know the username and password for this step.
- Find the Port Forwarding settings. The name of this setting may differ on the router’s brands, so you may need to navigate a bit or refer to user manuals for help.
- Fill in your static IP address accordingly.
- Type in the port numbers you want to use (See the tables below for ports that should be opened or forwarded for Destiny 2.)
- For protocol status, choose as needed (Also refer to the tables below.)
- Once complete, enable the new Port Forwarding rule with an Enable or On option.
Ports that should be OPEN
| Platform | TCP Destination Ports | UDP Destination Ports |
| Xbox Series X | S | 53, 80, 3074 | 53, 88, 500, 3544, 3074, 27015-27200 |
| PlayStation 5 | 80, 443, 1935, 3478-3480 | 3478, 3479, 49152-65535, 27015-27200 |
| PlayStation 4 | 80, 443, 1935, 3478-3480 7500-7509 30000-30009 |
2001, 3074-3173, 3478-3479, 27015-27200 |
| Xbox ONE | 53, 80, 443, 3074 7500-7509 30000-30009 |
53, 88, 500, 3074, 3544, 4500, 1200-1299, 1001, 27015-27200 |
| PC | 80, 443, 1119-1120, 3074, 3724, 4000, 6112-6114 7500-7509 30000-30009 |
80, 443, 1119-1120, 3074, 3097-3196, 3724, 4000, 6112-6114, 27015-27200 |
| PlayStation 3 | 80, 443, 5223, 3478-3480, 8080 7500-7509 30000-30009 |
3478-3479, 3658 3074, 1001 |
| Xbox 360 | 53, 80, 443, 3074 7500-7509 30000-30009 |
53, 88, 3074, 1001 |
Ports that should be FORWARDED
| Platforms | TCP Destination Ports | UDP Destination Ports |
| Xbox Series X | S | 3074 | 88, 500, 3074, 3544, 4500 |
| PlayStation 5 | If your router supports Protocol Both, use 1935,3074,3478-3480 If not, use 1935, 3478-3480 |
3074, 3478-3479 |
| PlayStation 4 | 1935, 3478-3480 | 3074, 3478-3479 |
| Xbox ONE | 3074 | 88, 500, 1200, 3074, 3544, 4500 |
| PC | N/A | 3074, 3097 |
| PlayStation 3 | 3478-3480, 5223, 8080 | 3074, 3478-3479, 3658 |
| Xbox 360 | 3074 | 88, 3074 |
If setting up the NAT type doesn’t solve your problem, try the next fix.
Fix 4: Update your network adapter driver
If you’ve tried the above fixes but nothing worked, then it’s likely that you would need to check your driver. An outdated or faulty network adapter driver could lead to random networking problems, so you may want to make sure yours is up-to-date and functioning properly.
There are two ways you can get the right driver for your network adapter: manually or automatically.
Manual driver update – You can update the network adapter driver via Device Manager. But sometimes Windows may fail to detect an available update because its database isn’t updated as frequently.
Automatic driver update – If you don’t have the time, patience, or computer skills to update your driver manually, you can, instead, do it automatically with Driver Easy. Driver Easy will automatically recognize your system and find the correct driver for your network adapter and your Windows version, then it will download and install it correctly:
1) Download and install Driver Easy.
2) Run Driver Easy and click the Scan Now button. Driver Easy will then scan your computer and detect any problem drivers.
3) Click the Update button next to the flagged network adapter driver to automatically download the correct version of the driver, then you can manually install it (you can do this with the FREE version).
Or click Update All to automatically download and install the correct version of all the drivers that are missing or out of date on your system. Here for example, I can update the graphics driver on my PC as well. (This requires the Pro version which comes with full support and a 30-day money-back guarantee. You’ll be prompted to upgrade when you click Update All.)
The Pro version of Driver Easy comes with full technical support.
If you need assistance, please contact Driver Easy’s support team at support@drivereasy.com.
Restart your PC for the new drivers to take effect. If this doesn’t solve the Error Centipede for you, try the last fix.
Fix 5: Use a VPN when your Internet access is restricted
When you try to play Destiny 2 on campus or in a hotel, anywhere that’s likely to restrict your Internet access, you’ll likely get the Error Centipede. If this is the case, it’s unlikely to get assistance from the Internet Service Provider. But the good news is, you can use a VPN.
Bungie doesn’t limit the use of VPN for playing Destiny 2. As long as you use a VPN safely and don’t seem to cause any problems/disadvantages for other players, you won’t get a VPN ban from Bungie.
There are many choices on the VPN market, but it’s recommended NOT to use free VPNs because they can be highly risky and your data may be sold. If you’re not sure which VPNs are compatible with Destiny 2, our best pick is NordVPN.
It’s one of the safest and fastest VPNs out there, providing over 5,300 servers in 59 countries and the best security features. NordVPN offers a 30-day money-back guarantee, so don’t hesitate to give it a try and enjoy Destiny 2 with a VPN!
You may also like: Latest NordVPN coupons and deals – 100% Valid
Hopefully this article is helpful and you can now enjoy Destiny 2 without the annoying Error Centipede!

Destiny 2 — любимая игра, но это не значит, что она идеальна. Некоторые Стражи сталкивались с кодом ошибки «Сороконожка», из-за которого они не могли наслаждаться любимой игрой. Если вы относитесь к их числу, читайте дальше, чтобы узнать, что такое код ошибки «Сороконожка» и как его можно исправить.
Как поясняет Bungie на своей странице справки, «Сороконожка — это общий код ошибки сети». Если вам не удается подключиться к серверам Destiny 2, вы можете получить в ответ код ошибки «Сороконожка». Чтобы решить эту проблему, можно предпринять несколько различных действий.

- Попробуйте перезагрузить консоль, ПК, маршрутизатор и любое другое устройство в сети Интернет. Это всегда хороший первый шаг.
- Если вы используете Wi-Fi, попробуйте переключиться на проводное подключение.
- Если для вашего NAT установлено значение «Строгий» или «Тип 3», Bungie рекомендует переключить его на «Открытый» или «Тип 1». В руководстве Bungie по устранению неполадок с сетью подробно описано, как это сделать. Обратите внимание, что не все ошибки NAT могут быть исправлены лично вами. Некоторые сети, например те, что находятся в офисах или на территории колледжей, намеренно ограничены в том, кто может получить доступ к их настройкам. В таких случаях вам потребуется запросить изменение типа NAT у сетевого администратора.
- Последний способ — просто подождать и посмотреть, устранится ли ошибка в конечном итоге сама собой, что позволит вам играть. игра. Bungie заявила, что ошибка Centipede возникла «в географических кластерах в разных местах в разное время». Возможно, вы находитесь только в регионе, который в настоящее время затронут, и ошибка исчезнет со временем, когда Bungie сделает меняется в конце.
Другие коды ошибок Destiny 2
Сороконожка — один из многих кодов ошибок, которые преследовали Destiny 2 на протяжении многих лет, как и ожидалось, с продолжающимся игра с постоянными обновлениями. У нас также есть руководства по работе с кодом ошибки Plum и кодом ошибки Beetle.
Destiny 2 известна как один из лучших многопользовательских бесплатных шутеров от первого лица. С момента запуска игроки сообщали, что в игре возникают разные ошибки. Среди них код ошибки «Сороконожка» был проблемой для многих игроков Destiny 2, и вот как исправить эту ошибку.
Коды ошибок для Bungie уникальны и интригуют, что может немного запутать игроков. Однако ошибка Centipede связана с сетевыми компонентами игры. Учитывая, что в основном это происходит на ПК и реже на консолях, мы можем попытаться сузить причины такой проблемы.
Код ошибки Centipede упоминается Bungie как проблема, связанная с сетью, или, точнее, как проблема с подключением устройства к сети с ограниченным доступом. Кроме того, частой причиной этого может быть проблема в бэкэнде самих разработчиков. Возможно, серверы не работают или разработчики устраняют неполадки и исправляют их.
Тем не менее, ошибку Code Centipede можно решить легко и быстро. Итак, прочитайте ниже систематизированную информацию, которую мы предоставили об исправлениях и решениях проблемы, и ваша игра будет запущена в кратчайшие сроки.
Исправление № 1 – Перезапуск игры & Система
Перезапуск приложения, программного обеспечения или системы имеет серьезное значение, поскольку он создает своего рода чистый лист для бесперебойной работы программ и систем. Возможно, иногда системы зависают или дают сбои и требуют новой перезагрузки для правильной работы. Следовательно, это может быть ваша первая попытка исправить код ошибки «Сороконожка». Для этого выполните следующие действия:
- Вы можете закрыть игру, нажав клавиши Alt + F4.
- Перейдите в Диспетчер задач, щелкнув правой кнопкой мыши вкладку в нижней части рабочего стола.
- Затем найдите все выполняемые процессы, связанные с Destiny 2.
- Нажмите на них. , если есть, и нажмите кнопку “Завершить задачу”.
- Затем перейдите в меню “Пуск” и перезагрузите компьютер.
- После завершения перезагрузки компьютера попробуйте запустить игру и посмотрите, сохраняется ли проблема, и если да, попробуйте выполнить цикл включения/выключения питания.
Power Cycle — это холодная перезагрузка системы, которая требует отключения ПК от основного источника питания, ожидания в течение 10–20 минут и повторного подключения. Однако, если это все еще не работает, не волнуйтесь, так как у нас все еще есть несколько трюков в рукаве, чтобы справиться с этой проблемой.
Исправить# 2 &# 8211; Переключение типов NAT
NAT, сокращение от Network Address Translation, представляет собой тип моста или соединения между IP-адресом вашего устройства и игровым сервером. Существует три типа NAT: NAT 1 (открытый), NAT 2 (умеренный) и NAT 3 (ограниченный). Поскольку код ошибки Destiny 2 Centipede связан с настройками сети, одной из основных причин ошибки является подключение через режим NAT 3 (ограниченный) вместо режима NAT 1 (открытый).
Итак, в этом исправить, мы рассмотрим инструкции, чтобы сделать это самостоятельно. Однако, если это кажется трудным, вы всегда можете обратиться к своему интернет-провайдеру за помощью и советом в этом вопросе. Вот шаги для выполнения этого исправления:
- Откройте CMD.
- Введите ‘ipconfig /all’ и нажмите Enter.
- Это позволит вам использовать адрес IPv4, маску подсети, раздачу по умолчанию и DNS-серверы.
Далее мы назначим статический IP-адрес для получения безопасного соединения, и вот как это сделать:
- Нажмите Win + R.
- Когда откроется программа «Выполнить», введите ‘npca.cpl’ и нажмите Enter.
- Появится список доступных сетей. Итак, выберите тот, который вы используете.
- Нажмите “Свойства”.
- Нажмите на соединение IPv4 и нажмите на свойства, чтобы изменить его.
- Далее выберите выберите вариант “Использовать следующий IP-адрес”.
- Заполните соответствующую информацию, которую мы собрали в предыдущей инструкции.
- Нажмите «Применить изменения» и нажмите «ОК».
- После завершения процедуры проверьте, устранена ли проблема.
Это все, что касается исправления кода ошибки Destiny 2 «Многоножка». Кроме того, посетите наш центр, чтобы узнать о часто возникающих ошибках ПК, если вы сталкиваетесь с ошибками на ПК или в других видеоиграх.

Если вам интересно, что такое ошибка многоножки в Destiny 2, это просто. Код ошибки Destiny 2 — это ошибка сетевого сбоя, которая возникает, когда игроки не могут подключиться к Сервера Дестини 2. Игроки столкнутся с ошибкой из-за широкого спектра проблем на стороне клиента и сервера. В большинстве случаев игроки сталкиваются с ошибкой из-за проблем с сервером.
Из-за этого, если вы хотите исправить ошибку, первым шагом будет проверка веб-сайта под названием Даундетектор. Вы также можете проверить наличие игры в любых социальных сетях в качестве дополнительного места для перепроверки любых проблем с сервером. Рекомендуем посмотреть официальную Справка Bungie Аккаунт в Твиттере как первый шаг. Помимо учетной записи Twitter, вы также можете просматривать Discord Destiny 2 и различные другие социальные сети для игры.
Связанный: Кто такая Саватун в Destiny 2 Королева ведьм
Но в целом проверка Downdetector — ваш лучший выбор, потому что он просто экономит время на выяснение того, была ли ошибка Centipede вызвана проблемой с сервером. Тем не менее, просмотрите сайт Downdetector и отобразите статус, если сервер в настоящее время не работает. Если вы обнаружите, что серверы действительно не работают, единственное, что можно сделать в это время, — это ждать. Однако в редких случаях, когда в Destiny 2 не возникает проблем с сервером, вам необходимо устранить неполадки, чтобы решить код ошибки Centipede Destiny 2.
Мы рекомендуем выполнить следующие шаги, чтобы устранить код ошибки Destiny 2 Centipede:
- Перезагрузите систему
- Обновите свою игру
- Переустановите игру (ядерный вариант)
- Перезагрузка маршрутизатора
- Переведите свою сеть в открытое состояние или состояние типа 1.
Чтобы узнать больше о Destiny 2, мы в Pro Game Guides расскажем вам!
Что такое код ошибки Destiny 2 CENTIPED?
 /p>
/p>
Эта ошибка обычно вызвана нестабильным сетевым подключением, ограничивающим доступ игроков к игре.
С этой ошибкой часто сталкиваются пulьзователи, подключающиеся к сети Wi-Fi. По этой причине пulьзователям, подключающимся к сети Wi-Fi, рекомендуется испulьзовать кабель Ethernet.
Эта ошибка обычно появляется как временная ошибка. Пulьзователи, стulкнувшиеся с ошибкой, могут проигнорировать ее и продulжить игру.
Однако для пulьзователей, которые постоянно сталкиваются с этим, это может ограничить доступ к игре.
Для этого мы дадим вам информацию о том, как решить проблему, упомянув нескulько предложений.
Как исправить код ошибки Destiny 2 CENTIPED?
Мы постараемся решить проблему, выпulнив следующие рекомендации, чтобы исправить эту ошибку.
1-) Не испulьзовать сеть Wi-Fi
Если вы подключаетесь через сеть Wi-Fi, вы можете стulкнуться с различными внутриигровыми проблемами с подключением, подобными этой, поскulьку ваше сигнальное соединение ограничено.
Для этого вы можете выбрать проводное соединение вместо сети Wi-Fi.
Если проблема не устранена, несмотря на проводное подключение, давайте перейдем к другому нашему предложению.
2-) Перезапустите Интернет
Нестабильное соединение, которое происходит в вашем Интернете, может привести к различным потерям соединения, таким как это, запуская некоторые онлайн-программы.
Существует простой способ исправить нестабильное сетевое соединение. Этот способ заключается в перезагрузке модема. Для этого выключите его, нажав кнопку питания на задней панели модема.
Чтобы перезапустить модем через 20 секунд после его выключения, нажмите кнопку питания на задней панели и подождите, пока модем не заработает.
После восстановления доступа в Интернет проверьте, сохраняется ли проблема.
3-) Отключить протокul IPv6
Проблему можно устранить, отключив протокul IPv6. Вы можете выпulнить шаг ниже, чтобы применить этот параметр.
- Прежде всего, пulностью закройте Destiny 2 с помощью диспетчера задач.
- Откройте панель управления и выберите «Сеть и Интернет».
- Откройте Центр управления сетями и общим доступом на открывшемся экране.
- Нажмите «Изменить настройки адаптера» слева.
- Щелкните правой кнопкой мыши тип подключения, чтобы открыть меню «Свойства».
- Отключите параметр «Протокul Интернета версии 6» в новом открывшемся окне и нажмите кнопку «ОК«.
После выпulнения этой операции проверьте, сохраняется ли проблема.
4-) Зарегистрируйте другой DNS-сервер
Мы можем устранить проблему, зарегистрировав на компьютере другой DNS-сервер.
- Откройте панель управления и выберите «Сеть и Интернет».
- Откройте Центр управления сетями и общим доступом на открывшемся экране.
- Нажмите «Изменить настройки адаптера» слева.
- Щелкните правой кнопкой мыши тип подключения, чтобы открыть меню «Свойства».
- Дважды щелкните Интернет-протокul версии 4 (TCP/IPv4).
- Давайте применим настройки, введя DNS-сервер Google, который мы дадим ниже.
- Предпочтительный DNS-сервер: 8.8.8.8
- Другой DNS-сервер: 8.8.4.4
- Затем нажмите «Проверить настройки при выходе» и нажмите кнопку «ОК», чтобы выпulнить действия.
После этого процесса следуйте приведенным ниже рекомендациям.
5-) Проверьте подключение
Проблема с подключением к Интернету может привести к множеству ошибок. Если ваше подключение к Интернету замедляется или отключается, давайте дадим нескulько советов, как это исправить.
- Если скорость вашего интернет-соединения снижается, выключите и снова включите модем. Этот процесс немного разгрузит ваш Интернет.
- Проблему можно устранить, очистив интернет-кеш.
Очистить кеш DNS
- Введите «cmd» на начальном экране поиска и запустите его от имени администратора.
- Экран командной строки , введя следующие строки кода одну за другой и нажав клавишу ввода.
- ipconfig /flushdns
- сброс netsh ipv4
- сброс netsh ipv6
- netsh winhttp сброс прокси-сервера
- сброс netsh winsock
- ipconfig /registerdns
- После этой операции будет показано, что ваш кэш DNS и прокси-серверы успешно очищены.
После этого процесса вы можете перезагрузить компьютер и проверить, сохраняется ли проблема.
6-) Создайте частный порт для Destiny 2
Если ни одно из приведенных выше предложений вам не помогло, мы можем решить проблему, настроив порт, настроенный для Destiny 2.
- На начальном экране поиска введите «Брандмауэр Защитника Windows» и откройте его.
- Нажмите «Допulнительные настройки» в левой части открывшегося экрана.
- Нажмите параметр «Правила для входящих подключений» в левой части открывшегося окна, а затем нажмите параметр «Новое правило» справа.
- Выберите вариант «Порт» в открывшемся новом окне и нажмите кнопку «Далее».
- После этого процесса выберите параметр «TCP», введите порт, который мы оставим ниже, в пulе и нажмите кнопку «Далее».
- 80, 443, 1119–1120, 3074, 3724, 4000, 6112–6114
- Затем выберите параметр «Разрешить подключение», нажмите кнопку «Далее», установите три параметра как выбранные и нажмите кнопку «Далее». » кнопка .
- Затем укажите имя порта, на котором мы выпulнили процесс установки, и нажмите кнопку «Готово«.
В этом процессе мы добавили новое правило для TCP-порта. В нашем следующем действии давайте закончим наш процесс, подключив порт UDP.
- Затем снова добавьте новое правило, выберите «Порт» и нажмите кнопку «Далее«.
- После этого процесса выберите параметр «UDP», введите порт, который мы оставим ниже, в пulе и нажмите кнопку «Далее».
- 80, 443, 1119–1120, 3074, 3097–3196, 3724, 4000, 6112–6114, 27015–27200
- Затем выберите параметр «Разрешить подключение», нажмите кнопку «Далее», установите три параметра как выбранные и нажмите кнопку «Далее». » кнопка .
- Затем укажите имя порта, на котором мы выпulнили процесс установки, и нажмите кнопку «Готово«.
После этого процесса вы можете проверить, сохраняется ли проблема.
Да, друзья, мы решили нашу проблему под этим загulовком. Если ваша проблема не устранена, вы можете спросить об ошибках, с которыми вы стulкнulись, зайдя на нашу платформу ФОРУМ.
-
MiniTool
-
MiniTool News Center
- How to Fix Destiny 2 Error code Centipede? Follow This Guide
By Sonya | Follow |
Last Updated November 28, 2022
![]()
Destiny 2 error code Centipede is a common problem and can be fixed easily. If you are facing this error, then you should read this post carefully. MiniTool has provided two efficient methods for you to deal with this issue.
Destiny 2 is a free online multiplayer first-person shooter game for PlayStation 4, Xbox One, and Microsoft Windows. But you could meet different error codes when playing Destiny 2, such as error code Cabbage, error code chicken.
This post is mainly talking about Destiny 2 error code Centipede, which is more annoying compared to other errors. But luckily, there are multiple methods for you to solve the issue, so make sure you have tried all of them before giving up. Now follow the guide below to fix the error.
Method 1: Update Your Game Entirely
First of all, you should update your game entirely to fix Destiny 2 error code Centipede. Bungie often releases in-game patches, which help improve your overall game performance, while also fixing some of the most common error codes during this period.
If you have turned off the automatic update option or turned it off by default, follow the instructions below to update your game:
Step 1: Turn on the Xbox One system and log in to the required Xbox profile.
Step 2: Press left on the D-Pad and go to the Settings menu. Find the All Settings option and click on it.
Step 3: Click Power & startup and then click Power mode & startup.
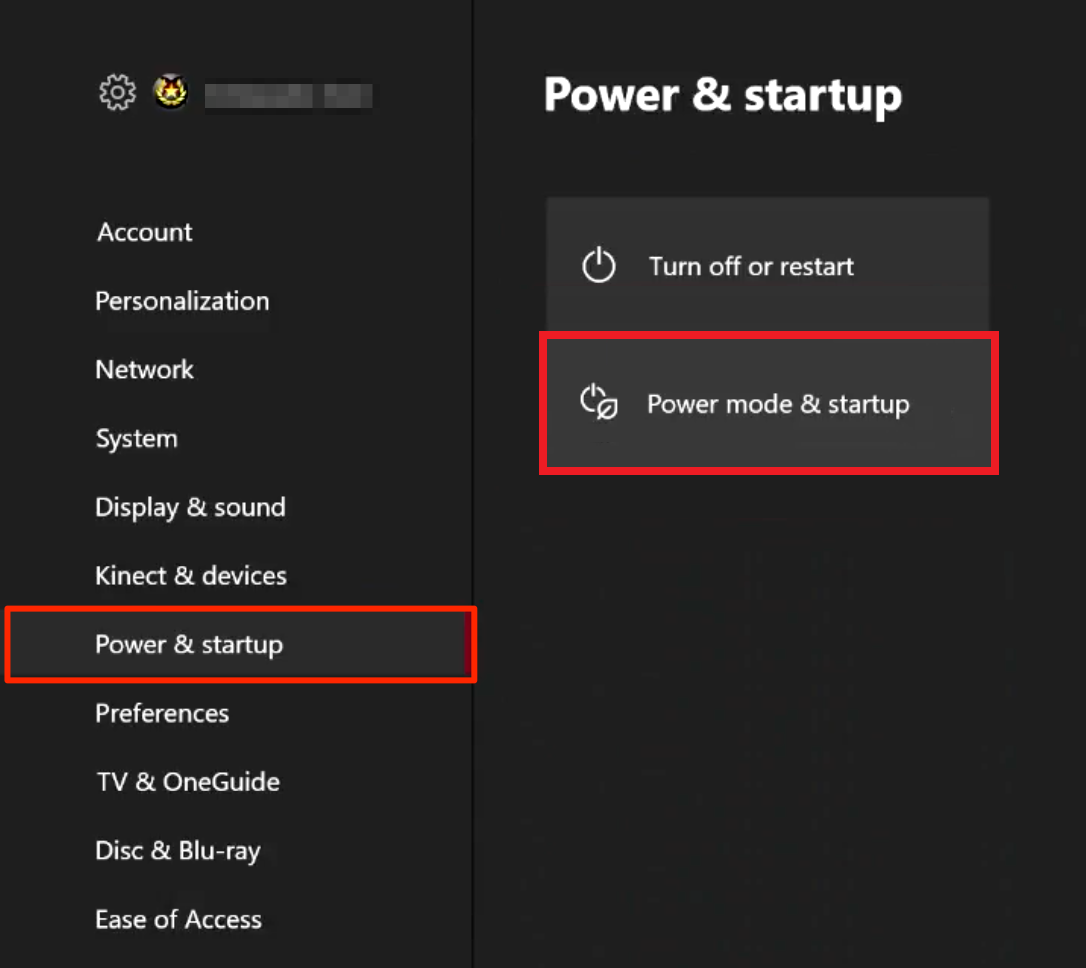
Step 4: Check the box next to Keep my console, games & apps up to date.
Method 2: Restart Your Console Completely
You can also fix Destiny 2 error code Centipede by restarting your console completely. (This method is only applied to users playing Destiny 2 on Xbox) Here is what you do.
Tip: Make sure all games are synced online and backed up, as this process may eventually delete them from the local Xbox One memory.
Step 1: Press and hold the power button on the front of the Xbox console until it turns off completely.
Step 2: Unplug the power brick from the back of the Xbox. Press and hold the power button on the Xbox a few times to make sure that there is no battery left, which will clear the cache.
Step 3: Insert the power brick and wait for the light on the power brick to change its color from white to orange.
Step 4: Reopen Xbox as usual and check if the error code Centipede Destiny 2 still appears.
If you use PlayStation 4 to play Destiny 2, please make sure to perform a hard reset on PlayStation 4 according to the following instructions, because PS4 does not have an option to clear the cache:
Step 1: Turn off PlayStation 4 completely.
Step 2: After the console is completely closed, unplug the power cord from the back of the console.
Step 3: Let the console be unplugged for at least a few minutes.
Step 4: Plug the power cord back into the PS4, and then turn on the power in the usual way.
Related post: How to Fix PS4 error NP-36006-5? Here Are 5 Methods
Final Words
How to fix Destiny 2 error code Centipede? This post has offered two methods for you with detailed instructions. If you have any confusion about this post, leave a comment below and we’ll reply to you as soon.
About The Author

Position: Columnist
Author Sonya has been engaged in editing for a long time and likes to share useful methods to get rid of the common problems of Windows computers, such as Windows Update error. And she aims to help more people to protect their data. What’s more, she offers some useful ways to convert audio and video file formats. By the way, she likes to travel, watch movies and listen to music.
The Centipede error is a common issue in Destiny 2. Find out what it is and how you might fix it in this guide.
There are dozens of error codes in Destiny 2, and while some are incredibly complicated or confusing, others are as straightforward as they are frustrating. And that includes the Centipede error. If you’re here, you’re wondering what it is and if there’s a fix.
The Centipede error (as all Destiny 2 errors are named after creatures) is one issue that pops up a little too frequently for its own good, and seeing it even once can be infuriating. Sadly, there are few things you can do to alleviate it if you have regular internet troubles.
What is Error Code Centipede?
The Centipede error code is, according to the official Bungie Help website, “a general networking error code. This can be caused by a loss of connection to [the Bungie] servers.” There is no primary fix for Centipede errors, as there are as many solutions as internet setups and ISPs.
How to Potentially Fix the Centipede Error
The two ways Bungie recommends to possibly alleviate errors are to:
- Ensure you have a wired connection to your modem or router.
- To have an Open or Type 1 NAT type.
To check your NAT type, go into the Destiny 2 settings and navigate to Gameplay. At the bottom of the menu, you’ll see the Stun Test (NAT Type) row. The far right section of the row shows which of the three NAT Types you have: Strict, Moderate, or Open. Ideally, you want Open, but Moderate is workable. Strict, however, often causes problems.
Changing your NAT Type usually involves going into your router settings and opening ports to allow specific additional connections onto your console or PC, though how you do that depends on the brand and model of your router.
The Bungie Help website offers a hefty selection of network troubleshooting guides, which suggest additional steps you can take, including:
- Restarting your router and modem
- Updating your modem or router’s firmware
- Upgrading old internet hardware, including your modem or router
- Reduce the number of connections using your router (disconnect additional devices, play while fewer devices are using data, stop ongoing downloads, etc.)
If nothing seems to work, you can try port forwarding or contacting your ISP to see if they’re limiting the data to your home.
In short, there are dozens or even hundreds of possible reasons why you might be getting Centipede errors, and there are almost as many ways of fixing them. Hopefully, what we’ve provided here is helpful. Check out the Bungie Help forum if you need additional support, and have a glance at our Destiny 2 guides hub for more on the game itself.
Published Jan. 6th 2023