Прошло около года с начала использования G6.
Использую с фирменным приложением на смартфоне Android из списка разрешённых производителем.
Без перезапусков сенсора и трансмиттера.
Установка на животе (единственное разрешённое место для взрослых).
Сигнал смартфоном ни разу не терялся без объективных причин.
При нахождении вдали сенсора от смартфона сигнал пропадает и возвращается сразу при приближении, а график пропущенных значений дозаполняется.
Ранее с трансмиттером после замены батарейки и приложением xDrip были проблемы, приходилось перезагружать смартфон. Такой проблемы при соблюдении вышеописанных рекомендаций производителя не возникало ни разу.
После водных процедур точный сигнал возвращается моментально и график дозаполняется, а иногда и вовсе не пропадает.
Ощущается полное доверие показаниям сенсора.
Один раз за год сенсор стоял 5 дней без ошибок, а на 6-ой, 7 и 8 день значения пропадали в совокупности около 8 часов в сутки. Было принято решение заменить этот сенсор, а производитель по звонку заменил неисправный сенсор, признав проблему. Конечно, нужно было менять раньше (отсутствие данных для AndroidAPS было весьма неприятно), но это было первым опытом замены.
Навскидку четверть сенсоров не отрабатывают до конца заложенного производителем срока и начинают выдавать временные ошибки в последние 12 часов. В части случаев калибровка или серия калибровок помогают вернуть сенсор в работу до конца установленного производителем срока.
Нет большого желания связываться с производителем по таким мелочам: сенсор идёт под замену. Гарантия производителя на сенсор 10 дней, но, строго говоря, стабильная работа сенсора происходит лишь 9 дней.
Клей Skin-Tac, который наносится на кожу перед приклеиванием сенсора тяжело отмывается, но сенсор стоит 10 дней уверенно и совсем никогда не отклеивается. Иногда, по краю пластыря клей чернеет.
Калибровку после старта сенсора можно делать, можно не делать: значения в любом случае точные, вне зависимости от того, на каком уровне глюкозы в крови он включается.
Значительные расхождения могут начинаться от 12 ммоль/л, но и у глюкометра погрешность высокая.
Приложение Clarity работает без перебоев, которые обязательно наблюдаются при перезапуске трансмиттера.
В отличие от G5 с xDrip, G6 в режиме от производителя достаточно быстро выходит из сигнала гипогликемии без определения значения (low), значения при низком уровне глюкозы в крови меняются оперативно, чтобы не возникало необходимости делать контроль глюкометром. Однако, добавляются 2 дополнительных фактора, помогающие этому: AndroidAPS заранее и оперативно прерывает подачу инсулина, а вкусные таблетки декстрозы Dextro Energy в кубиках с клюквой или магнезией быстро насыщают кровь глюкозой.
Уведомления с форума о новых сообщениях в темах или ЛС мне на email приходят нерегулярно.
Используем приложение AndroidAPS oref1 SMB / помпу Dana RS / мониторинг Dexcom G6 / инсулин ФИАСП.
Ждём нормальную бескатетерную помпу.

The Dexcom G6 is undoubtedly one of the most useful gadgets for monitoring glucose levels. Like any other modern piece of technology, it also has a few shortcomings that can come up when something goes wrong, which we call common Dexcom errors.
While there are plenty of things that can go wrong, there are only about five issues that often come up.
That is why we decided to list only those for now, and if you need help with anything else, please let us know in the comments section below.
With that out of the way, let us get right into it!
Related reading:
- Where should you insert & attach the Dexcom G6 CGM Sensor on your body?
- Best companion apps for Dexcom CGMS users
- The Best Diabetes management apps for your iPhone and Apple Watch this year
- 3 Best Blood Pressure Monitors to Use With Apple’s Health App
As an Amazon Associate, we earn from qualifying purchases using links in this post.
Contents
- 1 1: Dexcom G6 False Low Bug
- 2 2: No Readings
- 3 3: Signal Loss
- 4 4: Dexcom G6 App Not Working
- 5 5: Sensor Error
- 6 Is Dexcom App not working with a smartwatch?
- 7 Bonus Dexcom Tips and Tricks
- 8 Common Dexcom Errors: Wrapping Up
1: Dexcom G6 False Low Bug
The Dexcom G6 can automatically alert you in case glucose levels fall unacceptably low. However, there are plenty of reasons why it can also throw a false alarm.
More often than not, this seems to happen when the user is asleep.
So, we can safely assume that it’s a compression issue where you’re pushing down on the device and pushing it onto a muscle.

So, the easiest fix is to not lay on it if you can.
If not, you could also turn off the alarms for the night by disabling Bluetooth, muting your phone with headphones, or doing anything that’s going to mute the alarm for the night.
Another common reason why this happens is due to medication. Certain meds can mess with intestinal fluids and create both false lows and false highs.
So, pay attention to when the false alarm comes up and when you’re taking your meds. In that sense, it’s not even a false alarm. But, ask a professional if you can – to be safe.
Working out or dehydration can also temporarily affect your glucose levels – mainly when the Dexcom is too close to an area where more glucose is burned. That’s normal.
It can also happen due to a bad fit, calibration, insertion, or a wrong setup.
In this case, all you can do is re-install it and ensure everything was set up correctly.
Last but not least, there’s always a small chance that you either got a defective unit or that it got damaged somewhere along the way.
If it comes down to that, all you can do is contact tech support.
2: No Readings
Not getting any readings for quite some time is one of the most common Dexcom errors. If you don’t get anything for at least 20 minutes, there is a good chance of something wrong with the setup or a technical issue.
More often than not, this happens due to either long distances or objects that block the signal.
See, Bluetooth isn’t the best when it comes to range. You will generally not be able to get too far away from your smartphone, smartwatch, or any other device that connects to the Dexcom without losing the signal.
So, if that’s what is going on, wait until your device reconnects to Dexcom or force disable and enable Bluetooth to reconnect manually.
One more common reason that creates this issue is water. It can sometimes happen when you are taking a shower or going for a swim.
This can also happen during sleep if you are lying on the device and putting pressure on it.
So, generally, ensure you’re not too far away from your device, and there’s no water involved – and also try not to lay on the Dexcom while sleeping.
Check out the adhesive patch that you are using with your Dexcom G6 sensor. Here are some of the good Dexcom patches available from Amazon.
Worst case scenario, try setting up everything from scratch and remember that re-connection and sync can take as long as 3 hours.
If nothing works, call 1-844-607-8398 (Dexcom’s tech support) and see if they can do anything about it. There is always a chance that it’s a technical defect.
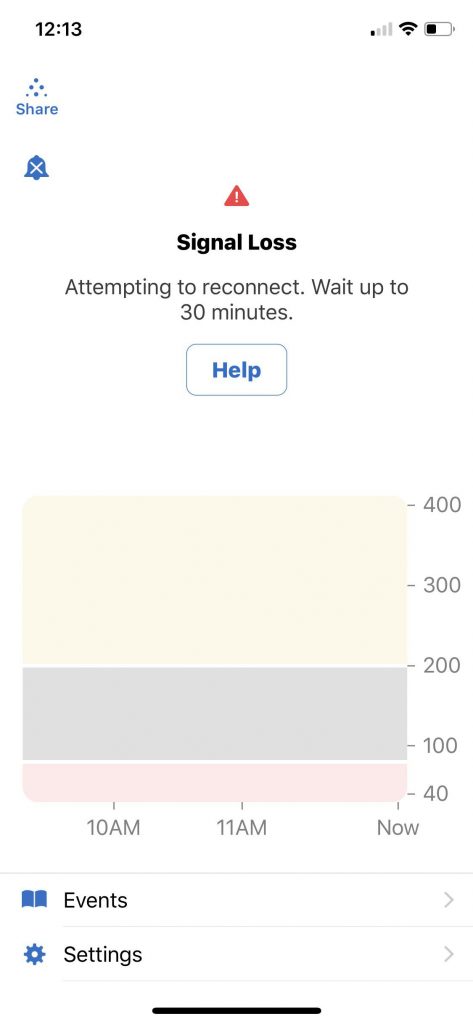
3: Signal Loss
Dexcom uses Bluetooth to connect with your device. In case you’re unfamiliar, Bluetooth is a wireless technology that works in close-range proximity.
And “close-range” is the keyword here cause one of the most common Dexcom errors is signal loss due to long-range connectivity.
A Dexcom G6, or any other Bluetooth device, can only stay connected up to a certain range and withstand many objects before losing the signal.
So, more often than not, the Dexcom signal loss issue is nothing more than you being too far from your phone/watch or having too many objects like furniture, walls, or anything like that.
If you’re near your device and still lose the signal, it could be due to water after a bath or a dip into the sea.
Sometimes, laying on top of the sensor while sleeping can also create this issue. But, more often than not, you’ll get a false low reading.
Some common fixes include:
- Turning the Bluetooth off and on
- Restarting your device
- And updating your app in case, you’re not running the latest version
Finally, if nothing works, there is a slight chance that you’re dealing with a technical issue.
In this case, we’d highly recommend communicating with Dexcom tech support at 1-844-607-8398.
4: Dexcom G6 App Not Working
One of the most common Dexcom errors isn’t even on Dexcom but its app. To be more specific, in the Dexcom G6 app. It’s no surprise that it has an average rating of 2.5/5.
Sometimes it may stop sending notifications or refuse to connect even when there is nothing wrong with Dexcom.
And the most common fix to such an issue is the most common one, “Have you tried turning it off and on?”
You can either try restarting the app on its own or rebooting the smartphone as it is. Alternatively, the last resort is clearing the data off the app.
To do that on (stock) Android:
- Open the Settings app
- Apps & notifications
- See all apps
- Dexcom 6
- Storage & cache
- Then select “clear storage”
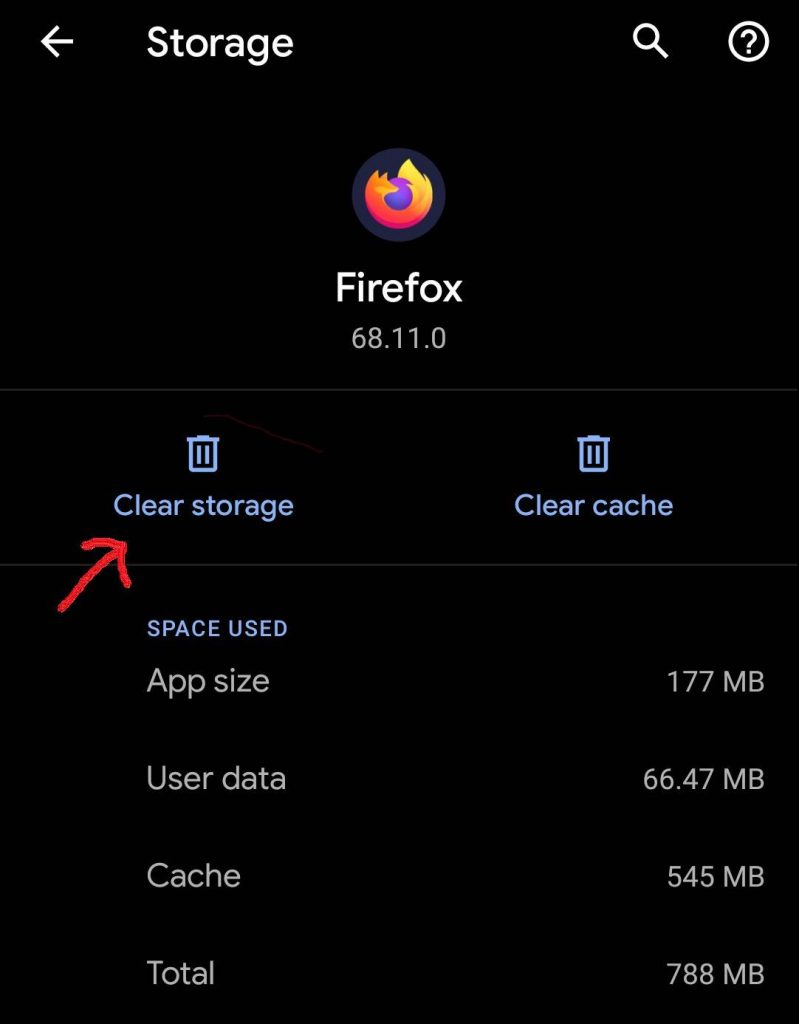
This is going to wipe everything off the app. So, it’s going to be like installing it for the first time.
Re-installing it isn’t the same cause the data usually remains even after uninstalling the app. But you could try that as well if you want to.
If you’re on iOS, chances are you won’t have to do anything since it’s a proprietary OS, and there’s not as much room for mistakes.
5: Sensor Error
The “sensor error” is undoubtedly one of the most common Dexcom errors. And we’ve got both good news and bad news regarding that subject.
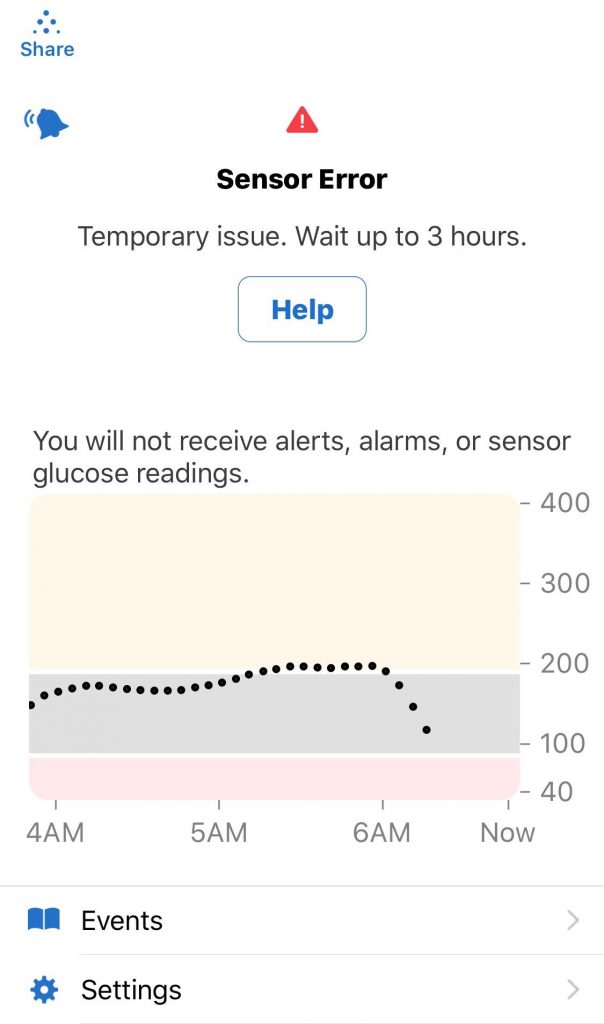
The good news is that, more often than not, you can fix this for free.
The bad news is that since this seems to be directly related to the physical sensor, you’ll have to ask Dexcom for a physical transmitter/sensor.
Pick up the SKIN GRIP Dexcom G6 or similar adhesive and waterproof patches, and extend your sensor life by more than 10+ days.
This problem seems to come up when the blood sugar rises above a specific threshold – and the exact threshold can significantly differ from sensor to sensor.
We’ve yet to see a software fix for this. So, all you can do here is call Dexcom and hope that they’ll agree to a solution.
Is Dexcom App not working with a smartwatch?
Unable to get Dexcom readings on your wearOS smartwatch?
The Dexcom app setup works pretty well for iOS users but, for some reason, has intermittent issues with the Android ecosystem. This is particularly the case for wearOS users trying to pipe data from their Android phone into their wearOS smartwatch.
Try these steps if you have issues getting the readings onto your Fossil Gen 5 smartwatch, Ticwatch, or other wearOS smartwatches from Dexcom.
- Restart your phone, followed by
- Restart your Smartwatch
- Give it some time and check if the Dexcom readings start showing up on your watch
The better approach for Android users is to try and use the BYOD Dexcom app and Xdrip. If you want, you can use Xdrip to upload data into nightspot or tidepool. That way, you have another data source in case Dexcom servers are down.
Dexcom blood glucose readings on Apple Watch with Always-on-display
Apple users tend to have a better experience with the Dexcom app on iOS.
If you are looking for a richer Dexcom experience on your Apple iPhone and Apple Watch, we recommend trying out the Sugarmate app.
Sugarmate is a companion app for iPhone users of the Dexcom G5/G6 continuous glucose monitoring (CGM) systems and also offers Apple Watch integration along with a web app for non-Apple users and can work with Amazon Alexa.
Why Sugarmate for Apple Watch?
For one, the Sugarmate app updates your readings more frequently than the Dexcom app. On your Apple Watch, it uses the Calendar complication to update.
Choose any Apple Watch face with a calendar component and put the calendar complication on your Apple Watch face.
When setting up the Sugarmate app, follow the directions to send Dev data to your calendar. You can create a new calendar called ‘Sugarmate readings’ and make it your default calendar.
Sugarmate on your iPhone can also help show your reading on your car dash via CarPlay when you connect your iPhone.
Is Dexcom data not showing via Sugarmate on Apple Watch? Have you tried syncing data
For Apple Watch users who have intermittent data syncing issues with the Dexcom app, one of the things that help is forcing the watch to sync the data manually.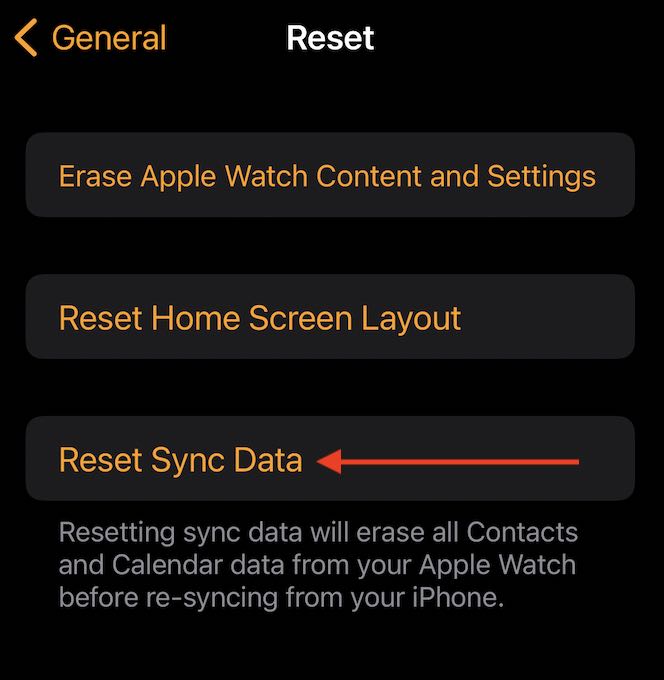
- Open the Watch app on your iOS device.
- Tap General > Reset.
- Tap Reset Sync Data multiple times.
- Erases all calendar and contacts data from Apple Watch and refreshes/re-syncs that data from your iPhone.
- Wait 5-10 minutes and check if the BG readings show up.
Bonus Dexcom Tips and Tricks
These are some of the most common Dexcom issues and what you can do about them. Before closing off, here are some endnotes to further help you:
- Always run the Dexcom app in the background. For iPhones, turn on background app refresh for the app in Settings > General > Background App Refresh. For Android, check your App Settings.
- Limit the number of apps that your phone runs in the background. As reader John points out, having too many apps running at one time often causes problems with the Dexcom app, especially on iPhones.
- Please don’t close or force close the Dexcom app–it needs to be on standby and refreshing in the background to work successfully.
- Don’t use battery savings or low power mode–this leads to errors with the Dexcom app.
- Try turning off Bluetooth and then turning it immediately back on.
- Open the Dexcom app and close all other apps. Then, forget the Dexcom from your phone’s Bluetooth settings. With the Dexcom app still open, then re-pair it with your phone. You should see a pairing request in the app. Accept it and follow any on-screen instructions to complete the pairing.
- Restart your phone by powering it off, waiting 30+ seconds, and powering back on.
- If you don’t like Dexcom’s stock case, you can also find 3rd party ones on Tallygear, myabetic, Shapeways, and even more, if you’re willing to do a Google search and look around.
- Keep 844-607-8398 handy. It’s Dexcom’s customer support number, and you never know when you may need it.
- Be careful where you place the Dexcom. You don’t want to lay on it while you’re sleeping. Not only it’s uncomfortable – but it can also introduce false lows and false highs.
- Set the follow high range a few points higher for your followers.
- Dexcom sometimes gives free adhesives if you call them.
Common Dexcom Errors: Wrapping Up
And that’s about it for now. If you need anything else, feel free to drop a comment, and maybe the MyHealthyApple team will come back to you as soon as possible.
If you liked this article, feel free to stick around for more health news, gadget reviews, how-to guides, and more like this.
We sometimes use affiliate links in our content from Amazon and others. It doesn’t cost you anything but helps us pay our expenses. Thank you for the support!
Last update on 2023-02-08 / Affiliate links / Images from Amazon Product Advertising API
Hi there, this is our first attempt with a Dexcom GCM, hoping someone here can point us into the right direction.
We’re on a Sony Xperia Z5 Compact, with Android version 7.1.1 (although I have tried other phones and Android versions with the same result already). We have the latest xDrip nightly build d7689af-2019.11.02 with a Dexcom G6 and currently ended up with a 8Gxxxx transmitter running firmware 2.18.2.88 🤦♀ Configuration wise I think we’re pretty solid, «Use the OB1 Collector», «Native Algorithm», «G6 support», «Allow OB1 unbonding» as well as «Allow OB1 initiate bonding» are enabled (although I have tried a few different variations here already too.
At first everything seems ok, the transmitter pairs and the phone service state reports «got no raw», we wait a little and start the sensor. The phone service state reports «got data from G6» and the sensor status shows the warming up time.

Upon the next connection attempt though, I see the phone service hanging in «Connect request» for a couple of minutes until it finally reports «Got no raw» with the sensor status changed to «Sensor Errors».


Finally after some time it goes into «Sensor failed 6» — which I believe means it has stopped again.
The logs report the following at first:

Then this for a long time:

Until finally:

I was looking into the GATT exception for a while there, changing some bluetooth settings around, but nothing helped so far. Also a bluetooth incompatibility would suggest this happening on a particular phone model/version. But I was able to reproduce this issue with the exact same outcome on three different hardware configurations thus far. The transmitter seems to be communicating with the device (at least I get battery readings). So maybe it’s the sensor itself?
Any advice would be much appreciated.
Thanks
Elisa
“10-day hard stop on G6 sensors.” – love, Dexcom

Did that one thing alone stop you from considering the G6? Well, good news…you can actually restart the sensors (and the transmitter).
There are several ways to restart a G6 sensor, listed below from easiest to hardest. (Technically, Options 1 and 2 are so much easier than other options…that it’s almost not worth doing the others)
- Use the G6 receiver to restart
- Use the phone to restart (without receiver)
- Use the resetTransmitter app
- Remove the transmitter from the sensor
UPDATE: It used to be that I thought that you could not restart a sensor if it had expired, without using Option 3 or 4…turns out this is not true! If you accidentally did not remember to start and finish Options 1 or 2 before your sensor session expired, don’t fret. I have used Option 1 to restart an ended sensor (basically just start on Step 4 of Option 1, but you don’t need to wait for a new BG to come in…because the session has expired). I haven’t personally tested how Option 2 would work in that situation, but it should work just the same.
However, do not end up in limbo…don’t start a restart process an hour before a session ends. Either start/finish Option 1 or 2 far enough in advance that you can complete the restart entirely…or wait until the session has ended and then begin a restart. The in-between process doesn’t work well, so pick a version and follow-through.
Option 1: Use G6 receiver
This is the easiest and preferred method because you don’t have to lose BG data during the restart process. You can just keep looping (if you are a looper) and watching BG data on your phone, Nightscout, and Follow apps the whole time.
To use this process, you do NOT have to be using a receiver on a regular basis. We only pull the receiver out in order to do the restarts. Normally, it sits in the closet, turned off, between session restarts. I think of the receiver as a magic restart wand that we pull out of the closet every so often.
We start and finish this whole process before the session is due to expire…so about 3 hours before the end of session, or sooner, we start the receiver going on the steps below.
- In your Alerts settings for the receiver, it’s a good idea to turn off the “signal loss” alert during this process. Your receiver is going to have signal loss for two hours and it would be annoying to hear that alert for the whole time. Just a good idea before you get started.
- If you don’t normally use the receiver, go ahead and turn it on. Get the receiver connected with the transmitter. Shortly after (about 5 minutes) the receiver connects, the receiver will start reading BGs from the existing session already going on the phone.
- Watch the receiver get a fresh BG value. Usually this happens just seconds after the phone app gets a new BG. During this process, the transmitter and receiver briefly talk and then disconnect from each other for the next 5 minutes. We are going to use that disconnected state to our advantage to restart the sensor.
- Wait about 15 seconds or so after the new BG value came in and then press the “Stop Sensor” option ON THE RECEIVER (not on the phone). You’ll be told “Are you sure you want to stop your sensor? It cannot be restarted, a new sensor is required.” Answer Yes. You’ll see a little progress bar go by for stopping sensor.
- On the screen that appears after the progress bar, press New Sensor. You’ll be promoted to choose between “No Code” or “Enter Code”. You can choose either. If you choose to “Enter Code”, go find your code from when you originally inserted the sensor (the one printed on the adhesive cover of the sensor). Contrary to early rumors, not all the sensors in a box have the same code. That code is the calibration code for the particular sensor wire that sensor is using. If you don’t have that code saved, go ahead and choose “No Code” (don’t just randomly use the code from a different sensor in your supplies).
- After you finish with the Code entry decisions, you’ll need to press the “Start Sensor” button that will appear on the receiver. You’ll see a “starting sensor” progress bar for a few seconds and then the 2-hour sensor warmup countdown circle will be displayed on the receiver.
- From this point forward for at least two hours…you need the receiver to NOT COME INTO COMMUNICATION WITH THE TRANSMITTER. There are several ways to do this, some ideas:
- Put the receiver in the microwave. The microwave blocks the communications between the receiver and the transmitter very effectively, just make sure you don’t turn on the microwave during the 2+ hours you’re waiting, or
- Put the receiver in a faraday bag (costs less than $10 and it can act just like the microwave, but a lot more portable and easy to manage), or
- Put the receiver “far enough away” that it stays out of range of the transmitter. Neighbor’s house, the corner of your backyard, etc. Just so long as it is far enough away that the transmitter and receiver won’t accidentally talk to each other during the 2+ hours of waiting. This is the second most common failure point for people trying to restart…they do not adequately keep the receiver from communicating with the transmitter during this 2 hour wait. I highly recommend using a microwave or a faraday bag for this option to prevent accidental communication.
- During this 2+ hours of waiting, the receiver will have “signal loss” and “no data” message. That’s a good thing. Don’t worry about that. You want that.

- Also during this 2+ hours of waiting, you’ll have BGs on the phone app uninterrupted. Your Nightscout site, dexcom follow app, dexcom G6 app, and Loop app (if you use it) will all continue to work as usual.
- After waiting 2+ hours at least (I usually go at least 2 hours and 10 minutes just in case), bring the receiver back into communications with the transmitter. Within 5 minutes, the “no data” message will be replaced with a warmup message when the receiver will connect with the transmitter again. The warmup circle looks like a 3/4 completed warmup circle, but don’t worry, it only has 5 minutes until you’re session is ready to start again.
- 5 minutes after the warmup circle appears, the receiver and phone will start showing BGs again for the newly restarted session (or the “enter 2 calibrations” request if you chose a “no code” session or used a reset transmitter).
- If required, enter the calibrations in both the phone and receiver at the same time. If your session did not require immediate calibrations to start the session, it is still not a bad idea to check and make sure you’ve restarted BGs at a reasonable value.
- Congrats, you’ve just restarted your G6 sensor session. Your newly started session will expire 10 days from the time that you did Step 5, so plan ahead if you are going to do any subsequent restarts.


Here’s the video for the G6 Option 1
Option 2: No-receiver restart
For non-US residents, sometimes you can purchase the G6 system without the receiver. So while you can still restart the sensor session without it, the disadvantage (vs. using Option 1) is that you will not see BGs for two hours during the restart process.
This process can be a little more prone to errors if using an android phone…some android phones reconnect with BT devices pretty aggressively I’ve heard.
Remember to start this process far enough in advance that you will finish it before the “Sensor Expires” time.
SIDE NOTE: I have heard from several t-slim users that this method does indeed work to restart the G6 for those users.
- In phone’s bluetooth list (in iPhone Settings), “forget” the Dexcom transmitter ID. In fact, “forget” all your old Dexcom transmitters if you don’t regularly delete them. Old ones don’t need to be saved. By forgetting the Dexcom transmitter, we are preventing the transmitter and app communications during the restart process…and that’s a good thing. We don’t want them paired during the 2 hours.
- Go to G6 app on the phone and “stop sensor” from the Settings menu. You’ll be told “Are you sure you want to stop your sensor? It cannot be restarted, a new sensor is required.” Answer Yes.
- On the screen that appears after, press “New Sensor”. You’ll be promoted to choose between “No Code” or “Enter Code”. You can choose either. If you choose to “Enter Code”, go find your code from when you originally inserted the sensor (the one printed on the adhesive cover of the sensor). That code is the calibration code for the particular sensor wire that sensor is using. If you don’t have that code saved, go ahead and choose “No Code” (don’t just randomly use the code from a different sensor in your supplies).
- After you finish with the Code entry decisions, you’ll need to press the “Start Sensor” button that will waiting on the app’s main screen. You’ll see a “starting sensor” progress bar for a few seconds and then the 2-hour sensor warmup countdown circle will be displayed on the phone.

- Wait at least 2 hours, but not so long that the old sensor session will expire during your wait. If the old session expires before you finish the remaining steps…you’ll have to move onto Option 3 or 4 (or replace the sensor).
- Your G6 app will also display “signal loss” during this time. That’s good, too. You want the transmitter to stay unpaired and “lost” during the warmup wait.
- After the 2 hour wait, restart the phone (hold down the power button and slide to turn off the phone). Open G6 app. This will trigger the phone to try to re-pair with transmitter. Accept the pairing request now that you’ve waited at least 2 hours. If you don’t get a pairing request within 5 minutes of the restart, you may need to restart the phone one more time.
- About 5 minutes after accepting the pairing request, you’ll be greeted with BGs again for the newly restarted session (or the “enter 2 calibrations” request if you chose a “no code” session or use a reset transmitter). If prompted, enter the calibrations and you’re good to go.


Option 3: Reset Transmitter
This option resets the day-counter that the transmitter holds internally. You know how the dexcom transmitter stops working at 112 days? Well, this process resets that counter to zero and in the process will allow you to start a new session. HOWEVER, it is a process to unpair-pair-unpair-pair the transmitter several times so, I’d recommend still using Option 1 or 2 above for regular sensor restarts. Come back to these directions when you simply need to extend that 112 days. Since it does work to allow a sensor restart…I’ll leave it here for the purposes of complete discussion of alternatives.
- Build the ResetTransmitter app as described in my blog post here.
- Make sure your G6 session has ended. You cannot be in an active session for a transmitter reset.
- Go to your iPhone’s Bluetooth area (in Settings) and “forget” the Dexcom transmitter.
- Delete the Dexcom G6 app.
- Shutdown and restart your iPhone.
- Open the ResetTransmitter app and enter your dexcom transmitter ID and press the Reset button. Within 5 minutes you should get a pairing request to accept. The reset success message will appear within a very short time after the pairing is accepted.
- IF you don’t get a pairing request within 5 minutes in Step 6, restart the phone again. Double check all the dexcom transmitters have been deleted from the bluetooth list on the phone. Open the ResetTransmitter app again and see if you get a pairing request within 5 minutes. (The toughest part of this process is getting the transmitter to successfully unpair and re-pair between apps. Sometimes it takes a few restarts and patience…but it does work eventually.)
- After the transmitter has been reset, you can reverse the process. Forget the Dexcom transmitter again from Bluetooth list, restart the phone. Reinstall the G6 app and go through the setup screens as if you were starting a new sensor. Once you get a successful pairing established, you can press the start session on your app.
Option 4: Remove the transmitter
The G6 transmitter is surrounded by plastic entirely. The locking wings for the transmitter are located under and inside the plastic ring surrounding the transmitter, making them very inaccessible by fingers. Therefore, popping out the G6 transmitter is a bit cumbersome, requires some small pointy tool, and frankly would be a little hard to do if your sensor is in an awkward spot to reach. I managed to do it with a simple tool by myself with the sensor on my arm (see video below), so it’s not impossible.
Technically, if you remove the transmitter, you can replace it back onto the same sensor (and tape it back down so it stays locked in place, if you’ve busted the hinge point in the process of removing the transmitter). This would allow you to restart a sensor session on the same sensor. I’ve heard from others that leaving it out for 15 minutes helps restarts…but I have not experienced the same.
I’m only mentioning this option for full disclosure of ALL the options…but really this shouldn’t be used. It’s so much easier to use one of the first two options.
Video of how to remove the transmitter:
Restarting G6 Transmitter (avoid the 90-112 days Dexcom shut down)
The Dexcom G6 transmitter is just like the G5 transmitter in that Dexcom artificially kills the transmitter by 112 days of use after first activation. If you’d like to use the transmitter beyond the 112 days, and instead use the transmitter until the end of its battery life, you can use the same process described in my G5-reset-transmitter post. The G6 transmitter can be reset at any time just like the G5 transmitters.
-
Contents
-
Table of Contents
-
Troubleshooting
-
Bookmarks
Quick Links
LBL014003 Rev 001 Dexcom G6 User Guide
0
Related Manuals for Dexcom G6
Summary of Contents for Dexcom G6
-
Page 1
LBL014003 Rev 001 Dexcom G6 User Guide… -
Page 2: Table Of Contents
9.5 Edit and Delete an Event in Your App 9.6 View Events 9.7 What’s Covered and What’s Coming Chapter 10: Alarm and Alerts 10.1 Introduction 10.2 Alarm and Alerts 10.3 Check in with Kelly LBL014003 Rev 001 Dexcom G6 User Guide…
-
Page 3
10.9 What was Covered and What’s Coming Chapter 11: Treatment Decisions 11.1 Introduction 11.2 Your HCP Is Your Partner 11.3 Using your G6 for Treatment Decisions 11.4 Check In With Jake and Kelly 11.5 You Decide! 11.6 What’s Covered and What’s Coming Chapter 12: Share Information With Your Support Team 12.1 Introduction… -
Page 4
Index LBL014003 Rev 001 Dexcom G6 User Guide… -
Page 5
LBL014003 Rev 001 Dexcom G6 User Guide… -
Page 6: Part 1: Get Started
1.1 Introduction Welcome to the G6 continuous glucose monitoring (CGM) family! This User Guide supports you in getting to know your G6. We also have numerous other resources available to help you to get the most out of your G6.
-
Page 7: Your Dexcom Account
All chapters in the G6 User Guide are laid out the same way: The beginning of each chapter lists what you’ll be able to do after you’ve finished, followed by the chapter’s content. At the end, there’s a recap of what was covered and what’s in the next chapter.
-
Page 8: Chapter 2: Indications For Use And Safety Statements
• Indications: Show who should use the system as well as when, why, and how they should use it • Contraindications: Let you know when not to use the G6. If used in these situations, you may hurt yourself or the system 2.3 How to Read Safety Statements…
-
Page 9
When in doubt, get your meter out. • No Number, No Arrow, No CGM Treatment Decision If your G6 doesn’t show a number or arrow, or your readings don’t match your symptoms, use your meter to make diabetes treatment decisions. -
Page 10
Follow system instructions. If you don’t, you could have a severe low or high glucose event. Precautions • Be Accurate, Be Quick Enter the exact BG value displayed on your meter within 5 minutes of using your meter. Don’t enter the G6 reading as a calibration. • Don’t Calibrate When Glucose Rate Is Changing Fast Don’t calibrate when your trend arrow is up, double-up, down, or double-down because your BG is… -
Page 11
• Where to Insert: Things to Check Keep the safety guard on until you put the G6 applicator against your skin. If you remove the safety guard first, you may hurt yourself by accidentally pushing the button that inserts the sensor before you mean to. -
Page 12
▪ No Readings Alert o System Alerts: ▪ Calibration Required (after 2-hour sensor warmup) ▪ Calibration Error ▪ Sensor Expired ▪ Replace Sensor ▪ Transmitter (not working) ▪ No Storage Error ▪ App Stopped LBL014003 Rev 001 Dexcom G6 User Guide… -
Page 13
Follow system instructions. If you don’t, you could have a severe low or high glucose event. Caution • Requires HCP Prescription U.S. law restricts the sale of the G6 Mobile to sale by, or on the order of, a physician. LBL014003 Rev 001 Dexcom G6 User Guide… -
Page 14
Share won’t work. • Check Your Smart Device App on: Whenever you power on your smart device, tap the G6 app to open it. If the app isn’t open, Share won’t work. • Check Followers’ Smart Devices o Sounds on: Followers must keep their smart device volume on, or at least the keep vibration on, so they can hear and/or feel alarm/alerts. -
Page 15: What’s Covered And What’s Coming
• Can explain how safety statements keep you safe • Can explain how to interpret safety statements • Have an overview of safety statements What’s Next? In the next chapter, you’ll learn the risks and benefits of using the G6. LBL014003 Rev 001 Dexcom G6 User Guide…
-
Page 16: Chapter 3: Risks And Benefits
Otherwise use your meter until you calibrate your G6. • When in doubt, get your meter out: If you feel like your glucose is low or high but your G6 number is within your target range, verify with your meter.
-
Page 17: Benefits
Making Treatment Decisions Using G6 You can use your G6 reading and trend arrow to make treatment decisions — like treating for a low or dosing for a high. See Chapter 11 for more information on treatment decisions. With G6, there’s no need to confirm your reading with a fingerstick.
-
Page 18: What’s Covered And What’s Coming
DIAMOND randomized clinical trial.” Diabetes Care. 40(6):736-741 doi: 10.2337/dc17- 0133. 3.3 What’s Covered and What’s Coming Now You Can: • List the risks and benefits of using the G6 What’s Next: Now let’s take a look at the G6! LBL014003 Rev 001 Dexcom G6 User Guide…
-
Page 19
LBL014003 Rev 001 Dexcom G6 User Guide… -
Page 20: Part 2: Let’s G6! The Basics
4.2 G6 CGM System The G6 is a medical device you use on yourself. It allows you to continually see your readings, updated every 5 minutes for up to 10 days, without the bother of taking constant fingerstick measurement. You’ll see: •…
-
Page 21
The transmitter snaps into the transmitter holder and wirelessly sends your glucose information to your display device(s). The transmitter is reuseable. If you have a new transmitter, open the package when you’re ready to use it. Display Device Overview LBL014003 Rev 001 Dexcom G6 User Guide… -
Page 22: What’s Covered And What’s Coming
You can choose which display device(s) to use: the Dexcom Receiver (receiver), the Dexcom G6 App (app) downloaded on your smart device, or both. They both show your readings, graphs, and trend arrows and alert you when there’s something you should be aware of.
-
Page 23: Chapter 5: Set Up Your Display Devices
You can use the receiver, the app, or both. Choose the device that’s best for you. The main difference between them is the app has Dexcom Share (Share). It lets you send your glucose information to others in real time so they can support you in your care. You can also schedule long-acting insulin dose reminders in the app.
-
Page 24
Is this your first Dexcom CGM app? If so, the app will walk you through setting it up. You’ll even set up your High and Low Alerts. If you’ve used the app before, the app will import your existing settings for your convenience. -
Page 25
Tap Let’s Get Started. App: Setup The next screens go over legal and safety information, including a video on using your G6 to make treatment decisions. To see the video another time, go to Settings > Help > Videos. After reading each, tap the appropriate answer to get more information or move forward. -
Page 26
If you’re new to the Dexcom app, these screens go over your alarm/alerts. After reading each screen, tap Next to move forward. App: Setup New users only: Set your Low Alert. You’ll get an alert if your glucose dips below the number you set. Default is 80 mg/dL. -
Page 27
Get your transmitter box. Tap Take Photo. b. Turn transmitter box upside down on a flat surface with barcodes facing up. Center longest barcode in green brackets. c. Checkmark confirms you entered the SN. LBL014003 Rev 001 Dexcom G6 User Guide… -
Page 28: Receiver
After completing your initial app setup, set up the receiver if you’d like to use that too. If not, go to Chapter 6 start your initial sensor. If you have issues setting up the G6 Mobile app, contact Technical Support (available 24/7) at: • Email: TechSupport@dexcom.com • Toll free: 1.888.738.3646 •…
-
Page 29
Press and hold power button for 2 seconds to turn receiver on. Wait for loading screen to appear. Receiver: Setup Wait. Receiver: Setup Welcome! Tap Next. Receiver: Setup Enter the date and time: LBL014003 Rev 001 Dexcom G6 User Guide… -
Page 30
Set your Low and High alerts using levels you’ve discussed with your HCP. The Low Alert default is 80 mg/dL; High is 200 mg/dL. Tap the up/down arrows to change the level. Tap Save. LBL014003 Rev 001 Dexcom G6 User Guide… -
Page 31
Enter your transmitter SN by tapping the up/down arrows. Tap Save. Receiver: Setup Chapter 6, you’ll see how to insert your sensor and attach your transmitter as well as how to pair and start LBL014003 Rev 001 Dexcom G6 User Guide… -
Page 32: What’s Covered And What’s Coming
• Download the G6 Mobile app • Set up the app with the recommended settings • Set up your receiver What’s Next? No matter which display device you use, next, you’ll insert your sensor. LBL014003 Rev 001 Dexcom G6 User Guide…
-
Page 33: Chapter 6: Start Your Sensor
Don’t: Don’t use expired sensors. Check the package label for the expiration date. It’s in YYYY-MM-DD format. Why: Expired sensors may give incorrect results. Consequences: You could have a severe low or high glucose event. LBL014003 Rev 001 Dexcom G6 User Guide…
-
Page 34: Choose Sensor Site
Contact your HCP for specific questions regarding the use of medical tape, barrier wipes, or other adhesives. 6.4 Insert Sensor Overview Before you insert your sensor, get to know the applicator using the picture below. LBL014003 Rev 001 Dexcom G6 User Guide…
-
Page 35: Insert Sensor
Insert Sensor Insert Sensor Wash and dry your hands. Insert Sensor Clean insertion site with alcohol wipe. Let dry. Insert Sensor LBL014003 Rev 001 Dexcom G6 User Guide…
-
Page 36
Check sensor for damage. Insert Sensor Pull off both tabs that cover the adhesive. Don’t touch adhesive. Insert Sensor Place applicator horizontally, not vertically, on skin. Firmly press down, sticking adhesive to your skin. LBL014003 Rev 001 Dexcom G6 User Guide… -
Page 37
Throw out applicator following local guidelines for disposal of blood-contacting components. Insert Sensor What’s left on you? The adhesive patch with these attached: • Sensor wire underneath • Transmitter holder on top You have successfully inserted the sensor! Having problems? LBL014003 Rev 001 Dexcom G6 User Guide… -
Page 38: Attach Transmitter
Wipe back of transmitter with alcohol wipe. Let dry. Be careful with the back of the transmitter. Don’t: • Touch it or the metal dots on it • Scratch it — it may harm the waterproof seal LBL014003 Rev 001 Dexcom G6 User Guide…
-
Page 39
(brand names include Blenderm , Tegaderm , Smith & Nephew IV3000 , 3M tape) for extra support. Order ™ ™ ® ™ LBL014003 Rev 001 Dexcom G6 User Guide… -
Page 40: Pair And Start Your Sensor
The range is reduced because doesn’t work as well through water. Consequences: You could have a severe low or high glucose event. We’ll review pairing and starting a sensor for the app, then for the receiver. LBL014003 Rev 001 Dexcom G6 User Guide…
-
Page 41
Screen provides countdown to sensor warmup. The ring darkens as the countdown moves forward. Keep smart device within 20 feet of transmitter during the sensor warmup period. App: Pair and Start Sensor Calibration Required means sensor warmup is complete. Open app. LBL014003 Rev 001 Dexcom G6 User Guide… -
Page 42
Press power button briefly to wake up receiver. Receiver: Pair and Start Sensor Wait. Receiver: Pair and Start Sensor Your transmitter and receiver can communicate now! You may need to unlock your screen. If so, tap 1, then LBL014003 Rev 001 Dexcom G6 User Guide… -
Page 43
You won’t get alarm/alerts or readings during sensor warmup. Use your meter when making a treatment decision during warmup. After sensor starts, Start Sensor option disappears from Menu, and Stop Sensor appears. Receiver: Pair and Start Sensor Sensor warmup is complete You’re ready to calibrate! See Chapter 7. LBL014003 Rev 001 Dexcom G6 User Guide… -
Page 44: Pairing Tips
6.8 What’s Covered and What’s Coming Now You Can: • Prepare for sensor insertion • Insert your sensor • Attach transmitter to sensor • Identify when transmitter and display device pair • Start sensor warmup LBL014003 Rev 001 Dexcom G6 User Guide…
-
Page 45
What’s Next? The next chapter guides you through calibration. LBL014003 Rev 001 Dexcom G6 User Guide… -
Page 46: Chapter 7: Calibrate
Although these body fluids are very similar, G6 readings can be different from meter values. Calibration evens them up. By calibrating when the system notifies you, the G6 uses your meter value to make sure the G6 readings remain accurate throughout your session.
-
Page 47: Prepare To Calibrate
• Trend arrow(s) straight up or down: Don’t calibrate when your trend arrow(s) points straight up or down; this means your reading is changing more than 2 mg/dL per minute. Why? Because by the time you take a meter value and enter it into your G6, your BG will have changed.
-
Page 48
Don’t Don’t calibrate when your trend arrow is up, double-up, down, or double-down Why: Calibrating when your BG is changing quickly may make your G6 inaccurate. Consequences: You could have a severe low or high glucose event. 7.4 Let’s Calibrate Calibration Schedule Below is a sample calibration schedule. -
Page 49
Wash and dry your hands with soap and water, not gel cleaners. App: Calibration Use meter to measure the BG from your fingertip. App: Calibration Tap Calibrate. The red circle shows when the G6 needs you to calibrate. What it means: • Sensor warmup is complete • Ready for first calibration App: Calibration Enter meter value using number pad. -
Page 50
Tap Calibrate to enter your second BG reading. Follow steps 1-5 and enter second reading. What it means: • Sensor accepted first calibration • Ready for second meter reading App: Calibration Calibration accepted: Calibrate icon has no red circle. LBL014003 Rev 001 Dexcom G6 User Guide… -
Page 51
App: Calibration Your G6 readings begin about 5 minutes after the device accepts your calibrations. Look for the number in the circle above the graph and dots on your trend graph. Each dot represents a single reading taken every 5 minutes. -
Page 52
Press power button briefly to wake up receiver screen. You won’t see calibration notifications when screen is black. Tap OK. What it means: • Sensor warmup is done • Ready for first calibration LBL014003 Rev 001 Dexcom G6 User Guide… -
Page 53
Verify BG value is correct. If correct, tap Yes. If you don’t tap Yes, the BG level isn’t saved. If incorrect, tap No and reenter. Receiver: Calibration Wait while BG value is accepted. LBL014003 Rev 001 Dexcom G6 User Guide… -
Page 54
The calibrate icon doesn’t have a red circle, so your calibration was accepted and no more are needed for now. Receiver: Calibration Your G6 readings begin about 5 minutes after the device accepts your first two calibrations. Look for the dots on your home screen. Each dot represents a single reading taken every 5 minutes. -
Page 55: Calibrate Only When Prompted (And Exceptions)
For example, if your meter reading is 180 mg/dL, your G6 reading should be between144 and 216 mg/dL. So if your G6 reading is 150, it’s within the 20/20 rule and you should not calibrate until notified. If your G6 reading is 220, it’s not within the 20/20 rule and you should…
-
Page 56: Check In With Jake And Kelly
First, a little background information: Jake is an adult. He manages his diabetes on his own, using his G6 and pens. Kelly, on the other hand, is a child. She and her parents work together to manage her diabetes using her G6 and a pump. Do either of these situations sound like yours? Let’s check in with Jake and Kelly to see what they do when their symptoms don’t match their CGM information.
-
Page 57: What’s Covered And What’s Coming
• Recognize how to get accurate meter values • List when you shouldn’t calibrate • Enter calibrations into the G6 What’s Next? Part 3: Next Steps will show you how to get the most out of your G6. LBL014003 Rev 001 Dexcom G6 User Guide…
-
Page 58
LBL014003 Rev 001 Dexcom G6 User Guide… -
Page 59: Part 3: Next Steps
The home screen below is from the Apple app. The Android app and receiver look similar. The only difference is where the Calibrate Icon, Settings Menu, and Event History/Add Event are. 8.3 Glucose Information This section shows you how to interpret your glucose reading, trend arrow, and graph. LBL014003 Rev 001 Dexcom G6 User Guide…
-
Page 60
High when your dots are in the yellow area of the graph o In your target range (between your high and low alert settings) when in the gray area o Low when in the red area LBL014003 Rev 001 Dexcom G6 User Guide… -
Page 61: Navigation And Status Bar
The Apple app, Android app, and receiver home screens have slightly different ways to navigate to other screens. This section details those differences. Apple App LBL014003 Rev 001 Dexcom G6 User Guide…
-
Page 62
Trend arrows show the speed and direction of your glucose trends based on the last three readings. Use the arrows to know when to take action before you’re too high or too low. Trend Arrow: Steady Changing: • Less than 1 mg/dL each minute • Up to 15 mg/dL in 15 minutes LBL014003 Rev 001 Dexcom G6 User Guide… -
Page 63
Trend Arrow: Rapidly Rising or Falling Changing: • More than 3 mg/dL each minute • More than 45 mg/dL in 15 minutes Trend Arrow: None System can’t calculate the speed and direction of your glucose change. LBL014003 Rev 001 Dexcom G6 User Guide… -
Page 64: What’s Covered And What’s Coming
• Explain differences between trend arrows What’s Next? Next you’ll learn how to enter events that affect your glucose levels. Track events so you and your HCP can reflect on patterns in your glucose levels. LBL014003 Rev 001 Dexcom G6 User Guide…
-
Page 65: Chapter 9: Events
An event is an action or situation that affects your glucose levels. With the G6, you can track your daily events so you can reflect on their effect on your glucose trends. Once entered into the app, or once you upload your receiver data, events can be viewed in Dexcom reports.
-
Page 66
You can have the app send you daily long-acting dose reminders. Let’s say you want to create a reminder to take 15 U of long-acting insulin every day at 10 am. The steps below show you how. App: Set Dose Reminder LBL014003 Rev 001 Dexcom G6 User Guide… -
Page 67
Tap Long-Acting Dose Reminders. App: Set Dose Reminder There are two reminders you can customize to fit your needs. Tap either reminder. App: Set Dose Reminder Tap Reminder switch to turn it on. LBL014003 Rev 001 Dexcom G6 User Guide… -
Page 68
Scroll to the time you want to be reminded. In this example, it’s 10 am. Android: Selecting a time looks different. App: Set Dose Reminder Type in the dose amount. It can be anything from 0.1 to 100.0 units. It’s 15 U in this example. LBL014003 Rev 001 Dexcom G6 User Guide… -
Page 69
The steps below show how to enter insulin on the receiver. Unlike the app, you can only log one kind of insulin and you can’t set up reminders. Receiver: Enter Insulin Tap Add event. Receiver: Enter Insulin Tap Insulin. LBL014003 Rev 001 Dexcom G6 User Guide… -
Page 70
Tap arrows to enter Units, up to 250. When you tap the arrow, number starts at last number entered. This example uses 10.35 Units. Receiver: Enter Insulin Tap Edit Date/Time Receiver: Enter Insulin LBL014003 Rev 001 Dexcom G6 User Guide… -
Page 71: Other Events
Oops! Entered an event incorrectly? Maybe you entered the wrong number of insulin units, or forgot to change the time before you saved it. Use the Events screen to delete and re-enter incorrect events you entered on your app. You cannot edit or delete events entered on your receiver. LBL014003 Rev 001 Dexcom G6 User Guide…
-
Page 72
Events you added have a red icon, which shows they can be deleted. Apple (shown below): Red icon is a circle on the left. Android: Red icon is a trash can on the right. Apple LBL014003 Rev 001 Dexcom G6 User Guide… -
Page 73: View Events
Turn your smart device to landscape to view your events — carbs, exercise, and health. At the bottom of the screen are the insulin doses you recorded. Touch and hold a spot on the screen to see detailed information for that time. Landscape shows event details. Insulin is at the bottom. LBL014003 Rev 001 Dexcom G6 User Guide…
-
Page 74: What’s Covered And What’s Coming
Followers to access your trend graph, they too will be able to view your Events. See Chapter 12 for more information. Events entered into your receiver can only be viewed on a Dexcom report. There are no markers on your receiver screen and they do not transfer to your app.
-
Page 75: Chapter 10: Alarm And Alerts
• Signal Loss When making treatment decisions using your G6, it’s best to keep your alerts turned on. Your Urgent Low Soon, Low, High, and Signal Loss Alerts are on when you set up your display device. The Rise and Fall Rate Alerts are off. Later in this chapter, you’ll learn how to customize them.
-
Page 76
The alarm lets you know when your reading drops to or below 55 mg/dL. Think of it as a safety net: Your glucose level is dangerously low — take action now! What you hear, feel, and see • Initial alarm: Vibrates 4 times • Until confirmed: Vibrates and beeps 4 times every 5 minutes. App Notification LBL014003 Rev 001 Dexcom G6 User Guide… -
Page 77
• Until confirmed: Vibrates and beeps 6 times every 5 minutes. • Updates: 15 minutes later, you get another Urgent Low Soon Alert if you’re still falling so quickly you’ll be at or below 55 mg/dL within 20 minutes App Notification LBL014003 Rev 001 Dexcom G6 User Guide… -
Page 78
During initial setup, you set your Low Alert level. What you hear, feel, and see • Initial alert: Vibrates 3 times • Until confirmed: Vibrates and beeps 3 times every 5 minutes. App Notification Receiver LBL014003 Rev 001 Dexcom G6 User Guide… -
Page 79
During initial setup, you set your High Alert level. What you hear, feel, and see • Initial alert: Vibrates 2 times • Until confirmed: Vibrates and beeps 2 times every 5 minutes App Notification LBL014003 Rev 001 Dexcom G6 User Guide… -
Page 80
• Until confirmed: Vibrates and beeps 2 times every 5 minutes Fall Rate Alert • Initial alert: Vibrates 3 times • Until confirmed: Vibrates and beeps 3 times every 5 minutes App Notification LBL014003 Rev 001 Dexcom G6 User Guide… -
Page 81
What you hear, feel, and see • Initial alert: Vibrates once • Until confirmed: Vibrates and beeps once every 5 minutes • All other system alerts also vibrate and beep once App Notification LBL014003 Rev 001 Dexcom G6 User Guide… -
Page 82: Check In With Kelly
I love the Urgent Low Soon! With it, I can prevent lows instead of just react to them. It’s so much healthier for Kelly and so much less stressful for all of us. LBL014003 Rev 001 Dexcom G6 User Guide…
-
Page 83: Confirming Alarm/Alerts
If you want to get repeated alerts when you stay in the alert range, use Repeat, explained below. Your Urgent Low Alarm will always repeat even after confirming if your glucose levels do not return to your target range. You can’t change your Urgent Low Alarm. App Notification Receiver Notification LBL014003 Rev 001 Dexcom G6 User Guide…
-
Page 84: Customizing Your Alerts Overview
Alert repeats to let you know you’re still high and might want to take more insulin. On the other hand, if the 2 hours pass and you’re back in your target range, your High Alert won’t repeat. We’ll also change your sound to Door Bell in the app and Normal in the receiver. App: Customizing Alerts App: Customize Alerts LBL014003 Rev 001 Dexcom G6 User Guide…
-
Page 85
Your high alert level shows. If your high alert was off, it would show Off instead. Tap High to see its settings. App: Customize Alerts This screen shows your current High alert settings. Alerts have: • On/off switch • Notify me options • Sound options App: Customize Alerts LBL014003 Rev 001 Dexcom G6 User Guide… -
Page 86
• Apple (shown below): Tap Back. • Android: Tap Save. App: Customize Alerts Tap Repeat to change how often your High Alert repeats after confirming. Repeats only if you stay above your high glucose level. LBL014003 Rev 001 Dexcom G6 User Guide… -
Page 87
Repeat shows how often you’ll get notified. App: Customize Alerts Tap Sound to customize alert sound. App: Customize Alerts Tap option you want — in this example, Door Bell — to change and hear sample of sound setting. LBL014003 Rev 001 Dexcom G6 User Guide… -
Page 88
Follow these steps to change your receiver alerts. In this example, we’ll be changing the High Alert setting to 190 mg/dL, repeating every 2 hours. Later, we’ll change the sound, too. Receiver: Customize Alerts Tap Menu. Receiver: Customize Alerts Tap Settings. LBL014003 Rev 001 Dexcom G6 User Guide… -
Page 89
Receiver: Customize Alerts Tap High. Receiver: Customize Alerts Check High Alert is on. Description This screen shows your current High Alert settings. Receiver: Customize Alerts Tap Level to set the High Alert level. LBL014003 Rev 001 Dexcom G6 User Guide… -
Page 90
Tap Repeat to change how often your High Alert repeats after initial alert and confirm. Receiver: Customize Alerts Tap arrows — in this example, the up arrow to 120 minutes, or 2 hours. Repeat range is 15 minutes to 4 hours. LBL014003 Rev 001 Dexcom G6 User Guide… -
Page 91
This list shows the different alarm/alert sounds available on the receiver, starting with the quietest. Receiver Sound: Vibrate Vibration only. No sound (except your receiver vibrating). Exceptions: Urgent Low Glucose Alarm and Urgent Low Soon Alert always beep and vibrate. LBL014003 Rev 001 Dexcom G6 User Guide… -
Page 92
Repeats Urgent Low Alarm and Urgent Low Soon Alert every 5 seconds until confirmed or reading improves. Medium volume beeps. Receiver: Test Sound Sample sound setting before selecting. This does not select your sound; it just lets you hear it. To select sound, see below. LBL014003 Rev 001 Dexcom G6 User Guide… -
Page 93
This list shows how to change your sound and try it out. Receiver: Customize Sounds Tap Menu. Receiver: Customize Sounds Tap Settings. Receiver: Customize Sounds Tap Sounds. Receiver: Customize Sounds Selected sound has checkmark. Default is Normal. Tap your choice. LBL014003 Rev 001 Dexcom G6 User Guide… -
Page 94: Why Customize Alerts
Are you concerned because you go high too often? Or do you want to know when you go low but don’t feel it? Maybe you want to bring your A1C down? Talk to your HCP about using your G6 to optimize your health.
-
Page 95
Low Alert setting to get Kelly’s attention while she can still think clearly enough to act on it and while there’s time for her to eat something to avoid a low. LBL014003 Rev 001 Dexcom G6 User Guide… -
Page 96: App: Alert Schedule
We’ll set up your High and Low levels first, then change the scheduled High Alert to vibrate. App: Setting Up Alert Schedule App: Set Up Alert Schedule Tap Settings. App: Set Up Alert Schedule Tap Alerts. App: Set Up Alert Schedule LBL014003 Rev 001 Dexcom G6 User Guide…
-
Page 97
Tap Next. Android: Selecting a time looks different. App: Set Up Alert Schedule Scroll to 5 pm, when your workday ends. Tap Next. Android: Selecting a time looks different. App: Set Up Alert Schedule LBL014003 Rev 001 Dexcom G6 User Guide… -
Page 98
During the days and times this schedule is in effect, you’ll get your High Alert when your glucose reading reaches 200 mg/dL. Tap Next. App: Set Up Alert Schedule Review the settings for your Alert Schedule. LBL014003 Rev 001 Dexcom G6 User Guide… -
Page 99
When Alert Schedule is on, there are two groups of settings in the Alerts menu: General and Scheduled. • General shows your settings during the days and times that aren’t in a schedule • Schedule shows settings for days and times that are scheduled In the Scheduled section, tap High. LBL014003 Rev 001 Dexcom G6 User Guide… -
Page 100: What Was Covered And What’s Coming
10.9 What’s Covered and What’s Coming Now You Can: • Define alarm and alerts • Recognize different alarm/alerts • Turn alerts on and off • Describe what to do when you get a Signal Loss Alert LBL014003 Rev 001 Dexcom G6 User Guide…
-
Page 101
• Customize your alerts on your app and receiver • Adjust your alert sounds • Use Repeat to avoid insulin stacking What’s Next? Next we’ll talk about how to use your G6 to make treatment decisions. LBL014003 Rev 001 Dexcom G6 User Guide… -
Page 102: Chapter 11: Treatment Decisions
Working with your HCP, define your target glucose range and your alert settings. Discuss how to stay within your target using the G6. Let your HCP guide you through the system features, including adjusting your alert settings to match your needs and goals, working with readings and trend arrows for treatment decisions, and managing your diabetes with the system.
-
Page 103
• How can you improve? 11.4 When to Use Your Meter There are times when you need to rely on your meter instead of your G6. When in Doubt, Get Your Meter Out Anytime you look at your home screen and think, “Oh! That’s not the number I thought I would see,”… -
Page 104: Using Your G6 For Treatment Decisions
You may have a number but not an arrow or vice versa. If that happens, use your meter. WARNING Do: Only make treatment decisions when your G6 shows both an arrow and a number. Why: No number, no arrow, no G6 treatment decisions. Consequences: You could have a severe low or high glucose event.
-
Page 105
Actions to consider when you are: • Low: Eat. Did you have too much insulin or exercise? • High: Watch and wait. Did you have too much insulin or exercise? • In target range: Eat LBL014003 Rev 001 Dexcom G6 User Guide… -
Page 106: Check In With Jake And Kelly
Treatment Decisions: No Arrow No arrow means you can’t use your G6 to make a treatment decision. Use your meter. 11.7 Check In With Jake and Kelly How do you use the trend arrow? Let’s check in with Jake and Kelly to see how they use it to fine-tune their treatment decisions.
-
Page 107: You Decide
An hour ago, you drank orange juice to treat a low glucose reading. Although you’re within your target range, as you sit down for dinner, you look at your G6 and see your trend arrow pointing down. Using the number and arrow below, what treatment decision would you make?
-
Page 108: What’s Covered And What’s Coming
• Identify when you can use your G6 in treatment decisions • Describe the importance of alarm/alerts in treatment decisions • Tell when you shouldn’t make a treatment decision using the G6 • Recognize when you should watch and wait before treating What’s Next?
-
Page 109: Chapter 12: Share Information With Your Support Team
To use Share, you and your Followers must have smart devices connected to the Internet. Followers also need the Dexcom Follow app installed. Share is not available on the receiver. LBL014003 Rev 001 Dexcom G6 User Guide…
-
Page 110
(simultaneous voice and data)? If not, during phone calls, you may not be able to share information; likewise, your Followers may not be able to get your information if they are on their phones. Dexcom Share and Follow will exchange any information missed after the phone call has ended •… -
Page 111
App: Set Up Share Tap Next. App: Set Up Share Android: The next two screens let you give permission for the app to run in the background. Tap I Understand, then Yes. LBL014003 Rev 001 Dexcom G6 User Guide… -
Page 112
App: Set Up Share Tap Next. App: Set Up Share Tap Let’s Get Started. LBL014003 Rev 001 Dexcom G6 User Guide… -
Page 113
App: Set Up Share Now invite people to Follow you. In the next steps, you’ll have Share send your Follower an invitation email. Your Follower needs to install the Dexcom Follow app on a display device that receives email. Tap Invite Followers App: Set Up Share Enter the Follower’s nickname and email address. -
Page 114
But your Follower can change it to notify when your reading goes below 75 mg/dL for 45 minutes. If the Follower isn’t getting data, they get notified after an hour. Tap the No More Data switch or the For More Than to customize these settings. LBL014003 Rev 001 Dexcom G6 User Guide… -
Page 115
Tap Next. App: Set Up Share Review Follower’s settings. Tap Send Invitation. LBL014003 Rev 001 Dexcom G6 User Guide… -
Page 116
The Followers List shows the status of each of your Followers and lets you invite new ones. Followers List Icons Invite New Follower Follower Didn’t Accept Invitation Yet Follower Didn’t Accept Invitation Within 7 Days. To re-invite, tap Add Follower. Follower Gets Notification(s) Follower Sees Trend Graph LBL014003 Rev 001 Dexcom G6 User Guide… -
Page 117
Dexcom Follow Follow Description Your Followers must download and install the Dexcom Follow App. They get a link to it in their invitation email or they can find it in their app store. Followers then have a window into your CGM information. -
Page 118
(simultaneous voice and data)? If not, during phone calls, you may not be able to share information. Likewise, your Follower may not be able to get your information if they are on a call. Dexcom Share and Follow will exchange any information missed after the phone call has ended. -
Page 119
Your Follower can use the screen below to customize notifications. For example, this Follower wants to know if you go below 70 mg/dL for more than 30 minutes. He also wants to be re-notified every 2 hours if you stay under 70. LBL014003 Rev 001 Dexcom G6 User Guide… -
Page 120: Check In With Jake And Kelly
I checked and they were right—Oops. My bad. I’d dropped. I popped a couple of glucose tabs, excused myself from my friend and the blackjack table, went straight to the casino’s store, and texted everyone back once I’d bought a snack. LBL014003 Rev 001 Dexcom G6 User Guide…
-
Page 121: Clarity Overview
Identify Share’s status by icon color o Set up Share o Invite Followers o Determine which CGM information to share o Change Follower settings o Tell Followers how to set up Follow • Describe CLARITY reports LBL014003 Rev 001 Dexcom G6 User Guide…
-
Page 122
What’s Next? In the next chapter, you’ll learn how to end a typical 10-day sensor session, along with removing the sensor and transmitter. LBL014003 Rev 001 Dexcom G6 User Guide… -
Page 123: Chapter 13: End Sensor And Transmitter Sessions
6 hours before (shown below), 2 hours before, and 30 minutes before • Clock counts down until session ends • Continue to get alarm/alerts and readings • You can end session early or wait App Notification LBL014003 Rev 001 Dexcom G6 User Guide…
-
Page 124
Sensor Session Over App: Open app to confirm. Receiver: Tap OK to confirm. What it means: • Sensor session is over • You won’t get alarm/alerts or readings until you replace sensor App Notification LBL014003 Rev 001 Dexcom G6 User Guide… -
Page 125: Remove Sensor
You’ll receive notifications as it nears the end of its battery life. PRECAUTION Don’t When ending a session, don’t throw away the transmitter Why: Transmitter is reusable and can be used until the system notifies you the transmitter battery is about to expire. LBL014003 Rev 001 Dexcom G6 User Guide…
-
Page 126
Grasp the wide rounded edge of the holder. Bend holder edge down to break it and release the transmitter. Remove Sensor and Transmitter Pull transmitter straight out. Remove Sensor and Transmitter Keep transmitter to use with next sensor. LBL014003 Rev 001 Dexcom G6 User Guide… -
Page 127: End Of Transmitter Battery
Just put the transmitter in the transmitter holder and start a new sensor. The steps below show you how. App: Pair New Transmitter App: Pair New Transmitter LBL014003 Rev 001 Dexcom G6 User Guide…
-
Page 128
Turn transmitter box upside down on a flat surface with barcodes facing up. Center longest barcode in green brackets. c. Checkmark confirms you entered the SN. Manual instructions: a. Tap Manually Enter. LBL014003 Rev 001 Dexcom G6 User Guide… -
Page 129
Insert sensor and attach transmitter. See Chapter 6 for more information. Receiver: Pairing New Transmitter Receiver: Pair New Transmitter Tap Menu. Receiver: Pair New Transmitter Tap Settings. Receiver: Pair New Transmitter Tap Transmitter. LBL014003 Rev 001 Dexcom G6 User Guide… -
Page 130
Receiver: Pair New Transmitter Tap Pair New. Receiver: Pair New Transmitter Find transmitter SN on back of box or transmitter. Receiver: Setup Enter your transmitter SN. Tap Save. LBL014003 Rev 001 Dexcom G6 User Guide… -
Page 131: What’s Covered And What’s Coming
• Identify Replace Sensor notifications at the end of your sensor session • Remove your sensor and save your transmitter if needed • Replace and pair transmitter What’s Next? In the next chapter, we’ll talk about solutions to common issues. LBL014003 Rev 001 Dexcom G6 User Guide…
-
Page 132: Chapter 14: Troubleshooting
• If you get one of these alerts, you won’t get the other alert for 30 minutes. • See Chapter 10. No Alarm/Alerts: Display Device Off Problem • Not getting alarm/alerts Solution • Make sure display device is on. LBL014003 Rev 001 Dexcom G6 User Guide…
-
Page 133
• Make sure display device battery is charged. o App: See your smart device instructions for more information. o Receiver: See below for charging instructions. • App: Make sure your app is running. Tap Dexcom icon to restart. No Alarm/Alerts: Notifications Off Problem •… -
Page 134
• Tap alert to get more information. • Wait up to 30 minutes while the system fixes itself. If not corrected after 30 minutes, you’ll see Sensor Failed. Contact Technical Support (see beginning of chapter). LBL014003 Rev 001 Dexcom G6 User Guide… -
Page 135
• Not getting readings Solution • No glucose alarm/alerts or readings. Use meter. • Tap alert to get more information. • Your sensor does not work. Contact Technical Support (see beginning of chapter). App notification Receiver LBL014003 Rev 001 Dexcom G6 User Guide… -
Page 136
• Open device Bluetooth settings. • Delete all Dexcom entries from My Devices. • Pair transmitter. • Wait up to 30 minutes. System may correct problem itself and continue to show readings. More than 30 minutes? Contact Technical Support (see beginning of chapter). -
Page 137
• No alarm/alerts or readings until warmup is done and you’ve entered two calibrations. Use meter. • See Chapter 6. • Have you been on this screen for more than 2 hours? Contact Technical Support (see beginning of chapter). LBL014003 Rev 001 Dexcom G6 User Guide… -
Page 138: Applicator
Receiver 14.3 Applicator Orange Button Stuck Problem • Can’t push the applicator orange button in Solution • Fold and break off safety guard before pushing orange button • See Chapter 6 Inserting Hurts LBL014003 Rev 001 Dexcom G6 User Guide…
-
Page 139
• Backing won’t come off the patch Solution • Lift the backing by the tab Adhesive Patch Won’t Stick Problem • The adhesive patch won’t stay on your skin for the entire sensor session Solution LBL014003 Rev 001 Dexcom G6 User Guide… -
Page 140
• Don’t panic! • Remove applicator and adhesive patch: 1. Gently pull applicator up until you see adhesive patch 2. Using your finger or thumb, hold front edge of patch and peel from skin LBL014003 Rev 001 Dexcom G6 User Guide… -
Page 141: App
• You can’t download the app from the app store on your smart device. Did you get a new smart device? Make sure it’s compatible with the app. Solution • Check dexcom.com/compatibility for a list of smart devices that work with the G6 app. • Stop your sensor session on your current smart device. See Chapter 13.
-
Page 142
• Connect receiver to charger — this turns it on Can’t See Screen — Change Brightness Problem • The receiver screen is too dim or bright Solution • Go to Menu>Brightness and change it. LBL014003 Rev 001 Dexcom G6 User Guide… -
Page 143
• Contact Technical Support (see beginning of chapter). 1. Plug receiver into wall to charge. The light shows the receiver is charging. 2. Tap Test Now quickly before screen disappears. If screen disappears too quickly, go to first step. LBL014003 Rev 001 Dexcom G6 User Guide… -
Page 144
You’re done. Don’t go on to the next step. 6. Uh-oh. You tested your speaker and vibrations and determined that they don’t work. You won’t hear alarm/alerts. Contact Technical Support (available 24/7) at: LBL014003 Rev 001 Dexcom G6 User Guide… -
Page 145: Low Battery
• When the receiver and transmitter reconnect after a temporary shutdown, Signal Loss, or similar issue, up to 3 hours of missed readings can fill in on the graph. • Shutting down the receiver does not extend your sensor session past the 10 days. LBL014003 Rev 001 Dexcom G6 User Guide…
-
Page 146
Problem • Dexcom stripe screen displays for no reason Solution • Wait a few seconds • If Dexcom stripe screen (see below) displays for more than 3 minutes, contact Technical Support (see beginning of chapter) System Check Passed Screen Problem •… -
Page 147: Calibration
• If same code displays again, write it down and contact Technical Support (see beginning of chapter). 14.6 Calibration G6 Reading ≠ Meter Value Problem G6 reading and meter value don’t match Solution • Different body fluids give different numbers: o Meter measures glucose from blood. o Sensor measures glucose from interstitial fluid.
-
Page 148
If you calibrate again and still get this error, enter one more meter value. o Wait 15 minutes. o If no readings appear on the display, the sensor needs to be replaced. Contact Technical Support to report error (see beginning of chapter). App notification Receiver LBL014003 Rev 001 Dexcom G6 User Guide… -
Page 149: Transmitter
• No readings, alarm/alerts until transmitter is replaced Solution • No alarm/alerts or readings until fixed. Use meter. • After confirming alert, it won’t re-alert. • Contact Technical Support (see beginning of chapter). App notification LBL014003 Rev 001 Dexcom G6 User Guide…
-
Page 150
• App: For more information, tap Help. • If these solutions don’t fix the issue, sensor may not be inserted correctly. Contact Technical Support (see beginning of chapter) for replacement. App notification Receiver LBL014003 Rev 001 Dexcom G6 User Guide… -
Page 151
Receiver Transmitter Battery Low Alert: Critically Low Problem • Your transmitter battery may expire before the end of this sensor session Solution • Order new transmitter using your normal process. See Appendix B. LBL014003 Rev 001 Dexcom G6 User Guide… -
Page 152: Sensor
• To end the sensor session early in the app, go to Stop Sensor in the Settings menu. To end the sensor session early in the receiver, go to Stop Sensor in the Menu. Menu items change: During sensor session, menu includes Stop Sensor. Between LBL014003 Rev 001 Dexcom G6 User Guide…
-
Page 153: Share
Troubleshooting Share Status Issues The Share status bar is a useful tool. It can help identify if there’s a problem and Dexcom Share is not working. See below for troubleshooting tips for the Share status bar. Whether or not Dexcom Share is working and your Followers are getting glucose alarm/alerts, always use your G6 display device for your readings and alerts.
-
Page 154
Problem • Share isn’t sharing because Dexcom server is offline Solution • Wait. Dexcom will fix the issue as soon as possible. For more information, contact Technical Support (see beginning of chapter). Share App LBL014003 Rev 001 Dexcom G6 User Guide… -
Page 155
Congratulations! Great job working your way through this guide! Make sure to check out the appendices for additional information that may be useful to you. And remember, you can always refer back to this guide as you get used to your G6 or if you have any questions in the future. -
Page 156: Appendix A: Glossary
Using a blood sample from non-fingertip (alternate) sites such as the palm, Testing forearm, or upper arm for meter values. Don’t use alternative site testing to calibrate the G6. Only use fingerstick measurements. Android Operating system used for smart devices.
-
Page 157
It’s important to treat hypoglycemia. If left untreated, hypoglycemia can lead to serious complications. The default Low Alert in the G6 is set to 80 mg/dL. Consult your HCP to determine the appropriate hypoglycemia setting for you. Indications How, for what purposes, and under what circumstances you should use the Operating system used for Apple smart devices. -
Page 158
Rooted on a smart device. The removal poses a security risk and data may become vulnerable. Do not install the G6 app on a jailbroken or rooted smart device. It may not work correctly. mg/dL Milligrams per deciliter. The standard unit of measure for BG readings in the United States. -
Page 159: Appendix B: Need Help? You’re Not Alone
Toll: 1.858.200.0200 B.2 Dexcom Patient Care Team The Dexcom Patient Care Team is a group of Certified Diabetes Educators (CDE) and Registered Nurses (RNs) offering you customer care and individualized education services around Dexcom CGM, including: • Product training — both initial and ongoing (for example, how to use a specific feature) •…
-
Page 160: Corporate
• Phone: o Toll Free: 1.888.738.3646 o Toll: 1.858.200.0200 o Fax: 1.877.633.9266 B.4 Corporate • Internet: dexcom.com • Address: 6340 Sequence Drive San Diego, CA 92121 LBL014003 Rev 001 Dexcom G6 User Guide…
-
Page 161: Going Through Security
Going through security often means you and your belongings go through a metal detector, x-ray machine, or even a body scanner. In this section, you’ll find out which are OK for your G6 components and which haven’t been tested and should be avoided.
-
Page 162: Appendix D: Extend Your App
If you don’t see readings while using these features, open your G6 app. D.1 Today View (Apple) You can check your G6 in your Apple Today view, even when your smart device is locked. Open Today View by swiping right from the left edge of the Home or Lock screens.
-
Page 163: Smart Watches
Quick Glance is on by default. Turn it off in the app: Settings > Quick Glance. D.3 Smart Watches Check your G6 on your Apple or Android smart watch. Suggested Use Using a smart watch with your system may change how you get alarm/alerts.
-
Page 164: Appendix E: Take Care Of Your G6
Apple Watch Android Wear Setup Check your G6 on your Android Wear watch with the Dexcom G6 watch face. See your watch instructions for details about changing the watch face. Android Wear Appendix E: Take Care of Your G6 E.1 G6 Maintenance Applicator/Sensor •…
-
Page 165
Don’t use aerosol sprays, solvents, alcohol wipes, or abrasives. o Turn off and unplug from USB cable before wiping. All G6 Components • To keep your G6 working safely, do not change any G6 component. WARNING Don’t: Don’t use a transmitter that is damaged or cracked. -
Page 166
When you plug in the receiver to charge, the Speaker Test screen displays. See Chapter 14 for more information. Tap Skip Test to return to the Home screen. Keep charging until home screen displays battery icon filled in. LBL014003 Rev 001 Dexcom G6 User Guide… -
Page 167: Storage
• Charging: Charge battery before each new sensor session. o Battery can only be charged using the Dexcom adapter/wall charger — don’t use a computer port or an external USB hub. o Don’t block access to the charger.
-
Page 168
You can update and/or check: • CGM information: Insertion date and time, last calibration, transmitter SN • Software versions: Transmitter and receiver • Insulin: Reminders for long-acting insulin doses • Support: Online help, account, and contact information LBL014003 Rev 001 Dexcom G6 User Guide… -
Page 169
Receiver: Check CGM Settings Receiver: Check CGM Settings Tap Menu. Receiver: Check CGM Settings Tap Settings. Receiver: Check CGM Settings You can update and/or check: • Alerts and sounds: Customize how and when you get alerts LBL014003 Rev 001 Dexcom G6 User Guide… -
Page 170: System Disposal
Different places have different requirements for disposing of electronics (receiver and transmitter) and parts that have come in contact with blood or other bodily fluids (sensor). Follow your area’s local waste management requirements. LBL014003 Rev 001 Dexcom G6 User Guide…
-
Page 171: Appendix F: Warranty
• Installation, maintenance, and service of products or services other than the CGM system (which may be subject to a separate limited warranty), whether provided by Dexcom or any other party; this includes your cell phone or smart device and your connection to the Internet.
-
Page 172
Dexcom shall not be liable for any special, incidental, consequential, or indirect damages, however caused, and on any theory of liability, arising in any way out of the sale, use, misuse, or inability to use, any Dexcom G6 or any feature or service provided by Dexcom for use with the Dexcom G6. -
Page 173
Dexcom shall not be liable for any special, incidental, consequential, or indirect damages, however caused, and on any theory of liability, arising in any way out of the sale, use, misuse, or inability to use, any Dexcom G6 or any feature or service provided by Dexcom for use with the Dexcom G6. -
Page 174: Appendix G: Technical Information
IP28: Protection against insertion of large objects and immersion in water for up to 8 feet for 24 hours Moisture Protection Protection against submersion in water Protection Against Type BF applied part Electrical Shock LBL014003 Rev 001 Dexcom G6 User Guide…
-
Page 175
Data Communication Range 20 feet The G6 is an M-PED (Medical-Portable Electronic Device), which meets the FAA RTCA /DO-160 edition G Section 20 Category T and Section 21, Category M. It can be used on aircraft according to the directions provided by the operator of the aircraft. -
Page 176
Power Supply Input typical commercial or hospital Lines environment. (30% dip in ) for (30% dip in ) for 25 cycles 25 cycles IEC 61000-4-11 for 250 cycles for 250 cycles IEC 60601-1-11 LBL014003 Rev 001 Dexcom G6 User Guide… -
Page 177
Guidance and Manufacturer’s Declaration — Electromagnetic Immunity The G6 is intended for use in the electromagnetic environment specified in the next table. The customer or the user of the G6 should ensure that it is used in such an environment. -
Page 178
Immunity Test Compliance Electromagnetic Environment Guidance The G6 is suitable for use in all establishments including RF Emissions domestic and those directly connected to the public low- Class B voltage power supply network that supplies buildings used for CISPR 11 domestic purposes. -
Page 179: Fcc Requirements
• Connect the equipment into an outlet on a circuit different from that to which the receiver is connected • Consult the dealer or an experienced radio/TV technician for help This portable transmitter with its antenna complies with FCC/IC RF exposure limits for general population/uncontrolled exposure. LBL014003 Rev 001 Dexcom G6 User Guide…
-
Page 180: Appendix H: Label Symbols
The following symbols may be found on the sensor, transmitter, and receiver package labels. These symbols tell you about the proper and safe use of the Dexcom G6. Some of these symbols may not have meaning in your region and are listed for informational purposes only.
-
Page 181
Immersion in Water Keep Dry Manufacturer Marking Certifies Device Meets European Council Directive 93/42/EEC MR Unsafe Non-Ionizing Radiation Part/Catalog Number Prescription Required Refer to Instruction Manual/Booklet Serial Number Ship-By Date Sterile by Radiation STERILE R LBL014003 Rev 001 Dexcom G6 User Guide… -
Page 182
Temperature Limitation Type BF Applied Part Use By Date LBL014003 Rev 001 Dexcom G6 User Guide… -
Page 183: Appendix I: Alarm/Alerts Vibrations And Sounds
Sensor Expiring Your session will end in less Silent than 2 hours. Alert You will not receive alerts, alarms, or sensor glucose readings after this time unless you replace your sensor. LBL014003 Rev 001 Dexcom G6 User Guide…
-
Page 184
To ensure your Dexcom CGM app functions correctly please follow these steps to free up storage: Exit this app Go to Settings > General > Usage > Manage Storage Free unnecessary storage LBL014003 Rev 001 Dexcom G6 User Guide… -
Page 185
Override Mute Title Sound Vibration Urgent Low Your sensor glucose reading Urgent Notify Below (default Glucose is below <glucose reading>. is 55 mg/dL) Alarm Repeat (default is 30 minutes) Sound (default is Urgent Low) LBL014003 Rev 001 Dexcom G6 User Guide… -
Page 186
Sound (default is Apple NO readings. Alert Signal Loss Alert) You will not receive alerts, Signal Enable/Disable Readings alarms, or sensor glucose Loss (default is disabled) Alert readings. Alert Sound (default is Signal Loss Alert) LBL014003 Rev 001 Dexcom G6 User Guide… -
Page 187
1 — 1 second vibe 1 — 1 second Required glucose reading. medium tone beep Calibration Enter your 2nd blood 1 — 1 second vibe 1 — 1 second Required glucose reading. medium tone beep LBL014003 Rev 001 Dexcom G6 User Guide… -
Page 188
Your sensor session 1 — 1 second vibe 1 — 1 second Sensor Shutoff Expired has ended. medium tone beep Alert Replace your sensor. You will not receive alerts, alarms, or sensor glucose readings. LBL014003 Rev 001 Dexcom G6 User Guide… -
Page 189
Pair a new transmitter. System Code: <error code> Silent Silent Recoverable error Check Enter 1 — 1 second vibe 1 — 1 second Set time alarm Date/Time medium tone beep LBL014003 Rev 001 Dexcom G6 User Guide… -
Page 190
Fall Rate Falling 3 — 1/3 second vibes, 3 — 1/3 second low Can be turned on/off by Alert 1/3 seconds apart tone beeps, 1/3 the user seconds apart LBL014003 Rev 001 Dexcom G6 User Guide… -
Page 191
Alert sensor glucose readings. Please wait… Urgent Low <EGV value> 4 – 200 ms vibes 4 — 1/4 second low EGV <= 55 mg/dL Glucose tone beeps, 1/4 Alarm seconds apart LBL014003 Rev 001 Dexcom G6 User Guide… -
Page 192
Alerts, 190 Glucose Information Rate of change arrows, 144 Trend screen, 135 Rate of change arrows, 144 Receiver Initial setup, 62 Overview, 61 Trend screen, 139 Safety statement Contraindications, 21 Indications, 20 Warning, 22 LBL014003 Rev 001 Dexcom G6 User Guide… -
Page 193
Preventing sensor failures, 120 Receiver: starting a Session, 82 Starting a, 80 Starting with app, 80 Warmup, 87 Share Followers, 36 Settings, 54 Setup, 58 Troubleshooting, 119 What is, 34 Signal Loss Alert, 218 LBL014003 Rev 001 Dexcom G6 User Guide… -
Page 194
© 2017 Dexcom, Inc. All rights reserved. Covered by patents www.dexcom.com/patents. Dexcom, Dexcom Follow, Dexcom G4 PLATINUM, Dexcom G5, Dexcom G6, Dexcom Share, G6, are either Bluetooth registered trademarks or trademarks of Dexcom, Inc. in the United States and/or other countries.
Содержание
- Как настроить xdrip для libre freestyle
- Что вам понадобится
- Особенности
- Устранение неполадок
- Источники
- Настройки xDrip+
- Основные настройки для всех систем мониторинга
- Идентификатор ресивера
- xDrip+ & Dexcom G6
- Версия xDrip+ в зависимости от серии трансмиттера G6.
- Настройки для работы с Dexcom
- Упреждающие перезапуски не рекомендуются
- Первое подключение трансмиттера G6
- Состояние батареи трансмиттера
- Увеличение срока работы трансмиттера
- Замена трансмиттера
- Новый сенсор
- Получение кода сенсора
- Устранение неполадок Dexcom G6 и xDrip+
- Проблемы сопряжения с трансмиттером
- Проблемы при запуске нового сенсора
- xDrip+ & Libre Freestyle
- Специфические настройки Libre
- Уровень батареи Libre smart reader
- Подключите трансмиттер Libre и запустите сенсор
Как настроить xdrip для libre freestyle
FreeStyle Libre 2 может передавать данные в xDrip+ без сканирования сенсора через NFC и без использования дополнительных устройств-трансмиттеров (MiaoMiao, BluCon, LimiTTer и т.д.).

Что вам понадобится
- смартфон на Android 5.0 или выше с функцией NFC (если настраиваете ребенку, NFC должен быть именно в смартфоне ребенка);
- новый сенсор FreeStyle Libre 2.
Если вы уже используете сенсор Libre 2, подождите, пока срок действия сенсора закончится. Все нижеописанное будет работать только начиная с нового сенсора, который вы активируете через взломанное приложение (НЕ через ридер).
Если в данный момент вы используете официальное приложение FreeStyle LibreLink, имейте в виду, что в ходе этой процедуры оно будет переустановлено и связь с текущим сенсором потеряется. Это значит, что он перестанет передавать сигналы по Bluetooth на смартфон. Его можно будет сканировать только через NFC. Поэтому, независимо от того, используете ли вы смартфон или ридер, подождите, пока текущий сенсор закончится.

2. Установите скачанный APK-файл.

3. Запустите приложение и пройдите все этапы начальной настройки. Не запускайте сенсор!


4. Откройте левое меню — Сигналы и дайте приложению все запрошенные разрешения. Альтернативный способ (если приложение не запрашивает разрешения) — зайдите в настройки смартфона, откройте список приложений, найдите LibreLink, откройте Разрешения и включите их все (Память и Местоположение). Если вы этого не сделаете, первый запущенный сенсор не будет ничего передавать по Bluetooth!


5. Убедитесь, что у смартфона включены Bluetooth, геолокация и NFC.

6. Скачайте и установите xDrip+ отсюда (установите самую первую версию в списке). Если это приложение уже установлено, все равно установите эту версию, не удаляя предыдущую.

7. Зайдите в xDrip+ — Настройки — Источник данных — выберите Libre2 (patched App).


8. Выйдите на главный экран xDrip+, откройте левое меню — Запуск датчика — Yes, today — Отметьте текущее время — ОК.
9. Установите новый сенсор Libre 2 и запустите его через LibreLink. Через 60 минут данные с сенсора начнут передаваться в xDrip+.
10. (Дополнительно) Настройте xDrip+ по своему желанию. Вы можете передавать данные на другие смартфоны и устройства (например, на смартфоны родителей), настроить сигналы тревоги, установить целевой диапазон и т.д.
11. Так как это новая экспериментальная функция, убедительно прошу написать о том, работает ли это у вас, насколько показания отличаются от глюкометра, с какими сложностями вы столкнулись и о любых проблемах мне: Telegram, ВКонтакте.
Особенности
- Если LibreLink выдаст ошибку сенсора (это бывает редко), вы сможете сканировать сенсор только через LimiTTer (в скором времени еще MiaoMiao и xDrip+).
- Для стабильного соединения рекомендуется время от времени (несколько раз в день) сканировать сенсор вручную через LibreLink. В противном случае возможно прекращение передачи данных через Bluetooth.
- Если ребенок случайно удалит LibreLink, то после переустановки данные, скорее всего, не будут передаваться по Bluetooth, а только через NFC.
- Сенсоры работают ровно 14 суток, ни минутой больше.
- Вам в любом случае придется ждать 60 минут при смене сенсора, это невозможно обойти.
Устранение неполадок
Если через час после активации сенсора он не начал передавать данные в xDrip+, но вы можете сканировать его через LibreLink, попробуйте следующее:
- убедитесь, что вы правильно выполнили все пункты инструкции;
- добавьте LibreLink и xDrip+ в исключения энергосбережения (на разных смартфонах это делается по-разному, обычно для этого нужно зайти в Настройки — Батарея (вместо этого может быть Оптимизация, Обслуживание, Питание или Энергосбережение), либо открыть в настройках список приложений и найти LibreLink, как в пункте 4 инструкции выше, но вместо Разрешений открыть Батарея — Оптимизация расхода — перевести приложение в категорию «Не оптимизированные»);
- подождите еще 1-2 часа, иногда данные начинают передаваться в xDrip+ не сразу;
- перезагрузите смартфон, обычно это помогает.
Если связь с сенсором периодически теряется, также попробуйте добавить LibreLink в исключения энергосбережения.
Источники
Автор не несет ответственности за любые последствия, возникшие в результате выполнения описанных ниже действий. На данный момент (18.07.2019) это новая функция, которая не была достаточно изучена. Никогда не используйте данные с сенсора CGM для изменения терапии, если не уверены в точности сенсора.
Источник
Настройки xDrip+
Если это еще не сделано, скачайте xDrip+.
** Эта документация относится только к xDrip + для Android. ** Существует приложение “xDrip for iOS”, которое не имеет ничего общего с исходным xDrip + для Android.
Для трансмиттеров G6, изготовленных после осени/конца 2018 года (серийный номер которых начинается с 80 или 81) пользуйтесь версией master .
Если серийный номер трансмиттера Dexcom G6 начинается с 8G. 8Н. или 8J. используйте одну из новейших ночных сборок.
Если в вашем телефоне работает Android 10 и у вас возникли трудности с xDrip + master попробуйте nightly build 2019/12/31 или новее .
Основные настройки для всех систем мониторинга
Правильно вводите адрес локатора вашего сайта (URL) включая S в конце https:// (не http://)
-> Сэндвич-меню (левый верхний угол домашнего экрана) -> Настройки-> Загрузка в облако-> Синхронизация с Nightscout (REST-API) -> Базовый URL
Отключите Автоматическую Калибровку Если отмечено поле Автоматическая Калибровка , одноразово активируйте Данные загрузки , а затем удалите флажок для Автоматической Калибровки и снова отключите Скачать данные , иначе ваши назначения (инсулин & углеводы) будут дважды добавлены в Nightscout.
Нажмите на Дополнительные опции
Отключите Загружать назначения и Восполнять пропущенные данные .
Предупреждение безопасности: Следует деактивировать “Загружать лечение/назначения” с xDrip, иначе в AAPS эти величины удвоятся, что приведет к неверному количеству активных углеводов COB и активного инсулина IOB.
Опция Оповещение о сбоях также должна быть отключена. Иначе вы будете получать сигнал каждые 5 минут если wifi/мобильная сеть слабые или сервер недоступен.
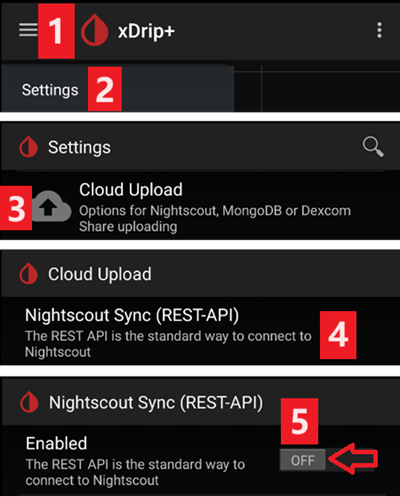
Взаимодействие с приложениями (Inter-app settings) (Трансляция) Для пользования AndroidAPS данные должны перенаправляться; вам следует активировать трансляцию xDrip+ в настройках Inter-App.
Для того чтобы не было расхождений между приложениями, необходимо активировать Отправлять отображаемое значение ГК .
Если вы также активировали Принимать назначения (Accept treatments) и трансляцию в AndroidAPS, то xDrip+ получит информацию об инсулине, углеводах и базальной скорости от AndroidAPS и сможет прогнозировать гипогликемию и т. д. более точно.

Идентификатор ресивера
Если вы обнаружили проблемы с локальной трансляцией (AAPS не получает значения ГК из xDrip +), перейдите в Параметры > Взаимодействие приложений > Идентификация получателя и введите info.nightscout.androidaps .
Внимание: Автокоррекция, как правило, меняет i на прописную букву. **Необходимо использовать только строчные буквы ** при вводе info.nightscout.androidaps . Прописная I не позволит AAPS получать данные ГК из xDrip+.

- Трансмиттер Dexcom G6 может одновременно подключаться к ресиверу Dexcom (или к помпе T:slim) и одному приложению на вашем телефоне.
- При использовании xDrip+ в качестве приемника сначала удалите приложение Dexcom. Невозможно одновременно подключить к трансмиттеру приложения xDrip+ и Dexcom!
- Если вам нужен функционал оригинального приложения Clarity и оповещения от xDrip +, пользуйтесь модифицированным приложением Dexcom с локальной передачей данных в xDrip +.
Версия xDrip+ в зависимости от серии трансмиттера G6.
- Для передатчиков G6, изготовленных после осени/конца 2018 года (серийный номер которых начинается с 80 или 81) пользуйтесь версией master .
- Если серийный номер трансмиттера Dexcom G6 начинается с 8G и 8Н попробуйте ночные сборки от 2019/07/28 или позднее.
Настройки для работы с Dexcom
Откройте настройки отладки G5/G6 -> Сэндвич-Меню (сверху слева на домашнем экране) -> Настройки -> Настройки отладки G5/G6 
Активируйте следующие параметры
- Использовать коллектор OB1
- Нативный Алгоритм (важно, если вы хотите использовать супер микроболюс SMB)
- Поддержка G6
- Разрешить разъединение OB1
- Разрешить OB1 инициировать сопряжение
Все другие опции должны быть отключены
Настройте уровень предупреждения о низком заряде батареи на 280 (внизу настроек отладки G5/G6)

Упреждающие перезапуски не рекомендуются
В трансмиттерах Dexcom чей серийный номер начинается с 8G, 8H, или 8J упреждающие перезапуски не работают и могут полностью убить сенсор!
Автоматическое продление работы сенсоров Dexcom ( упреждающие перезапуски, preemtive restarts ) не рекомендуется, так как может привести к скачкам значений ГК на 9 день после перезапуска.

Применение G6 немного сложнее, чем казалось раньше. Для правильного применения необходимо иметь в виду следующие моменты:
- Если вы используете нативные данные с кодом калибровки в xDrip или Spike, в целях безопасности не следует разрешать упреждающий (preemptive) перезапуск датчика.
- Если все же упреждающие перезапуски необходимы, то убедитесь, что вы делаете это в то время, когда можете следить за изменениями и калибровать при потребности.
- Если вы перезапускаете сенсор, делайте это либо без заводской калибровки для безопасных результатов в дни 11 и 12, либо будьте готовы калибровать и следить за изменениями.
- “Предварительное погружение” (установка сенсора намного раньше его старта в приложении) G6 с заводской калибровкой приведет к отклонениям в данных. Если вы все же делаете “предварительное погружение”, то для получения лучших результатов вам, вероятно, придется калибровать сенсор.
- Если вы не планируете отслеживать все возможные изменения, то лучше вернуться к традиционному режиму калибровки и использовать систему, как G5.
Подробнее о деталях и причинах этих рекомендаций читайте полную статью опубликованную в Tim Street на www.diabettech.com.
Первое подключение трансмиттера G6
Для второго и следующего трансмиттера смотрите Продление срока работы трансмиттера ниже.
Для передатчиков G6, изготовленных после осени/конца 2018 года (серийный номер которых начинается с 80 или 81) пользуйтесь версией master .
Если серийный номер трансмиттера Dexcom G6 начинается с 8G, 8Н bkb 8J попробуйте ночные сборки от 2019/07/28 или позднее.
Выключите оригинальный ресивер Dexcom (если используете).
Удерживайте на главном экране xDrip+ иконку капли крови для активации кнопки Мастер выбора источника ГК .
Использование Мастера выбора источника ГК обеспечивает настройки по умолчанию, включая OB1 & нативный режим
- Мастер позволит провести начальную настройку.
- Вам понадобится серийный номер трансмиттера, если вы пользуетесь им впервые.
Введите серийный номер нового трансмиттера (на упаковке трансмиттера или на его обратной стороне). Будьте осторожны, не путайте 0 (ноль) и O (прописную букву o).
![]()
Вставьте новый сенсор (только при замене)
Поместите трансмиттер в платформу сенсора
Если появляется сообщение с просьбой о сопряжении с “DexcomXX”, где “XX” — это последние два символа серийного номера передатчика. примите его (нажмите “pair”)
Не запускайте новый сенсор прежде чем на классической странице состояния не появится следующая информация Страница-> Состояние G5/G6-> PhoneServiceState:
- С трансмиттерами, серийный номер которых начинается с 80 или 81: “Got data hh:mm” (напр. “Got data 19:04 ”)
- С трансмиттерами, серийный номер которых начинается с 8G или 8H: “Got glucose hh:mm” (напр. “Got glucose 19:04 ”) или “Got no raw hh:mm” (i.e. “Got no raw 19:04”)

Нажмите старт сенсора (только при смене сенсора)
-> В нижней части экрана через несколько минут появится предупреждение о прогреве сенсора Осталось x,x часов .
-> Если серийный номер трансмиттера не начинается с 8G, 8H или 8J и в течение нескольких минут не появляется никаких указаний о времени прогрева сенсора, остановите и перезапустите сенсор.
Перезапустите коллектор (состояние системы — если не заменяете сенсор>
Не включайте оригинальный ресивер Dexcom (если им пользуетесь) до появления первых данных в xDrip+.
Удерживайте на главном экране xDrip+ иконку капли крови для активации кнопки Мастер выбора источника ГК .
![]()
![]()
![]()
![]()
Состояние батареи трансмиттера
- Статус батареи может быть виден в окне состояния системы (сэндвич-меню вверху слева на главном экране)
- Сделайте свайп влево, чтобы увидеть второй экран.

- Точные величины, когда наступает “смерть” трансмиттера из-за низкого заряда батареи, неизвестны. Следующая информация была размещена в сети после того, как передатчик “умер”:
- Пост 1: Дни передатчика: 151/Напряжение А: 297/Напряжение В: 260/Сопротивление: 2391
- Пост 2: передатчик дней: 249 / напряжение: 275 (на момент отказа)
Увеличение срока работы трансмиттера
Пока что не найдено способа продлить жизнь трансмиттеров, чей серийный номер начинается с 8G, 8H или 8J. То же относится и к трансмиттерам с серийным номером начинающимся с 81 и прошивкой 1.6.5. ** 27 ** (см. xDrip + — Состояние системы-G5/G6, как показано на снимке экрана выше ).
Для предотвращения трудностей при запуске сенсоров настоятельно рекомендуется продлить срок действия трансмиттера до 100-го дня первого использования.
-> Если серийный номер трансмиттера начинается с 81 с прошивкой 1.6.5. ** 27 ** переход за день 100 возможен только в том случае, если включен инженерный режим’и деактивирован ‘нативный режим’ (сэндвич-меню -> параметры-> Параметры отладки G5/G6-> нативный алгоритм), так как жесткий сброс трансмиттера невозможен.
При продлении срока действия трансмиттера работа сенсора будет остановлена. Поэтому проводить эту манипуляцию следует перед заменой сенсора или быть готовыми к тому, что состоится двухчасовая фаза его прогрева.
Остановите сенсор вручную через сэндвич-меню.
Переключитесь в инженерный режим :
- нажмите на пиктограмму шприца на главном экране xDrip+ справа
- затем нажмите на значок микрофона в нижнем правом углу
- В открывшемся текстовом окне впечатайте “включить инженерный режим”
- нажмите “Готово”
- Если включен Google Speak, вы можете дать голосовую команду: “enable engineering mode” (“включить инженерный режим”).
Зайти в настройки отладки G5 и убедитесь что использовать OB1 коллектор включен.
Дайте голосовую команду: “hard reset transmitter”(«жесткий сброс трансмиттера»)
Голосовая команда будет выполнена при следующем получении данных трансмиттера
Посмотрите на статус системы (сэндвич-меню -> системный статус) и убедитесь в результате
Через примерно 10 мин. вы можете переключиться на классический статус страницы (свайпом вправо) и нажать кнопку ‘Restart collector”. Это позволит обнулить счетчик дней без необходимости запуска нового сенсора.
Если на втором экране состояния системы вы видите сообщение “Состояние телефона: жесткий сброс возможно не произошел”, просто перезапустите сенсор и это сообщение должно исчезнуть.

Срок работы трансмиттера будет сброшен до 0 в случае успеха.
Замена трансмиттера
Для передатчиков G6, изготовленных после осени/конца 2018 года (серийный номер которых начинается с 80 или 81) пользуйтесь версией master .
Если серийный номер трансмиттера Dexcom G6 начинается с 8G, 8H или 8J, пользуйтесь одной из новых ночных сборок.
Выключите оригинальный ресивер Dexcom (если используете).
Остановить сенсор (только при смене сенсора)
Убедитесь, что он действительно остановлен:
На следующем экране “G5/G6 Status” найдите Queue Items ( Элементы в очереди ) на полпути вниз — там появится что-то вроде “Остановить Сенсор”
Подождите, пока это происходит — обычно в течение нескольких минут. Состояние сенсора должно быть “Остановлен” (см. снимок экрана).
-> Как удалить трансмиттер без остановки сенсора, см. видео https://youtu.be/AAhBVsc6NZo.


Забудьте устройство в системном состоянии XDrip и в настройках BT смартфона (показывается как Dexcom?? где ?? последние две цифры серийного № трансмиттера

Удалите трансмиттер (и сенсор при замене)
Поместите старый трансмиттер подальше, чтобы предотвратить повторное соединение. Микроволновая печь является идеальным щитом Фарадея для этого — но отключите кабель питания, чтобы быть на 100% уверенным, что никто ее не включит.
Удерживайте на главном экране xDrip+ иконку капли крови для активации кнопки Мастер выбора источника ГК .
Использование Мастера выбора источника ГК обеспечивает настройки по умолчанию, включая OB1 & нативный режим
- Мастер позволит провести начальную настройку.
- Вам понадобится серийный номер трансмиттера, если вы пользуетесь им впервые.
Введите серийный номер нового трансмиттера. Будьте внимательны и не перепутайте 0 (ноль) и O (заглавная буква o).
Вставьте новый сенсор (только при замене).
Поместите трансмиттер на сенсор — ** не запускайте сенсор немедленно!**
Новые “Трансмиттеры Firefly” (серийный номер начинающиеся с 8G, 8H или 8J) можно использовать только в нативном режиме.
Следующие опции не должны быть активированы для новых трансмиттеров “Firefly” (серийный номер которых начинается с 8G, 8H или 8J):
- Упреждающий перезапуск (отключить!)
- Перезапуск сенсора (отключить!)
- Возврат к xDrip (отключить!)

Проверьте в классическом состоянии страницу Состояние-> Состояние G5/G6-> PhoneServiceState, показано ли одно из следующих сведений:
- С трансмиттерами, серийный номер которых начинается с 80 или 81: “Got data hh:mm” (напр. “Got data 19:04 ”)
- С трансмиттерами, серийный номер которых начинается с 8G, 8H или 8J: “Got glucose hh:mm” (напр. “Got glucose 19:04 ”) или “Got no raw hh:mm” (i.e. “Got no raw 19:04”)
Подождите 15 минут, так как трансмиттер должен соединиться несколько раз с xDrip до запуска нового сенсора. Данные батареи будут показаны ниже информации о прошивке.

Выполните пуск сенсора но НЕ ЗАДНИМ ЧИСЛОМ! Всегда выбираем “Да, сегодня”!
Перезапустите коллектор (состояние системы — если не заменяете сенсор)
Не включайте оригинальный ресивер Dexcom (если им пользуетесь) до появления первых данных в xDrip+.
Удерживайте на главном экране xDrip+ иконку капли крови для активации кнопки Мастер выбора источника ГК .
![]()
![]()
![]()
![]()
Новый сенсор
Выключите оригинальный ресивер Dexcom (если используете).
При необходимости остановите сенсор
Убедитесь, что он действительно остановлен:
На следующем экране “G5/G6 Status” найдите Queue Items ( Элементы в очереди ) на полпути вниз — там появится что-то вроде “Остановить Сенсор”
Подождите, пока не исчезнет — обычно в течение нескольких минут.
Протрите контакты (обратная сторона трансмиттера) спиртом и просушите.
Если вы пользуетесь этой функцией, отключите Restart Sensor и Preemptive restarts (Сэндвич-меню -> Настройки -> Отладка G5/G6). Если вы пропустите этот шаг и оставите эти функции включенными, новый датчик не будет корректно запущен.

** Для новых трансмиттеров Firefly ** (серийный номер начинается с 8G, 8H или 8J) ** это обязательно, для всех остальных трансмиттеров рекомендуется ждать около 15 минут между остановкой и запуском нового сенсора (до тех пор пока Sensor Status: Stopped не появится на втором экране состояния системы). НЕ НАСТРАИВАЙТЕ ЗАДНИМ ЧИСЛОМ!**
Введите время установки
- Для использования нативного режима G6 необходимо подождать 2 часа для прогрева (т.е. время установки – сейчас).
- Если вы используете алгоритм xDrip+, то можно установить время более 2 часов назад, чтобы избежать прогрева. Данные могут быть очень неточными. Поэтому это не рекомендуется.
Введите код сенсора (на снимаемой фольге сенсора)
- Сохраните код на случай дополнительной переустановки (новый запуск после удаления трансмиттера)
- Код также можно найти в логах xDrip+ : Нажмите 3-точечное меню на главном экране xDrip+ и выберите Просмотр журналов событий .
При использовании G6 в “нативном режиме” калибровка не требуется. xDrip+ будет показывать данные автоматически после двухчасового прогрева.
Не включайте оригинальный ресивер Dexcom (если им пользуетесь) до появления первых данных в xDrip+.


Получение кода сенсора
В свежих версиях программы (начиная с 18 мая 2019) код сенсора отображается в состоянии системы (сэндвич-меню вверху слева на главном экране).
Сделайте свайп влево, чтобы увидеть второй экран.

Код сенсора Dexcom можно также найти в логах xDrip+.
Нажмите 3 точки меню (сверху справа на главном экране)
Выберите Просмотр журналов событий и выполните поиск слова “code”

Проблемы сопряжения с трансмиттером
- Трансмиттер должен быть виден в настройках bluetooth вашего смартфона.
- Трансмиттер будет виден как Dexcom?? где ?? последние две цифры серийного № трансмиттера (например, DexcomHY).
- Откройте состояние системы в xDrip+ (сэндвич-меню в левой верхней части главного экрана).
- Проверьте, виден ли трансмиттер на первой странице состояния системы (‘классическая страничка состояния системы’).
- Если нет: Удалите устройство из настроек bluetooth вашего смартфона.
- Подождите около 5 мин. до тех пор, пока трансмиттер Dexcom не подключится автоматически.
Проблемы при запуске нового сенсора
Обратите внимание, что следующий метод, скорее всего, не работает, если серийный номер передатчика Dexcom G6 которых начинается с 8G, 8H или 8J.
- Запуск сенсора сопровождается сообщением: “ОШИБКА: Сенсор не удалось запустить”
- Остановить сенсор
- Перезапустить телефон
- Запустить сенсор введя код 0000 (четыре нуля)
- Подождать 15 минут
- Остановить сенсор
- Запустить датчик с “реальным” кодом (напечатан на клеящемся протекторе)
Проверьте журнал xDrip+, начат ли в xDrip+ отсчет “Duration: 1 минута” (и так далее). Только в логах xdrip+ вы можете обнаружить на раннем этапе, остановлен ли сенсор. Более поздний статус статус не всегда отображается правильно внизу начального экрана.
xDrip+ & Libre Freestyle
Специфические настройки Libre
Откройте настройки Bluetooth -> Сэндвич-меню (сверху слева на главном экране) -> Настройки -> прокрутить вниз -> Менее распространенные настройки -> Настройки Bluetooth

Активируйте следующие параметры
- Включить Bluetooth
- Использовать сканирование
- Всегда обнаруживать сервисы
Все другие опции должны быть отключены

Уровень батареи Libre smart reader
- Уровень батареи таких устройств как MiaoMiao 2 может быть показан в AAPS.
- Подробности можно найти на странице снимков экрана.
Подключите трансмиттер Libre и запустите сенсор
![]()
![]()
![]()
© Copyright AndroidAPS community Revision 604eafaf .
Источник