Содержание
- Tomb Raider — Legend
- Disc error while reading bigfile 000 tomb raider underworld
- Disc error while reading bigfile 000 tomb raider underworld
- Disc error while reading bigfile 000 tomb raider underworld
- Tomb Raider Underworld и Ss 5.0.0.12171
- #1 suppaz
- #2 account has been deleted
- #3 OGG
- #4 Borka
- #5 OGG
- #6 pig
- #7 Valery Ledovskoy
- #8 AlexanderShad
- #9 Valery Ledovskoy
- #10 AlexanderShad
- #11 Vl-rr
- #12 userr
- #13 Vl-rr
Tomb Raider — Legend
Корче установил игру, начал запускать она стала просить диск,
кинул в неё No-CD и она стала выдовать мне вот такую ошибку
Failed to open BIGFILE.000
Может кто сталкивался с такой ху**** помогите решить проблему.
В точности такая же проблема! Незнаю че делать . 
Чё никто незнает чё за ху**я.
Скорее всего NoCD не рабочий. Давно когда проходил, таже фигня была, в инете другой скачал и без проблем прошел эту игру.
Скорее всего NoCD не рабочий. Давно когда проходил, таже фигня была, в инете другой скачал и без проблем прошел эту игру.
Я уже 3 разных NoCD с внешки качал и неодин непомог
А это что-новое продолжение или сборник старых?
Да , странно что кто-то ещё не знает , что Legend продолжение серии Tomb Raider . 

Корче установил игру, начал запускать она стала просить диск,
кинул в неё No-CD и она стала выдовать мне вот такую ошибку
Failed to open BIGFILE.000
Может кто сталкивался с такой ху**** помогите решить проблему.
С фекса качали?
Патч что там был, ставили?
Если ставили то это н. х не надо.
PS: У меня NoCD работает.
PPS: Игра классная.
С фекса качали?
Патч что там был, ставили?
Если ставили то это н. х не надо.
PS: У меня NoCD работает.
PPS: Игра классная.
Ну помогите кто нибудь.
Чё небыло такой х**ни ни у кого
Источник
Disc error while reading bigfile 000 tomb raider underworld
Error while reading game data.
Please verify the integrity of the game files using the Steam UI. For step-by-step instructions, see https://support.steampowered.com/kb_article.php?ref=2037-QEUH-3335
Error on two computers, file integrity checked many times. It doesn’t help.


I’d be inclined to check your drives integrity but i have to say it’s odd that you’re having the same issue on two computers. Maybe it’s Windows, but still odd. Try anyway, here:
Chkdsk (check disk) Time: 5-10 secs pr drive
Right click each drive in Explorer, go to Properties, Tools, Error Checking, Check
(That’ll check and repair your drives integrity)
SFC (system file check) Time: 2-5 mins
Press WIN+X, select Powershell (Admin)
Without apostrophes type & enter ‘sfc /scannow’
It’ll take a few minutes and you may need to reboot.
(That’ll check and repair Windows file integrity)
You probably won’t need DISM but it’s here FYI.
DISM (Deployment Image Servicing and Management) Time: No idea, never needed it.
Press WIN+X, select Powershell (Admin)
Without apostrophes type & enter ‘DISM.exe /Online /Cleanup-image /Scanhealth’
Without apostrophes type & enter ‘DISM.exe /Online /Cleanup-image /Restorehealth’
(That’ll check and repair the Windows image file)
I’d be inclined to check your drives integrity but i have to say it’s odd that you’re having the same issue on two computers. Maybe it’s Windows, but still odd. Try anyway, here:
Chkdsk (check disk) Time: 5-10 secs pr drive
Right click each drive in Explorer, go to Properties, Tools, Error Checking, Check
(That’ll check and repair your drives integrity)
SFC (system file check) Time: 2-5 mins
Press WIN+X, select Powershell (Admin)
Without apostrophes type & enter ‘sfc /scannow’
It’ll take a few minutes and you may need to reboot.
(That’ll check and repair Windows file integrity)
Источник
Disc error while reading bigfile 000 tomb raider underworld
— verify game integrity
— run as admin
— runs in compatibility mode
— update all drivers
— reinstall game
hopefully one of those will help

didn’t work for me. he keeps saying Out of Table range with the error massage
«Disc error while reading BIGFILE.000»
what could i do?
btw the same problem with TR Anniversary. but there it’s only out of range error


I’m posting this here, as I yesterday had the same error message for ALL Tomb Raider games after AoD (bought the entire package these days, mid-week madness offer).
THIS FIX IS FOR YOU, IF YOU HAVE YOUR STEAM FOLDER ON AN EXTERNAL HARDD!RIVE
This is what did the trick for me — nothing else (no «xp compatibility mode», no «run as admin», none of all the other fixes discussed here and in various other TR forums).
Since my games are on external HD, this solution here assumes you are running the game from a drive other than your C: drive (i.e. an external HD like mine). I think it has something to do with the partitioning or the drive lettering.
I moved the installed file from my external drive to my C: drive using the SteamMover tool (http://www.traynier.com/software/steammover). You can run the tool while Steam is running. Just set the move path to something like.
SteamMover will create a dynamic link that Steam will recognize. All you have to do then is run the game.
I had tried just about every fix in the book and found this solution while searching the net yesterday. It has worked for all Tomb Raider games after AoD (until AoD, this fix is not required, and the game will launch from my external HD without any issues). It thus should be considered a viable option if you’re having similar problems with other games.
Источник
Disc error while reading bigfile 000 tomb raider underworld
— verify game integrity
— run as admin
— runs in compatibility mode
— update all drivers
— reinstall game
hopefully one of those will help
didn’t work for me. he keeps saying Out of Table range with the error massage
«Disc error while reading BIGFILE.000»
what could i do?
btw the same problem with TR Anniversary. but there it’s only out of range error
I’m posting this here, as I yesterday had the same error message for ALL Tomb Raider games after AoD (bought the entire package these days, mid-week madness offer).
THIS FIX IS FOR YOU, IF YOU HAVE YOUR STEAM FOLDER ON AN EXTERNAL HARDD!RIVE
This is what did the trick for me — nothing else (no «xp compatibility mode», no «run as admin», none of all the other fixes discussed here and in various other TR forums).
Since my games are on external HD, this solution here assumes you are running the game from a drive other than your C: drive (i.e. an external HD like mine). I think it has something to do with the partitioning or the drive lettering.
I moved the installed file from my external drive to my C: drive using the SteamMover tool (http://www.traynier.com/software/steammover). You can run the tool while Steam is running. Just set the move path to something like.
SteamMover will create a dynamic link that Steam will recognize. All you have to do then is run the game.
I had tried just about every fix in the book and found this solution while searching the net yesterday. It has worked for all Tomb Raider games after AoD (until AoD, this fix is not required, and the game will launch from my external HD without any issues). It thus should be considered a viable option if you’re having similar problems with other games.
Источник
Tomb Raider Underworld и Ss 5.0.0.12171
#1 suppaz

Стоял 4.44, запускалась нормально
Поставил 5-ку — машина после запуска впадает в ступор, погасить ее корректно не получается
Может быть это из-за больших файлов с ресурсами, а может 5 стала понимать этот упаковщик ?
Размеры файлов в байтах.
При отключенном спайдере и всех модулях, что отключаются результат тот же — система становится страшно липкой, и через 10 секунд уже практически ни на что не реагирует.
Если снести 5-ку , то все запускается на ура
Может кто-то сталкивался, подскажите, как в 5-ке ограничить размер проверяемых файлов ?
В логах спайдера ничего криминального нет 🙁
C:gamesTomb Raider — Underworldbigfile.003 857 427 968
C:gamesTomb Raider — Underworldbigfile.000 2 145 345 536
C:gamesTomb Raider — Underworldbigfile.002 2 146 330 624
C:gamesTomb Raider — Underworldbigfile.001 2 139 930 624
C:gamesTomb Raider — Underworldbinkw32.dll
C:gamesTomb Raider — Underworldfmodex.dll
C:gamesTomb Raider — Underworldtru.exe 42 079 576
C:gamesTomb Raider — UnderworldReadme.rtf
Система Vista_Ultimate_32bit_SP1 со всеми апдейтами по текущую дату, за пару недель использования 5-ки никаких проблем кроме как с сабжем не возникало
#2 account has been deleted
#3 OGG
#4 Borka
Забанен за флуд

В исключениях SpiderGuard папка с игрой и сам екзешник, отдачи ноль.
#5 OGG
#6 pig

#7 Valery Ledovskoy

Хм. Только что закрыл Tomb Raider: Underworld, какое совпадение
Windows Vista Ultimate SP1.
Dr.Web Security Space 5.0.
Никаких проблем.
Так ещё и BOINC-клиент при этом работает.
Tomb Raider: Underworld лицензионный?
Проверку архивов в SpIDer Guard случайно не включили?
Да, а конфигурация компьютера какая?
Ещё попробуйте поставить патч до v1.1.
http://www.ag.ru/files/patches/tomb_raider_underworld#30586
http://www.ag.ru/files/patches/16758/30586/readme.html
Там есть исправления, связанные с работой на некоторых железках. Возможно, поможет.
Естественно, поставится только на лицензионную версию.
#8 AlexanderShad

Хм. Только что закрыл Tomb Raider: Underworld, какое совпадение
Windows Vista Ultimate SP1.
Dr.Web Security Space 5.0.
Никаких проблем.
Так ещё и BOINC-клиент при этом работает.
Tomb Raider: Underworld лицензионный?
Проверку архивов в SpIDer Guard случайно не включили?
Да, а конфигурация компьютера какая?
Ещё попробуйте поставить патч до v1.1.
http://www.ag.ru/files/patches/tomb_raider_underworld#30586
http://www.ag.ru/files/patches/16758/30586/readme.html
Там есть исправления, связанные с работой на некоторых железках. Возможно, поможет.
Естественно, поставится только на лицензионную версию.
#9 Valery Ledovskoy
И как я могу предположить. у вас проблем с игрой нету, так как у вас игра лицензия. и винда тоже лицензия rolleyes.gif
Не без этого. Так ведь и пользователь, у кого проблемы, пишет:
Система Vista_Ultimate_32bit_SP1 со всеми апдейтами по текущую дату
Насколько мне известно, Висту довольно сложно обновлять, если она пиратская. По крайней мере, автоматическое обновление на пиратке обычно отключают.
Имхо подобные глюки как раз и происходят по двум этим маленьким нюансам )
#10 AlexanderShad
И как я могу предположить. у вас проблем с игрой нету, так как у вас игра лицензия. и винда тоже лицензия rolleyes.gif
Не без этого. Так ведь и пользователь, у кого проблемы, пишет:
Система Vista_Ultimate_32bit_SP1 со всеми апдейтами по текущую дату
Насколько мне известно, Висту довольно сложно обновлять, если она пиратская. По крайней мере, автоматическое обновление на пиратке обычно отключают.
Согласен с Вами, невнимательно прочел.
Имхо подобные глюки как раз и происходят по двум этим маленьким нюансам )
Так вот и хотелось узнать — кто виноват и почему. То ли проблема игры, которая плохо работает на этом железе (возможно, только совместно с нашим антивирусом), то ли это чисто наша проблема на конкретном железе при запуске этой игры, то ли это кряк на игрушку так работает в присутствии нашего антивируса.
Возможно, это драйвер ATI глючит. У меня nVidia.
Вариантов может быть множество. Но в общем случае проблемы с игрой нет, нужно ждать частностей от пользователя, который испытывает проблемы.
#11 Vl-rr

. но я бы например не стал ставить пиратскую игру на лицензионную висту , так как если я правильно понял майкрософтское соглашение, ось периодически скидывает информацию о установленном ПО , и в случае, если обнаружится пиратка, то будут несколько вариантов развития данной ситуации )
#12 userr
#13 Vl-rr
..Если нет, не надо мусорить в темах.
Источник

В корне с игрой никаких папок нет.
Может файл повреждён(ЦД поцарапан) попроси презалить
Заодно и BigFIle.017 залейте)
- пожаловаться
- скопировать ссылку

вот в этой папке которая LуЁv находишь BIGFILE.000 и открываешь его с помошью екзешника в папке с игрой и все зашибись работает 
- пожаловаться
- скопировать ссылку

У меня была такая же проблема. Просто в месте, куда устанавливаеш игру не должно быть русских слов! Пример: D:Lara Crof — Anniversary
- пожаловаться
- скопировать ссылку
Люди! Я че-то не пойму! Уже игру практически прошла. Осталось последний уровень добить. А она, зараза, теперь требует от меня продления лицензии! Где её взять? Что за капризы вообще!!! >:0 Спасите! У меня ума не хватает (если честно-лень) самой догнать причину проблемы (и вообще-то хочется пообщаться)!
- пожаловаться
- скопировать ссылку
Не покупать украденные пиратами пресс-версии, которые они выдают за финальные, вот и все решение
- пожаловаться
- скопировать ссылку
Арвен 1982 Ну если уж так хочется поиграть не покупая лицензию, то можно скачать кряк. Его можно тут найти http://www.playground.ru/cheats/4107/
- пожаловаться
- скопировать ссылку
где лежит папка LуЁv ?
- пожаловаться
- скопировать ссылку
Lara Croft fixes your game
Overview
Fix profiles not saving or loading and out of table range disc error while reading BIGFILE. Works for Tomb Raider Anniversary, Legend, Underworld, Lara Croft Guardian of Light.
About
Learn to create a Windows Virtual Hard Disk (VHD) and install game into it.
No mods required. Uses built-in feature of Windows.
Estimated time: 10 minutes
Note: you do everything at your own risk, I’m not responsible if something goes wrong.
I came up with this idea to fix my old Tomb Raider games. It doesn’t affect performance. It gives you the freedom to store the game in the virtual hard disk (.vhdx) file on different volumes or external drive. Files will appear as if installed locally on C: startup disk.
- ERROR OUT OF TABLE RANGE Disc error while reading BIGFILE.000
- unable to save or load or auto-save to profile
- game can’t find steam or crashes
- game won’t run unless installed to C: startup disk
- game won’t run unless installed to external drive and saving won’t work
- errors on Windows via Bootcamp for Apple Mac users
I have tested my idea works for these other games.
I haven’t tested the newer games but it may still work.
A VHD might help for any games that were hard-coded to run from specific drive letters, paths, file systems or partition schemes.
Rate it up and comment 🙂
You can help other people by commenting below. Say which game you’re playing and what problem you had with it. People will want to know how this guide solved your issue. Please favorite and rate up my guide if you want to make me happy 🙂 I spent a long time making it. I like seeing when it helped someone.
Before you begin
Check out all the Useful Links I’ve included at the very bottom of this guide.
If you aren’t experiencing any of the problems described above then please try other troubleshooting steps. Some people may find virtual disks confusing. Only use them if you are confident in your computer skills and if it is likely to solve your problem. Don’t use virtual disks unnecessarily.
Check out Stella’s TombRaiders [tombraiders.net] website for game guides, info about common bugs, fixes and patches. You can even download savegame files [tombraiders.net] if you lost your progress. Thanks Stella!
If you see any errors like “Failed to find Steam” or “Steam Not Found” or “Could not find Steam” you might fix that by copying steam.dll file into the game install folder. Also note TexMod can cause the problem. Request help in Steam discussion.
If you see an error like “Autosave is damaged. Will be recreated” and problems persist, you might see here or here and read this steam guide “No Resume option and Croft Manor saving fix“.
If your computer has a multi-core CPU and Tomb Raider Underworld crashes on launch, you might solve the problem by temporarily lowering the number of CPUs used by the Steam applications. Open Task Manager, right click on Steam and choose Set Affinity, then deselect some cores and click OK. Try launch game. Remember that restarting Steam will reset the Affinity back to normal.
- Verify Integrity of Game Files (validate 100% files installed)
- Check for Programs Which May Interfere with Steam (eg. disable antivirus temporarily)
- Use Steam to move the game to a different disk/volume if possible
- Copy steam.dll file to game folder (see above: Game can’t find Steam)
- Run in compatibility mode [support.microsoft.com]
- Try to “Run as administrator” from the right-click context menu
- Logon as an administrator [support.microsoft.com] then try run the game
- Try disable Windows Data Execution Prevention (DEP) for the game (permanently) or system wide (temporarily)
- Update your graphics drivers (if the game runs but has graphical issues)
None of these ideas work for you? Then follow the virtual disk guide below.
1. Install game with Steam
Open the Steam Library. Begin installing game to C: boot drive like normal.
Note this guide is for Tomb Raider: Anniversary but steps are similar for other games.
While your game downloads we can continue.
2. Create Virtual Hard Disk file
In Windows operating system, search for and open the app Computer Management for Disk Management. The new window should appear like so.
In the menu bar select Action then from the drop-down select Create VHD. A new Create and Attach Virtual Hard Disk window should appear.
We must store the new virtual hard disk file in a new folder at our drive root () and type a sensible file name for it. Never install multiple games inside a single virtual disk.
Create new folder at the root () of C drive:
C:VirtualHardDisks
Location for my virtual disk will be this folder, with this filename:
Select settings for the new virtual hard disk:
- Virtual hard disk size: 10GB to fit Anniversary. Greater than size of game.
- Virtual hard disk format: VHDX is best for modern Windows systems.
- Virtual hard disk type: Dynamically expanding is best to conserve storage.
When finished click OK.
Disk Management should now show a new disk of the size we chose.
3. Initialize Disk
By default that new virtual hard disk VHDX file we created should have automatically attached and appear in Disk Management.
Right click it and from the drop-down menu select Initialize Disk. A new window will appear.
Choose MBR (Master Boot Record) partition style because these games are very old and our VHDX has only a small file size.
4. New Simple Volume
After we initialized the disk it will be marked as unallocated. We should make a new volume on it. Right click it and select New Simple Volume.
A new window will open for the New Simple Volume Wizard. Click next to begin.
Click next again, using the default value of maximum disk space.
Choose Do not assign a drive letter or drive path. This is very very very very important!
Choose to format as NTFS and type volume label to be same as the VHDX filename.
Review and then finish the wizard.
Wait for download to finish
Stop and wait until your game has finished downloading and installing.
5. Making empty folders to mount the VHD
Only do these steps once game is 100% downloaded and installed.
Find where the saved-games folder is. Mine was here:
Rename that folder to something different, for example:
Create a new folder in the same place with the original folder name:
Right click the game in steam library and open the Properties window.
Select the Local Files tab and then click Browse Local Files. It will open a new window in Windows File Explorer to where the game files are stored.
My game files installed to this folder:
Rename that folder to something different, for example:
Create a new folder in the same place with the original folder name:
6. Mount to the empty NTFS folders
Return to Disk Management.
Right click the virtual disk and select Change Drive Letter and Paths. A new window will appear. It should not have any paths mapped yet.
Select to Add. Add Drive Letter or Path window appears.
Choose to Mount in the following empty NTFS folder. Click Browse. The Browse for Drive Path window appears. Browse and select the empty save-game folder you made, then click OK.
You should now see a path has been added to the save-game folder. Now repeat this process again to also mount the virtual hard disk onto our empty steam game files folder.
As you see in my case I mounted the virtual disk onto both these empty folders we made:
From now on any files you put in those folders would actually be inside the virtual disk we made. You’ll see the file size of the tr-anniversary.vhdx file will grow as we move in the game files.
7. Relocate game files to virtual disk
You need to put all the game files inside of the virtual hard disk.
Copy all files from inside this directory:
Paste them into this directory:
If done correctly the file size of .vhdx will increase.
If file size of .vhdx did not increase you made a mistake.
8. Verify Integrity of Game Files
Verify Integrity of Game Files. It should validate 100% complete. This means all game files are available inside attached virtual disk.
Delete this directory to clean-up at the end:
9. Read before you play
Remember the game won’t run and missing executable error appears if Steam can’t find game files. This happens when virtual disk is detached or mount paths are wrong.
If you see this error then check virtual disk is attached and using correct mount paths.
Virtual disks detach every time you reboot. Attach them again after reboot. You can make computer do this automatically at startup.
10. Launch game
Launch the game from Steam library. It should work. Ignore if it says default profile won’t load.
Create a new profile. Start a new game then try saving. It should work.
How-to: Attach or detach virtual disks
Attach virtual disks by double clicking the vhdx file. It is OK if you see error Couldn’t Mount File because we didn’t assign a drive letter. Open Disk Management to see it did attach.
Attach virtual disks by opening Disk Management and in menu bar select Action then Attach VHD. This way you won’t see the error message.
Detach virtual disks by opening Disk Management window and right clicking the disk then from the drop-down menu select Detach VHD.
How-to: Auto-mount virtual disk at startup
Attach virtual disks automatically with Task Scheduler. This is optional.
Open Computer Management.
Select Task Scheduler. Select Create Task and the Create Task window appears.
Give the new task a name and description you’ll recognise. Make sure you check Run with highest privileges and Configure for: Windows 10. Change nothing else.
Select the Triggers tab. There are currently no triggers.
Click New and the New Trigger window appears.
Choose Begin the task: At startup. Make sure Enabled is checked. Delay task for: 30 seconds is optional but may work better for old computers. Change nothing else.
Click OK to add the new trigger.
Select the Conditions tab. Uncheck all boxes.
Select the Settings tab.
Select the Actions tab. There are currently no actions.
Click New and the New Action window appears.
Use these settings…
- Action: Start a program
- Program/script: PowerShell
- Add arguments: type script below including path to your own vhdx file.
The path to your .vhdx file must always be exactly correct otherwise it won’t mount. If you move the .vhdx file then you must adjust the path in the argument. If you uninstall and delete the .vhdx file then remember to delete the action.
Click OK and the action is added to our new task.
New actions can be added for each virtual disk you want to mount automatically.
Click OK when finished.
Task Scheduler should now list the task. From the actions sidebar you are able to permanently Delete, temporarily Disable, or Run the task immediately.
First let’s reboot and login to test it works.
After you reboot some blue windows will temporarily appear as PowerShell runs the Mount-DiskImage script we specified in the action argument.
Open Computer Management and select Disk Management. You should see the virtual disks you specified were mounted automatically. Launch the game. It should work.
External drives
You can store the game (.vhdx file) on another volume or external drive.
- Close the game.
- Detach virtual disk.
- Copy or move .vhdx file to the new location.
- Open Disk Management.
- Attach virtual disk. Check NTFS mount paths are still correct.
Uninstall game
This is how to properly delete your game.
- Attach the virtual disk.
- Open Steam and uninstall the game like normal.
- Detach the virtual disk.
- Open Windows File Explorer and delete the vhdx file permanently.
- If you configured to auto-mount at startup then remove that action from Task Scheduler.
Источник
Disc error while reading bigfile 000 tomb raider underworld


| 4,491 | уникальных посетителей |
| 74 | добавили в избранное |

Learn to create a Windows Virtual Hard Disk (VHD) and install game into it.
Estimated time: 10 — 15 minutes
I came up with this idea to fix old Tomb Raider games by running them from a virtual disk.
- ERROR OUT OF TABLE RANGE Disc error while reading BIGFILE.000
- unable to save or load or auto-save to profile.
- game can’t find steam or crashes.
- game won’t run unless installed to C: startup disk.
- game won’t run unless installed to external drive and saving won’t work.
- errors on Windows via Bootcamp for Apple Mac users.
- There is no performance penalty for running programs off a virtual disk.
- You can relocate the virtual hard disk file (.vhd) to a different volume or external drive.
- Likely to help for any old programs that are hard-coded to run from specific drive letters, paths, file systems or partition schemes.
Ratings and favorites help make finding this guide easier and encourages me to make more guides like this.
Check out all the Useful Links I’ve included at the very bottom of this guide.
If you aren’t experiencing any of the problems described above then please try other troubleshooting steps. Some people may find virtual disks confusing. Only use them if you are confident in your computer skills and if it is likely to solve your problem. Don’t use virtual disks unnecessarily.
Check out Stella’s TombRaiders [tombraiders.net] website for game guides, info about common bugs, fixes and patches. You can even download savegame files [tombraiders.net] if you lost your progress. Thanks Stella!
If you see any errors like «Failed to find Steam» or «Steam Not Found» or «Could not find Steam» you might fix that by copying steam.dll file into the game install folder. Also note TexMod can cause the problem. Request help in Steam discussion.
If you see an error like «Autosave is damaged. Will be recreated» and problems persist, you might see here or here and read this steam guide «No Resume option and Croft Manor saving fix».
If your computer has a multi-core CPU and Tomb Raider Underworld crashes on launch, you might solve the problem by temporarily lowering the number of CPUs used by the Steam applications. Open Task Manager, right click on Steam and choose Set Affinity, then deselect some cores and click OK. Try launch game. Remember that restarting Steam will reset the Affinity back to normal.
- Verify Integrity of Game Files (validate 100% files installed)
- Check for Programs Which May Interfere with Steam (eg. disable antivirus temporarily)
- Use Steam to move the game to a different disk/volume if possible
- Copy steam.dll file to game folder (see above: Game can’t find Steam)
- Run in compatibility mode [support.microsoft.com]
- Try to «Run as administrator» from the right-click context menu
- Logon as an administrator [support.microsoft.com] then try run the game
- Try disable Windows Data Execution Prevention (DEP) for the game (permanently) or system wide (temporarily)
- Update your graphics drivers (if the game runs but has graphical issues)
Open the Steam Library. Begin installing game to C: boot drive like normal.
Note this guide is for Tomb Raider: Anniversary but steps are similar for other games.
While your game downloads we can continue.
In Windows operating system, search for and open the app Computer Management for Disk Management. The new window should appear like so.
In the menu bar select Action then from the drop-down select Create VHD. A new Create and Attach Virtual Hard Disk window should appear.
We must store the new virtual hard disk file in a new folder at our drive root () and type a sensible file name for it. Never install multiple games inside a single virtual disk.
Create new folder at the root () of C drive:
C:VirtualHardDisks
Location for my virtual disk will be this folder, with this filename:
Select settings for the new virtual hard disk:
- Virtual hard disk size: 10GB to fit Anniversary. Greater than size of game.
- Virtual hard disk format: VHDX is best for modern Windows systems.
- Virtual hard disk type: Dynamically expanding is best to conserve storage.
When finished click OK.
Disk Management should now show a new disk of the size we chose.
By default that new virtual hard disk VHDX file we created should have automatically attached and appear in Disk Management.
Right click it and from the drop-down menu select Initialize Disk. A new window will appear.
Choose MBR (Master Boot Record) partition style because these games are very old and our VHDX has only a small file size.
After we initialized the disk it will be marked as unallocated. We should make a new volume on it. Right click it and select New Simple Volume.
A new window will open for the New Simple Volume Wizard. Click next to begin.
Click next again, using the default value of maximum disk space.
Choose Do not assign a drive letter or drive path. This is very very very very important!
Choose to format as NTFS and type volume label to be same as the VHDX filename.
Review and then finish the wizard.
Stop and wait until your game has finished downloading and installing.
Only do these steps once game is 100% downloaded and installed.
Right click the game in steam library and open the Properties window.
Select the Local Files tab and then click Browse Local Files. It will open a new window in Windows File Explorer to where the game files are stored.
My game files installed to this folder:
Return to Disk Management.
Right click the virtual disk and select Change Drive Letter and Paths. A new window will appear. It should not have any paths mapped yet.
Select to Add. Add Drive Letter or Path window appears.
Choose to Mount in the following empty NTFS folder. Click Browse. The Browse for Drive Path window appears. Browse and select the empty save-game folder you made, then click OK.
You should now see a path has been added to the save-game folder. Now repeat this process again to also mount the virtual hard disk onto our empty steam game files folder.
As you see in my case I mounted the virtual disk onto both these empty folders we made:
You need to put all the game files inside of the virtual hard disk.
Copy all files from inside this directory:
If done correctly the file size of .vhdx will increase.
If file size of .vhdx did not increase you made a mistake.
Verify Integrity of Game Files. It should validate 100% complete. This means all game files are available inside attached virtual disk.
Delete this directory to clean-up at the end:
Remember the game won’t run and missing executable error appears if Steam can’t find game files. This happens when virtual disk is detached or mount paths are wrong.
If you see this error then check virtual disk is attached and using correct mount paths.
Launch the game from Steam library. It should work. Ignore if it says default profile won’t load.
Create a new profile. Start a new game then try saving. It should work.
Attach virtual disks by double clicking the vhdx file. It is OK if you see error Couldn’t Mount File because we didn’t assign a drive letter. Open Disk Management to see it did attach.
Attach virtual disks by opening Disk Management and in menu bar select Action then Attach VHD. This way you won’t see the error message.
Detach virtual disks by opening Disk Management window and right clicking the disk then from the drop-down menu select Detach VHD.
Attach virtual disks automatically with Task Scheduler. This is optional.
Open Computer Management.
Select Task Scheduler. Select Create Task and the Create Task window appears.
Give the new task a name and description you’ll recognise. Make sure you check Run with highest privileges and Configure for: Windows 10. Change nothing else.
Select the Triggers tab. There are currently no triggers.
Click New and the New Trigger window appears.
Choose Begin the task: At startup. Make sure Enabled is checked. Delay task for: 30 seconds is optional but may work better for old computers. Change nothing else.
Click OK to add the new trigger.
Select the Conditions tab. Uncheck all boxes.
Select the Settings tab.
Select the Actions tab. There are currently no actions.
Click New and the New Action window appears.
Use these settings.
- Action: Start a program
- Program/script: PowerShell
- Add arguments: type script below including path to your own vhdx file.
The path to your .vhdx file must always be exactly correct otherwise it won’t mount. If you move the .vhdx file then you must adjust the path in the argument. If you uninstall and delete the .vhdx file then remember to delete the action.
Click OK and the action is added to our new task.
New actions can be added for each virtual disk you want to mount automatically.
Click OK when finished.
Task Scheduler should now list the task. From the actions sidebar you are able to permanently Delete, temporarily Disable, or Run the task immediately.
First let’s reboot and login to test it works.
After you reboot some blue windows will temporarily appear as PowerShell runs the Mount-DiskImage script we specified in the action argument.
Open Computer Management and select Disk Management. You should see the virtual disks you specified were mounted automatically. Launch the game. It should work.
Источник
Overview
Fix profiles not saving or loading and out of table range disc error while reading BIGFILE. Works for Tomb Raider Anniversary, Legend, Underworld, Lara Croft Guardian of Light.
About
Learn to create a Windows Virtual Hard Disk (VHD) and install game into it.
No mods required. Uses built-in feature of Windows.
Estimated time: 10 minutes
Note: you do everything at your own risk, I’m not responsible if something goes wrong.
I came up with this idea to fix my old Tomb Raider games. It doesn’t affect performance. It gives you the freedom to store the game in the virtual hard disk (.vhdx) file on different volumes or external drive. Files will appear as if installed locally on C: startup disk.
Common issues VHDs might fix
- ERROR OUT OF TABLE RANGE Disc error while reading BIGFILE.000
- unable to save or load or auto-save to profile
- game can’t find steam or crashes
- game won’t run unless installed to C: startup disk
- game won’t run unless installed to external drive and saving won’t work
- errors on Windows via Bootcamp for Apple Mac users
Games tested
I have tested my idea works for these other games.
- Tomb Raider Anniversary
- Tomb Raider Legend
- Tomb Raider Underworld
- Lara Croft and the Guardian of Light
I haven’t tested the newer games but it may still work.
- Tomb Raider (2013)
A VHD might help for any games that were hard-coded to run from specific drive letters, paths, file systems or partition schemes.


Rate it up and comment 🙂
You can help other people by commenting below. Say which game you’re playing and what problem you had with it. People will want to know how this guide solved your issue. Please favorite and rate up my guide if you want to make me happy 🙂 I spent a long time making it. I like seeing when it helped someone.
Before you begin
Read the Steam Troubleshooting and How-To’s.
Check out all the Useful Links I’ve included at the very bottom of this guide.
Do you have an unrelated problem?
If you aren’t experiencing any of the problems described above then please try other troubleshooting steps. Some people may find virtual disks confusing. Only use them if you are confident in your computer skills and if it is likely to solve your problem. Don’t use virtual disks unnecessarily.
Need help? Lost your save games?
Check out Stella’s TombRaiders[tombraiders.net] website for game guides, info about common bugs, fixes and patches. You can even download savegame files[tombraiders.net] if you lost your progress. Thanks Stella!
Game can’t find Steam?
If you see any errors like “Failed to find Steam” or “Steam Not Found” or “Could not find Steam” you might fix that by copying steam.dll file into the game install folder. Also note TexMod can cause the problem. Request help in Steam discussion.
Game runs but can’t resume or “Autosave is damaged”?
If you see an error like “Autosave is damaged. Will be recreated” and problems persist, you might see here or here and read this steam guide “No Resume option and Croft Manor saving fix“.
Game crashes on launch without showing errors
If your computer has a multi-core CPU and Tomb Raider Underworld crashes on launch, you might solve the problem by temporarily lowering the number of CPUs used by the Steam applications. Open Task Manager, right click on Steam and choose Set Affinity, then deselect some cores and click OK. Try launch game. Remember that restarting Steam will reset the Affinity back to normal.
Try basic troubleshooting steps first
- Verify Integrity of Game Files (validate 100% files installed)
- Check for Programs Which May Interfere with Steam (eg. disable antivirus temporarily)
- Use Steam to move the game to a different disk/volume if possible
- Copy steam.dll file to game folder (see above: Game can’t find Steam)
- Run in compatibility mode[support.microsoft.com]
- Try to “Run as administrator” from the right-click context menu
- Logon as an administrator[support.microsoft.com] then try run the game
- Try disable Windows Data Execution Prevention (DEP) for the game (permanently) or system wide (temporarily)
- Update your graphics drivers (if the game runs but has graphical issues)
More ideas from the web (optional)
- Users recommend installing the game to C: drive
- Some users reported success moving My Documents folder to C: drive
- How to move a steam game to another drive without re-downloading[www.howtogeek.com]
- Official Steam guide to Moving a Steam Installation and Games (in entirety)
- An unofficial method to move steam game library[www.techspot.com] (I can’t recommend it as it might break other games in your library)
- Command line interface users might test this idea[hardforum.com] to use symlinks or NTFS junctions. I haven’t tried it.
- Reduce available CPU cores for the application.
None of these ideas work for you? Then follow the virtual disk guide below.
1. Install game with Steam
Open the Steam Library. Begin installing game to C: boot drive like normal.

Note this guide is for Tomb Raider: Anniversary but steps are similar for other games.
While your game downloads we can continue.
2. Create Virtual Hard Disk file
In Windows operating system, search for and open the app Computer Management for Disk Management. The new window should appear like so.

In the menu bar select Action then from the drop-down select Create VHD. A new Create and Attach Virtual Hard Disk window should appear.

We must store the new virtual hard disk file in a new folder at our drive root () and type a sensible file name for it. Never install multiple games inside a single virtual disk.
Create new folder at the root () of C drive:
C:VirtualHardDisks
Location for my virtual disk will be this folder, with this filename:
C:VirtualHardDiskstr-anniversary.vhdx
Select settings for the new virtual hard disk:
- Virtual hard disk size: 10GB to fit Anniversary. Greater than size of game.
- Virtual hard disk format: VHDX is best for modern Windows systems.
- Virtual hard disk type: Dynamically expanding is best to conserve storage.
When finished click OK.
Disk Management should now show a new disk of the size we chose.
3. Initialize Disk
By default that new virtual hard disk VHDX file we created should have automatically attached and appear in Disk Management.

Right click it and from the drop-down menu select Initialize Disk. A new window will appear.

Choose MBR (Master Boot Record) partition style because these games are very old and our VHDX has only a small file size.
4. New Simple Volume
After we initialized the disk it will be marked as unallocated. We should make a new volume on it. Right click it and select New Simple Volume.

A new window will open for the New Simple Volume Wizard. Click next to begin.

Click next again, using the default value of maximum disk space.

Choose Do not assign a drive letter or drive path. This is very very very very important!

Choose to format as NTFS and type volume label to be same as the VHDX filename.

Review and then finish the wizard.

Wait for download to finish
Stop and wait until your game has finished downloading and installing.

5. Making empty folders to mount the VHD
Only do these steps once game is 100% downloaded and installed.
Create new empty saved games folder
Find where the saved-games folder is. Mine was here:
C:UsersUser1DocumentsEidosTomb Raider – Anniversary
Rename that folder to something different, for example:
C:UsersUser1DocumentsEidosTomb Raider – Anniversary Backup
Create a new folder in the same place with the original folder name:
C:UsersUser1DocumentsEidosTomb Raider – Anniversary
Create new empty Steam game folder
Right click the game in steam library and open the Properties window.

Select the Local Files tab and then click Browse Local Files. It will open a new window in Windows File Explorer to where the game files are stored.
My game files installed to this folder:
C:Program Files (x86)SteamsteamappscommonTomb Raider Anniversary
Rename that folder to something different, for example:
C:Program Files (x86)SteamsteamappscommonTomb Raider Anniversary Backup
Create a new folder in the same place with the original folder name:
C:Program Files (x86)SteamsteamappscommonTomb Raider Anniversary
6. Mount to the empty NTFS folders
Return to Disk Management.

Right click the virtual disk and select Change Drive Letter and Paths. A new window will appear. It should not have any paths mapped yet.

Select to Add. Add Drive Letter or Path window appears.

Choose to Mount in the following empty NTFS folder. Click Browse. The Browse for Drive Path window appears. Browse and select the empty save-game folder you made, then click OK.
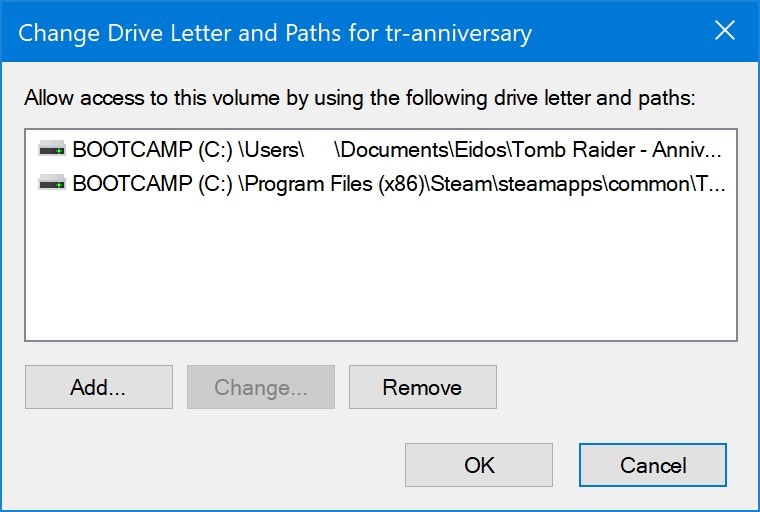
You should now see a path has been added to the save-game folder. Now repeat this process again to also mount the virtual hard disk onto our empty steam game files folder.
As you see in my case I mounted the virtual disk onto both these empty folders we made:
C:UsersUser1DocumentsEidosTomb Raider – Anniversary C:Program Files (x86)SteamsteamappscommonTomb Raider Anniversary
From now on any files you put in those folders would actually be inside the virtual disk we made. You’ll see the file size of the tr-anniversary.vhdx file will grow as we move in the game files.
7. Relocate game files to virtual disk
You need to put all the game files inside of the virtual hard disk.
Copy all files from inside this directory:
C:Program Files (x86)SteamsteamappscommonTomb Raider Anniversary Backup
Paste them into this directory:
C:Program Files (x86)SteamsteamappscommonTomb Raider Anniversary
If done correctly the file size of .vhdx will increase.

If file size of .vhdx did not increase you made a mistake.
8. Verify Integrity of Game Files
Verify Integrity of Game Files. It should validate 100% complete. This means all game files are available inside attached virtual disk.

Delete this directory to clean-up at the end:
C:Program Files (x86)SteamsteamappscommonTomb Raider Anniversary Backup
9. Read before you play
Remember the game won’t run and missing executable error appears if Steam can’t find game files. This happens when virtual disk is detached or mount paths are wrong.
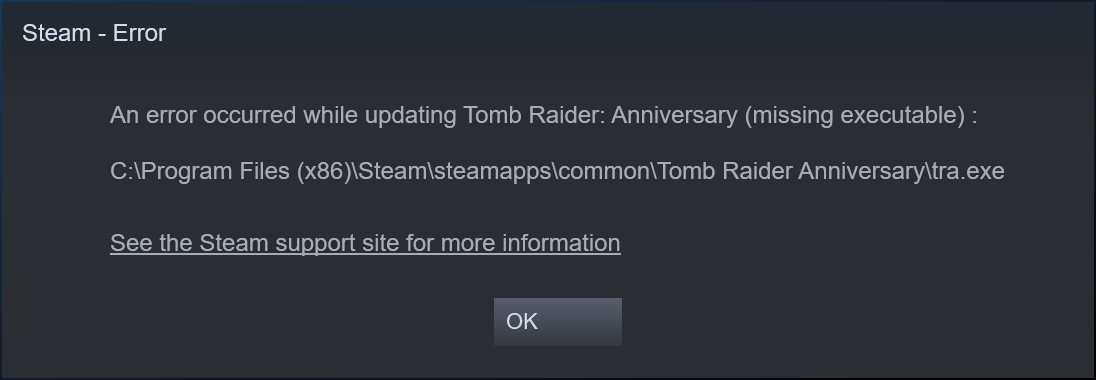
If you see this error then check virtual disk is attached and using correct mount paths.
Steam – Error
An error occurred while updating … (missing executable) :
Virtual disks detach every time you reboot. Attach them again after reboot. You can make computer do this automatically at startup.
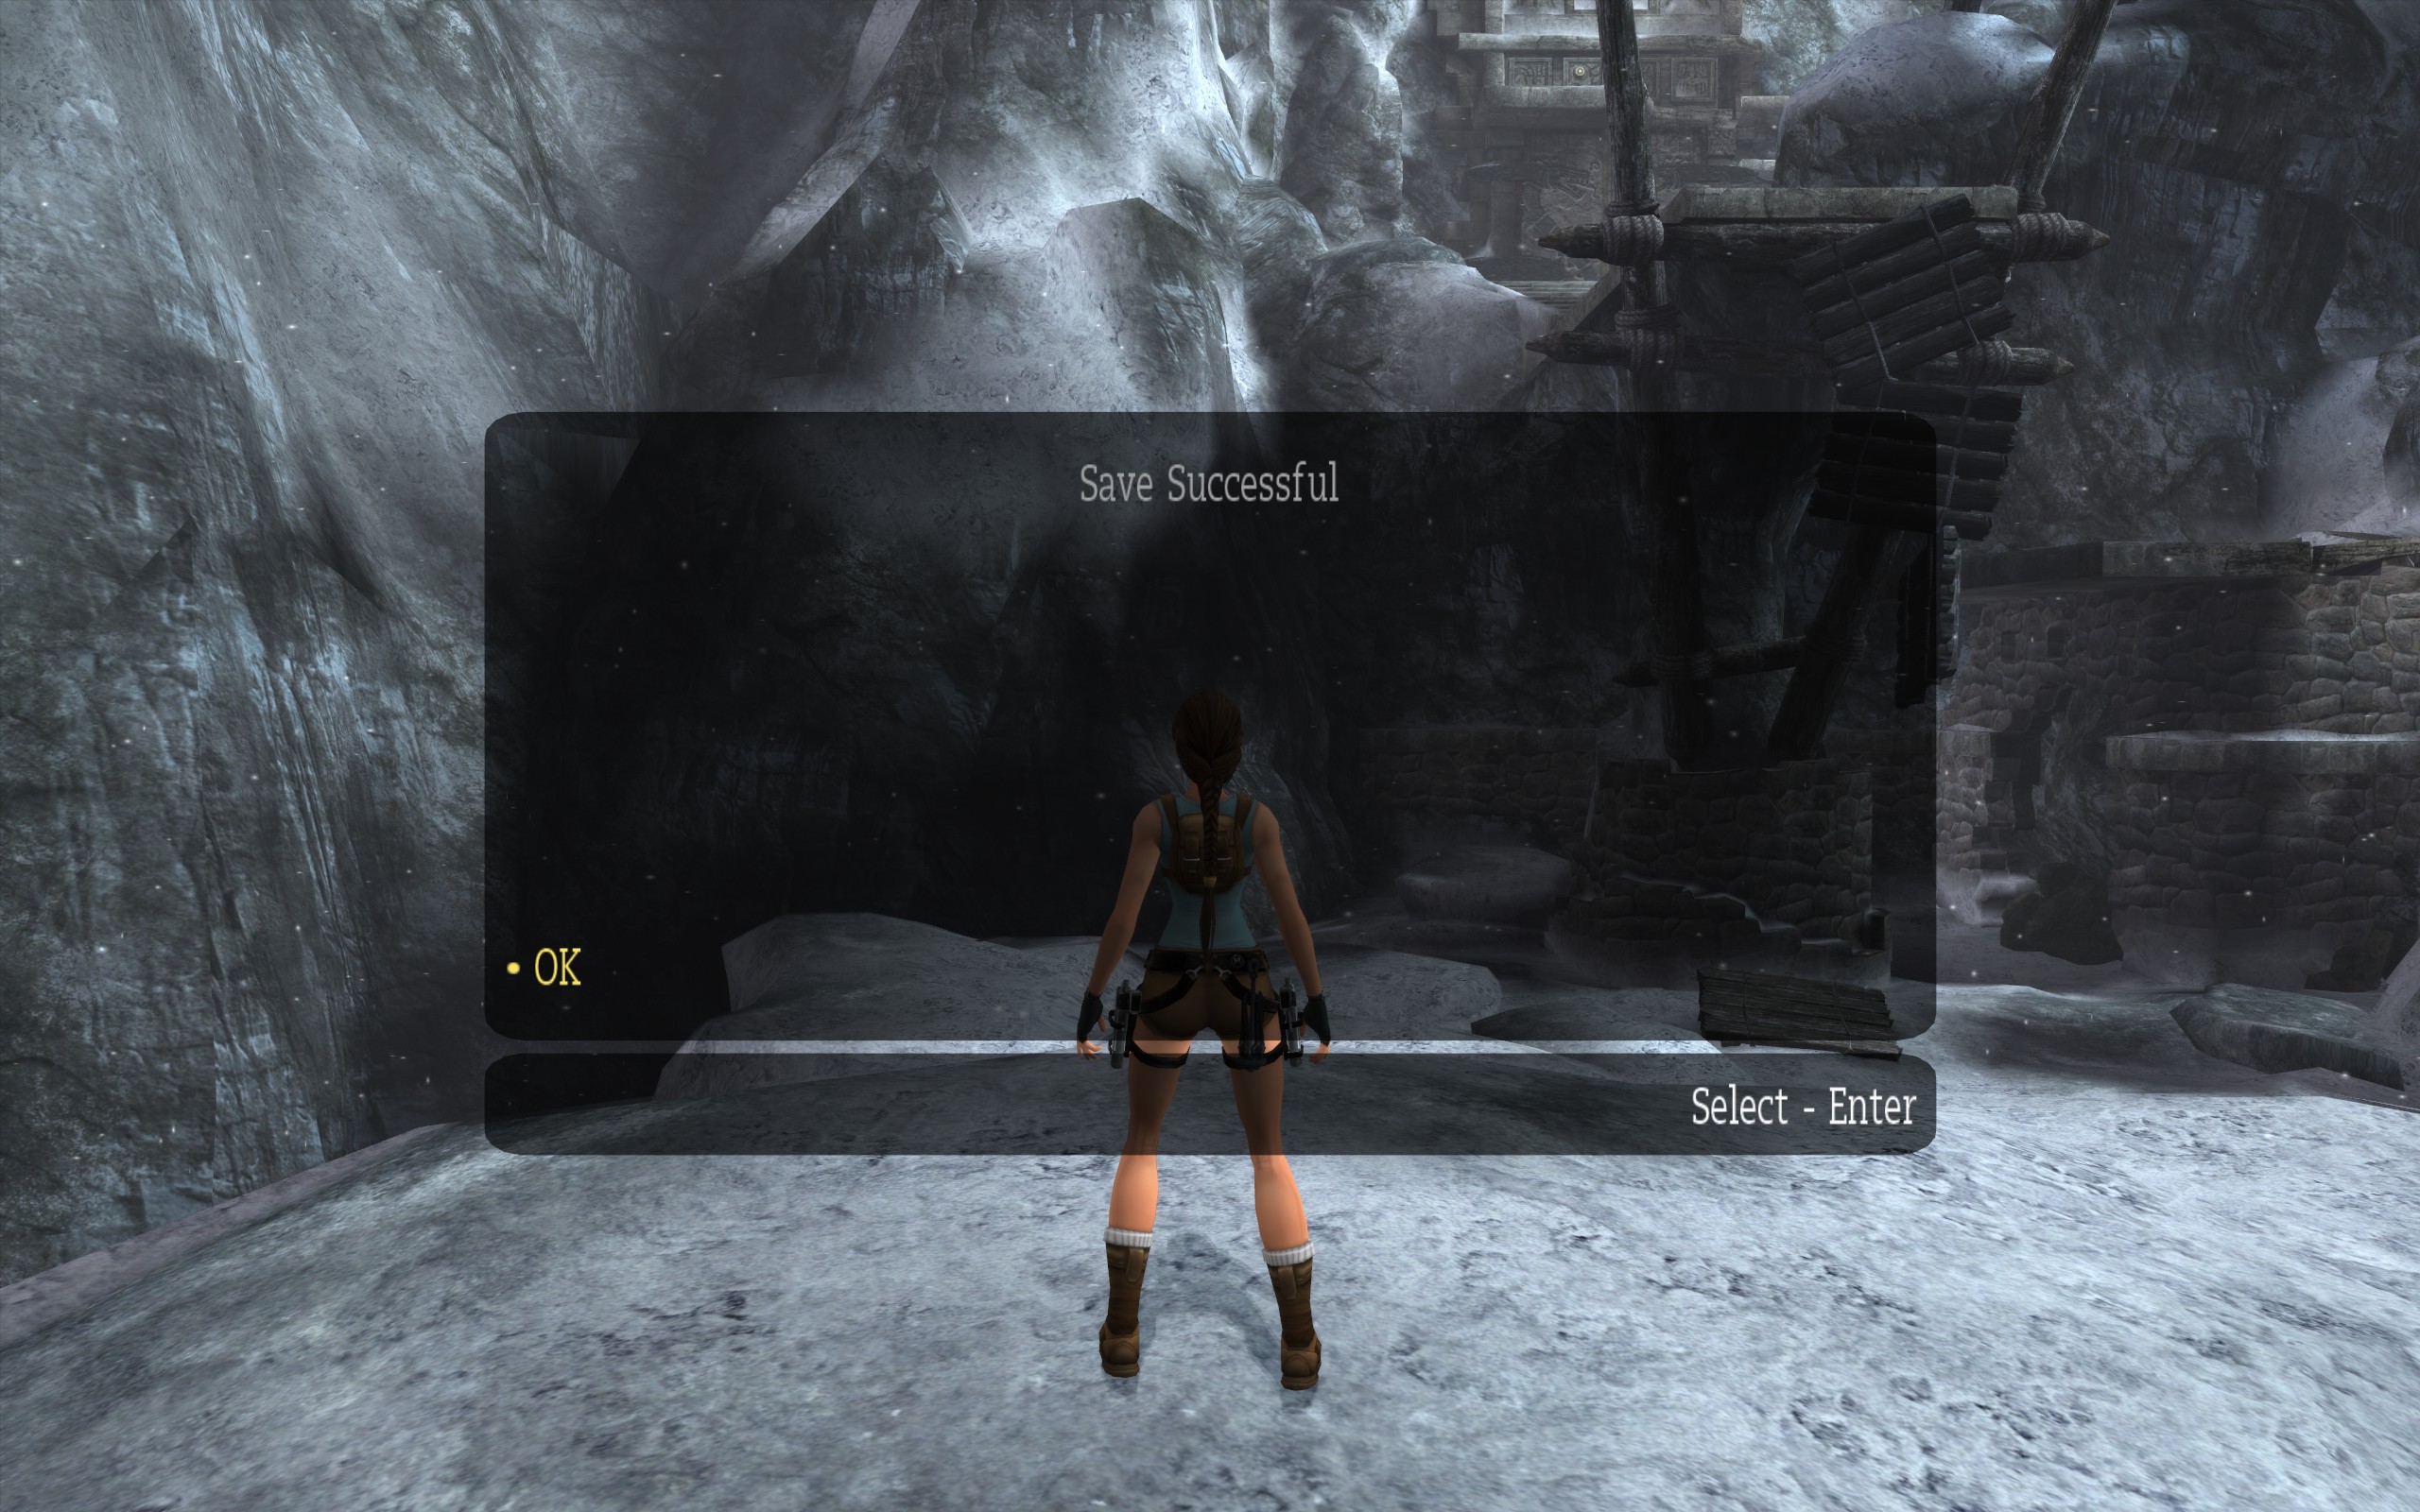
10. Launch game
Launch the game from Steam library. It should work. Ignore if it says default profile won’t load.

Create a new profile. Start a new game then try saving. It should work.
Please finish reading before you continue gaming!
How-to: Attach or detach virtual disks
Attach virtual disks by double clicking the vhdx file. It is OK if you see error Couldn’t Mount File because we didn’t assign a drive letter. Open Disk Management to see it did attach.

Attach virtual disks by opening Disk Management and in menu bar select Action then Attach VHD. This way you won’t see the error message.

Detach virtual disks by opening Disk Management window and right clicking the disk then from the drop-down menu select Detach VHD.


How-to: Auto-mount virtual disk at startup
Attach virtual disks automatically with Task Scheduler. This is optional.

Open Computer Management.
Select Task Scheduler. Select Create Task and the Create Task window appears.

Give the new task a name and description you’ll recognise. Make sure you check Run with highest privileges and Configure for: Windows 10. Change nothing else.
Select the Triggers tab. There are currently no triggers.

Click New and the New Trigger window appears.

Choose Begin the task: At startup. Make sure Enabled is checked. Delay task for: 30 seconds is optional but may work better for old computers. Change nothing else.
Click OK to add the new trigger.

Select the Conditions tab. Uncheck all boxes.

Select the Settings tab.

Select the Actions tab. There are currently no actions.

Click New and the New Action window appears.
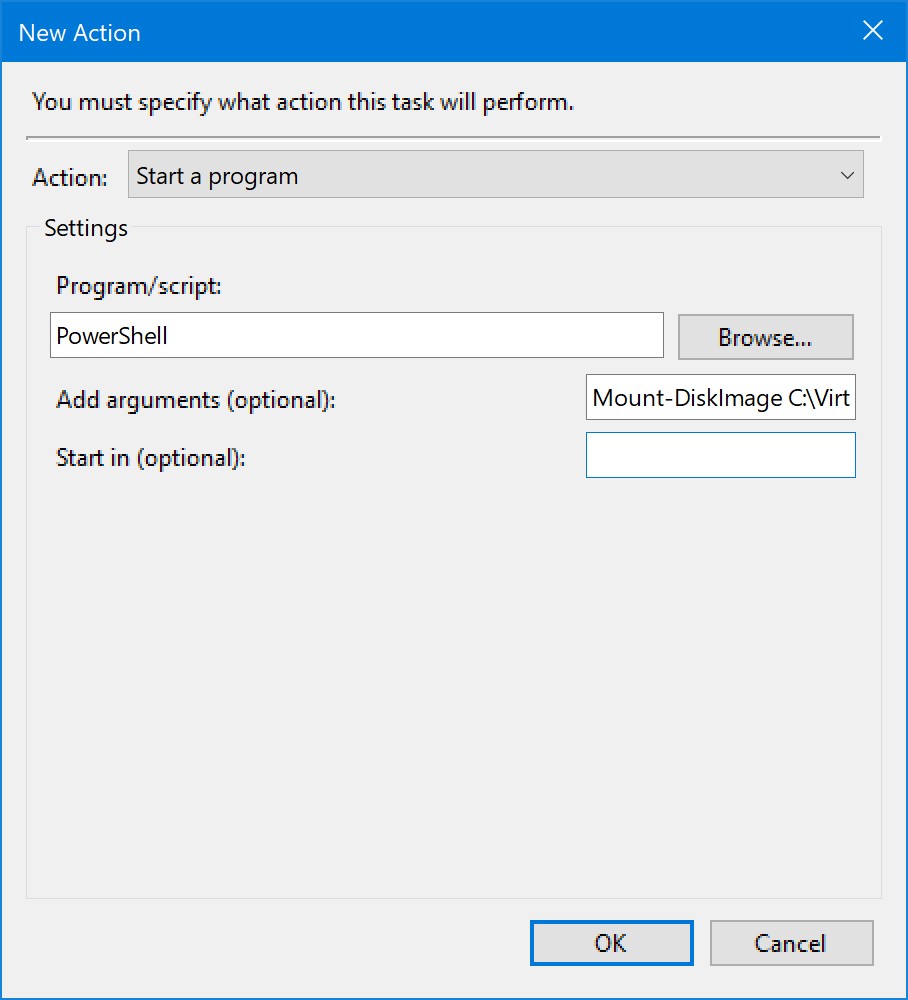
Use these settings…
- Action: Start a program
- Program/script: PowerShell
- Add arguments: type script below including path to your own vhdx file.
Mount-DiskImage C:VirtualHardDiskstr-anniversary.vhdx
The path to your .vhdx file must always be exactly correct otherwise it won’t mount. If you move the .vhdx file then you must adjust the path in the argument. If you uninstall and delete the .vhdx file then remember to delete the action.
Click OK and the action is added to our new task.

New actions can be added for each virtual disk you want to mount automatically.
Click OK when finished.

Task Scheduler should now list the task. From the actions sidebar you are able to permanently Delete, temporarily Disable, or Run the task immediately.
First let’s reboot and login to test it works.
After you reboot some blue windows will temporarily appear as PowerShell runs the Mount-DiskImage script we specified in the action argument.

Open Computer Management and select Disk Management. You should see the virtual disks you specified were mounted automatically. Launch the game. It should work.
External drives
You can store the game (.vhdx file) on another volume or external drive.
- Close the game.
- Detach virtual disk.
- Copy or move .vhdx file to the new location.
- Open Disk Management.
- Attach virtual disk. Check NTFS mount paths are still correct.
Uninstall game
This is how to properly delete your game.
- Attach the virtual disk.
- Open Steam and uninstall the game like normal.
- Detach the virtual disk.
- Open Windows File Explorer and delete the vhdx file permanently.
- If you configured to auto-mount at startup then remove that action from Task Scheduler.
Useful links
These links may help you.
Resources
- Stella’s Tomb Raider Site – Save Files, Fixes, Patches, Walkthroughs and more![tombraiders.net]
Download community made saved games
Related issues
- Tomb Raider Legend – Error – Data Execution Prevention
- Tomb Raider Underworld Crash On Launch caused by multi-core CPUs.
Launching the game
- Unable to load, change and create a profile. Note: solved with VHDs
- I still can’t save
- SAVE GAME LOST??? and no option to resume. The game runs but autosave got corrupted.
- FOUND FIX for losing saved checkpoints in Croft Manor
- No Resume option and Croft Manor saving fix
Game profiles, saving and loading
Unrelated issues
- Tomb Raider Anniversary – Missing Shadows?
- Tomb Raider Anniversary – Tip: *Don’t* Enable Anti-Aliasing
Graphics
- Steam – Game Overlay Issue Fix – Manual Hooking
- Tomb Raider Legend – SteamOverlay fix for TombRaider:Legend – no PID searching
- Tomb Raider Legend – (UPDATED) How to ACTUALLY fix the Steam Overlay (not the “Non-steam game” way)
Taking screenshots and using Steam overlay
- Can’t Alt + Tab Help. Note: MSI Afterburner and Windows FSE are possible causes. Try disable screen-capture or overlay softwares (eg. Discord).
Using Alt + Tab in the game
Страницы: Назад 1 [2] Все Вниз

Тема: Tomb Raider — Underworld (Прочитано 9632 раз)
0 Пользователей и 1 Гость просматривают эту тему.
там на русском и текст и вроде даже звук.
Новый диск,если мне память не изменяет,всё перевёл…
Качать всё полностью неохото
Патч можно попытаться сделать…

Патч можно попытаться сделать…
интересно ктож мне его сделает?
интересно ктож мне его сделает?
Ну кто — обладатель лицухи естественно…
На сколько я помню,у ребят из Crystal Dynamics обычно один главный файл-движ в игрушках — bigfile.dat. Сними с него чексумму с помощью Imagediff (MD5 128 bit) и кидай мне,посмоотрим что можно сделать..
Лицуху мне не сыскать, так что видно облом.
Лицуху мне не сыскать, так что видно облом.
Дык я ж тебе предлагаю патч сделать с твоей пиратки и моей лицухи…Если лень заниматься и разбираться,то так и скажи,в чём проблема?
Дык я ж тебе предлагаю патч сделать с твоей пиратки и моей лицухи…Если лень заниматься и разбираться,то так и скажи,в чём проблема?
Да нет я просто не догнал, как будет время попробую поварганю с bigfile.dat.
Добавлено позже:
Итак имеються аж 4 файла bigfile.000,bigfile.001,bigfile.002,bigfile.003. расширение как видишь не dat, а теперь обьясни чайнику какую вкладку выбрать в Imagediff, и манипуляции производить с каждым файлом?
Добавлено позже:
и если это вкладка diff image то какие галочки поставить?
Итак имеються аж 4 файла bigfile.000,bigfile.001,bigfile.002,bigfile.003.
Откуда аж 4 штуки?..У меня только 3-и файла. Какой размер сумарный у них?
а теперь обьясни чайнику какую вкладку выбрать в Imagediff
Вкладка Remote Scan (MD5 128 bit)…
« Последнее редактирование: 17 Июнь 2009, 13:13:38 от paul_met »
Откуда аж 4 штуки?..У меня только 3-и файла. Какой размер сумарный у них?
Откуда откуда да в дериктории игры первые три весят 2гб последний 800 итого 6.8гб.
Откуда откуда да в дериктории игры первые три весят 2гб последний 800 итого 6.8гб.
Не знаю что это за пиратский прикол,может какие-то из файлов тупо одинаковые. Сними чексумму со всех…
прикол в том что она у меня устанавливалась 2 ч, как gta.
К стати да, четыре файла, тоесть либо пираты чёто там перекопали, либо наши при локализации (что более вероятно) перепаковали по своему.

К стати да, четыре файла, тоесть либо пираты чёто там перекопали, либо наши при локализации (что более вероятно) перепаковали по своему.
Это ж как надо перепаковать,чтобы на гиг с копейками меньше получилось?..Нет,тут что-то не так,сравнивайте свои части,может некоторые почти не отличаются..И где чексуммы или уже не надо?
сумму снял, что интересно последний фаил весом 800 метров не дал над собой провести сие опыты. Извиняюсь за глупый вопрос как их прикрепить?
seebox, как обычно на обменник и ссылку в студию 
Добавлено позже:
Это ж как надо перепаковать,чтобы на гиг с копейками меньше получилось?..Нет,тут что-то не так,сравнивайте свои части,может некоторые почти не отличаются..И где чексуммы или уже не надо?
Ну пожать могли по другому или в русской версии убрали какието ресурсы, к примеру Dead Space у меня так пережата что поместилась в инстиал размером 3200 мб а сама игра ведь около 8 распаковывается.
А ксательно чексум если seebox, неможет выложить я сделаю но вот как ты их у себя прикрутиш?
Добавлено позже:
Чорд, не несмогу выложить 70метров слишком много для меня 
Добавлено позже:
Разве что в MD532
Добавлено позже:
З.Ы. Там к стати в папке мувиков на 500метров
да ща выложу тока у меня 50 метров получилось
да ща выложу тока у меня 50 метров получилось
Ага я тоже архиватором пожал стало поменьше. К стати с bigfile.003 у меня чексума снялась нормально могу выложить.
А ваши пиратки случайно не мультиязычные (ну типа на французком,немецком и т.д.)???
Если так,то в лицухе наверное вырезали лишний мусор,хотя когда скачаю чексуммы посмотрим…
paul_met, да выбор языков присутствует, видимо пираты поступили как делают довольно часто взяли английскую версию скачали с ZOG русик и добавили пофиксеный экзешник
Вообщем ничего путного не вышло,патчи получились по 1.5 гига. Получается что игровой архив перепакован и одинаковые части разбросаны по всем файлам,потому и получился выйгрыш только в 500 метров.
Хм, как вообще локализация нормальная звук-текст? А то пирадский перевод TR никогда не отличался качеством и эта часть не исключение, вот подумываю над покупкой лицензии, а так как она стоит довольно прилично (15 баксов) нехотелось бы зря брать.
« Последнее редактирование: 19 Июнь 2009, 00:25:33 от Photon9 »
Локализация мне понравилась (озвучка в основном,так как её там много)…А стоимость лицухи — да,дорого. Я как-то хотел купить,но потом подумал,что скачать выйдет гораздо дешевле…
Мне учитывая стоимость трафа (5грн сутки(0.7 бакса) + 5 коп метр)купить дешевле
Раз купить проще,тогда да…Хотя ощущения будут уже не те,проходя по второму разу…Я всегда по возможности стараюсь играть только в лицуху с русской озвучкой,чтобы не отвлекаться на субтитры,которые вечно ужасно напрягают (читая сабы не успеваешь оценить происходящее на экране,особенно в динамичных сценах; Да и зачем всматриваться,читать,когда можно слушать).
Вообщем ничего путного не вышло,патчи получились по 1.5 гига. Получается что игровой архив перепакован и одинаковые части разбросаны по всем файлам,потому и получился выйгрыш только в 500 метров.
Ну что они не покатят? Это каждый стоко весит?
Это каждый стоко весит?
Да,каждый из 3-х патчей…
paul_met а 7zip не поможет, впрочем извени за напряг, а качать стоко просто глупо, с руским текстом пройду нафиг и ладно.
paul_met а 7zip не поможет
Возможно и поможет слегка,но такой обьём я боюсь что не потяну…
Страницы: Назад 1 [2] Все Вверх