Содержание
- FIX; Disk service raised an external error, Prime OS 0.4.5 Installation (UEFI Mode)
- Tech SeedR
- Nicolás Chávez
- Husein Kikino
- captainandrew016
- SMK Youtube Channel
- Sikander Rander
- MR OTASH
- Kaash Game!
- Arsh Gtm
- Panther King
- Johnny Andrew
- Himal Wooli
- TSZツ Hercules
- Jaydeep
- Joyfulnes Nongsiej
- Mohammed Refaat
- KORMOV OFFICIAL
- TANAY BHOMIA
- KhAn Bb
- Disk service raised an external error. How To Install Prime OS Without Any ERROR
- _ragul _rp_
- Rajiv Deshpande
- LORD HANUMAN
- KAIDEN_GRG
- WTP NEW WATCH TAMIL
- Techz Boyie
- masood akram
- NAKUL ARORA
- Jihan Gaming
- Aditya Y
- Niraj Verma
- Amal Chacko
- SA Shamim Ahmad
- mohameeed fawzzzi
- Prakash 1
- Mr.Potato Head
- The Best Ways to Fix Diskpart Virtual Disk Service Errors [Partition Magic]
- What Is Virtual Disk Service?
- Error 1: Clean is not allowed on the disk containing the current boot, system, pagefile, crashdump or hibernation volume.
- Error 2: The volume size is too big.
- Error 3: The specified disk is not convertible. CDROMs and DVDs are examples of disks that are not convertable.
- Error 4: Only the first 2TB are usable on large MBR disks.
- Error 5: The size of the extent is less than the minimum.
- Error 6: The volume requires contiguous disk extents.
- Error 7: The extended partition is not empty.
- Error 8: Assigning or removing drive letters on the current boot or pagefile volume is not allowed.
- Summary
- About The Author
FIX; Disk service raised an external error, Prime OS 0.4.5 Installation (UEFI Mode)
Просмотров: 21 458
Tech SeedR
YouTube recently changed the way they monetize Content. My channel now needs 1,000 subscribers so it would be awesome if you could show your support by both watching my videos and subscribing to my channel if you haven’t already done so. Monetizing my videos allows me to invest back into the channel with new equipment so a small gesture from you goes a huge way for me. Many thanks for your support.
Nicolás Chávez
Husein Kikino
It’s mean that Installer PrimeOS .
exe doesn’t work at all. Thanks
captainandrew016
Tried this; computer simply ignores this and goes to windows.
SMK Youtube Channel
speak something or give captions
Sikander Rander
It is quite simple with iso file provided by Prime OS team.
MR OTASH
Error Black screen .
Kaash Game!
Hey! I was installing prime os but it is showing error
1. Variable root is not set
2. You need to load the kernel first
Please help for the same
Arsh Gtm
i dont have a usb please help me? easybcd says efi mode limits the featurs
Panther King
Bro how to enter boot menu in asus windows 10.
Johnny Andrew
hi can i just make the installer.exe to iso instead of downloading iso again?
Himal Wooli
vai mera pc ma usb na he dakha ta ha kaisa boot kara plz help
TSZツ Hercules
Where did u get dat rufus and iso file?
Jaydeep
(all videos) JUST SAY INSTALLER WILL NOT WORK DO OLD OS METHOD WITH PENDRIVE(ISO). :/ now i have to download 1gb again :/
Joyfulnes Nongsiej
Can you solve this error without using pendrive
How can I delete prime os .there is lots of prime os in my boot menu,wha should I do
Mohammed Refaat
he asked me what is the password for easy?
KORMOV OFFICIAL
I cant booting a prime os in uefi, «error, dont install kerner»
TANAY BHOMIA
Hey bro my file type of prime os is exe and it is not selecting in the rufus how can i do it ? because it say iso file when i turn it in the iso than it says erro
KhAn Bb
When i split the disk it says minitool partition wizard free cannot split the specified partition . No free MBR slot
Источник
Disk service raised an external error. How To Install Prime OS Without Any ERROR
Просмотров: 13 961
Thank you so much
After so much effort finally 😂
_ragul _rp_
Thankyou it’s working 🥺🥺
Rajiv Deshpande
bro vo prime os kay pandrive ma store hong ke pc ma
LORD HANUMAN
poora process karneke bad kya ham pendrive ezect kar sakthe hai
KAIDEN_GRG
Bhai muje wo esc wala part samaj nahi aaya
WTP NEW WATCH TAMIL
Hello bro please prime os problem please halp your whatsapp nova podugga oru photo anupuren
Techz Boyie
is it dual boot
masood akram
Will this delete my previous data?
NAKUL ARORA
Tried many videos but only your worked , took an hour but it’s fine
Thank You Bro❤️
Jihan Gaming
Disk selection ki time meri keybord me power nehi nehi ata. kya karu .
2-3 bar try kar cuki hu same problem . WAiting for your reply
Aditya Y
Bahi Windows delete Ho gya or ab
Ye bhi khul nhi
rha hai😑😕debug bta K screen blank Ho ja rhi hai
Niraj Verma
Amal Chacko
SA Shamim Ahmad
bro mera wifi ka problem he
mohameeed fawzzzi
Prakash 1
Prime OS windows installer is a proven malware that will destroy your windows pc’s. After installing this Prime OS windows installer your older 32 bit pc’s running pre windows 10 os will not be able to start up (boot). So you won’t be able to use your expensive pc and it will become completely useless.
Even in in latest 64 bit windows 10 pc’s you can see error on start up but some how they manage to overcome it. Also the address given in Prime OS website is fake (no such address in google maps ). The don’t even have an email or phone no to contact.
Better go for android x86 if you want android in pc as it is atleast working (bluetooth and wifi not working in android x86 , usb tethering works). But in android x86 also older iso files like CM13.0 r1 are malware causing even latest laptops/desktops to dysfunction because GRUB 2.02 used to boot the OS doesn’t show windows in it in dual boot set up. In such cases you need to install latest android x86 iso files like CM14.1,7.1,8.1 etc through system recovery (press F11 on start up in hp laptops), using usb disk- write any of these iso files to pendrive using rufus in another pc , and then again go to system recovery press start up repair and windows will automatically repair to show windows in the GRUB dual boot screen and you can enter by just clicking.
If you end up unable to start your 32 bit desktop/laptop/tablet pc after trying install this malware «prime os windows installer» do the following steps to recover your PC:-
For tablet PC — Boot into bios — for dual os — windows + android tablet pc’s press start and volume down to reach dual os boot screen — connect usb keyboard — select windows logo by pressing volume up button at the same time press esc button in usb keyboard — you will enter bios setting — go to secure boot by using direction arrow keys in usb keyboard and press enter — enable secure boot — start pc , if it says prime os bootloader blocked secure boot then press esc key repeatedly till the block message is gone / turns blank and then press start — touch will be disabled in secure boot, so use usb mouse to reset pc — after resetting again enter bios using usb keyboard and disable secure boot by entering the secure boot options — start again- now touch will be enabled.
For other laptops and desktop’s — start after enabling secure boot from bios and then disabling in same steps as said above.
In windows 8.1 in case of virus attack sometimes screen can go flickering and you will not be able to use your pc . Do the following steps to reset pc in such cases:- Press start button to sign out and press accessebility logo in down left corner- press onscreen keyboard- press shift key and while pressing the shift press restart, on restart choose an option screen will appear -press trouble shoot — reset.
Mr.Potato Head
Bro when i trying to write the size it maiking ting ting sound only
Источник
The Best Ways to Fix Diskpart Virtual Disk Service Errors [Partition Magic]
Here is the Virtual Disk Service Error roundup that discusses the reasons and solutions for some typical Virtual Disk Service Errors. It is wise for you to get MiniTool Partition Wizard to repair virtual disk service error.
What Is Virtual Disk Service?
At the age of Windows 2000, each company that made storage devices provided its own application to install and management their own storage devices. As a result, users had to run separate applications if they are using different types of storage devices on their computer system. This made disk/partition management difficult.
To address this issue, Windows Server 2003 introduced Virtual Disk Service (VDS). VDS is a set of application programming interfaces including the Disk Management snap-in, the DiskPart command-line tool, and the DiskRAID command-line tool, and provides a single interface for disks management.
Because of VDS, you don’t need to use different storage applications to manage different storage devices any more. Instead, you can use one compatible storage application to manage any hardware that has a VDS hardware provider. For more information, view the original resource on Microsoft.
Although VDS brings much convenience for disk/partition management, users are discussing how to fix virtual disk service errors over the net. Here we list some typical errors, along with the solutions.
Error 1: Clean is not allowed on the disk containing the current boot, system, pagefile, crashdump or hibernation volume.
While confirming diskpart clean command on system disk, you will receive the following error message:
Virtual Disk Service error: Clean is not allowed on the disk containing the current boot, system, pagefile, crashdump or hibernation volume.»
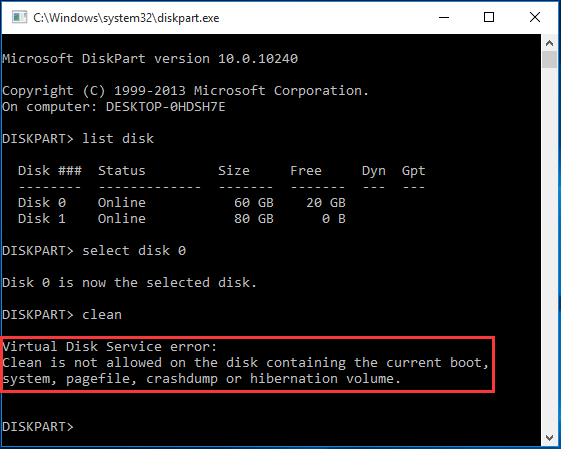
The reasons that lead to this error can be found in this post, then how can you clean a system disk successfully? The answer is: you can try using MiniTool Partition Wizard Bootable Edition to help you. MiniTool Partition Wizard Bootable Edition is created by the Bootable Media Builder feature that is available on all paid editions. It can be used to cope with various disk management issues without running Windows. Please do the followings:
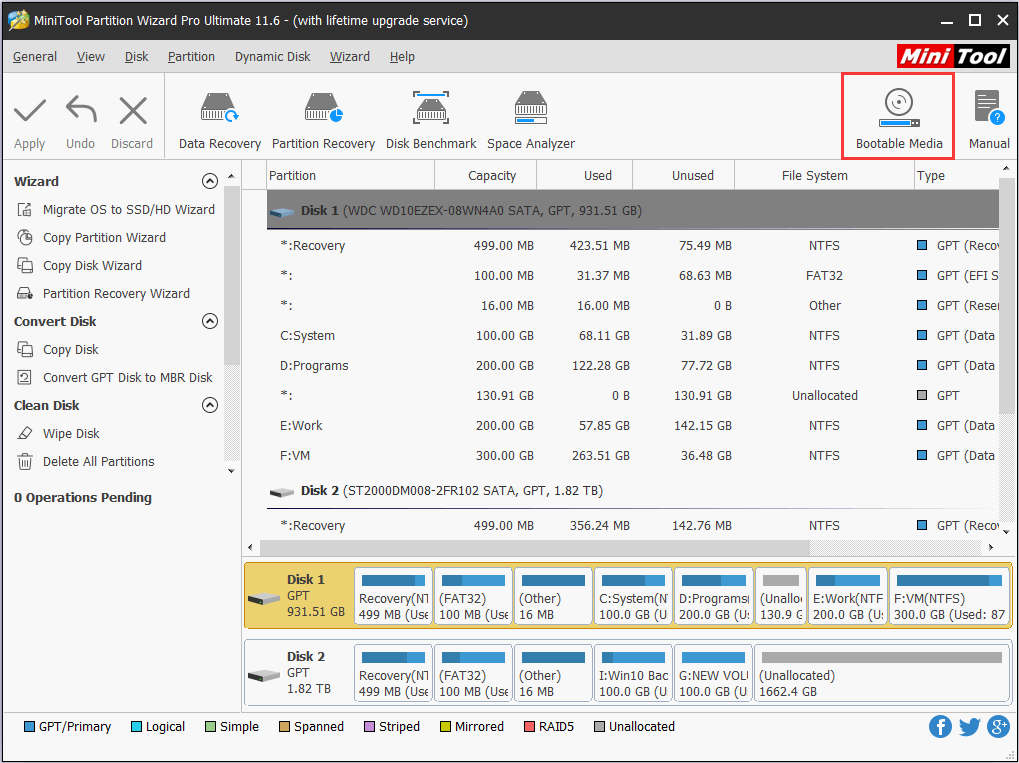
Step 1: Run MiniTool Partition Wizard Pro and select «Bootable Media» from tool bar to start.
Step 2: Burn the .iso image file to an USB flash drive or CD/DVD. You can refer to How to Build Boot CD/DVD Discs and Boot Flash Drive with Bootable Media Builder to know the details.
Step 3: Set computer to boot from the bootable media you have just created. Then you will see the main interface of MiniTool Partition Wizard Bootable Edition.
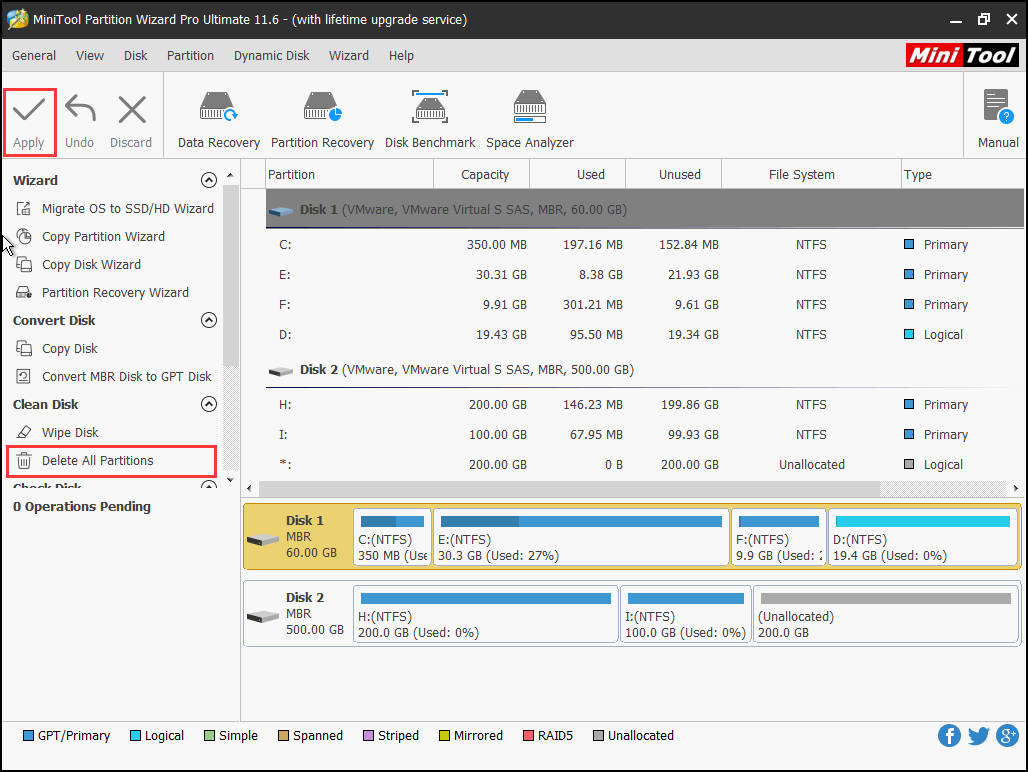
Step 4: Now click on the disk you want to clean and choose «Delete All Partitions«. Please ignore the warning message and click «Apply«.
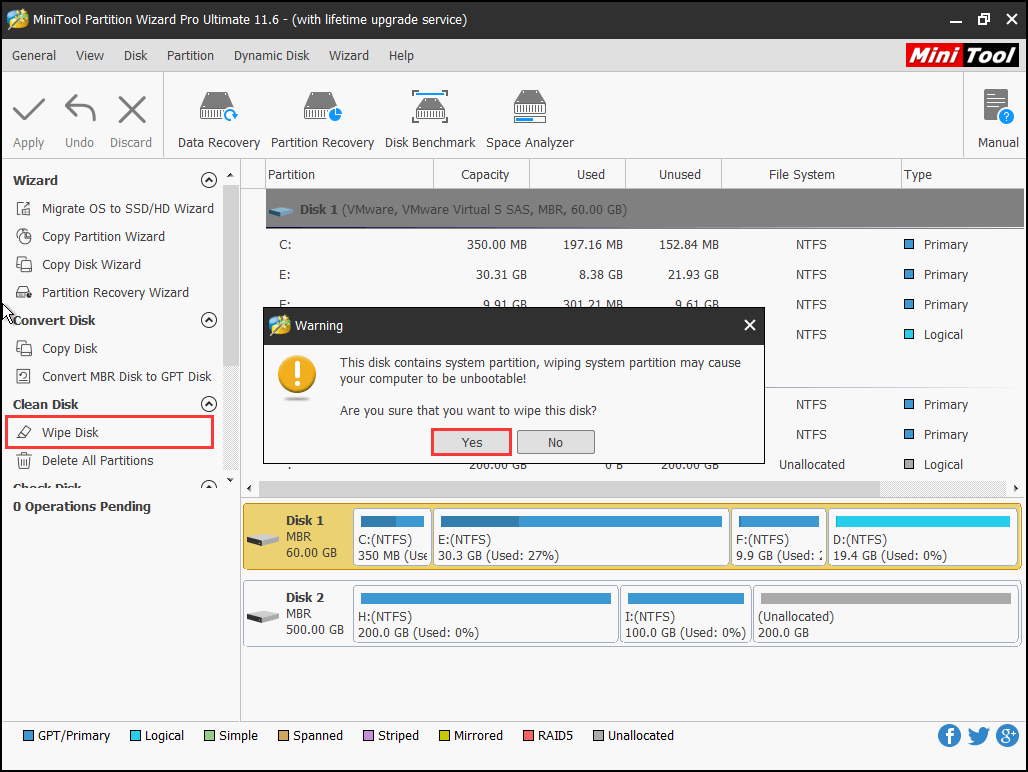
Also, you can choose «Wipe Disk» to clean the system disk. Be sure that you won’t search for a data recovery method after doing this, for it is an irreversible operation. You need to select a wiping method before you can finally apply the change.

Error 2: The volume size is too big.
When you are trying to format a partition to FAT32 using diskpart, you are likely to encounter the following message:
Virtual Disk Service error: The volume size is too big.
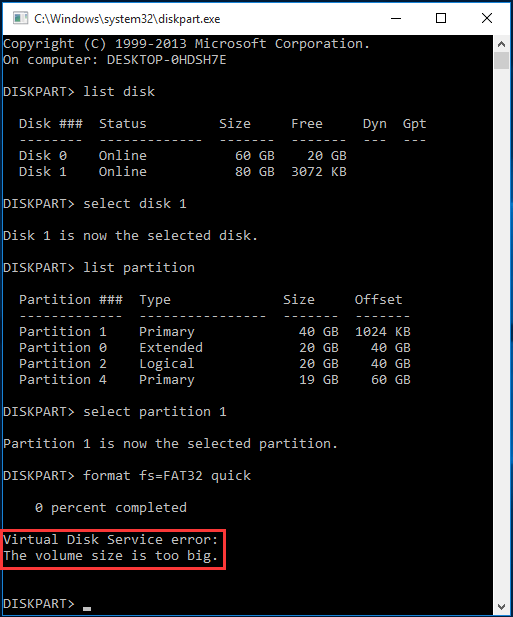
The reason is that the partition size has exceeded 32GB. In Windows, you can’t create/format a partition with FAT32 file system unless you employ third-party software. The interesting thing is that although Windows won’t allow to make such a partition, it is able to recognize and use it normally. So to format a partition that is larger than 32GB to FAT32, you can always rely on MiniTool Partition Wizard. It’s «Format Partition» feature offers more choices than Windows could.
Step 1: Launch MiniTool Partition Wizard and enter its main interface.
Step 2: Click the partition you want to format and select «Format Partition» from the Operations menu.
Step 3: In the pop-up window, drop down the file system option box to select FAT32 as the target file system. Then click «OK» to goerface.
Step 4: Click «Apply» to execute this conversio back to the main intn.


Error 3: The specified disk is not convertible. CDROMs and DVDs are examples of disks that are not convertable.
When using diskpart to convert a hard drive disk from MBR to GPT or vice versa, you will undoubtedly receive the following error message:
Virtual Disk Service error: The specified disk is not convertible. CDROMs and DVDs are examples of disks that are not convertable.
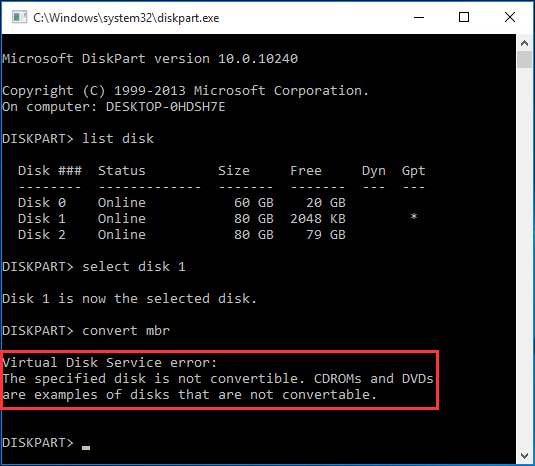
The reason is that by using windows built-in utility to convert disk type, you should wipe all partitions on that drive and then convert the drive to GPT or MBR. Thus, if you insist on converting disk type using diskpart, you need to run the following commands in order:
- List disk
- Select disk n where n is the drive number of the target disk
- Clean
- Convert GPT (or convert MBR)
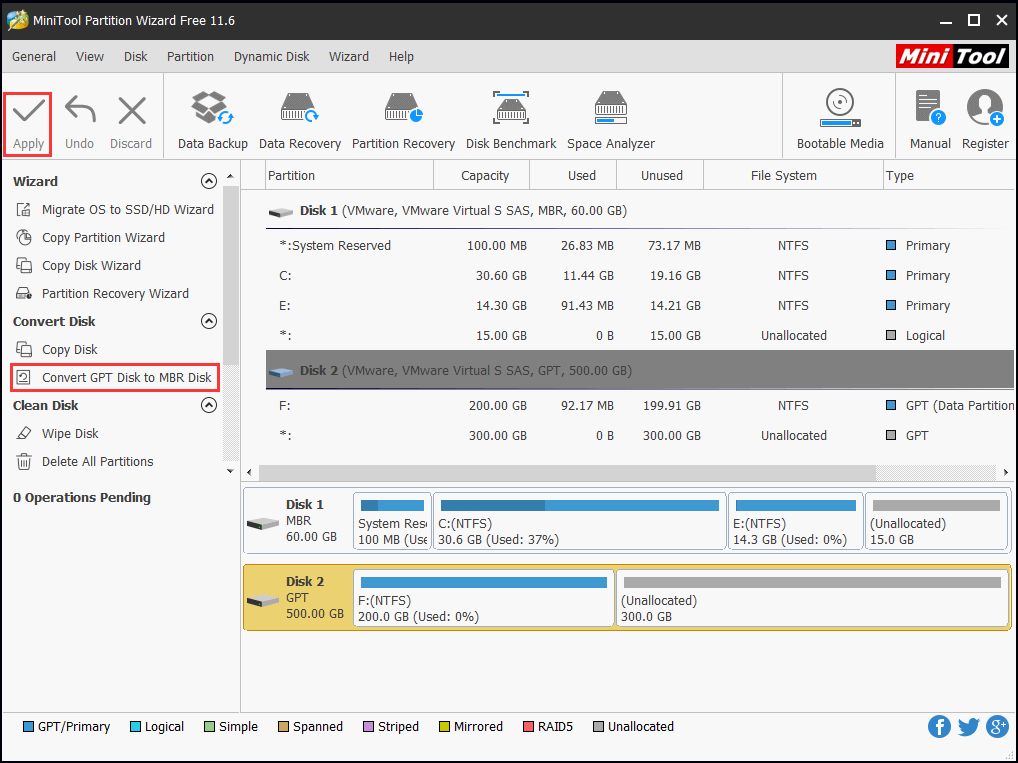
However, what if the target disk contains important data and you are tired of data backup? In this case, we suggest using MiniTool Partition Wizard to convert hard disk drive from MBR to GPT and vice versa.
Step 1: Launch MiniTool Partition Wizard and enter the main interface. Click on the disk to be converted and select «Convert GPT Disk to MBR Disk» or «Convert MBR Disk to GPT Disk«, depending on whether the disk is currently using GPT or MBR.
Step 2: Click «Apply» to finish conversion.
Error 4: Only the first 2TB are usable on large MBR disks.
When trying to create or extend a partition to more than 2TB on MBR disk, definitely you will see the following error message:
Virtual Disk Service error: Only the first 2TB are usable on large MBR disks. Cannot create partitions beyond the 2TB mark, nor convert the disk to dynamic.

By viewing the error message, you know this is caused by the 2TB limit on MBR disk. Thus, the only way to make use of the left space is to convert the MBR disk to GPT.
Like what explained in the former part, diskpart requires cleaning the drive before conversion and will lead to data loss, thus using Partition Wizard to do the conversion without data damage is the first choice. Please follow the steps in Error 3 to finish the conversion. After that, you can make use of the rest storage space by creating new partitions or extending current partitions.
Error 5: The size of the extent is less than the minimum.
When trying to use diskpart to extend a partition on basic disk, the following error message may appear:
Virtual Disk Service error: The size of the extent is less than the minimum.
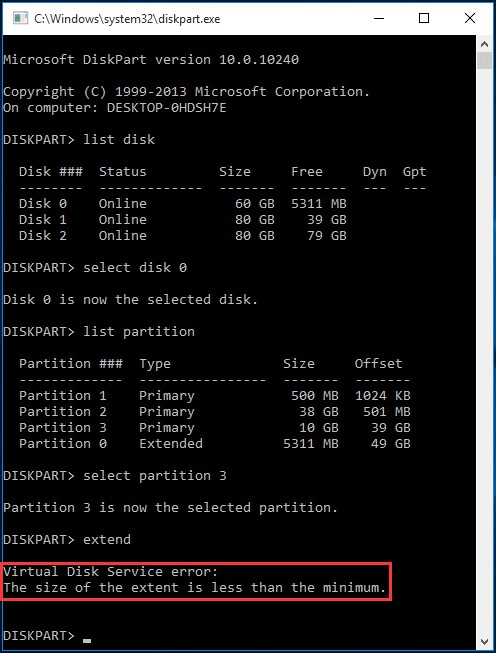
The reason is that you are trying to extend a primary partition by adding some free space. Usually, unallocated space can be used to extend primary only (in Server 2003, things are a little different, see more), and free space can be used to extend logical partition only. Thus, when using free space to expand primary partition, the size of the extent is less than the minimum error occurs.
Then how to avoid this error?
You can turn the primary partition to logical (will lead to data loss) or you can choose to delete the free space to make it unallocated. But in our opinion, using MiniTool Partition Wizard is much easier, because it takes both unallocated space and free space as unallocated space, and is able to use the unallocated space to extend any partition on the same drive.
Step 1: Launch MiniTool Partition Wizard to its main interface. Then click on the partition to be extended and choose «Move/Resize Partition» to occupy the adjacent unallocated space or «Extend Partition» to take storage space from any partition that can offer some free space.
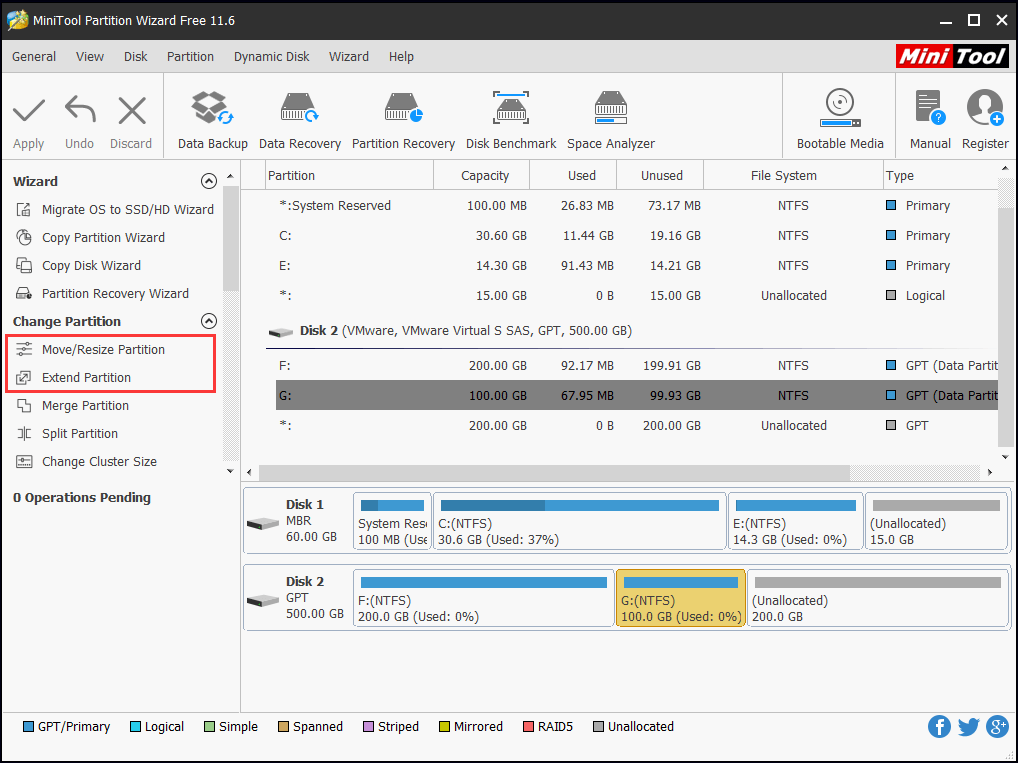
Step 2: Follow the guidance to specify the extending.
Step 3: Press «Apply» to save changes.
Error 6: The volume requires contiguous disk extents.
When trying to extend a volume on dynamic disk, sometimes this error messages appears:
Virtual Disk Service error: The volume requires contiguous disk extents.
On dynamic disk, diskpart is supposed to be able to extend simple volume and spanned volume as long as there is unallocated space, no matter whether it is contiguous or not. However, the exact reason that leads to this error message is not clear. Reformatting the hard drive or trying third-party software has been proved to be useful by many users.
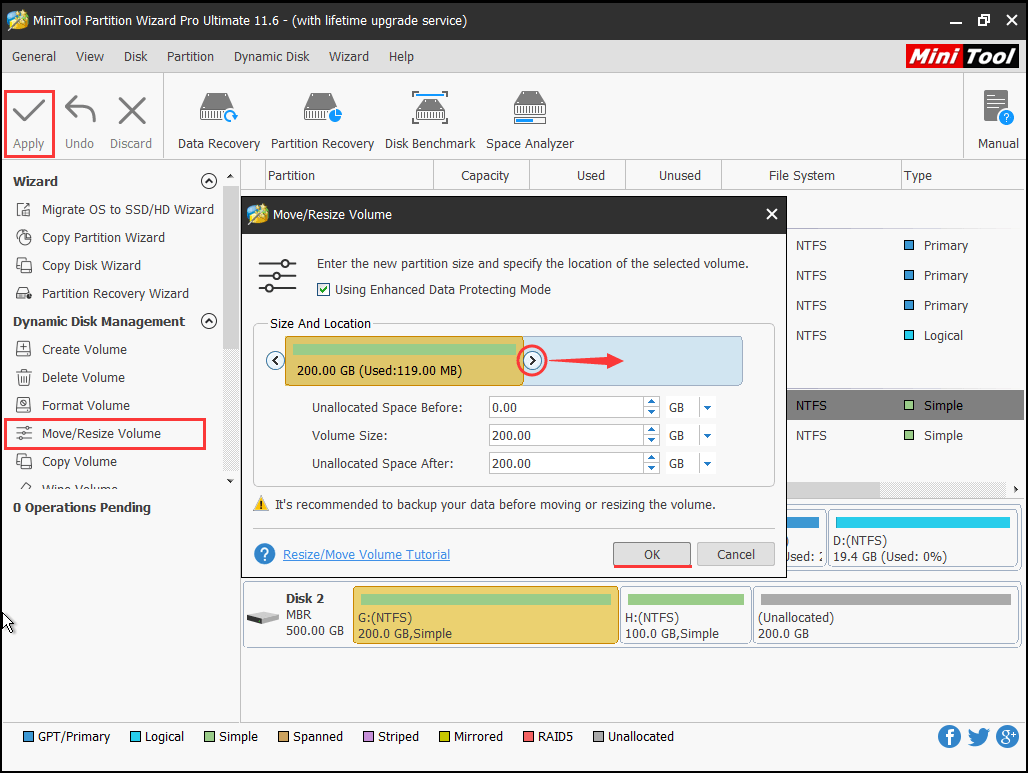
Step 1: Run Partition Wizard Pro, click on the simple/spanned volume to be extended and select «Move/Resize Volume» from the Operations menu.
Step 2: Drag the triangle to occupy part of/all unallocated space. Then click «OK» to go back to the main interface.
Step 3: Hit «Apply» to finish extending.
Error 7: The extended partition is not empty.
Another common error message is that when you try to delete a partition, you may come across the following:
Virtual Disk Service error: The extended partition is not empty.
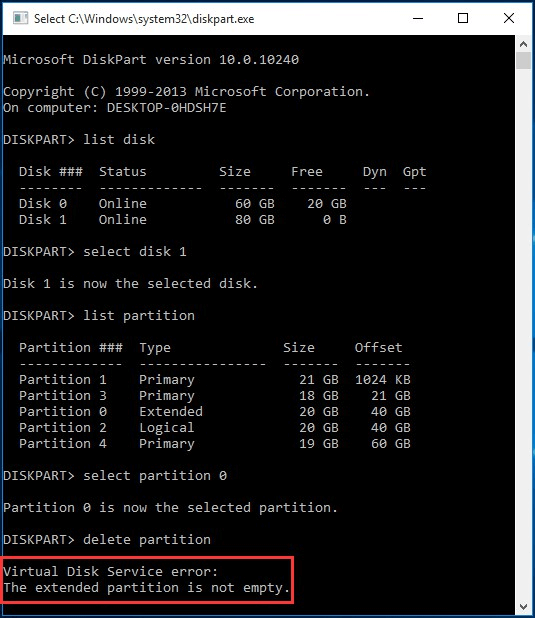
The reason is that you are deleting the extended partition. However, there are logical partitions included in the extended partition. To overcome this issue, you should delete the logical partitions one by one at first and then carry out deletion on the extended partition.
In our example, you should type these commands next to the error message to finish deleting extended partition:
- Select partition 2 (the logical partition)
- Delete partition
- Repeat these commands until there is no logical partition, then type:
- Select partition 0 (the extended partition)
- Delete partition
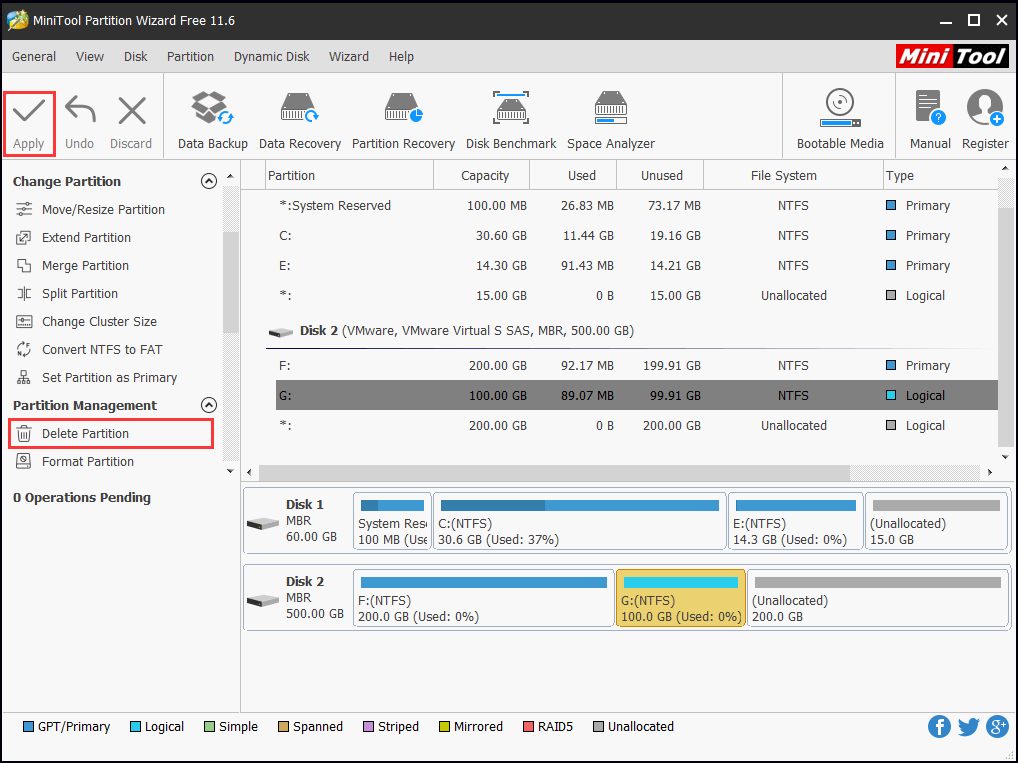
Using MiniTool Partition Wizard to delete extended partition can avoid or at least weaken this embarrassment, because when deleting a logical partition, Partition Wizard turns it into unallocated space directly instead of free space, thus avoiding the process of deleting the extended partition at last.
Step 1: At the main interface of Partition Wizard, click on the logical partition you want to delete and choose «Delete Partition» from the Operations menu.
Step 2: Click «Apply» to finish the deletion.
Error 8: Assigning or removing drive letters on the current boot or pagefile volume is not allowed.
When using diskpart to change drive letter, sometimes you will receive the following error message:
Virtual Disk Service error: Assigning or removing drive letters on the current boot or pagefile volume is not allowed.
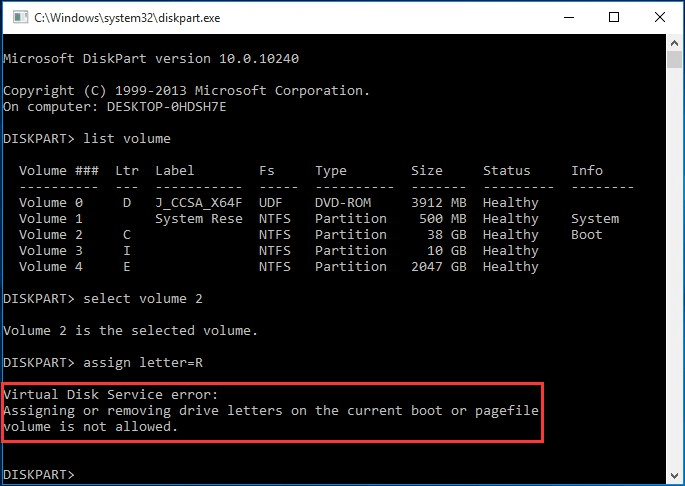
This occurs when you are making changes on the current boot volume or pagefile volume. Sometimes after reinstalling OS, you find that the system partition is D instead of C, so you want to make an exchange.
However, Microsoft says removing or changing drive letters on them may cause some programs run incorrectly. Even when you turn to Disk Management, you will see «The parameter is incorrect» when changing drive letter or «Assigning or removing drive letters on the current boot or pagefile volume is not allowed» when removing drive letter.
What if you really need to change the drive letter? Here we have to say you are recommended to keep the drive letter as it is, or make a partition backup and then reinstall OS. Apart from the above virtual disk service errors, there are many other similar errors that can occur when using diskpart to deal with disk/partition management. When you come across such error messages, remember you can have MiniTool Partition Wizard at hand, to overcome the problems.
Summary
In this post, we introduce what is virtual disk service, along with how to repair virtual disk service errors. If you are the one who is troubled by these errors, try MiniTool Partition Wizard, you will be amazed at how it deals all issues flexibly and how user-friendly it is.
If you have any questions towards using MiniTool Partition Wizard, welcome to leave comment to let us know. Also, you can contact [email protected] for technique assistance.

Rodin is an enthusiastic IT writer focusing on Windows trends, disk partition management and data recovery. She loves to write and share her idea about the useful tips and tricks on personal computers’ maintenance.
If you are looking for methods to improve your computer performance, manage hard drives and recover data from different devices, Rodin can provide reliable solutions for data management.
Источник
Содержание
- Что это за ошибка A disk read error occurred press ctrl+alt+del to restart
- Причины возникновения ошибки
- Решаем проблему с A disk read error occurred press ctrl+alt+del to restart
- Заключение
Во время загрузки своего компьютера пользователь может столкнуться с сообщением «A disk read error occurred press ctrl+alt+del to restart», причём нажатие указанных в сообщении клавиш ведёт к перезагрузке системы, и всё повторяется сначала. В данном материале я поясню, как исправить ошибку disk read error в Windows XP/7/10, расскажу о причинах её возникновения и особенностях решения указанной проблемы.

Обычно ошибка A disk read error occurred press ctrl+alt+del to restart («ошибка считывания диска») возникает во время процесса считывания с жёсткого диска компьютера необходимой системной информации, и напрямую связана с поломкой винчестера или аппаратными (программными) проблемами в его работе. Чаще всего пользователь встречается с ошибкой disk read error occurred во время загрузки операционной системы, причём, как уже упоминалось, нажатие указанных в ошибке трёх клавиш ничего не даёт, и после перезагрузки система всё так же отказывается работать.

Причины возникновения ошибки
Специалисты выделяют несколько распространённых причин возникновения ошибки A disk read error occurred press ctrl+alt+del to restart, а именно:
- проблемы с жёстким диском (его поломка, аппаратное повреждение, деформация логических разделов, повреждение boot-сектора жёсткого диска, «осыпание» диска вследствие износа и др.);
- проблемы с IDE или SATA-шлейфом, выступающим в качестве связующего звена между компьютером и жёстким диском;
- проблемы с модулями памяти RAM;
- проблема с ОС (некорректная инсталляция ОС, установка более старой версии на действующую новую, восстановление ОС на переполненный раздел жёсткого диска);
- проблемы с Биос;
- проблемы с другим оборудованием (неисправен блок питания, неисправен контроллер, контакты на материнской плате и др.).
Решаем проблему с A disk read error occurred press ctrl+alt+del to restart
- Проверяем работоспособность винчестера и шлейфа. Проверьте визуально шлейф жёсткого диска на наличие видимых повреждений, а также попробуйте заменить используемый шлейф. Не мешало бы проверить правильность и плотность подключения шлейфа от винчестера в нужный разъём материнской платы. Зайдите в Биос и проверьте, видит ли система ваш жёсткий диск. Если нет, и замена шлейфа не помогла – тогда несите ваш винчестер в сервисный центр.

Проверка видимости винчестера в биосе - Восстанавливаем загрузчик в MBR. Master Boor Record (или MBR) является главной загрузочной записью, содержащей необходимые данные для последующей загрузки операционной системы. MBR размещается в первых секторах жёсткого диска и несёт информацию о логических разделах винчестера. При повреждении MBR система выдаёт указанную нами ошибку A disk read error occurred press ctrl+alt+del to restart.
- Чтобы восстановить MBR в Windows 7 нужно сделать следующее. Загрузитесь с дистрибутива Windows 7 (на диске или флешке, проставив перед тем загрузку с них в биосе) и кликните на «восстановление системы». Затем нажмите на «Использовать средства восстановления» для нужной ОС, нажмите «Далее», а на следующем экране выберите командную строку. На экране строки переходим на ваш CD или DVD привод (если у вас это диск D, то достаточно нажать D: и Enter), затем набираем в командной строке cd boot, а затем bootsect /nt60 sys. MBR будет скопирована с установочного диска на ваш винчестер.
- Также может помочь в исправлении ошибки “A disk read error occurred press ctrl+alt+del to restart” подсоединение вашего жёсткого диска к другому компьютеру с рабочей системой. После подсоединения и загрузки ОС Windows нужно нажать F8, выбрать консоль восстановления, где ввести команды fixboot и fixmbr.
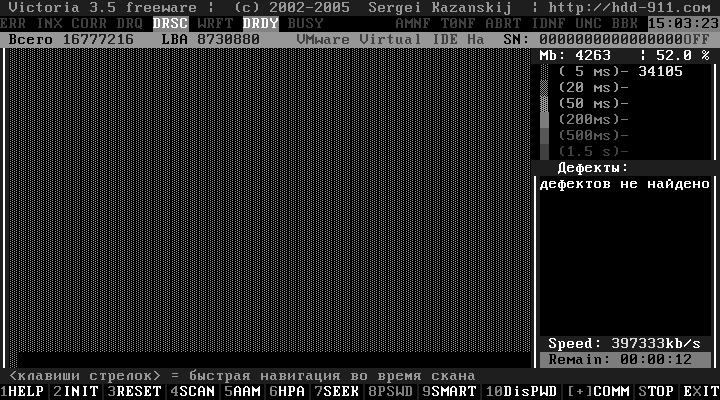
- Восстанавливаем целостность файловой системы. Если файловая система повреждена, то её можно исправить, зайдя в командную строку загрузочной среды нажав F8 в начале загрузки, а затем набрав команды chkdsk C: /r и chkdsk C: /f.
- Исправляем проблему с RAM. Если вы недавно приобрели новый модуль RAM, изымите его из компьютера, и попробуйте загрузить систему. Если проблема повторяется, попробуйте изъять другие модули RAM, оставив лишь один, и посмотреть, не исчезнет ли указанная проблема. Поэкспериментируйте с разными модулями памяти и разными слотами для неё. При выявлении неисправного модуля замените его.
- Восстанавливаем настройки Биос. Перезагружаем ПК, быстро жмём F8, ESC или DEL в начале загрузки ОС для попадания в Биос, там находим опцию «Load default BIOS», жмём на неё и сохраняем изменения. Перезагружаемся.

Функция Load default BIOS - Проверьте систему на вируса. Иногда причиной появления указанной ошибки A disk read error occurred press ctrl+alt+del to restart является деятельность вредоносных программ, изменяющих данные в загрузочных секторах жёсткого диска. Проверка системы мощными и современными антивирусами (напр., Dr.Web CureIt!) позволяет исправить проблему.
- Похожие ошибки при включении ПК. Полезные действия по исправлению аналогичных ошибок я описал в статьях ранее BOOTMGR is missing Press Ctrl+Alt+Del to restart и DRIVER IRQL NOT LESS OR EQUAL, они могут быть вам полезны.
- Используйте Live CD. Обычно на таких вспомогательных дисках содержаться программы для восстановления работы системы. Загрузитесь с такого диска и используйте для восстановления системы такие программы как HDD Regenerator, Paragon Partition Magic, Acronis Disk Director, Ease Recovery, Active File Recovery и другие.
- Переустанавливаем операционную систему. Один из самых эффективных и кардинальных механизмов решения проблемы «disk read error» — это полная переустановка файловой системы (при этом вы должны быть уверены, что ваш винчестер физически работоспособен).
- Проверяем функциональность блока питания и материнской платы. Если вы «грешите» на поломку материнки или БП, тогда можно проверить их работоспособность в ближайшем сервисном центре.


Заключение
Обычно, основными причинами возникновения проблемы A disk read error occurred press ctrl+alt+del to restart являются аппаратные проблемы с жёстким диском и шлейфом, а также повреждение MBR-записи на винчестере.
Использование перечисленных выше советов позволяет исправить проблему, при этом я бы советовал обратить особое внимание на работу антивирусных программ, ведь иногда причиной появления рассматриваемой в статье проблемы являются самые обычные вируса. Чаще проверяйте ваш винчестер на плохие («битые») сектора, проверяйте целостность файловой системы с помощью стандартных средств ОС Windows, следите за регулярным обновлением своего антивируса – и описываемая в данной статье проблема будет обходить вас стороной.
Как вам статья?

Задать вопрос
FIX; Disk service raised an external error, Prime OS 0.4.5 Installation (UEFI Mode)
Просмотров: 21 458
Tech SeedR
YouTube recently changed the way they monetize Content. My channel now needs 1,000 subscribers so it would be awesome if you could show your support by both watching my videos and subscribing to my channel if you haven’t already done so. Monetizing my videos allows me to invest back into the channel with new equipment so a small gesture from you goes a huge way for me. Many thanks for your support.
Nicolás Chávez
Husein Kikino
It’s mean that Installer PrimeOS .
exe doesn’t work at all. Thanks
captainandrew016
Tried this; computer simply ignores this and goes to windows.
SMK Youtube Channel
speak something or give captions
Sikander Rander
It is quite simple with iso file provided by Prime OS team.
MR OTASH
Error Black screen .
Kaash Game!
Hey! I was installing prime os but it is showing error
1. Variable root is not set
2. You need to load the kernel first
Please help for the same
Arsh Gtm
i dont have a usb please help me? easybcd says efi mode limits the featurs
Panther King
Bro how to enter boot menu in asus windows 10.
Johnny Andrew
hi can i just make the installer.exe to iso instead of downloading iso again?
Himal Wooli
vai mera pc ma usb na he dakha ta ha kaisa boot kara plz help
TSZツ Hercules
Where did u get dat rufus and iso file?
Jaydeep
(all videos) JUST SAY INSTALLER WILL NOT WORK DO OLD OS METHOD WITH PENDRIVE(ISO). :/ now i have to download 1gb again :/
Joyfulnes Nongsiej
Can you solve this error without using pendrive
How can I delete prime os .there is lots of prime os in my boot menu,wha should I do
Mohammed Refaat
he asked me what is the password for easy?
KORMOV OFFICIAL
I cant booting a prime os in uefi, «error, dont install kerner»
TANAY BHOMIA
Hey bro my file type of prime os is exe and it is not selecting in the rufus how can i do it ? because it say iso file when i turn it in the iso than it says erro
KhAn Bb
When i split the disk it says minitool partition wizard free cannot split the specified partition . No free MBR slot
Источник
Invalid system disk при загрузке
Вы решили поработать с компьютером, включили его, устроились поудобнее, но вместо приветствия увидели на экране «DISK BOOT FAILURE, INSERT SYSTEM DISK»? Это сообщение означает, что ПК не может загрузить данные с системного диска. Если эта ошибка не связана с поломкой винчестера, её можно исправить. Но иногда она возникает из-за аппаратной неисправности. В таком случае починку компьютера лучше доверить профессионалам.
Причины появления
«DISK BOOT FAILURE, INSERT SYSTEM DISK» переводится, как «Загрузочный диск отсутствует, вставьте системный диск». То есть ПК не распознаёт накопитель, на котором находится ОС. Вначале надо понять, почему возникла эта ошибка. А потом уж разбираться, что с ней делать. Проблема может появиться, если:
- Нарушен порядок загрузки. ПК пытается «отыскать» операционную систему там, где её нет.
- BIOS не распознаёт винчестер.
- Повреждён загрузочный раздел ОС.
- Жёсткий диск неправильно подключён.
- Жёсткий диск неисправен.
- Неисправен блок питания.
- Неисправна материнская плата.
Увидев такую ошибку при загрузке ПК, совершите описанные ниже действия
Как исправить?
Перед тем как что-то делать, вытащите все диски, CD, DVD, дискеты, флешки и внешние HDD. Оставьте только накопитель, на котором установлена ОС. И попробуйте перезагрузить компьютер. Если не получится, отключите CD-приводы и дисководы. Для этого аккуратно отсоедините их шлейфы от материнской платы. И снова попробуйте запустить ПК. Если после этого ошибка «DISK BOOT FAILURE» исчезнет, значит, в BIOS стоят неправильные параметры. Компьютер «ищет» файлы ОС не там, где надо.
Настройка BIOS
BIOS или «Базовая система ввода-вывода» активируется при включении ПК. Она контролирует процесс загрузки. В ней указано, с какого носителя будет запускаться ОС. И если выбран накопитель, на котором нет системных файлов, появится ошибка. Вот что надо делать для настройки BIOS:
- Сразу после включения компьютера нажмите Delete, F1, F2, F11 или Esc. Клавиша зависит от модели материнской платы. При запуске ПК внизу дисплея отобразится надпись, указывающая, какая кнопка нужна. Сообщение будет выглядеть примерно так «Press [клавиша] to enter setup».
- Отобразится меню BIOS. По нему можно «перемещаться» при помощи стрелочек на клавиатуре, открывать разделы — кнопкой Enter, возвращаться в предыдущее меню — кнопкой Esc. Внизу монитора должны быть указаны клавиши, необходимые для взаимодействия с графическим интерфейсом в меню.
- Перейдите на вкладку «Boot» и войдите в «Boot Device Priority». Это «приоритет загрузки».
- На первом месте должен стоять винчестер. Обычно он обозначен, как HDD, SDD или Hard Drive. Если операционная система находится на другом носителе, сделайте первым его.
- Вернитесь в основное меню, перейдите в «Exit» и выберите «Exit Saving Changes». Или нажмите F10.
- Попробуйте перезагрузить компьютер.
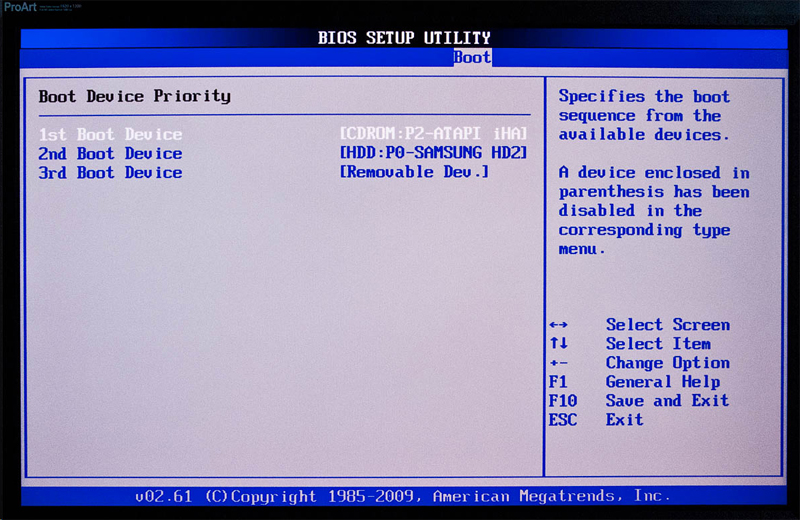
Первым в очереди должен быть ваш жесткий диск
Если вы вносили какие-то изменения в систему или «разгоняли» ПК, это могло повлиять на BIOS. Чтобы вернуть настройки по умолчанию, в разделе «Exit» выберите «Load Setup Defaults». Параметры будут сброшены.
Аппаратная настройка
Если BIOS не определяет винчестер и даже после настройки выдаёт ошибку «DISK BOOT FAILURE», что делать в этом случае? Скорее всего, проблема с самим жёстким диском или с его подключением. Или вышла из строя материнская плата. Также может быть неисправен блок питания.
При подобном раскладе придётся снимать крышку с системного блока и самостоятельно устранять неисправность. Если вы не разбираетесь во внутреннем устройстве компьютера и не знаете, куда подключать то или иное устройство, лучше обратиться в сервисный центр. Хотя на материнской плате все слоты разных размеров. К ним невозможно присоединить неподходящую деталь.
Перед тем как что-то делать, отключите ПК. Не просто завершите работу, а выньте вилку из розетки.
Имеет смысл узнать, в каком состоянии находится винчестер. Подсоедините его к другому компьютеру (если есть возможность), проверьте, «видит» ли его BIOS, загружается ли с него ОС. Если получилось, значит, накопитель работает. Сохраните свои персональные данные на всякий случай.
Чтобы устранить ошибку «DISK BOOT FAILURE, INSERT SYSTEM DISK» попробуйте следующее:
- Отключите шлейф жёсткого диска от материнской платы и подключите его снова.
- Присоедините его к другому разъёму SATA.
- Вытащите блок питания памяти CMOS (похож на батарейку-таблетку), подождите минут 30 и поставьте его на место.
- Переместите джампер Clear_CMOS (находится на материнской плате, может иметь и другое название — CLRTC, Clear_RTC, CCMOS) с контактов 1–2 на контакты 2–3. Подождите секунд 20 и верните всё как было.
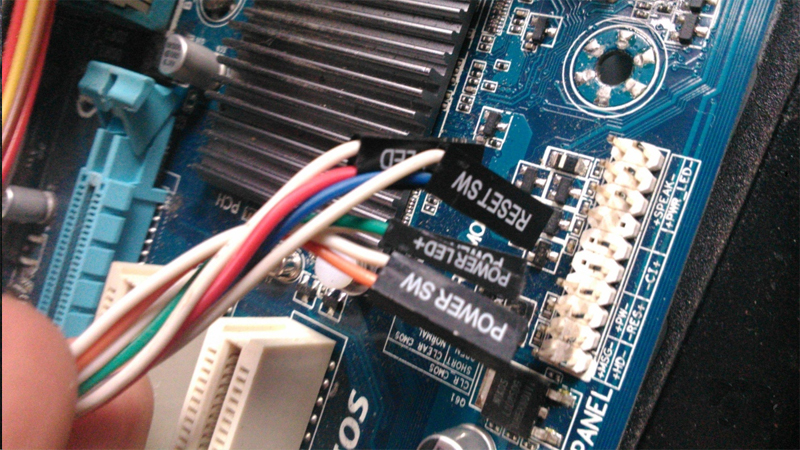
Выполняя описанные выше действия, проверяйте наличие ошибки на каждом этапе
После каждого шага проверяйте, отображается ли винчестер в BIOS. Для этого компьютер надо включать. Но при любых манипуляциях внутри системного блока ПК должен быть обесточен.
Если неисправность появилась из-за блока питания, его надо менять. Когда он разряжается, это негативно сказывается на работе компьютера — могут возникнуть и другие ошибки.
Восстановление системы
Ещё одна причина проблемы — повреждение загрузочного сектора жёсткого диска. Это значит, что недоступна та часть винчестера, на которой находится важная для ОС информация. В подобном случае надо восстановить системные данные. Они будут записаны на исправные сектора.
Вам нужен установочный CD-диск или другой накопитель с ОС (будет рассматриваться пример с Windows). Если у вас его нет, переустановить файлы не получится. Так как их неоткуда будет взять.
- В BIOS выставите приоритет, чтобы система запускалась с загрузочного диска.
- Вставьте в нужный привод накопитель с ОС.
- После включения можно будет выбрать опцию «Восстановление системы».
- Нажмите «Восстановление запуска» и подтвердите действие. ОС сама найдёт проблемы и автоматически их решит.
- Если не поможет, снова запустите загрузочный диск. Только теперь выберите пункт «Командная строка».
- Откроется окно с чёрным фоном и белым текстом. Напечатайте в нём «Bootrec.exe /FixMbr» без кавычек и нажмите Enter. Настройщик реанимирует основные загрузочные записи.
- Также можете ввести команду «Bootrec.exe /RebuildBcd». Будут просканированы все винчестеры на предмет наличия ОС.
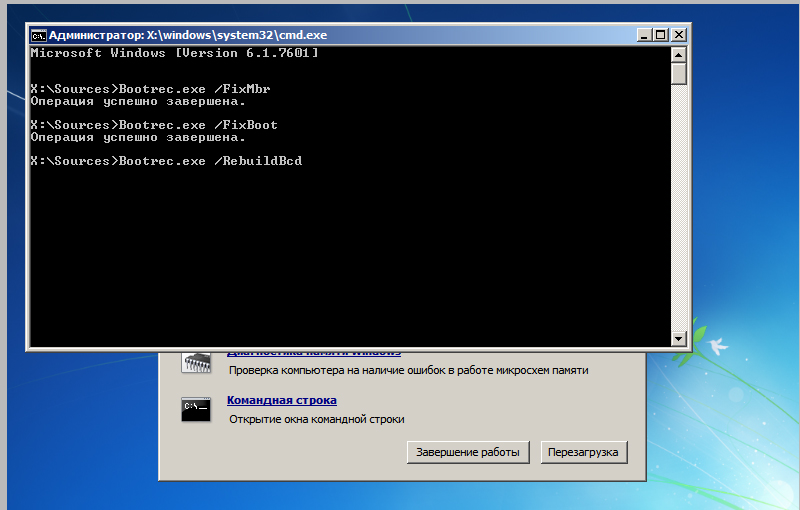
Введите команду для восстановления загрузочных записей
Если ни один из перечисленных методов не помог, значит, жёсткий диск сломан, пришла в негодность материнская плата или блок питания. Также проблема может быть в некачественном шлейфе или слоте для подключения. Починить их своими силами достаточно сложно. Для этого нужны профессиональные знания и навыки. Лучше доверить ремонт специалистам. Или купить новые детали.
Эта неисправность часто появляется, если изменён порядок загрузки или неправильно настроен BIOS. В таком случае можно устранить сбой самостоятельно. Если же проблема возникла из-за аппаратной неполадки, решить её будет не так просто.
Расскажите, сталкивались ли вы с этой ошибкой, и помог ли вам один из перечисленных способов.
Автор Svetlana dunina задал вопрос в разделе Программное обеспечение
Что делать,если при загрузки комп выдает Invalid system disk, Replace the disk, and then press any key? и получил лучший ответ
Ответ от сергей иванов[активный]
да
Тест S5 Box
Вот примерно так работает модуль в реале.
Ошибки при включение компьютера со ссылкой на SYSTEM DISK

Данный пост создал в большей мере для своих сотрудниц, обычных пользователей ПК, которые иногда сталкиваясь в начале своей работы с ошибками, о которых пойдет речь ниже в панике начинают причитать и бегать из кабинета в кабинет при поиске системного администратора и в случае если его нет названивать ему на мобильный. Исходя из этого надеюсь, что пользователи будут выполнять самые первые меры «диагностики» такие как проверка не вставлена ли дискета во флопик.
Прочитав это, надеюсь, самостоятельности станет больше, а работы для меня меньше =)
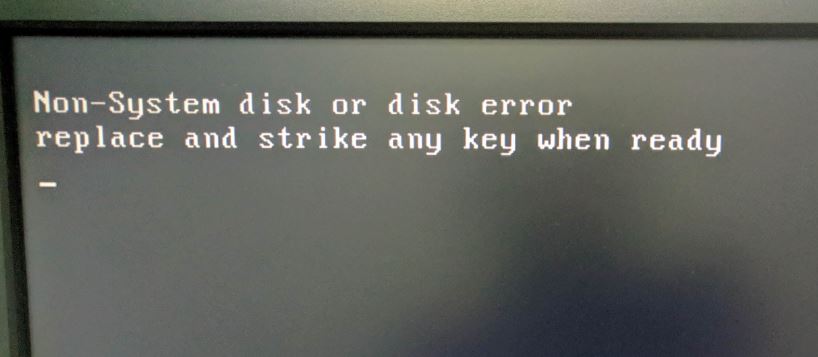
1. Non-System disk or disk error
Несистемный диск или ошибка диска

Причина:
Текущее устройство, с которого пытается загрузиться компьютер, не является загрузочным или была ошибка диска при попытке загрузки.
Способ решения:
1. Изменение носителя для загрузки
Если вы загружаетесь с устройств: DVD, CD, дискеты или диска USB. Убедитесь что они являются системными и содержат возможность загрузки ОС. Если вы хотите чтобы загрузка происходила с жесткого диска извлеките все указанные выше устройства(естественно кроме жесткого диска =) )! Либо еще причина может быть в том, что устройство повреждено или не предназначено для загрузки.
2. Установите в BIOS первоочередное устройство с которого хотите загружать.
BIOS может быть настроен на загрузку с неправильного устройства. Это может произойти даже при перепаде напряжения после которого в BIOS сбились настройик. Если вы подозреваете, порядок, загрузки устройств может быть не верен в BIOS Setup, перезагрузитесь и войдите в BIOS Setup. Если вы делаете это в первый раз, возможно Вам, потребуется обратиться к инструкции компьютера. Обычно чтобы зайти в BIOS необходимо нажимать кнопки Del, Esc, F1 или F2 сразу после включения компьютера. Клавиша для входа в BIOS различна для BIOS разных производителей.
Посмотрите в разделе Boot или загрузки. Обычно отображается в верхнем меню. Найдите опцию в названии которой есть Boot, а при необходимости выбирите порядок загрузки. В разделе Boot обычно указывается порядок загрузки устройств. Выставляем необходимое, сохраняем настройик BIOS и перезагружаемся.
Если это не изменит проблему.
3. Проверьте жесткий диск и кабели
Если вы ничего не изменяли, не добавляли и не удаляли жесткие диски, вероятно, что-то случилось с проводами. Проверьте, что диски установлены правильно и кабелеи подключены правильно. Отключите и подключите заново кабели устройства с которого должна происходить загрузка, часто случается, что при длительной эксплуатации компьютера при частой вибрации от жесткого диска может отойти провод питания или шлейф для подключения к материнской плате.
Если же добавляли дополнительный жесткий диск или меняли на них перемычки, то проверьте, чтобы перемычки на загрузочной диске стояли в режиме Master а на ведомом в режиме Slave.
Если проблема не ушла, то проверьте жесткий диск, подключив другим шлейфом к другому компьютеру.
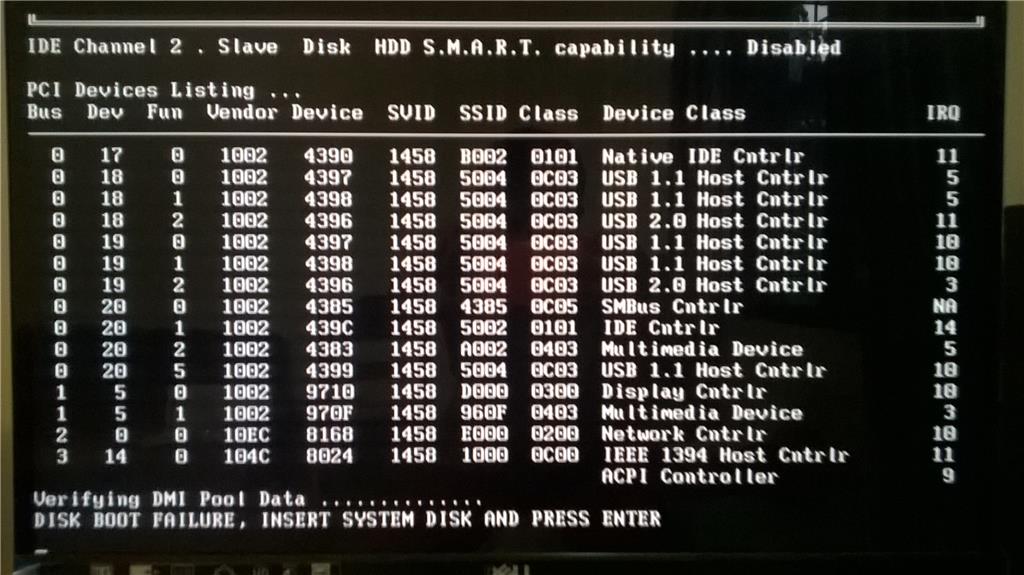
2. DISK BOOT FAILURE, INSERT SYSTEM DISK AND PRESS ENTER

Аналогичная предидущей ошибка. Выполнить проверку:
- возможно в дискетнице вставлена дискета;
- либо же по каким то причинам отвалился жесткий диск, тоесть компьютер не может найти диск на котором находится загрузчик ОС, для этого войдите в биос и исправьте это, так как написано выше в пункте 2.
3. A disk read error occurred

Ошибка чтения диска. Причины могут быть разнообразны. Во первых необходимо проверить жесткий диск, например путем подключения жесткого диска к другому компьютеру и попытаться загрузиться с него. Проверить перемычки и настройки в BIOS. Загружать при проверке предварительно отключив другие жесткие диски. Если выполнив все действия загрузка с этого HDD не удалась, то возможно аппаратная часть вышла из строя. Данную ошибку считаю крайне неприятной, желаю вам с этим не сталкиваться!
4. Invalid System disk

Дословно сообщение означает, что диск с которого выставлена загрузка не системный. Это означает, что в начале диска не содержится загрузочная запись (Master Boot Record) MBR. Соответственно при попытке загрузить операционную систему, компьютер не находит ее на вашем жестком диске. Если это так скорее всего ее придется переустанавливать.
Так же проверьте и если потребуется измените параметры BIOS, установив последовательность использования устройств для загрузки согласно нижеприведенному списку:
- Жесткий диск
- Диск A
- Устройства CD-ROM или DVD-ROM
5. Operating System not found

На сайте MICROSOFT об этой ошибке пишут следующее:
При попытке запуска компьютера, работающего под управлением Microsoft Windows XP, может появиться сообщение о том, что операционная система не найдена. Эта неполадка может быть вызвана сбоем жесткого диска, неправильными настройками системы BIOS, повреждением или отсутствием основной загрузочной записи (Master Boot Record, MBR) или неправильным указанием активного раздела. Для разрешения этой проблемы исправьте настройки BIOS, воспользуйтесь консолью восстановления Windows XP или укажите в качестве активного правильный раздел жесткого диска.
Что означает данная ошибка и как ее устранить?
С сообщением “Non-System disk or disk error replace and strike any key when ready”, появляющимся при включении или при перезагрузке, чаще всего сталкиваются обладатели ноутбуков и моноблоков фирмы HP. Хотя и на стационарных компьютерах оно не является редкостью. Повторное выключение и выключение устройства, как правило, не дают никаких результатов.
В данной статье мы рассмотрим причины появления ошибки, а также о методах ее самостоятельного устранения в домашних условиях.
О чем говорит ее появление?
Если перевести текст ошибки “Non-System disk or disk error replace and strike any key when ready” на русский язык, то получается следующее: Диск не системный или ошибка чтения диска. По готовности замените его и нажмите любую кнопку.
Более простыми словами все вышесказанное можно подытожить так: Ноутбук не может начать загрузку операционной системы с текущего загрузочного устройства (жесткого диска, флешки и т.д.), так как оно не является загрузочным (отсутствует загрузчик) или же оно повреждено.
Почему это могло произойти?
Возможных вариантов здесь несколько. А именно:
- Нарушена последовательность загрузки в BIOS;
- Проблемы с системным загрузчиком;
- Жесткий диск полностью вышел из строя или поврежден частично;
- Плохой контакт жесткого диска с материнской платой.
Что можно попробовать сделать самостоятельно для устранения проблемы?
Первым делом при появлении ошибки “Non-System disk or disk error replace and strike any key when ready” нужно полностью отключить ноутбук/компьютер, зажав кнопку включения на несколько секунд пока все индикаторы не потухнут.
Далее отключаем все внешние устройства, подключенные к ноутбуку/компьютеру. Это касается флешек, внешних жестких дисков, смартфонов, геймпадов и т.д.
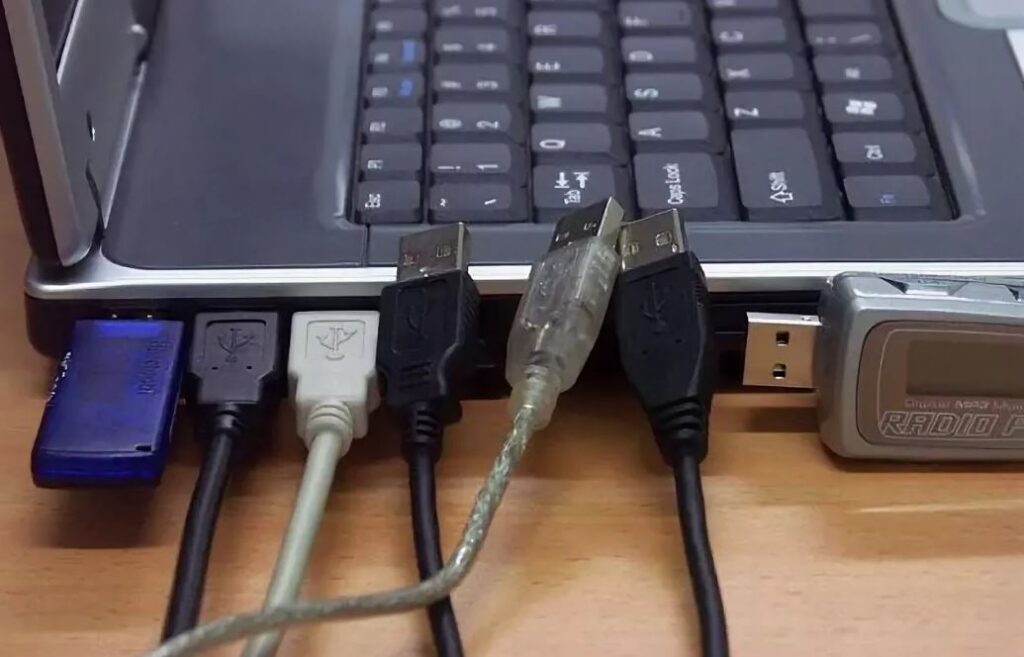
Отключение всех внешних устройств
Сделав это, снова пробуйте включать ПК. Также откройте DVD привод и обратите внимание чтобы в нем не было дисков.
По сути в данном случае действия аналогичны действиям при ошибке “disk boot failure insert system disk and press enter“, которая также возникает при проблемах с загрузочным устройством.
Если результата нет, то далее обязательно нужно проверить жесткий диск на работоспособность, а также проверить его физическое подключение к материнской плате.
Проверка поверхности жесткого диска
В идеале даже просто отключить и подключить.
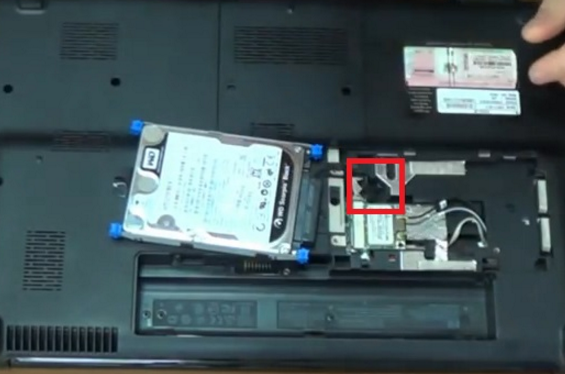
Проверка соединения жесткого диска в ноутбуке
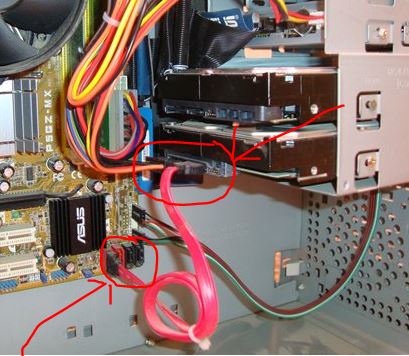
Кабели жесткого диска в компьютере
Последним этапом будет переустановка операционной системы. Но делать это стоит только в том случае, если вы проверили жесткий диск и уверены в его работоспособности. В противном случае ошибка может вернуться снова в ближайшее время.
Non system disk or disk error replace and strike any key when ready: что делать?

Non system disk or disk error replace and strike any key when ready – ошибка, с которой при загрузке операционной системы могут столкнуться владельцы ноутбуков HP или персональных компьютеров другой марки. Перевод на русский язык этой фразы – «Несистемный диск или ошибка диска замените и нажмите любую клавишу, когда будете готовы».
Что значит подобное сообщение? Оно означает, что при попытке запуска BIOS пытается обнаружить по указанным путям в настройках операционную систему. Но не может это сделать по каким-то причинам. В итоге, компьютер банально не запускается. И возникает вопрос- что делать?

Сам производитель этих ноутбуков, компания HP, подготовил специальную инструкцию, которое следует воспользоваться именно в этой ситуации. Предназначена она, в первую очередь, для техники с операционными системами Windows 7 и Vista, но многие пункты можно реализовывать и с другими версиями этой ОС.
Инструкция по устранению проблемы
Желательно действовать в выбранной последовательности, так как именно ее считают наиболее эффективной и действенной представители компании-производителя:
Исключить ненужные накопители для поиска системы
Делается это очень просто:
- Временно отключить любое внешнее устройство, которое подключается к ноутбуку посредством USB-порта;
- Убедиться, что в приводе отсутствуют какие-нибудь диски.

После этого рекомендуется зажать на 10-15 секунд кнопку питания техники, чтобы она полностью отключилась. Через пару секунд – включить оборудование и проверить результат. Если «ошибка чтения диска» исчезла, и система загружается нормально, то обязательно осуществить следующий пункт этой инструкции.
Сброс загрузочной последовательности
Этот этап необходимо реализовать, чтобы ситуация не повторилась снова – при том же подключении ранее деактивированных ЮСБ-устройств.
- Выполнить перезапуск оборудования;
- Нажать на «F10», чтобы активировалось окно системной конфигурации;
- Перейти в Boot Order через раздел Boot options;
- Воспользоваться клавишей «F9», чтобы выполнить сброс этих настроек до изначальных.

Обязательно подтвердить делаемые изменения.
Проверка состояния жесткого диска
Производитель изначально оснастил свое оборудованием специальными инструментами, позволяющими сделать необходимую проверку и избавиться от проблем, которые могут приводить к возникновению на экране сообщения «Non system disk or disk error replace and strike any key when ready».

- Выполнить выключение/включение ноутбука и нажать «F10»;
- В настройках БИОСа перейти в раздел «Средства диагностики», затем – в «Диагностику»;
- Выбрать Hard Drive Self Test;
- Система предложит быстрое или полное тестирование. Можно начать с первого, но второй вариант желательно также провести.
При запуске тестирования программа покажет время, необходимое ей для работы. Потребуется выждать его, перезапустить комп и проверить результат.
Второй вариант, если первый не помог или отсутствует в BIOS:
- В очередной раз полностью отключить компьютер. Подождать пару секунд и активировать его;
- Нажать на «F2». Несколько раз. Пока на экране не возникнет «Аппаратная диагностика UEFI для ПК HP»;
- Перейти в проверку компонентов;
- Выбрать проверку жесткого диска. Активировать тест в быстром режиме;
- Подождать результата и повторить тестирование еще раз.

Программа затребует диск, которые следует продиагностировать, если их используется несколько. Указать тот, который необходимо протестировать.
Не спешите выходить из этого окна. После парочки быстрых проверок рекомендуется запустить полное тестирования и дождаться результатов.
Извлечение винчестера и его повторная установка
Этот этап является необходимостью перед тестированием накопителя, описанными выше способами, если перед появлением сбоя ноутбук случайно упал. Или к нему было применено физическое воздействие другого типа.
Изначально нужно извлечь винчестер:
- Полностью выключить ноутбук;
- Перевернуть его, чтобы появилась возможность добраться до отсека с АКБ;
- Переставить все защелки в положение «открыто». Выдвинуть и достать батарею из компьютера.
Теперь можно достать сам жесткий диск:
- Взять подходящую крестовую отвертку и ослабить специальные винты, которые фиксируют крышку накопителя к самому ноутбуку;
- Приподнять крышечку и аккуратно извлечь жесткий диск;
- Ослабить подпружиненные винты;
- Аккуратно прижать выступ винчестера и потянуть его к внешнему краю корпуса. Это позволит отсоединить устройство от материнки.
- Теперь можно полностью вытащить винчестер из отсека.

Первый этап пройден. Теперь нужно поставить его обратно:
- Вставить накопитель в предназначенный для него отсек;
- Задвинуть жесткий диск внутрь, пока не будет обеспечена надежная фиксация;
- Затянуть подпружиненные болты, установить крышку на место ее эксплуатации, затянуть фиксирующие ее болты.
АКБ устанавливается таким образом, чтобы был слышан характерный щелчок.
Переустановка или восстановление системы
Если все описанные выше варианты не принесли требуемого результата, то представители компании-производителя рекомендуют выполнить переустановку операционной системы или ее восстановление.

Для первого пункта потребуется наличие специально созданного загрузочного диска. Для второго – воспользоваться фирменной утилитой, которая называется HP Recovery Manager.
Что еще может помочь – советы от обычных пользователей

Многие пользователи вообще не знают о существовании вышеописанной инструкции. Или всегда стараются действовать полностью самостоятельно. Поэтому не удивительно, что от юзеров часто также поступают весьма дельные советы, которые могут оказаться весьма эффективными:
Правильно выставить приоритет загрузки
Необходимо зайти в БИОС и выставить очередность устройств таким образом, чтобы на первом месте всегда находился жесткий диск. Если будет указан дисковод или ЮСБ-устройство, то вполне логично – ноутбук сначала попытается найти загрузочную область именно там. И иногда это может привести к возникновению именно этого неприятного состояния.

Естественно, меня приоритетность загрузки, не стоит забывать о сохранении сделанных изменений.
Отключение поиска информации в дисководе
Потребуется, если каждый раз при загрузке человек вынужден дополнительно нажимать клавишу «F1» для ее продолжения.
Опять следует посетить меню БИОС. Найти в нем пункт «Floppy». Выставить рядом с ним «none» или «Disabled». Естественно, сохранить изменения и спокойно перезапуститься.
Подведем итоги
Итак, чтобы избавиться от проблем с загрузкой операционной системы, которая приводит к возникновению на экране сообщения Non system disk or disk error, требуется следующее:
-
Главная
-
Скачать mp3
-
Fix Disk Service Raised An External Error Prime Os 0 4 5 Installation Uefi Mode

-
Автор: Tech SeedR
-
Длительность: 7 мин и 25 сек
-
Размер: 9.76 MB
-
Битрейт: 192 Kbps
-
Прослушиваний: 33.2K
Сейчас слушают
Fnf Vs Rayman
Роскошная Музыка Я Ее Просто Обожаю За Душу Берет Спасибо Автору
Вальс Музыка Я Дубравина Слова В Суслова
Для Растяжки Музыка
Это Дуа Сделает Вас Богатым
Ты Пчела Я Пчеловод
Imron Kormasam Bolmas Klip
Fire Baby Radio Mix
Песня Игра Бабушкины Носки
Zero Hind Kino Mp3 Skachat
Оедана Гоена
15 Degrees Christian Kiefer
Moemaw Naedon Ringing Bells
Вилена Хикматуллина И Юрий Тришин Штрихи Супер Дети Fest
Гиляльханум Сююв
Get Out Of Town Doug Raney
Fosky Toe Toe
Kabi Dark Horse
Инна Вальтер Женская Интуиция
Skydivermite Backwood After Sex
Песня Исцеления Зельда
Бабе Цветы Детям Мороженое
Смотреть все