Ошибка записи на диск Стим — распространенная ошибка, которая часто вызывает недоумение пользователей. Сбои в работе проявляют себя появлением сообщения при попытке загрузить / установить / обновить / запустить игру. Причиной ошибки записи на диск Steam может защит от записи, физические дефекты, действие антивируса или другие проблемы. Ниже приведем основные способы, позволяющие своими силами восстановить работоспособность софта.
Перезагрузите приложение и ПК
Первое, что нужно сделать, если не идет запись на диск в Steam — перезапустить компьютер / ноутбук и приложение. Такие действия спасают в ситуации, если проблема носит временный характер и вызвана незначительными сбоями в работе системы. Сначала перезапустите Стим, а если это не помогло, сделайте такое же действие с ПК. При отсутствии результата переходите к следующему шагу.

Уберите защиту от записи
Ошибка при записи на диск Стим может быть вызвана защитой от выполнения таких действий. В результате на компьютере или ноутбуке физически нельзя добавить или изменить файлы в папку или на весь диск. При наличии защиты появляется надпись, мол, произошла ошибка записи на диск Steam. Для устранения проблемы снимите защиту записи с того диска, где хранится интересующая игра.
Запустите программу от имени администратора
При поиске выходов из сложившейся ситуации нельзя отметать наиболее простой путь — запуск Стим от имени администратора. Метод выручает в ситуации, когда приложению по какой-то причине не хватает необходимых разрешений. Во многих случаях ошибка при записи на диск Steam исчезает, если дать приложению расширенные права.

Отключите настройку «Только для чтения»
Применение на ПК или ноутбуке операционной системы Виндовс позволяет использовать опцию «Только для чтения». Этот параметр можно активировать применительно к отдельным файлам или папкам. При появлении ошибки записи на диск в Стиме обратите внимание, какое разрешение установлено на каталоге. При наличии опции «Только для чтения», это неизбежно вызывает сбои в работе программы. Для решения проблемы сделайте следующее:
- Найдите папку Стим.
- Жмите по ней правой кнопкой мышки.
- Выключите пункт Только для чтения.
После этого еще раз запустите приложение и проверьте, подействовал указанный способ или нет.
Удалите поврежденные файлы
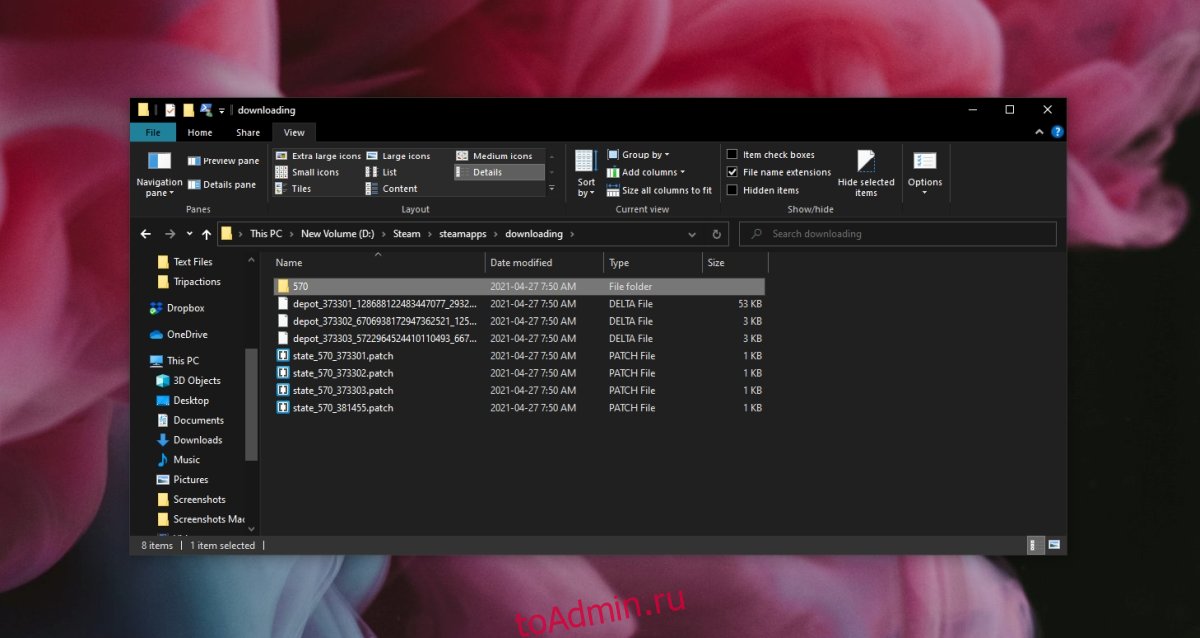
При поиске ответов на вопрос, что делать, если в Steam появляется ошибка записи на диск, попробуйте убрать поврежденные элементы. Когда при загрузке возникают трудности, Стим начинает автоматически подгружать некорректный файл. В результате возникают сбои в запуске приложения. Для решения ситуации сделайте следующее:
- Войдите в каталог Стим.
- Перейдите в папку Steamapps.
- Войдите в Common.
- Отыщите файл с таким же названием, как и имя игры, которую вы пытаетесь запустить.
- Проверьте размер документа. Самый плохой вариант — появление показателя 0 кБ, что значит, что ошибка записи на диск в Стиме вызвана именно этим файлом. Удалите его и попробуйте снова запустить игру.
Не бойтесь удалять поврежденные файлы, ведь при очередном входе система должна загрузить их в автоматическом режиме. Если при обновлении произошла ошибка записи на диск Стим, проблему можно исправить и в ручном режиме. Для этого сделайте следующее:
- Войдите в Стим и отыщите игру, которую вам нужно обновить или запустить.
- Жмите правой кнопкой мышки и выберите Свойства.

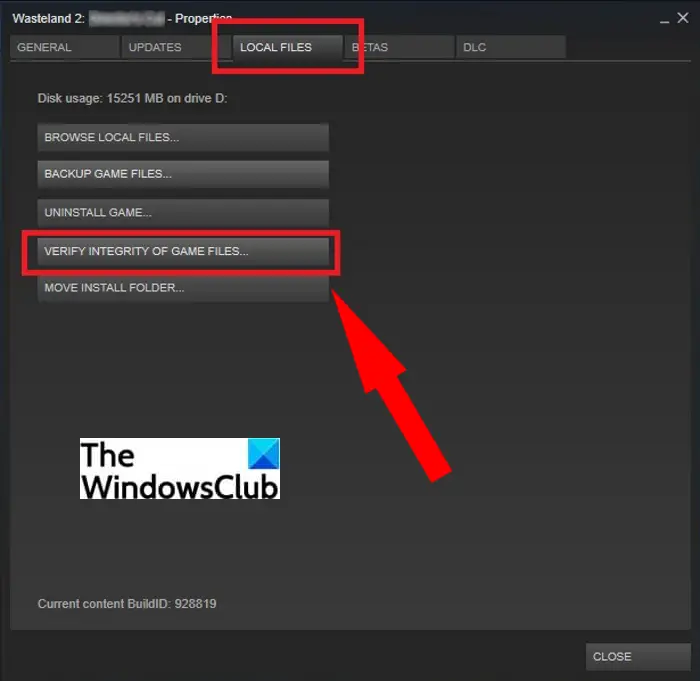
- Перейдите в Локальные файлы и жмите Проверить целостность файлов игры.

После выполненных шагов Стим проверяет файлы и при наличии повреждений он загружает новые при очередном пуске. Помните, если в игре применяется средство запуска, и оно грузит дополнительные обновления, не проверяйте целостность файлов. В таком случае обновленная игра будет заменена на стандартный лаунчер, и тогда придется снова загружать обновления.
Поменяйте безопасность папки
Распространенная причина, почему не идет запись на диск в Стиме — неправильные настройки записи и чтения. Как результат, появляется ошибка при загрузке. Для исправления ситуации сделайте следующие шаги:
- Войдите на диск, где установлен Стим.
- Жмите по папке правой кнопкой мышки.
- Выберите Свойства.

- Войдите в раздел Безопасность.
- Выберите каждого пользователя в разделе Группы или пользователи.

- Обратите внимание на наличие запрета касательно записи и чтения.
При обнаружении запрета кликните на Изменить и уберите ограничение. После этого снова жмите по папке Стим правой кнопкой мышки и перейдите в Свойства. Там найдите Атрибуты и снимите отметку Только для чтения (если вы не сделали это ранее).
Почистите кэш
На вопрос, что делать, если пишет «Ошибка записи на диск» в Стиме, многие пользователи рекомендуют почистить кэш. Такое действие помогает спасти ситуацию, если кэш поврежден или занимает слишком много оперативного пространства. Алгоритм действий имеет следующий вид:
- Войдите в Steam.
- Перейдите в категорию Вид слева вверху, а там Настройки.

- Зайдите в загрузки и жмите Очистить кэш загрузок.

После этого подтвердите действия и проверьте, ушла ошибка записи на диск Стим или нет. При отсутствии результата переходите к следующему шагу.
Поменяйте регион загрузки
Хороший способ, позволяющий исправить проблему — поменять регион сервера для загрузки. Как правило, программа определяет его автоматически, но иногда в этом процессе происходят сбои. Как вариант, правильный сервер может быть перегружен, из-за чего и возникают ошибки. Для решения проблемы сделайте следующее:
- Зайдите в Steam.
- Перейдите во вкладку Вид, а там Настройки.
- Зайдите в Загрузки и укажите другой регион.

После этого сохраните настройки, перезапустите приложение и проверьте, ушла ли прежняя ошибка.
Переместите Steam на другой диск
Сложнее обстоит ситуация, когда при установке произошла ошибка записи на диск Steam. В таком случае может помочь перенос программы на диск с большим количеством места. Если на основном диске места не хватает, возникает ошибка записи. В случае, когда такой шаг помогает с решением проблемы, это свидетельство проблем с элементом для хранения информации. Не бросайте ситуацию на самотек, ведь в дальнейшем с этим могут возникнуть другие проблемы.
Проверьте дисковое пространство на ошибки
Одна из причин, почему возникла ошибка записи на диск в Стиме — проблемы с дисковым пространством. Для устранения проблемы проверьте изделие на возможные проблемы. Кроме того, такие проверки полезны при наличии нескольких разделов на одном диске или, когда перемещение папки со Steam не дало результата. Если проблема с ошибками дискового пространства повторяется в будущем, может потребоваться замена HDD.
Отключите антивирус / брандмауэр или добавьте софт в исключения
Ошибка записи в Стим может свидетельствовать о действии антивирусной программы или брандмауэра. Причина в том, что некоторое ПО идентифицирует Steam в качестве вредоносной программы и блокирует ее. Если прежние шаги не исправили ошибку, попробуйте временно отключить антивирус на время загрузки приложения. При наличии результата добавьте Стим в исключения.
Это же правило касается брандмауэра (сетевого экрана), который также может блокировать работу Steam. Как и в прошлом случае, попробуйте временно отключить блокирующий софт и проверьте, появляется ли после этого ошибка записи. Если нет, добавьте Стим в исключения и спокойно работайте дальше.
В Стим бывают и другие ошибки, как их «лечить» читайте в соответствующих статьях:
- ошибка при запуске «Appname can`not run…»;
- ошибка подтверждения аккаунта.
Сбросьте конфигурацию до настроек по умолчанию
Во многих случаях может спасти сброс конфигурации Steam до первоначальных настроек, установленных по умолчанию. Для этого жмите на комбинацию Win+R, а после введите команду steam://flushconfig. После завершения выполненных шагов убедитесь, что они подействовали.
Предотвратите выполнение DEP-данных
В случае, когда появляется ошибка записи на диск Стим, может помочь предотвращение исполнения DEP-данных. Для решения этой задачи сделайте следующее:
- Кликните на сочетание кнопок Win+R.
- Пропишите команду sysdm.cpl для открытия свойств системы.

- Перейдите в раздел Дополнительно.
- Во вкладке Быстродействие жмите Параметры.

- В новой вкладке жмите на Предотвращение выполнения данных.

- Убедитесь, что функция включена. Если она выключена, жмите Добавить и укажите путь к исполнительному файлу Стим (steam.exe).
Итоги
В большинстве случаев рассмотренные шаги помогают справиться с ошибкой записи на диск Стим. При отсутствии результата всегда можно обратиться в сообщество для консультации и написать в службу поддержки. Но при выполнении рассмотренных в статье шагов в этом не возникает необходимости.
by Madalina Dinita
Madalina has been a Windows fan ever since she got her hands on her first Windows XP computer. She is interested in all things technology, especially emerging technologies… read more
Updated on December 15, 2021
- Have you ever encountered the Disk write error in Dota 2?
- You can quickly fix it by checking your hard drive for errors since corrupted files are to blame.
- If that doesn’t work, verify the integrity of the game cache and then delete the downloads folder.
- Continue reading below for detailed steps on how to fix the DotA 2 disk write error.

XINSTALL BY CLICKING THE DOWNLOAD FILE
This software will repair common computer errors, protect you from file loss, malware, hardware failure and optimize your PC for maximum performance. Fix PC issues and remove viruses now in 3 easy steps:
- Download Restoro PC Repair Tool that comes with Patented Technologies (patent available here).
- Click Start Scan to find Windows issues that could be causing PC problems.
- Click Repair All to fix issues affecting your computer’s security and performance
- Restoro has been downloaded by 0 readers this month.
DotA 2 is one of the most popular online multiplayer games, reuniting millions of players every day. Playing DotA 2 is fun, challenging and addictive, but sometimes the game can really get on players’ nerves.
There are various technical issues that may potentially affect the game, and they usually occur at the worst possible moment. Fortunately, these errors are quite rare.
One of the most frequent DotA 2 errors is the update disk write error message. If you’re experiencing this error, you’re in the right place. In this article, we’re going to list a few quick workarounds to fix this error.
Usually, this disk write error occurs when players try to install the latest DotA 2 updates:
So while i was doing the dota 2 update, allmost to the end, my antivirus program finds a “problem” or a trojan as it says in vconsole2.exe. and i get a disk write error. I tryed evrything, disabled my fire wall and antivirus, restarted the updated again same error at the same place […]
How do I fix disk write errors for DotA 2 on Windows 10?
- Check your hard drive for errors
- Disable your antivirus’ firewall
- Verify the integrity of the game cache
- Update your drivers
- Install DotA 2 on another drive
- Winsock reset
- Delete certain folders
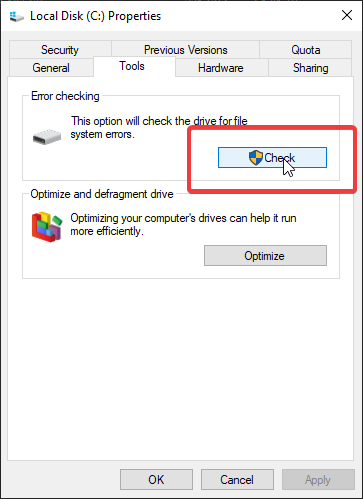
1. Check your hard drive for errors
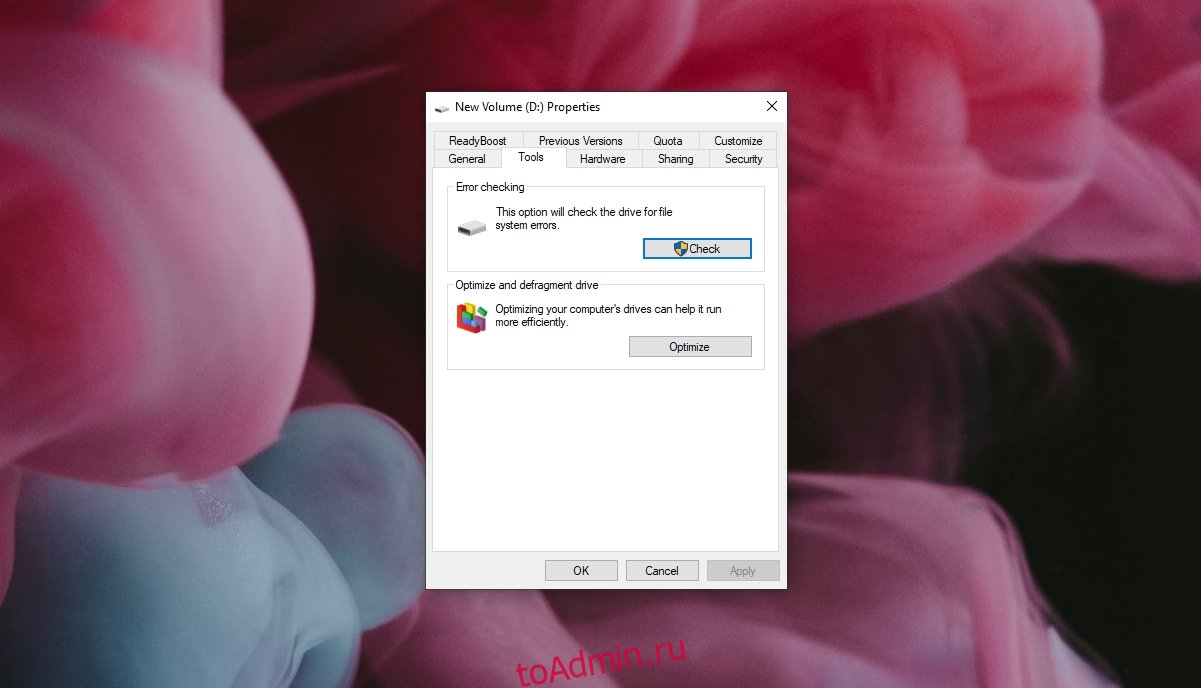
- Right-click the hard drive where you installed DotA 2 and select Properties.
- Go to Tools
- Click Check
Sometimes, file system errors can lead to Steam and DotA 2 problems.
However, if the problem persists and you’re sure that disk issues are to blame, you could also consider the use of a more powerful solution, and that is using a third-party tool like Restoro.
Besides being a generic Registry and DLL fixes, Restoro can easily handle disk errors as well, even those that Windows 10 itself cannot handle without a full CHKDSK or a SFC scan.
⇒ Get Restoro
2. Disable your antivirus’ firewall
Some users reported that they are also experiencing this particular DotA 2 error due to their firewall interfering. so another solution that you should try is to either disable the Windows 10 Firewall, or that of your antivirus.
While this could potentially fix the issue, you will be left exposed without a firewall to protect you, especially if you forget to turn it back on after you’re done playing.
So, instead of disabling your firewall, consider switching to an antivirus tool that has better firewall flexibility, or at least one that is easier to turn off and back on again.
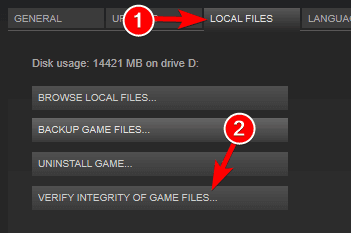
3. Verify the integrity of the game cache
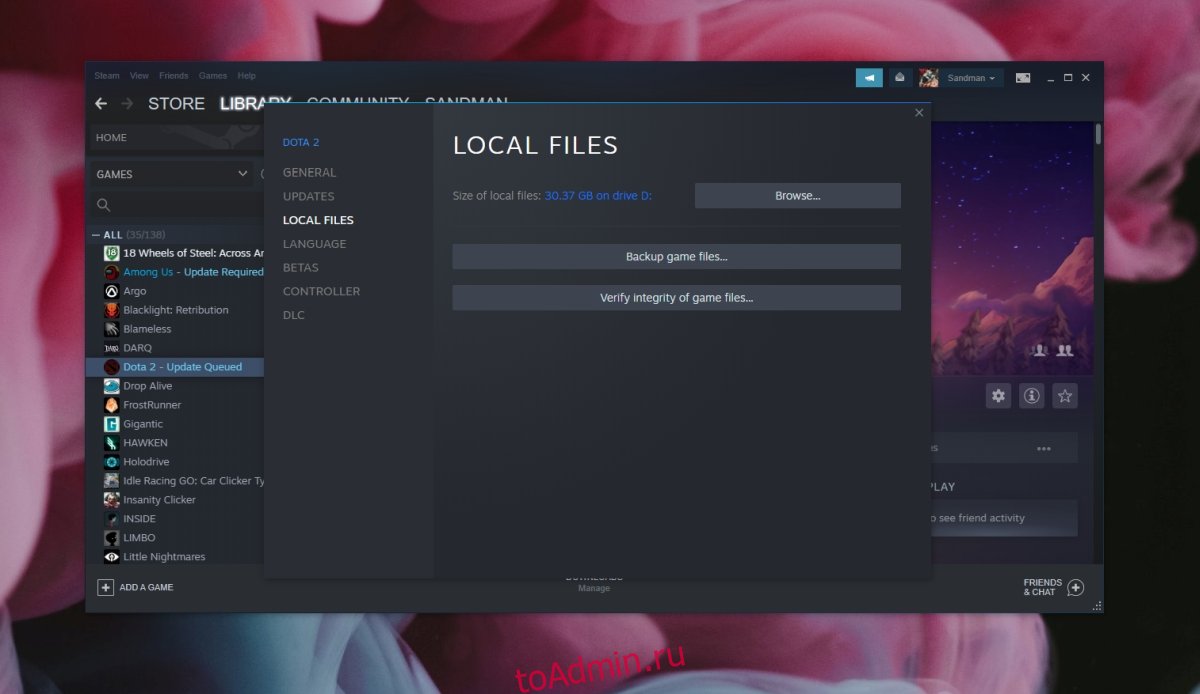
- Open your Steam Client > go to Library.
- Right-click on DotA 2 and select Properties.
- Under Local Files > choose Verify integrity of game cache…

- Wait until the process has finished and try to run your game again.
Some PC issues are hard to tackle, especially when it comes to corrupted repositories or missing Windows files. If you are having troubles fixing an error, your system may be partially broken.
We recommend installing Restoro, a tool that will scan your machine and identify what the fault is.
Click here to download and start repairing.
Another way to repair corrupted files is through Steam’s integrity checker.
4. Update your drivers
Outdated drivers have also been commonly associated with disk write errors, especially if the ones powering your HDD are incredibly old, or possibly even never updated.
Unlike other hardware components where it is easy to just visit the manufacturer’s website and get the driver, these are a bit trickier to handle, and it is best to leave them in the hands of dedicated third-party software.
That is why we recommend you try our DriverFix, a tool that is almost completely automated, created to find missing drivers, repair broken ones, and update the older ones, all within a few minutes.
Simply launch it, let it scan your Pc for problematic drivers, allow it to download and install them, and you’re all set.
⇒ Get DriverFix
5. Install DotA 2 on another drive
This issue may be triggered by some corrupted files on the drive. If you have a SSD or a second hard drive, install DotA 2 there and the problem should disappear.
6. Winsock reset
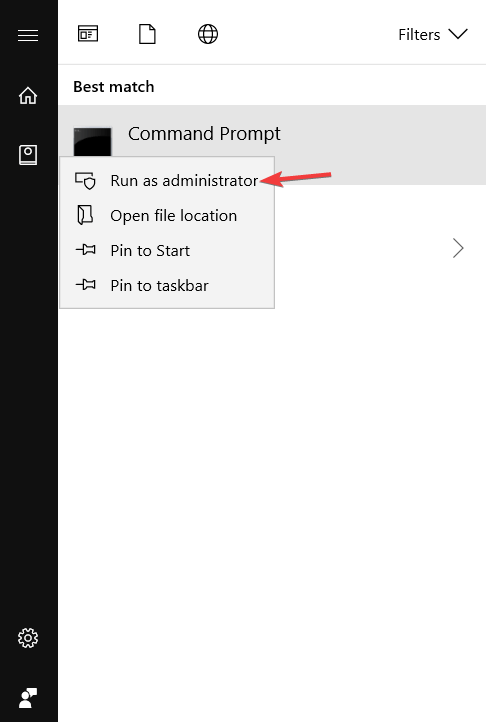
- In the Windows search box type cmd, right-click the first result, and select Run as administrator.

- In cmd, type netsh and then press Enter.
- Now, type winsock reset, press Enter and wait until your computer restarts.
7. Delete certain folders
7.1. Delete the Download folder
- Go to
Steamsteamapps - Delete the downloading folder
- Steam will download the update again
7.2 Delete the Common file
- Go to
C:Program FilesSteamsteamappscommon - Look for a DotA 2 file without an extension
- Delete it
- Hit play on the game in Steam and this should let you launch the game.
7.3. Delete any 0 KB files
- Go to
C:Program Files(x86) - Navigate to Steam > Steamapps > common
- Scroll down and when you see a 0 KB file, delete it
- Restart your DotA 2 update
There you go, we hope these solutions helped you fix the DotA 2 update disk write errors on Windows 10 and you can enjoy the game.
If you are aware of another way to solve the update disk write error in DotA 2, please post it in the comments section below along with any other questions.
![]()
Newsletter
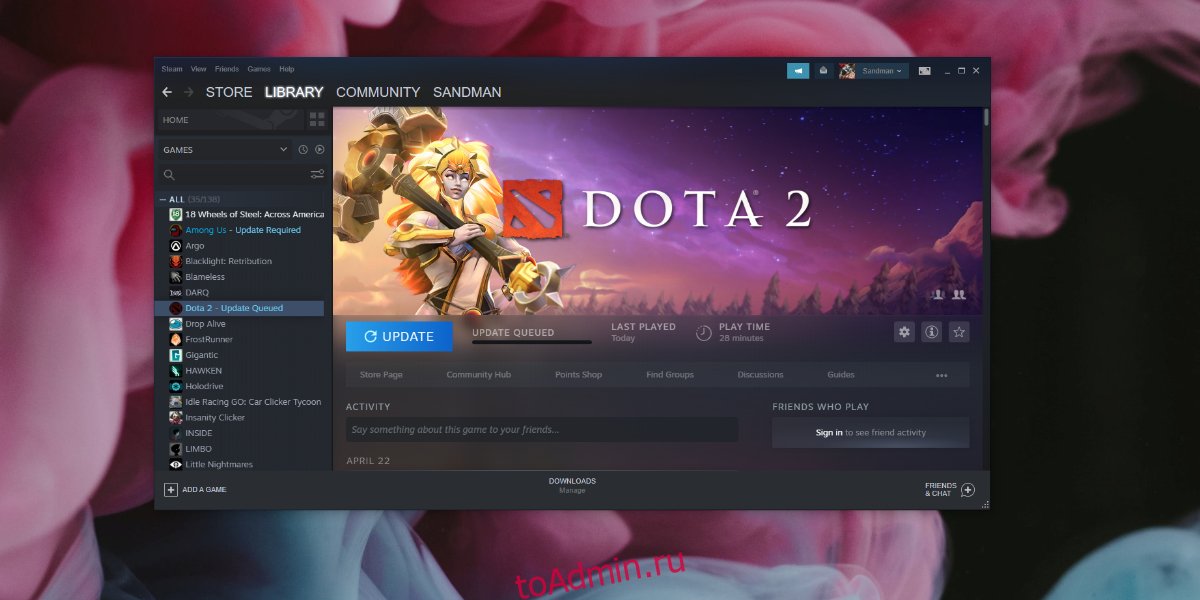
DOTA 2 регулярно обновляется, как и любое другое приложение или игра. Ему необходимы обновления для работы, и как часть обновления он добавит в систему больше файлов и обновит те, которые уже находятся на диске. По сути, для обновления игра должна иметь возможность записывать файлы на диск.
Если вы пытаетесь играть или обновлять DOTA 2 и видите ошибку записи на диск, это означает, что что-то блокирует сохранение и / или обновление файлов в игре. Это может быть проблема с Windows 10, самой игрой или Steam.
Попробуйте эти исправления.
1. Установите или отключите антивирус.
Антивирус может помешать обновлению DOTA 2. Это может помешать игре сохранять или обновлять существующие файлы. Единственное решение — отключить антивирус или добавить Steam в белый список.
Если вы решили отключить антивирус, включите Защитник Windows. Он не блокирует Steam и защитит вас в отсутствие другого антивирусного приложения.
2. Проверьте наличие ошибок на диске.
Приложения Steam можно установить на любой диск в вашей системе, и если у вас есть жесткий диск, он подвержен ошибкам. Эти ошибки могут быть причиной того, что игра не может обновляться.
Откройте проводник и перейдите на этот компьютер.
Щелкните правой кнопкой мыши диск, на котором установлена игра.
Выберите «Свойства».
Перейдите на вкладку Инструменты.
Щелкните Проверить.
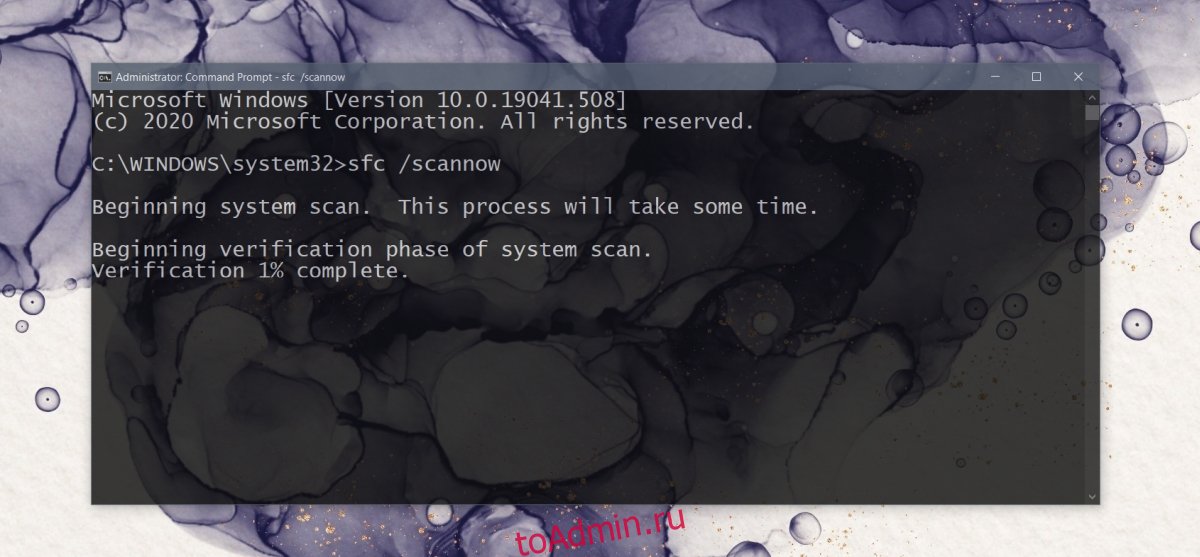
При обнаружении ошибок следует запустить сканирование SFC.
Откройте командную строку с правами администратора.
Выполните эту команду: sfc / scannow.
Подождите, пока сканирование завершится, и исправьте файлы.
3. Проверьте файлы игры.
Ошибка записи на диск DotA 2 может быть связана с повреждением файлов игры. Вы можете исправить их с помощью Steam.
Откройте Steam.
Перейти в библиотеку.
Щелкните правой кнопкой мыши DOTA 2 и выберите «Свойства».
Перейдите на вкладку «Локальные файлы».
Щелкните Проверить целостность файлов игры.
Подождите, пока проверка завершится.
4. Удалите загруженные файлы.
Возможно, проблема была в загруженных файлах. Вы можете удалить их и снова обновить игру.
Откройте проводник.
Перейдите к диску, на котором установлена DOTA 2.
Перейдите на страницу загрузки Steam.
Удалите там все файлы.
Обновите DOTA 2 снова.
5. Сбросить настройки сети.
Ваша сеть может препятствовать обновлению или установке. Вы можете попробовать перезапустить маршрутизатор, но также рекомендуется сбросить настройки сети в Windows 10.
Откройте командную строку с правами администратора.
Выполните эту команду: netsh.
После запуска команды запустите вторую команду: winsock reset.
Перезагрузите систему и попробуйте обновить DOTA 2.
Ошибка записи на диск в Dota 2: Заключение
«Ошибка записи на диск» не является эксклюзивной для DOTA 2. Вы можете получить ее в других играх, и те же исправления, перечисленные выше, скорее всего, будут работать. Если у вас есть приложения, которые могут мешать Steam сохранять или обновлять файлы, отключите их. Игры должны устанавливаться и обновляться без проблем.
Что вы думаете об этой статье?
На чтение 4 мин. Просмотров 17k. Опубликовано 03.09.2019
Dota 2 – одна из самых популярных многопользовательских онлайн-игр, объединяющая миллионы игроков каждый день. Игра в Dota 2 – это весело, интересно и захватывающе, но иногда игра действительно может действовать на нервы игроков.
Существуют различные технические проблемы, которые могут потенциально повлиять на игру, и они обычно возникают в самый неподходящий момент. К счастью, эти ошибки довольно редки.
Одной из наиболее частых ошибок Dota 2 является сообщение об ошибке записи на диск обновления. Если вы столкнулись с этой ошибкой, вы попали по адресу. В этой статье мы собираемся перечислить несколько быстрых решений, чтобы исправить эту ошибку.
Обычно эта ошибка записи на диск возникает, когда игроки пытаются установить последние обновления Dota 2:
Поэтому, пока я делал обновление для dota 2, почти до конца, моя антивирусная программа обнаружила «проблему» или трояна, как говорится в vconsole2.exe. и я получаю ошибку записи на диск. Я попробовал все, отключил брандмауэр и антивирус, перезапустил обновленную снова ту же ошибку в том же месте […]
Как исправить ошибку записи на диск в Dota 2? Вы можете быстро это исправить, проверив жесткий диск на наличие ошибок. В большинстве случаев поврежденные файлы вызывают ошибку. Если это не помогает, проверьте целостность кеша игры, а затем удалите папку загрузок.
Если вы хотите знать, как это сделать, проверьте шаги ниже.
Содержание
- Простые исправления ошибок записи диска Dota 2 в Windows 10
- Решение 1. Проверьте жесткий диск на наличие ошибок
- Решение 2 – Проверка целостности игрового кеша
- Решение 3 – Установите Dota 2 на другой диск
- Решение 4 – Сброс Winsock
- Решение 5 – Удалить папку загрузок
- Решение 6 – Удалить конкретный файл Dota 2
- Решение 7 – Удалить файл 0 КБ
- Решение 8 – Другие распространенные исправления

Простые исправления ошибок записи диска Dota 2 в Windows 10
- Проверьте жесткий диск на наличие ошибок
- Проверьте целостность кеша игры
- Установите Dota 2 на другой диск
- Сброс Winsock
- Удалить папку загрузок
- Удалить определенный файл Dota 2
- Удалить файл 0 КБ
- Другие распространенные исправления
Решение 1. Проверьте жесткий диск на наличие ошибок
Иногда ошибки файловой системы могут привести к проблемам в Steam и Dota 2. Чтобы решить их, проверьте и отремонтируйте свой диск:
- Щелкните правой кнопкой мыши жесткий диск, на котором установлена Dota 2, и выберите Свойства .
-
Перейдите на Инструменты > и нажмите Проверить .


-ЧИТАЙТЕ ТАКЖЕ: 14 лучших программ для проверки работоспособности жесткого диска для пользователей ПК
Решение 2 – Проверка целостности игрового кеша
Еще один способ восстановить поврежденные файлы – проверка целостности Steam. Чтобы использовать его, выполните следующие действия:
- Откройте свой Клиент Steam > и перейдите в Библиотеку .
- Нажмите правой кнопкой мыши на Dota 2 и выберите Свойства .
-
Под Локальными файлами> выберите Проверить целостность кеша игры…
- Дождитесь окончания процесса и попробуйте снова запустить игру.

Решение 3 – Установите Dota 2 на другой диск
Эта проблема может быть вызвана некоторыми поврежденными файлами на диске. Если у вас есть SSD или второй жесткий диск, установите Dota 2 там, и проблема должна исчезнуть.
- Читайте также: 7 лучших внешних жестких дисков и твердотельных накопителей USB-C
Решение 4 – Сброс Winsock
-
В поле поиска Windows введите cmd , щелкните правой кнопкой мыши первый результат и выберите Запуск от имени администратора .
- В cmd введите netsh и нажмите Enter .
- Теперь введите сброс winsock , нажмите Enter и дождитесь перезагрузки компьютера.

Решение 5 – Удалить папку загрузок
Перейдите в папку Steam/SteamApps > удалите папку для загрузки> Steam снова загрузит обновление.
- ЧИТАЙТЕ ТАКЖЕ: Как удалить Steam Cloud сохраняет [РУКОВОДСТВО ПО ШАГУ]
Решение 6 – Удалить конкретный файл Dota 2
Перейдите на страницу C: Program FilesSteamsteamappscommon > и найдите файл Dota 2 без расширения> удалите его> нажмите на игру в Steam, и это должно позволить вам запустить игру.
Решение 7 – Удалить файл 0 КБ
- Перейдите на страницу C: > Program Files (x86) .
- Перейдите на страницу Steam > Steamapps > common .
- Прокрутите вниз и, когда увидите файл 0 КБ , удалите его.
- Перезапустите обновление Dota 2.
Решение 8 – Другие распространенные исправления
- Проверьте, не блокирует ли ваш межсетевой экран связь Steam с сервером.
- Отключите антивирусную программу .
- Обновите свои драйверы .
Итак, мы надеемся, что эти решения помогли вам исправить ошибки записи диска обновления Dota 2 в Windows 10, и вы сможете наслаждаться игрой.
Если вам известен другой способ устранения ошибки записи диска обновления в Dota 2, пожалуйста, опубликуйте его в разделе комментариев ниже вместе с любыми другими вопросами.
Друг установил доту после переустановки виндовс. Но вот выскочила эта ошибка и мы как только не пытались её исправить,но ничего не выходит,причём дота установилась уже полностью,но надпись ошибка записи на диск не даёт запустить доту. Не пробовали только переустановить,но это так впадлу.Вот способы,которые мы перепробовали:
1. Перезагрузите Steam и ваш компьютер. Во многих случаях эта проблема носит временный характер. Самый простой способ исключить временную проблему — перезапустить Steam, а затем попытаться снова загрузить или сыграть в свою игру. Если это не сработает, перезагрузите компьютер.
Если вы все еще видите ошибку записи на диск Steam после перезапуска Steam и компьютера, перейдите к следующему шагу устранения неполадок.
2. Снять защиту от записи. Защита от записи не позволяет вашему компьютеру изменять или добавлять файлы в папку или на весь диск. Когда это происходит с вашим каталогом или диском Steam, это вызывает ошибку записи на диск Steam.
Чтобы устранить эту проблему, проверьте, на каком диске хранятся ваши игры Steam, а затем снимите защиту от записи с этого диска.
3. Отключите настройку только для чтения для вашего каталога Steam. Только для чтения — это параметр, который можно применять к папкам или отдельным файлам. Если ваш каталог Steam установлен только для чтения, это может вызвать ошибку записи на диск Steam. Чтобы решить эту проблему, найдите папку Steam и отключите параметр только для чтения.
4. Запустите Steam от имени администратора. Запуск программы, такой как Steam, с правами администратора дает ей дополнительные разрешения и может решить множество странных проблем. Если вы сняли защиту от записи или отключили параметр «Только чтение» и по-прежнему получаете ошибку записи на диск Steam, запуск Steam от имени администратора может решить вашу проблему.
5. Удалить поврежденные файлы. Когда что-то идет не так, как Steam начинает загружать игру, он может создать поврежденный файл, который впоследствии вызывает ошибку записи на диск Steam. Этот файл можно найти в вашей директории steamapps / common.
Чтобы решить эту проблему, перейдите в основной каталог Steam, перейдите в каталог steamapps / common и найдите файл с тем же именем, что и игра, которую вы пытаетесь загрузить. Если размер этого файла составляет 0 КБ, удалите его и попробуйте снова загрузить или запустить игру.
6. Проверьте целостность ваших игровых файлов. Если в вашем каталоге steamapps / common нет файла размером 0 КБ, есть вероятность, что вы имеете дело с поврежденными игровыми файлами. Лучший способ справиться с этим — использовать проверку целостности Steam.
Чтобы это исправить, откройте свою библиотеку Steam и найдите игру, которую вы пытаетесь обновить или в которую играете. Щелкните правой кнопкой мыши игру и выберите «Свойства» > «Локальные файлы» > «Проверить целостность файлов игры». Если Steam обнаружит поврежденные файлы, он автоматически загрузит новые версии этих файлов.
Внимание: если в вашей игре используется средство запуска, и оно загружает дополнительные обновления, не проверяйте целостность файлов игры. Это заменит вашу обновленную игру на базовый лаунчер, и вам потребуется повторно загрузить обновления через лаунчер.
7. Очистите кеш загрузки в Steam. Если ваш кеш загрузки Steam поврежден, это может привести к ошибкам записи на диск.
Чтобы решить эту проблему, откройте Steam. Затем перейдите в Steam Настройки > Загрузки Очистить кэш загрузок.
8. Переместите свою игру в Steam на другой диск. В некоторых случаях может возникнуть проблема с вашим диском, которая физически не позволяет Steam записывать на него данные. Самый простой способ исправить это, если у вас есть несколько дисков или разделов, — это перенести папку установки Steam на другой диск.
Внимание: если это решит проблему с ошибкой записи на диск Steam, это хороший признак того, что у вас проблема с оригинальным диском. Хотя вы исправили эту проблему, в будущем у вас могут возникнуть дополнительные проблемы с дисководом.
9. Ошибка проверки вашего диска. Если перемещение вашей установочной папки Steam решило вашу проблему, рекомендуется проверить ошибки на вашем диске. Также полезно выполнить эту проверку, если у вас есть несколько разделов на одном физическом диске, и перемещение папки Steam не решило вашу проблему.
В некоторых случаях этот процесс сможет выявлять поврежденные сектора и сообщать Windows об их игнорировании в будущем. Если проблема сохраняется или ухудшается, возможно, вам придется заменить жесткий диск.
10. Отключите антивирусную программу или добавьте исключения. В некоторых редких случаях ваша антивирусная программа может неправильно идентифицировать Steam как угрозу и препятствовать загрузке и сохранению игровых данных. Если ничто иное не исправило вашу ошибку записи на диск Steam, вы можете проверить, является ли это проблемой, временно отключив антивирус.
Если ошибка записи на Steam-диск исчезла с отключенным антивирусом, у вас есть несколько вариантов. Вы можете отключить антивирус при необходимости загрузить или обновить игру, переключиться на другой антивирус или добавить исключение для Steam в своей антивирусной программе.
11. Отключите брандмауэр или добавьте исключения. Это похоже на проблему с антивирусом, за исключением того, что ваш брандмауэр блокирует работу Steam. Это то же самое исправление, поэтому вы можете проверить, является ли это проблемой, временно отключив брандмауэр.
Если это решит вашу проблему, вам нужно либо добавить исключение для Steam в брандмауэр, либо попробовать другой брандмауэр.

Recently I wanted to start playing Dota 2 with my friends but suddenly, an error popped up ” Dota 2 disk write error ” while downloading the game and even for my other installed games, I can’t even update them.
After doing some research I found this happened to a lot of users, so I did some research to get the best and easy fixes that will stop you from going deep in technical stuff and protect your system from more errors.
The easiest and best way to fix the issue is to repair your steam library folder, open steam > steam settings > Downloads > and in Content Libraries click on steam library folders button > right-click on every folder and select the ” Repair Library folder “, doing this will solve your Dota 2 disk write error problem.
It can be less or greater than the time mentioned here because some fixes depend on the download speed of your internet. 30 minutes.
- Clearing the download cache
Sometimes due to the network or server failure which can be the main reason to get a damaged file from the server while downloading or updating any game so to fix this issue, we can just clear the download cache from steam settings, follow this step to clear the download cache, Steam Settings > Download section > Clear Download Cache

- Library Repair
This is the most effective method to fix the disk right issue for not just Dota 2 but for also any other games you face errors like this so here are the steps you can follow, steam settings > Downloads > and in Content Libraries click on steam library folders button > right-click on every folder and select the ” Repair Library folder “

- Controlled folder access
If you have gone through any article on the internet, most probably you encountered the fix that says that you have to disable the windows defender to fix this issue. This can cause you some serious problems related to viruses and cyber-attacks.
So the alternative way to solve this kind of problem is to give main programs controlled folder access, which means giving a program to read and write to the restricted parts of your hard drive, follow these steps to give any program folder access,— Open Windows Defender
— Click on ” Virus & Threat Protection “
— Go to Ransomware protection and click on ” Manage Ransomware protection “
— Click yes when a pop appears
— Click on ” Add an allowed app “
— Here you can choose 2 options ” Recently blocked apps ” or ” Browse all apps “
— If you select ” Recently blocked apps ” then a pop will appear to select the different apps ” .exe ” files to add in allowed lists if you see any of the names starting with “steam.exe” then click on it to add it.
— If you can’t find the name, then click on ” Browse all apps ” and then navigate to the application where it’s installed, like ” C:Program Files (x86)Steamsteam.exe “
— After selecting the steam program file click on add button.After doing this you don’t have to disable the Windows Defender to risk your system and also defender will not cause any problem to steam.

- Disabling Download Accelerator and Download Manager Programs
If you have any download accelerator or download manager like IDM, etc to manage all your downloads for your system, then disable it or uninstall it
- Disable or removing any cleaner
If you have a cleaner installed on your system like iObit, please uninstall it or have any antivirus installed in your system to temporarily disable it to check the next points.
- Disable Antivirus
If you have any antivirus installed in your system disable it while downloading or updating the game, here are the ways to disable antivirus,
— If you are using Avast
1. Search for the Avast icon in your computer’s system tray and right-click on it.
2. Click on Avast shields control.
3. Locate the options to disable the program – the options are to disable it for 10 minutes, an hour until the computer is restarted, or permanently (until you yourself turn it back on). Select whatever option suits you best and use it to disable the program.— If you are using AVG
1. Search for the AVG icon in your computer’s system tray and right-click on it.
2. Click on Temporarily disable AVG protection.
3. Choose how long you want AVG to be turned off and whether you want AVG to disable its Firewall too.
4. Click on OK to disable the antivirus program.— If you are using McAfee
1. Search for the McAfee Antivirus icon in your computer’s system tray and right-click on it.
2. Click on Exit.
You should see a dialog box warning you that McAfee‘s protection will be turned off. Click on Yes in this dialog box to disable the antivirus program - Add to the Game folder to the Exception list for antivirus and Windows Defender
Disabling antivirus doesn’t work then add the exception list in the exception list. Follow these steps to add steam folder in the exception list,
–– Windows Defender
1. Click the Windows button and in the search bar type “Windows defender”.
2. Open the application named “Windows Defender Security Center”.
3. Select the option “Virus and threat protection”.
4. Go to Virus and Threat Protection Settings. Windows may prompt you to allow administrator access to use this feature. If so, press Yes.
5. Search the window which says “Add or remove exclusions”. Click it and you will be navigated to a menu where you can add exclusions.
6. Click on the option which says “Exclude a folder” and navigate to your Dota 2 directory. Once you reach the location select the folder and save changes.— Bitdefender
1. Open Bitdefender and go to the Protection Window by clicking the shield icon shown below in the picture.
2. Click on the link which says View Modules.
3. Click on the Settings icon which you can see on the upper right corner of the antivirus.
4. Go to the Exclusions tab present in the window.
5. Click on “List of files and folders excluded from scanning”.
6. Click on the ADD button. Navigate to your Dota 2 directory and select the folder to exclude it from the scanning process. You should also select the Both option before you add an exception
7. Click Add and save changes.— Avast Antivirus
1. Open the Avast interface.
2. Click on Settings found at the bottom left corner of the screen. From Settings, browse to General and scroll down the options until you find Exclusions.
3. Expand the section and you will see a dialogue where you can add global exceptions. Navigate to your Chrome directory using the option of Browse.
4. Once you have selected the Dota 2 folder, click on ADD found at the bottom left side of the screen. Press OK and it is now added to global exceptions of Avast antivirus.— McAfee Antivirus
1. Open McAfee Antivirus by clicking on its icon present on the toolbar on the bottom right side of your Windows.
2. Click on Manage Security.
3. Select the option of Schedule and run scans option present in the box of Virus and Spyware Protection.
4. Select the option of Schedules scans from the list of options that follow. A new window will pop up and from there you will see the Add button present under the tab of Excluded Files and Folders. Select the Dota 2 directory after clicking Add through the file explorer.
5. Once you reach the location select the folder and save changes.–– Kaspersky AV
1. Open Kaspersky AV from the icon present in your taskbar at the bottom right of the screen.
2. Navigate to the Settings menu.
3. Select the tab of Additional and select the tab of Threats and Exclusions from the list of options given.
4. Click on the Configure Exclusions present in the middle of the screen.
5. Select the option of Add present in the bottom right of the screen.
6. Now navigate to the Dota 2 directory using the Browse button. Once you reach the location select the folder and save changes.— Malwarebytes
1. Open your Malwarebytes window by either clicking on the icon in the taskbar located at the bottom right side of the screen, or by clicking the program’s launch file.
2. Once the program is opened, click on the Malware Exclusions tab located on the left side of the window.
In this tab, you find an option that says “Add folder”. Click it and you will be navigated to File Explorer from where you can select your Dota 2 directory. - Re-installing
If anything doesn’t work for you, there is no option left behind for you instead of reinstalling steam. But, after reinstalling steam, you have to re-download all the games you installed from steam, and don’t worry, this will not delete the games you purchased from the Steam store.
— Click on the start menu and type control panel, open it
— Click on ” Uninstall a program “
— Navigate to Steam and right-click on steam
— Click on uninstall - Hardware failure check
Sometimes a hard disk can have a bad sector and this could lead to hardware failure problems and which can cause the disk write error after a specific storage limit has been crossed so to check this simply follow this step,
Step 1. Open This PC, right-click on System drive and choose Properties.
Step 2. Go to Tools, and then click Check. Click on Check under Error-checking.It will notify you about the drive failure, that it can be repairable or not if it’s repairable then the system will do it by itself and if the problem exists, you have to get to a new hard drive for your system.


The most common factors due to which gamers generally see steam content write errors is either because of not updating the steam regularly or because of the wrong setup of windows defender, any third-party cleaners-antivirus. But, believe me, 50% of them get rid of it by just restarting their system or applying the fixes mentioned from 2-5.
Prevention is better than cure
To prevent it from happening again any of these kinds of errors, here are some pieces of advice
- Regularly Updating your windows and drivers
- Better to pause any work you doing while the update is on going.
- Also check Steam for updates.
- Don’t use any cleaner it’s just make your system slow and cause more error.
- Don’t use free antivirus and just use Windows Defender if you can’t afford it.
- Before purchasing the antivirus make sure to check dates and some background check on antivirus key provider.
I have written the 9 easiest ways to fix disk write errors and work for all other games. Fix it by using them:), if the error doesn’t fix feel free to write it down in a comment we are glad to help you out.
Vishal Kumar
Finding a solution related to tech has been his keen area of interest, He like tech and is also a noob gamer who gives his best when he’s in focus mode. Like other tech and apps, there are some bugs and he knows it and figuring out to solve them.
Recent Posts
In this post, we will show you how to fix the Disk Write Error on Steam. Steam is a popular gaming platform where gaming enthusiasts can download, buy, and play games as well as talk about games. However, some users have complained of getting the disk write error on Steam while downloading or updating games that you purchased on Steam. It is triggered when you attempt to download a new game or when you are trying to update an existing game. The error message shows:
An error occurred while installing/updating <game name> (disk write error)

What causes the Disk Write Error on Steam?
The Disk Write Error on Steam can occur for a number of reasons. It can be triggered if there is write protection enabled on the drive, due to corrupted game files, because of corrupted download cache, bad sector and other disk errors, etc. In some cases, it might also occur due to your antivirus or firewall protection.
If you are one of those users facing the Steam disk write error, this guide will help you fix the error. Here, we will be mentioning multiple methods that will enable you to resolve this problem. Let us check out the fixes now.
Here are the fixes that you should try to resolve the Steam Disk Write Error on Windows PC:
- Try general suggestions like Restart Steam, Restart your PC, etc.
- Remove disk write protection.
- Verify the integrity of game files.
- Clear up the 0 KB files.
- Clear up the corrupted files in the log.
- Delete Steam download cache.
- Scan your drive for errors.
- Provide full control to Steam folder security.
- Disable your antivirus or firewall protection.
- Change your internet connection from Public to Private.
- Change the download region.
Let us elaborate on the above-listed methods now!
1] Try general suggestions like Restart Steam, Restart your PC, etc.
At first, you’d try some general tips and tricks to fix this error on Steam. You can try the following fixes:
- Restart the Steam client to counter temporary issues causing the Steam disk write error. To do so, first, you have to close the Steam Client completely. Clicking on the cross on the top right side in Steam Client will not close it completely. To close the Steam Client completely, click on System Tray, then right-click on the Steam icon, and select Exit. After completely closing the Steam Client, wait for a few seconds and then launch it again. See if it helps.
- Insufficient access permissions can also cause this error. So, try relaunching Steam as an administrator and see if the issue is gone or not.
- You can also try rebooting your PC and then relaunching Steam to check if the issue is gone.
- Check you are using out-of-date device drivers. If yes, update your drivers and see if the issue is fixed or not.
In case these methods don’t work for you, you will have to use some advanced troubleshooting methods from this guide.
2] Remove disk write protection
If there is write protection enabled on your disk, it will prevent your PC from adding or updating files to a folder or drive. You can try to remove disk write protection if this scenario applies to you. Check for the drive where the Steam games are saved and ensure that it is not write-protected. If it is, you can follow the guide that shows you how to remove disk write protection. This should fix up the error in case the root cause was write protection on your disk.
3] Verify integrity of game files
In case your game installation files are corrupted or are missing or incomplete, it may trigger the disk write error on Steam. So, what you have to do is verify the integrity o your game files using the dedicated feature in Steam. It will check for missing or incomplete game files and then update them to the latest files from Steam servers. To help you with the process, here are the exact steps for doing so:
- First, run Steam and then go to the Library section.
- Now, right-click on the game that is giving you the disk write error.
- Next, from the right-click context menu, press the Properties option.
- Then, move to the LOCAL FILES tab.
- After that locate the VERIFY INTEGRITY OF GAME FILES option and press on it.
- You now have to wait for some time until the game files are verified and updated. When the process is completed, exit the Steam client.
- Finally, relaunch Steam and try downloading or updating the game that was giving you a disk write error.
If this doesn’t fix the error for you, move to the next fix.
Read: An error occurred while installing or updating the Steam game
4] Clear up the 0 KB files
If there are many 0KB files in the Steam folder, it might cause a Steam disk write error. In case you think this is the reason for the error, try deleting all the 0KB files. You can follow the below steps for doing so:
- Firstly, simply open the Steam installation directory. By default, you can find it on this location: C:ProgramFiles(x86).
- Then, go to the Steam > steamapps > common folder
- Now, select all the 0KB files.
- After that, use the Delete option to remove those files.
You can now try downloading or updating on Steam and check if the error still persists or not.
Tip: Is it safe to delete Empty Folders or Zero-byte files in Windows?
5] Clear up the corrupted files in the log
If there are corrupted files in the Steam log, you might experience the disk write error on Steam. Hence, delete the corrupted files in the Steam log, and hopefully, that will resolve the issue for you. To do that, you can follow the below-listed steps:
- First, open the Steam installation directory using the steps mentioned in method (4).
- And then, navigate to the Steam > logs folder.
- Now, open the content_log file in Notepad.
- In this file, scroll to the end of the file.
- Next, check if there is failed to write error. If yes, follow the path of error and then delete the corrupted file.
- You can again continue downloading or updating games on Steam and then see if the issue is gone.
See: Fix Steam Error Code 105, Unable to connect to the server
6] Delete Steam download cache
You may also receive the disk write error on Steam if there is a corrupted Steam download cache. For doing so, in the Steam app, go to the Steam option from the main toolbar and then click on the Settings > Downloads option. Here, press the Clear Download Cache option and it will delete the Steam download cache.
You can now re-attempt to download or update on Steam and check if the issue is gone.
7] Scan your drive for errors
You also need to make sure that there are no drive errors on your PC as it might trigger the disk write error on Steam. Try running the CHKDSK tool on Windows PC that checks for drive errors and attempts to repair them. It will also check for bad sectors on your drive and fix them up if any.
8] Provide full control to the Steam folder security
Try providing full control to Steam folder security to resolve this error. You can follow the below steps for doing so:
- Firstly, go to the Steam installation directory using method (4).
- Now, right-click on the Steam folder and select Properties.
- Next, in the General tab, uncheck the Read-only (Only applies to files in folder) option.
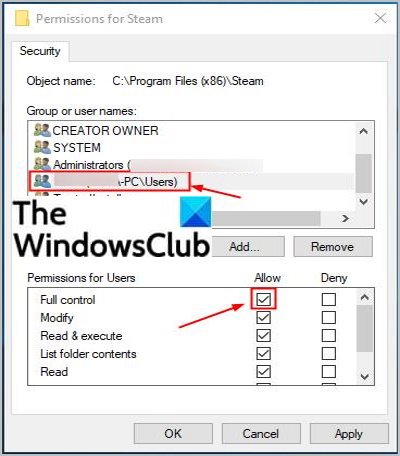
- After that, move to the Security tab and click the Edit button.
- Then, under the Group or user names, select your user account name.
- Now, check the Allow box for Full Control and press Apply > Ok button.
- Finally, relaunch the Steam app with administrator privilege and reattempt the action that was giving you the disk write error. Hopefully, the issue will be fixed now.
9] Disable your antivirus or firewall protection
If nothing works for you, there are a few instances in which antivirus or firewall protection is at fault. In case Steam is identified as a potential threat incorrectly, you might receive this error. So, try disabling your antivirus and firewall protection and see if the issue is fixed. If it resolves the issue, you can be sure that your antivirus or firewall is the main culprit.
Now, if you don’t want to completely disable your antivirus, add Steam to the exceptions of your antivirus. You can also whitelist Steam in Windows Firewall.
10] Change your internet connection from Public to Private
If the issue still persists, you need to change your internet connection profile settings. If your internet connection profile is set to Public, change it to Private. Changing the Wi-Fi or Ethernet connection profile from Public to Private has fixed the issue for many users. Maybe it will work for you too. The following instructions will guide you on this:

- Open your Windows 11/10 Settings (Win + I).
- Go to Network & internet.
- Select Wi-Fi or Ethernet (depending on the type of internet connection you have).
- Select Private under the Network profile type section.
11] Change the download region
Changing the download region, sometimes fixes the issues on Steam. You can try this fix and see if it helps. Change the download region in Steam Client. Follow the steps written below:

- Open the Steam Client.
- Go to “Steam > Settings.”
- Select Downlaods from the left side.
- Now, click on the Download Region drop-down and change your download region.
Read: How to fix Steam Error Code 83 on Windows PC
How do I check the health of my hard drive?
You can check the health of your hard drive using WMIC or Windows Management Instrumentation Command-line on Windows 11/10. You can enter a simple command and then check the status of your hard drive. There are some third-party free software using which you can check hard disk health. You can try HDD Expert, GSmartControl, and some more free hard disk health checker software.
How do I fix a corrupt Steam download?
To fix a corrupt Steam download, change your download region or clear up the Steam download cache. You can also try removing read-only permission for the Steam folder, disabling your antivirus, and shutting down unnecessary background processes. If nothing works, you can try uninstalling Steam and then reinstalling it on your PC.
Hope you find this guide helpful in case you were experiencing the disk write error on Steam.
Now read:
- Steam Error – Missing Content Manifest error on Windows
- Fix New Steam library folder must be writable error.