Summary: When you try to perform an action using the DiskPart utility, you may encounter an error that prevents you from using the utility. In this blog, we’ve shared some common reasons that may result in the DiskPart has encountered an error and the methods to fix the issue.

Contents
- What Causes ‘DiskPart has encountered an error’?
- Recover Data from the Disk
- How to Fix DiskPart has encountered an error?
- Solution
- Essential Tips to Prevent Disk Errors and Data Loss
DiskPart utility, comes with Windows OS, helps in managing your systems drive (drive partitions, volumes, or virtual hard disks.) It usually works even when the built-in Disk Management utility stops responding. Sometimes, when using the utility, you receive errors, such as ‘DiskPart has encountered an error’. The error appears with different messages, including:
- Access is denied
- The request could not be performed
- The request failed due to a fatal device hardware error
- The parameter is incorrect
- Data error cyclic redundancy check see the system, event log
What Causes ‘DiskPart has encountered an error’?
This error may occur due to several reasons, such as:
- Corrupted or damaged file system
- Inconsistent device connection
- Unsuccessful program installation
- Cluttered hard disk
- Misconfigured files
- The file system has turned RAW
- Write-protection is enabled
You can fix the error by using the troubleshooting methods shared in this blog. However, a few methods can cause data loss. So, we’d suggest you either take backup of your device data. If you’re unable to do so, use a powerful data recovery software to recovery your data.
Recover Data from the Disk
Restore data from your hard disk drive using an advanced data recovery software, such as Stellar Data Recovery for Windows. This DIY software can restore data in case of deletion, drive formatting, corruption, and malware attack. If you lose data while fixing the issues with your hard drive using the DiskPart utility, you can use this data retrieval software to get back your data. Follow the given steps:
- Download, install, and run Stellar Data Recovery for Windows on your system.

- Select Everything from the initial dashboard or choose the type of data you want to restore and click Next.

- Choose the location/folder/drive from the Recover from screen and then click Scan.

- Once the scanning is complete, you’ll see the results on the screen.
- Select the files from the results and click Recover.

- Next, click Browse to choose a location to save the data and click Start Saving.
Note: Don’t save the files at the exact location from where you’ve lost the data to prevent data overwriting.
How to Fix DiskPart has encountered an error?
Here, we’re sharing some common error messages that may occur while using DiskPart utility, along with the possible solutions to fix them.
Error 1: Fix DiskPart has encountered error access is denied
This error may occur if the write-protection is enabled on the drive or the Command Prompt terminal lacks the administrative-level permissions.
Solution
To fix the “DiskPart has encountered error access is denied”, you can try disabling the write-protection on the drive on which you’re trying to run the DiskPart utility. To do so, follow the given steps:
- Open the Run dialog box by pressing Windows + R and type regedit.
- Now, go to Computer > HKEY_LOCAL_MACHINE from the left pane and then go to SYSTEM.

- Next, expand and follow CurrentControlSet > Services.

- After that, scroll down, go to USBSTOR, and double-click on Start given in the right pane.

- Enter 3 in the Value data column and click OK.

- Once done, close the registry editor and check if you can use the DiskPart utility without any interruptions.
Error 2: DiskPart has encountered an error the request could not be performed because of an I/O device error
This error usually occurs when Windows faces difficulty performing an input/output action when trying to access a drive. Another reason could be bad sectors on the hard drive or a corrupted drive partition table.
Solutions
A. Update Disk Driver
Sometimes, a corrupt or outdated device driver may cause this DiskPart error. To get rid of this, you may try updating the disk driver by following given steps:
- Open Device Manager and then navigate to the device category.
- Expand the device category, right-click on the driver, and click Update driver.

- On the next prompt, choose ‘Search automatically for updated driver software.’

- Let Windows search for the latest driver software for the device.
- Once found, you can install the latest driver software and check if the problem is solved now.
B. Run CHKDSK Command
CHKDSK command, when run with attributes /f and /r, fixes corruption (if any) on the hard drive. Also, it scans and marks down the bad sectors on the drive. Although, while scanning and marking the bad sectors on the drive, it prevents Windows from reading and storing data from those bad sectors, which result in data loss.
Note: Before you proceed with performing CHKDSK command, we’d suggest you take backup of your data. If you have no backup, you may recover it using a powerful data recovery software.
- Run Command Prompt as an administrator and type CHKDSK /f/r/d: and press Enter. (Replace d: with your drive letter.)

- Wait for the process to complete. Once done, close the Command Prompt window and see if you can use the DiskPart utility.
C. Fix Damaged or Corrupt Hard Drive Partition Table by Rebuilding MBR Boot
As discussed above, another reason for ‘DiskPart has encountered an error’ could be a corrupted drive partition table. You may try fixing it by rebuilding MBR boot. Follow these steps:
- Type cmd to open Command Prompt and type the following commands one after another and press Enter.
Bootrec/fixmbr
Bootrec/fixboot

- Let the process end. Once done, close the Command Prompt window and reboot your system.
Error 3: DiskPart has encountered an error the request failed due to a fatal device hardware error
You may encounter this error when your HDD or SSD is physically or logically damaged and Windows can’t access or perform read-write operations on the drive. Another reason may include an un-initialized disk.
Solution
A. Initialize Disk in Disk Management
- Press Windows + X. Locate and open Disk Management.
- Next, find the drive appearing as Unallocated.

- Right-click on the drive and click Initialize Disk.

- Next, select GPT and then click OK.

- Complete the process. After that, the drive will be listed as Online and Basic.
- Finally, close the window and check if the error is gone.
- If Windows doesn’t detect your drive, chances are your hard drive is physically damaged. In that case, you’ll need to replace the hard drive.
Error 4: DiskPart has encountered an error the parameter is incorrect
This error occurs when you format your drive with the NT file system using the DiskPart utility. It occurs due to a damaged file system or bad sectors on the hard drive.
Solution
Create New Partition Using DiskPart Utility
To fix this error, you need to clean the disk using DiskPart Utility and create a new drive partition. Follow these steps:
- Open Command Prompt, type diskpart, and hit Enter.
- After that, type list disk and select disk X, then press Enter. (Replace X with your drive letter).
- Then type Clean and press Enter.
- Next, create partition primary and hit Enter.
- Type select partition 1 and press Enter.
- Now, type format fs=ntfs quick and hit Enter.
- Type assign letter=Z and press Enter.
- Finally, type exit and Enter.

- Close the Command Prompt window and reboot your system to check if the problem is fixed.
Error 5: DiskPart has encountered an error data error cyclic redundancy check see the system event log
This error may occur due to several reasons. However, the primary reasons include hard drive corruption, registry file corruption, misconfigured files, cluttered disk, unsuccessful program installation, etc. The CRC (Cyclic Redundancy Check) error is quite a severe issue. You need to resolve this error immediately to avoid system failure and data loss. There are different types of CRC errors, such as:
- Data Error (CRC) Error Message in Outlook
- Drive Is Not Accessible Data Error (Cyclic Redundancy Check)
- Cyclic Redundancy Check Error on an optical disc (CD, DVD, etc.)
Solution
Essential Tips to Prevent Disk Errors and Data Loss
Safely Remove the Hard Drive
Whenever you eject or remove the hard drive, do it cautiously to prevent any damage to the drive. Once the hard drive is damaged, physically or logically, you may encounter multiple disk errors.
Check Hard Drive Health
Always keep a track of your hard drive’s health status. You can do it by using a powerful Drive Monitor utility, which comes with Stellar Data Recovery Professional software. It monitors the key attributes – temperature, drive health, and performance – of a hard drive to help avoid any data loss due to impending disk failure. In addition, you can also find bad sectors on the drive for evaluating whether the hard drive can withstand a routine data recovery process. This way, you may protect your data by taking its backup on time and also get the hard drive repaired or replaced according to the situation.
Take Regular Backup
To avoid data loss, it is always suggested to take backup regularly. You can use Windows built-in backup utilities, such as Backup & Restore (Windows 7) or File History. You can also create a backup on another storage drive.
Conclusion
The ‘DiskPart has encountered an error’ may occur due to various reasons. In this blog, we’ve mentioned the methods to fix the error. You can follow the given DIY (do-it-yourself) methods to resolve the issue. Furthermore, due to this error, you may end up losing access to the data. In such a case, you can use Stellar Data Recovery for Windows to get back your data. This DIY data recovery software supports recovery from Windows PCs, laptops, and external storage media drives, such as HDDs, SSDs, USB drives, SD cards and more.
About The Author
Mansi
Mansi Verma is a Technology Writer at Stellar®. She is a Tech enthusiast, holding over 7 years of experience in Data Recovery, IoT, Artificial Intelligence, and the Robotics technology domain. She loves researching and providing DIY solutions and tips & tricks to solve Windows technical issues. In her spare time, she likes reading novels, and poetry. She also enjoys traveling and trekking.
Best Selling Products

Stellar Data Recovery Professional
Stellar Data Recovery Professional softw
Read More

Stellar Data Recovery Premium
Stellar Data Recovery Premium for Window
Read More

Stellar Data Recovery Technician
Stellar Data Recovery Technician intelli
Read More

Stellar Data Recovery Toolkit
Stellar Data Recovery Toolkit is an adva
Read More
When using DiskPart command line disk partitioning utility, you may receive «DiskPart has encountered an error» error which is followed by various error messages such as access is denied, the parameter is incorrect, I/O device error, media is write protected, device not ready, cyclic redundancy check, etc. In this article, we will talk about 6 types of errors occurred to DiskPart as well as corresponding solutions.
Error 1: DiskPart has encountered an error: Access is denied
Symptom
When you try to clear a USB flash drive with diskpart command, you may be blocked by the error:
DISKPART> clean
DiskPart has encountered an error: Access is denied.
See the System Event Log for more information.
If you check event log you might get something like this:
Failed to open device \?GLOBALROOTDeviceHarddiskVolume5. Error code: 5@020A0019
Let’s see a real case about access denied issue:
«Hey everyone, I had an old SanDisk memory card with 8GB capacity. I haven’t used it for 2 years. I inserted it to my laptop and Windows said it is not formatted. I attempted to format it in File Explorer, but Windows was unable to format it. So I tried formatting it using DiskPart, but it encountered an error: access is denied. I check event log and got: ‘Failed to open device \?GLOBALROOTDeviceHarddiskVolume8. Error code: 5@020A0019 EventID 8’ Anybody know how I can format the USB stick and remove the error?»
Causes
Usually, if the device you want to clean or format is considered to be blocked (e.g. write-protected) or hasn’t been authorized, the DiskPart command won’t be able to complete properly. For example, you didn’t log in computer as administrator, as some user account might be restricted to use Command Prompt even though you run it as Administrator.
Solutions
Solution 1: Check system event logs to hunt down any problem
Since the error message prompts to see system event logs, you may as well check computer’s logs for more information if you cannot find out what’s causing the problem.
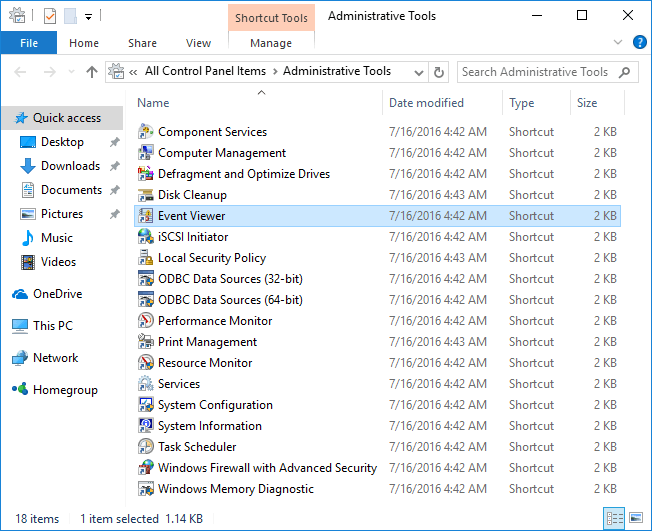
Step 1 Click Start menu to open Control Panel where you can select «Administrative Tools». Note: the option will be available after changing «View by» to «Large icons» at the top right corner.
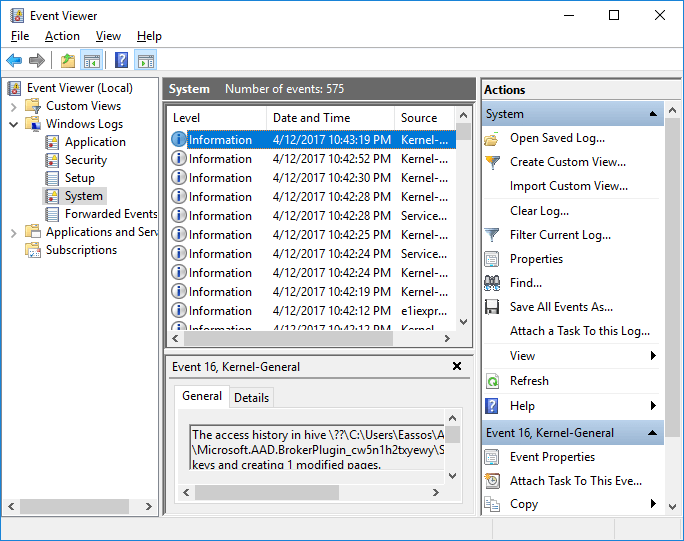
Step 2 Double-click shortcut «Event Viewer» in Administrative tools window.
Step 3 Expand «Windows Logs» to locate «System».
Step 4 Double-click one of the logs in the top center area of Event Viewer and you can see detailed information about the event./p>
Solution 2: Run Command Prompt as an Administrator
Step 1 Restart computer and log in Administrator account.
Step 2 Click Start button, click All Programs and then select Accessories.
Step 3 Right-click Command Prompt and select Run as administrator.
Step 4 The UAC (User Account Control) dialog box comes up and you should provide permission or password to confirm the action.
Step 5 Type and execute DiskPart command again and the «Access is denied» error won’t appear.
Error 2: DiskPart has encountered an error: The media is write protected
Symptom
«Hi, I have a 8GB SONY USB flash drive and I want to repartition it using DiskPart, because the flash drive turned to 189MB for no reason. I tried to format it in Command Prompt but receive the error ‘DiskPart has encountered an error. The media is write protected. Sine the USB flash drive does not have a write-protect switch. Any ideas can help me remove write protection? «
Causes
It is easy to lose access of what you have stored on drive, as there are changes that files are deleted by accident or get damaged by virus. Some mass storage device provides write-protection function to protect files and folders. However, some drive still can be set to read-only even though there is not a write-protection switch. Reasons behind write protection error vary from one to another, let’s see possible causes together.
- The storage media is damaged by virus or malware and cannot work properly.
- The read-only switch is placed to ON side by accident and the media becomes un-writable.
- The disk is set to read-only in Property or Registry to prevent writing actions.
- The drive has physical damages, such as bad sectors.
Solutions
Solution 1: Remove write protection using DiskPart
Step 1 Run Command Prompt as administrator, type in DiskPart and press Enter. To open Command prompt, press Win + R, type cmd in Run box and click OK.
Step 2 Type «list disk» and press Enter. Then all disks on your computer will be listed.
Step 3 Type in «select disk #» and press Enter key. You should replace # with the actual disk number, for example, you want to remove read-only for volumes on disk 1, then you should enter «select disk 1».
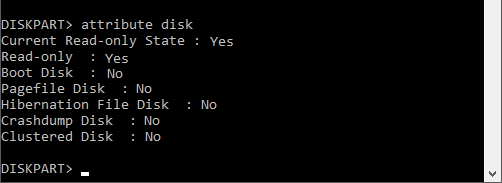
Step 4 Input «attribute disk» and press Enter. Now you can see whether the disk is read-only or not.
Step 5 Type command «attribute disk clear readonly» and press Enter. The «Current Read-Only State» and «Read-only» will be set to No. Then you can try DiskPart to check whether the error is fixed.
Solution 2: Remove read-only state in Registry Editor
Step 1 Right-click Start button on the bottom-left corner and select Run. Type «regedit» in search box and press Enter key. Click «Yes» if you are asked by User Account control.
Step 2 Expand keys following the path: HKEY_LOCAL_MACHINESYSTEMCurrentControlSetControlStorageDevicePolicies.
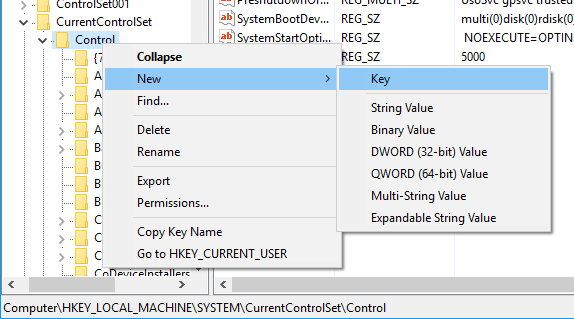
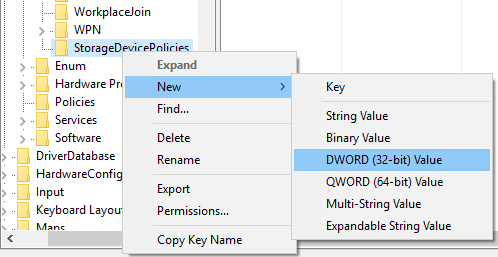
Step 3 If there is not StorageDevicePolicies on your computer, you need to create one. Right-click on «Control» and select «New» and «Key». Then name it as StorageDevicePolicies
Step 4 Right-click StorageDevicePolicies and select «New» and «DWORD (32-bit) Value». Then rename it as «WriteProtect».
Step 5 Right-click the newly created «WriteProtect» key and change the Value data to 0. Then click OK and close Registry Editor.
Error 3: DiskPart has encountered an I/O device error
Symptom
I/O device error occurs when device becomes unable to perform an Input / Output actions such as reading or copying data. This error can happen to various devices, including hard drive, external hard drive, USB flash drive, CD-ROM, DVD, SD card, etc. When you perform DiskPart on a disk which might be damaged, you are like to get the error message: DiskPart has encountered an error: The request could not be performed because of an I/O device error. If you access the disk in Windows you probably get same error message with error code 0x8007045D or 2147943517.
Causes
There are a number of possible causes for I/O device error and some are listed here:
- There is something wrong with device connection, such as bad cables, loose connection, USB ports insufficient power supply.
- The hardware is using an incompatible transfer mode or improper interface.
- The CD or DVD disk you are accessing is damaged or dirty.
- The storage device you are trying to use is damaged or defective. When you attempt to access data from a bad area, the error will appear.
- Operating system is trying to use a transfer mode which cannot be used by the device.
Symptom
Solution 1: Check hardware connections
Since loose hardware connection is a common case of I/O device error, you should make sure all cables are well and correctly connected.
Step 1 If the error is caused by an external device such as external hard drive, you can connect the drive to another USB port on the computer.
Step 2 If the device is connected via USB hub, then connect the drive directly to computer’s USB port in case of insufficient power supply.
Step 3 Replace the cable with a new one and reconnect storage device.
Step 4 If you are an advanced computer use, you can change cables for internal hard drives for a desktops or change enclosure for external HDD. If you are casual user then seek help from professionals.
If solutions above cannot resolve the I/O device error, connection is not likely the real case and you should continue with solution 2.
Solution 2: Change transfer mode for the device
If the transfer mode is configured incorrectly, Windows will not be able to transfer data among devices and computers. Thus the I/O device error might be fixed after changing to correct transfer mode.
Step 1 Open Device Manager. Right-click «This PC» and select Manage, then you can click Device Manager on the Computer Management window.
Step 2 Expand «IDE ATA/ATAPI controller» and you can see one or more listings for IDE ATA/ATAPI channels.
Step 3 Right-click the channel of the drive that causes I/O device error, select Properties and Advanced Settings tab. If you can’t decide which IDE channel to select, you can choose the one tagged «Secondary IDE Channel»
Step 4 Select «PIO Only» option in the Transfer Mode box, and you can see the device (usually Device 0) throwing the error. Then click OK and close all windows.
Step 5 Restart computer and test whether the error is removed.
Error 4: DiskPart has encountered an error: The parameter is incorrect
Symptom
When you attempt to format or resize a volume via Diskpart.exe in Windows RT, Windows Server 2012, Windows 8, etc., you may receive an error message like:
DISKPART> shrink
DiskPart has encountered an error: The parameter is incorrect. See the System Event Log for more information
DISKPART>
Causes
The incorrect parameter issue occurs when the file system on the partition is corrupted or the full volume encryption driver has been changed in Windows.
Solutions
Solution 1: Run CHKDSK to fix volume errors in Windows 10
CHKDSK is one of the useful Windows built-in utilities. Sometimes Check Disk can be a lifesaver, as it is able to fix volume errors like «the parameter is incorrect». Please note that, if the volume contains important files, you should backup data before running chkdsk in case of any accidents.
Step 1 Open File Explore and right-click the drive which reports DiskPart encountered errors, then choose Properties.
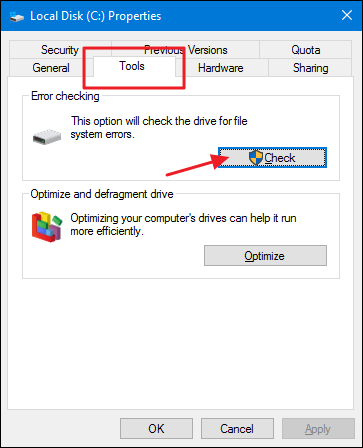
Step 2 Click Tools tab in the Properties window and click Check button. (For Windows 7 users, the button is called «Check Now»).
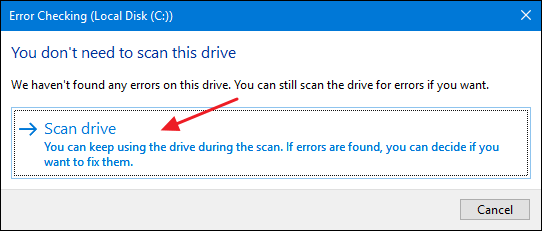
Step 3 Windows may inform you that there is no need to scan this drive. You can click «Scan drive» to perform a manual scan.
Step 4 Click Close button after the drive is successfully scanned.
Solution 2: Use Hotfix to fix the error
Step 1 Open Microsoft Support website and search for Hotfix. If the download is presented, then click the blue button «Hotfix Download Available».
Step 2 Click «I Accept» button for «Agreement for Microsoft Service».
Step 3 Select operating system version you are using, provide Email address and click «Request hotfix» button.
Step 4 Sign in the email address and open Inbox to find out the downloading link.
Step 5 Download hotfix and double-click the installer file. Then you can follow the on-screen instruction to install it. Restart computer after it is successfully installed.
Then you can try DiskPart again to check whether the parameter error appears or not.
How to recover files and folders when partition’s parameter is incorrect?
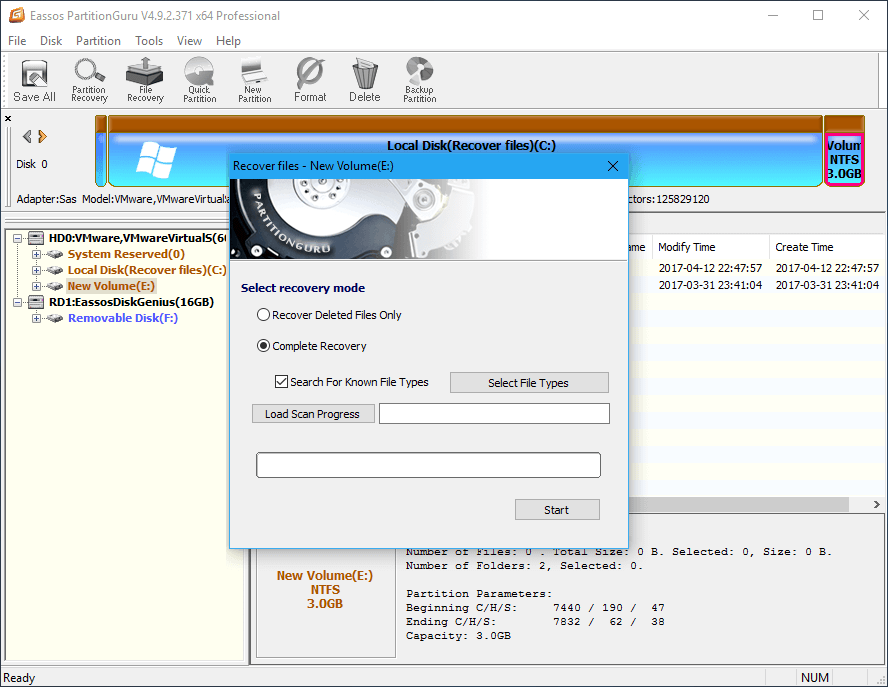
Step 1 Launch DiskGenius, partition manager and data recovery software, to get its main interface, then select the partition which reports «Drive is not accessible. The parameter is incorrect». Click «Files» tab and check whether your files are displayed directly. If not, move to step 2.
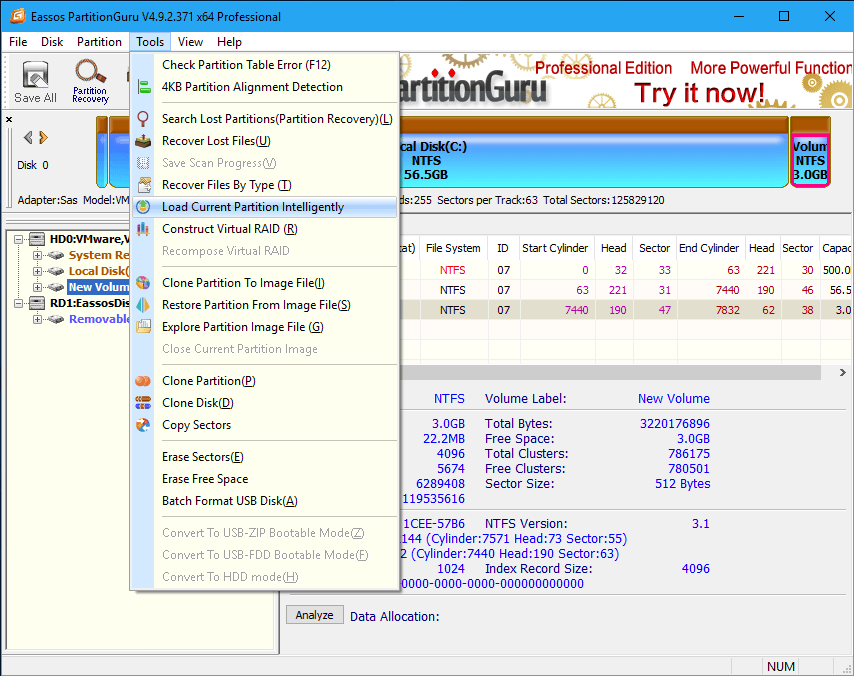
Step 2 Select the volume in question and click «Load Current Partition Intelligently» option. If the partition is not damaged that badly, data will be displayed with original directory structure directly. If have no luck, then go to next step.
Step 3 Select the partition again, click «File Recovery» button and click «Start» button. DiskGenius starts scanning the volume.
Step 4 When scanning completes, you can view and preview recoverable. To get files successfully recovered, you need to copy them to another partition.
Error 5: DiskPart has encountered a data error (cyclic redundancy check)
Symptom
Generally speaking, the data error, cyclic redundancy check, indicates there are bad spots on storage devices. Often time, you will encounter this error when attempting to read or write data to bad sectors, for example, if you use DiskPart command to clean a disk which contains bad sectors, you are likely to get this error message:
DiskPart has encountered an error: Data error (cyclic redundancy check). See the System Event Log for more information.
Causes
This issue occurs if storage devices contain bad sectors.
Solutions
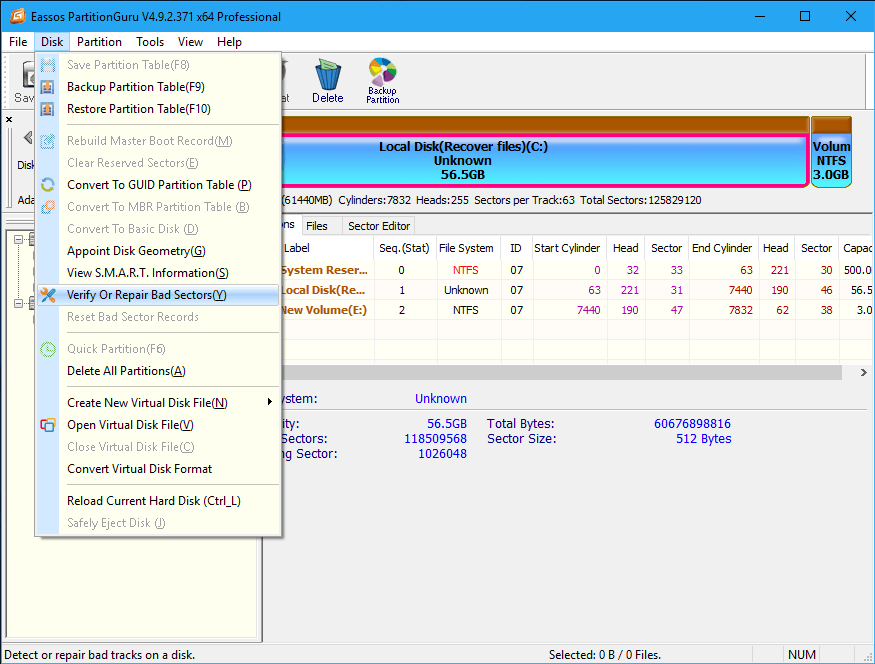
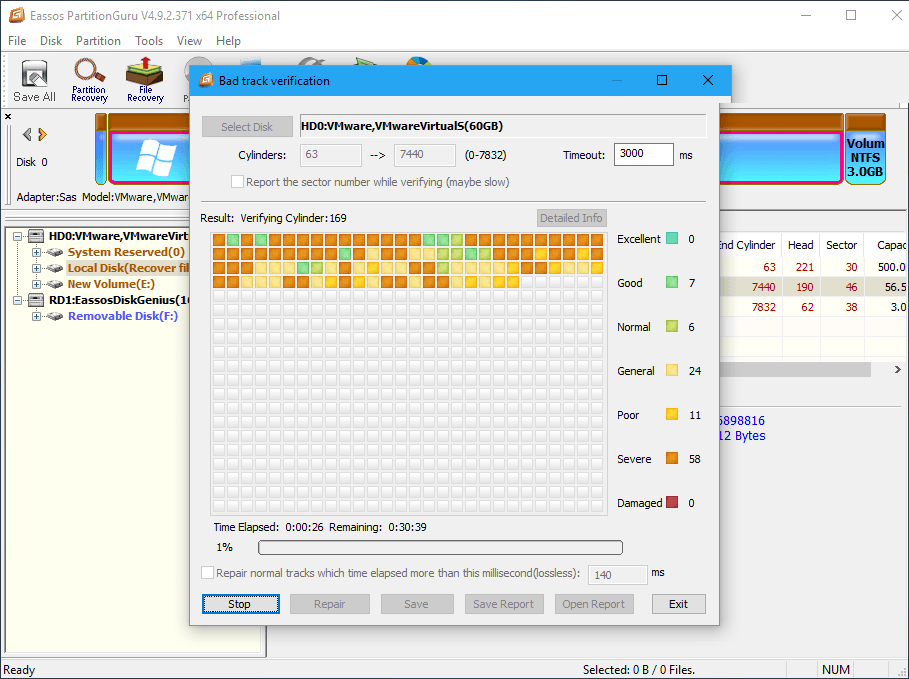
CHKDSK provides feature to verify bad sectors, but it is somewhat complicated. If you are not comfortable with Command Prompt, you can use DiskGenius to check bad sectors for the drive. DiskGenius is easier to use and it is able to repair bad sectors. What you should be aware is that bad sector repairing causes permanent damage to data, thus you should create a backup before performing any repairing actions.
Step 1 Choose partition / disk you want to check bad sectors and select «Verify Or Repair Bad Sectors» under Disk menu.
Step 2 Click «Start Verify» button and it starts scan bad sectors. Bad sectors will be marked as red block (damaged).
Step 3 When the verification complete, you can click «Repair» button to repair bad sectors.
Error 6: DiskPart has encountered device not ready error
Symptom
When you use DiskPart on a media which as a hardware problem, you stand a good chance to receive an error:
DiskPart has encountered an error: The device is not ready. See the System Event Log for more information.
If you check event log entry you might get «The driver detected a controller error on Device» or «VDS fails to write boot code on a disk during clean operation. Error code: 80070015@02070008»
Causes
There is something wrong with the storage controller on your mainboard or the disk itself has failed.
Solutions
Solution 1: Disable and re-enable the USB controller
If the «Device is not ready» error happens to USB disks, you can try this solution to fix it.
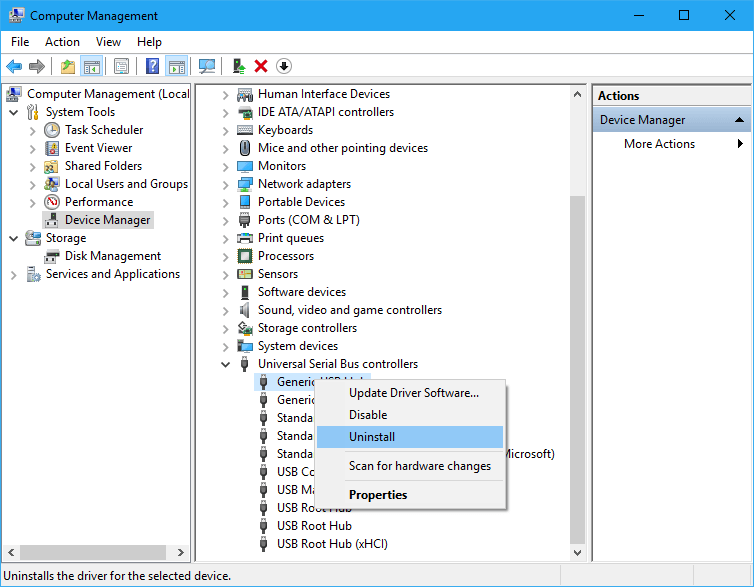
Step 1 Open Device Manager again. Click Start button and enter «Device Manager» in search box and you can find and open it.
Step 2 Browse the list to locate and expand «Universal Serial Bus controllers.»
Step 3 Right-click the first USB controller under «Universal Serial Bus controller» and click Uninstall. Then repeat this step until all USB controllers here are removed.
Step 4 Restart computer and retry DiskPart to check whether it is working.
Solution 2: Run hardware and device troubleshooter
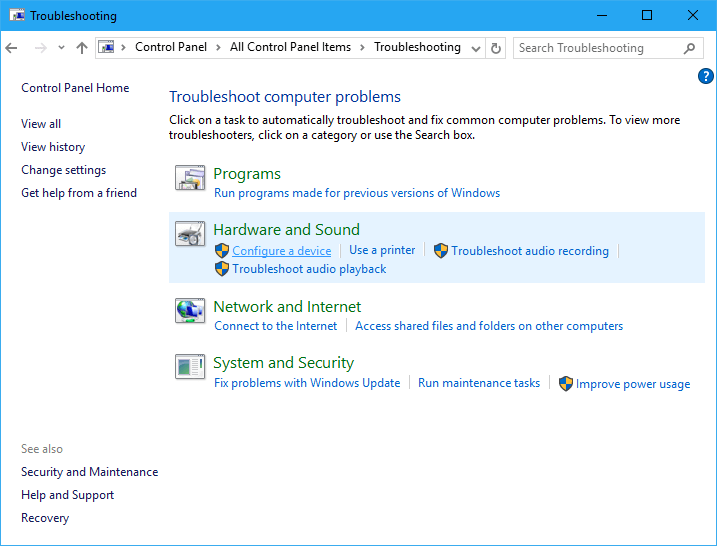
Step 1 Right-click Start button and select Control Panel. Type «troubleshoot» in the search box and Troubleshooting will be displayed. Click it.
Step 2 Click «Configure a device» under Hardware and Sound. If you are asked for confirmation or password, provide permission or password.
Step 3 The Hardware and Devices Troubleshooter comes up, and you can click «Next» button to check potential problems.
Step 4 When scanning completes, it will list a report. If errors are found, choose the ones you want to fix and click «Next» button. The troubleshooter will try to fix errors.
Summary
This article introduces 6 types of errors happens to DiskPart, including symptoms, causes and solutions. Hoping these solutions can help you a bit to troubleshoot DiskPart errors. Should you have any questions or better solutions, please feel free to contact us and share your ideas with all readers.
- Remove From My Forums
-
Question
-
Hi
i want ur help plz >
i have sony vaio usb flash disk 16GB ..
i have play with diskpart trying to re partition ,
but i do not know what happen ,, now the flash is with size 189 mb .
i try to clean it from diskpart but i can’t i have this mesage «diskpart has encountered an error the media is write protected «
i try many sol in the web but no one helped me >>
i have try to remov readonly but i can’t
help plz
thanks
-
Moved by
Tuesday, July 12, 2011 7:04 AM
(From:Server Core)
-
Moved by
Answers
-
Hi,
Can you run the following command in an elevated CMD prompt line?
C:diskpart
DISKPART> list disk
DISKPART> select disk 1
Note: Please adjust the disk number accordingly.
Disk 1 is now the selected disk.
DISKPART> clean
DISKPART> create partition primary
DISKPART> format fs=fat32 quick
If the issue continues, you may need to contact Sony to see whether there are some hardware issue with the USB disk. Thanks for your understanding.
Best Regards,
Vincent Hu
-
Marked as answer by
Vincent Hu
Tuesday, August 9, 2011 7:14 AM
-
Marked as answer by

