- Remove From My Forums
-
Question
-
When Have tried to repair corrupted Windows Image using DISM
repair tool and received the error : 0x800f0906Below are the details after running the Windows Component tool:
DISM /Online /Cleanup-Image /RestoreHealth
Deployment Image Servicing and Management tool
Version: 6.3.9600.17031Image Version: 6.3.9600.17031
[==========================100.0%==========================]
Error: 0x800f0906
The source files could not be downloaded.
Use the “source” option to specify the location of the files that are required to restore the feature. For more information on specifying a source location, see http://go.microsoft.com/fwlink/?LinkId=243077.The DISM log file can be found at C:WindowsLogsDISMdism.log
Do not know how can I fix it. The laptop has been bought with the system installed without separate installation disc.
Thanks and best regards, Ewa
Answers
-
Ewa
You need to download & mount an OS image to use the «sources» switch
DISM /Online /Cleanup-Image /RestoreHealth /source:WIM:X:SourcesInstall.wim:1 /LimitAccess Where «X» is the drive letter where the ISO is located. Simply change the «X» to the correct drive
letter
Wanikiya and Dyami—Team Zigzag
-
Marked as answer by
Friday, June 19, 2015 2:09 AM
-
Marked as answer by
-
-
Marked as answer by
EWAGOSIA
Sunday, May 10, 2015 1:01 PM
-
Marked as answer by
Ошибка DISM 0x800f0906: не удалось загрузить исходные файлы, возникла на компьютере под управлением Windows 10 после выполнения команды «DISM / Online / Cleanup-Image / RestoreHealth».
Сообщение об ошибке указывает на то, что Windows не может подключиться к Интернету для загрузки необходимых файлов для восстановления образа Windows 10, несмотря на тот факт, что система уже имеет доступ к Интернету и серверам Microsoft без каких-либо проблем.

DISM Ошибка 0x800f0906 в деталях:
«C: WINDOWS system32> DISM / Online / Cleanup-Image / RestoreHealth
Средство обслуживания образов развертывания и управления ими
Версия: 10.0.15063.0
Версия изображения: 10.0.15063.0
[========================== 100,0% ===================== =====]
Ошибка: 0x800f0906
Исходные файлы не могут быть загружены.
Используйте параметр «источник», чтобы указать расположение файлов, необходимых для восстановления функции. Для получения дополнительной информации об указании исходного местоположения см. Http://go.microsoft.com/fwlink/?LinkId=243077.
Файл журнала DISM находится по адресу C: WINDOWS Logs DISM dism.log «
Это руководство по устранению неполадок содержит подробные инструкции по устранению ошибки DISM 0x800f0906 в Windows 10/8 / 8.1
Как FiX DISM RestoreHealth Ошибка 0x800f0906.
Способ 1. Запустите команду DISM снова.
Способ 2. Проверьте настройки даты и времени.
Способ 3. Запустите средство устранения неполадок Центра обновления Windows.
Способ 4. Заставьте Windows заново создать папку Магазина обновлений Windows.
Другие методы, чтобы исправить ошибки DISM / RestoreHealth.
Способ 1. Запустите команду DISM снова.
На компьютере под управлением Windows 10 Home я обнаружил, что DISM завершается с ошибкой 0x800f0906, на 100% процесса восстановления работоспособности. Итак, я решил снова запустить команду «DISM / Online / Cleanup-Image / RestoreHealth» и, к счастью, проблема DISM «Исходные файлы не удалось загрузить» исчезла.
Поэтому, прежде чем вы перейдете к остальным методам, еще раз выполните команду «DISM / Online / Cleanup-Image / RestoreHealth», чтобы проверить, сохраняется ли ошибка DISM 0x800f0906.
Способ 2. Проверьте настройки даты и времени.
Убедитесь, что дата и время вашего компьютера (или телефона) указаны правильно. Для этого
1. Одновременно нажмите Windows ![]() + р ключи, чтобы открыть окно запуска команды.
+ р ключи, чтобы открыть окно запуска команды.
2. Тип панель управления и нажмите Войти.

2. Изменить вид: на Маленькие иконки.

3. открыто Дата и время.

4. Нажмите Изменить дату и время.

4а. Установите текущую дату / время / год и нажмите хорошо.
5. нажмите Изменить часовой пояс кнопка.

5а. Установите текущий часовой пояс и нажмите хорошо.

6. Выбрать Интернет время вкладку и нажмите Изменить настройки кнопка.

6а. Проверить Синхронизировать с интернет-сервером времени флажок затем выберите сервер времени из списка (например, time.windows.com).
6b. Когда закончите, нажмите Обновить сейчас.

6с. Когда время обновится, нажмите хорошо дважды, чтобы закрыть все открытые окна.
7. Перезапуск и снова запустите команду «DISM / Online / Cleanup-Image / RestoreHealth».
Способ 3. Запустите средство устранения неполадок Центра обновления Windows.
1. Загрузите и сохраните на своем компьютере средство устранения неполадок обновления Windows 10/8.
2. Запустить Устранение неполадок Центра обновления Windows и нажмите следующий.

3. выберите Попробуйте устранить неполадки в качестве администратора.

4. Нажмите следующий и выполните остальные шаги мастера, чтобы устранить проблемы с обновлением Windows.

5. Когда ремонт будет завершен, близко Мастер.

6. Перезапуск и снова запустите команду «DISM / Online / Cleanup-Image / RestoreHealth».
Способ 4. Заставьте Windows заново создать папку Магазина обновлений Windows.
Папка Windows Update Store (обычно называемая папкой «SoftwareDistribution») — это место, где Windows хранит загруженные обновления.
-Если папка SoftwareDistribution повреждена, это вызывает проблемы с Центром обновления Windows. Таким образом, одним из наиболее эффективных решений для решения проблем с Центром обновления Windows является воссоздание папки SoftwareDistribution. Для этого:
1. Одновременно нажмите Windows ![]() + р ключи, чтобы открыть окно запуска команды.
+ р ключи, чтобы открыть окно запуска команды.
2. В командной строке запуска введите: services.msc и нажмите Войти.

3. Щелкните правой кнопкой мыши на Центр обновления Windows обслуживание и выберите Стоп.

4. Откройте проводник Windows и перейдите к C: Windows папки.
5. Выберите и удалять «SoftwareDistribution«папка. *
(Нажмите Продолжать в окне «Доступ к папке запрещен»).
* Примечание. При следующем запуске Центра обновления Windows для хранения обновлений автоматически создается новая пустая папка SoftwareDistribution.

6. Перезапуск и снова запустите команду «DISM / Online / Cleanup-Image / RestoreHealth».
Другие методы, чтобы исправить ошибки DISM / RestoreHealth.
Если вы по-прежнему сталкиваетесь с проблемами при запуске DISM, после применения вышеупомянутых методов, продолжите и попробуйте инструкции из следующих статей:
Это оно! Дайте мне знать, если это руководство помогло вам, оставив свой комментарий о вашем опыте. Пожалуйста, любите и делитесь этим руководством, чтобы помочь другим.
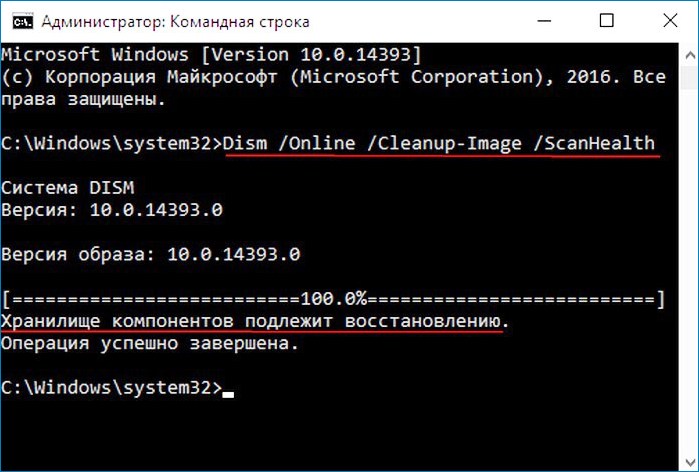
Здравствуйте, Владимир! У меня целая эпопея с восстановлением хранилища оригинальных компонентов Windows 10. Нужен Ваш совет, думаю я Вас пойму, так как считаю себя опытным пользователем. Установленная на моём ноутбуке Windows 10 работает со значительными ошибками. Решил проверить целостность системных файлов с помощью средства sfc /scannow, но вышла ошибка «Программа защиты ресурсов Windows обнаружила повреждённые файлы, но не может восстановить некоторые из них». Как я понял, ошибка эта обозначает, что нарушена целостность самого хранилища системных компонентов Win 10 (папка WinSxS). Тогда решил проверить целостность этого самого хранилища командой Dism /Online /Cleanup-Image /ScanHealth, вышло сообщение «Хранилище компонентов подлежит восстановлению». Соответственно восстанавливаю хранилище командой Dism /Online /Cleanup-Image /RestoreHealth, данная команда восстанавливает хранилище компонентов с помощью Центра обновлений Windows, и у меня опять выходит ошибка «Не удалось скачать исходные файлы. Укажите расположение файлов, необходимых для восстановления компонента, с помощью параметра «Источник»».
Непонятно, почему вылезла ошибка в этот раз, ведь интернет у меня есть. Ладно думаю, буду использовать для восстановления хранилища компонентов средство PowerShell и ISO-образ Windows 10, скачал дистрибутив Windows 10 и подсоединил его к виртуальному дисководу, запустил PowerShell и ввёл команду: Repair-WindowsImage -Online -RestoreHealth -Source F:sourcesinstall.wim:1 (где буква «F» соответствует букве подключенного образа с Win 10, а цифра «1» — индексу издания в образе Win 10 PRO (именно она у меня установлена), но и в очередной раз я потерпел неудачу — «Ошибка: 0x800f081. Сбой восстановления. Не найден источник восстановления, или хранилище компонентов восстановить невозможно».
На одном известном форуме подсказали, что не нужно подсоединять ISO-образ Windows 10 к виртуальному дисководу, а нужно смонтировать ISO-образ с файлами Win 10 в папку с помощью команды: Dism /Mount-Wim /WimFile:F:sourcesinstall.wim /index:1 /MountDir:C:WIM /ReadOnly (где WIM, это пустая папка на диске C:, в которую монтируется ISO-образ, а F:sourcesinstall.wim — местонахождение файла-образа install.wim), но у меня и здесь уже при монтировании вышел промах «Ошибка: 11. Была сделана попытка загрузить программу, имеющую неверный формат».
Короче я сдался и не знаю, почему у меня ничего не получается.
Автор — Владимир
Привет, друзья. Цель данной статьи рассказать начинающим пользователям в подробностях, как производить восстановление повреждённого хранилища компонентов Windows 10 в различных критических ситуациях. Если вы хотите проверить целостность системных файлов в своей операционной системе, то поможет вам в этом встроенная утилита «sfc /scannow», но если она выдаст ошибку: «Программа защиты ресурсов Windows обнаружила повреждённые файлы, но не может восстановить некоторые из них»,

то значит в вашей OS нарушена целостность самого хранилища системных компонентов (содержимое папки WinSxS). В этом случае нужно проверить целостность хранилища компонентов командой «Dism /Online /Cleanup-Image /ScanHealth», если при данной проверке тоже будут выходить различные ошибки, например, «Хранилище компонентов подлежит восстановлению», «Ошибка: 1910 Не найден указанный источник экспорта объекта», «Ошибка: 1726 Сбой при удалённом вызове процедуры»,
то в этом случае нужно сначала восстановить хранилище компонентов, а уже затем восстанавливать целостность системных файлов с помощью «sfc /scannow», вот здесь начинается самое интересное, так как имеется очень много нюансов, давайте разберём их все.
Запускаем командную строку администратора и вводим команду:
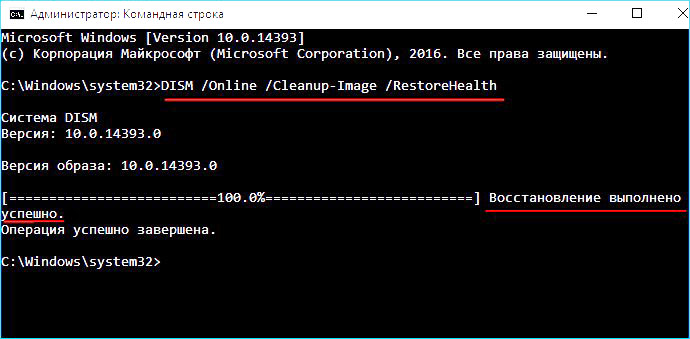
Dism /Online /Cleanup-Image /RestoreHealth
Данная команда восстанавливает хранилище компонентов с помощью Центра обновлений Windows (у вас должен работать Интернет), отсутствующие компоненты будут скачаны на серверах Майкрософт и восстановлены в вашей системе. В итоге должны получить сообщение «Восстановление выполнено успешно».
Но если данная команда выдаст ошибку 0x800f0906 «Не удалось скачать исходные файлы. Укажите расположение файлов, необходимых для восстановления компонента, с помощью параметра «Источник»» или

выйдет другая ошибка 0x800f081f «Не удалось найти исходные файлы. Укажите расположение файлов, необходимых для восстановления компонента, с помощью параметра «Источник»»,
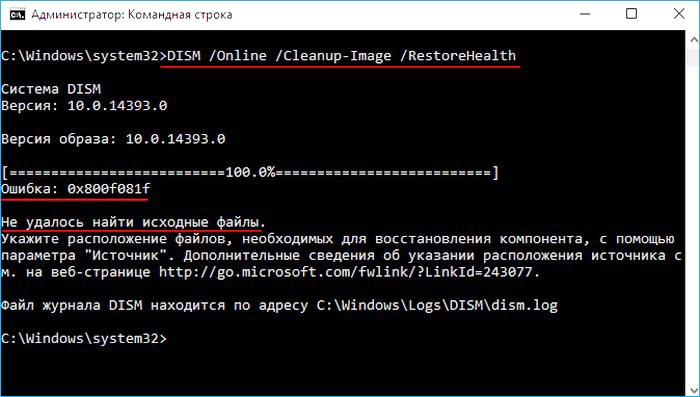
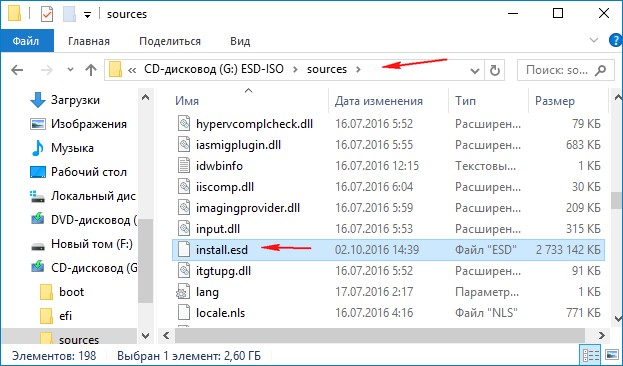
то нужно использовать для восстановления хранилища ISO-образ Windows 10. Скачиваем дистрибутив Windows 10 на сайте Майкрософт и подсоединяем его к виртуальному дисководу (в моём случае (G:)), затем заходим в папку sources и смотрим какое сжатие у файла-образа Windows 10,
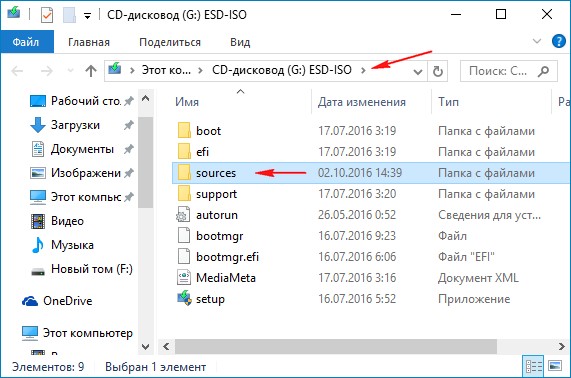
обычно бывает install.esd, запоминаем это, пригодится при вводе последующих команд (если в вашем случае попадётся файл install.wim, то читайте информацию в конце статьи).
соответственно вводим следующую команду:
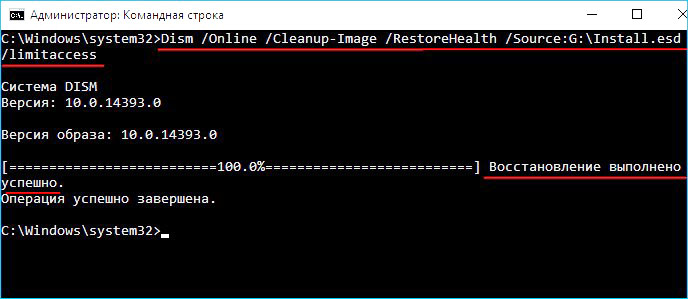
Dism /Online /Cleanup-Image /RestoreHealth /Source:G:Install.esd /limitaccess
где G: — буква виртуального дисковода с Windows 10,
Install.esd — файл-образ Win 10,
/limitaccess — параметр, закрывающий доступ к центру обновлений (ведь мы используем для восстановления дистрибутив Win 10)
В итоге получаем сообщение «Восстановление выполнено успешно. Операция успешно завершена».
Вот таким способом мы с вами восстановили повреждённое хранилище компонентов Windows 10.
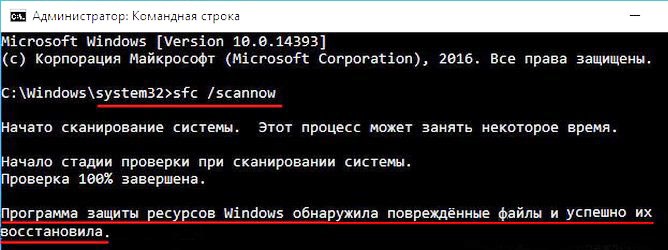
Хранилище компонентов восстановлено, теперь восстанавливаем целостность системных файлов Windows 10 командой «sfc /scannow». Получаем сообщение «Программа защиты ресурсов Windows обнаружила повреждённые файлы и успешно их восстановила». Целостность системных файлов Windows 10 восстановлена.
Ещё один способ восстановления хранилища компонентов с помощью файла виртуального жёсткого диска VHD
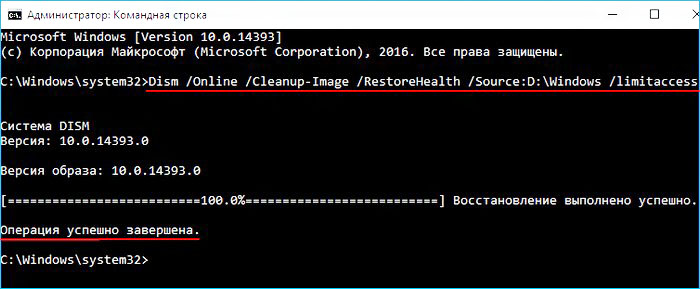
Друзья, но хочу сказать вам, что в особо сложных случаях, при вводе команды:
Dism /Online /Cleanup-Image /RestoreHealth /Source:G:Install.esd /limitaccess
вы опять получите ошибку, к примеру, «Ошибка: 1726 Сбой при удалённом вызове процедуры».
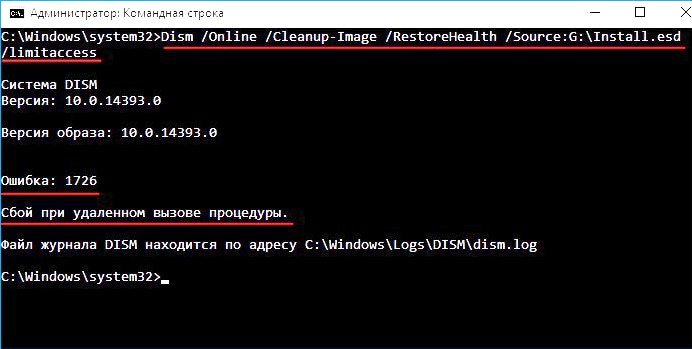
В этом случае нужно поступить так. Создать виртуальный жёсткий диск и распаковать на него содержимое файла-образа install.esd, после этого запустить команду:
Dism /Online /Cleanup-Image /RestoreHealth /Source:D:Windows /limitaccess
Где D: — буква подсоединённого виртуального диска VHD с развёрнутыми файлами Windows 10.
в результате будет произведено восстановление хранилища компонентов за счёт распакованных на виртуальный диск VHD файлов операционной системы.
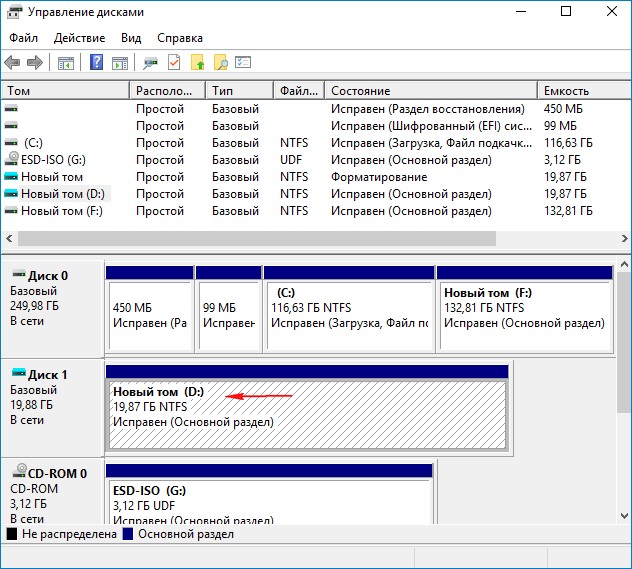
Идём в Управлении дисками и создаём виртуальный диск VHD. «Действие»—>«Создать виртуальный жёсткий диск»
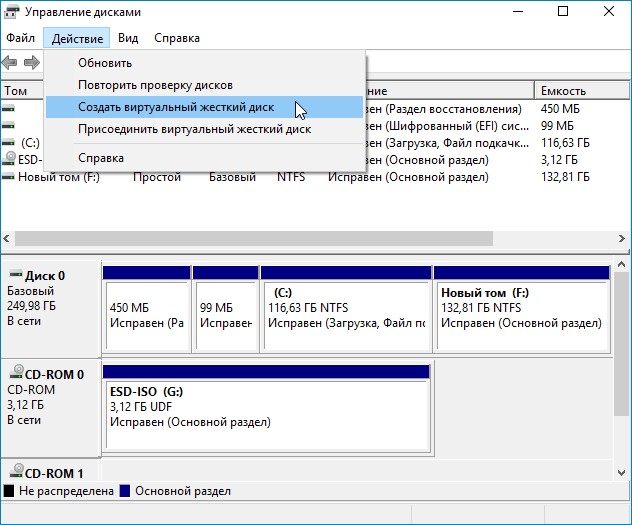
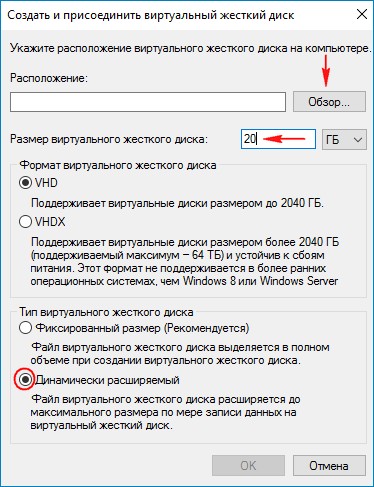
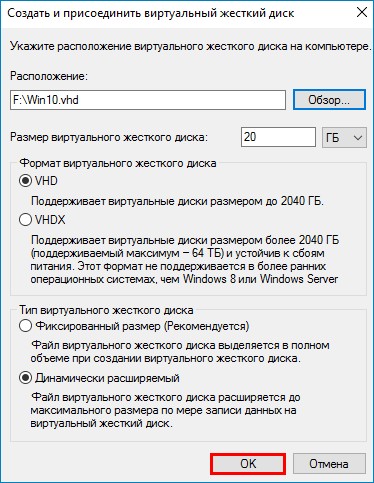
Отмечаем пункт «Динамический расширяемый». Размер виртуального жёсткого диска — 20 Гб. Жмём на кнопку «Обзор».
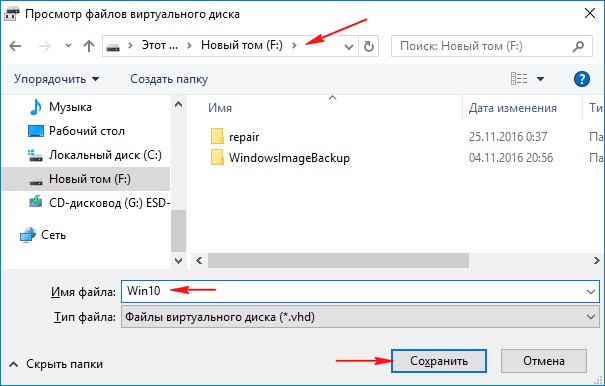
Выбираем в проводнике место сохранения виртуального жёсткого диска. Я выберу диск (F:). Присваиваю имя виртуальному диску — «Win10» и жму кнопку «Сохранить».
«ОК»
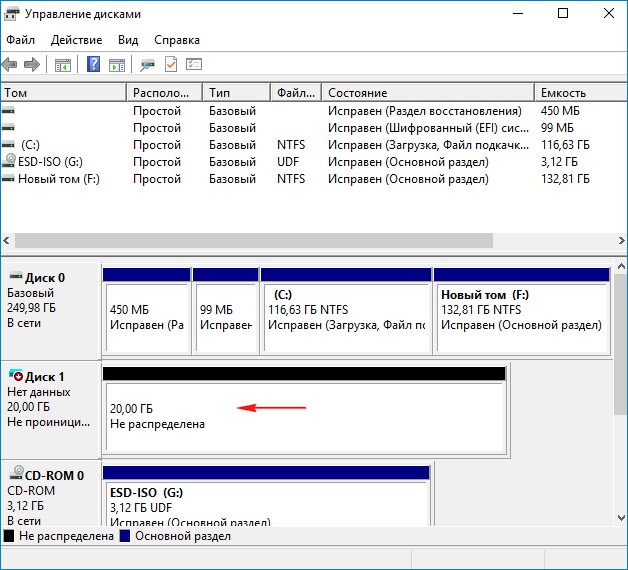
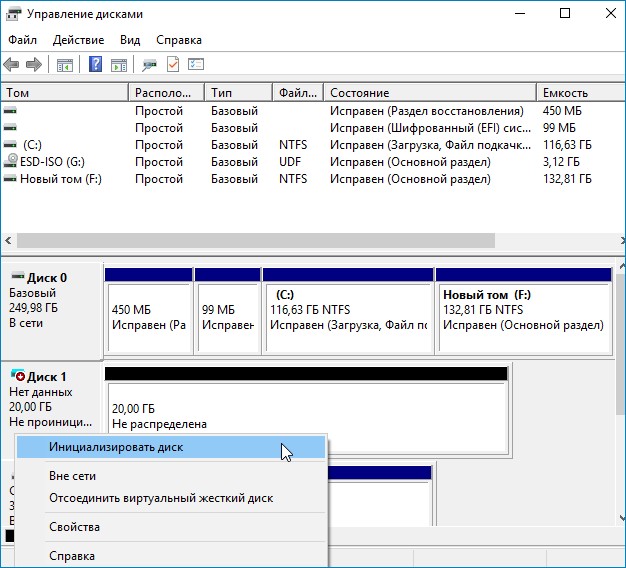
Созданный виртуальный диск представляет из себя в Управлении дисками нераспределённое пространство (Диск 1) размером 20 Гб.
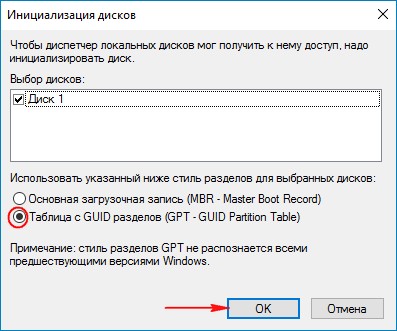
Щёлкаем на Диске 1 правой мышью и выбираем «Инициализировать диск»
По большему счёту всё равно какой пункт отмечать — MBR или GPT. Я отмечу пункт «Таблица с GUID разделов (GPT)» и жму «ОК»
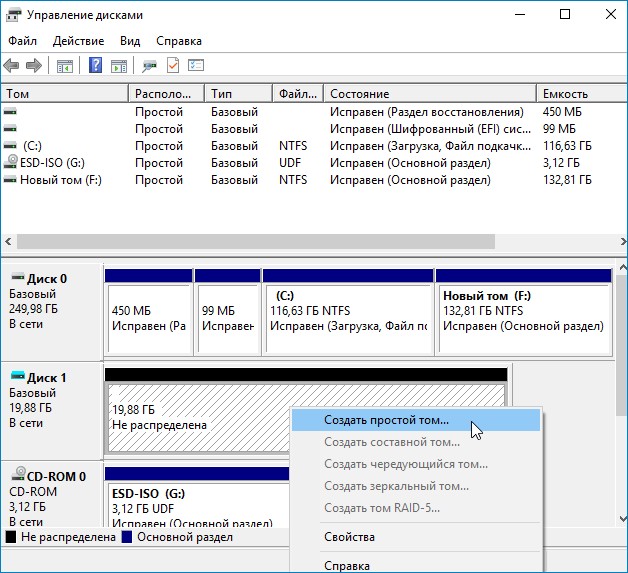
После инициализации диска создаём на нераспределённом пространстве простой том.
Новый том (G:) создан.
Архивы операционной системы — install.esd или install.wim могут содержать в себе несколько других архивов (релизов) операционных систем (Про, Домашняя и т.д.) и этим образам присваиваются индексы 1, 2, 3, 4. Чтобы узнать, какие образы находятся внутри нашего файла install.esd, вводим команду:
Dism /Get-WimInfo /WimFile:G:\sourcesinstall.esd
Где G: буква виртуального дисковода с Windows 10,
sourcesinstall.esd — адрес файла-образа install.esd в дистрибутиве Win 10.
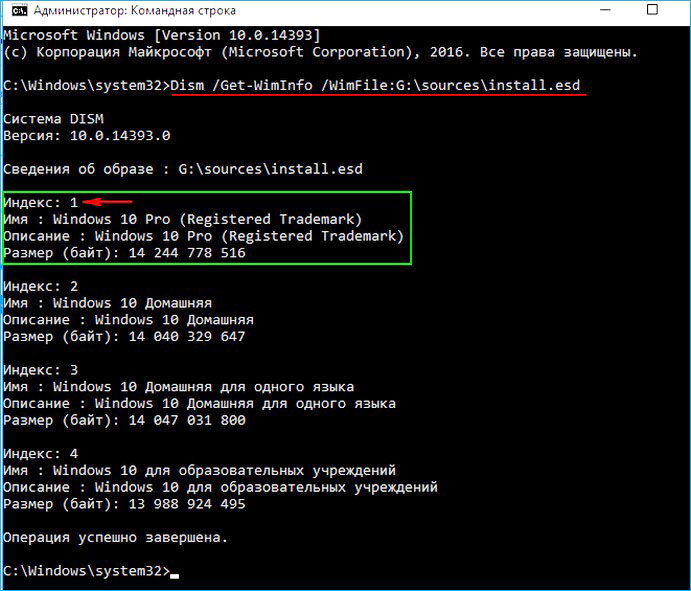
На моём компьютере установлена Windows 10 PRO и именно её я хочу восстановить. Нужный мне образ Win 10 PRO имеет индекс 1.
Вводим команду:
Dism /apply-image /imagefile:G:\sourcesinstall.esd /index:1 /ApplyDir:D:\
Где G:sources — адрес расположения файла install.esd,
index:1 — индекс Windows 10 PRO,
D: — подключенный виртуальный диск VHD (раздел D:).
Операция успешно завершена.
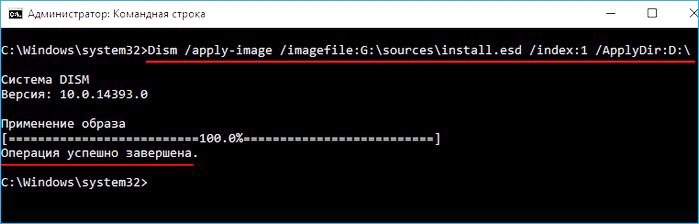
Файл install.esd (Win 10 PRO) развёрнут на виртуальный диск VHD (раздел D:).
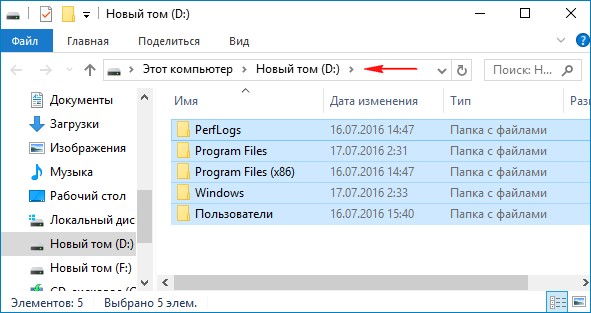
Ну и теперь восстанавливаем хранилище компонентов за счёт распакованных на виртуальный диск VHD (раздел D:) файлов операционной
системы Win 10, командой:
Dism /Online /Cleanup-Image /RestoreHealth /Source:D:Windows /limitaccess
Восстановление выполнено успешно. Операция успешно завершена.
Вот таким ещё способом мы с вами восстановили повреждённое хранилище компонентов Windows 10! Теперь восстанавливаем целостность системных файлов Windows 10 командой «sfc /scannow».
В конце статьи вам пригодится такая информация. Если в ISO-образе Windows 10, в папке sourses, вам попадётся вместо файла install.esd файл install.wim, то команда восстановления немного изменится:
Dism /Online /Cleanup-Image /RestoreHealth /Source:G:install.wim /limitaccess
Это команда восстановления хранилища компонентов.
Содержание
- 1 Решение 1. Удалите обновление KB3022345
- 2 Решение 2. Запустите сканирование SFC
- 3 Решение 3: вручную исправить повреждения
- 4 Решение 4. Установите все доступные обновления Windows для вашего компьютера.
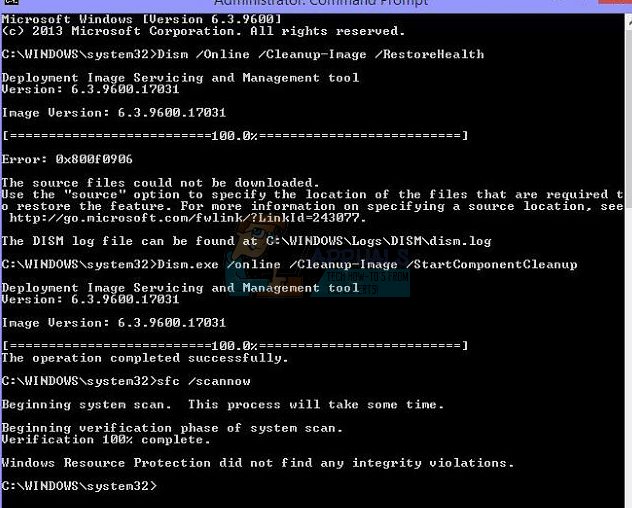
Многочисленные пользователи Windows 10 сообщали, что видели код ошибки 0x800f0906 при выполнении следующей команды с повышенными правами Командная строка: Dism.exe / Онлайн / Очистка-Изображение / RestoreHealth
Утилита командной строки DISM (Deployment Image Servicing and Management) — невероятно изящный маленький инструмент, который можно использовать для обслуживания и восстановления установки Windows. Сбой команды DISM.exe может быть довольно серьезной проблемой, особенно если это происходит, когда вам крайне необходимо, чтобы утилита работала с магией. При сбое средства командной строки DISM с кодом ошибки 0x800f0906 в сопроводительном сообщении об ошибке указывается, что исходные файлы не могут быть загружены или что файлы, необходимые для восстановления хранилища, не найдены.
В большинстве случаев эта проблема вызвана каким-либо повреждением или, в некоторых случаях, одним или несколькими последними обновлениями Windows, доступными для уязвимого компьютера, которые не устанавливаются. К счастью, вы можете многое сделать, чтобы попытаться решить эту проблему. Ниже приведены наиболее эффективные решения, которые вы можете использовать, чтобы попытаться избавиться от этой проблемы и получить инструмент DISM для успешного выполнения ремонта:
Решение 1. Удалите обновление KB3022345
Получение 0x800f0906 ошибка при попытке использовать инструмент обслуживания образов развертывания и управления ими восстановить функцию здоровья происходит для пользователей с KB3022345 обновление из-за ошибки, которая хорошо известна Microsoft и предположительно исправлена в последующих обновлениях.
KB3022345 обновление сломало оба DISM а также SFC для пользователей Windows, заставляя их выдавать подобные ошибки все время, когда вы пытаетесь их использовать. Решение этой проблемы так же просто, как удаление обновления, так что читайте дальше, чтобы увидеть, как вы можете сделать это довольно простым способом, и снова используйте DISM и SFC, когда они вам нужны.
- нажмите Windows Клавиша на клавиатуре, чтобы открыть Начните меню, и либо нажмите Панель управления, или введите Панель управления и откройте результат, в зависимости от того, какую версию Windows вы используете.
- Переключиться на Иконки вид, в правом верхнем углу Панель управления, и открыть Программы и особенности из списка.
- На левой стороне, нажмите на Просмотр установленных обновлений
- Вы увидите поисковая строка в правом верхнем углу введите KB3022345 найти обновление с меньшими усилиями.
- Когда вы нашли это, щелкните правой кнопкой мыши это и выбрать
- Как только все будет сделано, перезагружать твое устройство.
Несмотря на то, что обновления должны приносить исправления и улучшения, часто случается, что обновление нарушает что-то вместо того, чтобы исправить это, или исправляет одну вещь и три другие. К счастью, определить, какое обновление вызвало эту проблему, было легко, и Microsoft подтвердила, что это так, поэтому, если вы просто выполните описанные выше шаги по удалению обновления, у вас больше не будет этой проблемы с инструментом обслуживания образов развертывания и управления ими.
Решение 2. Запустите сканирование SFC
Поскольку повреждения являются одними из наиболее распространенных причин этой проблемы, лучше всего будет выполнить сканирование SFC. Сканирование SFC способно сканировать все системные файлы на вашем компьютере на наличие повреждений и исправлять любые найденные файлы. Чтобы запустить сканирование SFC на компьютере с Windows 10, вы можете использовать это руководство.
Решение 3: вручную исправить повреждения
- Щелкните правой кнопкой мыши на Стартовое меню кнопка, чтобы открыть Меню WinX.
- Нажмите на Командная строка (администратор) в Меню WinX запустить надземный Командная строка.
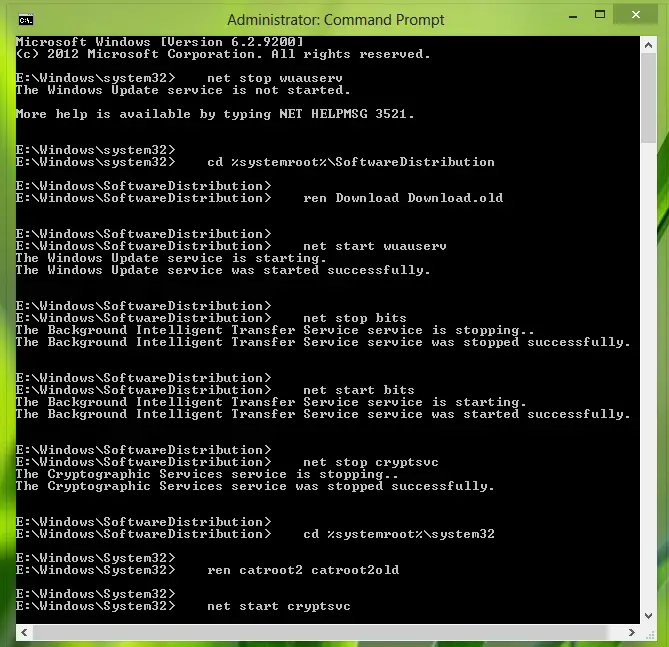
- Один за другим, введите каждую из следующих команд в повышенные Командная строка, прессование Войти после ввода каждой команды и ожидания полного выполнения одной команды перед вводом следующей:
чистая остановка wuauserv
cd% systemroot% SoftwareDistribution
ren Скачать Download.old
чистый старт wuauserv
стоповые биты
чистые стартовые биты
чистая остановка cryptsvc
cd% systemroot% system32
ren catroot2 catroot2old
чистый старт cryptsvc
- Закрыть надземный Командная строка.
- Запустить снова твой компьютер.
- Когда ваш компьютер загрузится, попробуйте запустить утилиту DISM и посмотрите, успешно ли она работает.
Решение 4. Установите все доступные обновления Windows для вашего компьютера.
Если вы столкнулись с этой проблемой из-за того, что одно или несколько обновлений Windows, доступных для вашего компьютера, не установлены, вы можете решить эту проблему, просто установив все доступные для вашего компьютера обновления Windows. Для этого вам необходимо:
- Открой Стартовое меню.
- Нажмите на настройки.
- Нажмите на Обновить безопасность.
- Нажмите на Центр обновления Windows в левой панели.
- На правой панели нажмите на Проверьте наличие обновлений.
- Ждать Центр обновления Windows проверить и получить все доступные обновления для вашего компьютера.
- Если для вашего компьютера доступны какие-либо обновления, загрузите и установите их.
После того, как все доступные обновления для вашего компьютера были успешно установлены, запустить снова компьютер. Как только компьютер загрузится, попробуйте запустить утилиту DISM и проверьте, решена ли проблема.
- Remove From My Forums
-
Question
-
Hello.
I wonder if you can help me.
I keep getting error 0x800f0906 when running DISM /Online /Cleanup-Image /RestoreHealth.
DISM /Online /Cleanup-Image /RestoreHealth
Deployment Image Servicing and Management tool
Version: 6.2.9200.16384Image Version: 6.2.9200.16384
[==========================100.0%==========================]
Error: 0x800f0906
The source files could not be downloaded.
Use the «source» option to specify the location of the files that are required to restore the feature.For more information, review the log file.
The DISM log file can be found at C:WindowsLogsDISMdism.log*********************
relevant bits from it seem to be:Checking System Update Readiness.
(p) CSI Payload Corrupt amd64_microsoft-windows-windowsupdateclient-ui_31bf3856ad364e35_7.8.9200.16927_none_28265fa316d944b7wuaext.dll
Repair failed: Missing replacement payload.
(p) CSI Payload Corrupt amd64_microsoft-windows-windowsupdateclient-ui_31bf3856ad364e35_7.8.9200.16927_none_28265fa316d944b7wushareduxresources.dll
Repair failed: Missing replacement payload.Summary:
Operation: Detect and Repair
Operation result: 0x800f0906
Last Successful Step: Entire operation completes.
Total Detected Corruption: 2
CBS Manifest Corruption: 0
CBS Metadata Corruption: 0
CSI Manifest Corruption: 0
CSI Metadata Corruption: 0
CSI Payload Corruption: 2
Total Repaired Corruption: 0
CBS Manifest Repaired: 0
CSI Manifest Repaired: 0
CSI Payload Repaired: 0
CSI Store Metadata refreshed: TrueIn adition, my windows 8 will not carry out a scheduled maintenance session.
Is this something I can repair. Any help would be appreciated. The setup event logs mentions 2 errors, so presumably this is the issue.
Answers
-
Hi,
Please upload the DISM.log files into OneDrive and post us the link here. The DISM log file can be found at
C:WindowsLogsDISMdism.log.Besides, for the CSI payload corrupt issue, please take a try to reset the Windows update components. Then try to run the command and check the results:
Follow this guide: How do I reset Windows Update components?
In addition, update the system to Windows 8.1 will make a better usage of the features and functions offered.
Windows 8.1 and Windows RT 8.1 build on
Windows 8 and Windows RT, to bring you enhancements in personalization, search, apps, the Windows Store, and cloud connectivity, and has the security and reliability features you expect from Windows. It’s fast and made to work
on a variety of devices—especially on the new generation of touch devices.For more information regarding update to Windows 8.1 from Windows 8. please see:
Update to Windows 8.1 from WIndows 8
Best regards
Michael Shao
TechNet Community Support
-
Marked as answer by
Tuesday, July 22, 2014 9:03 AM
-
Marked as answer by
-
Use the «source» option to specify the location of the files that are required to restore the feature.»
If we read the documentation, we might infer we can use any existing WinSxS as source?
http://technet.microsoft.com/en-us/library/hh825265.aspx
<quote>
You can restore and enable a feature that has previously been removed from the image. Use the
/Source argument to specify the location of the files that are required to restore the feature. The source of the files can by the Windows folder in a mounted image, for example c:testmountWindows. You can also use a Windows side-by-side
folder as the source of the files, for example z:sourcesSxS.If you specify multiple /Source arguments, the files are gathered from the first location where they are found and the rest of the locations are ignored. If you do not specify a
/Source for a feature that has been removed, the default location in the registry is used or, for online images, Windows Update (WU) is used.Use /LimitAccess to prevent DISM from contacting WU for online images.
</quote>
That quote was actually from under the /Enable-Feature operand but the /Source: operand has wider scope.
Compare the briefer description of the same operand given later under the /Cleanup-Image operand
<quote>
Use /Source with /RestoreHealth to specify the location of known good versions of files that can be used for the repair, such as a path to the Windows directory of a mounted image.
If you specify multiple /Source arguments, the files are gathered from the first location where they are found and the rest of the locations are ignored. If you do not specify a
/Source for a feature that has been removed, the default location in the registry is used or Windows Update (WU) is used for online images.Use /LimitAccess to prevent DISM from contacting WU for repair of online images.
</quote>
Does this mean the functionality is limited or that they were just trying to avoid being redundant? ; }
Good luck
Robert Aldwinckle
—-
Marked as answer by
Karen Hu
Tuesday, July 22, 2014 9:03 AM
-
Marked as answer by
- Remove From My Forums
-
Question
-
Hello.
I wonder if you can help me.
I keep getting error 0x800f0906 when running DISM /Online /Cleanup-Image /RestoreHealth.
DISM /Online /Cleanup-Image /RestoreHealth
Deployment Image Servicing and Management tool
Version: 6.2.9200.16384Image Version: 6.2.9200.16384
[==========================100.0%==========================]
Error: 0x800f0906
The source files could not be downloaded.
Use the «source» option to specify the location of the files that are required to restore the feature.For more information, review the log file.
The DISM log file can be found at C:WindowsLogsDISMdism.log*********************
relevant bits from it seem to be:Checking System Update Readiness.
(p) CSI Payload Corrupt amd64_microsoft-windows-windowsupdateclient-ui_31bf3856ad364e35_7.8.9200.16927_none_28265fa316d944b7wuaext.dll
Repair failed: Missing replacement payload.
(p) CSI Payload Corrupt amd64_microsoft-windows-windowsupdateclient-ui_31bf3856ad364e35_7.8.9200.16927_none_28265fa316d944b7wushareduxresources.dll
Repair failed: Missing replacement payload.Summary:
Operation: Detect and Repair
Operation result: 0x800f0906
Last Successful Step: Entire operation completes.
Total Detected Corruption: 2
CBS Manifest Corruption: 0
CBS Metadata Corruption: 0
CSI Manifest Corruption: 0
CSI Metadata Corruption: 0
CSI Payload Corruption: 2
Total Repaired Corruption: 0
CBS Manifest Repaired: 0
CSI Manifest Repaired: 0
CSI Payload Repaired: 0
CSI Store Metadata refreshed: TrueIn adition, my windows 8 will not carry out a scheduled maintenance session.
Is this something I can repair. Any help would be appreciated. The setup event logs mentions 2 errors, so presumably this is the issue.
Answers
-
Hi,
Please upload the DISM.log files into OneDrive and post us the link here. The DISM log file can be found at
C:WindowsLogsDISMdism.log.Besides, for the CSI payload corrupt issue, please take a try to reset the Windows update components. Then try to run the command and check the results:
Follow this guide: How do I reset Windows Update components?
In addition, update the system to Windows 8.1 will make a better usage of the features and functions offered.
Windows 8.1 and Windows RT 8.1 build on
Windows 8 and Windows RT, to bring you enhancements in personalization, search, apps, the Windows Store, and cloud connectivity, and has the security and reliability features you expect from Windows. It’s fast and made to work
on a variety of devices—especially on the new generation of touch devices.For more information regarding update to Windows 8.1 from Windows 8. please see:
Update to Windows 8.1 from WIndows 8
Best regards
Michael Shao
TechNet Community Support-
Marked as answer by
Tuesday, July 22, 2014 9:03 AM
-
Marked as answer by
-
Use the «source» option to specify the location of the files that are required to restore the feature.»
If we read the documentation, we might infer we can use any existing WinSxS as source?
http://technet.microsoft.com/en-us/library/hh825265.aspx
<quote>
You can restore and enable a feature that has previously been removed from the image. Use the
/Source argument to specify the location of the files that are required to restore the feature. The source of the files can by the Windows folder in a mounted image, for example c:testmountWindows. You can also use a Windows side-by-side
folder as the source of the files, for example z:sourcesSxS.If you specify multiple /Source arguments, the files are gathered from the first location where they are found and the rest of the locations are ignored. If you do not specify a
/Source for a feature that has been removed, the default location in the registry is used or, for online images, Windows Update (WU) is used.Use /LimitAccess to prevent DISM from contacting WU for online images.
</quote>
That quote was actually from under the /Enable-Feature operand but the /Source: operand has wider scope.
Compare the briefer description of the same operand given later under the /Cleanup-Image operand
<quote>
Use /Source with /RestoreHealth to specify the location of known good versions of files that can be used for the repair, such as a path to the Windows directory of a mounted image.
If you specify multiple /Source arguments, the files are gathered from the first location where they are found and the rest of the locations are ignored. If you do not specify a
/Source for a feature that has been removed, the default location in the registry is used or Windows Update (WU) is used for online images.Use /LimitAccess to prevent DISM from contacting WU for repair of online images.
</quote>
Does this mean the functionality is limited or that they were just trying to avoid being redundant? ; }
Good luck
Robert Aldwinckle
—-
Marked as answer by
Karen Hu
Tuesday, July 22, 2014 9:03 AM
-
Marked as answer by
Numerous Windows 10 users have reported seeing error code 0x800f0906 when running the following command in an elevated Command Prompt: Dism.exe /Online /Cleanup-Image /RestoreHealth
The DISM (Deployment Image Servicing and Management) command-line utility is an incredibly nifty little tool that can be used to service and repair a Windows installation. The DISM.exe command failing can be a pretty significant issue, especially if this happens when you desperately need the utility to work its magic. When the DISM command-line tool fails with error code 0x800f0906, the accompanying error message either states that the source files could not be downloaded or that the files required to repair the store could not be found.
In most cases, this issue is either caused by some kind of a corruption or, in some cases, one or more of the latest Windows updates available for the affected computer not being installed. Thankfully, though, there is a lot you can do to try and fix this problem. The following are the most effective solutions that you can use to try and get rid of this issue and get the DISM tool to successfully perform repairs:
Solution 1: Uninstall the KB3022345 Update
Getting a 0x800f0906 error when you’re trying to use the Deployment Image Servicing and Management tool’s restore health function happens for users with the KB3022345 update, due to a bug that is well known to Microsoft, and allegedly fixed in later updates.
The KB3022345 update broke both DISM and SFC for users of Windows, causing them to give this kind of errors all the time when you try to use them. Solving this issue is as easy as uninstalling the update, so read on to see how you can do this in a fairly simple way, and use DISM and SFC again when you need them.

- Press the Windows key on your keyboard to open the Start menu, and either click Control Panel, or type in Control Panel and open the result, depending on which version of Windows you’re using.
- Switch to Icons view, in the top right corner of Control Panel, and open Programs and Features from the list.
- On the left side, click on the View installed updates
- You will see a search box in the top right corner, type KB3022345 to find the update with less effort.
- When you’ve found it, right-click it, and choose
- Once everything is done, reboot your device.
Even though updates are supposed to bring fixes and improvements, it often happens that an update breaks something instead of fixing it, or fixes one thing and breaks three others. Fortunately, pinpointing which update caused this issue was easy, and Microsoft confirmed that this is the case, so if you simply follow the steps above to uninstalling the update, you won’t have this issue with the Deployment Image Servicing and Management tool anymore.
Solution 2: Run an SFC scan
Since corruptions are some of the most common causes of this issue, running an SFC scan is most definitely a good idea. An SFC scan is capable of scanning all of the system files on your computer for corruptions and fixing any that it finds. To run an SFC scan on a Windows 10 computer, you can use this guide.
Solution 3: Manually repair corruptions
- Right-click on the Start Menu button to open the WinX Menu.
- Click on Command Prompt (Admin) in the WinX Menu to launch an elevated Command Prompt.
- One by one, type each of the following commands into the elevated Command Prompt, pressing Enter after typing in each command and waiting for one command to be fully executed before typing in the next one:
net stop wuauserv
cd %systemroot%SoftwareDistribution
ren Download Download.old
net start wuauserv
net stop bits
net start bits
net stop cryptsvc
cd %systemroot%system32
ren catroot2 catroot2old
net start cryptsvc
- Close the elevated Command Prompt.
- Restart your computer.
- When your computer boots up, try running the DISM utility and see if it runs successfully.
Solution 4: Install any and all available Windows updates for your computer
If you are suffering from this issue because one or more of the Windows updates available for your computer is not installed, you can resolve this issue by simply installing any and all available Windows updates for your computer. In order to do so, you need to:
- Open the Start Menu.
- Click on Settings.
- Click on Update & security.
- Click on Windows Update in the left pane.
- In the right pane, click on Check for updates.
- Wait for Windows Update to check for and retrieve any and all available updates for your computer.
- If there are any updates available for your computer, download and install them.
Once all available updates for your computer have been successfully installed, restart the computer. As soon as the computer boots up, try running the DISM utility and check to see whether or not the problem has been fixed.

Kevin Arrows
Kevin is a dynamic and self-motivated information technology professional, with a Thorough knowledge of all facets pertaining to network infrastructure design, implementation and administration. Superior record of delivering simultaneous large-scale mission critical projects on time and under budget.
Download PC Repair Tool to quickly find & fix Windows errors automatically
If while running the DISM Tool, you see DISM Error 0x800f0906, The source files could not be downloaded message, then this post will be able to help you. A few days back, we posted about the repairing of corrupted Windows Image using Deployment Imaging and Servicing Management (DISM) component repair tool. Today, when I was trying the method of our posted article on a computer, I received an error and thus was unable to completely repair a Windows Image.
Fix Error 0x800f0906 on Windows 11/10

Here are the details of the complete scenario which I faced after running the Windows Component tool:
DISM /Online /Cleanup-Image /RestoreHealth
Deployment Image Servicing and Management tool
Version: 6.2.9200.16384Image Version: 6.2.9200.16384
[==========================100.0%==========================]
Error: 0x800f0906
The source files could not be downloaded.
Use the “source” option to specify the location of the files that are required to restore the feature. For more information on specifying a source location, see http://go.microsoft.com/fwlink/?LinkId=243077.The DISM log file can be found at C:WindowsLogsDISMdism.log
Repair Corrupt Windows Image
After doing some research about this error, I found that the following solution may work in this situation. You need to reset SoftwareDistribution and Catroot2 folders. The fix to the error goes like this:
1. Open administrative Command Prompt.
2. Copy the following commands one after the other into Command Prompt and hit Enter after every command:
net stop wuauserv
cd %systemroot%SoftwareDistribution
ren Download Download.old
net start wuauserv
net stop bits
net start bits
net stop cryptsvc
cd %systemroot%system32
ren catroot2 catroot2old
net start cryptsvc
3. That’s it! Close the Command Prompt. Reboot and try to run the DISM /Online /Cleanup-Image /RestoreHealth again and this time, you won’t receive the error code.
Please follow the steps and if the issue persists, revert back and we will be glad to help you!
See these posts if you need more on such subjects:
- Fix DISM Errors 87, 112, 11, 50, 2, 3, 87,1726, 1393, 0x800f081f
- DISM fails in Windows 10, The source files could not be found error.

An Electrical Engineer by profession, Kapil is a Microsoft MVP and a Windows Insider MVP. Please read the entire post & the comments first & create a system restore point before making any changes to your system.