Пользователи Windows 10 привыкли бороться с разными кодами сообщений об ошибке. Однако большинство из них являются результатом их собственных ошибок, независимо от того, сделано это сознательно или неосознанно. Например прерывание подключения к интернету во время обновления Windows или загрузка вредоносных программ, после чего вы запускаете инструмент DISM, чтобы исправить ошибки, но он выдает сам ошибку 87, 112, 11, 50, 2, 3, 87,1726, 1393, 0x800f081f.
DISM.exe — важный инструмент командной строки для устранения проблем в Windows 10, включая его предков. Он также работает над обслуживанием образов развертывания и управления, форматированием локальных дисков, создание виртуальных, проверка и восстановление поврежденных системных файлов.
Исправить ошибки DISM 87, 112, 11, 50, 2, 3, 87,1726, 1393, 0x800f081f
Если при запуске встроенного средства Windows 10 DISM вы получаете коды сообщений об ошибках, такие как 87, 112, 11, 50, 2, 3, 87,1726, 1393, 0x800f081f, тогда эти общие рекомендации по устранению неполадок могут помочь вам исправить ошибки. Такие ошибки обычно возникают при использовании параметра /restorehealth, но могут появляться при использовании других параметров.
1. Обновить инструмент DISM
Рекомендую: Советую вводить команды в командную строку CMD в автономном режиме (среде восстановления windows). Запустите CMD при восстановлении системы windows.
Откройте командную строку от имени администратора и введите следующую команду для обновления самого инструмента DISM. Это позволит отменить все ожидающие задачи, включая обновления Windows.
dism.exe /image:C: /cleanup-image /revertpendingactions
Введите ниже следующую команды для очистки хранилища компонентов, чтобы все снова могло работать правильно.
dism.exe /online /Cleanup-Image /StartComponentCleanup
Если вы находитесь в автономном режиме, то перезагрузитесь в безопасный режим и введите следующую команду SFC для проверке целостности системы.
sfc /scannow
Перезагрузите систему в нормальный режим и посмотрите, можно ли запустить следующую команду: dism.exe /online /Cleanup-Image /RestoreHealth, которая в основном выдавала ошибки.
2. Что может вызывать ошибки инструмента Dism
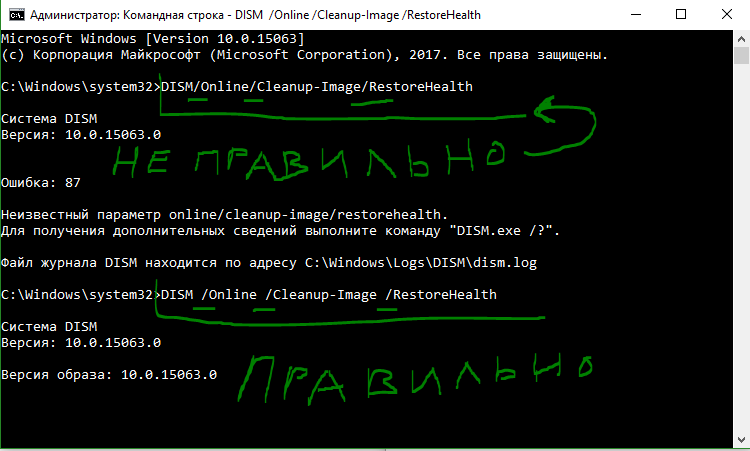
Важно знать почему происходит ошибка в инструменте DISM в Windows 10. Распространенной причиной этой проблемы является ввод неправильных команд в черное окно командной строки. Чтобы казалось нагляднее я вводил неправильную и правильную команду ниже.
- DISM/Online/Cleanup-Image/RestoreHealth — нет пробела после каждого слова перед слешем/. Выдает ошибку 87, что является неправильной командой.
- DISM /Online /Cleanup-Image /RestoreHealth — команда введена правильно и имеется пробел перед слешем /.
Смотрите еще:
- Как увеличить яркость экрана на ноутбуке Windows
- Не работают живые плитки в windows 10? Что делать?
- Что такое ACPI INT33A0 0 в Windows 10 и как исправить
- Как установить NET Framework 2.0 3.0 и 3.5 в Windows 10
- MSVCP140.dll отсутствует на компьютере
[ Telegram | Поддержать ]
Более или менее продвинутые пользователи нередко пользуются командной строкой, ведь через неё можно влиять на большинство системных процессов. При использовании строки DISM, которая есть в седьмой и следующих версиях Windows, время от времени могут появляться сообщения об ошибке.
Это норма для любой программы, но наша задача — избавиться от неполадки, чтобы выполнить необходимую команду. Ошибка 87 DISM возникает по нескольким причинам, и в каждом случае есть свои пути её устранения.

Иногда пользователи могут столкнуться с ошибкой 87 в строке DISM
Давайте выясним, при каких обстоятельствах обычно появляется такое сообщение и как избавиться от него без посторонней помощи.
С чем связана ошибка 87?
Как правило, она напрямую относится к любым действиям, выполняемым с директорией WinSxS. Если вдруг в Windows пропадёт любой системный файл, он тут же будет восстановлен рабочей копией из этой папки. То есть, WinSxS это очень важная папка с документами.
И вот ошибка 87 возникает в тот момент, когда пользователь пытается проделать какие-то операции с папкой через DISM. А теперь давайте конкретнее рассмотрим ситуации, когда возникает эта неполадка, чтобы в зависимости от них узнать способы избавления от неё.
Ошибка 87 при проверке целостности системных файлов
Время от времени Windows 7, 8, 8.1 и даже последняя версия начинает некорректно работать. Иногда компьютер внезапно перезагружается или попросту часто зависает. В такой ситуации обычно пользователям советуют не только проверить ПК на вирусы, но и выяснить, нет ли каких-либо повреждений в системных файлах.
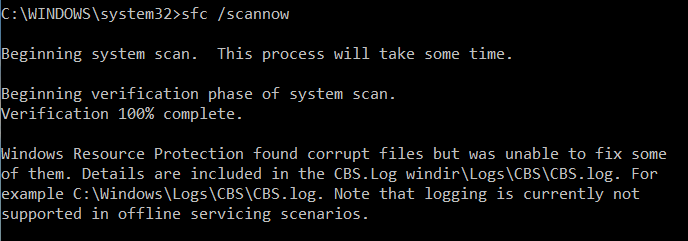
Чтобы произвести такую проверку, используется командная строка, где вводится sfc /scannow. Если всё хорошо, то пользователь получает соответствующий текст. Однако в некоторых случаях вы получите сообщение о том, что система нашла повреждённые файлы, но ничего не может с ними сделать.

В этот момент в игру вступает DISM — следует открыть его от имени администратора и ввести такие команды:
- DISM /Online /Cleanup-image /ScanHealth — если у вас седьмая версия Windows;
- Та же команда + DISM.exe /Online /Cleanup-image /RestoreHealth — две команды для Windows 8, 10. Первая необходима для поиска повреждений, вторая команда запускает их исправление.
Именно после первой комбинации из списка, которая разработана для седьмой версии системы, всплывает ошибка 87 в командной строке DISM с сопутствующим текстом «Параметр ScanHealth не распознан в этом контексте».
Как её исправить? Первое очень простое решение — проверить правильность ввода комбинации. Поскольку эта командная строка очень требовательна к каждому знаку, убедитесь, что ставите только один пробел перед каждым слешем.
Не помогло? Тогда вам следует скачать обновление под названием KB2966583 на сайте Майкрософт и установить его на своём компьютере.
После успешной установки вы сможете снова запустить командную строку DISM и выполнить восстановление целостности файлов Windows.
Ошибка 87 и попытки почистить директорию WinSxS
Иногда вышеупомянутую директорию, которая работает страховкой для всех самых важных файлов, пытаются уменьшить. Для чего? В большинстве случаев папка WinSxS занимает много места на диске — 5,7 и даже 8 и больше ГБ, что может не нравиться пользователям, особенно если свободной памяти и так не хватает.
Поэтому чтобы немного сэкономить место, можно удалить бэкап папки таким образом:
- Открывается DISM.
- Вводиться текст dism /online /cleanup-image /spsuperseded /hidesp.
Часто именно после этой команды выбивает ошибку 87 с таким текстом: «Параметр spsuperseded не распознан в этом контексте».
Что делать в таком случае? Проверьте работоспособность сервиса «Установщик модулей Windows». Если он нерабочий, установите его, запустите, и затем повторите вышеуказанные действия.
Если же это не помогло, значит, команда для удаления бэкапа уже выполнялась, и больше места вы сэкономить не сможете.

Теперь вы знаете, по каким причинам появляется ошибка 87 в командной строке Windows, и знаете, что делать для её исчезновения. Советуем быть аккуратными при пользовании подобными программами и внимательно следить за тем, в какие процессы вы вмешиваетесь, чтобы не навредить компьютеру.
Существует множество инструментов для восстановления Windows 10/11, которые можно использовать для восстановления сломанных или поврежденных файлов. Например, если ваша установка Windows 10 повреждена, вы обычно можете исправить это с помощью встроенной команды SFC /scannow.
Однако SFC также может выйти из строя, или проблема может заключаться не только в ней. В этом случае вам нужно использовать другую встроенную команду восстановления в DISM.
Что теперь произойдет, если DISM выйдет из строя в Windows 10/11? В этом руководстве мы покажем вам, как исправить инструмент, и вернемся к поддержанию вашего ПК в отличной форме.
Что такое ошибка DISM?
Существуют различные причины сбоя DISM в Windows 10. Ниже приведены некоторые варианты ошибки DISM и причины ее возникновения:
- Сбой DISM, операция не выполнялась — это довольно распространенная проблема с DISM. Однако вы можете решить эту проблему, выполнив DISM, используя ISO-файл Windows 10.
- DISM не удалось загрузить поставщика, выгрузить автономный реестр, очистить файловые буферы, установить каталог Windows и смонтировать образ — вот некоторые распространенные проблемы, с которыми вы можете столкнуться при сканировании DISM. Однако вы сможете исправить большинство из них, используя наши решения.
- Ошибка DISM 0x8000ffff, 0x800f0954, 0x800f081f. Если вы получаете какую-либо из этих ошибок, попробуйте скопировать файл install.wim из ISO-образа Windows 10 и использовать его для сканирования DISM.
- Сбой DISM при обработке команды cleanup-image, add-package — это некоторые распространенные проблемы с DISM, но их можно решить с помощью одного из наших решений.
- Сбой DISM при попытке скопировать загрузочные файлы. Это еще одна распространенная проблема с DISM, но вы можете исправить ее, очистив компоненты образа системы.
- Dism.exe не удалось проверить командную строку для загрузки диспетчера wim. Если у вас возникли какие-либо из этих проблем, перезапустите компоненты обновления Windows и проверьте, помогает ли это.
Удаляет ли DISM файлы?
DISM работает в основном для восстановления сломанных и поврежденных файлов на ПК. Он ведет журнал ошибок, обнаруженных на вашем ПК, и примененных исправлений.
Он не удаляет ваши файлы, приложения или данные. Так что вам не о чем беспокоиться.
Как исправить ошибку DISM?
1. Проверьте свой антивирус
В некоторых редких случаях эта проблема может быть вызвана вашим антивирусом. Ваш антивирус может мешать работе вашей системы и вызывать эту проблему.
Если в вашей системе произошел сбой DISM, вы можете решить проблему, просто отключив определенные антивирусные функции или приложение. Вы также пытаетесь удалить антивирусное программное обеспечение, если его отключение не решает проблему.
Если это решит проблему, вам, возможно, придется рассмотреть одно из лучших современных антивирусных программ в ESET NOD 32.
Это программное обеспечение использует передовые технологии для обеспечения безопасности вашего ПК, не вызывая ошибок. Более того, он обеспечивает как автономную, так и онлайн-безопасность и гарантирует вашу конфиденциальность. Так что пусть он позаботится о вашей безопасности, пока вы беспокоитесь о других вещах.
2. Введите правильное местоположение файла Install.wim.
Если DISM выдает сообщение «Не удается найти исходные файлы», вам необходимо смонтировать ISO-файл Windows 10 и указать расположение файла Install.wim.
Чтобы указать расположение файла, введите следующую команду в командной строке и нажмите Enterдля ее запуска:DISM /Online /Cleanup-Image /RestoreHealth /source:WIM:X:SourcesInstall.wim:1 /LimitAccess
Помните, что вам нужно заменить X буквой, соответствующей диску, на котором смонтирован ISO-файл Windows 10.
3. Скопируйте Install.wim на жесткий диск.
Немногие пользователи предположили, что вы можете решить эту проблему, скопировав Install.wim в корневой каталог вашего жесткого диска.
Чтобы получить файл Install.wim, загрузите ISO-образ Windows 10, смонтируйте его и найдите файл Install.wim.
После копирования файла Install.wim обязательно укажите правильное расположение файла Install.wim перед запуском сканирования DISM.
Кроме того, помните, что команда DISM чувствительна к регистру, и пользователи сообщали, что ввод install.wim вместо Install.wim приводил к сбою DISM. Поэтому введите правильное имя файла перед запуском сканирования DISM.
Несколько пользователей также сообщили, что DISM не поддерживает пробелы в исходном расположении. Итак, убедитесь, что в имени папки, содержащей файл, нет пробелов.
4. Очистите компоненты образа системы
- Откройте командную строку от имени администратора.
- Введите команду ниже и нажмите Enter.
Dism.exe /online /Cleanup-Image /StartComponentCleanup

- Дождитесь завершения процесса.
- Кроме того, вы также можете запустить следующие команды:
DISM /Online /Cleanup-Image /StartComponentCleanupDISM /Online /Cleanup-Image /AnalyzeComponentStore - Попробуйте снова выполнить сканирование DISM после выполнения этих команд. Запустите команды ниже:
Dism.exe /online /Cleanup-Image /StartComponentCleanupDism.exe /online /Cleanup-Image /StartComponentCleanup /ResetBase
Если вы столкнулись с ошибкой DISM 193, 740, 14098, 3017 и подобными вариантами, вы можете решить эти проблемы, очистив компоненты образа системы. Это просто, если вы выполните шаги, описанные выше.
5. Запустите средство устранения неполадок Центра обновления Windows.
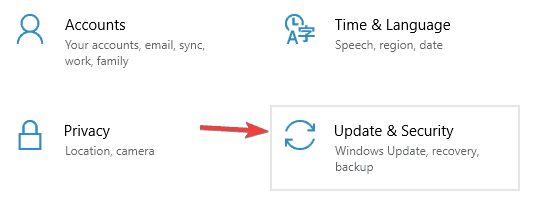
- Нажмите Windows + I, чтобы открыть приложение «Настройки».
- Выберите параметр «Обновление и безопасность».

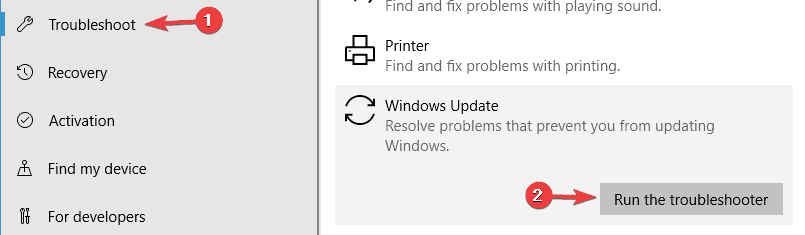
- Выберите «Устранение неполадок» в меню слева.
- Выберите Центр обновления Windows и нажмите Запустить средство устранения неполадок.

- Следуйте инструкциям на экране, чтобы завершить устранение неполадок.
По словам пользователей, иногда проблемы с DISM могут возникать из-за проблем с Центром обновления Windows.
Если DISM не удалось завершить или запустить в вашей системе, вы можете решить проблему, запустив средство устранения неполадок Центра обновления Windows.
После завершения устранения неполадок попробуйте повторно запустить сканирование DISM, и оно должно завершиться.
6. Сбросьте службы Центра обновления Windows
- Откройте командную строку от имени администратора.
- Когда запустится командная строка, выполните следующие команды:
net stop wuauservcd %systemroot%SoftwareDistributionren Download Download.oldnet start wuauservnet stop bitsnet start bitsnet stop cryptsvccd %systemroot%system32ren catroot2 catroot2oldnet start cryptsvc
Если DISM не удалось завершить, показывая, что DISM не поддерживает обслуживание на ПК с Windows, проблема может быть связана со службами Центра обновления Windows.
Однако вы можете решить эту проблему, просто сбросив службы Центра обновления Windows. После выполнения этих команд компоненты Центра обновления Windows должны перезапуститься, и проблема будет решена.
7. Отключить прокси
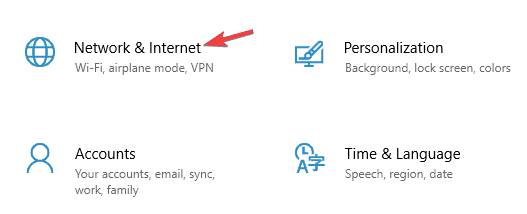
- Откройте приложение «Настройки».
- Выберите опцию «Сеть и Интернет».

- Выберите Прокси в меню слева. На правой панели отключите все настройки.

Если DISM не удалось завершить или запустить на вашем ПК, проблема может заключаться в вашем прокси-сервере. Многие пользователи используют прокси-сервер для защиты своей конфиденциальности в Интернете, но иногда ваш прокси-сервер может мешать работе вашей системы и приводить к этой и другим проблемам.
После отключения прокси проверьте, решена ли проблема. Хотя прокси — отличный способ защитить вашу конфиденциальность в Интернете, многие пользователи предпочитают использовать VPN, а не прокси.
Если вы хотите защитить свою конфиденциальность в Интернете и ищете хороший VPN, мы настоятельно рекомендуем вам рассмотреть PIA.
8. Убедитесь, что ваш. wim не доступен только для чтения
Для этого выполните следующие действия:
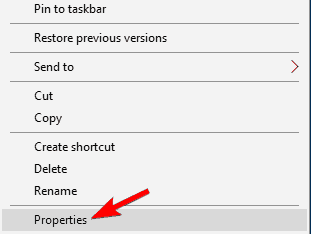
- Найдите файл install.wim на жестком диске, щелкните его правой кнопкой мыши и выберите «Свойства».

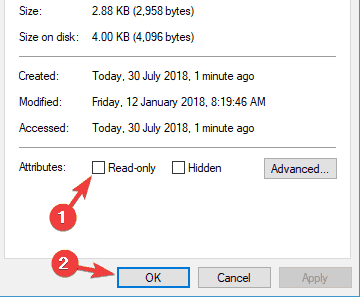
- Когда откроется окно «Свойства», обязательно снимите флажок «Только для чтения». Теперь нажмите «Применить» и «ОК», чтобы сохранить изменения.

Многие пользователи копируют файл install.wim из установочного ISO-образа Windows 10, чтобы запустить сканирование DISM в автономном режиме.
Однако несколько пользователей сообщили, что DISM дал сбой из-за того, что файл install.wim был установлен как файл только для чтения.
Если это произойдет, ваш компьютер не сможет ничего записать в файл install.wim, и сканирование DISM не будет завершено. Таким образом, изменение свойств файла install.wim должно решить проблему в этом случае.
После внесения этих изменений попробуйте повторно запустить сканирование DISM.
9. Выполните обновление на месте
- Скачайте и запустите Media Creation Tool.
- Теперь выберите опцию «Обновить этот компьютер сейчас».
- Программа установки подготовит необходимые файлы, так что вам придется подождать.
- Выберите Загрузить и установить обновления (рекомендуется) и нажмите Далее.
- Подождите, пока скачаются обновления.
- Следуйте инструкциям на экране. На экране «Все готово к установке» нажмите «Изменить, что сохранить».
- Выберите «Сохранить личные файлы и приложения» и нажмите «Далее».
- Следуйте инструкциям на экране, чтобы завершить процесс обновления на месте.
Если сканирование DISM не удалось завершить на вашем ПК, вашим окончательным решением может быть обновление на месте. Этот процесс переустановит Windows 10 и принудительно обновит ее до последней версии.
В отличие от переустановки, этот процесс сохранит все ваши файлы и установленные приложения, поэтому вы сможете продолжить с того места, на котором остановились.
Как узнать, работает ли DISM?
DISM не требует много времени для сканирования вашего ПК на наличие ошибок. Обычно это от 10 до 30 минут, но иногда может занять несколько часов.
Пользователи иногда сообщают, что он зависает на отметке прогресса около 20%. Но это не значит, что он не работает, это нормально. Пока он показывает прогресс, но команда все еще работает.
Что делать, если DISM не работает в Windows 11?
Если вы перешли на новую ОС, вы уже знаете, что она не так уж сильно отличается от Windows 10, за исключением некоторых новых функций и улучшенного дизайна.
И да, DISM может выходить из строя в Windows 11 так же часто, как и в более старых ОС, так что к этому нужно быть готовым.
К счастью, все перечисленные выше решения будут без проблем работать на новой ОС, и она станет еще более доступной.

В Windows 11 проще получить доступ к средству устранения неполадок
Как вы можете видеть на нашем снимке экрана выше, в Windows 11 параметр «Устранение неполадок» находится прямо в настройках системы, для доступа к нему требуется меньше кликов.
Сбой DISM в Windows 10 может лишить вас необходимого встроенного инструмента для бесплатного восстановления вашего ПК. Но с исправлениями в этом руководстве вы сможете снова заставить его работать.
Не стесняйтесь сообщить нам, если вам удалось снова заставить DISM работать в Windows 10, в комментариях ниже.
Для проверки целостности системных файлов и восстановления поврежденных файлов (библиотек) компонентов в Windows (Windows Server) можно использовать команды SFC и DISM. Эти две утилиты могут быть крайне полезными, если операционная система Windows работает нестабильно, появляются ошибки при запуске стандартных приложений или служб, после вирусного заражения и т.д.
В этой статье мы рассмотрим, как использовать команды
sfc /scannow
,
DISM /Online /Cleanup-Image /RestoreHealth
или
Repair-WindowsImage -Online -RestoreHealth
для восстановления образа и системных фалов в Windows 10/11 и Windows Server 2022/2019/2016.
Содержание:
- SFC /scannow: восстановление системных файлов Windows
- Проверка целостности хранилища компонентов Windows с помощью DISM
- Восстановление образа Windows с помощью DISM /RestoreHealth
- DISM /Source: восстановление образа Windows с установочного диска
- Восстановление образа Windows с помощью PowerShell
- DISM: восстановление поврежденного хранилища компонентов, если Windows не загружается
SFC /scannow: восстановление системных файлов Windows
Перед тем, как восстанавливать образ Windows с помощью DISM, рекомендуется сначала попробовать проверить целостность системных файлов с помощью утилиты SFC (System File Checker). Команда
sfc /scannow
позволяет проверить целостность системных файлов Windows. Если какие-то системные файлы отсутствуют или повреждены, утилита SFC попробует восстановить их оригинальные копии из хранилища системных компонентов Windows (каталог C:WindowsWinSxS).
Утилита SFC записывает все свои действия в лог-файл
windir%logscbscbs.log
. Для всех записей, оставленных SFC в файле CBS.log проставлен тег [SR]. Чтобы выбрать из лога только записи, относящиеся к SFC, выполните команду:
findstr /c:"[SR]" %windir%LogsCBSCBS.log >"%userprofile%Desktopsfc.txt"
Если команда sfc /scannow возвращает ошибку “
Программа защиты ресурсов Windows обнаружила повреждённые файлы, но не может восстановить некоторые из них / Windows Resource Protection found corrupt files but was unable to fix some of them
”, скорее всего утилита не смогла получить необходимые файла из хранилища компонентов (образа) Windows.
В этом случае вам нужно попробовать восстановить хранилище компонентов вашего образа Windows с помощью DISM.
После восстановления образа вы можете повторно использовать утилиту SFC для восстановления системных файлов.
Проверка целостности хранилища компонентов Windows с помощью DISM
Утилита DISM (Deployment Image Servicing and Management) доступна во всех версиях Windows, начиная с Vista.
Для сканирования образа Windows на наличие ошибок и их исправления используется параметр DISM /Cleanup-image. Команды DISM нужно запускать из командной строки, с правами администратора.
Чтобы проверить наличие признака повреждения хранилища компонентов в образе Windows (флаг CBS), выполните команду (не применимо к Windows 7/Server 2008R2):
DISM /Online /Cleanup-Image /CheckHealth
Эта команда не выполняет полное сканирование хранилища компонентов. Проверяются лишь записанные ранее маркеры повреждений и события в журнале Windows. Изменения в образ не вносятся. Команда проверит, не помечен ли ваш образ Windows как поврежденный и возможно ли исправить его.
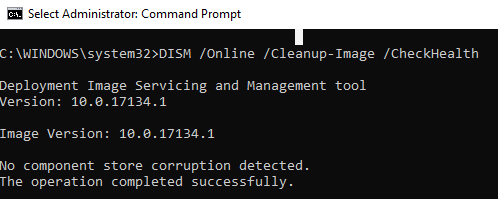
В этом примере команда вернула, что с образом все хорошо:
No component store corruption detected.
The operation completed successfully.
Чтобы выполнить полное сканирование хранилища компонентов на наличие повреждений в хранилище компонентов Windows, запустите команду:
DISM /Online /Cleanup-Image /ScanHealth
Команда проверки образа Windows может выполняться довольно долго (от 10 до 30 минут). И вернет один из трех результатов:
- No component store corruption detected – DISM не обнаружил повреждения в хранилище компонентов;
- The component store is repairable – DISM обнаружил ошибки в хранилище компонентов и может исправить их;
- The component store is not repairable – DISM не может исправить хранилище компонентов Windows (попробуйте использовать более новую версию DISM или вам придется восстанавливать образ Windows из резервной копии, сбрасывать или полностью переустанавливать вашу копию Windows.

В Windows 7 и Windows Server 2008 R2 для использования параметра DISM /ScanHealth нужно установить отдельное обновление KB2966583. Иначе при запуске DISM будет появляться “
Ошибка 87. Параметр ScanHealth не распознан в этом контексте
”.
Команда DISM /ScanHealth может вернуть ошибки:
- Ошибка: 1726. Сбой при удалённом вызове процедуры;
- Ошибка: 1910. Не найден указанный источник экспорта объекта.
Это однозначно говорит о том, что ваш образ Windows поврежден и его нужно восстановить.
Восстановление образа Windows с помощью DISM /RestoreHealth
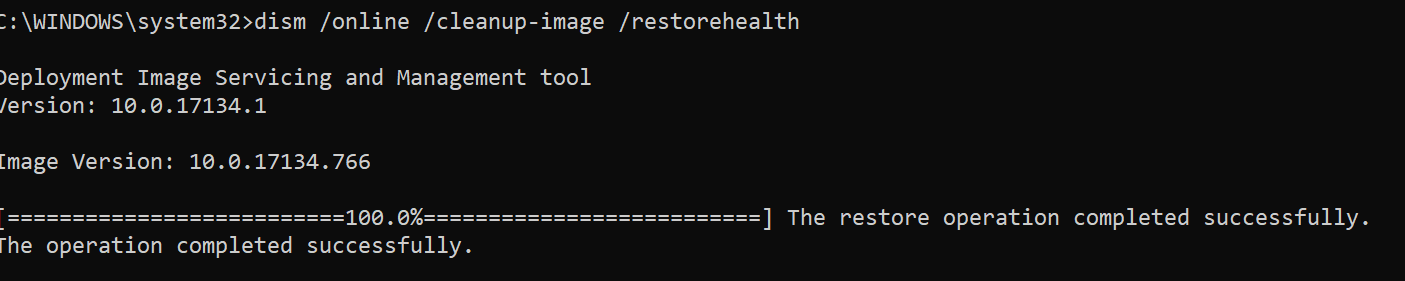
Чтобы исправить повреждения в хранилище компонентов образа Windows нужно использовать опцию RestoreHealth команды DISM. Эта опция позволит исправить найденные в образе ошибки, автоматически скачать и заменить файлы повреждённых или отсутствующих компонентов эталонными версиями файлов из центра обновлений Windows (на компьютере должен быть доступ в Интернет). Выполните команду:
DISM /Online /Cleanup-Image /RestoreHealth
В Windows 7/2008 R2 эта команда выглядит по другому:
DISM.exe /Online /Cleanup-Image /ScanHealth
Процесс сканирования и восстановления компонентов может быть довольно длительным (30 минут или более). DISM автоматически загрузит недостающие или поврежденные файлы образа с серверов Windows Update.
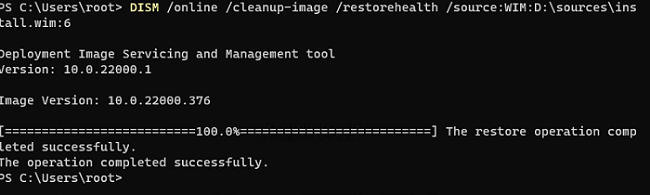
Восстановление выполнено успешно. Операция успешно завершена.
The restore operation completed successfully.
DISM /Source: восстановление образа Windows с установочного диска
Если на компьютере (сервере) отсутствует доступ в Интернет или отключена/повреждена служба Windows Update (как восстановить клиент Windows Update), то при восстановлении хранилища компонентов появятся ошибки:
- 0x800f0906 — Не удалось скачать исходные файлы. Укажите расположение файлов, необходимых для восстановления компонента, с помощью параметра Источник (0x800f0906 — The source files could not be downloaded. Use the source option to specify the location of the files that are required to restore the feature);
- Ошибка: 0x800f0950 — Сбой DISM. Операция не выполнена (0x800f0950 — DISM failed. No operation was performed);
- Ошибка:0x800F081F. Не удалось найти исходные файлы. Укажите расположение файлов, необходимых для восстановления компонента, с помощью параметра Источник (Error 0x800f081f, The source files could not be found. Use the «Source» option to specify the location of the files that are required to restore the feature).
 <
<
Во всех этих случаях вы можете использовать альтернативные средства получения оригинальных файлов хранилища компонентов. Это может быть:
- Установочный диск/флешка/iso образ Windows
- Смонтированный файл wim
- Папка sourcesSxS с установочного диска
- Файл install.wim с установочным образом Windows
Вы можете указать WIM или ESD файл с оригинальным установочным образом Windows, который нужно использовать в качестве источника для восстановления файлов системы. Предположим, вы смонтировали установочный ISO образ Windows 11 в виртуальный привод D:.
Примечание. Для восстановления поврежденных файлов в хранилище компонентов из локального источника версия и редакция Windows в образе должна полностью совпадать с вашей.
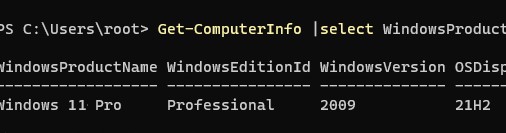
С помощью следующей PowerShell команды проверьте, какая версия Windows установлена на вашем компьютере:
Get-ComputerInfo |select WindowsProductName,WindowsEditionId,WindowsVersion, OSDisplayVersion
Выведите список доступных версий Windows в установочном образе:
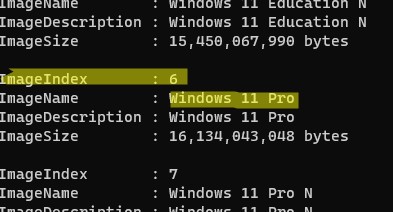
Get-WindowsImage -ImagePath "D:sourcesinstall.wim"
В нашем случае образ Windows 11 Pro в образе install.wim имеет
ImageIndex = 6
.
Для восстановления хранилища компонентов из локального WIM/ESD файла с блокированием доступа в интернет, выполните следующую команду (не забудьте указать ваш индекс версии Windows в файле):
DISM /online /cleanup-image /restorehealth /source:WIM:D:sourcesinstall.wim:6 /limitaccess
Или:
DISM /online /cleanup-image /restorehealth /source:ESD:D:sourcesinstall.esd:6 /limitaccess
Если при запуске появляется
- Ошибка Error: 50: DISM does not support servicing Windows PE with the /Online option, значит ваша DISM считает, что вы используете WinPE образWindows. Чтобы исправить это, удалите ветку реестра HKEY_LOCAL_MACHINESYSTEMCurrentControlSetControlMiniNT.
Ошибка DISM Error 87: проверьте правильно написания команды, убедитесь что вы используете версию DISM для вашей версии Windows (обычно бывает при загрузке через WinPE/WinRE).
Утилита DISM пишет подробный журнал сканирования и восстановления системных файлов в файл
C:WindowsLogsDISMdism.log
.
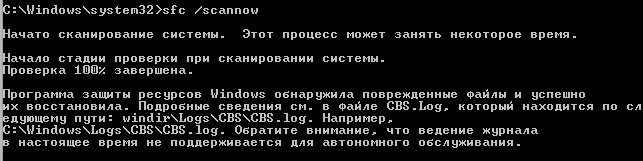
После восстановления хранилища компонентов вы можете запустить утилиту проверки системных файлов
sfc /scannow
. Скорее всего она успешно восстановит поврежденные файлы:
Программа защиты ресурсов Windows обнаружила поврежденные файлы и успешно их восстановила.
Windows Resource Protection found corrupt files and successfully repaired them.
Если все системные файлы целы, появится сообщение:
Windows Resource Protection did not find any integrity violations
Восстановление образа Windows с помощью PowerShell
В версии PowerShell в Windows 10/11 и Windows Server 2022/2019 есть аналоги рассмотренных выше команд DISM. Для сканирования хранилища компонентов и поиска повреждений в образе выполните:
Repair-WindowsImage -Online –ScanHealth
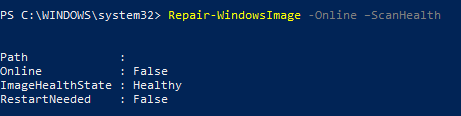
Если ошибок в хранилище компонентов не обнаружено, появится сообщение:
ImageHealth State: Healthy
Для запуска восстановления системных компонентов и файлов наберите:
Repair-WindowsImage -Online -RestoreHealth
При отсутствии доступа к интернету эта команда может зависнуть в процессе восстановления образа. Вы можете восстановить системные компоненты из локальной копии образа Windows в виде WIM/ESD файла, скопированного с установочного ISO образа Windows 10 (здесь также нужно указать индекс версии Windows в wim файле в качестве источника восстановления):
Repair-WindowsImage -Online -RestoreHealth -Source D:sourcesinstall.wim:5 –LimitAccess
DISM: восстановление поврежденного хранилища компонентов, если Windows не загружается
Если Windows не загружается корректно, вы можете выполнить проверку и исправление системных файлов в оффлайн режиме.
- Для этого загрузите компьютер с установочного образа Windows (проще всего создать загрузочную USB флешку с Windows 10/11 с помощью Media Creation Tool) и на экране начала установки нажмите
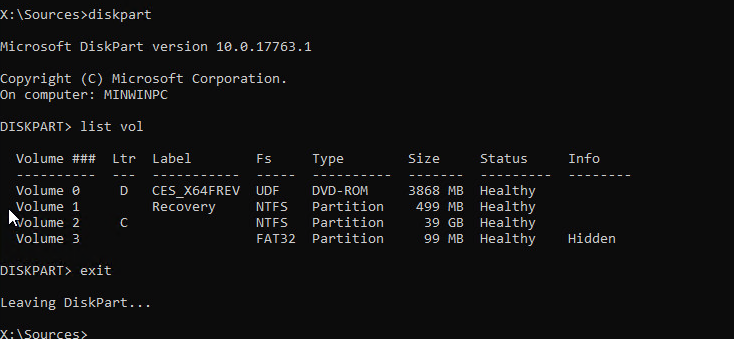
Shift + F10 - Чтобы разобраться с буквами дисков, назначенных в среде WinPE, выполните команду
diskpart
->
list vol
(в моем примере диску, на котором установлена Windows присвоена буква C:, эту букву я буду использовать в следующих командах);
- Проверим системные файлы и исправим поврежденные файлы командой:
sfc /scannow /offbootdir=C: /offwindir=C:Windows
- Для исправления хранилища компонентов используйте следующую команду (в качестве источника для восстановления компонентов мы используем WIM файл с установочным образом Windows 10, с которого мы загрузили компьютер):
Dism /image:C: /Cleanup-Image /RestoreHealth /Source:WIM:D:sourcesinstall.wim:6
- Если на целевом диске недостаточно места, то для извлечения временных файлов нам понадобится отдельный диск достаточного размера, например F:, на котором нужно создать пустой каталог:
mkdir f:scratch
и запустить восстановление хранилища компонентов командой:
Dism /image:C: /Cleanup-Image /RestoreHealth /Source:D:sourcesinstall.wim /ScratchDir:F:scratch


Совет. Другие полезные команды DISM, которые должен знать администратор:
-
DISM /Add-Package
– установка MSU/CAB файлов обновлений, интеграция обновлений в образ Windows; -
DISM /Get-Drivers
– получение списка установленных драйверов; -
DISM /Add-Driver
– добавление драйверов в образ; -
DISM /Export-Driver
– экспорт установленных драйверов Windows; -
DISM /Add-Capability
– установка дополнительных компонентов Windows через Features on Demand (например, RSAT, сервер OpenSSH или ssh клиент Windows; -
DISM /Enable-Features
и
/Disable-Features
– включение и отключение компонентов Windows (например, протокола SMBv1), -
DISM /online /Cleanup-Image /StartComponentCleanup
– очистка хранилища компонентов и удаление старых версий компонентов (папки WinSxS); -
DISM /set-edition
– конвертирование ознакомительной редакции Windows на полную без переустановки.
- Remove From My Forums
-
Question
-
I have a user who has a Lenovo notebook recently upgraded to Windows 10 Pro.
He complained that it is very sluggish and Internet Explorer is extremely sluggish since the upgrade to Windows 10. I ran SFC /scannow with this result:
Windows Resource Protection found corrupt files but was unable to fix some
of them. Details are included in the CBS.Log windirLogsCBSCBS.log. For
example C:WindowsLogsCBSCBS.log. Note that logging is currently not
supported in offline servicing scenarios.I ran Dism /Online /Cleanup-Image /RestoreHealth /Source:esd:E:x64SourcesInstall.esd:1 /limitaccess pointed to a USB drive with a fresh download of Windows 10 on it. I get this result:
Error: 0x800f081f
The source files could not be found.
Use the «Source» option to specify the location of the files that are required to restore the feature. For more information on specifying a source location, see
http://go.microsoft.com/fwlink/?LinkId=243077.The DISM log file can be found at C:WINDOWSLogsDISMdism.log
Here are the errors from the log file:
2015-11-25 09:45:57, Error DISM DISM Package Manager: PID=4792 TID=3828 Failed finalizing changes. — CDISMPackageManager::Internal_Finalize(hr:0x800f081f)
2015-11-25 09:45:57, Error DISM DISM Package Manager: PID=4792 TID=3828 The source files could not be found; their location must be specified using the
/source option to restore the feature. — GetCbsErrorMsg
2015-11-25 09:45:57, Error DISM DISM Package Manager: PID=4792 TID=3828 Failed processing package changes with session option CbsSessionOptionRepairStoreCorruption
— CDISMPackageManager::RestoreHealth(hr:0x800f081f)
2015-11-25 09:45:57, Error DISM DISM Package Manager: PID=4792 TID=3828 The source files could not be found; their location must be specified using the
/source option to restore the feature. — GetCbsErrorMsg
2015-11-25 09:45:57, Error DISM DISM Package Manager: PID=4792 TID=3828 Failed to restore the image health. — CPackageManagerCLIHandler::ProcessCmdLine_CleanupImage(hr:0x800f081f)
2015-11-25 09:45:57, Error DISM DISM Package Manager: PID=4792 TID=3828 Failed while processing command cleanup-image. — CPackageManagerCLIHandler::ExecuteCmdLine(hr:0x800f081f)
Daryl Sensenig Tents For Rent
-
Edited by
Wednesday, November 25, 2015 2:58 PM
sfc correction
-
Edited by
Answers
-
I ran the command anyway with these results:
C:WINDOWSsystem32>DISM /Online /Cleanup-Image /RestoreHealth /source:WIM:E:SourcesInstall.wim:1 /LimitAccess
Deployment Image Servicing and Management tool
Version: 10.0.10586.0Image Version: 10.0.10586.0
[==========================100.0%==========================]
Error: 0x800f081f
The source files could not be found.
Use the «Source» option to specify the location of the files that are required to restore the feature. For more information on specifying a source location, see
http://go.microsoft.com/fwlink/?LinkId=243077.The DISM log file can be found at C:WINDOWSLogsDISMdism.log
Have a happy Thanksgiving.
Daryl Sensenig Tents For Rent
Were you using the ISO downloaded from MCT (media creation tool ) ?
MCT gives you the Install.esd, not Install.wim.
Please use the tech Bench link and download the ISO. It will give you the Install.wim
http://www.microsoft.com/en-us/software-download/techbench
-
Edited by
david hk129
Friday, November 27, 2015 3:35 PM -
Marked as answer by
Daryl Sensenig
Tuesday, December 1, 2015 4:20 PM
-
Edited by
На чтение 4 мин. Просмотров 1.6k. Опубликовано 17.04.2021
Все версии операционной системы Windows поставляются с множеством различных инструментов и утилит, которые доступны пользователям Windows, если Windows когда-либо потребуется какой-либо ремонт. Одним из таких инструментов является инструмент развертывания образов и управления обслуживанием (DISM). Инструмент DISM можно использовать через любую командную строку (с соответствующими привилегиями) и можно использовать для проверки состояния сетевого или автономного образа Windows и исправления образа Windows, который был поврежден или нуждается в каком-либо другом ремонте. Ниже приводится одна из наиболее часто используемых командных строк DISM:
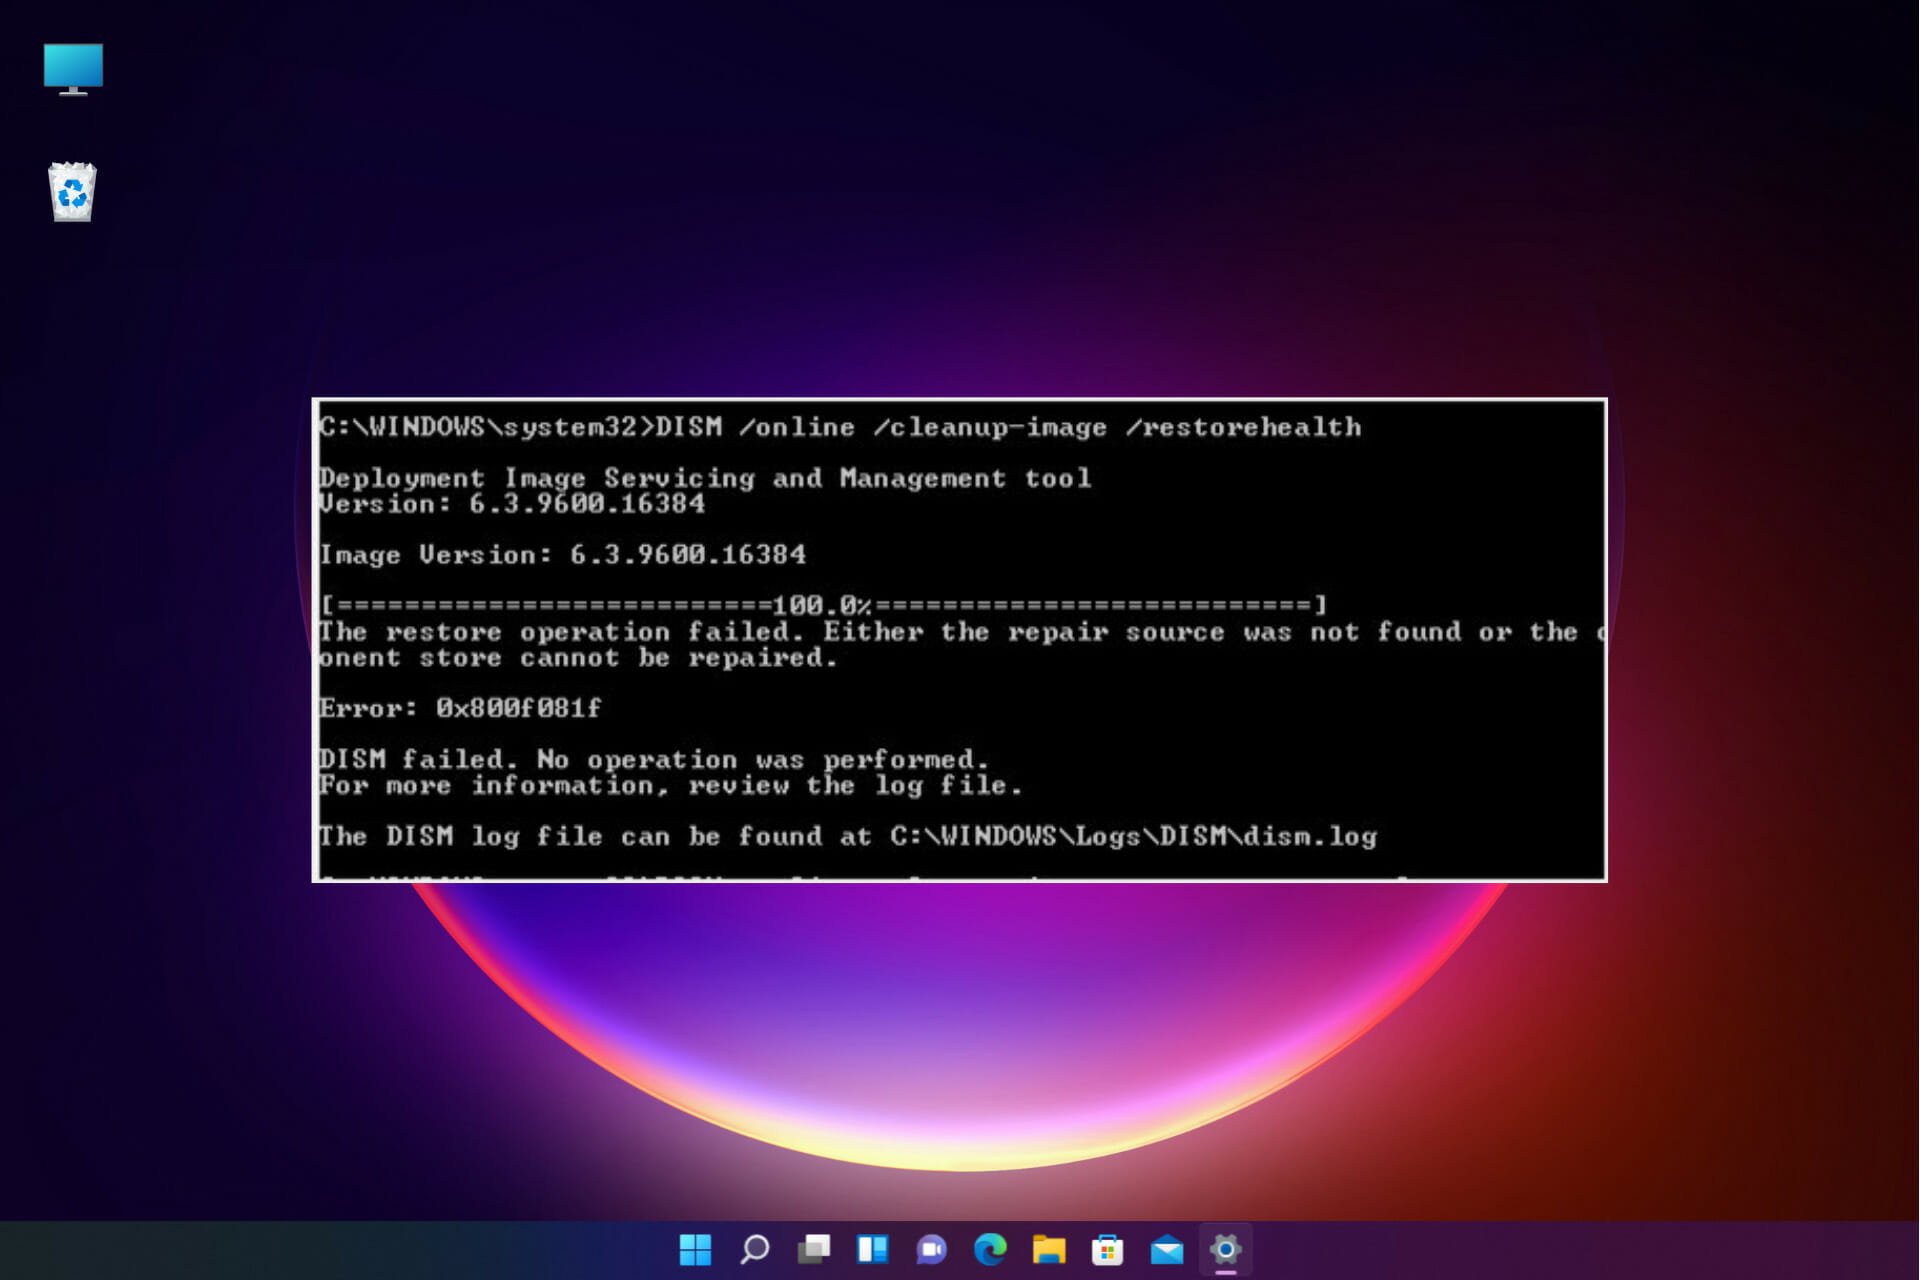
DISM/Online/Cleanup-Image/RestoreHealth
Эта конкретная командная строка используется для восстановления онлайн-образа Windows. Часть этой команды RestoreHealth в первую очередь инструктирует DISM восстановить онлайн-образ Windows, но также открывает пользователю возможность указать дополнительные источники восстановления, в которых DISM может искать файлы, необходимые для восстановления онлайн-образ Windows. Однако при запуске этой командной строки в Windows 10 некоторые пользователи Windows могут столкнуться с ошибкой и появлением следующего сообщения об ошибке.
« Ошибка: 0x800f081f Не удалось найти исходные файлы. »

В этом сообщении об ошибке в основном говорится, что DISM не удалось найти файлы, необходимые для исправления образа Windows в Интернете в их местоположение по умолчанию. Чтобы решить эту проблему, необходимо либо запустить очистку компонентов, а затем сканирование SFC, либо предоставить DISM расположение, содержащее файлы, необходимые для восстановления образа. Вы также можете исправить это, обновив Windows с помощью средства создания мультимедиа на веб-сайте Microsoft.
Содержание
- Метод 1. Выполнение очистки компонентов
- Метод 2: получение исходного кода из образа Windows
- Метод 3: Обновление Windows
Метод 1. Выполнение очистки компонентов
Используя переключатель очистки компонентов DISM, вы можете очистить образ и снова заставить все работать правильно. Вот как это сделать.
- Откройте меню “Пуск”, введите cmd , щелкните правой кнопкой мыши и Запуск от имени администратора .
- В командной строке с повышенными привилегиями введите следующие команды в том же порядке:
dism.exe/online/Cleanup-Image/StartComponentCleanup
sfc/scannow

- Дождитесь выполнения этих команд, а когда они будут выполнены, запустите: Dism/Online/Cleanup-Image/RestoreHealth
На этом этапе Dism/Online/Cleanup-Image/RestoreHealth должен снова работать.
Метод 2: получение исходного кода из образа Windows
Используя свежий образ Windows 10, вы можете запустить команду DISM, указав расположение, которое содержит файлы, необходимые для восстановления образа..
- С тех пор, как MS удалила iso-файлы tech bench, доступно не так много источников. Однако отсюда вы можете получить дампы образов.
- После загрузки ISO-образа Windows 10 вам необходимо смонтировать его на свой компьютер, чтобы компьютер извлек его и затем имел к нему доступ. . Чтобы смонтировать ISO-файл в Windows, перейдите сюда и выполните действия, относящиеся к используемой вами версии Windows.
- Откройте меню «Пуск», введите cmd , щелкните правой кнопкой мыши и выполните Запуск от имени администратора .
- В командной строке с повышенными привилегиями введите следующую команду, заменив X на каталог, в котором находится ISO-файл Windows 10. загруженное ранее монтируется:
DISM/Online/Cleanup-Image/RestoreHealth/source:WIM:X:SourcesInstall.wim:1/LimitAccess
- Дождитесь выполнения команды, и на этот раз DISM должен успешно восстановить образ Windows. .

Убедитесь, что вы загрузили ISO-файл Windows 10 по ссылке для дампа Tech Bench, указанной выше, поскольку в результате вы получите ISO-образ, содержащий Install.wim. файл, который вам нужен. При загрузке ISO-образа Windows 10 из Microsoft Media Creation Tool вы получите ISO-образ, содержащий файл Install.esd, который практически бесполезен для исправления ошибки 0x800f081f.
Метод 3: Обновление Windows
Хотя это долгий процесс, он решает проблему путем переустановки всего ядра Windows с последним образом от Microsoft, что устраняет проблему. . Этот инструмент будет работать в Windows 7, Windows 8.1 или Windows 10.
- Получите средство создания Windows 10 Media отсюда.
- Запустите исполняемый файл с вашего ПК. Вам необходимо запустить это от имени администратора.
- Примите условия лицензии и выберите Обновить этот компьютер сейчас в Что вы хотите сделать ? , а затем нажмите кнопку “Далее”.
- Инструмент начнет загрузку, а затем установку Windows 10. Внимательно следуйте инструкциям, чтобы завершить обновление.
- По завершении , у вас должна быть свежая копия Windows с целым файлом. Нет необходимости запускать Dism/Online/Cleanup-Image/RestoreHealth , но вы можете запустить его, чтобы узнать, решена ли ваша проблема.
Get back to fixing corrupt files on your PC with the built-in tool
by Milan Stanojevic
Milan has been enthusiastic about technology ever since his childhood days, and this led him to take interest in all PC-related technologies. He’s a PC enthusiast and he… read more
Published on October 7, 2022
Reviewed by
Vlad Turiceanu

Passionate about technology, Windows, and everything that has a power button, he spent most of his time developing new skills and learning more about the tech world. Coming… read more
- DISM.exe (Deployment Image Servicing and Management) is a useful command-line tool for Windows images and Windows Recovery Environment.
- The DISM failed issue might be caused by interference from your antivirus software.
- A quick fix for DISM not working is to clean up system image components or disable your proxy.
XINSTALL BY CLICKING THE DOWNLOAD FILE
This software will repair common computer errors, protect you from file loss, malware, hardware failure and optimize your PC for maximum performance. Fix PC issues and remove viruses now in 3 easy steps:
- Download Restoro PC Repair Tool that comes with Patented Technologies (patent available here).
- Click Start Scan to find Windows issues that could be causing PC problems.
- Click Repair All to fix issues affecting your computer’s security and performance
- Restoro has been downloaded by 0 readers this month.
The DISM command comes in very handy when it comes to repairing your Windows PC. For example, if your Windows 10 installation is corrupt, you can usually fix it using the built-in SFC /scannow command, followed by DISM.
However, the DISM can fail. In this case, you cannot use it to repair your PC, and the problems will not be fixed.
If DISM failed on your device, we will show you how to fix the tool in this guide and return to keeping your PC in top shape.
What causes the DISM failed issue?
There are various reasons for the DISM command not working on your Windows PC. Below are some of the variations of the DISM error and the causes:
- DISM failed no operation was performed – This is a relatively common problem with DISM. However, you might be able to fix the problem by performing the DISM can using the Windows ISO file. The full error message reads: DISM failed. no operation was performed. for more information, review the log file.
- DISM failed to load the provider, unload offline registry, flush file buffers, set the windows directory, and mount the image – These are some common problems you can encounter with DISM scan. However, you should be able to fix most of them using our solutions.
- DISM failed 0x8000ffff, 0x800f0954, 0x800f081f, 0x800f0827 – If you’re getting any of these errors, try copying the install.wim file from Windows 10 ISO and use it to perform a DISM scan.
- DISM failed while processing command cleanup-image, add-package – These are some common problems with DISM, but they can be solved using one of our solutions.
- DISM failure when attempting to copy boot files – This is another common problem with DISM, but you might be able to fix it by cleaning up system image components.
- Dism.exe failed validating command line to load wim manager – If you’re having any of these problems, restart Windows update components and check if that helps.
- DISM failed error 0x800f0905 – This is the case when users try running the DISM tool on encountering the 0x800f0905 update error.
- DISM failed no operation was performed Windows 11 – The DISM tool often fails with this error message in the latest iteration of Windows as well. The solution from above should do the trick.
- Dism /online /cleanup-image /restorehealth not working – While the other commands work, this one is not working for some users.
How can I fix the DISM not working issue?
- What causes the DISM failed issue?
- How can I fix the DISM not working issue?
- 1. Check your antivirus
- 2. Enter the correct location of Install.wim file
- 3. Copy the Install.wim file
- 4. Clean up system image components
- 5. Run the Windows Update troubleshooter
- 6. Reset Windows Update services
- 7. Disable proxy
- 8. Make sure that your .wim isn’t set to read-only
- 9. Perform an in-place upgrade
- How do you know if DISM is working?
- What can I do if DISM failed on Windows 11?
- Does DISM delete files?
1. Check your antivirus
In some rare instances, the DISM command not working issue can be caused by your antivirus. Your antivirus can interfere with your system and cause this problem.
If DISM failed on your system, you might be able to fix the problem simply by disabling certain antivirus features or the app. You also try to remove the antivirus software if disabling it does not solve the problem.
Should this fix the problem, you might need to consider one of the best modern antivirus software in ESET NOD 32.
This software uses cutting-edge technology to keep your PC secure without causing errors. What’s more, it provides both offline and online security and ensures your privacy. So, let it take care of your security while you worry about other things.
2. Enter the correct location of Install.wim file
If DISM is giving you the Can’t find source files message, you need to mount Windows 10 ISO file and specify the location of the Install.wim file.
To specify the location of the file, type the following command in Command Prompt and press Enter to run it: DISM /Online /Cleanup-Image /RestoreHealth /source:WIM:X:SourcesInstall.wim:1 /LimitAccess
Remember that you need to replace X with the letter that matches the drive where Windows 10 ISO file is mounted.
3. Copy the Install.wim file
Few users suggested that you can fix this problem by copying the Install.wim to the root directory of your hard drive.
To get Install.wim file, download Windows 10 ISO, mount it, and locate Install.wim file.
After copying the Install.wim file, be sure to enter the correct location of the Install.wim file before running the DISM scan.
Also, remember that the DISM command is case sensitive, and users reported entering install.wim instead of Install.wim caused the DISM to fail. Therefore, enter the correct file name before starting the DISM scan.
Few users also reported that DISM doesn’t support spaces in the source location. So, be sure that the containing folder doesn’t have any spaces in its name.
4. Clean up system image components
1. Open Command Prompt as administrator.
2. Type the command below and press Enter. Dism.exe /online /Cleanup-Image /StartComponentCleanup
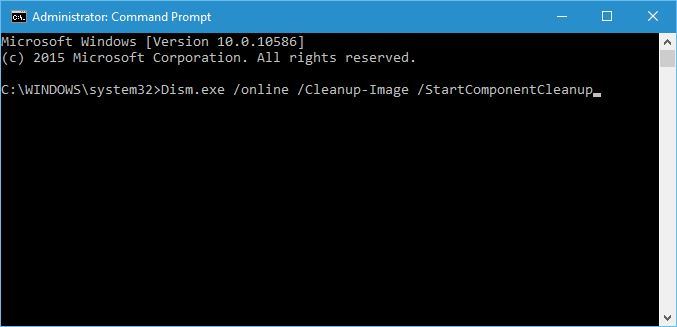
3. Wait for the process to finish.
4. Try to perform the DISM scan again after running these commands.
5. In addition, if DISM still isn’t working, you can also run the following commands:
DISM /Online /Cleanup-Image /StartComponentCleanup
DISM /Online /Cleanup-Image /AnalyzeComponentStore
Dism.exe /online /Cleanup-Image /StartComponentCleanup
Dism.exe /online /Cleanup-Image /StartComponentCleanup /ResetBase
If you’re facing DISM error 193, 740, 14098, 3017, and similar variations, you might be able to fix those problems by cleaning up the system image components.
Some PC issues are hard to tackle, especially when it comes to corrupted repositories or missing Windows files. If you are having troubles fixing an error, your system may be partially broken.
We recommend installing Restoro, a tool that will scan your machine and identify what the fault is.
Click here to download and start repairing.
This is simple, provided you follow the steps above. All you need is to run Command Prompt as an administrator and run a few commands with privileges.
There are many repair tools for Windows that can be used to fix broken or corrupted files. Check out our dedicated article to find out which are the best.
5. Run the Windows Update troubleshooter
- Press the Windows key + I to open the Settings app.
- Select the Update & Security option.

- Choose Troubleshoot from the menu on the left.
- Select Windows Update and click Run the troubleshooter.

- Follow the instructions on the screen to complete the troubleshooter.
According to users, sometimes DISM problems can occur due to Windows Update issues.
If DISM failed to complete or run on your system, you might be able to fix the problem by running the Windows Update troubleshooter.
Once the troubleshooter is finished, try to rerun the DISM scan, and it should be able to complete.
6. Reset Windows Update services
- Open Command Prompt as an administrator.
- When Command Prompt starts, run the following commands:
net stop wuauservcd %systemroot%SoftwareDistributionren Download Download.oldnet start wuauservnet stop bitsnet start bitsnet stop cryptsvccd %systemroot%system32ren catroot2 catroot2oldnet start cryptsvc
If DISM failed to complete, showing a DISM does not support servicing on Windows PC, the problem might be Windows Update services.
However, you can fix the problem simply by resetting Windows Update services. After these commands are executed, Windows Update components should restart, and the issue will be resolved.
7. Disable proxy
- Open the Settings app.
- Choose the Network & Internet option.

- Select Proxy from the menu on the left. In the right pane, disable all settings.

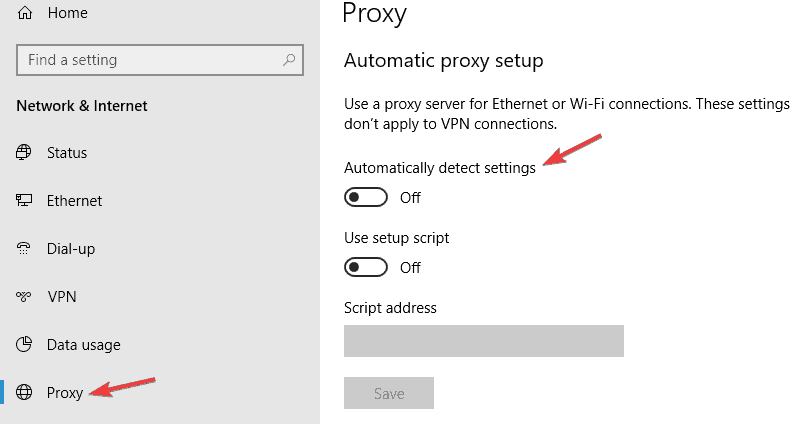
If DISM failed to complete or run on your PC, the problem might be your proxy. Many users use proxy to protect their privacy online, but sometimes your proxy can interfere with your system and lead to this and other issues.
After disabling your proxy, check if the problem is resolved. Although a proxy is a great way to protect your privacy online, many users prefer using a VPN over a proxy.
If you want to protect your privacy online and you’re looking for a good VPN, we strongly suggest you consider PIA.
- How to quickly fix DISM error 50 on Windows 10/11
- Sfc /scannow stops on Windows 10/11 [BEST SOLUTIONS]
- DISM source files could not be found? Try these 3 solutions
- Full Fix: Elevated permissions are required to run DISM
- Fix: Error 0X800f081f on Windows Update 10
8. Make sure that your .wim isn’t set to read-only
- Locate install.wim file on your hard drive, right-click it, and choose Properties.

- When the Properties window opens, make sure to uncheck the Read-only option. Now click Apply and OK to save changes.

Many users copy the install.wim file from Windows 10 installation ISO to run the DISM scan offline.
However, several users reported that DISM is not working because of the install.wim file was set as a read-only file.
If that happens, your PC won’t be able to write anything to the install.wim file and the DISM scan won’t complete. So, changing the properties of install.wim file should solve the issue in this case.
After making these changes, try to rerun the DISM scan.
9. Perform an in-place upgrade
- Download and run Media Creation Tool.
- Now select the Upgrade this PC now option.
- The setup will prepare the necessary files, so you’ll need to wait.
- Select Download and install updates (recommended) and click Next.
- Wait while the updates are downloaded.
- Follow the instructions on the screen. On the Ready to install screen, click the Change what to keep option.
- Select Keep personal files and apps and click Next.
- Follow the instructions on the screen to complete the in-place upgrade process.
If the DISM scan failed to complete on your PC, your final solution might be an in-place upgrade. This process will reinstall Windows 10 and force it to upgrade to the latest version.
Unlike reinstallation, this process will keep all your files and installed applications, so you can continue where you left off.
How do you know if DISM is working?
DISM does not take much time to scan your PC for errors. It is usually around 10 to 30 minutes but can sometimes take hours.
Users sometimes report that it hangs at around the 20% progress mark. But that does not mean it is not working, as this is normal. So far, it is showing progress, but the command is still working.
What can I do if DISM failed on Windows 11?
If you’ve upgraded to the new OS, you know by now that it’s not so different from Windows 10 apart from some new features and improved design.
And yes, DISM can fail on Windows 11 as often as on the older OSes, so you have to be prepared for this.
Luckily, all the solutions we listed above will work seamlessly on the new OS, and it will be even more accessible.
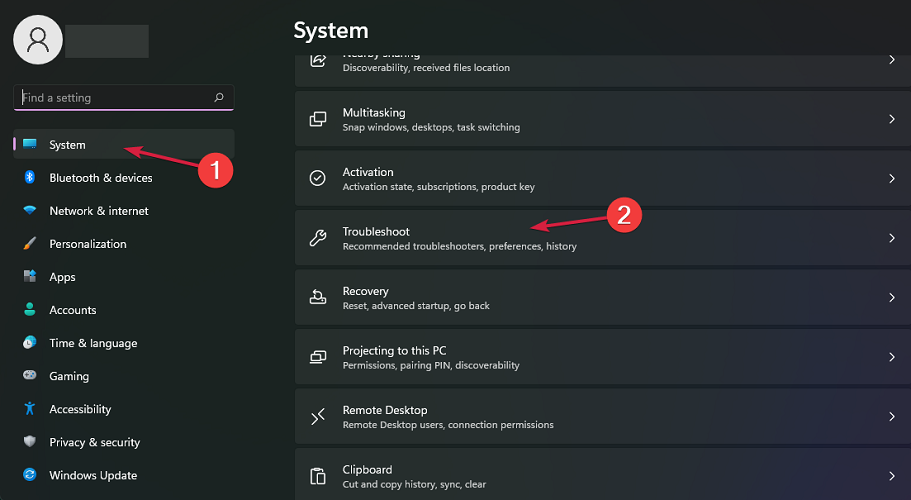
As you can see from our screenshot above, in Windows 11, the Troubleshoot option is right in the System settings, will be fewer clicks to access.
Does DISM delete files?
DISM works basically to repair broken and corrupt files on a PC. It keeps a log of the errors found on your PC, and the fixes applied.
It does not delete your files, app, or data. So you don’t have anything to worry about. DISM cannot harm your computer.
The DISM failed on Windows 10 or Windows 11 error can deprive you of an essential built-in tool to repair your PC for free. But with the fixes in this guide, you should be able to get it working again.
Are you facing other errors like the DISM error 2 on Windows 10? Then, check our guide to solve the problem quickly.
Feel free to let us know if you were able to get DISM working again on Windows in the comments below.
![]()
Newsletter
Get back to fixing corrupt files on your PC with the built-in tool
by Milan Stanojevic
Milan has been enthusiastic about technology ever since his childhood days, and this led him to take interest in all PC-related technologies. He’s a PC enthusiast and he… read more
Published on October 7, 2022
Reviewed by
Vlad Turiceanu
Passionate about technology, Windows, and everything that has a power button, he spent most of his time developing new skills and learning more about the tech world. Coming… read more
- DISM.exe (Deployment Image Servicing and Management) is a useful command-line tool for Windows images and Windows Recovery Environment.
- The DISM failed issue might be caused by interference from your antivirus software.
- A quick fix for DISM not working is to clean up system image components or disable your proxy.
XINSTALL BY CLICKING THE DOWNLOAD FILE
This software will repair common computer errors, protect you from file loss, malware, hardware failure and optimize your PC for maximum performance. Fix PC issues and remove viruses now in 3 easy steps:
- Download Restoro PC Repair Tool that comes with Patented Technologies (patent available here).
- Click Start Scan to find Windows issues that could be causing PC problems.
- Click Repair All to fix issues affecting your computer’s security and performance
- Restoro has been downloaded by 0 readers this month.
The DISM command comes in very handy when it comes to repairing your Windows PC. For example, if your Windows 10 installation is corrupt, you can usually fix it using the built-in SFC /scannow command, followed by DISM.
However, the DISM can fail. In this case, you cannot use it to repair your PC, and the problems will not be fixed.
If DISM failed on your device, we will show you how to fix the tool in this guide and return to keeping your PC in top shape.
What causes the DISM failed issue?
There are various reasons for the DISM command not working on your Windows PC. Below are some of the variations of the DISM error and the causes:
- DISM failed no operation was performed – This is a relatively common problem with DISM. However, you might be able to fix the problem by performing the DISM can using the Windows ISO file. The full error message reads: DISM failed. no operation was performed. for more information, review the log file.
- DISM failed to load the provider, unload offline registry, flush file buffers, set the windows directory, and mount the image – These are some common problems you can encounter with DISM scan. However, you should be able to fix most of them using our solutions.
- DISM failed 0x8000ffff, 0x800f0954, 0x800f081f, 0x800f0827 – If you’re getting any of these errors, try copying the install.wim file from Windows 10 ISO and use it to perform a DISM scan.
- DISM failed while processing command cleanup-image, add-package – These are some common problems with DISM, but they can be solved using one of our solutions.
- DISM failure when attempting to copy boot files – This is another common problem with DISM, but you might be able to fix it by cleaning up system image components.
- Dism.exe failed validating command line to load wim manager – If you’re having any of these problems, restart Windows update components and check if that helps.
- DISM failed error 0x800f0905 – This is the case when users try running the DISM tool on encountering the 0x800f0905 update error.
- DISM failed no operation was performed Windows 11 – The DISM tool often fails with this error message in the latest iteration of Windows as well. The solution from above should do the trick.
- Dism /online /cleanup-image /restorehealth not working – While the other commands work, this one is not working for some users.
How can I fix the DISM not working issue?
- What causes the DISM failed issue?
- How can I fix the DISM not working issue?
- 1. Check your antivirus
- 2. Enter the correct location of Install.wim file
- 3. Copy the Install.wim file
- 4. Clean up system image components
- 5. Run the Windows Update troubleshooter
- 6. Reset Windows Update services
- 7. Disable proxy
- 8. Make sure that your .wim isn’t set to read-only
- 9. Perform an in-place upgrade
- How do you know if DISM is working?
- What can I do if DISM failed on Windows 11?
- Does DISM delete files?
1. Check your antivirus
In some rare instances, the DISM command not working issue can be caused by your antivirus. Your antivirus can interfere with your system and cause this problem.
If DISM failed on your system, you might be able to fix the problem simply by disabling certain antivirus features or the app. You also try to remove the antivirus software if disabling it does not solve the problem.
Should this fix the problem, you might need to consider one of the best modern antivirus software in ESET NOD 32.
This software uses cutting-edge technology to keep your PC secure without causing errors. What’s more, it provides both offline and online security and ensures your privacy. So, let it take care of your security while you worry about other things.
2. Enter the correct location of Install.wim file
If DISM is giving you the Can’t find source files message, you need to mount Windows 10 ISO file and specify the location of the Install.wim file.
To specify the location of the file, type the following command in Command Prompt and press Enter to run it: DISM /Online /Cleanup-Image /RestoreHealth /source:WIM:X:SourcesInstall.wim:1 /LimitAccess
Remember that you need to replace X with the letter that matches the drive where Windows 10 ISO file is mounted.
3. Copy the Install.wim file
Few users suggested that you can fix this problem by copying the Install.wim to the root directory of your hard drive.
To get Install.wim file, download Windows 10 ISO, mount it, and locate Install.wim file.
After copying the Install.wim file, be sure to enter the correct location of the Install.wim file before running the DISM scan.
Also, remember that the DISM command is case sensitive, and users reported entering install.wim instead of Install.wim caused the DISM to fail. Therefore, enter the correct file name before starting the DISM scan.
Few users also reported that DISM doesn’t support spaces in the source location. So, be sure that the containing folder doesn’t have any spaces in its name.
4. Clean up system image components
1. Open Command Prompt as administrator.
2. Type the command below and press Enter. Dism.exe /online /Cleanup-Image /StartComponentCleanup
3. Wait for the process to finish.
4. Try to perform the DISM scan again after running these commands.
5. In addition, if DISM still isn’t working, you can also run the following commands:
DISM /Online /Cleanup-Image /StartComponentCleanup
DISM /Online /Cleanup-Image /AnalyzeComponentStore
Dism.exe /online /Cleanup-Image /StartComponentCleanup
Dism.exe /online /Cleanup-Image /StartComponentCleanup /ResetBase
If you’re facing DISM error 193, 740, 14098, 3017, and similar variations, you might be able to fix those problems by cleaning up the system image components.
Some PC issues are hard to tackle, especially when it comes to corrupted repositories or missing Windows files. If you are having troubles fixing an error, your system may be partially broken.
We recommend installing Restoro, a tool that will scan your machine and identify what the fault is.
Click here to download and start repairing.
This is simple, provided you follow the steps above. All you need is to run Command Prompt as an administrator and run a few commands with privileges.
There are many repair tools for Windows that can be used to fix broken or corrupted files. Check out our dedicated article to find out which are the best.
5. Run the Windows Update troubleshooter
- Press the Windows key + I to open the Settings app.
- Select the Update & Security option.
- Choose Troubleshoot from the menu on the left.
- Select Windows Update and click Run the troubleshooter.
- Follow the instructions on the screen to complete the troubleshooter.
According to users, sometimes DISM problems can occur due to Windows Update issues.
If DISM failed to complete or run on your system, you might be able to fix the problem by running the Windows Update troubleshooter.
Once the troubleshooter is finished, try to rerun the DISM scan, and it should be able to complete.
6. Reset Windows Update services
- Open Command Prompt as an administrator.
- When Command Prompt starts, run the following commands:
net stop wuauservcd %systemroot%SoftwareDistributionren Download Download.oldnet start wuauservnet stop bitsnet start bitsnet stop cryptsvccd %systemroot%system32ren catroot2 catroot2oldnet start cryptsvc
If DISM failed to complete, showing a DISM does not support servicing on Windows PC, the problem might be Windows Update services.
However, you can fix the problem simply by resetting Windows Update services. After these commands are executed, Windows Update components should restart, and the issue will be resolved.
7. Disable proxy
- Open the Settings app.
- Choose the Network & Internet option.
- Select Proxy from the menu on the left. In the right pane, disable all settings.
If DISM failed to complete or run on your PC, the problem might be your proxy. Many users use proxy to protect their privacy online, but sometimes your proxy can interfere with your system and lead to this and other issues.
After disabling your proxy, check if the problem is resolved. Although a proxy is a great way to protect your privacy online, many users prefer using a VPN over a proxy.
If you want to protect your privacy online and you’re looking for a good VPN, we strongly suggest you consider PIA.
- How to quickly fix DISM error 50 on Windows 10/11
- Sfc /scannow stops on Windows 10/11 [BEST SOLUTIONS]
- DISM source files could not be found? Try these 3 solutions
- Full Fix: Elevated permissions are required to run DISM
- Fix: Error 0X800f081f on Windows Update 10
8. Make sure that your .wim isn’t set to read-only
- Locate install.wim file on your hard drive, right-click it, and choose Properties.
- When the Properties window opens, make sure to uncheck the Read-only option. Now click Apply and OK to save changes.
Many users copy the install.wim file from Windows 10 installation ISO to run the DISM scan offline.
However, several users reported that DISM is not working because of the install.wim file was set as a read-only file.
If that happens, your PC won’t be able to write anything to the install.wim file and the DISM scan won’t complete. So, changing the properties of install.wim file should solve the issue in this case.
After making these changes, try to rerun the DISM scan.
9. Perform an in-place upgrade
- Download and run Media Creation Tool.
- Now select the Upgrade this PC now option.
- The setup will prepare the necessary files, so you’ll need to wait.
- Select Download and install updates (recommended) and click Next.
- Wait while the updates are downloaded.
- Follow the instructions on the screen. On the Ready to install screen, click the Change what to keep option.
- Select Keep personal files and apps and click Next.
- Follow the instructions on the screen to complete the in-place upgrade process.
If the DISM scan failed to complete on your PC, your final solution might be an in-place upgrade. This process will reinstall Windows 10 and force it to upgrade to the latest version.
Unlike reinstallation, this process will keep all your files and installed applications, so you can continue where you left off.
How do you know if DISM is working?
DISM does not take much time to scan your PC for errors. It is usually around 10 to 30 minutes but can sometimes take hours.
Users sometimes report that it hangs at around the 20% progress mark. But that does not mean it is not working, as this is normal. So far, it is showing progress, but the command is still working.
What can I do if DISM failed on Windows 11?
If you’ve upgraded to the new OS, you know by now that it’s not so different from Windows 10 apart from some new features and improved design.
And yes, DISM can fail on Windows 11 as often as on the older OSes, so you have to be prepared for this.
Luckily, all the solutions we listed above will work seamlessly on the new OS, and it will be even more accessible.
As you can see from our screenshot above, in Windows 11, the Troubleshoot option is right in the System settings, will be fewer clicks to access.
Does DISM delete files?
DISM works basically to repair broken and corrupt files on a PC. It keeps a log of the errors found on your PC, and the fixes applied.
It does not delete your files, app, or data. So you don’t have anything to worry about. DISM cannot harm your computer.
The DISM failed on Windows 10 or Windows 11 error can deprive you of an essential built-in tool to repair your PC for free. But with the fixes in this guide, you should be able to get it working again.
Are you facing other errors like the DISM error 2 on Windows 10? Then, check our guide to solve the problem quickly.
Feel free to let us know if you were able to get DISM working again on Windows in the comments below.
![]()