I’ve written custom admin actions that basically do QuerySet.update() for certain fields in the model. There are times when these actions shouldn’t be allowed to complete — instead, they should display an error and not do anything. I’ve tried message_user, but that displays a green checkmark, whereas I’d like it to display the Django admin error message.
A solution I’ve found online is to use a ModelForm, but I don’t think that applies in this case, as here everything happens on the admin change list page.
asked Jul 13, 2010 at 21:23
![]()
The message_user function used within the admin simply uses the contrib.messages package. You could try something like this:
from django.contrib import messages

# Then, when you need to error the user:
messages.error(request, "The message")
You can also use warning, debug, info and success in place of error
Hope that helps!
answered Jul 13, 2010 at 21:57
![]()
BartekBartek
15k2 gold badges57 silver badges65 bronze badges
3
from django.contrib import messages
...
self.message_user(request, "The message", level=messages.ERROR)
Сan also be used (messages.ERROR, messages.WARNING, messages.DEBUG, messages.INFO, messages.SUCCESS)
answered Jul 3, 2013 at 7:51
![]()
OlgaOlga
1,3712 gold badges24 silver badges34 bronze badges
0
You can use django.contrib.messages backend
from django.contrib import messages

def my_action(self, request, queryset):
  #do something
  messages.error(request,'Error message')
This will show the error message and the red error sign.
answered Jul 27, 2011 at 20:25
![]()
maximusmaximus
1511 silver badge3 bronze badges
0
Not sure whether this was fixed in newer django versions (I found the behaviour you described in django 1.2.1 and also in django-grappelli 2.0), but if you use Bartek’s method above, you’d also probably want to change the admin templates to show the messages differently. Specifically in base.html:
Change this:
{% if messages %}
        <ul class="messagelist">{% for message in messages %}<li>{{ message }}</li>{% endfor %}</ul>
    {% endif %}
to this:
{% if messages %}
        <ul class="messagelist">{% for message in messages %}<li{% if message.tags %} class="{{ message.tags }}"{% endif %}>{{ message}}</li>{% endfor %}</ul>
    {% endif %}
You might still need to tweak some CSS on top of that too, but at least it would come up as a different li class on the HTML.
Here’s a sample CSS change (compatible with grappelli)
ul.messagelist li.error {
background: url('../img/icons/icon-no.png') 20px 50% no-repeat;
background-color: #f2e6e6;

}
answered Apr 11, 2011 at 14:10
![]()
gingerlimegingerlime
5,1264 gold badges35 silver badges65 bronze badges
-
Getting Help
-
el
-
es
-
fr
-
id
-
it
-
ja
-
ko
-
pl
-
pt-br
-
zh-hans
- Language: en
-
1.8
-
1.10
-
1.11
-
2.0
-
2.1
-
2.2
-
3.0
-
3.1
-
3.2
-
4.0
-
4.2
-
dev
-
Documentation version:
4.1
How to manage error reporting
When you’re running a public site you should always turn off the
DEBUG setting. That will make your server run much faster, and will
also prevent malicious users from seeing details of your application that can be
revealed by the error pages.
However, running with DEBUG set to False means you’ll never see
errors generated by your site – everyone will instead see your public error
pages. You need to keep track of errors that occur in deployed sites, so Django
can be configured to create reports with details about those errors.
Email reports
Server errors
When DEBUG is False, Django will email the users listed in the
ADMINS setting whenever your code raises an unhandled exception and
results in an internal server error (strictly speaking, for any response with
an HTTP status code of 500 or greater). This gives the administrators immediate
notification of any errors. The ADMINS will get a description of the
error, a complete Python traceback, and details about the HTTP request that
caused the error.
Note
In order to send email, Django requires a few settings telling it
how to connect to your mail server. At the very least, you’ll need
to specify EMAIL_HOST and possibly
EMAIL_HOST_USER and EMAIL_HOST_PASSWORD,
though other settings may be also required depending on your mail
server’s configuration. Consult the Django settings
documentation for a full list of email-related
settings.
By default, Django will send email from root@localhost. However, some mail
providers reject all email from this address. To use a different sender
address, modify the SERVER_EMAIL setting.
To activate this behavior, put the email addresses of the recipients in the
ADMINS setting.
404 errors
Django can also be configured to email errors about broken links (404 “page
not found” errors). Django sends emails about 404 errors when:
DEBUGisFalse;- Your
MIDDLEWAREsetting includes
django.middleware.common.BrokenLinkEmailsMiddleware.
If those conditions are met, Django will email the users listed in the
MANAGERS setting whenever your code raises a 404 and the request has
a referer. It doesn’t bother to email for 404s that don’t have a referer –
those are usually people typing in broken URLs or broken web bots. It also
ignores 404s when the referer is equal to the requested URL, since this
behavior is from broken web bots too.
You can tell Django to stop reporting particular 404s by tweaking the
IGNORABLE_404_URLS setting. It should be a list of compiled
regular expression objects. For example:
import re
IGNORABLE_404_URLS = [
    re.compile(r'.(php|cgi)$'),
    re.compile(r'^/phpmyadmin/'),
]
In this example, a 404 to any URL ending with .php or .cgi will not be
reported. Neither will any URL starting with /phpmyadmin/.
The following example shows how to exclude some conventional URLs that browsers and
crawlers often request:
import re
IGNORABLE_404_URLS = [
    re.compile(r'^/apple-touch-icon.*.png$'),
    re.compile(r'^/favicon.ico$'),
    re.compile(r'^/robots.txt$'),
]
(Note that these are regular expressions, so we put a backslash in front of
periods to escape them.)
If you’d like to customize the behavior of
django.middleware.common.BrokenLinkEmailsMiddleware further (for
example to ignore requests coming from web crawlers), you should subclass it
and override its methods.
See also
404 errors are logged using the logging framework. By default, these log
records are ignored, but you can use them for error reporting by writing a
handler and configuring logging appropriately.
Filtering error reports
Warning
Filtering sensitive data is a hard problem, and it’s nearly impossible to
guarantee that sensitive data won’t leak into an error report. Therefore,
error reports should only be available to trusted team members and you
should avoid transmitting error reports unencrypted over the internet
(such as through email).
Filtering sensitive information
Error reports are really helpful for debugging errors, so it is generally
useful to record as much relevant information about those errors as possible.
For example, by default Django records the full traceback for the
exception raised, each traceback frame’s local variables, and the
HttpRequest’s attributes.
However, sometimes certain types of information may be too sensitive and thus
may not be appropriate to be kept track of, for example a user’s password or
credit card number. So in addition to filtering out settings that appear to be
sensitive as described in the DEBUG documentation, Django offers a
set of function decorators to help you control which information should be
filtered out of error reports in a production environment (that is, where
DEBUG is set to False): sensitive_variables() and
sensitive_post_parameters().
-
sensitive_variables(*variables)¶ -
If a function (either a view or any regular callback) in your code uses
local variables susceptible to contain sensitive information, you may
prevent the values of those variables from being included in error reports
using thesensitive_variablesdecorator:from django.views.decorators.debug import sensitive_variables @sensitive_variables('user', 'pw', 'cc') def process_info(user): pw = user.pass_word cc = user.credit_card_number name = user.name ...
In the above example, the values for the
user,pwandcc
variables will be hidden and replaced with stars (**********)
in the error reports, whereas the value of thenamevariable will be
disclosed.To systematically hide all local variables of a function from error logs,
do not provide any argument to thesensitive_variablesdecorator:@sensitive_variables() def my_function(): ...
When using multiple decorators
If the variable you want to hide is also a function argument (e.g.
‘user’ in the following example), and if the decorated function has
multiple decorators, then make sure to place@sensitive_variables
at the top of the decorator chain. This way it will also hide the
function argument as it gets passed through the other decorators:@sensitive_variables('user', 'pw', 'cc') @some_decorator @another_decorator def process_info(user): ...
-
sensitive_post_parameters(*parameters)¶ -
If one of your views receives an
HttpRequestobject
withPOST parameterssusceptible to
contain sensitive information, you may prevent the values of those
parameters from being included in the error reports using the
sensitive_post_parametersdecorator:from django.views.decorators.debug import sensitive_post_parameters @sensitive_post_parameters('pass_word', 'credit_card_number') def record_user_profile(request): UserProfile.create( user=request.user, password=request.POST['pass_word'], credit_card=request.POST['credit_card_number'], name=request.POST['name'], ) ...
In the above example, the values for the
pass_wordand
credit_card_numberPOST parameters will be hidden and replaced with
stars (**********) in the request’s representation inside the
error reports, whereas the value of thenameparameter will be
disclosed.To systematically hide all POST parameters of a request in error reports,
do not provide any argument to thesensitive_post_parametersdecorator:@sensitive_post_parameters() def my_view(request): ...
All POST parameters are systematically filtered out of error reports for
certaindjango.contrib.auth.viewsviews (login,
password_reset_confirm,password_change, andadd_viewand
user_change_passwordin theauthadmin) to prevent the leaking of
sensitive information such as user passwords.
Custom error reports
All sensitive_variables() and sensitive_post_parameters() do is,
respectively, annotate the decorated function with the names of sensitive
variables and annotate the HttpRequest object with the names of sensitive
POST parameters, so that this sensitive information can later be filtered out
of reports when an error occurs. The actual filtering is done by Django’s
default error reporter filter:
django.views.debug.SafeExceptionReporterFilter. This filter uses the
decorators’ annotations to replace the corresponding values with stars
(**********) when the error reports are produced. If you wish to
override or customize this default behavior for your entire site, you need to
define your own filter class and tell Django to use it via the
DEFAULT_EXCEPTION_REPORTER_FILTER setting:
DEFAULT_EXCEPTION_REPORTER_FILTER = 'path.to.your.CustomExceptionReporterFilter'
You may also control in a more granular way which filter to use within any
given view by setting the HttpRequest’s exception_reporter_filter
attribute:
def my_view(request):
    if request.user.is_authenticated:
        request.exception_reporter_filter = CustomExceptionReporterFilter()
    ...
Your custom filter class needs to inherit from
django.views.debug.SafeExceptionReporterFilter and may override the
following attributes and methods:
-
class
SafeExceptionReporterFilter¶ -
-
cleansed_substitute¶ -
The string value to replace sensitive value with. By default it
replaces the values of sensitive variables with stars
(**********).
-
hidden_settings¶ -
A compiled regular expression object used to match settings and
request.METAvalues considered as sensitive. By default equivalent
to:import re re.compile(r'API|TOKEN|KEY|SECRET|PASS|SIGNATURE', flags=re.IGNORECASE)
-
is_active(request)¶ -
Returns
Trueto activate the filtering in
get_post_parameters()andget_traceback_frame_variables().
By default the filter is active ifDEBUGisFalse. Note
that sensitiverequest.METAvalues are always filtered along with
sensitive setting values, as described in theDEBUG
documentation.
-
get_post_parameters(request)¶ -
Returns the filtered dictionary of POST parameters. Sensitive values
are replaced withcleansed_substitute.
-
get_traceback_frame_variables(request, tb_frame)¶ -
Returns the filtered dictionary of local variables for the given
traceback frame. Sensitive values are replaced with
cleansed_substitute.
-
If you need to customize error reports beyond filtering you may specify a
custom error reporter class by defining the
DEFAULT_EXCEPTION_REPORTER setting:
DEFAULT_EXCEPTION_REPORTER = 'path.to.your.CustomExceptionReporter'
The exception reporter is responsible for compiling the exception report data,
and formatting it as text or HTML appropriately. (The exception reporter uses
DEFAULT_EXCEPTION_REPORTER_FILTER when preparing the exception
report data.)
Your custom reporter class needs to inherit from
django.views.debug.ExceptionReporter.
-
class
ExceptionReporter¶ -
-
html_template_path¶ -
Property that returns a
pathlib.Pathrepresenting the absolute
filesystem path to a template for rendering the HTML representation of
the exception. Defaults to the Django provided template.
-
text_template_path¶ -
Property that returns a
pathlib.Pathrepresenting the absolute
filesystem path to a template for rendering the plain-text
representation of the exception. Defaults to the Django provided
template.
-
get_traceback_data()¶ -
Return a dictionary containing traceback information.
This is the main extension point for customizing exception reports, for
example:from django.views.debug import ExceptionReporter class CustomExceptionReporter(ExceptionReporter): def get_traceback_data(self): data = super().get_traceback_data() # ... remove/add something here ... return data
-
get_traceback_html()¶ -
Return HTML version of exception report.
Used for HTML version of debug 500 HTTP error page.
-
get_traceback_text()¶ -
Return plain text version of exception report.
Used for plain text version of debug 500 HTTP error page and email
reports.
-
As with the filter class, you may control which exception reporter class to use
within any given view by setting the HttpRequest’s
exception_reporter_class attribute:
def my_view(request):
    if request.user.is_authenticated:
        request.exception_reporter_class = CustomExceptionReporter()
    ...
See also
You can also set up custom error reporting by writing a custom piece of
exception middleware. If you do write custom
error handling, it’s a good idea to emulate Django’s built-in error handling
and only report/log errors if DEBUG is False.
Back to Top
Built-in Form Field Validations in Django Forms are the default validations that come predefined to all fields. Every field comes in with some built-in validations from Django validators. Each Field class constructor takes some fixed arguments.
The error_messages argument lets you specify manual error messages for attributes of the field. The error_messages argument lets you override the default messages that the field will raise. Pass in a dictionary with keys matching the error messages you want to override. For example, here is the default error message:
>>> from django import forms
>>> generic = forms.CharField()
>>> generic.clean('')
Traceback (most recent call last):
  ...
ValidationError: ['This field is required.']
And here is a custom error message:
>>> name = forms.CharField(
                error_messages={
               'required': 'Please enter your name'
                })
>>> name.clean('')
Traceback (most recent call last):
  ...
ValidationError: ['Please enter your name']
Syntax
field_name = models.Field(option = value)
Django Form Field Validation error_messages Explanation
Illustration of error_messages using an Example. Consider a project named geeksforgeeks having an app named geeks.
Refer to the following articles to check how to create a project and an app in Django.
- How to Create a Basic Project using MVT in Django?
- How to Create an App in Django ?
Enter the following code into forms.py file of geeks app. We will be using CharField for experimenting for all field options.
from django import forms
class GeeksForm(forms.Form):
geeks_field = forms.CharField(
error_messages = {
'required':"Please Enter your Name"
})
Add the geeks app to INSTALLED_APPS
INSTALLED_APPS = [
'django.contrib.admin',
'django.contrib.auth',
'django.contrib.contenttypes',
'django.contrib.sessions',
'django.contrib.messages',
'django.contrib.staticfiles',
'geeks',
]
Now to render this form into a view we need a view and a URL mapped to that view. Let’s create a view first in views.py of geeks app,
from django.shortcuts import render
from .forms import GeeksForm
def home_view(request):
context = {}
form = GeeksForm(request.POST or None)
context['form'] = form
if request.POST:
if form.is_valid():
temp = form.cleaned_data.get("geeks_field")
print(temp)
return render(request, "home.html", context)
Here we are importing that particular form from forms.py and creating an object of it in the view so that it can be rendered in a template.
Now, to initiate a Django form you need to create home.html where one would be designing the stuff as they like. Let’s create a form in home.html.
<form method = "POST">
{% csrf_token %}
{{ form }}
<input type = "submit" value = "Submit">
</form>
Finally, a URL to map to this view in urls.py
from django.urls import path
from .views import home_view
URLpatterns = [
path('', home_view ),
]
Let’s run the server and check what has actually happened, Run
Python manage.py runserver

Now let’s try to submit it empty and check if required error_message has been overridden.

Thus the field is displaying a custom error message for required attribute of Charfield.
More Built-in Form Validations
| Field Options | Description |
|---|---|
| required | By default, each Field class assumes the value is required, so to make it not required you need to set required=False |
| label | The label argument lets you specify the “human-friendly” label for this field. This is used when the Field is displayed in a Form. |
| label_suffix | The label_suffix argument lets you override the form’s label_suffix on a per-field basis. |
| widget | The widget argument lets you specify a Widget class to use when rendering this Field. See Widgets for more information. |
| help_text | The help_text argument lets you specify descriptive text for this Field. If you provide help_text, it will be displayed next to the Field when the Field is rendered by one of the convenience Form methods. |
| error_messages | The error_messages argument lets you override the default messages that the field will raise. Pass in a dictionary with keys matching the error messages you want to override. |
| validators | The validators argument lets you provide a list of validation functions for this field. |
| localize | The localize argument enables the localization of form data input, as well as the rendered output. |
| disabled. | The disabled boolean argument, when set to True, disables a form field using the disabled HTML attribute so that it won’t be editable by users. |
In this tutorial, we will learn how to show custom validation exceptions on Django admin.
Understanding The Problem
Django admin site will raise exceptions when we try to save objects with non-acceptable values. Often we need to create our custom validators and raise custom exceptions depending on the needs of the project. Like if you want the phone number to be in a particular format or you want to make sure the first name starts with a capital letter.
There are a lot of ways to achieve this but if your goal is to ensure proper validation limited from the admin interface only, then this tutorial is for you.
Note: If creating validators that remain constant throughout the app is your goal, then you should check out this article — Creating Custom Model Validation In Django
Displaying Custom Validation Exception in Django Admin
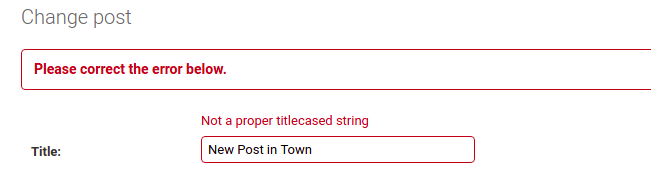
We will use the popular blog project for this tutorial. The goal is to ensure that the title of the post is in the proper title case.
Let’s have a look at our existing models.py and admin.py file.
models.py
class Post(models.Model):
    title = models.CharField(max_length=200, unique=True)
    slug = models.SlugField(max_length=200, unique=True)
    author = models.ForeignKey(
        User, on_delete=models.CASCADE, related_name="blog_posts")
    updated_on = models.DateTimeField(auto_now=True)
    content = models.TextField()
    created_on = models.DateTimeField(auto_now_add=True)
    status = models.IntegerField(choices=STATUS, default=0)
    summary = models.CharField(max_length=500, null=True, blank=True)

    class Meta:
        ordering = ["-created_on"]

    def __str__(self):
        return self.title
admin.py
@admin.register(Post)
class PostAdmin(SummernoteModelAdmin):
    list_display = ('title', 'slug', 'status', 'created_on')
    list_filter = ('status', 'created_on')
    search_fields = ['title', 'content']
    prepopulated_fields = {'slug': ('title',)}
Now to make custom validators for the admin site we need to create a custom form for our model. So in the same file or in a separate file create a form like this.
from django import forms

class PostForm(forms.ModelForm):
    def clean(self):
        title = self.cleaned_data['title']
        if not title.istitle():
            raise forms.ValidationError({'title': "Not a proper titlecased string"})
The model form comes with the clean() method that is responsible for performing validations.
Take the title value from the cleaned_data dictionary and run the validation through it, if it fails the raise the ValidationError with the exception message.
Finally. we need to link our form with the PostAdmin.
@admin.register(Post)
class PostAdmin(SummernoteModelAdmin):
    form = PostForm
    list_display = ('title', 'slug', 'status', 'created_on')
    list_filter = ('status', 'created_on')
    search_fields = ['title', 'content']
    prepopulated_fields = {'slug': ('title',)}
That’s it! Save the files run the server navigate to the admin and test the flow.
DJANGO
In any web application, we need to display notification messages to the end user after processing a form or some other types of his requests. To make this messaging system simple, Django provided full support to cookie and session based messaging for both anonymous and authenticated users.
This messages framework is capable of storing messages in one request and retrieving those messages in the subsequent request. Every message has a tag based on its priority(info,warning and error).
Enabling Django messages:
-> we need to put 'django.contrib.messages' in INSTALLED_APPS.

-> MIDDLEWARE_CLASSES should contains 'django.contrib.sessions.middleware.SessionMiddleware' and 'django.contrib.messages.middleware.MessageMiddleware'.

-> The 'context_processors' option of the DjangoTemplates backend defined in your TEMPLATES setting contains 'django.contrib.messages.context_processors.messages'.
storage.fallback.FallbackStorage is the default storage class.if you want, you can select another storage class by setting MESSAGE_STORAGE to its full import path, for example
MESSAGE_STORAGE = 'django.contrib.messages.storage.cookie.CookieStorage'
To write your own storage class, subclass the BaseStorage class in django.contrib.messages.storage.base and implement the _get and _store methods.
Add messages:
add_message(request, level, message, extra_tags='', fail_silently=False)

from django.contrib import messages
messages.add_message(request, messages.INFO, 'Hello world.')
Some shortcut methods to add messages with commonly used tags.
messages.debug(request, '%s SQL statements were executed.' % count)

messages.info(request, 'Three credits remain in your account.')

messages.success(request, 'Profile details updated.')

messages.warning(request, 'Your account expires in three days.')

messages.error(request, 'Document deleted.')
Display Messages in Temaplates :
{% if messages %}
<ul>
   {% for message in messages %}
	   <li>{{ message }}</li>
   {% endfor %}
</ul>
{% endif %}
The context processor also provides a DEFAULT_MESSAGE_LEVELS variable which is a mapping of the message level names to their numeric value:
{% if messages %}
<ul>
   {% for message in messages %}
	<li>
	   {% if message.level == DEFAULT_MESSAGE_LEVELS.ERROR %}Important: {% endif %}
	      {{ message }}
       {% endfor %}
	</li>
</ul>
{% endif %}
Get messages outside Templates:
from django.contrib.messages import get_messages>

storage = get_messages(request)

for message in storage:

    do_something_with_the_message(message)
Elaborating django messages with example:
Models.py:
from django.db import models

class Student(models.Model):

    name = models.CharField(max_length=100)

    r_no = models.CharField(max_length=10)
forms.py
from django.forms import ModelForm

from myapp.models import Student

class StudentForm(ModelForm):

    class Meta:

        model = Student

        fields = ['name', 'r_no']
views.py
from myapp.forms import StudentForm

from django.contrib import messages

from django.shortcuts import render

def my_view(request):

    if request.method == "POST":

         student_form = StudentForm(request.POST)

     if student_form.is_valid():

          student_form.save()

          messages.success(request, 'Student created successfully.')

          return render(request,"template1.html")

     else:

          messages.error(request, student_form.errors)

    students = Student.objects.all()

    return render(request,"template2.html",{"students":students})
template1.html
{% if messages %}
<ul>
	{% for message in messages %}
	   <li>{{ message }}</li>
	{% endfor %}
</ul>
{% endif %}
<form action="." method="post">
    {% csrf_token %}
    <input name="name" type="text" />
    <input name="r_no" type="text" />
    <button type="submit">Submit</button>
</form>
template2.html
{% if messages %}
<ul>
	{% for message in messages %}
	   <li>{{ message }}</li>
	{% endfor %}
</ul>
{% endif %}
<h2>Student list
Структура сообщений
Довольно часто в веб-приложениях требуется отобразить одноразовое уведомление (также известное как «флэш-сообщение») для пользователя после обработки формы или других типов пользовательского ввода.
Для этого Django обеспечивает полную поддержку обмена сообщениями на основе cookie и сессий, как для анонимных, так и для аутентифицированных пользователей. Фреймворк сообщений позволяет временно хранить сообщения в одном запросе и извлекать их для отображения в последующем запросе (обычно следующем). Каждое сообщение помечается определенным level, который определяет его приоритет (например, info, warning или error).
Включение сообщений
Сообщения реализуются через класс middleware и соответствующий context processor.
По умолчанию settings.py, созданный django-admin startproject, уже содержит все настройки, необходимые для включения функции сообщений:
-
'django.contrib.messages'находится вINSTALLED_APPS. -
MIDDLEWAREсодержит'django.contrib.sessions.middleware.SessionMiddleware'и'django.contrib.messages.middleware.MessageMiddleware'.По умолчанию storage backend полагается на sessions. Поэтому
SessionMiddlewareдолжен быть включен и появляться передMessageMiddlewareвMIDDLEWARE. -
Опция
'context_processors'бэкендаDjangoTemplates, определенная в вашей настройкеTEMPLATES, содержит'django.contrib.messages.context_processors.messages'.
Если вы не хотите использовать сообщения, вы можете удалить 'django.contrib.messages' из вашего INSTALLED_APPS, строку MessageMiddleware из MIDDLEWARE и контекстный процессор messages из TEMPLATES.
Настройка механизма сообщений
Бэкенды для хранения данных
Фреймворк сообщений может использовать различные бэкенды для хранения временных сообщений.
Django предоставляет три встроенных класса хранения данных в django.contrib.messages:
-
class
storage.session.SessionStorage¶ -
Этот класс хранит все сообщения внутри сессии запроса. Поэтому для его работы требуется приложение Django
contrib.sessions.
-
class
storage.cookie.CookieStorage¶ -
Этот класс хранит данные сообщения в cookie (подписанные секретным хэшем для предотвращения манипуляций) для сохранения уведомлений при разных запросах. Старые сообщения отбрасываются, если размер данных cookie превышает 2048 байт.
-
class
storage.fallback.FallbackStorage¶ -
Этот класс сначала использует
CookieStorage, а затем возвращается к использованиюSessionStorageдля сообщений, которые не могут поместиться в одном cookie. Он также требует примененияcontrib.sessionsот Django.Это поведение позволяет избегать записи в сессию, когда это возможно. Это должно обеспечить наилучшую производительность в общем случае.
FallbackStorage — это класс хранения по умолчанию. Если он не подходит для ваших нужд, вы можете выбрать другой класс хранения, установив MESSAGE_STORAGE на его полный путь импорта, например:
MESSAGE_STORAGE = 'django.contrib.messages.storage.cookie.CookieStorage'
-
class
storage.base.BaseStorage
Чтобы написать свой собственный класс хранения, подклассифицируйте класс BaseStorage в django.contrib.messages.storage.base и реализуйте методы _get и _store.
Уровни сообщений
Структура сообщений основана на архитектуре настраиваемых уровней, аналогичной модулю протоколирования Python. Уровни сообщений позволяют группировать сообщения по типу, чтобы их можно было фильтровать или по-разному отображать в представлениях и шаблонах.
Встроенные уровни, которые могут быть импортированы из django.contrib.messages напрямую, следующие:
| Постоянная | Назначение |
|---|---|
DEBUG |
Сообщения, связанные с разработкой, которые будут проигнорированы (или удалены) в производственном развертывании |
INFO |
Информационные сообщения для пользователя |
SUCCESS |
Действие было выполнено успешно, например, «Ваш профиль был успешно обновлен». |
WARNING |
Сбой не произошел, но может быть неизбежным |
ERROR |
Действие было не успешным или произошел какой-то другой сбой |
Настройка MESSAGE_LEVEL может быть использована для изменения минимального уровня записи (или это может быть changed per request). Попытки добавить сообщения с уровнем меньше этого будут проигнорированы.
Использование сообщений в представлениях и шаблонах
-
add_message(request, level, message, extra_tags=», fail_silently=False)[исходный код]
Добавление сообщения
Чтобы добавить сообщение, позвоните:
from django.contrib import messages
messages.add_message(request, messages.INFO, 'Hello world.')
Некоторые методы быстрого доступа предоставляют стандартный способ добавления сообщений с часто используемыми тегами (которые обычно представлены в виде HTML-классов для сообщения):
messages.debug(request, '%s SQL statements were executed.' % count)
messages.info(request, 'Three credits remain in your account.')
messages.success(request, 'Profile details updated.')
messages.warning(request, 'Your account expires in three days.')
messages.error(request, 'Document deleted.')
Отображение сообщений
-
get_messages(request)[исходный код]
В вашем шаблоне используйте что-то вроде:
{% if messages %}
<ul class="messages">
    {% for message in messages %}
    <li{% if message.tags %} class="{{ message.tags }}"{% endif %}>{{ message }}</li>
    {% endfor %}
</ul>
{% endif %}
Если вы используете контекстный процессор, ваш шаблон должен отображаться с RequestContext. В противном случае убедитесь, что для контекста шаблона доступно messages.
Даже если вы знаете, что есть только одно сообщение, вы все равно должны итерировать последовательность messages, потому что иначе хранилище сообщений не будет очищено для следующего запроса.
Контекстный процессор также предоставляет переменную DEFAULT_MESSAGE_LEVELS, которая является отображением имен уровней сообщений в их числовое значение:
{% if messages %}
<ul class="messages">
    {% for message in messages %}
    <li{% if message.tags %} class="{{ message.tags }}"{% endif %}>
        {% if message.level == DEFAULT_MESSAGE_LEVELS.ERROR %}Important: {% endif %}
        {{ message }}
    </li>
    {% endfor %}
</ul>
{% endif %}
Вне шаблонов, вы можете использовать get_messages():
from django.contrib.messages import get_messages

storage = get_messages(request)
for message in storage:
    do_something_with_the_message(message)
Например, вы можете получить все сообщения, чтобы вернуть их в виде JSONResponseMixin вместо TemplateResponseMixin.
get_messages() вернет экземпляр настроенного бэкенда хранилища.
Класс Message
-
class
storage.base.Message¶ -
Когда вы просматриваете список сообщений в шаблоне, то получаете экземпляры класса
Message. У них есть только несколько атрибутов:message: Фактический текст сообщения.level: Целое число, описывающее тип сообщения (см. раздел message levels выше).tags: Строка, объединяющая все теги сообщения (extra_tagsиlevel_tag), разделенные пробелами.extra_tags: Строка, содержащая пользовательские теги для этого сообщения, разделенные пробелами. По умолчанию она пустая.level_tag: Строковое представление уровня. По умолчанию это строчная версия имени связанной константы, но при необходимости это можно изменить с помощью параметраMESSAGE_TAGS.
Создание пользовательских уровней сообщений
Уровни сообщений — это не более чем целые числа, поэтому вы можете определить свои собственные константы уровней и использовать их для создания более персонализированных отзывов пользователей, например:
CRITICAL = 50

def my_view(request):
    messages.add_message(request, CRITICAL, 'A serious error occurred.')
При создании пользовательских уровней сообщений следует быть осторожным, чтобы не перегрузить существующие уровни. Значения для встроенных уровней следующие:
| Уровень Постоянный | Значение |
|---|---|
DEBUG |
10 |
INFO |
20 |
SUCCESS |
25 |
WARNING |
30 |
ERROR |
40 |
Если вам нужно определить пользовательские уровни в вашем HTML или CSS, вам нужно обеспечить сопоставление с помощью параметра MESSAGE_TAGS.
Примечание
Если вы создаете приложение многократного использования, рекомендуется использовать только встроенные message levels и не полагаться на какие-либо пользовательские уровни.
Изменение минимального записанного уровня для каждого запроса
Минимальный уровень записи может быть установлен по запросу с помощью метода set_level:
from django.contrib import messages

# Change the messages level to ensure the debug message is added.
messages.set_level(request, messages.DEBUG)
messages.debug(request, 'Test message...')

# In another request, record only messages with a level of WARNING and higher
messages.set_level(request, messages.WARNING)
messages.success(request, 'Your profile was updated.') # ignored
messages.warning(request, 'Your account is about to expire.') # recorded

# Set the messages level back to default.
messages.set_level(request, None)
Аналогично, текущий эффективный уровень может быть получен с помощью get_level:
from django.contrib import messages
current_level = messages.get_level(request)
Для получения дополнительной информации о том, как функционирует минимальный записанный уровень, смотрите Message levels выше.
Тихий сбой при отключении фреймворка сообщений
Если вы пишете многоразовое приложение (или другой кусок кода) и хотите включить функциональность обмена сообщениями, но не хотите требовать от пользователей включать ее, если они этого не хотят, вы можете передать дополнительный ключевой аргумент fail_silently=True любому из методов семейства add_message. Например:
messages.add_message(
    request, messages.SUCCESS, 'Profile details updated.',
    fail_silently=True,
)
messages.info(request, 'Hello world.', fail_silently=True)
Примечание
Установка fail_silently=True только скрывает MessageFailure, которые в противном случае возникли бы, когда рамка сообщений отключена, а человек пытается использовать один из методов семейства add_message. Она не скрывает сбои, которые могут возникнуть по другим причинам.
Добавление сообщений в представлениях на основе классов
-
class
views.SuccessMessageMixin¶ -
Добавляет атрибут сообщения об успехе к классам, основанным на
FormView-
get_success_message(cleaned_data)¶ -
cleaned_data— это очищенные данные из формы, которые используются для форматирования строки
-
Пример views.py:
from django.contrib.messages.views import SuccessMessageMixin
from django.views.generic.edit import CreateView
from myapp.models import Author

class AuthorCreateView(SuccessMessageMixin, CreateView):
    model = Author
    success_url = '/success/'
    success_message = "%(name)s was created successfully"
Очищенные данные из form доступны для строковой интерполяции с помощью синтаксиса %(field_name)s. Для ModelForms, если вам нужен доступ к полям из сохраненных object, переопределите метод get_success_message().
Пример views.py для ModelForms:
from django.contrib.messages.views import SuccessMessageMixin
from django.views.generic.edit import CreateView
from myapp.models import ComplicatedModel

class ComplicatedCreateView(SuccessMessageMixin, CreateView):
    model = ComplicatedModel
    success_url = '/success/'
    success_message = "%(calculated_field)s was created successfully"

    def get_success_message(self, cleaned_data):
        return self.success_message % dict(
            cleaned_data,
            calculated_field=self.object.calculated_field,
        )
Истечение срока действия сообщений
Сообщения помечаются для очистки при итерации экземпляра хранилища (и очищаются при обработке ответа).
Чтобы избежать очистки сообщений, вы можете установить хранилище сообщений в False после итерации:
storage = messages.get_messages(request)
for message in storage:
    do_something_with(message)
storage.used = False
Поведение параллельных запросов
Из-за того, как работают cookies (и, следовательно, сессии), поведение любых бэкендов, использующих cookies или сессии, не определено, когда один и тот же клиент делает несколько запросов, которые устанавливают или получают сообщения параллельно. Например, если клиент инициирует запрос, который создает сообщение в одном окне (или вкладке), а затем другой, который получает любые унифицированные сообщения в другом окне, до того, как первое окно перенаправится, сообщение может появиться во втором окне, а не в первом, где его можно ожидать.
Короче говоря, при нескольких одновременных запросах от одного и того же клиента сообщения не гарантированно будут доставлены в то же окно, которое их создало, а в некоторых случаях и вообще не будут доставлены. Обратите внимание, что это, как правило, не является проблемой в большинстве приложений и станет не проблемой в HTML5, где каждое окно/вкладка будет иметь свой собственный контекст просмотра.
Do you want to show a confirmation message on submitting the form in your Django website?
Let’s see if the user doesn’t provide correct information while filling the form. Do you want to show the error message as “Invalid form submission.”?
Show appropriate messages on the form submissions is very necessary.
Display messages after form submit in Django is not difficult as it seems to be. Here are the simple steps to implement a message framework for your Django website.
1. Initialize the Messages App in Django Settings
Add django.contrib.messages app entry in Django INSTALLED_APPS list in settings.py.
INSTALLED_APPS = [
    'django.contrib.admin',
    'django.contrib.auth',
    'django.contrib.contenttypes',
    'django.contrib.sessions',
    'django.contrib.messages',  #newly added
    'django.contrib.staticfiles',
    'main',
]
If you use the messages app without registering it in installed apps, you will get an error.
name 'messages' is not defined django.
This is the very first step.
2. Set up Your Common Message HTML Template.
There can be multiple forms in your web application. It is not a good practice to write the HTML template for each form.
What we are doing here is that we will write a separate HTML template and will include it in each form or wherever needed.
Here is the simple HTML template for submission.
{% if messages %}
  {% for message in messages %}
    <div class="alert alert-dismissible alert-success">
      <button type="button" class="close" data-dismiss="alert">
      ×
      </button>
      <strong>{{message}}</strong>
    </div>
 {% endfor %}
{% endif %}
Copy the above code and save this in the new template as messages.html in your template directory.
3. Include Message Template in Django Form
If you don’t have any Django form right now, let’s, create a simple HTML form with the POST method.
Include the messages.html. You can include it anywhere you want.
<div class="container">
    {% include 'messages.html' %}
    <form method="POST">
      <fieldset>
        <legend>Form</legend>
        {% csrf_token %}
        {{ form.as_p }}
        <button type="submit" class="btn btn-primary">
        Submit
        </button>
      </fieldset>
    </form>
</div>
In this case, I’m including it above the form. This will show the message at the top of the form after submission. If you want to display the message at the bottom of the form after submission, just include the messages.html at the bottom.
4. Set the Message on Form Submission
There are multiple message types that you can set like debug, info, success, error, and warning.
In this form submission, we are interested in setting up the success and error message.
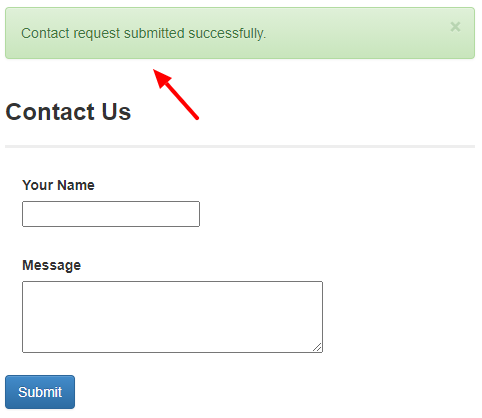
If the form submission is valid and submitted successfully, show “Contact form submitted successfully.”
messages.success(request, 'Contact request submitted successfully.')
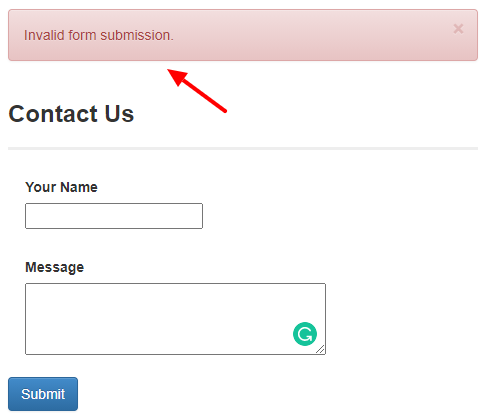
If the form submission is invalid, show “Invalid form submission.”
messages.error(request, 'Invalid form submission.')
You can also display the actual error so that the user can understand what has gone wrong.
messages.error(request, form.errors)
If you club these all changes, this is how a function in your views.py will look like for the contact form.
def contact_form(request):
    if request.method == "POST":
        form = ContactForm(request.POST)
        if form.is_valid():
            form.save()
            messages.success(request, 'Contact request submitted successfully.')
            return render(request, 'contact-form.html', {'form': ContactForm(request.GET)})
        else:
            messages.error(request, 'Invalid form submission.')
            messages.error(request, form.errors)
    else:
        form = ContactForm()
    return render(request, 'contact-form.html', {'form': form})
That’s all.
Start your Django server and Boom 😀 You are done!
Similarly, you can set the messages for Django registration and sign up. Show a logged-out message on successful logging out. Show sign-up message on successful sign-up.
5. Setting Message with Bootstrap
You can enrich your message framework with Bootstrap. You can set the different colors and formats for each type of error message.
Here is the list of alert tags in bootstrap and their corresponding colors.
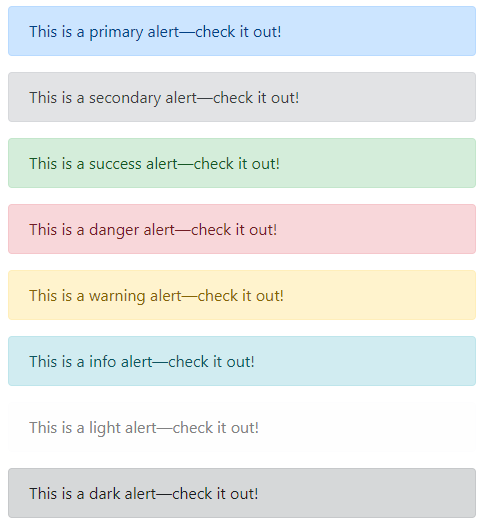
We can use these color formatting for different types of alert messages to show the different types of messages on the form submission. Let’s say, for valid submitting, use the success alert tag (the one with blue background), for error, use the danger alert tag (the one with red background).
You can set this mapping in settings.py. Set the message tags in the settings.py.
from django.contrib.messages import constants as messages
MESSAGE_TAGS = {
        messages.DEBUG: 'alert-secondary',
        messages.INFO: 'alert-info',
        messages.SUCCESS: 'alert-success',
        messages.WARNING: 'alert-warning',
        messages.ERROR: 'alert-danger',
}
Now you have to update your message template in messages.html.
{% for message in messages %}
<div class="container-fluid p-0">
  <div class="alert {{ message.tags }} alert-dismissible" role="alert" >
    <button type="button" class="close" data-dismiss="alert" aria-label="Close">
      <span aria-hidden="true">×</span>
    </button>
    {{ message }}
  </div>
</div>
{% endfor %}
Next, you can read all the entries submitted to your Django model/form.
This is how you can display messages after form submit in Django and Bootstrap. If you find any difficulty while setting messages Django form, let’s discuss it in the comment below.

14.03.2012
Думаю, вы хотите, чтобы ваши сообщения об ошибках в заполняемых формах были на том же языке, что и сам сайт. Один из простых способов — это добавить следующий код в соответствующий forms.py. Затем формы надо будет наследовать не от forms.Form, а от MyForm (обратите внимание, ExampleForm, в примере ниже, наследуется от него).
class MyForm(forms.Form):
    def __init__(self, *args, **kwargs):
        super(MyForm, self).__init__(*args, **kwargs)
        for k, field in self.fields.items():
            if 'required' in field.error_messages:
                field.error_messages['required'] = u'Это поле обязательно!'

class ExampleForm(MyForm):
    title = forms.CharField(max_length=100, required=True, label=u'Название')
Полный список error_messages для различных типов полей можно увидеть, если просмотреть этот раздел: https://docs.djangoproject.com/en/1.3/ref/forms/fields/#built-in-field-classes
Вот что есть на данный момент:
required — показывается, если данное поле обязательно;
max_length — если превышено максимальное количество символов в символьном поле / в случае с файлами — длина имени файла;
min_length — если символов меньше, чем должно быть, в символьном поле;
invalid_choice — если выбран невозможный choice;
invalid — при неправильном email’е и прочем неправильном вводе данных;
max_value — если превышено числовое значение;
min_value — если значение меньше минимального числового ограничения;
max_digits — если превышено количество цифр в числе;
max_decimal_places — если превышено количество цифр после запятой;
max_whole_digits — если превышено количество цифр до запятой;
missing — если файл не найден;
empty — если файл пустой;
invalid_image — если изображение повреждено;
invalid_list — если неправильный список choice’ов;
invalid_link — для URLField — вызывается, если данного url не существует.
Основано на примере с http://stackoverflow.com/questions/1481771/django-override-default-form-error-messages
django