First off, you’re defining a «login» view yourself, so when you try to call login(request, user) (what I assume is Django’s built in «login» function which sets the user session), it is instead calling your function:
def login(request):
    return render_to_response('login.html',{},context_instance=RequestContext(request))
Second, where did the TypeError occur? I assume since you know the nature of the error you’ve gotten to the Django traceback error page, if you could post the «copy-and-paste view» of the traceback itself, that would be enormously helpful.
You’re also doing some funky things with your views that can be easily cleaned up by some shortcut functions. 
However, since the nature of your question is how to do authentication in Django, here is the base you need to implement a manual login process, mostly just taken from the relevant documentation:
views.py
from django.contrib.auth import authenticate, login
from django.contrib.auth.decorators import login_required
from django.shortcuts import render

def loginTest(request):
    username = request.POST["username"]
    password = request.POST["password"]
    user = authenticate(username=username, password=password)
    if user is not None:
        if user.is_active:
            login(request, user)
            HttpResponseRedirect("/")
        else:
            HttpResponseRedirect("/login/")

@login_required(login_url="/login/")
def HomePage(request):
    return render(request, "HomePage.html")
urls.py
from django.conf.urls import patterns, include, url

from django.contrib import admin
admin.autodiscover()

urlpatterns = patterns('',
    # Examples:
    # url(r'^$', 'authtest.views.home', name='home'),
    # url(r'^blog/', include('blog.urls')),

    url(r'^admin/', include(admin.site.urls)),
    url(r'^login/', 'django.contrib.auth.views.login'),
    url(r'^', 'custom.views.HomePage'),
)
Also, for future reference, it would be helpful for you to post your entire script so we can see what you have imported at the top.
Using the Django authentication system
This document explains the usage of Django’s authentication system in its
default configuration. This configuration has evolved to serve the most common
project needs, handling a reasonably wide range of tasks, and has a careful
implementation of passwords and permissions. For projects where authentication
needs differ from the default, Django supports extensive extension and
customization of authentication.
Django authentication provides both authentication and authorization together
and is generally referred to as the authentication system, as these features
are somewhat coupled.
User objects
User objects are the core of the
authentication system. They typically represent the people interacting with
your site and are used to enable things like restricting access, registering
user profiles, associating content with creators etc. Only one class of user
exists in Django’s authentication framework, i.e., 'superusers' or admin 'staff' users are just user objects with
special attributes set, not different classes of user objects.
The primary attributes of the default user are:
usernamepasswordemailfirst_namelast_name
See the full API documentation for
full reference, the documentation that follows is more task oriented.
Creating users
The most direct way to create users is to use the included
create_user() helper function:
>>> from django.contrib.auth.models import User
>>> user = User.objects.create_user('john', 'lennon@thebeatles.com', 'johnpassword')

# At this point, user is a User object that has already been saved
# to the database. You can continue to change its attributes
# if you want to change other fields.
>>> user.last_name = 'Lennon'
>>> user.save()
If you have the Django admin installed, you can also create users
interactively.
Creating superusers
Create superusers using the createsuperuser command:
$ python manage.py createsuperuser --username=joe --email=joe@example.com
You will be prompted for a password. After you enter one, the user will be
created immediately. If you leave off the --username or --email options, it will
prompt you for those values.
Changing passwords
Django does not store raw (clear text) passwords on the user model, but only
a hash (see documentation of how passwords are managed for full details). Because of this, do not attempt to
manipulate the password attribute of the user directly. This is why a helper
function is used when creating a user.
To change a user’s password, you have several options:
manage.py changepassword *username* offers a method
of changing a user’s password from the command line. It prompts you to
change the password of a given user which you must enter twice. If
they both match, the new password will be changed immediately. If you
do not supply a user, the command will attempt to change the password
whose username matches the current system user.
You can also change a password programmatically, using
set_password():
>>> from django.contrib.auth.models import User
>>> u = User.objects.get(username='john')
>>> u.set_password('new password')
>>> u.save()
If you have the Django admin installed, you can also change user’s passwords
on the authentication system’s admin pages.
Django also provides views and forms that may be used to allow users to change their own
passwords.
Changing a user’s password will log out all their sessions. See
Session invalidation on password change for details.
Authenticating users
-
authenticate(request=None, **credentials)¶ -
Use
authenticate()to verify a set of
credentials. It takes credentials as keyword arguments,usernameand
passwordfor the default case, checks them against each
authentication backend, and returns a
Userobject if the credentials are
valid for a backend. If the credentials aren’t valid for any backend or if
a backend raisesPermissionDenied, it
returnsNone. For example:from django.contrib.auth import authenticate user = authenticate(username='john', password='secret') if user is not None: # A backend authenticated the credentials else: # No backend authenticated the credentials
requestis an optionalHttpRequestwhich is
passed on theauthenticate()method of the authentication backends.Note
This is a low level way to authenticate a set of credentials; for
example, it’s used by the
RemoteUserMiddleware. Unless
you are writing your own authentication system, you probably won’t use
this. Rather if you’re looking for a way to login a user, use the
LoginView.
Permissions and Authorization
Django comes with a built-in permissions system. It provides a way to assign
permissions to specific users and groups of users.
It’s used by the Django admin site, but you’re welcome to use it in your own
code.
The Django admin site uses permissions as follows:
- Access to view objects is limited to users with the “view” or “change”
permission for that type of object. - Access to view the “add” form and add an object is limited to users with
the “add” permission for that type of object. - Access to view the change list, view the “change” form and change an
object is limited to users with the “change” permission for that type of
object. - Access to delete an object is limited to users with the “delete”
permission for that type of object.
Permissions can be set not only per type of object, but also per specific
object instance. By using the
has_view_permission(),
has_add_permission(),
has_change_permission() and
has_delete_permission() methods provided
by the ModelAdmin class, it is possible to
customize permissions for different object instances of the same type.
User objects have two many-to-many
fields: groups and user_permissions.
User objects can access their related
objects in the same way as any other Django model:
myuser.groups.set([group_list])
myuser.groups.add(group, group, ...)
myuser.groups.remove(group, group, ...)
myuser.groups.clear()
myuser.user_permissions.set([permission_list])
myuser.user_permissions.add(permission, permission, ...)
myuser.user_permissions.remove(permission, permission, ...)
myuser.user_permissions.clear()
Default permissions
When django.contrib.auth is listed in your INSTALLED_APPS
setting, it will ensure that four default permissions – add, change, delete,
and view – are created for each Django model defined in one of your installed
applications.
These permissions will be created when you run manage.py migrate; the first time you run migrate after adding
django.contrib.auth to INSTALLED_APPS, the default permissions
will be created for all previously-installed models, as well as for any new
models being installed at that time. Afterward, it will create default
permissions for new models each time you run manage.py migrate (the function that creates permissions is connected to the
post_migrate signal).
Assuming you have an application with an
app_label foo and a model named Bar,
to test for basic permissions you should use:
- add:
user.has_perm('foo.add_bar') - change:
user.has_perm('foo.change_bar') - delete:
user.has_perm('foo.delete_bar') - view:
user.has_perm('foo.view_bar')
The Permission model is rarely accessed
directly.
Groups
django.contrib.auth.models.Group models are a generic way of
categorizing users so you can apply permissions, or some other label, to those
users. A user can belong to any number of groups.
A user in a group automatically has the permissions granted to that group. For
example, if the group Site editors has the permission
can_edit_home_page, any user in that group will have that permission.
Beyond permissions, groups are a convenient way to categorize users to give
them some label, or extended functionality. For example, you could create a
group 'Special users', and you could write code that could, say, give them
access to a members-only portion of your site, or send them members-only email
messages.
Programmatically creating permissions
While custom permissions can be defined within
a model’s Meta class, you can also create permissions directly. For
example, you can create the can_publish permission for a BlogPost model
in myapp:
from myapp.models import BlogPost
from django.contrib.auth.models import Permission
from django.contrib.contenttypes.models import ContentType

content_type = ContentType.objects.get_for_model(BlogPost)
permission = Permission.objects.create(
    codename='can_publish',
    name='Can Publish Posts',
    content_type=content_type,
)
The permission can then be assigned to a
User via its user_permissions
attribute or to a Group via its
permissions attribute.
Proxy models need their own content type
If you want to create permissions for a proxy model, pass for_concrete_model=False to
ContentTypeManager.get_for_model() to get the appropriate
ContentType:
content_type = ContentType.objects.get_for_model(BlogPostProxy, for_concrete_model=False)
Permission caching
The ModelBackend caches permissions on
the user object after the first time they need to be fetched for a permissions
check. This is typically fine for the request-response cycle since permissions
aren’t typically checked immediately after they are added (in the admin, for
example). If you are adding permissions and checking them immediately
afterward, in a test or view for example, the easiest solution is to re-fetch
the user from the database. For example:
from django.contrib.auth.models import Permission, User
from django.contrib.contenttypes.models import ContentType
from django.shortcuts import get_object_or_404

from myapp.models import BlogPost

def user_gains_perms(request, user_id):
    user = get_object_or_404(User, pk=user_id)
    # any permission check will cache the current set of permissions
    user.has_perm('myapp.change_blogpost')

    content_type = ContentType.objects.get_for_model(BlogPost)
    permission = Permission.objects.get(
        codename='change_blogpost',
        content_type=content_type,
    )
    user.user_permissions.add(permission)

    # Checking the cached permission set
    user.has_perm('myapp.change_blogpost')  # False

    # Request new instance of User
    # Be aware that user.refresh_from_db() won't clear the cache.
    user = get_object_or_404(User, pk=user_id)

    # Permission cache is repopulated from the database
    user.has_perm('myapp.change_blogpost')  # True

    ...
Proxy models
Proxy models work exactly the same way as concrete models. Permissions are
created using the own content type of the proxy model. Proxy models don’t
inherit the permissions of the concrete model they subclass:
class Person(models.Model):
    class Meta:
        permissions = [('can_eat_pizzas', 'Can eat pizzas')]

class Student(Person):
    class Meta:
        proxy = True
        permissions = [('can_deliver_pizzas', 'Can deliver pizzas')]

>>> # Fetch the content type for the proxy model.
>>> content_type = ContentType.objects.get_for_model(Student, for_concrete_model=False)
>>> student_permissions = Permission.objects.filter(content_type=content_type)
>>> [p.codename for p in student_permissions]
['add_student', 'change_student', 'delete_student', 'view_student',
'can_deliver_pizzas']
>>> for permission in student_permissions:
...     user.user_permissions.add(permission)
>>> user.has_perm('app.add_person')
False
>>> user.has_perm('app.can_eat_pizzas')
False
>>> user.has_perms(('app.add_student', 'app.can_deliver_pizzas'))
True
Authentication in web requests
Django uses sessions and middleware to hook the
authentication system into request objects.
These provide a request.user attribute
on every request which represents the current user. If the current user has not
logged in, this attribute will be set to an instance
of AnonymousUser, otherwise it will be an
instance of User.
You can tell them apart with
is_authenticated, like so:
if request.user.is_authenticated:
    # Do something for authenticated users.
    ...
else:
    # Do something for anonymous users.
    ...
How to log a user in
If you have an authenticated user you want to attach to the current session
— this is done with a login() function.
-
login(request, user, backend=None)¶ -
To log a user in, from a view, use
login(). It
takes anHttpRequestobject and a
Userobject.
login()saves the user’s ID in the session,
using Django’s session framework.Note that any data set during the anonymous session is retained in the
session after a user logs in.This example shows how you might use both
authenticate()and
login():from django.contrib.auth import authenticate, login def my_view(request): username = request.POST['username'] password = request.POST['password'] user = authenticate(request, username=username, password=password) if user is not None: login(request, user) # Redirect to a success page. ... else: # Return an 'invalid login' error message. ...
Selecting the authentication backend
When a user logs in, the user’s ID and the backend that was used for
authentication are saved in the user’s session. This allows the same
authentication backend to fetch the user’s
details on a future request. The authentication backend to save in the session
is selected as follows:
- Use the value of the optional
backendargument, if provided. - Use the value of the
user.backendattribute, if present. This allows
pairingauthenticate()and
login():
authenticate()
sets theuser.backendattribute on the user object it returns. - Use the
backendinAUTHENTICATION_BACKENDS, if there is only
one. - Otherwise, raise an exception.
In cases 1 and 2, the value of the backend argument or the user.backend
attribute should be a dotted import path string (like that found in
AUTHENTICATION_BACKENDS), not the actual backend class.
How to log a user out
-
logout(request)¶ -
To log out a user who has been logged in via
django.contrib.auth.login(), use
django.contrib.auth.logout()within your view. It takes an
HttpRequestobject and has no return value.
Example:from django.contrib.auth import logout def logout_view(request): logout(request) # Redirect to a success page.
Note that
logout()doesn’t throw any errors if
the user wasn’t logged in.When you call
logout(), the session data for
the current request is completely cleaned out. All existing data is
removed. This is to prevent another person from using the same web browser
to log in and have access to the previous user’s session data. If you want
to put anything into the session that will be available to the user
immediately after logging out, do that after calling
django.contrib.auth.logout().
Limiting access to logged-in users
The raw way
The raw way to limit access to pages is to check
request.user.is_authenticated and either redirect to a
login page:
from django.conf import settings
from django.shortcuts import redirect

def my_view(request):
    if not request.user.is_authenticated:
        return redirect('%s?next=%s' % (settings.LOGIN_URL, request.path))
    # ...
…or display an error message:
from django.shortcuts import render

def my_view(request):
    if not request.user.is_authenticated:
        return render(request, 'myapp/login_error.html')
    # ...
The login_required decorator
-
login_required(redirect_field_name=‘next’, login_url=None)¶ -
As a shortcut, you can use the convenient
login_required()decorator:from django.contrib.auth.decorators import login_required @login_required def my_view(request): ...
login_required()does the following:- If the user isn’t logged in, redirect to
settings.LOGIN_URL, passing the current absolute
path in the query string. Example:/accounts/login/?next=/polls/3/. - If the user is logged in, execute the view normally. The view code is
free to assume the user is logged in.
By default, the path that the user should be redirected to upon
successful authentication is stored in a query string parameter called
"next". If you would prefer to use a different name for this parameter,
login_required()takes an
optionalredirect_field_nameparameter:from django.contrib.auth.decorators import login_required @login_required(redirect_field_name='my_redirect_field') def my_view(request): ...
Note that if you provide a value to
redirect_field_name, you will most
likely need to customize your login template as well, since the template
context variable which stores the redirect path will use the value of
redirect_field_nameas its key rather than"next"(the default).login_required()also takes an
optionallogin_urlparameter. Example:from django.contrib.auth.decorators import login_required @login_required(login_url='/accounts/login/') def my_view(request): ...
Note that if you don’t specify the
login_urlparameter, you’ll need to
ensure that thesettings.LOGIN_URLand your login
view are properly associated. For example, using the defaults, add the
following lines to your URLconf:from django.contrib.auth import views as auth_views path('accounts/login/', auth_views.LoginView.as_view()),
The
settings.LOGIN_URLalso accepts view function
names and named URL patterns. This allows you
to freely remap your login view within your URLconf without having to
update the setting. - If the user isn’t logged in, redirect to
Note
The login_required decorator does NOT check the is_active flag on a
user, but the default AUTHENTICATION_BACKENDS reject inactive
users.
The LoginRequiredMixin mixin
When using class-based views, you can
achieve the same behavior as with login_required by using the
LoginRequiredMixin. This mixin should be at the leftmost position in the
inheritance list.
-
class
LoginRequiredMixin¶ -
If a view is using this mixin, all requests by non-authenticated users will
be redirected to the login page or shown an HTTP 403 Forbidden error,
depending on the
raise_exceptionparameter.You can set any of the parameters of
AccessMixinto customize the handling
of unauthorized users:from django.contrib.auth.mixins import LoginRequiredMixin class MyView(LoginRequiredMixin, View): login_url = '/login/' redirect_field_name = 'redirect_to'
Note
Just as the login_required decorator, this mixin does NOT check the
is_active flag on a user, but the default
AUTHENTICATION_BACKENDS reject inactive users.
Limiting access to logged-in users that pass a test
To limit access based on certain permissions or some other test, you’d do
essentially the same thing as described in the previous section.
You can run your test on request.user in
the view directly. For example, this view checks to make sure the user has an
email in the desired domain and if not, redirects to the login page:
from django.shortcuts import redirect

def my_view(request):
    if not request.user.email.endswith('@example.com'):
        return redirect('/login/?next=%s' % request.path)
    # ...
-
user_passes_test(test_func, login_url=None, redirect_field_name=‘next’)¶ -
As a shortcut, you can use the convenient
user_passes_testdecorator
which performs a redirect when the callable returnsFalse:from django.contrib.auth.decorators import user_passes_test def email_check(user): return user.email.endswith('@example.com') @user_passes_test(email_check) def my_view(request): ...
user_passes_test()takes a required
argument: a callable that takes a
Userobject and returnsTrueif
the user is allowed to view the page. Note that
user_passes_test()does not
automatically check that theUseris
not anonymous.user_passes_test()takes two
optional arguments:login_url- Lets you specify the URL that users who don’t pass the test will be
redirected to. It may be a login page and defaults to
settings.LOGIN_URLif you don’t specify one. redirect_field_name- Same as for
login_required().
Setting it toNoneremoves it from the URL, which you may want to do
if you are redirecting users that don’t pass the test to a non-login
page where there’s no “next page”.
For example:
@user_passes_test(email_check, login_url='/login/')
def my_view(request):
    ...
-
class
UserPassesTestMixin¶ -
When using class-based views, you
can use theUserPassesTestMixinto do this.-
test_func()¶ -
You have to override the
test_func()method of the class to
provide the test that is performed. Furthermore, you can set any of the
parameters ofAccessMixinto
customize the handling of unauthorized users:from django.contrib.auth.mixins import UserPassesTestMixin class MyView(UserPassesTestMixin, View): def test_func(self): return self.request.user.email.endswith('@example.com')
-
get_test_func()¶ -
You can also override the
get_test_func()method to have the mixin
use a differently named function for its checks (instead of
test_func()).
Stacking
UserPassesTestMixinDue to the way
UserPassesTestMixinis implemented, you cannot stack
them in your inheritance list. The following does NOT work:class TestMixin1(UserPassesTestMixin): def test_func(self): return self.request.user.email.endswith('@example.com') class TestMixin2(UserPassesTestMixin): def test_func(self): return self.request.user.username.startswith('django') class MyView(TestMixin1, TestMixin2, View): ...
If
TestMixin1would callsuper()and take that result into
account,TestMixin1wouldn’t work standalone anymore. -
The permission_required decorator
-
permission_required(perm, login_url=None, raise_exception=False)¶ -
It’s a relatively common task to check whether a user has a particular
permission. For that reason, Django provides a shortcut for that case: the
permission_required()decorator.:from django.contrib.auth.decorators import permission_required @permission_required('polls.add_choice') def my_view(request): ...
Just like the
has_perm()method,
permission names take the form"<app label>.<permission codename>"
(i.e.polls.add_choicefor a permission on a model in thepolls
application).The decorator may also take an iterable of permissions, in which case the
user must have all of the permissions in order to access the view.Note that
permission_required()
also takes an optionallogin_urlparameter:from django.contrib.auth.decorators import permission_required @permission_required('polls.add_choice', login_url='/loginpage/') def my_view(request): ...
As in the
login_required()decorator,
login_urldefaults tosettings.LOGIN_URL.If the
raise_exceptionparameter is given, the decorator will raise
PermissionDenied, prompting the 403
(HTTP Forbidden) view instead of redirecting to the
login page.If you want to use
raise_exceptionbut also give your users a chance to
login first, you can add the
login_required()decorator:from django.contrib.auth.decorators import login_required, permission_required @login_required @permission_required('polls.add_choice', raise_exception=True) def my_view(request): ...
This also avoids a redirect loop when
LoginView’s
redirect_authenticated_user=Trueand the logged-in user doesn’t have
all of the required permissions.
The PermissionRequiredMixin mixin
To apply permission checks to class-based views, you can use the PermissionRequiredMixin:
-
class
PermissionRequiredMixin¶ -
This mixin, just like the
permission_required
decorator, checks whether the user accessing a view has all given
permissions. You should specify the permission (or an iterable of
permissions) using thepermission_requiredparameter:from django.contrib.auth.mixins import PermissionRequiredMixin class MyView(PermissionRequiredMixin, View): permission_required = 'polls.add_choice' # Or multiple of permissions: permission_required = ('polls.view_choice', 'polls.change_choice')
You can set any of the parameters of
AccessMixinto customize the handling
of unauthorized users.You may also override these methods:
-
get_permission_required()¶ -
Returns an iterable of permission names used by the mixin. Defaults to
thepermission_requiredattribute, converted to a tuple if
necessary.
-
has_permission()¶ -
Returns a boolean denoting whether the current user has permission to
execute the decorated view. By default, this returns the result of
callinghas_perms()with the
list of permissions returned byget_permission_required().
-
Redirecting unauthorized requests in class-based views
To ease the handling of access restrictions in class-based views, the AccessMixin can be used to configure
the behavior of a view when access is denied. Authenticated users are denied
access with an HTTP 403 Forbidden response. Anonymous users are redirected to
the login page or shown an HTTP 403 Forbidden response, depending on the
raise_exception attribute.
-
class
AccessMixin¶ -
-
login_url¶ -
Default return value for
get_login_url(). Defaults toNone
in which caseget_login_url()falls back to
settings.LOGIN_URL.
-
permission_denied_message¶ -
Default return value for
get_permission_denied_message().
Defaults to an empty string.
-
redirect_field_name¶ -
Default return value for
get_redirect_field_name(). Defaults to
"next".
-
raise_exception¶ -
If this attribute is set to
True, a
PermissionDeniedexception is raised
when the conditions are not met. WhenFalse(the default),
anonymous users are redirected to the login page.
-
get_login_url()¶ -
Returns the URL that users who don’t pass the test will be redirected
to. Returnslogin_urlif set, orsettings.LOGIN_URLotherwise.
-
get_permission_denied_message()¶ -
When
raise_exceptionisTrue, this method can be used to
control the error message passed to the error handler for display to
the user. Returns thepermission_denied_messageattribute by
default.
-
get_redirect_field_name()¶ -
Returns the name of the query parameter that will contain the URL the
user should be redirected to after a successful login. If you set this
toNone, a query parameter won’t be added. Returns the
redirect_field_nameattribute by default.
-
handle_no_permission()¶ -
Depending on the value of
raise_exception, the method either raises
aPermissionDeniedexception or
redirects the user to thelogin_url, optionally including the
redirect_field_nameif it is set.
-
Session invalidation on password change
If your AUTH_USER_MODEL inherits from
AbstractBaseUser or implements its own
get_session_auth_hash()
method, authenticated sessions will include the hash returned by this function.
In the AbstractBaseUser case, this is an
HMAC of the password field. Django verifies that the hash in the session for
each request matches the one that’s computed during the request. This allows a
user to log out all of their sessions by changing their password.
The default password change views included with Django,
PasswordChangeView and the
user_change_password view in the django.contrib.auth admin, update
the session with the new password hash so that a user changing their own
password won’t log themselves out. If you have a custom password change view
and wish to have similar behavior, use the update_session_auth_hash()
function.
-
update_session_auth_hash(request, user)¶ -
This function takes the current request and the updated user object from
which the new session hash will be derived and updates the session hash
appropriately. It also rotates the session key so that a stolen session
cookie will be invalidated.Example usage:
from django.contrib.auth import update_session_auth_hash

def password_change(request):
    if request.method == 'POST':
        form = PasswordChangeForm(user=request.user, data=request.POST)
        if form.is_valid():
            form.save()
            update_session_auth_hash(request, form.user)
    else:
        ...
Authentication Views
Django provides several views that you can use for handling login, logout, and
password management. These make use of the stock auth forms but you can pass in your own forms as well.
Django provides no default template for the authentication views. You should
create your own templates for the views you want to use. The template context
is documented in each view, see All authentication views.
Using the views
There are different methods to implement these views in your project. The
easiest way is to include the provided URLconf in django.contrib.auth.urls
in your own URLconf, for example:
urlpatterns = [
    path('accounts/', include('django.contrib.auth.urls')),
]
This will include the following URL patterns:
accounts/login/ [name='login']
accounts/logout/ [name='logout']
accounts/password_change/ [name='password_change']
accounts/password_change/done/ [name='password_change_done']
accounts/password_reset/ [name='password_reset']
accounts/password_reset/done/ [name='password_reset_done']
accounts/reset/<uidb64>/<token>/ [name='password_reset_confirm']
accounts/reset/done/ [name='password_reset_complete']
The views provide a URL name for easier reference. See the URL
documentation for details on using named URL patterns.
If you want more control over your URLs, you can reference a specific view in
your URLconf:
from django.contrib.auth import views as auth_views

urlpatterns = [
    path('change-password/', auth_views.PasswordChangeView.as_view()),
]
The views have optional arguments you can use to alter the behavior of the
view. For example, if you want to change the template name a view uses, you can
provide the template_name argument. A way to do this is to provide keyword
arguments in the URLconf, these will be passed on to the view. For example:
urlpatterns = [
    path(
        'change-password/',
        auth_views.PasswordChangeView.as_view(template_name='change-password.html'),
    ),
]
All views are class-based, which allows
you to easily customize them by subclassing.
All authentication views
This is a list with all the views django.contrib.auth provides. For
implementation details see Using the views.
-
class
LoginView¶ -
URL name:
loginSee the URL documentation for details on using
named URL patterns.Methods and Attributes
-
template_name¶ -
The name of a template to display for the view used to log the user in.
Defaults toregistration/login.html.
-
next_page¶ -
New in Django 4.0.
The URL to redirect to after login. Defaults to
LOGIN_REDIRECT_URL.
-
redirect_field_name¶ -
The name of a
GETfield containing the URL to redirect to after
login. Defaults tonext. Overrides the
get_default_redirect_url()URL if the givenGETparameter is
passed.
-
authentication_form¶ -
A callable (typically a form class) to use for authentication. Defaults
toAuthenticationForm.
-
extra_context¶ -
A dictionary of context data that will be added to the default context
data passed to the template.
-
redirect_authenticated_user¶ -
A boolean that controls whether or not authenticated users accessing
the login page will be redirected as if they had just successfully
logged in. Defaults toFalse.Warning
If you enable
redirect_authenticated_user, other websites will
be able to determine if their visitors are authenticated on your
site by requesting redirect URLs to image files on your website. To
avoid this “social media fingerprinting” information
leakage, host all images and your favicon on a separate domain.Enabling
redirect_authenticated_usercan also result in a
redirect loop when using thepermission_required()decorator
unless theraise_exceptionparameter is used.
-
success_url_allowed_hosts¶ -
A
setof hosts, in addition torequest.get_host(), that are safe for redirecting
after login. Defaults to an emptyset.
-
get_default_redirect_url()¶ -
New in Django 4.0.
Returns the URL to redirect to after login. The default implementation
resolves and returnsnext_pageif set, or
LOGIN_REDIRECT_URLotherwise.
Here’s what
LoginViewdoes:- If called via
GET, it displays a login form that POSTs to the
same URL. More on this in a bit. - If called via
POSTwith user submitted credentials, it tries to log
the user in. If login is successful, the view redirects to the URL
specified innext. Ifnextisn’t provided, it redirects to
settings.LOGIN_REDIRECT_URL(which
defaults to/accounts/profile/). If login isn’t successful, it
redisplays the login form.
It’s your responsibility to provide the html for the login template
, calledregistration/login.htmlby default. This template gets passed
four template context variables:form: AFormobject representing the
AuthenticationForm.next: The URL to redirect to after successful login. This may
contain a query string, too.site: The currentSite,
according to theSITE_IDsetting. If you don’t have the
site framework installed, this will be set to an instance of
RequestSite, which derives the
site name and domain from the current
HttpRequest.site_name: An alias forsite.name. If you don’t have the site
framework installed, this will be set to the value of
request.META['SERVER_NAME'].
For more on sites, see The “sites” framework.
If you’d prefer not to call the template
registration/login.html,
you can pass thetemplate_nameparameter via the extra arguments to
theas_viewmethod in your URLconf. For example, this URLconf line would
usemyapp/login.htmlinstead:path('accounts/login/', auth_views.LoginView.as_view(template_name='myapp/login.html')),
You can also specify the name of the
GETfield which contains the URL
to redirect to after login usingredirect_field_name. By default, the
field is callednext.Here’s a sample
registration/login.htmltemplate you can use as a
starting point. It assumes you have abase.htmltemplate that
defines acontentblock:{% extends "base.html" %} {% block content %} {% if form.errors %} <p>Your username and password didn't match. Please try again.</p> {% endif %} {% if next %} {% if user.is_authenticated %} <p>Your account doesn't have access to this page. To proceed, please login with an account that has access.</p> {% else %} <p>Please login to see this page.</p> {% endif %} {% endif %} <form method="post" action="{% url 'login' %}"> {% csrf_token %} <table> <tr> <td>{{ form.username.label_tag }}</td> <td>{{ form.username }}</td> </tr> <tr> <td>{{ form.password.label_tag }}</td> <td>{{ form.password }}</td> </tr> </table> <input type="submit" value="login"> <input type="hidden" name="next" value="{{ next }}"> </form> {# Assumes you set up the password_reset view in your URLconf #} <p><a href="{% url 'password_reset' %}">Lost password?</a></p> {% endblock %}
If you have customized authentication (see Customizing Authentication) you can use a custom authentication form by
setting theauthentication_formattribute. This form must accept a
requestkeyword argument in its__init__()method and provide a
get_user()method which returns the authenticated user object (this
method is only ever called after successful form validation). -
-
class
LogoutView¶ -
Logs a user out on
POSTrequests.Deprecated since version 4.1: Support for logging out on
GETrequests is deprecated and will be
removed in Django 5.0.URL name:
logoutAttributes:
-
next_page¶ -
The URL to redirect to after logout. Defaults to
LOGOUT_REDIRECT_URL.
-
template_name¶ -
The full name of a template to display after logging the user out.
Defaults toregistration/logged_out.html.
-
redirect_field_name¶ -
The name of a
GETfield containing the URL to redirect to after log
out. Defaults to'next'. Overrides the
next_pageURL if the givenGETparameter is
passed.
-
extra_context¶ -
A dictionary of context data that will be added to the default context
data passed to the template.
-
success_url_allowed_hosts¶ -
A
setof hosts, in addition torequest.get_host(), that are safe for redirecting
after logout. Defaults to an emptyset.
Template context:
title: The string “Logged out”, localized.site: The currentSite,
according to theSITE_IDsetting. If you don’t have the
site framework installed, this will be set to an instance of
RequestSite, which derives the
site name and domain from the current
HttpRequest.site_name: An alias forsite.name. If you don’t have the site
framework installed, this will be set to the value of
request.META['SERVER_NAME'].
For more on sites, see The “sites” framework.
-
-
logout_then_login(request, login_url=None)¶ -
Logs a user out on
POSTrequests, then redirects to the login page.URL name: No default URL provided
Optional arguments:
login_url: The URL of the login page to redirect to.
Defaults tosettings.LOGIN_URLif not supplied.
Deprecated since version 4.1: Support for logging out on
GETrequests is deprecated and will be
removed in Django 5.0.
-
class
PasswordChangeView¶ -
URL name:
password_changeAllows a user to change their password.
Attributes:
-
template_name¶ -
The full name of a template to use for displaying the password change
form. Defaults toregistration/password_change_form.htmlif not
supplied.
-
success_url¶ -
The URL to redirect to after a successful password change. Defaults to
'password_change_done'.
-
form_class¶ -
A custom “change password” form which must accept a
userkeyword
argument. The form is responsible for actually changing the user’s
password. Defaults to
PasswordChangeForm.
-
extra_context¶ -
A dictionary of context data that will be added to the default context
data passed to the template.
Template context:
form: The password change form (seeform_classabove).
-
-
class
PasswordChangeDoneView¶ -
URL name:
password_change_doneThe page shown after a user has changed their password.
Attributes:
-
template_name¶ -
The full name of a template to use. Defaults to
registration/password_change_done.htmlif not supplied.
-
extra_context¶ -
A dictionary of context data that will be added to the default context
data passed to the template.
-
-
class
PasswordResetView¶ -
URL name:
password_resetAllows a user to reset their password by generating a one-time use link
that can be used to reset the password, and sending that link to the
user’s registered email address.This view will send an email if the following conditions are met:
- The email address provided exists in the system.
- The requested user is active (
User.is_activeisTrue). - The requested user has a usable password. Users flagged with an unusable
password (see
set_unusable_password()) aren’t
allowed to request a password reset to prevent misuse when using an
external authentication source like LDAP.
If any of these conditions are not met, no email will be sent, but the
user won’t receive any error message either. This prevents information
leaking to potential attackers. If you want to provide an error message in
this case, you can subclass
PasswordResetFormand use the
form_classattribute.Note
Be aware that sending an email costs extra time, hence you may be
vulnerable to an email address enumeration timing attack due to a
difference between the duration of a reset request for an existing
email address and the duration of a reset request for a nonexistent
email address. To reduce the overhead, you can use a 3rd party package
that allows to send emails asynchronously, e.g. django-mailer.Attributes:
-
template_name¶ -
The full name of a template to use for displaying the password reset
form. Defaults toregistration/password_reset_form.htmlif not
supplied.
-
form_class¶ -
Form that will be used to get the email of the user to reset the
password for. Defaults to
PasswordResetForm.
-
email_template_name¶ -
The full name of a template to use for generating the email with the
reset password link. Defaults to
registration/password_reset_email.htmlif not supplied.
-
subject_template_name¶ -
The full name of a template to use for the subject of the email with
the reset password link. Defaults to
registration/password_reset_subject.txtif not supplied.
-
token_generator¶ -
Instance of the class to check the one time link. This will default to
default_token_generator, it’s an instance of
django.contrib.auth.tokens.PasswordResetTokenGenerator.
-
success_url¶ -
The URL to redirect to after a successful password reset request.
Defaults to'password_reset_done'.
-
from_email¶ -
A valid email address. By default Django uses the
DEFAULT_FROM_EMAIL.
-
extra_context¶ -
A dictionary of context data that will be added to the default context
data passed to the template.
-
html_email_template_name¶ -
The full name of a template to use for generating a
text/html multipart email with the password reset link. By
default, HTML email is not sent.
-
extra_email_context¶ -
A dictionary of context data that will be available in the email
template. It can be used to override default template context values
listed below e.g.domain.
Template context:
form: The form (seeform_classabove) for resetting the user’s
password.
Email template context:
email: An alias foruser.emailuser: The currentUser,
according to theemailform field. Only active users are able to
reset their passwords (User.is_active is True).site_name: An alias forsite.name. If you don’t have the site
framework installed, this will be set to the value of
request.META['SERVER_NAME'].
For more on sites, see The “sites” framework.domain: An alias forsite.domain. If you don’t have the site
framework installed, this will be set to the value of
request.get_host().protocol: http or httpsuid: The user’s primary key encoded in base 64.token: Token to check that the reset link is valid.
Sample
registration/password_reset_email.html(email body template):Someone asked for password reset for email {{ email }}. Follow the link below: {{ protocol}}://{{ domain }}{% url 'password_reset_confirm' uidb64=uid token=token %}
The same template context is used for subject template. Subject must be
single line plain text string.
-
class
PasswordResetDoneView¶ -
URL name:
password_reset_doneThe page shown after a user has been emailed a link to reset their
password. This view is called by default if thePasswordResetView
doesn’t have an explicitsuccess_urlURL set.Note
If the email address provided does not exist in the system, the user is
inactive, or has an unusable password, the user will still be
redirected to this view but no email will be sent.Attributes:
-
template_name¶ -
The full name of a template to use. Defaults to
registration/password_reset_done.htmlif not supplied.
-
extra_context¶ -
A dictionary of context data that will be added to the default context
data passed to the template.
-
-
class
PasswordResetConfirmView¶ -
URL name:
password_reset_confirmPresents a form for entering a new password.
Keyword arguments from the URL:
uidb64: The user’s id encoded in base 64.token: Token to check that the password is valid.
Attributes:
-
template_name¶ -
The full name of a template to display the confirm password view.
Default value isregistration/password_reset_confirm.html.
-
token_generator¶ -
Instance of the class to check the password. This will default to
default_token_generator, it’s an instance of
django.contrib.auth.tokens.PasswordResetTokenGenerator.
-
post_reset_login¶ -
A boolean indicating if the user should be automatically authenticated
after a successful password reset. Defaults toFalse.
-
post_reset_login_backend¶ -
A dotted path to the authentication backend to use when authenticating
a user ifpost_reset_loginisTrue. Required only if you have
multipleAUTHENTICATION_BACKENDSconfigured. Defaults to
None.
-
form_class¶ -
Form that will be used to set the password. Defaults to
SetPasswordForm.
-
success_url¶ -
URL to redirect after the password reset done. Defaults to
'password_reset_complete'.
-
extra_context¶ -
A dictionary of context data that will be added to the default context
data passed to the template.
-
reset_url_token¶ -
Token parameter displayed as a component of password reset URLs.
Defaults to'set-password'.
Template context:
form: The form (seeform_classabove) for setting the new user’s
password.validlink: Boolean, True if the link (combination ofuidb64and
token) is valid or unused yet.
-
class
PasswordResetCompleteView¶ -
URL name:
password_reset_completePresents a view which informs the user that the password has been
successfully changed.Attributes:
-
template_name¶ -
The full name of a template to display the view. Defaults to
registration/password_reset_complete.html.
-
extra_context¶ -
A dictionary of context data that will be added to the default context
data passed to the template.
-
Helper functions
-
redirect_to_login(next, login_url=None, redirect_field_name=‘next’)¶ -
Redirects to the login page, and then back to another URL after a
successful login.Required arguments:
next: The URL to redirect to after a successful login.
Optional arguments:
login_url: The URL of the login page to redirect to.
Defaults tosettings.LOGIN_URLif not supplied.redirect_field_name: The name of aGETfield containing the
URL to redirect to after log out. Overridesnextif the given
GETparameter is passed.
Built-in forms
If you don’t want to use the built-in views, but want the convenience of not
having to write forms for this functionality, the authentication system
provides several built-in forms located in django.contrib.auth.forms:
-
class
AdminPasswordChangeForm¶ -
A form used in the admin interface to change a user’s password.
Takes the
useras the first positional argument.
-
class
AuthenticationForm¶ -
A form for logging a user in.
Takes
requestas its first positional argument, which is stored on the
form instance for use by sub-classes.-
confirm_login_allowed(user)¶ -
By default,
AuthenticationFormrejects users whoseis_active
flag is set toFalse. You may override this behavior with a custom
policy to determine which users can log in. Do this with a custom form
that subclassesAuthenticationFormand overrides the
confirm_login_allowed()method. This method should raise a
ValidationErrorif the given user may
not log in.For example, to allow all users to log in regardless of “active”
status:from django.contrib.auth.forms import AuthenticationForm class AuthenticationFormWithInactiveUsersOkay(AuthenticationForm): def confirm_login_allowed(self, user): pass
(In this case, you’ll also need to use an authentication backend that
allows inactive users, such as
AllowAllUsersModelBackend.)Or to allow only some active users to log in:
class PickyAuthenticationForm(AuthenticationForm): def confirm_login_allowed(self, user): if not user.is_active: raise ValidationError( _("This account is inactive."), code='inactive', ) if user.username.startswith('b'): raise ValidationError( _("Sorry, accounts starting with 'b' aren't welcome here."), code='no_b_users', )
-
-
class
PasswordChangeForm¶ -
A form for allowing a user to change their password.
-
class
PasswordResetForm¶ -
A form for generating and emailing a one-time use link to reset a
user’s password.-
send_mail(subject_template_name, email_template_name, context, from_email, to_email, html_email_template_name=None)¶ -
Uses the arguments to send an
EmailMultiAlternatives.
Can be overridden to customize how the email is sent to the user.Parameters: - subject_template_name – the template for the subject.
- email_template_name – the template for the email body.
- context – context passed to the
subject_template,
email_template, andhtml_email_template(if it is not
None). - from_email – the sender’s email.
- to_email – the email of the requester.
- html_email_template_name – the template for the HTML body;
defaults toNone, in which case a plain text email is sent.
By default,
save()populates thecontextwith the
same variables that
PasswordResetViewpasses to its
email context.
-
-
class
SetPasswordForm¶ -
A form that lets a user change their password without entering the old
password.
-
class
UserChangeForm¶ -
A form used in the admin interface to change a user’s information and
permissions.
-
class
UserCreationForm¶ -
A
ModelFormfor creating a new user.It has three fields:
username(from the user model),password1,
andpassword2. It verifies thatpassword1andpassword2match,
validates the password using
validate_password(), and
sets the user’s password using
set_password().
Authentication data in templates
The currently logged-in user and their permissions are made available in the
template context when you use
RequestContext.
Technicality
Technically, these variables are only made available in the template
context if you use RequestContext and the
'django.contrib.auth.context_processors.auth' context processor is
enabled. It is in the default generated settings file. For more, see the
RequestContext docs.
Users
When rendering a template RequestContext, the
currently logged-in user, either a User
instance or an AnonymousUser instance, is
stored in the template variable {{ user }}:
{% if user.is_authenticated %} <p>Welcome, {{ user.username }}. Thanks for logging in.</p> {% else %} <p>Welcome, new user. Please log in.</p> {% endif %}
This template context variable is not available if a RequestContext is not
being used.
Permissions
The currently logged-in user’s permissions are stored in the template variable
{{ perms }}. This is an instance of
django.contrib.auth.context_processors.PermWrapper, which is a
template-friendly proxy of permissions.
Evaluating a single-attribute lookup of {{ perms }} as a boolean is a proxy
to User.has_module_perms(). For example, to check if
the logged-in user has any permissions in the foo app:
Evaluating a two-level-attribute lookup as a boolean is a proxy to
User.has_perm(). For example,
to check if the logged-in user has the permission foo.add_vote:
{% if perms.foo.add_vote %}
Here’s a more complete example of checking permissions in a template:
{% if perms.foo %} <p>You have permission to do something in the foo app.</p> {% if perms.foo.add_vote %} <p>You can vote!</p> {% endif %} {% if perms.foo.add_driving %} <p>You can drive!</p> {% endif %} {% else %} <p>You don't have permission to do anything in the foo app.</p> {% endif %}
It is possible to also look permissions up by {% if in %} statements.
For example:
{% if 'foo' in perms %} {% if 'foo.add_vote' in perms %} <p>In lookup works, too.</p> {% endif %} {% endif %}
Managing users in the admin
When you have both django.contrib.admin and django.contrib.auth
installed, the admin provides a convenient way to view and manage users,
groups, and permissions. Users can be created and deleted like any Django
model. Groups can be created, and permissions can be assigned to users or
groups. A log of user edits to models made within the admin is also stored and
displayed.
Creating users
You should see a link to “Users” in the “Auth”
section of the main admin index page. The “Add user” admin page is different
than standard admin pages in that it requires you to choose a username and
password before allowing you to edit the rest of the user’s fields.
Also note: if you want a user account to be able to create users using the
Django admin site, you’ll need to give them permission to add users and
change users (i.e., the “Add user” and “Change user” permissions). If an
account has permission to add users but not to change them, that account won’t
be able to add users. Why? Because if you have permission to add users, you
have the power to create superusers, which can then, in turn, change other
users. So Django requires add and change permissions as a slight security
measure.
Be thoughtful about how you allow users to manage permissions. If you give a
non-superuser the ability to edit users, this is ultimately the same as giving
them superuser status because they will be able to elevate permissions of
users including themselves!
Changing passwords
User passwords are not displayed in the admin (nor stored in the database), but
the password storage details are displayed.
Included in the display of this information is a link to
a password change form that allows admins to change user passwords.
Данная статья является сборкой-компиляцией нескольких (основано на первой) статей, как результат моих изучений по теме jwt аутентификации в джанге со всем вытекающим. Так и не удалось (по крайней мере в рунете) найти нормальную статью, в которой рассказывается от этапа создания проекта, startproject, прикручивание jwt аутентификации.
Добротно исследовав, отдаю на людской суд.
Ссылки на пользуемые статьи прилагаются:
-
https://thinkster.io/tutorials/django-json-api/authentication
-
https://simpleisbetterthancomplex.com/tutorial/2018/12/19/how-to-use-jwt-authentication-with-django-rest-framework.html
-
https://www.django-rest-framework.org/api-guide/authentication/
-
https://medium.com/django-rest/django-rest-framework-jwt-authentication-94bee36f2af8
Настройка аутентификации JWT
Django поставляется с системой аутентификации, основанной на сеансах, и это работает из коробки. Это включает в себя все модели (models), представления (views) и шаблоны (templates), которые могут быть нужны вам для создания и дальнейшего логина пользователей. Но вот в чем загвоздка: стандартная система аутентификации Django работает только с традиционным ‘запрос-ответ’ циклом HTML.
Что мы имеем ввиду под «традиционным ‘запрос-ответ’ циклом HTML»? Исторически, когда пользователь хотел выполнить какое-то действие (например, создать новый аккаунт), он заполнял определенную форму в браузере. Далее, когда он кликал на кнопку «Отправить», браузер формировал запрос — который включал в себя данные, введенные пользователем — и отправлял на сервер, сервер обрабатывал запрос, и отвечал либо HTML страницей, либо редиректом на новую страницу. Это то, что мы имеем ввиду, когда говорим о «полном обновлении страницы».
Почему важно знать, что встроенная система аутентификации Django работает только с традиционным ‘запрос-ответ’ циклом HTML? Потому что клиент, для которого мы создадим данный API, не придерживается этого цикла. Вместо этого, клиент будет ожидать, что сервер вернет JSON, вместе обычного HTML. Возвращая JSON, мы можем позволить решать клиенту, а не серверу, что делать дальше. В цикле ‘запрос-ответ’ JSON, сервер получает данные, обрабатывает их и возвращает ответ (пока что как и в цикле ‘запрос-ответ’ HTML), но ответ не управляет поведением браузера. Ответ просто сообщает браузеру результат запроса.
К счастью, команда разработки Django поняла, что тренды веб разработки движутся именно в этом направлении. Они также знали, что некоторые проекты могут не захотеть использовать встроенные модели, представления и шаблоны. Вместо этого, они могут использовать собственные. Чтобы убедиться, что все усилия, затраченные на создание встроенной системы аутентификации Django, не потрачены зря, они решили сделать возможным использование наиболее важных частей, сохраняя при этом возможность настройки конечного результата.
Мы поговорим об этом позже в этом руководстве, а пока что вот список того, что вам нужно знать:
-
Мы создадим собственную модель User, взамен модели Django
-
Нам нужно будет написать наши собственные представления для поддержки возврата JSON вместо HTML
-
Поскольку мы не будем использовать HTML, нам не нужны встроенные шаблоны входа и регистрации Django
Аутентификация, основанная на сессии
По умолчанию, Django использует сессии для аутентификации. Прежде чем идти дальше, нужно проговорить, что это значит, почему это важно, что такое аутентификация на основе токенов и что такое JSON Web Token Authentication (JWT для краткости), и что из всего этого мы будем использовать далее в статье.
В Django сессии хранятся в файлах куки (cookie). Эти сессии, наряду со встроенным промежуточным ПО (middlewares) и объектами запросов, гарантируют, что пользователь будет доступен в каждом запросе. Доступ к пользователю можно получить как request.user. Когда пользователь вошел в систему, request.user является экземпляром класса User. Когда же он разлогинивается, request.user является экземпляром класса AnonymousUser. Независимо от того, аутентифицирован пользователь или нет, request.user всегда будет существовать.
В чем же разница? Говоря просто, в любое время, когда вы хотите узнать, является ли текущий пользователь аутентифицированным, вы можете использовать request.user.isauthenticated(), который вернет True в случае аутентификации пользователя и False в обратно случае. Если request.user является AnonymousUser, request.user.isauthenticated() вернет False. Это позволяет разработчику (вам ) преобразовать
if request.user is not None and request.user.isauthenticated(): в if request.user.isauthenticated():
В этом случае, требуется меньше набора текста — и это хорошо!
В нашем случае, клиент и сервер будут работать в разных местах. Например, сервер будет напущен по адресу http://localhost:3000, а клиент по адресу http://localhost:5000. Браузер будет считать, что эти две локации будут находиться в разных местах, аналогично запуску сервера на http://www.server.com и клиента на http://www.clent.com. Мы не будем разрешать внешним доменам получать доступ к нашим файлам cookie, поэтому нам нужно найти другое, альтернативное решение, для использования сессий.
Если вам интересно, почему мы не разрешаем доступ к нашим файлам cookie, ознакомьтесь со статьями о совместном использовании ресурсов между источниками (Cross-Origin Resource Sharing, CORS) и подделке межсайтовых запросов (Cross-Site Request Forgery, CSRF), по ссылкам ниже:
CORS
CSRF
Аутентификация, основанная на токенах
Наиболее распространенной альтернативой аутентификации на основе сессий/сеансов является т.н. аутентификация на основе токенов. Мы будем использовать особую форму такой аутентификации для защиты нашего приложения. При аутентификации на основе токенов сервер предоставляет клиенту токен после успешного запроса на вход. Этот токен уникален для пользователя и хранится в базе данных вместе идентификатором пользователя (если точнее, возможны раные вариации генерации токена, основная же идея в том, чтобы он аутентифицировал пользователя, позволяя знать кто это и давая доступ к апи, и имел время жизни, по истечении которого «протухал»). Ожидается, что клиент отправит токен вместе с будущими запросами, чтобы сервер мог идентифицировать пользователя. Сервер делает это путем поиска в таблице базы данных, содержащей все созданные токены. Если соответствующий токен найден, то сервер продолжает проверять, действителен ли токен. Если не найден, мы говорим, что пользователь не аутентифицирован. Поскольку токены хранятся в базе данных, а не в файлах куки, аутентификация на основе токенов соответствует нашим потребностям.
Верификация токенов
Мы всегда имеем возможность сохранить не только идентификатор пользователя (ID) с его токеном. Мы также можем хранить такие вещи, как дата истечения срока действия токена. В данном примере нам необходимо убедиться, что срок действия токена не прошел. Если прошел — считать, что токен недействителен. В таком случае, мы удаляем его из базы данных и просим пользователя снова войти в систему.
JSON Web Tokens
JSON Web Token (сокр. JWT) — это открытый стандарт (RFC 7519) , который определяет компактный и автономный способ безопасной передачи информации между двумя сторонами. Можно думать о JWT как о токенах аутентификации на стероидах.
Помните, что мы сказали, что будем использовать особую форму аутентификации на основе токенов? JWT это как раз то, что имелось ввиду.
Почему JSON Web Tokes лучше обычных токенов?
При переходе с обычных токенов на JWT мы получаем несколько преимуществ:
-
JWT — открытый стандарт. Это означает, что что все реализации JWT должны быть довольно похожими, что является преимуществом при работе с разными языками и технологиями. Обычные токены имеют более свободную форму, что позволяет разработчику решать, как лучше всего реализовывать токены.
-
JWT содержат информацию о пользователе, что удобно для клиентской стороны.
-
Библиотеки здесь берут на себя основную тяжелую работу. Развертывание собственной системы аутентификации опасно, поэтому мы оставляем важные вещи проверенным «в боях» библиотекам, которым можем доверять.
Создание приложения, создание пользовательской модели
Для начала, создадим проект. Перейдите в терминале в вашу рабочую директорию, и выполните командуdjango-admin startproject json_auth_project (если вылезает ошибка, установите глобально джангу командой pip3 install django).
Теперь необходимо создать виртуальное окружение. Перейдите в директорию проекта командой cd jsonauthproject, далее выполните команду python3 -m venv venv. Виртуальное окружение может создаваться некоторое время на слабых компьютерах, но итогом станет появление директории venv, содержащей виртуальное окружение. Его необходимо активировать, для этого выполните команду . ./venv/bin/activate. Далее советую создать файл requirements.txt, который по мере наполнения проекта внешними пакетами актуализировать (так же обязательно установите в окружении пакет django командой pip3 install django). Выполните команду pip3 freeze > requirements.txt (выполняйте данную команду каждый раз, когда добавляете новый пакет/ы в проект). Советую сразу применить стандартные системные миграции командой ./manage.py migrate. Теперь можно попробовать запустить проект, чтобы убедиться, что все работает. Для запуска девелоп-сервера выполните команду ./manage.py runserver. Результатом станут запуск сервера на localhost и портом по умолчанию 8000. Перейдите в браузере по ссылке http://localhost:8000. Видите ракету с надписью «The install worked successfully! Congratulations!» — она готова к запуску
Для начала, создадим апп (app) authentication: ./manage.py startapp authentication. В файле apps/authentication/models.py будут храниться модели, которые мы будем использовать для аутентификации. Создайте этот файл, если его нет.
Нам понадобится следующий набор импортов для создания классов User и UserManager, поэтому добавьте в начало файла код:
import jwt
from datetime import datetime, timedelta
from django.conf import settings from django.contrib.auth.models import (
AbstractBaseUser, BaseUserManager, PermissionsMixin
)
from django.db import modelsПри настройке аутентификации в Django одним из требований является указание настраиваемого класса Manager с двумя методами: createuser() и createsuperuser(). Чтобы узнать больше о пользовательской аутентификации в Django, прочтите https://docs.djangoproject.com/en/3.1/topics/auth/customizing/#substituting-a-custom-user-model
Наберите следующий код класса UserManager в файл apps/authentication/models.py и обязательно примите к сведению комментарии (больше про менеджеров: https://docs.djangoproject.com/en/3.1/topics/db/managers/):
class UserManager(BaseUserManager):
"""
Django требует, чтобы кастомные пользователи определяли свой собственный
класс Manager. Унаследовавшись от BaseUserManager, мы получаем много того
же самого кода, который Django использовал для создания User (для демонстрации).
"""
def create_user(self, username, email, password=None):
""" Создает и возвращает пользователя с имэйлом, паролем и именем. """
if username is None:
raise TypeError('Users must have a username.')
if email is None:
raise TypeError('Users must have an email address.')
user = self.model(username=username, email=self.normalize_email(email))
user.set_password(password)
user.save()
return user
def create_superuser(self, username, email, password):
""" Создает и возввращет пользователя с привилегиями суперадмина. """
if password is None:
raise TypeError('Superusers must have a password.')
user = self.create_user(username, email, password)
user.is_superuser = True
user.is_staff = True
user.save()
return userТеперь, когда мы имеем класс менеджера, мы можем создать модель пользователя, наберите далее:
class User(AbstractBaseUser, PermissionsMixin):
# Каждому пользователю нужен понятный человеку уникальный идентификатор,
# который мы можем использовать для предоставления User в пользовательском
# интерфейсе. Мы так же проиндексируем этот столбец в базе данных для
# повышения скорости поиска в дальнейшем.
username = models.CharField(db_index=True, max_length=255, unique=True)
# Так же мы нуждаемся в поле, с помощью которого будем иметь возможность
# связаться с пользователем и идентифицировать его при входе в систему.
# Поскольку адрес почты нам нужен в любом случае, мы также будем
# использовать его для входы в систему, так как это наиболее
# распространенная форма учетных данных на данный момент (ну еще телефон).
email = models.EmailField(db_index=True, unique=True)
# Когда пользователь более не желает пользоваться нашей системой, он может
# захотеть удалить свой аккаунт. Для нас это проблема, так как собираемые
# нами данные очень ценны, и мы не хотим их удалять :) Мы просто предложим
# пользователям способ деактивировать учетку вместо ее полного удаления.
# Таким образом, они не будут отображаться на сайте, но мы все еще сможем
# далее анализировать информацию.
is_active = models.BooleanField(default=True)
# Этот флаг определяет, кто может войти в административную часть нашего
# сайта. Для большинства пользователей это флаг будет ложным.
is_staff = models.BooleanField(default=False)
# Временная метка создания объекта.
created_at = models.DateTimeField(auto_now_add=True)
# Временная метка показывающая время последнего обновления объекта.
updated_at = models.DateTimeField(auto_now=True)
# Дополнительный поля, необходимые Django
# при указании кастомной модели пользователя.
# Свойство USERNAME_FIELD сообщает нам, какое поле мы будем использовать
# для входа в систему. В данном случае мы хотим использовать почту.
USERNAME_FIELD = 'email'
REQUIRED_FIELDS = ['username']
# Сообщает Django, что определенный выше класс UserManager
# должен управлять объектами этого типа.
objects = UserManager()
def __str__(self):
""" Строковое представление модели (отображается в консоли) """
return self.email
@property
def token(self):
"""
Позволяет получить токен пользователя путем вызова user.token, вместо
user._generate_jwt_token(). Декоратор @property выше делает это
возможным. token называется "динамическим свойством".
"""
return self._generate_jwt_token()
def get_full_name(self):
"""
Этот метод требуется Django для таких вещей, как обработка электронной
почты. Обычно это имя фамилия пользователя, но поскольку мы не
используем их, будем возвращать username.
"""
return self.username
def get_short_name(self):
""" Аналогично методу get_full_name(). """
return self.username
def _generate_jwt_token(self):
"""
Генерирует веб-токен JSON, в котором хранится идентификатор этого
пользователя, срок действия токена составляет 1 день от создания
"""
dt = datetime.now() + timedelta(days=1)
token = jwt.encode({
'id': self.pk,
'exp': int(dt.strftime('%s'))
}, settings.SECRET_KEY, algorithm='HS256')
return token.decode('utf-8')Если хотите узнать немного больше о кастомной аутентификации пользователя, несколько ссылок для глубокого изучения:
-
models.CustomUser— охватывает все, что Django ожидает от кастомной моделиUserhttps://docs.djangoproject.com/en/3.1/topics/auth/customizing/#django.contrib.auth.models.CustomUser -
models.AbstractBaseUserиmodels.PermissionsMixin— предоставляют несколько требований выше сразу https://docs.djangoproject.com/en/3.1/topics/auth/customizing/#django.contrib.auth.models.AbstractBaseUser https://docs.djangoproject.com/en/3.1/topics/auth/customizing/#django.contrib.auth.models.PermissionsMixin -
models.BaseUserManager— дает нам несколько полезных инструментов для запуска нашего классаUserManagerhttps://docs.djangoproject.com/en/3.1/topics/auth/customizing/#django.contrib.auth.models.BaseUserManager -
В справочнике по полям модели перечислены различные типы полей, поддерживаемые Django, и параметры, которые принимает каждое поле (например,
db_indexиunique) https://docs.djangoproject.com/en/3.1/ref/models/fields/
Определение AUTH_USER_MODEL в настройках проекта
По-умолчанию, Django предполагает, что модель пользователя стандартная — django.contrib.auth.models.User. Однако, мы хотим в качестве модели пользователя использовать нашу созданную модель. Поскольку мы создали класс User, следующее что нам нужно сделать, это указать Django использовать нашу модель User, а не стандартную.
Потратьте немного времени и почитайте о замене стандартной модели пользователя в Django: https://docs.djangoproject.com/en/3.1/topics/auth/customizing/#substituting-a-custom-user-model
Если вы уже перенесли свою модель базы данных до того, как указали кастомную модель User, вам может потребоваться удалить свою базу данных и повторно запустить миграции.
Укажите Django на использование нашей модели User, указав параметр AUTH_USER_MODEL в файле project/settings.py. Чтобы установить кастомную модель, введите в нижней части файла project/settings.py:
# Рассказать Django о созданной нами кастомной модели пользователя. Строка
# authentication.User сообщает Django, что мы ссылаемся на модель User в модуле
# authentication. Этот модуль зарегистрирован выше в настройке INSTALLED_APPS.
AUTH_USER_MODEL = 'authentication.User'Создание и запуск миграций
По мере добавления новых моделей и изменения существующих, нам потребуется обновлять базу данных, чтобы отобразить эти изменения. Миграции — это то, что Django использует, чтобы сообщить базе данных, что что-то изменилось. Наша же миграция сообщит, что нам нужно добавить новую таблицу для нашей кастомной модели User.
-
Примечание: Если вы уже использовали
./manage.py makemigrationsили./manage.py migrate, вам необходимо удалить базу данных прежде, чем продолжать. Для SQLite достаточно просто удалить файл, лежащий в корне директории проекта. Django будет недоволен, если вы изменитеAUTH_USER_MODELпосле создания базы данных, и лучше всего просто удалить базу данных и начать заново.
Теперь мы готовы создавать и применять миграции. После этого мы сможем создать нашего первого пользователя. Чтобы создать миграцию, необходимо запустить в консоли следующую команду:
./manage.py makemigrations
Это создаст стандартные миграции для нашего нового проекта Django. Однако, это не создат миграции для новых приложений внутри нашего проекта. В первый раз, когда мы хотим создать миграции для нового приложения, мы должны быть более конкретны.
Чтобы создать миграции для приложения authenticate, выполните
./manage.py makemigrations authentication
Это создаст инициализирующую миграцию для приложения authentication. В будущем. когда вы захотите сгенерировать новый миграции для приложения аутентификации, вам нужно будет запустить только
./manage.py makemigrations
Теперь мы можем применить миграции с помощью команды:
./manage.py migrate
В отличие от makemigrations, вам не нужно указывать название приложения при выполнении migrate.
Наш первый пользователь
Итак, мы создали нашу модель User, более того, наша база данных поднята и работает. Следующим шагом будет создание первого объекта пользователя, User. Мы сделаем этого пользователя суперадмином, так как будем использовать его для дальнейшего тестирования нашего приложения.
Создайте пользователя с помощью следующей команды терминала:
./manage.py createsuperuser
Django спросит вас о параметрах нового пользователя — почте, никнейме и пароле. После ввода данных, пользователь будет создан. Мои поздравления!
Для проверки успешного создания пользователя, перейдите в шелл Django, посредством выполнения следующей команды:
./manage.py shell_plus (или стандартную версию шелла ./manage.py shell)
Оболочка shell_plus предоставляется библиотекой django-extensions, которую необходимо установить (pip3 install django-extensions), если вы хотите пользоваться shell_plus. Это удобно, так как он автоматически импортирует модели всех приложения, указанных в INSTALLED_APPS. При желании, его также можно настроить для автоматического импорта других утилит.
После открытия оболочки, выполните следующие команды:
user = User.objects.first()
user.username
user.tokenЕсли все сделано нормально, вы должны увидеть в выводах username и token.
Регистрация новых пользователей
На текущий момент, пользователь не может делать чего бы то ни было интересного. Нашей следующей задачей будет создание эндпоинта для регистрации новых пользователей.
RegistrationSerializer
Создайте файл apps/authentication/serializers.py и наберите туда следующий код:
from rest_framework import serializers
from .models import User
class RegistrationSerializer(serializers.ModelSerializer):
""" Сериализация регистрации пользователя и создания нового. """
# Убедитесь, что пароль содержит не менее 8 символов, не более 128,
# и так же что он не может быть прочитан клиентской стороной
password = serializers.CharField(
max_length=128,
min_length=8,
write_only=True
)
# Клиентская сторона не должна иметь возможность отправлять токен вместе с
# запросом на регистрацию. Сделаем его доступным только на чтение.
token = serializers.CharField(max_length=255, read_only=True)
class Meta:
model = User
# Перечислить все поля, которые могут быть включены в запрос
# или ответ, включая поля, явно указанные выше.
fields = ['email', 'username', 'password', 'token']
def create(self, validated_data):
# Использовать метод create_user, который мы
# написали ранее, для создания нового пользователя.
return User.objects.create_user(**validated_data)Прочитайте внимательно код, обращая особое внимание на комментарии, а затем продолжим.
Немного о ModelSerializer
В приведенном выше коде мы создали класс RegistrationSerializer, который наследуется от сериализатора serializers.ModelSerializer. serializers.ModelSerializer — это просто абстракция поверх serializers.Serializer, про которую подробней можно почитать в документации Django REST Framework (DFR). ModelSerializer просто напросто упрощает для нас выполнение некоторых стандартных вещей, относящихся к сериализации моделей Django. Следует также отметить, что он позволяет указать два метода: создание и обновление. В приведенном выше примере мы написали наш собственный метод create() с использованием User.objects.create_user(), но не указали метод обновления. В этом случае DRF будет использовать собственный метод обновления по умолчанию для обновления пользователя.
RegistrationAPIView
Теперь мы можем сериализовывать запросы и ответы для регистрации пользователя. Далее, мы должны создать вью (views) для реализации эндпоинта (endpoint), что даст клиентской стороне URL для запроса на создание нового пользователя.
Создайте файл apps/authentication/views.py если его нет и наберите следующий код:
from rest_framework import status
from rest_framework.permissions import AllowAny
from rest_framework.response import Response
from rest_framework.views import APIView
from .serializers import RegistrationSerializer
class RegistrationAPIView(APIView):
"""
Разрешить всем пользователям (аутентифицированным и нет) доступ к данному эндпоинту.
"""
permission_classes = (AllowAny,)
serializer_class = RegistrationSerializer
def post(self, request):
user = request.data.get('user', {})
# Паттерн создания сериализатора, валидации и сохранения - довольно
# стандартный, и его можно часто увидеть в реальных проектах.
serializer = self.serializer_class(data=user)
serializer.is_valid(raise_exception=True)
serializer.save()
return Response(serializer.data, status=status.HTTP_201_CREATED)Проговорим о паре новых вещей в коде выше:
-
Свойство
permission_classes— это то, что решает, кто может использовать этот эндпоинт. Мы можем ограничить это авторизованными пользователями или администраторами и т.д. и т.п. -
Паттерн создания сериализатора, валидации и сохранения, который можно увидеть в методе post — довольно стандартный, и его можно часто увидеть в реальных проектах. Ознакомьтесь с ним подробнее.
Почитать про Django REST Framework (DRF) Permissions можно по ссылке https://www.django-rest-framework.org/api-guide/permissions/
Теперь мы должны настроить маршрутизацию для нашего проекта. В Django 1.x => 2.x были внесены некоторые изменения при переключении с URL на путь (path). Есть довольно много вопросов по адаптации старого URL-адреса к новому способу определения URL’s, но это выходит далеко за рамки данной статьи. Стоит сказать, что в последних версиях Django работа с роутами значительно упростилась, в чем можно убедиться далее.
Создайте файл apps/authentication/urls.py и поместите в него следующий код для обработки маршрутов нашего приложения:
from django.urls import path
from .views import RegistrationAPIView
app_name = 'authentication'
urlpatterns = [
path('users/', RegistrationAPIView.as_view()),
]В Django настоятельно рекомендуется создавать пути для конкретных модульных приложений. Это по факту заставляет задумываться о дизайне приложения и сохранении его автономности и возможности повторного использования. Что в данном случае мы и сделали. Мы также указали app_name = 'authentication', чтобы мы могли использовать включение (including) и придерживаться модульности приложения. Теперь нужно включить указанный выше файл в наш файл глобальных URL-адресов.
Откройте project/urls.py и вы увидите следующую строку в верхней части файла:
from django.urls import path
Первое, что нужно сделать, это импортировать метод include() из django.urls
from django.urls import path, include
Метод include() позволяет включить еще один файл без необходимости выполнения кучи другой работы, например, импортирования а затем повторной регистрации маршрута в этом файле.
Ниже видим следующее:
urlpatterns = [
path('admin/', admin.site.urls),
]Обновим это, чтобы включить наш новый файл urls.py:
urlpatterns = [
path('admin/', admin.site.urls),
path('api/', include('apps.authentication.urls', namespace='authentication')),
]Регистрация пользователя с помощью Postman
Теперь, когда мы создали модель User и добавили эндпоинт для регистрации новых пользователей, выполним быструю проверку работоспособности, чтобы убедиться, что мы на правильном пути. Для этого использует прекрасный инструмент тестирования (и далеко не только) апи под названием Postman (ознакомиться с его функциональность подробнее можно по ссылке https://learning.postman.com/docs/getting-started/introduction/).
Необходимо сформировать POST запрос по пути localhost:8000/api/users/ со следующей структурой данных в теле запроса:
{
"user": {
"username": "user1",
"email": "user1@user.user",
"password": "qweasdzxc"
}
}
В ответ вернутся данных только что созданного пользователя. Мои поздравления! Все работает как надо, правда, с небольшим нюансом. В ответе вся информация пользователя находится на корневом уровне, а не располагается в поле «user». Чтобы это исправить (чтобы ответ был похож на тело запроса при регистрации, указанное выше), нужно создать настраиваемое средство визуализации DRF (renderer).
Рендеринг объектов User
Создайте файл под названием apps/authentication/renderers.py и наберите в него следующий код:
import json
from rest_framework.renderers import JSONRenderer
class UserJSONRenderer(JSONRenderer):
charset = 'utf-8'
def render(self, data, media_type=None, renderer_context=None):
# Если мы получим ключ token как часть ответа, это будет байтовый
# объект. Байтовые объекты плохо сериализуются, поэтому нам нужно
# декодировать их перед рендерингом объекта User.
token = data.get('token', None)
if token is not None and isinstance(token, bytes):
# Как говорится выше, декодирует token если он имеет тип bytes.
data['token'] = token.decode('utf-8')
# Наконец, мы можем отобразить наши данные в простанстве имен 'user'.
return json.dumps({
'user': data
})Здесь ничего особо нового или интересного не происходит, поэтому прочитайте комментарии в коде и двигаемся дальше.
Теперь, откройте файл apps/auhentication/views.py и импортируйте созданный нами UserJSONRenderer, добавив следующую строку:
from .renderers import UserJSONRenderer
Кроме того, необходимо установить свойство renderer_classes класса RegistrationAPIView:
renderer_classes = (UserJSONRenderer,)Теперь, имея UserJSONRenderer на нужном месте, используйте запрос в Postman’e на создание нового пользователя. Обратите внимание, что теперь ответ находится внутри пространства имен «user».
Вход пользователей в систему
Поскольку теперь пользователи могут зарегистрироваться в приложении, нам нужно реализовать для них способ входа в свою учетную запись. Далее, мы добавим сериализатор и представление, необходимые пользователям для входа в систему. Мы также начнем смотреть, как наш API должен обрабатывать ошибки.
LoginSerializer
Откройте файл apps/authentication/serializers.py и добавьте следующий импорт:
from django.contrib.auth import authenticateПосле, наберите следующий код сериализатора в конце файла:
class LoginSerializer(serializers.Serializer):
email = serializers.CharField(max_length=255)
username = serializers.CharField(max_length=255, read_only=True)
password = serializers.CharField(max_length=128, write_only=True)
token = serializers.CharField(max_length=255, read_only=True)
def validate(self, data):
# В методе validate мы убеждаемся, что текущий экземпляр
# LoginSerializer значение valid. В случае входа пользователя в систему
# это означает подтверждение того, что присутствуют адрес электронной
# почты и то, что эта комбинация соответствует одному из пользователей.
email = data.get('email', None)
password = data.get('password', None)
# Вызвать исключение, если не предоставлена почта.
if email is None:
raise serializers.ValidationError(
'An email address is required to log in.'
)
# Вызвать исключение, если не предоставлен пароль.
if password is None:
raise serializers.ValidationError(
'A password is required to log in.'
)
# Метод authenticate предоставляется Django и выполняет проверку, что
# предоставленные почта и пароль соответствуют какому-то пользователю в
# нашей базе данных. Мы передаем email как username, так как в модели
# пользователя USERNAME_FIELD = email.
user = authenticate(username=email, password=password)
# Если пользователь с данными почтой/паролем не найден, то authenticate
# вернет None. Возбудить исключение в таком случае.
if user is None:
raise serializers.ValidationError(
'A user with this email and password was not found.'
)
# Django предоставляет флаг is_active для модели User. Его цель
# сообщить, был ли пользователь деактивирован или заблокирован.
# Проверить стоит, вызвать исключение в случае True.
if not user.is_active:
raise serializers.ValidationError(
'This user has been deactivated.'
)
# Метод validate должен возвращать словать проверенных данных. Это
# данные, которые передются в т.ч. в методы create и update.
return {
'email': user.email,
'username': user.username,
'token': user.token
}Когда сериализатор будет на своем месте, можно отправляться писать представление.
LoginAPIView
Откройте файл apps/authentication/views.py и обновите импорты:
from .serializers import LoginSerializer, RegistrationSerializerА затем, добавьте само представление:
class LoginAPIView(APIView):
permission_classes = (AllowAny,)
renderer_classes = (UserJSONRenderer,)
serializer_class = LoginSerializer
def post(self, request):
user = request.data.get('user', {})
# Обратите внимание, что мы не вызываем метод save() сериализатора, как
# делали это для регистрации. Дело в том, что в данном случае нам
# нечего сохранять. Вместо этого, метод validate() делает все нужное.
serializer = self.serializer_class(data=user)
serializer.is_valid(raise_exception=True)
return Response(serializer.data, status=status.HTTP_200_OK)Далее, откройте файл apps/authentication/urls.py и обновите импорт:
from .views import LoginAPIView, RegistrationAPIViewИ затем добавьте новое правило в urlpatterns:
urlpatterns = [
path('users/', RegistrationAPIView.as_view()),
path('users/login/', LoginAPIView.as_view()),
]Вход пользователя с помощью Postman
На данном этапе, пользователь должен иметь возможность войти в систему, используя соответствующий эндпоинт нашей системы. Сделаем это Откроем использованный ранее Postman, и попробуем выполнить пост запрос на http://localhost:8000/api/users/login/, передав в теле почту и пароль ранее созданного пользователя. Если все было сделано верно, должен вернуться объект вида:
{
"user": {
"email": "email@email.email",
"username": "admin",
"token": "eyJ0eXAiOiJKV1QiLCJhbGciOiJIUzI1NiJ9.eyJpZCI6MSwiZXhwIjoxNjA1MTE3MjkwfQ.W8B6RY-jGO9PYDTzDWxhrkSHsTe1p3jlzq1BL7Tbwcs"
}
}Как видно, в ответ включен token, который можно использовать для выполнения всех будущих запросов, требующих аутентификации пользователя.
Есть еще кое-что, что нам необходимо сделать. Попробуйте выполнить вход, указав неверные почту или пароль, или оба. Обратите внимание на ответ с ошибкой — с ней есть две проблемы. Во-первых, non_field_errors выглядит странно. Обычно этот ключ должен обзываться именем поля, по которому сериализатор не прошел проверку. Поскольку мы переопределили весь метод проверки, вместо использования отдельных методов, зависящих от проверяемого поля, такого как например validate_email, Django REST Framework не знает, какое поле атрибутировать. По умолчанию, это поле обзывается nonfield_errors, и так как наш клиент будет использовать это поле для отображения ошибок, нам необходимо изменить такое поведение. Во-вторых, клиент будет ожидать, что любые ошибки будут помещены пространство имен под соответствующим ключом ошибки в JSON ответе (как мы сделали это в эндпоинтах регистрации и входа). Мы добьемся этого, переопределив стандартную обработку ошибок Django REST Framework.
Перегрузка EXCEPTION_HANDLER и NON_FIELD_ERRORS_KEY
Одна из настроек DRF под названием EXCEPTION_HANDLER возвращает словарь ошибок. Мы хотим, чтобы имена наших ошибок находились под общим единым ключом, потому нам нужно переопределить EXCEPTION_HANDLER. Так же переопределим и NON_FIELD_ERRORS_KEY, как упоминалось ранее.
Начнем с создания project/exceptions.py, и добавления в него следующего кода:
from rest_framework.views import exception_handler
def core_exception_handler(exc, context):
# Если возникает исключение, которые мы не обрабатываем здесь явно, мы
# хотим передать его обработчику исключений по-умолчанию, предлагаемому
# DRF. И все же, если мы обрабатываем такой тип исключения, нам нужен
# доступ к сгенерированному DRF - получим его заранее здесь.
response = exception_handler(exc, context)
handlers = {
'ValidationError': _handle_generic_error
}
# Определить тип текущего исключения. Мы воспользуемся этим сразу далее,
# чтобы решить, делать ли это самостоятельно или отдать эту работу DRF.
exception_class = exc.__class__.__name__
if exception_class in handlers:
# Если это исключение можно обработать - обработать :) В противном
# случае, вернуть ответ сгенерированный стандартными средствами заранее
return handlers[exception_class](exc, context, response)
return response
def _handle_generic_error(exc, context, response):
# Это самый простой обработчик исключений, который мы можем создать. Мы
# берем ответ сгенерированный DRF и заключаем его в ключ 'errors'.
response.data = {
'errors': response.data
}
return responseПозаботившись об этом, откройте файл project/settings.py и добавьте новый параметр под названием REST_FRAMEWORK в конец файла:
REST_FRAMEWORK = {
'EXCEPTION_HANDLER': 'project.exceptions.core_exception_handler',
'NON_FIELD_ERRORS_KEY': 'error',
}Так переопределяются стандартные настройки DFR. Чуть позже, мы добавим еще одну настройку, когда будем писать представления, требующие аутентификации пользователя. Попробуйте отправить еще один некорректный (с неверными почтой и/или паролем) запрос на вход с помощью Postman — сообщение об ошибке должно измениться.
Обновить UserJSONRenderer
Нет, в ответе полученном с неверными почтой/паролем все совсем не так, как ожидалось. Да, мы получили ключ «error», но все пространство имен заключено в ключе «user», что совсем не хорошо. Давайте обновим UserJSONRenderer чтобы проверять ключ «error» и предпринять некоторые действия в таком случае. Откройте файл apps/authenticate/renderers.py и внесите следующие изменения:
import json
from rest_framework.renderers import JSONRenderer
class UserJSONRenderer(JSONRenderer):
charset = 'utf-8'
def render(self, data, media_type=None, renderer_context=None):
# Если представление выдает ошибку (например, пользователь не может
# быть аутентифицирован), data будет содержать ключ error. Мы хотим,
# чтобы стандартный JSONRenderer обрабатывал такие ошибки, поэтому
# такой случай необходимо проверить.
errors = data.get('errors', None)
# Если мы получим ключ token как часть ответа, это будет байтовый
# объект. Байтовые объекты плохо сериализуются, поэтому нам нужно
# декодировать их перед рендерингом объекта User.
token = data.get('token', None)
if errors is not None:
# Позволим стандартному JSONRenderer обрабатывать ошибку.
return super(UserJSONRenderer, self).render(data)
if token is not None and isinstance(token, bytes):
# Как говорится выше, декодирует token если он имеет тип bytes.
data['token'] = token.decode('utf-8')
# Наконец, мы можем отобразить наши данные в простанстве имен 'user'.
return json.dumps({
'user': data
})Теперь, пошлите снова некорректный (неверные почта/пароль) запрос с помощью Postman — все должно быть как ожидается.
Получение и обновление пользователей.
Пользователи могут регистрировать новые аккаунты и заходить, логиниться в эти аккаунты. Теперь пользователи нуждаются в возможности получить и обновить свою информацию. Давайте реализуем это прежде чем перейти к созданию профилей пользователей.
UserSerializer
Мы собираемся создать еще один сериализатор для профилей. У нас есть сериализаторы для запросов входа и регистрации, но нам так же нужна возможность сериализации самих пользовательских объектов.
Откройте файл apps/authentication/serializers.py и добавьте следующий код:
class UserSerializer(serializers.ModelSerializer):
""" Ощуществляет сериализацию и десериализацию объектов User. """
# Пароль должен содержать от 8 до 128 символов. Это стандартное правило. Мы
# могли бы переопределить это по-своему, но это создаст лишнюю работу для
# нас, не добавляя реальных преимуществ, потому оставим все как есть.
password = serializers.CharField(
max_length=128,
min_length=8,
write_only=True
)
class Meta:
model = User
fields = ('email', 'username', 'password', 'token',)
# Параметр read_only_fields является альтернативой явному указанию поля
# с помощью read_only = True, как мы это делали для пароля выше.
# Причина, по которой мы хотим использовать здесь 'read_only_fields'
# состоит в том, что нам не нужно ничего указывать о поле. В поле
# пароля требуются свойства min_length и max_length,
# но это не относится к полю токена.
read_only_fields = ('token',)
def update(self, instance, validated_data):
""" Выполняет обновление User. """
# В отличие от других полей, пароли не следует обрабатывать с помощью
# setattr. Django предоставляет функцию, которая обрабатывает пароли
# хешированием и 'солением'. Это означает, что нам нужно удалить поле
# пароля из словаря 'validated_data' перед его использованием далее.
password = validated_data.pop('password', None)
for key, value in validated_data.items():
# Для ключей, оставшихся в validated_data мы устанавливаем значения
# в текущий экземпляр User по одному.
setattr(instance, key, value)
if password is not None:
# 'set_password()' решает все вопросы, связанные с безопасностью
# при обновлении пароля, потому нам не нужно беспокоиться об этом.
instance.set_password(password)
# После того, как все было обновлено, мы должны сохранить наш экземпляр
# User. Стоит отметить, что set_password() не сохраняет модель.
instance.save()
return instanceСтоит отметить, что мы не определяем явно метод create в данном сериализаторе, поскольку DRF предоставляет метод создания по умолчанию для всех экземпляров serializers.ModelSerializer. С помощью этого сериализатора можно создать пользователя, но мы хотим, чтобы создание пользователя производилось с помощью RegistrationSerializer.
UserRetrieveUpdateAPIView
Откройте файл apps/authentication/views.py и обновите импорты следующим образом:
from rest_framework import status
from rest_framework.generics import RetrieveUpdateAPIView
from rest_framework.permissions import AllowAny, IsAuthenticated
from rest_framework.response import Response
from rest_framework.views import APIView
from .renderers import UserJSONRenderer
from .serializers import (
LoginSerializer, RegistrationSerializer, UserSerializer,
)Прописав импорты, создайте новое представление под названием UserRetrieveUpdateView:
class UserRetrieveUpdateAPIView(RetrieveUpdateAPIView):
permission_classes = (IsAuthenticated,)
renderer_classes = (UserJSONRenderer,)
serializer_class = UserSerializer
def retrieve(self, request, *args, **kwargs):
# Здесь нечего валидировать или сохранять. Мы просто хотим, чтобы
# сериализатор обрабатывал преобразования объекта User во что-то, что
# можно привести к json и вернуть клиенту.
serializer = self.serializer_class(request.user)
return Response(serializer.data, status=status.HTTP_200_OK)
def update(self, request, *args, **kwargs):
serializer_data = request.data.get('user', {})
# Паттерн сериализации, валидирования и сохранения - то, о чем говорили
serializer = self.serializer_class(
request.user, data=serializer_data, partial=True
)
serializer.is_valid(raise_exception=True)
serializer.save()
return Response(serializer.data, status=status.HTTP_200_OK)Теперь перейдем к файлу apps/authentication/urls.py и обновим импорты в начале файла, чтобы включить UserRetrieveUpdateView:
from .views import (
LoginAPIView, RegistrationAPIView, UserRetrieveUpdateAPIView
)И добавим новый путь в urlpatterns:
urlpatterns = [
path('user', UserRetrieveUpdateAPIView.as_view()),
path('users/', RegistrationAPIView.as_view()),
path('users/login/', LoginAPIView.as_view()),
]Откройте Postman и отправьте запрос на текущего пользователя на получение информации о текущем пользователе (GET localhost:8000/api/user/). Если все сделано правильно, вы должны получить сообщение об ошибке как следующее:
{
"user": {
"detail": "Authentication credentials were not provided."
}
}Аутентификация пользователей
В Django существует идея бекендов аутентификации. Не вдаваясь в подробности, бекенд — это, по сути, план принятия решения о том, аутентифицирован ли пользователь. Нам нужно создать собственный бекенд для поддержки JWT, поскольку по умолчанию он не поддерживается ни Django, ни Django REST Framework (DRF).
Создайте и откройте файл apps/authentication/backends.py и добавьте в него следующий код:
import jwt
from django.conf import settings
from rest_framework import authentication, exceptions
from .models import User
class JWTAuthentication(authentication.BaseAuthentication):
authentication_header_prefix = 'Token'
def authenticate(self, request):
"""
Метод authenticate вызывается каждый раз, независимо от того, требует
ли того эндпоинт аутентификации. 'authenticate' имеет два возможных
возвращаемых значения:
1) None - мы возвращаем None если не хотим аутентифицироваться.
Обычно это означает, что мы значем, что аутентификация не удастся.
Примером этого является, например, случай, когда токен не включен в
заголовок.
2) (user, token) - мы возвращаем комбинацию пользователь/токен
тогда, когда аутентификация пройдена успешно. Если ни один из
случаев не соблюден, это означает, что произошла ошибка, и мы
ничего не возвращаем. В таком случае мы просто вызовем исключение
AuthenticationFailed и позволим DRF сделать все остальное.
"""
request.user = None
# 'auth_header' должен быть массивом с двумя элементами:
# 1) именем заголовка аутентификации (Token в нашем случае)
# 2) сам JWT, по которому мы должны пройти аутентифкацию
auth_header = authentication.get_authorization_header(request).split()
auth_header_prefix = self.authentication_header_prefix.lower()
if not auth_header:
return None
if len(auth_header) == 1:
# Некорректный заголовок токена, в заголовке передан один элемент
return None
elif len(auth_header) > 2:
# Некорректный заголовок токена, какие-то лишние пробельные символы
return None
# JWT библиотека которую мы используем, обычно некорректно обрабатывает
# тип bytes, который обычно используется стандартными библиотеками
# Python3 (HINT: использовать PyJWT). Чтобы точно решить это, нам нужно
# декодировать prefix и token. Это не самый чистый код, но это хорошее
# решение, потому что возможна ошибка, не сделай мы этого.
prefix = auth_header[0].decode('utf-8')
token = auth_header[1].decode('utf-8')
if prefix.lower() != auth_header_prefix:
# Префикс заголовка не тот, который мы ожидали - отказ.
return None
# К настоящему моменту есть "шанс", что аутентификация пройдет успешно.
# Мы делегируем фактическую аутентификацию учетных данных методу ниже.
return self._authenticate_credentials(request, token)
def _authenticate_credentials(self, request, token):
"""
Попытка аутентификации с предоставленными данными. Если успешно -
вернуть пользователя и токен, иначе - сгенерировать исключение.
"""
try:
payload = jwt.decode(token, settings.SECRET_KEY)
except Exception:
msg = 'Ошибка аутентификации. Невозможно декодировать токеню'
raise exceptions.AuthenticationFailed(msg)
try:
user = User.objects.get(pk=payload['id'])
except User.DoesNotExist:
msg = 'Пользователь соответствующий данному токену не найден.'
raise exceptions.AuthenticationFailed(msg)
if not user.is_active:
msg = 'Данный пользователь деактивирован.'
raise exceptions.AuthenticationFailed(msg)
return (user, token)В этом файле много логики и исключений, но код довольно прост. Все, что мы сделали, это составили список условий, которые пользователю необходимо пройти для аутентификации, и описали исключения, которые выбросятся, если какое-то из условий окажется истинным.
Сообщить DRF про наш аутентификационный бекенд
Мы должны явно указать Django REST Framework, какой бекенд аутентификации мы хотим использовать, аналогично тому, как мы сказали Django использовать нашу пользовательскую модель.
Откройте файл project/settings.py и обновите словарь REST_FRAMEWORK следующим новым ключом:
REST_FRAMEWORK = {
...
'DEFAULT_AUTHENTICATION_CLASSES': (
'apps.authentication.backends.JWTAuthentication',
),
}Получение и обновление пользователей с помощью Postman
Теперь, когда наш новый бекенд аутентификаци установлен, ошибки аутентификации, которые мы наблюдали ранее, должна исчезнуть. Проверьте это, открыв Postman и отправив тот же самый запрос (GET localhost:8000/api/user/). Он должен быть успешным, и вы должны увидеть информацию о своем пользователе в ответе приложения. Помните, что мы создали эндпоинт обновления вместе с эндпоинтом получения информации? Давайте проверим и это. Отправьте запрос на обновление почты пользователя (PATCH localhost:8000/api/user/), передав в заголовках запроса токен. Если все было сделано верно, в ответе вы увидите, как адрес электронной почты изменился.
Итоги
Подведем краткие итоги того, что мы сделали в данной статье. Мы создали гибкую модель пользователя (в дальнейшем, можно ее расширять как душе угодно, добавляя разные поля, дополнительные модели и т.п.), три сериализатора, каждый из которых выполняют свою четко определенную функцию. Создали четыре эндпоинта, которые позволяют пользователям регистрироваться, входить в систему, получать и обновлять информацию о своем аккаунте. На мой взгляд, это очень приятный фундамент, основа, на которой можно строить какой-то новый ламповый проект по своему усмотрению:) (однако же, есть куча сфер, о которых можно говорить часами, например на языке крутится следующий этап о том, чтобы завернуть это все в контейнеры докера, прикрутив постгрес, редис и селери).
Этот документ объясняет использование системы аутентификации Django в конфигурации по умолчанию. Эта конфигурация развивалась для удовлетворения наиболее распространенных потребностей проекта, обрабатывая достаточно широкий спектр задач, и имеет тщательную реализацию паролей и разрешений. Для проектов, где потребности в аутентификации отличаются от конфигурации по умолчанию, Django поддерживает расширенные extension and customization> аутентификации.
Django authentication обеспечивает аутентификацию и авторизацию вместе и обычно называется системой аутентификации, поскольку эти функции в некоторой степени связаны между собой.
User объекты
Объекты User являются ядром системы аутентификации. Они обычно представляют людей, взаимодействующих с вашим сайтом, и используются для таких вещей, как ограничение доступа, регистрация профилей пользователей, ассоциирование контента с создателями и т.д. В системе аутентификации Django существует только один класс пользователей, т.е. пользователи 'superusers' или admin 'staff' — это просто объекты пользователей с установленными специальными атрибутами, а не разные классы объектов пользователей.
Основными атрибутами пользователя по умолчанию являются:
usernamepasswordemailfirst_namelast_name
См. full API documentation для полной справки, следующая документация больше ориентирована на задачи.
Создание пользователей
Самый прямой способ создания пользователей — использовать включенную вспомогательную функцию create_user():
>>> from django.contrib.auth.models import User >>> user = User.objects.create_user('john', 'lennon@thebeatles.com', 'johnpassword') # At this point, user is a User object that has already been saved # to the database. You can continue to change its attributes # if you want to change other fields. >>> user.last_name = 'Lennon' >>> user.save()
Если у вас установлен админ Django, вы также можете create users interactively.
Создание суперпользователей
Создайте суперпользователей с помощью команды createsuperuser:
$ python manage.py createsuperuser --username=joe --email=joe@example.com
Вам будет предложено ввести пароль. После ввода пароля пользователь будет создан немедленно. Если вы не указали параметры --username или --email, будет предложено ввести эти значения.
Изменение паролей
Django не хранит необработанные (открытый текст) пароли в модели пользователя, а только хэш (см. documentation of how passwords are managed для полной информации). В связи с этим не пытайтесь манипулировать атрибутом password пользователя напрямую. Поэтому при создании пользователя используется вспомогательная функция.
Чтобы изменить пароль пользователя, у вас есть несколько вариантов:
manage.py changepassword *username* предлагает метод изменения пароля пользователя из командной строки. Он предлагает вам изменить пароль данного пользователя, который вы должны ввести дважды. Если они оба совпадают, то новый пароль будет немедленно изменен. Если вы не укажете пользователя, команда попытается изменить пароль пользователя, чье имя пользователя совпадает с именем текущего пользователя системы.
Вы также можете изменить пароль программно, используя set_password():
>>> from django.contrib.auth.models import User >>> u = User.objects.get(username='john') >>> u.set_password('new password') >>> u.save()
Если у вас установлен админ Django, вы также можете изменить пароли пользователей на странице authentication system’s admin pages.
Django также предоставляет views и forms, которые могут быть использованы для того, чтобы позволить пользователям изменять свои собственные пароли.
Изменение пароля пользователя приведет к выходу из всех его сессий. Подробнее см. в разделе Аннулирование сессии при смене пароля.
Аутентификация пользователей
-
authenticate(request=None, **credentials)[исходный код]¶ -
Используйте
authenticate()для проверки набора учетных данных. Она принимает учетные данные в качестве аргументов ключевых слов,usernameиpasswordдля случая по умолчанию, сверяет их с каждым authentication backend и возвращает объектUser, если учетные данные действительны для бэкенда. Если учетные данные не действительны ни для одного бэкенда или если бэкенд поднимаетPermissionDenied, возвращаетсяNone. Например:from django.contrib.auth import authenticate user = authenticate(username='john', password='secret') if user is not None: # A backend authenticated the credentials else: # No backend authenticated the credentials
request— необязательныйHttpRequest, который передается в методеauthenticate()бэкендов аутентификации.Примечание
Это низкоуровневый способ аутентификации набора учетных данных; например, его использует
RemoteUserMiddleware. Если вы не пишете свою собственную систему аутентификации, вы, вероятно, не будете ее использовать. Скорее, если вы ищете способ входа пользователя в систему, используйтеLoginView.
Разрешения и авторизация
Django поставляется со встроенной системой разрешений. Она предоставляет возможность назначать разрешения определенным пользователям и группам пользователей.
Он используется администратором сайта Django, но вы можете использовать его в своем собственном коде.
Административный сайт Django использует разрешения следующим образом:
- Доступ к объектам просмотра ограничен пользователями, имеющими разрешение «просмотр» или «изменение» для данного типа объекта.
- Доступ к просмотру формы «Добавить» и добавлению объекта ограничен пользователями с правом «Добавить» для данного типа объекта.
- Доступ к просмотру списка изменений, форме «изменения» и изменению объекта ограничен пользователями с правом «изменения» для данного типа объекта.
- Доступ к удалению объекта ограничен пользователями, имеющими разрешение «удалить» для данного типа объекта.
Разрешения могут быть установлены не только для типа объекта, но и для конкретного экземпляра объекта. Используя методы has_view_permission(), has_add_permission(), has_change_permission() и has_delete_permission(), предоставляемые классом ModelAdmin, можно настроить разрешения для различных экземпляров объектов одного типа.
Объекты User имеют два поля типа «многие-ко-многим»: groups и user_permissions. Объекты User могут обращаться к связанным с ними объектам так же, как и к любым другим Django model:
myuser.groups.set([group_list]) myuser.groups.add(group, group, ...) myuser.groups.remove(group, group, ...) myuser.groups.clear() myuser.user_permissions.set([permission_list]) myuser.user_permissions.add(permission, permission, ...) myuser.user_permissions.remove(permission, permission, ...) myuser.user_permissions.clear()
Разрешения по умолчанию
Когда django.contrib.auth указано в настройках INSTALLED_APPS, это гарантирует, что четыре разрешения по умолчанию — добавление, изменение, удаление и просмотр — будут созданы для каждой модели Django, определенной в одном из ваших установленных приложений.
Эти разрешения будут созданы при запуске manage.py migrate; при первом запуске migrate после добавления django.contrib.auth к INSTALLED_APPS разрешения по умолчанию будут созданы для всех ранее установленных моделей, а также для любых новых моделей, устанавливаемых в это время. После этого он будет создавать разрешения по умолчанию для новых моделей каждый раз, когда вы запускаете manage.py migrate (функция, создающая разрешения, связана с сигналом post_migrate).
Предположим, что у вас есть приложение с app_label foo и моделью с именем Bar, для проверки основных разрешений вы должны использовать:
- добавить:
user.has_perm('foo.add_bar') - изменение:
user.has_perm('foo.change_bar') - удалить:
user.has_perm('foo.delete_bar') - вид:
user.has_perm('foo.view_bar')
К модели Permission редко обращаются напрямую.
Групи
django.contrib.auth.models.Group Модели — это общий способ категоризации пользователей, чтобы вы могли применять к ним разрешения или другие метки. Пользователь может принадлежать к любому количеству групп.
Пользователь в группе автоматически имеет разрешения, предоставленные этой группе. Например, если группа Site editors имеет разрешение can_edit_home_page, то любой пользователь в этой группе будет иметь это разрешение.
Помимо прав доступа, группы — это удобный способ разделить пользователей на категории, чтобы дать им определенный ярлык или расширенную функциональность. Например, вы можете создать группу 'Special users', и написать код, который может, скажем, дать им доступ к части вашего сайта, предназначенной только для членов клуба, или отправлять им сообщения по электронной почте, предназначенные только для членов клуба.
Программное создание разрешений
Хотя custom permissions может быть определено в классе Meta модели, вы также можете создавать разрешения напрямую. Например, вы можете создать разрешение can_publish для модели BlogPost в myapp:
from myapp.models import BlogPost from django.contrib.auth.models import Permission from django.contrib.contenttypes.models import ContentType content_type = ContentType.objects.get_for_model(BlogPost) permission = Permission.objects.create( codename='can_publish', name='Can Publish Posts', content_type=content_type, )
Затем разрешение может быть назначено на User через атрибут user_permissions или на Group через атрибут permissions.
Прокси-модели нуждаются в собственном типе содержимого
Если вы хотите создать permissions for a proxy model, передайте for_concrete_model=False в ContentTypeManager.get_for_model(), чтобы получить соответствующее ContentType:
content_type = ContentType.objects.get_for_model(BlogPostProxy, for_concrete_model=False)
Кэширование разрешений
ModelBackend кэширует разрешения на объект пользователя после первого раза, когда они должны быть получены для проверки разрешений. Обычно это подходит для цикла запрос-ответ, поскольку разрешения обычно не проверяются сразу после их добавления (например, в админке). Если вы добавляете разрешения и проверяете их сразу после этого, например, в тесте или представлении, самым простым решением будет повторная выборка пользователя из базы данных. Например:
from django.contrib.auth.models import Permission, User from django.contrib.contenttypes.models import ContentType from django.shortcuts import get_object_or_404 from myapp.models import BlogPost def user_gains_perms(request, user_id): user = get_object_or_404(User, pk=user_id) # any permission check will cache the current set of permissions user.has_perm('myapp.change_blogpost') content_type = ContentType.objects.get_for_model(BlogPost) permission = Permission.objects.get( codename='change_blogpost', content_type=content_type, ) user.user_permissions.add(permission) # Checking the cached permission set user.has_perm('myapp.change_blogpost') # False # Request new instance of User # Be aware that user.refresh_from_db() won't clear the cache. user = get_object_or_404(User, pk=user_id) # Permission cache is repopulated from the database user.has_perm('myapp.change_blogpost') # True ...
Модели прокси
Прокси-модели работают точно так же, как и конкретные модели. Разрешения создаются с использованием собственного типа содержимого прокси-модели. Прокси-модели не наследуют разрешения конкретной модели, которую они подклассифицируют:
class Person(models.Model): class Meta: permissions = [('can_eat_pizzas', 'Can eat pizzas')] class Student(Person): class Meta: proxy = True permissions = [('can_deliver_pizzas', 'Can deliver pizzas')] >>> # Fetch the content type for the proxy model. >>> content_type = ContentType.objects.get_for_model(Student, for_concrete_model=False) >>> student_permissions = Permission.objects.filter(content_type=content_type) >>> [p.codename for p in student_permissions] ['add_student', 'change_student', 'delete_student', 'view_student', 'can_deliver_pizzas'] >>> for permission in student_permissions: ... user.user_permissions.add(permission) >>> user.has_perm('app.add_person') False >>> user.has_perm('app.can_eat_pizzas') False >>> user.has_perms(('app.add_student', 'app.can_deliver_pizzas')) True
Аутентификация в веб-запросах
Django использует sessions и промежуточное ПО для подключения системы аутентификации к request objects.
Они обеспечивают атрибут request.user в каждом запросе, который представляет текущего пользователя. Если текущий пользователь не вошел в систему, этот атрибут будет установлен в экземпляр AnonymousUser, в противном случае это будет экземпляр User.
Вы можете различать их с помощью is_authenticated, например, так:
if request.user.is_authenticated: # Do something for authenticated users. ... else: # Do something for anonymous users. ...
Как войти в систему пользователя
Если у вас есть аутентифицированный пользователь, которого вы хотите присоединить к текущей сессии — это делается с помощью функции login().
-
login(request, user, backend=None)[исходный код]¶ -
Чтобы зарегистрировать пользователя в системе из представления, используйте
login(). Он принимает объектHttpRequestи объектUser.login()сохраняет идентификатор пользователя в сессии, используя фреймворк сессий Django.Обратите внимание, что любые данные, установленные во время анонимной сессии, сохраняются в сессии после входа пользователя в систему.
Этот пример показывает, как можно использовать
authenticate()иlogin():from django.contrib.auth import authenticate, login def my_view(request): username = request.POST['username'] password = request.POST['password'] user = authenticate(request, username=username, password=password) if user is not None: login(request, user) # Redirect to a success page. ... else: # Return an 'invalid login' error message. ...
Выбор бэкенда аутентификации
Когда пользователь входит в систему, его ID и бэкенд, который использовался для аутентификации, сохраняются в сессии пользователя. Это позволяет тому же authentication backend получить данные пользователя при последующем запросе. Бэкэнд аутентификации для сохранения в сессии выбирается следующим образом:
- Используйте значение необязательного аргумента
backend, если он предоставлен. - Используйте значение атрибута
user.backend, если он присутствует. Это позволяет использовать парыauthenticate()иlogin():authenticate()устанавливает атрибутuser.backendна возвращаемом объекте пользователя. - Используйте
backendвAUTHENTICATION_BACKENDS, если есть только один. - В противном случае вызовите исключение.
В случаях 1 и 2 значением аргумента backend или атрибута user.backend должна быть строка пути импорта с точкой (как в AUTHENTICATION_BACKENDS), а не реальный класс бэкенда.
Как выйти из системы
-
logout(request)[исходный код]¶ -
Чтобы выйти из пользователя, который вошел в систему через
django.contrib.auth.login(), используйтеdjango.contrib.auth.logout()в вашем представлении. Она принимает объектHttpRequestи не имеет возвращаемого значения. Пример:from django.contrib.auth import logout def logout_view(request): logout(request) # Redirect to a success page.
Обратите внимание, что
logout()не выдает никаких ошибок, если пользователь не вошел в систему.Когда вы вызываете
logout(), данные сессии для текущего запроса полностью очищаются. Все существующие данные удаляются. Это делается для того, чтобы другой человек не смог использовать тот же веб-браузер для входа в систему и получить доступ к данным сессии предыдущего пользователя. Если вы хотите поместить в сессию что-либо, что будет доступно пользователю сразу после выхода из нее, сделайте это после вызоваdjango.contrib.auth.logout().
Ограничение доступа для вошедших в систему пользователей
Сырой способ
Необработанный способ ограничения доступа к страницам заключается в проверке request.user.is_authenticated и либо перенаправлении на страницу входа:
from django.conf import settings from django.shortcuts import redirect def my_view(request): if not request.user.is_authenticated: return redirect('%s?next=%s' % (settings.LOGIN_URL, request.path)) # ...
…или вывести сообщение об ошибке:
from django.shortcuts import render def my_view(request): if not request.user.is_authenticated: return render(request, 'myapp/login_error.html') # ...
Декоратор login_required
-
login_required(redirect_field_name=‘next’, login_url=None)[исходный код]¶ -
В качестве сокращения можно использовать удобный декоратор
login_required():from django.contrib.auth.decorators import login_required @login_required def my_view(request): ...
login_required()делает следующее:- Если пользователь не вошел в систему, перенаправьте его на
settings.LOGIN_URL, передав текущий абсолютный путь в строке запроса. Пример:/accounts/login/?next=/polls/3/. - Если пользователь вошел в систему, выполните представление нормально. Код представления может считать, что пользователь вошел в систему.
По умолчанию путь, на который пользователь должен быть перенаправлен после успешной аутентификации, хранится в параметре строки запроса под названием
"next". Если вы предпочитаете использовать другое имя для этого параметра,login_required()принимает необязательный параметрredirect_field_name:from django.contrib.auth.decorators import login_required @login_required(redirect_field_name='my_redirect_field') def my_view(request): ...
Обратите внимание, что если вы зададите значение
redirect_field_name, то, скорее всего, вам также придется настроить шаблон входа в систему, так как контекстная переменная шаблона, хранящая путь перенаправления, будет использовать в качестве ключа значениеredirect_field_name, а не"next"(по умолчанию).login_required()также принимает необязательный параметрlogin_url. Пример:from django.contrib.auth.decorators import login_required @login_required(login_url='/accounts/login/') def my_view(request): ...
Обратите внимание, что если вы не указываете параметр
login_url, вам нужно убедиться, что параметрsettings.LOGIN_URLи ваше представление входа правильно связаны. Например, используя значения по умолчанию, добавьте следующие строки в URLconf:from django.contrib.auth import views as auth_views path('accounts/login/', auth_views.LoginView.as_view()),
settings.LOGIN_URLтакже принимает имена функций представления и named URL patterns. Это позволяет вам свободно переназначать представление входа в URLconf без необходимости обновлять настройки. - Если пользователь не вошел в систему, перенаправьте его на
Примечание
Декоратор login_required НЕ проверяет флаг is_active у пользователя, но по умолчанию AUTHENTICATION_BACKENDS отвергает неактивных пользователей.
The LoginRequiredMixin mixin
При использовании class-based views можно добиться того же поведения, что и при login_required, используя LoginRequiredMixin. Этот миксин должен находиться на самой левой позиции в списке наследования.
-
class
LoginRequiredMixin¶ -
Если представление использует этот миксин, все запросы неаутентифицированных пользователей будут перенаправляться на страницу входа или отображаться ошибка HTTP 403 Forbidden, в зависимости от параметра
raise_exception.Вы можете установить любой из параметров
AccessMixinдля настройки обработки неавторизованных пользователей:from django.contrib.auth.mixins import LoginRequiredMixin class MyView(LoginRequiredMixin, View): login_url = '/login/' redirect_field_name = 'redirect_to'
Примечание
Как и декоратор login_required, этот миксин НЕ проверяет флаг is_active на пользователе, но по умолчанию AUTHENTICATION_BACKENDS отклоняет неактивных пользователей.
Ограничение доступа для вошедших в систему пользователей, которые прошли тест
Чтобы ограничить доступ на основе определенных разрешений или какого-либо другого теста, вы сделаете практически то же самое, что описано в предыдущем разделе.
Вы можете запустить свой тест на request.user непосредственно в представлении. Например, это представление проверяет, есть ли у пользователя email в нужном домене, и если нет, перенаправляет на страницу входа:
from django.shortcuts import redirect def my_view(request): if not request.user.email.endswith('@example.com'): return redirect('/login/?next=%s' % request.path) # ...
-
user_passes_test(test_func, login_url=None, redirect_field_name=‘next’)[исходный код]¶ -
В качестве сокращения можно использовать удобный декоратор
user_passes_test, который выполняет перенаправление, когда вызываемый объект возвращаетFalse:from django.contrib.auth.decorators import user_passes_test def email_check(user): return user.email.endswith('@example.com') @user_passes_test(email_check) def my_view(request): ...
user_passes_test()принимает обязательный аргумент: вызываемый объект, который принимает объектUserи возвращаетTrue, если пользователю разрешено просматривать страницу. Обратите внимание, чтоuser_passes_test()не проверяет автоматически, чтоUserне является анонимным.user_passes_test()принимает два необязательных аргумента:login_url- Позволяет указать URL, на который будут перенаправлены пользователи, не прошедшие тест. Это может быть страница входа в систему и по умолчанию имеет значение
settings.LOGIN_URL, если вы его не укажете. redirect_field_name- То же самое, что и для
login_required(). Установка значенияNoneудаляет его из URL, что может понадобиться, если вы перенаправляете пользователей, не прошедших тест, на страницу без входа в систему, где нет «следующей страницы».
Например:
@user_passes_test(email_check, login_url='/login/') def my_view(request): ...
-
class
UserPassesTestMixin¶ -
При использовании class-based views, вы можете использовать
UserPassesTestMixinдля этого.-
test_func()¶ -
Вы должны переопределить метод
test_func()класса, чтобы указать выполняемый тест. Кроме того, вы можете установить любой из параметровAccessMixinдля настройки обработки неавторизованных пользователей:from django.contrib.auth.mixins import UserPassesTestMixin class MyView(UserPassesTestMixin, View): def test_func(self): return self.request.user.email.endswith('@example.com')
-
get_test_func()¶ -
Вы также можете переопределить метод
get_test_func(), чтобы миксин использовал для своих проверок функцию с другим именем (вместоtest_func()).
Укладка
UserPassesTestMixinИз-за того, как реализовано
UserPassesTestMixin, вы не можете складывать их в список наследования. Следующее НЕ работает:class TestMixin1(UserPassesTestMixin): def test_func(self): return self.request.user.email.endswith('@example.com') class TestMixin2(UserPassesTestMixin): def test_func(self): return self.request.user.username.startswith('django') class MyView(TestMixin1, TestMixin2, View): ...
Если бы
TestMixin1вызывалsuper()и учитывал этот результат,TestMixin1уже не работал бы автономно. -
Декоратор permission_required
-
permission_required(perm, login_url=None, raise_exception=False)[исходный код]¶ -
Это довольно распространенная задача — проверить, есть ли у пользователя определенное разрешение. По этой причине Django предоставляет ярлык для этого случая: декоратор
permission_required().:from django.contrib.auth.decorators import permission_required @permission_required('polls.add_choice') def my_view(request): ...
Как и в методе
has_perm(), имена разрешений принимают форму"<app label>.<permission codename>"(например,polls.add_choiceдля разрешения на модель в приложенииpolls).Декоратор также может принимать итерацию разрешений, в этом случае пользователь должен иметь все разрешения, чтобы получить доступ к представлению.
Обратите внимание, что
permission_required()также принимает необязательный параметрlogin_url:from django.contrib.auth.decorators import permission_required @permission_required('polls.add_choice', login_url='/loginpage/') def my_view(request): ...
Как и в декораторе
login_required(),login_urlпо умолчанию равенsettings.LOGIN_URL.Если задан параметр
raise_exception, декоратор подниметPermissionDenied, предлагая the 403 (HTTP Forbidden) view вместо перенаправления на страницу входа.Если вы хотите использовать
raise_exception, но при этом дать пользователям возможность сначала войти в систему, вы можете добавить декораторlogin_required():from django.contrib.auth.decorators import login_required, permission_required @login_required @permission_required('polls.add_choice', raise_exception=True) def my_view(request): ...
Это также позволяет избежать цикла перенаправления, когда
LoginViewстановитсяredirect_authenticated_user=True, а у вошедшего пользователя нет всех необходимых прав.
Миксин PermissionRequiredMixin
Чтобы применить проверку разрешений к class-based views, вы можете использовать PermissionRequiredMixin:
-
class
PermissionRequiredMixin¶ -
Этот миксин, как и декоратор
permission_required, проверяет, имеет ли пользователь, обращающийся к представлению, все заданные разрешения. Вы должны указать разрешение (или итерацию разрешений) с помощью параметраpermission_required:from django.contrib.auth.mixins import PermissionRequiredMixin class MyView(PermissionRequiredMixin, View): permission_required = 'polls.add_choice' # Or multiple of permissions: permission_required = ('polls.view_choice', 'polls.change_choice')
Вы можете установить любой из параметров
AccessMixin, чтобы настроить обработку неавторизованных пользователей.Вы также можете переопределить эти методы:
-
get_permission_required()¶ -
Возвращает итерабель имен разрешений, используемых данным микшином. По умолчанию используется атрибут
permission_required, при необходимости преобразуется в кортеж.
-
has_permission()¶ -
Возвращает булево значение, обозначающее, имеет ли текущий пользователь разрешение на выполнение декорированного представления. По умолчанию возвращается результат вызова
has_perms()со списком разрешений, возвращаемымget_permission_required().
-
Перенаправление несанкционированных запросов в представлениях на основе классов
Чтобы облегчить обработку ограничений доступа в class-based views, AccessMixin можно использовать для настройки поведения представления при отказе в доступе. Аутентифицированным пользователям отказывается в доступе с ответом HTTP 403 Forbidden. Анонимные пользователи перенаправляются на страницу входа или показывают ответ HTTP 403 Forbidden, в зависимости от атрибута raise_exception.
-
class
AccessMixin¶ -
-
login_url¶ -
Возвращаемое значение по умолчанию для
get_login_url(). По умолчаниюNone, в этом случаеget_login_url()возвращается кsettings.LOGIN_URL.
-
permission_denied_message¶ -
Возвращаемое значение по умолчанию для
get_permission_denied_message(). По умолчанию это пустая строка.
-
redirect_field_name¶ -
Возвращаемое значение по умолчанию для
get_redirect_field_name(). По умолчанию возвращается значение"next".
-
raise_exception¶ -
Если этот атрибут установлен в
True, то при невыполнении условий возникает исключениеPermissionDenied. ЕслиFalse(по умолчанию), анонимные пользователи перенаправляются на страницу входа в систему.
-
get_login_url()¶ -
Возвращает URL, на который будут перенаправлены пользователи, не прошедшие тест. Возвращает
login_url, если установлено, илиsettings.LOGIN_URLв противном случае.
-
get_permission_denied_message()¶ -
Когда
raise_exceptionравноTrue, этот метод можно использовать для управления сообщением об ошибке, передаваемым в обработчик ошибок для отображения пользователю. По умолчанию возвращает атрибутpermission_denied_message.
-
get_redirect_field_name()¶ -
Возвращает имя параметра запроса, который будет содержать URL, на который пользователь должен быть перенаправлен после успешного входа в систему. Если вы установите значение
None, параметр запроса не будет добавлен. По умолчанию возвращает атрибутredirect_field_name.
-
handle_no_permission()¶ -
В зависимости от значения
raise_exception, метод либо вызывает исключениеPermissionDenied, либо перенаправляет пользователя наlogin_url, по желанию включаяredirect_field_name, если оно установлено.
-
Аннулирование сессии при смене пароля
Если ваш AUTH_USER_MODEL наследует от AbstractBaseUser или реализует свой собственный метод get_session_auth_hash(), аутентифицированные сессии будут включать хэш, возвращаемый этой функцией. В случае AbstractBaseUser это HMAC поля пароля. Django проверяет, что хэш в сессии для каждого запроса совпадает с тем, который вычисляется во время запроса. Это позволяет пользователю выйти из всех своих сессий, изменив пароль.
Представления смены пароля по умолчанию, входящие в Django, PasswordChangeView и представление user_change_password в админке django.contrib.auth, обновляют сессию новым хэшем пароля, чтобы пользователь, меняющий свой пароль, не вышел из системы. Если у вас есть пользовательское представление смены пароля и вы хотите иметь подобное поведение, используйте функцию update_session_auth_hash().
-
update_session_auth_hash(request, user)[исходный код]¶ -
Эта функция принимает текущий запрос и обновленный объект пользователя, из которого будет получен новый хэш сессии, и соответствующим образом обновляет хэш сессии. Она также поворачивает ключ сессии, чтобы украденная сессионная cookie была недействительна.
Пример использования:
from django.contrib.auth import update_session_auth_hash def password_change(request): if request.method == 'POST': form = PasswordChangeForm(user=request.user, data=request.POST) if form.is_valid(): form.save() update_session_auth_hash(request, form.user) else: ...
Представления аутентификации
Django предоставляет несколько представлений, которые вы можете использовать для обработки входа, выхода и управления паролями. В них используется stock auth forms, но вы можете передавать и свои собственные формы.
Django не предоставляет шаблонов по умолчанию для представлений аутентификации. Вы должны создать свои собственные шаблоны для представлений, которые вы хотите использовать. Контекст шаблона документирован в каждом представлении, см. Все виды аутентификации.
Использование представлений
Существуют различные методы реализации этих представлений в вашем проекте. Самый простой способ — включить предоставленный URLconf в django.contrib.auth.urls в ваш собственный URLconf, например:
urlpatterns = [ path('accounts/', include('django.contrib.auth.urls')), ]
Это будет включать следующие шаблоны URL:
accounts/login/ [name='login'] accounts/logout/ [name='logout'] accounts/password_change/ [name='password_change'] accounts/password_change/done/ [name='password_change_done'] accounts/password_reset/ [name='password_reset'] accounts/password_reset/done/ [name='password_reset_done'] accounts/reset/<uidb64>/<token>/ [name='password_reset_confirm'] accounts/reset/done/ [name='password_reset_complete']
Представления предоставляют имя URL для более удобного использования. Подробнее об использовании именованных шаблонов URL см. в the URL documentation.
Если вы хотите получить больший контроль над своими URL-адресами, вы можете сослаться на определенное представление в URLconf:
from django.contrib.auth import views as auth_views urlpatterns = [ path('change-password/', auth_views.PasswordChangeView.as_view()), ]
Представления имеют необязательные аргументы, которые можно использовать для изменения поведения представления. Например, если вы хотите изменить имя шаблона, которое использует представление, вы можете указать аргумент template_name. Для этого в URLconf можно указать аргументы в виде ключевых слов, которые будут переданы представлению. Например:
urlpatterns = [ path( 'change-password/', auth_views.PasswordChangeView.as_view(template_name='change-password.html'), ), ]
Все представления являются class-based, что позволяет легко настраивать их с помощью подклассов.
Все виды аутентификации
Это список со всеми представлениями, которые предоставляет django.contrib.auth. Подробности реализации смотрите в Использование представлений.
-
class
LoginView¶ -
Имя URL:
loginПодробнее об использовании именованных шаблонов URL см. в разделе the URL documentation.
Методы и атрибуты
-
template_name¶ -
Имя шаблона, отображаемого для представления, используемого для входа пользователя в систему. По умолчанию имеет значение
registration/login.html.
-
next_page¶ -
New in Django 4.0.
URL для перенаправления после входа в систему. По умолчанию
LOGIN_REDIRECT_URL.
-
redirect_field_name¶ -
Имя поля
GET, содержащего URL для перенаправления после входа в систему. По умолчанию используетсяnext. Переопределяет URLget_default_redirect_url(), если передан заданный параметрGET.
-
authentication_form¶ -
Вызываемый объект (обычно класс формы), который будет использоваться для аутентификации. По умолчанию
AuthenticationForm.
-
Словарь контекстных данных, которые будут добавлены к контекстным данным по умолчанию, переданным в шаблон.
-
redirect_authenticated_user¶ -
Булево значение, определяющее, будут ли аутентифицированные пользователи, зашедшие на страницу входа, перенаправлены так, как будто они только что успешно вошли в систему. По умолчанию имеет значение
False.Предупреждение
Если вы включите опцию
redirect_authenticated_user, другие сайты смогут определить, авторизованы ли их посетители на вашем сайте, запрашивая URL перенаправления на файлы изображений на вашем сайте. Чтобы избежать такой утечки информации social media fingerprinting», размещайте все изображения и ваш favicon на отдельном домене.Включение
redirect_authenticated_userтакже может привести к циклу перенаправления при использовании декоратораpermission_required(), если не используется параметрraise_exception.
-
success_url_allowed_hosts¶ -
setхостов, в дополнение кrequest.get_host(), которые безопасны для перенаправления после входа в систему. По умолчанию используется пустойset.
-
get_default_redirect_url()¶ -
New in Django 4.0.
Возвращает URL для перенаправления после входа в систему. Реализация по умолчанию разрешает и возвращает
next_page, если установлен, илиLOGIN_REDIRECT_URLв противном случае.
Вот что делает
LoginView:- При вызове через
GETотображается форма входа в систему, которая POSTs на тот же URL. Подробнее об этом чуть позже. - При вызове через
POSTс учетными данными, предоставленными пользователем, он пытается войти в систему. В случае успешного входа представление перенаправляется на URL, указанный вnext. Еслиnextне указан, он перенаправляется наsettings.LOGIN_REDIRECT_URL(по умолчанию на/accounts/profile/). Если вход не был успешным, отображается форма входа.
Вы обязаны предоставить html для шаблона входа в систему, который по умолчанию называется
registration/login.html. Этому шаблону передаются четыре контекстные переменные шаблона:form: ОбъектForm, представляющийAuthenticationForm.next: URL для перенаправления после успешного входа в систему. Он также может содержать строку запроса.site: ТекущийSite, в соответствии с настройкойSITE_ID. Если у вас не установлен фреймворк сайта, это будет установлено в экземплярRequestSite, который берет имя сайта и домен из текущегоHttpRequest.site_name: Псевдоним дляsite.name. Если у вас не установлен фреймворк сайта, это значение будет установлено в значениеrequest.META['SERVER_NAME']. Подробнее о сайтах смотрите Структура «сайтов».
Если вы предпочитаете не вызывать шаблон
registration/login.html, вы можете передать параметрtemplate_nameчерез дополнительные аргументы методуas_viewв вашем URLconf. Например, эта строка URLconf будет использоватьmyapp/login.htmlвместо:path('accounts/login/', auth_views.LoginView.as_view(template_name='myapp/login.html')),
Вы также можете указать имя поля
GET, которое содержит URL-адрес для перенаправления на него после входа в систему с помощьюredirect_field_name. По умолчанию поле называетсяnext.Вот пример шаблона
registration/login.html, который вы можете использовать в качестве отправной точки. Он предполагает, что у вас есть шаблонbase.html, определяющий блокcontent:{% extends "base.html" %} {% block content %} {% if form.errors %} <p>Your username and password didn't match. Please try again.</p> {% endif %} {% if next %} {% if user.is_authenticated %} <p>Your account doesn't have access to this page. To proceed, please login with an account that has access.</p> {% else %} <p>Please login to see this page.</p> {% endif %} {% endif %} <form method="post" action="{% url 'login' %}"> {% csrf_token %} <table> <tr> <td>{{ form.username.label_tag }}</td> <td>{{ form.username }}</td> </tr> <tr> <td>{{ form.password.label_tag }}</td> <td>{{ form.password }}</td> </tr> </table> <input type="submit" value="login"> <input type="hidden" name="next" value="{{ next }}"> </form> {# Assumes you set up the password_reset view in your URLconf #} <p><a href="{% url 'password_reset' %}">Lost password?</a></p> {% endblock %}
Если вы настроили аутентификацию (см. Customizing Authentication), вы можете использовать пользовательскую форму аутентификации, установив атрибут
authentication_form. Эта форма должна принимать аргумент с ключевым словомrequestв своем методе__init__()и предоставлять методget_user(), который возвращает объект аутентифицированного пользователя (этот метод вызывается только после успешной проверки формы). -
-
class
LogoutView¶ -
Выводит пользователя из системы при запросе
POST.Не рекомендуется, начиная с версии 4.1: Поддержка выхода из системы при запросах
GETустарела и будет удалена в Django 5.0.Имя URL:
logoutАтрибуты:
-
next_page¶ -
URL для перенаправления после выхода из системы. По умолчанию
LOGOUT_REDIRECT_URL.
-
template_name¶ -
Полное имя шаблона для отображения после выхода пользователя из системы. По умолчанию имеет значение
registration/logged_out.html.
-
redirect_field_name¶ -
Имя поля
GET, содержащего URL для перенаправления после выхода из системы. По умолчанию используется значение'next'. Переопределяет URLnext_page, если передан заданный параметрGET.
-
Словарь контекстных данных, которые будут добавлены к контекстным данным по умолчанию, переданным в шаблон.
-
success_url_allowed_hosts¶ -
setхостов, в дополнение кrequest.get_host(), которые безопасны для перенаправления после выхода из системы. По умолчанию используется пустое значениеset.
Контекст шаблона:
title: Строка «Logged out», локализована.site: ТекущийSite, в соответствии с настройкойSITE_ID. Если у вас не установлен фреймворк сайта, это будет установлено в экземплярRequestSite, который берет имя сайта и домен из текущегоHttpRequest.site_name: Псевдоним дляsite.name. Если у вас не установлен фреймворк сайта, это значение будет установлено в значениеrequest.META['SERVER_NAME']. Подробнее о сайтах смотрите Структура «сайтов».
-
-
logout_then_login(request, login_url=None)¶ -
Выводит пользователя из системы при запросе
POST, затем перенаправляет на страницу входа в систему.Имя URL: URL по умолчанию не предоставляется
Дополнительные аргументы:
login_url: URL страницы входа в систему для перенаправления. По умолчаниюsettings.LOGIN_URL, если не указан.
Не рекомендуется, начиная с версии 4.1: Поддержка выхода из системы при запросах
GETустарела и будет удалена в Django 5.0.
-
class
PasswordChangeView¶ -
Имя URL:
password_changeПозволяет пользователю изменить свой пароль.
Атрибуты:
-
template_name¶ -
Полное имя шаблона, который будет использоваться для отображения формы смены пароля. По умолчанию
registration/password_change_form.html, если не указано.
-
success_url¶ -
URL для перенаправления после успешной смены пароля. По умолчанию
'password_change_done'.
-
form_class¶ -
Пользовательская форма «Смена пароля», которая должна принимать аргумент в виде ключевого слова
user. Форма отвечает за фактическое изменение пароля пользователя. По умолчанию используетсяPasswordChangeForm.
-
Словарь контекстных данных, которые будут добавлены к контекстным данным по умолчанию, переданным в шаблон.
Контекст шаблона:
form: Форма смены пароля (см.form_classвыше).
-
-
class
PasswordChangeDoneView¶ -
Имя URL:
password_change_doneСтраница, отображаемая после того, как пользователь изменил свой пароль.
Атрибуты:
-
template_name¶ -
Полное имя шаблона для использования. По умолчанию
registration/password_change_done.html, если не указано.
-
Словарь контекстных данных, которые будут добавлены к контекстным данным по умолчанию, переданным в шаблон.
-
-
class
PasswordResetView¶ -
Имя URL:
password_resetПозволяет пользователю сбросить пароль путем генерации ссылки одноразового использования, которая может быть использована для сброса пароля, и отправки этой ссылки на зарегистрированный адрес электронной почты пользователя.
Это представление будет отправлять сообщение электронной почты, если выполняются следующие условия:
- Указанный адрес электронной почты существует в системе.
- Запрашиваемый пользователь активен (
User.is_activeравноTrue). - У запрашиваемого пользователя есть пароль, который можно использовать. Пользователям, отмеченным непригодным паролем (см.
set_unusable_password()), не разрешается запрашивать сброс пароля, чтобы предотвратить злоупотребления при использовании внешнего источника аутентификации, например LDAP.
Если какое-либо из этих условий не выполняется, письмо не будет отправлено, но пользователь также не получит никакого сообщения об ошибке. Это предотвращает утечку информации к потенциальным злоумышленникам. Если вы хотите предоставить сообщение об ошибке в этом случае, вы можете подклассифицировать
PasswordResetFormи использовать атрибутform_class.Примечание
Имейте в виду, что отправка электронного письма требует дополнительного времени, поэтому вы можете быть уязвимы к атаке перечисления адресов электронной почты по времени из-за разницы между длительностью запроса сброса для существующего адреса электронной почты и длительностью запроса сброса для несуществующего адреса электронной почты. Чтобы уменьшить накладные расходы, вы можете использовать сторонний пакет, позволяющий отправлять электронные письма асинхронно, например django-mailer.
Атрибуты:
-
template_name¶ -
Полное имя шаблона, который будет использоваться для отображения формы сброса пароля. По умолчанию имеет значение
registration/password_reset_form.html, если не указано.
-
form_class¶ -
Форма, которая будет использоваться для получения email пользователя для сброса пароля. По умолчанию имеет значение
PasswordResetForm.
-
email_template_name¶ -
Полное имя шаблона, который будет использоваться для создания письма со ссылкой на сброс пароля. По умолчанию имеет значение
registration/password_reset_email.html, если не указано.
-
subject_template_name¶ -
Полное имя шаблона, который будет использоваться для темы письма со ссылкой на сброс пароля. По умолчанию имеет значение
registration/password_reset_subject.txt, если не указано.
-
token_generator¶ -
Экземпляр класса для проверки одноразовой ссылки. По умолчанию это будет
default_token_generator, это экземплярdjango.contrib.auth.tokens.PasswordResetTokenGenerator.
-
success_url¶ -
URL для перенаправления после успешного запроса на сброс пароля. По умолчанию
'password_reset_done'.
-
from_email¶ -
Действительный адрес электронной почты. По умолчанию Django использует
DEFAULT_FROM_EMAIL.
-
Словарь контекстных данных, которые будут добавлены к контекстным данным по умолчанию, переданным в шаблон.
-
html_email_template_name¶ -
Полное имя шаблона, используемого для генерации многокомпонентного письма text/html со ссылкой для сброса пароля. По умолчанию письмо в формате HTML не отправляется.
-
Словарь контекстных данных, которые будут доступны в шаблоне письма. Его можно использовать для переопределения значений контекста шаблона по умолчанию, перечисленных ниже, например
domain.
Контекст шаблона:
form: Форма (см.form_classвыше) для сброса пароля пользователя.
Контекст шаблона электронной почты:
email: Псевдоним дляuser.emailuser: ТекущийUser, в соответствии с полем формыemail. Только активные пользователи могут сбрасывать свои пароли (User.is_active is True).site_name: Псевдоним дляsite.name. Если у вас не установлен фреймворк сайта, это значение будет установлено в значениеrequest.META['SERVER_NAME']. Подробнее о сайтах смотрите Структура «сайтов».domain: Псевдоним дляsite.domain. Если у вас не установлен фреймворк сайта, то будет установлено значениеrequest.get_host().protocol: http или httpsuid: Первичный ключ пользователя, закодированный в base 64.token: Токен для проверки того, что ссылка сброса действительна.
Образец
registration/password_reset_email.html(шаблон тела письма):Someone asked for password reset for email {{ email }}. Follow the link below: {{ protocol}}://{{ domain }}{% url 'password_reset_confirm' uidb64=uid token=token %}
Тот же контекст шаблона используется для шаблона темы. Тема должна быть однострочной строкой обычного текста.
-
class
PasswordResetDoneView¶ -
Имя URL:
password_reset_doneСтраница, отображаемая после того, как пользователь получил по электронной почте ссылку для сброса пароля. Это представление вызывается по умолчанию, если для
PasswordResetViewне задан явный URLsuccess_url.Примечание
Если указанный адрес электронной почты не существует в системе, пользователь неактивен или имеет недействительный пароль, пользователь все равно будет перенаправлен на этот вид, но письмо отправлено не будет.
Атрибуты:
-
template_name¶ -
Полное имя шаблона для использования. По умолчанию
registration/password_reset_done.html, если не указано.
-
Словарь контекстных данных, которые будут добавлены к контекстным данным по умолчанию, переданным в шаблон.
-
-
class
PasswordResetConfirmView¶ -
Имя URL:
password_reset_confirmПредставляет форму для ввода нового пароля.
Ключевые аргументы из URL:
uidb64: Идентификатор пользователя, закодированный в base 64.token: Токен для проверки правильности пароля.
Атрибуты:
-
template_name¶ -
Полное имя шаблона для отображения представления подтверждения пароля. Значение по умолчанию —
registration/password_reset_confirm.html.
-
token_generator¶ -
Экземпляр класса для проверки пароля. По умолчанию это будет
default_token_generator, это экземплярdjango.contrib.auth.tokens.PasswordResetTokenGenerator.
-
post_reset_login¶ -
Булево значение, указывающее, следует ли автоматически аутентифицировать пользователя после успешного сброса пароля. По умолчанию имеет значение
False.
-
post_reset_login_backend¶ -
Пунктирный путь к бэкенду аутентификации, который будет использоваться при аутентификации пользователя, если
post_reset_loginявляетсяTrue. Требуется, только если у вас настроено несколькоAUTHENTICATION_BACKENDS. По умолчанию используетсяNone.
-
form_class¶ -
Форма, которая будет использоваться для установки пароля. По умолчанию имеет значение
SetPasswordForm.
-
success_url¶ -
URL для перенаправления после сброса пароля. По умолчанию
'password_reset_complete'.
-
Словарь контекстных данных, которые будут добавлены к контекстным данным по умолчанию, переданным в шаблон.
-
reset_url_token¶ -
Параметр токена, отображаемый как компонент URL-адресов сброса пароля. По умолчанию имеет значение
'set-password'.
Контекст шаблона:
form: Форма (см.form_classвыше) для установки пароля нового пользователя.validlink: Булево, истинно, если ссылка (комбинацияuidb64иtoken) действительна или еще не использована.
-
class
PasswordResetCompleteView¶ -
Имя URL:
password_reset_completeПредставляет представление, которое информирует пользователя о том, что пароль был успешно изменен.
Атрибуты:
-
template_name¶ -
Полное имя шаблона для отображения представления. По умолчанию имеет значение
registration/password_reset_complete.html.
-
Словарь контекстных данных, которые будут добавлены к контекстным данным по умолчанию, переданным в шаблон.
-
Вспомогательные функции
-
redirect_to_login(next, login_url=None, redirect_field_name=‘next’)¶ -
Перенаправляет на страницу входа в систему, а затем обратно на другой URL после успешного входа.
Требуемые аргументы:
next: URL для перенаправления после успешного входа в систему.
Дополнительные аргументы:
login_url: URL страницы входа в систему для перенаправления. По умолчаниюsettings.LOGIN_URL, если не указан.redirect_field_name: Имя поляGET, содержащего URL для перенаправления после выхода из системы. Переопределяетnext, если передан заданныйGETпараметр.
Встроенные формы
Если вы не хотите использовать встроенные представления, но желаете избежать необходимости писать формы для этой функциональности, система аутентификации предоставляет несколько встроенных форм, расположенных в django.contrib.auth.forms:
-
class
AdminPasswordChangeForm¶ -
Форма, используемая в интерфейсе администратора для изменения пароля пользователя.
Принимает
userв качестве первого позиционного аргумента.
-
class
AuthenticationForm¶ -
Форма для входа пользователя в систему.
Принимает
requestв качестве первого позиционного аргумента, который сохраняется в экземпляре формы для использования подклассами.-
confirm_login_allowed(user)¶ -
По умолчанию
AuthenticationFormотклоняет пользователей, чей флагis_activeустановлен вFalse. Вы можете отменить это поведение с помощью пользовательской политики, чтобы определить, какие пользователи могут войти в систему. Сделайте это с помощью пользовательской формы, которая является подклассомAuthenticationFormи переопределяет методconfirm_login_allowed(). Этот метод должен вызывать ошибкуValidationError, если данный пользователь не может войти в систему.Например, чтобы разрешить всем пользователям входить в систему независимо от статуса «активный»:
from django.contrib.auth.forms import AuthenticationForm

class AuthenticationFormWithInactiveUsersOkay(AuthenticationForm):
    def confirm_login_allowed(self, user):
        pass
(В этом случае вам также необходимо использовать бэкенд аутентификации, который позволяет неактивным пользователям, например
AllowAllUsersModelBackend).Или разрешить вход только некоторым активным пользователям:
class PickyAuthenticationForm(AuthenticationForm):
    def confirm_login_allowed(self, user):
        if not user.is_active:
            raise ValidationError(
                _("This account is inactive."),
                code='inactive',
            )
        if user.username.startswith('b'):
            raise ValidationError(
                _("Sorry, accounts starting with 'b' aren't welcome here."),
                code='no_b_users',
            )
-
-
class
PasswordChangeForm¶ -
Форма, позволяющая пользователю изменить свой пароль.
-
class
PasswordResetForm¶ -
Форма для создания и отправки по электронной почте ссылки одноразового использования для сброса пароля пользователя.
-
send_mail(subject_template_name, email_template_name, context, from_email, to_email, html_email_template_name=None)¶ -
Использует аргументы для отправки сообщения
EmailMultiAlternatives. Может быть переопределено, чтобы настроить способ отправки письма пользователю.Параметры: - subject_template_name – шаблон для темы.
- email_template_name – шаблон для тела письма.
- context – контекст, передаваемый в
subject_template,email_templateиhtml_email_template(если это неNone). - from_email – электронная почта отправителя.
- to_email – электронная почта подателя запроса.
- html_email_template_name – шаблон для HTML-тела; по умолчанию
None, в этом случае отправляется обычное текстовое письмо.
По умолчанию
save()заполняетcontextтеми же переменными, которыеPasswordResetViewпередает своему почтовому контексту.
-
-
class
SetPasswordForm¶ -
Форма, позволяющая пользователю изменить свой пароль без ввода старого пароля.
-
class
UserChangeForm¶ -
Форма, используемая в интерфейсе администратора для изменения информации и разрешений пользователя.
-
class
UserCreationForm¶ -
A
ModelFormдля создания нового пользователя.Он имеет три поля:
username(из модели пользователя),password1иpassword2. Он проверяет соответствиеpassword1иpassword2, проверяет пароль с помощьюvalidate_password()и устанавливает пароль пользователя с помощьюset_password().
Данные аутентификации в шаблонах
Текущий зарегистрированный пользователь и его разрешения доступны в template context при использовании RequestContext.
Техничность
Технически, эти переменные становятся доступными в контексте шаблона, только если вы используете RequestContext и включен контекстный процессор 'django.contrib.auth.context_processors.auth'. Он находится в сгенерированном по умолчанию файле настроек. Подробнее см. в RequestContext docs.
Пользователи
При отображении шаблона RequestContext в переменной шаблона User хранится текущий зарегистрированный пользователь, либо экземпляр AnonymousUser, либо экземпляр {{ user }}:
{% if user.is_authenticated %}
    <p>Welcome, {{ user.username }}. Thanks for logging in.</p>
{% else %}
    <p>Welcome, new user. Please log in.</p>
{% endif %}
Эта контекстная переменная шаблона недоступна, если не используется RequestContext.
Права
Разрешения вошедшего в систему пользователя хранятся в переменной шаблона {{ perms }}. Это экземпляр django.contrib.auth.context_processors.PermWrapper, который является дружественным шаблону прокси разрешения.
Оценка одноатрибутного поиска {{ perms }} как булева является прокси для User.has_module_perms(). Например, чтобы проверить, есть ли у вошедшего пользователя какие-либо разрешения в приложении foo:
Оценка двухуровневого атрибута поиска как булева является прокси для User.has_perm(). Например, чтобы проверить, есть ли у вошедшего пользователя разрешение foo.add_vote:
{% if perms.foo.add_vote %}
Вот более полный пример проверки разрешений в шаблоне:
{% if perms.foo %}
    <p>You have permission to do something in the foo app.</p>
    {% if perms.foo.add_vote %}
        <p>You can vote!</p>
    {% endif %}
    {% if perms.foo.add_driving %}
        <p>You can drive!</p>
    {% endif %}
{% else %}
    <p>You don't have permission to do anything in the foo app.</p>
{% endif %}
Можно также искать разрешения по операторам {% if in %}. Например:
{% if 'foo' in perms %}
    {% if 'foo.add_vote' in perms %}
        <p>In lookup works, too.</p>
    {% endif %}
{% endif %}
Управление пользователями в админке
Если у вас установлены и django.contrib.admin, и django.contrib.auth, администратор предоставляет удобный способ просмотра и управления пользователями, группами и разрешениями. Пользователи могут быть созданы и удалены, как и любая модель Django. Группы могут быть созданы, а разрешения могут быть назначены пользователям или группам. Журнал пользовательских правок моделей, сделанных в админке, также сохраняется и отображается.
Создание пользователей
Вы должны увидеть ссылку на «Пользователи» в разделе «Auth» на главной странице индекса администратора. Страница администратора «Добавить пользователя» отличается от стандартных страниц администратора тем, что она требует выбора имени пользователя и пароля, прежде чем вы сможете редактировать остальные поля пользователя.
Также обратите внимание: если вы хотите, чтобы учетная запись пользователя могла создавать пользователей с помощью сайта Django admin, вам нужно дать ей разрешение на добавление пользователей и изменение пользователей (т.е. разрешения «Добавить пользователя» и «Изменить пользователя»). Если у учетной записи есть разрешение на добавление пользователей, но нет разрешения на их изменение, эта учетная запись не сможет добавлять пользователей. Почему? Потому что если у вас есть разрешение на добавление пользователей, у вас есть возможность создавать суперпользователей, которые, в свою очередь, могут изменять других пользователей. Поэтому Django требует разрешения на добавление и изменение в качестве небольшой меры безопасности.
Вдумчиво отнеситесь к тому, как вы позволяете пользователям управлять разрешениями. Если вы дадите не суперпользователю возможность редактировать пользователей, это в конечном итоге будет равносильно предоставлению ему статуса суперпользователя, поскольку он сможет повышать разрешения пользователей, включая себя!
Изменение паролей
Пароли пользователей не отображаются в админке (и не хранятся в базе данных), но отображаются password storage details. В отображение этой информации включена ссылка на форму смены пароля, которая позволяет администраторам изменять пароли пользователей.
I’m trying to implement login and registration in my django project, I have registration working but my login authentication keeps failing in that if I enter a username and password it always fail to authenticate even though the username and password exists in the system. How would I go about fixing my login authentication always failing?
My auth_view function
def auth_view(request):
username=request.POST.get('username','')
password=request.POST.get('password','')
user = auth.authenticate(username=username,
password=password)
if user is not None:
auth.login(request,user)
return HttpResponseRedirect('accounts/loggedin')
else:
return HttpResponseRedirect('/accounts/invalid/')
My login html page
<!DOCTYPE html>
<link rel="stylesheet" type="text/css"
href="static/app/content/bootstrap-cosmo.min.css">
<link rel="stylesheet" type="text/css"
href="static/app/content/bootstrap-cosmo.css">
<html lang="en" xmlns="http://www.w3.org/1999/xhtml">
<head>
<meta charset="utf-8" />
<title></title>
</head>
<body>
<form class="form-horizontal" action="/accounts/auth/"
method="post">
{% csrf_token %}
<fieldset>
<legend>LOGIN</legend>
<div class="form-group">
<label for="username" class="col-lg-2 control-
label">Username</label>
<input type="text" class="form-control" id="username"
name="username" placeholder="username">
</div>
<div class="form-group">
<label for="password" class="col-lg-2 control-
label">Password</label>
<input type="password" class="form-control"
id="password" name="password" placeholder="Password">
</div>
<div class="form-group">
<button type="reset" class="btn btn-
default">Cancel</button>
<button type="submit" class="btn btn-
primary">Submit</button>
</div>
</fieldset>
</form>
</body>
</html>
This document explains the usage of Django’s authentication system in its default configuration. This configuration has evolved to serve the most common project needs, handling a reasonably wide range of tasks, and has a careful implementation of passwords and permissions. For projects where authentication needs differ from the default, Django supports extensive extension and customization of authentication.
Django authentication provides both authentication and authorization together and is generally referred to as the authentication system, as these features are somewhat coupled.
User objects
User objects are the core of the authentication system. They typically represent the people interacting with your site and are used to enable things like restricting access, registering user profiles, associating content with creators etc. Only one class of user exists in Django’s authentication framework, i.e., 'superusers' or admin 'staff' users are just user objects with special attributes set, not different classes of user objects.
The primary attributes of the default user are:
usernamepasswordemailfirst_namelast_name
See the full API documentation for full reference, the documentation that follows is more task oriented.
Creating users
The most direct way to create users is to use the included create_user() helper function:
>>> from django.contrib.auth.models import User
>>> user = User.objects.create_user('john', '[email protected]', 'johnpassword')
# At this point, user is a User object that has already been saved
# to the database. You can continue to change its attributes
# if you want to change other fields.
>>> user.last_name = 'Lennon'
>>> user.save()
If you have the Django admin installed, you can also create users interactively.
Creating superusers
Create superusers using the createsuperuser command:
$ python manage.py createsuperuser --username=joe [email protected]
You will be prompted for a password. After you enter one, the user will be created immediately. If you leave off the --username or --email options, it will prompt you for those values.
Changing passwords
Django does not store raw (clear text) passwords on the user model, but only a hash (see documentation of how passwords are managed for full details). Because of this, do not attempt to manipulate the password attribute of the user directly. This is why a helper function is used when creating a user.
To change a user’s password, you have several options:
manage.py changepassword *username* offers a method of changing a User’s password from the command line. It prompts you to change the password of a given user which you must enter twice. If they both match, the new password will be changed immediately. If you do not supply a user, the command will attempt to change the password whose username matches the current system user.
You can also change a password programmatically, using set_password():
>>> from django.contrib.auth.models import User
>>> u = User.objects.get(username='john')
>>> u.set_password('new password')
>>> u.save()
If you have the Django admin installed, you can also change user’s passwords on the authentication system’s admin pages.
Django also provides views and forms that may be used to allow users to change their own passwords.
Changing a user’s password will log out all their sessions if the SessionAuthenticationMiddleware is enabled. See Session invalidation on password change for details.
Authenticating users
-
authenticate(**credentials)[source] -
To authenticate a given username and password, use
authenticate(). It takes credentials in the form of keyword arguments, for the default configuration this isusernameandpassword, and it returns aUserobject if the password is valid for the given username. If the password is invalid,authenticate()returnsNone. Example:from django.contrib.auth import authenticate user = authenticate(username='john', password='secret') if user is not None: # the password verified for the user if user.is_active: print("User is valid, active and authenticated") else: print("The password is valid, but the account has been disabled!") else: # the authentication system was unable to verify the username and password print("The username and password were incorrect.")Note
This is a low level way to authenticate a set of credentials; for example, it’s used by the
RemoteUserMiddleware. Unless you are writing your own authentication system, you probably won’t use this. Rather if you are looking for a way to limit access to logged in users, see thelogin_required()decorator.
Django comes with a simple permissions system. It provides a way to assign permissions to specific users and groups of users.
It’s used by the Django admin site, but you’re welcome to use it in your own code.
The Django admin site uses permissions as follows:
- Access to view the “add” form and add an object is limited to users with the “add” permission for that type of object.
- Access to view the change list, view the “change” form and change an object is limited to users with the “change” permission for that type of object.
- Access to delete an object is limited to users with the “delete” permission for that type of object.
Permissions can be set not only per type of object, but also per specific object instance. By using the has_add_permission(), has_change_permission() and has_delete_permission() methods provided by the ModelAdmin class, it is possible to customize permissions for different object instances of the same type.
User objects have two many-to-many fields: groups and user_permissions. User objects can access their related objects in the same way as any other Django model:
myuser.groups = [group_list] myuser.groups.add(group, group, ...) myuser.groups.remove(group, group, ...) myuser.groups.clear() myuser.user_permissions = [permission_list] myuser.user_permissions.add(permission, permission, ...) myuser.user_permissions.remove(permission, permission, ...) myuser.user_permissions.clear()
Default permissions
When django.contrib.auth is listed in your INSTALLED_APPS setting, it will ensure that three default permissions – add, change and delete – are created for each Django model defined in one of your installed applications.
These permissions will be created when you run manage.py migrate; the first time you run migrate after adding django.contrib.auth to INSTALLED_APPS, the default permissions will be created for all previously-installed models, as well as for any new models being installed at that time. Afterward, it will create default permissions for new models each time you run manage.py migrate (the function that creates permissions is connected to the post_migrate signal).
Assuming you have an application with an app_label foo and a model named Bar, to test for basic permissions you should use:
- add:
user.has_perm('foo.add_bar') - change:
user.has_perm('foo.change_bar') - delete:
user.has_perm('foo.delete_bar')
The Permission model is rarely accessed directly.
Groups
django.contrib.auth.models.Group models are a generic way of categorizing users so you can apply permissions, or some other label, to those users. A user can belong to any number of groups.
A user in a group automatically has the permissions granted to that group. For example, if the group Site editors has the permission can_edit_home_page, any user in that group will have that permission.
Beyond permissions, groups are a convenient way to categorize users to give them some label, or extended functionality. For example, you could create a group 'Special users', and you could write code that could, say, give them access to a members-only portion of your site, or send them members-only email messages.
Programmatically creating permissions
While custom permissions can be defined within a model’s Meta class, you can also create permissions directly. For example, you can create the can_publish permission for a BlogPost model in myapp:
from myapp.models import BlogPost
from django.contrib.auth.models import Permission
from django.contrib.contenttypes.models import ContentType

content_type = ContentType.objects.get_for_model(BlogPost)
permission = Permission.objects.create(
    codename='can_publish',
    name='Can Publish Posts',
    content_type=content_type,
)
The permission can then be assigned to a User via its user_permissions attribute or to a Group via its permissions attribute.
Permission caching
The ModelBackend caches permissions on the User object after the first time they need to be fetched for a permissions check. This is typically fine for the request-response cycle since permissions are not typically checked immediately after they are added (in the admin, for example). If you are adding permissions and checking them immediately afterward, in a test or view for example, the easiest solution is to re-fetch the User from the database. For example:
from django.contrib.auth.models import Permission, User
from django.shortcuts import get_object_or_404
def user_gains_perms(request, user_id):
user = get_object_or_404(User, pk=user_id)
# any permission check will cache the current set of permissions
user.has_perm('myapp.change_bar')
permission = Permission.objects.get(codename='change_bar')
user.user_permissions.add(permission)
# Checking the cached permission set
user.has_perm('myapp.change_bar') # False
# Request new instance of User
# Be aware that user.refresh_from_db() won't clear the cache.
user = get_object_or_404(User, pk=user_id)
# Permission cache is repopulated from the database
user.has_perm('myapp.change_bar') # True
...
Authentication in Web requests
Django uses sessions and middleware to hook the authentication system into request objects.
These provide a request.user attribute on every request which represents the current user. If the current user has not logged in, this attribute will be set to an instance of AnonymousUser, otherwise it will be an instance of User.
You can tell them apart with is_authenticated(), like so:
if request.user.is_authenticated():
# Do something for authenticated users.
...
else:
# Do something for anonymous users.
...
How to log a user in
If you have an authenticated user you want to attach to the current session — this is done with a login() function.
-
login(request, user)[source] -
To log a user in, from a view, use
login(). It takes anHttpRequestobject and aUserobject.login()saves the user’s ID in the session, using Django’s session framework.Note that any data set during the anonymous session is retained in the session after a user logs in.
This example shows how you might use both
authenticate()andlogin():from django.contrib.auth import authenticate, login def my_view(request): username = request.POST['username'] password = request.POST['password'] user = authenticate(username=username, password=password) if user is not None: if user.is_active: login(request, user) # Redirect to a success page. else: # Return a 'disabled account' error message ... else: # Return an 'invalid login' error message. ...
Calling authenticate() first
When you’re manually logging a user in, you must successfully authenticate the user with authenticate() before you call login(). authenticate() sets an attribute on the User noting which authentication backend successfully authenticated that user (see the backends documentation for details), and this information is needed later during the login process. An error will be raised if you try to login a user object retrieved from the database directly.
Selecting the authentication backend
When a user logs in, the user’s ID and the backend that was used for authentication are saved in the user’s session. This allows the same authentication backend to fetch the user’s details on a future request. The authentication backend to save in the session is selected as follows:
- Use the value of the optional
backendargument, if provided. - Use the value of the
user.backendattribute, if present. This allows pairingauthenticate()andlogin():authenticate()sets theuser.backendattribute on theUserobject it returns. - Use the
backendinAUTHENTICATION_BACKENDS, if there is only one. - Otherwise, raise an exception.
In cases 1 and 2, the value of the backend argument or the user.backend attribute should be a dotted import path string (like that found in AUTHENTICATION_BACKENDS), not the actual backend class.
How to log a user out
-
logout(request)[source] -
To log out a user who has been logged in via
django.contrib.auth.login(), usedjango.contrib.auth.logout()within your view. It takes anHttpRequestobject and has no return value. Example:from django.contrib.auth import logout def logout_view(request): logout(request) # Redirect to a success page.Note that
logout()doesn’t throw any errors if the user wasn’t logged in.When you call
logout(), the session data for the current request is completely cleaned out. All existing data is removed. This is to prevent another person from using the same Web browser to log in and have access to the previous user’s session data. If you want to put anything into the session that will be available to the user immediately after logging out, do that after callingdjango.contrib.auth.logout().
Limiting access to logged-in users
The raw way
The simple, raw way to limit access to pages is to check request.user.is_authenticated() and either redirect to a login page:
from django.conf import settings
from django.shortcuts import redirect
def my_view(request):
if not request.user.is_authenticated():
return redirect('%s?next=%s' % (settings.LOGIN_URL, request.path))
# ...
…or display an error message:
from django.shortcuts import render
def my_view(request):
if not request.user.is_authenticated():
return render(request, 'myapp/login_error.html')
# ...
The login_required decorator
-
login_required(redirect_field_name='next', login_url=None)[source] -
As a shortcut, you can use the convenient
login_required()decorator:from django.contrib.auth.decorators import login_required @login_required def my_view(request): ...login_required()does the following:- If the user isn’t logged in, redirect to
settings.LOGIN_URL, passing the current absolute path in the query string. Example:/accounts/login/?next=/polls/3/. - If the user is logged in, execute the view normally. The view code is free to assume the user is logged in.
By default, the path that the user should be redirected to upon successful authentication is stored in a query string parameter called
"next". If you would prefer to use a different name for this parameter,login_required()takes an optionalredirect_field_nameparameter:from django.contrib.auth.decorators import login_required @login_required(redirect_field_name='my_redirect_field') def my_view(request): ...Note that if you provide a value to
redirect_field_name, you will most likely need to customize your login template as well, since the template context variable which stores the redirect path will use the value ofredirect_field_nameas its key rather than"next"(the default).login_required()also takes an optionallogin_urlparameter. Example:from django.contrib.auth.decorators import login_required @login_required(login_url='/accounts/login/') def my_view(request): ...Note that if you don’t specify the
login_urlparameter, you’ll need to ensure that thesettings.LOGIN_URLand your login view are properly associated. For example, using the defaults, add the following lines to your URLconf:from django.contrib.auth import views as auth_views url(r'^accounts/login/$', auth_views.login),
The
settings.LOGIN_URLalso accepts view function names and named URL patterns. This allows you to freely remap your login view within your URLconf without having to update the setting. - If the user isn’t logged in, redirect to
Note
The login_required decorator does NOT check the is_active flag on a user.
The LoginRequired mixin
When using class-based views, you can achieve the same behavior as with login_required by using the LoginRequiredMixin. This mixin should be at the leftmost position in the inheritance list.
-
class LoginRequiredMixin -
If a view is using this mixin, all requests by non-authenticated users will be redirected to the login page or shown an HTTP 403 Forbidden error, depending on the
raise_exceptionparameter.You can set any of the parameters of
AccessMixinto customize the handling of unauthorized users:from django.contrib.auth.mixins import LoginRequiredMixin class MyView(LoginRequiredMixin, View): login_url = '/login/' redirect_field_name = 'redirect_to'
Note
Just as the login_required decorator, this mixin does NOT check the is_active flag on a user.
Limiting access to logged-in users that pass a test
To limit access based on certain permissions or some other test, you’d do essentially the same thing as described in the previous section.
The simple way is to run your test on request.user in the view directly. For example, this view checks to make sure the user has an email in the desired domain and if not, redirects to the login page:
from django.shortcuts import redirect

def my_view(request):
    if not request.user.email.endswith('@example.com'):
        return redirect('/login/?next=%s' % request.path)
    # ...
-
user_passes_test(test_func, login_url=None, redirect_field_name='next')[source] -
As a shortcut, you can use the convenient
user_passes_testdecorator which performs a redirect when the callable returnsFalse:from django.contrib.auth.decorators import user_passes_test def email_check(user): return user.email.endswith('@example.com') @user_passes_test(email_check) def my_view(request): ...user_passes_test()takes a required argument: a callable that takes aUserobject and returnsTrueif the user is allowed to view the page. Note thatuser_passes_test()does not automatically check that theUseris not anonymous.user_passes_test()takes two optional arguments:-
login_url - Lets you specify the URL that users who don’t pass the test will be redirected to. It may be a login page and defaults to
settings.LOGIN_URLif you don’t specify one. -
redirect_field_name - Same as for
login_required(). Setting it toNoneremoves it from the URL, which you may want to do if you are redirecting users that don’t pass the test to a non-login page where there’s no “next page”.
For example:
@user_passes_test(email_check, login_url='/login/') def my_view(request): ... -
-
class UserPassesTestMixin -
When using class-based views, you can use the
UserPassesTestMixinto do this.-
test_func() -
You have to override the
test_func()method of the class to provide the test that is performed. Furthermore, you can set any of the parameters ofAccessMixinto customize the handling of unauthorized users:from django.contrib.auth.mixins import UserPassesTestMixin class MyView(UserPassesTestMixin, View): def test_func(self): return self.request.user.email.endswith('@example.com')
-
get_test_func() -
You can also override the
get_test_func()method to have the mixin use a differently named function for its checks (instead oftest_func()).
Stacking
UserPassesTestMixinDue to the way
UserPassesTestMixinis implemented, you cannot stack them in your inheritance list. The following does NOT work:class TestMixin1(UserPassesTestMixin): def test_func(self): return self.request.user.email.endswith('@example.com') class TestMixin2(UserPassesTestMixin): def test_func(self): return self.request.user.username.startswith('django') class MyView(TestMixin1, TestMixin2, View): ...If
TestMixin1would callsuper()and take that result into account,TestMixin1wouldn’t work standalone anymore. -
The permission_required decorator
-
permission_required(perm, login_url=None, raise_exception=False)[source] -
It’s a relatively common task to check whether a user has a particular permission. For that reason, Django provides a shortcut for that case: the
permission_required()decorator.:from django.contrib.auth.decorators import permission_required @permission_required('polls.can_vote') def my_view(request): ...Just like the
has_perm()method, permission names take the form"<app label>.<permission codename>"(i.e.polls.can_votefor a permission on a model in thepollsapplication).The decorator may also take an iterable of permissions, in which case the user must have all of the permissions in order to access the view.
Note that
permission_required()also takes an optionallogin_urlparameter:from django.contrib.auth.decorators import permission_required @permission_required('polls.can_vote', login_url='/loginpage/') def my_view(request): ...As in the
login_required()decorator,login_urldefaults tosettings.LOGIN_URL.If the
raise_exceptionparameter is given, the decorator will raisePermissionDenied, prompting the 403 (HTTP Forbidden) view instead of redirecting to the login page.If you want to use
raise_exceptionbut also give your users a chance to login first, you can add thelogin_required()decorator:from django.contrib.auth.decorators import login_required, permission_required @login_required @permission_required('polls.can_vote', raise_exception=True) def my_view(request): ...In older versions, the
permissionparameter only worked with strings, lists, and tuples instead of strings and any iterable.
The PermissionRequiredMixin mixin
To apply permission checks to class-based views, you can use the PermissionRequiredMixin:
-
class PermissionRequiredMixin -
This mixin, just like the
permission_requireddecorator, checks whether the user accessing a view has all given permissions. You should specify the permission (or an iterable of permissions) using thepermission_requiredparameter:from django.contrib.auth.mixins import PermissionRequiredMixin class MyView(PermissionRequiredMixin, View): permission_required = 'polls.can_vote' # Or multiple of permissions: permission_required = ('polls.can_open', 'polls.can_edit')You can set any of the parameters of
AccessMixinto customize the handling of unauthorized users.You may also override these methods:
-
get_permission_required() -
Returns an iterable of permission names used by the mixin. Defaults to the
permission_requiredattribute, converted to a tuple if necessary.
-
has_permission() -
Returns a boolean denoting whether the current user has permission to execute the decorated view. By default, this returns the result of calling
has_perms()with the list of permissions returned byget_permission_required().
-
Redirecting unauthorized requests in class-based views
To ease the handling of access restrictions in class-based views, the AccessMixin can be used to redirect a user to the login page or issue an HTTP 403 Forbidden response.
-
class AccessMixin -
-
login_url -
Default return value for
get_login_url(). Defaults toNonein which caseget_login_url()falls back tosettings.LOGIN_URL.
-
permission_denied_message -
Default return value for
get_permission_denied_message(). Defaults to an empty string.
-
redirect_field_name -
Default return value for
get_redirect_field_name(). Defaults to"next".
-
raise_exception -
If this attribute is set to
True, aPermissionDeniedexception will be raised instead of the redirect. Defaults toFalse.
-
get_login_url() -
Returns the URL that users who don’t pass the test will be redirected to. Returns
login_urlif set, orsettings.LOGIN_URLotherwise.
-
get_permission_denied_message() -
When
raise_exceptionisTrue, this method can be used to control the error message passed to the error handler for display to the user. Returns thepermission_denied_messageattribute by default.
-
get_redirect_field_name() -
Returns the name of the query parameter that will contain the URL the user should be redirected to after a successful login. If you set this to
None, a query parameter won’t be added. Returns theredirect_field_nameattribute by default.
-
handle_no_permission() -
Depending on the value of
raise_exception, the method either raises aPermissionDeniedexception or redirects the user to thelogin_url, optionally including theredirect_field_nameif it is set.
-
Session invalidation on password change
Warning
This protection only applies if SessionAuthenticationMiddleware is enabled in MIDDLEWARE_CLASSES. It’s included if settings.py was generated by startproject on Django ≥ 1.7.
Session verification will become mandatory in Django 1.10 regardless of whether or not SessionAuthenticationMiddleware is enabled. If you have a pre-1.7 project or one generated using a template that doesn’t include SessionAuthenticationMiddleware, consider enabling it before then after reading the upgrade considerations below.
If your AUTH_USER_MODEL inherits from AbstractBaseUser or implements its own get_session_auth_hash() method, authenticated sessions will include the hash returned by this function. In the AbstractBaseUser case, this is an HMAC of the password field. If the SessionAuthenticationMiddleware is enabled, Django verifies that the hash sent along with each request matches the one that’s computed server-side. This allows a user to log out all of their sessions by changing their password.
The default password change views included with Django, django.contrib.auth.views.password_change() and the user_change_password view in the django.contrib.auth admin, update the session with the new password hash so that a user changing their own password won’t log themselves out. If you have a custom password change view and wish to have similar behavior, use this function:
-
update_session_auth_hash(request, user) -
This function takes the current request and the updated user object from which the new session hash will be derived and updates the session hash appropriately. Example usage:
from django.contrib.auth import update_session_auth_hash

def password_change(request):
    if request.method == 'POST':
        form = PasswordChangeForm(user=request.user, data=request.POST)
        if form.is_valid():
            form.save()
            update_session_auth_hash(request, form.user)
    else:
        ...
If you are upgrading an existing site and wish to enable this middleware without requiring all your users to re-login afterward, you should first upgrade to Django 1.7 and run it for a while so that as sessions are naturally recreated as users login, they include the session hash as described above. Once you start running your site with SessionAuthenticationMiddleware, any users who have not logged in and had their session updated with the verification hash will have their existing session invalidated and be required to login.
Authentication Views
Django provides several views that you can use for handling login, logout, and password management. These make use of the stock auth forms but you can pass in your own forms as well.
Django provides no default template for the authentication views. You should create your own templates for the views you want to use. The template context is documented in each view, see All authentication views.
Using the views
There are different methods to implement these views in your project. The easiest way is to include the provided URLconf in django.contrib.auth.urls in your own URLconf, for example:
urlpatterns = [
url('^', include('django.contrib.auth.urls')),
]
This will include the following URL patterns:
^login/$ [name='login']
^logout/$ [name='logout']
^password_change/$ [name='password_change']
^password_change/done/$ [name='password_change_done']
^password_reset/$ [name='password_reset']
^password_reset/done/$ [name='password_reset_done']
^reset/(?P<uidb64>[0-9A-Za-z_-]+)/(?P<token>[0-9A-Za-z]{1,13}-[0-9A-Za-z]{1,20})/$ [name='password_reset_confirm']
^reset/done/$ [name='password_reset_complete']
The views provide a URL name for easier reference. See the URL documentation for details on using named URL patterns.
If you want more control over your URLs, you can reference a specific view in your URLconf:
from django.contrib.auth import views as auth_views
urlpatterns = [
url('^change-password/$', auth_views.password_change),
]
The views have optional arguments you can use to alter the behavior of the view. For example, if you want to change the template name a view uses, you can provide the template_name argument. A way to do this is to provide keyword arguments in the URLconf, these will be passed on to the view. For example:
urlpatterns = [
url(
'^change-password/$',
auth_views.password_change,
{'template_name': 'change-password.html'}
),
]
All views return a TemplateResponse instance, which allows you to easily customize the response data before rendering. A way to do this is to wrap a view in your own view:
from django.contrib.auth import views
def change_password(request):
template_response = views.password_change(request)
# Do something with `template_response`
return template_response
For more details, see the TemplateResponse documentation.
All authentication views
This is a list with all the views django.contrib.auth provides. For implementation details see Using the views.
-
login(request, template_name=`registration/login.html`, redirect_field_name='next', authentication_form=AuthenticationForm, current_app=None, extra_context=None) -
URL name:
loginSee the URL documentation for details on using named URL patterns.
Optional arguments:
-
template_name: The name of a template to display for the view used to log the user in. Defaults toregistration/login.html. -
redirect_field_name: The name of aGETfield containing the URL to redirect to after login. Defaults tonext. -
authentication_form: A callable (typically just a form class) to use for authentication. Defaults toAuthenticationForm. -
current_app: A hint indicating which application contains the current view. See the namespaced URL resolution strategy for more information. -
extra_context: A dictionary of context data that will be added to the default context data passed to the template.
Deprecated since version 1.9: The
current_appparameter is deprecated and will be removed in Django 2.0. Callers should setrequest.current_appinstead.Here’s what
django.contrib.auth.views.logindoes:- If called via
GET, it displays a login form that POSTs to the same URL. More on this in a bit. - If called via
POSTwith user submitted credentials, it tries to log the user in. If login is successful, the view redirects to the URL specified innext. Ifnextisn’t provided, it redirects tosettings.LOGIN_REDIRECT_URL(which defaults to/accounts/profile/). If login isn’t successful, it redisplays the login form.
It’s your responsibility to provide the html for the login template , called
registration/login.htmlby default. This template gets passed four template context variables:-
form: AFormobject representing theAuthenticationForm. -
next: The URL to redirect to after successful login. This may contain a query string, too. -
site: The currentSite, according to theSITE_IDsetting. If you don’t have the site framework installed, this will be set to an instance ofRequestSite, which derives the site name and domain from the currentHttpRequest. -
site_name: An alias forsite.name. If you don’t have the site framework installed, this will be set to the value ofrequest.META['SERVER_NAME']. For more on sites, see The “sites” framework.
If you’d prefer not to call the template
registration/login.html, you can pass thetemplate_nameparameter via the extra arguments to the view in your URLconf. For example, this URLconf line would usemyapp/login.htmlinstead:url(r'^accounts/login/$', auth_views.login, {'template_name': 'myapp/login.html'}),You can also specify the name of the
GETfield which contains the URL to redirect to after login by passingredirect_field_nameto the view. By default, the field is callednext.Here’s a sample
registration/login.htmltemplate you can use as a starting point. It assumes you have abase.htmltemplate that defines acontentblock:{% extends "base.html" %} {% block content %} {% if form.errors %} <p>Your username and password didn't match. Please try again.</p> {% endif %} {% if next %} {% if user.is_authenticated %} <p>Your account doesn't have access to this page. To proceed, please login with an account that has access.</p> {% else %} <p>Please login to see this page.</p> {% endif %} {% endif %} <form method="post" action="{% url 'login' %}"> {% csrf_token %} <table> <tr> <td>{{ form.username.label_tag }}</td> <td>{{ form.username }}</td> </tr> <tr> <td>{{ form.password.label_tag }}</td> <td>{{ form.password }}</td> </tr> </table> <input type="submit" value="login" /> <input type="hidden" name="next" value="{{ next }}" /> </form> {# Assumes you setup the password_reset view in your URLconf #} <p><a href="{% url 'password_reset' %}">Lost password?</a></p> {% endblock %}If you have customized authentication (see Customizing Authentication) you can pass a custom authentication form to the login view via the
authentication_formparameter. This form must accept arequestkeyword argument in its__init__method, and provide aget_user()method which returns the authenticated user object (this method is only ever called after successful form validation). -
-
logout(request, next_page=None, template_name='registration/logged_out.html', redirect_field_name='next', current_app=None, extra_context=None) -
Logs a user out.
URL name:
logoutOptional arguments:
-
next_page: The URL to redirect to after logout. -
template_name: The full name of a template to display after logging the user out. Defaults toregistration/logged_out.htmlif no argument is supplied. -
redirect_field_name: The name of aGETfield containing the URL to redirect to after log out. Defaults tonext. Overrides thenext_pageURL if the givenGETparameter is passed. -
current_app: A hint indicating which application contains the current view. See the namespaced URL resolution strategy for more information. -
extra_context: A dictionary of context data that will be added to the default context data passed to the template.
Deprecated since version 1.9: The
current_appparameter is deprecated and will be removed in Django 2.0. Callers should setrequest.current_appinstead.Template context:
-
title: The string “Logged out”, localized. -
site: The currentSite, according to theSITE_IDsetting. If you don’t have the site framework installed, this will be set to an instance ofRequestSite, which derives the site name and domain from the currentHttpRequest. -
site_name: An alias forsite.name. If you don’t have the site framework installed, this will be set to the value ofrequest.META['SERVER_NAME']. For more on sites, see The “sites” framework. -
current_app: A hint indicating which application contains the current view. See the namespaced URL resolution strategy for more information. -
extra_context: A dictionary of context data that will be added to the default context data passed to the template.
-
-
logout_then_login(request, login_url=None, current_app=None, extra_context=None) -
Logs a user out, then redirects to the login page.
URL name: No default URL provided
Optional arguments:
-
login_url: The URL of the login page to redirect to. Defaults tosettings.LOGIN_URLif not supplied. -
current_app: A hint indicating which application contains the current view. See the namespaced URL resolution strategy for more information. -
extra_context: A dictionary of context data that will be added to the default context data passed to the template.
Deprecated since version 1.9: The
current_appparameter is deprecated and will be removed in Django 2.0. Callers should setrequest.current_appinstead. -
-
password_change(request, template_name='registration/password_change_form.html', post_change_redirect=None, password_change_form=PasswordChangeForm, current_app=None, extra_context=None) -
Allows a user to change their password.
URL name:
password_changeOptional arguments:
-
template_name: The full name of a template to use for displaying the password change form. Defaults toregistration/password_change_form.htmlif not supplied. -
post_change_redirect: The URL to redirect to after a successful password change. -
password_change_form: A custom “change password” form which must accept auserkeyword argument. The form is responsible for actually changing the user’s password. Defaults toPasswordChangeForm. -
current_app: A hint indicating which application contains the current view. See the namespaced URL resolution strategy for more information. -
extra_context: A dictionary of context data that will be added to the default context data passed to the template.
Deprecated since version 1.9: The
current_appparameter is deprecated and will be removed in Django 2.0. Callers should setrequest.current_appinstead.Template context:
-
form: The password change form (seepassword_change_formabove).
-
-
password_change_done(request, template_name='registration/password_change_done.html', current_app=None, extra_context=None) -
The page shown after a user has changed their password.
URL name:
password_change_doneOptional arguments:
-
template_name: The full name of a template to use. Defaults toregistration/password_change_done.htmlif not supplied. -
current_app: A hint indicating which application contains the current view. See the namespaced URL resolution strategy for more information. -
extra_context: A dictionary of context data that will be added to the default context data passed to the template.
Deprecated since version 1.9: The
current_appparameter is deprecated and will be removed in Django 2.0. Callers should setrequest.current_appinstead. -
-
password_reset(request, is_admin_site=False, template_name='registration/password_reset_form.html', email_template_name='registration/password_reset_email.html', subject_template_name='registration/password_reset_subject.txt', password_reset_form=PasswordResetForm, token_generator=default_token_generator, post_reset_redirect=None, from_email=None, current_app=None, extra_context=None, html_email_template_name=None, extra_email_context=None) -
Allows a user to reset their password by generating a one-time use link that can be used to reset the password, and sending that link to the user’s registered email address.
If the email address provided does not exist in the system, this view won’t send an email, but the user won’t receive any error message either. This prevents information leaking to potential attackers. If you want to provide an error message in this case, you can subclass
PasswordResetFormand use thepassword_reset_formargument.Users flagged with an unusable password (see
set_unusable_password()aren’t allowed to request a password reset to prevent misuse when using an external authentication source like LDAP. Note that they won’t receive any error message since this would expose their account’s existence but no mail will be sent either.URL name:
password_resetOptional arguments:
-
template_name: The full name of a template to use for displaying the password reset form. Defaults toregistration/password_reset_form.htmlif not supplied. -
email_template_name: The full name of a template to use for generating the email with the reset password link. Defaults toregistration/password_reset_email.htmlif not supplied. -
subject_template_name: The full name of a template to use for the subject of the email with the reset password link. Defaults toregistration/password_reset_subject.txtif not supplied. -
password_reset_form: Form that will be used to get the email of the user to reset the password for. Defaults toPasswordResetForm. -
token_generator: Instance of the class to check the one time link. This will default todefault_token_generator, it’s an instance ofdjango.contrib.auth.tokens.PasswordResetTokenGenerator. -
post_reset_redirect: The URL to redirect to after a successful password reset request. -
from_email: A valid email address. By default Django uses theDEFAULT_FROM_EMAIL. -
current_app: A hint indicating which application contains the current view. See the namespaced URL resolution strategy for more information. -
extra_context: A dictionary of context data that will be added to the default context data passed to the template. -
html_email_template_name: The full name of a template to use for generating atext/htmlmultipart email with the password reset link. By default, HTML email is not sent. -
extra_email_context: A dictionary of context data that will available in the email template.
Deprecated since version 1.8: The
is_admin_siteargument is deprecated and will be removed in Django 1.10.Deprecated since version 1.9: The
current_appparameter is deprecated and will be removed in Django 2.0. Callers should setrequest.current_appinstead.The
extra_email_contextparameter was added.Template context:
-
form: The form (seepassword_reset_formabove) for resetting the user’s password.
Email template context:
-
email: An alias foruser.email -
user: The currentUser, according to theemailform field. Only active users are able to reset their passwords (User.is_active is True). -
site_name: An alias forsite.name. If you don’t have the site framework installed, this will be set to the value ofrequest.META['SERVER_NAME']. For more on sites, see The “sites” framework. -
domain: An alias forsite.domain. If you don’t have the site framework installed, this will be set to the value ofrequest.get_host(). -
protocol: http or https -
uid: The user’s primary key encoded in base 64. -
token: Token to check that the reset link is valid.
Sample
registration/password_reset_email.html(email body template):Someone asked for password reset for email {{ email }}. Follow the link below: {{ protocol}}://{{ domain }}{% url 'password_reset_confirm' uidb64=uid token=token %}The same template context is used for subject template. Subject must be single line plain text string.
-
-
password_reset_done(request, template_name='registration/password_reset_done.html', current_app=None, extra_context=None) -
The page shown after a user has been emailed a link to reset their password. This view is called by default if the
password_reset()view doesn’t have an explicitpost_reset_redirectURL set.URL name:
password_reset_doneNote
If the email address provided does not exist in the system, the user is inactive, or has an unusable password, the user will still be redirected to this view but no email will be sent.
Optional arguments:
-
template_name: The full name of a template to use. Defaults toregistration/password_reset_done.htmlif not supplied. -
current_app: A hint indicating which application contains the current view. See the namespaced URL resolution strategy for more information. -
extra_context: A dictionary of context data that will be added to the default context data passed to the template.
Deprecated since version 1.9: The
current_appparameter is deprecated and will be removed in Django 2.0. Callers should setrequest.current_appinstead. -
-
password_reset_confirm(request, uidb64=None, token=None, template_name='registration/password_reset_confirm.html', token_generator=default_token_generator, set_password_form=SetPasswordForm, post_reset_redirect=None, current_app=None, extra_context=None) -
Presents a form for entering a new password.
URL name:
password_reset_confirmOptional arguments:
-
uidb64: The user’s id encoded in base 64. Defaults toNone. -
token: Token to check that the password is valid. Defaults toNone. -
template_name: The full name of a template to display the confirm password view. Default value isregistration/password_reset_confirm.html. -
token_generator: Instance of the class to check the password. This will default todefault_token_generator, it’s an instance ofdjango.contrib.auth.tokens.PasswordResetTokenGenerator. -
set_password_form: Form that will be used to set the password. Defaults toSetPasswordForm -
post_reset_redirect: URL to redirect after the password reset done. Defaults toNone. -
current_app: A hint indicating which application contains the current view. See the namespaced URL resolution strategy for more information. -
extra_context: A dictionary of context data that will be added to the default context data passed to the template.
Template context:
-
form: The form (seeset_password_formabove) for setting the new user’s password. -
validlink: Boolean, True if the link (combination ofuidb64andtoken) is valid or unused yet.
Deprecated since version 1.9: The
current_appparameter is deprecated and will be removed in Django 2.0. Callers should setrequest.current_appinstead. -
-
password_reset_complete(request, template_name='registration/password_reset_complete.html', current_app=None, extra_context=None) -
Presents a view which informs the user that the password has been successfully changed.
URL name:
password_reset_completeOptional arguments:
-
template_name: The full name of a template to display the view. Defaults toregistration/password_reset_complete.html. -
current_app: A hint indicating which application contains the current view. See the namespaced URL resolution strategy for more information. -
extra_context: A dictionary of context data that will be added to the default context data passed to the template.
Deprecated since version 1.9: The
current_appparameter is deprecated and will be removed in Django 2.0. Callers should setrequest.current_appinstead. -
Helper functions
-
redirect_to_login(next, login_url=None, redirect_field_name='next') -
Redirects to the login page, and then back to another URL after a successful login.
Required arguments:
-
next: The URL to redirect to after a successful login.
Optional arguments:
-
login_url: The URL of the login page to redirect to. Defaults tosettings.LOGIN_URLif not supplied. -
redirect_field_name: The name of aGETfield containing the URL to redirect to after log out. Overridesnextif the givenGETparameter is passed.
-
Built-in forms
If you don’t want to use the built-in views, but want the convenience of not having to write forms for this functionality, the authentication system provides several built-in forms located in django.contrib.auth.forms:
-
class AdminPasswordChangeForm -
A form used in the admin interface to change a user’s password.
Takes the
useras the first positional argument.
-
class AuthenticationForm -
A form for logging a user in.
Takes
requestas its first positional argument, which is stored on the form instance for use by sub-classes.-
confirm_login_allowed(user) -
By default,
AuthenticationFormrejects users whoseis_activeflag is set toFalse. You may override this behavior with a custom policy to determine which users can log in. Do this with a custom form that subclassesAuthenticationFormand overrides theconfirm_login_allowed()method. This method should raise aValidationErrorif the given user may not log in.For example, to allow all users to log in regardless of “active” status:
from django.contrib.auth.forms import AuthenticationForm class AuthenticationFormWithInactiveUsersOkay(AuthenticationForm): def confirm_login_allowed(self, user): passOr to allow only some active users to log in:
class PickyAuthenticationForm(AuthenticationForm): def confirm_login_allowed(self, user): if not user.is_active: raise forms.ValidationError( _("This account is inactive."), code='inactive', ) if user.username.startswith('b'): raise forms.ValidationError( _("Sorry, accounts starting with 'b' aren't welcome here."), code='no_b_users', )
-
-
class PasswordChangeForm -
A form for allowing a user to change their password.
-
class PasswordResetForm -
A form for generating and emailing a one-time use link to reset a user’s password.
-
send_email(subject_template_name, email_template_name, context, from_email, to_email, html_email_template_name=None) -
Uses the arguments to send an
EmailMultiAlternatives. Can be overridden to customize how the email is sent to the user.Parameters: - subject_template_name – the template for the subject.
- email_template_name – the template for the email body.
-
context – context passed to the
subject_template,email_template, andhtml_email_template(if it is notNone). - from_email – the sender’s email.
- to_email – the email of the requester.
-
html_email_template_name – the template for the HTML body; defaults to
None, in which case a plain text email is sent.
By default,
save()populates thecontextwith the same variables thatpassword_reset()passes to its email context.
-
-
class SetPasswordForm -
A form that lets a user change their password without entering the old password.
-
class UserChangeForm -
A form used in the admin interface to change a user’s information and permissions.
-
class UserCreationForm -
A form for creating a new user.
Authentication data in templates
The currently logged-in user and their permissions are made available in the template context when you use RequestContext.
Technicality
Technically, these variables are only made available in the template context if you use RequestContext and the 'django.contrib.auth.context_processors.auth' context processor is enabled. It is in the default generated settings file. For more, see the RequestContext docs.
Users
When rendering a template RequestContext, the currently logged-in user, either a User instance or an AnonymousUser instance, is stored in the template variable {{ user }}:
{% if user.is_authenticated %}
    <p>Welcome, {{ user.username }}. Thanks for logging in.</p>
{% else %}
    <p>Welcome, new user. Please log in.</p>
{% endif %}
This template context variable is not available if a RequestContext is not being used.
Permissions
The currently logged-in user’s permissions are stored in the template variable {{ perms }}. This is an instance of django.contrib.auth.context_processors.PermWrapper, which is a template-friendly proxy of permissions.
In the {{ perms }} object, single-attribute lookup is a proxy to User.has_module_perms. This example would display True if the logged-in user had any permissions in the foo app:
{{ perms.foo }}
Two-level-attribute lookup is a proxy to User.has_perm. This example would display True if the logged-in user had the permission foo.can_vote:
{{ perms.foo.can_vote }}
Thus, you can check permissions in template {% if %} statements:
{% if perms.foo %}
    <p>You have permission to do something in the foo app.</p>
    {% if perms.foo.can_vote %}
        <p>You can vote!</p>
    {% endif %}
    {% if perms.foo.can_drive %}
        <p>You can drive!</p>
    {% endif %}
{% else %}
    <p>You don't have permission to do anything in the foo app.</p>
{% endif %}
It is possible to also look permissions up by {% if in %} statements. For example:
{% if 'foo' in perms %}
    {% if 'foo.can_vote' in perms %}
        <p>In lookup works, too.</p>
    {% endif %}
{% endif %}
Managing users in the admin
When you have both django.contrib.admin and django.contrib.auth installed, the admin provides a convenient way to view and manage users, groups, and permissions. Users can be created and deleted like any Django model. Groups can be created, and permissions can be assigned to users or groups. A log of user edits to models made within the admin is also stored and displayed.
Creating users
You should see a link to “Users” in the “Auth” section of the main admin index page. The “Add user” admin page is different than standard admin pages in that it requires you to choose a username and password before allowing you to edit the rest of the user’s fields.
Also note: if you want a user account to be able to create users using the Django admin site, you’ll need to give them permission to add users and change users (i.e., the “Add user” and “Change user” permissions). If an account has permission to add users but not to change them, that account won’t be able to add users. Why? Because if you have permission to add users, you have the power to create superusers, which can then, in turn, change other users. So Django requires add and change permissions as a slight security measure.
Be thoughtful about how you allow users to manage permissions. If you give a non-superuser the ability to edit users, this is ultimately the same as giving them superuser status because they will be able to elevate permissions of users including themselves!
Changing passwords
User passwords are not displayed in the admin (nor stored in the database), but the password storage details are displayed. Included in the display of this information is a link to a password change form that allows admins to change user passwords.
authentication.py
Auth needs to be pluggable.
— Jacob Kaplan-Moss, «REST worst practices»
Authentication is the mechanism of associating an incoming request with a set of identifying credentials, such as the user the request came from, or the token that it was signed with. The permission and throttling policies can then use those credentials to determine if the request should be permitted.
REST framework provides several authentication schemes out of the box, and also allows you to implement custom schemes.
Authentication always runs at the very start of the view, before the permission and throttling checks occur, and before any other code is allowed to proceed.
The request.user property will typically be set to an instance of the contrib.auth package’s User class.
The request.auth property is used for any additional authentication information, for example, it may be used to represent an authentication token that the request was signed with.
Note: Don’t forget that authentication by itself won’t allow or disallow an incoming request, it simply identifies the credentials that the request was made with.
For information on how to set up the permission policies for your API please see the permissions documentation.
How authentication is determined
The authentication schemes are always defined as a list of classes. REST framework will attempt to authenticate with each class in the list, and will set request.user and request.auth using the return value of the first class that successfully authenticates.
If no class authenticates, request.user will be set to an instance of django.contrib.auth.models.AnonymousUser, and request.auth will be set to None.
The value of request.user and request.auth for unauthenticated requests can be modified using the UNAUTHENTICATED_USER and UNAUTHENTICATED_TOKEN settings.
Setting the authentication scheme
The default authentication schemes may be set globally, using the DEFAULT_AUTHENTICATION_CLASSES setting. For example.
REST_FRAMEWORK = {
    'DEFAULT_AUTHENTICATION_CLASSES': [
        'rest_framework.authentication.BasicAuthentication',
        'rest_framework.authentication.SessionAuthentication',
    ]
}
You can also set the authentication scheme on a per-view or per-viewset basis,
using the APIView class-based views.
from rest_framework.authentication import SessionAuthentication, BasicAuthentication
from rest_framework.permissions import IsAuthenticated
from rest_framework.response import Response
from rest_framework.views import APIView

class ExampleView(APIView):
    authentication_classes = [SessionAuthentication, BasicAuthentication]
    permission_classes = [IsAuthenticated]

    def get(self, request, format=None):
        content = {
            'user': str(request.user),  # `django.contrib.auth.User` instance.
            'auth': str(request.auth),  # None
        }
        return Response(content)
Or, if you’re using the @api_view decorator with function based views.
@api_view(['GET'])
@authentication_classes([SessionAuthentication, BasicAuthentication])
@permission_classes([IsAuthenticated])
def example_view(request, format=None):
    content = {
        'user': str(request.user),  # `django.contrib.auth.User` instance.
        'auth': str(request.auth),  # None
    }
    return Response(content)
When an unauthenticated request is denied permission there are two different error codes that may be appropriate.
- HTTP 401 Unauthorized
- HTTP 403 Permission Denied
HTTP 401 responses must always include a WWW-Authenticate header, that instructs the client how to authenticate. HTTP 403 responses do not include the WWW-Authenticate header.
The kind of response that will be used depends on the authentication scheme. Although multiple authentication schemes may be in use, only one scheme may be used to determine the type of response. The first authentication class set on the view is used when determining the type of response.
Note that when a request may successfully authenticate, but still be denied permission to perform the request, in which case a 403 Permission Denied response will always be used, regardless of the authentication scheme.
Apache mod_wsgi specific configuration
Note that if deploying to Apache using mod_wsgi, the authorization header is not passed through to a WSGI application by default, as it is assumed that authentication will be handled by Apache, rather than at an application level.
If you are deploying to Apache, and using any non-session based authentication, you will need to explicitly configure mod_wsgi to pass the required headers through to the application. This can be done by specifying the WSGIPassAuthorization directive in the appropriate context and setting it to 'On'.
# this can go in either server config, virtual host, directory or .htaccess
WSGIPassAuthorization On
API Reference
BasicAuthentication
This authentication scheme uses HTTP Basic Authentication, signed against a user’s username and password. Basic authentication is generally only appropriate for testing.
If successfully authenticated, BasicAuthentication provides the following credentials.
request.userwill be a DjangoUserinstance.request.authwill beNone.
Unauthenticated responses that are denied permission will result in an HTTP 401 Unauthorized response with an appropriate WWW-Authenticate header. For example:
WWW-Authenticate: Basic realm="api"
Note: If you use BasicAuthentication in production you must ensure that your API is only available over https. You should also ensure that your API clients will always re-request the username and password at login, and will never store those details to persistent storage.
TokenAuthentication
Note: The token authentication provided by Django REST framework is a fairly simple implementation.
For an implementation which allows more than one token per user, has some tighter security implementation details, and supports token expiry, please see the Django REST Knox third party package.
This authentication scheme uses a simple token-based HTTP Authentication scheme. Token authentication is appropriate for client-server setups, such as native desktop and mobile clients.
To use the TokenAuthentication scheme you’ll need to configure the authentication classes to include TokenAuthentication, and additionally include rest_framework.authtoken in your INSTALLED_APPS setting:
INSTALLED_APPS = [
    ...
    'rest_framework.authtoken'
]
Make sure to run manage.py migrate after changing your settings.
The rest_framework.authtoken app provides Django database migrations.
You’ll also need to create tokens for your users.
from rest_framework.authtoken.models import Token

token = Token.objects.create(user=...)
print(token.key)
For clients to authenticate, the token key should be included in the Authorization HTTP header. The key should be prefixed by the string literal «Token», with whitespace separating the two strings. For example:
Authorization: Token 9944b09199c62bcf9418ad846dd0e4bbdfc6ee4b
If you want to use a different keyword in the header, such as Bearer, simply subclass TokenAuthentication and set the keyword class variable.
If successfully authenticated, TokenAuthentication provides the following credentials.
request.userwill be a DjangoUserinstance.request.authwill be arest_framework.authtoken.models.Tokeninstance.
Unauthenticated responses that are denied permission will result in an HTTP 401 Unauthorized response with an appropriate WWW-Authenticate header. For example:
WWW-Authenticate: Token
The curl command line tool may be useful for testing token authenticated APIs. For example:
curl -X GET http://127.0.0.1:8000/api/example/ -H 'Authorization: Token 9944b09199c62bcf9418ad846dd0e4bbdfc6ee4b'
Note: If you use TokenAuthentication in production you must ensure that your API is only available over https.
Generating Tokens
By using signals
If you want every user to have an automatically generated Token, you can simply catch the User’s post_save signal.
from django.conf import settings
from django.db.models.signals import post_save
from django.dispatch import receiver
from rest_framework.authtoken.models import Token

@receiver(post_save, sender=settings.AUTH_USER_MODEL)
def create_auth_token(sender, instance=None, created=False, **kwargs):
    if created:
        Token.objects.create(user=instance)
Note that you’ll want to ensure you place this code snippet in an installed models.py module, or some other location that will be imported by Django on startup.
If you’ve already created some users, you can generate tokens for all existing users like this:
from django.contrib.auth.models import User
from rest_framework.authtoken.models import Token

for user in User.objects.all():
    Token.objects.get_or_create(user=user)
By exposing an api endpoint
When using TokenAuthentication, you may want to provide a mechanism for clients to obtain a token given the username and password. REST framework provides a built-in view to provide this behaviour. To use it, add the obtain_auth_token view to your URLconf:
from rest_framework.authtoken import views
urlpatterns += [
    path('api-token-auth/', views.obtain_auth_token)
]
Note that the URL part of the pattern can be whatever you want to use.
The obtain_auth_token view will return a JSON response when valid username and password fields are POSTed to the view using form data or JSON:
{ 'token' : '9944b09199c62bcf9418ad846dd0e4bbdfc6ee4b' }
Note that the default obtain_auth_token view explicitly uses JSON requests and responses, rather than using default renderer and parser classes in your settings.
By default, there are no permissions or throttling applied to the obtain_auth_token view. If you do wish to apply to throttle you’ll need to override the view class,
and include them using the throttle_classes attribute.
If you need a customized version of the obtain_auth_token view, you can do so by subclassing the ObtainAuthToken view class, and using that in your url conf instead.
For example, you may return additional user information beyond the token value:
from rest_framework.authtoken.views import ObtainAuthToken
from rest_framework.authtoken.models import Token
from rest_framework.response import Response

class CustomAuthToken(ObtainAuthToken):

    def post(self, request, *args, **kwargs):
        serializer = self.serializer_class(data=request.data,
                                           context={'request': request})
        serializer.is_valid(raise_exception=True)
        user = serializer.validated_data['user']
        token, created = Token.objects.get_or_create(user=user)
        return Response({
            'token': token.key,
            'user_id': user.pk,
            'email': user.email
        })
And in your urls.py:
urlpatterns += [
    path('api-token-auth/', CustomAuthToken.as_view())
]
With Django admin
It is also possible to create Tokens manually through the admin interface. In case you are using a large user base, we recommend that you monkey patch the TokenAdmin class customize it to your needs, more specifically by declaring the user field as raw_field.
your_app/admin.py:
from rest_framework.authtoken.admin import TokenAdmin

TokenAdmin.raw_id_fields = ['user']
Using Django manage.py command
Since version 3.6.4 it’s possible to generate a user token using the following command:
./manage.py drf_create_token <username>
this command will return the API token for the given user, creating it if it doesn’t exist:
Generated token 9944b09199c62bcf9418ad846dd0e4bbdfc6ee4b for user user1
In case you want to regenerate the token (for example if it has been compromised or leaked) you can pass an additional parameter:
./manage.py drf_create_token -r <username>
SessionAuthentication
This authentication scheme uses Django’s default session backend for authentication. Session authentication is appropriate for AJAX clients that are running in the same session context as your website.
If successfully authenticated, SessionAuthentication provides the following credentials.
request.userwill be a DjangoUserinstance.request.authwill beNone.
Unauthenticated responses that are denied permission will result in an HTTP 403 Forbidden response.
If you’re using an AJAX-style API with SessionAuthentication, you’ll need to make sure you include a valid CSRF token for any «unsafe» HTTP method calls, such as PUT, PATCH, POST or DELETE requests. See the Django CSRF documentation for more details.
Warning: Always use Django’s standard login view when creating login pages. This will ensure your login views are properly protected.
CSRF validation in REST framework works slightly differently from standard Django due to the need to support both session and non-session based authentication to the same views. This means that only authenticated requests require CSRF tokens, and anonymous requests may be sent without CSRF tokens. This behaviour is not suitable for login views, which should always have CSRF validation applied.
RemoteUserAuthentication
This authentication scheme allows you to delegate authentication to your web server, which sets the REMOTE_USER
environment variable.
To use it, you must have django.contrib.auth.backends.RemoteUserBackend (or a subclass) in your
AUTHENTICATION_BACKENDS setting. By default, RemoteUserBackend creates User objects for usernames that don’t
already exist. To change this and other behaviour, consult the
Django documentation.
If successfully authenticated, RemoteUserAuthentication provides the following credentials:
request.userwill be a DjangoUserinstance.request.authwill beNone.
Consult your web server’s documentation for information about configuring an authentication method, e.g.:
- Apache Authentication How-To
- NGINX (Restricting Access)
Custom authentication
To implement a custom authentication scheme, subclass BaseAuthentication and override the .authenticate(self, request) method. The method should return a two-tuple of (user, auth) if authentication succeeds, or None otherwise.
In some circumstances instead of returning None, you may want to raise an AuthenticationFailed exception from the .authenticate() method.
Typically the approach you should take is:
- If authentication is not attempted, return
None. Any other authentication schemes also in use will still be checked. - If authentication is attempted but fails, raise an
AuthenticationFailedexception. An error response will be returned immediately, regardless of any permissions checks, and without checking any other authentication schemes.
You may also override the .authenticate_header(self, request) method. If implemented, it should return a string that will be used as the value of the WWW-Authenticate header in a HTTP 401 Unauthorized response.
If the .authenticate_header() method is not overridden, the authentication scheme will return HTTP 403 Forbidden responses when an unauthenticated request is denied access.
Note: When your custom authenticator is invoked by the request object’s .user or .auth properties, you may see an AttributeError re-raised as a WrappedAttributeError. This is necessary to prevent the original exception from being suppressed by the outer property access. Python will not recognize that the AttributeError originates from your custom authenticator and will instead assume that the request object does not have a .user or .auth property. These errors should be fixed or otherwise handled by your authenticator.
Example
The following example will authenticate any incoming request as the user given by the username in a custom request header named ‘X-USERNAME’.
from django.contrib.auth.models import User
from rest_framework import authentication
from rest_framework import exceptions

class ExampleAuthentication(authentication.BaseAuthentication):
    def authenticate(self, request):
        username = request.META.get('HTTP_X_USERNAME')
        if not username:
            return None

        try:
            user = User.objects.get(username=username)
        except User.DoesNotExist:
            raise exceptions.AuthenticationFailed('No such user')

        return (user, None)
Third party packages
The following third-party packages are also available.
django-rest-knox
Django-rest-knox library provides models and views to handle token-based authentication in a more secure and extensible way than the built-in TokenAuthentication scheme — with Single Page Applications and Mobile clients in mind. It provides per-client tokens, and views to generate them when provided some other authentication (usually basic authentication), to delete the token (providing a server enforced logout) and to delete all tokens (logs out all clients that a user is logged into).
The Django OAuth Toolkit package provides OAuth 2.0 support and works with Python 3.4+. The package is maintained by jazzband and uses the excellent OAuthLib. The package is well documented, and well supported and is currently our recommended package for OAuth 2.0 support.
Installation & configuration
Install using pip.
pip install django-oauth-toolkit
Add the package to your INSTALLED_APPS and modify your REST framework settings.
INSTALLED_APPS = [
    ...
    'oauth2_provider',
]

REST_FRAMEWORK = {
    'DEFAULT_AUTHENTICATION_CLASSES': [
        'oauth2_provider.contrib.rest_framework.OAuth2Authentication',
    ]
}
For more details see the Django REST framework — Getting started documentation.
Django REST framework OAuth
The Django REST framework OAuth package provides both OAuth1 and OAuth2 support for REST framework.
This package was previously included directly in the REST framework but is now supported and maintained as a third-party package.
Installation & configuration
Install the package using pip.
pip install djangorestframework-oauth
For details on configuration and usage see the Django REST framework OAuth documentation for authentication and permissions.
JSON Web Token Authentication
JSON Web Token is a fairly new standard which can be used for token-based authentication. Unlike the built-in TokenAuthentication scheme, JWT Authentication doesn’t need to use a database to validate a token. A package for JWT authentication is djangorestframework-simplejwt which provides some features as well as a pluggable token blacklist app.
Hawk HTTP Authentication
The HawkREST library builds on the Mohawk library to let you work with Hawk signed requests and responses in your API. Hawk lets two parties securely communicate with each other using messages signed by a shared key. It is based on HTTP MAC access authentication (which was based on parts of OAuth 1.0).
HTTP Signature Authentication
HTTP Signature (currently a IETF draft) provides a way to achieve origin authentication and message integrity for HTTP messages. Similar to Amazon’s HTTP Signature scheme, used by many of its services, it permits stateless, per-request authentication. Elvio Toccalino maintains the djangorestframework-httpsignature (outdated) package which provides an easy to use HTTP Signature Authentication mechanism. You can use the updated fork version of djangorestframework-httpsignature, which is drf-httpsig.
Djoser
Djoser library provides a set of views to handle basic actions such as registration, login, logout, password reset and account activation. The package works with a custom user model and uses token-based authentication. This is ready to use REST implementation of the Django authentication system.
django-rest-auth / dj-rest-auth
This library provides a set of REST API endpoints for registration, authentication (including social media authentication), password reset, retrieve and update user details, etc. By having these API endpoints, your client apps such as AngularJS, iOS, Android, and others can communicate to your Django backend site independently via REST APIs for user management.
There are currently two forks of this project.
- Django-rest-auth is the original project, but is not currently receiving updates.
- Dj-rest-auth is a newer fork of the project.
Drf-social-oauth2 is a framework that helps you authenticate with major social oauth2 vendors, such as Facebook, Google, Twitter, Orcid, etc. It generates tokens in a JWTed way with an easy setup.
drfpasswordless
drfpasswordless adds (Medium, Square Cash inspired) passwordless support to Django REST Framework’s TokenAuthentication scheme. Users log in and sign up with a token sent to a contact point like an email address or a mobile number.
django-rest-authemail
django-rest-authemail provides a RESTful API interface for user signup and authentication. Email addresses are used for authentication, rather than usernames. API endpoints are available for signup, signup email verification, login, logout, password reset, password reset verification, email change, email change verification, password change, and user detail. A fully functional example project and detailed instructions are included.
Django-Rest-Durin
Django-Rest-Durin is built with the idea to have one library that does token auth for multiple Web/CLI/Mobile API clients via one interface but allows different token configuration for each API Client that consumes the API. It provides support for multiple tokens per user via custom models, views, permissions that work with Django-Rest-Framework. The token expiration time can be different per API client and is customizable via the Django Admin Interface.
More information can be found in the Documentation.
- Previous
- Overview: Django
- Next
In this tutorial, we’ll show you how to allow users to log in to your site with their own accounts, and how to control what they can do and see based on whether or not they are logged in and their permissions. As part of this demonstration, we’ll extend the LocalLibrary website, adding login and logout pages, and user- and staff-specific pages for viewing books that have been borrowed.
| Prerequisites: | Complete all previous tutorial topics, up to and including Django Tutorial Part 7: Sessions framework. |
|---|---|
| Objective: | To understand how to set up and use user authentication and permissions. |
Overview
Django provides an authentication and authorization («permission») system, built on top of the session framework discussed in the previous tutorial, that allows you to verify user credentials and define what actions each user is allowed to perform. The framework includes built-in models for Users and Groups (a generic way of applying permissions to more than one user at a time), permissions/flags that designate whether a user may perform a task, forms and views for logging in users, and view tools for restricting content.
Note: According to Django the authentication system aims to be very generic, and so does not provide some features provided in other web authentication systems. Solutions for some common problems are available as third-party packages. For example, throttling of login attempts and authentication against third parties (e.g. OAuth).
In this tutorial, we’ll show you how to enable user authentication in the LocalLibrary website, create your own login and logout pages, add permissions to your models, and control access to pages. We’ll use the authentication/permissions to display lists of books that have been borrowed for both users and librarians.
The authentication system is very flexible, and you can build up your URLs, forms, views, and templates from scratch if you like, just calling the provided API to log in the user. However, in this article, we’re going to use Django’s «stock» authentication views and forms for our login and logout pages. We’ll still need to create some templates, but that’s pretty easy.
We’ll also show you how to create permissions, and check on login status and permissions in both views and templates.
Enabling authentication
The authentication was enabled automatically when we created the skeleton website (in tutorial 2) so you don’t need to do anything more at this point.
Note: The necessary configuration was all done for us when we created the app using the django-admin startproject command. The database tables for users and model permissions were created when we first called python manage.py migrate.
The configuration is set up in the INSTALLED_APPS and MIDDLEWARE sections of the project file (locallibrary/locallibrary/settings.py), as shown below:
INSTALLED_APPS = [
    # …
    'django.contrib.auth',  # Core authentication framework and its default models.
    'django.contrib.contenttypes',  # Django content type system (allows permissions to be associated with models).
    # …

MIDDLEWARE = [
    # …
    'django.contrib.sessions.middleware.SessionMiddleware',  # Manages sessions across requests
    # …
    'django.contrib.auth.middleware.AuthenticationMiddleware',  # Associates users with requests using sessions.
    # …
Creating users and groups
You already created your first user when we looked at the Django admin site in tutorial 4 (this was a superuser, created with the command python manage.py createsuperuser).
Our superuser is already authenticated and has all permissions, so we’ll need to create a test user to represent a normal site user. We’ll be using the admin site to create our locallibrary groups and website logins, as it is one of the quickest ways to do so.
Note: You can also create users programmatically, as shown below.
You would have to do this, for example, if developing an interface to allow «ordinary» users to create their own logins (you shouldn’t give most users access to the admin site).
from django.contrib.auth.models import User

# Create user and save to the database
user = User.objects.create_user('myusername', 'myemail@crazymail.com', 'mypassword')

# Update fields and then save again
user.first_name = 'Tyrone'
user.last_name = 'Citizen'
user.save()
It is highly recommended to set up a custom user model when starting an actual project. You’ll be able to easily customize it in the future if the need arises. For more information, see Using a custom user model when starting a project (Django docs).
Below we’ll first create a group and then a user. Even though we don’t have any permissions to add for our library members yet, if we need to later, it will be much easier to add them once to the group than individually to each member.
Start the development server and navigate to the admin site in your local web browser (http://127.0.0.1:8000/admin/). Login to the site using the credentials for your superuser account. The top level of the Admin site displays all of your models, sorted by «Django application». From the Authentication and Authorization section, you can click the Users or Groups links to see their existing records.
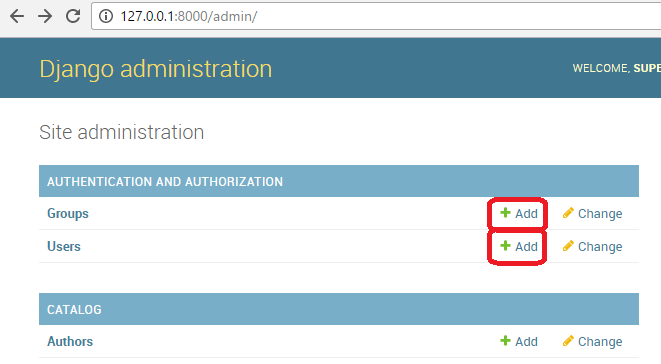
First lets create a new group for our library members.
-
Click the Add button (next to Group) to create a new Group; enter the Name «Library Members» for the group.

- We don’t need any permissions for the group, so just press SAVE (you will be taken to a list of groups).
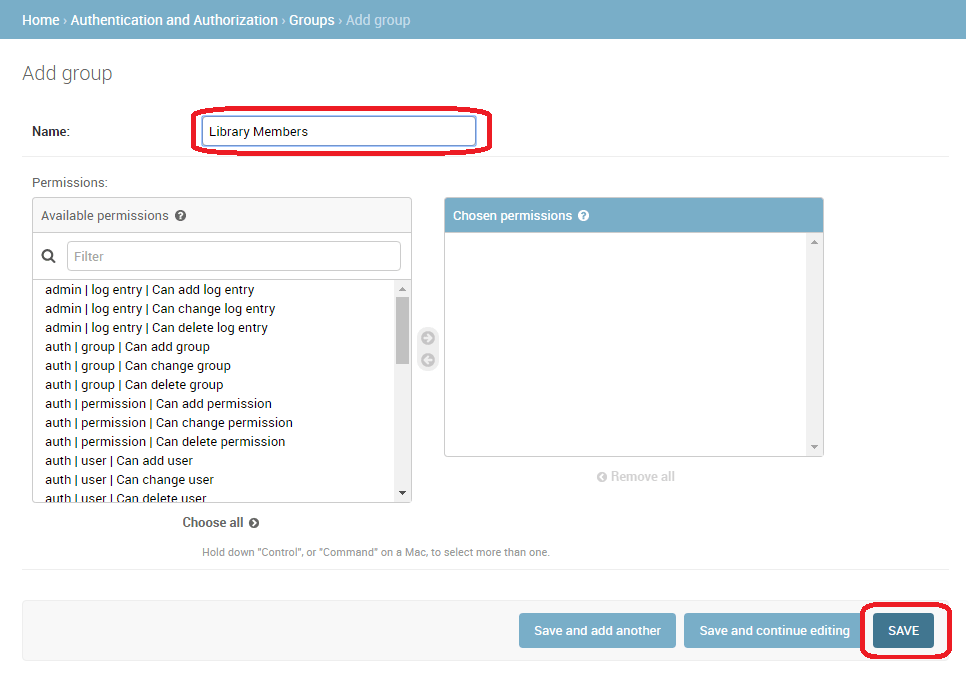
Now let’s create a user:
- Navigate back to the home page of the admin site
-
Click the Add button next to Users to open the Add user dialog box.

- Enter an appropriate Username and Password/Password confirmation for your test user
-
Press SAVE to create the user.
The admin site will create the new user and immediately take you to a Change user screen where you can change your username and add information for the User model’s optional fields. These fields include the first name, last name, email address, and the user’s status and permissions (only the Active flag should be set). Further down you can specify the user’s groups and permissions, and see important dates related to the user (e.g. their join date and last login date).
-
In the Groups section, select Library Member group from the list of Available groups, and then press the right-arrow between the boxes to move it into the Chosen groups box.

- We don’t need to do anything else here, so just select SAVE again, to go to the list of users.
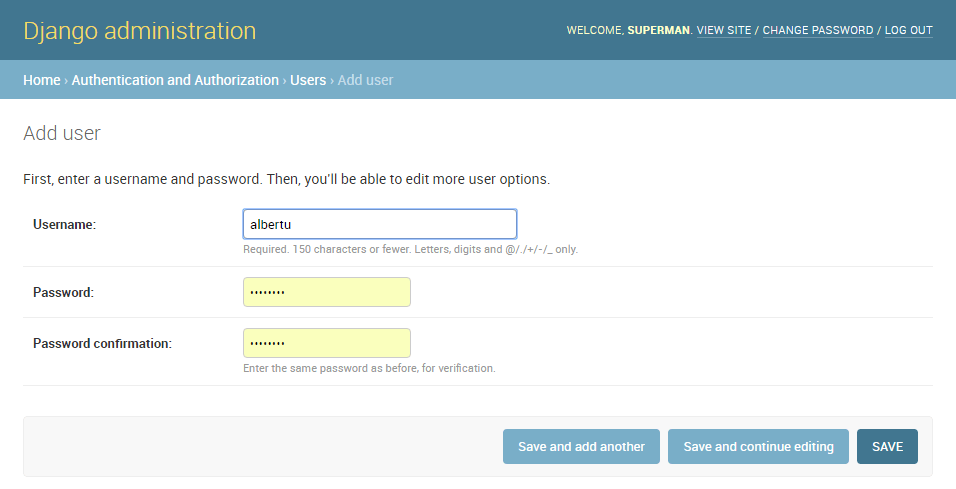
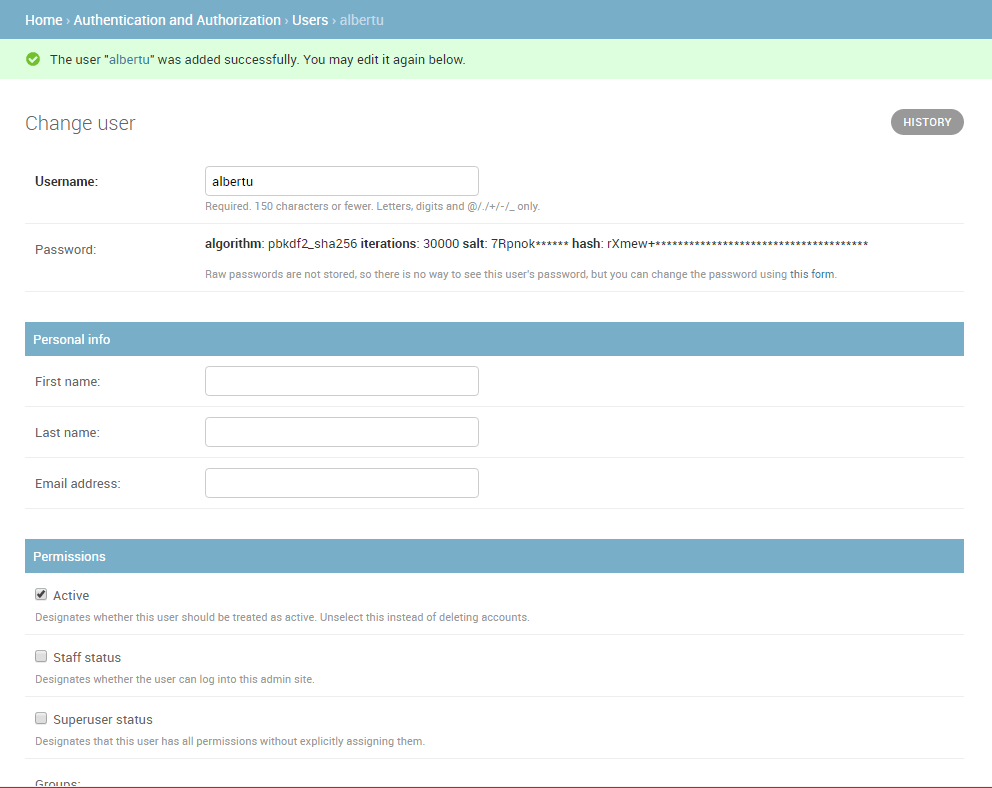
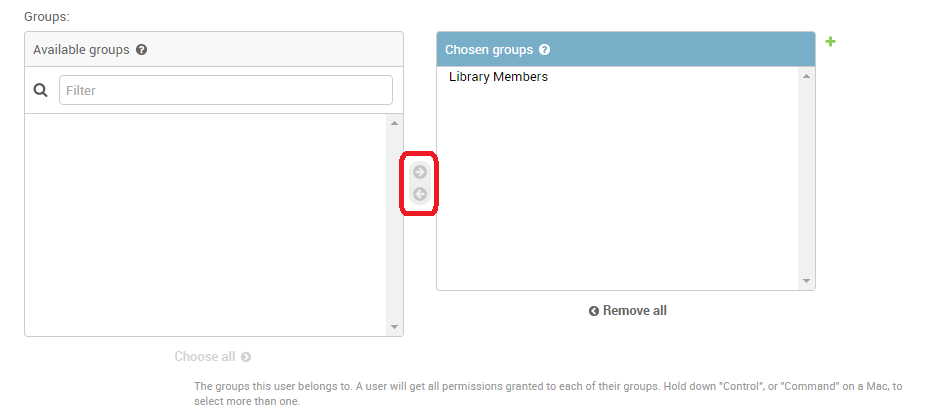
That’s it! Now you have a «normal library member» account that you will be able to use for testing (once we’ve implemented the pages to enable them to log in).
Note: You should try creating another library member user. Also, create a group for Librarians, and add a user to that too!
Setting up your authentication views
Django provides almost everything you need to create authentication pages to handle login, log out, and password management «out of the box». This includes a URL mapper, views and forms, but it does not include the templates — we have to create our own!
In this section, we show how to integrate the default system into the LocalLibrary website and create the templates. We’ll put them in the main project URLs.
Note: You don’t have to use any of this code, but it is likely that you’ll want to because it makes things a lot easier. You’ll almost certainly need to change the form handling code if you change your user model (an advanced topic!) but even so, you would still be able to use the stock view functions.
Note: In this case, we could reasonably put the authentication pages, including the URLs and templates, inside our catalog application. However, if we had multiple applications it would be better to separate out this shared login behavior and have it available across the whole site, so that is what we’ve shown here!
Project URLs
Add the following to the bottom of the project urls.py file (locallibrary/locallibrary/urls.py) file:
# Add Django site authentication urls (for login, logout, password management)

urlpatterns += [
    path('accounts/', include('django.contrib.auth.urls')),
]
Navigate to the http://127.0.0.1:8000/accounts/ URL (note the trailing forward slash!).
Django will show an error that it could not find this URL, and list all the URLs it tried.
From this you can see the URLs that will work, for example:
Note: Using the above method adds the following URLs with names in square brackets, which can be used to reverse the URL mappings. You don’t have to implement anything else — the above URL mapping automatically maps the below mentioned URLs.
accounts/ login/ [name='login']
accounts/ logout/ [name='logout']
accounts/ password_change/ [name='password_change']
accounts/ password_change/done/ [name='password_change_done']
accounts/ password_reset/ [name='password_reset']
accounts/ password_reset/done/ [name='password_reset_done']
accounts/ reset/<uidb64>/<token>/ [name='password_reset_confirm']
accounts/ reset/done/ [name='password_reset_complete']
Now try to navigate to the login URL (http://127.0.0.1:8000/accounts/login/). This will fail again, but with an error that tells you that we’re missing the required template (registration/login.html) on the template search path.
You’ll see the following lines listed in the yellow section at the top:
Exception Type:    TemplateDoesNotExist
Exception Value:    registration/login.html
The next step is to create a registration directory on the search path and then add the login.html file.
Template directory
The URLs (and implicitly, views) that we just added expect to find their associated templates in a directory /registration/ somewhere in the templates search path.
For this site, we’ll put our HTML pages in the templates/registration/ directory. This directory should be in your project root directory, that is, the same directory as the catalog and locallibrary folders. Please create these folders now.
Note: Your folder structure should now look like the below:
locallibrary/   # Django project folder
  catalog/
  locallibrary/
  templates/
    registration/
To make the templates directory visible to the template loader we need to add it in the template search path.
Open the project settings (/locallibrary/locallibrary/settings.py).
Then import the os module (add the following line near the top of the file).
import os # needed by code below
Update the TEMPLATES section’s 'DIRS' line as shown:
    # …
    TEMPLATES = [
      {
       # …
       'DIRS': [os.path.join(BASE_DIR, 'templates')],
       'APP_DIRS': True,
       # …
Login template
Warning: The authentication templates provided in this article are a very basic/slightly modified version of the Django demonstration login templates. You may need to customize them for your own use!
Create a new HTML file called /locallibrary/templates/registration/login.html and give it the following contents:
{% extends "base_generic.html" %}

{% block content %}

  {% if form.errors %}
    <p>Your username and password didn't match. Please try again.</p>
  {% endif %}

  {% if next %}
    {% if user.is_authenticated %}
      <p>Your account doesn't have access to this page. To proceed,
      please login with an account that has access.</p>
    {% else %}
      <p>Please login to see this page.</p>
    {% endif %}
  {% endif %}

  <form method="post" action="{% url 'login' %}">
    {% csrf_token %}
    <table>
      <tr>
        <td>{{ form.username.label_tag }}</td>
        <td>{{ form.username }}</td>
      </tr>
      <tr>
        <td>{{ form.password.label_tag }}</td>
        <td>{{ form.password }}</td>
      </tr>
    </table>
    <input type="submit" value="login">
    <input type="hidden" name="next" value="{{ next }}">
  </form>

  {# Assumes you setup the password_reset view in your URLconf #}
  <p><a href="{% url 'password_reset' %}">Lost password?</a></p>

{% endblock %}
This template shares some similarities with the ones we’ve seen before — it extends our base template and overrides the content block. The rest of the code is fairly standard form handling code, which we will discuss in a later tutorial. All you need to know for now is that this will display a form in which you can enter your username and password, and that if you enter invalid values you will be prompted to enter correct values when the page refreshes.
Navigate back to the login page (http://127.0.0.1:8000/accounts/login/) once you’ve saved your template, and you should see something like this:
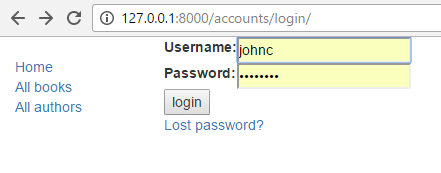
If you log in using valid credentials, you’ll be redirected to another page (by default this will be http://127.0.0.1:8000/accounts/profile/). The problem is that, by default, Django expects that upon logging in you will want to be taken to a profile page, which may or may not be the case. As you haven’t defined this page yet, you’ll get another error!
Open the project settings (/locallibrary/locallibrary/settings.py) and add the text below to the bottom. Now when you log in you should be redirected to the site homepage by default.
# Redirect to home URL after login (Default redirects to /accounts/profile/)
LOGIN_REDIRECT_URL = '/'
Logout template
If you navigate to the logout URL (http://127.0.0.1:8000/accounts/logout/) then you’ll see some odd behavior — your user will be logged out sure enough, but you’ll be taken to the Admin logout page. That’s not what you want, if only because the login link on that page takes you to the Admin login screen (and that is only available to users who have the is_staff permission).
Create and open /locallibrary/templates/registration/logged_out.html. Copy in the text below:
{% extends "base_generic.html" %}

{% block content %}
  <p>Logged out!</p>
  <a href="{% url 'login'%}">Click here to login again.</a>
{% endblock %}
This template is very simple. It just displays a message informing you that you have been logged out, and provides a link that you can press to go back to the login screen. If you go to the logout URL again you should see this page:
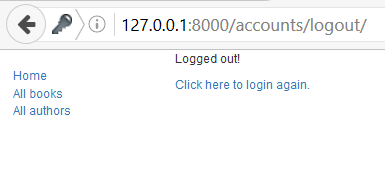
Password reset templates
The default password reset system uses email to send the user a reset link. You need to create forms to get the user’s email address, send the email, allow them to enter a new password, and to note when the whole process is complete.
The following templates can be used as a starting point.
Password reset form
This is the form used to get the user’s email address (for sending the password reset email). Create /locallibrary/templates/registration/password_reset_form.html, and give it the following contents:
{% extends "base_generic.html" %}

{% block content %}
  <form action="" method="post">
  {% csrf_token %}
  {% if form.email.errors %}
    {{ form.email.errors }}
  {% endif %}
      <p>{{ form.email }}</p>
    <input type="submit" class="btn btn-default btn-lg" value="Reset password">
  </form>
{% endblock %}
Password reset done
This form is displayed after your email address has been collected. Create /locallibrary/templates/registration/password_reset_done.html, and give it the following contents:
{% extends "base_generic.html" %}

{% block content %}
  <p>We've emailed you instructions for setting your password. If they haven't arrived in a few minutes, check your spam folder.</p>
{% endblock %}
Password reset email
This template provides the text of the HTML email containing the reset link that we will send to users. Create /locallibrary/templates/registration/password_reset_email.html, and give it the following contents:
Someone asked for password reset for email {{ email }}. Follow the link below:
{{ protocol }}://{{ domain }}{% url 'password_reset_confirm' uidb64=uid token=token %}
Password reset confirm
This page is where you enter your new password after clicking the link in the password reset email. Create /locallibrary/templates/registration/password_reset_confirm.html, and give it the following contents:
{% extends "base_generic.html" %}

{% block content %}
    {% if validlink %}
        <p>Please enter (and confirm) your new password.</p>
        <form action="" method="post">
        {% csrf_token %}
            <table>
                <tr>
                    <td>{{ form.new_password1.errors }}
                        <label for="id_new_password1">New password:</label></td>
                    <td>{{ form.new_password1 }}</td>
                </tr>
                <tr>
                    <td>{{ form.new_password2.errors }}
                        <label for="id_new_password2">Confirm password:</label></td>
                    <td>{{ form.new_password2 }}</td>
                </tr>
                <tr>
                    <td></td>
                    <td><input type="submit" value="Change my password"></td>
                </tr>
            </table>
        </form>
    {% else %}
        <h1>Password reset failed</h1>
        <p>The password reset link was invalid, possibly because it has already been used. Please request a new password reset.</p>
    {% endif %}
{% endblock %}
Password reset complete
This is the last password-reset template, which is displayed to notify you when the password reset has succeeded. Create /locallibrary/templates/registration/password_reset_complete.html, and give it the following contents:
{% extends "base_generic.html" %}

{% block content %}
  <h1>The password has been changed!</h1>
  <p><a href="{% url 'login' %}">log in again?</a></p>
{% endblock %}
Testing the new authentication pages
Now that you’ve added the URL configuration and created all these templates, the authentication pages should now just work!
You can test the new authentication pages by attempting to log in to and then log out of your superuser account using these URLs:
http://127.0.0.1:8000/accounts/login/http://127.0.0.1:8000/accounts/logout/
You’ll be able to test the password reset functionality from the link in the login page. Be aware that Django will only send reset emails to addresses (users) that are already stored in its database!
Note: The password reset system requires that your website supports email, which is beyond the scope of this article, so this part won’t work yet. To allow testing, put the following line at the end of your settings.py file. This logs any emails sent to the console (so you can copy the password reset link from the console).
EMAIL_BACKEND = 'django.core.mail.backends.console.EmailBackend'
For more information, see Sending email (Django docs).
Testing against authenticated users
This section looks at what we can do to selectively control content the user sees based on whether they are logged in or not.
Testing in templates
You can get information about the currently logged in user in templates with the {{ user }} template variable (this is added to the template context by default when you set up the project as we did in our skeleton).
Typically you will first test against the {{ user.is_authenticated }} template variable to determine whether the user is eligible to see specific content. To demonstrate this, next we’ll update our sidebar to display a «Login» link if the user is logged out, and a «Logout» link if they are logged in.
Open the base template (/locallibrary/catalog/templates/base_generic.html) and copy the following text into the sidebar block, immediately before the endblock template tag.
  <ul class="sidebar-nav">

    …

   {% if user.is_authenticated %}
     <li>User: {{ user.get_username }}</li>
     <li><a href="{% url 'logout' %}?next={{ request.path }}">Logout</a></li>
   {% else %}
     <li><a href="{% url 'login' %}?next={{ request.path }}">Login</a></li>
   {% endif %}
  </ul>
As you can see, we use if / else / endif template tags to conditionally display text based on whether {{ user.is_authenticated }} is true. If the user is authenticated then we know that we have a valid user, so we call {{ user.get_username }} to display their name.
We create the login and logout link URLs using the url template tag and the names of the respective URL configurations. Note also how we have appended ?next={{ request.path }} to the end of the URLs. What this does is add a URL parameter next containing the address (URL) of the current page, to the end of the linked URL. After the user has successfully logged in/out, the views will use this «next» value to redirect the user back to the page where they first clicked the login/logout link.
Note: Try it out! If you’re on the home page and you click Login/Logout in the sidebar, then after the operation completes you should end up back on the same page.
Testing in views
If you’re using function-based views, the easiest way to restrict access to your functions is to apply the login_required decorator to your view function, as shown below. If the user is logged in then your view code will execute as normal. If the user is not logged in, this will redirect to the login URL defined in the project settings (settings.LOGIN_URL), passing the current absolute path as the next URL parameter. If the user succeeds in logging in then they will be returned back to this page, but this time authenticated.
from django.contrib.auth.decorators import login_required

@login_required
def my_view(request):
    # …
Note: You can do the same sort of thing manually by testing on request.user.is_authenticated, but the decorator is much more convenient!
Similarly, the easiest way to restrict access to logged-in users in your class-based views is to derive from LoginRequiredMixin. You need to declare this mixin first in the superclass list, before the main view class.
from django.contrib.auth.mixins import LoginRequiredMixin

class MyView(LoginRequiredMixin, View):
    # …
This has exactly the same redirect behavior as the login_required decorator. You can also specify an alternative location to redirect the user to if they are not authenticated (login_url), and a URL parameter name instead of «next» to insert the current absolute path (redirect_field_name).
class MyView(LoginRequiredMixin, View):
    login_url = '/login/'
    redirect_field_name = 'redirect_to'
For additional detail, check out the Django docs here.
Example — listing the current user’s books
Now that we know how to restrict a page to a particular user, let’s create a view of the books that the current user has borrowed.
Unfortunately, we don’t yet have any way for users to borrow books! So before we can create the book list we’ll first extend the BookInstance model to support the concept of borrowing and use the Django Admin application to loan a number of books to our test user.
Models
First, we’re going to have to make it possible for users to have a BookInstance on loan (we already have a status and a due_back date, but we don’t yet have any association between this model and a User. We’ll create one using a ForeignKey (one-to-many) field. We also need an easy mechanism to test whether a loaned book is overdue.
Open catalog/models.py, and import the User model from django.contrib.auth.models (add this just below the previous import line at the top of the file, so User is available to subsequent code that makes use of it):
from django.contrib.auth.models import User
Next, add the borrower field to the BookInstance model:
borrower = models.ForeignKey(User, on_delete=models.SET_NULL, null=True, blank=True)
While we’re here, let’s add a property that we can call from our templates to tell if a particular book instance is overdue.
While we could calculate this in the template itself, using a property as shown below will be much more efficient.
Add this somewhere near the top of the file:
from datetime import date
Now add the following property definition to the BookInstance class:
Note: The following code uses Python’s bool() function, which evaluates an object or the resulting object of an expression, and returns True unless the result is «falsy», in which case it returns False.
In Python an object is falsy (evaluates as False) if it is: empty (like [], (), {}), 0, None or if it is False.
@property
def is_overdue(self):
    """Determines if the book is overdue based on due date and current date."""
    return bool(self.due_back and date.today() > self.due_back)
Note: We first verify whether due_back is empty before making a comparison. An empty due_back field would cause Django to throw an error instead of showing the page: empty values are not comparable. This is not something we would want our users to experience!
Now that we’ve updated our models, we’ll need to make fresh migrations on the project and then apply those migrations:
python3 manage.py makemigrations
python3 manage.py migrate
Admin
Now open catalog/admin.py, and add the borrower field to the BookInstanceAdmin class in both the list_display and the fieldsets as shown below.
This will make the field visible in the Admin section, allowing us to assign a User to a BookInstance when needed.
@admin.register(BookInstance)
class BookInstanceAdmin(admin.ModelAdmin):
    list_display = ('book', 'status', 'borrower', 'due_back', 'id')
    list_filter = ('status', 'due_back')

    fieldsets = (
        (None, {
            'fields': ('book', 'imprint', 'id')
        }),
        ('Availability', {
            'fields': ('status', 'due_back', 'borrower')
        }),
    )
Loan a few books
Now that it’s possible to loan books to a specific user, go and loan out a number of BookInstance records. Set their borrowed field to your test user, make the status «On loan», and set due dates both in the future and the past.
Note: We won’t spell the process out, as you already know how to use the Admin site!
On loan view
Now we’ll add a view for getting the list of all books that have been loaned to the current user. We’ll use the same generic class-based list view we’re familiar with, but this time we’ll also import and derive from LoginRequiredMixin, so that only a logged in user can call this view. We will also choose to declare a template_name, rather than using the default, because we may end up having a few different lists of BookInstance records, with different views and templates.
Add the following to catalog/views.py:
from django.contrib.auth.mixins import LoginRequiredMixin

class LoanedBooksByUserListView(LoginRequiredMixin,generic.ListView):
    """Generic class-based view listing books on loan to current user."""
    model = BookInstance
    template_name = 'catalog/bookinstance_list_borrowed_user.html'
    paginate_by = 10

    def get_queryset(self):
        return BookInstance.objects.filter(borrower=self.request.user).filter(status__exact='o').order_by('due_back')
In order to restrict our query to just the BookInstance objects for the current user, we re-implement get_queryset() as shown above. Note that «o» is the stored code for «on loan» and we order by the due_back date so that the oldest items are displayed first.
URL conf for on loan books
Now open /catalog/urls.py and add a path() pointing to the above view (you can just copy the text below to the end of the file).
urlpatterns += [
    path('mybooks/', views.LoanedBooksByUserListView.as_view(), name='my-borrowed'),
]
Template for on-loan books
Now, all we need to do for this page is add a template. First, create the template file /catalog/templates/catalog/bookinstance_list_borrowed_user.html and give it the following contents:
{% extends "base_generic.html" %}

{% block content %}
    <h1>Borrowed books</h1>

    {% if bookinstance_list %}
    <ul>

      {% for bookinst in bookinstance_list %}
      <li class="{% if bookinst.is_overdue %}text-danger{% endif %}">
        <a href="{% url 'book-detail' bookinst.book.pk %}">{{ bookinst.book.title }}</a> ({{ bookinst.due_back }})
      </li>
      {% endfor %}
    </ul>

    {% else %}
      <p>There are no books borrowed.</p>
    {% endif %}
{% endblock %}
This template is very similar to those we’ve created previously for the Book and Author objects.
The only «new» thing here is that we check the method we added in the model (bookinst.is_overdue) and use it to change the color of overdue items.
When the development server is running, you should now be able to view the list for a logged in user in your browser at http://127.0.0.1:8000/catalog/mybooks/. Try this out with your user logged in and logged out (in the second case, you should be redirected to the login page).
The very last step is to add a link for this new page into the sidebar. We’ll put this in the same section where we display other information for the logged in user.
Open the base template (/locallibrary/catalog/templates/base_generic.html) and add the «My Borrowed» line to the sidebar in the position shown below.
 <ul class="sidebar-nav">
   {% if user.is_authenticated %}
   <li>User: {{ user.get_username }}</li>

   <li><a href="{% url 'my-borrowed' %}">My Borrowed</a></li>

   <li><a href="{% url 'logout' %}?next={{ request.path }}">Logout</a></li>
   {% else %}
   <li><a href="{% url 'login' %}?next={{ request.path }}">Login</a></li>
   {% endif %}
 </ul>
What does it look like?
When any user is logged in, they’ll see the My Borrowed link in the sidebar, and the list of books displayed as below (the first book has no due date, which is a bug we hope to fix in a later tutorial!).
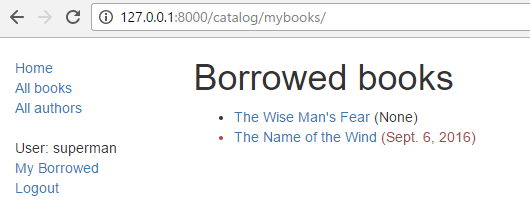
Permissions
Permissions are associated with models and define the operations that can be performed on a model instance by a user who has the permission. By default, Django automatically gives add, change, and delete permissions to all models, which allow users with the permissions to perform the associated actions via the admin site. You can define your own permissions to models and grant them to specific users. You can also change the permissions associated with different instances of the same model.
Testing on permissions in views and templates is then very similar to testing on the authentication status (and in fact, testing for a permission also tests for authentication).
Models
Defining permissions is done on the model «class Meta» section, using the permissions field.
You can specify as many permissions as you need in a tuple, each permission itself being defined in a nested tuple containing the permission name and permission display value.
For example, we might define a permission to allow a user to mark that a book has been returned as shown:
class BookInstance(models.Model):
    # …
    class Meta:
        # …
        permissions = (("can_mark_returned", "Set book as returned"),)
We could then assign the permission to a «Librarian» group in the Admin site.
Open the catalog/models.py, and add the permission as shown above. You will need to re-run your migrations (call python3 manage.py makemigrations and python3 manage.py migrate) to update the database appropriately.
Templates
The current user’s permissions are stored in a template variable called {{ perms }}. You can check whether the current user has a particular permission using the specific variable name within the associated Django «app» — e.g. {{ perms.catalog.can_mark_returned }} will be True if the user has this permission, and False otherwise. We typically test for the permission using the template {% if %} tag as shown:
{% if perms.catalog.can_mark_returned %}
    <!-- We can mark a BookInstance as returned. -->
    <!-- Perhaps add code to link to a "book return" view here. -->
{% endif %}
Views
Permissions can be tested in function view using the permission_required decorator or in a class-based view using the PermissionRequiredMixin. The pattern are the same as for login authentication, though of course, you might reasonably have to add multiple permissions.
Function view decorator:
from django.contrib.auth.decorators import permission_required

@permission_required('catalog.can_mark_returned')
@permission_required('catalog.can_edit')
def my_view(request):
    # …
A permission-required mixin for class-based views.
from django.contrib.auth.mixins import PermissionRequiredMixin

class MyView(PermissionRequiredMixin, View):
    permission_required = 'catalog.can_mark_returned'
    # Or multiple permissions
    permission_required = ('catalog.can_mark_returned', 'catalog.can_edit')
    # Note that 'catalog.can_edit' is just an example
    # the catalog application doesn't have such permission!
Note: There is a small default difference in the behavior above. By default for a logged-in user with a permission violation:
@permission_requiredredirects to login screen (HTTP Status 302).PermissionRequiredMixinreturns 403 (HTTP Status Forbidden).
Normally you will want the PermissionRequiredMixin behavior: return 403 if a user is logged in but does not have the correct permission. To do this for a function view use @login_required and @permission_required with raise_exception=True as shown:
from django.contrib.auth.decorators import login_required, permission_required

@login_required
@permission_required('catalog.can_mark_returned', raise_exception=True)
def my_view(request):
    # …
Example
We won’t update the LocalLibrary here; perhaps in the next tutorial!
Challenge yourself
Earlier in this article, we showed you how to create a page for the current user, listing the books that they have borrowed.
The challenge now is to create a similar page that is only visible for librarians, that displays all books that have been borrowed, and which includes the name of each borrower.
You should be able to follow the same pattern as for the other view. The main difference is that you’ll need to restrict the view to only librarians. You could do this based on whether the user is a staff member (function decorator: staff_member_required, template variable: user.is_staff) but we recommend that you instead use the can_mark_returned permission and PermissionRequiredMixin, as described in the previous section.
Warning: Remember not to use your superuser for permissions based testing (permission checks always return true for superusers, even if a permission has not yet been defined!). Instead, create a librarian user, and add the required capability.
When you are finished, your page should look something like the screenshot below.
Summary
Excellent work — you’ve now created a website where library members can log in and view their own content, and where librarians (with the correct permission) can view all loaned books and their borrowers. At the moment we’re still just viewing content, but the same principles and techniques are used when you want to start modifying and adding data.
In our next article, we’ll look at how you can use Django forms to collect user input, and then start modifying some of our stored data.
See also
In this module
Hi! The web interface works great however I can not connect using cURL:
Using: REST framework JWT Auth
settings: REST_USE_JWT = True
Here trying to log in with cURL
$ curl -X POST -d «{«username»:»shovel», «email»:»shovel@hammerdirt.ch», «password»:»123″}» http://localhost:8000/rest-auth/login/ -v
Note: Unnecessary use of -X or —request, POST is already inferred.
- Trying 127.0.0.1…
- TCP_NODELAY set
- Connected to localhost (127.0.0.1) port 8000 (#0)
POST /rest-auth/login/ HTTP/1.1
Host: localhost:8000
User-Agent: curl/7.63.0
Accept: /
Content-Length: 71
Content-Type: application/x-www-form-urlencoded
- upload completely sent off: 71 out of 71 bytes
< HTTP/1.1 400 Bad Request
< Date: Thu, 14 Feb 2019 03:10:41 GMT
< Server: WSGIServer/0.2 CPython/3.7.2
< Content-Type: application/json
< Vary: Accept, Cookie
< Allow: POST, OPTIONS
< X-Frame-Options: SAMEORIGIN
< Content-Length: 40
< - Connection #0 to host localhost left intact
{«password»:[«This field is required.»]} <—- does not see the password
I tried formatting the data like this also:
-d ‘{«username»:»shovel», «email»:»shovel@hammerdirt.ch», «password»:»123″}’
Got the same result.
Then i tried copying and pasting the returned JWT from the web interface to view the restricted page:
~$ curl -H «Authorization: JWTeyJ0eXAiOiJKV1QiLCJhbGciOiJIUzI1NzM5NCwiZW1haWwiOiIifQ.FILWdmNJchAwXh3SVdXSKu16YdrgkulaaXtqfsAygSg» -H «Content-Type: application/json» -X GET http://localhost:8000/api_jwt/see-stuff/ -v
Note: Unnecessary use of -X or —request, GET is already inferred.
- Trying 127.0.0.1…
- TCP_NODELAY set
- Connected to localhost (127.0.0.1) port 8000 (#0)
GET /api_jwt/see-stuff/ HTTP/1.1
Host: localhost:8000
User-Agent: curl/7.63.0
Accept: /
Authorization: JWTeyJ0eXAiOiJKV1QiLCJhbGciOiJIUzI1NiJ9.eyJJWT: yLCJ1c2VybmFtZSI6InNob3ZlbCIsImV4cCI6MTU1MDExMzM5NCwiZW1haWwiOiIifQ.FILWdmNJchAwXh3SVdXSKu16YdrgkulaaXtqfsAygSg
Content-Type: application/json
< HTTP/1.1 403 Forbidden
< Date: Thu, 14 Feb 2019 03:19:56 GMT
< Server: WSGIServer/0.2 CPython/3.7.2
< Content-Type: application/json
< Vary: Accept, Cookie
< Allow: GET, HEAD, OPTIONS
< X-Frame-Options: SAMEORIGIN
< Content-Length: 58
<
- Connection #0 to host localhost left intact
{«detail»:»Authentication credentials were not provided.»} <— same thing