Form and field validation
Form validation happens when the data is cleaned. If you want to customize
this process, there are various places to make changes, each one serving a
different purpose. Three types of cleaning methods are run during form
processing. These are normally executed when you call the is_valid()
method on a form. There are other things that can also trigger cleaning and
validation (accessing the errors attribute or calling full_clean()
directly), but normally they won’t be needed.
In general, any cleaning method can raise ValidationError if there is a
problem with the data it is processing, passing the relevant information to
the ValidationError constructor. See below
for the best practice in raising ValidationError. If no ValidationError
is raised, the method should return the cleaned (normalized) data as a Python
object.
Most validation can be done using validators — helpers that can be reused.
Validators are functions (or callables) that take a single argument and raise
ValidationError on invalid input. Validators are run after the field’s
to_python and validate methods have been called.
Validation of a form is split into several steps, which can be customized or
overridden:
-
The
to_python()method on aFieldis the first step in every
validation. It coerces the value to a correct datatype and raises
ValidationErrorif that is not possible. This method accepts the raw
value from the widget and returns the converted value. For example, a
FloatFieldwill turn the data into a Pythonfloator raise a
ValidationError. -
The
validate()method on aFieldhandles field-specific validation
that is not suitable for a validator. It takes a value that has been
coerced to a correct datatype and raisesValidationErroron any error.
This method does not return anything and shouldn’t alter the value. You
should override it to handle validation logic that you can’t or don’t
want to put in a validator. -
The
run_validators()method on aFieldruns all of the field’s
validators and aggregates all the errors into a single
ValidationError. You shouldn’t need to override this method. -
The
clean()method on aFieldsubclass is responsible for running
to_python(),validate(), andrun_validators()in the correct
order and propagating their errors. If, at any time, any of the methods
raiseValidationError, the validation stops and that error is raised.
This method returns the clean data, which is then inserted into the
cleaned_datadictionary of the form. -
The
clean_<fieldname>()method is called on a form subclass – where
<fieldname>is replaced with the name of the form field attribute.
This method does any cleaning that is specific to that particular
attribute, unrelated to the type of field that it is. This method is not
passed any parameters. You will need to look up the value of the field
inself.cleaned_dataand remember that it will be a Python object
at this point, not the original string submitted in the form (it will be
incleaned_databecause the general fieldclean()method, above,
has already cleaned the data once).For example, if you wanted to validate that the contents of a
CharFieldcalledserialnumberwas unique,
clean_serialnumber()would be the right place to do this. You don’t
need a specific field (it’s aCharField), but you want a
formfield-specific piece of validation and, possibly, cleaning/normalizing
the data.The return value of this method replaces the existing value in
cleaned_data, so it must be the field’s value fromcleaned_data(even
if this method didn’t change it) or a new cleaned value. -
The form subclass’s
clean()method can perform validation that requires
access to multiple form fields. This is where you might put in checks such as
“if fieldAis supplied, fieldBmust contain a valid email address”.
This method can return a completely different dictionary if it wishes, which
will be used as thecleaned_data.Since the field validation methods have been run by the time
clean()is
called, you also have access to the form’serrorsattribute which
contains all the errors raised by cleaning of individual fields.Note that any errors raised by your
Form.clean()override will not
be associated with any field in particular. They go into a special
“field” (called__all__), which you can access via the
non_field_errors()method if you need to. If you
want to attach errors to a specific field in the form, you need to call
add_error().Also note that there are special considerations when overriding
theclean()method of aModelFormsubclass. (see the
ModelForm documentation for more information)
These methods are run in the order given above, one field at a time. That is,
for each field in the form (in the order they are declared in the form
definition), the Field.clean() method (or its override) is run, then
clean_<fieldname>(). Finally, once those two methods are run for every
field, the Form.clean() method, or its override, is executed whether
or not the previous methods have raised errors.
Examples of each of these methods are provided below.
As mentioned, any of these methods can raise a ValidationError. For any
field, if the Field.clean() method raises a ValidationError, any
field-specific cleaning method is not called. However, the cleaning methods
for all remaining fields are still executed.
Raising ValidationError
In order to make error messages flexible and easy to override, consider the
following guidelines:
-
Provide a descriptive error
codeto the constructor:# Good ValidationError(_('Invalid value'), code='invalid') # Bad ValidationError(_('Invalid value'))
-
Don’t coerce variables into the message; use placeholders and the
params
argument of the constructor:# Good ValidationError( _('Invalid value: %(value)s'), params={'value': '42'}, ) # Bad ValidationError(_('Invalid value: %s') % value)
-
Use mapping keys instead of positional formatting. This enables putting
the variables in any order or omitting them altogether when rewriting the
message:# Good ValidationError( _('Invalid value: %(value)s'), params={'value': '42'}, ) # Bad ValidationError( _('Invalid value: %s'), params=('42',), )
-
Wrap the message with
gettextto enable translation:# Good ValidationError(_('Invalid value')) # Bad ValidationError('Invalid value')
Putting it all together:
raise ValidationError( _('Invalid value: %(value)s'), code='invalid', params={'value': '42'}, )
Following these guidelines is particularly necessary if you write reusable
forms, form fields, and model fields.
While not recommended, if you are at the end of the validation chain
(i.e. your form clean() method) and you know you will never need
to override your error message you can still opt for the less verbose:
ValidationError(_('Invalid value: %s') % value)
The Form.errors.as_data() and
Form.errors.as_json() methods
greatly benefit from fully featured ValidationErrors (with a code name
and a params dictionary).
Raising multiple errors
If you detect multiple errors during a cleaning method and wish to signal all
of them to the form submitter, it is possible to pass a list of errors to the
ValidationError constructor.
As above, it is recommended to pass a list of ValidationError instances
with codes and params but a list of strings will also work:
# Good raise ValidationError([ ValidationError(_('Error 1'), code='error1'), ValidationError(_('Error 2'), code='error2'), ]) # Bad raise ValidationError([ _('Error 1'), _('Error 2'), ])
Using validation in practice
The previous sections explained how validation works in general for forms.
Since it can sometimes be easier to put things into place by seeing each
feature in use, here are a series of small examples that use each of the
previous features.
Using validators
Django’s form (and model) fields support use of utility functions and classes
known as validators. A validator is a callable object or function that takes a
value and returns nothing if the value is valid or raises a
ValidationError if not. These can be passed to a
field’s constructor, via the field’s validators argument, or defined on the
Field class itself with the default_validators
attribute.
Validators can be used to validate values inside the field, let’s have a look
at Django’s SlugField:
from django.core import validators from django.forms import CharField class SlugField(CharField): default_validators = [validators.validate_slug]
As you can see, SlugField is a CharField with a customized validator
that validates that submitted text obeys to some character rules. This can also
be done on field definition so:
is equivalent to:
slug = forms.CharField(validators=[validators.validate_slug])
Common cases such as validating against an email or a regular expression can be
handled using existing validator classes available in Django. For example,
validators.validate_slug is an instance of
a RegexValidator constructed with the first
argument being the pattern: ^[-a-zA-Z0-9_]+$. See the section on
writing validators to see a list of what is already
available and for an example of how to write a validator.
Form field default cleaning
Let’s first create a custom form field that validates its input is a string
containing comma-separated email addresses. The full class looks like this:
from django import forms from django.core.validators import validate_email class MultiEmailField(forms.Field): def to_python(self, value): """Normalize data to a list of strings.""" # Return an empty list if no input was given. if not value: return [] return value.split(',') def validate(self, value): """Check if value consists only of valid emails.""" # Use the parent's handling of required fields, etc. super().validate(value) for email in value: validate_email(email)
Every form that uses this field will have these methods run before anything
else can be done with the field’s data. This is cleaning that is specific to
this type of field, regardless of how it is subsequently used.
Let’s create a ContactForm to demonstrate how you’d use this field:
class ContactForm(forms.Form): subject = forms.CharField(max_length=100) message = forms.CharField() sender = forms.EmailField() recipients = MultiEmailField() cc_myself = forms.BooleanField(required=False)
Use MultiEmailField like any other form field. When the is_valid()
method is called on the form, the MultiEmailField.clean() method will be
run as part of the cleaning process and it will, in turn, call the custom
to_python() and validate() methods.
Cleaning a specific field attribute
Continuing on from the previous example, suppose that in our ContactForm,
we want to make sure that the recipients field always contains the address
"fred@example.com". This is validation that is specific to our form, so we
don’t want to put it into the general MultiEmailField class. Instead, we
write a cleaning method that operates on the recipients field, like so:
from django import forms from django.core.exceptions import ValidationError class ContactForm(forms.Form): # Everything as before. ... def clean_recipients(self): data = self.cleaned_data['recipients'] if "fred@example.com" not in data: raise ValidationError("You have forgotten about Fred!") # Always return a value to use as the new cleaned data, even if # this method didn't change it. return data
Cleaning and validating fields that depend on each other
Suppose we add another requirement to our contact form: if the cc_myself
field is True, the subject must contain the word "help". We are
performing validation on more than one field at a time, so the form’s
clean() method is a good spot to do this. Notice that we are
talking about the clean() method on the form here, whereas earlier we were
writing a clean() method on a field. It’s important to keep the field and
form difference clear when working out where to validate things. Fields are
single data points, forms are a collection of fields.
By the time the form’s clean() method is called, all the individual field
clean methods will have been run (the previous two sections), so
self.cleaned_data will be populated with any data that has survived so
far. So you also need to remember to allow for the fact that the fields you
are wanting to validate might not have survived the initial individual field
checks.
There are two ways to report any errors from this step. Probably the most
common method is to display the error at the top of the form. To create such
an error, you can raise a ValidationError from the clean() method. For
example:
from django import forms from django.core.exceptions import ValidationError class ContactForm(forms.Form): # Everything as before. ... def clean(self): cleaned_data = super().clean() cc_myself = cleaned_data.get("cc_myself") subject = cleaned_data.get("subject") if cc_myself and subject: # Only do something if both fields are valid so far. if "help" not in subject: raise ValidationError( "Did not send for 'help' in the subject despite " "CC'ing yourself." )
In this code, if the validation error is raised, the form will display an
error message at the top of the form (normally) describing the problem. Such
errors are non-field errors, which are displayed in the template with
{{ form.non_field_errors }}.
The call to super().clean() in the example code ensures that any validation
logic in parent classes is maintained. If your form inherits another that
doesn’t return a cleaned_data dictionary in its clean() method (doing
so is optional), then don’t assign cleaned_data to the result of the
super() call and use self.cleaned_data instead:
def clean(self): super().clean() cc_myself = self.cleaned_data.get("cc_myself") ...
The second approach for reporting validation errors might involve assigning the
error message to one of the fields. In this case, let’s assign an error message
to both the “subject” and “cc_myself” rows in the form display. Be careful when
doing this in practice, since it can lead to confusing form output. We’re
showing what is possible here and leaving it up to you and your designers to
work out what works effectively in your particular situation. Our new code
(replacing the previous sample) looks like this:
from django import forms class ContactForm(forms.Form): # Everything as before. ... def clean(self): cleaned_data = super().clean() cc_myself = cleaned_data.get("cc_myself") subject = cleaned_data.get("subject") if cc_myself and subject and "help" not in subject: msg = "Must put 'help' in subject when cc'ing yourself." self.add_error('cc_myself', msg) self.add_error('subject', msg)
The second argument of add_error() can be a string, or preferably an
instance of ValidationError. See Raising ValidationError for more
details. Note that add_error() automatically removes the field from
cleaned_data.
I’m using Django forms. I’m validating in the model layer:
def clean_title(self):
title = self.cleaned_data['title']
if len(title) < 5:
raise forms.ValidationError("Headline must be more than 5 characters.")
return title
However, there are some things that I need to validate in the views.py . For example…was the last time the user posted something more than a minute ago?
That kind of stuff requires request.user, which the models layer cannot get. So, I must validate in the views.py. How do I do something in the views.py to do the exact thing as this?
raise forms.ValidationError("Headline must be more than 5 characters.")
asked Dec 19, 2010 at 9:56
![]()
2
I think gruszczy’s answer is a good one, but if you’re after generic validation involving variables that you think are only available in the view, here’s an alternative: pass in the vars as arguments to the form and deal with them in the form’s main clean() method.
The difference/advantage here is that your view stays simpler and all things related to the form content being acceptable happen in the form.
eg:
# IN YOUR VIEW
# pass request.user as a keyword argument to the form
myform = MyForm(user=request.user)
# IN YOUR forms.py
# at the top:
from myapp.foo.bar import ok_to_post # some abstracted utility you write to rate-limit posting
# and in your particular Form definition
class MyForm(forms.Form)
... your fields here ...
def __init__(self, *args, **kwargs):
self.user = kwargs.pop('user') # cache the user object you pass in
super(MyForm, self).__init__(*args, **kwargs) # and carry on to init the form
def clean(self):
# test the rate limit by passing in the cached user object
if not ok_to_post(self.user): # use your throttling utility here
raise forms.ValidationError("You cannot post more than once every x minutes")
return self.cleaned_data # never forget this! ;o)
Note that raising a generic ValidationError in the clean() method will put the error into myform.non_field_errors so you’ll have to make sure that your template contains {{form.non_field_errors}} if you’re manually displaying your form
answered Dec 19, 2010 at 10:14
![]()
Steve JalimSteve Jalim
11.8k1 gold badge36 silver badges54 bronze badges
3
You don’t use ValidationError in views, as those exceptions as for forms. Rather, you should redirect the user to some other url, that will explain to him, that he cannot post again that soon. This is the proper way to handle this stuff. ValidationError should be raised inside a Form instance, when input data doesn’t validate. This is not the case.
answered Dec 19, 2010 at 9:58
![]()
gruszczygruszczy
40.2k30 gold badges126 silver badges177 bronze badges
1
Содержание
- Documentation
- Form and field validation
- Raising ValidationError 
- Raising multiple errors
- Using validation in practice
- Using validators
- Form field default cleaning
- Cleaning a specific field attribute
- Cleaning and validating fields that depend on each other
- Documentation
- Creating forms from models
- ModelForm 
- Field types
- A full example
- Validation on a ModelForm 
- Overriding the clean() method
- Interaction with model validation
- Considerations regarding model’s error_messages 
- The save() method
- Changing the queryset
- Changing the form
- Specifying widgets to use in the form with widgets 
- Enabling localization for fields with localized_fields 
- Providing initial values
- Saving objects in the formset
- Limiting the number of editable objects
- Preventing new objects creation
- Using a model formset in a view
- Overriding clean() on a ModelFormSet 
- Using a custom queryset
- Using the formset in the template
- Inline formsets
- Overriding methods on an InlineFormSet 
- More than one foreign key to the same model
- Using an inline formset in a view
- Specifying widgets to use in the inline form
Documentation
Form and field validation
Form validation happens when the data is cleaned. If you want to customize this process, there are various places to make changes, each one serving a different purpose. Three types of cleaning methods are run during form processing. These are normally executed when you call the is_valid() method on a form. There are other things that can also trigger cleaning and validation (accessing the errors attribute or calling full_clean() directly), but normally they won’t be needed.
In general, any cleaning method can raise ValidationError if there is a problem with the data it is processing, passing the relevant information to the ValidationError constructor. See below for the best practice in raising ValidationError . If no ValidationError is raised, the method should return the cleaned (normalized) data as a Python object.
Most validation can be done using validators — helpers that can be reused. Validators are functions (or callables) that take a single argument and raise ValidationError on invalid input. Validators are run after the field’s to_python and validate methods have been called.
Validation of a form is split into several steps, which can be customized or overridden:
The to_python() method on a Field is the first step in every validation. It coerces the value to a correct datatype and raises ValidationError if that is not possible. This method accepts the raw value from the widget and returns the converted value. For example, a FloatField will turn the data into a Python float or raise a ValidationError .
The validate() method on a Field handles field-specific validation that is not suitable for a validator. It takes a value that has been coerced to a correct datatype and raises ValidationError on any error. This method does not return anything and shouldn’t alter the value. You should override it to handle validation logic that you can’t or don’t want to put in a validator.
The run_validators() method on a Field runs all of the field’s validators and aggregates all the errors into a single ValidationError . You shouldn’t need to override this method.
The clean() method on a Field subclass is responsible for running to_python() , validate() , and run_validators() in the correct order and propagating their errors. If, at any time, any of the methods raise ValidationError , the validation stops and that error is raised. This method returns the clean data, which is then inserted into the cleaned_data dictionary of the form.
The clean_ () method is called on a form subclass – where is replaced with the name of the form field attribute. This method does any cleaning that is specific to that particular attribute, unrelated to the type of field that it is. This method is not passed any parameters. You will need to look up the value of the field in self.cleaned_data and remember that it will be a Python object at this point, not the original string submitted in the form (it will be in cleaned_data because the general field clean() method, above, has already cleaned the data once).
For example, if you wanted to validate that the contents of a CharField called serialnumber was unique, clean_serialnumber() would be the right place to do this. You don’t need a specific field (it’s a CharField ), but you want a formfield-specific piece of validation and, possibly, cleaning/normalizing the data.
The return value of this method replaces the existing value in cleaned_data , so it must be the field’s value from cleaned_data (even if this method didn’t change it) or a new cleaned value.
The form subclass’s clean() method can perform validation that requires access to multiple form fields. This is where you might put in checks such as “if field A is supplied, field B must contain a valid email address”. This method can return a completely different dictionary if it wishes, which will be used as the cleaned_data .
Since the field validation methods have been run by the time clean() is called, you also have access to the form’s errors attribute which contains all the errors raised by cleaning of individual fields.
Note that any errors raised by your Form.clean() override will not be associated with any field in particular. They go into a special “field” (called __all__ ), which you can access via the non_field_errors() method if you need to. If you want to attach errors to a specific field in the form, you need to call add_error() .
Also note that there are special considerations when overriding the clean() method of a ModelForm subclass. (see the ModelForm documentation for more information)
These methods are run in the order given above, one field at a time. That is, for each field in the form (in the order they are declared in the form definition), the Field.clean() method (or its override) is run, then clean_ () . Finally, once those two methods are run for every field, the Form.clean() method, or its override, is executed whether or not the previous methods have raised errors.
Examples of each of these methods are provided below.
As mentioned, any of these methods can raise a ValidationError . For any field, if the Field.clean() method raises a ValidationError , any field-specific cleaning method is not called. However, the cleaning methods for all remaining fields are still executed.
Raising ValidationError 
In order to make error messages flexible and easy to override, consider the following guidelines:
Provide a descriptive error code to the constructor:
Don’t coerce variables into the message; use placeholders and the params argument of the constructor:
Use mapping keys instead of positional formatting. This enables putting the variables in any order or omitting them altogether when rewriting the message:
Wrap the message with gettext to enable translation:
Putting it all together:
Following these guidelines is particularly necessary if you write reusable forms, form fields, and model fields.
While not recommended, if you are at the end of the validation chain (i.e. your form clean() method) and you know you will never need to override your error message you can still opt for the less verbose:
The Form.errors.as_data() and Form.errors.as_json() methods greatly benefit from fully featured ValidationError s (with a code name and a params dictionary).
Raising multiple errors
If you detect multiple errors during a cleaning method and wish to signal all of them to the form submitter, it is possible to pass a list of errors to the ValidationError constructor.
As above, it is recommended to pass a list of ValidationError instances with code s and params but a list of strings will also work:
Using validation in practice
The previous sections explained how validation works in general for forms. Since it can sometimes be easier to put things into place by seeing each feature in use, here are a series of small examples that use each of the previous features.
Using validators
Django’s form (and model) fields support use of utility functions and classes known as validators. A validator is a callable object or function that takes a value and returns nothing if the value is valid or raises a ValidationError if not. These can be passed to a field’s constructor, via the field’s validators argument, or defined on the Field class itself with the default_validators attribute.
Validators can be used to validate values inside the field, let’s have a look at Django’s SlugField :
As you can see, SlugField is a CharField with a customized validator that validates that submitted text obeys to some character rules. This can also be done on field definition so:
is equivalent to:
Common cases such as validating against an email or a regular expression can be handled using existing validator classes available in Django. For example, validators.validate_slug is an instance of a RegexValidator constructed with the first argument being the pattern: ^[-a-zA-Z0-9_]+$ . See the section on writing validators to see a list of what is already available and for an example of how to write a validator.
Form field default cleaning
Let’s first create a custom form field that validates its input is a string containing comma-separated email addresses. The full class looks like this:
Every form that uses this field will have these methods run before anything else can be done with the field’s data. This is cleaning that is specific to this type of field, regardless of how it is subsequently used.
Let’s create a ContactForm to demonstrate how you’d use this field:
Use MultiEmailField like any other form field. When the is_valid() method is called on the form, the MultiEmailField.clean() method will be run as part of the cleaning process and it will, in turn, call the custom to_python() and validate() methods.
Cleaning a specific field attribute
Continuing on from the previous example, suppose that in our ContactForm , we want to make sure that the recipients field always contains the address «fred@example.com» . This is validation that is specific to our form, so we don’t want to put it into the general MultiEmailField class. Instead, we write a cleaning method that operates on the recipients field, like so:
Cleaning and validating fields that depend on each other
Suppose we add another requirement to our contact form: if the cc_myself field is True , the subject must contain the word «help» . We are performing validation on more than one field at a time, so the form’s clean() method is a good spot to do this. Notice that we are talking about the clean() method on the form here, whereas earlier we were writing a clean() method on a field. It’s important to keep the field and form difference clear when working out where to validate things. Fields are single data points, forms are a collection of fields.
By the time the form’s clean() method is called, all the individual field clean methods will have been run (the previous two sections), so self.cleaned_data will be populated with any data that has survived so far. So you also need to remember to allow for the fact that the fields you are wanting to validate might not have survived the initial individual field checks.
There are two ways to report any errors from this step. Probably the most common method is to display the error at the top of the form. To create such an error, you can raise a ValidationError from the clean() method. For example:
In this code, if the validation error is raised, the form will display an error message at the top of the form (normally) describing the problem. Such errors are non-field errors, which are displayed in the template with << form.non_field_errors >> .
The call to super().clean() in the example code ensures that any validation logic in parent classes is maintained. If your form inherits another that doesn’t return a cleaned_data dictionary in its clean() method (doing so is optional), then don’t assign cleaned_data to the result of the super() call and use self.cleaned_data instead:
The second approach for reporting validation errors might involve assigning the error message to one of the fields. In this case, let’s assign an error message to both the “subject” and “cc_myself” rows in the form display. Be careful when doing this in practice, since it can lead to confusing form output. We’re showing what is possible here and leaving it up to you and your designers to work out what works effectively in your particular situation. Our new code (replacing the previous sample) looks like this:
The second argument of add_error() can be a string, or preferably an instance of ValidationError . See Raising ValidationError for more details. Note that add_error() automatically removes the field from cleaned_data .
Источник
Documentation
Creating forms from models
ModelForm 
If you’re building a database-driven app, chances are you’ll have forms that map closely to Django models. For instance, you might have a BlogComment model, and you want to create a form that lets people submit comments. In this case, it would be redundant to define the field types in your form, because you’ve already defined the fields in your model.
For this reason, Django provides a helper class that lets you create a Form class from a Django model.
Field types
The generated Form class will have a form field for every model field specified, in the order specified in the fields attribute.
Each model field has a corresponding default form field. For example, a CharField on a model is represented as a CharField on a form. A model ManyToManyField is represented as a MultipleChoiceField . Here is the full list of conversions:
| Model field | Form field |
|---|---|
| AutoField | Not represented in the form |
| BigAutoField | Not represented in the form |
| BigIntegerField | IntegerField with min_value set to -9223372036854775808 and max_value set to 9223372036854775807. |
| BinaryField | CharField , if editable is set to True on the model field, otherwise not represented in the form. |
| BooleanField | BooleanField , or NullBooleanField if null=True . |
| CharField | CharField with max_length set to the model field’s max_length and empty_value set to None if null=True . |
| DateField | DateField |
| DateTimeField | DateTimeField |
| DecimalField | DecimalField |
| DurationField | DurationField |
| EmailField | EmailField |
| FileField | FileField |
| FilePathField | FilePathField |
| FloatField | FloatField |
| ForeignKey | ModelChoiceField (see below) |
| ImageField | ImageField |
| IntegerField | IntegerField |
| IPAddressField | IPAddressField |
| GenericIPAddressField | GenericIPAddressField |
| JSONField | JSONField |
| ManyToManyField | ModelMultipleChoiceField (see below) |
| PositiveBigIntegerField | IntegerField |
| PositiveIntegerField | IntegerField |
| PositiveSmallIntegerField | IntegerField |
| SlugField | SlugField |
| SmallAutoField | Not represented in the form |
| SmallIntegerField | IntegerField |
| TextField | CharField with widget=forms.Textarea |
| TimeField | TimeField |
| URLField | URLField |
| UUIDField | UUIDField |
As you might expect, the ForeignKey and ManyToManyField model field types are special cases:
- ForeignKey is represented by django.forms.ModelChoiceField , which is a ChoiceField whose choices are a model QuerySet .
- ManyToManyField is represented by django.forms.ModelMultipleChoiceField , which is a MultipleChoiceField whose choices are a model QuerySet .
In addition, each generated form field has attributes set as follows:
- If the model field has blank=True , then required is set to False on the form field. Otherwise, required=True .
- The form field’s label is set to the verbose_name of the model field, with the first character capitalized.
- The form field’s help_text is set to the help_text of the model field.
- If the model field has choices set, then the form field’s widget will be set to Select , with choices coming from the model field’s choices . The choices will normally include the blank choice which is selected by default. If the field is required, this forces the user to make a selection. The blank choice will not be included if the model field has blank=False and an explicit default value (the default value will be initially selected instead).
Finally, note that you can override the form field used for a given model field. See Overriding the default fields below.
A full example
Consider this set of models:
With these models, the ModelForm subclasses above would be roughly equivalent to this (the only difference being the save() method, which we’ll discuss in a moment.):
Validation on a ModelForm 
There are two main steps involved in validating a ModelForm :
Just like normal form validation, model form validation is triggered implicitly when calling is_valid() or accessing the errors attribute and explicitly when calling full_clean() , although you will typically not use the latter method in practice.
Model validation ( Model.full_clean() ) is triggered from within the form validation step, right after the form’s clean() method is called.
The cleaning process modifies the model instance passed to the ModelForm constructor in various ways. For instance, any date fields on the model are converted into actual date objects. Failed validation may leave the underlying model instance in an inconsistent state and therefore it’s not recommended to reuse it.
Overriding the clean() method
You can override the clean() method on a model form to provide additional validation in the same way you can on a normal form.
A model form instance attached to a model object will contain an instance attribute that gives its methods access to that specific model instance.
The ModelForm.clean() method sets a flag that makes the model validation step validate the uniqueness of model fields that are marked as unique , unique_together or unique_for_date|month|year .
If you would like to override the clean() method and maintain this validation, you must call the parent class’s clean() method.
Interaction with model validation
As part of the validation process, ModelForm will call the clean() method of each field on your model that has a corresponding field on your form. If you have excluded any model fields, validation will not be run on those fields. See the form validation documentation for more on how field cleaning and validation work.
The model’s clean() method will be called before any uniqueness checks are made. See Validating objects for more information on the model’s clean() hook.
Considerations regarding model’s error_messages 
Error messages defined at the form field level or at the form Meta level always take precedence over the error messages defined at the model field level.
Error messages defined on model fields are only used when the ValidationError is raised during the model validation step and no corresponding error messages are defined at the form level.
You can override the error messages from NON_FIELD_ERRORS raised by model validation by adding the NON_FIELD_ERRORS key to the error_messages dictionary of the ModelForm ’s inner Meta class:
The save() method
Every ModelForm also has a save() method. This method creates and saves a database object from the data bound to the form. A subclass of ModelForm can accept an existing model instance as the keyword argument instance ; if this is supplied, save() will update that instance. If it’s not supplied, save() will create a new instance of the specified model:
Note that if the form hasn’t been validated , calling save() will do so by checking form.errors . A ValueError will be raised if the data in the form doesn’t validate – i.e., if form.errors evaluates to True .
If an optional field doesn’t appear in the form’s data, the resulting model instance uses the model field default , if there is one, for that field. This behavior doesn’t apply to fields that use CheckboxInput , CheckboxSelectMultiple , or SelectMultiple (or any custom widget whose value_omitted_from_data() method always returns False ) since an unchecked checkbox and unselected
modelformset_factory() uses formset_factory() to generate formsets. This means that a model formset is an extension of a basic formset that knows how to interact with a particular model.
When using multi-table inheritance , forms generated by a formset factory will contain a parent link field (by default
_ptr ) instead of an id field.
Changing the queryset
By default, when you create a formset from a model, the formset will use a queryset that includes all objects in the model (e.g., Author.objects.all() ). You can override this behavior by using the queryset argument:
Alternatively, you can create a subclass that sets self.queryset in __init__ :
Then, pass your BaseAuthorFormSet class to the factory function:
If you want to return a formset that doesn’t include any preexisting instances of the model, you can specify an empty QuerySet:
Changing the form
By default, when you use modelformset_factory , a model form will be created using modelform_factory() . Often, it can be useful to specify a custom model form. For example, you can create a custom model form that has custom validation:
Then, pass your model form to the factory function:
It is not always necessary to define a custom model form. The modelformset_factory function has several arguments which are passed through to modelform_factory , which are described below.
Specifying widgets to use in the form with widgets 
Using the widgets parameter, you can specify a dictionary of values to customize the ModelForm ’s widget class for a particular field. This works the same way as the widgets dictionary on the inner Meta class of a ModelForm works:
Enabling localization for fields with localized_fields 
Using the localized_fields parameter, you can enable localization for fields in the form.
If localized_fields is set to the special value ‘__all__’ , all fields will be localized.
Providing initial values
As with regular formsets, it’s possible to specify initial data for forms in the formset by specifying an initial parameter when instantiating the model formset class returned by modelformset_factory() . However, with model formsets, the initial values only apply to extra forms, those that aren’t attached to an existing model instance. If the length of initial exceeds the number of extra forms, the excess initial data is ignored. If the extra forms with initial data aren’t changed by the user, they won’t be validated or saved.
Saving objects in the formset
As with a ModelForm , you can save the data as a model object. This is done with the formset’s save() method:
The save() method returns the instances that have been saved to the database. If a given instance’s data didn’t change in the bound data, the instance won’t be saved to the database and won’t be included in the return value ( instances , in the above example).
When fields are missing from the form (for example because they have been excluded), these fields will not be set by the save() method. You can find more information about this restriction, which also holds for regular ModelForms , in Selecting the fields to use.
Pass commit=False to return the unsaved model instances:
This gives you the ability to attach data to the instances before saving them to the database. If your formset contains a ManyToManyField , you’ll also need to call formset.save_m2m() to ensure the many-to-many relationships are saved properly.
After calling save() , your model formset will have three new attributes containing the formset’s changes:
models.BaseModelFormSet. changed_objects ¶ models.BaseModelFormSet. deleted_objects ¶ models.BaseModelFormSet. new_objects 
Limiting the number of editable objects
As with regular formsets, you can use the max_num and extra parameters to modelformset_factory() to limit the number of extra forms displayed.
max_num does not prevent existing objects from being displayed:
Also, extra=0 doesn’t prevent creation of new model instances as you can add additional forms with JavaScript or send additional POST data. See Preventing new objects creation on how to do this.
If the value of max_num is greater than the number of existing related objects, up to extra additional blank forms will be added to the formset, so long as the total number of forms does not exceed max_num :
A max_num value of None (the default) puts a high limit on the number of forms displayed (1000). In practice this is equivalent to no limit.
Preventing new objects creation
Using the edit_only parameter, you can prevent creation of any new objects:
Here, the formset will only edit existing Author instances. No other objects will be created or edited.
Using a model formset in a view
Model formsets are very similar to formsets. Let’s say we want to present a formset to edit Author model instances:
As you can see, the view logic of a model formset isn’t drastically different than that of a “normal” formset. The only difference is that we call formset.save() to save the data into the database. (This was described above, in Saving objects in the formset .)
Overriding clean() on a ModelFormSet 
Just like with ModelForms , by default the clean() method of a ModelFormSet will validate that none of the items in the formset violate the unique constraints on your model (either unique , unique_together or unique_for_date|month|year ). If you want to override the clean() method on a ModelFormSet and maintain this validation, you must call the parent class’s clean method:
Also note that by the time you reach this step, individual model instances have already been created for each Form . Modifying a value in form.cleaned_data is not sufficient to affect the saved value. If you wish to modify a value in ModelFormSet.clean() you must modify form.instance :
Using a custom queryset
As stated earlier, you can override the default queryset used by the model formset:
Note that we pass the queryset argument in both the POST and GET cases in this example.
Using the formset in the template
There are three ways to render a formset in a Django template.
First, you can let the formset do most of the work:
Second, you can manually render the formset, but let the form deal with itself:
When you manually render the forms yourself, be sure to render the management form as shown above. See the management form documentation .
Third, you can manually render each field:
If you opt to use this third method and you don’t iterate over the fields with a <% for %>loop, you’ll need to render the primary key field. For example, if you were rendering the name and age fields of a model:
Notice how we need to explicitly render << form.id >> . This ensures that the model formset, in the POST case, will work correctly. (This example assumes a primary key named id . If you’ve explicitly defined your own primary key that isn’t called id , make sure it gets rendered.)
Inline formsets
Inline formsets is a small abstraction layer on top of model formsets. These simplify the case of working with related objects via a foreign key. Suppose you have these two models:
If you want to create a formset that allows you to edit books belonging to a particular author, you could do this:
BookFormSet ’s prefix is ‘book_set’ ( name>_set ). If Book ’s ForeignKey to Author has a related_name , that’s used instead.
Overriding methods on an InlineFormSet 
When overriding methods on InlineFormSet , you should subclass BaseInlineFormSet rather than BaseModelFormSet .
For example, if you want to override clean() :
Then when you create your inline formset, pass in the optional argument formset :
More than one foreign key to the same model
If your model contains more than one foreign key to the same model, you’ll need to resolve the ambiguity manually using fk_name . For example, consider the following model:
To resolve this, you can use fk_name to inlineformset_factory() :
Using an inline formset in a view
You may want to provide a view that allows a user to edit the related objects of a model. Here’s how you can do that:
Notice how we pass instance in both the POST and GET cases.
Specifying widgets to use in the inline form
inlineformset_factory uses modelformset_factory and passes most of its arguments to modelformset_factory . This means you can use the widgets parameter in much the same way as passing it to modelformset_factory . See Specifying widgets to use in the form with widgets above.
Источник
- Previous
- Overview: Django
- Next
In this tutorial, we’ll show you how to work with HTML Forms in Django, and, in particular, the easiest way to write forms to create, update, and delete model instances. As part of this demonstration, we’ll extend the LocalLibrary website so that librarians can renew books, and create, update, and delete authors using our own forms (rather than using the admin application).
| Prerequisites: |
Complete all previous tutorial topics, including Django Tutorial Part 8: User authentication and permissions. |
|---|---|
| Objective: |
To understand how to write forms to get information from users and update the database. To understand how the generic class-based editing views can vastly simplify creating forms for working with a single model. |
Overview
An HTML Form is a group of one or more fields/widgets on a web page, which can be used to collect information from users for submission to a server. Forms are a flexible mechanism for collecting user input because there are suitable widgets for entering many different types of data, including text boxes, checkboxes, radio buttons, date pickers and so on. Forms are also a relatively secure way of sharing data with the server, as they allow us to send data in POST requests with cross-site request forgery protection.
While we haven’t created any forms in this tutorial so far, we’ve already encountered them in the Django Admin site — for example, the screenshot below shows a form for editing one of our Book models, comprised of a number of selection lists and text editors.
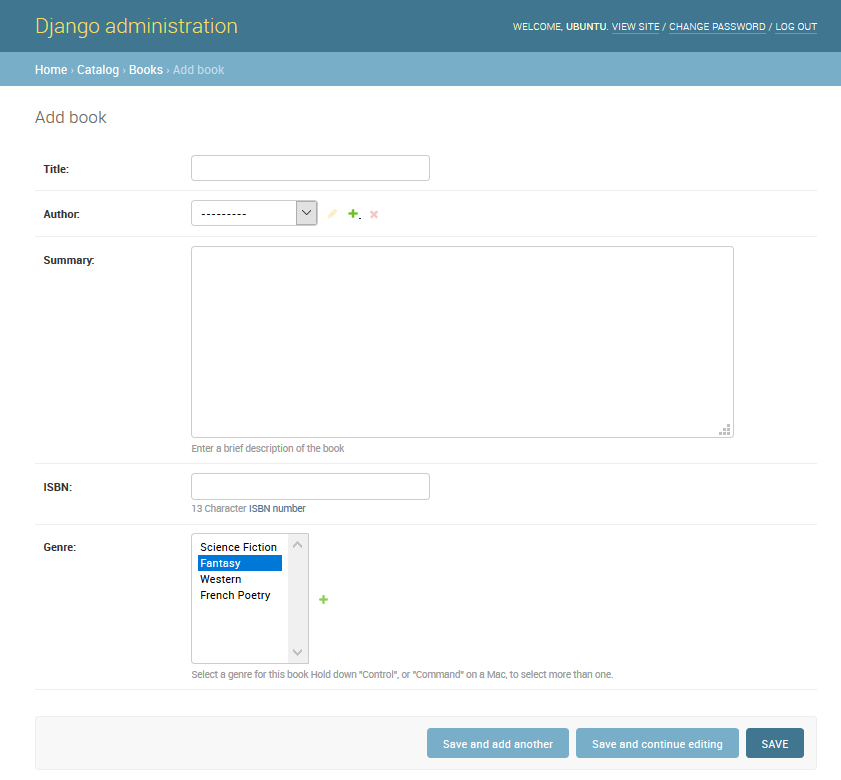
Working with forms can be complicated! Developers need to write HTML for the form, validate and properly sanitize entered data on the server (and possibly also in the browser), repost the form with error messages to inform users of any invalid fields, handle the data when it has successfully been submitted, and finally respond to the user in some way to indicate success. Django Forms take a lot of the work out of all these steps, by providing a framework that lets you define forms and their fields programmatically, and then use these objects to both generate the form HTML code and handle much of the validation and user interaction.
In this tutorial, we’re going to show you a few of the ways you can create and work with forms, and in particular, how the generic editing views can significantly reduce the amount of work you need to do to create forms to manipulate your models. Along the way, we’ll extend our LocalLibrary application by adding a form to allow librarians to renew library books, and we’ll create pages to create, edit and delete books and authors (reproducing a basic version of the form shown above for editing books).
HTML Forms
First, a brief overview of HTML Forms. Consider a simple HTML form, with a single text field for entering the name of some «team», and its associated label:
![]()
The form is defined in HTML as a collection of elements inside <form>…</form> tags, containing at least one input element of type="submit".
<form action="/team_name_url/" method="post">
<label for="team_name">Enter name: </label>
<input
id="team_name"
type="text"
name="name_field"
value="Default name for team." />
<input type="submit" value="OK" />
</form>
While here we just have one text field for entering the team name, a form may have any number of other input elements and their associated labels. The field’s type attribute defines what sort of widget will be displayed. The name and id of the field are used to identify the field in JavaScript/CSS/HTML, while value defines the initial value for the field when it is first displayed. The matching team label is specified using the label tag (see «Enter name» above), with a for field containing the id value of the associated input.
The submit input will be displayed as a button by default.
This can be pressed to upload the data in all the other input elements in the form to the server (in this case, just the team_name field).
The form attributes define the HTTP method used to send the data and the destination of the data on the server (action):
action: The resource/URL where data is to be sent for processing when the form is submitted. If this is not set (or set to an empty string), then the form will be submitted back to the current page URL.method: The HTTP method used to send the data: post or get.- The
POSTmethod should always be used if the data is going to result in a change to the server’s database, because it can be made more resistant to cross-site forgery request attacks. - The
GETmethod should only be used for forms that don’t change user data (for example, a search form). It is recommended for when you want to be able to bookmark or share the URL.
- The
The role of the server is first to render the initial form state — either containing blank fields or pre-populated with initial values. After the user presses the submit button, the server will receive the form data with values from the web browser and must validate the information. If the form contains invalid data, the server should display the form again, this time with user-entered data in «valid» fields and messages to describe the problem for the invalid fields. Once the server gets a request with all valid form data, it can perform an appropriate action (such as: saving the data, returning the result of a search, uploading a file, etc.) and then notify the user.
As you can imagine, creating the HTML, validating the returned data, re-displaying the entered data with error reports if needed, and performing the desired operation on valid data can all take quite a lot of effort to «get right». Django makes this a lot easier by taking away some of the heavy lifting and repetitive code!
Django form handling process
Django’s form handling uses all of the same techniques that we learned about in previous tutorials (for displaying information about our models): the view gets a request, performs any actions required including reading data from the models, then generates and returns an HTML page (from a template, into which we pass a context containing the data to be displayed). What makes things more complicated is that the server also needs to be able to process data provided by the user, and redisplay the page if there are any errors.
A process flowchart of how Django handles form requests is shown below, starting with a request for a page containing a form (shown in green).
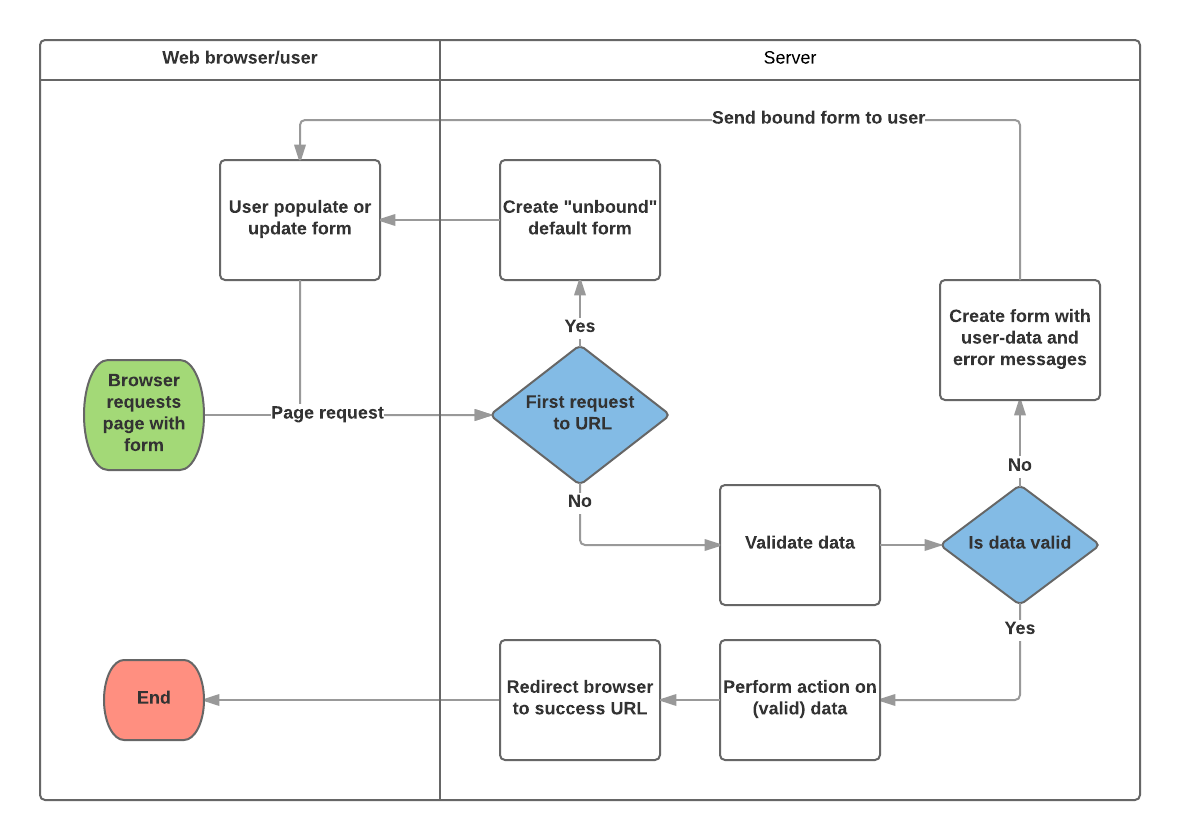
Based on the diagram above, the main things that Django’s form handling does are:
- Display the default form the first time it is requested by the user.
- The form may contain blank fields if you’re creating a new record, or it may be pre-populated with initial values (for example, if you are changing a record, or have useful default initial values).
- The form is referred to as unbound at this point, because it isn’t associated with any user-entered data (though it may have initial values).
- Receive data from a submit request and bind it to the form.
- Binding data to the form means that the user-entered data and any errors are available when we need to redisplay the form.
- Clean and validate the data.
- Cleaning the data performs sanitization of the input fields, such as removing invalid characters that might be used to send malicious content to the server, and converts them into consistent Python types.
- Validation checks that the values are appropriate for the field (for example, that they are in the right date range, aren’t too short or too long, etc.)
- If any data is invalid, re-display the form, this time with any user populated values and error messages for the problem fields.
- If all data is valid, perform required actions (such as save the data, send an email, return the result of a search, upload a file, and so on).
- Once all actions are complete, redirect the user to another page.
Django provides a number of tools and approaches to help you with the tasks detailed above. The most fundamental is the Form class, which simplifies both generation of form HTML and data cleaning/validation. In the next section, we describe how forms work using the practical example of a page to allow librarians to renew books.
Note: Understanding how Form is used will help you when we discuss Django’s more «high level» form framework classes.
Renew-book form using a Form and function view
Next, we’re going to add a page to allow librarians to renew borrowed books. To do this we’ll create a form that allows users to enter a date value. We’ll seed the field with an initial value 3 weeks from the current date (the normal borrowing period), and add some validation to ensure that the librarian can’t enter a date in the past or a date too far in the future. When a valid date has been entered, we’ll write it to the current record’s BookInstance.due_back field.
The example will use a function-based view and a Form class. The following sections explain how forms work, and the changes you need to make to our ongoing LocalLibrary project.
Form
The Form class is the heart of Django’s form handling system. It specifies the fields in the form, their layout, display widgets, labels, initial values, valid values, and (once validated) the error messages associated with invalid fields. The class also provides methods for rendering itself in templates using predefined formats (tables, lists, etc.) or for getting the value of any element (enabling fine-grained manual rendering).
Declaring a Form
The declaration syntax for a Form is very similar to that for declaring a Model, and shares the same field types (and some similar parameters). This makes sense because in both cases we need to ensure that each field handles the right types of data, is constrained to valid data, and has a description for display/documentation.
Form data is stored in an application’s forms.py file, inside the application directory. Create and open the file locallibrary/catalog/forms.py. To create a Form, we import the forms library, derive from the Form class, and declare the form’s fields. A very basic form class for our library book renewal form is shown below — add this to your new file:
from django import forms
class RenewBookForm(forms.Form):
renewal_date = forms.DateField(help_text="Enter a date between now and 4 weeks (default 3).")
Form fields
In this case, we have a single DateField for entering the renewal date that will render in HTML with a blank value, the default label «Renewal date:«, and some helpful usage text: «Enter a date between now and 4 weeks (default 3 weeks).» As none of the other optional arguments are specified the field will accept dates using the input_formats: YYYY-MM-DD (2016-11-06), MM/DD/YYYY (02/26/2016), MM/DD/YY (10/25/16), and will be rendered using the default widget: DateInput.
There are many other types of form fields, which you will largely recognize from their similarity to the equivalent model field classes:
BooleanFieldCharFieldChoiceFieldTypedChoiceFieldDateFieldDateTimeFieldDecimalFieldDurationFieldEmailFieldFileFieldFilePathFieldFloatFieldImageFieldIntegerFieldGenericIPAddressFieldMultipleChoiceFieldTypedMultipleChoiceFieldNullBooleanFieldRegexFieldSlugFieldTimeFieldURLFieldUUIDFieldComboFieldMultiValueFieldSplitDateTimeFieldModelMultipleChoiceFieldModelChoiceField
The arguments that are common to most fields are listed below (these have sensible default values):
required: IfTrue, the field may not be left blank or given aNonevalue. Fields are required by default, so you would setrequired=Falseto allow blank values in the form.label: The label to use when rendering the field in HTML. If a label is not specified, Django will create one from the field name by capitalizing the first letter and replacing underscores with spaces (e.g. Renewal date).label_suffix: By default, a colon is displayed after the label (e.g. Renewal date:). This argument allows you to specify a different suffix containing other character(s).initial: The initial value for the field when the form is displayed.widget: The display widget to use.help_text(as seen in the example above): Additional text that can be displayed in forms to explain how to use the field.error_messages: A list of error messages for the field. You can override these with your own messages if needed.validators: A list of functions that will be called on the field when it is validated.localize: Enables the localization of form data input (see link for more information).disabled: The field is displayed but its value cannot be edited if this isTrue. The default isFalse.
Validation
Django provides numerous places where you can validate your data. The easiest way to validate a single field is to override the method clean_<fieldname>() for the field you want to check. So for example, we can validate that entered renewal_date values are between now and 4 weeks by implementing clean_renewal_date() as shown below.
Update your forms.py file so it looks like this:
import datetime
from django import forms
from django.core.exceptions import ValidationError
from django.utils.translation import gettext_lazy as _
class RenewBookForm(forms.Form):
renewal_date = forms.DateField(help_text="Enter a date between now and 4 weeks (default 3).")
def clean_renewal_date(self):
data = self.cleaned_data['renewal_date']
# Check if a date is not in the past.
if data < datetime.date.today():
raise ValidationError(_('Invalid date - renewal in past'))
# Check if a date is in the allowed range (+4 weeks from today).
if data > datetime.date.today() + datetime.timedelta(weeks=4):
raise ValidationError(_('Invalid date - renewal more than 4 weeks ahead'))
# Remember to always return the cleaned data.
return data
There are two important things to note. The first is that we get our data using self.cleaned_data['renewal_date'] and that we return this data whether or not we change it at the end of the function.
This step gets us the data «cleaned» and sanitized of potentially unsafe input using the default validators, and converted into the correct standard type for the data (in this case a Python datetime.datetime object).
The second point is that if a value falls outside our range we raise a ValidationError, specifying the error text that we want to display in the form if an invalid value is entered.
The example above also wraps this text in one of Django’s translation functions, gettext_lazy() (imported as _()), which is good practice if you want to translate your site later.
Note: There are numerous other methods and examples for validating forms in Form and field validation (Django docs). For example, in cases where you have multiple fields that depend on each other, you can override the Form.clean() function and again raise a ValidationError.
That’s all we need for the form in this example!
URL configuration
Before we create our view, let’s add a URL configuration for the renew-books page. Copy the following configuration to the bottom of locallibrary/catalog/urls.py:
urlpatterns += [
path('book/<uuid:pk>/renew/', views.renew_book_librarian, name='renew-book-librarian'),
]
The URL configuration will redirect URLs with the format /catalog/book/<bookinstance_id>/renew/ to the function named renew_book_librarian() in views.py, and send the BookInstance id as the parameter named pk. The pattern only matches if pk is a correctly formatted uuid.
Note: We can name our captured URL data «pk» anything we like, because we have complete control over the view function (we’re not using a generic detail view class that expects parameters with a certain name). However, pk short for «primary key», is a reasonable convention to use!
View
As discussed in the Django form handling process above, the view has to render the default form when it is first called and then either re-render it with error messages if the data is invalid, or process the data and redirect to a new page if the data is valid. In order to perform these different actions, the view has to be able to know whether it is being called for the first time to render the default form, or a subsequent time to validate data.
For forms that use a POST request to submit information to the server, the most common pattern is for the view to test against the POST request type (if request.method == 'POST':) to identify form validation requests and GET (using an else condition) to identify the initial form creation request. If you want to submit your data using a GET request, then a typical approach for identifying whether this is the first or subsequent view invocation is to read the form data (e.g. to read a hidden value in the form).
The book renewal process will be writing to our database, so, by convention, we use the POST request approach.
The code fragment below shows the (very standard) pattern for this sort of function view.
import datetime
from django.shortcuts import render, get_object_or_404
from django.http import HttpResponseRedirect
from django.urls import reverse
from catalog.forms import RenewBookForm
def renew_book_librarian(request, pk):
book_instance = get_object_or_404(BookInstance, pk=pk)
# If this is a POST request then process the Form data
if request.method == 'POST':
# Create a form instance and populate it with data from the request (binding):
form = RenewBookForm(request.POST)
# Check if the form is valid:
if form.is_valid():
# process the data in form.cleaned_data as required (here we just write it to the model due_back field)
book_instance.due_back = form.cleaned_data['renewal_date']
book_instance.save()
# redirect to a new URL:
return HttpResponseRedirect(reverse('all-borrowed'))
# If this is a GET (or any other method) create the default form.
else:
proposed_renewal_date = datetime.date.today() + datetime.timedelta(weeks=3)
form = RenewBookForm(initial={'renewal_date': proposed_renewal_date})
context = {
'form': form,
'book_instance': book_instance,
}
return render(request, 'catalog/book_renew_librarian.html', context)
First, we import our form (RenewBookForm) and a number of other useful objects/methods used in the body of the view function:
get_object_or_404(): Returns a specified object from a model based on its primary key value, and raises anHttp404exception (not found) if the record does not exist.HttpResponseRedirect: This creates a redirect to a specified URL (HTTP status code 302).reverse(): This generates a URL from a URL configuration name and a set of arguments. It is the Python equivalent of theurltag that we’ve been using in our templates.datetime: A Python library for manipulating dates and times.
In the view, we first use the pk argument in get_object_or_404() to get the current BookInstance (if this does not exist, the view will immediately exit and the page will display a «not found» error).
If this is not a POST request (handled by the else clause) then we create the default form passing in an initial value for the renewal_date field, 3 weeks from the current date.
book_instance = get_object_or_404(BookInstance, pk=pk)
# If this is a GET (or any other method) create the default form
else:
proposed_renewal_date = datetime.date.today() + datetime.timedelta(weeks=3)
form = RenewBookForm(initial={'renewal_date': proposed_renewal_date})
context = {
'form': form,
'book_instance': book_instance,
}
return render(request, 'catalog/book_renew_librarian.html', context)
After creating the form, we call render() to create the HTML page, specifying the template and a context that contains our form. In this case, the context also contains our BookInstance, which we’ll use in the template to provide information about the book we’re renewing.
However, if this is a POST request, then we create our form object and populate it with data from the request. This process is called «binding» and allows us to validate the form.
We then check if the form is valid, which runs all the validation code on all of the fields — including both the generic code to check that our date field is actually a valid date and our specific form’s clean_renewal_date() function to check the date is in the right range.
book_instance = get_object_or_404(BookInstance, pk=pk)
# If this is a POST request then process the Form data
if request.method == 'POST':
# Create a form instance and populate it with data from the request (binding):
form = RenewBookForm(request.POST)
# Check if the form is valid:
if form.is_valid():
# process the data in form.cleaned_data as required (here we just write it to the model due_back field)
book_instance.due_back = form.cleaned_data['renewal_date']
book_instance.save()
# redirect to a new URL:
return HttpResponseRedirect(reverse('all-borrowed'))
context = {
'form': form,
'book_instance': book_instance,
}
return render(request, 'catalog/book_renew_librarian.html', context)
If the form is not valid we call render() again, but this time the form value passed in the context will include error messages.
If the form is valid, then we can start to use the data, accessing it through the form.cleaned_data attribute (e.g. data = form.cleaned_data['renewal_date']). Here, we just save the data into the due_back value of the associated BookInstance object.
Warning: While you can also access the form data directly through the request (for example, request.POST['renewal_date'] or request.GET['renewal_date'] if using a GET request), this is NOT recommended. The cleaned data is sanitized, validated, and converted into Python-friendly types.
The final step in the form-handling part of the view is to redirect to another page, usually a «success» page. In this case, we use HttpResponseRedirect and reverse() to redirect to the view named 'all-borrowed' (this was created as the «challenge» in Django Tutorial Part 8: User authentication and permissions). If you didn’t create that page consider redirecting to the home page at URL ‘/‘).
That’s everything needed for the form handling itself, but we still need to restrict access to the view to just logged-in librarians who have permission to renew books. We use @login_required to require that the user is logged in, and the @permission_required function decorator with our existing can_mark_returned permission to allow access (decorators are processed in order). Note that we probably should have created a new permission setting in BookInstance («can_renew«), but we will reuse the existing one to keep the example simple.
The final view is therefore as shown below. Please copy this into the bottom of locallibrary/catalog/views.py.
import datetime
from django.contrib.auth.decorators import login_required, permission_required
from django.shortcuts import get_object_or_404
from django.http import HttpResponseRedirect
from django.urls import reverse
from catalog.forms import RenewBookForm
@login_required
@permission_required('catalog.can_mark_returned', raise_exception=True)
def renew_book_librarian(request, pk):
"""View function for renewing a specific BookInstance by librarian."""
book_instance = get_object_or_404(BookInstance, pk=pk)
# If this is a POST request then process the Form data
if request.method == 'POST':
# Create a form instance and populate it with data from the request (binding):
form = RenewBookForm(request.POST)
# Check if the form is valid:
if form.is_valid():
# process the data in form.cleaned_data as required (here we just write it to the model due_back field)
book_instance.due_back = form.cleaned_data['renewal_date']
book_instance.save()
# redirect to a new URL:
return HttpResponseRedirect(reverse('all-borrowed'))
# If this is a GET (or any other method) create the default form.
else:
proposed_renewal_date = datetime.date.today() + datetime.timedelta(weeks=3)
form = RenewBookForm(initial={'renewal_date': proposed_renewal_date})
context = {
'form': form,
'book_instance': book_instance,
}
return render(request, 'book_renew_librarian.html', context)
The template
Create the template referenced in the view (/catalog/templates/catalog/book_renew_librarian.html) and copy the code below into it:
{% extends "base_generic.html" %}
{% block content %}
<h1>Renew: {{ book_instance.book.title }}</h1>
<p>Borrower: {{ book_instance.borrower }}</p>
<p{% if book_instance.is_overdue %} class="text-danger"{% endif %}>Due date: {{ book_instance.due_back }}</p>
<form action="" method="post">
{% csrf_token %}
<table>
{{ form.as_table }}
</table>
<input type="submit" value="Submit">
</form>
{% endblock %}
Most of this will be completely familiar from previous tutorials.
We extend the base template and then redefine the content block. We are able to reference {{ book_instance }} (and its variables) because it was passed into the context object in the render() function, and we use these to list the book title, borrower, and the original due date.
The form code is relatively simple. First, we declare the form tags, specifying where the form is to be submitted (action) and the method for submitting the data (in this case an «HTTP POST«) — if you recall the HTML Forms overview at the top of the page, an empty action as shown, means that the form data will be posted back to the current URL of the page (which is what we want). Inside the tags, we define the submit input, which a user can press to submit the data. The {% csrf_token %} added just inside the form tags is part of Django’s cross-site forgery protection.
Note: Add the {% csrf_token %} to every Django template you create that uses POST to submit data. This will reduce the chance of forms being hijacked by malicious users.
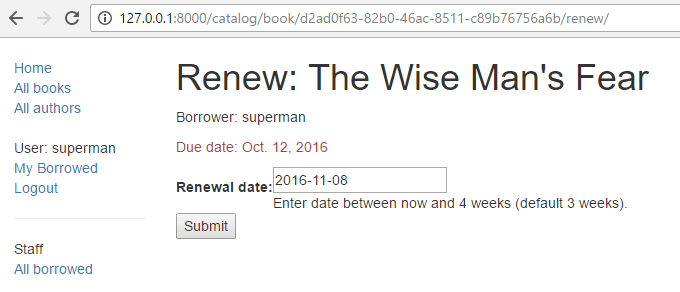
All that’s left is the {{ form }} template variable, which we passed to the template in the context dictionary. Perhaps unsurprisingly, when used as shown this provides the default rendering of all the form fields, including their labels, widgets, and help text — the rendering is as shown below:
<tr>
<th><label for="id_renewal_date">Renewal date:</label></th>
<td>
<input
id="id_renewal_date"
name="renewal_date"
type="text"
value="2016-11-08"
required />
<br />
<span class="helptext">Enter date between now and 4 weeks (default 3 weeks).</span>
</td>
</tr>
Note: It is perhaps not obvious because we only have one field, but, by default, every field is defined in its own table row. This same rendering is provided if you reference the template variable {{ form.as_table }}.
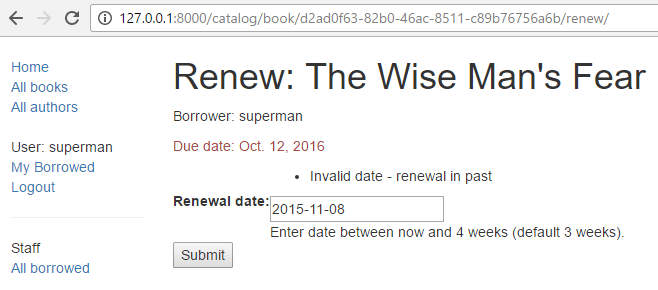
If you were to enter an invalid date, you’d additionally get a list of the errors rendered on the page (see errorlist below).
<tr>
<th><label for="id_renewal_date">Renewal date:</label></th>
<td>
<ul class="errorlist">
<li>Invalid date - renewal in past</li>
</ul>
<input
id="id_renewal_date"
name="renewal_date"
type="text"
value="2015-11-08"
required />
<br />
<span class="helptext">Enter date between now and 4 weeks (default 3 weeks).</span>
</td>
</tr>
Other ways of using form template variable
Using {{ form.as_table }} as shown above, each field is rendered as a table row. You can also render each field as a list item (using {{ form.as_ul }}) or as a paragraph (using {{ form.as_p }}).
It is also possible to have complete control over the rendering of each part of the form, by indexing its properties using dot notation. So, for example, we can access a number of separate items for our renewal_date field:
{{ form.renewal_date }}:The whole field.{{ form.renewal_date.errors }}: The list of errors.{{ form.renewal_date.id_for_label }}: The id of the label.{{ form.renewal_date.help_text }}: The field help text.
For more examples of how to manually render forms in templates and dynamically loop over template fields, see Working with forms > Rendering fields manually (Django docs).
Testing the page
If you accepted the «challenge» in Django Tutorial Part 8: User authentication and permissions you’ll have a list of all books on loan in the library, which is only visible to library staff. We can add a link to our renew page next to each item using the template code below.
{% if perms.catalog.can_mark_returned %}- <a href="{% url 'renew-book-librarian' bookinst.id %}">Renew</a> {% endif %}
Note: Remember that your test login will need to have the permission «catalog.can_mark_returned» in order to access the renew book page (perhaps use your superuser account).
You can alternatively manually construct a test URL like this — http://127.0.0.1:8000/catalog/book/<bookinstance_id>/renew/ (a valid bookinstance_id can be obtained by navigating to a book detail page in your library, and copying the id field).
What does it look like?
If you are successful, the default form will look like this:
The form with an invalid value entered will look like this:
The list of all books with renew links will look like this:

ModelForms
Creating a Form class using the approach described above is very flexible, allowing you to create whatever sort of form page you like and associate it with any model or models.
However, if you just need a form to map the fields of a single model then your model will already define most of the information that you need in your form: fields, labels, help text and so on. Rather than recreating the model definitions in your form, it is easier to use the ModelForm helper class to create the form from your model. This ModelForm can then be used within your views in exactly the same way as an ordinary Form.
A basic ModelForm containing the same field as our original RenewBookForm is shown below. All you need to do to create the form is add class Meta with the associated model (BookInstance) and a list of the model fields to include in the form.
from django.forms import ModelForm
from catalog.models import BookInstance
class RenewBookModelForm(ModelForm):
class Meta:
model = BookInstance
fields = ['due_back']
Note: You can also include all fields in the form using fields = '__all__', or you can use exclude (instead of fields) to specify the fields not to include from the model).
Neither approach is recommended because new fields added to the model are then automatically included in the form (without the developer necessarily considering possible security implications).
Note: This might not look all that much simpler than just using a Form (and it isn’t in this case, because we just have one field). However, if you have a lot of fields, it can reduce the amount of code quite significantly!
The rest of the information comes from the model field definitions (e.g. labels, widgets, help text, error messages). If these aren’t quite right, then we can override them in our class Meta, specifying a dictionary containing the field to change and its new value. For example, in this form, we might want a label for our field of «Renewal date» (rather than the default based on the field name: Due Back), and we also want our help text to be specific to this use case.
The Meta below shows you how to override these fields, and you can similarly set widgets and error_messages if the defaults aren’t sufficient.
class Meta:
model = BookInstance
fields = ['due_back']
labels = {'due_back': _('New renewal date')}
help_texts = {'due_back': _('Enter a date between now and 4 weeks (default 3).')}
To add validation you can use the same approach as for a normal Form — you define a function named clean_<field_name>() and raise ValidationError exceptions for invalid values.
The only difference with respect to our original form is that the model field is named due_back and not «renewal_date«.
This change is necessary since the corresponding field in BookInstance is called due_back.
from django.forms import ModelForm
from catalog.models import BookInstance
class RenewBookModelForm(ModelForm):
def clean_due_back(self):
data = self.cleaned_data['due_back']
# Check if a date is not in the past.
if data < datetime.date.today():
raise ValidationError(_('Invalid date - renewal in past'))
# Check if a date is in the allowed range (+4 weeks from today).
if data > datetime.date.today() + datetime.timedelta(weeks=4):
raise ValidationError(_('Invalid date - renewal more than 4 weeks ahead'))
# Remember to always return the cleaned data.
return data
class Meta:
model = BookInstance
fields = ['due_back']
labels = {'due_back': _('Renewal date')}
help_texts = {'due_back': _('Enter a date between now and 4 weeks (default 3).')}
The class RenewBookModelForm above is now functionally equivalent to our original RenewBookForm. You could import and use it wherever you currently use RenewBookForm as long as you also update the corresponding form variable name from renewal_date to due_back as in the second form declaration: RenewBookModelForm(initial={'due_back': proposed_renewal_date}.
Generic editing views
The form handling algorithm we used in our function view example above represents an extremely common pattern in form editing views. Django abstracts much of this «boilerplate» for you, by creating generic editing views for creating, editing, and deleting views based on models. Not only do these handle the «view» behavior, but they automatically create the form class (a ModelForm) for you from the model.
Note: In addition to the editing views described here, there is also a FormView class, which lies somewhere between our function view and the other generic views in terms of «flexibility» vs. «coding effort». Using FormView, you still need to create your Form, but you don’t have to implement all of the standard form-handling patterns. Instead, you just have to provide an implementation of the function that will be called once the submission is known to be valid.
In this section, we’re going to use generic editing views to create pages to add functionality to create, edit, and delete Author records from our library — effectively providing a basic reimplementation of parts of the Admin site (this could be useful if you need to offer admin functionality in a more flexible way than can be provided by the admin site).
Views
Open the views file (locallibrary/catalog/views.py) and append the following code block to the bottom of it:
from django.views.generic.edit import CreateView, UpdateView, DeleteView
from django.urls import reverse_lazy
from catalog.models import Author
class AuthorCreate(CreateView):
model = Author
fields = ['first_name', 'last_name', 'date_of_birth', 'date_of_death']
initial = {'date_of_death': '11/06/2020'}
class AuthorUpdate(UpdateView):
model = Author
fields = '__all__' # Not recommended (potential security issue if more fields added)
class AuthorDelete(DeleteView):
model = Author
success_url = reverse_lazy('authors')
As you can see, to create, update, or delete the views you need to derive from CreateView, UpdateView, and DeleteView (respectively) and then define the associated model.
For the «create» and «update» cases you also need to specify the fields to display in the form (using the same syntax as for ModelForm). In this case, we show how to list them individually and the syntax to list «all» fields. You can also specify initial values for each of the fields using a dictionary of field_name/value pairs (here we arbitrarily set the date of death for demonstration purposes — you might want to remove that). By default, these views will redirect on success to a page displaying the newly created/edited model item, which in our case will be the author detail view we created in a previous tutorial. You can specify an alternative redirect location by explicitly declaring parameter success_url (as done for the AuthorDelete class).
The AuthorDelete class doesn’t need to display any of the fields, so these don’t need to be specified. You do however need to specify the success_url, because there is no obvious default value for Django to use. In this case, we use the reverse_lazy() function to redirect to our author list after an author has been deleted — reverse_lazy() is a lazily executed version of reverse(), used here because we’re providing a URL to a class-based view attribute.
Templates
The «create» and «update» views use the same template by default, which will be named after your model: model_name_form.html (you can change the suffix to something other than _form using the template_name_suffix field in your view, for example, template_name_suffix = '_other_suffix')
Create the template file locallibrary/catalog/templates/catalog/author_form.html and copy the text below.
{% extends "base_generic.html" %}
{% block content %}
<form action="" method="post">
{% csrf_token %}
<table>
{{ form.as_table }}
</table>
<input type="submit" value="Submit" />
</form>
{% endblock %}
This is similar to our previous forms and renders the fields using a table. Note also how again we declare the {% csrf_token %} to ensure that our forms are resistant to CSRF attacks.
The «delete» view expects to find a template named with the format _model_name_confirm_delete.html (again, you can change the suffix using template_name_suffix in your view). Create the template file locallibrary/catalog/templates/catalog/author_confirm_delete.html and copy the text below.
{% extends "base_generic.html" %}
{% block content %}
<h1>Delete Author</h1>
<p>Are you sure you want to delete the author: {{ author }}?</p>
<form action="" method="POST">
{% csrf_token %}
<input type="submit" value="Yes, delete." />
</form>
{% endblock %}
URL configurations
Open your URL configuration file (locallibrary/catalog/urls.py) and add the following configuration to the bottom of the file:
urlpatterns += [
path('author/create/', views.AuthorCreate.as_view(), name='author-create'),
path('author/<int:pk>/update/', views.AuthorUpdate.as_view(), name='author-update'),
path('author/<int:pk>/delete/', views.AuthorDelete.as_view(), name='author-delete'),
]
There is nothing particularly new here! You can see that the views are classes, and must hence be called via .as_view(), and you should be able to recognize the URL patterns in each case. We must use pk as the name for our captured primary key value, as this is the parameter name expected by the view classes.
The author create, update, and delete pages are now ready to test (we won’t bother hooking them into the site sidebar in this case, although you can do so if you wish).
Note: Observant users will have noticed that we didn’t do anything to prevent unauthorized users from accessing the pages! We leave that as an exercise for you (hint: you could use the PermissionRequiredMixin and either create a new permission or reuse our can_mark_returned permission).
Testing the page
First, log in to the site with an account that has whatever permissions you decided are needed to access the author editing pages.
Then navigate to the author create page, http://127.0.0.1:8000/catalog/author/create/, which should look like the screenshot below.
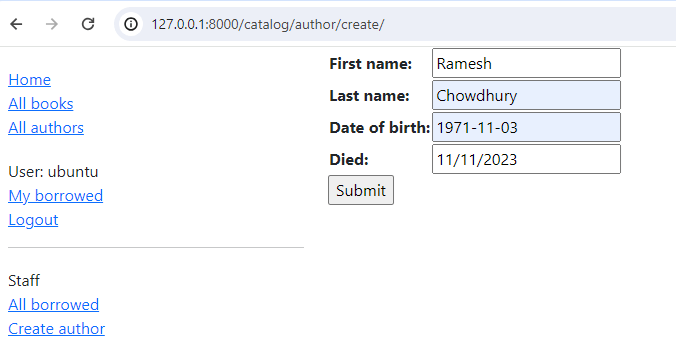
Enter values for the fields and then press Submit to save the author record. You should now be taken to a detail view for your new author, with a URL of something like http://127.0.0.1:8000/catalog/author/10.
You can test editing records by appending /update/ to the end of the detail view URL (e.g. http://127.0.0.1:8000/catalog/author/10/update/) — we don’t show a screenshot because it looks just like the «create» page!
Finally, we can delete the page by appending delete to the end of the author detail-view URL (e.g. http://127.0.0.1:8000/catalog/author/10/delete/). Django should display the delete page shown below. Press «Yes, delete.» to remove the record and be taken to the list of all authors.
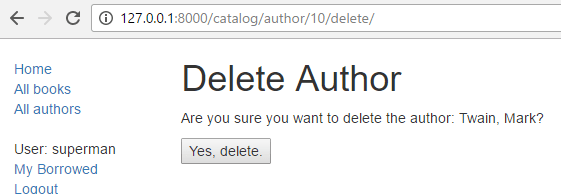
Challenge yourself
Create some forms to create, edit, and delete Book records. You can use exactly the same structure as for Authors. If your book_form.html template is just a copy-renamed version of the author_form.html template, then the new «create book» page will look like the screenshot below:
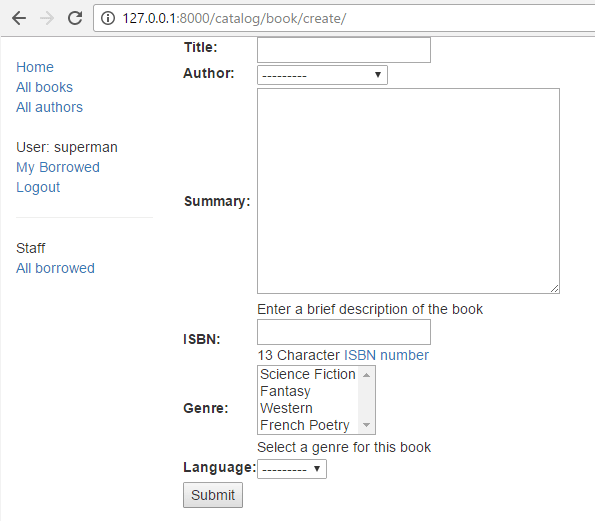
Summary
Creating and handling forms can be a complicated process! Django makes it much easier by providing programmatic mechanisms to declare, render, and validate forms. Furthermore, Django provides generic form editing views that can do almost all the work to define pages that can create, edit, and delete records associated with a single model instance.
There is a lot more that can be done with forms (check out our See also list below), but you should now understand how to add basic forms and form-handling code to your own websites.
See also
In this module
This post is part of my Django series. You can see an overview of the series along with instruction on how to get all the source code here.
This article assumes you are comfortable creating a Django project, can create apps and register them into the INSTALLED_APPS list of the settings file. If not please read my Django HelloWorld article.
This article assumes you have a project called DjangoSandBox in an application called formsintroduction.
- Basic Form
- Validation
- Basic Form With HTML
- Class Form
- Model Form Factory
- Widgets
- Joins
- Full Example
- Additional Notes
A Django Form instance automatically provides all the heavy work when working with HTTP forms; rendering UI, validation, cleaning and collection of data.
Basic Form
A basic Django Form is a class which inherits from forms.Form. It defines fields and looks similar to a Django model.
The following example defines a form which has a name and height field.
# forms.py
from django import forms
class BasicFormExample(forms.Form):
name = forms.CharField(label="Name", min_length=3, max_length=30)
height = forms.DecimalField(max_value=2, help_text="Height in meters", label="Height (M.CM)", decimal_places=2)
We can now use an instance of BasicFormExample within a function view; we pass it to the context object dictionary with a key of ‘form’.
When posting back we create an instance of the form initiated with the POST data. We can then ask the form if it is valid; this returns false if the model or additional form validation (which we will add later) is invalid.
We can ask for cleaned_data of the fields from the form; this gets us validated data fields. In this example we simply collect the data and pass them into a HttpResponse instance.
If the form is not considered valid we pass the form instance back to the request object.
#views/py
from django.http import HttpResponse
from django.shortcuts import render
from .forms.bastic_form_example import BasicFormExample
def basic(request):
if request.POST:
form = BasicFormExample(request.POST)
if form.is_valid():
name = form.cleaned_data['name']
height = form.cleaned_data['height']
return HttpResponse("{0} is {1} tall".format(name, height))
else:
return render(request, "formsintroduction/basic_form_example.html", {'form': form})
else:
form = BasicFormExample()
return render(request, 'formsintroduction/basic_form_example.html', {'form': form})
For our template we simply need to ask for the form to render itself. We use as_table function upon the form instance passed into the template context data.
Django provides the functions as_table, as_ul and as_p; this simply defines which html element to surrounds the rendered input element; TD, UI or P.
We also need to add a csrf_token to ensure we are protected from Cross-site request forgery attacks. When working with forms ‘{% csrf_token %}’ should always be included on the page; as long as we include this Django will take care of the rest.
We also add a button to submit the form.
<!-- templates/formsintroduction/basic_form_example.html -->
<!DOCTYPE html>
<html lang="en">
<head>
<meta charset="UTF-8">
<title></title>
</head>
<body>
<form method="post" action="">
{% csrf_token %}
<table>
{{ form.as_table }}
</table>
<p><input type="submit" value="Create"/></p>
</form>
</body>
</html>
We now hook in our view function into our URL routing config.
#formsintroduction/urls.py
from django.conf.urls import patterns, url
from . import views
urlpatterns =
patterns('',
url(r'^basic/$', views.basic, name="form_basic"),
We need to make sure that our app’s urls.py is configured within the project urls.py. I was working with an app called formsintroduction inside a project called DjangoSandBox.
#DjangoSandBox/urls.py
from django.conf.urls import patterns, include, url
from formsintroduction import urls as formsintroduction_urls
urlpatterns =
patterns('',
url(r'^formsintroduction/', include(formsintroduction_urls, namespace="formsintroduction")),
)
To test the page run the development server and navigate to:
http://127.0.0.1:8000/formsintroduction/basic/
Validation
This assumes that you have an understanding of adding validation onto Django models. If not you can read about this in my post here.
We automatically get server and client side validation for our model. For the example above this would ensure the name is of a minimum 3 characters and a maximum of 30. For the height it ensures a maximum value of 2 and a maximum number of two decimal places.
In short the constraints and validation that we place upon our model are automatically validated against in our form.
We can add additional validation onto our form.
Note: Where possible validation should be placed upon the model to support code reuse. Only bespoke validation for the page should be added directly onto the form.
Lets first write a custom validation function for our name field. We want to ensure that it starts with an upper case letter and then has at least 2 lower case letters. Upon failure we raise a django.core.exceptions.ValidationError.
# validators.py
from re import match
from django.core.exceptions import ValidationError
def validate_name(a_string):
a_match = match(r"[A-Z][a-z]{2,}$", a_string)
if a_match:
return True
raise ValidationError("Name must be a capitalised single word")
We now change our form to look like the following:
# forms/basic_form_example.py
from django import forms
from ..validators import validate_name
error_name = {
'required': 'You must enter a name!',
'invalid': 'Invalid name format.'
}
class BasicFormExample(forms.Form):
name = forms.CharField(label="Name", min_length=3, max_length=30, error_messages=error_name,
initial="Jim", validators=[validate_name])
height = forms.DecimalField(max_value=2, help_text="Height in meters", label="Height (M.CM)", decimal_places=2)
def clean(self):
cleaned_data = super(BasicFormExample, self).clean()
name = cleaned_data.get("name")
height = cleaned_data.get("height")
if name is None and height is None:
msg = "Both name and height are required!!!"
self.add_error('name', msg)
self.add_error('height', msg)
raise forms.ValidationError(msg)
return self.cleaned_data
def clean_name(self):
name = self.cleaned_data.get("name")
if " " in name:
raise forms.ValidationError("No spaces in the name please")
return name
In the example above:
- Field.validators takes a list of custom validators or inbuilt Django validators. These have been covered in my post about Django Model Validation.
- Field.error_messages takes a dictionary of error key to error message. We use it to provide custom error messages to the existing validation. This is the same funcitonality as per models. This has been covered in my post about Django Model Validation.
- The clean_field provides a hook to place specific field validation. The above is a bad example as it could easily be added as a validator against the model or form field using regular expressions; however this is only an example.
- Raising a ValidationError here automatically associates the error to the field
- The clean function provides an additional hook to perform cross field validation or anything else which might not be applicable or possible anywhere else.
- We can add validation messages against a field with the add_error function.
- We can raise a general validation message against the form by raising a ValidationError.
Note: Validation error messages are associated to a field or their form. the association affects where they are displayed to the user. Field errors are displayed next to the field they arose from, form errors are displayed above all fields. These have been covered in my post about Django Model Validation.
To test the page run the development server and navigate to:
http://127.0.0.1:8000/formsintroduction/basic/
Basic Form With HTML
In the above example we use the form passed into the template context data to render itself. If we need more control over the placement or composition of the html there is nothing stopping us from writing the html ourselves.
This example renders the form using html and Django template operators.
<!-- templates/formsintroduction/basic_form_with_html_example.html -->
<!DOCTYPE html>
<html lang="en">
<head>
<meta charset="UTF-8">
<title></title>
</head>
<body>
<form method="post" action="">
{% csrf_token %}
{{ form.non_field_errors }}
<div class="fieldWrapper">
{{ form.message.errors }}
<label for="{{ form.name.id_for_label }}">Name:</label>
{{ form.name }}
</div>
<div class="fieldWrapper">
{{ form.height.errors }}
{{ form.height.label_tag }}
{{ form.height }}
</div>
<p><input type="submit" value="Create"/></p>
</form>
</body>
</html>
We have access to some properties on the form which come in handy when building a working form page:
- The form.name and form.height renders the applicable input for the fields name and height respectively;. This includes any client side validation.
- The form.height.errors and form.name.errors renders the fields errors when and if applicable.
- The form.name.id_for_label reutrns the id to be used for the name field label.
- The form.height.label_tag is used to render the label for the height column instead of constructing it ourselves with the id_for_label property.
- The form.non_field_errors returns true or false depending upon if we have any validation errors which are not related directly to a field.
- The form.message.errors renders all non field validation error messages.
We can now hook in our new template into what is a virtual copy of the view function called in the example above.
#views.py
from django.http import HttpResponse
from django.shortcuts import render
from .forms.class_form_example import ClassBasedForm
def basic_html(request):
if request.POST:
form = BasicFormExample(request.POST)
if form.is_valid():
name = form.cleaned_data['name']
height = form.cleaned_data['height']
return HttpResponse("{0} is {1} tall".format(name, height))
else:
return render(request, "formsintroduction/basic_form_with_html_example.html", {'form': form})
else:
form = BasicFormExample()
return render(request, 'formsintroduction/basic_form_with_html_example.html', {'form': form})
Hook in our new view into our URL route config:
url(r'^basichtml/$', views.basic_html, name="form_basic_html"),
To test the page run the development server and navigate to:
http://127.0.0.1:8000/formsintroduction/basichtml/
Class Form
If we have a model class we can automatically generate a form from our model definition.
First our models; we are going to resuse the PhoneAddress and PhoneContact from the previous article when we looked at views. They sit in the viewsintroduction application.
# viewsintroduction/models.py
class PhoneAddress(Model):
number = models.IntegerField()
street_name = models.CharField(max_length=20)
city = models.CharField(max_length=20)
def __str__(self):
return "{0} {1} {2}".format(self.number, self.street_name, self.city)
def get_absolute_url(self):
return reverse('viewsintroduction:address', args=[self.id])
We can create a form based upon our model by simply inheriting from ModleForm and setting the model property of the Meta internal class.
We also define the fields property which defines which fields of the model are going to be displayed; this is mandatory.
#forms/clased_based_form.py
.from django import forms
from django.forms import ModelForm
from viewsintroduction.models import PhoneAddress
class ClassBasedForm(ModelForm):
class Meta:
model = PhoneAddress
fields = ("city", "street_name", "number")
labels = {'number': "House No."}
help_texts = {'number': "This is the number of the house."}
With regards to validation:
- We can implement the clean and clean_field functions
- We can add custom validation messages via the error_messages property of the class meta. This takes a dictionary keyed upon each field name, which in itself takes a dictionary keyed upon each error type and the custom error message.
- We can override the init function and set any settings as required; for example adding a custom validator onto a field.
A fuller example adding in validation and more meta information:
#forms/clased_based_form.py
from django import forms
from django.forms import ModelForm
from viewsintroduction.models import PhoneAddress
from ..validators import validate_name
class ClassBasedForm(ModelForm):
def __init__(self, *args, **kwargs):
super(ClassBasedForm, self).__init__(*args, **kwargs)
self.fields["city"].validators.append(validate_name)
def clean(self):
cleaned_data = super(ClassBasedForm, self).clean()
city = cleaned_data.get("city")
street_name = cleaned_data.get("street_name")
number = cleaned_data.get("number")
if city is None and street_name is None and number is None:
msg = "None of the fields have been set!!!"
for a_field in ('city', 'street_name', 'number'):
self.add_error(a_field, msg)
raise forms.ValidationError(msg)
return self.cleaned_data
def clean_city(self):
city = self.cleaned_data.get("city")
if " " in city:
raise forms.ValidationError("No spaces in the city name please")
return city
class Meta:
model = PhoneAddress
fields = ("city", "street_name", "number")
labels = {'number': "House No."}
help_texts = {'number': "This is the number of the house."}
error_messages = {
'number': {
'required': "We need a number of the house!",
'max_length': "We only accept houses up to 20!"}
}
Our view function looks similar to previous examples with a few changes:
- Our function view is going to be passed in a parameter called pk which defaults to none. We will strip this from the URL within our URL routing config shortly.
- We use get_object_or_404 to return the record. It is passed the primary key value and the model class. It will return the record or raise a 404 HTTP response if no record exists.
- We need to initiate the form with the post data if we are posting back otherwise the record instance. This is done with request.POST or None and instance=an_address being passed into the form constructor. If both are not set then we initiate the form from no data; i.e. the starting point.
- Calling form.save will automatically create or update the address record.
- Our address record knows its own URL via the get_absolute_url function. We can simply call redirect upon the record to redirect to the detail view we made in the previous article.
# views.py
from django.http import HttpResponse
from django.shortcuts import render, redirect, get_object_or_404
from .forms.class_form_example import ClassBasedForm
from viewsintroduction.models import PhoneAddress
def class_form(request, pk=None):
if pk:
an_address = get_object_or_404(PhoneAddress, pk=pk)
form = ClassBasedForm(request.POST or None, instance=an_address)
else:
form = ClassBasedForm(request.POST or None, initial={'city': 'Plymouth'})
if request.POST and form.is_valid():
an_address = form.save(commit=True)
return redirect(an_address)
else:
return render(request, 'formsintroduction/class_based_form_example.html', {'form': form})
In our template we will simply get our form to render itself:
<!-- templates/formsintroduction/class_based_form_example.html>
<!DOCTYPE html>
<html lang="en">
<head>
<meta charset="UTF-8">
<title></title>
</head>
<body>
<form method="post" action="">
{% csrf_token %}
<table>
{{ form.as_table }}
</table>
<p><input type="submit" value="Create"/></p>
</form>
</body>
</html>
We now hook in our view function with two a create and edit URL:
#urls.py url(r'^class/create/$', views.class_form, name="form_class_create"), url(r'^class/(?P<pk>[0-9]+)/edit/$', views.class_form, name="form_class_edit"),
With regards to the edit URL matching. We match the URL class/edit/xxx/ where xxx is the primary key. The primary key is made up of one or more numerical digits as noted by [0-9]+. We assign the integral into a variable called pk. The string ?P reads make a parameter for reference later on.
To test the page run the development server and navigate to:
http://127.0.0.1:8000/formsintroduction/class/create http://127.0.0.1:8000/formsintroduction/class/1/edit
Note: replace 1 with the id of your record
Model Form Factory
If we don’t want to customise the class based form we can use the modelform_factory class.
#views.py
from django.forms import modelform_factory
from django.shortcuts import render, redirect, get_object_or_404
from viewsintroduction.models import PhoneAddress
#views.py
def model_form_factory_form(request, pk=None):
phone_address_form = modelform_factory(PhoneAddress, fields=("city", "street_name", "number"))
if pk:
an_address = get_object_or_404(PhoneAddress, pk=pk)
form = phone_address_form(request.POST or None, instance=an_address)
else:
form = phone_address_form(request.POST or None)
if request.POST and form.is_valid():
an_address = form.save(commit=True)
return redirect(an_address)
else:
return render(request, 'formsintroduction/form_factory_example.html', {'form': form})
A simple template which asks the form to render itself.
<!-- templates/formsintroduction/form_factory_example.html -->
<!DOCTYPE html>
<html lang="en">
<head>
<meta charset="UTF-8">
<title>Form Factory Example</title>
</head>
<body>
<form method="post" action="">
{% csrf_token %}
<table>
{{ form.as_table }}
</table>
<p><input type="submit" value="Create"/></p>
</form>
</body>
</html>
Again we set us two URLs; one for creating and one for editing.
#urls.py url(r'^factory/create/$', views.model_form_factory_form, name="form_factory_create"), url(r'^factory/(?P<pk>[0-9]+)/edit/$', views.model_form_factory_form, name="form_factory_edit"),
To test the page run the development server and navigate to:
http://127.0.0.1:8000/formsintroduction/factory/create http://127.0.0.1:8000/formsintroduction/factory/1/edit
Note: replace 1 with the id of your record
Widgets provide extra customisation onto our fields; for example we can add a PasswordInput widget onto a CharField to give us a password input box which displays * instead of the password.
PasswordInput = forms.CharField(max_length=10, widget=forms.PasswordInput)
We can can add a Textarea onto a CharField to allow multi-line text input.
TextField = forms.CharField(widget=forms.Textarea)
We can render an input as hidden:
HiddenInput = forms.CharField(max_length=10, widget=forms.HiddenInput, initial='a')
The normal choice field be be changed to radios or a multi select list box:
TITLE_CHOICES = (
('MR', 'Mr.'),
('MRS', 'Mrs.'),
('MS', 'Ms.'),
)
# Drop Down
ChoiceField = forms.CharField(max_length=3, widget=forms.Select(choices=TITLE_CHOICES))
# Radio
RadioSelect = forms.CharField(max_length=10, widget=forms.RadioSelect(choices=TITLE_CHOICES))
# Multiple display and select
CheckboxSelectMultiple = forms.CharField(max_length=10, widget=forms.CheckboxSelectMultiple(choices=TITLE_CHOICES))
We can create a date selection widget limited to certain years or months:
YEARS_ = years = (2001, 2002, 2003, 2004, 2005, 2006, 2007, 2008, 2009) SelectDateWidget = forms.CharField(max_length=10, widget=SelectDateWidget(years=YEARS_))
A lot of the widgets can take parameters for extra customisation. Check the Django documentation for available widgets and their options.
We provide a working example for all of these widgets in the “A Full Example” section below.
Joins
Joins fields for 1:1 and 1:n are implemented by a ModelChoiceField form field defining the possible records to be joined to with the queryset parameter.
ForeignKey = forms.ModelChoiceField(queryset=ChildOfMany.objects.all()) OneToOneField = forms.ModelChoiceField(queryset=ChildOfOne.objects.all())
Many to many join fields are implemented in the same way but with a ModelMultipleChoiceField form field.
ManyToManyField = forms.ModelMultipleChoiceField(queryset=ChildManyToMany.objects.all())
We provide a working example for all of these in the “A Full Example” section below.
A Full Example
For every model field there is a recommended form field and as such editor and potentially a widget. The following is an example with “one of virtually everything”.
Lets take a model which has a field of virtually every type including joins of all types; 1:1, 1:n and 1:m.
#models.py
from django.db import models
from django.db.models import Model
TITLE_CHOICES = (
('MR', 'Mr.'),
('MRS', 'Mrs.'),
('MS', 'Ms.'),
)
class ChildOfMany(Model):
CharField = models.CharField(max_length=10)
def __str__(self):
return self.CharField
class ChildOfOne(Model):
CharField = models.CharField(max_length=10)
def __str__(self):
return self.CharField
class ChildManyToMany(Model):
CharField = models.CharField(max_length=10)
def __str__(self):
return self.CharField
class Meta:
verbose_name_plural = "children"
class ModelFieldsToFormFields(Model):
ChoiceField = models.CharField(max_length=3, choices=TITLE_CHOICES)
CharField = models.CharField(max_length=10)
CommaSeparatedIntegerField = models.CharField(max_length=50)
EmailField = models.EmailField()
TextField = models.TextField()
URLField = models.URLField()
DateField = models.DateField()
DateTimeField = models.DateTimeField()
TimeField = models.TimeField()
# FileField = models.FileField()
# ImageField = models.ImageField()
# FilePathField = models.FilePathField()
BigIntegerField = models.BigIntegerField()
BooleanField = models.BooleanField()
NullBooleanField = models.NullBooleanField()
PositiveIntegerField = models.PositiveIntegerField()
PositiveSmallIntegerField = models.PositiveSmallIntegerField()
SlugField = models.SlugField()
SmallIntegerField = models.SmallIntegerField()
DecimalField = models.DecimalField(decimal_places=2, max_digits=5)
FloatField = models.FloatField()
IntegerField = models.IntegerField()
GenericIPAddressField = models.GenericIPAddressField()
# Joins
ForeignKey = models.ForeignKey(ChildOfMany)
ManyToManyField = models.ManyToManyField(ChildManyToMany)
OneToOneField = models.OneToOneField(ChildOfOne)
Our form, using Django advised mappings of form field and widgets to model fields will then look like this:
# forms/complex_form_with_widgets.py
from django import forms
from django.forms.extras.widgets import SelectDateWidget
from ..models import TITLE_CHOICES, ChildOfOne, ChildManyToMany, ChildOfMany, ModelFieldsToFormFields
YEARS_ = years = (2001, 2002, 2003, 2004, 2005, 2006, 2007, 2008, 2009)
class ComplexFormWithWidgets(forms.ModelForm):
ChoiceField = forms.CharField(max_length=3, widget=forms.Select(choices=TITLE_CHOICES))
CharField = forms.CharField(max_length=10)
CommaSeparatedIntegerField = forms.CharField()
EmailField = forms.EmailField()
TextField = forms.CharField(widget=forms.Textarea)
URLField = forms.URLField()
DateField = forms.DateField()
DateTimeField = forms.DateTimeField()
TimeField = forms.TimeField()
# FileField = models.FileField()
# ImageField = models.ImageField()
# FilePathField = forms.FilePathField((match="*.py", recursive=True)
BigIntegerField = forms.IntegerField(min_value=-9223372036854775808, max_value=9223372036854775807.)
BooleanField = forms.BooleanField()
NullBooleanField = forms.NullBooleanField()
PositiveIntegerField = forms.IntegerField(min_value=0, max_value=2147483647)
PositiveSmallIntegerField = forms.IntegerField(min_value=0, max_value=32767)
SlugField = forms.SlugField()
SmallIntegerField = forms.IntegerField(min_value=-32768, max_value=32767)
DecimalField = forms.DecimalField()
FloatField = forms.FloatField()
IntegerField = forms.IntegerField()
GenericIPAddressField = forms.GenericIPAddressField()
# Joins
ForeignKey = forms.ModelChoiceField(queryset=ChildOfMany.objects.all())
ManyToManyField = forms.ModelMultipleChoiceField(queryset=ChildManyToMany.objects.all())
OneToOneField = forms.ModelChoiceField(queryset=ChildOfOne.objects.all())
# More Widgets
PasswordInput = forms.CharField(max_length=10, widget=forms.PasswordInput)
HiddenInput = forms.CharField(max_length=10, widget=forms.HiddenInput, initial='a')
RadioSelect = forms.CharField(max_length=10, widget=forms.RadioSelect(choices=TITLE_CHOICES))
CheckboxSelectMultiple = forms.CharField(max_length=10, widget=forms.CheckboxSelectMultiple(choices=TITLE_CHOICES))
SelectDateWidget = forms.CharField(max_length=10, widget=SelectDateWidget(years=YEARS_))
class Meta:
model = ModelFieldsToFormFields
exclude = () # Better to set fields explicitly
There is no real change in our view function from the model form example previously.
#views.py
from django.http import HttpResponse
from django.shortcuts import render, redirect, get_object_or_404
from .forms.complex_form_with_widgets import ComplexFormWithWidgets
from .models import ModelFieldsToFormFields
def complete_model_example(request, pk=None):
if pk:
an_instance = get_object_or_404(ModelFieldsToFormFields, pk=pk)
form = ComplexFormWithWidgets(request.POST or None, instance=an_instance)
else:
form = ComplexFormWithWidgets(request.POST or None)
if request.POST and form.is_valid():
if form.is_valid():
an_instance = form.save(commit=True)
return HttpResponse("Created with id={0}".format(an_instance.id))
else:
return render(request, 'formsintroduction/complete_model_form_example.html', {'form': form})
A simple html template asking the form to render itself:
<!-- templates/formsintroduction/complete_model_form_example.html-->
<!DOCTYPE html>
<html lang="en">
<head>
<meta charset="UTF-8">
<title></title>
</head>
<body>
<form method="post" action="">
{% csrf_token %}
<table>
{{ form.as_table }}
</table>
<p><input type="submit" value="Create"/></p>
</form>
</body>
</html>
Hook in our view to a create and edit URL within our URL routing config:
# urls.py url(r'^complete_model/create/$', views.complete_model_example, name="form_complete_create"), url(r'^complete_model/(?P<pk>[0-9]+)/edit/$', views.complete_model_example, name="form_complete_edit")
To test the page run the development server and navigate to:
http://127.0.0.1:8000/formsintroduction/complete_model/create http://127.0.0.1:8000/formsintroduction/complete_model/1/edit
Note: replace 1 with the id of your record
Additional Notes
We can pass data to the HTML via the attrs parameter which takes a dictionary of property to name. The following makes our char field take on a CSS class name.
CharField = forms.CharField(max_length=10, attrs={'class': 'special'})
References
- Django Field Types
- Django Widgets
Проверка форм и полей формы
Проверка формы происходит при нормализации её данных. При возникновении необходимости вмешаться в этот процесс, есть много мест, где можно это сделать и которые влияют на разные этапы проверки. Во время обработки формы вызываются три типа методов для нормализации данных. Процесс проверки запускается при вызове метода is_valid() формы. Существуют ситуации, которые запускают нормализацию и проверку данных (обращение к свойству errors или прямой вызов метода full_clean()), но они возникают достаточно редко.
В общем случае, любой нормализующий метод может вызвать исключение ValidationError при наличии проблем с данными, передавая соответствующее сообщение об ошибке в конструктор исключения. Смотрите ниже примеры, как правильно вызывать ValidationError. Если проблем не выявлено, то метод должен возвращать нормализованное значение в виде объекта языка Python.
Большая часть проверок может быть выполнена с помощью validators, которые являются простыми в использовании вспомогательными объектами. Валидатор — это простая функция (или вызываемый объект, callable), которая принимает единственный аргумент и вызывает исключение ValidationError в случае проблем с полученным значением. Валидаторы запускаются после вызова методов поля: to_python и validate.
Проверка формы состоит из нескольких этапов, каждый из которых может быть настроен или переопределён:
-
Вызов метода поля to_python() является первым этапом каждой проверки. Он приводит значение к соответствующему типу данных или вызывает исключение ValidationError, если это невозможно. Метод принимает сырое значение от виджета и возвращает нормализованное значение. Например, поле типа FloatField преобразовывает данные в тип float языка Python или вызывает исключение ValidationError.
-
Метод validate() поля выполняет специфическую для поля проверку данных и приводит значение к правильному типу данных, или вызывает исключение ValidationError на любую ошибку. Этот метод не возвращает значение и не должен изменять проверяемые данные. Если вам надо обеспечить логику, которую невозможно или нежелательно выносить в валидатор, то вам следует переопределить этот метод.
-
Метод поля run_validators() запускает все валидаторы и аккумулирует все возникающие ошибки в одно исключение ValidationError. Вам не стоит переопределять этот метод.
-
Метод clean() поля отвечает за вызов методов to_python(), validate() и run_validators() в правильном порядке и передачу их ошибок. Как только любой из этих методов вызовет исключение ValidationError, процесс проверки прекращается и ошибка передаётся выше. Этот метод возвращает проверенные данные, которые затем помещаются в словарь cleaned_data формы.
-
Для проверки значения поля используется метод clean_<fieldname>(), где <fieldname> заменяется на имя поля. Этот метод выполняет проверку значения. Метод не принимает аргументы. Для получения значения поля обращайтесь к словарю
self.cleaned_data и помните, что там будет объект языка Python, а не строка, переданная формой (значение находится в cleaned_data т.к. уже была выполнена проверка методом clean() поля).Например, если требуется проверить, что содержимое CharField поля с именем serialnumber является уникальным, то метод clean_serialnumber() будет правильным местом для такого функционала. Вам не нужно специальное поле (пусть будет CharField), но требуется хитрая проверка данных и, возможно, очистка/нормализация данных.
Этот метод должен возвращать очищенное значение, полученное из cleaned_data независимо, изменилось оно или нет.
-
Метод clean() потомка формы. Этот метод может выполнять любую проверку, которая нуждается в одновременном доступе к данным нескольких полей. Именно здесь вы можете проверять, что если поле A заполнено, то поле B должно содержать правильный адрес электронной почты и так далее. Данные, которые возвращает этот метод, помещаются в свойство cleaned_data формы.
Так как валидация полей выполняется перед вызовом clean(), вы можете получить доступ к атрибуту формы errors, который содержит уже полученные ошибки валидации.
Следует отметить, что любая ошибка, вызванная методом Form.clean() формы, не будет ассоциирована ни с каким полем. Такие ошибки привязываются к «особому» полю (__all__), доступ к которому можно получить через метод non_field_errors(). Если вам потребуется добавить ошибки к определённому полю формы, используйте add_error().
Также следует отметить, что существует ряд соглашений, которым необходимо следовать при переопределении метода clean() в вашем классе ModelForm. (Обратитесь к документации на ModelForm для получения подробностей.)
Эти методы вызываются в порядке, указанном выше, по одному полю за раз. Для каждого поля формы (в порядке их определения в классе формы) вызывается сначала метод Field.clean(), затем вызывается метод clean_<fieldname>(). После того, как пара этих методов будет вызвана для каждого поля формы, наступает очередь метода Form.clean() формы. Он будет вызыван в любом случае, даже если предыдущие методы вызывали ошибку.
Примеры для каждого из этих методов показаны ниже.
Как упоминалось ранее, любой из этих методов может вызвать исключение ValidationError. Для любого поля, если его метод clean() вызвал исключение ValidationError, то следующий метод для этого поля не вызывается. Тем не менее, методы для остальных полей отрабатывают в штатном режиме.
Вызов ValidationError
Для удобной работы с ошибками валидации используйте следующие правила:
-
Передайте при создании код ошибки через аргумент code:
# Good
ValidationError(_('Invalid value'), code='invalid')

# Bad
ValidationError(_('Invalid value'))
-
Переменные лучше передавать в аргументе params, а в сообщении указать места для подстановки:
# Good
ValidationError(
    _('Invalid value: %(value)s'),
    params={'value': '42'},
)

# Bad
ValidationError(_('Invalid value: %s') % value)
-
Используйте именованные параметры в сообщении. Это позволит использовать переменные в любом параметре при переопределении сообщения:
# Good
ValidationError(
    _('Invalid value: %(value)s'),
    params={'value': '42'},
)

# Bad
ValidationError(
    _('Invalid value: %s'),
    params=('42',),
)
-
Оберните сообщения в gettext для последующего перевода:
# Good
ValidationError(_('Invalid value'))

# Bad
ValidationError('Invalid value')
Все вместе:
raise ValidationError(
    _('Invalid value: %(value)s'),
    code='invalid',
    params={'value': '42'},
)
Соблюдать правила очень важно при создании переносимых форм, полей форм и моделей.
Не рекомендуется, но если вы в конце цепочки валидации(например, метод clean() формы) и никогда не будете переопределять сообщение, можно просто сделать:
ValidationError(_('Invalid value: %s') % value)
Методы Form.errors.as_data() и Form.errors.as_json() используют все возможности ValidationError (включая code и params).
Вызов нескольких ошибок
При обнаружении нескольких ошибок в процессе нормализации поля и при наличии желания отобразить их одновременно на форме, следует передать их в виде списка в конструктор исключения.
Рекомендуется использовать список объектов ValidationError с code и params, но можно использовать просто список строк:
# Good
raise ValidationError([
    ValidationError(_('Error 1'), code='error1'),
    ValidationError(_('Error 2'), code='error2'),
])

# Bad
raise ValidationError([
    _('Error 1'),
    _('Error 2'),
])
Использование проверки на практике
Выше мы рассмотрели как осуществляется проверка форм в целом. Так как временами бывает проще разобраться с функционалом, просмотрев его в действии, далее показан ряд небольших примеров, которые используют описанные возможности.
Использование валидаторов
Поля форм (и моделей) Django поддерживают использование простых функций и классов, которые известны как валидаторы. Это просто функция, которая принимает значение и ничего не возвращает, если значение верно, иначе вызывает ValidationError. Они могут быть переданы в конструктор поля через аргумент validators или определены в самом классе поля Field с помощью атрибута default_validators.
Простые валидаторы могут использоваться для проверки значений внутри полей. Давайте рассмотрим SlugField:
from django.forms import CharField from django.core import validators class SlugField(CharField): default_validators = [validators.validate_slug]
Как можно увидеть SlugField — это обычное поле CharField, которое имеет валидатор, проверяющий вводимое значение на допустимые символы. Все это можно указать при определении поля:
эквивалентно:
slug = forms.CharField(validators=[validators.validate_slug])
Обычные проверки, такие как проверка email или по регулярному выражению, можно выполнить используя существующие валидаторы Django. Например, validators.validate_slug экземпляр RegexValidator с первым аргументом равным ^[-a-zA-Z0-9_]+$. Подробности смотрите в разделе о создании валидаторов.
Встроенная проверка поля формы
Давайте сначала создадим собственное поле формы, которое проверяет, что переданные ему данные — это строка, содержащая адреса электронной почты, разделенные запятыми. Класс такого поля будет выглядеть следующим образом:
from django import forms from django.core.validators import validate_email class MultiEmailField(forms.Field): def to_python(self, value): "Normalize data to a list of strings." # Return an empty list if no input was given. if not value: return [] return value.split(',') def validate(self, value): "Check if value consists only of valid emails." # Use the parent's handling of required fields, etc. super(MultiEmailField, self).validate(value) for email in value: validate_email(email)
Каждая форма, использующая такое поле, будет вызывать эти методы до выполнения всех остальных действий с данными поля. Такая проверка привязана к этому типу поля и не зависит от дальнейшего его использования.
Давайте создадим простую форму ContactForm, чтобы показать как можно использовать это поле:
class ContactForm(forms.Form):
    subject = forms.CharField(max_length=100)
    message = forms.CharField()
    sender = forms.EmailField()
    recipients = MultiEmailField()
    cc_myself = forms.BooleanField(required=False)
Просто используем MultiEmailField как и любое другое поле. При вызове метода формы is_valid() происходит вызов метода MultiEmailField.clean(), который в свою очередь вызовет собственные методы to_python() и validate().
Проверка атрибута определённого поля
Продолжая работать над нашим примером, предположим, что на форме ContactForm поле электронной почты recipients всегда должно содержать адрес «fred@example.com». Эта проверка будет особенностью нашей формы, следовательно, нам не надо её помещать в класс MultiEmailField. Вместо этого мы напишем метод, который будет проверять поле recipients:
from django import forms

class ContactForm(forms.Form):
    # Everything as before.
    ...

    def clean_recipients(self):
        data = self.cleaned_data['recipients']
        if "fred@example.com" not in data:
            raise forms.ValidationError("You have forgotten about Fred!")

        # Always return the cleaned data, whether you have changed it or
        # not.
        return data
Очистка и проверка полей, которые зависят друг от друга
Допустим, что мы добавили ещё одно требование для нашей формы: если поле cc_myself равно True, то поле subject должно содержать слово «help». Раз мы выполняем проверку нескольких полей, то метод формы clean() будет правильным местом для нашего кода. Обратите внимание, мы сейчас говорим о методе clean() формы, а раньше говорили о методе clean() поля. Важно понимать разницу между ними при реализации алгоритма проверки данных. Поля содержат один источник данных, а формы — это коллекции полей.
К моменту вызова метода формы clean() все clean() методы полей уже отработали. Таким образом, свойство формы self.cleaned_data будет заполнено данными, прошедшими проверку. Следовательно, надо принять во внимание возможность того, что данные некоторых полей не прошли начальную поверку.
Существует два способа сообщить об ошибках на этом этапе. Обычно ошибку отображают сверху формы. Для этого достаточно вызвать исключение ValidationError в методе формы clean(). Например:
from django import forms

class ContactForm(forms.Form):
    # Everything as before.
    ...

    def clean(self):
        cleaned_data = super(ContactForm, self).clean()
        cc_myself = cleaned_data.get("cc_myself")
        subject = cleaned_data.get("subject")

        if cc_myself and subject:
            # Only do something if both fields are valid so far.
            if "help" not in subject:
                raise forms.ValidationError(
                    "Did not send for 'help' in the subject despite "
                    "CC'ing yourself."
                )
В данном коде, при возникновении ошибки во время проверки данных, форма отобразит сообщение об ошибке сверху (обычное поведение), описывая проблему.
Вызов super(ContactForm, self).clean() обеспечивает проверку данных в родительском классе. Если ваша форма наследуется от класса, который не возвращает словарь cleaned_data из метода clean() (это не обязательно), не записывайте в cleaned_data результат вызова super() и используйте вместо этого self.cleaned_data:
def clean(self):
    super(ContactForm, self).clean()
    cc_myself = self.cleaned_data.get("cc_myself")
    ...
Второй способ подразумевает назначение ошибки одному из полей. В нашем случае, давайте назначим сообщение об ошибке обоим полям («subject» и «cc_myself») при отображении формы. Использовать этот способ надо аккуратно, так как он может запутать пользователя. Мы лишь показываем возможные варианты, оставляя решение конкретной задачи вам и вашим дизайнерам. Наш новый код (заменяющий предыдущий пример) выглядит так:
from django import forms

class ContactForm(forms.Form):
    # Everything as before.
    ...

    def clean(self):
        cleaned_data = super(ContactForm, self).clean()
        cc_myself = cleaned_data.get("cc_myself")
        subject = cleaned_data.get("subject")

        if cc_myself and subject and "help" not in subject:
            msg = "Must put 'help' in subject when cc'ing yourself."
            self.add_error('cc_myself', msg)
            self.add_error('subject', msg)
Вторым аргументом add_error() может быть просто строка, но лучше объект ValidationError. Подробности смотрите в Вызов ValidationError. Обратите внимание, add_error() автоматически убирает поле из cleaned_data.