I’m struggling to make the ‘django.request’ logger work as advertised — 500 errors don’t seem to propagate to handlers attached to it.
In the default logging configuration for every new project, the comment says the «logging performed by this configuration is to send an email to the site admins on every HTTP 500 error». Obviously the email is only sent if you’ve setup ADMINS correctly, but I’m not even seeing the handler get called when a view raises an exception.
I built a testcase starting with an empty project, and adding my own handler to the ‘django.request’ logger:
LOGGING = {
    'version': 1,
    'disable_existing_loggers': False,
    'handlers': {
        'mail_admins': {
            'level': 'ERROR',
            'class': 'django.utils.log.AdminEmailHandler'
        },
        'my_error_handler' : {
            'level': 'ERROR',
            'class': 'log.MyErrorHandler'
        }
    },
    'loggers': {
        'django.request': {
            'handlers': ['mail_admins', 'my_error_handler'],
            'level': 'ERROR',
            'propagate': True,
        },
    }
}
The handler itself:
import logging
class MyErrorHandler(logging.Handler):
    def emit(self, record):
        print "handling error: %s" % record
If I call .error() on the logger myself, everything works as it should. But when a 500 is generated by a view, neither of the handlers are called. My views.py:
import logging

def home(request):

    #this error will be processed by MyErrorHandler
    logging.getLogger('django.request').error("Custom error message")

    #this won't
    raise Exception('500 error message')

    return HttpResponse("Home")
Everything else is the project is default; DEBUG is True, the middleware config is unchanged. Is there some hidden config option I need to enable to have this work as it says in the docs?
Thanks,
Matt.
-
Getting Help
-
el
-
es
-
fr
-
id
-
it
-
ja
-
ko
-
pl
-
pt-br
-
zh-hans
- Language: en
-
1.8
-
1.10
-
1.11
-
2.0
-
2.1
-
2.2
-
3.0
-
3.1
-
3.2
-
4.0
-
4.2
-
dev
-
Documentation version:
4.1
How to manage error reporting
When you’re running a public site you should always turn off the
DEBUG setting. That will make your server run much faster, and will
also prevent malicious users from seeing details of your application that can be
revealed by the error pages.
However, running with DEBUG set to False means you’ll never see
errors generated by your site – everyone will instead see your public error
pages. You need to keep track of errors that occur in deployed sites, so Django
can be configured to create reports with details about those errors.
Email reports
Server errors
When DEBUG is False, Django will email the users listed in the
ADMINS setting whenever your code raises an unhandled exception and
results in an internal server error (strictly speaking, for any response with
an HTTP status code of 500 or greater). This gives the administrators immediate
notification of any errors. The ADMINS will get a description of the
error, a complete Python traceback, and details about the HTTP request that
caused the error.
Note
In order to send email, Django requires a few settings telling it
how to connect to your mail server. At the very least, you’ll need
to specify EMAIL_HOST and possibly
EMAIL_HOST_USER and EMAIL_HOST_PASSWORD,
though other settings may be also required depending on your mail
server’s configuration. Consult the Django settings
documentation for a full list of email-related
settings.
By default, Django will send email from root@localhost. However, some mail
providers reject all email from this address. To use a different sender
address, modify the SERVER_EMAIL setting.
To activate this behavior, put the email addresses of the recipients in the
ADMINS setting.
404 errors
Django can also be configured to email errors about broken links (404 “page
not found” errors). Django sends emails about 404 errors when:
DEBUGisFalse;- Your
MIDDLEWAREsetting includes
django.middleware.common.BrokenLinkEmailsMiddleware.
If those conditions are met, Django will email the users listed in the
MANAGERS setting whenever your code raises a 404 and the request has
a referer. It doesn’t bother to email for 404s that don’t have a referer –
those are usually people typing in broken URLs or broken web bots. It also
ignores 404s when the referer is equal to the requested URL, since this
behavior is from broken web bots too.
You can tell Django to stop reporting particular 404s by tweaking the
IGNORABLE_404_URLS setting. It should be a list of compiled
regular expression objects. For example:
import re
IGNORABLE_404_URLS = [
    re.compile(r'.(php|cgi)$'),
    re.compile(r'^/phpmyadmin/'),
]
In this example, a 404 to any URL ending with .php or .cgi will not be
reported. Neither will any URL starting with /phpmyadmin/.
The following example shows how to exclude some conventional URLs that browsers and
crawlers often request:
import re
IGNORABLE_404_URLS = [
    re.compile(r'^/apple-touch-icon.*.png$'),
    re.compile(r'^/favicon.ico$'),
    re.compile(r'^/robots.txt$'),
]
(Note that these are regular expressions, so we put a backslash in front of
periods to escape them.)
If you’d like to customize the behavior of
django.middleware.common.BrokenLinkEmailsMiddleware further (for
example to ignore requests coming from web crawlers), you should subclass it
and override its methods.
See also
404 errors are logged using the logging framework. By default, these log
records are ignored, but you can use them for error reporting by writing a
handler and configuring logging appropriately.
Filtering error reports
Warning
Filtering sensitive data is a hard problem, and it’s nearly impossible to
guarantee that sensitive data won’t leak into an error report. Therefore,
error reports should only be available to trusted team members and you
should avoid transmitting error reports unencrypted over the internet
(such as through email).
Filtering sensitive information
Error reports are really helpful for debugging errors, so it is generally
useful to record as much relevant information about those errors as possible.
For example, by default Django records the full traceback for the
exception raised, each traceback frame’s local variables, and the
HttpRequest’s attributes.
However, sometimes certain types of information may be too sensitive and thus
may not be appropriate to be kept track of, for example a user’s password or
credit card number. So in addition to filtering out settings that appear to be
sensitive as described in the DEBUG documentation, Django offers a
set of function decorators to help you control which information should be
filtered out of error reports in a production environment (that is, where
DEBUG is set to False): sensitive_variables() and
sensitive_post_parameters().
-
sensitive_variables(*variables)¶ -
If a function (either a view or any regular callback) in your code uses
local variables susceptible to contain sensitive information, you may
prevent the values of those variables from being included in error reports
using thesensitive_variablesdecorator:from django.views.decorators.debug import sensitive_variables @sensitive_variables('user', 'pw', 'cc') def process_info(user): pw = user.pass_word cc = user.credit_card_number name = user.name ...
In the above example, the values for the
user,pwandcc
variables will be hidden and replaced with stars (**********)
in the error reports, whereas the value of thenamevariable will be
disclosed.To systematically hide all local variables of a function from error logs,
do not provide any argument to thesensitive_variablesdecorator:@sensitive_variables() def my_function(): ...
When using multiple decorators
If the variable you want to hide is also a function argument (e.g.
‘user’ in the following example), and if the decorated function has
multiple decorators, then make sure to place@sensitive_variables
at the top of the decorator chain. This way it will also hide the
function argument as it gets passed through the other decorators:@sensitive_variables('user', 'pw', 'cc') @some_decorator @another_decorator def process_info(user): ...
-
sensitive_post_parameters(*parameters)¶ -
If one of your views receives an
HttpRequestobject
withPOST parameterssusceptible to
contain sensitive information, you may prevent the values of those
parameters from being included in the error reports using the
sensitive_post_parametersdecorator:from django.views.decorators.debug import sensitive_post_parameters @sensitive_post_parameters('pass_word', 'credit_card_number') def record_user_profile(request): UserProfile.create( user=request.user, password=request.POST['pass_word'], credit_card=request.POST['credit_card_number'], name=request.POST['name'], ) ...
In the above example, the values for the
pass_wordand
credit_card_numberPOST parameters will be hidden and replaced with
stars (**********) in the request’s representation inside the
error reports, whereas the value of thenameparameter will be
disclosed.To systematically hide all POST parameters of a request in error reports,
do not provide any argument to thesensitive_post_parametersdecorator:@sensitive_post_parameters() def my_view(request): ...
All POST parameters are systematically filtered out of error reports for
certaindjango.contrib.auth.viewsviews (login,
password_reset_confirm,password_change, andadd_viewand
user_change_passwordin theauthadmin) to prevent the leaking of
sensitive information such as user passwords.
Custom error reports
All sensitive_variables() and sensitive_post_parameters() do is,
respectively, annotate the decorated function with the names of sensitive
variables and annotate the HttpRequest object with the names of sensitive
POST parameters, so that this sensitive information can later be filtered out
of reports when an error occurs. The actual filtering is done by Django’s
default error reporter filter:
django.views.debug.SafeExceptionReporterFilter. This filter uses the
decorators’ annotations to replace the corresponding values with stars
(**********) when the error reports are produced. If you wish to
override or customize this default behavior for your entire site, you need to
define your own filter class and tell Django to use it via the
DEFAULT_EXCEPTION_REPORTER_FILTER setting:
DEFAULT_EXCEPTION_REPORTER_FILTER = 'path.to.your.CustomExceptionReporterFilter'
You may also control in a more granular way which filter to use within any
given view by setting the HttpRequest’s exception_reporter_filter
attribute:
def my_view(request):
    if request.user.is_authenticated:
        request.exception_reporter_filter = CustomExceptionReporterFilter()
    ...
Your custom filter class needs to inherit from
django.views.debug.SafeExceptionReporterFilter and may override the
following attributes and methods:
-
class
SafeExceptionReporterFilter¶ -
-
cleansed_substitute¶ -
The string value to replace sensitive value with. By default it
replaces the values of sensitive variables with stars
(**********).
-
hidden_settings¶ -
A compiled regular expression object used to match settings and
request.METAvalues considered as sensitive. By default equivalent
to:import re re.compile(r'API|TOKEN|KEY|SECRET|PASS|SIGNATURE', flags=re.IGNORECASE)
-
is_active(request)¶ -
Returns
Trueto activate the filtering in
get_post_parameters()andget_traceback_frame_variables().
By default the filter is active ifDEBUGisFalse. Note
that sensitiverequest.METAvalues are always filtered along with
sensitive setting values, as described in theDEBUG
documentation.
-
get_post_parameters(request)¶ -
Returns the filtered dictionary of POST parameters. Sensitive values
are replaced withcleansed_substitute.
-
get_traceback_frame_variables(request, tb_frame)¶ -
Returns the filtered dictionary of local variables for the given
traceback frame. Sensitive values are replaced with
cleansed_substitute.
-
If you need to customize error reports beyond filtering you may specify a
custom error reporter class by defining the
DEFAULT_EXCEPTION_REPORTER setting:
DEFAULT_EXCEPTION_REPORTER = 'path.to.your.CustomExceptionReporter'
The exception reporter is responsible for compiling the exception report data,
and formatting it as text or HTML appropriately. (The exception reporter uses
DEFAULT_EXCEPTION_REPORTER_FILTER when preparing the exception
report data.)
Your custom reporter class needs to inherit from
django.views.debug.ExceptionReporter.
-
class
ExceptionReporter¶ -
-
html_template_path¶ -
Property that returns a
pathlib.Pathrepresenting the absolute
filesystem path to a template for rendering the HTML representation of
the exception. Defaults to the Django provided template.
-
text_template_path¶ -
Property that returns a
pathlib.Pathrepresenting the absolute
filesystem path to a template for rendering the plain-text
representation of the exception. Defaults to the Django provided
template.
-
get_traceback_data()¶ -
Return a dictionary containing traceback information.
This is the main extension point for customizing exception reports, for
example:from django.views.debug import ExceptionReporter class CustomExceptionReporter(ExceptionReporter): def get_traceback_data(self): data = super().get_traceback_data() # ... remove/add something here ... return data
-
get_traceback_html()¶ -
Return HTML version of exception report.
Used for HTML version of debug 500 HTTP error page.
-
get_traceback_text()¶ -
Return plain text version of exception report.
Used for plain text version of debug 500 HTTP error page and email
reports.
-
As with the filter class, you may control which exception reporter class to use
within any given view by setting the HttpRequest’s
exception_reporter_class attribute:
def my_view(request): if request.user.is_authenticated: request.exception_reporter_class = CustomExceptionReporter() ...
See also
You can also set up custom error reporting by writing a custom piece of
exception middleware. If you do write custom
error handling, it’s a good idea to emulate Django’s built-in error handling
and only report/log errors if DEBUG is False.
Back to Top
Содержание
- How To Fix – “HTTP 500 Server Error” When Setting DEBUG = False in Django on AzureAWS ?
- How To Fix – “HTTP 500 Server Error” When Setting DEBUG = False in Django on AzureAWS ?
- Primitive Checks :
- Check 1:
- Check 2:
- Check 3:
- Ошибка 500 internal server error Nginx
- Как исправить 500 internal server error Nginx
- 1. Ошибка в скрипте PHP
- 2. Превышено время выполнения или лимит памяти
- 3. Неверные права на файлы
- Выводы
- Похожие записи
- Оцените статью
- Об авторе
- 2 комментария к “Ошибка 500 internal server error Nginx”
- How to Fix 500 Internal Server Error in NGINX
- What is 500 Internal Server Error in NGINX
- How to Fix 500 Internal Server Error in NGINX
- 1. Hard Refresh
- 2. Examine Server Logs
- 3. Examine Your Script
- 4. Check File/Folder Permission
- 5. Check redirections
- 6. Increase Script Timeout
- 🌐 Как исправить распространенные ошибки веб-сервера Nginx
- Unable to connect/Refused to Connect
- The Connection Has Timed Out
- 404 Not Found
- 403 Forbidden
- 500 Internal Server Error
- Nginx показывает страницу по умолчанию
- 504 Gateway time-out
- Размер памяти исчерпан
- PR_END_OF_FILE_ERROR
- Resource temporarily unavailable
- Два файла виртуального хоста для одного и того же сайта
- PHP-FPM Connection reset by peer
- Утечки сокетов Nginx
- Заключение
How To Fix – “HTTP 500 Server Error” When Setting DEBUG = False in Django on AzureAWS ?
How To Fix – “HTTP 500 Server Error” When Setting DEBUG = False in Django on AzureAWS ?
In this post, we will see How To Fix – “HTTP 500 Server Error” When Setting DEBUG = False in Django. How the error might look like in the terminal or application. You might also find this error when you upgrade your Django version and start working with the newer version.
Coming to the error, it so happens that when you use DEBUG=TRUE, you get no error. But when you set DEBUG=FALSE, you get the error.
Let’s do some primitive checks.
Primitive Checks :
- Is the error happening at all the urls routes (apps) of your site ?
- Is the admin url working ?
- Are all your Static files in place ?
Once you are done with the Primitive Checks, you can proceed ahead with the more specific checks.
Check 1:
Some static files might also cause this problem when Debug was set to False.
The server might not be able to find some of the static files.
If the statics are not collected, in such cases also this error might occur.
- Verify your Static configs in Settings.py file and cross-check if their values are correct.
- STATIC_URL = ‘/static/’
- STATICFILES_DIRS =
- STATIC_ROOT
- Check your Static File configs in Settings.py. Try using below. Sometimes whitenoise is not able to find some static imagesfiles and throws ValueError. Try each of the below one by one and see if that solves the error. But use only one at a time for Setting.py.
- Do a collectstatic when you launch the server.
Check 2:
Have you used ALLOWED_HOSTS in Settings.py ?
ALLOWED_HOSTS is required in Production. This setting is MUST whenever you set DEBUG=False.
Because ALLOWED_HOSTS setting validates the request’s Host header and Safeguards against any kind of host-impacting attacks.
If you don’t use this , SuspiciousOperation is raised. That means when a user performs some operation, that is considered as suspicious from a security perspective e.g. tampering with a session cookie.
And if such a SuspiciousOperation exception reaches the WSGI handler level, then it is logged at the Error level.
Check 3:
Are you using the ADMINS in Settings.py ?
A list of all the people who get code error notifications.
Let’s see some interesting facts first.
First thing first, your Django app can actually send email to the users listed in the ADMINS setting whenever any an internal server error occurs (for HTTP status code of 500 or greater). That way, the ADMINS gets description of the error, complete Python traceback, details about the HTTP request that caused the error, the details of exceptions raised in the request/response cycle etc.
It is advisable to set this up by –
- Specifying EMAIL_HOST , EMAIL_HOST_USER and EMAIL_HOST_PASSWORD, SERVER_EMAIL
- Put the email addresses of the addressees in the ADMINS setting.
- Refer Django settings documentation for complete list of email settings.
- By default, Django will send email from [email protected] – modify the SERVER_EMAIL setting, for setting a different user.
Источник
Ошибка 500 internal server error Nginx
При разработке веб-сайтов и веб-приложений можно столкнуться с ошибкой 500 internal server error. Сначала она может испугать и ввести в заблуждение, поскольку обычно веб-сервер выдает более конкретные ошибки, в которых указана точная причина проблемы, например, превышено время ожидания, неверный запрос или файл не найден, а тут просто сказано что, обнаружена внутренняя ошибка.
Но не все так страшно и в большинстве случаев проблема вполне решаема и очень быстро. В этой статье мы разберем как исправить ошибку Internal server error в Nginx.
Как исправить 500 internal server error Nginx
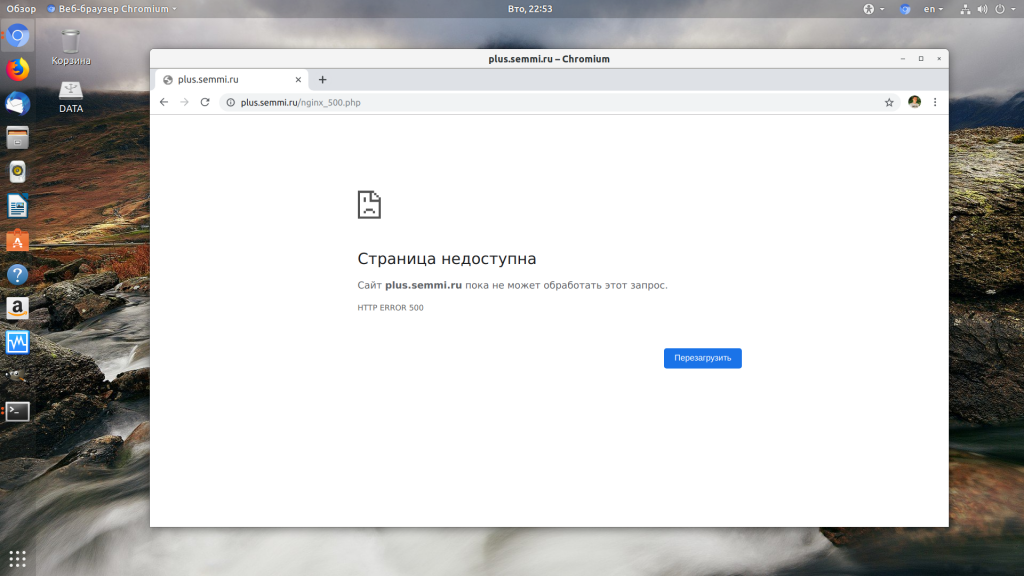
Дословно Internal server error означает внутренняя ошибка сервера. И вызвать её могут несколько проблем. Вот основные из них:
- Ошибки в скрипте на PHP — одна из самых частых причин;
- Превышено время выполнения PHP скрипта или лимит памяти;
- Неправильные права на файлы сайта;
- Неверная конфигурация Nginx.
А теперь рассмотрим каждую из причин более подробно и разберем варианты решения.
1. Ошибка в скрипте PHP
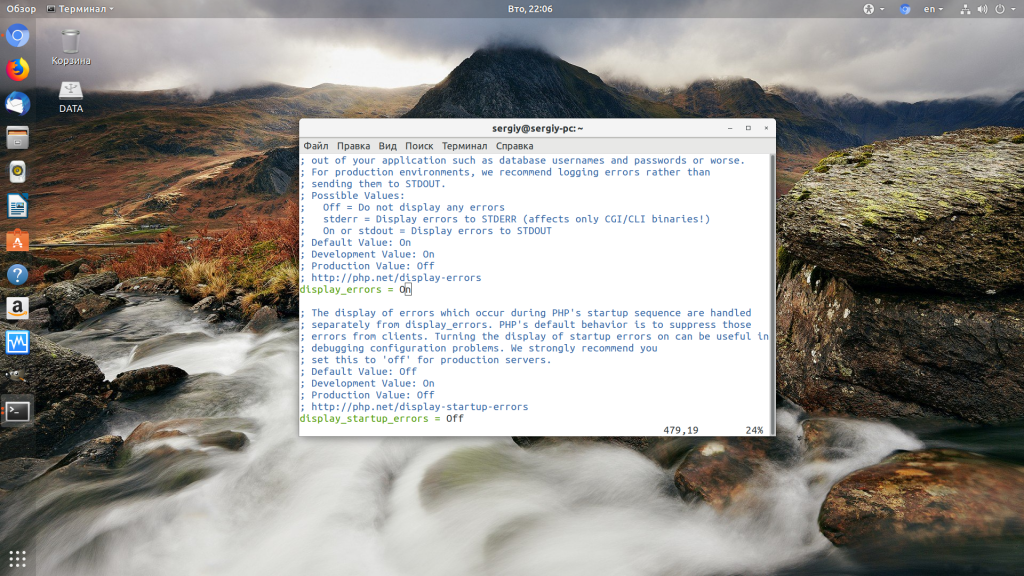
Мы привыкли к тому, что если в PHP скрипте есть ошибки, то сразу же видим их в браузере. Однако на производственных серверах отображение сообщений об ошибках в PHP отключено, чтобы предотвратить распространение информации о конфигурации сервера для посторонних. Nginx не может отобразить реальную причину ошибки, потому что не знает что за ошибка произошла, а поэтому выдает универсальное сообщение 500 internal server error.
Чтобы исправить эту ошибку, нужно сначала понять где именно проблема. Вы можете включить отображение ошибок в конфигурационном файле php изменив значение строки display_errors с off на on. Рассмотрим на примере Ubuntu и PHP 7.2:
sudo systemctl restart php-fpm
Затем обновите страницу и вы увидите сообщение об ошибке, из-за которого возникла проблема. Далее его можно исправить и отключить отображение ошибок, тогда все будет работать. Ещё можно посмотреть сообщения об ошибках PHP в логе ошибок Nginx. Обычно он находится по пути /var/log/nginx/error.log, но для виртуальных доменов может настраиваться отдельно. Например, смотрим последние 100 строк в логе:
tail -n 100 -f /var/log/nginx/error.log
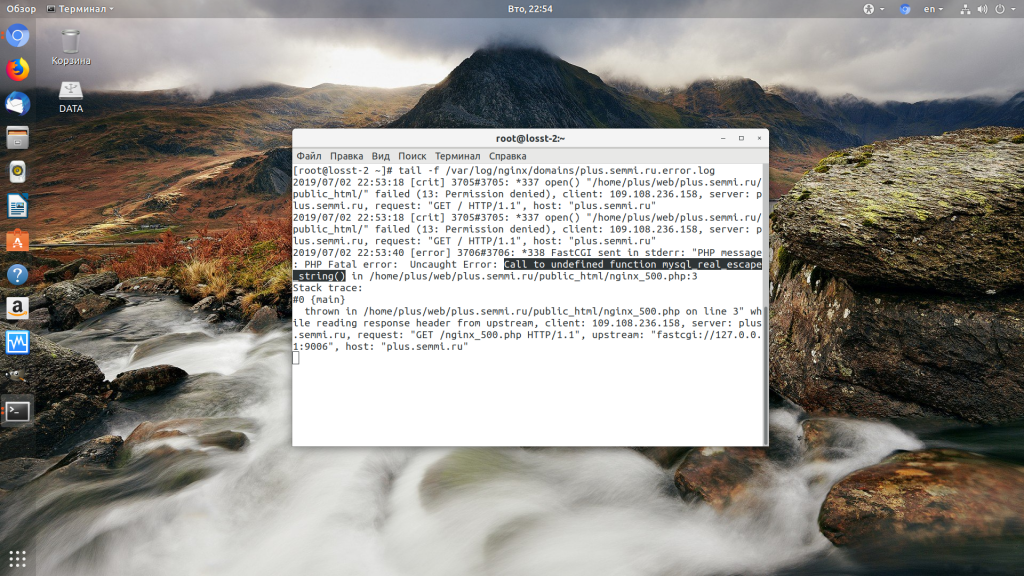
Теперь аналогично, исправьте ошибку и страница будет загружаться нормально, без ошибки 500.
2. Превышено время выполнения или лимит памяти
Это продолжение предыдущего пункта, так тоже относится к ошибкам PHP, но так, как проблема встречается довольно часто я решил вынести её в отдельный пункт. В файле php.ini установлены ограничения на время выполнения скрипта и количество оперативной памяти, которую он может потребить. Если скрипт потребляет больше, интерпретатор PHP его убивает и возвращает сообщение об ошибке.
Также подобная ошибка может возникать, если на сервере закончилась свободная оперативная память.
Если же отображение ошибок отключено, мы получаем error 500. Обратите внимание, что если время ожидания было ограничено в конфигурационном файле Nginx, то вы получите ошибку 504, а не HTTP ERROR 500, так что проблема именно в php.ini.
Чтобы решить проблему увеличьте значения параметров max_execution_time и memory_limit в php.ini:
sudo vi /etc/php/7.2/php.ini
max_execution_time 300
memory_limit 512M
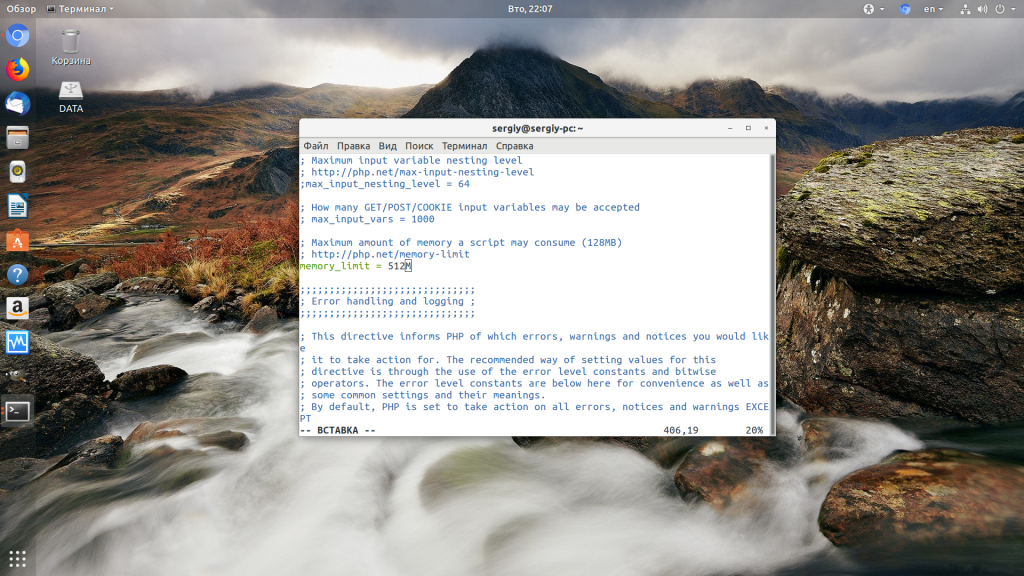
Также проблема может быть вызвана превышением других лимитов установленных для скрипта php. Смотрите ошибки php, как описано в первом пункте. После внесения изменений в файл перезапустите php-fpm:
sudo systemctl restart php-fpm
3. Неверные права на файлы
Такая ошибка может возникать, если права на файлы, к которым обращается Nginx установлены на правильно. Сервисы Nginx и php-fpm должны быть запущены от имени одного и того же пользователя, а все файлы сайтов должны принадлежать этому же пользователю. Посмотреть от имени какого пользователя запущен Nginx можно командой:
nginx -T | grep user
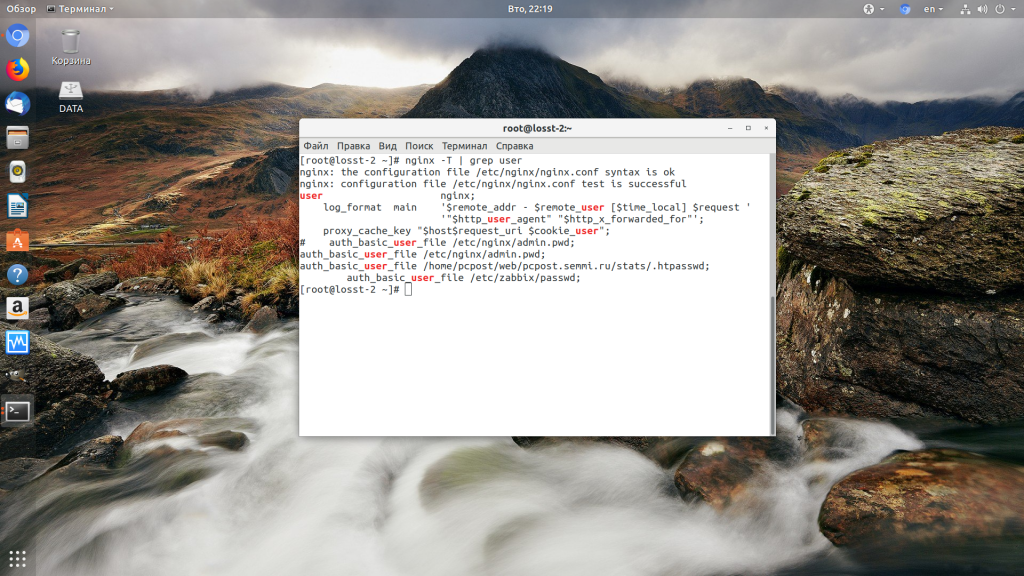
Чтобы узнать от какого пользователя запущен php-fpm посмотрите содержимое конфигурационного файла используемого пула, например www.conf:
sudo vi /etc/php-fpm.d/www.conf
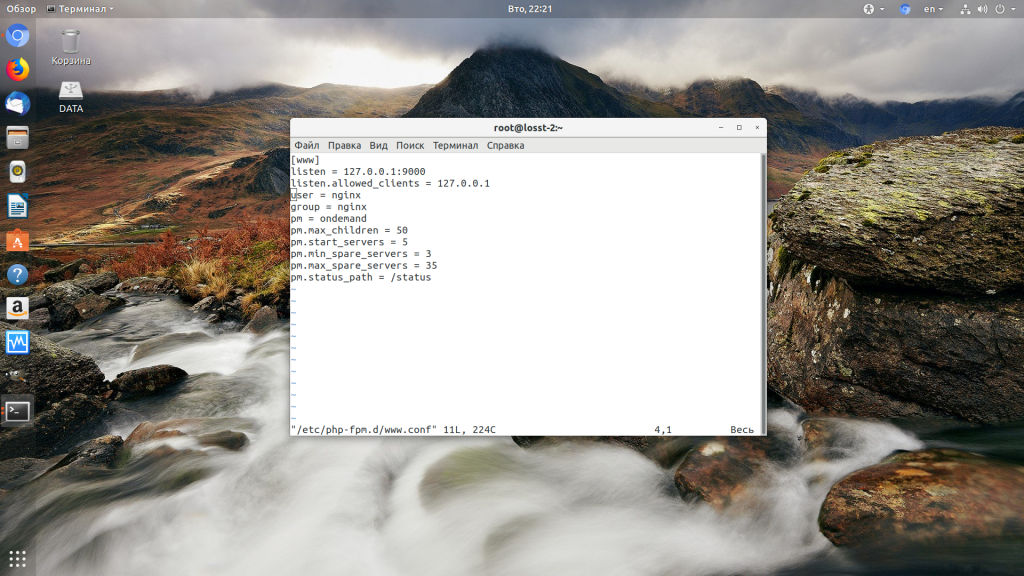
В моем случае это пользователь nginx. Теперь надо убедится, что файлы сайта, к которым вы пытаетесь обратиться принадлежат именно этому пользователю. Для этого используйте команду namei:
namei -l /var/www/site
Файлы сайта должны принадлежать пользователю, от имени которого запущены сервисы, а по пути к каталогу с файлами должен быть доступ на чтение для всех пользователей. Если файлы принадлежат не тому пользователю, то вы можете все очень просто исправить:
sudo chown nginx:nginx -R /var/www/site
Этой командой мы меняем владельца и группу всех файлов в папке на nginx:nginx. Добавить права на чтение для всех пользователей для каталога можно командой chmod. Например:
sudo chmod o+r /var/www/
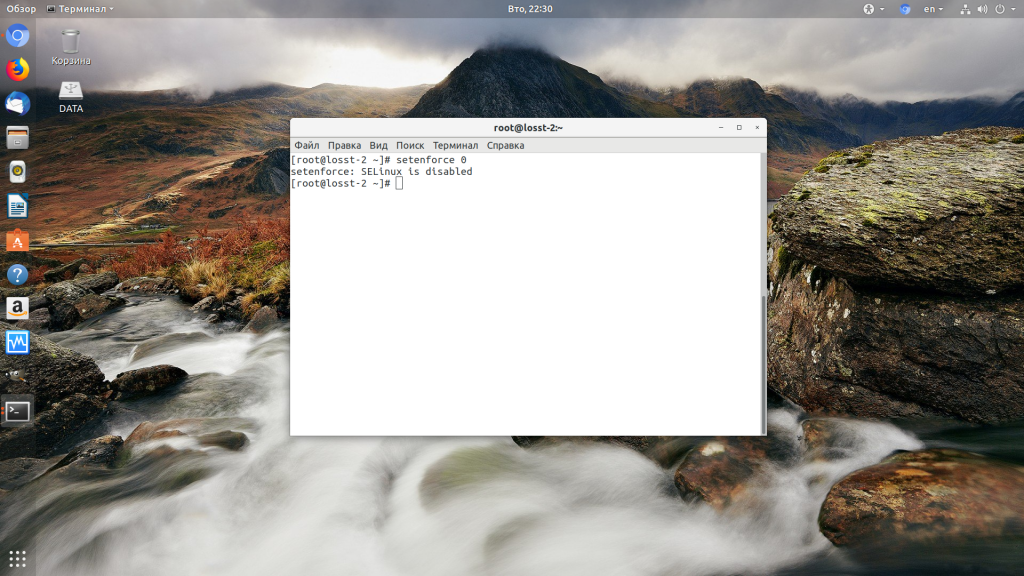
Далее все должно работать. Также, проблемы с правами может вызывать SELinux. Настройте его правильно или отключите:
Выводы
В этой статье мы разобрали что делать если на вашем сайте встретилась ошибка 500 internal server error nginx. Как видите проблема вполне решаема и в большинстве случаев вам помогут действия описанные в статье. А если не помогут, напишите свое решение в комментариях!
Похожие записи
Нет похожих записей.
Оцените статью
Об авторе
Основатель и администратор сайта losst.ru, увлекаюсь открытым программным обеспечением и операционной системой Linux. В качестве основной ОС сейчас использую Ubuntu. Кроме Linux, интересуюсь всем, что связано с информационными технологиями и современной наукой.
2 комментария к “Ошибка 500 internal server error Nginx”
Чушь.
1. header(«http/1.1 500 Internal Server Error») ;
И логи не помогут.
2. Если скрипт превышает лимиты, то, вероятнее всего, в коде что-то не так. Бесконечный цикл, например. С ним, кстати, и увеличение этих лимитов не спасёт.
статья однобока. проблема к nginx вряд ли имеет отношение, зря в заголовок вынесено название этого великолепного сервера. nginx может работать, и работает, в связке не только с PHP. а на PHP свет клином не сошёлся. если уж пишете о PHP то и выносите в заголовок PHP, а не nginx.
инициировать такую ошибку можно элементарно. например, отключаем сервис PostgreSQL и вуаля. Welcome home, dear!
Источник
How to Fix 500 Internal Server Error in NGINX
Sometimes NGINX server may give 500 Internal Server Error due to various reasons. In this article we will look at what does 500 Internal Server Error mean in NGINX and how to fix 500 Internal Server Error in NGINX.
What is 500 Internal Server Error in NGINX
NGINX gives 500 Internal Server Error when there is a server-side error that prevents NGINX from returning a proper response. It can be due to many different reasons such as faulty script, missing files referenced by code, inadequate file permissions, etc. NGINX is typically used as a reverse proxy server, so the most common reason for 500 Internal server is an error in one of its web servers like Apache that has encountered an issue and returned a 500 error response to NGINX, which is then returned to client browsers. There are various ways to fix internal server error in NGINX.
How to Fix 500 Internal Server Error in NGINX
Here are the steps to fix 500 Internal Server Error in NGINX on localhost, CPanel, PHP, Ubuntu and other platforms.
1. Hard Refresh
Sometimes you may get 500 internal server error in NGINX because your server is being restarted at that moment, or there are too many requests for web server to handle.
So it doesn’t have enough resources to serve your request.
In such cases, you can simply do a hard refresh of your page to force the browser to get latest web page version and fix 500 internal server error in NGINX. You can do this by pressing
- Windows: Ctrl + F5
- Mac: Apple + R or Cmd + R
- Linux: F5
2. Examine Server Logs
Open your server log in a text editor to analyze the most recent requests. Every server log contains information about requested URLs and response code for each request.
Find out which requests result in 500 internal server error. It may be that only one page, or a few pages give this error while others work fine.
Find out which requests cause 500 internal server error. Once you have identified the problematic URLs, open a browser and request them again to confirm that is indeed the case.
3. Examine Your Script
Next, analyze the script to process the problematic requests. Is it actually present at the right location? Are you referencing it properly, in your URL mapping/routing file?
If your script refers to another file, find out if that file path is correct. If you have referenced any program/function, have you called it correctly?
4. Check File/Folder Permission
This can also be due to improper file/folder permissions. Did you add/modify any file/folder recently?
Typically, files need a 644 permission and folders need a 755 permission. You can use FileZilla (Windows) and Chmod (Linux) to modify file permissions.
You can also look at the permissions of other files & folders in your code and update the same for your files/folders accordingly.
5. Check redirections
If you have incorrectly setup any redirections in web server, it can give 500 internal server error. For example, if you use Apache web server, make sure you have properly configured mod_rewrite module and .htaccess file.
Also use a third-party tool to check the syntax of redirection/URL rewrite rules in your server configuration file.
6. Increase Script Timeout
You may also get 500 internal server error in NGINX if your web server (e.g Apache) is timing out on the request. In such cases, increase your web server (not NGINX) timeout value so that it stays connected to NGINX longer, and returns a proper response.
Hopefully, the above tips will help you fix 500 internal server error in NGINX.
Ubiq makes it easy to visualize data in minutes, and monitor in real-time dashboards. Try it Today!
Источник
🌐 Как исправить распространенные ошибки веб-сервера Nginx
Nginx – очень популярный веб-сервер в наши дни.
В этой статье мы расскажем вам о некоторых распространенных ошибках при работе веб-сервера Nginx и возможных решениях.
Это не полный список.
Если вы все еще не можете устранить ошибку, попробовав предложенные решения, пожалуйста, проверьте логи сервера Nginx в каталоге /var/log/nginx/ и поищите в Google, чтобы отладить проблему.
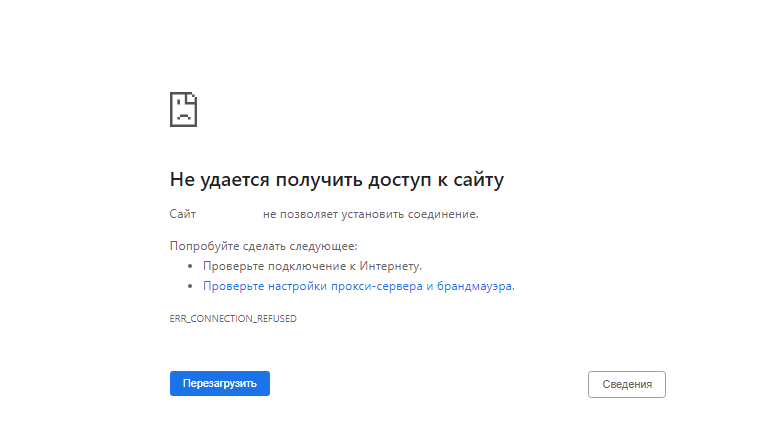
Unable to connect/Refused to Connect
Если при попытке получить доступ к вашему сайту вы видите следующую ошибку:
Это может быть потому, что:
- Nginx не запущен. Вы можете проверить состояние Nginx с помощью sudo systemctl status nginx. Запустите Nginx с помощью sudo systemctl start nginx. Если Nginx не удается запустить, запустите sudo nginx -t, чтобы выяснить, нет ли ошибок в вашем конфигурационном файле. И проверьте логи (sudo journalctl -eu nginx), чтобы выяснить, почему он не запускается.
- Брандмауэр блокирует порты 80 и 443. Если вы используете брандмауэр UFW на Debian/Ubuntu, выполните sudo ufw allow 80,443/tcp, чтобы открыть TCP порты 80 и 443. Если вы используете Firewalld на RHEL/CentOS/Rocky Linux/AlmaLinux, выполните sudo firewall-cmd –permanent –add-service=, затем sudo systemctl reload firewalld, чтобы открыть TCP порты 80 и 443.
- Fail2ban. Если ваш сервер использует fail2ban для блокировки вредоносных запросов, возможно, fail2ban запретил ваш IP-адрес. Выполните команду sudo journalctl -eu fail2ban, чтобы проверить, не заблокирован ли ваш IP-адрес. Вы можете добавить свой IP-адрес в список fail2ban ignoreip, чтобы он больше не был забанен.
- Nginx не прослушивает нужный сетевой интерфейс. Например, Nginx не прослушивает публичный IP-адрес сервера.
The Connection Has Timed Out
Это может означать, что ваш сервер находится в автономном режиме или Nginx работает неправильно.
Однажды у меня возникла проблема нехватки памяти, из-за чего Nginx не смог запустить рабочие процессы.
Если вы увидите следующее сообщение об ошибке в файле /var/log/nginx/error.log, вашему серверу не хватает памяти:
404 Not Found
404 not found означает, что Nginx не может найти ресурсы, которые запрашивает ваш веб-браузер.
Причина может быть следующей:
- Корневой каталог web не существует на вашем сервере. В Nginx корневой веб-каталог настраивается с помощью директивы root, например, так: root /usr/share/nginx/linuxbabe.com/;. Убедитесь, что файлы вашего сайта (HTML, CSS, JavaScript, PHP) хранятся в правильном каталоге.
- PHP-FPM не запущен. Вы можете проверить статус PHP-FPM с помощью sudo systemctl status php7.4-fpm (Debian/Ubuntu) или sudo systemctl status php-fpm.
- Вы забыли включить директиву try_files $uri /index.php$is_args$args; в конфигурационный файл сервера Nginx. Эта директива необходима для обработки PHP-кода.
- На вашем сервере нет свободного дискового пространства. Попробуйте освободить немного дискового пространства. Вы можете использовать утилиту ncdu (sudo apt install ncdu или sudo dnf install ncdu), чтобы узнать, какие каталоги занимают огромное количество дискового пространства.
403 Forbidden
Эта ошибка означает, что вам не разрешен доступ к ресурсам запроса.
Возможный сценарий включает:
- Администратор сайта блокирует публичный доступ к запрашиваемым ресурсам с помощью белого списка IP-адресов или других методов.
- На сайте может использоваться брандмауэр веб-приложения, например ModSecurity, который обнаружил атаку вторжения, поэтому заблокировал запрос.
Некоторые веб-приложения могут показывать другое сообщение об ошибке, когда происходит запрет 403. Оно может сказать вам, что “secure connection failed, хотя причина та же.
500 Internal Server Error
Это означает, что в веб-приложении произошла какая-то ошибка.
Это может быть следующее
- Сервер базы данных не работает. Проверьте состояние MySQL/MariaDB с помощью sudo systemctl status mysql. Запустите его с помощью sudo systemctl start mysql. Запустите sudo journalctl -eu mysql, чтобы выяснить, почему он не запускается. Процесс MySQL/MariaDB может быть завершен из-за проблем с нехваткой памяти.
- Вы не настроили Nginx на использование PHP-FPM, поэтому Nginx не знает, как выполнять PHP-код.
- Если ваше веб-приложение имеет встроенный кэш, вы можете попробовать очистить кэш приложения, чтобы исправить эту ошибку.
- Ваше веб-приложение может создавать свой собственный журнал ошибок. Проверьте этот файл журнала, чтобы отладить эту ошибку.
- Возможно, в вашем веб-приложении есть режим отладки. Включите его, и вы увидите более подробные сообщения об ошибках на веб-странице. Например, вы можете включить режим отладки в почтовом сервере хостинг-платформы Modoboa, установив DEBUG = True в файле /srv/modoboa/instance/instance/settings.py.
- PHP-FPM может быть перегружен. Проверьте журнал PHP-FPM (например, /var/log/php7.4-fpm.log). Если вы обнаружили предупреждение [pool www] seems busy (возможно, вам нужно увеличить pm.start_servers, или pm.min/max_spare_servers), вам нужно выделить больше ресурсов для PHP-FPM.
- Иногда перезагрузка PHP-FPM (sudo systemctl reload php7.4-fpm) может исправить ошибку.
Nginx показывает страницу по умолчанию
Если вы пытаетесь настроить виртуальный хост Nginx и при вводе доменного имени в веб-браузере отображается страница Nginx по умолчанию, это может быть следующее
- Вы не использовали реальное доменное имя для директивы server_name в виртуальном хосте Nginx.
- Вы забыли перезагрузить Nginx.
504 Gateway time-out
Это означает, что апстрим, такой как PHP-FPM/MySQL/MariaDB, не может обработать запрос достаточно быстро.
Вы можете попробовать перезапустить PHP-FPM, чтобы временно исправить ошибку, но лучше начать настраивать PHP-FPM/MySQL/MariaDB для более быстрой работы.
Вот конфигурация InnoDB в моем файле /etc/mysql/mariadb.conf.d/50-server.cnf.
Это очень простая настройка производительности.
- InnoDB buffer pool size должен быть не менее половины вашей оперативной памяти. (Для VPS с небольшим объемом оперативной памяти я рекомендую установить размер буферного пула на меньшее значение, например 400M, иначе ваш VPS будет работать без оперативной памяти).
- InnoDB log file size должен составлять 25% от размера буферного пула.
- Установите потоки ввода-вывода для чтения и записи на максимум (64).
- Заставьте MariaDB использовать 3 экземпляра буферного пула InnoDB. Количество экземпляров должно соответствовать количеству ядер процессора в вашей системе.
- После сохранения изменений перезапустите MariaDB.
После сохранения изменений перезапустите MariaDB.
Вы также можете установить более длительное значение тайм-аута в Nginx, чтобы уменьшить вероятность тайм-аута шлюза.
Отредактируйте файл виртуального хоста Nginx и добавьте следующие строки в блок server <…>.
Если вы используете Nginx с PHP-FPM, то установите для параметра fastcgi_read_timeout большее значение, например 300 секунд.
По умолчанию это 60 секунд.
Затем перезагрузите Nginx.
PHP-FPM также имеет максимальное время выполнения для каждого скрипта.
Отредактируйте файл php.ini.
Вы можете увеличить это значение до 300 секунд.
Затем перезапустите PHP-FPM
Размер памяти исчерпан
Если вы видите следующую строку в журнале ошибок Nginx, это означает, что PHP достиг лимита памяти в 128 МБ.
Вы можете отредактировать файл php.ini (/etc/php/7.4/fpm/php.ini) и увеличить лимит памяти PHP.
Затем перезапустите PHP7.4-FPM.
Если ошибка все еще существует, скорее всего, в вашем веб-приложении плохой PHP-код, который потребляет много оперативной памяти.
PR_END_OF_FILE_ERROR
- Вы настроили Nginx на перенаправление HTTP-запросов на HTTPS, но в Nginx нет блока сервера, обслуживающего HTTPS-запросы.
- Может быть, Nginx не запущен?
- Иногда основной бинарник Nginx запущен, но рабочий процесс может не работать и завершиться по разным причинам. Для отладки проверьте логи ошибок Nginx (/var/log/nginx/error.log).
Resource temporarily unavailable
Некоторые пользователи могут найти следующую ошибку в файле логов ошибок Nginx (в разделе /var/log/nginx/).
Обычно это означает, что на вашем сайте много посетителей и PHP-FPM не справляется с обработкой огромного количества запросов.
Вы можете изменить количество дочерних процессов PHP-FPM, чтобы он мог обрабатывать больше запросов.
Отредактируйте файл PHP-FPM www.conf.
(Путь к файлу зависит от дистрибутива Linux).
По умолчанию конфигурация дочернего процесса выглядит следующим образом:
Приведенная выше конфигурация означает.
- PHP-FPM динамически создает дочерние процессы. Нет фиксированного количества дочерних процессов.
- Создается не более 5 дочерних процессов.
- При запуске PHP-FPM запускаются 2 дочерних процесса.
- Есть как минимум 1 незанятый процесс.
- Максимум 3 неработающих процесса.
Убедитесь, что у вас достаточно оперативной памяти для запуска дополнительных дочерних процессов.
Сохраните и закройте файл.
Затем перезапустите PHP-FPM. (Возможно, вам потребуется изменить номер версии).
Чтобы следить за состоянием PHP-FPM, вы можете включить страницу status .
Найдите следующую строку в файле PHP-FPM www.conf.
Обратите внимание, что
Уберите точку с запятой, чтобы включить страницу состояния PHP-FPM.
Затем перезапустите PHP-FPM.
Затем отредактируйте файл виртуального хоста Nginx.
Добавьте следующие строки.
Директивы allow и deny используются для ограничения доступа.
Только IP-адреса из “белого списка” могут получить доступ к странице состояния.
Сохраните и закройте файл. Затем протестируйте конфигурацию Nginx.
Если проверка прошла успешно, перезагрузите Nginx, чтобы изменения вступили в силу.
В файле PHP-FPM www.conf дается хорошее объяснение того, что означает каждый параметр.
Если PHP-FPM очень занят и не может обслужить запрос немедленно, он поставит его в очередь.
По умолчанию может быть не более 511 ожидающих запросов, определяемых параметром listen.backlog.
Если вы видите следующее значение на странице состояния PHP-FPM, это означает, что в очереди еще не было ни одного запроса, т.е. ваш PHP-FPM может быстро обрабатывать запросы.
Если в очереди 511 ожидающих запросов, это означает, что ваш PHP-FPM очень загружен, поэтому вам следует увеличить количество дочерних процессов.
Вам также может понадобиться изменить параметр ядра Linux net.core.somaxconn, который определяет максимальное количество соединений, разрешенных к файлу сокетов в Linux, например, к файлу сокетов PHP-FPM Unix.
По умолчанию его значение равно 128 до ядра 5.4 и 4096 начиная с ядра 5.4.
Если у вас сайт с высокой посещаемостью, вы можете использовать большое значение.
Отредактируйте файл /etc/sysctl.conf.
Добавьте следующие две строки.
Сохраните и закройте файл. Затем примените настройки.
Примечание: Если ваш сервер имеет достаточно оперативной памяти, вы можете выделить фиксированное количество дочерних процессов для PHP-FPM, как показано ниже.
Два файла виртуального хоста для одного и того же сайта
Если вы запустите sudo nginx -t и увидите следующее предупреждение.
Это означает, что есть два файла виртуальных хостов, содержащих одну и ту же конфигурацию server_name.
Не создавайте два файла виртуальных хостов для одного сайта.
PHP-FPM Connection reset by peer
В файле логов ошибок Nginx отображается следующее сообщение.
Это может быть вызвано перезапуском PHP-FPM.
Если он перезапущен вручную самостоятельно, то вы можете игнорировать эту ошибку.
Утечки сокетов Nginx
Если вы обнаружили следующее сообщение об ошибке в файле /var/log/nginx/error.log, значит, у вашего Nginx проблема с утечкой сокетов.
Вы можете перезапустить ОС, чтобы решить эту проблему.
Если это не помогает, вам нужно скомпилировать отладочную версию Nginx, которая покажет вам отладочную информацию в логах.
Заключение
Надеюсь, эта статья помогла вам исправить распространенные ошибки веб-сервера Nginx.
Источник
Django logging is one of few basic Django concepts that developers usually neglect but is important to master.
So what exactly is logging?
Logging in Django is the process of storing certain records in some form of container (file, database, memory,…) which then helps us in certain stages of development.
Firstly, we need to understand the concept of logging, its advantages, disadvantages, and why we use it.
A good understanding, writing, and reading of logs can in the future make debugging easier and, among other things, prevent problems that may occur. While it may not seem like it, the key to creating large stable Django applications lies in logging.
What is Django logging?
Django logging module consists of 4 parts:
- Loggers (interface to log events from the application)
- Handlers (describes logging behavior, such as writing a message to the screen, to a file, or a network socket)
- Filters (providing additional control over recording logs)
- Formatters (provides control over rendered text – custom formats, etc.)
The simplest example of using a logging module is shown in the following example:
Example 1.
import logging # logger instance with name of module where it’s used (good practice) logger = logging.getLogger(__name__) logger.error(“Dummy text”)
And that’s it, the logger instance is defined and ready to use! No need to install additional libraries or modules. Plug and play!
Official Django documentation on logging.
Loggers, Log levels, and when to use one?
Loggers have certain log levels that describe events on our backend, let’s dive into it!
- DEBUG
- It would be a good practice to use debug method instead of print (read Logging vs printing section)
- INFO
- Used to log some general information as well as capture bottlenecks
- WARNING
- Describes problems that are small and potentially dangerous, such as missing CSRF_COOKIE
- ERROR
- Used when some exception is raised but not caught
- CRITICAL
- Never practically used in Django projects
| Level | Numeric value |
| CRITICAL | 50 |
| ERROR | 40 |
| WARNING | 30 |
| INFO | 20 |
| DEBUG | 10 |
All Django logging log levels in the implementation receive the same arguments, ie the structure of arguments (args) and keyword arguments (kwargs) is the same for all -> (msg, * args, ** kwargs).
Kwargs can receive 4 arguments:
exc_infodefaults False, if True it causes exception information to be added to logging messagestack_infodefaults False, if True logging message contains stack information till logger is calledstackleveldefaults 1, if not 1, the exact number of stack frames are skipped when computing the line number and function nameextradictionary in which we can put whatever information we find useful 🙂
Let’s see some basic logging examples:
Example 1.
from django.http import HttpResponse
import logging
logger = logging.getLogger(__name__)
def my_view(request):
logging.debug("DEBUG")
logging.info("INFO")
logging.warning("WARNING")
logging.error("ERROR")
logging.critical("CRITICAL")
return HttpResponse("Django logging example")
We come to an interesting output. WARNING, ERROR, and CRITICAL log levels are recorded but we don’t have DEBUG and INFO in the record.
This happens because the default level logging is WARNING and all “less critical” levels will not be recorded.
We can change this with a simple configuration.
Example 2.
from django.http import HttpResponse
import logging
logging.basicConfig(level=logging.DEBUG)
logger = logging.getLogger(__name__)
def my_view(request):
logging.debug("DEBUG")
logging.info("INFO")
logging.warning("WARNING")
logging.error("ERROR")
logging.critical("CRITICAL")
return HttpResponse("Django logging example")
Output: Starting development server at http://127.0.0.1:8000/ Quit the server with CONTROL-C. DEBUG:root:DEBUG INFO:root:INFO WARNING:root:WARNING ERROR:root:ERROR CRITICAL:root:CRITICAL [26/Nov/2021 15:35:59] "GET /example/logging/ HTTP/1.1" 200 22
Next example shows arguments and keyword arguments usage:
Example 3.
from django.http import HttpResponse
import logging
logger = logging.getLogger(__name__)
def my_view(request):
logging.error('Internal server error: %s', request.path,
exc_info=True, #default False
stack_info=True, #default True
stacklevel=1, #default 1
extra={
"status_code": 500,
"request": request
}
)
return HttpResponse("Django logging example")
Output:
ERROR:root:Internal server error: /example/logging/
NoneType: None
Stack (most recent call last):
. . .
File ".../django_logging/venv/lib/python3.8/site-packages/django/core/handlers/base.py", line 181, in _get_response
response = wrapped_callback(request, *callback_args, **callback_kwargs)
File ".../django_logging/example/views.py", line 8, in my_view
logging.error('Internal server error: %s', request.path,
[26/Nov/2021 16:08:15] "GET /example/logging/ HTTP/1.1" 200 22
exc_info=True outputs NoneType:None because no exception is caught.
stack_info=True produces Stack output (most recent call last)
Documentation on Module-level functions.
Handlers and handler classes
Handlers determine what happens to messages, whether we print them to standard output, to a file, or something else.
Several handler classes are set by default within the logging module, each of which I will briefly describe, and the choice depends on the use case.
| Handler | Outputs |
| StreamHandler | Streams, any object that supports write() and flush() |
| FileHandler | File |
| NullHandler | None usage explained: If you don’t want to produce any logs, it’s easier to change handler to NullHandler instead of removing logs |
| WatchedFileHandler | File |
| BaseRotatingHandler | None Used only for extending (to override methods) |
| RotatingFileHandler | File When the given size is about to be exceeded, a new file is opened |
| TimedRotatingFileHandler | File The new file is opened based on interval or when |
| SockerHandler | Network socket |
| DatagramHandler | Logging messages over UDP sockets |
| SysLogHandler | Logging messages to a remote or local Unix Syslog. |
| NTEventLogHandler | Logging messages to a local Windows NT, Windows 2000, or Windows XP event log. |
| SMTPHandler | Logging messages to an email address |
| MemoryHandler | Logging records in memory |
| HTTPHandler | Logging messages to a web server |
| QueueHandler | Logging messages to a queue |
| QueueListener | Not itself a handler, it is documented here because it works hand-in-hand with QueueHandler |
TIP - If unsure use RotatingFileHandler class.
WARNING - WatchedFileHandler should not be used on Windows.
Filter overview
Filters exist to give us extra control over handlers and loggers.
To create your filter inherit the Filter class.
Filter class has a filter method that receives a record in arguments. Also, the Filter class must return True if we want it to enter the logs, otherwise, the log is ignored.
Enough theory, let’s show what it looks like in practice!
Example 1.
import logging
from logging import Filter
class CustomFilter(Filter):
MODULE = ['example.views']
def filter(self, record: logging.LogRecord) -> bool:
if record.name in self.MODULE:
return False
return True
We defined CustomFilter class in which we inherited Filter, in the CustomFilter class we defined the module from which we do not want to receive logs.
In the filter method, we checked whether record.name (name of the module) is in the defined MODULE list, if located we do not record that log.
Let’s see how we added this filter to the logger instance.
from django.http import HttpResponse
import logging
from core.logging_filters import CustomFilter
logger = logging.getLogger(__name__)
custom_filter = CustomFilter()
logger.addFilter(custom_filter)
def my_view(request):
logger.error("ERROR")
return HttpResponse("Django logging example")
Documentation on filters.
Formatter overview
Formatter works similarly to the filter, we initialize our Custom class in which we inherit the Formatter class, we have more methods in it that we can override, I will focus on the most used format method.
Let’s look at the implementation!
Example 1.
from logging import Formatter, LogRecord
class CustomFormatter(Formatter):
def format(self, record: LogRecord) -> str:
return "Any type of information you want in your logs"
format method returns a string (what will be written in the log file).
The formatter is not added directly to the logger but the handler, as shown in the example:
from logging.handlers import RotatingFileHandler
from django.http import HttpResponse
import logging
from core.logging_formatters import CustomFormatter
logger = logging.getLogger(__name__)
handler = RotatingFileHandler('example.log', maxBytes=1000, backupCount=2)
custom_formatter = CustomFormatter()
handler.setFormatter(custom_formatter)
logger.addHandler(handler)
def my_view(request):
logger.error("ERROR")
return HttpResponse("Django logging example")
Documentation on formatters.
Logging vs printing
Why is it recommended to use a logging library instead of a print?
The goal is to have the most detailed view of what we want to show through the application.
Logging solves it through the log level, in each stage of the code, we can know whether we want to display error, warning, debug, or info.
Additionally, logging can be set to display eg timestamps and other application contexts with a fairly simple configuration. We have more control over the logger, which is always a better thing for a developer.
Print statements are not recorded, unlike logs.
Finally, depending on the webserver, a forgotten print statement may crash your entire server.
- f-strings don’t work with loggers
- use ISO-8601 Format for Timestamps
import logging logging.basicConfig(format='%(asctime)s %(message)s') #could be added as formatter
- Add logging before the app grows too much 🙂
- When
DEBUG=Falseand ERROR log level is triggered, email is sent to every email listed ADMINS - Don’t import and reuse logger from other modules, define a new logger
- gives you the ability to turn off and on certain loggers
- Use log rotation (RotatingFileHandler class) to prevent logs to grow too much
- the mechanism that is used to prevent full disks
- works by compressing and deleting old log files
import logging
from logging.handlers import RotatingFileHandler
logger = logging.getLogger(__name__)
handler = RotatingFileHandler('log_file.log', maxBytes=1000, backupCount=5)
logger.addHandler(handler)
- Use correct log levels!
- Logutils package ( https://pypi.org/project/logutils/ ) contains useful new and improved handlers
Use Django logging alternatives?
The logging module of the standard pyhon implementation has been tested and brought to perfection.
For each new version of Python, there is a possibility that each “third party module” breaks, and thus the logging in your application does not work.
I would not recommend using anything other than the above module for the pure reason that the alternatives are practically the same.
Don’t invent the wheel if it’s already invented. 🙂
Django projects with logging and analysis tools hide great power – so don’t be afraid to use it to improve your application!
We all know how amazingly exhaustive Django debugging can be, when you enable the Debug = True option in your settings file. It gives you a full traceback, complete with the str-ed versions of local variables. However, this post deals with the production-time scenario, when you might encounter an un-anticipated error in your code. Such errors can arise out of various reasons, such as-
1. A kind of input you did not anticipate.
2. A logical error of some kind, usually occuring out of boundary cases (like a sqrt function coming across a negative value)
3. (Worst kind) Some type of low-probability scenario you forgot to test.
In such cases, Django serves the 500 status code along with a “Server Error” message. All this is good, and if your application doesnt have any state variables that may get screwed, or low-probability errors aren’t that important to you, then you can simply ignore the rest of this post. However, if you would want atleast a minimalistic note being made on the server when something goes wrong, then you can set up a simple debug-logging system as a part of your Django project.
Heres how you go about it-
Step 1. Create a folder called debug in your Django project’s main directory (the one that contains the manage.py file).
Step 2. Make an empty __init__.py file inside the new folder, which will tell Python thats it contains relevant code.
Step 3. Make a models.py file in the folder, and add the following lines to it:
from django.db import models
class ExceptionLog(models.Model):
"""
Models any error occuring on the server.
"""
timestamp = models.DateTimeField('Time Stamp')
view = models.CharField('View', max_length=30)
exceptionclass = models.CharField('Exception Class', max_length=60)
message = models.CharField('Exception Message', max_length=100)
This sets up the basic database model for logging of Python Exceptions. Modify it as you wish, especially the names, max lengths and stuff.
Step 4. Make a file named admin.py in the folder, and add the following code to it:
from django.contrib import admin
from debug.models import ExceptionLog
class ExceptionLogAdmin(admin.ModelAdmin):
list_display = ('timestamp', 'view', 'exceptionclass',
'message')
list_filter = ('view', 'timestamp')
search_fields = ['message', 'exceptionclass', 'view']
admin.site.register(ExceptionLog, ExceptionLogAdmin)
The attributes are again to your taste – If you know the basics behind configuring the Django admin page, you already know what you want and how to get there. If you don’t, reading up on the Django tutorial will help.
Step 5. This is where we add the code that makes things work. Add a file called decorators.py in the directory, and add the given code to it:
from debug.models import ExceptionLog
from django.utils import timezone
from django.http import HttpResponse
def log_exceptions(view_name):
"""
Logs all the exceptions occuring in a Django view, to the
ExceptionLog model.
'view_name' denotes an identifier for the view that is
being debug-logged.
"""
def real_decorator(actual_view):
"""
This is the actual decorator.
"""
def wrapped_view(request):
"""
This is the version of the view that will monitor
itself for any un-expected Exception, and maintain basic
logs of the same.
"""
try:
#Run the view code
response = actual_view(request)
#If a response is generated without any Exception
#coming up, return it
return response
except Exception as e:
#If an unexpected Exception occurs, make a debug entry
#and save it
debug_entry = ExceptionLog(
timestamp=timezone.now(),
view=view_name,
exceptionclass=str(e.__class__),
message=str(e))
debug_entry.save()
#Return the Server Error(500) status code
return HttpResponse(status=500)
return wrapped_view
return real_decorator
This code uses the Python ‘magic’ called decorators with arguments. Frankly, I had never implemented Python decorators (used yes, during SymPy work), let alone with arguments, before this. But trust me- unless you have a very special case, this is the way to go for what we want to achieve here.
The decorator basically takes in as argument the name of the view, so that its known during logging. It encapsulates the working of the actual Django view thats being decorated in a try...except block, and logs the time-stamp, view name and the most important Exception details, in the event that one is raised.
Step 6. Add 'debug' to the 'INSTALLED_APPS' tuple in your settings.py Django file. This officially recognizes your new debug-logging app as a part of your complete server code.
Then, before re-starting the server, dont forget to do syncdb or migrate (depending on which Django version you use) on your project. This will essentially register the new models on the server, and make the details appear on your Django admin page.
Step 7. To set up any view in your project code for the debug-logging, just modify it as follows-
...other imports...
from debug.decorators import log_exceptions
@log_exceptions('Some View')
def some_view(request):
...view code...
If you also use the @csrf_exempt decorator on your view(s), make sure the log_exceptions decorator lies below it.
Voila! You are done! Now, whenever your decorated views raise an Exception, the relevant information will be logged on your Django admin page.
Ofcourse, this does not replace what real debugging does, nor is it as exhaustive (no traceback provided, for starters). It just stores the very basic info about what went wrong, when and where(in terms of which view). However, it will not give you complete details like file name, line no. etc. In a production environment, debugging to that extent is stupid and (should be) unnecessary. That brings me to the second important point-
Whenever an Exception is raised in your Python code, there are two things you can do about it-
1. ‘Duck it’ – Not handle it, letting it propagate down the function stack, OR
2. ‘Handle it’ – Using something like a try...except block, either repair the damage caused by the error (say returning a default value), or raise another Exception that better describes what went wrong (most often, in ‘high level’ terms).
I implore you to do the latter in your code, atleast as much as possible. Why? It just makes your life way easier. In simple programming terms, the lesser the depth of your function stack when an Exception is raised, the easier it is for you to understand what went wrong. But ofcourse, if you already knew things were going to go wrong, you would not need this debugging tool :-P.
But even then, try not to let Exceptions come out from places like the NumPy core, where it becomes frustratingly difficult to know how things screwed up. It is always a good practice to raise good-quality Exceptions yourself, with custom error-messages that say what went wrong. As long as you can understand the problem from looking at the Exception class and message, you are good to go!
EDIT 1: Ofcourse you could use better frameworks meant for this like Sentry and Opbeat. I wrote this post just to show a way to do it quick-and-dirty, in your code itself. If needed, not re-inventing the wheel is ofcourse always better :-).
Отчет об ошибках
При работе с публичным сайтом всегда следует отключать настройку DEBUG. Это заставит ваш сервер работать намного быстрее, а также не позволит злоумышленникам увидеть детали вашего приложения, которые могут быть раскрыты на страницах ошибок.
Однако, работа с DEBUG, установленным на False, означает, что вы никогда не увидите ошибок, генерируемых вашим сайтом — вместо этого все будут видеть ваши публичные страницы ошибок. Вам необходимо отслеживать ошибки, возникающие на развернутых сайтах, поэтому Django можно настроить на создание отчетов с подробной информацией об этих ошибках.
Отчеты по электронной почте
Ошибки сервера
Когда DEBUG равно False, Django будет отправлять письма пользователям, указанным в настройке ADMINS, всякий раз, когда ваш код вызывает необработанное исключение и приводит к внутренней ошибке сервера (строго говоря, для любого ответа с кодом состояния HTTP 500 или выше). Это дает администраторам немедленное уведомление о любых ошибках. Настройка ADMINS получит описание ошибки, полный трассировочный ответ Python и подробную информацию о HTTP-запросе, вызвавшем ошибку.
Примечание
Для того чтобы отправлять электронную почту, Django требует несколько параметров, указывающих, как подключиться к вашему почтовому серверу. Как минимум, вам нужно будет указать EMAIL_HOST и, возможно, EMAIL_HOST_USER и EMAIL_HOST_PASSWORD, хотя могут потребоваться и другие настройки в зависимости от конфигурации вашего почтового сервера. Полный список настроек, связанных с электронной почтой, приведен в the Django settings documentation.
По умолчанию Django будет отправлять электронную почту с адреса root@localhost. Однако некоторые почтовые провайдеры отклоняют все письма с этого адреса. Чтобы использовать другой адрес отправителя, измените параметр SERVER_EMAIL.
Чтобы активировать это поведение, поместите адреса электронной почты получателей в настройку ADMINS.
404 ошибки
Django также может быть настроен на отправку писем об ошибках неработающих ссылок (404 ошибки «страница не найдена»). Django отправляет электронные письма об ошибках 404, когда:
DEBUG— этоFalse;- Ваша установка
MIDDLEWAREвключаетdjango.middleware.common.BrokenLinkEmailsMiddleware.
Если эти условия выполнены, Django будет отправлять письма пользователям, указанным в настройке MANAGERS, всякий раз, когда ваш код вызывает 404 и запрос имеет referer. Django не будет отправлять email для 404, у которых нет реферера — обычно это люди, набирающие неработающие URL или неработающие веб-боты. Он также игнорирует 404, когда referer равен запрашиваемому URL, поскольку такое поведение также характерно для неработающих веб-ботов.
Вы можете указать Django прекратить сообщать о конкретных 404-х, изменив параметр IGNORABLE_404_URLS. Это должен быть список скомпилированных объектов регулярных выражений. Например:
import re IGNORABLE_404_URLS = [ re.compile(r'.(php|cgi)$'), re.compile(r'^/phpmyadmin/'), ]
В этом примере 404 на любой URL, заканчивающийся на .php или .cgi, не будет сообщен. Также не будет сообщено о любом URL, начинающемся с .cgi.
В следующем примере показано, как исключить некоторые обычные URL, которые часто запрашивают браузеры и краулеры:
import re IGNORABLE_404_URLS = [ re.compile(r'^/apple-touch-icon.*.png$'), re.compile(r'^/favicon.ico$'), re.compile(r'^/robots.txt$'), ]
(Обратите внимание, что это регулярные выражения, поэтому мы ставим обратную косую черту перед периодами, чтобы избежать их).
Если вы хотите дополнительно настроить поведение django.middleware.common.BrokenLinkEmailsMiddleware (например, игнорировать запросы, поступающие от веб-краулеров), вам следует создать его подкласс и переопределить его методы.
См.также
Ошибки 404 записываются в журнал с помощью фреймворка протоколирования. По умолчанию эти записи журнала игнорируются, но вы можете использовать их для сообщения об ошибках, написав обработчик и configuring logging соответствующим образом.
Фильтрация отчетов об ошибках
Предупреждение
Фильтрация конфиденциальных данных — сложная задача, и практически невозможно гарантировать, что конфиденциальные данные не просочатся в отчет об ошибке. Поэтому отчеты об ошибках должны быть доступны только доверенным членам команды, и вы должны избегать передачи отчетов об ошибках в незашифрованном виде через Интернет (например, по электронной почте).
Фильтрация конфиденциальной информации
Отчеты об ошибках очень полезны для отладки ошибок, поэтому обычно полезно записывать как можно больше релевантной информации об этих ошибках. Например, по умолчанию Django записывает full traceback для вызванного исключения, локальные переменные каждого traceback frame и HttpRequest attributes.
Однако иногда некоторые типы информации могут быть слишком чувствительными и, следовательно, не могут быть уместны для отслеживания, например, пароль пользователя или номер кредитной карты. Поэтому в дополнение к фильтрации параметров, которые кажутся чувствительными, как описано в документации DEBUG, Django предлагает набор декораторов функций, чтобы помочь вам контролировать, какая информация должна быть отфильтрована из отчетов об ошибках в производственной среде (то есть, когда DEBUG установлен на False): sensitive_variables() и sensitive_post_parameters().
-
sensitive_variables(*variables)[исходный код]¶ -
Если функция (представление или обычный обратный вызов) в вашем коде использует локальные переменные, которые могут содержать конфиденциальную информацию, вы можете предотвратить включение значений этих переменных в отчеты об ошибках с помощью декоратора
sensitive_variables:from django.views.decorators.debug import sensitive_variables @sensitive_variables('user', 'pw', 'cc') def process_info(user): pw = user.pass_word cc = user.credit_card_number name = user.name ...
В приведенном выше примере значения переменных
user,pwиccбудут скрыты и заменены звездочками (**********) в отчетах об ошибках, тогда как значение переменнойnameбудет раскрыто.Чтобы систематически скрывать все локальные переменные функции от журналов ошибок, не предоставляйте никаких аргументов декоратору
sensitive_variables:@sensitive_variables() def my_function(): ...
При использовании нескольких декораторов
Если переменная, которую вы хотите скрыть, также является аргументом функции (например, „
user“ в следующем примере), и если декорируемая функция имеет несколько декораторов, то убедитесь, что@sensitive_variablesнаходится в верхней части цепочки декораторов. Таким образом, аргумент функции будет скрыт при прохождении через другие декораторы:@sensitive_variables('user', 'pw', 'cc') @some_decorator @another_decorator def process_info(user): ...
-
sensitive_post_parameters(*parameters)[исходный код]¶ -
Если одно из ваших представлений получает объект
HttpRequestс параметрамиPOST parameters, которые могут содержать конфиденциальную информацию, вы можете предотвратить включение значений этих параметров в отчеты об ошибках с помощью декоратораsensitive_post_parameters:from django.views.decorators.debug import sensitive_post_parameters @sensitive_post_parameters('pass_word', 'credit_card_number') def record_user_profile(request): UserProfile.create( user=request.user, password=request.POST['pass_word'], credit_card=request.POST['credit_card_number'], name=request.POST['name'], ) ...
В приведенном выше примере значения POST-параметров
pass_wordиcredit_card_numberбудут скрыты и заменены звездочками (**********) в представлении запроса внутри отчетов об ошибках, тогда как значение параметраnameбудет раскрыто.Чтобы систематически скрывать все POST-параметры запроса в отчетах об ошибках, не предоставляйте никаких аргументов декоратору
sensitive_post_parameters:@sensitive_post_parameters() def my_view(request): ...
Все параметры POST систематически отфильтровываются из отчетов об ошибках для определенных представлений
django.contrib.auth.views(login,password_reset_confirm,password_change, иadd_viewиuser_change_passwordв админкеauth), чтобы предотвратить утечку конфиденциальной информации, такой как пароли пользователей.
Пользовательские отчеты об ошибках
Все, что делают sensitive_variables() и sensitive_post_parameters(), это, соответственно, аннотируют декорированную функцию именами чувствительных переменных и аннотируют объект HttpRequest именами чувствительных POST-параметров, так что эта чувствительная информация может быть впоследствии отфильтрована из отчетов при возникновении ошибки. Фактическая фильтрация выполняется стандартным фильтром отчетов об ошибках Django: django.views.debug.SafeExceptionReporterFilter. Этот фильтр использует аннотации декораторов для замены соответствующих значений на звездочки (**********), когда создаются отчеты об ошибках. Если вы хотите отменить или настроить это поведение по умолчанию для всего вашего сайта, вам нужно определить свой собственный класс фильтра и указать Django использовать его с помощью параметра DEFAULT_EXCEPTION_REPORTER_FILTER:
DEFAULT_EXCEPTION_REPORTER_FILTER = 'path.to.your.CustomExceptionReporterFilter'
Вы также можете более детально контролировать, какой фильтр использовать в данном представлении, задавая атрибут HttpRequest“exception_reporter_filter:
def my_view(request): if request.user.is_authenticated: request.exception_reporter_filter = CustomExceptionReporterFilter() ...
Ваш пользовательский класс фильтра должен наследоваться от django.views.debug.SafeExceptionReporterFilter и может переопределять следующие атрибуты и методы:
-
class
SafeExceptionReporterFilter[исходный код]¶ -
-
cleansed_substitute¶ -
New in Django 3.1.
Строковое значение, на которое следует заменить чувствительное значение. По умолчанию заменяет значения чувствительных переменных на звездочки (
**********).
-
hidden_settings¶ -
New in Django 3.1.
Скомпилированный объект регулярного выражения, используемый для сопоставления настроек и значений
request.META, считающихся чувствительными. По умолчанию эквивалентен:import re re.compile(r'API|TOKEN|KEY|SECRET|PASS|SIGNATURE', flags=re.IGNORECASE)
-
is_active(request)[исходный код]¶ -
Возвращает
Trueдля активации фильтрации вget_post_parameters()иget_traceback_frame_variables(). По умолчанию фильтр активен, еслиDEBUGравноFalse. Обратите внимание, что чувствительные значенияrequest.METAвсегда фильтруются вместе с чувствительными значениями настроек, как описано в документацииDEBUG.
-
get_post_parameters(request)[исходный код]¶ -
Возвращает отфильтрованный словарь POST-параметров. Чувствительные значения заменяются на
cleansed_substitute.
-
get_traceback_frame_variables(request, tb_frame)[исходный код]¶ -
Возвращает отфильтрованный словарь локальных переменных для заданного фрейма трассировки. Чувствительные значения заменяются на
cleansed_substitute.
-
New in Django 3.1.
Если вам необходимо настроить отчеты об ошибках помимо фильтрации, вы можете указать пользовательский класс отчета об ошибках, определив параметр DEFAULT_EXCEPTION_REPORTER:
DEFAULT_EXCEPTION_REPORTER = 'path.to.your.CustomExceptionReporter'
Ответственность за составление данных отчета об исключениях и их соответствующее форматирование в виде текста или HTML лежит на составителе отчетов об исключениях. (При подготовке данных отчета об исключениях репортер исключений использует DEFAULT_EXCEPTION_REPORTER_FILTER).
Ваш пользовательский класс репортера должен наследоваться от django.views.debug.ExceptionReporter.
-
class
ExceptionReporter[исходный код]¶ -
-
get_traceback_data()[исходный код]¶ -
Возвращает словарь, содержащий информацию об обратном проходе.
Это основная точка расширения для настройки отчетов об исключениях, например:
from django.views.debug import ExceptionReporter


class CustomExceptionReporter(ExceptionReporter):
    def get_traceback_data(self):
        data = super().get_traceback_data()
        # ... remove/add something here ...
        return data
-
get_traceback_html()[исходный код]¶ -
Возвращает HTML-версию отчета об исключениях.
Используется для HTML-версии отладочной страницы ошибки 500 HTTP.
-
get_traceback_text()[исходный код]¶ -
Возвращает текстовую версию отчета об исключениях.
Используется для текстовой версии отладочной страницы ошибки 500 HTTP и отчетов по электронной почте.
-
Как и в случае с классом фильтра, вы можете контролировать, какой класс репортера исключений использовать в любом данном представлении, устанавливая атрибут HttpRequest“exception_reporter_class:
def my_view(request):
    if request.user.is_authenticated:
        request.exception_reporter_class = CustomExceptionReporter()
    ...
См.также
Вы также можете настроить пользовательское информирование об ошибках, написав пользовательскую часть exception middleware. Если вы пишете пользовательскую обработку ошибок, хорошей идеей будет подражать встроенной обработке ошибок Django и сообщать/заносить ошибки в журнал только если DEBUG является False.
Вернуться на верх