На чтение 3 мин Просмотров 322 Опубликовано 13.07.2022
Если вы используете широкополосное подключение, » DNS Lookup failed» является очень распространенной проблемой в браузере Google Chrome. В основном эта проблема возникает, когда сетевое соединение не работает должным образом или когда DNS-сервер перестает отвечать. Не волнуйтесь, это обычная проблема, и ее можно легко решить. С помощью этого руководства вы сможете легко исправить ошибку DNS Lookup failure в Windows.
Содержание
- Как исправить ошибку DNS Lookup Failed?
- Метод 1: Очистить кэш DNS
- Метод 2 — Изменение DNS сервера
- Метод 3 — Очистка кэша/куки
- YouTube video: 3 способа исправить ошибку dns lookup failed
Как исправить ошибку DNS Lookup Failed?

Не существует правильного решения для этой ошибки. Поэтому вы можете попробовать следующие методы один за другим в том же порядке, как они описаны ниже.
Метод 1: Очистить кэш DNS
Windows и другие операционные системы хранят все свои данные DNS в кэше. При каждой попытке соединения или при отсутствии информации ваш DNS-провайдер информируется об этом. Суть этого хранения заключается в облегчении соединения. В кэше содержится информация и записи о веб-сайтах, которые вы посещали ранее. При удалении файлов кэша вся информация удаляется. Это популярный метод, используемый для устранения различных ошибок Google Chrome, таких как dns_probe_finished_no_internet , unable to connect to the proxy server и т.д. Очистка DNS не является сложным процессом. Любой может сделать это с легкостью.
- Лучший и самый простой способ — это нажать Windows Key + R , чтобы открыть диалоговое окно run.
- Затем введите cmd и нажмите enter.
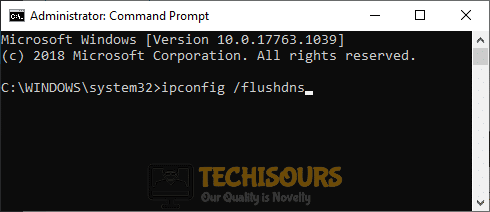
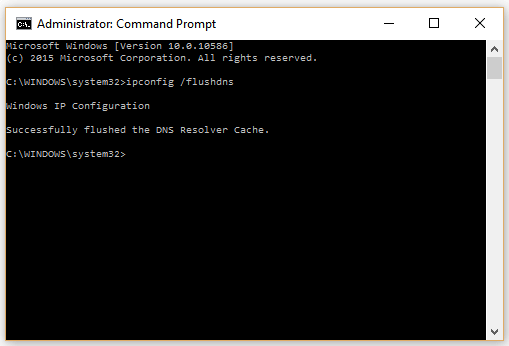
- Введите ipconfig / flushdns в командной строке и нажмите enter.

- Это удаляет весь кэш и гарантирует, что DNS кэш был удален и соединение работает правильно.
Метод 2 — Изменение DNS сервера
Вы можете попробовать этот метод, если вышеуказанный метод не работает. В этом методе вам нужно изменить адрес DNS-сервера вашего компьютера. Это можно сделать, выполнив следующие действия:
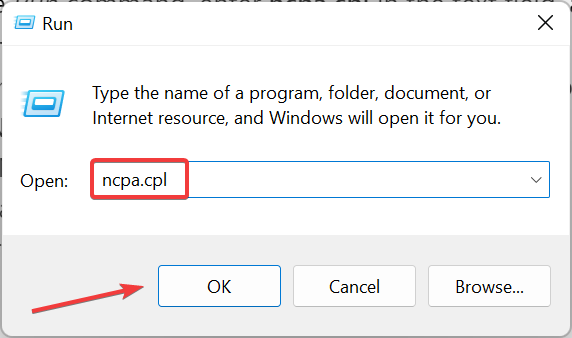
- Нажмите Windows + R, чтобы открыть окно запуска. В окне запуска введите ncpa.cpl и нажмите enter.
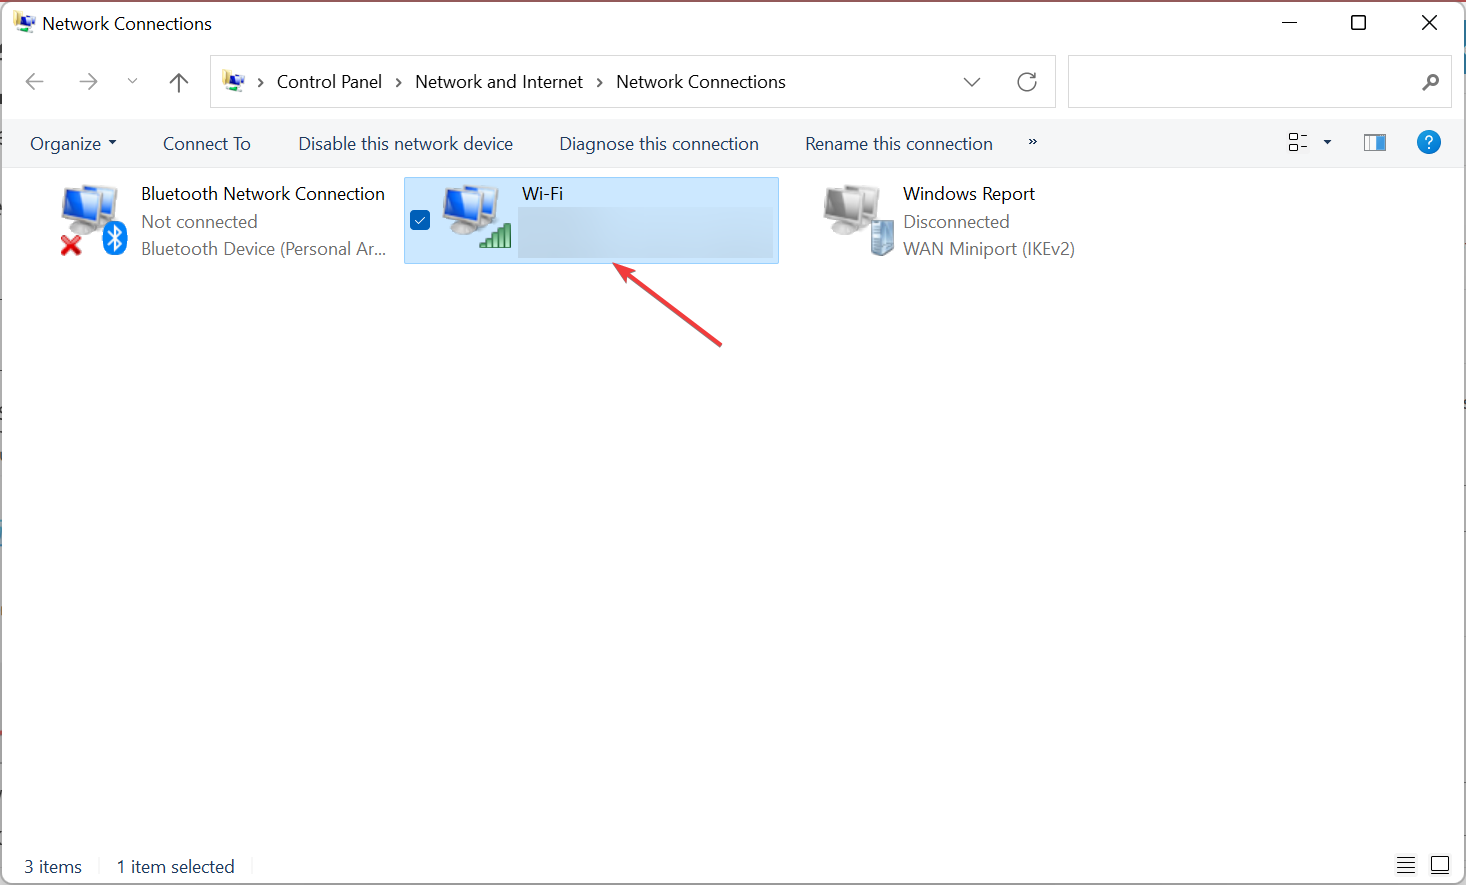
- Откроются сетевые подключения, теперь щелкните правой кнопкой мыши на адаптере WiFi или Ethernet и выберите Properties.

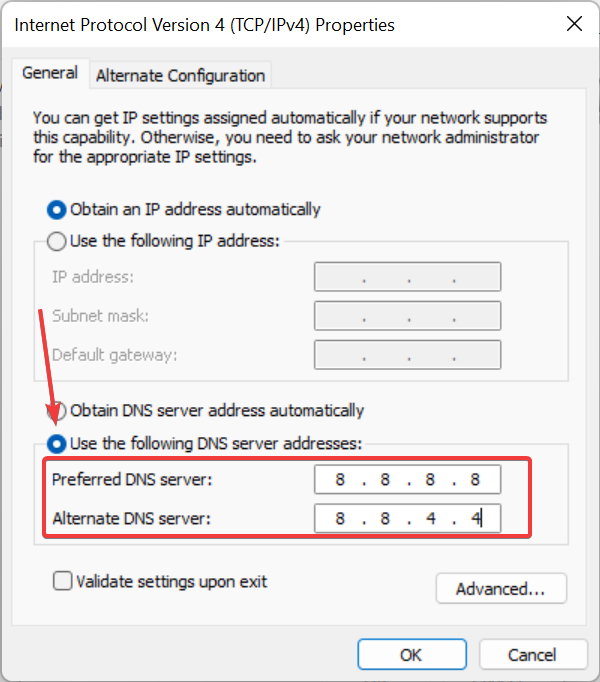
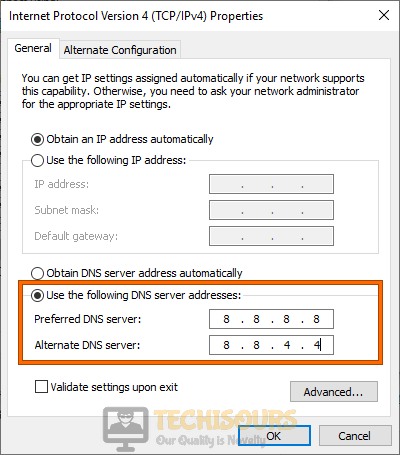
- Двойной щелчок на Internet Protocol Version 4 (TCP/ IPv4) и выберите Use the following DNS server addresses. Добавьте следующие адреса DNS-серверов, показанные ниже.

Мы использовали DNS-сервер Google, но вы можете использовать и другой DNS-сервер. Посмотрите лучший DNS-сервер для игр .
Метод 3 — Очистка кэша/куки
Помните, что перед тем, как попробовать этот метод, убедитесь, что вы попробовали первый и второй методы. В этом методе вам нужно очистить кэш и куки, а также данные просмотра. Для этого просто нажмите на значок параметров на панели инструментов и выберите Настройки. Затем прокрутите страницу вниз и нажмите на Расширенные настройки. В разделе Конфиденциальность и безопасность нажмите на Очистить данные просмотра.

Кроме того, вы можете попробовать отключить дополнения, потому что они могут быть возможной причиной ошибки DNS Lookup Failed. Это может устранить проблему. Если ошибка все еще существует, вы можете использовать режим приватного просмотра. Это также может быть альтернативным решением проблемы.
Наконец, вы должны выработать привычку регулярно обслуживать свою систему. Когда существует постоянная проблема вредоносных программ и вирусных атак, поврежденных данных, проблема поиска DNS является одним из последствий. Эта ошибка часто возникает из-за того, что вы не обслуживаете свой компьютер на регулярной основе, и происходит сбой DNS Lookup Failure.
YouTube video: 3 способа исправить ошибку dns lookup failed
.
Check the browser cookies and cache or switch to a public DNS server
by Matthew Adams
Matthew is a freelancer who has produced a variety of articles on various topics related to technology. His main focus is the Windows OS and all the things… read more
Updated on August 11, 2022
Fact checked by
Alex Serban

After moving away from the corporate work-style, Alex has found rewards in a lifestyle of constant analysis, team coordination and pestering his colleagues. Holding an MCSA Windows Server… read more
- Users reported getting DNS lookup failed errors when using their browsers.
- If you too encountered this error message, clear the browser cookies and cache, or flush the DNS, amongst other methods here.
- Also, find out how to find the DNS server in Windows.
- Easy migration: use the Opera assistant to transfer exiting data, such as bookmarks, passwords, etc.
- Optimize resource usage: your RAM memory is used more efficiently than in other browsers
- Enhanced privacy: free and unlimited VPN integrated
- No ads: built-in Ad Blocker speeds up loading of pages and protects against data-mining
- Gaming friendly: Opera GX is the first and best browser for gaming
- Download Opera
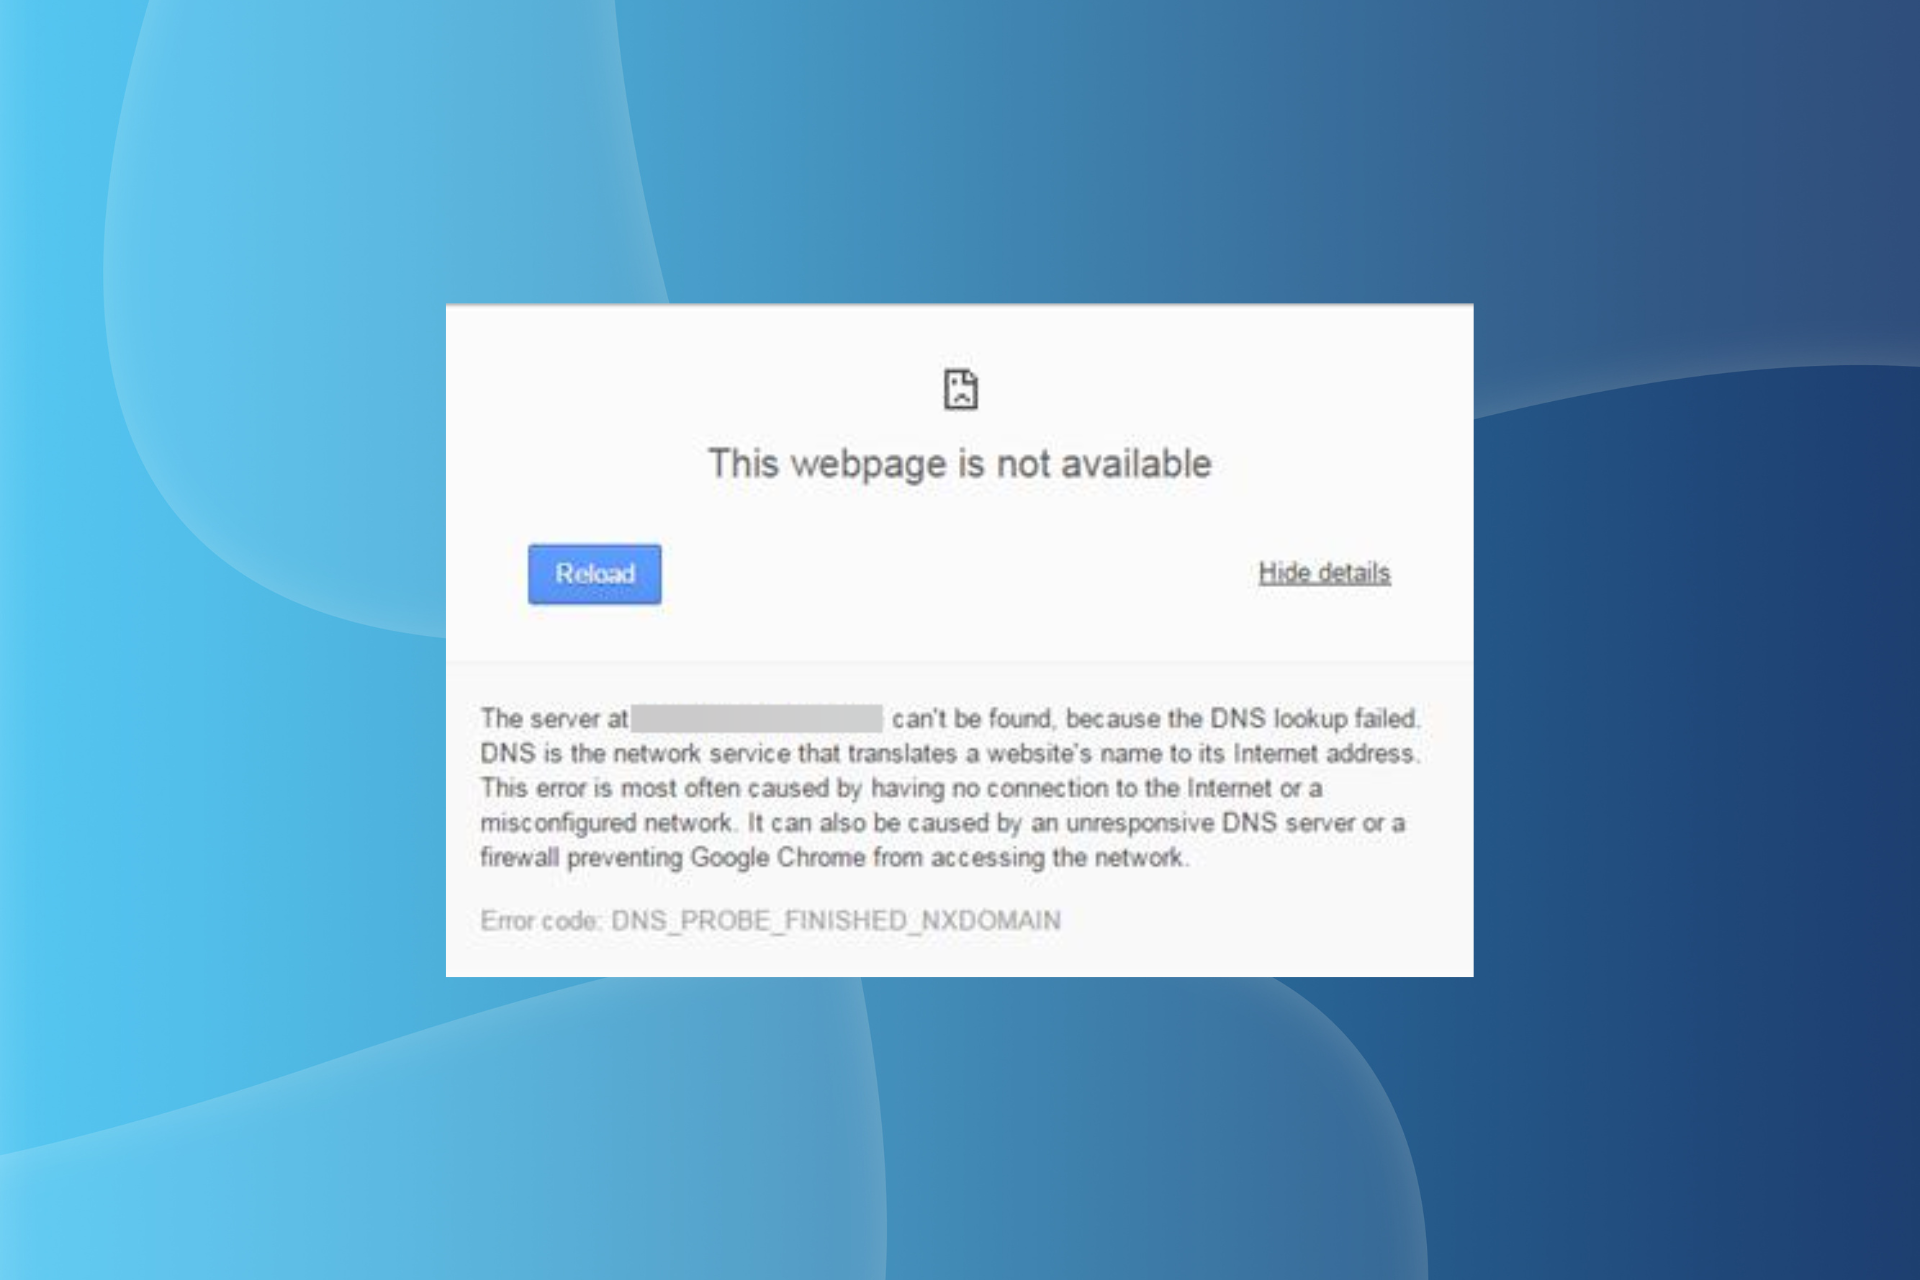
The DNS lookup failed message on the browser is a net connection error. The Google Chrome error message states This webpage is not available. The server at… can’t be found, because the DNS lookup failed.
The error message prevents users from accessing the website, but it, in most cases, doesn’t have to do with the website at all. Rather, the error is related to misconfigured browser settings, the presence of conflicting applications, or issues with the current DNS server.
Many came across the error in these cases:
- 504 DNS lookup failed FortiGate: Users with the FortiGate firewall have reported encountering the error frequently, and disabling the firewall did the trick.
- DNS lookup failed VPN: When encountering the error while using a VPN, switching to a reliable VPN should fix the error.
So, let’s find out how you can fix the DNS lookup failed error on your browser in the following sections, and all about the error itself.
What does it mean when DNS failed?
A DNS failed error basically indicates the inability to connect to the corresponding IP address of the website. It could be to problems with the DNS server itself, misconfigured network settings, or third-party applications conflicting with it.
In most cases, the solutions are simple and things are up and running in a jiffy. Many recommend switching to public DNS servers, such as that of Google, to eliminate errors like these.
Quick Tip:
If Google Chrome persists in showing you the error message even after you tried all troubleshooting solutions, you should try using a different browser instead. Opera is a great alternative.
Not only is it incredibly powerful and lightweight, but it is also extremely stable, receiving updates after updates that are constantly maintained in peak condition.
Opera
A web browser that balances out stability, performance, a high level of customization, and low system requirements.
Why do we need DNS?
Every website on the Internet is assigned an address, which consists of a string of numbers and characters. To simplify things for users, websites are also assigned a domain name. For instance, https://windowsreport.com/, is the domain name and not the IP address.
Now, while people understand the domain name, computers, on the other hand, use the assigned IP address.
This is where the DNS (Domain Name System) server comes into the picture. When you enter the domain name in the address bar of the browser, it locates the corresponding IP address and opens the website. And when the DNS fails, the website won’t open.
What to do if the browser stops working after DNS fail?
1. Clear cookies and cache

NOTE
The steps listed here are for Chrome, but the concept and the keyboard shortcut to launch the utility remains the same for all major browsers.
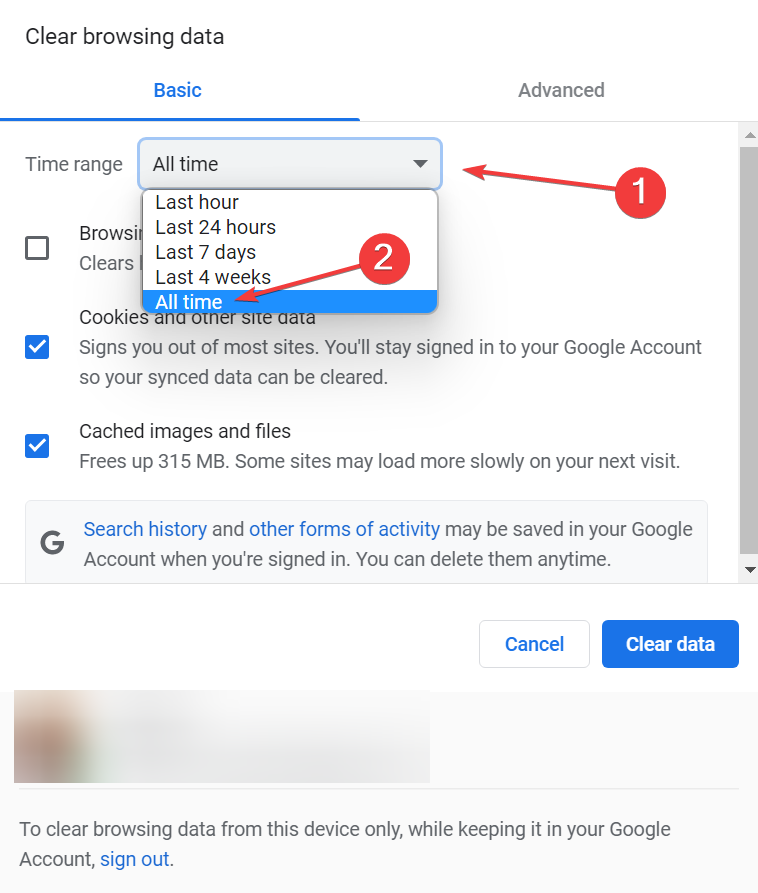
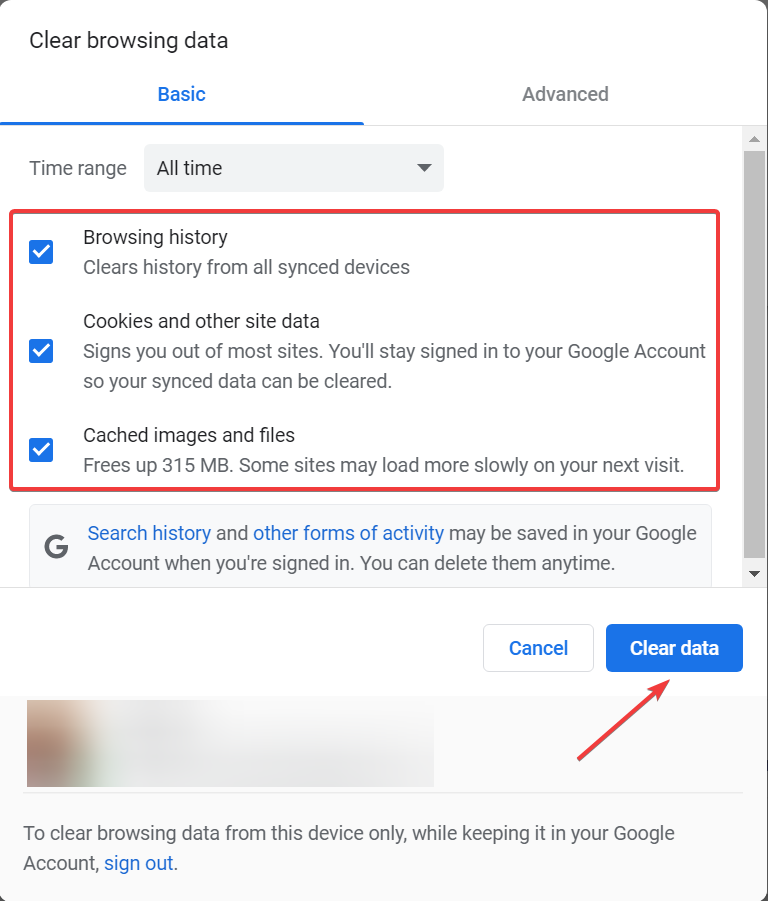
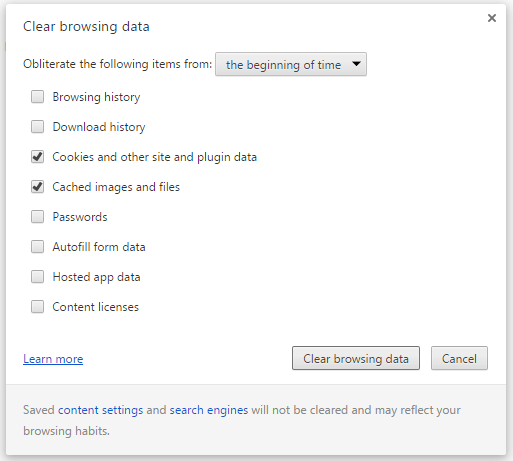
- Launch the browser, and press Ctrl + Shift + Del to open the Clear browsing data utility.
- Select All time from the Time range dropdown menu.

- Select the checkboxes for Browsing history, Cookies and other site data, and Cached images and files, and then click on Clear data at the bottom.

Some PC issues are hard to tackle, especially when it comes to corrupted repositories or missing Windows files. If you are having troubles fixing an error, your system may be partially broken.
We recommend installing Restoro, a tool that will scan your machine and identify what the fault is.
Click here to download and start repairing.
If the manual method seems like too much of a hassle, you could always opt for a third-party PC cleaner. This type of tool will scan your browser for unnecessary clutter and let you know what can be removed.
Alongside cleaning your browser, dedicated cookie cleaners generally include other PC optimization tools such as registry cleaners and startup editors.
On top of that, some browser cleaners will help you remove unwanted toolbars and plugins, remove spam/useless emails, and more.
We recommend CCleaner from the list of software we tested, which performs thorough cleaning, as one of the best tools for this task.
CCleaner makes it simple to get the most out of your computer because PC maintenance has to be at the top of the priority list. Furthermore, if you can tune up your computer on a regular basis, you’ll be more satisfied with its overall performance.
Once done, check if the DNS lookup failed error on the browser is fixed.
2. Open the Internet Connections Troubleshooter
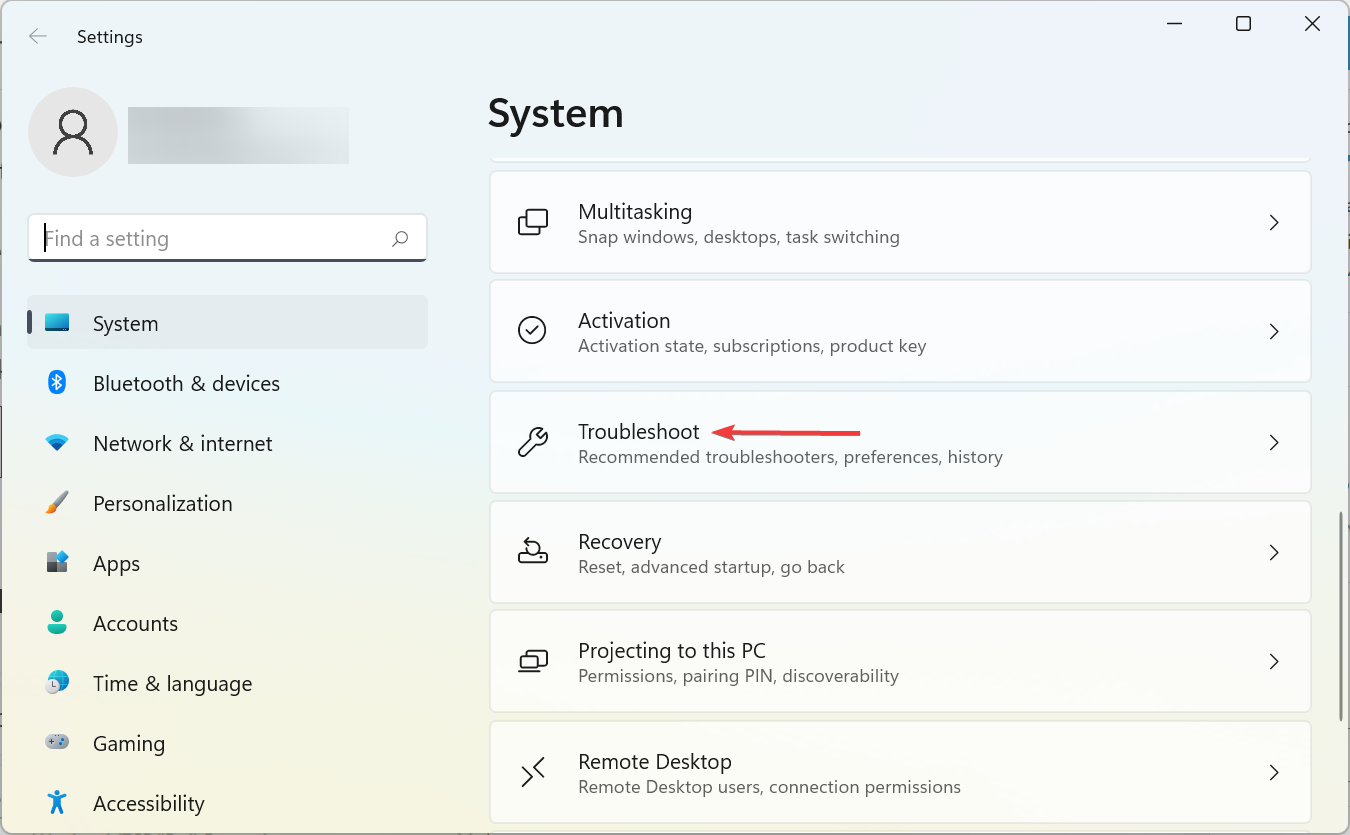
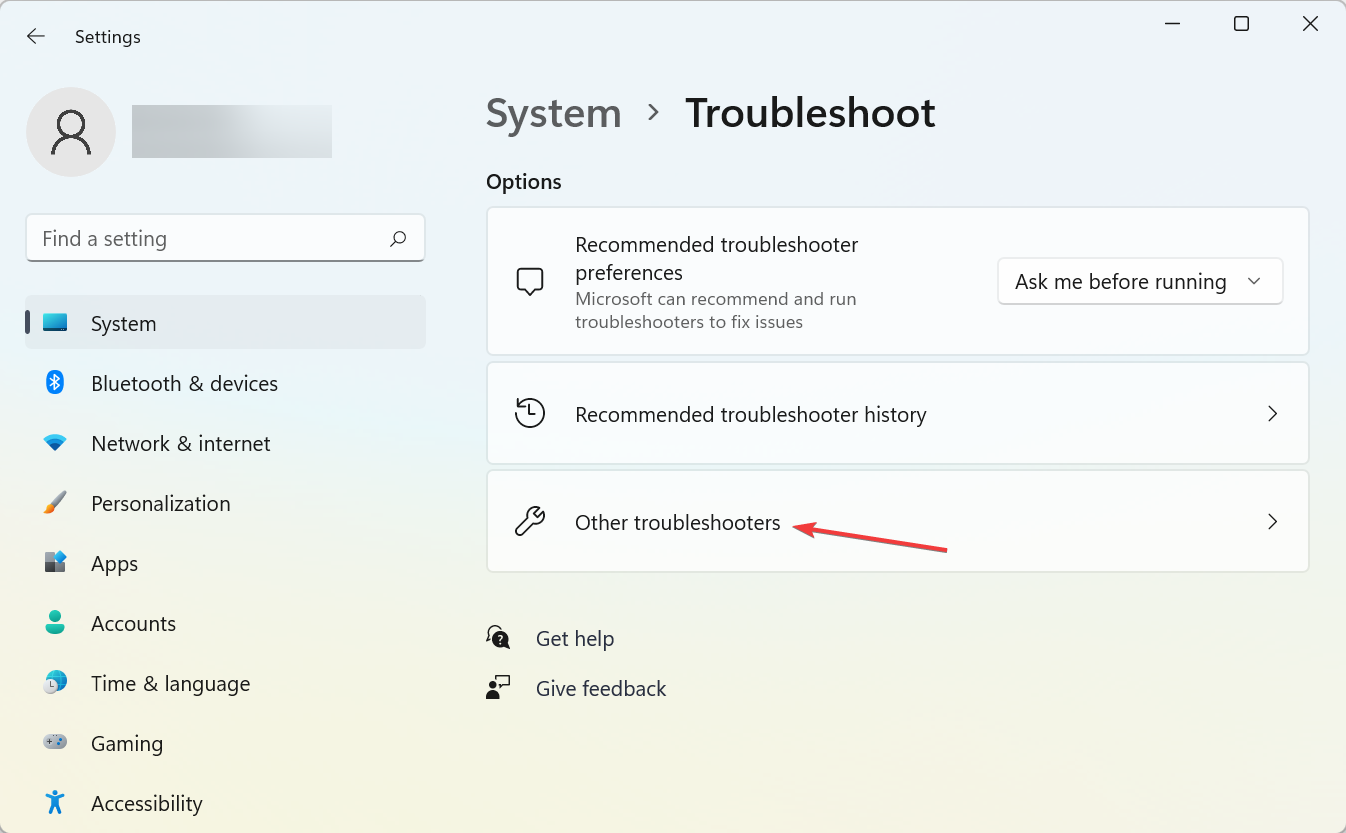
- Press Windows + I to open the Settings app, and click on Troubleshoot on the right.

- Next, click on Other troubleshooters.

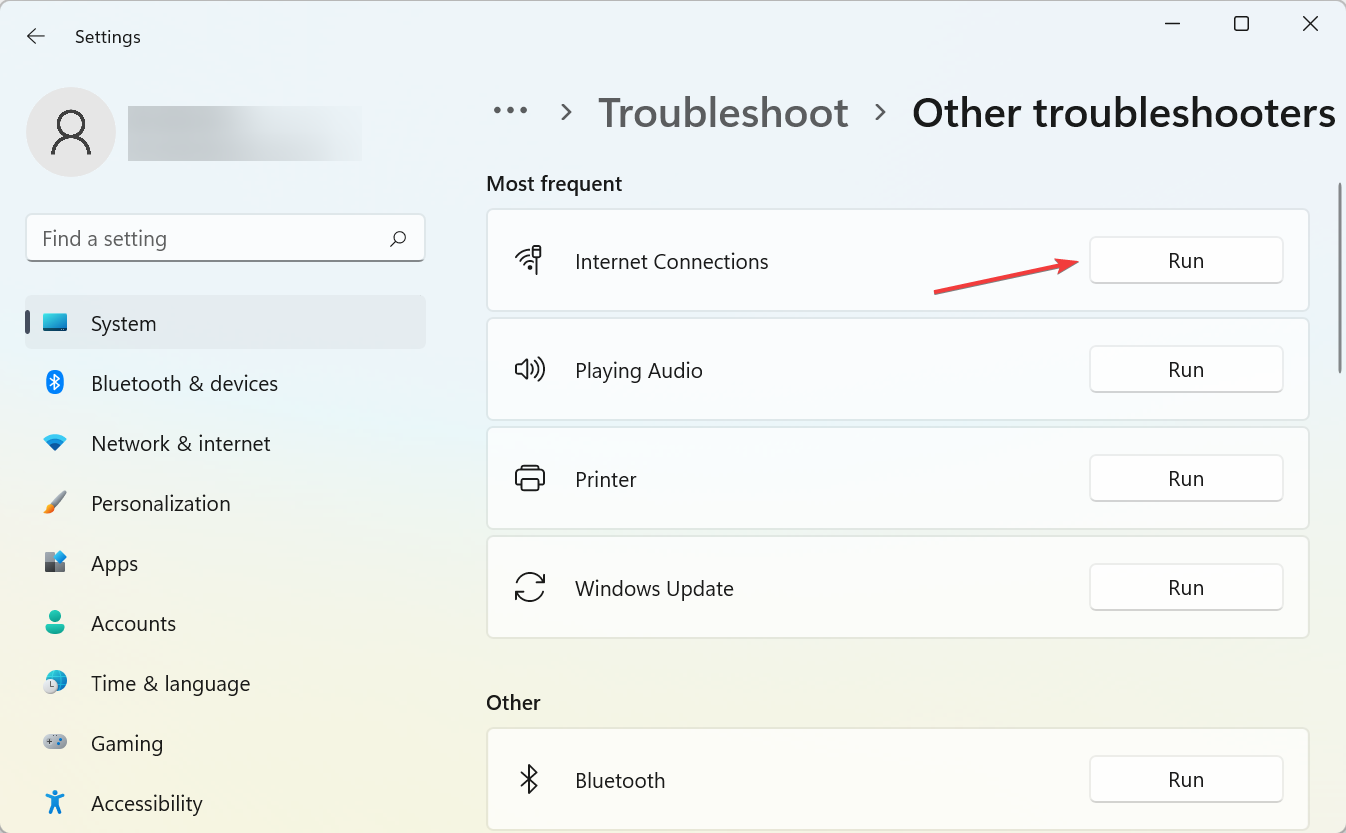
- Locate the Internet Connections option here, and click on the Run button next to it.
- Then go through the suggested resolutions from the troubleshooter.
Once done, check if the DNS lookup still fails intermittently on the browser. If that’s the case, head to the next method.
3. Change the DNS Server
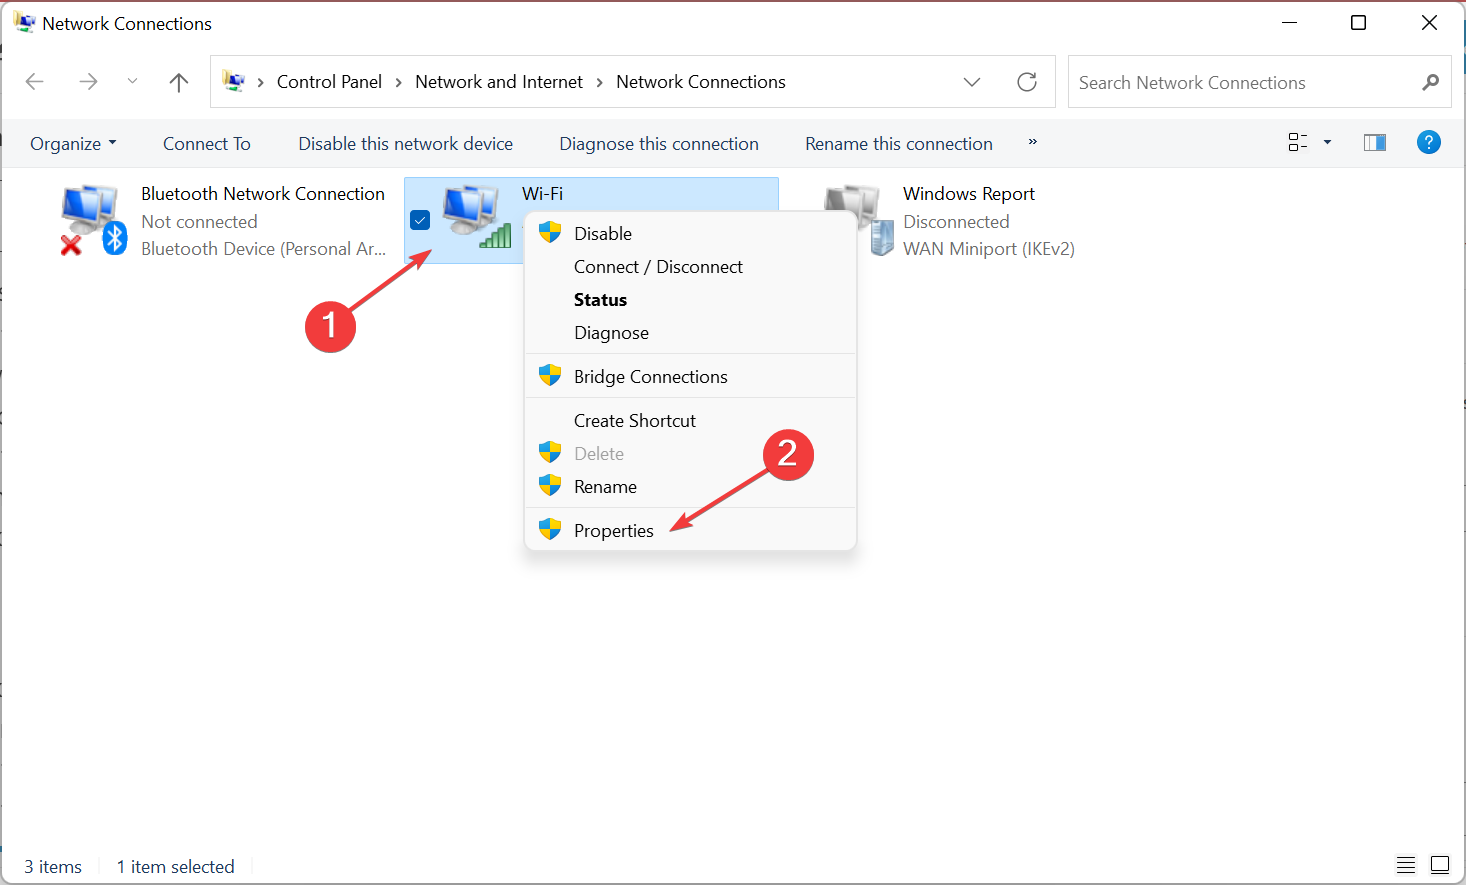
- Press Windows + S to launch the Run command, enter ncpa.cpl in the text field, and click OK.

- Right-click the active connection to select Properties.

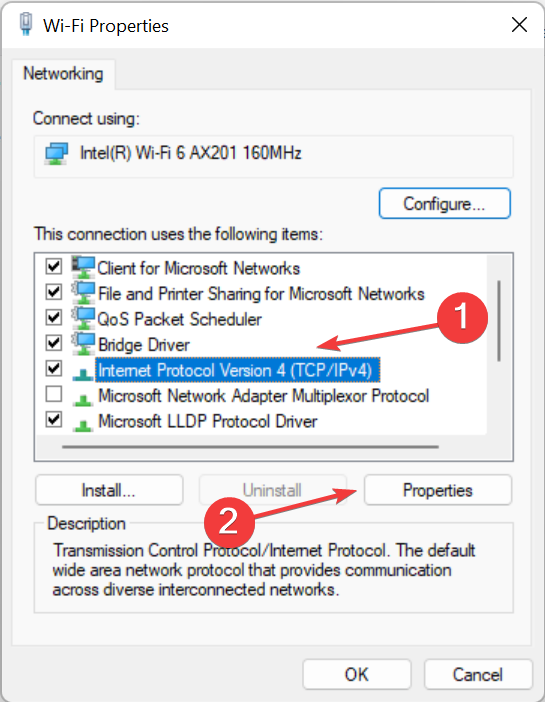
- Now, select Internet Protocol Version 4 (TCP/IPv4), and click the Properties button.

- Select the Use the following DNS server addresses radio button, and enter the following DNS server in the two fields:
- Preferred DNS server: 8.8.8.8
- Alternate DNS server: 8.8.4.4

- Click the OK button at the bottom of this and other windows to save the changes.

4. Flush the DNS
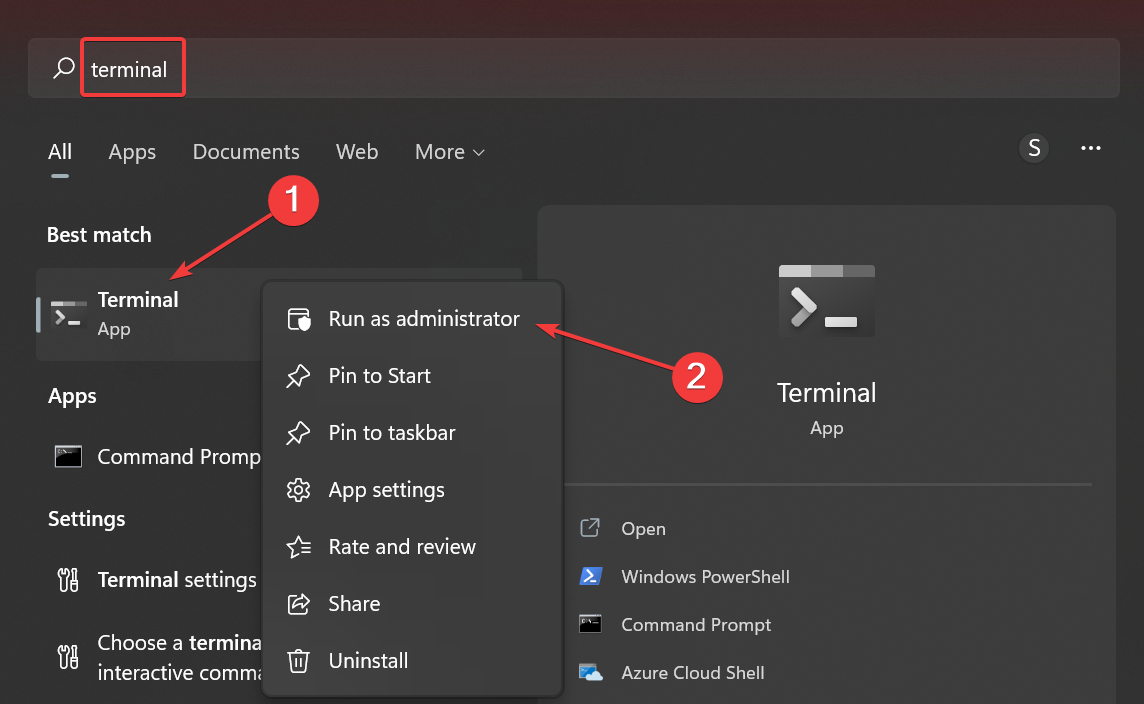
- Press Windows + S to open the Search menu, enter Terminal in the text field, right-click on the relevant search result, and select Run as administrator.

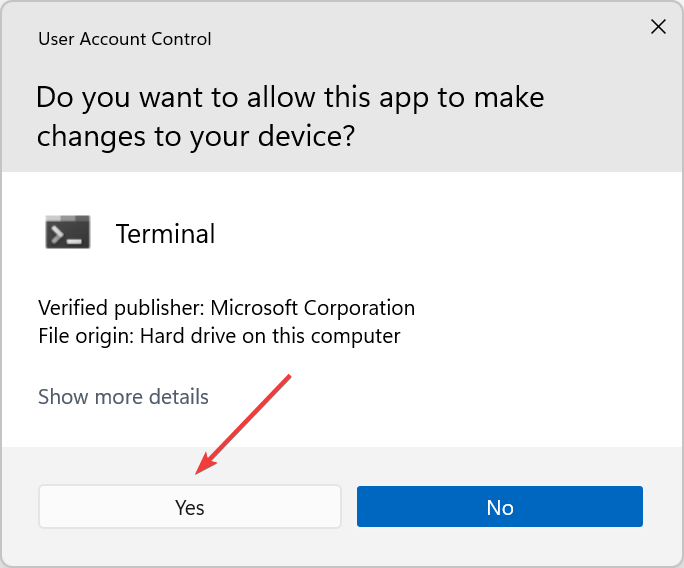
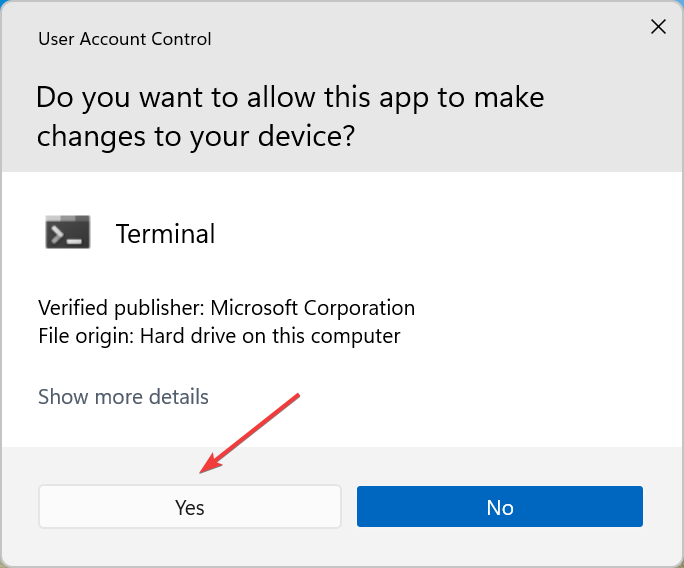
- Click Yes in the UAC prompt.

- Press Ctrl + Shift + 2 to open Command Prompt in a new tab.
- Now, paste the following command and hit Enter:
ipconfig /flushdns
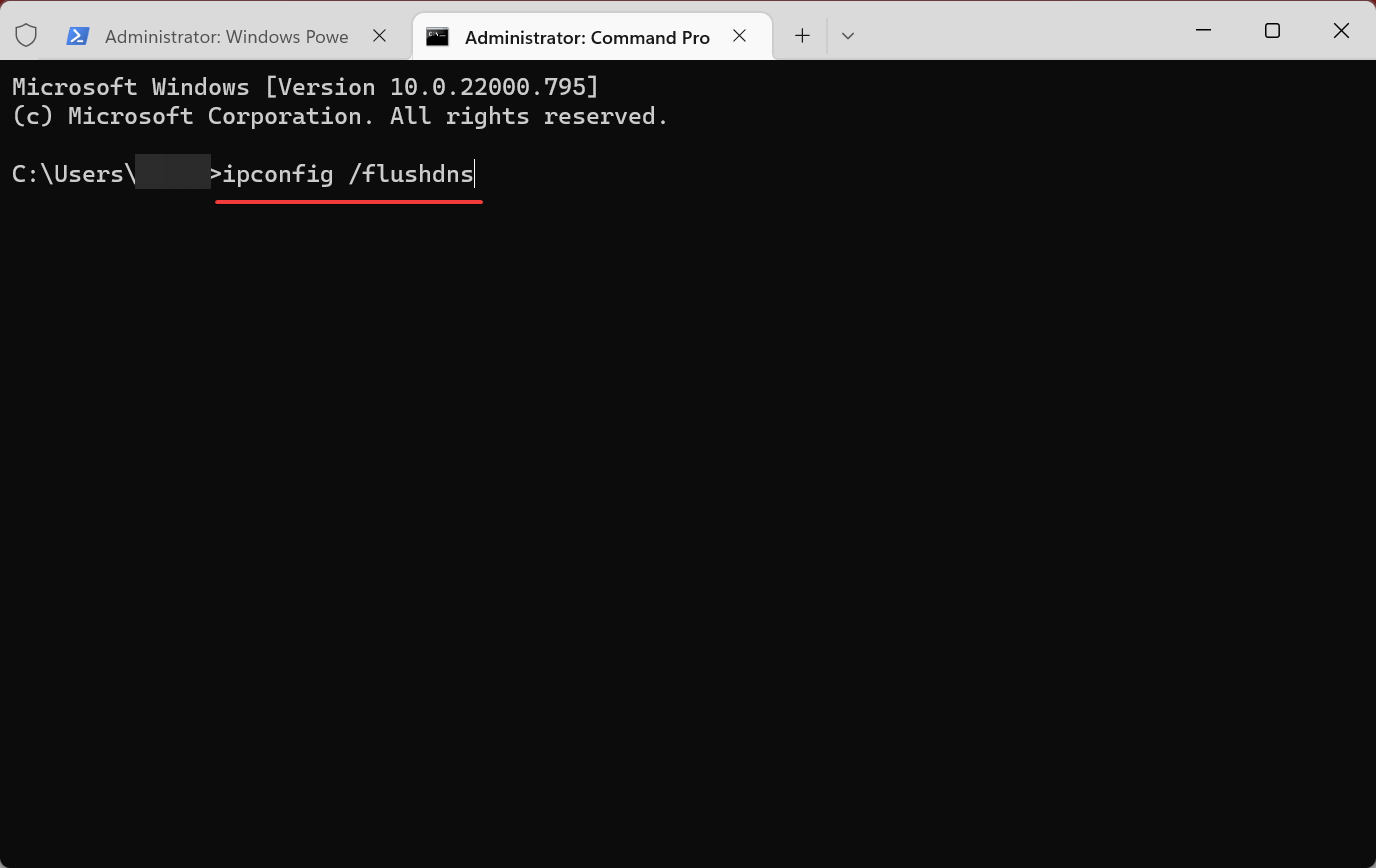
Flushing the DNS cache is a straightforward potential resolution for the DNS lookup failed error on browsers.
5. Restart the Network Stack
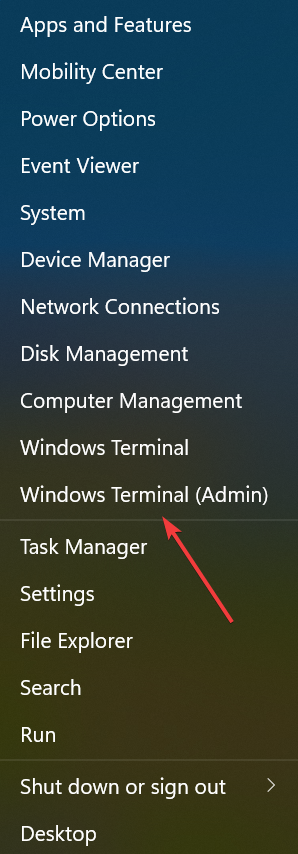
- Press Windows + X to open the Quick Access menu, and select Windows Terminal (Admin).

- Click Yes in the UAC prompt.
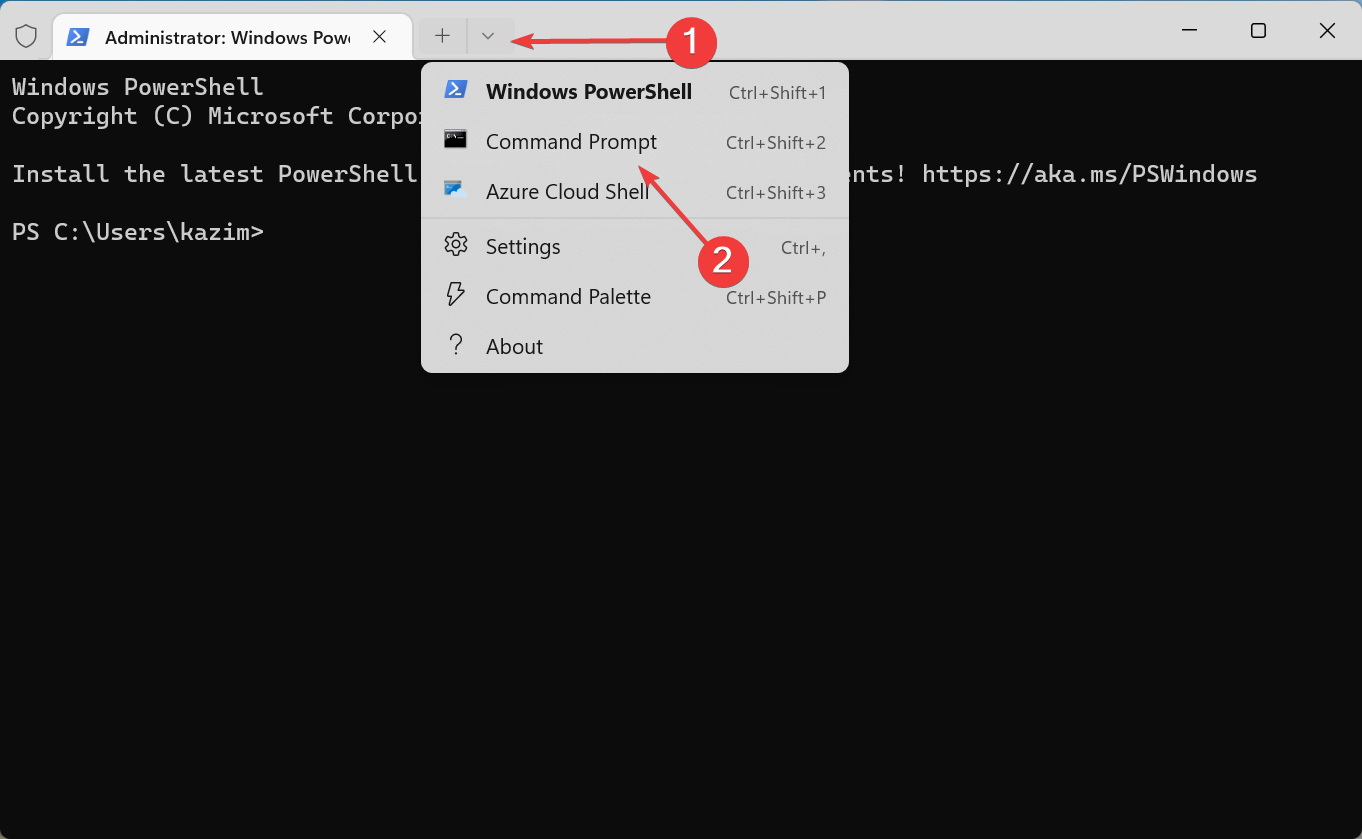
- Click on the arrow at the top, and select Command Prompt from the menu.

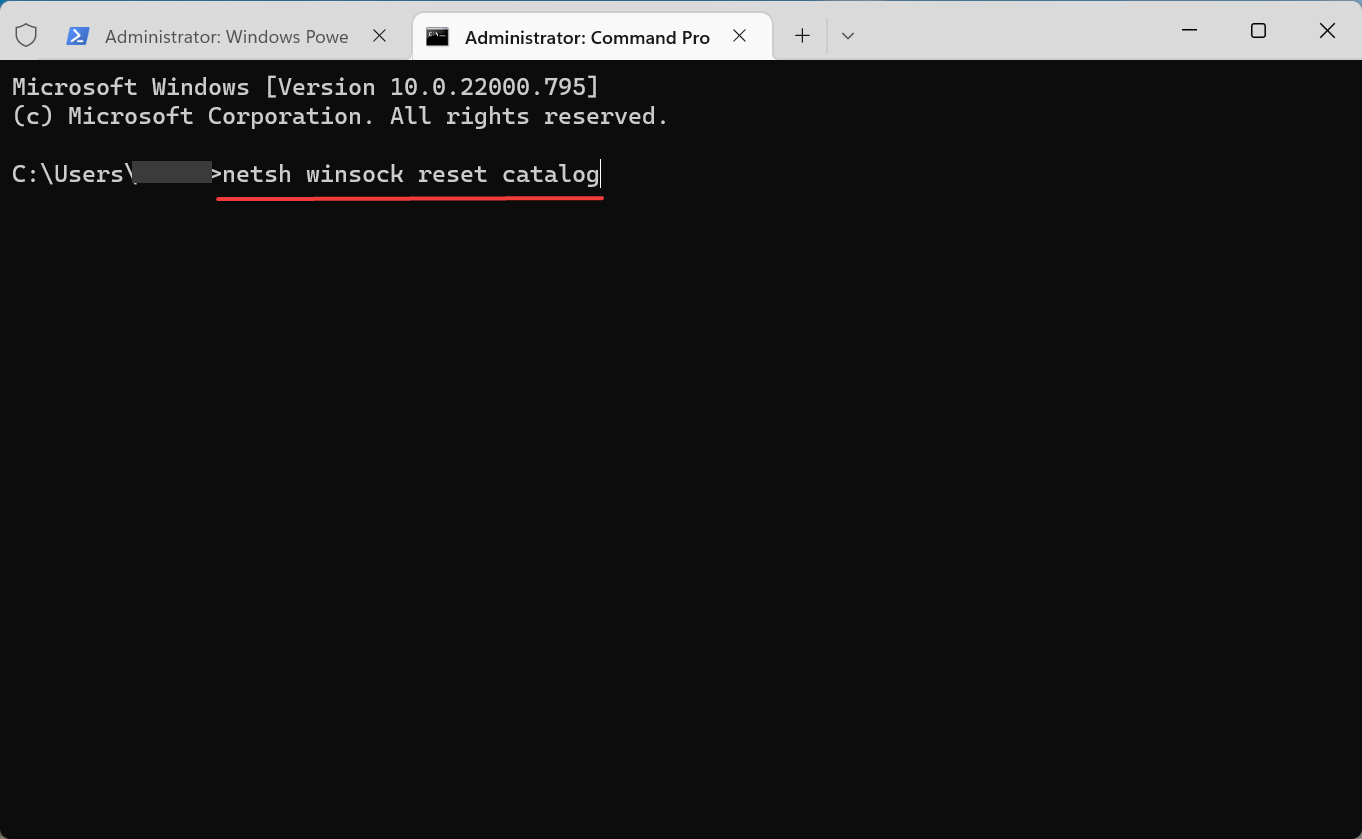
- Now, paste the following command and hit Enter:
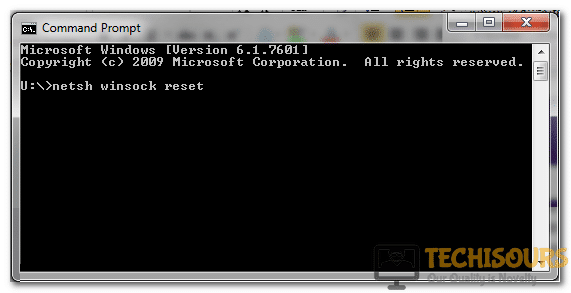
netsh winsock reset catalog - Once done, restart the computer for the changes to come into effect.
Some users might need to restart a corrupted network stack to fix the DNS lookup failed error on the browser.
How do I find my DNS server?
- Press Windows + R to open Run, type ncpa.cpl in the text field, and click OK.
- Now, double-click on the active network adapter.
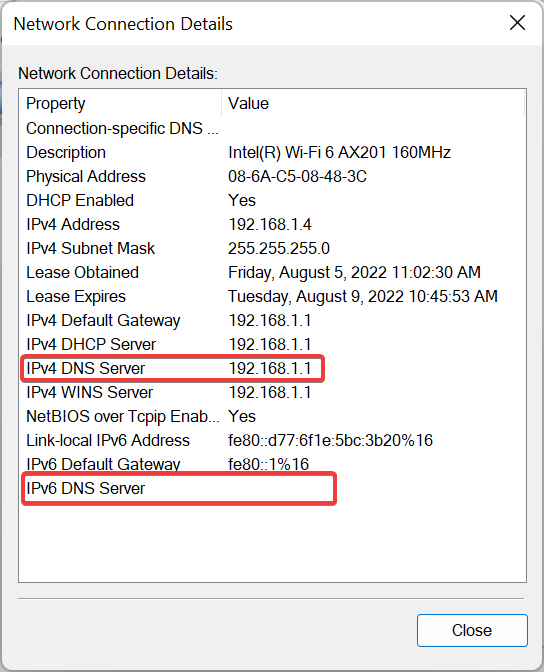
- Click on Details.

- You will now find the DNS server listed here.


The above resolutions will probably resolve the DNS lookup failed error for most users so that they can open webpages in Chrome and other browsers, whenever the error is encountered
Also, find out what to do when seeing the Your DNS server might be unavailable error message in Windows 10/11.
Tell us which fix worked for you in the comments section below.
![]()
Newsletter
DNS Lookup Failed is actually quite a common error that is being faced by a lot of Chrome users. However, the error isn’t restricted to just Chrome, there have been instances on Mozilla Firefox and other browsers as well. In this article, we have compiled solutions, workarounds, and fixes that will help you to completely get rid of the error message.

Also, we have acquired some information as to why it occurs in the first place and have also listed the reasons below. Make sure to read through the reasons why it occurs and then start implementing the solutions one-by-one until one of them fixes this error message for you.
What Causes the DNS Lookup Failed Error?
After going through certain solutions and workarounds, we came to the conclusion as to why this error is triggered in the first place.
- Network Issue: It is possible that your Network is being glitched or it is bugged due to which the DNS lookup Failed error is being triggered. Therefore, we suggest that you try and fix the network issues by running the troubleshooter as mentioned below.
- IP Address: Sometimes, the IP address might be blocked on the DNS server or it might have gotten blacklisted due to suspicious activities. Therefore, we suggest that you try and get around this error by trying to change your IP address.
- DNS cache: The DNS cache being stored on your computer can sometimes be corrupted which can end up causing the DNS loop failed issue. Therefore, we strongly suggest that you try and clear it out by flushing it completely.
- Chrome Extensions: The Chrome browser might have some faulty extensions installed due to which the connection might get derailed. Therefore, we suggest that you try and disable the Chrome extensions as mentioned below. The same goes for other browsers as well, you can try to block extensions and then check if doing so fixes the issue.
Now that we have taken you through almost all the listed reasons, it is about time that we start implementing the solutions.
Fixing the DNS Lookup Failed Issue:
Solution 1: Use Network Troubleshooter
Running the Network Troubleshooter might very well resolve the issue. Follow the steps below to access it:
- Press the “Windows + I” buttons on your keyboard simultaneously to open the settings.
- Once in the Windows Settings, click on the “Network & Internet” option.

Network and Internet - Now select “Network Troubleshooter” under Advanced Network Settings. After diagnosing is complete, the troubleshooter should display solutions in case any problems were found.

This should help resolve any possible issues with network settings and might resolve the DNS Lookup Failure error.
Solution 2: Reset Your IP Address
Turn off your Modem and turn it back on after 30 seconds. This should change your IP Address and possibly resolve the DNS Lookup Failed issue as well. While waiting to turn the modem back on, you should restart your computer as well.

Solution 3: Flush the DNS Cache
Flushing the DNS cache can potentially fix the DNS lookup failure error, follow the method below to do so:
- In the search bar near the Start menu type in “CMD”, and right-click on “Command Prompt” to select “Run As Administrator”.

Select Run As Administrator From The Command Prompt - Once the Command Window opens, type in the following commands and press “Enter” on your keyboard after each command:
ipconfig /flushdns
ipconfig /renew
ipconfig /registerdns

Flushing DNS - Check to see if doing so fixes the DNS lookup Error.

Solution 4: Change the DNS Server
Another possible fix is to change the DNS Server address. To do this you must follow the below-indexed steps:
- Press the “Window + R” keys together to open up the “Run” dialog box.
- In the Run prompt, type in “ncpa.cpl” and press “Enter” to open up the Network Connections window.

Typing in “ncpa.cpl” - Your current network connection will now be visible to you, right-click on it and select “Properties”.
- Now select “Internet Protocol Version 4 (TCP/IPv4)” and click on “Properties”.
- Choose the option that says “Use the following DNS server addresses” and type in the fields below.

Use the following DNS server addresses - Type in “8.8.8.8” in the Preferred DNS Server and “8.8.4.4” in the Alternative DNS Server box.
- Click on the “OK” button and close the other windows.
- Check to see if the DNS lookup Failed error is fixed.

Solution 5: Reset the Winsock Catalog
If the above fixes did not work for you, try resetting your Network Stack by following the steps below:
- In the search bar near the Start menu type in “Run” and press “Enter”.
- In the Run dialogue box, type in “cmd” and on your keyboard press and hold the following buttons in order: “Ctrl + Shift + Enter”.
- This should run the Command Prompt window as “Administrator”.
- Once the Command Window opens up, type in the following command and press “Enter”.
netsh winsock reset catalog

Type netsh winsock reset In Command Prompt - Press “Enter” and then “Restart” your computer.
Solution 6: Disable Chrome’s Extensions
Some extensions might mess up your browser function. To rule out the possibility of an extension causing the error, we are going to disable all the extensions by following the procedure below:
- In the search bar of Chrome, type in “chrome://extensions” and press “Enter”.
- You will now see all of your installed extensions. “Disable” all of them one by one.

Disable Chrome Extensions - Afterward “Restart” your browser.
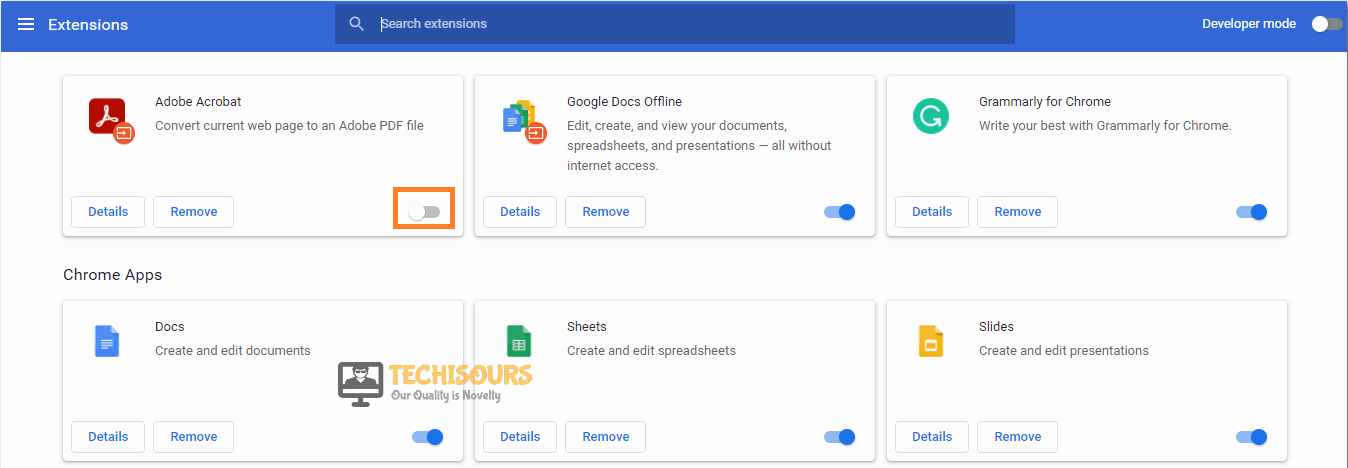
If this resolved your issue, this means there is an extension that is causing the DNS Lookup Failure error. To figure out the culprit, enable the extensions one by one again until you come up with the issue again.
Solution 7: Clear Chrome’s Browsing Data
The other thing that you can try is to clear Chrome’s data as chances are it might resolve the issue as well.
- Click on the 3 dots at the top-right corner in Google Chrome that says, “Customize and Control Google Chrome”
- From the drop-down menu hover your mouse over to the option “More Tools” and then click on “Clear Browsing Data”

Clear Browsing Data Option - Now go to the “Advanced” tab and change the time range to “All Time”.
- Tickmark “Browsing History”, “Cookies” and “Cached Images and Files” checkboxes.
- Now click on the “Clear Data” button.

Solution 8: Change Your Browser
Once all the above fixes fail and the issue persists you should consider changing your browser. We would suggest switching to “Opera” as it is a very stable browser and has tons of built-in features and tools that can prove useful at times.
Solution 9: Disable Proxy (Firefox Users only)
Firefox users who encounter DNS Failure error can follow the method below to resolve the issue:
- Launch Firefox Browser and click on the three horizontal lines at the top right corner that says “Open Application Menu” and select “Options”.

Clicking on “Options” in Firefox - Here, scroll down to the bottom at “Network Settings” and click on the “Settings” option.

Network Settings Firefox - In the pop-up Connection Settings window select the “No Proxy” option under Configure Proxy Access to the Internet.
- Click “OK” to save the changes.
- “Restart” your browser and hopefully, the issue will be resolved now.


Hopefully, by following all of the above fixes you might be able to get rid of the error easily but if it continues to stay then you may Contact Us here for further help.
Stuck with a Docker image DNS lookup error? Fear not, our Support Team is here with a solution.
At Bobcares, coming up with solutions for queries, big and small is a part of our Server Management Services.
Let’s take a look at how our Support Team resolved the DNS lookup error today.
About DNS lookup errors
Have you been experiencing a number of obscure errors with your applications?? This might be due to Docker’s internet connectivity issues. According to our Support Tech, this may be a result of failing DNS lookups. Resolving this issue will also help you bid adieu to the pesky docker image DNS lookup error.
Narrowing down docker image DNS lookup error
First, we will check the basic internet connectivity by pinging a public IP address. If it succeeds, you will get a similar output as seen below:
$ docker run busybox ping -c 1 192.203.230.10 # Ping a London-based NASA root nameserver PING 192.203.230.10 (192.203.230.10): 56 data bytes 64 bytes from 192.203.230.10: seq=0 ttl=53 time=113.866 ms --- 192.203.230.10 ping statistics --- 1 packets transmitted, 1 packets received, 0% packet loss round-trip min/avg/max = 113.866/113.866/113.866 ms
After that, let’s try resolving google.com domain as shown below:
$ docker run busybox nslookup google.com
Server: 8.8.8.8
Address 1: 8.8.8.8 nslookup: can't resolve 'google.com'
If you get a “can’t resolve” message as seen above, it indicates a problem with resolving DNS.
Why does docker image DNS lookup error occur?
Before we dive into resolving the issue, let’s take a look at why the DNS lookup errors keep occurring. In fact, a DNS server that is locally defined in the /etc/resolv.conf file, containers by default, use 8.8.8.8, Google’s public DNS server to resolve DNS.
Hence, the error occurs, then this process is interrupted. Interestingly, in some places, network administrators intentionally block public DNS servers to ensure that the network’s own DNS server is used instead.
In such cases, Docker containers that rely on the default configuration are unable to resolve DNS. Thereby making the internet unusable from within those containers.
Quick fix for docker image DNS lookup error
Our Support Engineers have come up with a quick fix to ensure that the docker container runs with a custom DNS server.
- First, we will track down the address of the DNS server from within Ubuntu with the following command:
$ nmcli dev show | grep 'IP4.DNS'
IP4.DNS[1]:                       10.0.0.2
- Then, we will run a docker container with the DNS server obtained in the previous step. We will include the –dns flag as well with the command as seen below:
$ docker run --dns 10.0.0.2 busybox nslookup google.com
Server: 10.0.0.2
Address 1: 10.0.0.2
Name: google.com
Address 1: 2a00:1450:4008:811::200e lhr26s02-in-x200e.1e100.net
Address 2: 216.58.198.173 lhr25s10-in-f14.1e100.net
Permanent fix for docker image DNS lookup error
If you prefer a more permanent fix, our Support Engineers have that covered as well.
- First, we will change the DNS settings of the Docker daemon by creating the daemon configuration file at /etc/docker/daemon.json.
- Then, configure the daemon configuration file with a set of two DNS, namely, the network DNS server and the Google DNS server. The latter works as a backup in case the network DNS server is not available.
/etc/docker/daemon.json: { "dns": ["10.0.0.2", "8.8.8.8"] } - After that, restart the docker service with the following command:
sudo service docker restart
You can test this fix by pinging google.com from any Docker container without having to override the DNS server. For instance:
$ docker run busybox nslookup google.com
Server: 10.0.0.2
Address 1: 10.0.0.2
Name: google.com
Address 1: 2a00:1450:4008:811::200e lhr26s02-in-x200e.1e100.net
Address 2: 216.58.198.173 lhr25s10-in-f13.1e100.net
[Need a hand with another query? Give us a call today.]
Conclusion
At the end of the day, we learned how to resolve the DNS lookup error. The Support Team at Bobcares offered us a quick fix as well as a more permanent fix to resolve the issue.
PREVENT YOUR SERVER FROM CRASHING!
Never again lose customers to poor server speed! Let us help you.
Our server experts will monitor & maintain your server 24/7 so that it remains lightning fast and secure.
GET STARTED
Disclaimer: This post may contain affiliate links, meaning we get a small commission if you make a purchase through our links, at no cost to you. For more information, please visit our Disclaimer Page.
Have you ever encountered DNS Lookup Failed error in Google Chrome? Do you know what this error is and how to fix it?
Nowadays, Microsoft’s Windows is a popular operating system that has installed and running on billion computers and devices.
However, it also has a few annoying errors that always repeat over and over and over again, such as DNS or BSOD errors. In Google Chrome, the DNS Lookup Failed is one of the most common errors, along with Err_Connection_Reset or Err_Name_Not_Resolved.
This error occurs because something happened to your DNS servers, such as DNS servers were timed out, or could not connect to DNS servers somehow.
Sometimes, this error occurs because your computer uses wrong DNS information. Also, expired caches could also cause DNS Lookup Failed error on your Google Chrome browser.
When it happens, you can’t use your Chrome browser to load any websites. It is a very annoying error, right?
However, this error is very easy to fix with a few simple steps. In this article, I will show you a few simple solutions you can follow and resolve DNS Lookup Failed error on your Google Chrome browser.
As I said above, if DNS servers are timed out, DNS Lookup Failed error could appear on your Chrome browser.
By default, Windows PC (or any other operating systems, such as Mac OS or Linux) will automatically be pulled DNS details directly from the ISP (Internet Service Provider) and use them as default DNS servers.
However, these DNS servers are not stable and always time out. When it is timed out, it could lead to DNS errors.
In order to fix it, you just need to replace the default DNS server on your computer with a third-party DNS service, like Google’s DNS or OpenDNS. Both are excellent alternative DNS server services that recommended by many regular users and experts.
How To Change Default DNS Server On Your Computer
In order to change the default DNS server on your Windows computer, open Network and Sharing Center by right-clicking “Network icon” in the taskbar notification area, and then click “Open Network and Sharing Center”.

Next, click on the currently connected network adapter and select Properties.
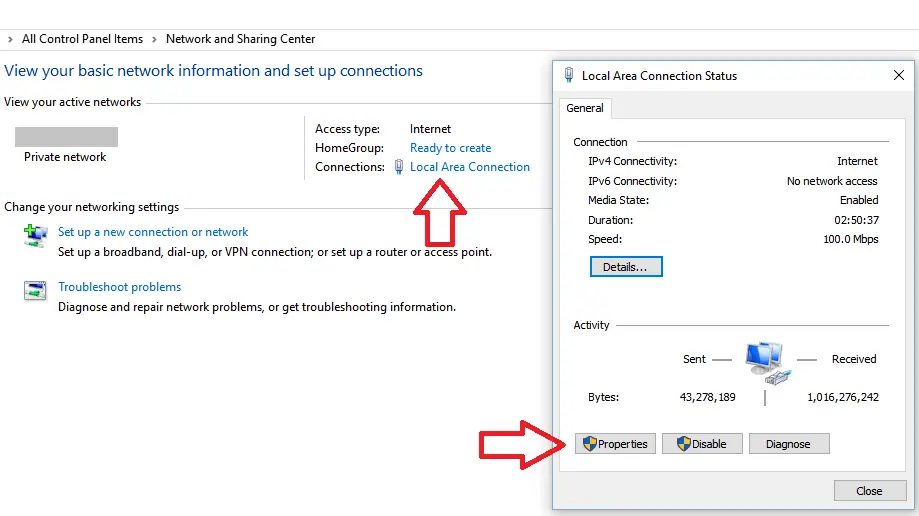
In the next step, click on the “Internet Protocol Version 4 (TCP/IPv4”. It will show you two boxes to enter DNS servers you want to use. Take a look at the image below.
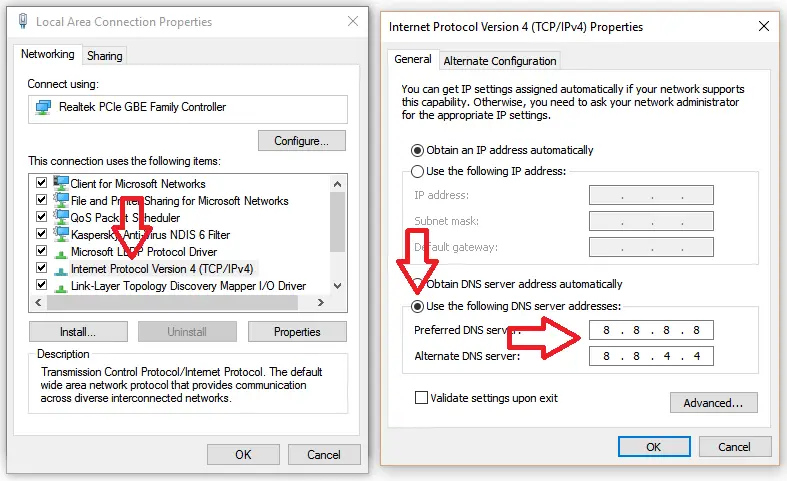
I often use Google’s DNS service with the following IP addresses: 8.8.8.8 and 8.8.4.4. Just fill up two boxes with these IP addresses and the error should be fixed immediately.
This method can also help you to fix many other DNS errors on your Windows computer, including Dns_Probe_Finished_Nxdomain and Dns_Probe_Finished_Bad_Config.
If you are facing any DNS errors, you should also try this solution.
Clear DNS Cache On Your Computer To Fix DNS Lookup Failed Error
If you have tried the method above, but the error persists, you can try to remove all DNS caches on your Windows PC with a simple command in Command Prompt.
As I mentioned above, wrong DNS information or expired DNS caches could be a cause of this DNS error. So if you want to fix it, just flush all DNS caches on your Windows computer.
In order to remove all DNS caches:
- Click on Start logo.
- Type cmd.exe in the Run dialog box.
- Right-click on the cmd.exe.
- Choose “Run as Administrator” to open Command Prompt program with administrator privilege.
- In Command Prompt program, type ipconfig /flushdns and press Enter.
That’s it!
To increase the successful percentage of this solution, you should also remove all caches and cookies of your Google Chrome browser. If you don’t know how to do that, read this article.
I hope you have fixed DNS Lookup Failed error on your Chrome browser with these methods. These solutions also help you to understand more about DNS errors and resolve other DNS problems.
Related posts:
Attention Before you read this post, I highly recommend you check out my resources page for access to the tools and services I use to not only maintain my system but also fix all my computer errors, by clicking here!
This post looks at the DNS lookup error, encompassing solutions, and a general overview of what a DNS is.
The definition of the DNS or Domain Name System is that of a hierarchical setup for services, nodes and resources that are tied to a private network or the internet. Through this system, internetworked information is distributed amongst peers using this domain name system. However, the most important aspect of its functionality is its ability to translate a meaningful domain name into binary or numerical identifiers which is better understood by network devices for the sole purpose of globally finding and addressing these specific devices.
The Domain Name System functions similarly to a phone directory or rather internet directory, in that it translates user created hostnames into IP addresses. An example of this would be the translation of www.example.com into an IP address which is constructed in the following format “XXX.XXX.XXX.XXX” where XXX donates a number from 1 to 255.
If, when attempting to access a site you receive the following message “lookup error” or “webpage is unavailable”, then there’s a good chance it is a DNS lookup error. Due to the constant DNS service halts, misconfigured firewalls and system crashes, DNS servers more often than not become unreachable. A server that is unresponsive typically results in decreased efficiency and increased lookup times. If queries made by the Domain Name System, stop receiving answers, then it can adversely affect your ability to access the internet. Thus, “This webpage is unavailable” is typically the way it manifests itself in your browser window. Anyway, continue reading for a number of techniques that you can use to fix this DNS lookup error.
Check Physical Connections
Before delving into any technical stuff, checking physical connections should be the very first thing that you do. Ensure that the cables that are connected to your modem/router are secure and that all the relevant lights on the device are flashing. There are times when the DNS lookup error is brought upon by loose cable(s), in the event that this is the case in your situation, you should reconnect your cables then immediately restart your computer.
You will also have to restart your router, which can be done through the routers settings screen. To do this, simply do the following.
1. First, ensure you’ve logged into your computer with a user profile that has administrative rights.
2. Then load up your browser windows and type either 192.168.0.1 or 196.168.1.1 into the address bar and press Enter.

Note: If you type the first IP address into your address bar and receive a “The connection has timed out” error message, then you should try the second IP address.
3. When the Authentication Required dialog box pops up, type in your routers User Name: and Password: then click on OK.

Note: If you haven’t already changed your default password then simply type admin into the User Name box and password into the Password box.
4. Once you’ve logged into your router, click on Diagnostics in the Maintenance section on the left side menu.

5. From the Diagnostics screen, click on the Reboot button within the Reboot the Router section of the page.

Flush Your DNS Server Cache
If after checking all your cable connections and restarting your router, the problem still persists, then flushing your DNS server cache may be able to do the trick. Additionally, you may want to try this method when you’re having problems accessing specific websites. Flushing your DNS cache is a fairly simple process that you can carry out at any time. Simply follow the instructions below to carry out this function.
1. First, ensure you’ve logged into your computer with administrative rights.
2. Then click on Start -> Run, type cmd and click on OK. [Windows Vista/7: Start -> Type cmd (into the Search programs and files box) and Press CTRL + Shift + Enter, then click on Continue]

3. Once Command Prompt has loaded up, type ipconfig /flushdns and hit Enter.

Renew Your IP
There are a number of reasons why you may want to renew your IP address. The most common reason why you may want to adopt this method is if you’ve lost your connection to the internet. This loss of connection could be due to your routers inability to assign IP address to computers attached to it. On the flip side, you may want to use this command to reset your internet connection as a possible fix for the DNS lookup error you’re currently faced with.
Do You Need To Renew Your IP Address?
Well, if you’ve followed my guide from the beginning and restarted your router, then renewing your IP address would be a pretty pointless endeavour. However, in the event that you opted against restarting your router, you can choose to renew your IP address without having to switch your router off, which would otherwise adversely affect other computers connected to the router. To do this, simply do the following.
1. First, ensure you’ve logged into your computer with administrative rights.
2. Then click on Start -> Run, type cmd and click on OK. [Windows Vista/7: Start -> Type cmd (into the Search programs and files box) and Press CTRL + Shift + Enter, then click on Continue]
3. From Command Prompt type ipconfig /release and press Enter.

4. Then type ipconfig /renew and press Enter.

Note: The first command will release your IP address, and the second command will assign you a new one. To double check that you’ve been assigned a new IP address, simply type ipconfig in Command Prompt.
Rebuild Your Connection to Fix DNS Lookup Error
Using the repair feature in network connections is probably a more user friendly approach to carrying out most of the functions outlined above. Anyway, in order to use this feature, simply do the following.
1. First, log into your computer with administrative rights.
2. Then click on Start, then right click on My Network Places and click on Properties.

3. From the Network Connections applet, double click on Local Area Connection.

4. This will bring up the Local Area Connection Status dialog box, from here click on the Support Tab, and then click on Repair.

Change Your DNS Servers
In most cases, simply clicking on the reload button in your browser is enough to fix a DNS lookup error. However, if the above mention techniques have seen little success, then you will definitely need to take more drastic action. The error(s) that you’re receiving could be due to the DNS servers of your Internet Service Provider (ISP). The good thing is that there are actually more reliable DNS servers out there that you can use. So changing your DNS server may be all you need to do to fix this problem. To do this, do the following.
1. First, ensure you’ve logged into your computer with administrative rights.
2. Then click on Start, then right click on My Network Places and select Properties.
3. From the Network Connections applet, right click on your Local Area Connection and select Properties.

4. This will bring up the Local Area Connection Properties page, click on Internet Protocol (TCP/IP), and then click on Properties.

5. From the Internet Protocol (TCP/IP) Properties page, click on Use the following DNS server addresses then type in the following OpenDNS Servers:

Preferred DNS Server: 208.67.222.222
Alternate DNS Server: 208.67.220.220
Alternatively, you could put these DNS server addresses into your router, that way, the servers will be used by everyone that accesses the internet through it. To do this, do the following.
1. First, follow steps 1 – 3 of “Check Physical Connections”.
2. Once logged in, click on Basic Settings, which is in the Setup section.

3. From Basic Settings, scroll down to Domain Name Server (DNS) Address and click on Use These DNS Servers, then type the two previously mentioned OpenDNS Server IP addresses above. Then click on Apply.

Are you looking for a way to repair all the errors on your computer?

If the answer is Yes, then I highly recommend you check out Advanced System Repair Pro.
Which is the leading registry cleaner program online that is able to cure your system from a number of different ailments such as Windows Installer Errors, Runtime Errors, Malicious Software, Spyware, System Freezing, Active Malware, Blue Screen of Death Errors, Rundll Errors, Slow Erratic Computer Performance, ActiveX Errors and much more. Click here to check it out NOW!
Introduction
DNS (domain name system) stores information related to domain names as a distributed database. The client-server service translates domain names to IP addresses and vice versa.
Most other network services, such as Web, emails, and file transfer, use DNS. A misconfigured DNS server can lead to critical connectivity issues. Thankfully, troubleshooting DNS issues is a vital and relatively simple process to follow.
Follow this tutorial to learn the practical steps in troubleshooting DNS issues.
Prerequisites
- A stable internet connection.
- Access to the command line/terminal.
- A user account with administrator/sudo privileges.
DNS troubleshooting follows logical steps from basic network troubleshooting to more in-depth analysis. Network services often report DNS issues for reasons that do not require in-depth DNS troubleshooting.
If you are experiencing DNS issues, start by performing the following steps before going on to in-depth troubleshooting:
- Check cables
If using a wired connection, make sure everything is connected properly. On wireless networks, check if WiFi is turned on and connected. Check the router if all cables are functional. Try to switch ports for ethernet cables and test out the connection.
- Restart router
Turn the router off and wait for at least two minutes before turning it on again. Wait until the router fully boots up before rechecking the connection.
- Scan for malware
Viruses sometimes block an internet connection. Run a scan to see if anything suspicious appears and handle accordingly.
- Check the website
If the problems arise when connecting to a particular website or a part of the website, check if the connection problem is with the website itself. One way to do this is using the ping command.
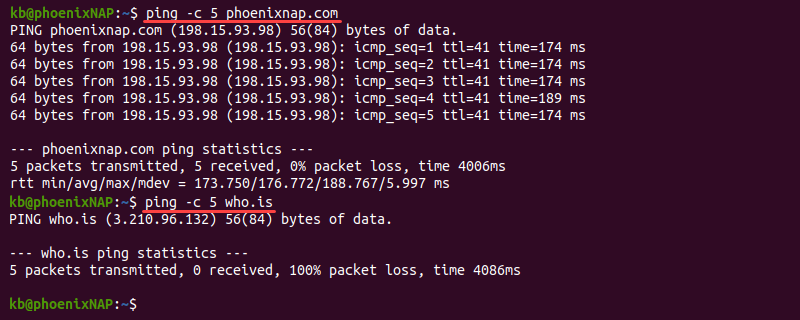
The command output helps identify the reason for the connection problem:
1. If ping does not show a response, the issue is most likely on the server’s end.
2. A common cause of an error in the response is a poorly configured DNS server or firewall restrictions. Learn how to resolve the «Temporary failure in name resolution» error.
3. If the output shows a response, the problem is most likely with the DNS.
The comprehensive list below provides valuable tips for troubleshooting DNS issues.
Check TCP/IP Settings
Misconfigured DNS server addresses are a common issue. Reset the settings and check if communication is back to normal. Depending on which OS you’re using, the steps are different.
For Windows:
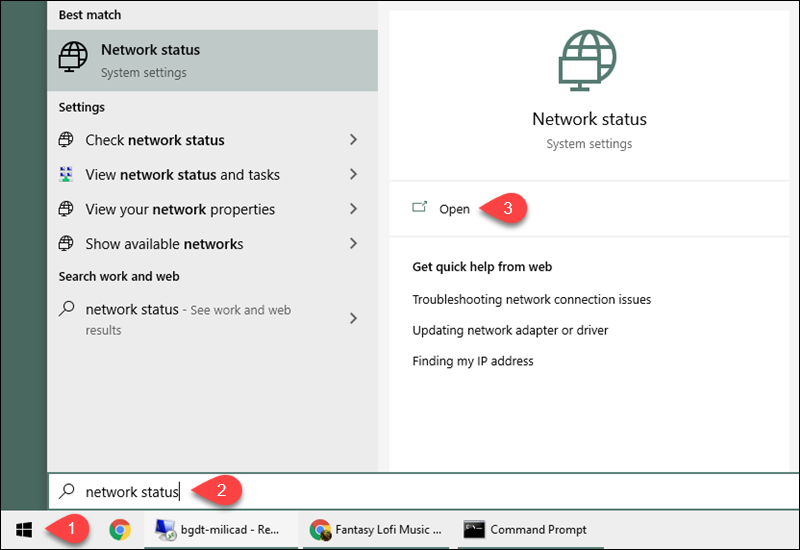
1. Search for Network Status in the Start menu and open the tool.
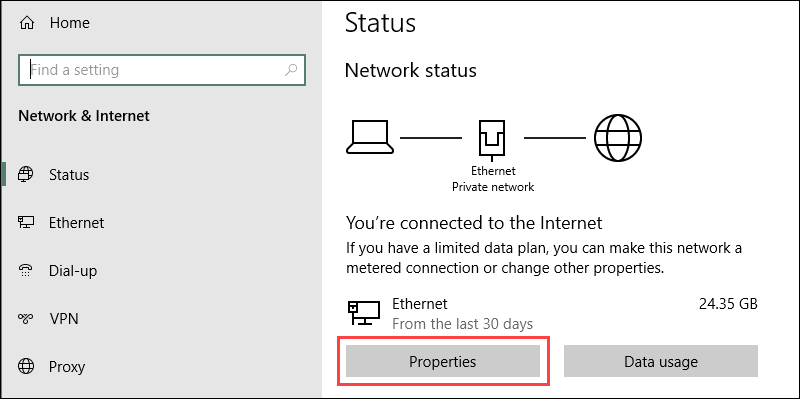
2. Select Properties under the network connection details.
3. Click the Edit button to change the IP settings.

4. If the IP assignment is Manual, double-check the IP, Preferred, and Alternate DNS addresses. Change IP assignment by selecting Automatic (DHCP) from the dropdown menu to reset back to normal.
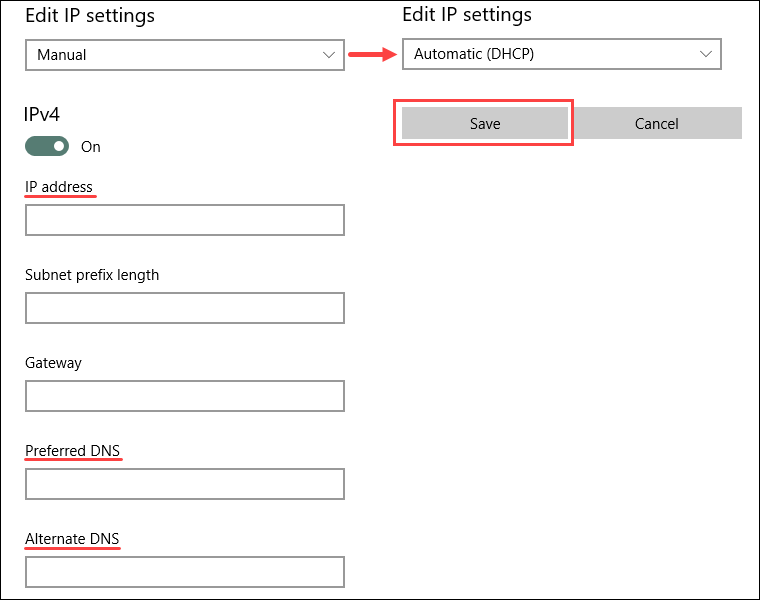
5. Save the settings when finished.
For Linux:
1. Click the connection icon in the top-right corner.
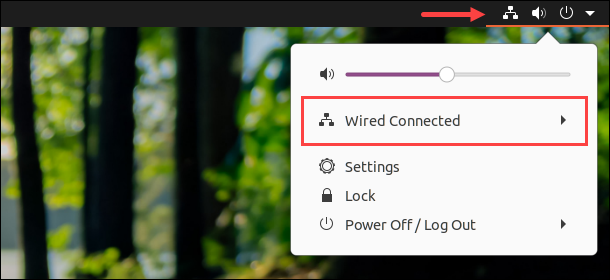
2. Open the menu and select Wired Settings.
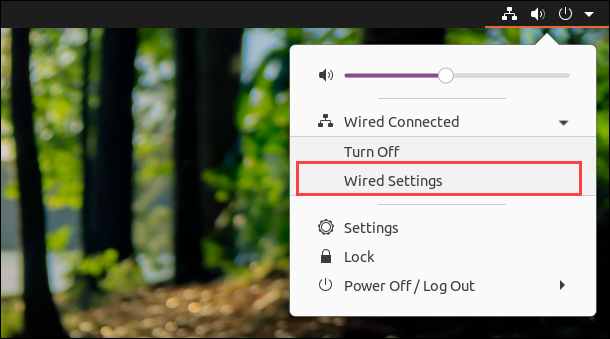
3. Click the gear icon in the connection pane to open the settings.
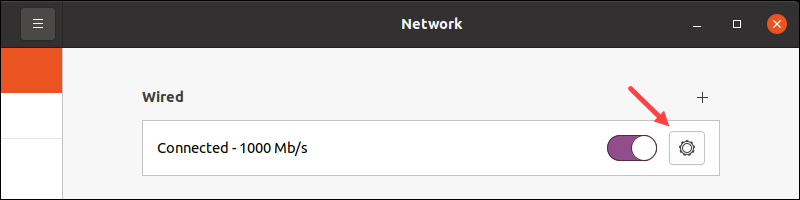
4. Navigate to the IPv4 tab in the settings menu.
5. If manually assigned, double-check the Address and DNS IP address list. Select the Automatic (DHCP) option and change the DNS switch to Automatic to reset back to normal.
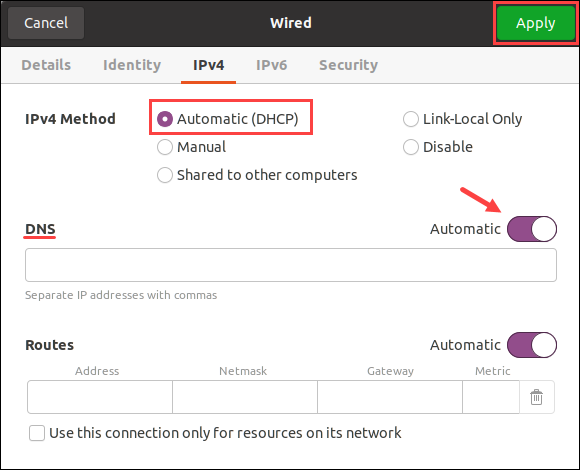
Apply the settings when finished and close the window. Lastly, check the connection to ensure everything functions correctly.
Note: Learn how to install and use PowerDNS on Ubuntu, an open-source DNS server solution that helps resolve namespaces.
Flush the DNS Cache
IP mapping to popular websites is often the target of malicious attacks. DNS caches information to improve loading speed, and it might have cached a wrong address. Clearing the DNS cache deletes all the lookup information and updates with subsequent requests.
Flushing DNS cache is a good security measure to take in general. Follow our tutorial for detailed and OS-specific instructions: How to Flush DNS Cache in macOS, Windows, & Linux.
Release and Renew DHCP Server IP
Releasing and renewing the IP address helps resolve an IP conflict and old DNS information by refreshing the cached information. The easiest way to accomplish a release and renewal is through the command prompt/terminal.
Warning: Resetting the IP disconnects the computer from the internet.
To renew the IP on Windows using the command prompt:
1. Run the following commands to release the current IP and renew the information:
IPCONFIG /RELEASE
IPCONFIG /RENEW
2. Check the new information with:
IPCONFIG /ALLTo force IP renewal on Linux via the terminal:
1. Open the terminal and release the current IP with the following command:
sudo dhclient -rThe terminal outputs a confirmation message, and the connection is closed.
2. Run dhclient without any options to renew the IP:
sudo dhclient
Change to Public DNS Servers
Change the DNS servers to public domain addresses. Some standard options are:
- Google’s
8.8.8.8address as primary and8.8.4.4as secondary. - Cloudflare’s
1.1.1.1address as primary and1.0.0.1as secondary.
Public domain addresses are generally reliable and are available for free. However, use this only as a temporary resolution.
On the other hand, some public domain DNS servers block traffic from malicious websites. A public DNS might detect a flagged website as suspicious, and the public DNS you’re using might be blocking access.
Use dig
The dig command (domain information groper) provides DNS information and helps in diagnosing issues. The utility’s raw output makes it the preferred method for troubleshooting DNS issues.
The program is available on macOS and Linux by default and is free to install on Windows.
To get dig information for a domain, run the following command in the terminal:
dig <domain name or IP>For example, to show the information for phoenixnap.com, run:
dig phoenixnap.com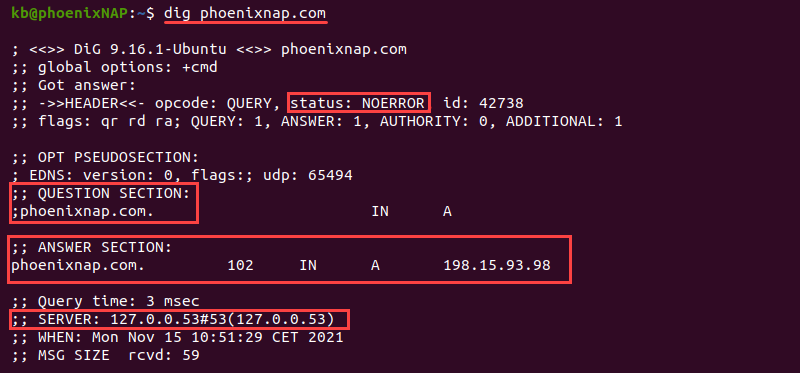
- The
statusshows whether a query was successful. - The
ANSWER SECTIONshows a response to a request sent in theQUESTION SECTION. - The
SERVERdisplays the address for the public DNS server.
By default, dig looks up the A record for a domain and shows which IP address the domain points to when resolving the name.
The dig tool offers many advanced options for comprehensive searches. For example, add the +trace tag to see the full path to the destination:
dig phoenixnap.com +trace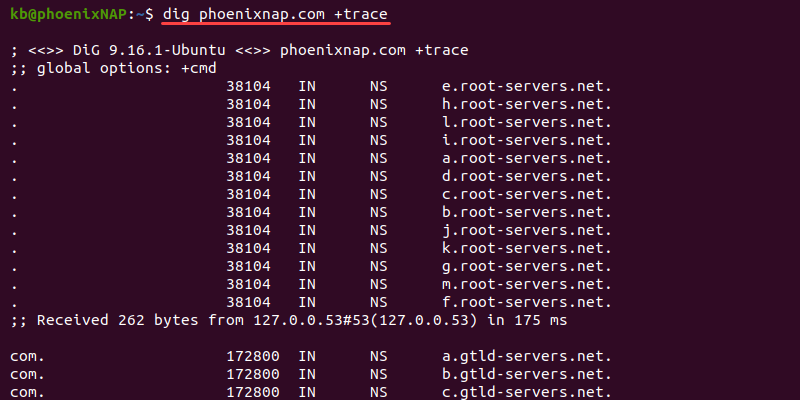
The +trace option helps pinpoint traffic drops in the route to the destination.
To check the delegated name servers, use the ns option:
dig phoenixnap.com ns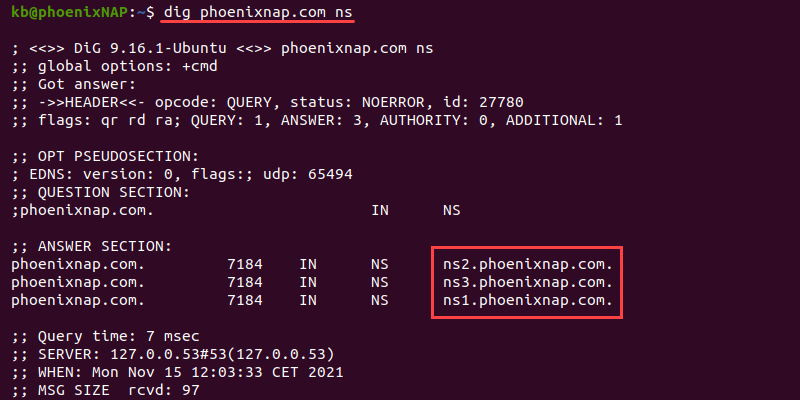
Use the ns option to help identify and troubleshoot delegation problems.
Use nslookup
The nslookup command provides functions for checking different DNS records and servers. The tool is available on macOS, Linux, and Windows operating systems by default, and it was the first tool for querying DNS.
To get nslookup information for a domain, use the following command in the command line/terminal:
nslookup <domain name or IP>For example, run nslookup for phoenixnap.com:
nslookup phoenixnap.com
The output prints the DNS server’s address and the A record response. The nslookup command is preferable for Windows because of its availability.
Use host
The host utility is a straightforward program for performing a DNS lookup. The command is available for macOS and Linux systems.
The basic syntax for host is:
host <domain name or IP>For example:
host phoenixnap.com
The host command is excellent for quickly checking if a domain name exists and resolves to an address. A typical use case for host is in bash scripts.
Use additional options to display more information. For example, add the -a tag to see a similar output to the dig command:
host -a phoenixnap.com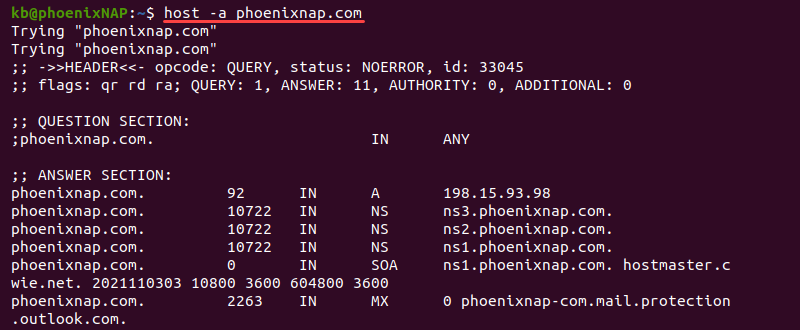
The output shows additional information in the answer section, such as the NS, SOA, MX, and other available records.
Use traceroute or tracert
The traceroute and tracert tools help trace a route from source to destination. When troubleshooting DNS issues, the commands help identify where packets stopped on the network. The traceroute command is available on macOS and Linux, while the Windows equivalent is tracert.
Note: Install the traceroute tool using the apt package manager:
sudo apt install tracerouteAs a readily available and simpler alternative, use tracepath.
To map the network, run the following command in the terminal:
traceroute <domain name or IP>If using a Windows machine, run:
tracert <domain name or IP>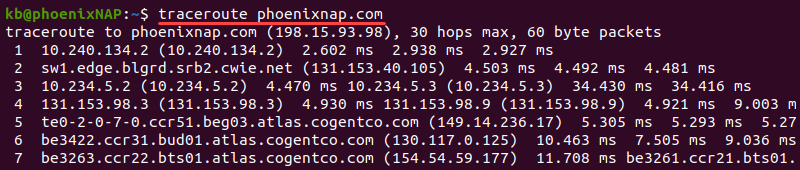
For more information on the traceroute/tracert command and how to read the output, check our comprehensive tutorial on How to Run a Traceroute on Linux, Windows & macOS.
Contact Your ISP
If the computer uses the ISP’s DNS, you cannot resolve the issues on your end. Contacting the ISP helps determine the problem and pinpoint the difficulties on their end.
Conclusion
At the end of this guide, you should have several tools and tricks to help you resolve DNS issues. If you’re looking to set up your DNS server at home to speed up your connection, try following our Raspberry Pi tutorial on How to Set Up Raspberry Pi as a DNS Server.