DNS resolution is an important service, without it functioning properly domain names will not be correctly resolved to IP addresses preventing other network services from working correctly. Therefore it is equally important to know how to troubleshoot DNS issues on a Linux client and fix any problems to reduce disruption.
There are multiple potential points of failure during the DNS lookup process such as at the system performing the lookup, at the DNS cache, or on an external DNS server. Here we will cover how to check these and perform various tests to identify where exactly the problem lies.

Studying for your RHCE certification? Checkout our RHCE video course over at Udemy which is 20% off when you use the code ROOTUSER.
Local Server Configuration
First off it’s important to understand the ‘hosts’ section of the /etc/nsswitch.conf file, the default configuration for hosts is shown below.
hosts: files dns myhostname
Essentially this means that host name resolution will be performed in the order specified, left to right. First files will be checked, followed by DNS.
As files are first these will be checked first, this references the local /etc/hosts file which contains static host name to IP address mappings. This file takes priority over any DNS resolution, any changes to the file will be placed straight into the DNS cache of that local server. Below is an example line of configuration from /etc/hosts
1.1.1.1 google.com
As this entry is in our host file locally, if we try to reach google.com our local machine will think that 1.1.1.1 is the correct IP address of google.com and will not perform a DNS lookup. This is demonstrated below by trying to ping google.com, DNS is not consulted as there is a hosts file entry which takes priority.
[[email protected] ~]# ping google.com
PING google.com (1.1.1.1) 56(84) bytes of data.
If there is no entry in the hosts file DNS will be used next as per /etc/nsswitch.conf. The servers used for DNS resolution will be specified in the /etc/resolv.conf file, below is an example configuration of this file.
nameserver 192.168.0.1
In this case all DNS queries of our system will go to the DNS server at 192.168.0.1. Other secondary and tertiary DNS servers can also be specified here as backups.
Testing DNS
For DNS resolution to succeed to 192.168.0.1, the DNS server at 192.168.0.1 will need to accept TCP and UDP traffic over port 53 from our server. A port scanner such as the nmap tool can be used to confirm if the DNS server is available on port 53 as shown below.
Note: To install nmap run ‘yum install nmap -y’.
[[email protected] ~]# nmap -sU -p 53 192.168.0.1
Starting Nmap 6.40 ( http://nmap.org ) at 2015-08-26 15:22 AEST
Nmap scan report for 192.168.0.1
Host is up (0.00091s latency).
PORT   STATE         SERVICE
53/udp open|filtered domain
MAC Address: 02:00:79:55:00:0D (Unknown)
Nmap done: 1 IP address (1 host up) scanned in 0.29 seconds

[[email protected] ~]# nmap -sT -p 53 192.168.0.1
Starting Nmap 6.40 ( http://nmap.org ) at 2015-08-26 15:22 AEST
Nmap scan report for 192.168.0.1
Host is up (0.00099s latency).
PORT   STATE SERVICE
53/tcp open  domain
MAC Address: 02:00:79:55:00:0D (Unknown)
Nmap done: 1 IP address (1 host up) scanned in 0.07 seconds
It’s worth noting that scanning UDP with nmap is not reliable due to the nature of UDP, this is why the state is listed as open or filtered. We can clearly see that TCP 53 is definitely open and responding which is a good sign, if the state was reported as filtered the next thing to investigate would be the connectivity to the DNS server, in particular any firewall running on the DNS server would need to be configured to allow TCP and UDP port 53 traffic in.
By running a packet capture we can view any DNS queries over the network, in this example we are running tcpdump to our local DNS server at 192.168.0.1 and we can see our request from 192.168.0.100 requesting the A record of google.com as well as the response of 216.58.220.142 which is returned from our local DNS server.
[[email protected] ~]# tcpdump -n host 192.168.0.1
tcpdump: verbose output suppressed, use -v or -vv for full protocol decode
listening on eth0, link-type EN10MB (Ethernet), capture size 65535 bytes
15:29:52.439222 IP 192.168.0.100.32811 > 192.168.0.1.domain: 8134+ A? google.com. (28)
15:29:52.440153 IP 192.168.0.1.domain > 192.168.0.100.32811: 8134 1/0/0 A 216.58.220.142 (44)
The Domain Information Groper (dig) tool can be used to perform DNS queries as demonstrated below. We are again querying for google.com and we are again returned the A record IP address of 216.58.220.142.
Note: Dig is provided by the bind-utils package which can be installed with ‘yum install bind-utils’.
[[email protected] ~]# dig google.com

; <<>> DiG 9.9.4-RedHat-9.9.4-18.el7_1.3 <<>> google.com
;; global options: +cmd
;; Got answer:
;; ->>HEADER<<- opcode: QUERY, status: NOERROR, id: 32536
;; flags: qr rd ra; QUERY: 1, ANSWER: 1, AUTHORITY: 0, ADDITIONAL: 0

;; QUESTION SECTION:
;google.com.                    IN      A

;; ANSWER SECTION:
google.com.             65      IN      A       216.58.220.142
The status of the dig query correctly returned the IP address from our local DNS server at 192.168.0.1 and the status was NOERROR, which is returned when the query has been successfully resolved. Response codes can help you in the troubleshooting process, for a full list of them refer to RFC 5395.
Test Authoritive DNS Server
With dig we can also directly query the authoritative name servers for a domain, these are the DNS servers that hold the authoritative records for the domains DNS zone – the source of truth. If a correct response is received from the authoritative DNS server but not when querying against your own DNS server then you should investigate why your local DNS server is not able to resolve the record.
To get the name servers of a domain we can use the ‘whois’ command as shown below. This is part of the whois package and can be installed with ‘yum install whois -y’ if not already present.
[[email protected] ~]# whois google.com | grep -i "name server"
   Name Server: NS1.GOOGLE.COM
   Name Server: NS2.GOOGLE.COM
   Name Server: NS3.GOOGLE.COM
   Name Server: NS4.GOOGLE.COM
As shown google.com currently has 4 authoritative name servers, if we run a dig directly against any of these we should receive an authoritative response, that is an up to date and non cached response straight from the source rather than from our local DNS server. In the below example we have run our query against @ns1.google.com
[[email protected] ~]# dig @NS1.GOOGLE.COM google.com

; <<>> DiG 9.9.4-RedHat-9.9.4-18.el7_1.3 <<>> @NS1.GOOGLE.COM google.com
; (1 server found)
;; global options: +cmd
;; Got answer:
;; ->>HEADER<<- opcode: QUERY, status: NOERROR, id: 3477
;; flags: qr aa rd; QUERY: 1, ANSWER: 1, AUTHORITY: 0, ADDITIONAL: 0
;; WARNING: recursion requested but not available

;; QUESTION SECTION:
;google.com.                    IN      A

;; ANSWER SECTION:
google.com.             300     IN      A       216.58.220.142
While the A record returned is the same in this instance, note that in this dig response we now have the “aa” flag in the header which represents that this is an authoritative answer and is not a cached response. If we run this same dig command again, the 300 second TTL that was returned in the answer section will continually state that the TTL is 300 seconds as the response is authoritative.
However if we were to run this dig without specifying @ns1.google.com we would be querying our 192.168.0.1 DNS server which is not authoritative for the google.com domain, after the first result the record will be cached locally. This can be confirmed by running the dig command again, as the TTL value will drop down until it reaches 0 and is removed from the cache completely.
By querying the authoritative name server directly we ensure that we are getting the most up to date response rather than a potential old cached response from our own local DNS server or local DNS cache.
Summary
As DNS is an important service being able to troubleshoot it is a useful skill. By default Linux will first check it’s local host file /etc/hosts before querying DNS servers defined in /etc/resolv.conf. It is important to confirm that the correct DNS servers have been specified within this file and that you can connect to them on TCP/UDP port 53. DNS queries can be checked with the dig command, either against the local DNS server or against the authoritative name server for the domain which will provide an up to date non cached result.
This post is part of our Red Hat Certified Engineer (RHCE) exam study guide series. For more RHCE related posts and information check out our full RHCE study guide.
I am unable to visit most sites online in either firefox or chrome. I can access google docs so I am researching on windows 7 (dualboot) and rebooting into Ubuntu (recently upgraded to 16.04).
Test 0:
$ sudo /etc/init.d/dns-clean
$
(nothing happened)
Test 1:
$ dig microsoft.com
; <<>> DiG 9.10.3-P4-Ubuntu <<>> microsoft.com
;; global options: +cmd
;; Got answer:
;; ->>HEADER<<- opcode: QUERY, status: NOERROR, id: 2944
;; flags: qr rd ra; QUERY: 1, ANSWER: 5, AUTHORITY: 0, ADDITIONAL: 1

;; OPT PSEUDOSECTION:
; EDNS: version: 0, flags:; udp: 512
;; QUESTION SECTION:
;microsoft.com.         IN  A

;; ANSWER SECTION:
microsoft.com.      896 IN  A   104.43.195.251
microsoft.com.      896 IN  A   23.100.122.175
microsoft.com.      896 IN  A   23.96.52.53
microsoft.com.      896 IN  A   191.239.213.197
microsoft.com.      896 IN  A   104.40.211.35

;; Query time: 102 msec
;; SERVER: 2001:558:feed::1#53(2001:558:feed::1)
;; WHEN: Tue Aug 29 14:54:43 EDT 2017
;; MSG SIZE  rcvd: 122
Test 2:
$ ping reddit.com
connect: Network is unreachable
Test 3:
$ less /etc/network/interfaces
# interfaces(5) file used by ifup(8) and ifdown(8)
auto lo
iface lo inet loopback
Test 4:
$ less /etc/NetworkManager/NetworkManager.conf
[main]
plugins=ifupdown,keyfile,ofono
/#dns=dnsmasq

no-auto-default=D4:BE:D9:A6:2E:C1,

[ifupdown]
managed=false
Test 5: Chrome
This site can’t be reached
www.reddit.com’s server DNS address could not be found.DNS_PROBE_FINISHED_NXDOMAIN
Test 6: Firefox
Server not found
Firefox can’t find the server at www.reddit.com.
Check the address for typing errors such as ww.example.com instead of www.example.com
If you are unable to load any pages, check your computer’s network connection.
If your computer or network is protected by a firewall or proxy, make sure that Firefox is permitted to access the Web.
Edit: Almost forgot, this seems to have started after I tried installing PlayOnLinux the other day. I uninstalled it but the problems persist.
Any thoughts?
Re: possible duplicate question : dns_probe_finished_nxdomain error caused by Ubuntu
dns_probe_finished_nxdomain error caused by Ubuntu
I clearly state in my question that the solution posed in the other thread of clearing the dns cache does not resolve my issue.
Name resolution is the process of relating easy-to-remember names with difficult-to-remember Internet Protocol (IP) addresses. The Domain Name System (DNS) provides name resolution services in most environments. These internal servers host a dynamic database of names and related IP addresses. These names may be as simple as hostnames or as complex as fully qualified domain names and web URLs.
DNS servers host resource records, such as start of authority (SOA), name server (NS), and mail exchange (ME). The two most common record types are A and pointer records (PTR). The A records service forwards lookup requests, specifying that a given name is related to a particular IP address. PTR maps an IP address to a particular name. When a forward lookup query arrives, it is serviced by the A record for that name. When a reverse lookup query arrives, the PTR for that IP address services it.
What might make you suspect a name resolution problem? Perhaps a user comments that they can no longer reach a resource such as a file server or printer, or an email server seems unavailable. Users may experience intermittent difficulty accessing an internal web server or related service. Perhaps users can connect to a server, but it isn’t the correct server, so an unexpected web page is displayed.
Because there are many types of name servers, especially in large networks, it can be difficult to determine the culprit. When troubleshooting, it can be useful to query specific name servers and examine their administrative resource records.
Install the tools
This article compares four useful tools for testing name resolution on your Linux systems:
- ping
- nslookup
- dig
- host
Before you begin, ensure the commands are installed. The ping command is probably already on your system, provided by the iputils package, but the other ones are in bindutils and aren’t installed by default. Install them using dnf or yum:
$ sudo dnf install bind-utilsHow to use ping
The basic ping command can help narrow down name resolution problems. This is a fundamental Linux troubleshooting technique.
First, test connectivity by hostname, assuming a remote host named server01 with an IP address of 192.168.1.101:
$ ping -c 3 server01If this succeeds and name resolution works, you probably don’t need to continue along this line of testing. If this test fails, try the ping command with the remote IP address:
$ ping -c 3 192.168.1.101If this works, connectivity exists. Name resolution is the problem since that’s where the failure appears. Now you can begin troubleshooting why the system isn’t resolving names properly.
If the ping by IP address fails, you have a network connectivity problem rather than a name resolution problem, and you can troubleshoot in that direction.
Ping helps you narrow down whether you have a name resolution issue or something else is happening.
[ Keep common commands close at hand. Download the Linux commands cheat sheet. ]
How to use nslookup
The nslookup command has been around a while. It has two modes: non-interactive and interactive. This article focuses on non-interactive mode since it most closely resembles the functionality of dig and host.
In non-interactive mode, simply type nslookup and the destination name (or URL) you need to resolve:
$ nslookup server01This output should display the IP address for server01, along with information about which server resolves the name. If this fails, it indicates a name resolution problem.
Perform a reverse lookup (resolving a known IP address to an unknown name) by typing:
$ nslookup 192.168.1.101To see specific resource record types, use the -type= option. Here’s an example that queries for the MX records of the example.com domain:
$ nslookup -type=MX example.comMany administrators work on multiple platforms. Nslookup is notable for being preinstalled on Microsoft Windows, which means you can learn one troubleshooting tool and use it on two platforms.
How nslookup compares
Nslookup is the oldest of the three tools and has been on the deprecation chopping block at least once. However, it’s still around. One concern about nslookup compared to host and dig is the format of its responses. It may be more difficult to extract information due to its layout. This becomes important when nslookup is used within a larger script.
How to use dig
Like the other commands in this article, dig enables you to make manual name resolution queries. It provides an immense amount of detail about the results, so many people prefer using it for significant troubleshooting tasks.
Generate forward lookups like this:
$ dig server01Initiate a reverse lookup by using the -x option and the known IP address:
$ dig -x 192.168.1.101Query the name server for specific record types by appending the type to the command:
$ dig example.com MXThis resolves the mail server for the example.com domain name.
As you can see, similar functionality exists within dig as nslookup.
[ Learn how to manage your Linux environment for success. ]
How dig compares
Using dig provides similar information as nslookup in a more organized format that’s easier to parse.
How to use host
Doing manual name resolutions with the host command are also straightforward.
Here is the basic syntax for a forward lookup:
$ host server01Here’s the syntax for a reverse lookup:
$ host 192.168.1.101Querying for SOA records relies on the -C option:
$ host -C example.comThe -t option causes the host command to display the specified record type. The following example queries for the MX records of example.com:
$ host -t mx example.comIf you’re not sure which record types you need or if you want to see them all, use the -a (any) option:
$ host -a example.comTo narrow the query’s scope to either IPv4 or IPv6 records, add the -4 or -6 options to the regular syntax. This may speed up query results in large networks or provide the focused information you need for additional troubleshooting.
Like nslookup and dig, host provides both forward and reverse lookups along with resource record type queries.
How host compares
Administrators may prefer host for its simplicity. Sometimes the detailed output from dig is too distracting or provides more information than is really required. For a quick, basic response, try host. It may also be the right solution for your scripts.
Wrapping up
To some degree, nslookup, dig, and host provide the same information and offer similar filtering options. The one you use in your next troubleshooting task may simply be the one that’s installed, especially if you work with multiple distributions or have created your own Linux version. I recommend knowing how to do a basic query with all three tools.
Some command options require a DNS zone transfer, which often is not allowed by the DNS server. Be aware of this, particularly for external name resolution servers or other DNS servers you don’t manage.
Finally, don’t forget that ping is a good place to start. It’s a quick way of determining whether name resolution is working correctly before delving deeper into manual resolution attempts that may not be part of the issue.
In this troubleshooting post, we will exaplin:
- Usage of dig command to troubleshoot common DNS problems.
- Identify symptoms and causes associated with common DNS issues.
Troubleshooting DNS
Due to the client-server architecture of DNS, properly working DNS name resolution on a system is almost always dependent on not only the proper configuration and operation of DNS on that system but also on that of its resolving nameserver and the many authoritative nameservers used to resolve its DNS requests. Since DNS is a distributed directory, recursive name resolution often involves numerous behind-the-scenes interactions with many different authoritative nameservers. These numerous interactions create many possible points for failure.
The use of caching nameservers significantly reduces DNS workloads and improves DNS performance. However, the caching function adds another point of failure by creating scenarios where it is possible for DNS responses received by clients to be inaccurate due to the data no longer being current.
Due to the critical role that DNS plays in the functioning of network services, it is important that Linux administrators be able to quickly resolve DNS issues when they occur, in order to minimize service interruptions. The key to accurate and efficient DNS troubleshooting is being able to pinpoint which of the multiple points in the myriad of behind-the-scenes client-server interactions is responsible for the unexpected behavior observed. This requires the use of proper tools and a clear understanding of the diagnostic data they provide. Domain Internet Groper (dig) is a good tool for investigating DNS issues due to its verbose diagnostic output.
Name resolution methods
Because DNS service is often the most widely used method of name resolution, it often bears the blame whenever unexpected name resolution results occur. Remember that aside from DNS, in a heterogeneous environment, name resolution on networked hosts can occur via other methods, such as local hosts files, Windows Internet Name Service (WINS), etc.
On Linux systems, name resolution is attempted first with the hosts file /etc/hosts by default, per order specified in /etc/nsswitch.conf. Therefore, when beginning name resolution troubleshooting, do not leap to the assumption that the issue resides with DNS. Begin first by identifying the name resolution mechanism which is in play, rather than simply starting with DNS. The getent command from the glibc-common package, as well as the gethostip command from the syslinux package, can both be used to perform name resolution, mirroring the process used by most applications in following the order of host name resolution as dictated by /etc/nsswitch.conf.
$ getent hosts example.com
172.25.254.254  example.com
$ gethostip example.com
example.com 172.25.254.254 AC19FEFE
If the result of getent or gethostip differs from that produced by dig, then it’s a clear indication that something besides DNS is responsible for the unexpected name resolution result. Consult /etc/nsswitch.conf to determine what other name resolution mechanisms are employed before DNS.
Client-server network connectivity
For DNS name resolution to work properly, a system must first be able to conduct client-server interactions with its resolving nameserver or other authoritative nameservers. Some common DNS issues that have their origin at this layer are the result of the resolver and firewall misconfigurations.
When using dig to troubleshoot a DNS issue, if a response is not received from a DNS server, it is a clear indication that the cause lies with the client-server network connectivity to the DNS server.
$ dig A example.com
; <<>> DiG 9.9.4-RedHat-9.9.4-14.el7 <<>> A example.com
;; global options: +cmd
;; connection timed out; no servers could be reached
A possible cause is the inability to reach the DNS server due to incorrect DNS server IP address(es) in a system’s DNS configuration. This could be in /etc/resolv.conf in the case of a system acting as a DNS client or in the forward-zone clause of /etc/unbound/unbound.conf in the case of a system configured as an unbound caching nameserver
Another possible cause is firewall rules, on either the client or server system, blocking DNS traffic on port 53. While DNS mostly uses the UDP protocol, it is important to note that when response data sizes exceed 512 bytes or 4096 bytes in the case of DNS servers that support Extension Mechanism for DNS (EDNS), resolvers will fall back to using TCP to retry the query. Therefore, proper DNS configuration should allow for DNS traffic on port 53 for both UDP and TCP. Allowing port 53 traffic for UDP only will result in a truncation error when the resolver encounters a response that is larger than what it can handle over UDP.
$ dig @serverX.example.com A labhost1.example.com
;; Truncated, retrying in TCP mode.
;; Connection to 172.25.1.11#53(172.25.1.11) for labhost1.example.com failed:
host unreachable
dig’s tcp or vc options are helpful for troubleshooting whether DNS queries can succeed with TCP. These options force dig to use TCP, rather than the default behavior of using UDP first and falling back to TCP only when response size necessitates it.
$ dig +tcp A example.com
When dealing with DNS issues at the network layer, dig provides a very sparse output and it is therefore often useful to also use a network packet analyzer, such as tcpdump, to determine what is transpiring behind the scenes at the network layer. Using tcpdump, the administrator can determine the information that cannot be ascertained with dig alone, such as the destination IP address of the DNS request, if request packets leave the client if request packets reach the server, if response packets leave the server if response packets reach the client, etc
DNS Response Codes
If DNS client-server communication is successful, dig will generate much more verbose output detailing the nature of the response received from the DNS server. The status field in the HEADER section of dig’s output reports the response code generated by the DNS server in response to the client’s query.
$ dig A example.com
; <<>> DiG 9.9.4-RedHat-9.9.4-14.el7 <<>> A example.com
;; global options: +cmd
;; Got answer:
;; ->>HEADER<<- opcode: QUERY, status: NOERROR, id: 30523
...
A status of NOERROR indicates the query was resolved successfully. If the server encounters problems fulfilling the client’s query, one of the following common error statuses will be displayed.
DNS Return Codes
| CODE | MEANING |
|---|---|
| SERVFAIL | The nameserver encountered a problem while processing the query. |
| NXDOMAIN | The queried name does not exist in the zone. |
| REFUSED | The nameserver refused the client’s DNS request due to policy restrictions. |
SERVFAIL
A common cause of SERVFAIL status is the failure of the DNS server to communicate with the nameservers authoritative for the name being queried. This may be due to the authoritative nameservers being unavailable. It could also be a problem at the network layer interfering with the client-server communication between the DNS server and the authoritative nameservers, such as network routing issues or firewall rules at any hop in the network path.
To determine why a nameserver is generating a SERVFAIL status while performing recursion on behalf of a client’s query, the administrator of the nameserver will need to determine which nameserver communication is causing the failure. dig’s + trace option is helpful in this scenario to see the results of nameserver’s iterative queries starting with the root nameservers
NXDOMAIN
An NXDOMAIN status indicates that no records were found associated with the name queried. If this is not the expected result and the query is directed at a server that is not authoritative for the name, then the server’s cache may contain a negative cache for the name. The user can either wait for the server to expire the negative cache of that name, or submit a request to the server administrator to flush the name from the server’s cache. Once the name is removed from the cache, the server will query the authoritative nameserver to receive current resource records for the name.
The other scenario where an NXDOMAIN status may be unexpectedly encountered is when querying a CNAME record containing an orphaned CNAME. In a CNAME record, the name on the right side of the record, the canonical name, should point to a name that contains either A or AAAA records. If these associated A or AAAA records are nonexistent or are later removed, then the canonical name in the CNAME record is orphaned. When this occurs, queries for the owner name in the CNAME record will no longer be resolvable and will result in an NXDOMAIN return code.
REFUSED
A REFUSED status indicates that the DNS server has a policy restriction that keeps it from fulfilling the client’s query. Policy restrictions are often implemented on DNS servers to restrict which clients can make recursive queries and zone transfer requests. Some common causes of an unexpected REFUSED return code are clients configured to query the wrong DNS servers or DNS server misconfiguration causing valid client requests to be refused.
OTHER COMMON DNS ISSUES
Outdated cached data
A DNS return code of NOERROR signifies that no errors were encountered in resolving a query. However, it does not guarantee that there are no DNS issues present. There are situations where the DNS records in the DNS response may not match the expected result. The most common cause for an incorrect answer is that the answer originated from cached data, which is no longer current.
In these situations, first confirm that the response is indeed nonauthoritative cached data. This can be easily determined by looking at the flags section of dig’s output. DNS responses, which are authoritative answers, will be indicated by the presence of the aa flag.
$ dig A example.com
; <<>> DiG 9.9.4-RedHat-9.9.4-14.el7 <<>> A example.com
;; global options: +cmd
;; Got answer:
;; ->>HEADER<<- opcode: QUERY, status: NOERROR, id: 22257
;; flags: qr aa rd ra; QUERY: 1, ANSWER: 1, AUTHORITY: 1, ADDITIONAL: 2
DNS responses that originate from cached data are not authoritative and therefore will not have the aa flag set. The other telltale sign that an answer is coming from cache is the counting down of the resource record’s TTL value in the responses of each subsequent query. TTLs of cached data will continuously count down to expiration while TTLs of authoritative data will always remain static.
Responses for nonexistent records
If a record has been removed from a zone and a response is still received when querying for the record, first confirm that the queries are not being answered from cached data. If the answer is authoritative as confirmed by the presence of the aa flag in dig’s output, then a possible cause is the presence of a wildcard (*) record in the zone.
*.example.com. IN A 172.25.254.254
A wildcard record serves as a catchall for all queries of a given type for a nonexistent name. With the previous wildcard record in place, if an A record previously existed for serverX.example.com and it is removed, queries for the name will still succeed and the IP address in the wildcard A record will be provided in its place.
Non-FQDN name errors
In a zone file, hostnames that are not expressed as Fully Qualified Domain Names (FQDNs) are automatically expanded to FQDNs by appending the name of the zone. To indicate that a name is an FQDN in a zone file, it must be ended with a “.”, i.e., “www.example.com.”. Failure to do so can lead to different issues depending on the type of record that the mistake is made in. For example, such a mistake made in the type-specific data portion of NS records has the potential of incapacitating an entire zone, while a mistake made in MX records could cause a complete halt of email delivery for a domain.
Looping CNAME records
While technically feasible, CNAME records that point to CNAME records should be avoided to reduce DNS lookup inefficiency. Another reason this is undesirable is the possibility of creating unresolvable **CNAME **loops, such as:
test.example.com. IN CNAME lab.example.com.
lab.example.com.  IN CNAME test.example.com.
While a CNAME record with an orphaned CNAME will result in an NXDOMAIN status, looping CNAME records will return as NOERROR.
Missing PTR records
Many network services use DNS to perform reverse lookups of incoming connections from clients. The absence of PTR records in DNS may result in issues, the nature of which varies depending on the service. SSHD, by default, will perform reverse lookups of connecting client IPs. Absence of PTR records will lead to delays in the establishment of these connections.
Many MTAs incorporate reverse DNS lookups of connecting client IPs as a defense against malicious email clients. In fact, many MTAs are configured to reject client connections for IPs, which cannot be resolved with a PTR query in DNS. As such, administrators supporting network services need to ensure that they understand the requirements these services have for not just forward, but also reverse DNS lookups.
Round-robin DNS
A name can have multiple A or AAAA records in DNS. This is known as round-robin DNS, and is often used as a simple, low-cost, load-balancing mechanism to distribute network resource loads across multiple hosts. When a DNS client queries for a name that contains multiple A or AAAA records, all records are returned as a set. However, the order that the records are returned in the set permutates for each query. Since clients normally make use of the first address in the set, the variation in the order of the records in each response effectively results in a distribution of network service requests across the multiple IP addresses in these round-robin DNS records.
While round-robin DNS is a valid technical configuration, there are times when this configuration is inadvertently created. When a request to change the IP address of an A record is mistakenly implemented as a resource record addition rather than a resource record modification, then round-robin DNS is created. If the network resources on the old IP address is retired, the load distribution effect of the round-robin DNS will result in service failures for approximately half of the clients
Модератор: Bizdelnick
-
ubuntuAndrew
- Сообщения: 205
- ОС: Linux Ubuntu 12.04
- Контактная информация:
Решено: Не работает DNS — не преобразуются адреса в ip.
Linux DeLi. Ядро Linux 2.4.33. Когда ввожу ping www.mail.ru, по пишет «Unknown host www.mail.ru». Кроме того не настроить динамический ip-адрес, dhclient’а нет, поэтому ввожу «ifconfig eth0 192.168.0.2». Доступны ip адреса, находящиеся в локальной сети.
даже не знаю что и делать… Да и должно ли быть так?
-
ubuntuAndrew
- Сообщения: 205
- ОС: Linux Ubuntu 12.04
-
Контактная информация:
Re: Решено: Не работает DNS — не преобразуются адреса в ip.
Сообщение
ubuntuAndrew » 09.05.2010 18:08
Караул! Когда устанавливал dhcp (скачал исходники с isc.org), то часто выводил «Цель all не требует выполнения команд», но там были all-mn all-еще что-то, потом оказалось, что у меня не прописан PATH каталог /usr/local/sbin. Ввел export PATH=»все-все-все что было+:/usr/local/sbin», запустил как всегда dhclient eth0, но вместо привычных сообщений о dhcp-запросах он помолчал и ушел.
-
ubuntuAndrew
- Сообщения: 205
- ОС: Linux Ubuntu 12.04
- Контактная информация:
Re: Решено: Не работает DNS — не преобразуются адреса в ip.
Сообщение
ubuntuAndrew » 11.05.2010 19:38
ifconfig -a:
eth0 Link encap:Ethernet HWaddr 00:50:04:54:96:6C
inet addr:192.168.0.2 Bcast:192.168.0.255 Mask:255.255.255.0
UP BROADCAST RUNNING MULTICAST MTU:1500 Metric:1
RX packets:0 errors:0 dropped:0 overruns:0 frame:0
TX packets:0 errors:0 dropped:0 overruns:0 carrier:0
collisions:0 txqueuelen:1000
RX bytes:0 (0.0 b) TX bytes:0 (0.0 b)
Interrupt:10 Base address:0x6800
lo Link encap:Local Loopback
LOOPBACK MTU:16436 Metric:1
RX packets:0 errors:0 dropped:0 overruns:0 frame:0
TX packets:0 errors:0 dropped:0 overruns:0 carrier:0
collisions:0 txqueuelen:0
RX bytes:0 (0.0 b) TX bytes:0 (0.0 b)
Папки /etc/networks нет вообще, вот /etc/networks:
# networks This file describes a number of netname-to-address
# mappings for the TCP/IP subsystem. It is mostly
# used at boot time, when no name servers are running.
#
loopback 127.0.0.0
# End of networks.
route:
Kernel IP routing table
Destination Gateway Genmask Flags Metric Ref Use Iface
192.168.0.0 * 255.255.255.0 U 0 0 0 eth0
tracert: Команда не найдена.
Заодно, содержимое каталога /etc:
adjtime bitlbee/ conf.d/ cron.d/ cron.daily/ cron.hourly/ cron.monthly/
cron.weekly/ cups/ ddclient/ devfsd.conf dhcpc/ fdprm fonts/
fstab group gtk-2.0/ hostname hosts hosts.allow.new hosts.deny.new
hotplug/ hotplug.d/ inetd.conf inittab inputrc issue ld.so.cache
lilo.conf lilo.conf.bak login.defs logrotate.d/ lynx.cfg lynx.lss
makepkg.conf man.conf mime.types modules.conf modules.devfs motd mtab
nanorc networks pacman.conf pango/ passwd pcmcia/ ppp/ profile profile.old
protocols rc* rc.conf rc.conf~ rc.conf~~ rc.conf.old rc.conf.old~ rc.d/
rc.local* rc.modules* rc.multi* rc.multi~* rc.multi.abackup* rc.service*
rc.shutdown* rc.single* resolv.conf resolve.conf securetty services shadow
shadow- shells skel/ slsh.rc ssh/ ssl/ sysctl.conf syslog.conf txt TZ wgetrc
X11/ xml/ zhcon.conf
C’est tout. Voici tout les plumes de ma tante…
Да, еще подробности моей сети. Интернет->модем ADSL со встроенным роутером -> роутер -> компьютер. На роутере настроен Static DHCP для моего компа — 192.168.0.2, ip роутера — 192.168.0.1, маска подсети — 255.255.255.0.
-

Red User
- Сообщения: 229
- ОС: Debian

Re: Решено: Не работает DNS — не преобразуются адреса в ip.
Сообщение
Red User » 11.05.2010 20:23
ubuntuAndrew писал(а): ↑
11.05.2010 19:38
Kernel IP routing table
Destination Gateway Genmask Flags Metric Ref Use Iface
192.168.0.0 * 255.255.255.0 U 0 0 0 eth0
Тебе надо добавить маршрут для адресов не из сети 192.168.0.0. После этого по крайней мере должны пинговаться гугловские dns:
Но вообще по-правильному это где-то должно настраиваться в дистрибутиво-специфичном месте, чтобы не вводить каждый раз команду.
А ведь когда-то не боялись мы программы любой,
И с одним лишь debug’ом выходили на бой,
И искусно написанный вирус встречали как брата
-
ubuntuAndrew
- Сообщения: 205
- ОС: Linux Ubuntu 12.04
- Контактная информация:
Re: Решено: Не работает DNS — не преобразуются адреса в ip.
Сообщение
ubuntuAndrew » 11.05.2010 20:49
Теперь роутер миновал, пинг взял все тестовые ip, которые я дал. Привел /etc/resolv.conf к следующему виду:
dyndns 216.146.35.35
dyndns2 216.146.36.36
Это dns сервера, необходимые для нормальной работы службы ddns (dyndns.com), но до сих пор dns адреса не резольвируются. Сейчас попробую выйти в Интернет через какой-нибудь публичный proxy-сервер.
-
Indarien
- Сообщения: 436
- ОС: Debian, Fedora, Ubuntu
Re: Решено: Не работает DNS — не преобразуются адреса в ip.
Сообщение
Indarien » 12.05.2010 13:37
ubuntuAndrew писал(а): ↑
11.05.2010 19:38
Папки /etc/networks нет вообще, вот /etc/networks:
Indarien писал(а): ↑
11.05.2010 12:51
и файл /etc/network/interfaces
Читайте внимательнее. Никаких нетворкс и йестердейзс.
/etc/network/interfaces
В ресолв.конф впишите ДНСки как сказали.
tracert — согласен нет, пардон, это из венды, traceroute нужен.
Шлюз по умолчанию. Вы сидите через модем, он у вас как, роутером стоит? Так поднимите на нем DHCP и пусть он вам сам раздает и ДНСки и шлюзы. Зачем терзать клиента?
покажите nslookup еще
А DHCP поднят, так настройте его просто. У меня у самого так было, когда-то чеез адсл, сча просто чеерз роутер, но не принципиально, все раздвалось с коробочки, просто подрубаешь тачкуноут и все, ХП, 7ка, Убунта, Деб все ходило без бубна.
-=Правильно заданный вопрос содержит 50% ответа=-
-
ubuntuAndrew
- Сообщения: 205
- ОС: Linux Ubuntu 12.04
- Контактная информация:
Re: Решено: Не работает DNS — не преобразуются адреса в ip.
Сообщение
ubuntuAndrew » 12.05.2010 17:03
Так… если файл /etc/networks — yesterday, то пора подумывать о смене Линукса… Ладно помучаюсь еще…
Надо вписывать вручную ip адреса всех сайтов, которые мне могут пригодится?
Что касается dhcp: модем дает ip адрес роутеру (192.168.1.2), а роутер уже дает ip адреса всей сети, в. ч. и моему компьютеру.
Вообще-то мне этот компьютер нужен только как LAMP сервер с Drupal и DynDNS клиентом. А ему нужны именно его dns сервера, используемые для подключений. Да и где у Linux настроить выход именно на определенные dns-сервера?
-
Red User
- Сообщения: 229
- ОС: Debian
Re: Решено: Не работает DNS — не преобразуются адреса в ip.
Сообщение
Red User » 12.05.2010 23:22
(ubuntuAndrew) писал(а):Надо вписывать вручную ip адреса всех сайтов, которые мне могут пригодится?
Думаю, не стоит.
(ubuntuAndrew) писал(а):Да и где у Linux настроить выход именно на определенные dns-сервера?
В /etc/resolv.conf
(ubuntuAndrew) писал(а):Сейчас попробую установить libc-2.11.
Зачем?
А ведь когда-то не боялись мы программы любой,
И с одним лишь debug’ом выходили на бой,
И искусно написанный вирус встречали как брата
-
ubuntuAndrew
- Сообщения: 205
- ОС: Linux Ubuntu 12.04
- Контактная информация:
Re: Решено: Не работает DNS — не преобразуются адреса в ip.
Сообщение
ubuntuAndrew » 12.05.2010 23:53
Так… Судя по словам Мани, resolv.conf содержит ассоциации между доменными именами узлов и их ip адресами. То есть что бы получить доступ к сайту site.examle с ip 192.168.192.168, надо вбить в resolv.conf:
Код: Выделить всё
site.examle   192.168.192.168
another.site2.example   192.168.192.169
И только после этого можно будет получить доступ только к этим двум сайтам.
Но по словам Red User:
Да и где у Linux настроить выход именно на определенные dns-сервера?
В /etc/resolv.conf
То есть получается, туда можно вписать какой-нибудь dns-сервер (именно один dns сервер) и все будет работать. Тогда в каком же виде представлять nameserver?
А libc я решил переустановить, поскольку даже после того, как я вбил в /etc/resolv.conf след. строку:
, пинг unixforum не брал. Так как ping обращается для резольвирования к системной функции из libc, а она resolv.conf не читает, следовательно libc кривая.
-
watashiwa_daredeska
- Бывший модератор
- Сообщения: 4038
- Статус: Искусственный интеллект (pre-alpha)
- ОС: Debian GNU/Linux
Re: Решено: Не работает DNS — не преобразуются адреса в ip.
Сообщение
watashiwa_daredeska » 13.05.2010 01:06
ubuntuAndrew писал(а): ↑
12.05.2010 23:53
Так… Судя по словам Мани, resolv.conf содержит ассоциации между доменными именами узлов и их ip адресами.
Нет. Нет. Нет. Ещё раз, я не знаю, что Вы там читаете и как, но /etc/resolv.conf — НЕ /etc/hosts. В /etc/resolv.conf имеется ограниченное число директив: nameserver, search и др. Это директивы, а не «типографский» элемент оформления, который надо заменить на что-то ещё, вбивать надо буква в букву и никак иначе.
ubuntuAndrew писал(а): ↑
12.05.2010 23:53
А libc я решил переустановить, поскольку даже после того, как я вбил в /etc/resolv.conf след. строку:
, пинг unixforum не брал.
Это строка для… ну, почти для /etc/hosts, а не для /etc/resolv.conf. Чтобы unixforum.org ресолвился в адрес 89.104.102.12, можно прописать в /etc/hosts строку:
. Ещё раз: в /etc/hosts, а не в /etc/resolv.conf, примечание: именно эту строку, в /etc/hosts. В /etc/resolv.conf прописывается другое и по другому.
В /etc/hosts прописывается соответсвие имя->IP вместо DNS, а в /etc/resolv.conf прописываются адреса DNS.
-
Indarien
- Сообщения: 436
- ОС: Debian, Fedora, Ubuntu
Re: Решено: Не работает DNS — не преобразуются адреса в ip.
Сообщение
Indarien » 13.05.2010 10:49
2 ubuntuAndrew
resolv.conf
Это НЕ файл где описываются хосты, там указываются ДНС сервера и только.
Вид должен быть таким
nameserver 8.8.8.8
nameserver IP адрес ДНС сервера
nameserver Это НЕ имя хоста, это синтаксис файла и писать надо именно nameserver пробел IP и никак иначе.
networks
У вас это файл?
-=Правильно заданный вопрос содержит 50% ответа=-
Introduction
DNS (domain name system) stores information related to domain names as a distributed database. The client-server service translates domain names to IP addresses and vice versa.
Most other network services, such as Web, emails, and file transfer, use DNS. A misconfigured DNS server can lead to critical connectivity issues. Thankfully, troubleshooting DNS issues is a vital and relatively simple process to follow.
Follow this tutorial to learn the practical steps in troubleshooting DNS issues.
Prerequisites
- A stable internet connection.
- Access to the command line/terminal.
- A user account with administrator/sudo privileges.
DNS troubleshooting follows logical steps from basic network troubleshooting to more in-depth analysis. Network services often report DNS issues for reasons that do not require in-depth DNS troubleshooting.
If you are experiencing DNS issues, start by performing the following steps before going on to in-depth troubleshooting:
- Check cables
If using a wired connection, make sure everything is connected properly. On wireless networks, check if WiFi is turned on and connected. Check the router if all cables are functional. Try to switch ports for ethernet cables and test out the connection.
- Restart router
Turn the router off and wait for at least two minutes before turning it on again. Wait until the router fully boots up before rechecking the connection.
- Scan for malware
Viruses sometimes block an internet connection. Run a scan to see if anything suspicious appears and handle accordingly.
- Check the website
If the problems arise when connecting to a particular website or a part of the website, check if the connection problem is with the website itself. One way to do this is using the ping command.
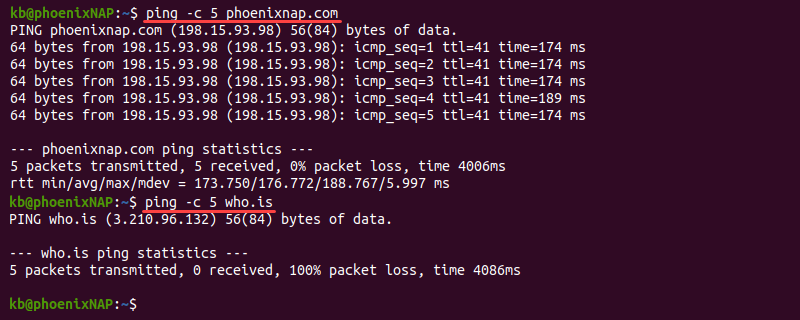
The command output helps identify the reason for the connection problem:
1. If ping does not show a response, the issue is most likely on the server’s end.
2. A common cause of an error in the response is a poorly configured DNS server or firewall restrictions. Learn how to resolve the «Temporary failure in name resolution» error.
3. If the output shows a response, the problem is most likely with the DNS.
The comprehensive list below provides valuable tips for troubleshooting DNS issues.
Check TCP/IP Settings
Misconfigured DNS server addresses are a common issue. Reset the settings and check if communication is back to normal. Depending on which OS you’re using, the steps are different.
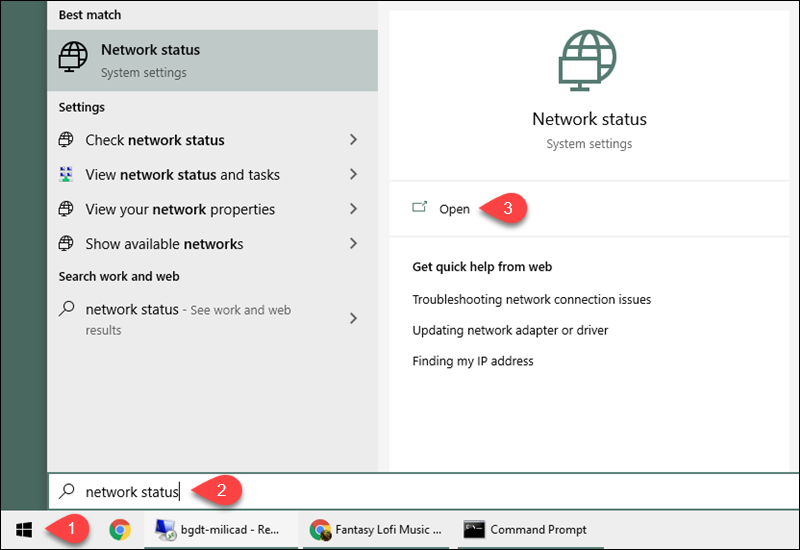
For Windows:
1. Search for Network Status in the Start menu and open the tool.
2. Select Properties under the network connection details.
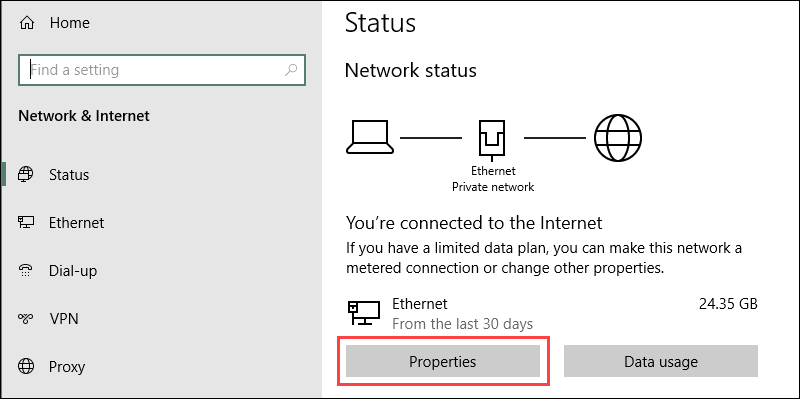
3. Click the Edit button to change the IP settings.

4. If the IP assignment is Manual, double-check the IP, Preferred, and Alternate DNS addresses. Change IP assignment by selecting Automatic (DHCP) from the dropdown menu to reset back to normal.
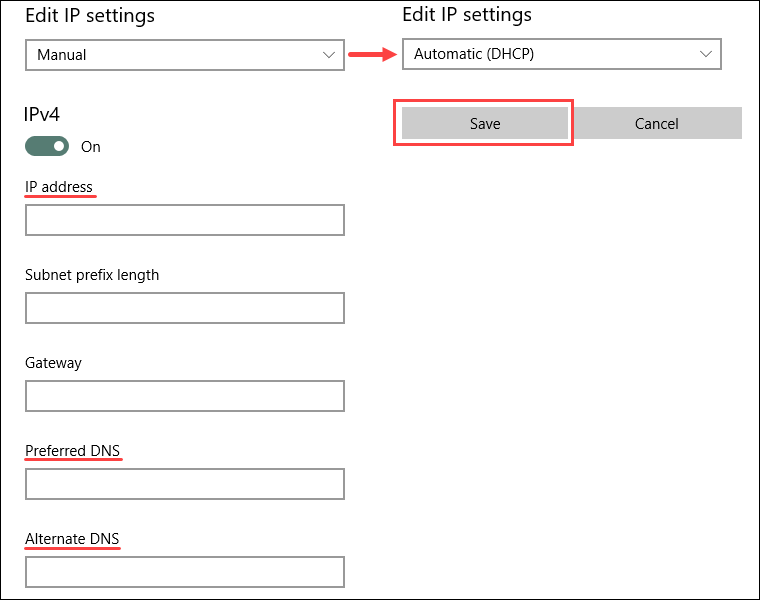
5. Save the settings when finished.
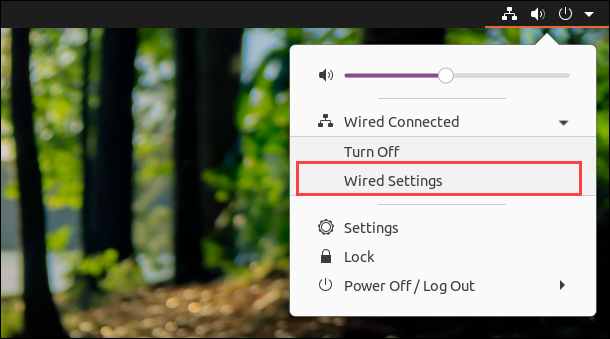
For Linux:
1. Click the connection icon in the top-right corner.

2. Open the menu and select Wired Settings.
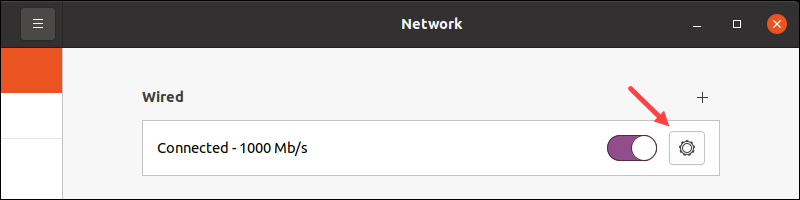
3. Click the gear icon in the connection pane to open the settings.
4. Navigate to the IPv4 tab in the settings menu.
5. If manually assigned, double-check the Address and DNS IP address list. Select the Automatic (DHCP) option and change the DNS switch to Automatic to reset back to normal.
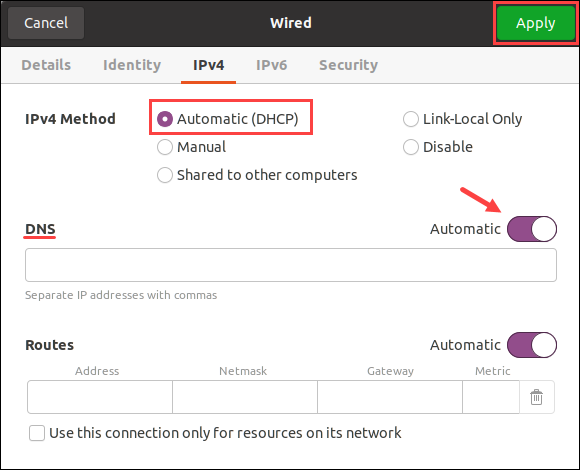
Apply the settings when finished and close the window. Lastly, check the connection to ensure everything functions correctly.
Note: Learn how to install and use PowerDNS on Ubuntu, an open-source DNS server solution that helps resolve namespaces.
Flush the DNS Cache
IP mapping to popular websites is often the target of malicious attacks. DNS caches information to improve loading speed, and it might have cached a wrong address. Clearing the DNS cache deletes all the lookup information and updates with subsequent requests.
Flushing DNS cache is a good security measure to take in general. Follow our tutorial for detailed and OS-specific instructions: How to Flush DNS Cache in macOS, Windows, & Linux.
Release and Renew DHCP Server IP
Releasing and renewing the IP address helps resolve an IP conflict and old DNS information by refreshing the cached information. The easiest way to accomplish a release and renewal is through the command prompt/terminal.
Warning: Resetting the IP disconnects the computer from the internet.
To renew the IP on Windows using the command prompt:
1. Run the following commands to release the current IP and renew the information:
IPCONFIG /RELEASE
IPCONFIG /RENEW
2. Check the new information with:
IPCONFIG /ALLTo force IP renewal on Linux via the terminal:
1. Open the terminal and release the current IP with the following command:
sudo dhclient -rThe terminal outputs a confirmation message, and the connection is closed.
2. Run dhclient without any options to renew the IP:
sudo dhclient
Change to Public DNS Servers
Change the DNS servers to public domain addresses. Some standard options are:
- Google’s
8.8.8.8address as primary and8.8.4.4as secondary. - Cloudflare’s
1.1.1.1address as primary and1.0.0.1as secondary.
Public domain addresses are generally reliable and are available for free. However, use this only as a temporary resolution.
On the other hand, some public domain DNS servers block traffic from malicious websites. A public DNS might detect a flagged website as suspicious, and the public DNS you’re using might be blocking access.
Use dig
The dig command (domain information groper) provides DNS information and helps in diagnosing issues. The utility’s raw output makes it the preferred method for troubleshooting DNS issues.
The program is available on macOS and Linux by default and is free to install on Windows.
To get dig information for a domain, run the following command in the terminal:
dig <domain name or IP>For example, to show the information for phoenixnap.com, run:
dig phoenixnap.com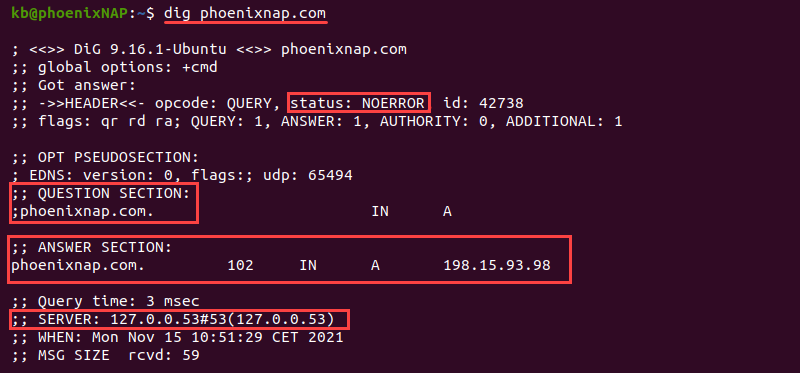
- The
statusshows whether a query was successful. - The
ANSWER SECTIONshows a response to a request sent in theQUESTION SECTION. - The
SERVERdisplays the address for the public DNS server.
By default, dig looks up the A record for a domain and shows which IP address the domain points to when resolving the name.
The dig tool offers many advanced options for comprehensive searches. For example, add the +trace tag to see the full path to the destination:
dig phoenixnap.com +trace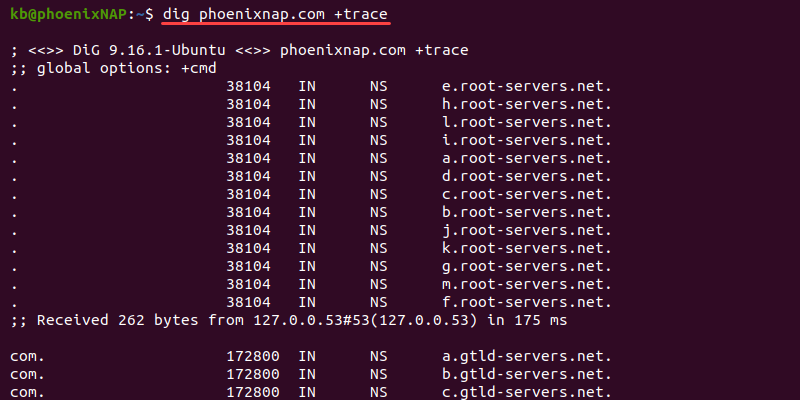
The +trace option helps pinpoint traffic drops in the route to the destination.
To check the delegated name servers, use the ns option:
dig phoenixnap.com ns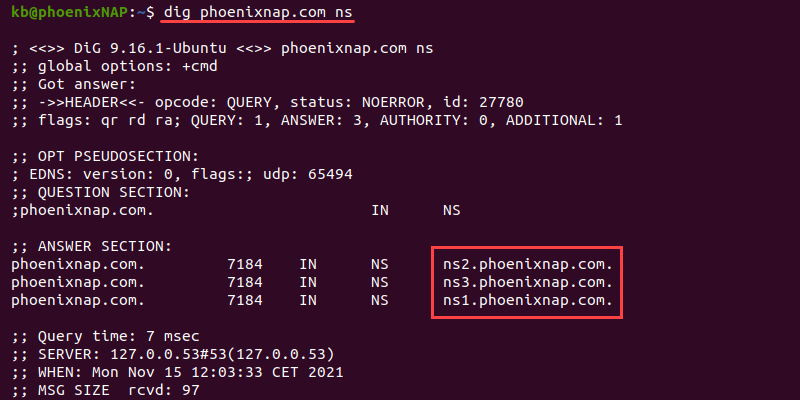
Use the ns option to help identify and troubleshoot delegation problems.
Use nslookup
The nslookup command provides functions for checking different DNS records and servers. The tool is available on macOS, Linux, and Windows operating systems by default, and it was the first tool for querying DNS.
To get nslookup information for a domain, use the following command in the command line/terminal:
nslookup <domain name or IP>For example, run nslookup for phoenixnap.com:
nslookup phoenixnap.com
The output prints the DNS server’s address and the A record response. The nslookup command is preferable for Windows because of its availability.
Use host
The host utility is a straightforward program for performing a DNS lookup. The command is available for macOS and Linux systems.
The basic syntax for host is:
host <domain name or IP>For example:
host phoenixnap.com
The host command is excellent for quickly checking if a domain name exists and resolves to an address. A typical use case for host is in bash scripts.
Use additional options to display more information. For example, add the -a tag to see a similar output to the dig command:
host -a phoenixnap.com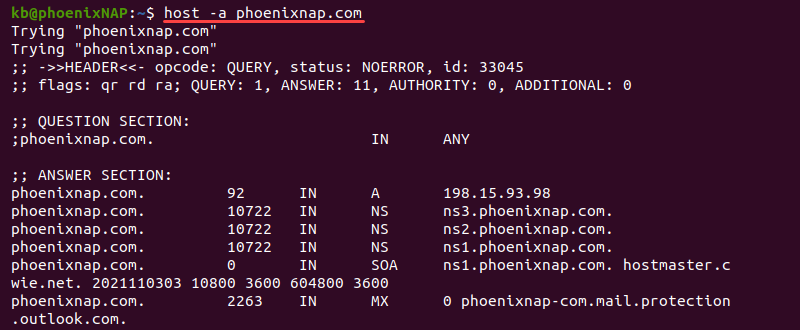
The output shows additional information in the answer section, such as the NS, SOA, MX, and other available records.
Use traceroute or tracert
The traceroute and tracert tools help trace a route from source to destination. When troubleshooting DNS issues, the commands help identify where packets stopped on the network. The traceroute command is available on macOS and Linux, while the Windows equivalent is tracert.
Note: Install the traceroute tool using the apt package manager:
sudo apt install tracerouteAs a readily available and simpler alternative, use tracepath.
To map the network, run the following command in the terminal:
traceroute <domain name or IP>If using a Windows machine, run:
tracert <domain name or IP>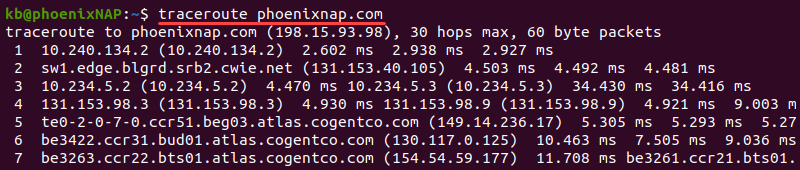
For more information on the traceroute/tracert command and how to read the output, check our comprehensive tutorial on How to Run a Traceroute on Linux, Windows & macOS.
Contact Your ISP
If the computer uses the ISP’s DNS, you cannot resolve the issues on your end. Contacting the ISP helps determine the problem and pinpoint the difficulties on their end.
Conclusion
At the end of this guide, you should have several tools and tricks to help you resolve DNS issues. If you’re looking to set up your DNS server at home to speed up your connection, try following our Raspberry Pi tutorial on How to Set Up Raspberry Pi as a DNS Server.
Содержание
Решение проблем
Этот раздел посвящен способам определения причины проблем, возникающих с DNS и BIND9.
Тестирование
resolv.conf
Первый шаг в тестировании BIND9 это добавление IP адреса сервера имен в список определителей сетевых имен. Первичный сервер имен должен настраиваться, как и любой другой узел сети, с двойной проверкой. Просто отредактируйте /etc/resolv.conf, добавив следующее:
nameserver	192.168.1.10
nameserver	192.168.1.11
Вам надо добавить также IP адрес вторичного сервера имен на случай недоступности первичного.
dig
Если вы установили пакет dnsutils, вы можете проверить свою установку используя обзорную утилиту DNS dig:
1. После установки BIND9 примените dig к интерфейсу обратной петли (loopback), чтобы убедиться, что порт 53 прослушивается. Из терминала наберите:
dig -x 127.0.0.1
Вы должны увидеть строки вывода, похожие на следующее:
;; Query time: 1 msec
;; SERVER: 192.168.1.10#53(192.168.1.10)
2. Если BIND9 настроен у вас как кэширующий сервер, используйте dig для замера времени при разрешении имени внешнего домена:
dig ubuntu.com
Обратите внимание на время в конце вывода результата команды:
;; Query time: 49 msec
После повторного вызова dig должно произойти улучшение:
;; Query time: 1 msec
ping
Теперь для демонстрации как приложения могут использовать DNS для разрешения сетевых имен используйте утилиту ping для отправки ICMP эхо-запроса. Из терминала наберите следующее:
ping example.com
Это проверит может ли сервер имен разрешить имя ns.example.com в IP адрес. Вывод команды будет напоминать следующее:
PING ns.example.com (192.168.1.10) 56(84) bytes of data.
64 bytes from 192.168.1.10: icmp_seq=1 ttl=64 time=0.800 ms
64 bytes from 192.168.1.10: icmp_seq=2 ttl=64 time=0.813 ms
named-checkzone
Хороший способ проверить ваши файлы зон — это использовать утилиту named-checkzone, установленную вместе с пакетом bind9. Эта утилита позволяет вам убедиться в корректности настроек до перезапуска BIND9 и применения изменений.
1. Для тестирования нашего файла прямой зоны из примера введите следующее в командной строке:
named-checkzone example.com /etc/bind/db.example.com
Если все настроенно верно, вы сможете увидеть вывод, похожий на:
zone example.com/IN: loaded serial 6
OK
2. Аналогично, для тестирования файла обратной зоны введите следующее:
named-checkzone 1.168.192.in-addr.arpa /etc/bind/db.192
Вывод должен напоминать следующее:
zone 1.168.192.in-addr.arpa/IN: loaded serial 3
OK
Serial Number вашего файла зоны может отличаться.
Журналирование
BIND9 имеет широкий набор доступных опций настроек журналов. Существуют две основные опции. С помощью опции channel указывается где вести журналы, а опция category определяет какую информацию писать в журнал.
Если опции журналов отсутствуют, по умолчанию применяется следующее:
logging {
     category default { default_syslog; default_debug; };
     category unmatched { null; };
};
Этот раздел раскрывает как настроить BIND9 посылать отладочные сообщения, связанные с DNS запросами в отдельный файл.
1. Сначала нам надо настроить канал (channel) для определения в какой файл посылать сообщения. Редактируем /etc/bind/named.conf.local и добавляем следующее:
logging {
    channel query.log {
        file "/var/log/query.log";
        severity debug 3;
    };
};
2. Затем настраиваем категорию (category) для отправки всех DNS запросов в файл:
logging {
    channel query.log {
        file "/var/log/query.log";
        severity debug 3;
    };
    category queries { query.log; };
};
Обратите внимание на опцию debug, которая может принимать значения от 1 до 3. Если уровень отладки не указан, о умолчанию используется 1.
3. Поскольку сервис named запускается от имени bind, надо создать файл и сменить ему пользователя:
    sudo touch /var/log/query.log
    sudo chown bind /var/log/query.log
4. Перед тем как сервис named сможет писать в новый файл журнала нужно изменить профиль AppArmor. Сначала редактируем файл /etc/apparmor.d/usr.sbin.named, добавив:
/var/log/query.log w,
или так:
/var/log/** rw,
Затем перегружаем профиль:
cat /etc/apparmor.d/usr.sbin.named | sudo apparmor_parser -r
На версии 12.4 работает следующая команда:
sudo apparmor_parser -r /etc/apparmor.d/usr.sbin.named
Дополнительную информацию по AppArmor смотрите в разделе AppArmor.
5. Теперь перегружаем BIND9 для применения изменений:
sudo service bind9 restart
Теперь вы можете увидеть файл /var/log/query.log, заполненный информацией о запросах. Это простейший пример использования опций журналирования BIND9. По использованию расширенных опций смотрите раздел Дополнительная информация.

- Forum
- The Ubuntu Forum Community
- Ubuntu Official Flavours Support
- Networking & Wireless
- [SOLVED] How to no connectivity Ubuntu DNS problem [fix]

-
How to no connectivity Ubuntu DNS problem [fix]
I installed Ubuntu 17.04 and Ubuntu-Mate 17.04 and found i had no INTERNET access. It looked like a problem with DNS.
Here are some simple solutions to the problem:
Method 1:
Open a terminal and copy and paste the following:
Code:
sudo gedit /etc/resolvconf/resolv.conf.d/tail
Add the following:Click Save and Restart your computer.
Method 2:
Open a terminal and copy and paste the following:
Code:
sudo gedit /etc/systemd/resolved.conf
Uncomment and change it toClick Save and Restart your computer.
Method 3:
With Network-manager Click Edit Connections > Wired Connection > Edit > Ipv4 Settings > Method: Automatic (DHCP) address only > DNS servers add 8.8.8.8 > Click Save
Restart your Network Connection or restart your computer.
With this method, if the connection under «Network Connections» is deleted the user will no longer have INTERNET access so i would not recommended it. Choose method 1 or 2 instead.
Last edited by jonathonp; April 16th, 2017 at 05:50 AM.
-
Re: How to no connectivity Ubuntu DNS problem [fix]
I installed Ubuntu Gnome 17.04 on a spare partition and wired internet did not work.
Method 2 in your post solved the difficulty.
Thank you
-
Re: How to no connectivity Ubuntu DNS problem [fix]
Methode nr 1 SOLVED my problem with DNS on Ubuntu 17.04 ——- Thank You very much
-
Re: How to no connectivity Ubuntu DNS problem [fix]
The 2nd method worked for me too. Thanks!
-
Re: How to no connectivity Ubuntu DNS problem [fix]
The first method works like a charm. Thanks.
Can you give a briefly explanation about how it works?Kind regards!
