
Две самых частых и досадных ошибки в браузере Chrome — это Dns probe finished bad config и Error name resolution failed. Обе связаны с ошибками сопоставления доменных имён с сетевыми адресами в вашем компьютере (характерно для Windows7, Windows8, Windows10, Android и Linux). Что делать? Ситуации, из-за которых появляются обе ошибки могут быть разными, поэтому поиск проблемы надо начинать с физических устройств, находящихся в вашей сети до компьютера, например роутера. Для начала немного теории о том, как работает DNS.
Dns probe finished bad config:

Error name resolution failed:

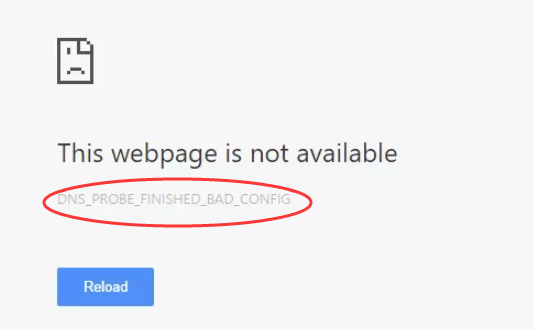
Опаньки! При загрузке этой страницы возникли неполадки:

Переходим к практической части статьи.
Ситуация:
Роутер + компьютер.
Проверяем проблему перезагрузками роутера (маршрутизатора) и подключением к нему других устройств. Если ошибка наблюдается на телефоне, ноутбуке и т.п., значит думаем, что делать с роутером — ресет до заводских настроек, обновление прошивки, повторная настройка соединения с провайдером. Если адреса полностью получаются автоматически, включая DNS-сервера, то имеет смысл сходить на форум провайдера и проконсультироваться насчёт адресов, которые можно вручную указать.
Многие роутеры умеют проводить диагностику соединения, то есть пинговать хосты. Пинг Яндекса роутером Asus:

На скриншоте видно, что роутер послал запрос Яндексу и тот ответил. Можно сказать, что сопоставление имён и адресов работает. Если не работает, то надо экспериментировать с DNS-серверами провайдера, либо указать альтернативный — 8.8.8.8, который стабилен и обслуживает Google. Пример:

В данной ситуации (скриншот) мы видим, что сопоставлением адресов занимаются два DNS: провайдерский и публичный от Гугла. То есть вероятность ошибки заметно снижена.
Очень многое зависит от топологии сети. Например, если провайдер использует VPN-соединение и VPN-сервер имеет доменное имя, то без указания внутреннего провайдерского DNS роутер не сможет определить адрес VPN-сервера. Некоторые роутеры позволяют сбросить и перестроить DNS-кеш специальными командами (аналогичное действие произойдёт при комплексном обновлении прошивки). Так что консультации на форуме провайдера, как и звонок в техподдержку могут оказаться лучшим решением. Можно поискать и форум производителя роутера, там тоже можно отыскать специалистов (поэтому лучше покупать не китайские устройства неизвестного происхождения, а бренды — Zyxel, Trendnet, Asus и т.п.).
На этой стадии самое ценное — определиться, работает сопоставление адресов с именами на роутере или нет. Если роутер пингует домены, значит работает, можно переходить к компьютеру. Если не пингует, то компьютер трогать бессмысленно.
Ситуация:
Роутер + компьютер, на роутере всё пингуется и открывается, на компьютере dns probe finished bad config.
Первым делом смотрим, как ваша сетевая карта/беспроводной адаптер взаимодействуют с роутером.
Очень многие пользователи используют на компьютерах полностью динамическое получение адресов с роутера. Это классно и устойчиво работает на дорогих роутерах и плохо на дешёвых из-за глюков последних.
Свойства подключения в сетевом адаптере:

В такой конфигурации в качестве DNS-сервера выступает ваш роутер, предположим, 192.168.1.1 и он же является шлюзом. Повторять эти настройки, прописывая вручную, смысла особого не имеет. Но можно указать два DNS-сервера — провайдерский и Google:
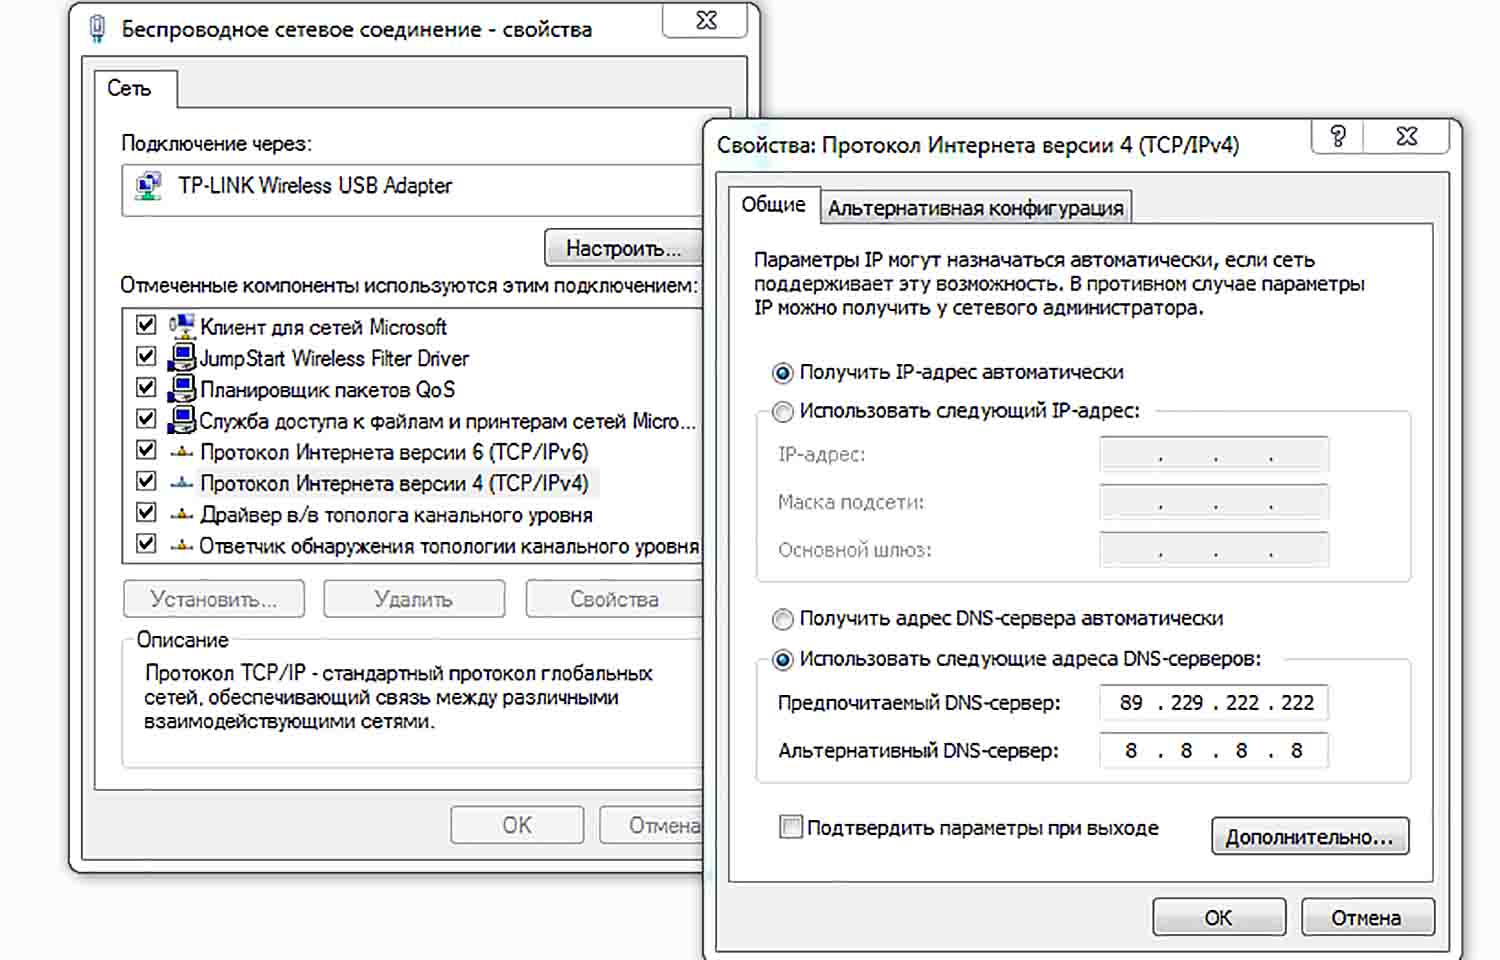
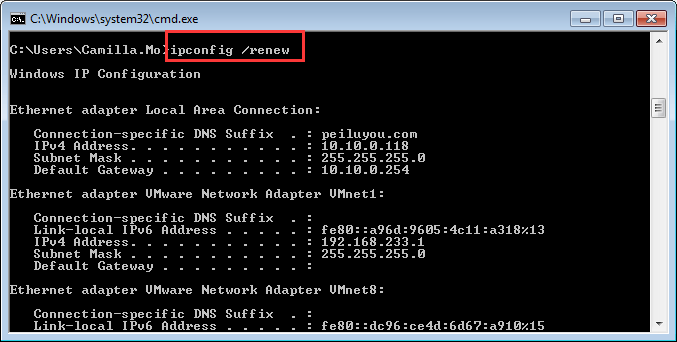
С этого момента компьютер начинает ориентироваться при сопоставлении имён с сетевыми адресами на свои настройки, а не на DNS роутера. В консоли Windows делаем ping ya.ru и смотрим на ответ от хоста Яндекса.
При возникающих периодических неполадках на компьютере:
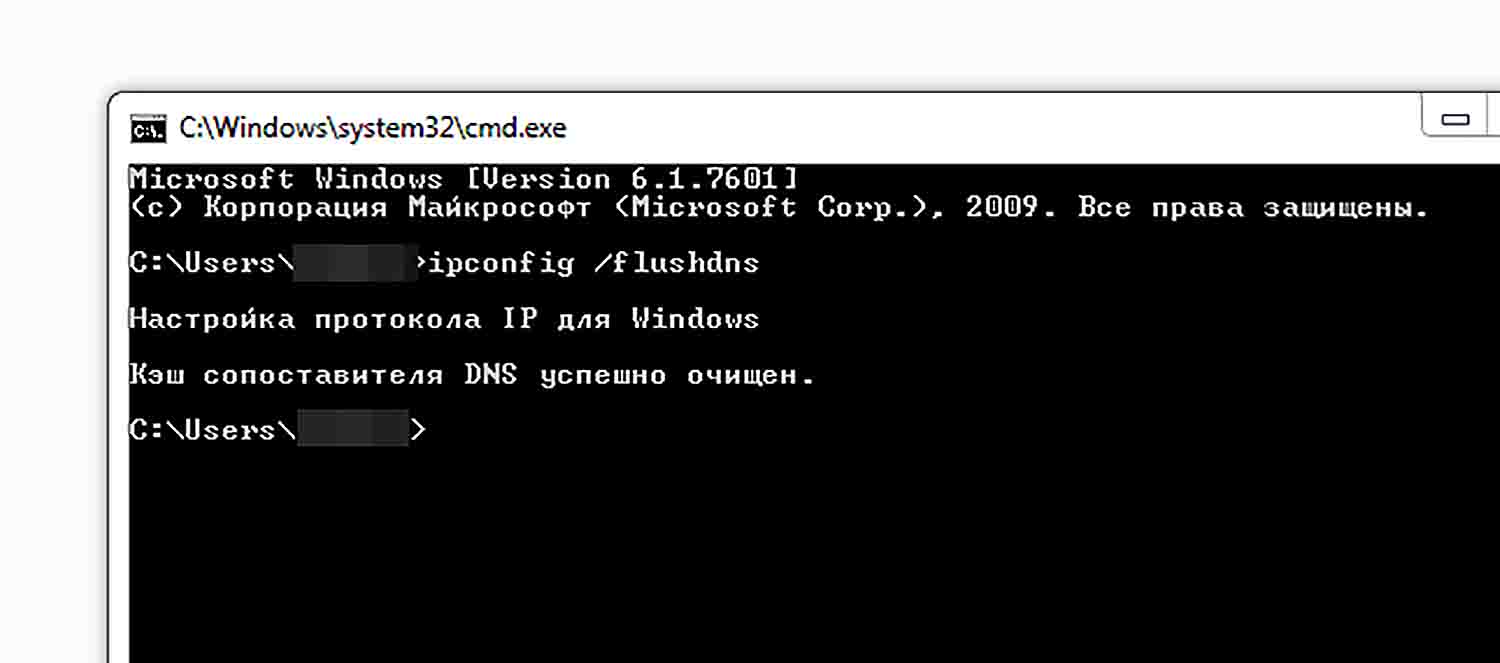
Действия в консоли Windows (Комбинация клавиш Win+R -> cmd и правой кнопкой на cmd — запуск от администратора).
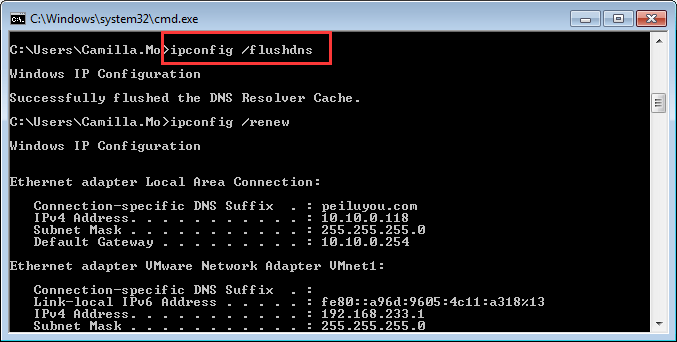
Очистить кеш DNS:
$ ipconfig /flushdns
Сброс Winsock (служба, работающая между приложением и сетью, может сбоить в результате действия вирусов и неправильных настроек). Нажмите на клавишу Win, затем в поиске наберите cmd и правой клавишей на результате — выполнить с правами администратора)
$ netsh winsock reset
DNS в Chrome
Смотрим в Хроме таблицу сопоставлений адресов с именами:
Открываем браузер Chrome и в адресной строке вводим:
chrome://net-internals/#dns
При нормальной работе DNS и браузера на компьютере вы увидите хосты и сопоставленные домены:

Нажатие Clear host cache сбросит кеш браузера Chrome.
Перезапуск DNS-клиента в Windows.
Комбинация клавиш Win+R -> и вводим services.msc. Вот так DNS-клиент корректно должен работать:
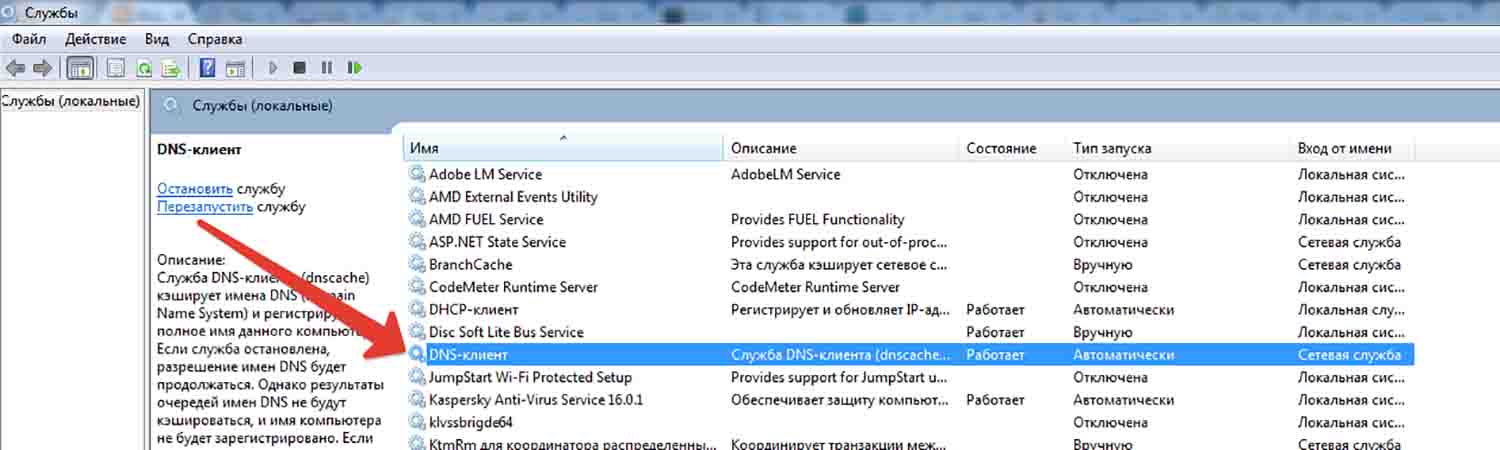
И там же можно перезапустить эту службу.
Файл HOSTS в Windows.
Этот файл любят перезаписывать вирусы. Как должен выглядеть файл Hosts по умолчанию.
Dns probe finished bad config в Android.
Данная неполадка может встретиться и в браузере Chrome на Android OS. Действия те же самые — для начала попробовать вручную указать DNS-сервера:

В Android настройки сети прячутся в свойствах точки доступа (долгое нажатие на точку доступа), статический адрес и дополнительно. На скриншоте указан адрес роутера в качестве DNS-сервера и DNS от Гугла 8.8.4.4 (тоже самое, что и 8.8.8.8).
When you’re browsing online, encountering an error message that prevents you from accessing a website is incredibly frustrating. One such error is the ‘DNS_PROBE_FINISHED_BAD_CONFIG’ message. It can occur regardless of your browser or Operating System.
If you run into this error when trying to open a site, don’t panic. It simply means that the Domain Name System (DNS) wasn’t able to resolve the IP address properly, which can happen for a variety of reasons.
Fortunately, as with most DNS-related issues, there are some simple solutions you can try to fix this problem.
In this article, we’ll explain what the DNS_PROBE_FINISHED_BAD_CONFIG error code means and some common causes of it. Then we’ll walk you through seven solutions for fixing it in Windows, macOS, Android, and Ubuntu.
Let’s get started!
What Is the DNS_PROBE_FINISHED_BAD_CONFIG Error?
To understand what this error means, it’s helpful to first get a general idea of the important role the DNS plays in helping users access websites. In a nutshell, the DNS directs traffic on the internet and is responsible for translating and connecting nameservers, URLs, and IP addresses with web servers.
All websites have unique IP addresses, such as 218.3.120.12. Rather than requiring you to memorize and enter the IP address any time you want to visit a website, the DNS makes it so you can use a more user-friendly domain name, such as kinsta.com.
When you input the URL into your browser, it begins the process known as DNS name resolution. This is where the DNS essentially looks up the URL/IP address and connects it with a web server. However, if for whatever reason the DNS is not able to successfully complete this process, it can return an error message instead.
DNS_PROBE_FINISHED_BAD_CONFIG is a network connection error that displays when there is a problem with the DNS configuration, which prevents it from connecting to a network. It is not specific to any one browser or system, meaning you could come across it in Google Chrome, Windows, or macOS, on an Android mobile device, etc.
Similar DNS Error Messages
A DNS error message occurs when your DNS or network settings are misconfigured. The DNS_PROB_FINISHED_BAD_CONFIG error is just one of them, and there are other similar messages you may run across.
For example, you might see the DNS_PROBE_FINISHED_NXDOMAIN error:
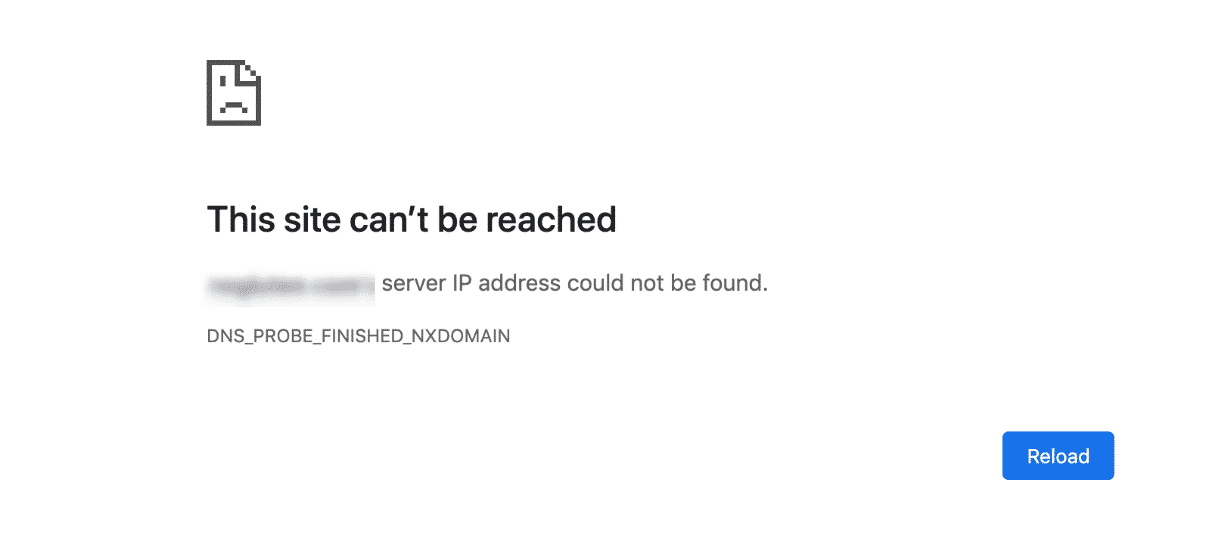
In this error message, “NXDOMAIN” stands for “Non-Existent Domain”. In other words, the domain name that was queried doesn’t exist.
Another similar DNS error is DNS_PROBE_FINISHED_NO_INTERNET:
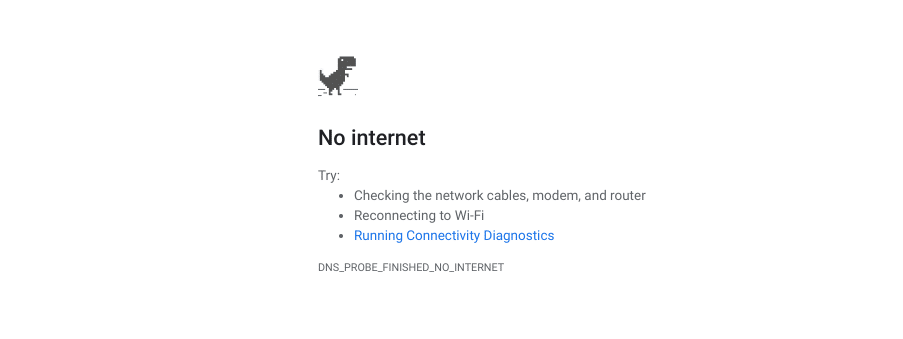
This error message indicates that a problem occurred while establishing an internet connection, or that the connection was lost.
Any of the above DNS errors can vary depending on the browser you’re using. So your message might also include phrases such as:
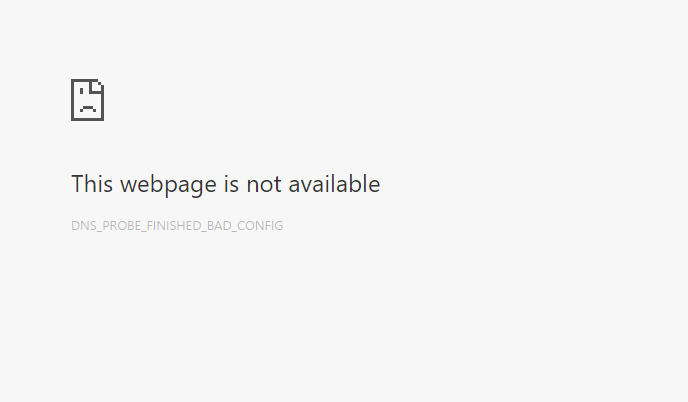
- This web page is not available.
- This site can’t be reached.
- Safari can’t find the server.
- We’re having trouble finding the site/web page.
- There is no internet connection.
As you can see, although they’re slightly different, all of these errors indicate a DNS or network misconfiguration. Therefore, they share many of the same solutions, as we’ll see shortly.
Common Causes of DNS_PROBE_FINISHED_BAD_CONFIG
While there are a handful of reasons you might be seeing this message, the good news is that you can at least narrow it down to a DNS or network issue. Some of the most common causes of DNS_PROBE_FINISHED_BAD_CONFIG include:
- Network settings that were accidentally changed
- Router settings changed through an unauthorized app
- Browser plugin(s), such as a VPN app, interfering or messing with the IP or DNS address
- Problematic firewall or antivirus software
- Corrupted files on your device
It’s also possible that the underlying issue is much simpler. For example, the error message may stem from a malfunctioning internet cable or a website that’s temporarily down.
How to Fix the DNS_PROBE_FINISHED_BAD_CONFIG Error Code (7 Ways)
Now that you have a better idea of what this error means, it’s time to get to work.
Before attempting any of the following solutions, we recommend first making sure your internet cables, modem, and router are properly connected. It’s also smart to refresh the web page, just to make sure there wasn’t a temporary glitch with the connection.
Once you eliminate those options, you’re ready to dive in. Let’s take a look at seven potential solutions you can use to fix the DNS_PROBE_FINISHED_BAD_CONFIG error.
1. Restart Your Router
Even if your router is securely hooked up, it may need a quick reboot to reset the IP address. Therefore, the first step is to restart your router.
To do so, simply hold down the power. After leaving it off for at least one minute, power it back on. While it’s restarting, you may also want to restart your computer.
Once both devices are back on, connect to your Wi-Fi or LAN network and try accessing the website again. If you’re still seeing DNS_PROBE_FINISHED_BAD_CONFIG, it’s time to move on to the next method.
2. Clear Your Browser Cache
While this likely isn’t what’s causing the DNS error, it doesn’t hurt to eliminate it as an option. You might want to first try accessing the website from a different browser than the one you’re currently using.
If you can do so successfully, the next logical solution is to clear the cache of the problematic browser.
The process for doing so will look slightly different, depending on your OS and browser. For detailed guidance, you can refer to our post on how to clear your browser cache.
3. Flush the DNS Cache and Renew Your IP Address
If there was a change recently made to your DNS, whether maliciously or accidentally, your system could be trying to use the local cache to connect to the network.
When this is the case, it makes sense that you might receive the DNS_PROBE_FINISHED_BAD_CONFIG message.
Therefore, the next solution to try is flushing your DNS cache, as well as releasing and renewing your IP address. If you’re using Windows 7 or Windows 10, you can do this through the Command Prompt app.
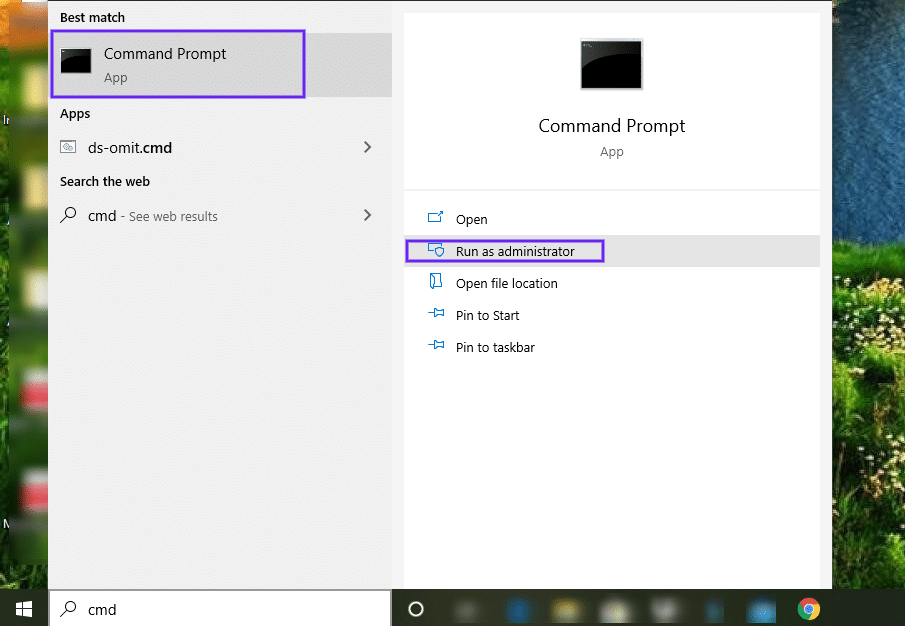
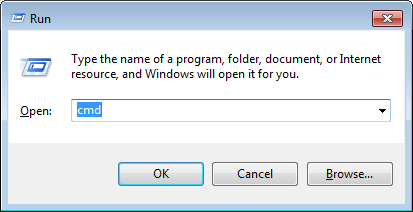
To open Command Prompt, click on the Windows icon/Start button and type “cmd” into the search field. Under Command Prompt, select Run as administrator:
In the Command Prompt window, type in the following commands, hitting the Enter key after each:
ipconfig /flushdns
ipconfig /release
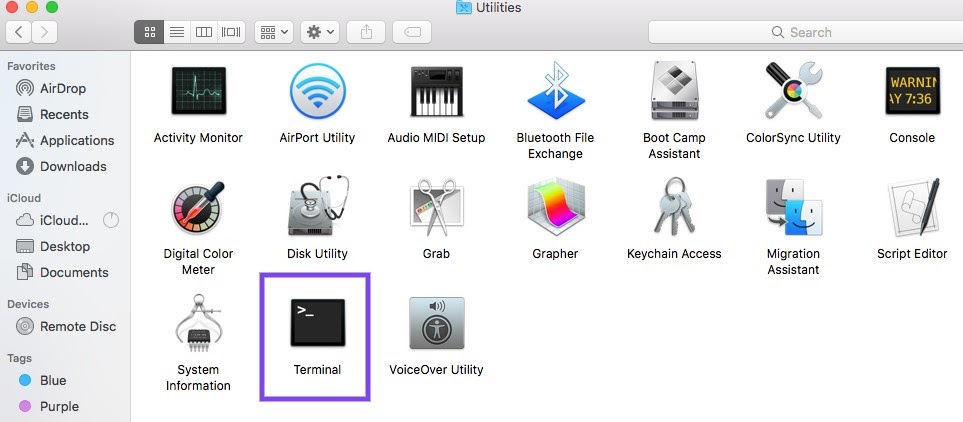
ipconfig /renewOn macOS, you can do this through the Terminal command-line interface. To locate it, click on the Apple icon, followed by Applications > Utilities > Terminal:
In the Terminal interface, the specific command you’ll use varies depending on your macOS version:
-
sudo killall -HUP mDNSResponder(macOS v10.11 or later)
-
sudo discoveryutil mdnsflushcache(Yosemite v10.10 through v10.10.3)
-
sudo killall -HUP mDNSResponder(Mavericks, Mountain Lion and Lion)
-
sudo dscacheutil -flushcache(Snow Leopard)
To release and renew the IP address, navigate to the Apple menu icon > System Preferences > Network > Advanced > Renew DHCP:
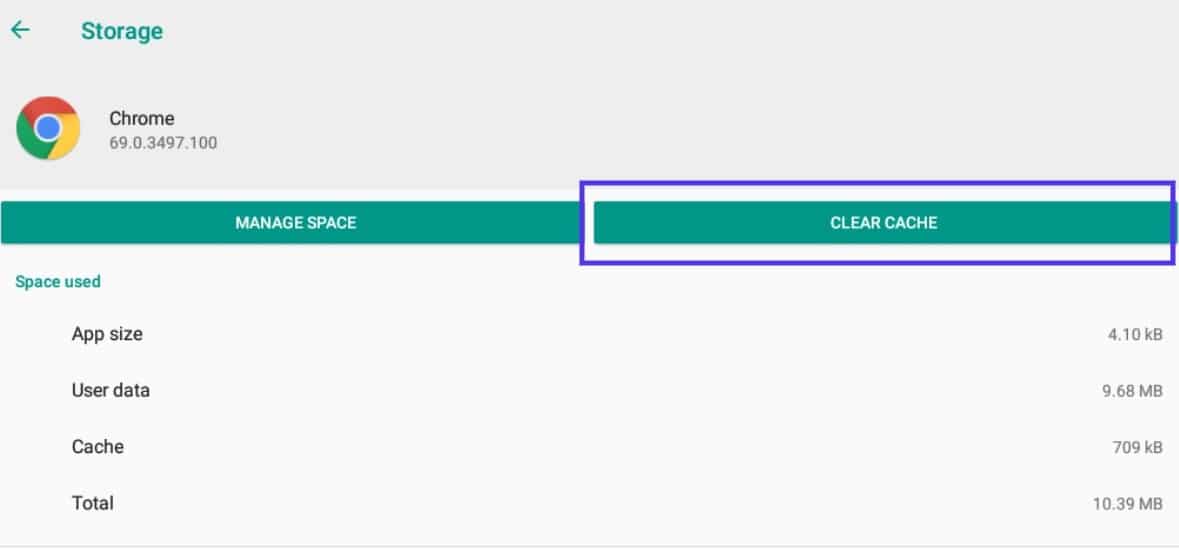
If you’re using an Android device, you can clear your DNS cache by going to Settings > Applications > App info:
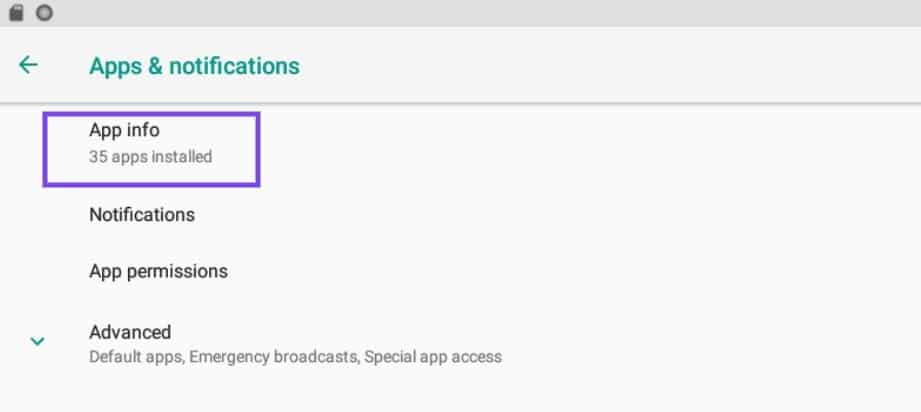
From the list of apps, select Chrome (or whatever browser app you’re using), followed by Storage. On the Storage page, click on the Clear Cache button:
Ubuntu users can launch the command Terminal by pressing CTRL + ALT + T, and then input the following command:
sudo systemd-resolve --flush-cachesFor more detailed guidance, refer to our guide on how to clear your DNS cache.
4. Manually Change the DNS Settings
If you’re still seeing the DNS_PROBE_FINISHED_BAD_CONFIG error message in your browser, the next thing you can try is changing your DNS settings. Your ISP assigns DNS servers by default.
However, you can temporarily switch to a public DNS server such as Google.
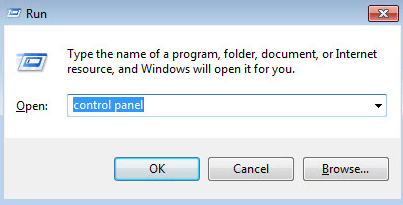
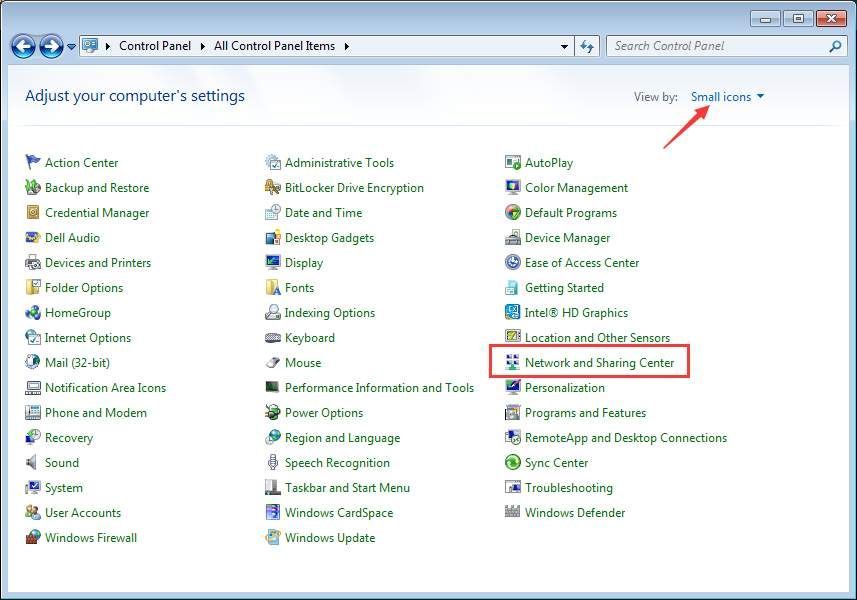
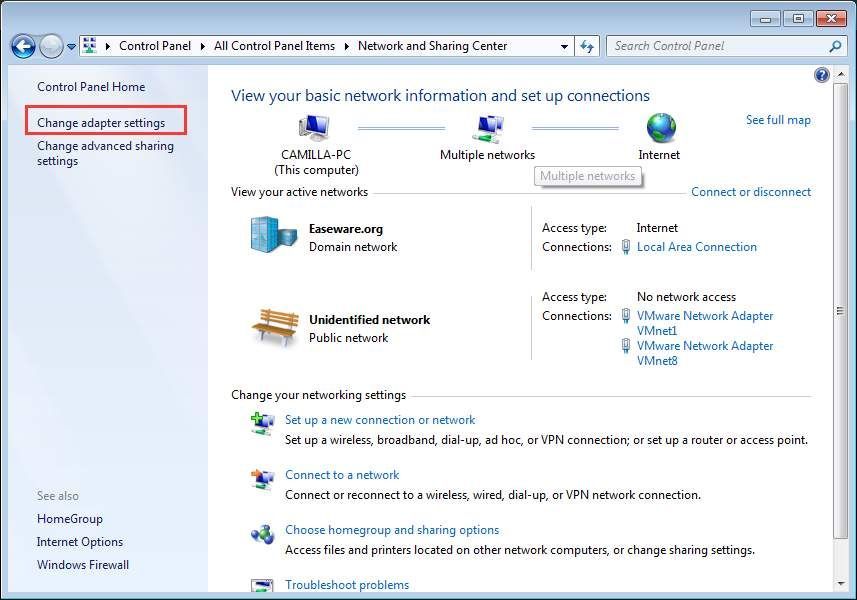
To do this in Windows, right-click on the network icon in the bottom right-hand corner of your screen, then select Open Network and Sharing Center.
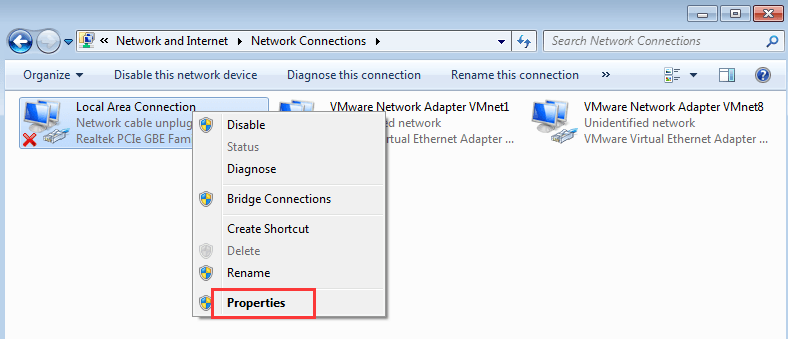
Once the Network window opens, right-click on your network connection and select Properties from the drop-down menu:

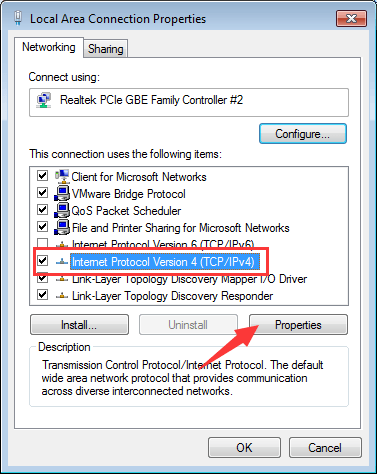
In the panel that opens, under the Networking tab, select “Internet Protocol Version 4 (TCP/IPv4)” followed by the Properties button:
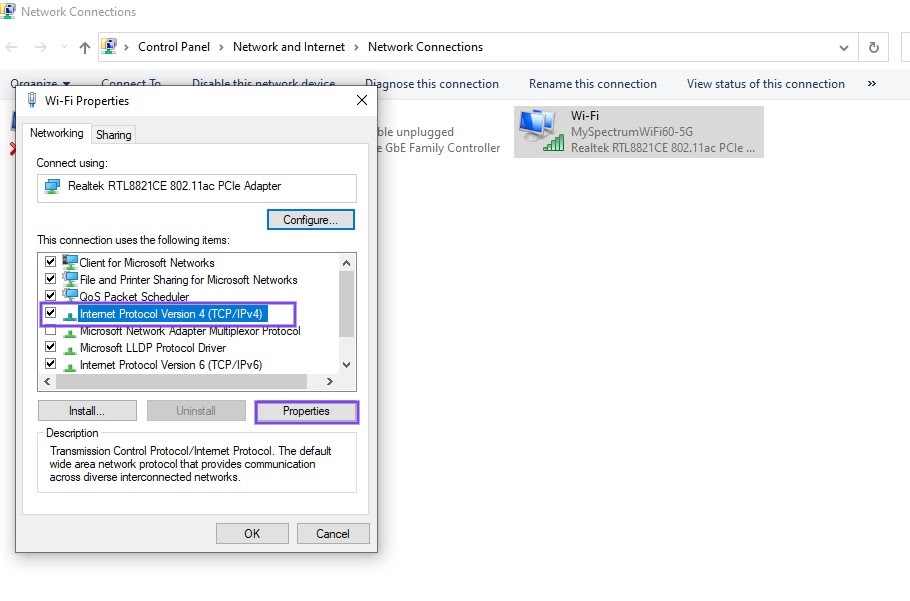
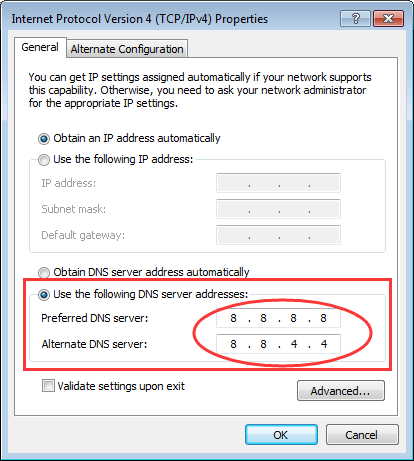
Under “Use the following DNS server addresses”, enter the following:
- Preferred DNS Server: 8.8.8.8
- Alternate DNS Server: 8.8.4.4
When you’re done, click OK. Refresh your browser and try accessing the website again.
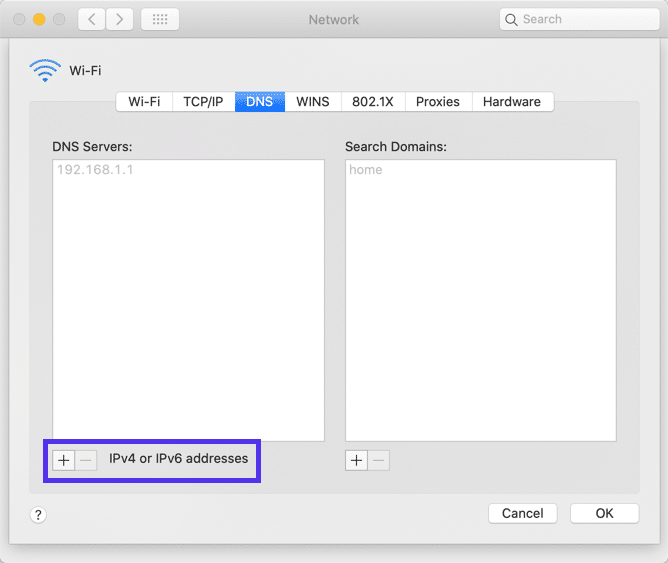
To change your DNS settings for macOS, click on the Apple menu icon, followed by System Preferences > Network. Select your network connection. You can add the new DNS addresses by clicking on the (+) icon:
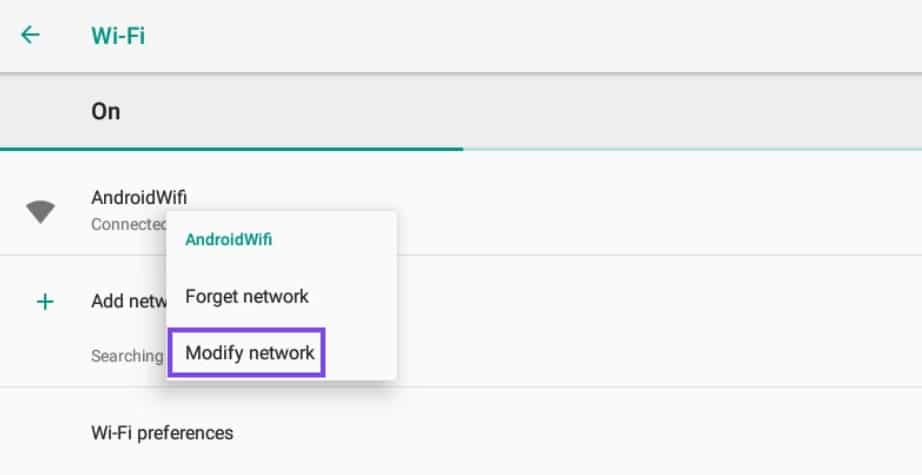
Android users can locate this option by navigating to Settings > WiFi. Press and hold the network, then click on Modify network:
Click on Advanced options, then under IP settings, select Static:
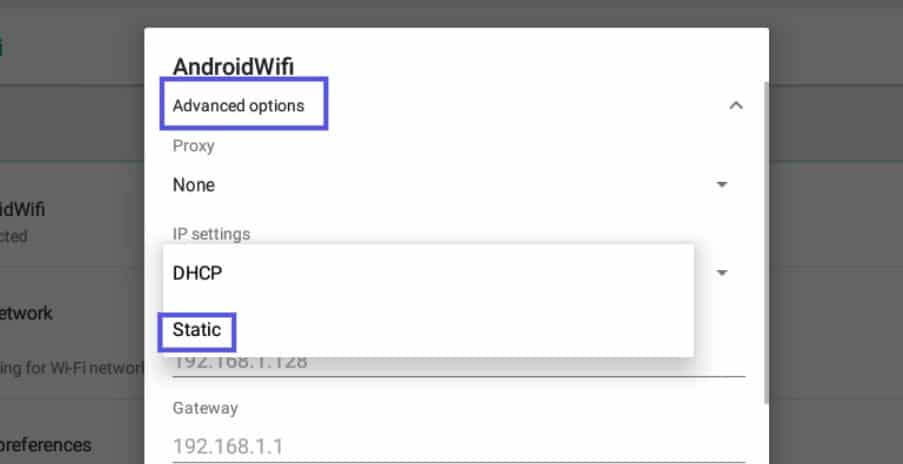
Enter the IP addresses into the respective fields, and save your changes.
If you’re running Ubuntu OS, you can change your DNS settings by clicking on the gear icon next to your network. Under IPv4 tab, there will be a text field to enter new DNS server addresses:

After you enter them, separating each with a comma, click on the Apply button.
5. Trash Temporary Files
Most browsers and systems will save temporary files to your device to use later.
However, if one of those files is corrupted, it may be what’s causing the DNS_PROBE_FINISHED_BAD_CONFIG error. Therefore, another solution we recommend is deleting your temporary files.
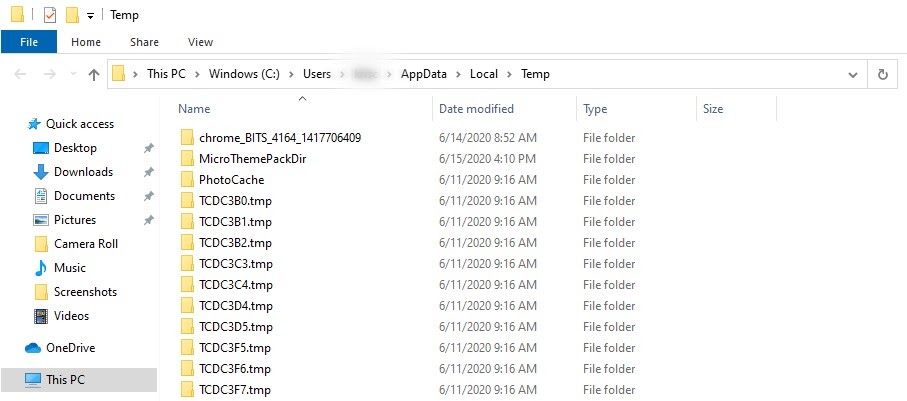
To do this in Windows, type “%temp%” into the search field along your desktop toolbar, and then hit Enter:

This will bring you to the “temp” directory on your computer, where you can view a list of temporary files:
Select all of them and delete them.
On macOS, you can do this by first clicking on Finder and selecting Home (this may be your username instead). Next, hit cmd + shift + . (the period key). This should make your hidden files visible, so you can delete them.
Alternatively, you can try opening Finder and using the Shift + Cmd + G keys. Then, in the text field of the window that opens, enter “~Library/caches”, followed by Enter. This should show you the relevant folders, which you can then delete.
Ubuntu users can skip this step entirely, since the /tmp folder is automatically emptied every time the system is rebooted.
6. Disable Antivirus Software and Firewalls
One of the common issues with antivirus software, firewalls, and VPNs is that they can sometimes conflict with network settings. More specifically, they can interfere with your DNS servers.
Therefore, if you’ve reached this point and the DNS_PROBE_FINISHED_BAD_CONFIG error persists, your next course of action should be to temporarily disable your antivirus software and firewall applications.
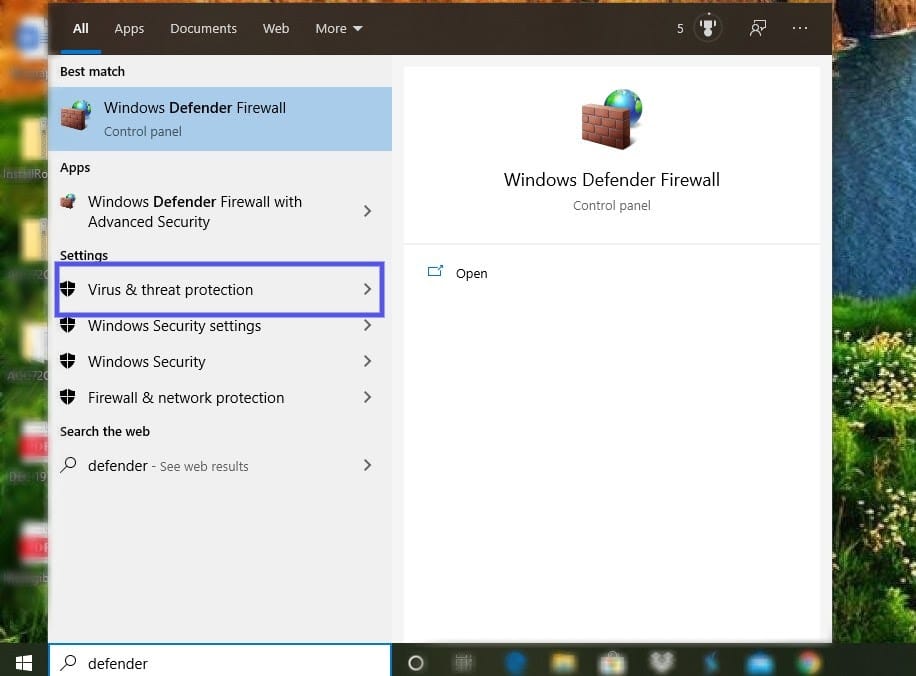
Here’s an example using Windows. Click on the Windows icon, then typing “defender” into the search field. Click on Virus & threat protection:
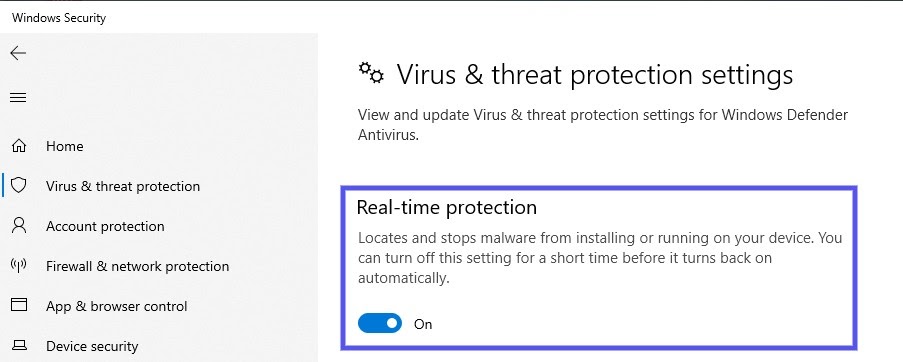
Navigate to Real-time protection, and toggle the switch to Off:
When you’re finished with that, in the left-hand panel, click on Firewall & network protection > Domain network:
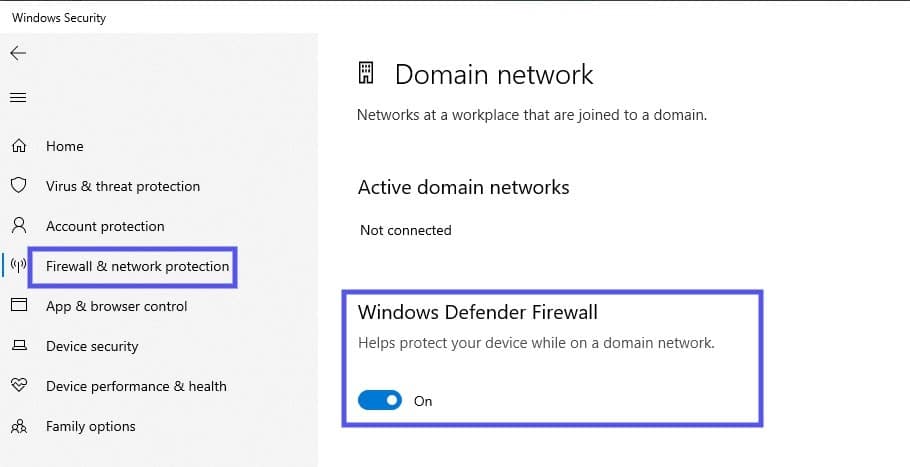
Under Windows Defender Firewall, toggle the switch to disable it. Now try accessing the website again.
Of course, the process for doing this will vary based on what system you’re using, as well as what antivirus and firewall software you have installed. If in doubt, check out the developer documentation for your specific software for more details.
You may also want to disable any WordPress security plugins you’re using, on the off chance that they’re causing an issue while you’re working on your website.
7. Update Your Network Drivers
If you’ve made it to this point on the list, it’s likely because you’re still seeing the DNS_PROBE_FINISHED_BAD_CONFIG error message after trying the above fixes. Fortunately, we have one more solution to try: updating your network drivers.
Outdated or corrupted network drivers can cause a variety of issues, including DNS and network interruptions. Windows Updates typically handle the necessary updates for you. However, you can double-check to see whether you can upgrade to the latest version manually.
To do so, type “device manager” into the search field of your taskbar, then click on the Device Manager control panel:
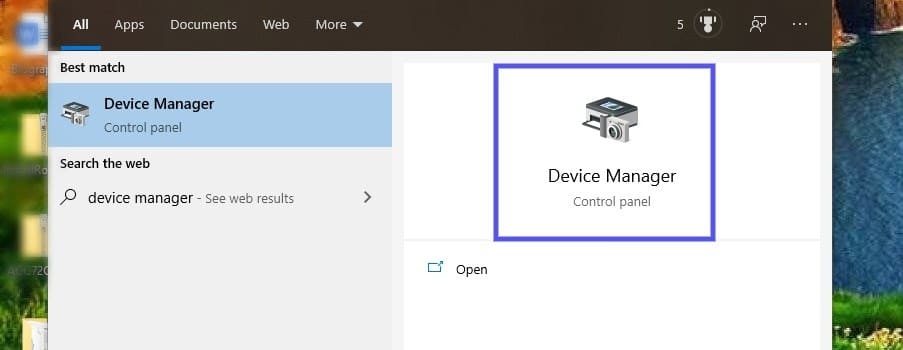
Click on Network adapters, then right-click on the network driver and select Update driver:

Restart your computer, and then try accessing the website again. You should no longer see the DNS_PROBE_FINISHED_BAD_CONFIG message!
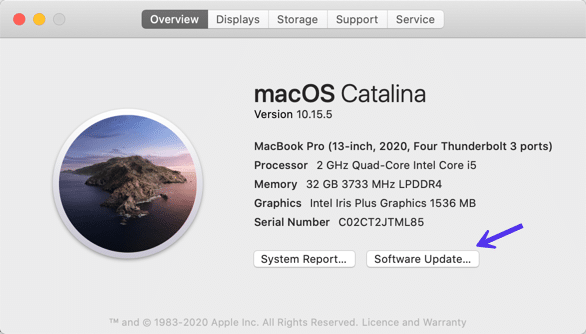
Apple handles system and driver updates as well, so this isn’t something you usually have to worry about on macOS. However, if you want to make sure your system is updated, you can do so by navigating to the Apple menu icon > About this Mac and then clicking on Software Update:
If you’re using Android, you can update your device by going to Settings > About Phone/Tablet/Phone/System > System Updates. The path may look slightly different, depending on the type of device you’re using and your version of Android.
Are you experiencing the DNS_PROBE_FINISHED_BAD_CONFIG error? Well, it means there’s an incorrect DNS configuration preventing access to a web page🚪. Here are 7 ways to fix the issue! ✌️Click to Tweet
Summary
There’s nothing fun about trying to access a website, only to find yourself staring at an error message. While irritating, DNS errors are actually quite common.
Fortunately, they’re also relatively easy to resolve and if you’re dealing with the DNS_PROBE_FINISHED_BAD_CONFIG error, here’s how to fix it:
- Restart your router.
- Clear your browser cache.
- Flush the DNS cache and renew your IP address.
- Manually change the DNS settings.
- Trash temporary files.
- Disable antivirus software and firewalls.
- Update your network drivers.
Get all your applications, databases and WordPress sites online and under one roof. Our feature-packed, high-performance cloud platform includes:
- Easy setup and management in the MyKinsta dashboard
- 24/7 expert support
- The best Google Cloud Platform hardware and network, powered by Kubernetes for maximum scalability
- An enterprise-level Cloudflare integration for speed and security
- Global audience reach with up to 35 data centers and 275 PoPs worldwide
Test it yourself with $20 off your first month of Application Hosting or Database Hosting. Explore our plans or talk to sales to find your best fit.
When you’re browsing online, encountering an error message that prevents you from accessing a website is incredibly frustrating. One such error is the ‘DNS_PROBE_FINISHED_BAD_CONFIG’ message. It can occur regardless of your browser or Operating System.
If you run into this error when trying to open a site, don’t panic. It simply means that the Domain Name System (DNS) wasn’t able to resolve the IP address properly, which can happen for a variety of reasons.
Fortunately, as with most DNS-related issues, there are some simple solutions you can try to fix this problem.
In this article, we’ll explain what the DNS_PROBE_FINISHED_BAD_CONFIG error code means and some common causes of it. Then we’ll walk you through seven solutions for fixing it in Windows, macOS, Android, and Ubuntu.
Let’s get started!
What Is the DNS_PROBE_FINISHED_BAD_CONFIG Error?
To understand what this error means, it’s helpful to first get a general idea of the important role the DNS plays in helping users access websites. In a nutshell, the DNS directs traffic on the internet and is responsible for translating and connecting nameservers, URLs, and IP addresses with web servers.
All websites have unique IP addresses, such as 218.3.120.12. Rather than requiring you to memorize and enter the IP address any time you want to visit a website, the DNS makes it so you can use a more user-friendly domain name, such as kinsta.com.
When you input the URL into your browser, it begins the process known as DNS name resolution. This is where the DNS essentially looks up the URL/IP address and connects it with a web server. However, if for whatever reason the DNS is not able to successfully complete this process, it can return an error message instead.
DNS_PROBE_FINISHED_BAD_CONFIG is a network connection error that displays when there is a problem with the DNS configuration, which prevents it from connecting to a network. It is not specific to any one browser or system, meaning you could come across it in Google Chrome, Windows, or macOS, on an Android mobile device, etc.
Similar DNS Error Messages
A DNS error message occurs when your DNS or network settings are misconfigured. The DNS_PROB_FINISHED_BAD_CONFIG error is just one of them, and there are other similar messages you may run across.
For example, you might see the DNS_PROBE_FINISHED_NXDOMAIN error:
In this error message, “NXDOMAIN” stands for “Non-Existent Domain”. In other words, the domain name that was queried doesn’t exist.
Another similar DNS error is DNS_PROBE_FINISHED_NO_INTERNET:
This error message indicates that a problem occurred while establishing an internet connection, or that the connection was lost.
Any of the above DNS errors can vary depending on the browser you’re using. So your message might also include phrases such as:
- This web page is not available.
- This site can’t be reached.
- Safari can’t find the server.
- We’re having trouble finding the site/web page.
- There is no internet connection.
As you can see, although they’re slightly different, all of these errors indicate a DNS or network misconfiguration. Therefore, they share many of the same solutions, as we’ll see shortly.
Common Causes of DNS_PROBE_FINISHED_BAD_CONFIG
While there are a handful of reasons you might be seeing this message, the good news is that you can at least narrow it down to a DNS or network issue. Some of the most common causes of DNS_PROBE_FINISHED_BAD_CONFIG include:
- Network settings that were accidentally changed
- Router settings changed through an unauthorized app
- Browser plugin(s), such as a VPN app, interfering or messing with the IP or DNS address
- Problematic firewall or antivirus software
- Corrupted files on your device
It’s also possible that the underlying issue is much simpler. For example, the error message may stem from a malfunctioning internet cable or a website that’s temporarily down.
How to Fix the DNS_PROBE_FINISHED_BAD_CONFIG Error Code (7 Ways)
Now that you have a better idea of what this error means, it’s time to get to work.
Before attempting any of the following solutions, we recommend first making sure your internet cables, modem, and router are properly connected. It’s also smart to refresh the web page, just to make sure there wasn’t a temporary glitch with the connection.
Once you eliminate those options, you’re ready to dive in. Let’s take a look at seven potential solutions you can use to fix the DNS_PROBE_FINISHED_BAD_CONFIG error.
1. Restart Your Router
Even if your router is securely hooked up, it may need a quick reboot to reset the IP address. Therefore, the first step is to restart your router.
To do so, simply hold down the power. After leaving it off for at least one minute, power it back on. While it’s restarting, you may also want to restart your computer.
Once both devices are back on, connect to your Wi-Fi or LAN network and try accessing the website again. If you’re still seeing DNS_PROBE_FINISHED_BAD_CONFIG, it’s time to move on to the next method.
2. Clear Your Browser Cache
While this likely isn’t what’s causing the DNS error, it doesn’t hurt to eliminate it as an option. You might want to first try accessing the website from a different browser than the one you’re currently using.
If you can do so successfully, the next logical solution is to clear the cache of the problematic browser.
The process for doing so will look slightly different, depending on your OS and browser. For detailed guidance, you can refer to our post on how to clear your browser cache.
3. Flush the DNS Cache and Renew Your IP Address
If there was a change recently made to your DNS, whether maliciously or accidentally, your system could be trying to use the local cache to connect to the network.
When this is the case, it makes sense that you might receive the DNS_PROBE_FINISHED_BAD_CONFIG message.
Therefore, the next solution to try is flushing your DNS cache, as well as releasing and renewing your IP address. If you’re using Windows 7 or Windows 10, you can do this through the Command Prompt app.
To open Command Prompt, click on the Windows icon/Start button and type “cmd” into the search field. Under Command Prompt, select Run as administrator:
In the Command Prompt window, type in the following commands, hitting the Enter key after each:
ipconfig /flushdns

ipconfig /release

ipconfig /renew
On macOS, you can do this through the Terminal command-line interface. To locate it, click on the Apple icon, followed by Applications > Utilities > Terminal:
In the Terminal interface, the specific command you’ll use varies depending on your macOS version:
-
sudo killall -HUP mDNSResponder(macOS v10.11 or later)
-
sudo discoveryutil mdnsflushcache(Yosemite v10.10 through v10.10.3)
-
sudo killall -HUP mDNSResponder(Mavericks, Mountain Lion and Lion)
-
sudo dscacheutil -flushcache(Snow Leopard)
To release and renew the IP address, navigate to the Apple menu icon > System Preferences > Network > Advanced > Renew DHCP:
If you’re using an Android device, you can clear your DNS cache by going to Settings > Applications > App info:
From the list of apps, select Chrome (or whatever browser app you’re using), followed by Storage. On the Storage page, click on the Clear Cache button:
Ubuntu users can launch the command Terminal by pressing CTRL + ALT + T, and then input the following command:
sudo systemd-resolve --flush-cachesFor more detailed guidance, refer to our guide on how to clear your DNS cache.
4. Manually Change the DNS Settings
If you’re still seeing the DNS_PROBE_FINISHED_BAD_CONFIG error message in your browser, the next thing you can try is changing your DNS settings. Your ISP assigns DNS servers by default.
However, you can temporarily switch to a public DNS server such as Google.
To do this in Windows, right-click on the network icon in the bottom right-hand corner of your screen, then select Open Network and Sharing Center.
Once the Network window opens, right-click on your network connection and select Properties from the drop-down menu:
In the panel that opens, under the Networking tab, select “Internet Protocol Version 4 (TCP/IPv4)” followed by the Properties button:
Under “Use the following DNS server addresses”, enter the following:
- Preferred DNS Server: 8.8.8.8
- Alternate DNS Server: 8.8.4.4
When you’re done, click OK. Refresh your browser and try accessing the website again.
To change your DNS settings for macOS, click on the Apple menu icon, followed by System Preferences > Network. Select your network connection. You can add the new DNS addresses by clicking on the (+) icon:
Android users can locate this option by navigating to Settings > WiFi. Press and hold the network, then click on Modify network:
Click on Advanced options, then under IP settings, select Static:
Enter the IP addresses into the respective fields, and save your changes.
If you’re running Ubuntu OS, you can change your DNS settings by clicking on the gear icon next to your network. Under IPv4 tab, there will be a text field to enter new DNS server addresses:
After you enter them, separating each with a comma, click on the Apply button.
5. Trash Temporary Files
Most browsers and systems will save temporary files to your device to use later.
However, if one of those files is corrupted, it may be what’s causing the DNS_PROBE_FINISHED_BAD_CONFIG error. Therefore, another solution we recommend is deleting your temporary files.
To do this in Windows, type “%temp%” into the search field along your desktop toolbar, and then hit Enter:
This will bring you to the “temp” directory on your computer, where you can view a list of temporary files:
Select all of them and delete them.
On macOS, you can do this by first clicking on Finder and selecting Home (this may be your username instead). Next, hit cmd + shift + . (the period key). This should make your hidden files visible, so you can delete them.
Alternatively, you can try opening Finder and using the Shift + Cmd + G keys. Then, in the text field of the window that opens, enter “~Library/caches”, followed by Enter. This should show you the relevant folders, which you can then delete.
Ubuntu users can skip this step entirely, since the /tmp folder is automatically emptied every time the system is rebooted.
6. Disable Antivirus Software and Firewalls
One of the common issues with antivirus software, firewalls, and VPNs is that they can sometimes conflict with network settings. More specifically, they can interfere with your DNS servers.
Therefore, if you’ve reached this point and the DNS_PROBE_FINISHED_BAD_CONFIG error persists, your next course of action should be to temporarily disable your antivirus software and firewall applications.
Here’s an example using Windows. Click on the Windows icon, then typing “defender” into the search field. Click on Virus & threat protection:
Navigate to Real-time protection, and toggle the switch to Off:
When you’re finished with that, in the left-hand panel, click on Firewall & network protection > Domain network:
Under Windows Defender Firewall, toggle the switch to disable it. Now try accessing the website again.
Of course, the process for doing this will vary based on what system you’re using, as well as what antivirus and firewall software you have installed. If in doubt, check out the developer documentation for your specific software for more details.
You may also want to disable any WordPress security plugins you’re using, on the off chance that they’re causing an issue while you’re working on your website.
7. Update Your Network Drivers
If you’ve made it to this point on the list, it’s likely because you’re still seeing the DNS_PROBE_FINISHED_BAD_CONFIG error message after trying the above fixes. Fortunately, we have one more solution to try: updating your network drivers.
Outdated or corrupted network drivers can cause a variety of issues, including DNS and network interruptions. Windows Updates typically handle the necessary updates for you. However, you can double-check to see whether you can upgrade to the latest version manually.
To do so, type “device manager” into the search field of your taskbar, then click on the Device Manager control panel:
Click on Network adapters, then right-click on the network driver and select Update driver:
Restart your computer, and then try accessing the website again. You should no longer see the DNS_PROBE_FINISHED_BAD_CONFIG message!
Apple handles system and driver updates as well, so this isn’t something you usually have to worry about on macOS. However, if you want to make sure your system is updated, you can do so by navigating to the Apple menu icon > About this Mac and then clicking on Software Update:
If you’re using Android, you can update your device by going to Settings > About Phone/Tablet/Phone/System > System Updates. The path may look slightly different, depending on the type of device you’re using and your version of Android.
Are you experiencing the DNS_PROBE_FINISHED_BAD_CONFIG error? Well, it means there’s an incorrect DNS configuration preventing access to a web page🚪. Here are 7 ways to fix the issue! ✌️Click to Tweet
Summary
There’s nothing fun about trying to access a website, only to find yourself staring at an error message. While irritating, DNS errors are actually quite common.
Fortunately, they’re also relatively easy to resolve and if you’re dealing with the DNS_PROBE_FINISHED_BAD_CONFIG error, here’s how to fix it:
- Restart your router.
- Clear your browser cache.
- Flush the DNS cache and renew your IP address.
- Manually change the DNS settings.
- Trash temporary files.
- Disable antivirus software and firewalls.
- Update your network drivers.
Get all your applications, databases and WordPress sites online and under one roof. Our feature-packed, high-performance cloud platform includes:
- Easy setup and management in the MyKinsta dashboard
- 24/7 expert support
- The best Google Cloud Platform hardware and network, powered by Kubernetes for maximum scalability
- An enterprise-level Cloudflare integration for speed and security
- Global audience reach with up to 35 data centers and 275 PoPs worldwide
Test it yourself with $20 off your first month of Application Hosting or Database Hosting. Explore our plans or talk to sales to find your best fit.
На чтение 4 мин. Просмотров 5.1k. Опубликовано 03.09.2019
Ошибка DNS_PROBE_FINISHED_BAD_CONFIG не является чем-то необычным, и ее можно увидеть во всех версиях Windows, поэтому неудивительно, что эта ошибка встречается и в Windows 10. К счастью для вас, эту ошибку довольно легко исправить, и сегодня мы покажем вам, как это сделать.
DNS_PROBE_FINISHED_BAD_CONFIG появляется ошибка в браузере Google Chrome, когда ваше интернет-соединение создает проблемы, и есть несколько простых способов, как это исправить.
Содержание
- Как исправить ошибку DNS_PROBE_FINISHED_BAD_CONFIG в Windows 10
- Решение 1. Перезагрузите маршрутизатор
- Решение 2 – обновить IP-адрес
- Решение 3 – очистить кеш DNS
- Решение 4 – Сбросить каталог IP
- Решение 5 – Изменить DNS-серверы
- Решение 6. Отключите антивирус
- Решение 7. Установите последние сетевые драйверы
- Решение 8 – Отключить программное обеспечение для блокировки сайтов
- Решение 9 – Проверьте ваш браузер и удалите временные файлы, кеш и куки
Как исправить ошибку DNS_PROBE_FINISHED_BAD_CONFIG в Windows 10
- Перезагрузите роутер
- Обновить IP-адрес
- Очистить кеш DNS
- Сбросить каталог IP
- Изменить DNS-серверы
- Отключи свой антивирус
- Установите последние сетевые драйверы
- Отключить блокировщики сайта
- Проверьте ваш браузер
Решение 1. Перезагрузите маршрутизатор
Это довольно просто, просто нажмите кнопку питания на маршрутизаторе, подождите минуту и снова включите маршрутизатор. Это должно сбросить ваш IP-адрес и устранить проблему.
Решение 2 – обновить IP-адрес
Но если простой перезапуск не решил проблему с ошибкой DNS_PROBE_FINISHED_BAD_CONFIG, вы можете попробовать обновить свой IP-адрес. И если вы не уверены, как это сделать, просто следуйте этим инструкциям:
- Запустите командную строку, нажав клавишу Windows + R и введя в нее cmd.
-
Когда командная строка запускается, введите следующую строку и нажмите Enter для ее запуска:
-
ipconfig/release

-
ipconfig/release
- Это освободит ваш IP-адрес.
-
Теперь введите эту строку и нажмите Enter, чтобы запустить ее:
-
ipconfig/renew
-
ipconfig/renew


Решение 3 – очистить кеш DNS
Следующее, что мы собираемся попробовать, это очистка кеша DNS. Для этого следуйте этим инструкциям:
- Откройте командную строку, как мы объясняли в предыдущем решении.
-
Когда откроется командная строка, введите эту строку и нажмите Enter, чтобы запустить ее:
-
ipconfig/flushdns
-
ipconfig/flushdns

Решение 4 – Сбросить каталог IP
-
Откройте командную строку и запустите эту строку:
-
netsh int ip reset
-
netsh int ip reset
-
Затем введите эту строку и нажмите Enter, чтобы запустить ее:
-
netsh каталог сброса winsock
-
netsh каталог сброса winsock


Решение 5 – Изменить DNS-серверы
И если ничего из вышеперечисленного не помогло, вы можете попробовать сменить DNS-серверы и посмотреть, устранена ли ошибка. Чтобы изменить DNS-серверы, сделайте следующее:
- Нажмите клавишу Windows + R, и когда откроется диалоговое окно «Выполнить», введите ncpa.cpl и нажмите Enter.
- Это должно запустить окно сетевых подключений.
- Найдите ваше соединение и щелкните по нему правой кнопкой мыши. Выберите Свойства.
- Выберите Internet Protocol Version 4 и нажмите «Свойства».
- В окне Свойства интернет-протокола версии 4 нажмите Использовать следующие адреса DNS-серверов.
-
Установите эти значения:
- Предпочитаемый DNS-сервер: 8.8.8.8
- Альтернативный DNS-сервер: 8.8.4.4
- Нажмите кнопку ОК, чтобы сохранить настройки.
Решение 6. Отключите антивирус
Если ничего не помогло, попробуйте отключить антивирус. Если вы используете Защитник Windows, выполните следующие действия, чтобы отключить его:
- Перейдите в «Пуск», введите «защитник» и щелкните первый результат, чтобы запустить Центр безопасности Защитника Windows.
-
Теперь нажмите на настройки защиты от вирусов и угроз
- Перейдите к защите в реальном времени и отключите эту опцию.


После того, как вы отключили антивирус, сделайте то же самое с брандмауэром.
- Перейдите в Пуск> Панель управления> Система и безопасность> Брандмауэр Windows
-
Нажмите на опцию «Включить и выключить брандмауэр Windows»
- Выключите брандмауэр.


После того, как вы отключили антивирус и брандмауэр, проверьте, сохраняется ли ошибка. Не забудьте включить оба решения безопасности после завершения теста.
Решение 7. Установите последние сетевые драйверы
Если ваши сетевые драйверы устарели или повреждены, это может объяснить, почему вы получаете ошибку DNS_PROBE_FINISHED_BAD_CONFIG. Перейдите в диспетчер устройств, обновите драйверы сети и проверьте, работает ли это решение для вас.

Решение 8 – Отключить программное обеспечение для блокировки сайтов
Если вы используете блокировщики веб-сайтов, временно отключите эти инструменты, чтобы увидеть, устраняет ли это решение проблему. Некоторые пользователи подтвердили, что ошибка исчезла после того, как они отключили блокировщики своего сайта.Протестируйте это решение, чтобы увидеть, работает ли оно и для вас.
Решение 9 – Проверьте ваш браузер и удалите временные файлы, кеш и куки
И, наконец, последнее решение в нашем списке: убедитесь, что ваш браузер не тот, который вызывает ошибку. Удалите куки, временные файлы и кеш и проверьте, помогает ли это. Для получения дополнительной информации о последующих действиях перейдите на официальную страницу поддержки вашего браузера.
Вот и все, я надеюсь, что по крайней мере одно из этих пяти решений помогло вам решить проблему с ошибкой DNS_PROBE_FINISHED_BAD_CONFIG в Windows 10. Если у вас есть какие-либо комментарии или вопросы, просто обратитесь к разделу комментариев ниже.
Примечание редактора . Этот пост был первоначально опубликован в ноябре 2015 года и с тех пор был полностью переработан и обновлен для обеспечения свежести, точности и полноты.
Существует множество проблем, которые могут помешать вам загрузить веб-страницы в Google Chrome из сломанное интернет-соединение к отключению сервера доменных имен (DNS). Это также может быть вызвано ошибкой отправки формы (err_cache_miss) или, если проблема не на вашей стороне, медленный или сломанный веб-сервер который перестает отвечать.
Однако одна досадная ошибка в Chrome, которая могла остановить загрузку страниц, — это ошибка «dns_probe_finished_bad_config». У этого есть ряд причин, но обычно это указывает на проблему с конфигурацией сервера доменных имен. Если вы хотите знать, как исправить ошибку dns_probe_finished_bad_config, вот что вам нужно сделать.

Сообщение об ошибке dns_probe_finished_bad_config обычно появляется в Google Chrome, когда DNS-сервер вашего устройства не может разрешить адрес веб-сайта, который вы пытались посетить. Во многих случаях это связано с какой-то необнаруженной проблемой с конфигурацией DNS на вашем устройстве.
Это могло произойти из-за того, что DNS-сервер отключен или больше не отвечает, или из-за неверно настроенных сетевых настроек на вашем устройстве. Например, если добавлены неправильные настройки DNS-сервера, Chrome не сможет загружать веб-сайты, что приведет к ошибке dns_probe_finished_bad_config (или аналогичной).
Это сообщение не зависит от устройства и может отображаться в Chrome на любом поддерживаемом устройстве (включая Windows или Mac). К сожалению, для этого сообщения нет единой идентифицируемой причины, но есть несколько общих шагов по устранению неполадок, которые вы можете предпринять для решения проблемы, которая должна работать для большинства пользователей.
Как исправить ошибку dns_probe_finished_bad_config в Google Chrome
Есть несколько способов исправить ошибку dns_probe_finished_bad_config в Google Chrome. К ним относятся:
- Перезагрузите устройство, чтобы очистить текущее сетевое соединение.
- Сброс подключения к Интернету, включая принудительную перезагрузку сетевого маршрутизатора или модема.
- Использование Windows PowerShell или Mac Terminal для сброса сетевых настроек.
- Переход на общедоступный DNS-сервер.
- Отключение любых сторонних инструментов или расширений для блокировки рекламы или веб-цензуры.
- Временное отключение стороннего антивируса или брандмауэра.
Хотя эти шаги не гарантируют устранения проблемы, они должны решить ее для большинства пользователей. Если вы по-прежнему сталкиваетесь с проблемами, вам может потребоваться устраните проблемы с вашим интернет-соединением дальше.
Перезагрузите устройство и сетевое подключение
Прежде чем вы решите изменить какие-либо настройки на своем устройстве, простое решение для многих пользователей — подумать о перезагрузке (особенно для пользователей ПК или Mac). Перезагрузка устройства приведет к его закрытию и восстановлению текущего подключения к вашей локальной сети, что в некоторых случаях может помочь исправить неработающую конфигурацию DNS.
Вам также следует подумать о перезапуске сетевого подключения, перезагрузив сетевой маршрутизатор или интернет-модем. Вы можете сделать это через веб-интерфейс или отключив и снова выключив маршрутизатор или модем.
Однако, если вы по-прежнему сталкиваетесь с проблемами DNS, вам нужно будет продолжить действия, указанные ниже.
Сбросить настройки сети в Windows или Mac
Хотя ошибка dns_probe_finished_bad_config может возникать на любом устройстве, пользователи Windows и Mac могут сбросить свои сетевые настройки, чтобы попытаться устранить ее. Это включает в себя сброс стека TCP / IP, в результате чего ваше устройство очищает все текущие настройки, освобождает ваш существующий IP-адрес и устанавливает новое соединение.
В Windows
- Если вы используете Windows, вы можете сделать это с помощью Windows PowerShell. Щелкните правой кнопкой мыши меню «Пуск» и выберите параметр Windows PowerShell (Admin), чтобы начать.
- В окне PowerShell последовательно введите следующие команды, чтобы сбросить настройки сети:
- netsh int ip сброс
- Сброс ipv4 интерфейса netsh
- Сброс ipv6 интерфейса netsh
- сброс netsh advfirewall
- сброс WinSock Netsh
- ipconfig / release
- ipconfig / обновить
- ipconfig / flushdns
- Выполнив приведенные выше команды, перезагрузите компьютер.
На Mac
- Чтобы быстро сбросить настройки сети на Mac, вам нужно открыть новое окно терминала. Вы можете запустить это, выбрав Launchpad> Other> Terminal.
- В окне терминала введите cd / Library / Preferences / SystemConfiguration / и нажмите Enter, чтобы переместить каталоги. После перемещения введите rm -f preferences.plist NetworkInterfaces.plist com.apple.airport.preferences.plist com.apple.wifi.message-tracer.plist, чтобы удалить файлы конфигурации сети, затем нажмите Enter для подтверждения.
- Введите sudo killall -HUP mDNSResponder; sudo dscacheutil -flushcache, чтобы стереть кеш DNS, затем перезагрузите Mac, чтобы подтвердить изменения. Вам нужно будет повторно подключиться к сети Wi-Fi (если вы подключены по беспроводной сети) после перезагрузки.
Перейти на альтернативные DNS-серверы
Сбои службы доменных имен часто могут быть связаны с неисправным DNS-сервером. Например, DNS-серверы, предоставляемые интернет-провайдером, иногда ненадежны и могут иметь сбои, что приводит к ошибке dns_probe_finished_bad_config (или аналогичной).
Чтобы решить эту проблему, вы можете сменить поставщика DNS на альтернативу, предоставляемую общественными организациями, такими как Google.
В Windows
- Для этого в Windows щелкните правой кнопкой мыши меню «Пуск» и выберите «Настройка».
- В меню «Настройки» выберите «Сеть и Интернет»> «Статус»> «Свойства».
- В меню настроек вашего подключения выберите параметр «Изменить».
- В раскрывающемся меню выберите «Вручную», затем выберите ползунок IPv4. В полях «Предпочтительный DNS» и «Альтернативный DNS» введите IP-адреса подходящих заменяющих DNS-серверов (например, 8.8.8.8 и 8.8.4.4 для общедоступных DNS-серверов Google), затем нажмите «Сохранить» для подтверждения.
- Перезагрузите компьютер, чтобы убедиться, что изменение DNS-сервера успешно применено.
На Mac
- Для этого на Mac выберите значок меню Apple> Системные настройки в строке меню.
- В меню «Системные настройки» выберите «Сеть», в боковом меню выберите подключение к Интернету, затем выберите «Дополнительно».
- В меню выберите вкладку DNS. В разделе DNS-серверы выберите значок плюса, затем введите IP-адрес общедоступного DNS-сервера (например, 8.8.8.8 для Google). Повторите процесс, чтобы добавить вторичный DNS-сервер (например, 8.8.4.4 для Google). Нажмите ОК, чтобы сохранить, затем нажмите Применить.
- После изменения DNS-серверов перезагрузите Mac.
Отключить сторонние инструменты
Некоторые сторонние инструменты или расширения браузера также могут повлиять на подключение к сети, что приведет к ошибке dns_probe_finished_bad_config. Это включает в себя блокировщики рекламы, инструменты веб-цензуры, антивирусное программное обеспечение и брандмауэры.
Из-за характера работы этих инструментов и расширений они могут мешать загрузке определенных веб-сайтов в Chrome. Если вы подозреваете, что это так, вам необходимо полностью отключить или удалить их.
Если они установлены на ваш ПК или Mac, удалить программное обеспечение с помощью меню настроек Windows или приложения Finder должно быть несложным. Если инструмент установлен в Chrome, вы сможете удалить расширение напрямую, выбрав значок меню с тремя точками> Дополнительные инструменты> Расширения в Chrome.
Устранение проблем с Google Chrome
Приведенные выше шаги должны помочь вам исправить ошибку dns_probe_finished_bad_config в Google Chrome. Однако, если у вас все еще есть проблемы, вам, возможно, придется взглянуть на переход на другой браузер для дальнейшего изучения проблемы или восстановления настроек Google Chrome по умолчанию.
Если Chrome перестает отвечать или регулярно дает сбой, вы можете предпринять другие шаги, в том числе переустановить его или переключиться на Chrome Canary версия тестовой сборки, хотя она может оказаться нестабильной. Однако, если вы хотите дополнительно оптимизировать Chrome, вы можете включить определенные флаги настроек Chrome, чтобы помочь вам в этом.
Если вы не можете подключиться к Интернету из-за ошибки DNS_PROBE_FINISHED_BAD_CONFIG , что предполагает ошибку, связанную с DNS, не волнуйтесь.Вы можете сказать, что это ошибка, связанная с DNS, по сообщению об ошибке. Эта ошибка может возникнуть, если подключение к Интернету не работает должным образом или если DNS-сервер не отвечает. Следуйте инструкциям ниже, чтобы снова получить доступ к веб-сайтам.
Когда вы получаете эту ошибку, первое, что вы можете сделать, это перезапустите роутер . Никаких дальнейших действий не требуется. Перезагрузите маршрутизатор и проверьте, решена ли проблема.
Если это не решит проблему, попробуйте следующие методы. Есть два способа исправить ошибку.
Метод 1. Освободить и обновить IP-адрес
Метод 2: изменение настроек DNS-сервера
Метод 1. Освободить и обновить IP-адрес
Windows и другие операционные системы хранят данные DNS в кеше, поэтому вы можете быстро получить доступ к веб-сайту, который посещали ранее. Но если IP-адрес веб-сайта будет изменен, вы не сможете получить доступ к веб-сайту и получите ошибки, связанные с DNS, например DNS_PROBE_FINISHED_BAD_CONFIG . Чтобы исправить эту ошибку, вы можете попробовать очистить кеш DNS и обновить IP-адрес.
Следуй этим шагам:
1) На клавиатуре нажмите Win + R (Клавиша с логотипом Windows и клавиша R) одновременно, чтобы вызвать окно запуска.
2) Тип cmd и щелкните Хорошо кнопка. Это открыть командную строку.
3) Тип ipconfig / release и нажмите в Войти на клавиатуре.
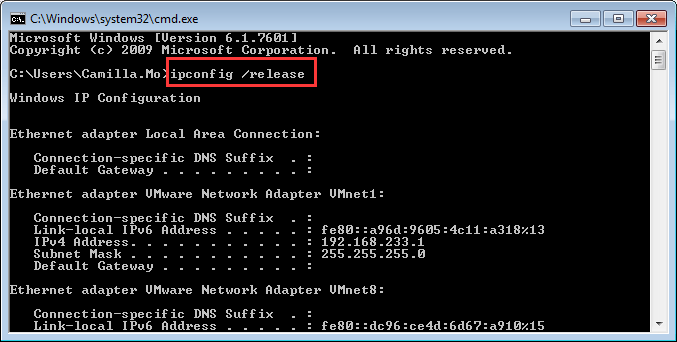
4) Затем введите ipconfig / flushdns и нажмите Войти клавишу на клавиатуре.
5) Затем введите ipconfig / обновить и нажмите Войти ключ на клавиатуре очередной раз.
6) Проверьте, решена ли проблема.
Метод 2: изменение настроек DNS-сервера
Если описанный выше метод не работает, вы можете попробовать изменить DNS-сервер. Когда вы подключаетесь к Интернету, ваш интернет-провайдер автоматически назначает вам DNS-сервер. когда вы получаете DNS_PROBE_FINISHED_BAD_CONFIG ошибка, на вашем текущем сервере DSN могут быть проблемы. Таким образом, вы можете изменить DNS-сервер на доступный DNS-сервер. Вы можете найти бесплатные DNS-серверы с помощью поиска в Google по ключевому слову «бесплатный DNS-сервер». Я рекомендую использовать общедоступный DNS-сервер Google, он безопасен и стабилен.
Выполните следующие действия, чтобы изменить DNS-сервер:
1) На клавиатуре нажмите кнопку Win + R (Клавиша с логотипом Windows и клавиша R) одновременно, чтобы вызвать окно запуска.
2) Тип панель управления и щелкните Хорошо кнопка. Это открыть панель управления.
3) Просмотр Маленькие значки и нажмите Центр коммуникаций и передачи данных .
4) Нажмите Изменение параметров адаптера на левой панели.
5) Щелкните правой кнопкой мыши проблемную сеть (если в сети возникла проблема, на значке может появиться красный значок X) и выберите Свойства .
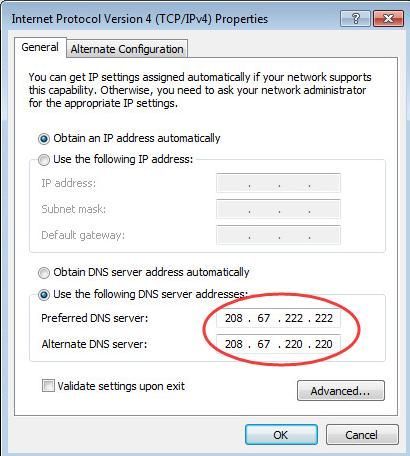
6) На вкладке «Сеть» выделите элемент Интернет-протокол версии 4 (TCP / IPv4) и нажмите в Свойства кнопка .
7) В разделе «Использовать следующие адреса DNS-серверов» установите DNS-сервер на другой доступный сервер. Рекомендуемый DNS-сервер — это общедоступный сервер Google: 8.8.8.8 и 8.8.4.4 .
Вы можете установить Предпочтительный DNS-сервер в виде 8.8.8.8 и установить Альтернативный DNS-сервер в виде 8.8.4.4 . Затем нажмите кнопку Хорошо кнопка. См. Изображение ниже:
 Проверьте, решена ли проблема.
Если вы по-прежнему не можете получить доступ к Интернету, попробуйте использовать указанные ниже адреса DNS-серверов и посмотрите, работает ли он.
Предпочтительный DNS-сервер: 208.67.222.222
Альтернативный DNS-сервер: 208.67.220.220
Если у вас есть вопросы или предложения, оставьте, пожалуйста, свой комментарий. Я хотел бы услышать любые идеи и предложения. Спасибо за чтение.
Вам также может понравиться…
(Бесплатная и платная) VPN для США в 2019 году | Нет журналов
Ошибка DNS_PROBE_FINISHED_BAD_CONFIG в Google Chrome чаще всего появляется тогда, когда вы предпринимаете попытку зайти на какой-либо ресурс. Из самого текста в ошибки, вы уже могли вынести предположение о том, что проблема каким-то образом может быть связана с DNS. Функционал DNS состоит в получении информации о домене через его имя.
Проблемы начинаются тогда, когда такого расклада не происходит. По-умолчанию, ваш компьютер выставлен на использование DNS с помощью роутера или модема, которые как раз таки используют DNS-сервер вашего провайдера, если только это не было каким-то образом изменено. Всегда рекомендуется использовать публичные DNS-сервера, так как те являются наиболее стабильным и надежным решением в Интернете. Именно их мы и будем рассматривать сегодня в этой статье.
Также проблема в виде DNS_PROBE_FINISHED_BAD_CONFIG в Google Chrome могла быть вызвана из-за некорректной записи в файле Hosts, которая может ограничить или же заблокировать доступ к определенным или всем ресурсам в сети.
Итак, давайте же пройдем теперь к методам решения ошибки DNS_PROBE_FINISHED_BAD_CONFIG в Google Chrome, выполнение которых не займет у вас много времени.
Исправляем ошибку DNS_PROBE_FINISHED_BAD_CONFIG в Google Chrome
- Нажмите Win+R.
- Впишите cmd и нажмите Enter.
- Впишите в командную строку ipconfig /flushdns и нажмите Enter. Данная команда очистит DNS кэш, который иногда может являться причиной появления указанной ошибки.
- Как только завершится очистка кэша, снова вызовите окно «Выполнить».
- Впишите ncpa.cpl и нажмите Enter для открытия окна «Сетевые подключения».
- Найдите свое подключение, нажмите на него правой кнопкой мыши и перейдите в «Свойства».
- Выберите в списке компонент «Протокол Интернета версии 4» и выберите его свойства.
- Поставьте галочку напротив опции, которая даст вам возможность использовать другие DNS-сервера.
- Теперь вам нужно выставить в параметрах те самые публичные DNS-сервера, о которых мы говорили ранее. Выставьте 8.8.8.8. для Предпочитаемого и 8.8.4.4. для Альтернативного адреса.
- Затем подтвердите изменения, и проверьте наличие ошибки DNS_PROBE_FINISHED_BAD_CONFIG в Google Chrome.
Метод №2 Очистка файла Hosts
Если выставление публичных адресов не дало положительных результатов, что вполне вероятно, то давайте попробуем почистить файл Hosts от возможно мешающих доменов, которые записаны в нем. Итак, сделайте следующее:
- Вам нужно открыть непосредственно сам файл Hosts при помощи простого Блокнота. Сделать это можно многими способами, но мы воспользуемся самым простым. Нажмите Win+R для открытия утилиты «Выполнить».
- Далее введите в пустую строку notepad %SystemRoot%system32driversetchosts и нажмите Enter.
- Теперь удалите все записи о доменах, которые будут находиться ниже строчки 127.0.0.1 localhost.
- Затем сохраните изменения в файле Hosts.
Снова попробуйте зайти на какой-нибудь сайт и проверьте наличие ошибки DNS_PROBE_FINISHED_BAD_CONFIG в Google Chrome.

Если вы не можете подключиться к Интернету из-за ошибки DNS_PROBE_FINISHED_BAD_CONFIG, что говорит об ошибке, связанной с DNS, не беспокойтесь. Вы можете сказать, что это ошибка DNS из сообщения об ошибке. Если интернет-соединение не работает должным образом или DNS-сервер не отвечает, эта ошибка может возникнуть. Следуйте инструкциям ниже, чтобы снова получить доступ к веб-сайтам.
Когда вы получаете эту ошибку, первое, что вы можете сделать, это перезагрузите роутер. Никаких дальнейших шагов не требуется. Перезагрузите маршрутизатор и проверьте, решена ли проблема.
Если это не решит проблему, попробуйте следующие методы. Есть два метода, которые вы можете использовать, чтобы исправить ошибку.
Метод 1: Выпуск Обновить IP-адрес
Способ 2: изменить настройки DNS-сервера
Метод 1: Выпуск Обновить IP-адрес
Windows и другие операционные системы хранят данные DNS в кэше, поэтому вы можете быстро получить доступ к веб-сайту, который вы посещали ранее. Но если IP-адрес веб-сайта изменился, вы не сможете получить доступ к веб-сайту и получите ошибки, связанные с DNS, такие как DNS_PROBE_FINISHED_BAD_CONFIG. Чтобы исправить эту ошибку, вы можете попытаться очистить кэш DNS и обновить IP-адрес.
Следуй этим шагам:
1) На клавиатуре нажмите Win + R (Клавиша с логотипом Windows и клавиша R) одновременно, чтобы вызвать окно запуска.
2) Тип CMD и нажмите Хорошо кнопка. Это открыть командную строку.

3) Тип ipconfig / release и нажмите Войти на вашей клавиатуре.

4) Затем введите ipconfig / flushdns и нажмите Войти ключ на клавиатуре.

5) Затем введите ipconfig / renew и нажмите Войти клавиша на клавиатуре снова.

6) Проверьте, решена ли проблема.
Способ 2: изменить настройки DNS-сервера
Если описанный выше метод не работает, вы можете попробовать сменить DNS-сервер. Когда вы подключаетесь к Интернету, ваш интернет-провайдер автоматически назначит вам DNS-сервер. когда вы получаете DNS_PROBE_FINISHED_BAD_CONFIG ошибка, ваш текущий сервер DSN, вероятно, будет иметь проблемы. Таким образом, вы можете изменить DNS-сервер на доступный DNS-сервер. Вы можете найти бесплатные DNS-серверы с помощью поиска Google с ключевым словом «бесплатный DNS-сервер». Я рекомендую использовать общедоступный DNS-сервер Google, который является безопасным и стабильным.
Выполните следующие действия, чтобы изменить DNS-сервер:
1) На клавиатуре нажмите Win + R (Клавиша с логотипом Windows и клавиша R) одновременно, чтобы вызвать окно запуска.
2) Тип панель управления и нажмите Хорошо кнопка. Это открыть панель управления.

3) Просмотр по Маленькие иконки и нажмите Центр коммуникаций и передачи данных.

4) Нажмите Смените настройки адаптера в левой панели.

5) Щелкните правой кнопкой мыши проблемную сеть (если в сети возникают проблемы, вы можете пометить красную метку X на значке.) И выбрать свойства.

6) На вкладке «Сеть» выделите элемент Интернет-протокол версии 4 (TCP / IPv4) и нажмите свойства кнопка.

7) В разделе «Использовать следующие адреса DNS-серверов» установите DNS-сервер на другой доступный сервер. Рекомендуемый DNS-сервер является общедоступным сервером Google: 8.8.8.8 а также 8.8.4.4.
Вы можете установить Предпочитаемый DNS-сервер как 8.8.8.8 и установить Альтернативный DNS-сервер как 8.8.4.4. Затем нажмите Хорошо кнопка. Смотрите изображение ниже:

Проверьте, решена ли проблема.
Если вы все еще не можете получить доступ к Интернету, попробуйте использовать адреса ниже DNS-сервера и посмотрите, работает ли он.
Предпочитаемый DNS-сервер: 208.67.222.222
Альтернативный DNS-сервер: 208.67.220.220

Если у вас есть какие-либо вопросы или предложения, пожалуйста, оставьте свой комментарий. Я хотел бы услышать о любых идеях и предложениях. Спасибо за ваше чтение.
Table Of Contents
- What is the DNS?
- Solutions
- Summary
- Related Posts:
Nothing is more frustrating than getting on your computer, and a web page just not working. It’s 2017, we expect technology to be automatic and work without flaws. Unfortunately, that is not the case yet. The error that this article goes into detail about prevents you from accessing certain web pages, and as you may have guessed from the name, is related to the DNS.
This issue is Google Chrome specific, but it can affect you on whatever device or operating system you are using. Therefore I will show steps on how to fix this nagging problem with the desktop operating system the Mac, the web browser Google Chrome, and the smartphone the Android.
A key to understanding this error is understanding exactly what the DNS is. So, that is where I will begin.
Also Read: Google Play 927 Error for Android

What is the DNS?
The DNS, or Domain Name Server, translates domains to specific IP addresses, so people can view them on their personal devices. Therefore, when this error is presented, it is your devices way of telling you that it can’t translate the address.
“DNS is kind of the hamster under the hood that drives the Internet”. – David Ulevitch
Your computer is set to use the DNS configured in your router or modem by default. This DNS is what your Internet Provider determines unless you change it.
Solutions
1. Power Cycle Your Router
I first talked about this step in my article on Error Codes for the Nintendo Wii, and although this is a step so easy anyone can do, it is still something you should always try. You may actually be surprised how many times this will actually work.
If you don’t remember what to do, just turn off and unplug your router or modem for about a minute, and then turn it back on and plug it back in. That is all you have to do, and just resetting it can make a huge difference.
2. Reset Your Google Chrome
Another simple task you can try is to reset Google Chrome. It’s the same principle as the previous step, except this time you are doing it with your web browser, not your modem.
This step is the exact same for any device or operating system. All you have to do is open up Chrome and in the address bar just type chrome://settings/resetProfileSettings and then press Enter. A pop-up like the one below will appear, and simply click reset, and this problem may be solved.

3. Renew Your IP Address
Think of this step as like refreshing a web page when it’s not loading. The only difference is that instead of a URL, we are dealing with your IP address. This tip should be performed with the next tip as well, as they go hand in hand, and won’t be nearly as effective if just done by themselves.
Mac
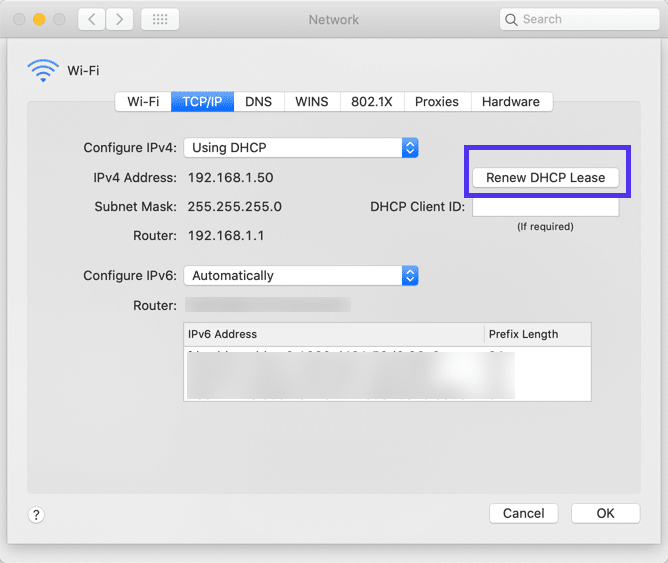
To renew your IP address on a Mac, follow these steps.
- As a common theme in this article and other, start by clicking on the Apple button and go to System Preference.
- After that, open Network. Once again, select the network you are connected to and click on the Advanced button.
- From the tabs, select TCP/IP.
- Finally, click on Renew DHCP Lease and doing so will renew your IP address.
Android
Renewing your IP address on a smartphone is a difficult process that requires some advanced knowledge of coding. For regularly everyday people, I would recommend just renewing it through your router or whatever your computer is connected to it. This is a much simpler process. However, if there is no other way than to do it through your Android, there is an app titled ipconfig in the Google Play Store that can help you do this.
4. Flush Your DNS Cache
Your DNS cache is a database that temporarily stores records of all recent and attempted visits to websites. Flushing or clearing this cache may correct this error. This is if there is a change in the DNS Server because your system will be looking up for its local cache to navigate you to a website, and its local cache will be inaccurate due to the change. That is why setting your DNS cache back to how it originally was may fix this problem.

Mac
To do this on a Mac requires you to type in some code. To do this, you need to open Terminal.
Terminal can be opened through Finder->Applications->Utilites->Terimal.
Once you have opened Terminal, you will type in a specific code that will completely flush your cache.
The code you type in will be completely different depending on what software version you currently are using on your mac. For a great list on what to type in depending on your version, check out this article from DreamHost.com.
Google Chrome
Clearing your DNS cache through Google Chrome is much easier in my opinion than through your computer.
- To do so, open up Chrome, and type in chrome://net-internals/#DNS into the search bar and press Enter.
- On the left-hand side, a menu is shown. Select DNS.
- From the DNS page, there will be a button you will see that reads Clear Host Cache. Select it, and that is all you have to do.
As you can see, it is a much simpler step than using your Mac computer. However, the Mac method is still viable if you use different browsers and want to clear the whole computer. The Google Chrome method will just clear the DNS for Chrome, nothing else.
Android
To do a DNS cache on your Android smartphone, start by opening up Google Chrome or whatever browser you use.
- Tap the menu button and select Settings in the menu that appears.
- Choose Privacy, which will have a new menu pop-up.
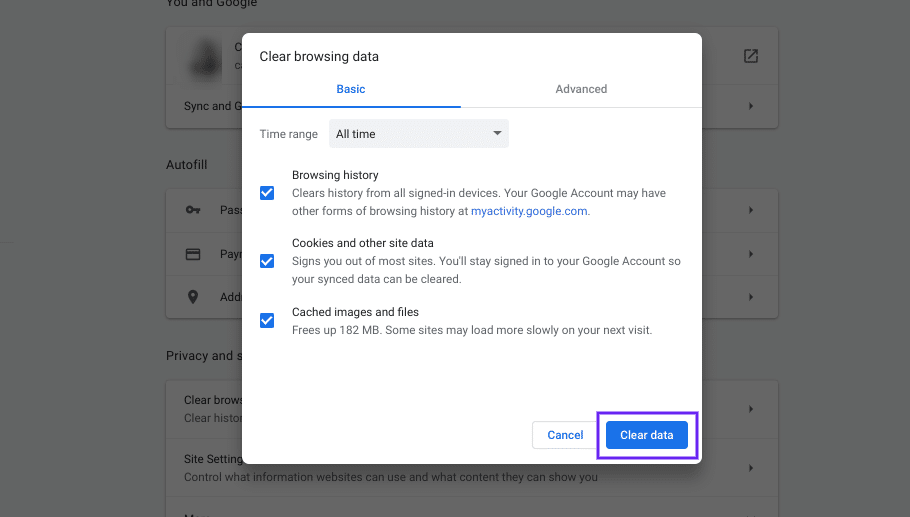
- Select Clear Browsing Data
When doing this last step, make sure that Cache, Cookies, and site data are all checked. Finally, tap Clear, and now your DNS is flushed.
5. Change Your DNS Address
As mentioned, a primary reason for this error is that many times your DNS settings are outdated and need to be updated. As a general rule, you want your primary DNS address to be 8.8.8.8 and your secondary to be 8.8.4.4. This step will show you how to check it, and then change it if need be.
Mac
- Start from the Apple menu and click System Preferences, then Network.
- Choose the network you’re connected to, and then select Advanced once you have highlighted it.
- A window with several tabs pops up. Select the DNS one.
- Click + to replace or add any listed addresses with 8.8.8.8 or 8.8.4.4.
- Click Apply and then OK.
That is all you need to do to change your DNS settings. Note that the numbers I gave you are the optimal ones, and many times those are the ones already pre-set on your Mac. If that is the case, then the DNS setting is not the problem. The important part was that at least your verified, so you can narrow down your options on what is causing the error.
Android
Configuring the DNS server to your liking is just as easy on Android devices.
- Start by opening the Settings on the device.
- Select Wi-Fi.
- Press and hold your current network and after a menu pops up, click on Modify network.
- Check the Show advanced options box if it is unchecked
- Where it says IP settings, change that to Static
- Add 8.8.8.8 to the DNS 1, and 8.8.4.4. DNS 2 fields.
- Finally, click Save
As always, disconnect from the network, reconnect, and then test again.
Summary
The DNS is a powerful server on everyone’s devices that most people have no clue exists or how to operate. It is responsible for one of the most important functions of your computer; translating a domain to your IP address. You can see why if there is something going wrong with it, there will be a major error with your web browser. This error is not one that will fix itself or go away, so you need to use these methods listed in the article. As you can tell, there are several solutions, and it can seem like a lot, as I am sure you are anxious to try and fix the problem as soon as possible.
However, it is important to be patient when dealing with these errors. Don’t get frustrated if your first attempt at fixing it doesn’t work. I strategically set this list up in order from things that take the shortest amount of time to the longest. All in all, if you had to do all five of these solutions, you may spend 15-20 minutes. It is definitely worth it, as you will be correcting a nagging error that will only keep coming back, not going away. If all else fails, contact your internet provider, and they may be able to assist you.
Have another great solution that worked for you or questions that weren’t answered? Don’t be shy, leave a comment below, and we’ll get back to you soon!

Ryan is a computer enthusiast who has a knack for fixing difficult and technical software problems. Whether you’re having issues with Windows, Safari, Chrome or even an HP printer, Ryan helps out by figuring out easy solutions to common error codes.