For those of you working with websites on a regular basis, errors specific to the CMS such as the white screen of death or database connection errors are somewhat common occurrences. But another subset of errors you will probably stumble upon are those tied to your internet connection and DNS.
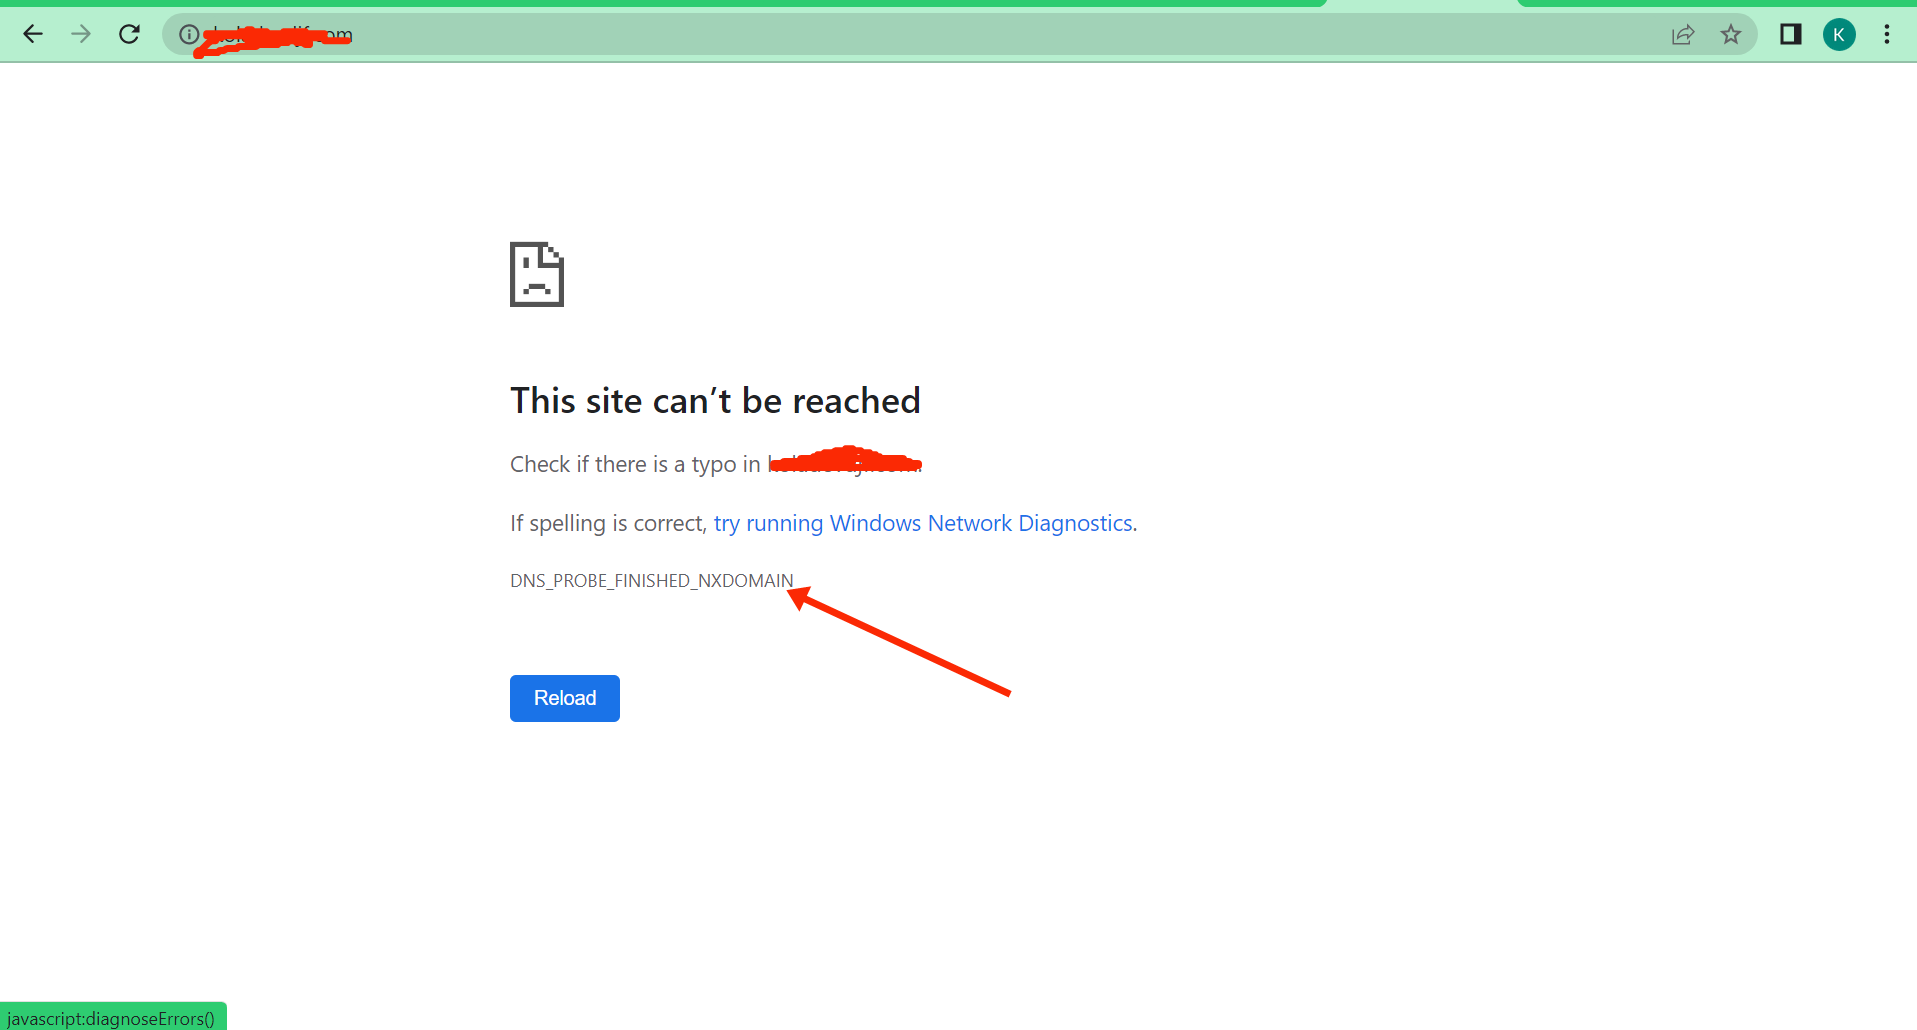
A very common error that Google Chrome users get when trying to browse to a web page is “This site can’t be reached – Server IP address could not be found,” together with DNS_PROBE_FINISHED_NXDOMAIN. This can be downright frustrating as suddenly you can’t browse to your website or perhaps even anywhere at all. 😫
If you’re seeing this error while trying to get to your site, don’t worry, this is fairly easy to fix. Check out the recommendations below on how to get connected again. This can also work for other browsers, such as Firefox, Edge, etc.
Prefer to watch the video version?
What Is DNS_PROBE_FINISHED_NXDOMAIN?
The reason for DNS_PROBE_FINISHED_NXDOMAIN is typically due to a misconfiguration or problem with your DNS. DNS is short for Domain Name System, which helps direct traffic on the internet by connecting domain names with actual web servers. Essentially, it takes a human-friendly request – a domain name like kinsta.com – and translates it into a computer-friendly server IP address – like 216.3.128.12.
When a user enters a URL in their web browser, DNS gets to work to connect that URL to the IP address of the actual server. This is called DNS name resolution and involves a DNS recursor querying various nameservers to figure out the actual IP address of a server. If DNS fails to resolve the domain name or address then you might receive the DNS_PROBE_FINISHED_NXDOMAIN error. The NXDOMAIN part stand stands for Non-Existent Domain. Read more about DNS and how it works.
| Error Code | DNS_PROBE_FINISHED_NXDOMAIN |
| Error Type | DNS error |
| Error Variations | This site can’t be reached Hmm. We’re having trouble finding that site Hmmm… can’t reach this page Safari Can’t Find the Server |
| Error Causes | Internet connection error Firewall is blocking access DNS misconfiguration DNS not yet propagated Unresponsive server |
What Does the DNS_PROBE_FINISHED_NXDOMAIN Error Look Like on Browsers?
There are a couple different variations of this error depending upon the browser you’re running.
Google Chrome
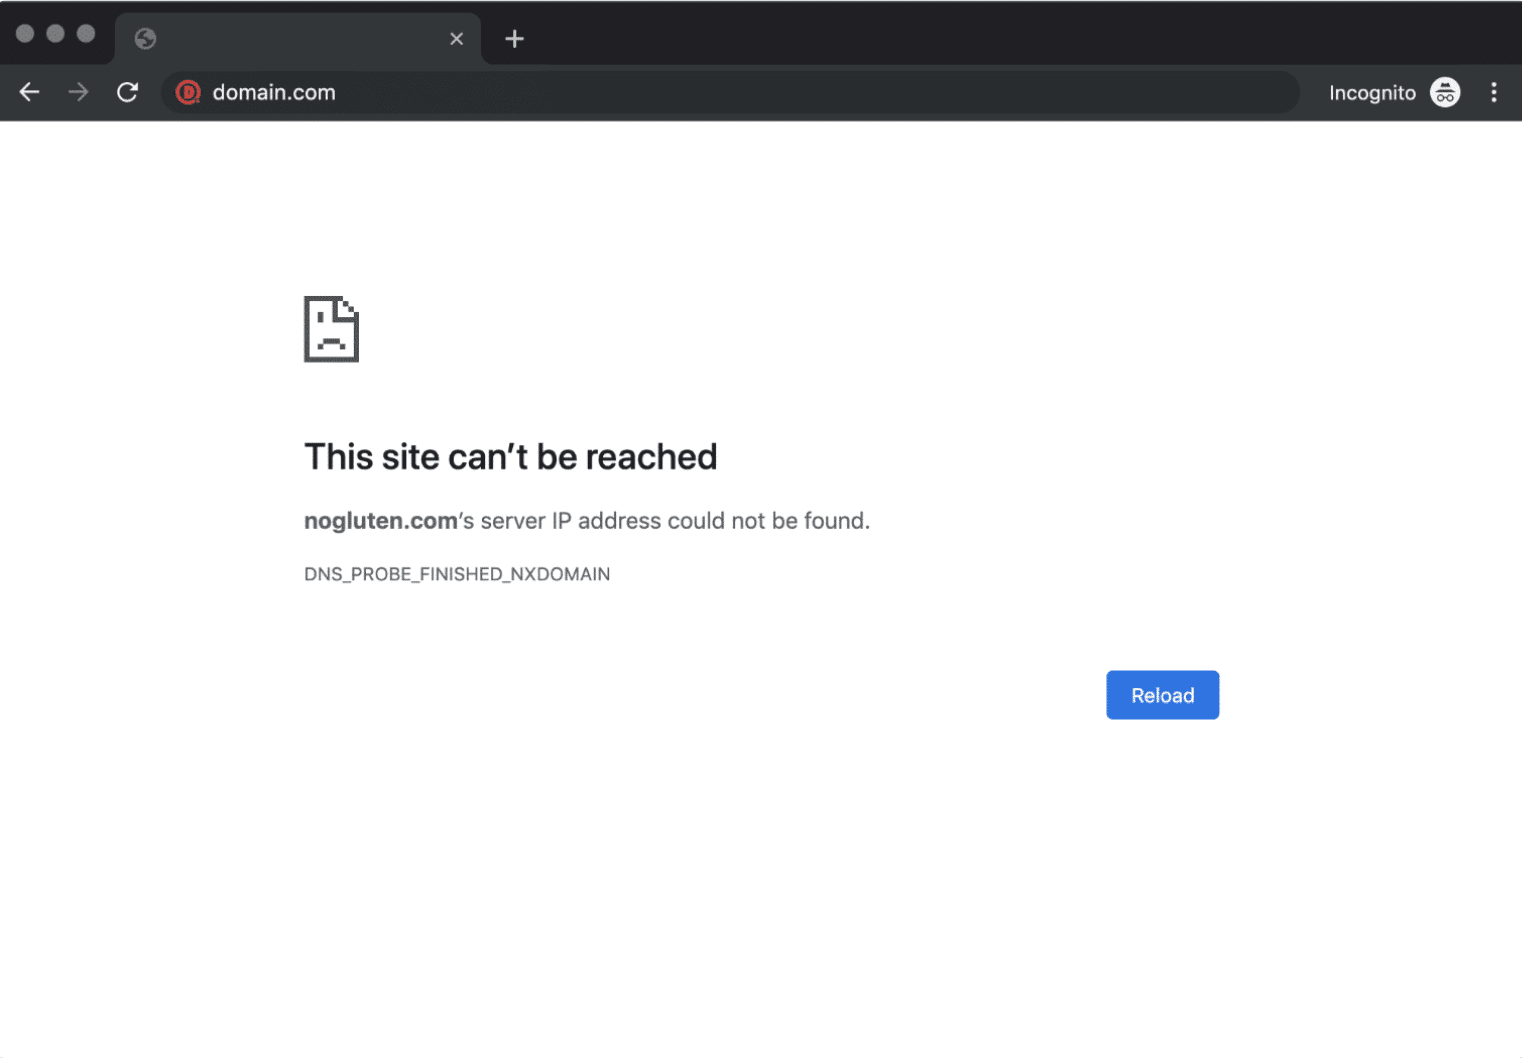
In Google Chrome this error will show as DNS_PROBE_FINISHED_NXDOMAIN (as seen below), highlighting that this site can’t be reached, followed by server IP address could not be found.
This site can’t be reached or This webpage is not available.
Mozilla Firefox
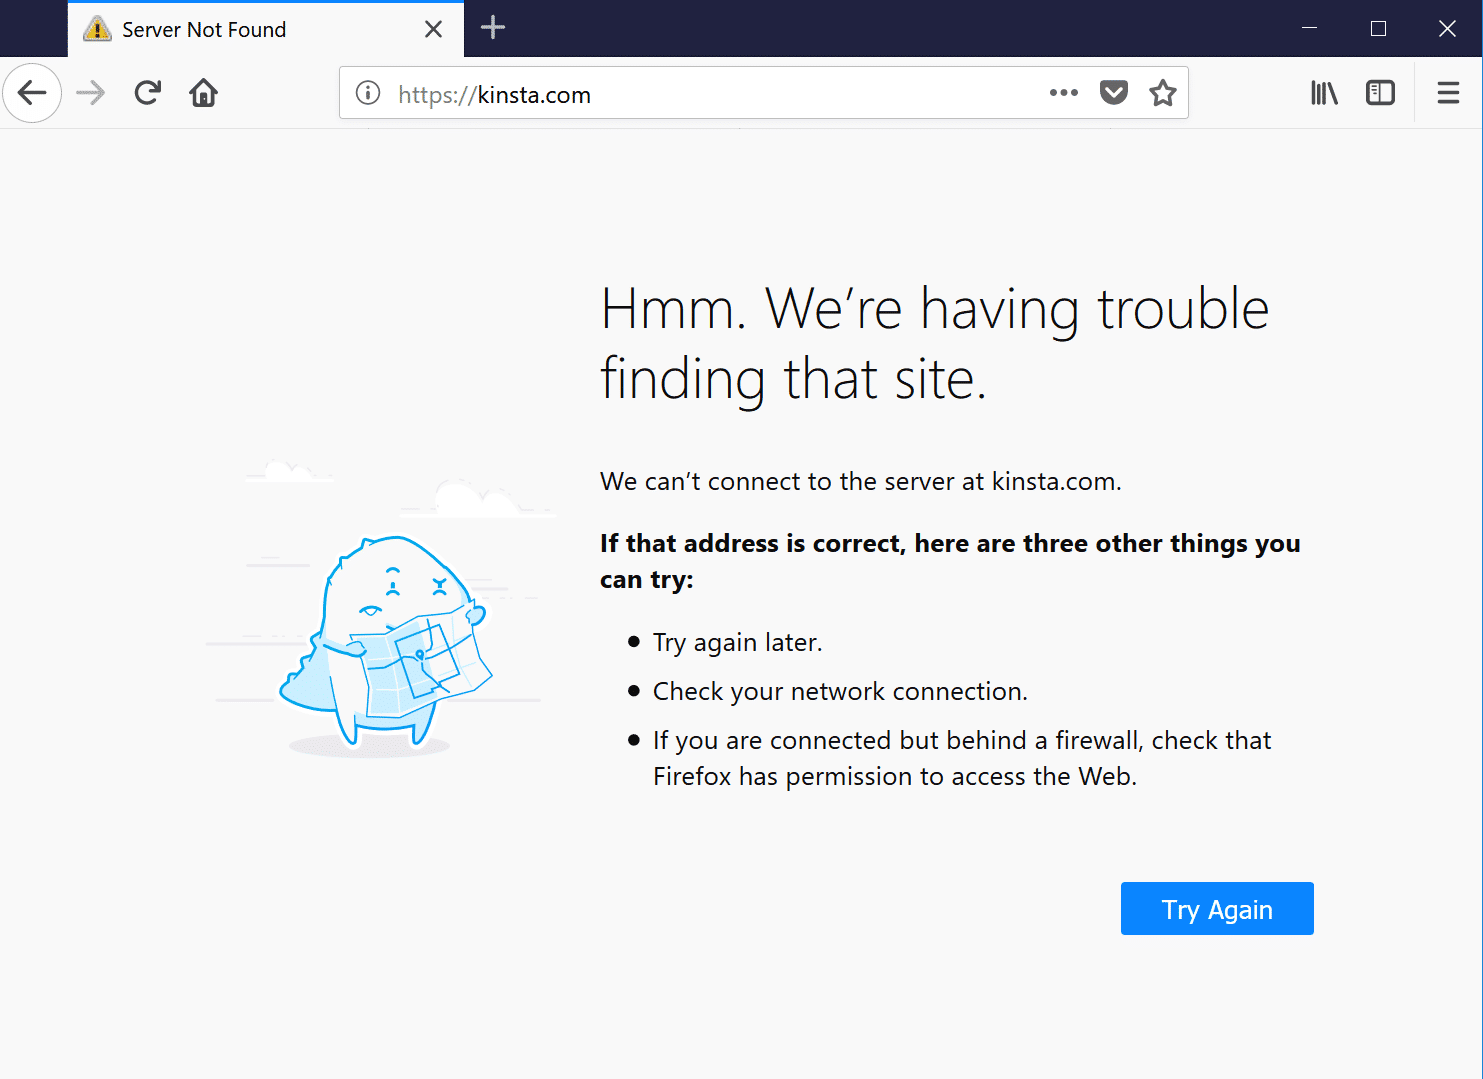
In Mozilla Firefox it will simply show as Hmm. We’re having trouble finding that site (as seen below).
We can’t connect to the server at domain.com.
Microsoft Edge
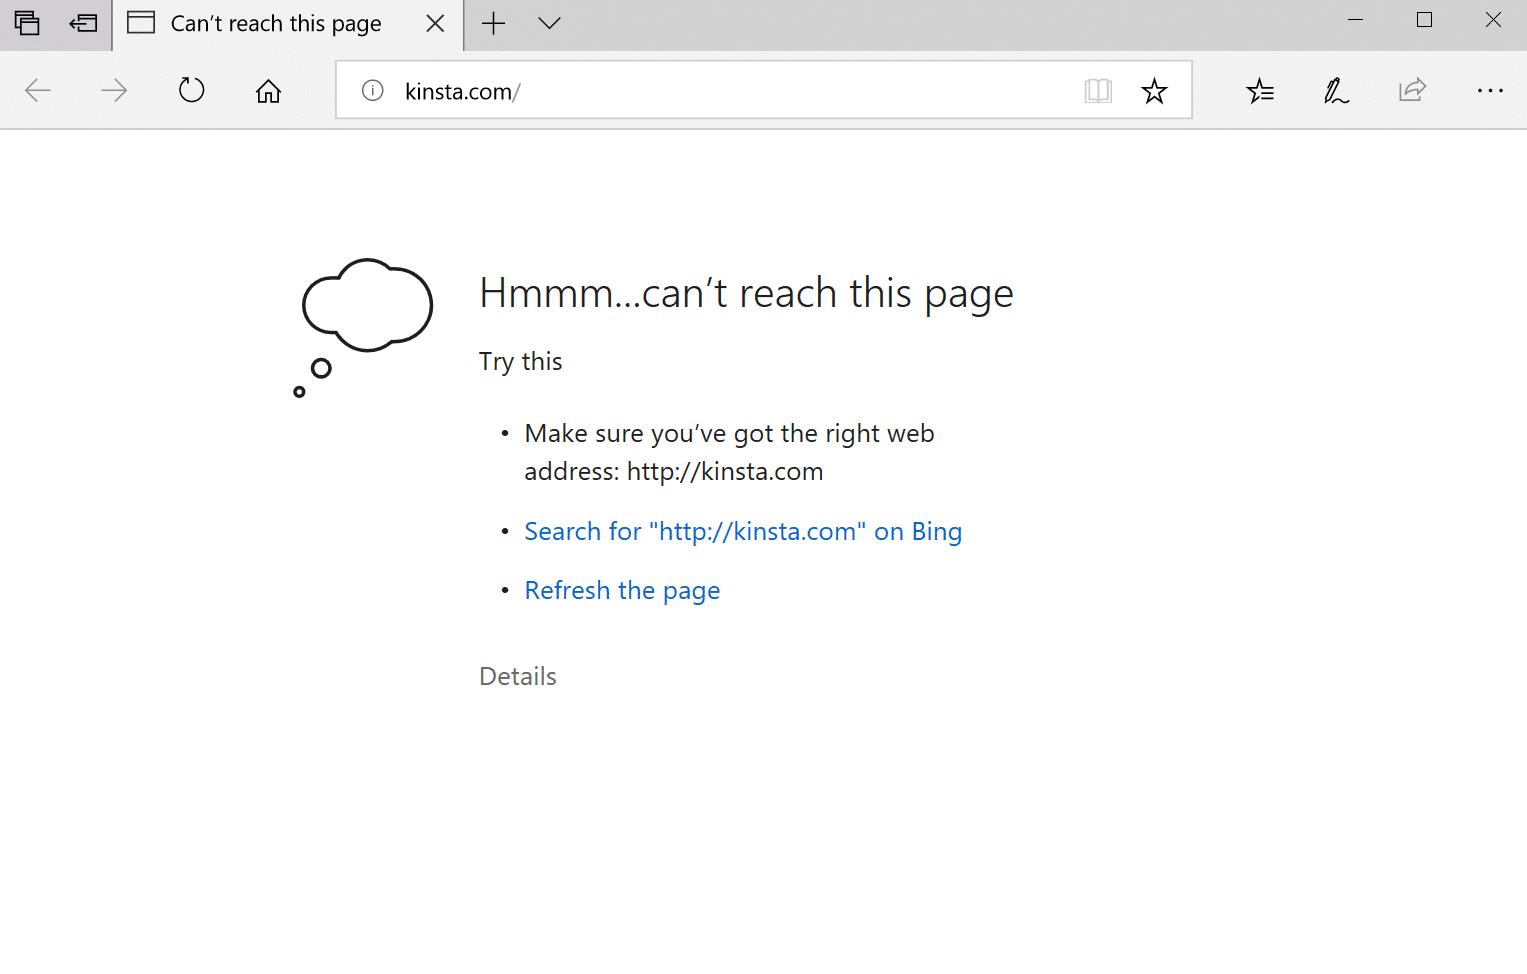
In Microsoft Edge, it will simply show as Hmmm… can’t reach this page (as seen below). Which isn’t very helpful.
Make sure you’ve got the right web address: domain.com.
Safari
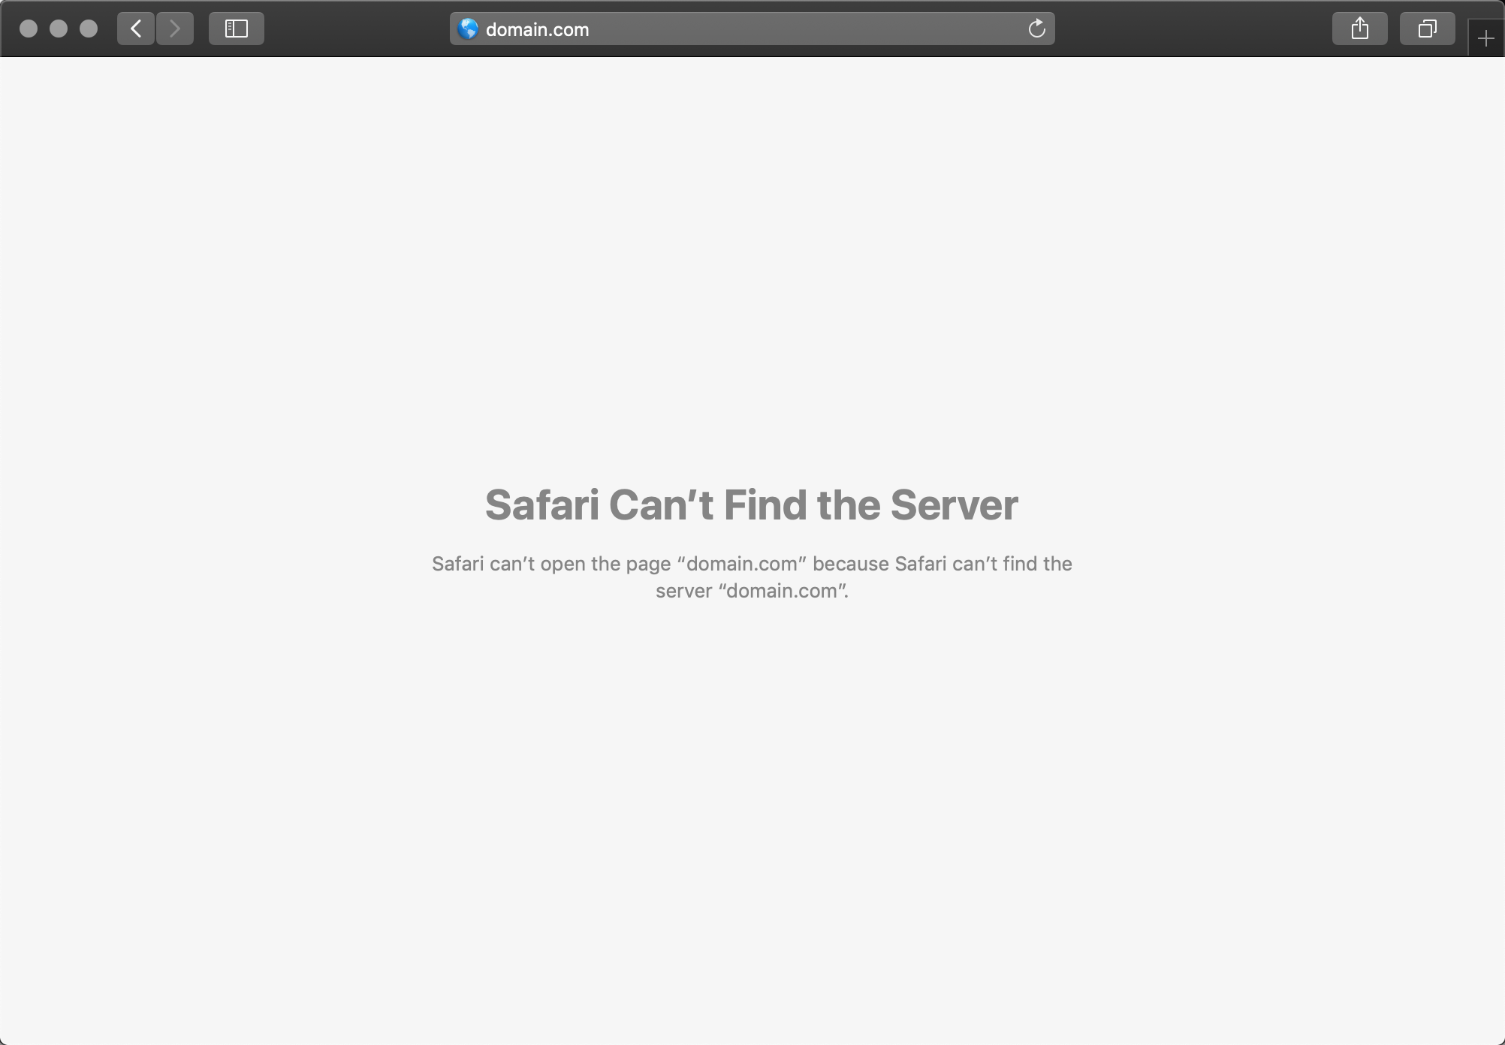
In Safari, it will simply show as Safari Can’t Find the Server (as seen below).
Safari can’t open the page “domain.com” because Safari can’t find the server “domain.com”.
Main Causes of the DNS_PROBE_FINISHED_NXDOMAIN Error
As mentioned, this error happens when the Domain Name System cannot resolve a website’s URL into an IP address. The causes for this could be:
- You typed the site name incorrectly into the search bar.
- There is an internet connection error preventing your access.
- Your firewall is blocking access to the website.
- An antivirus or a VPN is interfering with your network settings.
- The domain has expired or is not registered.
- Your DNS settings are not configured the right way.
How to Fix DNS_PROBE_FINISHED_NXDOMAIN on Desktop
Here are some recommendations and things to check to fix the error (sorted in order by most common reasons we see):
- Release and Renew IP Address
- Restart DNS Client Service
- Change DNS Servers
- Reset Chrome Flags
- Disable VPN and Antivirus Temporarily
- Check Your Local Hosts File
- Check DNS of Your Domain
- Restart Your Computer
1. Release and Renew IP Address
Due to the fact that this is usually a client-side DNS issue, the very first thing you should do is try releasing and renewing the IP address on your computer. This also includes flushing your local DNS cache, which is similar to browser cache.
Windows
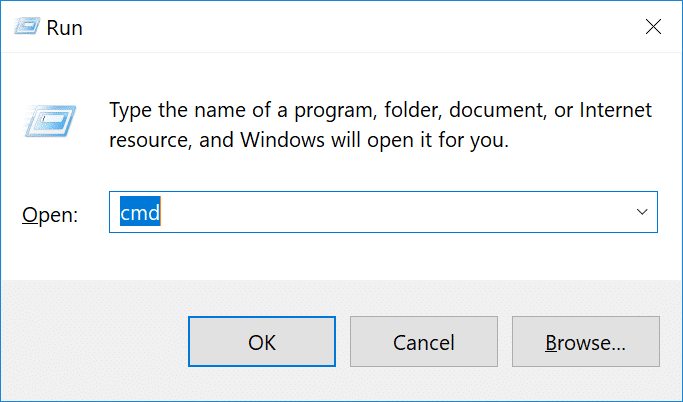
In Windows simply open up Command Prompt by pressing the Windows logo key and R. Then type “cmd” and hit Enter.
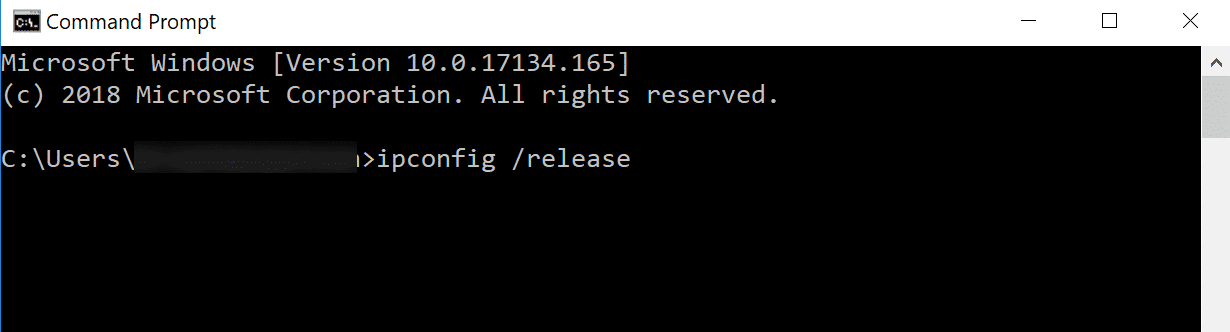
Type in ipconfig /release and hit Enter. This will release your current IP address.
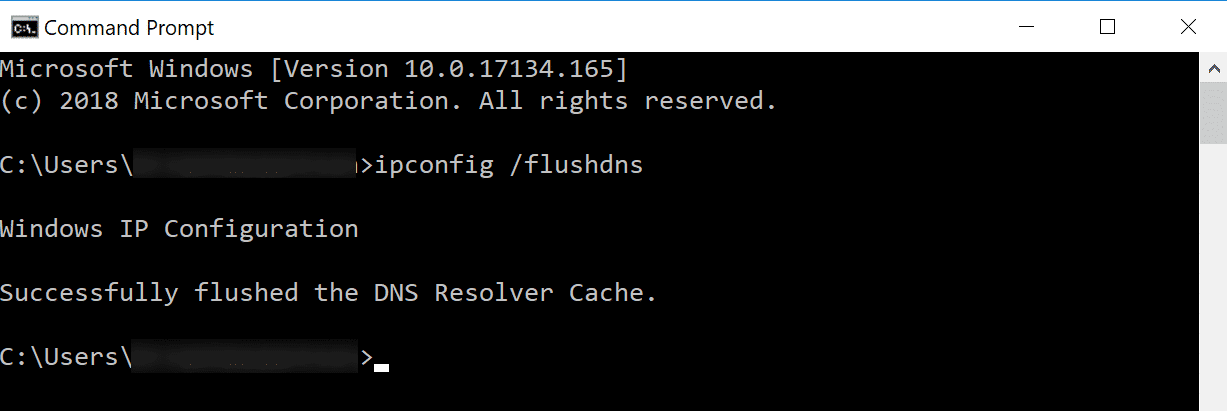
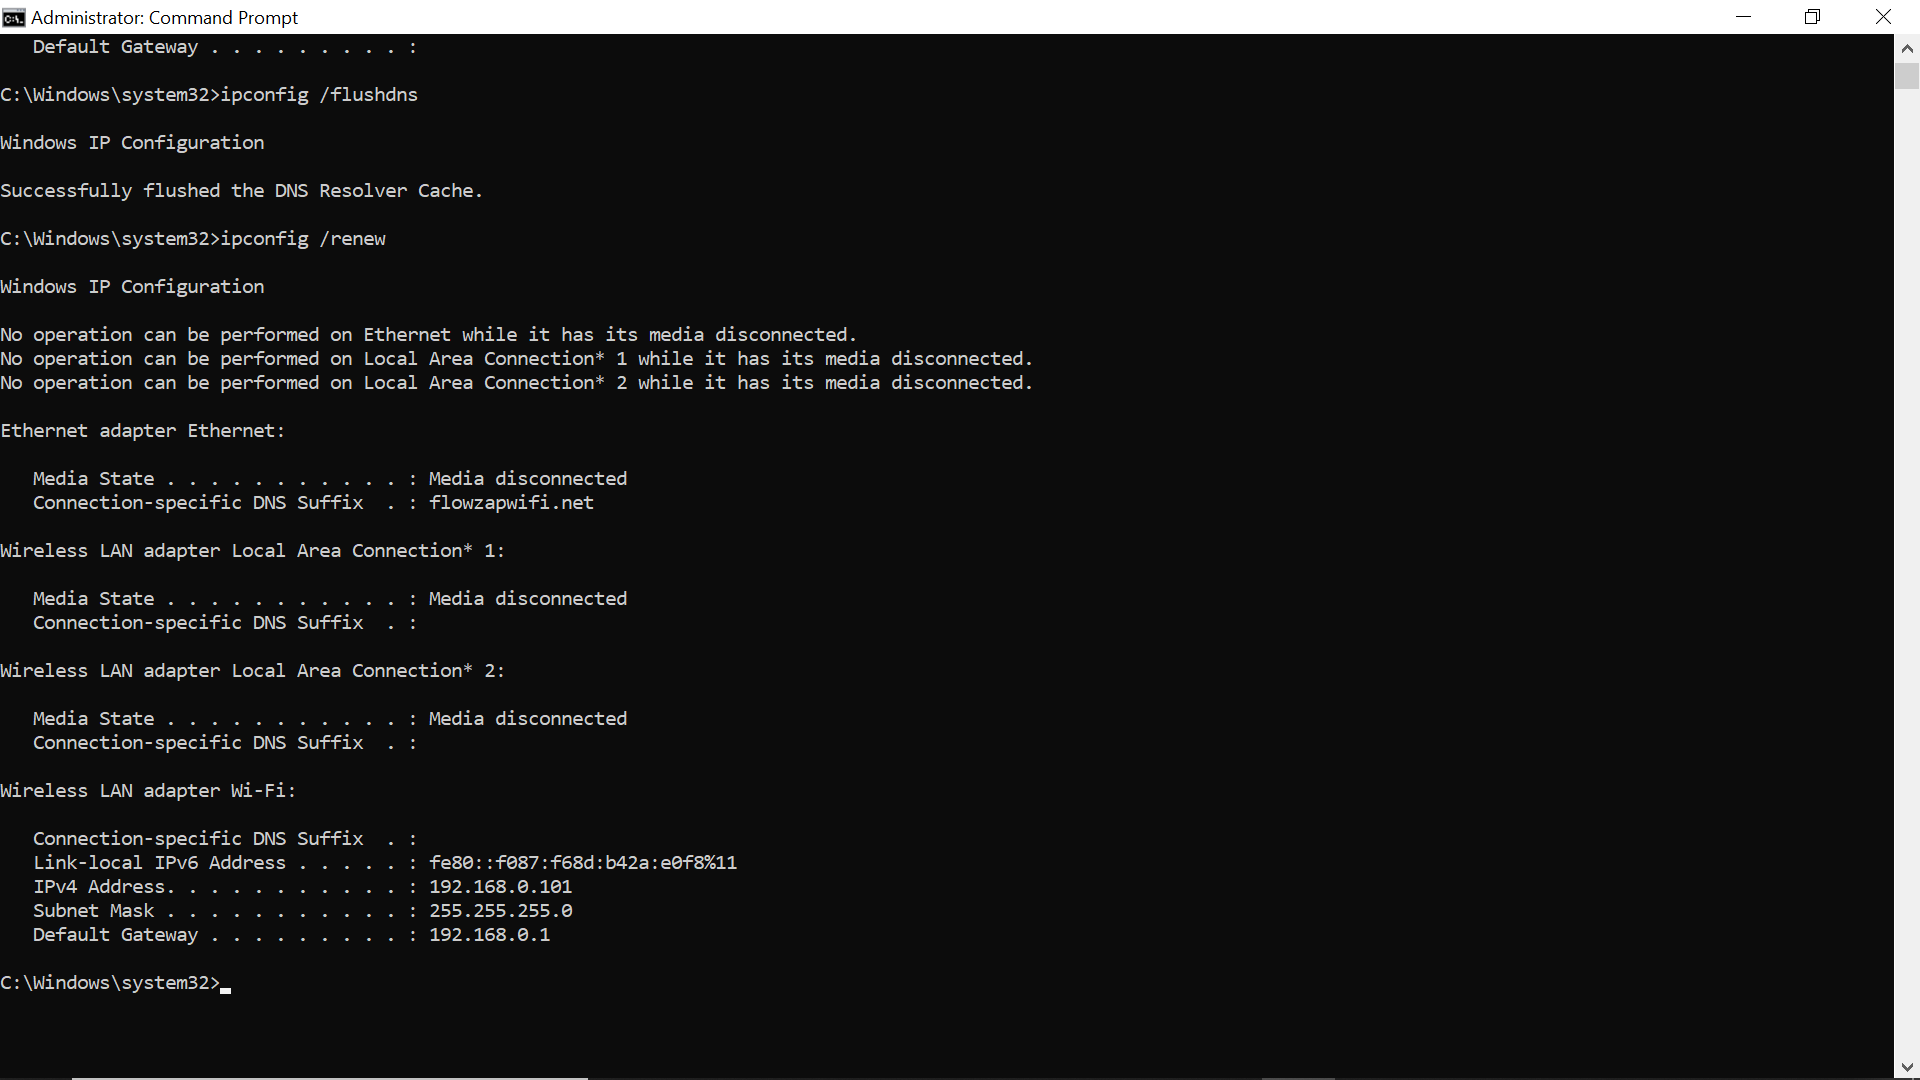
Then type in ipconfig /flushdns and hit Enter. This will flush your local DNS cache. You should see a “Successfully flushed the DNS resolver Cache” if it worked.
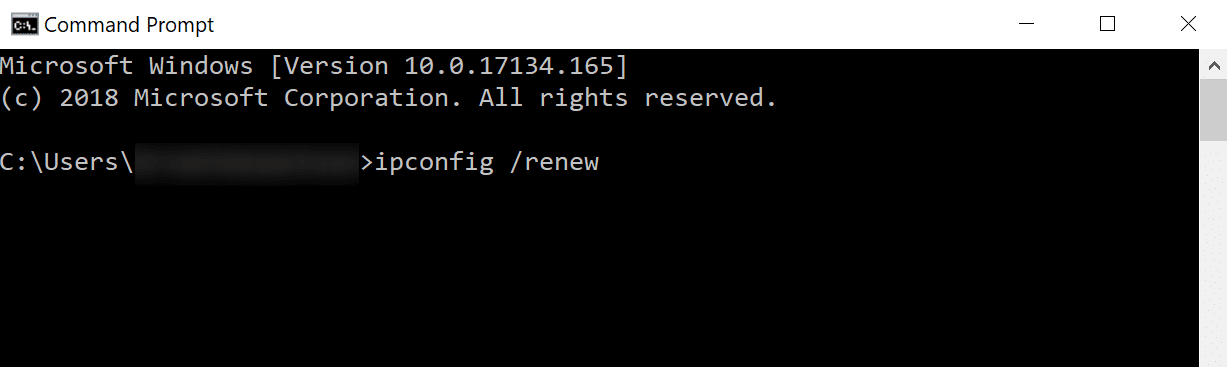
Then type in ipconfig /renew and hit Enter. This will renew your IP address.
You might also try resetting your IP settings and Winsock catalog with the following commands: netsh int ip set dns and netsh winsock reset.
An alternative way to flush and renew your DNS is simply by disabling your network adapter and re-enabling it.
Mac
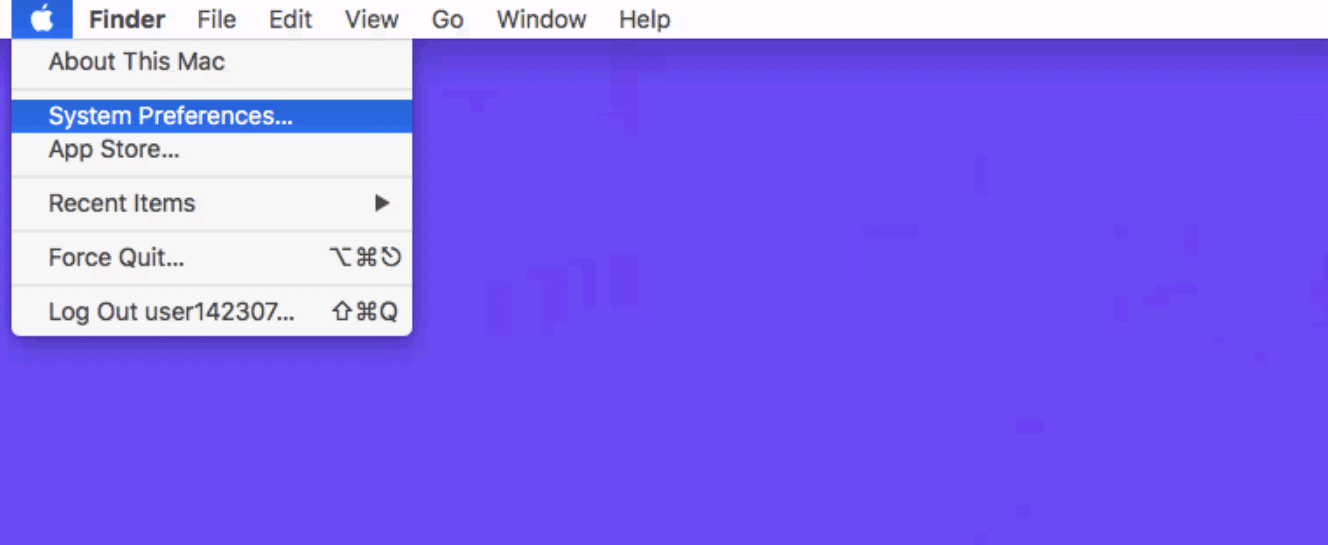
To release and renew your IP address on a Mac, go to System Preferences…
Click on the network icon and then click “Advanced.”

Click the TCP/IP tab heading if you aren’t already in there. Then click on the “Renew DHCP” lease button.
Just like we did above in Windows, Mac users can also clear their local DNS cache. Although this is done in a different place. Go to Utilities and then click on “Terminal.”

Enter in the following command:
dscacheutil -flushcache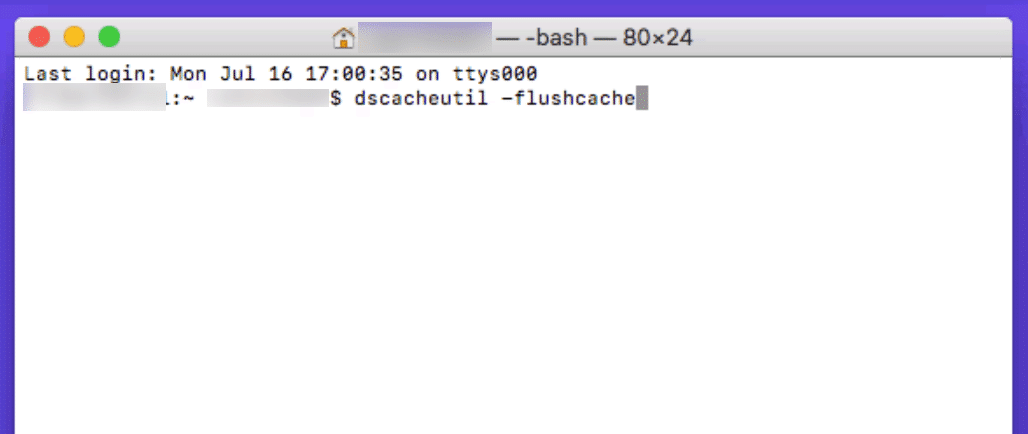
Note: There is no success message on Macs.
2. Restart DNS Client Service
If you’re running Windows you can try restarting the DNS client services which resolves and caches DNS domain names.
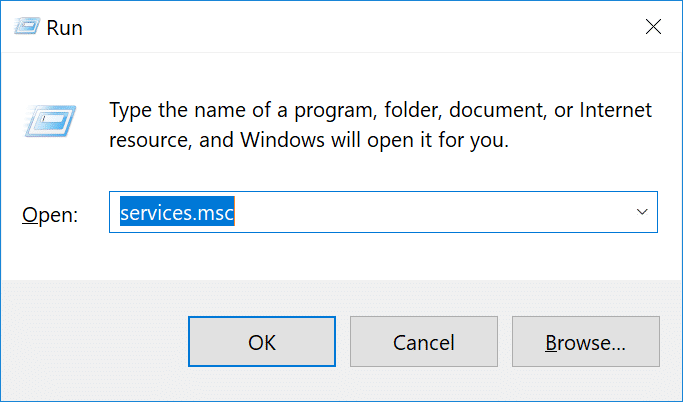
Simply open up Command Prompt by pressing the Windows logo key and R. Then type “services.msc” and hit Enter.
Scroll down to “DNS Client,” right click on it, and select “Restart.”
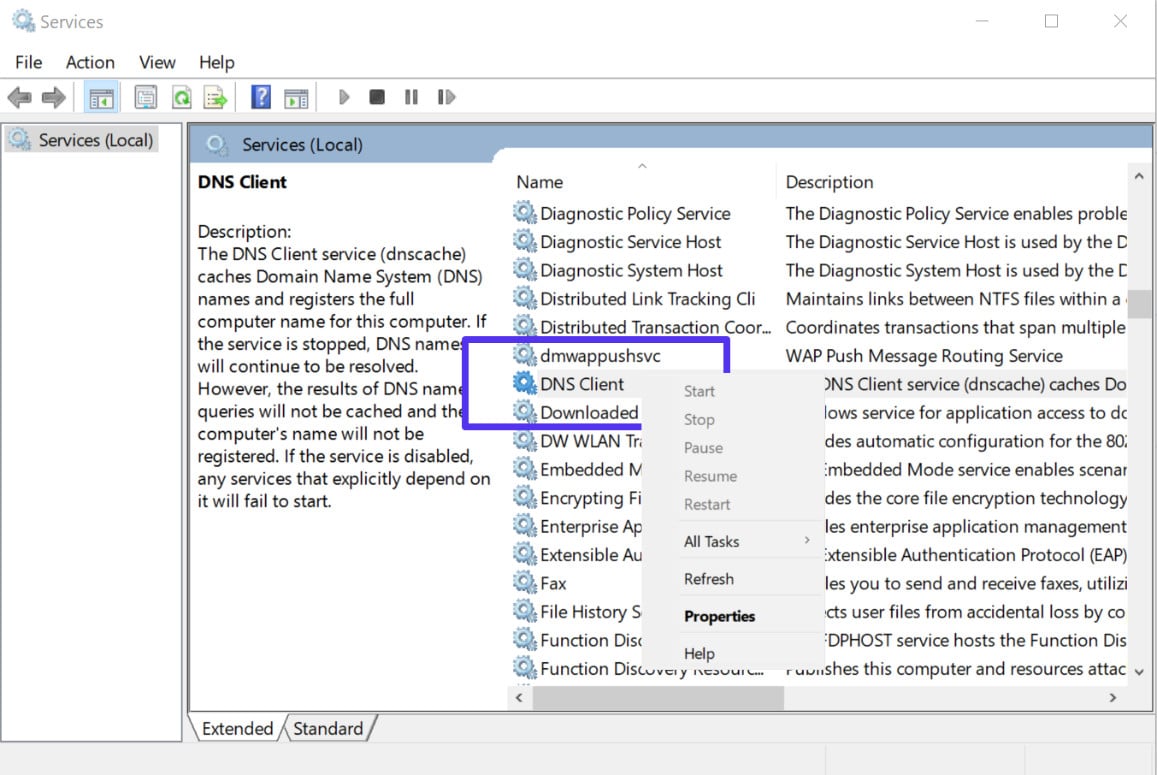
If the restart option is greyed out for you (as it was for us), an alternative way to do it is via the command prompt.
Open up Command Prompt by pressing the Windows logo key and R. Then type “cmd” and hit Enter.
Then enter the following commands:
net stop dnscache
net start dnscache
Depending on the version of Windows you’re running you might get an error saying:
The requested pause, continue, or stop is not valid for this service.
This is most likely because you need to run CMD as a network service to issue the command. If you’re running into this error, we suggest trying the other alternatives below first.
3. Change DNS Servers
The next thing you can try is changing your DNS servers. By default, DNS servers are automatically assigned by your ISP. But you could try temporarily changing these to a public DNS server, such as Google or Cloudflare.
- Some prefer to use Google’s public DNS (8.8.8.8 and 8.8.4.4) long-term due to them sometimes being more reliable.
- Cloudflare also just launched their new secure and blazing fast free DNS (1.1.1.1 and 1.0.0.1) which we will be using in this example. If you want to use Google’s the steps are the same, you simply replace the DNS server addresses with Googles.
Tip: If you’re already using a free DNS server and having issues, removing it and defaulting back to your ISP’s DNS servers also sometimes fix things. Google and Cloudflare aren’t perfect 100% of the time and there have been a few instances where we’ve noticed switching back has resolved the issue.
Windows
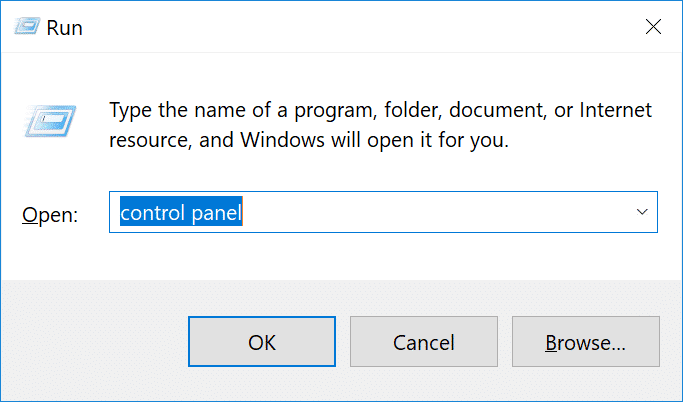
In Windows simply open up Command Prompt by pressing the Windows logo key and R. Then type “control panel” and hit Enter.
Click on “Network and Internet” and then “Network and Sharing Center.” On the left-hand side, click on “Change Adapter Settings.”

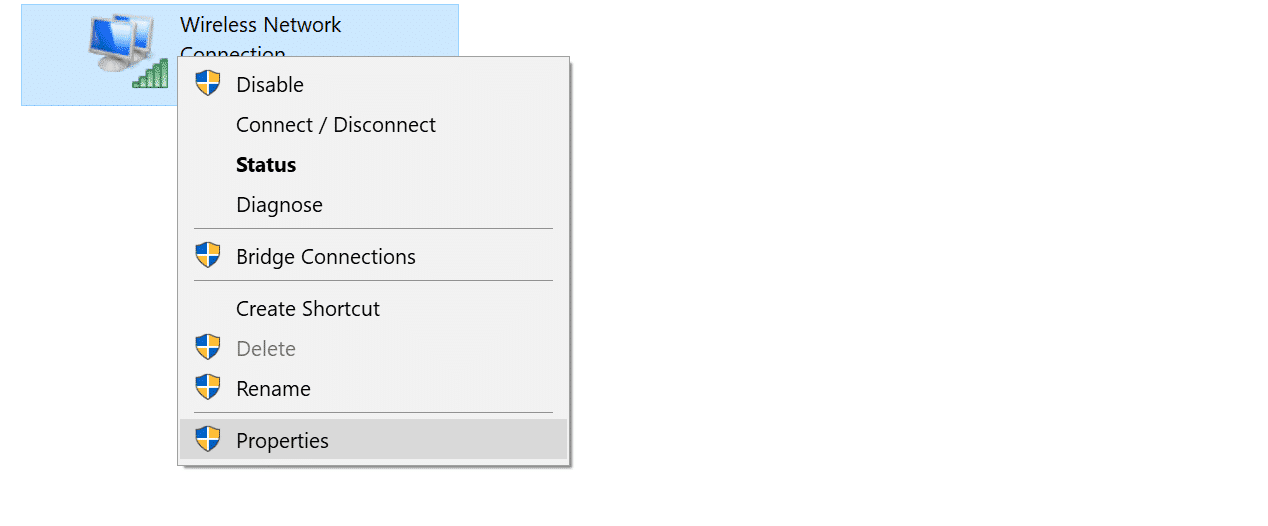
Right click on your current connection, this will either be Local Area Connection or Wireless Network Connection based on how you’re connecting. Then click on “Properties.”
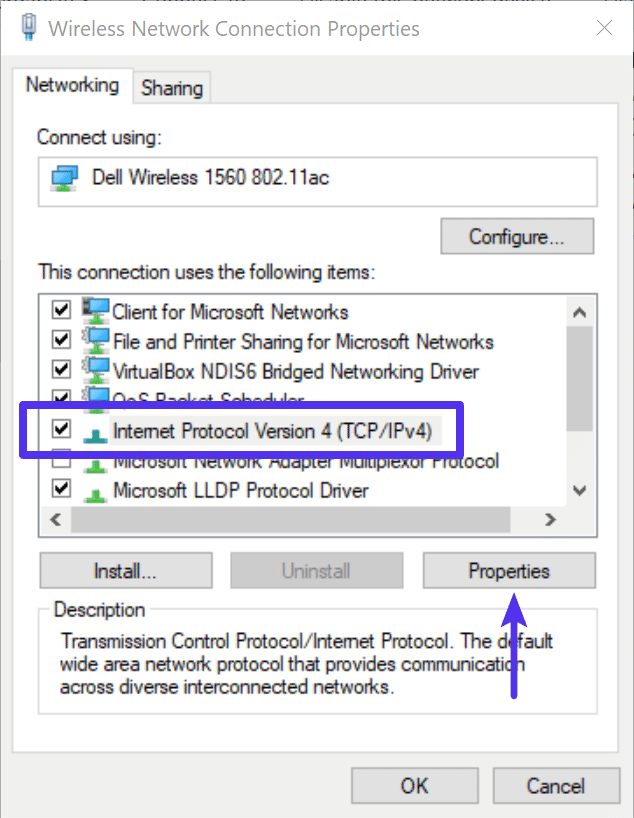
Select Internet Protocol Version 4 (or IPv6 if desired) and click on “Properties.”
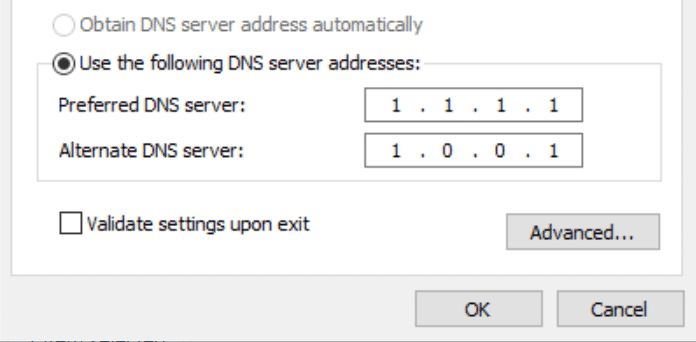
Make a note of any existing settings in case you need to revert back. Click “Use the following DNS server addresses.” Enter the following, or replace the existing with these:
For IPv4: 1.1.1.1 and 1.0.0.1
For IPv6: 2606:4700:4700::1111 and 2606:4700:4700::1001
Click OK, then Close. Restart your browser.
Mac
To change DNS servers on a Mac, go to System Preferences…
Click on the network icon and then click “Advanced.”
Click on the “DNS” tab.
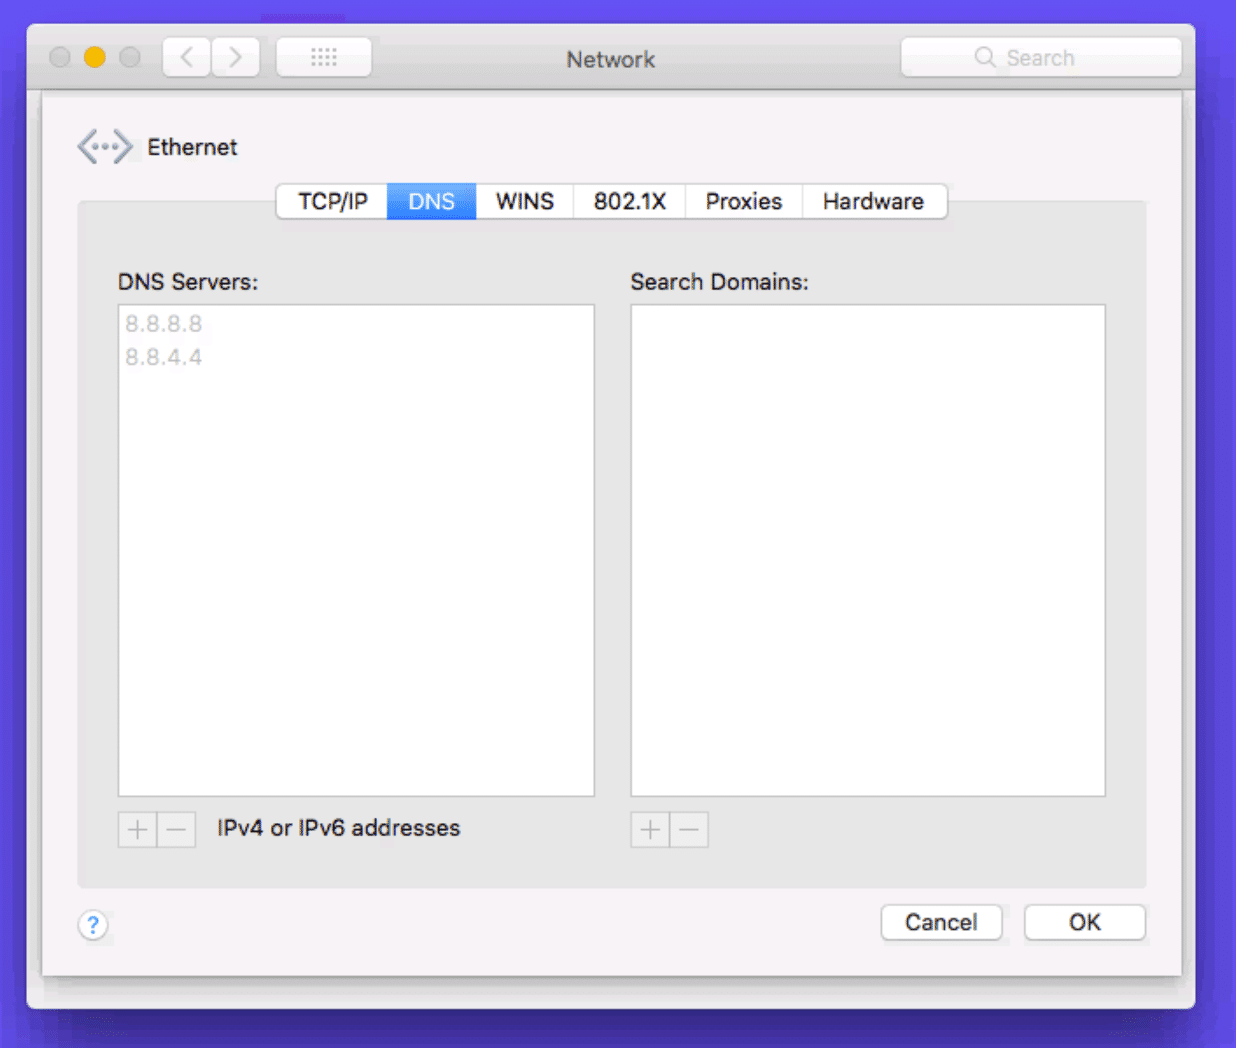
Then add Cloudflare’s DNS server addresses.
For IPv4: 1.1.1.1 and 1.0.0.1
For IPv6: 2606:4700:4700::1111 and 2606:4700:4700::1001
4. Reset Chrome Flags
Sometimes Chrome settings or experimental features can get accidentally changed or messed up. You reset these back to default by entering chrome://flags into your browser and clicking on “Reset all to default.”
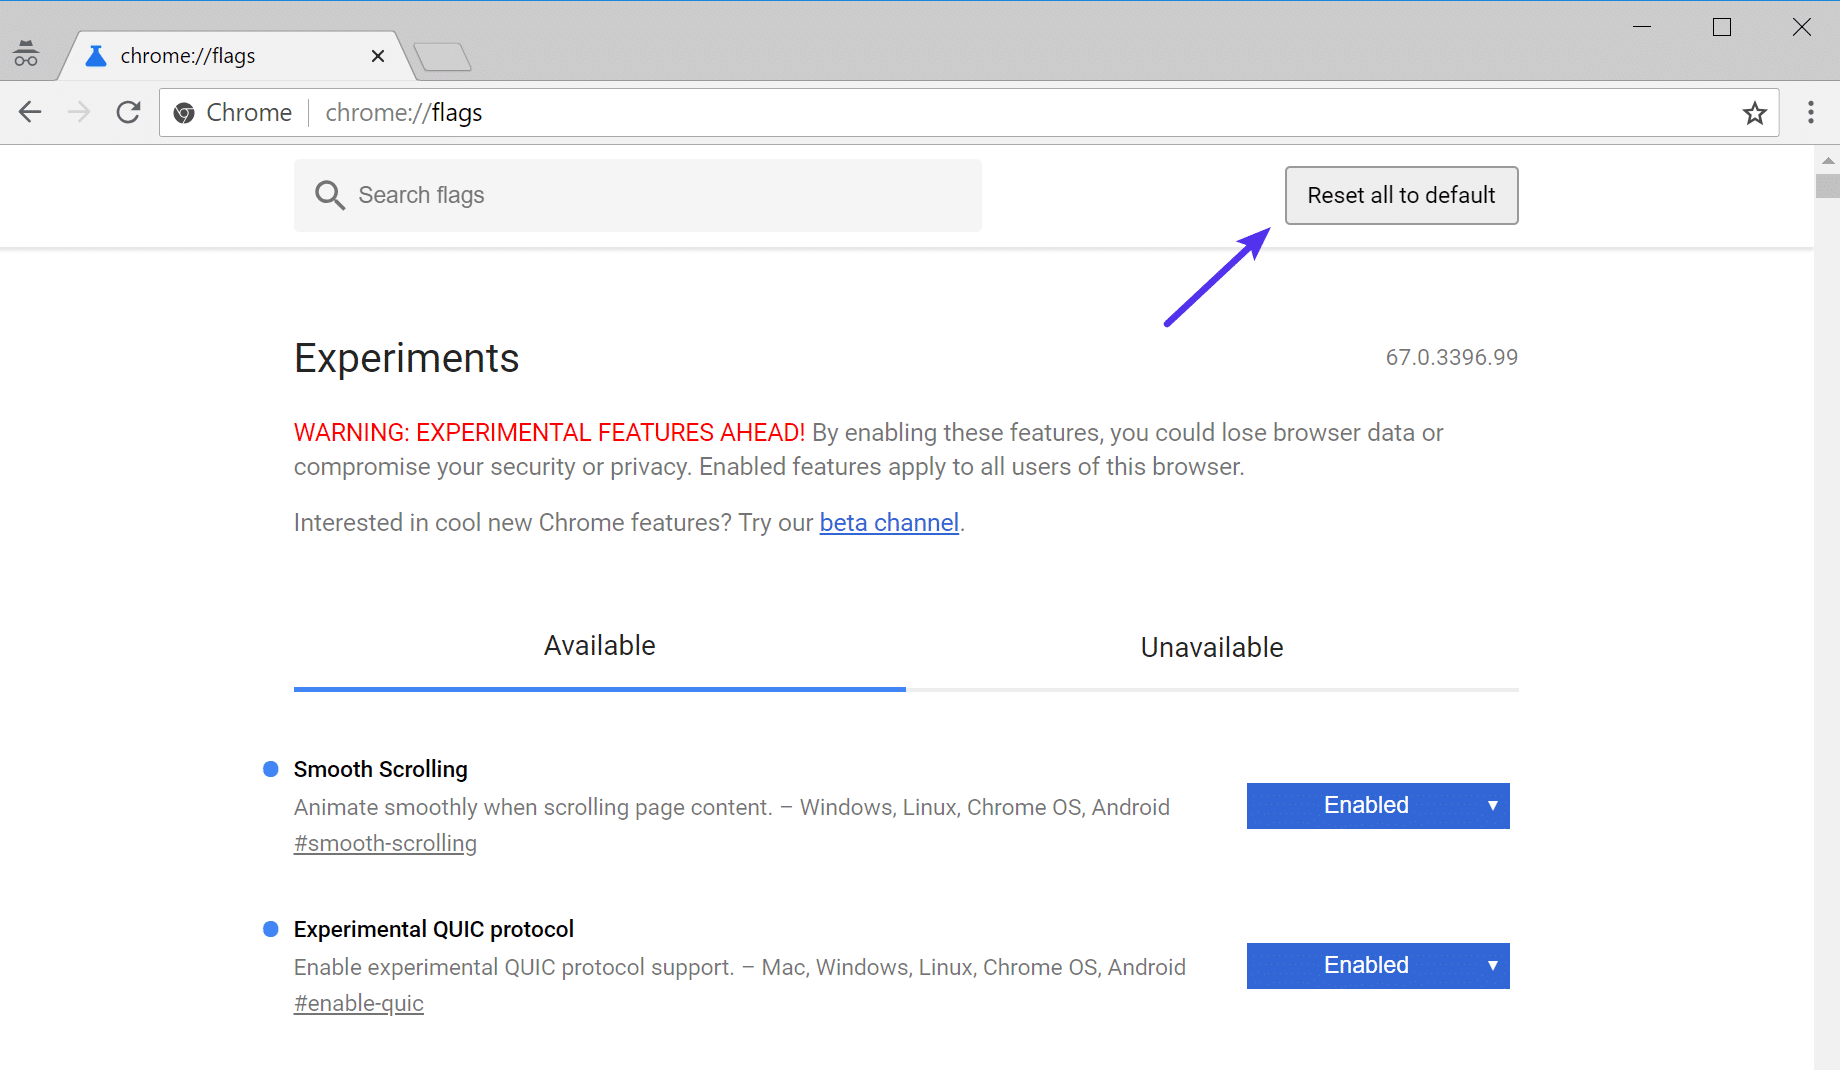
The restart your browser.
5. Disable VPN and Antivirus Temporarily
Sometimes VPNs and Antivirus software can conflict or override your network settings, including your DNS servers, etc. If you have any running, try temporarily disabling them (closing them) to see if it resolves the DNS probe finished nxdomain error in Chrome.
6. Check Your Local Hosts File
Every computer has what they call a local hosts file. This is a file that contains manual DNS entries which are mapped to specific IP addresses. Typically this is only edited when you want to preview your DNS before switching over domains to a new host. However, there is a multitude of different ways this file could have been changed or edited. Therefore, if none of the above options worked for you, it’s worth double checking your local hosts file to ensure the website you’re trying to access isn’t in there.
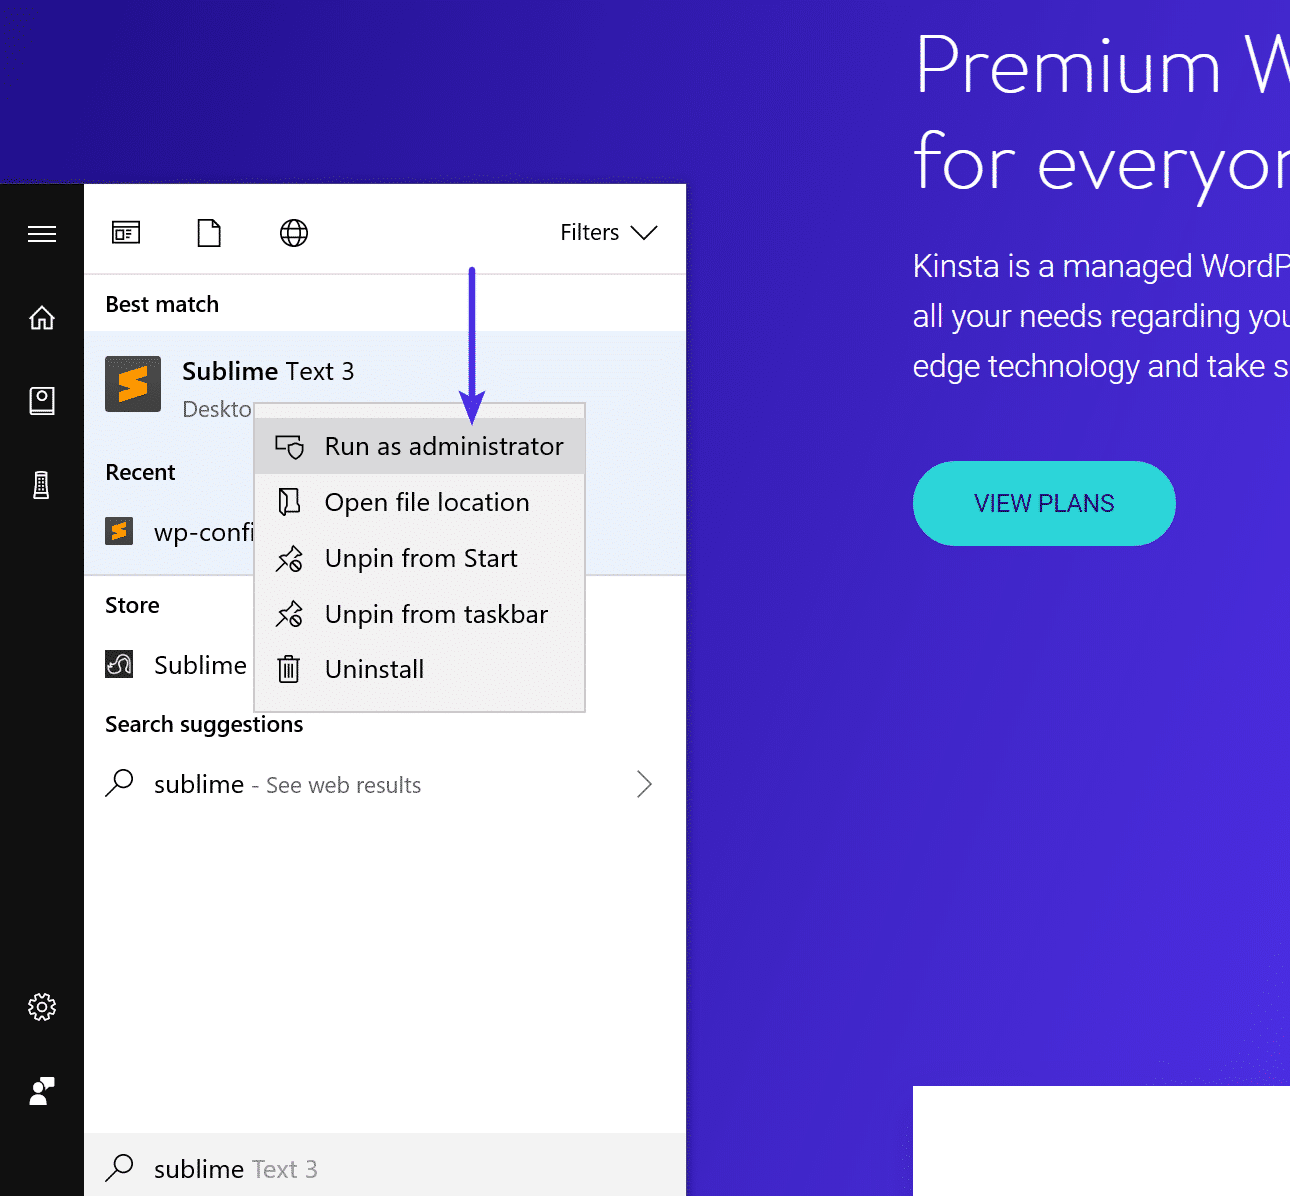
Windows
The hosts file typically requires additional access. So the first step is to open up your text editor as an administrator. Simply click on your start menu, search for your text editor, right-click on it and select “Run as administrator.” This can be done in any text editor such as Notepad, Notepad++, Atom, etc. We are using Sublime in our example below.
Within your text editor click File → Open and browse to the following location:
C:WindowsSystem32driversetc
Click on the hosts file and “Open.”
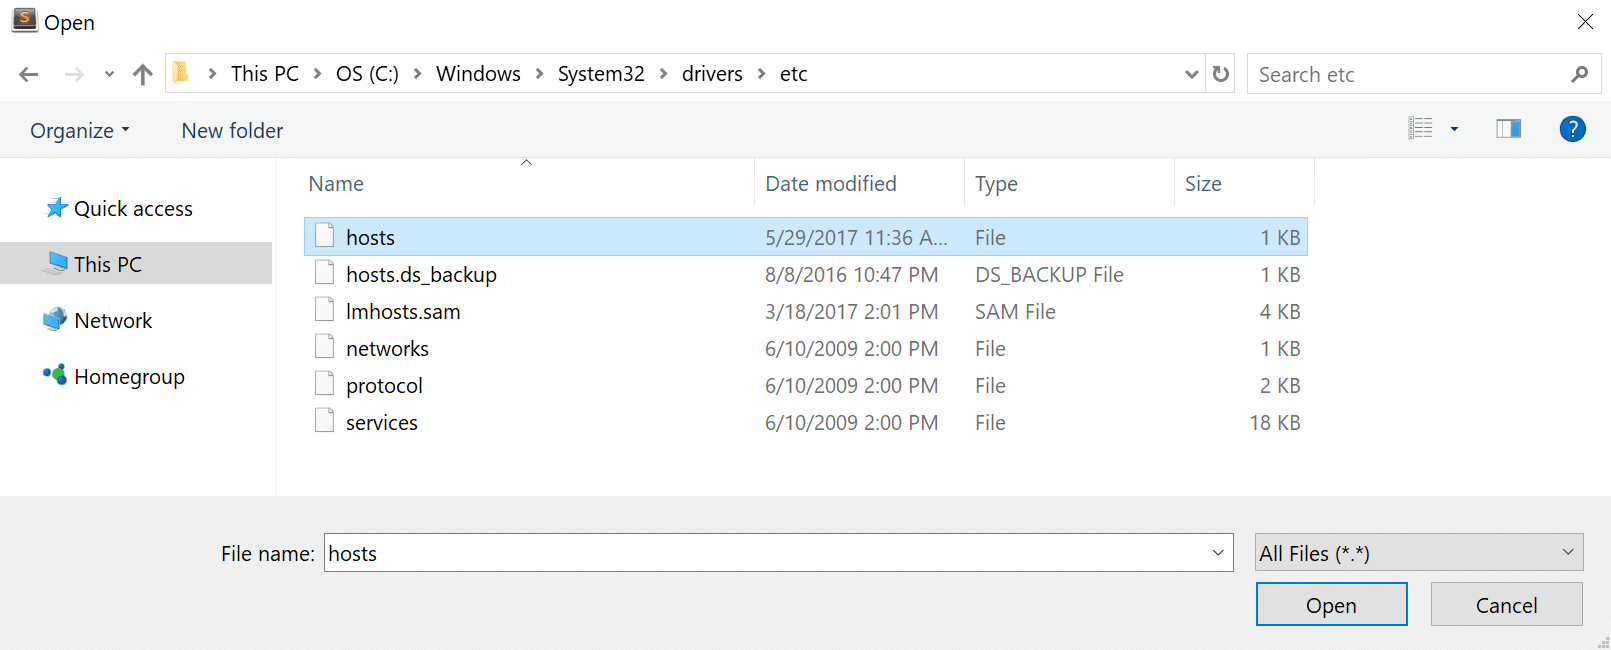
Double check and make sure the website you’re trying to visit isn’t listed in there. If it is, remove it.
Mac
To check your hosts file on a Mac, we recommend getting Gas Mask. It’s a free application which can be used as hosts file manager, hosts files editor, and switch between them. It makes everything quick and easy! Otherwise, you can follow the steps below to edit your hosts file on Mac manually.
Go to Utilities and then click on “Terminal.”
Enter in the following command and press Enter (you will most likely be prompted for your administrator password as well).
sudo nano /private/etc/hosts
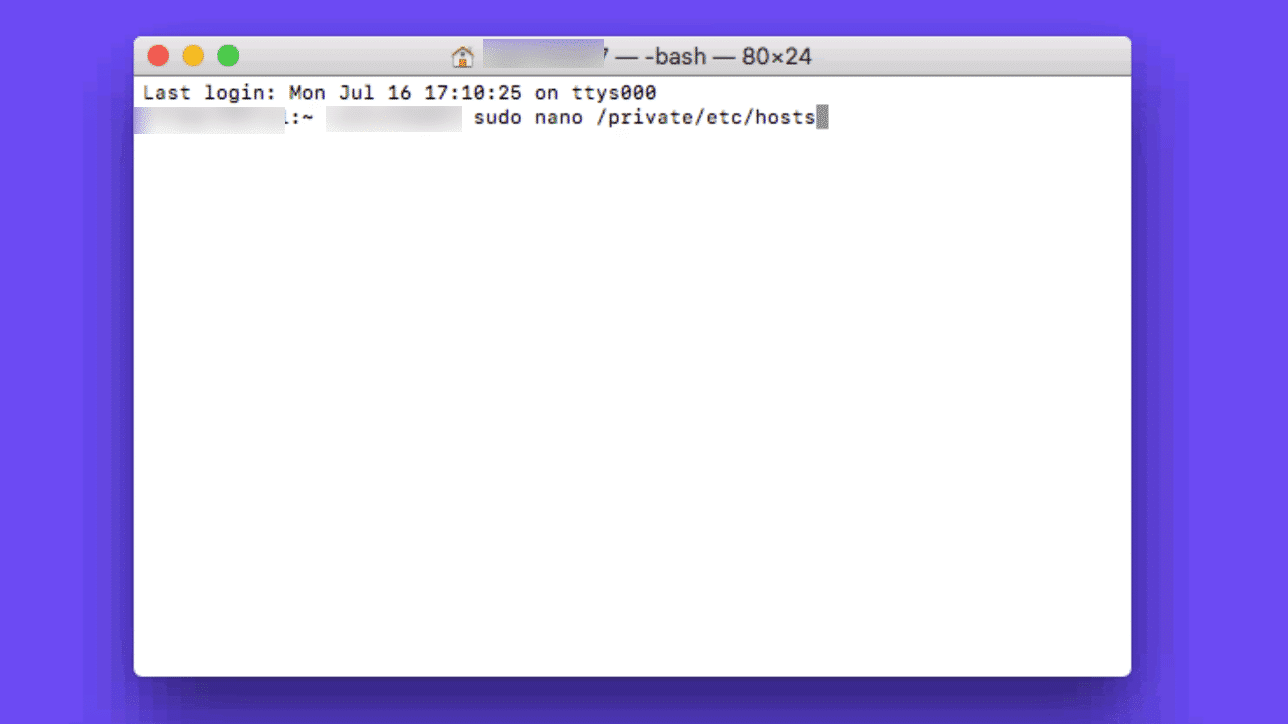
Double check and make sure the website you’re trying to visit isn’t listed in your hosts file. If it is, remove it.
7. Check DNS of Your Domain
If you’re only getting the DNS_PROBE_FINISHED_NXDOMAIN error on a single domain, even after checking your hosts file, you might need to check the DNS settings on the domain name itself. If you’re a Kinsta client we have an in-depth post on how to point your domain and or DNS to Kinsta. If you recently migrated your website to a new hosting provider, it could be the DNS was cached incorrectly on your computer. In which case, Step 2 above should have resolved that.
8. Restart Your Computer
We know it’s annoying, but it has to be mentioned. 😬 If none of the above options work, trying restarting your computer and even your router. We realize many of you probably have hundreds of tabs or applications open and that’s why we made this the last option. But rebooting devices actually clears out a lot of temporary cache.
How to Fix DNS_PROBE_FINISHED_NXDOMAIN on Mobile (Android & iOS)
These are the most common ways to fix this error on your mobile device:
- Restart Your Device
- Check for Chrome App Updates
- Clear Chrome’s Browser and App Data
- Check for System Updates
- Change Your Mobile Device’s Network Settings
1. Restart Your Device
You know that famous tech support question “Have you tried turning it off and back on again?”
Well, the phrase is popular for a reason: A reboot does often fix the problem! Before attempting any of the other solutions on this list, start first with a simple device restart.
Android
To restart your Android device, press and hold your device’s power button to bring up the Options menu, then tap on the Restart option:
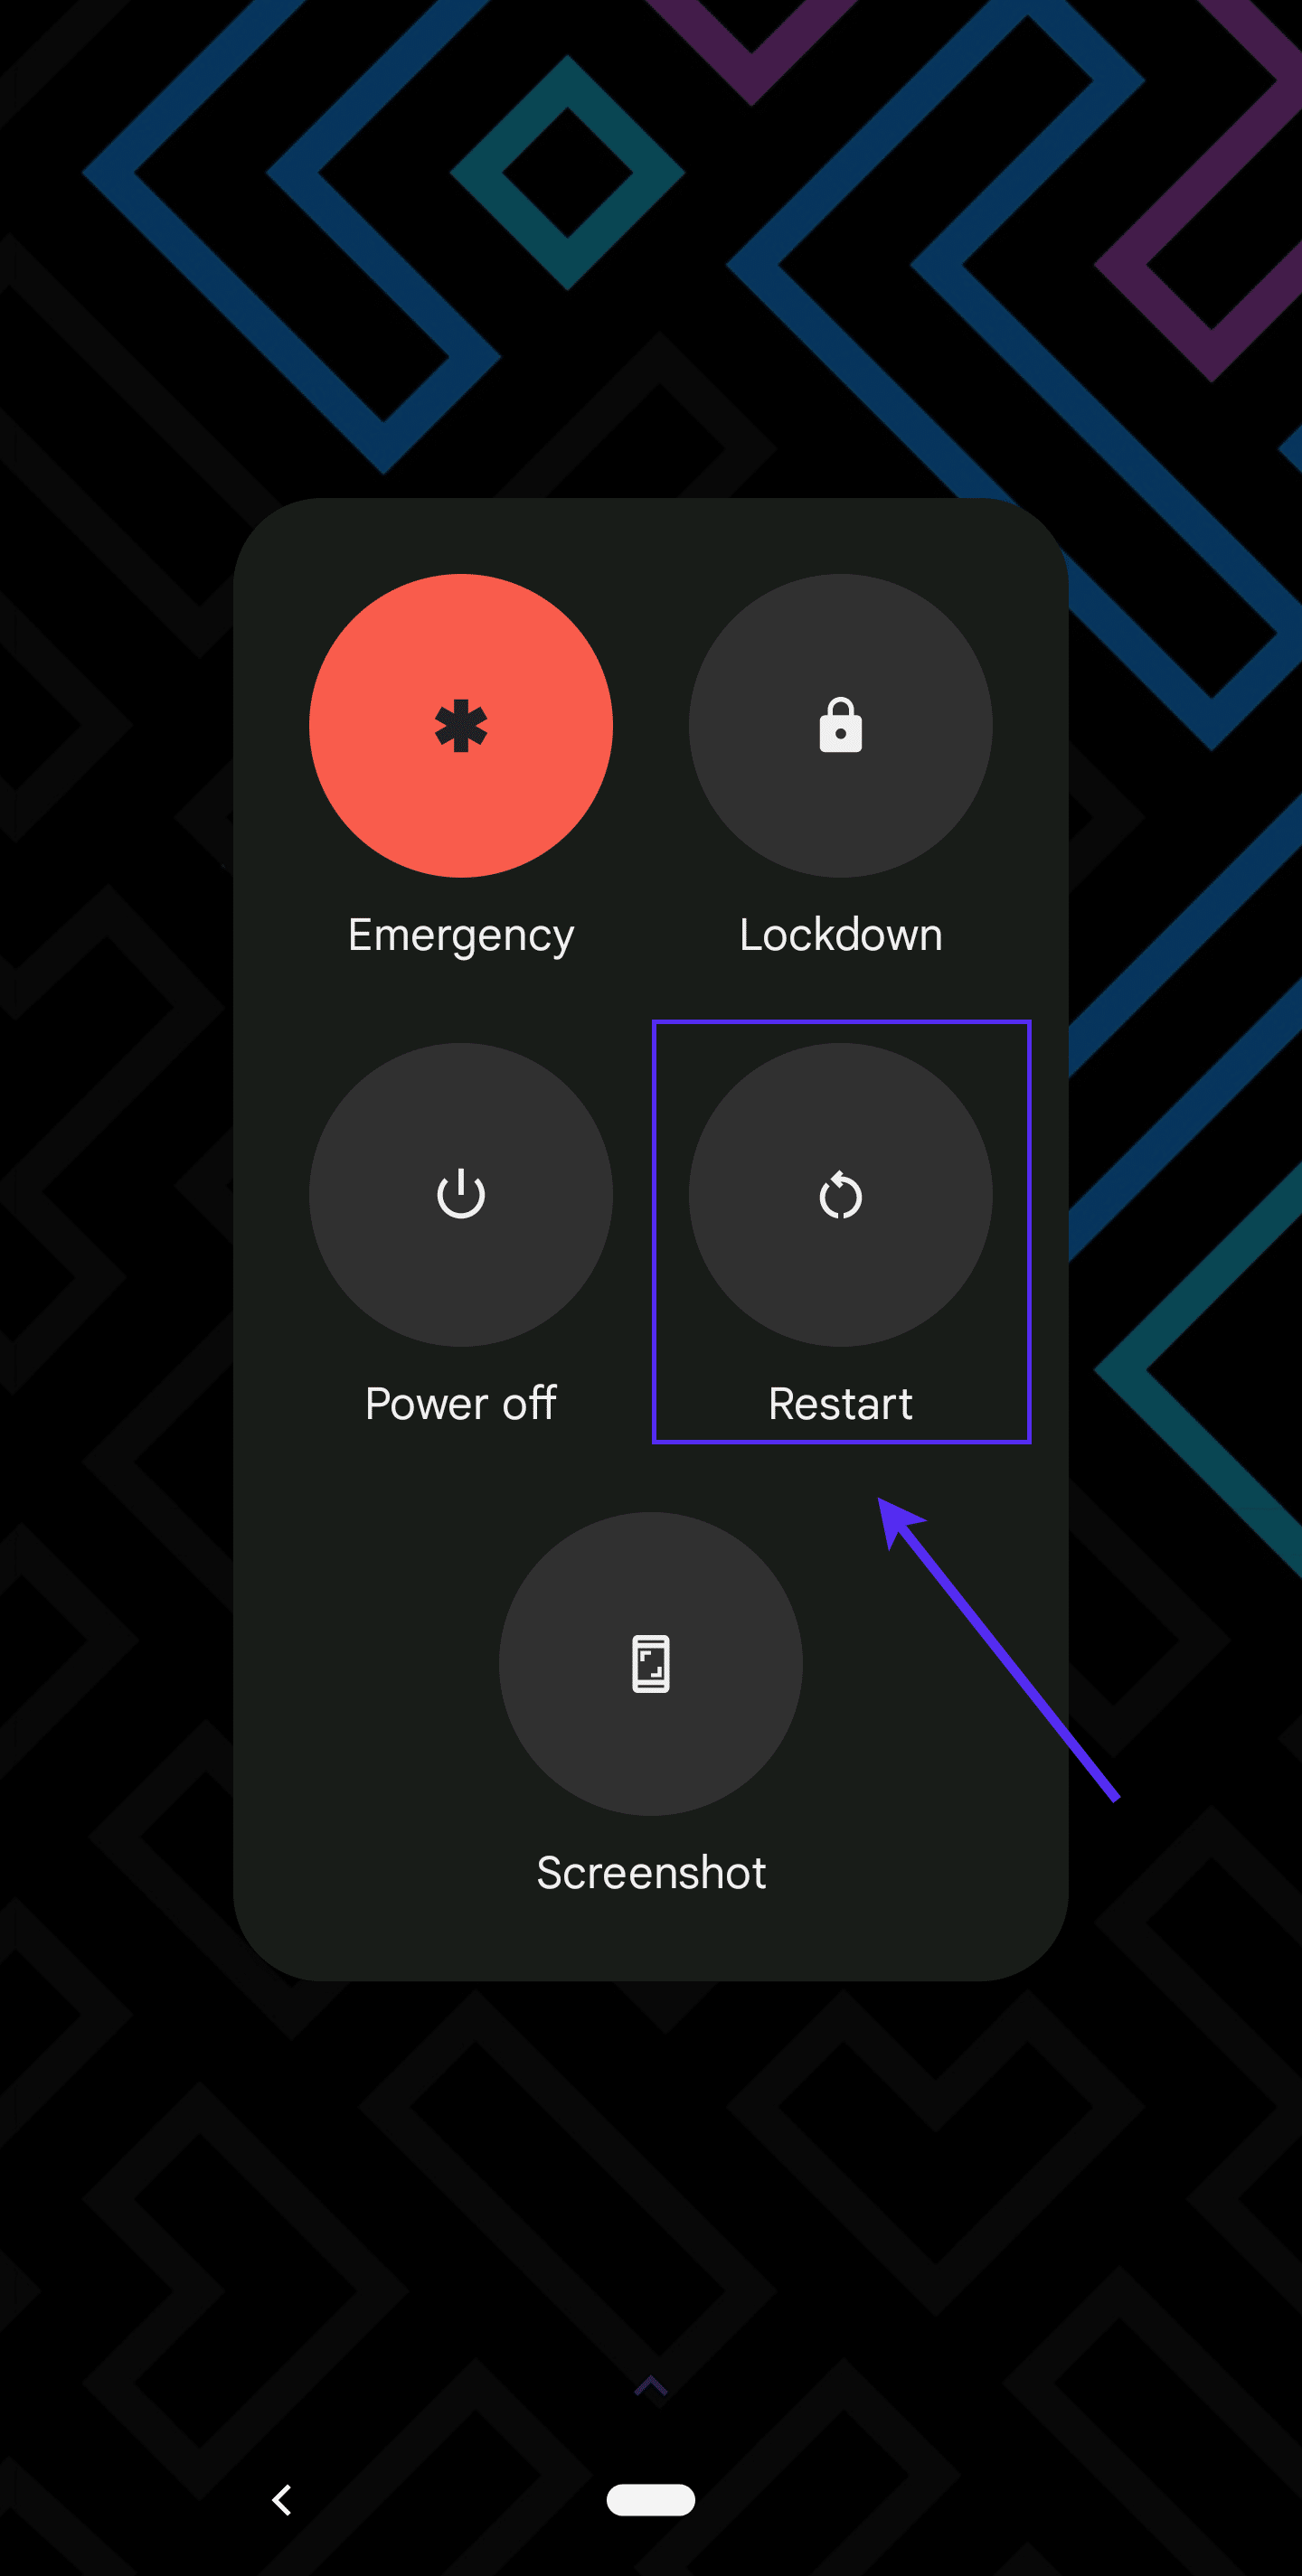
Wait for your device to restart, then open the Chrome app and check for the error.
iPhone/iOS
To restart your iPhone or other iOS device, begin by pressing and holding the power button and either of the two volume buttons:
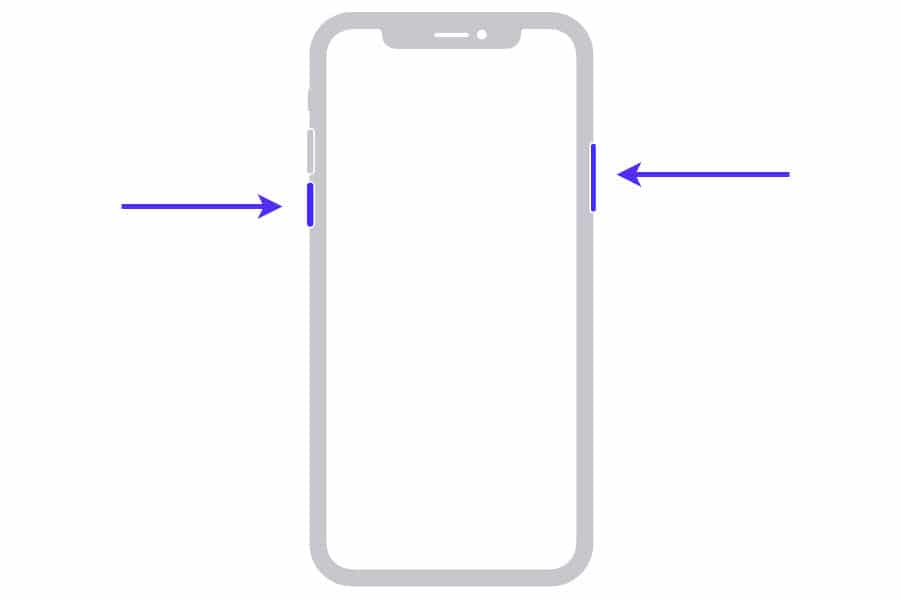
Keep these held down until the power-off slider appears on the screen:
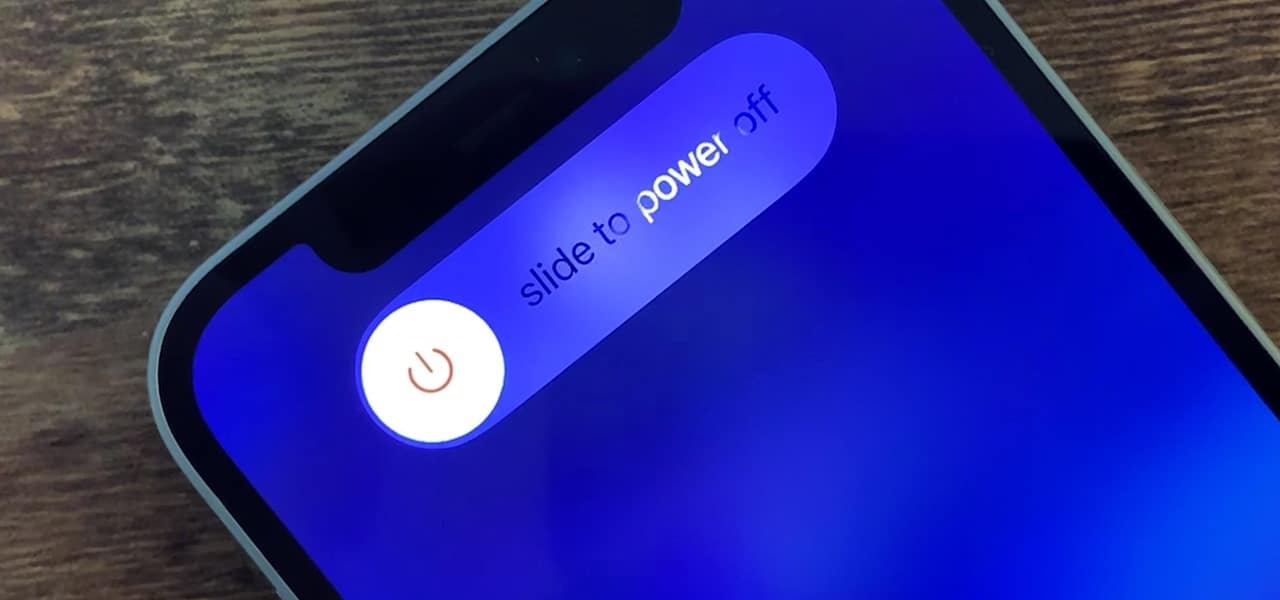
Drag the slider from one side to the other, then wait for the device to turn off.
Once it’s completely off, press and hold the device’s power button to turn it back on. Then check to see whether you’re still encountering the error.
2. Check for Chrome App Updates
The next step is to make sure that you’re using the very latest version of the Google Chrome app on your Android device
You can check for any Chrome updates and install them by following these steps:
- Open the App Store app (this is called Google Play Store on Android devices).
- Tap your profile icon at the top right (in the search bar).
- Tap the Manage apps and device menu option.
- Tap the Updates available button.
- Look for Google Chrome in the list. If you see it, tap the Update button next to it.
After the update has finished installing, relaunch the Chrome app and check to see if you’re still getting the error. If you are, move on to the next solution below.
3. Clear Chrome’s Browser and App Data
Caches are useful because they speed up your browsing experience. In fact, our tests show that Edge Caching reduces the time it takes to deliver full pages to browsers by more than 50%.
However, this cached data can also frequently be the source of errors like DNS_PROBE_FINISHED_NXDOMAIN.
Luckily, you don’t actually need this cached data, and clearing it out may fix the error.
You can clear your mobile device’s Chrome cache and app data with just a few taps:
- Open the Chrome app.
- Tap the hamburger menu icon (
⋮or⋯) at the top or bottom. - Tap History > Clear browsing data.
- Check Browsing history and Cached images and files. Leave the other options unchecked.
- If prompted with a “Also clear data from these sites?” message, confirm by tapping Clear.
- Wait for Chrome to finish clearing the data, then tap the OK, got it confirmation message.
Now, try visiting the page again to see if the error has vanished. If it hasn’t, don’t lose heart! Just move on to the next option below.
4. Check for System Updates
As with Chrome, you’ll want to be sure you’re running the latest version of the Android operating system (OS) that’s available for your device.
Android
Here’s how to see if your Android device has any pending system updates:
- Navigate to Settings > System.
- Tap System Update.
- This screen may tell you that your system is up to date. Regardless, tap the Check for update button at the bottom.
- Wait for the system to look for any available OS updates.
- If an update is found, agree to install it, then follow any further prompts to complete the installation.
- Restart your device if the update process doesn’t do so automatically.
iPhone/iOS
You can check for pending updates on your iPhone or other iOS device with these steps:
- Navigate to Settings > General > Software Update.
- Review the screen to see if there’s an update available. If there is, tap the Download and install button.
- Tap Install Now when prompted.
- Restart the device.
Once your device’s system has been updated and rebooted, check again for the error in the Chrome app. If it’s still there, try the next solution on this list.
5. Change Your Mobile Device’s Network Settings
We talked earlier about modifying desktop devices’ DNS settings to fix the DNS_PROBE_FINISHED_NXDOMAIN error. This same approach can also work with mobile devices.
Android
To change the DNS settings on your Android, follow these steps:
- Navigate to Settings > Network & Internet > Internet.
- Make sure Wi-Fi is toggled “On.”
- Press and hold your Wi-Fi network connection, then tap Modify.
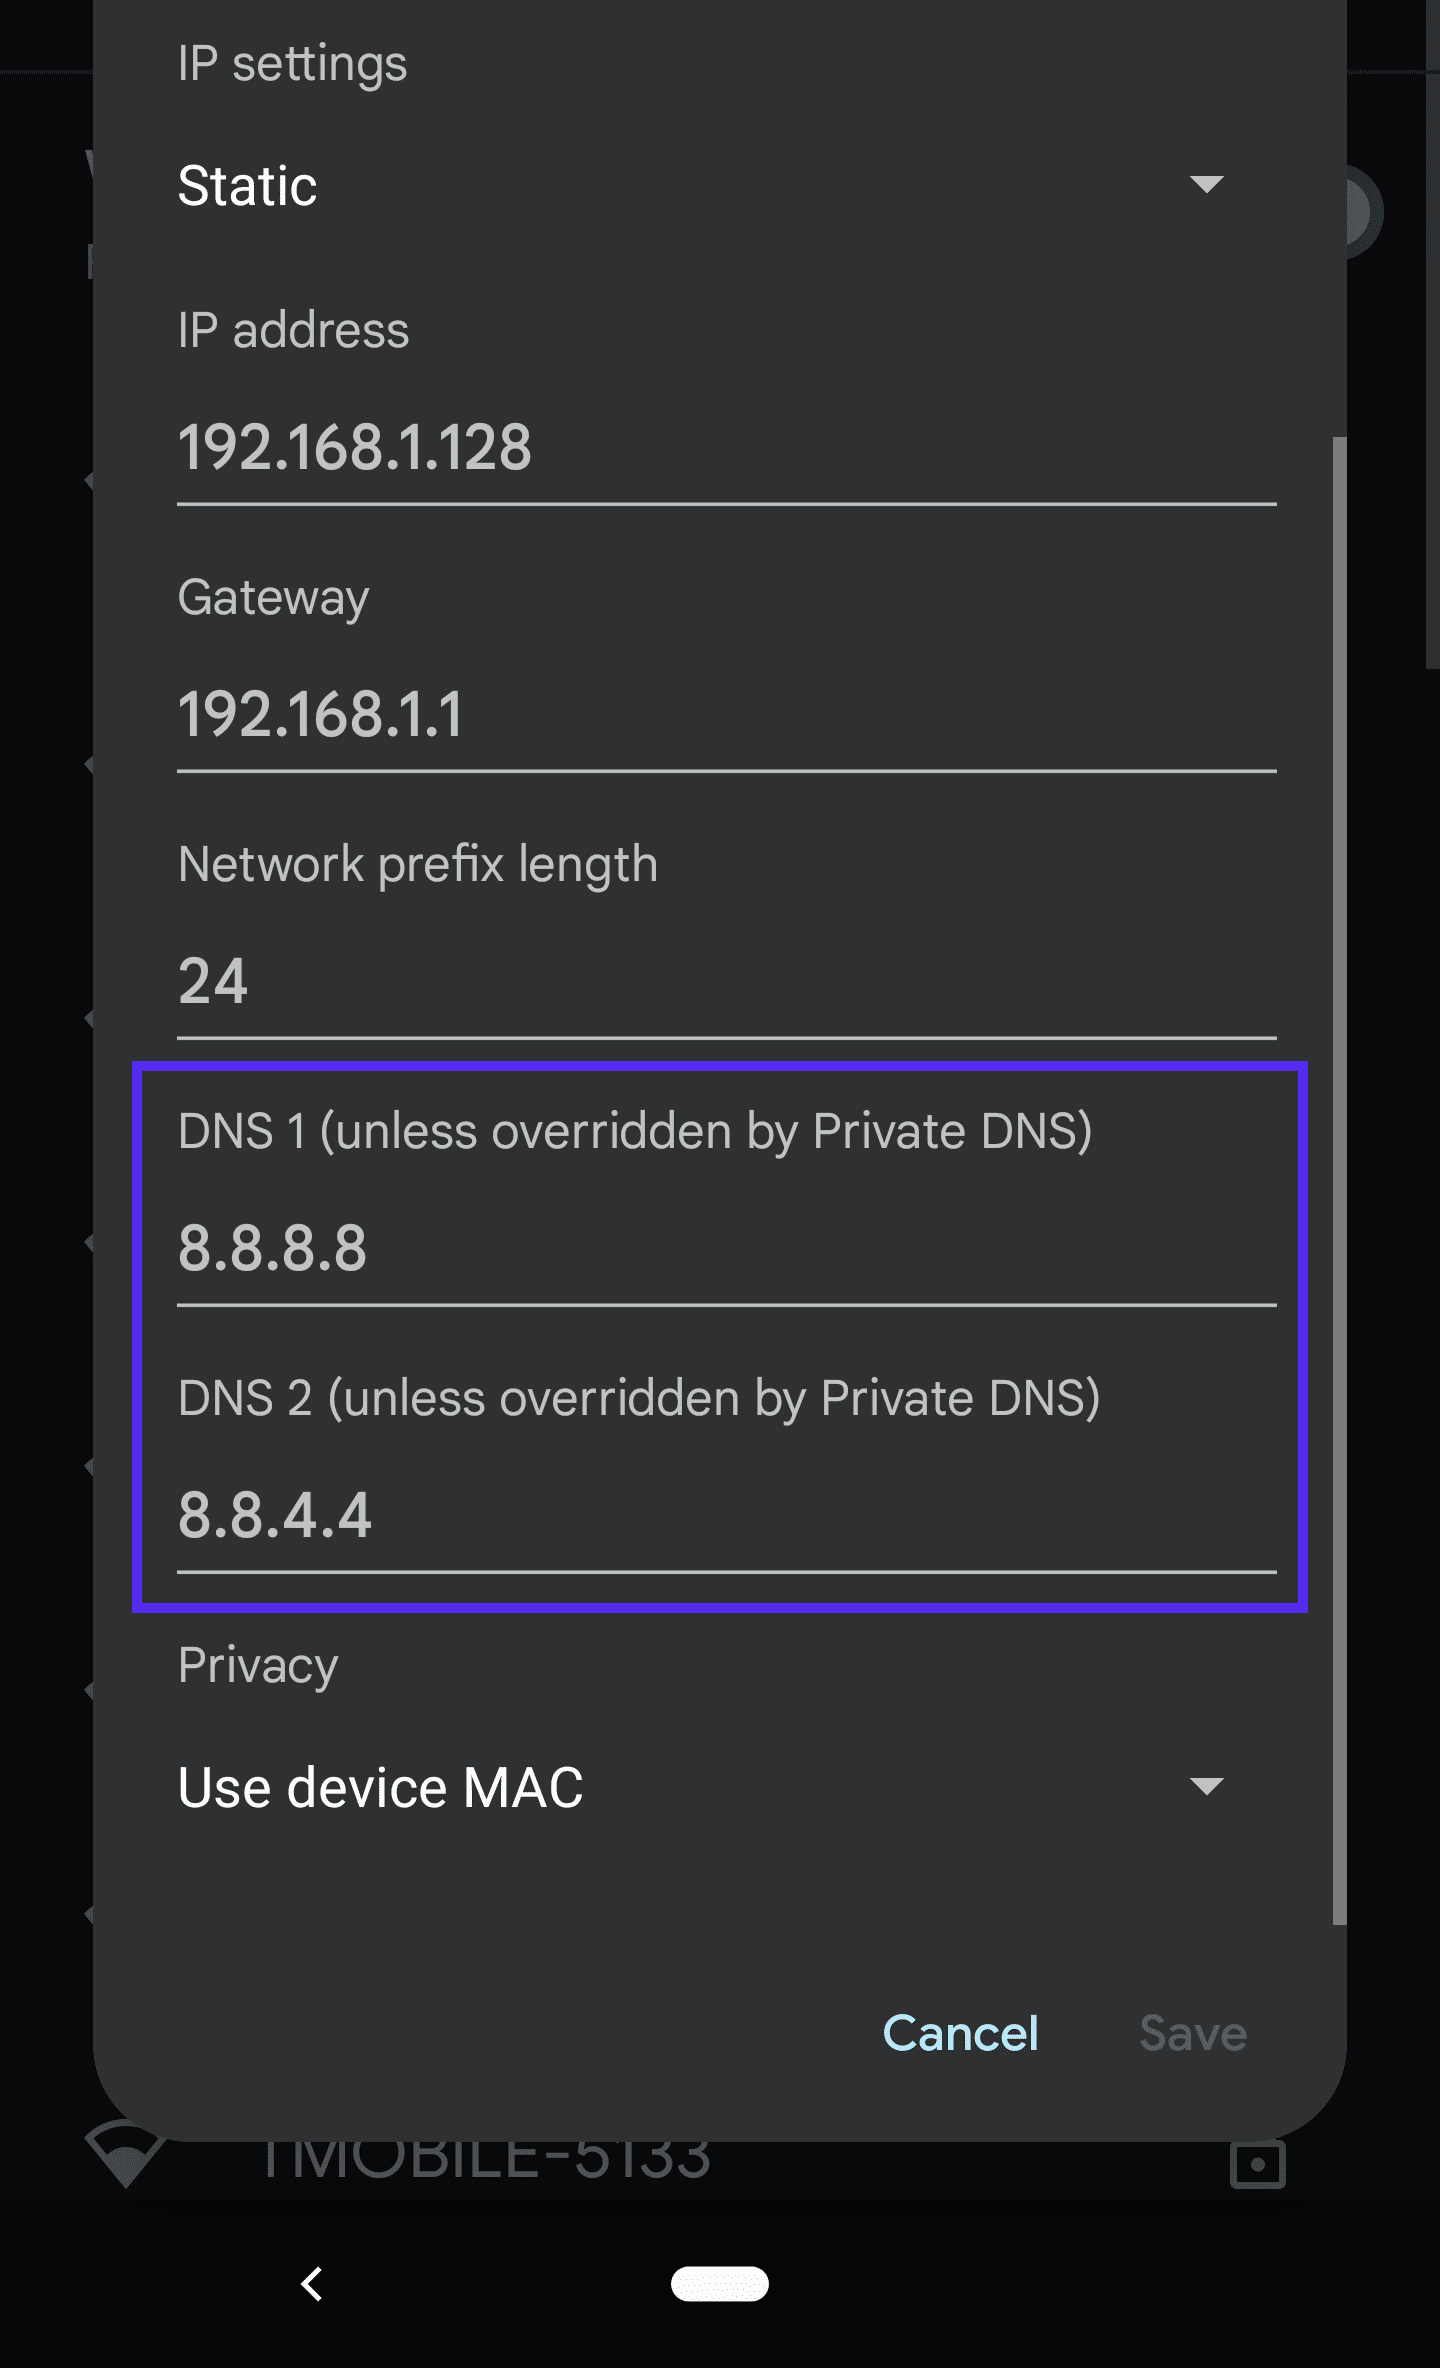
- Under Advanced options, locate the DNS 1 and DNS 2 fields and enter this information:
- DNS 1:
8.8.8.8 - DNS 2:
8.8.4.4
- DNS 1:
- Tap Save.
After saving your new settings, re-open the Chrome app and check to see if the error’s gone.
iPhone/iOS
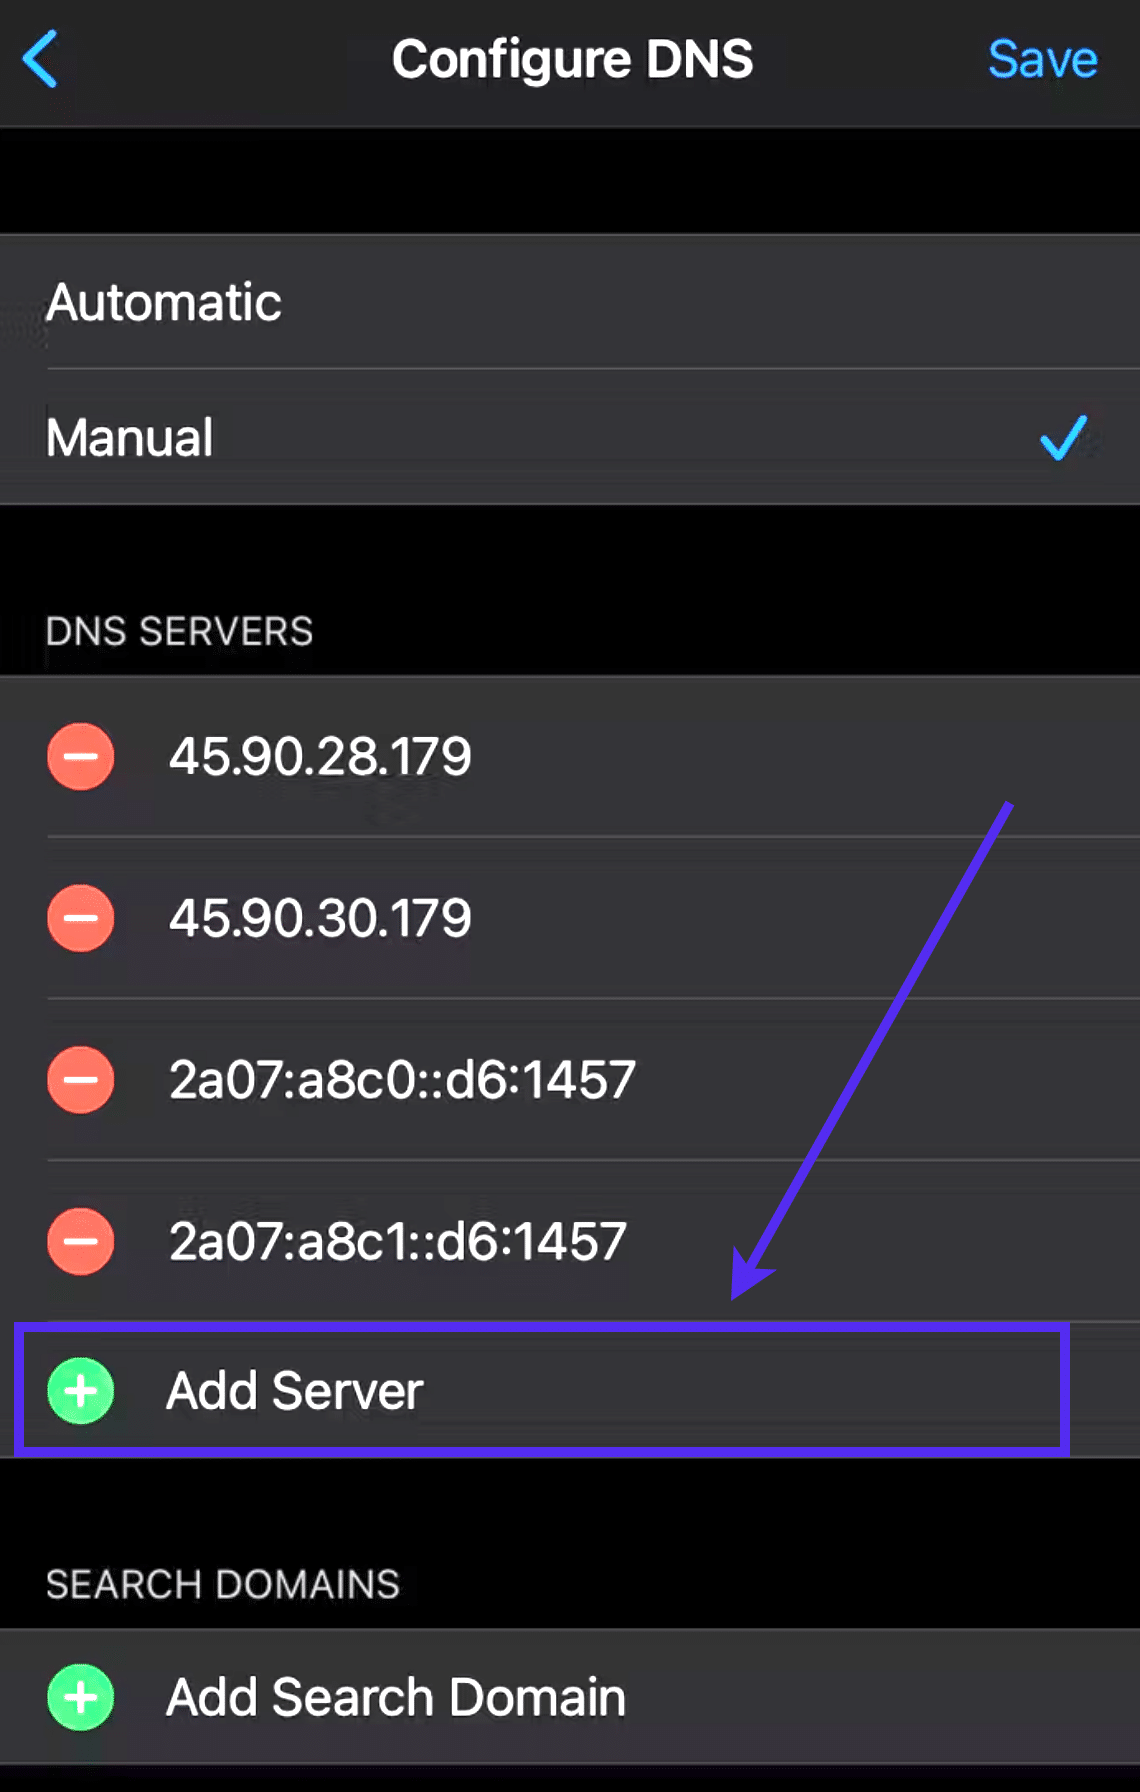
You can change the DNS settings on your iPhone or other iOS device with these steps:
- Navigate to Settings > Wi-Fi.
- Tap on your network in the menu.
- Tap Configure DNS > Manual.
- Remove the current listings under DNS Servers and add the following listings instead:
8.8.8.88.8.4.42001:4860:4860::88882001:4860:4860::8844
Now, restart the Chrome app and check again for the error message.
Summary
Even though it’s frustrating, the DNS_PROBE_FINISHED_NXDOMAIN error is usually pretty easy to get resolved. Between flushing your DNS cache, renewing your IP, and trying different DNS servers, you should hopefully be back up and surfing the web in no time.
Suggested reading: How to Fix the DNS_PROBE_FINISHED_BAD_CONFIG Error Code.
FAQ
What Is DNS_PROBE_FINISHED_NXDOMAIN?
The DNS_PROBE_FINISHED_NXDOMAIN error indicates that the Domain Name System (DNS) failed to resolve the domain name or address. NXDOMAIN stands for Non-Existent Domain.
What Causes DNS_PROBE_FINISHED_NXDOMAIN?
The DNS_PROBE_FINISHED_NXDOMAIN is typically caused by a misconfiguration or problem with your DNS.
How Do You Fix DNS_PROBE_FINISHED_NXDOMAIN?
Here are some recommendations and things to check to fix the error (sorted in order by most common reasons we see):
- Release and Renew IP Address
- Restart DNS Client Service
- Change DNS Servers
- Reset Chrome Flags
- Disable VPN and Antivirus Temporarily
- Check Your Local Hosts File
- Check DNS of Your Domain
- Restart Your Computer
How Do You Fix DNS_PROBE_FINISHED_NXDOMAIN on Mobile?
These are the most common ways to fix this error on your mobile device:
- Restart Your Device
- Check for Chrome App Updates
- Clear Chrome’s Browser and App Data
- Check for System Updates
- Change Your Mobile Device’s Network Settings
Get all your applications, databases and WordPress sites online and under one roof. Our feature-packed, high-performance cloud platform includes:
- Easy setup and management in the MyKinsta dashboard
- 24/7 expert support
- The best Google Cloud Platform hardware and network, powered by Kubernetes for maximum scalability
- An enterprise-level Cloudflare integration for speed and security
- Global audience reach with up to 35 data centers and 275 PoPs worldwide
Test it yourself with $20 off your first month of Application Hosting or Database Hosting. Explore our plans or talk to sales to find your best fit.
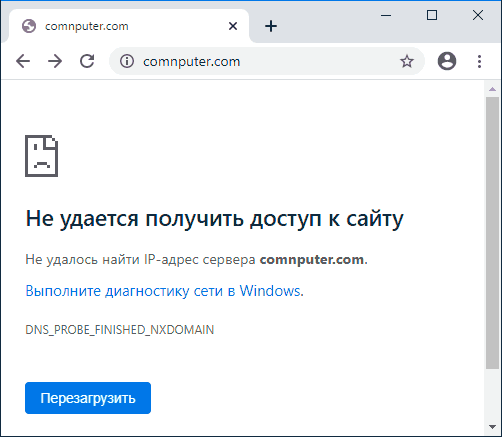
 Распространенная ошибка при открытии сайтов в Google Chrome — сообщение «Не удается получить доступ к сайту. Не удалось найти IP-адрес сервера.» и код ошибки DNS_PROBE_FINISHED_NXDOMAIN.
В этой инструкции подробно о том, что значит DNS PROBE FINISHED NXDOMAIN и как исправить эту ошибку Google Chrome в Windows 10, 8.1 и Windows 7, а также других ОС.
- Что значит эта ошибка
- Как исправить DNS PROBE FINISHED NXDOMAIN
- Дополнительные методы решения
- Видео инструкция
Что означает ошибка
Сам код ошибки при отсутствии иных факторов означает что вы обратились к несуществующему домену, NXDOMAIN — это Non-Existing Domain (несуществующий домен). К сожалению, появление этой ошибки не всегда говорит о том, что дело именно в этой причине.
Как исправить DNS PROBE FINISHED NXDOMAIN
Прежде чем приступать к каким-либо методам исправления, прошу внимательно отнестись к следующим 4-м пунктам:
- Правильно ли введен адрес сайта? Очень простой метод получить ошибку DNS_PROBE_FINISHED_NXDOMAIN — ввести произвольный случайный адрес (но для некоторых систем в этом случае вы увидите иную ошибку: ERR_NAME_NOT_RESOLVED).
- Если не удается получить доступ лишь к одному сайту, причем с разных устройств (даже при других кодах ошибок на некоторых из устройств), причина вероятнее всего в самом сайте, и вы здесь вряд ли сможете что-либо изменить: можно лишь предположить, что всё будет исправлено, а сайт не был закрыт.
- Если об ошибке сообщают все сайты на разных устройствах через один роутер, то, возможно, проблема на стороне провайдера и будет решена со временем. Также попробуйте перезагрузить роутер (выключить питание и включить снова).
- Если это ваш собственный сайт, который вы только что зарегистрировали, либо внесли изменения NS-серверов при смене хостинга, учитывайте, что для изменения записей на DNS серверах занимает время и в течение этого времени (обычно не более нескольких часов) вы можете получать NXDOMAIN-ошибку при попытке открыть сайт.
Если все эти пункты не относятся к вашему случаю, а об ошибке DNS PROBE FINISHED NXDOMAIN сообщают многие сайты или только на одном единственном компьютере или ноутбуке, далее первоочередные способы исправить проблему.
Смена параметров DNS-серверов на компьютере, очистка кэша DNS и проверка службы DNS-клиент
Прежде всего попробуйте изменить параметры DNS-серверов вашего Интернет-подключения:
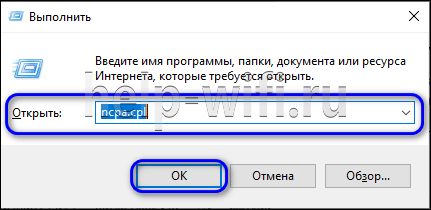
- Нажмите клавиши Win+R на клавиатуре, введите ncpa.cpl и нажмите Enter.
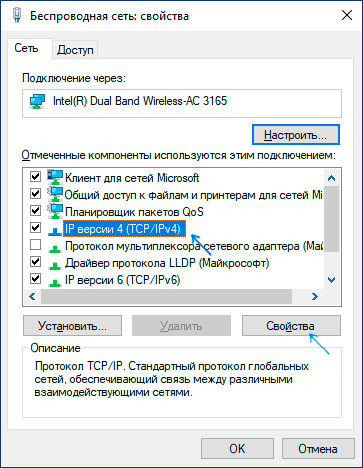
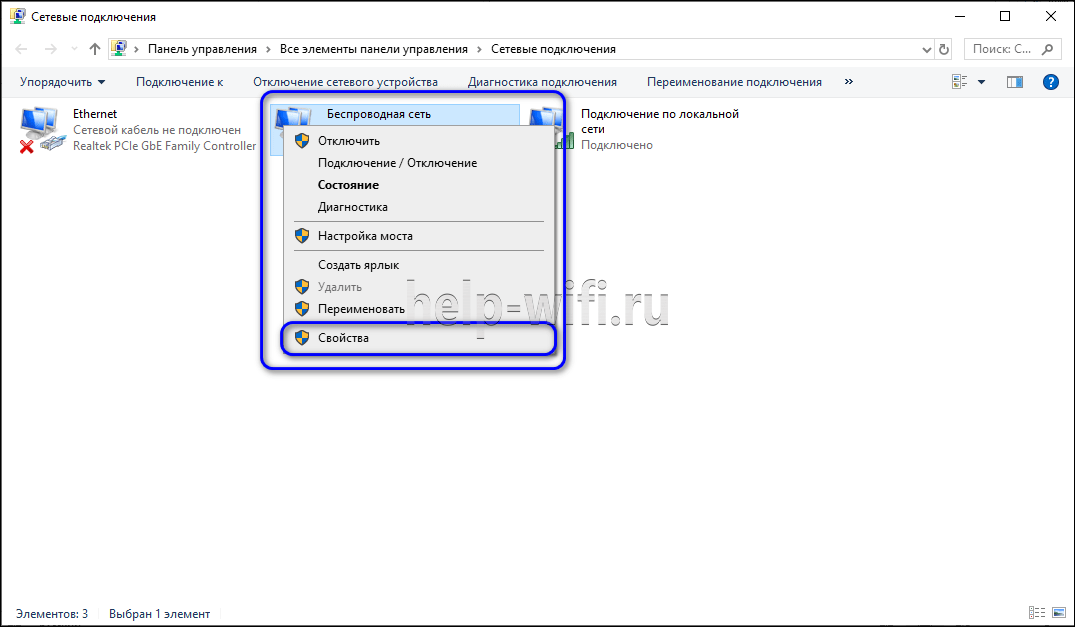
- Откроется список ваших сетевых подключений. Нажмите правой кнопкой мыши по активному Интернет-подключению и выберите пункт «Свойства».
- В списке выберите IP версии 4 (TCP/IPv4) и нажмите кнопку «Свойства».

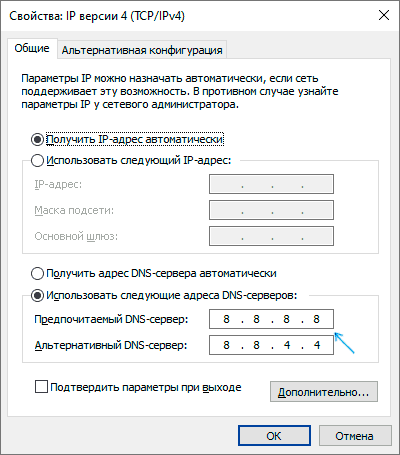
- Установите отметку «Использовать следующие адреса DNS-серверов» и укажите 8.8.8.8 и 8.8.4.4 (безопасные DNS-серверs Google). И нажмите Ок, применив настройки.

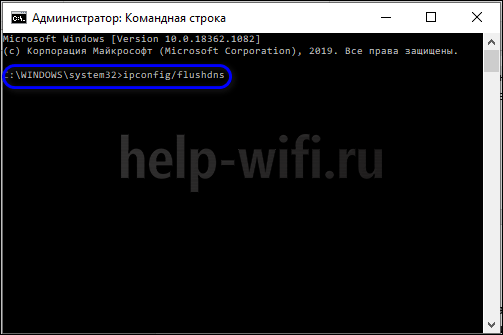
- Запустите командную строку от имени администратора, в ней введите ipconfig /flushdns и нажмите Enter.
- В адресной строке Google Chrome введите chrome://net-internals/#dns и нажмите кнопку «Clear host cache».
Дополнительно, зайдите в список служб Windows (Win+R, ввести services.msc) и проверьте, чтобы служба «DNS-клиент» была запущена, а тип её запуска был установлен в «Автоматически». Если это не так, подробно о включении службы в соответствующем разделе инструкции: Как исправить ошибку DNS_PROBE_FINISHED_NO_INTERNET.
По завершении этих действий проверьте, открывается ли сайт теперь или вновь сообщает об указанной ошибке.
Сброс Winsock и протокола TCP/IP
В ситуации, когда предыдущий метод не помог, попробуйте следующее: запустите командную строку от имени администратора и по порядку введите следующие 3 команды, нажимая Enter после каждой:
ipconfig /release
ipconfig /renew
netsh winsock reset
Если после выполнения этих трех команд и перезапуска Google Chrome ошибка не исчезла, используйте следующую команду:
netsh int ip reset
После неё закройте командную строку и обязательно перезагрузите ваш ПК или ноутбук, а лишь потом проверьте, была ли исправлена ошибка DNS PROBE FINOSHED NXDOMAIN.
Дополнительные методы исправить ошибку
Если предложенные способы не сработали, попробуйте также следующие шаги:
- Если на вашем компьютере установлена Windows 10, выполнить сброс параметров сети встроенными средствами системы.
- Отключите любые VPN, прокси (Как отключить Прокси-сервер), расширения анонимайзеры в Chrome, а также попробуйте отключить сторонние антивирусы и, при наличии, файрволлы. Также проверьте, будет ли появляться ошибка, если временно отключить брандмауэр Windows.
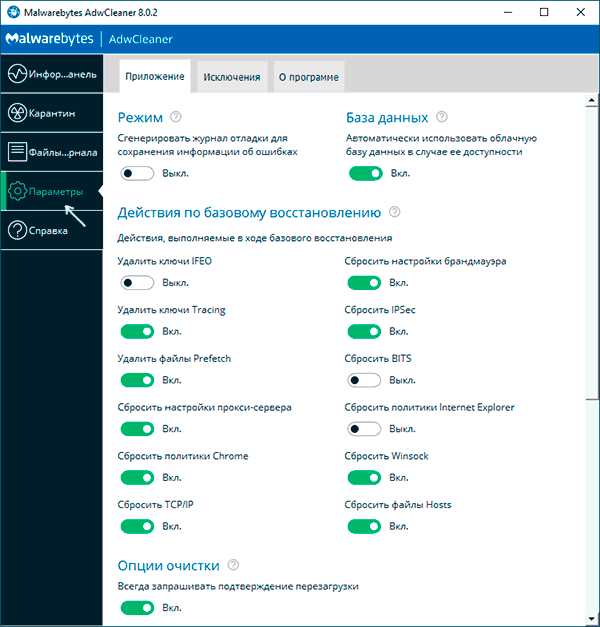
- Попробуйте загрузить AdwCleaner (специальное средство для удаления вредоносных программ) с официального сайта https://ru.malwarebytes.com/adwcleaner/ (если с компьютера не открылось с той же ошибкой, можно скачать на телефон, а потом по кабелю перенести на проблемный компьютер), затем в параметрах программы выставить параметры как на изображении ниже, после чего выполнить сканирование, очистку и перезагрузку компьютера.

- Если на компьютере есть точки восстановления, попробуйте использовать их, чтобы восстановить конфигурацию на дату до появления проблемы. Подробнее: Точки восстановления Windows 10 (подойдет и для предыдущих версий ОС).
- В диспетчере устройств (открыть его можно, нажав клавиши Win+R и введя devmgmt.msc) попробуйте удалить сетевой адаптер, использующийся для Интернет-подключения, а затем в меню выбрать «Действие» — «Обновить конфигурацию оборудования», дождаться повторной установки адаптера и посмотреть, была ли исправлена ошибка.
- Проверьте, не указан ли в настройках Интернет-подключения на Wi-Fi роутере DNS-сервер. Если указан, попробуйте отключить его (включить автоматическое получения адреса DNS-сервера).
Видео инструкция по решению DNS PROBE FINISHED NXDOMAIN в Chrome
Надеюсь, один из способов помог вам исправить DNS_PROBE_FINISHED_NXDOMAIN. Если же нет, еще раз прошу обратить внимание, на пункты из начала статьи, указывающие на то, что проблема может быть не с вашей стороны.
- Как исправить ошибку
В статье мы расскажем, из-за чего появляется «ошибка dns probe finished nxdomain» и как исправить эту ошибку.

Ошибка DNS-сервера
Ваш браузер показывает ошибку «dns probe finished nxdomain»? Что это значит? Чаще всего ошибка возникает на локальном уровне или из-за нарушений в работе DNS-серверов интернет-провайдера. В первом случае скорость решения проблемы зависит от действий пользователя. Во втором случае после исправления ошибки придется подождать обновления DNS-серверов.
Возникновение ошибки может быть связано со следующими причинами:
-
браузер закешировал страницу вашего сайта в момент, когда он был недоступен, и теперь показывает устаревшую информацию;
-
случайный баг в операционной системе;
-
блокировка ресурса антивирусом или брандмауэром;
-
проблемы с сетевым оборудованием: например,с работой Wi-Fi роутера;
-
неверно указаны DNS-серверы для домена;
-
нестабильная работа службы DNS;
-
проблема с DNS-серверами на стороне хостинг-провайдера сайта и др.
«Dns probe finished nxdomain» может встретиться при работе с любым популярным браузером (Google Chrome, Яндекс, Mozilla Firefox и др.), а также на любой версии операционной системы Windows.
Рассмотрим способы, которыми можно устранить ошибку.
Как исправить ошибку
В зависимости от причины нарушения работы DNS-серверов, для устранения «dns error» подойдет один из способов. С первого взгляда определить, в чём кроется причина ошибки сложно, поэтому попробуйте каждый способ:
-
Очистите кеш браузера: перейдите по адресу вашего сайта и нажмите «Ctrl» + «F5». Если этот способ не помог, переходите к следующему.
-
Откройте сайт через другой браузер. Если он по-прежнему недоступен, переходите к способу №3.
-
Перезагрузите компьютер и вновь зайдите на нужный ресурс. Если ошибка не устранилась, перейдите к следующему способу.
-
Перезагрузите Wi-Fi маршрутизатор: отключите его от питания на несколько минут и снова подключите обратно. Если сайт не работает, переходите к следующему способу.
-
Отключите антивирус и брандмауэр, если у вас ОС Windows. Если это помогло решить проблему, добавьте браузер в исключения антивируса и брандмауэра, и проблема не повторится. Если нет, попробуйте следующий способ.
-
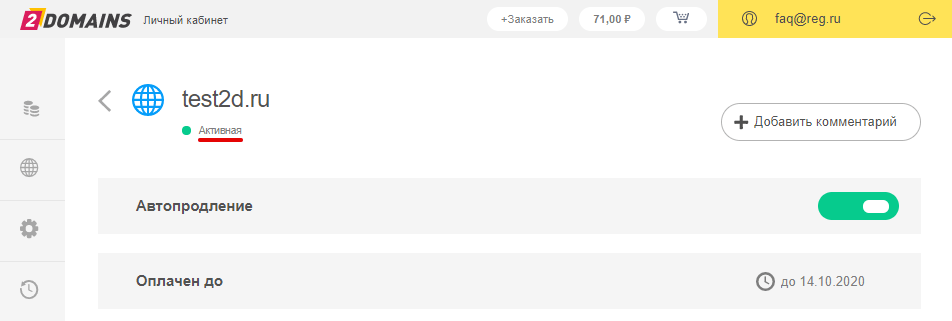
Проверьте активность вашего домена. Для этого в Личном кабинете найдите ваш домен. Если домен активен, перейдите к следующему способу.
-
Проверьте доступность сайта через сайт cameleo: укажите адрес вашего сайта и кликните GO. Если система покажет, что сайт доступен, значит проблема возникла на стороне интернет-провайдера. В этом случае дождитесь обновления DNS-серверов провайдера. Обычно DNS обновляются один раз в сутки, проверьте доступность сайта через 24 часа с обнаружения проблемы.
Проверить доступность помогает не только один сайт cameleo.xyz, но и сервис бесплатной проверки доступности сайта из различных частей мира. Если сайт недоступен и через этот ресурс, переходите к шагу №8.
-
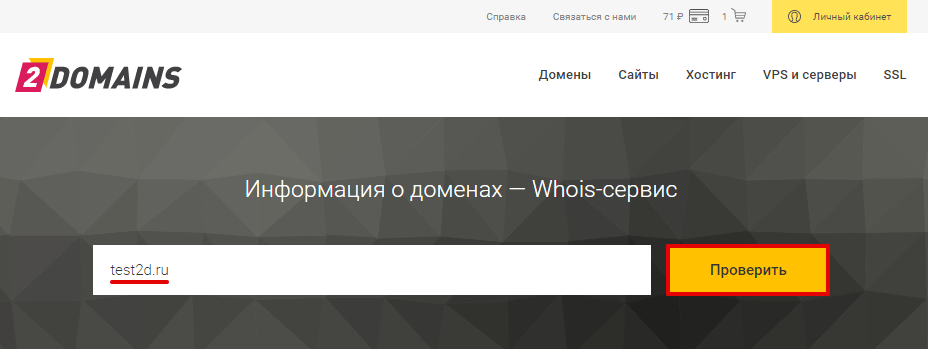
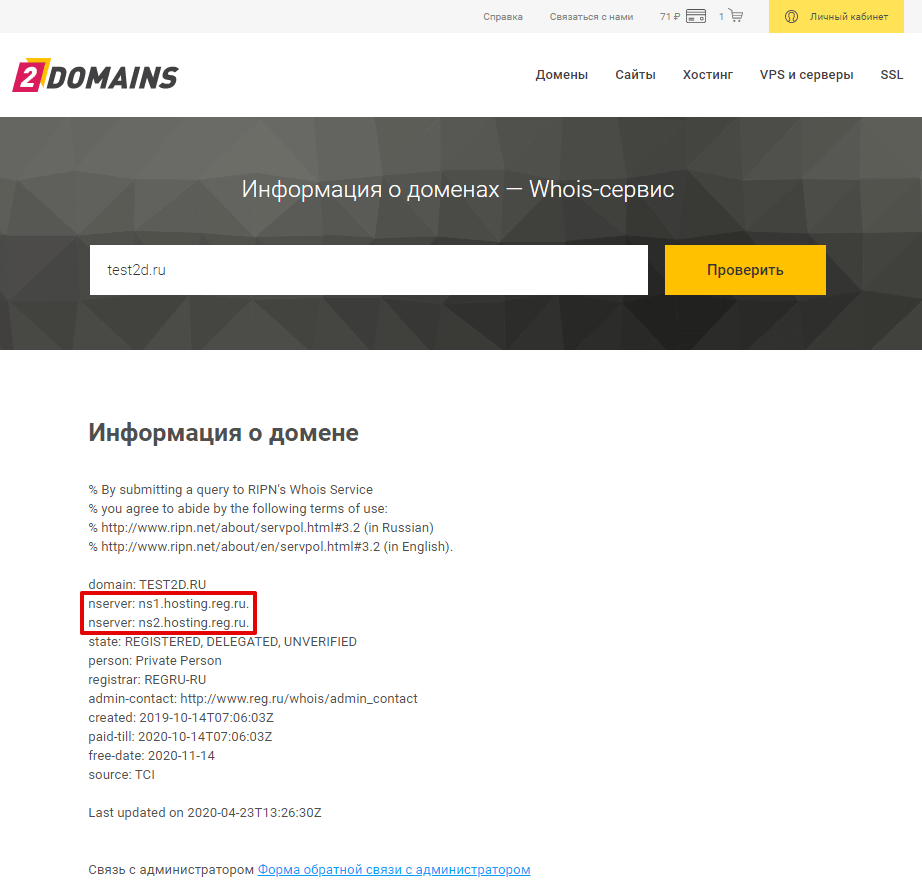
Проверьте, какие DNS-серверы прописаны для домена. Для этого:
-
Перейдите на страницу сервиса Whois. Затем введите имя вашего домена и нажмите Проверить:
-
Пара DNS-серверов домена указана в строках «nserver»:
Если для домена прописаны некорректные DNS, выберите один из двух способов:
-
Измените их по инструкции Как указать (изменить) DNS-серверы для домена. DNS-серверы обновятся в течение 24 часов.
-
Если вам нужно, чтобы сайт начал работать как можно быстрее, настройте DNS-серверы компании Google: 8.8.8.8 и 8.8.4.4. DNS обновятся в течение 3-4 часов.
Если у вас операционная система Windows, это можно сделать через параметры подключения TCP/IP по инструкции.
Готово. Когда DNS-серверы хостинг-провайдера обновятся, сайт должен отображаться корректно.
Если вы попробовали все способы, но сайт не заработал — вам поможет служба поддержки 2domains.
-
Помощь -
Хостинг -
Сайт не работает -
Ошибка DNS PROBE FINISHED NXDOMAIN
Ошибка «DNS PROBE FINISHED NXDOMAIN» связана с работой DNS-сервера вашего интернет-провайдера. Возможно, служба DNS работает нестабильно, некорректно указаны адреса DNS-серверов или возникла проблема с сетевым оборудованием на физическом уровне.
Устранение ошибки
Для устранения ошибки следуйте инструкции ниже:
-
1.
Очистите кеш браузера. Браузер мог закешировать страницу вашего сайта в момент, когда он был недоступен, и показывает устаревшую информацию. Для этого перейдите по адресу вашего сайта и нажмите «Ctrl» + «F5».
Если очистка кеша не помогла, перейдите к следующему шагу. -
2.
Проверьте, активен ли ваш домен в Личном кабинете:
Зеленый значок означает, что домен активен.
Если домен активен, но сайт недоступен, перейдите к следующему шагу.
-
3.
Проверьте доступность вашего сайта через сайт croxyproxy. Введите имя сайта и нажмите GO. Если сайт доступен, значит проблема возникла на стороне интернет-провайдера. Подождите, пока обновятся DNS-серверы провайдера. Обычно это происходит раз в 24 часа. DNS-серверы интернет-провайдеров обновляются с разной периодичностью. То есть с одного интернет-провайдера ваш сайт может открываться, а с другого — быть недоступен.
Также рекомендуем проверять доступность сайта с разных точек мира при помощи сервиса Бесплатная проверка доступности сайта из различных частей мира.
Важно: Чтобы проверить IDN-домен (например: ваш-сайт.рф), переведите его в Punycode (в формат XN—-7SBBF2B7BJ7B.XN—P1AI) и только затем вводите в строку на сайте croxyproxy.
-
4.
Если ваш сайт недоступен через сайт croxyproxy, проверьте, корректные ли DNS указаны для домена. Узнать, какие DNS прописаны для домена можно по инструкции: Как узнать, какие DNS-серверы прописаны для домена? Узнать, какие DNS-серверы следует использовать в REG.RU, можно по инструкции: Какие DNS-серверы прописать для домена?
Если для домена прописаны некорректные DNS, измените их по инструкции: Как прописать DNS для домена в личном кабинете REG.RU?
-
5.
Если вы не хотите ждать, рекомендуем прописать DNS-серверы компании Google в настройках сетевого подключения. Для этого на 6 шаге инструкции поставьте галочку Использовать следующие адреса DNS-серверов и пропишите два DNS-сервера: 8.8.8.8 и 8.8.4.4.
Для быстрой проверки доступности сайта укажите DNS-серверы компании Google, обычно они обновляются быстрее других (3-4 часа).
После этого очистите кеш браузера.
Готово, после обновления DNS-серверов сайт должен отображаться корректно.
Спасибо за оценку!
Как мы можем улучшить статью?
Нужна помощь?
Напишите в службу поддержки!
DNS_PROBE_FINISHED_NXDOMAIN — код уведомления о несуществующем доменном имени и, соответственно, о недоступности веб-страницы в браузере Google Chrome. Подобная ошибка возникает в любом другом браузере.
Причины появления и способы устранения
Ваш домен не делегирован
Проверить, делегирован домен или нет, вы можете с помощью Whois-сервиса.
Если DNS-серверы указаны корректно, необходимо убедиться, что в зоне домена на стороне хостинг-провайдера внесены А-записи.
Если вы используете хостинг нашей компании, домен должен быть делегирован на DNS-серверы:
ns3.nic.ru
ns4.nic.ru
ns8.nic.ru
Необходимые ресурсные записи при этом формируются автоматически, никаких дополнительных действий не требуется.
Если вы используете DNS-хостинг RU-CENTER, управление ресурсными записями производится в специальном редакторе.
Опечатка в доменном имени или домен не зарегистрирован
Возможно при указании доменного имени была допущена ошибка. Проверьте, зарегистрирован ли домен, с помощью сервиса Whois.
Обрыв связи
Если не открывается ни один сайт, проверьте подсоединение кабелей к компьютеру. Перезагрузите маршрутизатор — отключением питания или через панель управления роутером — и компьютер.
Ошибка в работе DNS-сервера провайдера
Замените прописанные в настройках сетевого подключения адреса серверов провайдера на адреса Google:
- В Windows 7 и 8.1: выберите подключение, откройте раздел «Свойства», перейдите на вкладку «Сеть», найдите среди отмеченных компонентов IP версии 4 или 6, нажмите на кнопку «Свойства» и введите адреса предпочитаемого и альтернативного серверов — 8.8.8.8 и 8.8.4.4 соответственно. Сохраните настройки, зайдите в браузер и очистите кэш комбинацией клавиш «Ctrl» + «F5».
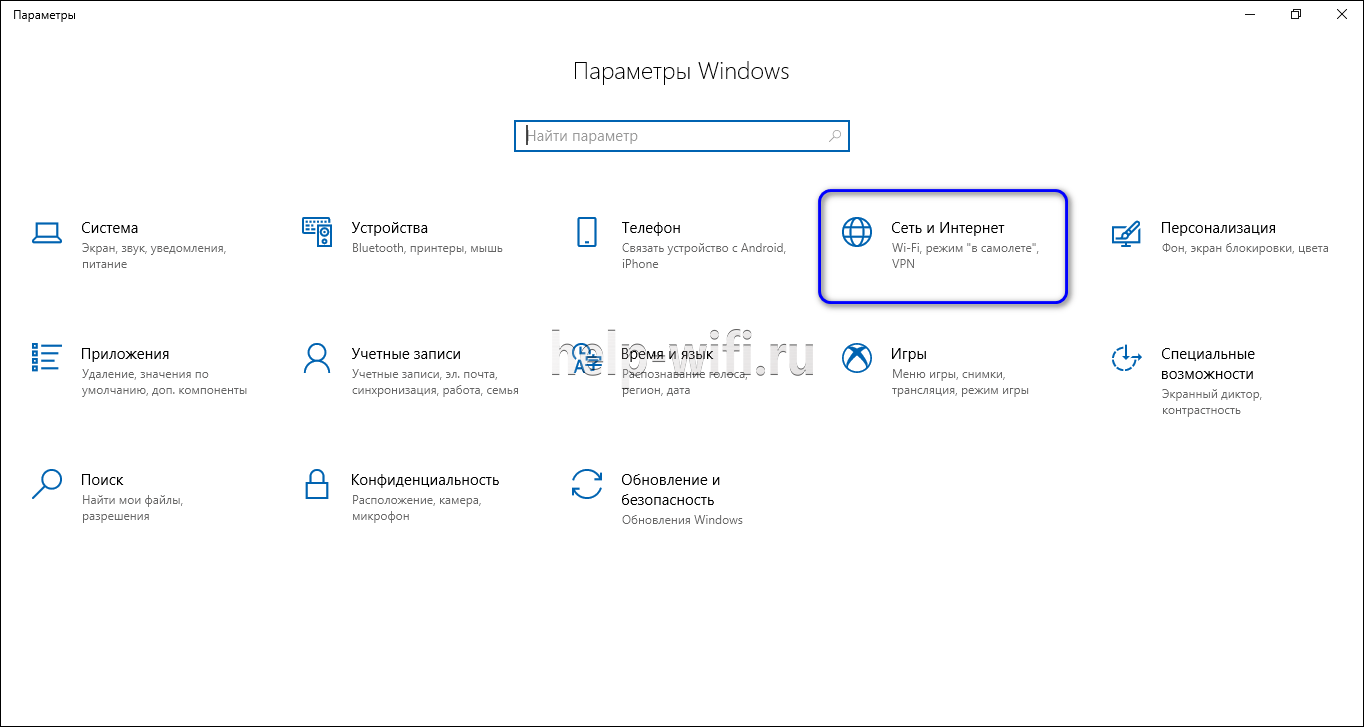
- В Windows 10: перейдите в раздел Пуск → Параметры → Сеть и Интернет, выберите сеть, в «Свойствах» откройте «Назначение IP», нажмите «Изменить» и задайте параметры вручную.
- В MacOS: зайдите в Apple → Системные настройки → Сеть, выберите подключение, нажмите кнопку «Дополнительно», перейдите на вкладку «DNS» и добавьте адреса серверов.
Альтернативный вариант — подождать обновления кэша DNS-сервера провайдера.
Установлены неверные параметры IP-адреса
Обновите IP-адрес и очистите кэш DNS:
- В Windows: запустите командную строку (Пуск → Выполнить → cmd.exe). Наберите одну за другой команды ipconfig /release, ipconfig /flushdns и ipconfig/renew, после введения каждой из них нажимая клавишу Enter.
- В MacOS: см. п. 3 предыдущего раздела. Откройте вкладку «TCP/IP» и нажмите на кнопку «Обновить DHCP». Зайдите в раздел Finder → Программы → Утилиты, запустите приложение «Терминал.app» и введите команду dscacheutil -flushcache.
Выключение или сбой службы DNS-клиента Windows
Откройте консоль управления службами через командную строку (Выполнить → services.msc) или через пункт «Администрирование» на панели управления. Найдите службу «DNS-клиент» и дважды кликните по ней мышкой. В открывшемся окне в поле «Тип запуска» установите значение «Автоматически».
Блокировка соединения приложением
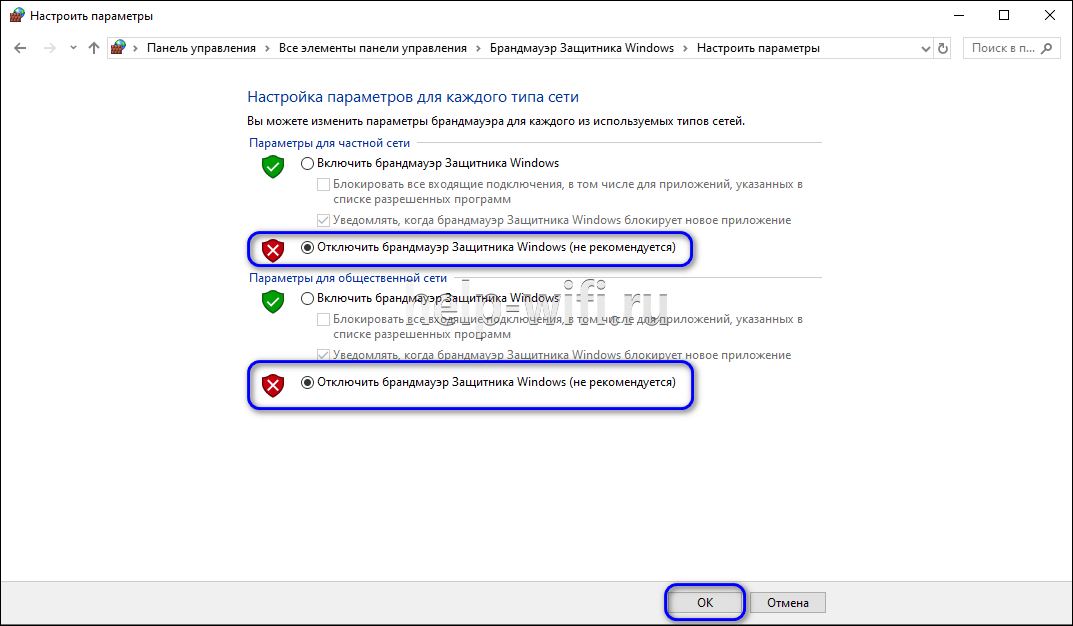
Отключите брандмауэр. Если ошибка исчезла, зайдите в панель управления → «Брандмауэр Windows» → «Разрешение взаимодействия с приложением или компонентом в брандмауэре Windows». В столбцах «Частная» и «Публичная» напротив браузера установите «галочки» и нажмите «ОК».
Сбой экспериментальных функций Chrome
Наберите в адресной строке chrome://flags и восстановите на открывшейся странице настройки по умолчанию.
Неверная привязка IP-адреса к домену в файле с базой данных доменных имён
Отредактируйте файл. Чтобы сделать это:
- В Windows: запустите текстовый редактор от имени администратора и откройте находящийся на системном диске в папке WindowsSystem32driversetc файл hosts. Убедитесь, что запрашиваемая веб-страница там не значится. В противном случае сотрите строку.
- В MacOS: запустите «Терминал.app». Введите команду sudo nano /private/etc/hosts и пароль. Проверьте файл.
Сбой драйвера сетевого адаптера
Переустановите драйвер.
На чтение 8 мин Просмотров 11.6к.

Юрий Санаев
Системный администратор. Менеджер по продажам компьютеров и wi-fi оборудования. Опыт работы – 10 лет. Знает о «железе» и софте все и даже больше.
Задать вопрос
Время от времени при попытке посетить какой-либо сайт пользователи встречаются с ошибкой «DNS_PROBE_FINISHED_NXDOMAIN». Помимо нее, на экране отображается сообщение «Не удалось получить доступ к сайту. Не удалось найти IP-адрес сервера». Такая проблема характерна для любого браузера и для всех версий ОС Windows (Windows 7, Windows 10 и др.). Чтобы ее устранить, нужно знать, почему она проявляется и какие варианты ее решения существуют.
Содержание
- Что это значит
- Как исправить ошибку
- Изменить адреса DNS сервера
- Перезагрузить ПК
- Перезапустить роутер
- Поменять браузер
- Сбросить настройки сети
- Отключить антивирус и брандмауэр
- Проверить службу «DNS-клиент»
- Проблема на стороне сайта
Что это значит
NXDOMAIN — это Non-Existing Domain, то есть несуществующий домен. Ошибка означает, что вы подключились к сайту, которого (якобы) нет в природе.

Если на экране ПК ошибка «DNS_PROBE_FINISHED_NXDOMAIN», обычно это случается по одной из следующих причин:
- временная остановка работы службы «DNS сервер»;
- ошибочные настройки сети;
- кэш DNS переполнен;
- неверные настройки в обозревателе препятствуют переводу пользователя на выбранный ресурс или выходу в Сеть в целом;
- антивирусное ПО или брандмауэр ограничивают доступ к нужному сайту или запрещают интернет-подключение полностью;
- перебои в работе маршрутизатора;
- нет подключения к Сети из-за ошибки, случившейся в самой ОС Windows;
- программы, действующие на компьютере, препятствуют доступу к интересующим сайтам или выходу в Интернет в целом.
Чтобы устранить неисправность, нужно поочередно рассмотреть все причины ошибки DNS_PROBE_FINISHED_NXDOMAIN», начиная от простейшей.
Как исправить ошибку
Исправить ошибку можно различными действиями: заменой адреса DNS сервера, перезагрузкой ПК и маршрутизатора, настройкой параметров веб-обозревателя или заменой на другую программу, сбросом настроек сети, отключением антивирусного ПО и брандмауэра.
Изменить адреса DNS сервера
Чтобы исправить ошибку «DNS_PROBE_FINISHED_NXDOMAIN», нужно сменить действующие адреса DNS-серверов на защищенные.
Инструкция:
- Нажать «WIN» + «R», в окне «Выполнить» ввести ncpa.cpl и кликнуть «ОК».
- Появится перечень подключений к Сети. Правой кнопкой мыши вызвать «Свойства» активного.
- В перечне компонентов навести курсор на «IP версии 4 (TCP/IPv4)», а затем нажать на кнопку «Свойства».

- Кликнуть напротив «Использовать следующие адреса DNS-серверов», ввести 8.8.8.8 и 8.8.4.4, подтвердить действие кнопкой «ОК».

Далее следует запустить командную строку, в обязательном порядке от имени администратора. На разных версиях ОС эти действия выполняются различным образом.
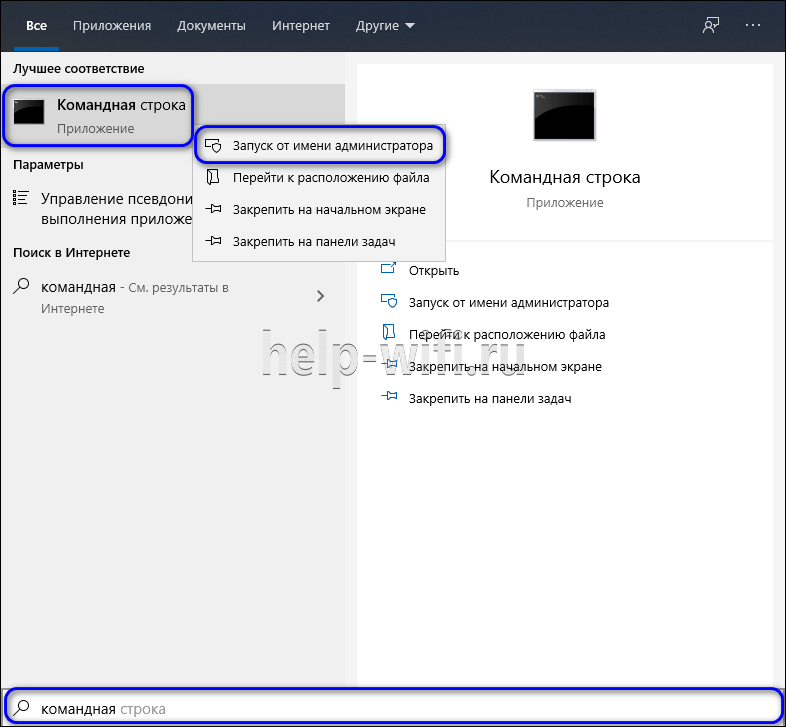
На Windows 10 через поиск найти «Командную строку». Правой кнопкой мыши вызвать ее контекстное меню и в перечне действий нажать «Запуск от имени администратора».
На Windows 8 и 10 нужно воспользоваться контекстным меню кнопки «Пуск» или нажать «WIN» + «X». В появившемся списке кликнуть «Командная строка (администратор)».

На Windows 7 нужно открыть «Пуск», далее «Все программы». Среди «Стандартных» найти «Командную строку», вызвать контекстное меню и нажать «Запуск от имени администратора».

В открывшейся строке нужно ввести «ipconfig/flushdns» и кликнуть «Enter».
Запустить браузер, в строке ввода адреса набрать «net-internals/#dns», нажать «Enter» и кликнуть «Clear host cashe».

Завершив все шаги, нужно запустить сайт повторно и убедиться, что он работает. Если результатов нет, следует приступать к дальнейшим шагам.
Перезагрузить ПК
Если ошибка вызвана случаем сбоем в операционной системе, то устранить ее можно перезагрузкой компьютера или ноутбука. Когда устройство снова запустится, нужно запустить браузер и повторно загрузить сайт. Если проблема не устранена, нужно переходить к следующему шагу.
Перезапустить роутер
Сбои в работе роутера – еще одна возможная причина проявления ошибки «DNS_PROBE_FINISHED_NXDOMAIN». Нужно отключить маршрутизатор от электросети на несколько минут, а затем повторно включить его и подождать, пока он не начнет работу. После этого нужно проверить, работает ли сайт, с которым возникли проблемы.
Поменять браузер
Если предыдущие шаги не устранили ошибку, то нужно искать проблему в используемом веб-обозревателе. Следует запустить любую другую программу для серфинга в сети – Chrome, Opera, Яндекс Браузер и т.д. – и посмотреть, открывается ли сайт.
Если код «DNS_PROBE_FINISHED_NXDOMAIN» не проявился, следует в настройках браузера посмотреть, не внесены ли в его параметры какие-либо изменения, препятствующие загрузке сайта. Также можно сбросить программу до заводских установок или удалить, а затем установить заново.
Сбросить настройки сети
На Windows 10 устранить проблему можно, выполнив сброс настроек сети с помощью встроенных возможностей системы.
Инструкция:
- Нажать «WIN» + «I», чтобы вызвать окно «Параметры Windows».
- Перейти в раздел «Сеть и Интернет».
- Нажать «Состояние».
- Прокрутить страницу вниз и нажать «Сброс сети».

- Кликнуть «Сбросить сейчас».

После нажатия на кнопку нужно подтвердить сброс сетевых параметров. Компьютер перезагрузится, после чего Windows спросит, должно ли устройство обнаруживаться в сети. Сброс завершен.
В ходе этой процедуры будут отключены, а затем заново установлены все сетевые адаптеры. Если ранее у пользователя были сложности с инсталляцией драйверов для сетевой карты или Wi-Fi модуля, скорее всего, они проявятся снова.
Отключить антивирус и брандмауэр
Еще одна причина отображения кода «DNS_PROBE_FINISHED_NXDOMAIN» — в работе антивируса или брандмауэра. Нужно выключить их.
Чтобы остановить работу антивирусного ПО, нужно кликнуть по его иконке в трее и выбрать «Остановить», «Отключить» или подобную команду, в зависимости от разработчика программы.
Чтобы завершить работу брандмауэра Windows, следует в поиске набрать название службы и выбрать ее в результатах.
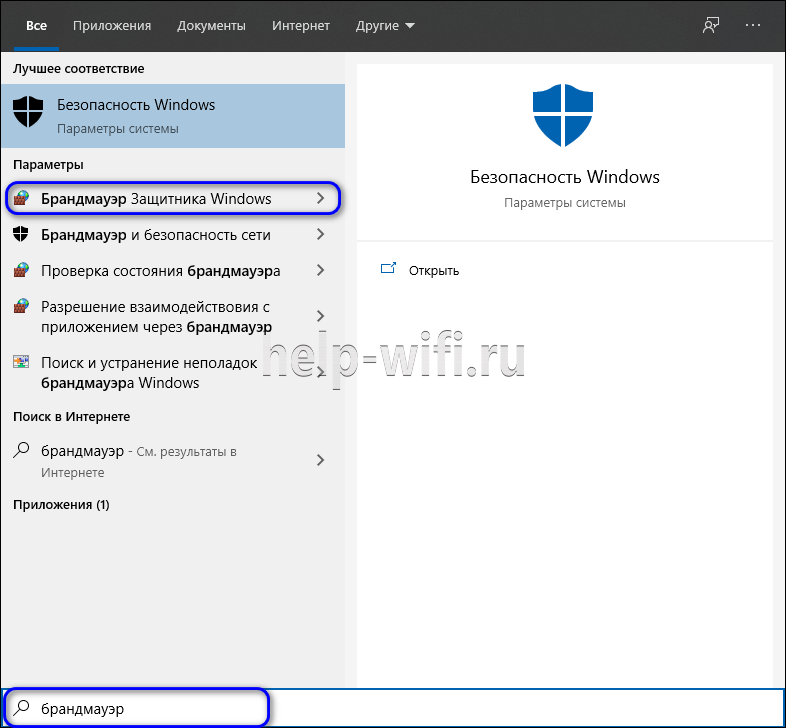
Кликнуть на «Включение и отключение брандмауэра».
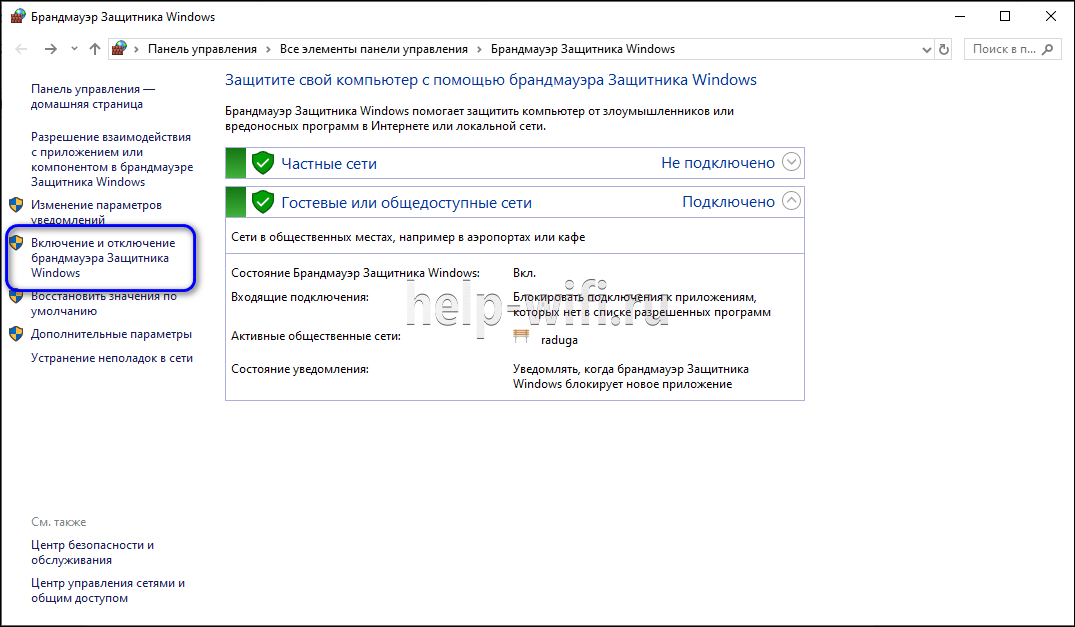
Выбрать «Отключить брандмауэр» для всех сетей, кликнуть «ОК».
Теперь следует проверить работу сайта. Если он запускается, браузер должен быть добавлен в исключения антивирусной программы или брандмауэра.
Инструкция для брандмауэра:
- Открыть «Брандмауэр Защитника Windows», как описано выше.
- Нажать «Разрешение взаимодействия с приложением или компонентом…».

- Найти браузер в списке программ и компонентов и поставить три метки в колонках «Название», «Частная», «Публичная».


После сохранения изменений нужно проверить работу сайта.
В антивирусном ПО также нужно найти встроенный брандмауэр и добавить обозреватель в его исключения.
Проверить службу «DNS-клиент»
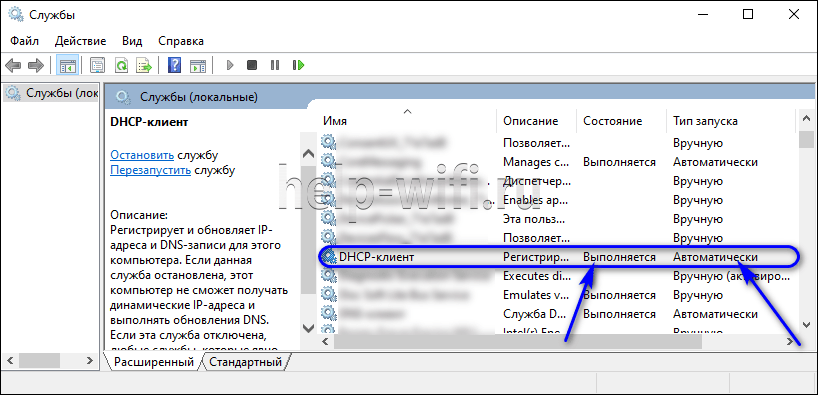
Эта проблема – редкая, но проверить ее все-таки требуется. Комбинацией «Win» + «R» нужно вызвать строку «Выполнить» и командой «services.msc» открыть список служб Windows.
Здесь нужно убедиться, что функция «DNS-клиент» функционирует и запускается в автоматическом режиме.
Если настройки иные, нужно кликнуть на службу, вызвать контекстное меню и перейти в «Свойства».
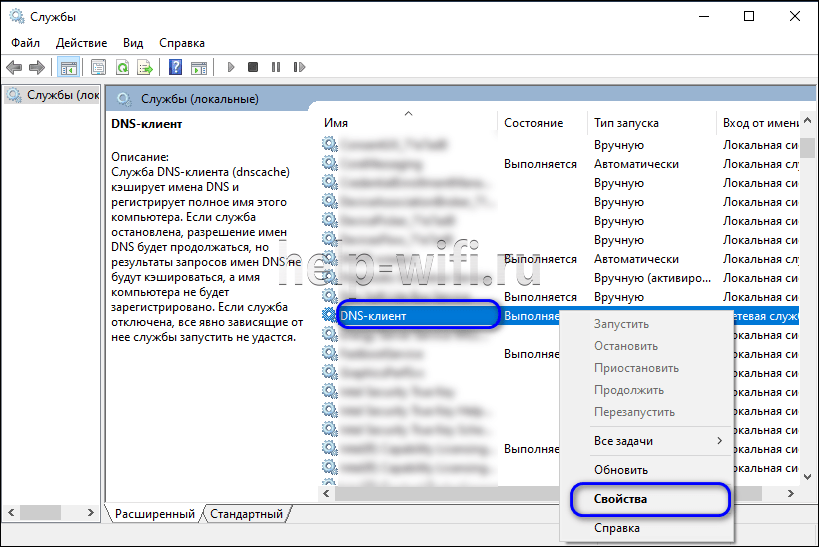
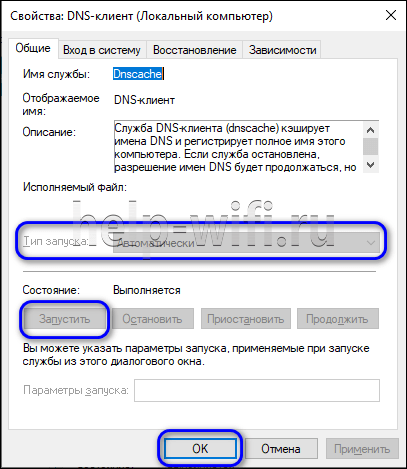
Далее установить «Автоматический тип запуска», нажать «Запустить», затем «ОК».
Проблема на стороне сайта
Если код «DNS_PROBE_FINISHED_NXDOMAIN» отображается при открытии одного сайта, причем на разных ПК или смартфонах и, возможно, с различными кодами ошибки, в то время, как другие веб-ресурсы работают корректно, это говорит о проблеме именно в работе этого ресурса. Скорее всего, на нем просто проводятся какие-то работы или же произошел сбой. Либо ресурс закрыт.
Ошибка может проявиться при неправильном вводе адреса сайта. Такое случается очень редко, но все-таки проверить это предположение нужно.
Если пользователь не сможет зайти на свой личный сайт, который он только что создал или внес изменения NS-серверов при замене хостинга, нужно учесть, что записи на DNS-серверах меняются через определенное время, чаще всего – через несколько часов. На протяжении этого срока может проявляться ошибка «DNS_PROBE_FINISHED_NXDOMAIN» при попытке входа на сайт.
Ошибка «DNS_PROBE_FINISHED_NXDOMAIN» время от времени проявляется у многих пользователей, независимо от версии Windows или используемого браузера. Зная, как ее устранить, пользователь легко с ней справится.
Часто неисправность решается перезагрузкой маршрутизатора или компьютера, сбросом ошибок браузера или его переустановкой, а также добавлением веб-обозревателя в настройки антивирусного ПО или брандмауэра.
Реже приходится сбрасывать параметры сети, изменять адреса серверов DNS или проверять функционирование DNS-клиента. Иногда проблема случается на открываемом сайте – тогда нужно лишь дождаться восстановления его работоспособности.
Читайте по ссылке о том, как справиться с другой ошибкой — «DNS probe finished no internet».
DNS_PROBE_FINISHED_NXDOMAIN error in Google Chrome browser can be frustrating and confusing for many users. This error usually appears when a user tries to access a website but the DNS server cannot resolve the domain name.
The browser error can be caused by several reasons such as an incorrectly entered domain name, a website server crash, or when the DNS server is unable to resolve the domain name. This article provides a few simple steps to help users fix this error and return to web browsing.
What does the DNS_PROBE_FINISHED_NXDOMAIN error code mean?
The DNS_PROBE_FINISHED_NXDOMAIN error in Google Chrome indicates that the domain name cannot be found on the DNS server. This error usually appears when you are trying to access a website but the DNS server cannot resolve the domain name.

A DNS (Domain Name System) server is a server that translates human-readable domain names (such as example.com) into machine-readable IP addresses (such as 192.0.2.1). This allows users to access web servers and other Internet resources by entering easy-to-remember domain names instead of hard-to-remember IP addresses.
Some causes of this error are beyond your control, but in some cases, you can fix the problem yourself. Here’s what you can do to troubleshoot systematically.
1. Reset your internet connection
Try disconnecting and reconnecting your router or modem to restart your Internet connection. Here are the steps to follow:

- Find your router or modem and unplug it.
- Wait a few minutes, then reconnect your router or modem.
- Wait while the router or modem reboots and establishes an Internet connection.
- Finally, try visiting the website again to see if the DNS_PROBE_FINISHED_NXDOMAIN error is resolved.
If you’re using a Wi-Fi connection, try switching to a wired connection to see if that makes a difference, or vice versa. If a particular adapter is causing this issue, you may need to perform a «Netsh Winsock Reset» or one of the other common network adapter troubleshooting tips.
2. Check your Localhosts file
You may have used a local hosts file to specify which IP addresses certain websites should use. Chrome will always use the IP settings specified in the localhosts file, so if they are incorrect or out of date, it may throw an error. See What is Localhost and how do I use it? For more information on how to check a file for errors, see
3. Disable VPN, Antivirus or Firewall (or change them)
If you have an active firewall (and you should!), disable it temporarily to see if it’s the culprit. Check its settings to see if it blocks certain websites or domains. The same goes for antivirus software, which can interfere with some websites. If your antivirus is blocking a particular site, make sure that the site is safe and that you are entering the correct URL.
You can also try changing your VPN location if you are using a VPN. Alternatively, turn off the VPN completely.

When you use a VPN, your internet traffic is routed through the VPN server before it reaches its destination. This can sometimes cause DNS issues such as slow DNS lookups or DNS errors.
However, it is important to note that disabling your VPN will also disable the security and privacy benefits it provides. Let’s say you’re using a VPN for security or privacy reasons. In this case, you should only disable it if you’re sure it’s causing a DNS resolution issue and if you’re willing to sacrifice the security and privacy benefits it provides.
4. Clear the DNS cache
The DNS cache is a temporary store on your computer that stores information about recently visited websites. Clearing the DNS cache can help resolve any issues with corrupted or outdated information that may be causing the error.
To use the flushdns command on Windows, follow these steps:
- Open a command prompt on your computer. Click the «Start» button and search for «Command Prompt» or «CMD».
- In a command prompt window, type: ipconfig /flushdns

- Press «Enter» to clear the DNS cache on your computer, delete all stored DNS information, and resolve any DNS issues you may have.
- If the flushdns command is successful, you should see the message «Successfully flushed the DNS resolver cache».
You can close the command prompt window when you’re done.
Any DNS issues should be resolved now. Clearing the DNS cache will not affect any active connections, but may cause a temporary delay when accessing web pages or other Internet resources for the first time after clearing.
5. Use an alternate DNS server on your router
Your ISP usually offers its own DNS servers, but they can vary in quality and reliability. Often the best way to fix DNS_PROBE_FINISHED_NXDOMAIN errors is to use a different set of servers altogether.
The following DNS server addresses are a good alternative that you can use:
- Google public DNS server: 8.8.8.8 and 8.8.4.4.
- Cloudflare DNS: 1.1.1.1 and 1.0.0.1
- OpenDNS: 208.67.222.222 and 208.67.220.220
- Quad9: 9.9.9.9 and 149.112.112.112
- Comodo Secure DNS: 8.26.56.26 and 8.20.247.20
- Norton ConnectSafe: 199.85.126.10 and 199.85.127.10
These DNS servers are free and offer a good balance of speed, security and reliability. You can use any of these DNS servers as an alternative to your current DNS server. However, it’s important to note that every user’s experience will be different, so you might want to try a few different DNS servers to see which one works best for you.
To change the DNS servers on your router, you can follow these steps:
- Open a web browser on your computer and enter the router’s IP address in the address bar. This is usually something like 192.168.1.1 or 192.168.0.1, but the exact address depends on your router model and settings.
- When prompted, enter the username and password for your router. You can find this information on a sticker on the bottom or side of your router, or in the documentation that came with your router.
- After logging into your router, look for the «Settings» or «Configuration» section. This is usually called «Advanced», «Settings» or «Configuration», but the exact name depends on the model and settings of your router.
- In the settings or configuration section, look for the DNS settings option. This is usually called «DNS», «Network» or «Internet», but the exact name depends on the model and settings of your router.
- In the DNS or network settings section, you should see an option to specify the DNS server you want to use. This may be called Primary DNS or Preferred DNS, but the exact name depends on your router model and settings.
- Enter the addresses of the DNS servers you want to use in the appropriate fields. This can be the address of a single DNS server or multiple DNS servers.
If you just want to change your DNS server settings for Windows, here’s how to do it:
- Open Control Panel > Network and Internet > Network and Sharing Center on your computer. You can find this by opening the start menu and searching for «Network and Sharing Center».
- Select Change adapter settings from the menu on the left.

- Right-click on the network adapter for which you want to change DNS servers and select «Properties» from the menu.

- In the network adapter properties window, select Internet Protocol version 4 (TCP/IP v4) and click the Properties button.

- In the Internet Protocol Version 4 (TCP/IPv4) Properties window, select the Use the following DNS server addresses option.

- Enter the addresses of the DNS servers you want to use in the Preferred DNS Server and Alternate DNS Server fields.
- Click OK to save your changes.
- Close the network adapter properties window and the Network and Sharing Center window.
After completing these steps, your computer will use the specified DNS servers to resolve domain names. You may need to restart your computer for the changes to take effect. You can use Mozilla Firefox or Microsoft Edge as alternative browsers until Chrome specific bugs are fixed.
6. Reset Chrome Flags
Resetting Chrome «flags» sometimes resolves DNS errors. To reset Chrome flags to default values, follow these steps:
- In the Chrome address bar, type chrome://flags and press Enter.
- On the Experiments page that appears, click the Reset All button at the top.

- This will reset all Chrome flags to their default values. Chrome may remove some flags from the list if they are no longer available or have been removed from Chrome.
Chrome flags are experimental features that have not been fully tested and may contain bugs. Resetting them can help resolve issues you may be experiencing with Chrome, but may remove features you rely on. View the list of flags after they have been reset. The flags are also present in the iOS and Android versions of the browser.
7. Contact your ISP
Your ISP may have a website or user control panel that you can visit to check if there are any known network issues. If you’re getting an error when using one internet connection but not another, it’s probably an issue with your ISP.
If the ISP’s official channels do not mention such an issue, please file a support ticket to let them know about the issue and get immediate help.
![dns_probe_finished_nxdomain Error [Solved]](https://www.freecodecamp.org/news/content/images/size/w2000/2022/04/earth-931552_1920.jpg)
If you are a regular Google Chrome user, then you might have encountered the error “dns_probe_finished_nxdomain” before. It is usually accompanied by “This site can’t be reached”.
This error is associated with the Domain Name System (DNS) server and can occur due to misconfiguration in the DNS server, an unresponsive server, or a yet-to-be-propagated DNS of a website.
The “nxdomain” in the error means you’re trying to access a “non-existent domain”.
In other browsers, the “dns_probe_finished_nxdomain” error could present itself in another way. On Microsoft Edge, it could appear as “Hmm…can’t reach this page”, and on Firefox, it usually appears as “Hmm. We’re having trouble finding that site”.
Fixing this error in order to restore your internet connectivity is not an uphill task. And so in this article, I’m going to show you 4 ways to fix it.
What We’ll Cover Here
- Disable your Antivirus and VPN
- Flush, Release,and Renew your DNS Cache
- Flush your Google Chrome Browser Cache)
- Restart your Router or Modem
- Manually Change your DNS Server
- Change your Google Chrome Browser DNS Server
- Conclusion
Fix 1 – Disable Your Antivirus and VPN
Antivirus programs are notorious for interfering with apps and stopping them from working the right way.
VPNs, on the other hand, can block some websites, while some other websites don’t work well with them.
If you are getting the “dns_probe_finished_nxdomain” error, consider disabling your Antivirus and turning off your VPN, then check to make sure you can access the internet again.
If you are able to access the internet after disabling your antivirus program and turning off your VPN, then this is the reason you’re getting the error.
If you are on Windows 10, you can disable Windows Security by following the steps below:
Step 1: Open the Task Manager by pressing ALT + SHIFT + ESC on your keyboard.
Step 2: Click on the Startup tab.
Step 3: Locate your Antivirus Program in the list, right-click on it, and select «Disable».
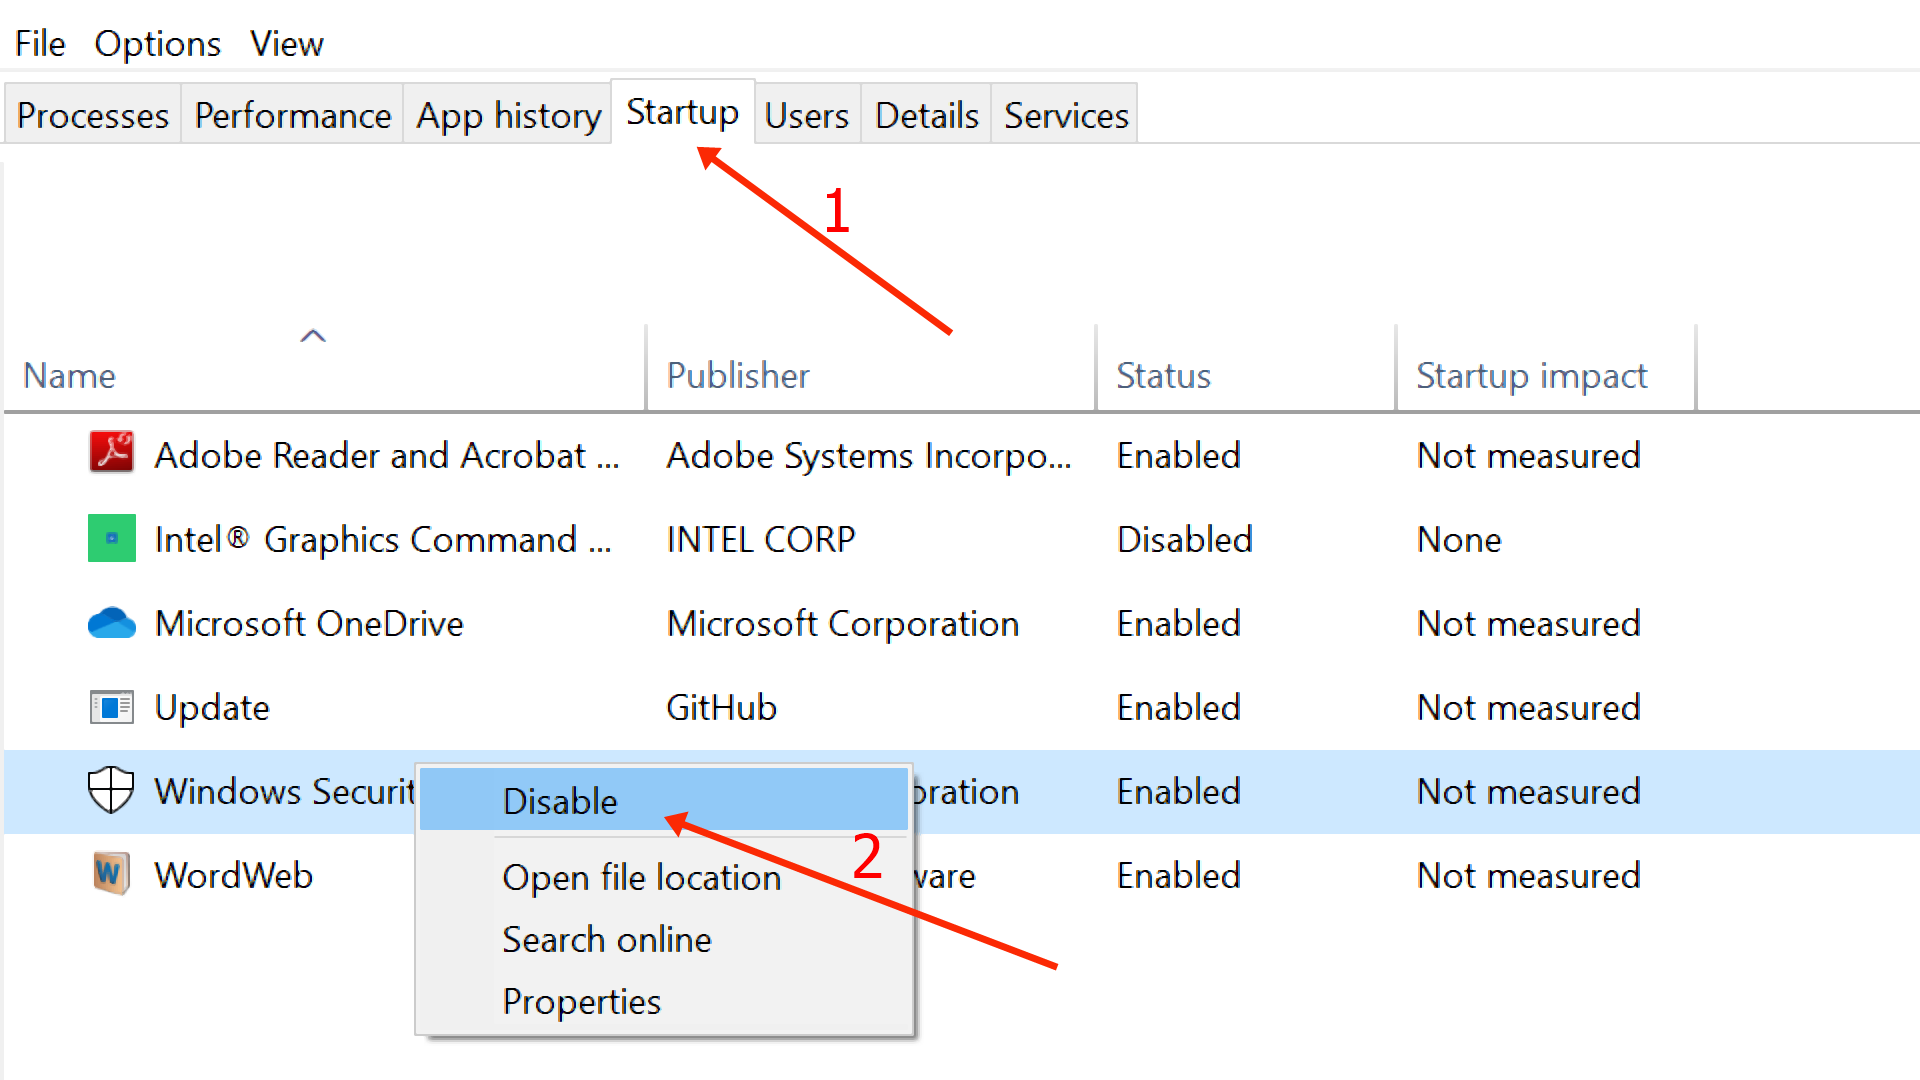
Try to access the internet again to see if the error isn’t shown anymore. If this fails to fix the error, keep reading and try other fixes in this article.
Fix 2 – Flush, Release, and Renew your DNS Cache
The DNS cache saves the IP addresses of websites you visited in order to speed up load time when you try to visit the same sites.
Flushing, releasing, and renewing the DNS cache can fix the “dns_probe_finished_nxdomain” error because the processes removes invalid IP configurations and outdated information in the DNS cache.
To flush, release, and renew your computer’s DNS on Windows, follow the steps highlighted below:
Step 1: Hit the WIN button on your keyboard and search for «cmd». Then select «Run as Administrator» on the right.
Step 2: Enter and execute the following commands one after the other:
ipconfig /flushdnsipconfig /release- `ipconfig /renew

You should also consider flushing Chrome’s DNS.
To flush Chrome’s DNS, all you need to do is type chrome://net-internals/#dns in the address bar and hit ENTER. Then click “Clear host cache”:
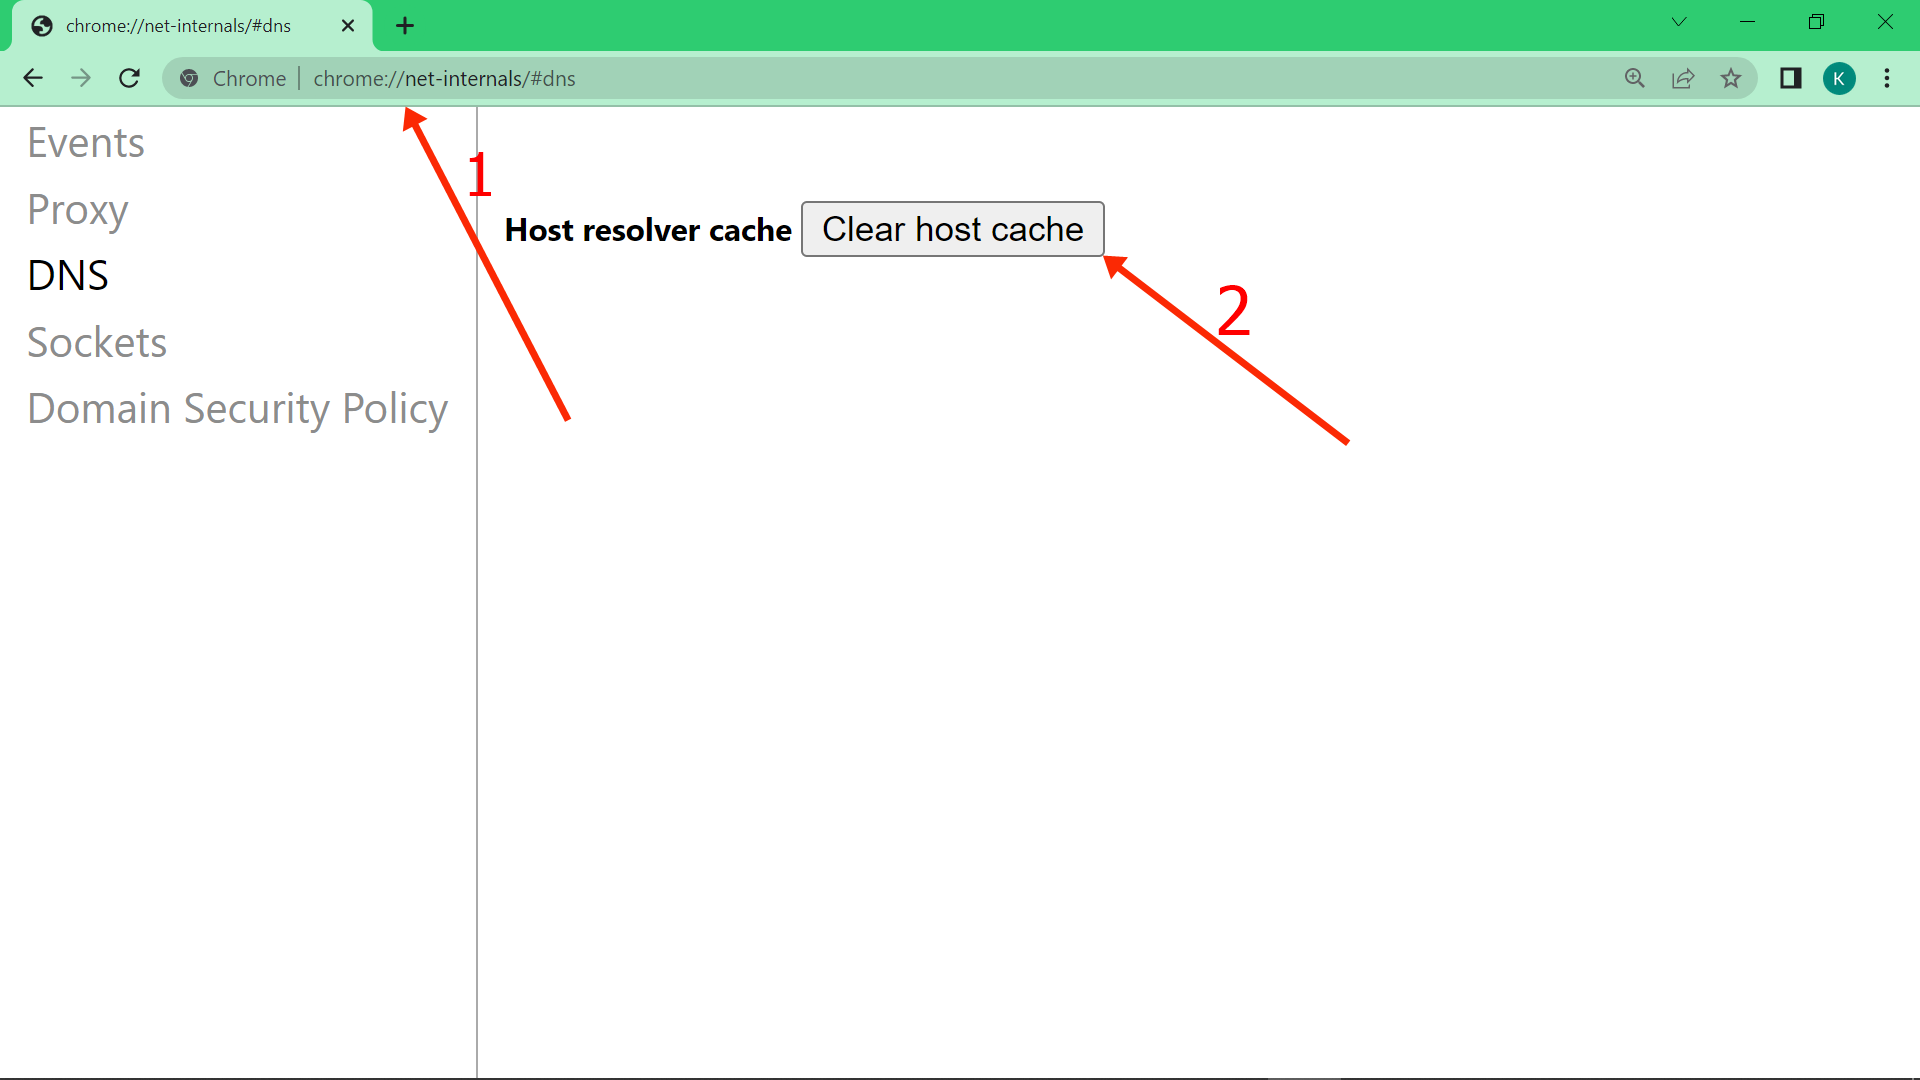
After flushing your computer’s DNS along with Chrome’s, restart your computer and check to see if you don’t get the error anymore.
Fix 3 – Restart your Router or Modem
If you access the internet through a router or modem, restarting it could help you get rid of the “dns_probe_finished_nxdomain” error.
This is because turning off and then turning on a router or modem clears the cache of IP addresses, which could fix the error in the long run.
To restart your router or modem, locate the power button and long-press to turn it off, then long-press again to turn it on.
Fix 4 – Manually Change your DNS Server
If any of the fixes above fail to work for you, you should consider changing your DNS server address as it is one of the most reliable ways to fix the “dns_probe_finished_nxdomain” error.
By default, a DNS server address is provided by your internet service provider, but using this default DNS is not always secure. And it could be the reason you are getting the “dns_probe_finished_nxdomain” error.
You can change your DNS server to one of the free ones provided by the likes of Google and Cloudflare.
The steps below show you how to change your DNS server to Google:
Step 1: Right-click on Start and select “Network Connections”:

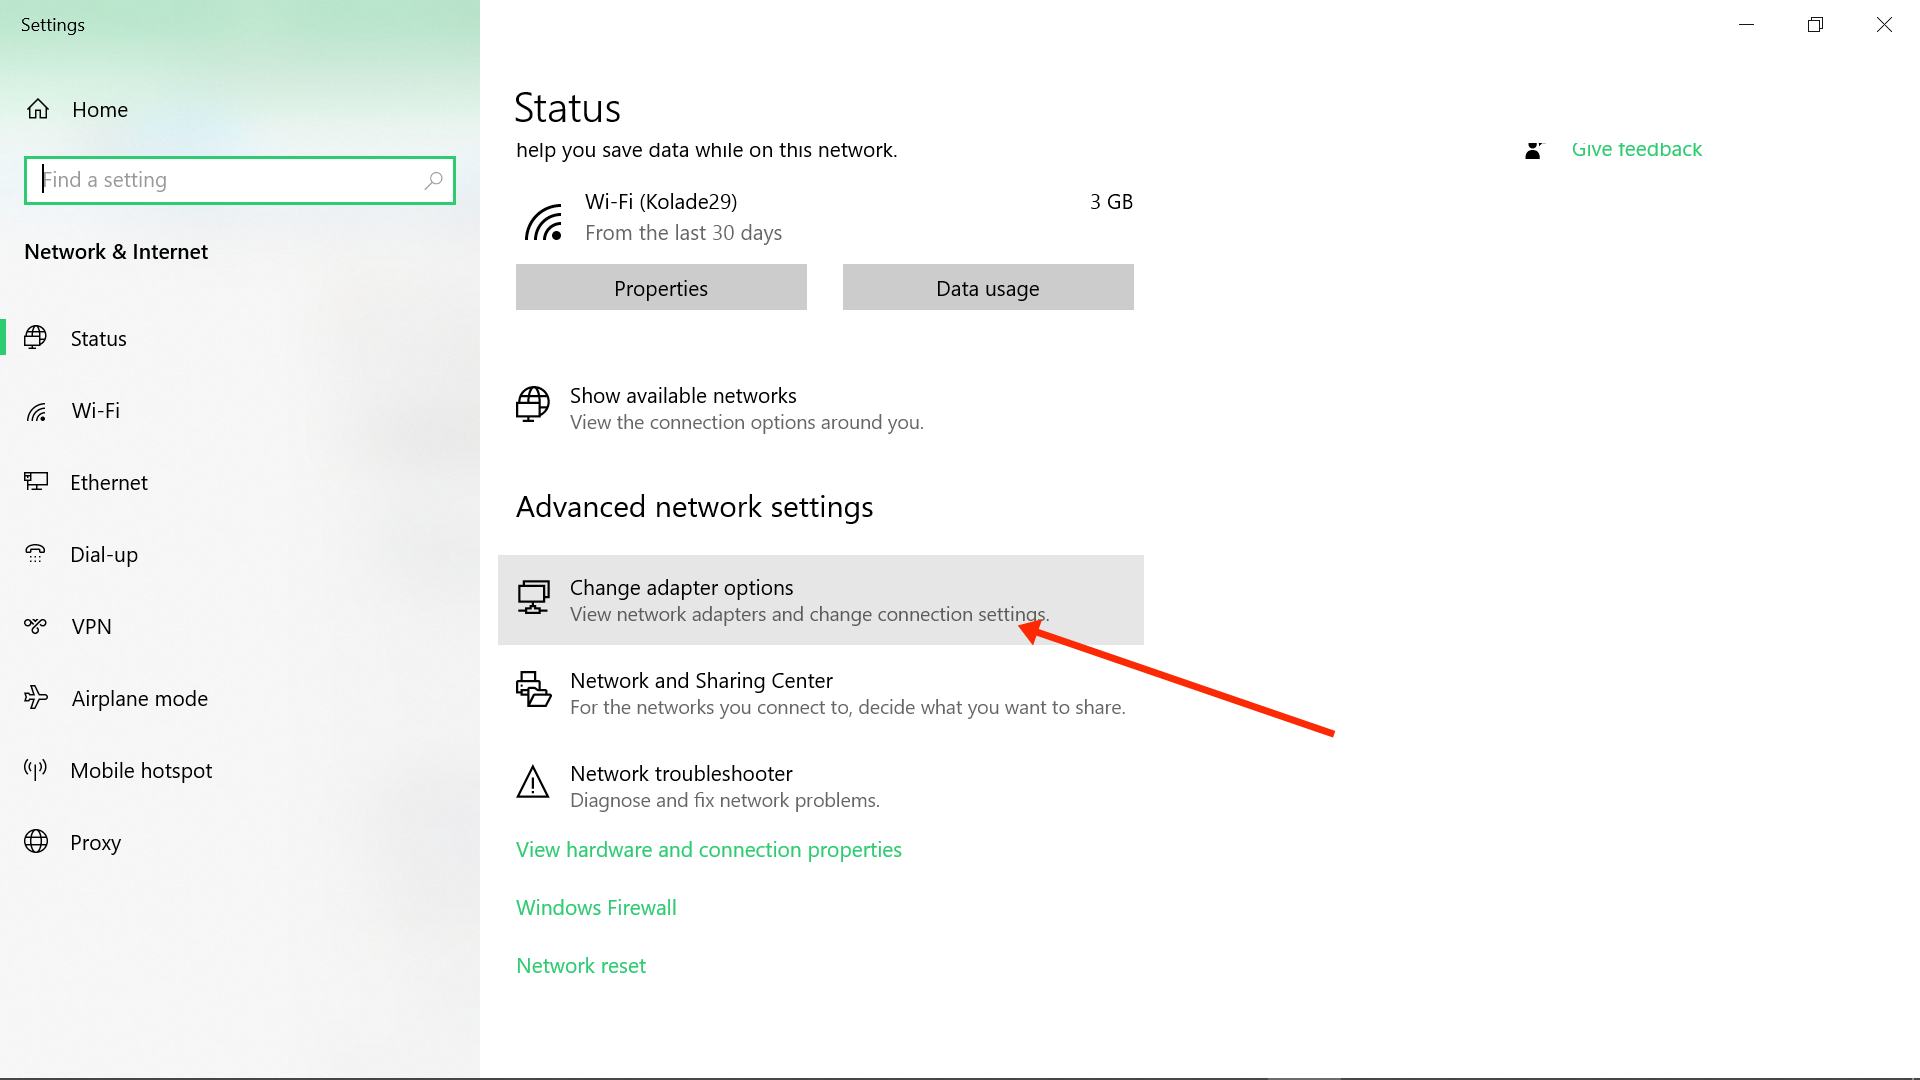
Step 2: Scroll down and select “Change adapter options”:
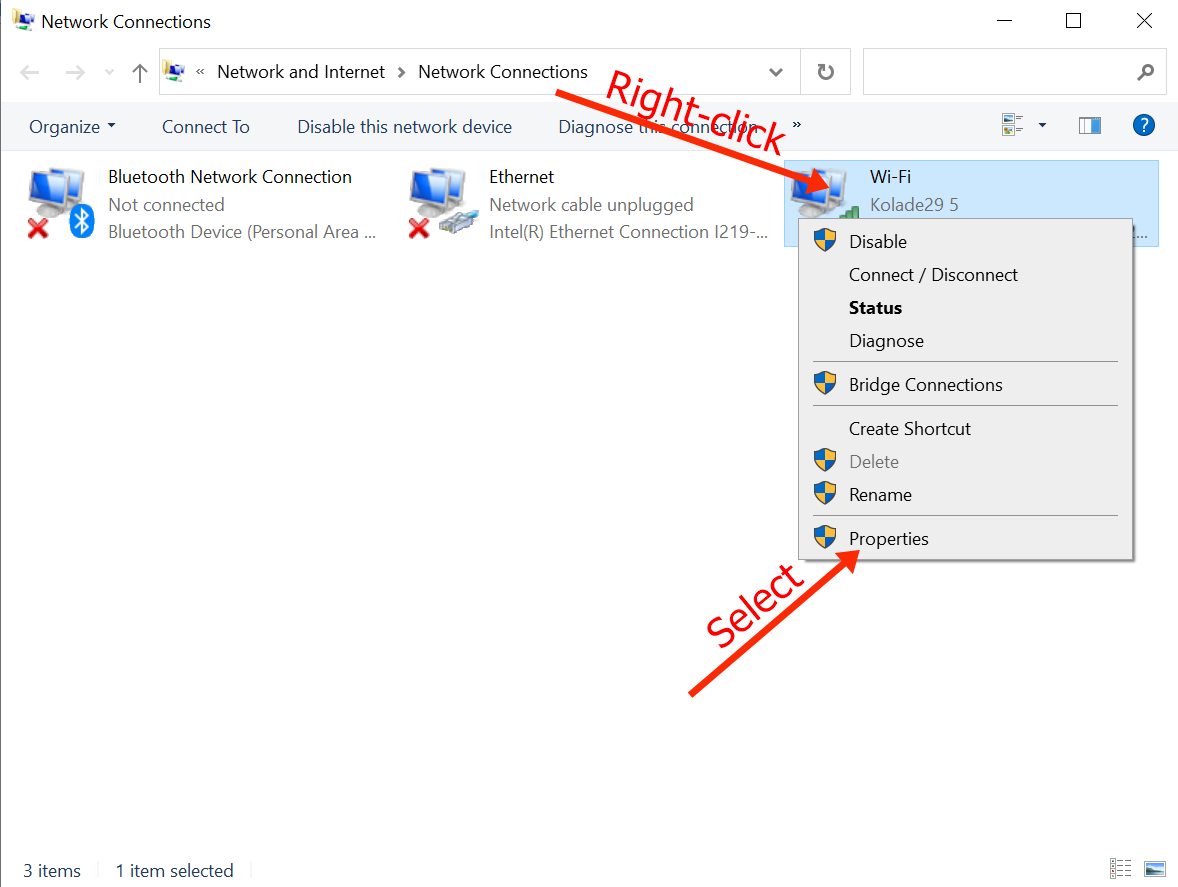
Step 3: In the pop-up that appears, right-click on the network you are connected to and select “Properties”:
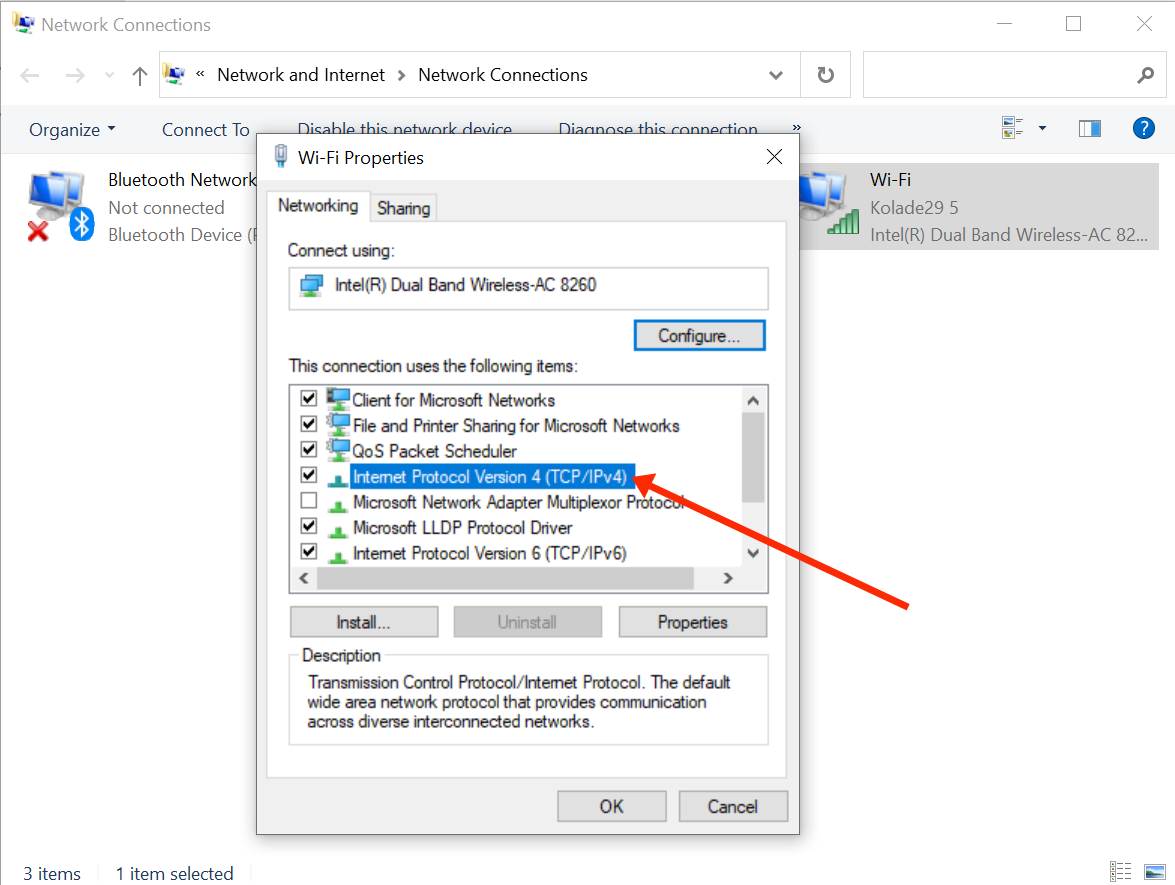
Step 4: In another pop-up that appears, double-click on “Internet Protocol Version 4 (TCP/IPv4)”:
Step 5: Another pop-up will appear. This time around, select the radio button that says “Use the following DNS server addresses”:
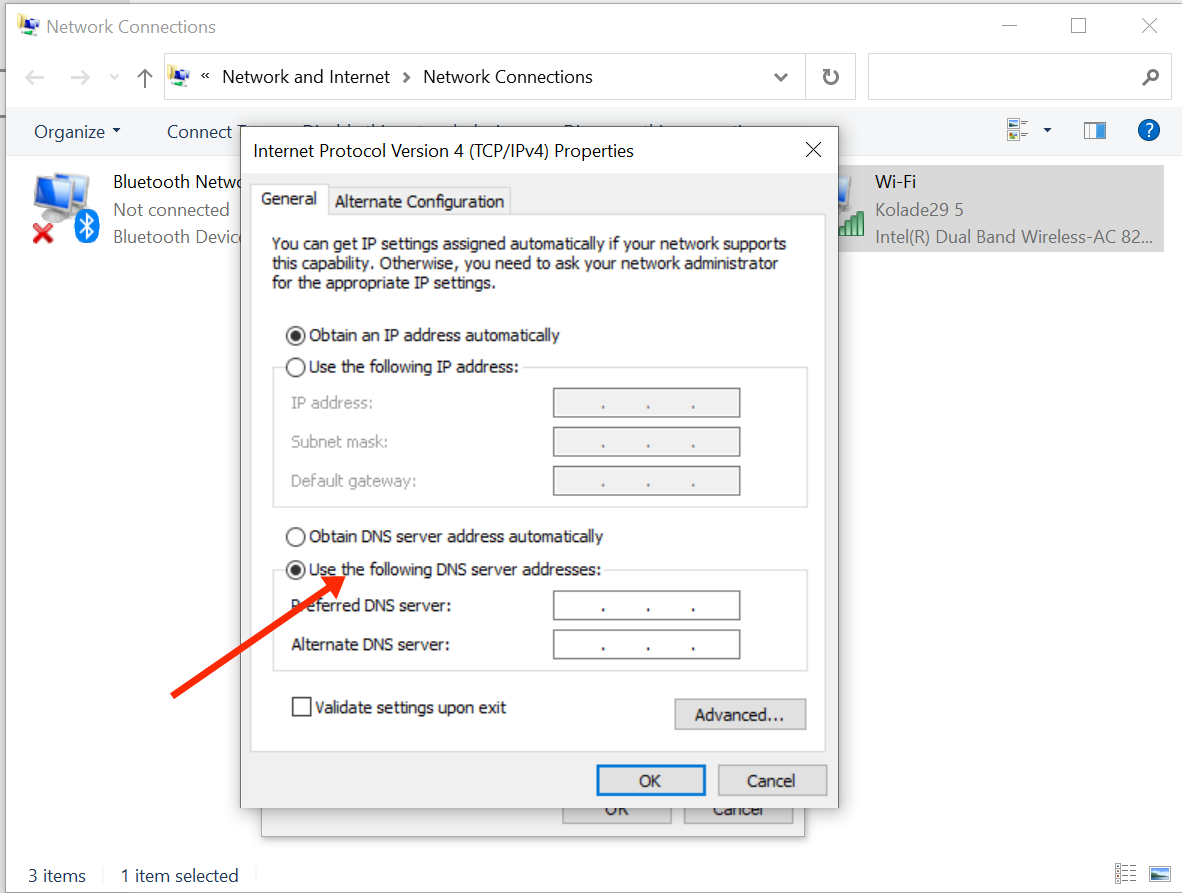
Step 6: Enter 8.8.8.8 for “Preferred DNS server” and 8.8.4.4 for “Alternate DNS server”. This is the free DNS server provided by Google.
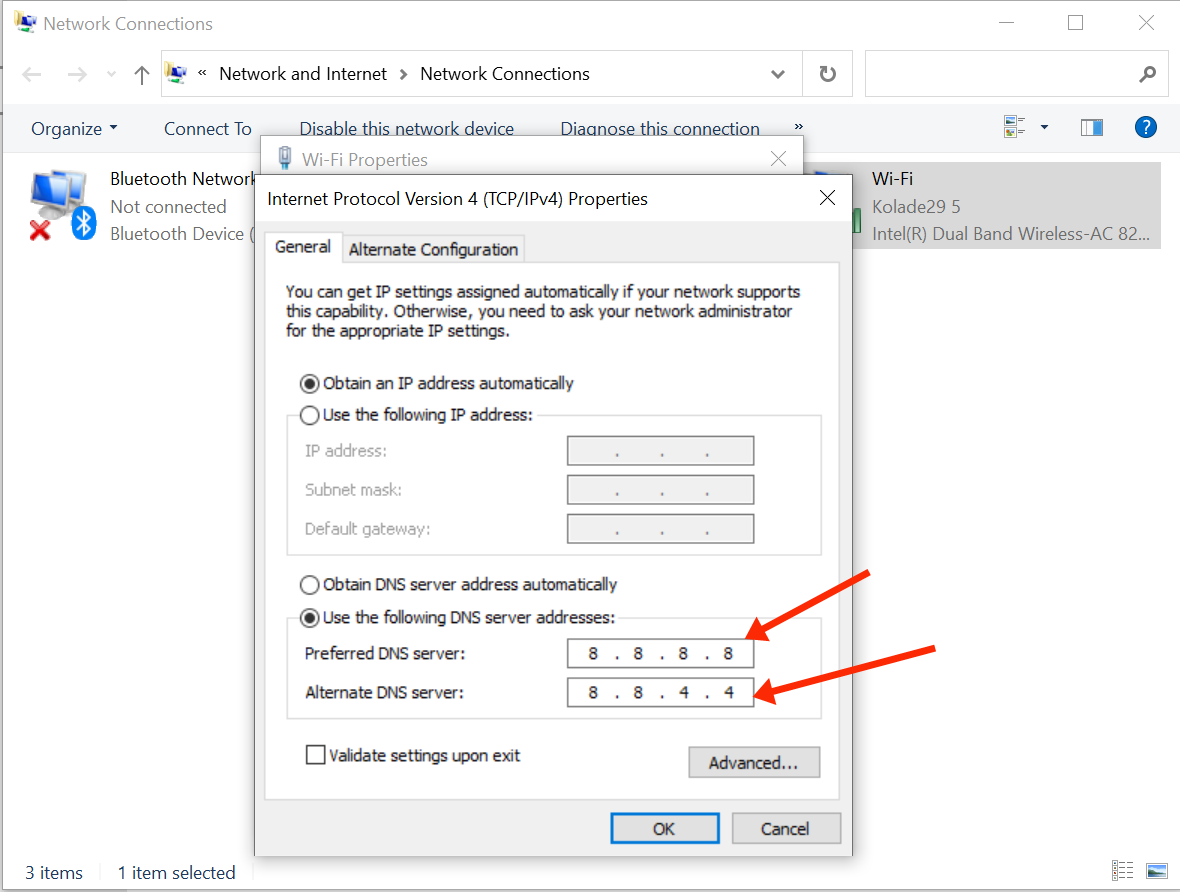
Step 7: Click “Ok”, and “Ok” once again.
N.B.: If your computer is configured to use IPv6 instead of IPv4, then in step 4, you should choose “Internet Protocol Version 6 (TCP/IPv6)” instead of “Internet Protocol Version 4 (TCP/IPv4)”. Then enter 2001:4860:4860::8888 for the preferred DNS server and 2001:4860:4860::8844 for the alternative DNS server.
You can also change the DNS server of the Google Chrome browser in particular.
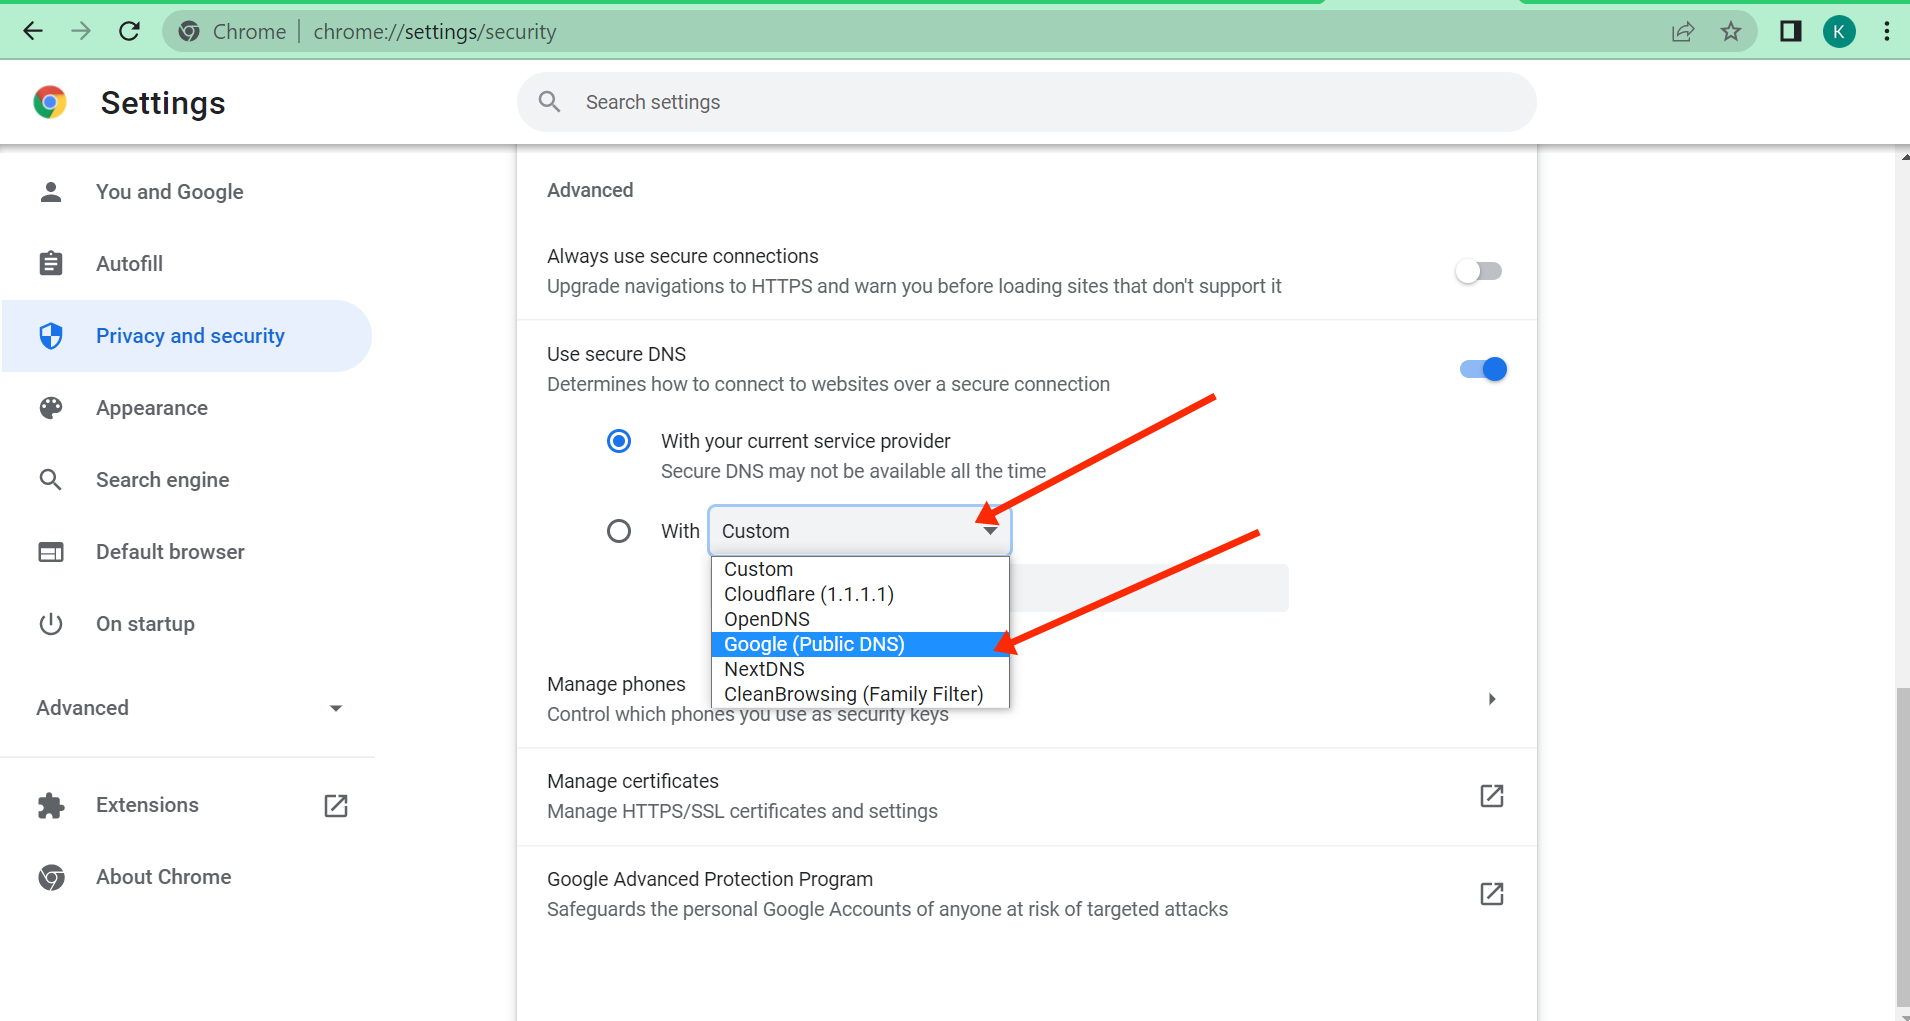
To do this, head over to your chrome browser, type chrome://settings/security in the address bar and hit ENTER.
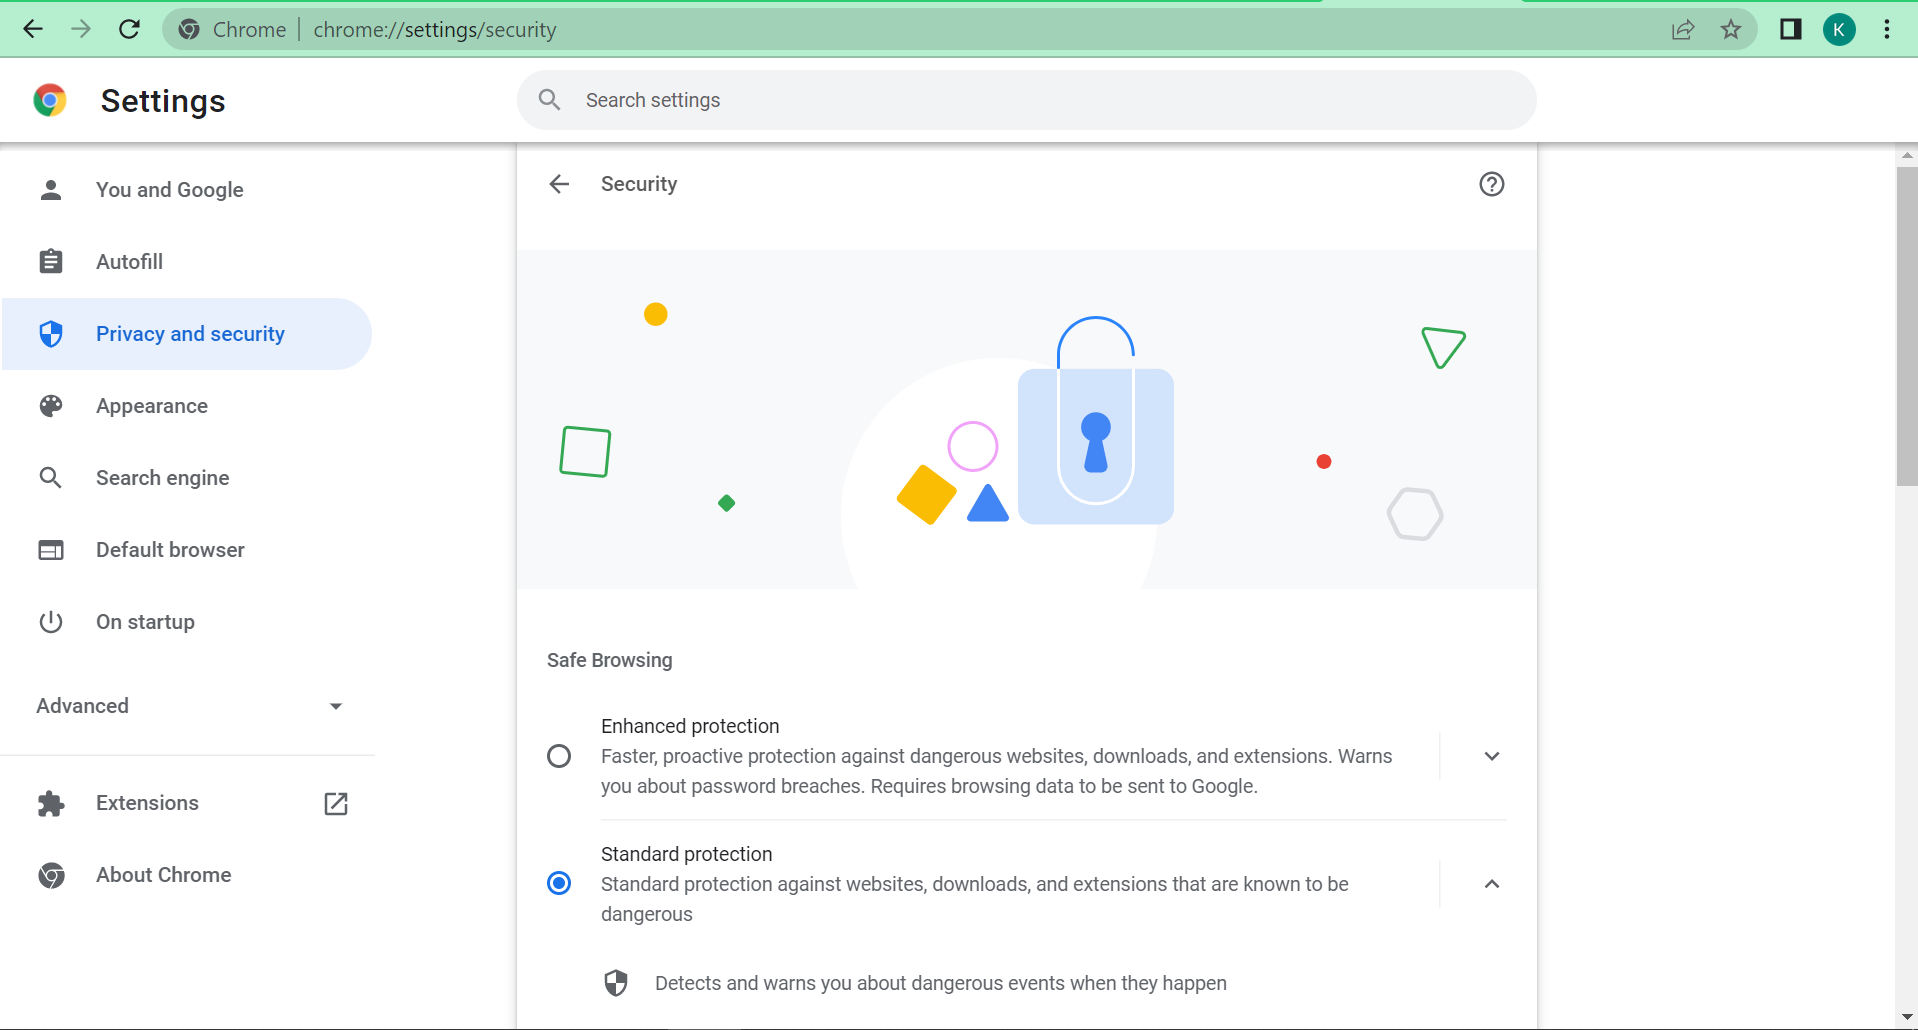
On the page that appears, scroll down, click on “Custom”, and select “Google (Public DNS)”:
After doing all this, check to see if your internet connection is restored.
Conclusion
As you can see in this article, resolving the “dns_probe_finished_nxdomain” error is not difficult because there are several ways you can fix it. This article discussed 4 of those ways.
If one of the fixes fails to resolve the error for you, then you should check out any of the rest. As for me, I experienced this error not long ago and what fixed it for me was changing my DNS server – Fix 4.
Thank you for reading.
Learn to code for free. freeCodeCamp’s open source curriculum has helped more than 40,000 people get jobs as developers. Get started