I am unable to visit most sites online in either firefox or chrome. I can access google docs so I am researching on windows 7 (dualboot) and rebooting into Ubuntu (recently upgraded to 16.04).
Test 0:
$ sudo /etc/init.d/dns-clean
$
(nothing happened)
Test 1:
$ dig microsoft.com
; <<>> DiG 9.10.3-P4-Ubuntu <<>> microsoft.com
;; global options: +cmd
;; Got answer:
;; ->>HEADER<<- opcode: QUERY, status: NOERROR, id: 2944
;; flags: qr rd ra; QUERY: 1, ANSWER: 5, AUTHORITY: 0, ADDITIONAL: 1

;; OPT PSEUDOSECTION:
; EDNS: version: 0, flags:; udp: 512
;; QUESTION SECTION:
;microsoft.com.         IN  A

;; ANSWER SECTION:
microsoft.com.      896 IN  A   104.43.195.251
microsoft.com.      896 IN  A   23.100.122.175
microsoft.com.      896 IN  A   23.96.52.53
microsoft.com.      896 IN  A   191.239.213.197
microsoft.com.      896 IN  A   104.40.211.35

;; Query time: 102 msec
;; SERVER: 2001:558:feed::1#53(2001:558:feed::1)
;; WHEN: Tue Aug 29 14:54:43 EDT 2017
;; MSG SIZE  rcvd: 122
Test 2:
$ ping reddit.com
connect: Network is unreachable
Test 3:
$ less /etc/network/interfaces
# interfaces(5) file used by ifup(8) and ifdown(8)
auto lo
iface lo inet loopback
Test 4:
$ less /etc/NetworkManager/NetworkManager.conf
[main]
plugins=ifupdown,keyfile,ofono
/#dns=dnsmasq

no-auto-default=D4:BE:D9:A6:2E:C1,

[ifupdown]
managed=false
Test 5: Chrome
This site can’t be reached
www.reddit.com’s server DNS address could not be found.DNS_PROBE_FINISHED_NXDOMAIN
Test 6: Firefox
Server not found
Firefox can’t find the server at www.reddit.com.
Check the address for typing errors such as ww.example.com instead of www.example.com
If you are unable to load any pages, check your computer’s network connection.
If your computer or network is protected by a firewall or proxy, make sure that Firefox is permitted to access the Web.
Edit: Almost forgot, this seems to have started after I tried installing PlayOnLinux the other day. I uninstalled it but the problems persist.
Any thoughts?
Re: possible duplicate question : dns_probe_finished_nxdomain error caused by Ubuntu
dns_probe_finished_nxdomain error caused by Ubuntu
I clearly state in my question that the solution posed in the other thread of clearing the dns cache does not resolve my issue.
![How to fix DNS_PROBE_FINISHED_NXDOMAIN Error? [11 Easy Ways]](https://monovm.com/wp-content/uploads/2022/11/how-to-fix%20DNS-PROBE-FINISHED-NXDOMAIN-Error138-847xAuto.webp)
List of content you will read in this article:
- 1. What is DNS_PROBE_FINISHED_XDOMAIN Error?
- 2. DNS PROBE FINISHED NXDOMAIN error Based on Different Browsers
- 3. 11 Methods to Fix the DNS_PROBE_FINISHED_NXDOMAIN Error
- 4. Conclusion
If you are frequently web surfer encountering the DNS_PROBE_FINISHED_NXDOMAIN error might sound familiar to you. It is a commonly occurring error that may be prevalent across various domains. It sometimes refers to when your domain seems non-existent, or the related IP address is unavailable. You can encounter this error on any browser whenever the site you try to reach is unavailable.
There can be various reasons for this error to occur in the first place. Before getting into the causes and the ways to fix this error, we will learn more about DNS_PROBE_FINISHED_NXDOMAIN.
What is DNS_PROBE_FINISHED_XDOMAIN Error?
DNS helps direct the incoming traffic by connecting the domain names with the web servers. This domain name gets converted into the IP address to be understood by the computer. This error commonly occurs when there is a mistake within the configuration or any issue with the DNS. The actual problem occurs when you provide the URL, and the DNS will not be able to search the server with an appropriate IP address regarding that server. Whenever the DNS fails to explore, it results in an error called DNS_PROBE_FINISHED_NXDOMAIN, where NXDOMAIN represents the non-existent domain.
There is nothing to worry about as it is easy to fix, and the solution comes in many ways suitable to you. Well, different browsers serve you with different ways of solving the problem. This error name is mostly for Google chrome, but that does not mean this error does not occur on other browsers.
DNS PROBE FINISHED NXDOMAIN error Based on Different Browsers
11 Methods to Fix the DNS_PROBE_FINISHED_NXDOMAIN Error
In the article below, we will learn various ways to implement different solutions on different operating systems. We will discuss the below-mentioned methods.
- Flushing the DNS Cache
- Releasing and Renewing the IP Address
- Changing the DNS Servers
- Restarting the DNS Client Service
- Checking the Local Hosts File
- Resetting the Chrome Flags
- Disabling the VPN or Antivirus
- Resetting the Network Adapter
- Moving to Google DNS
- Clearing the Chrome Browser Cache
- Contacting Your Internet Provider
1. By Flushing the DNS Cache
A DNS cache is a temporary file stored on your system that contains the IP address of the previously visited sites. One way is to clear that cache file to avoid the outdated IP address for the particular website. This solution may resolve your problem. You can follow the below steps for the different OS to resolve the issue.
How to Flush DNS in Windows
- Hit the start button and look for the command prompt. To make DNS cache changes, you must log in as an administrator. So right-click the command prompt and log in as administrator.
- A command prompt terminal will open and run the below command.
ipconfig/flushdns
- Click enter to complete the command and clear the DNS cache. This method is viable for Windows operating systems.

How to Flush DNS in Linux, CentOS, Ubuntu, Debian,
Ubuntu does not come with a DNS cache, so you must install a DNS service to do that manually. Once you start storing the DNS cache, you can clear it up to resolve the problem using the following steps.
- Open the terminal window using ctrl+alt+T.
- Use the below command on the terminal to clear the DNS entries and hit enter.
sudo /etc/init.d/nscd restart
So this is the guide to help you to fix dns_probe_finished_nxdomain ubuntu.
2. By Releasing and Renewing the IP Address
If applying the previous method did not work, you can use it to clear the cache, which is almost the same with some changes.
For Release and renew IP in Windows,
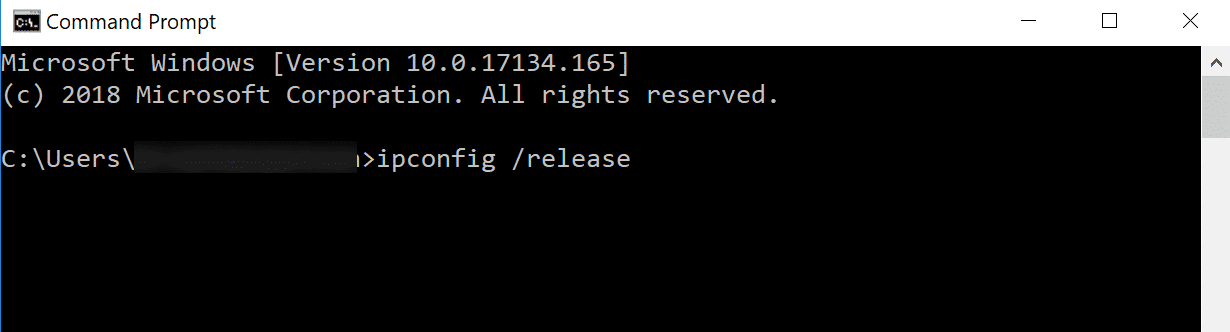
First, open the command prompt with administrative rights again by right-clicking it. Then you can follow the below steps to clear the DNS entry.
- You can use the following command to release the current IP address.
ipconfig/release
- Run the following command to display the full IP configs for all the adapters.
ipconfig/all
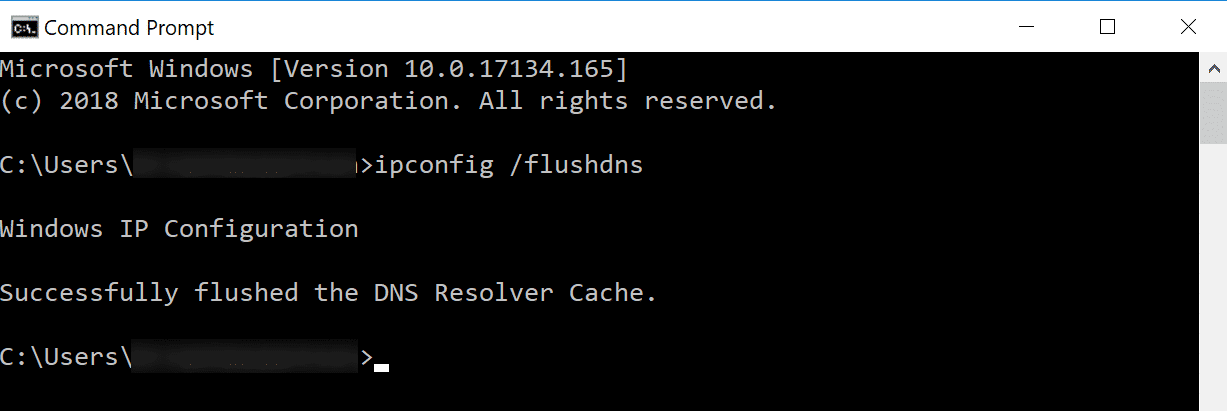
- To reset the DNS cache, run the following command.
ipconfig/flushdns
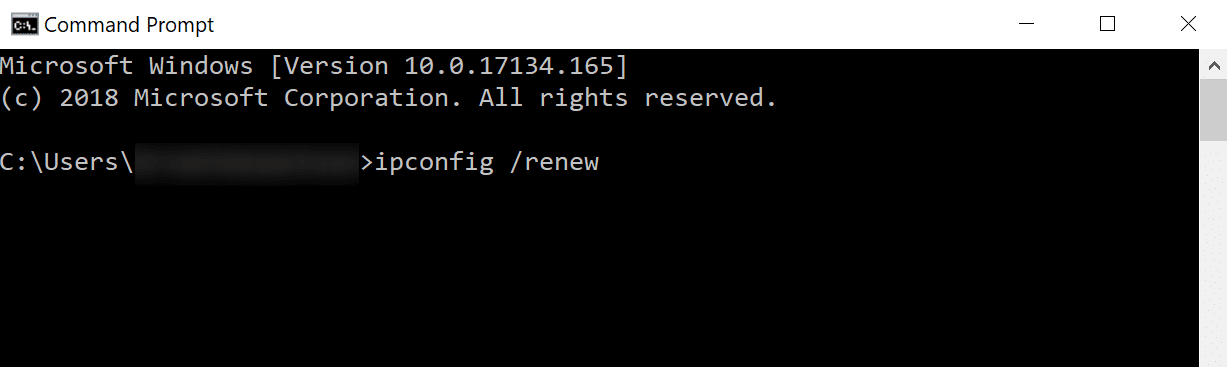
- The following command will renew the DNS setting for all adapters.
ipconfig/renew
- Resetting the IP setting for already present IP.
netsh int ip set dns
netsh winsock reset
- Then restart the system.
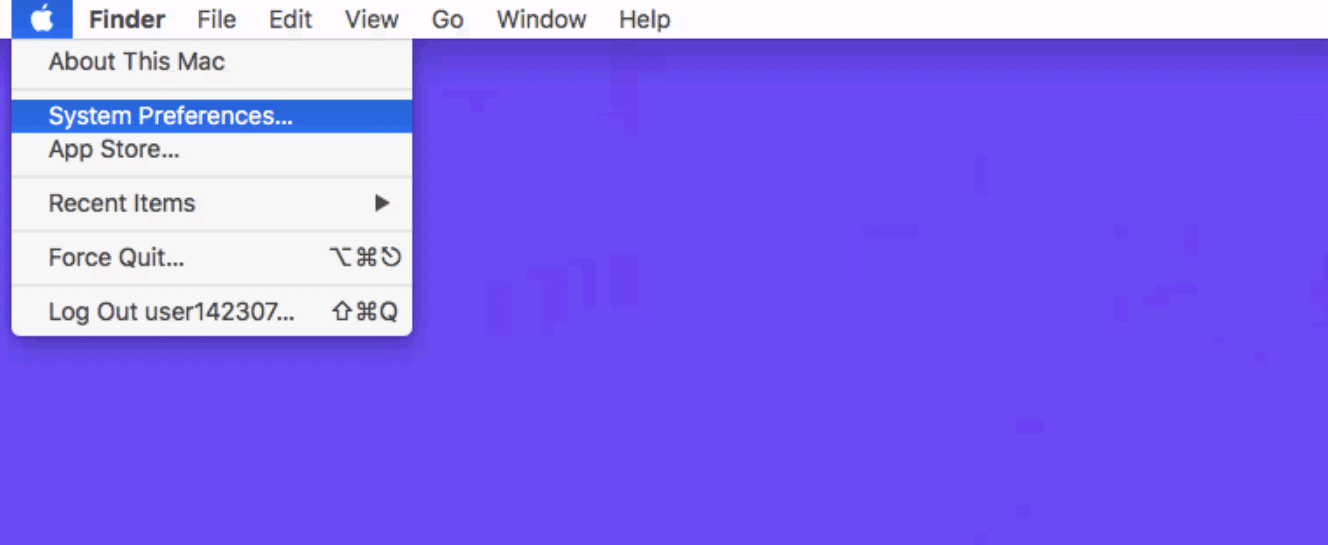
For Release and renew IP in MacOS.
You can follow the below steps to release and renew the IP address.
- Navigate to System Preferences and select Network.
- Go for the internet connection and click the Advanced option.
- Go to the TCP/IP menu and click the Renew DHCP Lease option.
- Click OK to make the changes, and then restart your computer.
3. By Changing the DNS Servers
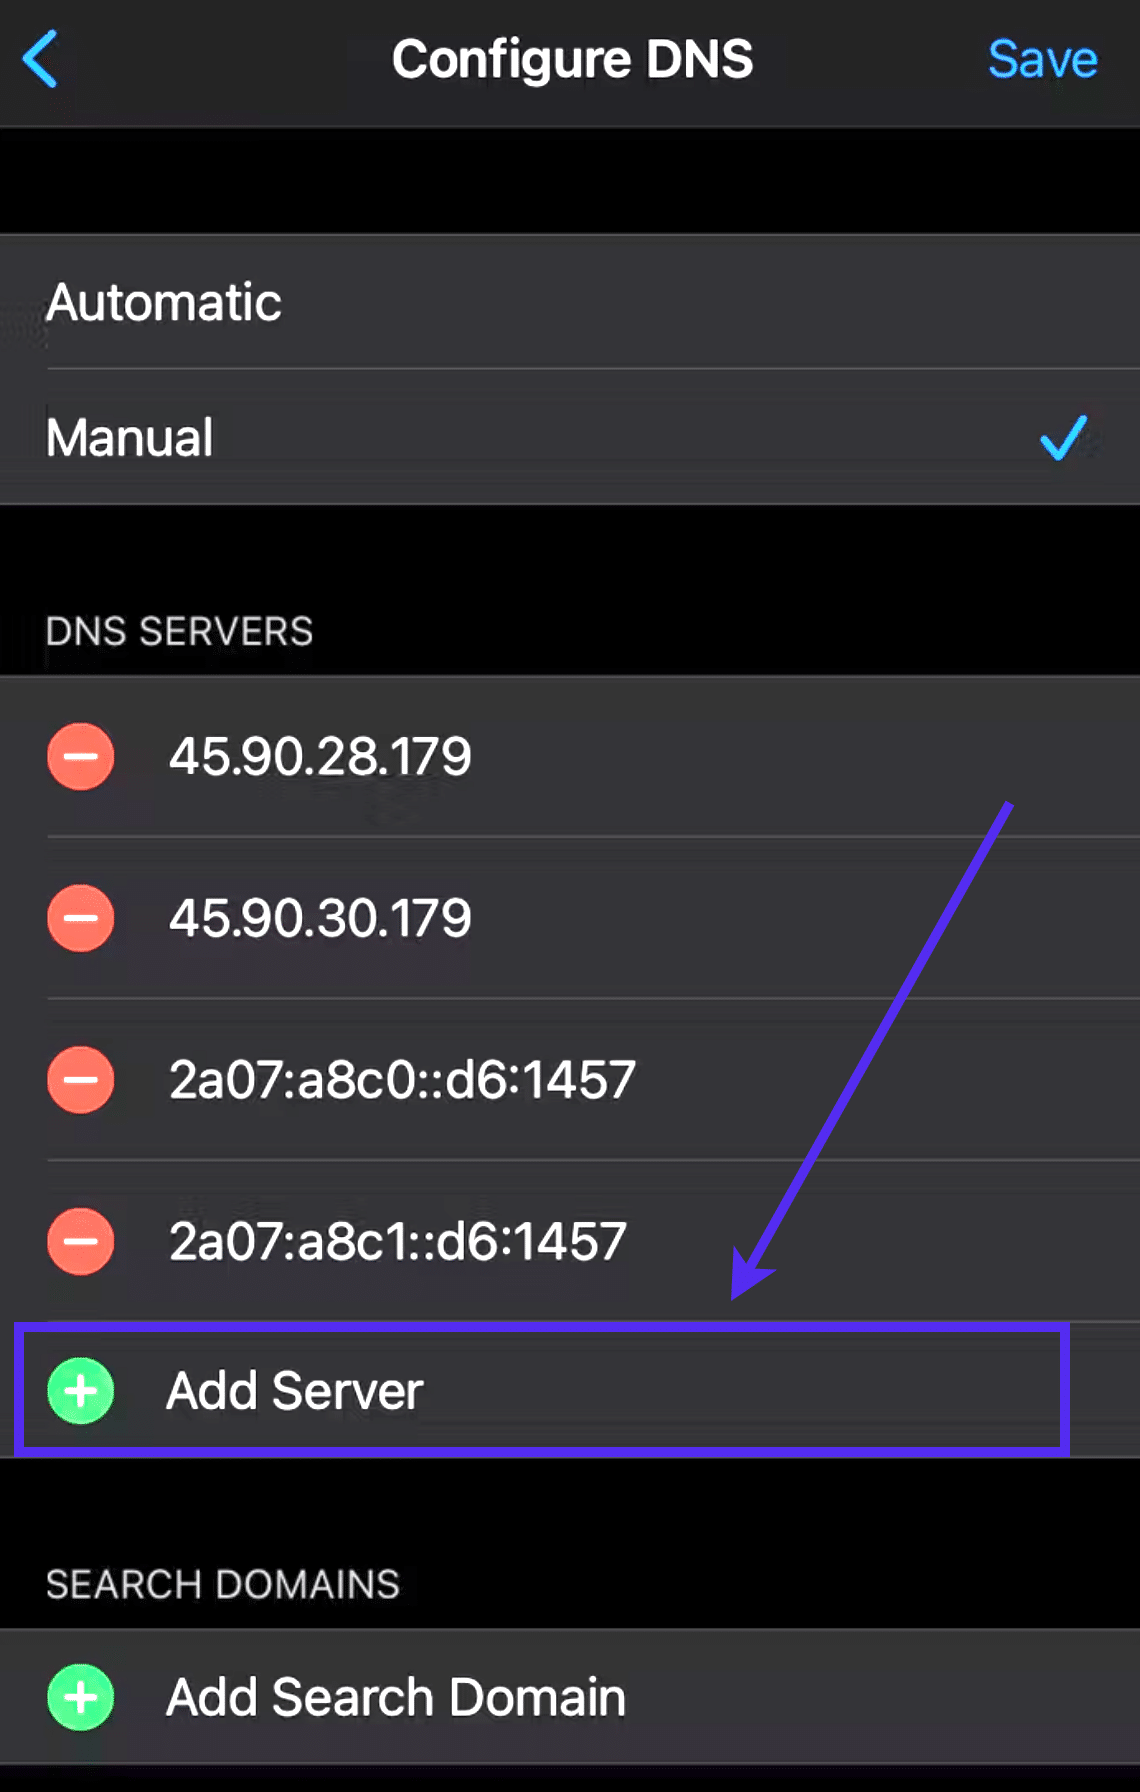
If none of the above-discussed methods work, you can try changing your system’s DNS. By default, the computer uses the internet service provider for DNS. to resolve the issue, and you can change it to Google DNS or Open DNS.
For Windows
Below are the steps to make DNS server changes on Windows.
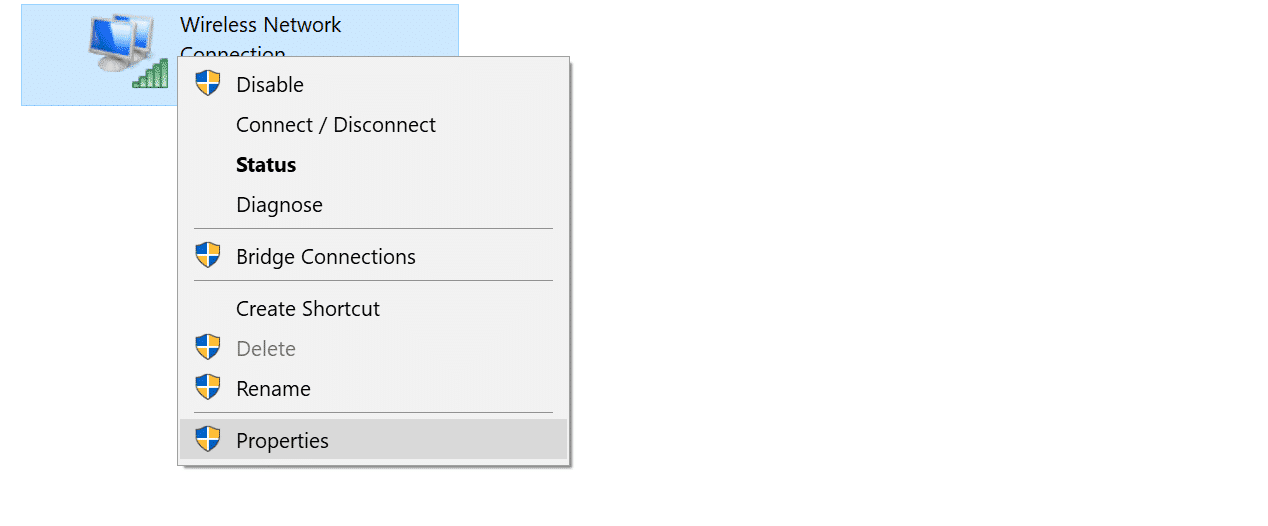
- Navigate to the Control panel and look for the Network and Sharing center, as shown below.
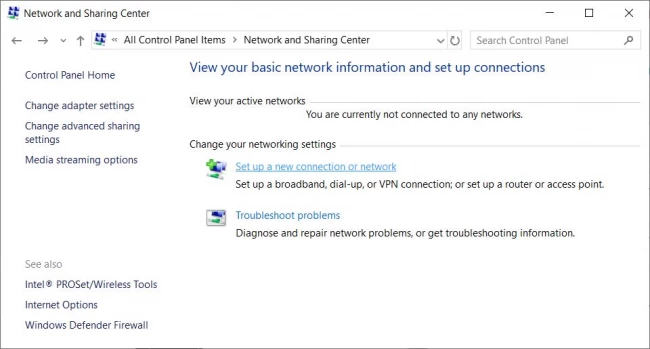
- Go to the Change Adapter setting on the left side menu.
- Right-click the current connection and hit properties.
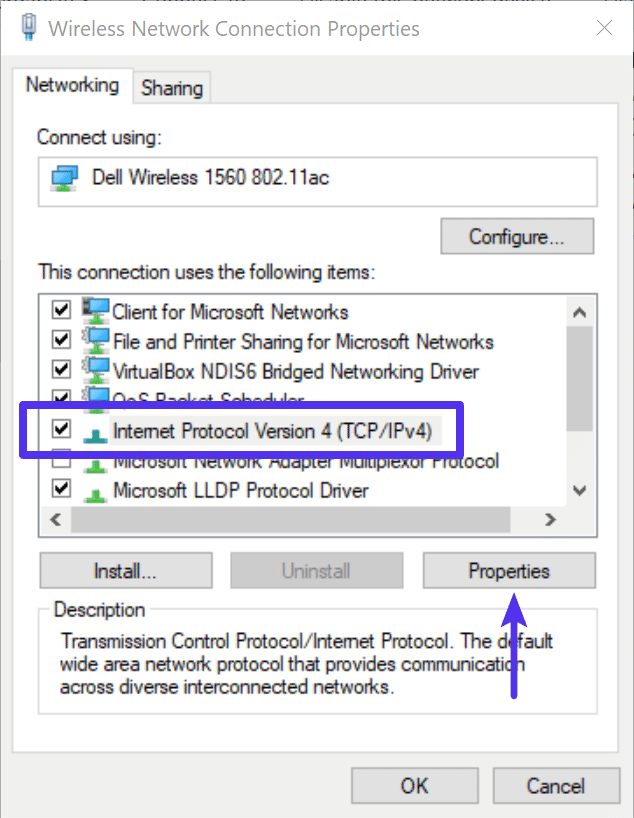
- Select the Internet Protocol Version 4 (TCP/IPv4) option and hit the properties option.
- You can change the DNS server from the Preferred and alternate DNS server options under the General tab.
For Google DNS-
8.8.8.8
8.8.4.4
For Open DNS-
208.67.220.222
208.67.222.220
- Click OK after making the changes accordingly.
For macOS.
Follow the below steps to make DNS server changes.
- Go to the Apple icon and look for system preferences.
- Go to the Network, select the currency used for the internet connection, and select the advanced option.
- Select the DNS tab, press the ‘+’ button, and provide the new DNS server details, either Google DNS or Open DNS, whose value will be the same as mentioned above.
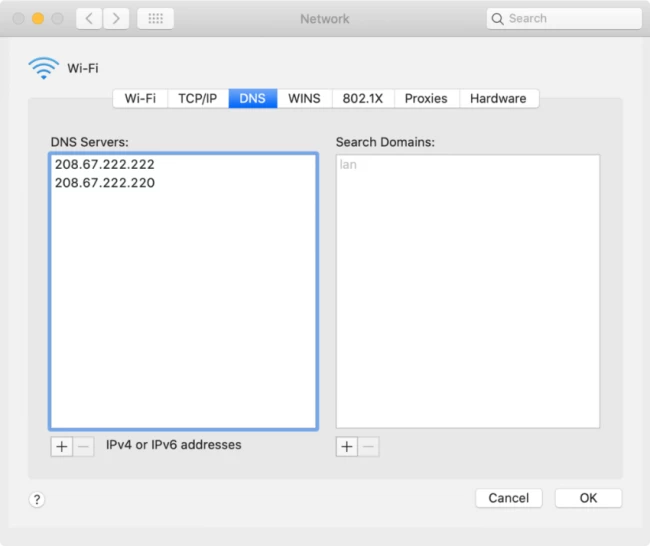
- Click OK to apply the changes.
4. BY Restarting the DNS Client Service
Three different ways to restart the DNS client service on the Windows OS are available.
Windows Command Prompt
- Open the command prompt with admin rights and run the below commands.
- Run the below command to Stop the DNS server.
net stop dnscache
Output:
The DNS Client service was stopped successfully.
- Now, start the DNS service again using the below command.
net start dnscache
Output:
The DNS Client service was started successfully.
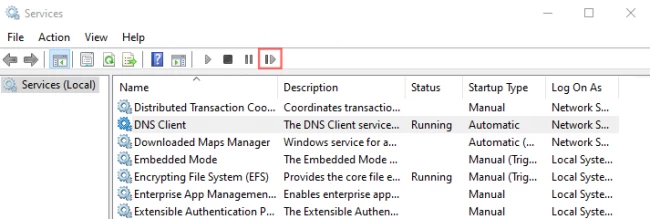
Windows Service Manager
- Open the search bar from the Start menu and look for services.
- Select the ‘DNS client’ option from the list, as shown in the image below.
- To apply the changes, you can now restart the DNS client service.
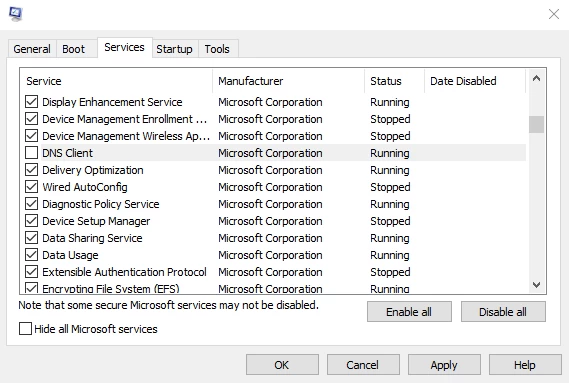
Windows System Configuration
- Open Run, type MSConfig, and enter.
- A new window will appear with all the services. Go for DNS client service.
- Disable the service by unclicking it.
- Click OK and then restart.
- Follow the first two steps again, and recheck the service.
- Restart your system after making the changes.
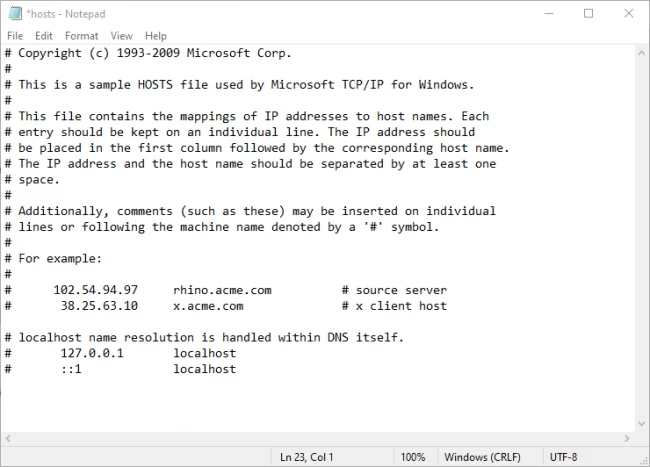
5. By Checking the Local hosts’ File
A host’s file is stored on your system locally that maps the IP addresses’ domain names. This file is always considered before visiting any website. If the file does not have any information for the website, it will search for the DNS system to load it. Make sure that the details are present there to avoid DNS issues.
Windows
- Open Notepad with administrative rights.
- Click fill and open.
- Now change the file filter to All Files.
- Copy the below address in the address bar to open the file.
%SystemRoot%:WindowsSystem32Driversetc
- Open the host’s file from the folder.
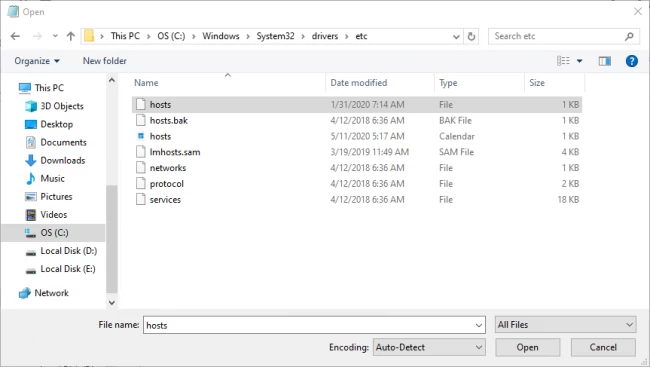
- Remove the visiting website’s domain name and IP address and save the changes.
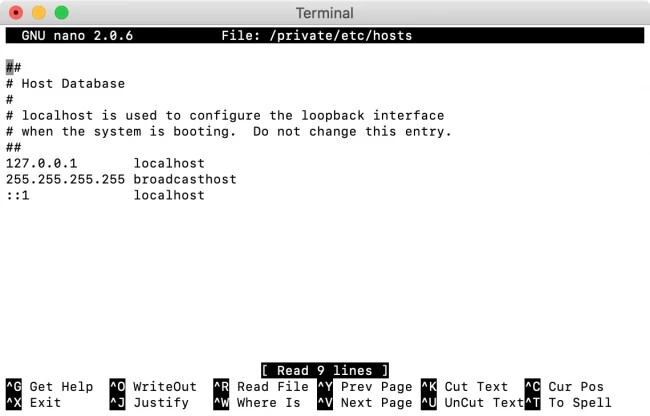
macOS
- Open the terminal from the launchpad.
- You can run the below command to open the Nano editor as administrator.
sudo nano /private/etc/hosts
- Enter the password for the admin account.
- You will be redirected to the hosts’ file.
- Remove the file details and save changes by clicking ctrl_O.
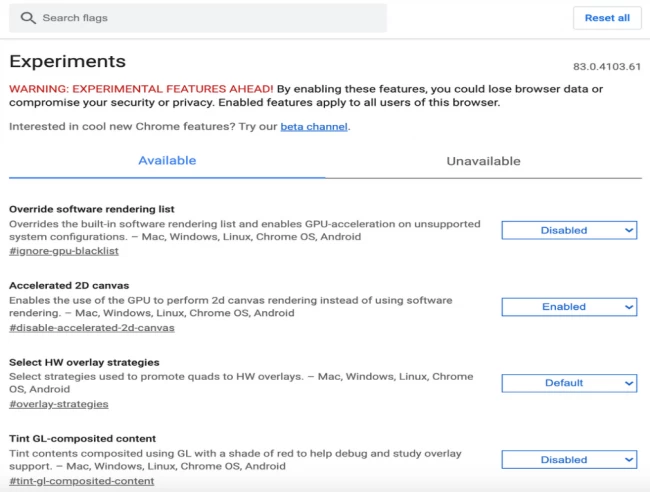
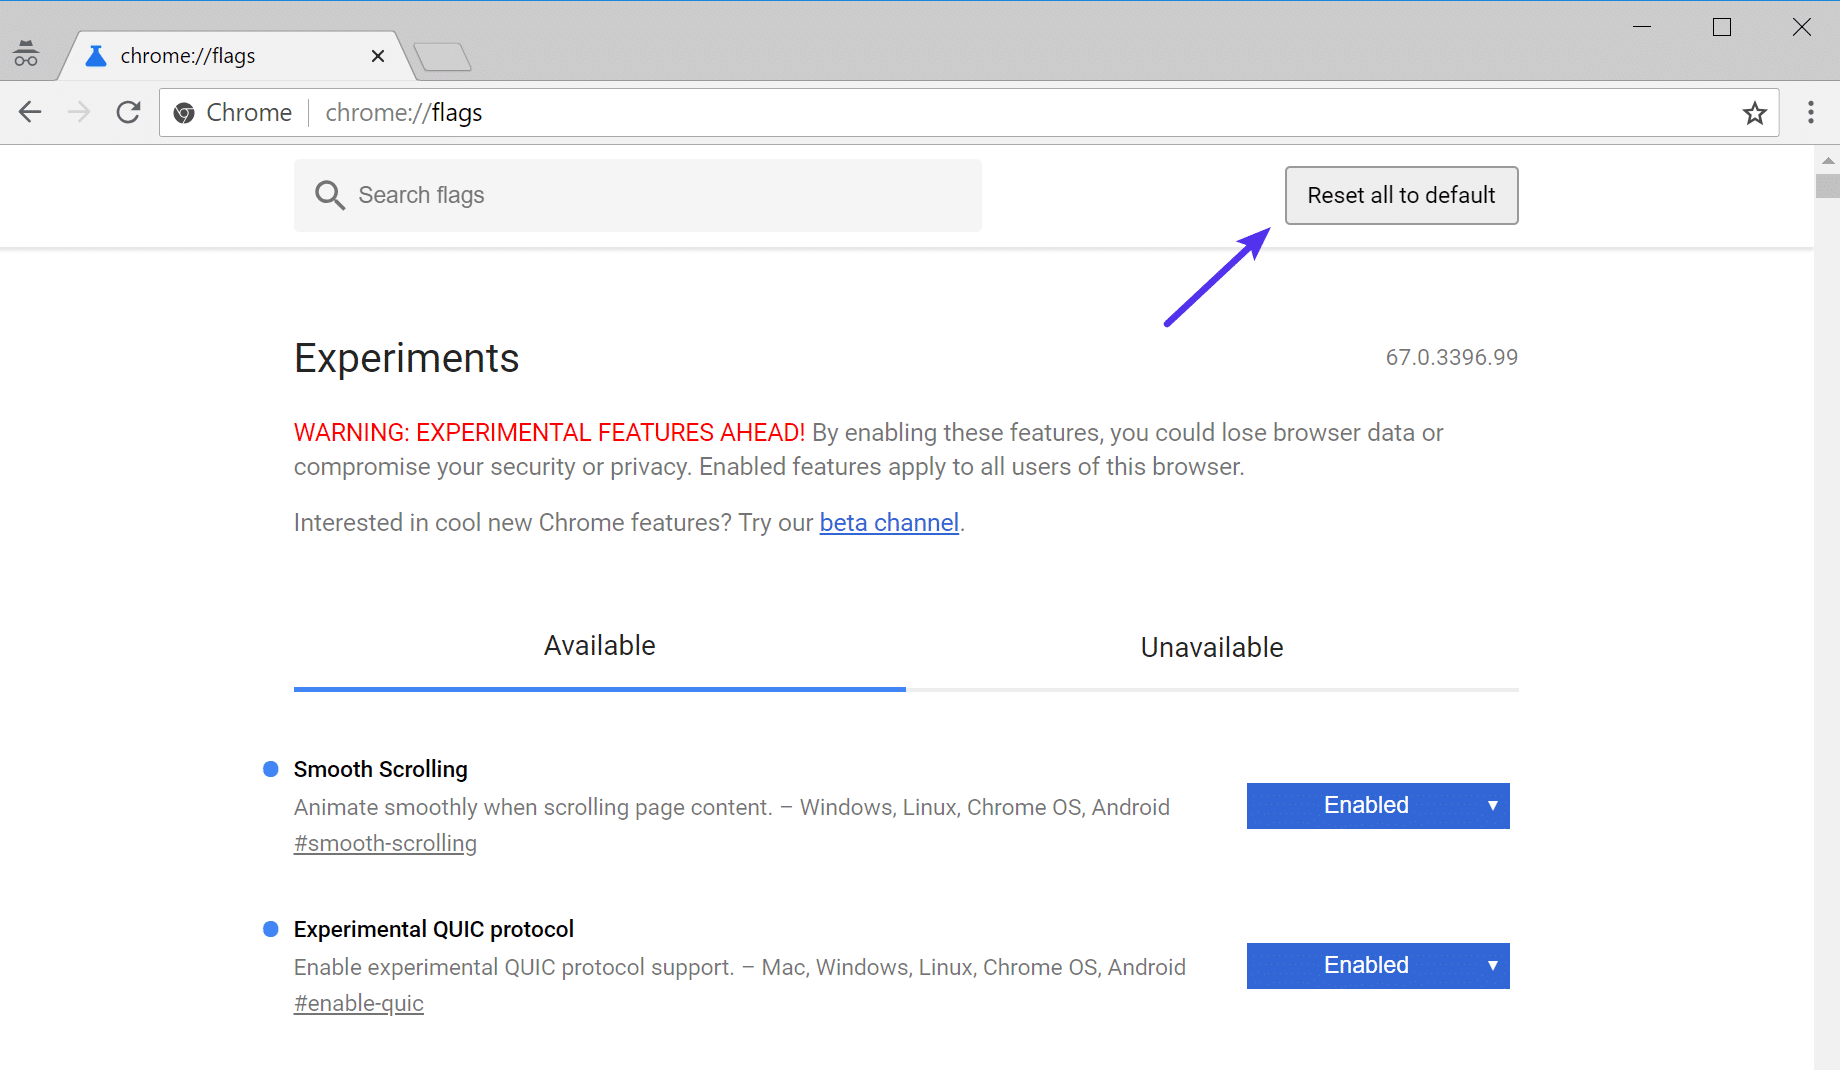
6. By Resetting the Chrome Flags
One solution is resetting the Google Chrome settings and the experimental features that were modified by mistake. Open the below link in Chrome.
chrome://flags
A window will appear with all experimental features; click reset all in the upper right corner. Then close and start the browser again.
7. By Disabling the VPN or Antivirus
Though VPN and Antivirus ensure safety but might prevent you from accessing some websites, to resolve the issue, you can temporarily turn off the active VPN or antivirus and roll back the changes if not required.
You can disable the Antivirus from the control panel and temporarily turn it off. To disable the VPN details on your system, follow the steps below.
- Go to Control Panel, navigate Network and Internet, and click Network Connections.
- Select the VPN accordingly and click Properties.
- Go to the Networking tab, and click uninstall.
- Restart the system after making the changes.
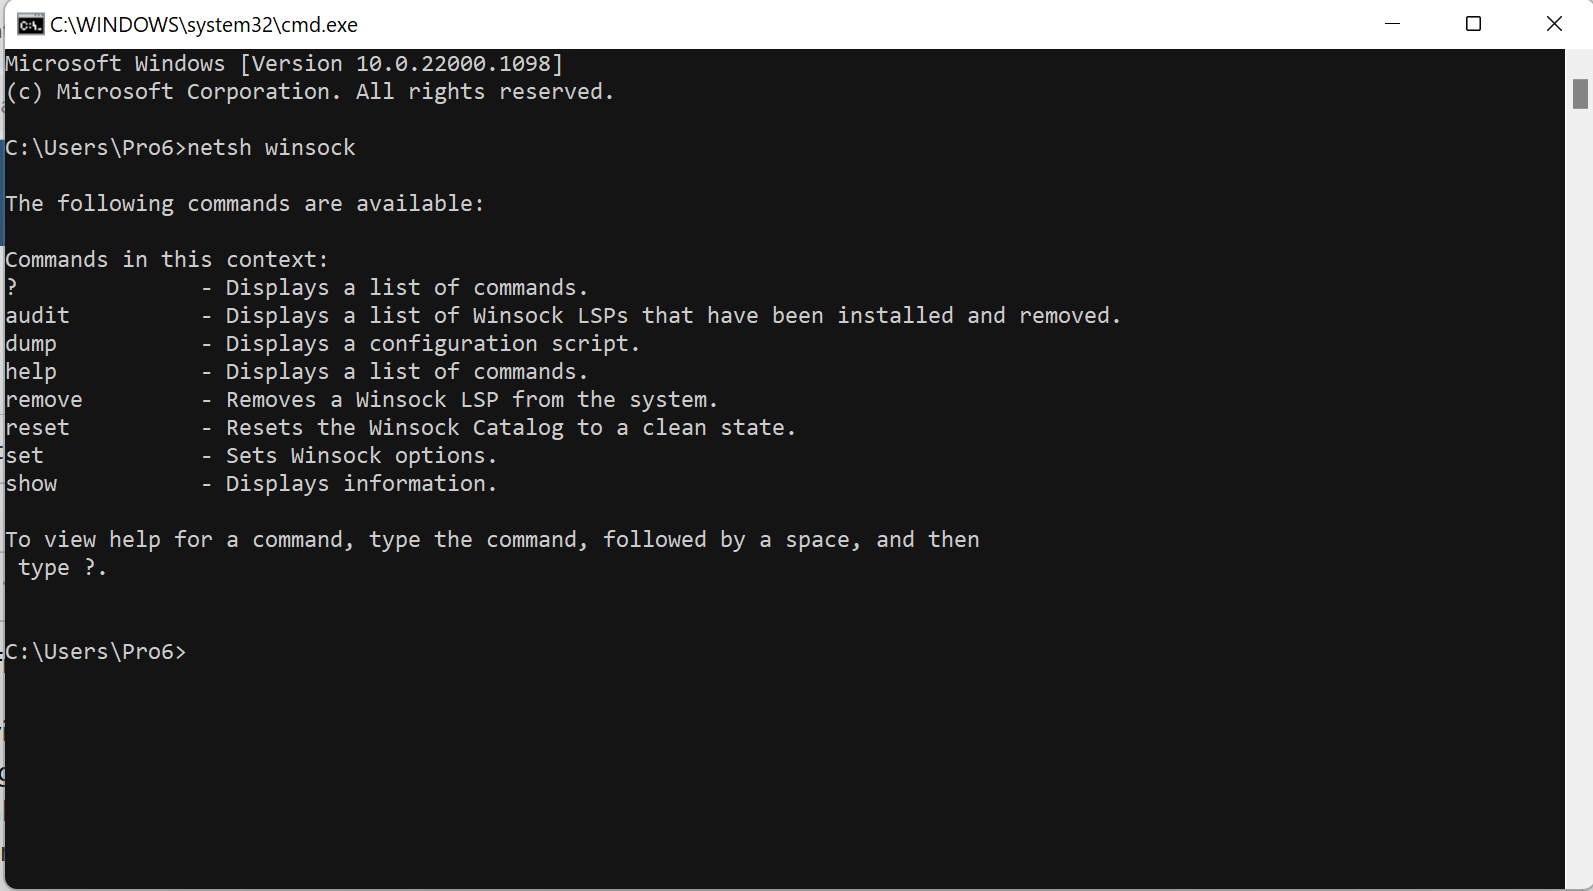
8. By Reset the Network Adapter
- Right-click the start button again and click on the command prompt.
- On this command prompt window, type in
netsh winsockreset and then enter. - Restart the computer after you have entered the command.
9. By Moving to Google DNS
If you often see error messages and experience low downs, you can switch to OpenDNS or Google DNS instead. These are two very reliable and tend to be swifter than the DNS Servers that your Internet Service Provider provides.
- Open your settings on the computer and click on “network & internet.”
- When the next screen appears, scroll to “network & sharing center.”
- Once that screen loads, click on the WiFi Network name
- After seeing the WiFi status screen, click the «Properties» option toward the bottom. If you are prompted to enter your admin password, do so now
- On the WiFi properties screen, choose «internet protocol version 4” and then select the “Properties” button
- On the following window, choose the “Use the following DNS Server” addresses option
- Enter the sequence 8.8.8.8 in the field beside the Preferred DS Server
- Next to the Alternate DNS server, go ahead and enter the sequence 8.8.4.4
- Select the OK button to save these new settings
10. By Clearing the Chrome Browser Cache
- Open the Google Chrome Browser on your PC
- Select the three dots in the Chrome Menu Icon and then hover the mouse over the More Tools section
- Click «Clear browsing data.”
- On the screen that pops up, choose “all-time” and then click “clear data.” If you want to retain certain browsing data, you can deselect individual items
11. By Contacting Your Internet Provider
This is one solution to avoid the issue, and you can try restarting your Internet router. Follow the below steps to ensure it:
- Unplug both your modem and router and wait for a few seconds.
- Plug the modem and router back in and wait for a few minutes.
- Check if the issue gets resolved.
You can call your internet provider to look into the issue if this does not work.
Conclusion
DNS_PROBE_FINISHED_NXDOMAIN problem is prevalent and easy to fix. We have already discussed 11 methods to help you eliminate the problem. We have mentioned easy-going steps for each method that is easy to manage and handle. There is no need to go through every method if your issue gets resolved with any method. Once you eliminate the DNS problem, you can access the website without issue.
People are also reading:
- What is DNS?
- Best DNS Servers to Use
- How to Install a DNS Server in Windows Server?
- How to Fix DNS Server Not Responding Error?
- Печать
Страницы: [1] Вниз

Тема: Код ошибки: DNS_PROBE_FINISHED_NXDOMAIN (Прочитано 34561 раз)
0 Пользователей и 1 Гость просматривают эту тему.

monstrikow

вылезла вот такая ошибка
Код ошибки: DNS_PROBE_FINISHED_NXDOMAIN
знаю что нужно прописать dns-nameserver 8.8.8.8
Но не знаю как!?
Наморщите мозг плиз)))))
Я знаю Бейсик, но для теории это достаточно
Остальные языки познаются в практике!!!
shyatan007
Пропишите в конфиге /etc/resolv.conf строчку nameserver 8.8.8.8
monstrikow

sudo gedit /etc/resolv.conf
и в самом низу?
а перезапускать как нибудь нужно, рестар делать, аль ещё что?
« Последнее редактирование: 22 Декабря 2014, 16:37:18 от monstrikow »
Я знаю Бейсик, но для теории это достаточно
Остальные языки познаются в практике!!!
shyatan007
А что там у вас сейчас прописано?
monstrikow
# Dynamic resolv.conf(5) file for glibc resolver(3) generated by resolvconf(
# DO NOT EDIT THIS FILE BY HAND — YOUR CHANGES WILL BE OVERWRITTEN
nameserver 127.0.1.1
search Dlink
Я знаю Бейсик, но для теории это достаточно
Остальные языки познаются в практике!!!
shyatan007
Последнюю строчку можете удалить. А 127.0.0.1 замените на 8.8.8.8
Karl500
Т.е. предупреждение
# DO NOT EDIT THIS FILE BY HAND — YOUR CHANGES WILL BE OVERWRITTEN
никого не останавливает? Ну-ну…
monstrikow
Я знаю Бейсик, но для теории это достаточно
Остальные языки познаются в практике!!!
shyatan007
« Последнее редактирование: 22 Декабря 2014, 17:00:19 от shyatan007 »
AnrDaemon
вылезла вот такая ошибка
Код ошибки: DNS_PROBE_FINISHED_NXDOMAIN
знаю что нужно прописать dns-nameserver 8.8.8.8
Но не знаю как!?
Наморщите мозг плиз)))))
Не надо. Это неумные люди, не способные разобраться в проблеме, советуют.
Попробуйте отключить IPv6.
И не забывайте указывать, ГДЕ вы эту ошибку встречаете.
P.S.
Если не поможет отключение IPv6 — звоните провайдеру и насилуйте ему мозг. Скорее всего, их DNS сбоит.
Хотите получить помощь? Потрудитесь представить запрошенную информацию в полном объёме.
Прежде чем [Отправить], нажми [Просмотр] и прочти собственное сообщение. Сам-то понял, что написал?…
- Печать
Страницы: [1] Вверх
Last updated on March 23rd, 2020 at 05:46 pm
In this post, I will explain to you how we can fix the dns_probe_finished_nxdomain error for our website. This is a very common error which occurs sometimes when we try to access our website. This error is really very frustrating when it occurs suddenly and you are unable to access your site.
If you get this error when you browse your website don’t worry this post help you to fix this with simple working steps. Here are some steps which work in most browsers like chrome and firefox etc.
- What is DNS?
- what does dns_probe_finished_nxdomain mean?
- How to fix dns_probe_finished_nxdomain?
What is DNS
DNS is Domain Name System, It is like an internet phone book. that is easy to remember like – trinitytuts.com. Whenever we type Domain and hit enter for example, When user type trinitytut.com in the address bar and hit enter then in the backend DNS translates it into a computer-friendly server IP address.
DNS_PROBE_FINISHED_NXDOMAIN is an error that notifies about DNS lookup failure. This error occurs due to misconfiguration or problem with your DNS. Due to this error, you are not able to access your site you see this error whenever you try “This site can’t be reached” or “This site is not available“.

Learn how to fix Linux DNS Probe finished issue in simple steps.
How to fix DNS_PROBE_FINISHED_NXDOMAIN
You can try below solution to fix DNS_PROBE_FINISHED_NXDOMAIN issues.
- Release and Renew IP Address
- Restart DNS Client Service
- Change DNS Servers
- Reset Your Browser
- Disable VPN and Antivirus Temporarily
1. Release and Renew IP Address
You can flush your local DNS cache and also try to clear your browser cache.
In Window open command prompt enter these commands ipconfig /release after this ipconfig /flushdns this command will flush all DNS cache. And after this type ipconfig /renew to renew your IP address.
In Mac open a terminal and enter this command dscacheutil -flushcache.
2. Restart DNS Client Service –
In Window press Windows + R then type servcies.msc hit enter then search for DNS client right-click on it select stop or start to enable/Disable the service.
3. Change DNS Servers –
In Window, you can follow the below steps to change DNS Server.
→ Go to the Control Panel
→ Click on Network and Internet
→ Click on Network and Sharing Center
→ Go to Change Adapter Settings.
→ You’ll see some network icons here. Select the network you’re currently connected to and right-click on it. Select Properties.
→ Click on IPv4 and select Properties.
→ If “Obtain DNS server address automatically” is selected, click the radio button next to “Use the following DNS server addresses:”
→ Now enter the DNS addresses you want to use.
→ Click on Ok and Close.
In Mac, you can change DNS servers using the below steps
→ Go to System Preferences
→ Click on the Network icon and then click Advanced after that click on DNS tab then add DNS server Address
For IPv4: 1.1.1.1 and 1.0.0.1
For IPv6: 2606:4700:4700::1111 and 2606:4700:4700::1001
In Linux, you can follow the below steps.
→ Open a terminal and add below command
sudo nano /etc/dhcp/dhclient.conf
→ Now add below line in the file
supersede domain-name-servers 8.8.8.8;
→ Save the file and restart the network.
sudo service network-manager restart
Refresh your page and done.
4. Reset Your Browser
– You can reset your browser from browser setting sometimes also help full.
5. Disable VPN and Antivirus Temporarily
Some time Antivirus and VPN overwrite network settings due to which you may get this error you can disable your antivirus or VPN temporary and try loading your website.
I hope this post helps you to fix DNS_PROBE_FINISHED_NXDOMAIN issue in your browser.
resolv.conf indeed contains the DNS-servers that should be used. But ubuntu now uses systemd which provides it’s own DNS-server.
127.0.0.53 is (just like 127.0.0.1) your own system, so resolv.conf forces your system to contact it’s own (systemd) dns-server. This systemd dns-server will send the requests to ‘real’ DNS-server(s).
You can change the final dnsserver(s) that systemd uses with:
systemd-resolve -i NETWORKINTERFACE --set-dns=SOMESERVER
Systemd allows you to use different settings for each networkconnection, which is why you also have to specify the network-interface.
Suppose you want to make sure that all dns-requests that are sent out on interface eth0 are being sent to 8.8.8.8, then the command becomes systemd-resolve -i eth0 --set-dns=8.8.8.8.
You can run this command for multiple interfaces if you need to make sure that in all these cases the same dns-server is being used.
See systemd-resolve --status for the current settings and man systemd-resolve for everything there is to know about configuring systemd’s DNS-server.
PS: You will probably already know this, but I’ll mention it anyway: Replace SOMESERVER by a IP-address instead of a name, because otherwise you would have a circular problem
I am using Ubuntu 14.04 64 bit with a wired connection. For the last 7 days, I have been unable to open Github. It instead has an error.
Is there anything wrong with my connection / hardware / network / browser settings or in website itself?
Chrome gives This webpage is not available with below details
The server at github.com can’t be found, because the DNS lookup
failed. DNS is the network service that translates a website’s name to
its Internet address. This error is most often caused by having no
connection to the Internet or a misconfigured network. It can also be
caused by an unresponsive DNS server or a firewall preventing Chromium
from accessing the network. Error code: DNS_PROBE_FINISHED_NXDOMAIN
Firefox gives Server not found
P.S. no firewall software installed on my system.
asked Dec 22, 2014 at 15:57
![]()
3
Go to Open Network and Sharing center ->change Adapter setting->Your Network->rigth click
->TCP/Ipv 4->click on properties ->use the following DNS server addresses ->
Preffered DNS Server :9.9.9.9
Alternate DNS Server :9.9.8.8
answered Dec 23, 2014 at 13:28
4
I had the same problem on a different platform. I was using windows 8.1 when I suddenly could not access github anymore, this error came right after creating a site on github pages.
I solved this by flushing my dns cache.
Type this in the command promt:
ipconfig /flushdns
answered Feb 26, 2016 at 7:23
![]()
1
On ubuntu just: right click on your connection on panel (top right on unity by default) and click configure network connections. Then right click on your wifi -> click edit -> go to IPv4 (you may need to extend the window to see it), and in «Other DNS servers» type: 8.8.8.8,9.9.8.8 and click OK.my settings on my Kubuntu (KDE instead of Unity)
answered May 12, 2016 at 16:05
![]()
If you run a website, you’ll likely run into the occasional error. Most originate either at the server or application level (within WordPress). However, sometimes you’ll run into an error such as “DNS_PROBE_FINISHED_NXDOMAIN” which stems from your computer settings.
In this article, we’re going to talk about how to identify the DNS_PROBE_FINISHED_NXDOMAIN error and go over all the ways you can deal with it.
Let’s get to work!
What Is the DNS_PROBE_FINISHED_NXDOMAIN Error?
To explain what the DNS_PROBE_FINISHED_NXDOMAIN is, we need to go over the concept of a Domain Name System (DNS). A DNS is a database of IP addresses mapped to domain names.
Every server has an IP address, which is used to identify the websites saved on that computer. However, instead of typing an IP address into your browser to access web content, you can simply use its corresponding domain name.
A DNS can identify which IP address a domain name points to. When you type in a URL, it searches its database to find the site you’re trying to access.
However, in some cases, DNS servers might not be able to fetch the information you want. If you run into the DNS_PROBE_FINISHED_NXDOMAIN error, here’s what happened:
- You tried to access a website using its domain name (which you know should work).
- Your computer submitted your request to the DNS it uses to map domains to the IP addresses they can connect to.
- The DNS server told your computer “That domain doesn’t exist!”, hence the “NXDOMAIN” part of the error.
When that happens, you’ll see an error message that looks like this (if you’re using Chrome):
The wording can vary a bit depending on which browser you’re using, but the gist is always the same. For example, here’s the same error in Firefox:
If you run into the DNS_PROBE_FINISHED_NXDOMAIN error, take a second to doublecheck if you’re typing in the right domain. Assuming the domain exists and you entered it correctly, the problem usually lies with your computer’s configuration.
How to Fix the DNS_PROBE_FINISHED_NXDOMAIN Error (3 Possible Solutions)
There are a lot of ways you can fix the error in question depending on what the root cause is. Unfortunately, that can be hard to identify.
However, each of the fixes below should only take you a few minutes to implement. If you follow our instructions and proceed with one fix after another, the DNS_PROBE_FINISHED_NXDOMAIN should be out of your way soon.
1. Renew Your IP Address and Flush/Restart Your Cache
One of the first things you should try if you run into local connectivity issues (besides restarting your router) is renewing your IP address. The process varies slightly depending on your Operating System (OS), so we’ve included instructions for both Windows and Mac users.
Windows
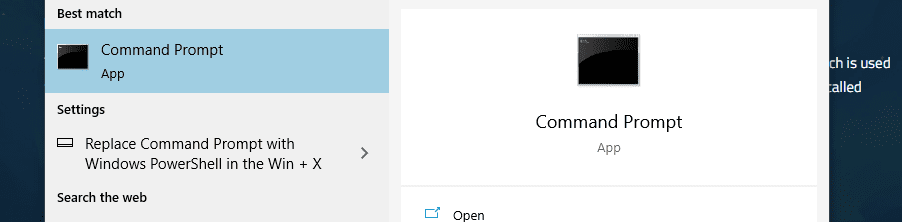
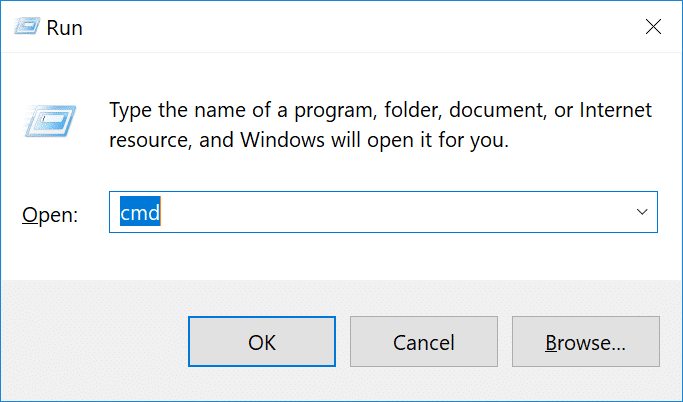
If you’re using Windows, you can renew your IP address by opening the command prompt with administrator privileges. To do so, go to the Windows Start menu and type “cmd”, then select the corresponding option:
Once it’s open, go through the following three commands one by one, hitting the Enter key after each one to execute it:
- ipconfig /release
- ipconfig /renew
- ipconfig /flushdns
Those three commands will release your IP address, renew it, and then flush your local DNS cache.
Another option to flush the local cache is to use the two following commands:
- net stop dnscache
- net start dnscache
These prompts stop and restart the Windows service that manages your local DNS cache. After running both sets of commands, try accessing the problem website once more to see if the error persists.
macOS
On macOS, you can renew your IP address without using commands. To do so, follow these instructions:
- Go to System Preferences.
- Navigate to Network, select your active connection, and click on the Advanced button.
- Go to TCP/IP and select the Renew DHCP option.
However, you will need to use Terminal to flush the DNS cache. Open it (Go > Utilities) and then enter the following prompt:
dscacheutil -flushcache
Now you’re ready to try accessing the offending URL again. If it still doesn’t work, move on to the next fix.
2. Configure Your Computer to Use a Different DNS Server
By default, your computer will decide which DNS server to connect to automatically. In some cases, that DNS server might not have the best response times. Or, it might be unavailable, leading to errors such as DNS_PROBE_FINISHED_NXDOMAIN.
One way to determine if that’s the source of the problem is to configure your connection to use a different DNS server. Let’s go over how to do that on both Windows and macOS.
Windows
Open the Windows Start menu and type “Network Status”. Select the first result that comes up and on the next screen, click on the Change adapter options setting:
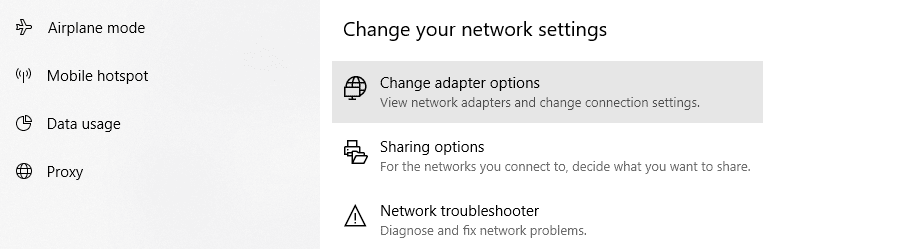
A new window will pop up including icons for all the connections set up on your computer:

Identify your active internet connection, then follow these steps:
- Right-click on the active connection and select Properties.
- Find the Internet Protocol Version 4 (TCP/IPv4) item, select it, and open its Properties setting.
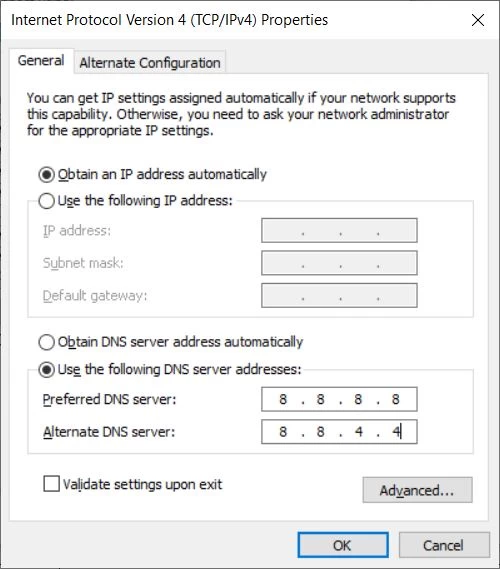
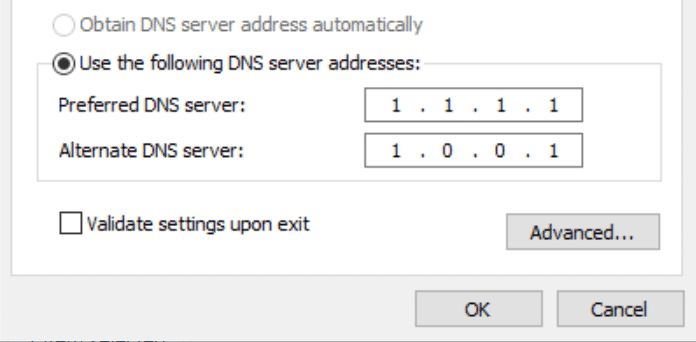
- Select the Use the following DNS server address option.
You should then see this screen, only without any numbers within the Preferred DNS server and Alternate DNS server fields:
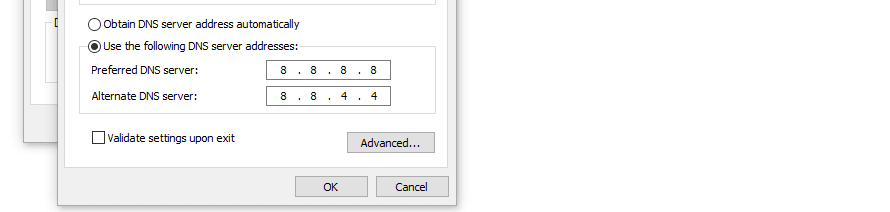
In the example above, we’re using Google’s public DNS servers. To do the same, enter “8.8.8.8” as your preferred DNS server and “8.8.4.4” for your alternate DNS server.
There are a lot more options when it comes to public DNS servers, so feel free to try out any of them. However, Google is usually a safe choice.
If you’re already using a custom DNS server and you run into the DNS_PROBE_FINISHED_NXDOMAIN, try using the opposite approach. That is, revert to the default settings to see if that fixes the issue.
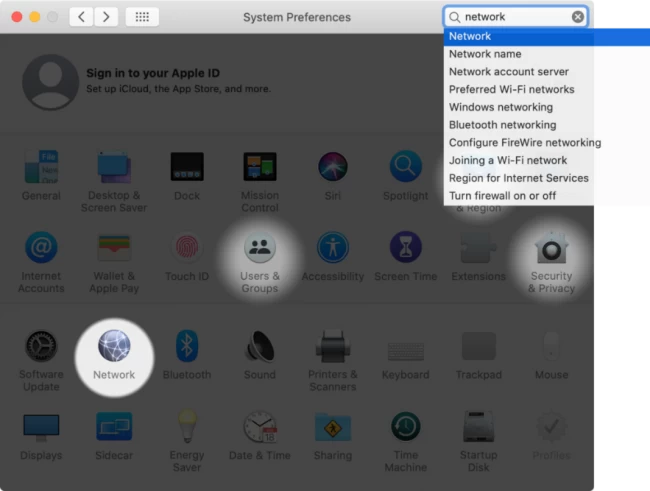
macOS
Changing your active connection’s DNS server on macOS works much the same as in Windows. Here’s what you need to do:
- Go to System Preferences.
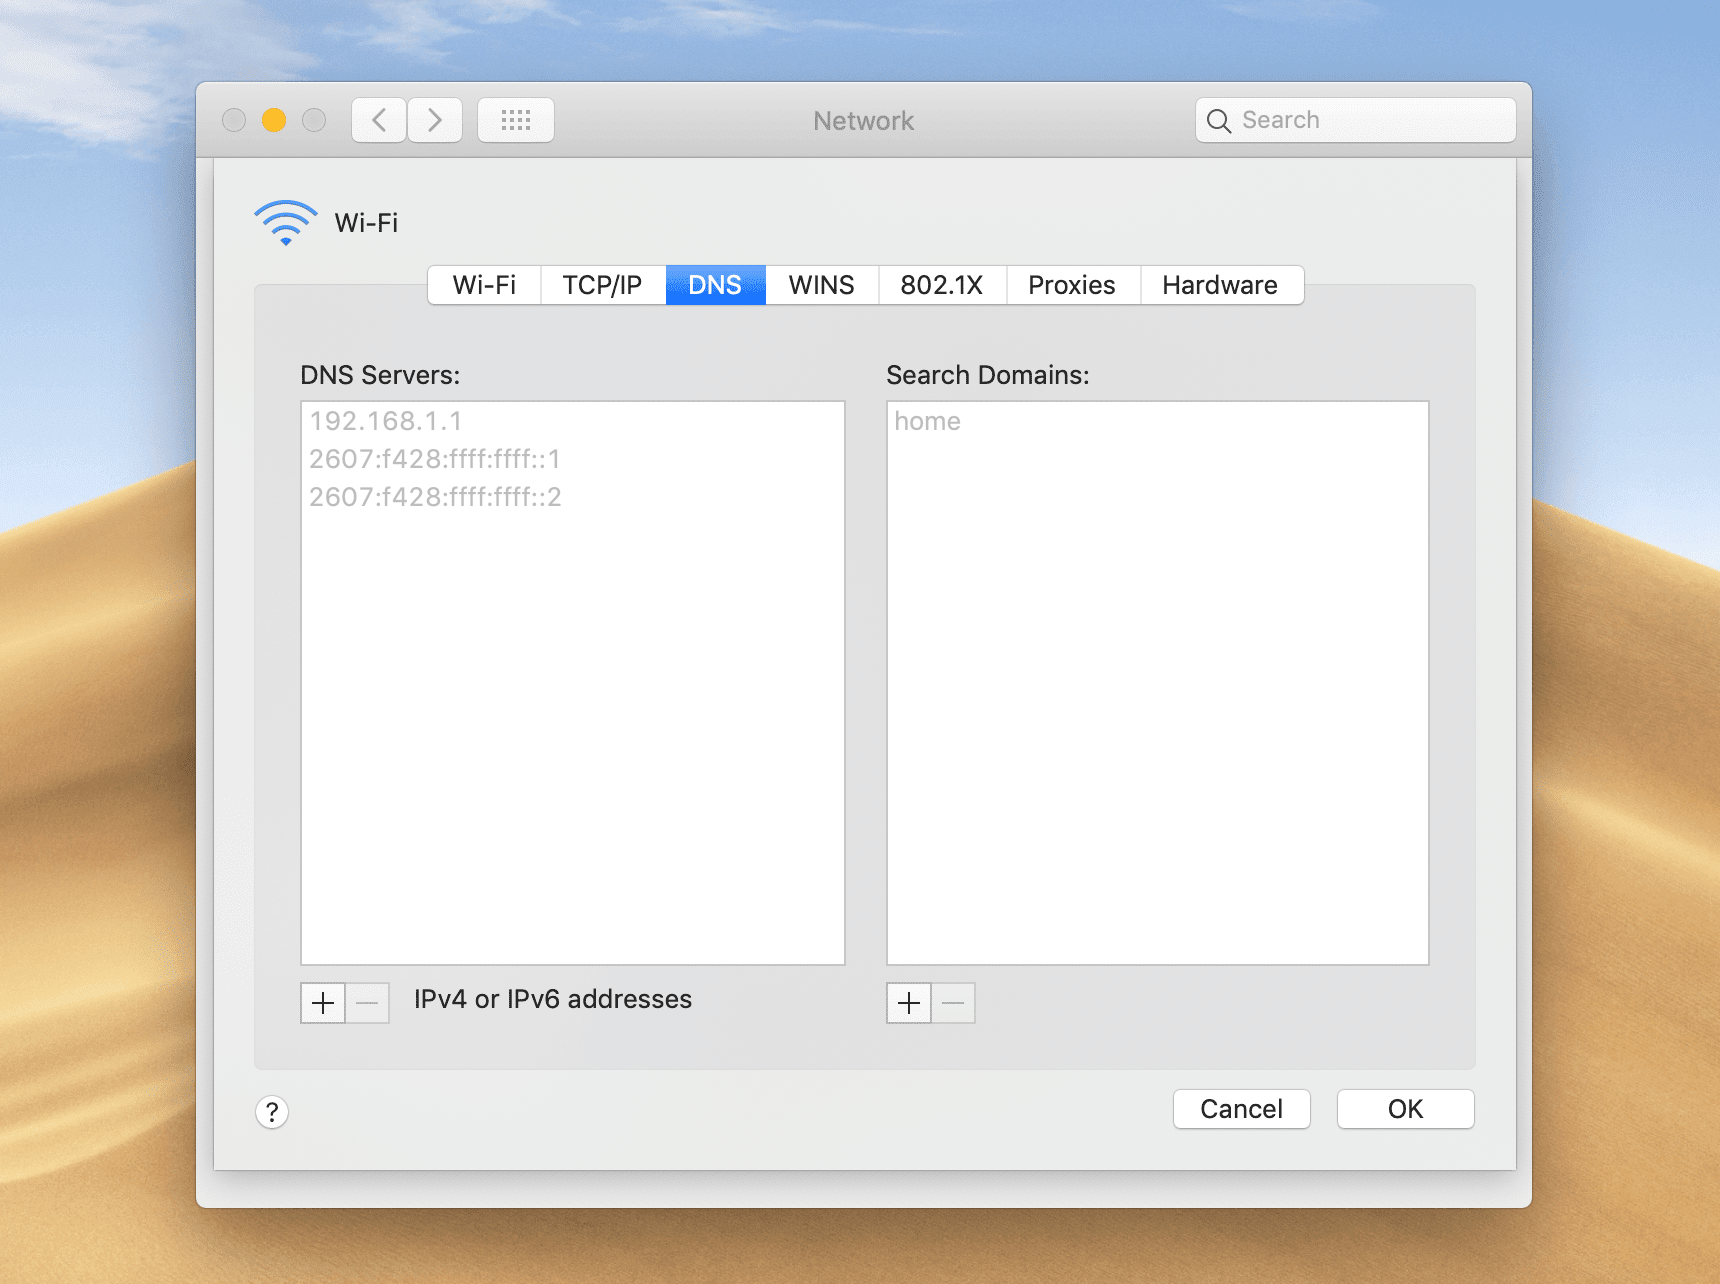
- Navigate to Network and select your active connection.
- Click on the Advanced button within your active connection’s settings.
- Select the DNS tab and add the addresses you want to use.
During step four, you should see a screen like this one:
Just as with Windows, you can use any DNS server you want. Once you’re done, check if the DNS_PROBE_FINISHED_NXDOMAIN error persists.
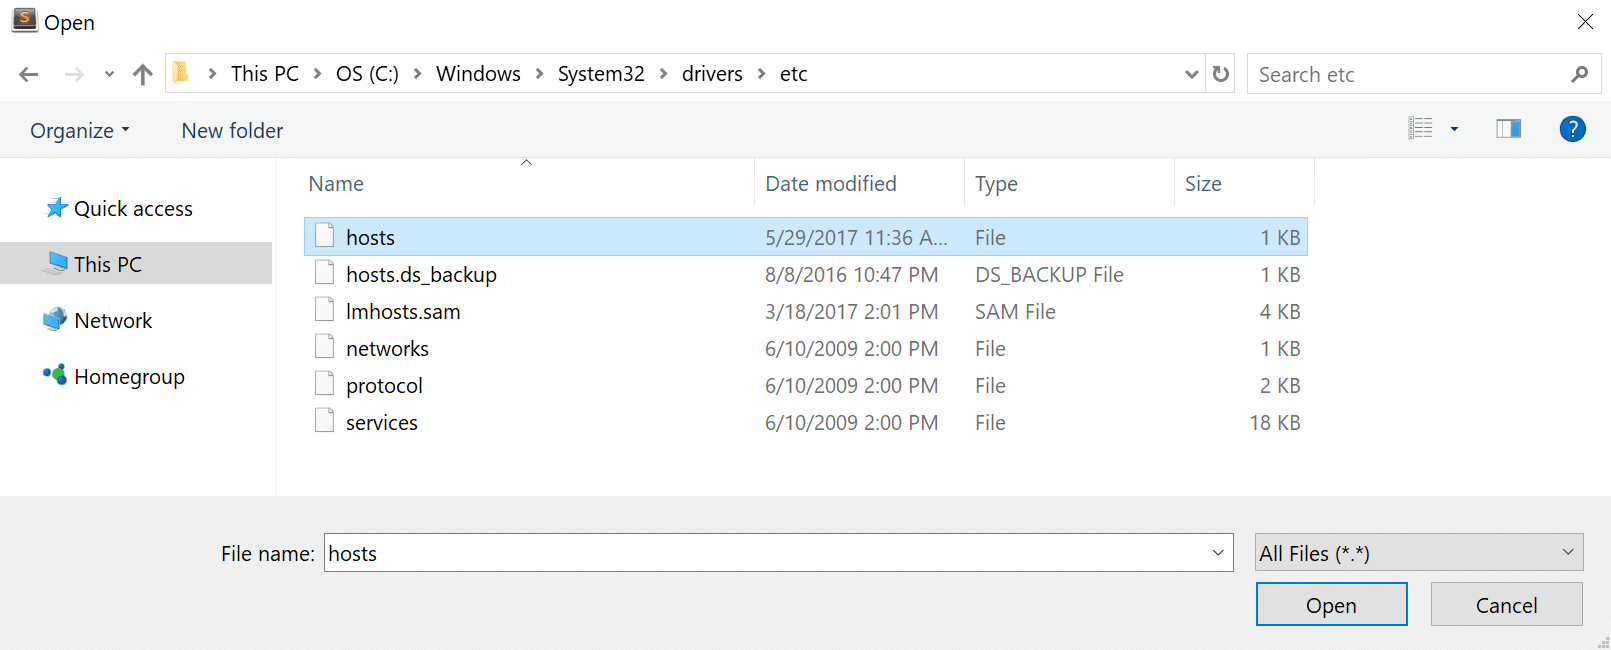
3. Check Your Computer’s hosts File
Your computer’s hosts file enables you to map IP addresses to domains manually. That can come in handy for local web development, for example, since you can map local sites to custom domains without registering them.
In some cases, programs may edit your hosts file without your knowledge. This can lead to errors such as DNS_PROBE_FINISHED_NXDOMAIN. Here’s how to fix it.
Windows
First, locate and open your hosts file. You can find it by navigating to the local directory C:WindowsSystem32driversetc:
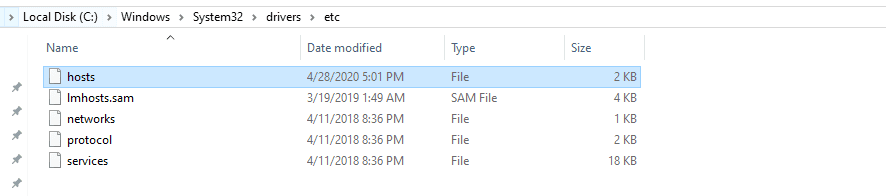
Open the file using your favorite text editor. Keep in mind that you might need to set administrative privileges to edit it.
In your hosts file, you’ll likely have at least a few custom mappings set up. Check to make sure none of the entries match the domain name you’ve been trying to access.
If the target domain is listed, remove the entry and save the changes to your hosts file. Then try accessing the site again.
macOS
The easiest way to edit your hosts file on macOS is using Terminal. First, open the application and enter the following command:
sudo nano /private/etc/hosts
The command will open your hosts file using the Nano text editor with administrative privileges. If you’re more comfortable with another editor, you can replace that part of the command.
Take a look around the file to see if the domain that’s returning the DNS_PROBE_FINISHED_NXDOMAIN error is there. If it is, remove that mapping and save your changes to the file.
Conclusion
There are many ways to fix the DNS_PROBE_FINISHED_NXDOMAIN error. Fortunately, most of the fixes are remarkably easy to implement. If you know what to do, you should be able to regain access to the website you’re trying to reach in a matter of minutes.
If you happen to run into the DNS_PROBE_FINISHED_NXDOMAIN error, here’s what you can do to solve it:
- Renew your IP address and flush/restart your cache.
- Configure your computer to use a different DNS service.
- Check your computer’s hosts file.
Do you have any questions about how to fix the DNS_PROBE_FINISHED_NXDOMAIN error in WordPress? Let’s talk about them in the comments section below!
Image by Visual Generation / shutterstock.com
For those of you working with websites on a regular basis, errors specific to the CMS such as the white screen of death or database connection errors are somewhat common occurrences. But another subset of errors you will probably stumble upon are those tied to your internet connection and DNS.
A very common error that Google Chrome users get when trying to browse to a web page is “This site can’t be reached – Server IP address could not be found,” together with DNS_PROBE_FINISHED_NXDOMAIN. This can be downright frustrating as suddenly you can’t browse to your website or perhaps even anywhere at all. 😫
If you’re seeing this error while trying to get to your site, don’t worry, this is fairly easy to fix. Check out the recommendations below on how to get connected again. This can also work for other browsers, such as Firefox, Edge, etc.
Prefer to watch the video version?
What Is DNS_PROBE_FINISHED_NXDOMAIN?
The reason for DNS_PROBE_FINISHED_NXDOMAIN is typically due to a misconfiguration or problem with your DNS. DNS is short for Domain Name System, which helps direct traffic on the internet by connecting domain names with actual web servers. Essentially, it takes a human-friendly request – a domain name like kinsta.com – and translates it into a computer-friendly server IP address – like 216.3.128.12.
When a user enters a URL in their web browser, DNS gets to work to connect that URL to the IP address of the actual server. This is called DNS name resolution and involves a DNS recursor querying various nameservers to figure out the actual IP address of a server. If DNS fails to resolve the domain name or address then you might receive the DNS_PROBE_FINISHED_NXDOMAIN error. The NXDOMAIN part stand stands for Non-Existent Domain. Read more about DNS and how it works.
| Error Code | DNS_PROBE_FINISHED_NXDOMAIN |
| Error Type | DNS error |
| Error Variations | This site can’t be reached Hmm. We’re having trouble finding that site Hmmm… can’t reach this page Safari Can’t Find the Server |
| Error Causes | Internet connection error Firewall is blocking access DNS misconfiguration DNS not yet propagated Unresponsive server |
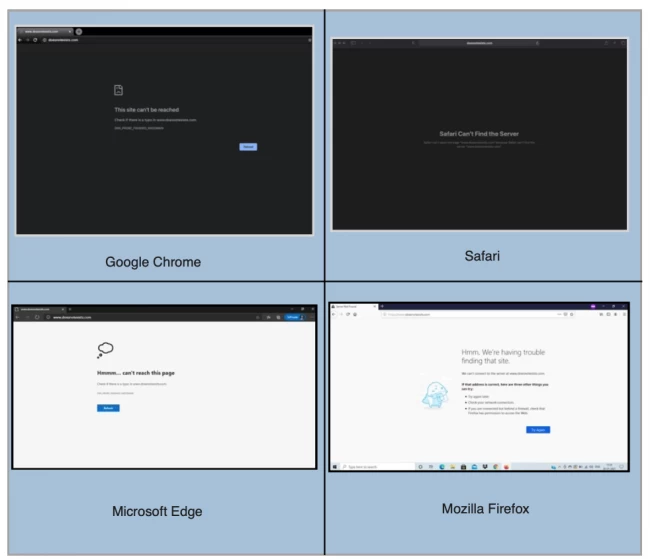
What Does the DNS_PROBE_FINISHED_NXDOMAIN Error Look Like on Browsers?
There are a couple different variations of this error depending upon the browser you’re running.
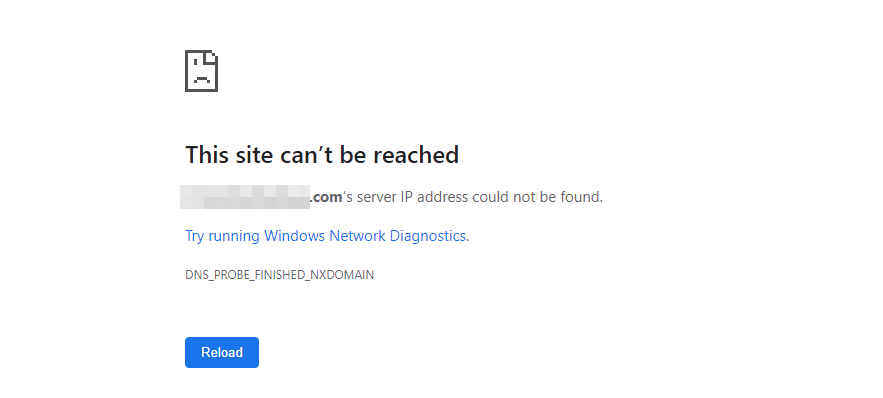
Google Chrome
In Google Chrome this error will show as DNS_PROBE_FINISHED_NXDOMAIN (as seen below), highlighting that this site can’t be reached, followed by server IP address could not be found.
This site can’t be reached or This webpage is not available.
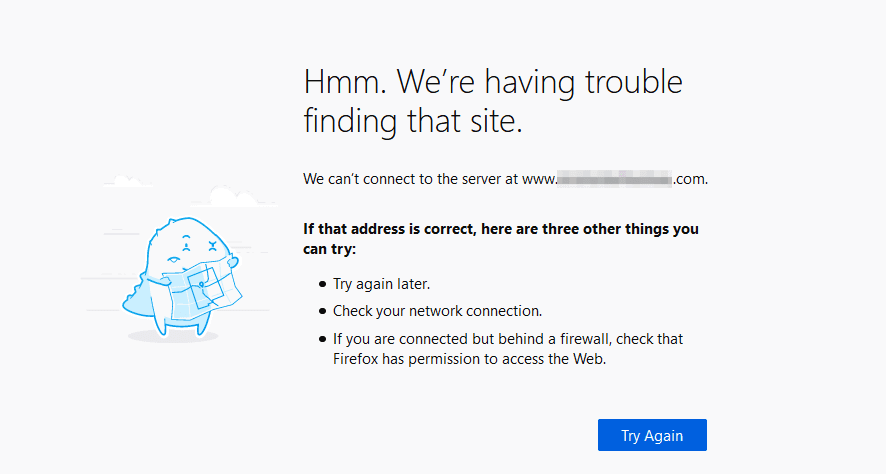
Mozilla Firefox
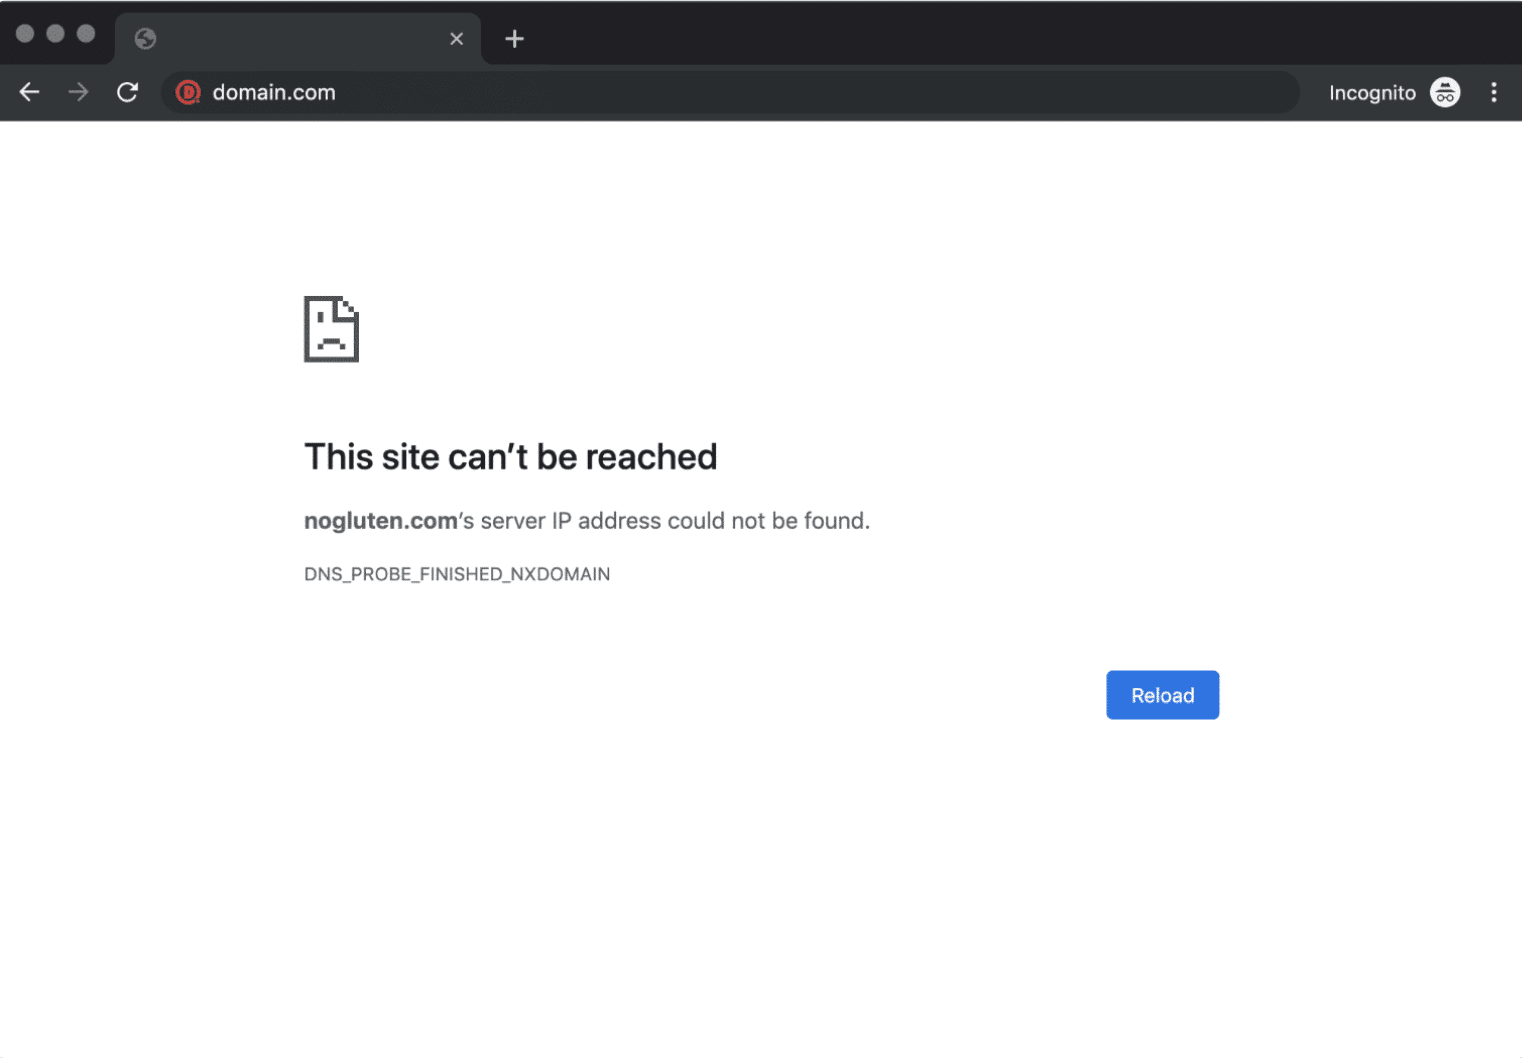
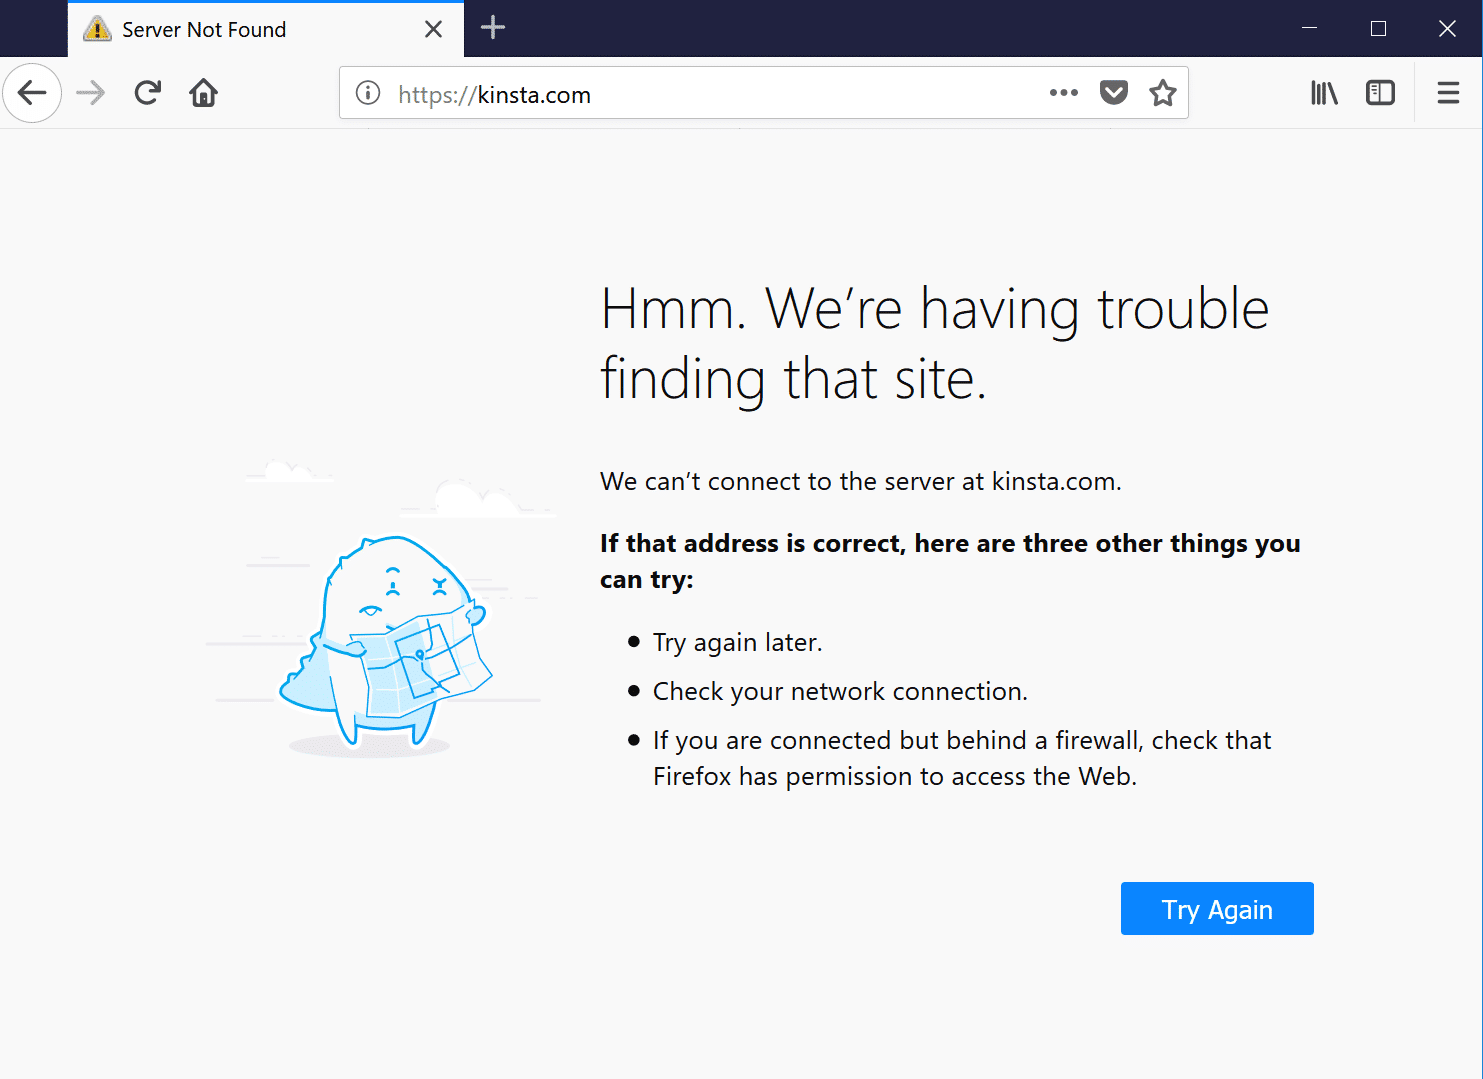
In Mozilla Firefox it will simply show as Hmm. We’re having trouble finding that site (as seen below).
We can’t connect to the server at domain.com.
Microsoft Edge
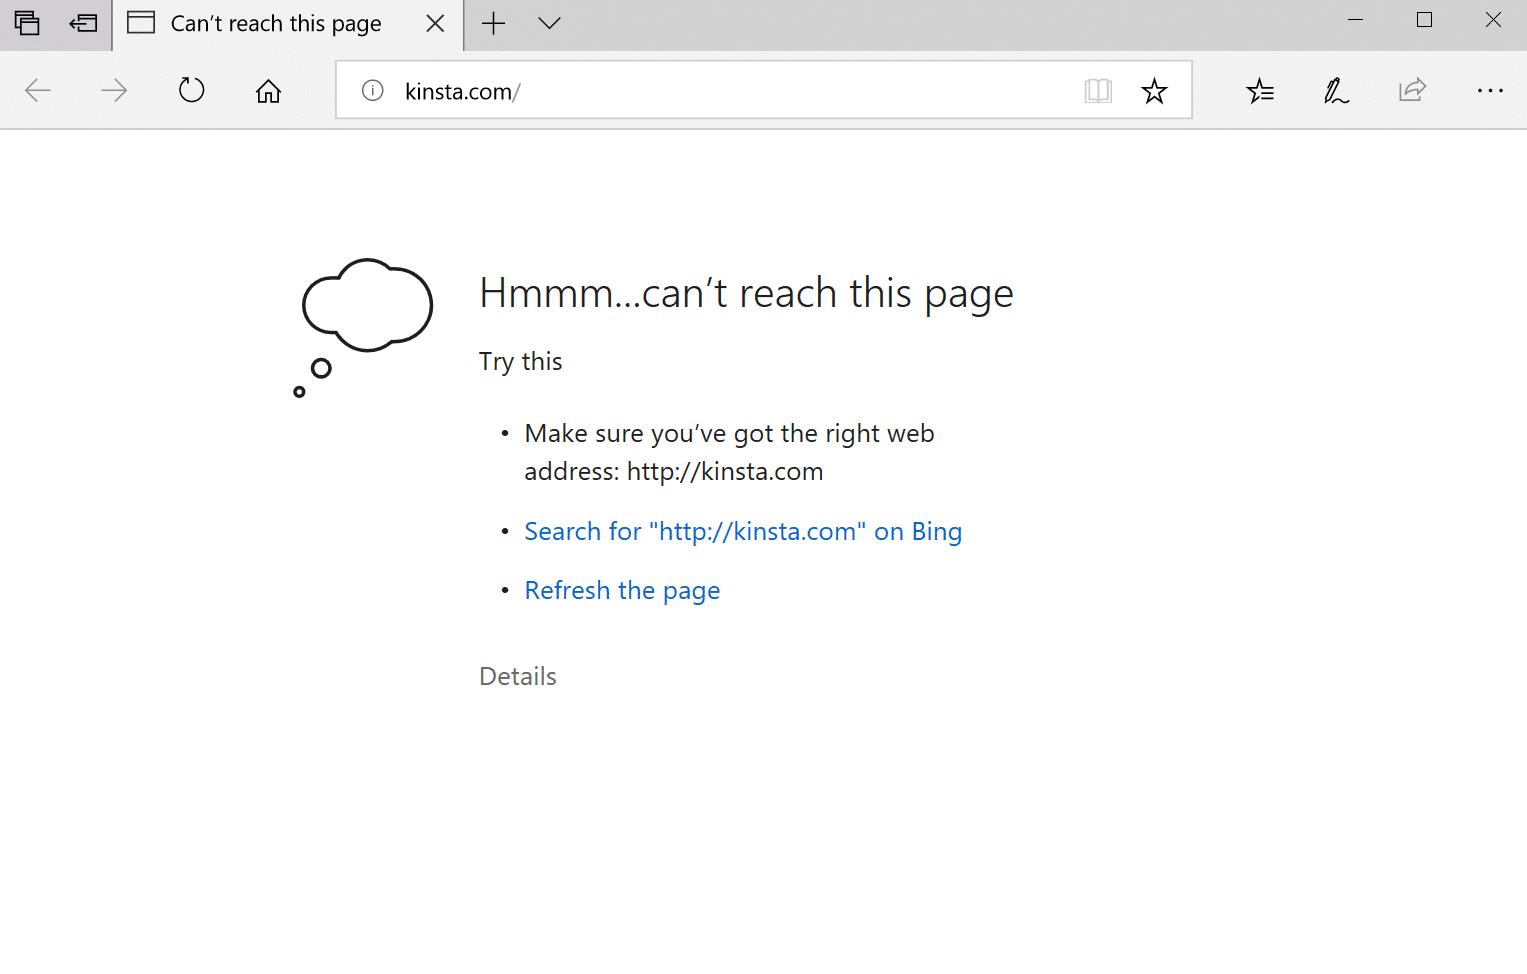
In Microsoft Edge, it will simply show as Hmmm… can’t reach this page (as seen below). Which isn’t very helpful.
Make sure you’ve got the right web address: domain.com.
Safari
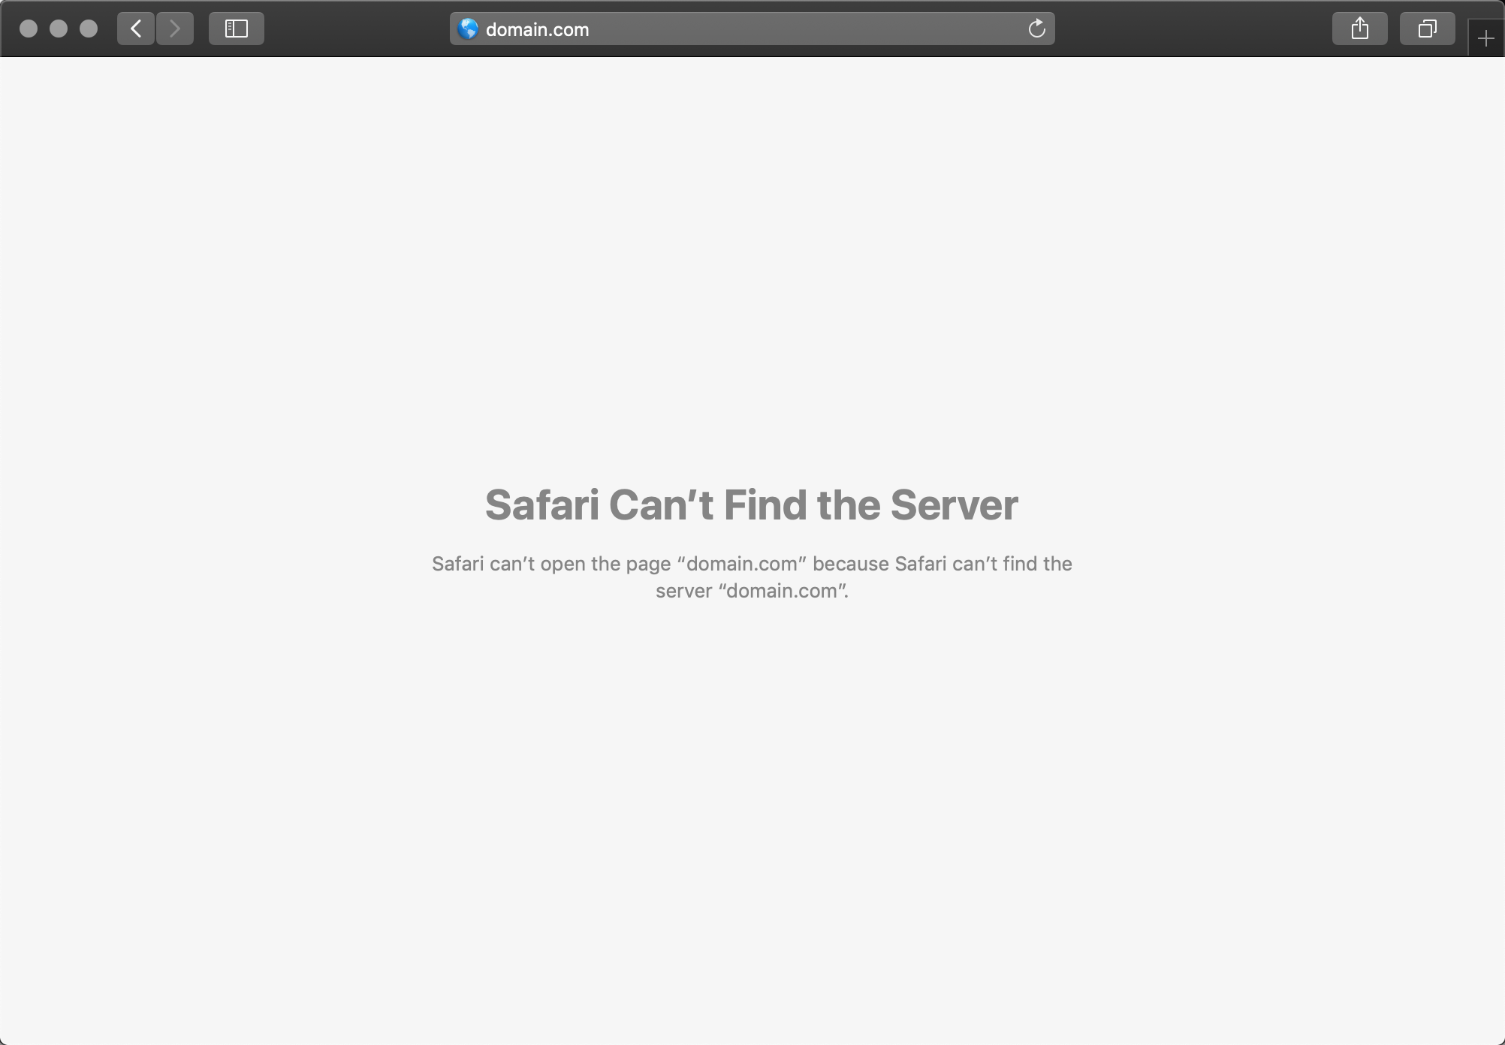
In Safari, it will simply show as Safari Can’t Find the Server (as seen below).
Safari can’t open the page “domain.com” because Safari can’t find the server “domain.com”.
Main Causes of the DNS_PROBE_FINISHED_NXDOMAIN Error
As mentioned, this error happens when the Domain Name System cannot resolve a website’s URL into an IP address. The causes for this could be:
- You typed the site name incorrectly into the search bar.
- There is an internet connection error preventing your access.
- Your firewall is blocking access to the website.
- An antivirus or a VPN is interfering with your network settings.
- The domain has expired or is not registered.
- Your DNS settings are not configured the right way.
How to Fix DNS_PROBE_FINISHED_NXDOMAIN on Desktop
Here are some recommendations and things to check to fix the error (sorted in order by most common reasons we see):
- Release and Renew IP Address
- Restart DNS Client Service
- Change DNS Servers
- Reset Chrome Flags
- Disable VPN and Antivirus Temporarily
- Check Your Local Hosts File
- Check DNS of Your Domain
- Restart Your Computer
1. Release and Renew IP Address
Due to the fact that this is usually a client-side DNS issue, the very first thing you should do is try releasing and renewing the IP address on your computer. This also includes flushing your local DNS cache, which is similar to browser cache.
Windows
In Windows simply open up Command Prompt by pressing the Windows logo key and R. Then type “cmd” and hit Enter.
Type in ipconfig /release and hit Enter. This will release your current IP address.
Then type in ipconfig /flushdns and hit Enter. This will flush your local DNS cache. You should see a “Successfully flushed the DNS resolver Cache” if it worked.
Then type in ipconfig /renew and hit Enter. This will renew your IP address.
You might also try resetting your IP settings and Winsock catalog with the following commands: netsh int ip set dns and netsh winsock reset.
An alternative way to flush and renew your DNS is simply by disabling your network adapter and re-enabling it.
Mac
To release and renew your IP address on a Mac, go to System Preferences…
Click on the network icon and then click “Advanced.”

Click the TCP/IP tab heading if you aren’t already in there. Then click on the “Renew DHCP” lease button.
Just like we did above in Windows, Mac users can also clear their local DNS cache. Although this is done in a different place. Go to Utilities and then click on “Terminal.”

Enter in the following command:
dscacheutil -flushcache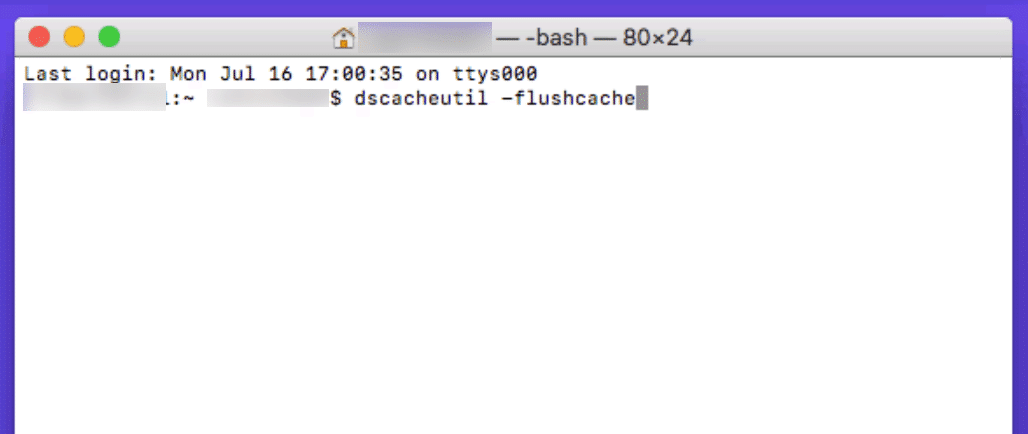
Note: There is no success message on Macs.
2. Restart DNS Client Service
If you’re running Windows you can try restarting the DNS client services which resolves and caches DNS domain names.
Simply open up Command Prompt by pressing the Windows logo key and R. Then type “services.msc” and hit Enter.
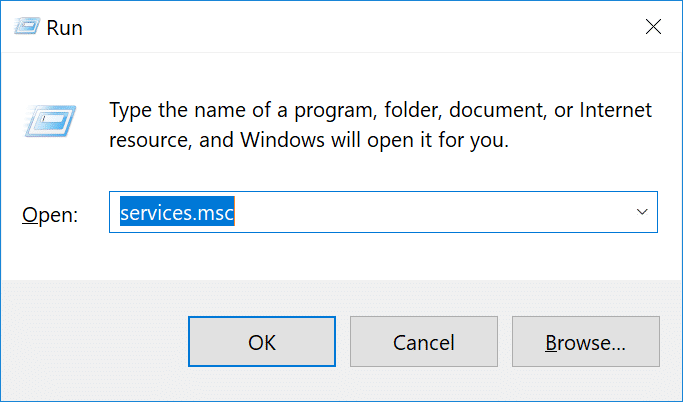
Scroll down to “DNS Client,” right click on it, and select “Restart.”
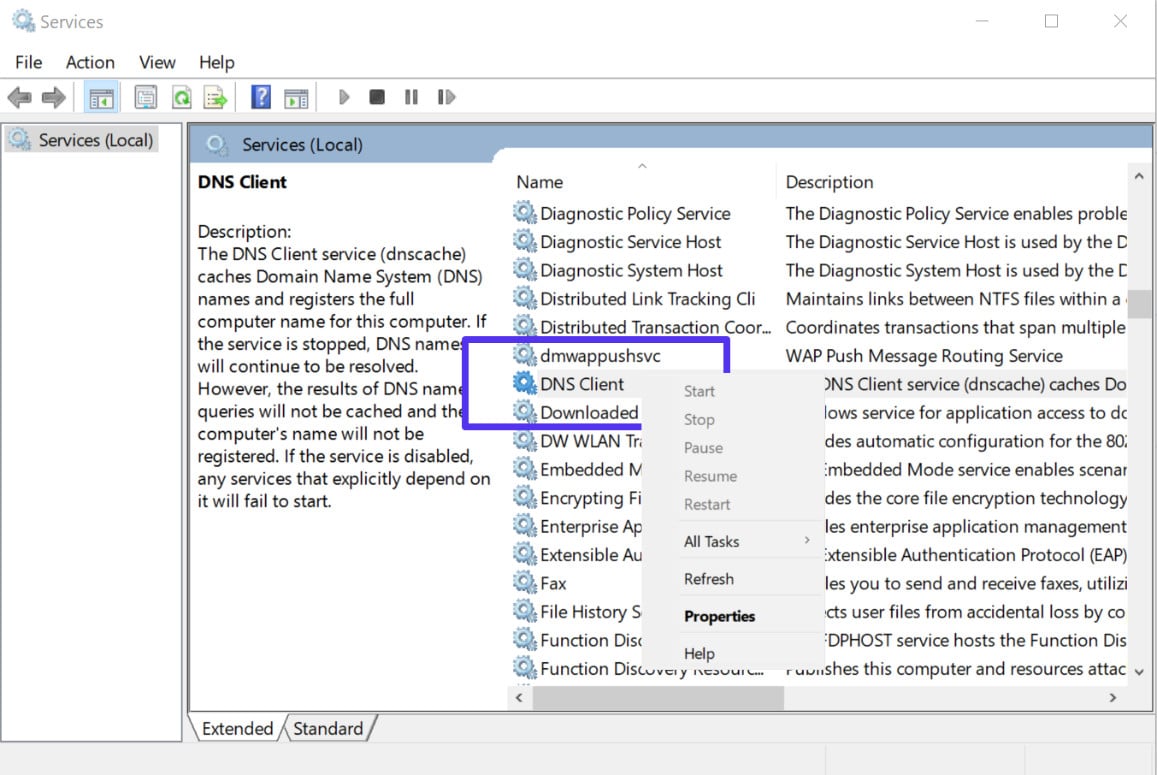
If the restart option is greyed out for you (as it was for us), an alternative way to do it is via the command prompt.
Open up Command Prompt by pressing the Windows logo key and R. Then type “cmd” and hit Enter.
Then enter the following commands:
net stop dnscache
net start dnscache
Depending on the version of Windows you’re running you might get an error saying:
The requested pause, continue, or stop is not valid for this service.
This is most likely because you need to run CMD as a network service to issue the command. If you’re running into this error, we suggest trying the other alternatives below first.
3. Change DNS Servers
The next thing you can try is changing your DNS servers. By default, DNS servers are automatically assigned by your ISP. But you could try temporarily changing these to a public DNS server, such as Google or Cloudflare.
- Some prefer to use Google’s public DNS (8.8.8.8 and 8.8.4.4) long-term due to them sometimes being more reliable.
- Cloudflare also just launched their new secure and blazing fast free DNS (1.1.1.1 and 1.0.0.1) which we will be using in this example. If you want to use Google’s the steps are the same, you simply replace the DNS server addresses with Googles.
Tip: If you’re already using a free DNS server and having issues, removing it and defaulting back to your ISP’s DNS servers also sometimes fix things. Google and Cloudflare aren’t perfect 100% of the time and there have been a few instances where we’ve noticed switching back has resolved the issue.
Windows
In Windows simply open up Command Prompt by pressing the Windows logo key and R. Then type “control panel” and hit Enter.
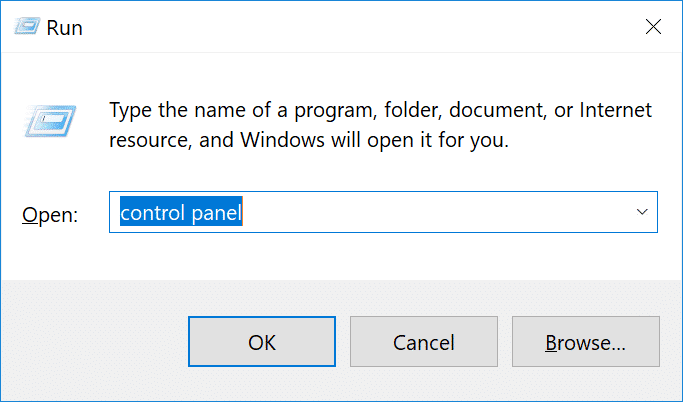
Click on “Network and Internet” and then “Network and Sharing Center.” On the left-hand side, click on “Change Adapter Settings.”

Right click on your current connection, this will either be Local Area Connection or Wireless Network Connection based on how you’re connecting. Then click on “Properties.”
Select Internet Protocol Version 4 (or IPv6 if desired) and click on “Properties.”
Make a note of any existing settings in case you need to revert back. Click “Use the following DNS server addresses.” Enter the following, or replace the existing with these:
For IPv4: 1.1.1.1 and 1.0.0.1
For IPv6: 2606:4700:4700::1111 and 2606:4700:4700::1001
Click OK, then Close. Restart your browser.
Mac
To change DNS servers on a Mac, go to System Preferences…
Click on the network icon and then click “Advanced.”
Click on the “DNS” tab.
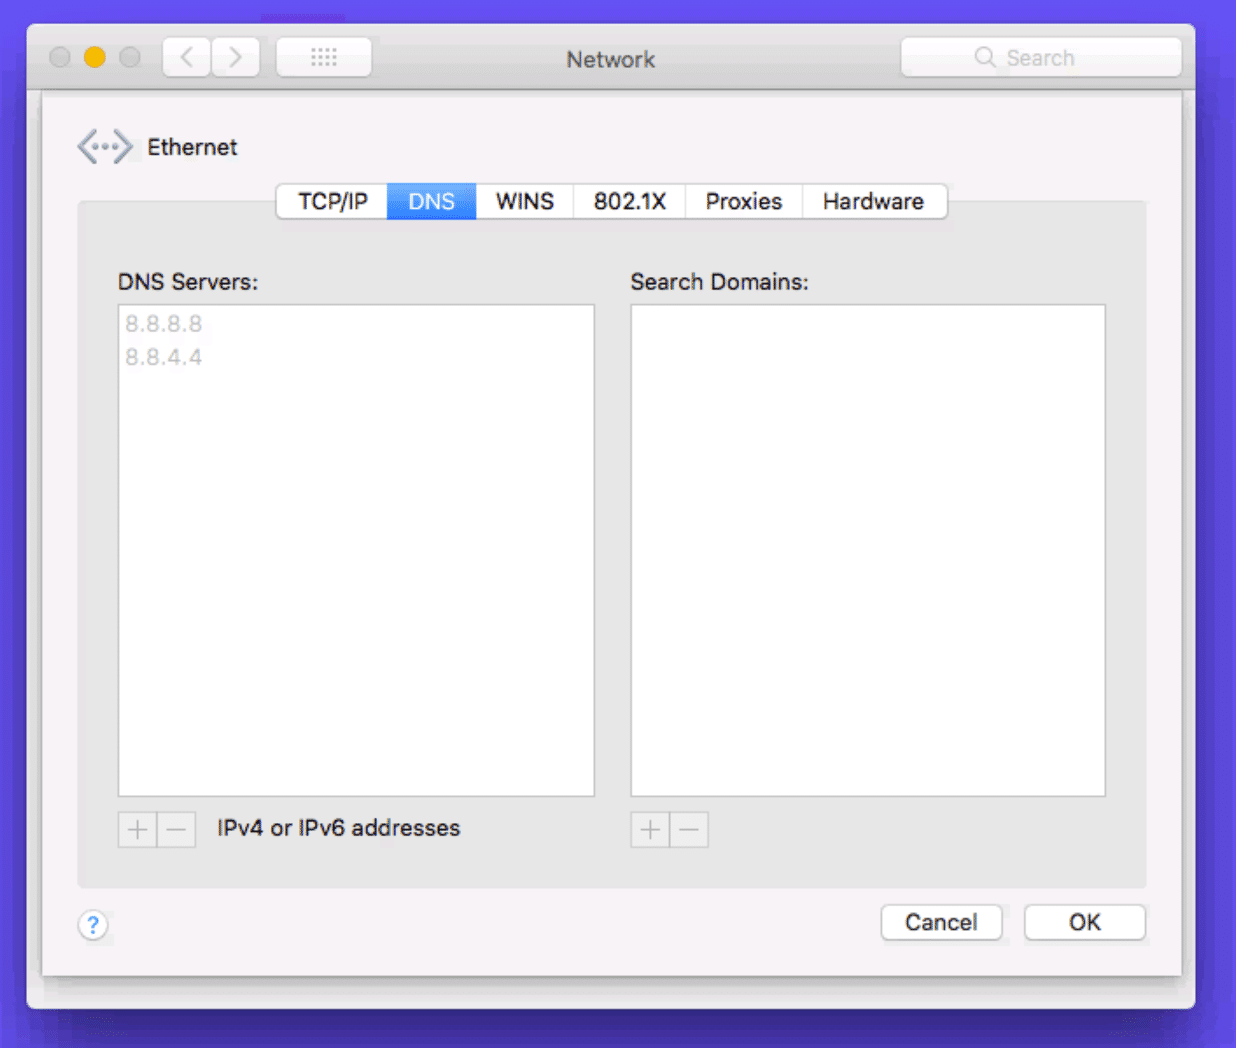
Then add Cloudflare’s DNS server addresses.
For IPv4: 1.1.1.1 and 1.0.0.1
For IPv6: 2606:4700:4700::1111 and 2606:4700:4700::1001
4. Reset Chrome Flags
Sometimes Chrome settings or experimental features can get accidentally changed or messed up. You reset these back to default by entering chrome://flags into your browser and clicking on “Reset all to default.”
The restart your browser.
5. Disable VPN and Antivirus Temporarily
Sometimes VPNs and Antivirus software can conflict or override your network settings, including your DNS servers, etc. If you have any running, try temporarily disabling them (closing them) to see if it resolves the DNS probe finished nxdomain error in Chrome.
6. Check Your Local Hosts File
Every computer has what they call a local hosts file. This is a file that contains manual DNS entries which are mapped to specific IP addresses. Typically this is only edited when you want to preview your DNS before switching over domains to a new host. However, there is a multitude of different ways this file could have been changed or edited. Therefore, if none of the above options worked for you, it’s worth double checking your local hosts file to ensure the website you’re trying to access isn’t in there.
Windows
The hosts file typically requires additional access. So the first step is to open up your text editor as an administrator. Simply click on your start menu, search for your text editor, right-click on it and select “Run as administrator.” This can be done in any text editor such as Notepad, Notepad++, Atom, etc. We are using Sublime in our example below.
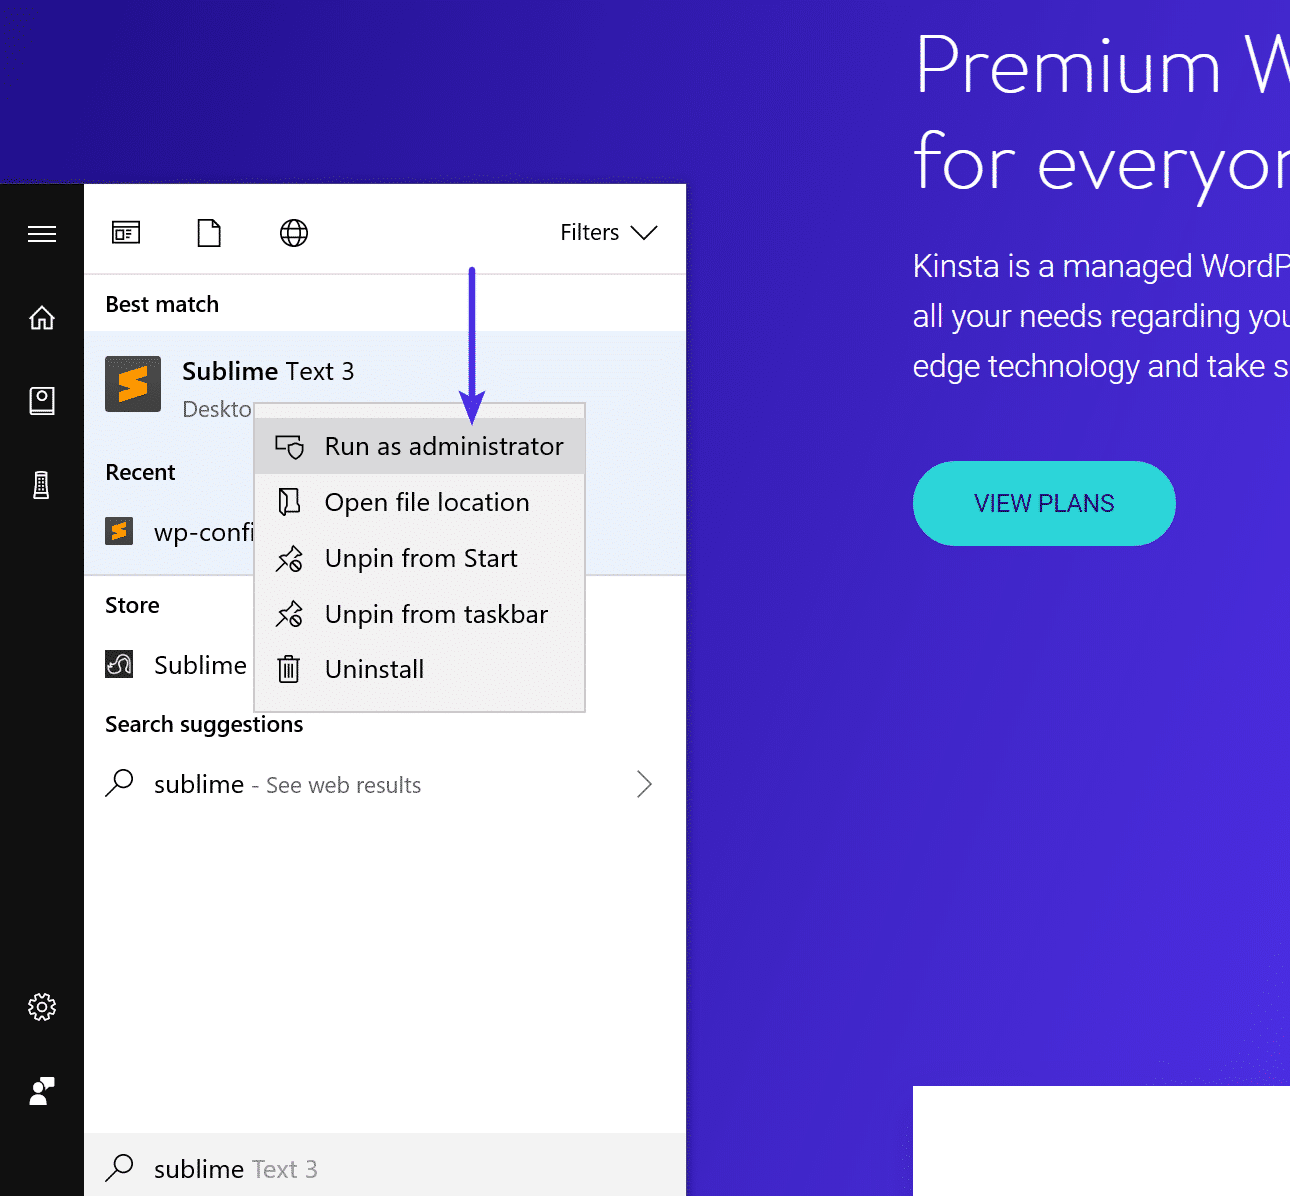
Within your text editor click File → Open and browse to the following location:
C:WindowsSystem32driversetc
Click on the hosts file and “Open.”
Double check and make sure the website you’re trying to visit isn’t listed in there. If it is, remove it.
Mac
To check your hosts file on a Mac, we recommend getting Gas Mask. It’s a free application which can be used as hosts file manager, hosts files editor, and switch between them. It makes everything quick and easy! Otherwise, you can follow the steps below to edit your hosts file on Mac manually.
Go to Utilities and then click on “Terminal.”
Enter in the following command and press Enter (you will most likely be prompted for your administrator password as well).
sudo nano /private/etc/hosts
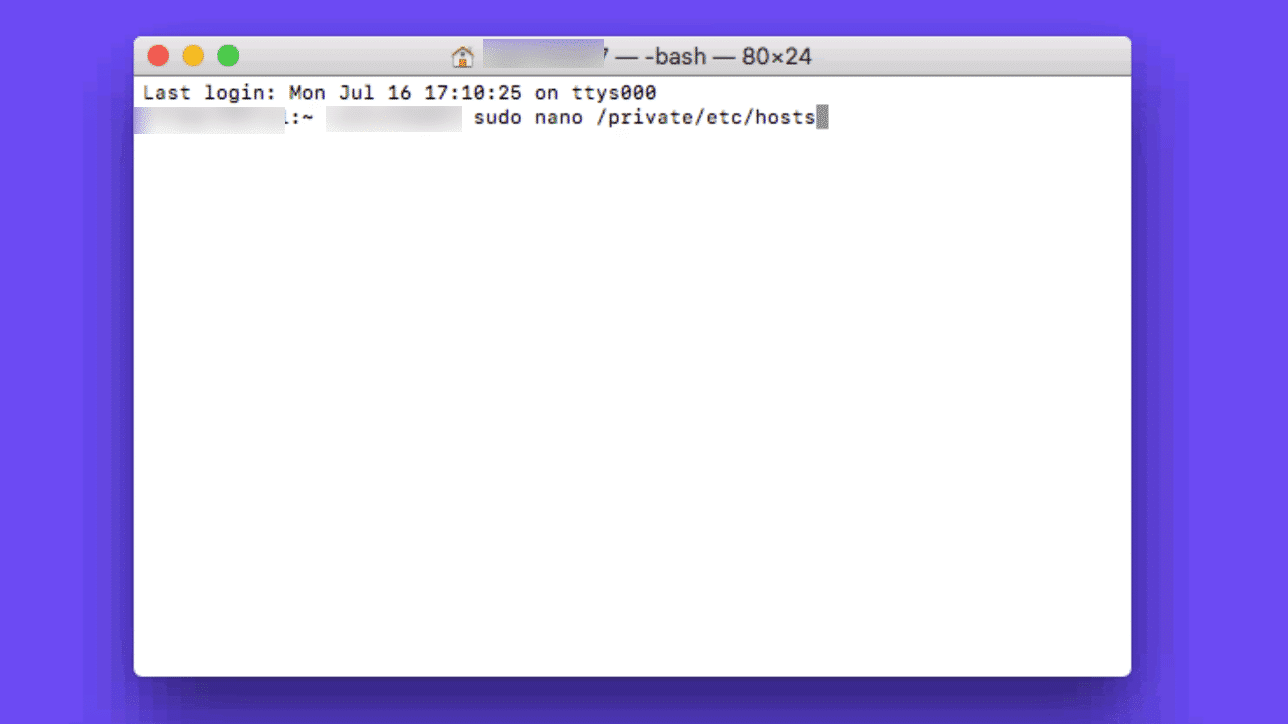
Double check and make sure the website you’re trying to visit isn’t listed in your hosts file. If it is, remove it.
7. Check DNS of Your Domain
If you’re only getting the DNS_PROBE_FINISHED_NXDOMAIN error on a single domain, even after checking your hosts file, you might need to check the DNS settings on the domain name itself. If you’re a Kinsta client we have an in-depth post on how to point your domain and or DNS to Kinsta. If you recently migrated your website to a new hosting provider, it could be the DNS was cached incorrectly on your computer. In which case, Step 2 above should have resolved that.
8. Restart Your Computer
We know it’s annoying, but it has to be mentioned. 😬 If none of the above options work, trying restarting your computer and even your router. We realize many of you probably have hundreds of tabs or applications open and that’s why we made this the last option. But rebooting devices actually clears out a lot of temporary cache.
How to Fix DNS_PROBE_FINISHED_NXDOMAIN on Mobile (Android & iOS)
These are the most common ways to fix this error on your mobile device:
- Restart Your Device
- Check for Chrome App Updates
- Clear Chrome’s Browser and App Data
- Check for System Updates
- Change Your Mobile Device’s Network Settings
1. Restart Your Device
You know that famous tech support question “Have you tried turning it off and back on again?”
Well, the phrase is popular for a reason: A reboot does often fix the problem! Before attempting any of the other solutions on this list, start first with a simple device restart.
Android
To restart your Android device, press and hold your device’s power button to bring up the Options menu, then tap on the Restart option:
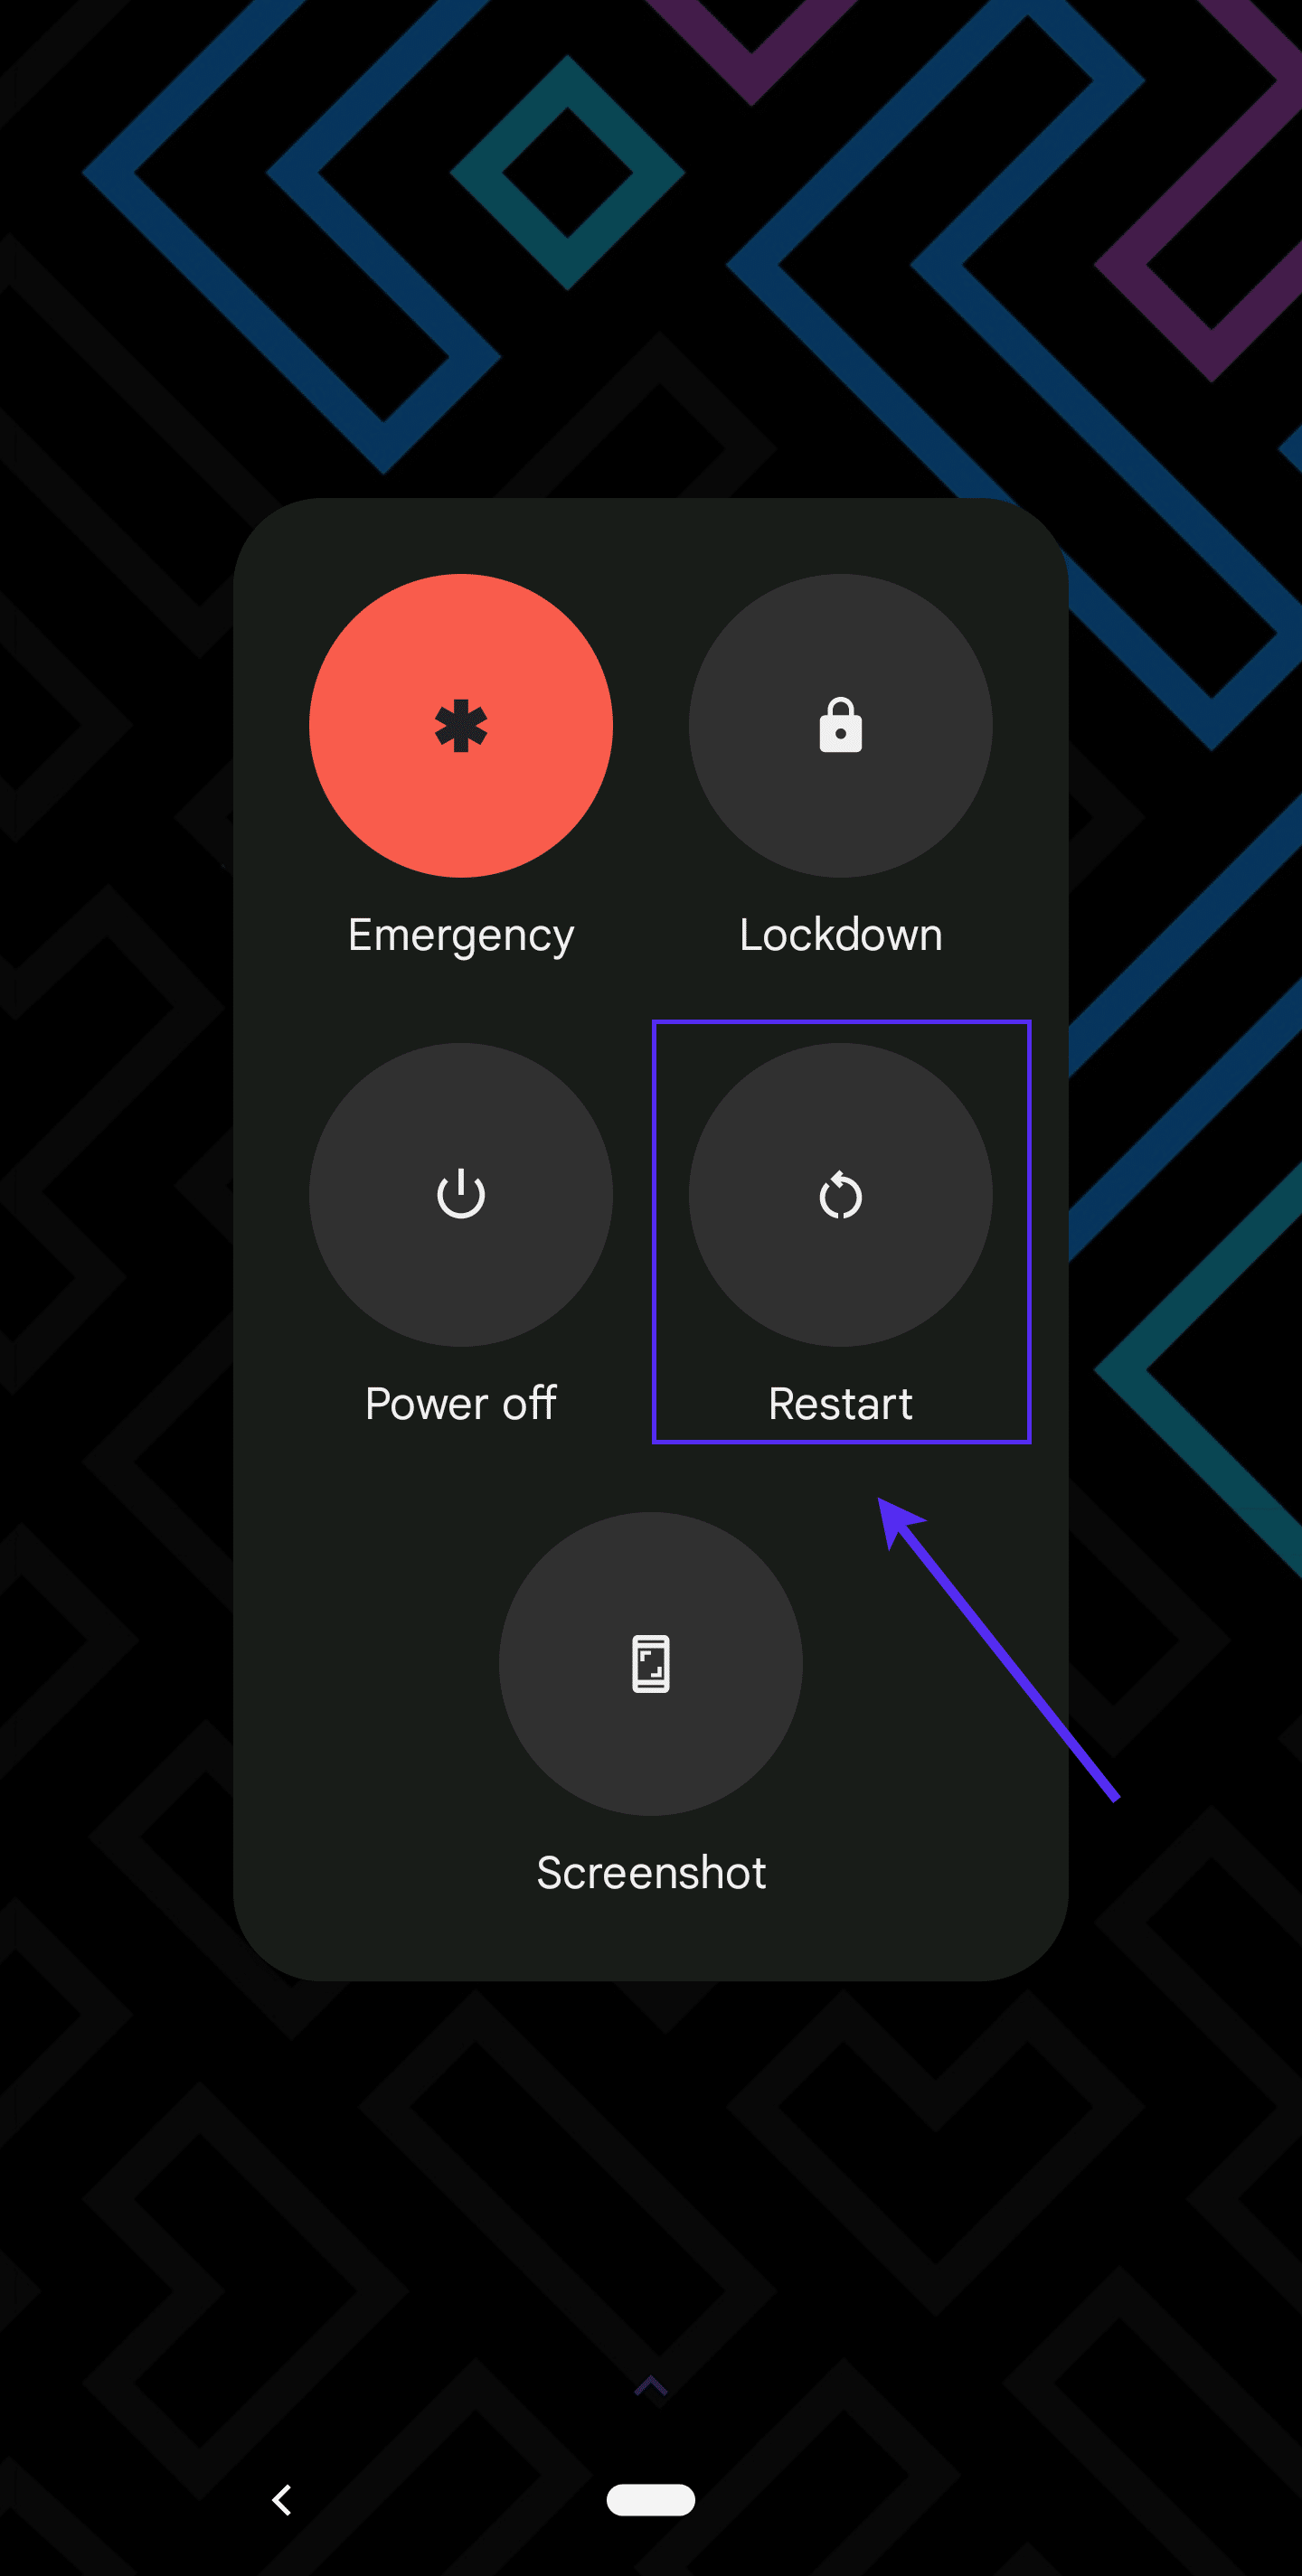
Wait for your device to restart, then open the Chrome app and check for the error.
iPhone/iOS
To restart your iPhone or other iOS device, begin by pressing and holding the power button and either of the two volume buttons:
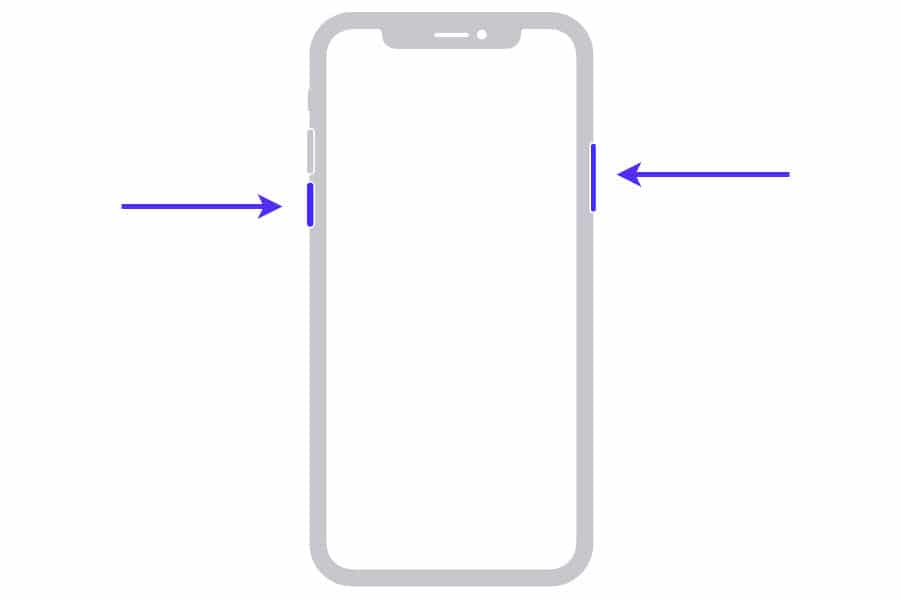
Keep these held down until the power-off slider appears on the screen:
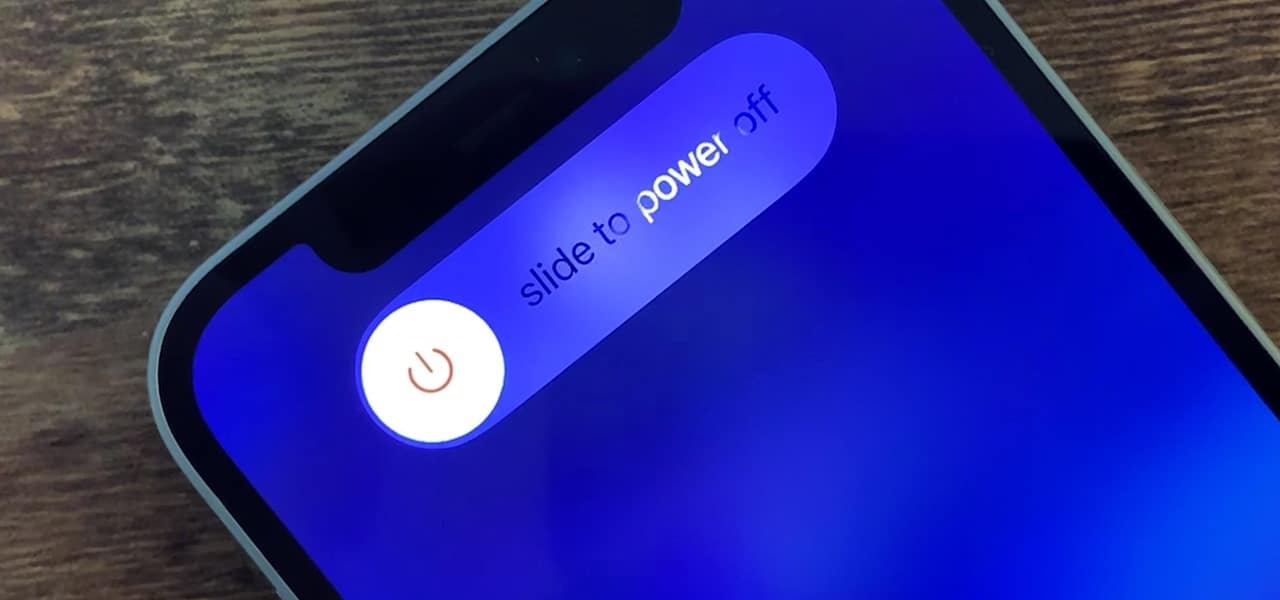
Drag the slider from one side to the other, then wait for the device to turn off.
Once it’s completely off, press and hold the device’s power button to turn it back on. Then check to see whether you’re still encountering the error.
2. Check for Chrome App Updates
The next step is to make sure that you’re using the very latest version of the Google Chrome app on your Android device
You can check for any Chrome updates and install them by following these steps:
- Open the App Store app (this is called Google Play Store on Android devices).
- Tap your profile icon at the top right (in the search bar).
- Tap the Manage apps and device menu option.
- Tap the Updates available button.
- Look for Google Chrome in the list. If you see it, tap the Update button next to it.
After the update has finished installing, relaunch the Chrome app and check to see if you’re still getting the error. If you are, move on to the next solution below.
3. Clear Chrome’s Browser and App Data
Caches are useful because they speed up your browsing experience. In fact, our tests show that Edge Caching reduces the time it takes to deliver full pages to browsers by more than 50%.
However, this cached data can also frequently be the source of errors like DNS_PROBE_FINISHED_NXDOMAIN.
Luckily, you don’t actually need this cached data, and clearing it out may fix the error.
You can clear your mobile device’s Chrome cache and app data with just a few taps:
- Open the Chrome app.
- Tap the hamburger menu icon (
⋮or⋯) at the top or bottom. - Tap History > Clear browsing data.
- Check Browsing history and Cached images and files. Leave the other options unchecked.
- If prompted with a “Also clear data from these sites?” message, confirm by tapping Clear.
- Wait for Chrome to finish clearing the data, then tap the OK, got it confirmation message.
Now, try visiting the page again to see if the error has vanished. If it hasn’t, don’t lose heart! Just move on to the next option below.
4. Check for System Updates
As with Chrome, you’ll want to be sure you’re running the latest version of the Android operating system (OS) that’s available for your device.
Android
Here’s how to see if your Android device has any pending system updates:
- Navigate to Settings > System.
- Tap System Update.
- This screen may tell you that your system is up to date. Regardless, tap the Check for update button at the bottom.
- Wait for the system to look for any available OS updates.
- If an update is found, agree to install it, then follow any further prompts to complete the installation.
- Restart your device if the update process doesn’t do so automatically.
iPhone/iOS
You can check for pending updates on your iPhone or other iOS device with these steps:
- Navigate to Settings > General > Software Update.
- Review the screen to see if there’s an update available. If there is, tap the Download and install button.
- Tap Install Now when prompted.
- Restart the device.
Once your device’s system has been updated and rebooted, check again for the error in the Chrome app. If it’s still there, try the next solution on this list.
5. Change Your Mobile Device’s Network Settings
We talked earlier about modifying desktop devices’ DNS settings to fix the DNS_PROBE_FINISHED_NXDOMAIN error. This same approach can also work with mobile devices.
Android
To change the DNS settings on your Android, follow these steps:
- Navigate to Settings > Network & Internet > Internet.
- Make sure Wi-Fi is toggled “On.”
- Press and hold your Wi-Fi network connection, then tap Modify.
- Under Advanced options, locate the DNS 1 and DNS 2 fields and enter this information:
- DNS 1:
8.8.8.8 - DNS 2:
8.8.4.4
- DNS 1:
- Tap Save.
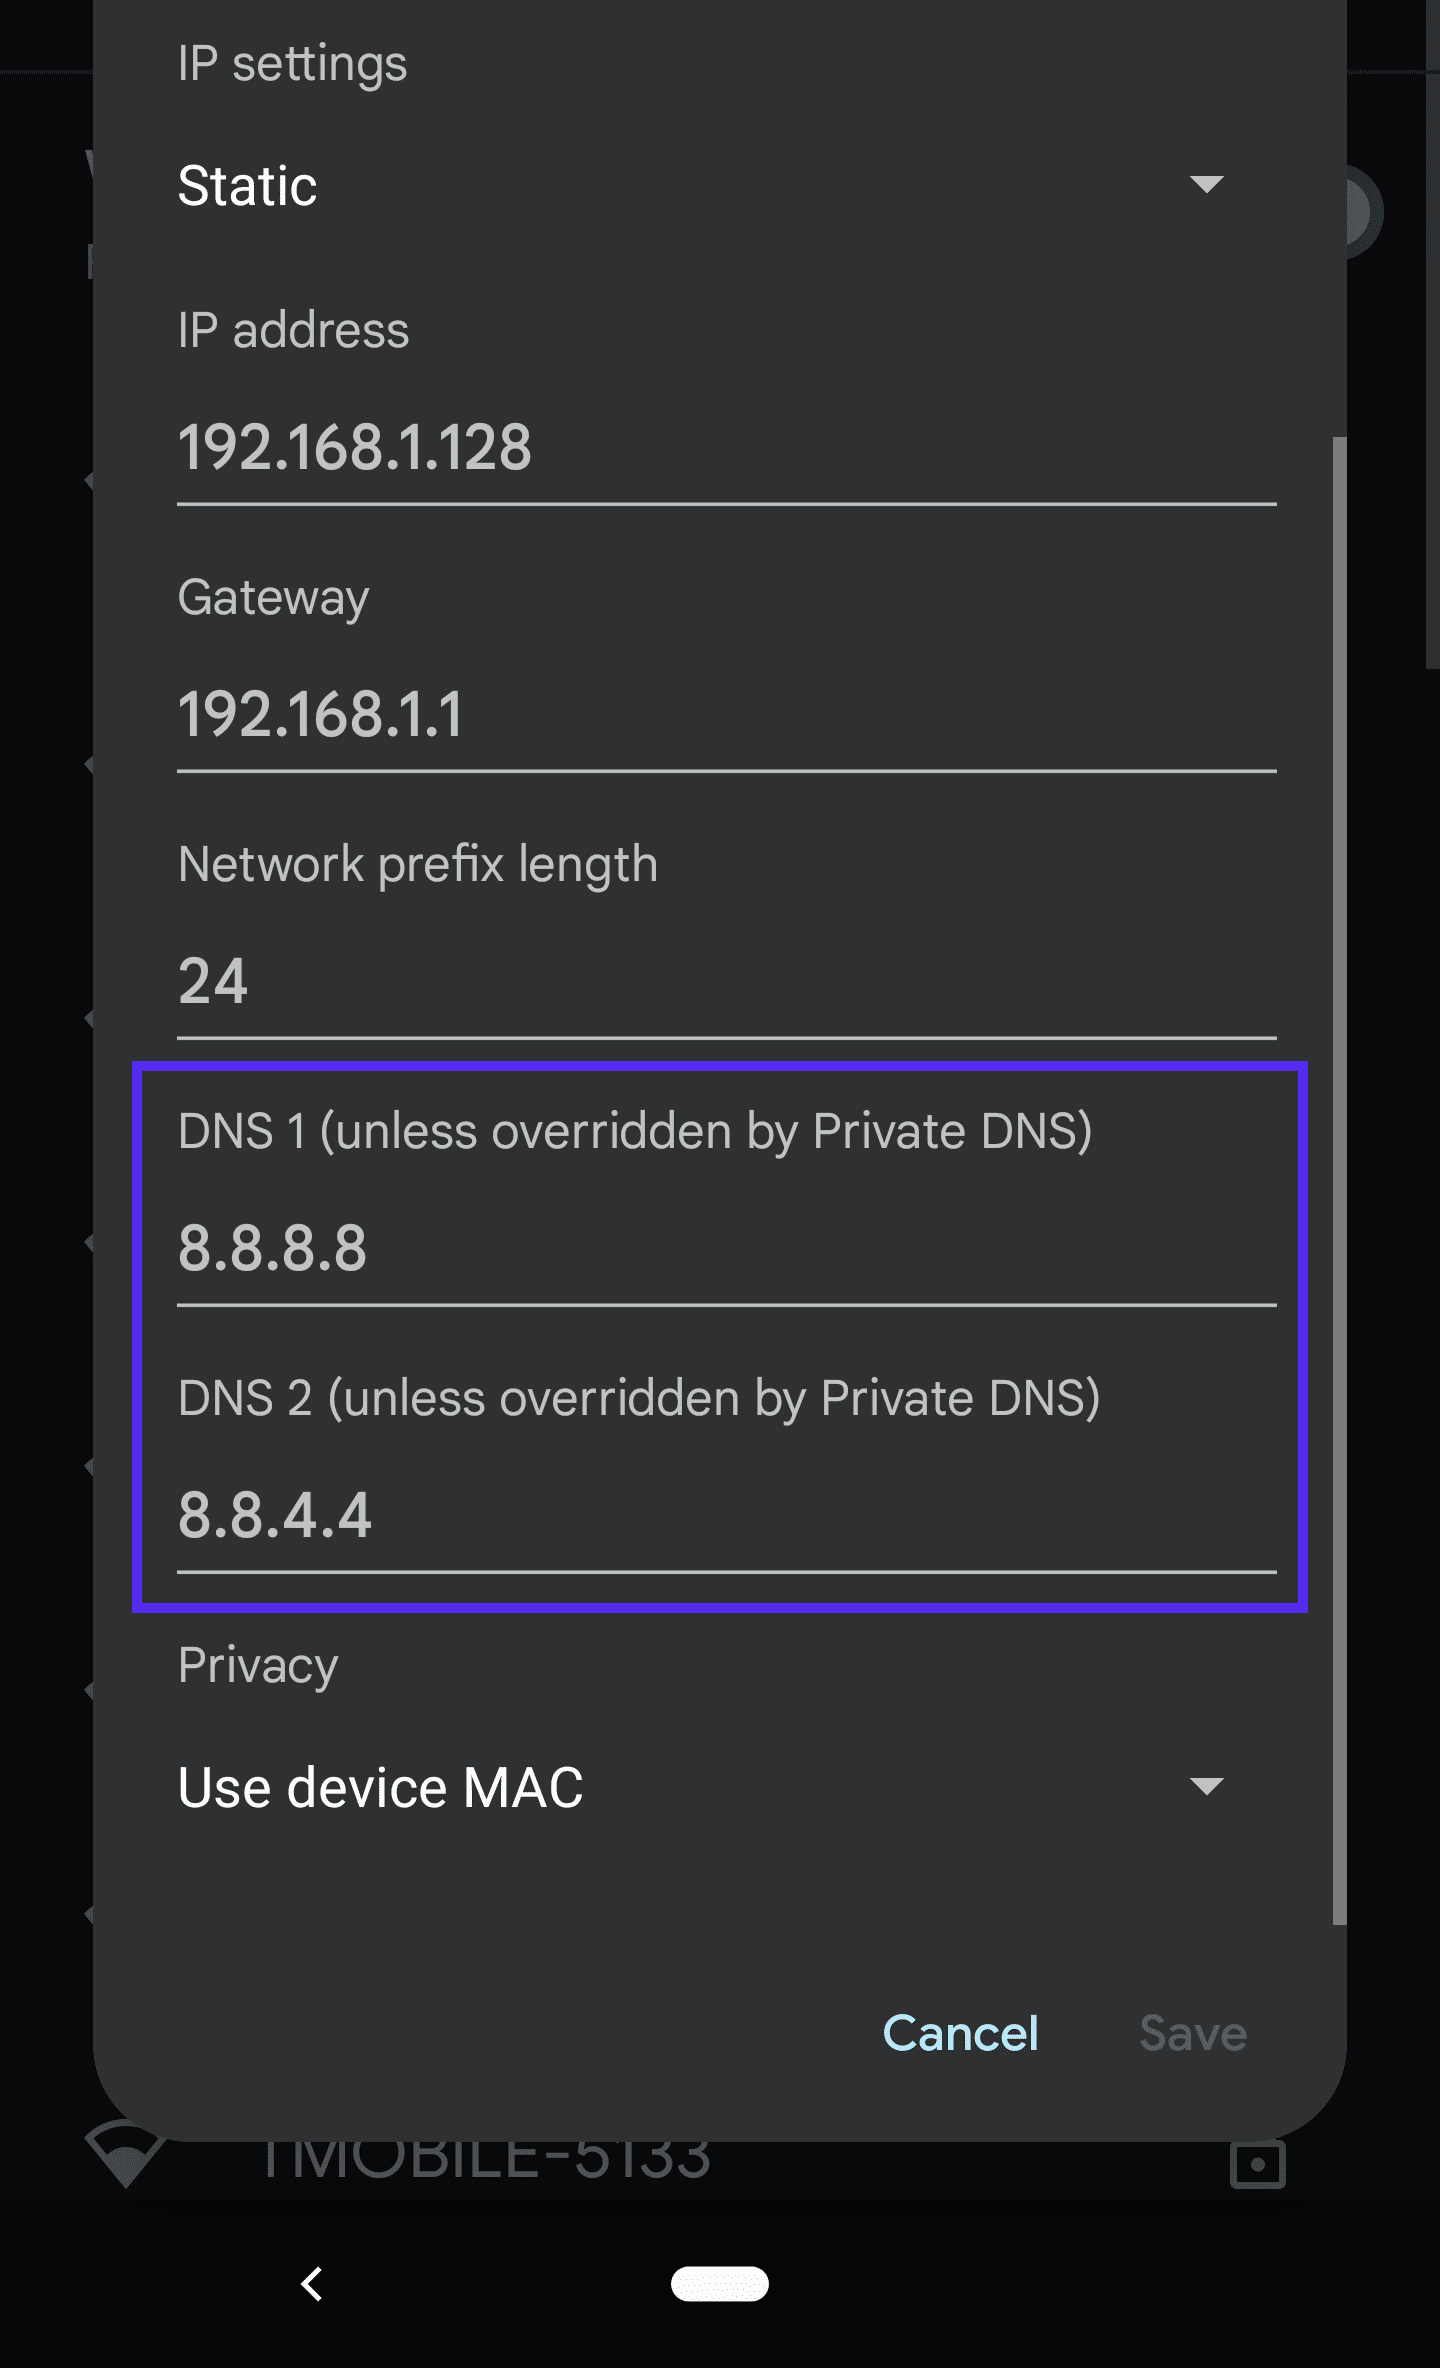
After saving your new settings, re-open the Chrome app and check to see if the error’s gone.
iPhone/iOS
You can change the DNS settings on your iPhone or other iOS device with these steps:
- Navigate to Settings > Wi-Fi.
- Tap on your network in the menu.
- Tap Configure DNS > Manual.
- Remove the current listings under DNS Servers and add the following listings instead:
8.8.8.88.8.4.42001:4860:4860::88882001:4860:4860::8844
Now, restart the Chrome app and check again for the error message.
Summary
Even though it’s frustrating, the DNS_PROBE_FINISHED_NXDOMAIN error is usually pretty easy to get resolved. Between flushing your DNS cache, renewing your IP, and trying different DNS servers, you should hopefully be back up and surfing the web in no time.
Suggested reading: How to Fix the DNS_PROBE_FINISHED_BAD_CONFIG Error Code.
FAQ
What Is DNS_PROBE_FINISHED_NXDOMAIN?
The DNS_PROBE_FINISHED_NXDOMAIN error indicates that the Domain Name System (DNS) failed to resolve the domain name or address. NXDOMAIN stands for Non-Existent Domain.
What Causes DNS_PROBE_FINISHED_NXDOMAIN?
The DNS_PROBE_FINISHED_NXDOMAIN is typically caused by a misconfiguration or problem with your DNS.
How Do You Fix DNS_PROBE_FINISHED_NXDOMAIN?
Here are some recommendations and things to check to fix the error (sorted in order by most common reasons we see):
- Release and Renew IP Address
- Restart DNS Client Service
- Change DNS Servers
- Reset Chrome Flags
- Disable VPN and Antivirus Temporarily
- Check Your Local Hosts File
- Check DNS of Your Domain
- Restart Your Computer
How Do You Fix DNS_PROBE_FINISHED_NXDOMAIN on Mobile?
These are the most common ways to fix this error on your mobile device:
- Restart Your Device
- Check for Chrome App Updates
- Clear Chrome’s Browser and App Data
- Check for System Updates
- Change Your Mobile Device’s Network Settings
Get all your applications, databases and WordPress sites online and under one roof. Our feature-packed, high-performance cloud platform includes:
- Easy setup and management in the MyKinsta dashboard
- 24/7 expert support
- The best Google Cloud Platform hardware and network, powered by Kubernetes for maximum scalability
- An enterprise-level Cloudflare integration for speed and security
- Global audience reach with up to 35 data centers and 275 PoPs worldwide
Test it yourself with $20 off your first month of Application Hosting or Database Hosting. Explore our plans or talk to sales to find your best fit.
I am using Ubuntu 14.04 64 bit with a wired connection. For the last 7 days, I have been unable to open Github. It instead has an error.
Is there anything wrong with my connection / hardware / network / browser settings or in website itself?
Chrome gives This webpage is not available with below details
The server at github.com can’t be found, because the DNS lookup
failed. DNS is the network service that translates a website’s name to
its Internet address. This error is most often caused by having no
connection to the Internet or a misconfigured network. It can also be
caused by an unresponsive DNS server or a firewall preventing Chromium
from accessing the network. Error code: DNS_PROBE_FINISHED_NXDOMAIN
Firefox gives Server not found
P.S. no firewall software installed on my system.
asked Dec 22, 2014 at 15:57
![]()
3
Go to Open Network and Sharing center ->change Adapter setting->Your Network->rigth click
->TCP/Ipv 4->click on properties ->use the following DNS server addresses ->
Preffered DNS Server :9.9.9.9
Alternate DNS Server :9.9.8.8
answered Dec 23, 2014 at 13:28
4
I had the same problem on a different platform. I was using windows 8.1 when I suddenly could not access github anymore, this error came right after creating a site on github pages.
I solved this by flushing my dns cache.
Type this in the command promt:
ipconfig /flushdns
answered Feb 26, 2016 at 7:23
![]()
1
On ubuntu just: right click on your connection on panel (top right on unity by default) and click configure network connections. Then right click on your wifi -> click edit -> go to IPv4 (you may need to extend the window to see it), and in «Other DNS servers» type: 8.8.8.8,9.9.8.8 and click OK.my settings on my Kubuntu (KDE instead of Unity)
answered May 12, 2016 at 16:05
![]()