На чтение 3 мин Опубликовано 02.10.2018
У многих пользователей, при первом использовании Android Studio нередко возникают различные неполадки. Одна из которых — ошибка «Emulation currently requires hardware acceleration». Что это за проблема, как ее решить и от нее избавиться? — расскажем обо всем поподробнее.
Содержание
- Суть возникновения
- Решение проблемы
- Активируем виртуализацию через BIOS
- На архитектуре Intel:
- На архитектуре AMD:
- Заключение
Суть возникновения
Чтобы пользоваться Android Studio, необходимо установить эмуляторный Intel Hardware Accelerated Execution Manager, но открыв ту же Android Studio. Стоит сказать, именно из-за него и появляется данная проблема. Ситуация возникает из-за того, что сама программа не устанавливает HAXM, а просто скачивает ее. То есть, вполне логично, что ее нужно установить.

Помните: ошибка может возникнуть даже из-за неправильного скачивания или установки. Загружайте файлы только из проверенных ссылок и не доверяйте посторонним сайтам. Они могут занести на ваш ПК вредоносное программное обеспечение.
Решение проблемы
Решить ошибку можно обычной установкой Intel Hardware Accelerated Execution Manager (HAXM). Отыскать файл можно таким вот методом:
- Открываем SDK Manager — переходим в Extras.
- Отыскиваем Intel Accelerator.
- Убеждаемся, справа, в процессах, написано “Installed”.
- Такого нет? — клацайте на “install package”.
- Когда проблема сохранилась, значит нужно сделать все вручную. Так программа точно установится.
- Находим инсталляционный элемент, прописывая в поиске: intelhaxm-android.exe. Возможно, потребуется открыть доступ к скрытым файлам и папкам. «Пуск» — «Панель управления» — «Параметры проводника» — «Вид» — «Скрытые файлы и папки» — «Показывать скрытые файлы и папки»;
- Клацаем два раза на инсталляху.
- Дожидаемся окончания и спокойно включаем HAXM.
В MacOS происходящее практически идентично:
Маршрут такой же самый, как и в обычных операционных системах, но ищем в конце файл «silent_install.sh». Необходмо запустить его. Тихая инсталляция закончится. Закрываем и заново запускаем Android Studio и спокойно пользуемся программой.
Активируем виртуализацию через BIOS
Также, виртуализацию оборудования можно активировать в параметрах БИОС:
На архитектуре Intel:
- перезагружаем ПК;
- активно нажимаем на F12, Del, F11, F10, F2 (зависит от версии ПК);
- зашли в биос;
- переходим в Advanced > CPU Configuration;
- ищем самую нижнюю строчку Intel Virtualization Technology;
- выставляем Enabled — сохраняем информацию и благополучно выходим.

Включение IVT в Intel

На архитектуре AMD:
- заходим в биос;
- Advanced > CPU Configuration;
- выставляем режим Enabled для строчки SVM Mode;
- переходим, чтобы сохранить настройки и выйти.
Обратите внимание: в случае, когда ЦП не имеет поддержки виртуализации, можно воспользоваться ARM эмулятором. В таком случае, придется создавать новое ВУ, либо изменить используемое устройство виртуализации. Зайдите в Android, в Диспетчере виртуальных устройств, в пункте CPU/ABI заменить на ARM в предложенном выпадающем меню.
Также, не забудьте выставить реалистичное значение доступной оперативной памяти, конечно, учитывайте ваши компьютерные возможности. Опять изменить количество используемой ОП можно при повторной инсталляции. Если ситуация не изменилась, перезагрузитесь и попробуйте заново.
Заключение
В целом, мы разобрались, что справиться с ошибкой “Error: x86 emulation currently requires hardware acceleration” можно и сделать это совсем несложно. Все вышеописанные действия правильные и решают данную проблему. Если советы не помогут: сносите снова программу — выполняйте очистку через CCleaner — устанавливайте все последние KB-пакеты обновлений в Windows — пробуйте вновь. Последний совет — используйте более раннюю версию.
Some users are encountering the “x86 emulation currently requires hardware acceleration!” error when trying to launch the AVD in Android Studio. Typically, the issue occurs in a few moments after the user tries to compile an application using Android Virtual Device. The issue is not specific to a certain Android Studio build as it’s reported to occur with newer and older builds. The error is not exclusive to a certain Windows version as there are reports of it occurring on Windows 7, Windows 8 and Windows 10.
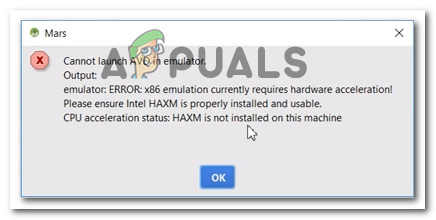
What is causing the “x86 emulation currently requires hardware acceleration!”?
We investigated this particular issue by looking at various user reports and the repair strategies that some affected users applied to get the issue resolved. Based on what we gathered, there are a few common scenarios that will trigger this particular error message:
- Intel/AMD Virtualization technology is not enabled from BIOS – This error might get thrown because your CPU is prevented from using the built-in hardware virtualization technologies by a BIOS setting. In this case, the solution is to access your BIOS settings and enable the hardware virtualization technology.
- The Intel HAXM module is not installed in Android Studio – This is one of the most common reasons why this error occurs. The installation of Intel HAXM is done in two steps ( downloading the module via the SDK manager and running the installation executable).
- A conflict between Avast’s virtualization and Android Studio’s AVD – The issue can also occur due to a well-known conflict between the built-in virtualization technology and Avast’s hardware-assisted virtualization. This 3rd party feature is also known to conflict with a number of other applications.
- Windows Hypervisor Platform is disabled for AMD CPU – Newer AMD CPUs all have hardware virtualization capabilities. But in order for the virtualization feature to work, you’ll need to ensure that the Windows Hypervisor Platform is enabled from the Windows Features screen.
- Machine’s CPU does not support hardware virtualization – This scenario might be applicable to older CPU models. If hardware virtualization is not supported by the equipped CPU, you will not be able to resolve this error message unless you replace your current CPU with a newer model.
If you’re currently struggling to resolve the “x86 emulation currently requires hardware acceleration!” error, this article will provide you with a selection of verified troubleshooting steps. Down below, you’ll discover several methods that other users struggling to resolve the same issue have used to fix or circumvent the issue.
To maintain maximum efficiency, we encourage you to follow the methods below in the order that they are presented. You should eventually stumble upon a fix that is effective in your particular scenario.
Method 1: Installing the Intel HAXM module
Before accessing the BIOS settings, let’s verify if the issue is not actually triggered by the missing of the Intel x86 Emulator Accelerator (HAXM installer). Without this module, AVD will not be able to compile applications that use hardware virtualization even if the technology is enabled on your computer.
Several users encountering the same error have reported that the issue went away for good after they downloaded the missing module via SDK Manager and installed it via the HAXM installer. Follow the steps below for complete step by step instructions:
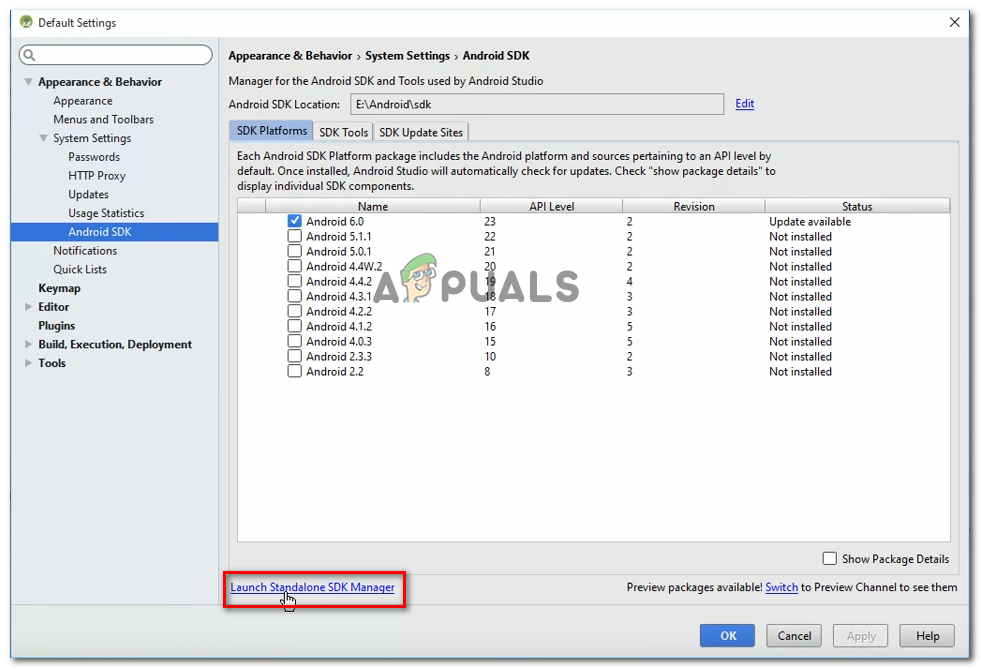
- In Android Studio, open SDK Manager by going to Tools > Android > SDK Manager.

Launching the Standalone SDK Manager Note: You can also go to File > Settings and click on Android SDK (under System Settings). Then, simply click on Launch Standalone SDK Manager to open the built-in installation utility.
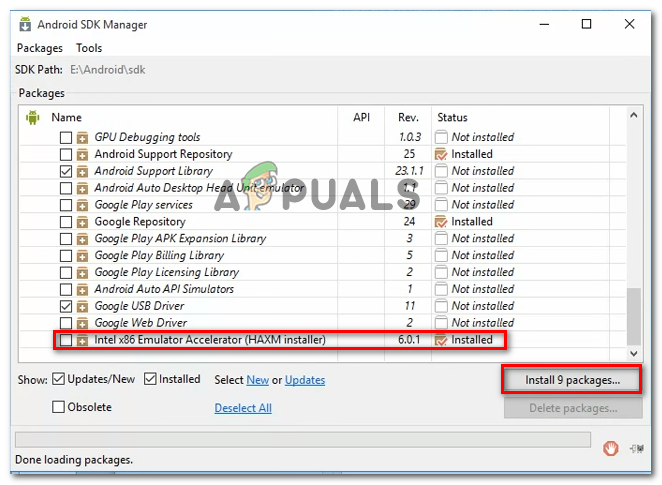
- Expand the Extras menu and check the box associated with Intel X86 Emulator Accelerator (HAXM). Then, simply click on Install Packages and wait for the procedure to complete.

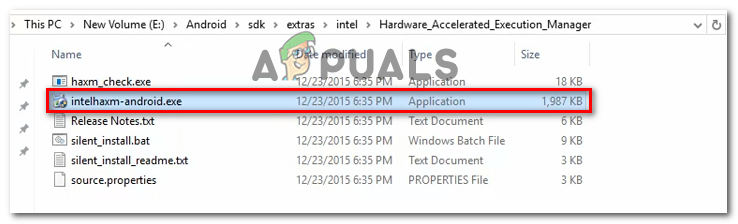
Installing the Intel x86 Emulator Accelerator (HAXM installer) - Now that the HAXM installer is downloaded, we need to take the steps appropriated to install it. To do this, navigate to the following location and double-click on intelhaxm-android.exe to install it:
C:users%USERNAME%AppDataLocalAndroidsdkextrasintelHardware_Accelerated_Execution_Manager

Installing the intelhaxm-android.exe - Follow the on-screen prompts to install the Intel HAXM and wait for the process to complete.
- Restart Android Studio, run the application again and see if the issue has been resolved.
If you’re still encountering the “x86 emulation currently requires hardware acceleration!” error, move down to the next below.
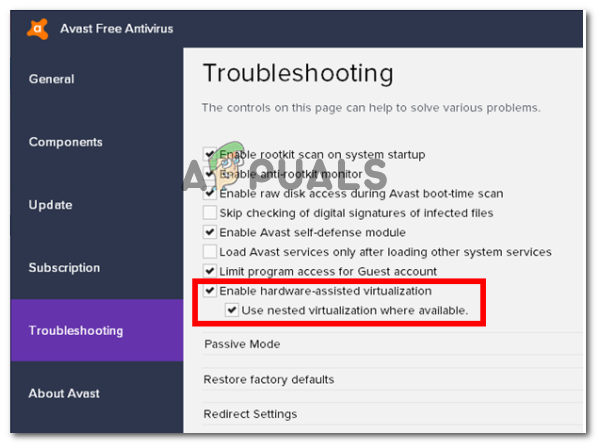
Method 2: Disabling Hardware-assisted virtualization from Avast
If you’re using Avast as an additional security layer, the error is most likely due to a conflict caused by one of its security features. As a lot of users have reported, the hardware-assisted virtualization of Avast is known to conflict with Android Studio’s AVD, which ends up producing the “x86 emulation currently requires hardware acceleration!” error.
If this scenario is applicable to you (you have Avast installed) follow the instructions below to disable hardware-assisted virtualization from the Settings menu of the security suite:
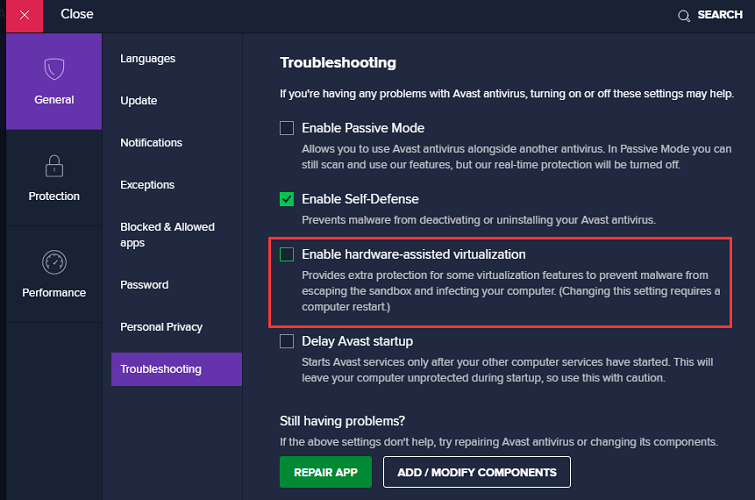
- Open Avast and access the Settings menu,
- Inside the Settings menu, go to the Troubleshooting tab and make sure that the boxes associated with Enable hardware-assisted virtualization and Use nested virtualization where available are Unchecked.

Disable hardware-assisted virtualization inside Avast - Restart your computer and see if the conflict has been eliminated at the next startup. Run the application inside Android studio and see if the error has been resolved.
If you’re still seeing the “x86 emulation currently requires hardware acceleration!” error when running the AVD, move down to the next method below.
Method 3: Enabling Hardware Virtualization from BIOS/UEFI settings
If the first method didn’t enable you to resolve the error message, it’s likely that the error message is occurring because hardware virtualization is disabled from your BIOS/UEFI settings. Hardware virtualization should be enabled by default in normal circumstances, but manual intervention, BIOS Updates, and even some 3rd party software might disable this technology.
Keep in mind that the process of enabling hardware virtualization will be different depending on your BIOS/UEFI settings and your motherboard and CPU manufacturer.
However, the first step would be to enter your BIOS or UEFI Settings. If you have the legacy setting menu (BIOS), you’ll need to press the Setup key during the initial booting sequence. The specific setup key should appear on the initial screen, but in case you don’t spot it, you can search for it online by using the search phrase “*motherboard model + setup key*“.
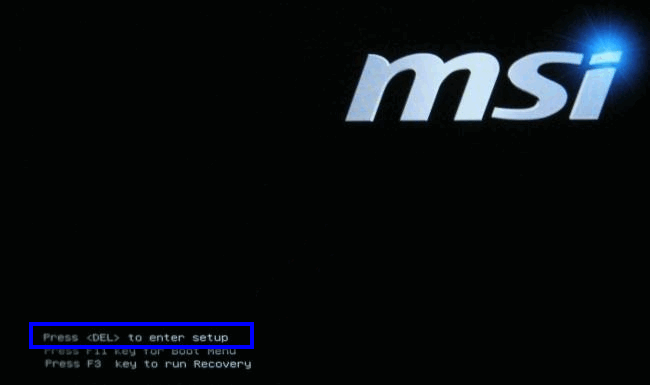
Note: You can also go about it blindly and press the most common Setup keys during the initial booting sequence. Typically, the setup key is one of the F keys (F2, F4, F6, F8, F10) or the Del key (on Dell computers).
If your computer uses the newer UEFI model, you will first need to access the Advanced Startup menu. To do this, press Windows key + R to open up a Run dialog box, then type “ms-settings:recovery” and press Enter to open the Recovery menu of the Settings app. Once you get there, simply click on the Restart now button under Advanced startup.
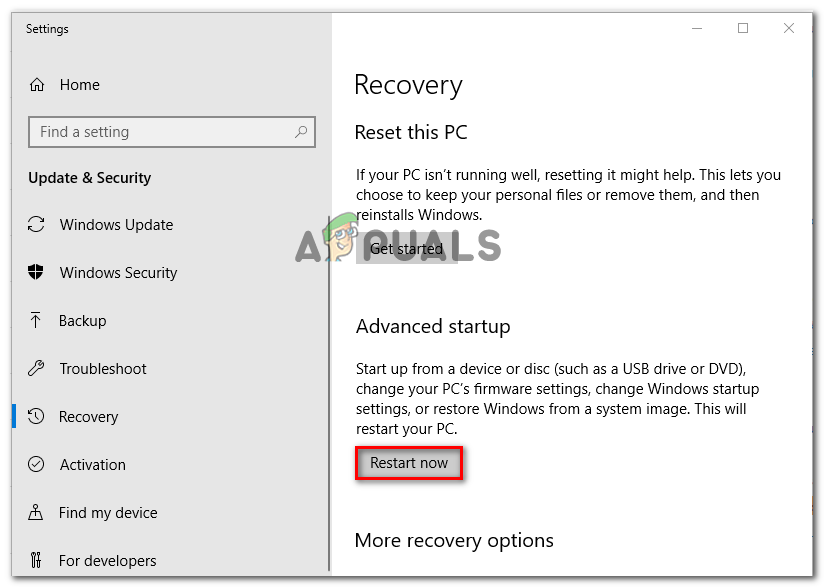
After a while, your computer will restart directly into the Advanced options menu. Once you get there, navigate to Advanced Options menu and click on UEFI Firmware Settings.

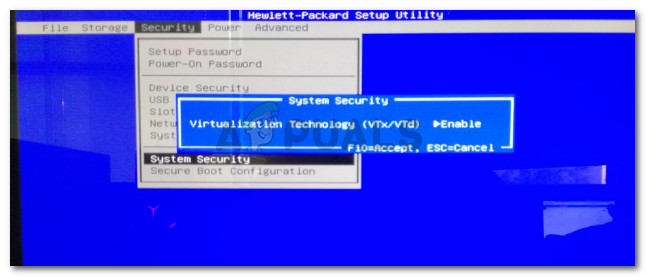
Once you’ve gained entry to your BIOS or UEFI settings, start looking for the hardware virtualization option. Depending on your BIOS/UEFI version, you’ll find this setting listed under different names. You can typically find it listed as either Virtualization technology (VTx/VTd), Intel Virtualization Technology or AMD-V Virtualization. Chances are the option will be located under Chipset, Processor, Advanced CPU Configuration or something similar.
Once you manage to enable hardware virtualization, save the BIOS/UEFI changes, restart your computer and see if the error is resolved at the next startup.
Method 4: Enabling Windows Hypervisor Platform (if applicable)
If you’re encountering the issue on an AMD CPU with virtualization technologies (newer CPU models such as Ryzen), the issue might be occured because Windows Hypervisor Platform is not enabled on your device.
But keep in mind that in order to enable this feature, you’ll need to ensure that you have Windows 10 build 1803 or older.
The Windows Hypervisor Platform can be enabled via the Turn Windows Feature On or Off screen. Here’s a quick guide on how to do this:
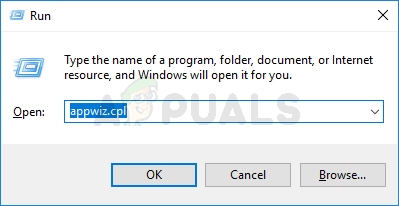
- Press Windows key + R to open up a Run dialog box. Then, type “appwiz.cpl” and press Enter to open the Programs & features screen.

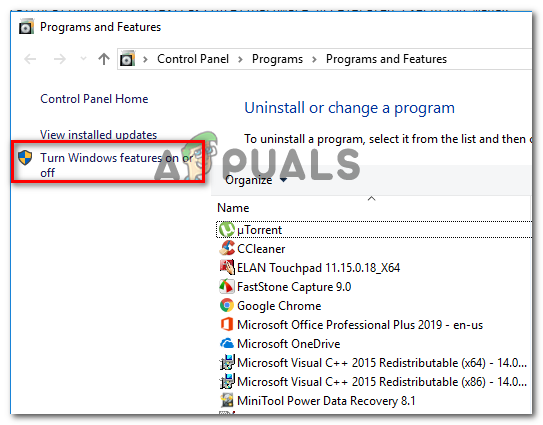
Type appwiz.cpl and Press Enter To Open Installed Programs Page - Inside the Programs & Features page, click on Turn Windows features on or off from the left-hand pane.

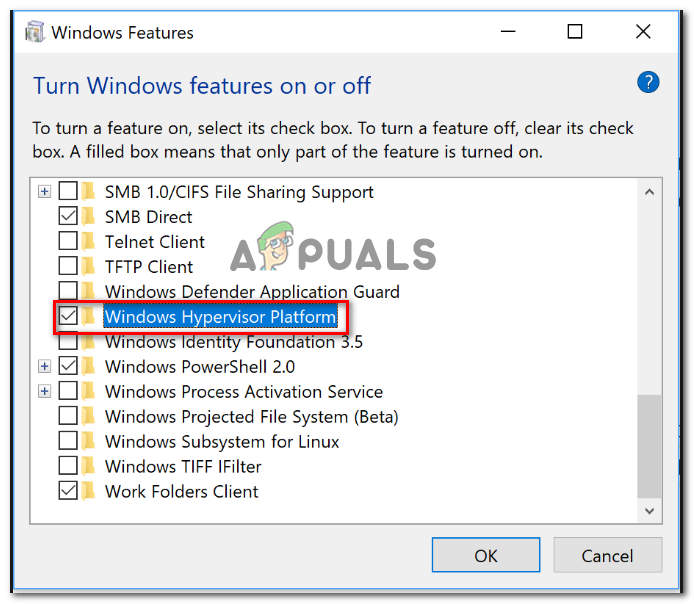
Accessing the Windows Features screen - Inside the Windows Features window, check the box associated with Windows Hypervisor Platform and hit Ok to enable the feature.

Enable the Hypervisor Platform Note: While you’re no this screen, also ensure that Hyper-V is enabled. If it isn’t, enable it by checking the box associated with it.
- Restart your computer and see if the error has been resolved.
Автор:
Laura McKinney
Дата создания:
5 Апрель 2021
Дата обновления:
5 Февраль 2023
![How To Fix X86 Emulation Currently Requires Hardware Acceleration [Tutorial]](https://i.ytimg.com/vi/RFZBRVfS4Fo/hqdefault.jpg)
Содержание
- Исправить эмулятор: ошибка: эмуляция x86 в настоящее время требует аппаратного ускорения!
- Метод1:Модуль Intel HAXM
- Метод 2: отключение аппаратной виртуализации
- Метод 3:включение аппаратной виртуализации из BIOS
- Метод 4:Использование UEFI
- Исправить эмулятор: ошибка: для эмуляции x86 в настоящее время требуется аппаратное ускорение процессора Ryzen
- Вывод
- Похожие сообщения:
Как исправить Эмулятор: ошибка: эмуляция x86 в настоящее время требует аппаратного ускорения! Если вы не установили программное обеспечение Intel HAXM на свое устройство Android, вы столкнетесь с ошибкой эмулятора x86 в вашем Студия Android. Почему из-за отсутствия Intel HAXM вы сталкиваетесь с этой ошибкой? Это потому, что Intel HAXM предназначен для ускорения вашего процессора и графической памяти. Благодаря этому ускорению эмулятор сможет работать над графической памятью. Эта ошибка появляется, когда вы пытаетесь запустить Android Virtual Studio (AVD) сразу после того, как пользователь пытается собрать любое приложение, используя его в Android Studio.
Исправить эмулятор: ошибка: эмуляция x86 в настоящее время требует аппаратного ускорения!

Метод1:Модуль Intel HAXM
Так как же решить ошибку эмуляции x86? Вам необходимо установить Модуль Intel HAXM. Как мы упоминали выше, этот модуль помогает AVD компилировать все приложения, использующие аппаратную визуализацию. После установки этого модуля эта ошибка исчезнет, и вы сможете установить приложения, необходимые для установки или компиляции.
- Шаг 1: Первое, что вам нужно сделать, это открыть студию Android. На вкладке настроек Android Studio по умолчанию перейдите в раскрывающееся меню «Внешний вид и поведение».
- Шаг 2: В раскрывающемся меню «Внешний вид и поведение» перейдите в раскрывающееся меню «Системные настройки» и выберите в нем Android SDK. Окно настроек Android SDK появится в правой части окна настроек.
- Шаг 3: Ты найдешь ‘Запустить автономный диспетчер SDK‘В Android SDK. Щелкните по нему.
- Шаг 4: Появится другое окно со списком всех пакетов, которые необходимо установить. Вы найдете Intel x86 Emulator Accelerator (установщик HAXM) в меню «Дополнительно». Установите этот флажок.
- Шаг 5: Нажмите на установочные пакеты, указанные в правом нижнем углу окна.
- Шаг 6: Хотя там написано «установить, ‘Достаточно загрузить программу. Теперь вам нужно его установить. Чтобы установить установщик HAXM в папку, на вашем компьютере, где вы загрузили установщик.
- Шаг 7: Достигнув местоположения, вы найдете файл приложения (файл .exe) с именем ‘intelhaxm-android.exe.«Установите программу обычным способом.
- Шаг 8: После установки приложения Intel HAXM необходимо перезапустить Android Studio. После этого запустите приложение, которое вы пытались запустить.
Если ошибка не исчезнет, попробуйте другие способы решения этой проблемы.
Метод 2: отключение аппаратной виртуализации
Тебе нужно попробовать отключение аппаратной виртуализации. Это процесс с использованием Avast. Это уровень безопасности, и некоторые функции безопасности Avast могут вызывать ошибку. А так же нужно отключить эту функцию безопасности на ПК через настройки. Это то, как вы должны следить за процессом.
- Шаг 1: Откройте Avast и перейдите в его настройки.
- Шаг 2: На вкладке настроек перейдите на вкладку Устранение неполадок. В вашем окне появится контрольный список.
- Шаг 3: Снимите флажки с метки ‘Включить аппаратную визуализацию, «И это суб-ярлык»Использовать вложенную визуализацию там, где она недоступна.’
- Шаг 4: Перезагрузите устройство, чтобы проверить, работает ли этот метод, запустив приложение в Android Studio.
Метод 3:включение аппаратной виртуализации из BIOS
Если вы все еще сталкиваетесь с ошибкой × 86 эмуляции, вам нужно попробовать 3-й метод, который включение аппаратной виртуализации из BIOS для настроек UEFI. Эти настройки обычно включены по умолчанию, но, вероятно, с помощью какого-либо стороннего программного обеспечения или обновления, или, возможно, по каким-либо причинам вы, должно быть, отключили BIOS или UEFI настройки. Методы зависят от того, какую материнскую плату и процессор вы используете. Вам нужно найти инструкции для этой конкретной материнской платы и процессора. Но в целом вам нужно будет выполнить следующие шаги:
- Шаг 1: Откройте настройки BIOS на вашем ПК в настройках.
- Шаг 2: В настройках BIOS есть кнопка «Setup». Щелкните по нему.
- Шаг 3: Найдите опцию визуализации оборудования на вашем ПК и включите визуализацию оборудования.
- Шаг 4: Перезагрузите компьютер
Если вы не можете найти ключ, вам нужно найти ключ настройки по имени конкретной материнской платы, которую вы используете (в Интернете).
ИЛИ
Метод 4:Использование UEFI
- Шаг 1: Откройте настройки устройства из меню «Пуск».
- Шаг 2: Перейдите на вкладку «Обновления и безопасность» в настройках.
- Шаг 3: Перейдите на вкладку Recovery там.
- Шаг 4: Вы увидите кнопку «Перезагрузить» под заголовком «Расширенная настройка» на вкладке «Восстановление» и нажмите ее.
- Шаг 5: После перезагрузки компьютера в вашем окне появится опция «Настройки прошивки UEFI». Щелкните по нему.
- Шаг 6: Как упоминалось выше, настройки для аппаратной визуализации называются по-разному для разных ЦП и материнских плат, найдите и включите.
- Шаг 7: Перезагрузите компьютер.
Исправить эмулятор: ошибка: для эмуляции x86 в настоящее время требуется аппаратное ускорение процессора Ryzen
Ошибка обычно растворяется приходом к этому методу. Но если ошибка не исчезнет, необходимо проверить, включена ли платформа гипервизора Windows. Эта проблема существует только для пользователей, использующих ЦП Ryzen (более новые версии ЦП с Windows 10 1803 или выше).
Вот как это сделать:
- Шаг 1: Откройте Панель управления.
- Шаг 2: Откройте «Программы».
- Шаг 3: Открытые программы и компоненты
- Шаг 4: Вы найдете вкладку «Включение или отключение компонентов Windows», нажмите на нее.
- Шаг 5: Когда появится список флажков, установите флажок «Платформа гипервизора Windows» и нажмите кнопку «ОК».
- Шаг 6: Перезагрузите компьютер.
Не пропустите: Эмулятор Sega CD
Вывод
Мы надеемся, что проблема решена, проблема с эмулятором: ошибка: эмуляция x86 в настоящее время требует аппаратного ускорения после прохождения всех методов. Если он все еще существует, значит, в нем отсутствуют файлы. Или, может быть, текущие файлы повреждены. В этом случае вам необходимо восстановить / заменить / скачать необходимые файлы. Пожалуйста, поделитесь своим мнением ниже.
Похожие сообщения:
- Лучший эмулятор SNES для ПК, Mac и Android
- GBA Emulator Android | Эмулятор Gameboy Advance
- GBA BIOS
- Лучший эмулятор Android для ПК, Windows 10, Mac
- Эмулятор Sega CD: как играть в игры Sega cd на пк или android
- Как отключить ускорение мыши на Android / Windows / Mac
![]()
15:27 Emulator: emulator: ERROR: x86 emulation currently requires hardware acceleration!
when ever i try to run the project the above error occurs. and i cant even open the virtual device from the AVD Manager
![]()
Looks like you are trying to launch an x86 or x86_64 AVD in Android Emulator. On Windows, that usually requires HAXM to be installed. Please tell us more about your host system (the PC or Mac where you run Android Studio):
- OS architecture and version, e.g. 64-bit Windows 10 Pro v1803.
- CPU model, e.g. Intel Core i7-8550U.
- HAXM version (as reported by SDK Manager > SDK Tools), e.g. 7.2.0.
- Android Emulator version (as reported by SDK Manager > SDK Tools), e.g. 27.3.8.
- AVD API level and architecture, e.g. API 28 x86.
![]()
Yes, I have the Following
- Windows 10 Pro 64-bit Operating Processor
- Intel Core i7-6500U
- Intel x86 emulator Accelerator (HAXM installer) 7.2.0
- Android Emulator 27.3.8
- API 28 x86
I have all the above following yet i am unable to open the virtual device neither can i run the project
the error that appears is
15:27 Emulator: emulator: ERROR: x86 emulation currently requires hardware acceleration!
![]()
Thanks. You seem to have HAXM installed correctly on a supported host system. Now let’s find out why HAXM is not working using a command line tool that is part of Android Emulator:
- Locate your Android Emulator installation (i.e. the directory that contains
emulator.exe, etc.), which is usuallyC:Users<username>AppDataLocalAndroidsdkemulator. - Open a Command Prompt window, and
cdinto that directory. emulator-check.exe accel hyper-v- Post the output here.
If the tool determines that neither HAXM nor Hyper-V is usable, you’ll need to check your BIOS settings and make sure Intel Virtualization Technology (or VT-x) is enabled. Otherwise, if Hyper-V is enabled, you’ll need to disable it in order to use HAXM. More details here: https://developer.android.com/studio/run/emulator-acceleration#accel-vm
![]()

the dospromt is showing that the Haxm is nt installed
where as in the android studio it shows that it is installed

![]()
![]()
Thank You, for your help and support. Now the HAXM is installed properly and and Virtual Device is working.
Hope, that i can help someone with this problem like you did.
I am still learning to operate Android Studio, if any problem arises, i hope that i can ask here for help and you will help resolve just like this one.
Thank-you A lot.
![]()
-
Partition Wizard
-
Partition Manager
- Error: x86 Emulation Currently Requires Hardware Acceleration
By Sherry | Follow |
Last Updated December 01, 2020
“Emulator: error: x86 emulation currently requires hardware acceleration» is an error message that you might encounter on Android Studio. In this post, MiniTool Partition Wizard puts together some solutions provided by users and you can also have a try to fix the problem.
Android Studio is the official integrated development environment for Android oprerating system. It is a developer tool for building market-leading apps and accelerating performance. Users can download and use this tool on Windows, macOS, and Linux based operating systems.
According to users, a message “emulator: error: x86 emulation currently requires hardware acceleration” pops up sometimes when they try to launch the AVD (Android Virtual Device). Unfortunately, the problem could exist on the Android Studio running on various Windows versions, including Windows 7, Windows 8, and Windows 10.
If you are bothered by the same problem, you might need these solutions listed in the following contents.
Solution 1: Disable Avast Hardware-assisted Virtualization
Some users report that the hardware-assisted virtualization of Avast would conflict with Android Studio’s AVD, which might be a reason for the error x86 emulation currently requires hardware acceleration on Android Studio. To fix the error, you can try disabling this feature in Avast if you have enabled it.
Step 1: Open the main interface of Avast and click Menu > Settings.
Step 2: In the General category, select Troubleshooting tab.
Step 3: Uncheck the option Enable hardware-assisted virtualization.
After disabling the hardware-assisted virtualization in Avast, you can restart your computer and launch Android Studio. Then check if the problem has been fixed. If it still exists, you should move on to the next solution.
Solution 2: Install the Intel HAXM Module
As we know, the PC need to meet the system requirements of Android Studio to run the program properly. Besides the system requirements, the Android Emulator also requires Intel Hardware Accelerated Execution Manager (HAXM) 6.2.1 or later versions.
Without HAXM module, AVD will be unable to compile applications using hardware virtualization and might get the error “emulator: error: x86 emulation currently requires hardware acceleration”.
To solve the problem, you need to download and install the HAXM module via SDK Manager in Android Studio. You just need to:
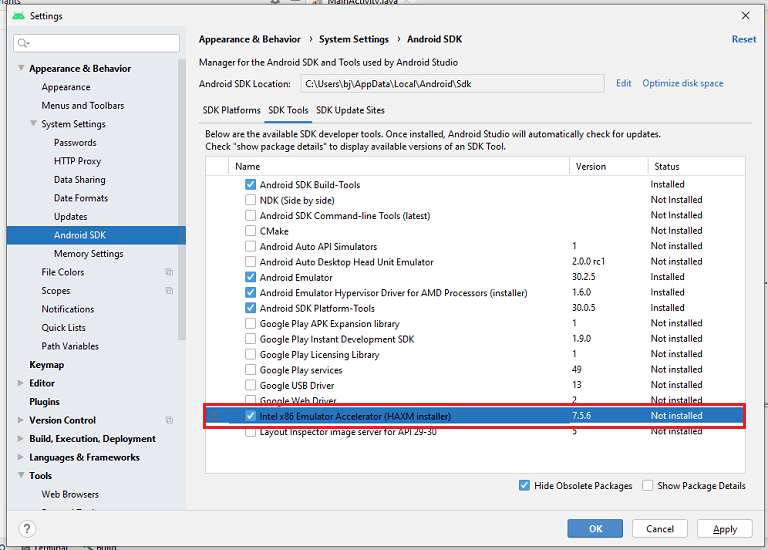
Step 1: Open Android Studio and click File > Settings > System Settings > Android SDK to visit the SDK Manager.
Step 2: Select SDK Tools tab. Then check Intel x86 Emulator Accelerator (HAXM installer) and click OK or Apply. After that, follow the onscreen instructions to finish downloading the HAXM installer.
Step 3: Press Win + E to open File Explorer and find the installer. By default, it will be stored in the following location:
C:usersusernameAppDataLocalAndroidsdkextrasintelHardware_Accelerated_Execution_Managerintelhaxm-android.exe
Step 4: Double-click intelhaxm-android.exe to run the installer and follow the instructions to install the HAXM module.
Then you can relaunch Android Studio and check if it works properly. If this doesn’t work, you can keep trying the next solution.
Solution 3: Enable Windows Hypervisor Platform
If you are using an AMD CPU with virtualization technologies (such as Ryzen), the reason for the error x86 emulation currently requires hardware acceleration on Android Studio might be the disabled Windows Hypervisor Platform on your PC. In this case, you can try enabling Windows Hypervisor Platform if it is available.
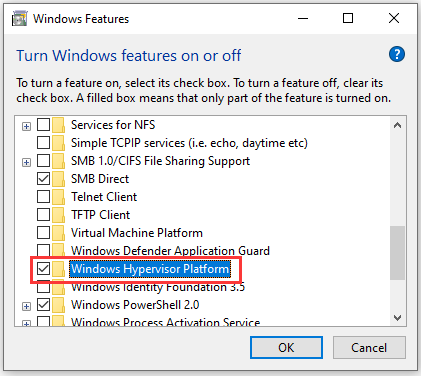
Step 1: Press Win + R to invoke Run window. Then type appwiz.cpl in the box and click OK to navigate to the programs and features quickly.
Step 2: Click Turn Windows features on or off in the left pane.
Step 3: Check the box next to Windows Hypervisor Platform and click OK to confirm the changes you have made.
Then you can reboot your PC and try using Android Studio again.
The “emulator: error: x86 emulation currently requires hardware acceleration” issue could also appear if the hardware virtualization is disabled in your BIOS or UEFI settings, and you might need to enable that feature to solve the problem.
Depending on the motherboard and CPU manufacturer, the detailed steps of enabling hardware virtualization might be different. You need to focus on the message which shows when the manufacturer logo appears during the startup. You can also search the motherboard module + setup key online to figure it out.
Tip: The hardware virtualization feature could also shows as Virtualization technology (VTx/VTd), Intel Virtualization Technology, or AMD-V Virtualization. And they could be listed under the Chipset, Processor, Advanced CPU Configuration, or similar categories.
About The Author

Position: Columnist
Sherry has been a staff editor of MiniTool for a year. She has received rigorous training about computer and digital data in company. Her articles focus on solutions to various problems that many Windows users might encounter and she is excellent at disk partitioning.
She has a wide range of hobbies, including listening to music, playing video games, roller skating, reading, and so on. By the way, she is patient and serious.
Learn how to solve the android AVD error x86 emulating an Android device in Windows.
The First time using the AVD manager of Android can be a headache for some Windows users, when they try to setup an emulator with a x86 Android* image for any target API level. To prevent this error, we need to ensure that we have Intel® HAXM for Android installed on our machine.
Solution
To get started, start the Android SDK Manager (located in Androidsdk) and verify in the Extras option if you already have the Intel x86 emulator accelerator (HAXM installer) already installed on your machine:
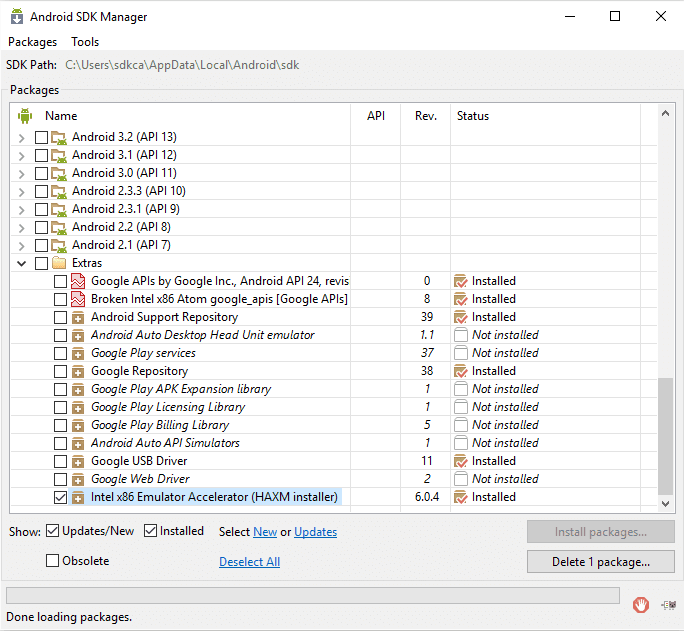
In case you don’t, select the mentioned item and click on Install packages to proceed with the download and the «installation». Once the manager has finished, proceed to start again the emulation of your device using the AVD Manager.
If the problem persists, that means that the Android SDK Manager doesn’t install automatically the emulator accelerator (although the download has been probably completed), therefore you need to proceed the manual installation.
The manager should download the HAXM Installer without any problem, so you need to locate the downloaded installer in the Android SDK folder (usually located in Android-sdk-folderextrasintelHardware_Accelerated_Execution_Manager):
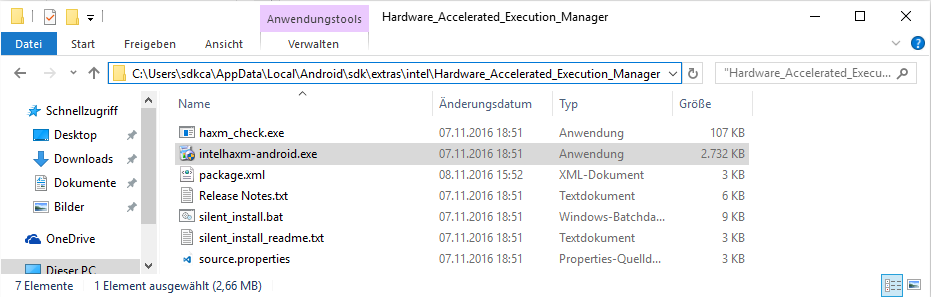
Proceed to execute the installer (intelhaxm-android.exe but in case you’re using older versions of the Android SDK manager it should be intelhaxm.exe instead) in administrator mode:

Note that if your processor doesn’t support the accelerated execution, then you can’t proceed the emulation with an Intel Atom x86 image. Remember to set a realistic value of RAM according to the available amount of your machine.
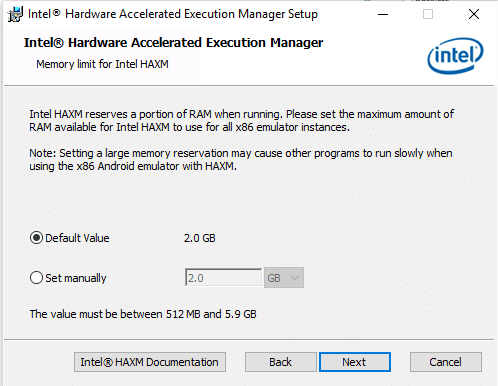
Note: the memory reservation setting can be changed by running the installer again.
After the installation, proceed to start your emulator again and the emulator now should start without problems. In case that the error persists, restart your computer and try once again and your problem should be solved.
Have fun !
|
0 / 0 / 0 Регистрация: 26.07.2018 Сообщений: 1 |
|
|
1 |
|
|
26.07.2018, 13:14. Показов 4362. Ответов 2
Ошибки:
__________________
0 |

|
2882 / 2294 / 769 Регистрация: 12.05.2014 Сообщений: 7,978 |
|
|
26.07.2018, 13:37 |
2 |
|
0 |
|
170 / 86 / 23 Регистрация: 04.02.2016 Сообщений: 293 Записей в блоге: 3 |
|
|
14.09.2018, 22:25 |
3 |
|
Была похожая проблема, только проц. Intel. Лечение: Далее у меня все заработало
1 |
")