Hi,
I have migrated 2-tier PKI from Windows Server 2003 x86 to Windows Server 2008 R2 environment. The migration went fine without big problems, some minor issues only. Both CA’s are online….
When migration from W2003 -> W2008R2 was made the ADDS schema was not upgraded. Because of that I didn’t installed Web Enrollment services. Schema was upgraded about 2 weeks ago (migration was made on Feb 2011) and after that Web Enrollment service was
installed.
Everyting has been working normally until I installed the Web Enrollment service. At the moment situation is that Root CA which has 2 AIA locations and 2 HTTP location are able to download crl and crt files but only via IE or Windows Explorer. Enterprise
PKI shows error message «unable to download».
SubCA has problems with HTTP locations also. When I copy link and open with IE crl & crt files open correctly. Enterprise PKI shows same error than in Root CA. I haven’t done any changes to Root CA. Only changes what has been made (exept security fixes)
has been Web enrollment service installation to SubCA regarding AD Certificate Services.
And I checked today morning that AllowDoubleEscaping is TRUE.
Here are the locations listed:
RootCA
AIA Location #1 Unable To Download
http://xxxxx01/CertEnroll/xxxxx01_Company%20Root%20CA.crt
AIA Location #2 Unable To Download
file://\xxxxx01CertEnrollxxxxxx01_Company Root CA.crt
CDP Location #1 Unable To Download
http://xxxxx01/CertEnroll/Company%20Root%20CA.crl
CDP Location #2 Unable To Download
file://\xxxxx01CertEnrollCompany Root CA.crl
SUBCA
AIA Location #1 OK ldap:///CN=Company%20Issuing%20SubCA,CN=AIA,CN=Public%20Key%20Services,CN=Services,CN=Configuration,DC=Company,DC=com?cACertificate?base?objectClass=certificationAuthority
AIA Location #2 Unable To Download
http://xxxxx02.Company.com/CertEnroll/xxxxx02.Company.com_Company%20Issuing%20SubCA.crt
CDP Location #1 Expiring ldap:///CN=Company%20Issuing%20SubCA,CN=xxxxx02,CN=CDP,CN=Public%20Key%20Services,CN=Services,CN=Configuration,DC=Company,DC=com?certificateRevocationList?base?objectClass=cRLDistributionPoint
DeltaCRL Location #1 OK ldap:///CN=Company%20Issuing%20SubCA,CN=xxxxx02,CN=CDP,CN=Public%20Key%20Services,CN=Services,CN=Configuration,DC=Company,DC=com?deltaRevocationList?base?objectClass=cRLDistributionPoint
DeltaCRL Location #2 Unable To Download
http://xxxxx02.Company.com/CertEnroll/Company%20Issuing%20SubCA+.crl
CDP Location #2 Unable To Download
http://xxxxx02.Company.com/CertEnroll/Company%20Issuing%20SubCA.crl
Doesn anyone have solution for this error? I would appreciate any help for this
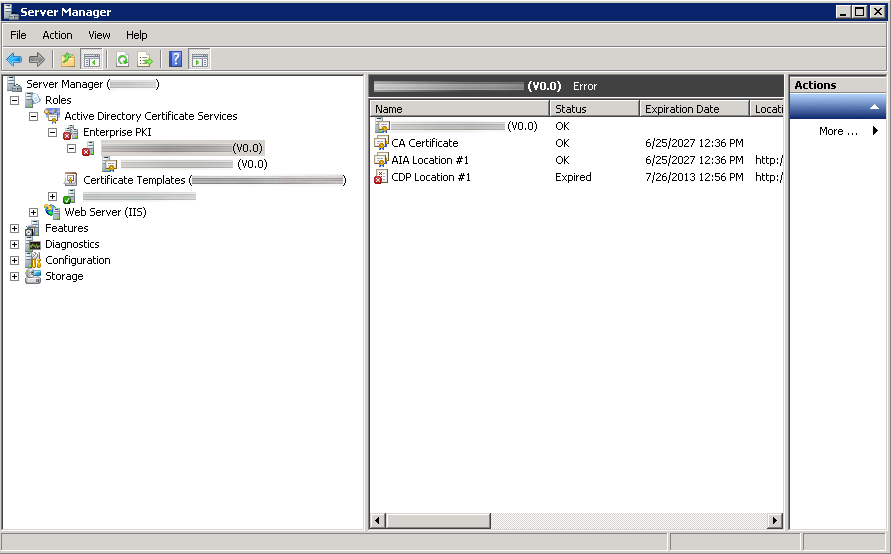
Synopsis: After the first year of deployment of one of my two-tier Enterprise PKI environments, I noticed that certificates were generating weird errors, new certificates could not be issued automatically, nor could certificates be requested manually.
Here is an image of what the subordinate certificate authority looked like in Server Manager; showing CDP Location #1 expired.
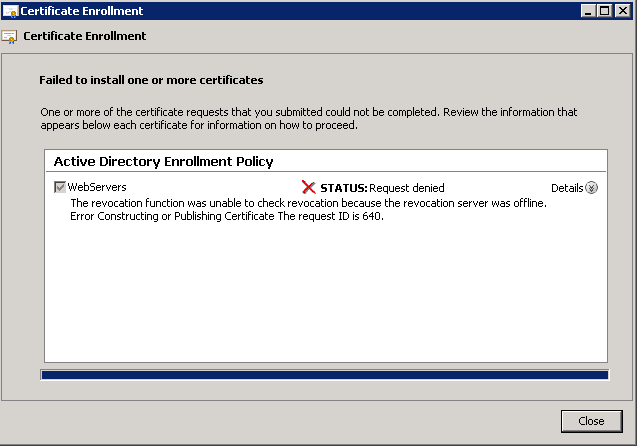
Here was an error that prompted my investigation, when requesting a certificate manually.
Status: Request denied
The revocation function was unable to check revocation because the revocation server was offline. Error Constructing or Publishing Certificate. The request ID is 640.
Here were some of the errors in event viewer on the subordinate CA:
Event ID: 48
Level: Warning
Revocation status for a certificate in the chain for CA certificate 0 for My CA0 could not be verified because a server is currently unavailable. The revocation function was unable to check revocation because the revocation server was offline. 0x80092013 (-2146885613).Event ID: 100
Level: Error
Active Directory Certificate Services did not start: Could not load or verify the current CA certificate. My CA The revocation function was unable to check revocation because the revocation server was offline. 0x80092013 (-2146885613).Revocation status for a certificate in the chain for CA certificate 0 for My CA could not be verified because a server is currently unavailable. The revocation function was unable to check revocation because the revocation server was offline. 0x80092013 (-2146885613).
Upon inspection, it turns out the CDP Location for the subordinate certificate authority had expired.
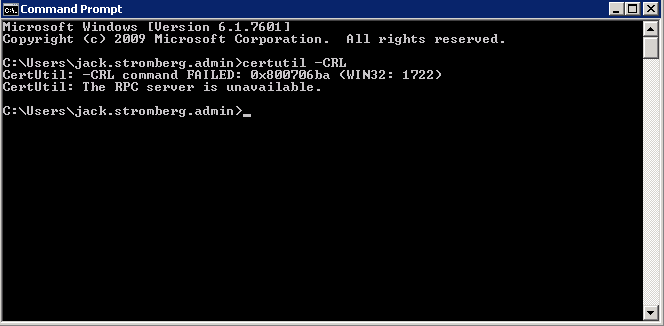
According to a couple technet article I stumbled across, if i ran certutil -CRL, it would renew the CDP location and all would be happy. Not surprisingly, I received another error:
CertUtil: -CRL command FAILED: 0x800706ba (WIN32: 1722)
CertUtil: The RPC server is unavailable.
Solution: When setting up my PKI environment, the CDP was manually published to the Subordinate CA for security reasons (the Root CA should be turned off most of the time). That being said, manually generating a new CRL from the Root CA, coping it over to the Subordinate CA’s directory that is publishing the CRL, and restarting the Active Directory Certificate Services service did the trick for me.
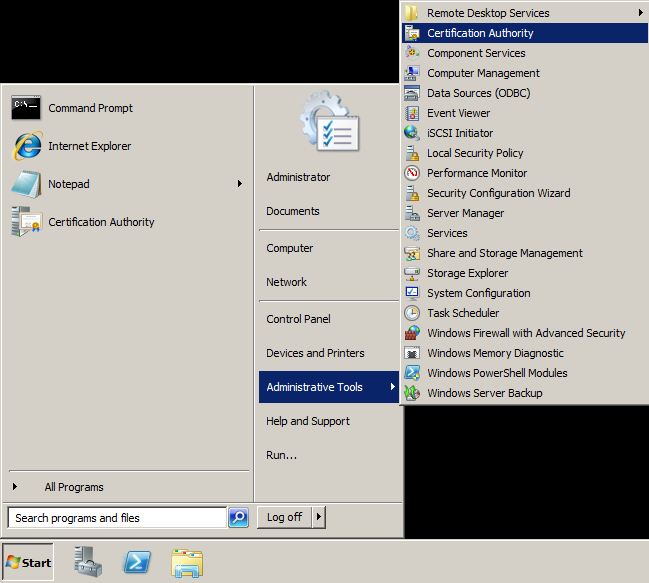
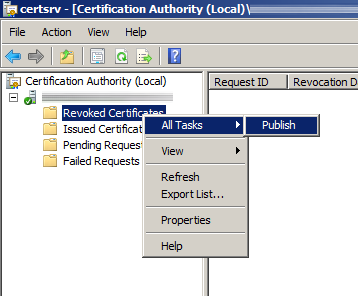
To manually generate the CRL from the Root CA
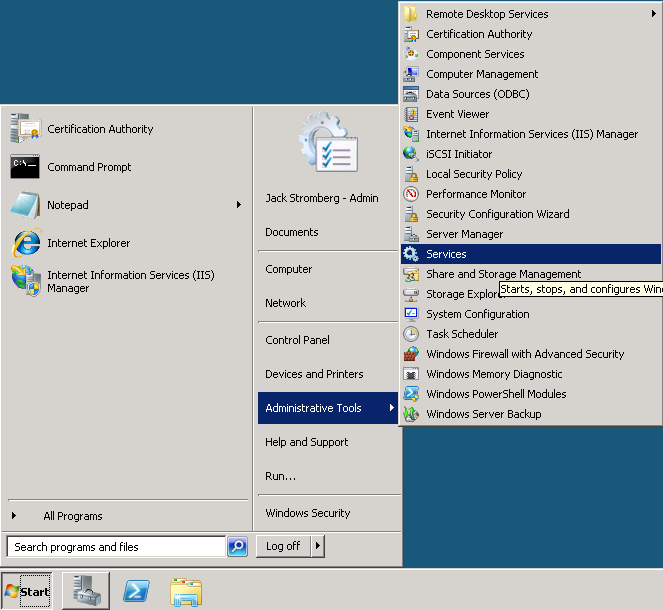
- Open up Active Directory Certificate Services (Start->Administrative Tools->Certification Authority)

- Under Certificate Authority, expand your CA, right click on Revoked Certificates, and select All Tasks -> Publish.

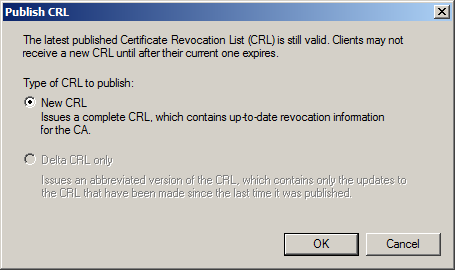
- Click New CRL when the Publish CRL dialog box pops up and click OK

- Navigate to the directory where the CDP gets published via Windows Explorer
- The default directory for this is usually at C:WindowsSystem32CertSrvCertEnroll
- Copy the YourCAName.crl file to an external hard drive to copy over to your subordinate ca.
Importing the CRL on the subordinate CA
The latest CRL is fetched from a published website. In this case, I needed to replace that CRL so the service could properly startup/continue processing certificate. To do so, I logged into the server hosting the CRL file, opened up IIS, and browsed to the area hosting the CDP. Last, I copied the CRL file we generated on the Root CA to this directory.
- Remote to the machine hosting the CRL file
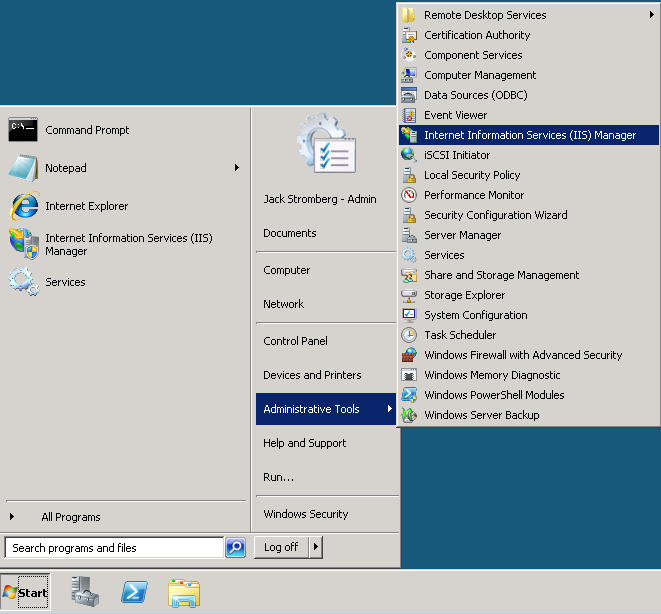
- Open up IIS Manager (Start->Administrative Tools->Internet Information Services (IIS) Manager

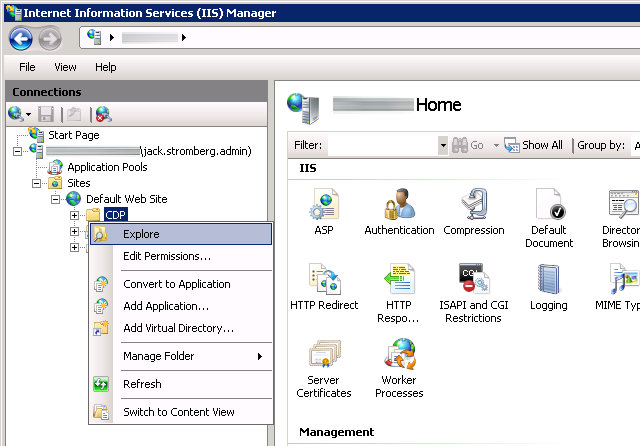
- Expand the server, Sites, Default Web Site, and right click on CDP, select Explore

- Copy the CRL we generated from the Root CA to the directory that just opened (if your certificate authority was working before, replace the old CRL with this one).
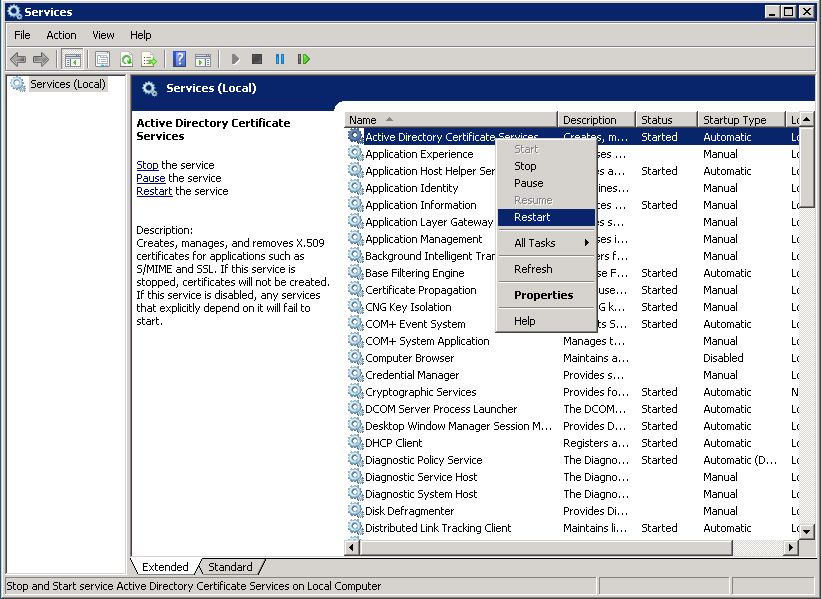
Restarting the service
- Click Start->Administrative Tools->Services

- Right click on Active Directory Certificate Services and select Restart (or Start if the service blew up like mine)

А вот и финальная третья часть нашей серии статей о центре сертификации на предприятии. Сегодня рассмотрим развертывание службы сертификатов на примере Windows Server 2016. Поговорим о подготовке контроллера домена, подготовке веб-сервера, установке корневого и издающего центров сертификации и об обновлении сертификатов. Заглядывайте под кат!

Первая часть серии
Вторая часть серии
Словарь терминов
В этой части серии использованы следующие сокращения и аббревиатуры:
- PKI (Public Key Infrastructure) — инфраструктура открытого ключа, набор средств (технических, материальных, людских и т. д.), распределённых служб и компонентов, в совокупности используемых для поддержки криптозадач на основе закрытого и открытого ключей. Поскольку аббревиатура ИОК не является распространённой, здесь и далее будет использоваться более знакомая англоязычная аббревиатура PKI.
- X.509 — стандарт ITU-T для инфраструктуры открытого ключа и инфраструктуры управления привилегиями.
- ЦС (Центр Сертификации) — служба выпускающая цифровые сертификаты. Сертификат — это электронный документ, подтверждающий принадлежность открытого ключа владельцу.
- CRL (Certificate Revocation List) — список отзыва сертификатов. Подписанный электронный документ, публикуемый ЦС и содержащий список отозванных сертификатов, действие которых прекращено по внешним причинам. Для каждого отозванного сертификата указывается его серийный номер, дата и время отзыва, а также причина отзыва (необязательно). Приложения могут использовать CRL для подтверждения того, что предъявленный сертификат является действительным и не отозван издателем… Приложения могут использовать CRL для подтверждения, что предъявленный сертификат является действительным и не отозван издателем.
- SSL (Secure Sockets Layer) или TLS (Transport Layer Security) — технология обеспечивающая безопасность передачи данных между клиентом и сервером поверх открытых сетей.
- HTTPS (HTTP/Secure) — защищённый HTTP, является частным случаем использования SSL.
- Internet PKI — набор стандартов, соглашений, процедур и практик, которые обеспечивают единый (унифицированный) механизм защиты передачи данных на основе стандарта X.509 по открытым каналам передачи данных.
- CPS (Certificate Practice Statement) — документ, описывающий процедуры управления инфраструктурой открытого ключа и цифровыми сертификатами.
Общий план развёртывания
Для развёртывания службы сертификатов нам потребуется четыре машины с Windows Server 2016, которые будут выполнять следующие функции:
- Контроллер домена — необходим для функционирования домена Active Directory;
- Веб-сервер — будет обеспечивать доступ к сертификатам ЦС и спискам отзывов для клиентов;
- Корневой ЦС — будет выполнять функции корневого ЦС;
- Подчинённый ЦС — будет выполнять функции издающего ЦС.
Развёртывание PKI будет проходить поэтапно на каждом сервере в том порядке, в котором они указаны выше. Подготовка контроллера домена будет сводиться к обеспечению функций Active Directory, GPO и учётных записей.
Подготовка контроллера домена
Перед развёртыванием PKI необходимо убедиться в работоспособности домена Active Directory и что все необходимые серверы (а именно, веб-сервер и подчинённый ЦС) введены в домен. А так же, что подготовлены необходимые учётные записи. На данном этапе нам потребуется только учётная запись с правами Enterprise Admins.
Ряд операций на подчинённом ЦС требуют прав Enterprise Admins, поскольку производится запись в раздел configuration naming context. Если это корневой домен леса, то для этих операций достаточно прав Domain Admins.
Следующим шагом будет конфигурирование политики автоматической выдачи сертификатов (autoenrollment). Эта политика нужна будет в процессе эксплуатации служб сертификатов для автоматической выдачи и обновления истёкших сертификатов на клиентах. Политика настраивается в конфигурации компьютера и пользователя:
- Computer ConfigurationPoliciesWindows SettingsSecurity SettingsPublic Key InfrastructureCertificate Services Client – Auto-Enrollment
- User ConfigurationPoliciesWindows SettingsSecurity SettingsPublic Key InfrastructureCertificate Services Client – Auto-Enrollment
Политика в обоих разделах должна быть сконфигурирована как показано на следующей картинке:
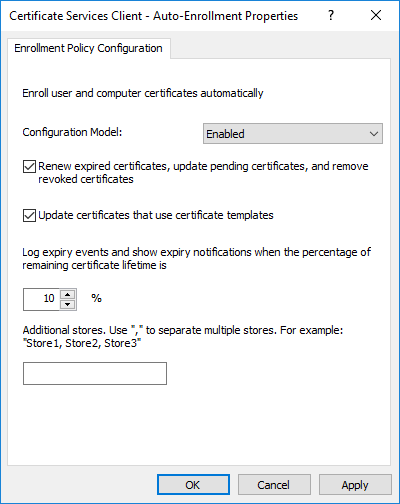
Сконфигурированный объект групповых политик (GPO) должен быть пристыкован к корню домена. Данную процедуру необходимо повторить во всех доменах текущего леса Active Directory.
Далее, необходимо создать запись типа CNAME с именем CDP на сервере ДНС, который будет указывать на веб-сервер (IIS). Эту процедуру необходимо выполнить как на внутреннем, так и на внешнем (который обслуживает зону в интернете) серверах ДНС. Запись можно создать при помощи PowerShell:
Add-DnsServerResourceRecord -CName -Name "cdp" -HostNameAlias "iis.contoso.com" -ZoneName "contoso.сom" Подготовка веб-сервера
На веб-сервере нам потребуется выполнить следующее: установить службу IIS (если ещё не установлена), создать общую папку и сконфигурировать веб-сайт на использование этой папки.
- Установка службы IIS
Для установки службы IIS можно воспользоваться следующей командой:
Install-WindowsFeature -Name Web-Server, Web-WebServer -IncludeManagementTools- Создание папки PKIdata
Согласно нашей конфигурационной таблице (см. часть 2), для хранения сертификатов ЦС и списков отзыва нам потребуется общая папка с сетевым именем PKI по следующему пути: C:InetPubwwwrootPKIdata
New-Item -ItemType Directory -Path C:InetPubwwwroot -Name PKIdata -Force
New-SmbShare -Path C:inetpubwwwrootPKIdata -Name PKI -FullAccess everyone
После этого нужно выдать права NTFS на запись в эту папку для группы Cert Publishers.
- Создание веб-сайта
Теперь нам необходимо создать отдельный веб-сайт с именем “CDP” и хост-именем “cdp.contoso.com”:
New-Website -Name CDP -HostHeader cdp.contoso.com -PhysicalPath C:inetpubwwwrootPKIdata
New-WebVirtualDirectory -Site cdp -Name pki -PhysicalPath C:inetpubwwwrootPKIdata- Включение поддержки Delta CRL
В нашем сценарии издающий ЦС будет публиковать Delta CRL, которые содержат символ плюс «+» в имени файла (например, contoso-pica+.crl). По умолчанию, IIS будет расценивать этот символ в запросе как метасимвол и не позволит клиентам скачать список отзыва. Для этого необходимо включить двойной эскейпинг в настройках IIS, чтобы расценивать знак плюса в запросе как литерал:
Import-Module -Name WebAdministration
Set-WebConfigurationProperty -PSPath 'MACHINE/WEBROOT/APPHOST' -Filter /system.webServer/security/requestFiltering -name allowdoubleescaping -Value 'true'
Установка корневого ЦС
Фактическая установка ЦС будет включать в себя несколько этапов:
- Подготовка предустановочных конфигурационных файлов (CAPolicy.inf);
- Установка компонента ЦС;
- Выполнение постустановочной конфигурации;
- Проверка установки.
Перед установкой корневого ЦС, необходимо ещё раз вернуться к конфигурационным таблицам:
| Название параметра | Значение параметра |
|---|---|
| Сервер ЦС | |
| Класс ЦС | Standalone CA |
| Тип ЦС | Root CA |
| Сертификат | |
| Имя сертификата | Contoso Lab Root Certification authority |
| Дополнительный суффикс | OU=Division Of IT, O=Contoso Pharmaceuticals, C=US |
| Провайдер ключа | RSA#Microsoft Software Key Storage Provider |
| Длина ключа | 4096 бит |
| Алгоритм подписи | SHA256 |
| Срок действия | 15 лет |
В таблице я выделил только те параметры, которые задаются до и в процессе установки. Остальные параметры будут настраиваться после установки.
Предварительная конфигурация
Предварительные конфигурационные файлы необходимы для ряда настроек, которые невозможно задать во время установки компонента (ни при помощи графического интерфейса, ни при помощи командной строки или PowerShell). К ним обычно относятся настройки расширений сертификата ЦС. Например, для настройки расширения сертификата Certificate Policies, необходимо использовать предварительный конфигурационный файл, в котором настраиваются параметры расширения. Для Microsoft ADCS таким файлом является файл CAPolicy.inf, который должен быть расположен по следующему пути: %windir%CAPolicy.inf. С синтаксисом этого файла можно ознакомиться в следующей статье: How CA Certificates Work. Поскольку никаких специфичных или нестандартных настроек в сертификате корневого ЦС мы делать не будем, поэтому и предварительный конфигурационный файл сейчас нам не потребуется.
Установка компонента ЦС
Прежде всего необходимо добавить установочные компоненты для AD CS:
Install-WindowsFeature AD-Certificate, ADCS-Cert-Authority -IncludeManagementToolsПосле этого сверьтесь с предыдущей таблицей, чтобы определить параметры установки. Исходя из данных таблицы, зададим параметры для командлета Install-AdcsCertificationAuthority:
Install-AdcsCertificationAuthority -CACommonName "Contoso Lab Root Certification Authority" `
    -CADistinguishedNameSuffix "OU=Division Of IT, O=Contoso Pharmaceuticals, C=US" `
    -CAType StandaloneRootCA `
    -CryptoProviderName "RSA#Microsoft Software Key Storage Provider" `
    -KeyLength 4096 `
    -HashAlgorithmName SHA256 `
    -ValidityPeriod "years" `
    -ValidityPeriodUnits 15 `
    -DatabaseDirectory $(Join-Path $env:SystemRoot "System32CertLog")
Итоговая настройка
После установки компонента ЦС необходимо настроить рабочие параметры ЦС. Рассмотрим ещё раз элементы, которые нам необходимо настроить:
| Название параметра | Значение параметра |
|---|---|
| Сервер ЦС | |
| Срок действия издаваемых сертификатов | 15 лет |
| Точки публикации CRT | 1) По-умолчанию 2) C:CertDatacontoso-rca< CertificateName>.crt3) IIS:InetPubPKIdatacontoso-rca< CertificateName>.crt* |
| Точки распространения CRT | 1) cdp.contoso.com/pki/contoso-rca<CertificateName>.crt |
| Точки публикации CRL | 1) По-умолчанию 2) C:CertDatacontoso-rca< CRLNameSuffix>.crt3) IIS:InetPubPKIdatacontoso-rca< CRLNameSuffix>.crt* |
| Точки распространения CRL | 1) cdp.contoso.com/pki/contoso-rca<CRLNameSuffix>.crt |
| Сертификат | |
| Состав CRL | Base CRL |
| Base CRL | |
| Тип | Base CRL |
| Срок действия | 6 месяцев |
| Расширение срока действия | 1 месяц |
| Алгоритм подписи | SHA256 |
| Публикация в AD | Нет |
* — копируется на сервер IIS
Скрипт настройки
Для конфигурирования настроек ЦС мы будем использовать BATCH скрипт с использованием утилиты certutil.exe:
::::::::::::::::::::::::::::::::::::::::::::::::::::::::::::::::::::::::::::::::::::::::
::                     Root CA post-installation script                               ::
::::::::::::::::::::::::::::::::::::::::::::::::::::::::::::::::::::::::::::::::::::::::
:: все комментарии помечены знаком двойного двоеточия (::)
:: записываем пути для публикации и распространения сертификатов ЦС и списков отзыва
:: в отдельные переменные
SET CrlLocal=C:CertDatacontoso-rca%%8.crl
SET CDP=http://cdp.contoso.com/pki/contoso-rca%%8.crl
SET AIA=http://cdp.contoso.com/pki/contoso-rca%%4.crt

:: Создаём папку в корне системного диска, куда будут записываться файлы ЦС. Эта папка
:: создаётся для удобства, чтобы не искать папку CertEnroll в глубине папки Windows.
md C:CertData

:: Настраиваем пути публикации и распространения для сертификатов ЦС и списков отзыва.
certutil -setreg CACRLPublicationURLs "1:%windir%system32CertSrvCertEnroll%%3%%8.crln1:%CrlLocal%n2:%CDP%"

certutil -setreg CACACertPublicationURLs "1:%windir%system32CertSrvCertEnroll%%1_%%3%%4.crtn2:%AIA%"

:: Поскольку мы не можем указывать пути публикации для файла сертификата, мы
:: вручную переименовываем его в необходимый формат и копируем в папку CertData
ren %windir%system32CertSrvCertEnroll*.crt contoso-rca.crt
copy %windir%system32CertSrvCertEnrollcontoso-rca.crt C:CertData

:: Задаём срок действия издаваемых сертификатов
certutil -setreg CAValidityPeriodUnits 15
certutil -setreg CAValidityPeriod "Years"

:: Задаём время жизни списков отзыва согласно нашей конфигурации
certutil -setreg CACRLPeriodUnits 180
certutil -setreg CACRLPeriod "Days"
certutil -setreg CACRLOverlapPeriod "Months"
certutil -setreg CACRLOverlapUnits 1

:: Отключаем дифференциальные списки отзыва (или Delta CRL)
certutil -setreg CACRLDeltaPeriodUnits 0

:: Отключаем генерацию кросс-сертификатов
certutil -setreg caCRLFlags +CRLF_DISABLE_ROOT_CROSS_CERTS

:: Конфигурируем ЦС для включения истёкших отозванных сертификатов в списки отзыва
certutil –setreg caCRLFlags +CRLF_PUBLISH_EXPIRED_CERT_CRLS

:: Включаем полный аудит событий на ЦС**
certutil -setreg CAAuditFilter 127

:: если версия ОС ниже, чем Windows Server 2016 необходимо задать алгоритм подписи.
:: Windows Server 2016 по умолчанию использует SHA256.
Certutil -setreg cacspCNGHashAlgorithm SHA256

:: Перезапускаем службу ЦС для применения изменений.
net stop certsvc && net start certsvc

:: Публикуем списки отзыва.
certutil -CRL
Ряд команд нуждается в более развёрнутом пояснении. Команды с настройкой расширений CRL Distribution Points и Authority Information Access имеют специфический синтаксис. Во-первых, пути публикации и распространения указываются в одну строку и разделяются символом новой строки «n». Каждый путь начинается с числа и отделяется от самого пути символом двоеточия. Это число в начале пути указывает битовую маску флагов публикации для конкретного пути. Значение каждого бита для расширений CDP и AIA приведено в следующей таблице:
| Название галочки в MMC | Числовое значение | Название галочки в MMC | Числовое значение |
|---|---|---|---|
| Publish CRLs to this location. | 1 | Include in the AIA extension of issued certificates. |
2 |
| Include in the CDP extension of issued certificates. | 2 | Include in the Online Certificate Status. Protocol (OCSP) extension. | 32 |
| Include in CRLs. Clients use this to find Delta CRL locations. | 4 | ||
| Include in all CRLs. Specifies where to publish in AD DS when publishing manually. | 8 | ||
| Publish Delta CRLs to this location. | 64 | ||
| Include in the IDP extension of issued CRLs. | 128 |
Если взять путь для CDP: 1:%windir%system32CertSrvCertEnroll%%3%%8.crl, то цифра 1 в начале строки говорит о том, что это путь физического размещения файла (Publich CRLs to this location). Другие опции здесь не используются. Для включения пути, который будет публиковаться в издаваемых сертификатах, мы будем использовать опцию «Include in the CDP extension of issued certificates» с числовым значением 2. Такой же принцип применяется и для остальных путей.
В каждом пути включены переменные с двойным знаком процента «%%». Это переменные, которые ЦС при формировании пути будет автоматически заполнять исходя из типа переменной.
Первый знак процента используется как эскейп-символ, чтобы процессор командной строки воспринял следующий знак процента как литерал. Дело в том, что знак процента в командном процессоре CMD является служебным символом. Сервер ЦС так же использует знак процента для указания, что это переменная. Для исключения конфликта в командном процессоре используется последовательность из двух знаков процента.
Следующая таблица содержит описание всех доступных переменных и их краткое описание:
| Переменная в редакторе расширений CDP и AIA | Переменная в скрипте | Где используется | Значение |
|---|---|---|---|
<ServerDNSName> |
%1 | CDP/AIA | Полное ДНС имя сервера ЦС |
<ServerShortName> |
%2 | CDP/AIA | Короткое (NetBIOS) имя сервера ЦС |
<CaName> |
%3 | CDP/AIA | Имя ЦС (атрибут CN в сертификате) |
<CertificateName> |
%4 | AIA | Индекс сертификата ЦС. Используется только при обновлении сертификата ЦС. |
<ConfigurationContainer> |
%6 | CDP/AIA | Путь к configuration naming context в Active Directory |
<CATruncatedName> |
%7 | CDP/AIA | Укороченное (санитизированное) имя сертификата ЦС. В общем случае будет совпадать с полным именем ЦС |
<CRLNameSuffix> |
%8 | CDP | Индекс ключа ЦС, которым был подписан данный CRL. Используется при обновлении ключевой пары ЦС. |
<DeltaCRLAllowed> |
%9 | CDP | Добавляет суффикс для Delta CRL (знак «+»). |
<CDPObjectClass> |
%10 | CDP | Класс объекта в Active Directory |
<CAObjectClass> |
%11 | CDP/AIA | Класс объекта в Active Directory |
В нашем конкретном случае будут использоваться только две переменные: <CertificateName> и <CRLNameSuffix>. Для исходного сертификата ЦС эти переменные пустые. При обновлении сертификата ЦС, переменная будет заменяться на «(index)», где index — номер сертификата ЦС. Индексирование начинается с нуля. Например, имя файла для последующего сертификата ЦС будет иметь вид: contoso-rca(1).crt. И так далее. То же самое касается и переменной , только здесь будет указываться индекс ключевой пары ЦС.
Отдельного внимания заслуживает команда, которая включает аудит операций на сервере ЦС, которые регистрируются в системном журнале Security.evtx. К ним относятся все основные операции: запуск/остановка службы, отправление запроса, выпуск или отклонение сертификата, выпуск списка отзыва. Эту строчку можно найти практически в каждом постустановочном скрипте для ЦС, которые можно найти в похожих статьях в интернете. И практически никто не утруждает себя в подробном объяснении механизма его работы, просто копируют из статьи в статью.
Особенность ведения аудита ЦС заключается в том, что настройка флагов аудита на ЦС является необходимым, но не достаточным условием. Механизм аудита основан на регистрации событий в журнале Security.evtx, который, в свою очередь зависит от настройки политики Audit Object Access в групповых политиках. Т.е. без настройки групповых политик никакого аудита не будет.
Опытные администраторы знают к чему приводит включение Audit Object Access — к лавинному созданию записей в журнале от других компонентов ОС. Например, аудит доступа файловой системы, реестра, других установленных ролей и т.д. В результате, журнал может буквально за день-два заполниться до отказа. Поэтому для эффективного использования аудита необходимы меры по фильтрации ненужных событий, например, при помощи функции подписки на интересующие события. Нет смысла в аудите, если его никто не может прочитать и эффективно проанализировать. Но эта тема уже выходит за рамки этой статьи.
Прочие настройки
После того как корневой ЦС установлен и сконфигурирован, убедитесь, что всё прошло без ошибок:
- Откройте оснастку Certification Authorities MMC (certsrv.msc), убедитесь, что служба запущена;
- Выберите свойства узла ЦС и проверьте поля сертификата, что они соответствуют ожидаемым значениям;
- Найдите в корне системного диска папку CertData и убедитесь, что там находится два файла: сертификат и список отзыва. Убедитесь, что поля списка отзыва соответствуют ожидаемым значениям.
Если всё хорошо, тогда скопируйте содержимое папки C:CertData на сервер IIS в папку PKIData. Сертификат корневого ЦС уже можно импортировать на все устройства, которые будут использовать нашу PKI.
Для импорта сертификата на доменные клиенты, достаточно загрузить его в Active Directory и после обновления групповых политик на клиентах, сертификат будет установлен в локальные хранилища сертификатов во всём лесу. Для публикации сертификата в AD необходимо выполнить следующую команду:
Certutil -f -dspublish pathcontoso-rca.crt RootCAДля установки сертификата на клиентах в рабочих группах и мобильные устройства необходимо воспользоваться другими инструментами, которые есть в вашем распоряжении. Например, System Center Configuration Manager или Mobile Device Management. Если подходящих инструментов нет, можно копировать и устанавливать сертификат на компьютеры при помощи утилиты certutil.exe. Для установки сертификата в локальное хранилище сертификатов выполните следующую команду:
Certutil -f -addstore Root pathcontoso-rca.crtУстановка издающего ЦС
Как и в случае с корневым ЦС, установка издающего ЦС включает в себя четыре этапа:
- Подготовка предустановочных конфигурационных файлов (CAPolicy.inf);
- Установка компонента ЦС;
- Выполнение постустановочной конфигурации;
- Проверка установки и конфигурации.
Предустановочная конфигурация
Если для корневого ЦС предустановочный конфигурационный файл нам не требовался, то для издающего ЦС он понадобится. В нём мы настроим расширения Certificate Policies и Basic Constraints для сертификата ЦС. Если с политиками всё понятно, то в расширении Basic Constraints мы запретим выдачу сертификатов другим ЦС с издающего ЦС, поскольку у нас двухуровневая иерархия и добавление новых уровней только усложняет нашу структуру и увеличивает время, затрачиваемое на проверку сертификатов клиентами. Также отключим автоматическую загрузку шаблонов из Active Directory в список выдаваемых шаблонов. По умолчанию, сервер ЦС загружает на выдачу некоторый набор шаблонов сертификатов. Это вредно по двум причинам:
- Контроллеры домена практически мгновенно обнаруживают появление ЦС в лесу и даже при отключённой политике автоматической выдачи сами запрашивают себе сертификаты.
- Администраторы сами должны определять какие шаблоны будут использовать в организации.
Поэтому мы сконфигурируем ЦС так, что список шаблонов к выдаче будет пустым. Это возможно сделать только через CAPolicy.inf. В нашем случае он будет иметь следующее содержимое:
; заголовок INI файла
[Version]
Signature= "$Windows NT$"

; указываем список политик, которые будут включены в сертификат ЦС. В нашем
; случае будет одна политика под названием AllIssuancePolicies.
[PolicyStatementExtension]
Policies = AllIssuancePolicy
; конфигурируем детали самой политики. Ссылку на документ Certificate Practice
; Statement (CPS) и объектный идентификатор политики
[AllIssuancePolicy]
URL = http://cdp.contoso.com/pki/contoso-cps.html
OID = 2.5.29.32.0
[BasicConstraintsExtension]
IsCA = True
PathLegth = 0
IsCritical = True
; секция прочих настроек ЦС
[certsrv_server]
; отключаем автоматическую загрузку шаблонов сертификатов для выдачи
LoadDefaultTemplates = 0
Файл с именем CAPolicy.inf необходимо скопировать в системную папку Windows до установки ЦС.
Установка компонента ЦС
Прежде всего необходимо добавить установочные компоненты для AD CS:
Install-WindowsFeature AD-Certificate, ADCS-Cert-Authority -IncludeManagementToolsПосле этого посмотрим на установочную таблицу, чтобы определить параметры установки:
| Название параметра | Значение параметра |
|---|---|
| Сервер ЦС | |
| Класс ЦС | Enterprise CA |
| Тип ЦС | Subordinate CA |
| Автоматическая загрузка шаблонов | Нет |
| Сертификат | |
| Имя сертификата | Contoso Lab Issuing Certification authority |
| Дополнительный суффикс | OU=Division Of IT, O=Contoso Pharmaceuticals, C=US |
| Провайдер ключа | RSA#Microsoft Software Key Storage Provider |
| Длина ключа | 4096 бит |
| Алгоритм подписи | SHA256 |
| Срок действия | 15 лет (определяется вышестоящим ЦС) |
| Политики выдачи | 1) Имя: All Issuance Policies OID=2.5.29.32.0 URL=http://cdp.contoso.com/pki/contoso-cps.html |
| Basic Constraints | isCA=True (тип сертификата — сертификат ЦС) PathLength=0 (запрещается создание других промежуточных ЦС под текущим ЦС). |
В таблице я выделил только те параметры, которые задаются в процессе установки. Остальные параметры будут настраиваться после установки. Исходя из этих данных сформируем параметры для командлета Install-AdcsCertificationAuthority:
Install-AdcsCertificationAuthority -CACommonName "Contoso Lab Issuing Certification authority" `
    -CADistinguishedNameSuffix "OU=Division Of IT, O=Contoso Pharmaceuticals, C=US" `
    -CAType EnterpriseSubordinateCa `
    -CryptoProviderName "RSA#Microsoft Software Key Storage Provider" `
    -KeyLength 4096 `
    -HashAlgorithmName SHA256
После выполнения этой команды будет выведено сообщение о том, что установка ЦС не завершена и для её завершения необходимо отправить сгенерированный запрос (находится в корне системного диска) на вышестоящий ЦС и получить подписанный сертификат. Поэтому находим файл с расширением «.req» в корне системного диска и копируем его на корневой ЦС и на корневом ЦС выполняем следующие команды:
 # отправляем запрос на ЦС.
certreq -submit 'C:CA-01.contoso.com_Contoso Lab Issuing Certification authority.req'
# предыдущая команда выведет номер запроса. Укажите этот номер запроса в следующей команде
# в моём случае это номер 2
certutil -resubmit 2
# после выпуска сертификата сохраните его в файл. При этом укажите тот же самый номер
# запроса, который был указан после выполнения первой команды
certreq -retrieve 2 C:subca.crt
Полученный файл (subca.crt) необходимо скопировать обратно на издающий ЦС и завершить инсталляцию:
certutil -installcert c:subca.crt
net start certsvc
Мы устанавливаем на ЦС выписанный сертификат и запускаем службу сертификатов. После успешной установки можно запустить оснастку Certification Authorities MMC (certsrv.msc) и убедиться, что сертификат успешно установлен и ЦС в работающем состоянии. Теперь осталось дело за постустановочной конфигурацией.
Итоговая настройка
По аналогии с корневым ЦС, нам потребуется сконфигурировать ряд параметров на издающем ЦС. Для этого мы снова напишем BATCH скрипт с использованием утилиты certutil.exe. Но прежде всего посмотрим установочную таблицу и выясним параметры, которые нам необходимо настроить:
Аналогичная таблица составляется и для издающего ЦС.
| Название параметра | Значение параметра |
|---|---|
| Сервер ЦС | |
| Срок действия издаваемых сертификатов | Максимально: 5 лет (остальное контролируется шаблонами сертификатов) |
| Публикация в AD (контейнеры) | AIA NTAuthCertificates |
| Состав CRL | Base CRL Delta CRL |
| Точки публикации CRT | 1) По-умолчанию 2) \IISPKIcontoso-pica< CertificateName>.crt |
| Точки распространения CRT | 1) cdp.contoso.com/pki/contoso-pica<CertificateName>.crt |
| Точки публикации CRL | 1) По-умолчанию 2) \IISPKIcontoso-pica< CRLNameSuffix><DeltaCRLAllowed>.crl |
| Точки распространения CRL | 1) cdp.contoso.com/pki/contoso-pica<CRLNameSuffix><DeltaCRLAllowed>.crl |
| Base CRL | |
| Тип | Base CRL |
| Срок действия | 1 неделя |
| Расширение срока действия | По умолчанию |
| Алгоритм подписи | SHA256 |
| Публикация в AD | Нет |
| Delta CRL | |
| Тип | Delta CRL |
| Срок действия | 1 день |
| Расширение срока действия | По-умолчанию |
| Алгоритм подписи | SHA256 |
| Публикация в AD | Нет |
За основу мы возьмём скрипт с корневого ЦС и изменим только отдельные фрагменты:
::::::::::::::::::::::::::::::::::::::::::::::::::::::::::::::::::::::::::::::::::::::::
::                     Issuing CA post-installation script                            ::
::::::::::::::::::::::::::::::::::::::::::::::::::::::::::::::::::::::::::::::::::::::::
:: все комментарии помечены знаком двойного двоеточия (::)
:: записываем пути для публикации и распространения сертификатов ЦС и списков отзыва
:: в отдельные переменные
SET CrlLocal=\IISPKIcontoso-pica%%8%%9.crl
SET CDP=http://cdp.contoso.com/pki/contoso-pica%%8%%9.crl
SET AIA=http://cdp.contoso.com/pki/contoso-pica%%4.crt

:: Настраиваем пути публикации и распространения для сертификатов ЦС и списков отзыва.
certutil -setreg CACRLPublicationURLs "1:%windir%system32CertSrvCertEnroll%%3%%8%%9.crln65:%CrlLocal%n6:%CDP%"

certutil -setreg CACACertPublicationURLs "1:%windir%system32CertSrvCertEnroll%%1_%%3%%4.crtn2:%AIA%"

:: Поскольку мы не можем указывать пути публикации для файла сертификата, мы
:: вручную переименовываем его в необходимый формат и копируем в сетевую папку
ren %windir%system32CertSrvCertEnroll*.crt contoso-pica.crt
copy %windir%system32CertSrvCertEnrollcontoso-pica.crt \IISPKI

:: Задаём срок действия издаваемых сертификатов
certutil -setreg CAValidityPeriodUnits 5
certutil -setreg CAValidityPeriod "Years"

:: Задаём время жизни списков отзыва согласно нашей конфигурации
:: базовый CRL
certutil -setreg CACRLPeriodUnits 1
certutil -setreg CACRLPeriod "weeks"

:: Delta CRL
certutil -setreg CACRLDeltaPeriodUnits 1
certutil -setreg CACRLDeltaPeriod "days"

:: Включаем полный аудит событий на ЦС**
certutil -setreg CAAuditFilter 127

:: Включаем наследование расширения Certificate Policies в издаваемых сертификатах
certutil -setreg PolicyEnableRequestExtensionList +"2.5.29.32"

:: Включаем поддержку расширения OcspRevNoCheck, если планируется установка
:: сетевого ответчика (Online Responder или OCSP сервера)
certutil -v -setreg policyeditflags +EDITF_ENABLEOCSPREVNOCHECK

:: если версия ОС ниже, чем Windows Server 2016 необходимо задать алгоритм подписи.
:: Windows Server 2016 по умолчанию использует SHA256.
Certutil -setreg cacspCNGHashAlgorithm SHA256

:: Перезапускаем службу ЦС для применения изменений.
net stop certsvc && net start certsvc

:: Публикуем списки отзыва.
certutil -CRL
Заметим, что в путях CRLDistribution Points, изменены флаги публикации (добавлена публикация Delta CRL) и добавлена переменная %9 в имя файла для поддержки уникального имени для дельты.
Здесь мы больше не создаём папку в корне системного диска, а используем сетевую папку PKI на сервере IIS, куда напрямую копируем файл сертификата и публикуем списки отзыва.
Прочие настройки
После того как издающий ЦС установлен и сконфигурирован, убедитесь, что всё прошло без ошибок:
- Откройте оснастку Certification Authorities MMC (certsrv.msc), убедитесь, что служба запущена
- Выберите свойства узла ЦС и проверьте поля сертификата, что они соответствуют ожидаемым значениям.
- Откройте сетевую папку PKI (на сервере IIS) и убедитесь, что там есть два файла сертификата (корневого и издающего ЦС) и три списка отзыва (один для корневого, два для издающего ЦС). Убедитесь, что поля в сертификатах и списках отзыва соответствуют ожидаемым значениям.
Когда основные параметры проверены, необходимо убедиться в правильной связи иерархии ЦС и доступности всех внешних файлов для клиентов. Для этого на сервере ЦС (а лучше, на рабочей станции, где установлены средства удалённого администрирования ЦС) необходимо запустить оснастку Enterprise PKI Health (pkiview.msc). Оснастка автоматически построит текущую иерархию и проверит доступность всех путей для скачивания сертификатов ЦС и списков отзыва. Никаких ошибок быть не должно. Если есть ошибка, необходимо её точно идентифицировать и устранить. В случае успешной настройки оснастка будет выглядеть следующим образом для корневого ЦС:
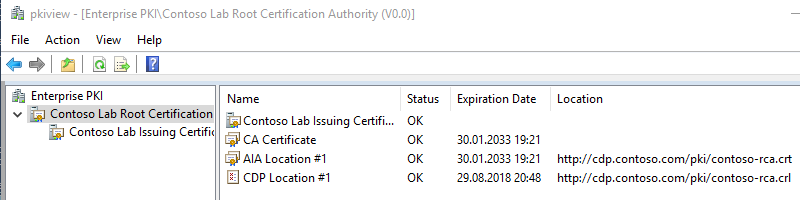
И для издющего ЦС:
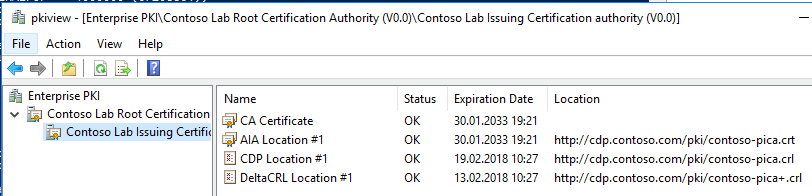
Если вся итоговая конфигурация соответствует ожидаемым значениям и оснастка Enterprise PKI Health не показывает ошибок, это может судить о том, что PKI установлена верно.
Рекомендации
После того, как все ЦС установлены, сконфигурированы и их работоспособность проверена, можно приступать к их эксплуатации. В этом разделе я дам несколько полезных рекомендаций, которых следует придерживаться, чтобы предостеречь себя от возможных потенциальных проблем во время эксплуатации PKI.
Шаблоны сертификатов
Наряду с установкой издающего ЦС, в Active Directory устанавливается набор уже готовых шаблонов сертификатов. Их можно просмотреть в оснастке Certificate Templates MMC (certtmpl.msc). Рекомендации по шаблонам сертификатов:
Использование готовых шаблонов сертификатов
Я рекомендую использовать их копии, даже если вы не планируете вносить в них изменения. Для создания копии шаблона выберите в списке подходящий шаблон, в контекстном меню выберите Duplicate Template и создайте его копию. Целесообразно в имя шаблона включить название компании, чтобы отличить предустановленный шаблон от вами созданного. Например, Contoso Web Server, Contoso Smart Card Logon. Это позволит сравнить настройки исходного и вами созданного шаблона в случае неработоспособности шаблона.
Версия шаблона
Начиная с Windows Server 2012, интерфейс создания шаблона несколько изменился. В самом начале появляется окно с выбором версии ОС на ЦС и предполагаемом клиенте:
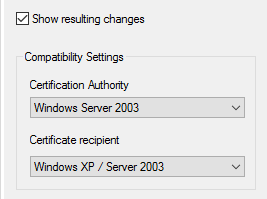
Если у вас используются современные версии ОС (например, Windows 7 и выше), может появиться желание выставить настройки на максимум. Если вы не уверены, что ваше приложение совместимо с CNG (Cryptography Next Generation), следует использовать настройки, которые приведены на картинке. Если вы выставляете ОС сервера и клиента выше, чем Windows Server 2003/Windows XP, шаблон будет использовать криптографию несовместимую с этими приложениями. Например, большинство приложений, написанных на .NET, семейство продуктов System Center, службы федераций (AD FS) и т.д. не смогут использовать ключи таких сертификатов (но проверять смогут).
Успешно такие сертификаты смогут использовать приложения, которые используют не .NET, а нативные функции CryptoAPI. К таким приложениям можно отнести, например, IIS, Remote Desktop Services.
Поля Subject и Subject Alternative Names
Существует два метода заполнения поля Subject и расширения Subject Alternative Names: автоматический и ручной. Это настраивается в настройках шаблона сертификата, во вкладке Subject Name.
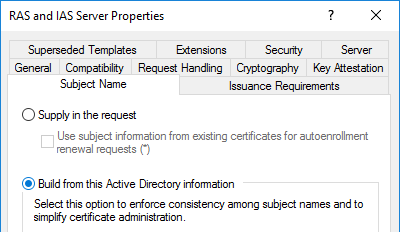
Если выбран второй пункт (как на картинке), ЦС игнорирует имя субъекта из запроса сертификата и заполняет эти поля из свойств учётной записи пользователя или устройства, которое запрашивает сертификат. В ряде случаев это не подходит (например, сертификаты для внутренних веб-сайтов) и имя субъекта заполняется из значения в запросе сертификата. Тогда переключатель необходимо выставить в верхнее положение. Дополнительно к этому, на вкладке Issuance Requirements обязательно надо выставить галочку «CA certificate manager approval».
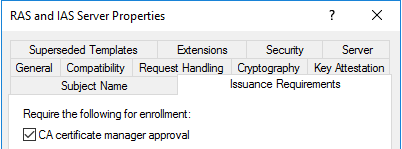
Это необходимо затем, что имя для сертификата никак не проверяется. Если этот момент не контролировать, пользователь может запросить сертификаты на любое имя и скомпрометировать весь лес Active Directory. Вряд ли вы позволите рядовому пользователю получить сертификат на имя администратора. После требования одобрения запроса менеджером сертификатов на ЦС, каждый запрос с явным указанием субъекта сертификата будет попадать на ЦС в папку Pending Requests и не будет подписан, пока оператор ЦС не изучит его содержимое и не примет решение о выпуске. Т.е. каждый такой запрос необходимо вручную проверять на содержимое и убедиться, что в запросе указаны верные и допустимые имена. В противном случае запрос должен быть отклонён.
Права на шаблоны сертификатов
Шаблоны сертификатов в Active Directory хранятся в разделе configuration naming context, который реплицируется между всеми контроллерами домена в лесу. Поэтому для назначения прав на шаблоны сертификатов можно использовать только глобальные и универсальные группы. Избегайте назначения прав отдельным пользователям и устройствам.
Обновление сертификатов ЦС
Периодически необходимо обновлять сертификаты ЦС. Рассмотрим несколько аспектов, связанных с обновлением сертификатов ЦС.
Периодичность обновления сертификата ЦС
Это делается в следующих случаях:
- Срок жизни сертификата ЦС истекает;
- Ключ ЦС скомпрометирован;
- Необходимо изменить длину ключа или алгоритм подписи;
- Слишком большой список отзыва (больше нескольких мегабайт).
Первый вопрос, если всё идёт штатно, за какое время до истечения срока действия сертификата ЦС его нужно обновлять?
Сертификат издающего ЦС должен обновляться за максимальный срок действия издаваемых сертификатов. В нашем случае срок действия сертификата издающего ЦС 15 лет, а максимальный срок действия издаваемых сертификатов 5 лет (см. конфигурационную таблицу). Это означает, что сертификат издающего ЦС необходимо обновить через 10 лет. Если это время затянуть, то мы не сможем обеспечить необходимый срок действия для самого долгосрочного шаблона.
Порядок обновления ЦС
В нашей двухуровневой иерархии сертификаты корневого и издающего ЦС имеют одинаковый срок действия. Поэтому, когда вы принимаете решение об обновлении сертификата любого ЦС, необходимо обновлять их вместе. Первым обновляется сертификат корневого ЦС, затем сертификат издающего ЦС.
Генерация ключей при обновлении сертификатов ЦС
При обновлении сертификатов ЦС вам предлагается две опции: использовать существующую ключевую пару или сгенерировать новую:
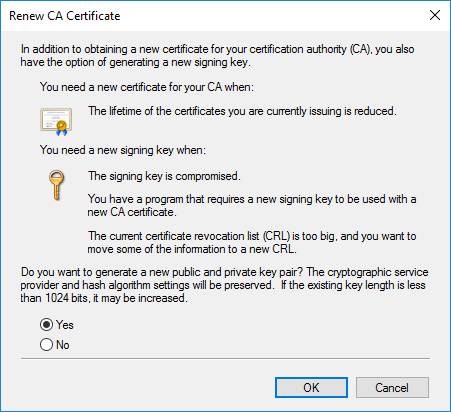
В диалоговом окне обновления ключевой пары приведены рекомендации Microsoft по выбору ключевой пары. Однако, практика показывает, что эти рекомендации устарели. Следует всегда генерировать новую ключевую пару. При использовании нескольких сертификатов ЦС клиентский модуль построения цепочки сертификатов иногда может ошибиться и выбрать неправильный сертификат. В базе знаний Microsoft отмечены такие проблемы. Примеры статей:
- Certificate validation fails when a certificate has multiple trusted certification paths to root CAs.
- «0x80092013, CRYPT_E_REVOCATION_OFFLINEA» error message when you try to verify a certificate that has multiple chains in Windows Server 2008 or in Windows Vista.
При генерации новой ключевой пары для каждого сертификата будет гарантирован только один путь к корневому сертификату и модуль построения цепочек сертификатов уже не ошибётся.
Резервное копирование
Вопросы резервного копирования и восстановления после отказа являются отдельной темой. Здесь я лишь отмечу основные моменты, которые следует учесть при планировании стратегии резервного копирования.
Microsoft Active Directory Certificate Services предоставляет инструменты для резервного копирования компонентов ЦС:
- Оснастка Certification Authority MMC (certsrv.msc);
- Утилита certutil.exe с параметром -backup.
С ними можно сделать резервную копию для ключевой пары ЦС и базы данных. Однако эти инструменты не позволяют делать резервную копию настроек ЦС. Эти операции необходимо выполнять вручную. Все настройки ЦС находятся в реестре по следующему пути:
HKLMSystemCurrentControlSetServicesCertSvcПри резервном копировании всегда экспортируйте данную ветку реестра. При восстановлении ЦС сохранённый REG файл импортируется обратно в реестр после установки роли ЦС.
Полный список элементов ЦС, который подлежит обязательному резервному копированию выглядит так:
- Ключи и сертификаты ЦС;
- База данных ЦС;
- Настройки ЦС из реестра;
- Предустановочный конфигурационный файл;
- Установочные и конфигурационные скрипты.
Этот список не зависит от принятой в вашей компании стратегии резервного копирования, он всегда должен быть включён в список резервных копий.
Об авторе
 Вадим Поданс — специалист в области автоматизации PowerShell и Public Key Infrastructure, Microsoft MVP: Cloud and Datacenter Management с 2009 года и автор модуля PowerShell PKI. На протяжении 9 лет в своём блоге освещает различные вопросы эксплуатации и автоматизации PKI на предприятии. Статьи Вадима о PKI и PowerShell можно найти на его сайте.
I did a «renew Cert» on one of my Enterprise subCAs, and it’s totally messed up my results on Enterprise PKI in MMC. In the Certificate Authority snapin, there are now two certs (Certificate #0 and #1). The AIA (ldap) is showing «Unable to Download», with the «original CN=». The CDP (ldap) location has a (1) on it, as does the DeltaCRL. Every time I renew the revocation, it makes both the original cert’s crl and a (1). The CDP/DeltaCRL (http) also both show «unable to download», even though the files exist in the directory. The only AIA location that shows OK is the http location.
I need to get rid of the old CA cert (the #0), I’ll re-push the new one out via a GPO once this all is resolved. I tried to remove the AIA via ADSIEdit, and then republish it via «certutil -dspublish» but that gives me a 0x80070057 (WIN32: 87 ERROR_INVALID_PARAMETER) error. Trying to connect to the Configuration of the specific CA via ADSIEdit says «server is not operational». In ADSIEdit CN=CDP there are multiple entries, the normal «CA», a «CA-1», and a «CA-1(1)».
This is in our «Test» environment (luckily), but I need to get a proper process sorted out as I need to do this in two other forests. I’m actually tempted to just totally rebuild a new CA in the other zones instead of fighting with all of this.
All I’m trying to do is re-issue a subCA’s cert, and get it to work correctly and report healthy in Enterprise PKI!
HKEY_LOCAL_MACHINESYSTEMCurrentControlSetServicesCertSvcConfigurationOMNI-
TST-CERTAUTH-01-CA-1CRLPublicationURLs:
CRLPublicationURLs REG_MULTI_SZ =
0: 65:C:windowssystem32CertSrvCertEnroll%3%8%9.crl
CSURL_SERVERPUBLISH — 1
CSURL_SERVERPUBLISHDELTA — 40 (64)
1: 79:ldap:///CN=%7%8,CN=%2,CN=CDP,CN=Public Key Services,CN=Services,%6%10
CSURL_SERVERPUBLISH -- 1
CSURL_ADDTOCERTCDP -- 2
CSURL_ADDTOFRESHESTCRL -- 4
CSURL_ADDTOCRLCDP -- 8
CSURL_SERVERPUBLISHDELTA -- 40 (64)

2: 134:http://pki.omni.phish/CertEnroll/%3%4%9.crl
CSURL_ADDTOCERTCDP -- 2
CSURL_ADDTOFRESHESTCRL -- 4
CSURL_ADDTOIDP -- 80 (128)
HKEY_LOCAL_MACHINESYSTEMCurrentControlSetServicesCertSvcConfigurationOMNI-
TST-CERTAUTH-01-CA-1CACertPublicationURLs:
CACertPublicationURLs REG_MULTI_SZ =
0: 1:C:Windowssystem32CertSrvCertEnroll%1_%3%4.crt
CSURL_SERVERPUBLISH — 1
1: 3:ldap:///CN=%7,CN=AIA,CN=Public Key Services,CN=Services,%6%11
CSURL_SERVERPUBLISH -- 1
CSURL_ADDTOCERTCDP -- 2

2: 32:http://%1/ocsp
CSURL_ADDTOCERTOCSP -- 20 (32)

3: 32:http://pki.omni.phish/oscp
CSURL_ADDTOCERTOCSP -- 20 (32)

4: 2:http://pki.omni.phish/CertEnroll/%3.crt
CSURL_ADDTOCERTCDP -- 2
First published on TECHNET on Feb 28, 2011
PKIVIEW was first introduced in Windows Server 2003 Resource kit. The tool is installed by default when you install the Windows 2008 Active Directory Certificate Services Role, and had been re-branded as «Enterprise PKI». The tool is implemented as a snap-in for the Microsoft Management Console.
Enterprise PKI gathers information through Active Directory about the CA certificates and certificate revocation lists (CRLs) from each CA in the enterprise. Then it validates the certificates and CRLs to ensure that they are working correctly. If they are not working correctly or if they are about to fail, it provides a detailed warning or some error information.
Enterprise PKI displays the status of Windows Server 2003, 2008 and 2008 R2 certification authorities that are registered in an Active Directory forest. You can use Enterprise PKI to discover all PKI components, including subordinate and root CAs that are associated with an enterprise CA. The tool can also manage important PKI containers, such as root CA trust and NTAuth stores, that are also contained in the configuration partition of an Active Directory forest.
Enterprise PKI is very useful when verifying the installation of an ADCS environment, or when a quick check is needed for the health of the distribution points and managed containers in Active Directory.
Launching Enterprise PKI
At a server running Windows 2008 or 2008 R2 ADCS service, launch Server Manager , expand Roles, Expand Active Directory Certificate Services and then click Enterprise PKI

The same console can be displayed, by running PKIVIEW.msc from the Search or Run menus
Enterprise PKI can also be launched from a Windows Server 2008, Windows Server 2008 R2, Windows Vista or Windows 7 computer by installing the Remote Server Administration Tools — Active Directory Certificate Services Tools from the Features set.
Enterprise PKI in Windows 2008 ADCS determines the AIA and CRL locations of the offline CA by examining certificates issued by the offline CA. The AIA and CDP distribution points for the online CAs are gathered by contacting the online CAs directly. This is different than the PKIVIEW tool behavior in Windows 2003 PKI, which relied on a CA Exchange certificate with a validity period of 1 week to gather the CDP and AIA distribution points of an issuing CA.


Running Enterprise PKI in Windows 2008 will still create the CA Exchange certificate, although as stated before, it is not used by the tool.
Understanding Distribution Points Health in Enterprise PKI
Enterprise PKI evaluates every URL included in the AIA and CDP extensions of the certificates in the CA hierarchy. The tool attempts to connect to each referenced URL and reports whether the certificate or CRL is reachable as well as whether the current version is reaching expiration.
Some of the most common mistakes encountered in PKI deployments are missing certificates or CRL files. When launching Enterprise PKI all the certification authorities in the hierarchy should be examined in the left hand pane.

The Right hand pane will include the CA’s certificate and the status of its publication points. Consider the following scenarios:
- If a publication point is configured correctly, the status column will report a value of OK .
- If the publication point is configured incorrectly or if the CA certificate or CRL is not copied correctly to the publication point, the status column reports a status of Unable to Download .

To troubleshoot Unable to Download publication points, right click the publication point and click Copy URL . Paste the URL in a browser to verify if it can’t be downloaded. A 404 «File not found» error in a browser indicated the file can’t be downloaded, or the file is missing

In general, this error can be attributed either to:
- A missing file (in my case above, it was the certificate file of the issuing CA). Copy the file to the distribution point and refresh Enterprise PKI.
- The HTTP URL is accessible through a Proxy. You should consider removing the proxy requirment for the computer security context
- There may be an access control list (ACL) blocking access to the file
- When dealing with Delta CRLs, the web site might block the download of the file due to double escaping. This issue can easily be solved by following the steps in How to avoid Delta CRL download errors on Windows Server 2008 with IIS7
- Finally, if the CA certificate or CRL is near expiration, the status column will report a value of Expiring

There are several ways to troubleshoot this issue:
- Renew the CA’s certificate if it is about to expire and publish it to the AIA distribution points
- CDP is about to expire, examine which CDP in the chain is about to expire, issue a new CRL and publish it to the distribution points
- This might also be a superficial message, when you know your issuing CA’s CDP publication frequency is about to issue a new CRL, however the display in Enterprise PKI is showing it as Expiring . Adjust the Options in Enterprise PKI as follows:


- The expiring certificate indicator: You can specify how many days before expiration of a certificate that the PKI Health Tool will indicate that a certificate is expiring. Consider using a much larger number than the default of 14 days. In fact, if you plan to issue certificates with a one-year validity period, you should use a notification of 365 days
- The base CRL expiration indicator: The base CRL indicator should be set to a value that reflects the base CRL publication interval of your issuing CA. If you publish the base CRL at a weekly interval, consider keeping the default expiration interval of two days. If you publish the base CRL on a daily interval, consider a value of eight hours
- The delta CRL expiration indicator Like the base CRL setting, you must choose a delta CRL interval that reflects your delta CRL publication. If you publish a delta CRL every day, the default of every four hours may be the right value for you. If you publish the delta CRL every eight hours, consider a value of two hours for expiration notification.
Examining and Understanding Active Directory Certificate Stores
Enterprise PKI can examine each of the Active Directory certificate and CRL stores by using the Manage AD Containers dialog box by right clicking Enterprise PKI, and then clicking Manage AD Containers . All the containers are stored in the configuration partition of the Active Directory Forest where the CA hierarchy is installed.

Certification Authorities Container:
Contains all the Root Certification Authorities in the Active Directory Forest. This container is accessed through the autoenrollment policies for users and computers and distributes the Root CAs to the local Trusted Root Certification Authorities store.
The Certification Authorities container is stored in CN=Certification Authorities, CN=Public Key Services, Configuration, CN=Services, DC= ForestRootdomain. The container can be accessed using any LDAP capable tool, such as ADSIEDIT, LDP.EXE, etc….
Enterprise PKI tool allows viewing or removing Trusted Root Certification Authorities to this container, but will not allow adding new Root Certification Authorities. Use Certutil -f -dspublish RootCA.cer RootCA command to add a new Root Certification Authority to this container,

Enrollment Services Container:
Contains all enterprise issuing certification authorities in an Active Directory Forest. The container is CN=Enrollment Services, CN=Public Key Services, Configuration, CN=Services, DC= ForestRootdomain . The container can be accessed using any LDAP capable tool, such as ADSIEDIT, LDP.EXE, etc….

Enterprise PKI tool allows viewing or removing Trusted Root Certification Authorities to this container, but will not allow adding new or existing enterprise certification authorities. The only method to add a new enterprise certification authority to the Enrollment Services Container is by using the Active Directory Certificate Services Role in Server Manager
NTAuthCertificates:
The NT Authority certificate object contains all entries for all CAs that can issue certificates used for smart card authentication and for Remote Authentication Dial-In User Service (RADIUS) authentication. The NTAuthCertificates object is stored in CN=NTAuthCertificates,CN=Public Key Services, Configuration, CN=Services, DC= ForestRootdomain. it can be accessed using any LDAP capable tool, such as ADSIEDIT, LDP.EXE.
Enterprise PKI tool allows adding, removing and viewing NTAuth certificates; in addition Certutil can be used to publish an NTAuth certificate if needed.

AIA Container :
Contains all CA certificates for all CAs in the CA hierarchy. The container is stored in CN=AIA, CN=Public Key Services,CN=Configuration, CN=Services, DC= ForestRootdomain. It can be accessed using any LDAP capable tool, such as ADSIEDIT, LDP.EXE.

Enterprise PKI tool allows viewing and removing certificate files from the AIA container, but will not allow adding new entries of new or existing certificates to the AIA container. A new entry can be added to the container using the Certutil -f -dspublish CertificateFile.cer NetBiosNameofCAServer.
CDP Container
Contains all base and delta CRLs for each CA in the CA hierarchy that publishes revocation information to Active Directory. This value is configured in the extensions tab of the LDAP extension.
For each CA publishing revocation information into Active Directory, a separate container is created, containing the base and delta CRLs -if any for that CA. The container for each CA will have an object referencing the CA’s sanitized name of type cRLCistributionPoint. The actual container per CA is stored in CN=NetBiosNameofCA,CN=CDP, CN=Public Key Services,CN=Configuration, CN=Services, DC= ForestRootdomain.

Enterprise PKI tool allows viewing, removing and saving certificate revocation list files from the CA’s respective container, but will not allow adding new entries of new or existing CRLs. An entry can be added to the container using Certutil -f -dspublish CertificateFile.crl NetBiosNameofCAServer or by issuing a new revocation list at the enterprise CA.
KRA Container:
Contains all Key Recovery Agent (KRA) certificates published to Active Directory Domain Services (AD DS) that are available for key archival operations on enterprise CAs. The actual container is CN=KRA, CN=Public Key Services,CN=Configuration, CN=Services, DC= ForestRootdomain. Each enterprise certification authority will have an entry of type ms-PKI-Private-Key-Recovery-Agent . Enterprise PKI tool allows viewing and removing certificate files from the KRA container, but will not allow adding new entries for new or existing key recovery agents. A new entry can be added to the certificate attribute of the enterprise certification authority using the Recovery Agents tab in the CA properties

Conclusion:
Enterprise PKI provides a view of the status of your network’s PKI environment. Having a view of multiple CAs and their current health states enables administrators to manage CA hierarchies and troubleshoot possible CA errors easily and effectively. Specifically, Enterprise PKI indicates the validity or accessibility of authority information access (AIA) locations and certificate revocation list (CRL) distribution points.
Amer Kamal
Senior Premier Field Engineer
If you missed the other parts in this article series please go to
- A Microsoft PKI Quick Guide – Part 1: Planning
- A Microsoft PKI Quick Guide – Part 2: Design
- A Microsoft PKI Quick Guide – Part 3: Installation
We have now gotten to our last article in our Microsoft PKI quick guide series. In the previous articles we gave you a quick overview on how to prepare, plan and design your Microsoft PKI. We also got a bit more technical, and showed you how to install a PKI based on Microsoft Certificate Services in Windows Server 2003. In this final article, we’ll give you a quick overview on how to maintain and troubleshoot your PKI using some basic, but very valuable tools.
The toolbox
One of the things that will be of great value to you and your PKI, is a toolbox containing the right tools. This will help you maintain a stable PKI and help you solve problems quickly and painlessly. However this is not an easy task, since there aren’t too many tools available, therefore we’ll just have to make the best of what we have. Here are your options for your Microsoft PKI toolbox (in no particular order):
- Certificate Services (certsrv.msc) – This MMC contains the primary functions you’ll need to configure and maintain your PKI.
- Certificate Templates (certtmpl.msc) – This MMC is used to maintain and secure certificate templates.
- Certificate Manager (certmgr.msc) – This MMC is used to control the certificates that are installed on a computer or the current user.
- Certutil.exe – A command line based certificate utility that does the same as the Certificate Services MMC plus a whole lot more.
- Event Viewer (Eventvwr.msc) – The Event Viewer MMC is not a typo. This tool is very important when troubleshooting your PKI, as you will soon learn.
- Enterprise PKI tools (PKIview.msc) – An MMC based PKI health tool, that you should make your best new friend.
- Capimon.exe – Allows an administrator to monitor a security application’s CryptoAPI calls and its results.
All of these tools all contribute to a well functioning PKI, but they can also reveal some very important information that will help you troubleshoot your PKI. And the best way to troubleshoot your PKI is by using a structured process. Here’s one approach:
- Always start your troubleshooting by checking the event logs. This may seem obvious, but almost all PKI related errors will be logged to the event logs. Even though you can display the error messages from the various programs such as the Certificate Services MMC, the event log is by far the easiest way to read and debug PKI related errors.
- Use the PKIview.msc tools to get a quick overview of the health of your PKI. PKIview.msc will normally reveal some of the most common errors including a missing or outdated CRL or an expired CA certificate. If everything seems ok from this tool, you can move on and concentrate on specific certificate related issues, such as security settings on certificate templates, etc.
- If the error still isn’t obvious or difficult to troubleshoot in the previous steps, then seek help from our resource list at the end of this article, or look for solutions via support.microsoft.com, newsgroups or forums.
Another thing that can be of great help is to have a checklist to follow after installation and during maintenance. Here’s one example to get you started:
- How is the availability of your PKI and your root certificates?
- Is the CRL available?
- Are the issued certificates working properly?
- Are the infrastructure components or applications that rely on certificates from your PKI working properly?
- How is the performance on systems that use certificates from your PKI?
- Are there any error messages related to certificates installed on a computer?
Let’s move on and take a quick look at a few of the utilities from our toolbox and how they can actually make life easier with respect to your PKI.
Certificate Services and Certificates Templates MMC Snap-in
The Certificate Services MMC Snap-in (certsrv.msc) is your primary PKI administrative console. You should try to spend some time with this MMC Snap-in and get familiar with the tool, since it gives you a deeper insight into the world of a Microsoft based PKI. With this snap-in, you’ll get a better understanding of what AIA, CDP, V2 certificate templates, etc., means and how they relate to some of the areas we covered in the previous PKI articles. The built-in help is also of great value, and even contains a small best-practice section (like many of the other built-in Windows Server 2003 help files). Most of the problems with a Microsoft based PKI are usually related to permission problems when a certificate is being issued or the availability of the CRL. So let’s look at a couple of examples where this tool can be of great help during troubleshooting of your PKI.
One of the most common errors you’ll see with respect to a PKI is an outdated or inaccessible CRL. The quick way is to publish the CRL from the Certificate Services MMC, but this can also be scripted from the command line as you’ll soon learn.

Figure 1: Publishing the CRL
You should make it a habit to occasionally check if a certificate has been issued or not, by checking the “Failed Requests” submenu on the left pane of the MMC console. From this menu you’ll be able to investigate why there was an error associated with a failed attempt to issue a certificate. Often this error will be difficult to read from the “Failed Request” section. The good part is that the same error will be added to the application log. And since it’s easier to copy an event log entry from Event Viewer than the Certificate Services MMC, this should be the preferred method to check for any PKI related errors, unless you of course you use some kind of delegated administration and customize your MMCs.
Another common error is incorrect security settings on certificate templates. You can the modify the security of certificate templates from the Certificate Services MMC by either right-clicking Certificate Templates and select Manage or start a new MMC where you add the Certificate Templates (certtmpl.msc) snap-in. Either way, from the Certificate Templates MMC, you select the properties of the certificate template you want to use. You then click the Security tab and make sure that the correct security group is allowed to receive a certificate, by enabling “Read” and “Enroll” permissions for that group.

Figure 2: Check if a certificate template has the correct security settings
PKIview.msc
One of the most valuable troubleshooting tools for your Microsoft PKI is PKIview.msc which is available in the Windows Server 2003 Resource Kit. With this tool, you can check the status of your PKI. When you start the graphical tool, you’ll see various indicators that will give you the updated health status of your PKI. A green checkmark indicates that everything is alright with your PKI. However a yellow warning sign indicates that a certificate or Certificate Revocation List (CRL) is close to expiration. If you see red errors, then it would normally indicate that CRL or Authority Information Access (AIA) locations cannot be reached. Red errors may also indicate that a CA is not trusted. If this is the case, then right click the error and click “Copy URL”. Paste the URL into a web browser, if it’s an HTTP location that can’t be reached, or use a tool like adsiedit.msc from Windows Support Tools to check whether the published CDP location actually contains the revocation or trusts list in error.
This tool is capable of much more, and at a minimum, you should run this tool once a week, to ensure the health of your PKI. The details in the errors will quickly indicate where exactly the error is, however it will not give you the exact solution. Here you still need to do some detective work, using some of the other tools mentioned in the toolbox list earlier in this article or Google for the event shown in PKIview.msc.

Figure 3: PKIview.msc is a great troubleshooting tool
Certutil.exe
The master of all Microsoft PKI tools is without any doubt Certutil.exe. This powerful command-line utility supersedes the resource kit tool from Windows 2000 called Dsstore.exe. There are several advantages using Certutil.exe. First of all, it’s easily scriptable and is capable of much more, both with respect to configuration, documentation and troubleshooting, compared to all the other tools in our PKI toolbox. Another advantage not mentioned very often, is that it can run many of the data-gathering features as a regular user. This is actually a great feature for troubleshooting certificate problems, without compromising the security of your PKI. The reason why troubleshooting your PKI with Certutil.exe will not compromise the security of your PKI is because many of the core configuration options aren’t available unless you have the necessary permissions.
Another advantage of Certutil.exe is the built-in change-management feature (sort of). Many of the Certificates Services settings are stored in Windows registry under:
“My ComputerHKEY_LOCAL_MACHINESYSTEMCurrentControlSetServicesCertSvc”
Whenever you make changes to your PKI using the “certutil –setreg” parameter, the utility will display the old setting first followed by the new setting afterwards.
We’re not going to walk through all the different features and options for Certutil.exe, since there are too many. However enter “Certutil -?” to get a complete overview. A little hint is that the Windows Server 2003 version of Certutil.exe can be ported to Windows Vista, Windows XP and Windows 2000. All you need to do is to copy Certutil.exe, Certcli.dll and Certadm.dll to a location on your Windows Vista, XP or Windows 2000 machine. There’s no need to register any DLL file, etc. Just run the command line utility from that location.
Our CA has suddenly stopped issuing certificates to Computers. Computer certificates can not be renewed or issued while User certificates are able to issued and requested and renewed as normal. When requesting a certificate I receive the following error. We recently configured a new CA server. Everything was working fine and I believe they stopped working when WMI was enabled for vulnerability analysis.
An error occurred while enrolling for a certificate. The certificate request could not be submitted to the certificate authority.
URL: ca.domain.comrootca
Error: The RPC Server is unavailable. 0x800706ba (WIN32: 1722 RPC_S_SERVER_UNAVAILABLE)
Below are the troubleshooting steps I have taken so far.
====================
CA Troubleshooting
====================
CLIFF NOTES:
The computers trust the CA and have the root ca cert under trusted root certificate authorities
The CA is not revoked
I have permissions for the CA
I have enroll permissions for the certificate templates
Template is configured correctly for auto enrollment
Authenticated Users have read permissions in ADSI edit in CN=Enrollment Services,CN=Public Key Services,CN=Services,CN=Configuration,DC=domain,DC=com
—————————————————————————————————-
The CA’s exist in ADSI edit in CN=Enrollment Services,CN=Public Key Services,CN=Services,CN=Configuration,DC=domain,DC=com
rootca Is an Enterprise CA
——————————————————
CA name: rootca
Sanitized CA short name (DS name): rootca
CA type: 0 — Enterprise Root CA
ENUM_ENTERPRISE_ROOTCA — 0
CA cert count: 1
KRA cert count: 0
KRA cert used count: 0
CA cert[0]: 3 — Valid
CA cert version[0]: 0 — V0.0
CA cert verify status[0]: 0
CRL[0]: 3 — Valid
CRL Publish Status[0]: 5
CPF_BASE — 1
CPF_COMPLETE — 4
Delta CRL Publish Status[0]: 6
CPF_DELTA — 2
CPF_COMPLETE — 4
DNS Name: ca.domain.com
Advanced Server: 1
CA locale name: en-US
Subject Template OIDs: 1.2.840.113549.1.9.1
2.5.4.3
2.5.4.11
2.5.4.10
2.5.4.7
2.5.4.8
0.9.2342.19200300.100.1.25
2.5.4.6
———————————————————-
Flags Attribute is set to 10
In PKIview.msc no errors are showing on the desired CA
In PKIView right click Enterprise PKI and Select Manager AD Containers.
Go to the Enrollment Services Container and make sure the status says OK
Click View on the certificate
Then select the Details tab and copy to file in C:UsersyourusernameDocuments
Open CMD.exe as an admin and test the validity
~~~~~~~~~~~~~~~~~~~~~~~~~~~~~~~~~
cd C:UsersyourusernameDocuments
certutil -verify TestCaValidity.cer > verifyresults.txt
type verifyresults.txt
~~~~~~~~~~~~~~~~~~~~~~~~~~~~~~~~~
RESULTS
~~~~~~~~~~~~~~~~~~~~~~~~~~~~~~~~~
C:UsersusernameDocuments>type verifyresults.txt
Issuer:
CN=ca
DC=domain
DC=com
Name Hash(sha1): hash
Name Hash(md5): hash
Subject:
CN=ca
DC=domain
DC=com
Name Hash(sha1): hash
Name Hash(md5): hash
Cert Serial Number: serial num
dwFlags = CA_VERIFY_FLAGS_CONSOLE_TRACE (0x20000000)
dwFlags = CA_VERIFY_FLAGS_DUMP_CHAIN (0x40000000)
ChainFlags = CERT_CHAIN_REVOCATION_CHECK_CHAIN_EXCLUDE_ROOT (0x40000000)
HCCE_LOCAL_MACHINE
CERT_CHAIN_POLICY_BASE
——— CERT_CHAIN_CONTEXT ———
ChainContext.dwInfoStatus = CERT_TRUST_HAS_PREFERRED_ISSUER (0x100)
SimpleChain.dwInfoStatus = CERT_TRUST_HAS_PREFERRED_ISSUER (0x100)
CertContext[0][0]: dwInfoStatus=10c dwErrorStatus=0
Issuer: CN=CA, DC=domain, DC=com
NotBefore: 8/14/2019 12:47 PM
NotAfter: 8/14/2024 12:57 PM
Subject: CN=CA, DC=domain, DC=com
Serial: serial
Template: CA
Cert: certthumb
Element.dwInfoStatus = CERT_TRUST_HAS_NAME_MATCH_ISSUER (0x4)
Element.dwInfoStatus = CERT_TRUST_IS_SELF_SIGNED (0x8)
Element.dwInfoStatus = CERT_TRUST_HAS_PREFERRED_ISSUER (0x100)
Exclude leaf cert:
Chain: thumbprint
Full chain:
Chain: chain thumb
————————————
Verified Issuance Policies: All
Verified Application Policies: All
Cert is a CA certificate
Leaf certificate revocation check passed
CertUtil: -verify command completed successfully.
~~~~~~~~~~~~~~~~~~~~~~~~~~~~~~~~~
Any error message at the bottom would indicate a chaining or revocation checking problem
In certsrv.msc right click the CA and select the security tab. Authentictated users need Request Certificates permissions
Run below command and check need permissions exist to enroll or autoenroll. If there is an access denied error change permissions on the template or add person or device to group who has pemrissions
~~~~~~~~~~~~~~~~~~~~~~~~~~~~~~~~~
certutil -template
~~~~~~~~~~~~~~~~~~~~~~~~~~~~~~~~~
==========================================================================================
Port 135 is open on ca and requesting machine.
DCOM is enabled and configured corectly on ca and Client
Check this at dcomcnfg.exe
Click Component Services — Computers
Right cilick select properties
Default properties should look like below
Test port 135 is open. Some Ports 1024-65535 must be usable
~~~~~~~~~~~~~~~~~~~~~~~~~~~~~~~~~
TNC ca -Port 135
TNC loclahost -Port 135
Write-Verbose ‘Test what port certutil is on’
tasklist > tasklist.txt
Get-Content .tasklist.txt | Select-string ‘certsrv.exe’
certsrv.exe 2576 Services 0 25,488 K
~~~~~~~~~~~~~~~~~~~~~~~~~~~~~~~~~
~~~~~~~~~~~~~~~~~~~~~~~~~~~~~~~~~
netstat -ano > ports.txt
Get-Content .ports.txt | Select-String 2576
TCP 0.0.0.0:49809 0.0.0.0:0 LISTENING 2576
TCP 10.0.2.223:49701 10.0.2.2:49669 ESTABLISHED 2576
TCP [::]:49809 [::]:0 LISTENING 2576
UDP 127.0.0.1:50099 *:* 2576
~~~~~~~~~~~~~~~~~~~~~~~~~~~~~~~~~
Certutil running on port 49809
Using portqryui.exe a downloaded tool I querired ca for ports 135,49809 and received no listening errors.
On the DC the group BuiltinCERTSVC_DCOM_ACCESS has Domain User, Domain Controllers, and Domain Computers as a member of this group
Test permission and connectivity with the below command
~~~~~~~~~~~~~~~~~~~~~~~~~~~~~~~~~
certutil -configrootca.domain.com -ping
~~~~~~~~~~~~~~~~~~~~~~~~~~~~~~~~~
CRLPublicationURL
Во-первых, вы публикуете на локальном диске (C: Windows System32 CertSrv CertEnroll % 3% 8% 9.crl), но больше нигде. Теперь вы можете вручную загрузить этот CRL в CDP, и в этом случае это нормально. В противном случае вам нужно добавить еще один URL-адрес (например, 65: файл: // \ [сервер] [общий ресурс] % 3% 8% 9.crl, где [server] — это ваш CDP, а [share] — это общий ресурс для каталога, содержащего ваши CRL), чтобы новые CRL автоматически публиковались в CDP центром сертификации.
Во-вторых, вы используете CDP http: //pki.omni.phish//CertEnroll/%3%4%9.crl. % 4 должен быть % 8.
При обновлении сертификата ЦС необходимо, чтобы исходный сертификат ЦС и список отзыва сертификатов оставались доступными, чтобы все конечные объекты, которым были выданы ранее сертификаты, по-прежнему работали. Центры сертификации Microsoft делают это, добавляя (1) к имени CRL непосредственно перед расширением .crl для 1-го замещающего сертификата (Сертификат №1 в MMC) и (2) для следующего обновления и так далее. Это настраивается параметром % 8 в разделе реестра CRLPublicationURL.
CAPublicationURL
Вы добавляете URL-адрес в сертификат CA как http: //pki.omni.phish/CertEnroll/%3.crt. Вам нужно добавить % 4 после % 3.
% 4 выполняет ту же работу, что и % 8 для CRL. Без него имя сертификата CA остается прежним.
Это можно исправить тремя разными способами:
- Вы можете использовать MMC — под Расширения в диалоговом окне CA Характеристики. Однако работать с ним действительно неуклюже.
- Вы можете использовать команду
certutil -setreg, но вам придется перезаписать все настройки — вы не можете редактировать одну строку. - Вы можете редактировать реестр прямо на
HKLMSYSTEMCurrentControlSetServicesCertSrvConfiguration[CA Name]
Я считаю, что последний самый простой.
Могу я предложить некоторую ревизию PKI и Microsoft ADCS, прежде чем вы перейдете к производству? 