-
Summary
-
Files
-
Reviews
-
Support
-
Downloads
-
Documentation Wiki
-
Code
-
Tickets
-
Discussion
Menu
▾
▴
Error while reading configuration file: The system cannot find the file specified.
Created:
2017-01-21
Updated:
2017-02-09
-

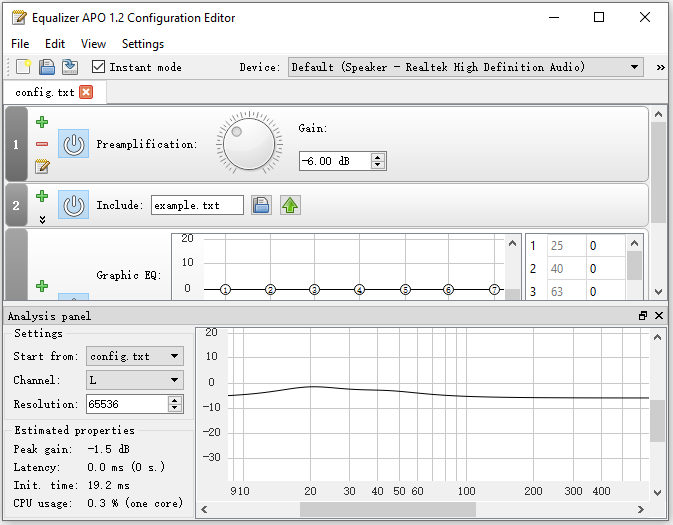
Error taken from the EqualizerAPO log.
Basically what’s going on is, I’m trying to use this APO but im using an external amp/dac. Sometimes it works, other times it just flat out doesn’t. I set a -30 dB preamp to test but it’s just not even seeing the file as no changes to the config file are working whereas when it’s working obviousy the changes are noticable on save of the file.
I’ve tried reinstalling EqualizerAPO, reinstalling it on the device, messing around in the enhancements and advanced tab in the sound setting in the control panel, etc.
Interestingly, when i use a virtual surround device that plays through the same amp/dac, EqaulizerAPO will work through it, but I don’t really need it there as it just jacks up the sound way too much.
Not sure if I’m explaining all these correctly as I’m just a casual user, but any suggestions would be helpful.
-
Please enable trace messages according to the Wiki. Then, when the error occurs again, please attach the log file to this thread.
-
Jonas, thanks for responding.
(deleted bloated trace)
Hope this helps.
Last edit: Charles Jameson 2017-02-10
-
Hope this helps.
Unfortunately it doesn’t, as it doesn’t show the error (as you already noted). Please keep the trace messages enabled and when the error occurs again, post the log again.
-
Sorry, I’ll try reinstalling it later when I’m free and see if it posts the error to the log.
-
Jonas, I was able to make the error fire off a couple time and so enabled trace. I know the log is pretty bloated so sorry about that, but I’m not sure what you’re looking for so I just let it go for awhile as I messed around.
Thanks.
-
I am interested in the trace messages that appear around the error messages, so that I can see some context. In your log file, the error messages are only at the beginning, when trace was not enabled.
Please do not disable the trace messages. If you reinstalled Equalizer APO, then please enable trace messages again directly after the installation.-
I did a reinstall and enabled the trace immediately following before I did anything as you said. Let me know if I can do anything else. Thanks.
-
-
Sorry, for some reason I did not see that you attached a log file to your last answer and I thought that you would attach it later.
Did you change the config.txt at the time that the error is shown in the log file? How do you edit the log file, using a text editor? There are some text editors that do special things when you save the file like saving to a new file, deleting the original file and then renaming the new file to the original file. Could that be the case?
-
That’s okay, I assumed you were busy and you would get to it and I don’t want to keep bumping this post over and over which is why I waited a few days.
So with the config file, sometimes I will make changes to it and there are no errors logged. What I usually do when I do a fresh install is replace the config.txt file with the version I have configured that I keep a copy of elsewhere on the hard drive because I just like the format better. Just a bit more readable to me.
Usually when the error is logged, it is when I’m replacing the config.txt file from the new install with the version I have a backup of. Though, this is not always the case. There have been times I’ve replaced the config file with a new file and the error doesn’t show to the log.
Also, when you ask if I’m editing the log file with a text editor, did you mean to say editing the config.txt file? I have edited the log file, i.e. erased it completely to start fresh to make it more readable when I send it to you, but if you really meant the config file, all I’m using for that is notepad.
As to your concern about text editor behavior, would notepad exhibit these behaviors? I’m not really sure how to fix that if that is happening or why that would interfere with EqualizerAPO in its abilty to find the file with the right format in the right directory…
Last edit: Charles Jameson 2017-02-16
-
Also, when you ask if I’m editing the log file with a text editor, did you mean to say editing the config.txt file?
Sorry, of course I meant editing the config.txt file. And no, notepad will not cause any problems.
So, the error only occurs when you are replacing the config.txt with your backup? Do you remove the file before you copy the backup or do you just overwrite? I tried to reproduce the error by overwriting config.txt directly when copying and I did not get any errors, but of course the timing might be different on your machine.
-
Well, regardless of what I do, the behavior is always they same, i.e. whether I’m moving the config file to and from the correct directory or just editing and saving the config file that’s there, it’s clear the equalizer isn’t working.
But I came upon a workaround completely be accident: so, I recently launched a game, and when I was in the game I went into the sound settings for the headphones (which is the device on which I installed equalizer apo). While there, I went into the enhancements tab and simply hit the «ok» button. Normally, this doesn’t work when I’m just in windows or playing something through a browser, but it caused the equalizer to start working somehow? Is this because I was in an application that has exclusive control over the device?
I tried to test this while just back in windows after a system restart, and editing the config file is back to not working. I literally have to launch an application with exclusive control, go into the device sound settings > enhancements > hit ok, then it will start working….ugh.
Last edit: Charles Jameson 2017-02-18
Log in to post a comment.
Содержание
- : FS : Error while reading/writing config.dat in 1066 #1537
- Comments
- Summarize of the problem/feature request
- Expected behavior
- Actual behavior
- Steps to reproduce
- System configuration
- Rules or log data
- Footer
- Error while reading config
- Re: Error writing config.dat
- Re: Error writing config.dat
- Re: Error writing config.dat
- Re: Error writing config.dat
- Re: Error writing config.dat
- Re: Error writing config.dat
- Re: Error writing config.dat
- Re: Error writing config.dat
- Re: Error writing config.dat
- Re: Error writing config.dat
- Re: Error writing config.dat
- Equalizer APO Discussion
- A system-wide equalizer for Windows 7 / 8 / 8.1 / 10 / 11
- Forums
- Error while reading configuration file: The system cannot find the file specified.
- Arch Linux
- #1 2015-06-30 02:03:00
- [SOLVED] Problem with conky after update
- #2 2015-06-30 02:37:04
- Re: [SOLVED] Problem with conky after update
- #3 2015-06-30 02:37:55
- Re: [SOLVED] Problem with conky after update
- #4 2015-06-30 05:36:12
- Re: [SOLVED] Problem with conky after update
- #5 2015-06-30 05:47:01
- Re: [SOLVED] Problem with conky after update
- #6 2015-06-30 06:08:57
- Re: [SOLVED] Problem with conky after update
- #7 2015-06-30 06:22:07
- Re: [SOLVED] Problem with conky after update
- #8 2015-06-30 06:47:57
- Re: [SOLVED] Problem with conky after update
- #9 2015-06-30 06:58:56
- Re: [SOLVED] Problem with conky after update
- #10 2015-06-30 09:07:39
- Re: [SOLVED] Problem with conky after update
- #11 2015-06-30 09:28:20
- Re: [SOLVED] Problem with conky after update
- #12 2015-06-30 13:26:00
- Re: [SOLVED] Problem with conky after update
- #13 2015-06-30 13:46:45
- Re: [SOLVED] Problem with conky after update
- #14 2015-06-30 15:14:18
- Re: [SOLVED] Problem with conky after update
- #15 2015-06-30 17:46:08
- Re: [SOLVED] Problem with conky after update
- #16 2015-06-30 18:08:47
- Re: [SOLVED] Problem with conky after update
- #17 2015-06-30 18:40:34
- Re: [SOLVED] Problem with conky after update
- #18 2015-06-30 20:23:52
- Re: [SOLVED] Problem with conky after update
- #19 2015-06-30 20:27:36
- Re: [SOLVED] Problem with conky after update
- #20 2015-06-30 20:31:30
- Re: [SOLVED] Problem with conky after update
- #21 2015-06-30 21:01:28
- Re: [SOLVED] Problem with conky after update
- #22 2015-06-30 21:14:18
- Re: [SOLVED] Problem with conky after update
- #23 2015-06-30 21:42:53
- Re: [SOLVED] Problem with conky after update
: FS : Error while reading/writing config.dat in 1066 #1537
Summarize of the problem/feature request
Error while reading/writing config.dat
When i try add new controller Generic HTTP Advanced [TESTING]
Expected behavior
I should add new controller(Generic HTTP Advanced [TESTING]) and save configuration .
Actual behavior
I cant add new controller (Generic HTTP Advanced [TESTING]). Wemos D1 mini reboot after submit configuration . And when i open again controller i se many different char in configuration like this: «Ҁ�??I�@xj�?�N�?���?���@»
Steps to reproduce
- When i try add controller(Generic HTTP Advanced [TESTING]) and save caused reboot .
I tried on 3 wemos d1 mini effect is the same
System configuration
Hardware:
Wemos d1 mini
ESP Easy version:
mega-20180625
ESP Easy settings/screenshots:
Build
20102 — Mega
Libraries
ESP82xx Core 2_4_1, NONOS SDK 2.2.1(cfd48f3), LWIP: 2.0.3
GIT version
mega-20180625
Plugins
73 [Normal] [Testing] [Development]
Build time
Jun 25 2018 02:18:45
Binary filename
ESP_Easy_mega-20180625_dev_ESP8266_4096.bin
Rules or log data
The text was updated successfully, but these errors were encountered:
The config file is a binary format, so seeing garbage is not an error.
Can you check the vendor ID of the flash chip?
And is it possible to gather a log from the moment you try to save, which leads to a crash?
Detecting chip type. ESP8266 Chip is ESP8266EX Chip ID: 0x004ef29e
Restart when i change type from ip to hostname in Generic HTTP Advanced [TESTING] without submit data
https://asciinema.org/a/FLWGJFm7tQhU0SVVxVJqsGAzS
359425 : SaveToFile: config.dat index: 32768 datasize: 1024 >Panic /home/travis/.platformio/packages/framework-arduinoespressif8266/cores/esp8266/core_esp8266_main.cpp:99 __yield ctx: sys sp: 3fff3050 end: 3fffffb0 offset: 01b0 >>>stack>>> >3fff3200: 00000100 3fff3260 3fffc718 0032bc04 >3fff3210: 00000004 401051ee 40105734 4025c348 >3fff3220: 3fff3260 3fff3260 00000000 4025c378 >3fff3230: 3fffc71
Second wemos
similar situation
Detecting chip type. ESP8266
Chip is ESP8266EX
Stub running.
Chip ID: 0x0073008a
https://asciinema.org/a/eAqBp0Pp0H2YsWQ9hXs5zWejj
Exception (2): epc1=0x3ffeb92c epc2=0x00000000 epc3=0x00000000 excvaddr=0x3ffeb92c depc=0x00000000 ctx: cont sp: 3ffffddc end: 400043e6 offset: 01a0 >>>stack>>>
93606 : SaveToFile: config.dat index: 32768 datasize: 1024 93628 : FS : Error while reading/writing config.dat in 1005 93630 : SaveToFile: config.dat index: 28672 datasize: 724 93682 : FILE : Saved config.dat
I guess the problem is probably more related to the «Generic HTTP Advanced [TESTING]» and not saving the settings.
The error indicates a yield() problem, which is often an indication of calling either yield() or delay() from a call-back function.
Maybe this is 2 issue i checked soft mega-20180621and had problem with garbage in fields HTTP URI: HTTP HEADERS: HTTP BODY:
480640 : WD : Uptime 8 ConnectFailures 0 FreeMem 17912
510640 : WD : Uptime 9 ConnectFailures 0 FreeMem 17912
540640 : WD : Uptime 9 ConnectFailures 0 FreeMem 17912
570640 : WD : Uptime 10 ConnectFailures 0 FreeMem 17912
600640 : WD : Uptime 10 ConnectFailures 0 FreeMem 17912
630640 : WD : Uptime 11 ConnectFailures 0 FreeMem 17912
639712 : SaveToFile: config.dat index: 32768 datasize: 1024
639731 : FS : Error while reading/writing config.dat in 1005
639782 : SaveToFile: config.dat index: 28672 datasize: 724
639837 : FILE : Saved config.dat
639843 : SaveToFile: config.dat index: 0 datasize: 1220
639899 : FILE : Saved config.dat
639917 : LoadFromFile: config.dat index: 28672 datasize: 724
639950 : LoadFromFile: config.dat index: 32768 datasize: 1024
639969 : FS : Error while reading/writing config.dat in 1066
640014 : Ram usage: Webserver only: 0 including Core: 0 flashStringCalls: 23 flashStringData: 7128
This seems to have been resolved, issue can most likely be closed.
© 2023 GitHub, Inc.
You can’t perform that action at this time.
You signed in with another tab or window. Reload to refresh your session. You signed out in another tab or window. Reload to refresh your session.
Источник
Error while reading config
#1 Post by hans65 » 01 Apr 2018, 09:19
Hi
I flashed my Sonoff with the 20180306 firmware and when I configure the device I get this error message:
FS : Error while reading/writing config.dat in 794
Is there anything I could do?

Re: Error writing config.dat
#2 Post by grovkillen » 01 Apr 2018, 09:21
Flash write count has hit Max.
You can reset it by using the command ResetFlashWriteCounter
Re: Error writing config.dat
#3 Post by hans65 » 01 Apr 2018, 09:31
Re: Error writing config.dat
#4 Post by grovkillen » 01 Apr 2018, 09:38
If you use the command you don’t need to reboot, a reboot will reset the count as well.
If that didn’t help I can’t think of something else to try right now.
Re: Error writing config.dat
#5 Post by hans65 » 01 Apr 2018, 10:44
Re: Error writing config.dat
#6 Post by grovkillen » 01 Apr 2018, 11:21
Re: Error writing config.dat
#7 Post by Oxyandy » 01 Apr 2018, 11:56
Re: Error writing config.dat
#8 Post by grovkillen » 01 Apr 2018, 12:05
Re: Error writing config.dat
#9 Post by Oxyandy » 01 Apr 2018, 13:41
Re: Error writing config.dat
#10 Post by grovkillen » 01 Apr 2018, 15:00
Re: Error writing config.dat
#11 Post by hans65 » 01 Apr 2018, 15:24
Have had the same problem with build 20180304b so I went back to build 20180221 now it works fine like before.
But before I could install the build 20180221 I’ve had to install the R148 version because when I tried to flash direct from 20180304b to 20180221 I could not see the device in my wifi enviroment.
Re: Error writing config.dat
#12 Post by Oxyandy » 02 Apr 2018, 01:17
is this with the absolute most recent releases ?
Has only every happened to me with the last few releases..
I can not say if it has been resolved (the writing config error) with most recent release as I am still back tracking bugs.
I am not flashing most recent firmwares anymore, until I get this done..
Tracking bugs. which exist in the most recent releases, but did not exist very early in V2 versions
Several bugs, not just one.. I should soon know exactly when they were introduced
(example between Dev5 & Dev6, ‘this change’ happened, it resulted in the following undesirable changes such as. )
I am very close, but the tests need to be repeated over & over to be confirmed, then hardware swapped & confirmed again..
I want the report to be exact, no random mistakes on my behalf..
The stuck GPIO14 bug (not necessarily just GPIO14, could be others . — but that is what I am testing with at the moment) — you know about this bug.
I know when it did not exist, but still not 100% when it was introduced, still stepping through firmware release until I ‘exactly’ pin point when.
Results are. Coming, coming.. I have been working on it almost non-stop..
Источник
Equalizer APO Discussion
A system-wide equalizer for Windows 7 / 8 / 8.1 / 10 / 11
Forums
Error while reading configuration file: The system cannot find the file specified.
Error taken from the EqualizerAPO log.
Basically what’s going on is, I’m trying to use this APO but im using an external amp/dac. Sometimes it works, other times it just flat out doesn’t. I set a -30 dB preamp to test but it’s just not even seeing the file as no changes to the config file are working whereas when it’s working obviousy the changes are noticable on save of the file.
I’ve tried reinstalling EqualizerAPO, reinstalling it on the device, messing around in the enhancements and advanced tab in the sound setting in the control panel, etc.
Interestingly, when i use a virtual surround device that plays through the same amp/dac, EqaulizerAPO will work through it, but I don’t really need it there as it just jacks up the sound way too much.
Not sure if I’m explaining all these correctly as I’m just a casual user, but any suggestions would be helpful.
Please enable trace messages according to the Wiki. Then, when the error occurs again, please attach the log file to this thread.
Jonas, thanks for responding.
(deleted bloated trace)
Hope this helps.
Unfortunately it doesn’t, as it doesn’t show the error (as you already noted). Please keep the trace messages enabled and when the error occurs again, post the log again.
Sorry, I’ll try reinstalling it later when I’m free and see if it posts the error to the log.
Jonas, I was able to make the error fire off a couple time and so enabled trace. I know the log is pretty bloated so sorry about that, but I’m not sure what you’re looking for so I just let it go for awhile as I messed around.
I am interested in the trace messages that appear around the error messages, so that I can see some context. In your log file, the error messages are only at the beginning, when trace was not enabled.
Please do not disable the trace messages. If you reinstalled Equalizer APO, then please enable trace messages again directly after the installation.
I did a reinstall and enabled the trace immediately following before I did anything as you said. Let me know if I can do anything else. Thanks.
Figure anything out?
Sorry, for some reason I did not see that you attached a log file to your last answer and I thought that you would attach it later.
Did you change the config.txt at the time that the error is shown in the log file? How do you edit the log file, using a text editor? There are some text editors that do special things when you save the file like saving to a new file, deleting the original file and then renaming the new file to the original file. Could that be the case?
That’s okay, I assumed you were busy and you would get to it and I don’t want to keep bumping this post over and over which is why I waited a few days.
So with the config file, sometimes I will make changes to it and there are no errors logged. What I usually do when I do a fresh install is replace the config.txt file with the version I have configured that I keep a copy of elsewhere on the hard drive because I just like the format better. Just a bit more readable to me.
Usually when the error is logged, it is when I’m replacing the config.txt file from the new install with the version I have a backup of. Though, this is not always the case. There have been times I’ve replaced the config file with a new file and the error doesn’t show to the log.
Also, when you ask if I’m editing the log file with a text editor, did you mean to say editing the config.txt file? I have edited the log file, i.e. erased it completely to start fresh to make it more readable when I send it to you, but if you really meant the config file, all I’m using for that is notepad.
As to your concern about text editor behavior, would notepad exhibit these behaviors? I’m not really sure how to fix that if that is happening or why that would interfere with EqualizerAPO in its abilty to find the file with the right format in the right directory.
Also, when you ask if I’m editing the log file with a text editor, did you mean to say editing the config.txt file?
Sorry, of course I meant editing the config.txt file. And no, notepad will not cause any problems.
So, the error only occurs when you are replacing the config.txt with your backup? Do you remove the file before you copy the backup or do you just overwrite? I tried to reproduce the error by overwriting config.txt directly when copying and I did not get any errors, but of course the timing might be different on your machine.
Well, regardless of what I do, the behavior is always they same, i.e. whether I’m moving the config file to and from the correct directory or just editing and saving the config file that’s there, it’s clear the equalizer isn’t working.
But I came upon a workaround completely be accident: so, I recently launched a game, and when I was in the game I went into the sound settings for the headphones (which is the device on which I installed equalizer apo). While there, I went into the enhancements tab and simply hit the «ok» button. Normally, this doesn’t work when I’m just in windows or playing something through a browser, but it caused the equalizer to start working somehow? Is this because I was in an application that has exclusive control over the device?
I tried to test this while just back in windows after a system restart, and editing the config file is back to not working. I literally have to launch an application with exclusive control, go into the device sound settings > enhancements > hit ok, then it will start working. ugh.
Источник
Arch Linux
You are not logged in.
#1 2015-06-30 02:03:00
[SOLVED] Problem with conky after update
Hi, the problem is that conky has no transparency after system update, i get this from console:
this is my conky rc file:
Last edited by adcdam (2015-07-01 04:38:04)
#2 2015-06-30 02:37:04
Re: [SOLVED] Problem with conky after update
I am facing the same issue. Transparency is gone. Rolling back to previous version fixed it.
#3 2015-06-30 02:37:55
Re: [SOLVED] Problem with conky after update
Same issue. It’s no longer recognizing valid variables and also has an issue with iconv now.
#4 2015-06-30 05:36:12
Re: [SOLVED] Problem with conky after update
I’m speculating here.
https://www.archlinux.org/packages/extra/x86_64/conky/ says source is still at http://conky.sourceforge.net/. Latest version there is 1.9.x.
Top google result for conky on github is https://github.com/brndnmtthws/conky, where latest version is 1.10.0 a few days ago.
https://github.com/brndnmtthws/conky/releases says 1.10.0 uses «new Lua-based config system».
Thing started breaking when conky was updated in arch repos from 1.9.x to 1.10.x.
I’m guessing the 1.10.x series will only understand the «new» config system and not 1.9.x config syntax.
Does that sound about right? 1.10.x is backward incompatible?
Last edited by sylvite (2015-06-30 05:37:18)
#5 2015-06-30 05:47:01
Re: [SOLVED] Problem with conky after update
Many projects (e.g. nmap and GIMP) abandoned their page on sourceforge in favor of github. I’d guess that’s the case here, too.
#6 2015-06-30 06:08:57
Re: [SOLVED] Problem with conky after update
Mine doesn’t even start:
EDIT: Also, is this new config system documented anywhere?
Last edited by CrazyTux (2015-06-30 06:11:50)
#7 2015-06-30 06:22:07
Re: [SOLVED] Problem with conky after update
Actually, it’s quite easy:
wrap your config section in
wrap your TEXT section in
the config options are lookup values and you need to assign the values (i.e. use «=»)
each line in the config section ends with «,»
replace «yes» and «no» with «true» and «false», resp. (without quotes)
all values except numbers, «true» and «false» need quotes
comments are marked with «—» instead of «#»
Unfortunately, it seems like «own_window_argb_visual» isn’t working, at the moment.
Last edited by coruun (2015-06-30 06:23:03)
#8 2015-06-30 06:47:57
Re: [SOLVED] Problem with conky after update
can you give an example of a working conkyrc file for example using my old conkyrc file?
#9 2015-06-30 06:58:56
Re: [SOLVED] Problem with conky after update
Try looking in /usr/share/doc/conky-1.10.0/conky.conf for an example of the new config.
I found I had to reconstruct my .conkyrc as I could not simply wrap the two sections up. Two things are currently not working and I need to look into them further:
. Double buffering to prevent flickering.
. cpubar no longer seems to draw a bar, just a vertical line.
As for transparency, all I can say is that it works for me.
#10 2015-06-30 09:07:39
Re: [SOLVED] Problem with conky after update
Regarding double buffering, this feature has been turned off by default. See ConkyBuildOptions.cmake and look for BUILD_XDBE. I used ABS to update the PKGBUILD and recompile so that it enables double buffering.
I guess this is a packaging bug, but there is probably some good reason that double buffering was disabled by default.
Here’s my current working conky.conf: http://codepad.org/zNZnCfDc. Transparency works fine after changing to the new config file format.
#11 2015-06-30 09:28:20
Re: [SOLVED] Problem with conky after update
Thanks for your example! Disabling «double_buffering» fixed it for me.
Last edited by coruun (2015-06-30 09:29:54)
#12 2015-06-30 13:26:00
Re: [SOLVED] Problem with conky after update
Disabling double buffering is not an acceptable solution for me.
Rolling back until maintainer compiles/packages it with sane defaults. Version 1.9 worksforme and I have no need/idea of what is in v1.10.
#13 2015-06-30 13:46:45
Re: [SOLVED] Problem with conky after update
I convert my conkyrc, but for transparency i have to activate own_window_argb_visual and disable double_buffer and install xcompmgr or compton. without double_buffer i got flickering and it also consume more memory.
I rollback to 1.9 and wait for a correct conky with double_buffer working.
#14 2015-06-30 15:14:18
Re: [SOLVED] Problem with conky after update
Regarding double buffering, this feature has been turned off by default. See ConkyBuildOptions.cmake and look for BUILD_XDBE. I used ABS to update the PKGBUILD and recompile so that it enables double buffering.
I guess this is a packaging bug, but there is probably some good reason that double buffering was disabled by default.
Here’s my current working conky.conf: http://codepad.org/zNZnCfDc. Transparency works fine after changing to the new config file format.
Thanks infiniteh!
Double buffering woks fine for me!!
#15 2015-06-30 17:46:08
Re: [SOLVED] Problem with conky after update
agree with @IMBJR. 2 main issues for me are double_buffering and graphs. Other minor things— «minimum_size» and «xftfont» are «unknown settings». changing «xftfont» to «font» worked fine, and removing «minimum_size» didn’t seem to change or break anything.
double_buffering should be enabled in the package build. not sure how to get cpugraph, up/downspeedgraph looking like 1.9. I’ll stick with 1.9 until at least these 2 issues are fixed.
Edit: looks like 1.10.0-2 package enables double_buffering.
Last edited by sylvite (2015-06-30 18:15:43)
#16 2015-06-30 18:08:47
Re: [SOLVED] Problem with conky after update
There are many issues with 1.10 and it’s more than packaging issues. From the top of my head, trying to parse the cpu load ($, $, etc) or frequency ($, $, etc) from a lua script kills conky outright, lua scripts always seem to see 1 cpu (bug report). Trying to use a bash line (eg bash -c ‘. ‘) from the TEXT section results in a parsing error. It will be a while before these are ironed out, 1.10 was a major rewrite, things were bound to break.
#17 2015-06-30 18:40:34
Re: [SOLVED] Problem with conky after update
The 1.10.0-2 package works for me in regards to double buffering.
As for other issues, remember that 1.10 does use quite a different config file layout. I had to go through all my failing parts and find how to replace them.
#18 2015-06-30 20:23:52
Re: [SOLVED] Problem with conky after update
The 1.10.0-2 is still missing ICONV support, which is necessary for some basic things such as showing the degree symbol.
#19 2015-06-30 20:27:36
Re: [SOLVED] Problem with conky after update
can you give an example of a working conkyrc file for example using my old conkyrc file?
I’d also like to see an actually working config. I’m also just assuming
/.conkyrc is still the proper filename/location for it.
And was it appropriate for him to call this 1.10? Such changes I think would justify a 2.0
The 1.10.0-2 is still missing ICONV support, which is necessary for some basic things such as showing the degree symbol.
Yeah.. it would be a bit awkward to look at temperatures without that.
Last edited by BlueYoshi (2015-06-30 20:29:11)
#20 2015-06-30 20:31:30
Re: [SOLVED] Problem with conky after update
Huh, I can’t get Conky to run at all — getting a segmentation fault with the sample conky.conf provided with the package.
Tried converting my old configuration, but it’s no go either (though doesn’t produce segmentation fault — just doesn’t appear to run at all).
Not impressed so far!
Edit: Clarified what sample conky.conf I mean.
Last edited by ninian (2015-06-30 20:32:47)
#21 2015-06-30 21:01:28
Re: [SOLVED] Problem with conky after update
I’d also like to see an actually working config. I’m also just assuming
/.conkyrc is still the proper filename/location for it.
The config I linked to above is working perfectly for me. All I did was rewrite my old config in the new format. Some things changed, like minimum_size, which was split into minimum_width and minimum_height. Double buffering, transparency, graphs, and even the degree symbol all work just fine. Everything is exactly as it was on 1.9, with one exception: «top name» now shows command-line arguments, which adds some visual clutter, but is fine for me.
Reading the conky manpage should clear things up a lot, especially regarding the location of the config file.
I’m sure there are plenty of bugs that my config doesn’t expose, but at least it works. I hope it can act as a baseline for anyone needing an example.
#22 2015-06-30 21:14:18
Re: [SOLVED] Problem with conky after update
To be fair, you can workaround ICONV support if you save you config file as ISO-8859-1 instead of UTF-8 (which is kind of backwards).
However, I still can’t get execgraph to work, it complains about «incorrect format», even when I know the outputting format is correct (at least according to the source, which seems to indicate it’s scanning with the
#23 2015-06-30 21:42:53
Re: [SOLVED] Problem with conky after update
I’d also like to see an actually working config. I’m also just assuming
/.conkyrc is still the proper filename/location for it.
The config I linked to above is working perfectly for me. All I did was rewrite my old config in the new format. Some things changed, like minimum_size, which was split into minimum_width and minimum_height. Double buffering, transparency, graphs, and even the degree symbol all work just fine. Everything is exactly as it was on 1.9, with one exception: «top name» now shows command-line arguments, which adds some visual clutter, but is fine for me.
Reading the conky manpage should clear things up a lot, especially regarding the location of the config file.
I’m sure there are plenty of bugs that my config doesn’t expose, but at least it works. I hope it can act as a baseline for anyone needing an example.
Yours is returning errors on my end. I’ve updated mine as well, but it’s still encountering issues with the config for unknown reasons.
Источник
Обновлено 2023 января: перестаньте получать сообщения об ошибках и замедлите работу вашей системы с помощью нашего инструмента оптимизации. Получить сейчас в эту ссылку
- Скачайте и установите инструмент для ремонта здесь.
- Пусть он просканирует ваш компьютер.
- Затем инструмент почини свой компьютер.
Эквалайзер АПО не работает? Распространенная ошибка, которую вы совершаете, заключается в том, что вы забыли активировать свое считывающее устройство в EQ APO. На снимке экрана показано, что выход AMD HDMI включен, это мой любимый интерфейс для отправки звука на процессор объемного звука. Активировав его в этом меню, мы можем быть уверены, что определенные нами фильтры будут применяться, если наш интерфейс поддерживается.

Equalizer APO — параметрический / графический эквалайзер для Windows. Он реализован как объект обработки звука (APO) для инфраструктуры системных эффектов, представленной в Windows Vista. Особенности: — практически неограниченное количество фильтров — работает на любом количестве каналов — очень низкая задержка, что делает его подходящим для интерактивных приложений — низкая загрузка ЦП — модульный графический интерфейс пользователя: — Windows Vista или выше (в настоящее время только Windows 7, 8, 8.1 и 10 были протестированы) — Драйверы звуковой карты должны поддерживать APO (это также относится к большинству встроенных аудиодрайверов) — Приложение не должно обходить инфраструктуру системных эффектов (API, такие как эксклюзивный режим ASIO или WASAPI, не могут использоваться) Эквалайзер APO лучше всего использовать вместе с Мастером эквалайзера комнаты.
Поэтому убедитесь, что все воспроизводящие устройства, на которых вы хотите выполнить обработку, включены и не забудьте перезагрузить компьютер после установки Equalizer APO, иначе он не будет работать. Если вам потребуется изменить эти параметры в будущем, они будут доступны через C: Program Files EqualizerAPO Configurator.exe или там, где вы установили программное обеспечение.
Обновление за январь 2023 года:
Теперь вы можете предотвратить проблемы с ПК с помощью этого инструмента, например, защитить вас от потери файлов и вредоносных программ. Кроме того, это отличный способ оптимизировать ваш компьютер для достижения максимальной производительности. Программа с легкостью исправляет типичные ошибки, которые могут возникнуть в системах Windows — нет необходимости часами искать и устранять неполадки, если у вас под рукой есть идеальное решение:
- Шаг 1: Скачать PC Repair & Optimizer Tool (Windows 10, 8, 7, XP, Vista — Microsoft Gold Certified).
- Шаг 2: Нажмите «Начать сканирование”, Чтобы найти проблемы реестра Windows, которые могут вызывать проблемы с ПК.
- Шаг 3: Нажмите «Починить все», Чтобы исправить все проблемы.

Чтобы убедиться, что эквалайзер APO включен на вашем аудио после перезапуска откройте папку C: Program Files EqualizerAPO Editor.exe (или в любом другом месте, где вы установили программу). Кроме того, хитрость заключается в том, чтобы создать ярлык для редактора APO EQ на рабочем столе, поскольку здесь вы измените свои фильтры.

Установить как SFX / EFX
Хотя это экспериментальная функция в окне конфигуратора, для многих пользователей установка SFX / EFX полностью решила проблему, и мы надеемся, что она принесет вам пользу. Это очень легко сделать, и попробовать это бесплатно не стоит. Взгляните на это ниже!
- Откройте программу Configurator для Equalizer APO, выполнив поиск в меню «Пуск». Нажмите на кнопку «Пуск» и начните печатать. Нажмите на первый доступный результат.
- На вкладке «Устройства воспроизведения» выберите все устройства, которые вы хотите использовать с эквалайзером, установив флажки рядом с ними.
- Установите флажок рядом с параметрами устранения неполадок (которые будут использоваться только в случае возникновения проблем), щелкните стрелку, чтобы открыть раскрывающееся меню, затем выберите «Установить как SFX / EFX (экспериментальный)» из меню.
- Примените изменения, закройте Конфигуратор и снова откройте Эквалайзер APO, чтобы он заработал прямо сейчас!
Примечание. Если это не работает, обязательно снимите флажки рядом с Использовать два исходных входа APO в параметрах устранения неполадок. Это помогло другим пользователям, поэтому обязательно попробуйте!
https://sourceforge.net/p/equalizerapo/discussion/general/thread/27336975/
Совет экспертов: Этот инструмент восстановления сканирует репозитории и заменяет поврежденные или отсутствующие файлы, если ни один из этих методов не сработал. Это хорошо работает в большинстве случаев, когда проблема связана с повреждением системы. Этот инструмент также оптимизирует вашу систему, чтобы максимизировать производительность. Его можно скачать по Щелчок Здесь

CCNA, веб-разработчик, ПК для устранения неполадок
Я компьютерный энтузиаст и практикующий ИТ-специалист. У меня за плечами многолетний опыт работы в области компьютерного программирования, устранения неисправностей и ремонта оборудования. Я специализируюсь на веб-разработке и дизайне баз данных. У меня также есть сертификат CCNA для проектирования сетей и устранения неполадок.
Сообщение Просмотров: 285

Содержание
- Что заставляет Equalizer APO не работать в Windows 10?
Полный контроль над звуком, исходящим из вашего ПК, — это то, чего жаждут многие пользователи, но они, похоже, не удовлетворены возможностями, предоставляемыми Microsoft. Вместо этого многие пользователи используют для этой цели эквалайзеры сторонних производителей. Эквалайзер APO является ярким примером этого, но пользователи сообщают, что он просто не работает.

Equalizer APO открывается и, похоже, работает правильно, но это просто не влияет на звук, исходящий из вашего компьютера. Есть несколько методов, которые использовали другие люди для решения этой проблемы, поэтому обязательно ознакомьтесь с ними!
Вот список нескольких причин, по которым Equalizer APO может не работать в Windows 10. Определение правильной причины проблемы — один из наиболее важных шагов в ее решении. Ознакомьтесь с коротким списком ниже!
- Улучшения устройства отключены — Если улучшения для проблемного устройства отключены в его свойствах, Equalizer APO может некорректно работать с устройством. Убедитесь, что вы исправили это, чтобы решить проблему!
- Аппаратное ускорение звука — Если в свойствах устройства включено аппаратное ускорение звука, могут возникнуть определенные проблемы, и Equalizer APO может не работать с устройством. Отключите аппаратное ускорение и проверьте, сохраняется ли проблема.
- Заблокировано антивирусом — Антивирусные инструменты могут распознавать Equalizer APO как вредоносные, и некоторые его функции могут быть заблокированы без вашего ведома. Убедитесь, что вы добавили исключение для его основного исполняемого файла.
Решение 1. Установите как SFX / EFX
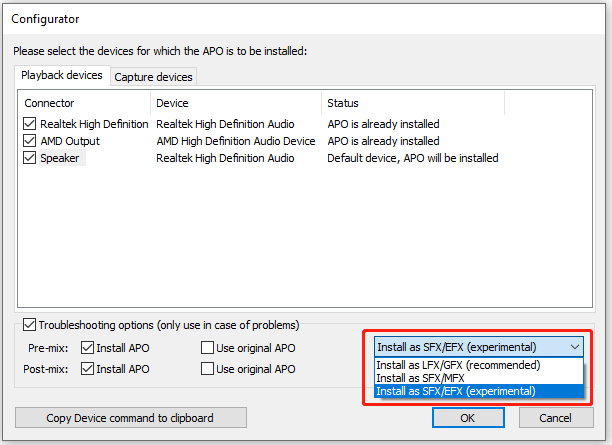
Несмотря на то, что эта функция указана как экспериментальная в окне конфигуратора, установка как SFX / EFX смогла полностью решить проблему для многих пользователей, и мы надеемся, что она также пойдет вам на пользу. Это очень легко выполнить, и попробовать ничего не стоит. Посмотрите это ниже!
- Открой Конфигуратор для Equalizer APO, выполнив поиск в меню Пуск. Щелкните значок Кнопка меню Пуск и начните печатать. Щелкните первый доступный результат.
- Под Устройства воспроизведения На вкладке выберите все устройства, которые вы хотите использовать с эквалайзером, установив флажки рядом с ними.

- Убедитесь, что оба поля «Использовать исходный APO» не отмечены.
- Установите флажок рядом с Варианты устранения неполадок (используйте только в случае проблем)щелкните стрелку, чтобы открыть раскрывающееся меню, и выберите Установить как SFX / EFX (экспериментально) вариант из меню.
- Примените изменения, закройте конфигуратор и снова откройте Equalizer APO, чтобы убедиться, что теперь он работает!
Заметка: Если это не сработает, попробуйте снять флажки рядом с двумя Использовать оригинальный APO записи в параметрах устранения неполадок. Это помогло другим пользователям, поэтому обязательно попробуйте!
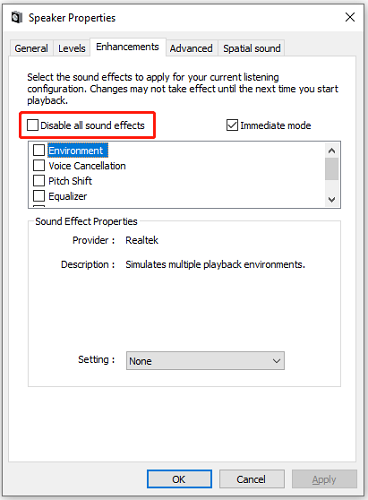
Решение 2. Убедитесь, что улучшения не отключены
Можно отключить все улучшения для определенного устройства воспроизведения. Это не позволяет вам использовать Equalizer APO для улучшения звука на устройстве, и вы можете видеть, что независимо от того, что вы делаете, со звуком на вашем компьютере ничего не происходит. Убедитесь, что вы включили улучшения в окне свойств вашего устройства!
- Щелкните правой кнопкой мыши значок громкости в правом нижнем углу экрана и выберите Звуки вариант. Альтернативный способ — открыть панель управления на вашем ПК и установить для параметра Просмотр по значение Большие иконки. После этого найдите и нажмите Звуки возможность открыть то же окно.
- Перейдите к Воспроизведение вкладка Звуки окно, которое только что открылось.
- Щелкните левой кнопкой мыши свое устройство и щелкните значок Свойства кнопка. Перейдите на вкладку «Улучшения» в окне «Свойства» и снимите флажок рядом с Отключить все улучшения вариант. Нажмите кнопку ОК и проверьте, работает ли сейчас Equalizer APO!

Решение 3. Отключите аппаратное ускорение звука
Этот вариант доступен не всем. Людям, у которых он есть в свойствах устройства вывода звука, следует подумать об отключении его, чтобы снова заработал Equalizer APO. Некоторые пользователи утверждают, что это все, что им потребовалось для решения проблемы, поэтому обязательно проверьте это!
- Щелкните правой кнопкой мыши значок громкости в правом нижнем углу экрана и выберите Звуки Альтернативный способ — открыть панель управления на вашем ПК и установить для параметра Просмотр по значение Большие иконки. После этого найдите и нажмите Звуки возможность открыть то же окно.
- Перейдите к Воспроизведение вкладка Звуки окно, которое только что открылось.
- Щелкните левой кнопкой мыши на гарнитуре и щелкните значок Свойства Перейдите к Продвинутый в окне свойств микрофона и проверьте Аппаратное ускорение раздел.
- Снимите флажок рядом с Разрешить аппаратное ускорение звука на этом устройстве вариант. Проверьте, правильно ли работает Equalizer APO!

Решение 4. Сделайте для него исключение в своем антивирусе
Многие программы не работают должным образом, если они признаны угрозой для вашей антивирусной программы. Создание исключения для Equalizer APO — это правильный шаг при устранении этой проблемы, поэтому обязательно следуйте инструкциям, описанным в Решении 5.
Однако не забудьте добавить эквалайзер APO исполняемый файл в появившемся окне с предложением перейти в папку установки. Он должен находиться в той же папке, в которую вы решили установить Equalizer APO. По умолчанию это:
C: Program Files (x86) Эквалайзер APO
Проверьте, можете ли вы теперь правильно использовать Equalizer APO. Если по-прежнему не работает, попробуйте перезагрузить компьютер и повторите попытку. Последний шаг — удалить антивирус и попробовать другой, если проблема не исчезнет.
Решение 5.Удалите ключ реестра
Это, вероятно, самый продвинутый метод, который вы можете использовать для решения проблем с Equalizer APO. Это включает в себя владение и удаление ключа реестра. Этот метод был предложен пользователем на интернет-форуме, и с тех пор он помог бесчисленному количеству пользователей справиться с этой проблемой. Посмотрите это ниже!
- Во-первых, вам нужно узнать имя значения реестра, которое нужно удалить. Это можно сделать с помощью Конфигуратора. открыто Конфигуратор выполнив поиск в меню «Пуск». Щелкните значок Кнопка меню Пуск и начните печатать. Щелкните первый доступный результат.
- Под Устройства воспроизведения выберите устройство, которое хотите использовать с эквалайзером, и щелкните значок Копировать команду устройства в буфер обмена кнопку внизу.

- Вставьте команду куда-нибудь. Скопированный текст должен выглядеть примерно так:
Устройство: Наушники для аудиоустройств высокой четкости {64e620cf-acc0-4d70-ac8f-c569b893ff4d}
- Часть, выделенная жирным шрифтом, очень важна, поэтому обратите на нее внимание, поскольку она представляет собой имя, которое вам нужно будет удалить.
- Поскольку вы собираетесь редактировать раздел реестра, мы рекомендуем вам ознакомиться с этой статьей, которую мы опубликовали для вас, чтобы сделать резервную копию реестра и предотвратить другие проблемы. Тем не менее, ничего плохого не произойдет, если вы будете внимательно и правильно следовать инструкциям.
- Открой Редактор реестра в окне поиска, набрав «regedit» в строке поиска, в меню «Пуск» или в диалоговом окне «Выполнить», к которому можно получить доступ с помощью Клавиша Windows + R комбинация клавиш. Перейдите к следующему разделу в вашем реестре, перейдя на левую панель:
HKEY_LOCAL_MACHINE SOFTWARE Microsoft Windows CurrentVersion MMDevices Audio Render
- Разверните последний ключ, найдите ключ с именем, выделенным жирным шрифтом выше, щелкните его правой кнопкой мыши и выберите Разрешения в появившемся контекстном меню.
- Щелкните значок Продвинутый Откроется окно «Дополнительные параметры безопасности». Здесь вам нужно изменить Владелец ключа.
- Щелкните значок + Изменить ссылка рядом с меткой «Владелец:». Появится окно выбора пользователя или группы.

- Выберите учетную запись пользователя через Продвинутый или просто введите свою учетную запись в области с надписью «Введите имя объекта для выбора» и нажмите OK. Добавить Все
- При желании, чтобы изменить владельца всех вложенных папок и файлов внутри папки, установите флажок «Заменить владельца подконтейнеров и объектов» в «Расширенные настройки безопасности» окно.

- Щелкните значок Добавить ниже и нажмите кнопку Выбрать принципала вверху. Выберите учетную запись пользователя через Продвинутый или просто введите свою учетную запись пользователя в области с надписью «Введите имя объекта для выбора‘И щелкните хорошо. Добавить Все
- Под Основные разрешения раздел, убедитесь, что вы выбрали Полный контроль перед применением внесенных вами изменений.

- Примените все, щелкните правой кнопкой мыши по ключу и выберите опцию «Удалить» в появившемся контекстном меню. Перезагрузите компьютер и переустановите APO с помощью Конфигуратора. Проверьте, правильно ли работает эквалайзер APO!
Решение 6. Выполните чистую установку
Выполнение чистой установки — это отличный способ начать с Equalizer APO, и мы настоятельно рекомендуем вам попробовать его, если все вышеперечисленное не дает результатов. Удаление его в Панели управления может быть недостаточно, и вам придется поискать в реестре оставшиеся ключи и значения. Выполните следующие действия, чтобы выполнить чистую установку Equalizer APO!
- Щелкните значок Стартовое меню и открыть Панель управления путем поиска, просто набрав в открытом окне меню «Пуск». Или вы можете щелкнуть винтик в нижней левой части меню Пуск, чтобы открыть Настройки app, если вы используете Windows 10.
- В Панель управления, выберите Просмотр как: Категория в правом верхнем углу окна панели управления и нажмите Удалить программу под Программы раздел.
- Если вы используете Настройки приложение, нажав на Программы должен немедленно открыть список всех установленных программ на вашем ПК, поэтому подождите, пока он загрузится
- Найдите Эквалайзер APO в Панели управления или в настройках и нажмите Удалить / Восстановить. Следуйте инструкциям, которые появляются после, чтобы полностью удалить его.
- Поскольку вы собираетесь редактировать раздел реестра, мы рекомендуем вам ознакомиться с этой статьей, которую мы опубликовали для вас, чтобы сделать резервную копию реестра и предотвратить другие проблемы. Тем не менее, ничего плохого не произойдет, если вы будете внимательно и правильно следовать инструкциям.
- Открой Редактор реестра в окне поиска, набрав «regedit» в строке поиска, в меню «Пуск» или в диалоговом окне «Выполнить», к которому можно получить доступ с помощью Клавиша Windows + R комбинация клавиш. Щелкните значок редактировать в строке меню в верхней части окна и щелкните найти. Вы также можете использовать комбинацию клавиш Ctrl + F.
- В появившемся окне поиска убедитесь, что вы вводите Эквалайзер APO в Найти то, что поле и щелкните Найти следующий кнопку после. Появится значение результата или ключ. Обязательно щелкните его правой кнопкой мыши и выберите Удалить в появившемся контекстном меню.
- Нажмите Редактировать >> Найти далее или используйте F3 кнопку для поиска других записей и убедитесь, что вы удалили их все. Убедитесь, что вы ищете Эквалайзер также! Вы также можете использовать CCleaner для автоматизации этого процесса.
- Загрузите последнюю версию Equalizer APO, посетив эта ссылка. Загрузите установочный файл, запустите его из папки «Загрузки», следуйте инструкциям на экране и проверьте, сохраняется ли проблема после переустановки!


Эквалайзер APO — отличный инструмент с открытым исходным кодом, который дает пользователю возможность контролировать звук, исходящий от его компьютера. Это полезно не только для музыкальных продюсеров, но и для обычных пользователей, которые ищут идеальный звук. Однако было отмечено, что Equalizer APO не работает на многих компьютерах. Это может быть связано с разными причинами, поэтому существуют различные способы решения проблемы, о которой мы поговорим в этой статье.

Fix Equalizer APO не работает на ПК с Windows
Если Equalizer APO не работает на вашем компьютере, следуйте решениям, упомянутым в этом посте, чтобы решить проблему.
- Сбросить все глобальные настройки
- Убедитесь, что ваше устройство вывода выбрано
- Установить как SFX/EFX
- Проверьте, отключены ли улучшения
- Устранение неполадок в чистой загрузке
- Удалить раздел реестра
- Переустановите приложение
Поговорим о них подробно.
1]Сбросить все глобальные настройки
Если Equalizer APO не работает на вашем компьютере, самое первое, что вы должны сделать, это сбросить все глобальные настройки. Это поможет вам, если проблема связана с неправильной настройкой, что происходит в большинстве случаев. Чтобы сделать то же самое, выполните предписанные шаги.
- Откройте приложение Equalizer APO.
В случае, если вы не можете найти его, перейдите в место, где вы установили приложение. Место обычно такое C:Program FilesEqualizerAPO а затем откройте Editor.exe. - Нажмите на Настройки > Сбросить все глобальные настройки.
- Избегайте всех предупреждений и подтвердите свои действия.
Наконец, проверьте, решена ли проблема.
2]Убедитесь, что ваше устройство вывода выбрано
Вы должны убедиться, что выбрано устройство вывода, которое вы хотите использовать, иначе эквалайзер не будет работать на нем. Многие пользователи, как правило, выбирают динамик по умолчанию в качестве устройства вывода, и когда они добавляют новый наушник, они забывают добавить его в приложение. Чтобы сделать то же самое, выполните предписанные шаги.
- Откройте Конфигуратор из меню «Пуск».
- Установите флажок, связанный с устройством, которое вы хотите использовать.
- Нажмите «ОК».
Вы заметите, что проблема решена.
3]Установить как SFX/EFX
Одна из экспериментальных функций SFX/EFX — лучший вариант, чем рекомендованный LFX/GFX для пользователей Windows. Эквалайзер APO не работает на некоторых компьютерах с настройками по умолчанию, но включение SFX/EFX делает приложение совместимым. Чтобы сделать то же самое, выполните следующие шаги.
- Разыскивать «Конфигуратор» из меню «Пуск».
- Выберите устройство, которое хотите настроить.
- Убедитесь, что Варианты устранения неполадок стоит только галочка.
- Выбирать Установить как SFX/EFX (экспериментально) вариант.
- Наконец, примените изменения и закройте Конфигуратор.
Надеюсь, это поможет вам.
4]Проверьте, отключены ли улучшения
В случае, если улучшения используемого вами устройства отключены, Эквалайзер не сможет внести какие-либо изменения. Обычно улучшения не отключаются, и пользователи склонны отключать их вручную, в любом случае мы покажем вам, как проверить, отключена ли функция. Выполните предписанные шаги, чтобы сделать то же самое.
- Открытым Панель управления.
- Изменять Просмотр по к Большие иконки и нажмите на кнопку Звук.
- Выберите устройство вывода и нажмите «Свойства».
- Перейдите на вкладку «Дополнительно» и щелкните поле, связанное с Включить улучшения звука.
- Нажмите «ОК» и закройте окно.
Наконец, перезагрузите компьютер и проверьте, решена ли проблема.
5]Устранение неполадок в чистой загрузке
Возможно, есть стороннее приложение, которое мешает Equalizer APO и мешает ему выполнять свою работу. Однако, поскольку мы не знаем, какое это приложение, вам следует выполнить чистую загрузку, не отключая службы Equalizer APO, и посмотреть, работает ли приложение в этом состоянии. В случае, если проблема решена в состоянии «Чистая загрузка», включите процессы вручную, чтобы выяснить виновника. Затем удалите приложение или остановите его обслуживание, и все будет хорошо.
6]Удалить раздел реестра
Возможно, один из реестров конфигуратора поврежден на вашем устройстве, самое простое решение в этом случае — стать владельцем этого ключа, а затем удалить его. Это позволит приложению создать новое и решить вашу проблему. Однако, прежде чем что-либо делать, создайте резервную копию реестра. Это будет использовано, если что-то пойдет не так.
После создания резервной копии откройте конфигуратор, выберите устройство, на котором вы хотите использовать эквалайзер, и нажмите команду «Копировать устройство в буфер обмена». Скопированная команда будет выглядеть примерно так.
Устройство: Гарнитура Airdopes 121v2 Hands-Free {0d849e6e-6557-4bdf-8e36-0875d738c212}
Обратите внимание на команду в фигурных скобках, так как это имя ключа, который мы будем удалять.
Теперь откройте редактор реестра и перейдите в следующее место.
HKEY_LOCAL_MACHINESOFTWAREMicrosoftWindowsCurrentVersionMMDevicesAudioRender
Ищи ключ, я просил тебя взять на заметку. Щелкните по нему правой кнопкой мыши и выберите Разрешения. Теперь нажмите кнопку «Дополнительно», затем нажмите кнопку «Изменить», расположенную рядом с «Владелец», введите «Каждый» в указанном поле и нажмите «Проверить имена». Затем нажмите Ok, поставьте галочку «Заменить владельца на подконтейнерах и объектах», и нажмите Применить > ОК. Вы возвращаетесь обратно в окно «Разрешения», там нажмите кнопку «Добавить», введите «Каждый» и щелкните Проверить имена. Выберите только что добавленного пользователя, установите флажок «Полный доступ» и нажмите «Применить» > «ОК». Наконец, щелкните правой кнопкой мыши ключ и выберите «Удалить». Теперь вы должны перезагрузить компьютер и проверить, работает ли приложение.
Надеюсь, это поможет вам.
7]Переустановите приложение
Если ничего не помогает, последним средством является переустановка приложения, так как высока вероятность того, что Equalizer APO, установленный в вашей системе, поврежден. Чтобы сделать то же самое, сначала удалите приложение, затем откройте редактор реестра, нажмите Ctrl + F, введите «Эквалайзер АПО» и удалите все связанные записи реестра. Наконец, выполните новую установку приложений. Чтобы сделать то же самое, зайдите на сайт equalizerapo.com и загрузите ZIP-файл, затем распакуйте его и запустите установочный файл. Следуйте инструкциям на экране, и все будет хорошо.
Мы надеемся, что вы сможете решить проблему, используя решения, упомянутые в этом посте.
Работает ли Equalizer APO в Windows 11?
Да, Equalizer APO отлично работает на Windows 11, приложение достаточно хорошо оптимизировано для всех версий Windows после XP. Путаница возникает из-за того, что Windows 11 не упоминается на странице загрузки Equalizer APO, однако последняя лучшая ОС от Microsoft поддерживает это приложение с открытым исходным кодом.
Читайте также: Как изменить настройки звука в Windows 11, чтобы улучшить звук
Как исправить сбой APO эквалайзера?
Если Equalizer APO не работает на вашем компьютере, вы должны следовать решениям, упомянутым в этом посте. Мы рекомендуем вам начать с первого решения, а затем двигаться вниз. Если приложение вообще не запускается в вашей системе, переустановите его. Это поможет вам.
Читайте: Лучшее бесплатное программное обеспечение для эквалайзера звука и звука для ПК с Windows 11/10
Работает ли Equalizer APO с Realtek?
Да, Equalizer APO работает с аудиодрайверами Realtek. Однако он не перезаписывает изменения, сделанные в консоли Realtek Audio, вместо этого он перенаправляет аудиопоток вашего устройства. Итак, если у вас есть устройство Realtek и вы хотите использовать Equalizer APO, вам не о чем беспокоиться.
Читать . Исправление объемного звука канала, не работающего в Windows 11.
-
Partition Wizard
-
Partition Magic
- How to Solve Equalizer App Not Working – New Update
By Sherry | Follow |
Last Updated January 05, 2023
Some users reported about Equalizer APO not working. Unfortunately, this problem could happen due to various factors, and it might be hard to figure out it in your case. To solve it, MiniTool Partition Wizard introduces some solutions.
Equalizer APO (Audio Processing Object) is a free and open-source audio equalizer for Windows 7/8/8.1/10.
Equalization parameters can be configured for multiple audio devices and applied to all Windows audio. Equalizer APO comes with a configuration editor with variable frequency resolution, and it allows users to save and load configuration in a text file.
A lot of users are using this software to improve their PC audio. However, some of them reported that their Equalizer APO doesn’t work and it makes no effect on the audio. If you are bothered by the same issue, you can try the following solutions to solve it.
Method 1: Disable Hardware Acceleration of Audio
When you face Equalizer APO not working, disabling hardware acceleration of audio might help. And here are the detailed steps.
Step 1: Press Win + R to invoke the Run window. Then type mmsys.cpl and press Enter to open the Sound settings.
Step 2: Under the Playback tab, right-click the headset you are using and select Properties.
Step 3: In the pop-up window, switch to the Advanced tab. Then uncheck the option “Allow hardware acceleration of audio with this device” under the Hardware Acceleration section.
Step 4: Click the OK button on each window to save the changes you have made.
Then you can check if Equalizer APO not working error has been solved.
Tips:
Your device might not support hardware acceleration. If you don’t see the hardware acceleration option, just move on to the next solution.
Method 2: Make Sure Enhancements Are Enabled
If you have disabled all enhancements for the specific playback device, Equalizer APO would not enhance the audio for your device. Therefore, you’d better check your settings and make sure the sound enhancements are enabled.
Step 1: Open Sound settings.
Step 2: Under the Playback tab, right-click your headset and select Properties.
Step 3: Go to the Enhancements tab. Then uncheck Disable all sound effects and click OK.
If Equalizer APO not working still exists even you are sure the sound enhancements are enabled, you need to try the next method.
Method 3: Allow Equalizer APO Through Firewall
Antivirus programs might prevent Equalizer APO from working properly sometimes. To solve the problem, you need to allow the app through Windows Defender Firewall or make an exception for it.
Method 4: Install as SFX/EFX
Some users have fixed Equalizer APO not working by installing as SFX/EFX. You can also have a try. And here are the detailed steps.
Step 1: Press Win + S to open the Windows Search utility. Then search for Configurator and open the app.
Step 2: Under the Playback devices tab, select the device you want to use with the equalizer. Then check Troubleshooting options (only use in case of problems).
Step 3: Uncheck both Use original APO boxes. Then select Install as SFX/EFX (experimental) from the drop-down menu.
Step 4: Click OK to save the changes.
Now you can check if Equalizer APO works properly.
Method 5: Reinstall Equalizer APO
If you tried all the solutions you can find but still encounter the Equalizer APO not working error, you might need to reinstall the Equalizer APO app.
Step 1: Open Control Panel. Then select View by: Category and select Uninstall a program.
Step 2: In the list of installed features and programs, right-click Equalizer APO and select Uninstall.
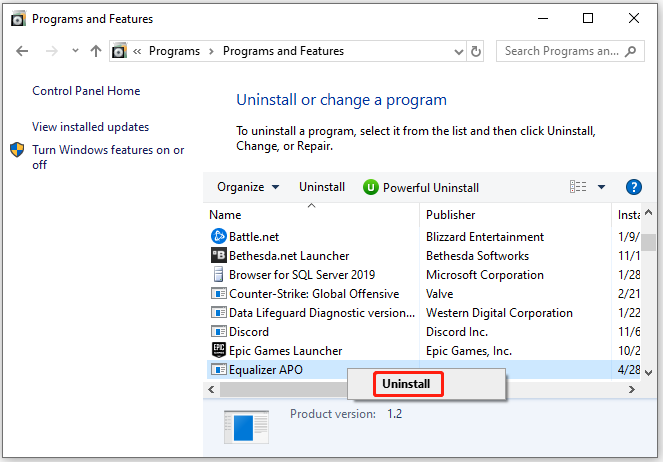
Step 3: Follow the on-screen instructions to finish the operation. Then remove remnants.
Note: You can also uninstall Equalizer with a professional and reliable software uninstaller.
Step 4: Download and install Equalizer APO again and check if it works well.
About The Author

Position: Columnist
Sherry has been a staff editor of MiniTool for a year. She has received rigorous training about computer and digital data in company. Her articles focus on solutions to various problems that many Windows users might encounter and she is excellent at disk partitioning.
She has a wide range of hobbies, including listening to music, playing video games, roller skating, reading, and so on. By the way, she is patient and serious.

Equalizer APO is a free application for Microsoft Windows that provides advanced audio controls for people who like more control over their computer’s sound. But many users have reported that when they make changes to the audio from Equalizer APO, they don’t find any of its effects on their computer’s audio. If you are also experiencing Equalizer APO not working on your Windows, find solutions for it in this guide.
Equalizer APO has a third-party GUI application, Peace. These solutions may also work for the Peace Equalizer not working problem. But it’s recommended to uninstall Peace, fix Equalizer APO, and when Equalizer APO begins working, install Peace. (Installation of Peace GUI is not essential for the working of Equalizer APO.)
What are the Causes of Equalizer APO Not Working on Windows 10?
- Incorrect Equalizer APO settings
- Hardware acceleration for the audio device is enabled
- Audio device enhancements are disabled
- Antivirus is blocking Equalizer APO
- Corrupted registry file of Equalizer APO
- No permission for Equalizer APO to take control of the audio device
- Corrupted audio drivers
Solutions To Fix Equalizer APO Not Working Issue on Microsoft Windows
Before applying the fixes, restart your computer and reopen Equalizer APO to check if it’s working. If not, apply these fixes one by one:
- Install the Program as SFX/EFX on Your Computer
- Make Sure Enhancements Are Not Disabled in System Sound Settings
- Disable Hardware Acceleration of Audio
- Delete the Equalizer APO Registry Key from Windows Registry
- Update Your Realtek Audio Drivers to Fix the Problem
- Reset All Global Preferences on Equalizer APO Editor
- Change Advanced Playback Properties
- Reinstall Your Audio Devices on Windows
- Allow Equalizer APO Through Firewall
- Make Sure Your Antivirus Hasn’t Blocked It
- Uninstall the Equalizer APO and its Peace GUI Software and Install it Again
1. Install the Program as SFX/EFX on Your Computer
We’ll start with tweaking the settings of Equalizer APO for your audio device. The application normally uses LFG/GFX. You can simply change it to SFX/EFX for Windows 7, 8.1, 10, and 11.
But what is SFX/EFX? This is an APO (Audio Processing Object) setting that Equalizer APO uses to signal your audio device about what to do. If the wrong APO is selected, your device won’t know the settings to change the audio.
So, you won’t find any effects of your recently changed audio configuration on your computer’s audio. We need to select the correct APO so Windows can detect when you make changes using Equalizer APO or the Peace GUI for Equalizer APO.
Follow these steps to select SFX/EFX APO:
- Click Start, type ‘Configurator’, and select the app. You can also open it by going to C:Program FilesEqualizerAPO and opening ‘Configurator.exe’.
- When the Configurator is open, select your audio by clicking and checkmarking it.

- Checkmark the box next to ‘Troubleshooting Options’.
- Click the drop-down menu that has ‘Install as LFX/GFX’ selected. It will open a small menu. Select ‘Install as SFX/EFX (experimental)’.

- Click OK.
- Restart your computer and try again.
If you have the Peace GUI, you can also open ‘Configurator’ by opening Peace. Click ‘Settings’, go to the ‘Debugging and Testing’ tab, and click ‘Equalizer APO’s Configurator’.
This setting is not final, but most users do find this to be helpful. However, some Windows 11 users reported that their Equalizer APO worked when they selected ‘Install as LFX/GFX’. So, try all the options one by one to see which one fits with your Windows version.
Note: Sometimes, Windows changes audio settings in updates. So, it is plausible that the ‘Install as LFX/GFX’ option may be working for you, but after the update, it stops working.
Our advice is whenever you find that Equalizer APO not working or its configurations are not detectable on your computer’s audio, change the settings with the above steps and try all the ‘Install as…’ options.
2. Make Sure Enhancements Are Not Disabled in System Sound Settings
The Windows system settings of your sound device have a feature known as enhancements that is available on all Windows versions (7 and above). If enhancements are disabled, Equalizer APO won’t be able to apply audio enhancements on your audio device and as a result, you will notice that the changes on Equalizer APO are not showing on your PC’s audio. For your E-APO to work, audio enhancements should be enabled.
- Right-click the audio icon on your taskbar and select ‘Sound’.

- It will open the Windows sound settings. Go to the ‘Playback’ tab.
- Right-click your audio device and choose ‘Properties’.

- Navigate to the ‘Enhancements’ tab.
- Make sure that the box next to ‘Disable all enhancements’ is not checked. If it is, uncheck it, and click Apply and OK.

- Restart your computer.
- Open EQ-APO and see if it’s working.
Keeping Enhancements enabled can deteriorate audio quality for some sound devices and computers. If you notice any deterioration, disable it again.
I can’t find the Enhancements tab in my audio device’s properties? Some users might not find Enhancements. Perhaps their sound card doesn’t support it. However, a software bug could also be the reason. Update your audio drivers and Windows. Moreover, try enabling the audio service from Windows Services.
- Press Windows key + R and type services.msc.
- Find ‘Windows Audio’ services file on Services.
- Right-click ‘Windows Audio’ and choose ‘Properties’.

- Navigate to the ‘General’ tab.
- Click the drop-down menu of ‘Startup type’ and select ‘Automatic’.
- Click OK and restart your PC.
3. Disable Hardware Acceleration of Audio
When hardware acceleration for your audio device is enabled, it shifts audio tasks from the CPU to the sound card. This reduces the load on the CPU and it can play games or perform other tasks more easily.
It’s possible that due to hardware acceleration, your audio device is not detecting the sound changes made by Equalizer APO.
Now to check if that’s true or not, we will disable the hardware acceleration of audio for your sound card.
- Go to the Windows Sound settings by right-clicking the audio icon on the taskbar and clicking ‘Sounds’.
- Click the ‘Playback’ tab.
- Right-click your sound device and choose ‘Properties’.
- Navigate to the ‘Advanced’ tab.
- Uncheck ‘Allow hardware acceleration of audio with this device’.
- Click Apply and OK.
- Restart your laptop/PC.
In case the option was already disabled (unchecked), try enabling it. But the recommended settings for Equalizer APO is disabled hardware acceleration.
If you don’t find a hardware acceleration option, your sound card may not support it. You can also try to update your audio drivers and Windows to check if the option appears.
4. Delete the Equalizer APO Registry Key from Windows Registry
Windows Registry Keys keep critical information on programs. The registry key of Equalizer APO may be corrupt or incorrect due to which equalizer APO not working on your Windows PC. We will delete the registry key of Equalizer APO to fix the problem.
For this, we will first take the registry key from Equalizer APO, then find the registry key, take ownership of it, and then delete it. This method is a bit long so follow all the steps carefully:
- Firstly, open the Equalizer APO Configurator. You can access it by clicking the Start menu, typing ‘Configurator’, and clicking it.
- Checkmark and select the audio device you want to configure.
- Click the checkmark box for ‘Troubleshooting options’ below the list of audio devices.
- Click the button ‘Copy Device command to clipboard’.

- Open Notepad and paste it there. It would look like this: Device: Speakers High Definition Audio Device {c159efa9-4a22-48b6-85c7-4dbd34f0811f}.
- Now, open Windows Registry Editor. Press CTRL + R, type redgedit, and hit enter. Or click Start, type redgedit, and click ‘Run as administrator’.

- Click the address bar below the menu bar and paste this location to find the required registry: HKEY_LOCAL_MACHINESOFTWAREMicrosoftWindowsCurrentVersionMMDevicesAudioRender

- It will have the folder of your audio device’s registry. Look at the text you copied from Equalizer APO and go to the folder with the same name. In this case, it is {c159efa9-4a22-48b6-85c7-4dbd34f0811f}.
- We have found the folder. Now, we will change the ownership of the folder so we can delete it. Right-click the folder and select ‘Permissions’.

- You will see the window for folder security settings. Click ‘Advanced’.
- At the upper part of the window, click ‘Change’ next to ‘Owner’.

- Type the name ‘Everyone’ and hit enter (If this doesn’t work, type the name of the Windows user account you’re signed in to.).
- This will give you access to the account. We still require access to all the subfolders and files in that folder. For this, on the window you’re on, checkmark the ‘Replace ownership on subcontainers and objects’.

- Click Apply and OK.
- We need full control of the folder. So, click ‘Advanced’ again from the folder security window.
- Click ‘Add’ to open another window. Click ‘Select a principal’ on it.
- It will again ask you to enter the name of the user account. Type in the same account you entered in the previous step. So, type ‘Everyone’ and click OK.
- Checkmark ‘Full Control’ that you’ll see under ‘Basic information’ and click OK.

- Click Apply and OK on the previous folder security window.
- Now, you’ll be back to the registry editor.
- Right-click the same registry, choose ‘Delete’, and confirm. If it doesn’t delete, close the registry editor and open it again.
5. Update Your Realtek Audio Drivers to Fix the Problem
Old drivers that haven’t been updated since the first Windows installation face compatibility issues. They are prone to become corrupted as well. If you’re facing the Equalizer APO not working Realtek or for any other audio device, you can try updating the audio driver.
- Open Start, type ‘Device Manager’, and click it.
- Find ‘Audio inputs and outputs’ and double click on it.
- Right-click your audio device to select ‘Update driver’.

- A driver update wizard will open. Choose ‘Search automatically for drivers’. (Make sure you’re connected to the internet as this will check for drivers online.)
- If an update is available, you’ll see it update to the latest driver. If not, it’ll say that the best drivers for your device are already installed.
Update Your Audio Device Drivers from Windows Update
The Windows update program on 8.1, 10, and 11 can also detect driver updates and download and install directly from the updates window.
- Open Start, type ‘Windows Update’, and click the app.
- Click ‘Check for updates.
- Once it’s done checking for updates, select ‘View all optional updates’ below the listed updates.

- Click ‘Driver updates’. You’ll find a list of driver updates available for your computer’s devices. Find audio drivers and checkmark them. Then press the ‘Download and install’ button.
6. Reset All Global Preferences on Equalizer APO Editor
Any incorrect Equalizer APO settings can lead it to stop working or not work in the first place. You can completely reset the Equalizer APO settings to check if this fixes the issue.
You will lose all the saved configurations and audio settings on Equalizer APO. To save your configuration files, go to C:Program FilesEqualizerAPOconfig and copy-paste the text files to another folder.
Here’s how to reset your Equalizer APO settings.
- Open Start, scroll down the installed programs to find the Equalizer APO folder. Click it and select ‘Configuration Editor’.
- On the editor, click ‘Settings’ on the menu bar and choose ‘Reset all global preferences’.

- Confirm the action by clicking ‘Yes’.
- Restart your computer.
Reset Equalizer APO Configuration Extension (Peace) Settings
- If you want to reset Peace, open Peace from the Start menu.
- Click ‘Settings’ at the bottom right.

- Now, click ‘Reset’.

7. Change Advanced Playback Properties
For fixing the Equalizer APO issue, we have to play around a bit with the advanced playback settings of your audio device on Windows sound settings.
- Right-click the sound icon near the date and time on the taskbar and choose ‘Sounds’.
- Navigate to the ‘Playback’ tab.
- Right-click your preferred audio device and select ‘Properties’.
- Go to the ‘Advanced’ tab.
- You’ll find two checkboxes under ‘Exclusive Mode’ about exclusive control of the device. Checkmark them if unchecked and vice versa.

- Click Apply and OK on this window.
- Then, click Apply and OK again on the Sound window.
- Restart your computer.
8. Reinstall Your Audio Devices on Windows
Updating your audio driver can fix the Equalizer APO not working issue, but if you don’t find any updates or Equalizer APO is not working even after the update, reinstall the audio devices of your Windows PC.
But you don’t need to go through a complicated process for this because Windows keeps the driver files of the installed devices. Once you uninstall the device, Windows will install it back in a few seconds. Follow these steps:
- Click Start, type ‘Device Manager’, and click the app.
- Look for ‘Audio Inputs and outputs’ and double-click it.
- Right-click your audio device and select ‘Uninstall device’.

- This will uninstall the audio device and it will disappear.
- Click the computer with a magnifier icon below the menu bar. The device will be reinstalled and will appear again on the list.
9. Allow Equalizer APO Through Firewall
Firewall blocks unnecessary and unknown programs from accessing the internet to make your PC secure. Equalizer APO doesn’t use the internet for its main operation of configuring your computer’s audio so the probability of it getting blocked by a Firewall is less.
But you should try it nonetheless. We will show the method to allow Equalizer APO through Windows Firewall.
- Click the notification area button on the taskbar and open Windows Security by clicking the shield icon.
- On Windows Security, choose ‘Firewall & network protection’.
- Click ‘Change Settings’ and then select ‘Choose another app’.

- It will open a small box where you can browse a file. Go to C:Program FilesEqualizerAPO and select the Editor.exe file of Equalizer APO. Make sure that it’s checkmarked and click OK.

- Perform the same steps for the Configurator.exe file in the Equalizer APO folder.
If you have any other Firewall program, open its settings to find an option for allowing a new program.
10. Make Sure Your Antivirus Hasn’t Blocked It
Equalizer APO is a harmless program and most antiviruses consider it a safe program. But if you can’t open the Equalizer APO Configuration Editor (Editor.exe) or Configurator (Configurator.exe), your antivirus may have blocked it or the program wasn’t installed correctly. To fix this we need to exclude Equalizer APO from Windows Defender.
- Open the notification icons area on the taskbar and click the shield icon.
- It will open Windows Security. Select ‘Virus & threat protection.
- Under ‘Virus & threat protection settings, choose ‘Manage Settings.

- Scroll down to find the ‘Exclusions’ section. Click ‘Add or remove exclusions.

- Press the ‘Add an exclusion’ button, select ‘Folder’, and browser and choose the folder of Equalizer APO.

For Peace GUI, follow the same steps and allow the Peace programs one by one. Its location is mostly this: C:Program FilesEqualizerAPOconfig. However, if you excluded the whole Equalizer APO folder, you have automatically excluded all the programs of Equalizer APO and Peace.
The method to exclude a program or folder from an antivirus is different for every security program. If you have any third-party antivirus, open its settings and find the exclusion or any similar section. If you can’t find it, open Google and search ‘How to exclude files on [antivirus name]’.
11. Uninstall the Equalizer APO and its Peace GUI Software and Install it Again
If you can’t open the open Equalizer APO files (Configurator and Editor) or Peace files and you have unblocked them from the antivirus, try reinstalling it. A reinstall is also recommended if you’ve tried the above methods and the changes on Equalizer APO don’t affect the computer’s audio.
We will uninstall it from Windows, download Equalizer APO and Peace from Sourceforge, and install it again. Follow these steps:
- Click Start and go to Settings.
- Choose ‘Apps’.
- If you have the Peace GUI for Equalizer APO installed, uninstall it first. Click ‘Peace’ in the apps, and select the ‘Uninstall’ option. Its settings will open, uninstall it from there.
- Go back to ‘Apps’. Scroll down to find ‘Equalizer APO’. Click it and press the ‘Uninstall’ button.

- It will open the uninstallation wizard of Equalizer APO. Follow the onscreen instructions.
- After the uninstall, restart your computer.
- To download Equalizer APO, open your web browser, and search ‘Equalizer APO free download’.
- Download and install it on your computer. When installing it for the audio device, use Method 1.
- Now, open your web browser and search on Google ‘Peace GUI for Equalizer APO’. Download and install it.
Conclusion
Applying different methods to fix the Equalizer APO and Peace Equalizer not working problem may take from a few minutes to an hour. Apply every method because you never know which one may work for you.
Содержание
- Как исправить: Эквалайзер APO не работает
- Что такое эквалайзер APO?
- Установить как SFX / EFX
- How to Fix Equalizer APO not Working on Windows 10?
- What Causes Equalizer APO not to Work on Windows 10?
- Solution 1: Install as SFX/EFX
- Solution 2: Make Sure Enhancements are not Disabled
- Solution 3: Disable Hardware Acceleration of Audio
- Solution 4: Make an Exception for it in Your Antivirus
- Solution 5: Delete a Registry Key
- Solution 6: Perform a Clean Install
- Как исправить APO эквалайзера, не работающего в Windows 10?
- Что заставляет Equalizer APO не работать в Windows 10?
- Решение 1. Установите как SFX/EFX
- Решение 2. Убедитесь, что улучшения не отключены
- Решение 3. Отключите аппаратное ускорение звука
- Решение 4. Сделайте для него исключение в своем антивирусе
- Решение 5. Удалите ключ реестра
- Решение 6. Выполните чистую установку
- Найдены дубликаты
- Объёмный виртуальный звук в любимых наушниках на любой звуковой карте. Вплоть до 7.1 + деморолик от меня
- Альтернативы продуктам Adobe в Open source
- Звуковой редактор Audacity передает данные в Россию
- Мой топ программ для дизайна и не только)
- Как обработать голос в программе Adobe Audition
- Найти и сохранить таймкоды всех объектов на видео одним кликом или машинное обучение для видеомонтажа
- Equalizer apo не работает
- Установка
- Настройка
- Устранение проблем
- Панель управления
- Файлы логов
- Аппаратный OpenAL
- А нужен ли эквалайзер?
- Эквалайзер Windows 7 и 10
- Менеджер аудиодрайвера VIA HD Audio Deck
- Преимущества
- Недостатки
- Работа с аудиоустройствами Realtek
- Преимущества
- Недостатки
- Профессиональный Voxengo Marvel
- Преимущества
- Недостатки
- Многофункциональный Equalizer APO
- Преимущества
- Недостатки
- Декоративный NeonVisual
- Преимущества
- Недостатки
- Подведем итоги
Как исправить: Эквалайзер APO не работает
Обновление: Перестаньте получать сообщения об ошибках и замедляйте работу своей системы с помощью нашего инструмента оптимизации. Получите это сейчас на эту ссылку
Эквалайзер АПО не работает? Распространенная ошибка, которую вы совершаете, заключается в том, что вы забыли активировать свое считывающее устройство в EQ APO. На снимке экрана показано, что выход AMD HDMI включен, это мой любимый интерфейс для отправки звука на процессор объемного звука. Активировав его в этом меню, мы можем быть уверены, что определенные нами фильтры будут применяться, если наш интерфейс поддерживается.

Что такое эквалайзер APO?
Поэтому убедитесь, что все воспроизводящие устройства, на которых вы хотите выполнить обработку, включены и не забудьте перезагрузить компьютер после установки Equalizer APO, иначе он не будет работать. Если вам потребуется изменить эти параметры в будущем, они будут доступны через C: Program Files EqualizerAPO Configurator.exe или там, где вы установили программное обеспечение.

Чтобы убедиться, что эквалайзер APO включен на вашем аудио после перезапуска откройте папку C: Program Files EqualizerAPO Editor.exe (или в любом другом месте, где вы установили программу). Кроме того, хитрость заключается в том, чтобы создать ярлык для редактора APO EQ на рабочем столе, поскольку здесь вы измените свои фильтры.

Установить как SFX / EFX
Хотя это экспериментальная функция в окне конфигуратора, для многих пользователей установка SFX / EFX полностью решила проблему, и мы надеемся, что она принесет вам пользу. Это очень легко сделать, и попробовать это бесплатно не стоит. Взгляните на это ниже!
Примечание. Если это не работает, обязательно снимите флажки рядом с Использовать два исходных входа APO в параметрах устранения неполадок. Это помогло другим пользователям, поэтому обязательно попробуйте!

CCNA, веб-разработчик, ПК для устранения неполадок
Я компьютерный энтузиаст и практикующий ИТ-специалист. У меня за плечами многолетний опыт работы в области компьютерного программирования, устранения неисправностей и ремонта оборудования. Я специализируюсь на веб-разработке и дизайне баз данных. У меня также есть сертификат CCNA для проектирования сетей и устранения неполадок.
Источник
How to Fix Equalizer APO not Working on Windows 10?
Having complete control over sound coming out of your PC is something plenty of users crave for but they don’t seem to be satisfied with options provided by Microsoft. Instead, many users use third-party equalizers for the purpose. Equalizer APO is a prime example of this but users have reported that it simply won’t work.
 Equalizer APO Not Working on Windows 10
Equalizer APO opens and appears to be working properly but it simply doesn’t affect the audio coming out of your computer. There are several methods other people used to resolve this problem so make sure you check them out!
What Causes Equalizer APO not to Work on Windows 10?
Here is a list of a couple of causes which can make Equalizer APO not work on Windows 10. Determining the correct cause to the problem is one of the most important steps in resolving it. Check out the shortlist below!
Solution 1: Install as SFX/EFX
Even though this is listed as an experimental feature in the Configurator window, installing as SFX/EFX managed to resolve the problem completely for many users and we hope it will do you good as well. It’s very easy to perform and it costs nothing to try. Check it out below!
Note: If that doesn’t work, make sure you try to uncheck the boxes next to two Use original APO entries in Troubleshooting options. This has helped other users so make sure you try it out!
Solution 2: Make Sure Enhancements are not Disabled
It’s possible to disable all enhancements for the specific playback device. This prevents you from using Equalizer APO to enhance the audio for the device and you can see that no matter what you do, nothing happens with the audio on your computer. Make sure you enable enhancements in your device’s properties window!
Solution 3: Disable Hardware Acceleration of Audio
This option is not available to everyone. The people who have it in their audio output device’s properties should consider disabling it for the sake of Equalizer APO working again. Several users claim that this is all it took for them to resolve the problem so make sure you check it out!
Solution 4: Make an Exception for it in Your Antivirus
Many programs fail to work properly if they are recognized as a threat to your antivirus program. Creating an exception for Equalizer APO is the right thing to do when troubleshooting this issue so make sure you follow the steps explained in Solution 5.
However, make sure you add the Equalizer APO executable in the box which will appear prompting you to navigate to the installation folder. It should be in the same folder where you decided to install Equalizer APO in. By default it’s:
Check to see if you are now able to use Equalizer APO properly. If it still won’t work, try restarting your computer and try again. The last step would be to uninstall the antivirus and try a different one if the same issue persists.
Solution 5: Delete a Registry Key
This is probably the most advanced method you can use to resolve issues with Equalizer APO. It involves taking ownership and deleting a registry key. This method was suggested by a user on an internet forum and it has since helped countless users deal with this problem. Check it out below!
Please back up your registry keys before proceeding with this method using these (steps).
Solution 6: Perform a Clean Install
Performing a clean install is a neat way of starting over with Equalizer APO and we highly recommend you try it out if everything above fails to provide results. Uninstalling it in Control Panel may not be enough and you will have search through the registry for remaining keys and values. Follow the steps below to perform a clean install of Equalizer APO!
Источник
Как исправить APO эквалайзера, не работающего в Windows 10?
Полный контроль над звуком, исходящим из вашего ПК, — это то, чего жаждут многие пользователи, но, похоже, они не удовлетворены возможностями, предоставляемыми Microsoft. Вместо этого многие пользователи используют для этой цели эквалайзеры сторонних производителей. Эквалайзер APO является ярким примером этого, но пользователи сообщают, что он просто не будет работать. 
Эквалайзер APO открывается и, похоже, работает правильно, но это просто не влияет на звук, исходящий из вашего компьютера. Есть несколько методов, которые использовали другие люди для решения этой проблемы, поэтому обязательно ознакомьтесь с ними!
Что заставляет Equalizer APO не работать в Windows 10?
Вот список из нескольких причин, по которым Equalizer APO не работает в Windows 10. Определение правильной причины для проблема — один из самых важных шагов в ее решении. Ознакомьтесь с кратким списком ниже!
Решение 1. Установите как SFX/EFX
Несмотря на то, что эта функция указана как экспериментальная в окне Конфигуратора, установка как SFX/EFX смогла полностью решить проблему для многих пользователей, и мы надеемся, что это принесет вам пользу. Это очень легко выполнить, и попробовать ничего не стоит. Проверьте это ниже!
Примечание : Если это не сработает, убедитесь, что вы пытаетесь снять флажки рядом с двумя записями Использовать исходный APO в параметрах устранения неполадок. Это помогло другим пользователям, поэтому обязательно попробуйте!
Решение 2. Убедитесь, что улучшения не отключены
Это можно отключить все улучшения для конкретного устройства воспроизведения. Это не позволяет вам использовать Equalizer APO для улучшения звука для устройства, и вы можете видеть, что независимо от того, что вы делаете, со звуком на вашем компьютере ничего не происходит. Убедитесь, что вы включили улучшения в окне свойств вашего устройства!
Решение 3. Отключите аппаратное ускорение звука
Этот вариант доступен не всем. Людям, у которых он указан в свойствах устройства вывода звука, следует рассмотреть возможность его отключения, чтобы снова заработал Equalizer APO. Некоторые пользователи утверждают, что это все, что им потребовалось для решения проблемы, поэтому обязательно проверьте это!
Решение 4. Сделайте для него исключение в своем антивирусе
Многие программы не работают должным образом, если они признаны угрозой для вашей антивирусной программы. Создание исключения для Equalizer APO — правильный шаг при устранении этой проблемы, поэтому обязательно следуйте инструкциям, описанным в решении 5.
Однако убедитесь, что вы добавили Equalizer APO исполняемый в появившемся окне с предложением перейти в папку установки. Он должен находиться в той же папке, в которую вы решили установить Equalizer APO. По умолчанию это:
Проверить чтобы узнать, можете ли вы теперь правильно использовать Equalizer APO. Если по-прежнему не работает, попробуйте перезагрузить компьютер и повторите попытку. Последним шагом было бы удалить антивирус и попробовать другой, если проблема не исчезнет.
Решение 5. Удалите ключ реестра
Это, вероятно, наиболее продвинутый метод, который вы можете использовать для решения проблем с Equalizer APO. Это включает в себя владение и удаление ключа реестра. Этот метод был предложен пользователем на интернет-форуме, и с тех пор он помог бесчисленному количеству пользователей справиться с этой проблемой. Проверьте это ниже!
Пожалуйста, сделайте резервную копию ваших ключей реестра, прежде чем продолжить этот метод, используя эти (шаги).
Решение 6. Выполните чистую установку
Выполнение Чистая установка — это удобный способ начать с Equalizer APO, и мы настоятельно рекомендуем вам попробовать его, если все вышеперечисленное не даст результатов. Удаление его из панели управления может быть недостаточно, и вам придется поискать в реестре оставшиеся ключи и значения. Выполните следующие действия, чтобы выполнить чистую установку Equalizer APO!
Источник
Делюсь просто потому, что сам в своё время искал, ничего не нашел и забыл до недавнего времени.
Тем, у кого встроенная звуковая карта, скорее всего не пригодится, у вас наверняка есть спецсофт с эквалайзером. У меня такого, для моего ЦАП к сожалению нет, что очень странно.

Для прослушивания музыки и вытягивания плохенького битрейта я использую foobar2000+ozone

Но последнее время, стало много звуков из браузера и, встал вопрос, как улучшить его на постоянной основе везде.
Вот собственно и нашлось https://equalizerapo.com/ Прекрасно заработал и не глючит в сочетании с foobar и ozone, отключать не нужно.

Найдены дубликаты
Что за сборка foobar снизу? Симпатичная.

Объёмный виртуальный звук в любимых наушниках на любой звуковой карте. Вплоть до 7.1 + деморолик от меня
Здравствуйте уважаемые Пикабушники!
Не знаю был ли пост на эту тему, но я не нашел.
Речь пойдет о том как добиться так называемого бинаурального звучания в играх, фильмах и музыке, благодаря бесплатным OpenSource проектам на Виндовс. (Если вам понравится этот пост позже выложу инструкцию под Линукс).
Очень полезно для онлайн шутеров, позволяет получить нехилое преимущество.
Так же фильмы начинают звучать совсем по другому! А музыка при прослушивании играет как будто из колонок, из-за чего мозг не так устает при частом прослушивании.
Мой деморолики в конце поста, можете послушать их в наушниках (в колонках не работает) и решить, а нужно ли вам это.
И так что нам понадобится две программы, а точнее программа и модуль для неё.
Следуем инструкции установки, устанавливается просто (как и большинство программ в Виндовс. Будут вопросы, добро пожаловать в комментарии).


3) Скачиваем и устанавливаем программу-модуль Hesuvi (она то и дает объёмный звук).
Следуем инструкции установки, устанавливается просто (как и большинство программ в Виндовс. Будут вопросы, добро пожаловать в комментарии).
4) Настойки ОС Виндовс.
Но не расстраивайтесь, позиционирования звука как в кинотеатре у вас не будет, но звуковой эффект будет как в колонках 2.0 что неплохо для стерео музыки.

5) Настройка Hesuvi
Запускаем программу Hesuvi. Видим такое первым такое окно ка на скриншоте ниже. Это основная рабочая вкладка virtualization. Ставим справа галочки Upmix Content, или не ставим =)..
ВАЖНО: Управление эффектами производится на этой вкладке с меню-списке Common HRIRs.
Выбираем на свой вкус, лично мне нравится dh++.wav (это dolby headphone).

Переходим во вкладку Connection, видим штекеры, наживаем на них, так чтобы они загорелись синим цветом и «вставились в разъем, как на картинке ниже).
Также ниже проверяем установлено ли по умолчанию значение Visualization ниже под изображением штекеров.

Далее переходи на вкладку Addiction и ставим единственную главку как на скриншоте.
(у меня работало и без нее, но не помешает на всякий случай).

Виртуальный звук 7.1
Виртуальный звук 7.1
Если будут вопросы жду вас в комментариях!
Спасибо за внимание! Удачи!

Альтернативы продуктам Adobe в Open source

Звуковой редактор Audacity передает данные в Россию

В мае 2022 года у Audacity сменился владелец — его выкупила компания Muse, офис которой зарегистрирован в Сан-Франциско.


Мой топ программ для дизайна и не только)


Как обработать голос в программе Adobe Audition

Найти и сохранить таймкоды всех объектов на видео одним кликом или машинное обучение для видеомонтажа

Порог вхождения в видеомонтаж за последние несколько лет понизился до такой степени, что скоро «Режиссер монтажа» вымрет как профессия! Их функции все чаще на себя берут режиссеры, продюсеры, редакторы и прочие.
Этому способствует развитие монтажных систем и цифровых носителей, которые очень упростили процессы, доведя видеомонтаж до банальных «копировать», «обрезать» и «сохранить». Ушли в прошлое сложные монтажки, которые требовали определенной подготовки для пользователя в области коммутации видеооборудования и параметров кодирования.
Аналоговые Betacam-ы были вытеснены всевозможными флешками, а многочисленные кодеки пришли к единым стандартам, таким как H.264.
Новый виток развития наметился в последнее время благодаря повсеместному развитию нейронных сетей. Теперь эти технологии постепенно подбираются в видеопроизводству.
Теперь искать любые фрагменты видео очень просто
Дело в том что почти треть работы видеомонтажера заключается в рутинном поиске видеоряда из исходников, которые надо каждый раз шерстить в поиске контекстного плана под закадровый текст, по моему это не несет никакой творческой составляющей. Ну и подумал я, а что если написать соф, который будет проходится по папке с исходниками, распознавать объекты, аккуратненько записывать их в БД. Далее, в момент поиска видео фрагментов для так называемой «джинсы», вводится поисковое слово, например «Солнце», и все что находится каким то образом передается в монтажную систему.
Сказано-сделано, через какое то время я выложил приложение Videoindex в Mac App Store.
Моя программа предлагает указать путь к папке с исходниками, выбрать одну из двух встроенных в приложение обученных моделей Core ML (или даже использовать свои личные модели, если такие имеются) и запустить сканирование вашей библиотеки видео.
Она будет распознавать объекты на видео и записывать информацию о пути к конкретному файлу и таймкоду найденного обьекта. После завершения сканирования, можно будет воспользоваться поиском, который выдаст все найденные фрагменты, соответствующие поисковому запросу.

Весь найденный список фрагментов можно будет экспортировать в формат XML, который как раз используется для переноса сохраненных секвенций с файлами и поддерживается практически всеми современными монтажными программами.

В итоге буквально в пару кликов все, что вы искали, окажется аккуратно выложено на секвенции в вашем проекте. То, что раньше могло занять буквально половину дня, сейчас займет пару минут.
Похожая (если не та же самая) технология распознавания используется в iOS для распознавания объектов на ваших фото, и облегчает навигацию по альбомам в iPhone.
Базовые модели машинного обучения используются для распознавания видеообъектов. Приложение поставляется с двумя моделями — YOLOv3 и Resnet50. Вы можете использовать их вместе и по отдельности, а также как свои собственные файлы моделей Core ML.
Управление моделями производится в окне настроек где доступныаж три слота для загрузки моделей. Первый слот предназначен для модели YOLOv3, второй — для Resnet50, а третий слот доступен для загрузки ваших собственных файлов модели Core ML.

Videoindex активно отслеживает состояние каталогов, которые вы добавили для сканирования. То есть, если вы удалите или добавите файлы в папку, указанную в программе, эти изменения будут сохранены в базе данных Videoindex при следующем запуске. Если появляются новые файлы, статус просканированной папки изменится на «Еще не просканирован», и вы сможете сканировать новые видеофайлы.
Конечно, нужно учитывать что качество индексации и поиска напрямую зависит от качества обученных моделей, которые содержат информацию о распознаваемых объектах. Но файлов моделей с каждым днем становится все больше, организуются сообщества, где доступны для скачивания файлы моделей в различных форматах, таких как Kaggle, или просто набор картинок – Dataset, которые используются для создания этих самых обученных моделей.

А пока предлагаю скачать Videoindex в Mac App Store и попробовать. На Mac с процессорами M1 программа работает особенно эффективно, так как в этих чипах используются ML-акселераторы. Хотелось бы надеяться, что со временем, запустив последний Adobe Premier, мы увидим всего лишь одну кнопку с надписью «Cмонтировать» и все. 🙂
Источник
Equalizer apo не работает

Очень часто мы хотим получить приятное для нас звучание, выраженный яркий вокал, сочные низкие частоты (басы), и остренькие, звонкие высокие частоты. Но далеко не в каждом компьютере стоит хорошая звуковая карта с прикрученным на уровне драйверов эквалайзером и мы довольствуемся встроенным звуком, зачастую без оного. Если дело касается компьютера и CARPC системы с операционной системой Windows Vista SP2 и выше то эту задачу легко разрешить.
Отсюда можно взять вот такой вот Equalizer APO.

Я большой любитель слушать музыку с ярким и сочным звучанием, от себя хочу сказать что этот эквалайзер уделывает все встроенные эквалайзеры в разы по всем параметрам. Здесь вам есть и адекватный гейн, и шлюзы срезов частот с обоих концов, а сам эквалайзер является как 15-полосным, 31-полосным так и параметрическим, что открывает широченные возможности по его настройке, поскольку можно задать любую частоту и амплитуду. И самое клёвое, он практически не жрёт ресурсов процессора, да ещё к тому же имеет встроенный анализатор пиков в реальном времени, т.е. вы можете отследить где вы переборщили с усилением амплитуды той или иной частоты.
Но у всякой клёвой вещи есть свои недостатки. Equalizer APO не умеет работать через интерфейсы прямого взаимодействия с железом типа ASIO. То есть ему строго прописано подружиться с WASAPI (тракт звукового ядра Windows), но с другой стороны это отчасти и хорошо, поскольку эквалайзер работает просто со всем звуком который проходит через систему, будь то видеоигры, кино, аудиоплеер. Поживём-увидим, может в будущих версиях его научат понимать и ASIO.
Самую свежую версию этого замечательного приложения можно забрать отсюда. Язык только английский и немецкий, но интерфейс интуитивно понятный, десятка минут изучения и вы сами поймёте что к чему. Приложение представляет собой виртуальные блоки, соединяемые друг с другом в порядке последовательности. Обратите внимание также что существуют две версии для 64-битных и 32-битных систем.
Установка
Настройка

Примерный алгоритм настройки фильтра через Room EQ Wizard:
Устранение проблем
Панель управления
Если вы установили Equalizer APO, но изменения в конфигурационном файле никак не влияют на звучание, возможно, APO выключен в Панели управления.
В диалоге свойств перейдите на вкладку «Улучшения» и проверьте, что у вас не установлена отметка «Отключение всех звуковых эффектов» (даже если список эффектов пустой):

Затем перейдите на вкладку «Дополнительно» и проверьте, что у вас установлена отметка «Включить дополнительные средства звука»:

Файлы логов
Чтобы получить больше информации, вы можете включить сообщения трассировки, после чего Equalizer APO будет записывать строки, отмеченные как «(TRACE)», в файл, даже при нормальной работе. Для этого откройте regedit.exe, перейдите в HKEY_LOCAL_MACHINESOFTWAREEqualizerAPO и установите значение EnableTrace в true. Теперь при воспроизведении или записи аудио через устройство, для которого включен Equalizer APO, информации о инициализации и конфигурационных файлах будет записываться в файл лога. Это может быть полезно, например, в случае, когда, надо выяснить, интерпретируется ли конфигурационный файл нужным образом. После окончания проверки желательно установит параметр EnableTrace обратно в false, чтобы лог файл не продолжал увеличиваться без надобности.
Аппаратный OpenAL
Как правило, приложения, использующие OpenAL для вывода не представляют собой проблему, так как обычно они используют в качестве back-end DirectSound, поддерживающий APO. Однако, некоторые разработчики звуковых карт предоставляют библиотеки OpenAL с аппаратным ускорением, позволяющие получать непосредственный доступ к аппаратной части, в обход APO. Для OpenAL с аппаратным ускорением возможность использовать APO отсутствует, потому в данном случае выходом может быть только использование другого метода вывода или переключение OpenAL в программный режим.
Современный персональный компьютер является сложной технической системой для работы и развлечения. «Общение» с пользователем происходит посредством устройств вывода звуковой и графической информации. Вопреки распространенным заблуждениям, диапазон настроек и уровень качества звучания зависит не только от подключенных к ПК аудиоколонок и динамиков, но и от аппаратной части (контроллера) и аудиодрайвера.
В этой статье мы расскажем вам о том, как настроить звучание аудиосистемы «под себя» и как пользоваться эквалайзером для Windows 7 и 10. Как и обычно, мы будем использовать стандартные инструменты операционной системы и загруженные из Сети специальные программы.
А нужен ли эквалайзер?
Наверняка большая часть людей, читающих эту статью, уже «в теме» и знакомы с понятием «Эквалайзер» и его назначением. Для тех, кто не в курсе ‒ ответим вкратце.
Эквалайзер – устройство или программа, регулирующая громкость звука на каждой частоте. Настройка уровня громкости низких и высоких частот позволяет выровнять Амплитудно-частотную характеристику системы. Другими словами, эквалайзер помогает компенсировать недостатки аудиосистемы (особенно бюджетной) и делает звучание приятнее и чище.
По мнению специалистов, высококачественные компьютерные аудиосистемы, имеющие минимальный коэффициент искажения, не нуждаются в настройке звука эквалайзером. Обычно это многоканальные «Hi-Fi» системы с дискретной звуковой картой. Однако он станет полезен при использовании низкокачественной аппаратуры, например, встроенного в материнскую плату стандартного аудиоконтроллера, бюджетных колонок и кабелей.
Далее мы рассмотрим стандартный эквалайзер Windows и сравним его с аналогами.
Эквалайзер Windows 7 и 10
Чтобы добраться до искомых настроек и включить эквалайзер в Windows:
По такому же принципу вы можете открыть эквалайзер в Windows 10. Его вид не отличается от вышеуказанной панели на «семерке».
Менеджер аудиодрайвера VIA HD Audio Deck
Большинство современных материнских плат нижнего и среднего ценового сегмента оборудованы аудиоконтроллером от компании «VIA Technologies» или «Realtek». Для каждого из них существует свой драйвер с программой настройки звука.
Важно! Устанавливайте только тот драйвер и программу, которые подходят для микросхемы контроллера вашего ПК. Эта информация указывается на коробке материнской платы и в техническом руководстве.
Сначала мы рассмотрим работу с «VIA HD Audio Deck».
В полях указываем версию операционной системы, тип драйвера и приложение.

После установки обязательно нужно перезагрузить компьютер.
Сразу же включаем «Расширенный режим».
Функционал эквалайзера от VIA более широкий, нежели стандартный от Windows. Он может похвастаться режимом плавной настройки и наличием редактируемого списка предустановленных профилей. Помимо этого, есть еще масса настроек, включая микшер, коррекцию помещения и прочие.
Преимущества
Недостатки
Работа с аудиоустройствами Realtek
Realtek является конкурентом фирмы VIA. Она предлагает устройства и ПО к ним приблизительно того же уровня качества. Как и в предыдущем случае, их звуковые процессоры работают с программой собственной разработки.
Чтобы найти эквалайзер Realtek в Windows, нужно сначала:
Выбираем программу согласно вашей версии операционной системы.
Проходим проверку «на бота» и качаем программу.

Преимущества
Недостатки
Профессиональный Voxengo Marvel
От простых решений мы плавно переходим к профессиональным программам-эквалайзерам для Windows, одной из которых является «Voxengo Marvel GEQ». В его основе лежит фазово-линейный 16-полосный графический компенсатор, настраиваемый под конкретную аудиосистему и пользователя. Его можно адаптировать как для новичка, так и для меломана «со стажем».
Процесс обработки звука фильтрами занимает всего 9 миллисекунд, что исключает искажения и посторонние шумы при воспроизведении мелодии. Программа способна работать сразу с 8 входными/выходными каналами.
Для использования Voxengo Marvel GEQ на своем ПК делаем следующее:
Вот так выглядит его окно при раздельной настройке каждого канала:
Преимущества
Недостатки
Многофункциональный Equalizer APO
Среди массы доступных для Windows 7 и 10 эквалайзеров от сторонних разработчиков выгодно выделяется «Equalizer APO». По функционалу он опережает многих конкурентов, так как работает с неограниченным количеством частот. Каждая полоса имеет точную настройку громкости, что делает звук на выходе максимально чистым даже на самой низкокачественной аудиосистеме.
Чтобы начать работать с Equalizer APO:


Главное окно представлено в виде конструктора, который дополняется необходимыми блоками (инструментами). Сами полосы можно добавлять или убирать при необходимости, а их уровень указывать в числовом виде либо перетаскиванием точки пика на графике. Эти и другие действия можно производить для каждого аудиоканала отдельно.
Преимущества
Недостатки
Декоративный NeonVisual
Программа «NeonVisual» относится к особому разряду украшений рабочего стола, выполняющих две задачи одновременно: великолепная визуализация проигрываемой мелодии и отображение ее тембра на каждой выделенной частоте. NeonVisual не является полноценным инструментом, но может использоваться как дополнение к описанным выше вариантам.
Для запуска ПО на своем компьютере делаем следующие действия:

Главное окно делится на две части. В поле «Визуализации» можно выбрать понравившуюся тему. В «Модули» имеются готовая панель управления плеером, часы и редактируемая консоль, к которой можно привязать любые действия на ПК, включая управление эквалайзером.
При грамотном оформлении рабочий стол смотрится шедеврально: 

Преимущества
Недостатки
Подведем итоги
В этой статье мы выбрали одни из самых востребованных программ-эквалайзеров в дополнение к стандартным средствам операционной системы. Какой из эквалайзеров для Windows лучший – решать вам. Однако мы поможем вам в принятии решения и вкратце подведем итог для каждого из приведенных вариантов.
Максимальную пользу из Equalizer APO возьмут лишь профессионалы. Неопытный в этом вопросе пользователь столкнется с массой неудобств.
Источник