Как устранить ошибки, возникающие при загрузке страницы
Если вы видите сообщение об ошибке (например, «Опаньки…»), значит, у Chrome возникли проблемы при загрузке страницы. Сайт может работать медленно или не открываться совсем.
Если при загрузке страницы произошла ошибка, следуйте инструкциям ниже. Для начала попробуйте обновить страницу.
Обновите страницу
Как правило, достаточно обновить страницу.
Нажмите на значок «Ещё» ![]()
![]() «Обновить»
«Обновить» ![]() .
.
Если проблему не удалось устранить
Шаг 1. Проверьте подключение к интернету
Убедитесь, что устройство подключено к Wi-Fi или мобильному Интернету.
Затем обновите вкладку с ошибкой.
Шаг 2. Очистите кеш
Загрузке веб-страниц могут препятствовать данные, хранящиеся в Chrome.
Откройте страницу в режиме инкогнито
- Откройте приложение Chrome
 на телефоне или планшете Android.
 - Нажмите на значок с тремя точками Новая вкладка инкогнито.
- На вкладке инкогнито перейдите на нужную веб-страницу. Если она открывается, очистите кеш и удалите файлы cookie.
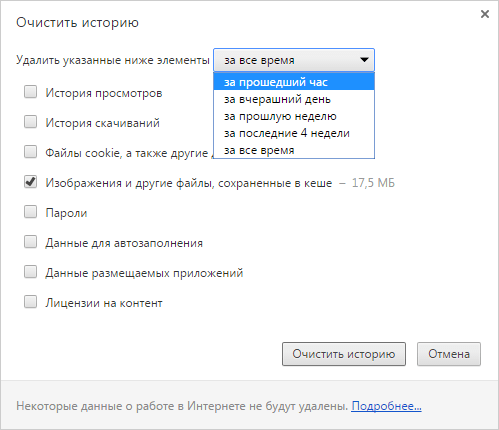
Очистите кеш и удалите файлы cookie
- Нажмите на значок «Ещё» Настройки.
- Выберите Конфиденциальность и безопасность Очистить историю.
- В меню «Временной диапазон» выберите Все время.
- Отметьте Файлы cookie и данные сайтов и Изображения и другие файлы, сохраненные в кеше. Снимите остальные флажки.
- Нажмите Удалить данные.
- Обновите вкладку с ошибкой.
3. Закройте другие вкладки и приложения
Возможно, они заняли много места в памяти устройства, поэтому загрузить сайт не удается.
- Освободите память:
- Закройте все вкладки кроме той, в которой вы получили сообщение об ошибке.
- Закройте работающие приложения и остановите скачивание контента.
- Обновите вкладку с ошибкой.
Не удалось устранить проблему?
Шаг 4. Перезапустите телефон или планшет
Иногда другие приложения мешают загрузке страницы.
- Перезапустите телефон или планшет.
- Попробуйте загрузить страницу ещё раз.
5. Обновите Chrome
Коды ошибок, возникающих при загрузке страницы
Следующие коды ошибок означают, что при загрузке веб-страницы возникла проблема:
- «Опаньки…» Chrome не может загрузить веб-страницу.
- ERR_NAME_NOT_RESOLVED. Несуществующий веб-адрес.
- ERR_INTERNET_DISCONNECTED. Устройство не подключено к интернету.
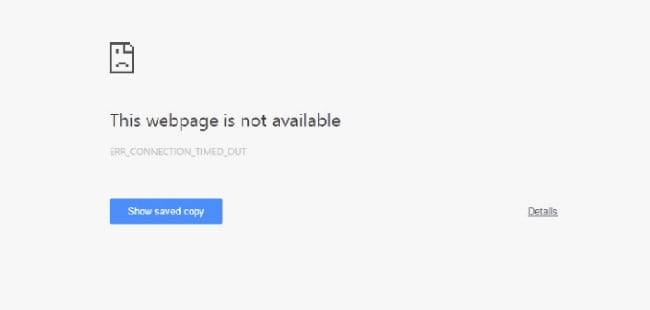
- ERR_CONNECTION_TIMED_OUT или ERR_TIMED_OUT. Для подключения к веб-странице потребовалось слишком много времени. Возможные причины: либо скорость соединения слишком низкая, либо страницу пытается открыть слишком много пользователей.
- ERR_CONNECTION_RESET. Соединение со страницей было прервано.
- ERR_NETWORK_CHANGED. При загрузке страницы устройство отключилось от сети или подключилось к новой.
- ERR_CONNECTION_REFUSED. Страница не позволила Chrome подключиться к ней.
- ERR_CACHE_MISS. Страница просит повторно отправить ранее введенные данные.
- ERR_EMPTY_RESPONSE. Сайт не отправил данные и, возможно, недоступен.
- ERR_SSL_PROTOCOL_ERROR. Страница отправила данные, непонятные для Chrome.
- ERR_BAD_SSL_CLIENT_AUTH_CERT. Не удается войти на сайт (например, банка или организации) из-за ошибки в сертификате клиента.
Все коды ошибок можно найти на странице chrome://network-errors/.
Могут также возникать следующие проблемы:
- Невозможно найти сайт.
- Сайт не открывается.
- HTTPS-сайт не открывается.
- Фотография не загружается.
- Новая вкладка не загружается.
Обратитесь за помощью
- Если открываются все сайты, кроме одного, скорее всего, ошибка возникла в работе именно этого сайта.
- Обновите страницу. Если она не откроется, напишите нам, нажав Отправить отзыв.
- Включите автоматическую отправку отчетов об ошибках, чтобы помочь нам быстрее справляться со сбоями, или сообщите о проблеме в Chrome.
- Свяжитесь с владельцем сайта и сообщите о проблеме.
- Получите совет от экспертов на справочном форуме Chrome.
Эта информация оказалась полезной?
Как можно улучшить эту статью?
Как исправить тайм-аут ERR?
Как исправить ошибку ERR_CONNECTION_TIMED_OUT
- Проверьте ваше соединение. Google Chrome, Firefox и Edge рекомендуют вам проверить сетевое соединение. …
- Временно отключите брандмауэр и антивирусное программное обеспечение. …
- Отключить настройки прокси. …
- Сменить DNS-серверы.
Почему на моем телефоне время ожидания соединения истекло?
Путем исправления настроек даты и времени
Если эта ошибка возникает на вашем устройстве, это может быть одной из наиболее вероятных причин. Итак, чтобы устранить эту ошибку, просто исправьте дату и время с помощью следующих шагов. Перейти к Настройки >> Дата и время. Затем включите автоматический часовой пояс.
Почему мой телефон не подключается к WIFI?
Перезагрузка телефона может устранить сбои и помочь ему повторно подключиться к Wi-Fi. Если ваш телефон по-прежнему не подключается, пора заняться некоторая перезагрузка. В приложении «Настройки» выберите «Общее управление». Там нажмите «Сброс». … Ваш телефон перезагрузится — попробуйте снова подключиться к Wi-Fi.
Почему у Google тайм-аут?
Проверьте свой брандмауэр и безопасность в Интернете, чтобы убедиться, что вашему браузеру не заблокирован доступ в Интернет.. Если в вашей системе установлено какое-либо программное обеспечение для фильтрации веб-сайтов, удалите их. Как только вы примените эти изменения в брандмауэре, в Google Chrome не будет ошибки тайм-аута.
Как исправить ERR-соединение?
Содержание
- Решение 1. Проверьте подключение к Интернету и при необходимости перезапустите маршрутизатор.
- Решение 2. Сбросьте настройки сети.
- Решение 3. Отключите прокси-сервер и VPN-подключения.
- Решение 4. Очистите кеш DNS.
- Решение 5. Получите или измените DNS-серверы вручную.
Как изменить тайм-аут по умолчанию?
Системные таймауты устанавливаются в приложении «Настройки».
- Нажмите кнопку «Настройки» на главном экране.
- Откроется экран настроек. …
- Выберите Тайм-ауты.
- Выберите подходящий тайм-аут из списка, а затем нажмите кнопку Открыть тайм-аут.
- Выберите и перетащите кнопку управления вдоль ползунка, чтобы настроить время ожидания.
Что означает истекло время ожидания ошибки?
ERR_CONNECTION_TIMED_OUT — распространенная и неприятная ошибка в Google Chrome. Это означает сервер слишком долго отвечает. В результате вы не можете выполнять поиск в Chrome. Это могло быть очень неприятно. Но не волнуйтесь.
Что означает время ожидания соединения с сервером?
Тайм-аут подключения к серверу означает, что сервер слишком долго отвечает на запрос данных, сделанный с другого устройства. Тайм-ауты не являются ответным сообщением: они появляются, когда нет ответа, и запрос сервера не выполняется в течение заранее определенного периода времени.
Что на моем телефоне истекло время ожидания ответа?
В любом случае не было получено ответа ни с отказом, ни с одобрением запроса аутентификации. Тайм-аут вызова означает, что сервис Duo так и не получил обновлений от провайдера телефонии. Когда пользователь инициирует аутентификацию телефонного звонка, мы запрашиваем у соответствующего провайдера телефонной связи их номер телефона.
Что мне делать, если мой Wi-Fi подключен, но нет доступа к Интернету?
Тогда проблема находится на стороне интернет-провайдера, и с ним следует связаться, чтобы подтвердить и решить проблему.
- Перезагрузите маршрутизатор. …
- Устранение неполадок с вашего компьютера. …
- Очистите кеш DNS с вашего компьютера. …
- Настройки прокси-сервера. …
- Измените беспроводной режим на вашем маршрутизаторе. …
- Обновите устаревшие сетевые драйверы. …
- Сбросьте настройки маршрутизатора и сети.
Что делать, если мобильные данные включены, но не работают?
Что делать, если мои мобильные данные включены, но не работают:
- Включение / выключение режима полета.
- Перезагрузить устройство.
- Включите правильный сетевой режим.
- Сбросьте настройки APN вашего устройства.
- Установите протокол APN на IPv4 / IPv6.
- Очистить раздел кеша из режима восстановления.
- Сбросьте настройки сети вашего телефона.
Что делать, если не работает WiFi?
Устранение проблем с подключением к Wi-Fi
- Шаг 1. Проверьте настройки и перезапустите. Убедитесь, что Wi-Fi включен. Затем выключите и снова включите для повторного подключения. …
- Шаг 2: Найдите тип проблемы. Телефон: попробуйте подключиться к сети Wi-Fi с другого устройства, например ноутбука или телефона друга. …
- Шаг 3. Устранение неполадок по типу проблемы. Телефон.
Наверное, всем людям, которые активно пользуются Интернетом, при входе на какой-либо сайт встречалась ошибка ERR_CONNECTION_TIMED_OUT. Однако как исправить ее, в свою очередь, мало кто знает. На самом деле, соответствующее сообщение не означает ничего страшного, и в большинстве случаев проблему можно устранить, в результате чего попасть на сайт.

Что это за ошибка ERR_CONNECTION_TIMED_OUT и как переводится соответствующее сообщение
Переводится сообщение «ERR_CONNECTION_TIMED_OUT» следующим образом: время подключения истекло. Дело в том, что в веб-браузерах настроен лимит на время, на протяжении которого он ожидает ответа от запрашиваемого веб-сервера. Если за заданный период сайт не ответил, то выводится соответствующая ошибка.
Как можно видеть, разобраться, что значит ошибка ERR_CONNECTION_TIMED_OUT – не сложно. А зная, что она собой представляет, можно ее попробовать решить.
Как исправить ошибку ERR_CONNECTION_TIMED_OUT и попасть на запрашиваемый сайт
Самый простой способ, как исправить ошибку ERR_CONNECTION_TIMED_OUT заключается в освобождении оперативной памяти и уменьшении нагрузки на центральный процессор. Дело в том, что когда вычислительные ресурсы компьютера забиты, у него остается мало мощности на обработку новых вычислений, в том числе и открытие страниц сайтов.
Если не удаётся установить соединение с сайтом изучите действия по решению проблемы.
Чтобы это сделать потребуется закрыть все неиспользуемые приложения. Другой вариант – перезагрузить компьютер.

Бывает так, что ошибка ERR_CONNECTION_TIMED_OUT появляется в одном браузере, но в другом обозревателе все сайты нормально открываются. В этом случае проблему решить легко, так как связана она с тем, что межсетевой экран блокирует программе доступ в сеть.
Чтобы это исправить потребуется:
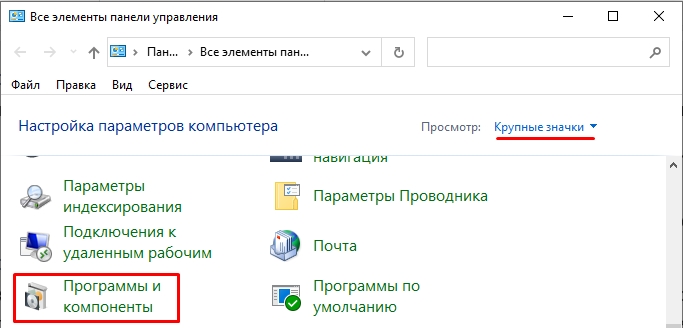
- Открыть «Панель управления»;
- Выбрать пункт «Система и безопасность»;
- Открыть «Брандмауэр Windows»;
- Зайти в «Дополнительные параметры»;
- Перейти на вкладку «Правила для входящих соединений»;
- Найти в списке нужный браузер и дважды кликнуть по нему;
- В открывшемся окне выбрать «Разрешить подключения»;
- Нажать «OK» для сохранения параметров.
После соответствующих действий ошибка должна перестать беспокоить. Однако если вы пользуетесь другим межсетевым экраном (не брандмауэром Windows), то вам придется найти инструкцию по работе с вашим файрволом или изучить программу самостоятельно.

Также соответствующая проблема может возникать и в случаях, когда компьютер подключен к интернету не напрямую, а через прокси. Если он локальный, то следует посмотреть все ли в порядке с подключением на компьютере, который раздает интернет. Если же человек использует web-прокси или VPN, то ему следует попробовать сменить их на другие, либо попытаться выйти в Сеть без оных. Порядок конфигурации прокси и VPN зависит от приложения, которое используется для этих целей.
Если все вышеперечисленные действия не помогли исправить ошибку ERR_CONNECTION_TIMED_OUT, то, скорее всего, проблема либо на стороне сервера, на котором опубликован сайт, либо у провайдера. В этом случае ничего не сделаешь, а придется только ждать, когда сайт вернется в строй или провайдер устранит неисправности у себя.
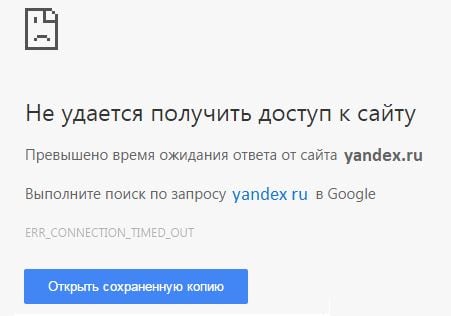
Всем привет! В этой статье мы рассмотрим, наверное, самую популярную проблему – когда не открывается какой-то из сайтов в браузере, и вы видите ошибку с текстом: Не удается получить доступ к сайту. Превышено время ожидания ответа от сайта. Код ошибки: NET_ERR_CONNECTION_TIMED_OUT.
Если перевести на русский – ошибка возникает в тот момент, когда браузер посылает запрос на Web-сервер (и определенную страницу), но не получает от неё ответ в течение установленного времени. Вот ряд причин, из-за чего это может происходить:
- У вас есть проблема с доступом к интернету.
- Проблема лежит на стороне сайта – возможно, на сервере проходят технические работы или он повис. Нужно будет просто подождать.
- Из-за одной очень «классной» организации в РФ данный сайт может быть заблокирован. В более редких случаях он может не работать аналогично из-за блокировки, но не быть в списке запрещенных или заблокированных. Все дело в том, что «профессионалы», который там работают, при тестировании новых возможностей блокировки – блокируют и сторонние сайты.
- Переадресация со стороны файла hosts – что может свидетельствовать о наличии вирусов на компе.
- Если у вас включен Proxy или VPN – а они не работают.
- Проблема со стороны провайдера или оборудования, к которому вы подключены.
- Неправильная работа домашнего роутера.
- Неправильно введен адрес в адресную строку – просто проверьте, чтобы URL был верным.
- Есть проблема с операционной системой, некоторыми модулями и службами, отвечающими за подключение к интернету.
В итоге вылезает ошибка. Ниже в статье мы рассмотрим все варианты решения, которые могут вам помочь при возникновении проблемы (NET_ERR_CONNECTION_TIMED_OUT).
Содержание
- ШАГ 1: Проверка физического подключения
- ШАГ 3: Проверка сайта и DNS
- ШАГ 4: Проверка файла Hosts
- ШАГ 5: Отключение прокси и VPN
- ШАГ 6: Переустановка браузера
- ШАГ 7: Восстановление работоспособности системы
- ШАГ 8: Ручная установка драйверов
- Ничего не помогло
- Задать вопрос автору статьи
ШАГ 1: Проверка физического подключения
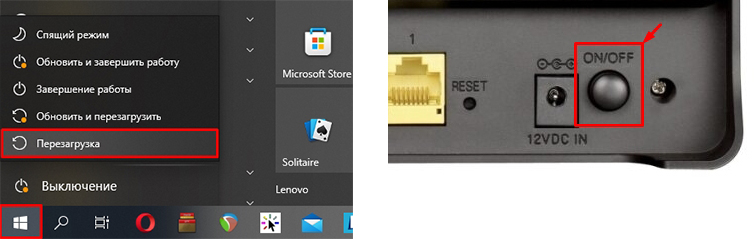
Итак, в первую очередь проверьте, чтобы интернет-кабель, который идет от провайдера, был плотно подключен к компьютеру или вашему домашнему роутеру. Иногда контакты окисляются и интернет просто пропадает. Возьмите интернет кабель, вытащите его и подключите его снова. То же самое касается и кабелей, которые идут от роутера к ПК или ноутбуку. Просто переподключите их.
Далее перезагрузите сам компьютер и роутер. На роутере достаточно два раза нажать по кнопке «Питания». Если такой кнопки нет, то просто выдергиваем его из розетки и вставляем обратно.
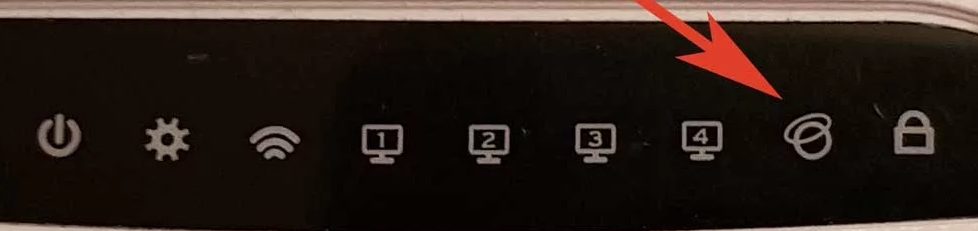
После того как роутер полностью загрузится, посмотрите на индикаторы и найдите лампочку «WAN» – она может иметь название «Интернет» или логотип маленькой планетки. Этот индикатор должен гореть. Если он не горит, то значит, скорее всего, проблема у провайдера – стоит ему позвонить в службу технической поддержки. Телефон службы тех. поддержки можно найти в интернете или в договоре.
Роутер можно проверить еще другим способом – подключите к нему телефон или планшет по Wi-Fi и попробуйте выйти через него в интернет. Если с роутером все в порядке, проверьте на компьютере, нет ли рядом со значком подключения к Wi-Fi или LAN каких-то знаков (крестика или желтого треугольника).
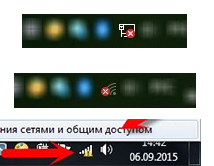
Если вы наблюдаете что-то подобное, то уже читаем отдельные инструкции ниже:
- Красный крестик сверху подключения.
- Желтый треугольник сверху подключения.
ШАГ 3: Проверка сайта и DNS
Проверьте, подключаетесь ли вы к другим сайтам. И если да, то можно проверить подключение к этому сайту на телефоне через мобильный интернет. Если подключения нет, то тут есть два варианта:
- Сайт пока не работает и нужно подождать.
- Этот сайт каким-то образом заблокирован, но на него можно попробовать зайти через VPN. Иногда бывает, что сайт не работает только в данной стране.
Если же на другом устройстве на сайт зайти можно, то есть вероятность, что у вас есть проблемы с DNS. Давайте попробуем это решить.
- Одновременно жмем по клавишам:
+ R
- Вводим команду:
ncpa.cpl
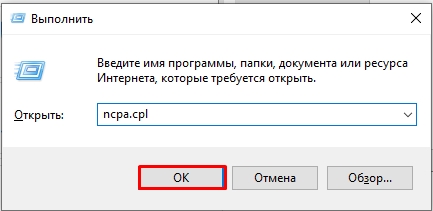
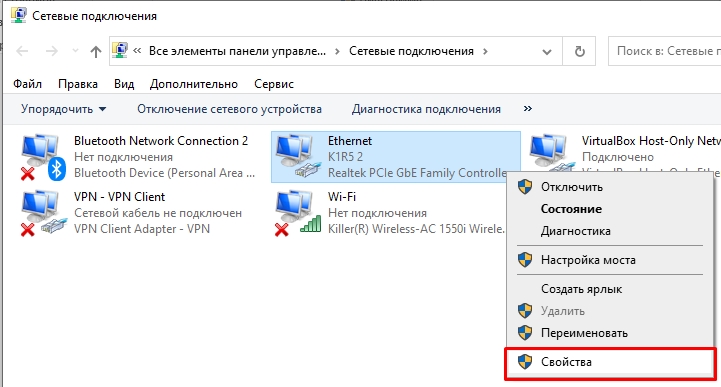
- Вы должны увидеть все подключения вашего компьютера. Выберите то, через которое вы подключены к интернету. Если это проводное подключение, то выбираем «Ethernet», если беспроводное, то «Wi-Fi». Жмем правой кнопкой мыши (ПКМ) и заходим в «Свойства».
- Выделите «Интернет протокол 4», зайдите в «Свойства» и установите DNS от Google:
8.8.8.8
8.8.4.4
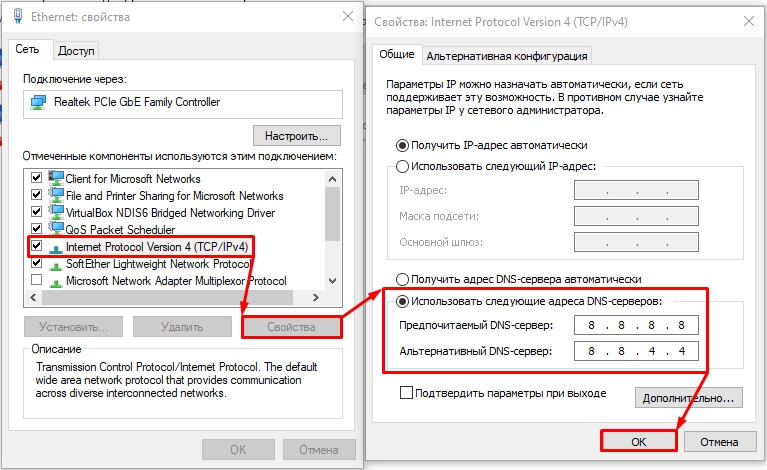
- Два раза нажмите «ОК».
ШАГ 4: Проверка файла Hosts
- Перейдите по пути:
C:WindowsSystem32driversetc
- После этого откройте файл «hosts» с помощью блокнота.
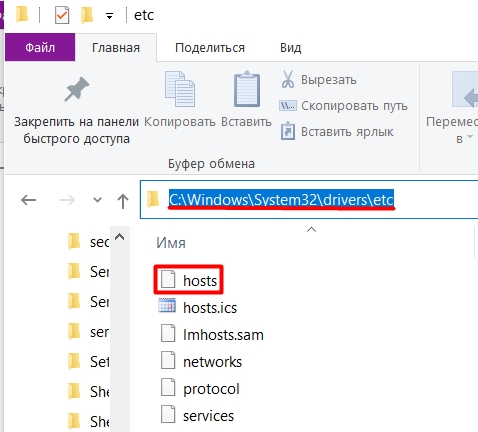
- Если там есть какие-то подозрительные строчки без знака (#) в начале – выделите их и удалите. Можно даже выделить все (Ctrl + A) и удалить (Del). После этого сохраните файл (Ctrl + S).
Если в файле было что-то подозрительное – проверьте ваш компьютер антивирусной программой со свежими базами.
ШАГ 5: Отключение прокси и VPN
Если вы используете Proxy или ВПН, то отключите их. Читаем подробно инструкции:
- Как отключить прокси.
- Как отключить VPN.
ШАГ 6: Переустановка браузера
Возможно, браузер побит или заражен вредоносным ПО. Причем даже после проверки антивирусной программой, он будет работать неправильно. Поэтому проще всего его полностью удалить и установить заново.
- Жмем:
Ctrl + R
- Вводим:
control
- Открываем «Программы и компоненты».
- В списке найдите ваш браузер, нажмите ПКМ и удалите.
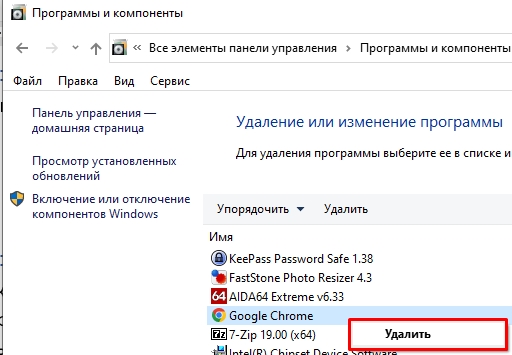
- После удаления откройте Microsoft Edge или любой другой браузер и через поиск найдите официальный сайт браузера. После этого скачайте и установите его повторно.
ШАГ 7: Восстановление работоспособности системы
Если проблема появилась недавно после установки каких-то программ или драйверов, или просто очень резко без каких-либо явных причин, то вам должен помочь откат системы до точки восстановления.
Если это не поможет, можно воспользоваться командной строкой – запускаем консоль с правами администратора (для этого можно воспользоваться поиском).
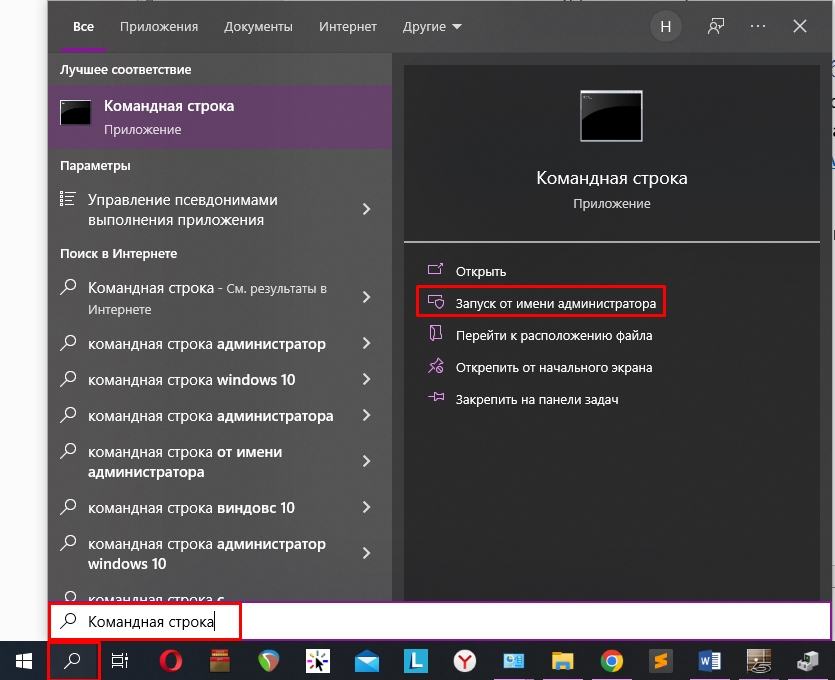
После этого вводим ряд команд (после каждой жмем «Enter», чтобы её применить):
netsh int ip reset c:resetlog.txt
Перезагружаем комп и вводим еще две команды:
netsh winsock reset
ipconfig /flushdns
Мы только что сбросили настройки сети. Дополнительно вы можете запустить восстановление целостности системных файлов:
sfc /scannow
И проверяем жесткий диск на наличие битых секторов. Также команда исправляет некоторые ошибки системы:
chkdsk C: /F /R
ШАГ 8: Ручная установка драйверов
Очень часто проблема связана с драйвером сетевой карты или Wi-Fi адаптера. Причем он может делать вид, что работает – то есть он нормально отображается в трее и даже подключается. Но вот при коннекте к интернету могут возникать проблемы.
В таком случае вам нужно вручную скачать и установить драйвера с официального сайта производителя. Очень важно сделать это самому и не доверять «Диспетчеру устройств» – именно он устанавливает дрова автоматически. Я понимаю, что у вас сейчас нет интернета, поэтому придется поискать знакомого, друга или скачать их с интернета на работе.
Подробную инструкцию по установке драйверов – читаем тут.
Ничего не помогло
Все возможные решения мы уже рассмотрели в статье выше. Это значит, что с компьютером у вас точно все в порядке. Остается только два варианта:
- Сайт просто «Лежит» – то есть сервер сломался или не работает в данное время.
- Есть проблемы у провайдера – поэтому стоит им позвонить. У меня такое один раз было, когда сгорел порт маршрутизатора, к которому был подключен весь подъезд.
В любом случае вы всегда можете обратиться ко мне за помощью в комментариях. Опишите свою ситуацию и обязательно напишите, что вы уже сделали из статьи. Чем подробнее будет ваш рассказ, тем больше шансов, что я смогу вам помочь. До новых встреч на портале WiFiGiD.RU.
Are you seeing the “ERR_CONNECTION_TIMED_OUT” error in your browser? Not a very helpful error message, is it? If you are a daily WordPress user, then it’s always good to be aware of common errors like these that might prevent you from getting access to your website.
In today’s post, we’re going to take a deep dive into the “ERR_CONNECTION_TIMED_OUT” error and examine why you might see this and what you can do to fix it quickly. Simply put, it’s an indication that the system is unavailable and the time given for one to connect has elapsed, and now the request has timed out. But what does that actually mean?
Let’s find out!
Check Out Our Video Guide to Fixing the ERR_CONNECTION_TIMED_OUT Error
What is the ERR_CONNECTION_TIMED_OUT Error?
An ERR_CONNECTION_TIMED_OUT error typically means there is something wrong with your local network connection. However, that’s not always the case.
According to the WordPress support documentation, a connection timed out error appears when your website is trying to do more than your server can manage. It’s particularly common on shared hosting where your memory limit is restricted.
When you visit a website and it doesn’t load, your browser will try for around 30 seconds or so until it terminates the connection. After which it will return an “ERR_CONNECTION_TIMED_OUT” error, indicating a communication problem. In Google Chrome you might see this as “This site can’t be reached. Domain.com took too long to respond.”

Due to all the different web browsers, operating systems, and servers, the error can present itself in a number of different ways. But most of them have the same or similar meaning. “ERR_NETWORK_CHANGED” and “ERR_CONNECTION_REFUSED” are two very closely related errors that can usually be solved with the same troubleshooting steps below.
Another common error code that appears under ‘This site can’t be reached’ is the DNS_PROBE_FINISHED_NXDOMAIN, which is a DNS error that essentially means the domain that was requested doesn’t exist.
Below are a few examples of how the error might present itself in different browsers.
Mozilla Firefox
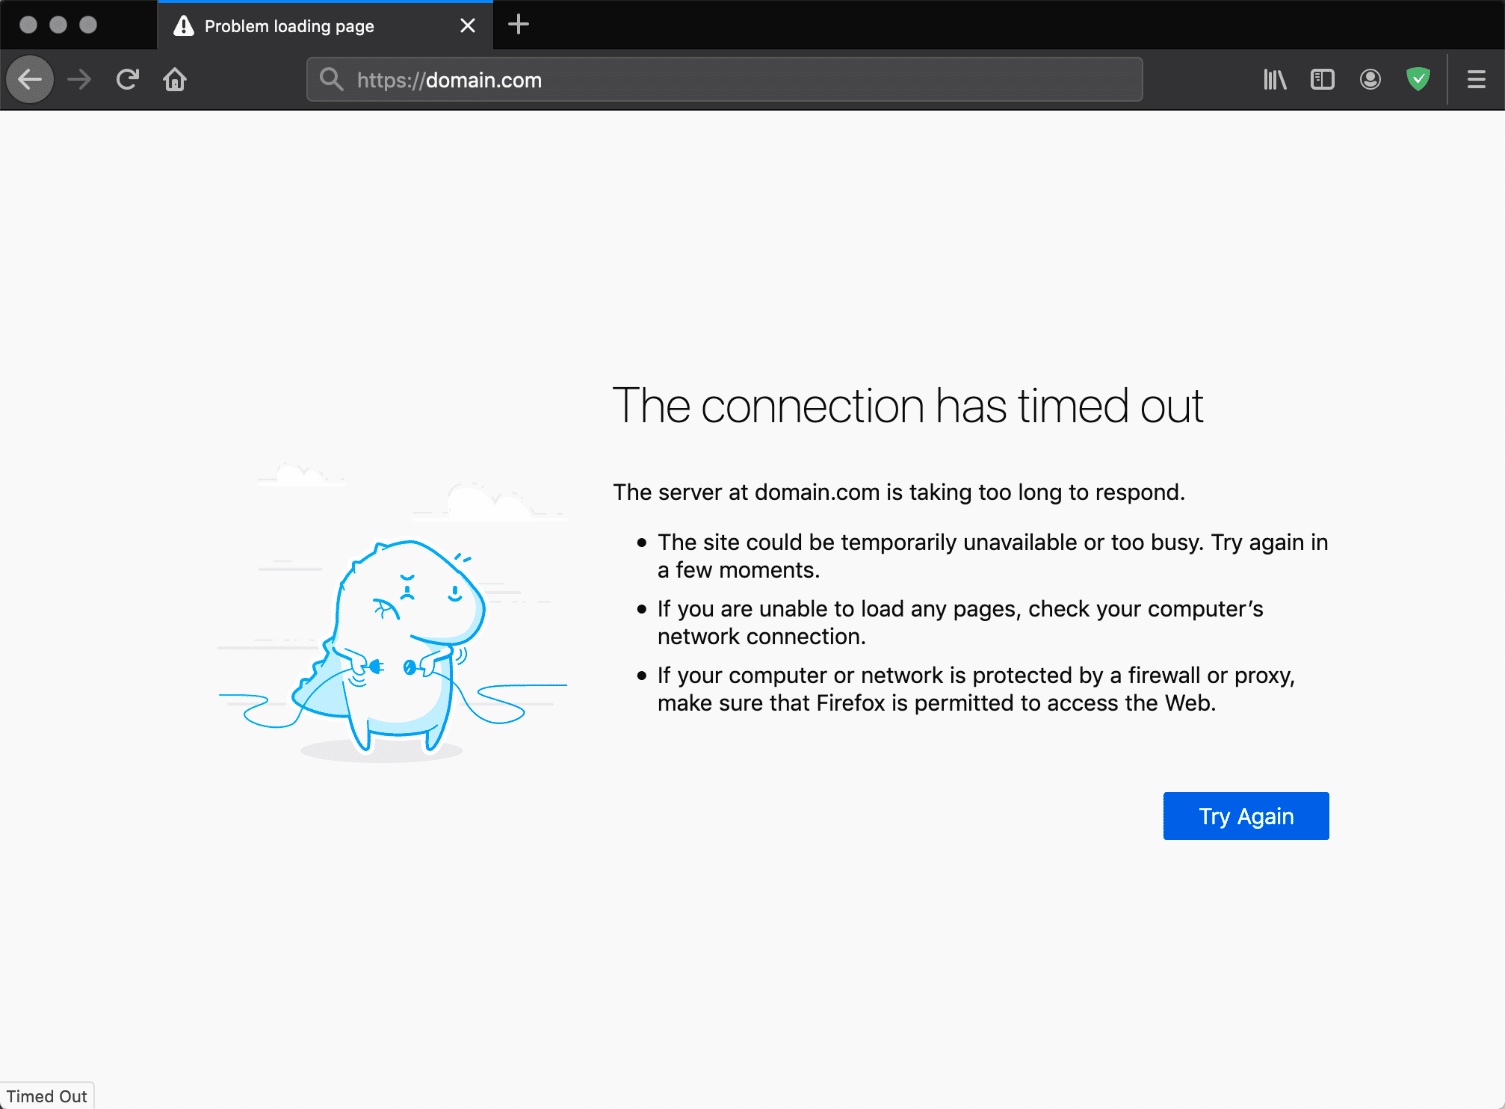
In Mozilla Firefox the error will show as “The connection has timed out.” The server at domain.com is taking too long to respond.
Microsoft Edge
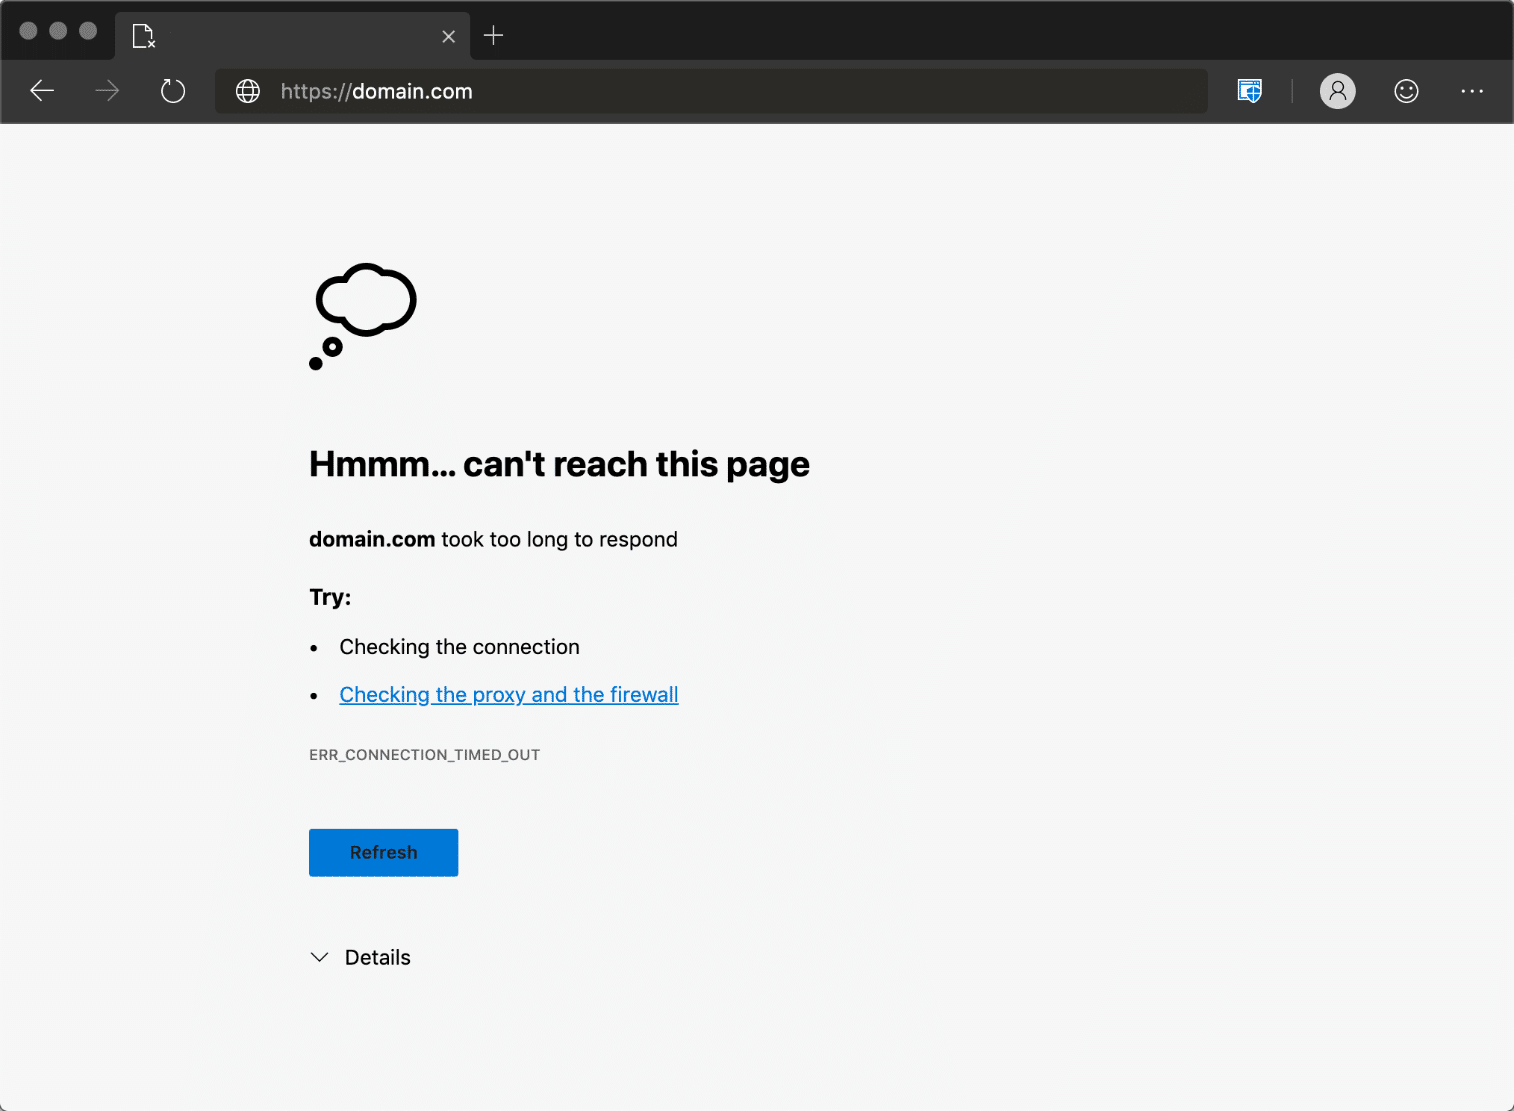
In Microsoft Edge, the error will show as “Hmmm… can’t reach this page. Domain.com took too long to respond.” In Edge, however, it does also contain the “ERR_CONNECTION_TIMED_OUT” error.
Safari
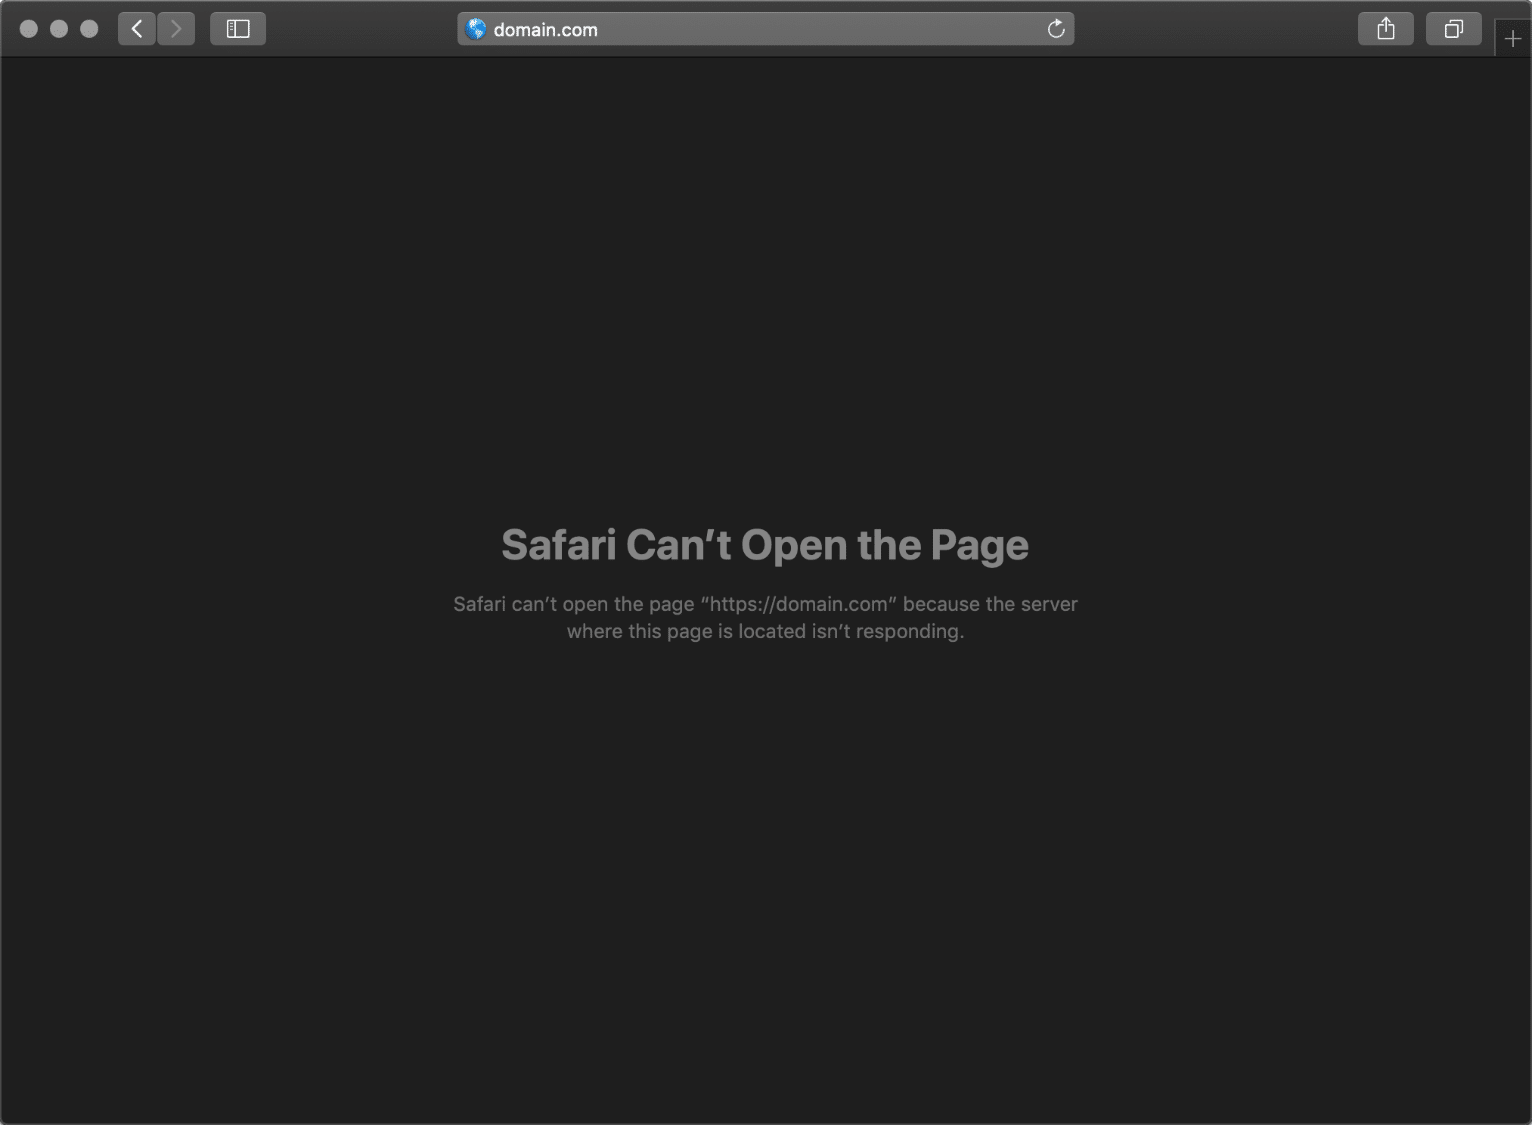
In Safari, the error will show as “Safari Can’t Open the Page. Safari can’t open the page domain.com because the server where this page is located isn’t responding.”
We’ve taken our knowledge of effective website management at scale, and turned it into an ebook and video course. Click to download The Guide to Managing 60+ WordPress Sites!
How to Fix the ERR_CONNECTION_TIMED_OUT Error
Where should you start troubleshooting if you see this error on your WordPress site? Without a great deal of context, it can sometimes be frustrating and overwhelming where to even begin. Typically these are either client-side problems (issues with your network connection or firewall) or an issue with the server at which the site is hosted (memory limits, execution times, etc.).
1. Check Your Connection
Google Chrome, Firefox, and Edge all recommend that you should check your network connection. While this might sound obvious, they all point to checking your connection first as it’s one of the most common reasons for the error. Here are a few things we recommend:
- Restart your home or office router. This only takes a few minutes and solves more problems than a lot of people would like to admit. To completely power cycle it, disconnect the power supply and then wait 30 seconds before plugging it back in.
- Check to see if you’re on a bad or slow wifi connection. This is a common occurrence on busy public wifi hotspots such as coffee shops or airports.
2. Disable Firewall and Antivirus Software Temporarily
Firewalls and antivirus software are intended to protect users and their systems. They scan your device regularly and automatically block any suspicious activity. However, this type of security can at times lead to connection issues.
This is because firewalls can often block pages they don’t need to or reject content that is completely safe. We’ve seen this happen many times with software like AVG. To check whether this is the case for you, try disabling your firewall and antivirus programs. Of course, this is only advised if you know for sure that the site you’re intending to visit is safe.
Additionally, you should only disable this kind of software temporarily. Switch it back on after you’ve finished checking to see whether the error has been resolved, so you don’t become vulnerable to attacks. If you repeatedly encounter errors because of your firewall or antivirus software, you may want to consider changing what you’re using.
These types of tools also have what is called a “false-positive” report you can fill out. If you’re 100% positive that a site your visiting is blocked and shouldn’t be, you can let the software developer know. Here are a few quick links:
- AVG false positive form
- Norton false positive form
- Sophos false positive form
3. Disable Proxy Settings
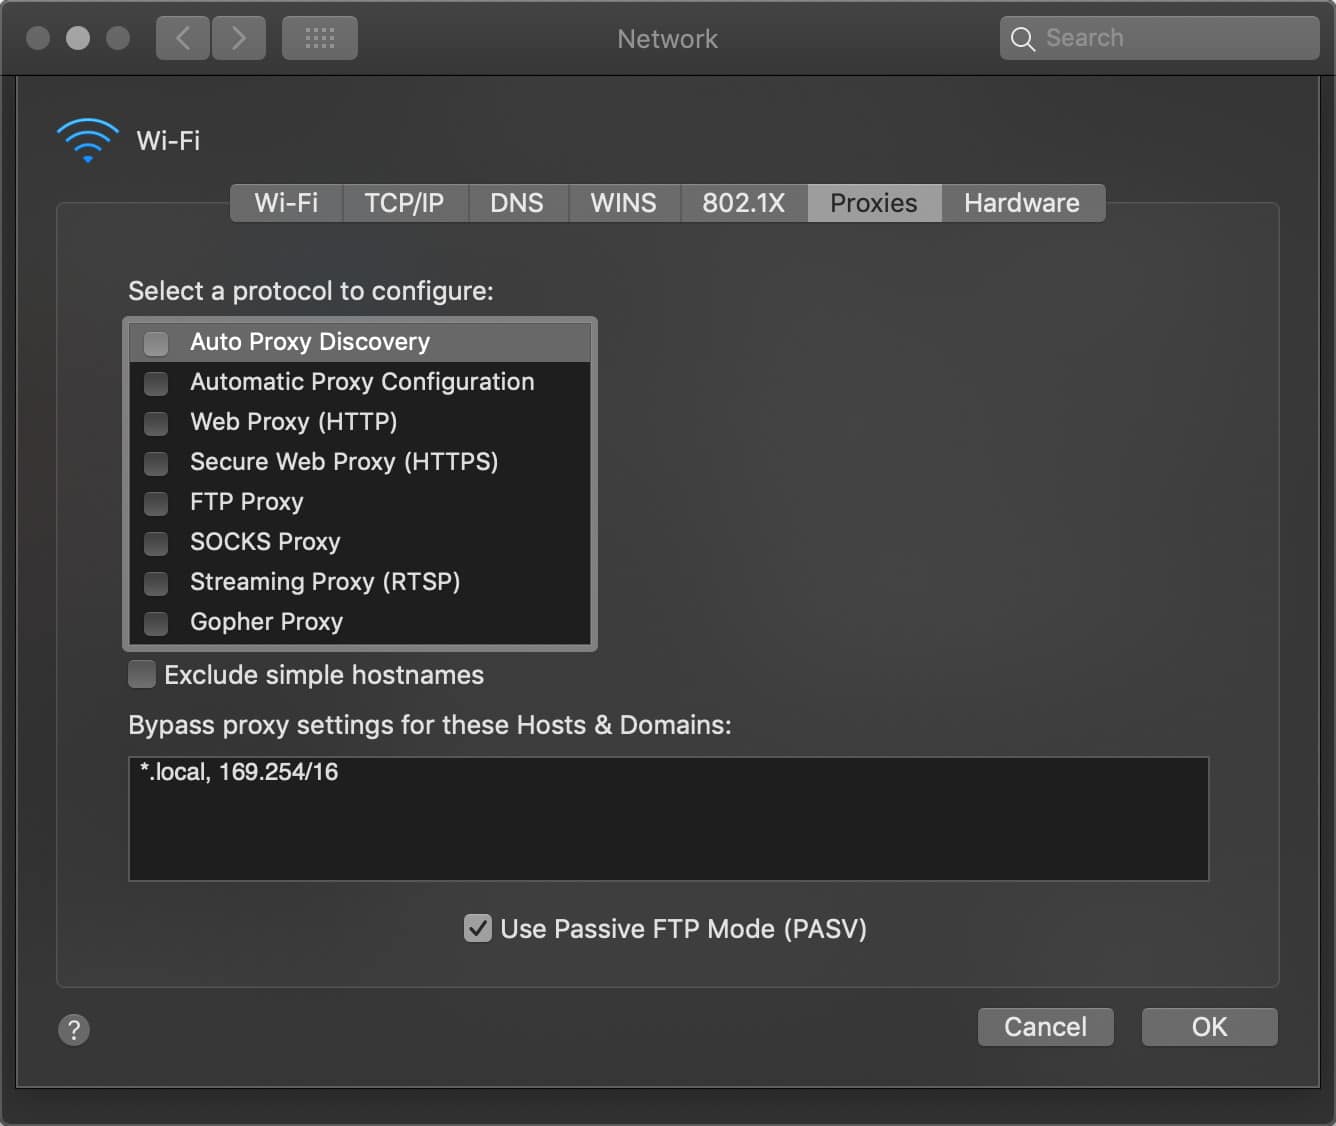
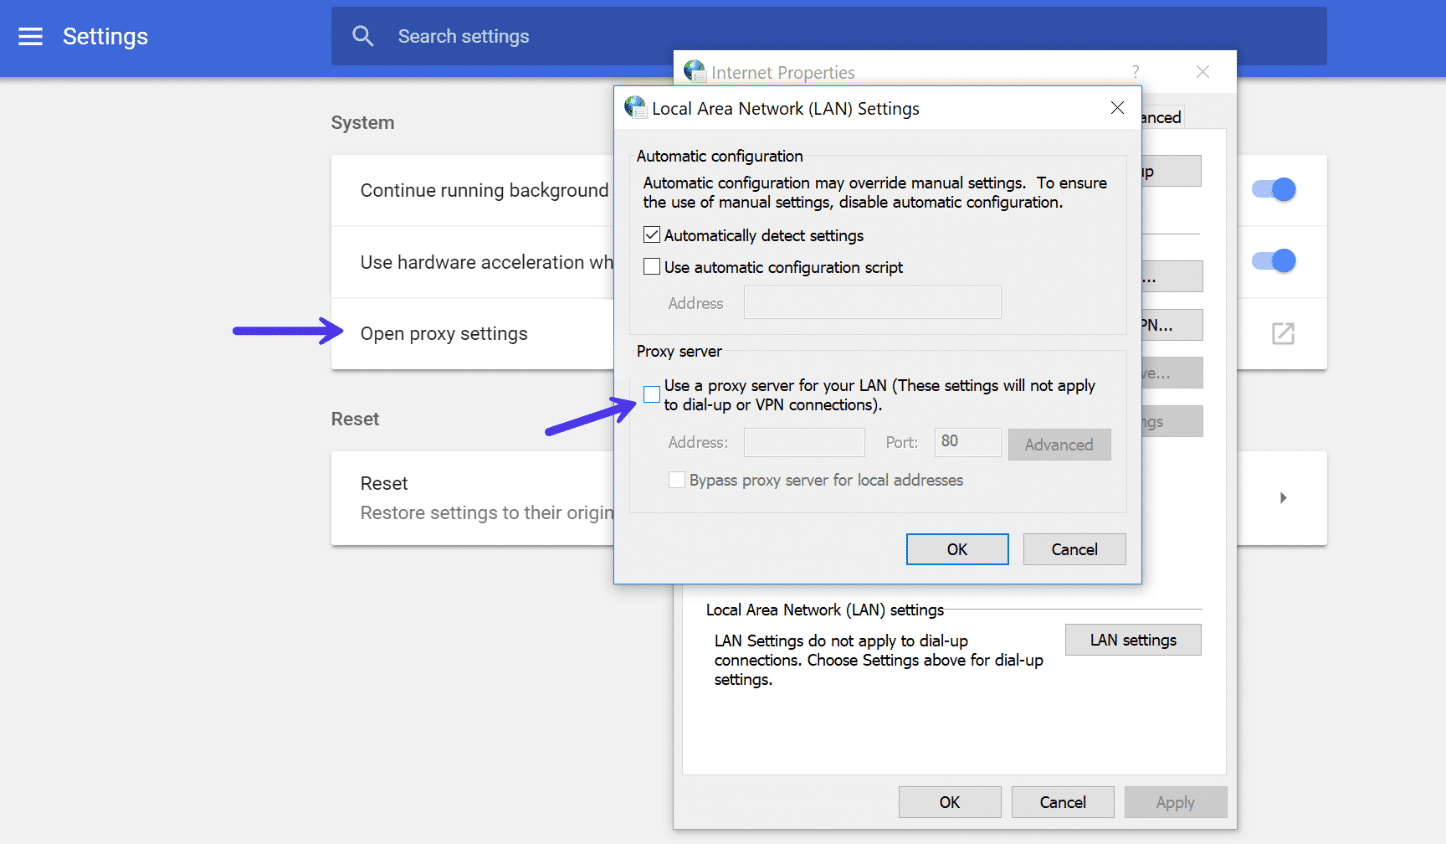
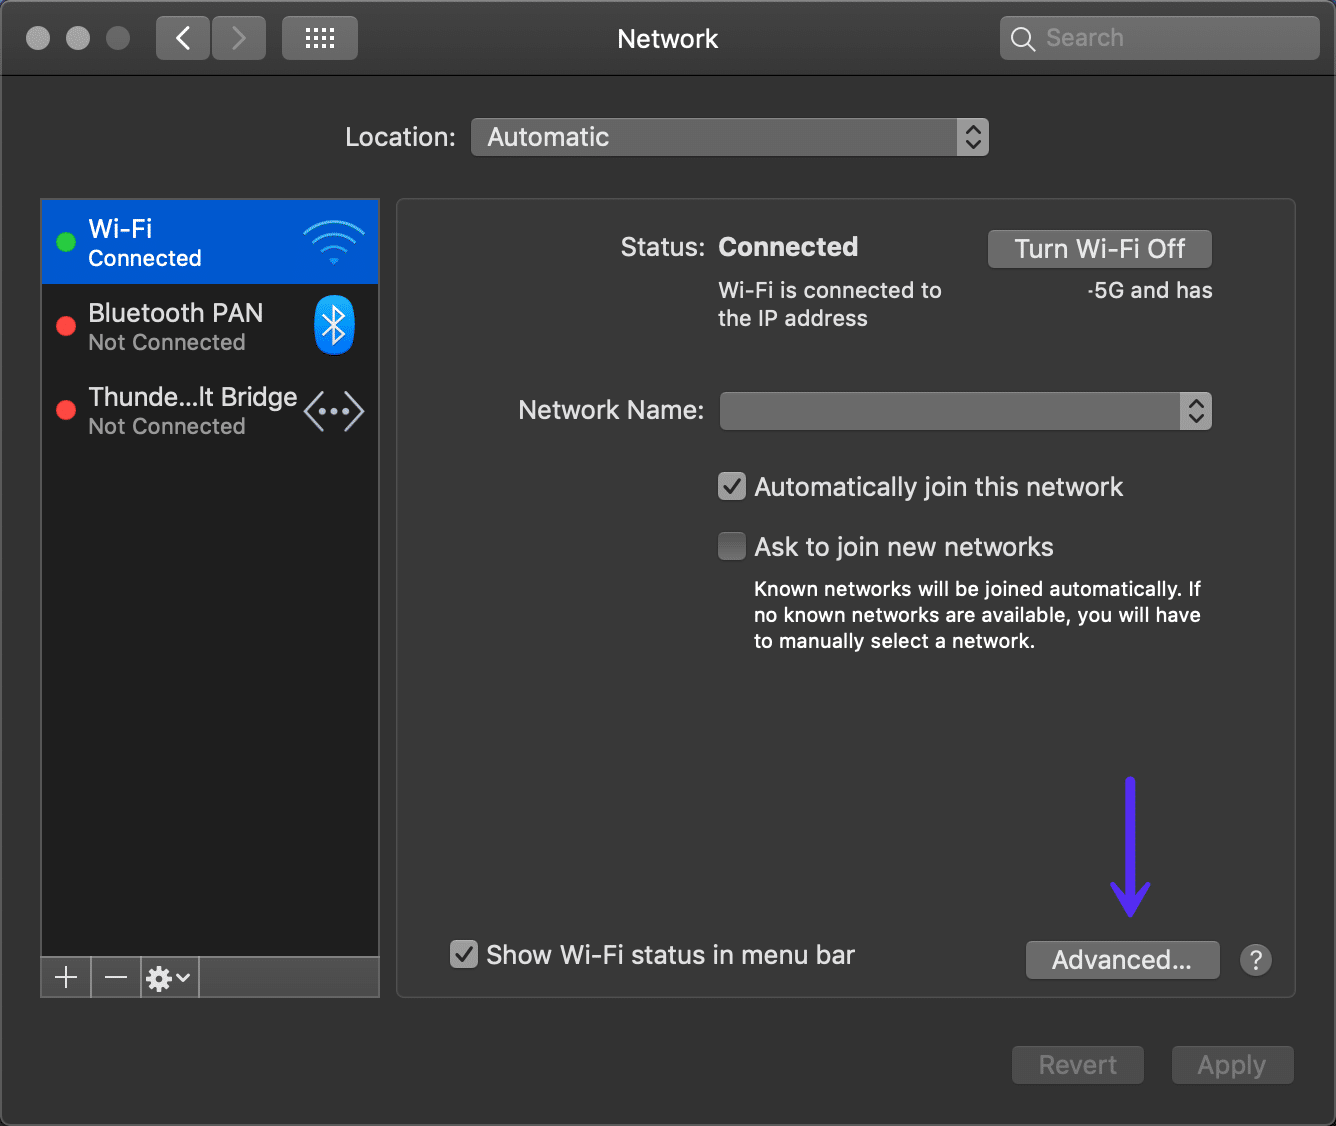
Sometimes you might see the ERR_CONNECTION_TIMED_OUT error if you are utilizing a proxy service. This is usually pretty rare, especially on the client-side. However, one might have been set without you even knowing it. To disable or check to ensure no proxy settings are enabled, follow these steps.
Access the Settings menu in your Chrome browser. This will open up the complete menu of options. Under the System section (you’ll need to click Advanced at the bottom to see this), you should find an entry titled Open proxy settings. By selecting it, you’ll be taken to the corresponding menu:
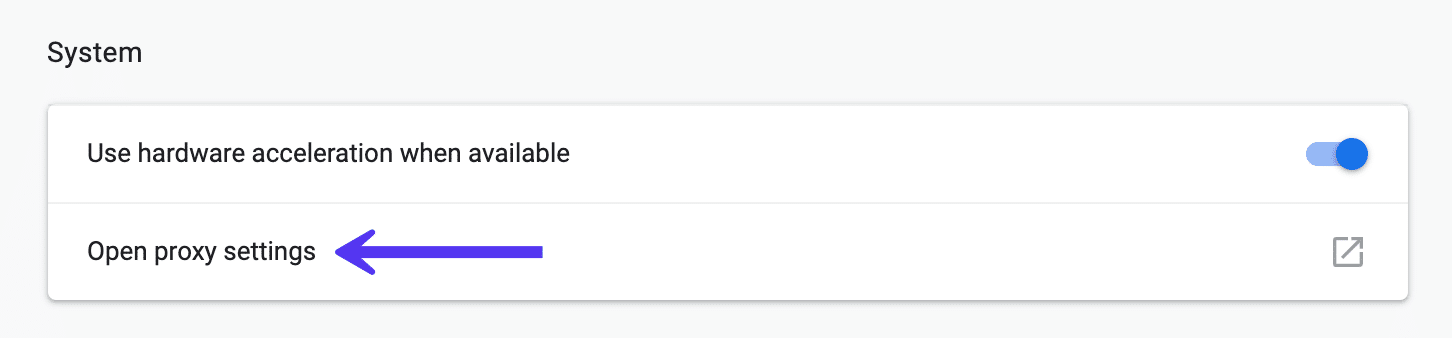
Your next step depends on the system you’re currently using. Windows users will want to click on LAN Settings and uncheck the Use proxy server for LAN option. If you’re a Mac user, you should immediately find yourself in the relevant menu. You’ll then have to uncheck all selectable proxy protocols and check to see if the ERR_CONNECTION_TIMED_OUT message has been resolved.
If you’re on Windows, you will see a “Local Area Network (LAN) Settings” window appear. You will want to confirm that the “Use a proxy server for your LAN” option is unchecked.
The same goes if you’re using a VPN like ExpressVPN or TunnelBear. Make sure you’re not connected by accident.
4. Change DNS Servers
The next thing you can try is changing your DNS servers. By default, DNS servers are automatically assigned by your ISP. But you could try temporarily changing these to a public DNS server, such as Google or Cloudflare.
- Some prefer to use Google’s public DNS (8.8.8.8 and 8.8.4.4) long-term due to them sometimes being more reliable.
- Cloudflare also offers secure and blazing fast free DNS (1.1.1.1 and 1.0.0.1) which we will be using in this example. If you want to use Google’s the steps are the same, you simply replace the DNS server addresses with Googles.
Tip: If you’re already using a free DNS server and having issues, removing it and defaulting back to your ISP’s DNS servers also sometimes fix things.
Google and Cloudflare aren’t perfect 100% of the time and there have been a few instances where we’ve noticed switching back has resolved the issue. This is especially true if you’re using a Wifi hotspot in an airport or coffee shop.
Windows
In Windows simply open up Command Prompt by pressing the Windows logo key and R. Then type “control panel” and hit Enter.
Click on “Network and Internet” and then “Network and Sharing Center.” On the left-hand side, click on “Change Adapter Settings.”

Right click on your current connection, this will either be Local Area Connection or Wireless Network Connection based on how you’re connecting. Then click on “Properties.”
Select Internet Protocol Version 4 (or Version 6 if desired) and click on “Properties.”
Make a note of any existing settings in case you need to revert back. Click “Use the following DNS server addresses.” Enter the following, or replace the existing with these:
For IPv4: 1.1.1.1 and 1.0.0.1
For IPv6: 2606:4700:4700::1111 and 2606:4700:4700::1001
Click OK, then Close. Restart your browser.
Mac
To change DNS servers on a Mac, go to System Preferences…
Click on the network icon and then click “Advanced.”
Click on the “DNS” tab.
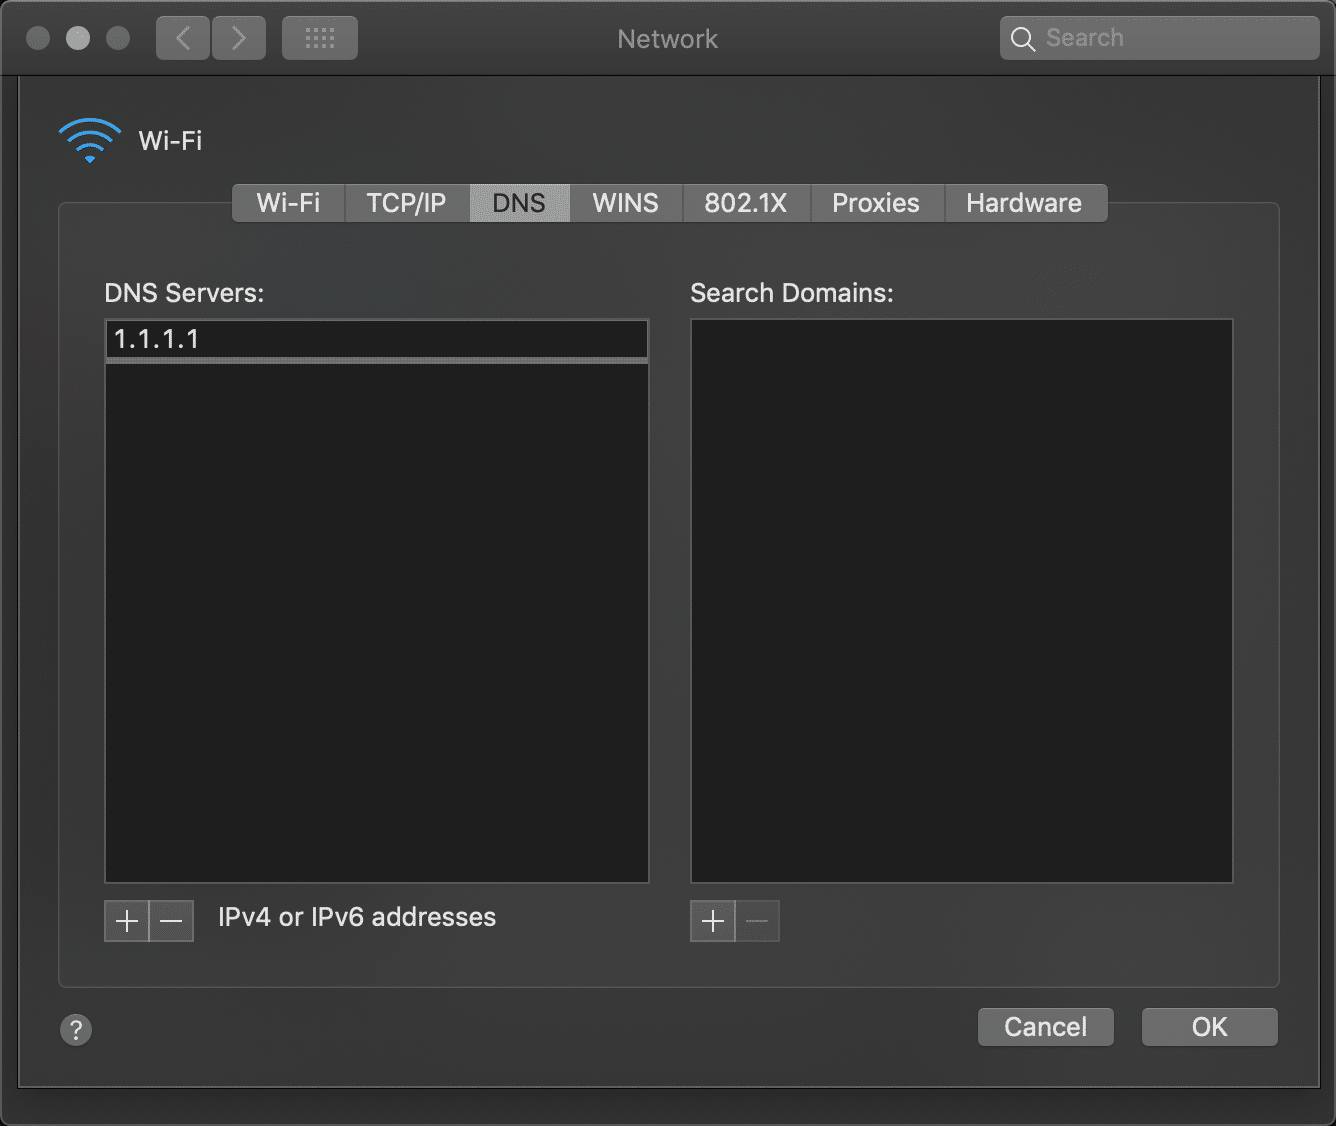
Then add Cloudflare’s DNS server addresses.
For IPv4: 1.1.1.1 and 1.0.0.1
For IPv6: 2606:4700:4700::1111 and 2606:4700:4700::1001
5. Flush/Renew DNS
You can also try flushing your local DNS cache. This is similar to clearing your browser cache. It could be that the site you’re trying to visit isn’t resolving to the correct IP address. If you’ve just migrated your WordPress site to a new host, it’s important to wait for things to fully propagate. This can sometimes take up to 24 hours, although it can be as little as a few minutes. This depends on your DNS provider and the TTL value of your DNS records.
Windows
In Windows simply open up Command Prompt and enter the following:
ipconfig /flushdns
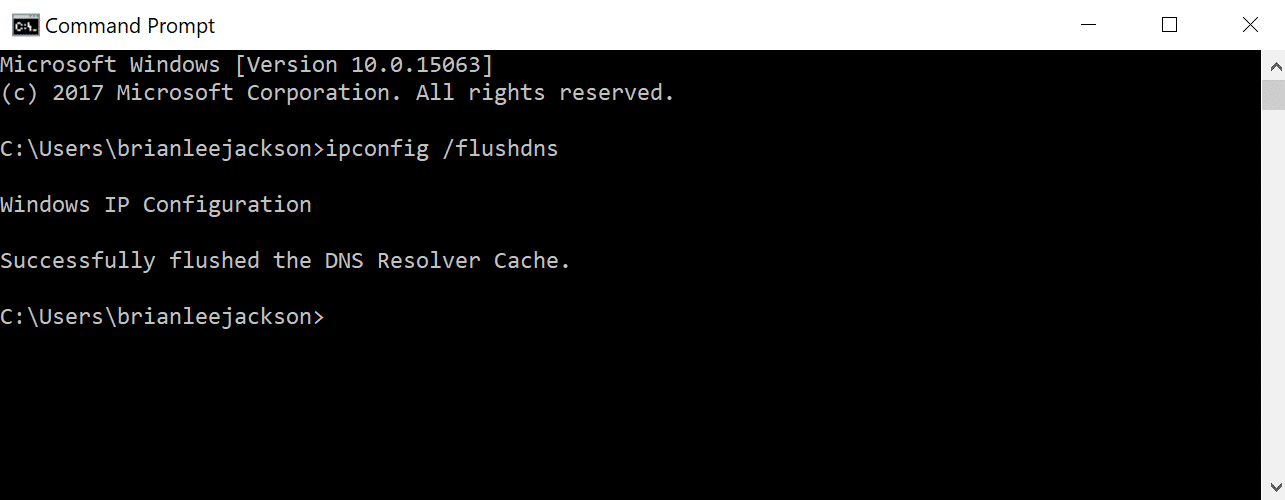
You should see a “Successfully flushed the DNS resolver Cache” if it worked.
Mac
For macOS users, you can enter the following in the terminal:
dscacheutil -flushcache
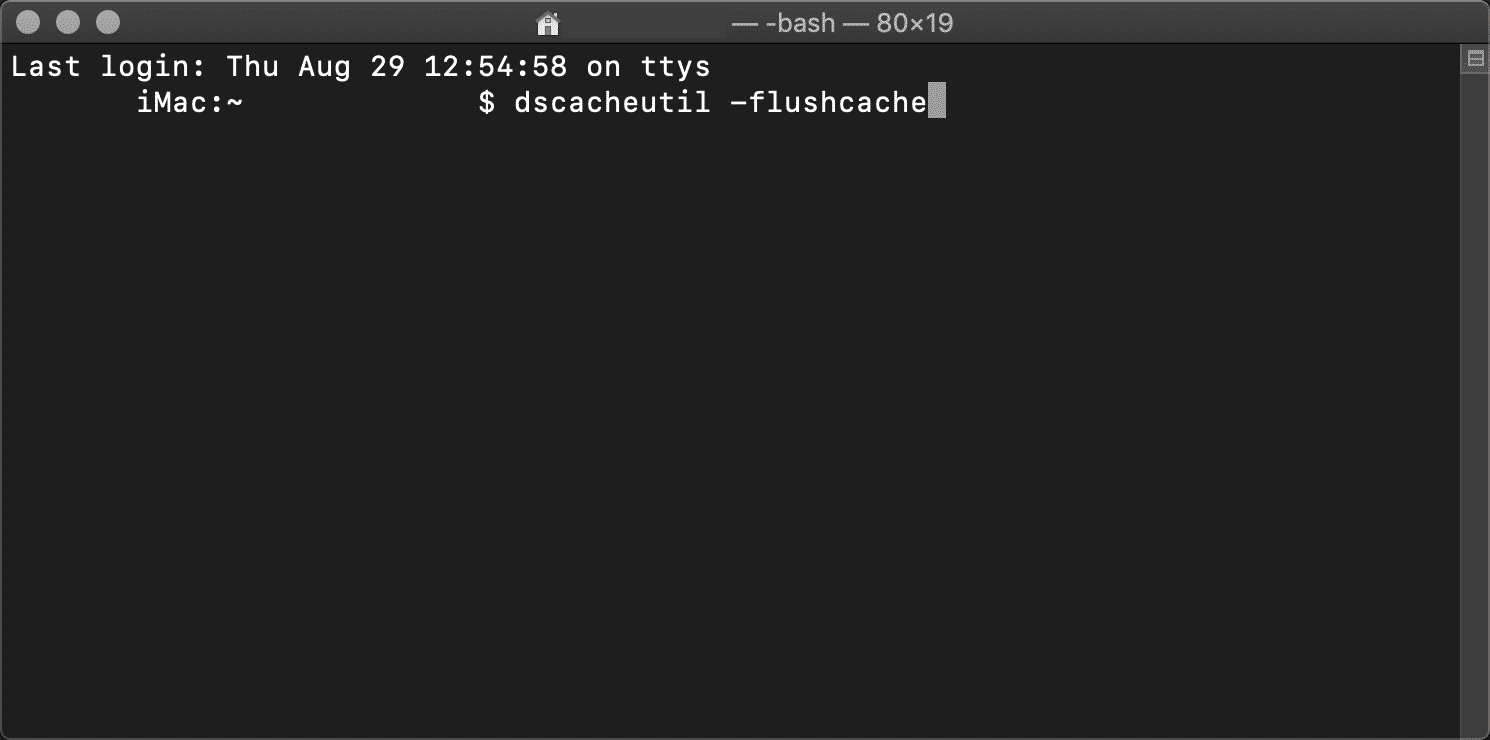
Note: There is no success message on Macs.
6. Check Your Hosts File
Every computer has what they call a local hosts file. This is a file that contains manual DNS entries which are mapped to specific IP addresses. Typically this is only edited when you want to preview your DNS before switching over domains to a new host. Or perhaps you have a local development site running using a tool like DevKinsta, Vagrant, or Docker.
There is a multitude of different ways this file could have been changed or edited. Therefore, it’s always good to check to ensure the website you’re trying to access isn’t in there. Just follow the steps below.
Windows
The hosts file typically requires additional access. So the first step is to open up your text editor as an administrator. Simply click on your start menu, search for your text editor, right-click on it and select “Run as administrator.” This can be done in any text editor such as Notepad, Notepad++, Atom, etc. We are using Sublime in our example below.
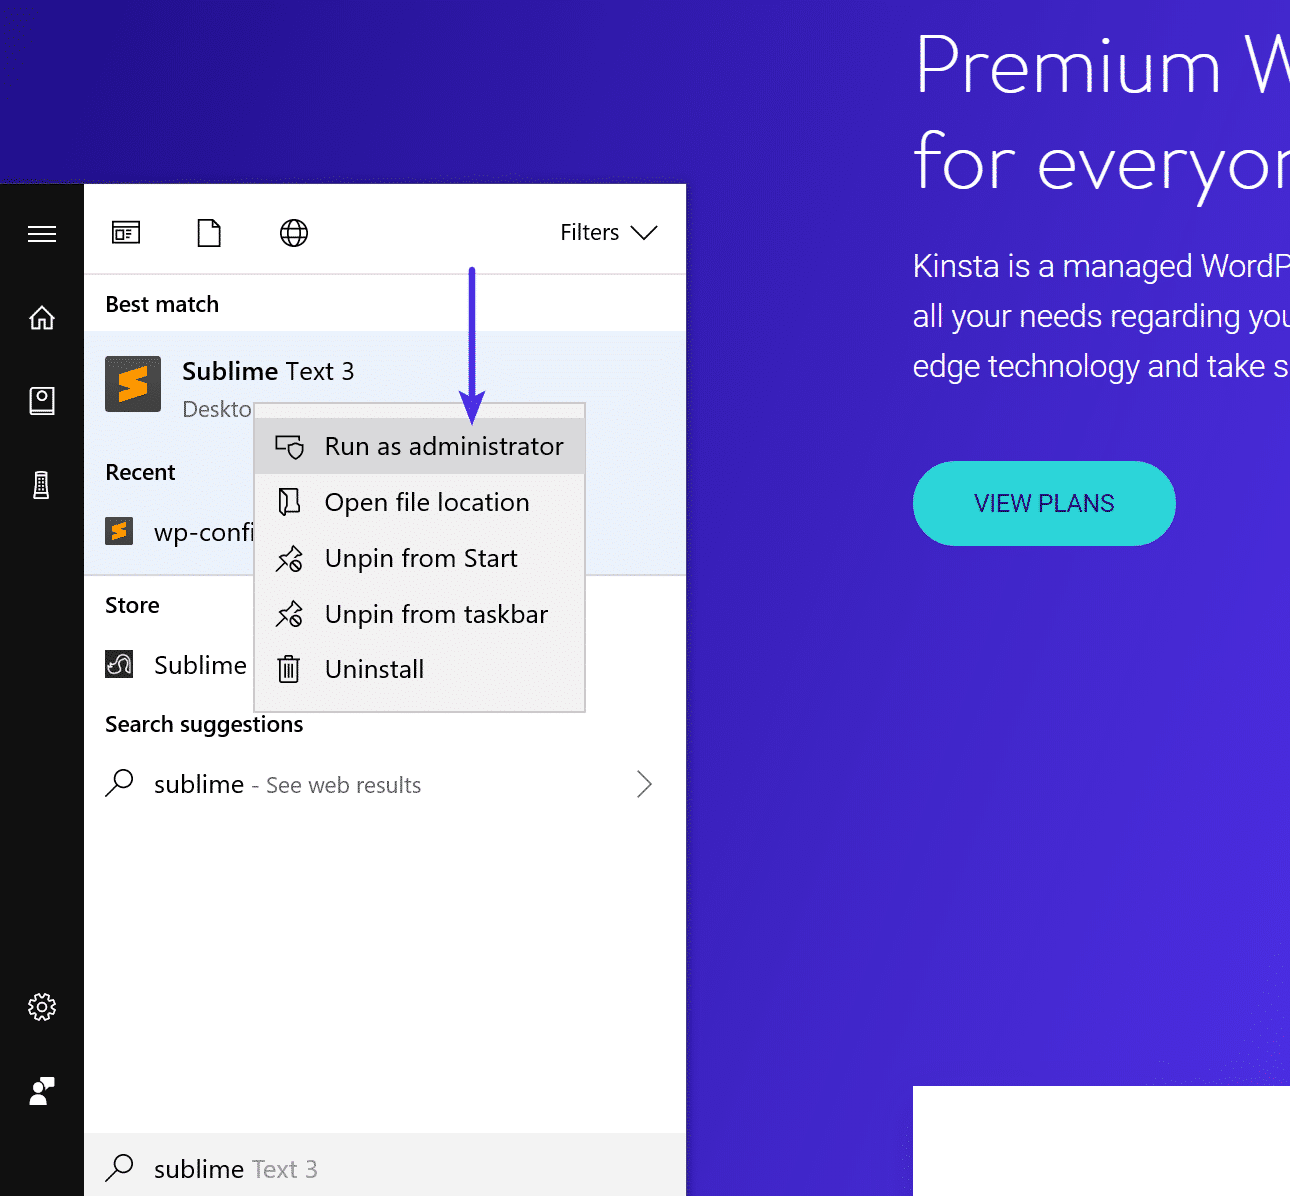
Within your text editor click File → Open and browse to the following location:
C:WindowsSystem32driversetc
Click on the hosts file and “Open.”
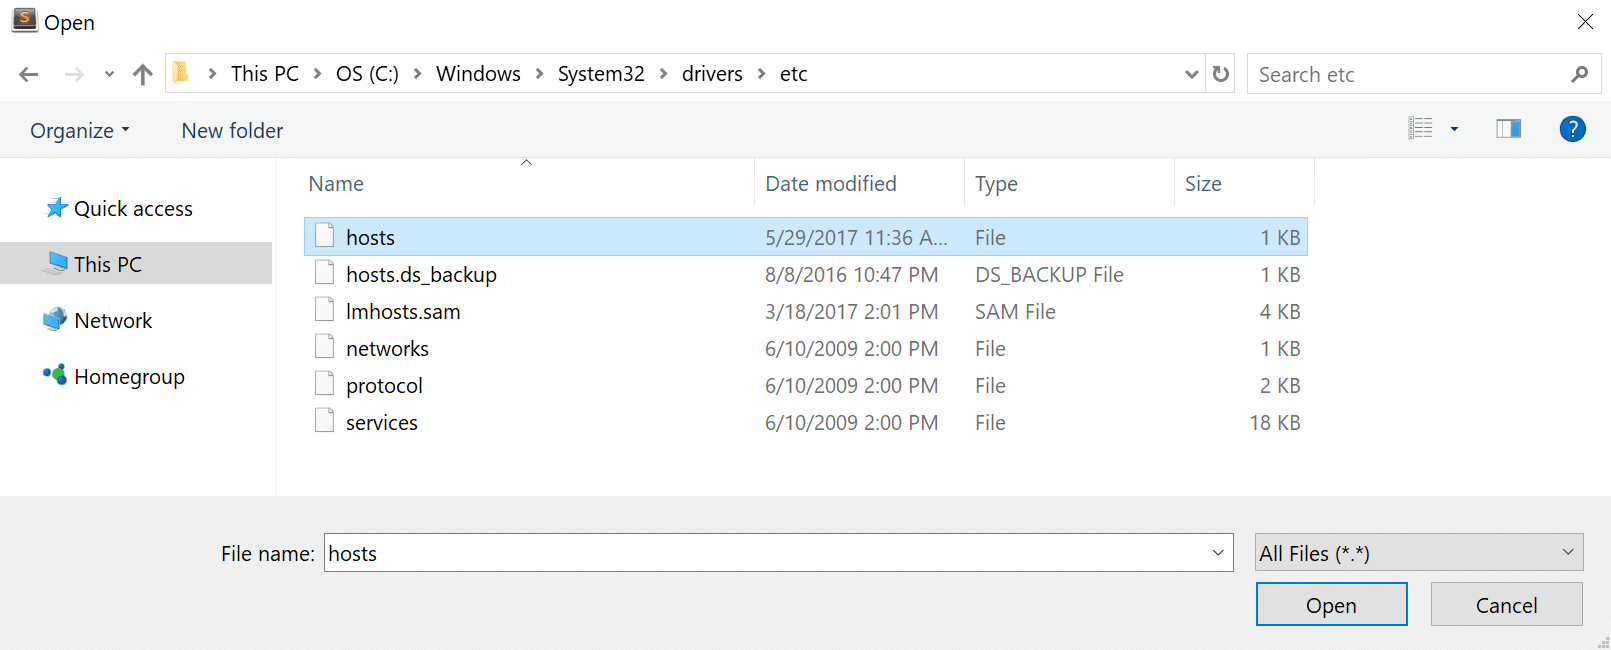
Double-check and make sure the website you’re trying to visit isn’t listed in there. If it is, remove it.
Mac
To check your hosts file on a Mac, we recommend getting Gas Mask. It’s a free application that can be used as hosts file manager, hosts files editor, and switch between them. It makes everything quick and easy! Otherwise, you can follow the steps below to edit your hosts file on Mac manually.
Go to Utilities and then click on “Terminal.”
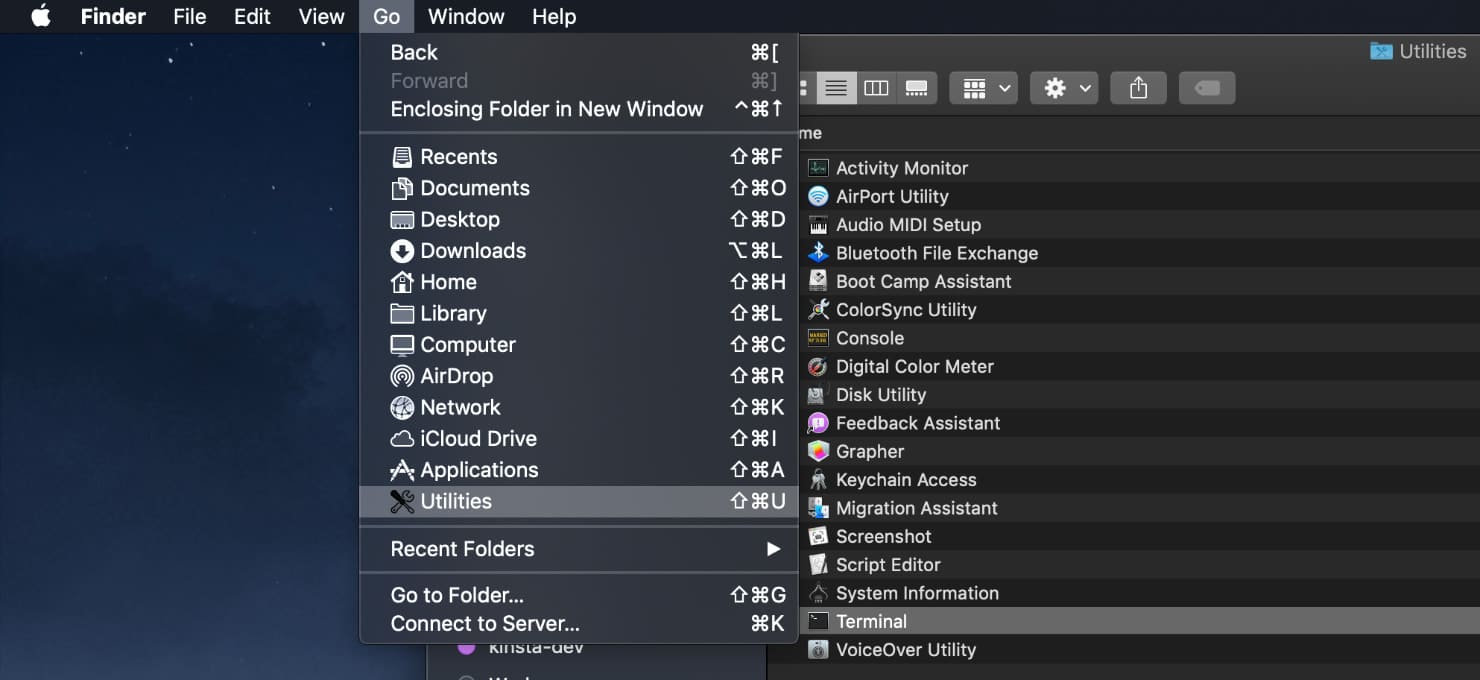
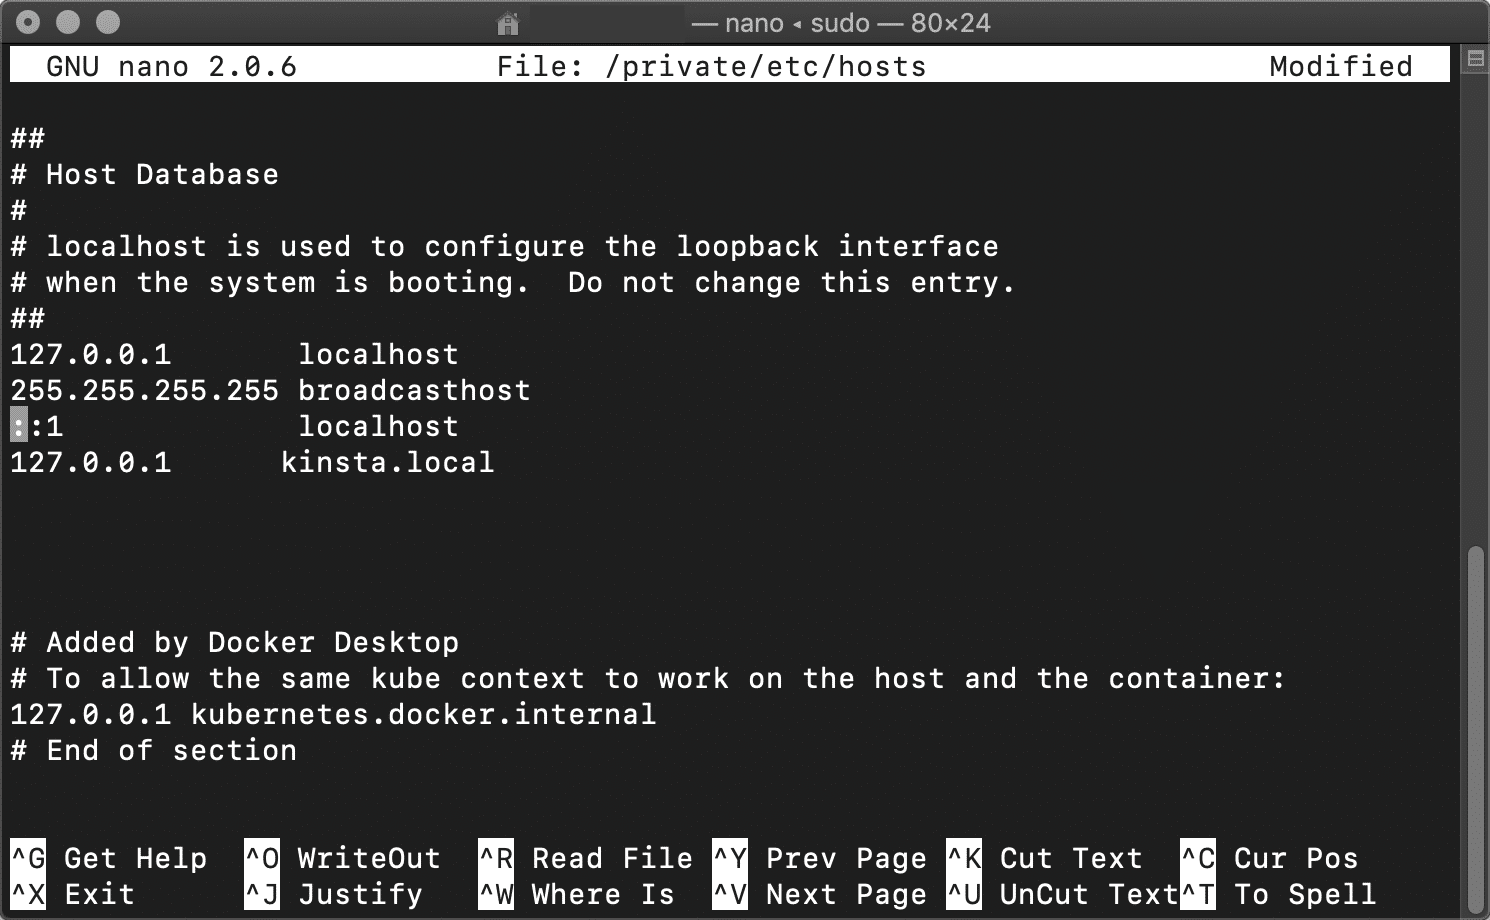
Enter in the following command and press Enter (you will most likely be prompted for your administrator password as well).
sudo nano /private/etc/hosts
Double-check and make sure the website you’re trying to visit isn’t listed in your hosts file. If it is, remove it.
7. Check the DNS of Your Domain
You should also verify that the DNS of your domain is correctly pointed to your hosting provider. If you’re a Kinsta client we have an in-depth post on how to point your domain and or DNS to Kinsta. If you recently migrated your WordPress website to a new host, it could be the DNS was cached incorrectly on your computer. In which case, step 5 above should resolve that. Or it may simply be too soon and you need to wait a few hours for the DNS to fully propagate.
8. Clear Browser Cache
Web browsers store information in cache on your computer. This includes your browsing history, saved login data, and cookies – all of which are recorded in order to load the relevant pages more quickly the next time they’re visited.
And if Edge Caching is enabled, it is even possible to cut in half the time it takes to deliver the HTML of pages to your site’s visitors.
Although they’re useful, caches can cause numerous issues when they become outdated. Fortunately, this problem is easily solved by clearing your cache.
But before you do that, you can easily check to see if it’s a browser cache issue by first opening up your browser in incognito mode. Or you can try a different browser. If you’re still seeing the error, then you will want to proceed with clearing your cache.
In this example, we’ll be using Google Chrome. Begin by opening up the primary menu (in the top-right corner of your browser window). From there, select More Tools: You can then click on Clear browser data.
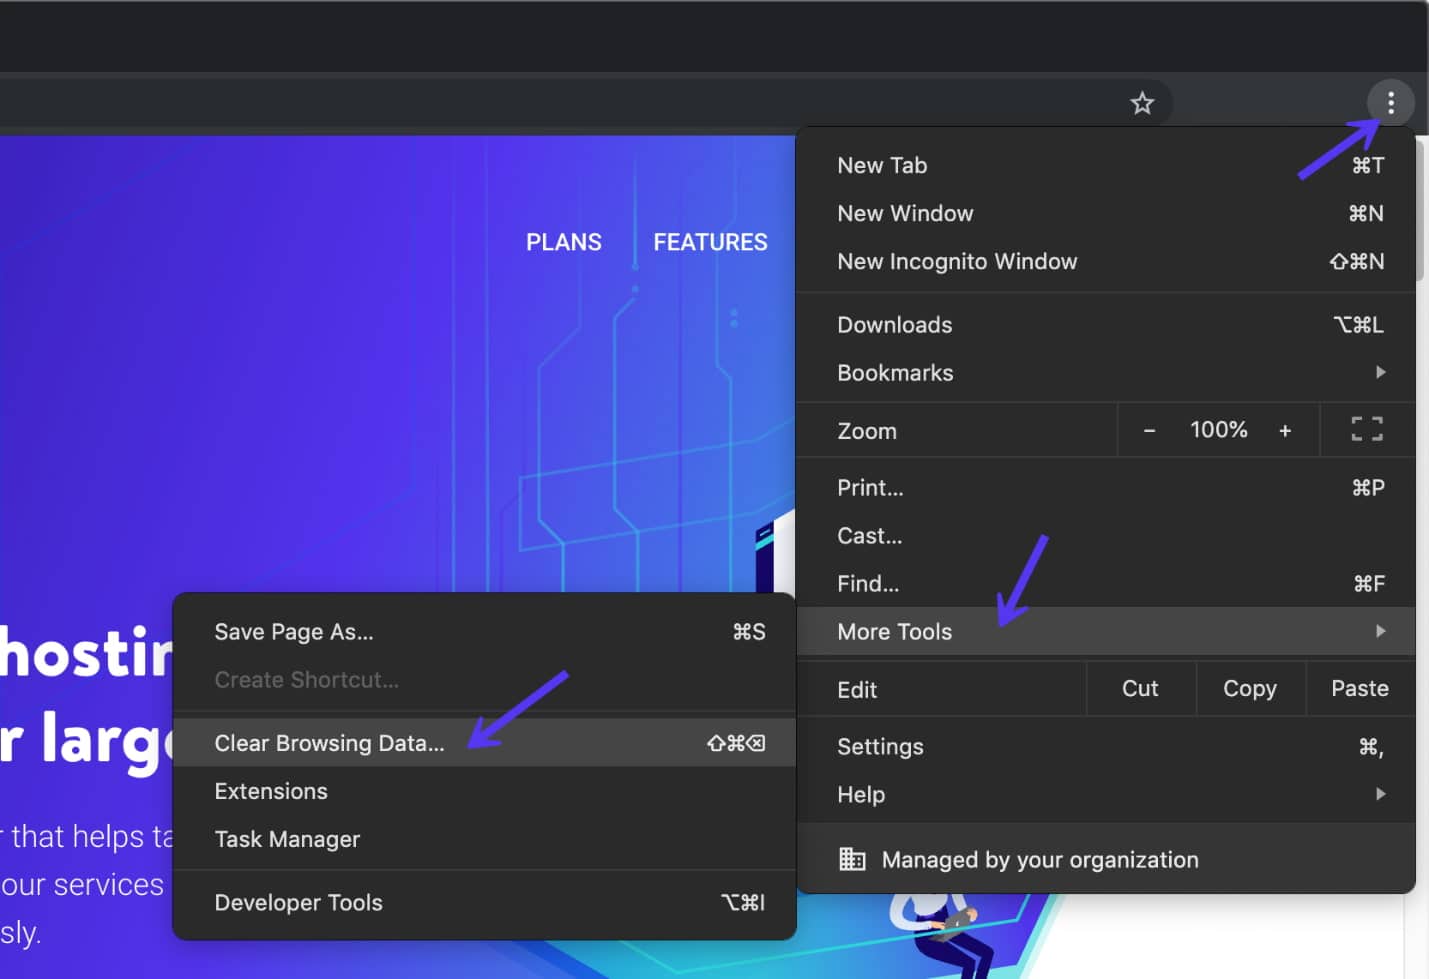
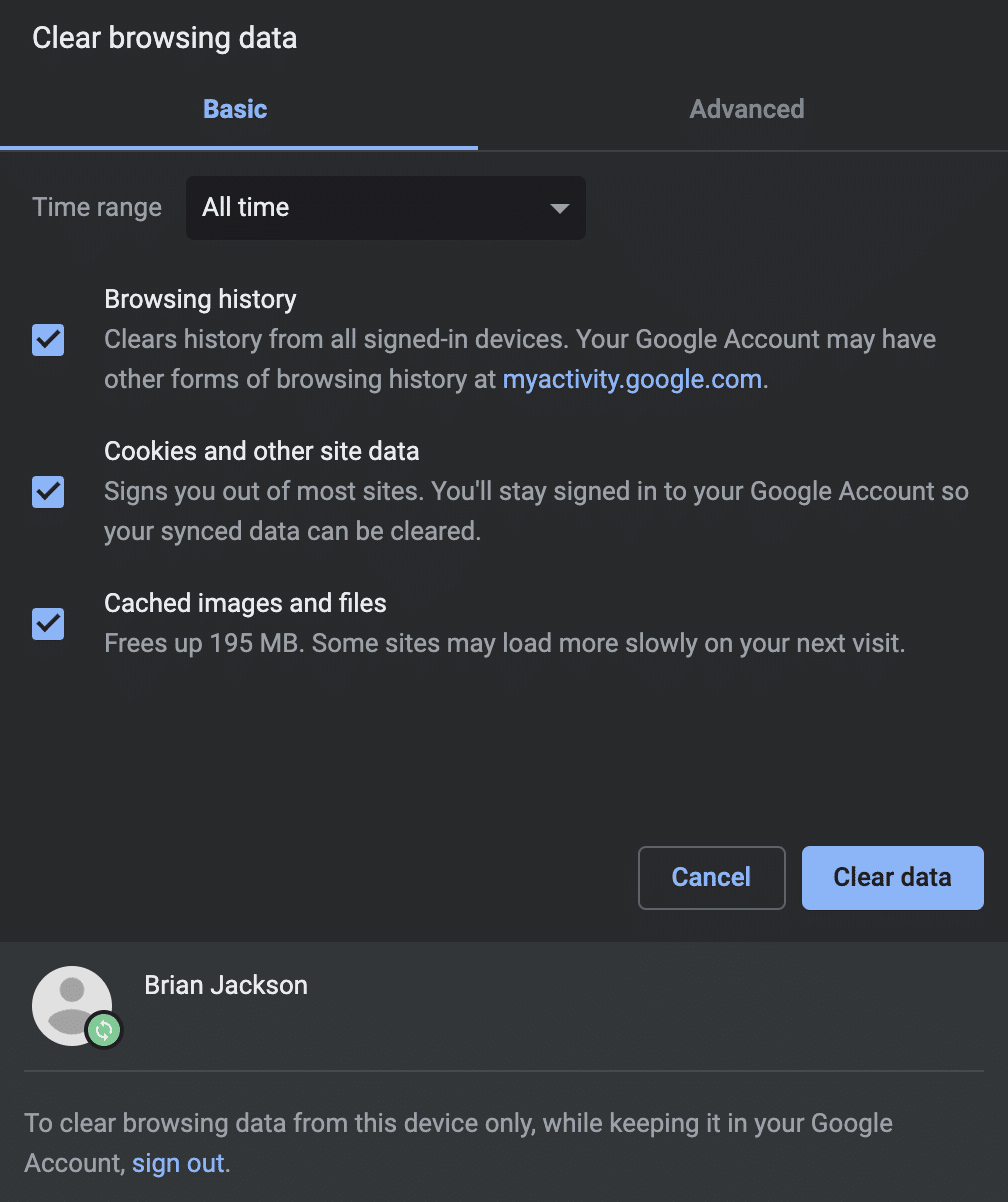
On the resulting page, you’ll need to make sure that all listed file categories are selected. If they aren’t, Chrome won’t be able to empty the entire cache. Instead, it will simply remove the most recent entries, which won’t result in the desired effect:
An alternative method of completing this process is to enter the following URL into your address bar:
chrome://settings/clearBrowserData
The resulting screen should grant you access to the same options we’ve outlined above. Here are some other helpful links for clearing cache.
- How to Force Refresh a Single Page for All Browsers
- How to Clear Cache for Google Chrome
- How to Clear Cache for Mozilla Firefox
- How to Clear Cache on Mac (Safari)
- How to Clear Cache for Internet Explorer
- How to Clear Cache for Microsoft Edge
- How to Clear Cache for Opera
9. Look at The Maximum Execution Time
The rest of the troubleshooting steps we’ll be diving into are those that have to do with the configuration of your WordPress site or server that may help fix the “ERR_CONNECTION_TIMED_OUT” error.
The first is the maximum execution time set for your site. On most servers, the default time is set to 30 seconds. This is the amount of time a PHP script is allowed to run (after which it times out). On shared hosts, this is typically set low or left at the default.
You can’t easily modify this from WordPress as the php.ini file is located on your server. To modify this, we recommend reaching out to your hosting provider to see if they can help. At Kinsta, we set the default maximum execution time to 300 seconds.
If you want to try and modify this yourself, it can usually be done with one of the following options. Both will depend on how your hosting provider configures their servers.
Option 1 – Modify Max Execution Time in php.ini File
If you have a php.ini file in your home directory, find the max_execution_time parameter and modify it. For example, if it’s set to 30 seconds, you can increase it to 300 seconds.
max_execution_time = 300
Option 2 – Modify Max Execution Time in .htacess File
If the above option doesn’t work, you might be able to change it within your .htaccess file. Just like with the php.ini file, this is typically located within your home directory. Place the following in the top of your .htaccess file:
php_value max_execution_time 300
10. Temporarily Disable Your Plugins
As with most WordPress errors, a plugin can definitely be the root of the problem. To determine if that’s what’s happening, you’ll need to disable all of your site’s plugins. However, if you’re getting the “ERR_CONNECTION_TIMED_OUT” error it means you don’t have access to your WordPress admin area. This means you will need to SFTP into your site. We recommend using FileZilla.
Once your SFTP client is ready, connect to your website through it and navigate to your WordPress root folder. In case you can’t find it, it’s usually called public_html, html, public, www, or your site’s name. If you’re a Kinsta client, it’s your public folder.

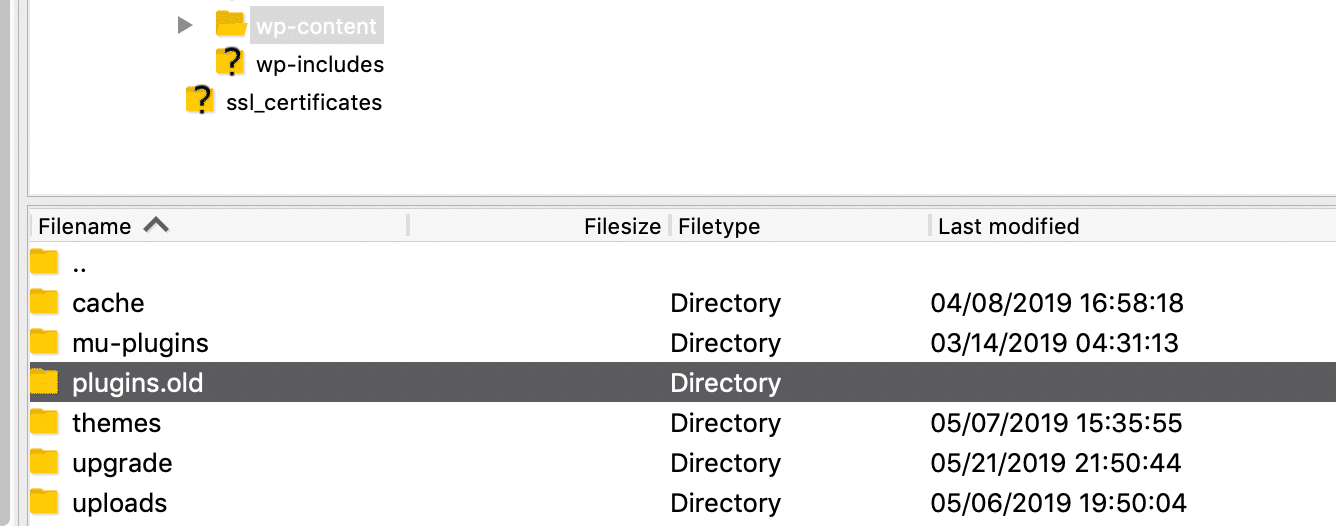
Open that folder, and navigate to the wp-content directory. Inside, you’ll see a folder called plugins, which contains individual subdirectories for each of the plugins installed on your site (both active and inactive).
What you’re going to do now is right-click on the plugins folder, and rename it to something else. We recommend plugins.old or plugins.deactivated, so you can easily recognize it later.
WordPress will now not be able to find any of your plugins. When that happens, it will automatically disable those plugins.
Now, try accessing your WordPress dashboard. If the timeout error is gone, then you can assume that one of your plugins was the culprit. All you have to do is figure out which one was at fault.
Return to the wp-content directory, and rename your original plugins folder correctly. Then, you’ll need to disable each of your plugins one by one, until you find the culprit.
To do this, open the wp-content/plugins directory. Inside, you’ll find one folder for each of your plugins. The process you’re going to follow is much the same as before:
- Start with the first folder, and rename it to anything you like.
- Check your website to see if the error is gone.
- If it isn’t, return the plugin folder from the previous step to its original name.
- Move on to the next plugin on your list, repeating the above steps.
This process can take a while if you have a lot of plugins, but it’s vital to check each plugin in turn. If at any point you identify the plugin that’s causing the error, you can uninstall it or replace it with another tool.
If you make it to the end of these steps without finding a solution, you can move on to the next stage of troubleshooting.
11. Temporarily Revert to Default Theme
Now that you’ve ruled out your plugins as the cause of the timeout error, it’s time to do the same with your active theme. In fact, your theme could also be creating compatibility issues.
Unfortunately, the process doesn’t work the same as above. WordPress won’t revert to the default theme if simply rename the theme folder, you would end up with an error like “The theme directory “theme name” does not exist.” Or if you try to rename the entire theme directory folder, you end up with “ERROR: The themes directory is either empty or doesn’t exist. Please check your installation.”
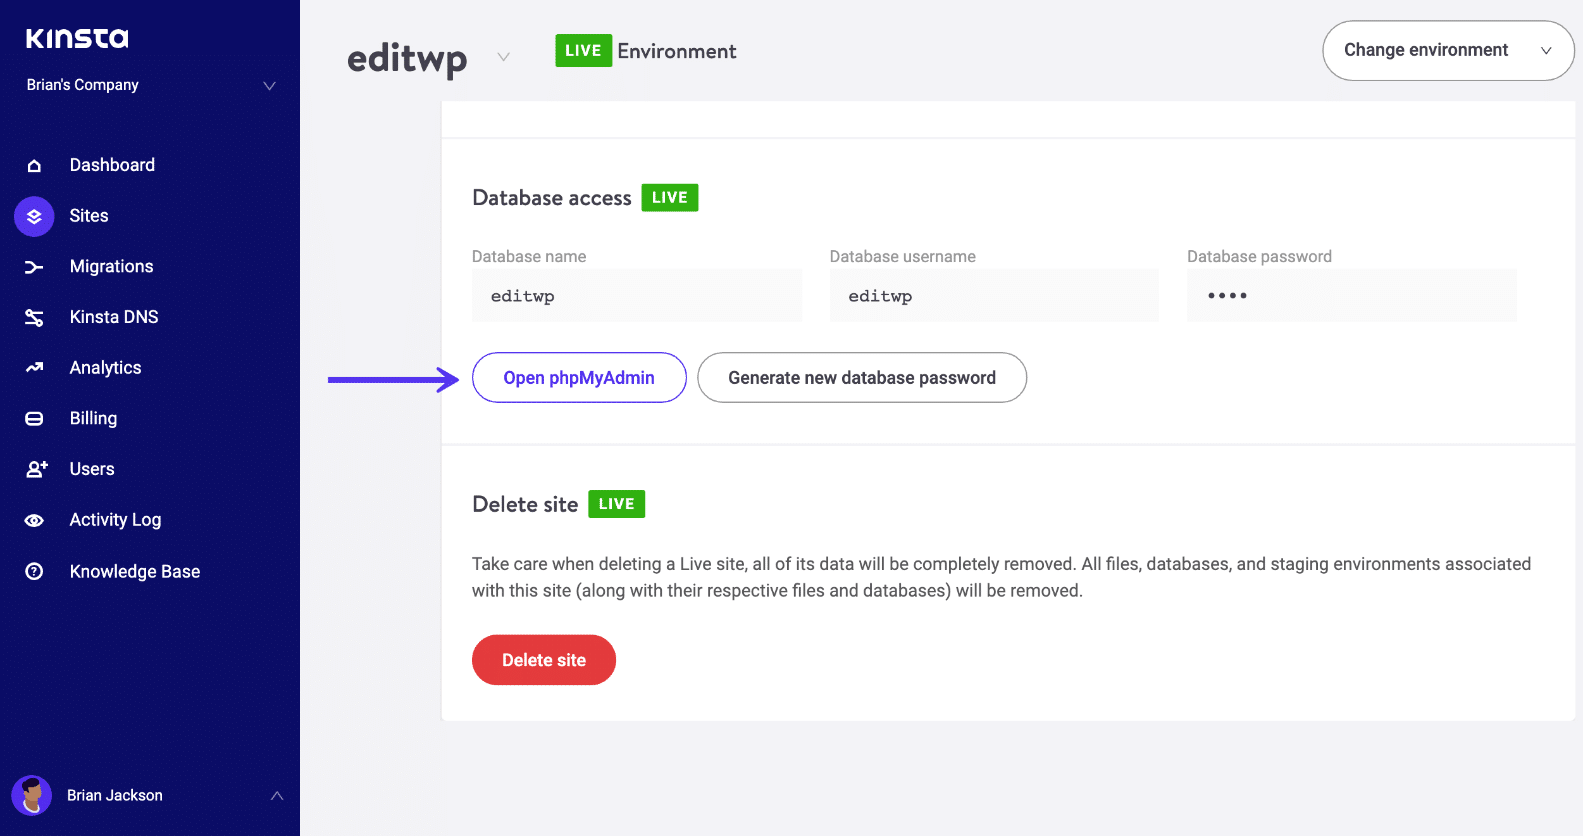
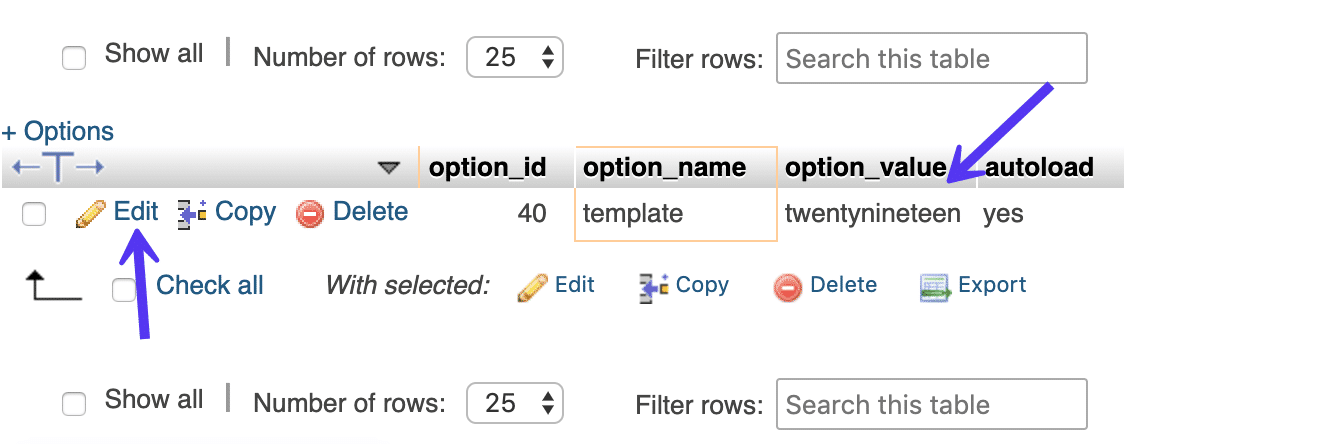
Therefore, you need to access your WordPress database by logging into phpMyAdmin. If you’re a Kinsta client, this can be found within the “Info” section of the MyKinsta dashboard.
Click into the “wp_options” table, then click on the “Search” tab. You will want to search under the “option_name” for template.

Under the “option_value” column you will see the current name of your theme. Change this to one of the default themes, such as “twentynineteen.”
Check your website again to see if this has fixed the error. If it did, it simply means it’s a problem with your WordPress theme and you might want to try reinstalling it or reverting to your most recent backup.
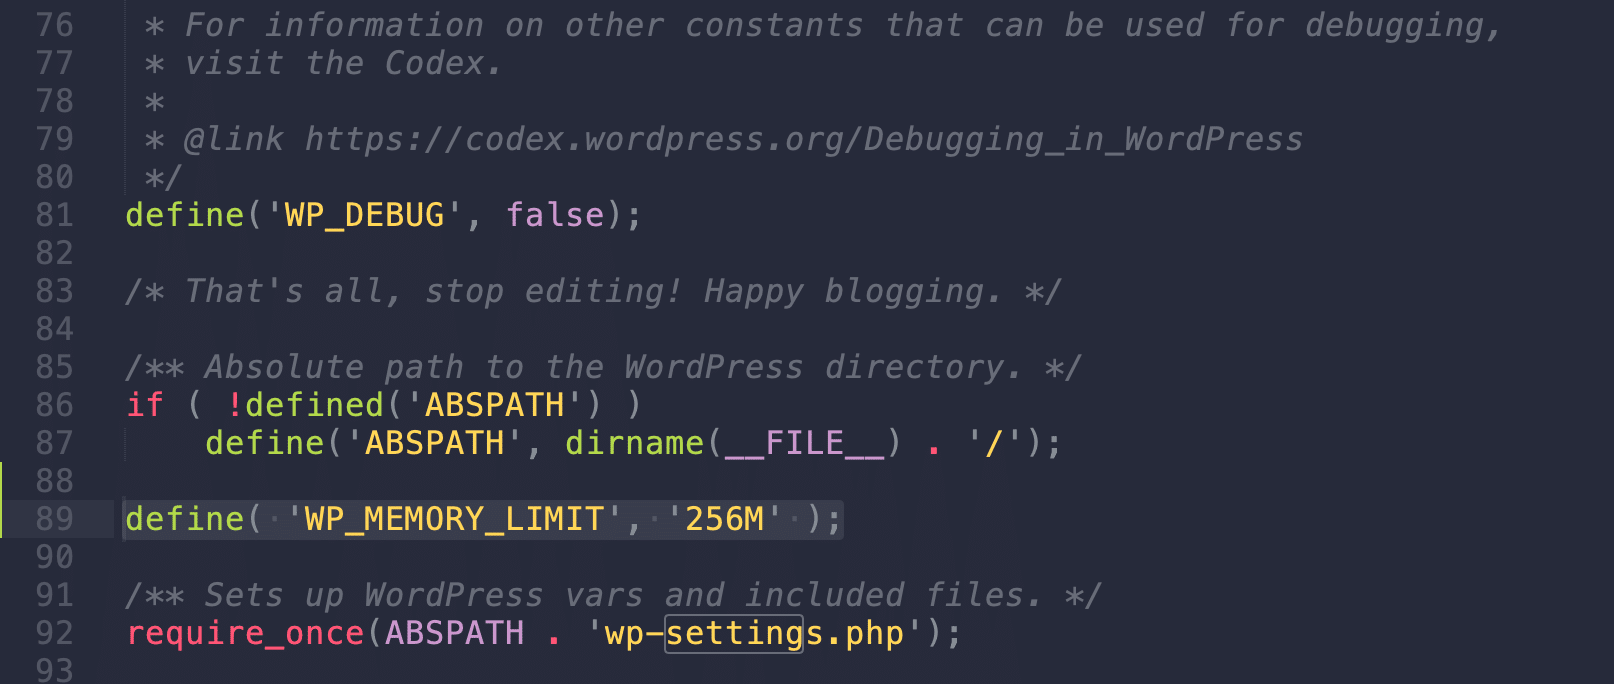
12. Increase the Memory Limit
The WP_MEMORY_LIMIT parameter allows you to specify the maximum amount of memory that can be consumed by PHP. If you are using shared hosting, it’s most likely set to a low value such as 64M. At Kinsta, we set the default memory limit to 256M.
You can increase the memory limit by adding the following to your wp-config.php file. This must be placed above the wp-settings.php inclusion.
define( 'WP_MEMORY_LIMIT', '256M' );
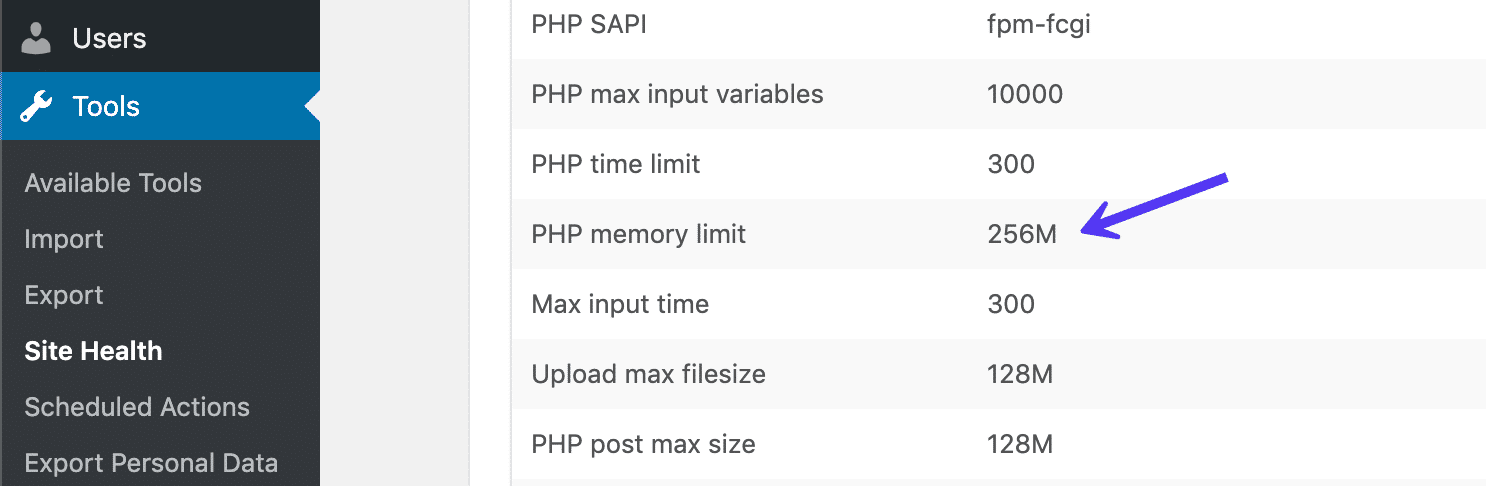
Not sure what your current PHP memory limit is set to? If you have access to your WordPress dashboard and are running WordPress 5.2 or above, you can see the PHP memory limit under the “Site Health” tool.
Can’t reach your site because of the *ERR_CONNECTION_TIMED_OUT* error message? Here are 12 possible ways to fix it! 💻😱Click to Tweet
Summary
Connection and timeout errors are never fun to troubleshoot, but hopefully, you have a little more knowledge in your toolbelt now to help resolve it quickly.
It’s important to remember that the “ERR_CONNECTION_TIMED_OUT” error be a result of a client-side problem such as your network connection, or an issue with the server where your WordPress site is hosted. Have any other tips to resolve this error? Let us know below in the comments.
(Suggested reading: Learn how to fix the ERR_CACHE_MISS error in Chrome)
Get all your applications, databases and WordPress sites online and under one roof. Our feature-packed, high-performance cloud platform includes:
- Easy setup and management in the MyKinsta dashboard
- 24/7 expert support
- The best Google Cloud Platform hardware and network, powered by Kubernetes for maximum scalability
- An enterprise-level Cloudflare integration for speed and security
- Global audience reach with up to 35 data centers and 275 PoPs worldwide
Test it yourself with $20 off your first month of Application Hosting or Database Hosting. Explore our plans or talk to sales to find your best fit.
Are you seeing the “ERR_CONNECTION_TIMED_OUT” error in your browser? Not a very helpful error message, is it? If you are a daily WordPress user, then it’s always good to be aware of common errors like these that might prevent you from getting access to your website.
In today’s post, we’re going to take a deep dive into the “ERR_CONNECTION_TIMED_OUT” error and examine why you might see this and what you can do to fix it quickly. Simply put, it’s an indication that the system is unavailable and the time given for one to connect has elapsed, and now the request has timed out. But what does that actually mean?
Let’s find out!
Check Out Our Video Guide to Fixing the ERR_CONNECTION_TIMED_OUT Error
What is the ERR_CONNECTION_TIMED_OUT Error?
An ERR_CONNECTION_TIMED_OUT error typically means there is something wrong with your local network connection. However, that’s not always the case.
According to the WordPress support documentation, a connection timed out error appears when your website is trying to do more than your server can manage. It’s particularly common on shared hosting where your memory limit is restricted.
When you visit a website and it doesn’t load, your browser will try for around 30 seconds or so until it terminates the connection. After which it will return an “ERR_CONNECTION_TIMED_OUT” error, indicating a communication problem. In Google Chrome you might see this as “This site can’t be reached. Domain.com took too long to respond.”
Due to all the different web browsers, operating systems, and servers, the error can present itself in a number of different ways. But most of them have the same or similar meaning. “ERR_NETWORK_CHANGED” and “ERR_CONNECTION_REFUSED” are two very closely related errors that can usually be solved with the same troubleshooting steps below.
Another common error code that appears under ‘This site can’t be reached’ is the DNS_PROBE_FINISHED_NXDOMAIN, which is a DNS error that essentially means the domain that was requested doesn’t exist.
Below are a few examples of how the error might present itself in different browsers.
Mozilla Firefox
In Mozilla Firefox the error will show as “The connection has timed out.” The server at domain.com is taking too long to respond.
Microsoft Edge
In Microsoft Edge, the error will show as “Hmmm… can’t reach this page. Domain.com took too long to respond.” In Edge, however, it does also contain the “ERR_CONNECTION_TIMED_OUT” error.
Safari
In Safari, the error will show as “Safari Can’t Open the Page. Safari can’t open the page domain.com because the server where this page is located isn’t responding.”
We’ve taken our knowledge of effective website management at scale, and turned it into an ebook and video course. Click to download The Guide to Managing 60+ WordPress Sites!
How to Fix the ERR_CONNECTION_TIMED_OUT Error
Where should you start troubleshooting if you see this error on your WordPress site? Without a great deal of context, it can sometimes be frustrating and overwhelming where to even begin. Typically these are either client-side problems (issues with your network connection or firewall) or an issue with the server at which the site is hosted (memory limits, execution times, etc.).
1. Check Your Connection
Google Chrome, Firefox, and Edge all recommend that you should check your network connection. While this might sound obvious, they all point to checking your connection first as it’s one of the most common reasons for the error. Here are a few things we recommend:
- Restart your home or office router. This only takes a few minutes and solves more problems than a lot of people would like to admit. To completely power cycle it, disconnect the power supply and then wait 30 seconds before plugging it back in.
- Check to see if you’re on a bad or slow wifi connection. This is a common occurrence on busy public wifi hotspots such as coffee shops or airports.
2. Disable Firewall and Antivirus Software Temporarily
Firewalls and antivirus software are intended to protect users and their systems. They scan your device regularly and automatically block any suspicious activity. However, this type of security can at times lead to connection issues.
This is because firewalls can often block pages they don’t need to or reject content that is completely safe. We’ve seen this happen many times with software like AVG. To check whether this is the case for you, try disabling your firewall and antivirus programs. Of course, this is only advised if you know for sure that the site you’re intending to visit is safe.
Additionally, you should only disable this kind of software temporarily. Switch it back on after you’ve finished checking to see whether the error has been resolved, so you don’t become vulnerable to attacks. If you repeatedly encounter errors because of your firewall or antivirus software, you may want to consider changing what you’re using.
These types of tools also have what is called a “false-positive” report you can fill out. If you’re 100% positive that a site your visiting is blocked and shouldn’t be, you can let the software developer know. Here are a few quick links:
- AVG false positive form
- Norton false positive form
- Sophos false positive form
3. Disable Proxy Settings
Sometimes you might see the ERR_CONNECTION_TIMED_OUT error if you are utilizing a proxy service. This is usually pretty rare, especially on the client-side. However, one might have been set without you even knowing it. To disable or check to ensure no proxy settings are enabled, follow these steps.
Access the Settings menu in your Chrome browser. This will open up the complete menu of options. Under the System section (you’ll need to click Advanced at the bottom to see this), you should find an entry titled Open proxy settings. By selecting it, you’ll be taken to the corresponding menu:
Your next step depends on the system you’re currently using. Windows users will want to click on LAN Settings and uncheck the Use proxy server for LAN option. If you’re a Mac user, you should immediately find yourself in the relevant menu. You’ll then have to uncheck all selectable proxy protocols and check to see if the ERR_CONNECTION_TIMED_OUT message has been resolved.
If you’re on Windows, you will see a “Local Area Network (LAN) Settings” window appear. You will want to confirm that the “Use a proxy server for your LAN” option is unchecked.
The same goes if you’re using a VPN like ExpressVPN or TunnelBear. Make sure you’re not connected by accident.
4. Change DNS Servers
The next thing you can try is changing your DNS servers. By default, DNS servers are automatically assigned by your ISP. But you could try temporarily changing these to a public DNS server, such as Google or Cloudflare.
- Some prefer to use Google’s public DNS (8.8.8.8 and 8.8.4.4) long-term due to them sometimes being more reliable.
- Cloudflare also offers secure and blazing fast free DNS (1.1.1.1 and 1.0.0.1) which we will be using in this example. If you want to use Google’s the steps are the same, you simply replace the DNS server addresses with Googles.
Tip: If you’re already using a free DNS server and having issues, removing it and defaulting back to your ISP’s DNS servers also sometimes fix things.
Google and Cloudflare aren’t perfect 100% of the time and there have been a few instances where we’ve noticed switching back has resolved the issue. This is especially true if you’re using a Wifi hotspot in an airport or coffee shop.
Windows
In Windows simply open up Command Prompt by pressing the Windows logo key and R. Then type “control panel” and hit Enter.
Click on “Network and Internet” and then “Network and Sharing Center.” On the left-hand side, click on “Change Adapter Settings.”
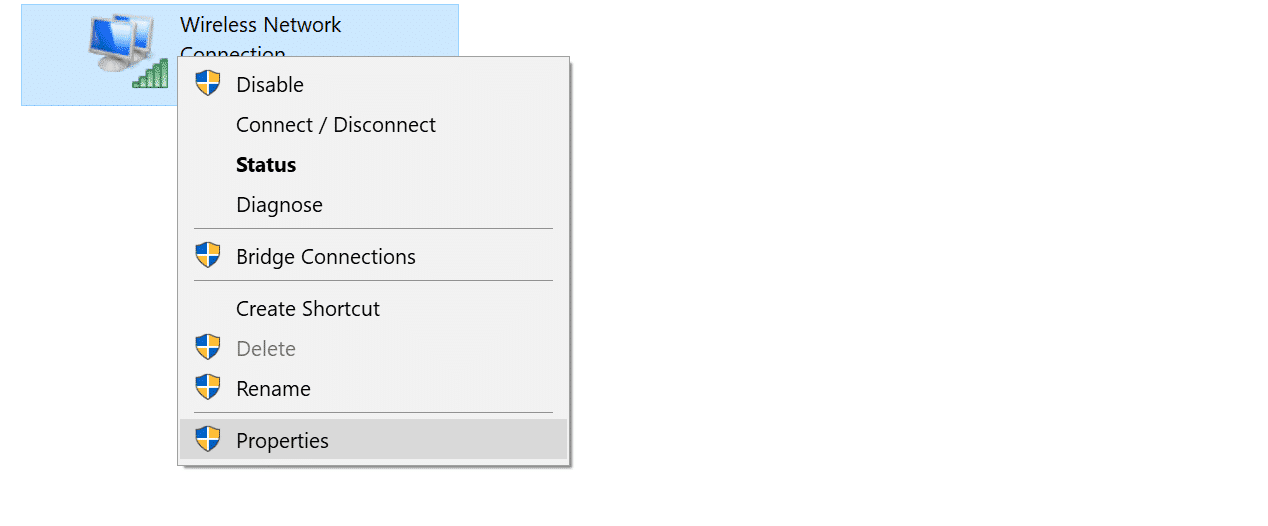
Right click on your current connection, this will either be Local Area Connection or Wireless Network Connection based on how you’re connecting. Then click on “Properties.”
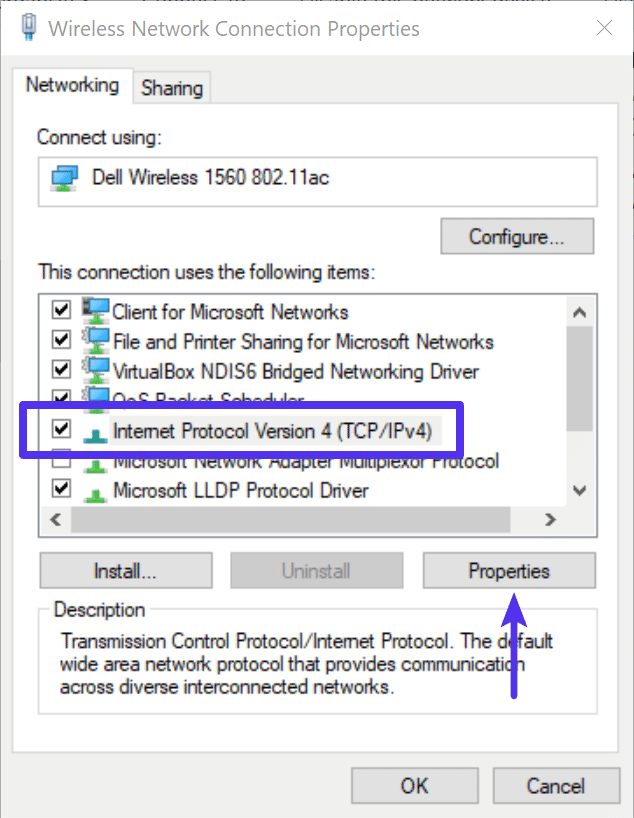
Select Internet Protocol Version 4 (or Version 6 if desired) and click on “Properties.”
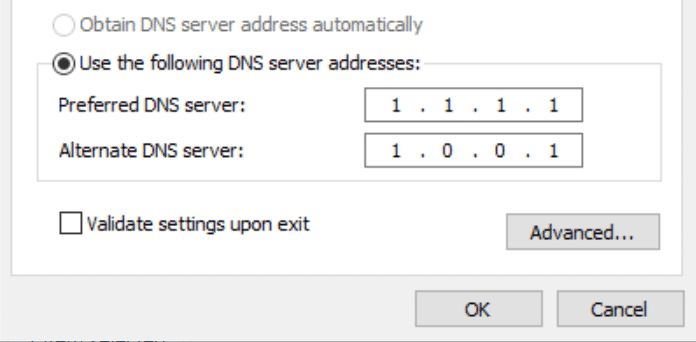
Make a note of any existing settings in case you need to revert back. Click “Use the following DNS server addresses.” Enter the following, or replace the existing with these:
For IPv4: 1.1.1.1 and 1.0.0.1
For IPv6: 2606:4700:4700::1111 and 2606:4700:4700::1001
Click OK, then Close. Restart your browser.
Mac
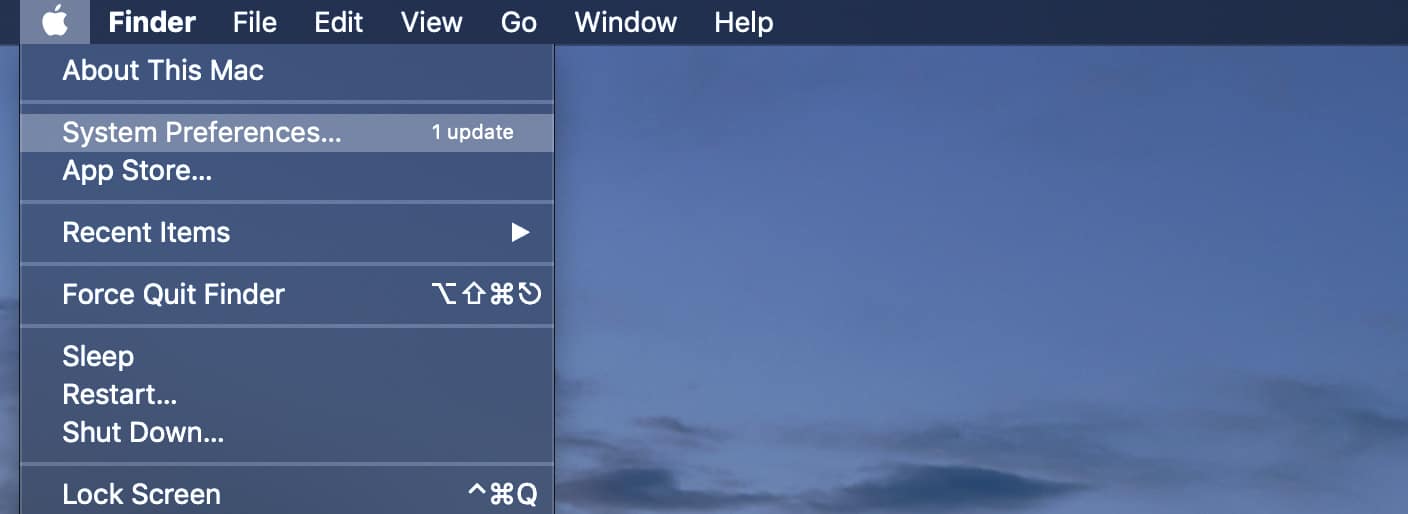
To change DNS servers on a Mac, go to System Preferences…
Click on the network icon and then click “Advanced.”
Click on the “DNS” tab.
Then add Cloudflare’s DNS server addresses.
For IPv4: 1.1.1.1 and 1.0.0.1
For IPv6: 2606:4700:4700::1111 and 2606:4700:4700::1001
5. Flush/Renew DNS
You can also try flushing your local DNS cache. This is similar to clearing your browser cache. It could be that the site you’re trying to visit isn’t resolving to the correct IP address. If you’ve just migrated your WordPress site to a new host, it’s important to wait for things to fully propagate. This can sometimes take up to 24 hours, although it can be as little as a few minutes. This depends on your DNS provider and the TTL value of your DNS records.
Windows
In Windows simply open up Command Prompt and enter the following:
ipconfig /flushdns
You should see a “Successfully flushed the DNS resolver Cache” if it worked.
Mac
For macOS users, you can enter the following in the terminal:
dscacheutil -flushcache
Note: There is no success message on Macs.
6. Check Your Hosts File
Every computer has what they call a local hosts file. This is a file that contains manual DNS entries which are mapped to specific IP addresses. Typically this is only edited when you want to preview your DNS before switching over domains to a new host. Or perhaps you have a local development site running using a tool like DevKinsta, Vagrant, or Docker.
There is a multitude of different ways this file could have been changed or edited. Therefore, it’s always good to check to ensure the website you’re trying to access isn’t in there. Just follow the steps below.
Windows
The hosts file typically requires additional access. So the first step is to open up your text editor as an administrator. Simply click on your start menu, search for your text editor, right-click on it and select “Run as administrator.” This can be done in any text editor such as Notepad, Notepad++, Atom, etc. We are using Sublime in our example below.
Within your text editor click File → Open and browse to the following location:
C:WindowsSystem32driversetc
Click on the hosts file and “Open.”
Double-check and make sure the website you’re trying to visit isn’t listed in there. If it is, remove it.
Mac
To check your hosts file on a Mac, we recommend getting Gas Mask. It’s a free application that can be used as hosts file manager, hosts files editor, and switch between them. It makes everything quick and easy! Otherwise, you can follow the steps below to edit your hosts file on Mac manually.
Go to Utilities and then click on “Terminal.”
Enter in the following command and press Enter (you will most likely be prompted for your administrator password as well).
sudo nano /private/etc/hosts
Double-check and make sure the website you’re trying to visit isn’t listed in your hosts file. If it is, remove it.
7. Check the DNS of Your Domain
You should also verify that the DNS of your domain is correctly pointed to your hosting provider. If you’re a Kinsta client we have an in-depth post on how to point your domain and or DNS to Kinsta. If you recently migrated your WordPress website to a new host, it could be the DNS was cached incorrectly on your computer. In which case, step 5 above should resolve that. Or it may simply be too soon and you need to wait a few hours for the DNS to fully propagate.
8. Clear Browser Cache
Web browsers store information in cache on your computer. This includes your browsing history, saved login data, and cookies – all of which are recorded in order to load the relevant pages more quickly the next time they’re visited.
And if Edge Caching is enabled, it is even possible to cut in half the time it takes to deliver the HTML of pages to your site’s visitors.
Although they’re useful, caches can cause numerous issues when they become outdated. Fortunately, this problem is easily solved by clearing your cache.
But before you do that, you can easily check to see if it’s a browser cache issue by first opening up your browser in incognito mode. Or you can try a different browser. If you’re still seeing the error, then you will want to proceed with clearing your cache.
In this example, we’ll be using Google Chrome. Begin by opening up the primary menu (in the top-right corner of your browser window). From there, select More Tools: You can then click on Clear browser data.
On the resulting page, you’ll need to make sure that all listed file categories are selected. If they aren’t, Chrome won’t be able to empty the entire cache. Instead, it will simply remove the most recent entries, which won’t result in the desired effect:
An alternative method of completing this process is to enter the following URL into your address bar:
chrome://settings/clearBrowserData
The resulting screen should grant you access to the same options we’ve outlined above. Here are some other helpful links for clearing cache.
- How to Force Refresh a Single Page for All Browsers
- How to Clear Cache for Google Chrome
- How to Clear Cache for Mozilla Firefox
- How to Clear Cache on Mac (Safari)
- How to Clear Cache for Internet Explorer
- How to Clear Cache for Microsoft Edge
- How to Clear Cache for Opera
9. Look at The Maximum Execution Time
The rest of the troubleshooting steps we’ll be diving into are those that have to do with the configuration of your WordPress site or server that may help fix the “ERR_CONNECTION_TIMED_OUT” error.
The first is the maximum execution time set for your site. On most servers, the default time is set to 30 seconds. This is the amount of time a PHP script is allowed to run (after which it times out). On shared hosts, this is typically set low or left at the default.
You can’t easily modify this from WordPress as the php.ini file is located on your server. To modify this, we recommend reaching out to your hosting provider to see if they can help. At Kinsta, we set the default maximum execution time to 300 seconds.
If you want to try and modify this yourself, it can usually be done with one of the following options. Both will depend on how your hosting provider configures their servers.
Option 1 – Modify Max Execution Time in php.ini File
If you have a php.ini file in your home directory, find the max_execution_time parameter and modify it. For example, if it’s set to 30 seconds, you can increase it to 300 seconds.
max_execution_time = 300
Option 2 – Modify Max Execution Time in .htacess File
If the above option doesn’t work, you might be able to change it within your .htaccess file. Just like with the php.ini file, this is typically located within your home directory. Place the following in the top of your .htaccess file:
php_value max_execution_time 300
10. Temporarily Disable Your Plugins
As with most WordPress errors, a plugin can definitely be the root of the problem. To determine if that’s what’s happening, you’ll need to disable all of your site’s plugins. However, if you’re getting the “ERR_CONNECTION_TIMED_OUT” error it means you don’t have access to your WordPress admin area. This means you will need to SFTP into your site. We recommend using FileZilla.
Once your SFTP client is ready, connect to your website through it and navigate to your WordPress root folder. In case you can’t find it, it’s usually called public_html, html, public, www, or your site’s name. If you’re a Kinsta client, it’s your public folder.
Open that folder, and navigate to the wp-content directory. Inside, you’ll see a folder called plugins, which contains individual subdirectories for each of the plugins installed on your site (both active and inactive).
What you’re going to do now is right-click on the plugins folder, and rename it to something else. We recommend plugins.old or plugins.deactivated, so you can easily recognize it later.
WordPress will now not be able to find any of your plugins. When that happens, it will automatically disable those plugins.
Now, try accessing your WordPress dashboard. If the timeout error is gone, then you can assume that one of your plugins was the culprit. All you have to do is figure out which one was at fault.
Return to the wp-content directory, and rename your original plugins folder correctly. Then, you’ll need to disable each of your plugins one by one, until you find the culprit.
To do this, open the wp-content/plugins directory. Inside, you’ll find one folder for each of your plugins. The process you’re going to follow is much the same as before:
- Start with the first folder, and rename it to anything you like.
- Check your website to see if the error is gone.
- If it isn’t, return the plugin folder from the previous step to its original name.
- Move on to the next plugin on your list, repeating the above steps.
This process can take a while if you have a lot of plugins, but it’s vital to check each plugin in turn. If at any point you identify the plugin that’s causing the error, you can uninstall it or replace it with another tool.
If you make it to the end of these steps without finding a solution, you can move on to the next stage of troubleshooting.
11. Temporarily Revert to Default Theme
Now that you’ve ruled out your plugins as the cause of the timeout error, it’s time to do the same with your active theme. In fact, your theme could also be creating compatibility issues.
Unfortunately, the process doesn’t work the same as above. WordPress won’t revert to the default theme if simply rename the theme folder, you would end up with an error like “The theme directory “theme name” does not exist.” Or if you try to rename the entire theme directory folder, you end up with “ERROR: The themes directory is either empty or doesn’t exist. Please check your installation.”
Therefore, you need to access your WordPress database by logging into phpMyAdmin. If you’re a Kinsta client, this can be found within the “Info” section of the MyKinsta dashboard.
Click into the “wp_options” table, then click on the “Search” tab. You will want to search under the “option_name” for template.
Under the “option_value” column you will see the current name of your theme. Change this to one of the default themes, such as “twentynineteen.”
Check your website again to see if this has fixed the error. If it did, it simply means it’s a problem with your WordPress theme and you might want to try reinstalling it or reverting to your most recent backup.
12. Increase the Memory Limit
The WP_MEMORY_LIMIT parameter allows you to specify the maximum amount of memory that can be consumed by PHP. If you are using shared hosting, it’s most likely set to a low value such as 64M. At Kinsta, we set the default memory limit to 256M.
You can increase the memory limit by adding the following to your wp-config.php file. This must be placed above the wp-settings.php inclusion.
define( 'WP_MEMORY_LIMIT', '256M' );
Not sure what your current PHP memory limit is set to? If you have access to your WordPress dashboard and are running WordPress 5.2 or above, you can see the PHP memory limit under the “Site Health” tool.
Can’t reach your site because of the *ERR_CONNECTION_TIMED_OUT* error message? Here are 12 possible ways to fix it! 💻😱Click to Tweet
Summary
Connection and timeout errors are never fun to troubleshoot, but hopefully, you have a little more knowledge in your toolbelt now to help resolve it quickly.
It’s important to remember that the “ERR_CONNECTION_TIMED_OUT” error be a result of a client-side problem such as your network connection, or an issue with the server where your WordPress site is hosted. Have any other tips to resolve this error? Let us know below in the comments.
(Suggested reading: Learn how to fix the ERR_CACHE_MISS error in Chrome)
Get all your applications, databases and WordPress sites online and under one roof. Our feature-packed, high-performance cloud platform includes:
- Easy setup and management in the MyKinsta dashboard
- 24/7 expert support
- The best Google Cloud Platform hardware and network, powered by Kubernetes for maximum scalability
- An enterprise-level Cloudflare integration for speed and security
- Global audience reach with up to 35 data centers and 275 PoPs worldwide
Test it yourself with $20 off your first month of Application Hosting or Database Hosting. Explore our plans or talk to sales to find your best fit.
Просмотров 41.8к. Опубликовано 20 мая, 2019 Обновлено 24 июня, 2019
ERR_CONNECTION_TIMED_OUT довольно распространена в Windows, Android и Mac. Это ошибка браузера, которая указывает, что что-то не так с веб-сайтом, который вы пытаетесь открыть, или с тем, какой путь вы используете для его достижения. Ошибка не говорит о том, что она, скорее всего, вызвана неправильной настройкой на вашем компьютере, а не в сети.
Что касается браузера, путь к Интернету начинается с вашей сетевой карты. Любые проблемы с этого момента — это «соединение», поскольку это связано с синтаксисом ошибок.
Как правило, есть три вещи, которые вы можете сделать, чтобы исправить ошибки ERR_CONNECTION_TIMED_OUT в Windows. Проверьте конфигурацию сети, проверьте файл HOSTS и обновите свой стек DNS и IP. Хотя каждый из них может показаться сложным, на самом деле это довольно просто сделать.
В этом руководстве предполагается, что ваш интернет работает для всего остального, но в вашем браузере обнаружены ошибки ERR_CONNECTION_TIMED_OUT.
Проверьте конфигурацию сети
Ошибки конфигурации сети обычно возникают сразу после обновления сетевого драйвера или значительного обновления Windows.
- На клавиатуре нажать комбинацию клавиш Win+R.
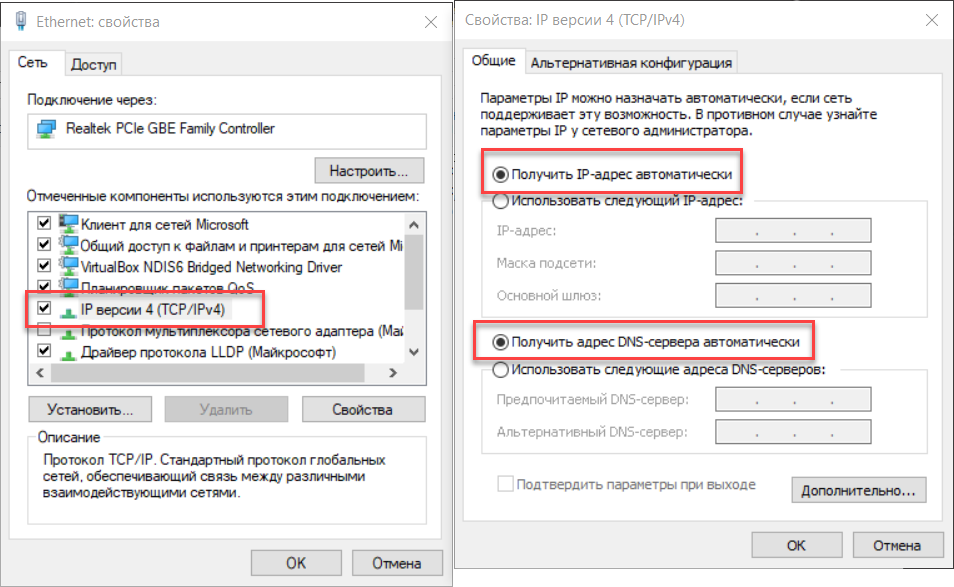
- В открывшемся окне, в поле «Открыть», напечатать или скопировать туда с этой страницы команду «ncpa.cpl«. Нажать клавишу Enter.
- Выберите вашу сетевую карту, щелкните правой кнопкой мыши и выберите Свойства.
- Убедитесь, что у IPv4 есть флажок рядом с ним. Некоторые обновления Windows 10 по какой-то причине отключили IPv4. Это может использовать ошибку.
- Выделите IPv4 и выберите Свойства.
- Убедитесь, что выбран параметр «Получить IP-адрес автоматически», если в вашей сети не настроены статические адреса.

- Если выбрано «Получить IP-адрес автоматически», вернитесь на шаг назад и снимите флажок рядом с IPv4.
- Перезагрузите компьютер, повторите шаги 1-3 и еще раз проверьте поле IPv4, чтобы снова включить его.
- Протестируйте.
Проверьте файл WINDOWS HOSTS
В файле Windows HOSTS происходит блокировка веб-сайта. Этот файл может быть изменен вручную или автоматически программами безопасности, поэтому стоит проверить, есть ли у вас проблемы с подключением к веб-сайту.
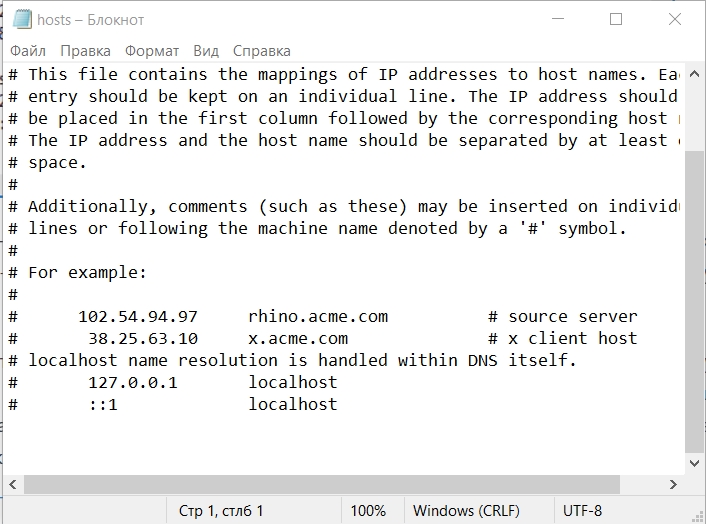
- Перейдите в C:WindowsSystem32driversetc.
- Щелкните правой кнопкой мыши файл HOSTS и выберите «Изменить».
- Проверьте, указаны ли какие-либо веб-сайты в списке или есть какие-либо ошибки в файле. В стандартном файле HOSTS каждая строка должна иметь знак «#». Это означает, что это только для информации и не активно. Моя картинка на картинке выше была изменена, так как я использую свой файл HOSTS для блокировки рекламы вместо использования блокировщика рекламы.
- Если вы удалили какие-либо строки, перезагрузите компьютер и повторите тестирование.
ОБНОВИТЕ СВОЙ СТЕК DNS И IP, ЧТОБЫ ИСПРАВИТЬ ОШИБКИ ERR_CONNECTION_TIMED_OUT
Проблемы с DNS могут вызвать тайм-ауты, поэтому стоит попробовать, если у вас все еще есть проблемы.
- Откройте командную строку от имени администратора.
- Введите «ipconfig /flushdns».
- Введите «ipconfig /registerdns».
- Введите «ipconfig /release».
- Введите «ipconfig /renew».
- Перезагрузите компьютер и повторите попытку.
Наконец, если ни один из этих шагов не исправляет ошибки ERR_CONNECTION_TIMED_OUT, единственный вариант — удалить браузер и заново установить его. В то время как задача последней инстанции, было известно, чтобы сбросить все и заставить ваш интернет работать как надо. Как вы уже пробовали все остальное, это стоит попробовать!
Ошибка ERR_CONNECTION_TIMED_OUT появляется, когда вы открываете какой-то сайт или страницу в социальной сети. Это может произойти на любом веб-сервере, независимо от его популярности, качества и наличия обновлений.
Что это за ошибка ERR_CONNECTION_TIMED_OUT
Когда открывается сайт, ваш ПК обращается к серверу, чтобы отобразить содержимое. На это отводится определенное время, когда оно заканчивается, вам сообщают, что страница недоступна, т.к., время соединения истекло – описание ошибки именно так звучит в переводе.

Ошибка Err connection timed out
Фактически, это означает, что возникли какие-то проблемы на сайте или конкретно с вашим подключением. Причем, ошибка касается только одного ресурса, например, Facebook, а с другими всё в порядке, можно спокойно просмотреть содержимое.
Ошибка может быть вызвана:
- большим количеством одновременных обращений к серверу (чаще всего в играх, а также в определенные периоды, например, в Новогоднюю ночь, когда все поздравляют друг друга в социальных сетях и совершают много одинаковых действий в одно и то же время);
- сбоем маршрутизатора;
- блокировкой антивируса.
Как исправить ошибку ERR_CONNECTION_TIMED_OUT
Есть несколько способов справиться с возникшей проблемой, если только это не связано с самим сайтом. В противном случае лучше написать в службу поддержки.
Сброс интернет-соединения
При появлении CONNECTION_TIMED_OUT_CONNECT первое, что нужно сделать – выключить роутер и оставить его на 1-2 минуты, а затем снова включить. После перезагрузки ситуация может исправиться.
Обновление IP и сброс Winsock
Если первый метод не помог, попробуем менее очевидный:
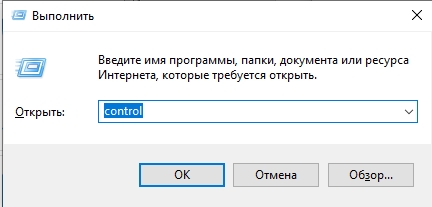
- В «Пуске» найдите Command Line, кликните дополнительной кнопкой мыши и выберите Run As Administrator.
- В поле впишите ipconfig /release + «Enter».
- Не дожидаясь сообщения о ходе операции, наберите также: ipconfig /all + «Enter».
- Затем впишите: ipconfig /flushdns + «Enter».
- Снова не ждите отчета системы, вбивайте: ipconfig /renew + «Enter» и netsh int ip set dns + «Enter» (сохраняйте все знаки и пробелы).
- И, наконец, последняя команда, позволяющая сбросить предустановки Windows Sockets: netsh winsock reset + «Enter».
Перезапустите систему и попробуйте зайти на проблемный сайт, чтобы убедиться, что ошибка исправлена.
Переход на публичные DNS-серверы

Публичные DNS сервера
В этом случае мы воспользуемся серверами, которые предлагает Google:
- Кликните дополнительной кнопкой манипулятора по «Пуску» и нажмите Network connection.
- Найдите название существующего, щелкните по нему дважды и выберите вкладку Properties.
- Здесь нужно развернуть ссылку, подписанную Internet Protocol version 4 и отметить, что вы самостоятельно впишите сервер.
- Вы увидите две строчки: в первую впишите 8.8.8.8., а во вторую — 8.8.4.4.
- Согласитесь с изменениями и перезагрузите ПК.
- Попробуйте открыть сайт.
Если ничто не помогло, обязательно проверьте, не фильтрует ли антивирус сайт, на который вы безуспешно пытаетесь попасть. Откройте настройки брандмауэра и создайте правило для сайта, в котором будет прописано разрешение на установление соединения.
Также блокировать сайт может встроенный брандмауэр Windows. Его можно отключить, если у вас есть антивирус или вписать адрес ресурса в список исключений.
Каждый пользователи сети Интернет сталкивался с ситуацией, когда браузер оповещает сообщением «Превышено время ожидания ответа от сайта» о невозможности посетить тот или иной сайт. Это случалось по разным причинам и решение этой проблемы обязательно будет найдено вами ниже в статье.
Содержание
- Что означает ошибка в браузере ERR_CONNECTION_TIMED_OUT?
- Что делать при сообщении об ошибке превышения времени ожидания ответа от сайта
- Устраняем проблемы в сети и настраиваем её
- Очищаем браузер для правильной работы
Что означает ошибка в браузере ERR_CONNECTION_TIMED_OUT?
В первую очередь, чтобы успешно устранить проблему ERR_CONNECTION_TIMED_OUT – необходимо четко знать причины ее появления, а также некоторые особенности сайтов и браузера. Причины сообщения о превышении времени ожидания ответа от сайта могут появиться как на стороне сервера, так и у клиента в браузере. При совершенном клике на одну из ссылок любого сайта, клиент или попросту ваш браузер посылает на сервер сайта, к которому вы обратились, запрос на отображение в нем (браузере) нужной страницы. Но разработчики решили, что браузер не может ждать вечно ответа от сервера, когда сайт по каким-то причинам не отвечает, он ожидает некоторое время, а затем сообщает пользователю о том, что сайт, к которому вы обращаетесь, не доступен.
Каждый браузер имеет свое время ожидание ответа от сайта. Если истек такой срок ожидания, то браузер выдает сообщение, что сайт не отвечает.
Основные причины оповещения об истекшем сроке ожидания ответа от сервера:
- У пользователя нет интернета, либо настройки произведены неверно.
- «Засоренный» браузер, а также сбитые настройки.
- Ограничение сайта по регионам.
- Причины на стороне сервера. На сайте проводятся профилактические работы. В этом случае, иногда вместо ошибки появляется сообщение о работах и времени их завершения.

Что делать при сообщении об ошибке превышения времени ожидания ответа от сайта
Давайте подробнее рассмотрим варианты, из-за которых браузер оповещает нас об ошибке. Если у вас произошла ошибка только один раз на одном сайте (например: ru.4game.com, www.youtube.com, vk.com, www.twitch.tv, steamcommunity.com, 192.168.0.1), попробуйте просто перезагрузить страницу или обновить ее, нажав F5 или CTRL+F5. Также исключим вариант, когда у вас явные проблемы с интернетом, он у вас отключен.
Устраняем проблемы в сети и настраиваем её
Шаг 1. Проверьте, прежде всего, свое подключение, чтобы убедиться, что ошибка не на вашей стороне. Если все сайты запускаются у вас в браузере, а некоторые нет, тогда перезагрузите роутер. Это можно сделать в его настройках. Также можно попробовать отключить и включить его, если у вас динамический IP-адрес.
Шаг 2. Причиной сообщения может быть очень медленный интернет, такое бывает, когда пользуешься мобильным интернетом в отдаленных регионах с плохим сигналом на компьютере. В этом случае проверьте скорость через онлайн сервисы для измерения скорости передачи и приема пакетов. При неудовлетворительном результате прохождения теста скорости обратитесь к вашему провайдеру за консультацией.

Шаг 3. Не лишним будет просмотреть настройки браузера. В разделе DNS-адрес должны быть указаны корректные данные для вашей сети. В том случае, если адрес не совпадает с тем, что должен быть – удаляйте и заполняйте нужным. Есть вероятность, что ваша система заражена вирусом и самостоятельно перенастраивает пункты меню вашего браузера. В этом случае воспользуйтесь антивирусным ПО. В идеальном варианте, помимо установленных антивирусных программ воспользуйтесь одноразовыми онлайн проверками на вирусы и утилитами от Kaspersky, Dr.Web, Nod32.
Шаг 4. В настройках роутера следует проверить параметр MTU, чтобы устранить «Превышено время ожидания ответа от сайта». Он часто может «слетать». Для разных сетей и роутеров значение разное, необходимо найти в Интернете именно под свою модель и сеть и перенастроить. При неправильных настройках MTU часто невозможно открыть различные социальные сети: Вконтакте, Одноклассники, а также видеохостинг YouTube и т.д. Или их загрузка будет длиться очень долго.
Очищаем браузер для правильной работы
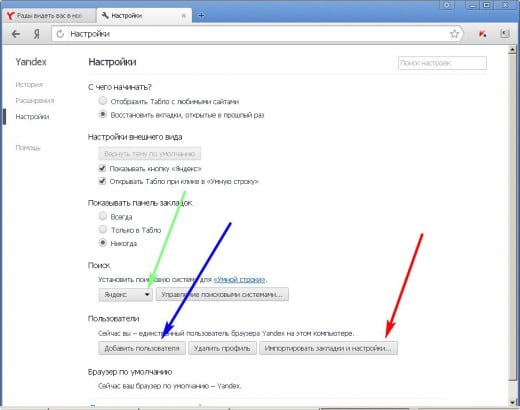
Также уделите особое внимание настройкам браузера. Откройте в настройках кэш и почистите его (очистить кэш в Опере и Гугл Хром), то же самое сделайте с куки.
Следует поиграть с встроенными режимами и другими настройками, а именно: активируйте турбо-режим, потом деактивируйте его. Используйте различные настройки прокси-сервера, включите аппаратное ускорение, если не помогло – ставим назад. Делается это вовсе не потому, что мы не знаем что делать, и используем «метод тыка», а именно потому, что все вышеперечисленные указания могут быть причиной простоя времени ожидания ответа от сервера.
Зайдите в историю браузера и почистите ее. Откройте плагины и дополнения браузера, все неважные и второстепенные – удалите, они не только могут быть причиной ошибки работы браузера, но еще и тормозят его. Все перечисленные причины относятся к стороне клиента, но они также могут появиться и на стороне сервера. Сайт может быть подвержен настройкам и поэтому недоступен посетителям. Попробуйте зайти на форум сайта – многие солидные ресурсы делают форумы отдельно от основных сайтов именно для того, чтобы оповещать пользователей о каких либо событиях на сайте, из-за которых он временно недоступен, например атаки хакеров.