-
denka1991
- Новичок
- Сообщения: 11
- Зарегистрирован: 31 окт 2016, 19:00
Kingston Data Traveler G4. Ошибка при прошивке.
Здравствуйте. Прошу высказать мнения и рекомендации, есть ли выход из сложившейся ситуации.
Флешка фирмы Kingston, модель Data Traveler G4, ёмкость 32 Gb, интерфейс USB 3.0, обратная совместимость с USB 2.0. Время пользования флешкой до её отказа — 1 месяц.
Рабочая флешка была вставлена в старый ноутбук (2008г.) для скачивания файлов, затем после возникшей ошибки при копировании файлов флешка стала защищённой от записи и неформатируемой. После просмотра сайта и форума http://www.usbdev.ru/ флешку прошил программой MPALL_F1_7F00_DL07_v503_0A (BN07V502TAW.BIN, FW07V50253TW.BIN). При прошивке возникла ошибка «CT-Preformat status error 0x5014», флешка стала весить 0 байт и при попытке зайти появляется сообщение «Вставьте диск в устройство «Съёмный диск (G:)».
Параметры флешки ДО прошивки MPALL:
Controller: Phison PS2307
Possible Memory Chip(s): Not available
Flash ID: AD3A18A3 6125
Chip F/W: 05.00.50
Firmware Date: 2016-01-14
ID_BLK Ver.: 1.3.13.0
MP Ver.: MPALL v3.13.00
VID: 0951
PID: 1666
Manufacturer: Kingston
Product: silicon power
Query Vendor ID: Kingston
Query Product ID: silicon power
Query Product Revision: PMAP
Physical Disk Capacity: 31043616768 Bytes
Windows Disk Capacity: 31026741248 Bytes
Internal Tags: 2Q6P-S74J
File System: FAT32
Relative Offset: 4032 KB
USB Version: 3.00 in 2.00 port
Declared Power: 300 mA
ContMeas ID: 0BFC-01-00.
Параметры флешки ПОСЛЕ прошивки MPALL:
Controller: Phison PS2307
Possible Memory Chip(s): Not available
Flash ID: AD3A18A3 6125
Chip F/W: 05.02.41
Firmware Date: 2016-02-03
MP Ver.: MPALL vFF.FF.FF
VID: 13FE
PID: 5100
Manufacturer: Phison
Product: 2307 FW BURNER
Query Vendor ID:
Query Product ID: USB DISK 30X
Query Product Revision: 1.00
Physical Disk Capacity: 0 Bytes
Windows Disk Capacity: 0 Bytes
Internal Tags: 4RYF-LTMJ
USB Version: 3.00 in 2.00 port
Declared Power: 100 mA
ContMeas ID: 0BFC-02-00.
-
denka1991
- Новичок
- Сообщения: 11
- Зарегистрирован: 31 окт 2016, 19:00
Kingston Data Traveler G4. Ошибка при прошивке.
Сообщение
denka1991 » 01 ноя 2016, 14:37
После подключения в главном окне программы Phison UP Tool флешка обнаруживается с ошибкой (запись на красном фоне, а не на голубом):
### Flash Fail 1 ###
### Err: 0003, (67,0,-1,1) ###
Далее после установки параметров и старта прошивки после 22 секунд появляется следующая ошибка:
### Flash Fail 1 ###
### Err: 0082, ASIC Jump Error ###
Скажите, существуют другие способы восстановления работоспособности флешки? Или стоит бросить это «гиблое» дело?
-
Long_Dog
- Новичок
- Сообщения: 6
- Зарегистрирован: 14 окт 2016, 22:10
Kingston Data Traveler G4. Ошибка при прошивке.
Сообщение
Long_Dog » 01 ноя 2016, 16:33
Флешку в тестовый режим переводил?
У меня была аналогичная ситуация, только с DT100G3. Много раз переподключал, только на раз 20 появилась надпись на синем фоне и удалось восстановить. Так что пробуй еще ![]() и, скорее всего, все получится
и, скорее всего, все получится ![]() Сам уже потерял всякие надежды на восстановление, но…терпение и труд все перетрут
Сам уже потерял всякие надежды на восстановление, но…терпение и труд все перетрут
Отправлено спустя 1 минуту 14 секунд:
ТОЛЬКО ПОДКЛЮЧАТЬ НАДО В ТЕСТОВОМ РЕЖИМЕ!!!
-

DesignerMix
- Администратор

- Сообщения: 7010
- Зарегистрирован: 25 апр 2014, 10:51
- Откуда: Белгород
- Контактная информация:

-
denka1991
- Новичок
- Сообщения: 11
- Зарегистрирован: 31 окт 2016, 19:00
Kingston Data Traveler G4. Ошибка при прошивке.
Сообщение
denka1991 » 02 ноя 2016, 15:12
Long_Dog, DesignerMix,
после подключения флешки в тестовом режиме (замкнул выводы 29 и 30 микросхемы памяти), флешка определилась компьютером.
Запустив форматирование в программе UPTool, по истечении 1 часа выскочила след. ошибка (на красном фоне):
UP307,,Hynix16-TLC (2CE) (TLC.16K)-32GB[2/1]
(Size:7810 MB) 01:00:06
### Err:1106 ### D1-2P [0000.000V].
-
DesignerMix
- Администратор
- Сообщения: 7010
- Зарегистрирован: 25 апр 2014, 10:51
- Откуда: Белгород
- Контактная информация:
Kingston Data Traveler G4. Ошибка при прошивке.
Сообщение
DesignerMix » 02 ноя 2016, 20:01
denka1991,
denka1991 писал(а): поменяв в настройках программы Phison UP Tool параметр ECC (было 8, стало 12), возникает та же ошибка.
А не пробовали делать высокоуровневое форматирование вместо низкоуровневого?
denka1991 писал(а): Подскажите, для прошивки в программе Phison MPALL v5.03.0A-DL07 какие файлы прошивки использовать?
Так как контроллер у вас Phison PS2307 то имена прошивок и бернеров должны начинаться с 07 BN07* или FW07*. Прошивку стоит выбирать либо по маске FWxxFF01xxx50.BIN либо FWxxFF01Vxxx53.BIN (последняя для памяти произведенной по технологии eD3, но я не уверен что у вас именно такая, хотя я выше прилагал код из файла утилиты для прошивки где есть комментарий что она eD3)
- Правила форума
- История изменений форума
- Мой YouTube-канал
-
DesignerMix
- Администратор
- Сообщения: 7010
- Зарегистрирован: 25 апр 2014, 10:51
- Откуда: Белгород
- Контактная информация:
Kingston Data Traveler G4. Ошибка при прошивке.
Сообщение
DesignerMix » 02 ноя 2016, 23:17
В общем я подключился к компьютеру автора темы удаленно и попробовал различные прошивки, и программы, самой подходящей (ее кстати посоветовали автору темы и на usbdev) оказалась программа Phison UPTool v2.093_20150312 которую я подобрал в самом начале темы, она корректно определяет флешку, работает с контроллером и видит всю память. Я сменил настройки ECC на 9 и запустил процесс восстановления, но ждать времени не было, так что ушел. Думаю что автор темы потом напишет здесь к чему это привело, хотя шансов на восстановление как мне кажется мало, думаю память таки сильно повреждена.
- Правила форума
- История изменений форума
- Мой YouTube-канал
-
Long_Dog
- Новичок
- Сообщения: 6
- Зарегистрирован: 14 окт 2016, 22:10
Kingston Data Traveler G4. Ошибка при прошивке.
Сообщение
Long_Dog » 03 ноя 2016, 08:47
denka1991 писал(а): Long_Dog, DesignerMix,
после подключения флешки в тестовом режиме (замкнул выводы 29 и 30 микросхемы памяти), флешка определилась компьютером.
Запустив форматирование в программе UPTool, по истечении 1 часа выскочила след. ошибка (на красном фоне):
UP307,,Hynix16-TLC (2CE) (TLC.16K)-32GB[2/1]
(Size:7810 MB) 01:00:06
### Err:1106 ### D1-2P [0000.000V].
Действительно, скорее всего, память полетела окончательно… ![]() У меня если вылетали ошибки, то только на 3%…затем заново запускал восстановление и все проходило успешно…и еще интересно, что до ошибки проходил целый час…у меня 16GB восстановило минут за 12…
У меня если вылетали ошибки, то только на 3%…затем заново запускал восстановление и все проходило успешно…и еще интересно, что до ошибки проходил целый час…у меня 16GB восстановило минут за 12… ![]()
-
denka1991
- Новичок
- Сообщения: 11
- Зарегистрирован: 31 окт 2016, 19:00
Kingston Data Traveler G4. Ошибка при прошивке.
Сообщение
denka1991 » 03 ноя 2016, 10:58
Сообщаю о результатах. С момента старта прошивки (Low Level Format, Fast Smart Test) прошло 12 часов, и показывает также как и вначале старта 3% Complete.
Думаю, смысла ожидать более нет. Ещё раз благодарю за советы и помощь DesignerMix и Long_Dog.
-
Long_Dog
- Новичок
- Сообщения: 6
- Зарегистрирован: 14 окт 2016, 22:10
Kingston Data Traveler G4. Ошибка при прошивке.
Сообщение
Long_Dog » 04 ноя 2016, 08:36
Попробуй заново поставить UPTool и запустить на восстановление. Позавчера была ситуация, что утилита распознавала сломанную флешку только на красном фоне, думал уже все…допрошивался. Потом вставил рабочую флешку, и она также определялась только на красном фоне. Переустановил утилиту и все заработало.(Не знаю, чем это вызвано, но может быть поможет в качестве последней надежды). Еще можно попробовать другую версию утилиты.
-
Powershell
- Новичок
- Сообщения: 7
- Зарегистрирован: 05 апр 2016, 19:12
Kingston Data Traveler G4. Ошибка при прошивке.
Сообщение
Powershell » 30 май 2017, 15:11
Отправлено спустя 2 минуты 29 секунд:
Отправлено спустя 7 минут 2 секунды:
О, друзья! Вчера случилось все то же, что у топикстартера: просто копировались фильмы на флешку. Вылетела ошибка записи.
Через несколько попыток стала read only. Еще через какое-то время стала определяться в девайсах не как Kingston, а USB DISK 30X.
Controller: Phison PS2307
Possible Memory Chip(s): Not available
Chip F/W: 05.00.50
Firmware Date: 2016-01-14
VID: 13FE
PID: 5100
Manufacturer:
Product: USB DISK 30X
Query Vendor ID:
Query Product ID: USB DISK 30X
Query Product Revision: 1.00
Physical Disk Capacity: 0 Bytes
Windows Disk Capacity: 0 Bytes
Internal Tags: 8RYF-AADG
Если еще кто-то заглядывает в эту ветку: стоит ли ее помучить, или сразу отправить на кладбище? Покупалась в Лос-Анжелесе (Walmart).
PS: И отдельное мысленное спасибо DesignerMix — удивляюсь, как он может спокойно, вежливо, без мата помогать десяткам людей с их проблемами ![]()
-
Powershell
- Новичок
- Сообщения: 7
- Зарегистрирован: 05 апр 2016, 19:12
Kingston Data Traveler G4. Ошибка при прошивке.
Сообщение
Powershell » 30 май 2017, 21:30
Спасибо за ответ ![]()
Замыкание ног 14+15, 22+23, 23+24 результатов не дало, а 4+5 сработало. Вот и отчет:
Controller: Phison PS2307
Possible Memory Chip(s):
Hynix H27UDG8M2MTR
Memory Type: TLC
Flash ID: AD3A18A3 6125
Chip F/W: 01.05.10
Firmware Date: 2015-04-24
MP Ver.: MPALL vFF.FF.FF
VID: 13FE
PID: 5500
Manufacturer: Phison
Product: 2307 Boot ROM
Query Vendor ID:
Query Product ID: 2307 PRAM
Query Product Revision: 1.00
Physical Disk Capacity: 0 Bytes
Windows Disk Capacity: 0 Bytes
Internal Tags: 2RAF-AV9G
USB Version: 2.00
Declared Power: 100 mA
ContMeas ID: 7568-02-00
Содержание
- Статусы ASIC и устранение ошибок
- Основные ошибки в работе ASIC-майнера
- Antminer t9+ некоректно работает
- Gavreda
Статусы ASIC и устранение ошибок
ASIC-майнеры настроены на довольно быструю и эффективную добычу криптовалюты и стали популярны. Однако в их работе случаются сбои – падает хешрейт, нагревается оборудование, возможно возникновение серьезных ситуаций, таких как пожар. Чтобы не допустить этого, нужно постоянно мониторить статус ASIC, понимать его значение.
Основные ошибки в работе ASIC-майнера
Структура ASIC-майнера состоит из нескольких частей – программного и аппаратного обеспечения. Программное обеспечение помогает управлять деталями оборудования и способно отслеживать напряжение электрического тока, а также интенсивность охлаждения, и сообщать о возможных неисправностях. Аппаратное обеспечение состоит из блока питания и вентиляторов, микропроцессоров и плат, блока памяти.
Одна из важнейших ошибок, о которых сообщает программное обеспечение, это “DISABLED”. Статус означает, что майнинг остановлен в связи с поломкой во избежание перегрева деталей. Нужно найти поломку и устранить ее. Чтобы возобновить майнинг после ремонта, необходимо дать команду “mining start”. Если оборудование непригодно для восстановления, то можно купить ASIC у нас.
- ERROR_TEMP_LOST означает потерю датчика температуры. После того, как определитель теряется 2 раза и более, майнинг останавливается во избежание перегрева.
- ERROR_EEPROM_INFO появляется при ошибке чтения. Чтобы устранить сбой, надо перепрошить EEPROM.
- ERROR_SOC_INIT означает ошибку инициализации драйвера из-за поломки аппаратной части или проблем с программным обеспечением – несоответствия его модели майнера или неправильной установки. Необходима диагностика аппаратной части и переустановка программного обеспечения или использование предыдущей его версии.
- ERROR_POWER_LOST означает проблемы с блоком питания из-за его поломки или программное обеспечение его не опознает.
- ERROR_FAN_LOST – это выход из строя кулера или дефект датчика.
- ERROR_TEMP_TOO_LOW. Буквально статус означает низкую температуру. Проблема кроется в программном обеспечении либо потере датчика температуры.
- SUSPENDED – статус, при котором требуется перезагрузка.
- TUNING означает проведение тюнинга, при котором скорость добычи криптовалюты может снизиться.
Если какая-то деталь не подлежит восстановлению, то купить все для майнинга вы сможете у нас.
Источник
Antminer t9+ некоректно работает
Gavreda
Новичок
0.000000] Booting Linux on physical CPU 0x0
[ 0.000000] Linux version 3.14.0-xilinx-gb190cb0-dirty ([email protected]) (gcc version 4.8.3 20140320 (prerelease) (Sourcery CodeBench Lite 2014.05-23) ) #57 SMP PREEMPT Fri Dec 9 14:49:22 CST 2016
[ 0.000000] CPU: ARMv7 Processor [413fc090] revision 0 (ARMv7), cr=18c5387d
[ 0.000000] CPU: PIPT / VIPT nonaliasing data cache, VIPT aliasing instruction cache
[ 0.000000] Machine model: Xilinx Zynq
[ 0.000000] cma: CMA: reserved 128 MiB at 27800000
[ 0.000000] Memory policy: Data cache writealloc
[ 0.000000] On node 0 totalpages: 258048
[ 0.000000] free_area_init_node: node 0, pgdat c0740a40, node_mem_map e6fd8000
[ 0.000000] Normal zone: 1520 pages used for memmap
[ 0.000000] Normal zone: 0 pages reserved
[ 0.000000] Normal zone: 194560 pages, LIFO batch:31
[ 0.000000] HighMem zone: 496 pages used for memmap
[ 0.000000] HighMem zone: 63488 pages, LIFO batch:15
[ 0.000000] PERCPU: Embedded 8 pages/cpu @e6fc0000 s9088 r8192 d15488 u32768
[ 0.000000] pcpu-alloc: s9088 r8192 d15488 u32768 alloc=8*4096
[ 0.000000] pcpu-alloc: [0] 0 [0] 1
[ 0.000000] Built 1 zonelists in Zone order, mobility grouping on. Total pages: 256528
[ 0.000000] Kernel command line: noinitrd mem=1008M console=ttyPS0,115200 root=ubi0:rootfs ubi.mtd=1 rootfstype=ubifs rw rootwait
[ 0.000000] PID hash table entries: 4096 (order: 2, 16384 bytes)
[ 0.000000] Dentry cache hash table entries: 131072 (order: 7, 524288 bytes)
[ 0.000000] Inode-cache hash table entries: 65536 (order: 6, 262144 bytes)
[ 0.000000] Memory: 884148K/1032192K available (5032K kernel code, 283K rwdata, 1916K rodata, 204K init, 258K bss, 148044K reserved, 253952K highmem)
[ 0.000000] Virtual kernel memory layout:
[ 0.000000] vector : 0xffff0000 — 0xffff1000 ( 4 kB)
[ 0.000000] fixmap : 0xfff00000 — 0xfffe0000 ( 896 kB)
[ 0.000000] vmalloc : 0xf0000000 — 0xff000000 ( 240 MB)
[ 0.000000] lowmem : 0xc0000000 — 0xef800000 ( 760 MB)
[ 0.000000] pkmap : 0xbfe00000 — 0xc0000000 ( 2 MB)
[ 0.000000] modules : 0xbf000000 — 0xbfe00000 ( 14 MB)
[ 0.000000] .text : 0xc0008000 — 0xc06d1374 (6949 kB)
[ 0.000000] .init : 0xc06d2000 — 0xc0705380 ( 205 kB)
[ 0.000000] .data : 0xc0706000 — 0xc074cf78 ( 284 kB)
[ 0.000000] .bss : 0xc074cf84 — 0xc078d9fc ( 259 kB)
[ 0.000000] Preemptible hierarchical RCU implementation.
[ 0.000000] Dump stacks of tasks blocking RCU-preempt GP.
[ 0.000000] RCU restricting CPUs from NR_CPUS=4 to nr_cpu_ids=2.
[ 0.000000] RCU: Adjusting geometry for rcu_fanout_leaf=16, nr_cpu_ids=2
[ 0.000000] NR_IRQS:16 nr_irqs:16 16
[ 0.000000] ps7-slcr mapped to f0004000
[ 0.000000] zynq_clock_init: clkc starts at f0004100
[ 0.000000] Zynq clock init
[ 0.000014] sched_clock: 64 bits at 333MHz, resolution 3ns, wraps every 3298534883328ns
[ 0.000290] ps7-ttc #0 at f0006000, irq=43
[ 0.000590] Console: colour dummy device 80×30
[ 0.000625] Calibrating delay loop. 1325.46 BogoMIPS (lpj=6627328)
[ 0.040200] pid_max: default: 32768 minimum: 301
[ 0.040414] Mount-cache hash table entries: 2048 (order: 1, 8192 bytes)
[ 0.040436] Mountpoint-cache hash table entries: 2048 (order: 1, 8192 bytes)
[ 0.042547] CPU: Testing write buffer coherency: ok
[ 0.042882] CPU0: thread -1, cpu 0, socket 0, mpidr 80000000
[ 0.042942] Setting up static identity map for 0x4c4af8 — 0x4c4b50
[ 0.043160] L310 cache controller enabled
[ 0.043178] l2x0: 8 ways, CACHE_ID 0x410000c8, AUX_CTRL 0x72760000, Cache size: 512 kB
[ 0.120988] CPU1: Booted secondary processor
[ 0.210220] CPU1: thread -1, cpu 1, socket 0, mpidr 80000001
[ 0.210348] Brought up 2 CPUs
[ 0.210367] SMP: Total of 2 processors activated.
[ 0.210375] CPU: All CPU(s) started in SVC mode.
[ 0.211031] devtmpfs: initialized
[ 0.213407] VFP support v0.3: implementor 41 architecture 3 part 30 variant 9 rev 4
[ 0.214594] regulator-dummy: no parameters
[ 0.222019] NET: Registered protocol family 16
[ 0.224312] DMA: preallocated 256 KiB pool for atomic coherent allocations
[ 0.226555] cpuidle: using governor ladder
[ 0.226569] cpuidle: using governor menu
[ 0.233899] syscon f8000000.ps7-slcr: regmap [mem 0xf8000000-0xf8000fff] registered
[ 0.235398] hw-breakpoint: found 5 (+1 reserved) breakpoint and 1 watchpoint registers.
[ 0.235411] hw-breakpoint: maximum watchpoint size is 4 bytes.
[ 0.235524] zynq-ocm f800c000.ps7-ocmc: ZYNQ OCM pool: 256 KiB @ 0xf0080000
[ 0.257084] bio: create slab at 0
[ 0.258474] vgaarb: loaded
[ 0.259176] SCSI subsystem initialized
[ 0.260036] usbcore: registered new interface driver usbfs
[ 0.260608] usbcore: registered new interface driver hub
[ 0.260847] usbcore: registered new device driver usb
[ 0.262173] media: Linux media interface: v0.10
[ 0.262331] Linux video capture interface: v2.00
[ 0.262572] pps_core: LinuxPPS API ver. 1 registered
[ 0.262584] pps_core: Software ver. 5.3.6 — Copyright 2005-2007 Rodolfo Giometti [email protected] >
[ 0.262706] PTP clock support registered
[ 0.263052] EDAC MC: Ver: 3.0.0
[ 0.264093] Advanced Linux Sound Architecture Driver Initialized.
[ 0.266793] DMA-API: preallocated 4096 debug entries
[ 0.266808] DMA-API: debugging enabled by kernel config
[ 0.266883] Switched to clocksource arm_global_timer
[ 0.286180] NET: Registered protocol family 2
[ 0.286838] TCP established hash table entries: 8192 (order: 3, 32768 bytes)
[ 0.287000] TCP bind hash table entries: 8192 (order: 4, 65536 bytes)
[ 0.287160] TCP: Hash tables configured (established 8192 bind 8192)
[ 0.287223] TCP: reno registered
[ 0.287242] UDP hash table entries: 512 (order: 2, 16384 bytes)
[ 0.287292] UDP-Lite hash table entries: 512 (order: 2, 16384 bytes)
[ 0.287559] NET: Registered protocol family 1
[ 0.287913] RPC: Registered named UNIX socket transport module.
[ 0.287925] RPC: Registered udp transport module.
[ 0.287934] RPC: Registered tcp transport module.
[ 0.287942] RPC: Registered tcp NFSv4.1 backchannel transport module.
[ 0.287955] PCI: CLS 0 bytes, default 64
[ 0.288385] hw perfevents: enabled with ARMv7 Cortex-A9 PMU driver, 7 counters available
[ 0.290391] futex hash table entries: 512 (order: 3, 32768 bytes)
[ 0.291749] bounce pool size: 64 pages
[ 0.292622] jffs2: version 2.2. (NAND) © 2001-2006 Red Hat, Inc.
[ 0.292834] msgmni has been set to 1486
[ 0.293593] io scheduler noop registered
[ 0.293606] io scheduler deadline registered
[ 0.293661] io scheduler cfq registered (default)
[ 0.304797] dma-pl330 f8003000.ps7-dma: Loaded driver for PL330 DMAC-2364208
[ 0.304817] dma-pl330 f8003000.ps7-dma: DBUFF-128x8bytes Num_Chans-8 Num_Peri-4 Num_Events-16
[ 0.428548] e0001000.serial: ttyPS0 at MMIO 0xe0001000 (irq = 82, base_baud = 3124999) is a xuartps
[ 1.001602] console [ttyPS0] enabled
[ 1.005862] xdevcfg f8007000.ps7-dev-cfg: ioremap 0xf8007000 to f0068000
[ 1.013485] [drm] Initialized drm 1.1.0 20060810
[ 1.030441] brd: module loaded
[ 1.039777] loop: module loaded
[ 1.049297] e1000e: Intel(R) PRO/1000 Network Driver — 2.3.2-k
[ 1.055045] e1000e: Copyright(c) 1999 — 2013 Intel Corporation.
[ 1.062830] libphy: XEMACPS mii bus: probed
[ 1.067525] ————- phy_id = 0x3625e62
[ 1.072276] xemacps e000b000.ps7-ethernet: pdev->id -1, baseaddr 0xe000b000, irq 54
[ 1.080907] ehci_hcd: USB 2.0 ‘Enhanced’ Host Controller (EHCI) Driver
[ 1.087580] ehci-pci: EHCI PCI platform driver
[ 1.094788] zynq-dr e0002000.ps7-usb: Unable to init USB phy, missing?
[ 1.101607] usbcore: registered new interface driver usb-storage
[ 1.108445] mousedev: PS/2 mouse device common for all mice
[ 1.114528] i2c /dev entries driver
[ 1.121402] zynq-edac f8006000.ps7-ddrc: ecc not enabled
[ 1.126901] cpufreq_cpu0: failed to get cpu0 regulator: -19
[ 1.132776] Xilinx Zynq CpuIdle Driver started
[ 1.137636] sdhci: Secure Digital Host Controller Interface driver
[ 1.143728] sdhci: Copyright(c) Pierre Ossman
[ 1.148141] sdhci-pltfm: SDHCI platform and OF driver helper
[ 1.154867] mmc0: no vqmmc regulator found
[ 1.158908] mmc0: no vmmc regulator found
[ 1.196902] mmc0: SDHCI controller on e0100000.ps7-sdio [e0100000.ps7-sdio] using ADMA
[ 1.205570] usbcore: registered new interface driver usbhid
[ 1.211087] usbhid: USB HID core driver
[ 1.215780] nand: device found, Manufacturer ID: 0x2c, Chip ID: 0xda
[ 1.222078] nand: Micron MT29F2G08ABAEAWP
[ 1.226044] nand: 256MiB, SLC, page size: 2048, OOB size: 64
[ 1.231979] Bad block table found at page 131008, version 0x01
[ 1.238201] Bad block table found at page 130944, version 0x01
[ 1.244253] 3 ofpart partitions found on MTD device pl353-nand
[ 1.250035] Creating 3 MTD partitions on «pl353-nand»:
[ 1.255130] 0x000000000000-0x000002000000 : «BOOT.bin-env-dts-kernel»
[ 1.263158] 0x000002000000-0x00000b000000 : «angstram-rootfs»
[ 1.270474] 0x00000b000000-0x000010000000 : «upgrade-rootfs»
[ 1.279374] TCP: cubic registered
[ 1.282612] NET: Registered protocol family 17
[ 1.287317] Registering SWP/SWPB emulation handler
[ 1.293199] regulator-dummy: disabling
[ 1.297532] UBI: attaching mtd1 to ubi0
[ 1.821974] UBI: scanning is finished
[ 1.833559] UBI: attached mtd1 (name «angstram-rootfs», size 144 MiB) to ubi0
[ 1.840639] UBI: PEB size: 131072 bytes (128 KiB), LEB size: 126976 bytes
[ 1.847402] UBI: min./max. I/O unit sizes: 2048/2048, sub-page size 2048
[ 1.854066] UBI: VID header offset: 2048 (aligned 2048), data offset: 4096
[ 1.860945] UBI: good PEBs: 1152, bad PEBs: 0, corrupted PEBs: 0
[ 1.866925] UBI: user volume: 1, internal volumes: 1, max. volumes count: 128
[ 1.874032] UBI: max/mean erase counter: 39/22, WL threshold: 4096, image sequence number: 1984962504
[ 1.883249] UBI: available PEBs: 0, total reserved PEBs: 1152, PEBs reserved for bad PEB handling: 40
[ 1.892464] UBI: background thread «ubi_bgt0d» started, PID 1080
[ 1.892469] drivers/rtc/hctosys.c: unable to open rtc device (rtc0)
[ 1.896361] ALSA device list:
[ 1.896364] No soundcards found.
[ 1.912799] UBIFS: background thread «ubifs_bgt0_0» started, PID 1082
[ 1.941657] UBIFS: recovery needed
[ 2.021904] UBIFS: recovery completed
[ 2.025567] UBIFS: mounted UBI device 0, volume 0, name «rootfs»
[ 2.031513] UBIFS: LEB size: 126976 bytes (124 KiB), min./max. I/O unit sizes: 2048 bytes/2048 bytes
[ 2.040625] UBIFS: FS size: 128626688 bytes (122 MiB, 1013 LEBs), journal size 9023488 bytes (8 MiB, 72 LEBs)
[ 2.050509] UBIFS: reserved for root: 0 bytes (0 KiB)
[ 2.055538] UBIFS: media format: w4/r0 (latest is w4/r0), UUID 56FDF5FA-8D29-4AA7-95D4-1C2E28C7C4E9, small LPT model
[ 2.067069] VFS: Mounted root (ubifs filesystem) on device 0:11.
[ 2.074458] devtmpfs: mounted
[ 2.077588] Freeing unused kernel memory: 204K (c06d2000 — c0705000)
[ 2.915746] random: dd urandom read with 0 bits of entropy available
[ 3.326901]
[ 3.326901] bcm54xx_config_init
[ 3.936927]
[ 3.936927] bcm54xx_config_init
[ 7.937769] xemacps e000b000.ps7-ethernet: Set clk to 24999999 Hz
[ 7.943855] xemacps e000b000.ps7-ethernet: link up (100/FULL)
[ 22.988280] In axi fpga driver!
[ 22.991346] request_mem_region OK!
[ 22.994736] AXI fpga dev virtual address is 0xf01fe000
[ 22.999874] *base_vir_addr = 0xc51e
[ 23.014397] In fpga mem driver!
[ 23.018178] request_mem_region OK!
[ 23.021684] fpga mem virtual address is 0xf3000000
[ 23.776204]
[ 23.776204] bcm54xx_config_init
[ 24.406130]
[ 24.406130] bcm54xx_config_init
[ 28.406523] xemacps e000b000.ps7-ethernet: Set clk to 24999999 Hz
[ 28.412540] xemacps e000b000.ps7-ethernet: link up (100/FULL)
[ 1150.046952] random: nonblocking pool is initialized
This is user mode for mining
Detect 1GB control board of XILINX
Miner Type = S9
Miner compile time: Sun Nov 2 11:55:42 UTC 2018 type: Antminer S9set_reset_allhashboard = 0x0000ffff
set_reset_allhashboard = 0x00000000
set_reset_allhashboard = 0x0000ffff
miner ID : 81126c411375885c
set_reset_allhashboard = 0x0000ffff
chain[5]: [63:255] [63:255] [63:255] [63:255] [63:255] [63:255] [63:255] [63:255]
Check chain[5] PIC fw version=0x03
chain[6]: [63:255] [63:255] [63:255] [63:255] [63:255] [63:255] [63:255] [63:255]
Check chain[6] PIC fw version=0x03
chain[7]: [63:255] [63:255] [63:255] [63:255] [63:255] [63:255] [63:255] [63:255]
Check chain[7] PIC fw version=0x03
Fix freq=650 Chain[5] voltage_pic=108 value=880
Fix freq=650 Chain[6] voltage_pic=108 value=880
Fix freq=650 Chain[7] voltage_pic=108 value=880
set_reset_allhashboard = 0x0000ffff
set_reset_allhashboard = 0x00000000
Chain[J6] has 63 asic
Chain[J7] has 63 asic
Chain[J8] has 63 asic
Chain[J6] has no freq in PIC, set default freq=650M
Chain[J6] has no core num in PIC
Chain[J7] has no freq in PIC, set default freq=650M
Chain[J7] has no core num in PIC
Chain[J8] has no freq in PIC, set default freq=650M
Chain[J8] has no core num in PIC
Miner fix freq .
read PIC voltage=940 on chain[5]
Chain:5 chipnum=63
Asic[ 0]:650
Asic[ 1]:650 Asic[ 2]:650 Asic[ 3]:650 Asic[ 4]:650 Asic[ 5]:650 Asic[ 6]:650 Asic[ 7]:650 Asic[ 8]:650
Asic[ 9]:650 Asic[10]:650 Asic[11]:650 Asic[12]:650 Asic[13]:650 Asic[14]:650 Asic[15]:650 Asic[16]:650
Asic[17]:650 Asic[18]:650 Asic[19]:650 Asic[20]:650 Asic[21]:650 Asic[22]:650 Asic[23]:650 Asic[24]:650
Asic[25]:650 Asic[26]:650 Asic[27]:650 Asic[28]:650 Asic[29]:650 Asic[30]:650 Asic[31]:650 Asic[32]:650
Asic[33]:650 Asic[34]:650 Asic[35]:650 Asic[36]:650 Asic[37]:650 Asic[38]:650 Asic[39]:650 Asic[40]:650
Asic[41]:650 Asic[42]:650 Asic[43]:650 Asic[44]:650 Asic[45]:650 Asic[46]:650 Asic[47]:650 Asic[48]:650
Asic[49]:650 Asic[50]:650 Asic[51]:650 Asic[52]:650 Asic[53]:650 Asic[54]:650 Asic[55]:650 Asic[56]:650
Asic[57]:650 Asic[58]:650 Asic[59]:650 Asic[60]:650 Asic[61]:650 Asic[62]:650
Chain:5 max freq=650
Chain:5 min freq=650
read PIC voltage=940 on chain[6]
Chain:6 chipnum=63
Asic[ 0]:650
Asic[ 1]:650 Asic[ 2]:650 Asic[ 3]:650 Asic[ 4]:650 Asic[ 5]:650 Asic[ 6]:650 Asic[ 7]:650 Asic[ 8]:650
Asic[ 9]:650 Asic[10]:650 Asic[11]:650 Asic[12]:650 Asic[13]:650 Asic[14]:650 Asic[15]:650 Asic[16]:650
Asic[17]:650 Asic[18]:650 Asic[19]:650 Asic[20]:650 Asic[21]:650 Asic[22]:650 Asic[23]:650 Asic[24]:650
Asic[25]:650 Asic[26]:650 Asic[27]:650 Asic[28]:650 Asic[29]:650 Asic[30]:650 Asic[31]:650 Asic[32]:650
Asic[33]:650 Asic[34]:650 Asic[35]:650 Asic[36]:650 Asic[37]:650 Asic[38]:650 Asic[39]:650 Asic[40]:650
Asic[41]:650 Asic[42]:650 Asic[43]:650 Asic[44]:650 Asic[45]:650 Asic[46]:650 Asic[47]:650 Asic[48]:650
Asic[49]:650 Asic[50]:650 Asic[51]:650 Asic[52]:650 Asic[53]:650 Asic[54]:650 Asic[55]:650 Asic[56]:650
Asic[57]:650 Asic[58]:650 Asic[59]:650 Asic[60]:650 Asic[61]:650 Asic[62]:650
Chain:6 max freq=650
Chain:6 min freq=650
read PIC voltage=940 on chain[7]
Chain:7 chipnum=63
Asic[ 0]:650
Asic[ 1]:650 Asic[ 2]:650 Asic[ 3]:650 Asic[ 4]:650 Asic[ 5]:650 Asic[ 6]:650 Asic[ 7]:650 Asic[ 8]:650
Asic[ 9]:650 Asic[10]:650 Asic[11]:650 Asic[12]:650 Asic[13]:650 Asic[14]:650 Asic[15]:650 Asic[16]:650
Asic[17]:650 Asic[18]:650 Asic[19]:650 Asic[20]:650 Asic[21]:650 Asic[22]:650 Asic[23]:650 Asic[24]:650
Asic[25]:650 Asic[26]:650 Asic[27]:650 Asic[28]:650 Asic[29]:650 Asic[30]:650 Asic[31]:650 Asic[32]:650
Asic[33]:650 Asic[34]:650 Asic[35]:650 Asic[36]:650 Asic[37]:650 Asic[38]:650 Asic[39]:650 Asic[40]:650
Asic[41]:650 Asic[42]:650 Asic[43]:650 Asic[44]:650 Asic[45]:650 Asic[46]:650 Asic[47]:650 Asic[48]:650
Asic[49]:650 Asic[50]:650 Asic[51]:650 Asic[52]:650 Asic[53]:650 Asic[54]:650 Asic[55]:650 Asic[56]:650
Asic[57]:650 Asic[58]:650 Asic[59]:650 Asic[60]:650 Asic[61]:650 Asic[62]:650
Chain:7 max freq=650
Chain:7 min freq=650
max freq = 650
set baud=1
Chain[J6] PIC temp offset=62,0,0,0,0,0,38,28
chain[5] temp chip I2C addr=0x9a
chain[5] has no middle temp, use special fix mode.
Chain[J6] chip[244] use PIC middle temp offset=0 typeID=55
New offset Chain[5] chip[244] local:47 remote:51 offset:28
Chain[J6] chip[244] get middle temp offset=28 typeID=55
Chain[J7] PIC temp offset=62,0,0,0,0,0,38,28
chain[6] temp chip I2C addr=0x9a
chain[6] has no middle temp, use special fix mode.
Chain[J7] chip[244] use PIC middle temp offset=0 typeID=55
New offset Chain[6] chip[244] local:45 remote:47 offset:30
Chain[J7] chip[244] get middle temp offset=30 typeID=55
Chain[J8] PIC temp offset=62,0,0,0,0,0,38,28
chain[7] temp chip I2C addr=0x9a
chain[7] has no middle temp, use special fix mode.
Chain[J8] chip[244] use PIC middle temp offset=0 typeID=55
New offset Chain[7] chip[244] local:44 remote:47 offset:29
Chain[J8] chip[244] get middle temp offset=29 typeID=55
Chain[J6] set working voltage=880 [108]
Chain[J7] set working voltage=880 [108]
Chain[J8] set working voltage=880 [108]
setStartTimePoint total_tv_start_sys=6085 total_tv_end_sys=6086
restartNum = 2 , auto-reinit enabled.
do read_temp_func once.
do check_asic_reg 0x08
get RT hashrate from Chain[5]: (asic index start from 1-63)
get RT hashrate from Chain[6]: (asic index start from 1-63)
get RT hashrate from Chain[7]: (asic index start from 1-63)
Check Chain[J6] ASIC RT error: (asic index start from 1-63)
Check Chain[J7] ASIC RT error: (asic index start from 1-63)
Check Chain[J8] ASIC RT error: (asic index start from 1-63)
Done check_asic_reg
do read temp on Chain[5]
Chain[5] Chip[62] TempTypeID=55 middle offset=28
read failed, old value: Chain[5] Chip[62] local Temp=61
read failed on Chain[5] Chip[62] middle Temp old value:76
Special fix Chain[5] Chip[62] middle Temp = 76
Done read temp on Chain[5]
do read temp on Chain[6]
Chain[6] Chip[62] TempTypeID=55 middle offset=30
read failed, old value: Chain[6] Chip[62] local Temp=57
read failed on Chain[6] Chip[62] middle Temp old value:72
Special fix Chain[6] Chip[62] middle Temp = 72
Done read temp on Chain[6]
do read temp on Chain[7]
Chain[7] Chip[62] TempTypeID=55 middle offset=29
read failed, old value: Chain[7] Chip[62] local Temp=59
read failed on Chain[7] Chip[62] middle Temp old value:74
Special fix Chain[7] Chip[62] middle Temp = 74
Done read temp on Chain[7]
Set fixed full fan speed
FAN PWM: 100
read_temp_func Done!
CRC error counter=0
Источник
Не могу понять,Запускаю UpTool 2.093 (2015.01.14)
Он ее определяет как UP23N, TH58NVG8TDK(2CE) (eD3.8k)-32GB[2/1]
Но на самой флешки написано память TC58TEG7TDKTA03 и Контроллер 2251-68 VID/PID 13fe/3e00
При попытки нажать start выдает ошибку Err:0082,ASIC Jump Error
Что я делаю не так?
Volume: F:
Controller: Phison 2251-68
Possible Memory Chip(s):
Toshiba TH58NVG8T2JTA20
Toshiba TH58TEG8T2JTA20
Toshiba TH58TEG8T2JBA4C
Toshiba TC58NVG7T2JTA00
Toshiba TC58TEG7T2JTA00
Memory Type: TLC
Flash ID: 983AA892 7650
Chip F/W: 01.00.10
Firmware Date: 2013-02-04
MP Ver.: MPALL vFF.FF.FF
VID: 13FE
PID: 3E00
Manufacturer:
Product: 2268 PRAM
Query Vendor ID:
Query Product ID: 2268 PRAM
Query Product Revision: 1.00
Physical Disk Capacity: 0 Bytes
Windows Disk Capacity: 0 Bytes
Internal Tags: 2RAF-AV9J
USB Version: 2.00
Declared Power: 50 mA
ContMeas ID: C6F4-02-00
Microsoft Windows 7 SP1 x64 Build 7601
Program Version: 8.5.0.592
Насколько я помню, ещё никто на форуме не смог починить флешку с такой микросхемой флеш-памяти.
Нужно ждать появления в свободном доступе свежих версий ПО, что-то давно обнов не было.
я как понял тут 2 микросхемы флеш памяти.одна TC58TEG7TDKTA03 а другая наверное то что определяется… на самой написано только hvnj0f9 d1c 128
Всё это не имеет значения, ориентируйтесь на 983AA8927650
Короче как то оно прошилось… 4 часа
Что значит BAD 296/16688 ?
скорость флешки в районе 3МБ в сек.
можно ли как нибудь ее ускорить?
Ну 3МБ это вполне неплохо для прошитой через UPTOOL флешки. Они всегда работают заметно медленее, чем те что через MPALL прошиты.
Некоторые USB3.0 флешки по 3мбс работают и ничего и то прямо из магазина.
Оставьте как есть, мой вам совет!
- USBDev.ru Forum
-
►
Choose UFD Controller [Выберите модель контроллера USB-флешки ] -
►
Phison Chips [Реанимация устройств на контроллерах от Phison] -
►
Mirex 32GB TC58TEG7TDKTA03 ремонт / Phison PS2251-68 + 983AA892 7650
Быстрый ответ
0 Пользователей и 1 Гость просматривают эту тему.
Очень глупо убил свою флешку. В uptool нажал на иконку слева от флешки и программа начала низкоуровневое форматирование. Еще раз нажал — форматирование было отменено, но поздно. Флешка убита. Но нет худа без добра. Этой же программой восстановил флешку. Именно своим опытом восстановления хочу поделиться.
Использовалась программа Phison UPTool v2.061 (2013.01.18) ; UPTool_Ver2061(Release07).rar; size: 1 065 840 bytes скачанная с сайта http://www.usbdev.ru/files/phison/
1 Запускаем программу. Если флешки нет жмите ReFresh. Если совсем нет, попробуйте справа вверху попереключать режимы.
2 Жмем Setup. В окне аутентификации просто нажмите Ок. Попадем в меню настройки. Дело в том, что я перед тем, как угробить флешку сохранил ее инфу и потом сам выставил прошивку, но, как мне кажется, данная программа способна сама автоматически определить прошивку. Поскольку если установить в Auto, то в названии флешки будет отображаться название нужной прошивки.
3 Далее на скриншотах я подписал, что менял.
4 Сохраните настройки в ini-файл. Закройте меню Setup. В главном окне на всякий случай загрузите настройки кнопкой Load SETTING. Еще раз все проверьте и жмите старт. У меня на перепрошивку ушло окола часа.
5 Результат сравнения инфы(Слева — стало, справа — было). 16G на 8G я поменял в личных целях.
« Последнее редактирование: 24 Марта 2013, 03:22:27 от Nikopol2013 »

Записан
А ели флешка красным цветом, и не хочит прошиваться 
Записан
А ели флешка красным цветом, и не хочит прошиваться
привет парни!я чайник и может подскажите….у меня флеха silicon power 8gb…недавно начала глючит при просмотре фильмов на телике…включаю фильм-минут 6 воспроизводится-потом выкидует(работала год)…другие флехи на телике четко работают….на компе она тоже четко работает(запись-чтение) без сбоев.пробывал форматировать-без результата..я так понял видимо нужно перепрошить..прогуглил инет-вот вам и попал..скачал USBDeview-узнал что у меня тоже этот контроллер 2251-67 13FE 4100..скачал вашу прогу-все сделал по вашему описанию-флеха горит красным цветом и тоже видимо не хочет прошиватся???парни может подскажите ее все таки шить нужно или можно обойтись другими методами….спасибо
Записан
У меня убитая тоже на красном фоне была. Тут на скриншоте рабочая флешка, по-этому и фон синий.
Записан
Спасибо!Восстановил Toshiba 16gb 2251-61 13fe 3e00
Записан
на 6-й секунде после старта краснеет и пишет «asic jump error».(((
У меня проблема с неизвестно откуда взявшейся «защитой диска». Флешка видна и читаема. Честно говоря, очень трудно на этом сайте нарыть то, что нужно. да еще с этим переездом на новый адрес (ссылки отсылают на нот фаунд). Может подскажете утилиты, которые помогут именно в моем случае? (напомню, снять защиту).
Volume: I:
Controller: Phison 2251-67
Possible Memory Chip(s):
  Toshiba TC58TEG6T2JTA00
  Toshiba TC58NVG6T2JTA00
Memory Type: TLC
Flash ID: 98DE9892 7257
Chip F/W: 06.05.53
Firmware Date: 2012-05-11
ID_BLK Ver.: 1.1.93.0
MP Ver.: MPALL v3.24.0B
VID: 0951
PID: 1642
Manufacturer: Kingston
Product: DT 101 G2
Query Vendor ID: Kingston
Query Product ID: DT 101 G2
Query Product Revision: PMAP
Physical Disk Capacity: 15724707840 Bytes
Windows Disk Capacity:  15720574976 Bytes
Internal Tags: 2P6P-S76A
File System: NTFS
Relative Offset: 4032 KB
USB Version: 2.00
Max. Power: 200 mA
ContMeas ID: 7283-02-00
Записан

тоже убита низкоуровневым форматирование, не одна прога не видит, только вот винда реагирует желтым знаком и все.
подскажите что делать
Записан
Спасибо! Восстановил silicon power 8gb, все ок, прошивка заняла почти полтора часа на ноутбуке с восьмеркой.
Убитую флешку обязательно запускайте в тестовом режиме перед прошивкой, и все получится)))
Записан
что можно делать посоветуйте
Записан
Была убитая флешка smartbuy 16 gb монолит http://www.smartbuydisc.ru/sb/product/usb-flesh/index.php?SECTION_ID=&ELEMENT_ID=16920
Глюкала жутко, не определялась в диспетчере устройств как дисковые устройства
Видно было только в Контроллеры Универсальной последовательной шины USB, как неизвестное устройство.Вскрыл и вытащил её из корпуса, затем замкнул левый контакт на корпус. Стала определятся НО пишет что нехватка питания порта USB.
Замкнул контакты на извлечённой из пк флехе, и всунул в порт, сообщение о нехватке питания пропали. И флха определилась как USB DISK 30X. Вот что выдал
ChipGenius_v4_00_0028_stable
Protocal Version: USB 2.00
Current Speed: Full Speed
Max Current: 100mA
USB Device ID: VID = 13FE PID = 1D00
Serial Number: 000000000000
Device Name: USB DISK 30X
Device Revision: 0110
Product Model: USB DISK 30X
Product Revision: 1.00
Controller Vendor: Phison
Controller Part-Number: PS2251-67(PS2267) — F/W 06.03.34 [2012-07-05]
Flash ID code: 983AA892 — Toshiba [TLC]
Чисто интуитивно понял что не всё так гладко, да и скорость записи ни в какие ворота (7гиг 3часа). По VID = 13FE PID = 1D00 подбор утилит ни к чему не привёл.
Начал рыть дальше по PS2251-67(PS2267) и Flash ID code: 983AA892. Нашёл утилиту Phison_MPALL v3.60.0B и о чудо всё сработало флеха перепрошилась и пришла в чувства.
Вот что выдал ChipGenius_v4_00_0028_stable после востановления
Description: [D:]Запоминающее устройство для USB(USB DISK 2.0)
Device Type: Mass Storage Device
Protocal Version: USB 2.00
Current Speed: High Speed
Max Current: 200mA
USB Device ID: VID = 13FE PID = 4100
Serial Number: 84003A45EB92D201
Device Name: USB DISK 2.0
Device Revision: 0100
Product Model: USB DISK 2.0
Product Revision: PMAP
Controller Vendor: Phison
Controller Part-Number: PS2251-67(PS2267) — F/W 06.03.34 [2012-07-05]
Flash ID code: 983AA892 — Toshiba
Вот теперь всё верно. И скорость запись — чтение стали нормальными.
Авось кому сгодится !!!
« Последнее редактирование: 20 Октября 2013, 23:21:46 от yurbasbarobas »
Записан
Удалось победить флешку Silicon Power 16gb. Тип контроллера тот же. Спасибо огромное.
Записан
Большое спасибо! Помогло! Флешка Team Group inc. Color Turn была защищена от записи.
Controller: Phison 2251-67
Possible Memory Chip(s):
  Toshiba TC58NVG6T2HTA00
  Toshiba TC58TEG6T2JTA00
  Toshiba TH58TVG6T2HBA4C
  Toshiba TC58NVG6T2JTA00
Memory Type: TLC
Flash ID: 98DE9892 72D7
Chip F/W: 06.05.53
Firmware Date: 2012-05-11
ID_BLK Ver.: 1.1.98.0
MP Ver.: MPALL v3.60.0D
VID: 13FE
PID: 4100
Manufacturer:
Product: USB DISK 2.0
Query Vendor ID:
Query Product ID: USB DISK 2.0
Query Product Revision: PMAP
Physical Disk Capacity: 7743995904 Bytes
Windows Disk Capacity:  7723089920 Bytes
Internal Tags: 2Q2P-S372
File System: FAT32
Relative Offset: 4032 KB
USB Version: 2.00
Max. Power: 200 mA
ContMeas ID: AF69-01-00
Записан
спасибо большое за мануал мне помогло с флешкой на 8 гиг 
Записан
Флешка SiliconPower-16G (PS2251-67)
Процес прошивки доходит до 20% и долго стоит на них,потом резко на 97% и выдаёт ошибку. Прошиваю с тестового режима. И у автора на первом скрине букофка Н,а у меня почему то F
Volume: F:
Controller: Phison 2251-67
Possible Memory Chip(s):
  Toshiba TH58TEG7T2JBA4C
Memory Type: TLC
Flash ID: 98DE9892 72D7
Chip F/W: 01.01.10
Firmware Date: 2011-11-26
MP Ver.: MPALL vFF.FF.FF
VID: 13FE
PID: 3E00
Manufacturer:
Product: 2267 PRAM
Query Vendor ID:
Query Product ID: 2267 PRAM
Query Product Revision: 1.00
Physical Disk Capacity: 0 Bytes
Windows Disk Capacity:  0 Bytes
Internal Tags: 2RAF-LV22
USB Version: 2.00
Declared Power: 50 mA
ContMeas ID: 0CCC-02-00
Microsoft Windows 7 SP1 x64
« Последнее редактирование: 20 Февраля 2014, 21:56:03 от mitus74 »
Записан
Нужна помощь, флешка без перевода в тестовый режим ни как не реагирует.
1) Smart Buy Cobra 16GB (SB16GBCR-K)
http://www.ulmart.ru/goods/422202
2) 2013 год
3) Данные сняты с переведённой в тестовый режим.
Volume: E:
Controller: Phison 2251-67
Possible Memory Chip(s): Not available
Flash ID: 984CA092 7657
Chip F/W: 01.01.10
Firmware Date: 2011-11-26
MP Ver.: MPALL vFF.FF.FF
VID: 13FE
PID: 3E00
Manufacturer:
Product: 2267 PRAM
Query Vendor ID:
Query Product ID: 2267 PRAM
Query Product Revision: 1.00
Physical Disk Capacity: 0 Bytes
Windows Disk Capacity: 0 Bytes
Internal Tags: 2RAF-LV2S
USB Version: 2.00
Declared Power: 50 mA
ContMeas ID: FE25-13-00
Microsoft Windows XP SP3
————————————
…
Program Version: 7.8.0.537
А вот данные снятые с рабочей.
Description: [D:]Запоминающее устройство для USB(USB DISK 2.0)
Device Type: Mass Storage Device
Protocal Version: USB 2.00
Current Speed: High Speed
Max Current: 200mA
USB Device ID: VID = 13FE PID = 4100
Serial Number: 84003A45EB92D201
Device Name: USB DISK 2.0
Device Revision: 0100
Product Model: USB DISK 2.0
Product Revision: PMAP
Controller Vendor: Phison
Controller Part-Number: PS2251-67(PS2267) — F/W 06.03.34 [2012-07-05]
Flash ID code: 983AA892 — Toshiba
4) из GetInfo:
FC1 – FC2 = FF – FF
MP Ver. = MP v255.FF.FF
Mode = 255
5) Пробовал программы Phison_MPALL v3.60.0B (Раньше ей восстанавливал удачно), Phison_MPALL_V3.63_PS2251-67 (ошибка Driver:E:Mode 255, ID Issue 0002 98 4c a0 92 76 57 b). Phison MPALL v3.63.0C-DL17 та же ошибка.
фото прилагаю, Флешку без перевода в тестовый режим ПК не видит и не реагирует.
Если нужна ещё информация или скрины то могу сделать.
« Последнее редактирование: 10 Марта 2014, 15:54:20 от yurbasbarobas »
Записан
Возьми софтину из первого поста UPTool_Ver2061(Release07).rar и всё получится. Я тоже долго мучался,потому что из под Вин7 она плохо работает,но после нескольких попыток всё получилось,флешка как новая заработала. 
Записан
У меня поменялся Flash ID: стал таким 984CA092, а был рабочим таким Flash:983AA892
Спасибо за совет но ни какими программами её не оживить пока Flash ID не станет таким же 983AA892. Если бы подсказал кто как это сделать
Записан
Volume: F:
Controller: Phison 2251-67
Possible Memory Chip(s): Not available
Flash ID: 98DE9092 7257
Chip F/W: 01.01.10
Firmware Date: 2011-11-26
MP Ver.: MPALL vFF.FF.FF
VID: 13FE
PID: 3E00
Manufacturer:
Product: 2267 PRAM
Query Vendor ID:
Query Product ID: 2267 PRAM
Query Product Revision: 1.00
Physical Disk Capacity: 0 Bytes
Windows Disk Capacity: 0 Bytes
Internal Tags: 2RAB-LV43
USB Version: 2.00
Declared Power: 50 mA
ContMeas ID: B211-01-00
Microsoft Windows 8 x64
————————————
Пишет иногда как нормальная флешка раз 30 иногда видет ее как съемный диск кликая отзывается как вставте диск, программа которая выше при нажатие на старт ничего не происходит
Записан
флеш maxell 8 Gb (USB Disk 30k vid 13FE pid 1D00 корпус монолит,резиновый слон)просто определялась системой и все, на открытие писала вставте диск,после проги стала 10,5 Gb все ок, в настройках ничего не трогал только vid pid указал свой.
Записан
Флешка SiliconPower-16G (PS2251-67)
Процес прошивки доходит до 20% и долго стоит на них,потом резко на 97% и выдаёт ошибку. Прошиваю с тестового режима. И у автора на первом скрине букофка Н,а у меня почему то FVolume: F:
Controller: Phison 2251-67
Possible Memory Chip(s):
Toshiba TH58TEG7T2JBA4C
Memory Type: TLC
Flash ID: 98DE9892 72D7
Chip F/W: 01.01.10
Firmware Date: 2011-11-26
MP Ver.: MPALL vFF.FF.FF
VID: 13FE
PID: 3E00
Manufacturer:
Product: 2267 PRAM
Query Vendor ID:
Query Product ID: 2267 PRAM
Query Product Revision: 1.00
Physical Disk Capacity: 0 Bytes
Windows Disk Capacity: 0 Bytes
Internal Tags: 2RAF-LV22
USB Version: 2.00
Declared Power: 50 mA
ContMeas ID: 0CCC-02-00
Microsoft Windows 7 SP1 x64[/]Буковки разные потому как в системе определилась флешка ( H-F-C-D ) О как! P.s ответ для тех кто читает
Записан
Подскажите пож, как как флеху 2251-67 перевести в тестовый режим. в устройствах определяется как «неизвестное устройство». флешка стала неизвестным устройством после программы UFD_Recover_Tool. и вообще возможно ли с ней что то сделать если не может нормально определиться. спасибо заранее.
Записан
Записан
Спасибо огромное «Anatolij»
Записан
5 Результат сравнения инфы(Слева — стало, справа — было). 16G на 8G я поменял в личных целях.
[/quote]
добрый вечер . после ресивера нтв + , умерла флешка кумо 32 гига . новая . просто записалась полная и пипец . не открывается не форматируется . прогой UPtool вернул к жизни , но памяти меньше половины , 11 гигов из 32 г . как вернуть полную ? помогите советом пожалуйста .
Записан
Оживил флешку Kingston DT101 G2 32GB, чип Phison PS2251-67, память по маркировке FD32B08UCT1, реально TC58NVG7T2JTA00 с помощью UPTool 2.061 с первой страницы
Записан
-

-
September 23 2017, 08:33
Собранные на скорую руку ошибки UPTool.
Практического смысла немного (логи UPTool вполне информативны), но возможно, кому-то поможет
0070h Err at Setup Parameters For IB-Table
0051h Downgrade Flash, but not found IB-Table
0052h Bad Column is not paired.
0061h Diff of controllers in F/W & ROM
0073h Not Support Controller
0075h MBC Page is not enough for CK/IB
0075h MBC Page is not enough for no CK MBC IB
0078h Enhance Ecc mode sorting , but used not support FW. Please new FW
0082h Cannot get ISP version
0082h Err at install ISP
0082h Burner ISP read fail
0082h ISP allocate buffer fail
0082h ISP file not found
0082h ISP file too small
0084h Flash Reset Fail
0085h D1 Source Block Need:%d > D1 Source Block Have:%d
0091h NewSort_eD3_CopyBack_2Slot
0101h FSlot-%d, Flash ID fail
0990h Fail to init Bad Column
1106h Burner ISP allocate buffer fail
1106h Burner ISP file not found
1106h Burner ISP file too small
1106h Burner ISP read fail
1106h Cannot get burner version
1106h Cannot get ISP version
1106h Cannot Install burner ISP code
1106h Cannot Install burner ISP code
1106h ISP file not found
1107h Could not store CP to Bad-Block
1107h F/W allocate buffer fail
1107h F/W ISP file too small
1107h F/W ISP read fail
1107h Find CZ-Block fail, no more good block
1107h unknown error, CZ page could not be located
110Fh Too few CodePage
1120h Err at Burner to JUMP
1122h Burner load IB-Table
1123 Fail to get CZ from Burner
1124h F/W Code file not found
1125h Err at Jump to ISP
1199h 67BC: Good block for CP Over Search Rule
6019h Disk is still in ROM stage
Начало
If you’ve purchased a PC from Dell lately you might have noticed that there is an option to get the recovery media, specifically Windows 8.1, on an 8GB USB flash drive. After collecting a few of these, you may start asking yourself if you can use these for something other than recovery media. This is about when you discover that the the freaking things are read only. Here’s how to reformat the newer, «Blue Label», Dell USB Recovery drives.
UPDATE 2016/10/07: If you have Dell Windows 10 USB sticks, please see How to Disable the Write Protection on Dell Windows 10 USB Recovery Sticks.
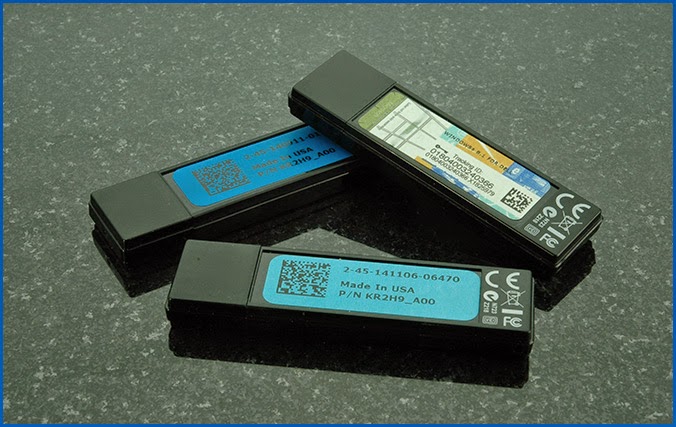
UPDATE: jParnell8839 pointed out in the comments below (and I confirmed) that at least some, if not all, of the Dell USB drives that are currently shipping with Dell PCs do not work with this process and it may brick your USB drive. The offending drives have blue labels and can be identified in UPTool as «TC58TEG6DDK (eD2.16K)». Blue label drives that identify themselves as «TC58TEG6TCK (eD3.8K)» should work with UPTool without issue.
UPDATE 2: Steve Cole posted in the comments below the solution for the eD2.16k drives. The new guide can be found at http://www.techunboxed.com/2015/07/how-to-disable-write-protection-on-dell.html. Thanks Steve.
Disabling the Write Protection on Dell eD3.8k Blue Label Drives
The older versions of these drives, with the multi-color label on the back, were writable after a low-level format (see… How to Disable the Write Protection on the Dell Windows 8 USB Recovery Stick for a step-by-step guide). The low-level format tool that works so well on the old drives ruins the newer version of the drives with solid blue labels on the back.
The Internet to the rescue! I’ve been at a loss for a few months on what to do with the Blue Label drives. I’ve tried a number of things and fried a number of USB thumb drives. I had given up on the Blue Label drives when Tojo swaggered in and dropped the solution in the comments of the original Dell USB drive post. What I’ve done, below, is take his directions and put them in our guide format. I’ve made no attempt to try other settings and have made very little changes. All the credit should go to Tojo.
I’ve low-level formatted more than a few blue label Dell USB drives with this utility and it works well. It also fixed the Blue Label drives that the other low-level format utility had seemingly ruined. It even works on the older, multi-color labeled drives, but it’s much slower than the other tool. Again, see the other post for those drives.
WARNING: This process will irrevocably destroy all data on the USB flash drive.
Start by downloading UPTool Ver. 2.092. This can also be downloaded from Tojo’s original location, but I’ve added the dell.ini file to the zip to speed up the process. One last note to cover my ass and temper your expectations, I know nothing about the origins of this utility, use it at your own risk.
Unzip the archive to a folder somewhere and double-click UPTool_Ver2092.exe.
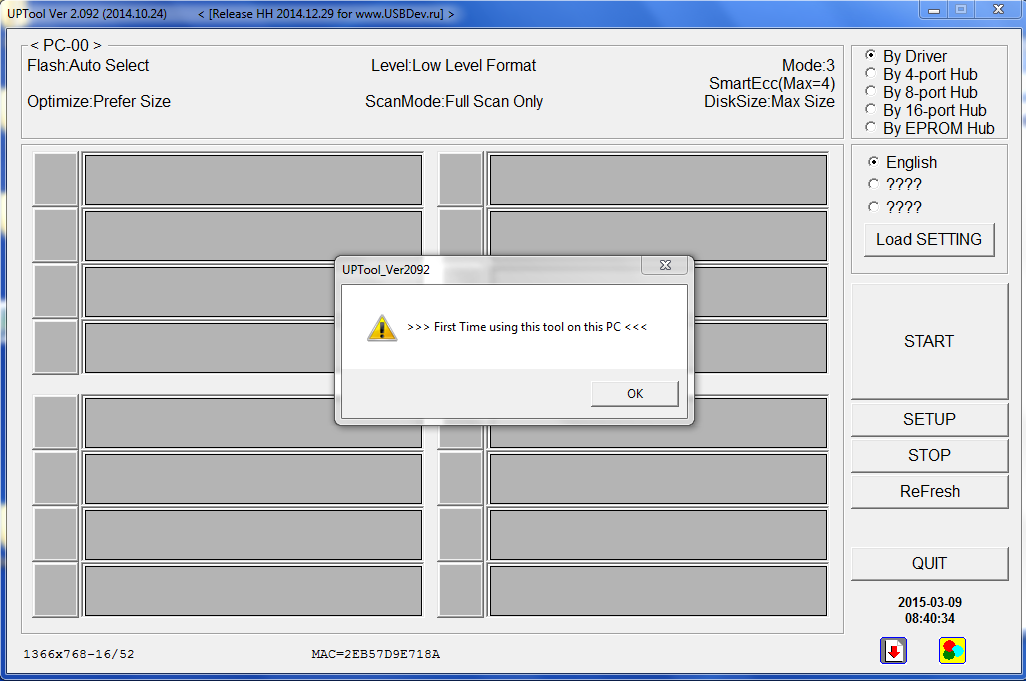
If this is the first time you’ve run UPTool, you’ll get a notification.
Click OK and plug your blue label Dell USB drive into the USB port.
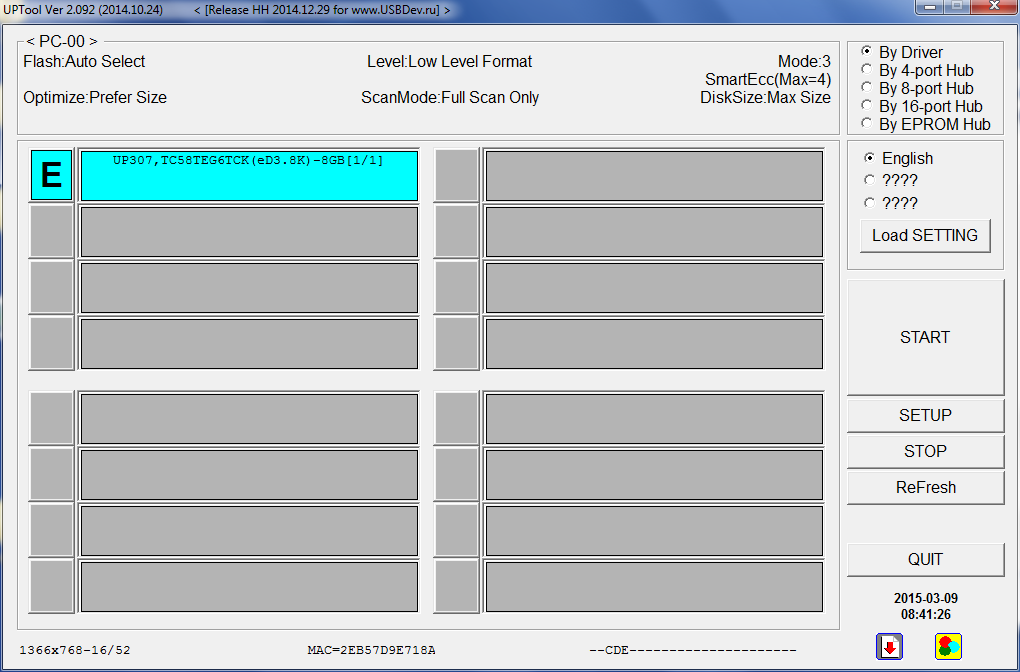
In this example, the utility shows the drive as E and highlights it in blue.
In the upper right hand corner, select something other than By Driver that continues to display the drive in blue.
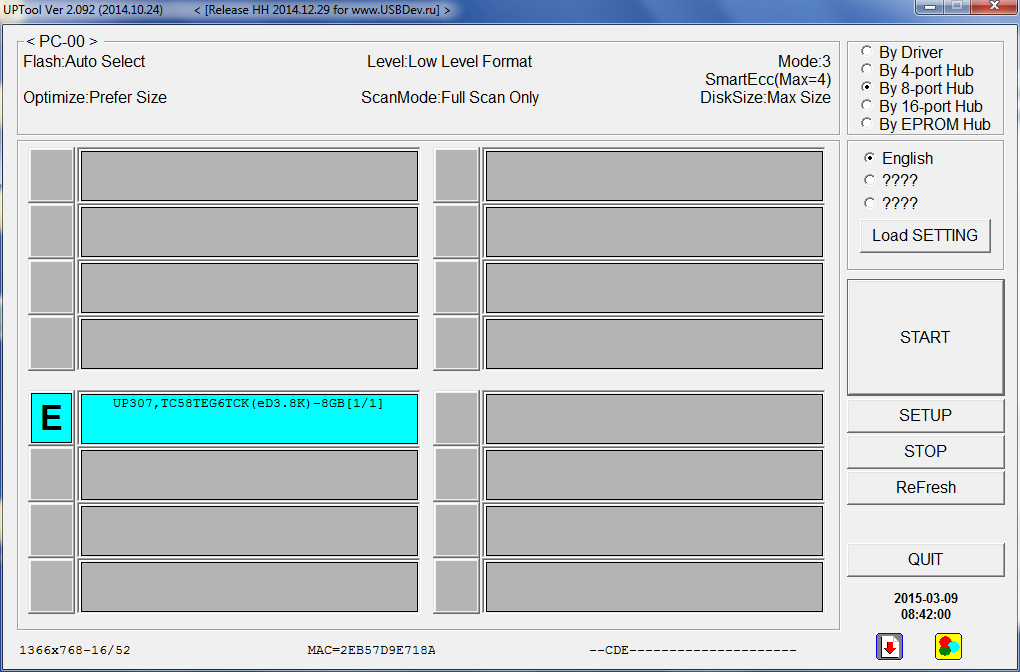
I’ve selected By 8-port Hub, and the drive moved down to the top slot of the lower left hand group.
Click the Load SETTING button.
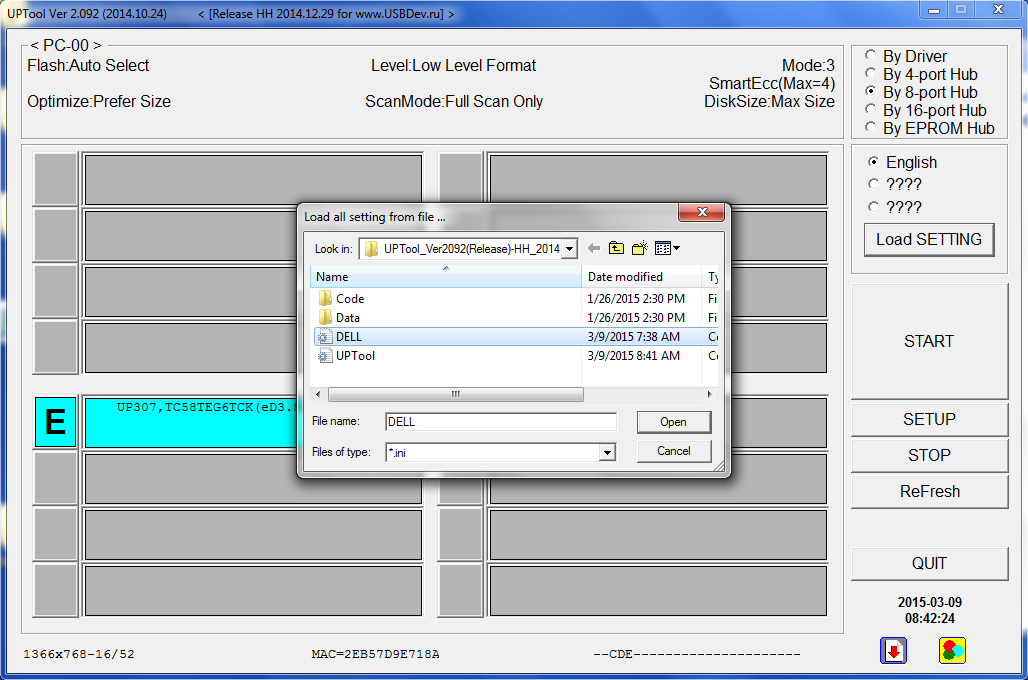
Browse to the DELL.ini file and click Open.

Click the ReFresh button to make sure the utility is reading the drive using the new settings. The drive may move to a different slot.
Click the START button to start the low-level format of the drive.

The representation of the drive on the screen should change from blue to yellow.

After almost an hour, this one took 54 minutes, the utility completed the low-level format. The drive should be show in green but every blue label drive I’ve done shows this error. Even with this error, all my drives function as expected.
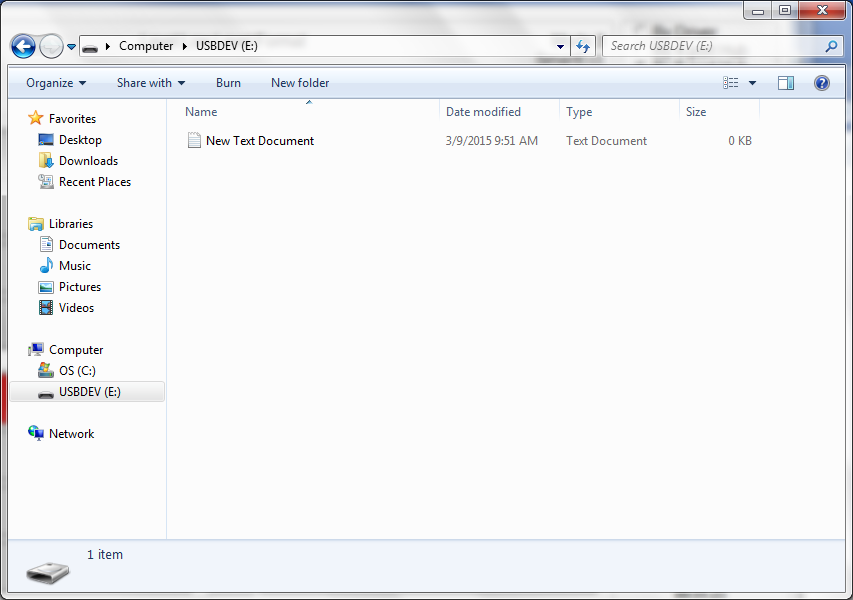
The newly formatted drive with a test file.
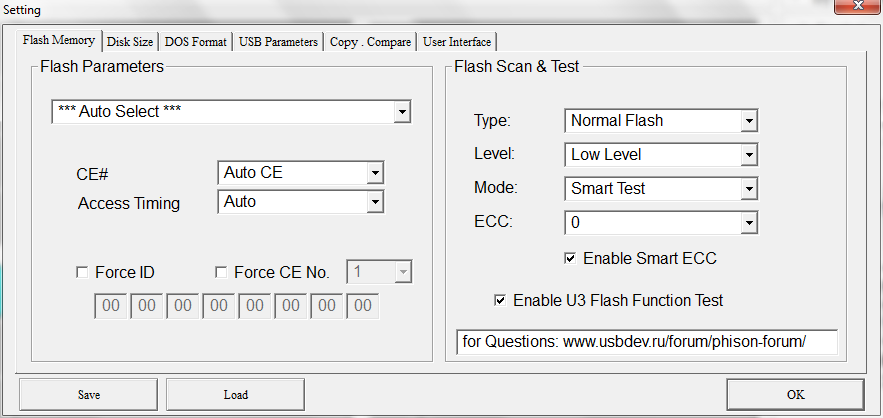
If you choose to change the settings manually, you can edit the dell.ini file or refer to these screen shots of the Setting screens that are accessed by clicking on the SETUP button.

Click OK to authenticate.

ASIC-майнеры настроены на довольно быструю и эффективную добычу криптовалюты и стали популярны. Однако в их работе случаются сбои – падает хешрейт, нагревается оборудование, возможно возникновение серьезных ситуаций, таких как пожар. Чтобы не допустить этого, нужно постоянно мониторить статус ASIC, понимать его значение.
Структура ASIC-майнера состоит из нескольких частей – программного и аппаратного обеспечения. Программное обеспечение помогает управлять деталями оборудования и способно отслеживать напряжение электрического тока, а также интенсивность охлаждения, и сообщать о возможных неисправностях. Аппаратное обеспечение состоит из блока питания и вентиляторов, микропроцессоров и плат, блока памяти.
Одна из важнейших ошибок, о которых сообщает программное обеспечение, это “DISABLED”. Статус означает, что майнинг остановлен в связи с поломкой во избежание перегрева деталей. Нужно найти поломку и устранить ее. Чтобы возобновить майнинг после ремонта, необходимо дать команду “mining start”. Если оборудование непригодно для восстановления, то можно купить ASIC у нас.
Другие статусы:
- ERROR_TEMP_LOST означает потерю датчика температуры. После того, как определитель теряется 2 раза и более, майнинг останавливается во избежание перегрева.
- ERROR_EEPROM_INFO появляется при ошибке чтения. Чтобы устранить сбой, надо перепрошить EEPROM.
- ERROR_SOC_INIT означает ошибку инициализации драйвера из-за поломки аппаратной части или проблем с программным обеспечением – несоответствия его модели майнера или неправильной установки. Необходима диагностика аппаратной части и переустановка программного обеспечения или использование предыдущей его версии.
- ERROR_POWER_LOST означает проблемы с блоком питания из-за его поломки или программное обеспечение его не опознает.
- ERROR_FAN_LOST – это выход из строя кулера или дефект датчика.
- ERROR_TEMP_TOO_LOW. Буквально статус означает низкую температуру. Проблема кроется в программном обеспечении либо потере датчика температуры.
- SUSPENDED – статус, при котором требуется перезагрузка.
- TUNING означает проведение тюнинга, при котором скорость добычи криптовалюты может снизиться.
Если какая-то деталь не подлежит восстановлению, то купить все для майнинга вы сможете у нас.
Актуальные цены на оборудование и аксессуары можно уточнить в Прайс-листе
Начну без предысторий и лишних рассказов.
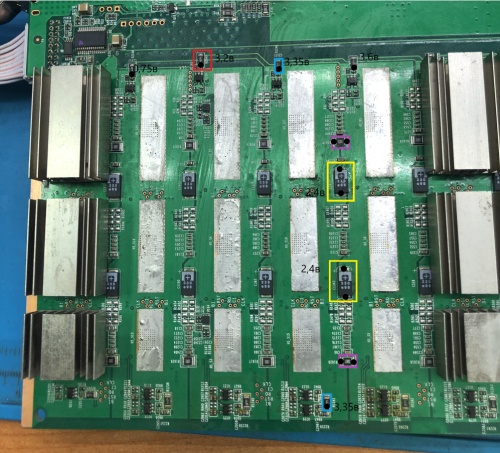
Есть 4 платы с аналогичными проблемами мною до конца не изученных.Все элементы помечены разным цветом,замеры черной точкой на фото для лучшего понимания ситуации.
Алгоритм:
1.Плавающий CLK, ro,rst в 4 домене дали понять, что проблемы либо в чипах которые находятся в кз/отвале или в к/з по питанию.
2.Замер напряжения на нижней ноге LDO(1,8В) дали так же плавающее значение.
3.Замер сопротивления на той же ноге в пределе 4,5 кОм(правильное должно быть 1,5кОм)
4.Выпайка всего домена, замер напряжения, стабилизировалось до 1,8в.
5.Визуальный осмотр, выявление обломившегося на пополам резистора на 5 ом(отмечен красным)
6.Сильный нагрев тантала (отмеченным желтым) около 200градусов, выпайка.Нагрев резистора на 10ом(отмечен фиолетовым), выпайка.Нагрев двух резисторов на 5ом(отмечен голубым).Кз больше не выявляется, подача отдельно напряжения на участки цепи не дает результатов(либо не до конца понимаю куда правильно подать).
7.Запайка заведомо исправных элементов обратно дают аналогичный эффект и все уходит в цикл.
Есть догадки, что на домен приходит завышенная напруга, только по какой причине
Изменено 8 Feb 2022, 06:45 пользователем Bodrov
Коды ошибок асик майнера WhatsMiner
0 ErrSucc ОК ОК — обычный
21 ErrNotPlugged 1 или более хеш-плат не обнаружены Сигнал Hashboard PLUG не обнаружен Номер обнаруженной платы питания, если их более одной, разделенные пробелами 1. Проверьте правильность подключения кабеля SPI (по сравнению с обычной машиной) и снова подключите кабель. 2. Замените плату управления. 3. Замените проблемную доску хешрейта (переделайте доску головоломки).
22 ErrPsuI2cFail Аномальная связь по управлению питанием Неправильная связь I2C источника питания — 1. Заменить блок питания. 2. Замените плату управления.
23 ErrEncoreAllFail Все хэш-платы не могут быть включены SPI недоступен для всех плат хешрейта — 1. Убедитесь, что винты на обоих концах клеммы питания и соединения кабеля SPI не ослаблены. 2. Заменить блок питания. 3. Замените плату управления. 4. Отремонтируйте всю машину.
24 ErrEncoreFail Некоторые платы не включаются SPI недоступен на некоторых хэш-досках Номер хэшборда, для которого произошел сбой связи по SPI, если их несколько, разделенных пробелами 1. Убедитесь, что винты на обоих концах клеммы питания и соединения кабеля SPI не ослаблены. 2. Заменить блок питания. 3. Замените плату управления. 4. Замените проблемную хеш-доску (переделайте доску-головоломку).
25 ErrSetPllFail Не удалось поднять частоту хэш-платы Не удалось поднять частоту хэш-платы Номер хэшборда: частота ошибок 1. Убедитесь, что винты на обоих концах клеммы питания и соединения кабеля SPI не ослаблены. 2. Заменить блок питания. 3. Замените плату управления. 4. Замените проблемную хеш-доску (переделайте доску-головоломку).
26 ErrSetVolFail Не удалось установить напряжение Не удалось установить напряжение Номер хэшборда: 1/2 1. Убедитесь, что винты на обоих концах клеммы питания и соединения кабеля SPI не ослаблены. 2. Заменить блок питания. 3. Замените плату управления. 4. Заменить проблемную хеш-доску (присоединиться)
27 ErrBistFail Тест чипа BIST не пройден Тест чипа BIST не пройден Номер хэшборда: 1/2 1. Убедитесь, что винты на обоих концах клеммы питания и соединения кабеля SPI не ослаблены. 2. Заменить проблемную хеш-доску (присоединиться к плате)
28 ErrSpiFail Ненормальная связь платы хешрейта не может быть автоматически восстановлена ??во время работы Ненормальное соединение SPI платы хешрейта не может быть автоматически восстановлено во время работы Номер хэшборда 1. Убедитесь, что винты на обоих концах клеммы питания и соединения кабеля SPI не ослаблены. 2. Замените проблемную хеш-доску (переделайте доску-головоломку)
29 ErrI2cFail Ненормальная связь по питанию во время работы не может быть восстановлена ??автоматически Связь I2C с ненормальным источником питания не может быть автоматически восстановлена ??во время работы — 1. Заменить блок питания. 2. Замените плату управления.
30 ErrNetwork Подключение к майнинговому пулу прервано Подключение к майнинговому пулу прервано — Если эта проблема возникает на большом количестве или на всех майнинговых машинах с одним и тем же коммутатором: 1. Проверьте правильность настроек пула для майнинга. 2. Проверьте конфигурацию сетевой среды (например, конфигурацию DHCP, конфигурацию DNS, порт и т. Д.). Если проблемы возникают только на одной или нескольких машинах для майнинга: 1. Проверьте правильность настроек пула для майнинга. 2. Проверить подключения к сетевому порту майнера. 3. Замените сетевой кабель на работающую майнинговую машину. 4. Замените плату управления.
31 ErrBadChip Повреждение отдельных микросхем, что приводит к искусственно завышенной вычислительной мощности Повреждение отдельных микросхем, что приводит к искусственно завышенной вычислительной мощности Номер поврежденной микросхемы: номер хеш-платы, если их более одной, разделенные пробелами В ремонт
32 ErrOverheat Hashboard перегрелся Hashboard перегрелся Номер хэшборда 1. Проверьте, вращаются ли передний и задний вентиляторы, если они не вращаются, сначала замените вентиляторы, а затем замените плату управления / блок питания. 2. Убедитесь, что направление ветра спереди и сзади согласовано, согласуется ли оно с другими машинами, если нет, измените направление вентилятора. 3. Если температура воздуха на входе горной машины превышает 40 градусов, необходимо улучшить температурную среду в шахте. 4. Если определенная плата хешрейта часто перегревается, вы можете заменить проблемную плату хешрейта (переделайте головоломку).
33 ErrInvTemp Невозможно прочитать температуру чипа Невозможно прочитать температуру чипа Номер хэшборда 1. Убедитесь, что винты на обоих концах клеммы питания и соединения кабеля SPI не ослаблены. 2. Заменить блок питания. 3. Замените плату управления. 4. Замените проблемную хеш-доску (переделайте доску-головоломку).
34 ErrMisPlugged Неправильное подключение кабеля связи платы управления Ненормальное подключение кабеля SPI платы управления Номер хэшборда 1. Проверьте, совместим ли метод (последовательность) подключения кабеля SPI хэш-платы с другими машинами той же модели. 2. Замените плату управления.
35 ErrPsuFail Аномальный источник питания Аномальный источник питания 1. Обратите внимание на то, что если нет явного отклонения от нормы вычислительной мощности всей машины (не отключается плата), то перезагрузить 2. Убедитесь, что винты на обоих концах клеммы питания и соединения кабеля SPI не ослаблены. 3. Заменить блок питания.
36 ErrInvCorenum Некоторые чипы не работают должным образом Количество хороших фишек ненормальное Номер хэшборда: номер чипа 1. Обратите внимание на то, что если нет явного отклонения от нормы вычислительной мощности всей машины (не отключается плата), то перезагрузить 2. Перезапустите майнер, чтобы увидеть, появляется ли по-прежнему та же ошибка. 3. Замените проблемную хеш-плату.
37 ErrInvVidtype Тип платы управления / версия прошивки / количество микросхем не совпадает Тип платы управления / версия прошивки / количество микросхем не совпадает vidtype, minertype, subtype, chipnum После накопления нескольких единиц (> 10) обратитесь в ремонт.
38 ErrBadRearChips Наконец, у некоторых чипов низкая вычислительная мощность. Последние несколько уровней чипов имеют низкую вычислительную мощность В ремонт
39 ErrInvTuneParam Аномальные параметры старения Напряжение начальной частоты старения неверно В ремонт
| Errcode | Scope of application | Explanation | Troubleshooting steps |
| 0 | Whole miner | Normal | Normal |
| 21 | hashboard | one or more hashboards can’t be detected | 1. check and see whether the SPI cables are firmly and correctly connected (compared the connection of cables with working miners), reconnect the SPI cables, don’t change sequence of connection 2. replace control board with other well functional one 3. replace defective hashboard(s) with other well functional one(s) (defective one should be returned for repair/replacement) |
| 22 | Whole miner | PSU communication is abnormal | 1. replace PSU with other well functional one 2. replace control board with other well functional one |
| 23 | Whole miner | All hashboards can’t be powered up | 1. check and see whether screws on the PSU side and SPI connection are loose 2. replace PSU with other well functional one 3. replace control board with other well functional one 4. whole miner should be returned for repair |
| 24 | hashboard | one or more hashboards can’t be powered up | 1. check and see whether screws on the PSU side and SPI connection are loose 2. replace PSU with other well functional one 3. replace control board with other well functional one 4. replace defective hashboard(s) with other well functional one(s) (defective one should be returned for repair/replacement) |
| 25 | hashboard | frequency increase of hashboards fails | 1. check hashrate of the miner, if there is nothing obviously abnormal (no missing hashboard), no action should be taken 2. check and see whether screws on the PSU side and SPI connection are loose 3. replace PSU with other well functional one 4. replace control board with other well functional one 5. replace defective hashboard(s) with other well functional one(s) (defective one should be returned for repair/replacement) |
| 26 | hashboard | voltage setting fails | 1. check and see whether screws on the PSU side and SPI connection are loose 2. replace PSU with other well functional one 3. replace control board with other well functional one 4. replace defective hashboard(s) with other well functional one(s) (defective one should be returned for repair/replacement) |
| 27 | hashboard | chip BIST test fails | 1. check and see whether screws on the PSU side and SPI connection are loose 2. replace defective hashboard(s) with other well functional one(s) (defective one should be returned for repair/replacement) |
| 28 | hashboard | abnormal communication of hashboard, it can’t be automatically recovered when running | 1. check and see whether screws on the PSU side and SPI connection are loose 2. replace defective hashboard(s) with other well functional one(s) (defective one should be returned for repair/replacement) |
| 29 | Whole miner | abnormal communication of PSU can’t be automatically recovered when running | 1. replace PSU with other well functional one 2. replace control board with other well functional one |
| 30 | Whole miner | pool disconnect | If the problem occurs in a large number of miners or all of the mines under the same switch: 1. please first check whether pool setting is correct 2. then check network configuration (such as DHCP configuration, DNS configuration, ports, etc.) If the problem occurs in only one or just a small number of miners under the same switch: 1. please first check whether pool setting is correct 2. then check whether network cable is firmly connected 3. replace network cable with other one from other well working miner 4. replace control board with other well functional one |
| 31 | hashboard | damage of some individual chip causes inflated high hashrate of the miner | no action should be taken |
| 32 | hashboard | hashboard overheat | 1. check and see whether both fans are spinning, if not, replace fan with other functional one, if still not, then replace control board or PSU 2. check and see whether wind direction of both fans are the same, whether wind direction are the same with other miners, if not, exchange fans 3. meter the inlet temperature of the miner, if above 40 °C, cooling system of the mining farm should be improved 4. if some hashboard is overheated frequently, that hashboard should be replaced (returned for repair) |
| 33 | hashboard | chip temperature can’t be read | 1. check and see whether screws on the PSU side and SPI connection are loose 2. replace PSU with other well functional one 3. replace control board with other well functional one 4. replace defective hashboard(s) with other well functional one(s) (defective one should be returned for repair/replacement) |
| 34 | cables of control board is connected incorrectly | 1. check hashrate of the miner, if there is nothing obviously abnormal (no missing hashboard), no action should be taken 2. check whether hashboard SPI cables are conneted in the same way (sequence) as other miners of same model 3. replace control board with other well functional one |
|
| 35 | hashboard | PSU voltage is too low | 1. check hashrate of the miner, if there is nothing obviously abnormal (no missing hashboard), no action should be taken 2.check and see whether screws on the PSU side and SPI connection is loose 3. replace PSU with other well functional one |
| 36 | hashboard | working or some chips is abnormal | 1. check hashrate of the miner, if there is nothing obviously abnormal (no missing hashboard), no action should be taken 2. reboot the miner to see whether the same error is given 3. replace defective hashboard(s) with other well functional one(s) (defective one should be returned for repair/replacement) |
| 37 | Whole miner | mismatch of control board version/firmware version/quantity of chips | if there are more than 10 miners with same error, please contact engineers |
| 38 | hashboard | low hashrate of last few chips | no action should be taken |
| 39 | hashboard | testing parameter is abnormal | no action should be taken |
| 40 | hashboard | PSU load is insufficient | 1. check and see whether screws on the PSU side and SPI connection are loose 2. replace PSU with other well functional one 3. replace defective hashboard(s) with other well functional one(s) (defective one should be returned for repair/replacement) |
| 41 | hashboard | startup voltage of PSU is too low | 1. check hashrate of the miner, if there is nothing obviously abnormal (no missing hashboard), no action should be taken 2. check and see whether screws on the PSU side and SPI connection are loose 3. replace PSU with other well functional one 4. replace control board with other well functional one |
| 42 | hashboard | implementation of plan B fails when hashboard frequency increases | 1. check hashrate of the miner, if there is nothing obviously abnormal (no missing hashboard), no action should be taken 2. check and see whether screws on the PSU side and SPI connection are loose 3. replace PSU with other well functional one 4. replace control board with other well functional one 5. replace defective hashboard(s) with other well functional one(s) (defective one should be returned for repair/replacement) |
| Attention: 1. The miner should be powered up again to see whether it is back to normal after every step is taken 2. If the problem is not solve after replacement the part, the part should go back to its original unit 3. Error code and brief description of the problem should be attached to the hashboard that is confirmed defective and that will be returned for repair |
Error
code
Reason Processing method
110 Fanin detect speed error
Check whether the fan connection is normal,
or replace the power supply, or replace the
fan
111 Fanout detect speed error
Check whether the fan connection is normal,
or replace the power supply, or replace the
fan
130 Fanin speed error
Check whether the fan connection is normal,
or replace the power supply, or replace the
fan
131 Fanout speed error
Check whether the fan connection is normal,
or replace the power supply, or replace the
fan
140 Fan speed is too high Please check the environment temperature
200
Power probing error, no
power found
Detecting power output wiring, updating the
latest firmware, or replacing power supply
201
Power supply and
configuration file
mismatch
Replace the correct PSU
203 Power protecting Please check the environment temperature
204 Power current protecting Please check the environment temperature
205 Power current error Inspection of power supply in power grid
206 Power input voltage is low
Improve power supply conditions and input
voltage
207
Power input current
protecting
Improve power supply conditions and input
voltage
210 Power error status Check power failure code
213
Power input voltage and
current do not match the
power
Replace the PSU
233
Power output over
temperature protection
Please check the environment temperature
234
Power output over
temperature protection
Please check the environment temperature
235
Power output over
temperature protection
Please check the environment temperature
236
Overcurrent Protection of
Power Output
Please check the environment temperature,
check copper row screw
237
Overcurrent Protection of
Power Output
Please check the environment temperature,
check copper row screw
238
Overcurrent Protection of
Power Output
Please check the environment temperature,
check copper row screw
239
Overvoltage Protection of
Power Output
Inspection of power supply in power grid
240
Low Voltage Protection for
Power Output
Inspection of power supply in power grid
241
Power output current
imbalance
Replace the power
243
Over-temperature
Protection for Power Input
Please check the environment temperature
244
Over-temperature
Protection for Power Input
Please check the environment temperature
245
Over-temperature
Protection for Power Input
Please check the environment temperature
246
Overcurrent Protection for
Power Input
Please check the environment temperature
247
Overcurrent Protection for
Power Input
Please check the environment temperature
248
Overvoltage Protection for
Power Input
Inspection of input voltage in power grid
249
Overvoltage Protection for
Power Input
Inspection of input voltage in power grid
250
Undervoltage Protection
for Power Input
Inspection of input voltage in power grid
251
Undervoltage Protection
for Power Input
Inspection of input voltage in power grid
253 Power Fan Error Replace the PSU
254 Power Fan Error Replace the PSU
255
Protection of over power
output
Please check the environment temperature
256
Protection of over power
output
Please check the environment temperature
257
Input over current
protection of power supply
primary side
Try to power off and restart, no effect to
replace the power supply
263
Power communication
warning
Check whether the screws of the control
board are locked
264 Power communication error
Check whether the screws of the control
board are locked
267 Power watchdog protection Contact the technician in time
268
Power output over-current
protection
Check the ambient temperature, check the
copper bar screw
269
Power input over-current
protection
Improve power supply conditions and input
voltage
270
Power input over-voltage
protection
Inspection of input voltage in power grid
271
Power input under-voltage
protection
Inspection of input voltage in power grid
272
Warning of excessive power
output of power supply
Please check the environment temperature
273
Power input power too high
warning
Please check the environment temperature
274 Power fan warning
Check if the power fan is blocked and may
need to be replaced
275
Power over temperature
warning
Please check the environment temperature
300
SM0 temperature sensor
detection error
Check the connection of the hashboard
301
SM1 temperature sensor
detection error
Check the connection of the hashboard
302
SM2 temperature sensor
detection error
Check the connection of the hashboard
320
SM0 temperature reading
error
Check whether the control board screw is
locked properly, check the connection board
and the arrangement contact
321
SM1 temperature reading
error
Check whether the control board screw is
locked properly, check the connection board
and the arrangement contact
322
SM2 temperature reading
error
Check whether the control board screw is
locked properly, check the connection board
and the arrangement contact
329
Control board temperature
sensor communication error
Replace the power supply
350 SM0 temperature protecting Please check the environment temperature
351 SM1 temperature protecting Please check the environment temperature
352 SM2 temperature protecting Please check the environment temperature
410 SM0 detect eeprom error Check adapter board and wiring contact
411 SM1 detect eeprom error Check adapter board and wiring contact
412 SM2 detect eeprom error Check adapter board and wiring contact
420 SM0 parser eeprom error Contact the technician in time
421 SM1 parser eeprom error Contact the technician in time
422 SM2 parser eeprom error Contact the technician in time
430 SM0 chip bin type error Contact the technician in time
431 SM1 chip bin type error Contact the technician in time
432 SM2 chip bin type error Contact the technician in time
440
SM0 eeprom chip num X
error
Contact the technician in time
441
SM1 eeprom chip num X
error
Contact the technician in time
442
SM2 eeprom chip num X
error
Contact the technician in time
510 SM0 miner type error
The version and type of hashboard are
inconsistent, replace the correct hashboard
511 SM1 miner type error
The version and type of hashboard are
inconsistent, replace the correct hashboard
512 SM2 miner type error
The version and type of hashboard are
inconsistent, replace the correct hashboard
530 SM0 not found
Check the connection and arrangement of the
adapter board, or replace the control
board, check whether the hash board
connector is empty welded
531 SM1 not found
Check the connection and arrangement of the
adapter board, or replace the control
board, check whether the hash board
connector is empty welded
532 SM2 not found
Check the connection and arrangement of the
adapter board, or replace the control
board, check whether the hash board
connector is empty welded
540 SM0 reading chip id error
Check adapter board and wiring contact,
Clean the dust on the hashboard
541 SM1 reading chip id error
Check adapter board and wiring contact,
Clean the dust on the hashboard
542 SM2 reading chip id error
Check adapter board and wiring contact,
Clean the dust on the hashboard
550 SM0 have bad chips Replacement of bad chips
551 SM1 have bad chips Replacement of bad chips
552 SM2 have bad chips Replacement of bad chips
560 SM0 loss balance
Plug in the adapter plate, and then screw
in the power connection hashboard again
561 SM1 loss balance
Plug in the adapter plate, and then screw
in the power connection hashboard again
562 SM2 loss balance
Plug in the adapter plate, and then screw
in the power connection hashboard again
600
Environment temperature is
high
Please check the environment temperature
610
If the ambient temperature
is too high in high
performance mode, return
to normal mode
Check the ambient temperature, high
performance mode needs to be controlled
below 30 ?
710
Control board rebooted as
exception
Updating the latest firmware.Check whether
the control board screw is locked properly
800 cgminer checksum error Re-upgrade firmware
801
system-monitor checksum
error
Re-upgrade firmware
802
remote-daemon checksum
error
Re-upgrade firmware
2010 All pools are disable Please check the network or pools configure
2020 Pool0 connect failed Please check the network or pools configure
2021 Pool1 connect failed Please check the network or pools configure
2022 Pool2 connect failed Please check the network or pools configure
2030
High rejection rate of
pool
Please check the network or pools
configure.Setting of mining currency
2040
The pool does not support
the asicboost mode
Check pool configuration
5110 SM0 Frequency Up Timeout reboot
5111 SM1 Frequency Up Timeout reboot
5112 SM2 Frequency Up Timeout reboot
8410
Software version error
(M2x miner with M3x
firmware, or M3x with M2x
firmware).
Upgrade to the correct firmware version
PSU
Error
code
Reason processing method
0x0001 Input undervoltage Check the power supply
0x0002
Temperature sampling over
temperature protection of
power radiator
Power on again after 10 minutes of power
failure. If it occurs again, replace the
power supply
0x0004
Temperature sampling over
temperature protection of
power radiator
Power on again after 10 minutes of power
failure. If it occurs again, replace the
power supply
0x0008
Over temperature
protection of
environmental temperature
sampling in power supply
Power on again after 10 minutes of power
failure. If it occurs again, replace the
power supply
0x0010 Primary side over current
Power on again after 10 minutes of power
failure. If it occurs again, replace the
power supply
0x0020 Output undervoltage Check the power supply
0x0040
Output over current
(continuous load 320A for
more than 2S)
Tighten the copper bar screw again
0x0080 Primary side over current
Power on again after 10 minutes of power
failure. If it occurs again, replace the
power supply
0x0100
Single circuit overcurrent
(protection point 120a)
Check the PSU
0x0200
Single circuit overcurrent
(protection point 120a)
Check the PSU
0x0400
Single circuit overcurrent
(protection point 120a)
Check the PSU
0x0800 Fan failure Replace the PSU
0x1000
Output over current
(continuous load of 310A
for more than 5min)
Check the PSU
0x2000
Output over current
(continuous load 295A for
more than 10min)
Check the PS
Error code Reason Processing method 110 Fanin detect speed error Check whether the fan connection is normal, or replace the power supply, or replace the fan 111 Fanout detect speed error Check whether the fan connection is normal, or replace the power supply, or replace the fan 130 Fanin speed error Check whether the fan connection is normal, or replace the power supply, or replace the fan 131 Fanout speed error Check whether the fan connection is normal, or replace the power supply, or replace the fan 140 Fan speed is too high Please check the environment temperature 200 Power probing error, no power found Detecting power output wiring, updating the latest firmware, or replacing power supply 201 Power supply and configuration file mismatch Replace the correct PSU 203 Power protecting Please check the environment temperature 204 Power current protecting Please check the environment temperature 205 Power current error Inspection of power supply in power grid 206 Power input voltage is low Improve power supply conditions and input voltage 207 Power input current protecting Improve power supply conditions and input voltage 210 Power error status Check power failure code 213 Power input voltage and current do not match the power Replace the PSU 233 Power output over temperature protection Please check the environment temperature 234 Power output over temperature protection Please check the environment temperature 235 Power output over temperature protection Please check the environment temperature 236 Overcurrent Protection of Power Output Please check the environment temperature, check copper row screw 237 Overcurrent Protection of Power Output Please check the environment temperature, check copper row screw 238 Overcurrent Protection of Power Output Please check the environment temperature, check copper row screw 239 Overvoltage Protection of Power Output Inspection of power supply in power grid 240 Low Voltage Protection for Power Output Inspection of power supply in power grid 241 Power output current imbalance Replace the power 243 Over-temperature Protection for Power Input Please check the environment temperature 244 Over-temperature Protection for Power Input Please check the environment temperature 245 Over-temperature Protection for Power Input Please check the environment temperature 246 Overcurrent Protection for Power Input Please check the environment temperature 247 Overcurrent Protection for Power Input Please check the environment temperature 248 Overvoltage Protection for Power Input Inspection of input voltage in power grid 249 Overvoltage Protection for Power Input Inspection of input voltage in power grid 250 Undervoltage Protection for Power Input Inspection of input voltage in power grid 251 Undervoltage Protection for Power Input Inspection of input voltage in power grid 253 Power Fan Error Replace the PSU 254 Power Fan Error Replace the PSU 255 Protection of over power output Please check the environment temperature 256 Protection of over power output Please check the environment temperature 257 Input over current protection of power supply primary side Try to power off and restart, no effect to replace the power supply 263 Power communication warning Check whether the screws of the control board are locked 264 Power communication error Check whether the screws of the control board are locked 267 Power watchdog protection Contact the technician in time 268 Power output over-current protection Check the ambient temperature, check the copper bar screw 269 Power input over-current protection Improve power supply conditions and input voltage 270 Power input over-voltage protection Inspection of input voltage in power grid 271 Power input under-voltage protection Inspection of input voltage in power grid 272 Warning of excessive power output of power supply Please check the environment temperature 273 Power input power too high warning Please check the environment temperature 274 Power fan warning Check if the power fan is blocked and may need to be replaced 275 Power over temperature warning Please check the environment temperature 300 SM0 temperature sensor detection error Check the connection of the hashboard 301 SM1 temperature sensor detection error Check the connection of the hashboard 302 SM2 temperature sensor detection error Check the connection of the hashboard 320 SM0 temperature reading error Check whether the control board screw is locked properly, check the connection board and the arrangement contact 321 SM1 temperature reading error Check whether the control board screw is locked properly, check the connection board and the arrangement contact 322 SM2 temperature reading error Check whether the control board screw is locked properly, check the connection board and the arrangement contact 329 Control board temperature sensor communication error Replace the power supply 350 SM0 temperature protecting Please check the environment temperature 351 SM1 temperature protecting Please check the environment temperature 352 SM2 temperature protecting Please check the environment temperature 410 SM0 detect eeprom error Check adapter board and wiring contact 411 SM1 detect eeprom error Check adapter board and wiring contact 412 SM2 detect eeprom error Check adapter board and wiring contact 420 SM0 parser eeprom error Contact the technician in time 421 SM1 parser eeprom error Contact the technician in time 422 SM2 parser eeprom error Contact the technician in time 430 SM0 chip bin type error Contact the technician in time 431 SM1 chip bin type error Contact the technician in time 432 SM2 chip bin type error Contact the technician in time 440 SM0 eeprom chip num X error Contact the technician in time 441 SM1 eeprom chip num X error Contact the technician in time 442 SM2 eeprom chip num X error Contact the technician in time 510 SM0 miner type error The version and type of hashboard are inconsistent, replace the correct hashboard 511 SM1 miner type error The version and type of hashboard are inconsistent, replace the correct hashboard 512 SM2 miner type error The version and type of hashboard are inconsistent, replace the correct hashboard 530 SM0 not found Check the connection and arrangement of the adapter board, or replace the control board, check whether the hash board connector is empty welded 531 SM1 not found Check the connection and arrangement of the adapter board, or replace the control board, check whether the hash board connector is empty welded 532 SM2 not found Check the connection and arrangement of the adapter board, or replace the control board, check whether the hash board connector is empty welded 540 SM0 reading chip id error Check adapter board and wiring contact, Clean the dust on the hashboard 541 SM1 reading chip id error Check adapter board and wiring contact, Clean the dust on the hashboard 542 SM2 reading chip id error Check adapter board and wiring contact, Clean the dust on the hashboard 550 SM0 have bad chips Replacement of bad chips 551 SM1 have bad chips Replacement of bad chips 552 SM2 have bad chips Replacement of bad chips 560 SM0 loss balance Plug in the adapter plate, and then screw in the power connection hashboard again 561 SM1 loss balance Plug in the adapter plate, and then screw in the power connection hashboard again 562 SM2 loss balance Plug in the adapter plate, and then screw in the power connection hashboard again 600 Environment temperature is high Please check the environment temperature 610 If the ambient temperature is too high in high performance mode, return to normal mode Check the ambient temperature, high performance mode needs to be controlled below 30 ℃ 710 Control board rebooted as exception Updating the latest firmware.Check whether the control board screw is locked properly 800 cgminer checksum error Re-upgrade firmware 801 system-monitor checksum error Re-upgrade firmware 802 remote-daemon checksum error Re-upgrade firmware 2010 All pools are disable Please check the network or pools configure 2020 Pool0 connect failed Please check the network or pools configure 2021 Pool1 connect failed Please check the network or pools configure 2022 Pool2 connect failed Please check the network or pools configure 2030 High rejection rate of pool Please check the network or pools configure.Setting of mining currency 2040 The pool does not support the asicboost mode Check pool configuration 5110 SM0 Frequency Up Timeout reboot 5111 SM1 Frequency Up Timeout reboot 5112 SM2 Frequency Up Timeout reboot 8410 Software version error (M2x miner with M3x firmware, or M3x with M2x firmware). Upgrade to the correct firmware version PSU Error code Reason processing method 0x0001 Input undervoltage Check the power supply 0x0002 Temperature sampling over temperature protection of power radiator Power on again after 10 minutes of power failure. If it occurs again, replace the power supply 0x0004 Temperature sampling over temperature protection of power radiator Power on again after 10 minutes of power failure. If it occurs again, replace the power supply 0x0008 Over temperature protection of environmental temperature sampling in power supply Power on again after 10 minutes of power failure. If it occurs again, replace the power supply 0x0010 Primary side over current Power on again after 10 minutes of power failure. If it occurs again, replace the power supply 0x0020 Output undervoltage Check the power supply 0x0040 Output over current (continuous load 320A for more than 2S) Tighten the copper bar screw again 0x0080 Primary side over current Power on again after 10 minutes of power failure. If it occurs again, replace the power supply 0x0100 Single circuit overcurrent (protection point 120a) Check the PSU 0x0200 Single circuit overcurrent (protection point 120a) Check the PSU 0x0400 Single circuit overcurrent (protection point 120a) Check the PSU 0x0800 Fan failure Replace the PSU 0x1000 Output over current (continuous load of 310A for more than 5min) Check the PSU 0x2000 Output over current (continuous load 295A for more than 10min) Check the PS