Download PC Repair Tool to quickly find & fix Windows errors automatically
MBR2GPT is a Microsoft tool that converts a disk from the Master Boot Record (MBR) to the GUID Partition Table (GPT) partition style without modifying or deleting the data from the disk. The tool can be used from both Advanced Windows Recovery mode and from the full Windows 11/10 operating system (OS) by using the /allowFullOS option.

In case when using this tool, the system generates an error message which relates to MBR2GPT failing, and permission or privilege issues, then this post will help you fix it.
Here is the full error message:
enableprivilege: AdjusttokenPrivileges failed (Error:0x514)
Error: failed to enable backup/restore privileges
Check that you are running in a process with elevated privileges
The error clearly states that the command has not been executed or does not have enough privilege to execute. Any command which modifies system files of the OS needs admin permission. So the solution is rather simple.
1] Sign in with an admin account
First, make sure you are signed in with an Admin account and not with a regular account. It can be a Microsoft connected account or a local admin account; it will not matter.
2] Temporarily disable UAC
Second, disable UAC until the command execution is complete. User Account Control (UAC) is a technology and security feature that makes sure any program which wants to change system files has actually admin permission.
3] Temporarily disable system restore
Third, disable system restore. Since you will be changing the Partition style, it is important to remove anything which belongs to the old system. While the user files are not changed, it is better to get rid of these.
4] Run CMD or PowerShell with elevated privileges
Lastly, open elevated Command Prompt or PowerShell. Then you can run the MBR2GPT tool to make the proper conversion. Post this; you should not be stopped by restricted by admin issues.
PS: See this post if you receive MBR2GPT disk layout validation failed, cannot find OS partition, non-system disk, cannot install new boot files, cannot find room for the EFI system partition errors.
I hope the post helped execute the MBR2GPT command without any privilege issues in Windows 11/10.

Ashish is a veteran Windows and Xbox user who excels in writing tips, tricks, and features on it to improve your day-to-day experience with your devices. He has been a Microsoft MVP (2008-2010).
-
- Oct 4, 2009
-
- 89
-
- 1
-
- 18,535
- 0
-
#1
I have attenpted to change to uefi using win10 adk and diskmanagement separately, as admin. Seems to be the same results- not converting.
The information I have indicated : verify mbr; Issue command: (in diskmanagement) mbr2gpt.exe/convert/allowfullos… As this resulted in return of command listing instructions . I used elevated prompt after trying command prompt in Winpe with same results.
The results in elevated prompt are :C:users>mbr2gpt.exe /convert /allowfullos
EnablePrivilege: AdjusttokePrivileges failed (error:0x514)
Error: Failed to enable backup/restore privileges.
Check that you are funning in a process with elevated privileges.
I will appreciate advice on curing this issue.
Ps. How do I attach pictures?

-
- Jun 12, 2015
-
- 61,167
-
- 5,188
-
- 166,290
- 10,454
-
#2
Last edited: Sep 14, 2021
-
- Jun 12, 2015
-
- 61,167
-
- 5,188
-
- 166,290
- 10,454
-
#2
Last edited: Sep 14, 2021
-
- Oct 4, 2009
-
- 89
-
- 1
-
- 18,535
- 0
-
#3
from what i can tell you should dombr2gpt /validate
first before running the convert
fullos only needed if you run inside windows. By default, MBR2GPT.exe is blocked unless it is run from Windows PE. This option overrides this block and enables disk conversion while running in the full Windows environment. https://docs.microsoft.com/en-us/windows/deployment/mbr-to-gptmbr2gpt /convert
is all you need to type in winpe
How to switch from Legacy to UEFI boot mode (MBR2GPT conversion)
In the context of my work as a system administrator from time to time I have to deal with desktop / client issues in addition to infrastructure and server problems. So I recently had to cope with 2 problems that had the same cause. Case 1:On one workstation, Bitlocker had
it-infrastructure.solutionsreasons for that error are: https://www.thewindowsclub.com/mbr2gpt-failed-causing-privilege-issues-on-windows-10
PS pictures: upload to an image sharing website and share links here.

Attempted elevated command with mbr2gpt /validate /disk: 1 — response was «ERROR: MBR2GPT can only be used from the Windows Preinstallation Environment. Use /allowFullOS to override.»
next tried «mbr2gpt/validate/disk: 1/allowfullos» still got the results showing /…. all of various configurations.
I’d prefer to alter bios config rather that re-inputting Win to obtain uefi setup.
-
- Jun 12, 2015
-
- 61,167
-
- 5,188
-
- 166,290
- 10,454
-
#4
- go to settings/update & security/recovery
- under advanced startup, click restart now button
- this restarts PC in a blue menu
- choose troubleshoot
- choose advanced
- choose command prompt
enter the commands. most of the reasons for that error don’t exist in here.
system restore isn’t running
nor is UAC
you can’t run in admin in here but that shouldn’t stop it.
I assume PC has got UEFI and its not from 2010 and doesn’t actually support it?
-
- Oct 4, 2009
-
- 89
-
- 1
-
- 18,535
- 0
-
#5
Attempted elevated command with mbr2gpt /validate /disk: 1 — response was «ERROR: MBR2GPT can only be used from the Windows Preinstallation Environment. Use /allowFullOS to override.»next tried «mbr2gpt/validate/disk: 1/allowfullos» still got the results showing /…. all of various configurations.
I’d prefer to alter bios config rather that re-inputting Win to obtain uefi setup.
Strangely, I copied the mbr2gpt /validate /disk:1/allowFullOS from MS Win Deployment example and it worked.
Thank you for you helpful information.
-
- Jun 12, 2015
-
- 61,167
-
- 5,188
-
- 166,290
-
- 10,454
-
#6
-
- Oct 4, 2009
-
- 89
-
- 1
-
- 18,535
- 0
-
#7
It could have been a spacing issue, some commands need exact spacing or you will get errors.
Well the bios change didn’t take. Rebooted and SSd still showing MBR. Suggestions?
-
- Oct 4, 2009
-
- 89
-
- 1
-
- 18,535
- 0
-
#8
Well the bios change didn’t take. Rebooted and SSd still showing MBR. Suggestions?
Here’s what I did:
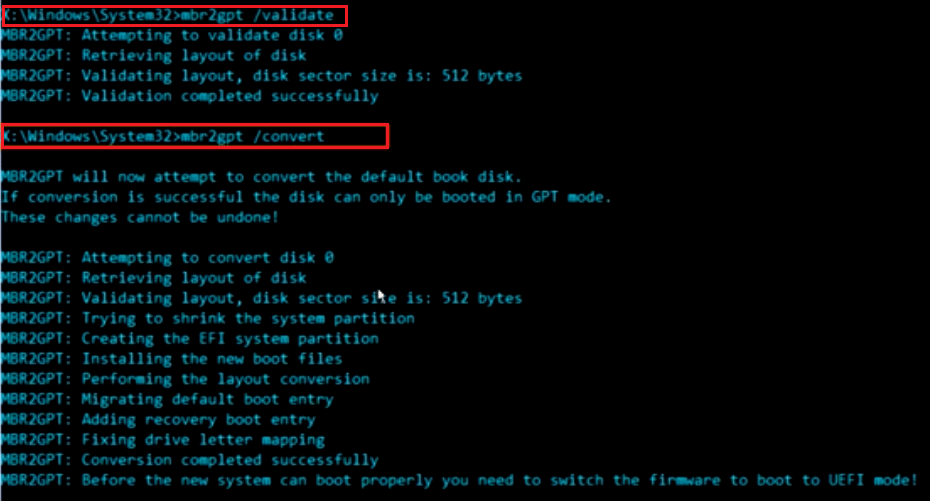
C:Windowssystem32>mbr2gpt /validate /disk:0 /allowFullOS
MBR2GPT: Attempting to validate disk 0
MBR2GPT: Retrieving layout of disk
MBR2GPT: Validating layout, disk sector size is: 512 bytes
MBR2GPT: Validation completed successfully
When I rechecked diskpart, disk 0 was still mbr.
Disk ### Status Size Free Dyn Gpt
——— ————- ——- ——- — —
Disk 0 Online 465 GB 502 MB
Disk 1 Online 1863 GB 6144 KB
-
- Jun 12, 2015
-
- 61,167
-
- 5,188
-
- 166,290
- 10,454
-
#9
validate is just making sure drive can run the convert — Instructs MBR2GPT.exe to perform only the disk validation steps and report whether the disk is eligible for conversion.
you still need to run
mbr2gpt /convert
Convert — Instructs MBR2GPT.exe to perform the disk validation and to proceed with the conversion if all validation tests pass.
so do both commands and then swap BIOS boot method to UEFI. Important one is really the convert command
-
- Oct 4, 2009
-
- 89
-
- 1
-
- 18,535
- 0
-
#10
validate doesn’t convert though
validate is just making sure drive can run the convert — Instructs MBR2GPT.exe to perform only the disk validation steps and report whether the disk is eligible for conversion.you still need to run
mbr2gpt /convertConvert — Instructs MBR2GPT.exe to perform the disk validation and to proceed with the conversion if all validation tests pass.
so do both commands and then swap BIOS boot method to UEFI. Important one is really the convert command
Finally got it to convert to uefi. Mobo was a 2013+ allowed uefi or legacy. Anyway the convert was the fix.
Thank you!! for your help
| Thread starter | Similar threads | Forum | Replies | Date |
|---|---|---|---|---|
|
B
|
Question Can someone recommend me a audio format converter program ? | Windows 10 | 5 | Jan 15, 2023 |
|
|
[SOLVED] attempting to update realtek drivers caused a complete failure blue screen of death. | Windows 10 | 5 | Dec 25, 2022 |
|
|
[SOLVED] What have I missed attempting fresh install via USB? | Windows 10 | 35 | Dec 22, 2022 |
|
|
[SOLVED] PC wont boot after doing mbr2gpt convert using third party software | Windows 10 | 66 | Dec 1, 2022 |
|
|
Question Windows 10 will not boot. Basic recovery steps attempted with no success. | Windows 10 | 2 | Nov 28, 2022 |
|
B
|
Question Windows 10 update from 8.1 Fails as it attempts to install from flash drive on my HP Pavilion Notebook | Windows 10 | 2 | Sep 29, 2022 |
|
R
|
Question Mbox to PST Converter WIN 10 | Windows 10 | 2 | Aug 8, 2022 |
|
|
Question Convert/Save .webp images automatically to .jpeg/jpg images, when saving web pages in Chrome/Firefox. | Windows 10 | 4 | Jul 25, 2022 |
|
K
|
Question Attempt of Fixing a BSOD Issue | Windows 10 | 19 | Jun 25, 2022 |


- Advertising
- Cookies Policies
- Privacy
- Term & Conditions
- Topics
MBR2GPT — это инструмент Microsoft, который преобразует диск из основной загрузочной записи (MBR) в стиль раздела таблицы разделов GUID (GPT) без изменения или удаления данных с диска. Средство можно использовать как в режиме расширенного восстановления Windows, так и в полной операционной системе (ОС) Windows 10 с помощью /allowFullOS вариант.
В случае, если при использовании этого инструмента система генерирует сообщение об ошибке, которое связано с ошибкой MBR2GPT, а также проблемами с разрешениями или привилегиями, этот пост поможет вам исправить это.
Вот полное сообщение об ошибке:
enableprivilege: Ошибка AdjusttokenPrivileges (ошибка: 0x514)
Ошибка: не удалось включить права резервного копирования / восстановления.
Убедитесь, что вы работаете в процессе с повышенными привилегиями
В ошибке четко указано, что команда не была выполнена или у нее недостаточно прав для выполнения. Любая команда, изменяющая системные файлы ОС, требует разрешения администратора. Так что решение довольно простое.
1]Войдите в систему с учетной записью администратора
Во-первых, убедитесь, что вы вошли в систему с учетной записью администратора, а не с обычной учетной записью. Это может быть подключенная учетная запись Microsoft или учетная запись локального администратора; это не имеет значения.
2]Временно отключить UAC
Во-вторых, отключите UAC до завершения выполнения команды. Контроль учетных записей пользователей (UAC) — это технология и функция безопасности, которая гарантирует, что любая программа, которая хочет изменить системные файлы, действительно имеет разрешение администратора.
3]Временно отключить восстановление системы
В-третьих, отключите восстановление системы. Поскольку вы будете изменять стиль разделов, важно удалить все, что принадлежит старой системе. Пока пользовательские файлы не меняются, от них лучше избавиться.
4]Запустите CMD или PowerShell с повышенными привилегиями.
Наконец, откройте командную строку с повышенными привилегиями или PowerShell. Затем вы можете запустить инструмент MBR2GPT, чтобы выполнить правильное преобразование. Опубликуйте это; Вас не должны останавливать ограниченные администратором вопросы.
PS: См. Этот пост, если вы получили сообщение об ошибке проверки макета диска MBR2GPT, не можете найти раздел ОС, несистемный диск, не можете установить новые загрузочные файлы, не можете найти место для ошибок системного раздела EFI.
Надеюсь, этот пост помог выполнить команду MBR2GPT без каких-либо проблем с привилегиями в Windows 10.
- Remove From My Forums
-
Question
-
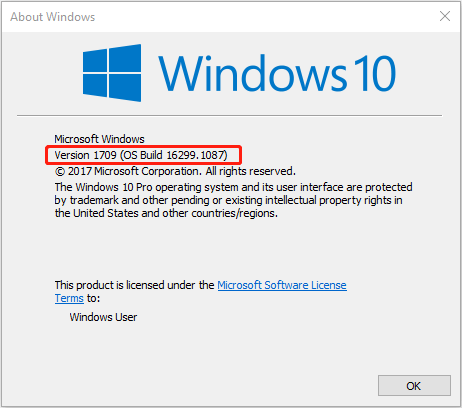
I have the latest version of Windows 10 16299.192 using a Dell laptop. I’m trying to use the MBR2GPT utility to change my system disk from MBR to GPT. The link below contains a Microsoft video I used for instructions:
https://docs.microsoft.com/en-us/windows/deployment/mbr-to-gpt
When I’m using the MBR2GPT tool in Administrator privilege (Administrator account is local, so no MS account) in the command mode, the system generate a message:
enableprivilege: AdjusttokenPrivileges failed (Error:0x514)
Error: failed to enable backup/restore privileges
Check that you are running in a process with elevated privileges
I set the UAC level for the Administrator account to “off”, but receive still the same message.
Any tips?
В канале Telegram я рассказывал об утилите mbr2gpt, входящей в состав Windows 10 1709. Сам по себе процесс конвертации очень простой, но есть несколько граблей, которые я хочу расставить. В основном, они затрагивают владельцев изданий Pro и Enterprise, поскольку связаны с BitLocker и Hyper-V.
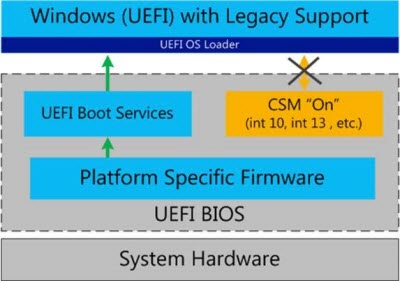
Если у вас есть веские причины для создания большого количества разделов, GPT — правильный выбор. MBR поддерживает не более четырех основных разделов, а управление дополнительными неэффективно.
Второй и более важный аспект — безопасная загрузка с Secure Boot, препятствующая подмене загрузчика (это, например, делал Petya). Secure Boot работает только при нативной загрузке в UEFI и не работает в режиме эмуляции Legacy BIOS с помощью CSM. В Windows для нативного UEFI требуется загрузочный том в разметке GPT.
Смотрите также мой развернутый ответ вопрос по этой теме — UEFI, GPT и загрузка 32- и 64-разрядных ОС Windows.
Конвертация MBR в GPT
Первая команда проверяет возможность перехода, вторая выполняет его из-под запущенной ОС. У меня никаких проблем не возникало, хотя если включен BitLocker, первая команда подскажет, что придется временно приостановить шифрование.
mbr2gpt /validate /allowfullos
mbr2gpt /convert /allowfullos
Первый раздел System Reserved объемом 500MB остается на память, но перфекционисты найдут способ объединить его с системным разделом каким-нибудь сторонним ПО.
Включение или возобновление BitLocker
После конвертации попытка включить BitLocker может закончиться сообщением «The system cannot find the file specified».
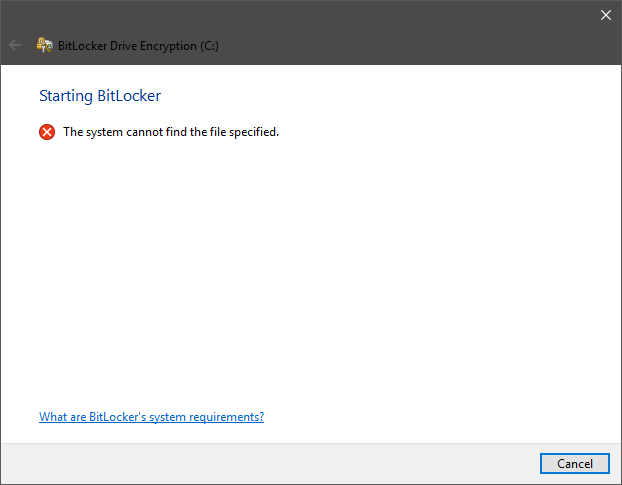
Лечится это переименованием файла
%windir%System32RecoveryReAgent.xml
Новый файл создается автоматически.
Включение Secure Boot
Имея GPT, логично укрепить безопасность загрузки — в UEFI BIOS включите Secure Boot и загрузку в нативный UEFI (вместо CSM). Первое невозможно без второго, и у меня это выглядит примерно так (включение Secure Boot форсирует режим загрузки UEFI).
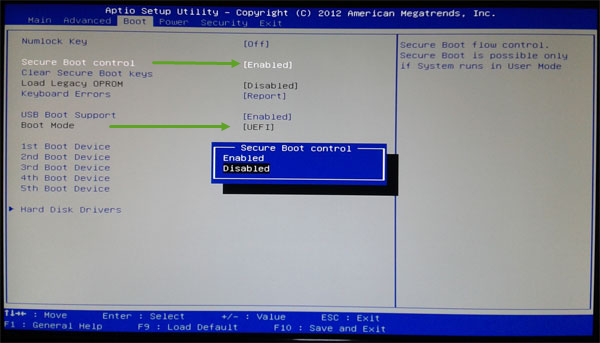
Если не можете найти настройки в разделе Boot или Security, смотрите документацию к материнской плате или ноутбуку.
Автоматический запуск гипервизора
Если после всех этих манипуляций вы запустите ВМ в Hyper-V, то наверняка получите такую ошибку.
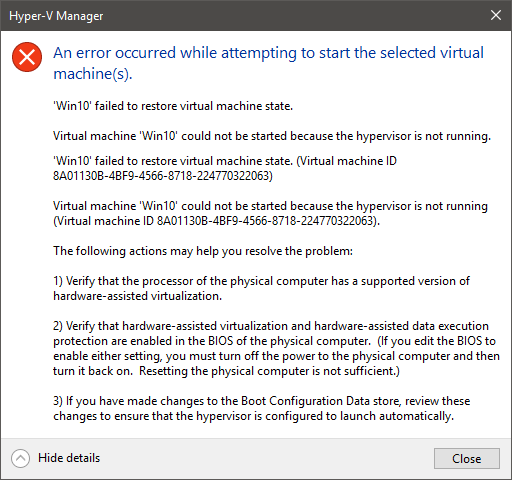
Тут много букв, но скорее всего проблема в пункте 3 — гипервизор не запускается автоматически. Лечится это одной командой в CMD и перезагрузкой.
BCDEDIT /Set {current} hypervisorlaunchtype auto
Если не помогло, сбросьте BIOS к дефолтным параметрам, включите там виртуализацию и повторите команду.
Дискуссия и опрос
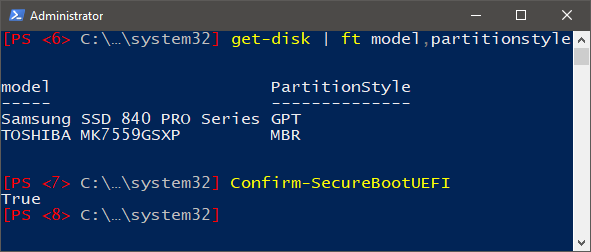
Тип разметки диска и статус Secure Boot можно быстро посмотреть в PowerShell командлетами Get-Disk (PartitionStyle) и Confirm-SecureBootUEFI (True = включено).
Опрос, как обычно, покажет расклад среди читателей. А вы уже перешли на GPT с Secure Boot или вас все устраивает на MBR?
Ваша конфигурация разметки дисков и безопасной загрузки на основном домашнем ПК с Windows 10
- MBR, и меня все устраивает (27%, голосов: 218)
- GPT, Secure Boot включен (26%, голосов: 207)
- У меня не Windows 10 (15%, голосов: 122)
- GPT, Secure Boot выключен (14%, голосов: 111)
- MBR, но хочу перейти на GPT (11%, голосов: 85)
- Не знаю / лень разбираться (6%, голосов: 48)
- Моего варианта тут нет (2%, голосов: 15)
Проголосовало: 806 [архив опросов]
![]() Загрузка …
Загрузка …
Are you using Windows MBR2GPT.EXE to convert your system disk from MBR to GPT? Sometimes, you may get errors that prevent you from completing the conversion. In this post, MiniTool Partition Wizard tells you why these errors occur and shows you how to solve these MBR2GPT failed errors.
Introduction to MBR2GPT
Nowadays, many people may know that UEFI boot mode is superior to Legacy boot mode (BIOS vs UEFI). However, Legacy requires MBR while UEFI requires GPT. To use UEFI mode, some people may want to change the system disk from MBR to GPT.
MBR2GPT.EXE is a tool offered by Windows used to convert the system disk from Master Boot Record (MBR) to GUID Partition Table (GPT) partition style without modifying or deleting data on the disk. It is usually stored in WindowsSystem32.
The commonly-used MBR2GPT commands are as follows:
- mbr2gpt /validate /disk:0 (This command will validate the disk to see if the disk is suitable for the conversion. If this command fails, the conversion will definitely fail.)
- mbr2gpt /convert /disk:0
Tip:
1. If you don’t specify the disk number, it will choose disk 0 by default.
2. You can run the MBR2GPT.EXE tool in both WinPE and the running Windows system. But if you want to run this tool in the running Windows, you must add «/allowFullOS» to the command.
To run the MBR2GPT tool, you should make sure your PC meets the following requirements. Otherwise, you will get errors during or after the MBR2GPT conversion.
- You should make sure your PC is running Windows 10 version 1703 or later.
- Make sure your PC is not in dual boot.
- The Windows system must be a 64-bit one.
- The disk you want to convert should be a system disk and MBR disk. In addition, the system partition should be active.
- The disk has enough space that is not occupied by partitions (16KB + 2 sectors at the front of the disk; 16KB + 1 sector at the end of the disk).
- The disk has at most 3 primary partitions (including the hidden system reserved partition, recovery partitions, etc.).
- The disk has no extended/logical partition.
- All partitions on the disk are of MBR types recognized by Windows.
- If your Windows 10 OS disk is encrypted by BitLocker, you need to decrypt the OS disk before the conversion. After the conversion, you will be able to encrypt the OS disk again.
MBR2GPT Failed Errors
When you run the MBR2GPT tool, you may get return codes. Some return codes indicate successful conversion while others indicate MBR2GPT failed errors. Here is the table of MBR2GPT.EXE return codes:
| Return code | Description |
| 0 | Conversion completed successfully. |
| 1 | Conversion was canceled by the user. |
| 2 | Conversion failed due to an internal error. |
| 3 | Conversion failed due to an initialization error. |
| 4 | Conversion failed due to invalid command-line parameters. |
| 5 | Conversion failed due to error reading the geometry and layout of the selected disk. |
| 6 | Conversion failed because one or more volumes on the disk is encrypted. |
| 7 | Conversion failed because the geometry and layout of the selected disk do not meet requirements. |
| 8 | Conversion failed due to error while creating the EFI system partition. |
| 9 | Conversion failed due to error installing boot files. |
| 10 | Conversion failed due to error while applying GPT layout. |
| 100 | Conversion to GPT layout succeeded, but some boot configuration data entries could not be restored. |
However, in most cases, the MBR2GPT tool will give you an error message instead of an error code. The common MBR2GPT failed errors are as follows:
- Disk layout validation failed for disk 0. This disk number may change sometimes. The possible reasons of this error include: more than 3 partitions, unrecognized partition found (eg, extended partition), etc.
- Cannot find OS partition(s) for disk 0. This disk number may change sometimes. The possible reason of this error is that there is no BCD data found.
- Cannot find room for the EFI system partition. The possible reasons of this error include: not enough unallocated space, or not enough free space in the system drive (usually the C).
- Cannot create EFI system partition. The possible reasons of this error are similar to the previous error.
- Cannot perform layout conversion. The possible reasons of this error include: unsupported version of Windows, OEM partition mapping issue, etc.
- LayoutConversion: Layout conversion failed. Error: 0x00000032[gle=0x00000032]; Cannot perform layout conversion. Error: 0x00000032[gle=0x00000032]. This error usually indicates that you are trying to use the MBR2GPT tool on an unsupported version of Windows.
These errors will occur when you perform the MBR2GPT convert command. Sometimes, these errors will be followed by MBR2GPT conversion failed error.
Tip:
1. There are many other MBR2GPT errors like «Failed to enable backup/restore privileges». But the errors listed here are the most common ones.
2. If you don’t know what issue causes your MBR2GPT failed error, you can try finding the log files. The paths are as follows: C:Windowssetupact.log and C:Windowssetuperr.log.
How to Fix MBR2GPT Failed Errors [Solution 6 Is the Best]
In this part, I list the most possible solutions for each MBR2GPT failed error. You can try them.
1. Solution for Unsupported Windows Version
- Press Windows key + R to call out the Run box.
- In the Run box, type «winver» and press Enter. You will get the OS version and build.
- Open File Explorer, right-click This PC and choose Properties. Check System type and you will know whether your PC is running 64-bit OS.
If your Windows version is earlier than Windows 10 version 1703, you just need to upgrade your Windows to the latest version. But if your Windows is 32-bit, you need to fresh install the 64-bit Windows.
How to Upgrade 32 Bit to 64 Bit in Win10/8/7 without Data Loss
2. Solution for Disk Layout Validation Failed
If you get disk layout validation failed for disk 0 error, you can do as follows:
- Open Run box.
- Type «diskmgmt.msc» and press Enter to open Disk Management. In this tool, check the layout of the system disk.
If there are extended partitions, you should convert them to primary partitions (or delete them); if there are other unrecognizable partitions, you should format or delete them; if there are four or more partitions, you should merge them or delete until there are 3 or less partitions on the disk.
Tip: If you plan to format or delete partitions, please back up data to external drives in advance. Then, you can delete partitions in Disk Management.
3. Solution for Cannot Find OS Partition(s)
If you get the «MBR2GPT cannot find OS partition» error, it may mean that the BCD data is corrupt. You can run the following command to fix the BCD data:
- bcdboot c:Windows /f bios /s c:
Some people have reported that this method worked for them and you can have a try.
4. Solution for EFI System Partition Failure
If you get the «cannot find room for the EFI system partition» or «cannot create EFI system partition» error, the solution is to make sure there are enough unallocated space on the disk and free space in the C drive.
Some people report that they have solved this issue by shrinking the C drive to create unallocated space, and then moving the unallocated space to the front of the disk. To do this, I recommend you to use Move/Resize feature of MiniTool Partition Wizard, because Windows can’t complete this job. In addition, this feature is free.
Tip: The unallocated space should be large enough. 1GB is recommended.
5. Solution for Cannot Perform Layout Conversion
Some people report that they have solved the «cannot perform layout conversion» issue by using the following command:
- exe /convert /disk:0 /map:222=af9b60a0-1431-4f62-bc68-3311714a69ad /allowFullOS
But this command will convert the disk to dynamic disk and cause some errors. Therefore, some people suggest using the following command instead:
- exe /convert /disk:0 /map:222=ebd0a0a2-b9e5-4433-87c0-68b6b72699c7 /allowFullOS
This command will successfully convert the disk partition structure to GPT but maintain the disk as a Basic disk.
Note: The above commands may be only available to Dell PC, because the 222 stands for the Dell OEM recovery partition on the MBR disk.
6. An All-in-one Solution for MBR2GPT Failed Error
Causes for MBR2GPT conversion failed issue are various. It’s possible that there are other unknown causes for the MBR2GPT failed error. If you don’t know how to solve this issue, or these solutions don’t work, you can try MiniTool Partition Wizard.
This tool can also convert a disk from MBR to GPT without data loss. In addition, it can apply to both system disks and non-system disks. But to apply it to the system disk, you should get the Pro or higher edition. Here is the guide:
Tip: Before using this tool to convert the system disk from MBR to GPT, please make sure your system is 64-bit first.
Free Download
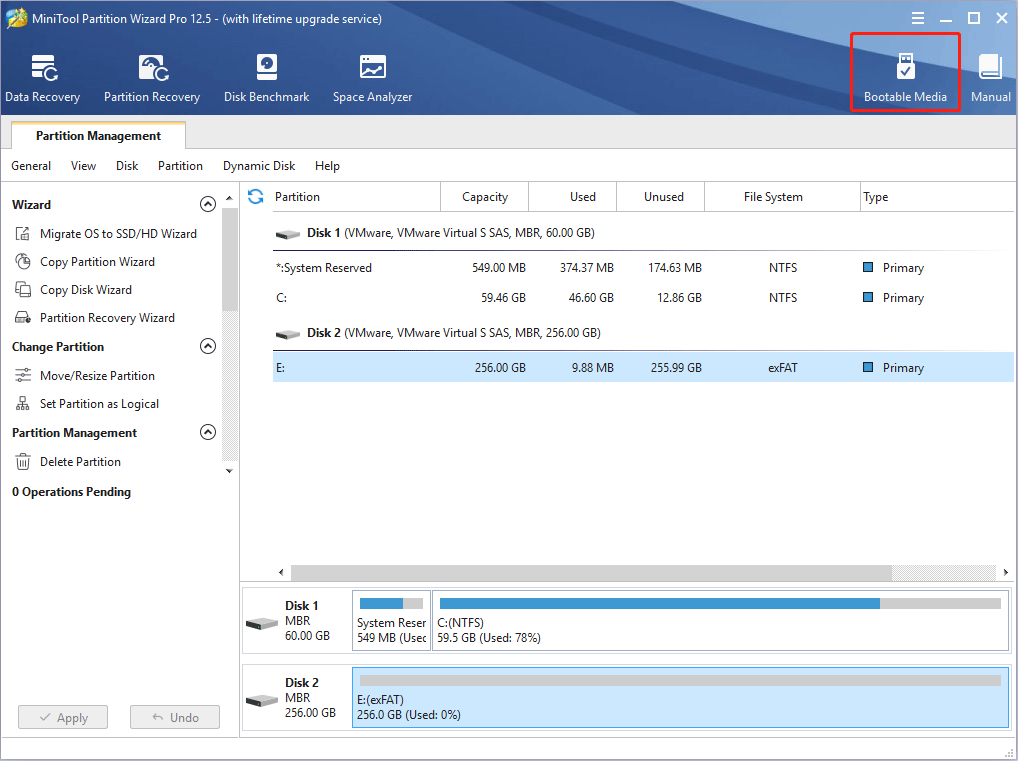
Step 1: Create a USB bootable media. MiniTool Partition Wizard can perform the conversion without this step. But to avoid any accidents, I recommend you to complete this step.
- Connect a USB drive to PC.
- Launch MiniTool Partition Wizard and go to its main interface.
- Click Bootable Media and then follow the on-screen instructions to create a USB bootable media.
Step 2: After the bootable media is created, restart your PC and press the BIOS key to enter the BISO interface (or press the boot menu key to open then boot menu). Set the USB drive as the first boot device and save changes. Hence, the PC can boot from the USB drive.
Step 3: After the PC boots from the bootable media, please do not do any operations. You just need to wait until MiniTool Partition Wizard opens automatically.
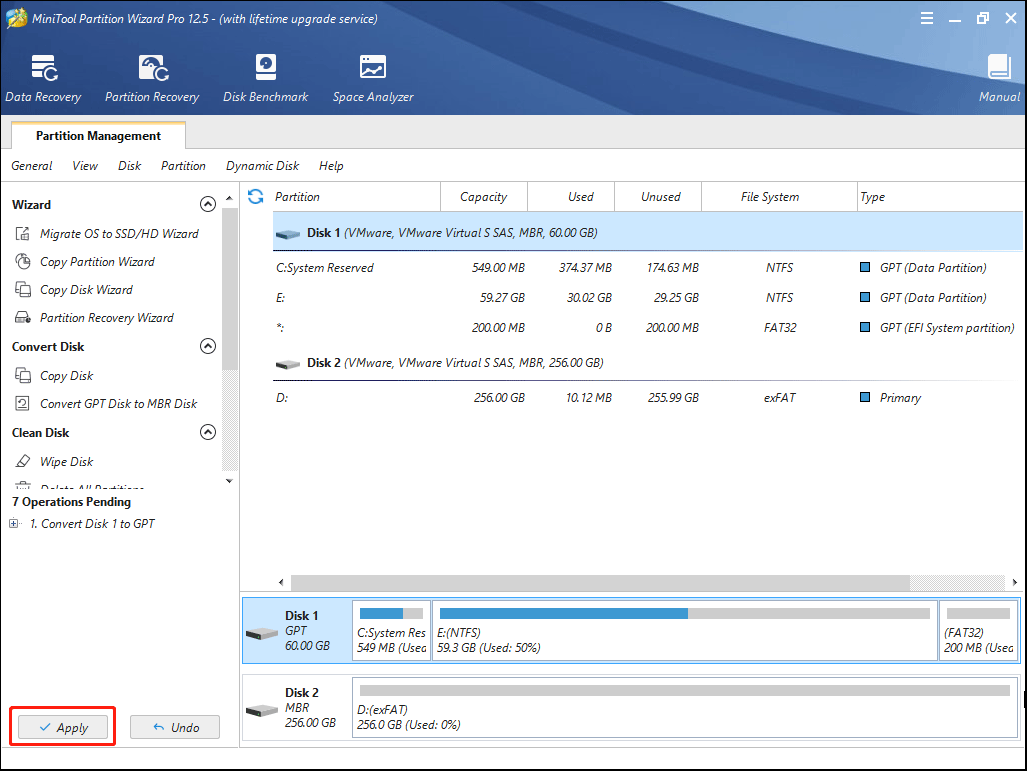
Step 4: Right-click on the system disk and choose Convert MBR Disk to GPT Disk. Click Yes and then Yes again to confirm two warnings.

Step 5: Click the Apply button to execute the conversion operation.
Step 6: After the conversion is completed, restart PC and enter BIOS again. This time, you should set the hard drive back to the first boot device and then enable UEFI boot mode. Then, you can save changes and boot up the PC.
Here is a post talking about how to fix MBR2GPT failed errors. It lists some most common errors and offers solutions corresponding to these errors. If you fail to covert the system disk from MBR to GPT by using the MBR2GPT tool, this post may help you.Click to Tweet
Bottom Line
Is this post useful to you? Have you encountered other MBR2GPT conversion failed errors? Do you know other methods that can solve the MBR2GPT failed errors? Please leave a comment in the following zone. In addition, if you have difficulty in using MiniTool Partition Wizard, please contact us via [email protected]. We will get back to you as soon as possible.
|
1 / 1 / 0 Регистрация: 27.11.2014 Сообщений: 24 |
|
|
1 |
|
|
28.04.2021, 08:52. Показов 9620. Ответов 13
Здравствуйте! Обновил материнскую плату со старой с БИОС на новую с UEFI (Gigabyte Z490). Хочу использовать UEFI, а для этого требуется перевести диск с MBR в GPT. Желательно без переустановки винды. Из двух команд: Ошибка следующая: ошибка По моему он не может найти загрузчик винды. Но он у меня точно на диске С: на системном ССД. ПС: приложил логи ошибки и скрин управления дисками. Миниатюры
__________________
0 |

|
8449 / 2971 / 494 Регистрация: 14.04.2011 Сообщений: 7,367 |
|
|
28.04.2021, 14:29 |
2 |
|
Я бы делал так: MBR2GPT.ехе не должна икать загрузчик при проверке диска, так как он (загрузчик) всё-равно будет установлен новый.
сама винда старая, она обновлена ещё с Windows 7 с ломаным загрузчиком Возможно отсюда «растут ноги» у проблемы Windows какой разрядности? Если х32, то нет смысла пробовать переделывать на UEFI загрузку.
1 |

|
1 / 1 / 0 Регистрация: 27.11.2014 Сообщений: 24 |
|
|
29.04.2021, 06:53 [ТС] |
3 |
|
1 Не пользоваться MBR2GPT.ехе., так как результат может быть непредсказуемый. Если очень хочется сделать именно через MBR2GPT.ехе, то следующие два пункта Согласен -я начал сразу решать проблему этого способа, не проверив другие варианты
а) перед применением MBR2GPT.ехе, сделать бэкап системы и перенести информацию с раздела Н, на другие диски. Раздел Н вообще создался при клонировании на новый ССД, на нём ничего нет по идее.
Возможно отсюда «растут ноги» у проблемы Загрузчика два тусуются похоже — перед стартом винды появляется окно с выбором загрузчика Windows 7 и Windows 10. Подскажи как лучше, по твоему мнению, сделать преобразование диска из MBR в GPT? (Акронис или им подобные?) чтобы мне в UEFI переключиться. Спасибо!
0 |
|
Модератор
15150 / 7738 / 726 Регистрация: 03.01.2012 Сообщений: 31,808 |
|
|
29.04.2021, 10:29 |
4 |
|
fanatf1, Да. Загрузчик у вас на диске С… А UEFI-загрузчик требует «отдельную квартиру» — Шифрованный EFI-раздел с файловой системой fat32… Так что просто конвертировать не удастся. Вот тут рекомендация для «настоящего» диска GPT, на котором не оказалось загрузчика:https://www.cyberforum.ru/post15430135.html и https://www.cyberforum.ru/post15430591.html
0 |
|
1 / 1 / 0 Регистрация: 27.11.2014 Сообщений: 24 |
|
|
29.04.2021, 11:41 [ТС] |
5 |
|
Тогда два вопроса: 1.
Так что просто конвертировать не удастся. Хмм — нашёл как вариант через AOMEI Partition Assistant с загрузочной флешкой и тогда он может подхватывать системный/загрузочный диск. Там в примерах у них получается так сделать и AOMEI Partition Assistant сам создаёт «квартирку» для загрузчика и форматирует в фат32 и конвертирует — и всё сам)! У меня также не сработает? Приложил фото из примера — ДО преобразования и ПОСЛЕ. 2.
Вот тут рекомендация для «настоящего» диска GPT, на котором не оказалось загрузчика «Сначала надо дать созданному под загрузчик разделу букву (проще через дискпарт). Например, букву M. Потом bcdboot C:windows /L ru-ru /s M: /f uefi» Миниатюры
0 |
")
|
Модератор
15150 / 7738 / 726 Регистрация: 03.01.2012 Сообщений: 31,808 |
|
|
29.04.2021, 12:15 |
6 |
|
Там в примерах у них получается так сделать и AOMEI Partition Assistant сам создаёт «квартирку» для загрузчика и форматирует в фат32 и конвертирует — и всё сам)! У меня также не сработает? Попробуйте. Если раздел создастся, то не надо ничего делать вручную
0 |
|
1 / 1 / 0 Регистрация: 27.11.2014 Сообщений: 24 |
|
|
29.04.2021, 12:27 [ТС] |
7 |
|
Только если после конвертации ОС не загрузится — дать разделу fat32 букву и прописать загрузчик вручную Я просто проговорю чтобы не упустить: СНАЧАЛА запускаю AOMEI Partition Assistant — который по идее должен MBR в GPT сделать сам. Он всё делает. ПОТОМ я переключаю БИОС в UEFI (раз всё у меня уже сделано для этого) и ожидаю загрузки ОС. 1а. В какой момент создать дополнительый раздел (квартирку) 100/350 мб для загрузчика? 1. Если нет то как мне получить доступ к diskpart чтобы вручную его прописать? Загрузочная флешка? LiveCD? Флешка с Виндой? 2. Какие команды прописать в diskpart /bcdboot? Код list disk sel disk X - где Х, это номер под которым загрузочный SSD create part efi format fs=fat32 assign letter=m exit а потом Код bcdboot C:windows /s M: /l ru-ru /f UEFI Спасибо.
0 |
|
Модератор
15150 / 7738 / 726 Регистрация: 03.01.2012 Сообщений: 31,808 |
|
|
29.04.2021, 12:53 |
8 |
|
Create partition efi можно только на диске, на котором есть место. Если места нет — ужать подходящий для этого раздел (в дискпарте — shrink) — если не указывать размер, то раздел создастся на всё нераспределённое пространство. Если хотите ограничить «квартирку» конкретным размером — Create partition efi size=500 (указан размер 500 Мб)
1 |
|
1 / 1 / 0 Регистрация: 27.11.2014 Сообщений: 24 |
|
|
29.04.2021, 13:02 [ТС] |
9 |
|
Спасибо! но я понял и не понял — Сжать загрузочный диск могу, в винде прям сейчас, сделаю раздел например 500 мб неразмеченной области. Дальше какие мои действия: запустить Акронис с флешки и дать ему всё делать как в примере моём? Или как сделать самому руками? Я последовательность действий не уловил
0 |
 ((
((|
Модератор
15150 / 7738 / 726 Регистрация: 03.01.2012 Сообщений: 31,808 |
|
|
29.04.2021, 15:01 |
10 |
|
Пожалуй, надо так:
AOMEI Partition Assistant сам создаёт «квартирку» для загрузчика и форматирует в фат32 и конвертирует — и всё сам)! 2. Попробовать загрузиться А создавать вручную сам раздел будет нужно только в том случае, если его не создаст AOMEI Partition Assistant
1 |
|
8449 / 2971 / 494 Регистрация: 14.04.2011 Сообщений: 7,367 |
|
|
29.04.2021, 15:08 |
11 |
|
Подскажи как лучше, по твоему мнению, сделать преобразование диска из MBR в GPT? (Акронис или им подобные?) чтобы мне в UEFI переключиться. Я бы делал так: Всё.
1 |
|
1 / 1 / 0 Регистрация: 27.11.2014 Сообщений: 24 |
|
|
30.04.2021, 09:11 [ТС] |
12 |
|
Я бы делал так: У меня как раз есть новый ССД под систему! 1. делаю бэкап текущей винды Верно? Добавлено через 4 минуты Правильно ли пишу: 1.Прописать загрузчик на EFI раздел нового ССД. Код list disk sel disk X - где Х, это номер под которым загрузочный SSD create part efi format fs=fat32 assign letter=m exit 2. Прописать загрузчик на EFI раздел нового ССД Код bcdboot C:windows /s M: /l ru-ru /f UEFI
0 |
|
8449 / 2971 / 494 Регистрация: 14.04.2011 Сообщений: 7,367 |
|
|
30.04.2021, 09:34 |
13 |
|
Решение
разворачиваю/клонирую систему на новый ССД Развернуть систему из бэкапа, да. Уточнение команды, должно быть так В остальном вроде всё правильно. Добавлено через 6 минут Код bcdboot C:windows /s M: /l ru-ru /f UEFI возможно вместо C: нужно будет подставить другую букву (смотря, как всё будете делать). На месте буквы C: должна быть буква раздела на который Вы развернёте бэкап системы.
1 |
 Сообщение было отмечено fanatf1 как решение
|
1 / 1 / 0 Регистрация: 27.11.2014 Сообщений: 24 |
|
|
10.05.2021, 08:50 [ТС] |
14 |
|
Вопрос решён! т.к. у меня появился новый чистый ССД, то я сделал следующее: 1. Подключил новый ССД и инициализировал его как GPT Винда запустилась, загрузчик на месте, формат загрузки UEFI! Спасибо Андрей1224 и gecata! Вы реально крутые!
1 |
|
IT_Exp Эксперт 87844 / 49110 / 22898 Регистрация: 17.06.2006 Сообщений: 92,604 |
10.05.2021, 08:50 |
|
14 |
In older versions of Windows, you were forced to reinstall the entire operating system if you wanted to convert legacy BIOS or Master Boot Record (MBR) to UEFI or GUID Partition Table (GPT). However, a new and simple tool called MBR2GPT was introduced in Windows 10. It lets you convert legacy BIOS to UEFI with just two commands.
Here is how you can convert legacy BIOS to UEFI in Windows 10. If you’re a Windows 11 user, you shouldn’t do anything, as UEFI mode is enabled by default on your device.
Do not skip any of the prerequisites of legacy BIOS to UEFI conversion mentioned below, as it can lead to system failure and even hardware issues in some cases.
Content
- Why Convert Legacy BIOS to UEFI?
- Prerequisites for Legacy BIOS to UEFI Conversion
- Do I Need to Convert Legacy BIOS to UEFI in Windows 11?
- How to Check Whether You Are Using Legacy BIOS
- How to Convert Legacy BIOS to UEFI
- How to Fix the MBR2GPT «Disk Layout Validation Failed» Error
- Frequently Asked Questions
You probably have some inkling why you’d want to change from the legacy BIOS to UEFI, but just to confirm, here’s what you need to know. Both BIOS and UEFI perform the same function on your PC – namely under-the-hood software integrated into your motherboard chip that lets you control various important low-level things.
Your BIOS/UEFI lets you control things like boot order, connected hardware, fan speeds, the physical lights on your computer and system time. Modern motherboards even let you undervolt and overclock your CPU! It’s powerful stuff.
UEFI is basically the new BIOS, performing the same job but better. With UEFI, you get faster boot times (ostensibly), higher drive capacities, better update methods and driver support, and a 64-bit mode (where BIOS is only 16-bit).
In other words, switching to UEFI is a bit of an upgrade and worth doing. Note that even modern computers (including Windows 11) tend to still call the motherboard software the BIOS, even if it’s technically UEFI.
Prerequisites for Legacy BIOS to UEFI Conversion
There are many secondary requirements listed below for a flawless conversion. If you ignore any of these prerequisites, your Windows hardware may fail leading to a black screen. (Read the FAQ to know what options are available for you in case you encounter this problem.)
- While there will be no data loss while converting legacy BIOS to UEFI, please back up your system as a precaution.
- Always verify whether your Windows system is capable of supporting UEFI in the first place. Generally, all motherboards launched after 2014 are UEFI secure boot capable but that’s not always the case. So you should verify the eligibility for your device specifically.
To do so, use the Run command with the shortcut Win + R and type msinfo32 to launch the System Information window. In its right-hand side panel, check your BIOS Version/Date. If it says UEFI, your device is eligible for legacy BIOS to UEFI conversion. However, if it only gives the name of your BIOS version, the device does not have UEFI firmware settings. Trying to convert the legacy BIOS will lead to hardware failures.

- You should be using Windows 10 v1703 or higher. If you are not sure, press Win + R, type
winverand press Enter. On the second line, you should see “version 1703” or higher.

- The disk you are trying to convert should not have more than three partitions. If you have more than three partitions on the Windows 10 installation drive, either merge or delete the excess partitions. Otherwise, you’ll encounter a “Disk Layout Validation Failed” error, which is fixable but best avoided.
- If you are using BitLocker to encrypt your system, decrypt the drive and disable BitLocker protection before starting the conversion process. With BitLocker protection turned on, Windows 10 cannot convert your drive from legacy BIOS to UEFI.
- After converting, you may have to change your motherboard firmware settings from legacy BIOS to UEFI. Depending on your motherboard manufacturer, the procedure to switch from one to the other will be different. Have your motherboard manual handy to make things easier for you.
- Don’t proceed with the legacy BIOS to UEFI conversion if your Windows device is already on UEFI with secure boot enabled. We’ll show you how to check for this below.
If you want to know more, we have a full guide on the differences between UEFI and BIOS.
Do I Need to Convert Legacy BIOS to UEFI in Windows 11?
If you’re using Windows 11, it means your device is past the milestone in switching from legacy BIOS to UEFI. This is because migrating to a UEFI secure boot is a mandatory Windows 11 compatibility requirement. There is no separate provisioning of legacy BIOS in Windows 11.
In rather simple words, Windows 11 doesn’t support legacy BIOS at all. If you want to install Windows 11 on an older Windows 10 device, you should first check whether that computer supports UEFI mode or not, and it should have a GPT partition, not MBR (check the following section for more details on this).
You can check this from a “Windows Security” option where “Secure boot” is displayed as On. Microsoft recommends you keep it that way to deter any malicious software from loading when the device is booting.

The secure boot settings can also be verified from the BIOS options (called UEFI Firmware Settings) accessible in Windows 11 “Advanced startup.” After the BIOS screen shows up, navigate to the Boot Options tab. According to Microsoft, UEFI should be shown as the “first or only option.” This is especially true for Dell, HP, and Lenovo laptops. However, some other manufacturers may have continued to retain both UEFI and legacy/CSM.

How to Check Whether You Are Using Legacy BIOS
Before you switch from legacy BIOS to UEFI in Windows 10, check whether you are actually using legacy BIOS. After all, there is no use converting if you are already on UEFI.
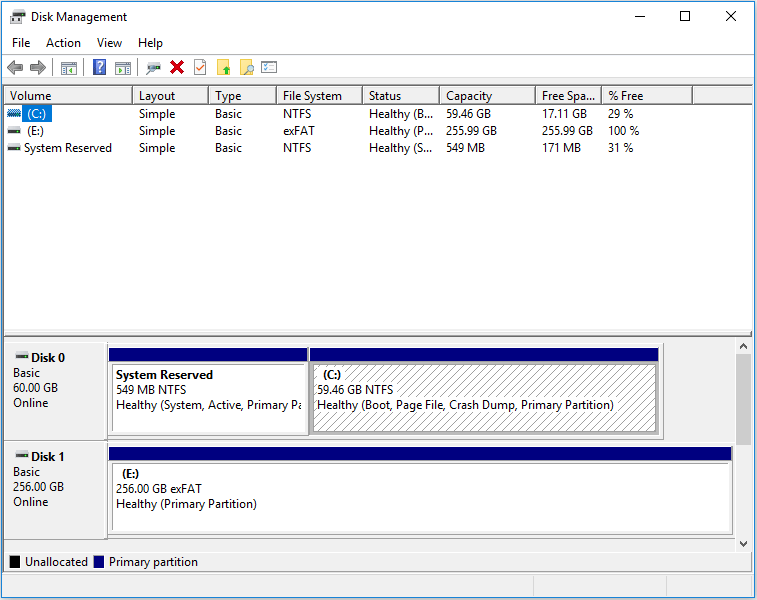
- Search for “Create and format hard disk partitions” in the Start menu and press Enter to open the built-in Disk Management tool.
- Right-click on the Windows installation disk, Disk 0, and select “Properties.”

- In the Properties Window, go to the “Volumes” tab. If you see “Master Boot Record (MBR)” next to “Partition style,” you are on Legacy BIOS.
- If, on the other hand, it says “GUID Partition Table (GPT)” as in the image below, then you’re already on UEFI and don’t need to do anything more!

How to Convert Legacy BIOS to UEFI
Once you’ve confirmed you are on legacy BIOS and have backed up your system, you can convert Legacy BIOS to UEFI.
- Access Command Prompt from Windows’s advanced startup by pressing Win + X.
- Go to “Shut down or sign out” and click on the “Restart” button while holding the Shift key.

- The above action will reboot your system to the Advanced Startup screen.
- Go to “Troubleshoot -> Advanced Options” and select the option “Command Prompt.”

- Validate the disk you are trying to convert. Type the below command and press Enter.
If you see the “Validation completed successfully” message, proceed to the next step. If you see any errors, your disk or system may not meet the conversion requirements.

If you have problems validating at this point, enter the following command. We highly recommend you use this add-on code to not lose data.
mbr2gpt /validate /allowFullOS

- After validating the disk, execute the below command:
As soon as you execute, Windows 10 will start the conversion process, i.e., add all the required UEFI boot files and GPT components, then update the Boot Configuration Data.

- Restart your system, launch your motherboard firmware settings screen and change it from legacy BIOS to UEFI. The procedure to change from Legacy BIOS to UEFI depends on your motherboard manufacturer. Consult the manual for the exact steps.
- After booting into Windows 10, you can verify whether or not you are converted. Just as before, open the disk properties window from the Disk Management tool and go to the “Volumes” tab. Here, you should see “GUID Partition Table (GPT)” next to “Partition style.”
How to Fix the MBR2GPT “Disk Layout Validation Failed” Error
While changing your hard drive from MBR to GPT, you may sometimes receive the error message: “MBR2GPT Disk layout validation failed for Disk#,” with the number # referring to your boot disk.
There are two reasons for this error: more than three partitions and no available space in C drive, the boot disk.

- To solve the “Disk Layout Validation Failed” error, go to “Create and format hard disk partitions” from the search menu and check whether you have more than three partitions in the boot disk, Disk 0.
- You need to “merge and delete” some of these extra partition volumes to bring down the number of partitions to three or less. Do create a backup of any important data in the extra partitions.

- The second reason for the error is the Disk 0 drive not having enough space for an MBR to GPT conversion. To resolve this, you need to shrink its volume to anything between 200 MB to 2 GB.
Note: if your device is already on a GPT layout, these options will be greyed out.

Frequently Asked Questions
Why am I seeing a black screen after changing legacy BIOS to UEFI?
If you’re seeing a black screen after changing over from legacy BIOS to UEFI, it means you did not complete one or more prerequisites we have listed above.
Having a black screen after restart may or may not indicate hardware failure. If your Windows device is healthy, you should be able to access its “safe mode” by pressing the Power button followed by what is known as a “Boot key.” Common boot keys include F2, F6, F12, Del, and Esc. They vary among laptop/PC manufacturers and you should check your precise laptop/PC model to know its boot key.
Once the Safe mode menu items are visible, attempt a factory image restore of your Windows computer. This will revert your Windows device to the exact configuration in which it was shipped by the manufacturer. You can also try a simpler System Restore if it works for you.
If you cannot access the Safe mode using Power button and boot keys, it definitely indicates hardware failure. This leaves you no other choice but to have the device repaired by a competent PC hardware expert.
How do I resolve the «0x514; MBR2GPT failed to enable backup/restore privileges» error on Windows 10?
Some users have experienced an “administrator not found on the system” error while performing the MBR to GPT conversion on a command prompt even though they were signed into the computer as administrator. To deal with this problem, ensure that you are running the elevated Command Prompt which is the Administrator mode. It can be easily accessed from the Start menu.
Can I go back to legacy BIOS from UEFI?
If you had your Windows 10/11 OS installed in UEFI mode, it is possible to go back to legacy BIOS (although we’ll highly recommend not doing this). You have to initiate an “advanced startup” on your Windows device and enter the UEFI Firmware settings to disable the UEFI secure mode which can be reenabled later.
Image Credit: Unsplash

Sayak Boral
Sayak Boral is a technology writer with over eleven years of experience working in different industries including semiconductors, IoT, enterprise IT, telecommunications OSS/BSS, and network security. He has been writing for MakeTechEasier on a wide range of technical topics including Windows, Android, Internet, Hardware Guides, Browsers, Software Tools, and Product Reviews.
Subscribe to our newsletter!
Our latest tutorials delivered straight to your inbox