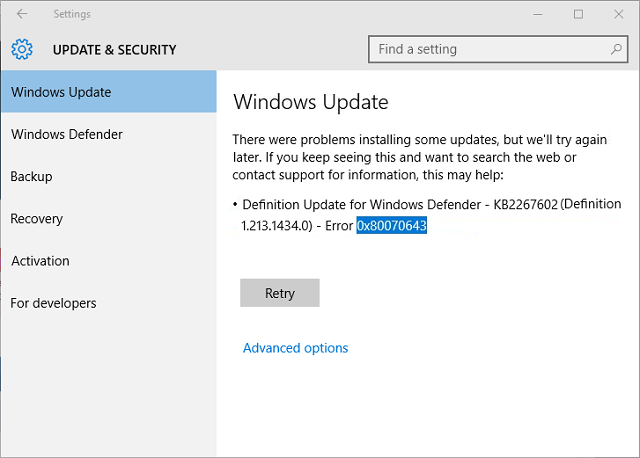
Microsoft releases system updates from time to time and by default To fix bugs on the current system and improve features. And Windows 10 operating system has been set to check and install those updates automatically provided that the computer is connected to the Internet. Most of the time, Users face error 0x80070643 failed to install MSI package during Install updates, definition updates of windows defender or installing MSI packages. This problem is seen more in Windows 10 than Windows 8 or 7. Most of the time this Error show during these updates: KB4457128, KB4457142 installation. The update or installation process may stop by showing an error code like 0x80070643.
Sometimes you may saw an Error message like “Unable to install Windows Update: 0x80070643” or error 0x80070643 failed to install the MSI package. This error message can be seen when the .NET framework on your computer has a problem, or the update related to MS 2003 components fails.
This issue may occur if the MSI software update registration has become corrupted, or if the .NET Framework installation on the computer has become corrupted. Also if the System files or registry gets damaged or corrupted, the Windows Update feature fails to access certain user data or MSI software update registration or the .NET Framework installation is corrupted this will result in error 0x80070643 failed to install MSI package
Most of the time, This error is related to windows defender or .NET Framework. So, While describing the solutions, I will focus more on this security solution of Microsoft. Here is the method that can help you to fix error 0x80070643.
Repair or update Windows .NET Framework
This framework is an important part of windows, .NET Framework plays an important part in software installation and system updates on all versions of the Windows system. And it should be well installed and updated to the latest version in order that other programs can be built, deployed, or ran normally. If it becomes corrupted, Windows update, Software installations, etc. may be problematic. So, You can download this .net framework repair tool from Microsoft and run it on your PC.
Manually Repair .NET Framework
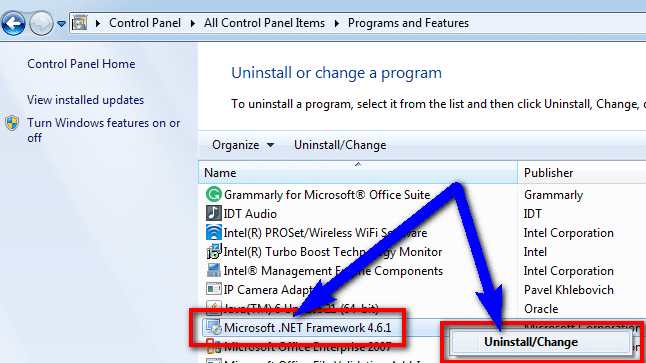
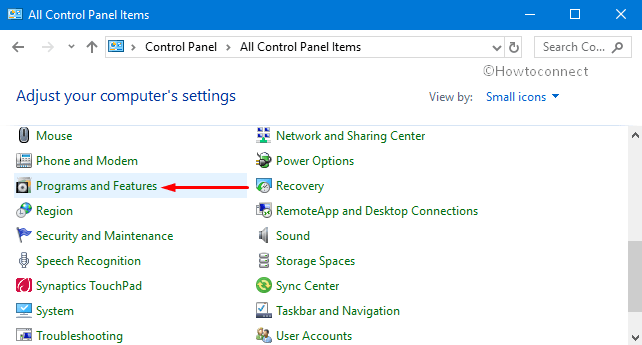
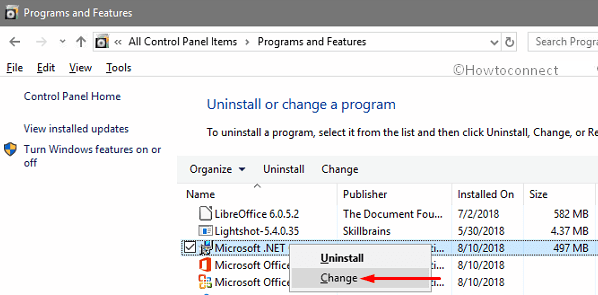
Close all currently running software and click “Start” to select Control Panel. Next click Programs and “Program and Features”. Locate Microsoft .NET Framework 4 Client Profile from these listed programs. Select it and click the tab Uninstall/Change
Note: If there is no Microsoft .NET Framework 4 Client Profile on your computer, download it online and install it to update your PC.
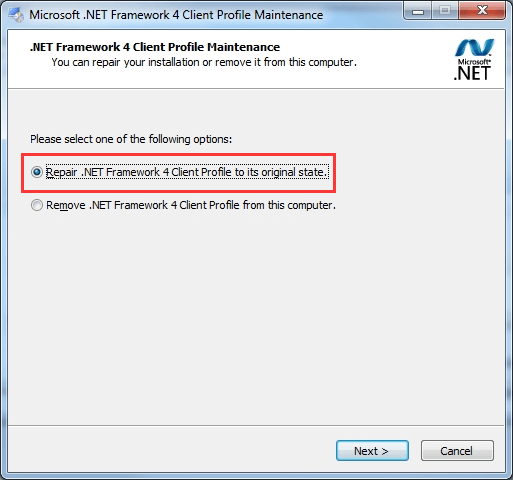
On the pop-up window select Repair .NET Framework 4 Client Profile to its original state and click the Next button.
Uninstall and reinstall the .NET Framework
Use the .NET Framework Cleanup Tool to uninstall multiple versions of the .NET Framework, and then reinstall the components.
Download the .NET Framework cleanup tool.
When you are prompted, click Open, and then click Extract Now. In the files that you extracted, double-click cleanup_tool.exe. Do you want to run the .NET Framework Setup Cleanup Utility? the message, click Yes.
Click Yes to accept the license agreement.
In the Product to the cleanup window, click the list, select .NET Framework – All Versions, and then click Cleanup Now.
Note The cleanup tool does not let you remove the .NET Framework 2.0 in Windows Vista or later versions of Windows because the .NET Framework is installed as an operating system component. After the .NET Framework is removed, restart the computer. Visit Windows Update again, and then check for and install updates.
Also, Try to reinstall the .NET Framework update. Hope you will not face any error. if the problem continues try the next steps.
Use Windows Update Troubleshooter
Your PC has a built-in troubleshooter to solve common problems. Before trying any additional ways to resolve your issue, You can run the troubleshooter and see if it repair the errors.
Open Start Menu and type troubleshooting and then open the Troubleshooting app. Now, Click on Fix problems with windows update.
When windows update Troubleshoot tool opens click on Advanced and tick on Apply repairs automatically. Now, Go ahead and click next following the on-screen instructions. this will take some moment to find problems and this will fix itself.
After doing it, Check if the problem still exists or not.
Restart Windows Update Components
You can restart several windows update components including the security center to fix this Error At first, You have to stop these services, and then you have to rename two system folders. After doing it, Start these service components again.
Open Command Prompt as administrator. To do it, Just right-click on the Start button (Windows logo) and choose Command Prompt (Admin).
Now, You can stop these services by running these commands. I recommend you hit enter for each command.
First type net stop wuauserv to stop the windows update service.
Next Type net stop cryptSvc to Stop the Cryptographic Services.
Type net stop bits to Stop the background intelligence Service.
Now Type net stop msiserver To stop the MSI server.
At last type net stop wscsvc to stop the Windows Security Center service.
After doing it, You will need to rename SoftwareDistribution and catroot2 folders. You may do it from C > Windows and System 32 folders. You also can do it from the command prompt which is much easier. Here are the commands to do it –
ren C:WindowsSoftwareDistribution SoftwareDistribution.old
ren C:WindowsSystem32catroot2 Catroot2.old
- Now, After renaming the folders, Start those services again. To do it, run these commands –
First type net start wuauserv to start the windows update service. - Next Type net start cryptSvc to Start the Cryptographic Services.
- Type net start bits to Start the background intelligence Service.
- Now Type net start msiserver To start the MSI server.
- At last type net start wscsvc to start the Windows Security Center service.
Now, Restart your PC and try to update windows and windows defender. I hope, This time you won’t encounter any problem like update error 0x80070643.>
Check and Repair System Files
Running SFC and DISM commands are very common ways to check and repair corrupted windows system files. Sometimes, For internal windows errors, Any update installations may be stopped by showing a failure message with an error code. These commands will help you to fix these internal problems.
Repair corrupted system files with SFC /scannow
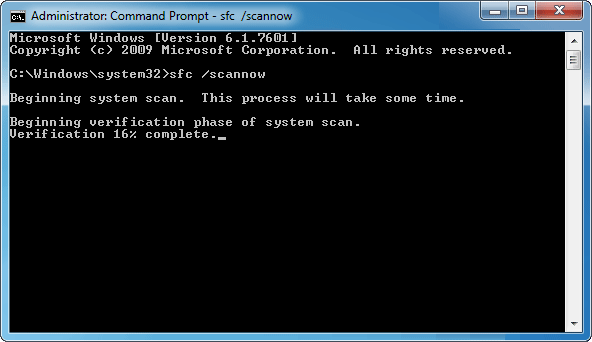
System file checker comes in handy, as it’s capable of scanning and finding out corrupted files and replace them with correct ones.
Open Command Prompt. Click the Start button and All Programs to locate Accessories where you can find Command Prompt. Right-click it and Run as administrator. Type sfc/scannow in the Command Prompt and press Enter. Then it starts to scan and repair corrupted system files. You just need to wait for this process to complete.
Uninstall Antivirus Completely
If you have uninstalled your antivirus recently and have started using windows defender, You can follow this method. When we uninstall our security software, It may not be removed completely from our PC. Later, The files which remain even after uninstalling may cause several problems, especially to windows defender. So, First, you have to remove your anti-malware program completely. All antivirus company has special tools to do this job easily. You can check out this list of these tools. After completely wipe out the antivirus from your PC, Try to update again.
These are some best working solutions to fix Windows 10 update installation error 0x80070643 failed to install MSI package. Have any Query suggestion feel free to comment below.
Содержание
- How to fix Windows error code 0x80070643?
- Overview on error code 0x80070643
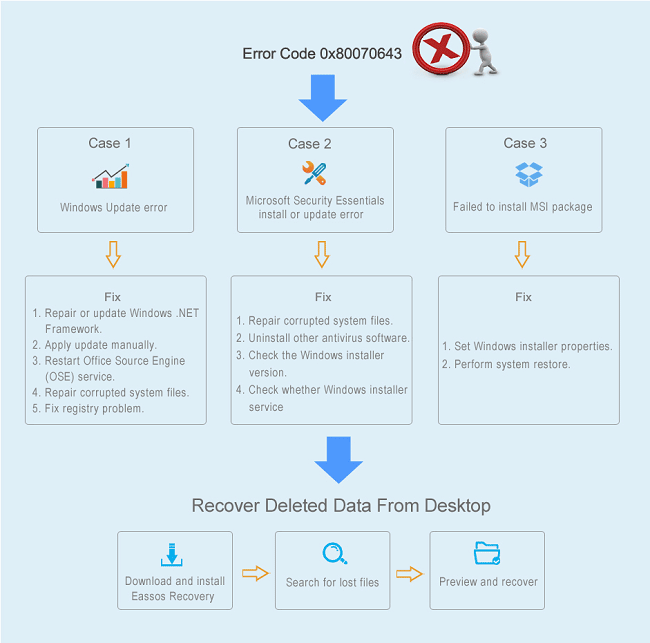
- Case 1: Windows update error code 0x80070643
- Symptoms
- Main causes of this update error
- Solutions
- Case 2: Microsoft Security Essentials install or update error 0x80070643
- Problem Description
- Solution
- Case 3: Error 0x80070643: Failed to install MSI package
- How to recover deleted data from desktop?
- Расследование ошибки установки Visual Studio 2015
How to fix Windows error code 0x80070643?
This page explains symptoms, causes and step-by-step solutions to error code 0x80070643 which happens to Windows update, Microsoft Security essentials and MSI. Besides, this article introduces how to get back lost data from desktop after computer undergoing 0x80070643 error. As Windows user, you may often encounter this error; if you feel uncomfortable with it, you can read through methods in this article to fix it as soon as possible.
Overview on error code 0x80070643
0x80070643 is a generic error that is likely to happen to many operations, such as Windows update installation, update or installation of Microsoft Security Essentials and other programs, Microsoft Office error, etc. The error code 0x80070643 is also the error format of containing number and letter, which is similar to other Windows errors such as 0x80070002. It comes with error message produced by programs or system, through which we can identify the specific problem. Though many cases report the same error code, causes and solutions to the specific issue vary widely and are case-by-case. This article guides you through several cases on this error code and you can follow outlined solutions to fix the error. These headlines below are quick links to detailed content:
Case 1: Windows update error code 0x80070643
Symptoms
Windows is very user-friendly operating system used by millions of users across the world and it has to install updates to keep it up to date and repair system vulnerabilities. Microsoft releases system updates from time to times and by default, our operating system has been set to check and install those updates automatically provided that computer is connected to the Internet. Updates fix bugs on current system and improve features. In addition, system updates can be downloaded directly from Microsoft website and installed manually.
If you are a Windows user, you will never skip updating Windows to assure your PC safe and good environment. However, Window update can’t go well all the time and there are several messages that you may run into during system update, for instance, «Unable to install Windows Update: 0x80070643». This error message can be seen when the .NET framework on your computer has problem, or the update related to MS 2003 components fails.
Besides, if your PC is running Windows 10 and you tried to apply KB3122947 update you might also see the same error code «Update for Windows 10 Version 1511 for x64-based Systems (KB3122947) — Error 0x80070643».
Main causes of this update error
- Unable to install the latest system update
- System files or registry gets damaged or corrupted due to some reason
- Windows Update feature fails to access certain user data
- Virus or malware infection
- MSI software update registration or the .NET Framework installation is corrupted
- Microsoft Office Source Engine (Ose.exe) has been disabled or corrupted
Solutions
Solutions to this error vary from person to person on account that it happens to multiple circumstances. Hence, not all solutions listed here will work for your problem, and you need to select one or two of them in line with actual condition.
Method 1: Repair or update Windows .NET Framework
.NET Framework plays an important part in software installation and system updates on all versions of Windows system. And it should be well installed and updated to the latest version in order that other programs can be built, deployed or ran normally.
Step 1
Close all currently running software and click «Start» to select Control Panel. Next click Programs and «Program and Features».
Step 2
Locate Microsoft .NET Framework 4 Client Profile from these listed programs. Select it and click the tab Uninstall/Change which is called Change/Remove in Windows XP.
Note: If there is not Microsoft .NET Framework 4 Client Profile on your computer, download it online and install it to update your PC.
Step 3
On the pop-up window select Repair .NET Framework 4 Client Profile to its original state and click Next button.
Step 4
Click Finish when repairing process is done and click Restart Now to restart computer.
Now you can try to install Windows updates again and see whether the error is eliminated. If the error continues to appear, follow steps in following solutions.
Method 2: Apply update for your computer manually
Since this means works for many people, it’s worth your while to give it a shot. If you are not skilled in computer operations, you can finish the task with ease:
Step 1
Open Control Panel by clicking Start button. Click System and Security and select Windows Update.
Step 2
Click Check for Updates on the left part of the panel to search for available updates for your computer.
Step 3
When Updated are listed, please click «Install updates» to reinstall updates.
Method 3: Restart Office Source Engine (OSE) service
If your computer installs Microsoft Office 2003 and you have to update some components for it, you might get the error due to the Ose.exe file problem. Here is the remedy.
Step 1
Click Windows + R keys to open Run box. Type services.msc in the searching box and press Enter.
Step 2
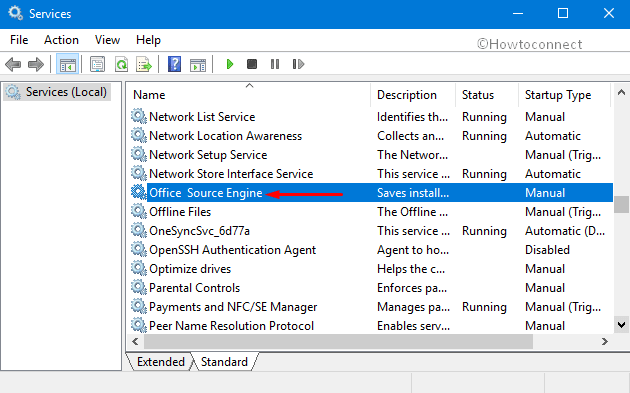
Find out and double-click Office Source Engine in the list.
Step 3
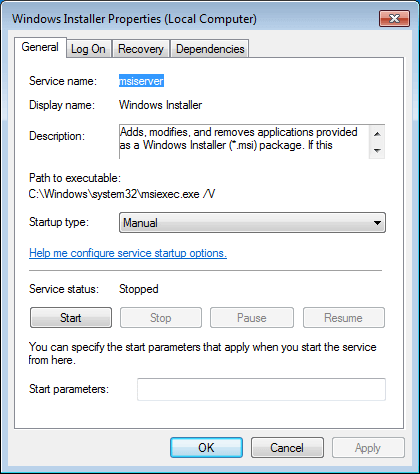
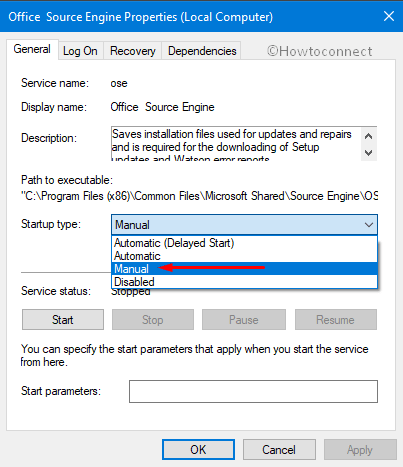
Change the Startup type. If the startup type has been disabled, change it to manual. To do this, double-click it and set startup type as Manual and click OK.
Step 4
Try to install Office update once again.
If the above steps still don’t work, you may have to repair Ose.exe file by copying the original file from Office 2003 CD. The last resort of fix this issue is removing and reinstalling Office 2003. If the error doesn’t relate to Office 2003 and these actions will be meaningless.
Method 4: Repair corrupted system files with SFC /scannow
After installing Windows, users starts to install, uninstall or update programs and applications on computer. Besides, various actions and tasks will be done by computer users and system. During the process, there will be corrupted or damaged files appearing in system and causing problem. It is, therefore, suggested to scan and check whether your system contains these files. System file checker comes in handy, as it’s capable of scanning and finding out corrupted files and replace them with correct ones.
Step 1
Open Command Prompt. Click Start button and All Programs to locate Accessories where you can find Command Prompt. Right-click it and Run as administrator.
Step 2
Type sfc/scannow in the Command Prompt and press Enter. Then it starts to scan and repair corrupted system files. You just need to wait for this process to complete.
Step 3
When the repairing is done without reporting any error you can try to run Windows update again. If he process reports that some corrupted files can’t be repaired, you’ll have to consider a system restore.
Method 5: Fix registry problem
For some Windows 10 users, this error may appear in this way «Update for Windows 10 for x64-based Systems (KB3081704) — Error 0x80070643», the effective solution to this situation is going to registry and carrying out some simple operations.
Step 1
Open Registry Editor. Click Start button and type regedit in the search box and press Enter key. If you are prompted by UAC (User Account Control), click YES.
Step 2
Browse the registry by following the path: HKEY_LOCAL_MACHINESYSTEMCurrentControlSetControlBackupRestoreFilesNotToBackup. If FilesNotToBackup exists, then close the editor.
Note: If there is not «FilesNotToBackup» under the path, you need to add it manually. Right-click Backup Restore to select New and click «Key». Next type FilesNotToBackup and press Enter key.
Step 3
Click Start button to type services.msc and press Enter. Scroll down and find out background Intelligent Transfer Service.
Step 4
Double click the service just found and click Start under the General tab. Click Ok to make the setting take effect. If it has been set as Start already, click Stop and then again click Start.
Case 2: Microsoft Security Essentials install or update error 0x80070643
Problem Description
«I encountered the error code 0x80070643 when I tried to install Microsoft Security Essentials. Though I had had it installed in my computer before that, it failed to work after I used .net cleanup tool. Then I uninstalled it and wanted to reinstall it. Now, whenever I run the installer of Security Essentials I get the error message ‘An error has prevented Microsoft Security Essentials Installations Wizard from continuing. Please restart your computer and try again. The Microsoft Security Essentials Installation Wizard has returned your computer to its original state. Error Code: 0x80070643′»
The installation and updating of MSE is an easy task, but sometimes you get the error and fail to complete the operation. This section explains how to get rid of the error. Before that I’ll list several possible causes of the issue.
- You might have installed other antivirus software on your computer while you are installing MSE. The error might be the result of leftover files, registry entries and firewall settings from third-partition antivirus software.
- The Windows installer you are using is not up-to-date.
- The Windows installer service is not turned on.
Solution
Step 1
Run system file checker to repair corrupted system files. Open Command Prompt and execute command sfc/scannow. Wait for the scan to complete and restart computer.
Step 2
Uninstall other antivirus software. If you have any third-party antivirus software installed on your PC, then remove and uninstall it. Go Control Panel and select Program and Feature, next select Uninstalled a Program. Scroll down to browse the list of programs installed on your PC, locate antivirus such as McAfee, Morton, AVG, etc., and uninstall all of them and reboot computer.
Step 3
Check the Windows installer version if you are Windows XP user. View the path C:WindowsSystem32 and right click MSIEXEC.EXE to view Properties. The version number should be at least 3.1 or higher. Windows 7 or Vista users do no need to do this operation, as the default version is 3.1.
Step 4
Check whether Windows installer service is running. Press Windows + R keys and type services.msc in the Run box to open Services panel. Find out Windows Installer service and get it started.
Case 3: Error 0x80070643: Failed to install MSI package
MSI is an installation package whose function is distributing software throughout Windows during an installation. MSI installer is used by many software distributors as it is easy to use and has good compatibility. However, it may report errors when you use it, for example «Error 0x80070643: Failed to install MSI package.» «Error 0x80070643: Failed to configure per-user MSI package.» Let’s see how to fix the issue. To fix the error, please try these steps:
Step 1
Start the service. Open Services window by typing service.msc in Run box which can be opened by pressing Windows key and R key from keyboard. Look for Windows installer and view its properties so as to set the Startup type as Start.
It’s recommended to check whether this service is started or not, because it is the main cause behind the error and the easiest solution.
Step 2
System restore. If there is no effective means, you’ll have to perform system restore. This step requires your system have a system backup, otherwise you can’t carry out system restore. Hence, it’s very helpful to create a system backup when system is in its great status.
How to recover deleted data from desktop?
If you are facing Windows error 0x80070643 on your computer, your system is no longer in a good condition and might contain potential serious problem such as data loss, system breakdown. Therefore, you should fix it as soon as possible. In addition, you should know how to recover lost data from system partition or exactly desktop. Many people have the habit of placing files they often edit on desktop, which actually is not a wise action. Desktop belongs to system partition, and any system problem may lead to file loss. If you are troubled by same issue, keep reading to find out resolution.
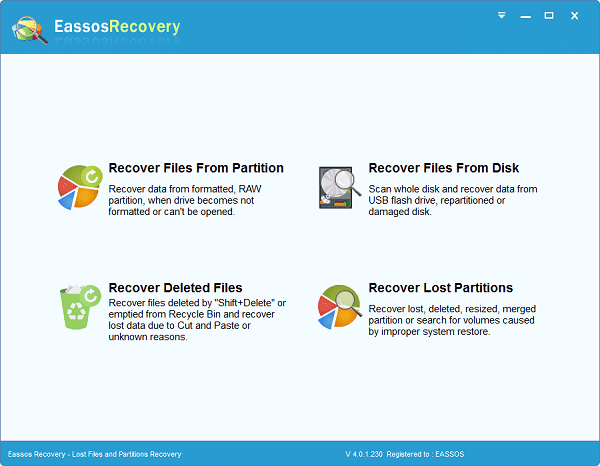
Eassos Recovery Free is free data recovery software and it provides a special recovery mode for deleted files: recover files deleted by «Shift + Delete» or emptied from Recycle Bin and recover lost data due to Cut & Paste or other unknown reasons. Here is the recovery process:
Step 1
Install Eassos Recovery Free and start it. Click «Recover Deleted Files»
Step 2
Select system partition which is usually drive C: and click Next to search for deleted data.
Step 3
Preview listed files and found out files you want to recovery. Select files by checking them and click «Recover» button to save them to a secure location.
Источник
Расследование ошибки установки Visual Studio 2015
Решили мы как-то перевести свой проект на Visual Studio 2015 — там ведь столько захватывающих фич! Вчера вот только решили, а уже сегодня утром я запустил её инсталлятор. Небо было безоблачным, ничто не предвещало беды. Ну что, в самом деле, может пойти не так? Сколько уже этих Visual Studio переставлено — не счесть (я, помнится, ещё 6.0 когда-то ставил). Кто бы мог подумать, что эта тривиальнейшая задача может вылиться в весьма неожиданный забег по граблям длинной почти в целый рабочий день.
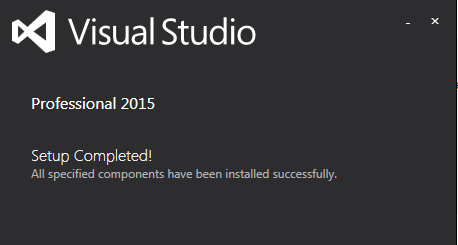
Похрустев немного жестким диском, красивый инсталятор показал мне совершенно некрасивое сообщение об ошибке. Вот такое: 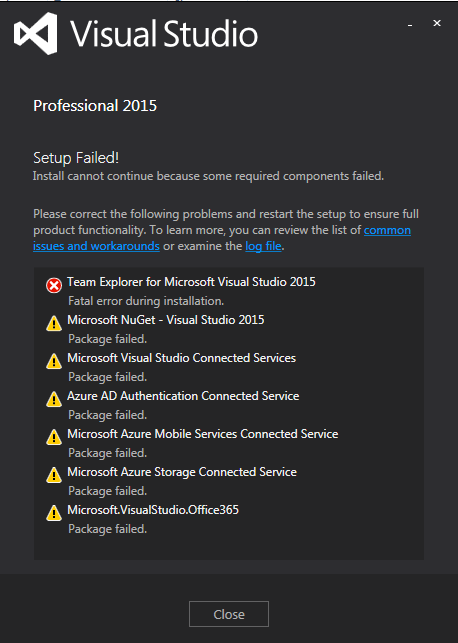
Хм. Не поставился значит, Team Explorer и ещё пару минорных пакетов. Ну ок. Закрываем, переустанавливаем. Не помогает. Удаляем студию, перезагружаемся, устанавливаем — та же ошибка. Лезем в Гугл с вопросом об ошибке установки Visual Studio 2015 на этапе инсталляции компонента Team Explorer и понимаем, что проблема это массовая — десятки ссылок с тем же описанием:
1, 2, 3, 4, 5, 6, 7, 8, 9, 10, 11, 12, 13, 14, 15, 16, 17
Отвечают на все эти вопросы специалисты первой линии техподдержки Microsoft, советы которых сводятся к «отключите антивирус», «проверьте чексуму образа со студией», «проверьте диск на ошибки». Ничего из этого, конечно, не помогает, о чём им и рассказывают, после чего они пропадают и больше не отвечают. Очень дружелюбная пользовательская поддержка, ничего не скажешь.
Ну что же, пора включать голову, брать в руки инструменты и разбираться. Поехали.
Итак, всё что у нас есть, это входная точка ошибки — проблема с Team Explorer. И ссылочка на лог-файл на приведённом выше скриншоте. Ну ок, давайте пойдём почитаем что там лог-файл думает о нашей ошибке.
Всё, что можно понять из этого лога, это то что компонент ставился-ставился, да что-то не поставился. Бывает, мол, чего уж там. Ну, спасибо большое за информацию!
Ладно, давайте зайдём с другой стороны. Team Explorer это (как и почти всё в современных версиях Visual Studio) — VSIX (компонент, расширение). Ставится отдельно от ядра студии специальной программой VSIXInstaller.exe, которая живёт в C:Program Files (x86)Microsoft Visual Studio 14.0Common7IDE и умеет при установке этих самых VSIX-компонентов писать во временную папку (ну, ту, которая %TEMP%) логи о том, как всё прошло. Идём в %TEMP%, находим по времени ошибки из лога выше файлик, соответствующий установке Team Explorer. Вот он:
Ну, тут уже побольше всякого интересного написано, конечно. Нас интересует первый момент, когда что-то пошло не так. Вот он:
26.11.2015 17:31:06 — System.TypeInitializationException: The type initializer for ‘VSIXInstaller.SupportedSKUs’ threw an exception. —> System.BadImageFormatException: Could not load file or assembly ‘Microsoft.VisualStudio.Settings.14.0.dll’ or one of its dependencies. is not a valid Win32 application. (Exception from HRESULT: 0x800700C1)
Хм, произошла ошибка при попытке загрузить сборку Microsoft.VisualStudio.Settings.14.0.dll. Первой моей мыслью было то, что студия как-то запуталась в порядке установки своих компонентов и пытается использовать при установке что-то, что ещё не установилось куда надо. Так, есть у нас в системе такая библиотека?
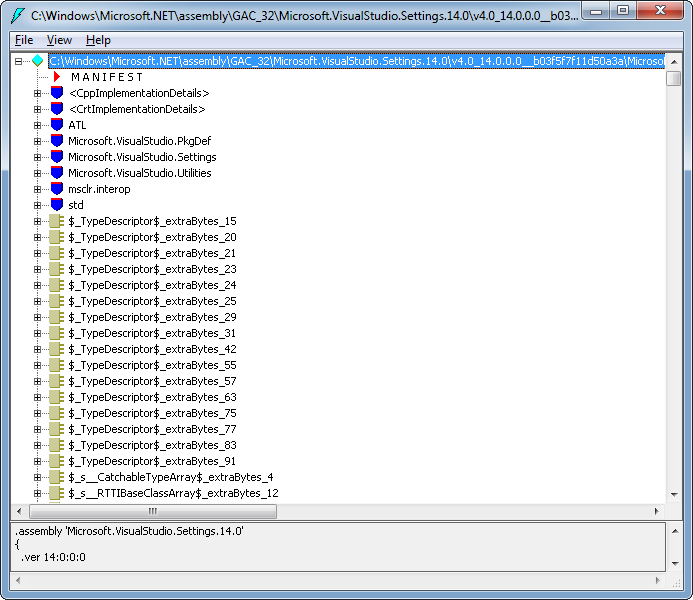
Оказалось — есть. Лежит в GAC, там где ей и положено лежать:

Так, что же получается? Сборка есть, она находится там, где нужно, но не загружается. Может быть, битая? Берём IL DASM, загружаем — всё ок.
Может быть умельцы из Microsoft сумели написать такой инсталлятор, у которого иногда получается не найти сборку в GAC? Берём Process Monitor, добавляем в него фильтр на открытие файлов и снова запускаем инсталлятор студии. Доходим до ошибки, смотрим логи.

Так, инсталлятор ищет Microsoft.VisualStudio.Settings.14.0.dll и находит её ровно там, где она и должна быть — в GAC. Ок, что же не так?
Читаем ещё раз сообщение об ошибке: «System.BadImageFormatException: Could not load file or assembly ‘Microsoft.VisualStudio.Settings.14.0.dll’ or one of its dependencies. is not a valid Win32 application.». Так, если сама Microsoft.VisualStudio.Settings.14.0.dll есть и валидна — может быть дело в одной из её зависимостей? Возвращаемся в Process Monitor и смотрим что там загружается непосредственно после нашей сборки.

Ага, vcruntime140.dll загружается. Это redistributable-библиотека от Visual Studio 2015. Ну, она-то точно должна была поставиться на одном из первых этапов установки! Но давайте проверим, чем уже чёрт не шутит.
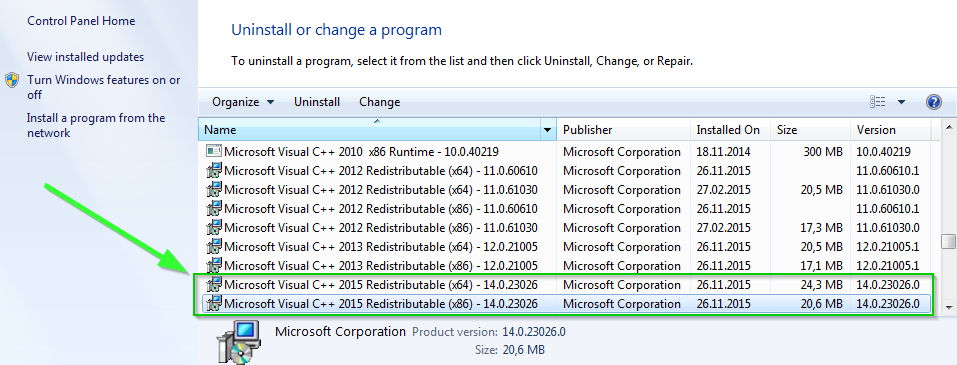
Проверка раз — в списке установленных программ:
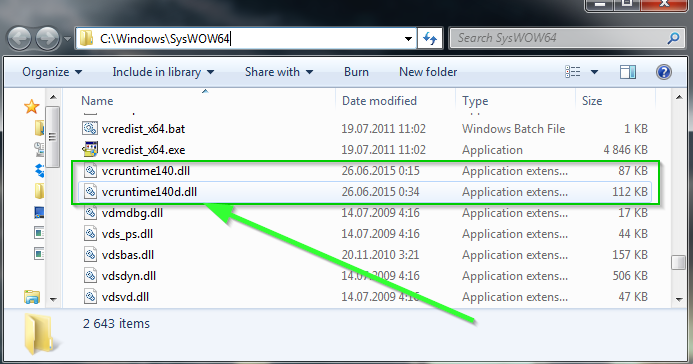
Проверка два — в папке C:WindowsSysWOW64:
Проверка три — это, собственно, «SUCCESSS» в логе Process Monitor:
Последняя проверка — вообще железобетонный аргумент: видите, поискали, попробовали открыть, открылось успешно — значит файл найдён. Всё, подозрения снимаются, идём дальше. Так, какую-же библиотеку инсталлятор VSIX пытается подгрузить следующей по логами Process Monitor?
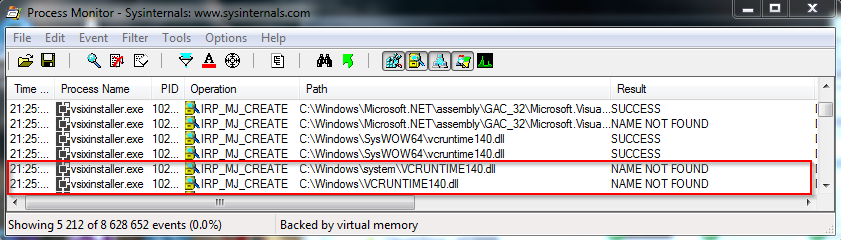
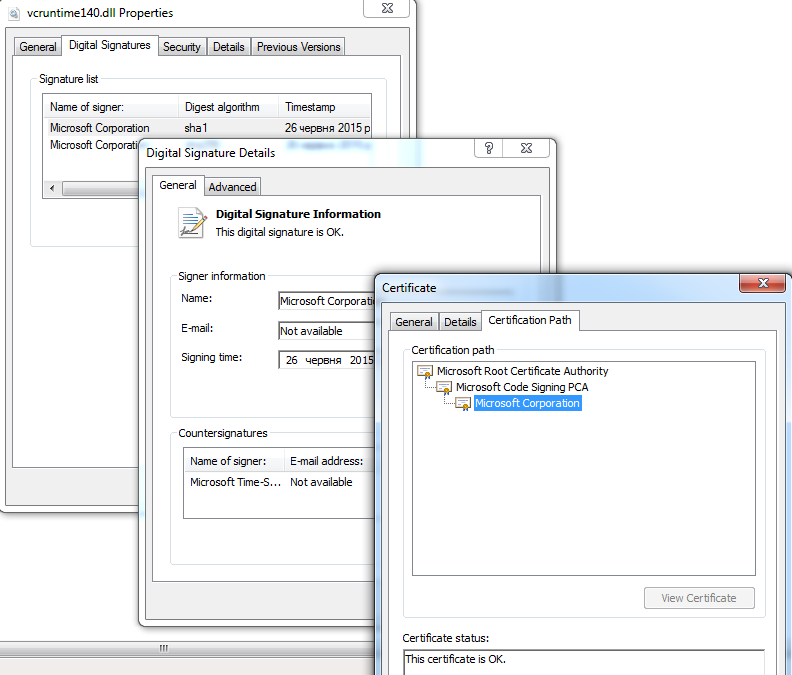
Как это опять vcruntime140.dll уже в другой папке?! Получается, найдя vcruntime140.dll в папке C:WindowsSysWOW64 и успешно её открыв (а мы знаем что так и было по логам выше!) загрузчик зависимостей всё-же почему-то счёл её недостаточно хорошей и отбросил. Как же так?! Это что — не майкрософтовская библиотека? Смотрим свойства:
Да нет, нормальная библиотека. Почему же не загрузилась? Давайте посмотрим на неё внимательнее. Для этого в составе любой версии Visual Studio есть отличная утилита dumpbin. Запускаем её с вот такими ключами:
и смотрим на результаты:
Подождите-подождите… А почему это ты, библиотечка, 64-битная?! Ты же лежишь в папке C:windowsSysWOW64, где вообще-то место только 32-битным библиотекам! А ну-ка давайте посмотрим, что же тогда лежит в C:WindowsSystem32?
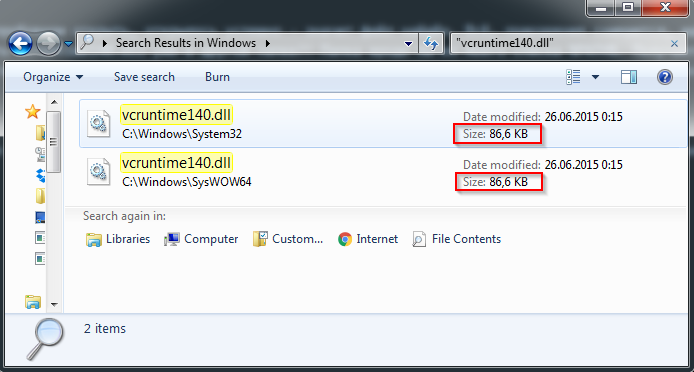
А то же самое (кто не верит в размер — можете проверить каким-нибудь WinMerge, они идентичны). Вы уже уловили, в чём суть? Ошибка закралась в инсталятор Redistributable-компонентов, входящий в инсталятор Visual Studio 2015 — он просто ставит 64-битные версии рантайм-библиотек и в папку для 64-битных библиотек (C:WindowsSystem32) и в папку для 32-битных (c:windowsSysWOW64). В итоге при дальнейшей попытке использования 64-битной версии всё будет ок, а вот при попытке загрузки 32-битной версии будет то, что мы увидели при установке Team Explorer — загадочные ошибки вообще без упоминания библиотеки vcruntime140.dll и Redistributable-пакета. И делай, что хочешь.
А что же мы хотим делать? А удалить x86-часть Redistributable-пакета Visual Studio 2015, скачать её отдельно с сайта Microsoft и переустановить. Сюрприз — на сайте Microsoft версия правильная, она установит 32-битную версию библиотеки в C:windowsSysWOW64, после чего можно перезапустить установку Visual Studio 2015 и она успешно дойдёт до конца!
Осталось как-то объяснить начальству почему это я целый день устанавливал Visual Studio, если с этим дети в третьем классе за час справляются. В общем-то ради этой цели и была написана данная статья, а уж зачем вы её прочли — я не знаю 🙂
Источник
Further investigation, during the ServiceDispatcher installation the logfile says :
File: C:Program FilesQlikSenseHybridDeploymentServiceappsettings.json; Won’t Overwrite; Won’t patch; Existing file is unversioned but modified.
Our current (Sept2018) appsetings.json file in this location doesn’t hold the node :
«LocalBearerToken»: {
«SigningAlgorithm»: «RS256»,
«Certificate»: «./server.pem»,
«PrivateKey»: «./server_key.pem»
}
The Powershell script that is executed during the installation IS updated as per the log :
File: C:Program FilesQlikSenseHybridDeploymentServiceConfigure-Service.ps1; Overwrite; Won’t patch; Existing file is unversioned and unmodified — hash doesn’t match source file
I unpacked all installation files from the SchedulerDispatcher.MSI and took a peek at the updated Configure-Service.ps1 script. In this script they try to set 2 variables based on an object (appsettings) created from the unmodified/not-overwritten appsettings.json file:
$appsettings.LocalBearerToken.Certificate = «$localCertificatesLocationserver.pem»
$appsettings.LocalBearerToken.PrivateKey = «$localCertificatesLocationserver_key.pem»
As this node doesn’t exist in the not-updated appsettings.json file, the Powershell script returns the error in previous post, returning in the MSI returning an error code and the whole rollback starts.
This evening, before trying the upgrade for a 4th time, I will modify the appsettings.json file to hold this LocalBearerToken entry in the current appsettings.json file. This should cause the Configure-Service.ps1 script not to throw an error and hopefully finished the installation succesfully. I will post the outcome.
This page explains symptoms, causes and step-by-step solutions to error code 0x80070643 which happens to Windows update, Microsoft Security essentials and MSI. Besides, this article introduces how to get back lost data from desktop after computer undergoing 0x80070643 error. As Windows user, you may often encounter this error; if you feel uncomfortable with it, you can read through methods in this article to fix it as soon as possible.
Overview on error code 0x80070643
0x80070643 is a generic error that is likely to happen to many operations, such as Windows update installation, update or installation of Microsoft Security Essentials and other programs, Microsoft Office error, etc. The error code 0x80070643 is also the error format of containing number and letter, which is similar to other Windows errors such as 0x80070002. It comes with error message produced by programs or system, through which we can identify the specific problem. Though many cases report the same error code, causes and solutions to the specific issue vary widely and are case-by-case. This article guides you through several cases on this error code and you can follow outlined solutions to fix the error. These headlines below are quick links to detailed content:
Case 1: Windows update error code 0x80070643
Symptoms
Windows is very user-friendly operating system used by millions of users across the world and it has to install updates to keep it up to date and repair system vulnerabilities. Microsoft releases system updates from time to times and by default, our operating system has been set to check and install those updates automatically provided that computer is connected to the Internet. Updates fix bugs on current system and improve features. In addition, system updates can be downloaded directly from Microsoft website and installed manually.
If you are a Windows user, you will never skip updating Windows to assure your PC safe and good environment. However, Window update can’t go well all the time and there are several messages that you may run into during system update, for instance, «Unable to install Windows Update: 0x80070643». This error message can be seen when the .NET framework on your computer has problem, or the update related to MS 2003 components fails.
Besides, if your PC is running Windows 10 and you tried to apply KB3122947 update you might also see the same error code «Update for Windows 10 Version 1511 for x64-based Systems (KB3122947) — Error 0x80070643».
Main causes of this update error
- Unable to install the latest system update
- System files or registry gets damaged or corrupted due to some reason
- Windows Update feature fails to access certain user data
- Virus or malware infection
- MSI software update registration or the .NET Framework installation is corrupted
- Microsoft Office Source Engine (Ose.exe) has been disabled or corrupted
Solutions
Solutions to this error vary from person to person on account that it happens to multiple circumstances. Hence, not all solutions listed here will work for your problem, and you need to select one or two of them in line with actual condition.
Method 1: Repair or update Windows .NET Framework
.NET Framework plays an important part in software installation and system updates on all versions of Windows system. And it should be well installed and updated to the latest version in order that other programs can be built, deployed or ran normally.
Step 1
Close all currently running software and click «Start» to select Control Panel. Next click Programs and «Program and Features».
Step 2
Locate Microsoft .NET Framework 4 Client Profile from these listed programs. Select it and click the tab Uninstall/Change which is called Change/Remove in Windows XP.
Note: If there is not Microsoft .NET Framework 4 Client Profile on your computer, download it online and install it to update your PC.
Step 3
On the pop-up window select Repair .NET Framework 4 Client Profile to its original state and click Next button.
Step 4
Click Finish when repairing process is done and click Restart Now to restart computer.
Now you can try to install Windows updates again and see whether the error is eliminated. If the error continues to appear, follow steps in following solutions.
Method 2: Apply update for your computer manually
Since this means works for many people, it’s worth your while to give it a shot. If you are not skilled in computer operations, you can finish the task with ease:
Step 1
Open Control Panel by clicking Start button. Click System and Security and select Windows Update.
Step 2
Click Check for Updates on the left part of the panel to search for available updates for your computer.
Step 3
When Updated are listed, please click «Install updates» to reinstall updates.
Method 3: Restart Office Source Engine (OSE) service
If your computer installs Microsoft Office 2003 and you have to update some components for it, you might get the error due to the Ose.exe file problem. Here is the remedy.
Step 1
Click Windows + R keys to open Run box. Type services.msc in the searching box and press Enter.
Step 2
Find out and double-click Office Source Engine in the list.
Step 3
Change the Startup type. If the startup type has been disabled, change it to manual. To do this, double-click it and set startup type as Manual and click OK.
Step 4
Try to install Office update once again.
If the above steps still don’t work, you may have to repair Ose.exe file by copying the original file from Office 2003 CD. The last resort of fix this issue is removing and reinstalling Office 2003. If the error doesn’t relate to Office 2003 and these actions will be meaningless.
Method 4: Repair corrupted system files with SFC /scannow
After installing Windows, users starts to install, uninstall or update programs and applications on computer. Besides, various actions and tasks will be done by computer users and system. During the process, there will be corrupted or damaged files appearing in system and causing problem. It is, therefore, suggested to scan and check whether your system contains these files. System file checker comes in handy, as it’s capable of scanning and finding out corrupted files and replace them with correct ones.
Step 1
Open Command Prompt. Click Start button and All Programs to locate Accessories where you can find Command Prompt. Right-click it and Run as administrator.
Step 2
Type sfc/scannow in the Command Prompt and press Enter. Then it starts to scan and repair corrupted system files. You just need to wait for this process to complete.
Step 3
When the repairing is done without reporting any error you can try to run Windows update again. If he process reports that some corrupted files can’t be repaired, you’ll have to consider a system restore.
Method 5: Fix registry problem
For some Windows 10 users, this error may appear in this way «Update for Windows 10 for x64-based Systems (KB3081704) — Error 0x80070643», the effective solution to this situation is going to registry and carrying out some simple operations.
Step 1
Open Registry Editor. Click Start button and type regedit in the search box and press Enter key. If you are prompted by UAC (User Account Control), click YES.
Step 2
Browse the registry by following the path: HKEY_LOCAL_MACHINESYSTEMCurrentControlSetControlBackupRestoreFilesNotToBackup. If FilesNotToBackup exists, then close the editor.
Note: If there is not «FilesNotToBackup» under the path, you need to add it manually. Right-click Backup Restore to select New and click «Key». Next type FilesNotToBackup and press Enter key.
Step 3
Click Start button to type services.msc and press Enter. Scroll down and find out background Intelligent Transfer Service.
Step 4
Double click the service just found and click Start under the General tab. Click Ok to make the setting take effect. If it has been set as Start already, click Stop and then again click Start.
Case 2: Microsoft Security Essentials install or update error 0x80070643
Problem Description
«I encountered the error code 0x80070643 when I tried to install Microsoft Security Essentials. Though I had had it installed in my computer before that, it failed to work after I used .net cleanup tool. Then I uninstalled it and wanted to reinstall it. Now, whenever I run the installer of Security Essentials I get the error message ‘An error has prevented Microsoft Security Essentials Installations Wizard from continuing. Please restart your computer and try again. The Microsoft Security Essentials Installation Wizard has returned your computer to its original state. Error Code: 0x80070643′»
The installation and updating of MSE is an easy task, but sometimes you get the error and fail to complete the operation. This section explains how to get rid of the error. Before that I’ll list several possible causes of the issue.
- You might have installed other antivirus software on your computer while you are installing MSE. The error might be the result of leftover files, registry entries and firewall settings from third-partition antivirus software.
- The Windows installer you are using is not up-to-date.
- The Windows installer service is not turned on.
Solution
Step 1
Run system file checker to repair corrupted system files. Open Command Prompt and execute command sfc/scannow. Wait for the scan to complete and restart computer.
Step 2
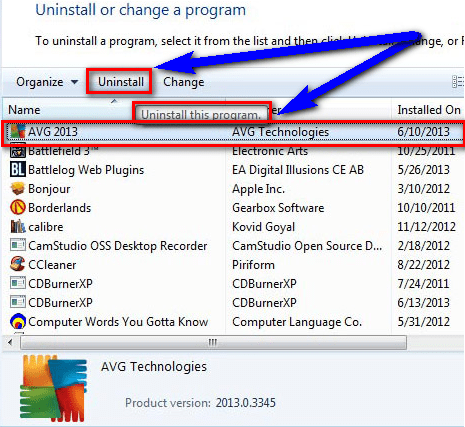
Uninstall other antivirus software. If you have any third-party antivirus software installed on your PC, then remove and uninstall it. Go Control Panel and select Program and Feature, next select Uninstalled a Program. Scroll down to browse the list of programs installed on your PC, locate antivirus such as McAfee, Morton, AVG, etc., and uninstall all of them and reboot computer.
Step 3
Check the Windows installer version if you are Windows XP user. View the path C:WindowsSystem32 and right click MSIEXEC.EXE to view Properties. The version number should be at least 3.1 or higher. Windows 7 or Vista users do no need to do this operation, as the default version is 3.1.
Step 4
Check whether Windows installer service is running. Press Windows + R keys and type services.msc in the Run box to open Services panel. Find out Windows Installer service and get it started.
Case 3: Error 0x80070643: Failed to install MSI package
MSI is an installation package whose function is distributing software throughout Windows during an installation. MSI installer is used by many software distributors as it is easy to use and has good compatibility. However, it may report errors when you use it, for example «Error 0x80070643: Failed to install MSI package.» «Error 0x80070643: Failed to configure per-user MSI package.» Let’s see how to fix the issue. To fix the error, please try these steps:
Step 1
Start the service. Open Services window by typing service.msc in Run box which can be opened by pressing Windows key and R key from keyboard. Look for Windows installer and view its properties so as to set the Startup type as Start.
It’s recommended to check whether this service is started or not, because it is the main cause behind the error and the easiest solution.
Step 2
System restore. If there is no effective means, you’ll have to perform system restore. This step requires your system have a system backup, otherwise you can’t carry out system restore. Hence, it’s very helpful to create a system backup when system is in its great status.
How to recover deleted data from desktop?
If you are facing Windows error 0x80070643 on your computer, your system is no longer in a good condition and might contain potential serious problem such as data loss, system breakdown. Therefore, you should fix it as soon as possible. In addition, you should know how to recover lost data from system partition or exactly desktop. Many people have the habit of placing files they often edit on desktop, which actually is not a wise action. Desktop belongs to system partition, and any system problem may lead to file loss. If you are troubled by same issue, keep reading to find out resolution.
Eassos Recovery Free is free data recovery software and it provides a special recovery mode for deleted files: recover files deleted by «Shift + Delete» or emptied from Recycle Bin and recover lost data due to Cut & Paste or other unknown reasons. Here is the recovery process:
Step 1
Install Eassos Recovery Free and start it. Click «Recover Deleted Files»
Step 2
Select system partition which is usually drive C: and click Next to search for deleted data.
Step 3
Preview listed files and found out files you want to recovery. Select files by checking them and click «Recover» button to save them to a secure location.
I am trying to install an application(.msi), I used WiX installer to create a exe(it has depenendcies). I tried installing it in some of the PC and it works perfectly fine. But in one of the system when it is trying to install the msi it givens an error and roll backs the installation(which is normal).
Unable to figure out why it is not installing in this specific machine. Any suggestions.?
asked Jan 18, 2017 at 13:02
![]()
4
This article seems to indicate that it’s a generic issue — the system needs a reboot:
https://support.microsoft.com/en-us/kb/974061
so that’s the first thing to try. If the issue persists it’s probably something to do with the system being stuck in a state where it thinks there’s a install still running. They could look at this to see the registry items that can affect this:
http://www.installsite.org/pages/en/msifaq/error/1618.htm
If you install the MSI file producing a log then it may show what’s going on: msiexec /I [path to msi file] /l*vx [path to text log file]
It’s possible that there is something in your setup that is causing this on that machine, especially if it performs another setup or a driver install (or something like that) that leaves the system in a state where it needs a reboot to continue your installation. Also, sometimes it’s useful to add the MsiSystemRebootPending property as a launch condition so you don’t start the install if a reboot is pending:
https://msdn.microsoft.com/en-us/library/windows/desktop/aa370492(v=vs.85).aspx
The error (from the comment) -2147024891 is 0x80070005, Access is denied. There does seem to be an occasional error where the system account loses access to some folders, so that may be the issue in this particular case. If the access to the C: drive (and maybe some others) do not allow full access to the SYSTEM account then that could result in some odd downstream problems.
answered Jan 18, 2017 at 17:43
![]()
PhilDWPhilDW
20.1k1 gold badge18 silver badges27 bronze badges
6
I have suffered the same problem. For future users facing with similar issue.
- 0x80070005 Failed to create registration key
- Error 0x80070659: Failed to install MSI package, Failed to execute MSI package, Failed to configure per-machine MSI package, Error 0x80070659: Failed to execute MSI package
- Could not open key: UNKNOWNComponentsxxyy. Verify that you have sufficient access to that key, or contact your support personnel.
In my case, I use Process Monitor to check installation process.
Found error (MainEngineThread is returning 1625) occur just in RegQueryKey-SUCCESS-RegOpenKey-SUCCESS-RegQueryValue-NAME NOT FOUND-RegCloseKey.
After I disable the KEY (by delete or rename).
The installation could continue, creating new key-value, treated as Product not registered: beginning first-time install.
So, the reason seems to be there is some old un-cleaned registry detected(especially at HKCRInstallerProducts).
Also, could first try check log of msiexec.exe.
And it’s not related with Group Policy Object (GPO) or special config on computer.
When searching for my issue, I google here, thanks for sharing.
And I post my summarize at SOLIDWORKS VC VSTA 安装 权限 注册表 策略组 相关问题 (Most in Chinese, but have a lot reference).
answered Jan 18, 2021 at 1:33
![]()
So, here this is all about Error 0x80070643 Windows PC Failed to install MSI package code problem & here we are giving some fresh, easy tips and tricky solutions and the methods guides too. All you have to do one thing is that check and read this Error Code 0x80070643 issue once only and grab the best solutions whichever fits your PC or your device.
Problems were installing some updates, but you will try again later If you keep seeing this & want to search the web or contact support for information Update for Windows 10 version 1511 for X64-based systems (kb3122947) – Error 0x80070643 Failed to Install MSI Package
This Error 0x80070643 Windows may occur due to various reasons. This runtime error is usually a result of Windows firewall settings & registry entries. This Error happens when you are trying to update your Windows 10 on PC. This error includes some PC system crashes, virus infection & freezes. You may get this error 0x80070643 Windows when you are trying to install Microsoft Security Essentials on your PC which is running the Windows OS (Operating System). It occurs when a file that is related to the installation becomes damaged or corrupted. This Error 0x80070643 Windows may also happen during installing MSI package or be updating your windows update.
Causes of Error 0x80070643 Windows Code Problem:
- Update for Microsoft Visual Studio 2010 tools for offline
- PC Error 0x80070643 Windows problem
- Failed to Install MSI Package error
How to Fix & Solve Error 0x80070643 Windows Code Issue
So, here are some quick tips and tricks for efficiently fixing and solving this type of Error 0x80070643 Windows PC Code problem from you permanently.
1. Disable or Uninstall your Windows Antivirus Software on your PC –
By Disabling or uninstalling your antivirus software can quickly fix and solve this Update for Windows 10 version 1511 for x64-based Systems Error 0x80070643 Windows 7 problem.
2. Fix by Cleaning Temporary Unwanted Files from your Windows –

- Go to the start menu
- Search or go to the Disk Cleanup there
- Click on it and opens it there
- Tick the boxes which you want to clear it
- After that, click on the OK tab & select Yes to Delete
- After that, wait for some time to remove it
- After, close the tab
- Restart your PC
- That’s it, done
Fixing by cleaning your temporary and the junk files can quickly solve this Update for Windows 10 Version 1511 for X64-based systems kb4023057 Error 0x80070643: Failed to install MSI package. The problem with your PC.
3. Turn OFF the Fast Startup on your Windows PC –
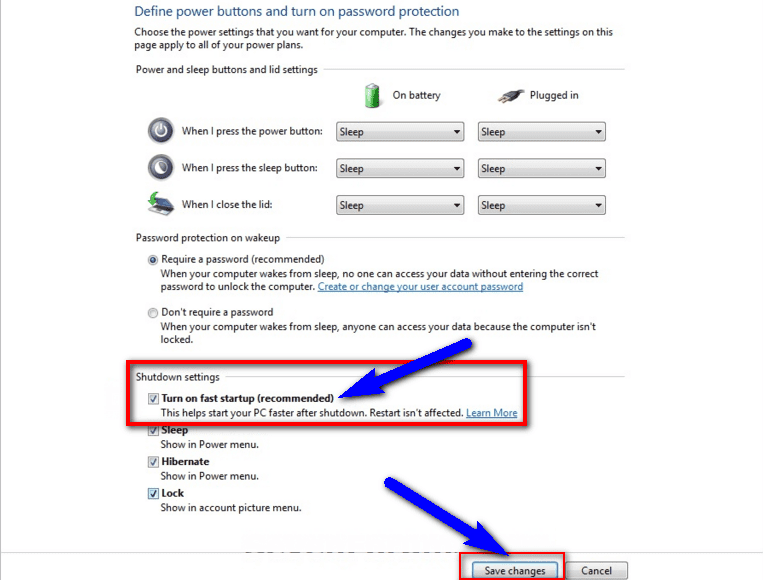
- Go to the start menu
- Search or go to the Control Panel
- Click on it and opens it there
- After that, go to the Power option there
- & click on the ‘Choose what the power buttons do‘ there
- Now, click on the “Changes settings that are currently unavailable” option there
- After that, there untick the “Turn on fast startup” options
- After finished, close the tab
- That’s it, done
By turning off, the fast startup option can fix and solve this kb4336999 Error 0x80070643: Failed to Install MSI Package Windows 10 defender problem from your PC.
4. Fix by Cleaning Boot on your Windows PC –

- Go to the start menu
- Search for ‘MSConfig‘ in the search box and press Enter there
- Click on the User Account Control permission
- & click on the Continue option there
- On the General tab there,
- Click on the ‘Selective Startup‘ option there
- Under the Selective Startup tab, click on ‘Clear the Load Startup‘ items checkbox
- Click on the services tab there,
- Click to select the “Hide All Microsoft Services” checkbox
- Then, click on the ‘Disable All‘ & press Ok button there
- After that, close the tab
- & restart your PC
- That’s it, done
By cleaning the boot, you can quickly get back from this Error 0x80070643 failed to install msi package Windows 10 problem.
5. Update your Windows Drivers on your PC –

- Go to the start menu
- Search or go to the Control Panel
- Click on it and opens it there
- After that, scroll down and go to the “Windows Update” section there
- Click on it & Check if any newly latest driver update is available or not
- If any, Update it fast
- Or, you can set it as ‘automatically update.’
- For that, go to the left side
- & click on the “Changes Settings” option there
- After open, click on the drop-down menu there
- Select the “Install Updates Automatically” option there
- & click on the OK button to save this configuration
- After completing, close the tab
- That’s it, done
So by this above method, you can quickly get back from this Update for Windows 10 version 1511 for X64-based systems (kb3122947) – sccm Error 0x80070643 PC problem issue on your Windows PC forever.
” OR “
- Go to the start menu
- Search or go to the Control Panel or direct go to Device Manager
- Click on it and opens it there
- After going to device Manager there,
- check if any driver has error sign there
- If any, then right-click on it
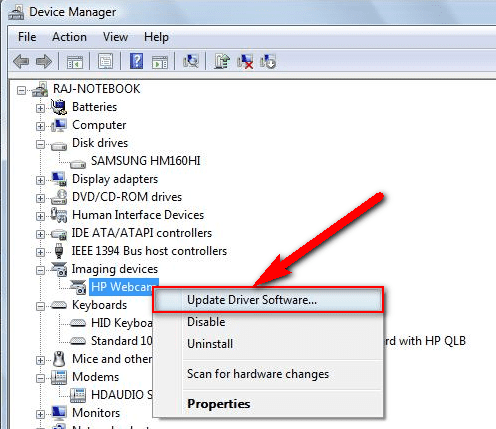
- & Click on the “Update driver software” there
- Wait for some minutes to update it
- After updating, close the tab
- That’s it, done
Updating your driver by any of these two methods can quickly fix and solve this Error 0x80070643 windows defender: Failed to install MSI package problem from your PC.
6. Uninstall the Microsoft .NET Framework & Reinstall it again on your PC –
- Go to the start menu
- Search or go to the Control Panel
- Click on the ‘Programs and Features‘ option there
- Select the “.NET framework” Software there &
- Right-click on it & select Uninstall to uninstall it
- After that, close the tab
- Now, again reinstall it again
- That’s it, done
By uninstalling and reinstalling the .NET framework can also fix and solve this Windows Update kb4336986 Error 0x80070643 code problem from you.
7. Run the sfc /scannow command in the CMD (Command Prompt) –

- Go to the start menu
- Search or go to the Command Prompt
- Click on that and opens it
- A Pop-up will open there
- Type this below the following command
” sfc/scannow “ - After that, press Enter there
- Wait for some seconds there
- After complete, close the tab
- That’s it, done
Run an sfc/scannow command in the command prompt can quickly fix and solve this Update for Microsoft Visual Studio 2010 Tools for Office Runtime 2018 11 update for windows 10 version 1803 for x64 based systems kb4023057 Error 0x80070643 Windows 10 code problem from your PC.
8. Repair the Registry Errors from your Windows PC –
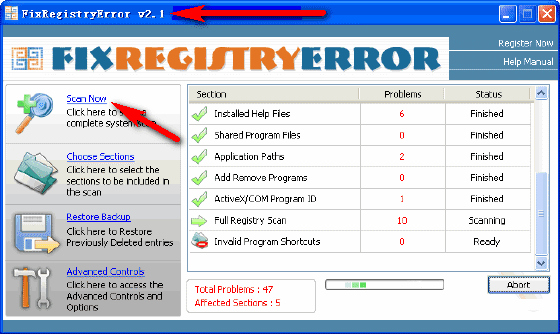
Registry errors may be a cause of Windows Update Error 0x80070643 Windows 7. This error code problem can only be fixed by repairing errors in your Windows registry. So that it will fix and solve your this error problem.
9. Run a Full Scan of your Windows PC for Malware or Virus –
- Go to the start menu
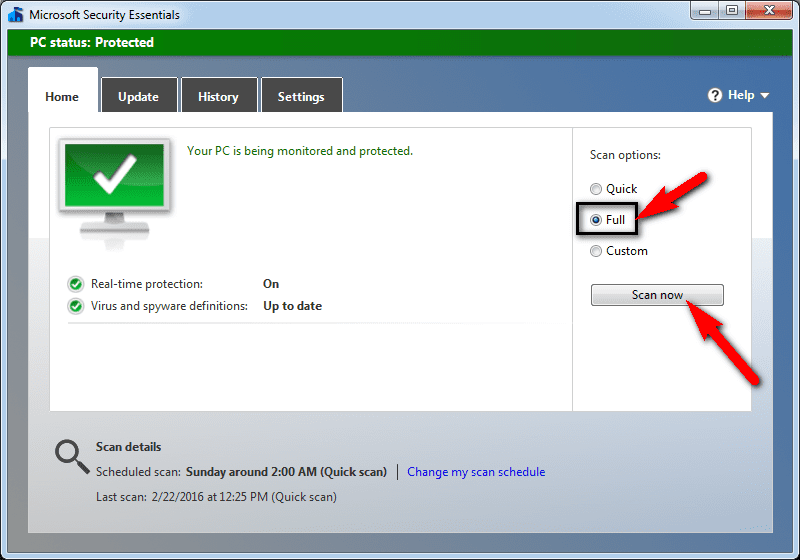
- Search or go to the “Microsoft Security Essentials” there
- Click on it and opens it there
- A Pop-up will open there
- Check the ‘Full‘ option there to scan thoroughly
- After, click on the ‘Scan Now‘ option to scan carefully
- After scanning, close the tab
- That’s it, done
By running a full scan of your PC can get rid out of these Windows Update Error 0x80070643 sccm problems from your PC completely.
10. Allow Google Chrome Browser through Windows Firewall on your PC –
- Go to the start menu
- Search or go to the Control Panel
- Go to the ‘Internet and Network‘ option
- Click on “Configure” at the right
- In the section titled ‘Firewall Protection is enabled.’
- Click on the Advanced tab there
- Select the ‘Program Permissions‘ from the home list in the left
- Click on the “Add Allowed Program” button there on the right
- Use the ‘Windows Explorer‘ to browse & locate your application “.Exe“
- Click on OK button and close the Security Center
- After finishing, close the tab
- That’s it, done
By allowing Google Chrome browser through the Windows, Firewall can also fix this Error 0x80070643 msi Windows 10 code problem quickly.
11. Check for Corrupted Hard Drive by CHKDSK /F Command on your PC –
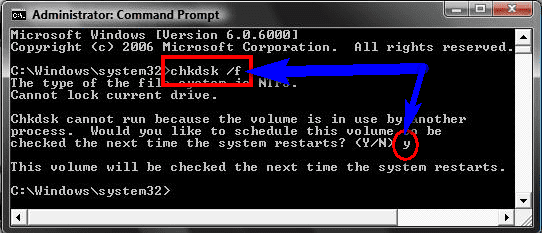
- Go to the start menu
- Search or go to the CMD (Command Prompt) there
- A Pop-up will open there
- Type this following command there
” CHKDSK /F “ - & Press enter there
- After that, close the tab
- That’s it, done
By checking the corrupted hard drive error and fixing it can solve this Windows Update Error 0x80070643 python: Failed to install MSI package problem.
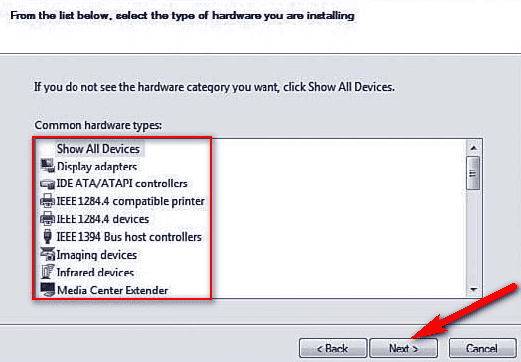
12. Reinstall the Drivers for the Device on your PC –

By Reinstalling the drivers for the device will fix your kb4023057 Error 0x80070643 Failed to install MSI package problem.
13. Create a System Restore Point on your Windows PC –

- Go to the start menu
- Search or go to the ‘System Restore.’
- Clicks on it and open it there
- After that, tick on the “Recommended settings” or ‘Select a restore point‘ there
- After selecting, click on the Next option there
- Now, follow the wizard
- After completing, close the tab
- That’s it, done
So by this method, you may get back from this Error 0x80070643 SQL Windows PC problem completely.
“ OR “

- Go to the start menu
- Search or go to the ‘System Properties.’
- Click on it and opens it
- After that, go to the “System Protection” option there
- Now, click on the “System Restore” option there
- & Create a Restore point there
- After completing, close the tab
- That’s it, done
Run a system restore and creating a new restore point by any of these two methods can solve this Error 0x80070643 defender Windows 10 PC problem from your PC completely.
14. Remove or Reconfigure the newly Installed Windows Device on your PC –
By Removing or reconfiguring the newly installed device will fix your Windows Update 2018 11 updates for windows 10 version 1803 for x64 based systems kb4023057 Error 0x80070643 problem.
15. Troubleshoot & Run an Automatic Windows Repair on your PC –
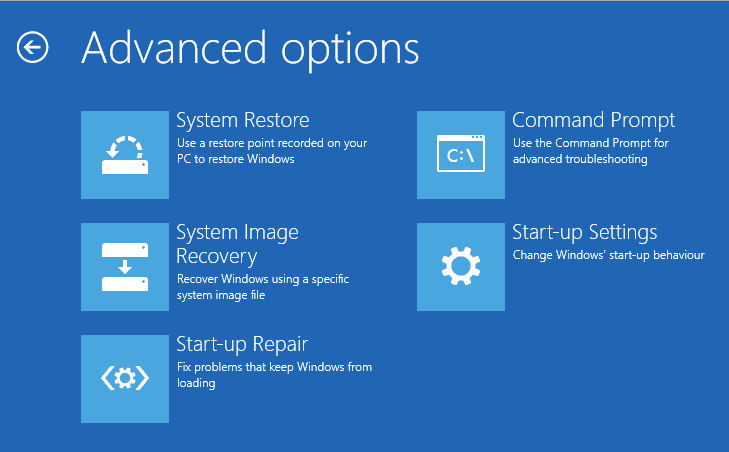
- Go to the start menu
- Search or go to the PC settings there
- Click on the ‘Troubleshoot‘ option there
- After opening, click on the ‘Advanced options‘ there
- Then, click on the “Automatic Repair” option there
- After troubleshooting, close the tab
- That’s it, done
By running an automatic repair of your PC can get rid out of this update for windows 10 version 1709 for x64 based systems kb4041994 Error 0x80070643 Windows 10 problem from your PC.
16. Restart your Windows PC [OPTIONAL] –

- Go to the Start menu
- Click on the right side of ‘Shutdown.’
- Click on Restart option there to restart
- That’s it, done
If this is your first time you have seen this stop error screen then by restarting your PC again will quickly fix this Install Error 0x80070643 Windows 10 problem.
These are the quick and the best way methods to get quickly rid out of this Error 0x80070643 Failed to Install MSI Package Windows PC Code issue from you entirely. Hope these solutions will surely help you to get back from this Error 0x80070643 Windows problem.
If you are facing or falling in this Error 0x80070643 Failed to Install MSI Package Windows PC Code problem or any error problem, then comment down the error problem below so that we can fix and solve it too by our top best quick methods guides.
Do you encounter Error Code 0x80070643 along with a warning message Failed to Install MSI Package in Windows 10 PC? If yes, then don’t worry as this article provides a decent range of solutions to fix this issue. Microsoft releases system updates to rectify the already present bugs and problems on your current operating system. If connected to the internet, Windows 10 based device automatically looks for updates to make the system more efficient and smoother as well.
Failed to Install MSI Package in Windows 10 is one of the more frequent error messages as compared to its previous versions. In general, this problem pops up while performing KB3106246, KB2267602 installation. Update or its installation often fails with the presence of stop code 0x80070643. This is associated with MSI software update registration, MS 2003 Components moreover .NET Framework. It mostly occurs if any of them is corrupted or if the system files get damaged somehow. In such scenarios, Windows update fails to access certain user data and thus leading to this issue on your PC. Here in this article, we will discuss several promising solutions such as Configuring .NET Framework, repairing Windows Updates Components, checking and system files to fix this bug entirely.
Here is how to fix Error Code 0x80070643 Failed to Install MSI Package in Windows 10 –
Repair or Update Windows .NET Framework
The outdated or corrupt file might be responsible for occurring of Error Code 0x80070643. Therefore you must update all of them. The “.Net Framework” is an application for software installation or system update. Now, if .NET Framework is active on your device, always make an attempt to keep it up to date. Therefore, the most feasible way to get rid of Error Code 0x80070643 Failed to Install MSI Package in Windows 10 is to either update or troubleshoot .NET Framework.
Downloading the .Net Framework Repair Tool from Microsoft and running it in your PC may resolve this trouble.
Manually Repair .NET Framework
If the above solution doesn’t work efficiently on your PC, try to manually repair this tool by going through these easy series of steps.
At first, click on the Cortana box and type Control Panel. Hit on the result to open Control Panel.
Make the icons into smaller view and then choose Programs and Features.
Move to the right pane and right-click Microsoft .NET Framework 4 Client Profile from the visible list of programs. Now, hit the Change option.
Mark the first option from pop-up window namely Repair .NET Framework 4 Client Profile and click the Next button.
Now go through the onscreen instructions and wait for a few seconds to repair this tool.
Note: If you cannot locate the “Microsoft .NET Framework 4 Client Profile” then download as well as install it to bypass the error.
Check Office Source Engine Service
If you occupy MS Office 2003, you may need to every now and then install its components. So, if you are confronting Error Code 0x80070643 including Failed to Install MSI Package in Windows 10, ose.exe file of Office 2003 might be the culprit. In that case, you need to restart Office Source Engine (OSE) to solve the problem.
Access Run dialog box and type services.msc on the available space. Click OK to open Services.
On the console, locate and double-click the service namely Office Source Engine (see snapshot).
Click the Startup type drop-down and pick Manual. Click OK to save the changes of the service and check for the error code.
Use Windows Update Troubleshooter
Windows 10 has yet another useful inbuilt troubleshooter to resolve the common issues that occur. After running, it will make an attempt to solve this problem automatically and let your system run error free.
Open Windows Settings program by jointly hitting Win + I shortcut keys. From the main interface, click the Update & security category, the last one.
On the left sidebar, choose the Troubleshoot option.
Now, jump to the right pane, locate Windows Update. Select it and click Run the troubleshooter button from the detail pane.
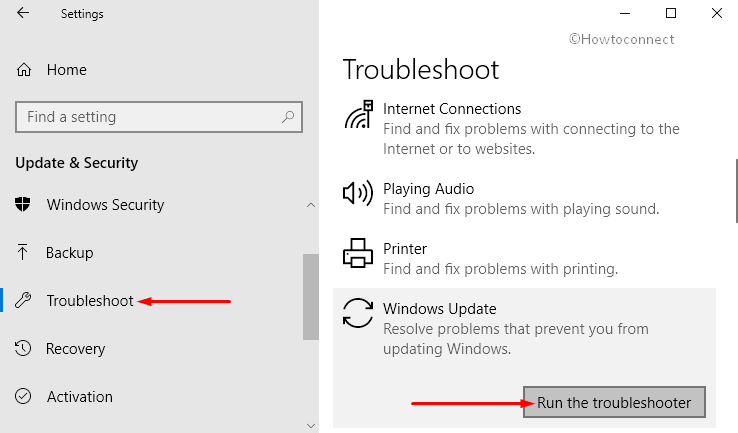
When the wizard will come, it will start detecting the issues related to Windows Update. Follow the on-screen instructions to choose the problematic area and wait for some time until it tries to fix.
Finally, check whether this resolves the Error Code 0x80070643 Failed to Install MSI Package in Windows 10.
Restart Windows Update Components
There is a possibility that several Windows Update components are basically the reason behind the occurrence of ‘Failed to Install MSI Package in Windows 10’ Error message. You need to restart these components and the security center of your system to fix the issue. You should first stop all these services and rename the SoftwareDistribution and cartoon2 folder, then start these components again.
Open Run dialog box by hitting “Win + R” shortcut keys altogether. Here, type CMD in the blank text field of Run. Now, to access it with admin rights, jointly press “Ctrl + Shift + Enter” hotkeys.
See our article on How to Open Command Prompt as Admin From Run Dialog in Windows 10.
If UAC prompts up on the computer screen, go ahead with the Yes option. Type the given below commands to stop these services and hit Enter after each command.
net stop wuauserv
net stop cryptSvc
net stop bits
net stop msiserver
net stop wscsvc
Rename SoftwareDistribution and catroot2 folders just by running the underneath commands.
ren C:WindowsSoftwareDistribution SoftwareDistribution.old
ren C:WindowsSystem32catroot2 Catroot2.old
If you are not comfortable with Command Prompt you should access ‘File Explorer‘, navigate to this path and right click on it.
C:WindowsSoftwareDistribution
Here, perform a right-click on it, select Rename option. Change it as SoftwareDistribution.old.
Repeat these steps for the catroot2 folder as well.
Once the renaming process is completed start again those services. Just type or copy/paste the below-given commands and hit Enter at the last of each.
net start wuauserv
net start cryptSvc
net start bits
net start wscsvc
Once you successfully execute the above commands, restart Windows 10 PC. Hopefully, after going through this workaround, the system will no more encounter issues like Error code 0x80070643.
Perform Windows Update
For many, performing Windows Update helped in resolving Error Code 0x80070643.
Click the Start icon on the left of the taskbar and select Settings. Choose Update & Security tab on the homepage of the application.
On the right-hand side of Windows Update, make a click on the Check for updates button.
If they are available, grab and install them right away.
Check and Repair System Files
SFC /Scannow and DISM.exe are impactful commands that use to detect moreover repair corrupted Windows system files. In multiple cases, when internal Windows error occurs on your device, Windows updates will just stop functioning and display failure messages with various stop codes. Just execute these commands on elevated Command Prompt and you are done.
Open the taskbar search box and type cmd. Command Prompt icon will appear as the Best match. Right click on its icon and select ‘Run as Administrator‘ option from the context menu.
When this prompts up UAC dialog on your display screen, hit Yes.
Now type sfc /scannow and press Enter. This will take some time to search corrupt files present on your PC. You have to be patient and wait till the built-in tool repairs the faulty system files automatically.
Proceeding forward, execute this given list of DISM commands to bypass Error Code 0x80070643 Failed to Install MSI Package in Windows 10.
DISM /Online /Cleanup-Image /CheckHealth
DISM /Online /Cleanup-Image /ScanHealth
DISM /Online /Cleanup-Image /RestoreHealth
For reference, see SFC /Scannow, DISM.Exe, CHKDSK Windows 10.
Uninstall Antivirus Completely
Most of the time, the presence of third-party antivirus solutions can also lead to the Error Code 0x80070643. Their installation or configuration method may interrupt certain areas of your system which results in this specific issue.
Perform a right-click on Start icon and from the WinX menu, choose Apps and Features option.
Apps Settings page will appear. Switch to the right pane and select the 3rd party antivirus from the list of installed applications. Finally, make a hit on the “Uninstall” button and remove the software from your PC.
However, the remnants of the program may also cause issues on your system. So, you can Use Revo Uninstaller On Windows 10 to Force Uninstall Stubborn Programs.
Wrapping Up
The above-mentioned are the best workarounds to bypass Error Code 0x80070643 Failed to Install MSI Package in Windows 10.
Repair any Windows problems such as Blue/Black Screen, DLL, Exe, application, Regisrty error and quickly recover system from issues using Reimage.