Просмотров 191к. Опубликовано 27 июня, 2019 Обновлено 29 июня, 2019
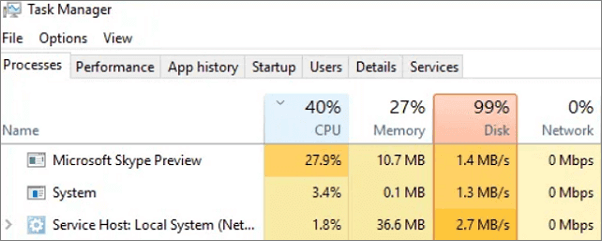
Если вы открываете диспетчер задач Windows 10 и видите в процессах что диск загружен на 100%, что-то вызывает перегрузку жесткого диска. Ваш компьютер начинает медленно работать, что его практически невозможно использовать, и вы задаетесь вопросом, что вы сделали неправильно. Ответ — ничего! Эта проблема может возникнуть сама по себе. Но хорошая новость в том, что эту проблему можно легко решить.
8 способов исправлений проблемы использования 100% диска в Windows 10
Вот несколько способов, которые помогли другим пользователям решить проблему с диском в Windows 10 на 100%. Возможно, вам не нужно пробовать их все; просто пройдите вниз по списку, пока не найдете тот, который работает для вас.
Способ 1: Отключите поиск Windows
Временно отключить поиск Windows
Windows Search — это функция windows, которая выполняет поиск файлов на вашем компьютере намного быстрее. Если вы вообще не используете его или у вас есть другое поисковое приложение, вы можете полностью отключить его. Отключение этой службы остановит индексацию всех файлов. Но у вас все равно будет доступ к поиску, который займет больше времени.
Вот как временно отключить Windows Search и выяснить, является ли это причиной загрузкой жесткого диска на 100 процентов. (Обратите внимание, что поиск Windows включится после перезагрузки компьютера.)
- На клавиатуре одновременно нажмите клавишу с логотипом windows
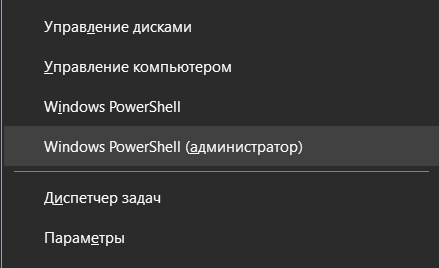
+ X, затем выберите «Командная строка» («Администратор»). Вместо командой строки, у вас может быть Windows PoweShell.
- Нажмите «Да» в окне запроса контроля учетных записей.
- Появится окно с черным или синим фоном. Это окно командной строки. В этом окне введите следующую команду:
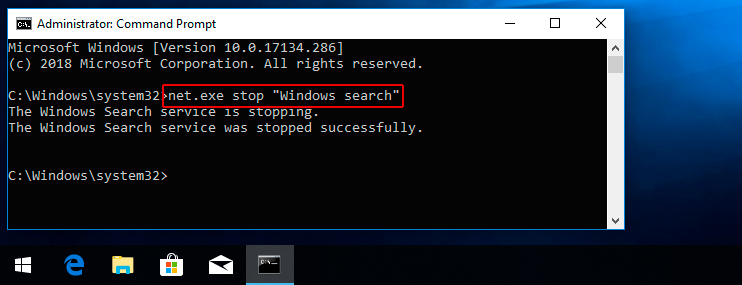
net.exe stop "Windows search" - Нажмите Enter на клавиатуре.
Проверьте, улучшается ли использование вашего диска и производительность вашего компьютера. Если это способ помог, можете навсегда отключить Windows Search, как описано ниже. Если не помогло, переходите к способу 2.
Навсегда отключить поиск Windows
Если вы обнаружили, что Windows Search вызывает 100% ошибку использования диска в Windows 10, вы можете навсегда отключить Windows Search:
- Одновременно нажмите клавишу с логотипом
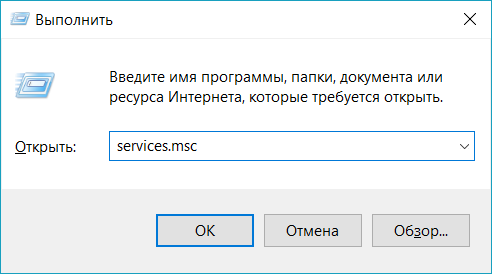
+ R и введите
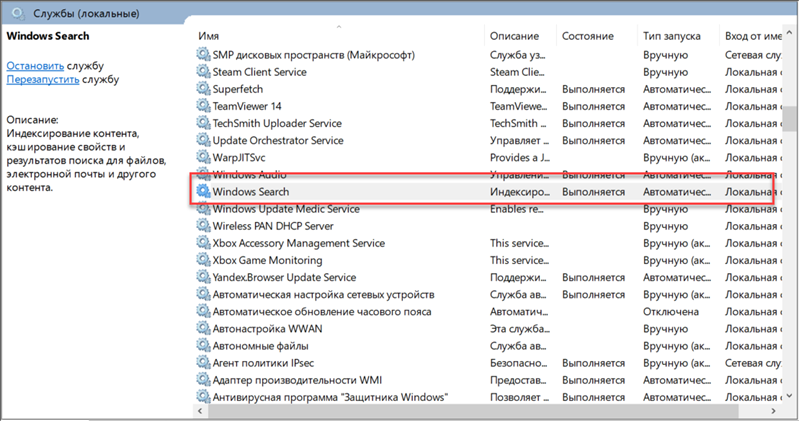
services.msc. - Найдите параметр Windows Search, дважды щелкните по нему, чтобы открыть окно свойств.
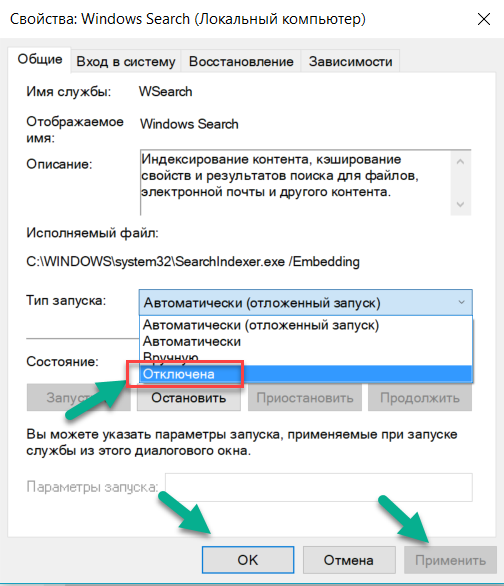
- Измените тип запуска на Отключена. Затем нажмите Применить и OK, чтобы сохранить изменения.
- Проверьте использование диска вашего компьютера: введите «диспетчер задач» в строке поиска Windows и выберите «Диспетчер задач», затем на вкладке «Процессы» посмотрите на % в верхней части столбца «Диск». Если больше не 100%, вы устранили проблему!
Если проблема с использованием диска на 100% не устранена, попробуйте следующий способ, описанный ниже.
Способ 2: Обновите драйвера вашего устройства
Если описанные выше действия не решают проблему 100% использования диска в Windows 10, это может быть вызвано драйвером устройства.
Смотрите также: Топ бесплатных программ для обновления драйверов для Windows
Вы можете автоматически обновить все драйверы устройств до последней правильной версии с помощью Driver Booster.
Driver Booster автоматически распознает вашу систему и найдет для нее правильные драйверы. Вам не нужно точно знать, на какой системе работает ваш компьютер, вам не нужно рисковать загрузкой и установкой неправильного драйвера, и вам не нужно беспокоиться об ошибках при установке.
Способ 3: Отключите SuperFetch
SuperFetch помогает сократить время загрузки и повысить эффективность загрузки программ. Тем не менее, он был определен как потенциальная причина проблем с производительностью диска в Windows 8 и более поздних версиях Windows, включая Windows 10. Вот как остановить эту службу:
- На клавиатуре одновременно нажмите клавишу с логотипом windows
+ X, затем выберите «Командная строка» («Администратор»). Вместо командой строки, у вас может быть Windows PoweShell.
- Нажмите «Да» в окне запроса контроля учетных записей.
- Появится окно с черным или синим фоном. Это окно командной строки. В этом окне введите следующую команду:
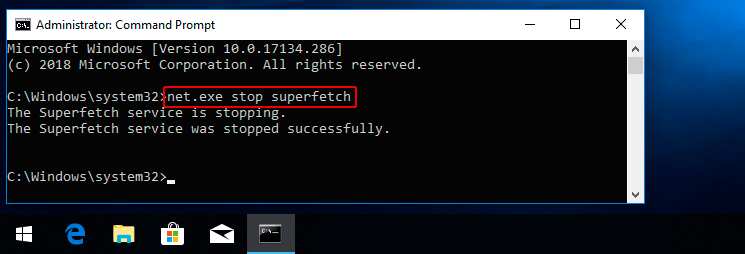
net.exe stop superfetch - Нажмите Enter на клавиатуре.
- Подождите несколько минут, чтобы увидеть, начинает ли ваш компьютер работать лучше. Или проверьте загруженность диска вашего компьютера: откройте «Диспетчер задач», затем на вкладке «Процессы» посмотрите на % в верхней части столбца «Диск». Если это больше не 100%, вы устранили проблему!
Если проблема с использованием диска на 100% не устранена, попробуйте следующий способ, описанный ниже.
Способ 4: Выполните проверку диска
- На клавиатуре одновременно нажмите клавишу с логотипом windows
+ X, затем выберите «Командная строка» («Администратор»). Вместо командой строки, у вас может быть Windows PoweShell.
- Нажмите «Да» в окне запроса контроля учетных записей.
- Появится окно с черным или синим фоном. Это окно командной строки. В этом окне введите следующую команду:
chkdsk.exe /f /r - Нажмите Enter на клавиатуре, затем введите
Y, чтобы подтвердить, что вы хотите выполнить проверку диска при следующей перезагрузке компьютера. Пожалуйста, сначала убедитесь, что вы закрыли все свои приложения.
ВАЖНО! Проверка диска начнется при следующей загрузке компьютера, и на ее выполнение может потребоваться некоторое время (для некоторых компьютеров может потребоваться более трех часов). Если при перезагрузке у вас нет времени ждать завершения проверки диска, вы можете пропустить ее.
- Подождите несколько минут, чтобы увидеть, начинает ли ваш компьютер работать лучше. Или проверьте загруженность диска вашего компьютера: откройте «Диспетчер задач», затем на вкладке «Процессы» посмотрите на % в верхней части столбца «Диск». Если это больше не 100%, вы устранили проблему!
Если проблема с использованием диска на 100% не устранена, попробуйте следующий способ, описанный ниже.
Способ 5: Сброс виртуальной памяти
Виртуальная память может считаться расширением физической памяти вашего компьютера. Это комбинация оперативной памяти и части вашего жесткого диска. Если оперативной памяти недостаточно для выполнения задачи, Windows временно сохраняет файлы в виртуальной памяти, а затем, при необходимости, возвращает их обратно в оперативную память.
Для сброса виртуальной памяти:
- На клавиатуре, нажмите клавишу
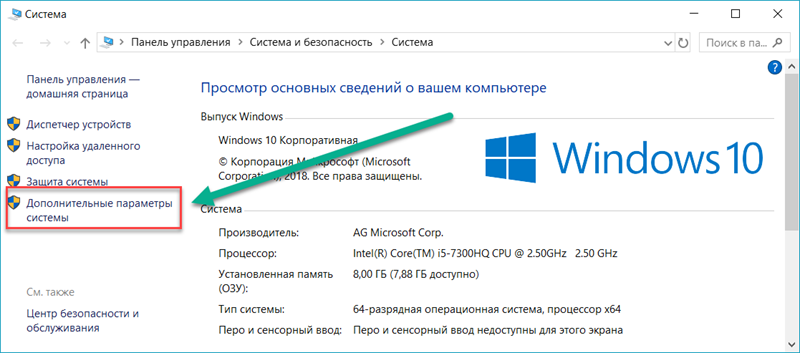
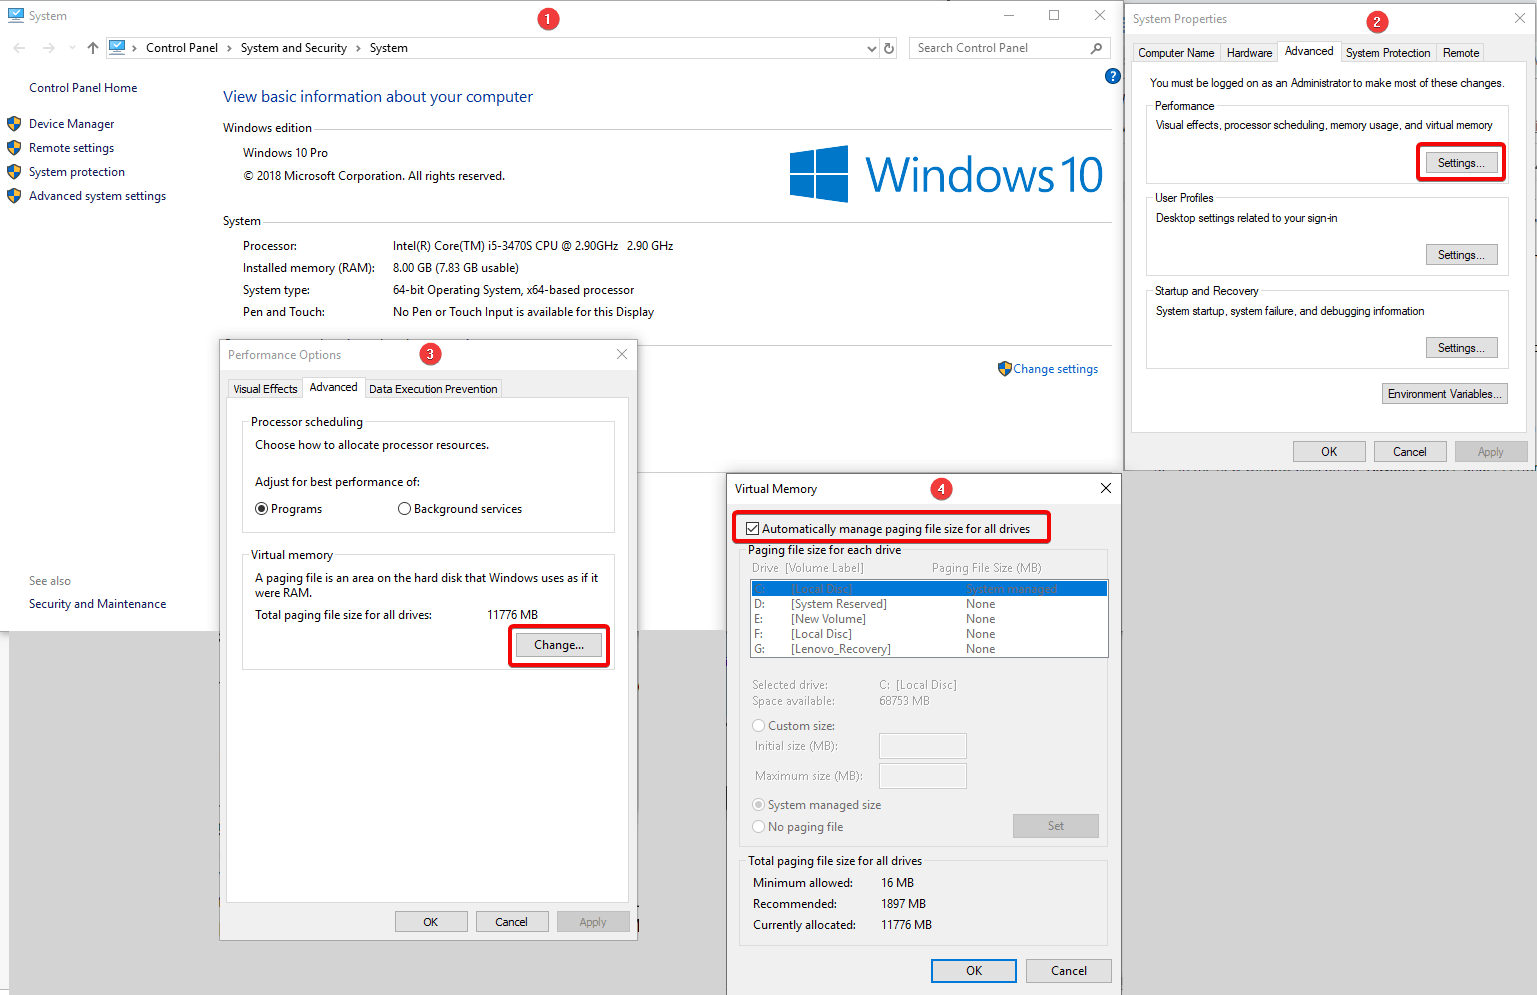
+ Pause/Break. Затем выберите «Дополнительные параметры системы» на левой панели.
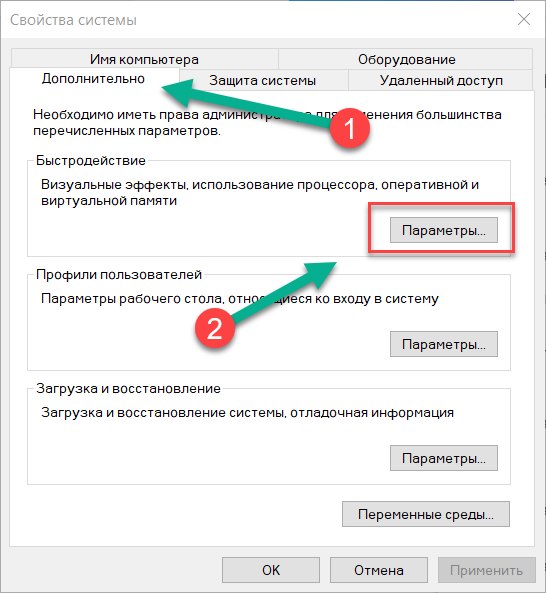
- Перейдите на вкладку «Дополнительно», затем нажмите «Параметры» в разделе «Быстродействие».
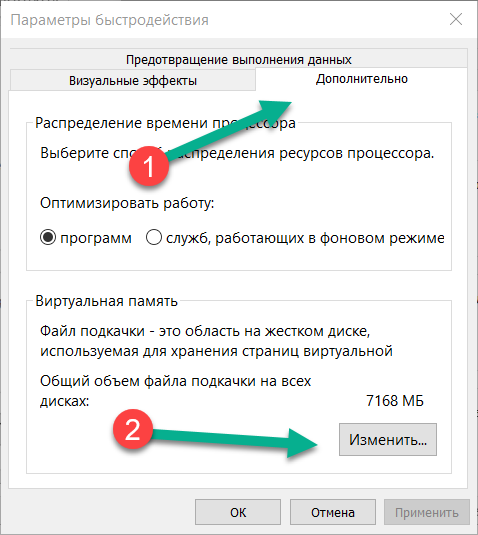
- Снова перейдите на вкладку «Дополнительно» и выберите « Изменить…» в разделе «Виртуальная память».
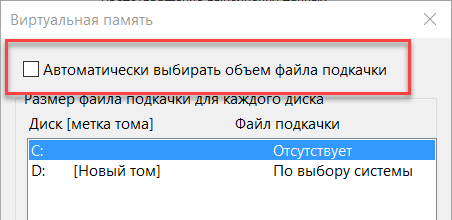
- Убедитесь, что флажок «Автоматически выбирать объем файла подкачки» для всех дисков НЕ отмечен.
- Выберите диск (жесткий диск или раздел, в котором установлен Windows, как правило это диск C: ) , и введите начальный размер и максимальный размер виртуальной памяти:
- Начальный размер — это значение варьируется в зависимости от вашего компьютера. Если вы не уверены, какое значение использовать, просто введите любое число из категории Рекомендуемые .
- Максимальный размер — не устанавливайте это значение слишком высоким. Это должно быть примерно в 1,5 раза больше вашего физического ОЗУ. Например, ПК с 4 ГБ (4096 МБ) оперативной памяти должен иметь не более примерно 6,144 МБ виртуальной памяти (4096 МБ х 1,5).После ввода значений виртуальной памяти нажмите « Установить» , затем нажмите « ОК» для продолжения.
- Очистите все временные файлы вашего компьютера. На клавиатуре нажмите клавишу
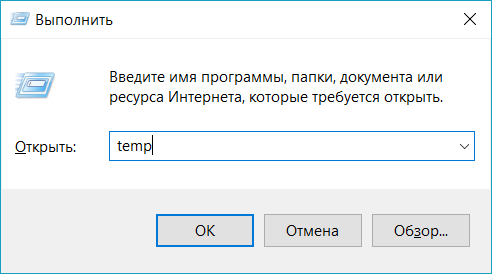
+ R , затем в окне Выполнить, введите
tempи нажмите Enter. Это откроет проводник Windows с открытой папкой Temp и покажет вам все временные файлы на вашем компьютере. - Выберите все файлы в папке Temp и удалите их.
- Проверьте загруженность диска вашего компьютера: откройте «Диспетчер задач», затем на вкладке «Процессы» посмотрите на % в верхней части столбца «Диск». Если это больше не 100%, вы устранили проблему!
Если проблема с использованием диска на 100% не устранена, попробуйте следующий способ, описанный ниже.
Способ 6: Временно отключите антивирус
Если вы установили антивирусные или антивирусные программы, такие как Norton, Kaspersky, AVG, Avast Behavior Shield или Malwarebytes, вы должны временно отключить их или отключить, чтобы убедиться, что они вызывают проблемы с использованием вашего диска.
Обратите внимание, что у Microsoft есть собственная антивирусная программа по умолчанию, Защитник Windows . Он автоматически включается, даже если у вас также установлены другие антивирусные приложения. Даже если вы отключите другие антивирусные программы, Защитник Windows всегда будет рядом с вами в течение определенного промежутка времени. Поэтому не нужно слишком беспокоиться о временном отключении антивируса.
После того, как вы отключили антивирус , проверьте загруженность диска вашего компьютера: откройте «Диспетчер задач», затем на вкладке «Процессы» посмотрите на % в верхней части столбца «Диск». Если это больше не 100%, вы устранили проблему!
Если проблема с использованием диска на 100% не устранена, попробуйте следующий способ, описанный ниже.
Способ 7: Измените настройки Google Chrome и Skype
Для некоторых пользователей Windows 10 определенная комбинация настроек браузера Skype и Google Chrome вызывает проблему 100% загруженности диска в Windows 10. Вот как исправить эти настройки (обратите внимание, что формулировка в разных версиях Chrome может немного отличаться):
- В Google Chrome нажмите трехточечный значок в верхнем правом углу и выберите «Настройки».
- Прокрутите вниз до нижней части страницы и нажмите «Дополнительно».
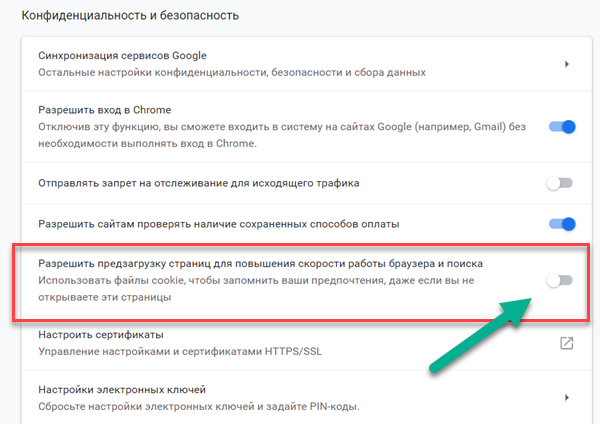
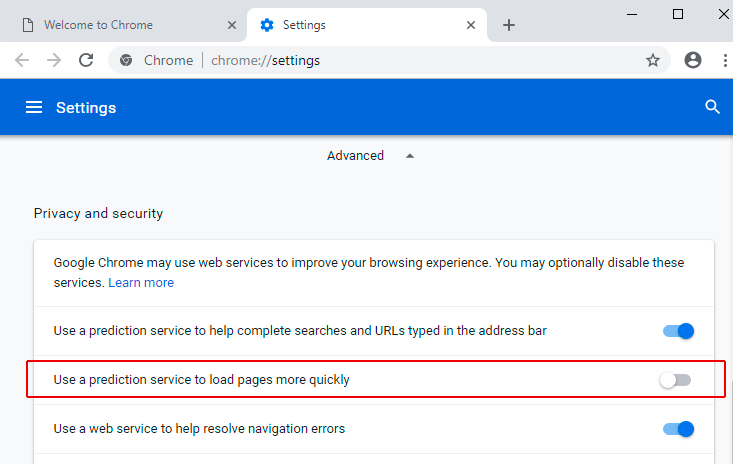
- В категории «Конфиденциальность и безопасность» убедитесь, что использование службы прогнозирования для более быстрой загрузки страниц отключено.
- Убедитесь, что ваш Skype не работает.
- В проводнике Windows перейдите в
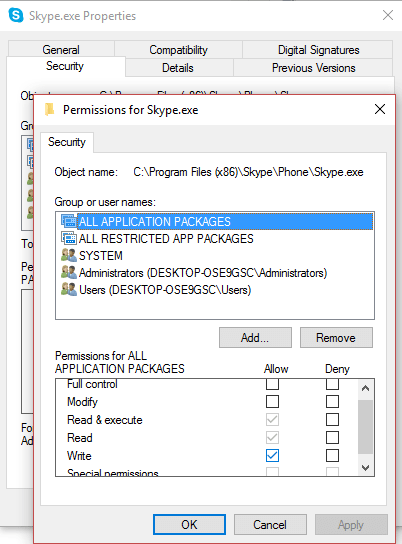
C:Program Files (x86)SkypePhone. - Щелкните правой кнопкой мыши по Skype.exe и выберите «Свойства».
- Перейдите на вкладку «Безопасность» и выберите «Изменить».
- Нажмите ВСЕ ПАКЕТЫ ПРИЛОЖЕНИЙ и установите флажок Разрешить для записи. Затем нажмите Применить и ОК, чтобы сохранить изменения.
- Проверьте загруженность диска вашего компьютера: откройте «Диспетчер задач», затем на вкладке «Процессы» посмотрите на % в верхней части столбца «Диск». Если это больше не 100%, вы устранили проблему!
Если проблема с использованием диска на 100% не устранена, попробуйте следующий способ, описанный ниже.
Способ 8: Исправьте ваш драйвер StorAHCI.sys
Проблема 100 процентной загрузки диска в Windows 10 также может быть вызвана некоторыми моделями расширенного интерфейса хост-контроллера PCI-Express (AHCI PCIe), работающими с драйвером входящей почты StorAHCI.sys из-за ошибки микропрограммы.
Вот как определить, является ли это вашей проблемой, и исправить ее:
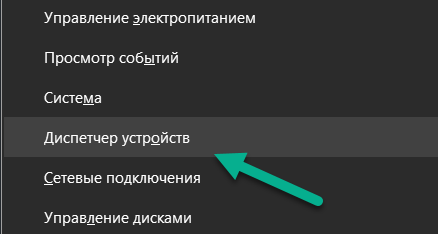
- Откройте Диспетчер устройств, одновременно нажав клавишу с логотипом
+ X , чтобы выбрать Диспетчер устройств.
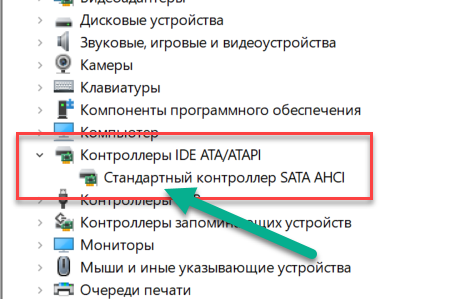
- Разверните категорию Контроллеры IDE ATA / ATAPI и дважды щелкните Стандартный контроллер SATA AHCI.
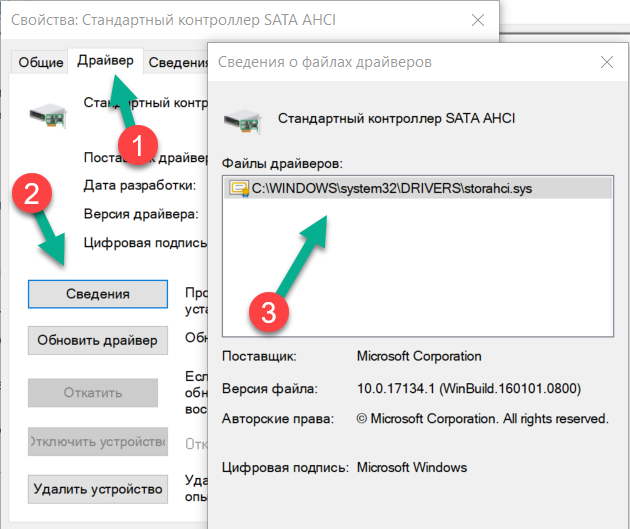
- Перейдите на вкладку «Драйвер» и нажмите «Сведения». Если вы видите, что storahci.sys хранится в пути к папке system32, значит, вы используете драйвер AHCI для входящих сообщений.
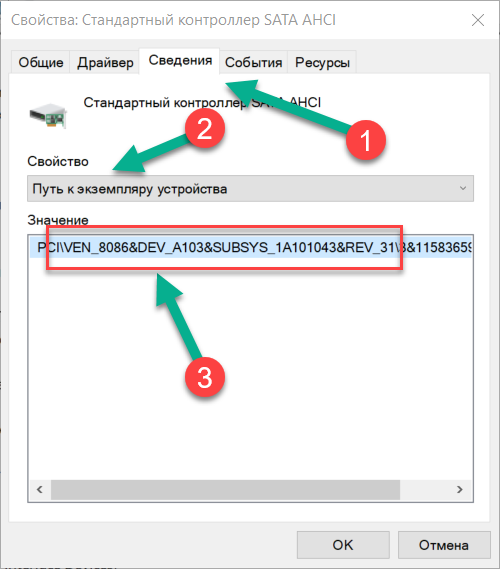
- Закройте окно «Сведения о драйвере» и перейдите на вкладку «Сведения». В раскрывающемся меню выберите «Путь к экземпляру устройства». Запишите путь, начиная с VEN_.
- Введите regedit в поле поиска на панели «Пуск», затем нажмите «Enter» на клавиатуре, чтобы запустить редактор реестра. Затем перейдите к:
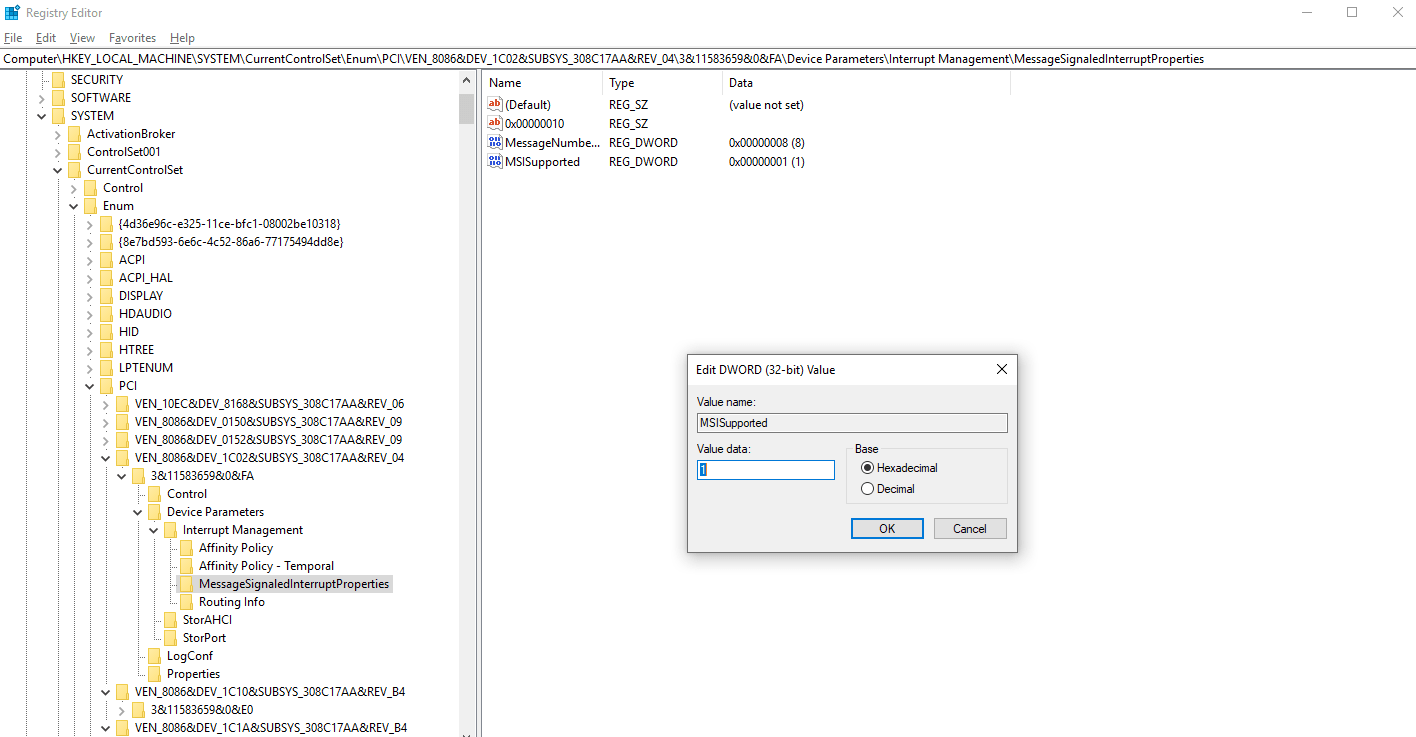
HKEY_LOCAL_MACHINESystemCurrentControlSetEnumPCI <AHCIController><Случайное число>Device ParametersInterruptManagementMessageSignaledInterruptProperties<AHCI Controller> здесь относится к имени, которое вы видите на шаге 2.
<Случайное число> отличается на разных машинах.
- Дважды щелкните ключ MSISupported и измените значение на 0.
- Перезагрузите компьютер после внесения изменений, затем проверьте загруженность диска вашего компьютера: откройте «Диспетчер задач», затем на вкладке «Процессы» посмотрите на % в верхней части столбца «Диск». Если это больше не 100%, вы устранили проблему!
Пожалуйста отпишитесь в комментарии, какой способ вам помог, а также может вы знаете ещё способы, поделитесь, мы обязательно добавим в статью с упоминанием вас как автора способа решения проблемы с 100 процентной загруженности диска в диспетчере задач.
For people who use their PC frequently, storage can eventually pile up without many of us noticing. Your PC’s disk usage is a variable that can have its storage used very quickly and eventually read 100% disk usage.
The article below shows many solutions if your system shows 100% disk usage.
Automatically Fix Disk Usage Errors
Recommended: To easily install drivers automatically, use the tool below.
What is the Disk on my PC?
A PC’s disk is its hard drive, where all your programs, documents, and other files are stored. The disk is where your computer’s operating system (Windows, macOS, etc.) is installed, and all of your software applications and user data. When your computer starts up, the operating system and all of your software load from the disk into the computer’s memory, or RAM.
Windows Automatic Repair Tool

System Information
-
Your machine is currently running Windows 10 -
Restoro is compatible with your operating system.
Recommended: To repair Windows Errors, use this software package; Restoro System Repair. This repair tool has been proven to identify and fix these errors and other Windows problems with very high efficiency.

-
100% safe as confirmed by Norton. -
Only your system and hardware are evaluated.
Restart Your System
When you encounter disk usage errors, it probably happens due to junk of temporary files on the hard disk consuming maximum space and not letting the operating system work properly. In this context, you would get an error pop-up, i.e., fix high disk usage or disk usage 100 windows 10. If you face a disk usage error, the primary way to resolve the problem is to restart your device. Here is how you can act.
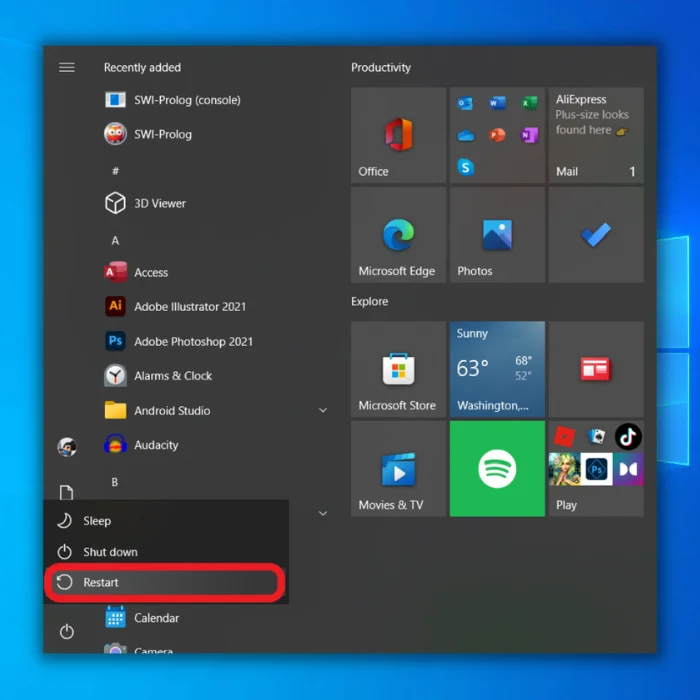
Step 1: In the windows main menu, click on the windows icon and select the power option.
Step 2: In the context menu of the power option, select restart
Update Windows
Using an older version of OS (windows) on the device may also lead to disk usage in windows errors. The system files may not communicate with the device’s hard disk installed, resulting in 100% disk usage windows 10. In this context, updating windows to the latest version on the device can fix the error. Here are the steps to follow:
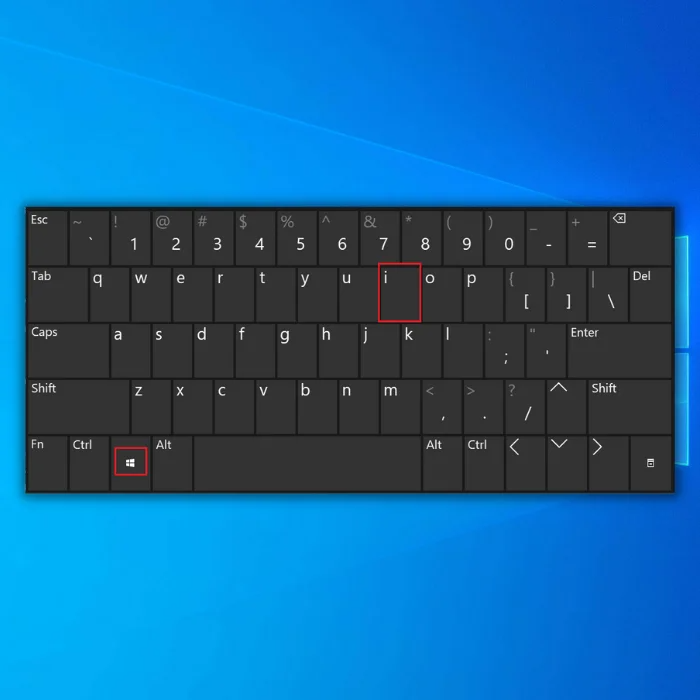
Step 1: Launch settings with windows key+ I from the keyboard. In the settings menu, click the option of update and security.

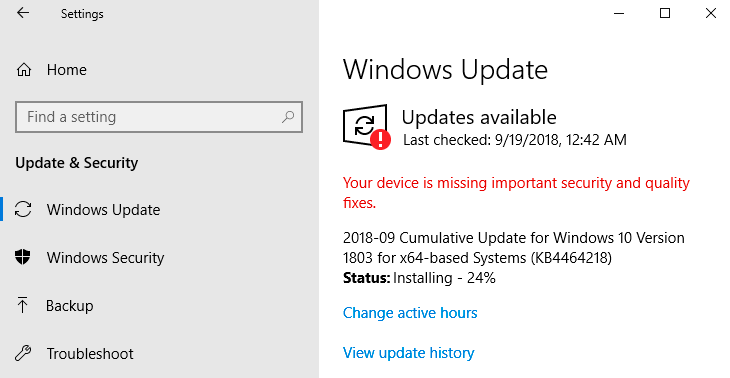
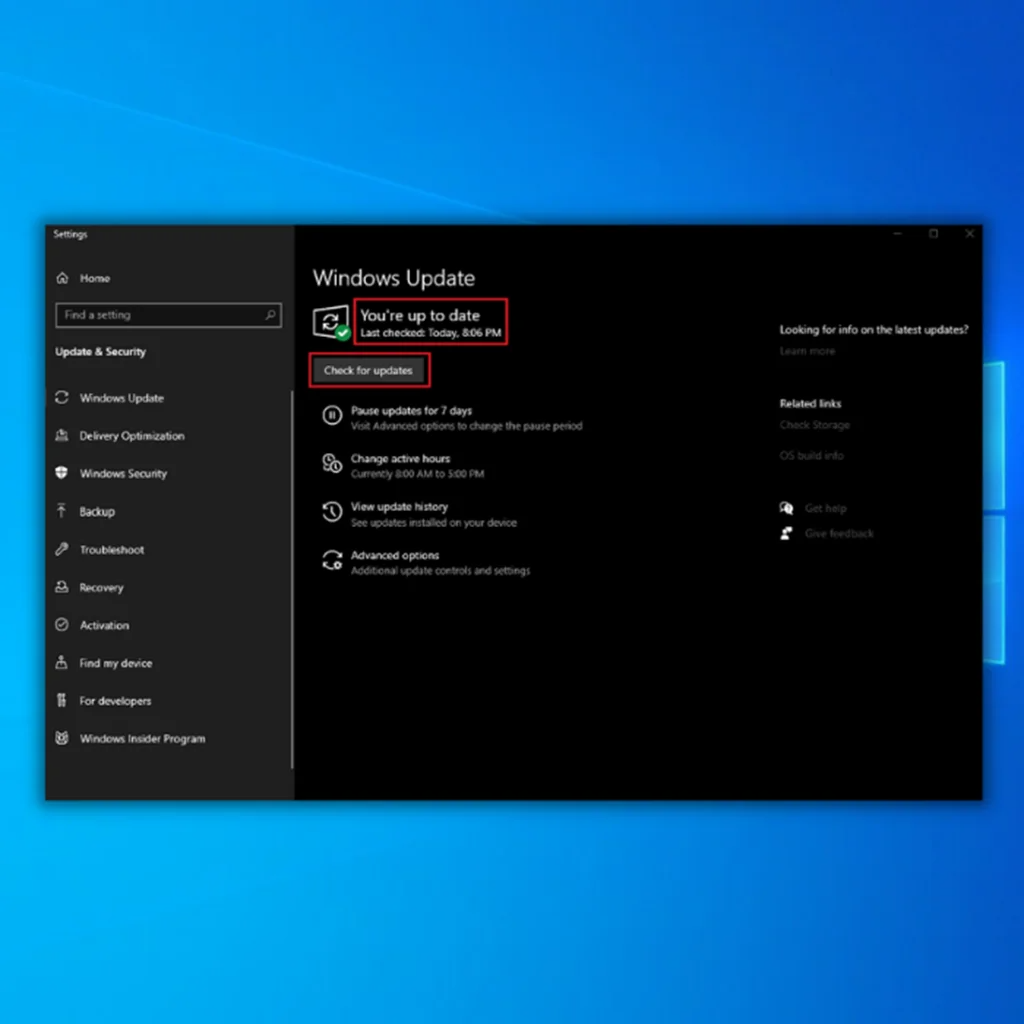
Step 2: In the update and security window, click on windows update. And check for updates. Select update. Your device will install the update automatically. Restart the device to check if you still get an error message.
Disable Windows Search
Windows search is a feature of the Windows operating system that allows users to search for files and folders on their computers. When Windows search is enabled, it indexes all the files on your computer to make it easier for you to find what you’re looking for. This indexing process can cause your computer to use up a lot of disk space and can lead to 100% disk usage if there are a lot of files on your computer.
Any search loop on windows can also cause disk usage errors like 100% disk usage in windows 10. this issue comes with two potential quick fixes, i.e., temporarily disable windows search or permanently disable windows search. Here is how you can perform the fixes.
1- Temporarily disabling windows search
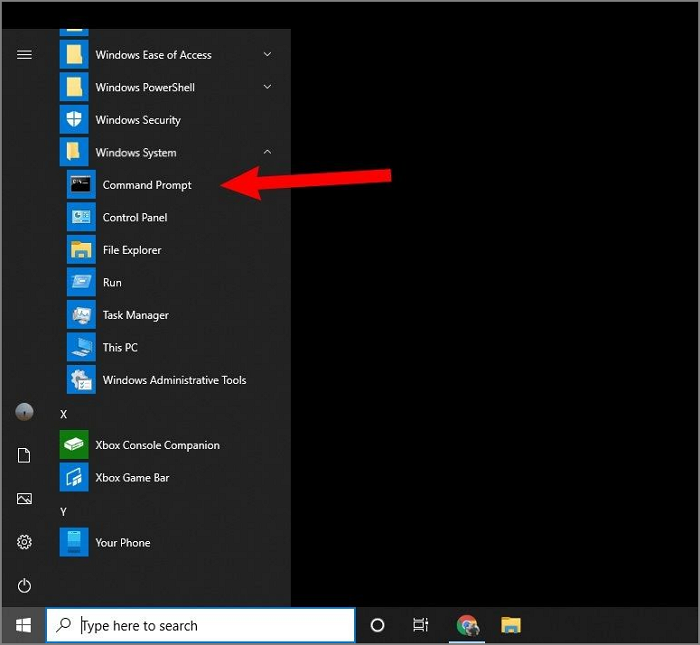
Step 1: Launch the command prompt from the windows main menu. Type the command in the taskbar’s search box and click the option in the list.
Step 2: Select the option of run as administrator.

Step 3: In the command prompt, type net.exe, stop “Windows search,” and click enter to complete the action. It will stop the windows search temporarily to check if the disk usage error is solved.

Permanently Disabling Windows Search
Step 1: Launch the Run utility with windows key+R, and in the command box, type services. msc. Click enter to continue.
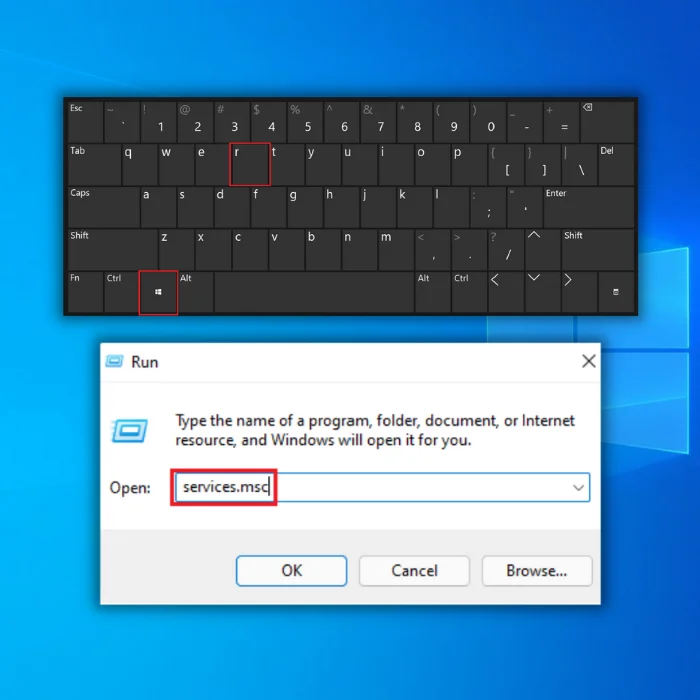
Step 2: In the services menu, navigate to windows search and right-click the option to select properties from the context menu.
Step 3: In the properties window, go to the general tab, click on startup type and select the option of disabled. Click apply and ok to save changes.

Disabling Windows search can help free up some disk space and may also solve your 100% disk usage problem. However, it’s worth noting that disabling Windows search may make it more difficult for you to find the files and folders you’re looking for. So if you’re not having any problems with 100% disk usage, you may consider keeping Windows search enabled.
Disable SuperFetch Service
Superfetch mostly leads to disk performance errors, i.e., 100% disk usage in windows 10. Although it reduces the operating system’s boot time, it can interrupt the computer’s disk usage and, in turn, interrupt management. To resolve the problematic disk errors and reduce disk usage, one can permanently disable the superfetch service. Here is how you can perform the command.
Step 1: Launch the command prompt from the taskbar’s search box. In the box, type the command and click the option in the list. Choose run as administrator mode for launching the utility.

Step 2: In the UAC pop-up window, click yes to continue.

Step 3: In the command prompt, type either net.exe stop superfetch or net.exe stop sys main. Click enter to complete the action. As the command completes, the superfetch service will be disabled.

Perform a Clean Boot
While performing a clean boot, you are allowing your OS to launch on the device with a minimal number of system files and drivers. It automatically reduces usage in windows 10. By using minimal windows features, one can assist in the high performance of the hard drive. Hence, utilizing the original boot configuration to perform a clean boot can help resolve the disk usage problem. Here are the steps to follow:
Step 1: In the search box of the windows main menu, type msconfig. Click on the option to launch.

Step 2: Right-click msconfig to select run as administrator from the menu. It will launch a system configuration utility.

Step 3: In the system configuration utility pop-up window, select the General tab and select the selective startup option.

Step 4: In the next window, uncheck the option of load startup items.
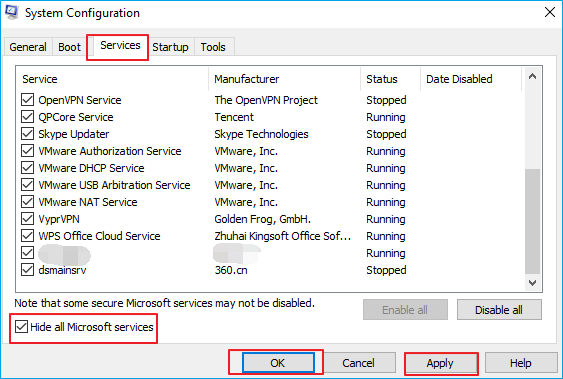
Step 5: Head to the services tab and checkmark the option of hide all Microsoft services followed by clicking disable all button option. Click ok to continue. Restart the device to start the normal mode.

Update Device Drivers
A computer’s physical memory can also show up highest disk usage due to outdated device drivers. Getting driver details may show that the windows system cannot communicate with old versions of drivers causing high disk usage. So updating drivers from the device manager or via windows updates can help to resolve the challenging disk issues. Here are the steps to follow:
Step 1: In the main menu’s search bar, type device manager and double-click the option to launch it.

Step 2: Check the attached and running devices list in the device manager window.
Step 3: If you see any device with an exclamation mark, right-click the device and select update driver from the drop-down menu.

Step 4: In the update driver window, select Search automatically for drivers. This will initiate searching for any available update linked to the device and its drivers. If no update is available, select the search for updated drivers option in the windows updates option.
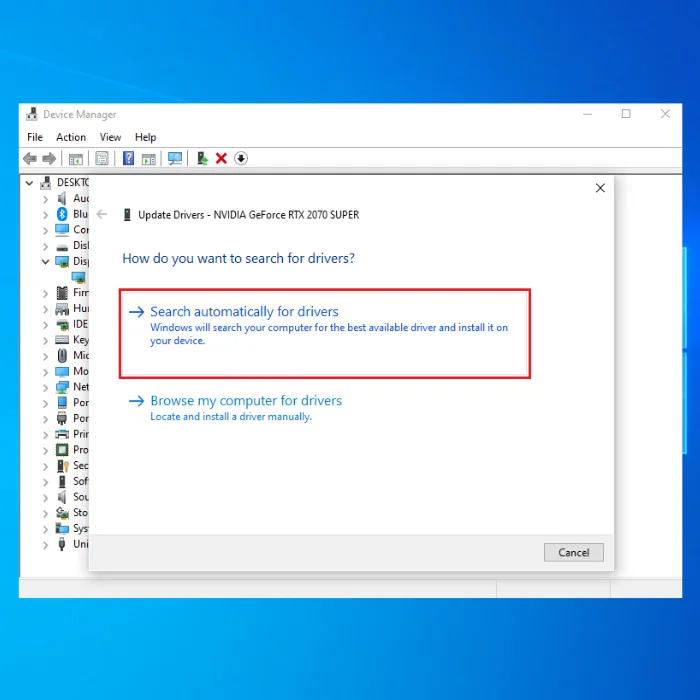

Step 4: In the windows update window, select Check for updates. If the window is updated, then select the drivers update section. Check the options and select the option of Download and install.

Check for Corrupted System Files
For checking the corrupted system files consuming and blocking the hard disk space or system drive in windows 10, SFC (system file checker) scan is the best option. It helps scan all system files and identifies the corrupted ones and potential solutions to fix them. Here are the steps for running an SFC scan to resolve 100% disk usage in windows 10.
Step 1: Launch the Run utility by clicking the windows key+R from the keyboard.
Step 2: In the run command box, type cmd and click Ctrl + Shift + Enter to launch the command prompt by giving administrative permissions. Click Yes to continue.

Step 3: In the command prompt, type sfc /scannow and click enter to continue.

Step 4: Once the SFC scan is completed, close the prompt and restart your device to check if the error is resolved.
Perform a Disk Check
For the errors linked to the hard disk, i.e., 100% disk usage windows 10, performing the disk check can help run a system scan for all the files on a hard drive. In this context, using windows task manager can serve the purpose. Here are the steps to follow:
Step 1: Launch the task manager pop-up list with windows key+ X. Select the command prompt (admin) option. It will launch a command prompt with all administrative privileges.

Step 2: In the window of UAC, click yes to continue.

Step 3: In the command prompt, type chkdsk.exe/f/r and click enter to continue. In the following command line, type Y to complete the command. The disk check action will start as soon as you boot the device.

Step 4: In the next step, type task manager in the taskbar search box. Double-click the option in the list to launch the feature.

Step 5: In the task manager window, navigate to the processes tab and check the disk usage (%) in the disk column in the header menu.
Reset Virtual Memory
Temporary files consume all the memory from RAM due to errors associated with pagefile. Sys. In this context, virtual memory deals with the hard disk as RAM and causes 100% disk usage in windows 10. The only solution to fix the issue is via resetting the virtual memory. Here are the steps to follow:
Step 1: Launch the control panel from the taskbar’s search box and double-click the option to launch it.

Step 2: In the control panel window, select the system and security option and choose the system properties option.

Step 3: In the system properties window, navigate to advanced system settings in the left pane. In the pop-up window, locate the advanced tab, and under the performance section, click on the settings button.
Step 4: In the new pop-up, the performance tab, navigate to the advanced tab, and under the virtual memory tab, click change to continue.

Step 5: In the next pop-up screen, check the box of option Automatically manage paging file size.

Step 6: In the next step, check the option of no paging file and click Ok to complete the action.

Fix StorAHCI.Sys Driver
Any firmware bug leached to PCI-Express (AHCI PCIe) models associated with the StorAHCI.sys driver can result in 100% disk usage windows 10 error. Here are the steps to follow:
Step 1: Launch the device manager with windows key+ X and select the Device manager option from the pop-up list.

Step 2: In the device manager window, navigate to IDE ATA/ATAPI Controllers and expand the option.

Step 3: In the list, right-click the option of the AHCI controller to select properties from the context menu.

Step 4: In the properties window, navigate the drivers tab and click on driver details. Check the destination for StorAHCI.sys.

Step 5: In the next window, select the option of device instant path and note down the path.
Step 6: Launch the registry editor from the run command box via windows key+ R. In the command box, type regedit and click ok to continue.
Step 7: In the registry editor, locate the following key and click the option.
HKEY_LOCAL_MACHINESystemCurrentControlSetEnumPCI <AHCI Controller><Random Number>Device ParametersInterrupt ManagementMessageSignaledInterruptProperties

Step 8: In the next step, click the option of MSISupported key and change its value to 0. Click Ok to complete the action.

Step 9: In the next step, launch the task manager by right-clicking anywhere in the taskbar and selecting the option of taskbar settings. Check the status of disk usage from the disk column.

Change Energy Options
For settling the 100% disk usage windows 10 error, changing the device’s power usage/energy options can serve the pursuit. Here are the steps to follow:
Step 1: Launch the control panel by typing control in the taskbar’s search box.

Step 2: Select the hardware and sound option in the control panel window.

Step 3: In the next step, click on the option of power options. Select the option of changing plan settings.
Step 4: Click on Change advanced power settings in the following pop-up.
Step 5: Now choose a high-performance option from the context menu. Restart the device to check if the errors exist.

Change Settings in Google Chrome
When it takes a long to load any webpage, it constantly binges on the hard disk and utilizes space, leading to hard disk errors. Making specific changes via the internet browser can help to resolve the error, and chrome users can follow the given steps to fix the issue.
Step 1: Launch Chrome and select the settings option from the hamburger menu.
Step 2: In the next step, select advanced settings. Under the Privacy section, toggle the button off for the option Use a prediction service to load pages more quickly.

Other Methods to Lower Disk Usage
- Use Disk Cleanup to delete unnecessary files on your hard disk. To open Disk Cleanup, click the Start button, type Disk Cleanup in the Search box, and then press Enter.
- Delete temporary files. Temporary files are stored on your hard disk so that you can access them more quickly. However, they can take up a lot of space, especially if you don’t regularly delete them. To delete temporary files, click the Start button, type %TEMP% in the Search box, and then press Enter. In the Temp folder, select all the files and folders. Press Delete on your keyboard.
- Reduce the size of your pagefile. The pagefile is a file on your hard disk that Windows uses to store information that can’t fit into RAM. You can safely reduce your pagefile size if you have a lot of RAM. To do this, open the Control Panel and click System and Security > System > Advanced system settings > Performance > Advanced > Change. In the Virtual Memory box, uncheck the Automatically manage paging file size for all drives check box. Select a custom size for your page file and then click Set.
- Remove unnecessary programs from your computer. Programs you don’t use often can take up a lot of space on your hard disk. To remove a program from your computer, click the Start button, type Add or remove programs in the Search box, and then press Enter. In the Add or Remove Programs window, select the program you want to remove and click Uninstall.
Keep your Windows Updated Regularly
When the Task Manager is opened, Windows users may experience disk usage at 100%. This can be due to several reasons, but one of the most common is that updates are not installed regularly. The system may become unstable when updates are not installed, resulting in disk usage at 100%.
Keeping your windows updated is important for several reasons. Not only does it keep your system running smoothly, but it also helps to prevent 100% disk usage. By keeping your updates installed, you can help to avoid this issue and keep your computer running at its best.
Frequently Asked Questions About Disk Usage 100 Windows
What is Antivirus Software?
Antivirus software is a program that helps protect your computer from viruses and other types of malware. It typically scans your files and email attachments for threats and can help protect your computer from infection. Antivirus programs usually take up a large amount of space in your storage and can be removed without consequence.
Why Can’t I Use a Disk on My Windows Explorer?
Windows Explorer may not be able to use a disk because the disk is not formatted with a file system that Windows Explorer can read. To format the disk, open Disk Management and, right-click the disk, then select Format.
What is Advanced Host Controller Interface?
Advanced Host Controller Interface (AHCI) is a hardware interface specification defining a standard for operating Serial ATA (SATA) computer host controllers. AHCI was developed to allow the use of SATA hard drives and optical drives by providing a standard way for the system BIOS, operating system, and device drivers to communicate.
What does 100% Disk Usage Mean?
100% disk usage indicates that your computer uses all its available disk space to store files. This can cause your computer to run slowly or crash if it runs out of space. You can free up disk space by deleting unused files or expanding storage.
Does Antivirus Software Impact Disk Usage in Windows 10?
Disk usage measures how much space a program or file takes on a disk drive. Antivirus programs often consume much disk space, typically storing an extensive database of virus definitions. This can result in disk usage creeping up over time and cause problems for users with limited disk space.
Why Should I Clear Space on My Disk?
A computer’s disk space is a precious commodity. When it becomes full, the computer can no longer store new files, and this can cause errors and slow down your computer. To avoid these problems, you should clear space on your disk regularly. You can free up space by deleting old files, emptying your recycle bin, and compressing large files.
Do Downloaded Program Files take up Space on My PC Disk?
Yes, downloaded program files take up space on your PC disk. However, the amount of space they take up will vary depending on the program size and how many programs you have downloaded.
Is it Safe to Delete Antivirus Applications Installed?
Deleting antivirus applications installed on your computer is safe because they are only used for protection. These applications can be uninstalled without any adverse effects on the system and will not cause any data loss.
Will Disabling Windows Updates Clear Disk Space?
Disabling Windows updates will not clear disk space. However, it may prevent your computer from downloading updates automatically, which can take up a significant amount of disk space.
Why does Windows Search Entry take up Disk Space?
Windows Search Entry can take up disk space if the index is not maintained. The index is a file that stores information about where files are located on the computer. If the index is not supported, the index will become fragmented and take up more disk space.
Updated by
Cici on Dec 06, 2022
Quick Navigation: How to Fix Disk 100 in Task Manager (10 Tips)
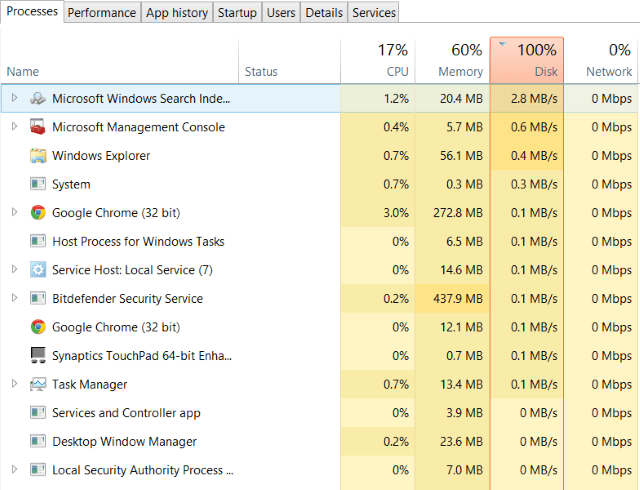
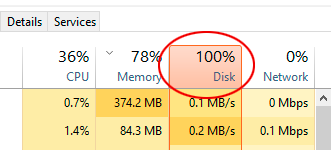
Most Windows 11/10/8.1/8/7 users may have experienced this issue — Windows is running slow and has a slow response time. Just like the picture shows, your windows 11/10 is at 100% usage. To fix the Windows 11/10 100% disk usage issue, you must follow the tips below.
| Workable Solutions | Troubleshooting 100 Disk Usage |
|---|---|
| Ways 1. Restart your computer | Click the «Start» icon. Go to «Shut down or sign out > Restart.»…Full steps |
| Ways 2. Check for malware | Your security software should be able to deal with this, whether it’s a free app or a paid suite…Full steps |
| Way 3. Update Windows 10 | Click the «Start» icon. Go to «Settings > Update & Security settings > Windows Update»…Full steps |
| Way 4. Fix disk error | Press the Windows key and type cmd. Right-click «Command Prompt» and…Full steps |
| More Effective Fixes | Disable Superfetch service > Clean Up Junk Files > Reset Virtual Memory > Perform a Clean Boot…Full steps |
Check What Causes Task Manager Disk 100 Usage in Windows 11/10
First, we’re going to open the task manager and take a look at our disk usages. So as you can see, if it is now 100% and is slowing our computer down.
Step 1. Type task manager in the Windows search bar and select «Task Manager.»
Step 2. In the Processes tab, look at the «Disk» process to see what is causing your hard disk 100% usage.
Here are the top 10 methods that have helped other users fix their Windows 10 100% disk usage problem. Simply follow the operation procedures to resolve disk usage 100 in Task Manager.
Way 1. Restart Your Computer to Fix 100 Disk Usage
We often restart our computer or laptop if the computer screen just froze, outlook crashed. A restart solves much of the computer issues, and your Windows 10 100% disk usage problem is no exception. You can also restart your PC to tackle this problem. It is a sufficient way.
Step 1. Click the «Start» icon.
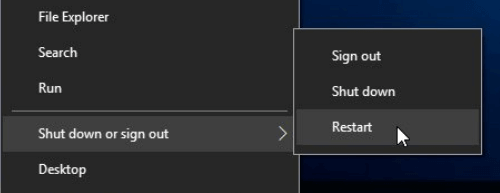
Step 2. Go to «Shut down or sign out > Restart.»
After the restart, you may have resolved your disk issue. If you still have a problem, read on.
Way 2. Check For Malware in Windows 11/10
Usually, the virus could be the leading cause of loss of situations, and 100% disk usage is no exception. Your security software should be able to deal with this, whether it’s a free app or a paid suite. At the very least, tools such as BitDefender, Avast, and AVG anti-virus should be able to scan your system drive and detect any problems, although with a heavy load on your drive already, this may take a while. This method would take some time since your disk is already experiencing high usage. But it is still necessary to identify and remove malware.
Way 3. Update Windows to Solve 100 Disk Usage
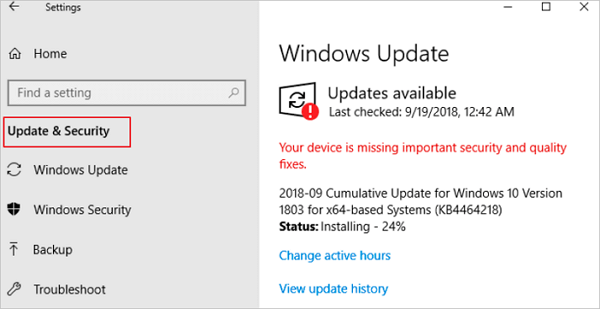
The latest updates can often resolve severe problems with your Windows 10. Make sure that you have the latest Windows updates installed on your PC. Windows 10 offers you the choice of when and how to get the latest updates to keep your device running smoothly and securely. To manage your options, follow the steps below.
Step 1. Click the «Start» icon.
Step 2. Go to «Settings > Update & Security settings > Windows Update».
You can check for new updates and install them if they are available. This solution may do good to the overall performance of your system, including that of your hard drive.
Way 4. Fix Disk Error If 100 Disk Usage Still Exists
If nothing above is working, then you could have a problem with your hard drive.
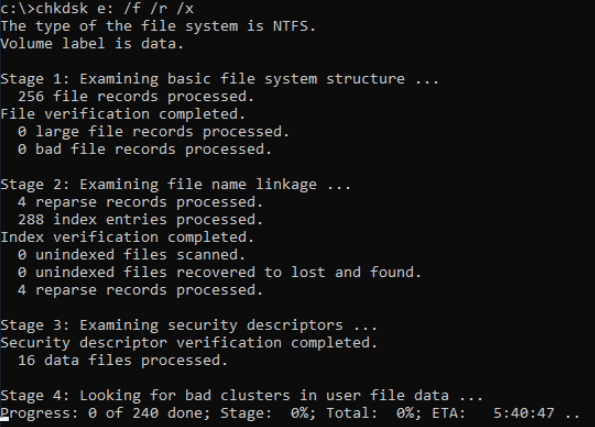
Whenever you find your hard drive performs poorly, or Windows asks you to repair drive errors, you can first try to run CHKDSK to do the job.
Step 1. Press the Windows key and type cmd.
Step 2. Right-click «Command Prompt» and choose «Run as administrator.»
Step 3. Enter the following command: chkdsk E: /f /r /x
«E» means the drive letter of the partition you want to check.
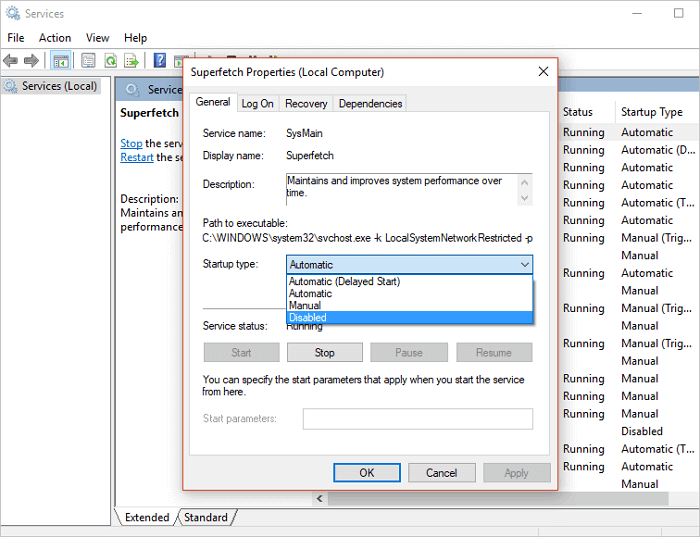
Way 5. Stop the Superfetch Service
Superfetch is like drive caching, which copies all your commonly used files to RAM. This feature allows programs to boot faster. However, if your system doesn’t have the latest hardware, Service Host Superfetch can easily cause high disk usage. High disk usage due to this service isn’t always a problem. You can stop this service to solve Windows 100 disk usage error.
Step 1. Press Windows + R or type Run in the Windows 10 search box. Type services.msc into the «Open» box and click the «OK» button.
Step 2. Now find «Superfetch». Right-click it > select «Properties» > click «Stop» on the pop-up windows > click «Disabled» from the ‘startup type’ drop-down menu.
Way 6. Reset Virtual Memory and Increase the Ram
Virtual memory is a combination of RAM and a portion of your hard drive. «When the RAM isn’t enough to perform a task, Windows will temporarily store files in virtual memory, then swap them back to RAM when required.»
Some computers’ operating systems don’t support more than a certain amount of RAM. For example, 32-bit versions of Windows can’t use more than 4 GB of RAM, so installing more than 4 GB of RAM is a waste. If your computer supports installing more Ram, click here to Increase the Ram. If increasing the Ram is a waste, reset the virtual memory.
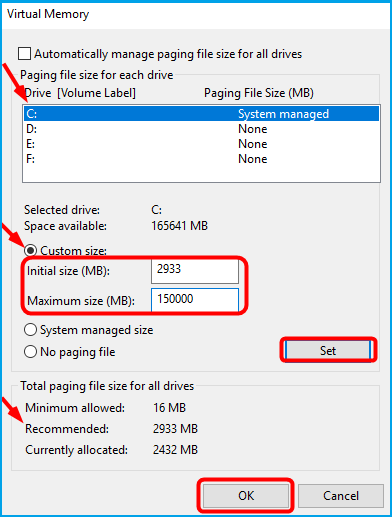
Steps to reset virtual memory:
Step 1. Press Windows key + Pause/ Break key at the same time. Then choose Advanced System Settings on the left panel.
Step 2. Go to the «Advanced» tab, then click «Settings».
Step 3. Go to the «Advanced» tab again, and choose Change in the Virtual memory section.
Step 4. Make sure that the Automatically manage paging file size for all drives checkbox is NOT ticked.
Step 5. Select your windows drive (the hard drive or partition that has Windows installed on it – usually C:), and enter an Initial size and Maximum size for your virtual memory:
- Initial size: This value varies, depending on your computer.
- Maximum size: Don’t set this value too high. It should be about 1.5 times the size of your physical RAM. e.g., A PC with 4 GB (4096 MB) of RAM should have no more than about 6,144 MB virtual memory (4096 MB x 1.5).
Once you’ve entered your virtual memory values, click Set, then click «OK» to continue.
Step 6. Clear all your computer’s ‘temp’ files. On your keyboard, press the Windows key and R at the same time, then in the Run form, type temp and hit Enter. This will invoke Windows Explorer with your Temp folder open, showing you all the temp files on your computer.
Step 7. Select all the files in the Temp folder and delete them.
Way 7. Clean Up Junk Files and Running Memory
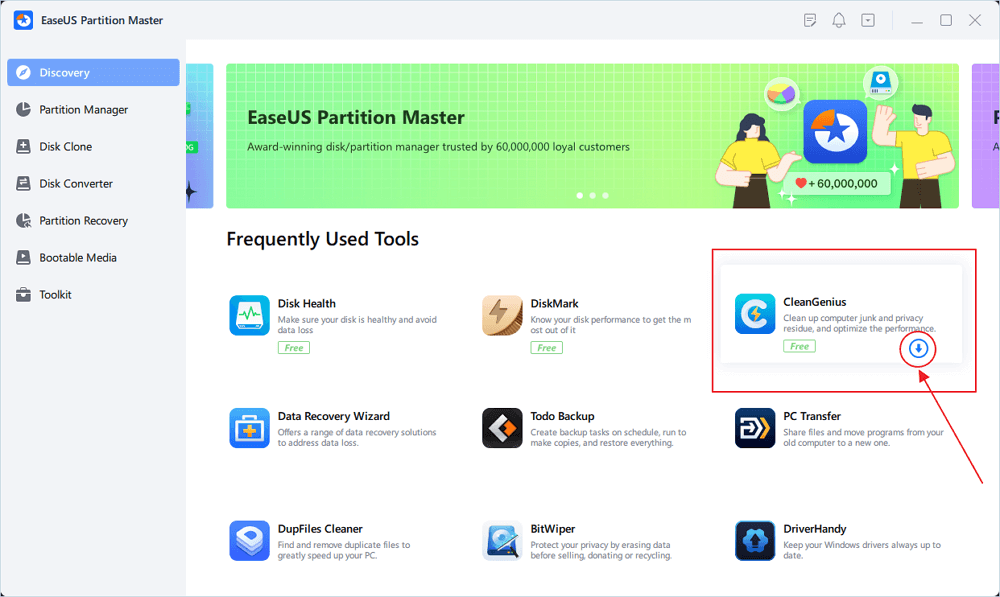
Clear up junk files and running memory appropriately will low disk usage. EaseUS CleanGenius offers you with junk file cleanup feature. You can clear up your PC for free without difficulty. Follow the simple steps to solve the 100% disk usage problem.
Step 1. Download and install EaseUS Partition Master Suite on your PC. Click to download PC Cleaner on panel.
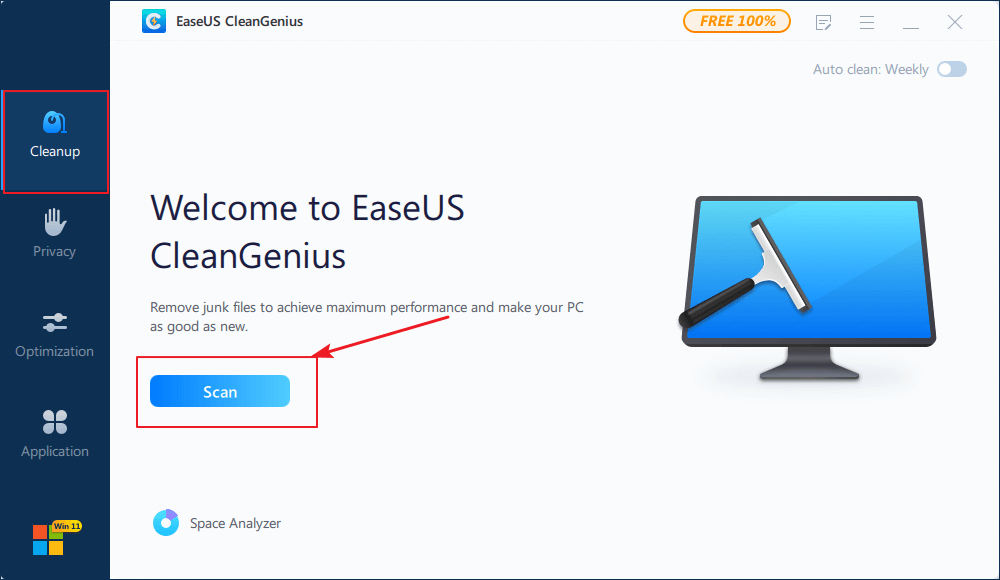
Step 2. Install EaseUS CleanGenius on your PC. To begin with, navigate to «Cleanup» and click «Scan.»
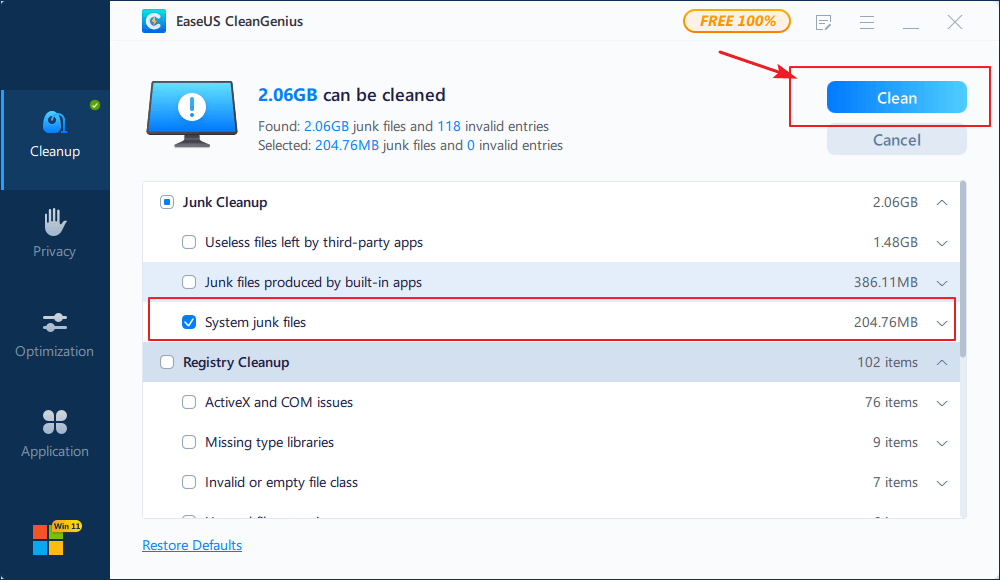
Step 3. EaseUS CleanGenius will start immediately to scan all the useless files, select system junk files and invalid entries, and click «Clean» over all your PC.
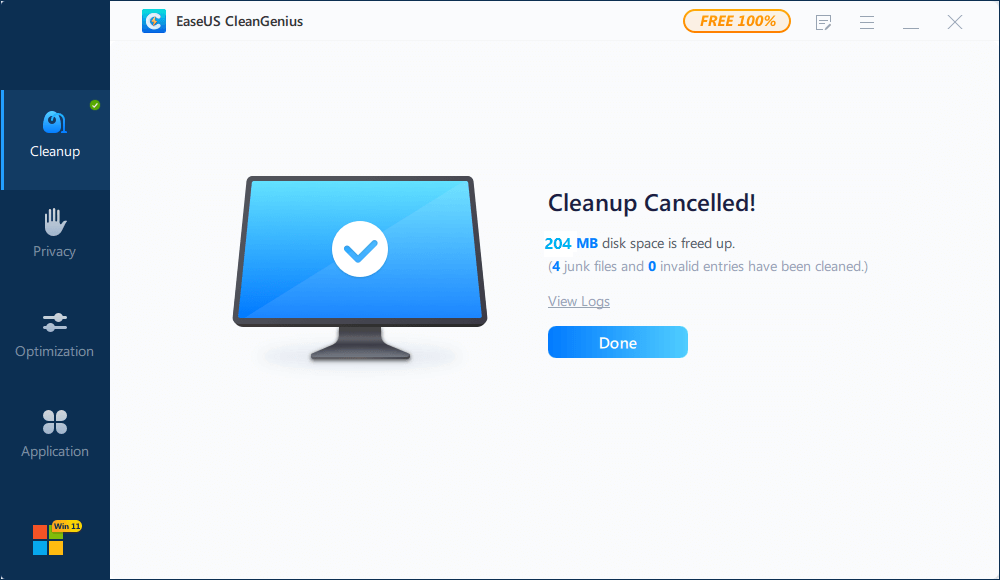
Step 4. Once completed, you can see clearly how many MBs or GBs of data are cleaned. Click «Done» to finish the process.
Way 8. Perform a Clean Boot on Windows 11/10
Clean Boot State is used to diagnose and troubleshoot advanced Windows problems. A «clean boot» starts Windows with a minimal set of drivers and startup programs so that you can determine whether a background program is interfering with your system performance. If you have never performed a clean boot, now is the time to learn.
Step 1. Type msconfig in start search and hit «Enter» to open «System Configuration.»
Step 2. Click the «General» tab, and then click «Selective Startup.» Clear the «Load Startup Items» checkbox, and ensure that «Load System Services» and «Use Original boot configuration» are checked.
Step 3. Click the «Services» tab. Select the «Hide all Microsoft services» checkbox. Select the item and then select «Disable all.»
Step 4. Click «Apply/OK» and restart the computer. This will put Windows into a Clean Boot State.
Way 9. Upgrade the Hard Drive to a Larger One
The hard drive that develops too many bad sectors on it would largely send your computer into a loop with high disk usage. Or, your computer hard drive might be too old to work properly, even there is plenty of unused space available. Still, your computer functions like a turtle and consistently reports 100% disk usage.
It’s time to upgrade the hard drive. EaseUS Partition Master can help you replace the hard drive in question with a new one without taking the time to reinstall Windows 11/10. This is how you start:
Connect the alternative hard disk to the computer (If it is a new hard disk, initialize it to an MBR disk).
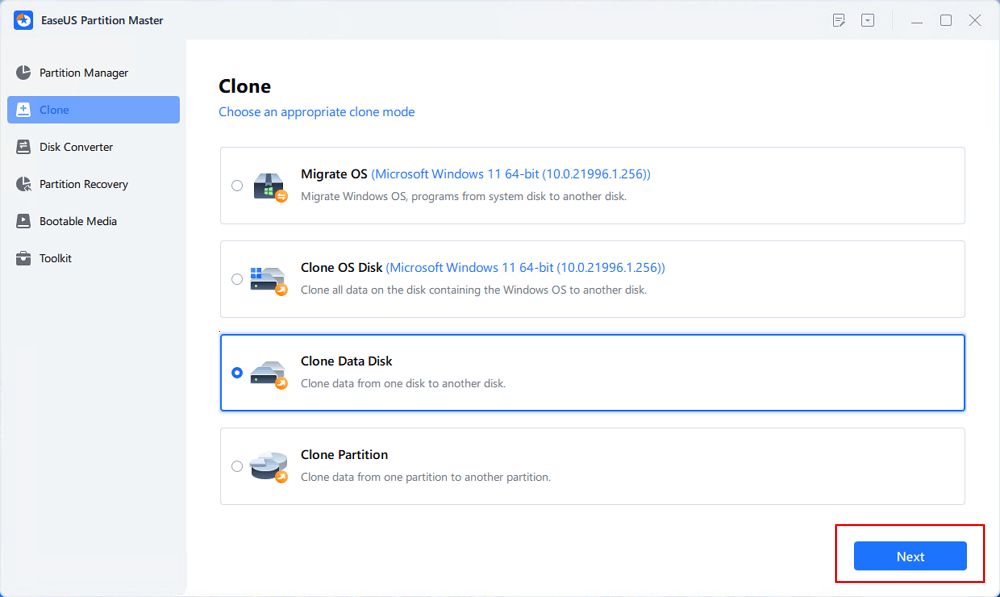
Step 1. Select the source disk.
- Go to the «Clone» tab, click «Clone OS Disk» or «Click Data Disk». And then click «Next» to continue.
- Select the source disk that you want to copy or clone. Then, select «Next».
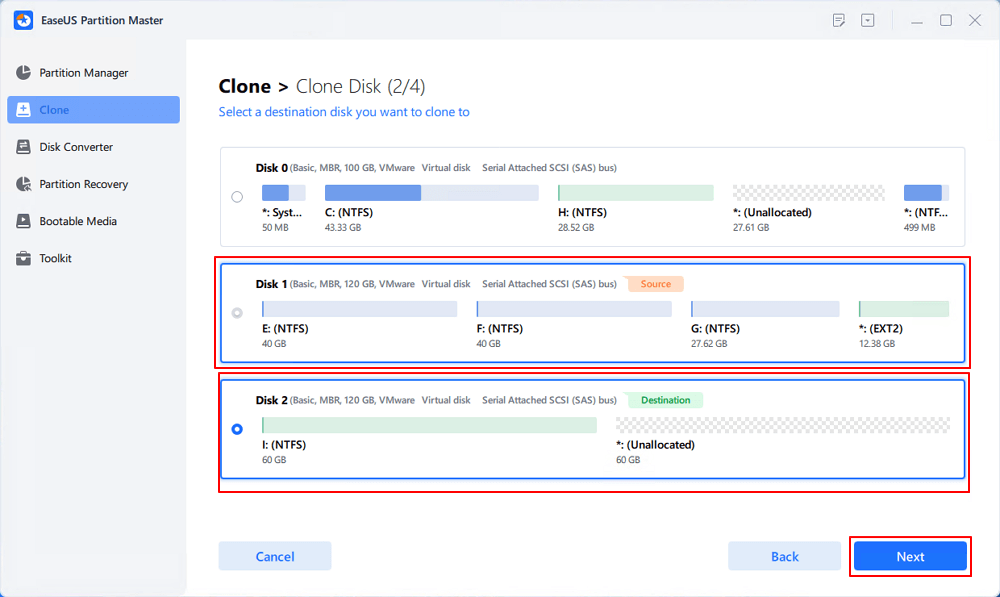
Step 2. Select the target disk.
- Choose the wanted HDD/SSD as your destination and click «Next» to continue.
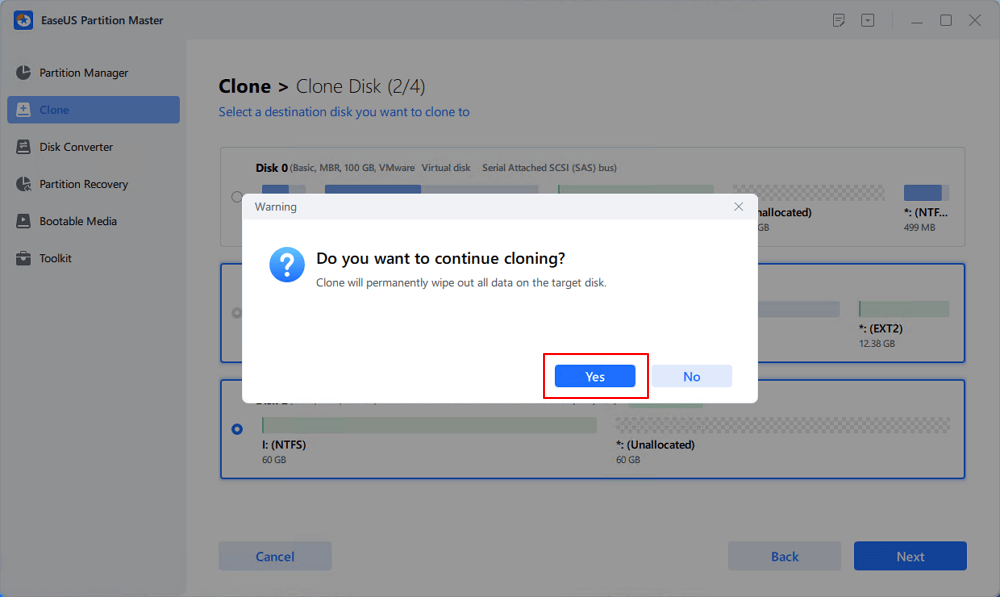
- Check the warning message and click «Yes» to confirm.
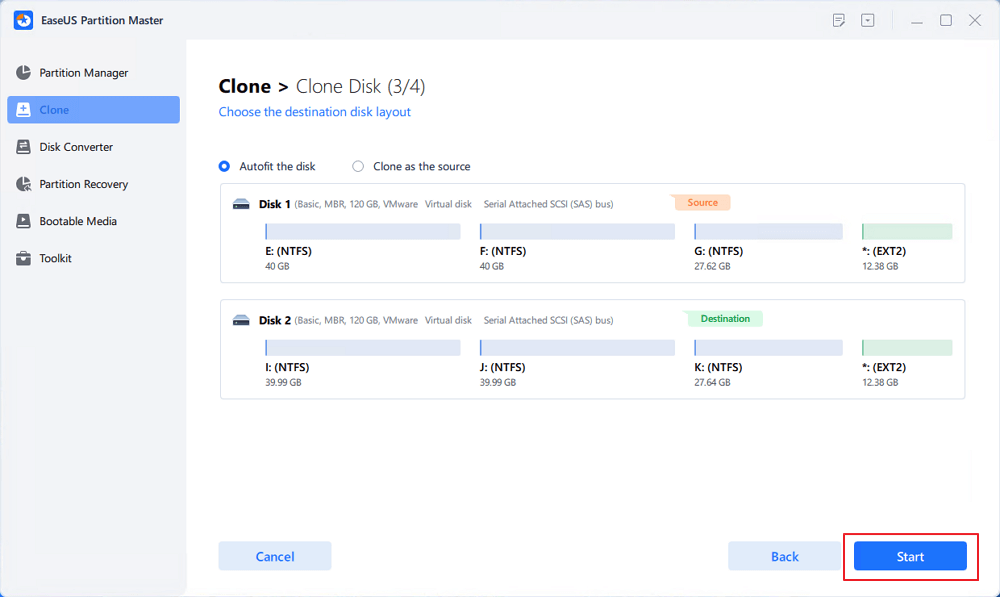
Step 3. Select clone mode.
You can select «Autofit the disk», «Clone as the source» to customize your disk layout.
Step 4. Click «Start» to start cloning process.
Way 10. Turn to Remote Assistance
Is the 100% disk usage issue slowing down your Windows 8.x or Windows 10 computer? Have any of these methods fixed the problem? Tell us, and let’s see if we can get it resolved. EaseUS also provides 1-on-1 remote assistance to fix the Windows issue. If the solution above does not work for you, contact our professionals via email or LiveChat on this page.
Don’t Try These Solutions to Fix Windows 11/10 100 Disk Usage (Important)
When you search for Windows 10 100 disk usage, you get millions of results to help you solve your problem.
However, I come across a whole bunch of solutions that just don’t settle well with 100% disk usage in the task manager. But these operations cause problems later on. The situation is like this example — the whole arm has been anesthetized for a long time because you want to treat your finger. Try to avoid doing anything listed below:
Disabling the BITS Service — It’s required by Windows for your PC to be updated, and it won’t help to disable it.
Disabling Windows Search Services — Disabling this will not solve your problem. On the contrary, these are core Windows services, and you should not disable them.
Modifying Page File -You should leave it so that Windows manages the page file. Don’t try custom values.
Disabling Windows Defender — Don’t disable Defender, your computer may be infected with a virus.
Conclusion
Try the real fixes to resolve disk 100 usage errors in the task manager. Avoid the four useless solutions, as I have mentioned before. If you still have problems, you can always ask us for help. We are glad to help.
Related Questions About 100% Disk Usage
There are hot topics about the 100% disk usage issue on the internet. You can read on if you are interested in any one of them.
Why is my disk usage at 100 Windows 10?
In general, your hard drive should never be at 100% usage, so if it is, there is some reason for the condition. You need to fix the issue or risk a very slow-moving computer. You can check your disk situation in the task manager and solve the problem in this post.
Is 100 disk usage bad?
Even if your drive seems pretty comfortable acting as a chronic overachiever, keep in mind that 100% disk usage is not something good for you. Your disk working at or near 100 percent causes your computer to slow down and become laggy and unresponsive. As a result, your PC cannot perform its tasks properly.
Is it OK to disable SuperFetch?
Yes! There is no risk of side effects if you decide to turn it off. Our recommendation is that if your system is running well, leave it on. If you have issues with high HDD usage, high RAM usage, or degraded performance during RAM-heavy activities, then try turning it off and see if it helps.
How much RAM do you need for Windows 10?
2GB RAM. 2GB of RAM is the minimum system requirement for the 64bit version of Windows 10.


Описание
- Компьютер работает медленно, а в диспетчере задач диск постоянно загружен на 100%.
- После загрузки компьютера, несколько минут компьютер тормозит, а загрузка диска 100%.
Проблема встречается на ноутбуках, моноблоках, настольных ПК. Тип носителя также не имеет значения — высокая нагрузка может быть на HDD или SSD.
Причина
- Активное использование системой файла подкачки.
- Процесс, активно использующий дисковую систему компьютера.
- Сильная фрагментированность.
- Логические или физические ошибки носителя.
- Вирусы.
Решение
1. Отключаем файл подкачки
В большинстве современных компьютеров используется большое количество оперативной памяти, поэтому надобности в файле подкачки нет.
Для его отключения в Windows 10 / 8.1 кликаем правой кнопкой мыши по Пуск:
И выбираем Система:
В Windows 7 и ниже открываем Проводник – кликаем правой кнопкой мыши по Компьютер и выбираем Свойства.
Теперь в левой части открывшегося окна кликаем по Дополнительные параметры системы:
В появившемся окне на вкладке Дополнительно находим раздел Быстродействие и нажимаем кнопку Параметры:
Переходим на вкладку Дополнительно:
И нажимаем Изменить в разделе Виртуальная память:
Теперь снимаем галочку Автоматически выбирать объем файла подкачки и ставим указатель на диск с файлом подкачки:
Чуть ниже устанавливаем выбор на пункте Без файла подкачки и нажимаем Задать:
Система выкинет предупреждение о невозможности создать отладочную информацию при возникновении критической ошибки. Соглашаемся, нажав Да.
Затем закрываем все окна нажимая OK и перезагружаем компьютер.
Если система продолжит зависать, а диск при этом будет использоваться на 100%, следуем инструкции ниже.
2. Если диск грузит процесс system
С процесса system нельзя снять задачу, но что делать, если он создает большую нагрузку?
Как правило, это происходит из-за служб Windows:
- Snupchat;
- Superfetch;
- Windows Search;
- Windows Update;
- Агент политики IPsec;
- Центр обновления Windows;
- Служба политики диагностики;
- Клиент отслеживания изменившихся связей;
- KtmRm для координатора распределенных транзакций.
Пробуем их сначала отключить по одной из консоли Службы или с использованием команды net stop <имя службы>. Если это дает временный эффект, отключаем автозапуск данных служб.
Также, в редких случаях, проблемой может быть брандмауэр Windows. Пробуем его отключить.
3. Проверяем физическое состояние носителя
Физическая неисправность диска также возможна и она влияет на скорость отклика носителя.
Необходимо изучить S.M.A.R.T. диска, а также выполнить проверку поверхности на наличие ошибок. Для этого можно воспользоваться программами CrystalDiskInfo, HD Tune или любым другим аналогом.
Если проверка показала наличие неисправных областей, носитель необходимо заменить.
4. Удаление утилит для работы диска
Снижение производительности может быть связано с наличием в системе программного обеспечения для управления диском, например, технология хранения Intel Rapid. Удаление данного программного компонента может решить проблему.
5. Смотрим загрузку жесткого диска
Встроенными средствами:
Запускаем диспетчер задач. Для этого кликаем правой кнопкой мыши по нижней панели задач и выбираем Диспетчер задач:
* Совет: а еще диспетчер задач можно вызвать комбинацией клавиш CTRL + SHIFT + ESC.
В самом диспетчере переходим на вкладку Производительность:
И кликаем по Открыть монитор ресурсов:
Открывшееся окно разворачиваем на весь экран. Сворачиваем все счетчики производительности, оставив только диск:
Отсортируем таблицу сначала на чтение диска так, чтобы стрелка показывала вниз:
Среди результатов находим процессы, которые нагружают диск на чтение.
Теперь отсортируем показатели на запись:
Так мы получим процессы, нагружающие дисковую систему на запись.
Теперь самостоятельно изучим, что за программы нагружают систему и нужны ли они нам для работы. Ненужные программы можно удалить или отключить из автозапуска.
Process Explorer:
Для более детальной информации можно воспользоваться программой Process Explorer. По умолчанию, она не показывает нагрузку на дисковую систему, поэтому открываем окно редактирования колонок:
Переходим на вкладку Process Disk и ставим галочки на чтение и запись диска:
6. Отключаем режим гибернации
Если компьютер какое-то время грузит дисковую систему после вывода его из спящего режима, пробуем отключить гибернацию — для этого запускаем командную строку от администратора и вводим:
powercfg -h off
Перезагружаем компьютер и какое-то время тестируем работу ПК. Позже, режим гибернации можно снова включить:
powercfg -h on
7. Оптимизируем носитель
При использовании HDD (не SSD) большое значение на производительность играет фрагментированность данных (их физическая разбросанность по поверхности диска). Для оптимальной работы необходимо выполнить дефрагментацию. Для SSD диска можно выполнить оптимизацию — заполнение свободного пространства нулевыми данными. С этими двумя задачами легко справиться программа Defraggler.
Частая дефрагментация портит диск — HDD амортизируется физически, а SSD теряет ресурс чтения/записи. Откровенно говоря, для последнего она не сильно поможет, так как фрагментированность данных не уменьшает его производительность. Стоит выполнять дефрагментацию умеренно по необходимости.
8. Выполняем антивирусную проверку
Лучше всего выполнить не только полную проверку установленным антивирусом, но и дополнительно просканировать систему лечащей утилитой, например, CureIt.
Сам установленный антивирус также может быть причиной проблемы — пробуем его обновить, временно отключить, удалить.
9. Делаем логическую проверку диска
Логические ошибки также могут вызывать проблемы.
Проверка выполняется из командной строки командой:
chkdsk c: /f
* где с: — буква раздела для проверки.
Подробнее о том, как сделать проверку диска.
10. Чистка диска
В некоторых случаях, может помочь обычная чистка диска от временных файлов. Для этого проще всего воспользоваться специализированными программами, например, CCleaner.
Также стоит удалить все ненужные файлы, которые занимают место.
После перезагружаем компьютер и наблюдаем за нагрузкой диска.
11. Замена диска на SSD
HDD уже не могут удовлетворить всем потребностям современных систем. В качестве альтернативы возможен переход на использование SSD носителя под операционную систему и установленные программы. Для хранения информации можно оставить HDD.
В чем была проблема?
Если вам удалось решить проблему, поделитесь своим опытом для других:
* в процентах показаны результаты ответов других посетителей.
Читайте также
Почему компьютер может работает медленно
Are you getting 100% disk usage notification on your Windows 10 machine? Is your computer’s performance slow and sluggish in spite of a new Windows 10 device? Thinking, what’s going on?
Worry not, we will help you fix 100% Disc Usage on Windows 10.
Windows 10 100% Disk Usage: Resolved!
Living life to the fullest is a great philosophy for you but not for your hard disk. Therefore, when you get 100% disk usage notification don’t ignore it instead find the culprit and take immediate action.
To know what can make system using 100% disk and how to fix 100% disc usage on Windows 10 read further.
Before we begin let’s learn how to open Task Manager. As it will help us to know the root cause of 100 percent disk usage problem.
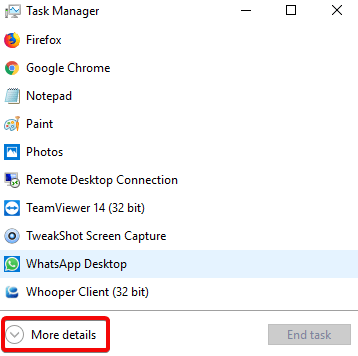
Right click on the Windows TaskBar > Task Manager > Click on down arrow More details > Process > Disk.
Ways to fix Windows 100% disc usage problem on Windows 10:
List of Contents
- 1. Check Disk for error
- 2. Check your PC for viruses or other threats
- 3. Disable Windows Search – Boost Windows 10 Performance
- 4. Disable Service Host Superfetch
- 5. Check for Flash and disable it
- 6. Tweak Skype Settings
- 7. Fix AHCI Drive
- 8. Steam can cause 100% disc usage
- 9. Disable Diagnostic Tracking in Windows 10
- 10. Check Windows Update for High Disk Usage
- 11. Reset Your Virtual Memory
- 12. Activate High Performance Mode
- 13. Install the Latest SATA Drivers
1. Check Disk for error
When you get 100% disk usage notification the first thing to do is to head to Task Manager.
To do so, right-click the Taskbar > Task Manager > More details > Process > Disk.
Here, you’ll be able to see Disk column in red indicating there’s a problem with hard disk.
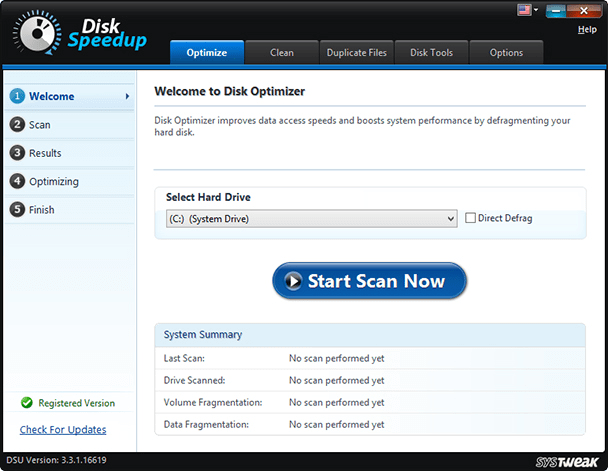
To resolve this you can either use Disk Speedup a tool that will check disk for errors, repair file system issues, defragment hard drives, wipe out junk, and make your hard disk last longer. Or can follow the manual steps to fix disk errors.
Open Windows Explorer > This PC > unhide disk partitions > right-click on C: > select Properties.
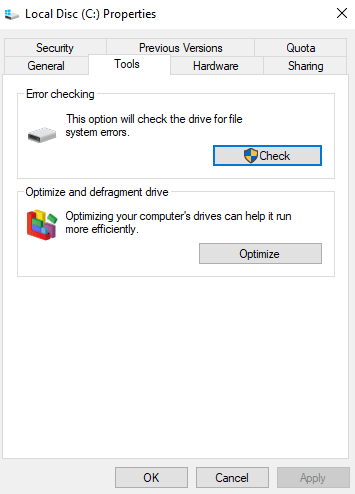
In the new window that opens click Tools tab > click on Check under Error checking. In the new window click Scan drive, wait for the scanning to finish. You may need to restart the system for full disk repair. This should help in fixing the error.
2. Check your PC for viruses or other threats
If you see your drive constantly working at or near 100% without any reason check your PC for viruses or malware infections. As malware, viruses are one of the common reasons for 100% disk usage on Windows 10. You can use Microsoft’s default Windows Defender or can use your trustworthy antivirus program to scan your system for malware issues:
Settings > Update & Security > Windows Defender > Open Windows Defender > Full
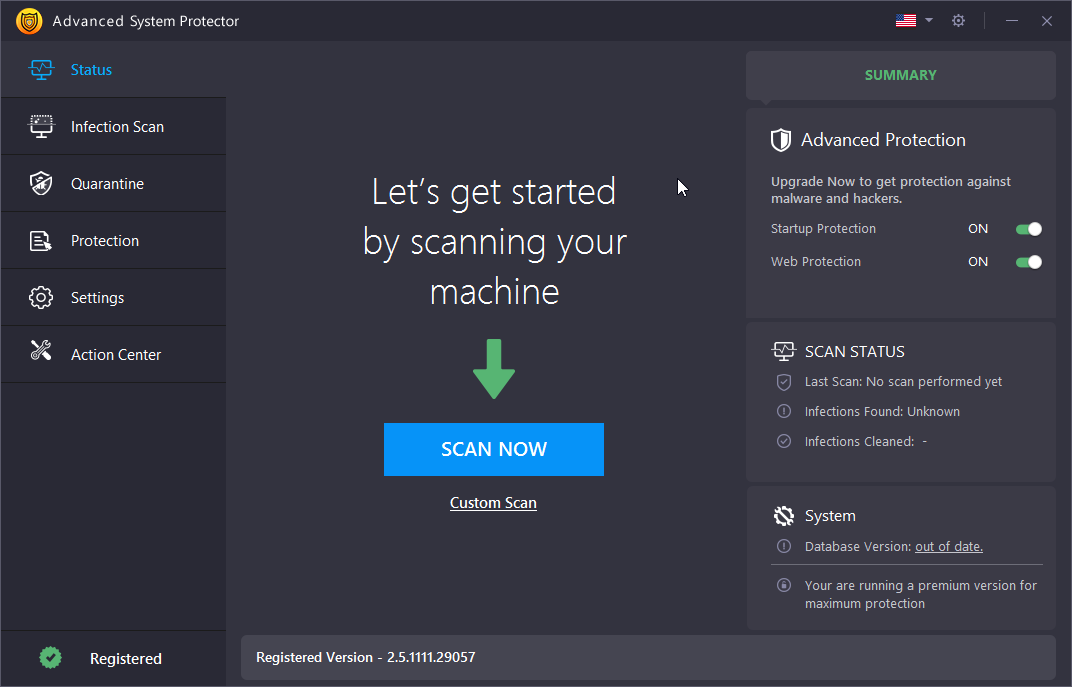
However, if you do not have one try using Systweak’s Advanced System Protector. A tool that scans your system drive for any problems. This might take a while as your drive is near 100%, so wait for the scan to finish.
If threats are detected by Advanced System Protector clean them and them and reboot the PC. After this check your drive’s performance. Hopefully, disk 100% on Windows 10 should be resolved, if not, then malware wasn’t the reason, so read further.
Also Read: How To Fix Mouse Not Working On Windows 10 PC
3. Disable Windows Search – Boost Windows 10 Performance
A bug in Windows 10 results in search loop that can increase the load on system drive resulting in 100% disk usage message. Therefore to prevent this from happening and to fix disk 100% on Windows 10 open elevated Command Prompt. For this click Start button > type cmd > right-click > Run as administrator.
Here type net.exe stop “Windows search.” This will stop Windows search command.
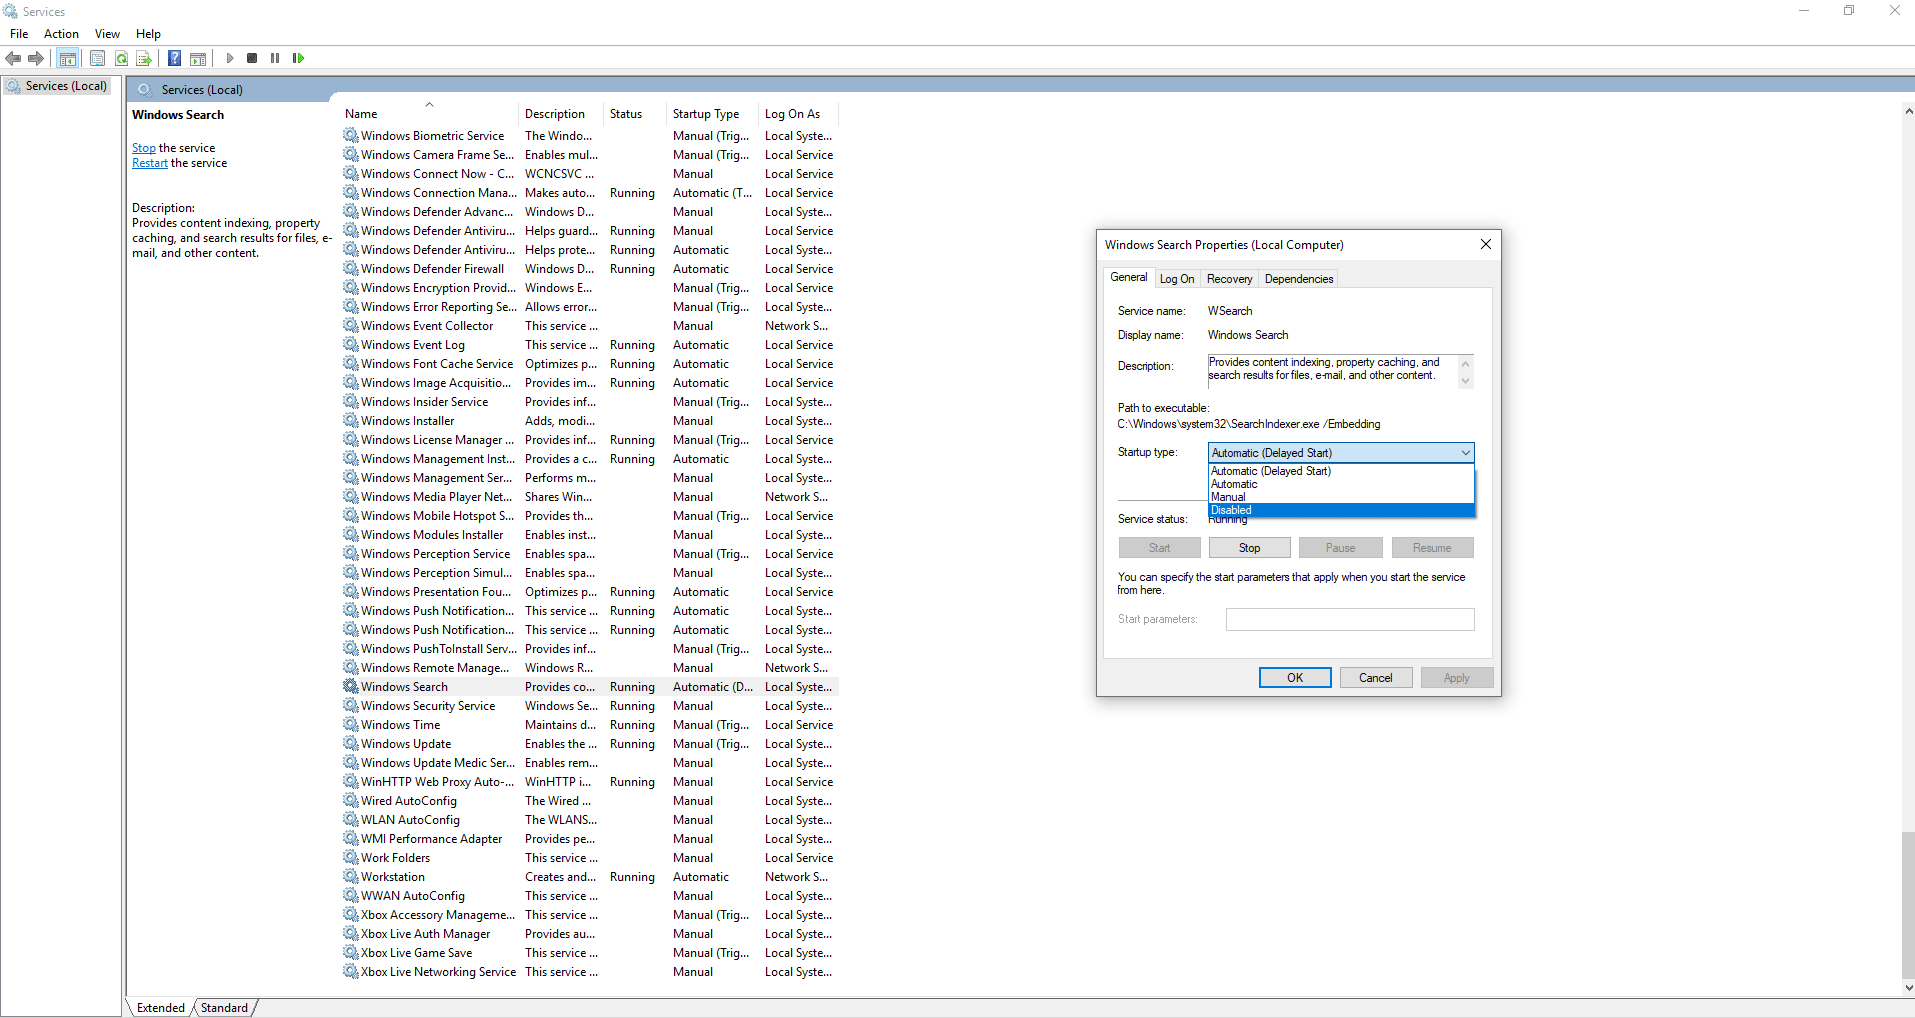
In addition to this, disable Windows Search or Indexing. To do so, press WIN+R > type services.msc > press Enter. Here, look for Windows Search > double-click on it. This will open Windows Search Properties window. Here under Startup type click down arrow and select Stop.
Click OK to save changes.
This should improve your Windows 10 performance. If not, let’s move to the next method.
4. Disable Service Host Superfetch
The next thing or another Windows 10 feature that can cause Windows 100% disk usage is service host superfetch.
To handle this, open elevated Command Prompt (follow the steps explained above) and type: net.exe stop superfetch
Wait for a while so that the command can be processed. Now see if the problem is resolved.
5. Check for Flash and disable it
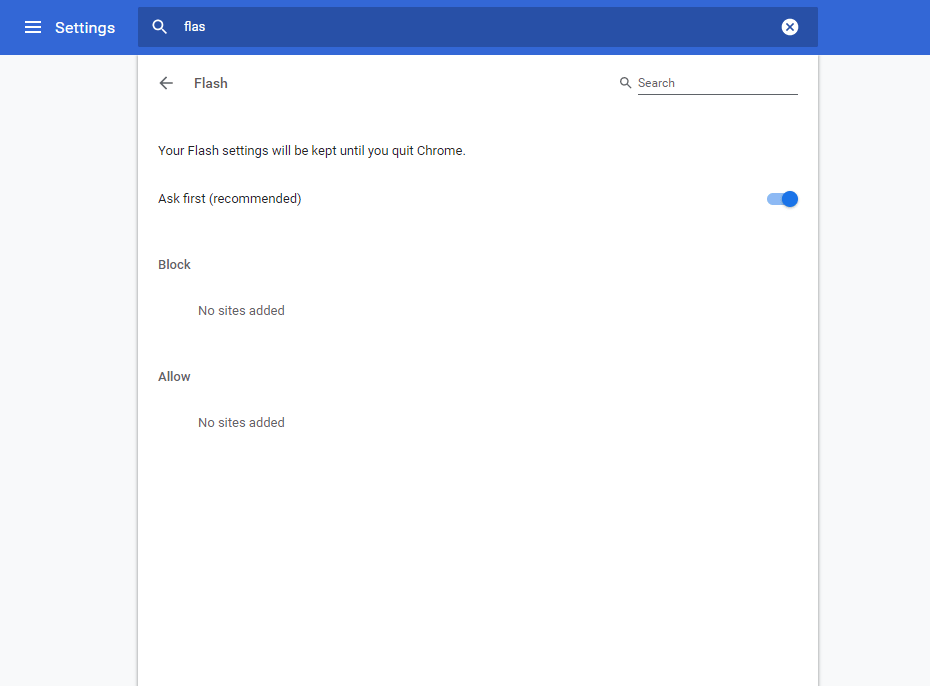
Another common reason of 100% disk usage on Windows 10 is Flash. Although, Adobe plans to kill this multimedia plugin in 2020, but until then you’ll need to force kill it. To do so, open your Google Chrome web browser menu > Settings > Show advanced settings locate Privacy section > click on Site settings > search Flash > toggle it to Block sites from running Flash.
Restart the browser and check if disk running at 100% notification has disappeared or not.
If this doesn’t work, try using a different web browser. See our guide best web browsers for Windows 10.
6. Tweak Skype Settings
Skype is a widely used application by Windows 10 users and sometimes it is the reason for 100% disk usage on Windows 10. To find out if Skype is behind it, you’ll need to check if Skype is running. If running head to Task Manager to Quit the application.
Next, press WIN+R > paste: C:Program Files (x86)SkypePhone > Ok.
Here look for Skype.exe > right-click > Properties > Security tab > click Edit > select ALL APPLICATION PACKAGES.
Check the box next to Write > click Apply > Ok. Head back to see if things change.
Nothing changed? 
7. Fix AHCI Drive
Sometimes system drivers can cause 100% disc usage on Windows 10 as they are incompatible. One such driver is StorAHCI.sys. A driver intended to connect storage devices to PC or laptop through Advanced Host Controller Interface PCI-Express.
Since you are reading this, it seems the problem is not yet resolved. To fix problem StorAHCI.sys driver problem you can use Advanced Driver Updater. A tool that will help you fix all driver related problem.
However, if you want to resolve the firmware bug in StorAHCI.sys driver manually open Device Manager.
For this open run window by pressing Windows + R key. Next type devmgmt.msc and press enter. Now under Device Manager window unhide IDE ATA/ATAPI Controllers. If you see AHCI Controller entry, double-click it > click on the Driver tab > Driver Details.
If you see C:Windowssystem32DRIVERSstorahci.sys, it means your Windows 10 is affected by the bug. Close driver details box and click on the Details tab. Here under property click the down arrow and select Device instance path > right-click on the value list and Copy it. Paste the content in Notepad.
Next, open registry editor via Run Window. Press WIN+R > type regedit. Navigate to: HKEY_LOCAL_MACHINESystemCurrentControlSetEnumPCI.
Now press CTRL+F to open the find window and paste the copied string to open correct AHCI Controller, followed by the random number.
Next, unhide Device ParametersInterrupt ManagementMessageSignaledInterruptProperties you should see MSISupported listed in the right-hand pane. Double-click it, and change the Value data: to 0. Click OK and restart Windows.
Check if the problem is resolved. If this doesn’t work then something else might be the reason behind 100% disc usage message.
If you are a gamer and use Steam then you need to check it as it can be maxing out the HDD.
Also Read: How To Fix Bluetooth Not Working on Windows 10?
8. Steam can cause 100% disc usage
To resolve 100% disk usage caused by Steam clear Steam cache.
To do so, make sure Steam is not running. If it is running use Windows 10 Task Manager and force close Steam software.
Next, open Run window by pressing WIN+R, here enter steam://flushconfig
You’ll see a dialogue box, asking you to proceed with deleting content, click OK to proceed.
Note: Deleting cache will have no effect on the games and saves.
9. Disable Diagnostic Tracking in Windows 10
Finally, it’s worth checking out diagnostic tracking in Windows 10 as many a time it has been found to be the cause of 100 disc usage on Windows 10.
To stop this service you’ll need to open elevated Command Prompt.
For this, click Start > type cmd > right click on the first result Command Prompt > Run as administrator.
Right.
Now in Command Prompt window type sc config “DiagTrack” start= disabled
sc stop “DiagTrack”
This will stop the running service.
In addition, to this go to Settings > System > Notification & actions. Here toggle off Get tips, tricks and suggestions as you use Windows.
This will surely improve the performance and will resolve the issue.
Apart from these possible fixes try implementing these following fixes too.
Windows Update, Virtual Memory, High Performance Mode are also some of the possible reasons that cause 100% disc usage on Windows 10.
10. Check Windows Update for High Disk Usage
100% disc usage notification that you see on Windows 10 can be caused due when Windows Update refuse to download.
To resolve this close all the running processes—shut down all running application and wait for the files to download. After the download your PC’s might require a restart.
11. Reset Your Virtual Memory
Sometimes virtual memory – combination of RAM and hard disk space also causes 100 percent disc usage message on Windows 10. To fix his you’ll need to reset virtual memory for this follow the steps below:
- Press Windows + Pause/Break keys together to open System screen.
- Click on Advanced System Settings in the left pane.
- In the new window click on the Advanced tab > under Performance click Settings.
- Here you’ll see another Advanced tab, with a section labeled Virtual memory. Click Change and uncheck the checkbox next to Automatically manage paging file size for all drives.
Now you can customize the size of virtual memory. For this select the drive on which Windows is installed, it is (usually C:) > Custom size. Here, add an Initial size and Maximum size; both are measured in MB rather than GB. Once done click Set > OK to continue.
After this clear previous data stored in virtual memory. For this press WIN+R to open the Run window. Here, enter temp to open temp directory. Now select all the file and tap Delete to remove all temporary files.
12. Activate High Performance Mode
One final thing you should try is to switch to high performance mode. Usually standard power modes are behind the 100% disk usage error message. Therefore, to fix it switch to high performance mode. For this press WIN+X > Power Options. Now click Additional power settings > High performance > OK.
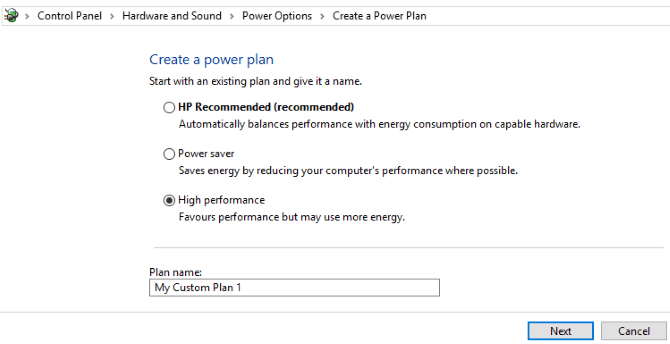
If you don’t see this option create a custom power plan by click on Create a power plan, option present in the left pane. Select High performance > give a name to the power plan > tweak any personal power settings. This should fix 100% disk usage issue.
13. Install the Latest SATA Drivers
A storage device driver can cause 100% disk usage error, and as Windows 10 uses SATA connections for hard drives, SSDs, and optical drives. If the drivers aren’t up to date, the disk usage error can occur.
To fix this upgrade to latest SATA drivers.
For this press WIN+X > select Device Manager > expand Storage controllers > identify the correct controller for your SATA devices > right click > Update driver > Browse my computer for driver software option > Let me pick from a list of available drivers on my computer > choose Standard AHCI Controller. You’ll now be able to see the difference in Windows 10 performance.
To bring this to effect restart your system.
If you can’t try using Advanced Driver Updater, a smart and advanced tool to update to most compatible and up to date driver.
In the end we can say under normal usage, disk load cannot be close to 100%. But if you ever come across this notification you can try the fixes described above to resolve 100% disc usage message on Windows 10.
Quick Reaction:
A tech enthusiast who started her career as a technical support agent understands the importance of problem-solving. Being in the IT industry for almost 12 years she has a vision to help people with troubleshooting. She specializes in curating articles about the latest update in the tech world. In her free time, she loves reading mystery, sci-fi books, and travelling.
Windows 10 users who experience issues such as slow response time may look into their Task Manager for guidance. Task Manager provides you with a wealth of information regarding the processes that are currently running on your machine.
Among the metrics, you can monitor with Task Manager is your computer’s disk usage. If you see a disk usage of 100% your machine’s disk usage is maxed out and your system’s performance will be degraded. You need to take some corrective action.
Many users who have recently upgraded to Windows 10 have complained of their computers running slowly and Task Manager reporting 100% disk usage.
Here are 10 methods you can use to attempt to resolve the problem of high disk usage on your Windows 10 system. Some may take longer than usual due to the stress and increased usage that your hard drive is already under.
Way 1: Restart Your System
You know from experience that restarting your machine can often resolve all kinds of issues. Your Windows 10 100% disk usage problem is no exception. While taking this route may not help you find out the underlying reason for the problem, if it goes away, that may be sufficient for you.
Be sure to use the “Restart” option which starts your system in a fresh state as opposed to the “Shut Down” option which preserves your system state and may not resolve your disk issue.
Way 2: Update Windows
Installing the latest updates can often resolve mysterious problems with your Windows 10 system. Check if you are up to date by going into the “Update and security” section of the Windows Settings app.
You can check for new updates and install them if they are available.
Settings > Update & Security settings > Windows Update
This may improve the overall performance of your system including that of your hard drive.
➡️ Also check: How to Upgrade Windows 10 to Windows 11 without Losing Data
Way 3: Disable Windows Search
A known bug in Windows 8 and 10 can cause a search loop that can be the cause of your high disk usage. To temporarily stop the Windows Search facility and see if it improves your disk issue, open an admin prompt and enter the command: net.exe stop “Windows search”. This will stop Windows search from running until the next time Windows is restarted.
If it turns out that Windows Search was responsible for your Windows 10 disk usage reaching 100%, you can disable it permanently by following this procedure:
Way 4: Check For Malware
Your computer may be infected with malware that is causing your disk usage to spike. If you have antivirus software running in the background it should have caught the issue. Nothing is perfect though, so force your antivirus package to scan your hard drive for a potential infection. This could be a time-consuming process since your disk is already experiencing high usage but might be necessary to identify and remove malicious software.
Way 5: Stop the Superfetch Service
Another Windows 10 feature that can cause problems is the Windows Superfetch service. You can disable this service temporarily in a similar fashion to Windows search with the command: net.exe stop superfetch.
To disable the service permanently, use the same procedure as for disabling Windows search.
Way 6: Change Energy Options from Balanced to High Performance
This change of energy settings seems to have worked for a number of users who have experienced 100% disk usage on Windows 10.
Use this procedure:
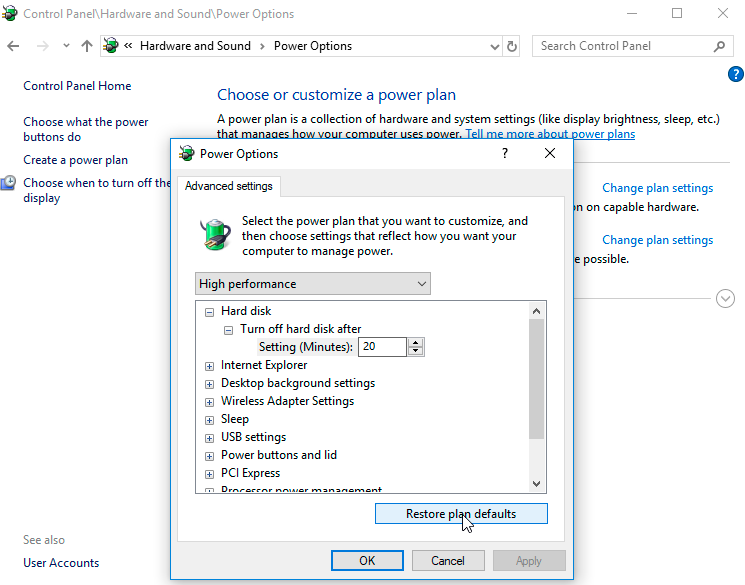
- Go to Power Options > Change plan settings > Change advanced power settings.
- Select the High-performance option from the drop-down box and make sure all plan settings are set to their defaults.
Way 7: Temporarily Turn Off Your Antivirus Software
Another step to take when investigating the cause behind your Windows 10 100% disk usage problem is to turn off your antivirus software temporarily. See if this improves your disk usage. If so, you may want to consider changing antivirus packages. Even Windows Defender can cause problems by increasing I/O and network usage which might lead to high disk usage.
Way 8: Reset Virtual Memory in Windows 10
Virtual memory treats your disk as if it is RAM and uses it to swap out temporary files when it runs out of actual RAM. Errors in the pagefile.sys can cause 100% disk usage on your Windows 10 machine. The remedy to this problem is to reset your virtual memory settings.
Follow these steps to reset your virtual memory:
Way 9: Run Check Disk
A check disk can show you if there are any physical problems with your hard drive. Usually, a high disk usage indicates that there is an application or logical issue driving the disk usage, but it is worth your time to rule out any physical damage. Run check disk and note its results.
Way 10: Change Settings in Google Chrome and Skype
Some users have reported that making these changes to your Google Chrome and Skype settings can have a beneficial effect on your disk usage.
For Chrome, make this change:
- Settings -> Show advanced settings.
- Under Privacy section, uncheck the “Use a prediction service to load pages more quickly” option.
- You should also try disabling Flash in Google Chrome.
If these methods don’t resolve your issue with 100% disk usage on your Windows 10 computer, you may need to look into replacing your hard drive. One last thing to try is to disable any automatic defrag processes that are running as they may be causing you problems. In general, your hard drive should never be at 100% usage, so if it is, there is some reason for the condition. You need to fix the issue or risk a very slow moving computer.

Jeff Cochin
Jeff Cochin is a data management and recovery expert. He also serves as a technical writer, testing and reviewing tech solutions in various fields. Jeff Cochin is a professional data management, warehousing and recove…
Read full bio
Jeff Cochin is a data management and recovery expert. He also serves as a technical writer, testing and reviewing tech solutions in various fields. Jeff Cochin is a professional data management, warehousing and recove…
Read full bio
Approved by
Brett Johnson
This article has been approved by Brett Johnson, Data Recovery Engineer at ACE Data Recovery. Brett has a Bachelor’s Degree in Computer Systems and Network, 12 years of experience.
This article has been approved by Brett Johnson, Data Recovery Engineer at ACE Data Recovery. Brett has a Bachelor’s Degree in Computer Systems and Network, 12 years of experience.

