When you’re dealing with web proxies, you’re liable to encounter a wide range of possible errors. This is primarily because the web was not designed with the use of proxies in mind. They are, in a sense, exploits in the way the web works.
Unfortunately, there’s a sort of sliding scale of errors in proxies. Errors come when a piece of software, a server, or a website expects one thing and gets something else. It’s like opening a box labeled “puppies” and getting spiders. You error out of that situation right quick.
The more data the proxy passes, the fewer errors there are. However, if the server passes enough data, it’s no longer even really a proxy, it’s just a referral server and is part of a normal web operation.
Many people use proxies because they want a more anonymous connection, though, and that’s what causes problems. A proxy server that passes your requests but strips out header data is sending one thing while a server expects another.
Most of the time, this doesn’t cause any issues; it just means the server thinks you’re located somewhere else and doesn’t have much data about you to report to analytics. Sometimes, though, the discrepancy between expected data and provided data causes an error.
That’s what the ERR_PROXY_CONNECTION_FAILED error is. It’s a particular set of software interacting with a proxy in a particular way such that it causes an issue.
Related,
- The Most Common HTTP Proxy Error Codes – 503 Proxy Error Fixed!
To Err is Human
To forgive is divine, but forgiveness doesn’t help you in this situation. In fact, you may be begging for it if you’ve been fighting this error for a while. The problem is, it’s a pretty specific, narrow situation that doesn’t come up a lot, so you may have been happily using proxies for quite a while without ever encountering the error.
What is err_proxy_connection_failed
The error is specific to Google Chrome, which may be helpful to know if you’re willing to use another browser. That’s not always possible, though; similar errors will show up on Firefox and – god forbid – IE if you’re using them.
Why chrome err_proxy_connection_failed
The error itself is caused when you try to access a page that uses SSL, which is going to be more and more pages moving forward ever since Google declared SSL was a search ranking factor.
If you’re interested in making sure that the error you’re getting is the one we’re talking about and not just a related error, you can replicate the behavior by using a proxy that filters SSL requests and use it to try to access the HTTPS Google page or Facebook. You’ll end up with the Error 130:
ERR_PROXY_CONNECTION_FAILED: Unknown Error message. You can read a bit more about the error and why it happens here.
Another possible cause of the error is a broken registry key on Windows machines. If you’re getting the error intermittently, or on a non-Windows machine, this isn’t the problem. However, if it is, you may have to try alternative solutions.
How to fix error code err_proxy_connection_failed
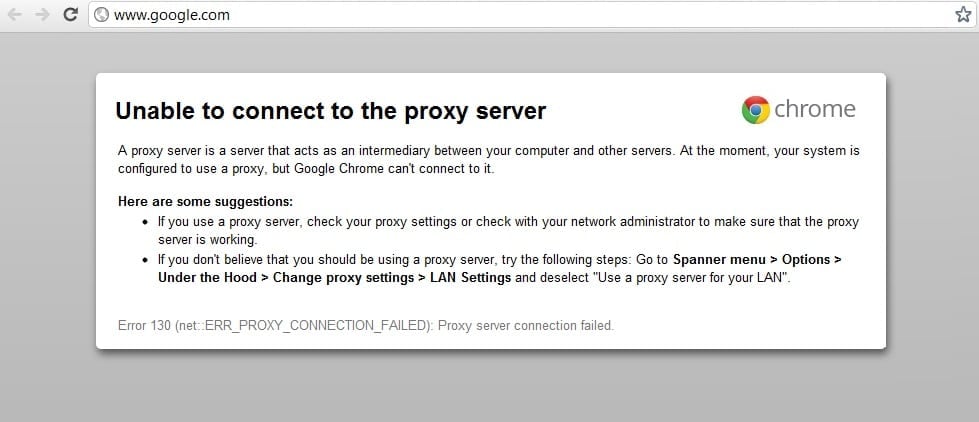
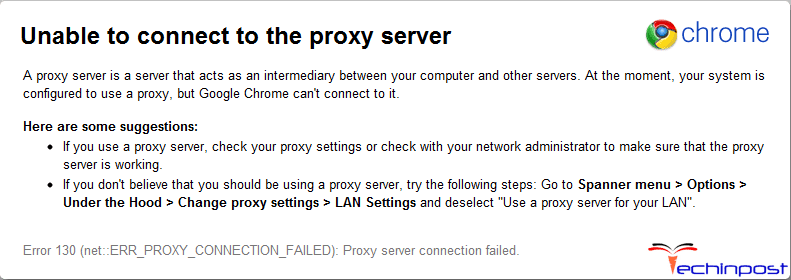
“Unable to connect to the proxy server”
Error 130 (net:: “err_tunnel_connection_failed”): Proxy Server connection failed in Google chrome? Fixing it right now!
Change Browser Proxy Settings
In Chrome – the source of this error most of the time – you can go to change your browser settings by navigating to the Chrome settings URL, which is chrome://chrome/settings/.
By visiting that URL, you are presented with a basic settings menu. Click to show advanced settings, then scroll down to the section labeled network. There will be a “change proxy settings” option there, and the option you’re looking for is “automatically detect.”
When your browser is set to automatically detect proxy settings, it will look for settings about proxies embedded in your operating system.
For Windows, it looks for the configuration used by IE as well.
For Mac, it pulls the Safari settings.
By turning off this automatic detection, you allow Chrome – or whatever application you’re using based on it – to use its own settings, which are likely set by you or the proxy owner to be more effective.
You can read more about Chrome and its handling of proxy information in this developer document. It’s probably overkilled if all you needed to know was to change one setting, but it helps you understand what’s going on and why.
- How to Set Up Proxy in Safari for Mac OS
Make Sure IP, Password, and Port Are Correct
This is a simple tip, but it’s an important first one nonetheless. There are three important bits of information when using a proxy to connect to a site. Those are the IP address of the proxy you’re using, the password you need to authenticate if any, and the port you need to connect.
The IP address is quick and easy to test. Just try using the proxy to reach another site. If it works, your IP works and your issue is with the SSL. If it doesn’t, check to make sure the proxy is still online, and that the IP address you want to use is correct.
The password is a password. Verify that you’re using the right one. You should be able to manage that on your own.
As for the port, most proxies by default connect through port 80. This is the most common web port for proxies, but it’s far from the only one. I recommend checking into the system you’re trying to access and see if there are specific ports it uses.
For example, some proxy providers will work on a port like 55555. This might be a question you ask your proxy provider, or it might be a question you research about the site you’re trying to connect to.
Related: How to setup proxy server in chrome.
Make Sure IP Authentication Matches
Some proxies will pass geolocation data, while others do not. Some websites take offense to this. They want to know where you’re coming from. A lot of times, nothing comes of it if you don’t provide that information. You just end up as one of the garbage connections in analytics providing no useful data.
Other times, though, the site will have filters in place. They want to make sure that their traffic is coming from the areas they offer. A local HVAC company in Wisconsin doesn’t want or care to know about people visiting their site from California. A US-only business doesn’t care about visitors from Russia. It’s all the same concept; keeping your visitors in the areas you service.
Some sites take this a step further and will identify and filter connections from high-risk countries, or from out of their service area. High-risk countries tend to be countries where a lot of scammers reside, like Nigeria, Vietnam, and Bangladesh.
Other sites might not actively block connections coming in from risky countries, but instead might just look for hidden or mismatched IP authentication data. If the site gets a connection claiming to come from Oklahoma but reads an IP coming from Sweden, there’s probably something fishy going on, and that connection may be blocked.
By fixing your authentication data, or choosing a different proxy for the task at hand, you can remove the errors caused by the mismatch.
Read more: Username and Password or IP Authentication: Which is Better?
Contact Proxy Provider for Support
If all else fails, one thing you can do is hope you have a high-quality proxy provider. Just visit their site and send their support staff a message, give them a call, or use whatever other contact information they have provided. A good provider will have a solution on hand, or at the very least will have a trained technician available to help you with your problems.
This isn’t much help if you’re using a free proxy list that doesn’t have active support. Most of the time, these lists are made up of compromised computers and they’re run by a small team of foreign nationals who don’t have any support structure. You’d be hoping they would work with you, while they’re hoping you won’t go out of your way to harm their reputation. Not that they care; they survive without you.
- Is It Possible to Find Reliable and Working Public Proxies?
Consider a Software Solution
I put this option in the end, even though it might be the easiest of them all, just because it has the potential to cause more harm than good. This is because a software solution by default can only fix problems on your computer, not on the proxy itself. Therefore, this fix is only valid if the registry key on your Windows PC is the problem.
Fair warning: much of the time, any program that tampers with the registry has the potential to
cause problems with other software and normal operation of the machine. Ideally, you will want to find a program that will allow you to selectively fix a single issue, rather than presenting you with a list of 500 it finds and forcing you to fix them all at once.
One possible option is to try the software called RegCure Pro. I have not used it myself, so exercise caution when you’re downloading and installing software from an untrusted source. Scan any files you download for viruses and be wary if it asks you for any personal information.
For reference, here is the registry fix you can make to bypass the error in Internet Explorer. The error is no longer the ERR TUNNEL one we’re familiar with, though; in this specific situation, the error is “Error Code: 502 Proxy Error. The Forefront TMG denied the specified Uniform Resource Locator (URL).”
The fix is to dive into your Registry using Reg Edit.
Check under HKEY_LOCAL_MACHINE or HKEY_CURRENT_USER for the tree of Software – Microsoft – Internet Explorer – Main – FeatureControl. You will need to find or create the key FEATURE_SHOW_FAILED_CONNECT_CONTENT_KB942615. In it, set the reg key name to iexplore.exe, the type to REG_DWORD, and the value to 0x00000001.
Be aware that making this change has the potential to open you up to a security exploit that has been known since at least 2011, and thus is likely in use by numerous viruses floating around the web.
I recommend that you only implement this change when you’re actively needing to access something on the page via proxy and cannot access it any other way. Once you’ve got what you need, remove the key so you close the security hole.
Alternatively, ditch IE. If you’re married to using a Microsoft browser, Edge is supposed to be quite good in comparison. Chrome, of course, has a bunch of fixes above you can try.
The Android Issue
Android phones and tablets use Google’s operating system, and of course, Google is going to put Chrome in their OS as their sole web browser.
That means if you’re trying to use a proxy service on a mobile device running Android, you’re stuck with chrome, so you won’t be able to use a different browser unless you have a device with an alternative installed. Also, despite being chrome, the chrome://chrome/settings URL doesn’t exist. If you’re encountering the error on mobile Chrome, try these steps:
1. Try updating your version of Chrome. On an Android device, you need to go to the Play Store and swipe over to the “My apps” tab, and then install any updates that are available for the Chrome app.
2. Try opening a new incognito tab to do your browsing there. If your issue was caused by the data being passed or a data mismatch, as mentioned in the IP authentication section, incognito should solve it by not passing as much data along. Note that if this solves the problem, you may have a Chrome extension affecting your ability to connect.
3. Clear your mobile browser cache and cookies. Yes, this is a step you should do even on mobile devices.
4. Clear your profile. This is sort of a nuclear option but can remove any data hampering your ability to browse via proxy. Go to your settings, app settings, and chrome settings. Once there, clear your app data. This will remove your profile, clear your local state, and reset any errant flags.
Be aware that you may have to log in, input data, open old tabs, and generally restore your sessions manually.
Another alternative is to use a dedicated proxy manager for your phone. ProxyDroid is one such manager, though it does require that your device be rooted for full access. This is a problem you’ll encounter a lot with proxy management on mobile; you need root access to make the most of the functions these apps provide.
This is because by default mobile devices segregate a lot of their data, to make it harder for them to be compromised or hacked and exploited. However, many of the advanced features we come to expect in PCs are locked out on mobile for that reason.
- How to Configure a Proxy Server on Android
If all of that fails to work, every desktop and mobile fix, well, maybe the problem isn’t on your end. Contact your proxy provider and work with them to see if the problem is on their end.
If so, they can fix it from where they are. If not, it’s also possible that the site you’re trying to access is having issues. The ERR_PROXY_CONNECTION error can also appear when the site you’re trying to reach is under a DDoS attack. You’ll just have to wait for the issue to resolve itself, in that case.
- Guide to Setting up private proxy server from Home PC
- The Definitive Tutorial on Setting Up Zennoposter
- Setting Up Proxies for Multiple Tabs in Ghost Browser – How To

Fix Unable To Connect To The Proxy Server Error Code 130: If you are seeing Error 130 (net::ERR_PROXY_CONNECTION_FAILED) than this means your browser is not able to connect to the internet because of the proxy connection. Either you have invalid proxy connection or configuration of proxy is controlled by the third party. In any case, you won’t be able to open any web page and that my friend is a very big problem.
Error 130 (net::ERR_PROXY_CONNECTION_FAILED) Proxy server connection failed or Unable to connect to the proxy server
This error is sometimes caused because of harmful malware installed on your system and they mess up your PC by changing proxies and other system configuration. But don’t worry troubleshooter is here to fix this issue, so just follow the below-mentioned methods.
Contents
- Fix Unable To Connect To The Proxy Server Error Code 130
- Method 1: Uncheck Proxy Option
- Method 2: Clear Browsing Data
- Method 3: Reset Chrome Settings
- Method 4: Flush/Renew DNS & IP
- Method 5: Use Google DNS
- Method 6: Delete Proxy Server Registry Key
- Method 7: Run CCleaner and Malwarebytes
- Method 8: Run Chrome Cleanup Tool
Make sure to create a restore point just in case something goes wrong.
Method 1: Uncheck Proxy Option
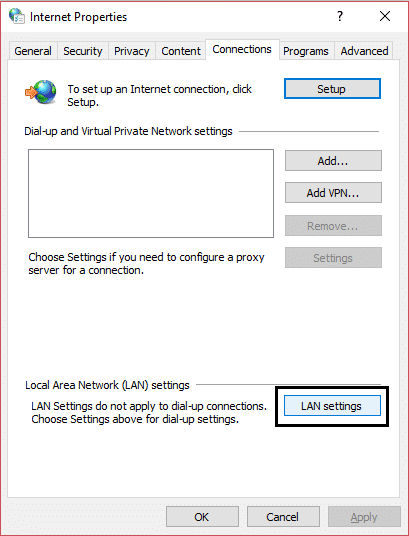
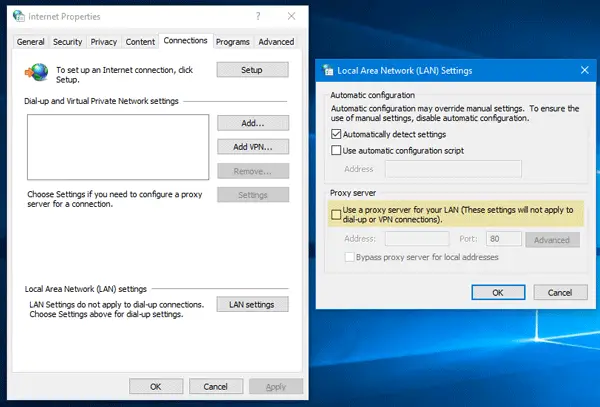
1.Press Windows Key + R then type “inetcpl.cpl” and hit enter to open Internet Properties.
2.Next, Go to Connections tab and select LAN settings.
3.Uncheck Use a Proxy Server for your LAN and make sure “Automatically detect settings” is checked.
4.Click Ok then Apply and reboot your PC.
Method 2: Clear Browsing Data
If you’re using Google Chrome from a long time then chances are that you forgot to clear browsing data which can cause Unable To Connect To The Proxy Server Error Code 130 (net::ERR_PROXY_CONNECTION_FAILED).
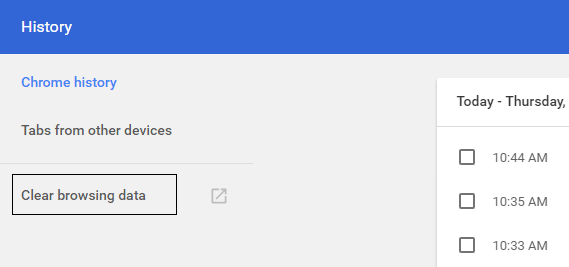
1.Open Google Chrome and press Cntrl + H to open history.
2.Next, click Clear browsing data from the left panel.
3.Make sure the “beginning of time” is selected under Obliterate the following items from.
4.Also, check mark the following:
- Browsing history
- Download history
- Cookies and other sire and plugin data
- Cached images and files
- Autofill form data
- Passwords
5.Now click Clear browsing data and wait for it to finish.
6.Close your browser and restart your PC.
Method 3: Reset Chrome Settings
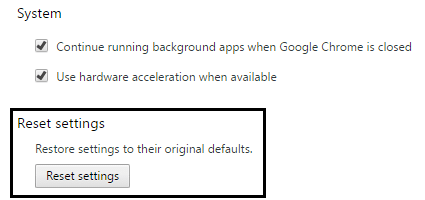
1.Open Google Chrome and go to settings.
2.Scroll down and click Show Advanced Settings.
3.Find Reset settings and click on it.
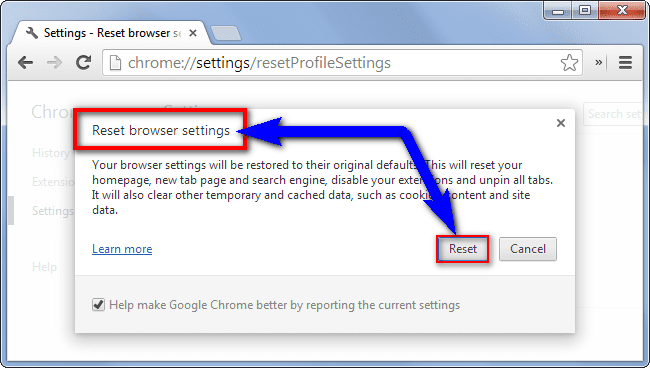
4.Again, it will ask for confirmation, so click Reset.
5.Wait for the browser to reset settings and once done, close everything.
6.Reboot your PC to save changes. This will Fix Unable To Connect To The Proxy Server Error Code 130.
Method 4: Flush/Renew DNS & IP
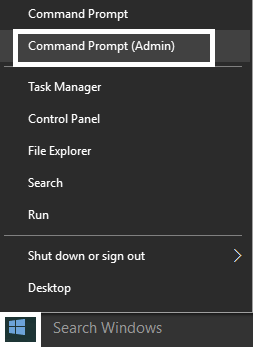
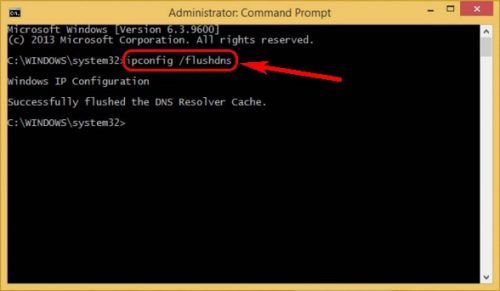
1.Press Windows Key + X then select Command Prompt (Admin).
2.In the cmd type the following and hit enter after each one:
- ipconfig /flushdns
- nbtstat –r
- netsh int ip reset
- netsh winsock reset
3.Restart your PC to apply changes.
Method 5: Use Google DNS
1.Open Control Panel and click on Network and Internet.
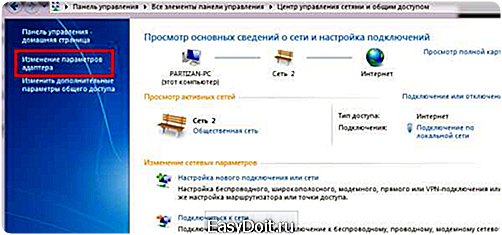
2.Next, click Network and Sharing Center then click on Change adapter settings.
3.Select your Wi-Fi then double click on it and select Properties.
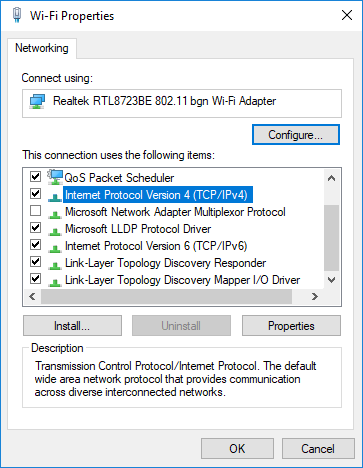
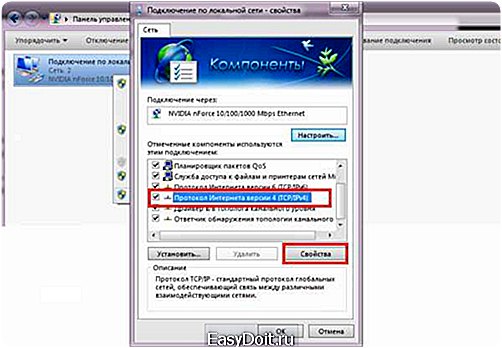
4.Now select Internet Protocol Version 4 (TCP/IPv4) and click Properties.
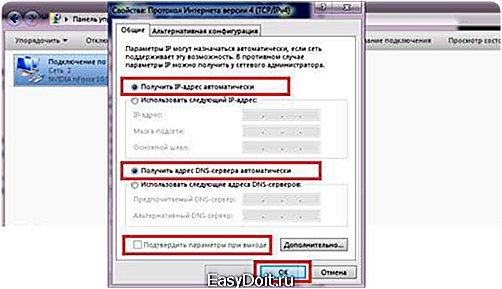
5.Check mark “Use the following DNS server addresses” and type the following:
Preferred DNS server: 8.8.8.8
Alternate DNS server: 8.8.4.4
6.Close everything and you may be able to Fix Unable To Connect To The Proxy Server Error Code 130.
Method 6: Delete Proxy Server Registry Key
1.Press Windows Key + R then type “regedit” and hit Enter to open Registry Editor.
2.Navigate to the following registry key:
HKEY_CURRENT_USERSoftwareMicrosoftWindowsCurrentVersionInternet Settings
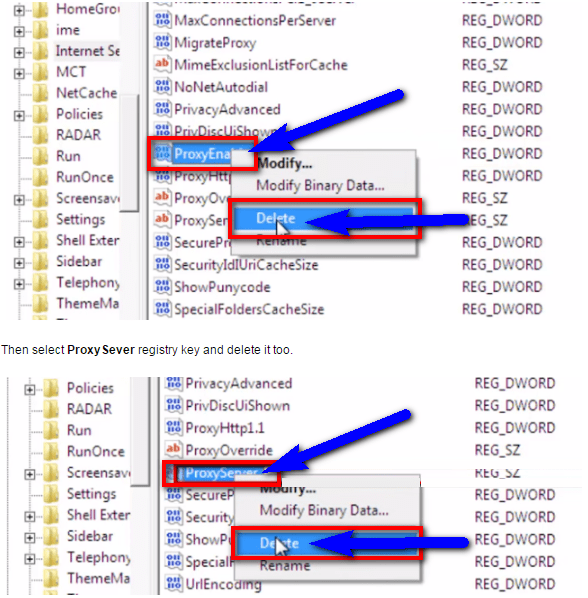
3.Select ProxyEnable key in the right-hand side window, then right-click on it and select Delete.
4.Follow the above step for the ProxyServer registry key also.
5.Close everything and reboot your PC to save changes.
Method 7: Run CCleaner and Malwarebytes
Perform a Full antivirus scan to make sure your computer is secure. In addition to this run CCleaner and Malwarebytes Anti-malware.
1.Download and install CCleaner & Malwarebytes.
2.Run Malwarebytes and let it scan your system for harmful files.
3.If malware is found it will automatically remove them.
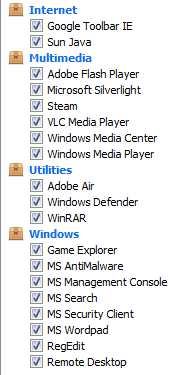
4.Now run CCleaner and in the “Cleaner” section, under the Windows tab, we suggest checking the following selections to be cleaned:
5.Once you’ve made certain the proper points are checked, simply click Run Cleaner, and let CCleaner run its course.
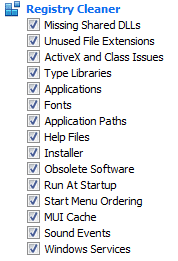
6.To clean your system further select the Registry tab and ensure the following are checked:
7.Select Scan for Issue and allow CCleaner to scan, then click Fix Selected Issues.
8.When CCleaner asks “Do you want backup changes to the registry?” select Yes.
9.Once your backup has completed, select Fix All Selected Issues.
10.Restart your PC.
Method 8: Run Chrome Cleanup Tool
The official Google Chrome Cleanup Tool helps in scanning and removing software’s that may cause the problem with chrome such as crashes, unusual startup pages or toolbars, unexpected ads you can’t get rid of, or otherwise changing your browsing experience.
The above fixes will definitely help you Fix Unable To Connect To The Proxy Server Error Code 130 (net::ERR_PROXY_CONNECTION_FAILED) but if you are still experiencing the error then as a last resort you can reinstall your Chrome Browser.
You may also check:
- Fix Err Connection Timed Out Issue in Google Chrome
- How To Fix SSL Connection Error in Google Chrome
- How to fix This site can’t be reached error in Gooogle Chrome
- How to fix Server’s certificate has been revoked in chrome
- Fix ERR_TUNNEL_CONNECTION_FAILED error in Google Chrome
- How To Fix SSL Certificate Error in Google Chrome
That’s it you have successfully Fix Unable To Connect To The Proxy Server Error Code 130 (net::ERR_PROXY_CONNECTION_FAILED) but if you still have any queries regarding this post feel free to ask them in the comment’s section.
Содержание
- Fix Unable To Connect To The Proxy Server Error Code 130
- Fix Unable To Connect To The Proxy Server Error Code 130
- Method 1: Uncheck Proxy Option
- Method 2: Clear Browsing Data
- Method 3: Reset Chrome Settings
- Method 4: Flush/Renew DNS & IP
- Method 5: Use Google DNS
- Method 6: Delete Proxy Server Registry Key
- Method 7: Run CCleaner and Malwarebytes
- Method 8: Run Chrome Cleanup Tool
- Невозможно подключиться к прокси-серверу – код ошибки 130
- Не удается подключиться к прокси-серверу
- Нет подключения к Интернету ERR_PROXY_CONNECTION_FAILED — как исправить
- Исправление ошибки ERR_PROXY_CONNECTION_FAILED
- Видео инструкция
Fix Unable To Connect To The Proxy Server Error Code 130
Fix Unable To Connect To The Proxy Server Error Code 130: If you are seeing Error 130 (net::ERR_PROXY_CONNECTION_FAILED) than this means your browser is not able to connect to the internet because of the proxy connection. Either you have invalid proxy connection or configuration of proxy is controlled by the third party. In any case, you won’t be able to open any web page and that my friend is a very big problem.
This error is sometimes caused because of harmful malware installed on your system and they mess up your PC by changing proxies and other system configuration. But don’t worry troubleshooter is here to fix this issue, so just follow the below-mentioned methods.
Fix Unable To Connect To The Proxy Server Error Code 130
Make sure to create a restore point just in case something goes wrong.
Method 1: Uncheck Proxy Option
1.Press Windows Key + R then type “inetcpl.cpl” and hit enter to open Internet Properties.
2.Next, Go to Connections tab and select LAN settings.
3.Uncheck Use a Proxy Server for your LAN and make sure “Automatically detect settings” is checked.
4.Click Ok then Apply and reboot your PC.
Method 2: Clear Browsing Data
If you’re using Google Chrome from a long time then chances are that you forgot to clear browsing data which can cause Unable To Connect To The Proxy Server Error Code 130 (net::ERR_PROXY_CONNECTION_FAILED).
1.Open Google Chrome and press Cntrl + H to open history.
2.Next, click Clear browsing data from the left panel.
3.Make sure the “beginning of time” is selected under Obliterate the following items from.
4.Also, check mark the following:
- Browsing history
- Download history
- Cookies and other sire and plugin data
- Cached images and files
- Autofill form data
- Passwords
5.Now click Clear browsing data and wait for it to finish.
6.Close your browser and restart your PC.
Method 3: Reset Chrome Settings
1.Open Google Chrome and go to settings.
2.Scroll down and click Show Advanced Settings.
3.Find Reset settings and click on it.
4.Again, it will ask for confirmation, so click Reset.
5.Wait for the browser to reset settings and once done, close everything.
6.Reboot your PC to save changes. This will Fix Unable To Connect To The Proxy Server Error Code 130.
Method 4: Flush/Renew DNS & IP
1.Press Windows Key + X then select Command Prompt (Admin).
2.In the cmd type the following and hit enter after each one:
- ipconfig /flushdns
- nbtstat –r
- netsh int ip reset
- netsh winsock reset
3.Restart your PC to apply changes.
Method 5: Use Google DNS
1.Open Control Panel and click on Network and Internet.
2.Next, click Network and Sharing Center then click on Change adapter settings.
3.Select your Wi-Fi then double click on it and select Properties.
4.Now select Internet Protocol Version 4 (TCP/IPv4) and click Properties.
5.Check mark “Use the following DNS server addresses” and type the following:
Preferred DNS server: 8.8.8.8
Alternate DNS server: 8.8.4.4
6.Close everything and you may be able to Fix Unable To Connect To The Proxy Server Error Code 130.
Method 6: Delete Proxy Server Registry Key
1.Press Windows Key + R then type “regedit” and hit Enter to open Registry Editor.
2.Navigate to the following registry key:
3.Select ProxyEnable key in the right-hand side window, then right-click on it and select Delete.
4.Follow the above step for the ProxyServer registry key also.
5.Close everything and reboot your PC to save changes.
Method 7: Run CCleaner and Malwarebytes
Perform a Full antivirus scan to make sure your computer is secure. In addition to this run CCleaner and Malwarebytes Anti-malware.
2.Run Malwarebytes and let it scan your system for harmful files.
3.If malware is found it will automatically remove them.
4.Now run CCleaner and in the “Cleaner” section, under the Windows tab, we suggest checking the following selections to be cleaned:
5.Once you’ve made certain the proper points are checked, simply click Run Cleaner, and let CCleaner run its course.
6.To clean your system further select the Registry tab and ensure the following are checked:
7.Select Scan for Issue and allow CCleaner to scan, then click Fix Selected Issues.
8.When CCleaner asks “Do you want backup changes to the registry?” select Yes.
9.Once your backup has completed, select Fix All Selected Issues.
10.Restart your PC.
Method 8: Run Chrome Cleanup Tool
The official Google Chrome Cleanup Tool helps in scanning and removing software’s that may cause the problem with chrome such as crashes, unusual startup pages or toolbars, unexpected ads you can’t get rid of, or otherwise changing your browsing experience.
The above fixes will definitely help you Fix Unable To Connect To The Proxy Server Error Code 130 (net::ERR_PROXY_CONNECTION_FAILED) but if you are still experiencing the error then as a last resort you can reinstall your Chrome Browser.
You may also check:
That’s it you have successfully Fix Unable To Connect To The Proxy Server Error Code 130 (net::ERR_PROXY_CONNECTION_FAILED) but if you still have any queries regarding this post feel free to ask them in the comment’s section.
Aditya Farrad
Aditya is a self-motivated information technology professional and has been a technology writer for the last 7 years. He covers Internet services, mobile, Windows, software, and How-to guides.
Источник
Невозможно подключиться к прокси-серверу – код ошибки 130
Если при посещении веб-сайта появляется сообщение об ошибке Ошибка 130 (net :: ERR_PROXY_CONNECTION_FAILED) Не удалось подключиться к прокси-серверу или Невозможно подключиться к прокси-серверу , то это потому, что ваш прокси-сервер Сервер вызывает проблему. Либо прокси-соединение на вашем компьютере является недопустимым, либо, если прокси-сервер используется веб-сайтом, настроен неправильно. В этом посте мы расскажем, как можно исправить этот код ошибки 130.
Не удается подключиться к прокси-серверу
1] Удалить или перенастроить прокси-сервер
- Нажмите клавишу Windows + R, затем введите « inetcpl.cpl » и нажмите клавишу ВВОД, чтобы открыть Свойства обозревателя.
- Затем перейдите на вкладку Подключения и выберите настройки локальной сети.
- Снимите флажок Использовать прокси-сервер для вашей локальной сети и убедитесь, что установлен флажок « Автоматически определять настройки ».
- Нажмите Ok, затем Apply и перезагрузите компьютер.
Если вы используете стороннюю прокси-службу, обязательно отключите ее.
Если вы являетесь владельцем веб-сайта, который использует программное обеспечение Proxy для своего веб-сайта, обязательно проверьте конфигурацию программного обеспечения.
2] Сброс DNS, сброс Winsock и сброс TCP/IP
Иногда веб-сайты не разрешаются, потому что DNS на вашем ПК все еще помнит старый IP. Поэтому не забудьте очистить DNS, сбросить Winsock и сбросить TCP/IP.
Вы также можете использовать нашу бесплатную программу FixWin для выполнения этих трех операций одним щелчком мыши.
3] Запустите средство устранения неполадок сети .
Посмотрите, может ли какой-либо из этих 5 сетевых устранения неполадок помочь вам решить проблему.
4] Используйте общедоступный DNS Google
Если это не помогает, используйте Google Public DNS и посмотрите, подходит ли вам это. Вам необходимо явно изменить настройки DNS в вашей операционной системе, используя IP-адреса DNS. Всякий раз, когда вы вводите доменное имя в браузер, известно, что DNS будет искать IP-адрес доменного имени и возвращать вам результат.
- Прежде всего, щелкните правой кнопкой мыши значок сети на панели задач и выберите Центр управления сетями и общим доступом.
- Выберите «Изменить настройки адаптера».
- Поиск сетевого подключения, используемого для подключения к Интернету; опция может быть либо «Подключение по локальной сети», либо «Беспроводное подключение».
- Щелкните правой кнопкой мыши и выберите «Свойства».
- Выберите новое окно, чтобы выбрать «Протокол Интернета 4 (TCP/IPv4)», а затем нажмите кнопку «Свойства».
- Установите флажок «Использовать следующие адреса DNS-серверов» в новом окне.
- Введите 8.8.8.8 и 8.8.4.4 .
- Наконец, нажмите OK и выйдите.
Мы надеемся, что один из этих советов поможет вам избавиться от ошибки.
Источник
Нет подключения к Интернету ERR_PROXY_CONNECTION_FAILED — как исправить

В этой простой инструкции подробно о том, как исправить ошибку ERR_PROXY_CONNECTION_FAILED в Google Chrome или других браузерах на его основе, а также видео, где все описываемые шаги показаны наглядно. Схожая ошибка: ERR_TUNNEL_CONNECTION_FAILED.
Исправление ошибки ERR_PROXY_CONNECTION_FAILED
Как, вероятно, ясно из текста ошибки «proxy connection failed» (не удалось подключиться к прокси-серверу), проблема возникает из-за чего-то, связанного с прокси-сервером. И наиболее эффективное решение — отключить использование прокси-сервера для подключений, за исключением тех случаев, где это требуется провайдером или в корпоративной сети (о последнем варианте также поговорим).
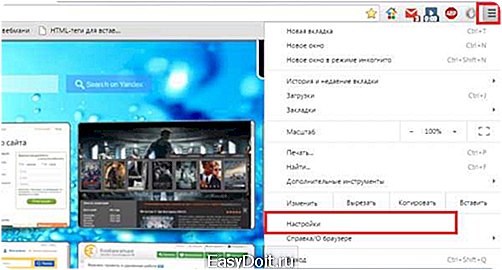
- В Google Chrome (или другом браузере на базе Chromium) откройте меню и зайдите в Настройки. Используйте кнопку поиска для того, чтобы найти «прокси», либо откройте внизу страницы настроек пункт «Дополнительные настройки», а затем в разделе «Система» нажмите «Настройки прокси-сервера».
- В результате браузер Chrome перенаправит вас на утилиту настройки прокси-сервера вашей ОС. Далее — пример для Windows 10, 8.1 и Windows 7.
- В открывшемся окне нажмите по кнопке «Настройка сети».
- В следующем окне снимите отметку «Использовать прокси-сервер для локальных подключений» и, если установлен такой пункт — «Автоматическое определение параметров».
- Примените все сделанные настройки и попробуйте обновить страницу в браузере.
Также существуют другие способы отключить прокси-сервер в Windows, которые могут оказаться полезными.
Обычно, описываемых шагов оказывается достаточно для исправления ERR_PROXY_CONNECTION_FAILED и после отключения прокси страницы в браузере открываются, как и раньше, однако если этого не произошло, попробуйте:
- Временно отключить сторонние антивирусы и сетевые утилиты (файрволлы и прочее).
- При использовании VPN с помощью стороннего ПО, попробуйте отключить его.
- Проверить, наблюдается ли проблема в других браузерах. Если нет — попробовать отключить расширения в проблемном браузере, а также проверить ярлык браузера.
- В крайнем случае и при условии, что вы умеете настраивать Интернет, можно также попробовать выполнить сброс сетевых настроек Windows 10 (если у вас эта версия ОС).
В тех случаях, когда наличие прокси-сервера необходимо в параметрах подключения (например, в корпоративной сети) и вы уверены в правильности всех данных, причиной проблемы может быть временное его отключение из-за проблем или задач обслуживания: вы можете либо дождаться, когда проблема будет решена не с вашей стороны, либо уточнить информацию у ответственного лица.
Видео инструкция
Если предложенные варианты не помогли, опишите вашу ситуацию более подробно в комментариях, возможно, удастся найти решение.
Источник
Download PC Repair Tool to quickly find & fix Windows errors automatically
When visiting a website if you receive an error saying Error 130 (net:: ERR_PROXY_CONNECTION_FAILED) Proxy server connection failed or Unable to connect to the proxy server, then its because your proxy server is causing an issue. Either the proxy connection on your computer is invalid or if there is a proxy used by the website is misconfigured. In this post, we are going to share how you can fix this Error Code 130.
1] Remove or Reconfigure Proxy
- Press Windows Key + R then type “inetcpl.cpl” and hit enter to open Internet Properties.
- Next, Go to Connections tab and select LAN settings.
- Uncheck Use a Proxy Server for your LAN and make sure “Automatically detect settings” is checked.
- Click Ok then Apply and reboot your PC.
If you are using a third-party proxy service, make sure to disable it.
If you are the website owner who is using Proxy software for your website, make sure to check the configuration of the software.
2] Flush DNS, reset Winsock and reset TCP/IP
Sometimes the websites don’t resolve because the DNS in your PC still remembers old IP. So make sure to Flush the DNS, Reset Winsock and Reset TCP/IP.
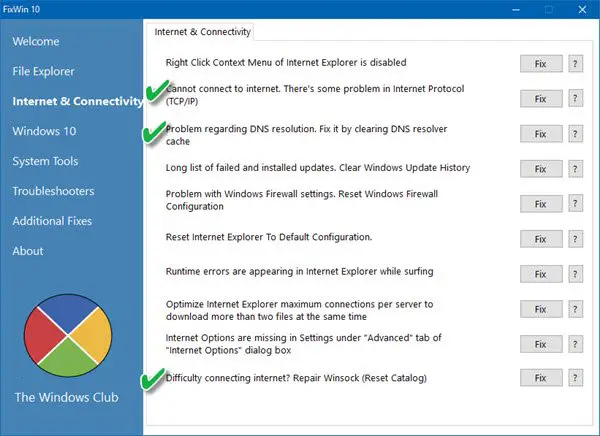
You can also use our freeware FixWin to carry out these three operations with a click.
3] Run Network Troubleshooters
See if any one of these 5 Network Troubleshooters are able to help you fix the problem.
4] Use Google Public DNS
If it does not help, use Google Public DNS and see if that works for you. You need to explicitly change the DNS settings in your operating system use the DNS IP addresses. Whenever you type the domain name into the browser, it is a known fact that DNS will look for the IP address of the domain name and return the result to you.
- First of all, right-click on the taskbar Network icon and select Network and Sharing Center.
- Select “Change Adapter Settings”.
- Search for the network connection that is used to connect to the internet; the option might be either “Local Area Connection” or “Wireless Connection”.
- Right-click on it and click Properties.
- Choose the new window to select “Internet Protocol 4 (TCP/IPv4)” and then click the Properties button.
- Click the checkbox for “Use the following DNS server addresses” in the new window.
- Enter in 8.8.8.8 and 8.8.4.4
- Finally, click OK and exit.
We hope one of these tips helps you get rid of the error.
Anand Khanse is the Admin of TheWindowsClub.com, a 10-year Microsoft MVP (2006-16) & a Windows Insider MVP (2016-2022). Please read the entire post & the comments first, create a System Restore Point before making any changes to your system & be careful about any 3rd-party offers while installing freeware.
Если при посещении веб-сайта вы получаете сообщение об ошибке: Ошибка 130 (net :: ERR_PROXY_CONNECTION_FAILED) Ошибка подключения к прокси-серверу или Невозможно подключиться к прокси-серверу, то это связано с тем, что ваш прокси-сервер вызывает проблему. Либо прокси-соединение на вашем компьютере недействительно, либо прокси-сервер, используемый веб-сайтом, настроен неправильно. В этом посте мы расскажем, как исправить код ошибки 130.
Не удается подключиться к прокси-серверу
1]Удалить или перенастроить прокси
- Нажмите Windows Key + R, затем введите «inetcpl.cpl» и нажмите Enter, чтобы открыть. Интернет-свойства.
- Затем перейдите на вкладку «Подключения» и выберите «Настройки локальной сети».
- Снимите флажок «Использовать прокси-сервер для вашей локальной сети» и убедитесь, что установлен флажок «Автоматически определять настройки».
- Нажмите «ОК», затем «Применить» и перезагрузите компьютер.
Если вы используете стороннюю прокси-службу, обязательно отключите ее.
Если вы являетесь владельцем веб-сайта, который использует программное обеспечение прокси для своего веб-сайта, обязательно проверьте конфигурацию программного обеспечения.
2]Очистить DNS, сбросить Winsock и сбросить TCP / IP.
Иногда веб-сайты не разрешаются, потому что DNS на вашем компьютере все еще запоминает старый IP-адрес. Поэтому не забудьте очистить DNS, сбросить Winsock и сбросить TCP / IP.
Вы также можете использовать нашу бесплатную программу FixWin, чтобы выполнять эти три операции одним щелчком мыши.
3]Запустите средства устранения неполадок сети
Посмотрите, сможет ли один из этих 5 средств устранения неполадок сети помочь вам решить проблему.
4]Используйте Google Public DNS
Если это не помогает, используйте Google Public DNS и посмотрите, работает ли это для вас. Вам необходимо явно изменить настройки DNS в вашей операционной системе, используя IP-адреса DNS. Каждый раз, когда вы вводите доменное имя в браузере, это известный факт, что DNS будет искать IP-адрес доменного имени и возвращать вам результат.
- Прежде всего, щелкните правой кнопкой мыши значок сети на панели задач и выберите Центр управления сетями и общим доступом.
- Выберите «Изменить настройки адаптера».
- Найдите сетевое соединение, которое используется для подключения к Интернету; вариант может быть либо «Подключение по локальной сети», либо «Беспроводное подключение».
- Щелкните его правой кнопкой мыши и выберите «Свойства».
- В новом окне выберите «Протокол Интернета 4 (TCP / IPv4)» и нажмите кнопку «Свойства».
- Установите флажок «Использовать следующие адреса DNS-серверов» в новом окне.
- Введите в 8.8.8.8 и 8.8.4.4
- Наконец, нажмите ОК и выйдите.
Мы надеемся, что один из этих советов поможет вам избавиться от ошибки.
.
If you are one of those who is again & again facing & struggling with the Google Chrome Error 130 Failed to Load Webpage code problem, then today, here, we are going to show you the best and the most comfortable way and the solutions for fixing and solving this error problem efficiently.
This shows an error code message like,
Unable to connect to the proxy server
A Proxy Server is a server that acts as an intermediary between your computer and other servers. Currently, your system is configured to use a proxy, but Google Chrome can’t connect to it.
Error 130 (net::ERR_PROXY_CONNECTION_FAILED) Proxy server connection failed.
This error is mostly found in your windows google chrome error code issue problem. This error means that there is a proxy issue. Many numerous things can cause this type of Error Code 130 problem.
Causes of Google Chrome Error 130 Failed to load Webpage Issue:
- Google Chrome Browser error issue
- Windows PC error problem
So, here are some quick tips and tricks for easily fixing and resolving this type of Google Chrome Error 130 Failed to Load Webpage Code problem from you permanently.
How to Fix Google Chrome Error 130 Failed to load Webpage Issue
1. Reset your Internet Browser Settings –
- Go to the start menu
- Open your browser there
- Go to ‘Settings‘ there
- Click on the “Show advanced settings” tab
- Find & click on the “Reset browser settings” tab there
- After resetting, close the tab there
- That’s it, done
Resetting your browser settings can also eliminate the end of this order Error 130 problem from you.
2. Check & Untick your Internet Proxy Server Settings –
Check your proxy settings or contact your network administrator to ensure the server is working. If you don’t believe you should use a proxy server, then,
- Go to the Google Chrome menu
- Click on the Settings tab there
- Click on the ‘Show Advanced Settings‘ option there
- Click on the “Change Proxy Settings” tab there
- Now, go to the “LAN settings” and deselect the
” Use a Proxy server for your LAN “ - After deselecting, close the tab there
- That’s it, done
By checking your proxy settings, you can quickly eliminate this Error 130 steam code problem from your browser.
3. Reset your TCP/IP & Flush DNS (Domain Name System) in CMD –
- Go to the start menu
- Search and go to the CMD (Command Prompt)
- Click it and opens it
- A Pop-up will open there now
- Now, Type the below commands there
ipconfig /flushdns
nbtstat -r
nbtstat -rr
netsh int ip reset
netsh Winsock reset - Press Enter there to start
- After completing, close the tab
- & restart your PC once
- That’s it, done
Resetting the TCP/IP and flushing the DNS can also quickly fix this Error 130 mql4 problem from your PC completely.
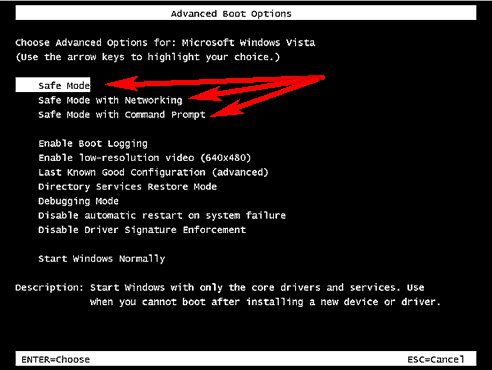
4. Run your Windows PC in Safe Mode –
- Go to the start menu
- Click on the Shutdown drop-down menu &
- Select the Restart option there
- Now, remove the battery & reinsert it in
- Afterward, restart your PC again
- Just after restarting,
- Select the “Safe Mode” option there
- Now, wait for some minutes to reset it
- That’s it, done
Running Windows in safe mode can eliminate this Error 130 mql4 code problem.
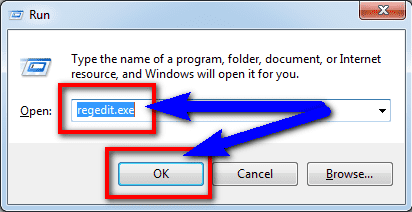
5. Fix by Running the ‘Regedit’ Command in CMD (Command Prompt) –
- Go to the start menu
- Search or go to the ‘RUN‘ there
- Type “regedit” & press OK or Press Enter there
- A pop-up will open there
- In the registry editor there,
- Expand the various levels until you reach the windows key in the path above
- On the right side of the editor,
- Double-click on the ‘LoadApplnit_DLLs value.’
- Change it to ‘0‘ & press OK there
- Exit the registry editor,
- Close all tabs &
- Restart your PC once
- That’s it, done
Fixing by running this command in the command prompt can quickly fix and solve this Error 130 when loading URL code problem.
6. Fix by Deleting the Proxy Key –
- Go to the start menu.
- Now go to the HKEY_CURRENT_USERSoftwareMicrosoftWindowsCurrentVersionInternet Settings.
- Then, in the right side panel,
- Select the “ProxyEnable Key” & delete it there
- Then, go to & select the “ProxyServer registry key” & delete it too
- After completing, close the tab
- After that, restart your PC once
- That’s it, done
Removing the proxy key will quickly fix this K7 total security Error 130 code problem from your PC.
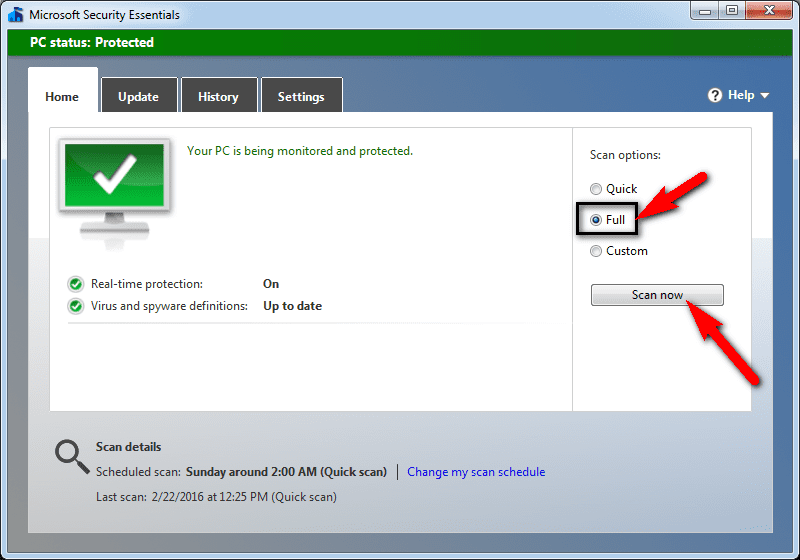
7. Run a Full Scan of your Windows PC –
- Go to the start menu.
- Search or go to the ‘Microsoft Security Essentials.’
- Click on it and opens it.
- Tick the ‘Full‘ option to run a full scan of your PC
- Now, click on the “Scan Now” option there to scan your PC
- Now, wait for some minutes to scan it
- After completing, close the tab
- That’s it, done
By scanning your PC for malware/viruses, Microsoft Security Essentials can quickly fix and solve this error 130 adobe problem.
Conclusion:
These are the quick and the best methods to get rid of this Google Chrome Error 130 Failed to Load Webpage code issue from you entirely. Hopefully, these solutions will help you get back from this Error 130 problem.
If you are facing or falling into this Google Chrome Error 130 Failed to Load Webpage code problem or any error problem, then comment down the error problem below so that we can fix and solve it too by our top best quick methods guides.
This article discusses troubleshooting information for following error messages:
- Error Code 130: Failed to load web page (unknown error)
- Restore failing with system error occurred (130). Restore is failing only for 1 file
- The connection to <group name> failed with status 1030
- Error 130 (net::ERR_PROXY_CONNECTION_FAILED) Proxy server connection failed
Error 130 appears on different programs. Some of them are listed below:
- Adobe Acrobat
- Canon Pixma Printer software
- Java
- Nitro PDF
- Steam
- Symantec Antivirus
Disable Proxy Server
As default your web browser enables proxy servers. You may receive proxy errors due to incorrect proxy configurations. Disable the proxy server as shown below:
For Windows 8.1/ 8:
1. Press Windows Key + X.
2. Click Run.
3. Type “inetcpl.cpl”
4. Click OK.
5. Internet Properties dialog will open. Click the Connections tab.
6. Click “LAN Settings” button.
7. Uncheck the checkbox labelled “Automatically detect settings”.
8. Click OK | Apply | OK.
For Earlier Versions of Windows:
1. Press Windows Key + R.
2. Refer Steps # 3-8 from Windows 8.1/ 8 user’s paragraph.
Reset Proxy Registry Entries
Make changes to the proxy settings which are located in the Windows Registry. Delete and re-create the proxy settings.
For Windows 8.1/ 8 and Earlier Versions:
1. Press Windows Key + X.
2. Click “Command Prompt (Admin”
3. Type the following commands one by one:
reg add “HKCUSoftwareMicrosoftWindowsCurrentVersionInternet Settings” /v ProxyEnable /t REG_DWORD /d 0 /f
reg delete “HKCUSoftwareMicrosoftWindowsCurrentVersionInternet Settings” /v ProxyServer /f
4. Exit Registry Editor.
Change Citrix Web Settings
These settings are applicable if you’re receiving error 130 while connecting through an access gateway or secure gateway.
For Windows 8.1/ 8 and Earlier Versions:
1. Launch Citrix Web Interface Management console.
2. Click XenApp Web Sites under Citrix Web Interface category.
3. Choose the website which points to a Secure/ Access Gateway and appears under XenApp Web Sites frame.
4. Click Secure Access.
5. A new wizard will load namely Edit secure access settings.
6. Specify appropriate values in Gateway Translated, Gateway Direct, Gateway Alternate and then click Next.
7. Follow the wizard your own.
Remove Incompatible Drivers
The best way to identify incompatible drivers is to check for a yellow color exclamation mark in Device Manager. Here’s how:
For Windows 8,1/ 8:
1. Press Windows Key + X.
2. Click Device Manager.
3. Expand the top entry.
4. Click View | Show hidden devices.
5. Check for devices having a yellow color exclamation mark. Right click such devices, select Uninstall.
6. Reboot when you’re finished uninstalling them.
For Earlier Versions of Windows:
1. Click Start.
2. Type “Device Manager” in the Search Box.
3. Press ENTER.
4. Refer Steps # 3-6 from Windows 8.1/ 8 user’s paragraph.

I am director and business manager at Sorcim Technologies. The product Clone Files Checker, this blog, and the content written for the blog are the properties of Sorcim. We are responsible for the content and we are always willing to answer your queries about our solutions. We encourage you to contact us should you have any questions!
We are into IT since 2004. We love to make software programs, web-services and mobile applications that solve various computing problems.
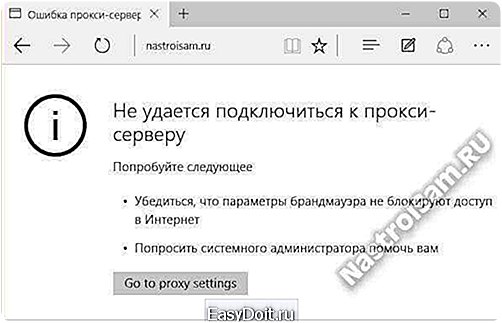
Не удается подключиться к прокси-серверу — что делать?
Содержание
- 1 Не удается подключиться к прокси-серверу — что делать?
- 1.1 Исправляем ошибку в браузере
- 1.2 Не удается подключиться к прокси-серверу из-за вируса
- 1.3 Как исправить ошибку (Видео)
- 2 Не удаётся подключиться к прокси-серверу. Как исправить ошибку?!
- 3 Ошибка 130 (нетто: err_proxy_connection_failed). Что делать?
- 4 Не удается подключиться к прокси серверу — как локализовать и устранить ошибку
21.06.2014 windows | интернет
В этой инструкции подробно о том, как исправить ошибку, когда при открытии сайта браузер пишет, что не удается подключиться к прокси-серверу. Такое сообщение вы можете увидеть в Google Chrome, Яндекс браузере и в Опере. Не важно, используете ли вы Windows 7 или Windows 8.1.
Сначала о том, какая именно настройка вызывает появление данного сообщения и как это исправить. А затем — про то, почему даже после исправления ошибка с подключением к прокси серверу появляется снова.
Исправляем ошибку в браузере
Итак, причина того, что браузер сообщает об ошибке подключения к прокси-серверу в том, что по какой-то причине (которые будут рассмотрены далее), в свойствах подключения на вашем компьютере автоматическое определение параметров подключения было изменено на использование прокси-сервера. И, соответственно, что нам нужно сделать — вернуть все «как было». (Если вам удобнее будет просмотреть инструкцию в видео формате, пролистайте статью вниз)
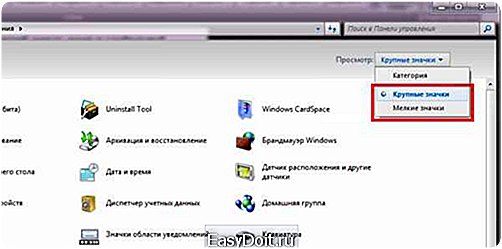
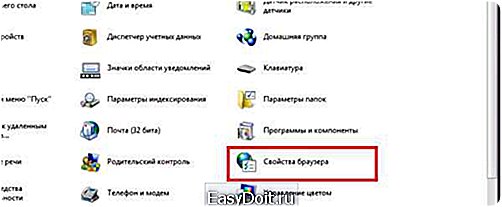
- Зайдите в панель управления Windows, переключитесь к виду «Значки», если стоят «Категории» и откройте «Свойства браузера» (Также пункт может называться «Свойства обозревателя»).
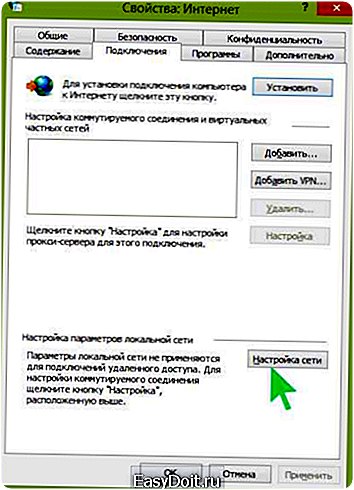
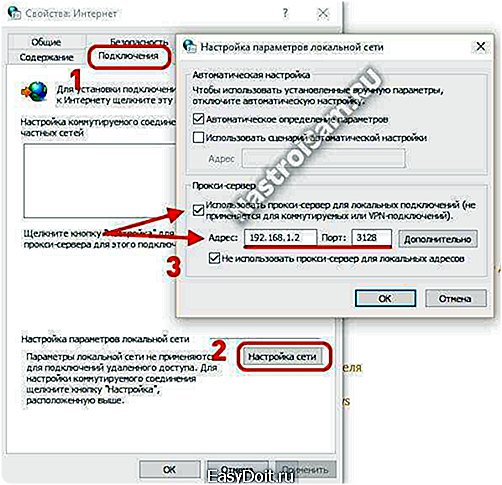
- Перейдите на вкладку «Подключения» и нажмите «Настройка сети».
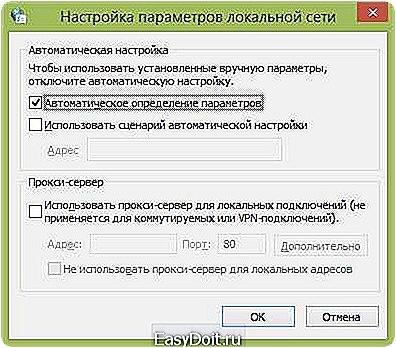
- Если стоит отметка «Использовать прокси-сервер для локальных подключений», уберите ее и установите автоматическое определение параметров, как на картинке. Примените параметры.
Примечание: если вы используете Интернет в организации, где доступ осуществляется через сервер, изменение этих параметров может привести к тому, что Интернет станет недоступен, лучше обратитесь к Администратору. Инструкция предназначена для домашних пользователей, у которых появилась эта ошибка в браузере.
Если вы используете браузер Google Chrome, то же самое вы можете сделать следующим образом:
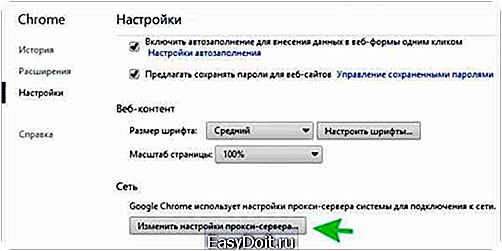
- Зайти в настройки браузера, нажать «Показать дополнительные настройки».
- В разделе «Сеть» нажать кнопку «Изменить настройки прокси-сервера».
- Дальнейшие действия уже были описаны выше.
Примерно подобным же образом можно изменить настройки прокси и в Яндекс браузере и в Опере.
Если после этого сайты стали открываться, и ошибка больше не появляется — отлично. Однако, может быть, что после перезагрузки компьютера или даже раньше, сообщение о проблемах с подключением к прокси-серверу появится снова.
В этом случае, еще раз зайдите в настройки подключения и, если увидите там, что параметры опять поменялись, перейдите к следующему шагу.
Не удается подключиться к прокси-серверу из-за вируса
Если в параметрах подключения сама по себе появляется отметка об использовании прокси-сервера, по всей вероятности, на вашем компьютере появилось вредоносное ПО или оно было не до конца удалено.
Как правило, такие изменения вносят «вирусы» (не совсем), которые показывают вам непонятную рекламу в браузере, всплывающие окна и прочее.
В этом случае, стоит озаботиться удалением такого вредоносного программного обеспечения со своего компьютера. Об этом я подробно написал в двух статьях, и они должны помочь вам исправить проблему и убрать ошибку «не удается подключиться к прокси-серверу» и другие симптомы (скорее всего поможет уже первый способ в первой статье):
В будущем же могу рекомендовать не устанавливать программы из сомнительных источников, пользоваться только проверенными расширениями для браузеров Google Chrome и Яндекс и придерживаться безопасных практик работы за компьютером.
Как исправить ошибку (Видео)
А вдруг и это будет интересно:
remontka.pro
Не удаётся подключиться к прокси-серверу. Как исправить ошибку?!
В этой статье я расскажу о проблеме, с которой в последнее время всё чаще и чаще обращаются пользователи, сэкономившие на хорошем антивирусе — это ошибка в браузере: «Не удалось подключиться к прокси-серверу». Дело в том, что прокси — это сервер, который пропускает через себя весь трафик клиента и, тем самым позволяет его полностью контролировать. Для мошенников он очень удобен, так как можно выудить у юзера логины и пароли к почте, аккаунтам социальных сетей и электронным кошелькам. При необходимости, он может ещё и рекламу подсовывать. Такая зараза попадает к пользователям так же, как и рекламные ad-ware модули. Пользователь некоторое время не замечает того, что вся его информация проходит через сторонний узел. Но рано или поздно сервер прикрывают, а браузер клиентов начинает ругаться, что подключение к прокси-серверу невозможно. Как от этого избавиться?
В операционных системах Windows 7 и Windows 8 нужно зайти в «Свойства обозревателя». Для этого нажимаем комбинацию клавиш Win+R и вводим команду inetcpl.cpl в строку «Открыть».
Жмём на «ОК» и нам откроется окно «Свойства Интернет», где нас интересует вкладка «Подключения». В самом низу окна будет кнопка «Настройка сети». Нажимаем на неё.
Таким образом мы попадаем в параметры локальной сети.Смотрим на раздел «Прокси-сервер». Смотрим что там прописано и убираем галочку «Использовать прокси-сервер для локальных подключений».
В Windows 10 нажимаем кнопку Пуск и в меню выбираем пункт «Параметры». Откроется вот такое окно:
Выбираем пункт «Сеть и Интернет». В следующем меню надо выбрать раздел «Прокси»:
В открывшемся окне надо в самом низу окна найти ползунок «Использовать прокси-сервер» и сдвигаем его в положение «Выкл». Ползунок «Определение параметров автоматически» оставляем включенным, а вот сценариев настройки никаких быть не должно. Нажимаем кнопку сохранить и закрываем окно. Перезапускаем браузер.
После этого не забудьте проверить свой компьютер с помощью хорошей антивирусной программы. Правда, не всю подобную заразу удаётся убрать с помощью антивируса из-за того, что она не определяется им, как вредоносная. Тогда Вам может помочь инструкция Как удалить рекламу в браузере. Иначе, рискуете тем, что каждый раз при включении компьютера всё будет заново прописано в параметрах и Ваш Интернет-обозреватель снова будет выдавать ошибку «Не удалось подключиться к прокси-серверу».
Этот способ актуален для браузеров Internet Explorer, Microsoft Edge, Chrome, Opera и Яндекс.Браузер. Если Вы пользуетесь Mozilla Firefox выдаётся другая ошибка — «Прокси-сервер отказывается принимать соединения». Чтобы изменит параметры сети, надо зайти в «Настройки» -> «Дополнительные» -> «Сеть»:
Ставим флажок «Без прокси» и нажимаем кнопку «ОК».
Примечание: Если же Вы реально выходите в Интернет через прокси-сервер (например, подключены к районной локальной сети или сети общежития), то обратите внимание, какой у Вас прописан адрес и порт Proxy-сервера.
Если он указан правильно, то далее Вам нужно обращайтесь в техподдержку своего провайдера или, если сеть маленькая, искать администратора сети.
nastroisam.ru
Ошибка 130 (нетто: err_proxy_connection_failed). Что делать?
Эта история о том, как я пыталась решить проблему error 130 — прокси-соединение с сервером не удалось. Два дня назад компьютер перестал пускать меня в интернет. Все показывает, что я подключена к интернету, работает скайп. А вот попасть в интернет не могу.
Мне пишет ошибка 130: err_proxy_connection_failed . И что не делай, ничего не помогает. Я работаю на Google Chrome.
Сначала я подумала, что проблема в этом браузере. Но как оказалось, нет. Вошла через Mozzilla Firefox – такая же история error и все тут.
1. Хорошо, что у мужа есть компьютер. Мы решили искать в информацию в интернет. Нашли вот что: Для начала нужно открыть интернет
2. Нажать кнопку «Сервис» выбрать « Свойства обозревателя».
3. Дальше на вкладке «Подключения» щелкнуть» Настройка LAN».
4. Требуется установить флажок «Использовать прокси-сервер для локальной сети».
5. А в поле «Адрес» нужно ввести адрес прокси-сервера.
6. В поле «Порт» написать номер порта.
7. Если сеть требует отдельных адресов прокси для разных служб — HTTP, FTP, HTTPS, то нажать «Дополнительно» и вписать отдельные адреса прокси-сервера.
8. Все, жмем « ОК», и ждем пару секунд.
Я подумала, ведь я не использую прокси сервер и также не имею адреса прокси – сервера. Что же делать, проблему же как-то решать нужно?
Решила попробовать. Проделала все что написано, дошла до этого момента «введите адрес»… и все, а дальше ничего.
Вскоре я решила эту проблему быстро и неожиданно. Хотите узнать как?
Теперь рассказываю. Я задействовала «метод тыка». В настройках нашла прокси-сервер и начала нажимать на разные настройки. Нажала на одно требование – проверила, сработало-ли. Главное запомнить на что нажала, а лучше записать. Не сработало, отменила. Нажала следующее и так далее.
И вот ура – сработало!
Как у меня все получилось подробно:
Заходим в «Параметры» Google Chrome. Нажимаем «Изменить настройки прокси-сервера».
В открывшемся окошке нажимаем «Настройка сети» и убираем галочку из «Использовать прокси- сервер для локальных подключений».Нажимаете»ОК». Автоматически галочка перейдет на «Автоматическое определение параметров». Если это не случилось, поставьте галочку сами.лезна
Все. Если кому-то информация окажется полезна , оставьте комментарий. Приветствуются комментарии с фото.
Эта история о том, как я пыталась решить проблему error 130 — прокси-соединение с сервером не удалось. Два дня назад компьютер перестал пускать меня в интернет. Все показывает, что я подключена к интернету, работает скайп. А вот попасть в интернет не могу.Мне пишет ошибка 130: err_proxy_connection_failed . И что не делай, ничего не помогает. Я работаю на Google Chrome.Сначала я подумала, что проблема в этом браузере. Но как оказалось, нет. Вошла через Мozzilla Firefox – такая же история error и все тут. Хорошо, что у мужа есть компьютер. Мы решили искать в информацию в интернет. Нашли вот что: Для начала нужно открыть интернет. Нажать кнопку «Сервис» выбрать « Свойства обозревателя». Дальше на вкладке «Подключения» щелкнуть» Настройка LAN». Требуется установить флажок «Использовать прокси-сервер для локальной сети». А в поле «Адрес» нужно ввести адрес прокси-сервера. В поле «Порт» написать номер порта. Если сеть требует отдельных адресов прокси для разных служб — HTTP, FTP, HTTPS, то нажать «Дополнительно» и вписать отдельные адреса прокси-сервера. Все, жмем « ОК», и ждем пару секунд.Я подумала, ведь я не использую прокси сервер и также не имею адреса прокси – сервера. Что же делать, проблему же как-то решать нужно? Решила попробовать. Проделала все что написано, дошла до этого момента «введите адрес»… и все, а дальше ничего.Вскоре я решила эту проблему быстро и неожиданно. Хотите узнать как?Теперь рассказываю. Я задействовала «метод тыка». В настройках нашла прокси-сервер и начала нажимать на разные настройки. Нажала на одно требование – проверила, сработало-ли. Главное запомнить на что нажала, а лучше записать. Не сработало, отменила. Нажала следующее и так далее.И вот ура – сработало!Как у меня все получилось подробно:Заходим в «Параметры» Google Chrome. Нажимаем «Изменить настройки прокси-сервера».В открывшемся окошке нажимаем «Настройка сети» и убираем галочку из «Использовать прокси- сервер для локальных подключений».Нажимаете»ОК». Автоматически галочка перейдет на «Автоматическое определение параметров». Если это не случилось, поставьте галочку сами.лезна Все.
Если кому-то информация окажется полезна , оставьте комментарий.
mix-n.blogspot.ru
Не удается подключиться к прокси серверу — как локализовать и устранить ошибку
Иногда пользователь, который серфит интернет, при загрузке страницы видит следующее сообщение: «Не удается подключиться к прокси серверу».
Что нужно делать, чтобы восстановить доступ к глобальной сети?
Содержание:
Собственно, сделать это не так уж и сложно, нужно лишь действовать согласно инструкциям, изложенным ниже.
Но для начала нужно примерно представить себе, что такое прокси.
Прокси сервер (Proxy) – своеобразный компьютер-посредник, стоящий между вами и глобальной сетью.
Эдакий компьютер-посредник, через который проходит весь трафик, идущий к вам. Сервер обрабатывает данные, информацию и файлы, которые затем передает вам.
Подавляющее большинство провайдеров интернета работает с использованием технологии Прокси.
Но иногда технология начинает сбоить со стороны клиента, т.е. вашего ПК, выдавая вышеописанные надписи. Сейчас будем пытаться их убрать.
вернуться к меню ↑
Если у вас возникают ошибки с прокси, значит, на ПК по той или иной причине изменились параметры доступа к интернету.
Нам нужно вернуть все в первостепенное положение.
Для этого откройте вашу панель управления и переключитесь к виду «Значки», чтобы было удобнее искать нужный.
Далее ищем пункт со свойствами обозревателя (либо браузера).
Теперь ищем вкладку, которая называется «подключения». Здесь ищем кнопку, выделенную на скриншоте.
В подавляющем большинстве случаев проблема кроется во флажке, который стоит на «прокси». Его нужно переключить на автоматическое определение и сохраниться.
В случае, если отметка и так установлена на автоматических параметрах, нужно сделать следующее.
Возвращаемся в панель управления и ищем «центр управления сетями…».
Нужно сменить параметры.
Зачастую отображается лишь одно соединение, которое в данный момент активно. Кликаем правой кнопкой, а затем ищем свойства объекта.
Не пугайтесь при виде такого количества параметров. Главное – не убирать нужные флажки и не выставлять лишних.
Все что требуется – выделить пункт с IPv4 и нажать на кнопку «свойства».
Сделайте все так, как на скриншоте и сохранитесь.
Если у вас прописаны статичные цифры, то лучшим выходом из положения станет обращение к провайдеру. Уточните у него, какие параметры и адреса должны быть прописаны.
Возможно, произошел системный сбой.
Важно! Подобные манипуляции хороши лишь для частного пользования сетью. Если вы находитесь в большой организации, то подобное вмешательство может попросту лишить вас доступа. Лучше привлеките системного администратора.
вернуться к меню ↑
Если вы пользуетесь обозревателем вроде Google Chrome, или же Opera/Яндекс, то можно решить ситуацию следующим способом. (для примера используется Гугл).
Открываете настройки браузера.
Активируете режим с дополнительным набором параметров. Для этих целей пролистайте страницу в самый низ.
Ищите раздел «сеть» и нажимаете на единственную активную кнопку с настройками подключения.
Все дальнейшие настройки уже были опубликованы выше. Если сайты стали открываться и работать корректно, значит, все сделано правильно.
К сожалению, подобный «косяк» может возникнуть снова после перезагрузки системы.
В таком случае компьютер нужно будет «лечить» от вирусов.
вернуться к меню ↑
Если параметры подключения изменяются сами по себе, значит, ваш компьютер был заражен каким-то вредоносным ПО.
Всему виной либо собственная халатность, либо устаревший антивирус, либо стремление скачать контент из непроверенных источников, что чревато вот такими последствиями и даже инцидентами похуже.
В некоторых случаях в браузеры добавляется какая-то дополнительная реклама, которой ранее никогда там не было.
Также вылазят всплывающие окна и прочие объявления, которые начинают мешать работать.
Нужно позаботиться о чистке системы. Во-первых, обновите ваши антивирусные базы до корректных версий.
Если подобное ПО не установлено – сделайте это в срочном порядке.
После этого можно воспользоваться сторонними утилитами либо попробовать исправить положение дел вручную.
Первый вариант более быстрый, но второй – надежнее.
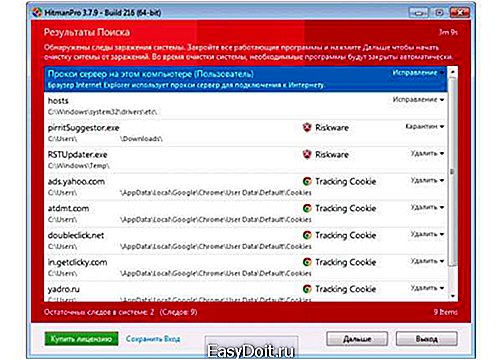
Для начала попробуйте скачать утилиту Hitman Pro и с ее помощью провести детальную диагностику системы.
К слову, ПО нуждается в активации, но это можно сделать бесплатно.
Второй пример, который также пользуется большим спросом – утилита Anti-Malware.
Нередко этот тандем используется вместе, чтобы исправлять недочеты друг друга. Работает такая связка весьма и весьма продуктивно.
Зачастую даже не требуется дополнительных действий со стороны пользователя.
вернуться к меню ↑
Если вы пользуетесь Chrome и «случайно» скачали что-то не оттуда, то помимо ошибок с прокси на ваш браузер дополнительно могут установиться различные расширения, которые еще сильнее усложнят работу в интернете.
Нужно от них избавиться.
В этом случае помогает лишь так называемый метод «научного тыка», т.е. отключаете попеременно каждое расширение и смотрите, что именно изменилось.
Самое смешное то, что «сбоить» может программа, которая ране работала весьма стабильно и корректно.
Ее попросту могли взломать злоумышленники для своих целей. Если это так – придется искать альтернативу.
Как видите, ошибки с прокси-сервером могут возникать не только по причине вашей халатности, хотя эта причина является основной.
В некоторых случаях сбой может давать сама система либо ее компоненты.
В процессе чистки не стоит в целом полагаться на стороннее программное обеспечение, поскольку оно не дает 100%-гарантий, что все будет приведено в первостепенный вид.
Надеемся, с помощью наших инструкций вам удастся восстановить контроль над интернетом на отдельно взятом ПК.
Не удается подключиться к прокси серверу — как локализовать и устранить ошибку
geek-nose.com


