Notice that another issue that might be causing this is that, the «FollowSymLinks» option of a parent directory might have been mistakenly overwritten by the options of your project’s directory. This was the case for me and made me pull my hair until I found out the cause!
Here’s an example of such a mistake:
<Directory />
        Options FollowSymLinks
        AllowOverride all
        Require all denied
</Directory>

<Directory /var/www/>
        Options Indexes # <--- NOT OK! It's overwriting the above option of the "/" directory.
        AllowOverride all
        Require all granted
</Directory>
So now if you check the Apache’s log message(tail -n 50 -f /var/www/html/{the_error_log_file_of_your_site}) you’ll see such an error:
Options FollowSymLinks and SymLinksIfOwnerMatch are both off, so the RewriteRule directive
is also forbidden due to its similar ability to circumvent directory restrictions
That’s because Indexes in the above rules for /var/www directory is overwriting the FolowSymLinks of the / directory. So now that you know the cause, in order to fix it, you can do many things depending on your need. For instance:
<Directory />
        Options FollowSymLinks
        AllowOverride all
        Require all denied
</Directory>

<Directory /var/www/>
        Options FollowSymLinks Indexes # <--- OK.
        AllowOverride all
        Require all granted
</Directory>
Or even this:
<Directory />
        Options FollowSymLinks
        AllowOverride all
        Require all denied
</Directory>

<Directory /var/www/>
        Options -Indexes # <--- OK as well! It will NOT cause an overwrite.
        AllowOverride all
        Require all granted
</Directory>
The example above will not cause the overwrite issue, because in Apache, if an option is «+» it will overwrite the «+»s only, and if it’s a «-«, it will overwrite the «-«s… (Don’t ask me for a reference on that though, it’s just my interpretation of an Apache’s error message(checked through journalctl -xe) which says: Either all Options must start with + or -, or no Option may. when an option has a sign, but another one doesn’t(E.g., FollowSymLinks -Indexes). So it’s my personal conclusion -thus should be taken with a grain of salt- that if I’ve used -Indexes as the option, that will be considered as a whole distinct set of options by the Apache from the other option in the «/» which doesn’t have any signs on it, and so no annoying rewrites will occur in the end, which I could successfully confirm by the above rules in a project directory of my own).
Hope that this will help you pull much less of your hair! 
Introduction
Apache is a popular open-source app for running web servers, owing to its reliability and stability. Despite its ease of use, it’s not uncommon to encounter a ‘403 Forbidden’ error after setting up a website using Apache.
In this tutorial, we will go over potential causes of the Apache ‘403 Forbidden’ error and different ways you can fix it.

Prerequisites
- A user account with root or sudo privileges
- Access to the command line terminal
- An installed version of Apache web server
Apache 403 Forbidden: Effects and Possible Causes
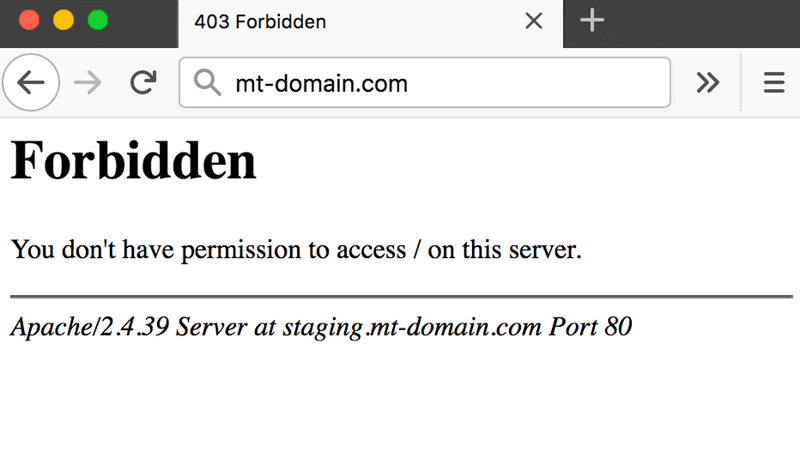
The Apache ‘403 Forbidden’ error appears when you try to load a web page with restricted access. Depending on your browser and the website in question, there are different versions of the 403 error message:
- Forbidden
- Error 403
- HTTP Error 403.14 – Forbidden
- 403 Forbidden
- HTTP 403
- Forbidden: You don’t have permission to access the site using this server
- Error 403 – Forbidden
- HTTP Error 403 – Forbidden
There are several potential reasons why the Apache 403 error occurs:
- The first option is a permission error in the webroot directory, where users don’t have access to website files.
- The second possible reason for a 403 error is missing or incorrect settings in the Apache configuration files.
- Finally, failing to set up a default directory index also triggers a 403 error message in Apache.
How to Fix ‘403 Forbidden’ in Apache
If you have come across an Apache ‘403 Forbidden’ message, there are several ways to fix it:
Method 1: Setting File Permissions and Ownership
If you suspect the cause of the 403 error to be incorrect file permissions, use:
sudo chmod -R 775 /path/to/webroot/directoryThe chmod command sets the execute permission for the webroot directory and read permission for the index.html file.
To change directory ownership, use:
sudo chown -R user:group /path/to/webroot/directoryWhere:
useris the user account with root privileges on your web server.groupiswww-dataorapache.
Restart the Apache web server for the changes to take effect.
If you are working with Ubuntu, use the following command to restart Apache:
sudo systemctl restart apache2If you are working with Centos, use:
sudo systemctl restart httpdMethod 2: Setting Apache Directives
It is possible that the proper require directive is not configured and restricts access to resources. To fix it:
1. Access Apache’s main configuration file. For Ubuntu, use:
sudo nano /etc/apache2/apache2.confFor Centos, use:
sudo nano /etc/httpd/httpd.conf2. Once you open the configuration file, scroll down to the following section:
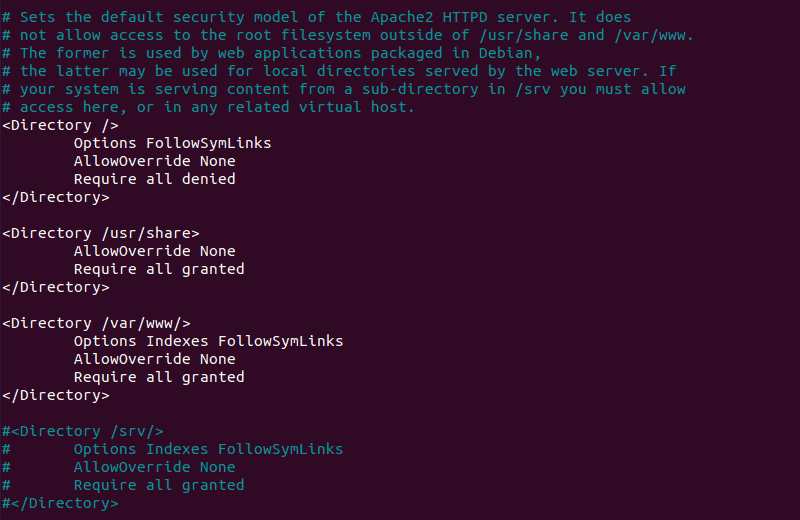
3. If the final line in the <Directory /var/www/> section contains Require all denied, change it to Require all granted.
4. Press Ctrl+X and then Y to save changes to the Apache configuration file.
5. Restart the Apache web server for the changes to take effect. For Ubuntu, use:
sudo systemctl restart apache2For Centos, use:
sudo systemctl restart httpdMethod 3: Adding a Default Directory Index
When a user visits a URL that requests a directory, the web server looks for a file in the given directory. If the file or any similar files are not found, and directory index listings are disabled, the web server displays the ‘403 Forbidden’ error message.
To fix the issue, add a default directory index.
1. Access Apache’s main configuration file by using:
sudo nano /etc/apache2/apache2.conf2. Scroll down to find out the default index file name:
DirectoryIndex index.html index.cgi index.pl index.php index.xhtml3. Make sure there is a file in the webroot folder with this name and upload it if it’s missing.
Conclusion
After following this tutorial, you should be able to determine the cause of an Apache ‘403 Forbidden’ error and fix any issues you may find.
If you want to find out more about 403 forbidden error, read our article 403 forbidden error — what is it and how to fix it.
На чтение 3 мин Опубликовано 19.07.2020
Веб-сервер Apache является одним из самых популярных и широко используемых веб-серверов с открытым исходным кодом благодаря своей стабильности и надежности.
Веб-сервер управляет огромным рынком, особенно на платформах веб-хостинга.
Как бы то ни было, вы можете получить ошибку «Forbidden – You don’t have permission to access / on this server» в вашем браузере после настройки вашего веб-сайта.
Это довольно распространенная ошибка, и многие пользователи уже сталкивались с ней при тестировании своего сайта.
Так в чем же эта ошибка?
Также называемая «ошибка 403», эта такая ошибка в Apache , которая отображается на веб-странице, когда вы пытаетесь получить доступ к веб-сайту с ограниченным или запрещенным доступом.

Кроме того, ошибка может отображаться по разному:
- HTTP Error 403 – Forbidden
- Forbidden: You don’t have permission to access [directory] on this server
- 403 Forbidden
- Access Denied You don’t have permission to access
- 403 forbidden request forbidden by administrative rules
Содержание
- Так что вызывает такие ошибки?
- 1. Неправильные права доступа к файлам / каталогам
- 2. Неправильная настройка файлов конфигурации Apache
- Фиксим ‘403 Forbidden Error’
- 1. Настройте права доступа к файлам и владение каталогом webroot
- 2. Настройте директивы в главном конфигурационном файле Apache
Так что вызывает такие ошибки?
‘403 ошибка‘ возникает по следующим основным причинам:
1. Неправильные права доступа к файлам / каталогам
Эта ошибка может быть вызвана из-за неправильных прав доступа к файлам/папкам в каталоге webroot.
Если права доступа к файлам по умолчанию не настроены для предоставления пользователям доступа к файлам веб-сайта, то вероятность появления этой ошибки в веб-браузере высока.
2. Неправильная настройка файлов конфигурации Apache
Эта ошибка также может быть связана с неправильной настройкой одного из файлов конфигурации Apache.
Это может быть неверный параметр, который был включен по ошибке, или отсутствующие директивы в файле конфигурации.
Фиксим ‘403 Forbidden Error’
Если вы столкнулись с этой ошибкой, вот несколько шагов, которые вы можете предпринять, чтобы исправить это.
1. Настройте права доступа к файлам и владение каталогом webroot
Известно, что неправильные права доступа к файлам и владение каталогами ограничивают доступ к файлам сайта.
Поэтому, во-первых, убедитесь, что права доступа к файлам рекурсивно назначены каталогу webroot, как показано далее.
Каталог webroot всегда должен иметь разрешения EXECUTE, а файл index.html должен иметь разрешения READ.
$ sudo chmod -R 775 /path/to/webroot/directory
Кроме того, настройте владельца каталога, как показано далее:
$ sudo chown -R user:group /path/to/webroot/directory
Где user является обычным вошедшим в систему пользователем, а группа – www-data или apache.
Наконец, перезапустите веб-сервер Apache, чтобы изменения вступили в силу.
$ sudo systemctl restart apache2
Если это не решает проблему, перейдите к следующему шагу:
2. Настройте директивы в главном конфигурационном файле Apache
Убедитесь, что в главном конфигурационном файле Apache /etc/apache2/apache2.conf у вас есть этот блок кода:
<Directory />
        Options FollowSymLinks
        AllowOverride None
        Require all denied
</Directory>

<Directory /usr/share>
        AllowOverride None
        Require all granted
</Directory>

<Directory /var/www/>
        Options Indexes FollowSymLinks
        AllowOverride None
        Require all granted
</Directory>
Сохраните и выйдите, а затем перезапустите Apache.
Если вы используете Apache в системах RHEL / CentOS, убедитесь, что вы ослабили доступ к каталогу /var/www в главном файле конфигурации Apache /etc/httpd/conf/httpd.conf.
<Directory "/var/www">
    AllowOverride None
    Require all granted
</Directory>
Затем сохраните все изменения и перезагрузите Apache.
Пожалуйста, не спамьте и никого не оскорбляйте.
Это поле для комментариев, а не спамбокс.
Рекламные ссылки не индексируются!
1. You should configure your /etc/hosts file like that:
127.0.0.1   localhost
127.0.0.1   test-site
127.0.1.1   my-hostname
# The following lines are desirable for IPv6 capable hosts. etc...
Where test-site is the second «localhost». And my-hostname is the «System hostname» defined in /etc/hostname.
2. You should define and enable a Virtual Host (VH):
There is a default HTTP VH. It’s placed in /etc/apache2/sites-available/. The filename is 000-default.conf. You have to edit it (you can rename it, if you want, or make some other .conf files, based on it) and after that you have to enable it.
You can enable it manually through creation of «soft, symbolic link»:
sudo ln -s /etc/apache2/sites-available/000-default.conf /etc/apache2/sites-enabled/
Or you can use Apache2 tool called a2ensite, which make the same:
sudo a2ensite 000-default.conf
Let’s assume there has 3 Virtual Hosts, enabled SSL, and registered private domain (SOS.info for an example):
/etc/apache2/sites-available/http.SOS.info.conf
/etc/apache2/sites-available/https.SOS.info.conf
And one which is created for the purposes of this topic:
/etc/apache2/sites-available/http.test-site.conf
The content of First 2 VHs is:
$ cat /etc/apache2/sites-available/http.SOS.info.conf
<VirtualHost *:80>
    ServerName SOS.info
    ServerAlias www.SOS.info
    ServerAdmin admin@SOS.info

    # Redirect Requests to SSL
    Redirect permanent "/" "https://SOS.info/"

    ErrorLog ${APACHE_LOG_DIR}/http.SOS.info.error.log
    CustomLog ${APACHE_LOG_DIR}/http.SOS.info.access.log combined
</VirtualHost>
This one redirects all HTTP requests to HTTPS.
$ cat /etc/apache2/sites-available/https.SOS.info.conf
<IfModule mod_ssl.c>
    <VirtualHost _default_:443>
        ServerName SOS.info
        ServerAlias www.SOS.info
        ServerAdmin admin@SOS.info

        DocumentRoot /var/www/html

        SSLEngine on
        SSLCertificateFile /etc/ssl/certs/SOS.info.crt
        SSLCertificateKeyFile /etc/ssl/private/SOS.info.key
        SSLCertificateChainFile /etc/ssl/certs/SOS.info.root-bundle.crt
        #etc..
    </VirtualHost>
</IfModule>
This is the HTTPS VH.
The content of these two files can be posted in one file, but in this case their management (a2ensite/a2dissite)will be more difficult.
The third Virtual Host is that, which is created for our purposes:
$ cat /etc/apache2/sites-available/http.test-site.conf
<VirtualHost *:80>
    ServerName test-site
    ServerAlias test-site.SOS.info

    DocumentRoot /var/www/test-site
    DirectoryIndex index.html

    ErrorLog ${APACHE_LOG_DIR}/test-site.error.log
    CustomLog ${APACHE_LOG_DIR}/test-site.access.log combined

    <Directory /var/www/test-site>
        # Allow .htaccess
        AllowOverride All
        Allow from All
    </Directory>
</VirtualHost>
3. With this configuration you should access:
http://localhost     # pointed to the directory of the mine Domain
https://localhost    # iin our case: /var/www/html (SOS.info), but you should get an error, because the SSL certificate

http://SOS.info      # which redirects to https://SOS.info
https://SOS.info     # you should have valid SSL certificate

http://www.SOS.info  # which is allied to http://SOS.info and redirects to https://SOS.info
https://www.SOS.info # which is allied to https://SOS.info
On the main example you should access and:
http://test-site           # pointed to the directory /var/www/test-site
http://test-site.SOS.info  # which is allied to http://test-site
Try to open the site in the web browser or just try (in the terminal) with next commands:
$ curl -L http://test-site/index.html
$ curl -L http://test-site.SOS.info/index.html
Of course, you need to have some index.html pages in their DocumentRoot
I will leave next notes by reason of pedantry

4. You need properly configured `/etc/apache2/apache2.conf`.
Ii is good idea to spend some time to improve your server’s security. These manuals are about the security configuration: 1st and 2nd. Here you can get free SSL certificate. These sites will help you to check your progress: 1st and 2nd.
According to above security manuals /etc/apache2/apache2.conf file must looks like:
Mutex file:${APACHE_LOCK_DIR} default

PidFile ${APACHE_PID_FILE}

Timeout 60

#KeepAlive Off
KeepAlive On
MaxKeepAliveRequests 100
KeepAliveTimeout 5

HostnameLookups Off

ErrorLog ${APACHE_LOG_DIR}/error.log
LogLevel warn

IncludeOptional mods-enabled/*.load
IncludeOptional mods-enabled/*.conf

Include ports.conf

<Directory />
    Options None FollowSymLinks
    AllowOverride None
    Require all denied
</Directory>

<Directory /var/www/>
    Options None FollowSymLinks
    AllowOverride None
    Require all granted
</Directory>

AccessFileName .htaccess
<FilesMatch "^.ht">
    Require all denied
</FilesMatch>

LogFormat "%v:%p %h %l %u %t "%r" %>s %O "%{Referer}i" "%{User-Agent}i"" vhost_combined
LogFormat "%h %l %u %t "%r" %>s %O "%{Referer}i" "%{User-Agent}i"" combined
LogFormat "%h %l %u %t "%r" %>s %O" common
LogFormat "%{Referer}i -> %U" referer
LogFormat "%{User-agent}i" agent

IncludeOptional conf-enabled/*.conf
IncludeOptional sites-enabled/*.conf

# Hide Server type in the http error-pages
ServerSignature Off
ServerTokens Prod

# Etag allows remote attackers to obtain sensitive information
FileETag None

# Disable Trace HTTP Request
TraceEnable off

# Set cookie with HttpOnly and Secure flag.
# a2enmod headers
Header edit Set-Cookie ^(.*)$ $1;HttpOnly;Secure

# Clickjacking Attack
Header always append X-Frame-Options SAMEORIGIN

# CX-XSS Protection
Header set X-XSS-Protection "1; mode=block"

# Disable HTTP 1.0 Protocol
RewriteEngine On
RewriteCond %{THE_REQUEST} !HTTP/1.1$
RewriteRule .* - [F]

# Change the server banner @ ModSecurity
# Send full server signature so ModSecurity can alter it
ServerTokens Full
# Alter the web server signature sent by Apache
<IfModule security2_module>
    SecServerSignature "Apache 1.3.26"
</IfModule>
Header set Server "Apache 1.3.26"
Header unset X-Powered-By

# Hde TCP Timestamp
#   gksu gedit /etc/sysctl.conf
#   >> net.ipv4.tcp_timestamps = 0
# Test: sudo hping3 SOS.info -p 443 -S --tcp-timestamp -c 1

# Disable -SSLv2 -SSLv3 and weak Ciphers
SSLProtocol all -SSLv2 -SSLv3
SSLHonorCipherOrder on
SSLCipherSuite "EECDH+ECDSA+AESGCM EECDH+aRSA+AESGCM EECDH+ECDSA+SHA384 EECDH+ECDSA+SHA256 EECDH+aRSA+SHA384 EECDH+aRSA+SHA256 EECDH+aRSA EECDH EDH+aRSA !aNULL !eNULL !LOW !3DES !MD5 !EXP !PSK !SRP !DSS !RC4"
5. Set up the Firewall.
To allow/deny external access to your web server you can use UFW (Uncomplicated Firewall):
sudo ufw allow http
sudo ufw allow https
To allow only tcp protocol use:
sudo ufw allow http/tcp
sudo ufw allow https/tcp
You can use and the port number directly:
sudo ufw allow 80/tcp
sudo ufw allow 443/tcp
Just in case you can reload the «rules table»:
sudo ufw reload
You can use and UFW’s GUI interface, called gufw.
sudo apt update
sudo apt install gufw
gufw &
Choice the Office profile. It will set: Status:ON, Incoming:Deny and Outgoing:Allow and add your rules.
6. If you have a router don’t forget to forward some ports:
If you have a router and you want your web server to be accessible from Internet, don’t forget to add some port forwarding. Something like this.
Apache web server is one of the most popular and widely used open-source web servers thanks to its stability and reliability. The web server commands a huge market, especially in the web hosting platforms.
Be that as it may, you may get a “Forbidden – You don’t have permission to access / on this server” error on your browser after setting up your website. It’s quite a common error and a good chunk of users have experienced it while testing their site. So what is this error?
Demystifying the Forbidden Error
Also referred to as the 403 Forbidden error, Apache’s ‘Forbidden Error’ is an error that is displayed on a web page when you are attempting to access a website that’s restricted or forbidden. It’s usually splashed on the browser as shown.
Additionally, the error can manifest in several ways on the browser as indicated below:
- HTTP Error 403 – Forbidden
- Forbidden: You don’t have permission to access [directory] on this server
- 403 Forbidden
- Access Denied You don’t have permission to access
- 403 forbidden requests forbidden by administrative rules
So what causes such errors?
The ‘403 Forbidden Error‘ occurs due to the following main reasons:
1. Incorrect File / Directory Permissions
This error can be triggered due to incorrect file/folder permissions on the webroot directory. If the default file permissions are not adjusted to grant users access to the website files, then the chances of this error popping on a web browser are high.
2. Misconfiguration of the Apache Configuration Files
This error can also be attributed to a misconfiguration of one of the Apache configuration files. It could be an incorrect parameter that has been included or missing directives in the configuration file.
Fixing the ‘403 Forbidden Error’
If you have encountered this error, here are a few steps that you can take to remedy this.
1. Adjust file permissions & ownership of the webroot directory
Incorrect file permissions & directory ownership are known to restrict access to website files. So, firstly, be sure to assign the file permissions recursively to the webroot directory as shown.
The webroot directory should always have EXECUTE permissions and the index.html file should have READ permissions.
$ sudo chmod -R 775 /path/to/webroot/directory
Additionally, adjust the directory ownership as shown:
$ sudo chown -R user:group /path/to/webroot/directory
Where the user is the regular logged-in user and the group is www-data or apache.
Finally, reload or restart the Apache webserver for the changes to take effect.
$ sudo systemctl restart apache2
OR
$ sudo systemctl restart httpd
If this does not resolve the issue, proceed to the next step:
2. Adjust directives in Apache main configuration file
If you are on Debian-based Linux, in Apache’s main configuration file /etc/apache2/apache2.conf, ensure that you have this block of code:
<Directory />
        Options FollowSymLinks
        AllowOverride None
        Require all denied
</Directory>

<Directory /usr/share>
        AllowOverride None
        Require all granted
</Directory>

<Directory /var/www/>
        Options Indexes FollowSymLinks
        AllowOverride None
        Require all granted
</Directory>
Save and exit and thereafter, restart the Apache.
If you are running Apache on RHEL-based distributions / CentOS systems, ensure that you relax access to the /var/www directory in the /etc/httpd/conf/httpd.conf main Apache configuration file.
<Directory "/var/www">
    AllowOverride None
    Require all granted
</Directory>
Then save all the changes and reload Apache.
If after trying all these steps you are still getting the error, then please check the configuration of your virtual host files. We have detailed articles on how you can configure the Apache Virtual host file on:
- How to Install Apache with Virtual Hosts on Debian
- How to Configure Apache Virtual Hosts on Rocky Linux
- How to Install Apache with Virtual Host on CentOS
I hope that the steps provided have helped you clear the 403 error.
If You Appreciate What We Do Here On TecMint, You Should Consider:
TecMint is the fastest growing and most trusted community site for any kind of Linux Articles, Guides and Books on the web. Millions of people visit TecMint! to search or browse the thousands of published articles available FREELY to all.
If you like what you are reading, please consider buying us a coffee ( or 2 ) as a token of appreciation.

We are thankful for your never ending support.
#
# This is the main Apache HTTP server configuration file.  It contains the
# configuration directives that give the server its instructions.
# See <URL:http://httpd.apache.org/docs/2.2> for detailed information.
# In particular, see
# <URL:http://httpd.apache.org/docs/2.2/mod/directives.html>
# for a discussion of each configuration directive.
#
# Do NOT simply read the instructions in here without understanding
# what they do.  They're here only as hints or reminders.  If you are unsure
# consult the online docs. You have been warned.
#
# Configuration and logfile names: If the filenames you specify for many
# of the server's control files begin with "/" (or "drive:/" for Win32), the
# server will use that explicit path.  If the filenames do *not* begin
# with "/", the value of ServerRoot is prepended -- so "/var/log/httpd/foo_log"
# with ServerRoot set to "/etc/httpd" will be interpreted by the
# server as "/etc/httpd//var/log/httpd/foo_log".

#
# ServerRoot: The top of the directory tree under which the server's
# configuration, error, and log files are kept.
#
# Do not add a slash at the end of the directory path.  If you point
# ServerRoot at a non-local disk, be sure to point the LockFile directive
# at a local disk.  If you wish to share the same ServerRoot for multiple
# httpd daemons, you will need to change at least LockFile and PidFile.
#
ServerRoot "/etc/httpd"

#
# Listen: Allows you to bind Apache to specific IP addresses and/or
# ports, instead of the default. See also the <VirtualHost>
# directive.
#
# Change this to Listen on specific IP addresses as shown below to
# prevent Apache from glomming onto all bound IP addresses.
#
#Listen 12.34.56.78:80

Listen 80

#
# Dynamic Shared Object (DSO) Support
#
# To be able to use the functionality of a module which was built as a DSO you
# have to place corresponding `LoadModule' lines at this location so the
# directives contained in it are actually available _before_ they are used.
# Statically compiled modules (those listed by `httpd -l') do not need
# to be loaded here.
#
# Example:
# LoadModule foo_module modules/mod_foo.so
#
LoadModule authn_file_module modules/mod_authn_file.so
LoadModule authn_dbm_module modules/mod_authn_dbm.so
LoadModule authn_anon_module modules/mod_authn_anon.so
LoadModule authn_dbd_module modules/mod_authn_dbd.so
LoadModule authn_default_module modules/mod_authn_default.so
LoadModule authz_host_module modules/mod_authz_host.so
LoadModule authz_groupfile_module modules/mod_authz_groupfile.so
LoadModule authz_user_module modules/mod_authz_user.so
LoadModule authz_dbm_module modules/mod_authz_dbm.so
LoadModule authz_owner_module modules/mod_authz_owner.so
LoadModule authnz_ldap_module modules/mod_authnz_ldap.so
LoadModule authz_default_module modules/mod_authz_default.so
LoadModule auth_basic_module modules/mod_auth_basic.so
LoadModule auth_digest_module modules/mod_auth_digest.so
LoadModule file_cache_module modules/mod_file_cache.so
LoadModule cache_module modules/mod_cache.so
LoadModule disk_cache_module modules/mod_disk_cache.so
LoadModule mem_cache_module modules/mod_mem_cache.so
LoadModule dbd_module modules/mod_dbd.so
LoadModule dumpio_module modules/mod_dumpio.so
LoadModule ext_filter_module modules/mod_ext_filter.so
LoadModule include_module modules/mod_include.so
LoadModule filter_module modules/mod_filter.so
LoadModule substitute_module modules/mod_substitute.so
LoadModule deflate_module modules/mod_deflate.so
LoadModule ldap_module modules/mod_ldap.so
LoadModule log_config_module modules/mod_log_config.so
LoadModule log_forensic_module modules/mod_log_forensic.so
LoadModule logio_module modules/mod_logio.so
LoadModule env_module modules/mod_env.so
LoadModule mime_magic_module modules/mod_mime_magic.so
LoadModule cern_meta_module modules/mod_cern_meta.so
LoadModule expires_module modules/mod_expires.so
LoadModule headers_module modules/mod_headers.so
LoadModule ident_module modules/mod_ident.so
LoadModule usertrack_module modules/mod_usertrack.so
# LoadModule unique_id_module modules/mod_unique_id.so
LoadModule setenvif_module modules/mod_setenvif.so
LoadModule version_module modules/mod_version.so
LoadModule proxy_module modules/mod_proxy.so
LoadModule proxy_connect_module modules/mod_proxy_connect.so
LoadModule proxy_ftp_module modules/mod_proxy_ftp.so
LoadModule proxy_http_module modules/mod_proxy_http.so
LoadModule proxy_scgi_module modules/mod_proxy_scgi.so
LoadModule proxy_ajp_module modules/mod_proxy_ajp.so
LoadModule proxy_balancer_module modules/mod_proxy_balancer.so
LoadModule ssl_module modules/mod_ssl.so
LoadModule mime_module modules/mod_mime.so
LoadModule dav_module modules/mod_dav.so
LoadModule status_module modules/mod_status.so
LoadModule autoindex_module modules/mod_autoindex.so
LoadModule asis_module modules/mod_asis.so
LoadModule info_module modules/mod_info.so
LoadModule suexec_module modules/mod_suexec.so
LoadModule cgi_module modules/mod_cgi.so
LoadModule cgid_module modules/mod_cgid.so
LoadModule dav_fs_module modules/mod_dav_fs.so
LoadModule vhost_alias_module modules/mod_vhost_alias.so
LoadModule negotiation_module modules/mod_negotiation.so
LoadModule dir_module modules/mod_dir.so
LoadModule imagemap_module modules/mod_imagemap.so
LoadModule actions_module modules/mod_actions.so
LoadModule speling_module modules/mod_speling.so
LoadModule userdir_module modules/mod_userdir.so
LoadModule alias_module modules/mod_alias.so
LoadModule rewrite_module modules/mod_rewrite.so

<IfModule !mpm_netware_module>
<IfModule !mpm_winnt_module>
#
# If you wish httpd to run as a different user or group, you must run
# httpd as root initially and it will switch.
#
# User/Group: The name (or #number) of the user/group to run httpd as.
# It is usually good practice to create a dedicated user and group for
# running httpd, as with most system services.
#

User http
Group http

</IfModule>
</IfModule>

# 'Main' server configuration
#
# The directives in this section set up the values used by the 'main'
# server, which responds to any requests that aren't handled by a
# <VirtualHost> definition.  These values also provide defaults for
# any <VirtualHost> containers you may define later in the file.
#
# All of these directives may appear inside <VirtualHost> containers,
# in which case these default settings will be overridden for the
# virtual host being defined.
#

#
# ServerAdmin: Your address, where problems with the server should be
# e-mailed.  This address appears on some server-generated pages, such
# as error documents.  e.g. admin@your-domain.com
#

ServerAdmin minga@aprenda.dev

#
# ServerName gives the name and port that the server uses to identify itself.
# This can often be determined automatically, but we recommend you specify
# it explicitly to prevent problems during startup.
#
# If your host doesn't have a registered DNS name, enter its IP address here.
#
#ServerName www.example.com:80

#
# DocumentRoot: The directory out of which you will serve your
# documents. By default, all requests are taken from this directory, but
# symbolic links and aliases may be used to point to other locations.
#

DocumentRoot "/srv/http"

#
# Each directory to which Apache has access can be configured with respect
# to which services and features are allowed and/or disabled in that
# directory (and its subdirectories).
#
# First, we configure the "default" to be a very restrictive set of
# features.
#
<Directory />
    Options FollowSymLinks
    AllowOverride None
    Order deny,allow
    Deny from all
</Directory>

#
# Note that from this point forward you must specifically allow
# particular features to be enabled - so if something's not working as
# you might expect, make sure that you have specifically enabled it
# below.
#

#
# This should be changed to whatever you set DocumentRoot to.
#
<Directory "/srv/http">
    #
    # Possible values for the Options directive are "None", "All",
    # or any combination of:
    #   Indexes Includes FollowSymLinks SymLinksifOwnerMatch ExecCGI MultiViews
    #
    # Note that "MultiViews" must be named *explicitly* --- "Options All"
    # doesn't give it to you.
    #
    # The Options directive is both complicated and important.  Please see
    # http://httpd.apache.org/docs/2.2/mod/core.html#options
    # for more information.
    #
    # Options Indexes FollowSymLinks
    Options Indexes All

    #
    # AllowOverride controls what directives may be placed in .htaccess files.
    # It can be "All", "None", or any combination of the keywords:
    #   Options FileInfo AuthConfig Limit
    #
    AllowOverride None

    #
    # Controls who can get stuff from this server.
    #
    Order allow,deny
    Allow from all

</Directory>


<Directory "/home/gral/web-sit/local">
        Options +Indexes FollowSymLinks +ExecCGI
        AllowOverride AuthConfig FileInfo
                Order allow,deny
        Allow from all
</Directory>
# this was just a test


#
# DirectoryIndex: sets the file that Apache will serve if a directory
# is requested.
#
<IfModule dir_module>
    DirectoryIndex index.html
</IfModule>

#
# The following lines prevent .htaccess and .htpasswd files from being
# viewed by Web clients.
#
<FilesMatch "^.ht">
    Order allow,deny
    Deny from all
    Satisfy All
</FilesMatch>

#
# ErrorLog: The location of the error log file.
# If you do not specify an ErrorLog directive within a <VirtualHost>
# container, error messages relating to that virtual host will be
# logged here.  If you *do* define an error logfile for a <VirtualHost>
# container, that host's errors will be logged there and not here.
#

ErrorLog "/var/log/httpd/error_log"

#
# LogLevel: Control the number of messages logged to the error_log.
# Possible values include: debug, info, notice, warn, error, crit,
# alert, emerg.
#

LogLevel warn

<IfModule log_config_module>
    #
    # The following directives define some format nicknames for use with
    # a CustomLog directive (see below).
    #
    LogFormat "%h %l %u %t "%r" %>s %b "%{Referer}i" "%{User-Agent}i"" combined
    LogFormat "%h %l %u %t "%r" %>s %b" common

    <IfModule logio_module>
      # You need to enable mod_logio.c to use %I and %O
      LogFormat "%h %l %u %t "%r" %>s %b "%{Referer}i" "%{User-Agent}i" %I %O" combinedio
    </IfModule>

    #
    # The location and format of the access logfile (Common Logfile Format).
    # If you do not define any access logfiles within a <VirtualHost>
    # container, they will be logged here.  Contrariwise, if you *do*
    # define per-<VirtualHost> access logfiles, transactions will be
    # logged therein and *not* in this file.
    #
    CustomLog "/var/log/httpd/access_log" common

    #
    # If you prefer a logfile with access, agent, and referer information
    # (Combined Logfile Format) you can use the following directive.
    #
    #CustomLog "/var/log/httpd/access_log" combined
</IfModule>

<IfModule alias_module>
    #
    # Redirect: Allows you to tell clients about documents that used to
    # exist in your server's namespace, but do not anymore. The client
    # will make a new request for the document at its new location.
    # Example:
    # Redirect permanent /foo http://www.example.com/bar

    #
    # Alias: Maps web paths into filesystem paths and is used to
    # access content that does not live under the DocumentRoot.
    # Example:
    # Alias /webpath /full/filesystem/path
    #
    # If you include a trailing / on /webpath then the server will
    # require it to be present in the URL.  You will also likely
    # need to provide a <Directory> section to allow access to
    # the filesystem path.

    #
    # ScriptAlias: This controls which directories contain server scripts.
    # ScriptAliases are essentially the same as Aliases, except that
    # documents in the target directory are treated as applications and
    # run by the server when requested rather than as documents sent to the
    # client.  The same rules about trailing "/" apply to ScriptAlias
    # directives as to Alias.
    #
    ScriptAlias /cgi-bin/ "/srv/http/cgi-bin/"

</IfModule>

<IfModule cgid_module>
    #
    # ScriptSock: On threaded servers, designate the path to the UNIX
    # socket used to communicate with the CGI daemon of mod_cgid.
    #
    #Scriptsock /var/run/httpd/cgisock
</IfModule>

#
# "/srv/http/cgi-bin" should be changed to whatever your ScriptAliased
# CGI directory exists, if you have that configured.
#
<Directory "/srv/http/cgi-bin">
    AllowOverride None
    Options None
    Order allow,deny
    Allow from all
</Directory>

#
# DefaultType: the default MIME type the server will use for a document
# if it cannot otherwise determine one, such as from filename extensions.
# If your server contains mostly text or HTML documents, "text/plain" is
# a good value.  If most of your content is binary, such as applications
# or images, you may want to use "application/octet-stream" instead to
# keep browsers from trying to display binary files as though they are
# text.
#
DefaultType text/plain

<IfModule mime_module>
    #
    # TypesConfig points to the file containing the list of mappings from
    # filename extension to MIME-type.
    #
    TypesConfig conf/mime.types

    #
    # AddType allows you to add to or override the MIME configuration
    # file specified in TypesConfig for specific file types.
    #
    #AddType application/x-gzip .tgz
    #
    # AddEncoding allows you to have certain browsers uncompress
    # information on the fly. Note: Not all browsers support this.
    #
    #AddEncoding x-compress .Z
    #AddEncoding x-gzip .gz .tgz
    #
    # If the AddEncoding directives above are commented-out, then you
    # probably should define those extensions to indicate media types:
    #
    AddType application/x-compress .Z
    AddType application/x-gzip .gz .tgz

    #
    # AddHandler allows you to map certain file extensions to "handlers":
    # actions unrelated to filetype. These can be either built into the server
    # or added with the Action directive (see below)
    #
    # To use CGI scripts outside of ScriptAliased directories:
    # (You will also need to add "ExecCGI" to the "Options" directive.)
    #
    #AddHandler cgi-script .cgi

    # For type maps (negotiated resources):
    #AddHandler type-map var

    #
    # Filters allow you to process content before it is sent to the client.
    #
    # To parse .shtml files for server-side includes (SSI):
    # (You will also need to add "Includes" to the "Options" directive.)
    #
    #AddType text/html .shtml
    #AddOutputFilter INCLUDES .shtml
</IfModule>

#
# The mod_mime_magic module allows the server to use various hints from the
# contents of the file itself to determine its type.  The MIMEMagicFile
# directive tells the module where the hint definitions are located.
#
#MIMEMagicFile conf/magic

#
# Customizable error responses come in three flavors:
# 1) plain text 2) local redirects 3) external redirects
#
# Some examples:
#ErrorDocument 500 "The server made a boo boo."
#ErrorDocument 404 /missing.html
#ErrorDocument 404 "/cgi-bin/missing_handler.pl"
#ErrorDocument 402 http://www.example.com/subscription_info.html
#

#
# EnableMMAP and EnableSendfile: On systems that support it,
# memory-mapping or the sendfile syscall is used to deliver
# files.  This usually improves server performance, but must
# be turned off when serving from networked-mounted
# filesystems or if support for these functions is otherwise
# broken on your system.
#
#EnableMMAP off
#EnableSendfile off

# Supplemental configuration
#
# The configuration files in the conf/extra/ directory can be
# included to add extra features or to modify the default configuration of
# the server, or you may simply copy their contents here and change as
# necessary.

# Server-pool management (MPM specific)
#Include conf/extra/httpd-mpm.conf

# Multi-language error messages
Include conf/extra/httpd-multilang-errordoc.conf

# Fancy directory listings
Include conf/extra/httpd-autoindex.conf

# Language settings
Include conf/extra/httpd-languages.conf

# User home directories
Include conf/extra/httpd-userdir.conf

# Real-time info on requests and configuration
#Include conf/extra/httpd-info.conf

# Virtual hosts
Include conf/extra/httpd-vhosts.conf

# Local access to the Apache HTTP Server Manual
#Include conf/extra/httpd-manual.conf

# Distributed authoring and versioning (WebDAV)
#Include conf/extra/httpd-dav.conf

# Various default settings
Include conf/extra/httpd-default.conf

# Secure (SSL/TLS) connections
#Include conf/extra/httpd-ssl.conf
#
# Note: The following must must be present to support
#       starting without SSL on platforms with no /dev/random equivalent
#       but a statically compiled-in mod_ssl.
#
<IfModule ssl_module>
SSLRandomSeed startup builtin
SSLRandomSeed connect builtin
</IfModule>