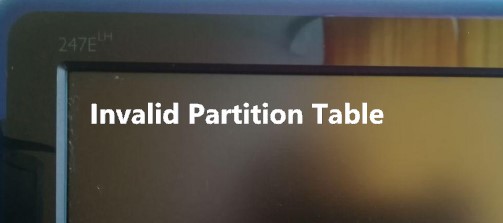
Ошибка Invalid Partition Table (недопустимая таблица разделов) может появиться в любой версии Windows, и может возникнуть как при включении компьютера, так и при попытке установить Windows с USB-флешки. Таблица разделов хранится на диске для описания разделов и хранения их записей. Ошибка Invalid Partition Table может возникать из-за какого-либо повреждения в таблице, на диске более двух разделов отмечены как активные, повреждение MBR или неправильная последовательность загрузки. В этой инструкции о том, как исправить ошибку Invalid Partition Table в Windows 10/7 при попытке установить систему с флешки или при включении компьютера.
Создание установочной флешки
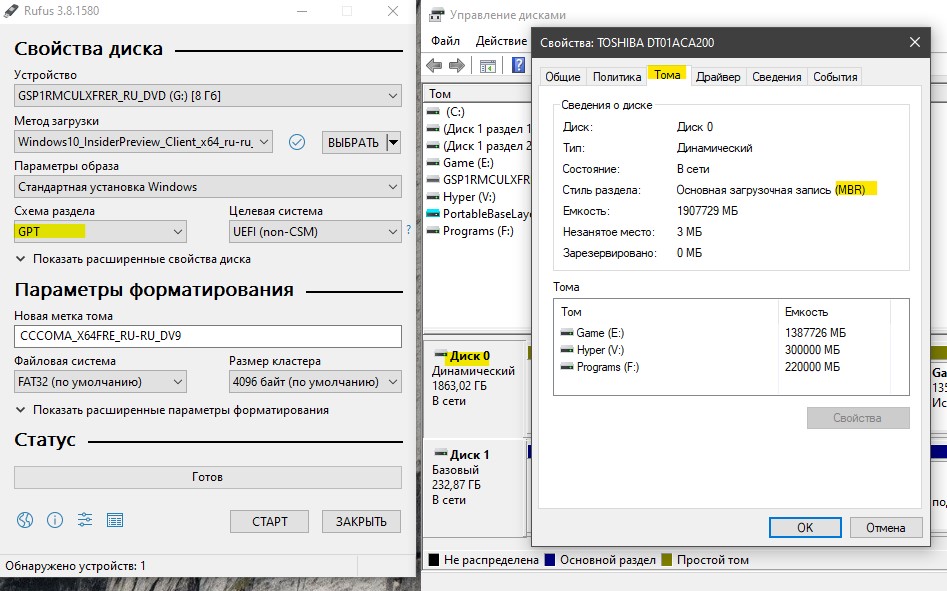
Если ошибка Invalid Partition Table появляется при попытке установить Windows с флешки, то это связано с тем, что некоторые пользователи создают установочную флешку не правильно. К примеру, они создают в программе Rufus ISO образ с разметкой GPT, но у них жесткий или SSD диск, на котором Windows, размечен как MBR. Если у вас на компьютере диск MBR. то и установочную флешку вы должны создавать с разметкой MBR. Особенно это касается, когда пользователи пытаются установить Windows 10 через утилиту MediaCreationTool на старые компьютеры, со старым BIOS.
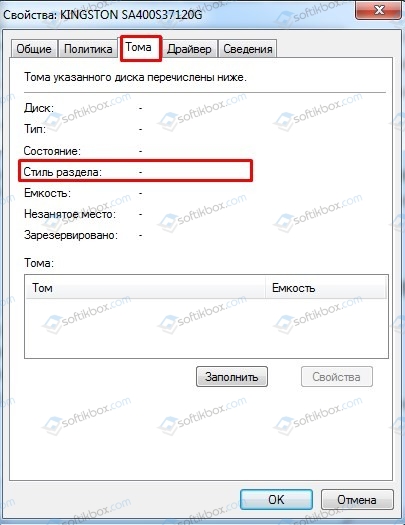
- Нажмите правой кнопкой мыши по кнопке «Пуск» и выберите «Управление дисками«. Щелкните по «Диск 0«, на котором Windows, правой кнопкой мыши и выберите «Свойства». Перейдите во вкладку «Тома» и посмотрите текущую разметку диска.
- Если диск MBR, то создайте установочную флешку с разметкой MBR (рекомендую rufus). Если у вас будет написано, что таблица GUID или GPT, то создайте установочную флешку с разметкой GPT.
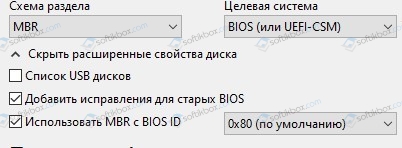
Если выше не помогла рекомендация, то у вас BIOS старее, чем предполагалось. Нажмите в Rufus на «Показать расширенные параметры» и выберите галочками два пункта:
- Добавить исправления для старых BIOS.
- Использовать MBR с BIOS ID.

Последовательность загрузки

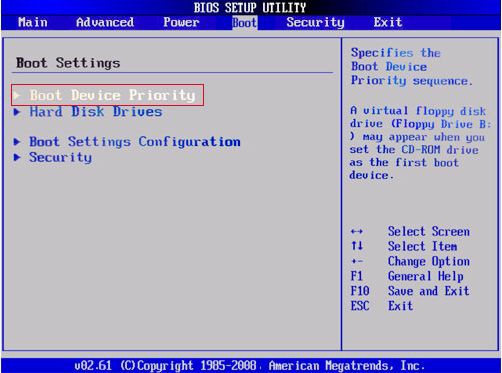
Если ошибка Invalid Partition Table появляется при включении ПК, то отсоедините все USB утсрйоства (флешки, принтера) от USB портов компьютера или ноутбука. Далее, выключите компьютер. При включении ПК, сразу нажимайте много раз кнопку DEL, чтобы попасть в BIOS. В BIOS нужно поставить на первое место загрузку с диска на котором Windows.
Разновидностей BIOS много, легче поискать в Google картинках, но обычно строка BOOT, и в ней задается приоритет загрузки.
Деактивировать активный том через Diskpart
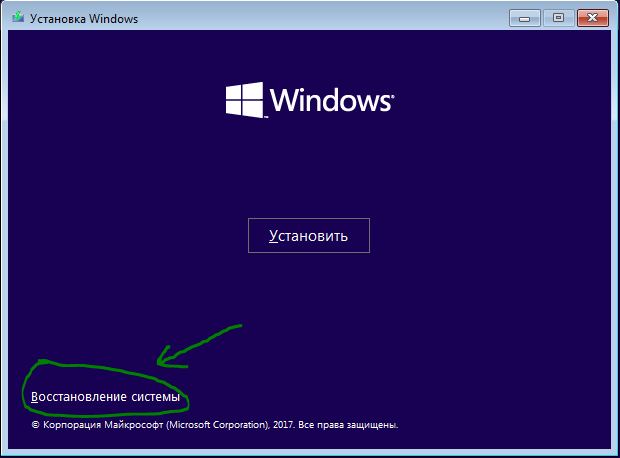
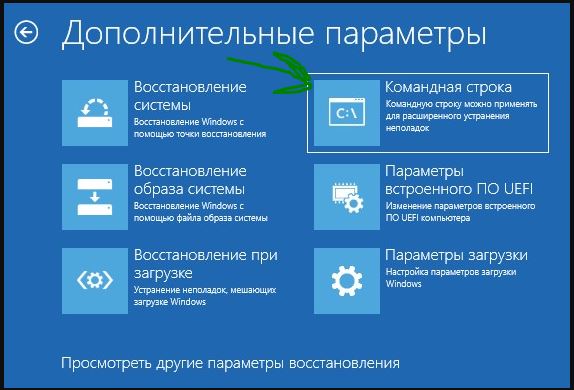
Если ошибка Invalid Partition Table вызвана двумя или более активными разделами в системе, это решение поможет. Вам понадобиться установочная флешка с Windows, чтобы запустить командную строку при включении компьютера. Начните установку Windows, когда дойдете до пункта установки, то нажмите снизу на «Восстановление системы«. Вас перебросит в дополнительные параметры загрузки, где вы должны запустить командную строку. Но перед этим, нажмите на «Восстановление при загрузке«, чтобы попытаться исправить ошибки автоматически.
Это пример на Windows 10, в Windows 7 он схож.
В командной строке вводите следующие команды:
diskpart— запуск инструмента.list volume— просмотр разделов.
Вы должны увидеть значок * напротив раздела, что будет означать? что он активен. Если у вас есть *, то приступайте ниже вводить команды.
select volume 1— выбрать том из списка, который помечен *.inactive— деактивировать активный том.

Восстановить MBR вручную
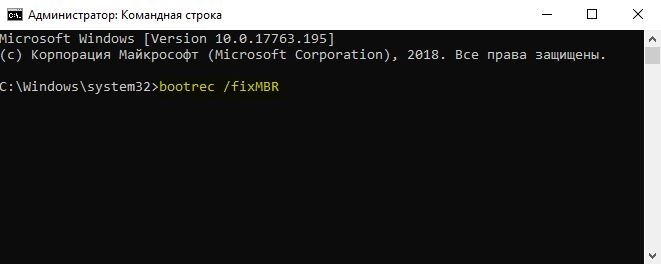
Если ошибка Invalid Partition Table возникает из-за поврежденной загрузочной записи, то нужно восстановить MBR. Запустите командную строку с загрузочной флешки, как показано выше способом, и введите команды.
bootrec /fixbootbootrec /scanosbootrec /fixmbrbootrec /rebuildbcd
Смотрите еще:
- Операционная система не найдена при включении компьютера
- Как войти в BIOS и выбрать первым загрузочный USB Flash или DVD
- Загрузочная флешка для установки windows 7/8.1/10
- Установка Windows на данный диск невозможна, так как выбранный диск имеет стиль разделов GPT
- Как конвертировать MBR в GPT без потери данных в Windows
[ Telegram | Поддержать ]
| View previous topic :: View next topic | |||||||||||||||
| Author | Message | ||||||||||||||
|---|---|---|---|---|---|---|---|---|---|---|---|---|---|---|---|
| Kenji Miyamoto Veteran 
Joined: 28 May 2005 |
|
||||||||||||||
| Back to top |
|
||||||||||||||
| DONAHUE Watchman 
Joined: 09 Dec 2006 |
|
||||||||||||||
| Back to top |
|
||||||||||||||
| Hu Moderator Joined: 06 Mar 2007 |
|
||||||||||||||
| Back to top |
|
||||||||||||||
| NeddySeagoon Administrator 
Joined: 05 Jul 2003 |
|
||||||||||||||
| Back to top |
|
||||||||||||||
| Kenji Miyamoto Veteran
Joined: 28 May 2005 |
|
||||||||||||||
| Back to top |
|
||||||||||||||
| DONAHUE Watchman
Joined: 09 Dec 2006 |
|
||||||||||||||
| Back to top |
|
||||||||||||||
| Kenji Miyamoto Veteran
Joined: 28 May 2005 |
|
||||||||||||||
| Back to top |
|
||||||||||||||
| Kenji Miyamoto Veteran
Joined: 28 May 2005 |
|
||||||||||||||
| Back to top |
|
||||||||||||||
| DONAHUE Watchman
Joined: 09 Dec 2006 |
|
||||||||||||||
| Back to top |
|
||||||||||||||
| Kenji Miyamoto Veteran
Joined: 28 May 2005 |
|
||||||||||||||
| Back to top |
|
||||||||||||||
| DONAHUE Watchman
Joined: 09 Dec 2006 |
|
||||||||||||||
| Back to top |
|
||||||||||||||
| Kenji Miyamoto Veteran
Joined: 28 May 2005 |
|
||||||||||||||
| Back to top |
|
||||||||||||||
| DONAHUE Watchman
Joined: 09 Dec 2006 |
|
||||||||||||||
| Back to top |
|
||||||||||||||
| Hu Moderator Joined: 06 Mar 2007 |
|
||||||||||||||
| Back to top |
|
||||||||||||||
| Kenji Miyamoto Veteran
Joined: 28 May 2005 |
|
||||||||||||||
| Back to top |
|
||||||||||||||
| DONAHUE Watchman
Joined: 09 Dec 2006 |
|
||||||||||||||
| Back to top |
|
||||||||||||||
|

|
You cannot post new topics in this forum |
I’m trying to add a second SSD to a Centos 6 system. But I get the Error 5 partition table invalid or corrupt at boot.
The system already has a single SSD (sdb) and a pair of HDDs (sd{a,c}) in a RAID 1 array from where it boots. It is as if the new SSD assumes one of the devices of the RAID array. Is it? How to avoid that or rearrange the setup?
# cat fstab

UUID=967b4035-782d-4c66-b22f-50244fe970ca /                       ext4    defaults        1 1
UUID=86fd06e9-cdc9-4166-ba9f-c237cfc43e02 /boot                   ext4    defaults        1 2
UUID=72552a7a-d8ae-4f0a-8917-b75a6239ce9f /ssd                    ext4    discard,relatime    1 2
UUID=8000e5e6-caa2-4765-94f8-9caeb2bda26e swap                    swap    defaults        0 0
tmpfs                   /dev/shm                tmpfs   defaults        0 0
devpts                  /dev/pts                devpts  gid=5,mode=620  0 0
sysfs                   /sys                    sysfs   defaults        0 0
proc                    /proc                   proc    defaults        0 0

# ll /dev/disk/by-id/
total 0
lrwxrwxrwx. 1 root root  9 Jun 15 23:50 ata-OCZ-VERTEX3_OCZ-43DSRFTNCLE9ZJXX -> ../../sdb
lrwxrwxrwx. 1 root root 10 Jun 15 23:50 ata-OCZ-VERTEX3_OCZ-43DSRFTNCLE9ZJXX-part1 -> ../../sdb1
lrwxrwxrwx. 1 root root  9 Jun 15 23:50 ata-ST3500413AS_5VMT49E3 -> ../../sdc
lrwxrwxrwx. 1 root root 10 Jun 15 23:50 ata-ST3500413AS_5VMT49E3-part1 -> ../../sdc1
lrwxrwxrwx. 1 root root 10 Jun 15 23:50 ata-ST3500413AS_5VMT49E3-part2 -> ../../sdc2
lrwxrwxrwx. 1 root root 10 Jun 15 23:50 ata-ST3500413AS_5VMT49E3-part3 -> ../../sdc3
lrwxrwxrwx. 1 root root  9 Jun 15 23:50 ata-ST3500413AS_5VMTJNAJ -> ../../sda
lrwxrwxrwx. 1 root root 10 Jun 15 23:50 ata-ST3500413AS_5VMTJNAJ-part1 -> ../../sda1
lrwxrwxrwx. 1 root root 10 Jun 15 23:50 ata-ST3500413AS_5VMTJNAJ-part2 -> ../../sda2
lrwxrwxrwx. 1 root root 10 Jun 15 23:50 ata-ST3500413AS_5VMTJNAJ-part3 -> ../../sda3
lrwxrwxrwx. 1 root root  9 Jun 15 23:50 md-name-localhost.localdomain:0 -> ../../md0
lrwxrwxrwx. 1 root root  9 Jun 15 23:50 md-name-localhost.localdomain:1 -> ../../md1
lrwxrwxrwx. 1 root root  9 Jun 15 23:50 md-name-localhost.localdomain:2 -> ../../md2
lrwxrwxrwx. 1 root root  9 Jun 15 23:50 md-uuid-a04d7241:8da6023e:f9004352:107a923a -> ../../md1
lrwxrwxrwx. 1 root root  9 Jun 15 23:50 md-uuid-a22c43b9:f1954990:d3ddda5e:f9aff3c9 -> ../../md0
lrwxrwxrwx. 1 root root  9 Jun 15 23:50 md-uuid-f403a2d0:447803b5:66edba73:569f8305 -> ../../md2
lrwxrwxrwx. 1 root root  9 Jun 15 23:50 scsi-SATA_OCZ-VERTEX3_OCZ-43DSRFTNCLE9ZJXX -> ../../sdb
lrwxrwxrwx. 1 root root 10 Jun 15 23:50 scsi-SATA_OCZ-VERTEX3_OCZ-43DSRFTNCLE9ZJXX-part1 -> ../../sdb1
lrwxrwxrwx. 1 root root  9 Jun 15 23:50 scsi-SATA_ST3500413AS_5VMT49E3 -> ../../sdc
lrwxrwxrwx. 1 root root 10 Jun 15 23:50 scsi-SATA_ST3500413AS_5VMT49E3-part1 -> ../../sdc1
lrwxrwxrwx. 1 root root 10 Jun 15 23:50 scsi-SATA_ST3500413AS_5VMT49E3-part2 -> ../../sdc2
lrwxrwxrwx. 1 root root 10 Jun 15 23:50 scsi-SATA_ST3500413AS_5VMT49E3-part3 -> ../../sdc3
lrwxrwxrwx. 1 root root  9 Jun 15 23:50 scsi-SATA_ST3500413AS_5VMTJNAJ -> ../../sda
lrwxrwxrwx. 1 root root 10 Jun 15 23:50 scsi-SATA_ST3500413AS_5VMTJNAJ-part1 -> ../../sda1
lrwxrwxrwx. 1 root root 10 Jun 15 23:50 scsi-SATA_ST3500413AS_5VMTJNAJ-part2 -> ../../sda2
lrwxrwxrwx. 1 root root 10 Jun 15 23:50 scsi-SATA_ST3500413AS_5VMTJNAJ-part3 -> ../../sda3
lrwxrwxrwx. 1 root root  9 Jun 15 23:50 wwn-0x5000c500383621ff -> ../../sdc
lrwxrwxrwx. 1 root root 10 Jun 15 23:50 wwn-0x5000c500383621ff-part1 -> ../../sdc1
lrwxrwxrwx. 1 root root 10 Jun 15 23:50 wwn-0x5000c500383621ff-part2 -> ../../sdc2
lrwxrwxrwx. 1 root root 10 Jun 15 23:50 wwn-0x5000c500383621ff-part3 -> ../../sdc3
lrwxrwxrwx. 1 root root  9 Jun 15 23:50 wwn-0x5000c5003838b2e7 -> ../../sda
lrwxrwxrwx. 1 root root 10 Jun 15 23:50 wwn-0x5000c5003838b2e7-part1 -> ../../sda1
lrwxrwxrwx. 1 root root 10 Jun 15 23:50 wwn-0x5000c5003838b2e7-part2 -> ../../sda2
lrwxrwxrwx. 1 root root 10 Jun 15 23:50 wwn-0x5000c5003838b2e7-part3 -> ../../sda3
lrwxrwxrwx. 1 root root  9 Jun 15 23:50 wwn-0x5e83a97f592139d6 -> ../../sdb
lrwxrwxrwx. 1 root root 10 Jun 15 23:50 wwn-0x5e83a97f592139d6-part1 -> ../../sdb1

# fdisk -l

Disk /dev/sdb: 120.0 GB, 120034123776 bytes
255 heads, 63 sectors/track, 14593 cylinders
Units = cylinders of 16065 * 512 = 8225280 bytes
Sector size (logical/physical): 512 bytes / 512 bytes
I/O size (minimum/optimal): 512 bytes / 512 bytes
Disk identifier: 0x79298ec9

   Device Boot      Start         End      Blocks   Id  System
/dev/sdb1               1       14594   117219328   83  Linux

Disk /dev/sdc: 500.1 GB, 500107862016 bytes
255 heads, 63 sectors/track, 60801 cylinders
Units = cylinders of 16065 * 512 = 8225280 bytes
Sector size (logical/physical): 512 bytes / 512 bytes
I/O size (minimum/optimal): 512 bytes / 512 bytes
Disk identifier: 0x000d99de

   Device Boot      Start         End      Blocks   Id  System
/dev/sdc1               1        1275    10240000   fd  Linux raid autodetect
/dev/sdc2   *        1275        1339      512000   fd  Linux raid autodetect
/dev/sdc3            1339       60802   477633536   fd  Linux raid autodetect

Disk /dev/sda: 500.1 GB, 500107862016 bytes
255 heads, 63 sectors/track, 60801 cylinders
Units = cylinders of 16065 * 512 = 8225280 bytes
Sector size (logical/physical): 512 bytes / 512 bytes
I/O size (minimum/optimal): 512 bytes / 512 bytes
Disk identifier: 0x000b3327

   Device Boot      Start         End      Blocks   Id  System
/dev/sda1               1        1275    10240000   fd  Linux raid autodetect
/dev/sda2   *        1275        1339      512000   fd  Linux raid autodetect
/dev/sda3            1339       60802   477633536   fd  Linux raid autodetect

Disk /dev/md0: 10.5 GB, 10484641792 bytes
2 heads, 4 sectors/track, 2559727 cylinders
Units = cylinders of 8 * 512 = 4096 bytes
Sector size (logical/physical): 512 bytes / 512 bytes
I/O size (minimum/optimal): 512 bytes / 512 bytes
Disk identifier: 0x00000000

Disk /dev/md0 doesn't contain a valid partition table

Disk /dev/md2: 489.1 GB, 489095557120 bytes
2 heads, 4 sectors/track, 119408095 cylinders
Units = cylinders of 8 * 512 = 4096 bytes
Sector size (logical/physical): 512 bytes / 512 bytes
I/O size (minimum/optimal): 512 bytes / 512 bytes
Disk identifier: 0x00000000

Disk /dev/md2 doesn't contain a valid partition table

Disk /dev/md1: 524 MB, 524275712 bytes
2 heads, 4 sectors/track, 127997 cylinders
Units = cylinders of 8 * 512 = 4096 bytes
Sector size (logical/physical): 512 bytes / 512 bytes
I/O size (minimum/optimal): 512 bytes / 512 bytes
Disk identifier: 0x00000000

Disk /dev/md1 doesn't contain a valid partition table

# cat /etc/grub.conf
default=0
timeout=5
splashimage=(hd2,1)/grub/splash.xpm.gz
hiddenmenu
title CentOS (2.6.32-220.17.1.el6.x86_64)
    root (hd2,1)
    kernel /vmlinuz-2.6.32-220.17.1.el6.x86_64 ro root=UUID=967b4035-782d-4c66-b22f-50244fe970ca rd_MD_UUID=f403a2d0:447803b5:66edba73:569f8305 rd_MD_UUID=a22c43b9:f1954990:d3ddda5e:f9aff3c9 rd_NO_LUKS rd_NO_LVM rd_NO_DM LANG=en_US.UTF-8 SYSFONT=latarcyrheb-sun16 KEYBOARDTYPE=pc KEYTABLE=br-abnt2 crashkernel=auto rhgb quiet
    initrd /initramfs-2.6.32-220.17.1.el6.x86_64.img
09.03.2020
Просмотров: 27256
При включении компьютера или при попытке загрузить Windows (любой версии) с флешки на экране монитора может появиться ошибка Invalid Partition Table, которая переводиться как «Недопустимая таблица разделов». Нужно отметить, что таблица разделов находиться на диске для описания разделов и хранения данных. Если на диске несколько разделов отмечены как активные или произошел сбой последовательности загрузки разделов, MBR повреждено, то система выдаст данную ошибку.
Читайте также: Способы решения ошибки 0x0000008B: MBR CHECKSUM MISMATCH
Как исправить ошибку Invalid Partition Table?
Ошибка Invalid Partition Table при загрузке системы может появляться в нескольких случаях:
- При попытке установки системы с флешки;
- При запуске ПК с уже установленной Windows.
Если вы попытались установить Windows со съемного накопителя и столкнулись с такой ошибкой, то причина может крыться в неправильно созданном образе. Дело в том, что некоторые юзеры создают установочные образы через программу Rufus ISO. При записи диска через данную программу нужно выбирать разметку GPT или MBR. Для HDD нужно выбрать GPT, а для SSD – MBR. Если неверно указать разметку диска, то образ просто не подойдет для записи. Это касается и пользователей Windows 10, которые для установки ОС используют инструмент Media Creation Tool.
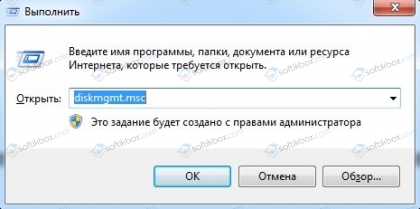
Для того, чтобы правильно выбрать разметку диска, нужно нажать правой кнопкой мыши на кнопке «Пуск» и выбрать «Управление дисками» или ввести аналогичный запрос через поисковую строку Windows или строку «Выполнить» (diskmgmt.msc).
Появиться новое окно. Нужно нажать правой кнопкой мыши на тому диске, что обозначен 0 или с установленной ОС. Выбираем «Свойства».
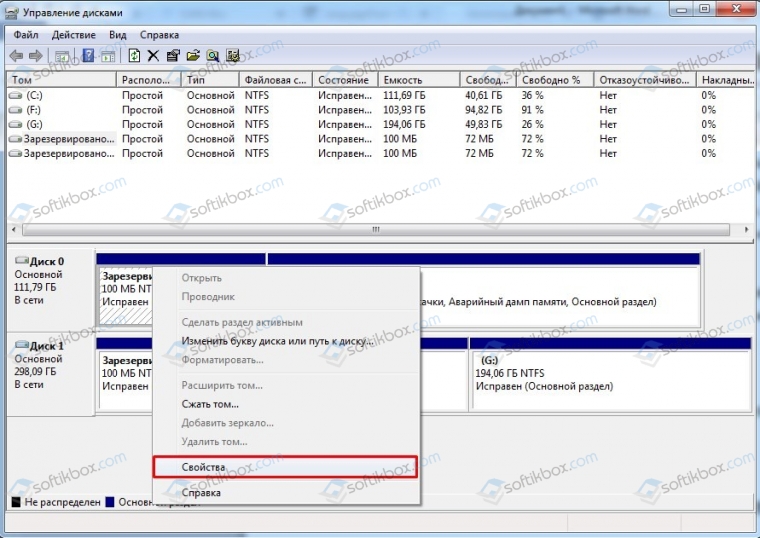
Переходим во вкладку «Оборудование» (если у вас два диска), а далее выбираем вкладку «Тома». Смотрим стиль раздела.
Теперь, если у вас стиль MBR, то создайте установочную флешку с разметкой MBR. Если у вас будет написано, что таблица GUID или GPT, то создайте флешку с разметкой GPT и повторите попытку установки Windows.
Если же ошибка Invalid Partition Table повторилась, то, возможно, у вас старая версия прошивки материнской платы. Для этого случая в программе Rufus ISO предусмотрена функция «Добавить исправления для старых BIOS», а также «Использовать MBR с BIOS ID».
Вновь по-новому записываем установочный диск и повторяем установку Windows.
Если же ошибка появляется не при установке, а при запуске самого ПК с уже инсталлированной Windows, то проблема может крыться в приоритетности загрузки носителей. Для этого нужно при запуске Windows нажать несколько раз «F2» или «Del», чтобы попасть в BIOS. Нужно перейти в раздел «Boot» и найти «Boot Device Priority». Ставим, чтобы первым был жесткий диск с Windows, далее остальные устройства.

Сохраняем изменения и перезагружаем ПК.
Если же у вас по ошибке два тома помечены как активные, то для исправления такой ситуации потребуется установочный диск или флешка. Загружаемся с него и выбираем «Восстановление системы». Далее, в зависимости от вашей операционной системы, нужно попасть в командную строку. В консоли по очереди нужно вводить следующие команды:
- diskpart — запуск инструмента;
- list volume – отображение имеющихся разделов;
ВАЖНО! Напротив раздел будет указана *, что означает, что раздел активен. Если у вас есть *, то приступайте ниже вводить команды.
- select volume 1 — выбрать том из списка, который помечен *.
- inactive — деактивировать активный том.
Перезагружаем ПК и проверяем систему на работоспособность.
Также, ошибка Invalid Partition Table может появиться из-за повреждения MBR раздела. Однако его можно восстановить. Для этого потребуется перезагрузить ПК, подключить установочную флешку или диск, выбрать «Восстановление системы», «Командная строка» и по очереди ввести:
- bootrec /fixboot
- bootrec /scanos
- bootrec /fixmbr
- bootrec /rebuildbcd
После выполнения данных команд нужно вновь перезагрузить ПК.
Если ошибка не исчезла, то нужно проверить жесткий диск на ошибки с помощью программы Victoria HDD или любой другой или вовсе переустановить Windows.
пока сюда положу, надо как-нибудь перевести
GRUB error codes
Загрузка Grub, пожалуйста, подождите…
Ситуация
GRUB loading stage 1.5
GRUB loading, please wait...
Система останавливается после вывода этого сообщения. При попытке загрузки с дискеты grub проблема исчезает.
Решение
Согласно The_Bell, вы могли бы изменить порядок загрузки в вашем BIOS.
Уберите в BIOS первоочередную загрузку с дискеты.
penetrode написал, что такое поведение также может быть вызвано неправильной установкой CFLAGS. Несмотря на то, что текущий ebuild grub фильтрует -fstack-protector, хуже не будет, если перекомпилировать grub с чистыми CFLAGS, когда ничего другое не помогает.
# CFLAGS="-O2 -march=i686 -fomit-frame-pointer -pipe" emerge grubERRORS REPORTED BY THE STAGE 1[/b]
The general way that the Stage 1 handles errors is to print an error string and then halt. Pressing CTRL-ALT-DEL will reboot.
The following is a comprehensive list of error messages for the Stage 1:
«Hard Disk Error»
This error message will occur if the Stage 2 or Stage 1.5 is being read from a hard disk, and the attempt to determine the size and geometry of the hard disk fails.
«Floppy Error»
This error message will occur if the Stage 2 or Stage 1.5 is being read from a floppy disk, and the attempt to determine the size and geometry of the floppy disk fails. It’s listed as a different error since the probe sequence is different than for hard disks.
«Read Error»
This error message will occur if a disk read error happens while trying to read the Stage 2 or Stage 1.5.
«Geom Error»
This error message will occur if the location of the Stage 2 or Stage 1.5 is not in the area supported by reading the disk with the BIOS directly. This could occur because the BIOS translated geometry has been changed by the user or the disk is moved to another machine or controller after installation, or GRUB was not installed using itself (if it was, the Stage 2 version of this error would have been seen during that process and it would not have completed the install).
ERRORS REPORTED BY THE STAGE 1.5
The general way that the Stage 1.5 handles errors is to print an error number in the form «Error: » and then halt. Pressing Ctrl-Alt-Del will reboot.
The error numbers correspond to the Errors Reported by the Stage 2 in the listed sequence.
ERRORS REPORTED BY THE STAGE 2
The general way that the Stage 2 handles errors is to abort the operation in question, print an error string, then (if possible) either continue based on the fact that an error occurred or wait for the user to deal with the error.
The following is a comprehensive list of error messages for the Stage 2 (error numbers for the Stage 1.5 are listed before the colon in each description):
Error 1 : Filename must be either an absolute filename or blocklist
This error is returned if a file name is requested which doesn’t fit the syntax/rules listed in the Filesystem.
Error 2 : Bad file or directory type
This error is returned if a file requested is not a regular file, but something like a symbolic link, directory, or FIFO.
Error 3 : Bad or corrupt data while decompressing file
This error is returned if the run-length decompression code gets an internal error. This is usually from a corrupt file.
Error 4 : Bad or incompatible header in compressed file
This error is returned if the file header for a supposedly compressed file is bad.
Error 5 : Partition table invalid or corrupt
This error is returned if the sanity checks on the integrity of the partition table fail. This is a bad sign.
Error 6 : Mismatched or corrupt version of stage1/stage2
This error is returned if the install command points to incompatible or corrupt versions of the stage1 or stage2. It can’t detect corruption in general, but this is a sanity check on the version numbers, which should be correct.
Error 7 : Loading below 1MB is not supported
This error is returned if the lowest address in a kernel is below the 1MB boundary. The Linux zImage format is a special case and can be handled since it has a fixed loading address and maximum size.
Error 8 : Kernel must be loaded before booting
This error is returned if GRUB is told to execute the boot sequence without having a kernel to start.
Error 9 : Unknown boot failure
This error is returned if the boot attempt did not succeed for reasons which are unknown.
Error 10 : Unsupported Multiboot features requested
This error is returned when the Multiboot features word in the Multiboot header requires a feature that is not recognized. The point of this is that the kernel requires special handling which GRUB is probably unable to provide.
Error 11 : Unrecognized device string
This error is returned if a device string was expected, and the string encountered didn’t fit the syntax/rules listed in the Filesystem.
———
Error 12 : Invalid device requested
This error is returned if a device string is recognizable but does not fall under the other device errors.
Ошибка Grub 12
Ситуация
12 : Invalid device requested.
Эта ошибка выдается, если синтаксис команд верен, и несмотря на это происходит ситуация, не описанная в других ошибках.
Решение
Запускали ли вы две приведенные ниже строки, когда установливали grub в свою загрузочную запись интерактивными командами?
grub> root (hd0,0)
grub> setup (hd0)
Вместо (hd0,0) должен быть указан ваш загрузочный раздел, а вместо (hd0) — выбранный жесткий диск. Помните, что (hd0) устанавливает начальный загрузчик в главную загрузочную запись (MBR) первого жесткого диска (первичный ведущий — primary master).
————
Error 13 : Invalid or unsupported executable format
This error is returned if the kernel image being loaded is not recognized as Multiboot or one of the supported native formats (Linux zImage or bzImage, FreeBSD, or NetBSD).
Error 14 : Filesystem compatibility error, cannot read whole file
Some of the filesystem reading code in GRUB has limits on the length of the files it can read. This error is returned when the user runs into such a limit.
————-
Error 15 : File not found
This error is returned if the specified file name cannot be found, but everything else (like the disk/partition info) is OK.
Ошибка Grub 15
Cитуация
Эта ошибка может возникать на двух различных этапах настройки GRUB: во время начальной настройки (при установке в главную загрузочную запись), и после загрузки системы при попытке запустить Linux (или любой другой раздел).
grub> root (hd0,0)
Filesystem type is xfs, partition type 0x83grub> setup (hd0)
Checking if "/boot/grub/stage1" exists... no
Checking if "/grub/stage1" exists... no
Error 15: File not found
Booting 'gentoo Linux'root (hd0,0)
Filesystem type is ext2fs, partition type 0x83
kernel (hd0,0)/boot/kernel-2.4.20 root=/dev/hda3 vga=792
Error 15: File not found
Press any key to continue...
Решение: проблема при начальной настройке
Эта ошибка выдается, если невозможно найти указанный файл, при этом все остальное (диск, раздел) указано верно.
Довольно часто эта ошибка обозначает отсутствие файла образа ядра. Убедитесь, что необходимый файл находится на загрузочном разделе.
Чтобы выяснить точное имя вашего ядра, загрузитесь с установочного компакт-диска и смонтируйте свой корневой раздел (root), а при необходимости и загрузочный раздел (boot). Потом переключитесь (chroot) в свою систему Gentoo и выведите на экран список имеющихся файлов, чтобы увидеть доступные образы ядер:
Это перечислит все ядра на вашем загрузочном разделе. Если ваше ядро отсутствует, обеспечьте, чтобы оно было скомпилировано (с помощью genkernel или вручную):
# cd /usr/src/linux/
# make menuconfig
А так его скопировать в загрузочный раздел:
# cp /usr/src/linux/arch/i386/boot/bzImage /bootПроверьте, что имя ядра точно совпадает с указанным в файле grub.conf. Также, убедитесь, что строчка kernel в вашем файле grub.conf (menu.lst) явно или неявно указывает на нужный раздел.
Еще замечена ошибка, когда BIOS игнорирует диск, на котором находится ядро или стадии grub. Кроме того, на разделе, на котором grub хранит свои стадии, не должна использоваться настройка программного RAID-5 (или другой технологии деления на полосы).
Решение: проблема загрузки раздела
Прежде всего, убедитесь в правильности используемых строк root и setup.
Если вы уверены, что они правильные, тогда возможно, вы используете дефектную версию GRUB (0.93.20031222). Обновите свое дерево портежей или замаскируйте эту версию grub:
(Выполните это из изолированной среды)
# echo "=sys-boot/grub-0.93.20031222" >> /etc/portage/package.mask
# emerge grub -p
Также можно попробовать сценарий grub-install, как рекомендовано авторами GRUB:
(Параметр —root-directory необходим, если вы используете отдельный
загрузочный раздел. В других случаях его следует опустить)
# grub-install --root-directory=/boot /dev/hdaЕсли ничего из этого не помогает, возможно, ваш раздел поврежден. Проверьте раздел на наличие ошибок:
(Убедитесь, что загрузочный раздел, здесь /dev/hda1, не смонтирован)
—————
Error 16 : Inconsistent filesystem structure
This error is returned by the filesystem code to denote an internal error caused by the sanity checks of the filesystem structure on disk not matching what it expects. This is usually caused by a corrupt filesystem or bugs in the code handling it in GRUB.
————
Error 17 : Cannot mount selected partition
This error is returned if the partition requested exists, but the filesystem type cannot be recognized by GRUB.
Ошибка Grub 17
Ситуация
root (hd0,0)
filesystem type unknown partition type 0x7Error 17 : Cannot mount selected partition
Решение
Эта ошибка выдается, если требуемый раздел существует, но тип файловой системы не опознается GRUB.
Убедитесь в правильности настройки root(x,y) в своем grub.conf.
Кроме того, если вы пытаетесь загрузить Windows, обеспечьте, чтобы в вашем файле grub.conf были строки root (hdX,Y) (или rootnoverify (hdX,Y)) и chainloader (hdX,Y)+1.
————
Error 18 : Selected cylinder exceeds maximum supported by BIOS
This error is returned when a read is attempted at a linear block address beyond the end of the BIOS translated area. This generally happens if your disk is larger than the BIOS can handle (512MB for (E)IDE disks on older machines or larger than 8GB in general).
Ошибка Grub 18
Ситуация
kernel (hd1,4)/bzImage root=/dev/hdb7Error 18: Selected cylinder exceeds max supported by BIOS
Решение
Эта ошибка возникает при попытке чтения по линейному адресу блока за пределами транслируемой BIOS области. Обычно это случается, если размер вашего диска больше, чем BIOS может обработать (512МБ для дисков IDE на старых компьютерах, или больше 8ГБ вообще).
Попробуйте обновить свой BIOS и/или перенести загрузочный раздел в начало (или хотя бы в пределы соответствующей области).
—————
Error 19 : Linux kernel must be loaded before initrd
This error is returned if the initrd command is used before loading a Linux kernel.
Error 20 : Multiboot kernel must be loaded before modules
This error is returned if the module load command is used before loading a Multiboot kernel. It only makes sense in this case anyway, as GRUB has no idea how to communicate the presence of such modules to a non-Multiboot-aware kernel.
Error 21 : Selected disk does not exist
This error is returned if the device part of a device- or full file name refers to a disk or BIOS device that is not present or not recognized by the BIOS in the system.
Error 22 : No such partition
This error is returned if a partition is requested in the device part of a device- or full file name which isn’t on the selected disk.
Error 23 : Error while parsing number
This error is returned if GRUB was expecting to read a number and encountered bad data.
Error 24 : Attempt to access block outside partition
This error is returned if a linear block address is outside of the disk partition. This generally happens because of a corrupt filesystem on the disk or a bug in the code handling it in GRUB (it’s a great debugging tool).
Error 25 : Disk read error
This error is returned if there is a disk read error when trying to probe or read data from a particular disk.
Error 26 : Too many symbolic links
This error is returned if the link count is beyond the maximum (currently 5), possibly the symbolic links are looped.
Error 27 : Unrecognized command
This error is returned if an unrecognized command is entered on the command-line or in a boot sequence section of a configuration file and that entry is selected.
Error 28 : Selected item cannot fit into memory
This error is returned if a kernel, module, or raw file load command is either trying to load its data such that it won’t fit into memory or it is simply too big.
Error 29 : Disk write error
This error is returned if there is a disk write error when trying to write to a particular disk. This would generally only occur during an install of set active partition command.
Error 30 : Invalid argument
This error is returned if an argument specified to a command is invalid.
Error 31 : File is not sector aligned
This error may occur only when you access a ReiserFS partition by block-lists (e.g. the command install). In this case, you should mount the partition with the `-o notail’ option.
Error 32 : Must be authenticated
This error is returned if you try to run a locked entry. You should enter a correct password before running such an entry.
Error 33 : Serial device not configured
This error is returned if you try to change your terminal to a serial one before initializing any serial device.
Error 34 : No spare sectors on the disk
This error is returned if a disk doesn’t have enough spare space. This happens when you try to embed Stage 1.5 into the unused sectors after the MBR, but the first partition starts right after the MBR or they are used by EZ-BIOS.
——-
7. GRUB GRUB GRUB GRUB GRUB …
Ситуация
GRUB GRUB GRUB GRUB GRUB GRUB GRUB GRUB GRUB GRUB GRUB GRUB GRUB GRUB GRUB
  GRUB GRUB GRUB GRUB GRUB GRUB GRUB GRUB GRUB GRUB GRUB GRUB GRUB GRUB GRUB
...
Решение
Согласно этой теме, это может быть вызвано автоматическим определением дисков вашим BIOS. Попробуйте установить в BIOS тип диска User Type HDD.
Другая возможная причина: в вашу главную загрузочную запись (MBR) был установлен Grub, и вы попытались переустановить его (например, из-за замены жестких дисков), но использовали неправильные команды setup и root.
8. Опрос устройств для поиска дисков, обслуживаемых BIOS. Может занять длительное время.
Ситуация
При попытке установки grub зависает, выдав следующую строку:
# grub
Probing devices to guess BIOS drives. This may take a long time.
Решение
Одной названной причиной была экзотическая конфигурация дисков, типа установки на одном шлейфе дисков ультра/не-ультра DMA.
9. При установке Grub он просто зависает
Ситуация
При установке grub зависает:
(на этом установка останавливается)
Решение
Если у вас нет привода для дискет, указали ли вы параметр —no-floppy?
10. Распаковка Linux…выполнено, загрузка ядра.
Ситуация
Систем зависает после вывода следующей строки:
Uncompressing Linux... Ok, booting the kernel.Решение
Строго говоря, это не ошибка Grub. Одна из возможных причин — неверная работа ACPI, при включенной поддержке в ядре. Попробуйте отключить его в своем BIOS или ядре.
11. Grub просто выдает свою командную строку
Ситуация
При загрузке системы выводится командная строка grub вместо списка вариантов загрузки, определенного в вашем файле grub.conf.
Решение
Смонтируйте свой загрузочный раздел и убедитесь в существовании файла grub/grub.conf.
# mount /dev/hda1 /mnt/gentoo/boot
# cat /mnt/gentoo/boot/grub/grub.conf
Так же удостоверьтесь, что символьная ссылка menu.lst существует:
# ls -l /mnt/gentoo/boot/grub/menu.lst
lrwxrwxrwx  1 root root 9 Mar  7 14:00 /mnt/gentoo/boot/grub/menu.lst -> grub.conf
Если нет, заново создайте ее:
# cd /mnt/gentoo/boot/grub
# ln -snf grub.conf menu.lst
Если необходимо, переустановите grub:
(запускайте изнутри изолированной среды (chroot) )
# grub-install --root-directory=/boot /dev/hda12. Невозможно обнаружить устройство для /boot/boot: отсутствует или не блочное устройство
Ситуация
При запуске grub-install в процессе установки GRUB выдается следующая ошибка:
# grub-install --root-directory=/boot /dev/hda
Could not find device for /boot/boot: not found or not a block device
Решение
Убедитесь, что вы не забыли следующее:
# cp /proc/mounts /etc/mtab13. После нажатия на ENTER в меню Grub система перезагружается
Ситуация
При загрузке после нажатия на ENTER в меню Grub система перезагружается.
Решение
Попробуйте отключить поддержку кадрового буфера в своем ядре. Если это не поможет, отключите APM и ACPI.
14. После нажатия на ENTER в меню Grub экран становится чистым
Ситуация
Во время загрузки, после нажатия клавиши ENTER в меню Grub экран очищается, но система отзывается (например, можно помигать светодиодом клавиши numlock).
Решение
Отключите кадровый буфер (обычно требуется удалить запись vga=XYZ из файла grub.conf) и проверьте выбранную архитектуру процессора в конфигурации ядра.
15. Исчезновение картинки Grub
Ситуация
При загрузке системы вы лишены нарядной заставки Gentoo.
Решение
Прежде всего, проверьте, существует ли файл заставки, указанный в вашем grub.conf. Если причина в этом — проверьте сценарий ebuild grub. Возможно, заставочная картинка в используемой версии закомментирована.
16. Отказ при загрузке Windows со второго жесткого диска
Ситуация
После выбора раздела Windows система отказывается загружаться без видимой причины.
Решение
cyrillic сообщает нам, что можно «отобразить» (map) ваши диски в другом порядке, изменив запись для Windows в файле grub.conf таким образом:
title Windows XP
  map (hd0) (hd1)
  map (hd1) (hd0)
  chainloader (hd1,0)+1
17. При попытке установить Grub появляется ошибка сегментации
Ситуация
Ситуация, описанная ниже, касается только grub-0.95.x в момент установки Grub в загрузочный сектор.
grub> root (hd0,0)
grub> setup (hd0)
Segmentation fault
Решение
Ошибка, вызывающая данную проблему, известна и исправлена в grub версии 0.96. Также известно, что grub 0.94 r1 и grub 0.94 r2 должны работать правильно. Если и они дают сбой, можно попытаться установить grub-static, который на текущий момент стабилен на amd64 и нестабилен на x86 (~x86). Для получения дополнительно информации обратитесь к ошибке #79378.
Вы устанавливаете Windows на SSD-накопитель и вдруг видите сообщение об ошибке «Недопустимая таблица разделов». Или вы можете столкнуться с этой ошибкой случайно при использовании вашего устройства. Но в чем причина его проявления и как от него избавиться?
Давайте подробно рассмотрим проблему «недопустимой таблицы разделов» и рассмотрим лучшие решения. Проверять Лучшие способы исправить ошибки Центра обновления Windows в Windows 11.
Что такое таблица разделов и почему она вызывает отображение ошибки?
Жесткий диск компьютера содержит несколько разделов. Таблица разделов — это специальная таблица, разделенная на разделы, которая упрощает управление данными вашего компьютера.
Как только таблица разделов обнаружит какие-либо неожиданные проблемы, вы сразу же увидите ошибку «Недопустимая таблица разделов». Вот причины этой проблемы:
- Таблица разделов повреждена, а на жестком диске есть битые сектора.
- Неправильная последовательность загрузки.
- Версия БИОС устарела.
- Несколько разделов помечены как активные.
- Есть некоторые проблемы с настройками системы.
Теперь давайте проверим решения этой проблемы.
1. Восстановите поврежденную таблицу разделов с помощью Check Disk Tool
Если таблица разделов повреждена, лучшим решением будет выполнить проверку диска (CHKDSK). Этот встроенный инструмент тщательно просканирует ваш жесткий диск, проверит таблицу разделов, устранит любые проблемы и оптимизирует поврежденные сектора.
Вот шаги для проверки диска:
- Нажмите на Win + R Чтобы открыть диалоговое окно «Выполнить».
- Тип CMD И нажмите Shift + Ctrl + Enter Чтобы открыть командную строку с правами администратора.
- Введите следующую команду и нажмите Enter Чтобы запустить проверку диска:
chkdsk C: /f
Однако, если Windows (ОС) установлена на другом диске, замените C: в команде и используйте правильную букву диска. Например, используйте E:, если здесь установлена Windows. Оттуда перезагрузите устройство после завершения сканирования.
Если проблема не устранена, попробуйте поискать другие поврежденные сектора на диске и посмотрите, поможет ли это. Вот как это сделать:
- Откройте командную строку в соответствии с предыдущими шагами.
- Введите следующую команду и нажмите Enter:
chkdsk C: /r
Дождитесь завершения сканирования и перезагрузите компьютер.
2. Сбросить последовательность загрузки
Последовательность загрузки играет важную роль при включении компьютера. По сути, он обеспечивает набор процессов, которые ваш компьютер выполняет при включении.
Теперь, если последовательность загрузки неверна, у вашего устройства могут возникнуть проблемы при загрузке. В большинстве случаев это приведет ко многим проблемам, таким как ошибка «Недопустимая таблица разделов». Поэтому сброс последовательности загрузки может помочь решить проблему.
Вот шаги для сброса последовательности загрузки:
- Перезагрузите ваше устройство.
- Нажмите назначенную клавишу BIOS. Обычно ключ F2 или же F12 Для большинства устройств Windows.
- В меню BIOS перейдите на вкладку Boot.
- Прокрутите вниз до раздела. Приоритет загрузки. Вы должны увидеть параметры для первого загрузочного устройства и второго загрузочного устройства.
- Теперь убедитесь, что опция жесткого диска отображается в качестве первого загрузочного устройства. В противном случае используйте клавиши со стрелками и соответствующие функциональные клавиши (которые обычно появляются внизу экрана), чтобы установить жесткий диск в качестве первого загрузочного устройства.
Наконец, перейдите на вкладку Выход И нажмите Enter. Это должно сбросить последовательность загрузки и избавиться от ошибки «Неверная таблица разделов». Проверять Как получить доступ к BIOS на ПК с Windows 8/10.
3. Обновите БИОС
Вы можете столкнуться с этой проблемой, потому что BIOS устарел. На самом деле эта ошибка обычно появляется, если вы устанавливаете Windows на SSD-диск, когда BIOS устарел.
В этом случае обновление BIOS может помочь избавиться от проблемы. Однако обновление BIOS зависит от модели оборудования. Итак, если вы используете устройство Lenovo, HP, Dell, Asus или MSI, вот как перепрограммировать BIOS:
- Как обновить BIOS на Устройство Lenovo.
- Как обновить BIOS на Устройство HP.
- Как обновить BIOS на Устройство Dell.
- Как обновить BIOS на Asus .устройство.
- Как обновить BIOS на Устройство MSI.
4. Деактивируйте другие разделы с помощью Diskpart
Ваше устройство будет работать правильно только в том случае, если раздел помечен как «активный». Этот параметр гарантирует, что ваше устройство загружается только с единственного выбранного вами раздела.
Однако вы, вероятно, столкнетесь с проблемой «недопустимой таблицы разделов», если два или более разделов помечены как «активные». В этом конкретном случае у вашего устройства возникают проблемы с выбором раздела для загрузки.
Теперь, вот как деактивировать другие разделы, чтобы решить эту проблему:
- Нажмите на Win + R Чтобы открыть диалоговое окно «Выполнить».
- Тип CMD И нажмите Shift + Ctrl + Enter Чтобы открыть командную строку с правами администратора.
- Тип DiskPart И нажмите Enter для запуска Diskpart.
- Затем введите Список дисков И нажмите Enter Отображает список дисков на вашем устройстве. Вы должны увидеть такие параметры, как Диск 0, Диск 1 и другие.
- Теперь выберите имя диска, содержащего Windows. Например, если диск 0, введите следующую команду и нажмите Enter.
Select Disk 0
Далее следует просмотреть список разделов. Для этого введите следующую команду и нажмите Enter.
select partition
Вы должны увидеть разные разделы с названиями Раздел 1, Часть 2 и другие. Раздел, содержащий вашу Windows, должен быть помечен как основной раздел.
Если какие-то другие разделы отмечены как «основные», вот как их деактивировать:
- Чтобы выбрать раздел 2, введите следующую команду и нажмите Enter.
select partition 2
- Наконец, введите следующую команду и нажмите Enter Деактивировать раздел.
inactive
Чтобы восстановить настройки по умолчанию, выберите соответствующий раздел и введите активный , затем нажмите Enter. Проверять Как загрузиться в режиме UEFI прямо из Windows 10.
5. Восстановите ваше устройство в предыдущее состояние
В некоторых случаях вы могли допустить ошибки при настройке системных параметров Windows. В этом случае это могло привести к появлению ошибки «Недопустимая таблица разделов».
Поэтому может помочь восстановление вашего устройства до его предыдущего состояния. В дополнение к этому, это также может решить любые другие системные проблемы, с которыми вы сталкиваетесь в настоящее время.
Теперь, вот как восстановить ваше устройство в прежнее состояние:
- Тип Восстановить в строке поиска меню «Пуск» и выберите наиболее подходящее.
- Перейти на вкладку защита системы Затем нажмите кнопку «Восстановление системы». Нажмите Далее, чтобы продолжить.
- Выберите последнюю точку восстановления из списка и нажмите «Далее», чтобы продолжить. Следуйте инструкциям на экране, чтобы завершить процесс.
Легко исправить ошибку неверной таблицы разделов
Ошибка «Недопустимая таблица разделов» очень раздражает, но ее легко решить. Если вы когда-нибудь столкнетесь с этой проблемой, попробуйте решения, которые мы рассмотрели.
И если эта ошибка приведет к потере данных, беспокоиться не о чем. Существуют различные методы, которые вы можете применить Чтобы восстановить потерянные данные.