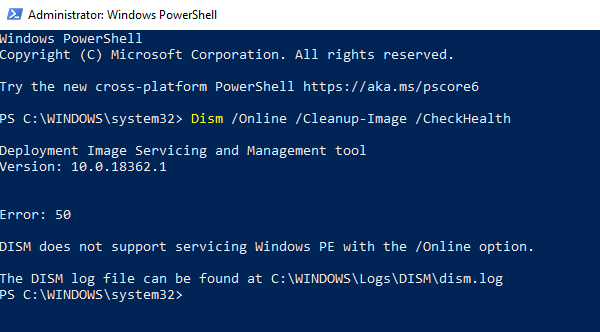
Пользователи операционной системы Windows 10 могут сталкиваться с «Ошибка 50: Средство DISM не поддерживает обслуживание среды предустановки Windows PE с использованием параметра /Online». В сегодняшней статье мы во всех подробностях рассмотрим эту ошибку и расскажем вам, как от нее можно избавиться.
Почему возникает «Ошибка 50: Средство DISM…»?
Система обслуживания образов развертывания и управлениями ими (DISM) позволяет пользователям Windows 10 монтировать образ Windows PE (среду предустановки Windows) для добавления пакетов, драйверов и языковых наборов в систему.
Как правило, Windows PE предназначена для подготовки образа системы и развертывания его на нескольких компьютерах, находящихся в одной и той же сети. Такой подход зачастую используют в рабочей обстановке. Подобный образ нельзя использовать в качестве полноценной ОС.
Причина за «Ошибка 50: Средство DISM…» — недоступность функционала среды предустановки на ОС Windows 10 последних сборок. Проще говоря, утилита DISM пытается воспользоваться Windows PE, однако та недоступна, вследствие чего и возникает ошибка.
Это можно исправить двумя методами:
- удаление ключа, имеющего отношение к Windows PE, в реестре системы;
- задействование «revertpendingactions» в DISM.
Однако знайте, что они сработают лишь в том случае, если у вас действительно установлена полноценная Windows 10, которая по ошибке воспринимается DISM в качестве Windows PE.
Как исправить «Ошибка 50: Средство DISM…»?
Ниже вы сможете найти парочку проверенных методов для решения этой ошибки. Давайте начнем с чего-то полегче…
Метод №1 Удаление ключа, имеющего отношение к Windows PE, в реестре системы
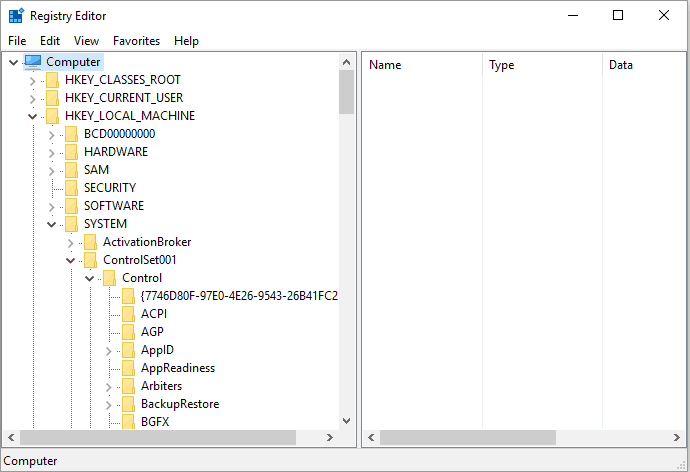
В реестре системы находится особый ключ, который имеет прямое отношение к среде предустановки Windows. Когда DISM начинает свою работу, он проверяет данный ключ. Находится этот ключик в следующей ветке реестра:
- HKEY_LOCAL_MACHINESYSTEMCurrentControlSetControlMiniNT
Чтобы исправить ошибку, вам необходимо попросту избавиться от этого ключа. Для этого сделайте следующее:
- нажмите комбинацию Windows+R;
- пропишите в пустую строчку значение «regedit» и нажмите Enter;
- перейдите в ветку, указанную выше;
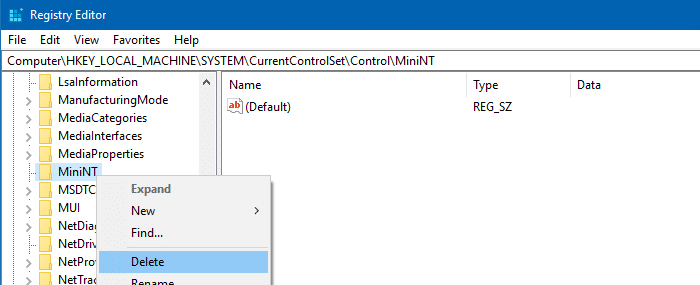
- нажмите правой кнопкой мыши на MiniNT (или WinPE) и выберите «Удалить»;
- теперь попытайтесь воспользоваться DISM с параметром «/Online» и посмотрите, исчезла ли ошибка.
Все теперь должно заработать, но только в том случае, если ваша система не является Windows PE. «Ошибка 50: Средство DISM…» возникает лишь в полноценных операционных системах по причине присутствует указанного выше ключа в реестре.
Метод №2 Задействование «revertpendingactions» в DISM
- создайте локальный аккаунт Администратора у себя на компьютере;
- войдите в среду восстановления Windows 10 и запустите через нее Командную строку;
- пропишите в ней следующую команду:
- dism.exe /image:C: /cleanup-image /revertpendingactions
- далее перезапустите компьютер и войдите в Безопасный режим;
- откройте Командную строку с правами Администратора и выполните в ней следующую команду:
- SFC/ scannow
- перезапустите компьютер и войдите в систему в нормальном режиме;
- запустите DISM в работу с опцией «/online».
Команда по откату (revertpendingactions) должна отменить изменения в системе, которые могли быть внесены тем или иным обновлением. Когда вы примените эту команду и перезагрузите свой компьютер, перед вами должен будет появиться синий экран, который укажет на откат обновлений.
Мы надеемся, что данный материал помог разрешить проблему с Windows PE и «Ошибка 50: Средство DISM…» вас больше не беспокоит.
This tutorial contains instructions to resolve the following error when running the DISM command «Dism.exe /Online /Cleanup-Image /Restorehealth» from the Windows Recovery Environment: «Error 50, DISM does not support servicing Windows PE with the /Online option».
The above error is occurred, because in WinRE the operating system is not running, so the /Online switch is useless at this case. In fact the /Online switch in DISM tool, specifies that the action is to be taken on the operating system that is currently running.

How to fix: Error 50 DISM does not support servicing Windows PE with the /Online option. (Windows 10)
1. After booting your computer from the Windows 10 installation media, press SHIFT + F10 keys at the first install screen to launch Command Prompt.
2. Inside the WinRE command prompt window, get a list of all available drives, by giving this command:
- wmic logicaldisk get name

3. Then find out which drive contains the «Windows» folder, by typing this command: *
- dir drive-letter:
* e.g. To see the contents of the C: drive, type: «dir C:» (without quotes). If you cannot see the «Windows» folder on the C: drive, then continue to the next drive (e.g. «dir D:», «dir E:», etc.), until see the «Windows» folder.
[As you can see at the screenshot below, the Windows folder (at this case) is located at the D: drive.]

4. Once you find the «Windows» drive (e.g. the «D» in this example), give this command to repair the offline Windows image:
- dism.exe /Image:D: /Cleanup-Image /Restorehealth
* Notes:
1. Where D = the Windows drive. (Change it according your situation)
2. There is space between / («…/Image:D: /Cleanup-Image…»)
3. If after executing the above command, you receive the «Error 0x800f081f: The source files could not be found», then perform a repair upgrade. To do that: **
a. Boot from the Windows 10 installation media.
b. At Windows Setup wizard, press ‘Next‘ and then click ‘Install Now‘.
c. Accept the ‘License agreement’.
d. When asked, select Upgrade: Install Windows and keep files, settings, and applications.** If you able to start your Windows 10 in Safe Mode with networking , then run the following command (in Admin Command Prompt):
- DISM /Online /Cleanup-Image /RestoreHealth

5. When the DISM operation is completed, give the following SFC command to complete the repairs. *
- SFC /SCANNOW /OFFBOOTDIR=D: /OFFWINDIR=D:Windows
* Notes:
1. Where D = the Windows drive. (Change it according your situation).
2. There is space between / («…/OFFBOOTDIR=D: /OFFWINDIR…»)

6. When the operation is completed, reboot your computer. *
* Note: If you cannot fix the error using the above instructions, backup your files and clean install Windows.
Did it work for you?
Please leave a comment in the comment section below or even better: like and share this blog post in the social networks to help spread the word about this solution.
If this article was useful for you, please consider supporting us by making a donation. Even $1 can a make a huge difference for us.

На чтение 3 мин. Просмотров 8.7k. Опубликовано 03.09.2019
Обновление и подготовка образа Windows – это операции, которые можно выполнить с помощью специальных команд DISM. Средство командной строки Deployment Image Servicing and Management (DISM) также можно использовать для устранения наиболее распространенных проблем, связанных с программным обеспечением Windows, поэтому возможность выполнения команд DISM весьма важна. Вот почему при возникновении ошибки 50 вы должны научиться устранять неисправности, мешающие правильной работе DISM.
Таким образом, если вы попытались выполнить определенную команду DISM, но получили сообщение « Ошибка 50 DISM не поддерживает обслуживание Windows PE с помощью параметра/online option », вы попали по адресу. В этом руководстве мы увидим, как исправить набор инструментов DISM в Windows 10.
Содержание
- Вот как можно исправить ошибку 50 DISM в Windows 10
- Удалить связанный ключ реестра
- Сбросить BIOS
- Обновите программное обеспечение DISM
Вот как можно исправить ошибку 50 DISM в Windows 10
- Удалить связанный ключ реестра
- Сбросить BIOS
- Обновите программное обеспечение DISM
Удалить связанный ключ реестра
Когда появляется ошибка 50, это означает, что Windows считает, что место, из которого вы запускаете команду, находится в среде Win PE (среда предустановки), и это происходит из-за неуместного раздела реестра. Итак, для исправления этой ошибки вам необходимо удалить этот ключ следующим образом:
- Нажмите клавиши Win + R на клавиатуре, чтобы открыть окно «Выполнить».
-
Там введите regedit и нажмите Enter.

- В редакторе реестра найдите запись HKEY_LOCAL_MACHINE и разверните ее – просто нажмите на нее.
-
Из нового списка, который будет отображаться, разверните HKEY_LOCAL_MACHINESYSTEMCurrentControlSetControl.
- Под полем управления должна быть папка с именем MiniNT.
- Щелкните правой кнопкой мыши на этой папке и выберите «Разрешения».
- Убедитесь, что там указано ваше имя пользователя, а также убедитесь, что включена опция Полный контроль.
- Снова щелкните правой кнопкой мыши папку MiniNT и на этот раз выберите Удалить.
- Подтвердите изменения и перезапустите систему Windows 10.


Для очистки реестра вы также можете использовать специальный очиститель реестра.
Сбросить BIOS
На вашем компьютере доступ к BIOS (доступ к BIOS отличается в зависимости от производителя).
В BIOS найдите запись «Параметры по умолчанию» и получите к ней доступ. В меню, которое будет отображаться на вашем компьютере, выберите «Сбросить по умолчанию» или «Заводские настройки». Подтвердите изменения и перезагрузите устройство.
Это должно быть все, и «Ошибка 50 DISM не поддерживает обслуживание Windows PE с параметром/online» должна быть решена.
ТАКЖЕ ПРОЧИТАЙТЕ . Исправлено: сбой DISM в Windows 10
Обновите программное обеспечение DISM
- В своем окне cmd (которое должно быть открыто уже после получения ошибки DISM 50) введите dism.exe/image: C:/cleanup-image/revertpendingactions .
-
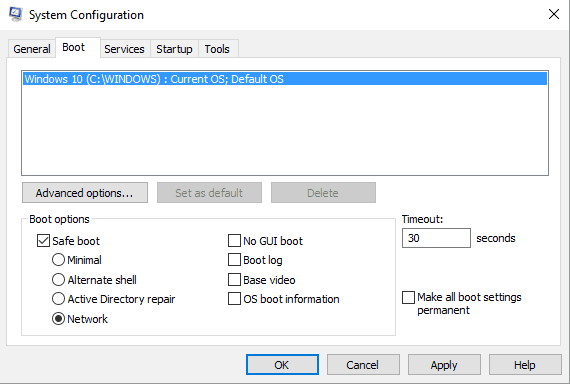
Затем перезагрузите безопасный режим в вашей системе Windows 10: нажмите Win + R , введите msconfig , переключитесь в режим загрузки и выберите безопасный режим.
-
В безопасном режиме откройте окно cmd с повышенными правами: нажмите Win + X и выберите Командная строка (Admin) .
- В окне cmd введите SFC/scannow и дождитесь начала сканирования – это может занять некоторое время в зависимости от того, сколько файлов и программ хранится на вашем устройстве.
- После этого перезагрузитесь в режим Windows, так как это должно быть все.


Подсказка : если вы не можете выполнить описанные ниже действия, попробуйте создать новую учетную запись Windows, прежде чем запускать это решение для устранения неполадок.
Там у вас есть это; это были решения для устранения неполадок, которые следует применять, когда отображается сообщение об ошибке «Ошибка 50 DISM не поддерживает обслуживание Windows PE с параметром/online».
Вы также можете поделиться своим опытом с нами и нашими читателями, используя поле комментариев ниже – вы также можете связаться с нашей командой через нашу страницу О нас, где вы можете заполнить контактную форму. Наслаждаться.
Download PC Repair Tool to quickly find & fix Windows errors automatically
If you receive Error 50, DISM does not support servicing Windows PE with the /online option message in Windows 11/10; then this post may help you fix the DISM error. Windows PE stands for Windows Preinstallation Environment (Windows PE) or Windows Recovery Environment (Windows RE).

The DISM tool lets you mount a Windows PE image and add or remove packages, drivers, and language packs in the same way you would any Windows 10 or Windows 11 image using the appropriate driver, package, or international-servicing commands. However, the Windows PE feature has been removed now, but DISM ‘thinks’ that Windows PE is still present, and hence the error occurs.
So when you run DISM in Windows PE environment with the /online option i.e.
- Dism /Online /Cleanup-Image /CheckHealth
- Dism /Online /Cleanup-Image /ScanHealth
- Dism /Online /Cleanup-Image /RestoreHealth
It gives an error – DISM tool does not support servicing Windows PE with the online option.
As we said that Windows PE is a preinstallation environment that is used to prepare an image, and then deploy it across multiple computers. That image deploys Windows to computers, but it cannot be used as a standard OS. There are two ways to fix it:
- Deleting the registry key related to Windows PE
- Use revertpendingactions with DISM
Remember this will only work if you genuinely have Windows 11/10, but it is being misunderstood as Windows PE.
1] Deleting Registry key related with Windows PE
In Windows PE, there is a specific registry key that can identify Windows PE. When the DISM tool runs, it checks for that registry key. The Key is located at
HKEY_LOCAL_MACHINESYSTEMCurrentControlSetControlMiniNT

To fix the error, we will need to delete the key if they are available in the Registry.
- Open Registry Editor by typing regedit in the Run Prompt, followed by hitting the Enter key.
- Navigate to either of the key path mentioned above.
- Right-click on WinPE or MiniNT and delete it.
- Now execute the DISM tool with the online option, and see if it works.
It will work, but only if your system is not truly Windows PE. The error occurs on a full-fledge OS because of the presence of the Registry key. If you genuinely have Windows PE, you should consider installing a full-fledged OS.
2] Use revertpendingactions with DISM
- Create another local admin user account.
- Boot into Advanced Recovery Mode, and locate the Command Prompt option
- Enter the following command: dism.exe /image:C: /cleanup-image /revertpendingactions
- After that, reboot your machine into Safe Mode.
- In Safe Mode, open an elevated Command Prompt and run the SFC/ scannow command
- Again reboot the computer in normal mode, and execute the DISM with /online option.
The revert option will start rolling back the changes any update was attempting to apply. When you enable this command and reboot, you should see a blue splash screen that shows the updates being reverted.
We hope these steps helped you resolve Windows PE issue, and you were able to run the DISM tool with the online option issue.

Anand Khanse is the Admin of TheWindowsClub.com, a 10-year Microsoft MVP (2006-16) & a Windows Insider MVP (2016-2022). Please read the entire post & the comments first, create a System Restore Point before making any changes to your system & be careful about any 3rd-party offers while installing freeware.
When you run the DISM tool (with the /online switch) to scan or restore the health of the operating system components, the tool may throw up Error 50. Here is the full error message verbatim:
Deployment Image Servicing and Management tool
Version: 10.0.16299.15Error: 50
DISM does not support servicing Windows PE with the /Online option.
The DISM log file can be found at C:WindowsLogsDISMdism.log

This can happen if you run any of these /online commands to scan or repair the components of the running Windows 8/10 installation:
Dism /Online /Cleanup-Image /CheckHealth
Dism /Online /Cleanup-Image /ScanHealth
Dism /Online /Cleanup-Image /RestoreHealth
Related article: Repair Windows 10 Using DISM and SFC
DISM thinks you’re running Windows PE
Apparently, the DISM tool thinks that you’re using it from the Windows Preinstallation Environment (Windows PE) or Windows Recovery Environment (Windows RE), whereas you may be running the tool on a running operating system. The presence of the following registry key causes Windows to think that you’re running Windows PE.
HKEY_LOCAL_MACHINESYSTEMCurrentControlSetControlMiniNT
Windows PE is a standalone preinstallation environment and as an integral component of other setup and recovery technologies, such as Setup for Windows, Windows Deployment Services (Windows DS), the Windows Recovery Environment (Windows RE) etc.
The “MiniNT” key doesn’t exist by default when you install Windows. As for how the key ended up on your registry, it’s possible that you (or a third-party program) have applied the following registry tweak in an attempt to enable ReFS file system format.
[HKEY_LOCAL_MACHINESYSTEMCurrentControlSetControlMiniNT]
"AllowRefsFormatOverNonmirrorVolume"=dword:00000001
Resilient File System (ReFS) is a Microsoft proprietary file system with the intent of becoming the “next generation” file system after NTFS. You can read more on that in Microsoft Docs post Resilient File System (ReFS) overview.
To fix DISM Error: 50 “DISM does not support servicing Windows PE”, delete the MiniNT registry key using these steps:
-
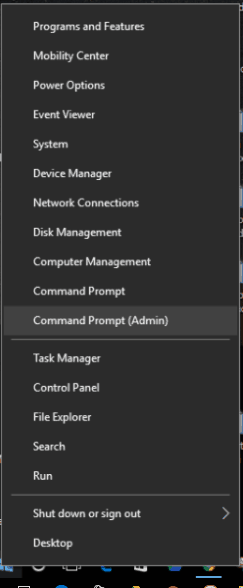
- Right-click Start, click Run.
- Type
regedit.exeand click OK. - Navigate to the following registry key:
HKEY_LOCAL_MACHINESYSTEMCurrentControlSetControlMiniNT

- Right-click
MiniNT, and choose Delete - Exit the Registry Editor.
- No restart is required, usually. See if you can run DISM now.
This fixes DISM Error: 50 “DISM does not support servicing Windows PE” in Windows.
One small request: If you liked this post, please share this?
One «tiny» share from you would seriously help a lot with the growth of this blog.
Some great suggestions:
- Pin it!
- Share it to your favorite blog + Facebook, Reddit
- Tweet it!
So thank you so much for your support. It won’t take more than 10 seconds of your time. The share buttons are right below. 
Ramesh Srinivasan is passionate about Microsoft technologies and he has been a consecutive ten-time recipient of the Microsoft Most Valuable Professional award in the Windows Shell/Desktop Experience category, from 2003 to 2012. He loves to troubleshoot and write about Windows.
Ramesh founded Winhelponline.com in 2005.
by Andrew Wafer
Andrew is not just trying to bring you closer to Windows, but he’s truly interested in this platform. He just happens to be passionate about sharing that knowledge… read more
Updated on April 19, 2022
- Refreshing and preparing a Windows image are operations that can be completed by using dedicated DISM commands.
- So, if you tried to execute a certain DISM command, but you got the Error 50 DISM does not support servicing Windows PE with the /online option message, you are in the right place.
- You can try to repair corrupted registry keys that may cause this error to appear on your Windows 10 or 11 computer.
- At the same time, you may try to access your BIOS and change certain options to repair this DISM issue efficiently.

Refreshing and preparing a Windows image are operations that can be completed by using dedicated DISM commands.
The Deployment Image Servicing and Management (DISM) command-line tool can also be used for repairing the most common Windows software-related problems, so being able to execute DISM commands is quite important.
That’s why, when experiencing the error 50, you should learn how to address the malfunctions that are preventing DISM from running correctly.
Even though such system issues may require more technical know-how, you can dive deep into the problem and resolve it step-by-step.
There are also specific commands you can use in order to fix the persistent error on your Windows device.
So, if you tried to execute a certain DISM command, but you got the Error 50 DISM does not support servicing Windows PE with the /online option message, you are in the right place. In this guide, we will see how to fix the DISM toolkit on Windows 10.
How to fix DISM error 50 on Windows 10/11?
- Delete the associated registry key
- Reset BIOS
- Refresh the DISM software
- Use Command Prompt
1. Delete the associated registry key
When the error 50 appears it means that Windows thinks that the location from which you run the command is within Win PE (Pre-installation Environment) and this happens because of a misplaced registry key. So, for fixing this error you need to remove this key by following:
- Press the Win+R keyboard keys for bringing up the Run box.
- There, type Regedit and press Enter.

- From Registry Editor located the HKEY_LOCAL_MACHINE entry and expand it – just click on it.
- From the new list that will be displayed expand HKEY_LOCAL_MACHINESYSTEMCurrentControlSetControl.

- Under the Control field, there should be a folder named MiniNT.
- Right-click on this folder and choose Permissions.
- Make sure that your username is mentioned there and also ensure that the Full control option is checked.
- Right-click on the MiniNT folder again and this time choose Delete.
- Confirm your changes and restart your Windows 10 system.

To clean your registry, you can also consider dedicated registry cleaner tools.
In case you require a professional cleaning tool that will repair any registry entries problems, you can employ CCleaner.
Using this software you can detect different problems in your Windows registry and fix them automatically in a more secure manner.
2. Reset BIOS
On your computer access BIOS (reaching BIOS is different depending on each manufacturer).
From BIOS look for the Default Options entry and access it. From the menu that will be displayed on your computer choose reset to default or factory default. Confirm your changes and restart your device.
That should be all and the Error 50 DISM does not support servicing Windows PE with the /online option should be now resolved.
3. Refresh the DISM software

NOTE
If you cannot complete the steps below try to create a new Windows account before starting this troubleshooting solution.
- In your cmd window (which should be already opened since you received the DISM 50 error) type dism.exe /image:C: /cleanup-image /revertpendingactions.
- Next, reboot safe mode on your Windows 10 system: press Win+R, enter MSConfig, switch to Boot, and choose Safe Mode.

- From safe mode open an elevated cmd window: press Win+X and select Command Prompt (Admin).

- In the cmd window type SFC/ scannow and wait while the scan runs – it might take a while depending on how many files and programs are stored on your device.
- Afterward, reboot into Windows mode as that should be all.
- 0x80248007: How to Fix This Error Code in 8 Steps
- HP Laptop Camera Is Not Working: 5 Quick Ways to Fix It
4. Use Command Prompt
It’s possible to resolve DISM error 50 by using specific commands in the Windows Command Prompt utility.
There are a few commands that you can try in order to repair this operational issue and are as follows:
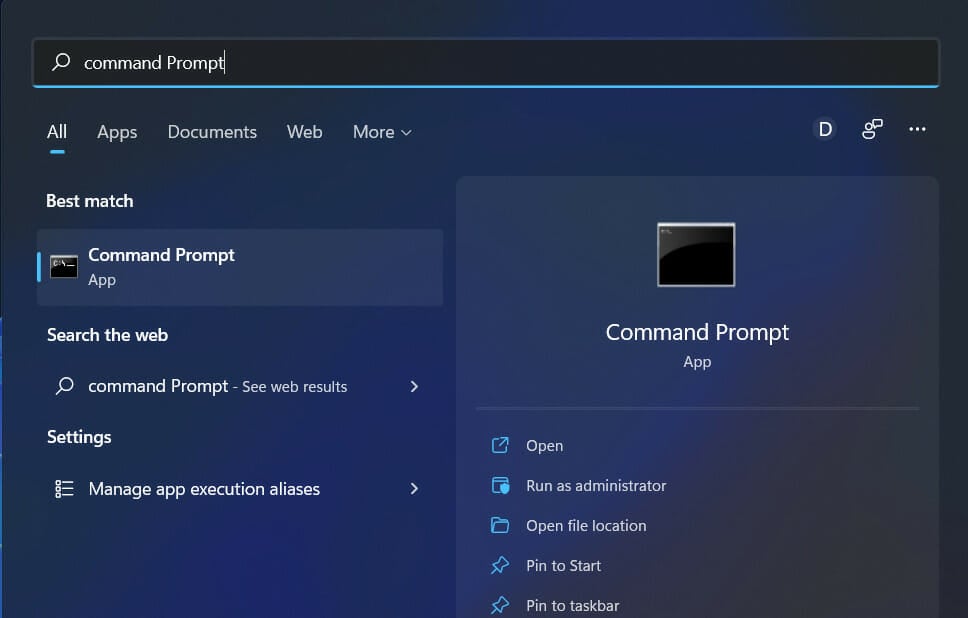
- Type Command Prompt in the Start Menu and then press Enter.

- Assure you have administrator rights before entering the commands.
- Type in the next commands to fix the specific DISM error.

wmic logicaldisk get name
dir drive-letter:
DISM /Online /Cleanup-Image /RestoreHealth
There you have it; those were the troubleshooting solutions for the Error 50 DISM does not support servicing Windows PE with the /online option error message.
If you are trying to find other Windows Update solutions, make sure to check the Windows Update hub.
Take a quick tour of our specially created Windows 10 Errors Hub. Here you will find more solutions like this one to help fix a multitude of system errors.
You can also share your own experience with us and our readers by using the comments field below.
![]()
Newsletter
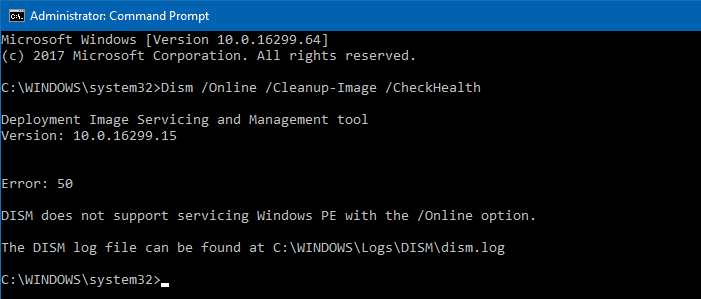
При запуске инструмента DISM (с /online переключатель) для сканирования или восстановления работоспособности компонентов операционной системы, инструмент может выкинуть Error 50, Вот полное дословное сообщение об ошибке:
Средство обслуживания образов развертывания и управления ими
Версия: 10.0.16299.15Error: 50
DISM не поддерживает обслуживание Windows PE с параметром / Online.
Файл журнала DISM находится по адресу C: Windows Logs DISM dism.log
Это может произойти, если вы запустите любой из этих /online Команды для сканирования или исправления компонентов работающей установки Windows 8/10:
Dism /Online /Cleanup-Image /CheckHealth
Dism /Online /Cleanup-Image /ScanHealth
Dism /Online /Cleanup-Image /RestoreHealth
Связанная статья: Ремонт Windows 10 с использованием DISM и SFC
DISM считает, что вы используете Windows PE
Очевидно, инструмент DISM считает, что вы используете его из среды предустановки Windows (Windows PE) или среды восстановления Windows (Windows RE), в то время как вы можете запускать инструмент на Бег Операционная система. Наличие следующего раздела реестра заставляет Windows думать, что вы используете Windows PE.
HKEY_LOCAL_MACHINESYSTEMCurrentControlSetControlMiniNT
Windows PE представляет собой автономную среду предварительной установки и является неотъемлемым компонентом других технологий установки и восстановления, таких как установка для Windows, службы развертывания Windows (Windows DS), среда восстановления Windows (Windows RE) и т. Д.
Клавиша «MiniNT» не существует по умолчанию при установке Windows. Что касается того, как ключ оказался в вашем реестре, возможно, что вы (или сторонняя программа) применили следующую настройку реестра в попытке включить формат файловой системы ReFS.
[HKEY_LOCAL_MACHINESYSTEMCurrentControlSetControlMiniNT]
"AllowRefsFormatOverNonmirrorVolume"=dword:00000001
Эластичная файловая система (ReFS) — это проприетарная файловая система Microsoft, целью которой является файловая система «следующего поколения» после NTFS. Вы можете прочитать больше об этом в Microsoft Docs после обзора Resilient File System (ReFS).
Исправлена ошибка 50 «DISM не поддерживает обслуживание Windows PE»
Чтобы исправить ошибку DISM: 50 «DISM не поддерживает обслуживание Windows PE», удалите MiniNT ключ реестра с помощью этих шагов:
-
- Щелкните правой кнопкой мыши Start, выберите Run.
- Тип
regedit.exeи нажмите ОК. - Перейдите к следующему разделу реестра:
HKEY_LOCAL_MACHINESYSTEMCurrentControlSetControlMiniNT
- Щелкните правой кнопкой мыши
MiniNTи выберите Удалить - Выйдите из редактора реестра.
- Перезагрузка не требуется, как правило. Посмотрите, сможете ли вы запустить DISM сейчас.

Это исправляет ошибку DISM: 50 «DISM не поддерживает обслуживание Windows PE» в Windows.