I have this error in my site
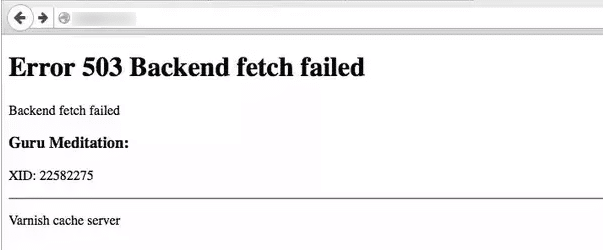
Error 503 Backend fetch failed
Backend fetch failed
Guru Meditation:
XID: 526707
Varnish cache server
Anyone know what may be the cause or how to find out what happens?
![]()
asked May 6, 2015 at 6:03
![]()
1
There’s a common reason that varnish returns 503 that is not explained on the varnish error list. I have learnt this from experience.
If your web server is returning 500 error or similar then varnish simply says Error 503 Backend fetch failed.
what you need to do is to always try to fetch without varnish to see if the error is in varnish or the web server. For example if you have a different hostname for the webserver, load that and find the error, if you fix that, then restart varnish and that solves it most of the time.
answered Jun 23, 2015 at 23:28
![]()
0
That means that Varnish has been properly configured to accept incoming connections, but is not yet available to serve your backend. This error is common when varnish receives a request but your backend is still restarting/releasing.
answered Jun 22, 2015 at 17:41
![]()
crico_avencrico_aven
3312 silver badges6 bronze badges
This can be due to the length of cache tags used by Magento exceeding Varnish’s default of 8192 bytes.
This can be solved by modifying the varnish configs:
- CentOS 6: /etc/sysconfig/varnish
- CentOS 7: /etc/varnish/varnish.params
- Ubuntu: /etc/default/varnish
Find http_resp_hdr_len.
If the parameter doesn’t exist, add it after thread_pool_max.
Magento suggests setting http_resp_hdr_len to a value equal to the product count of your largest category multiplied by 21.
For example, setting the value to 65536 bytes should work if your largest category has 3,000 products:
-p http_resp_hdr_len=65536
See here: http://devdocs.magento.com/guides/v2.0/config-guide/varnish/tshoot-varnish-503.html
answered Nov 20, 2017 at 11:32
![]()
harriharri
44410 silver badges26 bronze badges
We see this on our Drupal site sometimes. Forgive me if you don’t follow the Drupal-isms here, but, basically, there are Drupal entities that can reference other content entities (nodes), and in some situations you can have an entity hold many of these references. Let’s say you add 4 references to one of these entities but you only specify the content (add IDs) for 3 of them, leaving the fourth one blank, it will result in this error.
answered Sep 1, 2020 at 19:33
![]()
syzygy333syzygy333
1231 gold badge1 silver badge6 bronze badges
A lot of users have been getting the “Error 503 Backend fetch Failed” message while trying to access their website or a website on the internet. This is mostly attributed to requests piling up in the cache server memory when a website fails to load but it might have some other potential triggers as well.
In this article, we will be talking about some potential triggers as well as address them with solutions that can be used to conveniently fix this issue. Make sure to follow the steps in a step-by-step and careful manner to avoid any further escalation. WordPress and Hosting accounts are different for all people so we will provide some general instructions and you can look for those settings on your Hosting Account CPanel.
Why is the “Error 503 Backend fetch Failed” Message Triggered?
After reading through some user experiences, we came to the conclusion that the following are some of the most important reasons due to which this error message occurs in the first place.
- Other Tabs: Sometimes, if you are using your browser with a lot of tabs opened, it can cause a strain on the origin server resource. Therefore, it is recommended that you try and close out the unnecessary tabs and then check to see if you are still getting the “Error 503 Backend fetch Failed” issue.
- Browser Issue: In certain cases, the browser that you are using might not be able to open the website because it doesn’t have the required features or doesn’t meet the requirements. Therefore, try to change the browser and use a different one to check if it now works.
- Web Browser Configurations: It is possible that the browser that you are using has set some configurations which are preventing it from being able to properly load the website. Therefore, we recommend that you try and set these configurations to default.
Now that you have gone through some of the most important triggers, we can finally move on towards implementing the solutions.
Before You Start:
The moment you encounter this error on your device while trying to visit a website the first thing you should do is to refresh the webpage. Press the auto-refresh icon located at the left-most corner of your Chrome browser or you can also press the “Ctrl + R” keys simultaneously on your keyboard to reload the webpage after a few seconds. This is a simple potential fix that can work in resolving your issue instantly.
Moreover, if this doesn’t work for you then try to restart your router/modem in order to resolve any DNS Server configuration issues if any. Furthermore, if you encounter this error on your WordPress site you can simply try to reinstall WordPress as this is the simplest and basic most fix in this case before proceeding on to the other advanced solutions.
Solution 1: Exit From All Tabs
If you have any other active tabs running on your device then you should close them all in order to save the memory (RAM) and it can also be beneficial in maintaining a strong internet speed thereby eradicating the error completely.
Solution 2: Use Another Browser
In case you are experiencing this error on the default browser of your device try switching to a couple of other web browsers like Internet Explorer, Firefox or Chrome, etc. All of them have different default settings that can enable you to visit the webpage smoothly and can help you fix the problem successfully.
Solution 3: Reboot the Router
Another solution could be to reboot your Wi-Fi router so as to resolve all of your internet-related issues. To do so proceed with the steps below:
- Close the browser and shut down your PC completely.
- Wait for a few minutes and then restart it again.
- Now switch off the modem / Wi-Fi router by unplugging all the power cords and wait for a couple of minutes.

Disconnect Internet Devices - Turn it on again, open the web browser and navigate to the website again.
- Check to see if the error 503 backend fetch failed WordPress issue still persists or not.

Solution 4: Run A PC Optimizer Tool
Most of the time the outdated or faulty internet connection settings on your device can give rise to this error too so in order to resolve this try using a PC Optimizer tool. PC Optimizer tool like Avast Cleanup provides the ultimate tuneup kit to speed up your computer, improves system performance, and allows you to get rid of unnecessary junk files and apps.
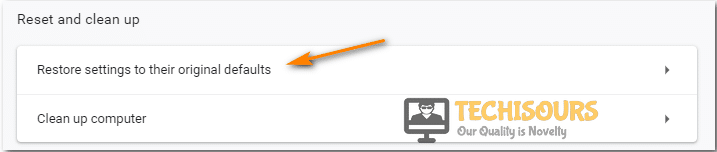
Solution 5: Reset the Web Browser
If it happens that the website you are trying to visit doesn’t get loaded on your default browser easily but works perfectly fine on any other device or browser then you need to reset your browser. Follow these steps to reset the Chrome browser:
- Open the Chrome browser on your desktop PC and click on the three vertical dots appearing in the top-right corner of your screen.
- Here select the “More” option and then click to select “Settings”.

Open Settings - Navigate below to find the “Advanced” icon and expand it by clicking on the downward icon displayed next to it.
- In here locate the “Reset and CleanUp” section. For Mac OS and Linux users find the section of “Reset Settings”.
- Now press the “Restore Settings to their Original Defaults” option and a dialog box will pop up on your screen.

Restore Settings - Here checkmark the box displaying “Help Make Chrome Better by Reporting the Current Settings” and afterward hit the “Reset Settings” option.

Resetting chrome settings - Finally, launch your browser again, visit the website and examine if you have been able to solve the problem successfully.


Solution 6: Reload the Website Later
Most of the time it happens that numerous amount of users are trying to access the same webpage at a time which in turn results in increasing the visitor traffic on the page. This is also a major source of generating such error. In order to overcome this, you must wait for a while until the traffic load decreases on a certain website and then visit it again for the successful loading of the webpage.
Solution 7: Enable the Varnish Plugin
If you own a web-based business then you must make sure to enable the Varnish plugin in order to increase the speed of your website. It is a sort of web accelerator which acts like a proxy server and works to minimize the time in loading a certain website. Follow these steps to enable the varnish plugin:
- Open your desktop PC and launch your WordPress administration page by entering in your login credentials.
- Navigate to find the option of “Plugins”.
- Scroll to the menu on the left pane and select “Add New”.
- Here locate the “Varnish” plugin.
- Select “Plugin” and next choose the option of “Add Plugin”.

Add Varnish Plugin - Once the plugin is added successfully click to “Activate Plugin”.
Solution 8: Deactivate the Plugins (WordPress Users)
Another potential fix if you encounter this error on your WordPress site is that you must try to deactivate the installed plugins on your website. You can simply proceed by opening up the dashboard and then selecting the “Plugins” option from there. You will be navigated to a window where you can see all of the installed plugins so you just need to locate the specific plugin from here which you actually want to deactivate. Right-click on it and select deactivate but you can always choose to reinstall it back whenever you need it in the future.
Solution 9: Notify the Website Admin
Despite implementing all of the above fixes if you are not able to get through this error then the last available option with you is to contact the website admin directly and narrate your issue. You might be able to get a response in a few days and can also get to know if the website’s server is down hence giving rise to the Error 503 Backend fetch Failed error.
Hopefully, until now you’d be able to fix the issue completely but if the error still exists you can Contact Us here and we will further troubleshoot the problem for you.
Содержание
- Ошибка Error 503 Backend fetch failed что делать
- Причины появления проблемы
- Способы решения ошибки Error 503 Backend fetch failed
- Способы устранения ошибки 503: сбой бэкэнд-выборки
- Что такое ошибка 503 Backend Fetch Fetch?
- Причины «Ошибка 503 сбой выборки из бэкэнд»:
- Как устранить ошибку 503: сбой выборки из бэкэнд
- Исправление 1. Обновите веб-страницу
- Исправление 2: Закройте несколько вкладок
- Исправление 3: попробуйте другой браузер
- Исправление 4: перезагрузите WiFi-роутер
- Исправление 5: Запустите средство обслуживания доверенного ПК
- Исправление 6: сбросьте настройки браузера
- Как мне избавиться от ошибки 503 в Chrome?
- Исправление 7. Обратитесь к администратору веб-сайта
- Easily Fix Error 503 Backend fetch Failed WordPress and Varnish Cache Server
- Why is the “Error 503 Backend fetch Failed” Message Triggered?
- Before You Start:
- Fixing the error 503 backend fetch failed varnish cache server:
- Solution 1: Exit From All Tabs
- Solution 2: Use Another Browser
- Solution 3: Reboot the Router
- Solution 4: Run A PC Optimizer Tool
- Solution 5: Reset the Web Browser
- Solution 6: Reload the Website Later
- Solution 7: Enable the Varnish Plugin
- Solution 8: Deactivate the Plugins (WordPress Users)
- Solution 9: Notify the Website Admin
Ошибка Error 503 Backend fetch failed что делать
Компьютер нужен нам в первую очередь для выхода в Интернет, где на каждом шагу подстерегает большое количество опасностей. Сегодня я поделюсь информацией об одной из таких угроз – ошибке Error 503 Backend fetch failed, и расскажу, что нужно делать, чтобы от нее избавиться. Неприятно то, что данная проблема может возникнуть абсолютно на любом устройстве, использующемся для выхода в Сеть, включая и мобильные гаджеты. Но, как всегда, раз есть ошибка, то есть и решения, созданные умными головами, которыми мы и воспользуемся.

Чтобы подобрать верное решение, необходимо сначала понять причины, из-за которых вылетает ошибка Error 503.
Причины появления проблемы
Данный код ошибки означает, что сервер по каким-то внутренним причинам не в состоянии ответить на обращенный к нему запрос. Чаще всего это связано с:
- кратковременным сбоем при запуске онлайн-приложения;
- неспособностью ресурсов удаленного сервера справиться с огромным количеством запросов, сделанных одновременно;
- нехваткой памяти сервера, необходимой для обработки направленных к нему запросов;
- окончанием срока действия сертификата SSL;
- проведением технических работ на интернет-ресурсе.
Как видим, ошибка вылетает из-за сбоев в техническом состоянии удаленного сервера по не зависящим от пользователя обстоятельствам.
Способы решения ошибки Error 503 Backend fetch failed
Понятно, что от обычного пользователя, сидящего за экраном своего компьютера или держащего в руках мобильный гаджет, почти ничего не зависит – он не сможет при помощи своих средств решить техническую сторону ошибки. Тем не менее стоит предпринять несколько шагов, с помощью которых иногда можно сразу разрешить проблему.
- Первым делом следует попробовать выполнить перезагрузку страницы, нажав F5 (обычно при работе в любом браузере) или на стрелочку, выполняющую функцию обновления ↻.


Не забывайте перезагружать компьютер после каждых внесенных в него изменений. Это позволит корректно установить все обновления.
Источник
Способы устранения ошибки 503: сбой бэкэнд-выборки
«Что означает« Ошибка 503 при загрузке серверной части »? Уведомление отображается, когда я пытаюсь посетить веб-страницу в моем браузере ».
Вам знаком этот сценарий? Продолжайте читать, если вам нужно решить эту проблему.
Что такое ошибка 503 Backend Fetch Fetch?
Сообщение «Ошибка 503: сбой выборки из бэкенда» — это сообщение об ошибке ответа протокола передачи гипертекста (HTTP). Вы можете столкнуться с ним независимо от используемого устройства, операционной системы или браузера. Это связано с веб-сайтом, который вы пытаетесь посетить. Это означает, что сервер неисправен и не отвечает должным образом. Ошибка возникает, когда сервер веб-сайта получает больше запросов, чем он может обработать за раз.
Когда вы пытаетесь посетить веб-сайт, но он не отвечает или делает это с очень медленной скоростью, запросы выстраиваются в очередь, что сервер может не справиться. Это может привести к тому, что кеш-память вашего браузера будет занята, что впоследствии приведет к ошибке бэкэнд-выборки.
Причины «Ошибка 503 сбой выборки из бэкэнд»:
- Низкая скорость Интернета: проблемы с подключением к сети или низкая скорость Интернета являются основной причиной, по которой вы можете столкнуться с ошибкой 503 в своем браузере. Веб-сайт загружается слишком долго или не загружается, что приводит к накоплению запросов. Затем данные веб-сайта накапливаются в памяти кеш-сервера, что приводит к ошибке «Ошибка при извлечении из серверной части».
- Сервер веб-сайта находится на обслуживании: если сервер веб-сайта, который вы пытаетесь посетить, находится на плановом / временном обслуживании, ваши запросы будут помещены в очередь, и вы получите ошибку 503 в своем браузере.
- Веб-сайт был признан подозрительным и заблокирован: если в вашем браузере активен блокировщик рекламы, и вы пытаетесь посетить веб-сайт, на котором много рекламного контента, он предотвратит загрузку такого контента. По этой причине запросы накапливаются и приводят к обсуждаемой ошибке. Другие инструменты безопасности в вашем браузере также предотвращают загрузку подозрительных веб-сайтов, что приводит к ошибке, с которой вы столкнулись.
Как устранить ошибку 503: сбой выборки из бэкэнд
Большой! Вы зашли так далеко. Давайте теперь рассмотрим вопрос, который привел вас к этому руководству.
Как исправить ошибку 503: сбой при загрузке бэкэнд? Вот решения:
- Обновите веб-страницу
- Закройте несколько вкладок
- Попробуйте другой браузер
- Перезагрузите WiFi роутер
- Запустите надежный инструмент для обслуживания ПК
- Сбросьте ваш браузер
- Свяжитесь с администратором сайта
Мы возьмем их по одному.
Исправление 1. Обновите веб-страницу
Естественно, первое, что вы сделаете, когда веб-сайт не загружается, — это нажмите кнопку «Обновить». Итак, если вы столкнулись с ошибкой 503 бэкэнд-выборки, имеет смысл обновить веб-страницу. Если вы сделаете это достаточно много раз (по крайней мере, два или три раза), вы сможете обойти ошибку. Однако, если это не сработало для вас, переходите к следующему исправлению.
Исправление 2: Закройте несколько вкладок
Попробуйте закрыть другие активные вкладки в браузере, чтобы снизить нагрузку на кеш-память. Это также может помочь повысить скорость вашего интернета, если она недостаточно высока.
Исправление 3: попробуйте другой браузер
Если в вашем браузере в фоновом режиме выполняется несколько процессов, это может снизить скорость просмотра и вызвать ошибку 503. Или, возможно, в вашем браузере есть настройки, препятствующие загрузке веб-страницы. Попробуйте использовать другой браузер для посещения веб-сайта и посмотрите, загрузится ли он.
Исправление 4: перезагрузите WiFi-роутер
Это хорошее исправление, особенно если вы получаете сообщение «Ошибка бэкэнд-выборки: ошибка 503» на нескольких веб-сайтах. У вас могут быть проблемы с подключением к Интернету, которые можно решить, перезагрузив маршрутизатор.
Закройте браузер и перезагрузите компьютер. Затем выключите маршрутизатор и подождите примерно полминуты, прежде чем снова его включить. Перезапустите браузер и попробуйте снова посетить веб-сайт. Посмотрите, была ли устранена ошибка.
Исправление 5: Запустите средство обслуживания доверенного ПК
Как упоминалось ранее, низкая скорость интернета — одна из основных причин рассматриваемой ошибки. Это может иметь какое-то отношение к настройкам подключения к Интернету на вашем компьютере. Вы можете решить эту проблему автоматически с помощью Auslogics BoostSpeed. Инструмент был разработан разработчиком приложения Microsoft Silver, ему доверяют и рекомендуют эксперты по всему миру. BoostSpeed запускает сканирование, чтобы обнаружить все неоптимальные настройки на вашем компьютере. Затем, используя точные методы, он настраивает их для обеспечения максимальной производительности.
Исправление 6: сбросьте настройки браузера
Сброс настроек браузера — это разумный вариант действий, если большинство посещаемых вами веб-сайтов выдают в вашем браузере сообщение «Ошибка 503: сбой при загрузке серверной части», но загружаются успешно, когда вы загружаете их с помощью другого устройства или другого браузера.
Как мне избавиться от ошибки 503 в Chrome?
Выполните следующие действия, чтобы сбросить настройки браузера Chrome, если веб-сайты продолжают выдавать ошибку 503:
- Запустите браузер Chrome.
- Щелкните значок «Еще», отображаемый в виде трех вертикальных точек в правом верхнем углу окна. Раскроется раскрывающееся меню.
- Щелкните «Настройки».
- Прокрутите страницу вниз и щелкните стрелку вниз рядом с полем «Дополнительно», чтобы развернуть меню.
- Прокрутите вниз до раздела «Сброс и очистка» (если вы используете Chrome в операционной системе Windows). Если вы используете Chrome на Chromebook, Linux или Mac OS, прокрутите вниз до раздела «Сбросить настройки».
- Нажмите на опцию «Восстановить исходные настройки по умолчанию».
- В открывшемся диалоговом окне вы можете установить флажок «Помогите улучшить Chrome, сообщив о текущих настройках». Затем нажмите кнопку «Сбросить настройки».
- Перезапустите браузер и посмотрите, устранена ли ошибка.
Имейте в виду, что сброс означает восстановление настроек вашего браузера по умолчанию. Ваши закладки, история просмотров и сохраненные пароли не будут удалены, но следующие изменения вступят в силу на всех устройствах, на которых вы вошли в систему:
- Если вы выбрали другую поисковую систему в качестве поисковой системы по умолчанию, она будет снова изменена на Google.
- Ваши закрепленные вкладки будут удалены.
- Настройки контента, такие как разрешение веб-сайту использовать ваш микрофон или показывать всплывающие окна, будут сброшены.
- Файлы cookie и данные сайта будут сброшены.
- Расширения браузера отключаются. Если вы хотите снова включить их после сброса, перейдите в меню браузера и нажмите «Дополнительные инструменты»> «Расширения».
- Тема вашего браузера будет сброшена.
Исправление 7. Обратитесь к администратору веб-сайта
Если вы дошли до этого момента, не исправив ошибку, единственный вариант, который у вас остался, — это связаться с администратором проблемного веб-сайта и сообщить им об ошибке. Таким образом, вы также можете узнать, находится ли сервер сайта на техническом обслуживании и когда он снова будет доступен.
Мы надеемся, что наше руководство по исправлению ошибки «Ошибка 503: сбой серверной загрузки» было для вас полезным. Не забудьте заглянуть в наш блог, чтобы получить более содержательные советы по решению проблем с Windows.
Источник
Easily Fix Error 503 Backend fetch Failed WordPress and Varnish Cache Server
A lot of users have been getting the “Error 503 Backend fetch Failed” message while trying to access their website or a website on the internet. This is mostly attributed to requests piling up in the cache server memory when a website fails to load but it might have some other potential triggers as well.
Error 503 Backend Fetch Failed
In this article, we will be talking about some potential triggers as well as address them with solutions that can be used to conveniently fix this issue. Make sure to follow the steps in a step-by-step and careful manner to avoid any further escalation. WordPress and Hosting accounts are different for all people so we will provide some general instructions and you can look for those settings on your Hosting Account CPanel.
Why is the “Error 503 Backend fetch Failed” Message Triggered?
After reading through some user experiences, we came to the conclusion that the following are some of the most important reasons due to which this error message occurs in the first place.
- Other Tabs: Sometimes, if you are using your browser with a lot of tabs opened, it can cause a strain on the origin server resource. Therefore, it is recommended that you try and close out the unnecessary tabs and then check to see if you are still getting the “Error 503 Backend fetch Failed” issue.
- Browser Issue: In certain cases, the browser that you are using might not be able to open the website because it doesn’t have the required features or doesn’t meet the requirements. Therefore, try to change the browser and use a different one to check if it now works.
- Web Browser Configurations: It is possible that the browser that you are using has set some configurations which are preventing it from being able to properly load the website. Therefore, we recommend that you try and set these configurations to default.
Now that you have gone through some of the most important triggers, we can finally move on towards implementing the solutions.
Before You Start:
The moment you encounter this error on your device while trying to visit a website the first thing you should do is to refresh the webpage. Press the auto-refresh icon located at the left-most corner of your Chrome browser or you can also press the “Ctrl + R” keys simultaneously on your keyboard to reload the webpage after a few seconds. This is a simple potential fix that can work in resolving your issue instantly.
Moreover, if this doesn’t work for you then try to restart your router/modem in order to resolve any DNS Server configuration issues if any. Furthermore, if you encounter this error on your WordPress site you can simply try to reinstall WordPress as this is the simplest and basic most fix in this case before proceeding on to the other advanced solutions.
Fixing the error 503 backend fetch failed varnish cache server:
Solution 1: Exit From All Tabs
If you have any other active tabs running on your device then you should close them all in order to save the memory (RAM) and it can also be beneficial in maintaining a strong internet speed thereby eradicating the error completely.
Solution 2: Use Another Browser
In case you are experiencing this error on the default browser of your device try switching to a couple of other web browsers like Internet Explorer, Firefox or Chrome, etc. All of them have different default settings that can enable you to visit the webpage smoothly and can help you fix the problem successfully.
Solution 3: Reboot the Router
Another solution could be to reboot your Wi-Fi router so as to resolve all of your internet-related issues. To do so proceed with the steps below:
- Close the browser and shut down your PC completely.
- Wait for a few minutes and then restart it again.
- Now switch off the modem / Wi-Fi router by unplugging all the power cords and wait for a couple of minutes.
 Disconnect Internet Devices
 - Turn it on again, open the web browser and navigate to the website again.
- Check to see if the error 503 backend fetch failed WordPress issue still persists or not.
Solution 4: Run A PC Optimizer Tool
Most of the time the outdated or faulty internet connection settings on your device can give rise to this error too so in order to resolve this try using a PC Optimizer tool. PC Optimizer tool like Avast Cleanup provides the ultimate tuneup kit to speed up your computer, improves system performance, and allows you to get rid of unnecessary junk files and apps.
Solution 5: Reset the Web Browser
If it happens that the website you are trying to visit doesn’t get loaded on your default browser easily but works perfectly fine on any other device or browser then you need to reset your browser. Follow these steps to reset the Chrome browser:
- Open the Chrome browser on your desktop PC and click on the three vertical dots appearing in the top-right corner of your screen.
- Here select the “More” option and then click to select “Settings”. Open Settings
- Navigate below to find the “Advanced” icon and expand it by clicking on the downward icon displayed next to it.
- In here locate the “Reset and CleanUp” section. For Mac OS and Linux users find the section of “Reset Settings”.
- Now press the “Restore Settings to their Original Defaults” option and a dialog box will pop up on your screen. Restore Settings
- Here checkmark the box displaying “Help Make Chrome Better by Reporting the Current Settings” and afterward hit the “Reset Settings” option. Resetting chrome settings
- Finally, launch your browser again, visit the website and examine if you have been able to solve the problem successfully.
Solution 6: Reload the Website Later
Most of the time it happens that numerous amount of users are trying to access the same webpage at a time which in turn results in increasing the visitor traffic on the page. This is also a major source of generating such error. In order to overcome this, you must wait for a while until the traffic load decreases on a certain website and then visit it again for the successful loading of the webpage.
Solution 7: Enable the Varnish Plugin
If you own a web-based business then you must make sure to enable the Varnish plugin in order to increase the speed of your website. It is a sort of web accelerator which acts like a proxy server and works to minimize the time in loading a certain website. Follow these steps to enable the varnish plugin:
- Open your desktop PC and launch your WordPress administration page by entering in your login credentials.
- Navigate to find the option of “Plugins”.
- Scroll to the menu on the left pane and select “Add New”.
- Here locate the “Varnish” plugin.
- Select “Plugin” and next choose the option of “Add Plugin”. Add Varnish Plugin
- Once the plugin is added successfully click to “Activate Plugin”.
Solution 8: Deactivate the Plugins (WordPress Users)
Another potential fix if you encounter this error on your WordPress site is that you must try to deactivate the installed plugins on your website. You can simply proceed by opening up the dashboard and then selecting the “Plugins” option from there. You will be navigated to a window where you can see all of the installed plugins so you just need to locate the specific plugin from here which you actually want to deactivate. Right-click on it and select deactivate but you can always choose to reinstall it back whenever you need it in the future.
Solution 9: Notify the Website Admin
Despite implementing all of the above fixes if you are not able to get through this error then the last available option with you is to contact the website admin directly and narrate your issue. You might be able to get a response in a few days and can also get to know if the website’s server is down hence giving rise to the Error 503 Backend fetch Failed error.
Hopefully, until now you’d be able to fix the issue completely but if the error still exists you can Contact Us here and we will further troubleshoot the problem for you.
Источник
I getting this error how can i do? i try to editing many time but still not work.
Error 503 Backend fetch failed
Backend fetch failedGuru Meditation:
XID: 35
Varnish cache server
My CentOS 7: /etc/varnish/varnish.params
# Varnish environment configuration description. This was derived from
# the old style sysconfig/defaults settings# Set this to 1 to make systemd reload try to switch VCL without restart. RELOAD_VCL=1
# Main configuration file. You probably want to change it. VARNISH_VCL_CONF=/etc/varnish/default.vcl
# Default address and port to bind to. Blank address means all IPv4
# and IPv6 interfaces, otherwise specify a host name, an IPv4 dotted
# quad, or an IPv6 address in brackets.
# VARNISH_LISTEN_ADDRESS=192.168.1.5 VARNISH_LISTEN_PORT=80# Admin interface listen address and port VARNISH_ADMIN_LISTEN_ADDRESS=127.0.0.1 VARNISH_ADMIN_LISTEN_PORT=6082
# Shared secret file for admin interface VARNISH_SECRET_FILE=/etc/varnish/secret
# Backend storage specification, see Storage Types in the varnishd(5)
# man page for details. VARNISH_STORAGE=»malloc,1024M»# User and group for the varnishd worker processes VARNISH_USER=varnish VARNISH_GROUP=varnish
# Other options, see the man page varnishd(1) DAEMON_OPTS=»-a :80 -T localhost:6082 -f /etc/varnish/default.vcl -S /etc/varnish/secret -s
malloc,1024m -p thread_pool_min=5 -p thread_pool_max=500 -p
thread_pool_timeout=300 -p http_resp_hdr_len=65536 -p
http_resp_size=98304 -p workspace_backend=98304″
update:
1) Yes, the vcl file generated by Magento.
2)
tcp 0 0 0.0.0.0:80 0.0.0.0:* LISTEN 4338/varnishd
tcp 0 0 127.0.0.1:6082 0.0.0.0:* LISTEN 4337/varnishd
tcp6 0 0 :::80 :::* LISTEN 4338/varnishd
tcp6 0 0 :::8080 :::* LISTEN 3905/httpd
3) i in vcl edited added http:// beacuse when i only /pub/health_check.php will be 503, but added http:// the theme look like something wrong no css.
.probe = {.
url = «http://example.com/pub/health_check.php»;
4) i used this command
curl -I -v —location-trusted ‘http://example.com’
show this, but i dont know working or not working, beacuse the var/page_cache/ directory is not empty. the mage-tags file still here.
< X-Magento-Cache-Control: max-age=0, must-revalidate, no-cache,no-store
X-Magento-Cache-Control: max-age=0, must-revalidate,no-cache, no-store < Age: 0 Age: 0 <
X-Magento-Cache-Debug: MISS
X-Magento-Cache-Debug: MISS
Компьютер нужен нам в первую очередь для выхода в Интернет, где на каждом шагу подстерегает большое количество опасностей. Сегодня я поделюсь информацией об одной из таких угроз – ошибке Error 503 Backend fetch failed, и расскажу, что нужно делать, чтобы от нее избавиться. Неприятно то, что данная проблема может возникнуть абсолютно на любом устройстве, использующемся для выхода в Сеть, включая и мобильные гаджеты. Но, как всегда, раз есть ошибка, то есть и решения, созданные умными головами, которыми мы и воспользуемся.
Чтобы подобрать верное решение, необходимо сначала понять причины, из-за которых вылетает ошибка Error 503.
Причины появления проблемы
Данный код ошибки означает, что сервер по каким-то внутренним причинам не в состоянии ответить на обращенный к нему запрос. Чаще всего это связано с:
- кратковременным сбоем при запуске онлайн-приложения;
- неспособностью ресурсов удаленного сервера справиться с огромным количеством запросов, сделанных одновременно;
- нехваткой памяти сервера, необходимой для обработки направленных к нему запросов;
- окончанием срока действия сертификата SSL;
- проведением технических работ на интернет-ресурсе.
Как видим, ошибка вылетает из-за сбоев в техническом состоянии удаленного сервера по не зависящим от пользователя обстоятельствам.
Способы решения ошибки Error 503 Backend fetch failed
Понятно, что от обычного пользователя, сидящего за экраном своего компьютера или держащего в руках мобильный гаджет, почти ничего не зависит – он не сможет при помощи своих средств решить техническую сторону ошибки. Тем не менее стоит предпринять несколько шагов, с помощью которых иногда можно сразу разрешить проблему.
- Первым делом следует попробовать выполнить перезагрузку страницы, нажав F5 (обычно при работе в любом браузере) или на стрелочку, выполняющую функцию обновления ↻.

- Если первый способ не помогает, то вернитесь к проблемному сайту через какое-то время, может быть, специалисты уже успеют отладить со своей стороны техническую составляющую эту проблему.
- Как рекомендация – старайтесь посещать проблемные страницы в моменты, когда другие пользователи наименее активны, это даст возможность серверу нормально справиться с количеством направленных к нему запросов.
- Если ошибка 503 продолжает вылетать, перезагрузите ПК либо мобильное устройство/ ноутбук, а также оборудование, при помощи которого выходите в Сеть.
- В случае, когда сервер все же не отвечает на обращенные к нему запросы, найдите контактные данные проблемного сайта или самого ресурса и отправьте сообщение об ошибке Error 503 Backend fetch failed, приложив скриншот, если в форме обратной связи для него предусмотрено поле.
- Если решение долго не находится, а вам обязательно нужно попасть на проблемный сайт, используйте бесплатные DNS-серверы. Для этого введите в строке поиска своего рабочего браузера “как изменить адрес DNS-сервера в (название используемой на устройстве операционной системы)” и поищите решение на предложенных ресурсах. К примеру, если вы используете Windows 10, то на первом же сайте в выдаче Яндекса будет подробная инструкция по изменению DNS-сервера.

- Проблема может быть и в качестве услуг, предоставляемых провайдером. В этом случае решайте все вопросы с ним.
Не забывайте перезагружать компьютер после каждых внесенных в него изменений. Это позволит корректно установить все обновления.
Опубликовано 06 ноября 2017 Обновлено 01 октября 2020
Tags:
ops (12)
Varnish is incredibly stable, but that doesn’t mean troubleshooting doesn’t have to take place. On rare occassions crashes may occur. Based on the available server resources and traffic patterns, misconfigured runtime parameters may cause unwanted behavior.
Crashes rarely occur, but when they do, you need to figure out what’s going on.
Even when Varnish is stable, the hit rate of the cache might be too low for your liking.
There are many ways to perform troubleshooting: from panic inspection, to Varnish Shared Memory Logs (VSL), to monitoring metrics.
Restarting and reloading
“Have you tried turning it off and on again?» is a very common question asked by IT support staff and quite often it turns out to be an effective measure.
However, restarting is often considered lazy problem solving because it lacks the ambition inspect the root cause. But when you’ve run out of options or out of time, a quick restart can be considered.
Restart
Here’s how you can restart Varnish:
sudo systemctl restart varnish
This command will kill the varnishd runtime process and start it up again. Any runtime parameters that weren’t persisted in the systemd service file will be reset.
Reload
Performing a Varnish reload will only reload the VCL configuration and has no impact on the state of the varnishd main or child processes.
Here’s how you reload the VCL configuration:
sudo systemctl reload varnish
The systemd reload will call the varnishreload script that will gracefully add a new VCL configuration, while discarding older configurations.
Varnish panics
When the Varnish child process crashes a panic is triggered and the child process is restarted. The panic.show CLI command will return the last panic.
Here’s how to return the last panic:
sudo varnishadm panic.show
An example panic
Here’s an example of a panic that we triggered ourselves through the varnishadm debug.panic.worker command:
$ sudo varnishadm panic.show
Panic at: Mon, 03 Jan 2022 13:16:43 GMT
Assert error in ccf_panic(), cache/cache_panic.c line 725:
  Condition((strcmp("", "You asked for it")) == 0) not true.
version = varnish-6.0.8 revision 97e54ada6ac578af332e52b44d2038bb4fa4cd4a, vrt api = 7.1
ident = Linux,5.10.76-linuxkit,aarch64,-junix,-sdefault,-sdefault,-hcritbit,epoll
now = 11645.069782 (mono), 1641215803.491569 (real)
Backtrace:
  0xaaaaca50fcd0: /usr/sbin/varnishd(+0x4fcd0) [0xaaaaca50fcd0]
  0xaaaaca57c5f4: /usr/sbin/varnishd(VAS_Fail+0x24) [0xaaaaca57c5f4]
  0xaaaaca50e474: /usr/sbin/varnishd(body_status_2str+0) [0xaaaaca50e474]
  0xaaaaca57ea1c: /usr/sbin/varnishd(+0xbea1c) [0xaaaaca57ea1c]
  0xaaaaca57ee54: /usr/sbin/varnishd(VCLS_Poll+0x2d0) [0xaaaaca57ee54]
  0xaaaaca4f1e28: /usr/sbin/varnishd(CLI_Run+0x58) [0xaaaaca4f1e28]
  0xaaaaca50ad10: /usr/sbin/varnishd(child_main+0x1a0) [0xaaaaca50ad10]
  0xaaaaca54d6c4: /usr/sbin/varnishd(+0x8d6c4) [0xaaaaca54d6c4]
  0xaaaaca57ea1c: /usr/sbin/varnishd(+0xbea1c) [0xaaaaca57ea1c]
  0xaaaaca57ee54: /usr/sbin/varnishd(VCLS_Poll+0x2d0) [0xaaaaca57ee54]
thread = (cache-main)
thr.req = (nil) {
},
thr.busyobj = (nil) {
},
vmods = {
},
The error message, the filename, the line number and the backtrace are the tools you have to figure out what caused the panic and how to potentially solve it.
You can get help when you cannot figure these panics out on your own.
Debug mode
The varnishd program has a -d flag that enables debug mode.
When enabling debug mode, the parent process will run in the foreground with a CLI connection on stdin/stdout. The child process must be started explicitly with a CLI command. Terminating the parent process will also terminate the child.
Enabling debug mode
Here’s an example where the -d debug flag is added to varnishd:
$ varnishd -f default.vcl -d
Warnings:
VCL compiled.

Debug: Version: varnish-6.0.8 revision 97e54ada6ac578af332e52b44d2038bb4fa4cd4a
Debug: Platform: Linux,5.10.76-linuxkit,aarch64,-junix,-sdefault,-sdefault,-hcritbit
200 318
-----------------------------
Varnish Cache CLI 1.0
-----------------------------
Linux,5.10.76-linuxkit,aarch64,-junix,-sdefault,-sdefault,-hcritbit
varnish-6.0.8 revision 97e54ada6ac578af332e52b44d2038bb4fa4cd4a

Type 'help' for command list.
Type 'quit' to close CLI session.
Type 'start' to launch worker process.

start
Debug: Child (927) Started
200 0

Info: Child (927) said Child starts
When to use debug mode
An occasional Varnish panic can be caught using the panic.show CLI command, as mentioned earlier. When the panic occurs, the child process will restart and request handling continues.
If multiple panics occur, the last panic will be overwritten and the original panic you’re trying to investigate will no longer be available through panic.show. To prevent this information from being lost, debug mode can be used.
Debug mode is very similar to running the varnishd program in the foreground via the -F runtime parameter. The main difference is that a CLI is available and that the child process is not automatically started.
Thanks to the CLI being available, you can run additional commands while debugging. These commands include:
param.show,param.setandparam.resetto show, set, and reset runtime parametersstopandstartto stop and start thevarnishdchild processvcl.load,vcl.useandvcl.discardto load, activate and remove VCL configurations
The Guru Meditation error
The Guru Meditation errors that Varnish returns are well-known, but usually have nothing to do with problems within Varnish.
As you can see in the example below, the Guru Meditation error reports that Varnish couldn’t reach the backend:
<!DOCTYPE html>
<html>
  <head>
    <title>503 Backend fetch failed</title>
  </head>
  <body>
    <h1>Error 503 Backend fetch failed</h1>
    <p>Backend fetch failed</p>
    <h3>Guru Meditation:</h3>
    <p>XID: 123456</p>
    <hr>
    <p>Varnish cache server</p>
  </body>
</html>
The output format for these types of errors and the fact that the term Guru Meditation is used, is all part of the built-in VCL for the vcl_synth and vcl_backend_error subroutines.
The vcl_synth subroutine is reponsible for synthetic responses that are returned in the client-side logic of Varnish. For errors that happen at the backend-side, the vcl_backend_error subroutine is used.
Client-side synthetic responses
If you want to intercept Varnish Shared Memory Logs (VSL) for client-side synthetic responses, you can run the following command:
sudo varnishlog -g request -q "VCL_call eq 'SYNTH'"
If you want to intercept VSL transactions for synthetic responses that return 400-range status codes, you can run the following command:
sudo varnishlog -g request -q "VCL_call eq 'SYNTH'
 and RespStatus >= 400 and RespStatus < 500"
This will ensure that non-erroneous synthetic responses are not part of the output.
These commands will present a VSL transaction every time a client-side Guru Meditation error takes place in real time.
If you want to dump all the old transactions in the VSL memory buffer that match these criteria, you can add the -d parameter to the command. Here’s an example:
sudo varnishlog -d -g request -q "VCL_call eq 'SYNTH'
 and RespStatus >= 400 and RespStatus < 500"
VSL output example
Here’s a VSL example for a request that resulted in a synthetic response with a 400-range status code:
$ sudo varnishlog -g request -q "VCL_call eq 'SYNTH'
 and RespStatus >= 400 and RespStatus < 500"
*   << Request  >> 8
-   Begin          req 7 rxreq
-   Timestamp      Start: 1641228924.312547 0.000000 0.000000
-   Timestamp      Req: 1641228924.312547 0.000000 0.000000
-   ReqStart       172.17.0.1 55068 a0
-   ReqMethod      PRI
-   ReqURL         /
-   ReqProtocol    HTTP/1.1
-   ReqHeader      Host: localhost
-   VCL_call       RECV
-   VCL_return     synth
-   VCL_call       HASH
-   VCL_return     lookup
-   Timestamp      Process: 1641228924.312633 0.000086 0.000086
-   RespProtocol   HTTP/1.1
-   RespStatus     405
-   RespReason     Method Not Allowed
-   RespReason     Method Not Allowed
-   RespHeader     Date: Mon, 03 Jan 2022 16:55:24 GMT
-   RespHeader     Server: Varnish
-   RespHeader     X-Varnish: 8
-   VCL_call       SYNTH
-   RespHeader     Content-Type: text/html; charset=utf-8
-   RespHeader     Retry-After: 5
-   VCL_return     deliver
-   RespHeader     Content-Length: 272
-   Storage        malloc Transient
-   RespHeader     Connection: keep-alive
-   Timestamp      Resp: 1641228924.312984 0.000437 0.000351
-   ReqAcct        73 0 73 204 272 476
-   End
From these logs you can conclude that an HTTP 405 Method Not Allowed error was returned because the invalid PRI request method was used.
This behavior is part of the built-in VCL for vcl_recv that prevents the PRI request method from being used.
You can slim down the output by only selecting the tags you need:
$ sudo varnishlog -i RespStatus -i RespReason -g request -q "VCL_call eq 'SYNTH'
 and RespStatus >= 400 and RespStatus < 500"
*   << Request  >> 8
-   RespStatus     405
-   RespReason     Method Not Allowed
-   RespReason     Method Not Allowed
Backend errors
When the Guru Meditation error returns output like 503 Backend fetch failed, the vcl_backend_error subroutine is called because the backend fetch failed.
This is not client-side logic based on faulty input from the user, but backend logic for a request that was not served from the cache. In the execution flow the vcl_backend_fetch and the vcl_backend_response subroutines are responsible for fetching a response from the backend and storing it in the cache.
When things go wrong, the synthetic error is returned, but you can also catch these errors in the Varnish Shared Memory Logs (VSL) using the following command:
sudo varnishlog -g request -q "VCL_call eq 'BACKEND_ERROR'"
VSL output example
Here’s a VSL example where the backend fetch fails and a backend error is returned:
$ sudo varnishlog -g request -q "VCL_call eq 'BACKEND_ERROR'"
*   << Request  >> 32790
-   Begin          req 32789 rxreq
-   Timestamp      Start: 1641287864.851443 0.000000 0.000000
-   Timestamp      Req: 1641287864.851443 0.000000 0.000000
-   ReqStart       172.17.0.1 55092 a0
-   ReqMethod      GET
-   ReqURL         /
-   ReqProtocol    HTTP/1.1
-   ReqHeader      Host: localhost
-   VCL_call       RECV
-   VCL_return     hash
-   VCL_call       HASH
-   VCL_return     lookup
-   VCL_call       MISS
-   VCL_return     fetch
-   Link           bereq 32791 fetch
-   Timestamp      Fetch: 1641287864.852788 0.001346 0.001346
-   RespProtocol   HTTP/1.1
-   RespStatus     503
-   RespReason     Backend fetch failed
-   RespHeader     Date: Tue, 04 Jan 2022 09:17:44 GMT
-   RespHeader     Server: Varnish
-   RespHeader     Content-Type: text/html; charset=utf-8
-   RespHeader     Retry-After: 5
-   RespHeader     X-Varnish: 32790
-   RespHeader     Age: 0
-   RespHeader     Via: 1.1 varnish (Varnish/6.0)
-   VCL_call       DELIVER
-   VCL_return     deliver
-   Timestamp      Process: 1641287864.852818 0.001375 0.000030
-   RespHeader     Content-Length: 282
-   RespHeader     Connection: keep-alive
-   Timestamp      Resp: 1641287864.852978 0.001535 0.000160
-   ReqAcct        73 0 73 250 282 532
-   End
**  << BeReq    >> 32791
--  Begin          bereq 32790 fetch
--  VCL_use        boot
--  Timestamp      Start: 1641287864.851951 0.000000 0.000000
--  BereqMethod    GET
--  BereqURL       /
--  BereqProtocol  HTTP/1.1
--  BereqHeader    Host: localhost
--  BereqHeader    Accept-Encoding: gzip
--  BereqHeader    X-Varnish: 32791
--  VCL_call       BACKEND_FETCH
--  VCL_return     fetch
--  FetchError     backend boot.default: fail errno 111 (Connection refused)
--  Timestamp      Beresp: 1641287864.852372 0.000422 0.000422
--  Timestamp      Error: 1641287864.852377 0.000426 0.000004
--  BerespProtocol HTTP/1.1
--  BerespStatus   503
--  BerespReason   Service Unavailable
--  BerespReason   Backend fetch failed
--  BerespHeader   Date: Tue, 04 Jan 2022 09:17:44 GMT
--  BerespHeader   Server: Varnish
--  VCL_call       BACKEND_ERROR
--  BerespHeader   Content-Type: text/html; charset=utf-8
--  BerespHeader   Retry-After: 5
--  VCL_return     deliver
--  Storage        malloc Transient
--  Length         282
--  BereqAcct      0 0 0 0 0 0
--  End
The log output has 2 transactions:
- One for the client-side transaction with the incoming request and outgoing response
- One for the backend fetch and backend response
In the backend transaction, the FetchError tag clearly indicates a Connection refused error. The fact that the backend server is not available is the reason for the failure.
Of course the output can be reduced by only selecting the necessary tags.
Backend health monitoring
Instead of waiting for backend fetch failures to occur, you can actively monitor the health of your backends. This requires a health probe to be defined and assigned to the backends:
vcl 4.1;

probe health {
    .request =
        "HEAD / HTTP/1.1"
        "Host: localhost"
        "Connection: close"
        "User-Agent: Varnish Health Probe";
    .interval  = 10s;
    .timeout   = 5s;
    .window    = 5;
    .threshold = 3;
}

backend default {
    .host = "127.0.0.1";
    .port = "8080";
    .probe = health;
}
The probe named health will send an HTTP HEAD call for the / resource to the backend every 10 seconds. The probe will time out after 5 seconds. As soon as 3 out of 5 health checks fail, the backend is considered sick.
VSL backend health checks
The Backend_health VSL tag will return the backend health on a real-time basis. You can run the following command to display the backend health:
sudo varnishlog -g raw -i Backend_health
Here’s the output for the failing backend:
$ sudo varnishlog -g raw -i backend_health
0 Backend_health - boot.default Still sick -------- 2 3 5 0.000000 0.000000 Open error 111 (Connection refused)
0 Backend_health - boot.default Still sick -------- 2 3 5 0.000000 0.000000 Open error 111 (Connection refused)
As you can see, the same Connection refused error is returned. Because the interval of the health probe was set to 10 seconds, a new log line will appear every 10 seconds.
When the backend failure is fixed, the VSL will reflect the fix:
$ sudo varnishlog -g raw -i backend_health
0 Backend_health - boot.default Still sick 4---X-RH 1 3 5 0.003040 0.001013 HTTP/1.1 200 OK
0 Backend_health - boot.default Still sick 4---X-RH 2 3 5 0.005553 0.002148 HTTP/1.1 200 OK
0 Backend_health - boot.default Back healthy 4---X-RH 3 3 5 0.001177 0.001906 HTTP/1.1 200 OK
0 Backend_health - boot.default Still healthy 4---X-RH 4 3 5 0.001419 0.001784 HTTP/1.1 200 OK
Although the first log line already displays an HTTP/1.1 200 OK status, the backend health is not yet healthy. For the backend the be fully healthy, 3 out of 5 checks should succeed according to the health probe settings.
As of the third log line, the backend is considered Back healthy and as of the fourth log line the backend is considered Still healthy.
CLI backend health
If you don’t want to consult the VSL and want a backend health summary, you can call the backend.list CLI command.
As you can see in the output below, the default backend is considered healthy thanks to the health check probe that is monitoring this backend:
$ sudo varnishadm backend.list
Backend name         Admin      Probe      Last updated
boot.default         probe      Healthy    5/5 Tue, 04 Jan 2022 10:00:31 GMT
If the backend becomes sick, the backend.list command will reflect this:
$ sudo varnishadm backend.list
Backend name         Admin      Probe      Last updated
boot.default         probe      Sick       2/5 Tue, 04 Jan 2022 10:04:41 GMT
Varnish is not caching
Troubleshooting is not only about dealing with errors in Varnish. Sometimes the hit rate of the cache will be too low and the backend will be overwhelmed while Varnish is still in perfect shape.
Figuring out why Varnish isn’t caching pages it was supposed to cache can be done using specific VSL commands.
Cache misses aren’t usually that bad: a miss is just a cache hit that hasn’t taken place yet. Eventually the object will end up in the cache. However, if the TTL of your objects is too low or if the cache is full, cached objects will be removed from the cache.
Cache bypasses on the other hand have a bigger impact: these objects will never end up in the cache. This is either caused by built-in VCL logic that prevents data to be stored in the cache or served from the cache, or by custom VCL logic that has the same effect.
VSL commands
You could list all VSL transactions that resulted in a pass. The following command will help you with that:
sudo varnishlog -i ReqUrl -i ReqMethod -i ReqProtocol -I ReqHeader:Host
    -I ReqHeader:Cookie -I ReqHeader:Authorization
    -i VCL_call -i VCL_return
    -q "VCL_call eq 'PASS'"
You could also be looking at a specific URL and ask yourself the same question:
sudo varnishlog -i ReqUrl -i ReqMethod -i ReqProtocol -I ReqHeader:Host
	-I ReqHeader:Cookie -I ReqHeader:Authorization
   -i VCL_call -i VCL_return
	-q "ReqUrl eq '/'"
In this case we’re looking for requests that hit the homepage (/).
The output of these commands will tell us why Varnish wasn’t serving the response from the cache
Because it was a POST request
The following VSL output indicates that an HTTP POST call was used for the request:
$ sudo varnishlog -i ReqUrl -i ReqMethod -i ReqProtocol -I ReqHeader:Host
    -I ReqHeader:Cookie -I ReqHeader:Authorization
    -i VCL_call -i VCL_return
    -q "VCL_call eq 'PASS'"
*   << Request  >> 2
-   ReqMethod      POST
-   ReqURL         /
-   ReqProtocol    HTTP/1.1
-   ReqHeader      Host: localhost
-   VCL_call       RECV
-   VCL_return     pass
-   VCL_call       HASH
-   VCL_return     lookup
-   VCL_call       PASS
-   VCL_return     fetch
-   VCL_call       DELIVER
-   VCL_return     deliver
And that’s the reason why this request was not served from the cache.
Because the request contained a cookie
The built-in VCL for the vcl_recv will not serve objects from the cache if the request contains a Cookie header.
The VSL output below illustrates this behavior:
$ sudo varnishlog -i ReqUrl -i ReqMethod -i ReqProtocol -I ReqHeader:Host
    -I ReqHeader:Cookie -I ReqHeader:Authorization
    -i VCL_call -i VCL_return
    -q "VCL_call eq 'PASS'"
*   << Request  >> 3
-   ReqMethod      GET
-   ReqURL         /
-   ReqProtocol    HTTP/1.1
-   ReqHeader      Host: localhost
-   ReqHeader      Cookie: lang=en
-   VCL_call       RECV
-   VCL_return     pass
-   VCL_call       HASH
-   VCL_return     lookup
-   VCL_call       PASS
-   VCL_return     fetch
-   VCL_call       DELIVER
-   VCL_return     deliver
The built-in VCL for the vcl_recv also bypasses the cache when an Authorization header is sent. The idea is that authorized content is private and should not be cached.
Here’s the VSL output for such a request:
$ sudo varnishlog -i ReqUrl -i ReqMethod -i ReqProtocol -I ReqHeader:Host
    -I ReqHeader:Cookie -I ReqHeader:Authorization
    -i VCL_call -i VCL_return
    -q "VCL_call eq 'PASS'"
*   << Request  >> 98327
-   ReqMethod      GET
-   ReqURL         /
-   ReqProtocol    HTTP/1.1
-   ReqHeader      Host: localhost
-   ReqHeader      Authorization: Basic dGVzdDp0ZXN0
-   VCL_call       RECV
-   VCL_return     pass
-   VCL_call       HASH
-   VCL_return     lookup
-   VCL_call       PASS
-   VCL_return     fetch
-   VCL_call       DELIVER
-   VCL_return     deliver
Because of an invalid request method
In an earlier example we bypassed the cache for uncacheable request methods such as POST. Only GET and HEAD are cacheable.
But Varnish will also not cache if it doesn’t recognize the request method. When an invalid request method is used, Varnish will assume the input is not an HTTP request.
At that point the request will be piped to the backend. This means that a TCP connection is opened to the backend, all the incoming bytes are sent, and the response is returned. No effort is made to treat the request or response as HTTP.
In terms of the Varnish Finite State Machine, a pass call is no longer made and instead a pipe call is made.
Here’s how you query for these requests in VSL:
sudo varnishlog -g request -i ReqUrl -i ReqMethod -i ReqProtocol -I ReqHeader:Host
    -I ReqHeader:Cookie -I ReqHeader:Authorization
    -i VCL_call -i VCL_return
    -q "VCL_return eq 'pipe'"
And here’s some example VSL output:
$ sudo varnishlog -g request -i ReqUrl -i ReqMethod -i ReqProtocol -I ReqHeader:Host
    -I ReqHeader:Cookie -I ReqHeader:Authorization
    -i VCL_call -i VCL_return
    -q "VCL_return eq 'pipe'"
*   << Request  >> 22
-   ReqMethod      FOO
-   ReqURL         /
-   ReqProtocol    HTTP/1.1
-   ReqHeader      Host: localhost
-   VCL_call       RECV
-   VCL_return     pipe
-   VCL_call       HASH
-   VCL_return     lookup
**  << BeReq    >> 23
--  VCL_call       PIPE
--  VCL_return     pipe
In this example the FOO request method was used, which results in a transition to the vcl_pipe subroutine.
Because of a Hit-For-Miss
When Varnish receives a response from the backend server, the vcl_backend_response logic will examine the cacheability of the response. If the response is not deemed cacheable, Varnish will create a Hit-For-Miss object that will allow the next requests to bypass the cache as well as the request coalescing waiting list.
As long as the backend response returns uncacheable responses, Hit-For-Misses will occur. We can spot these in VSL by looking for the HitMiss tag.
The following command will filter out all VSL transactions that contain a HitMiss tag.
sudo varnishlog -g request -q "HitMiss"
From a Finite State Machine point of view a transition from vcl_recv to vcl_hash is made. Although the requested object is found in the cache, it is a Hit-For-Miss object, which causes a transition to the vcl_miss subroutine.
A more targeted approach to find uncacheable content is to filter the logs for backend transactions that have uncacheable as one of the values in the TTL tag:
sudo varnishlog -g request -b -i BeReqUrl -I BerespHeader:Cache-Control
	-I BerespHeader:Expires -I BerespHeader:Vary -I BerespHeader:Set-Cookie
	-I BerespHeader:Surrogate-Control -i TTL -q "TTL[6] eq 'uncacheable'"
Let’s use this command, that only displays specific tags, to explore some uncacheable scenarios.
Because of a zero TTL
One of the potential root causes of a Hit-For-Miss is a response that results in a zero TTL. A TTL of zero can be set through the Cache-Control header or the Expires header.
Here are a couple examples of such header values:
Cache-Control: max-age=0
Cache-Control: s-maxage=0
Expires: Thu, 1 Jan 1970 12:00:00 GMT
Here’s some VSL output that illustrates this scenario:
$ sudo varnishlog -g request -b -i BeReqUrl -I BerespHeader:Cache-Control
	-I BerespHeader:Expires -I BerespHeader:Vary -I BerespHeader:Set-Cookie
	-I BerespHeader:Surrogate-Control -i TTL -q "TTL[6] eq 'uncacheable'"
**  << BeReq    >> 32810
--  BereqURL       /
--  BerespHeader   Cache-Control: max-age=0
--  TTL            RFC 0 10 0 1641298426 1641298426 1641298426 0 0 cacheable
--  TTL            VCL 120 10 0 1641298426 cacheable
--  TTL            VCL 120 10 0 1641298426 uncacheable
--  BerespHeader   Vary: Accept-Encoding
You can clearly spot the Cache-Control: max-age=0 response header that was sent by the backend. And although the first occurence of the TTL tag sees this as a cacheable response, the built-in VCL for this scenario will turn this into an uncacheable response and creates a Hit-For-Miss object as a result.
Because of private, no-cache, no-store
Another scenario where a response is deemed uncacheable is when the Cache-Control response header contains keywords like private, no-cache or no-store.
Here’s some VSL output for this scenario:
$ sudo varnishlog -g request -b -i BeReqUrl -I BerespHeader:Cache-Control
	-I BerespHeader:Expires -I BerespHeader:Vary -I BerespHeader:Set-Cookie
	-I BerespHeader:Surrogate-Control -i TTL -q "TTL[6] eq 'uncacheable'"
**  << BeReq    >> 43
--  BereqURL       /
--  BerespHeader   Cache-Control: private, no-cache, no-store
--  TTL            RFC 120 10 0 1641298797 1641298797 1641298796 0 0 cacheable
--  TTL            VCL 120 10 0 1641298797 cacheable
--  TTL            VCL 120 10 0 1641298797 uncacheable
--  BerespHeader   Vary: Accept-Encoding
The Cache-Control: private, no-cache, no-store response header is responsible for this response not being cacheable, which is in accordance with the the built-in VCL for this scenario.
When the Surrogate-Control response header contains the no-store keyword, Varnish will not cache the response.
Here’s some VSL output for this scenario:
$ sudo varnishlog -g request -b -i BeReqUrl -I BerespHeader:Cache-Control
	-I BerespHeader:Expires -I BerespHeader:Vary -I BerespHeader:Set-Cookie
	-I BerespHeader:Surrogate-Control -i TTL -q "TTL[6] eq 'uncacheable'"
**  << BeReq    >> 46
--  BereqURL       /
--  BerespHeader   Surrogate-Control: no-store
--  TTL            RFC 120 10 0 1641298986 1641298986 1641298985 0 0 cacheable
--  TTL            VCL 120 10 0 1641298986 cacheable
--  TTL            VCL 120 10 0 1641298986 uncacheable
--  BerespHeader   Vary: Accept-Encoding
Have a look at the built-in VCL for this scenario.
The built-in VCL describes how Varnish deals with cookies out-of-the-box.
But while the occurrence of a Cookie request header causes a cache bypass, the occurrence of a Set-Cookie header in the response causes a Hit-For-Miss object being created.
When setting a cookie, a state change is implied, which is not cacheable. The built-in VCL has measures in place to prevent responses with Set-Cookie headers from being cached.
Here’s some VSL output for this scenario:
$ sudo varnishlog -g request -b -i BeReqUrl -I BerespHeader:Cache-Control
	-I BerespHeader:Expires -I BerespHeader:Vary -I BerespHeader:Set-Cookie
	-I BerespHeader:Surrogate-Control -i TTL -q "TTL[6] eq 'uncacheable'"
**  << BeReq    >> 49
--  BereqURL       /
--  BerespHeader   Set-Cookie: language=en; expires=Thu, 03-Feb-2022 12:31:26 GMT; Max-Age=2592000; path=/
--  TTL            RFC 120 10 0 1641299487 1641299487 1641299486 0 0 cacheable
--  TTL            VCL 120 10 0 1641299487 cacheable
--  TTL            VCL 120 10 0 1641299487 uncacheable
--  BerespHeader   Vary: Accept-Encoding
Because of wildcard variations
The Vary header can be used to issue cache variations based on certain request header values.
A Vary: Accept-Language header will make sure a variation of a cached object is created based on the value of the Accept-Language request header. This ensures that you can cache multilingual content without having to write extra VCL.
The challenge is to strike the right balance between having enough cache variations and maintaining an acceptable hit rate.
But if a response contains a Vary: * header, Varnish is supposed to vary on all request headers. This defies the purpose of caching and the built-in VCL considers this an uncacheable scenario.
Here’s some VSL output for this scenario:
$ sudo varnishlog -g request -b -i BeReqUrl -I BerespHeader:Cache-Control
	-I BerespHeader:Expires -I BerespHeader:Vary -I BerespHeader:Set-Cookie
	-I BerespHeader:Surrogate-Control -i TTL -q "TTL[6] eq 'uncacheable'"
**  << BeReq    >> 32813
--  BereqURL       /
--  BerespHeader   Vary: *
--  TTL            RFC 120 10 0 1641299772 1641299772 1641299771 0 0 cacheable
--  TTL            VCL 120 10 0 1641299772 cacheable
--  TTL            VCL 120 10 0 1641299772 uncacheable
--  BerespHeader   Vary: *, Accept-Encoding
Debug logs
Throughout this tutorial we’ve used the Varnish Shared Memory Logs (VSL) quite extensively. However, from a troubleshooting and debugging point of view, we haven’t yet looked at the Debug VSL tag.
Varnish will occassionally add some debug information to the logs through the Debug tag. VMOD developers may also use this tag to log information that wouldn’t fit in any other tag.
One example is an HTTP/2 upgrade request on a Varnish system that doesn’t have HTTP/2 enabled. The protocol upgrade happens through the Upgrade: h2c request header.
When Varnish notices it cannot upgrade the connection to HTTP/2 because the -p feature=+http2 runtime parameter wasn’t passed, it continues to serve HTTP/1.1 content, but logs the upgrade attempt through a Debug VSL tag.
Here’s an example:
$ sudo varnishlog -g request -c -i "Req*" -i Debug
*   << Request  >> 54
-   Debug          "H2 upgrade attempt%00"
-   ReqStart       127.0.0.1 47000 a0
-   ReqMethod      GET
-   ReqURL         /
-   ReqProtocol    HTTP/1.1
-   ReqHeader      Host: localhost
-   ReqHeader      User-Agent: curl/7.74.0
-   ReqHeader      Accept: */*
-   ReqHeader      Upgrade: h2c
-   ReqHeader      X-Forwarded-For: 127.0.0.1
-   ReqAcct        87 0 87 273 33 306
Timeouts
Varnish has some timeouts that can be configured, which can improve the overall experience.
Although you can focus on reducing the amount of time it takes to receive a request or the amount of time it takes to generate a response, sometimes it just makes sense to increase the timeout value.
Varnish allows you to configure both client-side timeouts as well as a collection of backend timeouts.
Client-side timeouts
The timeout_idle parameter is one of these. It’s a sort of keep-alive timeout that defines how long a connection remains open after a request. If no new pipelined request is received on the connection within five seconds, the connection is closed.
The idle_send_timeout parameter defines how long Varnish is willing to wait for the next bytes, after having already received data. This is a typical between-bytes timeout.
And then there’s also the send_timeout parameter, which acts as a last-byte timeout.
From a Denial of Service (DoS) perspective these settings can help you prevent slowloris attacks.
From a performance point of view, these settings can also be used to improve the end-user experience. If your Varnish servers sit behind a set of load balancers, it makes sense to increase timeout_idle because you know they are the only devices that are directly connecting to Varnish, and they are most probably going to reuse their connections with Varnish.
If you’re handling large volumes of data that are processed by potentially slow clients, you can also increase the send_timeout value.
Backend timeouts
For requests that cannot be served from the cache, a backend connection is made to the origin server, which acts as the source of truth.
If your backend is slow, or the connection is unreliable, backend connections might be left open for too long. It is also possible that the connection is closed while data is still being sent.
In order to strike the right balance, Varnish offers a set of backend timeouts:
connect_timeout: the amount of time Varnish is willing to wait for the backend to accept the connectionfirst_byte_timeout: the timeout for receiving the first byte from the originbetween_bytes_timeout: the amount of time we are willing to wait in between receiving bytes from the backend
Here’s a quick reminder on how to configure this in VCL:
vcl 4.1;

backend default {
    .host = "origin.example.com";
    .port = "80";
    .connect_timeout = "10s";
    .first_byte_timeout = "90s";
    .between_bytes_timeout = "5s";
}
These settings are of course also available as varnishd runtime parameters, but it is important to know that the values in VCL are on a per-backend basis, and take precedence over the runtime parameters.
These parameters can also be specified on a per-request basis, using bereq.connect_timeout or bereq.first_byte_timeout from VCL_backend_fetch in VCL.
The backend_idle_timeout parameter is not configurable in VCL, defaults to 60 seconds, and defines how long a backend connection can be idle before Varnish closes it.
Performance issues
As mentioned in the beginning of this tutorial: the performance of Varnish can depend on the available server resources and traffic patterns. The configuration of runtime parameters can also play a part in this.
It is important to point out that the default values of the various runtime parameters were carefully considered. But that doesn’t mean they are right for your environment.
Degraded performance in Varnish usually takes place when Varnish doesn’t have enough cache storage, when Varnish doesn’t have enough workspace memory or when Varnish doesn’t have enough threads.
Not enough caching storage
By default, Varnish allocates 256 MB of memory for caching objects. That’s not a lot, but it’s conservative and should work on systems that have less than 1GB of RAM.
If Varnish is the only service running on the server, the rule of thumb is to allocate 80% of the server’s available memory to Varnish. This percentage only accounts for the object storage. Memory that is used to process requests is not part of that calculation though.
Monitoring the object storage memory consumption in Varnish can be done through the varnishstat program that is part of your Varnish installation.
varnishstat displays continuously updated counters, which can be filtered by using the -f option.
Here’s a varnishstat example that only monitors Shared Memory Allocation counters:
sudo varnishstat -f "SMA.*.g_*" -1
Here’s the output:
SMA.s0.g_alloc                  40      .   Allocations outstanding
SMA.s0.g_bytes            41445760      .   Bytes outstanding
SMA.s0.g_space            63411840      .   Bytes available
SMA.Transient.g_alloc           23      .   Allocations outstanding
SMA.Transient.g_bytes         7176      .   Bytes outstanding
SMA.Transient.g_space            0      .   Bytes available
We can conclude that this server still has 63411840 bytes of storage available and 41445760 bytes of storage are in use.
The Transient storage engine is a secondary storage engine that is not limited in size. It is used for shortlived objects and for streaming uncacheable data.
If you’re running out of memory and Varnish needs to store new objects, it will evict the least recently used (LRU) objects to free up space.
The MAIN.n_lru_nuked counter in varnishstat will increase when this happens. This is a clear warning that you’re running out of memory. This is not disastrous because we’re dealing with a cache: the content can always be fetched from the origin server.
Increasing the cache storage
If it turns out that you haven’t allocated enough memory to Varnish, you can increase the cache storage by modifying the -s runtime parameter in your systemd unit file.
You can edit the runtime configuration through the following command:
sudo systemctl edit --full varnish
An editor will open and this is what you’ll see:
[Unit]
Description=Varnish Cache, a high-performance HTTP accelerator
After=network-online.target nss-lookup.target

[Service]
Type=forking
KillMode=process

# Maximum number of open files (for ulimit -n)
LimitNOFILE=131072

# Locked shared memory - should suffice to lock the shared memory log
# (varnishd -l argument)
# Default log size is 80MB vsl + 1M vsm + header -> 82MB
# unit is bytes
LimitMEMLOCK=85983232

# Enable this to avoid "fork failed" on reload.
TasksMax=infinity

# Maximum size of the corefile.
LimitCORE=infinity

ExecStart=/usr/sbin/varnishd
	  -a :80
	  -a localhost:8443,PROXY
	  -p feature=+http2
	  -f /etc/varnish/default.vcl
	  -s malloc,256m
ExecReload=/usr/sbin/varnishreload

[Install]
WantedBy=multi-user.target
Please change -s malloc,256m with a value that suits your needs. Once you’re done, save the file and close the editor.
Please restart Varnish to enable these new settings by running the following command:
sudo systemctl restart varnish
Not enough workspace memory
Workspace memory is a Varnish-specific concept. This type of memory is used for request and response parsing, for VCL storage, and also for any VMOD requiring memory space to store data.
There are different kinds of workspaces, and each of them can be tuned. When a workspace overflow occurs, this means the transactions couldn’t allocate enough memory to perform their tasks.
- The
workspace_clientparameter, with a default value of 64 KB, is used to limit memory allocation for HTTP request handling. - The
workspace_backendparameter, which also has a default value of 64 KB, sets the amount of memory that can be used during backend processing. - The
workspace_sessionparameter limits the size of workspace memory used to establish the TCP connection to Varnish. The default value is 0.5 KB.
When a task consumes more memory than allowed in one of the specific workspace contexts, the transaction is aborted, and an HTTP 503 response is returned. When a workspace_session overflow occurs, the connection will be closed.
It is always possible to increase the size of the various workspaces. Memory consumption depends on what happens in VCL, but also depends on the input Varnish receives from clients and backends.
A better solution is to optimize your VCL, or reduce the size and the amount of headers that are sent by the backend. But sometimes, you have no control over this, or no way to significantly reduce memory consumption. In that case, increasing workspace_client or workspace_backend is your best move.
Luckily there are ways to monitor workspace overflow. These workspaces have a varnishstat overflow counter:
MAIN.ws_client_overflowMAIN.ws_backend_overflowMAIN.ws_session_overflow
When these counters start increasing, don’t blindly increase the workspace size. Instead, have a look at your logs, see which transactions cause the overflow, and try to figure out if you can optimize that part of your VCL to avoid the overflows in the future.
As always, varnishstat and varnishlog will be the tools you need to figure out what is going on before deciding to increase the size of the workspaces.
Not enough threads
The threading settings are the best way to tune the concurrency of Varnish. The thread_pool_min and thread_pool_max runtime parameters control how many threads are in the thread pool.
By default there are two thread pools, which can be changed by modifying the thread_pools parameter. But benchmarks have shown no significant improvement by changing the value.
When varnishd starts, 200 threads are created in advance: 100 threads per thread pool. The thread_pool_min parameter can be used to tune this number.
Growing the thread pools
When the thread pools are running out of available threads, Varnish will grow the pools until thread_pool_max is reached. Growing the pools is also somewhat resource intensive.
By increasing thread_pool_min, it’s easier to cope with an onslaught of incoming traffic upon restart. This is common when Varnish sits behind a load balancer and is suddenly added to the rotation.
On the other hand, starting varnishd with too many threads will have an impact on the resource consumption of your server.
A good indicator is the MAIN.threads counter in varnishstat. It lets you know how many threads are currently active. You can correlate this number to your resource usage, and it helps you establish a baseline.
The thread_pool_min parameter should at least be the number of threads in use for an average traffic pattern.
When the MAIN.threads_limited counter increases, it means the thread pools ran out of available threads. If there is room to grow the pools, Varnish will add threads. If not, tasks will be queued until a thread is available.
The MAIN.threads_limited counter might increase early on when the MAIN.threads counter reaches the thread_pool_min threshold. As the pools are grown, it won’t occur that much. But when MAIN.threads reaches the thread_pool_max value, the change rate of the MAIN.threads_limited counter can indicate problematic behavior.
The thread queue doesn’t have an infinite size: each thread pool has a queue limit of 20 tasks. This is configurable via the thread_queue_limit parameter. When the queue is full, any new task or request will be dropped.
So when the MAIN.threads_limited counter increases, and the MAIN.sess_dropped or MAIN.req_dropped counters are increasing as well, know that the queue is full and sessions/streams are being dropped.
You can choose to increase the thread_queue_limit, which will allow more tasks to be queued. Unless resources are too tight, you really want to increase thread_pool_min because it will make your system more responsive.
Shrinking the thread pools
When a thread has been idle for 300 seconds, Varnish will clean it up. This is controlled by the thread_pool_timeout parameter. The MAIN.threads counter will reflect this.
This means Varnish will automatically shrink the thread pools based on demand, but with a delay. But if increased server load, caused by varnishd worker threads, is too much for your system, you should decrease thread_pool_max to an acceptable level.
If you believe Varnish needs to clean up idle threads quicker, you can reduce the thread_pool_timeout. But remember: destroying threads also consumes resources.
Tuning the worker stack size
Another factor that will impact server load is the worker stack size. This is stack space that is consumed by every worker thread. By limiting the stack size, we manage to reduce the memory footprint of Varnish on the system. The size is configurable via the thread_pool_stack parameter. The default stack size in Varnish is 48 KB. The default process stack size on Linux is typically multiple orders of magnitude larger than the stack sizes we use in Varnish.
Stack space is typically consumed by third-party libraries that are used by Varnish. libpcre, the library to run Perl Compatible Regular Expressions, can consume quite a bit of stack space. If you write very complicated regular expressions in VCL, you might even cause a stack overflow.
When a stack overflow happens, you should increase the value of thread_pool_stack. But this, in its turn, will have a direct impact on resource consumption because the worker stack size is per thread.
If you set your worker stack size to 100 KB and you have 5000 threads in two thread pools, this will consume almost 1 GB of memory. So be careful, and consider reducing thread_pool_max when this would be too taxing on your system.
HTTP limits
HTTP requests and responses are parsed by Varnish. As mentioned earlier, parsing them requires a bit of workspace memory.
Incoming requests and cached responses are parsed in the client context, and use client workspace memory. When a cache miss takes place, and the response needs to be parsed from the origin server, we operate in the backend context. This will consume backend workspace memory.
There are certain limits in place that prevent Varnish from having to waste too much memory on request and response parsing and to avoid DoS attacks.
Here’s an overview of runtime parameters that limit the length and size of requests and responses:
http_max_hdr: the maximum number of headers an HTTP request or response may contain. The default value is 64.http_req_hdr_len: the maximum size of an individual request header. By default this is 8 KB.http_req_size: the maximum total size of the HTTP request headers. This defaults to 32 KB.http_resp_hdr_len: the maximum size of an individual response header. By default this is 8 KB.http_resp_size: the maximum total size of the HTTP response headers. This defaults to 32 KB.
When requests or responses exceed these limits, the transaction will fail.
HTTP request limit examples
Here’s some example logging output when the http_max_hdr threshold is exceeded:
*   << Request  >> 5
-   Begin          req 4 rxreq
-   Timestamp      Start: 1611051232.286266 0.000000 0.000000
-   Timestamp      Req: 1611051232.286266 0.000000 0.000000
-   BogoHeader     Too many headers: foo:bar
-   HttpGarbage    "GET%00"
-   RespProtocol   HTTP/1.1
-   RespStatus     400
-   RespReason     Bad Request
-   ReqAcct        519 0 519 28 0 28
-   End
As you can see, an HTTP 400 status code is returned when this happens.
Here’s an example where an individual request header exceeds the http_req_hdr_len limit:
*   << Request  >> 98314
-   Begin          req 98313 rxreq
-   Timestamp      Start: 1611051653.320914 0.000000 0.000000
-   Timestamp      Req: 1611051653.320914 0.000000 0.000000
-   BogoHeader     Header too long: test:YnEJyVqxTMgn7aX
-   HttpGarbage    "HEAD%00"
-   RespProtocol   HTTP/1.1
-   RespStatus     400
-   RespReason     Bad Request
-   ReqAcct        10081 0 10081 28 0 28
-   End
When the total request size exceeds http_req_size, the following output can be found in your VSL:
*   << Session  >> 32793
-   Begin          sess 0 HTTP/1
-   SessOpen       172.21.0.1 60576 http 172.21.0.3 80 1611052643.429084 30
-   SessClose      RX_OVERFLOW 0.001
-   End
HTTP response limit examples
When the origin server returns too many headers and exceeds the http_max_hdr limit, this doesn’t result in an HTTP 400 status, but in an actual HTTP 503.
You might see the following output appear in your VSL:
-- BogoHeader     Too many headers:foo: bar
-- HttpGarbage    "HTTP/1.1%00"
-- BerespStatus   503
-- BerespReason   Service Unavailable
-- FetchError     http format error
And when this happens, the MAIN.losthdr counter in varnishstat will also increase.
When the http_resp_hdr_len limit is exceeded, you will see the following output end up in VSL:
--  BogoHeader     Header too long: Last-Modified: Tue,
--  HttpGarbage    "HTTP/1.1%00"
--  BerespStatus   503
--  BerespReason   Service Unavailable
--  FetchError     http format error
And finally, when the http_resp_size limit is exceeded, the following VSL line may serve as an indicator:
Get help
Troubleshooting can be hard sometimes. Although this detailed troubleshooting tutorial can get you a long way, you might need some help figuring out what’s going on.
Luckily there are ways to get help: help from the community and help from Varnish Software’s support department.
Get help →
CentOS Web Panel is a free control panel that allows quick and easy management of servers.
It allows to improve server performance and website speed with web applications like Varnish Cache.
But, enabling Varnish Cache often creates the error “503 backend fetch failed” due to configuration problems.
At Bobcares, we help server owners to find the real reason for such errors as part of our Support Services for Web Hosts.
Today, let’s see what causes the CentOS Web Panel error “503 backend fetch failed” and how we fix it.
What causes the error “503 backend fetch failed” ?
Before diving into the details of the error, we need to know the purpose of Varnish Cache in the web server configuration.
Varnish cache is a reverse proxy that is put in front of the web server. The helps to reduce the loading times of websites. The web page requests first reach the Varnish cache that listens on port 80.
Varnish visits the back-end server once to cache and store the pages. Then all future requests for the same page will be served by Varnish. This ensures faster loading of pages.
At times, when server do not having adequate memory or if there are too many requests queuing up, backend connection to server fails. Then website shows the error;
Error 503 Backend fetch failed
Backend fetch failed
Guru Meditation:
XID: 1639327
Varnish cache server
The typical reasons for the errors are :
1. Memory issues
For servers where there are too many requests queuing up, adequate amount of memory is needed to serve the requests. When there is limit for the memory use, it results in connection failure with back-end web server.
2. Wrong Varnish cache configuration
Similarly, from our expertise in managing servers, wrong Varnish Cache configuration also can cause the error.
The major configuration errors are :
- Varnish and Apache using same port 80.
- The IP used in Varnish configuration not listening properly.
How to fix “503 backend fetch failed” in CentOS Web Panel?
Now that we know the major failure points, let’s see how we can fix the error.
1. Allocate more Memory
The amount of memory that Varnish will use depends on the number of requests it receive. Higher the number of requests, higher the memory consumption.
Hence, firstly our Support Engineers do a proactive analysis of number of website visitors on the server. Then, we estimate the total memory usage. And, we add additional memory for varnish cache to avoid further problems.
2. Correct Varnish Configuration
Similarly, our Support Engineers adjust the varnish port, IP address and other parameters from the CentOS Web Panel. The interface looks as shown in the picture.
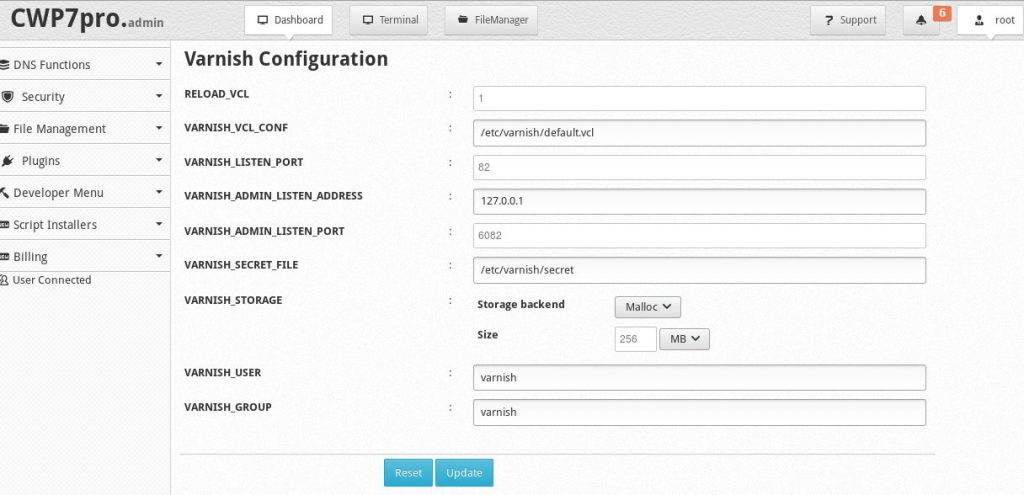
And, when there is high load in the server even after re-configuring Varnish cache, we can disable the Varnish cache from the CentOS web panel (CWP). To do this,
- Login to CWP
- Click on Apache Settings drop down
- Change Webservers
Our Support Engineers re-enable the varnish cache only after ensuring proper memory allocation on the server.
Conclusion
CentOS Web Panel error “503 backend fetch failed” happens mainly due to memory allocation issues or bad varnish cache configuration. Today, we’ve seen the top causes for the error and how our Support Engineers fix them.
PREVENT YOUR SERVER FROM CRASHING!
Never again lose customers to poor server speed! Let us help you.
Our server experts will monitor & maintain your server 24/7 so that it remains lightning fast and secure.
SEE SERVER ADMIN PLANS
var google_conversion_label = «owonCMyG5nEQ0aD71QM»;
Is error 503 backends fetch failed, preventing you from accessing your website? If yes, then you must read this article. In this article, we have covered easy and simple methods to fix this error.
If you are facing error 503, then you are not alone. Many users have reported the same problem and are struggling to fix it. This error does not allow you to access your website on the internet. This is the HTTP code that the website server uses to inform you about the error. Servers only use standard code to tell you about the problem.
The HTTP requests the code after analyzing the internal server error. When the server does not fill the request for the website or other online resources, the HTTP server displays the error 503 backends fetch failed.
The website or sever sometimes customizes 503 errors according to the problem. That is why the error code might differ every time it appears.
Before understanding the methods to solve this problem, you first know about the error and its cause. We have covered every aspect of this topic in detail, so make sure that you read this full article.
So, without further ado, let’s dive straight into how to fix error 503 backends fetch failed.
What is the Error 503 Backend Fetch Failed?
When your website stops responding due to some server or other problems, the website displays error 503 backend fetch failed. It tells you that the server of the website is currently not working properly.
The HTTP generates the error code and displays it on your screen. This error code tells you about the problem, and you can troubleshoot the system to detect the exact reason behind the problem.
Similar to the internal server code, the status code of this error is 500. When the problem occurs, this error might occur on all your web browsers and even on your mobile phone.
What Causes Error 503 Backend Fetch to Fail?
Now that you know about the error 503 backends fetch failed, you must also know what triggers this error code. Following are some reasons behind the error that you must know.
- Other tabs: Sometimes, too much traffic on the server leads to error 503 backend fetch failed. This happens when you open multiple tabs at the same time. Therefore, we will recommend you close unnecessary tabs and check whether the error 503 persists.
- Browser Issue: Many times, the browser fails to open the particular website because of its incapability of meeting the requirement and the features resulting in this error. Therefore, change the browser and then try opening this website.
- Web browser configuration: Sometimes, due to browser configuration, the website does not open. That is why you must check the configuration and set it by default.
Now that we have talked about the reasons that cause error 503 backends fetch failed while accessing a website. Let’s head towards the solution of error 503 backends fetch failed. We will recommend you read each solution carefully before trying it out.
Besides, if you are experiencing the issues like Err_empty_response in Chrome, here are the top solutions for you.
Before You Begin
Alright, before you start with the following solutions, we just want you to go to the website and refresh the page. At the top-right corner of the page, you can find an automatic refresh icon. It is denoted with an arrow symbol.
Also, press Ctrl and R keys on your keyboard together continuously to reload the page. This is the easy and quick way to reload the website and remove error 503 backend fetch failed.
If the above method does not help you to load the website, try restarting the modem or router. This is the most effective way to solve any DNS Server configuration problem. In case you encounter error 503 on your WordPress site, then reinstall the WordPress again.
We have mentioned these solutions earlier because these are a simple and quick way to fix error 503. In this section, we have only talked about some common and popular solutions.
If the above solutions do not help you to solve the problem, read further to know about nine different solutions to fix the error 503 backends fetch failed.
Solution 1: Close All Tabs to Fix Error 503 Backend Fetch Failed
In case you are running multiple tabs at the same time, you must close all the tabs immediately.
Unnecessary tabs slow down the speed of the internet, and it also takes up too much space in RAM. That is why it is recommended to close all tabs and then try opening the website.
Solution 2: Use a Different Browser to Fix Error 503 Backend Fetch Failed
If you are facing error 503 over and over again while accessing a particular website, try opening the website from a different browser.
There are many browsers available, like Firefox, Internet Explorer, Google Chrome, etc. Each browser incorporates different default settings that might help you to open the website and fix the problem.
Solution 3: Reboot the Router to Fix Error 503 Backend Fetch Failed
Another simple and quick way to fix error 503 backend fetch failed on your computer system is to reboot the Wi-Fi router.
To carry on this process, you must take the following steps.
1: Close all the tabs and shut down your computer system completely.
2: Wait a little bit and then restart the computer again.
3: After this, plug off the Wi-Fi router or modem and wait for a few minutes.

4: Turn on the router again and browse the particular website.
5: Check whether the error 503 persists.
Many times faulty and improper internet connections trigger error 503 backends fetch failed on your website. Therefore, to solve this issue, you can run a PC Optimizer tool.
You can use the Avast Cleanup tool as it provides you with many advanced features to speed up your PC, removes unnecessary junk from the cache and the server, and improves the performance of the computer system.
Solution 5: Reset the Web Browser to Fix Error 503 Backend Fetch Failed
In case the website does not load on your computer system and the browser but it works fine on other devices and browsers, then you must reset the browser.
This happens because of the configuration that the browser sets up automatically. If you are facing this problem on your Chrome browser, the following steps will help you to reset it.
1: Open the Chrome browser on your computer system, and tap on the vertical dots located at the top-right of your screen, and the drop-down menu will appear.
2: From the menu, select the ‘More’ option and click on ‘Settings.’

3: Search for the ‘Advanced’ button and click on it to expand.

4: After that, click on the ‘Reset and Cleanup’ section for Android. In the case of iOS and Mac, click on ‘Reset Settings.’
5: Then, tap on the ‘Restore settings to their Original defaults’ option, and this will open a new dialog box on your screen.
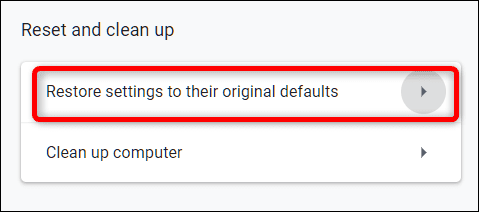
6: Search for the option Help ‘Make Chrome Better by Reporting the Current Settings’ and check the box placed next to the option. Now, click on the Reset Settings option.

7: After completing the above steps, launch your browser again and go to the website again to check whether error 503 persists.
Solution 6: Activate the Varnish Plugin to Fix Error 503 Backend Fetch Failed
In case you own a website, then you must activate the Varnish plugin. This plugin helps you to enhance the speed of the website by minimizing the loading process.
It is a kind of web accelerator that clears the unnecessary traffic on the server and thus increases the speed of the website. If you don’t know the process of enabling the Varnish plugin, then follow the below-given steps.
1: Open your computer system and launch the WordPress administration with the help of your credentials.
2: Search for the plugins option in your WordPress dashboard.
3: Now click on the plugin option and select ‘Add’ from the drop-down menu.
4: In the Add section, navigate to the Varnish plugin.
5: Choose ‘Plugin’ and then select the ‘Add Plugin’ option.

6: After that, click on the ‘Activate’ button to activate the Varnish plugin.
After activating the Varnish plugin, visit the website again and check whether error 503 backend fetches failed to pop up on your screen.
Solution 7: Reload the Website Later to Fix Error 503 Backend Fetch Failed
Many times happens due that the server of the website crash because many people try to load that particular website on their system. Therefore you must load that particular website after some time.
Wait till the traffic load from the server decreases, and then try to load the website on your system. This might help you to solve this problem.
Solution 8: Disable the Plugins (WordPress Users)
This is another way you can fix the website error 503 backends fetch failed. Log in to your Website dashboard and navigate to the ‘Plugins’ section. Now deactivate all the installed plugins from your WordPress.
You can find the ‘Deactivate’ option below every plugin or right-click on the plugin and select the ‘Deactivate’ option. And you can select the specific plugin that you want to deactivate. You always have the option to reinstall the plugin again.

Solution 9: Notify the Admin of the Website
If the above solutions are not helping you to fix the error 503 backends fetch failed, then the option that you are left with is contacting your website admin.
Yes, you have heard right. You can contact the admin of the website and report your issue to them. You might end up getting a response after a few days regarding the problem.
Many times due to the server being down, you get error 503 backend. If the server problem is the cause of the error, they will notify you with the same.
Conclusion
In this article, we have talked about every aspect of the topic in detail. We have discussed what is error 503 backends fetch failed, what its causes are, and its solutions.
Plus, before the solution, we have mentioned three simple and quick methods to fix this problem.
It is recommended to read this full article to understand every solution so that you can implement it properly. If you know more methods for fixing this error, comment below and let us know.
This website uses cookies to ensure you get the best experience on our website
Nginx access.log return nothing, it means Varnish doesn’t connect to Nginx.
This is output of varnishlog
*   << BeReq    >> 65545
-   Begin          bereq 65544 fetch
-   Timestamp      Start: 1435311769.628920 0.000000 0.000000
-   BereqMethod    GET
-   BereqURL       /
-   BereqProtocol  HTTP/1.1
-   BereqHeader    Accept: text/html,application/xhtml+xml,application/xml;q=0.9,image/webp,*/*;q=0.8
-   BereqHeader    User-Agent: Mozilla/5.0 (Windows NT 6.1; WOW64) AppleWebKit/537.36 (KHTML, like Gecko) Chrome/43.0.2357.130 Safari/537.36
-   BereqHeader    Accept-Language: en-US,en;q=0.8,ja;q=0.6,vi;q=0.4
-   BereqHeader    X-Forwarded-For: 14.161.40.160, 127.0.0.1, 127.0.0.1
-   BereqHeader    Host: xxx.com
-   BereqHeader    Accept-Encoding: gzip
-   BereqHeader    Surrogate-Capability: key=ESI/1.0
-   BereqHeader    X-Varnish: 65545
-   VCL_call       BACKEND_FETCH
-   VCL_return     fetch
-   FetchError     no backend connection
-   Timestamp      Beresp: 1435311769.628976 0.000056 0.000056
-   Timestamp      Error: 1435311769.628981 0.000061 0.000005
-   BerespProtocol HTTP/1.1
-   BerespStatus   503
-   BerespReason   Service Unavailable
-   BerespReason   Backend fetch failed
-   BerespHeader   Date: Fri, 26 Jun 2015 09:42:49 GMT
-   BerespHeader   Server: Varnish
-   VCL_call       BACKEND_ERROR
-   BerespHeader   Content-Type: text/html; charset=utf-8
-   BerespHeader   Retry-After: 5
-   VCL_return     deliver
-   Storage        malloc Transient
-   ObjProtocol    HTTP/1.1
-   ObjStatus      503
-   ObjReason      Backend fetch failed
-   ObjHeader      Date: Fri, 26 Jun 2015 09:42:49 GMT
-   ObjHeader      Server: Varnish
-   ObjHeader      Content-Type: text/html; charset=utf-8
-   ObjHeader      Retry-After: 5
-   Length         282
-   BereqAcct      0 0 0 0 0 0
-   End