![]()
I just bought an Ortur Laser Master 2 20w and its like the the laser in the axis assembly is going straight to the right and hitting the end, then errors out. What do you believe it is?
Thank you for your time.
Amanda
ok
Starting stream
Layer C00 [SC7A20:(365)
Shock and Movement detected!]
Ortur Laser Master 2 Ready!
OLF 140.
Grbl 1.1h [‘$’ for help]
[MSG:’$H’|’$X’ to unlock]
error:9 G-code locked out during alarm or jog state.
On or near line 105:
Job halted
Stream completed in 0:03
Starting stream
Layer C00
error:9
G-code locked out during alarm or jog state.
On or near line 0:
![]()
Hi @CityLotHomestead,
At Grbl startup, error 9 is normal: When powering up, Grbl enters Alarm mode to force the origin point because it cannot know its position.
To unlock, all you have to do is running the homing procedure (Grbl command $H). You can also unlock the alarm with the $X command, but be careful, this does not allow Grbl to know its position. So you will have to make sure by yourself that the Gcode program does not exceed the limits of your machine.
It is also possible to deactivate the Alarm mode on power-up by deactivating the homing in the parameters of Grbl ($22 = 0).
It doesn’t seem to me that the version of Grbl used on your Otur Master 2 machine is grbl-Mega-5X. I couldn’t help you more, I don’t know the other versions as well.
@++;
Gauthier.
![]()
Thank you so much! I truly appreciate you. It is a Laser Master 2 20w.
…
On Thu, May 13, 2021 at 4:02 AM Gauthier Brière ***@***.***> wrote:
Hi @CityLotHomestead <https://github.com/CityLotHomestead>,
At Grbl startup, error 9 is normal: When powering up, Grbl enters Alarm
mode to force the origin point because it cannot know its position.
To unlock, all you have to do is running the homing procedure (Grbl
command $H). You can also unlock the alarm with the $X command, but be
careful, this does not allow Grbl to know its position. So you will have to
make sure by yourself that the Gcode program does not exceed the limits of
your machine.
It is also possible to deactivate the Alarm mode on power-up by
deactivating the homing in the parameters of Grbl ($22 = 0).
It doesn’t seem to me that the version of Grbl used on your Otur Master 2
machine is grbl-Mega-5X. I couldn’t help you more, I don’t know the other
versions as well.
@++;
Gauthier.
—
You are receiving this because you were mentioned.
Reply to this email directly, view it on GitHub
<#197 (comment)>,
or unsubscribe
<https://github.com/notifications/unsubscribe-auth/AUBWWFCHGNX22IA6RGHHXUTTNOBS3ANCNFSM44ZUS5WQ>
.
![]()
I just bought an Ortur Laser Master 2 20w and its like the the laser in the axis assembly is going straight to the right and hitting the end, then errors out. What do you believe it is?
Thank you for your time.
Amanda
ok
Starting stream
Layer C00 [SC7A20:(365)
Shock and Movement detected!]
Ortur Laser Master 2 Ready!
OLF 140.
Grbl 1.1h [‘$’ for help]
[MSG:’$H’|’$X’ to unlock]
error:9 G-code locked out during alarm or jog state.
On or near line 105:
Job halted
Stream completed in 0:03
Starting stream
Layer C00
error:9
G-code locked out during alarm or jog state.
On or near line 0:
![]()
Hi @CityLotHomestead,
At Grbl startup, error 9 is normal: When powering up, Grbl enters Alarm mode to force the origin point because it cannot know its position.
To unlock, all you have to do is running the homing procedure (Grbl command $H). You can also unlock the alarm with the $X command, but be careful, this does not allow Grbl to know its position. So you will have to make sure by yourself that the Gcode program does not exceed the limits of your machine.
It is also possible to deactivate the Alarm mode on power-up by deactivating the homing in the parameters of Grbl ($22 = 0).
It doesn’t seem to me that the version of Grbl used on your Otur Master 2 machine is grbl-Mega-5X. I couldn’t help you more, I don’t know the other versions as well.
@++;
Gauthier.
![]()
Thank you so much! I truly appreciate you. It is a Laser Master 2 20w.
…
On Thu, May 13, 2021 at 4:02 AM Gauthier Brière ***@***.***> wrote:
Hi @CityLotHomestead <https://github.com/CityLotHomestead>,
At Grbl startup, error 9 is normal: When powering up, Grbl enters Alarm
mode to force the origin point because it cannot know its position.
To unlock, all you have to do is running the homing procedure (Grbl
command $H). You can also unlock the alarm with the $X command, but be
careful, this does not allow Grbl to know its position. So you will have to
make sure by yourself that the Gcode program does not exceed the limits of
your machine.
It is also possible to deactivate the Alarm mode on power-up by
deactivating the homing in the parameters of Grbl ($22 = 0).
It doesn’t seem to me that the version of Grbl used on your Otur Master 2
machine is grbl-Mega-5X. I couldn’t help you more, I don’t know the other
versions as well.
@++;
Gauthier.
—
You are receiving this because you were mentioned.
Reply to this email directly, view it on GitHub
<#197 (comment)>,
or unsubscribe
<https://github.com/notifications/unsubscribe-auth/AUBWWFCHGNX22IA6RGHHXUTTNOBS3ANCNFSM44ZUS5WQ>
.
Содержание
- Команды GRBL v1.1. Подробное описание.
- GRBL v1.1 Команды в реальном времени.
- Команда в реальном времени характеризуется такими действиями, как:
- Описание команд ASCII в реальном времени
- Описание команд в реальном времени в расширенном коде ASCII
- Команды переопределения
- Быстрые переопределения
- Изменение скорости шпинделя
- Команды Grbl ‘$’
Команды GRBL v1.1. Подробное описание.
В предыдущей статье был рассмотрен процесс настройки прошивки GRBL v1.1 и основные команды, необходимые для этого. Сегодня разберем подробное описание команд. Данная информация не пригодится, если вы собрали станок, настроили и пользуетесь им. Полученные знания нужны для более глубокого понимания работы прошивки GRBL v1.1.
В связи с тем, что я планирую разработать автономный контроллер для управления ЧПУ станком, данную информация нужно знать. Но обо всем по порядку.
GRBL v1.1 Команды в реальном времени.
Команды в реальном времени – это отдельные управляющие символы, которые могут быть отправлены GRBL для выполнения команд и действий в реальном времени. Это означает, что они могут быть отправлены в любое время и в любом месте, и GRBL немедленно ответит, независимо от того, что он делает в данный момент. Эти команды включают сброс, удержание, возобновление, запрос отчета о состоянии и переопределения (в версии 1.1).
Команда в реальном времени характеризуется такими действиями, как:
- выполнится за десятки миллисекунд;
- это одиночный символ, который можно отправить в GRBL в любое время;
- не требует перевода строки или возврата каретки после них;
- не считается частью протокола потоковой передачи;
- перехватывается при получении и никогда не помещается в буфер для анализа GRBL;
- будет игнорировать несколько команд до тех пор, пока не будет выполнена первая полученная команда;
- может быть привязана к входному контакту и может управляться кнопкой или переключателем;
- действия зависят от состояния или того, что делает GRBL. Никаких действий может не происходить;
- описания объясняют, как они работают и чего ожидать.
Описание команд ASCII в реальном времени
Пользователю доступен ввод с клавиатуры четырех команд в реальном времени. Эти командные символы в реальном времени управляют некоторыми основными функциями GRBL.

Команда «0x18» (ctrl-x) – Мягкий сброс:
- немедленно останавливает и безопасно перезагружает GRBL без включения и выключения питания;
- принимает и выполняет эту команду в любое время;
- если сбросить во время движения, GRBL выдаст сигнал тревоги, чтобы указать, что положение может быть потеряно из-за остановки движения;
- при сбросе, когда он не находится в движении, положение сохраняется, и повторное возвращение в исходное положение не требуется;
- для выполнения данной команды возможно установить внешнюю кнопку или переключатель;
Команда «?» – Запрос отчета о состоянии:
- немедленно генерирует и отправляет обратно данные времени выполнения с отчетом о состоянии;
- принимает и выполняет эту команду в любое время, за исключением цикла возврата в исходное положение и появления критического аварийного сигнала (ошибка жесткого / мягкого предела).
Команда «
» – Начало цикла / Возобновление:
- возобновляет приостановку подачи, состояние защитной двери / парковки, когда дверь закрыта, и состояния паузы программы M0;
- в противном случае команда игнорируется;
- если опция парковки во время компиляции включена и состояние защитной двери готово к возобновлению, GRBL повторно включит шпиндель и охлаждающую жидкость, вернется в исходное положение, а затем возобновит работу;
- для выполнения данной команды возможно установить внешнюю кнопку или переключатель.
Команда «!» – Задержка подачи:
- переводит GRBL в состояние приостановки или удержания. Если машина находится в движении, она замедлится до полной остановки, а затем остановится;
- команда выполняется, когда GRBL находится в состоянии IDLE, RUN или JOG. В противном случае она игнорируется;
- согласно определению управления станком, задержка подачи не отключает шпиндель или охлаждающую жидкость. Только движение;
- для выполнения данной команды возможно установить внешнюю кнопку или переключатель.
Описание команд в реальном времени в расширенном коде ASCII
GRBL v1.1 установил более десятка новых команд в реальном времени для управления подачей, ускорением и коррекцией шпинделя. Чтобы помочь предотвратить непреднамеренное изменение пользователем переопределений нажатием клавиши, а также дать возможность вводить больше команд позже, все новые управляющие символы были перемещены в расширенный набор символов ASCII. Их нелегко набрать на клавиатуре, но, в зависимости от ОС, их можно вводить с помощью определенного сочетания клавиш и кода.
Команда «0x84» – Защитная дверь:
- команда обычно подключается к входному контакту для обнаружения открытия защитной двери, также позволяет графическому интерфейсу пользователя активировать поведение защитной двери;
- немедленно переводится в состояние DOOR и отключает шпиндель и охлаждающую жидкость. Если машина находится в движении, она замедлится до полной остановки, а затем остановится;
- если выполняется во время самонаведения, GRBL останавливает движение и подает сигнал тревоги наведения;
- если он уже находится в состоянии приостановки или HOLD, состояние DOOR заменяет его;
- если включена опция парковки во время компиляции, GRBL будет парковать шпиндель в указанном месте;
- команда выполняется, когда GRBL находится в состоянии IDLE, HOLD, RUN, HOMING или JOG. В противном случае она игнорируется;
- при быстрой подаче защитная дверь отменяет перемещение и все движения в очереди в буфере планировщика. Когда защитная дверца закрывается и возобновляется, GRBL вернется в состояние IDLE;
- для выполнения данной команды возможно установить внешнюю кнопку или переключатель, если данная команда включена в прошивке перед компиляцией;
- в некоторых сборках GRBL v0.9 для этой команды использовался символ, но это было не задокументировано.
Команда «0x85» – Отмена Jog:
- немедленно отменяет текущее состояние путем удержания подачи и автоматически сбрасывает все оставшиеся команды в буфере;
- команда игнорируется, если она не находится в состоянии JOG или если отмена подачи уже активирована и находится в процессе;
- GRBL вернется в состояние IDLE или состояние DOOR, если защитная дверь была обнаружена как приоткрытая во время отмены.
Команды переопределения
- Немедленно изменяют значения коррекции подачи. Активное движение подачи изменяется за десятки миллисекунд.
- Не изменяют быстрые темпы, в том числе G0, G28 и G30, или Jog.
- Значение коррекции подачи не может быть 10% или больше 200%.
- Если значение коррекции подачи не изменяется, команда игнорируется.
- Диапазон коррекции подачи и приращения можно изменить в config.h.
- 0x90: Установить 100% запрограммированной скорости;
- 0x91: Увеличить на 10%;
- 0x92: Уменьшить на 10%;
- 0x93: Увеличить на 1%;
- 0x94: Уменьшить на 1%.
Быстрые переопределения
- Немедленно изменяет значение быстрой коррекции. Активное быстрое движение изменяется за десятки миллисекунд.
- Выполняет только при ускоренном перемещении, в том числе G0, G28 и G30.
- Если значение быстрой коррекции не изменяется, команда игнорируется.
- Значения быстрой коррекции можно изменить в config.h.
- 0x95: Установить на 100% полную скорость;
- 0x96: Установить на 50% от скорости;
- 0x97: Установить 25% от скорости.
Изменение скорости шпинделя
- Немедленно изменяет значение коррекции скорости шпинделя. Активная скорость шпинделя изменяется за десятки миллисекунд.
- Значения коррекции могут быть изменены в любое время, независимо от того, включен шпиндель или нет.
- Значение коррекции шпинделя не может быть 10% или больше 200%.
- Если значение коррекции шпинделя не изменяется, команда игнорируется.
- Диапазон и приращения коррекции шпинделя можно изменить в config.h.
- 0x99: Установить 100% запрограммированной скорости шпинделя;
- 0x9A: Увеличить на 10%;
- 0x9B: Уменьшить на 10%;
- 0x9C: Увеличить на 1%;
- 0x9D: Уменьшить на 1%.
Команда «0x9E» – Переключить состояние шпинделя:
- переключает состояние шпинделя «включен» или «выключен», но только в состоянии HOLD;
- в противном случае команда игнорируется, особенно во время движения. Это предотвращает случайное отключение во время работы, которое может привести к повреждению детали / машины или причинить травму. Промышленные ЧПУ станки блокируют остановку шпинделя аналогичным образом;
- когда движение возобновляется через запуск цикла, последнее состояние шпинделя будет восстановлено спустя 4,0 секунды (настраивается), прежде чем возобновить движение инструмента. Это гарантирует, что пользователь не забудет включить его снова;
- при отключении значения коррекции скорости шпинделя все еще могут быть изменены, и они будут действовать после повторного включения шпинделя.
Команды Grbl ‘$’
Команды «$» — это системные команды Grbl, используемые для настройки параметров, просмотра или изменения состояний и режимов работы Grbl, а также запуска цикла возврата в исходное положение.
Сейчас мы попробуем разобраться, что это все значит, как и зачем использовать.
HLP – СПРАВКА, название данного сообщения.
$$ и $x=val — команды вывода и записи настроек прошивки GRBL. Мы рассматривали настройку этих параметров в статье «Прошивка grbl 1.1, настройка — инструкция на русском«.
$# — Вывести параметры G-code.
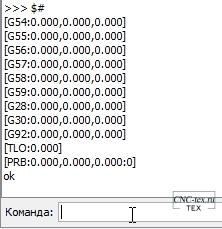
Параметры G-code сохраняют значения координат смещения для G54-G59 координируют работу, G28/G30 предопределенных позиций, G92 смещение координат, коррекции длин инструмента, и зондирования. Большинство из этих параметров сразу же записываются в EEPROM. Это означает, что они останутся такими же, независимо от выключения питания, пока они не будут изменены явно. Непостоянные параметры, которые не будут сохранятся при перезапуске или выключении питания и повторном включении в G92, смещение длины G43.1 инструмента, и G38.2 данных зондирования.
G54-G59 координирует работу, может быть изменено с помощью команды G10 L2 Px или G10 L20 Px определено стандартом GCode NIST и стандартом EMC2 (linuxcnc.org).
G28/G30 предварительно определенные позиции могут быть изменены с помощью G28.1 и G30.1 команд, соответственно.
При вводе $#, Grbl отвечает сохраненными значениями, которые были заложены для каждой системы. TLO обозначает смещение длины инструмента, и PRB показывает координаты последнего цикла зондирования, где :1 обозначает, был ли последний зонд успешным, а :0 — неудачным.
$G — посмотреть анализ состояния G-code.
Эта команда напечатает все активные режимы GCode в Grbl. При отправке этой команды, Grbl выдаст ответ начинающийся с [GС: и чтото типа:
Эти режимы определяют, какой следующий блок G-code или команды будут интерпретироваться анализатором G-code Grbl. Для тех, кто незнаком с G-code и станками с ЧПУ, анализатор устанавливает режимы в определенном состоянии, так что не надо постоянно указывать анализатору как работать. Эти режимы объединены в так называемые «модальные группы», которые не могут быть одновременно логически активными. Например, группа модальных единиц устанавливает интерпретируется ли ваш G-code программы в дюймах или в миллиметрах.
Краткий перечень модальных групп, поддерживаемых Grbl, будет показан ниже, но более полные и подробные описания можно найти на сайте LinuxCNC. G-code команды жирным шрифтом указывают режимы по умолчанию после включения питания контроллера Grbl или его перезагрузки.
| Модельные группы | Входящие команды |
| Режим движения | G0, G1, G2, G3, G38.2, G38.3, G38.4, G38.5, G80 |
| Выбор системы координат | G54, G55, G56, G57, G58, G59 |
| Выбор плоскости | G17, G18, G19 |
| Режим расстояния | G90, G91 |
| Дуга IJK режим расстояния | G91.1 |
| Режим подачи | G93, G94 |
| Режим единиц | G20, G21 |
| Коррекция радиуса фрезы | G40 |
| Коррекция длины инструмента | G43.1, G49 |
| Программный режим | M0, M1, M2, M30 |
| Состояние шпинделя | M3, M4, M5 |
| Статус СОЖ | M7, M8, M9 |
В дополнение к режимам синтаксического анализатора G-code, Grbl сообщит активный номер инструмента Т, скорость вращения шпинделя S, и скорость подачи F, установленные после перезагрузки.
Обратите внимание, что этот список не включает немодальную группу команд G-code и они не перечислены в отчете синтаксического анализатора $G, поскольку они влияют только на текущую строку, в которой они вводятся. Для полноты здесь приведены поддерживаемые немодальные команды Grbl:
| Поддерживаемые немодальные команды |
| G4, G10 L2, G10 L20, G28, G30, G28.1, G30.1, G53, G92, G92.1 |
$I — Показать информацию о программе.
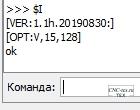
Эта команда выводит ответ пользователю Grbl о версии и дату сборки данной версии программы. Опционально, $I может хранить короткие строки, чтобы помочь определить, с каким ЧПУ вы общаетесь , если у вас есть больше одной, машины с использованием Grbl. Чтобы установить эту строку, отправьте Grbl $I = XXX, где XXX это ваша строка с коментарием, которая должна составлять менее 80 символов. В следующий раз когда вы запросите Grbl с командой $I , Grbl напечатает строку о версии сборке и дате дополнив в конце вашим комментарием.
ПРИМЕЧАНИЕ. Некоторые производители могут заблокировать доступ к перезаписи строки информации о сборке, чтобы они могли хранить там информацию о продукте и коды.
$N — посмотреть стартовые блоки.
$Nx блоки запуска, которыеGrbl запускает каждый раз включении питания или перезагрузке Grbl. Другими словами, блок запуска является линиями G-кода, которые вы можете хранить в Grbl авто-запуска, чтобы установить ваш G-код с модальными значениями по умолчанию, или что нужно делать Grbl каждый раз, когда вы запускаете вашу машину. Grbl может хранить два блока G-кода в системе по умолчанию.
Так, при подключении к Grbl, и вводе значения $N, Grbl должен дать короткий ответ вида:
Не так много, но это просто означает, что в строке $N0 нет блока G-code, который Grbl мог бы запустить при запуске. $N1 — следующая строка для запуска.
$Nx=значение — сохранить стартовый блок.
ВАЖНО: Будьте очень осторожны при сохранении любых команд движения (G0/1,G2/3,G28/30) в блоках запуска. Эти команды движения будут запускаться каждый раз, когда вы сбрасываете или включаете Grbl, поэтому, если у вас возникла чрезвычайная ситуация и вам необходимо выполнить аварийную остановку и сброс, перемещение блока запуска может и, скорее всего, быстро ухудшит ситуацию. Кроме того, не помещайте никакие команды, которые сохраняют данные в памяти, такие как G10/G28.1/G30.1. Это заставит Grbl постоянно перезаписывать эти данные при каждом запуске и сбросе, что в конечном итоге приведет к износу памяти вашего Arduino.
Типичное использование для блока запуска — просто установить предпочтительные модальные состояния, такие как режим дюймов G20, всегда по умолчанию использовать другую систему рабочих координат или предоставить пользователю возможность запустить какую-то уникальную пользовательскую функцию, которая ему нужна. за их сумасшедший проект.
Чтобы установить блок запуска, введите $N0 =, затем допустимый блок G-кода и ввод. Grbl запустит блок, чтобы проверить, является ли он действительным, а затем ответит ok или error: чтобы сообщить вам, успешно ли это или что-то пошло не так. Если есть ошибка, Grbl не сохранит ее.
Например, предположим, что вы хотите использовать свой первый блок запуска $N0, чтобы установить режимы синтаксического анализатора G-code, такие как рабочая координата G54, режим дюймов G20, плоскость XY G17. Вы должны ввести $N0 = G20 G54 G17 с вводом, и вы должны увидеть ответ ok. Затем вы можете проверить, сохранено ли оно, набрав $N, и теперь вы должны увидеть ответ вроде $N0 = G20G54G17.
Как только у вас есть блок запуска, сохраненный в памяти Grbl, каждый раз при запуске или сбросе вы будете видеть, как ваш блок запуска печатается обратно вам, начиная с open-chevron>, и ответа Grbl: ok, чтобы указать, все ли работает нормально. Итак, для предыдущего примера вы увидите:
Если у вас есть несколько блоков запуска G-code, они будут печатать вам по порядку при каждом запуске. И если вы хотите очистить один из блоков запуска (например, блок 0), введите $N0 = без знака равенства.
ПРИМЕЧАНИЕ. Существуют два варианта включения блоков запуска с запуском. Во-первых, он не будет работать, если Grbl инициализируется в состоянии АВАРИЯ или выходит из состояния АВАРИЯ через разблокировку $X по соображениям безопасности. Всегда обращайтесь к режиму АВАРИЯ и отменяйте его, а затем заканчивайте сбросом, при котором блоки запуска будут запускаться при инициализации. Во-вторых, если у вас включен режим самонаведения, блоки запуска будут выполняться сразу после успешного цикла самонаведения, а не при запуске.
$C — Проверить режим G-code.
Этот режим переключает анализатор G-code Grbl на прием всех входящих блоков и их полную обработку, как при обычной работе, но он не перемещает оси, игнорирует задержки и отключает шпиндель и охлаждающую жидкость. Это предназначено для того, чтобы предоставить пользователю способ проверить, как его новая программа G-code работает с анализатором Grbl, и следить за ошибками (и проверять нарушения мягкого лимита, если они включены).
При выключении Grbl выполнит автоматический мягкий сброс (^X). Это делается для двух вещей, немного упрощает управление кодом, но это также мешает пользователям начать работу, когда их режимы G-code не такие, как они думают. Сброс системы всегда дает пользователю новый, последовательный старт.
$X — Выключить сигнализацию блокировки.
Режим АВАРИЯ Grbl — это состояние, когда что-то пошло не так, как например, нарушена жесткая граница или прерывание во время цикла, или Grbl не знает свое положение. По умолчанию, если вы включили возврата и включили Arduino, Grbl переходит в аварийное состояние, потому что он не знает свое положение. Аварийный режим блокирует все команды G-code до тех пор, пока не будет выполнен цикл возврата в исходное положение $H, или, если пользователю необходимо переопределить блокировку сигнализации, чтобы переместить свои оси от концевых выключателей, например, блокировка аварийной сигнализации «$X» отменяет блокировки и позволяет функциям G-code снова работать.
Будьте осторожны! Это следует использовать только в чрезвычайных ситуациях. Возможна потеря позтционирования, и Grbl может оказаться не там, где вы думаете. Поэтому рекомендуется использовать инкрементальный режим G91 для коротких ходов. Затем выполните цикл возврата в исходное положение или выполните сброс сразу после этого.
Как отмечалось ранее, строки запуска не выполняются после команды $X. Всегда сбрасывайте, когда вы сбросили сигнал тревоги и исправили сценарий, вызвавший его. Когда Grbl переходит в режим ожидания, строки запуска будут работать в обычном режиме.
$H — Запуск цикла возврата.
Эта команда — единственный способ выполнить цикл возврата в Grbl. Некоторые другие контроллеры движения назначают специальную команду G-code для запуска цикла возврата в исходное положение, но это неправильно в соответствии со стандартами G-code. Homing (возврат) — это совершенно отдельная команда, обрабатываемая контроллером.
СОВЕТ: После запуска цикла возврата в исходное положение достаточно бегать вручную все время до положения в середине объема рабочей области. Вы можете установить предварительно определенную позицию G28 или G30 в качестве позиции после возвращения в исходное положение, ближе к месту обработки. Чтобы установить их, вам сначала нужно переместить машину туда, куда вы хотите, чтобы она переместилась после возвращения в исходное положение. Введите G28.1 (или G30.1), чтобы Grbl сохранил эту позицию. Итак, после возвращения «$H», вы можете просто ввести «G28» (или «G30»), и он будет двигаться там автоматически. В общем, переместить ось XY в центр и оставить ось Z вверх. Это гарантирует, что инструмент в шпинделе не сможет вмешаться и что он ничего не зацепит.
$Jx = line — запускает режим движения Jog.

Впервые в Grbl v1.1, эта команда выполнит специальное движение. Существует три основных различия между Jog движением и движением, управляемым G-code.
— Как и обычные команды G-code, несколько движений Jog режима могут быть поставлены в очередь в буфере планировщика, но Jog режим может быть легко отменен с помощью команды реального времени jog-cancel или feed-hold. Grbl немедленно удержит текущее движение, а затем автоматически очистит буферы от всех оставшихся команд.
— Jog-команды полностью независимы от состояния синтаксического анализатора G-code. Это не изменит режимы, такие как режим увеличения расстояния G91. Таким образом, вам больше не нужно обязательно возвращать его обратно в режим абсолютного расстояния G90. Это помогает снизить вероятность запуска с неправильными включенными режимами G-code.
— Если мягкие ограничения включены, любая команда Jog режима, которая превышает мягкое ограничение, просто вернет ошибку. Он не выдаст сигнал Аварии, как это было бы с обычной командой G-code. Это обеспечивает гораздо более приятное и плавное взаимодействие с графическим интерфейсом или джойстиком.
Выполнение пробежки требует определенной структуры команд, как описано ниже:
— первые три символа должны быть ‘$J =‘, чтобы указать режим.
— команда jog следует сразу после ‘=’ и работает как обычная команда G1.
— скорость подачи интерпретируется только в единицах G94 в минуту. Предыдущее состояние G93 игнорируется во это время.
— XYZ: одно или несколько слов оси с заданным значением.
— F — значение скорости подачи. ПРИМЕЧАНИЕ. Каждому движению требуется это значение, и он не рассматривается как модальный.
— Необязательные слова: Jog выполняется на основе текущего состояния синтаксического анализатора G-code G20/G21 и G90/G91. Если передается одно из следующих необязательных слов, это состояние переопределяется только для одной команды.
— G20 или G21 — дюймовый и миллиметровый режим
— G90 или G91 — абсолютные и дополнительные расстояния
— G53 — Перемещение в машинных координатах
— все остальные G-code, М-code и слова значения не принимаются в команде jog.
— пробелы и комментарии разрешены в команде. Они удалены предварительным парсером.
— пример: G21 и G90 — активные модальные состояния перед движением. Это последовательные команды.
$J= X10.0 Y-1.5 переместится на X = 10.0 мм и Y = -1.5 мм в рабочей системе координат (WPos).
$J= G91 G20 X0,5 переместится на +0,5 дюйма (12,7 мм) до X = 22,7 мм (WPos). Обратите внимание, что G91 и G20 применяются только к этой команде специального движения.
$J= G53 Y5.0 переместит машину на Y = 5.0 мм в системе координат машины (MPos). Если смещение рабочей координаты для оси Y составляет 2,0 мм, то Y составляет 3,0 мм (WPos).
Команды Jog ведут себя почти так же, как и обычная потоковая передача G-code. Каждая команда jog вернет ‘ok‘, когда специальное движение было проанализировано и настроено для выполнения. Если команда недопустима или превышает мягкое ограничение, Grbl выдаст сообщение об ошибке: Несколько команд могут быть поставлены в очередь.
ПРИМЕЧАНИЕ. Дополнительные сведения об использовании этой команды для создания интерфейса джойстика с малой задержкой или интерфейса поворотного набора см. в дополнительной документации.
$RST=$, $RST=# и $RST =* — восстановить настройки и данные Grbl по умолчанию.
Эти команды не перечислены в основном справочном сообщении Grbl $, но доступны, чтобы позволить пользователям восстанавливать часть или все данные памяти Grbl. Примечание: Grbl автоматически сбросится после выполнения одной из этих команд, чтобы гарантировать правильную инициализацию системы.
$RST=$: стирает и восстанавливает настройки $$ Grbl до значений по умолчанию, что определяется файлом настроек, который используется при компиляции Grbl. Зачастую OEM-производители создают свои прошивки Grbl с рекомендованными для конкретной машины настройками. Это дает пользователям и OEM-производителям быстро вернуться к исходной точке, если что-то пошло не так или пользователь хочет начать все сначала.
$RST=#: стирает и обнуляет все смещения рабочих координат G54-G59 и позиции G28/30, сохраненные в памяти. Обычно это значения, отображаемые в распечатке параметров $#. Это обеспечивает простой способ их очистки без необходимости делать это вручную для каждого набора с помощью команды G20 L2/20 или G28.1/30.1.
$RST=*: Это очищает и восстанавливает все данные памяти, используемые Grbl. Сюда входят настройки $$, параметры $#, строки запуска $N и информационная строка $I. Обратите внимание, что это не стирает всю память, только области данных, которые использует Grbl. Чтобы выполнить полную очистку, воспользуйтесь прошивкой контроллера в Arduino IDE.
ПРИМЕЧАНИЕ. Некоторые OEM-производители могут ограничить использование некоторых или всех этих команд для предотвращения стирания определенных данных, которые они используют.
$SLP — включить спящий режим.
Эта команда переведет Grbl в отключенное состояние, отключив шпиндели, контакты охлаждающей жидкости и шагового двигателя, и заблокирует любые команды. Выход из него возможен только при мягком сбросе или выключении питания. После повторной инициализации Grbl автоматически войдет в аварийное состояние, потому что он не уверен, где он находится из-за отключения шаговых двигателей.
Эта функция полезна, если вам нужно автоматически отключить все в конце работы, добавив эту команду в конец вашей программы G-code, настоятельно рекомендуется добавить команды, чтобы сначала переместить ваш станок на безопасное место для парковки до этой команды. Также следует подчеркнуть, что у вас должен быть надежный станок с ЧПУ, который будет отключать все, когда он должен, как ваш шпиндель. Grbl не несет ответственности за любой ущерб, который он может причинить. Никогда не стоит оставлять свою машину без присмотра. Поэтому используйте эту команду с предельной осторожностью!
Более подробное описание читайте на сайте проекта на английском языке.
Понравился статья Команды GRBL v1.1. Подробное описание! Не забудь поделиться с друзьями в соц. сетях.
А также подписаться на наш канал на YouTube, вступить в группу Вконтакте, в группу на Facebook.
Спасибо за внимание!
Технологии начинаются с простого!
Источник
Yuri
Yuri
СКАЗАЛ ТУТ НЕМНОГО
- Регистрация
- 11.09.2019
- Сообщения
- 500
- Реакции
- 838
- Баллы
- 138
- Возраст
- 60
- Адрес
- Украина
- Город
- Черкассы
- Имя
- Юра
- Плата
- самодельная на ESP32
- #196
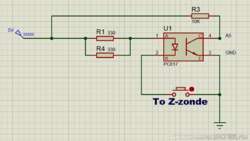
А какой смысл в гальванической развязке? Развязки достаточно только оптической, либо для переноса уровня (если цепь щупа питается повышенным напряжением), либо для снижения импеданса цепи (на низкоимпедансные цепи сложнее навести помеху).
давайте все называть своими именами
если говорим о гальванической развязке — то схема должна соответствовать, я её привел
схема приведенная выше никакого отношения к гальванической развязке не имеет, это схема простого низкоомного входа, выполненного на оптопаре, где вместо оптопары проще поставить простой транзистор
Robinson1957

- Регистрация
- 07.01.2020
- Сообщения
- 3 778
- Реакции
- 4 868
- Баллы
- 188
- Возраст
- 65
- Город
- г.Новокузнецк
- Имя
- Владимир
- Отчество
- Александрович
- Станок
- 1610>2216
- Плата
- W 2.08
- Прошивка
- v1.1F
- #197
вместо оптопары проще поставить простой транзистор
Безусловно, проще. Ставьте. Только не вижу преимущества транзистора перед оптроном.
Yuri
Yuri
СКАЗАЛ ТУТ НЕМНОГО
- Регистрация
- 11.09.2019
- Сообщения
- 500
- Реакции
- 838
- Баллы
- 138
- Возраст
- 60
- Адрес
- Украина
- Город
- Черкассы
- Имя
- Юра
- Плата
- самодельная на ESP32
- #198
Безусловно, проще. Ставьте. Только не вижу преимущества транзистора перед оптроном.
мы опять разговариваем об разном
сделать низкоомный вход можно и без транзистора, достаточно одного резистора
давайте тогда гвоздь называть фрезой, он же что то там режет хоть на заборе хоть в станке
мы же штихель называем штихелем, фрезу — фрезой
данная схема — вход с развязкой , выполненная на оптопаре и нет тут гальванической развязки
-

1620795396524.png
109.5 KB · Просмотры: 42
Robinson1957
- Регистрация
- 07.01.2020
- Сообщения
- 3 778
- Реакции
- 4 868
- Баллы
- 188
- Возраст
- 65
- Город
- г.Новокузнецк
- Имя
- Владимир
- Отчество
- Александрович
- Станок
- 1610>2216
- Плата
- W 2.08
- Прошивка
- v1.1F
- #199
данная схема — вход с развязкой , выполненная на оптопаре и нет тут гальванической развязки
Никто не спорит, что гальванической развязки тут нет, тут присутствует только сигнальная развязка.
Да и насчет гвоздя, сложно представить гвозди хотя бы из быстрореза (HSS), тем более из твердосплава. Разве только это плод больной фантазии.
Vlad-I-Mir

- Регистрация
- 23.02.2021
- Сообщения
- 2 924
- Реакции
- 3 880
- Баллы
- 188
- Возраст
- 53
- Адрес
- Россия
- Веб-сайт
- cnc3018.ru
- Город
- Задонск
- Область
- Липецкая
- Имя
- Владимир
- Отчество
- Викторович
- Станок
- CNC 3018 Pro /пока сток/
- Плата
- CNC шилд, 3.2
- Прошивка
- 1,1h
- #200
И снова вопрос!
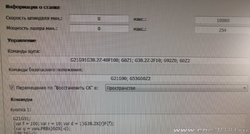
Почему когда стоит стандартная строка G21G91G38.2Z-40F100; G0Z1; G38.2Z-2F10 станок всё отрабатывает, останавливается на ноле, обнуляю в ручную и нет ни каких ошибок. А когда в конце строки добавляю G92Z0; G0Z5; G90G17, то после подъема на 5 мм выдает ошибку <Error 9
В консоли:
G21G91G38.2Z-40F100 <ok
G0Z1 <ok
G38.2Z-2F10 <ok
G92Z0 <ok
G0Z5 <ok
G90G17 <Error 9
Но при этом станком можно дальше управлять…
demyuri

- Регистрация
- 31.10.2019
- Сообщения
- 9 079
- Реакции
- 8 083
- Баллы
- 200
- Возраст
- 48
- Адрес
- РОССИЯ
- Веб-сайт
- youtu.be
- Город
- Барнаул
- Имя
- Юрий
- Станок
- 3018 ПРО, доработанный
- Плата
- Дятел 3.4
- Прошивка
- 1.1f
- #201
Г-код заблокирован во время тревоги или толчкового режима.
уж сколько раз твердили миру…

gnea/grbl
An open source, embedded, high performance g-code-parser and CNC milling controller written in optimized C that will run on a straight Arduino — gnea/grbl
 github.com
Robinson1957
- Регистрация
- 07.01.2020
- Сообщения
- 3 778
- Реакции
- 4 868
- Баллы
- 188
- Возраст
- 65
- Город
- г.Новокузнецк
- Имя
- Владимир
- Отчество
- Александрович
- Станок
- 1610>2216
- Плата
- W 2.08
- Прошивка
- v1.1F
- #202
когда в конце строки добавляю G92Z0; G0Z5; G90G17
Между G90 и G17 надо ставить разделитель «;».
И для какой цели нужна G17? Система и так по умолчанию стоит в этой плоскости.
Vlad-I-Mir
- Регистрация
- 23.02.2021
- Сообщения
- 2 924
- Реакции
- 3 880
- Баллы
- 188
- Возраст
- 53
- Адрес
- Россия
- Веб-сайт
- cnc3018.ru
- Город
- Задонск
- Область
- Липецкая
- Имя
- Владимир
- Отчество
- Викторович
- Станок
- CNC 3018 Pro /пока сток/
- Плата
- CNC шилд, 3.2
- Прошивка
- 1,1h
- #203
Между G90 и G17 надо ставить разделитель «;».
А в постпроцессоре нет разделителя… Программу когда создает, то самая первая строка прописана G90G17 без всяких знаков…
И для какой цели нужна G17? Система и так по умолчанию стоит в этой плоскости.
Да вот как-то раз заметил не произошло переключения почему-то между относительной и абсолютной системой координат… Я привык работать в абсолютной (вроде правильно) системе, забил Х10 — переехало в 10, забил 5 — вернулось на пять, а получилось, что оно переехало на 15… Вот, что-бы было всё как перед зондированием… Что то типа такого…
demyuri
- Регистрация
- 31.10.2019
- Сообщения
- 9 079
- Реакции
- 8 083
- Баллы
- 200
- Возраст
- 48
- Адрес
- РОССИЯ
- Веб-сайт
- youtu.be
- Город
- Барнаул
- Имя
- Юрий
- Станок
- 3018 ПРО, доработанный
- Плата
- Дятел 3.4
- Прошивка
- 1.1f
- #204
Не, тут скорее всего другое. Г17 используется по умолчанию, а в этой команде дублируется. Вот и выдает ошибку: не фиг мне 2 раза указывать, где пилить, сам знаю!
Vlad-I-Mir
- Регистрация
- 23.02.2021
- Сообщения
- 2 924
- Реакции
- 3 880
- Баллы
- 188
- Возраст
- 53
- Адрес
- Россия
- Веб-сайт
- cnc3018.ru
- Город
- Задонск
- Область
- Липецкая
- Имя
- Владимир
- Отчество
- Викторович
- Станок
- CNC 3018 Pro /пока сток/
- Плата
- CNC шилд, 3.2
- Прошивка
- 1,1h
- #205
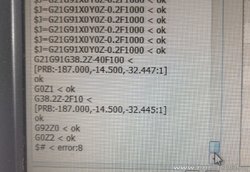
Вот сегодня только что проверил с нотика, что происходит:
Когда стоит стандартная строка G21G91G38.2Z-40F100; G0Z1; G38.2Z-2F10 станок всё отрабатывает, останавливается на ноле, обнуляю в ручную и нет ни каких ошибок. Когда дописываю G92Z0 то всё происходит тоже самое, только обнуляется ось Z. Но когда добавляю ещё подъём, то после подъёма выскакивает:
$#<Error:8…
(из справочника ошибок:
Error 8 – STATUS_IDLE_ERROR Вы ввели команду, разрешенную только в том случае, если активным состоянием контроллера является «Неактивен».Например, вы отправили команду $$ во время выполнения другого задания.)
Заметил, что станок дальше работает, но вот почему выскакивает ошибка, не пойму…
SnakeKVC
- Регистрация
- 27.12.2019
- Сообщения
- 5 028
- Реакции
- 4 324
- Баллы
- 138
- Возраст
- 45
- Адрес
- от верблюда
- Город
- Самара
- Имя
- Андрей
- Отчество
- Евгеньевич
- Станок
- 3018 Upgraded
- Плата
- Woodpecker v3.4
- Прошивка
- 1.1f
- #206
Вот сегодня только что проверил с нотика, что происходит:
Когда стоит стандартная строка G21G91G38.2Z-40F100; G0Z1; G38.2Z-2F10 станок всё отрабатывает, останавливается на ноле, обнуляю в ручную и нет ни каких ошибок. Когда дописываю G92Z0 то всё происходит тоже самое, только обнуляется ось Z. Но когда добавляю ещё подъём, то после подъёма выскакивает:
$#<Error:8…
(из справочника ошибок:
Error 8 – STATUS_IDLE_ERROR Вы ввели команду, разрешенную только в том случае, если активным состоянием контроллера является «Неактивен».Например, вы отправили команду $$ во время выполнения другого задания.)Заметил, что станок дальше работает, но вот почему выскакивает ошибка, не пойму…
Полную строку с командой покажите?
Vlad-I-Mir
- Регистрация
- 23.02.2021
- Сообщения
- 2 924
- Реакции
- 3 880
- Баллы
- 188
- Возраст
- 53
- Адрес
- Россия
- Веб-сайт
- cnc3018.ru
- Город
- Задонск
- Область
- Липецкая
- Имя
- Владимир
- Отчество
- Викторович
- Станок
- CNC 3018 Pro /пока сток/
- Плата
- CNC шилд, 3.2
- Прошивка
- 1,1h
- #207
Полную строку с командой покажите?
Ща, всё брошу, начну шарики надувать…


Минутку…
Ваши сообщения автоматически объединены: 04.06.2021
Вот…
Ваши сообщения автоматически объединены: 04.06.2021
Убираю G0Z2 и ошибка пропадает…
Ваши сообщения автоматически объединены: 04.06.2021
Не, тут скорее всего другое. Г17 используется по умолчанию, а в этой команде дублируется. Вот и выдает ошибку: не фиг мне 2 раза указывать, где пилить, сам знаю!
Г17 пока убрал…

-

Снимок9.JPG
456.5 KB · Просмотры: 32
-

Снимок10.JPG
711.9 KB · Просмотры: 30
SnakeKVC
- Регистрация
- 27.12.2019
- Сообщения
- 5 028
- Реакции
- 4 324
- Баллы
- 138
- Возраст
- 45
- Адрес
- от верблюда
- Город
- Самара
- Имя
- Андрей
- Отчество
- Евгеньевич
- Станок
- 3018 Upgraded
- Плата
- Woodpecker v3.4
- Прошивка
- 1.1f
- #208
Ща, всё брошу, начну шарики надувать…


Минутку…
Ваши сообщения автоматически объединены: 04.06.2021
Вот…
Ваши сообщения автоматически объединены: 04.06.2021
Убираю G0Z2 и ошибка пропадает…
Ваши сообщения автоматически объединены: 04.06.2021
Г17 пока убрал…

А команда $N, что выдаёт?
Vlad-I-Mir
- Регистрация
- 23.02.2021
- Сообщения
- 2 924
- Реакции
- 3 880
- Баллы
- 188
- Возраст
- 53
- Адрес
- Россия
- Веб-сайт
- cnc3018.ru
- Город
- Задонск
- Область
- Липецкая
- Имя
- Владимир
- Отчество
- Викторович
- Станок
- CNC 3018 Pro /пока сток/
- Плата
- CNC шилд, 3.2
- Прошивка
- 1,1h
- #209
А команда $N, что выдаёт?
Это в каком месте?
SnakeKVC
- Регистрация
- 27.12.2019
- Сообщения
- 5 028
- Реакции
- 4 324
- Баллы
- 138
- Возраст
- 45
- Адрес
- от верблюда
- Город
- Самара
- Имя
- Андрей
- Отчество
- Евгеньевич
- Станок
- 3018 Upgraded
- Плата
- Woodpecker v3.4
- Прошивка
- 1.1f
- #210
В консоли набрать $N

Ошибка не из-за этой команды.
@fra589 Hi,
I do not know what happened, but even after doing the new download, cn5X ++ did not recognize the arduino, to try to misdirect if the firmware was really flashed, I used the GRBL Controller 3.6.1 and it was really well flashed after I returned the application and voila already works. Very strange, but it looks like it already works.
Now I would like to give you some ideas,
I think there should be a viewer of the work in drawing mode and not only in code G, let’s imagine using the app in some machines for newbies does not matter to see or know the code G, but to see the evolution of the drawing.
Have a CAM mode such as bCNC that uses plugins to do simple things like flatten, pocketing, drill, etc, or even make a mix between that CAM and EstlCam that is very good.
I do not know if it is complicated because I do not understand programming, but I’m thinking of automating a real machine that cuts in stone with a disk in XYZ, but it’s very old and move by oil pressure, the idea is to put an automaton, an arduino, drivers an inverts and a app as it is, the question is need of encoders to report the position of the machine, so that even if it loses its way it retrieves them, to be as precise as possible, I have not yet chosen the hardware at the level of drivers, encoders, inverts, because I do not know how to solve the question of the encoders and also of jogging because it will be necessary to move the machine through joysticks
Grbl Interface Basics
The interface for Grbl is fairly simple and straightforward. With Grbl v1.1, steps have been taken to try to make it even easier for new users to get started, and for GUI developers to write their own custom interfaces to Grbl.
Grbl communicates through the serial interface on the Arduino. You just need to connect your Arduino to your computer with a USB cable. Use any standard serial terminal program to connect to Grbl, such as: the Arduino IDE serial monitor, Coolterm, puTTY, etc. Or use one of the many great Grbl GUIs out there in the Internet wild.
The primary way to talk to Grbl is performed by sending it a string of characters, followed by a carriage return. Grbl will then process the string, set it up for execution, and then reply back with a response message, also terminated by a return, to tell you how it went. These command strings include sending Grbl: a G-code block to execute, commands to configure Grbl’s system settings, to view how Grbl is doing, etc.
To stream a g-code program to Grbl, the basic interface is to send Grbl a line of g-code, then wait for the proper response message starting with an ok or error. This signals Grbl has completed the parsing and executing the command. At times, Grbl may not respond immediately. This happens when Grbl is busy doing something else or waiting to place a commanded motion into the look-ahead planner buffer. Other times, usually at the start of a program, Grbl may quickly respond to several lines, but nothing happens. This occurs when Grbl places a series of commanded motions directly in the planner queue and will try to fill it up completely before starting.
Along with response messages, Grbl has push messages to provide more feedback on what Grbl is doing and are also strings terminated by a return. These messages may be «pushed» from Grbl to the user in response to a query or to let the user know something important just happened. These can come at any time, but usually from something like a settings print out when asked to. Push messages are easily identified because they don’t start with an ok or error like response messages do. They are typically placed in [] brackets, <> chevrons, start with a $, or a specific string of text. These are all defined and described later in this document.
Finally, Grbl has real-time commands that are invoked by a set of special characters that may be sent at any time and are not part of the basic streaming send-response interface. These cause Grbl to immediately execute the command and typically don’t generate a response. These include pausing the current motion, speed up/down everything, toggle the spindle during a job, reset Grbl, or query Grbl for a real-time status report. See the Commands document to see what they are and how they work.
Writing an Interface for Grbl
The general interface for Grbl has been described above, but what’s missing is how to run an entire G-code program on Grbl, when it doesn’t seem to have an upload feature. This is where this section fits in. Early on, users fiercely requested for flash drive, external RAM, LCD support, joysticks, or network support so they can upload a g-code program and run it directly on Grbl. The general answer to that is, good ideas, but Grbl doesn’t need them. Grbl already has nearly all of the tools and features to reliably communicate with a graphical user interface (GUI) or a seperate host interface that provides all those extra bells and whistles. Grbl’s base philosophy is to minimize what Grbl should be doing, because, in the end, Grbl needs to be concentrating on producing clean, reliable motion. That’s it.
Streaming a G-Code Program to Grbl
Here we will describe two different streaming methods for Grbl GUIs. One of the main problems with streaming to Grbl is the USB port itself. Arduinos and most all micro controllers use a USB-to-serial converter chip that, at times, behaves strangely and not typically how you’d expect, like USB packet buffering and delays that can wreak havoc to a streaming protocol. Another problem is how to deal with some of the latency and oddities of the PCs themselves, because none of them are truly real-time and always create micro-delays when executing other tasks. Regardless, we’ve come up with ways to ensure the G-code stream is reliable and simple.
The following streaming protocols require tracking the response messages to determine when to send the next g-code line. All push messages are not counted toward the streaming protocol and should be handled separately. All real-time command characters can be sent at any time and are never placed in Grbl’s RX serial buffer. They are intercepted as they come in and simply sets flags for Grbl to execute them.
Streaming Protocol: Simple Send-Response [Recommended]
The send-response streaming protocol is the most fool-proof and simplest method to stream a G-code program to Grbl. The host PC interface simply sends a line of G-code to Grbl and waits for an ok or error: response message before sending the next line of G-code. So, no matter if Grbl needs to wait for room in the look-ahead planner buffer to finish parsing and executing the last line of G-code or if the the host computer is busy doing something, this guarantees both to the host PC and Grbl, the programmed G-code has been sent and received properly. An example of this protocol is published in our simple_stream.py script in our repository.
However, it’s also the slowest of three outlined streaming protocols. Grbl essentially has two buffers between the execution of steps and the host PC interface. One of them is the serial receive buffer. This briefly stores up to 127 characters of data received from the host PC until Grbl has time to fetch and parse the line of G-code. The other buffer is the look-ahead planner buffer. This buffer stores up to 16 line motions that are acceleration-planned and optimized for step execution. Since the send-response protocol receives a line of G-code while the host PC waits for a response, Grbl’s serial receive buffer is usually empty and under-utilized. If Grbl is actively running and executing steps, Grbl will immediately begin to execute and empty the look-ahead planner buffer, while it sends the response to the host PC, waits for the next line from the host PC, upon receiving it, parse and plan it, and add it to the end of the look-ahead buffer.
Although this communication lag may take only a fraction of a second, there is a cumulative effect, because there is a lag with every G-code block sent to Grbl. In certain scenarios, like a G-code program containing lots of sequential, very short, line segments with high feed rates, the cumulative lag can be large enough to empty and starve the look-ahead planner buffer within this time. This could lead to start-stop motion when the streaming can’t keep up with G-code program execution. Also, since Grbl can only plan and optimize what’s in the look-ahead planner buffer, the performance through these types of motions will never be full-speed, because look-ahead buffer will always be partially full when using this streaming method. If your expected application doesn’t contain a lot of these short line segments with high feed rates, this streaming protocol should be more than adequate for a vast majority of applications, is very robust, and is a quick way to get started.
Streaming Protocol: Character-Counting [Recommended with Reservation]
To get the best of both worlds, the simplicity and reliability of the send-response method and assurance of maximum performance with software flow control, we came up with a simple character-counting protocol for streaming a G-code program to Grbl. It works like the send-response method, where the host PC sends a line of G-code for Grbl to execute and waits for a response message, but, rather than needing special XON/XOFF characters for flow control, this protocol simply uses Grbl’s responses as a way to reliably track how much room there is in Grbl’s serial receive buffer. An example of this protocol is outlined in the stream.py streaming script in our repo. This protocol is particular useful for very fast machines like laser cutters.
The main difference between this protocol and the others is the host PC needs to maintain a standing count of how many characters it has sent to Grbl and then subtract the number of characters corresponding to the line executed with each Grbl response. Suppose there is a short G-code program that has 5 lines with 25, 40, 31, 58, and 20 characters (counting the line feed and carriage return characters too). We know Grbl has a 128 character serial receive buffer, and the host PC can send up to 128 characters without overflowing the buffer. If we let the host PC send as many complete lines as we can without over flowing Grbl’s serial receive buffer, the first three lines of 25, 40, and 31 characters can be sent for a total of 96 characters. When Grbl sends a response message, we know the first line has been processed and is no longer in the serial read buffer. As it stands, the serial read buffer now has the 40 and 31 character lines in it for a total of 71 characters. The host PC needs to then determine if it’s safe to send the next line without overflowing the buffer. With the next line at 58 characters and the serial buffer at 71 for a total of 129 characters, the host PC will need to wait until more room has cleared from the serial buffer. When the next Grbl response message comes in, the second line has been processed and only the third 31 character line remains in the serial buffer. At this point, it’s safe to send the remaining last two 58 and 20 character lines of the g-code program for a total of 110.
While seemingly complicated, this character-counting streaming protocol is extremely effective in practice. It always ensures Grbl’s serial read buffer is filled, while never overflowing it. It maximizes Grbl’s performance by keeping the look-ahead planner buffer full by better utilizing the bi-directional data flow of the serial port, and it’s fairly simple to implement as our stream.py script illustrates. We have stress-tested this character-counting protocol to extremes and it has not yet failed. Seemingly, only the speed of the serial connection is the limit.
RESERVATION:
- If a g-code line is parsed and generates an error response message, a GUI should stop the stream immediately. However, since the character-counting method stuffs Grbl’s RX buffer, Grbl will continue reading from the RX buffer and parse and execute the commands inside it. A GUI won’t be able to control this. The interim solution is to check all of the g-code via the $C check mode, so all errors are vetted prior to streaming. This will get resolved in later versions of Grbl.
Interacting with Grbl’s Systems
Along with streaming a G-code program, there a few more things to consider when writing a GUI for Grbl, such as how to use status reporting, real-time control commands, dealing with EEPROM, and general message handling.
Status Reporting
When a ? character is sent to Grbl (no additional line feed or carriage return character required), it will immediately respond with something like <Idle|MPos:0.000,0.000,0.000|FS:0.0,0> to report its state and current position. The ? is always picked-off and removed from the serial receive buffer whenever Grbl detects one. So, these can be sent at any time. Also, to make it a little easier for GUIs to pick up on status reports, they are always encased by <> chevrons.
Developers can use this data to provide an on-screen position digital-read-out (DRO) for the user and/or to show the user a 3D position in a virtual workspace. We recommend querying Grbl for a ? real-time status report at no more than 5Hz. 10Hz may be possible, but at some point, there are diminishing returns and you are taxing Grbl’s CPU more by asking it to generate and send a lot of position data.
Grbl’s status report is fairly simply in organization. It always starts with a word describing the machine state like IDLE (descriptions of these are available elsewhere in the Wiki). The following data values are usually in the order listed below and separated by | pipe characters, but may not be in the exact order or printed at all. For a complete description of status report formatting, read the Real-time Status Reports section below.
Real-Time Control Commands
The real-time control commands, ~ cycle start/resume, ! feed hold, ^X soft-reset, and all of the override commands, all immediately signal Grbl to change its running state. Just like ? status reports, these control characters are picked-off and removed from the serial buffer when they are detected and do not require an additional line-feed or carriage-return character to operate.
One important note are the override command characters. These are defined in the extended-ASCII character space and are generally not type-able on a keyboard. A GUI must be able to send these 8-bit values to support overrides.
EEPROM Issues
EEPROM access on the Arduino AVR CPUs turns off all of the interrupts while the CPU writes to EEPROM. This poses a problem for certain features in Grbl, particularly if a user is streaming and running a g-code program, since it can pause the main step generator interrupt from executing on time. Most of the EEPROM access is restricted by Grbl when it’s in certain states, but there are some things that developers need to know.
- Settings should not be streamed with the character-counting streaming protocols. Only the simple send-response protocol works. This is because during the EEPROM write, the AVR CPU also shuts-down the serial RX interrupt, which means data can get corrupted or lost. This is safe with the send-response protocol, because it’s not sending data after commanding Grbl to save data.
For reference:
- Grbl’s EEPROM write commands:
G10 L2,G10 L20,G28.1,G30.1,$x=,$I=,$Nx=,$RST= - Grbl’s EEPROM read commands:
G54-G59,G28,G30,$$,$I,$N,$#
G-code Error Handling
Grbl’s g-code parser is fully standards-compilant with complete error-checking. When a G-code parser detects an error in a G-code block/line, the parser will dump everything in the block from memory and report an error: back to the user or GUI. This dump is absolutely the right thing to do, because a g-code line with an error can be interpreted in multiple ways. However, this dump can be problematic, because the bad G-code block may have contained some valuable positioning commands or feed rate settings that the following g-code depends on.
It’s highly recommended to do what all professional CNC controllers do when they detect an error in the G-code program, halt. Don’t do anything further until the user has modified the G-code and fixed the error in their program. Otherwise, bad things could happen.
As a service to GUIs, Grbl has a «check G-code» mode, enabled by the $C system command. GUIs can stream a G-code program to Grbl, where it will parse it, error-check it, and report ok‘s and errors:‘s without powering on anything or moving. So GUIs can pre-check the programs before streaming them for real. To disable the «check G-code» mode, send another $C system command and Grbl will automatically soft-reset to flush and re-initialize the G-code parser and the rest of the system. This perhaps should be run in the background when a user first loads a program, before a user sets up his machine. This flushing and re-initialization clears G92‘s by G-code standard, which some users still incorrectly use to set their part zero.
Jogging
As of Grbl v1.1, a new jogging feature is available that accepts incremental, absolute, or absolute override motions, along with a jog cancel real-time command that will automatically feed hold and purge the planner buffer. The most important aspect of the new jogging motion is that it is completely independent from the g-code parser, so GUIs no longer have to ensure the g-code modal states are set back correctly after jogging is complete. See the jogging document for more details on how it works and how you can use it with an analog joystick or rotary dial.
Synchronization
For situations when a GUI needs to run a special set of commands for tool changes, auto-leveling, etc, there often needs to be a way to know when Grbl has completed a task and the planner buffer is empty. The absolute simplest way to do this is to insert a G4 P0.01 dwell command, where P is in seconds and must be greater than 0.0. This acts as a quick force-synchronization and ensures the planner buffer is completely empty before the GUI sends the next task to execute.
Message Summary
In v1.1, Grbl’s interface protocol has been tweaked in the attempt to make GUI development cleaner, clearer, and hopefully easier. All messages are designed to be deterministic without needing to know the context of the message. Each can be inferred to a much greater degree than before just by the message type, which are all listed below.
-
Response Messages: Normal send command and execution response acknowledgement. Used for streaming.
ok: Indicates the command line received was parsed and executed (or set to be executed).error:x: Indicated the command line received contained an error, with an error codex, and was purged. See error code section below for definitions.
-
Push Messages:
< >: Enclosed chevrons contains status report data.Grbl X.Xx ['$' for help]: Welcome message indicates initialization.ALARM:x: Indicates an alarm has been thrown. Grbl is now in an alarm state.$x=valand$Nx=lineindicate a settings printout from a$and$Nuser query, respectively.[MSG:]: Indicates a non-queried feedback message.[GC:]: Indicates a queried$Gg-code state message.[HLP:]: Indicates the help message.[G54:],[G55:],[G56:],[G57:],[G58:],[G59:],[G28:],[G30:],[G92:],[TLO:], and[PRB:]messages indicate the parameter data printout from a$#user query.[VER:]: Indicates build info and string from a$Iuser query.[echo:]: Indicates an automated line echo from a pre-parsed string prior to g-code parsing. Enabled by config.h option.>G54G20:ok: The open chevron indicates startup line execution. The:oksuffix shows it executed correctly without adding an unmatchedokresponse on a new line.
In addition, all $x=val settings, error:, and ALARM: messages no longer contain human-readable strings, but rather codes that are defined in other documents. The $ help message is also reduced to just showing the available commands. Doing this saves incredible amounts of flash space. Otherwise, the new overrides features would not have fit.
Other minor changes and bug fixes that may effect GUI parsing include:
- Floating point values printed with zero precision do not show a decimal, or look like an integer. This includes spindle speed RPM and feed rate in mm mode.
$Greports fixed a long time bug with program modal state. It always showedM0program pause when running. Now during a normal program run, no program modal state is given until anM0,M2, orM30is active and then the appropriate state will be shown.
On a final note, this interface tweak came about out of necessity, as more data is being sent back from Grbl and it is capable of doing many more things. It’s not intended to be altered again in the near future, if at all. This is likely the only and last major change to this. If you have any comments or suggestions before Grbl v1.1 goes to master, please do immediately so we can all vet the new alteration before its installed.
Grbl Response Messages
Every G-code block sent to Grbl and Grbl $ system command that is terminated with a return will be parsed and processed by Grbl. Grbl will then respond either if it recognized the command with an ok line or if there was a problem with an error line.
-
ok: All is good! Everything in the last line was understood by Grbl and was successfully processed and executed.- If an empty line with only a return is sent to Grbl, it considers it a valid line and will return an
oktoo, except it didn’t do anything.
- If an empty line with only a return is sent to Grbl, it considers it a valid line and will return an
-
error:X: Something went wrong! Grbl did not recognize the command and did not execute anything inside that message. TheXis given as a numeric error code to tell you exactly what happened. The table below decribes every one of them.| ID | Error Code Description |
|:————-:|—-|
|1| G-code words consist of a letter and a value. Letter was not found. |
|2| Numeric value format is not valid or missing an expected value. |
|3| Grbl ‘$’ system command was not recognized or supported. |
|4| Negative value received for an expected positive value. |
|5| Homing cycle is not enabled via settings. |
|6| Minimum step pulse time must be greater than 3usec |
|7| EEPROM read failed. Reset and restored to default values. |
|8| Grbl ‘$’ command cannot be used unless Grbl is IDLE. Ensures smooth operation during a job. |
|9| G-code locked out during alarm or jog state |
|10| Soft limits cannot be enabled without homing also enabled. |
|11| Max characters per line exceeded. Line was not processed and executed. |
|12| (Compile Option) Grbl ‘$’ setting value exceeds the maximum step rate supported. |
|13| Safety door detected as opened and door state initiated. |
|14| (Grbl-Mega Only) Build info or startup line exceeded EEPROM line length limit. |
|15| Jog target exceeds machine travel. Command ignored. |
|16| Jog command with no ‘=’ or contains prohibited g-code. |
|20| Unsupported or invalid g-code command found in block. |
|21| More than one g-code command from same modal group found in block.|
|22| Feed rate has not yet been set or is undefined. |
|23| G-code command in block requires an integer value. |
|24| Two G-code commands that both require the use of theXYZaxis words were detected in the block.|
|25| A G-code word was repeated in the block.|
|26| A G-code command implicitly or explicitly requiresXYZaxis words in the block, but none were detected.|
|27|Nline number value is not within the valid range of1—9,999,999. |
|28| A G-code command was sent, but is missing some requiredPorLvalue words in the line. |
|29| Grbl supports six work coordinate systemsG54-G59.G59.1,G59.2, andG59.3are not supported.|
|30| TheG53G-code command requires either aG0seek orG1feed motion mode to be active. A different motion was active.|
|31| There are unused axis words in the block andG80motion mode cancel is active.|
|32| AG2orG3arc was commanded but there are noXYZaxis words in the selected plane to trace the arc.|
|33| The motion command has an invalid target.G2,G3, andG38.2generates this error, if the arc is impossible to generate or if the probe target is the current position.|
|34| AG2orG3arc, traced with the radius definition, had a mathematical error when computing the arc geometry. Try either breaking up the arc into semi-circles or quadrants, or redefine them with the arc offset definition.|
|35| AG2orG3arc, traced with the offset definition, is missing theIJKoffset word in the selected plane to trace the arc.|
|36| There are unused, leftover G-code words that aren’t used by any command in the block.|
|37| TheG43.1dynamic tool length offset command cannot apply an offset to an axis other than its configured axis. The Grbl default axis is the Z-axis.|
|38| Tool number greater than max supported value.|
Grbl Push Messages
Along with the response message to indicate successfully executing a line command sent to Grbl, Grbl provides additional push messages for important feedback of its current state or if something went horribly wrong. These messages are «pushed» from Grbl and may appear at anytime. They are usually in response to a user query or some system event that Grbl needs to tell you about immediately. These push messages are organized into six general classes:
-
Welcome message — A unique message to indicate Grbl has initialized.
-
ALARM messages — Means an emergency mode has been enacted and shut down normal use.
-
‘$’ settings messages — Contains the type and data value for a Grbl setting.
-
Feedback messages — Contains general feedback and can provide useful data.
-
Startup line execution — Indicates a startup line as executed with the line itself and how it went.
-
Real-time status reports — Contains current run data like state, position, and speed.
Welcome Message
Grbl X.Xx ['$' for help]
The start up message always prints upon startup and after a reset. Whenever you see this message, this also means that Grbl has completed re-initializing all its systems, so everything starts out the same every time you use Grbl.
X.Xxindicates the major version number, followed by a minor version letter. The major version number indicates the general release, while the letter simply indicates a feature update or addition from the preceding minor version letter.- Bug fix revisions are tracked by the build info version number, printed when an
$Icommand is sent. These revisions don’t update the version number and are given by date revised in year, month, and day, like so20161014.
Alarm Message
Alarm is an emergency state. Something has gone terribly wrong when these occur. Typically, they are caused by limit error when the machine has moved or wants to move outside the machine travel and crash into the ends. They also report problems if Grbl is lost and can’t guarantee positioning or a probe command has failed. Once in alarm-mode, Grbl will lock out all g-code functionality and accept only a small set of commands. It may even stop everything and force you to acknowledge the problem until you issue Grbl a reset. While in alarm-mode, the user can override the alarm manually with a specific command, which then re-enables g-code so you can move the machine again. This ensures the user knows about the problem and has taken steps to fix or account for it.
Similar to error messages, all alarm messages are sent as ALARM:X, where X is an alarm code to tell you exacly what caused the alarm. The table below describes the meaning of each alarm code.
| ID | Alarm Code Description |
|---|---|
1 |
Hard limit triggered. Machine position is likely lost due to sudden and immediate halt. Re-homing is highly recommended. |
2 |
G-code motion target exceeds machine travel. Machine position safely retained. Alarm may be unlocked. |
3 |
Reset while in motion. Grbl cannot guarantee position. Lost steps are likely. Re-homing is highly recommended. |
4 |
Probe fail. The probe is not in the expected initial state before starting probe cycle, where G38.2 and G38.3 is not triggered and G38.4 and G38.5 is triggered. |
5 |
Probe fail. Probe did not contact the workpiece within the programmed travel for G38.2 and G38.4. |
6 |
Homing fail. Reset during active homing cycle. |
7 |
Homing fail. Safety door was opened during active homing cycle. |
8 |
Homing fail. Cycle failed to clear limit switch when pulling off. Try increasing pull-off setting or check wiring. |
9 |
Homing fail. Could not find limit switch within search distance. Defined as 1.5 * max_travel on search and 5 * pulloff on locate phases. |
Grbl $ Settings Message
When a push message starts with a $, this indicates Grbl is sending a setting and its configured value. There are only two types of settings messages: a single setting and value $x=val and a startup string setting $Nx=line. See [Configuring Grbl v1.x] document if you’d like to learn how to write these values for your machine.
-
$x=valwill only appear when the user queries to print all of Grbl’s settings via the$$print settings command. It does so sequentially and completes with anok.-
In prior versions of Grbl, the
$settings included a short description of the setting immediately after the value. However, due to flash restrictions, most human-readable strings were removed to free up flash for the new override features in Grbl v1.1. In short, it was these strings or overrides, and overrides won. Keep in mind that once these values are set, they usually don’t change, and GUIs will likely provide the assistance of translating these codes for users. -
NOTE for GUI developers: As with the error and alarm codes, settings codes are available in an easy to parse CSV file in the
/doc/csvfolder. These are continually updated. -
The
$$settings print out is shown below and the following describes each setting.
-
$0=10
$1=25
$2=0
$3=0
$4=0
$5=0
$6=0
$10=255
$11=0.010
$12=0.002
$13=0
$20=0
$21=0
$22=0
$23=0
$24=25.000
$25=500.000
$26=250
$27=1.000
$30=1000
$31=0
$32=0
$100=250.000
$101=250.000
$102=250.000
$110=500.000
$111=500.000
$112=500.000
$120=10.000
$121=10.000
$122=10.000
$130=200.000
$131=200.000
$132=200.000
ok
	| `$x` Code | Setting Description, Units |
|:-------------:|----|
| **`0`** | Step pulse time, microseconds |
| **`1`** | Step idle delay, milliseconds |
| **`2`** | Step pulse invert, mask |
| **`3`** | Step direction invert, mask |
| **`4`** | Invert step enable pin, boolean |
| **`5`** | Invert limit pins, boolean |
| **`6`** | Invert probe pin, boolean |
| **`10`** | Status report options, mask |
| **`11`** | Junction deviation, millimeters |
| **`12`** | Arc tolerance, millimeters |
| **`13`** | Report in inches, boolean |
| **`20`** | Soft limits enable, boolean |
| **`21`** | Hard limits enable, boolean |
| **`22`** | Homing cycle enable, boolean |
| **`23`** | Homing direction invert, mask |
| **`24`** | Homing locate feed rate, mm/min |
| **`25`** | Homing search seek rate, mm/min  |
| **`26`** | Homing switch debounce delay, milliseconds |
| **`27`** | Homing switch pull-off distance, millimeters |
| **`30`** | Maximum spindle speed, RPM |
| **`31`** | Minimum spindle speed, RPM |
| **`32`** | Laser-mode enable, boolean |
| **`100`** | X-axis steps per millimeter |
| **`101`** | Y-axis steps per millimeter |
| **`102`** | Z-axis steps per millimeter |
| **`110`** | X-axis maximum rate, mm/min |
| **`111`** | Y-axis maximum rate, mm/min |
| **`112`** | Z-axis maximum rate, mm/min |
| **`120`** | X-axis acceleration, mm/sec^2 |
| **`121`** | Y-axis acceleration, mm/sec^2 |
| **`122`** | Z-axis acceleration, mm/sec^2 |
| **`130`** | X-axis maximum travel, millimeters |
| **`131`** | Y-axis maximum travel, millimeters |
| **`132`** | Z-axis maximum travel, millimeters |


- The other `$Nx=line` message is the print-out of a user-defined startup line, where `x` denotes the startup line order and ranges from `0` to `1` by default. The `line` denotes the startup line to be executed by Grbl upon reset or power-up, except during an ALARM.

  - When a user queries for the startup lines via a `$N` command, the following is sent by Grbl and completed by an `ok` response. The first line sets the initial startup work coordinate system to `G54`, while the second line is empty and does not execute.
$N0=G54
$N1=
ok
------

#### Feedback Messages

Feedback messages provide non-critical information on what Grbl is doing, what it needs, and/or provide some non-real-time data for the user when queried. Not too complicated. Feedback message are always enclosed in `[]` brackets, except for the startup line execution message which begins with an open chevron character `>`.

- **Non-Queried Feedback Messages:** These feedback messages that may appear at any time and is not part of a query are listed and described below. They are usually sent as an additional helpful acknowledgement of some event or command executed. These always start with a `[MSG:` to denote their type.

- `[MSG:Reset to continue]` - Critical event message. Reset is required before Grbl accepts any other commands. This prevents ongoing command streaming and risking a motion before the alarm is acknowledged. Only hard or soft limit errors send this message immediately after the ALARM:x code.

- `[MSG:‘$H’|’$X’ to unlock]`- Alarm state is active at initialization. This message serves as a reminder note on how to cancel the alarm state. All g-code commands and some ‘$’ are blocked until the alarm state is cancelled via homing `$H` or unlocking `$X`. Only appears immediately after the `Grbl` welcome message when initialized with an alarm. Startup lines are not executed at initialization if this message is present and the alarm is active.

- `[MSG:Caution: Unlocked]` - Appears as an alarm unlock `$X` acknowledgement. An 'ok' still appears immediately after to denote the `$X` was parsed and executed. This message reminds the user that Grbl is operating under an unlock state, where startup lines have still not be executed and should be cautious and mindful of what they do. Grbl may not have retained machine position due to an alarm suddenly halting the machine.  A reset or re-homing Grbl is highly recommended as soon as possible, where any startup lines will be properly executed.

- `[MSG:Enabled]` - Appears as a check-mode `$C` enabled acknowledgement. An 'ok' still appears immediately after to denote the `$C` was parsed and executed.

- `[MSG:Disabled]` - Appears as a check-mode `$C` disabled acknowledgement. An 'ok' still appears immediately after to denote the `$C` was parsed and executed. Grbl is automatically reset afterwards to restore all default g-code parser states changed by the check-mode.

- `[MSG:Check Door]` - This message appears whenever the safety door detected as open. This includes immediately upon a safety door switch detects a pin change or appearing after the welcome message, if the safety door is ajar when Grbl initializes after a power-up/reset.

  - If in motion and the safety door switch is triggered, Grbl will immediately send this message, start a feed hold, and place Grbl into a suspend with the DOOR state.
  - If not in motion and not at startup, the same process occurs without the feed hold.
  - If Grbl is in a DOOR state and already suspended, any detected door switch pin detected will generate this message, including a door close.
  - If this message appears at startup, Grbl will suspended into immediately into the DOOR state. The startup lines are executed immediately after the DOOR state is exited by closing the door and sending Grbl a resume command.

- `[MSG:Check Limits]` - If Grbl detects a limit switch as triggered after a power-up/reset and hard limits are enabled, this will appear as a courtesy message immediately after the Grbl welcome message.

- `[MSG:Pgm End]` - M2/30 program end message to denote g-code modes have been restored to defaults according to the M2/30 g-code description.

- `[MSG:Restoring defaults]` - Appears as an acknowledgement message when restoring EEPROM defaults via a `$RST=` command. An 'ok' still appears immediately after to denote the `$RST=` was parsed and executed.

- `[MSG:Sleeping]` - Appears as an acknowledgement message when Grbl's sleep mode is invoked by issuing a `$SLP` command when in IDLE or ALARM states. Note that Grbl-Mega may invoke this at any time when the sleep timer option has been enabled and the timeout has been exceeded. Grbl may only be exited by a reset in the sleep state and will automatically enter an alarm state since the steppers were disabled.
    - NOTE: Sleep will also invoke the parking motion, if it's enabled. However, if sleep is commanded during an ALARM, Grbl will not park and will simply de-energize everything and go to sleep.

- **Queried Feedback Messages:**

  - `[GC:]` G-code Parser State Message

  	```
  	[GC:G0 G54 G17 G21 G90 G94 M5 M9 T0 F0.0 S0]
  	ok
  	```

 		- Initiated by the user via a `$G` command. Grbl replies as follows, where the `[GC:` denotes the message type and is followed by a separate `ok` to confirm the `$G` was executed.

   	- The shown g-code are the current modal states of Grbl's g-code parser. This may not correlate to what is executing since there are usually several motions queued in the planner buffer.

   	- NOTE: Program modal state has been fixed and will show `M0`, `M2`, or `M30` when they are active. During a run state, nothing will appear for program modal state.


- `[HLP:]` : Initiated by the user via a `$` print help command. The help message is shown below with a separate `ok` to confirm the `$` was executed.
  ```
  [HLP:$$ $# $G $I $N $x=val $Nx=line $J=line $C $X $H ~ ! ? ctrl-x]
  ok
  ```
  	- _**NOTE:** Grbl v1.1's new override real-time commands are not included in the help message. They use the extended-ASCII character set, which are not easily type-able, and require a GUI that supports them. This is for two reasons: Establish enough characters for all of the overrides with extra for later growth, and prevent accidental keystrokes or characters in a g-code file from enacting an override inadvertently._


- The `$#` print parameter data query produces a large set of data which shown below and completed by an `ok` response message.

  	- Each line of the printout is starts with the data type, a `:`, and followed by the data values. If there is more than one, the order is XYZ axes, separated by commas.

    		```
    [G54:0.000,0.000,0.000]
    [G55:0.000,0.000,0.000]
    [G56:0.000,0.000,0.000]
    [G57:0.000,0.000,0.000]
    [G58:0.000,0.000,0.000]
    [G59:0.000,0.000,0.000]
    [G28:0.000,0.000,0.000]
    [G30:0.000,0.000,0.000]
    [G92:0.000,0.000,0.000]
    [TLO:0.000]
    [PRB:0.000,0.000,0.000:0]
    ok
    ```

  	- The `PRB:` probe parameter message includes an additional `:` and suffix value is a boolean. It denotes whether the last probe cycle was successful or not.

- `[VER:]` and `[OPT:]`: Indicates build info data from a `$I` user query. These build info messages are followed by an `ok` to confirm the `$I` was executed, like so:

    ```
    [VER:v1.1f.20170131:Some string]
    [OPT:VL,16,128]
    ok
    ```

		- The first line `[VER:]` contains the build version and date.
    - A string may appear after the second `:` colon. It is a stored EEPROM string a user via a `$I=line` command or OEM can place there for personal use or tracking purposes.
		- The `[OPT:]` line follows immediately after and contains character codes for compile-time options that were either enabled or disabled and two values separated by commas, which indicates the total usable planner blocks and serial RX buffer bytes, respectively. The codes are defined below and a CSV file is also provided for quick parsing. This is generally only used for quickly diagnosing firmware bugs or compatibility issues.

  		| `OPT` Code | Setting Description, Units |
|:-------------:|----|
| **`V`** | Variable spindle enabled |
| **`N`** | Line numbers enabled |
| **`M`** | Mist coolant enabled |
| **`C`** | CoreXY enabled |
| **`P`** | Parking motion enabled |
| **`Z`** | Homing force origin enabled |
| **`H`** | Homing single axis enabled |
| **`L`** | Two limit switches on axis enabled |
| **`D`** | Spindle direction pin used as enable pin |
| **`0`** | Spindle enable off when speed is zero enabled |
| **`S`** | Software limit pin debouncing enabled |
| **`R`** | Parking override control enabled |
| **`A`** | Allow feed rate overrides in probe cycles |
| **`*`** | Restore all EEPROM disabled |
| **`$`** | Restore EEPROM `$` settings disabled |
| **`#`** | Restore EEPROM parameter data disabled |
| **`I`** | Build info write user string disabled |
| **`E`** | Force sync upon EEPROM write disabled |
| **`W`** | Force sync upon work coordinate offset change disabled |
| **`L`** | Homing initialization auto-lock disabled |

- `[echo:]` : Indicates an automated line echo from a command just prior to being parsed and executed. May be enabled only by a config.h option. Often used for debugging communication issues. A typical line echo message is shown below. A separate `ok` will eventually appear to confirm the line has been parsed and executed, but may not be immediate as with any line command containing motions.
    ```
    [echo:G1X0.540Y10.4F100]
    ```
    - NOTE: The echoed line will have been pre-parsed a bit by Grbl. No spaces or comments will appear and all letters will be capitalized.

------

#### Startup Line Execution

- `>G54G20:ok` : The open chevron indicates a startup line has just executed. The startup line `G54G20` immediately follows the `>` character and is followed by an `:ok` response to indicate it executed successfully.

  - A startup line will execute upon initialization only if a line is present and if Grbl is not in an alarm state.

  - The `:ok` on the same line is intentional. It prevents this `ok` response from being counted as part of a stream, because it is not tied to a sent command, but an internally-generated one.

  - There should always be an appended `:ok` because the startup line is checked for validity before it is stored in EEPROM. In the event that it's not, Grbl will print `>G54G20:error:X`, where `X` is the error code explaining why the startup line failed to execute.

  - In the rare chance that there is an EEPROM read error, the startup line execution will print `>:error:7` with no startup line and a error code `7` for a read fail. Grbl will also automatically wipe and try to restore the problematic EEPROM.


------

#### Real-time Status Reports

- Contains real-time data of Grbl’s state, position, and other data required independently of the stream.

- Categorized as a real-time message, where it is a separate message that should not be counted as part of the streaming protocol. It may appear at any given time.

- A status report is initiated by sending Grbl a '?' character.

- Like all real-time commands, the '?' character is intercepted and never enters the serial buffer. It's never a part of the stream and can be sent at any time.

- Grbl will generate and transmit a report within ~5-20 milliseconds.

- Every ’?’ command sent by a GUI is not guaranteed with a response. The following are the current scenarios when Grbl may not immediately or ignore a status report request. _NOTE: These may change in the future and will be documented here._

  - If two or more '?' queries are sent before the first report is generated, the additional queries are ignored.

  - A soft-reset commanded clears the last status report query.

  - When Grbl throws a critical alarm from a limit violation. A soft-reset is required to resume operation.

  - During a homing cycle.

- **Message Construction:**

- A message is a single line of ascii text, completed by a carriage return and line feed.

- `< >` Chevrons uniquely enclose reports to indicate message type.

- `|` Pipe delimiters separate data fields inside the report.

- The first data field is an exception to the following data field rules. See 'Machine State' description for details.

- All remaining data fields consist of a data type followed by a `:` colon delimiter and data values. `type:value(s)`

- Data values are given either as as one or more pre-defined character codes to indicate certain states/conditions or as numeric values, which are separated by a `,` comma delimiter when more than one is present. Numeric values are also in a pre-defined order and units of measure.

- The first (Machine State) and second (Current Position) data fields are always included in every report.

- Assume any following data field may or may not exist and can be in any order. The `$10` status report mask setting can alter what data is present and certain data fields can be reported intermittently (see descriptions for details.)

- The `$13` report inches settings alters the units of some data values. `$13=0` false indicates mm-mode, while `$13=1` true indicates inch-mode reporting. Keep note of this setting and which report values can be altered.

- **Data Field Descriptions:**

  - **Machine State:**

    - Valid states types:  `Idle, Run, Hold, Jog, Alarm, Door, Check, Home, Sleep`

    - Sub-states may be included via `:` a colon delimiter and numeric code.

    - Current sub-states are:

      	- `Hold:0` Hold complete. Ready to resume.
       	- `Hold:1` Hold in-progress. Reset will throw an alarm.
      	- `Door:0` Door closed. Ready to resume.
      	- `Door:1` Machine stopped. Door still ajar. Can't resume until closed.
      	- `Door:2` Door opened. Hold (or parking retract) in-progress. Reset will throw an alarm.
  		- `Door:3` Door closed and resuming. Restoring from park, if applicable. Reset will throw an alarm.

    - This data field is always present as the first field.

  - **Current Position:**

      - Depending on `$10` status report mask settings, position may be sent as either:

        - `MPos:0.000,-10.000,5.000` machine position or
        - `WPos:-2.500,0.000,11.000` work position

      - **NOTE: Grbl v1.1 sends only one position vector because a GUI can easily compute the other position vector with the work coordinate offset `WCO:` data. See WCO description for details.**

      - Three position values are given in the order of X, Y, and Z. A fourth position value may exist in later versions for the A-axis.

      - `$13` report inches user setting effects these values and is given as either mm or inches.

      - This data field is always present as the second field.

  - **Work Coordinate Offset:**

      - `WCO:0.000,1.551,5.664` is the current work coordinate offset of the g-code parser, which is the sum of the current work coordinate system, G92 offsets, and G43.1 tool length offset.

      - Machine position and work position are related by this simple equation per axis: `WPos = MPos - WCO`

      	- **GUI Developers:** Simply track and retain the last `WCO:` vector and use the above equation to compute the other position vector for your position readouts. If Grbl's status reports show either `WPos` or `MPos`, just follow the equations below. It's as easy as that!
      		- If `WPos:` is given, use `MPos = WPos + WCO`.
      		- If `MPos:` is given, use `WPos = MPos - WCO`.

      - Values are given in the order of the X,Y, and Z axes offsets. A fourth offset value may exist in later versions for the A-axis.
      - `$13` report inches user setting effects these values and is given as either mm or inches.

      - `WCO:` values don't change often during a job once set and only requires intermittent refreshing.

      - This data field appears:

        - In every 10 or 30 (configurable 1-255) status reports, depending on if Grbl is in a motion state or not.
        - Immediately in the next report, if an offset value has changed.
        - In the first report after a reset/power-cycle.

      - This data field will not appear if:

        - It is disabled in the config.h file. No `$` mask setting available.
        - The refresh counter is in-between intermittent reports.

  - **Buffer State:**

      - `Bf:15,128`. The first value is the number of available blocks in the planner buffer and the second is number of available bytes in the serial RX buffer.

      - The usage of this data is generally for debugging an interface, but is known to be used to control some GUI-specific tasks. While this is disabled by default, GUIs should expect this data field to appear, but they may ignore it, if desired.

      	- IMPORTANT: Do not use this buffer data to control streaming. During a stream, the reported buffer will often be out-dated and may be incorrect by the time it has been received by the GUI. Instead, please use the streaming protocols outlined. They use Grbl's responses as a direct way to accurately determine the buffer state.

      - NOTE: The buffer state values changed from showing "in-use" blocks or bytes to "available". This change does not require the GUI knowing how many block/bytes Grbl has been compiled with.

      - This data field appears:

        - In every status report when enabled. It is disabled in the settings mask by default.

      - This data field will not appear if:

        - It is disabled by the `$` status report mask setting or disabled in the config.h file.

  - **Line Number:**

      - `Ln:99999` indicates line 99999 is currently being executed. This differs from the `$G` line `N` value since the parser is usually queued few blocks behind execution.

      - Compile-time option only because of memory requirements. However, if a GUI passes indicator line numbers onto Grbl, it's very useful to determine when Grbl is executing them.

      - This data field will not appear if:

        - It is disabled in the config.h file. No `$` mask setting available.
        - The line number reporting not enabled in config.h. Different option to reporting data field.
        - No line number or `N0` is passed with the g-code block.
        - Grbl is homing, jogging, parking, or performing a system task/motion.
        - There is no motion in the g-code block like a `G4P1` dwell. (May be fixed in later versions.)

  - **Current Feed and Speed:**

      - There are two versions of this data field that Grbl may respond with.

      	- `F:500` contains real-time feed rate data as the value. This appears only when VARIABLE_SPINDLE is disabled in config.h, because spindle speed is not tracked in this mode.
      	- `FS:500,8000` contains real-time feed rate, followed by spindle speed, data as the values. Note the `FS:`, rather than `F:`, data type name indicates spindle speed data is included.

      - The current feed rate value is in mm/min or inches/min, depending on the `$` report inches user setting.
      - The second value is the current spindle speed in RPM

      - These values will often not be the programmed feed rate or spindle speed, because several situations can alter or limit them. For example, overrides directly scale the programmed values to a different running value, while machine settings, acceleration profiles, and even the direction traveled can also limit rates to maximum values allowable.

      - As a operational note, reported rate is typically 30-50 msec behind actual position reported.

      - This data field will always appear, unless it was explicitly disabled in the config.h file.

  - **Input Pin State:**

      - `Pn:XYZPDHRS` indicates which input pins Grbl has detected as 'triggered'.

      - Pin state is evaluated every time a status report is generated. All input pin inversions are appropriately applied to determine 'triggered' states.

      - Each letter of `XYZPDHRS` denotes a particular 'triggered' input pin.

        - `X Y Z` XYZ limit pins, respectively
        - `P` the probe pin.
        - `D H R S` the door, hold, soft-reset, and cycle-start pins, respectively.
        - Example: `Pn:PZ` indicates the probe and z-limit pins are 'triggered'.
        - Note: `A` may be added in later versions for an A-axis limit pin.

      - Assume input pin letters are presented in no particular order.

      - One or more 'triggered' pin letter(s) will always be present with a `Pn:` data field.

      - This data field will not appear if:

        - It is disabled in the config.h file. No `$` mask setting available.
        - No input pins are detected as triggered.

  - **Override Values:**

      - `Ov:100,100,100` indicates current override values in percent of programmed values for feed, rapids, and spindle speed, respectively.

      - Override maximum, minimum, and increment sizes are all configurable within config.h. Assume that a user or OEM will alter these based on customized use-cases. Recommend not hard-coding these values into a GUI, but rather just show the actual override values and generic increment buttons.

      - Override values don't change often during a job once set and only requires intermittent refreshing. This data field appears:

        - After 10 or 20 (configurable 1-255) status reports, depending on is in a motion state or not.
        - If an override value has changed, this data field will appear immediately in the next report. However, if `WCO:` is present, this data field will be delayed one report.
        - In the second report after a reset/power-cycle.

      - This data field will not appear if:

        - It is disabled in the config.h file. No `$` mask setting available.
        - The override refresh counter is in-between intermittent reports.
        - `WCO:` exists in current report during refresh. Automatically set to try again on next report.

  - **Accessory State:**

  	- `A:SFM` indicates the current state of accessory machine components, such as the spindle and coolant.

  	- Due to the new toggle overrides, these machine components may not be running according to the g-code program. This data is provided to ensure the user knows exactly what Grbl is doing at any given time.

  	- Each letter after `A:` denotes a particular state. When it appears, the state is enabled. When it does not appear, the state is disabled.

  		- `S` indicates spindle is enabled in the CW direction. This does not appear with `C`.
  		- `C` indicates spindle is enabled in the CCW direction. This does not appear with `S`.
      	- `F` indicates flood coolant is enabled.
      	- `M` indicates mist coolant is enabled.

     - Assume accessory state letters are presented in no particular order.

    - This data field appears:

  		- When any accessory state is enabled.
      	- Only with the override values field in the same message. Any accessory state change will trigger the accessory state and override values fields to be shown on the next report.

    - This data field will not appear if:

      	- No accessory state is active.
      	- It is disabled in the config.h file. No `$` mask setting available.
      	- If override refresh counter is in-between intermittent reports.
      	- `WCO:` exists in current report during refresh. Automatically set to try again on next report.
Welcome to Our Community
Some features disabled for guests. Register Today.
- Thread Status:
-
Not open for further replies.
-

Builder
- Joined:
- Nov 6, 2017
- Messages:
- 447
- Likes Received:
- 102
I almost finished building my Arco System and started working on electronics. I have CNC xPro V3 board with GRBL V1.1. I use GrblControl software. I didn’t connect anything to the board. I got Error Codes 6 and 9. I found out that Error Code 6 means no homing switches are installed. I don’t know that Error Code 9 means. I didn’t buy any switches. I connected the board to an 24VDC PSU made for CNC routers and 3D printers. How can I fix the Error Code problems?
-
Builder
- Joined:
- Nov 6, 2017
- Messages:
- 447
- Likes Received:
- 102
I can’t enter anything in the textbox because GRBLControl keeps on flashing the error codes every second.
-
Staff Member
Moderator
Builder
Resident Builder- Joined:
- Aug 6, 2013
- Messages:
- 2,600
- Likes Received:
- 1,504
use the Arduino serial console, or UGS to change the settings.
-
Staff Member
Moderator
Builder
Resident Builder- Joined:
- Aug 6, 2013
- Messages:
- 2,600
- Likes Received:
- 1,504
but wait, if you are using ‘grblcontrol’ and GRBL1.1 then it will never work since GRBLcontrol has not been updated to work with GRBL 1.1.
rather use Candle 1.1.7 Releases · Denvi/Candle · GitHub -
Builder
- Joined:
- Nov 6, 2017
- Messages:
- 447
- Likes Received:
- 102
How can I turn off homing and limits?
-
Builder
- Joined:
- Nov 6, 2017
- Messages:
- 447
- Likes Received:
- 102
I found out that GRBL Panel software works. I can jog the machine. I should be getting the switches from Probotix.
-
Builder
- Joined:
- Apr 12, 2018
- Messages:
- 6
- Likes Received:
- 4
I’m having a similar issue — Running a CNC xPRO V3 on an oxcnc build with macOS. It was running fine, but my old mac died, so I replaced it and now I get an endless loop of error:9 whenever I connect to the board. Did alot of reading and tried every possible solution I could find but to no avail. Would appreciate anyone’s suggestions on how to resolve this problem.
Cheers.
-
Staff Member
Moderator
Builder
Resident Builder- Joined:
- Aug 6, 2013
- Messages:
- 2,600
- Likes Received:
- 1,504
error:9 is «G-code locked out during alarm or jog state«.
so why is it in an alarm state?
do you have homing switches? anything changed?
check the GRBL setup carefully.
What GUI are you using? it may have had settings on the old machine that you need to duplicate on the new. -
Builder
- Joined:
- Apr 12, 2018
- Messages:
- 6
- Likes Received:
- 4
I can’t pinpoint why it is an alarm state. Yes, I have homing switches and physically nothing changed other than running it on a new computer. I even tried physically disconnecting the switches to see if I would get a different response but it’s the same.
I did reflash the board to GRBL 1.1f to see if that made any difference but same error and I have gone through the GBRL setup to check that the settings are the same as when it was operating properly.
I was using UGS. I’ve also tried UGS platform and OpenBuilds CONTROL but all report that the board is in an alarm state that I can’t get out of. -
Staff Member
Moderator
Builder
Resident Builder- Joined:
- Mar 1, 2017
- Messages:
- 11,011
- Likes Received:
- 3,490
Dump out your Grbl settings for us to check. Otherwise we can only offer guesswork
Send $$, copy, paste in a reply
Also, copy paste the output of «$N» -
Staff Member
Moderator
Builder
Resident Builder- Joined:
- Aug 6, 2013
- Messages:
- 2,600
- Likes Received:
- 1,504
First
Change the GRBL settings to turn off homing entirely and check that it then comes up without an alarm.
Home will then be wherever you turned it on.Then:
Use the OpenBuildsCONTROL troubleshooting page to check that the switches are working correctly.
Once the switches are confirmed to be working correctly you can reenable homing (but leave soft limits off)
Make sure you set the ‘homing pull off’ to enough to release the switches reliably.
The default is 1mm which is pretty much always too small.Note that the serial console will usually display details about the cause of the alarm.
-
Builder
- Joined:
- Apr 12, 2018
- Messages:
- 6
- Likes Received:
- 4
Ok, so here are my GRBL settings along with most of the message string. I turned off homing but that didn’t seem to resolve the issue, it was still in an alarm state. I was able to check the limit switched using OpenBuildsCONTROL and they are working correctly.
It’s very hard to actually change any of the settings because of the frequency of the alarm/error pop up window.
I’ve posted the result of «$N» at the end.
Thanks.
-
Staff Member
Moderator
Builder
Resident Builder- Joined:
- Aug 6, 2013
- Messages:
- 2,600
- Likes Received:
- 1,504
error 1 and 2 mean:
1 G-code words consist of a letter and a value. Letter was not found.
2 Numeric value format is not valid or missing an expected value.
so I’d say that your PC or controller is not communicating correctly over usb. Tried a different (short) USB cable? -
Builder
- Joined:
- Apr 12, 2018
- Messages:
- 6
- Likes Received:
- 4
Tried a shorter cable, no luck.
Not sure what else to try. -
Staff Member
Moderator
Builder
Resident Builder- Joined:
- Mar 1, 2017
- Messages:
- 11,011
- Likes Received:
- 3,490
1) Run ‘$RST=*’ from the Serial Console tab
2) go to Wizards and Tools — grbl Flash. Reflash your controller.
3) unplug everything to avoid any external faults from putting us on a goose chase, connect just the board, via USB to computer
4) reboot Pc
5) test again -
Staff Member
Moderator
Builder
Resident Builder- Joined:
- Mar 1, 2017
- Messages:
- 11,011
- Likes Received:
- 3,490
Oh and of course all this is OpenBuilds CONTROL (known to work… Get it working here first it miggt be your other software)
-
Builder
- Joined:
- Apr 12, 2018
- Messages:
- 6
- Likes Received:
- 4
Managed to reflash the controller, unplugged everything, rebooted & still got error messages. See below
-
Staff Member
Moderator
Builder
Resident Builder- Joined:
- Mar 1, 2017
- Messages:
- 11,011
- Likes Received:
- 3,490
While it starts up fine, then starts erroring… what are you sending/doing/clicking when the errors start…
At the end, the port closed. Did you hit disconnect, or did the port die on its own…
Still looks like USB comms issues if you didnt send/do anything1) Try a different cable
2) Try a different PC
3) Make sure you have the official FDTI Drivers Virtual COM Port DriversLast suggestion — sure you are on latest version of CONTROL (v1.0.172 at the time of this post) OpenBuilds Software — FREE Software for CNC Control: OpenBuilds CONTROL and OpenBuilds CAM
Might be a clue here too… That new Mac might be the issue… Either drivers, or the ports are broken? Try a different PC (bet its gonna work fine on another PC)
-
Builder
- Joined:
- Apr 12, 2018
- Messages:
- 6
- Likes Received:
- 4
Peter & David, thanks for your time and input — looks like it was the FDTI drivers. You both pointed to a USB communications issue. I had neglected to install the correct drivers on my new computer — I installed them tonight and the board is responding as it should. Haven’t had a chance to cut anything yet but through OpenBuilds CONTROL, I’ve been able to jog and home the machine which I could not do before. Looking forward to doing some cutting tomorrow. Thanks again!
-
Builder
- Joined:
- May 25, 2020
- Messages:
- 38
- Likes Received:
- 4
Hey Jeff, I am getting the same error 6 and then 9….. What did you do to remedy the error codes…. Thanks!
-
Staff Member
Moderator
Builder
Resident Builder- Joined:
- Mar 1, 2017
- Messages:
- 11,011
- Likes Received:
- 3,490
Read gnea/grbl — all errors and alarms
But you need to know what ALARM (note difference between errors and alarm) put it in locked mode first
Please don’t split off from your existing thread about the same issue Error 9 carving Paradise Box — just makes it harder to keep track of the troubleshooting steps. In that thread the same applies. Each error 9 has a very clear history leading up to it. Please go back to that thread and provide the requested information so we can tell you what the root cause is


- Thread Status:
-
Not open for further replies.