Содержание
- A1 4111 samsung error
- Samsung C1860 Laser Printer Error A1-4111 Repair
- Introduction: Samsung C1860 Laser Printer Error A1-4111 Repair
- Supplies
- Step 1: Remove the Right Side Panel
- Step 2: Solenoid Fix
- Step 3: Test and Reassemble
- Be the First to Share
- Recommendations
- Clocks Contest
- Organization Challenge
- Crafts For Kids Challenge
- 35 Comments
- Samsung laser multifunction fixed. Error A1-4111
- Pommie
- throbscottle
- asinella
- Pommie
- asinella
- Kevin S
- TechDoc
- Pommie
- throbscottle
- Teidra78
- Samsung laser multifunction fixed. Error A1-4111
- skylt
- LAKERMN
- Attachments
- LAKERMN
- rjenkinsgb
- Samsung laser multifunction fixed. Error A1-4111
- Pommie
- winsotnwx
- The Plaid Cow
- pfinchpf
- egmn888
- Novitchka888
- Attachments
- tnorman2
A1 4111 samsung error
КОНФЕРЕНЦИЯ СТАРТКОПИ
Принтеры, копировальные аппараты, МФУ, факсы и другая офисная техника:
вопросы ремонта, обслуживания, заправки, выбора
Добрый день! У меня samsung clx-4195fw была такая ошибка a1-4111 и a1-4112 долго ломал голову думал сам сломал или из-за того что полез смазывать или прошивка но нет! решил вопрос! это недоработка завода! прочитав на форумах с переводчиком! РЕШЕНИЕ: 1) снимаете крышку правую боковую если стоять лицом к принтеру 2) с лева вверху есть электро-магнитик он притягивает железную площадку. на электро-магните и на железной площадке есть приклеенная резинка толщиной в миллиметр примерно 3) вам нужна резинка на подвижной железной площадке ее нужно снять и приклеить на 1 миллиметр потолще не 1 а 2 мм я взял самоклеещуюся резинку 2 миллиметра в леруа мерлен для ножек мебельных! весь смысл в том что электро-магнитику не хватает мощности дотянуться до площадки. после всей прцедуры площадка становится на миллиметр ближе к электро-магниту! сейчас мфу работает пез проблем! всем спасибо!
Но ить.
марлен (0): 1) снимаете крышку правую боковую если стоять лицом к принтеру 2) с лева вверху есть электро-магнитик он притягивает железную площадку
То что снимать правую боковую крышку, а электро-магнитик слева вверху этоть ладноть. Но кто может догадаться снимать крышку стоя спиной к принтеру, и главное как он это сделает. вот это в моей голове никак не укладывается.
:)))
я весь инет облазил а решение только одно нашел с транслейтером на инглише вы думаете я понял че надо делать и че менять после хорошо руки из тела! а мое решение для того же инета при поиске гуглом чтоб нашли! представь щас какой нибудь китайца с отверткой или араб. я думаю эта проблема не только моего мфу у самсы все принтеры и мфу однотипные меняется только маркировка это маркетинговая уловка и внутренности тоже однотипные а ведь многие из-за этой беды побежали менять моторы так ошибка звучит! возможно это решение спасет кошельки лохозавров!
(3) Все правильно сделал. Только мысли четче формулируй. Пусть и с телефона пишешь, но ведь для всех пишешь, а не одному знакомому. Удели чуть больше времени и стилю и орфографии. Хотя бы запятые не поленись проставить. А то тяжело читать. Особенно малопосвященым в дела ремонта (на которых ты и ориентируешь свой текст) Те кто в теме, эту самсунгово-хероксную фишку с залипанием «резинки» на электромагнитах давно знают. Еще с более младших моделей. Они то поймут о чем речь. А вот малоопытные твое изложение не поймут.
марлен (3): у самсы все принтеры и мфу однотипные меняется только маркировка
Бред.
марлен (3): многие из-за этой беды побежали менять моторы
И пусть бегут: если головы нет, пусть работают ногами.
марлен (3): возможно это решение спасет кошельки лохозавров
А вы у них спросили — им это надо?
СОВА (4): А то тяжело читать
Да практически невозможно. Слова все знакомые, а мысль ловится с трудом.
(5) Да ладно уж. Чего так строго? 🙂 Человек из лучших побуждений.
Хотя. жизнь достаточно жестока. Раньше или позже к этому все равно придется привыкнуть.
Источник
Samsung C1860 Laser Printer Error A1-4111 Repair

Introduction: Samsung C1860 Laser Printer Error A1-4111 Repair


UPDATE: October 2022, the pad slipped again, it was working fine for 3 years. I put a spot of Gorilla urethane glue under the pad (since it is much less sticky now) and it is good to go again. Cheers!
Your Samsung Laser Printer is beeping and spitting out Error #A1-4111 on the display screen.
I had to do quite a bit of searching to find the simple fix here: http://jimlund.org/blog/?p=747 for a different printer model. The fix worked but I thought an Instructable with pictures would be helpful.
Supplies
Step 1: Remove the Right Side Panel
1. Before starting, turn off the power with the power switch next to the power cord then disconnect the power cord.
2. Remove any data cables since you will be spinning it all around.
3. On my printer (other models may vary) there are 5 screws that need to be removed first:
Facing the front, open the large lower front cover and remove the three screws on the front right
Turn to the back and open the back cover. Remove the two screws on the left. Notice any screws that are different and remember their position.
4. Slide the right side cover towards the back. It should come away easily. Set it aside.
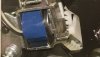
Step 2: Solenoid Fix
This problem is with the small blue solenoid in the upper left corner. A pad slips or falls off and the printer gets unhappy.
Remove the retaining screw and pull it out a bit to work on.
If yours is missing, look around for it. If it or the stickiness is gone, a few layers of masking tape cut in a small square can fix it.
In my case the small foam pad had just slipped. So I could just lift it with an X-acto knife carefully and reposition it then make sure it was stuck well right under the tab.
Step 3: Test and Reassemble
Reinstall the solenoid.
If you promise not to touch any open electronics, plug in the power cord and see if the error now goes away. Watch the motors and solenoid to see that they spin and click on power up sequencing.
Take out the powercord so you can put the side panel back on. A stack of post-its underneath to tilt it up makes it easier to engage all of the tabs on the side panel.
Reverse the steps of disassembly. Be sure to put the different screw in the correct hole. The tiny screw goes in the lower position in the back on my model printer.
Plug in and enjoy.
Did you make this project? Share it with us!
Recommendations


Clocks Contest

Organization Challenge

Crafts For Kids Challenge


Gosh, took 2 seconds for google to find this page. Amazing how simple it can be to fix something that would have taken a trip to the computer store and/or a new purchase a few years ago. THANKS!
Top tip — worked first time!

Got a C1810W from work a few years ago. Love it. Just started throwing this error. This fix worked like a charm. Thanks so much! Just pulled the pad over with some tweezers and good as new.


You’re a Rockstar and life saver. Something so small causing so much headache!

Just used your information. My Samsung Xpress C1860FW is happy and functioning again. Outstanding work! Thank you for taking the time to create the content.
I just watched a YouTuber Adamant IT (87) Samsung Xpress Actuator Motor Failure — LFC#259 — YouTube use your Instructable to fix this problem on the same exact machine for a customer. He ask everyone to give you a shout out. So here it is great Job.


You Sir, are a King among men. I cannot thank you enough for this mate.
Sincerely,
Marc.

Instructions worked perfectly for my Samsung C1810W. Amazing that such a tiny foam pad being slightly out of alignment can cause such problems! Afterwards, it had to re-calibrate, but once that was done, it was back to normal again.


Just signed up to this site to say thank you.
One more happy printer user here.
For reference I have a C1810W device which is up and running again thanks to you.

Worked first time, thankyou!
You are a superstar, one printer saved from the bin and hundreds of pounds saved, repair cost total £0.00 .
Thanks

robibby1 back again with another thank u to blipvert .. it happened again, fixed again .. I put a small dot of glue on the pad this time, hoping it stops slipping
You have made my day man! I was cringing at the thought of an overpriced, dishonest repair person coming out to the house and charging me hundreds of dollars to fix this problem. I bought this Samsung Xpress C1860FW approximately 7 years ago and have never had an issue with it until now, I love this machine and don’t want to replace it until I absolutely have to. I bought it for $250 and was thinking that would be what it would have cost to fix it and that I was going to have a choice to make until I found your most helpful and sooooo easy to do intractable. Your fix worked like a champ and I couldn’t be happier. Repair cost: $0.00, thank you!
Источник
Samsung laser multifunction fixed. Error A1-4111
Pommie
Well-Known Member
I’ve posted this here so a google search might help future owners with this problem
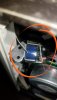
I have a Samsung C1860FW multifunction colour laser and yesterday it errored with error A1-4111 — Actuator Motor Failure.
Check manual and removed the right hand cover ( to remove unscrew 4 screw, two at the back and two at the front and slide it backwards — the manual just says «Remove right cover». ). Found this,

I identified the broken bit from an internet post that indicated it was the blue relay type thing in the top left corner. I found that if I «helped» this relay during the switch on sequence the error went away.
I then noticed the foam pads on the relay, one on the coil and one on the actuator arm.
And Voila, all fixed.
Hoping this will help someone else in the future.

throbscottle
Well-Known Member
asinella
New Member
Pommie
Well-Known Member
I’ve circled it above. If you compare that to the above «before» photo you will see the difference.
asinella
New Member
Kevin S
New Member
TechDoc
New Member
Pommie
Well-Known Member
Just glad that it has helped a few people. It’s obviously a design flaw that they’ll hopefully fix.
throbscottle
Well-Known Member
Teidra78
New Member
I’ve posted this here so a google search might help future owners with this problem
I have a Samsung C1860FW multifunction colour laser and yesterday it errored with error A1-4111 — Actuator Motor Failure.
Check manual and removed the right hand cover ( to remove unscrew 4 screw, two at the back and two at the front and slide it backwards — the manual just says «Remove right cover». ). Found this,
View attachment 109840
I identified the broken bit from an internet post that indicated it was the blue relay type thing in the top left corner. I found that if I «helped» this relay during the switch on sequence the error went away.
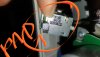
I then noticed the foam pads on the relay, one on the coil and one on the actuator arm.
View attachment 109841
Notice that the one on the top of the actuator is not under the stop. These appear to be small self adhesive pads that can slide around and mine had sliden away from the stop.
A little shoving with a screw driver moved it back where it belonged under the stop.
View attachment 109842
And Voila, all fixed.
Hoping this will help someone else in the future.
Источник
Samsung laser multifunction fixed. Error A1-4111
skylt
New Member
LAKERMN
New Member
Attachments
LAKERMN
New Member

rjenkinsgb
Well-Known Member
To me it looks like the rear pad has drifted «upwards», you can see an area of metal between it and the edge of the armature, which should not be there.
(Behind the bent up part)
Look at the relay picture close-ups on the first page; that pad only has to be a fraction away from the edge (bottom in your photo) for it to slide past the retainer when the relay is released.
Samsung laser multifunction fixed. Error A1-4111
Pommie
Well-Known Member
That relay looks to be activated — the foam underneath is squashed. Is the upper most foam in line with the end of the plate?
winsotnwx
New Member
The Plaid Cow
New Member
pfinchpf
New Member
egmn888
New Member
Novitchka888
New Member
Hello Mike & all —
Thank you for your help with this error message — the instructions were so helpful and, for now, seem to have solved the problem as it has for so many others.
My printer is the Samsung Xpress C1860FW and I got the error message: error #A1-4111
Wanted to share my own experience in case it helps others — I did the steps Mike described for the error message. Then after I turned everything on again, I got a second error message #A1-4112.
Googling led me to this youtube video which is addressing error message #A1-4112, but for a slightly different printer — Samsung CLX-6260
The interior of that printer seems similar to the Samsung Xpress C1860FW — and the helpful person who made the video points out the process of removing the solenoid unit and putting a thicker pad onto the connector lever.
In my case, I took the solenoid unit out and rotated the existing pad because one part of it was worn out but the other surrounding part was thicker.
For now it is working again.
Thank you everyone for sharing your experience.
Attachments

tnorman2
New Member
WOW — it’s fixed. As so many have already said. Thank you! Thank you! Thank you!
Had no idea what was wrong with this Error A1-4111 — amazing how such an advanced machine could be rendered useless by such a non-technical issue as a cheap foam spacer. While Samsung certainly made one of the most advanced printers ever, I’m very disappointed that they could not provide this simple fix to their customers. This printer is absolutely perfect when it works — especially when it comes to the wireless technology and user-friendly printer software — Samsung is the best!
We purchased it in 2017 but rarely used so is still practically brand new and only went bad recently 3-years later. Looking at the date of this post appears this problem started right away when the printer was first released which means it was a design flaw from the start as one of the commenters suggests and Samsung ignored the problem probably trying to avoid warranty claims hoping they fail after the warranty expired like most did.
One problem we had was just getting to the screws to get the cover off. So downloaded the Service Manual which is nice to have: Section 3.3.5 Transfer Roller Assy «Remove back cover» p.3-10 https://www.manualslib.com/download/1196296/Samsung-Sl-C1860fw.html
The back cover clips into the grove on the lower left side which takes A LOT of force to get out — almost feels like the little plastic hinge is going to break if you do it wrong like so many of these cheap plastic things do so be careful. Appears they embedded groves on the edge of the cover at the finger points to hold while pulling and applying pressure. Eventually it does «snap» out of place.
Once open, the little foam pad was so old it was completely dried up and so deteriorated it wasn’t touching anything and what was left fell off when touched with screwdriver. So unscrewed the little screw holding the solenoid in place to get it out far enough to inspect and then carefully scraped off the sticky leftover residue with finger nail and replaced with a new pad custom cut to size out of some thin weather strip we had leftover in garage. You could also use tape if thick enough (next best thing would be some kind of duct tape or electrical tape a few layers thick) as one of the other commenters used but we happen to have the same kind of foam with same thickness to make a new pad. Careful the actuator is still connected with one wire to front and obviously the machine should be unplugged before starting any of this disassembly.
Also as the above commenter says, just taking the solenoid unit out and rotating might also help clear the problem by resetting it. You can plug it in with the right cover off as long as you replace the back cover and watch how it spins which we tried at first but got same error so replacing the pad seems to fix the problem for most.
After putting it back together, it’s working like new again.
Источник
-
07-01-2020
#1
Samsung Xpress C1810W error #A1-4111
Hi Guys, hope your all doing as good as possible with the Covid-19 fiasco.
one site said that it was a sticking solenoid in the upper left corner inside the right side cover
.
well, i removed and fixed that one. same thing.
then i found the fuser pressure release drive solenoid was also sticking, and wasn’t turning that shaft.
i removed that solenoid and clutch. cleaned the clutch and shimmed the solenoid.that seems to be working, but the error is still there.
another source, manualslib service manual said it was an issue with the transfer roller engagement not working, and to check contacts from main drive unit to main board. otherwise suspect both of those.
the 2nd TR roller on the back door doesn’t appear to index, so it must be in the ITB belt unit.
that i couldn’t get out, without forcing it.i did remove the waste toner container, and i do see the metal bar on the rear frame that needs to be removed to get it out, but i cant even get it to budge. i had the drum drawer pulled, as well as the paper cassette.
does anyone have any advice or input on this issue??
thank you very much, and i hope you all have a safe 4th of July.
Jim
-
07-02-2020
#2
Re: Samsung Xpress C1810W error #A1-4111
ok, i found so far the ITB removal process, darn thing.
still looking to see what the solenoid does that i repaired since it didn’t fix it, and i told customer it had been obviously fixed before, and he told me, he did it.
that’s always the first red flag…
Jim
-
07-02-2020
#3
Re: Samsung Xpress C1810W error #A1-4111
Hi Guys,
i studied the parts book. i only see one solenoid on the main drive unit.
but there is another shown in the right frame.does anyone know if this unit uses a solenoid to cycle/ index the ITB transfer belt transfer rollers?
-
07-02-2020
#4
Re: Samsung Xpress C1810W error #A1-4111
so, the darn thing.
i got the ITB out. couldn’t find any other solenoids anywhere without removing the main drive unit.but i did find that the ITB has a shaft that rotates to raise or lower the transfer rollers. and for the life of me, i cant find anything that drives that gear on the shaft. and i can’t see anything inside the belt that would power it. nor, could i find any sensor that would look for the wheel notch on the opposite side as the drive gear.
i tried it in the other position thinking that it ships new in the retracted position, and rotates from the belt movement?? but it didn’t for me doing it manually.screwy. and of course i re seated all the P/Js to the main board, oh, except the ribbon cables.
and at $160 for the drive unit, it don’t seem to make sence. the solenoid on the drive unit is spared separately, but i got it working by removing the offending rubber pad.
have a nice evening.
Introduction: Samsung C1860 Laser Printer Error A1-4111 Repair
UPDATE: October 2022, the pad slipped again, it was working fine for 3 years. I put a spot of Gorilla urethane glue under the pad (since it is much less sticky now) and it is good to go again. Cheers!
Uh Oh!
Your Samsung Laser Printer is beeping and spitting out Error #A1-4111 on the display screen.
I had to do quite a bit of searching to find the simple fix here: http://jimlund.org/blog/?p=747 for a different printer model. The fix worked but I thought an Instructable with pictures would be helpful.
Supplies
Phillips screwdriver
Step 1: Remove the Right Side Panel
1. Before starting, turn off the power with the power switch next to the power cord then disconnect the power cord.
2. Remove any data cables since you will be spinning it all around.
3. On my printer (other models may vary) there are 5 screws that need to be removed first:
Facing the front, open the large lower front cover and remove the three screws on the front right
Turn to the back and open the back cover. Remove the two screws on the left. Notice any screws that are different and remember their position.
4. Slide the right side cover towards the back. It should come away easily. Set it aside.
Step 2: Solenoid Fix
This problem is with the small blue solenoid in the upper left corner. A pad slips or falls off and the printer gets unhappy.
Remove the retaining screw and pull it out a bit to work on.
If yours is missing, look around for it. If it or the stickiness is gone, a few layers of masking tape cut in a small square can fix it.
In my case the small foam pad had just slipped. So I could just lift it with an X-acto knife carefully and reposition it then make sure it was stuck well right under the tab.
Step 3: Test and Reassemble
Reinstall the solenoid.
If you promise not to touch any open electronics, plug in the power cord and see if the error now goes away. Watch the motors and solenoid to see that they spin and click on power up sequencing.
Take out the powercord so you can put the side panel back on. A stack of post-its underneath to tilt it up makes it easier to engage all of the tabs on the side panel.
Reverse the steps of disassembly. Be sure to put the different screw in the correct hole. The tiny screw goes in the lower position in the back on my model printer.
Plug in and enjoy.
Be the First to Share
Recommendations
Skip to main content
![]()
![]()
Welcome to our site!
Electro Tech is an online community (with over 170,000 members) who enjoy talking about and building electronic circuits, projects and gadgets. To participate you need to register. Registration is free. Click here to register now.
-
Welcome to our site! Electro Tech is an online community (with over 170,000 members) who enjoy talking about and building electronic circuits, projects and gadgets. To participate you need to register. Registration is free. Click here to register now.
-
Electronic Requests
-
Repairing Electronics
You should upgrade or use an alternative browser.
Samsung laser multifunction fixed. Error A1-4111
-
Thread starterPommie
-
Start dateDec 28, 2017
- Status
- Not open for further replies.
-
#81
-
#82
Attachments
-
 Samsung Printer Pad 2.jpg
-
#83
I think I may be the only one, but mine still isn’t working
Pad was firmly in place but used a little extra tape but it seems its like white cog jamming inside?
Did you ever get yours working?

-
#84
I got it apart, and my pad seems to look fine… Any clues with this pic?
To me it looks like the rear pad has drifted «upwards», you can see an area of metal between it and the edge of the armature, which should not be there.
(Behind the bent up part)
Look at the relay picture close-ups on the first page; that pad only has to be a fraction away from the edge (bottom in your photo) for it to slide past the retainer when the relay is released.
Samsung laser multifunction fixed. Error A1-4111
www.electro-tech-online.com
I’d move it down so it’s at or slightly over the edge again.
-
#85
Mike.
-
#86
-
#87
-
#88
-
#89
-
#90
Thank you for your help with this error message — the instructions were so helpful and, for now, seem to have solved the problem as it has for so many others.
My printer is the Samsung Xpress C1860FW and I got the error message: error #A1-4111
Wanted to share my own experience in case it helps others — I did the steps Mike described for the error message. Then after I turned everything on again, I got a second error message #A1-4112.
Googling led me to this youtube video which is addressing error message #A1-4112, but for a slightly different printer — Samsung CLX-6260
The interior of that printer seems similar to the Samsung Xpress C1860FW — and the helpful person who made the video points out the process of removing the solenoid unit and putting a thicker pad onto the connector lever.
In my case, I took the solenoid unit out and rotated the existing pad because one part of it was worn out but the other surrounding part was thicker.
For now it is working again.
Thank you everyone for sharing your experience.
Attachments
-
#91
Had no idea what was wrong with this Error A1-4111 — amazing how such an advanced machine could be rendered useless by such a non-technical issue as a cheap foam spacer. While Samsung certainly made one of the most advanced printers ever, I’m very disappointed that they could not provide this simple fix to their customers. This printer is absolutely perfect when it works — especially when it comes to the wireless technology and user-friendly printer software — Samsung is the best!
We purchased it in 2017 but rarely used so is still practically brand new and only went bad recently 3-years later. Looking at the date of this post appears this problem started right away when the printer was first released which means it was a design flaw from the start as one of the commenters suggests and Samsung ignored the problem probably trying to avoid warranty claims hoping they fail after the warranty expired like most did.
One problem we had was just getting to the screws to get the cover off. So downloaded the Service Manual which is nice to have: Section 3.3.5 Transfer Roller Assy «Remove back cover» p.3-10 https://www.manualslib.com/download/1196296/Samsung-Sl-C1860fw.html
The back cover clips into the grove on the lower left side which takes A LOT of force to get out — almost feels like the little plastic hinge is going to break if you do it wrong like so many of these cheap plastic things do so be careful. Appears they embedded groves on the edge of the cover at the finger points to hold while pulling and applying pressure. Eventually it does «snap» out of place.
Once open, the little foam pad was so old it was completely dried up and so deteriorated it wasn’t touching anything and what was left fell off when touched with screwdriver. So unscrewed the little screw holding the solenoid in place to get it out far enough to inspect and then carefully scraped off the sticky leftover residue with finger nail and replaced with a new pad custom cut to size out of some thin weather strip we had leftover in garage. You could also use tape if thick enough (next best thing would be some kind of duct tape or electrical tape a few layers thick) as one of the other commenters used but we happen to have the same kind of foam with same thickness to make a new pad. Careful the actuator is still connected with one wire to front and obviously the machine should be unplugged before starting any of this disassembly.
Also as the above commenter says, just taking the solenoid unit out and rotating might also help clear the problem by resetting it. You can plug it in with the right cover off as long as you replace the back cover and watch how it spins which we tried at first but got same error so replacing the pad seems to fix the problem for most.
After putting it back together, it’s working like new again!!!
P.S. see page 2-18 of the Service Manual — LSU (Laser Scanner Unit) for a short mind-blowing explanation about how this printer actually works. Whoever invented that technology must have been from another Planet apparently relying on some sub-standard parts like this cheap actuator to make it all work. You certainly won’t be fixing a LSU error with any duct tape!
Attachments
-
#92
this little tip fixed the #A1-4111 issue and its now back on duty!
-
#93
Mike.
-
#94
I’ve posted this here so a google search might help future owners with this problemI have a Samsung C1860FW multifunction colour laser and yesterday it errored with error A1-4111 — Actuator Motor Failure.
Check manual and removed the right hand cover ( to remove unscrew 4 screw, two at the back and two at the front and slide it backwards — the manual just says «Remove right cover»!!!). Found this,
View attachment 109840I identified the broken bit from an internet post that indicated it was the blue relay type thing in the top left corner. I found that if I «helped» this relay during the switch on sequence the error went away.
I then noticed the foam pads on the relay, one on the coil and one on the actuator arm.
View attachment 109841
Notice that the one on the top of the actuator is not under the stop. These appear to be small self adhesive pads that can slide around and mine had sliden away from the stop.
A little shoving with a screw driver moved it back where it belonged under the stop.
View attachment 109842And Voila, all fixed.
Hoping this will help someone else in the future.
Mike.
-
#95
-
#96
Sharing an update on this, while the «quick fix» of rotating the solenoid pad helped for a while (Did this mid-March, now it is mid-August) — 4-5 months later I’m still intermittently getting the error message again so am going to try substituting the original pad for something like the weather stripping material that @tnorman2
Its frustrating to have to go back in and do this, but I still have several toner cartridges for this printer. The image quality is great, when it works!
Hello Mike & all —Thank you for your help with this error message — the instructions were so helpful and, for now, seem to have solved the problem as it has for so many others.
My printer is the Samsung Xpress C1860FW and I got the error message: error #A1-4111
Wanted to share my own experience in case it helps others — I did the steps Mike described for the error message. Then after I turned everything on again, I got a second error message #A1-4112.Googling led me to this youtube video which is addressing error message #A1-4112, but for a slightly different printer — Samsung CLX-6260
The interior of that printer seems similar to the Samsung Xpress C1860FW — and the helpful person who made the video points out the process of removing the solenoid unit and putting a thicker pad onto the connector lever.
In my case, I took the solenoid unit out and rotated the existing pad because one part of it was worn out but the other surrounding part was thicker.
For now it is working again.
Thank you everyone for sharing your experience.
-
#97
How about silicone with a PSA adhesive applied?
-
#98
greetings
Manuela
- Status
- Not open for further replies.
Similar threads
-
Electronic Requests
-
Repairing Electronics
-
This site uses cookies to help personalise content, tailor your experience and to keep you logged in if you register.
By continuing to use this site, you are consenting to our use of cookies.
- Sign up
- Sign in
- HP Community
- Printers
- Samsung
- error code A1-4111 call service
Options
- Mark Topic as New
- Mark Topic as Read
- Float this Topic for Current User
- Bookmark
- Subscribe
- Mute
- Printer Friendly Page
![]()

Create an account on the HP Community to personalize your profile and ask a question
Your account also allows you to connect with HP support faster, access a personal dashboard to manage all of your devices in one place, view warranty information, case status and more.

08-23-2020
04:31 AM

HP Recommended
- Mark as New
- Bookmark
- Subscribe
- Permalink
- Flag Post
Product: Samsung Xpress C1810W
Operating System: Microsoft Windows 7 (64-bit)
got error code A1-4111 call service and printer stopped warming up. error is permanent
1 REPLY 1
08-24-2020
01:19 PM
HP Recommended
- Mark as New
- Bookmark
- Subscribe
- Permalink
- Flag Post
This error indicates an issue with the transfer roller movement. If error does not clear by restarting then disassembly is required to further diagnose, first step of which is to make sure that the connector between the main drive and the feed drive unit is correct and if it is then the step motor on the feed unit may be bad. If replacing the feed motor does not resolve the issue then the main board needs to be replaced.
If you find the information provided useful or solves your problems, help other users find the solution easier by giving kudos and marking my post as an accepted solution.
I am a volunteer, offering my knowledge to support fellow users, I do not work for HP nor speak for HP.


Was this reply helpful?
Yes
No
![]()
Be alert for scammers posting fake support phone numbers and/or email addresses on the community.
If you think you have received a fake HP Support message, please report it to us by clicking on «Flag Post».
† The opinions expressed above are the personal opinions of the authors, not of HP. By using this site, you accept the Terms of Use and Rules of Participation.

-
English
Open Menu

† The opinions expressed above are the personal opinions of the authors, not of HP. By using this site, you accept the <a href=»https://www8.hp.com/us/en/terms-of-use.html» class=»udrlinesmall»>Terms of Use</a> and <a href=»/t5/custom/page/page-id/hp.rulespage» class=»udrlinesmall»> Rules of Participation</a>.