- Remove From My Forums
-
Question
-
It seems that other than the ‘dir’ command, every command I run from my dos prompt, I get an «Access is denied.» message. Example:
C:Usersaagha>ipconfig
Access is denied.
I’ve checked my UAC settings and made sure they’re set to «Never Notify».
I’ve also tried to run sfc.exe, but can’t:
C:Usersaagha>sfc.exe
Access is denied.Finally, I’ve tried to run cmd.exe as administrator, but no luck.
The one thing I’ve noticed is that if I go to cmd.exe’s Properties and then the Security tab, I see that TrustedInstaller has Full control, but SYSTEM, Administrators and Users have only:
- Read & execute and
- Read
I’ve tried to change permissions by editing, but when I do so, I get an «Access is denied» message.
I’ve run out of ideas on what else to try and would appreciate the help.
-
Edited by
Sunday, April 21, 2013 6:37 AM
Answers
-
SOLVED!
The problem was that I had the Personal firewall from Comodo installed. By uninstalling this, all normal DOS functionality seems to have returned!
-
Marked as answer by
tracycai
Thursday, April 25, 2013 7:20 AM
-
Marked as answer by
-
Right click c:windowssystem32 folder or
c:windowssystem32ipconfig.exe and
click Properties. Click on the security tab and check for the permission for Users. Make sure that the Read&execute is allowed.
Tracy Cai
TechNet Community Support
-
Marked as answer by
tracycai
Monday, April 15, 2013 9:15 AM
-
Marked as answer by
-
If above steps by Tracy works, you can right click on C: ( the partition having OS) add your account and replace permissions to all the child objects.
Arnav Sharma | Facebook |
Twitter Please remember to click “Mark as Answer” on the post that helps you, and to click “Unmark as Answer” if a marked post does not actually answer your question. This can be beneficial to other community members
reading the thread.-
Marked as answer by
tracycai
Monday, April 15, 2013 9:15 AM
-
Marked as answer by
-
Hi Tracy — Sorry for not getting back to you sooner, I was travelling on business.
I did as you suggested. Clicked on the C:windowssystem32 folder and went to Properties and clicked on the security tab. The following Group or user names are listed:
- CREATOR OWNER
- SYSTEM
- Administrators (SunTzuAdministrators)
- Users (SunTzuUsers)
- TrustedInstaller
For each of these, here’s what’s marked as Permissions:
- CREATOR OWNER: Special permissions
- SYSTEM: Special permissions
- Administrators (SunTzuAdministrators): Special permissions
- Users (SunTzuUsers): Read & execute, List folder contents, Read
- TrustedInstaller: List folder contents, Special permissions
If I do the same and look at ipconfig.exe in the same folder, here’s the users that are there:
- SYSTEM
- Administrators (SunTzuAdministrators)
- Users (SunTzuUsers)
- TrustedInstaller
Their permissions for this one file are as follows:
- SYSTEM: Read & execute, Read
- Administrators (SunTzuAdministrators): Read & execute, Read
- Users (SunTzuUsers): Read & execute, Read
- TrustedInstaller: Full control, Modify, Read & execute, Read, Write
I tried to go to a dos prompt and try ipconfig again, and this is what I got:
C:Usersaagha>ipconfig.exe
Access is denied.Here’s running the «path» command. C:windowssystem32 is indeed there:
C:Usersaagha>path
PATH=C:Program FilesCommon FilesMicrosoft SharedWindows Live;C:Windowssyst
em32;C:Windows;C:WindowsSystem32Wbem;C:WindowsSystem32WindowsPowerShellv
1.0;C:Program FilesThinkPadBluetooth Software;C:Program FilesThinkPadBlu
etooth Softwaresyswow64;C:Program Files (x86)Common FilesLenovo;C:Program F
iles (x86)Common FilesUlead SystemsMPEG;C:Program Files (x86)LenovoAccess
Connections;C:Program FilesCommon FilesLenovo;C:Program Files (x86)Lenovo
Client Security Solution;C:Program FilesLenovoClient Security Solution;C:Pro
gram FilesjEdit;C:Program Files (x86)RSA SecurID Token Common;C:SWTOOLSRead
yApps;C:Program Files (x86)QuickTimeQTSystem;C:Program FilesCommon FilesM
icrosoft SharedWindows Live;C:Program FilesCommon FilesMicrosoft SharedWind
ows Live;C:Windowssystem32;C:Windows;C:WindowsSystem32Wbem;C:WindowsSyst
em32WindowsPowerShellv1.0;C:Program FilesThinkPadBluetooth Software;C:Pr
ogram FilesThinkPadBluetooth Softwaresyswow64;C:Program Files (x86)Common F
ilesLenovo;C:Program Files (x86)Common FilesUlead SystemsMPEG;C:Program Fi
les (x86)LenovoAccess Connections;C:Program FilesCommon FilesLenovo;C:Pro
gram Files (x86)LenovoClient Security Solution;C:Program FilesLenovoClient
Security Solution;C:Program FilesjEdit;C:Program Files (x86)RSA SecurID Toke
n Common;C:SWTOOLSReadyApps;C:Program Files (x86)QuickTimeQTSystem;%JAVA_H
OME%bin;%ANT_HOME%bin;C:cygwinbin-
Marked as answer by
aagha
Saturday, April 20, 2013 5:31 PM

a.txt and b.txt are text files and in_red.exe is a program that takes in input as characters and outputs characters till EOF is reached.I am the admin of the system.
Also,windows gives a popup saying this app isin’t available in your PC.
    C:UsersAryamaan JainDesktopio_redir>dir /b
    a.txt
    b.txt
    in_red.exe

    C:UsersAryamaan JainDesktopio_redir>in_red.exe < a.txt >b.txt
    Access is denied.
asked Oct 16, 2016 at 5:46
![]()
aj14aj14
1931 gold badge2 silver badges10 bronze badges
2
After a long search,I found out that the program in_red.exe got corrupted(became of size 0kb) for some reason I don’t know. However, I replaced the program and now the command is working perfectly.
answered Oct 16, 2016 at 13:44
![]()
aj14aj14
1931 gold badge2 silver badges10 bronze badges
Access is denied as you are not the owner of the folder where you are trying to execute the command. To get ownership of the folder please follow the following steps:
- Right click folder
- Select «Properties»
- Select the «Security» tab
- Click the «Advanced» button
- Select the «Owner» tab
- Click the «Edit» button
- Under ‘Change owner to’ highlight the user you wish to set as owner
- Check the ‘Replace owner on subcontainers and objects’ box
- Click the ‘Apply’ button
answered Oct 1, 2019 at 16:06
![]()
Look at the following issues
-
You have a personal firewall installed. Try uninstalling it.
-
You have not logged in as an administrator, try to login as an administrator.
-
You can also check by right clicking
c:windowssystem32folder orc:windowssystem32ipconfig.exeand selecting Properties. Click on the security tab and check for the permission for users. Make sure that the Read & Execute permission is on. -
If the above steps don’t work, you can right click on
C:(the OS partition), add your account and replace permissions of all the child objects.
![]()
answered Oct 16, 2016 at 5:55
![]()
Akshay TilekarAkshay Tilekar
1,8302 gold badges10 silver badges22 bronze badges
5
Run it as administrator to prevent Google showing a snap error:
REG ADD “HKLMSoftwarePoliciesGoogleChrome” /v RendererCodeIntegrityEnabled /t REG_DWORD /d 0
![]()
Elletlar
3,1067 gold badges30 silver badges38 bronze badges
answered Nov 10, 2020 at 4:11
![]()
Gain the right privileges in order to access the data you want
by Milan Stanojevic
Milan has been enthusiastic about technology ever since his childhood days, and this led him to take interest in all PC-related technologies. He’s a PC enthusiast and he… read more
Published on October 7, 2022
Reviewed by
Vlad Turiceanu

Passionate about technology, Windows, and everything that has a power button, he spent most of his time developing new skills and learning more about the tech world. Coming… read more
- Any message stating that Access is denied can’t be good. If you stumble across it while using your Windows 10 running device, it’s actually worse.
- Since this can interfere with your work by not allowing you to access certain directories or apps, here’s a complete list of tested solutions to fix it.
- Adding your account to the Administrators group might help, so don’t hesitate to apply the below steps.

XINSTALL BY CLICKING THE DOWNLOAD FILE
This software will repair common computer errors, protect you from file loss, malware, hardware failure and optimize your PC for maximum performance. Fix PC issues and remove viruses now in 3 easy steps:
- Download Restoro PC Repair Tool that comes with Patented Technologies (patent available here).
- Click Start Scan to find Windows issues that could be causing PC problems.
- Click Repair All to fix issues affecting your computer’s security and performance
- Restoro has been downloaded by 0 readers this month.
Access is denied message can appear while trying to access certain directories or applications thus interfering with your work.
Although this message can cause problems, you should be able to fix it on Windows 10 by using one of our solutions.
What Access Denied means?
If access to a network share, an Intranet, or the Internet is being refused to you and you are seeing the message above, then you do not have the authorization to access the resource in question and will need to use another account.
You might need to change the type or your account or log into another one altogether in order to pass this security check successfully.
Why am I getting Access denied in Windows 10 when opening a folder?
This message usually means that you don’t have the proper privileges to access this directory. Sometimes, you might even get Access denied message on administrator account.
In other instances, you’ll get You need permission to perform this action error. In most cases, switching to a proper account or taking ownership of the folder in question will fix the problem.
How do you fix Access Denied?
- What Access Denied means?
- Why am I getting Access denied in Windows 10 when opening a folder?
- How do you fix Access Denied?
- Fix — Access is denied in Windows 10
- 1. Take ownership of the directory
- 1.1 Automatically assign permissions
- 1.2 Manually assign permissioms
- 1.3 Use Command Prompt to take ownership
- 2. Add your account to the Administrators group
- 3. Enable the hidden Administrator account
- 4. Check your permissions
- 5. Use Command Prompt to reset permissions
- 6. Set your account as administrator
- 8. Close Google Drive and reinstall it
- 9. Edit your registry
- 10. Turn off User Account Control
- 11. Disable your antivirus software
- 12. Change ownership or permissions of Temp and Installer folders
- 13. Check environment variables
- Fix — Access is denied Windows 10 cmd
- 1. Pin Command Prompt to Start Menu
- 2. Run Command Prompt as administrator
- Fix — Access is denied Windows 10 hard drive
- 1. Change your permissions
- 2. Change the sharing settings
- 3. Check if USB drives are blocked
- 4. Uninstall HP Device Manager
- Fix — Access is denied Windows 10 Notepad
- 1. Run Notepad as administrator
- 2. Change how files open
- 3. Delete desktop.ini files
- Why is Access denied when I am the administrator?
Fix – Access is denied in Windows 10
1. Take ownership of the directory
1.1 Automatically assign permissions
The problem is present on all versions, so you can get Access denied message on Windows 11 as well. Luckily, we have solutions that will help you regardless of the version you’re using.
This error usually appears when you try to access a file or a directory while having insufficient privileges. This happens if you’re not an administrator or if you don’t have ownership over a folder.
To fix the problem you just have to assign ownership to your account, and you can do that by following these instructions:
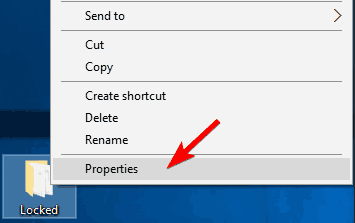
1. Locate the problematic folder, right-click it and choose Properties from the menu.
2. Navigate to the Security tab and then click the Advanced button.
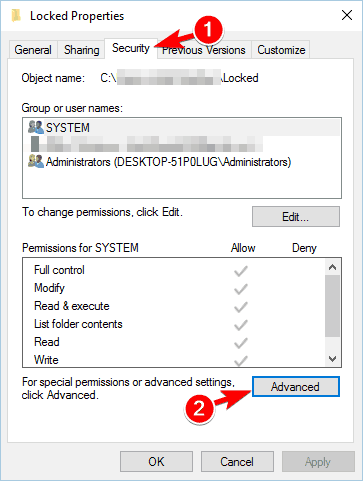
3. Locate the Owner section at the top and click on Change. The Select User or Group window will now appear.

4. In the Enter the object name to select field enter Administrators or your user name, then click the Check Names button. If everything is in order your input will change.
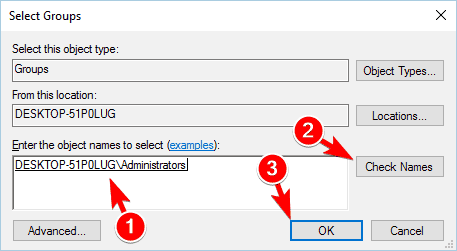
5. Click OK to save changes. The owner section will now change.
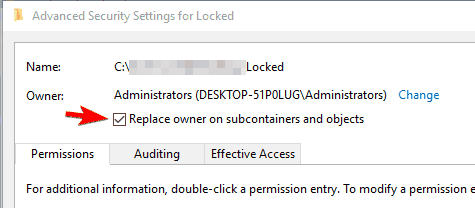
6. Check Replace owner on subcontainters and objects and click Apply and OK to save changes. Some users are suggesting to check Replace all child object permission entries option, so you might do that as well.
1.2 Manually assign permissioms
In some cases, you might have to manually assign permissions to your account. To do that, follow these simple steps:
- Navigate to Advanced Security Settings.
- A list of all users will appear. If your user account isn’t listed, click the Add button.

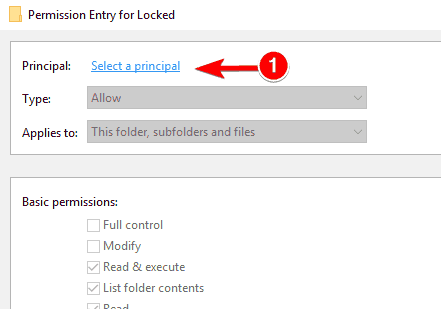
- Click on Select a principal.

- Now enter your user account name, click Check Names, and then OK. We already showed you how to do that in Step 5 above, so be sure to check it out.
- Set Type to Allow and Applies to This folder, subfolders, and files and check Full control. Now click the OK button.

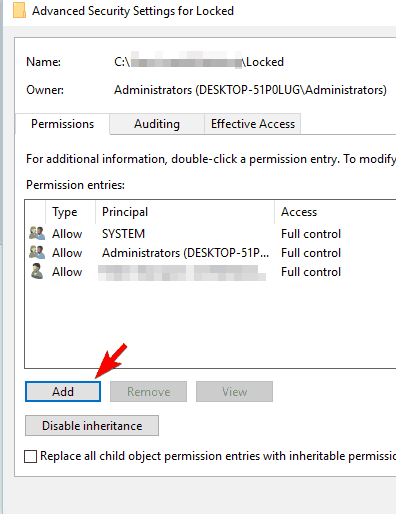

If your user name is already available, simply double-click it and perform Step 5.
1.3 Use Command Prompt to take ownership
Another way to take ownership is to use Command Prompt. To do that, start Command Prompt as administrator and enter the following lines:
takeown /f “path_to_folder” /r /d yicacls "path_to_folder" /grant administrator:F /T
Of course, be sure to replace path_to_folder with an actual path to the inaccessible folder. After running these two commands you should have full access to the problematic folder, and thus fix the Access is denied error with Command Prompt.
2. Add your account to the Administrators group
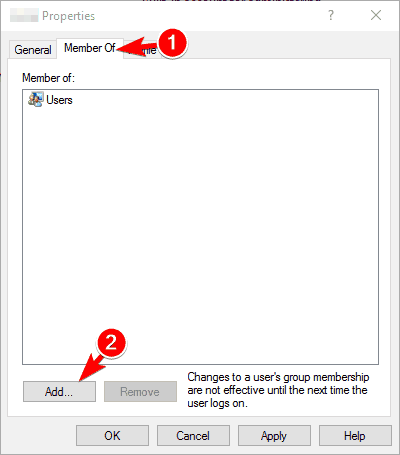
Sometimes Access is denied message appears if you try to access a folder while not having administrator privileges. This can be a problem, but you can fix it by adding your account to the Administrators group.
To do that on Windows 10, follow these steps:
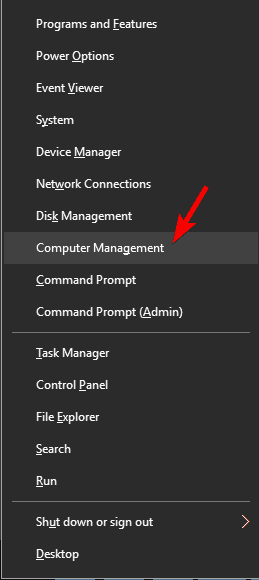
- Press Windows Key + X to open Win + X menu. Select Computer Management from the list.

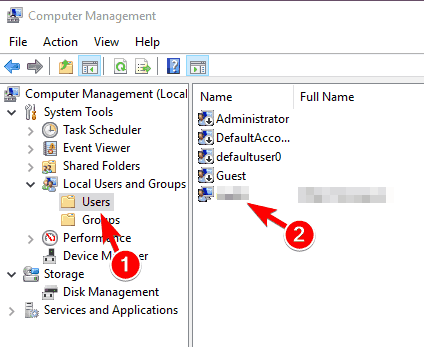
- When the Computer Management window opens, navigate to Local Users and Groups followed by Users. Now double-click your account in the left pane.

- Navigate to the Member Of tab and click the Add button.

- In Enter the object names to select field enter Administrators and click Check Names. If everything is in order, click OK.

- Select Administrators and click Apply and OK.
- After doing that, restart your PC and check if the problem is resolved.

3. Enable the hidden Administrator account
Windows 10 by default has a built-in Administrator account that you can use. By using this account you should have unrestricted access to your PC.
Due to security measures, this account isn’t easily accessible, but you can enable it by doing the following:
- Press Windows Key + X and select Command Prompt (Admin) from the menu.

- When Command Prompt starts, run the following command and press Enter. By doing so you’ll unlock the administrator account:
net user administrator /active: yes - Now log off of your account and switch to the newly enabled Administrator account. From there you should be able to access your files without any problems.
- After you’re done using the Administrator account, go back to your main account and start Command Prompt as administrator again. Now enter the following command to disable the Administrator account:
net user administrator /active: no
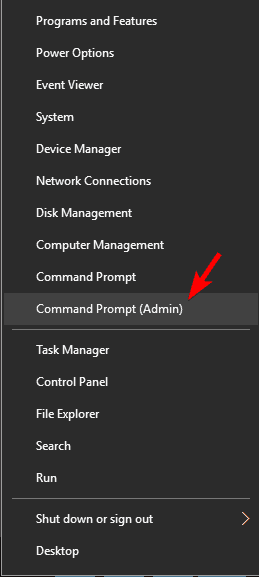
Keep in mind that after switching back to your main account the issue might still persist. If needed, you can use the Administrator account to make the necessary changes to your system and fix the problem.
4. Check your permissions
Sometimes you’ll get Access is denied message if you lack certain permissions to access the desired directory. However, you should be able to fix the problem by following these steps:
- Locate the problematic directory, right-click it and choose Properties from the menu.
- Navigate to the Security tab and click the Edit button.

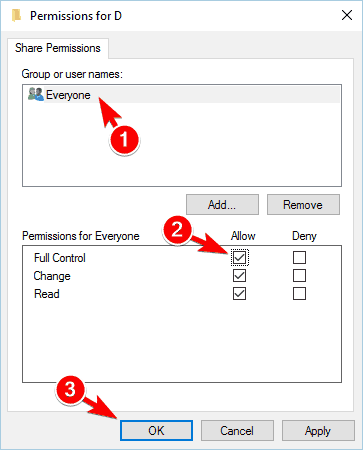
- Select your user name from the list and make sure that you check Full control for Allow column in Permissions section.

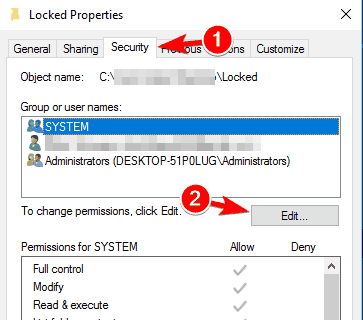
This is a simple solution, but if your user name isn’t on the list you’ll have to add it manually and then change its permissions.
Several users reported that you need to grant Full control to both Administrators and Users over the problematic folder, so be sure to try that as well.
In some cases, you might even want to give Full Control to Everyone in order to fix the problem.
5. Use Command Prompt to reset permissions
According to users, you might be able to fix this problem simply by using Reset Permissions tool. Simply download the tool, run it, select the problematic directory, and check all available options.
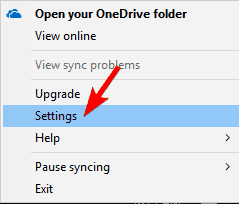
After doing that, you should be able to access the directory without any problems, otherwise, OneDrive may be causing this issue, so to fix it you need to do the following:
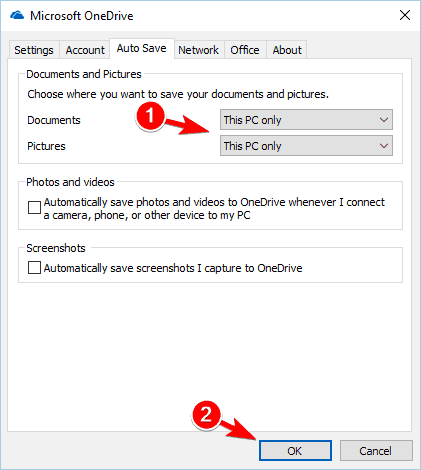
- Right-click OneDrive icon in the bottom right corner and choose Settings from the menu.

- Go to Auto Save tab and set both Documents and Pictures to This PC only. Click OK to save changes.

If that doesn’t solve the problem, you’ll need to perform the following steps as well:
- Start Command Prompt as administrator.
- When Command Prompt opens, enter the following commands:
-
cd /users/Your_Username -
icacls Pictures /reset /t /q -
cd /<path to OneDrive folder> -
icacls Pictures /reset /t /q
-
- After doing that, restart your PC.
If the problem still persists, you might have to repeat this solution and disable OneDrive until Microsoft fixes the problem.
6. Set your account as administrator
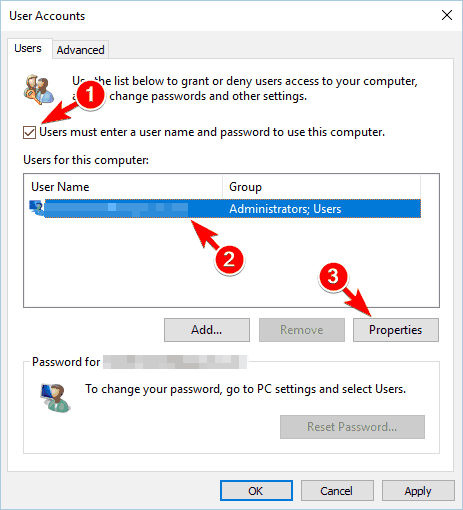
If you’re getting Access is denied message, you might be able to fix it simply by setting your account as an administrator. This is rather simple and you can do it by following these steps:
- Press Windows Key + R and enter control userpasswords2. Press Enter or click OK.

- User Accounts window will now appear. Check Users must enter a user name and password to use this computer. Now select your account and click on Properties.

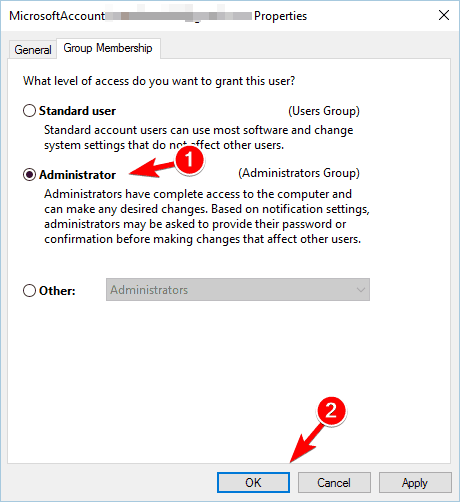
- Navigate to the Group Membership tab. Select Administrator and click Apply and OK.

- After doing that, restart your PC and check if the issue still persists.

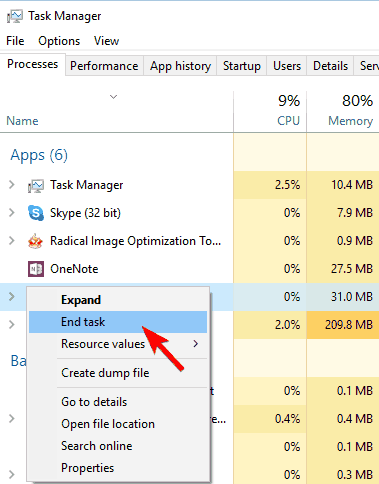
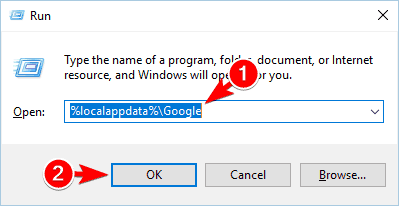
8. Close Google Drive and reinstall it
Access is denied message sometimes appears while using Google Drive. To fix the issue, you need to completely close Google Drive and end all processes associated with it. To do that, follow these steps:
- Press Ctrl + Shift + Esc to open Task Manager.
- When Task Manager opens, locate all Google Drive processes, right-click them and choose End Task from the menu.

- After ending all Google Drive processes, uninstall the application.
- Now press Windows Key + R and enter %localappdata%Google. Press Enter or click OK.
- Locate the Drive folder and rename it to Drive.old.
- Install Google Drive again and check if the problem is resolved.
9. Edit your registry
According to users, this error message can appear if you try to access a network shared directory. This can be a big problem, but you can resolve it by making a few changes to your registry.
Modifying the registry can cause certain issues, so be extra cautious and export your registry just in case. To modify your registry, do the following:
- Press Windows Key + R and enter regedit. Press Enter or click OK.
- When Registry Editor opens, in the left pane navigate to this key:
HKEY_LOCAL_MACHINESYSTEMCurrentControlSetServicesLanmanWorkstationParameters - In the right pane, right-click the empty space and choose a New followed by DWORD.
- Enter AllowInsecureGuestAuth as the name of the new DWORD.

- Double-click the newly created AllowInsecureGuestAuth DWORD to open its properties. Set Value data to 1 and click OK to save changes.

- After doing that, restart your PC and check if the problem is resolved.
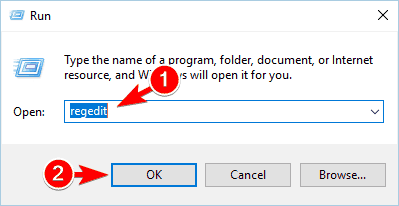

Keep in mind that this solution only applies to network-shared folders, so it won’t work with local folders.
10. Turn off User Account Control
Some PC issues are hard to tackle, especially when it comes to corrupted repositories or missing Windows files. If you are having troubles fixing an error, your system may be partially broken.
We recommend installing Restoro, a tool that will scan your machine and identify what the fault is.
Click here to download and start repairing.
User Account Control is a useful feature that will prevent applications and users from running commands that require administrative privileges.
This is a useful feature, but sometimes it can cause Access is denied message to appear, especially when installing new software. To fix the issue, you need to do the following:
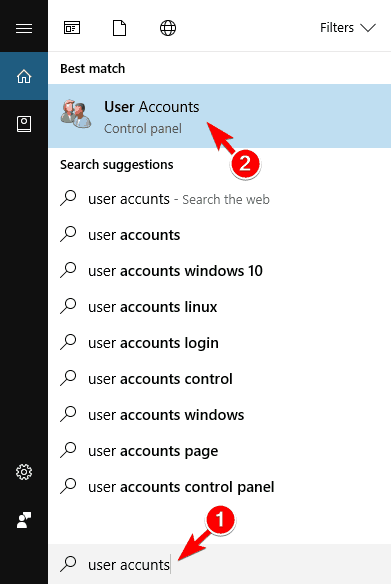
- Press Windows Key + S and enter user accounts. Now select User Accounts from the list of results.

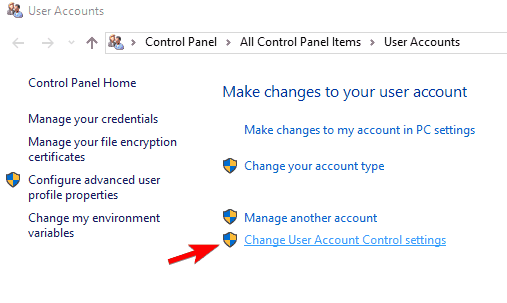
- When the User Accounts window opens, click on Change User Account Control settings.

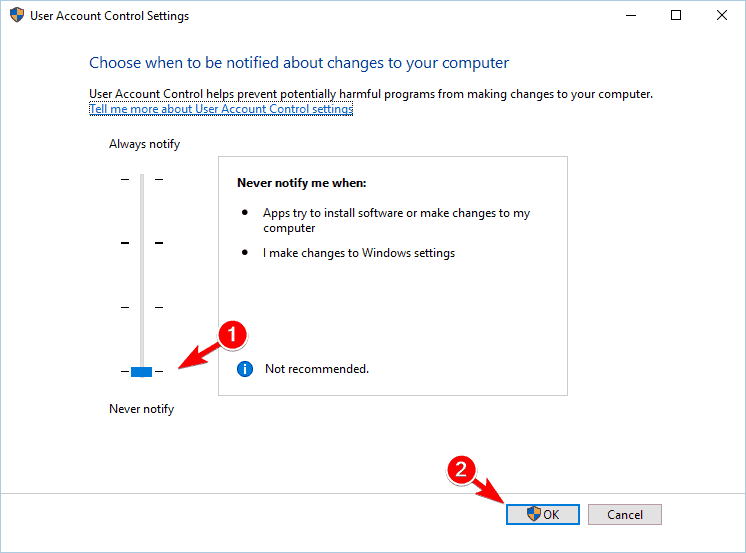
- Move the slider all the way down and click the OK button to save changes.

- After doing that, try to install the application again.
11. Disable your antivirus software
Antivirus software is rather important, but sometimes third-party antivirus can cause this error to appear.
According to users, they got Access is denied message while trying to install certain applications, and the cause was their security software.
To fix this issue you just need to temporarily disable your security software and try to install the application again.
If the problem doesn’t appear, it means that the issue was caused by your antivirus software, so you should consider updating or replacing it.
There are multiple efficient antivirus programs that will not interfere with other applications on your PC. Then, discover them and choose from the best antiviruses compatible with Windows10.
- Drive is not accessible in Windows 10/11? Check these fixes
- FIX: Error 0x80070005 Access is denied
- Fix Windows 10 update error 0x80070422 in a couple of steps
- Full Fix: Elevated permissions are required to run DISM
- Application has been blocked to accessing graphics hardware
12. Change ownership or permissions of Temp and Installer folders
When installing new software its temporary files are usually moved to Temp or Installer folders. However, if you don’t have the necessary permissions, you might not be able to install the desired application.
If this error message appears while trying to install applications, be sure to check if the following folders have the necessary permissions
- C:WindowsInstaller
- C:UsersYour_usernameAppDataLocalTemp
If needed, you might have to change ownership or permissions in order to fix this problem.
13. Check environment variables
In some cases, Access is denied message can appear while trying to create a zipped folder in Windows.
This is usually because the %TEMP% variable isn’t properly set. To fix this problem, you need to configure environment variables by doing the following:
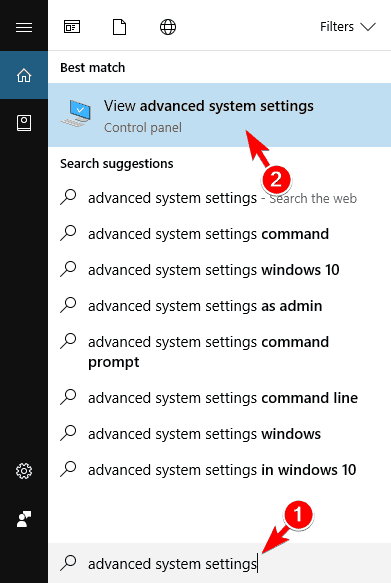
- Press Windows Key + S and enter advanced system settings. Select View advanced system settings from the menu.

- Click on Environment Variables button.

- Locate TEMP on the list and check if its value is set correctly. If not, double-click the TEMP and set its value to:
%USERPROFILE%AppDataLocalTemp
- Save changes and restart your PC.
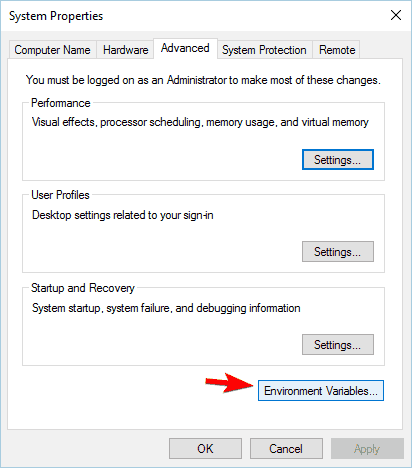
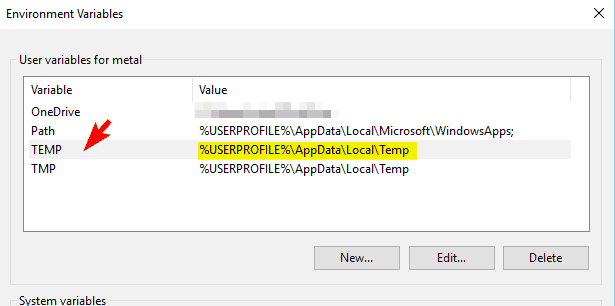
After doing that, navigate to the %TEMP% folder by entering %TEMP% in the address bar in File Explorer. Once you open the Temp folder, try to create a new folder and delete it.
If you can’t create or delete a folder, you’ll need to take ownership of the Temp folder or change your permissions.
Fix – Access is denied Windows 10 cmd
1. Pin Command Prompt to Start Menu
If you’re getting Access is denied message while trying to start Command Prompt, you might want to try pinning it to Start Menu.
- According to users, this workaround solved the problem for them, so you might want to try it. To do that, simply press
WindowsKey +Sand enter command prompt. - Right-click Command Prompt from the list of results and choose Pin to Start from the menu.
- After doing that, try launching Command Prompt using the Start Menu shortcut.
2. Run Command Prompt as administrator
Sometimes Access is denied can appear in PowerShell or Command Prompt while trying to run a certain command.
This message indicates that you don’t have the necessary privileges to access a specific file or to perform a specific command. However, you can fix this issue in most cases simply by running Command Prompt as an administrator.
We already explained how to start Command Prompt with administrative privileges in one of our previous solutions, so be sure to check them out.
Fix – Access is denied Windows 10 hard drive
1. Change your permissions
If you can’t access a hard drive partition due to Access is denied message, you might want to try changing your permissions or the owner.
We already explained how to do that in our previous solutions, so be sure to grant Full Control to your user account in order to access your hard drive partition.
Several users reported that you can fix the problem by giving Full Control to Everyone group, so try that as well. Keep in mind that you might have to add the group manually if it’s not available on the list.
It’s crucial to remember that you shouldn’t change the permissions of your system drive. If you have problems accessing your C: drive, you might want to try a different solution.
We have to mention that this solution can be potentially dangerous, so keep in mind that you’re using it at your own risk.
2. Change the sharing settings
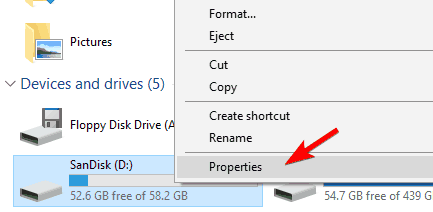
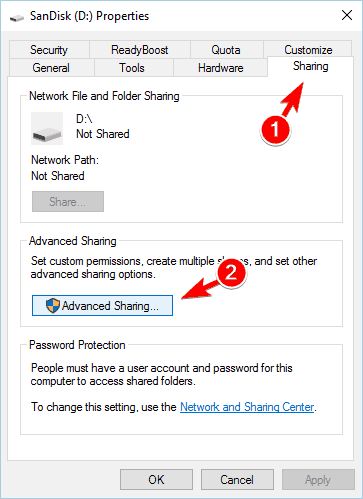
According to users, if this error appears while accessing external hard drive you can fix it simply by changing a few settings. To fix the issue, due to the following:
- Open This PC, locate your external hard drive, right-click it and choose Properties from the menu.

- Navigate to the Sharing tab and click on Advanced Sharing.

- When the Advanced Sharing window opens, check Share this folder option and then click on Permissions.

- Select Everyone from the list and check Full Control in Allow column. Click Apply and OK to save changes.
- After saving the changes, check if the problem is resolved.

3. Check if USB drives are blocked
Sometimes you might not be able to access an external hard drive due to Access is denied message. This can occur because USB drives are blocked by your registry.
Before we start fixing the problem, we have to mention that this solution can be potentially dangerous, so be extra cautious. To search your registry, do the following:
- Open Registry Editor.
- Select Computer in the left pane and press
Ctrl+F. Enter RemovableStorageDevices, and click Find Next.
- If you find RemovableStorageDevices values, set Deny to 0 and save changes.
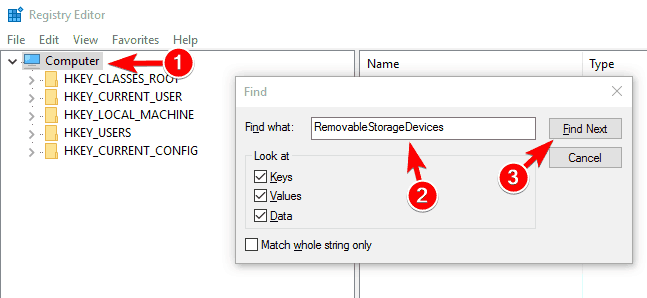
Keep in mind that these values might not be available on your PC, so if you can’t find them you should probably skip this solution.
4. Uninstall HP Device Manager
If you’re having this error while accessing a hard drive partition on an HP device, you might want to try removing HP Device Manager software.
Several users reported that this application prevents them from accessing their hard drive, so be sure to remove it and check if that solves the problem.
Fix – Access is denied Windows 10 Notepad
1. Run Notepad as administrator
This error message can appear sometimes while starting Notepad. If you have the same problem, you should try running Notepad as an administrator.
To do that, simply locate Notepad shortcut, right-click it and choose Run as administrator. If that solves the problem, you should set Notepad to always run with administrative privileges.
To do that, follow these steps:
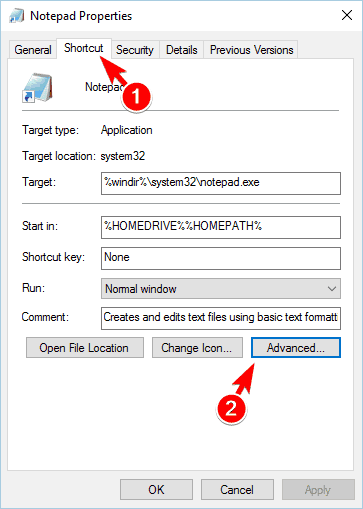
- Locate the Notepad shortcut, right-click it and choose Properties from the menu.

- Go to the Shortcut tab and click the Advanced button.

- Now check Run as administrator option and click the OK button.

- Click Apply and OK to save changes and try to start Notepad using the shortcut. If you did everything right, Notepad will always start with administrative privileges.


2. Change how files open
Access is denied message can appear if Notepad starts automatically with Windows. This is usually caused by .ini files, but you can easily solve this issue. To do that, follow these instructions:
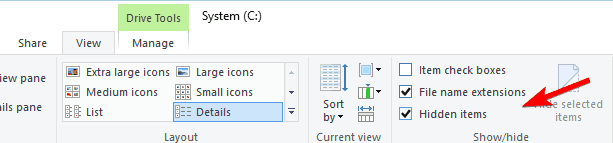
- Go to your C: drive.
- Click on View and check Hidden files and File name extensions.

- Now locate any .ini file in C: directory, right-click it to choose Open with followed by Choose another app.

- Select the Provisioning package runtime processing tool and click OK.
- Restart your PC.
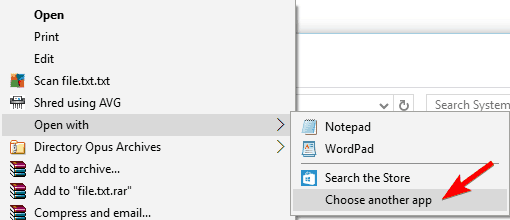
After your PC restarts, check if the problem is resolved.
3. Delete desktop.ini files
If Notepad and Access is denied message appear every time you start your PC, you might want to try deleting the desktop.ini file.
This file is located in these directories:
- C:UsersYour_UsernameAppDataRoamingMicrosoftWindowsStart MenuStartup
- C:Program DataMicrosoftWindowsStart MenuProgramsStartup
Visit both directories and remove desktop.ini files from them. Keep in mind that this file can be hidden, so be sure to reveal hidden files and folders. We already showed you how to do that in our previous solution, so be sure to check it out.
After deleting desktop.ini files, the problem should be completely resolved and Notepad won’t start anymore along with Windows.
Why is Access denied when I am the administrator?
User Account Control is a helpful security feature that is included with Windows 10. The purpose of this feature is to alert you anytime you or an application tries to carry out an action that needs administrator capabilities.
Even if you are logged in with an administrative account, you can get a notice saying that access is forbidden when you try to use this function. You may get around that however by turning off the User Account Control option on your computer.
To find out more solutions, check out our guide on how to fix Access denied on Windows 10/11 administrator account.
Access is denied message can affect both files and folders, and it can even prevent you from installing new applications. This can be a big problem, but we hope that you managed to solve it by using one of our solutions.
Still having issues? Fix them with this tool:
SPONSORED
If the advices above haven’t solved your issue, your PC may experience deeper Windows problems. We recommend downloading this PC Repair tool (rated Great on TrustPilot.com) to easily address them. After installation, simply click the Start Scan button and then press on Repair All.
![]()
Newsletter
Содержание
- Access is denied when you run a batch job on a Windows Server 2003-based computer
- Symptoms
- Cause
- Resolution 1: Grant Cmd.exe Read and Execute permissions
- Resolution 2: Grant Read and Execute permissions for Cmd.exe file to Batch group
- More information
- Системная ошибка 5 Отказано в доступе — как исправить?
- Методы решения для «Системная ошибка 5. Отказано в доступе» при выполнении команд net stop, net start, net user
- Cmd error access is denied
- Answered by:
- Question
- Answers
- Cmd error access is denied
- Answered by:
- Question
- Answers
Access is denied when you run a batch job on a Windows Server 2003-based computer
This article provides solution to an error (Access is denied) that occurs when you run a batch job on a Microsoft Windows Server 2003-based computer.
Applies to: В Windows Server 2003
Original KB number: В 867466
Symptoms
When you run a batch job that runs under the context of a regular user account, the script may not run. If you run the batch job by using the Scheduled Tasks feature, the following error message may be logged in the Scheduled Tasks log file (Schedlgu.txt):
If you use a debugger program to try to determine why the batch job does not work, the following error message may appear in the debug output:
Cause
This issue occurs if all the following conditions are true:
- You run the batch job on a Windows Server 2003-based member server.
- The batch job runs as a non-interactive process.
- The batch job is configured to run under the context of an account that is not a member of the Administrators group.
In Windows Server 2003, the Users group does not have Read and Execute permissions to the command processor (Cmd.exe). By default, the Cmd.exe program has the following permissions settings:
The Interactive implicit group and the Service implicit group have Read and Execute permissions.
On a member server, the TelnetClients group also has Read and Execute permissions. On a domain controller, the Batch implicit group also has Read and Execute permissions.
The Administrators group and the System implicit group have Full Control permissions.
To resolve this issue, use either of the following methods.
Resolution 1: Grant Cmd.exe Read and Execute permissions
Grant the Cmd.exe program Read and Execute permissions for the user account that the batch job runs under. To do this, follow these steps:
Click Start, and then click Windows Explorer.
Locate and then right-click the Cmd.exe file. The Cmd.exe file is located in the %windir%System32 folder.
Click Properties.
Click the Security tab.
Click Add.
In the Enter the object names to select box, type the user name that the batch job runs under, and then click OK two times.
When you add the user, the user is automatically granted Read and Execute permissions.
Click Yes when you are prompted to continue.
Resolution 2: Grant Read and Execute permissions for Cmd.exe file to Batch group
Grant Read and Execute permissions for the Cmd.exe file to the Batch group. This permits all batch processes to run the command processor. To do this, follow these steps:
- Click Start, and then click Windows Explorer.
- Locate and then right-click the Cmd.exe file. The Cmd.exe file is located in the %windir%System32 folder.
- Click Properties.
- Click the Security tab.
- Click Add.
- In the Enter the object names to select box, type Batch, and then click OK two times.
- Click Yes when you are prompted to continue.
More information
The behavior that is described in this article is different from the default behavior of Microsoft Windows 2000 Server. By default, Windows 2000 Server grants Read permissions and Execute permissions to the Users group.
For more information about implicit groups, visit the following Microsoft Web sites:
Источник
Системная ошибка 5 Отказано в доступе — как исправить?
 При выполнении команд net user, net stop, net start и других в командной строке Windows 11 или Windows 10 вы можете получить сообщение: «Системная ошибка 5. Отказано в доступе». Начинающему пользователю не всегда ясно, чем вызвана ошибка и как решить проблему.
В этой инструкции подробно о том, почему возникает системная ошибка 5 при запуске и остановке служб или работе с учетными записями пользователе в командной строке.
Методы решения для «Системная ошибка 5. Отказано в доступе» при выполнении команд net stop, net start, net user

Причина того, что в результате выполнения команд сообщается о системной ошибке 5 «Отказано в доступе» в том, что командная строка (Терминал Windows или Windows PowerShell) запущен не от имени администратора. Или, в некоторых случаях — в том, что ваш пользователь и вовсе не имеет прав администратора на компьютере.
В первом случае решение будет простым: запустите командную строку от имени Администратора, для этого вы можете:
- Начать набирать «Командная строка» в поиске на панели задач Windows 11 или Windows 10, а затем в результатах поиска нажать «Запуск от имени Администратора».

- Нажать правой кнопкой мыши по кнопке «Пуск» и выбрать «Терминал Windows (Администратор)» или «Windows PowerShell (Администратор)»
- Использовать инструкции Как запустить командную строку от имени Администратора в Windows 11 и Как запустить командную строку от имени Администратора в Windows 10.


Ошибка не будет появляться после того, как вы запустите командную строку с соответствующими правами.
Если ваш пользователь не имеет прав администратора на компьютере, но вы имеете доступ к учетной записи с правами администратора, вы можете зайти под ней, а потом сделать текущего пользователя администратором: Как сделать пользователя администратором в Windows 10 (в Windows 11 действия аналогичны).
В сценарии, когда компьютер контролируется не вами, права администратора вам предоставить не готовы, команды вы выполнить не сможете (разве что обходными путями, такими как сброс пароля для учетной записи администратора).
Источник
Cmd error access is denied
This forum has migrated to Microsoft Q&A. Visit Microsoft Q&A to post new questions.
Answered by:
![]()
Question
![]()
![]()
It seems that other than the ‘dir’ command, every command I run from my dos prompt, I get an «Access is denied.» message. Example:
C:Usersaagha>ipconfig
Access is denied.
I’ve checked my UAC settings and made sure they’re set to «Never Notify».
I’ve also tried to run sfc.exe, but can’t:
C:Usersaagha>sfc.exe
Access is denied.
Finally, I’ve tried to run cmd.exe as administrator, but no luck.
The one thing I’ve noticed is that if I go to cmd.exe’s Properties and then the Security tab, I see that TrustedInstaller has Full control, but SYSTEM, Administrators and Users have only:
I’ve tried to change permissions by editing, but when I do so, I get an «Access is denied» message.
I’ve run out of ideas on what else to try and would appreciate the help.
Answers
![]()
![]()
The problem was that I had the Personal firewall from Comodo installed. By uninstalling this, all normal DOS functionality seems to have returned!
![]()
![]()
Tracy Cai
TechNet Community Support

![]()
![]()
Arnav Sharma | Facebook | Twitter Please remember to click “Mark as Answer” on the post that helps you, and to click “Unmark as Answer” if a marked post does not actually answer your question. This can be beneficial to other community members reading the thread.
![]()
![]()
Hi Tracy — Sorry for not getting back to you sooner, I was travelling on business.
I did as you suggested. Clicked on the C:windowssystem32 folder and went to Properties and clicked on the security tab. The following Group or user names are listed:
- CREATOR OWNER
- SYSTEM
- Administrators (SunTzuAdministrators)
- Users (SunTzuUsers)
- TrustedInstaller
For each of these, here’s what’s marked as Permissions:
- CREATOR OWNER: Special permissions
- SYSTEM: Special permissions
- Administrators (SunTzuAdministrators): Special permissions
- Users (SunTzuUsers): Read & execute, List folder contents, Read
- TrustedInstaller: List folder contents, Special permissions
If I do the same and look at ipconfig.exe in the same folder, here’s the users that are there:
- SYSTEM
- Administrators (SunTzuAdministrators)
- Users (SunTzuUsers)
- TrustedInstaller
Their permissions for this one file are as follows:
- SYSTEM: Read & execute, Read
- Administrators (SunTzuAdministrators): Read & execute, Read
- Users (SunTzuUsers): Read & execute, Read
- TrustedInstaller: Full control, Modify, Read & execute, Read, Write
I tried to go to a dos prompt and try ipconfig again, and this is what I got:
C:Usersaagha>ipconfig.exe
Access is denied.
Here’s running the «path» command. C:windowssystem32 is indeed there:
C:Usersaagha>path
PATH=C:Program FilesCommon FilesMicrosoft SharedWindows Live;C:Windowssyst
em32;C:Windows;C:WindowsSystem32Wbem;C:WindowsSystem32WindowsPowerShellv
1.0;C:Program FilesThinkPadBluetooth Software;C:Program FilesThinkPadBlu
etooth Softwaresyswow64;C:Program Files (x86)Common FilesLenovo;C:Program F
iles (x86)Common FilesUlead SystemsMPEG;C:Program Files (x86)LenovoAccess
Connections;C:Program FilesCommon FilesLenovo;C:Program Files (x86)Lenovo
Client Security Solution;C:Program FilesLenovoClient Security Solution;C:Pro
gram FilesjEdit;C:Program Files (x86)RSA SecurID Token Common;C:SWTOOLSRead
yApps;C:Program Files (x86)QuickTimeQTSystem;C:Program FilesCommon FilesM
icrosoft SharedWindows Live;C:Program FilesCommon FilesMicrosoft SharedWind
ows Live;C:Windowssystem32;C:Windows;C:WindowsSystem32Wbem;C:WindowsSyst
em32WindowsPowerShellv1.0;C:Program FilesThinkPadBluetooth Software;C:Pr
ogram FilesThinkPadBluetooth Softwaresyswow64;C:Program Files (x86)Common F
ilesLenovo;C:Program Files (x86)Common FilesUlead SystemsMPEG;C:Program Fi
les (x86)LenovoAccess Connections;C:Program FilesCommon FilesLenovo;C:Pro
gram Files (x86)LenovoClient Security Solution;C:Program FilesLenovoClient
Security Solution;C:Program FilesjEdit;C:Program Files (x86)RSA SecurID Toke
n Common;C:SWTOOLSReadyApps;C:Program Files (x86)QuickTimeQTSystem;%JAVA_H
OME%bin;%ANT_HOME%bin;C:cygwinbin
Источник
Cmd error access is denied
This forum has migrated to Microsoft Q&A. Visit Microsoft Q&A to post new questions.
Answered by:
![]()
Question
![]()
![]()
It seems that other than the ‘dir’ command, every command I run from my dos prompt, I get an «Access is denied.» message. Example:
C:Usersaagha>ipconfig
Access is denied.
I’ve checked my UAC settings and made sure they’re set to «Never Notify».
I’ve also tried to run sfc.exe, but can’t:
C:Usersaagha>sfc.exe
Access is denied.
Finally, I’ve tried to run cmd.exe as administrator, but no luck.
The one thing I’ve noticed is that if I go to cmd.exe’s Properties and then the Security tab, I see that TrustedInstaller has Full control, but SYSTEM, Administrators and Users have only:
I’ve tried to change permissions by editing, but when I do so, I get an «Access is denied» message.
I’ve run out of ideas on what else to try and would appreciate the help.
Answers
![]()
![]()
The problem was that I had the Personal firewall from Comodo installed. By uninstalling this, all normal DOS functionality seems to have returned!
![]()
![]()
Tracy Cai
TechNet Community Support
![]()
![]()
Arnav Sharma | Facebook | Twitter Please remember to click “Mark as Answer” on the post that helps you, and to click “Unmark as Answer” if a marked post does not actually answer your question. This can be beneficial to other community members reading the thread.
![]()
![]()
Hi Tracy — Sorry for not getting back to you sooner, I was travelling on business.
I did as you suggested. Clicked on the C:windowssystem32 folder and went to Properties and clicked on the security tab. The following Group or user names are listed:
- CREATOR OWNER
- SYSTEM
- Administrators (SunTzuAdministrators)
- Users (SunTzuUsers)
- TrustedInstaller
For each of these, here’s what’s marked as Permissions:
- CREATOR OWNER: Special permissions
- SYSTEM: Special permissions
- Administrators (SunTzuAdministrators): Special permissions
- Users (SunTzuUsers): Read & execute, List folder contents, Read
- TrustedInstaller: List folder contents, Special permissions
If I do the same and look at ipconfig.exe in the same folder, here’s the users that are there:
- SYSTEM
- Administrators (SunTzuAdministrators)
- Users (SunTzuUsers)
- TrustedInstaller
Their permissions for this one file are as follows:
- SYSTEM: Read & execute, Read
- Administrators (SunTzuAdministrators): Read & execute, Read
- Users (SunTzuUsers): Read & execute, Read
- TrustedInstaller: Full control, Modify, Read & execute, Read, Write
I tried to go to a dos prompt and try ipconfig again, and this is what I got:
C:Usersaagha>ipconfig.exe
Access is denied.
Here’s running the «path» command. C:windowssystem32 is indeed there:
C:Usersaagha>path
PATH=C:Program FilesCommon FilesMicrosoft SharedWindows Live;C:Windowssyst
em32;C:Windows;C:WindowsSystem32Wbem;C:WindowsSystem32WindowsPowerShellv
1.0;C:Program FilesThinkPadBluetooth Software;C:Program FilesThinkPadBlu
etooth Softwaresyswow64;C:Program Files (x86)Common FilesLenovo;C:Program F
iles (x86)Common FilesUlead SystemsMPEG;C:Program Files (x86)LenovoAccess
Connections;C:Program FilesCommon FilesLenovo;C:Program Files (x86)Lenovo
Client Security Solution;C:Program FilesLenovoClient Security Solution;C:Pro
gram FilesjEdit;C:Program Files (x86)RSA SecurID Token Common;C:SWTOOLSRead
yApps;C:Program Files (x86)QuickTimeQTSystem;C:Program FilesCommon FilesM
icrosoft SharedWindows Live;C:Program FilesCommon FilesMicrosoft SharedWind
ows Live;C:Windowssystem32;C:Windows;C:WindowsSystem32Wbem;C:WindowsSyst
em32WindowsPowerShellv1.0;C:Program FilesThinkPadBluetooth Software;C:Pr
ogram FilesThinkPadBluetooth Softwaresyswow64;C:Program Files (x86)Common F
ilesLenovo;C:Program Files (x86)Common FilesUlead SystemsMPEG;C:Program Fi
les (x86)LenovoAccess Connections;C:Program FilesCommon FilesLenovo;C:Pro
gram Files (x86)LenovoClient Security Solution;C:Program FilesLenovoClient
Security Solution;C:Program FilesjEdit;C:Program Files (x86)RSA SecurID Toke
n Common;C:SWTOOLSReadyApps;C:Program Files (x86)QuickTimeQTSystem;%JAVA_H
OME%bin;%ANT_HOME%bin;C:cygwinbin
Источник
При выполнении команд net user, net stop, net start и других в командной строке Windows 11 или Windows 10 вы можете получить сообщение: «Системная ошибка 5. Отказано в доступе». Начинающему пользователю не всегда ясно, чем вызвана ошибка и как решить проблему.
В этой инструкции подробно о том, почему возникает системная ошибка 5 при запуске и остановке служб или работе с учетными записями пользователе в командной строке.
Методы решения для «Системная ошибка 5. Отказано в доступе» при выполнении команд net stop, net start, net user
Причина того, что в результате выполнения команд сообщается о системной ошибке 5 «Отказано в доступе» в том, что командная строка (Терминал Windows или Windows PowerShell) запущен не от имени администратора. Или, в некоторых случаях — в том, что ваш пользователь и вовсе не имеет прав администратора на компьютере.
В первом случае решение будет простым: запустите командную строку от имени Администратора, для этого вы можете:
- Начать набирать «Командная строка» в поиске на панели задач Windows 11 или Windows 10, а затем в результатах поиска нажать «Запуск от имени Администратора».

- Нажать правой кнопкой мыши по кнопке «Пуск» и выбрать «Терминал Windows (Администратор)» или «Windows PowerShell (Администратор)»

- Использовать инструкции Как запустить командную строку от имени Администратора в Windows 11 и Как запустить командную строку от имени Администратора в Windows 10.
Ошибка не будет появляться после того, как вы запустите командную строку с соответствующими правами.
Если ваш пользователь не имеет прав администратора на компьютере, но вы имеете доступ к учетной записи с правами администратора, вы можете зайти под ней, а потом сделать текущего пользователя администратором: Как сделать пользователя администратором в Windows 10 (в Windows 11 действия аналогичны).
В сценарии, когда компьютер контролируется не вами, права администратора вам предоставить не готовы, команды вы выполнить не сможете (разве что обходными путями, такими как сброс пароля для учетной записи администратора).
Question
Issue: How to fix “System error 5 has occurred. Access is denied” on Windows?
I tried to run Net View command in Command Prompt, but the commands were not executed successfully. I got an error “System error 5 has occurred. Access is denied.” What does it mean, and what should I do to work around it? I’m using Windows 10.
Solved Answer
If you run commands via Command Prompt utility on your computer, a system error like “System error 5 has occurred” should initially not occur. Unfortunately, practice shows that it does show up from time to time to users while executing commands without administrative privileges. Initially, it simply means that you cannot execute the command because you don’t have admin rights.
“System error 5 has occurred. Access is denied” is a relatively old problem that has been around since Windows 7 release. However, users’ reports on the official Microsoft[1] website indicate the fact that the problem hasn’t been resolved and resettled into Windows 8, 8.1, and 10.
In general, as long as you run commands via Command Prompt, regardless of which operating system version, you might receive the error. It is also important to mention that another error of a similar nature (Error 5: Access is denied), although it occurs under different circumstances.
The error can be related to many different commands (for example, Net View or Net Time). In general, system error 5 in Command Prompt[2] appears when the user attempts to execute more advanced commands. There are particular occasions when such error occurs, and some of them can be related to incorrect settings of the PC configuration:
- Time Synchronization issues. If the time on your device is set up wrongly, issues like that may appear. To resolve this particular problem, you need to enable the time sync feature on the PC and make sure that the correct time zone for your region is used in the first place.
- The account is disabled. It is possible that you try to use a disabled account or one that doesn’t exist on the domain. In this situation, you can try to ensure that the account is enabled on the domain and exist if you try to use it. You can use Netdom command-line utility on the PC for that.
- Missing permission to access the remote computer. Before trying to access the remote computer, you should make sure that you have all the required permissions. If any of those are missing, an error of any sort may appear. System error 5 is one of them. It is simply fixable, you need to get all the required permissions from the remote computer.
However, in the majority of cases, “System error 5 has occurred’ emerges due to the lack of administrative privileges. Even if the PC user is logged into the system as an administrator, Command Prompt may deny access if it is not run as administrator.
 You can try fixing the “System error 5 has occurred. Access is denied” error code by performing some methods manually.
Fix it now!
Fix it now!
To repair damaged system, you have to purchase the licensed version of Reimage Reimage.
As soon as you fix the “System error 5 has occurred,” you should optimize your PC. However, particular programs can also help you immediately if particular files got corrupted or malware affected the machine and caused an issue with the Command Prompt.
To check the registry, system files, malware,[3] missing files, cache,[4], and other problems, we would recommend running a scan with ReimageMac Washing Machine X9. This tool[5] can find rogue components in the computer system, taking care of outdated registry entries, which also might increase the speed of your computing work.
 “System error 5 has occurred. Access is denied” is an old problem which occurs on Windows OS-based computers.
Open Command Prompt and run it as an administrator
Fix it now!
Fix it now!
To repair damaged system, you have to purchase the licensed version of Reimage Reimage.
Therefore, to fix “System error 5 has occurred. Access is denied” on Windows 7, 8, 10 or another version, you should open an elevated Command Prompt with administrative privileges. For this purpose, you should:
Windows 7:
- Open Start menu, type cmd, and press Enter.
- Right-click on the search results, and select Run as administrator.
- If a UAC opens, click OK to confirm.
Windows 8, 8.1 or 10:
- Press Windows key + X to open a drop-down menu.
- Select Command Prompt (Admin).
- Alternatively, you can click Windows key and type cmd.
- Right-click on the search results,
- Select Run as administrator.
- If a UAC opens, click OK to confirm.
Run the Command Prompt as Administrator to take care of “System error 5 has occurred. Access is denied” error message.

Modify Windows Registry Editor entries
Fix it now!
Fix it now!
To repair damaged system, you have to purchase the licensed version of Reimage Reimage.
If running Command Prompt with administrative privileges did not bring any good results, please try to perform the following steps, and the error might be taken care of:
- Open Start and type regedit, and press Enter.
- Use the left pane to navigate to the HKEY_LOCAL_MACHINE\SYSTEM\CurrentControlSet\Services\LanmanServer\Parameters key.
- Click on Edit menu and select Add Value.
- Name the new value as MinFreeConnections.
- Then select Add -> New -> REG_DWORD.
- Set the value of the new key to 5 and close Registry Editor.
- After that, right-click on Windows key and select Control Panel.
- Select Network and locate Installed Network Software.
- Under Installed Network Software, highlight Server and select Configure.
- Locate Optimization and select Maximize Throughput for File Sharing under it.
- Click OK.
- After that, open Start,
- Next type cmd, right-click it, and select Run as Administrator.
- Type net stop server and net start server.
- Press Enter after each of them.
 Fix “System error 5 has occurred. Access is denied” error by launching the Registry Editor and performing some actions there.
- Head to the following path:
HKEY_CURRENT_USER\Software\Microsoft\Office\FrontPage\Addins\ - Remove FPE.com.AddIn entry name by right-clicking the key and selecting Delete.
- As soon as that is removed, Restart the machine and check if the error is occurring still.
Repair your Errors automatically
ugetfix.com team is trying to do its best to help users find the best solutions for eliminating their errors. If you don’t want to struggle with manual repair techniques, please use the automatic software. All recommended products have been tested and approved by our professionals. Tools that you can use to fix your error are listed bellow:
do it now!
Download Fix
Happiness
Guarantee
do it now!
Download Fix
Happiness
Guarantee
Compatible with Microsoft Windows
Compatible with OS X
Still having problems?
If you failed to fix your error using Reimage, reach our support team for help. Please, let us know all details that you think we should know about your problem.
Reimage — a patented specialized Windows repair program. It will diagnose your damaged PC. It will scan all System Files, DLLs and Registry Keys that have been damaged by security threats.Reimage — a patented specialized Mac OS X repair program. It will diagnose your damaged computer. It will scan all System Files and Registry Keys that have been damaged by security threats.
This patented repair process uses a database of 25 million components that can replace any damaged or missing file on user’s computer.
To repair damaged system, you have to purchase the licensed version of Reimage malware removal tool.

To stay completely anonymous and prevent the ISP and the government from spying on you, you should employ Private Internet Access VPN. It will allow you to connect to the internet while being completely anonymous by encrypting all information, prevent trackers, ads, as well as malicious content. Most importantly, you will stop the illegal surveillance activities that NSA and other governmental institutions are performing behind your back.
Unforeseen circumstances can happen at any time while using the computer: it can turn off due to a power cut, a Blue Screen of Death (BSoD) can occur, or random Windows updates can the machine when you went away for a few minutes. As a result, your schoolwork, important documents, and other data might be lost. To recover lost files, you can use Data Recovery Pro – it searches through copies of files that are still available on your hard drive and retrieves them quickly.
Причиной ошибки может быть то, что файл был поврежден или файл был зашифрован …..
В процессе открытия файла или папки в Windows, но вы не можете открыть его, и на экране вы получите сообщение об ошибке «Отказано в доступе». Эта статья покажет вам несколько способов исправить ошибки «Отказано в доступе», которые появляются в разных ситуациях.
Инструкция по исправлению ошибок Access Denied при доступе к файлам или папкам в Windows
Обзор ошибки «Отказано в доступе»
Это довольно распространенная ошибка в Windows, связанная с доступом, файловой системой и т. Д. Эта проблема возникает, когда вы не можете открыть файлы или папки, службы на компьютере, которые не могут быть запущены, не можете открыть файлы в Интернете, не можете получить доступ к сайту, и т. д. Причиной ошибки может быть то, что файл был поврежден, или файл был зашифрован, профиль пользователя поврежден, … Даже при входе в систему Часто используются правильные имя пользователя и пароль, вы не можете открыть папку. Сообщения об ошибках различаются в зависимости от проблемы.
Проблема 1: Ошибка Ошибка 5: Доступ запрещен
Сообщение об ошибке Ошибка 5: доступ запрещен
При установке приложений или игр на компьютер вы не можете получить доступ к определенным местам или редактировать файлы. Вы пытаетесь перезапустить определенную службу или программное обеспечение, но не можете. Вы получаете одно из следующих сообщений об ошибке:

- «Windows не удалось запустить службу SSHD на локальном компьютере. Ошибка 5: доступ запрещен» (Windows не может запустить службу SSHD на локальном компьютере. Ошибка 5: доступ запрещен)
- «При установке не удалось создать каталог с полным путем к файлу. Ошибка 5: доступ запрещен» (программа установки не может создать каталог с полным путем к файлу. Ошибка 5: доступ запрещен).
- «Исправлена ошибка, из-за которой не удалось выполнить установку. Ошибка 5: доступ запрещен» (невозможно выполнить файл во временном каталоге. Программа установки отменена. Ошибка 5: доступ запрещен).
Причина ошибки 5: доступ запрещен
- Окно контроля учетных записей (UAC) не авторизует локальных пользователей.
- Существующие пользователи не имеют достаточных разрешений для доступа.
- Отсутствие разрешения на доступ к удаленным компьютерам.
- Ошибка синхронизации времени.
- Брандмауэр или программное обеспечение сторонних программ может удалить соединение с удаленным компьютером.
Как исправить ошибку Ошибка 5: Доступ запрещен
1. Проверьте, правильно ли установлены дата и время на вашем компьютере.
Если дата и время на вашем компьютере установлены неправильно, это может вызвать много ошибок в системе, включая ошибку 5: доступ запрещен. Поэтому, чтобы исправить ошибку, первое решение, которое вы можете применить, — это убедиться, что дата и время на вашем компьютере установлены правильно.
2. Запустите программу под Admin
Иногда некоторые программы требуют определенных разрешений для выполнения действий. Поэтому попробуйте запустить программу с правами администратора и проверьте, не исчезла ли ошибка.
— Если вы запускаете программу из меню «Пуск», щелкните правой кнопкой мыши любую программу и выберите «Запуск от имени администратора».
— Если вы запустите программу в другом разделе, щелкните правой кнопкой мыши любую программу, затем выберите Запуск от имени администратора.
— Если вы хотите запустить командную строку под Admin, просто щелкните правой кнопкой мыши кнопку «Пуск» и выберите «Командная строка» (Admin)

3. Очистить систему от вирусов.
Вирусы оказывают огромное «влияние» на вашу систему. Если ваш компьютер подвергся вирусной атаке, это может привести к ошибкам в файлах, включить / отключить службы, отключить брандмауэр Windows и заставить ваш компьютер работать все медленнее и медленнее.
Вирусы могут влиять на «основные» файлы, которые требуются Windows для запуска приложений, вызывая ошибку 5. Чтобы убедиться, что ошибок нет, перейдите к очистке системы. с эффективным антивирусом.
Читатели могут обратиться к некоторым эффективным антивирусным программам для компьютеров Windows здесь.
4. Очистите временные файлы и системные папки
Windows хранит ненужные файлы, в то время как пользователи используют компьютеры и выходят в Интернет. И это также причина того, что ваш компьютер становится все медленнее и медленнее, потому что он хранит много ненужных файлов и является причиной ошибки 5. Чтобы очистить ненужные файлы, выполните следующие действия:
1. Нажмите комбинацию клавиш Windows + R, чтобы открыть окно команды «Выполнить», затем введите в него cmd, но не нажимайте Enter.
2. Нажмите и удерживайте Ctrl + Shift и нажмите Enter, чтобы открыть командную строку под Admin.
3. В окне командной строки введите в него «cleanupmgr» и нажмите Enter.
4. Очистка диска начнет вычислять пространство, которое занимают ненужные файлы, и отобразит список на экране.
5. В это время на экране отображается список нежелательных файлов. Ваша задача — выбрать элементы, которые вы хотите очистить, и затем нажать «ОК».
5. Обновить (обновить) драйвер
Если версия драйвера слишком старая, это может привести к ошибке. Поэтому, чтобы исправить ошибку, вы можете попробовать применить решение для обновления драйвера.
Чтобы обновить драйвер, выполните следующие действия:
1. Щелкните правой кнопкой мыши Мой компьютер (или Этот компьютер в Windows 10), затем нажмите Свойства.
2. В окне «Свойства» вы увидите элемент «Диспетчер устройств» на левой панели (в Windows 10, 8x, Windows 7 и Windows Vista).
Если вы используете Windows XP, вам нужно будет добавить шаги, чтобы перейти на вкладку «Оборудование», и вы увидите запись диспетчера устройств.
3. В окне диспетчера устройств проверьте, есть ли какие-либо значки в списке желтого цвета. Если это так, щелкните правой кнопкой мыши и выберите «Свойства». В окне «Свойства» перейдите на вкладку «Драйверы» и нажмите «Обновить драйверы».
Чтобы обновить (обновить) все последние версии драйверов, перейдите в Панель управления, затем нажмите «Центр обновления Windows» (в Windows 10 выберите «Настройки»> «Обновление и безопасность» и нажмите «Проверить наличие обновлений»). Этот процесс загрузит и установит последние версии драйверов и установит необходимые файлы на ваш компьютер.
6. Зашифруйте файлы или папки
Шифрование — лучшее решение для защиты ваших файлов и папок от несанкционированного доступа других лиц. Если вы не можете получить доступ к этим файлам и папкам, лучше всего зашифровать файлы и папки.
Выполните следующие действия для шифрования файлов и папок:
Щелкните правой кнопкой мыши файл или папку и выберите «Свойства». Далее в окне «Свойства» выберите вкладку «Общие» и нажмите кнопку «Дополнительно».
Здесь вам просто нужно удалить содержимое зашифрованного содержимого, чтобы обеспечить безопасность данных.

Если выбран параметр «Зашифровать содержимое для защиты данных», необходимо подтвердить расшифровку файлов и открыть эти файлы.
7. Восстановить право собственности на файлы или каталоги
Чтобы восстановить право собственности на файлы или каталоги, сначала щелкните правой кнопкой мыши файл или папку, которую хотите открыть, и выберите «Свойства», чтобы открыть окно «Свойства». Здесь вы выбираете вкладку Безопасность.
Если нет доступа к каталогу, на экране вы увидите сообщение с просьбой использовать права администратора для доступа к каталогу. Ваша задача — нажать Продолжить, чтобы продолжить. В это время появится всплывающее окно с опциями для смены владельца.

В разделе «Смена владельца» выберите свою учетную запись администратора или учетную запись пользователя. Затем выберите опцию «Заменить владельца» для подконтейнеров и объектов.

Нажмите кнопку «ОК», чтобы увидеть содержимое папки «Папка». Хотите заменить права доступа к каталогу разрешениями, предоставляющими вам полный доступ? Все разрешения будут заменены, если вы нажмете «Да».
Нажмите Да, чтобы продолжить.

Вы можете сбросить режим безопасности и разрешить необходимые разрешения для каталога и содержимого каталога выше.
8. Использование проверки ошибок диска
Выполнение команды CheckDisk или Disk Error Checking интегрировано в Windows 8. В Windows 8 Microsoft перепроектировала утилиту chkdsk — инструмент для обнаружения, проверки и исправления ошибок разделов диска. В дополнение к Windows 8, Microsoft также представила системный файл с именем ReFS, который не требует chkdsk в автономном режиме для исправления ошибок.
9. Отключите простой общий доступ к файлам (в Windows XP)
Чтобы отключить режим простого общего доступа к файлам, сначала нажмите Пуск, Мой компьютер. В меню «Сервис» выберите «Свойства папки», «Просмотр».
Затем в разделе «Дополнительные настройки» удалите раздел «Использовать простой общий доступ к файлам (рекомендуется)» и нажмите «ОК» для завершения.
")
Проблема 2: Не удается открыть файл или папку
Сообщения об ошибках не могут открыть файлы или папки
При попытке открыть файлы или папки в Microsoft Windows вы не можете получить доступ и получать сообщения об ошибках, такие как:
- «Папка недоступна. Доступ запрещен» (Невозможно получить доступ к каталогу. Доступ запрещен — каталог представляет собой имя папки, которую вы не можете открыть).
- «В настоящее время у вас нет прав доступа к этой папке. Нажмите« Продолжить », чтобы получить доступ к этой папке» (в настоящее время у вас нет доступа к этой папке, нажмите «Продолжить», чтобы получить постоянный доступ к этой папке).
- «Bđn đã được phép phép phép nhập vao thư mục này. Hаy lấy truy cập cho thư mục này. (Вам было отказано в доступе к этой папке. Чтобы получить доступ к этой папке, вам потребуется использовать вкладку Security).

Причиной ошибки не может открыть файл или папку
Ошибка «Отказано в доступе» может возникнуть по одной или нескольким из следующих причин:
- Владение папками было изменено
- У вас нет соответствующих прав
- Файл зашифрован
- Файлы хранятся в папке Windows.old из предыдущей системы. Обычно это происходит после обновления вашего компьютера до новой версии Windows.
Как исправить ошибки не могу открыть файлы или папки
1. Получить право собственности на файлы или папки в Windows
Шаг 1. Выберите файл или папку, владельцем которой вы хотите стать, и щелкните правой кнопкой мыши, чтобы выбрать «Свойства» в контекстном меню.
Шаг 2. Выберите вкладку «Безопасность» и нажмите кнопку «Дополнительно», затем нажмите «Изменить». Если вас попросят предоставить подтверждающий пароль или пароль администратора, предоставьте подтверждение или введите пароль.
Шаг 3. Введите имя человека, которому вы хотите предоставить право собственности, и нажмите «Проверить».
Шаг 4. Нажмите ОК. Если вы хотите, чтобы этот человек был владельцем папок и файлов, хранящихся в этой папке, установите флажок Заменить владельца для подконтейнеров и объектов.
Шаг 5. Нажмите ОК.
2. Изменить доступ
Как правило, ошибки «Отказано в доступе» связаны с доступом к файлам и папкам или их изменениям. Если у вас нет прав, вы не можете получить доступ к указанному местоположению. Если вы вошли в систему как администратор и по-прежнему не можете получить доступ к каталогу, вы можете изменить разрешения. Примечание: для изменения разрешений необходимо войти в систему как администратор.
Шаг 1. Выберите файл или папку и щелкните правой кнопкой мыши, чтобы выбрать «Свойства», затем перейдите на вкладку «Безопасность».
Шаг 2. Нажмите свое имя в группе или имена пользователей, чтобы увидеть свои права.
Шаг 3. Выберите все параметры в Разрешить и нажмите OK и Применить. После этого вы будете иметь полные права на управление файлами или каталогами, такими как редактирование, чтение, выполнение, просмотр содержимого каталога и т. Д.
3. Файл или папка зашифрованы
Шифрование данных является одним из лучших способов защиты данных от несанкционированного доступа. Вы не можете получить доступ к зашифрованным файлам или папкам без соответствующего сертификата. Вы можете проверить, зашифрована ли папка:
Шаг 1. Выберите и щелкните правой кнопкой мыши определенный файл или папку, чтобы выбрать Свойства.
Шаг 2. Выберите вкладку General, затем нажмите кнопку Advanced. Если вы видите опцию Зашифровать содержимое для защиты данных, файл зашифрован, вам нужен сертификат, чтобы открыть его.
Проблема 3: Отклонить при доступе к файлам / папкам, об ошибках изменения или удалить файлы или папки
Сообщение об ошибке отклонено при доступе к файлам / папкам
Когда вы удаляете, копируете, перемещаете или изменяете файл или папку на своем компьютере, вы можете быть заблокированы ошибкой «Отказано в доступе», сообщающей, что у вас нет разрешения на это. Сообщение об ошибке:
- «Доступ к папке запрещен. Для выполнения этого действия вам необходимо разрешение. Вы можете запросить разрешение у TrustedInstaller для внесения изменений в эту папку» (Доступ к каталогу запрещен. Для выполнения этого действия вам необходимо разрешение. Для внесения изменений необходимо разрешение TrustedInstaller. папка).
- «Доступ к целевой папке запрещен. Для выполнения этого действия требуется разрешение» (Доступ к целевой папке запрещен. Для выполнения этой задачи требуется разрешение).

Причина ошибки отказа при доступе к файлам / папкам
Эта ошибка может быть вызвана следующими причинами:
- Файл, к которому у вас нет доступа, используется.
- У вас нет доступа к этому файлу.
- Профили пользователей могут быть повреждены.
Как исправить ошибки отклонения при доступе к файлам / папкам
1. Получить право собственности с помощью командной строки
Есть несколько способов получить право собственности на файл или каталог, и это решение использует командную строку для восстановления прав владения.
Шаг 1. Щелкните правой кнопкой меню «Пуск» и выберите «Командная строка» («Администратор»). Если в сообщении введите пароль или подтвердите, введите пароль и подтвердите.
Шаг 2. Подтвердите путь к каталогу, владельцем которого вы хотите стать. Например, вы хотите восстановить право собственности на папку «Фото» на диске E, адрес которой: E: Фото.
Шаг 3. Введите команду takeown / f «E: Фотографии (замените путь к вашему каталогу), затем нажмите Enter.
Шаг 4. После завершения процесса перезагрузите компьютер и проверьте, устранена ли проблема.
2. Удалите поврежденные файлы сторонним программным обеспечением.
Поврежденные файлы не могут работать должным образом, это могут быть файлы изображений, документы, системные файлы и т. Д. Многие файлы повреждены или не могут быть удалены. Вот самый простой способ удалить поврежденные файлы.
Шаг 1. Скачайте, установите и запустите Eassos PartitionGuru.
Шаг 2. Выберите поврежденный файл или папку, которую вы хотите удалить, щелкните правой кнопкой мыши и выберите «Удалить файлы напрямую».

Шаг 3. Нажмите кнопку Удалить, чтобы удалить выбранный файл. Обратите внимание, что файлы, удаленные таким образом, не попадут в корзину, поэтому следует удалять файлы, которые больше не важны
Советы по предотвращению поврежденных файлов:
- Сохраните файл правильно. Когда возникает проблема или ошибка при сохранении файла, файл может быть поврежден
- Удалите безопасное запоминающее устройство USB. Нажмите на устройство «Безопасное извлечение и извлечение носителя» перед удалением USB-устройства.
- Выключите компьютер правильно. Чтобы выключить компьютер, вы должны нажать кнопку «Пуск» и нажать «Выключить» вместо прямого нажатия кнопки питания.
3. Создайте новую учетную запись локального пользователя
Если проблема с отказом в доступе вызвана поврежденной учетной записью, вы можете решить проблему, создав новую учетную запись / профиль локального пользователя. Чтобы создать новую учетную запись, выполните следующие действия:
Шаг 1. Нажмите на меню «Пуск» и выберите «Настройки». Нажмите Учетные записи в настройках Windows.
Шаг 2. Выберите «Семья и другие люди» слева, а затем нажмите «Добавить кого-то еще на этот компьютер».
Шаг 3. Нажмите на ссылку У меня нет этой информации для входа и нажмите Далее. На следующем экране нажмите Добавить учетную запись пользователя без Microsoft, затем нажмите Далее. Теперь вы можете ввести свое имя пользователя, пароль, подсказку к паролю и выбрать Далее.
Проблема 4: Получите сообщение об ошибке «Местоположение не доступно. Доступ запрещен»
Thông báo lỗi Местоположение не доступно. В доступе отказано
При открытии раздела на жестком диске компьютера или USB-устройстве вы не можете открыть его и получить ошибку
- «Местоположение недоступно. E: недоступно. Доступ запрещен» (Местоположение недоступно. Не удается получить доступ к диску E:. Доступ запрещен.)
Причина ошибки местоположения недоступна. L trui truy cập Access
- Файловая система повреждена. Файловая система на диске повреждена и поэтому более недоступна.
- У вас нет соответствующих прав.
Cách sửa lỗi Местоположение не доступно. В доступе отказано
1. Измените права доступа к диску
Шаг 1. В проводнике Windows щелкните правой кнопкой мыши раздел, к которому у вас нет доступа, и выберите Свойства> Безопасность> Дополнительно.
Шаг 2. Нажмите Добавить в разделе «Дополнительные параметры безопасности» и на следующем экране нажмите «Выбрать»
Шаг 3. Введите имя пользователя и нажмите ОК. Затем вы можете выбрать следующую информацию:
Тип: Разрешить Применяется к: этой папке, подпапкам и файлам Основные разрешения: Полный доступ
Шаг 4. Нажмите OK и Применить, чтобы сохранить изменения.
2. Восстановление данных с диска не может получить доступ и отформатировать его
Если изменение разрешений не решает проблему, вы можете восстановить данные с диска, который недоступен, и отформатировать их для устранения проблемы. Это легко получить данные из любого места и отказано в доступе. Вот шаги для восстановления данных с поврежденного диска.
Шаг 1. Установите и запустите Eassos PartitionGuru, затем проверьте, отображается ли раздел напрямую. Если нет, перейдите к следующему шагу.
Шаг 2. Выберите диск, к которому нет доступа, и нажмите кнопку «Восстановление файлов» на панели инструментов. Вы должны быть уверены, что выбрали правильный раздел.
Шаг 3. Выберите режим полного восстановления и нажмите кнопку «Пуск», чтобы начать сканирование файлов и папок в выбранном разделе.

Шаг 4. Предварительный просмотр файла. Файлы, найденные Eassos PartitionGuru, автоматически отображаются во время сканирования, и вы можете просмотреть перечисленные файлы и папки, чтобы проверить, не повреждены ли они.
Шаг 5. Восстановите данные. Выберите файлы и папки, которые вы хотите восстановить, и щелкните их правой кнопкой мыши, чтобы выбрать «Копировать в», затем вы можете выбрать место для сохранения восстановленных данных.

Проблема 5: Ошибка доступа запрещена при использовании DiskPart
Сообщение об отказе в доступе при использовании DiskPart
При использовании DiskPart для очистки диска вы не можете выполнить и получить сообщение об ошибке:
- «ДИСКПАРТ> Чисто»
- «DiskPart обнаружил ошибку: доступ запрещен» (DiskPart имеет ошибку: отказ в доступе).
- «См. Системный журнал событий для получения дополнительной информации» (См. Журнал событий для получения дополнительной информации).
Причина ошибки «Отказано в доступе» при использовании DiskPart
- Вы не авторизованы.
- Устройство, которое вы хотите очистить в режиме защиты от записи.
Как исправить ошибки Access Denied при использовании DiskPart
1. Запустите командную строку от имени администратора.
Шаг 1. Войдите в систему с учетной записью администратора. Если нет, перезагрузите компьютер и получите доступ к учетной записи администратора.
Шаг 2. Нажмите на меню «Пуск» и введите cmd в поле поиска.
Шаг 3. Щелкните правой кнопкой мыши «cmd.exe» и выберите «Запуск от имени администратора». Если запрашивается пароль или подтверждение, следуйте.
2. Удалить режим защиты от записи
Шаг 1. Нажмите Windows + R, чтобы открыть Run, введите regedit и нажмите OK, чтобы открыть редактор реестра.
Шаг 2. В редакторе реестра перейдите к HKEY_LOCAL_MACHINESYSTEMCurrentControlSetControlStorageDevicePolicies
Шаг 3. Щелкните правой кнопкой мыши WriteProtect и измените цену на 0.
Обратитесь к некоторым из следующих статей:
Удачи!
What worked for my Windows 8.1 PC:
First of all close Windows Explorer by:
Press Ctrl + Alt + Del for opening Task Manager, go to processes, find Windows Explorer, right click, and end task. Don’t worry if start bar is gone and something else. Use Alt + Tab for traversing between files. Then in Task Manager click File and Run new task, and type cmd. This will open you a Command Line.
Inside the Terminal:
If your version is 32 bit, and it is in my case, it’s located in Program Files (x86), so you should type:
cd "C:Program Files (x86)Gitgit-cheetah"
regsvr32 /u git_shell_ext64.dll
This was for unregistering.
You can traverse between directories using cd directoryname and you can get back one directory by cd ... For viewing what is in a directory you can type dir in when you are in that directory. For deleting the file type:
del /F filename
After that again open the Task Manager, go to File, then run explorer .
This way you will get to usual display. Go to the Git folder which we wanted to get rid of and delete it simply.
I hope this works for other people who are using Windows 8.1.